

Page 1
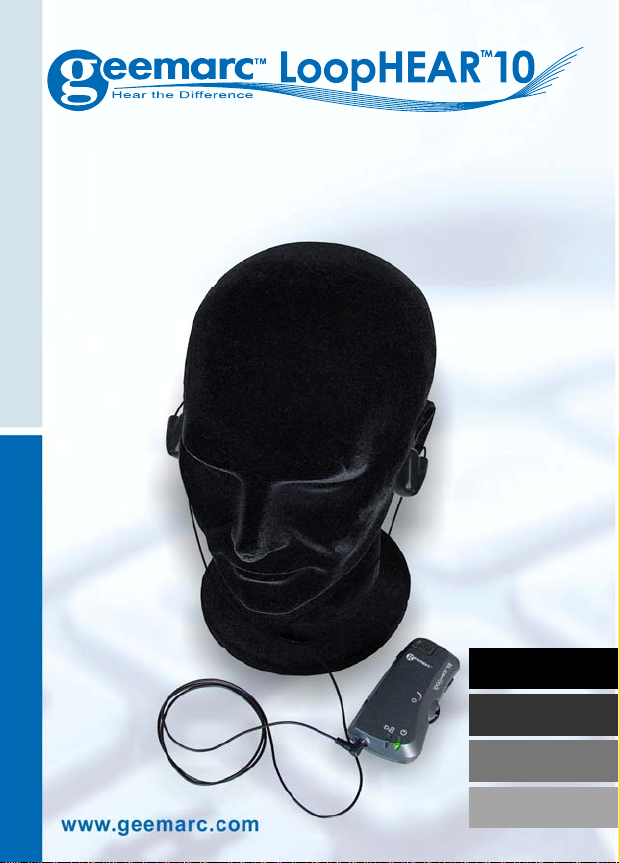
Amplified hearing assistant
Amplificateur portatif
Tragbarer Höverstäker
Amplificator portatil
English P1
Français P16
Deutsch S30
Español P44
Page 2
1
Page 3

CONTENTS
Please refer to our website:
www.geemarc.com for an up to date user
guide, as there may be important updates and
changes you need to be aware of.
CONTENTS .............................................................. 2
INTRODUCTION ...................................................... 3
Unpacking the LoopHEAR
DESCRIPTION ......................................................... 5
General Description .................................................. 5
INSTALLATION ........................................................ 8
Setting Up ................................................................. 8
USING THE LoopHEARTM10 ................................... 9
Turning the LoopHEAR
Tone and Balance Setting ........................................ 10
TROUBLESHOOTING ............................................ 11
SAFETY INFORMATION ........................................ 12
GUARANTEE .......................................................... 13
FCC STATEMENT ................................................... 14
RECYCLING DIRECTIVES ..................................... 15
TM
10 ................................. 4
TM
10 On and Off ................... 9
2
Page 4

Congratulations on purchasing your Geemarc
LoopHEARTM10. The LoopHEARTM10 is a rechargeable
assistive listening device. It amplifies sp eech to geth er
with sounds from a variety of sources like TV, radio and
telephone.
The LoopHEAR
Hearing Aids when using headphones.
Note: users of digital hearing aids must make
sure their aids have been programmed for use
with the ‘T’ setting.
It is important that you read the instructions below in
orde r to use your Geemarc LoopHEAR
potential. Keep this user guide in a safe place for future
reference.
INTRODUCTION
TM
10 can be used as an alternative to
TM
10 to their full
3
Page 5

INTRODUCTION
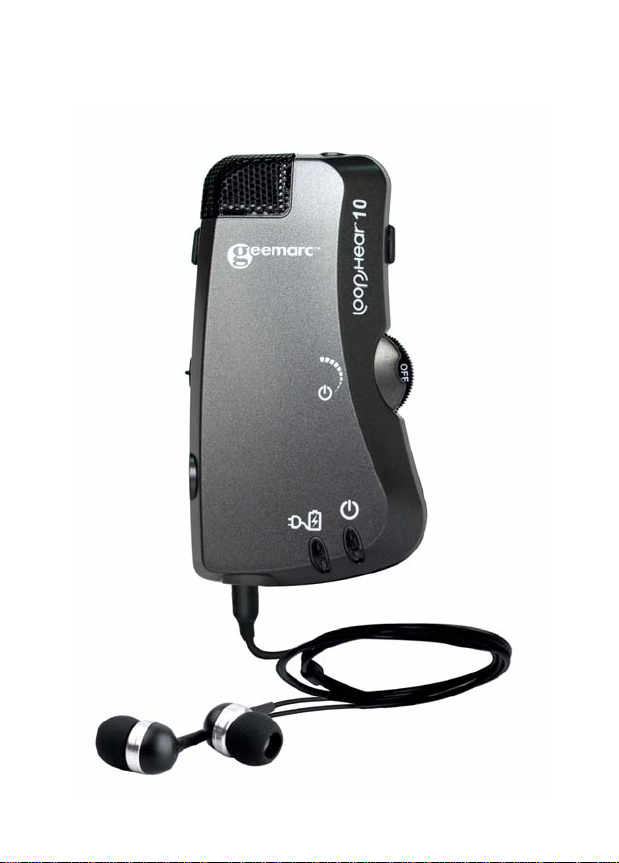
Unpacking the LoopHEARTM10
When unpacking the LoopHEARTM10, you should find
the following in the box:
TM
• LoopHEAR
• Headset with rubber ear cushions
• 3.7V Li-po Rechargeable Battery
• Micro usb / usb cable for recharging
• Lanyard (option)
• A microphone with "holder" and 3m lead (option)
• A belt clip
• 1 User Guide
For product support and help visit our website at
lines are open 09h00 to 16h00 Mon to Fri
2 rue Galilée, Parc de l’Etoile, 59791 Grande-Synthe
This product is made in China To Geemarc Telecom
10 Conversation Piece
www.geemarc.com
E-mail: help@geemarc.com
Telephone: 01707 387602
Cedex, France
4
Page 6
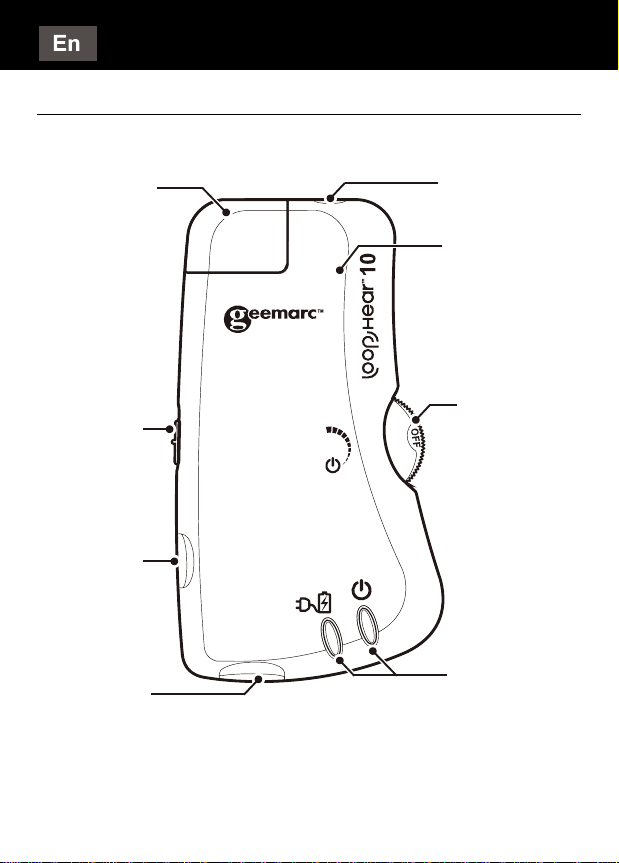
DESCRIPTION
General Description
Internal
Microphone
Mode Switch
(MIC or T)
Charging
Port
Micro USB
(5.0 V DC)
Headset port
5
Port
LH10
Conversation
Piece
On/Off
Volume
control wheel.
Charge and
On LED
Microphone
Page 7

DESCRIPTION
Belt Clip
Battery
Compartment
Cover
6
Page 8
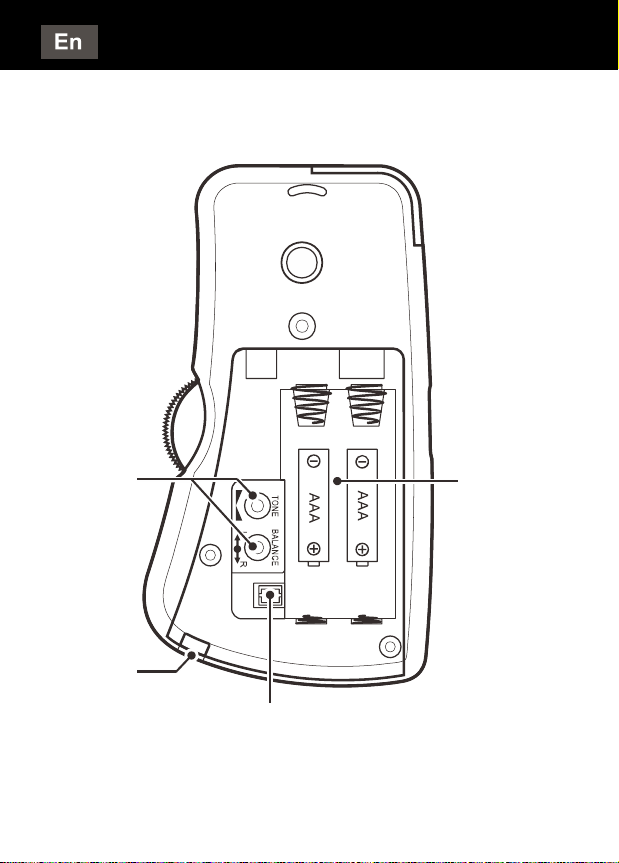
DESCRIPTION
Tone &
Balance
Setting
Clip for
lanyard
(option)
Space for
Battery-pack
or batteries
Plug for the battery pack
7
Page 9
INSTALLATION
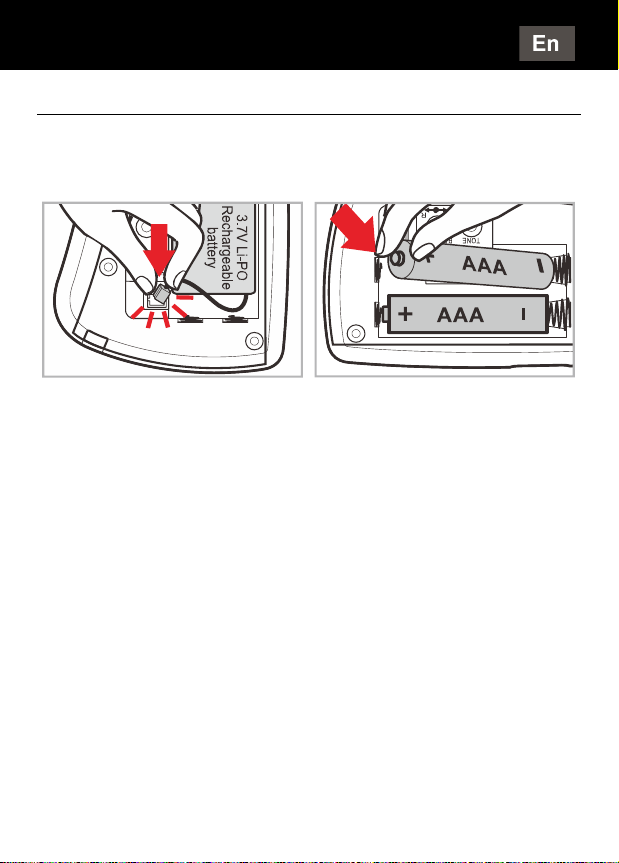
Setting Up
Open the battery compartment. Connect the supplied
rechargeable battery (3.7V) into the battery compartment
located on the rear of the LH10 Conversation Piece.
Or insert 2 single batteries (1.5V AAA non rechargeable)
instead of the set battery supplied.
With AAA battery mode, if the 'On' LED turns red when
in use, the LH10 needs to have new batteries (No Red
LED indication when using the rechargeable battery).
To charge the battery, connect the supplied USB cable
to the micro USB socket on the left hand side of the
unit and then into the USB socket to PC or standard
power supply 5V DC. The power supply LED turns red.
Headset
Insert the headset lead into the headset port found on
the base of the Communication Piece.
8
Page 10
USING THE LH10
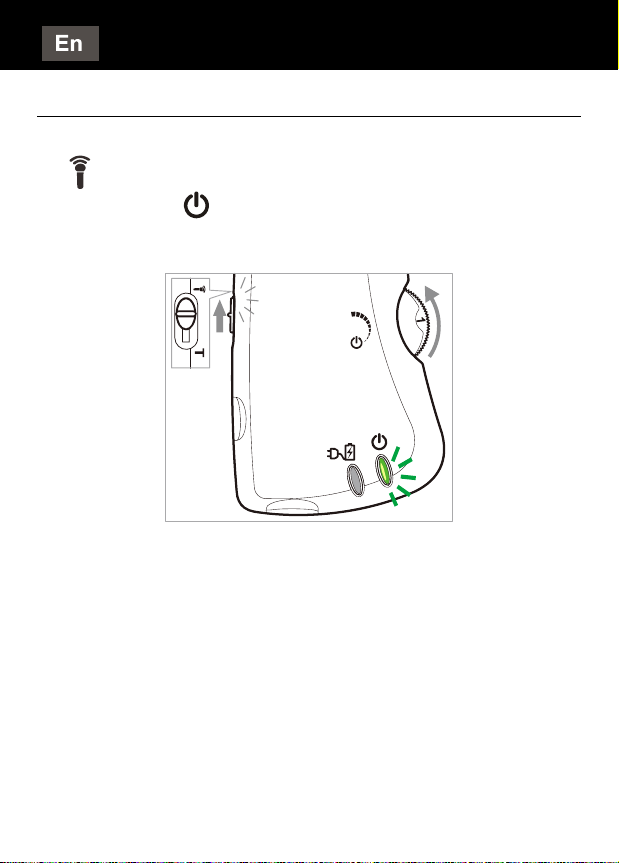
Turning the LoopHEARTM10 On and Off
Switch the headset on. Ensure the mode switch is set
(MIC). Roll the On/Off Volume control wheel
to
upwards. The
the Volume to a comfortable level by rolling the On/Off
Volume control wheel.
To turn the LH10 off, roll the On/Off Volume control
wheel downwards. The Green LED will switch off and
OFF will be showing on the On/Off Volume control
wheel
(On) LED will display Green. Adjust
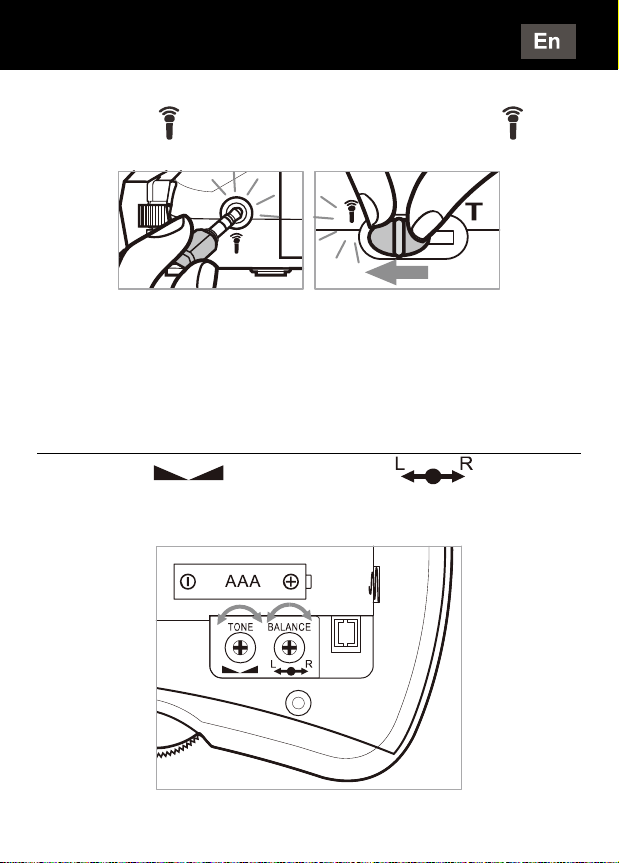
The LH10 can be used in rooms especially equipped
with a magnetic loop (conference …etc) due to its "built
in T coil". Simply by setting the mode switch to T, the
LH10 will receive the emitted magnetic waves then
amplify them to your headset. You will receive all the
benefits of the "built in T coil".
9
Page 11
USING THE LH10
An external microphone (option) can be connected in
the socket
position , in this case the "built in T coil" is disabled.
"Mic", then set the switch to "Mic"
Microphone
The LH10 is built with an internal microphone which
enables you to hear all the surrounding sounds.
Tone and Balance Setting
The tone ( ) and Balance ( ) can be
adjusted by using the controls found within the
battery compartment.
10
Page 12

TROUBLESHOOTING
The 'On' LED is Red
• Charge the battery if the battery pack is used or
replace with new batteries if standard AAA batteries
are installed.
The LH10 appears not to be working
• Make sure that the headset is securely plugged in.
• Make sure that the volume is correctly adjusted.
• Make sure that the battery is fully charged or use
good batteries.
• Make sure the mode switch is set to MIC if using
headset/earpiece or T if using an induction loop.
The LH10 is not charging
• Make sure that the power supply cord is plugged in
correctly i.e. into a working wall socket and into the
LH10 Conversation Piece.
• Make sure that the battery is inserted correctly and is
of the recommended type.
11
Page 13

SAFETY INFORMATION
General
Do not open the unit. Contact the helpline for all repairs.
Cleaning
Clean the LH10 with a soft cloth. Never use polishes or
cleaning agents - they could damage the finish or the
electrics inside.
Environmental
Do not expose to direct sunlight.
Always ensure there is a free flow of air over the
surfaces of the LH10.
Do not place any part of your product in water and do
not use it in damp or humid conditions e.g. bathrooms.
Do not expose your product to fire or other hazardous
conditions.
Avoid touching the LH10 Conversation Piece with
clothing or hands, as this can create excessive noise.
12
Page 14

From the moment your Geemarc LoopHEARTM10 is
purchased, Geemarc guarantee it for the period of 2
years. During this time, all repairs or replacements (at
our discretion) are free of charge. Should you experience
a problem then contact our help line or visit our website
at www.geemarc.com. The guarantee does not cover
accidents, negligence or breakages to any parts. The
product must not be tampered with or taken apart by
anyone who is not an authorised Geemarc representative.
The Geemarc guarantee in no way limits your legal
rights.
IMPORTANT: YOUR RECEIPT IS PART OF YOUR
GUARANTEE AND MUST BE RETAINED AND
PRODUCED IN THE EVENT OF A WARRANTY
CLAIM.
GUARANTEE
DECLARATION: Geemarc Telecom SA hereby declares
that this LoopHEAR
es s en t ia l requirements and other relevant provisions of
the Radi o Equipment Directive 2014/53/EU.
The declaration of conformity may be consulted at
www.geemarc.com
Radio Frequency (RF) power : <250 mW
TM
10 is in compliance with the
13
Page 15

FCC STATEMENT
FCC CLASS B
NOTE : This equipment has been te sted and fo und to
comply with the limits for a Class B digital device, pursuant
to Part 15 of FCC Rules.
These limits are designed to provide reasonable protection
against harmful interference in a residential installation.
This equipment generates, uses and can radiate radio
frequency energy and, if not installed and used in
accordance with the instructions, may cause harmful
interference to radio communications.
However, there is no guarantee that interference will not
occur in a particular installation. If this equipment does
cause harmful interference to radio or television reception,
which can be determined by turning the equipment off
and on, the user is encouraged to try to correct the
interference by one or more of the following measures:
• Re-orient or relocate the receiving antenna.
• Increase the separation between the equipment and
receiver.
• Connect the equipment into an outlet on a circuit
different from that to which the receiver is connected.
• Consult the dealer or an experienced radio TV
technician for help.
NOTICE: This device complies with Part 15 of the FCC
Rules. Operation is subject to the followin g two condition s:
(1) this device may not cause harmful interference, and
(2) this devise must accept any interference received,
including interference that may cause undesired
operation.
14
Page 16

RECYCLING DIRECTIVES
The WEEE (Waste Electrical and Electronic Equipment)
has been put in place for the products at the e nd of their
useful life are recycled in the best way.
When this product is finished with, please do not p ut it in
your domestic waste bin.
Please use one of the following disposal options:
- Remove the batteries and deposit them in an appropriate
WEEE skip. Deposit the product in an appropriate WEEE
skip.
- Or, hand the old product to the retailer. If you purchase
a new one, they should accept it.
Thus if you respect these instructions you ensure human
health and environmental protection.
All electrical and electronic products including batteries
should be disposed of separately from the municipal
waste stream via designated collection facilities appointed
by the government or the local authorities.
CAN ICES-3(B)/NMB-3(B)
15
Page 17

SOMMAIRE
Voir sur notre site internet si une version plus
récente de cette notice d’utilisation est
disponible.
www.geemarc.com
SOMMAIRE ............................................................ 16
INTRODUCTION .................................................... 17
Contenu du LoopHEAR
DESCRIPTION ....................................................... 19
Général ................................................................... 19
INSTALLATION ...................................................... 22
Batteries .................................................................. 22
UTILISATION ......................................................... 23
Marche/Arrêt – Volume ........................................... 23
Ajustement tonalité –balance .................................. 24
EN CAS DE PROBLEME ....................................... 25
SECURITE .............................................................. 26
GARANTIE ............................................................. 27
Déclaration de conformité de la FCC .................. 28
REGLES DE RECYCLAGE .................................... 29
TM
10 .................................. 18
16
Page 18

INTRODUCTION
Félicitations pour l’achat du Geemarc LoopHEARTM10.
Le LoopHEAR
à l’écoute. Il amplifie les conversations ou toute autre
source sonore comme la TV, radio ou téléphone.
Il peut aussi être utilisé avec un appareil auditif. Si vous
utilisez une boucle magnétique à la place du casque,
la caractéristique "bobine- T " du LH10 permet d’être
complémentaire à votre appareil.
Note: Assurez vous que votre appareil auditif
possède bien la position "T"
Veuillez lire attentivement cette notice avant d'utiliser le
Geemarc LH10. Gardez-la soigneusement pour un
usage futur.
TM
10 est un appareil rechargeable d’aide
17
Page 19

INTRODUCTION
Contenu du LoopHEARTM10
Au déballage du LH10, vous devez trouver :
• 1 unité LH10
• 1 écouteur stéréo
• 1 Batterie 3.7V Li po rechargeable
• 1 cable micro USB/USB
• 1 Tour de cou (option)
• 1 clip de ceinture
• 1 Micro avec attache + cordon 3m (option)
• 1 Notice d’utilisation
Consulter notre site Internet pour obtenir la notice
détaillée ou des informations et de l' aide sur nos
produits : www.geemarc.com
Email: sav@geemarc.fr
Téléphone: 03 28 58 75 99
2 rue Galilée, Parc de l’Etoile, 59791 Grande-Synthe
Cedex, France
Produit fabriqué en Chine pour Geemarc Telecom
18
Page 20

Général
Microphone
interne
Position
(MIC ou T)
Prise micro
USB (5.0 V
DC)
Prise casque
DESCRIPTION
19
Prise
Microphone
extérieur
Unité LH10
Molette
Marche/Arrêt
- Volume
Témoins de
charge et
Marche
/Arrêt
Page 21

DESCRIPTION
Clip ceinture
Compartiment
Batterie
20
Page 22

Réglage
Balance
Tonalité
DESCRIPTION
Emplacement
batterie ou
piles
Emplacement
pour tour de
cou (option)
Connecteur bloc batterie
21
Page 23

INSTALLATION
Batteries
Ouvrez le compartiment batterie situé à l’arrière du LH10,
connecter le bloc batt erie 3.7V dans le connecteur et
refermez.
Vous pouvez aussi utiliser 2 piles standard 1.5V AAA
non rechargeables (non fournies) à la place du bloc
batterie. Insérez les dans le compa rtiment en respectant
les polarités comme indiqué dans le fond.
En mode Pile, si la LED est rouge en utilisation, veuillez
remplacer les piles non rechargeable du LH10 (pas
d’indication de voyant rouge s i on u tilise la batt erie)
Pour recharger la batterie, connectez le câble au
connecteur micro USB du produit et à l’alimentation
USB (PC ou autre).
Casque
Connectez le casque dans la prise casque du LH10.
22
Page 24

UTILISATION DU LH10
Marche/Arrêt ; Volume
LH10: Assurez-vous de la position du commutateur sur
MIC (
Utilisez la molette latérale pour mettre en marche/
arrêter l'appareil. En fonctionnement le témoin "ON(
doit être vert ; à l'arrêt, ce témoin est éteint. Ajuster le
volume (1 à 6) en tournant la molette.
Le LH10 peut aussi être utilisé dans des salles
spécialisées équipées de boucles magnétiques (salles
de conférence par exemple). Grâce à son système
interne "bobine-T", le LH10 recevra les ondes de la
pièce qui seront amplifiées et émises vers le casque.
Basculez simplement le commutateur du LH10 sur la
position "T".
).
)"
23
Page 25

UTILISATION DU LH10
Microphone
Le LH10 est équipé d'un microphone interne pouva nt
capter le son ambiant d'une sale.
On peut ajouter en option sur le LH10 un micro externe
muni d'un câble de 3m pouvant se connecter dans la prise
"Mic", ne pas oublier de positionner le commutateur sur
“Mic", la fonction "bobine- T " est alors désactivée.
Réglage Tonalité / Balance
Ces réglages peuvent être effectués à l'aide d'un fin
tournevis.
Ouvrez le compartiment batterie, ajustez le ou les
potentiomètres (en bleu) "
Tonalité".
Balance", "
24
Page 26

EN CAS DE PROBLEME
Le témoin Marche/Arrêt est rouge
• Rechargez la batterie, ou remplacer les piles si
utilisées.
Vous n'entendez rien
• Verifiez les connections.
• Augmentez le volume.
• les batteries sont peut-être faibles > rechargez.
• Vérifiez la position du commutateur MIC / T suivant
ce que vous utilisez.
Pas de charge
• Vérifier la bonne connection du chargeur.
• Essayez avec une autre prise de courant.
• Vérifiez la position de la batterie (polarité).
25
Page 27

SECURITE - ENTRETIEN
Général
Ne pas ouvrir l’appareil. Contactez votre point de vente
en cas de problème.
Evitez de laisser tomber l’appareil.
Ne pas jeter les piles dans un feu ou dans une poubelle,
ramenez-les dans un centre de collecte.
Entretien
Si vous désirez nettoyer votre LH10, utilisez un chiffon
doux. Les différents produits de nettoyage sont
déconseillés, ils risquent d’endommager l’intérieur de
l’appareil et ainsi entraîner une défaillance de votre
LH10.
Environnement
Ne pas exposer aux rayons directs du soleil.
Ne pas placer l’appareil dans un endroit à fort e h umidité .
(Salle de bains, évier, piscine ... etc.), ni dans un endroit
trop chaud (feu).
Respecter les conditions normales de température à
savoir entre 5
En cas d’inutilisation prolongée, il est conseillé de retire r
les piles ou la batterie de l’appareil.
O
C et 45 OC.
26
Page 28

Votre Geemarc LoopHEARTM10 est garanti pendant 2
ans, suivant la date d’achat. Au cours de cette période,
toutes les réparations ou tous les remplacements (à notre
seule discrétion) seront effectués sans frais. En cas de
problème, contactez notre service d'assistance ou
rendez-vous sur notre site Web: www.geemarc.com.
La garantie ne couvre pas les accidents, la négligence
ou les ruptures de pièces. Le produit ne doit pas être
altéré ou démonté par quiconque n'étant pas un
représentant agréé de Geemarc.
La garantie de Geemarc ne limite en aucun cas vos
droits légaux.
IMPORTANT : VOTRE FACTURE FAIT PARTIE DE
VOTRE GARANTIE ET DOIT ÊTRE CONSERVÉE ET
PRODUITE LORS D'UNE RÉCLAMATION SOUS
GARANTIE.
Remarque : la garantie est applicable en France
uniquement.
Directives CE: Geemarc Telecom SA déclare par la
présente que ce LoopHEAR
exigences essentielles ainsi qu'à d'autres dispositions
pertinentes de la Directive 2014/53/UE concernant les
équipements hertziens.
La déclaration de conformité peut être consultée sur le
site : www.geemarc.com
Puissance de la fréquence radio : <250 mW
GARANTIE
TM
10 est conforme aux
27
Page 29

Déclaration de conformité de la FCC
FCC CLASSE B
NOTE: Cet appareil a été testé et déclaré conforme aux
limites imposées aux appareils numériques de la classe B,
en vertu de la partie 15 des règles de la FCC. Ces limites
sont conçues pour fournir une protection suffisante contre
les interférences nuisibles dans les installations résidentielle s.
Cet appareil génère, utilise et peut dégager de l'énergie
de radiofréquence et, s'il n'est pas installé et utilisé
conformément aux instructions du fabricant, provoquer
un brouillage préjudiciable aux communications radio.
Il n'existe toutefois aucune garantie qu'un appareil particulier
ne sera pas victime du brouillage. Si cet appareil entraîne
un brouillage préjudiciable à la réception des émissions
radio ou de télévision, identifiable en mettant le terminal
hors puis sous tension, il est recommandé à l'utilisateur
de tenter de résoudre ce problème au moyen d'une ou
plusieurs des mesures suivantes :
• Orienter l'antenne réceptri ce différemment ou la changer
de place.
• Augmenter la distance séparant l'équipement du
récepteur.
• Connecter l'équipement à une prise sur un circuit différent
de celui sur lequel est branché le récepteur.
• Obtenir de l' aide auprès du revendeur ou d'un technicien
radio / TV expérimenté.
ATTENTION: Cet appareil est conforme à la partie 15 des
règles de la FCC. Son fonctionnement est soumis aux
deux conditions suivantes : (1) Cet appareil ne doit pas
provoquer de brouillage préjudiciable, et (2) Il doit accepter
tout brouillage reçu, y compris le brouillage pouvant entraîner
un mauvais fonctionnement.
28
Page 30

RECYCLAGE
Recommandations pour le recyclage :
La directive DEEE (Déchet d'Equipement Electrique et
Electronique) a été mise en place dans le but d'assurer
la collecte sélective en vue de la valorisation,
réutilisation ou recyclage des produits en fin de vie.
Lorsque votre produit ne fonctionne plus, ne le jet ez pas
dans votre poubelle ménagère.
Suivez l'une des procédures décrites ci-dessous :
- Déposez les batteries et votre ancien appareil d ans un
lieu de collecte approprié.
- Ou rapportez votre ancien appareil au magasin ou vous
achèterez le nouveau. Il devra l'accepter.
Ainsi, si vous respectez ces instructions vous faites un
geste pour l'environnement et vous contribuez à la
préservation des ressources naturelles et à la protection
de la santé humaine.
Tous les produits électriques et électroniques incluant
des batteries doivent être jetés séparément, dan s le flux
de déchets municipaux par l'intermédiaire des installations
de collecte désignés par le gouvernement ou les autorités
locales.
CAN ICES-3 (B) / NMB-3 (B)
29
Page 31

INHALTSÜBERSICHT
Prüfen Sie auf unserer Website ob eine
neuere Version dieser Bedienungsanleitung
verfügbar ist.
www.geemarc.com
INHALTSÜBERSICHT ............................................ 30
EINLEITUNG ........................................................... 31
Auspacken des LoopHEAR
BESCHREIBUNG .................................................... 33
Allgemeine Beschreibung ........................................ 33
INSTALLATION ....................................................... 36
Einrichtung ............................................................... 36
GEBRAUCH DES LH10 .......................................... 37
An-und Ausschalten des LH10 ................................ 37
Einstellung von Klang und Balance ......................... 38
PROBLEMBEHANDLUNG ..................................... 39
SICHERHEITSINFORMATIONEN ........................... 40
GARANTIE .............................................................. 41
FCC-Erklärung ......................................................... 42
RECYCLING-RICHTLINIE ...................................... 43
TM
10 .............................. 31
30
Page 32

Herzlichen Glückwunsch zum Kauf Ihres Geemarc
LH10. Das LH10 ist ein Akku-Hörverstärker. Er verstärkt
Sprache und Klang aus einer Vielfalt von Quellen, wie
zum Beispiel TV, Rundfunk und Telefon.
Das LH10 kann als eine Alternative zu Hörgeräten
benutzt werden, indem man den Kopfhörer benutzt.
Wenn Sie ein induktives Halsband, anstatt den Kopfhörer
verwenden, ermöglicht die im LH10 eingebaute TMagnetspule dem Gerät, als ein Zusatz zu Ihrem Hörgerät
zu funktionieren.
Hinweis: Nutzer von digitalen Hörhilfen sollten sich
unbedingt vergewissern, dass Ihre Hörhilfen für die
Nutzung der Einstellung ‚T’ programmiert wurden.
Es ist wichtig, dass Sie die folgenden
Bedienungsanweisungen gründlich durchlesen, um
das volle Potential Ihres Geemarc LH10 zu nutzen.
Bewahren Sie diese Gebrauchsanleitung gut auf, um
später darauf zurückgreifen zu können.
EINLEITUNG
31
Page 33

EINLEITUNG
Auspacken des LH10
Wenn Sie das LH10 auspacken, sollten Sie folgendes in
der Verpackung finden:
• Kommunikationseinheit LH10
• Kopfhörer mit Gummiohrpolster
• Wiederaufladbarer Akku mit 3.7V Li po
• Micro usb/usb Ladekabel
• Taljereep (optionen)
• Mikrofon mit einem Kabel von 3 m Länge
(optionen)
• Gürtel-Clip
• Gebrauchsanleitung
Produktsupport und Hilfe erhalten Sie auf unserer
Webseite unter www.geemarc.com/de
E-mail:kundendienst@geemarc.com
Telefon:+49(0)30 209 95 789
2 rue Galilée, Parc de l’Etoile, 59791 Grande-Synthe
Cedex, France
Von Geemarc Telecom im China hergestellt
32
Page 34

BESCHREIBUNG
Allgemeine Beschreibung
Interne Mikrofon
Moduswahlschalter
(MIC oder
T)
Ladebuchse
(5.0V DC)
Steckdose
Kopfhörer
Mikrofonbuchse
LH10
Kommunikationseinheit
An/AusVolumenregler
LED für
Lade- und
Betriebsanzeige
33
Page 35

BESCHREIBUNG
Gürtel-Clip
Batteriefachabdeckung
34
Page 36

Regler für
Klang &
Balance
Halsschleife
(optionen)
BESCHREIBUNG
Akkufach
Batterien (nicht
wiederaufladbar
)
Akkuanschlussstecker
35
Page 37

INSTALLATION
Einrichtung
Öffnen Sie das Batteriefach. Lege n Sie de n mitgelieferte n
wiederaufladbaren Akku (3.7V) in das sich auf der
Rückseite der Kommunikationseinheit LH10 befindliche
Batteriefach ein.
Sie können auch zwei Batterien (nicht wiederaufladbar)
1,5V AAA anstatt einen Akku zu benutzen. Legen Sie
die Batterien in dem Batteriefach mit der richtigen
Polarität.
Schließen Sie den passenden Stecker an das Lad egerä t
an, Schließen Sie das Ladegerät an die Stromversorgung
an und das andere Ende der Leitung in die Ladebuchse
auf der linken Seite der Kommunikationseinheit LH10.
Wenn die 'On' LED während des Betriebs auf rot schaltet,
müssen die Batterien gewechselt werden. Die LED
leuchtet nur, wenn Sie nicht aufladbare Batterien
benutzen.
36
Page 38

GEBRAUCH DES LH10
An- und Ausschalten des LH10
Setzen Sie den Kopfhörer auf. Vergewissern Sie sich,
dass der Modusschalter auf
Drehen Sie den An/Aus-Lautstärkeregler auf. Die
LED muss jetzt grün leuchten. Stellen Sie durch
Drehen des An/Aus-Lautstärkereglers die Lautstärke
auf einen für Sie angenehmen Pegel.
Um das LH10 auszuschalten, drehen Sie den An/AusLautstärkeregler hinunter. Die grüne LED wird
erlöschen und der An/Aus-Lautstärkeregler zeigt "OFF“.
(MIC) gestellt wurde.
Das LH10 kann auch bei spezialen Raüme benutzt
werden, die mit einer Induktionsspüle gestattet sind
(Konferenzraum zum Beispiel). Dank sein internes TSpule System empfängt das LH10 die Ra umstrahlung en,
die verstärkt werden und nach dem Headset gesendet
werden. Schalten Sie einfach den Schalter vom LH10
auf T Position.
37
Page 39

GEBRAUCH DES LH10
Mikrophon
Die LH10 sind mit einem internen Mikrophon ausg estat tet,
die das Ambientelärm eines Raums bekommen kann.
Das LH10 ist mit einem externen Mikrophon mit einem
3 Millimeter Kabeln geliefert (Option). Das Kabel kann
in die Mikrodose eingesteckt werden. Denn bitte nicht
vergessen auf Mikrophon Position zu schalten. in diesem
Fall ist die integrierte Induktionsschlaufe deaktiviert
Einstellung von Klang und Balance
Klang ( ) und Balance ( ) können reguliert
werden, indem sie den Regl er b enu tze n, de r sic h i n de m
Batteriefachdefindet.
38
Page 40

PROBLEMBEHANDLUNG
Die 'On' LED ist rot
Laden Sie die Batterie auf, wenn Sie die Batterieeinheit
verwenden oder ersetzen Sie die Batterien, wenn Sie
Standard AAA Batterien nutzen.
Das LH10 scheint nicht zu funktionieren
•
Vergewissern Sie sich, dass der Kopfhörer fest
angeschlossen ist.
• Vergewissern Sie sich, dass die Lautstärke richtig
eingestellt ist.
• Vergewissern Sie sich, dass die Akkus vollständig
aufgeladen sind.
• Vergewissern Sie sich, dass der Modusschalter auf
‚MIC’ gestellt ist, wenn Sie ein Kopfhörer verwenden
– oder auf ‚T’, wenn Sie eine Induktionsschleife
verwenden.
Das LH10 lädt nicht
• Vergewissern Sie sich, dass der Stromkabel sowohl
richtig in eine funktionierende Steckdose als auch in
die Kommunikationseinheit des LH10 eingesteckt ist.
• Vergewissern Sie sich, dass der Akku richtig eingesetzt
und vom vorgeschriebenen Typus ist.
39
Page 41

SICHERHEITSINFORMATION
Allgemein
Bitte niemals das Gerät öffnen. Setzen Sie sich für alle
Reparaturen mit dem Kundenservice in Verbindung.
Reinigung
Reinigen Sie das LH10 mit einem weichen Tuch.
Benutzen Sie niemals Scheuer- oder Reinigungsmittel
- diese können das Außenmaterial oder die Elektronik
beschädigen.
Umweltbedingungen
Nicht direkt dem Sonnenlicht aussetzen.
Stellen Sie stets sicher, dass die Oberfläche n des LH10
nicht abgedeckt sind und die Luft darum herum frei
zirkulieren kann.
Tauchen Sie Ihr Produkt bzw. Teile desselben niemals
in Wasser und verwenden Sie es nicht in feuchter oder
dampfender Umgebung, wie zum Beispiel in
Badezimmern.
Setzen Sie Ihr Produkt niemals offenem Feuer oder
anderen Gefährdungen aus.
Vermeiden Sie, die Kommunikationseinheit LH10 mit
Kleidung in Berührung kommen zu lasse n oder mit
Händen anzufassen, weil dies störende Geräusche
verursachen kann.
40
Page 42

GARANTIE
Die von Geemarc Telecom Ltd gewährleistete Garantie
für Ihr Geemarc LoopHEAR
Kaufdatum. Während dieses Zeitraums erfolgen alle
Reparaturen oder ein Ersatz (nach Ermessen Geemarcs)
kostenlos. Sollten Sie ein Problem haben, dann setzen
Sie sich mit unserer Hotline in Verbindung oder besuchen
unsere Website unter www.geemarc.com. Die Garantie
schließt Unfälle und Schäden durch Fahrlässigkeit oder
Beschädigung von Teilen aus. Das Produkt darf nur
von autorisierten Geemarc Vertretern geöffnet bzw.
repariert werden. Die Geemarc Telecom Ltd Garantie
schränkt Ihre gesetzlichen Rechtsansprüche in keiner
Weise ein.
WICHTIG: IHR KAUFBELEG IST TEIL DER GARANTIE
UND MUSS IM GARANTIEFALL VORGELEGT
WERDEN.
KONFORMITÄTSERKLÄRUNG: Geemarc Telecom SA
erklärt hiermit, dass dieses Produkt LoopHEAR
die grundlegenden Anforderungen der RED-Richtlinie
2014/53/EU erfüllt.
Die Konformitätserklärung kann unter folgender Adresse
gefunden werden: www.geemarc.com
Struhlungsleitung : < 250 mW
TM
10 gilt für zwei Jahren ab
TM
10
41
Page 43

FCC-Erklärung
FCC Klasse B
Hinweis : Das vorliegende Gerät erfüllt die
Grenzwertbestimmungen für digitale Geräte der Klasse B
nach Teil 15 der FCC-Regeln zur Funkentstörung. Ziel
dieser Bestimmungen ist es, beim Betrieb des Gerätes
innerhalb einer Wohnumgebung einen angemessenen
Schutz gegen störende Interferenzen zu gewährleisten.
Dieses Gerät erzeugt und nutzt Hochfrequenzenergie und
kann diese auch ausstrahlen. Wird es nic ht gemäß de n
hier gegebenen Anweisungen angeschlo ssen und ge nutzt,
kann das Gerät Funkübertragungen erheblich stören.
Es ist jedoch trotz Befolgen der Anweisungen möglich, dass
bei bestimmten Geräten Störungen auftreten. Sollten durch
das Gerät Störungen beim Radio- bzw. Fernsehempfang
auftreten, was z.B. durch Ein- und Ausschaltung des Geräts
geprüft werden kann, versuchen Sie, diese durch f olgende
Maßnahmen zu beheben:
• Richten Sie die Empfangsantenne neu aus.
• Erhöhen Sie den Abstand zwischen Gerät und Empfä nger.
• Schließen Sie das Gerät an eine Netzquelle auf einem
anderen Kreislauf an, als dem, an den der Empfäng er
angeschlossen ist.
•
Wenden Sie sich an Ihren Fachhändler oder einen
erfahrenen Radio- und Fernsehtechniker für Hilfe.
Hinweis :
Bestimmungen. Der Betrieb unterliegt den folgenden zwei
Bedingungen : (1) Das Gerät darf keine Interferenzen
verursachen, und (2) Das Gerät muss unanfällig gegenüber
beliebigen empfangenen Störungen sein, einschließlich
solcher, die einen unerwünschten Betrieb verurs achen.
Dieses Gerät entspricht Teil 15 der FCC-
42
Page 44

RECYCLING-RICHTLINIE
Kommunale Geräteentsorgungsdienste wurden
weitgehend flächendeckend eingerichtet, damit Produkte
am Ende ihrer Nutzungsdauer auf beste Weise recycelt
werden können.
Geben Sie dieses Produkt nach Ende der Nutzungsdauer
bitte nicht in Ihren Hausmüll.
Bitte verwenden Sie eine der folgenden
Entsorgungsmöglichkeiten:
- Entfernen Sie die Batterien und geben Sie diese bei
einer geeigneten Batteriesammelstelle ab.
- Geben Sie das Produkt bei einer geeigneten
Geräteentsorgungsstelle ab.
- Andernfalls geben Sie das alte Produkt dem Händler
zurück. Wenn Sie ein neues kaufen, sollte dieser es
entgegennehmen.
Wenn Sie diese Empfehlungen berücksichtigen, tragen
Sie zum Schutz von Gesundheit und Umwelt bei.
Alle Elektro- und Electronikgeräte einschließlich Batterien
sind getrennt vom allgemeinen Hausmüll über dafür
staatlich vorgesehene Stellen zu entsorgen.
CAN ICES-3(B)/NMB-3(B)
43
Page 45

ÍNDICE
Ya está disponible en nuestra web la guía de
usuario actualizadaf.
www.geemarc.com
ÍNDICE ...................................................................... 44
INTRODUCCIÓN ...................................................... 45
Contenido del LoopHEAR
DESCRIPCIÓN ......................................................... 47
Descripción general .................................................. 47
INSTALACIÓN ......................................................... 50
Configuración ............................................................ 50
CÓMO SE USA EL LoopHEARTM10 ........................ 51
Encendido y apagado del LoopHEAR
Configuración del tono y del balance ........................ 51
DIAGNÓSTICO DE AVERÍAS .................................. 53
INFORMACIÓN DE SEGURIDAD ............................ 54
GARANTÍA ............................................................... 55
Declaración de la FCC ............................................ 56
DIRECTIVAS DE RECICLAJE ................................. 57
TM
10 .................................. 46
TM
10 ............... 51
44
Page 46

Enhorabuena por haber comprado un teléfono Geemarc
LH10. El LH10 es un dispositivo recargable de asistencia
a la escucha. Amplifica la voz junto con sonidos
procedentes de una variedad de fuentes, como la TV,
la radio y el teléfono.
El LH10 puede utilizarse como opción a los audífonos
cuando se utilicen auricu lares de cab eza (casc os) .
Nota : los que utilicen audífonos digitales deberán
asegurarse de que éstos han sido programados
para su empleo con el ajuste en ‘T’.
Es importante que lea las siguientes instrucciones para
saber aprovechar todo el potencial de su LH10 de
Geemarc. Guarde las siguientes instrucciones de
funcionamiento en un lugar seguro por si deseara
consultarlas en un futuro.
INTRODUCCIÓN
45
Page 47

INTRODUCCIÓN
Contenido del LoopHEARTM10
En el interior del embalaje del LH10 debe rá encontra r lo
siguiente :
TM
• Elemento de conversación LoopHEAR
• Auriculares de cabeza con acolchados de goma en
las orejas
• Batería recargable de 3.7V
• Cable Micro USB / USB para la recarga
• Acollador (option)
• Un micrófono junto con un cable de 3 m (option)
• Una pinza para el cinturón
• 1 instrucciones de funcionamiento
10
Para obtener soporte y ayuda acerca del producto,
visite nuestro sitio web: www.geemarc.com
2 rue Galilée, Parc de l’Etoile, 59791 Grande-Synthe
Cedex, France
Este producto está fabricado en China para Geemarc Telecom
46
Page 48

DESCRIPCIÓN
Descripción general
Puerto de
micrófono
Interruptor
de modo
(MIC o T)
Puerto para
recargar
(5V DC)
Puerto del
auricular
47
Puerto del
micrófono
Elemento de
comunicación
LH10
Ruleta de control
de volumen
conexión /
desconexión
LED de carga y
de encendido
Page 49

DESCRIPCIÓN
Clip de
cinturón
Tapa del
compartimento
para la batería
48
Page 50

Ajuste de
tono y
balance
DESCRIPCIÓN
Espacio para
baterías
Clip para el
cordón de
soporte
(opcional)
Enchufe para la batería
49
Page 51

INSTALACIÓN
Configuración
Abra el compartimento para la batería. Inserte la batería
recargable que se suministra (3.7 V) en el interior del
compartimento para la batería que se encuentra en la
parte posterior del elemento de comunicación LH10.
En r inserte 2 baterías (1.5V AAA no recargables) en
vez del conjunto de baterías t suministradas.
En el modo de batería AAA, si el LED indicador se
enciende en rojo cuando se utilice. El LH10 necesita
nuevas baterías. (no hay indicación LED roja al utilizar
baterías recargables.
Para cargar la batería, conecte el cable USB suministrado
a la toma micro USB del lado izquierdo de la unidad y
luego a la USB de la PC o toma de potencia estándar
de 5V DC.
El LED del suministro de potencia se encenderá en rojo.
Auricular
Introduzca el cable de los auriculares de cabeza en su
puerto correspondiente, el que se encuentra en la base
del elemento de comunicación.
50
Page 52

CÓMO SE USA EL LH10
Encendido y apagado del LH10
Póngase los auriculares de cabeza. Asegúrese de que
el interruptor de modo se encuentre en la posición
MIC (LH10). Gire la rueda de control de volumen On/Off
(encendido / apagado) hacia arriba. Se pondrá verde el
LED de encendido. Ajuste el volumen a un nive l cómodo
girando la rueda de control de volumen On/Off (encendido
/ apagado).
Para apagar el LH10-. gire hacia abajo la rueda de control
de volumen On/Off. Se apagará el LED verde y en la
ruleta de control de volumen On/Off podrá leerse OFF
(apagado).
Sólo con el LH10
El LH10 puede utilizarse para mejorar y complementar
su audífono por su estructura de aparato auditivo (bobina
en T). Pasando el interruptor de modo a T y enchufando
un bucle de inducción en la toma de conexión de los
auriculares de cabeza, recibirá todos los beneficios de
la bobina en T integrada.
51
Page 53

CÓMO SE USA EL LH10
Se puede conectar un micrófono externo (opcional) a la
toma
Mic y luego configurar el interriptor a la po sición
Mic, en este caso la bobina T integrada se desactuva.
Micrófono
El LH10 posee un micrófono interno que le permite
escuchar los sonidos del entorno.
Configuración del tono y del balance
Pueden ajustarse el tono ( ) y el balance
( ) utilizando los controles que se encuentran
dentro del compartimento para la batería.
52
Page 54

DIAGNÓSTICO DE AVERÍAS
El LED o piloto rojo está intermitente
• Cargue la batería si se utiliza un paquete de baterías
con nuevas baterías si se instalan baterías AAA
estándar.
Parece que no funciona el LH10
• Asegúrese de que estén bien enchufados los auriculares
de cabeza.
•
Asegúrese de que el volumen esté correctamente
ajustado.
• Asegúrese de que las pilas están bien cargadas.
• Asegúrese de que el interruptor de modo haya sido
fijado en MIC si utiliza unos auriculares de cabeza/de
oído o una T si se utiliza un bucle de inducción LH10.
El LH10 no se está cargando
•
Asegúrese de que el cable de suministro eléctrico
está bien enchufado, es decir, en un enchufe de
alimentación que funcione correctamente y en el
elemento de comunicación LH10.
• Asegúrese de que la batería está bien introducida , y
que es del tipo que se recomien da.
53
Page 55

INFORMACIÓN DE SEGURIDAD
Aspectos generales
No abra el equipo. Llame al servicio técnico para
cualquier reparación.
Limpieza
Limpie el LH10 con un paño suave. No utilice nunca
productos de limpieza ni abrillantadores, ya que podrían
dañar el exterior o los componentes eléctricos internos.
Medio ambiente
No exponer directamente a la radiación solar.
Asegúrese de que siempre circula aire por las
superficies del LH10.
No introduzca ninguna pieza del producto en agua, y
no lo utilice en condiciones de humedad media o alta,
como cuartos de baño.
No exponga el producto directamente a una llama ni a
condiciones peligrosas.
No debe tocar el elemento de comunicación LH10 con
textiles o con las manos, ya que podría originar un ruid o
excesivo.
54
Page 56

GARANTÍA
Geemarc concederá una garantía de un año a partir de
momento de adquisición del LoopHEAR
Durante este período de tiempo, todas las reparaciones
o recambios de piezas (lo que nosotros decidamos) serán
sin coste alguno para usted. Si tuviera cualquier problema,
póngase en contacto con el teléfono de asistencia o
visite nuestro sitio de internet en www .gee marc .com.
La garantía no cubre accidentes, negligencias o
roturas de ninguna de las piezas. El producto no
deberá ser modificado ni inferido por nadie que no sea
el representante autorizado de Geemarc. La garantía
Geemarc no supone en ningún caso límite alguno para
sus derechos legales.
IMPORTANTE : SU FACTURA DE COMPRA FORMA
PARTE DE LA GARANTÍA Y DEBERÁ CONSERVARSE
Y MOSTRARSE CUANDO SE HICIERA UNA
RECLAMACIÓN DE GARANTÍA.
DECLARACIÓN : Geemarc Telecom SA declara por
la presente, que este LoopHEAR
requisitos esenciales y otras disposiciones pertinentes
de las Directivas de Equipos de Radio 2014/53/UE.
La declaración de conformidad podrá ser consultada
en www.geemarc.com
Poder radiante: <250mW
TM
10 Geemarc.
TM
10 cumple con los
55
Page 57

Declaración de la FCC
FCC Clase B
NOTA: Este equipo ha sido probado y cumple con los
límites para un dispositivo digital de Clase B, de acuerdo
con la Parte 15 de las normas FCC. Estos límites han sido
diseñados para proporcionar una protección razonable
contra las interferencias perjudiciales en una instalación
residencial. Este equipo genera, utiliza y puede irradiar
energía de radiofrecuencias y, si no se instala y utiliza de
acuerdo con las instrucciones, puede causar int erfer encias
perjudiciales en las comunicaciones de radio.
Sin embargo, no hay garantía de que no se producir án
interferencias en una instalación particular. Si este equipo
causara interferencias perjudiciales en la recepción de radio
o televisión, lo cual puede comprobarse encendiéndolo y
apagándolo, se recomienda al usuario que intente corregir
la interferencia realizando una o más de las siguientes
medidas:
• Reorientar o reubicar la antena receptora.
• Aumentar la separación entre el equipo y el receptor.
• Conectar el equipo a una toma de un circuito distinto de
aquel al que está conectado el receptor.
• Consulte al distribuidor o a un técnico de radio y televisión
para obtener ayuda.
NOTA : Este dispositivo cumple con la parte 15 de las
Reglas de la Comisión Federal de Comunicaciones. La
operación está sujeta a las dos condiciones siguientes: (1)
este dispositivo no puede causar interferencias perjudiciales
y (2) este dispositivo debe aceptar cualquier interferencia
recibida, incluidas las interferencias que puedan causar
un funcionamiento no deseado.
56
Page 58

DIRECTIVAS DE RECICLAJE
Se ha aplicado la Directiva WEEE (Waste Electrical an d
Electronic Equipment-Residuos de equipamiento eléctrico
y electrónico) para que los productos, al final de su vida
útil, sean reciclados correctamente.
Cuando termine la vida de su produ cto, no l o ti re a su
cubo de basura doméstica.
Puede elegir entre las siguientes opciones de eliminación :
- Quite las pilas y deposítelas en un punto de recogida
de residuos adecuado. Deposite el p r odu ct o igualmente
en el lugar adecuado para dicho residuo.
- También puede entregar el producto antiguo en el lugar
donde lo compró. Si va a comprar uno nuevo, lo correcto
es que le acepten el viejo.
Así, si respeta estas instrucciones, estará protegiendo
la salud humana y el medio ambiente.
Todos los productos eléctricos y electrónicos, incluyendo
las baterías deberán eliminarse de forma separada del
resto de los residuos urbanos utilizando puntos de
recogida designados por el gobierno o por las autoridades
locales.
CAN ICES-3(B)/NMB-3(B)
57
Page 59

58
Page 60

59
UGLoopHEAR10_EnFrGeSp_V1.5
 Loading...