

Page 1

JUPITER 20JUPITER 20
JUPITER 20
JUPITER 20JUPITER 20
Index p2
Sommaire p3
Hands-free speaker phone
Page 2

INDEX
DESCRIPTION 4
SETTING UP
-Installation 6
-Settingtime 7
-Settingringervolume 8
-Tone/ Pulse switch(T/P) 8
-Settingspeakervolume 8
USING THE PHONE
-Making a call 9
-Receiving a call 9
-Last numberredial 10
-Rbutton 1 0
-Storingnumbersinmemory 10
-Diallingnumbersfrommemory 11
GUARANTEE 12
Forproduct supportandhelp visit ourwebsite at
www.geemarc.com
telephone 01707 384438
orfax01707372529
2
Page 3

SOMMAIRE
DESCRIPTION 14
REGLAGES
-Installation 16
-Réglagedel’heure 1 7
-Réglageduvolumede sonnerie 18
-InterrupteurTone/Pulse(T/P) 18
-Réglageduvolumeduhaut-parleur 1 8
UTILISATION DU TELEPHONE
-Appeler 1 9
-Répondreàunappel 19
-Rappeldudernier numéro composé (ToucheBIS) 20
-Touche R 20
-Mémoriserunnumérodetéléphone 2 0
-Appeld’unnuméroenmémoire 21
GARANTIE 23
Parcd’ActivitésduBasroch
2, rueGalilée
TEL. SERVICE APRES VENTE :
03 28 58 75 99
Pour tout renseignement technique ou toute
commande visitez notre site web sur
www.geemarc.com.
3
Page 4

DESCRIPTION
Handset
Hook Switch
Wall Mounting
Clip
Speaker
R
Button Button Button
Microphone
NOTE: When you are in speakerphone mode ( button), you can
speak through the microphone to make or answer a call.
M1
/P
M2 M3
SET
MEM
Button
4
In use LED
STORE Button
Page 5
DESCRIPTION
(classified TNV-3 according to EN60950 standard)
Desktop
Brackets
Ringer
Volume
Switch
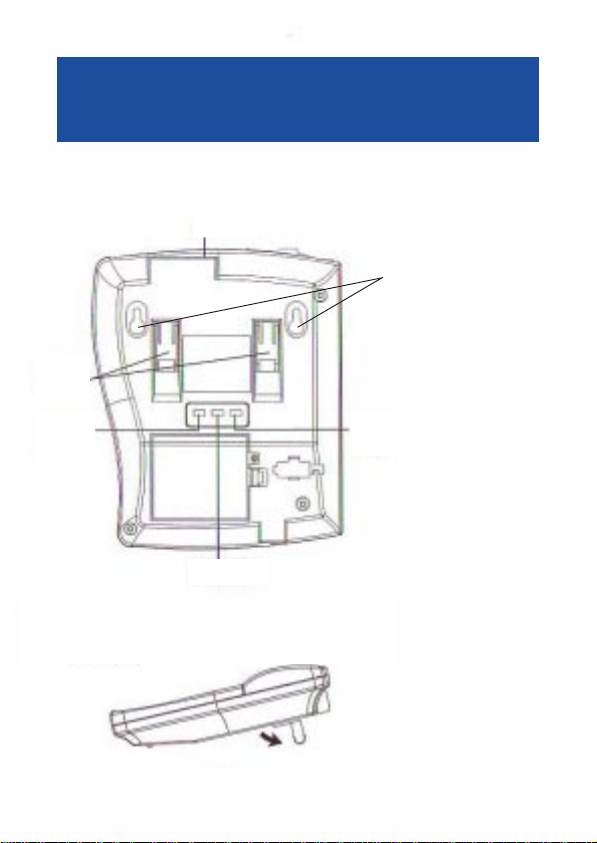
NOTE: Above brackets are in wall mounting state, if you wish to put
your telephone on the destop,please turn around the brackets on
the desktop state as below:
LINE Socket
Switch
Tone/Pulse
Wall mount holes
Speaker Volume Switch
5
Page 6
SETTING UP
1 - INSTALLATION
-Connectthehandsetcord.
-Connectthetelephoneline. (Classified TNV-3accordingto EN60950 standard).
-Liftthehandsettoensurethatyoucanhearthedialtone.Thecalltimerand
theinuseLED will light.
-Replacethehandsetand the LCD displaywillshowasfollows:
00-00
Calltimerindicate: Minutes Seconds
-Thelast2digitswillstartcountingup.
TheLCDdisplay has 3differentsformats:
-Timedisplay:this is the defaultformat.
16-45-30
Hours Minutes Secondes
-Call timer display:
05-18
Minutes Secondes
6
Page 7

SETTING UP
-TelephoneNumberDisplay:displaysthetelephonenumber(upto10
digits)asthedigitsarebeingdialedfromthetelephonekeypad,orfrom
memory.Ifthetelephonenumberismorethan10digits,onlythelast10digits
aredisplayed.
0123456789
2 - SETTING TIME
-Liftthehandset.
-Pressthe
-Pressthe * keytoselectthedesired number.
-Pressthe #keytoconfirmandenterintotheminutesetting.
-Pressthe * keytoselectthedesired number.
-Pressthe # keytoselectthedesirednumber.
-Replacethehandsetonthecradle.
-Thedisplaywillshowtime and will startcountingupafterfewseconds.
Forexample as below :
key,timedisplaywillappear and hourdigitwill flashes
16-45-30
Note:This is alsothe default display format when the unit is in the
idlestate (On hook).
7
Page 8

SETTING UP
3 - SETTING RINGER VOLUME
Youcansetthe desired ringer levelbyusingthe ringerHi/Loswitch
locatedonthebaseoftheunit.
4 - TONE / PULSE SWITCH (T/P)
AswitchT/Plocatedunderthe base allows tosetthediallingmode.
The Tone/Pulseswitch is factory pre-set to Tone position. In the UK, all
telephoneexchangesnowuseTonedialing.Ifyourphonedoes not dialout
it is probably being used from an older private switch board (PBX). In this
case,the Tone/Pulseswitch must bemoved to Pulse.
5 - SETTING SPEAKER VOLUME
Youcansetthe desired speakervolume levelbyusing the ringer Hi/Lo
switchlocatedonthebaseoftheunit.
For product support and help visit our website at
www.geemarc.com
telephone01707384438
orfax01707372529
8
Page 9

USING THE PHONE
1- MAKING A CALL
-Pressthe
TheLCDwilldisplaythe call timer asfollowsforexampleand the in useLED
willlight:
keyonce(Speakerphonemode)orliftthehandset.
00-18
-Usethedialkeypadtodialthenumber.Thedigitsbeingdialledwillappear
ontheLCDdisplayat the same time.Forexample:
0123456789
Afterabout3secondsthe LCD display willswitchtothecalltimer mode.
-TheCallTimerwill stop whenyoureplacethehandset or press the
againattheendofthecall.TheLCDwillrevert back to the default modeafter
about3seconds.
Note: If using the handset, you can switch to using the
speakerphone….simplypressthe
2- RECEIVINGA CALL
Whenthereisanincomingcall,theJupiter 20 will ring.
Liftthehandsetorpress
soonafterthecallisanswered and the inuseLEDwilllight.
keytoanswerthecall.The Call Timer willstart
keyonce,andreplacethehandset.
key
9
Page 10

USING THE PHONE
3 - LAST NUMBER REDIAL
Theunitcanstoreforsubsequentredialthelastnumberthatyoucalled.
-To redial the number,liftthehandsetorpressthe
-Pressthe
Thepreviouslydiallednumberwillbeautomaticallyredialed.
4 - R BUTTON
Theseareusedwith the newservicesprovidedon digital exchanges.For
detailspleasecontactyournetworkoperator.
NOTE:Ifyoudon’tusetheprovidedservicesondigitalexchanges,theRbutton
onlycut the line if you press it to dial a new number for example without replace
thehandset.
5 - STORING NUMBERS IN MEMORY
TheJupiter20canstoreupto13numbersof20digitseachinthememories.
Ofthe13 memories, 3aredirect access bypressingM1,M2,orM3 keys.
Itis suggested you store the most frequently used numbers inthesememories.
Theother10memoriescanbeaccessedbypressingtheMEMkeyfollowedby
digits0to9onthedial keypad.
To storenumbers intomemory:
-Liftthehandsetorpress the
- Press the key once.
-Dialinthetelephonenumberyouwishtostore into memory.The number
willappearontheLCD display asyoudialthedigits.
- Press
/P keyonce as soonas you hearthe dial tone.
key once again.
/P
keyonce.
keyonce.
10
Page 11

USINGTHEPHONE
- Press the M1, M2 or M3 keys (for storing the number into one of these
locations)ortheMEMkey followed byadigit0to9.
Tochange anumber already storedin Memory:simply followthe above
procedure,andthenewnumberwillreplacethenumberstoredpreviously.
NOTE:Ifyouareusingtheunit with a PABXwhichneedsyou to wait for
anoutsideline,at step 3alwayskeyinthe
insertsa3secPAUSEwhen dialing. Thedisplaywillshow“P”followed
bythe number.
6 - DIALLING NUMBERSFROM MEMORY
/P key.The /P key
-Pressthe
TheLCDwilldisplaythe call timerasfollowsforexample:
keyonceorliftthe handset.
00-04
-Press the memory location key(s) i.e.M1, M2,M3 orMEM followed bya
digit0to9.
Thedigitsbeingdialledwill appear ontheLCDdisplayat the same time.For
example:
0170737237
Thecalltimerwillstart.
11
Page 12

GUARANTEE
GUARANTEE
FromthemomentyourGeemarcproductispurchased,Geemarcguaranteeit
fortheperiodofoneyear. During thistime,allrepairsorreplacements(atour
option)arefreeofcharge.Shouldyouexperience a problem thencontactour
helplineorvisit our websiteatwww.geemarc.com.Theguaranteedoes not
coveraccidents,negligenceorbreakagestoanyparts. Theproductmustnot
betamperedwithortakenapartbyanyonewhoisnotanauthorisedGeemarc
representative.TheGeemarcguarantee innowaylimits your legalrights.
IMPORTANT: YOUR RECEIPT IS PART OF YOUR GUARANTEE AND
MUST BE RETAINED AND PRODUCED IN THE EVENT OF A
WARRANTY CLAIM
Pleasenote:Theguaranteeappliestothe United Kingdomonly.
Declaration:Hereby Geemarc TelecomSAdeclares that thisproductis in
compliancewiththeessentialrequirements and otherrelevantprovisionsof
theRadioand TelecommunicationsTerminalEquipmentDirective 1999/5/
EECandin particular article3section 1a, 1bandsection 3. Thetelephone
doesnotoperateifthe line currentislowerthan18 mA.
Telephoneconnection:Voltagespresentonthetelecommunication network
areclassifiedTNV-3 (TelecommunicationNetwork Voltage)accordingto the
EN60950standard.
12
Page 13

Forproduct supportandhelp visit ourwebsite at
www.geemarc.com
telephone 01707 384438
orfax01707372529
13
Page 14

DESCRIPTION
Interrupteur de
Combiné
raccroché/décroché
Clip de
montage mural
Haut Parleur
ToucheRTouche
Microphone
NOTE: Lorsque vous ête en mode haut-Parleur ( button), vous pouvez
parler au travers du microphone pour appler ou répondre à un appel.
M1
/P
M2 M3
Touche
Haut-parleur
14
SET
Touche
MEM
Voyant de
fonctionnement
ToucheSTORE
Page 15

DESCRIPTION
Prise cordon de ligne
(Classée TNT-3 selon la norme EN 60950)
Pieds de
position
bureau
Interrupteur
Volume de
Sonnerie
Interrupteur
Tone /Pulse
NOTE: Si vous désirez utiliser votre téléphone en position bureau,
soulevez simplement les pieds de positionnement bureau situés en
dessous de votre téléphone comme décris ci-dessous:
Trous de fixation murale
Interrupteur de volume haut-parleur
15
Page 16

INSTALLATION
1 - INSTALLATION
-Connectezlecordonducombiné.
-Connectezlecordondeligne.(ClasséeTNT-3selon lanormeEN60950).
-Décrochezle combiné pourvérifierquevous avez latonalité.La minuterie
(duréede l’appel)etlevoyantdefonctionnementsemettentenfonctionnement.
-Replacezlecombiné,l’écranLCDaffichera par exemple :
00-00
Minutes Secondes
-Lesdeuxdernierschiffresdelaminuteriesemettentenfonctionnement..
L’écranLCD a 3 formatsdifférents:
-Affichagedel’heure:c’estleformat par défaut.
16-45-30
Heures Minutes Secondes
-Minuterie(duréedesappels):
05-18
Minutes Secondes
16
Page 17

INSTALLATION
-Affichagedunumérocomposé:L’afficheurpeutafficherj’usqu’à10chiffres
lorsde lacompositiondunuméro.Silenumérode téléphoneestsuppérieurà10
chiffres,seulementles10dernierschiffresserontaffichésàl’écran.
0123456789
2-REGLAGEDEL’HEURE
-Décrochezlecombiné.
-Appuyezsurla touche ,L’affichagede l’heure va apparaître etlechiffre
del’heure clignotera.
-Appuyez sur la touche * pour sélectionnerlechiffredésiré.
-Appuyezsur la touche # pourconfirmeretentrerdans le mode réglage des
minutes.
-Appuyezsur la touche * poursélectionnerlechiffredésiré.
-Appuyezsur la touche # poursélectionner lechiffre désiré.
-Raccrochezlecombiné,l’afficheurindiquel’heureetcommenceàcompter
aprèsquelques secondes.
Commeparexempleci-dessous:
16-45-30
Note:Ceformatd’affichage est leformatpardéfaut à enmodeattente
(pasd’utilisationdutéléphone).
17
Page 18

INSTALLATION
3-REGLAGE DUVOLUMEDE SONNERIE
Vouspouvezréglerleniveaudesonneriede votre téléphone avec l’interrupteur
Hi/Lositueren dessousdevotretéléphone(Hi: Fort, Lo:Faible).
4 - INTERRUPTEUR TONE / PULSE (T/P)
Un interrupteur T/P situé en dessous de votre téléphone vous permet de
choisirlemodedenumérotation.L’interrupteurTone/Pulseestprépositionné
enusinesurlapositionTone.EnFrancelemodedenumérotationutiliséestle
modeVocal(Tone).Sivotretéléphonenecomposepaslenuméro,celàviens
probablementde l’utilisation d’un ancien PABX(centraltéléphonique). Dansce
cas,ilsuffitsimplement de changer la position de l’interrupteurTone/Pulsesur
lapositionPulse.
3-REGLAGE DU VOLUMEDU HAUT-PARLEUR
Vouspouverréglerlevolumedu haut-parleur de votretéléphoneavecl’interrupteurHi/Lositueren dessousdevotretéléphone (Hi: Fort,Lo:Faible).
Parcd’Activitésdu Basroch
2,rueGalilée
TEL. SERVICE APRES VENTE :
03 28 58 75 99
Pourtout renseignement techniqueou toutecommande
visitez notre site web sur www.geemarc.com.
18
Page 19

UTILISER LE TELEPHONE
1- APPELER
-Appuyezsur la touche
l’appel)se mettera en fonctionnement, le voyant de fonctionnement s’allume et
l’afficheurindiquera par exemple:
oudécrochezlecombiné.Laminuterie(durée de
00-18
-Utilisezleclavierpourcomposervotrenuméro.Leschiffres correspondants
s’affichentsurl’écranLCDcommeparexemple:
0123456789
Aprèsenviron3secondes,l’écranLCDaffichera de nouveaux la minuterie.
-La minuteries’arrêteautomatiquementlorsquevousraccrochezlecombinéou
lorsquevousappuyez sur
LCDretourneraenmodedéfaut(affichagedel’heure)environaprès3secondes.
Note: Si vous utilisez le combiné, vous pouvez à tout moment de la
conversation utiliserle haut-parleur (fonctionmainslibres)….appuyez
simplementsur la touche ,et raccrochez le combiné.
2 - REPONDRE A UN APPEL
Lorsque le téléphone sonne, déccrochez le combiné ou appuyez sur la touche
pourrépondre àl’appel, la minuterie se meten fonctionnementdès que
l’appelestprisetlevoyantdefonctionnements’allume.
unefoisde plus pourterminerl’appel. L’écran
19
Page 20

UTILISATION DU TELEPHONE
3 - RAPPEL DU DERNIER NUMERO COMPOSE (TOUCHE BIS).
Vouspouvezrecomposerautomatiquementlederniernumérocomposé.
-Pourrecomposerlederniernuméro,déccrochezlecombinéouappuyezsur
latouche
-Appuyezsur la touche
-Le numéro de votre correspant se recompose automatiquement.
4 - TOUCHE R
Touche d’accèsauxservicesdevotreopérateurtéléphonique, pour tout renseignementconcernatcesservicescontactezvotreopérateur.
Note:sivousn’êtesabonnésàaucunservice spécial, un appui sur latouche
Rcoupelaligne lorsque vous êtesencommunication.
5- MEMORISER UN NUMERO DETELEPHONE
LeJupiter20possède13mémoiresde20chiffres maximumparmémoire. m.
Surles13mémoires,3sontdirectesenappuyantsimplementsur M1,M2,ou
M3.Nousvoussuggéronsde mémoriser les numéroslesplusutilisésoules
plusimportants dans ces mémoires. Lesautres10 mémoiressont indirectes et
peuventêtre accessibles en appuyant sur la touche MEM suivie d’un chiffre de
0à 9 sur le clavier.
.
/Pdèsquevousentendezlatonalité.
Pourmémorisezunnuméroenmémoire:
-Déccrochezlecombinéouappuyez sur la touche
-Appuyez sur la touche
.
20
.
Page 21

UTILISATION DU TELEPHONE
-Composezlenumérodetéléphonequevousdésirezmettreenmémoire.Le
numéroapparaîtsurl’écranLCDlorsquequevouscomposezlenuméro.
-Appuyez denouveausur la touche .
-Appuyezsurunedes touches M1, M2ou M3(Pourmémoriserlenumérosur
unede ces touches) ou appuyez sur la touche MEM suivied’unchiffrede0 à9.
Pourmodifier unnuméro misen mémoire: Suivez simplement la procédureci-dessus,lenouveaunuméroentréeffaceral’ancien.
NOTE:Sivous utilisez unPABXqui nécessite untempsd’attente pour
pour obtenir une ligne extérieure, vous pouvez insérer une pause à
l’étape3 dela miseen mémoireen appuyantsur la touche RD./P.Ceci
permetd’insérerunepaused’environ3secondes,l’écranLCDaffichera
un «P» suivi du reste du numéro.
6- APPEL D’UN NUMERO ENMEMOIRE
-Appuyez su la touche
L’écranLCDaffichelaminuteried’appelcommeparexemple:
oudéccrochezlecombiné.
00-04
-Appuyez sur l’une destouchesmémoired’accèsdirect M1,M2, M3ousur
MEMsuivid’undes chiffres0 to 9.
Lenumérosecomposesur l’écran LCD commeparexemple:
21
Page 22

UTILISATION DU TELEPHONE
0170737237
Laminuterie d’appel se met alorsenfonctionnement.
Parcd’Activitésdu Basroch
2,rueGalilée
TEL. SERVICE APRES VENTE :
03 28 58 75 99
Pourtout renseignement techniqueou toute
commandevisitez notre site web sur
www.geemarc.com.
22
Page 23

GARANTIE
GARANTIE
Cetappareilestgaranti1 an pièces etmain-d'oeuvre.Ladated'achat
figurantsurleticket de caisse ferafoi.Cettegarantie s'exerce sous réserve
d'uneutilisationnormaledel'appareil.Lesdommages occasionnés par les
surtensionsélectriques,lafoudreoupar un choc surl'appareilnepeuvent
enaucuncasêtre couvertsparla garantie. En casdeproblèmefonctionnel
etavantdenousretourner votre appareil, contacteznotreserviceaprès
ventede:8h30à 12h30 etde14h00à17h00 du Lundi auJeudietde8h30
à12h30etde14h00à 16h30 le Vendredi.
Raccordementtéléphonique:lestensions présentes surceréseausont
classéesTRT-3(T ensiondeRéseaudeTélécommunication)ausensdela
normeEN60950.
Ceproduitrespectelesexigencesde compatibilitéélectro-magnétiqueetde
sécuritéélectrique demandées par la directive européenne RTTE.Par ailleurs,
ilestcompatibleavecles différents réseaux téléphoniqueseuropéens(normesTBR21/37/38).Le fonctionnement del’appareil n’estpas garanti sile
courantdeligneestinférieur à 18 mA.
Parcd’Activitésdu Basroch
2,rueGalilée
TEL. SERVICE APRES VENTE :
03 28 58 75 99
Pourtout renseignement techniqueou toute
commandevisitez notre site web sur
www.geemarc.com.
23
UGJUP20 ED01
 Loading...