

Page 1
JUPITER 10JUPITER 10
JUPITER 10
JUPITER 10JUPITER 10
Index p2
Sommaire p3
T e l e p h o n e
Page 2

INDEX
DESCRIPTION 4
SETTING UP
- Installation 6
- Setting time 7
- Setting ringer volume 8
- Tone / Pulse switch (T/P) 8
USING THE PHONE
- Making a call 9
- Receiving a call 9
- Last number redial 9
- R button 1 0
- Mute button 1 0
- Storing numbers in memory 10
- Dialling numbers from memory 11
GUARANTEE 12
For product support and help visit our website at
www.geemarc.com
telephone 01707 384438
or fax 01707 372529
2
Page 3

SOMMAIRE
DESCRIPTION 14
REGLAGES
- Installation 16
- Réglage de l’heure 1 7
- Réglage du volume de sonnerie 18
- Interrupteur Tone / Pulse (T/P) 18
UTILISATION DU TELEPHONE
- Appeler 1 9
- Répondre à un appel 19
- Rappel du dernier numéro composé (Touche BIS) 19
- Touche R 20
- Touche secret 20
- Mémoriser un numéro de téléphone 2 0
- Appel d’un numéro en mémoire 21
GARANTIE 22
Parc d’Activités du Basroch
2, rue Galilée
TEL. SERVICE APRES VENTE :
03 28 58 75 99
Pour tout renseignement technique ou toute
commande visitez notre site web sur
www.geemarc.com.
3
Page 4
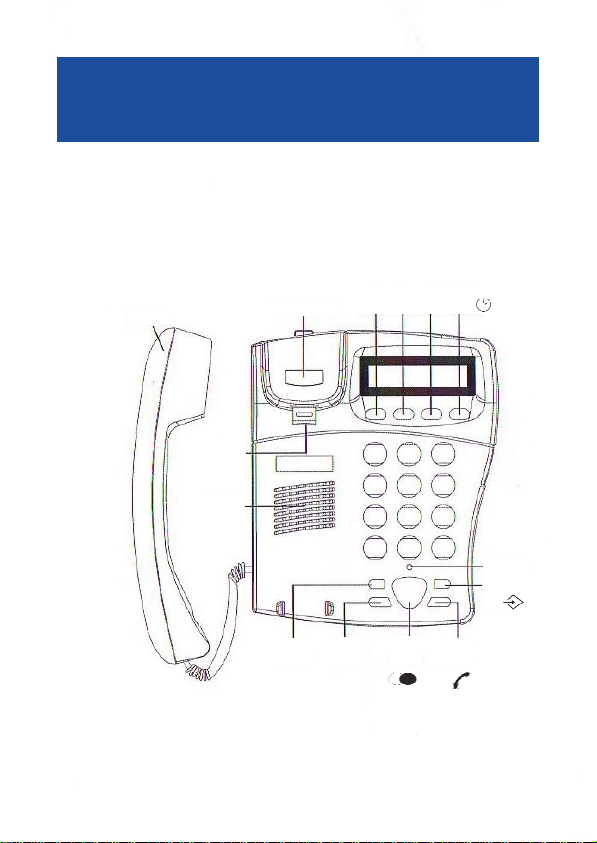
DESCRIPTION
Handset
Wall Mounting
Clip
Speaker
Hook Switch
MEM
Button
4
R
Button
M2 M3
RD./P
SET
MUTE
Button
In use LED
STORE Button
M1
Button
/P
Page 5

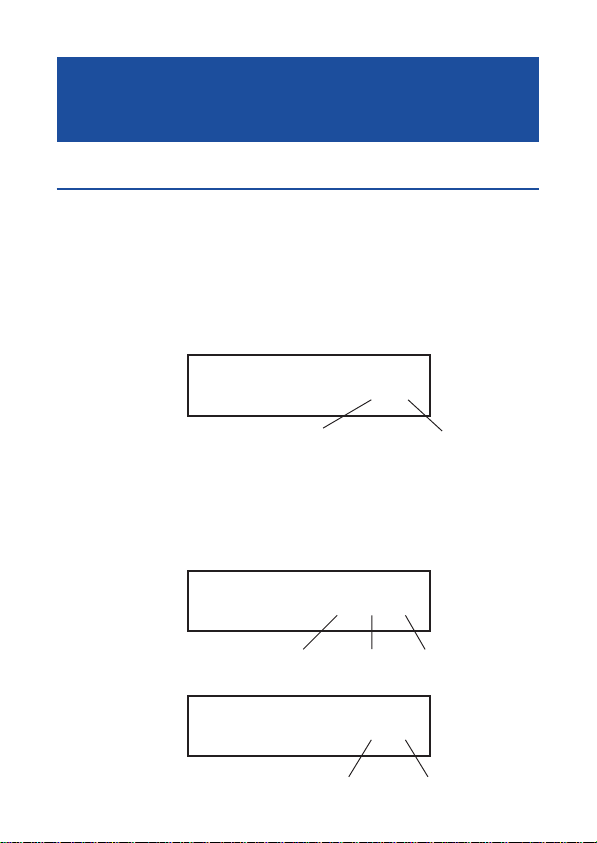
DESCRIPTION
(classified TNV-3 according to EN60950 standard)
Desktop
Brackets
Ringer
Volume
Switch
NOTE: Above brackets are in wall mounting state, if you wish to put
your telephone on the destop,please turn around the brackets on
the desktop state as below:
LINE Socket
Switch
Tone/Pulse
Wall mount holes
5
Page 6
SETTING UP
1 - INSTALLATION
- Connect the handset cord.
- Connect the telephone line. (Classified TNV-3 according to EN60950 standard).
- Lift the handset to ensure that you can hear the dial tone. The call timer and
the in use LED will light.
- Replace the handset and the LCD display will show as follows:
00-00
Call timer indicate : Minutes Seconds
- The last 2 digits will start counting up.
The LCD display has 3 differents formats:
- Time display : this is the default format.
16-45-30
Hours Minutes Secondes
- Call timer display:
05-18
Minutes Secondes
6
Page 7
SETTING UP
- TelephoneNumber Display : displays the telephone number (upto 10
digits) as the digits are being dialed from the telephone keypad, or from
memory.Ifthetelephone number is more than 10 digits, only the last 10 digits
are displayed.
0123456789
2 - SETTING TIME
- Lift the handset.
- Press the
- Press the * key to select the desired number.
- Press the # key to confirm and enter into the minute setting.
- Press the * key to select the desired number.
- Press the # key to select the desired number.
- Replace the handset on the cradle.
- The display will show time and will start counting up after few seconds.
For example as below :
key, time display will appear and hour digit will flashes
16-45-30
Note: This is also the default display format when the unit is in the
idle state (On hook).
7
Page 8

SETTING UP
3 - SETTING THE RINGER VOLUME
You can set the desired ringer level by using the ringer Hi / Low switch
located on the base of the unit.
4 - TONE / PULSE SWITCH (T/P)
A switch T/P located under the base allows to set the dialling mode.
The Tone/Pulse switch is factory pre-set to Tone position. In the UK, all
telephone exchanges now use Tone dialing. If your phone does not dial out
it is probably being used from an older private switch board (PBX). In this
case, the Tone/Pulse switch must be moved to Pulse.
For product support and help visit our website at
www.geemarc.com
telephone 01707 384438
or fax 01707 372529
8
Page 9

USING THE PHONE
1 - MAKING A CALL
- Lift the handset.
The LCD will display the call timer as follows for example and the in use LED
will light:
00-18
- Use the dial keypad to dial the number. The digits being dialled will appear
on the LCD display at the same time. For example:
0123456789
After about 3 seconds the LCD display will switch to the call timer mode.
- The Call Timer will stop when you replace the handset at the end of the call.
The LCD will revert back to the default mode after about 3 seconds.
2 - RECEIVING A CALL
When there is an incomingcall,theJupiter10willring. Lift handset to answer the
call. The Call Timer will start soon after the call is answered and the in use LED
will light.
3 - LAST NUMBER REDIAL
The unit can store for subsequent redial the last number that you called.
- To redial the number, lift the handset.
/P
9
Page 10

USING THE PHONE
- Press the key once as soon as you hear the dial tone.
The previously dialled number will be automatically redialed.
4 - R BUTTON
These are used with the new services provided on digital exchanges. For
details please contact your network operator.
NOTE: If you don’t use the provided services on digital exchanges, the R button
only cut the line if you press it to dial a new number for example without replace
the handset.
5 - MUTE BUTTON
If you wish to speak privately to someone else in the room without your caller
overhearing press and hold the button. Yourcaller may still be heard during
the MUTE operation. To resume normal conversation , release the button.
6 - STORING NUMBERS IN MEMORY
The Jupiter 20 can store upto 13 numbers of 20 digits each in the memories.
Of the 13 memories, 3 are direct access by pressing M1, M2, or M3 keys.
It is suggested you store the most frequently used numbers in these memories.
The other 10 memories can be accessed by pressing the MEM key followed by
digits 0 to 9 on the dial keypad.
To store numbers into memory :
- Lift the handset.
- Press the key once.
- Dial in the telephone number you wish to store into memory. The number
/P
10
Page 11

USING THE PHONE
will appear on the LCD display as you dial the digits.
- Press key once again.
- Press the M1, M2 or M3 keys (for storing the number into one of these
locations) or the MEM key followed by a digit 0 to 9.
To change a number already stored in Memory: simply follow the above
procedure, and the new number will replace the number stored previously.
NOTE: If you are using the unit with a PABXwhich needs you to wait for
an outside line, at step 3 always key in the key. The key
inserts a 3 sec PAUSE when dialing. The display will show “P” followed
by the number.
7 - DIALLING NUMBERS FROM MEMORY
- Lift the handset.
The LCD will display the call timer as follows for example:
/P
00-04
- Press the memory location key (s) i.e. M1, M2, M3 or MEM followed by a digit
0 to 9.
The digits being dialled will appear on the LCD display at the same time. For
example:
/P
The call timer will start.
0170737237
11
Page 12

GUARANTEE
GUARANTEE
From the moment your Geemarc product is purchased, Geemarc guarantee it
for the period of one year. During this time, all repairs or replacements (at our
option) are free of charge.Should you experience a problem then contact our
helpline or visit our website at www.geemarc.com.The guarantee does not
cover accidents, negligence or breakages to any parts. The product must not
be tampered with or taken apart by anyone who is not an authorised Geemarc
representative.The Geemarc guarantee in no way limits your legal rights.
IMPORTANT: YOUR RECEIPT IS PART OF YOUR GUARANTEE AND
MUST BE RETAINED AND PRODUCED IN THE EVENT OF A
WARRANTY CLAIM
Please note: The guarantee applies to the United Kingdom only.
Declaration : Hereby Geemarc Telecom SA declares that this product is in
compliance with the essential requirements and other relevant provisions of
the Radio and Telecommunications Terminal Equipment Directive 1999/5/
EEC and in particular article 3 section 1a, 1b and section 3. The telephone
does not operate if the line current is lower than 18 mA.
Telephoneconnection : Voltages present on the telecommunication network
are classified TNV-3 (Telecommunication Network Voltage) according to the
EN60950 standard.
12
Page 13

For product support and help visit our website at
www.geemarc.com
telephone 01707 384438
or fax 01707 372529
13
Page 14

DESCRIPTION
Combiné
Clip de
montage mural
Haut Parleur
Interrupteur de
raccroché/décroché
Touche
MEM
14
Touche
R
M1
Touche
BIS/PAUSE
M2 M3
/P
SET
Touche
SECRET
Voyant de
fonctionnement
Touche de mise
en mémoire
Page 15

DESCRIPTION
Prise cordon de ligne
(Classée TNT-3 selon la norme EN 60950)
Pieds de
position
bureau
Interrupteur
Volume de
Sonnerie
Interrupteur
Tone /Pulse
NOTE: Si vous désirez utiliser votre téléphone en position bureau,
soulevez simplement les pieds de positionnement bureau situés en
dessous de votre téléphone comme décris ci-dessous:
Trous de fixation murale
15
Page 16

INSTALLATION
1 - INSTALLATION
- Connectez le cordon du combiné.
- Connectez le cordon de ligne. (Classée TNT-3 selon la norme EN60950).
- Décrochez le combiné pour vérifier que vous avez la tonalité. La minuterie
(durée de l’appel) et le voyant de fonctionnement se mettent en fonctionnement.
- Replacez le combiné, l’écran LCD affichera par exemple :
00-00
Minutes Secondes
- Les deux derniers chiffres de la minuterie se mettent en fonctionnement..
L’écran LCD a 3 formats différents:
- Affichage de l’heure : c’est le format par défaut.
16-45-30
Heures Minutes Secondes
- Minuterie (durée des appels):
05-18
Minutes Secondes
16
Page 17

INSTALLATION
- Affichage du numéro composé : L’afficheur peut afficher j’usqu’à 10 chiffres
lors de la composition du numéro. Si le numéro de téléphone est suppérieur à 10
chiffres, seulement les 10 derniers chiffres seront affichés à l’écran.
0123456789
2 - REGLAGE DE L’HEURE
- Décrochez le combiné.
- Appuyez sur la touche , L’affichagede l’heure va apparaître et le chiffre
de l’heure clignotera.
- Appuyez sur la touche * pour sélectionner le chiffre désiré .
- Appuyez sur la touche # pour confirmer et entrer dans le mode réglage des
minutes.
- Appuyez sur la touche * pour sélectionner le chiffre désiré.
- Appuyez sur la touche # pour sélectionner le chiffre désiré.
- Raccrochez le combiné, l’afficheur indique l’heure et commence à compter
après quelques secondes.
Comme par exemple ci-dessous :
16-45-30
Note: Ce format d’affichage est le format par défaut à en mode attente
(pas d’utilisation du téléphone).
17
Page 18

INSTALLATION
3 - REGLAGE DU VOLUME DE SONNERIE
Vouspouver régler le niveau de sonnerie de votre téléphone avec l’interrupteur Hi / Low situer en dessous de votre téléphone (Hi: For, Low: Faible).
4 - INTERRUPTEUR TONE / PULSE (T/P)
Un interrupteur T/P situé en dessous de votre téléphone vous permet de
choisir le mode de numérotation . L’interrupteur Tone/Pulseest prépositionné
en usine sur la position Tone.En France le mode de numérotation utilisé est le
mode Vocal(Tone). Si votre téléphone ne compose pas le numéro, celà viens
probablement de l’utilisation d’un ancien PABX (central téléphonique). Dans ce
cas, il suffit simplement de changer la position de l’interrupteur Tone/Pulse sur
la position Pulse.
Parc d’Activités du Basroch
TEL. SERVICE APRES VENTE :
Pour tout renseignement technique ou toute
commande visitez notre site web sur
2, rue Galilée
03 28 58 75 99
www.geemarc.com.
18
Page 19

UTILISER LE TELEPHONE
1 - APPELER
- Décrochez le combiné. La minuterie (durée de l’appel) se mettera en fonctionnement, le voyant de fonctionnement s’allume et l’afficheur indiquera par exemple:
00-18
- Utilisez le clavier pour composer votre numéro. Les chiffres correspondants
s’affichent sur l’écran LCD comme par exemple:
0123456789
Après environ 3 seconde, l’écran LCD affichera de nouveaux la minuterie.
- La minuterie s’arrête automatiquement lorsque vous raccrochez le combiné
pour terminer l’appel. L’écran LCD retournera en mode défaut (affichage de
l’heure) environ après 3 secondes.
2 - REPONDRE A UN APPEL
Lorsque le téléphone sonne. Déccrochez le combiné pour répondre à l’appel. La
minuterie se met en fonctionnement dès que l’appel est pris, et le voyant de
fonctionnement s’allume.
3 - RAPPEL DU DERNIER NUMERO COMPOSE (TOUCHE BIS).
Vouspouvez recomposer automatiquement le dernier numéro composé.
- Pour recomposer le dernier numéro, déccrochez le combiné.
19
Page 20

UTILISATION DU TELEPHONE
Appuyez sur la touche /P dès que vous entendez la tonalité.
- Le numéro de votre correspant se recompose automatiquement.
4 - TOUCHE R
Touche d’accès aux services de votre opérateur téléphonique, pour tout renseignement concernat ces services contactez votre opérateur.
Note : si vous n’êtes abonnés à aucun service spécial, un appui sur la touche
R coupe la ligne lorsque vous êtes en communication.
5 - TOUCHE SECRET
Cette touche permet de couper ponctuellement le microphone en cours de
communication. Appuyez et maintenez la touche
vous entend plus. Relâchez la touche
5 - MEMORISER UN NUMERO DE TELEPHONE
Le Jupiter 20 possède 13 mémoires de 20 chiffres maximum par mémoire. m.
Sur les 13 mémoires, 3 sont directes en appuyant simplement sur M1, M2, ou
M3. Nous vous suggérons de mémoriser les numéros les plus utilisés ou les
plus importants dans ces mémoires. Les autres 10 mémoires sont indirectes et
peuvent être accessibles en appuyant sur la touche MEM suivie d’un chiffre de
0 à 9 sur le clavier.
Pour mémorisezr un numéro en mémoire :
- Déccrochez le combiné.
- Appuyez sur la touche
.
pour rétablir la conversation.
20
. Votre correspondant ne
Page 21
UTILISATION DU TELEPHONE
- Composez le numéro de téléphone que vous désirez mettre en mémoire. Le
numéro apparaît sur l’écran LCD lorsque que vous composez le numéro.
- Appuyez de nouveau sur la touche
- Appuyez sur une des touches M1, M2 ou M3(Pour mémoriser le numéro sur
une de ces touches) ou appuyez sur la touche MEM suivie d’un chiffre de 0 à 9.
Pour modifier un numéro mis en mémoire: Suivez simplement la procédure ci-dessus, le nuoveau numéro entré effacera l’ancien.
NOTE: Si vous utilisez un PABX qui nécessite un temps d’attente pour
pour obtenir une ligne extérieure, vous vpouvez insérer une pause à
l’étape 3 de la mise en mémoire en appuyant sur la touche /P. Ceci
permet d’insérer une pause d’environ 3 secondes, l’écran LCD affichera
un «P» suivi du reste du numéro.
6 - APPEL D’UN NUMERO EN MEMOIRE
- Déccrochez le combiné.
L’écranLCD affiche la minuterie d’appel comme par exemple:
-Appuyez sur l’une des touches mémoire d’accès direct M1, M2, M3 ou
sur MEM suivi d’un des chiffres 0 to 9.
Le numéro se compose sur l’écran LCD comme par exemple:
.
00-04
0170737237
La miunterie d’appel se met alors en fonctionnement.
21
Page 22

GARANTIE
GARANTIE
Cet appareil est garanti 1 an pièces et main-d'oeuvre. La date d'achat
figurant sur le ticket de caisse fera foi. Cette garantie s'exerce sous réserve
d'une utilisation normale de l'appareil. Les dommages occasionnés par les
surtensions électriques, la foudre ou par un choc sur l'appareil ne peuvent
en aucun cas être couverts par la garantie. En cas de problème fonctionnel
et avant de nous retourner votre appareil, contactez notre service après
vente de : 8h30 à 12h30 et de 14h00 à 17h00 du Lundi au Jeudi et de 8h30
à 12h30 et de 14h00 à 16h30 le Vendredi.
Raccordement téléphonique : les tensions présentes sur ce réseau sont
classées TRT-3(Tensionde Réseau de Télécommunication) au sens de la
norme EN60950.
Ce produit respecte les exigences de compatibilité électro-magnétique et de
sécurité électrique demandées par la directive européenne RTTE.Par ailleurs,
il est compatible avec les différents réseaux téléphoniques européens (normes TBR21/37/38).Le fonctionnement de l’appareil n’est pas garanti si le
courant de ligne est inférieur à 18 mA.
Parc d’Activités du Basroch
2, rue Galilée
TEL. SERVICE APRES VENTE :
03 28 58 75 99
Pour tout renseignement technique ou toute
commande visitez notre site web sur
www.geemarc.com.
22
UGJUP10 ED01
 Loading...