

Page 1
CLA 1
GB
User guide index p.2
F
Sommaire de la notice d’utilisation p.2
E X T R A E A R P I E C E
Page 2

GB
INDEX
DESCRIPTION 3
SETTING UP
- Connecting the CLA 1 5
- Select your phone 5
- Select the working mode (Handset / headset) 5
- How to use the handset 6
- How to use the earpiece 6
- How to use the headset (option) 6
TROUBLE SHOOTING 7
GUARANTEE 8
F
SOMMAIRE
DESCRIPTION 9
REGLAGES
- Connecter le CLA 1 11
- Selectionner le type de téléphone 11
- Selectionner le mode de fonctionnement (combiné /casque) 1 1
- Utilisation du combiné 12
- Utilisation de l’écouteur 12
- Utilisation du casque (option) 12
PROBLEMES DE FONCTIONNEMENT 13
GARANTIE 14
2
Page 3
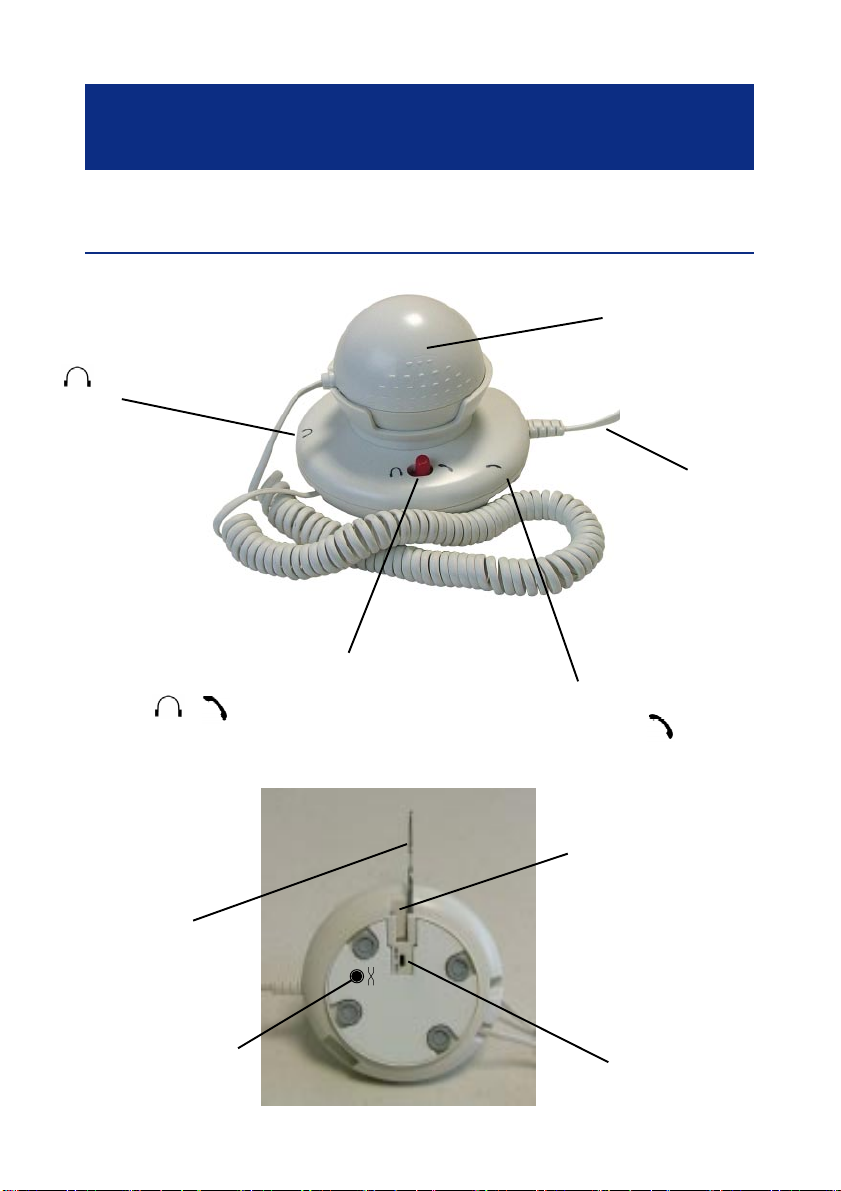
DESCRIPTION
Headset socket (1)
(*)
DESCRIPTION
Earpiece (5)
Base cord connection
(4) (*)
Headset/ Handset select switch (2)
/
Headset hook/Rack mounting
Hook/Rack
Earpiece polarity
switch (7)
(*) Classified TNV-3accordingtoEN60950standard.
Handset socket (3)
(*)
Hook/Rack slide for
mounting
(insert up to listen «clic»)
CLB/CL
switch (6)
3
Page 4
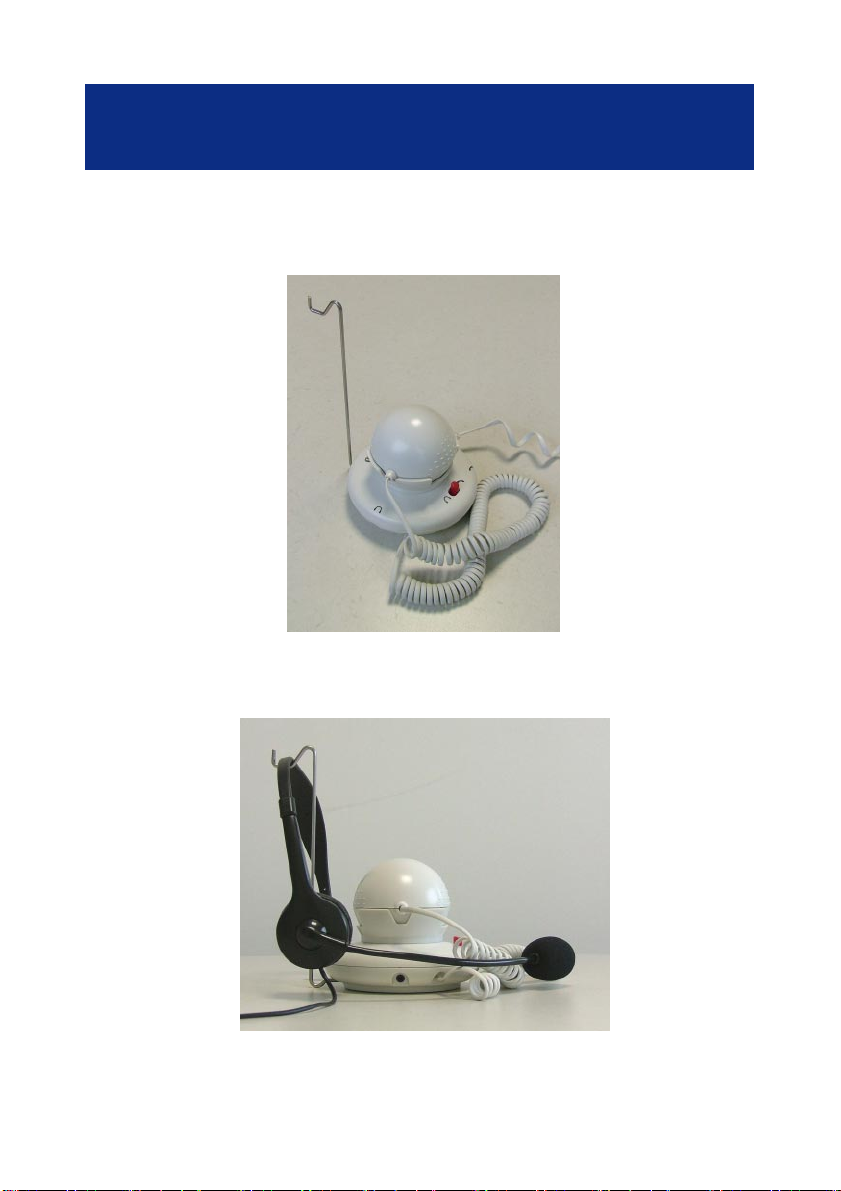
DESCRIPTION
View of the CLA 1 after Hook/Rack mounted:
View of the CLA 1 with a headset on Hook/Rack:
Note: Headset is an option and is not supplied with the CLA 1.
Geemarc headset reference : HEADSCL_BLK
4
Page 5

SETTINGS
SETTING
Connecting the CLA 1
T o connect the CLA 1 to your phone please follow the instructions
carefully . See pictures on page 3 to locate the plugs and socket.
1 - Disconnect your handset from your phone base.
2 - Connect the CLA 1 short curly cord (4) to the handset phone
socket.
3 - Connect the handset curly cord to the CLA 1 handset socket
(3) .
4 - Connect the headset (option) to the headset socket (1) .
Select your phone
T o have the best receiving level set the switch CL-B/CL (6) located
under the CLA 1 to the desired position, the CL-B position must
be used for phones with handset boost feature (like CL 200,CL
400, CL 500) and CL position for normal phone (like CL 50, CL
100).
Select the function mode (Handset / headset)
Y ou can select the function mode by using the switch (2) located
on the CLA 1 top to select the handset by setting the switch to the
position and the headset by setting the switch to the .
The CLA 1 is now ready to use.
Note: The CLA 1 functionality are only guaranted with Geemarc
telephones CL 50 to CL 500 range.
5
Page 6

SETTINGS
How to use the handset
Make sure that the switch (2) is set to . When you receive a call
lift the handset from the cradle and speak, at the end of the call
replace the handset in the phone cradle.
How to use the earpiece
When you receive a call, lift the handset from the cradle and speak.
A second person can lift the earpiece and use it as a handset to
listen to the conversation. Or you can put the earpiece to your other
ear to improve your reception. At the end of the call simply replace
the handset and the earpiece in their respective cradles.
Note: In this case, earpiece and handset can be used at the same
time.
How to use the headset (headset is not supplied)
When you receive a call, lift your handset and place it near the phone
base, make sure that the switch (2) is set to . Then speak and
listen your correspondent with your headset (Geemarc headset ref:
HEADSCL_BLK) . At the end of the call replace the handset in the
phone cradle.
Note: In this case, earpiece and headset can be used at the same
time.
6
Page 7

TROUBLE SHOOTING
IMPORTANT NOTICE:
The CLA 1 will work with all CLEARSOUND 50 to 500 series. It
may happend that CLA 1 does not work with telephones from others
suppliers, we cannot guarantee the functionality of the
CLA 1 in this case.
Note: if you get a loud noise oscillation or crackling when connecting
the headset simply press the switch (7) located under the
CLA 1 to avoid the problem (earpiece polarity).
TROUBLE SHOOTING
- No dial tone: Make sure everythings is connected in the correct
plugs.
- The receiving level is too low or too high: Check the CL-B/CL
switch located under your CLA 1.
- Crackling into the headset or earpiece: check the switch (7)
located under the CLA 1.
- Nothing happens after following the instructions above: check your
telephone and the network connection.
For product support and help visit our website at www.geemarc.com
telephone 01707 384438
or fax 01707 372529
7
Page 8

GUARANTEE
GUARANTEE
From the moment your Geemarc product is purchased, Geemarc
guarantee it for the period of one year. During this time, all rep airs
or replacements (at our option) are free of charge.Should you
experience a problem then contact our helpline or visit our website
at www.geemarc.com.The guarantee does not cover accidents,
negligence or breakages to any parts. The product must not be
tampered with or taken apart by anyone who is not an authorised
Geemarc representative.The Geemarc guarantee in no way limits
your legal rights.
IMPORTANT: YOUR RECEIPT IS PART OF YOUR
GUARANTEE AND MUST BE RETAINED AND PRODUCED
IN THE EVENT OF A WARRANTY CLAIM
Please note: The guarantee applies to the United Kingdom only .
DECLARA TION: Geemarc Telecom SA Hereby declares that
this product is in compliance with the essential requirements and
other relevant provisions of the Radio and Telecommunications
Terminal Equipment Directive 1999/5/EEC and in particular
article 3 section 1a, 1b and section 3.
For product support and help visit our website at www.geemarc.com
telephone 01707 384438
or fax 01707 372529
8
Page 9
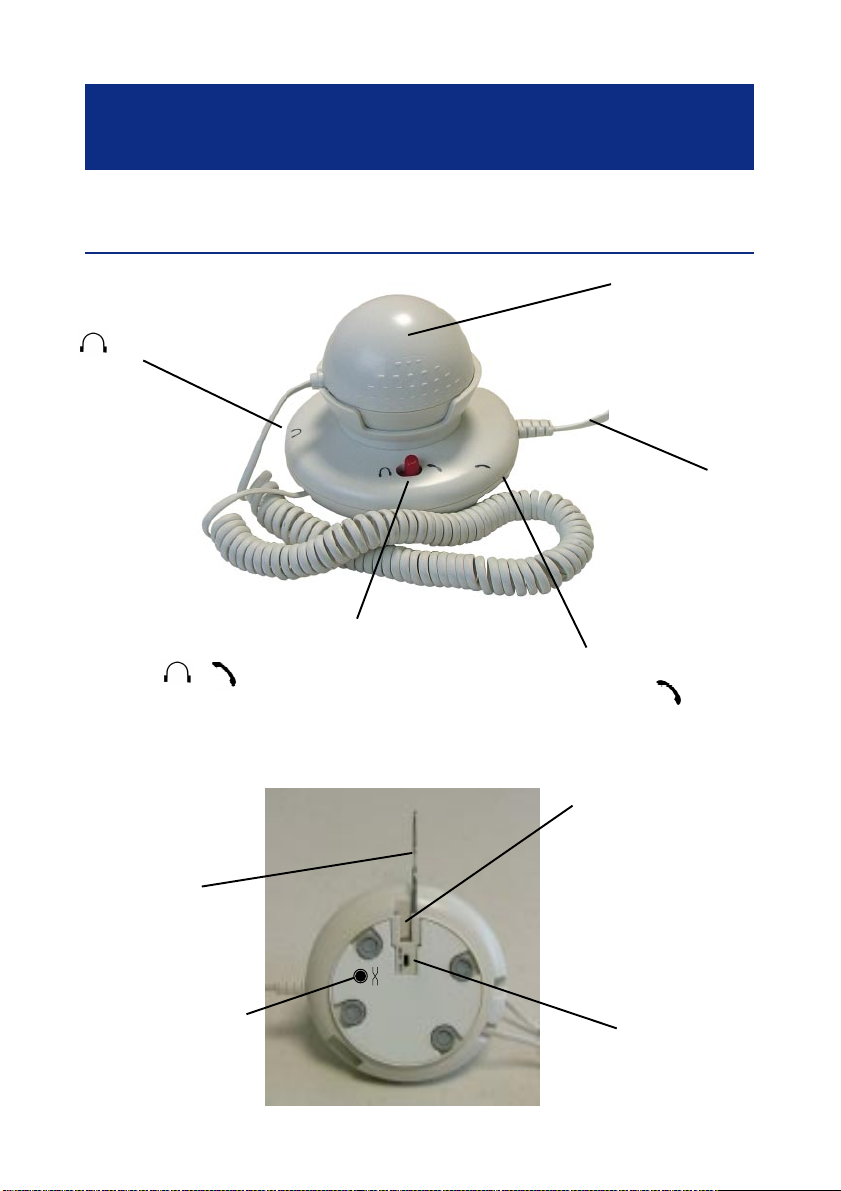
DESCRIPTION
Prise casque (1)
(*)
DESCRIPTION
Ecouteur (5)
Cordon de connection
à la base (4) (*)
Interrupteur de sélection Casque/Combiné (2)
/
Montage du support casque
Support
casque
Interrupteur polarité
casque (7)
(*) Classée TRT-3 selon la norme EN60950
9
Prise combiné (3)
(*)
Glissière de montage
du support
(insérer jusqu’au «clic»)
Interrupteur
CLB/CL
(6)
Page 10

DESCRIPTION
Vue du CLA 1 avec son support casque:
Vue du CLA 1avec un casque sur son support:
Note: Le casque est une option et n’est pas fourni avec le CLA 1.
Référence casque Geemarc : HEADSCL_BLK
10
Page 11

REGLAGES
REGLAGES ET UTILISATION
Connecter le CLA 1
Pour connecter le CLA 1 à votre téléphone suivez simplement les
instructions suivantes. Aidez-vous des photos page 3 pour effectuer les connections.
1 - Déconnectez le combiné de la base de votre téléphone.
2 - Connectez le petit cordon du CLA 1 (4) sur la prise combiné de
votre base.
3 - Connectez le cordon de votre combiné sur la prise de connection
combiné du CLA 1 (3) .
4 - Connectez le casque dans la prise casque du CLA 1 (2).
Sélectionnez votre téléphone
Pour obtenir les performances correspondant à votre téléphone,
positionnez l’interrupteur CL-B/CL (6) situé en dessous du CLA 1
sur la position désirée, la position CL-B et destinée pour les téléphones ayant la fonction boost sur le combiné (CL200, CL400,
CL500) et la position CL pour les combinés normaux (CL 50, CL
100, BB 100, BB 300).
Selectionnez le mode de fonctionnement (combiné / casque)
Vous pouvez sélectionner le mode de fonctionnement en utilisant
l’interrupteur (2) situé sur le dessus du CLA 1 pour sélectionner
l’un ou l’autre mode de fonctionnement. Positionnez l’interrupteur
sur la position pour utiliser le combiné et sur la position
pour utiliser le casque. Le CLA 1 est maintenant prêt à être utilisé.
Note: Nous garantissons le fonctionnement du CLA 1 seulement
qu’avec les téléphones de la gamme CL50 à CL500 et BB100 à
BB300.
11
Page 12

DESCRIPTION
Utilisation du combiné
Vérifiez que l’interrupteur (2) est positionné sur . Lorsque vous
recevez un appel décrochez le combiné et parlez. A la fin de la
conversation replacez le combiné sur son support.
Utilisation de l’écouteur
Lorsque vous recevez un appel, décrochez votre combiné et
parlez. Une deuxième personne peut prendre l’écouteur et l’utiliser tout simplement comme un combiné pour écouter la conversation . Vous pouvez aussi le porter à votre oreille pour augmenter le
niveau de réception. A la fin de la conversation, replacez tout simplement le combiné et l’écouteur sur leur supports respectifs.
Note: Vous pouvez utiliser dans ce cas l’écouteur et le combiné
en même temps.
Utilisation du casque (non fourni)
Lorsque vous recevez un appel, décrochez votre combiné et placez-le sur le côté de votre téléphone. Vérifiez que l’interrupteur (2)
est placé sur la position . V ous pouvez parler et écouter votre
correspondant avec le casque (référence casque Geemarc:
HEADSCL_BLK). A la fin de la conversation, replacez simplement le combiné sur son support.
Note: Vous pouvez utiliser dans ce cas l’écouteur et le casque en
même temps.
12
Page 13

PROBLEMES DE FONCTIONNEMENT
NOTE IMPORTANTE:
Le CLA 1 fonctionne avec toute la série des CLEARSOUND 50 à
500 et BB100 à BB300. Il peut arriver que le CLA 1 ne fonctionne
pas avec des téléphones provenant d’autres fournisseurs, nous
ne garantissons pas le fonctionnement du CLA 1 dans ces conditions.
Note: Si vous avez un sifflement ou des craquements lorsque vous
connectez le casque, appuyez simplement sur l’interrupteur(7 )
situé en dessous pour annuler le problème.
PROBLEMES DE FONCTIONNEMENT
- Pas de tonalité: vérifiez que tous les cordons soient correctement connectés.
- Le niveau de réception est trop faible ou trop fort: vérifiez la position du switch CL-B/CL (6) en dessous du CLA 1.
- Craquements ou bruit dans le casque ou l’écouteur: appuyez sur
l’interrupteur (7) sous le CLA 1.
- Si rien ne fonctionne après les vérifications ci-dessus, vérifiez
votre téléphone et votre connection au réseau téléphonique.
TEL. SERVICE APRES VENTE :
03 28 58 75 99
Pour tout renseignement technique ou toute commande visitez
notre site web sur www.geemarc.com.
Parc d’Activités du Basroch
2, rue Galilée
59760 Grande Synthe
13
Page 14

GARANTIE
GARANTIE
Cet appareil est garanti 1 an pièces et main-d'oeuvre. La date d'achat figurant
sur le ticket de caisse fera foi. Cette garantie s'exerce sous réserve d'une
utilisation normale de l'appareil. Les dommages occasionnés par les surtensions électriques, la foudre ou par un choc sur l'appareil ne peuvent en aucun
cas être couverts par la garantie. En cas de problème fonctionnel et avant de
nous retourner votre appareil, contactez notre service après vente de : 8h30 à
12h30 et de 14h00 à 17h00 du Lundi au Jeudi et de 8h30 à 12h30 et de 14h00
à 16h30 le Vendredi.
TEL. SERVICE APRES VENTE :
03 28 58 75 99
Raccordement téléphonique
classées TRT-3 (Tension de Réseau de Télécommunication) au sens de la norme
EN60950.
Ce produit respecte les exigences de compatibilité électro-magnétique et de
sécurité électrique demandées par la directive européenne RTTE.Par ailleurs,
il est compatible avec les différents réseaux téléphoniques européens (normes TBR21/37/38).
: les tensions présentes sur ce réseau sont
TEL. SERVICE APRES VENTE :
03 28 58 75 99
Pour tout renseignement technique ou toute commande visitez
notre site web sur www.geemarc.com.
Parc d’Activités du Basroch
2, rue Galilée
59760 Grande Synthe
UGCLA 1Ed-01
14
 Loading...