

Page 1
DALLAS 100 VM
English
AMPLIFIED TELEPHONE WITH
OUTGOING VOICE MODULATION
Page 2
2
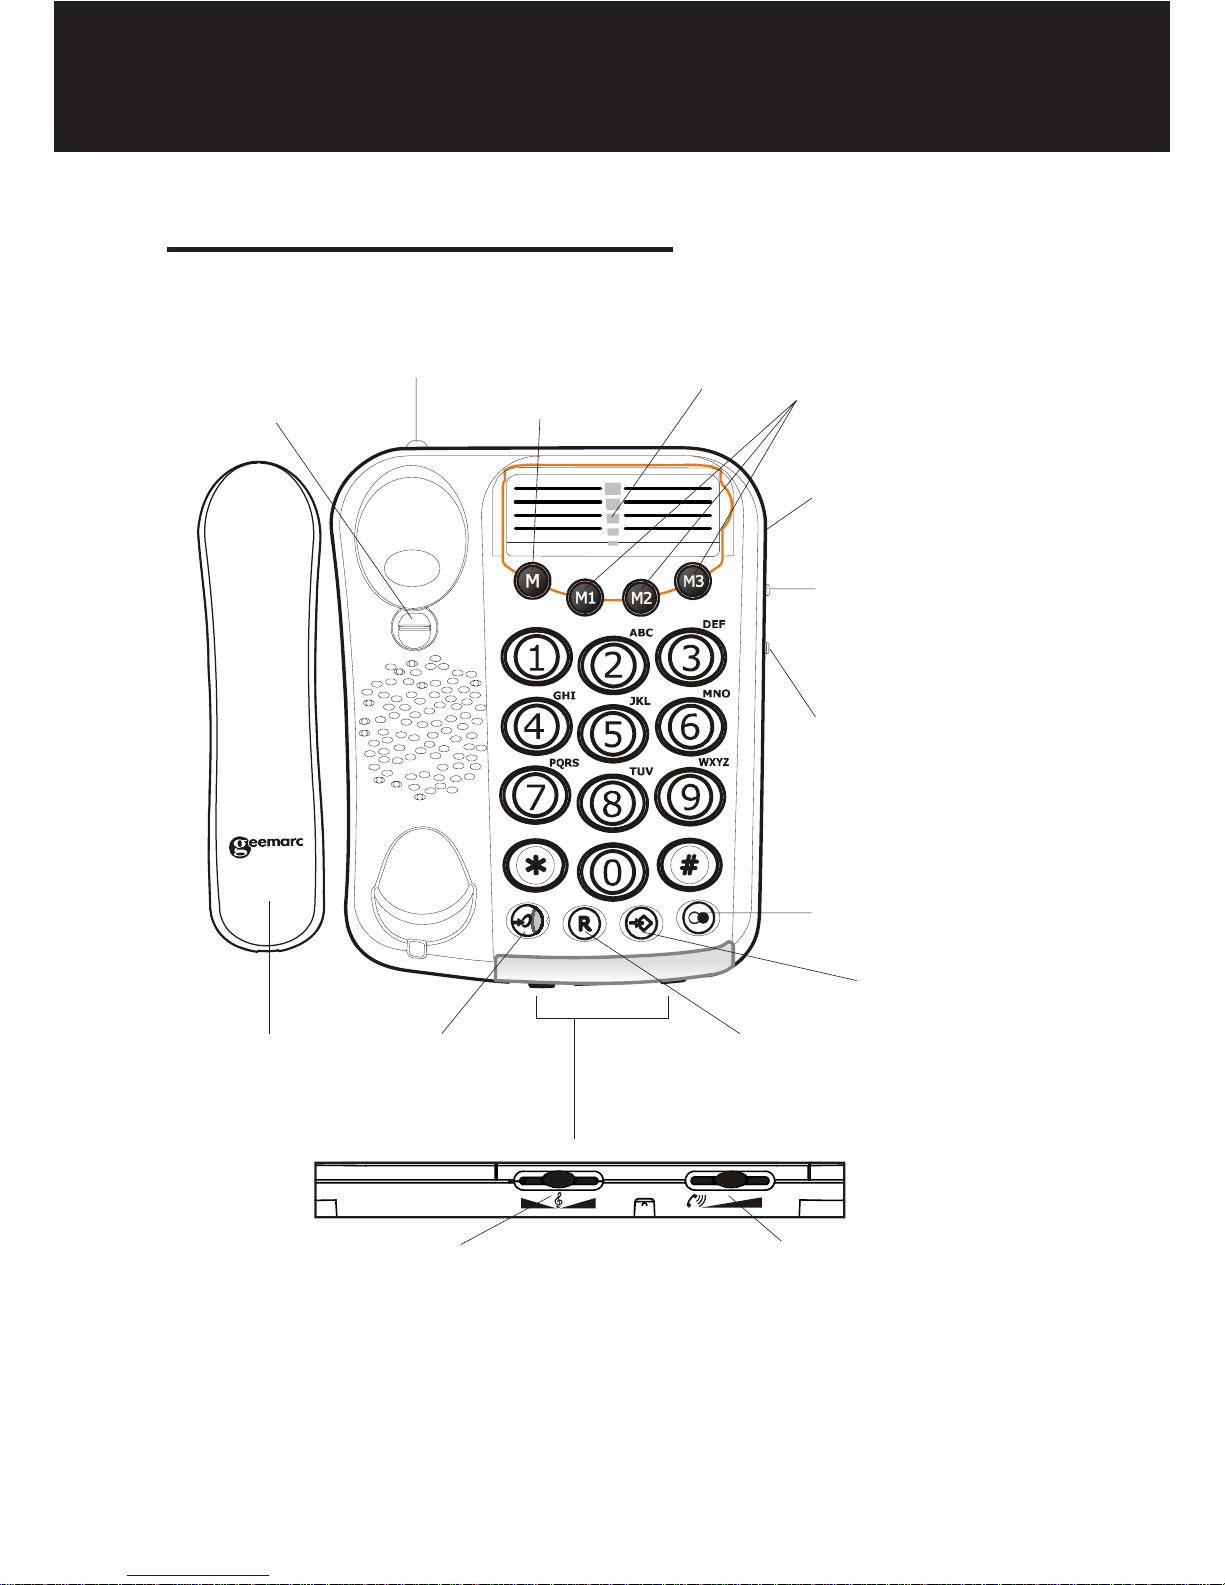
DESCRIPTION
(*) Classified TNV-3 according to EN60950 standard.
Last number
redial
Ringer Volume
settings
Indirect
memory
button
Quick Dial
locations,
M1,M2 and M3
Line cord
socket*
R button (for private exchanges)Amplify
Sending level
amplified
setting
GENERAL DESCRIPTION
Memory storing key
Handset tone
slide control
Handset volume
slide control
Ringer tone
setting
Handset
Clip for
wall
mounting
Voice
meter
Page 3
3
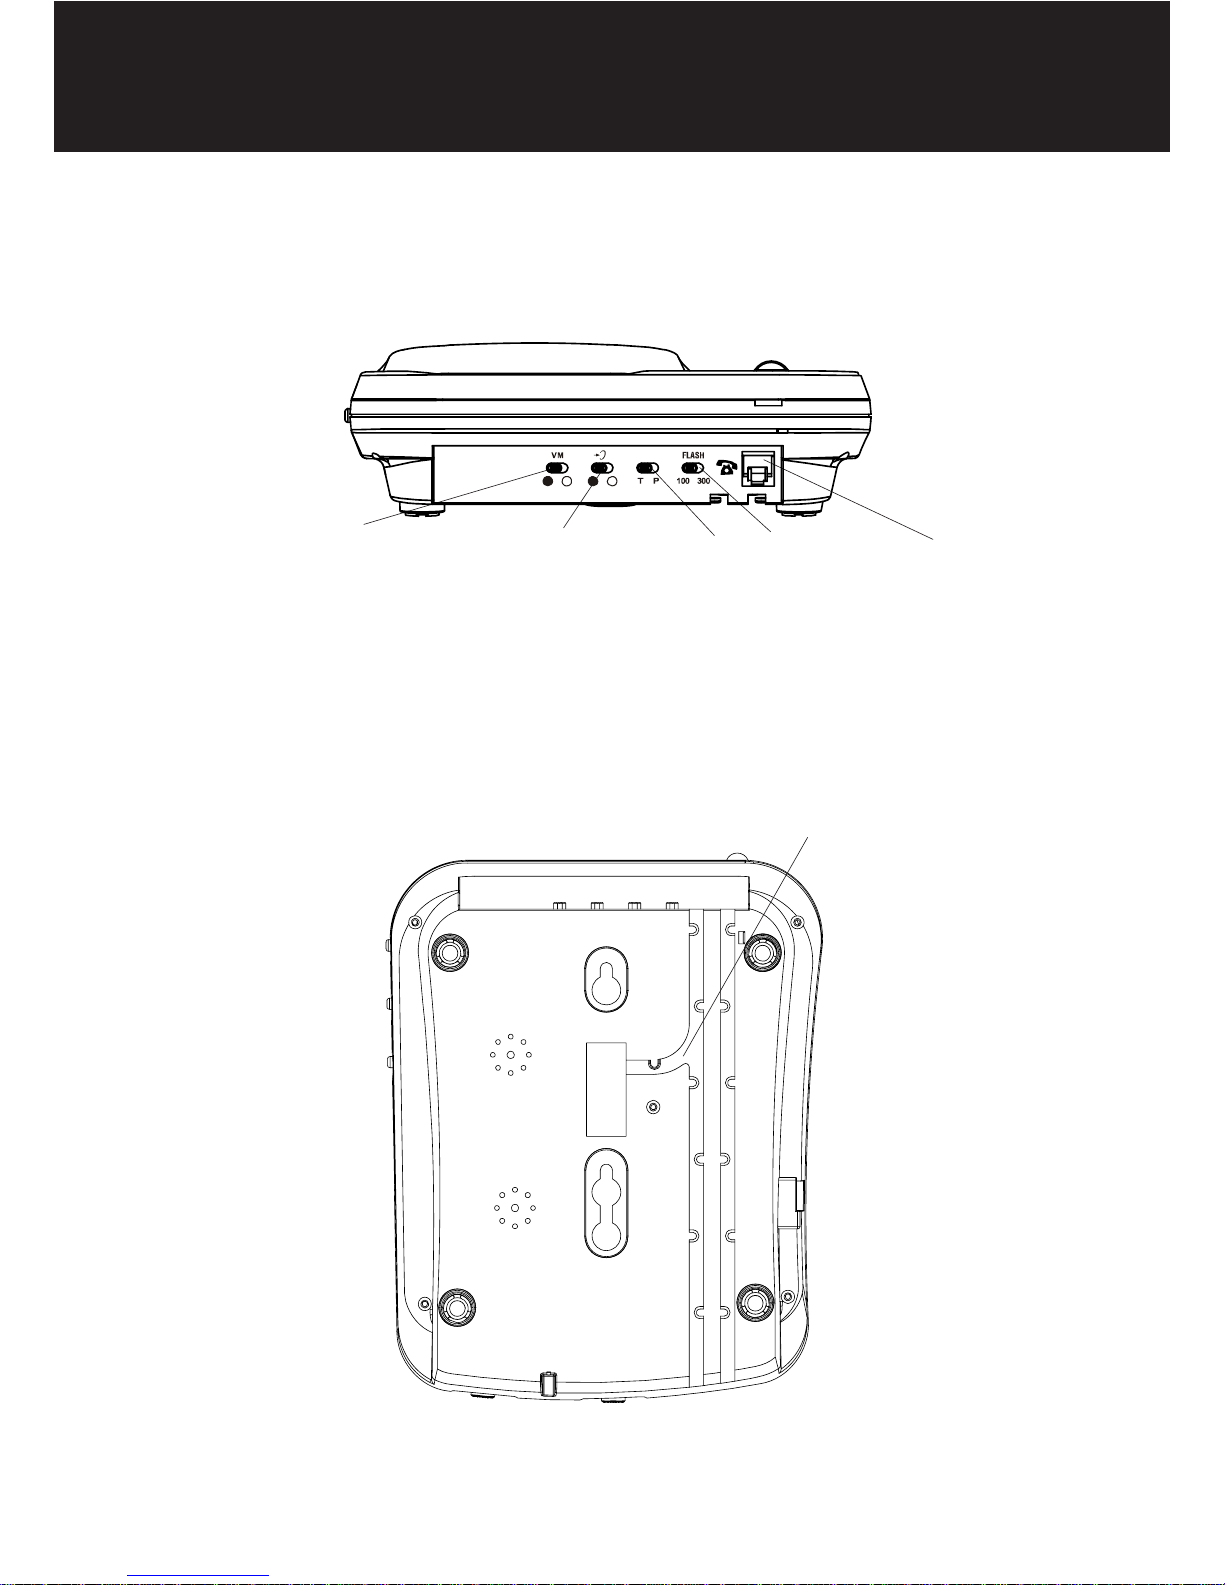
Thread the line cord
through this groove
REAR
BASE
Amplify
default
setting
Dialing
mode
setting
Flash
setting
Telephone
line socket
Voice level
meter setting
DESCRIPTION
Page 4
4
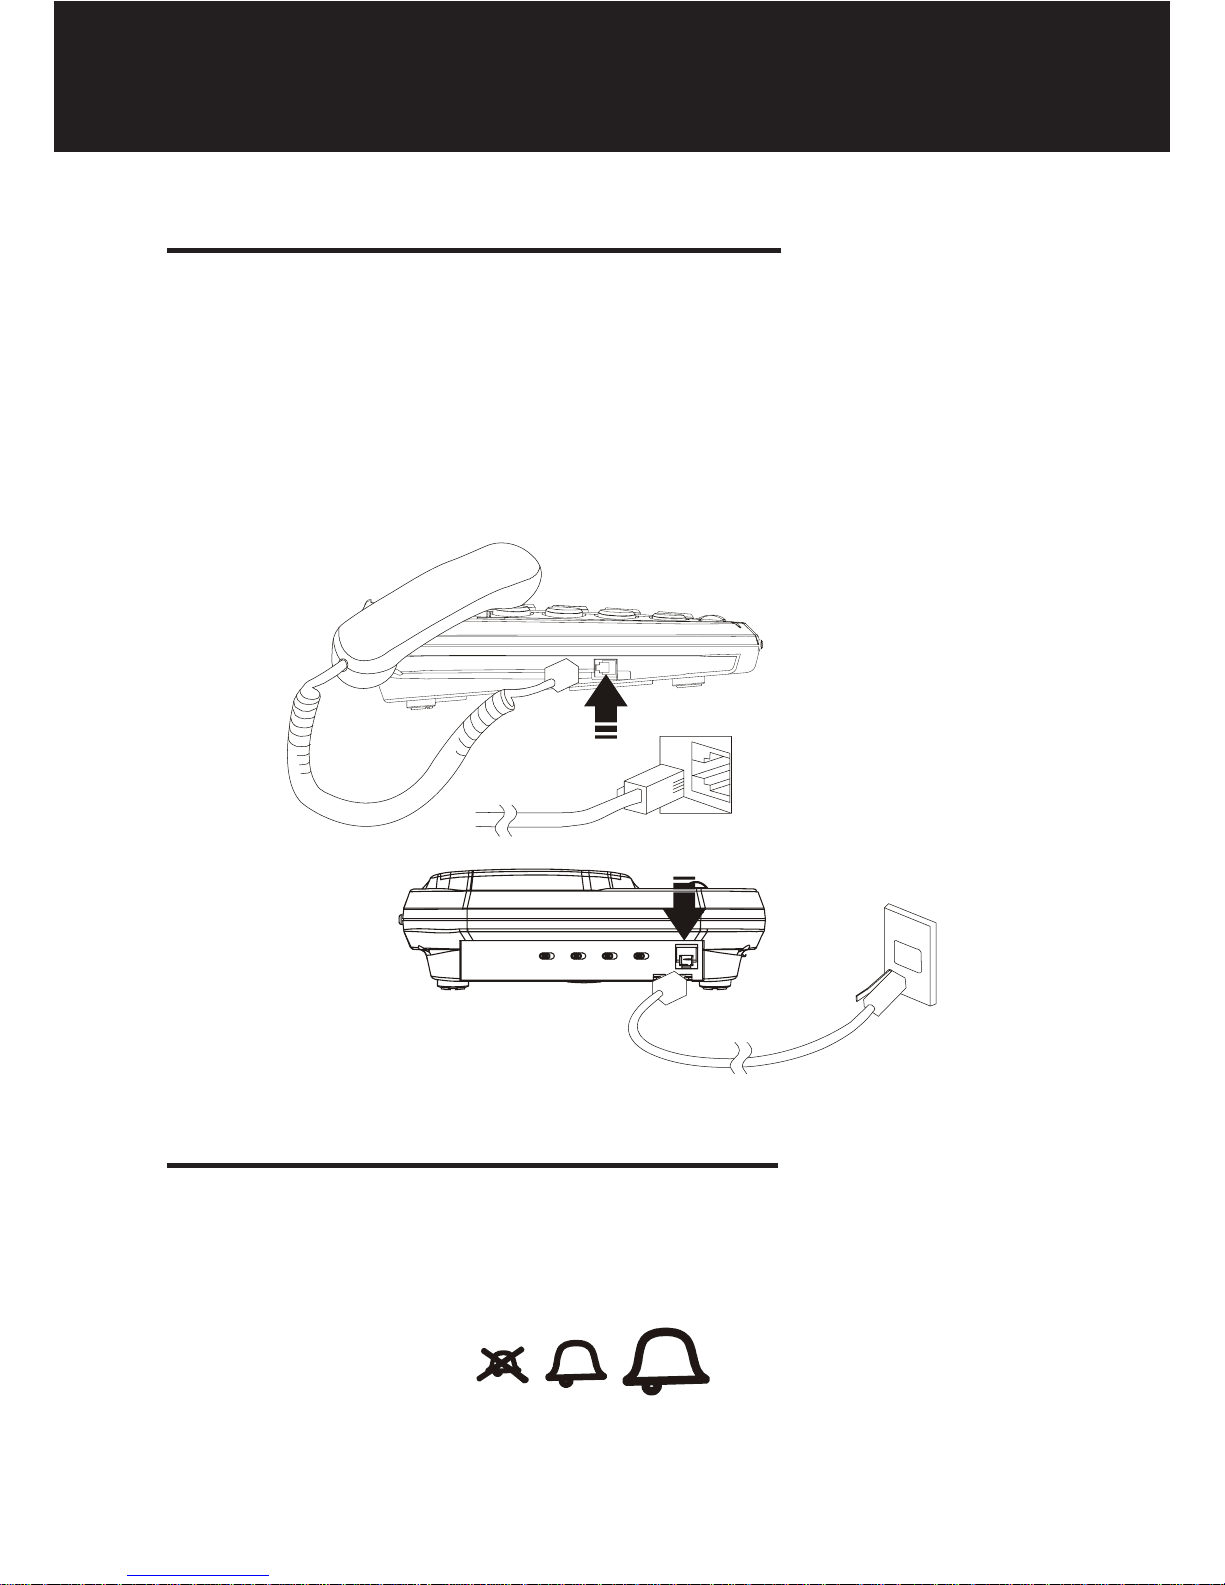
1 - CONNECTING TELEPHONE
1 - Connect the handset cord.
2 - Connect the line cord to the socket located
at rear of telephone then connect the PTT
plug*.
2 - RINGER VOLUME SETTING
A switch located on the right side allows the ringer
to be switched to HI, LOW or OFF
SETTING UP
(*) Classified TNV-3 according to EN60950 standard.
Page 5
5
SETTING UP
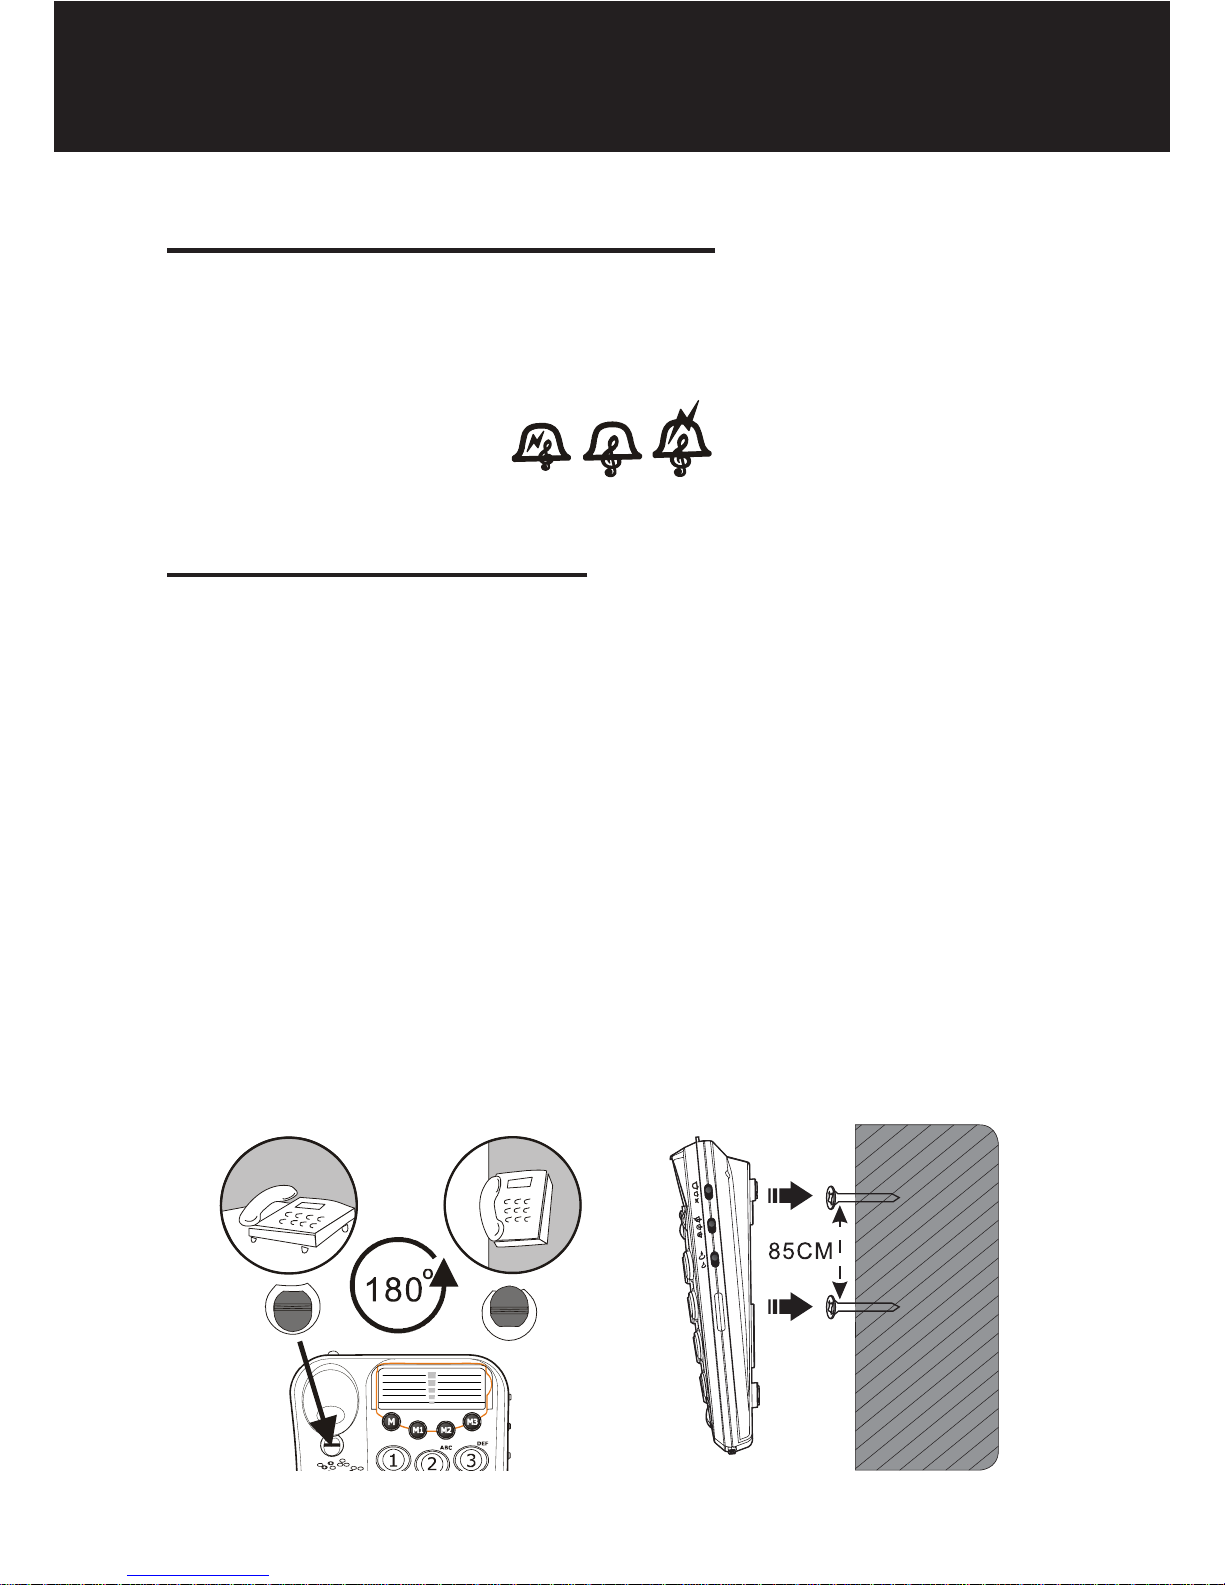
3 - RINGER TONE SETTING
A switch located on the right side allows the
melody to be switched to HI, Middle or LOW.
4 - WALL MOUNTING
To wall-mount your telephone, slide out the clip
turn around and slide back into the wall mounting
position (located in the base unit, just below the
ear piece).This will ensure that the handset stays
firmly in position. Make 2 holes in the wall 85mm
apart, insert the wall plugs and the wall mounting
screws. The screws should protrude from wall
by 6-7 mm. Place the phone onto the screwheads and slide down to secure.
Page 6

6
SETTING UP
5 - TONE/PULSE SWITCH (T/P)**
The Tone/Pulse switch is factory pre-set to Tone
position (T).In the UK,all telephone exchanges
now use Tone dialing. If your phone does not dial
out it is probably being used from an older private switch board (PBX). In this case, the Tone/
Pulse switch must be moved to Pulse (P).
** Please note that this switch is not to be moved
after setting.
Page 7

7
USING THE PHONE
1 - ANSWERING INCOMING CALL
- When an incoming call is received the phone
will ring and flash. To answer the call lift the
handset and speak.
- On completion of the call, carefully replace the
handset in the cradle to release the line.
2 - VOLUME RECEIVING ADJUSTMENT
You can increase the volume according to your
own hearing requirements.
Use the button, located on the front side, to
adjust the level according to your own hearing
requirements.
Page 8

8
3 - TONE RECEIVING ADJUSTMENT
If the receiver volume has been amplified, the tone
control can also be adjusted. You can adjust and
increase the low frequency or high frequency
sounds with the tone slide control on the front
edge of the unit.
Note: The tone adjustment function will not be
effective when the receiver volume is set to normal level.
4 - MAKING A CALL
- Lift the handset.
- Await the dial tone and dial required number.
- On completion of the call, carefully replace the
handset in the cradle.
USING THE PHONE
Page 9

9
5 - SENDING LEVEL ADJUSTMENT
If your voice is quiet or called parties have difficulty
hearing you, you can increase the sending level
volume with the switch located on the right
side.
6 - LAST NUMBER REDIAL
- Lift the handset.
- Await the dial tone and press button.
- The previously dialled number will be
automaticaly redialled (not in use for memory
numbers).
7 - R , * & # BUTTONS
These are used with the new services provided
on digital exchanges. For details please contact
your network operator.
USING THE PHONE
0db +4db
Page 10

10
8 - STORING TELEPHONE NUMBERS
Your phone can store 3 direct and 10 indirect
memories (16 digits maximum for each memory).
- Lift the handset.
- Press button.
- Dial the telephone number you wish to store.
- Press button.
- Press one of the direct memory buttons, M1,
M2, M3.
Or press M and any button 0 to 9 on the key pad
under which you wish to store the telephone
number in indirect memory.
- Replace the handset.
Note : Numbers will be lost if you disconnect your
phone. Entering a new number in memory will
automatically erase the previous number.
USING THE PHONE
Page 11

11
9 - DIALLING STORED NUMBER
- Lift the handset and await the dial tone.
- Press appropriate direct memory button M1,
M2, or M3. The stored number will be dialled out
automatically.
Or press the M button followed by the keypad 0
to 9 button under which the desired number is
stored. The stored number will be dialled out
automatically.
To register your stored phones numbers, use the
index located on the base.
10 - VOICE METER FUNCTION
Push switch to adjust voice level meter ON
and OFF .
On mode:
When unit is off-hook, the voice meter LEDs inside the memory card cover will indicate the outgoing voice level on telephone line.
Off mode:
When unit is off-hook, the voice meter is turned
off.
USING THE PHONE
Page 12

12
11 - AMPLIFICATION SETTING
a.Set the AMPLIFY Switch located at rear side
of unit to ON position, the Amplification is auto
on when handset is lifted.
b.Set the AMPLIFY Switch to OFF posi-
tion, the Amplification is off when handset is lifted.
12 - RECEIVE VOLUME AMPLIFICATION
When unit is off-hook, press the button to
toggle the amplification On & Off
Amplification On:
When amplification is on, the corresponding LED
on, +15dB extra amplification is applied to the
handset receive volume control.
Amplification Off:
When amplification is off, the corresponding LED
is off, no extra amplification to the handset receive volume control.
USING THE PHONE
Page 13

13
13 - FLASH TIME SETTING
a.Set the flash Switch located at rear side of unit
.set to 100ms position (for UK), the time is auto
set in 100ms mode when handset is lifted.
b.Set the flash Switch to 300ms position (for
French), the time is auto set in 300ms mode when
handset is lifted.
USING THE PHONE
Page 14

14
From the moment your Geemarc product is purchased,
Geemarc guarantee it for the period of one year. During this
time, all repairs or replacements (at our discretion) are free of
charge. Should you experience a problem then contact our
help line or visit our website at www .geemarc.com. The
guarantee does not cover accidents, negligence or breakages
to any parts. The product must not be tampered with or taken
apart by anyone who is not an authorized Geemarc
representative. The Geemarc guarantee in no way limits your
legal rights.
IMPORTANT: YOUR RECEIPT IS PART OF YOUR
GUARANTEE AND MUST BE RETAINED AND PRODUCED
IN THE EVENT OF A WARRANTY CLAIM.
Please note: The guarantee applies to the United
Kingdom only
DECLARATION: Geemarc Telecom SA hereby declares that
this product is in compliance with the essential requirements
and other relevant provisions of the Radio and
Telecommunications Terminal Equipment Directive 1999/5/
EEC and in particular article 3 section 1a, 1b and section 2.
The telephone does not operate if the line current is lower than
18 mA.
The declaration of conformity may be consulted at
www.geemarc.com
Telephone connection: Voltages present on the
telecommunication network are classified TNV-3
(Telecommunication Network Voltage) according to the
EN60950 standard.
GUARANTEE
Page 15

15
The WEEE (Waste Electrical and Electronic Equipment) has
been put in place for the products at the end of their useful life
are recycled in the best way.
When this product is finished with, please do not put it in your
domestic waste bin.
Please use one of the following disposal options:
- Remove the batteries and deposit them in an appropriate
WEEE skip. Deposit the product in an appropriate WEEE skip.
- Or, hand the old product to the retailer. If you purchase a new
one, they should accept it.
Thus if you respect these instructions you ensure human health
and environmental protection.
For product support and help visit our website at
www.geemarc.com
Telephone 01707 384438
Or fax 01707 372529
RECYCLING DIRECTIVES
Page 16

Parcdel’Etoile
2, rue Galilée
59760 Grande Synthe
TEL. SERVICE APRES VENTE:
03 28 58 75 99
www.geemarc.com
5 Swallow Court
Swallowfields
Welwyn Garden City
Hertfordshire, AL7 1SB
For product support:
01707 384438
www.geemarc.com
Walter Kolb Str. 9-11
60594 Frankfurt am Main
Deutschland
Tel: 069 / 96 217 635
Fax: 069 / 96 217 620
www.geemarc.com
UGDALLAS 100 VM_EN_V.1.0
France Germany
5 Swallow Court
Swallowfields
Welwyn Garden City
Hertfordshire, AL7 1SB
For product support:
01707 384438
www.geemarc.com
UK
 Loading...