

Page 1

APOLLO 10
User guide
English
Page 2

English
Please Read This Instruction
Manual
Thank you for purchasing this
phone. Please read this manual
before attempting to set up or use
this unit. It contains important
information of installation and
using. Keep this manual for future
reference.
FEATURES LIST
1. Flash function
2. Mute function
3. Last number redial
4. 2 One-touch memory buttons
5. 10 Two-touch memory buttons
6. Ringer melody & volume setting
7. Wall mounting
INTRODUCTION
CHECK THE CONTENTS OF THE
BOX
Box should contain:
• Handset with handset cord
• Phone base
• User's manual
CONNECTING LINE CORD
Plug one end of the supplied
modular cord into the line jack.
Then plug the other end into
telephone line jack.
1
Page 3
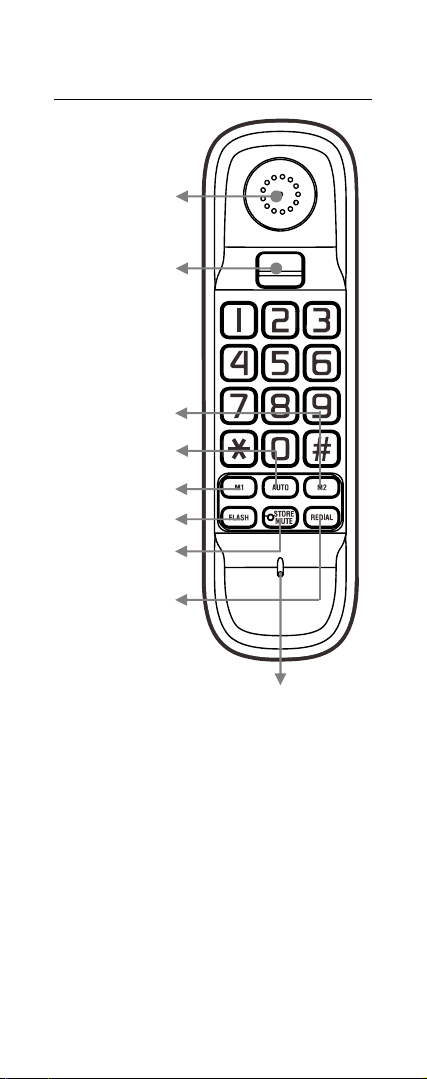
LOCATION OF CONTROLS
Receiver
Hook
Switch
M2 button
AUTO button
FLASH button
STORE/MUTE
button
REDIAL button
Microphone
2
Page 4
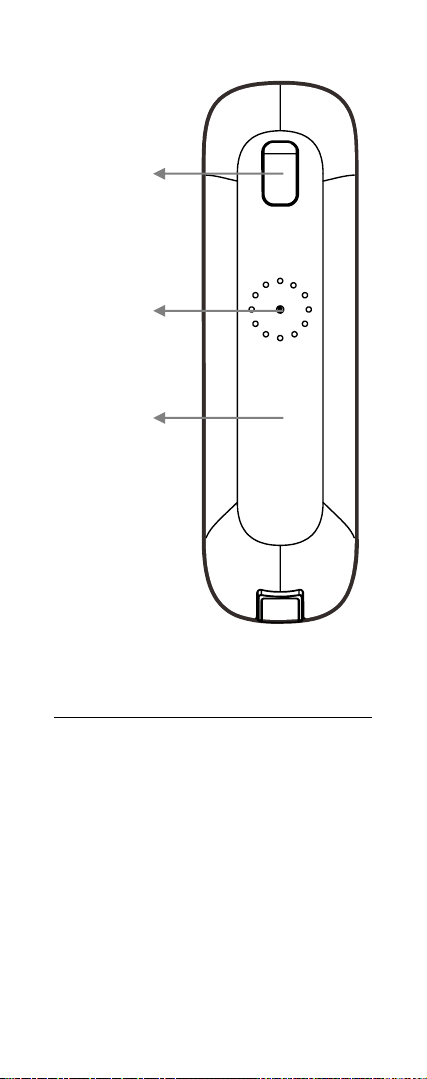
Ringer
Indicator
Buzzer
Handset
OPERATIONS FOR
TELEPHONE
Normal dialling
1. Lift the handset.
2. Enter the telephone number you
want to dial.
3. Replace the handset in the
cradle to end the call.
REDIAL function
This feature allows you to redial
the last number you have called by
one-touch operation.
3
Page 5

1. Lift the handset.
2. Press the REDIAL button to dial
the last dialled number out.
FLASH function
Press the FLASH button to
terminate a call and institute a
dialling tone for another call.
NOTE: Pressing the FLASH button
during a call will disconnect your
current call and terminate the
conversation.
MUTE function
If you wish to speak privately to
someone else in the room without
your caller overhearing, press the
STORE/MUTE button once and
the Mute indicator will flash. You
will still be able to hear the caller
but they will be unable to hear you
during the mute operation. To
resume normal conversation, just
press the STORE/MUTE button
again.
One-touch memory
A. Store the numbers
You can store 2 numbers in onetouch memory.
1. Lift the handset.
2. Press the STORE/MUTE button.
3. Press one of the location
buttons (M1 or M2).
4
Page 6

4. Enter the telephone number you
wish to store.
5. Press the STORE/MUTE button
to confirm and replace the handset
in the cradle, then the number has
been stored.
B. Dial the stored number
1. Lift the handset to get a dial
tone.
2. Press one of the location
buttons (M1 or M2) to dial out the
number.
Two-touch memory
A. Store the numbers
You can store 10 numbers in twotouch memory.
1. Lift the handset.
2. Press the STORE/MUTE button.
3. Press the AUTO button.
4. Press the location button (0-9).
5. Enter the telephone number you
wish to store.
6. Press the STORE/MUTE button
to confirm and replace the handset
in the cradle, then the number has
been stored.
B. Dial the stored numbers
1. Lift the handset to get a dial
tone.
2. Press the AUTO button followed
by the location button (0-9) to dial
out the stored number.
5
Page 7

Ringer Setting
The unit has 3 ringer melodies.
You can program the melody you
desired as follow:
Lift the handset, press the
STORE/MUTE button followed by
the # one, then:
Press numeric button 1 (or 2 or 3)
to get the melody 1.
Press numeric button 4 (or 5 or 6)
to get the melody 2.
Press numeric button 7 (or 8 or 9)
to get the melody 3.
Press numeric button 0 to turn off
the ringer.
Different numeric buttons stand for
different volume levels in the same
melody. Please see the table
below for details:
Low Mid High
Melody1
Melody2
Melody3
1 2 3
4 5 6
7 8 9
NOTE: When code 0 (tone ringer
off) has been programmed, the
device will automatically return to
previous setting (tone ringer on) by
next off-hook.
Wall Installation
The unit can be mounted to a wall
surface using two self-tapping
screws (not supplied). Follow the
instructions.
1. Install the two self-tapping
screws at a distance of 8.3cm from
each other and located on a
vertical centre line (See Figure 1).
6
Page 8
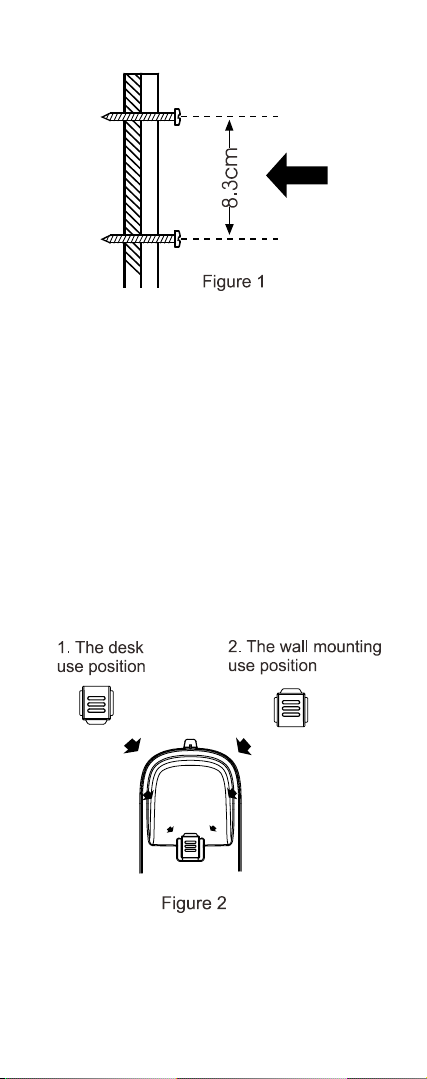
2. Tighten each screw just enough
to allow the wall mounting bracket
enough clearance to slip
comfortably over each screw head.
3. Connect one end of the
telephone line cord into the unit
line Jack. Connect the other end of
the telephone line cord into a
nearby telephone wall outlet.
4. The handset hanger tab is
shipped for wall mounting. For
desk use position, slide the tab out
and rotate 180 degrees (See
Figure 2).
7
Page 9
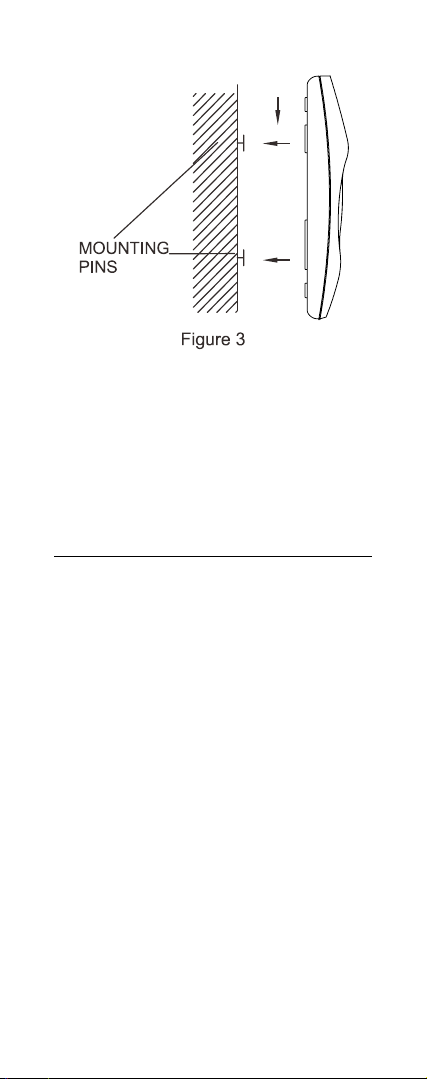
5. To install as a wall unit (See
Figure 3)
a. Align the hole on the bottom of
the telephone with mounting
screws on the wall.
b. Slowly slide the unit down until it
clicks into place.
TROUBLESHOOTING
PROBLEM: No dialling tone
SOLUTION:
• Check all modular plugs to be
sure they have clicked into
place.
• Are the cords damaged in any
way?
• Try another phone jack. If your
telephone works on another
jack, there may be a problem
with your wiring.
PROBLEM: Phone doesn't ring.
SOLUTION:
How many extensions are
connected to your line? If more
than five telephones are installed
on the same line, you may need to
8
Page 10

contact your local telephone
company to confirm the maximum
number of extensions for your
calling area.
CARE OF YOUR PHONE
1. Avoid rough handling, areas
with excessive moisture, heavy
Dust or extreme temperature.
2. The unit should be cleaned
regularly, use a mild detergent
and slightly damp cloth, DO
NOT use strong solvent or
abrasive.
3. DO NOT expose the telephone
in direct sunlight or use it in
extreme humidity.
GUARANTEE
From the moment your Geemarc
product is purchased, Geemarc
guarantee it for the period of 2
years. During this time, all repairs
or replacements (at our discretion)
are free of charge. Should you
experience a problem then contact
our help line or visit our website at
www.geemarc.com
guarantee does not cover
accidents, negligence or
breakages to any parts. The
product must not be tampered with
or taken apart by anyone who is
not an authorized Geemarc
representative. The Geemarc
guarantee in no way limits your
legal rights.
. The
9
Page 11

IMPORTANT: YOUR RECEIPT IS
PART OF YOUR GUARANTEE
AND MUST BE RETAINED AND
PRODUCED IN THE EVENT OF A
WARRANTY CLAIM.
Please note: The guarantee applies
to the United Kingdom only
DECLARATION: Geemarc
Telecom SA hereby declares that
this product is in compliance with
the essential requirements and
other relevant provisions of the
European directives
The declaration of conformity may be
consulted at www.geemarc.com
Telephone connection: Voltages
present on the telecommunication
network are classified TNV-3
(Telecommunication
Network Voltage)
according to the
EN60950 standard.
RECYCLING DIRECTIVES
The WEEE (Waste Electrical and
Electronic Equipment) has been
put in place for the products at the
end of their useful life are recycled
in the best way.
When this product is finished with,
please do not put it in your
domestic waste bin.
Please use one of the following
disposal options:
10
Page 12

- Remove the batteries and deposit
them in an appropriate WEEE skip.
Deposit the product in an
appropriate WEEE skip.
- Or, hand the old product to the
retailer. If you purchase a new
one, they should accept it.
Thus if you respect these
instructions you ensure
human health and
environmental protection.
For product support and help visit
our website at www.geemarc.com
Telephone 01707 384438
Or fax 01707 372529
UGApollo 10_En_v1.1
11
 Loading...