

Page 1
www.geeetech.com
Shenzhen Getech Technology CO.LTD
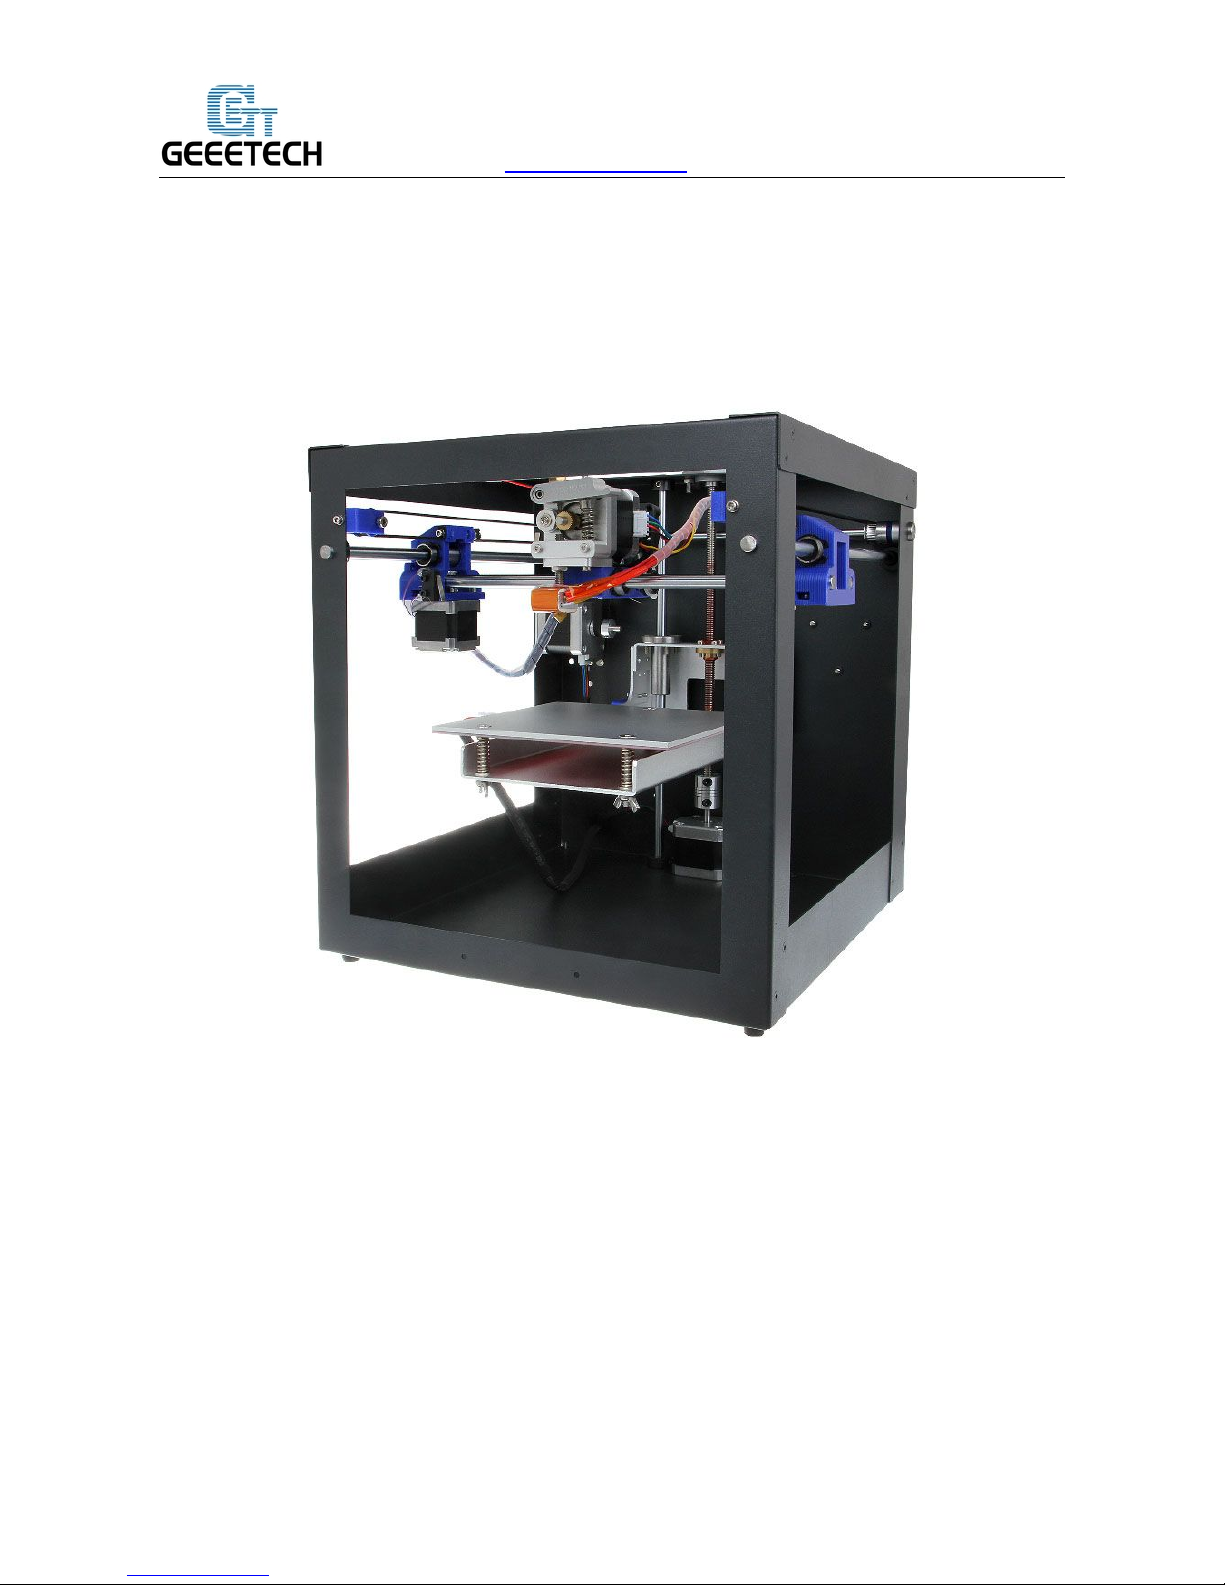
User Manual for Me Creator
Page 2
www.geeetech.com
Shenzhen Getech Technology CO.LTD
1. Power Supply Wiring
1. Take out the power supply, there is a 110V/220V switch on it. Please make sure that the switch
is at the correct position according to the residential electricity standard of your country.
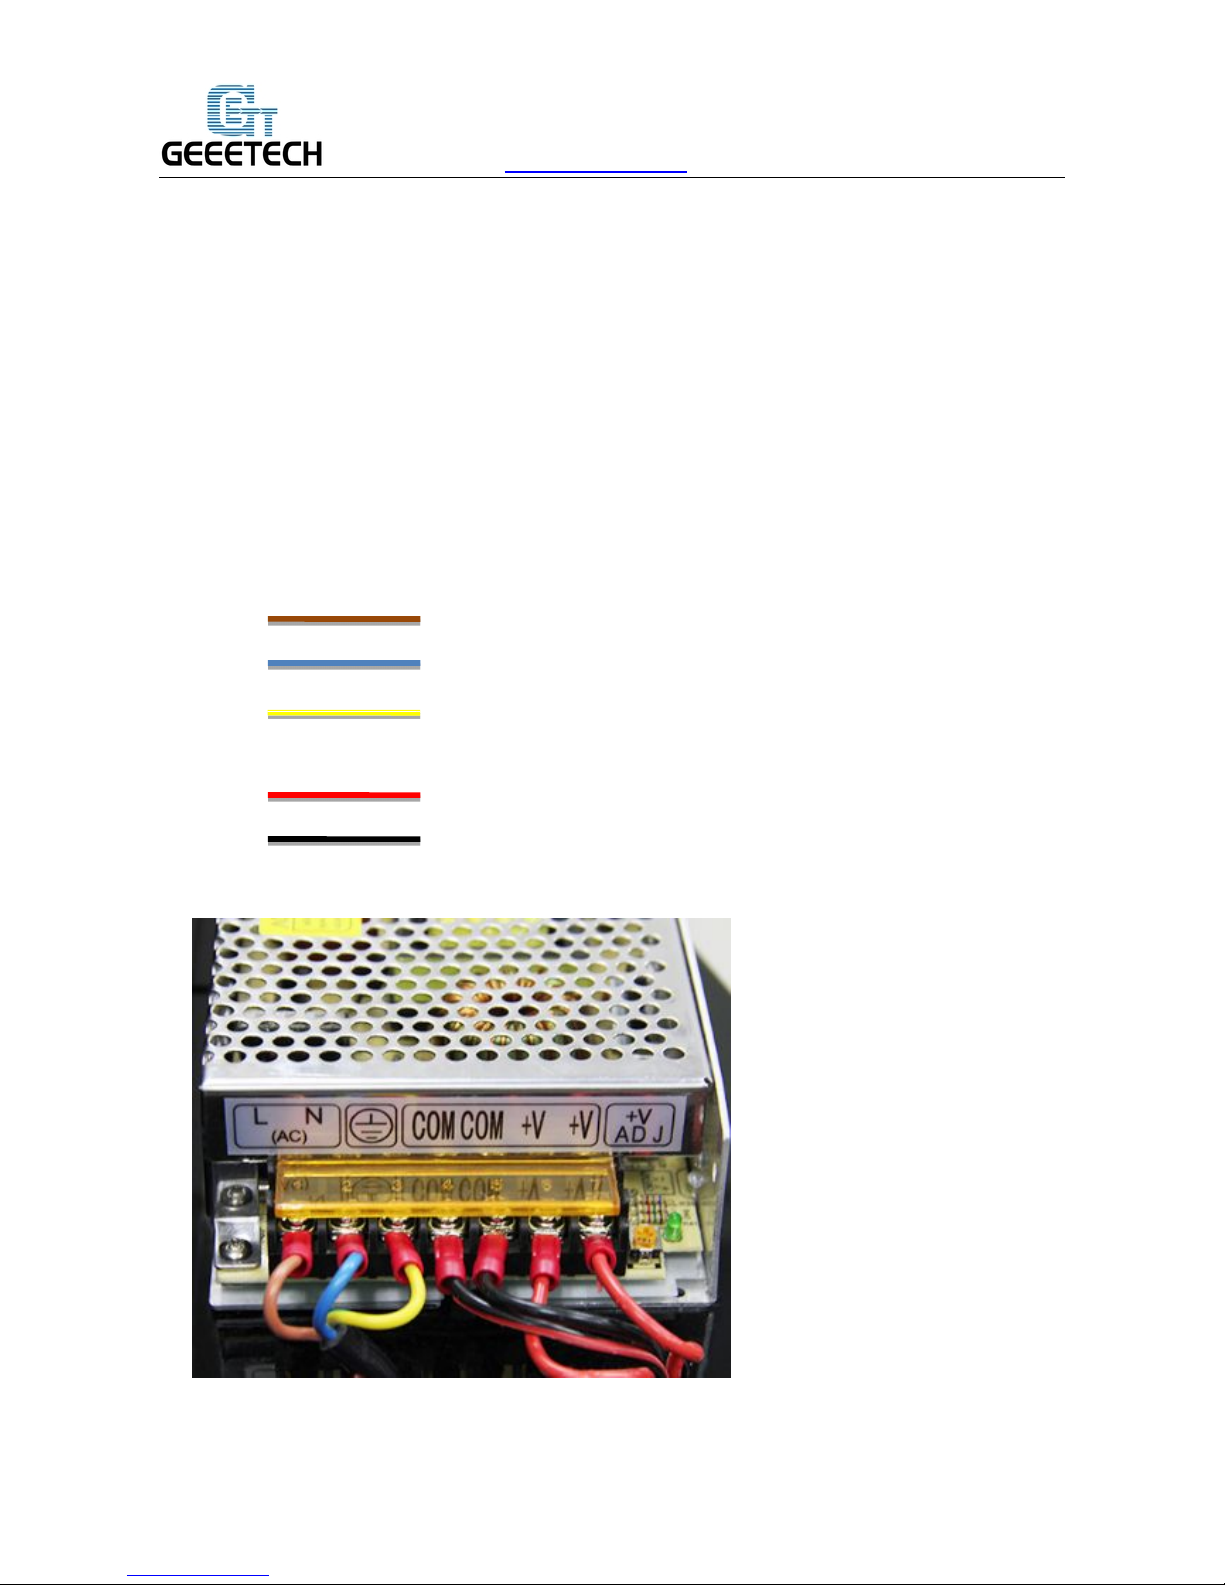
2. Loosen the screws, and connect power lines to corresponding ports in turn under the instructions
of the colors of power lines and the marks on DC power supply.
3. take note of the colors and their corresponding connection as a mistake can cause you harm or
damage the printer. If you are unsure of your skills and abilities here, please consult a
professional.
BROWN Live (L)
BLUE Neutral (N)
GREEN / Ground (GND)
YELLOW
RED Positive (+)
BLACK Common (COM)
Page 3

www.geeetech.com
Shenzhen Getech Technology CO.LTD
Note: Both of the power supply and LCD of Me Creator are external, and there are no installation
holes set on the body of machine. Please find a flat place for the placement of your printer, LCD
and power supply.
2. Software Resources
2.1Repetier host V 1.6.0
http://www.repetier.com/download-now/
2.2Arduino IDE
http://www.geeetech.com/wiki/images/a/a2/Arduino-1.0.1-windows.zip
2.3Me Creator firmware(for Sanguinololu
)
http://www.geeetech.com/forum/download/file.php?id=1563
3. Install USB Driver
Connect the printer to computer with USB cable, and the computer will start installing the
device driver software. After the successful installation of driver, please go to the Device
manager to find the USB Serial Port. This port is the printer's communications port.
If the driver can not be automatically installed, please download the USB driver and manually
install it.
http://www.ftdichip.com/Drivers/CDM/CDM%20v2.12.00%20WHQL%20Certified.exe
Page 4

www.geeetech.com
Shenzhen Getech Technology CO.LTD
Page 5
www.geeetech.com
Shenzhen Getech Technology CO.LTD
4. Connect the Printer to Repetier Host
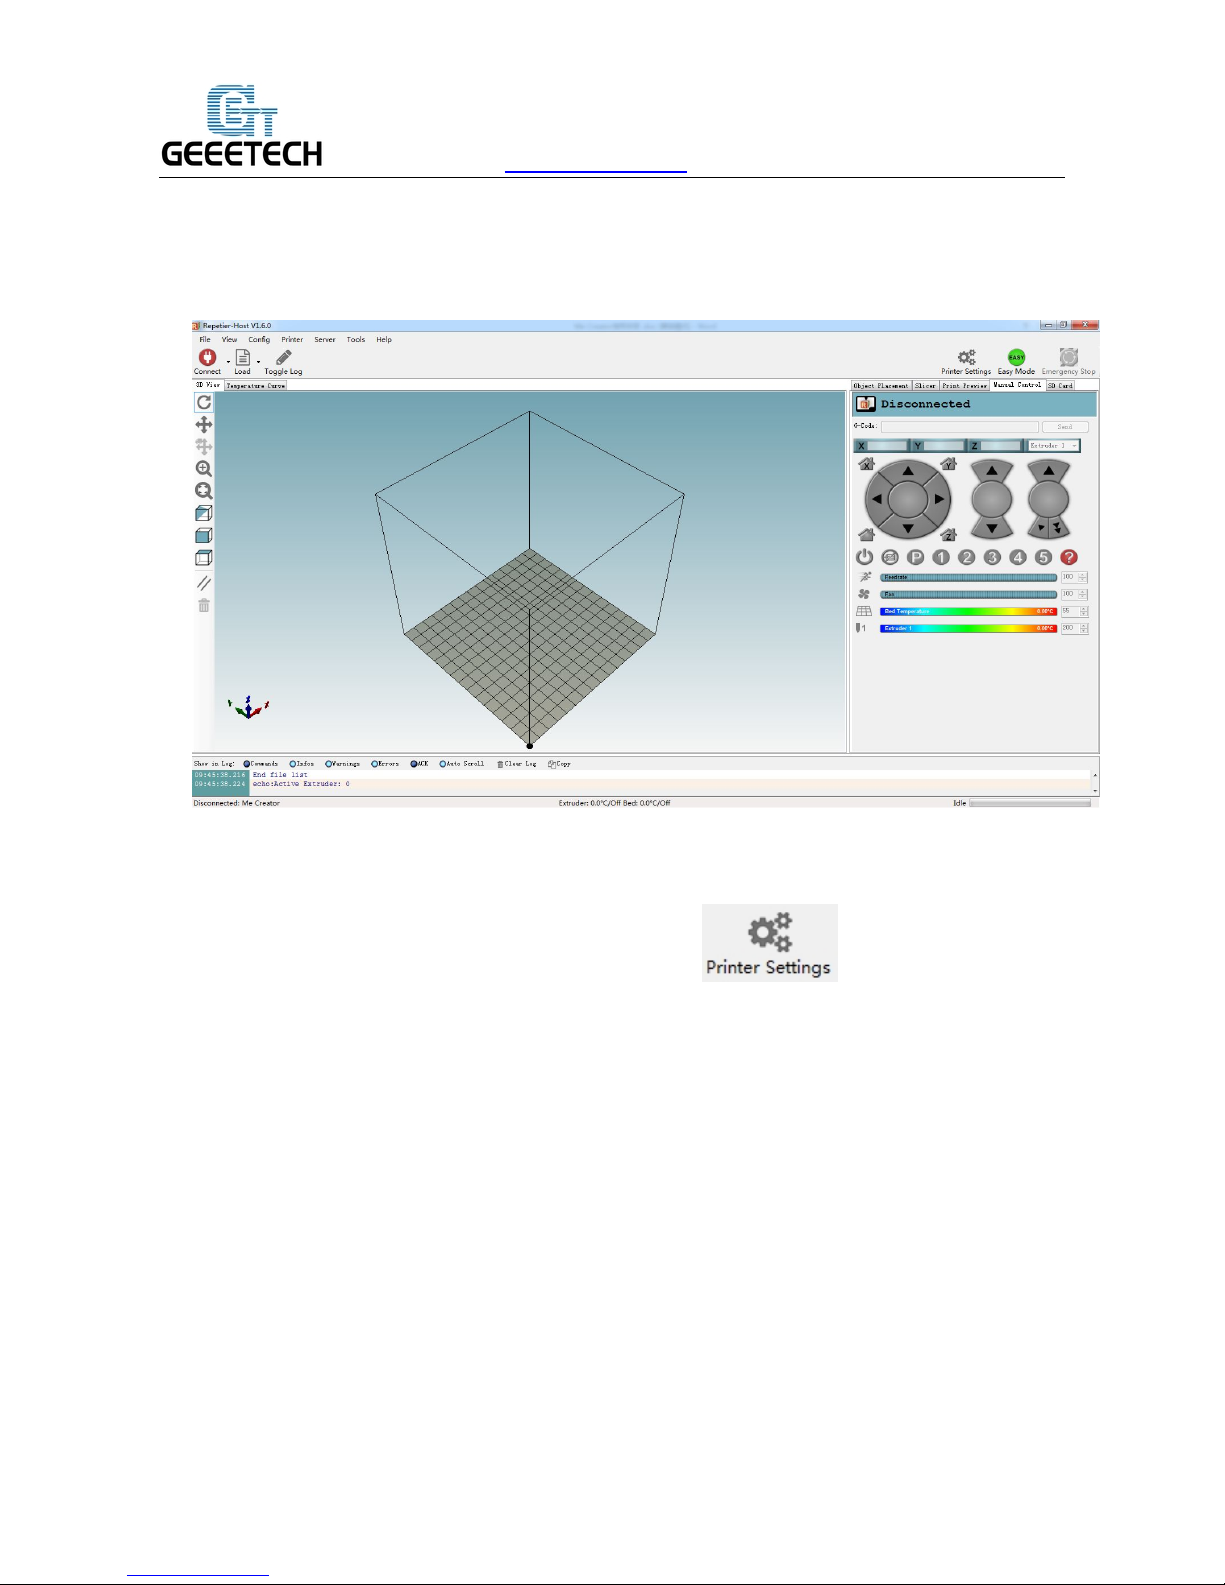
After installing Repetier Host, plug USB cable into computer and open Repetier Host.
When you start Repetier Host for the first time, you need to configure the printer parameters,
and then do the connection. Click the Printer Settings in the top right corner,
following window will appear.
Page 6
www.geeetech.com
Shenzhen Getech Technology CO.LTD
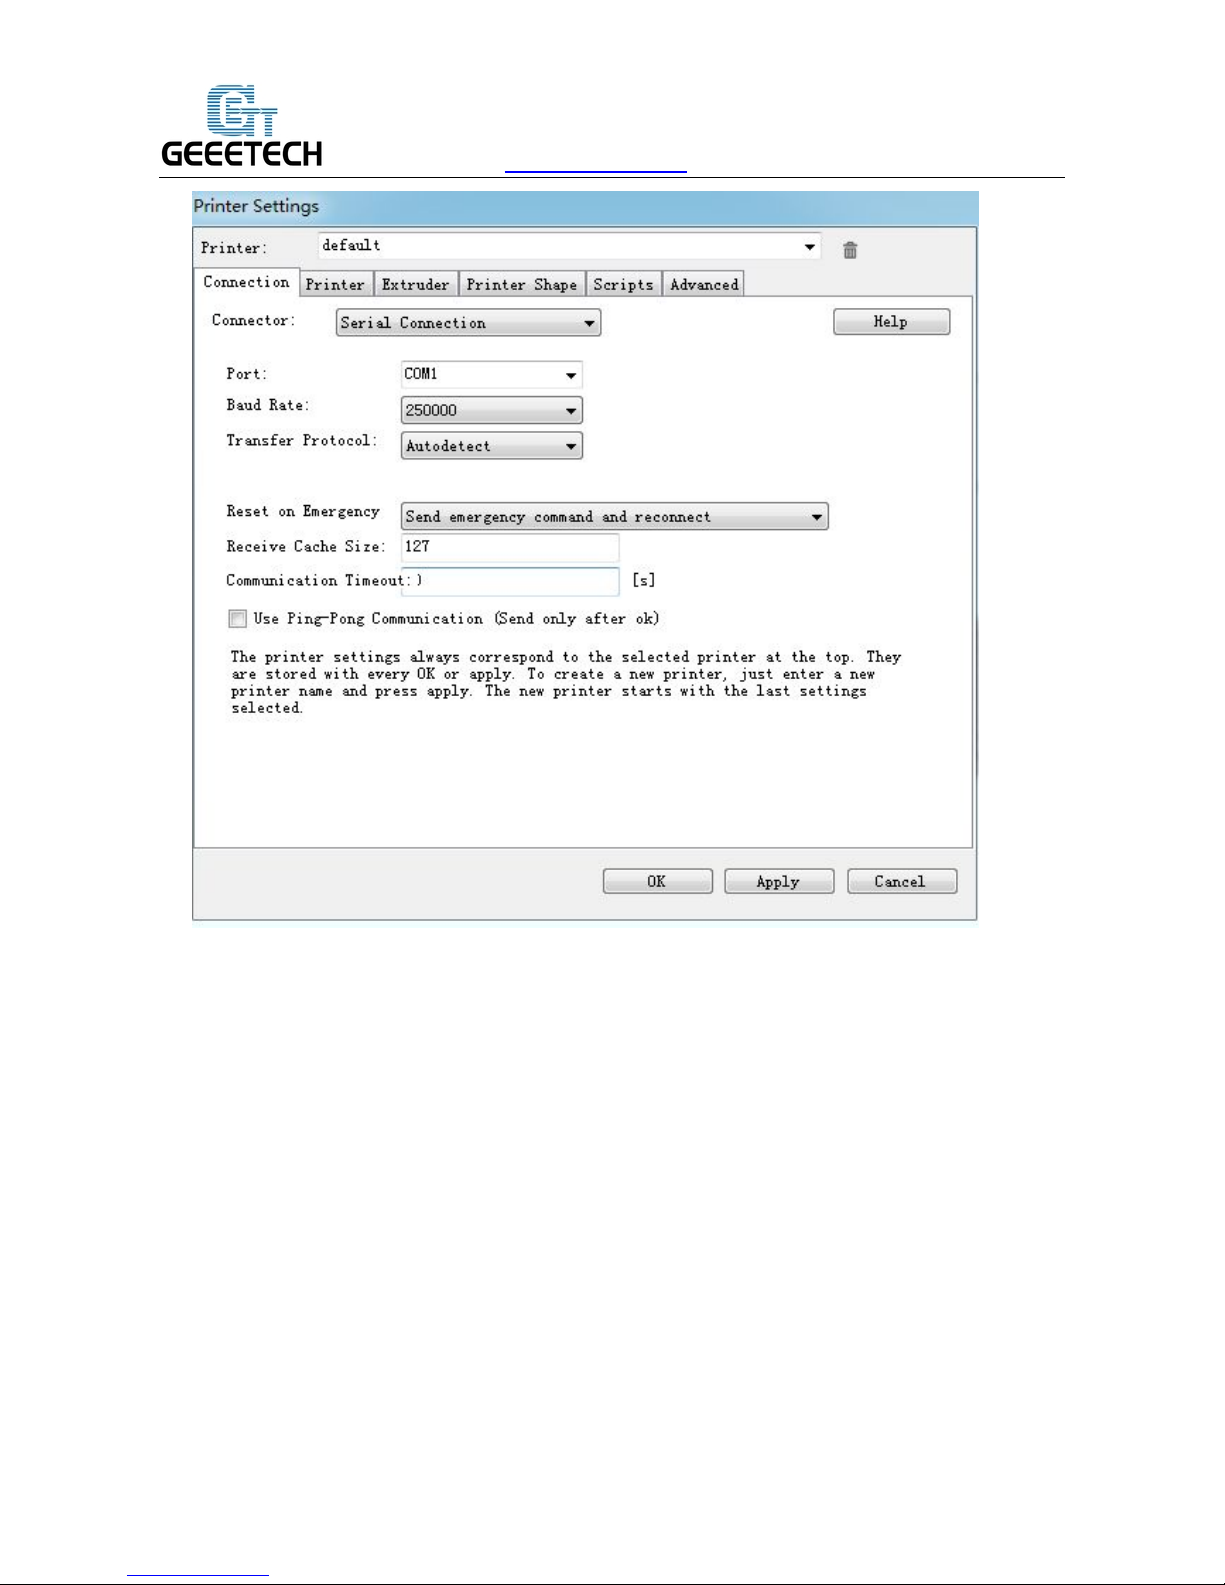
4.1 Create New Printer
In the pull-down menu at the top, it shows current selected printer. When it starts for the first
time, it only has the default printer. Change the name of the printer and click Apply can create a
new printer.
Page 7

www.geeetech.com
Shenzhen Getech Technology CO.LTD
There are six tags in total here. Configure relevant parameters of the printer here.
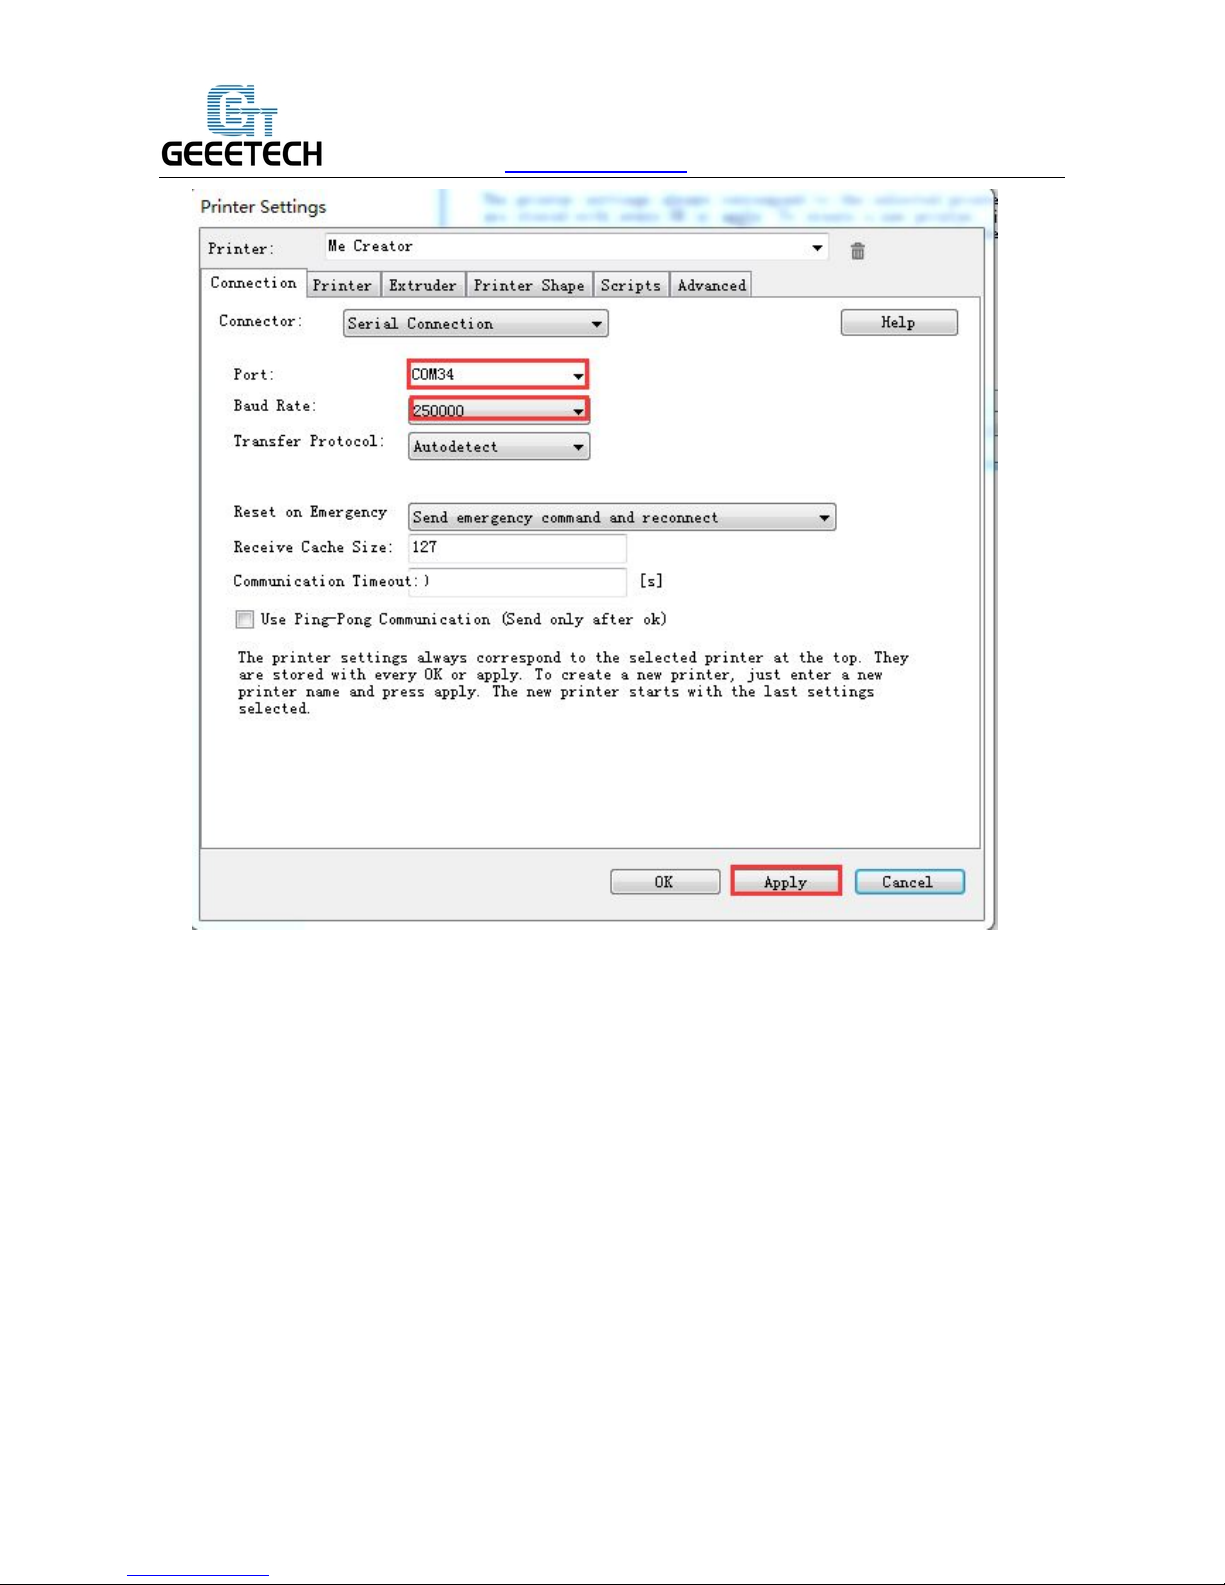
4.2Connection
Choose right Port and Baud Rate. For other parameters please leave them as default, and click
Apply.
Port : Get the printer connected to the port of computer, which is corresponding to the USB
Serial Port in the Device manager.
Baud Rate: Corresponding to the Baud Rate in firmware. Generally it is set as 250000.
Page 8
www.geeetech.com
Shenzhen Getech Technology CO.LTD
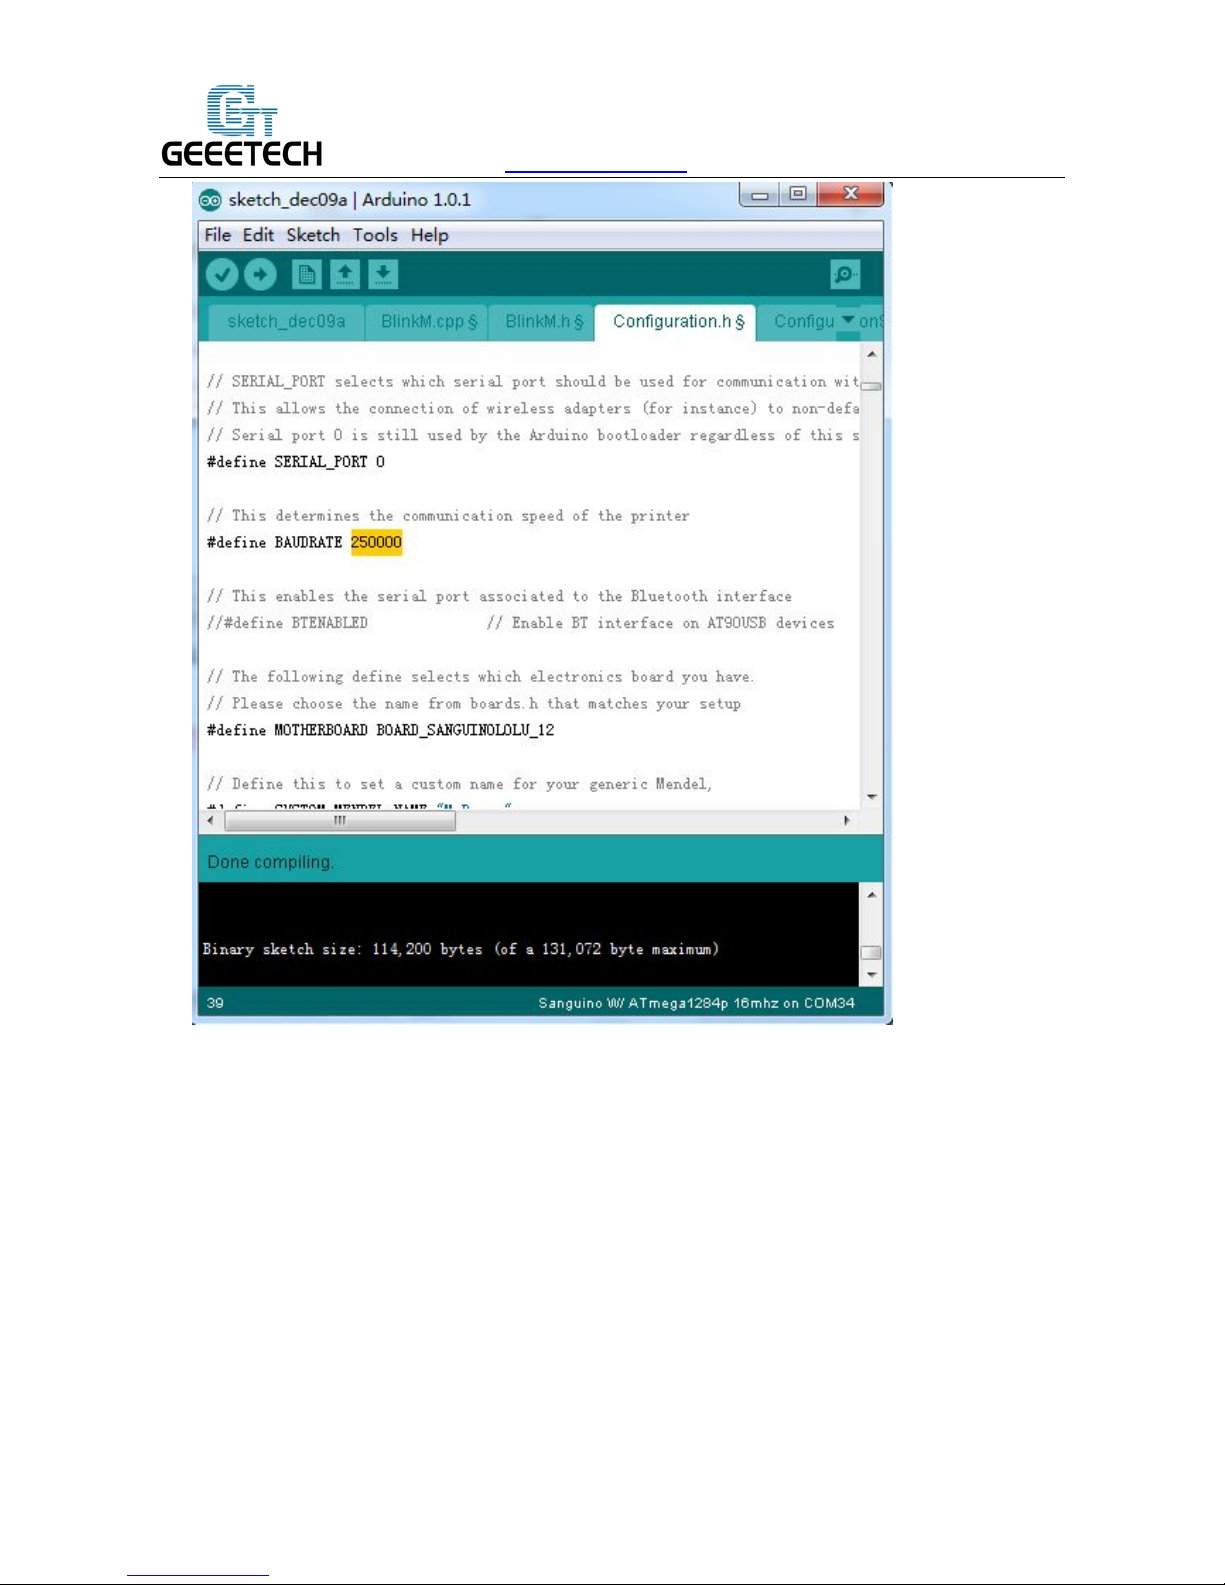
Note: If the operating system is Mac OS, please set the baud rate as 115200. Meanwhile, you need
to do debugging for the motor direction of the printer again after re-uploading the firmware.
Open the firmware in Arduino 1.0.1, change the baud rate of firmware to 115200 in
Configuration.h file.
After modification, re-upload the firmware. About how to burn the firmware, please refer to the
FAQ.
Page 9
www.geeetech.com
Shenzhen Getech Technology CO.LTD
After successfully modifying the baud rate in firmware, modify the baud rate in Repetier-Host
to 115200 as well.
Page 10
www.geeetech.com
Shenzhen Getech Technology CO.LTD
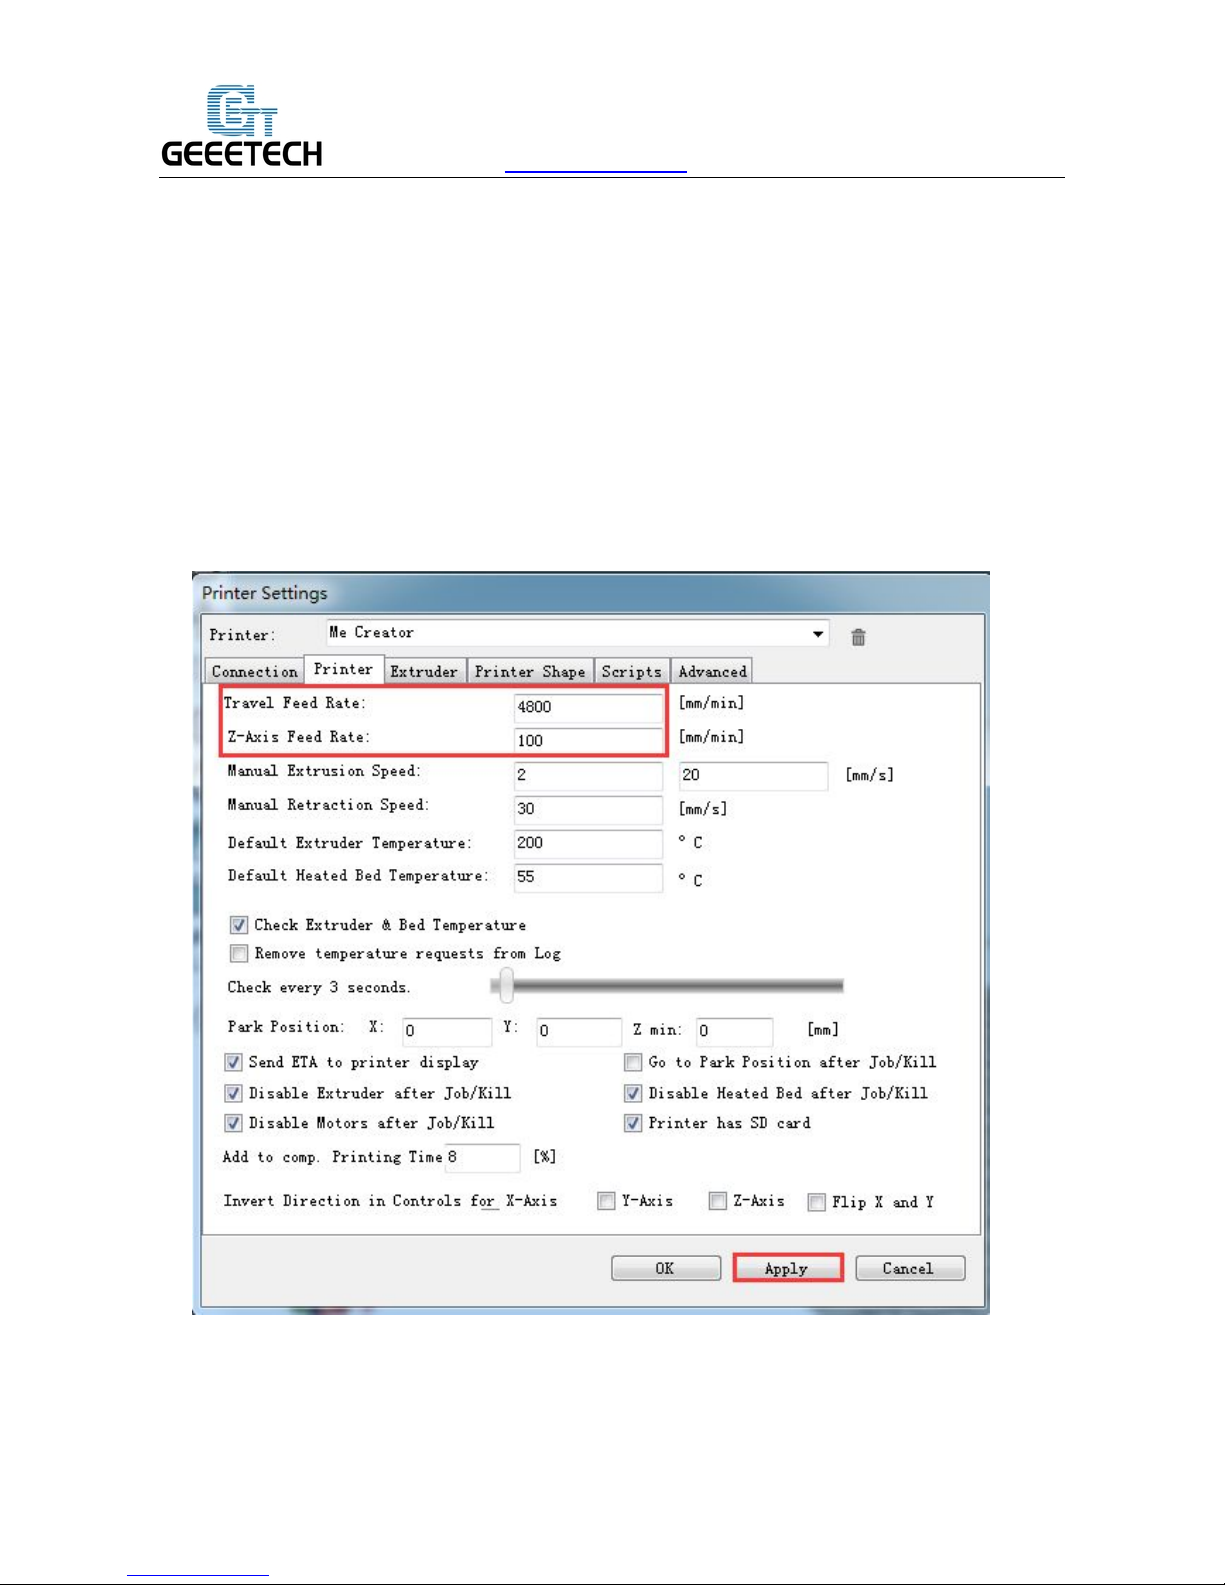
4.3Printer
Set the extruder’s moving speed both in horizontal direction and Z-axis direction in the Printer tab,
and click Apply.
Travel Feed Rate: 4800mm/min
Z-Axis Feed Rate: 100mm/min
This is the default printing speed of Repetier-Host. You can adjust these two speeds if you need. But
please note that too fast print speed will lower the print quality.
Page 11

www.geeetech.com
Shenzhen Getech Technology CO.LTD
4.4Extruder
Number of the extruder: 1
Diameter of extruder 1: 0.3
Page 12

www.geeetech.com
Shenzhen Getech Technology CO.LTD
4.5 Printer shape
Printer type: classical printer
Home X:Min
Home Y:Max
Home Z:Min
X Min:0 X Max: 150 Bed Left: 0
Y Min:0 Y Max: 150 Bed Front: 0
Printing zone: 150 x 150 x 150 (length/width/height)
After setting, click the button in the top left corner of Home Page. When the button
Page 13

www.geeetech.com
Shenzhen Getech Technology CO.LTD
turns green and changes into , the printer connection is successful.
5. Function Test
The uploaded firmware of Me Creator before delivery is based om Windows operating system, and
we have done debugging on it to make sure that every part of it can work normally. However, there
may be abnormal circumstances because of the process of transportation or other unpredictable
factors. Please do simple test before using it.
5.1 Use Repetier-Host to Test
5.1.1 Motor’s running direction test
Before the test, manually set the motors of X / Y / Z axis at the intermediate position of each axis in
order to avoid accidental collision occurring during the test. There is emergency stop button in the
top right corner , or you can cut off the power. Be prepared for emergency stop. Open
Repetier host and connect the printer. Click Home button , then three axes will move towards
the endstop. After they touching the endstop they will move back for a short distance and then stop
the movement. If the moving direction is reversed, you can change the direction in firmware.(please
refer to FAQ)
Page 14

www.geeetech.com
Shenzhen Getech Technology CO.LTD
5.1.2 Heating function test
Click the heating button of the hot bed and the extruder . When the icon changes into
the state as shown below, it indicates the heating is ongoing.
Page 15

www.geeetech.com
Shenzhen Getech Technology CO.LTD
Meanwhile you can see the temperature at the bottom of Repetier. If the hot bed or extruder can not
be heated, please refer to FAQ.
5.1.3 Extruder test
Please note: It is set in the firmware that the extruder will not work before the temperature reaches
above 170℃. Therefore, please heat the hotend above 170℃before testing any motor inserted in
the extruder’s port. Otherwise motor will not have any response.
First we raise the temperature to 200℃, then click the downward arrow and it begins extrusion.
Click the downward arrow to test if the extrusion of filament 0 is fluent or not. In order to avoid
blockage, please extrude filament at 1mm or 0.1 mm. You can use one hand to hold the filament so
that you can easily know the situation of motor’s rotation and filament’s movement.
Page 16

www.geeetech.com
Shenzhen Getech Technology CO.LTD
5.2 Use LCD for Test
5.2.1 Homing
LCD>Prepare>Auto Home
Turn on the printer, first please make a homing. If you don’t make a homing, it will choose the
current position as home position by default. Debugging has been done on Me Creator before its
delivery, and the homing direction is toward the endstop under normal
situation.
Page 17

www.geeetech.com
Shenzhen Getech Technology CO.LTD
5.2.2 Heating
LCD>Prepare>Preheat PLA/Preheat ABS
Test the heating function of hotbed and extruder. Default settings are as follows:
Preheat PLA: Nozzle:180°,Bed:70°
Preheat ABS:Nozzle:230°,Bed:110°
During heating process, please observe if the extruder and hotbed are heated to the preset
temperatures or not. Also note that after heating to the preset temperature, the temperature will not
rise and it maintains at the preset temperature.
You can change the preset temperature by entering LCD>Control>Temperature> Preheat PLA
Conf/Preheat ABS Conf. Choose Store Memory to save the current parameters in current directory.
5.2.3 Motor Direction
LCD>Prepare>Move Axis>Move Axis 10mm/ Move Axis 1mm/ Move Axis 0.1mm
Page 18

www.geeetech.com
Shenzhen Getech Technology CO.LTD
If the homing and heating tests are normal, next you need to test the running of X, Y, Z axis and
extruder motor in Move Axis option. At the same time you need to observe if the running direction
of the motor is correct or not. For example, the extruder involves extrusion and withdrawing. If the
motor direction is opposite, the extruder can not feed normally.
X,Y axis can move at 10mm,1mm or 0.1mm.
Z axis and Extruder can only move at 1mm or 0.1mm.
For the printer, you need to check whether the extrusion is normal or not. Please set a reasonable
temperature depending on the melting point of filament, then test the feeding at 1mm or 0.1mm.
1) Choose CD>Control>Temperature>Nozzle to set extruder temperature.(generally it is the
melting point of the filament)
2) When the temperature of extruder reaches the melting point of the filament, begin the
extrusion at 1mm or 0.1mm. Check if the extrusion is fluent or not. If not, please refer to the
FAQ.
Page 19

www.geeetech.com
Shenzhen Getech Technology CO.LTD
2.2.4 Unlocking motor
After unlocking motors, each axis can be moved by hand.
6. Hotbed Leveling
Before printing, please check whether the moving path of the extruder is parallel with the hotbed or
not, which is called leveling.
Coarse tuning
Adjust the trigger of the endstop of Z axis, and try your best to set the homing position of Z axis
right on the hotbed.
Page 20

www.geeetech.com
Shenzhen Getech Technology CO.LTD
Fine tuning
1)Make a homing for the printer.
2)Unlock the motor, manually move the extruder to the three positions of the hotbed shown in the
picture. At this moment the nozzle tip is already very near to the hot bed because of previous coarse
tuning.
4. Put a piece of A4 paper between the extruder and hotbed. If there is a little bit friction when you
pull the paper back and forth, the distance is proper. Otherwise you need to adjust the screw in
this corner of the hotbed to slightly lift or lower the hotbed.
Page 21

www.geeetech.com
Shenzhen Getech Technology CO.LTD
7. Printing
7.1 Online printing
7.1.1 Import STL file
Prepare the object you want to print, and open the Object Placement. Import STL file by
clicking .
Please note that the print object can not exceed the printing zone.
7.1.2 Slicing Parameters Setting
Repetier-Host is bundled with two slicers: Slic3r and CuraEngine. We use slice 3r as example to
introduce how to set slicing parameters of Me Creator.
Click Slicer>Configuration
Page 22

www.geeetech.com
Shenzhen Getech Technology CO.LTD
Following interface of Slic3r will appear:
Page 23

www.geeetech.com
Shenzhen Getech Technology CO.LTD
Set the height of layer and the first layer in Print Settings, and save the setting.
Set filament diameter as 1.75 in Filament Settings.
Temperature setting
PLA: Extruder 190℃-210℃, hotbed 55℃-65
℃
ABS: Extruder 240℃-250℃, hotbed 85℃-95
℃
When you print with ABS, you are advised to use ABS glue.
Page 24

www.geeetech.com
Shenzhen Getech Technology CO.LTD
Set hotbed size and nozzle diameter in Printer Settings, and save the setting.
Page 25

www.geeetech.com
Shenzhen Getech Technology CO.LTD
Except for above hardware parameters settings, you should also pay attention to parameters like
printing speed etc. Because they are important to improving the printing quality. It needs your
long-time practice and experience. Here we give you a setting for reference. Please download the
ini.file
You can import it into slic3r to view it according to following steps.
Note: this slicing setting is corresponding to following parameters
Printer type: Me Creator(nozzle diameter:0.3)
Filament: PLA/1.75
Page 26

www.geeetech.com
Shenzhen Getech Technology CO.LTD
Click File<Load Config to import the Me Creator.ini slicing setting .
Click save in Printer Settings tab.
Page 27

www.geeetech.com
Shenzhen Getech Technology CO.LTD
Click save in Filament Settings tab.
Page 28

www.geeetech.com
Shenzhen Getech Technology CO.LTD
Click save in Printer Settings tab.
After saving, return back to Slicer tab. Choose Me Creator slicing setting in the pull-down menu of
Print Settings/Printer Settings/Filament Settings.
Page 29

www.geeetech.com
Shenzhen Getech Technology CO.LTD
Click Slice with Slic3r to start slicing.
Slicing is over, and click Print to begin printing.
7.2 Stand-alone printing
If you want to print by using the SD card, you can save the .gcode file in SD card for printing.
Page 30

www.geeetech.com
Shenzhen Getech Technology CO.LTD
Note: The printer only recognizes .gcode file, and the file can not be placed in any folder!
Steps are as follows:
Click Save for SD Print, and choose the save button in the dialog box.
Choose a save path, and generate g.code file which can be used for SD card printing.
Insert the SD card into the printer, and choose the corresponding .gcode to print.
Press the knob on LCD, rotate the knob to enter the main menu and choose Print from SD option.
Page 31

www.geeetech.com
Shenzhen Getech Technology CO.LTD
Choose corresponding .gcode file to begin printing.
Heating
When heating is completed, it begins printing automatically.
Page 32

www.geeetech.com
Shenzhen Getech Technology CO.LTD
8.FAQ
8.1 How to burn firmware?
Me Creator uses Sanguinololu motherboard.
Download Me Creator firmware
http://www.geeetech.com/forum/download/file.php?id=1563
For burning process please refer to the following link
http://www.geeetech.com/forum/viewtopic.php?f=20&t=16433
8.2 The hotbed or extruder can not be heated.
http://www.geeetech.com/forum/viewtopic.php?f=13&t=17117
8.3 Modifying motor direction
http://www.geeetech.com/forum/viewtopic.php?f=13&t=17037
 Loading...