

Page 1

Owner’s
Manual
30″ and 36″
Induction Cooktops
For Models:
ZHU30
ZHU36
76,2 cm et 91,4 cm (30″ et 36″)
Table de cuisson à induction
Manuel du propriétaire
Pour à la Modèles :
ZHU30
ZHU36
La section française commence à la page 27
30″ y 36″
Anafe de inducción
Manual del propietario
Para Modelos:
ZHU30
ZHU36
La sección en español empieza en la página 51
49-80509
06-07 JR
Page 2

Consumer Information
Induction Cooktop
2
Introduction
Your new Monogram cooktop makes an eloquent statement of style, convenience and kitchen
planning flexibility. Whether you chose it for its purity of design, assiduous attention to detail—
or for both of these reasons—you’ll find that your Monogram cooktop’s superior blend of form and
function will delight you for years to come.
Your Monogram cooktop was designed to provide the flexibility to blend in with your kitchen
cabinetry. Its sleek design can be beautifully integrated into the kitchen.
The information on the following pages will help you operate and maintain your cooktop properly.
If you have any questions, visit our Website at: monogram.com
Contents
Care and Cleaning
Control Lock Pad . . . . . . . . . . . . . . . . . . . . . . . . . . 19
Glass Cooktop . . . . . . . . . . . . . . . . . . . . . . . . . 19–21
Packaging Tape . . . . . . . . . . . . . . . . . . . . . . . . . . . 19
Consumer Services
Before You Call for Service . . . . . . . . . . . . . .22, 23
Important Phone Numbers . . . . . . . . . . . . . . . . 25
Model and Serial Number . . . . . . . . . . . . . . . . . . . 2
Safety Instructions . . . . . . . . . . . . . . . . . . . . . . .4–7
Warranty . . . . . . . . . . . . . . . . . . . . . . . . . . . . . . . . . 26
Operating Instructions
Cookware Recommendations . . . . . . .10–12, 18
Features of Your Cooktop . . . . . . . . . . . . . . . . .8, 9
How Induction Cooking Works . . . . . . . . . . . . . . . .10
Kitchen Timer . . . . . . . . . . . . . . . . . . . . . . . . . . . . .16
Locking the Cooktop . . . . . . . . . . . . . . . . . . . . . . .17
Low Setting . . . . . . . . . . . . . . . . . . . . . . . . . . . . . . .15
Setting the Controls . . . . . . . . . . . . . . . . . . . .13–15
Surface Elements . . . . . . . . . . . . . . . . . . . . . . . . . 13
Before
using your
cooktop
Read this manual carefully. It is intended to help
you operate and maintain your new cooktop
properly.
Keep it handy for answers to your questions.
If you don’t understand something or need more
help, there is a list of toll-free consumer service
numbers included in the back section of this
manual.
OR
Visit our Website at: monogram.com
Write
down the
model &
serial
numbers
You’ll find them on a label under the cooktop.
Fill out and return the Consumer Product
Registration Card that is packed with this
product.
Before sending in the card, please write the
numbers here:
Model Number
Serial Number
Use these numbers in any correspondence or
service calls concerning your cooktop.
Page 3

3
If you
received a
damaged
cooktop
Immediately contact the dealer (or builder) that
sold you the cooktop.
Save time
& money
Read this manual. Inside you will find many
helpful hints on how to use and maintain your
cooktop properly. Just a little preventive care on
your part can save you a great deal of time and
money over the life of your cooktop.
You’ll find many answers to common problems
in the Before You Call for Service section. If you
review our chart of Troubleshooting Tips first,
you may not need to call for service at all.
If you
need
service
To obtain service, see the Consumer Services
page in the back of this manual.
We’re proud of our service and want you to be
pleased. If for some reason you are not happy
with the service you receive, here are some
steps to follow for further help.
FIRST, contact the people who serviced your
appliance. Explain why you are not pleased.
In most cases, this will solve the problem.
NEXT, if you are still not pleased, write all the
details—including your phone number—to:
Manager, Customer Relations
GE Appliances
Appliance Park
Louisville, KY 40225
Consumer Information
Induction Cooktop
Page 4

IMPORTANT SAFETY INSTRUCTIONS
4
WARNING!
For your safety, the information in this manual must be followed to minimize the risk of fire or explosion, electric
shock, or to prevent property damage, personal injury, or loss of life.
This unit has been tested and found to comply with
the limits for a class B digital device, pursuant to Part
18 of the FCC rules. These limits are designed to
provide reasonable protection against harmful
interference in a residential installation. This unit
generates, uses and can radiate radio frequency
energy and, if not installed and used in accordance
with the instructions, may cause harmful interference
to radio communications. However, there is no
guarantee that interference will not occur in a
particular installation. If this unit does cause harmful
interference to radio or television reception, which can
be determined by turning the unit off and on, the user
is encouraged to try to correct the interference by one
or more of the following measures:
•
Reorient or relocate the receiving antennae.
•
Increase the distance between the unit and receiver.
•
Connect the unit into an outlet or a circuit different
from that to which the receiver is connected.
IMPORTANT SAFETY NOTICE:
•
The California Safe Drinking Water and Toxic
Enforcement Act requires the Governor of California
to publish a list of substances known to the state to
cause cancer, birth defects or other reproductive
harm, and requires businesses to warn customers
of potential exposure to such substances.
•
Use proper pan size. This appliance is equipped
with one or more COOKING ZONES of different sizes.
Select utensils having flat bottoms large enough to
cover the Cooking Zones. The pan detection sensors
will not allow the affected Cooking Zone to operate
without a pan present.
•
Utensil handles should be turned inward and
should not extend over adjacent cooking zones
to reduce the risk of burns, ignition of flammable
materials and spillage due to unintentional contact
with the utensil.
•
Never leave prepared food on the cooking zones
unattended. Boilovers cause smoking and greasy
spillovers that may ignite, or a pan that has boiled
dry may melt or become damaged.
•
Protective liners: Do not use aluminum foil to line
any part of the cooktop. Only use aluminum foil as
recommended after the cooking process, if used as
a cover to be placed over the food. Any other use of
aluminum foil may result in the risk of electric shock,
fire or short circuit.
•
Avoid placing any objects on or near the keypads
in order to prevent accidental activation of the
cooktop controls.
•
Know which touch key pad controls each surface
of the Cooking Zones.
•
Clean the appliance regularly to keep all parts
free of grease that could catch fire. Exhaust fan
ventilation hoods and grease filters should be kept
clean. Do not allow grease to accumulate on hood
or filter. Greasy deposits in the fan could catch fire.
When flaming food under the hood, turn fan on.
Refer to hood manufacturer's instructions for cleaning.
Serial Plate Location
You will find the model and serial number printed on
the serial plate. The serial plate is located under the
cooktop. Please see the illustration for exact location.
Remember to record the serial number BEFORE
INSTALLATION of the cooktop (See Product Registration,
page 2). The serial plate is located under the burner box
of the cooktop.
Name plate location
CAUTION:
Persons with a pacemaker or similar medical
device should exercise caution when using or
standing near an induction unit while it is in
operation. The electromagnetic field may affect the
working of the pacemaker or similar medical device.
It is advisable to consult your doctor or the
pacemaker manufacturer about your particular
situation.
Page 5

5
WARNING!
For your safety, the information in this manual must be followed to minimize the risk of fire
or explosion, electric shock, or to prevent property damage, personal injury, or loss of life.
When using electrical appliances, basic safety precautions should be followed, including the following:
•
Use this appliance only for its intended use
as described in this manual.
•
Do not attempt to repair or replace any
part of your cooktop unless it is specifically
recommended in this manual. All other
servicing should be referred to a qualified
technician.
•
Before performing any service, disconnect
the cooktop power supply at the household
distribution panel by removing the fuse or
switching off the circuit breaker.
•
Be sure your appliance is properly installed
and grounded by a qualified technician in
accordance with the provided installation
instructions.
•
Have the installer show you the location
of the circuit breaker or fuse. Mark it for
easy reference.
•
Do not leave children alone—children
should not be left alone or unattended
in an area where an appliance is in use.
They should never be allowed to sit or
stand on any part of the appliance.
•
Teach children not to play with the controls
or any other part of the cooktop.
•
Do not allow anyone to climb, stand or
hang on the cooktop.
•
CAUTION:Items of interest to
children should not be stored in cabinets
above a cooktop—children climbing on the
cooktop to reach items could be seriously
injured.
•
Always keep combustible wall coverings,
curtains or drapes a safe distance from
your cooktop.
•
Always keep dish towels, dishcloths, pot
holders and other linens a safe distance
away from your cooktop.
•
Always keep wooden and plastic utensils
and canned food a safe distance away
from your cooktop. They may become hot
and could cause burns.
•
Never wear loose-fitting or hanging
garments while using the appliance.
Flammable material could be ignited
if brought in contact with hot surface
elements and may cause severe burns.
•
Use only dry pot holders—moist or damp
pot holders on hot surfaces may result in
burns from steam. Do not let pot holders
touch hot surface elements. Do not use a
towel or other bulky cloth. Such cloths can
catch fire on a hot surface element.
•
Do not use water on grease fires. Never
pick up a flaming pan. Turn the controls off.
Smother a flaming pan on a surface element
by covering the pan completely with a wellfitting lid, cookie sheet or flat tray. Use a
multi-purpose dry chemical or foam-type
extinguisher.
•
Flaming grease outside a pan can be
put out by covering with baking soda or,
if available, by using a multi-purpose dry
chemical or foam-type fire extinguisher.
•
When preparing flaming foods under the
hood, turn the fan on.
•
Cook meat and poultry thoroughly—meat
to at least an INTERNAL temperature of
160°F and poultry to at least an INTERNAL
temperature of 180°F. Cooking to these
temperatures usually protects against
foodborne illness.
SAFETY PRECAUTIONS
Page 6

6
IMPORTANT SAFETY INSTRUCTIONS
• Do not touch glass ceramic surface
elements while cooking. This surface may
be hot enough to burn even though it may
appear dark in color. During and after use, do
not touch, or let clothing or other flammable
materials contact the cooking surface. Note
the hot indicator lights and allow sufficient
time for cooling first.
• Hot surfaces may include both the cooktop
and areas facing the cooktop.
• To minimize the possibility of burns,
ignition of flammable materials and
spillage, the handle of a container should
be turned toward the center of the cooktop
without extending over any nearby surface
elements.
• Always turn off the surface element control
before removing the cookware.
• Never leave surface elements unattended
at high heat settings. Boilovers may cause
smoking and greasy spillovers may ignite.
• Keep an eye on foods being fried at high
or medium-high heat settings.
• Foods for frying should be as dry as
possible. Frost on frozen foods or moisture
on fresh foods can cause hot fat to bubble
up and over the sides of the pan.
• Use little fat for effective shallow or deep-
fat frying. Filling the pan too full of fat can
cause spillovers when food is added.
• If a combination of oils or fats will be used
in frying, stir together before heating, or as
fats melt slowly.
• Always heat fat slowly, and watch as it heats.
• Use a deep-fat thermometer whenever
possible to prevent overheating fat beyond
the smoking point.
• Never try to move a pan of hot fat,
especially a deep-fat fryer. Wait until the
fat is cool.
• Do not store flammable materials near
the cooktop.
• Keep the hood and grease filters clean to
maintain good venting and to avoid grease
fires.
• Do not store or use combustible materials,
gasoline or other flammable vapors and
liquids in the vicinity of this or any
appliance.
• Clean only parts listed in this Owner’s
Manual.
• Do not leave paper products, cooking
utensils or food on the cooktop when not
in use.
• Keep cooktop clean and free of
accumulation of grease or spillovers
which may ignite.
• Never heat unopened food containers.
Pressure buildup may make container burst
and cause injury.
• Never leave jars or cans of fat drippings
on or near your cooktop.
• Never use your appliance for warming
or heating the room.
SAFETY PRECAUTIONS
Page 7

7
• Avoid scratching the glass cooktop. The
cooktop can be scratched with items such
as sharp instruments, rings or other jewelry.
• Never use the glass cooktop surface as a
cutting board.
• Do not place or store items on top of the
glass cooktop surface when it is not in use.
• Be careful when placing spoons or other
stirring utensils on glass cooktop surface
when it is in use. They may become hot
and could cause burns.
• Avoid heating an empty pan. Doing so may
damage the cooktop and the pan.
• Do not allow water, other liquids or grease
to remain on the cooktop.
• Do not operate the glass surface elements
if the glass is broken. Spillovers or cleaning
solution may penetrate a broken cooktop
and create a risk of electrical shock. Contact
a qualified technician immediately should
your glass cooktop become broken.
• Spilled or burnt-on foods may cause
accidental activation or deactivation of the
keypad. Clean the keypad thoroughly, and
controls will resume normal operation.
• Clean the cooktop with caution. Always
lock the control panel using the control lock
feature and wait until the entire glass surface
is cool before attempting to clean the
cooktop. See the Locking the Cooktop section
for details. If a wet sponge or cloth is used
to wipe spills on a hot surface element, be
careful to avoid steam burns. Some cleansers
can produce noxious fumes if applied to
a hot surface.
■NOTE: We recommend that you avoid
wiping any surface element areas until they
have cooled and the indicator light has gone
off. Sugar spills are the exception to this.
Please see the Cleaning the glass cooktop
section.
• To avoid possible damage to the cooking
surface, do not apply the cleaning cream
to the glass surface when it is hot.
• After cleaning, use a dry cloth or paper
towel to remove all the cleaning cream
residue.
• Read and follow all instructions and
warnings on the cleaning cream labels.
• Large scratches or impacts to cooktops
can lead to broken or shattered glass.
• Use care when touching the cooktop. The
glass surface of the cooktop will retain heat
after the controls have been turned OFF.
• Do not stand on the glass cooktop.
SAVE THESE INSTRUCTIONS
INDUCTION SURFACE ELEMENTS
Page 8
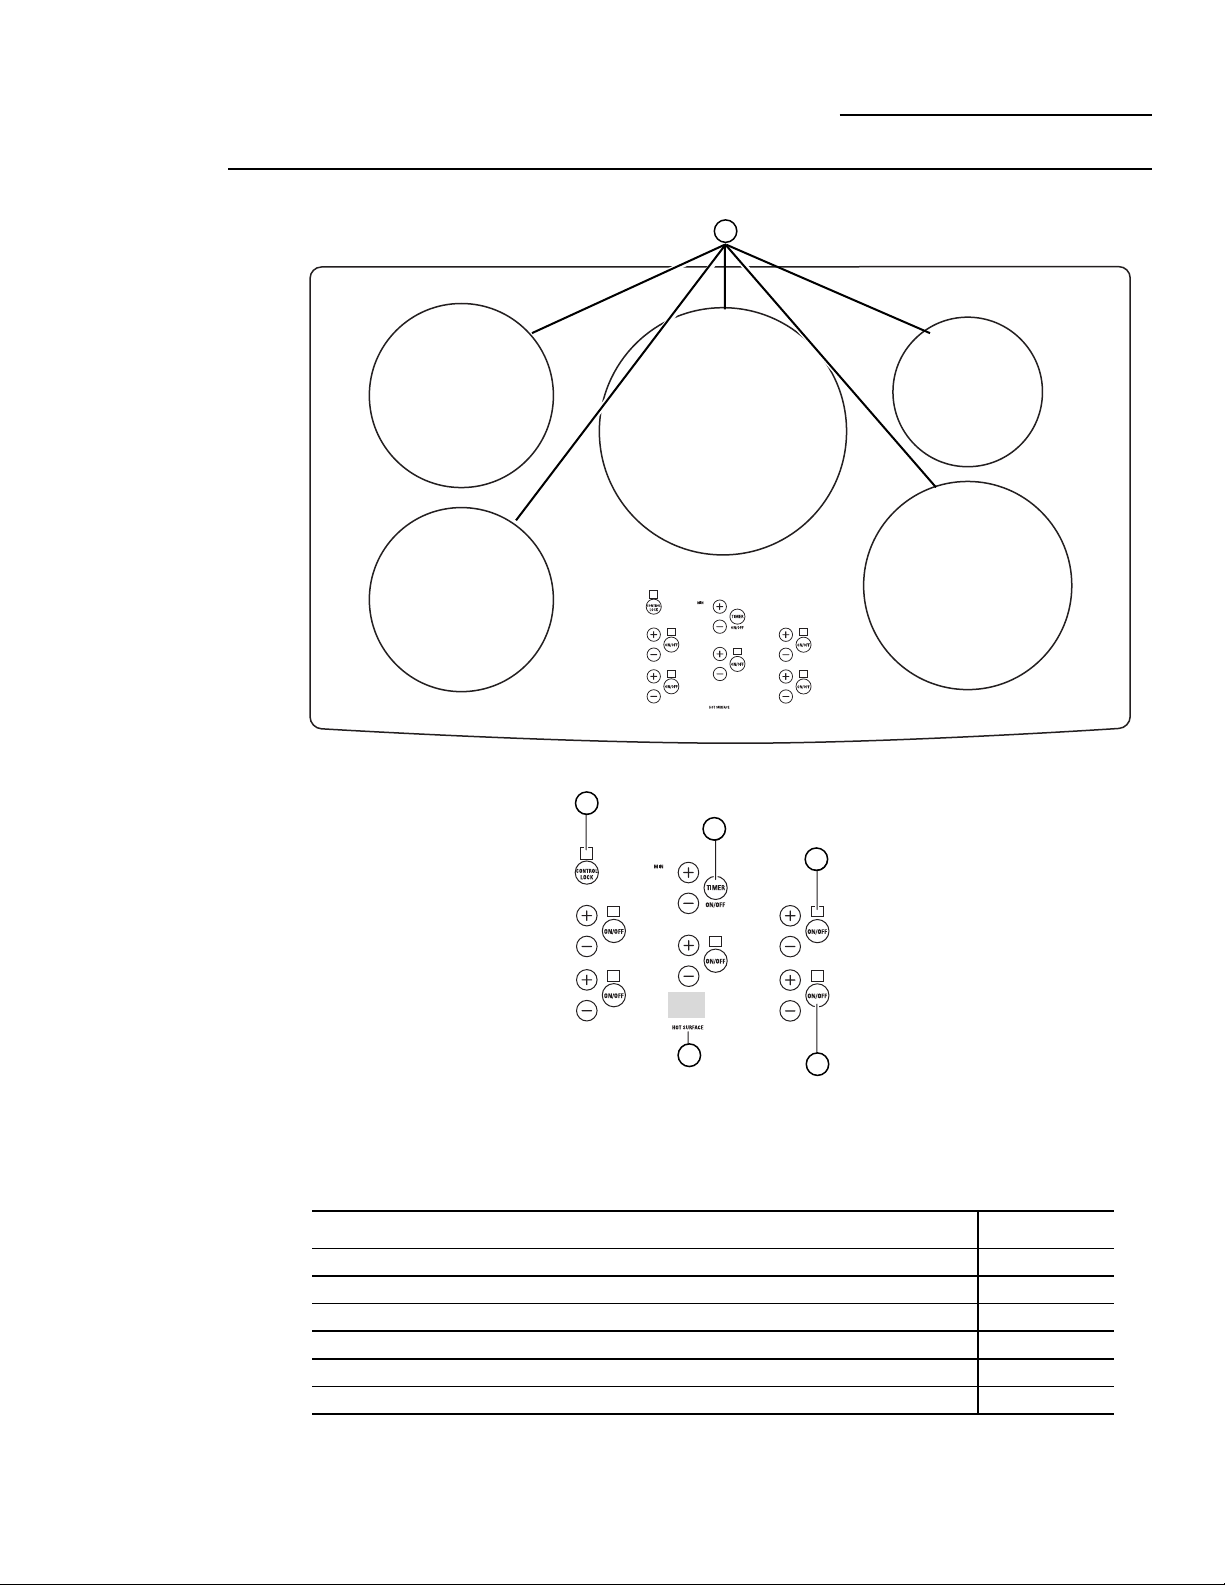
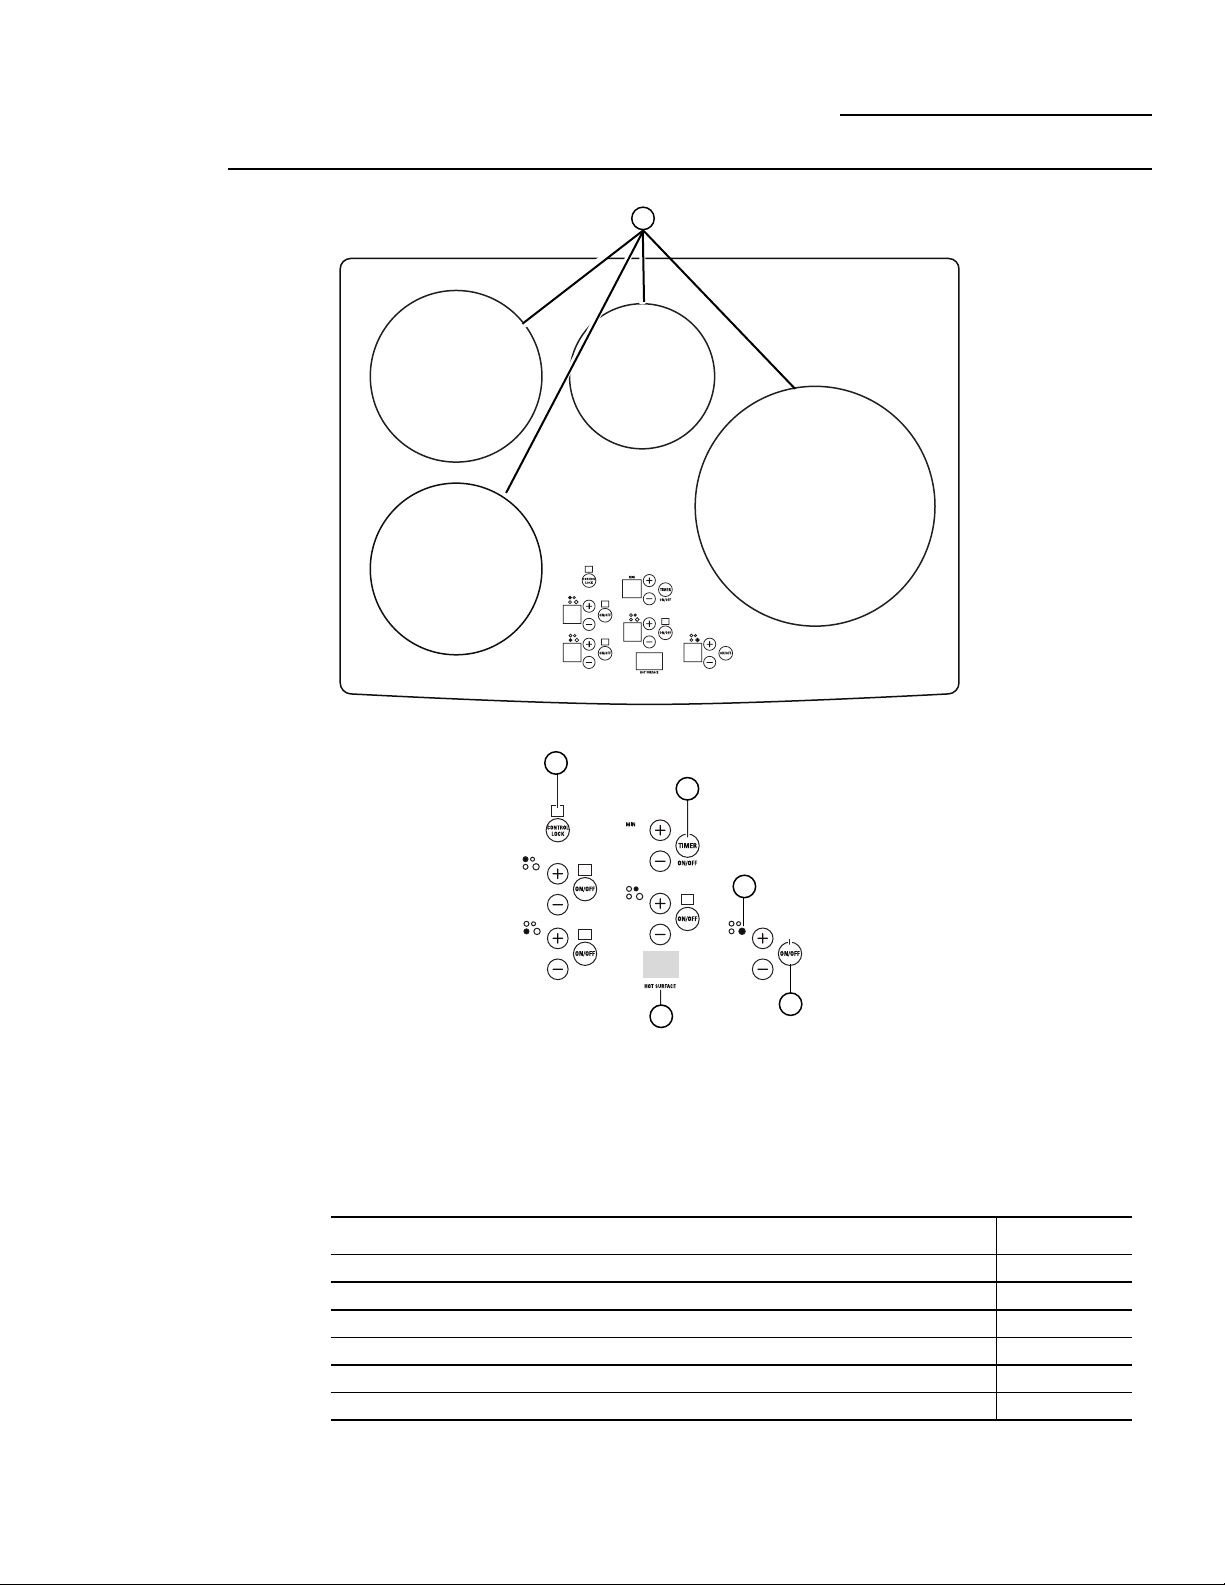
Features of Your Cooktop
Induction Cooktop
Features
(Throughout this
manual, features and
appearance may
vary.)
8
Feature Index Page
1 Cooking Elements 13
2 Control Lock 17
3 Kitchen Timer 16
4 ON Indicator Light (one for each element) 13
5 Hot Surface Indicator Light Area 13
6 Cooking Element ON/OFF Control 13
ZHU36 – 36″ Induction Cooktop
1
5
2
4
3
6
Page 9
9
Features of Your Cooktop
Induction Cooktop
Features
(Throughout this
manual, features and
appearance may
vary.)
NOTE: 30” models have cooking element location
indicators next to each control.
1
2
3
5
Feature Index Page
1 Cooking Elements 13
2 Control Lock 17
3 Kitchen Timer 16
4 ON Indicator Light (one for each element) 13
5 Hot Surface Indicator Light Area 13
6 Cooking Element ON/OFF Control 13
ZHU30 – 30″ Induction Cooktop
6
4
Page 10

10
Each cooking element requires a MINIMUM pan size.
If the pan is properly centered, and of the correct
material, but is too small for the cooking element,
the element cannot be activated. The display will
flash “F” along with the power level selected.
Cookware larger than the element ring may be
used; however, heat will only occur above the
element.
For best results, the cookware must make FULL
contact with the glass surface.
Do not allow the bottom of the pan or cookware
to touch the surrounding metal cooktop trim or
to overlap the cooktop controls.
For best performance, match the pan size to the
element size. Using a smaller pot on a larger burner
will generate less power at any given setting.
Using Your Cooktop
Induction Cooktop
How induction cooking works
The elements beneath the cooking surface
produce a magnetic field that causes the
electrons in the ferrous metal pan to vibrate
and produce heat.
The cooking surface itself does not heat. Heat
is produced in the cooking pan, and cannot be
generated until a pan is placed on the cooking
surface.
When the element is activated, the pan begins to
heat immediately and in turn heats the contents
of the pan.
Magnetic induction cooking requires the use
of cookware made of ferrous metals—metals
to which magnets will stick, such as iron or steel.
Use pans that fit the element size. The pan must
be large enough for the safety sensor to activate
an element.
The cooktop will not start if a very small steel or
iron utensil (less than the minimum size across
the bottom) is placed on the cooking surface
when the unit is turned on—items such as steel
spatulas, cooking spoons, knives and other
small utensils.
Using the
correct size
cookware
5-3/4” Min. Dia.
Pan Size
5-3/4” Min. Dia.
Pan Size
5-3/4” Min. Dia.
Pan Size
5-3/4” Min. Dia.
Pan Size
4-3/4” Min.
Dia.
Pan Size
7” Min. Dia.
Pan Size
4-3/4” Min.
Dia. Pan Size
7” Min. Dia.
Pan Size
7” Min. Dia.
Pan Size
30” Wide Cooktop. Use the minimum size pan shown for
each cooking element.
36” Wide Cooktop. Use the minimum size pan shown for each
cooking element.
Use the minimum size pan for the element.
The pan material is correct if a magnet
sticks to the bottom.
Min. Size
Page 11
11
Using the
cookware
correctly
Cookware must fully contact the surface of the
cooking element.
Use flat-bottomed pans sized to fit the cooking
element and also to the amount of food being
prepared.
CAUTION:
• The cooking elements may appear to be cool
while turned ON and after they have been turned
OFF. The glass surface may be HOT from residual
heat transferred from the cookware and burns
may occur.
• DO NOT TOUCH HOT COOKWARE or PANS
directly with hands. Always use mitts or pot
holders to protect hands from burns.
• DO NOT SLIDE cookware across the cooktop
surface. Doing so may permanently damage
the appearance of the ceramic cooktop.
Using Your Cooktop
Induction Cooktop
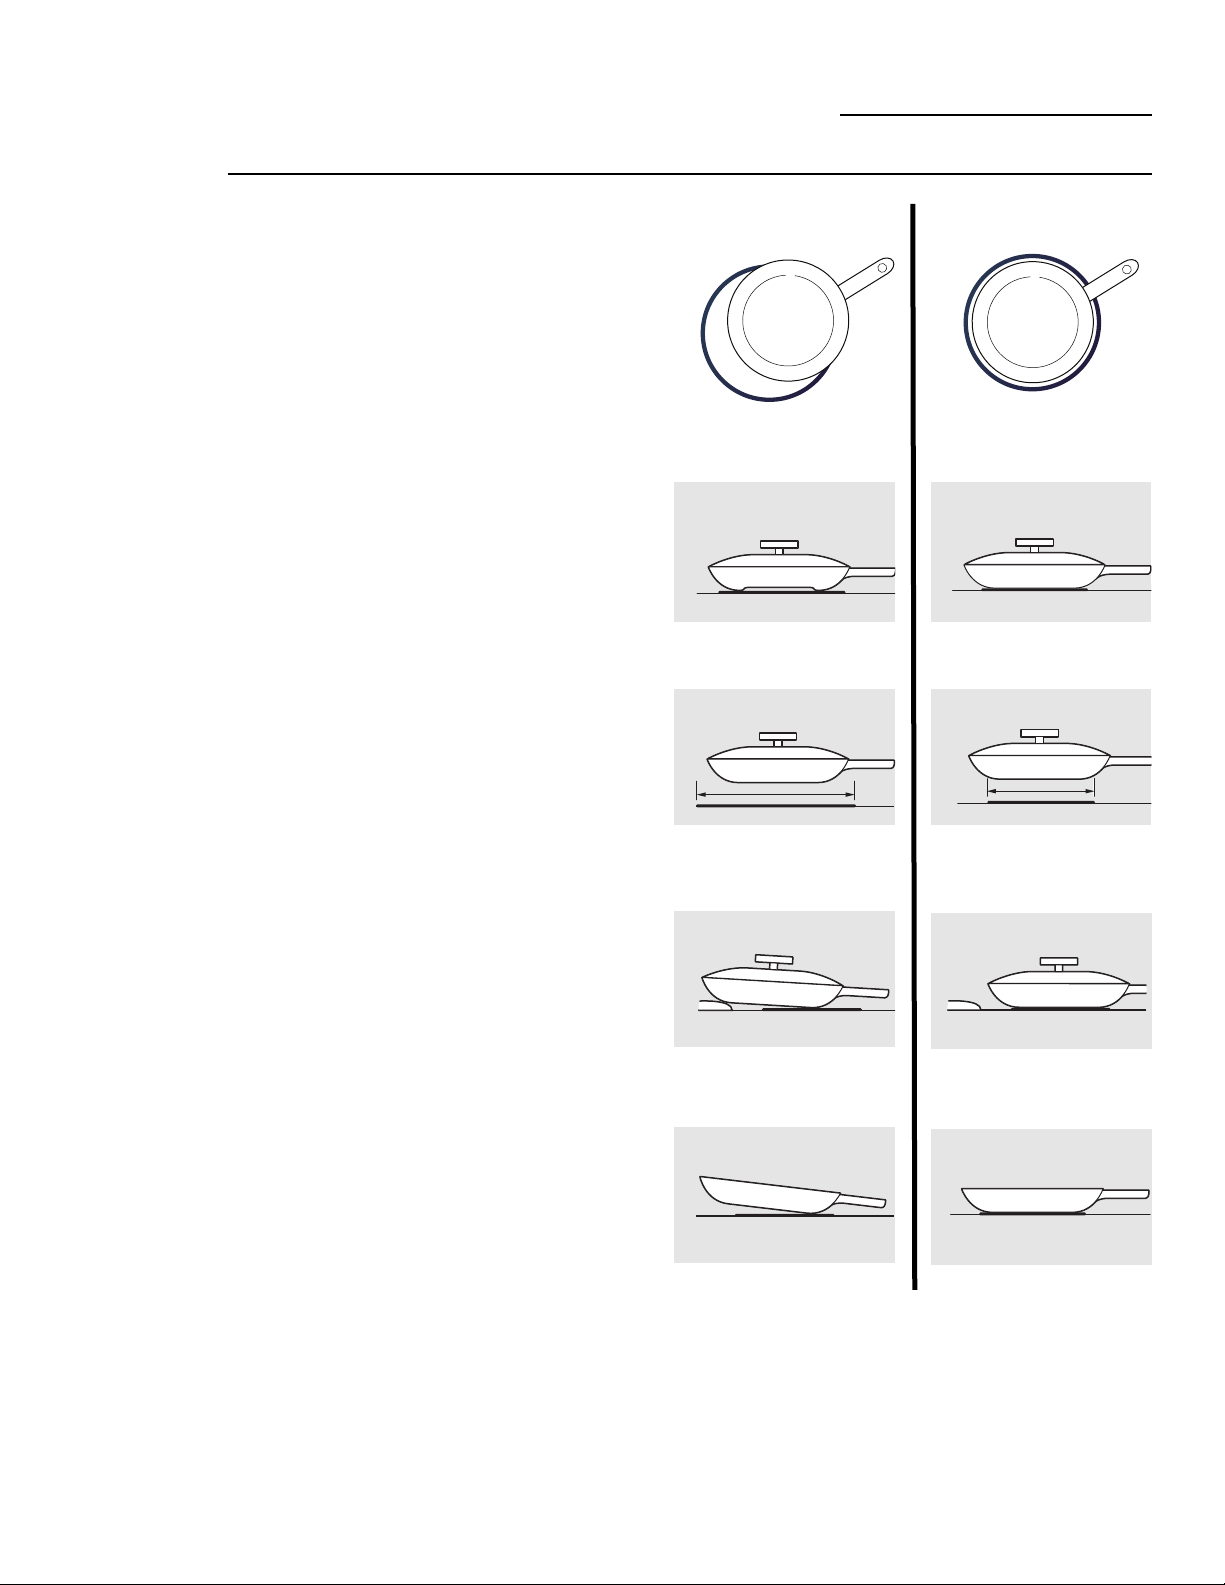
Cookware not centered on
cooking element surface.
Curved or warped pan bottoms
or sides.
Pan does not meet the minimum
size required for the cooking
element used.
Cookware centered correctly
on cooking element surface.
Flat pan bottom.
Pan size meets or exceeds the
recommended minimum size
for the cooking element used.
INCORRECT
CORRECT
Pan bottom rests on cooktop
trim or does not rest completely
on the cooktop surface.
Heavy handle tilts pan.
Pan bottom rests completely on
the cooktop surface.
Pan is properly balanced.
Page 12

12
Using Your Cooktop
Induction Cooktop
Do not place wet pans or lids on the cooking
surface or induction rings.
Do not place wet fingers on the glass cooktop.
Wipe up spills on the controls with dry hands.
Do not use woks with support rings. This type
of wok will not heat on an induction element.
Use only a flat-bottomed wok, available from many
cookware manufacturers. The bottom of the wok
should match the diameter of the induction ring to
insure proper contact.
Some special cooking procedures require specific
cookware such as pressure cookers, deep-fat fryers,
etc. Cookware with flat bottoms that match the size
of the surface element being used will produce the
best results.
For best
results
Choosing
cookware
Use quality cookware with heavier bottoms for
better heat distribution and even cooking results.
Choose cookware made of magnetic stainless
steel, enamel coated cast iron, enameled steel
and combinations of these materials.
Some cookware is specifically identified by the
manufacturer for use with induction cooktops.
Use a magnet to test if the cookware will work.
Flat-bottomed pans give best results. Pans with
rims or slight ridges can be used.
Round pans give best results. Pans with warped
or curved bottoms will not heat evenly.
For wok cooking, use a flat-bottomed wok. Do
not use a wok with a support ring.
Cookware “noise”
Slight sounds may be produced by different
types of cookware. Heavier pans such as
enameled cast iron produce less noise than a
lighter weight multi-ply stainless steel pan. The
size of the pan, and the amount of contents, can
also contribute to the sound level.
When using adjacent elements that are set at
certain power level settings, magnetic fields may
interact and produce a low whistle or intermitted
“hum”. These noises can be reduced or eliminated
by lowering or raising the power level settings of
one or both of the elements. Pans that completely
cover the element ring will produce less noise.
A low “humming” noise is normal particularly
on high settings.
Use a flat-bottomed wok.
Use a griddle.
Use flat-bottomed pans.
Page 13

13
Touch control
Using Your Cooktop
Induction Cooktop
Cooking
elements
Touch the pad lightly with the flat part of your
fingertip. Touch the center of the pad to ensure
the cooktop response.
A “beep”sound can be heard with each touch
to any pad.
Each of the cooking elements have separate
ON/OFF pads and LED display.
Be sure to use cookware that meets the
minimum pan size requirements.
To turn on a cooking element:
1 Place a pan with food onto the induction element.
The pan size should match the indicator ring.
2 Touch the ON/OFF pad. “5” will flash
in the display.
3 Touch the (+) or (-) pad to select power level and
to activate the induction element. A sound will
beep. The (+) or (-) pad must be pressed within
10 seconds to activate the element.
NOTE: You can also touch and hold the pad to scroll
quickly to the desired setting.
The induction circuit detects the pan and allows
the element to be activated. Both the element ON
indicator light and the cooktop HOT SURFACE light
will illuminate. If no power level is selected within
10 seconds, the zone will be deactivated.
To turn the control to OFF, touch the ON/OFF pad.
The induction element will be turned off and the
display will be blank.
With an element control ON:
If a pan is removed or moved to off-center from the
cooking ring, the control will flash “F” along with the
power setting. After 30 seconds, the element will be
deactivated and displays will turn off.
If the pan is placed back on the zone within
30 seconds, the flashing will stop and cooking
will resume.
Page 14

Using Your Cooktop
Induction Cooktop
14
Power level
settings
The cooktop offers 19 power levels, including a
Boost setting. Power levels range from “L” to 9
in precise half-step increments. For example: 1,
1-1/2, 2, 2-1/2 and up to power level 9.
Power Level “L”, the lowest setting, is
recommended for “Keep Warm.”
The power level increases one-half level with
each touch.
Power level 9 is the highest normal power setting.
The power level with a fraction indicates the
additional half-step setting.
Flashing “F”
in display
If a pan is removed or moved off-center from the
cooking ring during the cooking process, the
control will flash “F” along with the power setting.
The flashing “F” indicates that the pan is no
longer detected. After 30 seconds, the element
will be deactivated and the display will turn off.
If the pan is returned to the surface element
within 30 seconds, the flashing “F” will disappear
and cooking will resume.
Boost
setting
Boost is the highest power level, designed for large
quantity rapid cooking and boiling. Boost will
operate for a maximum of 10 minutes. After 10
minutes, it will automatically revert to power level 9.
Boost may be repeated after the initial 10 minute
cycle.
CAUTION: Do not leave a pot unattended while
in the Boost Mode.
To start the Boost power setting:
1 Place a pan matching the size of the induction
element over the selected indicator ring.
2 Touch the ON/OFF pad. “5” will flash
in the display.
3 Touch and hold the (+) pad until the display
reads “H.”
NOTE: If the pan is removed, the display will flash “F”
alternating to “H”. After 30 seconds, the elements will
turn off automatically.
Sounds you may hear:
You may hear a slight “buzz” sound when
cooking with the Boost or high mode. This is
normal. The sound depends on the type of pot
being used. Some pots will “buzz” louder
depending on the material. A “buzz” sound may
be heard if the pan contents are cold. As the pan
heats, the sound will decrease. If the power level
is reduced, the sound level will go down.
1/2
Page 15
15
Using Your Cooktop
Induction Cooktop
Power sharing
Four burner cooktops are divided into two
separate heating zones. The right and left side
cooking zones are powered by separate and
independent induction generators. One generator
controls 2 elements, or two cooking zones within
a heating section share the power of one
generator.
Five burner cooktops are divided into 3 zones.
The right and left side have separate cooking
zones and the large center element is another
separate cooking zone.
Power Sharing is activated when both elements
in the same cooking zone are activated and one
element is set for Boost (H). The element that is
not set for Boost will change to a lower power
level. This is called Power Sharing. When Boost
operation is complete (10 minutes), the other
element may be reset to any power level. Both
elements can operate simultaneously at normal
power level settings of “L” to 9.
4 burner cooktops with right and left side (2)
induction generators.
5 burner cooktops with right, left and center (3)
induction generators.
Using the
low setting
1 Place a pan with food onto the induction element.
The pan size should match the indicator ring.
2 Touch the ON/OFF pad. “5” will flash in the display.
3 Touch the (-) pad until the display reads “L.” A
sound will beep.
Do not use plastic wrap to cover food. Plastic may
melt onto the surface and be very difficult to remove.
Use only cookware recommended for this cooktop.
The Low setting will keep hot, cooked food at serving
temperature. Always start with hot food. Do not use
to heat cold food.
Placing uncooked or cold food on surface element
set for Low could result in food-borne illness.
For best results, all food set for Low should be
covered with a lid or aluminum foil. Pastries or breads
should be vented to allow moisture to escape.
Always use pot holders or oven mitts when removing
food from the element set for Low as cookware and
plates will be hot.
CAUTION: Do not warm food on the “L”
power level for more than two hours.
IMPORTANT NOTE FOR FOUR BURNER
MODELS:
The elements on the right side share one
generator. Both elements can operate at any
non-Boost (level L to 9) power level at the same
time. If the large front element is set for “H” or
Boost, the smaller element at the right rear will
be deactivated or turned off automatically. The
smaller right rear element can be activated and
set for any power level after the Boost operation
of the larger element is completed (10 minutes).
Page 16

16
Using Your Cooktop
Induction Cooktop
Using the
kitchen
timer
NOTE: Use the kitchen timer to measure cooking time
or as a reminder. The kitchen timer does not control
the cooking elements.
1 Touch the Timer ON/OFF pad.
2 Touch the (+) or (-) pad to choose the desired
number of minutes. When the (+) or (-) pad is held
for several seconds, the timer will increase or
decrease at a faster rate. The timer will
automatically start to count down the minutes
you have selected within 5 seconds of the last
entry. The display will show the minutes and
a “ . “ will flash.
3 The timer displays minutes remaining until it
reaches one minute. At one minute, the timer
will beep and start counting down seconds.
With one minute remaining, the timer will beep
every 10 seconds. When all time has counted
down, the timer will signal a long beep and the
display will become blank.
Touch the ON/OFF pad to turn the timer off at any
time. Touch (+) or (-) to add or subtract to the set
time.
Hot surface
indicator
light
A HOT SURFACE indicator light (one for each cooking
element) will glow immediately when any element is
activated. The indicator light(s) glow when the glass
surface is hot , and will remain on until the surface
has cooled to a temperature that is safe to touch.
Page 17

17
Error alerts
(Flashing
“E”/”c” and
“E” “o”)
Error alerts indicate a temporary problem that may
be corrected by the user.
Clear Keypad—If the display flashes “E” alternating
to “c”, the keypad is sensing continuous activation
of one or more keypads. Clean or clear any
obstructions on the keypad area. Obstructions may
be water, food spills, a utensil or other objects.
To resume cooking, touch the ON/OFF pad, then
select the power level.
Over Temperature—If the display flashes “E”
alternating to “o”, the cooktop sensor indicates
that the induction element or electronics have
overheated.
Overheating of the element is caused by placing
an empty pan on the element and selecting a high
power level. The element sensor detects very high
temperatures (above normal cooking temperatures),
turns off the power and displays the error. A second
potential cause of this error is a lack of cooling air
to the bottom of the cooktop, which can cause
overheating of the electronics. If this situation
occurs, make sure the air inlet below the cooktop
is unobstructed.
Touch the ON/OFF pad and allow the cooktop
to cool for 30 to 45 minutes before operation
can begin again.
If either of these conditions persist, call for service.
IMPORTANT: If the “E” flashes alone, without
alternating to a “c” or “o”, a hardware error has
occurred. Call for service.
Using Your Cooktop
Induction Cooktop
Control lock
IMPORTANT: As a convenience, you can lock the
entire cooktop at any time when it is not in use or
before cleaning. Locking the cooktop will prevent
surface elements from being turned on accidentally.
To lock the cooktop:
Touch and hold the CONTROL LOCK pad for 5
seconds.
A two-beep signal will sound, and the CONTROL
LOCK light will glow, indicating that the cooktop is
locked.
If the cooktop is locked while a surface element
is in use, it will automatically turn off.
The CONTROL LOCK does not affect the timer.
If Control Lock is set while the timer is counting
down, it will continue to operate.
To unlock the cooktop:
Touch and hold the CONTROL LOCK pad again
for 5 seconds. A two-beep signal will sound, and
the CONTROL LOCK light will go out, indicating
that the cooktop is unlocked.
Page 18
18
Using Your Cooktop
Induction Cooktop
Observe
the following
points in
canning
When canning with water-bath or pressure
canner, larger-diameter pots may be used. This is
because boiling water temperatures (even under
pressure) are not harmful to the cooktop surfaces
surrounding the surface elements.
HOWEVER, DO NOT USE LARGE-DIAMETER
CANNERS OR OTHER LARGE-DIAMETER POTS FOR
FRYING OR BOILING FOODS OTHER THAN WATER.
Most syrup or sauce mixtures—and all types of
frying—cook at temperatures much higher than
boiling water. Such temperatures could eventually
harm the glass cooktop surfaces.
1 Be sure the canner fits over the center of the
surface element. If your cooktop or its location
does not allow the canner to be centered on
the surface element , use smaller-diameter pots
for good canning results.
2 Flat-bottomed canners must be used. Do not
use canners with flanged or rippled bottoms
(often found in enamelware) because they
don’t make enough contact with the surface
elements and take a long time to boil water.
3 When canning, use recipes and procedures
from reputable sources. Reliable recipes
and procedures are available from the
manufacturer of your canner; manufacturers
of glass jars for canning, such as Ball and Kerr
brand; and the United States Department
of Agriculture Extension Service.
4 Remember that canning is a process that
generates large amounts of steam. To avoid
burns from steam or heat, be careful when
canning.
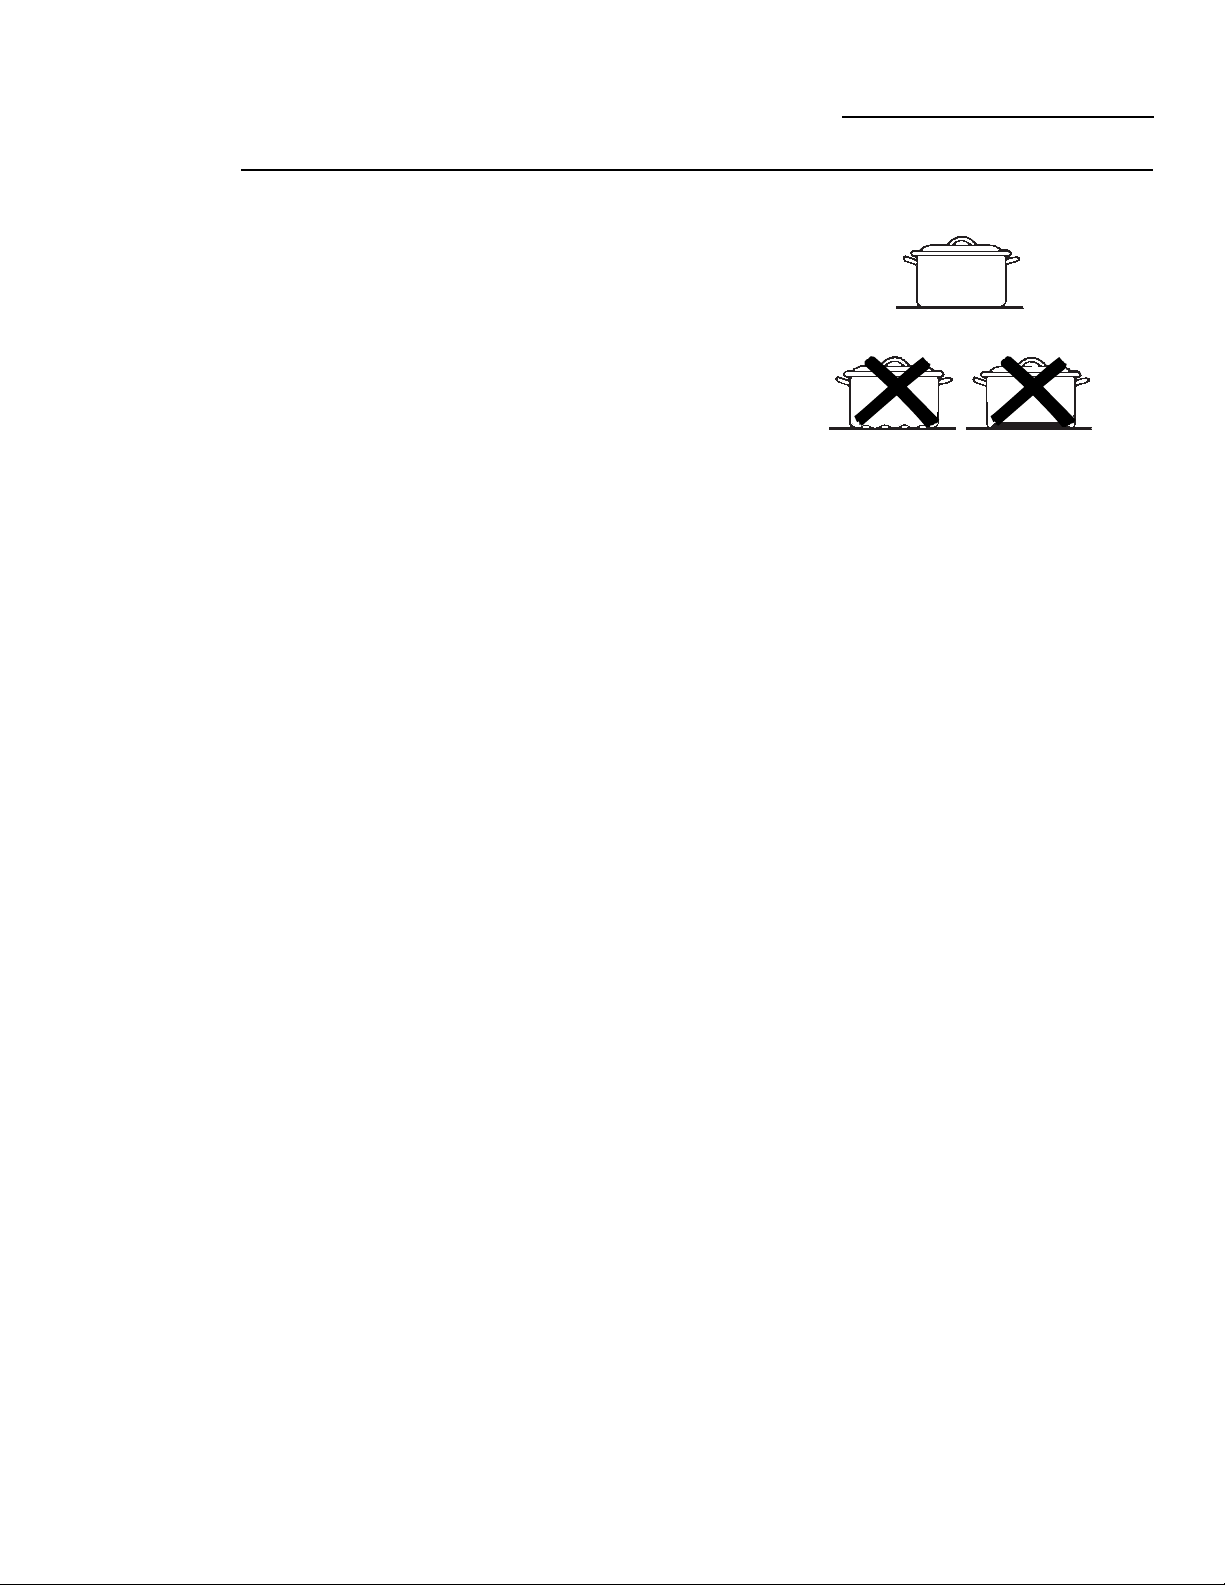
Note: Flat-bottomed canners are
required for glass cooktops.
Wrong!
Right!
NOTE: If your house has low voltage, canning
may take longer than expected, even though
directions have been carefully followed. The
process time will be shortened by:
(1) using a pressure canner, and
( 2) starting with HOT tap water for fastest
heating of large quantities of water.
CAUTION:
• Safe canning requires that harmful
microorganisms are destroyed and that the
jars are sealed completely. When canning
foods in a water-bath canner, a gentle but
steady boil must be maintained for the
required time. When canning foods in a
pressure canner, the pressure must be
maintained for the required time.
• After you have adjusted the controls, it is very
important to make sure the prescribed boil or
pressure levels are maintained for the required
time.
• Since you must make sure to process the
canning jars for the prescribed time, with no
interruption in processing time, do not can
on any cooktop surface element if your canner
is not flat.
Page 19

19
Care and Cleaning
Induction Cooktop
Control lock pad
As a convenience, you can lock the entire
cooktop at any time when it is not in use or
before cleaning.
Locking the cooktop will prevent surface
elements from being turned on accidentally.
Begin by locking the cooktop; see
Control Lock.
How to remove
protective
shipping film
and packaging
tape
Carefully grasp a corner of the protective shipping
film with your fingers and slowly peel it from the
appliance surface. Do not use any sharp items to
remove the film. Remove all of the film before using
the appliance for the first time. To assure no damage
is done to the finish of the product, the safest way to
remove the adhesive from packaging tape on new
appliances is an application of a household liquid
dishwashing detergent. Apply with a soft cloth and
allow to soak.
NOTE: The adhesive must be removed from all
parts. It cannot be removed if it is baked on.
Normal
daily
cleaning
Use CERAMA BRYTE®Ceramic Cooktop Cleaner on
the glass cooktop.
To maintain and protect the surface of your glass
cooktop, follow these steps:
1 Before using the cooktop for the first time, clean it
with CERAMA BRYTE®Ceramic Cooktop Cleaner.
This helps protect the top and makes cleanup
easier.
2 Daily use of CERAMA BRYTE®Ceramic Cooktop
Cleaner will help keep the cooktop looking new.
3 Shake the cleaning cream well. Apply a few drops
of CERAMA BRYTE®Ceramic Cooktop Cleaner
directly to the cooktop.
4 Use a paper towel or CERAMA BRYTE®Cleaning
Pad for Ceramic Cooktops to clean the entire
cooktop surface.
5 Use a dry cloth or paper towel to remove all
cleaning residue. No need to rinse.
NOTE: It is very important that you DO NOT heat
the cooktop until it has been cleaned thoroughly.
Clean your cooktop after each spill.
Use CERAMA BRYTE®Ceramic
Cooktop Cleaner.
Be sure electrical power is off and all surfaces are cool before cleaning any part of the cooktop.
Page 20

20
Care and Cleaning
Induction Cooktop
Burned-on
residue
WARNING: DAMAGE to your glass surface may
occur if you use scrub pads other than the pad
included with your cooktop.
1 Allow the cooktop to cool.
2 Spread a few drops of CERAMA BRYTE®Ceramic
Cooktop Cleaner on the entire burned residue
area.
3 Using the included CERAMA BRYTE®Cleaning
Pad for Ceramic Cooktops, rub the residue area,
applying pressure as needed.
4 If any residue remains, repeat the steps listed
above as needed.
5 For additional protection, after all residue has
been removed, polish the entire surface with
CERAMA BRYTE®Ceramic Cooktop Cleaner
and a paper towel.
Use a CERAMA BRYTE®Cleaning Pad for
Ceramic Cooktops or a Scotch-Brite
®
Multi-Purpose No Scratch blue scrub
pad.
Heavy
burned-on
residue
1 Allow the cooktop to cool.
2 Use a single-edge razor blade scraper at
approximately a 45° angle against the glass
surface and scrape the soil. It will be necessary
to apply pressure to the razor scraper in order
to remove the residue.
3 After scraping with the razor scraper, spread a
few drops of CERAMA BRYTE®Ceramic Cooktop
Cleaner on the entire burned residue area. Use
the CERAMA BRYTE®Cleaning Pad to remove
any remaining residue.
4 For additional protection, after all residue has
been removed, polish the entire surface with
CERAMA BRYTE®Ceramic Cooktop Cleaner and
a paper towel.
The CERAMA BRYTE®Ceramic Cooktop
Scraper and all recommended supplies
are available through our Parts Center.
See instructions under “To Order Parts”
section on next page.
NOTE: Do not use a dull or nicked
blade.
Page 21

21
Care and Cleaning
Induction Cooktop
Glass surface—
potential for
permanent
damage
Damage from sugary spills and melted plastic:
1 Turn off all surface elements. Remove hot pans.
2 Wearing an oven mitt:
a. Use a single-edge razor blade scraper
(CERAMA BRYTE®Ceramic Cooktop Scraper) to
move the spill to a cool area on the cooktop.
b. Remove the spill with paper towels.
3 Any remaining spillover should be left until the
surface of the cooktop has cooled.
4 Don’t use the surface elements again until all of
the residue has been completely removed.
NOTE: If pitting or indentation in the glass surface
has already occurred, the cooktop glass will have to
be replaced. In this case, service will be necessary.
Metal marks
and scratches
1 Be careful not to slide pots and pans across your
cooktop. It will leave metal markings on the
cooktop surface.
These marks are removable using the CERAMA
BRYTE®Ceramic Cooktop Cleaner with the
CERAMA BRYTE®Cleaning Pad for Ceramic
Cooktops.
2 If pots with a thin overlay of aluminum or copper
are allowed to boil dry, the overlay may leave
black discoloration on the cooktop.
This should be removed immediately before
heating again or the discoloration may be
permanent.
WARNING: Carefully check the bottom of pans
for roughness that would scratch the cooktop.
Our testing shows that
if you are cooking high
sugar mixtures such as
jelly or fudge and have
a spillover, it can cause
permanent damage to
the glass surface
unless the spillover is
immediately removed.
To order CERAMA BRYTE®Ceramic Cooktop
Cleaner and the cooktop scraper, please call
our toll-free number:
National Parts Center 800.626.2002
CERAMA BRYTE®Ceramic
Cooktop Cleaner . . . . . . . . . . . .# WX10X300
CERAMA BRYTE®Ceramic
Cooktop Scraper . . . . . . . . . . .# WX10X0302
Kit . . . . . . . . . . . . . . . . . . . . . . . . . . . .# WB64X5027
(Kit includes cream and cooktop scraper)
CERAMA BRYTE®Cleaning Pads for
Ceramic Cooktops . . . . . . . . .# WX10X350
To order parts
Page 22

22
Questions?
Before you
call for
service…
Before You Call For Service
Induction Cooktop
POSSIBLE CAUSES
• Improper cookware being used. Use pans that are recommended
for induction, have flat bottoms and match the size of the
surface element.
• Cooktop controls improperly set . Check to be sure the correct
control is set for the surface element you are using.
• Wrong pan type. Use a magnet to check that cookware is
induction compatible.
• Pan is too small. Flashing “F”—pan size is below the minimum
size for the element. See the Using the correct size cookware
section.
• Pan not positioned correctly. Center the pan in the cooking ring.
• Incorrect cleaning methods being used. Use recommended
cleaning procedures. See the Care and Cleaning section.
• Cookware with rough bottoms being used, coarse particles
(salt or sand) were between the cookware and the surface of
the cooktop or cookware has been slid across the cooktop surface.
To avoid scratches, use the recommended cleaning procedures.
Make sure bottoms of cookware are clean before use, and use
cookware with smooth bottoms.
• Food spillovers not cleaned before next use. See the Care and
Cleaning section.
• Hot surface on a model with a light-colored glass cooktop.
This is normal. The surface may appear discolored when it is hot.
This is temporary and will disappear as the glass cools.
• Hot cooktop came into contact with plastic placed on the hot
cooktop. See the Care and Cleaning section.
• Hot sugar mixture spilled on the cooktop. Call a qualified
technician for replacement.
• Keypad is dirty. Clean the keypad.
• A fuse in your home may be blown or the circuit breaker tripped.
Replace the fuse or reset the circuit breaker.
• Improper cookware being used. Use a flat induction capable pan
that meets the minimum size for the element being used. See
the Using the correct size cookware section.
• Pan is improperly placed. Make sure the pan is centered on the
corresponding surface element.
• Cooktop control improperly set . Check to see that the control is
set properly.
PROBLEM
SURFACE ELEMENTS WILL
NOT MAINTAIN A ROLLING
BOIL OR COOKING IS SLOW
SURFACE ELEMENTS DO
NOT WORK PROPERLY
FLASHING “F”
SCRATCHES ON COOKTOP
GLASS SURFACE
AREAS OF DISCOLORATION
ON THE COOKTOP
PLASTIC MELTED TO
THE SURFACE
PITTING (OR INDENTATION)
OF THE COOKTOP
UNRESPONSIVE KEYPAD
PAN DETECTION/SIZING
NOT WORKING PROPERLY
Page 23

23
Questions?
Before you
call for
service…
Before You Call For Service
Induction Cooktop
POSSIBLE CAUSES
• A hardware error has occurred. Call for service.
• Keypad Error, indicating keypad cleaning is needed. Clean the
keypad area. Wipe up spills or remove utensils from the keypad
area.
• Over Temperature, indicating over temperature of a surface
element or electronics. Remove an empty pan from the surface
element. Allow the cooktop to cool down approximately 30
minutes. Check to be sure ventilation to the cooling system
below the cooktop is not blocked.
PROBLEM
DISPLAY FLASHING “E”
ALONE (NO OTHER LETTER)
DISPLAY FLASHING “E”
ALTERNATING TO “c”
DISPLAY FLASHING “E”
ALTERNATING TO “o”
Page 24

24
Notes
Induction Cooktop
Page 25

25
General Electric Company
Warranty Registration Department
P.O. Box 32150
Louisville, KY 40232-2150
Place
1st Class
Letter
Stamp
Here
GE Appliances
Consumer Product
Ownership Registration
Important Mail Today
Page 26

26
Consumer Product Ownership Registration
Dear Customer:
Thank you for purchasing our product and thank you for placing your confidence in us. We are proud to
have you as a customer!
Follow these three steps to protect your new appliance investment:
1
Complete and mail
your Consumer
Product Ownership Registration
today.
Have the peace of mind
of knowing we can
contact you in the
unlikely event of a
safety modification.
2
After completing this
registration, write your model
and serial numbers in this
manual. You will need this
information should you require
service. The service number in
the USA: 800.444.1845. In
Canada: 1.888.880.3030.
3
Read your Owner’s Manual
carefully. It will help you
operate your
new appliance properly.
Important: To ensure that your product is registered, mail the separate product registration card.
If the separate product registration card is missing, fold and mail the form below. No envelope is needed.
Consumer Product Ownership Registration
Product Model Serial
Cooktop
Important
Mail
Today!
First
Name
Apt. #
Street
Address
City
Last
Name
Zip
CodeState
Date Placed In
Use
Month Day Year
Phone
Number
TAPE CLOSED
FOLD HERE
Mr. Ms. Mrs. Miss
General Electric Company
Louisville, KY 40225
Monogram®
✄ ✄
✄
ge.com
Page 27

27
Please place in envelope and mail to:
Veuillez mettre dans une enveloppe et envoyez à :
OWNERSHIP REGISTRATION
P.O. BOX 1780
MISSISSAUGA, ONTARIO
L4Y 4G1
(FOR CANADIAN CONSUMERS ONLY)
Page 28

28
Page 29

29
With the purchase of your new Monogram appliance, receive
the assurance that if you ever need information or assistance
from GE, we’ll be there. All you have to do is call—toll- free!
GE Answer Center
®
In the USA:
800.626.2000
Whatever your question about any Monogram major appliance, GE Answer Center®information service
is available to help. Your call—and your question—will be answered promptly and courteously. And you
can call any time. GE Answer Center®service is open 24 hours a day, Monday through Saturday.
OR
Visit our Website at: monogram.com
In Canada, call 800.561.3344.
In-Home
Repair Service
In the USA:
800.444.1845
In Canada:
800.561.3344
A GE consumer service professional will provide expert repair service, scheduled at a time that’s
convenient for you. Many GE Consumer Service company-operated locations offer you service
today or tomorrow, or at your convenience (7:00 a.m. to 10:00 p.m. weekdays, 8:00 a.m. to 6:00
p.m. Saturday and Sunday). Our factory-trained technicians know your appliance inside and out—
so most repairs can be handled in just one visit.
In Canada: Monday to Friday, 7:00 a.m. to 8:00 p.m. and Saturday, 8:00 a.m. to 5:00 p.m. EDST.
Service Contracts
In the USA:
800.626.2224
In Canada:
800.561.3344
You can have the secure feeling that GE Consumer Service will still be there after your
warranty expires. Purchase a GE contract while your warranty is still in effect and you’ll
receive a substantial discount . With a multiple-year contract, you’re assured of future
service at today’s prices.
Parts and
Accessories
In the USA:
800.626.2002
In Canada:
800.561.3344
Individuals qualified to service their own appliances can have parts or accessories sent directly
to their home. The GE parts system provides access to over 47,000 parts…and all GE Genuine
Renewal Parts are fully warranted. VISA, MasterCard and Discover cards are accepted.
User maintenance instructions contained in this manual cover procedures intended to be
performed by any user. Other servicing generally should be referred to qualified service
personnel. Caution must be exercised, since improper servicing may cause unsafe operation.
For Customers With
Special Needs…
In the USA:
800.626.2000
GE offers, free of charge, a brochure to assist in planning a barrier-free
kitchen for persons with limited mobility.
Consumers with impaired hearing or speech who have access to a
TDD or a conventional teletypewriter may call 800.TDD.GEAC
(800.833.4322) to request information or service.
Consumer Services
Induction Cooktop
Page 30

Some states/provinces do not allow the exclusion or limitation of incidental or consequential damages,
so the above limitation or exclusion may not apply to you. This warranty gives you specific legal rights,
and you may also have other rights which vary from state to state/province to province. To know what
your legal rights are in your state/province, consult your local or state/provincial consumer affairs
office or your state’s Attorney General.
Warrantor in USA: General Electric Company, Louisville, KY 40225
Warrantor in Canada: Mabe Canada Inc.
Warranty
Induction Cooktop
YOUR MONOGRAM COOKTOP WARRANTY
Staple sales slip or cancelled check here. Proof of original
purchase date is needed to obtain service under warranty.
WHAT IS
COVERED
From the Date
of the Original
Purchase
LIMITED ONE-YEAR WARRANTY
For one year from date of original purchase, we will provide, free of charge, parts and
service labor in your home to repair or replace any part of the cooktop that fails because
of a manufacturing defect.
This warranty is extended to the original purchaser and any succeeding owner for products purchased
for ordinary home use in the 48 mainland states, Hawaii, Washington, D.C. or Canada. If the product is
located in an area where service by a GE Authorized Servicer is not available, you may be responsible for
a trip charge or you may be required to bring the product to an Authorized GE Service location for service. In
Alaska the warranty is the same except that it is LIMITED because you must pay to ship the product to the
service shop or for the service technician’s travel costs to your home.
All warranty service will be provided by our Factory Service Centers or by our authorized Customer
Care
®
servicers during normal working hours.
Should your appliance need service, during warranty period or beyond, in the USA call 800.444.1845.
In Canada: 800.561.3344. Please have your serial number and model number available when calling
for service.
WHAT IS NOT
COVERED
EXCLUSION OF IMPLIED WARRANTIES—Your sole and exclusive remedy is product
repair as provided in this Limited Warranty. Any implied warranties, including the
implied warranties of merchantability or fitness for a particular purpose, are limited
to one year or the shortest period allowed by law.
• Service trips to your home to teach you how
to use the product.
• Improper installation, delivery or
maintenance.
• If you have an installation problem, contact
your dealer or installer. You are responsible
for providing adequate electrical, gas,
exhausting and other connecting facilities
as described in the Installation Instructions
provided with the product.
• Replacement of house fuses or resetting of
circuit breakers.
• Damage to the product due to misuse or abuse.
• Failure of the product if it is used for
other than its intended purpose or used
commercially.
• Damage to product caused by accident, fire,
floods or acts of God.
• Incidental or consequential damage caused
by possible defects with this appliance.
• Damage caused after delivery.
• Product not accessible to provide required
service.
GE Consumer & Industrial
Appliances
General Electric Company
Louisville, KY 40225
monogram.com
30
Page 31

31
Information de consommateur
Table de cuisson à induction
Introduction
Votre nouvelle table de cuisson Monogram constitue une démonstration éloquente de style, de
commodité et de souplesse pour la planification de la cuisine. Que vous la choisissiez pour la pureté
de son design, pour l’attention soignée de ses détails—ou pour ces deux raisons à la fois—vous vous
apercevrez que la fusion supérieure de forme et de fonction de votre table de cuisson Monogram
vous ravira pour les années à venir.
Votre table de cuisson Monogram a été conçue avec la flexibilité nécessaire pour se fondre dans le
mobilier existant. Son design aux lignes pures s’intégrera parfaitement dans votre cuisine.
Les informations des pages suivantes vous aideront à utiliser et à entretenir correctement votre table
de cuisson.
Pour tout renseignement complémentaire, consultez notre site web sur : monogram.com
Table des
matières
Nettoyage et entretien
Ruban d’emballage . . . . . . . . . . . . . . . . . . . . . . . . . 48
Verrouillage des commandes . . . . . . . . . . . . . . . 48
Vitre de la table de cuisson . . . . . . . . . . . . . . 48-50
Service au consommateur
Avant de contacter le
service après-vente . . . . . . . . . . . . . . . . . . . . .51, 52
Consignes de sécurité . . . . . . . . . . . . . . . . . . . .33-36
Garantie . . . . . . . . . . . . . . . . . . . . . . . . . . . . . . . . . . . 54
Modèle et numéro de série . . . . . . . . . . . . . . . . . . 31
Numéros de téléphone importants . . . . . . . . . . 53
Mode d’emploi
Caractéristiques de votre
table de cuisson . . . . . . . . . . . . . . . . . . . . . . . . .37, 38
Configuration des commandes . . . . . . . . . . .42-44
Éléments de surface . . . . . . . . . . . . . . . . . . . . . . . . 42
Fonctionnement de la cuisson à induction . . . . .39
Minuteur de cuisine . . . . . . . . . . . . . . . . . . . . . . . . .45
Niveau basse température . . . . . . . . . . . . . . . . . .44
Recommandations sur
la batterie de cuisine . . . . . . . . . . . . . . . . .39-41, 47
Verrouillage de la table de cuisson . . . . . . . . . . .46
Avant
d’utiliser
votre table
de cuisson
Lisez attentivement ce manuel. Il a été conçu
pour vous aider à utiliser et à entretenir
correctement votre nouvelle table de cuisson.
Conservez-le à portée de main pour répondre
à vos questions.
Si vous ne comprenez pas quelque chose ou que
vous avez besoin d’aide, vous trouverez la liste
des numéros d’appel gratuit du service aprèsvente au verso de la couverture de ce manuel.
OU
Visitez notre site web sur : monogram.com
Notez les
numéros de
modèle et
de série
Vous les trouverez sur l’étiquette située sous la
table de cuisson.
Remplissez et renvoyez la carte d’enregistrement
du produit, livrée avec cet appareil.
Avant d’envoyer la carte, veuillez noter les
numéros ici :
Numéro de modèle
Numéro de série
Utilisez ces numéros dans toute correspondance
ou pour tout appel au service après-vente,
concernant votre table de cuisson.
Page 32

32
Si vous
recevez une
table de
cuisson
endommagée
Contactez immédiatement le revendeur (ou le
constructeur) qui vous a vendu la table de
cuisson.
Économisez
du temps
et de
l’argent
Lisez ce manuel. Vous y trouverez de nombreuses
astuces utiles concernant l’utilisation et la
maintenance correcte de votre table de cuisson.
De simples soins préventifs de votre part peuvent
vous faire économiser du temps et de l’argent,
tout au long de la vie de votre table de cuisson.
Vous trouverez de nombreuses réponses aux
problèmes courants dans la section Avant de
contacter le service. Si vous consultez au
préalable notre tableau d’astuces de dépannage, il
est possible que vous n’ayez pas besoin du tout
d’appeler notre service après-vente.
Si vous avez
besoin
d’une
intervention
Pour utiliser le service, consultez la page du
service au verso de la couverture de ce manuel.
Nous sommes fiers de notre service et nous
voulons que vous en soyez satisfait. Si, pour une
quelconque raison, vous êtes mécontent du
service fourni, voici la procédure à suivre pour
obtenir une aide supplémentaire.
PREMIÈREMENT, contactez la personne qui a
réparé votre appareil. Expliquez-lui les raisons de
votre mécontentement. Dans la plupart des cas,
cela résoudra le problème.
ENSUITE, si vous êtes toujours mécontent,
écrivez tous les détails—y compris votre numéro
de téléphone—à :
Manager, Customer Relations
GE Appliances
Appliance Park
Louisville, KY 40225
Information de consommateur
Table de cuisson à induction
Page 33

CONSIGNES DE SÉCURITÉ IMPORTANTES
ATTENTION !
Pour votre sécurité, il est nécessaire de respecter scrupuleusement les informations de ce manuel pour réduire les
risques d’incendie ou d’explosion, de choc électrique, ou pour éviter des dommages matériels, des blessures ou la mort .
Cet appareil a été testé et il est conforme aux limites
d’un dispositif numérique de classe B, conformément à
la partie 18 des règles FCC. Ces limites sont conçues
pour fournir une protection raisonnable contre les
interférences nocives dans une installation domestique.
Cet appareil génère, utilise et peut émettre de l’énergie
sous la forme de fréquence radio et, s’il n’est pas
installé et utilisé en conformité avec les instructions, il
peut provoquer des interférences nocives sur les
communications radio. Cependant, il n’existe aucune
garantie que des interférences se produiront dans une
installation particulière. Si cet appareil provoque des
interférences nocives sur la réception radio ou
télévision, ce qui peut être détecté en mettant l’appareil
sous et hors tension, l’utilisateur est encouragé à
essayer de corriger ces interférences en appliquant
l’une ou plusieurs des mesures suivantes :
•
Réorientez ou déplacez l’antenne réceptrice.
•
Augmentez la distance entre l’appareil et le récepteur.
•
Branchez l’appareil dans une prise ou un circuit
différent de celui sur lequel est branché le récepteur.
AVIS DE SÉCURITÉ IMPORTANT
•
La loi californienne Safe Drinking Water and Toxic
Enforcement oblige le gouverneur de Californie à
publier la liste des substances connues en l’état pour
provoquer le cancer, des malformations congénitales
ou d’autres préjudices liés à la reproduction, et
contraint les professionnels à prévenir les clients sur
les risques d’une exposition potentielle à de telles
substances.
•
Utilisez un récipient de la taille appropriée. Cet
appareil est équipé d’une ou plusieurs ZONES DE
CUISSON de différentes tailles. Sélectionnez des
récipients possédant des fonds plats suffisamment
grands pour recouvrir les zones de cuisson. Les
capteurs de détection de récipient ne permettront
pas le fonctionnement de la zone de cuisson à la
puissance 2, sans la présence d’un récipient.
•
Les manches des récipients doivent être orientés
vers l’intérieur et ne doivent pas surplomber les
zones de cuisson adjacentes, afin de réduire les
risques de brûlures, d’allumage des matériaux
inflammables et de renversement, provoqués par
un contact accidentel avec l’ustensile.
•
Ne laissez jamais de plat préparé sur les zones de
cuisson sans surveillance. Les débordements par
bouillonnement provoquent de la fumée et des
projections graisseuses qui peuvent s’enflammer,
ou un récipient dont le contenu s’est évaporé après
bouillonnement peut être endommagé ou fondre.
•
Emballages protecteurs : n’utilisez pas de feuille
d’aluminium pour envelopper une quelconque
partie de la table de cuisson. Utilisez une feuille
d’aluminium uniquement comme c’est recommandé
après le processus de cuisson, dans le cas d’une
utilisation comme un couvercle à placer au-dessus
du plat. Toute autre utilisation d’une feuille
d’aluminium peut provoquer un risque de choc
électrique, d’incendie ou de court-circuit.
•
Évitez de placer des objets sur ou à proximité du
clavier à touches afin d’empêcher une activation
accidentelle des commandes de la table de
cuisson.
•
Sachez la correspondance entre les touches de
commande et les zones de cuisson activées.
•
Nettoyez régulièrement l’appareil pour supprimer
toute trace de graisse qui pourrait s’enflammer. Les
hottes de ventilation et d’extraction et les filtres à
graisse doivent être maintenus propres. Ne laissez pas
la graisse s’accumuler dans la hotte ou sur le filtre. Les
dépôts graisseux du ventilateur peuvent s’enflammer.
Dans le cas où le plat s’enflammerait pendant la
cuisson, actionnez le ventilateur. Consultez le mode
d’emploi du fabricant de la hotte pour son nettoyage.
Emplacement de la plaque de série
Le modèle et le numéro de série sont gravés sur la
plaque de série. La plaque de série est située sous la
table de cuisson. Consultez l’illustration ci-dessous pour
connaître l’emplacement exact. Pensez à enregistrer le
numéro de série AVANT L’INSTALLATION de la table de
cuisson (consultez la section Enregistrement du produit,
page 27). La plaque de série est située sous le boîtier
des brûleurs de la table de cuisson.
Emplacement de la plaque de série
DANGER :
Les personnes avec un stimulateur cardiaque ou
un dispositif médical similaire doivent redoubler de
prudence lors de l’utilisation d’une unité à induction ou
à proximité de l’appareil en fonctionnement. Le champ
électromagnétique peut affecter la bonne marche du
stimulateur cardiaque ou du dispositif médical similaire.
Il est conseillé de consulter votre médecin ou le
fabricant du stimulateur sur votre situation particulière.
33
Page 34

34
CONSIGNES DE SÉCURITÉ IMPORTANTES
ATTENTION !
Pour votre sécurité, il est nécessaire de respecter scrupuleusement les informations de ce manuel
pour réduire les risques d’incendie ou d’explosion, de choc électrique, ou pour éviter des dommages
matériels, des blessures ou la mort.
Lors de l’utilisation d’appareils électriques, il est nécessaire de respecter des consignes de sécurité basiques, et d’appliquer les
mesures suivantes :
• Utilisez cet appareil uniquement pour son
usage prévu, tel qu’il est décrit dans ce
manuel.
• N’essayez pas de réparer ou de remplacer
une quelconque partie de la table de cuisson,
sauf indication contraire dans ce manuel.
Toute autre réparation doit être effectuée par
un technicien qualifié.
• Avant toute réparation, débranchez
l’alimentation de la table de cuisson du
tableau de distribution électrique en enlevant
le fusible ou en actionnant le disjoncteur.
• Assurez-vous que l’appareil est correctement
installé et raccordé à la terre par un
technicien qualifié, conformément aux
instructions d’installation fournies.
• L’installateur doit montrer à l’utilisateur
l’emplacement du coupe-circuit ou du fusible.
Notez-le pour s’y référer facilement.
• Ne laissez pas des enfants seuls – les enfants
ne doivent pas rester seuls ou sans
surveillance dans un endroit où un appareil
est en fonctionnement. Il leur est formellement
interdit de s’asseoir ou de se tenir sur une
quelconque partie de l’appareil.
• Apprenez aux enfants à ne pas jouer avec les
commandes ou avec toute partie de la table
de cuisson.
• Interdisez à toute personne de grimper,
de se tenir sur ou de s’accrocher à la table
de cuisson.
• DANGER : les articles d’intérêt pour
les enfants ne doivent pas être stockés dans
les placards au-dessus de la table de
cuisson—les enfants qui grimperaient sur
l’appareil pour atteindre ces articles pourraient
sérieusement se blesser.
• Tenez toujours éloignés les revêtements
murals, les rideaux ou les draperies
combustibles à une distance suffisante
de la table de cuisson.
• Tenez toujours éloignés les torchons, les
lavettes, les poignées et le linge de maison
à une distance suffisante de la table de
cuisson.
• Tenez toujours éloignés les ustensiles en bois
et en plastique, ainsi que les aliments en
conserve, à une distance suffisante de la
table de cuisson. Ils peuvent chauffer et
provoquer des brûlures.
• Ne portez jamais de vêtements amples ou
lâches pendant l’utilisation de l’appareil. Les
matériaux inflammables peuvent s’enflammer
au contact des éléments de surface chauds et
provoquer de sérieuses brûlures.
• Utilisez uniquement des poignées sèches—
des poignées humides ou mouillées sur des
surfaces chaudes peuvent provoquer des
brûlures à cause de la vapeur dégagée. Ne
laissez pas les poignées toucher les éléments
de surface chauds. N’utilisez pas de serviette ou
une autre étoffe encombrante. De telles étoffes
peuvent s’enflammer au contact d’un élément
de surface chaud.
• N’utilisez pas d’eau sur des feux graisseux.
Ne saisissez jamais un récipient en flammes.
Éteignez l’appareil avec les commandes.
Étouffez le récipient en flammes sur un élément
de surface en la recouvrant complètement
avec un couvercle bien ajusté, une plaque de
four ou un plateau plat. Utilisez un extincteur
chimique sec multiusage ou de type mousse.
De la graisse en flammes en dehors d’un
récipient peut être neutralisée en la recouvrant
avec du bicarbonate de soude ou, si disponible,
en utilisant un extincteur chimique sec
multiusage ou de type mousse.
• Lors de la préparation de plats à flamber
sous la hotte, actionnez le ventilateur.
• Cuisinez bien la viande et la volaille—la
viande au moins à une température INTERNE
de 71°C et la volaille au moins à une
température interne de 82°C. La cuisson à
ces températures protège généralement
contre les intoxications alimentaires.
MESURES DE SÉCURITÉ
Page 35

35
• Ne touchez pas les éléments de la surface
vitrée en céramique pendant la cuisson.
Cette surface peut être suffisamment chaude
pour brûler, même si sa couleur paraît
sombre. Pendant et après utilisation, ne
touchez pas et ne laissez pas des étoffes ou
d’autres matériaux inflammables au contact
de la surface de cuisson. Notez que
l’indicateur de chaleur est allumé et laissez
d’abord refroidir suffisamment de temps.
Les surfaces chaudes peuvent inclure la table
de cuisson elle-même et les zones qui font
face à la table de cuisson.
• Pour minimiser les risques de brûlures,
d’allumage des matériaux inflammables et
de renversement, le manche d’un récipient
doit être tourné vers le centre de la table de
cuisson, sans surplomber les éléments de
surface chauds adjacents.
• Éteignez toujours la commande de
l’élément de surface avant d’enlever
l’ustensile.
• Ne laissez jamais des éléments de surface
sans surveillance réglés sur des hautes
températures. Des débordements par
bouillonnement peuvent provoquer de la
fumée et l’allumage des projections
graisseuses.
• Gardez un oeil sur les aliments en cours de
friture à des hautes températures ou à des
températures moyennes-hautes.
• Les aliments à frire doivent être aussi secs
que possible. Le givre sur les aliments
congelés et l’humidité sur les aliments frais
peuvent provoquer le bouillonnement de la
matière grasse chaude et son débordement
hors du récipient.
• Utilisez peu de matière grasse pour une
friture superficielle ou dans une friteuse. Le
remplissage exagéré de matière grasse dans
un récipient peut provoquer des projections
graisseuses lors de l’ajout d’aliments.
• Si une combinaison d’huile ou de matière
grasse doit être utilisée pour une friture,
remuez-la avant de la chauffer car les
graisses se mélangent lentement.
• Chauffez toujours lentement la matière
grasse et surveillez-la pendant la cuisson.
• Utilisez un thermomètre de friture aussi
souvent que possible pour empêcher la
surchauffe de la matière grasse au-delà
du point de fumée.
• Ne tentez jamais de déplacer un récipient
remplie de matière grasse chaude,
notamment une friteuse. Patientez jusqu’à
ce qu’elle refroidisse.
• Ne stockez pas de matériaux inflammables
à proximité de la table de cuisson.
• Maintenez propres la hotte et les filtres
à graisse pour conserver une bonne
ventilation et pour éviter les feux de
graisse.
• Ne stockez pas ou n’utilisez pas de
matériaux combustibles, d’essence ou
d’autres vapeurs et liquides inflammables
à proximité de cet appareil ou d’un autre.
• Nettoyez uniquement les pièces listées
dans le manuel d’utilisation.
• Ne laissez pas des produits en papier, des
ustensiles de cuisine ou des aliments sur
la table de cuisson quand elle n’est pas
en fonctionnement.
• Maintenez propre la table de cuisson et
évitez l’accumulation des graisses ou des
projections graisseuses qui pourraient
s’enflammer.
• Ne chauffez jamais de récipients
alimentaires non ouverts. La montée en
pression peut faire exploser le récipient et
provoquer des blessures.
• Ne laissez jamais de pots ou de plats
de graisse à égoutter sur ou à proximité
de la table de cuisson.
• N’utilisez jamais l’appareil pour se
réchauffer ou chauffer la pièce.
MESURES DE SÉCURITÉ
Page 36

36
CONSIGNES DE SÉCURITÉ IMPORTANTES
• Évitez de rayer la vitre de la table de
cuisson. La table de cuisson peut se rayer
avec des objets comme des instruments
tranchants, des bagues ou d’autres bijoux.
• N’utilisez jamais la surface vitrée de
la table de cuisson comme planche à
découper.
• Ne posez pas ou ne stockez pas d’articles
sur la surface vitrée de la table de cuisson
lorsqu’elle n’est pas utilisée.
• Faites attention à la pose de cuillères ou
d’autres ustensiles à remuer sur la surface
vitrée de la table de cuisson, lorsqu’elle est
en fonctionnement. Ils peuvent devenir
chauds et provoquer des brûlures.
• Évitez de chauffer un récipient vide. Dans le
cas contraire, cela pourrait endommager la
table de cuisson et le récipient.
• Ne laissez pas de l’eau, d’autres liquides ou
de la graisse sur la table de cuisson.
• N’utilisez pas les éléments de surface si la
vitre est cassée. Des projections graisseuses
ou des produits de nettoyage peuvent
pénétrer dans la fissure et créer un risque de
choc électrique. Contactez immédiatement
un technicien qualifié dès que la vitre de la
table de cuisson est fendue.
• La cuisson ou des projections d’aliments
peut provoquer l’activation ou la
désactivation des touches du clavier.
Nettoyez soigneusement le clavier à touches
et les commandes retrouveront un
fonctionnement normal.
• Nettoyez la table de cuisson avec
précaution. Verrouillez toujours le panneau
de commandes à l’aide de la fonctionnalité
de verrouillage des commandes et attendre
que la surface vitrée entière ait refroidi, avant
de nettoyer la table de cuisson. Consultez la
section Verrouillage de la table de cuisson
pour en savoir plus. Si vous utilisez une
éponge ou un chiffon mouillé pour essuyer
les projections sur un élément de surface
chaud, faites attention aux brûlures causées
par la vapeur. Certains nettoyants peuvent
produire des fumées toxiques dans le cas
d’une application sur une surface chaude.
REMARQUE : nous vous recommandons
d’éviter d’essuyer les éléments de surface
tant qu’ils ne sont pas froids et que
l’indicateur de chaleur ne s’est pas éteint.
Les projections sucrées constituent une
exception à la règle. Consultez la section
Nettoyage de la vitre de la table de cuisson.
• Pour éviter d’endommager éventuellement
la surface de cuisson, n’appliquez pas de
crème de nettoyage sur la surface vitrée
lorsqu’elle est chaude.
• Après le nettoyage, utilisez un chiffon sec
ou une serviette en papier pour supprimer
tout résidu de crème de nettoyage.
• Lisez et respectez toutes les instructions
et avertissements sur les étiquettes des
crèmes de nettoyage.
• De grandes rayures ou de gros impacts
sur la table de cuisson peuvent conduire
à briser ou fracasser la vitre.
• Faites attention lors du contact avec la
table de cuisson. La surface vitrée de la table
de cuisson conservera la chaleur après
l’extinction des commandes.
• Ne vous tenez pas sur la vitre de la table
de cuisson.
CONSERVEZ CES INSTRUCTIONS
ÉLÉMENTS DE SURFACE À INDUCTION
Page 37

Caractéristiques de votre table de cuisson
Table de cuisson à induction
37
Index des caractéristiques Page
1 Éléments de cuisson 38
2 Verrouillage des commandes 42
3 Minuteur 41
4 Témoin lumineux ON (pour chaque élément) 38
5 Zone des témoins lumineux de surface chaude 38
6 Commande ON/OFF d’un élément de cuisson 38
ZHU36 – Table de cuisson de 36”
1
5
2
4
3
6
Caractéristiques
(Dans ce manuel, les
caractéristiques et
l’apparence peuvent varier
selon votre modèle.)
Page 38

38
Caractéristiques de votre table de cuisson
Table de cuisson à induction
Caractéristiques
(Dans ce manuel, les
caractéristiques et
l’apparence peuvent
varier selon votre
modèle.)
REMARQUE : les modèles de 30” possèdent des
indicateurs d’emplacement des éléments de
cuisson à côté de chaque commande.
1
2
3
5
Index des caractéristiques Page
1 Éléments de cuisson 38
2 Verrouillage des commandes 42
3 Minuteur 41
4 Témoin lumineux ON (pour chaque élément) 38
5 Zone des témoins lumineux de surface chaude 38
6 Commande ON/OFF d’un élément de cuisson 38
ZHU30 – Table de cuisson de 30”
6
4
Page 39

39
Chaque élément de cuisson nécessite un récipient
d’une taille MINIMALE. Si le récipient est
correctement centré, et fabriqué avec un métal
correct, mais trop petit pour l’élément de cuisson,
l’élément ne peut pas être activé. Un « F » clignotant
s’affichera ainsi que le niveau de puissance
sélectionné.
Un récipient plus grand que le cercle de l’élément
peut être utilisé ; cependant, la chaleur se diffusera
uniquement au-dessus de l’élément.
Pour de meilleurs résultats, le récipient doit être en
contact TOTAL avec la surface vitrée.
Ne laissez pas le fond du récipient toucher la
bordure métallique de la table de cuisson ou
chevaucher les commandes de la table de cuisson.
Pour de meilleures performances, faites
correspondre la taille du récipient avec la taille
de l’élément. L’utilisation d’un petit récipient sur
un grand brûleur générera moins de puissance
à n’importe quel niveau.
Utilisation de votre table de cuisson
Table de cuisson à induction
Fonctionnement de la cuisson à induction
Les éléments situés sous la surface de cuisson
produisent un champ magnétique qui fait vibrer
les électrons dans le récipient en métal ferreux,
produisant de la chaleur.
La surface de cuisson elle-même ne chauffe pas. La
chaleur est produite dans le récipient de cuisson et ne
peut être générée tant que le récipient n’est pas placé
sur la surface de cuisson.
Lorsque l’élément est activé, le récipient commence à
chauffer immédiatement et son contenu se réchauffe.
La cuisson par induction magnétique nécessite
d’utiliser une batterie de cuisine fabriquée à partir de
métaux ferreux—des métaux sur lesquels un aimant
se colle, comme le fer ou l’acier.
Utilisez des récipients dont la taille correspond à celle
de l’élément. Le récipient doit être suffisamment grand
pour que le capteur de sécurité active l’élément.
La table de cuisson ne démarrera pas si un ustensile
en fer ou en acier très petit (inférieur à la taille
minimale en largeur) est placé sur la surface de
cuisson lorsque l’appareil est en fonctionnement—
comme une spatule en acier, des cuillères, des
couteaux et d’autres petits instruments.
Utilisation
d’une
batterie
de cuisine
à la taille
correcte
Diamètre
minimal du
récipient 14,6 cm
(5-3/4”)
Diamètre
minimal du
récipient 14,6 cm
(5-3/4”)
Diamètre
minimal du
récipient 14,6 cm
(5-3/4”)
Diamètre
minimal du
récipient 14,6 cm
(5-3/4”)
Diamètre
minimal de
récipient 12 cm
(4-3/4”)
Diamètre minimal du
récipient 16,5 cm
17,7 cm (7”)
Diamètre
minimal de
récipient 12 cm
(4-3/4”)
Diamètre minimal
du récipient
17,7 cm (7”)
Diamètre minimal
du récipient
17,7 cm (7”)
Table de cuisson d’une largeur de 91,4 cm (36”). Utilisez un
récipient de la taille minimale indiquée pour chaque élément
de cuisson.
Table de cuisson d’une largeur de 76,2 cm (30”). Utilisez un
récipient de la taille minimale indiquée pour chaque élément
de cuisson.
Utilisez un récipient de la taille minimale
pour chaque élément. Le matériau du
récipient est correct si un aimant se colle
sur son fond.
Taille
minimale
Page 40

40
Recommandations
sur la batterie de
cuisine
La batterie de cuisine doit être en contact total
avec la surface de l’élément de cuisson.
Utilisez des récipients à fond plat dont la taille
correspond à l’élément de cuisson et à la
quantité d’aliments à préparer.
DANGER :
• Les éléments de cuisson peuvent apparaître
comme froids lors de leur mise en
fonctionnement et après avoir été arrêtés.
La surface vitrée peut être CHAUDE à cause
de la chaleur résiduelle provenant du
récipient et par conséquent, il existe un
risque de brûlures.
• NE TOUCHEZ PAS LE RÉCIPIENT ou LA
CASSEROLE directement avec les mains.
Utilisez toujours des gants antichaleur ou
des poignées pour protéger vos mains
contre les brûlures.
• NE FAITES PAS GLISSER le récipient sur la
surface de la table de cuisson. Cela pourrait
endommager définitivement l’aspect de la
table de cuisson en céramique.
Utilisation de votre table de cuisson
Table de cuisson à induction
Le récipient n’est pas centré
sur la surface de l’élément de
cuisson.
Le fond ou les côtés du récipient
sont recourbés ou inclinés.
Le récipient ne correspond pas à
la taille minimale requise par
l’élément de cuisson utilisé.
Le récipient est correctement
centré sur la surface de
l’élément de cuisson.
Le fond du récipient est plat.
Le récipient correspond à ou
dépasse la taille minimale
requise par l’élément de cuisson
utilisé.
INCORRECT
CORRECT
Le fond du récipient repose sur
la bordure de la table de cuisson
ou ne repose pas complètement
sur la surface de l’élément de
cuisson.
Un manche trop lourd incline le
récipient.
Le fond du récipient repose
entièrement sur la surface de
l’élément de cuisson.
Le récipient est correctement
équilibré.
Page 41

41
Utilisation de votre table de cuisson
Table de cuisson à induction
Ne posez pas de récipients ou de couvercles
mouillés sur la surface de cuisson ou sur les
anneaux d’induction.
Ne posez pas de doigt mouillé sur la vitre de
la table de cuisson. Essuyez les projections sur
les commandes avec les mains sèches.
N’utilisez pas de wok posé sur un socle circulaire.
Ce type de wok ne chauffera pas sur un élément
à induction.
Utilisez uniquement un wok à fond plat, disponible
chez la plupart des fabricants de batterie de cuisine.
Le fond du wok doit correspondre au diamètre de
l’anneau d’induction, afin de garantir un contact
correct.
Certaines procédures de cuisson spéciales
nécessitent un récipient particulier, comme un
autocuiseur, une friteuse, etc. Les récipients à fond
plat, qui correspondent à la taille de l’élément de
surface utilisé, produiront les meilleurs résultats.
Pour de
meilleurs
résultats
Batterie
de cuisine
adaptée
Utilisez une batterie de cuisine de qualité, à fond
massif pour une meilleure répartition de la
chaleur et même de meilleurs résultats de
cuisson. Choisissez une batterie de cuisine
fabriquée en acier inoxydable aimanté, en fonte
émaillée, en acier émaillé ou avec une
combinaison de ces matériaux.
Certaines batteries de cuisine sont spécialement
identifiées par le fabricant pour une utilisation
avec les tables de cuisson à induction. Utilisez un
aimant pour tester la validité d’une batterie de
cuisine.
Les récipients à fond plat donnent les meilleurs
résultats. Les récipients à bord ou striés peuvent
être utilisés.
Les récipients ronds donnent de meilleurs
résultats. Les récipients à fond courbe ou incliné
ne chaufferont les aliments de manière
homogène.
Pour la cuisine au wok, utilisez un wok à fond
plat. N’utilisez pas de wok posé sur un socle
circulaire.
Batterie de cuisine « bruyante »
Différents types de batterie de cuisine produisent
de légers sons. Les récipients massifs, comme
ceux en fonte émaillée, produisent moins de bruit
que les récipients en acier inoxydable
multicouche plus légers. La taille du récipient, et
la quantité d’aliments, peuvent aussi contribuer
au niveau sonore.
Lors de l’utilisation d’éléments adjacents avec
un certain niveau de puissance, les champs
magnétiques peuvent interagir entre eux et
produire un faible sifflement ou un
« bourdonnement » intermittent. Ces bruits
peuvent être réduits ou éliminés en diminuant ou
en augmentant le niveau de puissance de l’un ou
de l’ensemble des éléments. Les récipients qui
recouvrent entièrement le cercle de l’élément
produiront moins de bruit.
Un faible bruit de « bourdonnement » est normal,
notamment avec une puissance élevée.
Utilisez un wok à fond plat.
Utilisez une
plaque chauffante.
Utilisez des
récipients à fond plat.
Page 42

42
Utilisation des
commandes à
touche
Utilisation de votre table de cuisson
Table de cuisson à induction
Éléments de
cuisson
Appuyez légèrement sur la touche avec la partie
plate du bout de votre doigt. Appuyez au centre
de la touche pour garantir une réponse de la
table de cuisson.
Un « bip » retentira à chaque appui sur une
touche.
Chaque élément de cuisson dispose d’une touche
ON/OFF indépendante et d’un affichage à diodes.
Assurez-vous d’utiliser une batterie de cuisine qui
respecte les exigences de taille minimale.
Pour mettre en marche un élément de cuisson :
1 Placez un récipient avec un contenu alimentaire sur
un élément à induction. La taille du récipient doit
correspondre à celle de l’anneau indicateur.
2 Appuyez sur la touche ON/OFF. « 5 » s’affichera en
clignotant.
3 Appuyez sur la touche (+) ou (-) pour sélectionner le
niveau de puissance et activer l’élément à induction.
Un bip retentit. Il est nécessaire d’appuyer sur la
touche (+) ou (-) dans les 10 secondes qui suivent,
pour activer l’élément.
REMARQUE : vous pouvez aussi appuyer et tenir
enfoncée la touche pour faire défiler rapidement les
puissances et atteindre le réglage souhaité.
Le circuit d’induction détecte le récipient et autorise
l’activation de l’élément. Le témoin lumineux ON et
le témoin lumineux HOT SURFACE correspondant
s’allument ensemble. Si aucun niveau de puissance
n’est sélectionné dans les 10 secondes, la zone sera
désactivée.
Pour arrêter le processus, appuyez sur la touche
ON/OFF. L’élément à induction s’arrêtera et l’affichage
s’éteindra.
Lorsqu’un élément est activé sur ON :
Si le récipient est enlevé ou déplacé en dehors de
l’anneau de cuisson, un « F » s’affichera en clignotant ,
ainsi que le niveau de puissance. Après 30 secondes,
l’élément sera désactivé et l’affichage s’éteindra.
Si le récipient est replacé sur la zone dans les 30
secondes, le clignotement s’arrêtera et la cuisson
reprendra.
Page 43

Utilisation de votre table de cuisson
Table de cuisson à induction
43
Réglage du
niveau de
puissance
La table de cuisson propose 19 niveaux de
puissance, y compris un réglage de puissance
renforcée. La plage de puissance s’étend de
« L » à « 9 » par incréments d’une précision du
demi-point. Par exemple : 1, 1-1/2, 2, 2-1/2 et
ainsi de suite jusqu’à 9.
Le niveau de puissance « L », réglage le plus
faible, est recommandé pour « tenir au chaud »
un récipient.
Le niveau de puissance augmente d’un
demi-point à chaque appui sur la touche.
La puissance 9 est le niveau normal le plus élevé.
Le niveau de puissance avec une fraction
indique un réglage par demi-point
supplémentaire.
« F »
s’affiche en
clignotant
Si un récipient est enlevé ou déplacé en dehors
de l’anneau de cuisson pendant le processus de
cuisson, un « F » s’affichera en clignotant, ainsi
que le niveau de puissance. Le « F » clignotant
indique que le récipient n’est plus détecté. Après
30 secondes, l’élément sera désactivé et
l’affichage s’éteindra.
Si le récipient est replacé sur l’élément de surface
dans les 30 secondes, le « F » clignotant
s’éteindra et la cuisson reprendra.
Puissance
renforcée
Il s’agit du plus haut niveau de puissance, conçu
pour une cuisson ou une ébullition rapide d’un
contenu de grande quantité. La puissance renforcée
fonctionnera au maximum pendant 10 minutes.
Après ces 10 minutes, la puissance reviendra
automatiquement au niveau 9.
Le réglage de puissance renforcée peut être répété
après le cycle initial de 10 minutes.
DANGER : ne laissez pas un récipient sans
surveillance avec le niveau de puissance renforcée.
Pour activer le niveau de puissance renforcée :
1 Placez un récipient dont la taille correspond à
l’élément à induction sur l’anneau indicateur
sélectionné.
2 Appuyez sur la touche ON/OFF. « 5 » s’affichera
en clignotant.
3 Appuyez et tenez enfoncée la touche (+) jusqu’à
ce que « H » s’affiche.
REMARQUE : si le récipient est enlevé, un « F » et
un « H » s’afficheront alternativement en clignotant.
Après 30 secondes, l’élément s’éteindra
automatiquement.
Bruits éventuels :
Il est possible d’entendre un léger
« bourdonnement » lors d’une cuisson avec le
niveau de puissance renforcée. C’est normal. Le
son dépend du type de récipient utilisé. Certains
récipients « bourdonneront » plus forts en
fonction du matériau. Un « bourdonnement »
peut se produire si le contenu du récipient est
froid. Au fur et à mesure que le récipient chauffe,
le son diminuera. Si le niveau de puissance est
diminué, le son diminuera aussi.
1/2
Page 44

44
Utilisation de votre table de cuisson
Table de cuisson à induction
Partage de
puissance
Les tables de cuisson à quatre brûleurs sont divisées
en deux zones de chauffe séparées. Les zones de
cuisson gauche et droite sont alimentées par des
générateurs d’induction indépendants. Un générateur
pilote 2 éléments ou les deux zones de cuisson d’une
section de chauffe partagent la puissance d’un
générateur.
Les tables de cuisson à cinq brûleurs sont divisées
en trois zones. Les côtés gauche et droit disposent de
zones de cuisson séparées et le grand élément central
constitue une autre zone de cuisson indépendante.
Le partage de puissance est actif lorsque tous les
éléments de la même zone de cuisson sont activés et
qu’un élément est réglé sur le niveau de puissance
renforcée (H). Le niveau de l’élément qui n’est pas réglé
sur le niveau de puissance renforcée bascule alors sur
une puissance plus faible. Cela s’appelle le partage de
puissance. Lorsque le fonctionnement en puissance
renforcée est terminé (10 minutes), l’autre élément peut
être réinitialisé sur n’importe quel niveau de puissance.
Tous les éléments d’une même zone de chauffe
peuvent fonctionner simultanément aux niveaux de
puissance normaux, de « L » à 9.
Table de cuisson à 4 brûleurs avec 2 générateurs
d’induction côté gauche et côté droit.
Table de cuisson à 5 brûleurs avec 3 générateurs
d’induction côté gauche, centre et côté droit.
Utilisation
du niveau
basse
température
« L »
1 Placez un récipient avec un contenu alimentaire sur
un élément à induction. La taille du récipient doit
correspondre à celle de l’anneau indicateur.
2 Appuyez sur la touche ON/OFF. « 5 » s’affichera en
clignotant.
3 Appuyez et tenez enfoncée la touche (-) jusqu’à ce
que « L » s’affiche. Un bip retentit.
N’utilisez pas d’emballage en plastique pour couvrir les
aliments. Le plastique peut fondre sur la surface vitrée
et être difficile à supprimer.
Utilisez uniquement une batterie de cuisine
recommandée pour cette table de cuisson.
Le niveau basse température maintiendra chaud un
plat cuisiné, à la température de service. Commencez
toujours avec des aliments chauds. N’utilisez pas ce
réglage pour chauffer des aliments froids.
La pose d’aliments froids ou non cuisinés sur un élément
de surface réglé sur le niveau basse température peut
provoquer une intoxication alimentaire.
DANGER : ne chauffez pas d’aliments
avec le niveau de puissance « L »
pendant plus de deux heures.
REMARQUE IMPORTANTE POUR LES MODÈLES À
QUATRE BRÛLEURS :
Les éléments du côté droit partagent le même
générateur. Les deux éléments peuvent fonctionner à
n’importe quel niveau de puissance non renforcée (de L
à 9) en même temps. Si le grand élément à l’avant est
réglé sur le niveau de puissance renforcée « H », le plus
petit élément à l’arrière droite sera désactivé ou éteint
automatiquement. Le plus petit élément à l’arrière
droite pourra être réactivé et réglé sur n’importe quel
niveau de puissance, une fois que le fonctionnement en
puissance renforcée du grand élément est terminé (10
minutes).
Pour de meilleurs résultats, tous les aliments
chauffés avec le niveau basse température
doivent être couverts d’un couvercle ou d’une
feuille d’aluminium. Les pâtisseries ou les pains
doivent être ventilés pour permettre à l’humidité
de s’échapper.
Utilisez toujours des poignées ou des gants
antichaleur pour retirer les aliments d’un élément
réglé sur le niveau basse température, car la
table de cuisson et le récipient seront chauds.
Page 45

45
Utilisation de votre table de cuisson
Table de cuisson à induction
Utilisation
du minuteur
de cuisine
REMARQUE : utilisez le minuteur de cuisine pour
mesurer le temps de cuisson ou comme pense-bête.
Le minuteur de cuisine ne contrôle en aucun cas les
éléments de cuisson.
1 Appuyez sur la touche ON/OFF du minuteur.
2 Appuyez sur la touche (+) ou (-) pour sélectionner
le nombre de minutes souhaité. Lorsque la touche
(+) ou (-) reste enfoncée pendant plusieurs
secondes, les minutes défilent à grande vitesse.
Le minuteur commencera automatiquement à
décompter les minutes sélectionnées dans les
5 secondes suivant la dernière entrée. Les minutes
s’afficheront et un « .» clignotera.
3 Les minutes s’affichent jusqu’à ce qu’il ne reste
plus qu’une minute. À une minute, le minuteur
émettra un bip et décomptera ensuite les
secondes restantes.
Pendant la dernière minute, le minuteur émettra
un bip toutes les 10 secondes. Lorsque le temps
est écoulé, le minuteur émettra un long bip et
l’affichage s’éteindra.
Appuyez sur la touche ON/OFF pour arrêter le
minuteur à n’importe quel moment. Appuyez sur la
touche (+) ou (-) pour augmenter ou diminuer le
temps défini.
Témoin
lumineux
de surface
chaude
Un témoin lumineux HOT SURFACE (un pour chaque
élément de cuisson) s’allumera immédiatement lors
de l’activation de l’élément correspondant. Le témoin
lumineux s’allume lorsque la surface vitrée est chaude
et reste allumé jusqu’à ce que la surface refroidisse à
une température acceptable au toucher.
Page 46

46
Messages
d’erreur
(« E » / « c » et
« E » / « o »)
Les messages d’erreur indiquent un problème
temporaire qui peut être corrigé par l’utilisateur.
Clavier activé—si « E » s’affiche en clignotant
alternativement avec « c », c’est que le clavier
détecte l’activation continue d’une ou plusieurs
touches. Supprimez toute obstruction dans la zone
du clavier. L’obstruction peut être provoquée par de
l’eau, une projection d’aliments, un ustensile ou
d’autres objets.
Pour reprendre la cuisson, appuyez sur la touche
ON/OFF, puis sélectionnez le niveau de puissance.
Surchauffe—si « E » s’affiche en clignotant
alternativement avec « o », c’est que le capteur
de la table de cuisson indique une surchauffe de
l’électronique ou de l’élément à induction.
La surchauffe d’un élément est provoquée par la
pose d’une casserole vide sur l’élément concerné
et la sélection d’un niveau de puissance élevée.
Le capteur de l’élément détecte les très hautes
températures (supérieures aux températures
normales de cuisson), coupe alors l’alimentation
électrique et affiche le message d’erreur. Une autre
cause possible de cette erreur est une absence d’air
frais dans le fond de la table de cuisson, ce qui peut
provoquer la surchauffe de l’électronique. Dans ce
cas-là, assurez-vous que l’entrée d’air sous la table de
cuisson n’est pas obstruée.
Appuyez sur la touche ON/OFF et laissez la table
de cuisson refroidir pendant 30 à 45 minutes,
avant de recommencer à l’utiliser.
Si l’erreur persiste, contactez le service.
IMPORTANT : si le « E » clignote seul, sans
alterner avec le « c » ou le « o », il s’agit d’une
panne matérielle. Contactez le service.
Utilisation de votre table de cuisson
Table de cuisson à induction
Verrouillage
des
commandes
IMPORTANT: à votre convenance, vous pouvez
verrouiller la totalité de la table de cuisson à
n’importe quel moment, lorsqu’elle n’est pas utilisée
ou avant un nettoyage. Le verrouillage de la table
de cuisson empêchera d’activer accidentellement
les éléments de surface.
Pour verrouiller la table de cuisson :
Appuyez et tenez enfoncée la touche CONTROL
LOCK pendant 5 secondes.
Un signal à deux bips retentira et le témoin lumineux
CONTROL LOCK s’allumera, indiquant que la table de
cuisson est verrouillée.
Si la table de cuisson est verrouillée alors qu’un
élément de surface est en fonctionnement, celui-ci
sera automatiquement désactivé.
La commande CONTROL LOCK n’affecte pas le
minuteur. Si le verrouillage des commandes est
activé pendant un décompte du minuteur, celui-ci
continuera à fonctionner.
Pour déverrouiller la table de cuisson :
Appuyez et tenez enfoncée la touche CONTROL
LOCK pendant 5 secondes. Un signal à deux bips
retentira et le témoin lumineux CONTROL LOCK
s’éteindra, indiquant que la table de cuisson est
déverrouillée.
Page 47

47
Utilisation de votre table de cuisson
Table de cuisson à induction
Respectez
les points
suivants pour
faire des
conserves
Lorsque vous faites des conserves au bain-marie
ou avec un autocuiseur, des récipients de grand
diamètre peuvent être utilisés. C’est parce que les
températures d’ébullition de l’eau (même sous
pression) ne sont pas nocives pour les surfaces
de la table de cuisson autour des éléments de
surface.
CEPENDANT, N’UTILISEZ PAS DE STÉRILISATEURS
DE GRAND DIAMÈTRE OU D’AUTRES RÉCIPIENTS
DE GRAND DIAMÈTRE POUR FRIRE OU BOUILLIR
DES ALIMENTS AUTRE QUE DE L’EAU. La plupart
des mélanges de sirop ou de sauce – et tous les
types de friture – cuisent à des températures
beaucoup plus élevées que celles de l’eau bouillie.
De telles températures peuvent éventuellement
endommager la surface vitrée de la table de
cuisson.
1 Assurez-vous que le stérilisateur est bien centré
sur l’élément de surface. Si votre table de
cuisson ou son emplacement ne permet pas de
centrer le stérilisateur sur l’élément de surface,
utilisez un récipient d’un plus petit diamètre
pour de meilleurs résultats.
2 Des stérilisateurs à fond plat doivent être
employés. N’utilisez pas de stérilisateurs avec
des fonds à rebord ou ondulés (ce qui est
souvent le cas des récipients émaillés) parce
que le contact avec l’élément de surface n’est
pas suffisant et entraînera une durée
d’ébullition prolongée.
3 Lorsque vous faites des conserves, utilisez des
recettes et des procédures en provenance de
sources réputées. Des recettes et des
procédures fiables sont disponibles chez le
fabricant de votre stérilisateur, chez les
fabricants de flacons en verre pour conserve,
comme la marque Ball and Kerr, et le
département des services de l’agriculture des
États-Unis.
4 Souvenez-vous que la réalisation de conserves
est un processus qui génère de grandes
quantités de vapeur. Pour éviter les brûlures
provoquées par la vapeur ou la chaleur, faites
attention en faisant des conserves.
Remarque : des stérilisateurs à fond
plat sont nécessaires pour les tables
de cuisson vitrées.
Incorrect !
Correct !
REMARQUE : si votre domicile possède une
tension faible, la réalisation de conserves peut
prendre plus de temps que prévu, même si les
instructions ont été scrupuleusement respectées.
Il est possible de réduire cette durée :
(1) en utilisant un autocuiseur et
(2) en commençant avec de l’eau CHAUDE du
robinet pour une ébullition plus rapide d’une
grande quantité d’eau.
DANGER :
• La réalisation de conserves en toute sécurité
nécessite que les micro-organismes soit
détruits et que le flacon soit complètement
scellé. Lorsque vous faites des conserves au
bain-marie, une ébullition douce mais
constante doit être maintenue le temps
nécessaire. Lorsque vous faites des
conserves avec un autocuiseur, la pression
doit être maintenue le temps nécessaire.
• Après avoir réglé les commandes, il est très
important de s’assurer que les niveaux
d’ébullition ou de pression sont maintenus le
temps nécessaire.
• Puisque vous devez vous assurer de stériliser
les flacons de conserve le temps nécessaire,
sans aucune interruption du processus, ne le
faites pas sur l’élément de surface d’une
table de cuisson si le fond de votre
stérilisateur n’est pas plat.
Page 48

48
Nettoyage et entretien
Table de cuisson à induction
Touche de
verrouillage
des
commandes
À votre convenance, vous pouvez verrouiller
la table de cuisson entière à n’importe quel
moment, lorsqu’elle n’est pas utilisée ou avant
un nettoyage.
Le verrouillage de la table de cuisson empêchera
d’activer accidentellement les éléments de
surface.
Avant un nettoyage, commencez par verrouiller
la table de cuisson ; consultez la section
Verrouillage des commandes.
Comment retirer
le film protecteur
d’expédition
et le ruban
d’emballage
Saisissez délicatement un coin du film protecteur
d’expédition avec vos doigts et décollez-le
doucement de la surface de l’appareil. N’utilisez pas
d’outils tranchants pour enlever le film. Enlevez tout
le film avant d’utiliser l’appareil pour la première fois.
Pour être sûr que la finition de l’appareil ne sera pas
endommagée, la façon correcte d’enlever l’adhésif
du ruban d’emballage sur les appareils neufs
consiste à appliquer du détergent liquide de lavevaisselle domestique. Appliquez-le avec un chiffon
doux et laissez tremper.
REMARQUE : l’adhésif doit être enlevé en totalité
avant d’utiliser la table de cuisson. Il ne peut plus
être enlevé s’il est chauffé.
Nettoyage
normal
quotidien
Utilisez la crème nettoyante CERAMA BRYTE®sur votre
table de cuisson en vitrocéramique.
Pour entretenir et protéger votre table de cuisson
en vitrocéramique, conformez-vous aux instructions
suivantes :
1 Avant d’utiliser votre table de cuisson pour la
première fois, nettoyez-la avec de la crème
nettoyante CERAMA BRYTE®pour table de
cuisson. Cela vous aidera à la protéger et à la
conserver propre.
2 Votre table de cuisson conservera son aspect neuf
si vous utilisez chaque jour la crème nettoyante
CERAMA BRYTE®pour table de cuisson.
3 Secouez bien le flacon de crème nettoyante. Versez
quelques gouttes de crème nettoyante CERAMA
BRYTE®directement sur votre table de cuisson.
4 Utilisez une serviette en papier ou une éponge
CERAMA BRYTE
®
pour table de cuisson en
vitrocéramique afin de nettoyer la surface
de la table de cuisson.
5
Utilisez un chiffon sec ou une serviette en papier
pour nettoyer toute la surface de la table de
cuisson. Pas besoin de rincer.
NOTE : Vous devez faire bien attention de NE PAS
faire chauffer la table de cuisson avant de la
nettoyer complètement.
Nettoyez votre table de cuisson
chaque fois qu’elle est sale. Utilisez
la crème nettoyante CERAMA BRYTE
®
pour table de cuisson.
Assurez-vous que l’alimentation électrique est coupée et que toutes les surfaces sont froides avant de nettoyer une
quelconque partie de la table de cuisson.
Page 49

49
Nettoyage et entretien
Table de cuisson à induction
Résidus
calcinés
AVERTISSEMENT : Vous pouvez ENDOMMAGER votre
surface en vitrocéramique si vous utilisez des
éponges de récurage autres que celles comprises
avec votre appareil.
1 Laissez refroidir la table de cuisson.
2 Versez quelques gouttes de crème nettoyante
CERAMA BRYTE®sur tous les résidus calcinés.
3 À l’aide de l’éponge de récurage CERAMA BRYTE
®
pour table de cuisson en vitrocéramique, frottez
les résidus en exerçant la pression nécessaire.
4 S’il reste des résidus, répétez les opérations
indiquées ci-dessus.
5 Pour mieux protéger après avoir enlevé les
résidus, polissez toute la surface avec la crème
nettoyante CERAMA BRYTE®et une serviette
de papier.
Utilisez une éponge CERAMA BRYTE
®
pour table de cuisson en
vitrocéramique ou une éponge de
récurage bleue tout usage antiégratignures Scotch-Brite®.
Résidus
calcinés
difficiles
à enlever
1 Laissez refroidir la table de cuisson.
2 Tenez un grattoir à lame simple à un angle
d’environ 45º sur la surface de vitrocéramique
et raclez les résidus. Vous devrez exercer de la
pression sur le grattoir à lame pour les enlever.
3 Après avoir enlevé les résidus avec le grattoir
à lame, versez quelques gouttes de crème
nettoyante CERAMA BRYTE®pour table de
cuisson sur les résidus calcinés. Utilisez l’éponge
CERAMA BRYTE®pour enlever les résidus restants.
4 Pour mieux protéger après avoir enlevé les
résidus, polissez toute la surface avec la crème
nettoyante CERAMA BRYTE®et une serviette
de papier.
On peut se procurer le grattoir CERAMA
BRYTE®pour table de cuisson en
vitrocéramique et tous les accessoires
recommandés dans nos Centres de
pièces détachées. Consultez les
instructions dans la section « Comment
commander des pièces » à la page
suivante.
NOTE : N’utilisez jamais une lame
émoussée ou ébréchée.
Page 50

50
Nettoyage et entretien
Table de cuisson à induction
Surface de
vitrocéramique—
possibilité de
dommages
permanents.
Dommages causés par du sucre chaud ou
des matières plastiques fondues :
1 Éteignez toutes les unités de la table de cuisson.
Enlevez toutes les casseroles chaudes.
2 Portez des gants de cuisine :
a. Utilisez un grattoir à lame simple (grattoir
CERAMA BRYTE®pour table de cuisson en
vitrocéramique) pour repousser les matières
fondues sur une surface froide de la table de
cuisson.
b. Enlevez les matières fondues avec une
serviette en papier.
3 Vous devez laisser toute matière fondue que vous
n’avez pas réussi à enlever jusqu’à ce que la table
de cuisson refroidisse complètement.
4 Ne réutilisez jamais la table de cuisson avant
d’avoir enlevé complètement les résidus
NOTE : S’il s’est déjà formé sur votre table de
cuisson en vitrocéramique des creux ou des
piqûres, vous devrez la remplacer. Dans ce cas,
vous devez appeler le service.
Traces de métal
et rayures
1 Faites attention de ne pas faire glisser des
ustensiles de cuisine sur votre table de cuisson.
Ils laisseront des traces de métal sur la surface
de vitrocéramique.
Vous pourrez enlever ces traces en appliquant la
crème nettoyante CERAMA BRYTE®à l’aide de
l’éponge CERAMA BRYTE®pour table de cuisson en
vitrocéramique.
1 Si vous laissez des casseroles recouvertes d’une
couche d’aluminium ou de cuivre chauffer à sec,
leur métal peut laisser des traces noires sur la
table de cuisson.
Vous devez enlever ces traces immédiatement,
avant de faire chauffer à nouveau la table de
cuisson. Autrement, les traces risquent de devenir
permanentes.
AVERTISSEMENT : Vérifiez toujours le fond de vos
casseroles pour vous assurer qu’elles n’aient pas
d’aspérités qui risquent de rayer la table de cuisson.
D’après nos essais, il
semble que si vous
cuisinez des aliments
riches en sucre comme
de la confiture ou du
caramel, et s’ils
débordent, ils peuvent
occasionner des
dommages permanents
à la surface de
vitrocéramique si vous
ne la nettoyez pas
immédiatement.
Pour commander la crème et le grattoir
CERAMA BRYTE®, veuillez composer notre
numéro de téléphone sans frais.
Centre national de pièces
détachées : 800.626.2002.
Crème nettoyante CERAMA BRYTE
®
pour table de cuisson
en vitrocéramique . . . . . . . . . . . . . . .# WX10X300
Grattoir CERAMA BRYTE®pour table de
cuisson en vitrocéramique . . . .# WX10X0302
Trousse . . . . . . . . . . . . . . . . . . . . .# WB64X5027
(la trousse comprend un flacon de crème et un
grattoir)
Éponges CERAMA BRYTE®pour tables de
cuisson en vitrocéramique . . . . .# WX10X350
Comment
commander
des pièces
Page 51

51
Questions ?
Avant de
contacter
le service
après-vente...
Avant de contacter le service
Table de cuisson à induction
CAUSES POSSIBLES
• Utilisation d’un récipient incorrect. Utilisez des récipients
recommandés pour l’induction, à fond plat et qui correspondent
à la taille de l’élément de surface.
• Réglages incorrects des commandes de la table de cuisson.
Vérifiez que la commande appropriée est réglée correctement
pour l’élément de surface utilisé.
• Type incorrect de récipient. Utilisez un aimant pour vérifier que le
récipient est compatible avec l’induction.
• Récipient trop petit. La taille du récipient est inférieure à la taille
minimale requise pour l’élément. Consultez la section Utilisation
d’une batterie de cuisine à la taille correcte.
• Mauvaise position du récipient. Centrez le récipient sur l’anneau
de cuisson.
• Utilisation de mauvaises méthodes de nettoyage. Utilisez les
procédures de nettoyage recommandées. Consultez la section
Nettoyage et entretien.
• Utilisation d’un récipient avec des aspérités sur le fond ou présence
de particules (sable ou sel) entre le récipient et la surface de la table
de cuisson ou quelqu’un a fait glisser récipient à la surface de la
table de cuisson. Pour éviter les rayures, utilisez les procédures de
nettoyage recommandées. Assurez-vous que le fond des récipients
est propre avant utilisation et utilisez une batterie de cuisine avec des
fonds lisses.
• Des projections alimentaires n’ont pas été nettoyées avant
l’utilisation suivante. Consultez la section Nettoyage et entretien.
• Surface chaude sur un modèle avec une vitre de table de cuisson
légèrement colorée. C’est normal. La surface peut apparaître
décolorée lorsqu’elle est chaude. C’est un phénomène
temporaire qui disparaîtra lorsque la vitre refroidira.
• La table de cuisson chaude est entrée en contact avec un
plastique posé sur la table de cuisson chaude. Consultez la
section Nettoyage et entretien.
• Un mélange sucré chaud a été projeté sur la table de cuisson.
Contactez un technicien qualifié pour un remplacement.
• Le clavier est sale. Nettoyez le clavier.
• Un fusible de votre domicile. Remplacez le fusible ou réinitialisez
le disjoncteur. peut avoir grillé ou le disjoncteur a sauté.
• Utilisation d’une batterie de cuisine incorrecte. Utilisez un
récipient plat compatible avec l’induction et qui correspond à la
taille minimale requise par l’élément utilisé. Consultez la section
Utilisation d’une batterie de cuisine à la taille correcte.
• Mauvais positionnement du récipient. Assurez-vous que le
récipient est centré sur l’élément de surface correspondant.
corresponding surface element.
• Réglages incorrects des commandes de la table de cuisson.
Vérifiez le réglage correct de la commande.
PROBLÈME
LES ÉLÉMENTS DE SURFACE
N’ASSURENT PAS UNE
ÉBULLITION CONTINUE OU
LA CUISSON EST LENTE
LES ÉLÉMENTS DE SURFACE
NE FONCTIONNENT PAS
CORRECTEMENT
« F » CLIGNOTANT
RAYURES SUR LA SURFACE
VITRÉE DE LA TABLE DE
CUISSON
ZONES DÉCOLORÉES SUR
LA TABLE DE CUISSON
PLASTIQUE FONDU SUR
LA SURFACE
TROU (OU ÉCHANCRURE)
DANS LA TABLE DE CUISSON
TOUCHES DU CLAVIER
INOPÉRANTES
LA DÉTECTION/MESURE
DE TAILLE DU RÉCIPIENT
NE FONCTIONNE PAS
CORRECTEMENT
Page 52

52
Questions ?
Avant de
contacter
le service
après-vente...
Avant de contacter le service
Table de cuisson à induction
CAUSES POSSIBLES
• Une panne matérielle s’est produite. Contactez le service.
• Erreur de clavier, indiquant qu’un nettoyage du clavier est
nécessaire. Nettoyez la zone du clavier. Essuyez les projections
ou enlevez les ustensiles de la zone du clavier.
• Surchauffe, indiquant qu’un élément de surface ou l’électronique est
en surchauffe. Enlevez le récipient vide de l’élément de surface.
Laissez la table de cuisson refroidir pendant environ 30 minutes.
Vérifiez que la ventilation du système de refroidissement sous la
table de cuisson n’est pas obstruée.
PROBLÈME
AFFICHAGE D’UN « E »
CLIGNOTANT SEUL (SANS
AUCUNE AUTRE LETTRE)
AFFICHAGE D’UN « E »
ALTERNANT AVEC UN « C »
AFFICHAGE D’UN « E »
ALTERNANT AVEC UN « O »
Page 53

53
Please place in envelope and mail to:
Veuillez mettre dans une enveloppe et envoyez à :
OWNERSHIP REGISTRATION
P.O. BOX 1780
MISSISSAUGA, ONTARIO
L4Y 4G1
(FOR CANADIAN CONSUMERS ONLY)
Page 54

54
Page 55

Avec l’achat de votre nouvel appareil Monogram, soyez assuré
de recevoir toute l’information ou l’assistance dont vous
pourriez avoir besoin, de la part de GE. Tout ce que vous avez
à faire, c’est de nous appeler—gratuitement !
GE Answer
Center
®
800.561.3344
Quelle que soit votre question concernant n’importe quel appareil Monogram, le service d’information
du GE Answer Center®est disponible pour vous aider. Votre appel—et votre question —seront pris en
compte rapidement et courtoisement. Et vous pouvez nous contacter n’importe quand. Le service GE
Answer Center®est ouvert 24 heures sur 24, du lundi au samedi.
OU
Visitez notre site web sur : monogram.com
Service de
réparation
à domicile
800.561.3344
Un professionnel qualifié du service GE s’occupera de la réparation, à un moment qui vous
convienne. La plupart des entreprises du service GE vous proposent une intervention le jour même
ou le lendemain, ou à votre convenance (de 07h00 à 22h00 les jours de semaine, de 08h00 à
18h00 les samedis et dimanches). Nos techniciens formés en usine connaissent l’intérieur et
l’extérieur de votre appareil—la plupart des réparations peuvent être effectuées en une
intervention seulement.
Au Canada : lundi au vendredi, de 07h00 à 20h00 et samedi, de 08h00 à 17h00 EDST.
Contrats
de service
800.561.3344
Vous pouvez être rassuré de savoir que le service GE sera toujours là après l’expiration de votre
garantie. Souscrivez à un contrat GE pendant que votre garantie est toujours en vigueur et vous
bénéficierez d’une ristourne substantielle. Avec un contrat sur plusieurs années, vous êtes assuré
d’un futur service au prix d’aujourd’hui.
Pièces
détachées et
accessoires
800.561.3344
Les personnes qualifiées pour réparer leurs propres appareils peuvent commander des pièces
détachées et des accessoires et se les faire envoyer directement à domicile. Le système de pièces
détachées GE propose un accès à plus de 47 000 pièces... et toutes les pièces de rechange d’origine
GE bénéficient d’une garantie complète. Les cartes bancaires VISA, MasterCard et Discover sont
acceptées.
Les instructions de maintenance contenues dans ce manuel détaillent les procédures à utiliser
par n’importe quel utilisateur. Toute autre réparation ou intervention doit être effectuée par
un technicien qualifié. La prudence est nécessaire, car une réparation incorrecte peut
provoquer un fonctionnement dangereux de l’appareil.
Pour les clients
avec des
besoins
spéciaux…
Aux États-Unis
800.626.2000
GE offre gratuitement une brochure pour aider à la planification d’une
cuisine sans entrave pour les personnes à mobilité réduite.
Les consommateurs malentendants ou muets qui ont accès à un TDD
ou à un téléscripteur conventionnel peuvent appeler le 800.TDD.GEAC
(800.833.4322) pour solliciter information ou service.
Service au consommateur
Table de cuisson à induction
55
Page 56

GE Consumer & Industrial
Appliances
General Electric Company
Louisville, KY 40225
monogram.com
Certains états/provinces n’autorisent pas l’exclusion ou la limitation des dommages fortuits ou indirects,
par conséquent la limitation ou l’exclusion ci-dessus peut ne pas s’appliquer à vous. Cette garantie vous
donne des droits légaux particuliers et il est possible que vous puissiez bénéficier d’autres droits, qui
varient d’un état/province à l’autre. Pour connaître quels sont vos droits légaux dans votre
état/province, consultez le bureau de service aux consommateurs local ou national ou le ministère
de la Justice.
Garant aux États-Unis : General Electric Company, Louisville, KY 40225
Garant au Canada : Mabe Canada Inc.
Garantie
Table de cuisson à induction
GARANTIE DE VOTRE TABLE DE CUISSON
Agrafez ici le chèque annulé ou le reçu de votre achat.
La preuve d’achat originale sera nécessaire pour bénéficier
du service après-vente pendant la période de garantie.
CE QUI EST
COUVERT
À partir de la
date d’achat
originale
GARANTIE LIMITÉE D’UN AN
Pendant une année à compter de la date d’achat originale, nous fournirons gratuitement les
pièces et la main-d’oeuvre à votre domicile, pour réparer ou remplacer n’importe quelle partie
de la table de cuisson qui serait défectueuse à cause d’un défaut de fabrication.
Cette garantie est étendue à l’acheteur original et à tout propriétaire successif pour les appareils
achetés pour un usage domestique ordinaire dans les 48 États continentaux, à Hawaii, à Washington
D.C. ou au Canada. Si cet appareil est installé dans un endroit où il n’existe pas de service agréé GE,
vous pouvez avoir à prendre en charge les frais de transport, ou il peut vous être demandé d’apporter
l’appareil dans un service GE agréé pour réparation. En Alaska, la garantie est la même, sauf qu’elle est
LIMITÉE parce que vous devez prendre en charge les frais de transport au magasin ou les frais de
déplacement du technicien du service à votre domicile.
Tous les services de garantie sont fournis par nos centres de service d’usine, ou par un technicien
Customer Care
®
agréé, pendant les heures de travail normales.
Dans le cas où votre appareil nécessiterait une intervention, pendant la période de garantie ou au-delà,
appelez le 800.444.1845 aux États-Unis. Au Canada, appelez le 800.561.3344. Munissez-vous du numéro
de modèle et du numéro de série lors de votre appel au service après-vente.
CE QUI N’EST
PAS COUVERT
EXCLUSION DES GARANTIES IMPLICITES – Votre seul et unique recours réside dans
la réparation de l’appareil telle qu’elle est définie dans cette garantie limitée.
Toutes autres garanties implicites, y compris les garanties implicites de valeur
commerciale ou d’adéquation à un usage particulier, sont limitées à une année
ou à la plus petite période autorisée par la loi.
• Les déplacements à domicile pour vous
apprendre à utiliser l’appareil.
• Une installation, une livraison ou une
maintenance incorrecte. Si vous rencontrez
un problème d’installation, contactez votre
revendeur ou votre installateur. Vous êtes
responsable de la fourniture appropriée
d’électricité, de gaz, d’évacuation et d’autres
raccordements, comme indiqué dans les
instructions d’installation fournies avec votre
produit.
• Le remplacement des fusibles du domicile
ou la réinitialisation des disjoncteurs.
• Un dommage de l’appareil à cause d’une
mauvaise utilisation ou d’un abus.
• Une panne de l’appareil dans le cas d’une
utilisation autre que celle prévue, ou d’une
utilisation commerciale.
• Un dommage de l’appareil provoqué par un
accident, un incendie, une inondation ou un
cas de force majeure.
• Un dommage annexe ou consécutif provoqué
par d’éventuels défauts de cet appareil.
• Un dommage provoqué après la livraison.
• Un appareil non accessible pour exécuter la
réparation nécessaire.
56
Page 57

57
Información para el consumidor
Anafe de inducción
Introducción
Su nuevo anafe Monogram hace una elocuente declaración de estilo, comodidad y flexibilidad en la
planificación de la cocina. Si lo ha elegido por su pureza de diseño o su aplicada atención a los
detalles -o por ambas razones- usted descubrirá que la combinación superior de formas y funciones
de su anafe Monogram lo deleitará durante muchos años.
Su anafe Monogram fue diseñado para otorgarle la flexibilidad para formar un conjunto armonioso
con sus gabinetes de cocina. Si diseño elegante puede integrarse a la perfección dentro de la cocina.
La información de las páginas siguientes lo ayudarán a operar y mantener su anafe de una manera
adecuada.
Si tiene alguna pregunta, visite nuestro sitio Web en: monogram.com
Contenidos
Cuidado y limpieza
Almohadilla de bloqueo de control . . . . . . . . 74
Anafe de vidrio . . . . . . . . . . . . . . . . . . . . . . . . 74-76
Cinta de embalaje . . . . . . . . . . . . . . . . . . . . . . . . 74
Servicios para el consumidor
Antes de llamar al servicio técnico . . . . .77, 78
Garantía . . . . . . . . . . . . . . . . . . . . . . . . . . . . . . . . . . 82
Instrucciones de seguridad . . . . . . . . . . . . .59-62
Número de modelo y de serie . . . . . . . . . . . . . 59
Números telefónicos importantes . . . . . . . . . .81
Instrucciones de Operación
Características de su anafe . . . . . . . . . . . .63, 64
Cómo configurar los controles. . . . . . . . .68-70
Cómo funciona la cocción por inducción . . . .65
Cómo trabar el anafe . . . . . . . . . . . . . . . . . . . . .72
Configuración baja . . . . . . . . . . . . . . . . . . . . . . . .70
Elementos de superficie . . . . . . . . . . . . . . . . . . 68
Recomendaciones sobre
recipientes de cocción . . . . . . . . . . . . . .65-67, 73
Temporizador de cocina . . . . . . . . . . . . . . . . . . .71
Antes de
usar su
anafe
Lea este manual con detenimiento. Su objetivo
es ayudarlo a operar y mantener su nuevo anafe
de una manera adecuada.
Manténgalo a mano para responder sus
preguntas.
Si no entiende algo o necesita más ayuda, hay
una lista de números gratuitos de atención al
cliente en la sección trasera de este manual.
O
Visite nuestro sitio Web: monogram.com
Escriba los
números de
modelo y
de serie
Usted puede encontrarlos en una etiqueta bajo
el anafe.
Llene la Tarjeta de Registro de Producto del
Consumidor incluida con este producto.
Antes de enviar la tarjeta, tenga a bien escribir
los números aquí:
Número de modelo
Número de serie
Utilice estos números en cualquier
correspondencia o llamadas de servicio técnico
relacionadas con su anafe.
Page 58

58
Si usted
recibió un
anafe
dañado
Comuníquese de inmediato con el vendedor
(o constructor) que le vendió el anafe.
Ahorre
tiempo y
dinero
Lea este manual. Aquí encontrará una serie de
consejos útiles sobre cómo usar y mantener su
anafe correctamente. Un poco de cuidado
preventivo de su parte puede ahorrarle mucho
tiempo y dinero respecto de la vida útil de su
anafe.
Encontrará una gran cantidad de respuestas a
problemas comunes en la sección “Antes de
llamar al servicio técnico". Si usted examina
primero nuestra tabla de Consejos para detección
de problemas, quizás no necesite llamar al
servicio técnico.
Si necesita
servicio
técnico
Para obtener servicio técnico, diríjase a la página
de Servicios para el consumidor en la parte
trasera de este manual.
Estamos orgullosos de nuestro servicio y
deseamos que usted quede satisfecho. Si por
alguna razón no está satisfecho con el servicio
que recibe, aquí incluimos algunos pasos a
seguir para obtener más ayuda.
PRIMERO, contacte a las personas que realizaron
el servicio en su artefacto. Explique por qué no
está satisfecho. En la mayoría de los casos, esto
solucionará el problema.
DESPUÉS, si aún así no está satisfecho, escriba
todos los detalles—incluyendo número
telefónico—a:
Manager, Customer Relations
GE Appliances
Appliance Park
Louisville, KY 40225
Información para el consumidor
Anafe de inducción
Page 59

INFORMACIÓN IMPORTANTE DE SEGURIDAD
¡ADVERTENCIA!
Para su seguridad, la información de este manual debe seguirse al pie de la letra a fin de minimizar el riesgo de
incendio o explosión, descarga eléctrica, o para prevenir daños, lesiones personales o la muerte.
Esta unidad se ha puesto a prueba y se ha determinado
que cumple con los límites de un dispositivo digital de
clase B, de conformidad con la Parte 18 de las normas
de la FCC. Estos límites están diseñados para brindar
una protección razonable contra interferencia dañina
dentro de una instalación residencial. Esta unidad
genera, utiliza y puede irradiar energía de frecuencia de
radio y, si no se instala y usa de acuerdo con las
instrucciones, puede provocar una interferencia dañina
a las comunicaciones de radio. Sin embargo, no hay
garantía de que no haya interferencia en una
instalación determinada. Si la unidad provoca
interferencia nociva a la recepción de radio y televisión,
lo que puede determinarse encendiendo y apagando la
unidad, el usuario puede corregir la interferencia a través
de una o más de las siguientes medidas:
• Reoriente o cambie la posición de las antenas
receptoras.
• Incremente la distancia entre la unidad y el receptor.
• Conecte la unidad a un tomacorriente o un circuito
diferente del que está usando el receptor.
NOTIFICACIÓN DE SEGURIDAD
IMPORTANTE:
•
La ley californiana sobre aguas potables y tóxicos
exige que el Gobernador de California publique
una lista de sustancias que según el estado
provoquen cáncer, defectos congénitos u otros
daños reproductivos, y exige a las empresas que
adviertan a los clientes sobre la exposición potencial
a dichas sustancias.
•
Utilice el tamaño adecuado de recipiente de
cocción. Este artefacto está equipado con una o
más ZONAS DE COCCIÓN de diferentes tamaños.
Elija recipientes de cocción con bases planas lo
suficientemente grandes para las zonas de cocción.
Los sensores de detección del recipiente de cocción
no permitirán que la zona de cocción afectada
funcione sin un recipiente en su lugar.
•
Las manijas de los utensilios deben girarse hacia
adentro y no deben extenderse sobre zonas de
cocción adyacentes para reducir el riesgo de
quemaduras, la ignición de materiales inflamables y
el derrame debido a contacto no intencional con el
utensilio.
•
Nunca deje alimentos ya preparados sin atención
en las zonas de cocción. Los alimentos que hierven
y se derraman pueden provocar humo y derrames
grasosos que pueden prenderse fuego, o un
recipiente que hierve en seco puede derretirse o
dañarse.
•
Revestimientos protectores: No utilice papel de
aluminio para revestir ninguna parte del anafe.
Sólo utilice papel de aluminio después del proceso
de cocción, si se usa como una tapa para colocar
sobre los alimentos. Cualquier uso diferente del
papel de aluminio puede provocar un riesgo de
descarga eléctrica, incendio o cortocircuito.
•
Evite colocar cualquier objeto sobre o cerca de las
almohadillas para evitar la activación accidental
de los controles del anafe.
•
Sepa qué almohadillas del teclado controlan cada
una de las zonas de cocción.
•
Limpie el artefacto regularmente para mantener
todas las piezas libres de grasa, lo que podría
ocasionar un incendio. Las campanas de
ventilación de los ventiladores de extracción y los
filtros de grasa deben mantenerse limpios. No
permita la acumulación de grasa en la campana o
en el filtro. Los depósitos grasosos del ventilador
pueden prenderse fuego. Cuando flamee alimentos
bajo la campana, encienda el ventilador. Para la
limpieza, lea las instrucciones del fabricante de la
campana.
Ubicación de la placa de serie
Encontrará el número de modelo y serie impreso en la
placa de serie. La placa de serie se encuentra bajo el
anafe. Vea la ilustración para determinar la ubicación
exacta. Recuerde registrar el número de serie ANTES
DE LA INSTALACIÓN del anafe (Ver Registro de
Producto, en la página 57). La placa de serie se
encuentra bajo la caja de quemadores del anafe.
Ubicación de la placa de serie
PRECAUCIÓN:
Las personas que utilicen un marcapasos o un
dispositivo médico similar deben tener cuidado
cuando utilicen y se encuentren cerca de una
unidad por inducción. El campo electromagnético
puede afectar el funcionamiento del marcapasos
o del dispositivo médico similar. Es recomendable
consultar a su médico o al fabricante del
marcapasos sobre su situación particular.
59
Page 60

60
INFORMACIÓN IMPORTANTE DE SEGURIDAD
¡ADVERTENCIA!
Para su seguridad, la información de este manual debe seguirse al pie de la letra a fin de minimizar
el riesgo de incendio o explosión, descarga eléctrica, o para prevenir daños, lesiones personales o
la muerte.
Cuando se usen artefactos eléctricos, siempre deben seguirse precauciones básicas de seguridad, incluyendo las siguientes:
• Utilice este artefacto sólo con el uso
previsto que se describe en el manual.
• No intente reparar o cambiar ninguna
pieza de su anafe a menos que esté
específicamente recomendado en este
manual. Cualquier otro servicio debe
realizarlo un técnico calificado.
• Antes de realizar cualquier clase de
reparación, desenchufe la conexión
eléctrica del anafe desde el panel de
distribución doméstica quitando el fusible o
desconectando el disyuntor.
• Asegúrese de que un técnico calificado
realice una correcta instalación y puesta
a tierra del artefacto de acuerdo con las
instrucciones de instalación provistas.
• Solicite al instalador que le muestre la
ubicación del disyuntor o fusible. Márquelo
para una fácil referencia.
• No deje a los niños solos; éstos no deben
quedar solos o sin atención en un área
donde un artefacto esté en uso. Nunca
debe permitirse que se sienten o se paren en
cualquier parte de este artefacto.
• Enseñe a los niños que no deben jugar con
los controles u otras piezas del anafe.
• No permita que nadie se suba, se pare o se
cuelgue del anafe.
•
PRECAUCIÓN: Ciertos productos
de interés para los niños no deben guardarse
en gabinetes sobre el anafe: los niños que se
suban sobre el anafe para alcanzar elementos
pueden lesionarse gravemente.
•
Siempre mantenga las coberturas de pared
combustibles, cortinas o persianas a una
distancia prudencial de su anafe.
•
Siempre mantenga repasadores, agarraderas
y otras telas a una distancia prudencial
del anafe.
•
Siempre mantenga utensilios de madera y
plástico y alimentos enlatados a una
distancia prudencial del anafe. Pueden
calentarse y provocar quemaduras.
•
Nunca use vestimentas holgadas o amplias
mientras utilice este artefacto. El material
inflamable puede incendiarse si entra en
contacto directo con los elementos de
superficie calientes, lo que puede provocar
quemaduras graves.
•
Use sólo agarraderas secas: las agarraderas
húmedas o mojadas colocadas en superficies
calientes pueden provocar quemaduras de
vapor. No permita que las agarraderas entren
en contacto con los elementos de superficie.
No use una toalla u otra tela gruesa. Esas telas
pueden prenderse fuego sobre un elemento
de superficie caliente.
•
No utilice agua en incendios de grasa. Nunca
levante una sartén en llamas. Apague los
controles. Apague una sartén en llamas sobre
un elemento de superficie cubriendo la sartén
por completo con una tapa que se ajuste bien,
una plancha para galletas o una bandeja
plana. Utilice un extintor químico seco multiuso
o de tipo espumoso.
La grasa en llamas fuera de una sartén puede
apagarse cubriéndola con bicarbonato de
sodio o, si estuviera disponible, un extintor
químico seco multiuso o de tipo espumoso.
•
Si flambea alimentos bajo la campana,
encienda la ventilación.
•
Cocine carnes rojas y de ave por completo:
Carnes rojas hasta alcanzar una
temperatura INTERNA de por lo menos 160°F
y las carnes de ave a una temperatura
INTERNA de por lo menos 180°F. La cocción a
estas temperaturas generalmente protege
de enfermedades transmitidas por los
alimentos.
PRECAUCIONES DE SEGURIDAD
Page 61

61
INFORMACIÓN IMPORTANTE DE SEGURIDAD
• No toque los elementos de superficie
vitrocerámicos mientras cocine. Esta
superficie puede estar lo suficientemente
caliente para quemar aún cuando puede
parecer de color oscuro. Durante y después
del uso, no toque ni deje que vestimenta u
otros materiales inflamables hagan contacto
con la superficie de cocción. Note las luces
indicadoras de caliente y deje suficiente
tiempo para enfriar.
Las superficies calientes pueden incluir
el anafe y las áreas frente a él.
• Para minimizar la posibilidad de
quemaduras, el encendido de materiales
inflamables y los derrames, la manija del
recipiente debe girarse hacia el centro del
anafe sin sobrepasarse a ningún elemento
de superficie cercano.
• Siempre apague el control del elemento de
superficie antes de quitar los recipientes de
cocción.
• Nunca deje elementos de superficie
desatendidos en configuraciones de calor
altas. Los alimentos que hierven y se
derraman pueden provocar humo y los
derrames grasosos pueden prenderse fuego.
• Siempre esté atento a los alimentos que se
están friendo en configuraciones de calor
altas o medianas.
• Los alimentos que vayan a freírse deben
estar bien secos. La escarcha en alimentos
congelados o la humedad en alimentos
frescos pueden provocar que la grasa
caliente chisporrotee por los costados
del recipiente.
• Utilice poca grasa para lograr una fritura
efectiva. Llenar los recipientes con
demasiada grasa puede generar derrames
cuando se agregan los alimentos.
• Si va a utilizar una combinación de aceites
y grasas para freír, mézclelos antes de
calentar mientras las grasas se derriten
lentamente.
• Siempre caliente la grasa lentamente,
y préstele atención mientras se calienta.
• Utilice un termómetro para grasas cuando
sea posible para evitar sobrecalentarla más
allá del punto de ahumado.
• Nunca trate de trasladar un recipiente
lleno de grasa caliente, especialmente una
freidora. Espere a que la grasa se enfríe.
• No almacene materiales inflamables cerca
del anafe.
• Conserve la campana y filtros de grasa
limpios para mantener una buena
ventilación y para evitar incendios
provocados por la grasa.
• No almacene o use materiales
combustibles, gasolina u otros vapores o
líquidos inflamables cerca de este o
cualquier otro artefacto.
• Limpie sólo las partes listadas en el Manual
del propietario.
• No deje productos de papel, utensilios de
cocina o alimentos sobre el anafe cuando
no lo esté usando.
• Mantenga el anafe limpio y libre de
acumulaciones de grasa o derrames que
puedan prenderse fuego.
• Nunca caliente recipientes de comida
cerrados. La acumulación de presión puede
hacer que el recipiente explote y provoque
lesiones.
• Nunca deje frascos o latas con restos
de grasa sobre o cerca del anafe.
• Nunca use su artefacto para calentar
la habitación.
PRECAUCIONES DE SEGURIDAD
Page 62

62
INFORMACIÓN IMPORTANTE DE SEGURIDAD
• Evite rayar el anafe de vidrio. El anafe
puede rayarse con elementos como
instrumentos filosos, anillos u otras joyas.
• Nunca use la superficie de vidrio del anafe
como una tabla para cortar.
• No coloque o almacene productos sobre la
superficie de vidrio del anafe cuando no lo
esté usando.
• Tenga cuidado al colocar cucharas u otros
utensilios para mezclar sobre la superficie
de vidrio del anafe cuando esté en uso.
Pueden calentarse y provocar quemaduras.
• No caliente un recipiente vacío. Hacerlo
puede dañar el anafe y el recipiente.
• No permita la acumulación de agua, otros
líquidos o grasa sobre el anafe.
• No utilice los elementos de superficie de
vidrio si el vidrio está roto. Los derrames o
la solución de limpieza pueden penetrar
el anafe roto y crear un riesgo de descarga
eléctrica. Si su anafe de vidrio se rompe,
comuníquese con un técnico calificado
inmediatamente.
• Los alimentos derramados o quemados
pueden provocar la activación o
desactivación accidental del teclado.
Limpie bien el teclado y los controles
volverán a funcionar de manera normal.
• Limpie el anafe con cuidado. Siempre
bloquee el panel de control utilizando la
característica de bloqueo de control y espere
hasta que toda la superficie de vidrio se
enfríe antes de limpiar el anafe. Para más
detalles, ver la sección Cómo bloquear el
anafe. Si se utiliza una esponja o un paño
para limpiar derrames sobre un elemento de
superficie caliente, tenga cuidado de evitar
quemaduras de vapor. Algunos limpiadores
pueden producir humos tóxicos si se los
aplica a una superficie caliente.
NOTA: Recomendamos que evite limpiar
los elementos de superficie hasta que se
hayan enfriado y la luz indicadora se haya
apagado. Los derrames de azúcar son la
excepción. Por favor, vea la sección Cómo
limpiar el anafe de vidrio.
• Para evitar posibles daños a la superficie
de cocción, no aplique la crema de limpieza
a la superficie de vidrio cuando esté
caliente.
• Después de la limpieza, use un paño seco o
una toalla de papel para quitar los restos
de crema de limpieza.
• Lea y cumpla con todas las instrucciones y
advertencias de las etiquetas de las
cremas de limpieza.
• Los rayones o impactos sobre anafes
pueden romper o trizar el vidrio.
• Tenga cuidado al tocar el anafe. La
superficie de vidrio del anafe retendrá calor
después de que los controles se hayan
apagado (OFF).
• No se pare sobre el anafe de vidrio.
GUARDE ESTAS INSTRUCCIONES
ELEMENTOS DE SUPERFICIE DE INDUCCIÓN
Page 63

Características de su anafe
Anafe de inducción
Características
(A lo largo de este
manual, las
características y
apariencia pueden ser
diferentes a las de su
modelo.)
63
Índice de características Página
1 Elementos de cocción 68
2 Bloqueo de control 72
3 Temporizador de minuto 71
4 Luz indicadora de encendido (ON) (una por cada elemento) 70
5 Área de luz indicadora de superficie caliente 71
6 Control de encendido/apagado (ON/OFF) del elemento de cocción 68
ZHU36 – Anafes de 36”
1
5
2
4
3
6
Page 64

64
Características de su anafe
Anafe de inducción
Características
(A lo largo de este
manual, las
características y
apariencia pueden ser
diferentes a las de su
modelo.)
NOTA: Los modelos de 30” cuentan con
indicadores de ubicación de elemento de cocción
al lado de cada control.
1
2
3
5
Índice de características Página
1 Elementos de cocción 62
2 Bloqueo de control 68
3 Temporizador de minuto 65
4 Luz indicadora de encendido (ON) (una por cada elemento) 62
5 Área de luz indicadora de superficie caliente 62
6 Control de encendido/apagado (ON/OFF) del elemento de cocción 62
ZHU30 – Anafes de 30″
6
4
Page 65

65
Cada elemento de cocción requiere un tamaño de
recipiente MÍNIMO. Si el recipiente se centra de
manera adecuada, y es del material correcto, pero
es muy pequeño para el elemento de cocción, el
elemento no puede activarse. En la pantalla
destellará “F” junto con el nivel de energía
seleccionado.
Pueden utilizarse elementos de cocción más
grandes que el anillo del elemento; sin embargo, el
calor se generará sólo por encima del elemento.
Para mejores resultados, el recipiente debe hacer
contacto TOTAL con la superficie de vidrio.
No permita que la parte inferior del recipiente de
cocción toque los rebordes de metal que rodean el
anafe o que queden sobre los controles del anafe.
Para un mejor desempeño, ajuste el tamaño del
recipiente al tamaño del elemento. Usar una olla
más pequeña sobre un quemador más grande
genera menos energía en cualquier configuración.
Cómo usar su anafe
Anafe de inducción
Cómo funciona la cocción por inducción
Los elementos ubicados debajo de la superficie
de cocción producen un campo magnético, lo
que hace que el recipiente de metal ferroso
vibre y produzca calor.
La superficie de cocción misma no se calienta. El
calor se produce en el recipiente de cocción y no
puede generarse hasta que se coloque el
recipiente en la superficie de cocción.
Cuando se activa el elemento, el recipiente
comienza a calentarse de inmediato y a su vez
calienta el contenido del recipiente.
La cocción por inducción magnética requiere el
uso de recipientes de cocción hechos de metales
ferrosos; metales a los que se adhieren los
imanes, como hierro o acero.
Utilice recipientes que se ajusten al tamaño del
elemento. El recipiente debe ser lo
suficientemente grande para que el sensor de
seguridad pueda activar un elemento.
El anafe no comenzará a funcionar si un utensilio
de acero o hierro pequeño (menor al tamaño
mínimo de la parte inferior) se coloca sobre la
superficie de cocción cuando se enciende la
unidad—elementos tales como espátulas
de acero, cucharas, cuchillos u otros utensilios
pequeños.
Cómo usar
el tamaño
correcto
de recipiente
5-3/4” Min. Dia.
Tamaño del
recipiente
5-3/4” Min. Dia.
Tamaño del
recipiente
5-3/4” Min. Dia.
Tamaño del
recipiente
5-3/4” Min. Dia.
Tamaño del
recipiente
4-3/4” Min.
Dia. Tamaño
del recipiente
7” Min. Dia.
Tamaño del
recipiente
4-3/4” Min.
Dia. Tamaño
del recipiente
7” Min. Dia.
Tamaño del
recipiente
7” Min. Dia.
Tamaño del
recipiente
Anafe de 30” de ancho. Utilice el recipiente de tamaño
mínimo ilustrado para cada elemento de cocción.
Anafe de 36” de ancho. Utilice el recipiente de tamaño mínimo
ilustrado para cada elemento de cocción.
Utilice el recipiente de tamaño mínimo
para el elemento. El material del recipiente
de cocción es el correcto si un imán puede
pegarse a la base.
Tamaño
mínimo
Page 66

66
Cómo elegir
el mejor
recipiente
de cocción
Los recipientes deben hacen contacto total sobre
la superficie del elemento de cocción.
Utilice recipientes de base plana del tamaño
adecuado para el elemento de cocción y también
adecuado para la cantidad de alimentos que se
están preparando.
PRECAUCIÓN:
• Los elementos de cocción pueden parecer fríos
cuando están encendidos (ON) y después de que
se han apagado (OFF). La superficie de vidrio
puede estar CALIENTE debido a calor residual
transferido del recipiente de cocción y pueden
provocarse quemaduras.
• NO TOQUE RECIPIENTES DE COCCIÓN CALIENTES
directamente con sus manos. Siempre use
guantes de cocina o agarraderas para proteger
las manos de quemaduras.
• NO DESLICE recipientes de cocción a través
de la superficie del anafe. Hacerlo puede dañar
permanentemente la apariencia del anafe
de cerámica.
Cómo usar su anafe
Anafe de inducción
El recipiente de cocción no está
centrado en la superficie del
elemento de cocción.
Bases o lados del recipiente
de cocción curvados o torcidos.
El recipiente no cumple con el
tamaño mínimo requerido para
el elemento de cocción utilizado.
El recipiente de cocción está
centrado correctamente en la
superficie del elemento de
cocción.
Base de recipiente plana.
El tamaño del elemento cumple
con el tamaño mínimo
recomendado, o lo supera, para
el elemento de cocción utilizado.
INCORRECTO
CORRECTO
La base del recipiente está
apoyada sobre un reborde del
anafe o no se apoya por
completo sobre la superficie del
anafe.
Una manija pesada inclina
el recipiente.
La base del recipiente se apoya
completamente sobre la
superficie del anafe.
El recipiente está bien
equilibrado.
Page 67

67
Cómo usar su anafe
Anafe de inducción
No coloque recipientes o tapas mojadas sobre la
superficie de cocción o los anillos de inducción.
No coloque dedos mojados sobre el anafe de vidrio.
Limpie derrames sobre los controles con las manos
secas.
No use woks con anillos de soporte. Esta clase de
wok no se calienta sobre un elemento de inducción.
Use solamente un wok de base plana, disponible en
varios fabricantes de recipientes de cocción. La
base del wok debe ser igual al diámetro del anillo de
inducción para garantizar un contacto adecuado.
Algunos procedimientos especiales de cocción
requieren recipientes de cocción específicos tales
como ollas de presión, freidoras, etc. Los recipientes
con bases planas iguales al tamaño del elemento
de superficie arrojarán los mejores resultados.
Para
mejores
resultados
Recipientes
de cocción
adecuados
Utilice recipientes de cocción de calidad con
bases más pesadas para lograr una mejor
distribución del calor y resultados de cocción
parejos. Elija recipientes de cocción hechos de
acero inoxidable magnético, hierro fundido
esmaltado, acero esmaltado y combinaciones de
estos materiales.
Algunos recipientes de cocción están
específicamente identificados por el fabricante
para utilizar con anafes de inducción. Utilice un
imán para comprobar que el recipiente sea
el adecuado.
Los recipientes de base plana dan los mejores
resultados. Pueden utilizarse recipientes con
bordes o pequeños rebordes.
Los recipientes redondos dan los mejores
resultados. Los recipientes con bases torcidas o
curvadas no calentarán de manera pareja.
Para cocinar con wok, utilice uno con base plana.
No utilice un wok con un anillo de soporte.
“Ruidos” de recipientes de cocción
Diferentes tipos de recipientes de cocción
pueden producir sonidos suaves. Los recipientes
más pesados como los de hierro fundido
esmaltado producen menos ruido que los
recipientes más livianos de acero inoxidable de
capas múltiples. El tamaño del recipiente y la
cantidad de contenidos también pueden
contribuir al nivel de sonido.
Cuando se usan elementos cercanos que están
programados en configuraciones de energía
determinadas, los campos magnéticos pueden
interactuar y producir un silbido bajo o un
“zumbido” intermitente. Estos ruidos pueden
reducirse o eliminarse bajando o subiendo las
configuraciones de nivel de energía de uno o
ambos elementos. Los recipientes que cubren por
completo el anillo del elemento producen menos
ruido.
Un “zumbido” bajo resulta normal
particularmente en configuraciones altas.
Utilice un wok de base plana.
Utilice una plancha.
Utilice recipientes
de base plana.
Page 68

68
Cómo usar
los controles
táctiles
Cómo usar su anafe
Anafe de inducción
Elementos
de cocción
Presione la almohadilla suavemente con la parte
plana de la yema del dedo. Presione el centro de
la almohadilla para garantizar la respuesta del
anafe.
Podrá escucharse un pitido con cada presión
sobre las almohadillas.
Cada uno de los elementos de cocción cuenta con
almohadillas de encendido/ apagado (ON/OFF) y
una pantalla de LED.
Asegúrese de utilizar recipientes de cocción que
cumplan con los requerimientos de tamaño
mínimo.
Para encender un elemento de cocción:
1 Coloque un recipiente con alimentos sobre el
elemento de inducción. El tamaño de recipiente
debe ser similar al anillo indicador.
2 Presione la almohadilla encendido/ apagado
(ON/OFF). En la pantalla podrá verse “5”.
3 Presione la almohadilla (+) o (-) para seleccionar el
nivel de energía y para activar el elemento de
inducción. Se oirá un pitido. Debe presionarse la
almohadilla (+) o (-) dentro de los 10 segundos para
activar el elemento.
NOTA: Usted también puede presionar y sostener la
almohadilla para pasar más rápidamente a la
configuración deseada.
El circuito de inducción detecta el recipiente y permite
que se active el elemento. Se iluminarán la luz
indicadora de encendido (ON) del elemento y la luz del
anafe de SUPERFICIE CALIENTE (HOT SURFACE). Si no
se elige un nivel de energía dentro de los 10 segundos,
la zona quedará desactivada.
Para apagar el control (OFF), presione la almohadilla
ON/OFF (encendido/apagado). El elemento de
inducción se apagará y la pantalla quedará en blanco.
Con un control de elemento encendido (ON):
Si el recipiente se quita o se desplaza fuera del centro
del anillo de cocción, el control destellará “F” junto a la
configuración de energía. Después de 30 segundos, el
elemento se desactivará y las pantallas se apagarán.
Si el recipiente se vuelve a colocar en la zona dentro
de los 30 segundos, el destello se detendrá y
continuará la cocción.
Page 69

Cómo usar su anafe
Anafe de inducción
69
Configuraciones
de nivel de
energía
El anafe cuenta con 19 niveles de energía, además
de una configuración de impulso (Boost). Los
niveles de energía van desde "L" hasta 9 en
precisos incrementos de medio paso. Por ejemplo:
1, 1-1/2, 2, 2-1/2 y hasta el nivel de energía 9.
Se recomienda el nivel de energía de “L”, la
configuración más baja, para “mantener caliente”.
El nivel de energía aumenta de a medio nivel con
cada presión.
El nivel de energía 9 es la configuración de
energía normal más elevada.
El nivel de energía con una fracción indica la
configuración adicional de medio paso.
Destella "F”
en la
pantalla
Si un recipiente se quita o se desplaza fuera del
centro del anillo de cocción durante el proceso
de cocción, el control destellará “F” junto a la
configuración de energía. La “F” que destella
indica que ya no se detecta el recipiente.
Después de 30 segundos, el elemento se
desactivará y las pantallas se apagarán.
Si el recipiente se vuelve a colocar en el elemento
de superficie dentro de los 30 segundos, la "F”
desaparecerá y continuará la cocción.
Configuración
de impulso
(Boost)
El nivel de impulso es el más elevado, diseñado para
cocción y hervor rápidos de grandes cantidades.
El impulso funciona durante un máximo de 10
minutos. Después de 10 minutos, cambiará al nivel
9 de manera automática.
El impulso puede repetirse después del ciclo inicial
de 10 minutos.
PRECAUCIÓN: No deje una olla sin atención
mientras se esté usando el modo impulso.
Para iniciar la configuración de energía de
impulso (Boost):
1 Coloque una olla del mismo tamaño del elemento
de inducción sobre el anillo indicador
seleccionado.
2 Presione la almohadilla ON/OFF (encendido/
apagado). En la pantalla podrá verse “5”.
3 Presione y sostenga la almohadilla (+) hasta que
pueda leerse “H” en la pantalla.
NOTA: Si se quita el recipiente, la pantalla destellará
“F” alternando con “H”. Después de 30 segundos, los
elementos se apagarán automáticamente.
Sonidos que puede llegar a oír:
Usted puede oír un “zumbido” suave cuando
cocine con el modo impulso (Boost) o alto. Esto
es normal. El sonido depende del tipo de olla
que se esté usando. Algunas ollas emitirán un
“zumbido” más fuerte dependiendo del material.
Puede oírse un “zumbido” si los contenidos del
recipiente están fríos. A medida que el recipiente
se caliente, el sonido desaparecerá. Si se reduce
el nivel de energía, el nivel de sonido disminuirá.
1/2
Page 70

70
Cómo usar su anafe
Anafe de inducción
Distribución
de energía
Los anafes de cuatro quemadores están divididos en
dos zonas de calentamiento individuales. Las zonas de
cocción de lado derecho e izquierdo cuentan con
generadores de inducción separados e independientes.
Un generador controla 2 elementos, o dos zonas de
cocción dentro de una sección de calentamiento
comparten la energía de un generador.
Los anafes de cinco quemadores están divididos en 3
zonas. Los lados derecho e izquierdo tienen zonas de
cocción separadas y el elemento central grande es otra
zona de cocción individual. La distribución de energía se
activa cuando ambos elementos de la misma zona de
cocción se activan y un elemento se configura para
Impulso (H). El elemento que no esté configurado para
Impulso cambiará a un nivel de energía más bajo. Esto se
denomina distribución de energía. Cuando la operación
de impulso haya finalizado (10 minutos), el otro elemento
puede reconfigurarse para cualquier nivel de energía.
Ambos elementos pueden funcionar de manera
simultánea a niveles de energía normales de “L” a 9.
Anafe de 4 quemadores con generadores
de inducción de lados derecho e izquierdo (2).
Anafe de 5 quemadores con generadores
de inducción de lados derecho, izquierdo y central (3).
Cómo usar la
configuración
baja “L”
1 Coloque un recipiente con alimentos sobre el
elemento de inducción. El tamaño de recipiente debe
ser similar al anillo indicador.
2 Presione la almohadilla ON/OFF (encendido/ apagado).
En la pantalla podrá verse “5”.
3 Presione la almohadilla (-) hasta que en la pantalla
pueda verse “L”. Se escuchará un pitido.
No utilice envoltorios plásticos para cubrir alimentos. El
plástico puede derretirse en la superficie y será muy
difícil limpiarlo.
Utilice sólo los recipientes recomendados para este
anafe.
La configuración baja (Low) mantendrá alimentos
calientes y cocidos a una temperatura de servicio.
Siempre empiece con alimentos calientes. No lo utilice
para calentar alimentos fríos.
Colocar alimentos sin cocer o fríos en un elemento de
superficie en configuración baja puede provocar
enfermedades transmitidas por los alimentos.
PRECAUCIÓN: No caliente alimentos en
el nivel de energía “L” por más de
dos horas.
NOTA IMPORTANTE PARA LOS MODELOS DE
CUATRO QUEMADORES:
Los elementos del lado derecho comparten un
generador. Ambos elementos pueden funcionar en
cualquier nivel de energía que no sea Impulso (nivel L
a 9) al mismo tiempo. Si el elemento frontal grande
está configurado para “H” o Impulso, el elemento más
pequeño trasero derecho se desactivará o se apagará
automáticamente. El elemento trasero derecho más
pequeño puede activarse y configurarse en cualquier
nivel de energía después de que la operación de
Impulso del elemento más grande haya finalizado
(10 minutos).
Para mejores resultados, todos los alimentos
para configuración Baja deben cubrirse con una
tapa o papel de aluminio. Los pastelitos y panes
deben ventilarse para permitir la salida del vapor.
Siempre utilice agarraderas o guantes de cocina
cuando quita alimentos del elemento
configurado en Baja ya que los recipientes y los
platos estarán calientes.
Page 71

71
Cómo usar su anafe
Anafe de inducción
Cómo usar el
temporizador
de cocina
NOTA: Utilice el temporizador de cocina para medir el
tiempo de cocción o como un recordatorio. El
temporizador de cocina no controla los elementos de
cocción.
1 Presione la almohadilla de ON/OFF
(encendido/apagado) del temporizador.
2 Presione la almohadilla (+) o (-) para elegir la
cantidad deseada de minutos. Cuando se
sostiene la almohadilla (+) o (-) durante varios
segundos, el temporizador subirá o bajará a una
velocidad mayor. El temporizador comenzará a
hacer una cuenta regresiva automática de los
minutos que ha seleccionado dentro de los 5
segundos del último ingreso. La pantalla
mostrará los minutos y destellará un “ .“
3 El temporizador muestra los minutos restantes
hasta que alcanza un minuto. En un minuto, el
temporizador emitirá un pitido y comenzará a
hacer una cuenta regresiva de segundos.
Cuando reste un minuto, el temporizador emitirá
un pitido cada 10 segundos. Cuando haya
finalizado todo el tiempo, el temporizador dará un
pitido largo y la pantalla quedará en blanco.
Presione la almohadilla ON/OFF para apagar el
temporizador en cualquier momento. Presione (+) o
(-) para sumar o restar el tiempo configurado.
Luz
indicadora
de superficie
caliente
Una luz indicadora de SUPERFICIE CALIENTE (HOT
SURFACE) (una para cada elemento de cocción) se
encenderá inmediatamente cuando se active
cualquier elemento. Las luces indicadoras se
encienden cuando la superficie de vidrio está caliente,
y permanecerán encendidas hasta que la superficie
se haya enfriado a una temperatura segura para
tocar.
Page 72

72
Alertas de
error (destello
de “E”/”c” y
“E” “o”)
Los alertas de error indican un problema temporal
que el usuario puede corregir.
Limpiar el teclado (Clear Keypad)—Si en la pantalla
destella “E” alternando con “c”, el teclado detecta
una activación continua del una o más teclas. Limpie
o quite las obstrucciones del área de teclado. Las
obstrucciones pueden ser agua, derrames de
alimentos, un utensilio u otros objetos.
Para reanudar la cocción, presione la almohadilla
ON/OFF (encendido/apagado), luego seleccione el
nivel de energía.
Temperatura excesiva (Over Temperature)—Si en la
pantalla destella “E” alternando con “o”, el sensor el
anafe indica que el elemento de inducción o los
elementos electrónicos se han sobrecalentado.
El sobrecalentamiento del elemento se provoca al
colocar un recipiente vacío sobre el elemento y
seleccionar un nivel de energía elevado. El sensor del
elemento detecta temperaturas muy elevadas (por
encima de la temperaturas normales de cocción),
apaga la energía y muestra el error. Una segunda
causa potencial de este error es la falta de aire de
enfriamiento en la parte inferior del anafe, lo que
puede provocar un sobrecalentamiento de los
elementos electrónicos. Si esto ocurre, verifique que
la toma de aire ubicada debajo del anafe no esté
obstruida.
Presione la almohadilla ON/OFF (encendido/
apagado) y deje enfriar el anafe durante 30 a 45
minutos antes de reanudar el funcionamiento.
Si alguna de estas condiciones continúa, llame al
servicio técnico.
IMPORTANTE: Si la “E” destella sola, sin alternar
con “c” o “o”, ha ocurrido un error de hardware.
Llame al servicio técnico.
Cómo usar su anafe
Anafe de inducción
Bloqueo
de control
IMPORTANTE: Como una comodidad, usted puede
bloquear todo el anafe en cualquier momento
cuando no esté en uso o antes de la limpieza.
Bloquear el anafe evitará que los elementos de
superficie se enciendan accidentalmente.
Para bloquear el anafe:
Presione y sostenga la almohadilla de BLOQUEO DE
CONTROL (CONTROL LOCK) durante 5 segundos.
Se emitirá una señal sonora de dos pitidos, y la luz
de BLOQUEO DE CONTROL se encenderá, indicando
que el anafe está bloqueado.
Si el anafe se bloquea mientras un elemento de
superficie se encuentra en uso, éste se apagará
automáticamente.
El BLOQUEO DE CONTROL no afecta el
temporizador. Si el bloqueo de control se configura
mientras el temporizador está haciendo la cuenta
regresiva, continuará funcionando.
Para desbloquear el anafe:
Presione y sostenga la almohadilla de BLOQUEO DE
CONTROL (CONTROL LOCK) de nuevo durante 5
segundos. Se emitirá una señal sonora de dos
pitidos, y la luz de BLOQUEO DE CONTROL se
apagará, indicando que el anafe está desbloqueado.
Page 73

73
Cómo usar su anafe
Anafe de inducción
Preste
atención a los
siguientes
puntos
cuando realice
conservas
Cuando utilice recipientes con baño de maría o de
presión, pueden utilizarse ollas de gran diámetro.
Esto se debe a que las temperaturas del agua
hirviendo (incluso bajo presión) no son dañinas
para las superficies de cocción que rodean los
elementos de superficie.
SIN EMBARGO, NO USE OLLAS PARA CONSERVA DE
DIÁMETRO GRANDE U OTRAS OLLAS DE DIÁMETRO
GRANDE PARA FREÍR O HERVIR ALIMENTOS QUE
NO SEAN AGUA. La mayoría de los jarabes y las
mezclas de salsas—y todas las clases de frituras—
se cocinan a temperaturas mucho más elevadas
que el agua hirviendo. Con el tiempo, dichas
temperaturas podrían dañar las superficies del
anafe de vidrio.
1 Asegúrese de que la olla para conservas calce
bien sobre el centro del elemento de superficie.
Si su anafe o su ubicación no permiten que la
olla de conservas quede centrada en el
elemento de superficie, use ollas de menor
diámetro para mejores resultados de
conservas.
2 Deben utilizarse ollas para conserva de base
plana. No utilice ollas para conserva con bases
rebordeadas u ondeadas (comunes en
recipientes esmaltados) porque no hacen el
contacto suficiente con los elementos de
superficie y tardan mucho tiempo en hervir
agua.
3 Cuando haga conservas, utilice recetas y
procedimientos provenientes de fuentes
confiables. El fabricante de su olla para
conservas ofrece recetas y procedimientos
confiables, al igual que los fabricantes de
frascos para conservas, como la marca Ball
and Kerr, y el Servicio de Extensión del
Ministerio de Agricultura de los Estados Unidos.
4 Recuerde que realizar conservas es un proceso
que genera grandes cantidades de vapor. Para
evitar quemaduras de vapor o calor, tenga
cuidado al realizar conservas.
Nota: Se requieren ollas para
conservas de base plana para los
anafes de vidrio.
¡Incorrecto!
¡Correcto!
NOTA: Si su hogar tiene voltaje bajo, las
conservas pueden tardar más de lo esperado,
aún cuando se han seguido las instrucciones
cuidadosamente. El tiempo de procesamiento se
acortará:
(1) usando una olla de presión, y
(2) comenzando con agua del grifo CALIENTE
para un calentamiento más rápido de
grandes cantidades de agua.
PRECAUCIÓN:
• Una realización segura de conservas requiere
que se destruyan microorganismos nocivos y
que los frascos se sellen por completo. Cuando
haga conservas de alimentos en una olla con
baño de maría, debe mantenerse un hervor
suave pero constante por el tiempo requerido.
Cuando haga conservas en una olla de
presión, la presión debe mantenerse por el
tiempo requerido.
• Después de que haya ajustado los controles,
es muy importante garantizar que el hervor
indicado o los niveles de presión se
mantengan durante el tiempo requerido.
• Ya que debe asegurarse de procesar los
frascos para conservas durante el tiempo
indicado, sin interrupción en el tiempo de
procesamiento, no haga conservas en un
elemento de superficie del anafe si su olla no
es plana.
Page 74

74
Cuidado y limpieza
Anafe de inducción
Almohadilla de bloqueo de control
Como una comodidad, usted puede bloquear
todo el anafe en cualquier momento cuando no
esté en uso o antes de la limpieza.
Bloquear el anafe evitará que los elementos de
superficie se enciendan accidentalmente.
Comience bloqueando el anafe; ver Bloqueo de
control.
Cómo quitar el
envoltorio de
protección y la
cinta de embalaje
Con cuidado tome una punta del envoltorio de
protección con sus dedos y lentamente quítelo de
la superficie del artefacto. No use elementos filosos
para quitar el envoltorio. Quite todo el envoltorio
antes de usar el artefacto por primera vez.
Para asegurarse de no dañar la terminación de
producto, la mejor forma de quitar el pegamento de
la cinta de embalaje de los artefactos nuevos
consiste en aplicar detergente líquido común.
Aplique con un paño suave y deje remojar.
NOTA: Se debe retirar el adhesivo de todas las
partes antes de usar el anafe. Si se derrite será
imposible de quitar.
Limpieza
normal de
uso diario
Use limpiador de anafes de cerámica CERAMA
BRYTE®en su anafe de vidrio.
Para mantener y proteger la superficie de su anafe
de vidrio, siga estos pasos:
1 Antes de usar el anafe por primera vez, límpielo
con limpiador de anafes de cerámica CERAMA
BRYTE®. Esto ayuda a proteger el anafe y hace
la limpieza más sencilla.
2 El uso diario del limpiador de anafes de cerámica
CERAMA BRYTE®ayudará a mantener el artefacto
como nuevo.
3 Sacuda bien la crema de limpieza. Aplique unas
gotas de limpiador de anafes de cerámica
CERAMA BRYTE
®
directamente sobre el anafe.
4 Utilice una toalla de papel o un paño de limpieza
para anafes de cerámica CERAMA BRYTE
®
para
limpiar toda la superficie del anafe.
5 Use un paño seco o una toalla de papel para
quitar los restos del limpiador. No hace falta
enjuagar.
NOTA: Es muy importante que NO CALIENTE
el anafe hasta que lo haya limpiado por
completo.
Limpie el anafe después de cada
derrame. Utilice el limpiador de
anafes de cerámica CERAMA BRYTE®.
Asegúrese de que la energía eléctrica esté apagada y que todas las superficies estén frías antes de limpiar cualquier
parte del anafe.
Page 75

75
Cuidado y limpieza
Anafe de inducción
Residuos
pegados
ADVERTENCIA: Usted puede DAÑAR la superficie
de vidrio si utiliza esponjillas que no sean las
recomendadas.
1 Deje enfriar el anafe.
2 Coloque unas gotas de limpiador de anafes de
cerámica CERAMA BRYTE®sobre toda el área
de residuos pegados.
3 Utilizando el paño de limpieza para anafes de
cerámica CERAMA BRYTE®incluida, frote el
área sucia aplicando presión según sea
necesario.
4 Si quedan restos, repita los pasos indicados con
anterioridad.
5 Para protección adicional, después de haber
quitado todos los restos, pula toda la superficie
con limpiador de anafes de cerámica CERAMA
BRYTE®y una toalla de papel.
Utilice un paño de limpieza para anafes
de cerámica CERAMA BRYTE®o un
paño de restregar azul suave
multipropósitos Scotch-Brite®.
Residuos
pegados
rebeldes
1 Deje enfriar el anafe.
2 Utilice la rasqueta de filo único a un ángulo
aproximado de 45° contra la superficie del
vidrio y rasque la suciedad. Puede ser
necesario aplicar presión a la rasqueta para
quitar la suciedad.
3 Después de rascar con la rasqueta de filo,
coloque unas gotas de limpiador de anafes de
cerámica CERAMA BRYTE®sobre el área
de suciedad quemada. Utilice el paño de
limpieza para anafes de cerámica CERAMA
BRYTE®para quitar la suciedad restante.
4 Para protección adicional, después de haber
quitado todos los restos, pula toda la superficie
con limpiador de anafes de cerámica CERAMA
BRYTE®y una toalla de papel.
La rasqueta de anafes de cerámica
CERAMA BRYTE®y todos los insumos
recomendados se encuentran
disponibles en nuestro Centro de
Repuestos. Ver instrucciones bajo la
sección “Para solicitar repuestos” en
la página siguiente.
NOTA: No utilice hojas desafiladas o
dañadas.
Page 76

76
Cuidado y limpieza
Anafe de inducción
Superficie
de vidrio:
posibilidades de
daño permanente
Daños por derrames azucarados
y plástico derretido:
1 Apague todos los elementos de superficie. Quite
las ollas calientes.
2 Utilizando un guante de cocina:
a. Use una rasqueta de filo único (rasqueta para
anafes de cerámica CERAMABRYTE®) para
desplazar el derrame a un área fría sobre
el anafe.
b. Quite el derrame con toallas de papel.
3 Cualquier derrame restante debe dejarse hasta
que la superficie del anafe se haya enfriado.
4 No use los elementos de superficie de nuevo
hasta que todos los restos se haya quitado por
completo.
NOTA: Si la superficie de vidrio ya ha sufrido marcas
o hendiduras, el vidrio del anafe deberá cambiarse.
En este caso, será necesaria la atención de un
técnico.
Marcas de
metal y
rayones
1 Tenga cuidado de no deslizar ollas y sartenes a
través de su anafe. Dejará marcas de metal sobre
la superficie del anafe.
Estas marcas pueden quitarse utilizando el
limpiador de anafes de cerámica CERAMA
BRYTE®con el paño de limpieza para anafes
de cerámica CERAMA BRYTE®.
2 Si se permite que ollas con una capa fina de
aluminio o cobre hiervan en seco, la capa puede
dejar una decoloración negra en el anafe.
Esto debe quitarse de inmediato antes de
calentar de nuevo o la decoloración puede llegar
a ser permanente.
ADVERTENCIA: Verifique con cuidado que la base
de las ollas no sea áspera para no rayar el anafe.
Nuestras pruebas
demostraron que si se
cocinan mezclas con
niveles elevados de
azúcar, como jalea o
fudge, y se produce
un derrame, puede
provocarse un daño
permanente en la
superficie de vidrio a
menos que el derrame
se quite de inmediato.
Para solicitar el limpiador de anafes
de cerámica CERAMA BRYTE®y la rasqueta
de anafes, llame a nuestro número gratuito:
Centro nacional
de repuestos 800.626.2002
Limpiador de anafes
de cerámica
CERAMA BRYTE® . . . . . . . . . . . . .# WX10X300
Rasqueta de anafes
de cerámica
CERAMA BRYTE® . . . . . . . . . . . .# WX10X0302
Equipo . . . . . . . . . . . . . . . . . . . . . . . . .# WB64X5027
(El equipo incluye la
crema y la rasqueta)
Paños de limpieza para
anafes de cerámica
CERAMA BRYTE® . . . . . . . . . . . . .# WX10X350
Para solicitar
repuestos
Page 77

77
Preguntas?
Antes de
llamar al
servicio
técnico
Antes de llamar al servicio técnico
Anafe de inducción
CAUSAS POSIBLES
• Se está utilizando recipientes de cocción inadecuados. Use ollas
recomendadas para la inducción, con bases planas y del mismo
tamaño del elemento de superficie.
• Los controles del anafe están mal configurados. Verifique para
estar seguro de que se ha configurado el control correcto para el
elemento de superficie que está utilizando.
• Recipiente incorrecto. Use un imán para verificar que el
recipiente sea compatible con la inducción.
• El recipiente es muy pequeño. Destella una "F”: el tamaño del
recipiente es menor que el tamaño mínimo para el elemento.
Ver la sección Cómo usar el tamaño correcto de recipiente.
• El recipiente no está bien colocado. Centre el recipiente en el
anillo de cocción.
• Se están usando métodos de limpieza incorrectos. Utilice
procedimientos de limpieza recomendados. Ver la sección
Cuidado y limpieza.
• Se están usando recipientes con bases ásperas o hay partículas
gruesas (sal o arena) entre el recipiente y la superficie del anafe o se
ha deslizado un recipiente a través de la superficie del
anafe. Para evitar rayones, use los procedimientos de limpieza
recomendados. Verifique que las bases de los recipientes estén
limpias antes del uso, y utilice recipientes con bases lisas.
• No se limpiaron los derrames de alimentos antes del uso
siguiente. Ver la sección Cuidado y limpieza.
• Superficie caliente en un modelo con un anafe de vidrio de color
claro. Esto es normal. La superficie puede parecer decolorada
cuando está caliente. Esto es temporal y desaparecerá mientras
se enfría el vidrio.
• El anafe caliente entró en contacto con plástico. Ver la sección
Cuidado y limpieza.
• Se ha derramado una mezcla azucarada caliente en el anafe.
Llame a un técnico calificado para el reemplazo.
• El teclado está sucio. Limpie el teclado.
• El fusible puede haberse quemado o el disyuntor puede haber
saltado. Cambie el fusible o vuelva a configurar el disyuntor.
• Se está utilizando recipientes de cocción inadecuados. Use un
recipiente plano con capacidad de inducción que cumpla con el
tamaño mínimo para el elemento que se está usando. Ver la
sección Cómo usar el tamaño correcto de recipiente.
• El recipiente está mal colocado. Verifique que el recipiente esté
centrado en el elemento de superficie correspondiente.
• El control del anafe está mal configurado. Verifique que el control
esté bien configurado.
PROBLEMA
LOS ELEMENTOS DE
SUPERFICIE NO MANTIENEN
UN HERVOR CONSTANTE O
LA COCCIÓN ES LENTA
LOS ELEMENTOS DE
SUPERFICIE NO FUNCIONAN
BIEN
DESTELLA UNA "F”
RAYONES EN LA SUPERFICIE
DE VIDRIO DEL ANAFE
ÁREAS DE DECOLORACIÓN
EN EL ANAFE
PLÁSTICO DERRETIDO
SOBRE LA SUPERFICIE
MARCAS (O HENDIDURAS)
EN EL ANAFE
EL TECLADO NO RESPONDE
LA DETECCIÓN/MEDICIÓN
DE OLLAS NO ESTÁ
FUNCIONANDO DE MANERA
ADECUADA
Page 78

78
Preguntas?
Antes de
llamar al
servicio
técnico
Antes de llamar al servicio técnico
Anafe de inducción
CAUSAS POSIBLES
• Ha ocurrido un error de hardware. Llame al servicio técnico.
• Error de teclado; indica que debe limpiarse el teclado. Limpie el
área del teclado. Limpie derrames o quite los utensilios del área
del teclado.
• Temperatura excesiva; indica una temperatura excesiva en el
elemento de superficie o en los elementos electrónicos. Quite una
olla vacía del elemento de superficie. Deje que el anafe se enfríe
durante aproximadamente 30 minutos. Verifique que la
ventilación del sistema de enfriamiento bajo el anafe no esté
bloqueada.
PROBLEMA
LA PANTALLA DESTELLA "E”
SOLO (NINGUNA OTRA
LETRA)
LA PANTALLA DESTELLA
"E” ALTERNANDO CON “c”
LA PANTALLA DESTELLA "E”
ALTERNANDO CON “o”
Page 79

Con la compra de su nuevo artefacto Monogram, tenga la
tranquilidad de que si alguna vez necesita información o
asistencia de GE, estaremos listos para hacerlo. ¡Todo lo que
tiene que hacer es llamar en forma gratuita!
GE Answer
Center
®
800.626.2000
Cuando tenga una consulta sobre cualquier artefacto importante Monogram, el servicio de
información GE Answer Center®estará listo para ayudarlo. Su llamada—y su pregunta—serán
respondidas rápida y cortésmente. Y usted puede llamar en cualquier momento. El servicio GE
Answer Center®está abierto 24 horas al día, de lunes a sábado.
O
Visite nuestro sitio web: monogram.com
Servicio técnico
doméstico:
800.444.1845
Un profesional de servicio técnico de GE le brindará un servicio de reparación experto,
programado en un momento que resulte conveniente para usted. Muchas locaciones operadas
por la compañía de servicio técnico de GE le ofrecen un servicio en el día o al día siguiente, a
cuando sea conveniente para usted (7:00 a.m. a 10:00 p.m. días de semana, 8:00 a.m. a 6:00 p.m.
sábados y domingos). Nuestros técnicos capacitados en la fábrica conocen el artefacto por
completo, así que la mayor parte de las reparaciones puede efectuarse en sólo una visita.
Contratos de
servicio técnico
800.626.2224
Usted puede estar tranquilo de que el Servicio Técnico de GE estará allí para ayudarlo cuando
finalice su garantía. Adquiera un contrato GE mientras su garantía sigue vigente y recibirá un
descuento sustancial. Con un contrato de varios años, usted se asegura servicio técnico futuro
con los precios de hoy.
Piezas y
accesorios
800.626.2002
Las personas calificadas para arreglar sus propios artefactos pueden recibir las piezas o
accesorios directamente en sus hogares. El sistema de piezas de GE ofrece acceso a más de 47.000
repuestos…y todas las Piezas de Repuesto Genuinas de GE tienen garantía total. Se aceptan tarjetas
VISA, MasterCard y Discover.
Las instrucciones de mantenimiento del usuario incluidas en este manual cubren los
procedimientos a realizar por cualquier usuario. Cualquier otra clase de arreglos deben ser
efectuados por personal de servicio técnico calificado. Debe tenerse mucho cuidado, porque
los arreglos inadecuados pueden provocar un funcionamiento poco seguro.
Para clientes
con necesidades
especiales…
800.626.2000
GE le ofrece, en forma gratuita, un folleto para ayudar a planificar una
cocina libre de barreras para personas con movilidad limitada.
Los consumidores con problemas auditivos o de habla que tienen acceso a
un TDD (teléfono para sordomudos) o un teletipo convencional pueden
llamar al 800.TDD.GEAC (800.833.4322) para solicitar información o servicio
técnico.
Servicios al consumidor
Anafe de inducción
79
Page 80

Algunos estados/provincias no permiten la exclusión o limitación de daños incidentales o resultantes,
por lo tanto esta exclusión o limitación puede no aplicarse en su caso. Este garantía le otorga derechos
legales específicos y usted puede contar con otros derechos, que pueden variar de estado a
estado/provincia a provincia. Para conocer sus derechos legales en su estado/provincia, consulte
a su oficina del consumidor local o estatal/provincial o al Fiscal General de su estado.
Garante en los EE.UU.: General Electric Company, Louisville, KY 40225
Garante en Canadá: Mabe Canada Inc.
Garantía
Anafe de inducción
GARANTÍA DE SU ANAFE MONOGRAM
Abroche el comprobante de venta o cheque compensado aquí.
Se necesita una prueba de la fecha de compra original para
obtener servicio técnico cubierto por la garantía.
ELEMENTOS
CUBIERTOS
Desde la fecha
de compra
original
GARANTÍA LIMITADA DE UN AÑO
Durante un año a partir de la fecha original de compra, otorgaremos, en forma gratuita, piezas y
servicio técnico en su hogar para reparar o reemplazar cualquier parte de su anafe que falle
debido a defectos en la fabricación.
Esta garantía se extiende al comprador original y cualquier dueño posterior para productos adquiridos
para uso doméstico dentro de los 48 estados continentales, Hawai, Washington, D.C. o Canadá. Si el
producto se encuentra en una región donde no hay Servicio Técnico de GE, usted será responsable del
cargo del viaje o usted puede tener que llevar el producto a un Servicio Técnico Autorizado de GE para
efectuar la reparación. En Alaska la garantía es la misma salvo que es LIMITADA porque usted debe
pagar el envío del producto a la tienda de servicio técnico o los gastos de viaje del técnico hasta su
hogar.
Todo el servicio de garantía debe suministrarse por parte de nuestros Centros de Servicio de Fábrica o
por técnicos autorizados de Customer Care
®
durante un horario normal de trabajo.
Si su artefacto requiere servicio técnico, durante el período de garantía o después del mismo, en los
EE.UU. llame al 800.444.1845. En Canadá: 800.561.3344. Tenga el número de serie y de modelo a mano
cuando llame para solicitar un servicio técnico.
ELEMENTOS
NO CUBIERTOS
EXCLUSIÓN DE GARANTÍAS IMPLÍCITAS—Su único y exclusivo recurso es la
reparación del producto como se establece en la presente Garantía Limitada.
Las garantías implícitas, incluyendo garantías de comerciabilidad y aptitud para
un objetivo particular, se encuentran limitadas a un año o el período más corto
permitido por la ley.
• Visitas a su hogar para enseñarle a usar el
producto.
• Instalación, entrega o mantenimiento
inadecuados.
Si tiene un problema con la instalación,
comuníquese con su vendedor o instalador.
Usted es responsable de suministrar
adecuadas instalaciones eléctricas, de gas, de
salida y otras conexiones como se describe en
las Instrucciones de Instalación incluidas con
el producto.
• Reemplazo de fusibles domésticos o la
reconfiguración de disyuntores.
• Daños al producto debido a uso inadecuado o
abuso.
• Fallas del producto si se utiliza para un
objetivo diferente del previsto o se usa de
forma comercial.
• Daños al producto provocados por accidentes,
incendios, inundaciones o fuerza mayor.
• Daños incidentales o resultantes provocados
por posibles defectos en este artefacto.
• Daños provocados después de la entrega.
• Producto no accesible para prestar el servicio
técnico solicitado.
GE Consumer & Industrial
Appliances
General Electric Company
Louisville, KY 40225
monogram.com
 Loading...