

Page 1
,,. ,
.-
,.
36
%??iigz)”dor
!
I
-.\i
,.\
~,,
L
Page 2

---
Yournew MonogramTh’
convenienceand kitchen planningf]exibi]ity.Wlietl]cryOLIdime it forits
purity of design,practical storage arrangementsor assiduousattentionto
detail—orfor all of these reasons—you’llfind that yOLU-Monogram
refrigerator’s superiorblend of form and function will delight yoL[for
years to come.
The ZIS36N Monogram refrigerator was designed to providethe flexibility
to blend in with your kitchen cabinetry.Through a seriesof product and
trim kit choices, the Monogramrefrigerator can be beautifullyintegrated
into the kitchen.
The information on the following pages willhelp you operate and maintain
your refrigerator properly.
For more information, please refer to the following publications: ~
2f4-rvloo2
Product Planning and Installation Information
49-6445
Installation Instructions
49-6446
T’rimOptions and Instructions
These can be;btained from a GE Monogramdealer. For a listing of
dealers—or if you have other questions—please call the GE Answer
Center’ (800.626.2000).
refrigeratormakes an eloquentstatementof style,
!
Contents
Safety Instructions ........................4
Drawers.........................................
Food Storage Suggestions ............6
Storage Times
Icemaker
Tenlperatul”eCOntrOIS...................5
-.
Quick Serve’r’fSystem...................s
Shelves
Water Filter Accessory .................9
(h-c i.mdCleaning .................10, 1I
.......................................
..........................................
Condenser
Drawer/Co\~crRemoval .......12
Light Bui[>Repl;icemcnt ......11
Vacation Tips .......................]~
Pr[)blcnl
solver.....................14–16
........................
...... ............. .........
10
Installation
7
6
9
s
Adapter PIL~g........................13
Clearances............................13
Electrical Requil-ements.......13
GroundinU
Leveling
Appliance Registration .................3
Consumer Services .....................18
h40deland Serial Numbers...........3
wilI”12111ty
.................................
~............................
...............................
.... .......... .......................
13
13
13
19
Page 3
—-.
.
Read -thisbook carefully.
It isintended to help you operateand maintain yoLIrnewrefrigeratorproperly.
Keep ithandy for answersto your questions.
If yoL~don’t understand somethingor need more help, write (includeyour
phonenumber):
ConsumerAffairs
GE Appliances
AppliancePark
Louisville,KY 40225
‘Writedown themodelandserialnumber.
You’llsee them on a label on theright side,near the bottomof the fresh
food compartment.
These numbers are also on the Consumer ProductOwnership Registration
Card that came with your refrigerator.Before sendingin this card, please
write these numbershere:
Model Number
Serial Number
Use these numbers in any
correspondence or service calls
concerning your refrigerator.
Ifyou received a damagedrefrigerator...
Immediately contact the dealer (or builder) that sold yoLlthe refrigerator.
Savetime andmoney.Beforeyou requestservice...
Check the PI”oblemSolver in the back of this book. It lists causes of minor
operating problems that you can correct yourself.
If you needservice...
To obtain service, scc the
Consumer Services page in the
back 01this book.
We’re proud of our service and
want yOUto be pl(mxl. If’for SOmc
1.C:lSOI1Y(3LIWCIIOthapp}~Withthe
service YOLIreceive, he173are thl”ee
s[eps [0 k)]low for further help.
1;IRST.contact(11Cpcopk JV11O
scrviccd your :~ppiitllkk?,Explai!l
Why}’OUill”~110[
cases. [his wi11sol\’cthe problcnl.
pk’WX[.1111110S[
NEXT, if yoLlnre still not pleased,
write a]l the det:li]s—illc]tldillg
YOLI1.@lOnenLlnlber-to:
Managel-,Consumel”Relations
GE Appliances
Appliance Park
Louisville, KY 40225
FINALLY. if your problem is still
not resolved. write:
MajorApplimx ConsLlmcr
Action Panel
o()NO1-tllwi]~ker Drive
~llic:lg(~.IL 60606
—.
‘3
Page 4
——
IMPORTANTSAFETYINSTRUCTIONS
ReadAllInstructionsBeforeUsingThisAppliance.
WARNING—Whenusingthisappliance,
alwaysexercisebasicsafetyprecautions,
includingthefollowing:
eUsethis
as describedin thisUseandCareGuide.
~This
applianceonlyforitsintendedpurpose
refrigeratormustbeproperlyinstalledin
accordancewiththeInstallationInstructions
beforeitisused.See
Afteryourrefrigeratorisin operation,donot
e
theGroundingInstructions.
touchthecoldsurfacesinthefreezer
compartment,particularlywhenhandsare
dampor wet.
cold surfaces.
eD. not
Skinmay adhereto theseextremely
placefingersor handsontheautomatic
icemakingmechanismwhilethe refrigeratoris
pluggedin.
possibleinjury.It will alsopreventinterference
with themovingparts of theejectormechanism
with theheatingelementthatreleasesthe cubes.
notallowanyoneto climbonthe shelves.
eDo
Childrenespeciall~couldfall off and gethurt.
This willhelpprotectyou from
youroldrefrigeratorisstillaround
s H’
thehousebut not in use,besure to
——
5
removethedoors.
possibilityof dangerto children.
This willreducethe
or
oDon’trefreezefrozenfoodswhichhave
thawedcompletely.
of Agriculturein HomeandGarclenBulletin
No, 69 says:
“,, ,Youmay safelyrefreezefrozenfoodsthathave
thawedif they stillcontainicecrystalsor if they are
stillcold—below40°F.
“.. .Thawedgroundmeats,poultryor fish thathave
any off-odoror off-colorshouldnotbe refrozenand
shouldnotbe eaten.Thawedicecreamshouldbe
discarded.If the odoror colorof anyfood is poor
or questionable,get rid of it.Thefoodmaybe
dangerousto eat.
“Evenpartialthawingand refreezingreducethe
eatingqualityof foods,particularlyfruits,
vegetablesandpreparedfoods.The eatingquality
ofred meatsis affectedlessthan thatof many other
foods.Use refrozenfoodsas soonas possible to
saveas much oftheir eatingqualityasyou can.”
The UnitedStatesDepartment
oDonot operateyour refrigeratorinthe
presenceofexplosivefumes.
oDo not storeor usegasolineor otherflammable
vaporsand liquidsin the vicinityofthisor any
otherappliance.
SAW
oUnplugyourrefrigeratorbefore
~Before
cleaning
NOTE:
thatany servicingbe performedby a
qualifieciindividual.
replacinga burned-outlightbulb,
andmakingrepairs.
Westronglyrecommend
unplugthe refrigeratoror turn offpowe~*at the
circuitbreakeror fusebox
contactwith a live wire filament.(A burned-out
jigh[bLl]bIII:Iybreak whenbeing replaced.)
in order10~lvoid
IVOTE:Turningfreezer compartmenttemperature
control to OFF positiondoes nol removepower to
tilt lightcircuit.
4
Page 5
OPERATINGYOUR
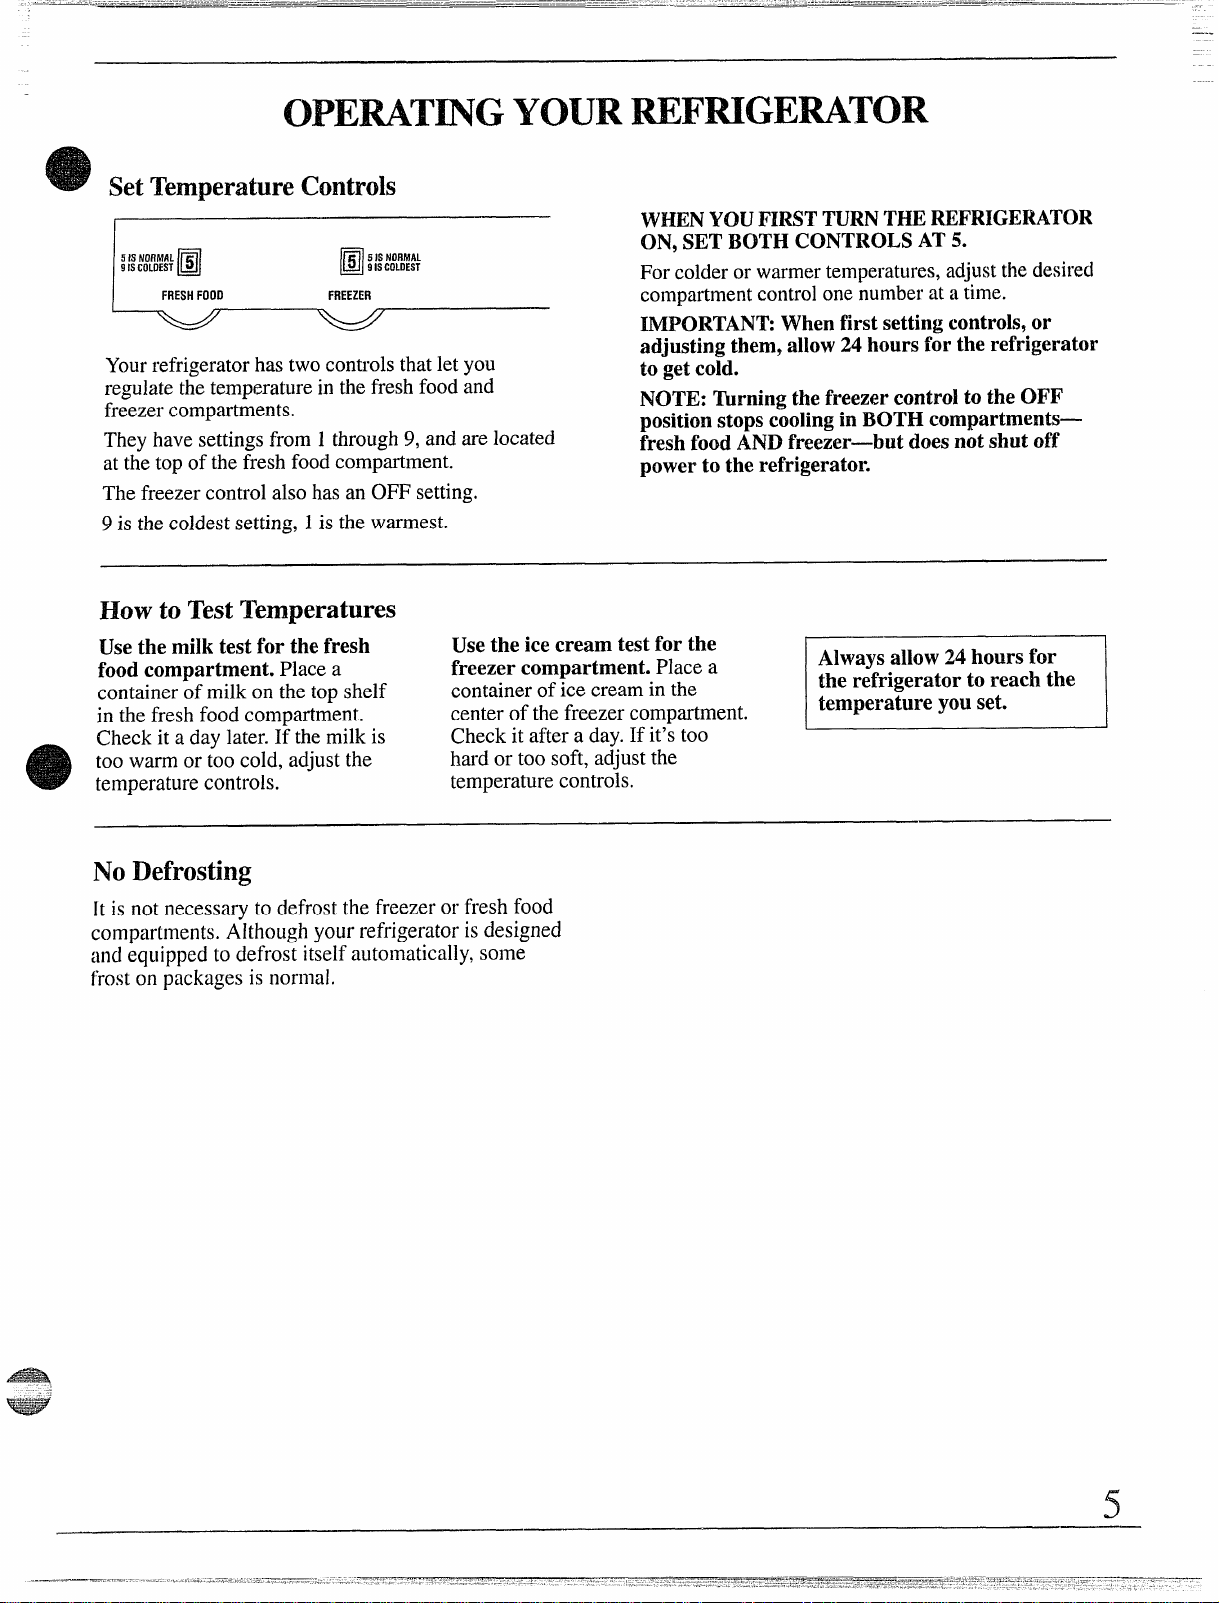
SetTemperatureControls
5 IS NORMAL
9 IS COLDEST
El
FRESH FOOO
I
1
Yourrefrigerator hastwo controlsthat let you
regulatethe temperaturein the fresh food and
freezer compartments.
They have settingsfrom 1through 9, and are located
at the top of thefl”eshfood compartment.
The freezer control also hasan OFF setting.
9is thecoldestsetting,1is thewarmest.
HowtoTestTemperatures
Use the milk test for the fresh
food compartment. Place a
containerof milk on the top shelf
in the fresh food compartment.
Check it a day later. If the milk is
too warm or too cold, adjust the
temperature controls.
FREEZER
Use the ice cream test for the
freezer compartment. Place a
container of ice cream in the
center of the freezer compartment.
Check it after a day.If it’stoo
hard or too soft, adjust the
temperature controls.
REFRIGERATOR
WHENYOUFIRSTTURNTHEREFRIGERATOR
ON, SETB(M’HCONTROLSAT 5.
For colderor warmertemperatures,adjustthe desired
compartmentcontrolone numberat a time.
IMPORTANT:Whenfirst setting controls,or
adjustingthern3allow24 hoursfor the refrigerator
tO@ cold.
NOTE: Thrningthe freezercontrol to the OFF
positionstops coolingin BOTH compartments—
freshfood AND freezer—butdoes notshut off
power to the refrigerator.
Always allow 24 hoursfor
the refrigeratorto reachthe
temperature you set.
NoDefrosting
It is not necessary to defrost the freezer or fresh food
compartments. Although your refrigerator is designed
anclequipped to defrost itself automatically,some
f’reston packages is normal.
5
Page 6
FOODSTORAGESUGGESTIONS
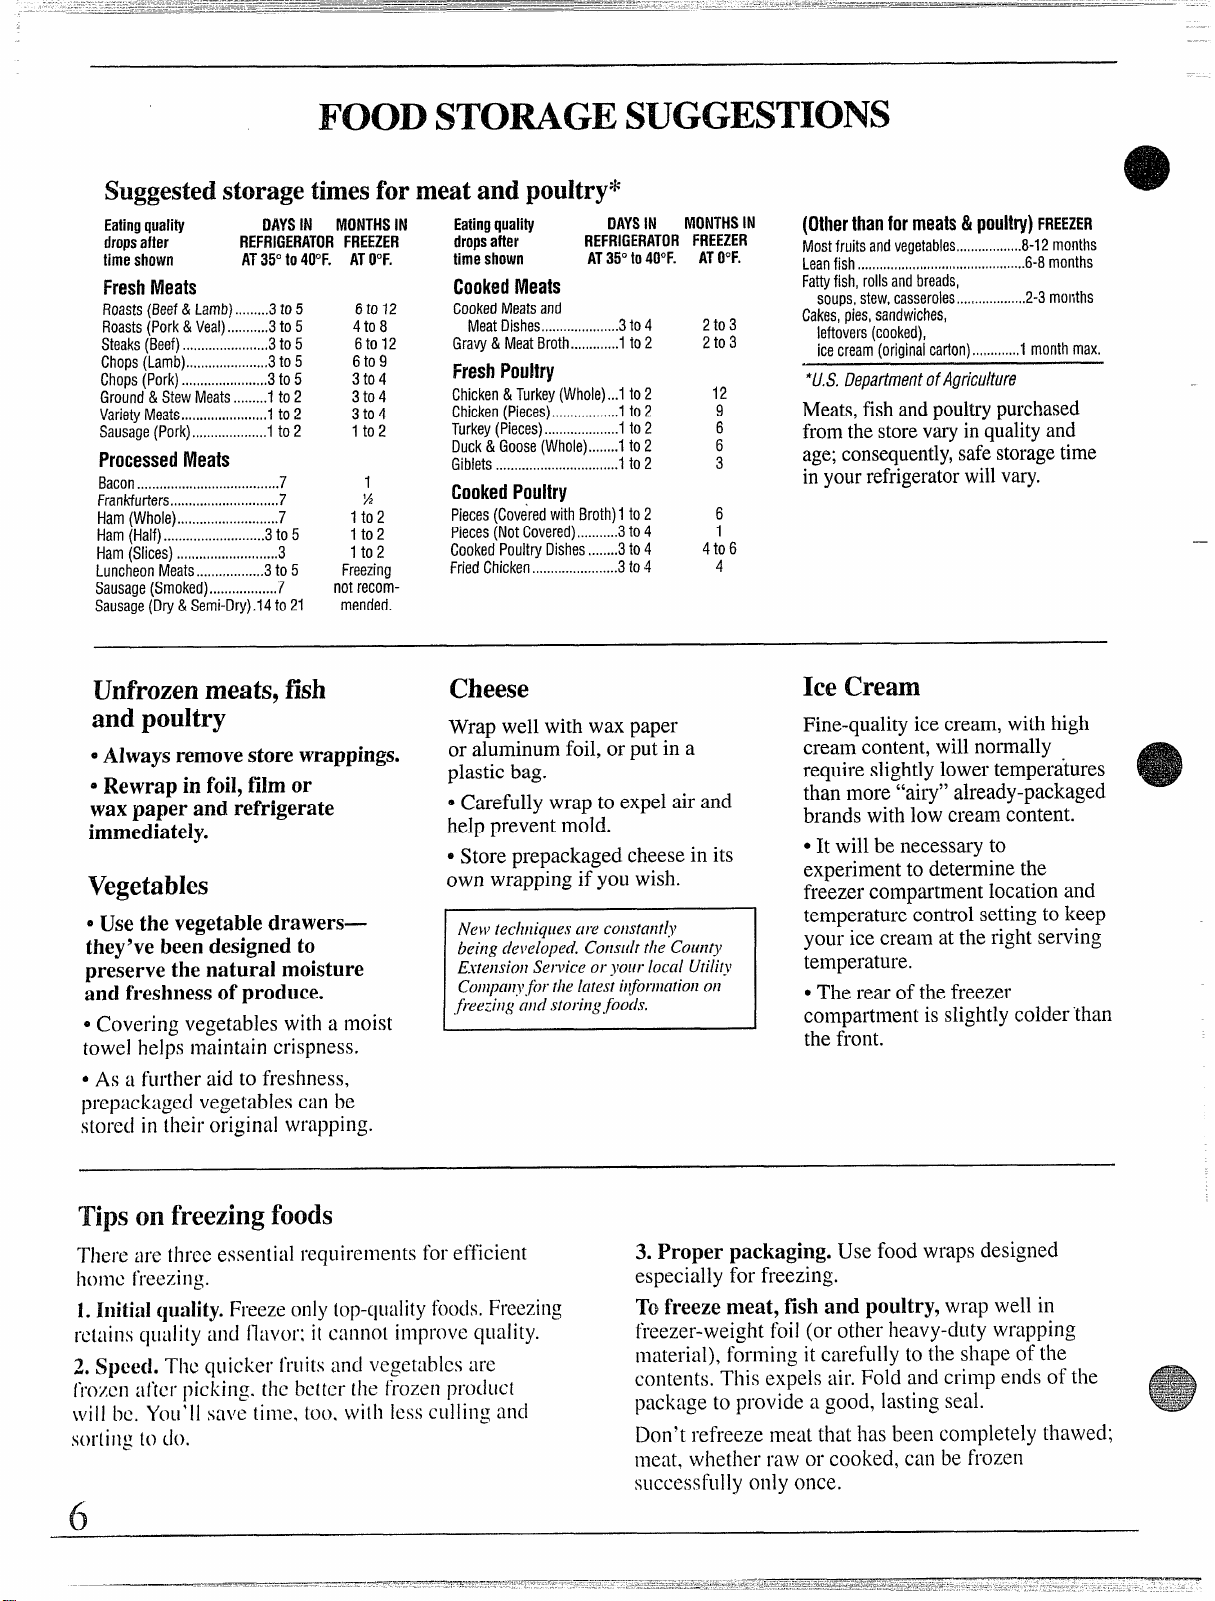
Suggestedstoragetimesformeatandpouhy*
Eatingquality DAYSIN MONTHS IN
dropsafkr REFRIGERATOR FREEZER
timeshown AT35°t0400F. ATO°F.
FreshMeats
Roasts(Beef& Lamb).......3to5 6to12
Roasts(Pork &Veal)...........3to5 4t08
Steaks(Beef),.,,....,....,....!.,,.3to 5 6 to 12
Chops(’Lamb),........,.,.,!......,3to 5 6 to 9
Chops (Pork) .,.....................3to 5
Ground & Stew Meats.........1to 2 3 to 4
Variety Meats,..,,,,,,,,,,......,,..l to 2 3 to 4
Sausage(Pork).,,.................l to 2 1to 2
3 to 4
ProcessedMeats
Bacon.,.............,......................7 1
Frankfurters.............................7
Ham(Whole)...........................7
Ham(Half) ...........................3to 5
Ham(Slices) .........................3
Luncheon Meats....,,.,,.......,.3to
Sausage(Smoked)..................7
Sausage(Dry & Semi-Dry).14to 21
5 Freezing
‘/2
1 to 2
1 to 2
1to 2
not recom-
mended.
Eatingquality
dropsaftf!r REFRIGERATOR FREEZER
timeshown
CookedMeats
CookedMeatSand
Meat Dishes.....................3to4
Gravy& Meat Broth.............l to 2
FreshPoultry
Chicken& Turkey(Whole)...l to 2
Chicken(Pieces)......,...........l
Turkey (Pieces)....................l to 2
Duck & Goose (Whole)........l to 2
Giblets ........,............,......,....1to 2
CookedPoultry
Pieces(Coveredwith Broth)l to 2
Pieces(Not Covered)...........3to 4
Cooked Poultry Dishes........3to 4
FriedChicken
.,...,......,..........3to 4
DAYSIN
AT35°t0400F. ATO”F
MONTHS IN
2t03
2 to 3
to2
6
1
4 to 6
4
(Otherthanformeats& poult9) FREEZER
Most fruits andvegetables
Leanfish ...,...,.,,,.,...0.,....,,,....0..............6-8months
Fattyfish, rolls andbreads,
soups, stew,casseroles,...!..!....3....,,2-3moliths
Cakes,pies, sandwiches,
leftovers (cooked),
icecream (oriainal carton).,,,..,.,.,.,l
,,,,.,......,..,..8-12 months
monthmax,
*US. DepartmentofAgriculture
Meats,fishandpoultrypurchased
fromthestorevaryin qualityand
age;consequently,safestoragetime
inyourrefrigeratorwillvary.
—
Unfrozenmeats,fish
andpmdtry
Always removestore wrappings.
o
8Rewrap in foil, film or
wax paper and refrigerate
immediately.
Cheese
Wrap well with wax paper
or aluminum foil, or put in a
plastic bag.
oCarefully wrap to expel air and
help prevent mold.
oStore prepackaged cheese in its
Vegetabks
oUse the vegetable drawers—
they’ve been designed to
preserve the natural moisture
and freshness of produce.
own wrapping if yoLlwish.
New techniques are cotntmtly
being developed. Consult the County
Extension Service or ~7011r
COmpm?’.fiN-the latest il~formationon
j)eezi}lg ond storingfoods.
oCovering vegetables with a moist
towel helps maintain crispness.
oAs a further aid to freshness,
prepackagedvegetables can be
stored in their
originalw~”app@.
Tipson freezingfoods
There are three essential requirements for efficient
home freczillg.
1.Initialquality.Freezeonlytop--qualityfoods.Freezing
rc[ains qudli[y and flavor; it cannot improve quality.
2. Speed. TIN quicker !.ruitsand vegetables arc
froxcn :~i’tcrpicking. the better the frozen product
~~liII~V~+yell’IIs:lv~tinle, tot~,Wi[h
SOIIingto do.
lesscullingancl
he Cream
Fine-quality ice cream, with high
cream content, will normally
require slightlylower temperatures
than more “airy” already-packaged
brands with low cream content.
● It will be necessary to
experimentto determine the
freezer compartment location and
temperature control settingto keep
your ice cream at the right serving
local uti/itJl
3. Proper packaging. Use food wraps designed
especially for freezing.
To freeze meat, fish and poultry, wrap well in
freezer-weight foil (or other heavy-duty Wrapping
material), forming it carefully to the shape of the
contents. This expels air. Fold and crimp ends of the
package to provide a good, lasting seal.
Don’t refreeze meat that has been completely thawed;
meat, whether raw or cooked, can be frozen
successfully only once.
temperature.
● The rear of the freezer
compartment is slightlycolder than
the front.
6
Page 7

STORAGEDRAWERS
FruitandVegetableDrawers
The storagedrawers at the bottomof the fresh food
compartmentare designed to providehigh humidity
levelsrequiredby most vegetablesand lower
humiditylevelsrequired for most fruits,
When replacingthe drawers,always push them a]]
the way in.
Storage timewill depend upon the typeof food and its
conditionwhen placed in the drawers.
Excess water
drawersshouldbe emptiedandthedrawerswipeddry.
thatyoumayfindin thebottomofthe
l—
-1 I
SealedDmwer
This refrigerated drawer is designed to keep
unwrapped foods fresh by retaining the natural
moisture contentof foods such as:
eAflichokes
@Asparagus @Cherries
o Beets,topped
Blueberries oCurrants
o
o carrots
celery
0
o corn
Greens,leafy o Radishes
o
Lettuce
o
o Parsley o Spinach
Peas,green
o
o Plums
o Rhubarb
~ Tomatoes,ripe
UnseakdDrawer
This refrigerated drawer is designed to provide lower
humidity storagefor items such as:
oApples
~Apricots @Oranges
~Grapes
@Mushrooms ~Pears
As in any refrigerated storage area, itis
recommended that foods with strong odors be
stored wrapped—foods suchas:
oBroccoli o Cabbage o Parsnips
@Brusselssprouts
e (j’auliflower
e Greenonions
~Turnips
SealedSnackPan
The Sealed Snack Pan retains high humidity for the convenient storage of
meats and cheese, bacon, hors d’oeuvres, spreads and snacks.
o Nectarines
UIPeaches
[
[H-+=+-l /711
● Raspberries
@Squash,summer
QStrawberries
o
Tangerines
1
‘7
Page 8

SHELVES
How to RearrangeYour$$helves
AdjustableSheIvesin BothCompartments
Temperedglassshelvesin the fresh food compartment
and steel wire shelvesin the freezer compartmentare
adjustable,enablingyou to make efficientshelf
arrangementsto fit yourfamily’sfood storage needs.
Toremove shelves: Tiltshelf up at front, then lift it
up and out of tracks on rear wall of refrigerator.
i-l
Toreplace shelves:Select desiredshelfheight.With
shelffrontraisedslightly,engagetoplugs intracksat
rearof cabinet.Thenlowerfrontof shelfuntilitlocks
intoposition,
QuickServeTMDishes
These cooking-serving-
storage disheshave
Lexan@polycarbonate
resin lids.
Dishes and lids are safe
for use in microwave
ovens, refrigerators,
freezers, and are dishwasher-safe. The dishes should The wine rack is designed to hold a bottle on its side
not be used for cooking high-fat foods such as bacon
and high-sugar foods such as candy and syrup. The
high temperatures of the fat and sugar can cause
bubbles to form on the insideof the dish.
CAUTION:
*Dishes and lids are not designed for use in the
regular oven, on the range-top or in the broiler.
Such use can be hazardous.
L
J’
RemovableWineRack
El
1
D
II
D
and will fit on any shelf.
To relocate the wine rack:
Pull the wine rack straight out, position its lip over
either edge of the shelf yoL~want to suspend it from
and push it all the way in.
(on some models)
Adjustabk Bins on Both Doors
a
bins can bc movedup anddownto Inee(
IMOI.
your storage requirements.
To rcmove: Lill the bin up :lndslide it towards you.
8
Page 9

AUTOMATICICEM.MKER
Your icemakerwill produceeight cubes per
cycle—approximatelyi00 cubes in a 24-hourperiod,
dependingon freezer compartmenttemperature,mom
temperature,number of dooropeningsand other use
conditions.
Feelerarm
in STOP
position
(up)
Tostarttheautomaticicemakingoperation:
*Make sure the shelf underthe icemaker is in the
factory-setposition.Two clipshold it in place where
it belongsto assure propericemaking operation.
oPlace the ice storage bin directlyunder the icemaker
and all the way to the rear.
0Move the icemaker feeler arm to the ON (down)
position.
The ice cube mold will fill with water automatically
after cooling to freezing temperature, and first cubes
will normally freeze after several hours. When cubes
are solidly frozen, they will be ejected from the mold
into the ice storage bin. Icemaking will continue until
the feeler arm senses a sufficient accumulation of ice
cubes in the storage bin and halts the operation
temporarily.For maximum ice storage, level the
stored cubes with yOLU-hand occasionally.Be sure
nothing interferes with the swing of the feeler arm.
The icemaker ejects cubes in groLlpsof eight and it is
normal for several cubes to bejoined together.
Once your icmaker is in oimwtion, throw
away the fi!*stfew batches of ice cubes.
flushaway any impuritiesin the water line.Do the
same thingaffcr vacalionsor cxtcndwlperiodswhen
iceisn’t used.
I
This will
Caution:
Undercertain rarecircumstam.ws,icecubes may bc
discolored,LIsua]]yappearingwith a green-b]uish
color.The cause of thisUnUSUaldiscoloraticmis
apparentlydue to a combinationof factorssuchm
certain characteristicsof localwaters, househoki
plumbingand the accumulationof coppersaltsin
an inactive watersupply linewhich feeds the
icemaker.Continued consumptionof such
discoloredice cubes may be injuriousto your
health.If such discolorationis observed,discard
the ice cubesand contact yourGE Factory Service
Centeror an authorizedCustomer Care@servicer.
Moveiwmakerfeelerarmto STOP’(up)
position when:
home water supply is to be off for severalhours
o
~ice storage bin is to be removed for a period of time
~going away on vacation, at which time you
should also turn off the valve in the water supply
line to your refrigerator
If ice is used infrequently, old cubeswill
becomecloudy andtastestale.Emptyice storage
binperiodicallyandwashit in lukewarmwater.
When a large suppIy of ice will be needed, make
anextrasLlpplyaheadof time. Emptybin,putcubes
inplasticbagsor containersandstorein thefreezer
compartmentuntilthe binrefills.
If this is your first icemaker, you’ll hearoccasional
soundsthatmaybe unfamiliar.They arenormal
icemaking sounds and are not cause for concern.
WaterFilterAccessory
Youricecubes can only be as fresh-tasting as the
water that produces them. That’s why it’s a good idea
to purify your water with a water filter.
Itsactivated charcoa] removes musty, stale ociol”sand
unplctwantmedicinal, meld] ic tastes. A porous fiber
u:ulridge ca[clmsdirt, rust particles. sand and silt
\v}li]~spcci;llcrys[ais I-educedeposits Ofhal.d
SCillC.
The water filter is an option at extra cost and is
available from your GE dealer. Specify WR97X02 14.
It has complete installation instructions and installs in
minutes on 1/4”copper water line.
9
Page 10

CAREAND
Cleaning—Outside
Thedoorhandhx Id trim can be clcancd witht!
clothdampenedwitha solutionofmildliquid
dishwashingdetergentandwater.Drywith
cloth. Don’tusc
wi]~ 011 the door ha)Icllws w [rim.
Chming-Inside
Insidethe freshfoodandfreezercompartments
should becleaned at least once a year.Unplug the
refrigerator before cleaning.If this is not practical,
wring excess moisture outof spongeor cloth when
cleaning around switches, lightsc)rcontrols.
Use warm water and baking soda solution—abotlt
a tablespoon of baking sodato a quart of water,This
both cleans and neutralizes odors.Rinse thoroughly
with water and wipe dry.
Other parts of the refrigerator-including door
gaskets, meat and
bin and all plastic parts-can becleaned the
way. After cleaning door gaskets, apply a thin layer of
petroleumjelly to the door gaskets at the hinge side.
This helpskeep the gaskets from sticking and bending
out of shape. Do not use cleansing powders or other
abrasive cleaners.
vegetabledrawers,icestorage
ii sofi
same
TohelppreventOCJO1*S,Icavctinopenbox01”
bakingsoda in the rcai401’(IICrcl’rigerator,on lhc
top shelf’,Change [hchox cwcrythree months.An
open box of baking sodain the [’rcczcrwill ahsorh
stalefreezer cxlorst
Do
not wash any plastic partsfromyouI*
refrigeratorinyour automaticdishwasher.
QuickServe’l’M
autotnaticdishwasher or by hand with liquid
dishwashingdetergent and watel-.YOUcan remove
stainsby soaking them in a bleach-and-water
solution—onepart chlorine bleach to three parts
water. (Stubborn stainsmay require two or more
hours of soaking.) Use a plastic scouring pad to
remove burned-on soil. Do not use cleansing powders
or other abrasive cleaners.
dishes and lids can be cleaned in an
Condenser
To cIean the condenser fins:
First, note where the freezer compartment temperature
control dial is set. Then turn it to OFF. This turns off
the compressor.Wait untilitcools (about30 minutes).
Decorativepanel
—
Removethe decorativepane]by liftingup and
towards yoL1.
Then unplug the unit or tul”noff powel”at the circuit
breaker or fuse box.
The plLlg is
locatedstraight
back past the
condenser fillS.
{11
Condenserfins
_ Condenser fins
rille
Use a soft bristle brush to loosen dust and lint on
the condenser fins. Use a vacuum hose to remove soiL
Aftercleaning:Reconnect power by plugging the
unit back in, or at the fuse box or circuit breaker.
Replacethedecorativepanel.
TLU-llthe freezer temperature control dial back to
its original setting or to 5. See the Tempel”ature
Controls section.
CAUTION:Thegrillebelowthedecorative
panel provide necessary air circdation. Do not
cover or alter the grille or damage to the cooling
mayocam.
unit
Page 11

Lightbulbreplacementin thefreshfood
There areupperam!lowerlighthulhsinthef’rcsh
faodcompartments.
replace a MIx
To
UnplIJgjrdrigerator01*turnMl’poweratthecircuit
1.
breaker or fuse box.
2. Remove t!mlightshield from the topfresh food
light by pushing ~hefrontend up and pulling it towiml
you to release it from therear retaining lip. (It may
bend slightly.)
To change the bottomrefrigerator light,pull out the
top drawer, look to the rem of the fresh food
compartment and repkwebulb as needed,
3. Replace with the same size bulb, reinstallthe
shield for the upper fresh food light,and
the refrigerator in.
To reinstall the upper fresh food shield, hook the front
edge first, then push it up and back until the shield
rests in place.
pltlg
I
Lightbulbreplacementin thefreezercompartment
m
1+!
llJ
u
01
g
I
HI
Toreplace a bulb:
~. Unp~L1grefrigerator 01”turn off power at the circuit
breaker or fuse box.
2. Remove the freezer 1ightshield by pulling the front
edge down and free and then pull it toward yOU.
3. Replace with the same size bulb, reinstaHthe
shield for the upper fresh food light, and plug
the refl-igeratorin.
To
repiacethefreezershield,set the back edge on
the rear tabs and then push L]pin the front until it rests
in place.
You may bend the shield slightly to help in removal
and replacement.
(continued next page)
Page 12

CAIU3ANDCLEAN~G
(continutxl)
DrawerandCoverRemoval
To removedrawers ancltheircover when the fresh
fooclcompartmentdoor cannot beopenc(ifully:
Drawers at the bottom ofthe fresh food compartment
will stop before
refrigerator,to help preventcontents from spilling
onto floor.These drawers can be removed easily by
~l.aspingthesidesandliftingup slightlywhile P~llliW
drawer past
1. Remove food from the shelfabove the upper
drawer and take out the shelf.
2. Take out the Quick Serve’”kidishes.
3.PLdlthe upper
drawer partway out.
Reach in, push the
glass up; tilt it and
take it out.
comingallthe way out of the
“stop” location.
(#0131111the Upper
(.h”awcr
andliftthe
clear the
5.
foward and up, tilt the
i’orward
l’rOntto ‘-
stops,
Roll the drawer
drawer and take it out.
6.Remove the lower two
drawers the same way.
After cleaning, replace
in reverse order.
——”—.—.”—
e
when yougoonvacation
FOr Mtemkd vacations or absences,removefood
and shut off power to the refrigerator at fuse box or
circuit breaker. Clean the interior with baking soda
solution of one tablespoon of soda to one quart of
water. Wipe dry. To prevent odors, leave open box of
soda in refrigerator. Leave doors open.
For
shortervacations,remove perishable foods and
leave controls at regular settings. However, if room
temperattlre is expected to drop below 60°F., follow
same instructions as for extended vacations.
Move the
position
the
refrigerato~”.
ieemaker feeler arm to the STOP (up)
andbe sureto shutoff thewater supply to
Page 13

INSTALLATION
IMPORTANT...PleaseReadCkwfuliy.
—
Howtoconnectelectricity
Forpersonalsafety,thisappliancemustbe properlygrounded.
The power corclof thisappliancoisequipped with
a three-prong(grounding)
standardthree-prong (grounding)wall outlet (Fig, 1)
to minimizethe possibilityof electric shock hazard
from this appliance.
phg which mates with a
I
Fig.1
Have wall outlet and circuitchecked by a qualified
electrician to make sure outlet is properly grounded.
Where a standard two-prong wall outlet is
encountered, it is your personal responsibility and
obligation to have it replaced with a properly
grounded three-prong wall outlet.
INSUREPROPE”RGROUND“
EXISTSBEFOREUSE
~
DONOT,UNDERANYCIRCUMSTANC1;S,
CUTOR REMOVUTHE THIRB(GROUND)
PRONGFROMTHE POWERCORD.
DO NOT~JSEANADAPTERPLUGTO
CONNECTTHE REFRIGERAT(~IlTO A
TWO*PRONG OUTLET.
DONOT USEANEXTM’+S1ONCORDWIrlW
THIS APPLIANCE.
Therefrigeratorshmdd alwaysbepluggedinto
itsownindividualeiectl”icaloutlet—(115volt,60
Hertz, single phase AC—protected by a 20-amp. time
delay fuse or circuit breaker). This is rccornmendecl
for best performance and to prevent overloading
house wiringcircuits,whichcouldcausea fire
hazardfromoverheatingwires.
IMPORTANT:The water line and the electrical
outlet must be installed in the exact locationdescribed
in the Installation Instructions (Pub. No. 49-6445).
Location
Install therefrigeratorona floorstrongenoughto
supportit whenit is
Do
not install refrigerator where temperature wiII
go behw 6~0~.because it will not run often enough
to maintain proper temperatures.
fuliy loaded.
Leveling
This model has 4-point leveling. All four corners are
supported by leve~inglegs. The front wheels are nonadjustable; they are only used for positioning the unit.
o
Toleveltheback of the unit, turn hex nut located
above the front wheels.
oTo level thefrontof theunit,usea 1YJ”openend
wrenchandadjustthe levelinglegs.
~TLH”IIhex nut or front levelinglegclockwiseto raise
theunit,counter-c]ockwiseto lowertheunit.
SeetheInstallationInstructions(pub.No. 49-6445)
forcompletedirections.
Clearances
If therefrigeratoris tobe installedinacorner,allow
2“ between the hinges of the refrigerator and the wall
to assure a 90°door opening capability.
No other clearances at top, sides or back are required.
II I
Hexnut
\
\
Wheel
v
Levelingleg
Page 14

QUESTIONS?
USETHISPROBLEMSOLVER
PROBLEM
REFRIGERATOR
DOESNOTOPERATE
MOTOROPERATES
FORLONGPERIODS
MOTORSTARTS&
STOPSFREQUENTLY
VD3RATIONOR
RATTLING
POSSIBLECAUSE
*Maybeindefrostcyclewhenmotordocsnotoperateforabout30tninutm.
● TemperaturecontrolisinOFFposition.
● If theinteriorlight is noton,therefrigertitormaynotlx pluggedinatthe
walloutlet.
● Iftheplugsaresecureandtherefrigeratorstillfailstooperute,pluga lampinto
thesameoutletto determineif thereisa trippedcircuitbreakerorburnedoutfuse,
● Modernrefrigeratorswithmorestoragespace anda largerfreezercompartment
requiremoreoperatingtime.
~Normalwhenrefrigeratoris firstdeliveredtoyourhome—usuallyrequires
24hourstocompletelycooldown.
oLargeamountsoffoodplacedinrefrigeratorto becooled
OJ”frozen.
*Hotweather-frequent dooropenings.
Door leftopen.
@
eTemperaturecontrolsaresettoocold.
eCondenser needs cleaning.
oTemperature control starts and stopsmotor to maintain even temperatures.
eIf refrigerator vibrates, more than likely it is not resting solidlyon the floor.The
front leveling legs need adjusting, or floor is weak or uneven. Adjust levelers or
call your installer.
oIf dishesvibrateon shelves,trymovingthem.Slightvibrationisnormal.
OPERATING
SOUNDS
~Thehigh speedcompressormotorrequiredtomaintainnearzerotemperatures
in thehugefreezercompartmentmayproducehighersoundlevelsthanyourold
refrigerator.
oNormalfan airflow-one fanblowscoldairthroughtherefrigeratorandfreezer
compartments—
anotherfancoolsthecompressormotor.
*TheseNORMALsoundswillalsobeheardfromtimeto time:
~Defrosttimerswitchclicksat defrost.
eDefrostwaterdripping.
~TemperaturecontrolclicksON orOFF.
~Refrigerantboilingor gurgling.
0Crackingor poppingof coolingcoilscausedby expansionandcontraction
duringdefrostandrefrigerationfollowingdefrost.
eIce cubesdroppingintothebin andwaterrunninginpipesas icemakerrefills.
Page 15

PROBLEM
POSSII!LECAUSE
FOODSDRYOUT
FRESHFOOD
ORFREEZER
COMPARTMENT
TEMPERATURE
TOOWARM
DOORS NOT
CLOSINGPROPERLY
FROSTORICE
CRYSTALSON
FROZENFOOD
AUTOMATIC
ICEMAKER
DOESNOTWORK
● Foodsnotcovered,wrappmiorseahxlproperly.
● Temperaturecontrolnotsetcoldenough,
● Warmwetither-frequentdooropenings.
● Doorleftopenfortoolonga time,
● Packagemaybeholdingdooro13m
● Refrigeratornot.level,Adjustlevelersorcalltheinstaller,Whenctibinct
islevel,doorswillclosegentlyandsecurely.
● DOOI*may have been left ajar or package holding dooropen.
eToofrequentortoolong dooropenings,
eFrostwithinpackageisnormal.
● Icmnakerfeelerarmin STOP(up)position.
@Watersupplyturnedoffor notconnected.
@Freezercompartmenttoowarm.
. Cubestoosmall-water shutoffvalveconnectingrefrigeratortohomewaterline
maybeclogged.
QSometimescubesfuseto thesideof theicemoldandholdthefeeler armin the
STOP(up)position.Removethisiceto restarttheicernaker.
oWhenreachingforcubesbyhand,youmayhavepushedthefeelerarmintothe
STOP(up)positionbymistake.
~Piledup cubesin storagebinmaycauseicemakertoshutoffprematurely.With
icemakerfeelerarmin STOP(up)position,levelcubesinbinbyhand.
.4s&A
e-
SLOWICECUBE
FREEZING
ICECUBESHAVE
ODOWTASTE
*Doormayhavebeenleftopen.
e Turntemperatureoffreezingcompartmentcolder.
eOldcubes needto bediscarded.
~Icestoragebinneedsto beemptiedandwashed.
BUnsealedpackagesinrefrigeratorand/orfreezercompartmentsmay be
transmittingodor/tasteto icecubes.
~Interiorofrefrigeratorneedscleaning.
)Poor-tastingincomingwater.Installa waterfilter.
(continued next page)
Page 16

PROBLEMSOLVER
(continued)
PROBLEM
MOISTUREFORMS
ONCABINET
SURFACEBETWEEN
THEDOORS
MOISTURE
COLLECTSINSIDE
REFRIGERATOR
HASODOR
INTERIORLIGHT
DOESNOTWORK
UNEVENSPACINGOR
GAPSBETWEENDOORS
AND CABINETS
Ifyouneedmore help...call,toll
GEAnswerCenter@
$00.626.2000
consumerinformationservice
POSSIBLECAUSE
● Notullusua]during periodsofhighhumidity.Ii”problempersists!
callforservice.
. Toofrequentor toolong dooropenings,
● In humidweather,aircarriesmoistureinto refrigeratorwhendoorsareopened.
● Foodswithstrongodorsshouldbetightlycovered.
sCheckfor spoiledfood.
o Interiorneedscleaning.
. Keepopenboxof bakingsodain refrigerator;replaceeverythreemonths.
*No poweratoutlet.Callinstalleror electrician.
o Light bulbneedsreplacing.
o Checkfuseandcircuitbreaker.
oCabinetsarenotlevelor square.Call theinstalleror cabinetmaker.
free:
Page 17

Withthepurchaseofyour new GE applia~~e, receive the assurance that ifyou ever neecl
—..
i~ormation or assistance from
GE,we’ll be there.Allyou havetodo iscall—toll-free!
Repai?’siwvict?
.
AGE consumerserviceprofessionalwillprovideexpert
convenience(’7:00a.m.to7:00p.m.weekdays,9:00a.m.to
repairservice,scheduledata timethat’sconvenientfor 2:00p.m.Saturdays).Our factory-trainedtechnicians
you. ManyGEConsumerServicecompany-operated knowyourappliance insideand out–so mostrepairscan
locationsofferyouservicetodayor tomorrow,or atyour
Whateveryourquestion aboutanyGEmajorappliance,
GEAnswerCenterginformationserviceisavailableto
help.Yourcall–and yourquestion-will be answered
Upon request, GEwillprovide
BraillecontrolsforavarietyofGE
appliances,and abrochure to
assistinplanning abarrier-free
“t.,, ow”,,,*t,,””.,.,, wr\tnrM.”AIN
,,
#EcWONA.A
”..,,..,... = .. ......0 .7, . ...,. !.,
kitchenfor personswithlimited
mobility.Toobtaintheseitems,fi-ee
behandled injustonevisit,
promptlyand courteously.Andyoucancallanytime.
GEAnswerCenter@serviceisopen 24hoursa day,7
daysaweek.
Consumerswithimpaired hearing or speechwho have
accesstoaTDDor aconventional teletypewritermaycall
800-TDD-GEAC(800-833-4322)to requestinformation
orservice.
Ofchal-ge,call800,626,2000,
Youcan have tlw secure feeIing tha(.GE Consumer
Service willstill lx thaw after
yOLw warranty expires.
]’Llrchasca GEcontract WhilCyoLlrwarrantyisstillin
Individualsqualifiedtoservicetheirownappliances
canIXIVC.]Ieeckxlpnr(sor
mxxsorics sen[ clirect1)’10
[ 11~’irhonle.‘1’hcGlipartssys[cmpr(n’idesaccess{()over
‘i7’,()()0pal”[s...itI~d
Jv;ir14;lll[(’(1.VISA,iVIINler[hrd;Ind
;II’CXq)wci.
—-
—
al] GE (k~nlline Renewal Rum are filHJ-
I)iscO\’cr carcls
effect ancl yoL~’11receive a substantial discount. With a
multiple-yearcontract, you’reassuredoffuture serviceat
tockiy’sprices.
Usermaintenanceinstructionscontainedinthisbooklet
cover proceduresintendedtobeperformedbyanyuser.
Otherservicinggenerallyshotddbereferred toqualified
service
improperservicingmaycauseunsafeoperation.
personnel.Cautionmustbe exercised,since
Page 18

YOURGEREFMGERATOR
Saveproofof originalpurchasedatesuchasyoursalessliporcancelledchecktoestablishwarrantyperiod.
[1
WHATISCOVERED
E NOTCOVERED
FULLONE-YEARWARRANTY
Forone yearfrom dateof original
purchase,we will provide,free of
charge, partsand servicelabor in
your hometo repairor replaceany
part of therefrf~eratcwthat fails
becauseof a manufacturing
defect.
FULL FIVE-YEARWARRANTY
Forfive yearsfrom date of original
purchase,we will provide,free of
charge, parts and servicelabor in
your home to repair or replaceany
part of the sealecf refrigerating
system (thecompressor,
condenser,evaporatorand all
connectingtubing) that fails
becauseof a manufacturing
defect.
eService trips to your home to
teach you how to usethe product.
ReadyourUse andCare material.
If you then have any questions
about operating the product please
contact your dealer or our
Consumer Affairs office at the
address below, or call, toll free:
GE Answer Center@
800.626.2000
consumer information service
eImproper installation.
If you have an installation problem,
contact your dealer or installer.
Youare responsiblefor providing
adequate electrical, plumbing and
other connecting facilities.
This warrantyis extendedto
the original purchaserand any
succeedingownerfor products
purchasedfor ordinary homeuse
inthe 48 mainlandstates, Hawaii
andWashington,D,C, InAlaskathe
warrantyis the same exceptthat it
is LIMITED becauseyou must pay
to ship the productto the service
shopor for the servicetechnician’s
travel coststo your home,
All warranty servicewill be
providedby our FactoryService
Centersor by ourauthorized
Customer Care” servicersduring
normalworking hours.
Look inthe White or Yellow Pages
of your telephone directoryfor
GENERAL ELECTRIC COMPANY,
GENERAL ELECTRIC FACTORY
SERVICE, GENERAL ELECTRIC-
HOTPOINT FACTORYSERVICE
or GENERAL ELECTRIC
CUSTOMER CARE@SERVICE.
8Replacement of house fuses or
resetting of circuit breakers.
~Failure of the product if it is used
for other than its intended purpose
or used commercially.
oDamage to product caused
by accident, fire, floods or acts
of God.
eLoss of food dueto spoilage.
WARRANTOR IS NOT
RESPONSIBLE FOR
CONSEQUENTIAL DAMAGES.
Some states do not allow the exclusion or limitation of incidental or consequential damages, so the above limitation or exclusion
may not apply to you. This warranty gives you specific legal rights, and you may also have other rights which vary from state to state.
To know what your legal rights are in your state, consult your local or state consumer affairs office or your state’s Attorney General.
Warrantor: General Electric Company
If further help is needed concerning this warranty, write:
Manager—Consumer Affairs, GE Appliances, Louisville, KY 40225
Page 19

[;(?/t(r(//E/{!cr//[’c(wpJn)’
h’Y.i025
L(mwillt?,
I’1111.S(I. .l!l-(ilili~,
1’,11I X().1(i21):~!12!~l’f~(l I
7S75
1.02 (:( :
 Loading...