

Page 1

Owner's
Manual
Stainless Steel
Professional
30", 36" and 48"
Dual Fuel Ranges
Natural Gas Models
ZDP48N4G
ZDP48N6R
ZDP48N6D
ZDP36N6
ZDP36N4R
ZDP36N4D
ZDP30N4
Liquid Propane Models
ZDP48L4G
ZDP48L6R
ZDP48L6D
ZDP36L6
ZDP36L4R
ZDP36L4D
ZDP30L4
ge.eom
@
Monogram:
Page 2
Consumer Information
Smir_less S_eel ICang'e
Introduction Your new Monogran/ range makes an eloquent statement of style, convenience and kitchen
planning flexibility. Whether vou chose it tot its pm'ity of design, assiduous attention to detail--
or for both of these reasons--you'll find that wmr Monogram range's superior blend of torm
and flmction will delight you tot vears to come.
Tile infiwmation on tile tollowing pages will hel I) you operate and maintain vom _range properly.
If win have any other questions, visit ore" _'ebsite at: g'e.com
Contents Surface Cooking
Burners ................... 15, 16
Controls ............... 14, 15, 19
C_o kwa re .................... 17
Dual-Flame Bm'ners ............ 16
Features ..................... 14
(;riddle ................... 20, 21
Grill ..................... 18-20
Oven
Almninmn Foil ............ 8, 9, 24
Baking/Roasting ........... 22-24
Broiling/Broiling Guide ..... 26, 27
Controls ......... 14, 22, 23, 26-28
Convection Cooking ........ 25, 26
Features ..................... 14
Proofing ..................... 23
Self Cleaning Instructions .... 28, 29
Care and Cleaning
Backguards ................... 36
Burner Caps .................. 33
Burner Grates ................ 33
Broiler Pan and Grid ........... 31
Companion Standard Clean ...... 29
Control Panel and Knobs ........ 30
Drip Tra)_s, I,iners
and Drain Tubes ............... 34
Griddle ...................... 35
Grill ........................ 36
I,flt-Off Oven Door , ............ 36
Oven Heating Elements ......... 30
Oven I,ight .................. 31
Sealed Bm'ner _ssemblies ....... 32
Self Clean Oven Racks .......... 36
Stainless Steel ................. 30
Consumer Services
hnportant Phone Numbers ...... 39
Model and Serial Nmnber . .... 3, 14
Problem Solver . ............ 37, 38
Product Registration ....... 3, 43, 44
Safety Instructions ....... 2, 3, 4-13
Warranty ..................... 42
WARNING: If the information in this manual is
not followed exactly, a fire or explosion may result
causing property damage, personal injury or death.
-- Do not store or use gasoline or other flammable
vapors and liquids in the vicinity of this or an),
other appliance.
-- WHAT TO DO IF YOU SMELL GAS
• Do not try m light any appliance.
• Do not touch any electrical switch;
do not use any phone in your building.
• Immediately call your gas supplier from a
neighbor's phone. Follow the gas supplier's
iustructious.
• If you cannot reach your gas supplier, call the
fire department.
-- Installation and service must be performed by
a qualified installer, service agency or the gas
supplier.
AVERTISSEMENT : Si vous ne suivez pas
exactement les informations contenues daus ce
manuel, vous pouvez provoquer nn incendie ou
nne explosion qui peut occasionner des
dommages mat6riels, des blessures corporelles
ou m6me la mort.
-- Ne conservez ou n'utilisez jamais d'essence ou
d'autres vapeurs ou liquides inflammables au
voisinage de cet appareil ou de tout autre appareil
m6nager.
-- QUE FAIRE SI VOUS SENTEZ LE GAZ
• N'essayez pas d'allumer nn appareil m6nager.
• Ne touchez aucnn commutateur 61ectrique;
n'ufilisez pas le t616phone dans votre bittiment.
• Appelez imm6diatement votre fournisseur
de gaz en utilisant le t616phone d'nn voisin.
Suivez les instructions du fournisseur de gaz.
• Si vous ne pouvez pas joindre votre fournisseur
de gaz, appelez les pompiers.
-- L'installation et le service doivent 6tre effectu6s
par un iustallateur qtmlifi6, nn centre de service
ou votre fournisseur de gaz.
Page 3
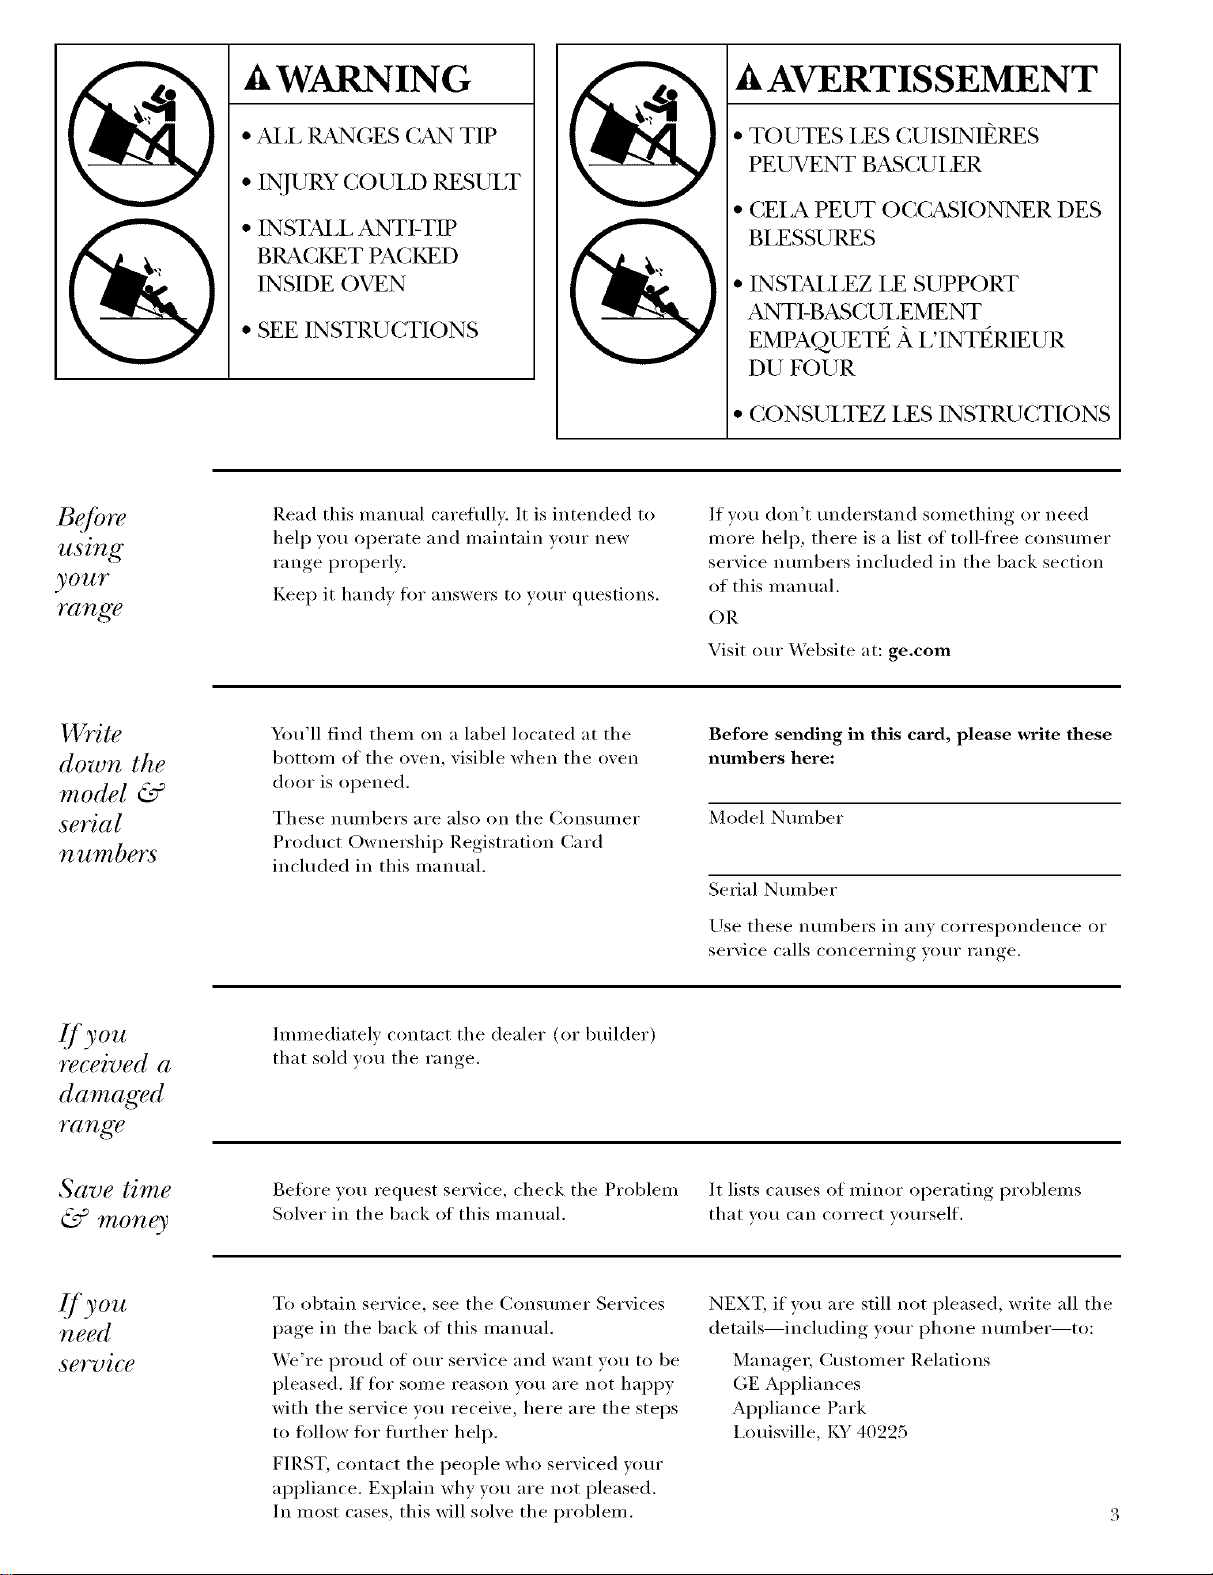
A WARNING
A AVERTISSEMENT
Be/bre
using
your
range
• AI,I, RANGES (;AN TIP
)
• INJURY COUI,D RESUIX
• INSTAl1, ANTI-TIP
BRACKET PACKED
INSIDE OVEN
• SEE INSTRU CTIONS
Read this manual carefllllv. It is intended to
help you operate and maintain your new
range properly.
Keep it handy for answers to your questions.
• TOUTES LES CUISINIt_RES
PEUVENT BASCUI,ER
• CEIA PEUT OCCASIONNER DES
BI,ESSURES
• INSTAII£Z I£ SUPPORT
ANTI-BASCUI,EMENT
EMPAQ.UETt_ ]_ I?INTt_RIEUR
DU FOUR
• CONSUIXEZ I,ES INSTRUCTIONS
If you don't understand something or need
more help, there is a list of tolMi'ee consuiner
seiwice numbers included in the back section
()f this manual.
OR
Visit our X4ebsite at: ge.com
Write
down the
model &
serial
nun<ibis
If you
received a
damaged
range
Save time
& mon_
If you
need
service
You'll find them on a label located at tile
bottom of the oven, visible when the oven
door is opened.
These numbers are also on tile Consumer
Product Ownership Registration Card
included in this manual.
Immediatel) contact tile dealer (or builder)
that sold xou the ran ,e
Befl)re xou request serxice, check tile Problem It lists causes of minor operating problems
Solxer in tile back of this manual, that xou can correct yourself.
To obtain seIwice, see tile Consumer Seiwices
page in the back of this manual.
We're proud of our service and want vou to be
pleased. If fl)r some reason vou are not happy
with the service you receive, here are the steps
to fl)llow ti)r flu'tiler help.
FIRST, contact tile people who seIwiced your
appliance. Explain wily you are not pleased.
In most cases, this will solve the problem.
Before sending in this card, please write these
numbers here:
Model Number
Serial Number
Use these nuinbers in an) correspondence or
set\ice calls concerning )our range.
NEXT, if you are still not pleased, write all tile
details--including your phone numbei_to:
Managei; Customer Relations
GE Appliances
Appliance Park
I,ouisville, KY 40225
Page 4
IMPORTANT SAFETY INSTRUCTIONS
IMPOR 77ANT SAFETY NOTICE
" The California Safe Drinking Water and
Toxic Enforcement Act requires the
Governor of Califln'nia to publish a list
of substances known to the state to cause
cancer, birth deibcts or other reproductive
harm, and requires businesses to warn
customers of potential exposure to such
substances.
, The fiberglass insulation in self-cleaaa ovens
gives off a very small amount of carbon
monoxide during the cleaning cycle.
Exposme can be minimized by venting with
an open window or using a ventilation thn
or hood.
SAI >27T Pt 2 CA U770NS
When using your appliance, follow basic safety
precautions, including the following:
" Have the installer show you the location of
the range gas shut-off valve and how to turn
it off if necessary.
" Be sure all pacMng materials are removed
from the range befln'e operating it to prevent
fire or smoke damage should tile packing
material ignite.
"After prolonged use of a raJage, high floor
temperatures may result and many floor
coverings will not withstazad this kind of use.
Never install tile range over vinyl tile or
linoleum that cannot withstand such use.
Never install it directly over interior kitchen
caq) eting.
" Locate the rlmge out of kitchen traffic path
and out of drafty locations and areas with
poor air circulation.
" Gas appliances can cause minor exposure
to four of these substances, namely benzene,
carbon monoxide, fln'maldehyde and soot,
caused primarily by the incomplete
combustion of natural gas or LP hmls.
Properly ac{justed burners, indicated bv
a bhfish rather than a yellow flame, will
minimize incomplete combustion. Exposure
to these substances can be minimized by
venting with an open window or using a
ventilation thn or hood.
AWARNING:
M1 ranges can tip and injury
could result. To prevent
accidental tipping of the range,
attach it to the wM1 by installing
the Anti-Tip device supplied.
To check if tile device is
installed and engaged properl>
carefully tip tile range flu'ward.
The Anti-Tip device should
engage and prevent the range
fl'om tipping over.
If you pull tile rlmge out fl'om tile wall fl)r
any reason, make sure the device is properly
engaged when you push tile range back
against tile wall.
If it is not, there is a possible risk of tile range
tipping over and causing il_jm y if you or a
child stand, sit or lean on an open door.
Please reibr to tile Anti-Tip infl)rmation in
the installation instructions.
Failure to take this precaution could result in
tipping of tile range and il_jury.
Page 5

AVIS IMPORTANT DE SECURITE
AVIS IMPOR 7ANT DE SECUtdT 2
" Le California Safe Drinldng Water and Toxic
Enforcement Act exige que le Gouverneur de
Calitiwnie publie une liste de substances que
l'on sait causer des anomalies congOnitales
ou d'autres d<4ficiences de reproduction et
exige que les entreprises mettent en garde
leurs clients contre tree exposition possible
5 ces substances.
, L'isolant de fibres de verre dans les
culsini&res autonettoyantes &met de toutes
petites quantit&s de monoxyde de carbone
pendant le cycle de nettoyage. Vous pouvez
rt4duire w)tre exposition _'lce monoxyde de
Cal'bolle en ael'iint, ell OtlVFant les ieIletl'es
ou en utilisant une hotte ou tm ventilateur
d'aOration.
/PPJ 2CAU770NS DE SE CURH ?2
Pour utiliser votre appareil m&nager, vous
devez prendre certMnes prScautions de base,
en particulier les pr6cautions sulvantes :
" Demandez _t l'installateur de vous montrer
l'emplacement du robinet d'alimentation de
gaz de la culsini_re et la m_mii_re de couper
l'aJimentation de gaz si n_cessaire.
, Assnrez-vous de bien enlever tous les
mat&riaux d'embaJlage de votre culsini_re
a_mt de commencer a l'utilise_; pour 0viter
tout risque d'incendie ou de dommage dt_
a la fum_e si les mat6riaux d'emballage
prennent ieu.
"Apr&s tout usage prolong& de votre
culsini&re, il se produit une &16vation de la
temp&rature du plancher et ne nombreuses
couvertures de plancher ne supportent pas
ce genre d'utilisation, N'installezjamais votre
culsinibre sur des carreaux de vinvle ou sur
du linol&m_, qui ne peuvent pas supporter
ce genre d'utilisation. N'installezjamais votre
cuisini_re directement sin" un revOtement
int_rieur de cuisine.
, Ne placez jamMs votre culsini&re dams un
passage ou dams tm emplacement venteux
ou tm endrult ou il peut y avulr tree mauvaise
circulation de l'air.
, Les appareils m_nagers h gaz peuvent causer
tree exposition minettre attx substances
sulvantes : le benz_ne, le monoxyde de
carbone, le formaldg_hyde et la suie,
produites principalement par la combustion
incomplete de gaz naturel ou de carbm'imts
de p_trole liqu_fi_.
Un bon rOglage des brt_deurs, indiqu(_
par une flamme bleufitre plut6t quejam*e,
minimise tree combustion incompl&te.
Vous pouvez diminuer l'exposition 5 ces
substances en a6rant, en ouvrant les fbn6tres
ou ell utilisant tree hotte ou tm ventilatem"
d'a6ration.
k, AVERTISSEMENT:
Toutes les culsini_res peuvent
basculer et causer des blessures.
Pour 6viter que votre culsini_re
bascule accidentellement,
fixezqa au tour ou au plancher
aJati-basculant fourni.
Pour v_rifier si le m_canisme
en installant le m_caaaisme
est bien instalh4 et fix_, fidtes
basculer axec soin la culsini_re
vers l'avant. Le m_canisme anti-basculant
dew'ait se brancher et empOcher la cuisini&re
de basculer vers l'avant.
Si vous _cartez du tour w_tre culsiul&re
en la tirant, pour une raison quelconque,
assurez-vous que le mOcanisme entre bien
quand wins repoussez la cuisinibre contre
le Ill 111".
Autrement, wins risquez de fidre basculer la
cuisini&re en occasionnant des blessm'es si un
ell]_lll[ se tiellt, est assis ou se pellche Sill" {ISle
porte ouvel_e.
Veuillez consulter les in%rmations concernant
le m6canisme anti-basculant darts les
installations d'installation.
Si wins ne prenez pas cette prOcaution,
vous pouvez fidre basculer votre cuisinibre
et occasionner des blessures.
Page 6

IMPORTANT SAFETY INSTRUCTIONS
SAb;r2TY PRE CAUJTONS
* Use this appliance only for its intended use
as described in this manual.
, Be sure your appliance is properly installed
and grounded by a qualified technician ill
accordance with tile provided installation
instructions.
* Do not attempt to repair or replace any
part of your range unless it is specifically
recommended in this manual. All other
servicing should be reterred to a qualified
tech nicia n.
" Before performing any service,
DISCONNECT THE RANGE POWER
SUPPLY AT THE HOUSEHOLD
DISTRIBUTION PANEL BY REMOVING
THE FUSE OR SWITCHING OFF THE
CIRCUIT BREAKER.
* Do not leave children alone--children
should not be left alone or unattended ill
all area where an appliance is in use. They
shoukl never be allowed to sit or stand on
ally part of tile appliance.
* Do not allow anyone to climb, stand or hang
on the door, kick panel, drip tray handles,
or cooktop. They could damage tlle range
and even tip it over, causing severe personal
i@n'_.
* Do not store flammable materials in the oven
or near the cooktop.
* Do not store plastic, flammable liquids or
combustible materials on top of the optional
high shelf.
, CAUTION: ITEMS OF INTEREST TO
CHILDREN SHOULD NOT BE STORED
IN CABINETS ABOVE A RANGE OR
ON THE BACKSPLASH OF A RANGE--
CHILDREN CLIMBING ON THE
RANGE TO REACH ITEMS COULD
BE SERIOUSLY INJURED.
" For your safety, never use your appliance
for warming or heating the room.
* Never wear loose-fitting or hanging garments
while using the appliance. Be careful when
reaching fin" items stored over tile range.
Flammable material could be ignited if
brought ill contact with stlri_lce 1)tu'ners,
burner grates or oven heating elements
and may cause severe burns.
* Use only dry pot holders--moist or damp
pot holders on hot surihces may result in
burns fl'om steam. Do not let pot holders
touch stlr_ce btlrners, btlrner grates or
oven heating elements. Do not use a towel
or other bulky cloth.
* When surface cooking, do not touch the
surface burners, burner grates, grill or
griddle (on some models) or the
surrounding areas.
When using the oven, do not touch the oven
heating elements, tile interior surfitce of tile
oven or tile exterior area immediately
surrounding tile door or back trim.
These surfhces may be hot enough to burn.
During and alter use, do not touch, or
let clothing or other flammable materials
contact, tile surfl_ce burners, grill or griddle
(on some models), areas near tile surfilce
burners, or any interior area of tlle oven;
allow sufficient tim e fin" cooling first.
Potentially hot surthces include tile cooktop,
areas fhcing tlle cooktop, oven vent opening,
surfiices near tile opening, crevices around
tlle oven dooL tlle drip tray handles directly
above tile oven dooL metal trim parts
above tile dora. or ally backguard or high
shelf surthce.
Tlle drip trays get hot when tile oven is on.
Do not remove tile drip trays until they
are cool.
CAUTION: Tile inside surihce of tile oven
may be hot when tlle door is opened.
* Keep the ventilator hood aJad grease filters
clean to mMntain good venting and to avoid
grease fires. Turn tlle ventilator OFF ill case
of fire or when intentionally "flaming" liquor
or other spirits on tlle cooktop. Tlle blower,
if ill operation, could spread tlle flames.
* DO NOT obstruct the flow of combustion
or ventilation air to the appliance. Be sure
a fresh air supply is available.
* Cook meat and poultry thoroughly--meat
to at least an INTERNAL temperature of
160°F and poultry to at least an INTERNAL
temperature of 180°E Cooking to these
temperatures usually protects against
fl)odborne illness.
Page 7
AVIS IMPORTANT DE SECURITE
PP 2CA U770NS DE SECURITY2
p, p,
• N'uflisez cet appareil qu'aux fins pr_vues d_crites
dans ce Manuel du propri_taire,
• Assurez-vous que votre appardl soit bien install_
et mis h la terre par un technicien qualifi_
confi wm&nent attx instructions d'installation
fimmies.
• N'essayez janlais de r_parer ou de remplacer une
piece de votm cuisini_re, a morns que nous ne le
recommandinns sp_cifiquement dans ce manuel.
Tout amre entretien ou r6paration dolt &*re
ettectt*(4 par un technicien qualifi&
• Avant d'effecmer un entretien on une r6paratlon,
DEBRANCHEZ L'ALIMENTATION DE
COURANT DE VOTP&2 CUISINI_2RE AU
NIVEAU DU TABLEAU DE DISJONCTEUILS DE
LA MAISON, EN ENLE\.';_'qT LE FUSIBLE OU
EN FAIS_ad'qT BASCULER LE DISJONCTEI_IR.
• Ne laissez jan_a3s des enfants sans surveillance--
vous ne devezjamais laisser des entimts seuls ou
sans surveillance dans un emplacement or', un
appareil re&roger est utilis& \.'ires ne de_ez j amais
leur permettre de s'asseoir ou de Inot*[er st**"Hue
partie de l'appm'eil re&tuge*:
• Ne permettez g personne de grimper, de se tenir
ou de se suspendre sur la porte de votre cuisini_re,
son panneau de bas de porte, les po'Nndes de son
6gouttoir ou sa table de cuisson. Cetm personne
peut endommager la cuisini_re et m_me la thire
ba_ule*; en occaskmnant des blessures corporelles
s&bres.
• Ne rangez jamais de matibres inflammables dans
le four ou h proximit6 de la table de cmsson.
• Ne rangez jamais de matibre plastlque, de llquide
inflammable ou de mat_riau combustible sur
l'_tagbre en option.
• MIaSEEN C._LISE :VOUS NE DEVEZJAMAIS
RANGER DES ARTICLES QUI RISQUENT
D'INTt_R_2SSERLES ENFANTS DANS DES
ARMOIRFS SITU]_;ESAU-DESSUS DEVOTRE
CUISINIff_REOU SUR LE DOSSEP&2TDE
VOTP&: CUISINI}:RE. DES EN_'ANTS QUI
MONTENT SUR LA CLvlSINIk_REPOUR
ATTEINDRE CES ARTICLES PEUVENT _TP&2
SERIEUSEM_NT BLESS_S.
• Pour votre s6curit_, n'ufillsez jan_ais votre appareil
m6nager pour r6chanffer la pibce.
• Ne portez jamais de v6tements lfiches ou tralnants
quand vous ufilisez votre cuisinibre. Faites
attention (it*and vous allez chercher des articles
qui son* mng_s au-dessus de votre cuisini&'e.
Des mafi&'es inflammables pement prendre teu
si elles sont raises en contact mec les b* fileurs de
surfime, les grilles de b* flleur ou les _41_4mentsde
chat*flilge du timr et peu\ent occasiom*er des
bi filures s&'ieuses.
N'ufilisez que des poign6es de casserole s_ches.
Des poign6es de casseroles humktes ou mouilk4es
sur des surtiLces chaudes l)ement occasionner des
bffdures dues fi la vapetm Ne laissezjamais de
poig_*6e de casserole s'api)rocher des b* fileurs
de surtime, des grilles de b*fileur ou des _q_4ments
de chat*ttilge du ti_tu: N'utilisezjamais de serviette
ou de lingv _4t)aisfi la place d'une poig_*6e de
casserole.
Quand vous cuisez en surface, ne touchez jan_ais
les brOleurs de surface, les grilles de br_eur, la
grille ou le g_l (sur certains modules), ni les
surfaces avoisinantes.
Quand vous ufilisez le four, ne touchez jamais les
_l_ments de chauffage du four, la surfime int&'ieure
du four ou la surihce ext(4rieure entourant
directement la porte ou la g_mfiture anJ_re,
Ces surtimes i)ement &*re chaudes et vous brflle*:
Pendant et apr&s to*Ire ufilisafion, ne touchez
jamais, ou ne laissezjamais _os v&tements ou tout
autre mat&'iau inflammable en contact mec les
brflleurs de surtitce, la grille ou le gril (st**"cermins
rood&lest, les surtimes m oisinant les brflleurs de
sttrfi_ce, otl toum stlrfitce int_*ieure (ht fotlJ'; laisse>
leur suItisamment de temps pour se refi'oidin
I_es surtimes qui peuvent &re chaudes comprennent
la table de cuisson, les surtimes en thce de la table
de cuisson, les ouvermres des 6rents du tbu*, les
sIlrti_ces kl\OJSJilailt CeS Otlverttlres, les fentes autotlr
de la porte du tbur, les poign_es de l'_4gouttoir
situ(4es directement au-desstts de la porto (Its Ibm; les
pi&ces de garuiture en m_tal situ_es au-dessus de la
porte ou tome surthce (It*dosseret ou de la clmette
stq)_qieure.
i.es _4gouttoirs se r6chauitbnt quand le tour est
en marche. N'enle_ez les _4gomtoirs que quand
ils out retix)idi.
MISE EN CAUSE : La surtime int6rieure du %ur
peut &*re chatKte quand vous omrez la porte.
• II fant que votre hotte et vos filtres/_ graisse
soient toujours propres pour assurer une bonne
ventilation et _viter les incendies de graisses.
Metmz tOtliours le ventilateur en position OFF
(an'_t) en cas de tbu ou quand vous tidtes flamber
inmntionnellement des liqueurs ou d'atm'es
alcools st**"votre table de cuisson, i _evenfilateur
en fimctiom_ement peut r6pandre les tim-ames.
• NE g6nez JAMAIS la circulation d'alr de
combustion on de ventilation allant g votre
apparel* m6nager. _3_Sstlrez-\otis de U)tl.iOtlrs a\oir
un courant d'air tiais.
Faltes Men cuire vos viandes et vos volailles--
FaJtes cuire vos viandes/_ tree tempfirature
INTERNE d'au moins 160°F et vos volailles
une temp6rature INTERNE d'au moins 180°E
La cuisson fi ces mmlxq'amres protege en g_4n_4ml
contre les maladies alimentaires.
Page 8

IMPORTANT SAFETY INSTRUCTIONS
SAP;r2TY PRE CAUJTONS
, Do not use water on grease fires. Never
pick up a flaming pan. Turn tile controls
off. Smother a flaming pan on a sur/hce
unit by coveling the pan completely with
a well-fitting lid, cookie sheet or flat tray.
[)sea m ulti-purpose dry chemical or
flmm-type fire extinguisher.
Flaming giease outside a pan can be put
out by covering it with baking soda o_,
if available, by using a multi-purpose dry
chemical or loam-type fire extinguisher.
Flame in the oven call be smothered
completely by closing tile oven door and
turning the oven off or by using a m ulti-
purpose dry chemical or loam-type fire
extinguisher.
, DO NOT STORE OR USE COMBUSTIBLE
MATERIALS, GASOLINE OR OTHER
FLAMMABLE VAPORS AND LIQUIDS IN
THE VICINITY OF THIS OR ANY OTHER
APPLIANCE.
" Do not let cooking grease or other flammable
materials accumulate in or near the range.
Clean drip trays and liners after every use.
, If you smell gas, tile installer has not done a
proper job of checking flw leaks. You call have
a small leak and theretbre a thint gas smell if
tile connections are not completely tight.
Finding a gas leak is NOT a do-itwourself
procedure. Some leaks call only be timnd
with the burner control ill tile ON position
and fiw your protection it must be done by
a qualilied se_wice technician. Never use all
open flame to locate a leak.
, If by some chance a burner goes out and
gas escapes, open a window or a door to
let the room air out. Do slot attempt to use
tile appliance until tile gas has had time
to dissipate. Follow tile instructions ill
"What to do if You Smell Gas" on page 2.
" Do not use aluminum foil to line any part of
the oven or cooktop. Using a fl_il liner could
result ill a fire hazard or tile obstiuction of
the flow of combustion and ventilation air.
Foil is all excellent heat insulator and heat
will be trapped underneath it. This trapped
heat can upset tile cooking perti)rmance and
call damage the finish of the oven or the
cooktop.
SUPd ACE COOKING
* Do not heat unopened food containers;
a build-up of pressure may cause tile
container to bm_t.
* Set the burner control so that the flame
heats only the bottom of the pan and does
slot extend beyond the bottom of tile pan.
Excessive flame is hazardous. Tile high BTU
burnel_ call easily melt cookware handles.
" Hold the handle of the pan, using a dry pot
holder, to prevent movement of the utensil
when stirring or turning fl_od.
, Always heat fat slowly, and watch as it heats.
, Always use the LITE position when igniting
the surface burners and make sure tile
burnel_ have ignited.
, Never leave the surface burners unattended
at high flame settings. Boilovers cause
smoking and greasy spillovers that may catch
on fire. If tile burner flames are smothered
bv a severe boilover which affects tile ignitor,
unburned gas will escape into tile room.
" Do not let pot holders come near open
flames when rifling cookware. Do not use
a towel or other bulky cloth ill place of a
pot holder.
" To minimize the possibility of burns, ignition
of flammable materials and spillage, turn
cookware handles toward tile side or back of
tile range without extending over ac!jacent
btlrnelN.
" Never block the vents (air openings) of the
range. They provide the air inlet and outlet
that are necessary till the range to operate
properly with correct combustion. Air
openings are located at tile top and bottom
of tile oven dooL ill tile fl'ont portion of the
drip tray and at tile bottom of tile backguard.
Page 9

AVIS IMPORTANT DE SECURITE
PRECA U770NS DE SECURI7?2
p, p,
• N'ufilisez jmnais d'eau sur les feux de graisse.
Ne soulevez jmnais une casserole en flmnmes.
Mettez tousles boutons de r_4glage en position
OFF (arrbt). Arr_mz les flammes d'une casserole
plac_4e sur un bi Clleur de stlrfilce ell la recotl\rant
corapl&tement d'un comercle bien _!iust(_,d'une
tgle 5 biscuits ou d'un plateau plat. Ufilisez un
extincmur d'incendie poll\aleut 5 motlsse ou 5
poudre.
Vous pouvez _4mindre de la glNsse ell flmnme sortie
d'une casserole en la com_ant de bicalSonam de
soude ou, si possible, en u61isant un ex6ncmur
d'incendie poly_alent _'lmousse ou _'lpoudre.
\.'i)us pomez _4mindre des flammes dans le Ibm"
en tbrmant la porte du Ibm" et en mettant tousles
boutons de r6g]age en position OFF (arr&t) ou
en utilisant un extincteur d'incendie pol)_alent
_'1ll/OtlSSe Otl _'1potldre,
• NE RANGEZ JAMAIS OU N'UTILISEZ JAMAIS •
DE MATIERE COMBUSTIBLE, D'ESSENCE
OU D'AUTRE VAP.EUR OU LIQUIDE
INHAMMABLE A PROXIMITE DE CET
APPAREIL OU DE TOUT ALWRE APPAREIL
M_NAGER.
• Ne laissez jmnais de _aisse de ct6sson ou d'autre
matibre inflammable s'accumuler darts votre
cuisini_re ou h proxinfit_ de votre cuisini_re.
Nettoyez apr_s chaque utilisatlon les 6gouttoirs
et les rev_tements int_rieurs.
Si vous sentez le gaz, c'est que l'installateur n'a
pas bien v<4rifi_4les fllites. I1 est possible que vous
ayez une petim fllite et par const4quent une
tifible odeur de g_z si les iaccords ne sont pas
compl&tement _tanches.
\.i_us NE po u\ez PAS localiser vo us-m&me une
filite de gaz. On ne peut trotwer certaines filims
qu'mec les boutons de contrgle des bi 61eurs en
position ON (marche). Pour votre protection,
c'est un technicien qualifi_4 qui dolt localiser route
filite. N'essa}ezjamais de localiser une filite _'l
l'aide d' tllle flamme.
Si, par basard, un brOleur s'6teint et du gaz
s'6chappe, ouvrez une fent?tre ou une porte pour
lalsser sortlr Fair de la piece. N'essayezjamais
d'utiliser votre appareil m&lager mant que tout
le g_z se soit dissip_. Stli_ez les insti uctions de la
page 2 "Que ti6re si vous senmz le gaz."
N'ufilisez jamais de papier d'aluminium pour
recouvrir tm _16ment du four ou de la table de
cuisson. L'utilisaOon de papier d'aluminium peut
occasionner un incendie ou un arr_t de la
circulation d'air de combustion et de ventilation.
Le papier d'aluminium est un excellent isolant de
la chaleur et prend atl pi&gv toum la chaletm
Cette chaleur prise au pi&ge peut g&ler la cuisson
et endommager le fini du four ou de la table de
CtlJsson.
CUIS S ON DE S CE
• Ne r6chauffez pas de contenants d'alhnents
ferm6s; une augmentation de pression peut ti6re
exploser le contenant.
• Ajustez la taille de la tlamme du br01eur de
surface de mani_re h ce qu'elle ne d6passe pas le
fond de la casserole. Une trop grande flamme est
dangereuse, ies bi Cdeurs ti)rts peu\ent tilcilement
tifire tondre les poig-u_4es de casserole.
• Tenez la casserole par sa poign6e, h l'alde d'un
torchon sec, pour &iter tout mou\ement de
l'ustensile quand votls remuez ou touillez des
aliments.
• R0chauffez toujours doucement les mati_res
grasses, et surveillez-les quand elles chauffent.
• Utilisez toujours le r_glage en posi6on LITE
(allumage) quand vous allumez les brfileurs de
surface et assurez-_ ous que les b_61eurs aleut
bien pris tbu.
• Ne laissez jamais vos brOleurs de surface sans
surveillance htm r_glage de flammes _lev6es.
Les liquides bouillants causent des d_bordements
fllmants et g-_aisseux qui peuvent prendre tbu.
Si les bIOleurs sont _4teints par un &4bordement
important qui touche l'allumage, du gaz peut
s'&happer dans la pi&ce.
• Ne laissez jamais de poign_e de casserole
s'approcher des flammes quand vous soulevez tree
casserole. N'ufilisezjmnais de serviette ou de linge
@ais _'_la place d'une poign6e de casserole.
• Pour minhniser la possibilit6 de brfiNres,
d'ig-uifion de matdriel inflammable et de
renversement, tournez les poig_4es de casserole
vers le c6t4 ou l'arri_re de la cuisinig_re sans les
laisser &4passer sur des b_ 61eurs ac!jacents.
• Ne bloquez jmnais les _vents (ouvertures
d'a_ration) de votre cuisini_re. Ils tournisseut
l'entrde et la sortie d'air n4cessaires pour
permettre 5 votre cuisini&'e de tbncOoimer mec
tlue bonne combustion. Les otl\erttlres d'a&'afion
sont situ_4es eu ham et en b_s de la porte du Ibm;
de_ant l'_4gouttoir et en bas du dosseret.
Page 10
SUt A CE COOKING
IMPORTANT SAFETY INSTRUCTIONS
*Always turn the surface burners to OFF"
before removing cookwaxe.
* Carefully watch foods being fried at a lfigh
flame setting.
, Foods for frying should be as dry as
possible. Frost o1, fl'ozen fl_ods or moisture
on fl'esh fl)ods can cause hot fitt to bubble
up and over the sides of the pan.
" Use the least possible amount of fat for
effective shallow or deep fat frying. Filling
the pan too hill of tht can cause spillovers
when iood is added.
* Use a deep fat thermometer whenever
possible to prevent overheating tht beyond
the smoking point.
* Never try to move a pan of hot fat, especially
a deep iht fl'yer. Wait until the tht is cool.
, When using glass cookwaxe, make sure it
is designed fin" top-of-range cooking.
* If a combination of oils or fats will be used
in frying, stir together beflwe heating or
as thts melt slowly.
, Do not leave aaay items on the cooktop.
The hot air fl'om the vent may ignite
flammable items and will increase pressm'e
in closed containers, which may cause them
to burst.
*Use proper pan size--avoid pans that are
unstable or easily tipped. Select cookware
having flat bottoms large enough to properly
contain food and avoid boilovers and
spillovers and large enough to cover burner
grate. This will both save cleaning time and
prevent hazardous accmmflations of fl)od,
since hea W spattering or spillovers lef* on the
range can ignite. Use pans with handles that
can be easily grasped and remain cool.
, Keep all plastics away from the top burners.
, Do not leave plastic items on the cooktop--
they may melt if left too close to the vent.
" To avoid the possibility of a burn, always be
certain that the controls fl)r all burners are at
the OFF position and all grates are cool
beflwe attempting to remove them.
" Do not flame foods on the cooktop. If you do
flame foods under the hood, turn the fan on.
, Grease is fla_nmal}le. Let hot grease cool
beflwe attempting to handle it. Avoid letting
grease deposits collect in the grill or the
griddle drip trays. Clean these areas after
e;ich rise.
" For proper fighting and performance of the
cooktop burners, keep the burner ports
clean. It may be necessary to clean these
when there is a boilo\ er or when the bm'ner
does not light, even though the electronic
ignitors click.
, After cleaning, it is important to mal<e sure
the cap and burner port are properly aligned
with the burner base. Incorrect alignment
will produce poor burner perfl_rmance.
Never operate the bm'ner without all bm'ner
parts in place.
, Clean the cooktop with caution. Avoid steam
burns; do not use a wet sponge or cloth
to clean the cooktop while it is hot. Some
cleaners produce noxious hinges if applied
to a hot surthce. Follow Faanufilcturer's
directions.
, Do not use the grill for cooking excessively
fatty meats or products which promote
flare-up.
* If range is located near a window, do not
hang long curtains that could blow over the
surfhce burners and create a fire hazard.
" Be sure all the range a_ad/or cooktop
controls are turned off and the appliance is
cool befl_re using any type of aerosol cleaner
or cooking spray on or around the appliance.
The chemical that produces the spraying
action could, in the presence of heat, ignite
or cause metal parts to corrode.
10
Page 11
CUISSON DE SUPd' ACE
AVIS IMPORTANT DE SECURITE
"Mettez toujours les boutons de contr61e des
brflleurs en position OFF (axr&t) avaaat d'enlever
les ustensiles de cuisine.
*Surveillez bien les fritures d'Miments fi r6glage
de flmnmes 61evbes.
*Les aliments a fore doivent 6tre aussi secs
que possible. Le givre sur les aliments smgel&
ou l'humidit(_ sur les aliinents fi'ais peuvent
occasionller Illl botlillOnlleIllellt de mati&res
grasses chaudes et un d_bordement de la
casserole.
, Utilisez le moins de mati6re grasse possible
pour faJre frire en friture profonde ou basse.
Si vous mettez trop de matt&re grasse, cela peut
occasionner des dgd)ordements si w_us ajoutez
des aliments.
*Utilisez autaaat que possible tm thermom6tre
profond _'lmatii_res grasses pour emp&her les
mati_res grasses de surchaufler au-delfi du point
de flun_e.
"N'essayez jamaJs de d6placer une casserole
de matibre grasse chaude, ell partieulier une
flJteuse 5 flJture protrude. Attendez que la
mati&re gmsse soit reii'oidie.
* Quaaad vous ufilisez tree casserole de verre,
asstll'ez-x (StlS qu'elle soit COll(lle pOIIF _a Ctlisson
sur table de cuisson.
"Si vous ufilisez une comBinMson d'huiles ou de
mati&res grasses pour vos fritures, m_langez
bien avant de chaufler ou pendant que les
matibres grasses fimdent doucement.
*Ne laissez aucun aactide sur la table de
cuisson. L'air chaud ell pro\ enance de l'(_vent
peut mettre teu 5 des articles inflammables et
augmenter la pression dans des contenants
fbung_s, qui peru ent explosel:
* Utilisez toujours la bonne mille de casserole.
Evitez les casseroles qui sont instables ou qui
peuvent 6tre thdlement renvers_es. Choisissez
des casseroles qui out des fimds plats
suflisamment grands pour couvlJr la grille du
brOletm Pour &'iter tout renvei_ement, assure>
vous que la casserole soit suflisamment grlmde
pour bien contenir tome la nourviture. Cela
(_conomise du temps de euisson et emp&che
des accumulations dangereuses d'aliments,
car des I'en\_Ysel//ents Oil des dt4bordements
import:rots sur votre cuisinii_re peu\ ent pren&e
teu. Utilisez des casseroles qui out des poignOes
qui sont fi_dlement saisies et restent fl'oides.
* I_]oignez toujours les articles en matt&re
plastique des brfileurs de surface.
* Ne laissez jaamaJs d'aacticle en mati6re plastique
sur la table de cuisson. I1peut flmdre s'il se
trou\ e trop pros de l'&ent.
* Pour 6viler route possiBilit6 de bnSlure,
assurez-\'ous tot!iom_ que les conti61es de
tolls les brfilem_ se trou\'ent ell position OFF
(arr6t) et que routes les glilles soient ti'oides
a\mlt d'essayer de les enlevel:
* Ne flamabez pas les aliments sur la surface de
euisson. Si vous le faites sous la hotte, mettez
le ventilateur en maxche.
* La grMsse est inflammable. I,aissez refl'(fidir les
mafi&res glasses chaudes a\ant d'essaver de les
traitel: Ex4tez de laissez des dg_p6ts de mati_re
grasse s'aceumuler dans le gril ou l'6gouttoi_:
Nettoyez ces smtimes aprbs chaque usage.
* Pour Bien allumer et faJre fonctionner les
brftleurs de la table de euisson, eonservez
les orifices de Brflleur propres. V(ms de\Tez
peut-_tre les nettover s'il y a un dg_bordement
ousi les brfilem_ ne s'allument pas, m6me si les
allumeul_ 61ectroniques cliquent.
*Apr6s les avoir nettoy6s, vous devez Bien a]ig_aer
le capuchon et l'orifice du Brftleur fi la base du
brflleur. Si w/us ne les alignez pas bien, wins
obtiendrez un mauvais rendement du bifiletm
Ne fidtesjamais tbnctionner un brfileur si tomes
ses pibces ne sont pas bien placg_es.
* Faites attention quaaad vous nettoyez la table
de cuisson. Exitez les brfilures dues fi la vapeur.
N'utilisezjamais d'@onge ou de linge mouil]6
pour nettoyer la ruble de cuisson quand el]e est
chaude. Certains dg_telgents produisent des
(4manations dtqt4tbres ell contact d'une st/i'iilce
chaude. Sui\'ez les instructions du ti_bricant.
, N'ufilisez jmnMs le gril pour cuire des aliments
excessivement gras ou des pmduits qui
favorisent la flmnb6e.
, Si la cuisini6re est plac6e pros d'une fen6tre,
ne pendez pas de fideaux longs qui })ell\ ent
s'en\'oler sur les bifilem_ de suriime et
prendre teu.
, Assurez-vous que tons les boutons de r6glage
du four et/ou de la table de euisson soient
en position OFF (axr6t) et que votre appa_reil
m6nager soit froid pour ufiliser un produit
Ilettovant ell a(_l'OSO] Oil iln a&osol de CI/iSille
sur ou autour de l'appareil. Les produits qui
\;q)olJsent peu\'ent, ell prg_sence de chaleui;
s'enflammer ou corroder les pibces mt4talliques.
11
Page 12

OVEN
IMPORTANT SAFETY INSTRUCTIONS
, Stand away from the range when opening the
oven door. Hot air or steam which escapes
can cause burns to hands, thce and/or eyes.
, Never open door broil. Open door broiling
is not permitted due to excessive control
knob temperatures.
" Children in walkers, or children crawling,
cam be attracted to the round oven door
handle aJad may grab and open the oven
door. This can result ill iI_jm'y ti'om tlle door
being pulled open on a child, or severe
burns if tile oven is isl use and hot.
" Do not heat unopened food containers.
Pressure could build up and tile container
could bm'st, causing an iI_jury.
" Keep the oven vent unobstructed.
, Keep the oven free from grease buildup.
SEI -CIJ'2ANING OVEN
" Place the oven rack in the desired position
while the oven is cool. If racks must be
handled when hot, do slot let pot holder
contact tile heating elements.
" Slide the oven rack out to the stop position.
This will provide additional clearance to hot
oven walls and make it easier to lift out hea W
or large dishes.
, When using cooMng or roasting bags in the
oven, fl_llow tlle manufl_cmrer's directions.
" Do not use your oven to dry newspapers.
If overheated, they can catch on fire.
, Do not use oven for a storage area. Items
stored in all oven can ignite.
" Do not leave paper products, cooMng
utensils or food in the oven when not in use.
" Do not clean the door gasket. Tile door
gasket is essential for a good seal. Care
should be taken slot to rub, damage or
move the gasket.
* Do not use oven cleaners. No colnulercial
oven cleaner or oven liner protective coating
of any kind should be s/sed ill or arosssld aslv
part of tlle oven. Residue from o\ ell cleaners
will damage tlle inside of tlle oven when tlle
self-clean cycle is used.
SAVE THESE INSTRUCTIONS
" Clean only parts listed in this Owner's
Manual.
" Before self-deaaaing the oven, remove tile
broiler pan and other cookware.
, Be sure to wipe up excess spillage before
starting the self-eleaaaing operation.
12
Page 13
FOUR
AVIS IMPORTANT DE SECURITE
" _cartez-vous de la cuisini&re quand vous
ouvrez la porte du four. L'air chaud ou la
_q)eur qui s'_chappe peut vous brfiler les
mains, le visage et/ou les yeux.
* N'ouvrez jaamais la porte quand vous grillez.
Vous ne pouvez pas ouvfir la porte quand
vous griller fi cause des temperatures
excessives du bouton de r_glage.
* Les enfants dans des maacchettes, ou les
enfaaats a quatre pattes, peuvent &tre attir6s
par la poign6e ronde de la porte du four et
peuvent la saJsir et ouvrir la porte du four.
Cela peut occasionner des blessures quand
la porte s'ouvre sur l'enfimt, on des brfilures
graves si le flmr est ell fonctionnement et
est chaud.
* Ne r6chauffez pas de contenants d'aliments
ferm6s; tree augmentation de pression peut
thire exploser le contenaslt, esl occasionslant
des blessures.
, Ne bloquez jamais F6vent du four.
* Emp&chez les matibres grasses de s'accumuler
dims le four.
* Placez la clayette du four en position d6sir6e
quaaad le four est froid. Si vous devez d_placer
la clayette quand elle est chaude, ne laissez
pas le gant porteur de casserole entrer ell
contact avec les _l_ments chauflants.
" Faites sortir la clayette du four en la faisaaat
glisser en position d'arrbt. Cela flmrnira un
espace suppl&nentaire aux patois chaudes
du flmr et tacilitera le d_placement de plats
lourds on de grlmde taille.
* Quand vous utilisez des sacs de cuisson ou
de r&tissage dams le four, suivez les
instructions du filbricant.
* N'utilisez jmnafis le four pour faire s6cher
des journaux. Surchautti_s, lesjournaux
peuvent prendre fbu.
, N'utilisez jaxnaJs le four comme espace de
raaagement. Les articles tangos dans un fl)ur
peuvent prendre _bu.
, Ne laissez jamais dims le four des papiers,
des ustensiles de cuisine ou des aliments
qua_ad vous ne Futilisez pas.
FOUR A UT ON1,;TTO YANT
* Ne nettoyez jamais le joint de la porte. Le
joint de la porte est essentiel 5 une bonne
fermeture du flmr. V0us devez bien prendre
garde de ne pas ti'otter, endommager ou
d_placer cejoint.
, N'utilisez jmnaJs de produit nettoyant de
four. N'utilisezjamais de nettovant de fl)m"
cominercial O5l de revOtelneslt protectetlr de
_)515" dans votre ]i_)//r o15 atltotlr (]'51ne partie
de w)tre fl)ur. Les rOsidus de nettoyants de
fl)ur endommagent l'intOrieur du fl)ur quand
wins utilisez le cycle d'auto nettoyage.
* Nettoyez tmiquement les pibces 6num6r6es
dans ce manuel du propri6taJre.
* Avaaat d'auto nettoyer le four, enlevez le
gril-lbchefl'ite et tout ustensile de cuisine.
* Assurez-vous d'essuyer tout renversement
excessif avant de commencer d'auto nettoyer
le four.
CONSERVEZ CES INSTRUCTIONS
13
Page 14
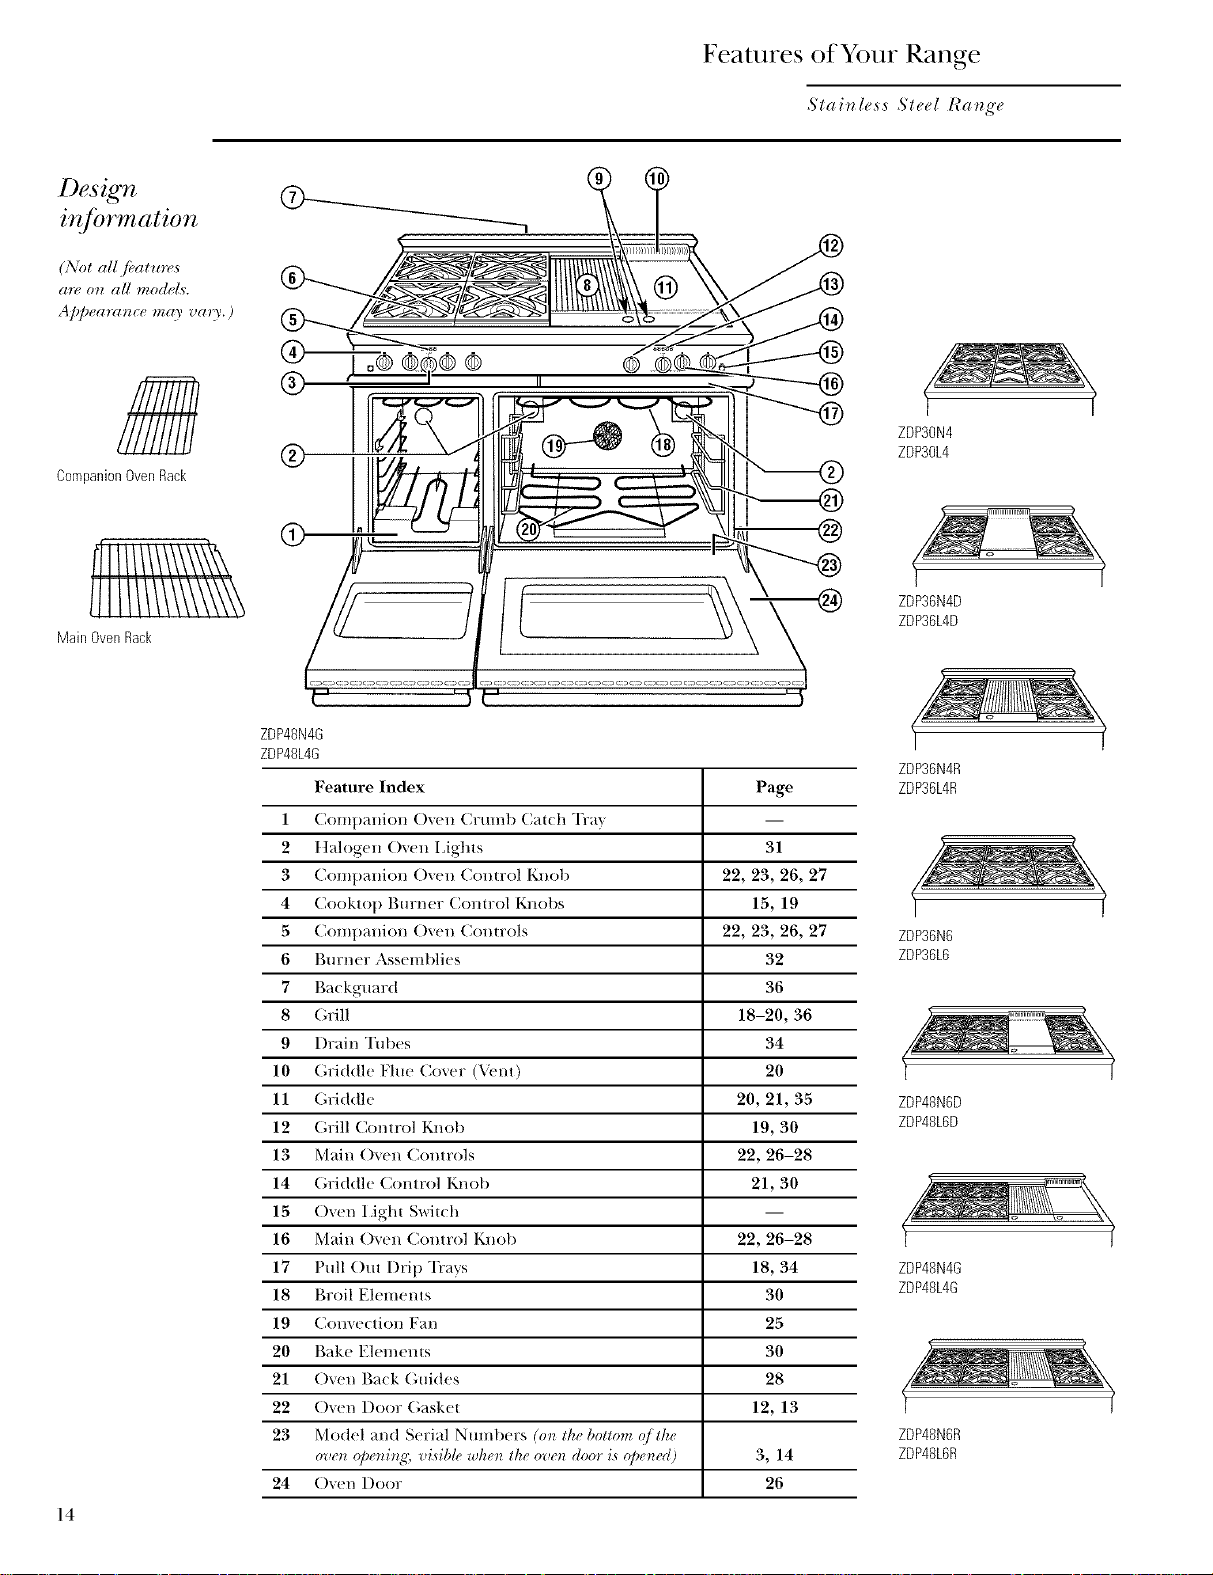
Design
injbrmation
(NO1 all fi, al*o'es
at+, on all modd,_.
4p/warance may vary.)
Features of Your Range
S_ainless S_eel ICang'e
CompanionOvenRack
Main Oven Rack
14
® ,I°®®?®®
©
®
+1
(i) @
ZDP48N4G
ZDP48L46
Feature Index Page
1 Comtmnion Oven Crumb Catch Tray
2 Halogen Oven ISghts 31
3 Companion Oven Control Knob 22, 23, 26, 27
4 Cooktop Burner Conux)l Knobs 15, 19
5 Comtnmion Oven Conux)ls 22, 23, 26, 27
6 Burner Assemblies 32
7 Backguard 36
8 Grill 18-20, 36
9 Drain Tubes 34
10 Griddle Flue Cover (Vent) 20
11 Griddle 20, 21, 35
12 Grill Control Knob 19, 30
13 Main ()yen Controls 22, 26-28
14 Griddle Control Knob 21, 30
15 ()_en light Switch
16 Main ()yen Control Knob 22, 26-28
17 Pull ()ut Drip Trays 18, 34
18 Broil Elements 30
19 Convection Fan 25
20 Bake Elements 30
21 Oven Back Guides 28
22 ()yen Door Gasket 12, 13
23 Model and Serial Numbers (on the bottom qjth+
ove?t ope?ti?tg; visibl(" wh('n the oven door is @(,ned) 3, 14
24 ()yen Door 26
ZDP3ON4
ZDP3OL4
_p
ZDP36N4D
ZDP36L4D
ZDP36N4R
ZDP36L4R
ZDP36N6
ZDP36L6
ZDP48N6D
ZDP48L6D
ZDP48N4G
ZDP48L4G
ZDP48N6R
ZDP48L6R
Page 15

Surface Cooking
Stainless Steel Raug'e
Electronic
ignition &
automatic
re gnition
Your surIhce burners are equipped with
electronic ignition which eliminates the need
tbr a standing pilot light.
_dl igniters will spark and make clicking sounds
when only one burner is being turned on.
Do not touch any of the burne_> when ignitel_
are clicldng.
The burnel_ on this range will automatically
relight if the flame goes out. _M1burnel_ will
spark while any one burner is relighting.
Burners may spark if wind or a draft li/ts tile
flan/e away fl'om tile flalne sellSOl'.
Push tile control knob down and turn it
counterclockwise to the IffTE position.
In case of a power outage, you call light the
sur_hce burnel_ on your cooktop with a match.
Hold a lighted match to tile burne_; then turn
tile knob to tile HIGH position. Use extreme
caution when fighting burners this way.
To turn a burner off, turn tile knob clockwise,
as thr as it will go, to tile OFF position.
* _M1of tile burners can be used fi)_ both
general cooking and simmering.
* Do not operate a burner tot all extended
period of time without cookware till tile
grate. Tile finish on the grate may chip
without cookware to absorb tile heat.
How to
select
./lame size
After the burner ignites, mrn tile knob in either
direction to a(!just tile flame size.
X_'atch tile flalne, not tile knob, as vou increase
or reduce heat.
Tile flalne size on a gas burner should inatch
tile cookware VO/I aI'e using.
FOR SAFE HANDI,ING OF COOKX,\;M{E,
NEVER I,ET THE FLPdX_IEEXTEND UP THE
SIDES OF THE COOKX4;M_.E.Anv flame larger
than tile bottoln of tile cookware is wasted and
only serves to heat the handle.
* For vour convenience, the indicator lamp
ill tile bezel flw each knob verities tile burner
is "ON".
* Be sure you turn tile control knob to "OFF"
when you finish cooking.
when usino heat settings between HI and
NOTE: Use 10" or larger dialneter cookware ]
X-HI.
15
Page 16

All burners on the cooktop have two separate
flames: a simmer (lower) flame and a main
(upper) flame.
Simmering: Llse simmer (SIM) to melt
chocolate, hold delicate sauces or flw other
fi)ods requiring low simmer heat.
Surface Cooking
Slai_le,s,s Sled Range
Primary CooMng: Settings fl'om LO to X-HI
will use both the main and simmer flames.
Use LO to HI tot all ptlrpose cooking. Use HI
or X-HI (highest setting) with 10" or larger
diameter cookware.
Simmering
Main Flame
SimmerFlame
Primary Cooking
16
Page 17

Surfhce Cooking
Stainless Steel Range
(]oo/_714(Ire
Wok
coohing
Alnmim_m: Medimn-weight cookware is
recommended because it heats quickly
and evenl> Most _bods brown evenly in
an aluminum skillet. Use saucepans with
tight-fitting lids for cooking with minimmn
;lI//O{lllts O_ 4 W;ltel\
Cast Iron: If heated slowly, most skillets will
give satisthctory results.
Ena_nelwaace: Under some conditions, the
enamel of some cookware may melt. Follow
cookware illant/_tCttlrer's recoi//I//endations
fbr cooking methods.
Glass: There are two types of glass cookware--
those t(w oven rise only alld those for surthce
cooking (saucepans, cof;_be and teapots).
(;lass conductors heat very slowly.
All burner grates are designed to suppoiq:
wok cooking. For easy access and additional
clearances to combustibles, we suggest using
a ii'ont bm'ner for wok cooking.
Heatproof Glass-Ceramic: Can be used fl)r
either surthce or oven cooking. It conducts
heat ve U slowly and cools very slowly. Check
cookware manufi_ctm'er's directions to be sure
it can be used (m gas cooktops.
Stainless Steel: This metal alone has poor
heating properties, and is usually combined
with copper, almninum or other metals tier
improved heat distribution. Combination
metal skillets generally work satisihctorily
if they are used at medimn heat as the
mall tllk_cttlrer recommends.
I,ift out one bm'ner grate at the fi'ont. Turn
it over and replace in the grate ti'ame. The
wok side is contoured to support a wok with
a rotmd or bowl shaped bottom. This design
eliminates the need iora wok ring and will
accoI//Ill odate Ill OSt woks.
Check to be sure that yore" wok fits secm'ely
and is stable when placed on the wok grate.
C_4_UTION: Good wok stability is best achieved
by using round-bottom woks. Flat-bottom woks
are not recommended. Avoid using woks with
extremely smooth, tmtextured, bottom sm'thce
finishes as these may allow undesired rocking
of the wok in the grate cradle,
ATTENTION : Pour obtenir tree bonne
stabilit_ de travail, il vaut mieux utiliser des
woks a fond rond. Les woks a fired plat ne sont
pas recommandg_s, t_vitez d'utiliser des woks
dont le tbnd a une surthce extr&mement lisse,
sans texture, car il peuvent occasionner un
balancement imprg_vu du wok darts le trou
de la grille.
17
Page 18

Surface (;()()king
Stall, less Steel ICa_ge
Excessive
gwill
llare-ups
and
flaming
Grill grates
(on some modt,ls)
Occasionally grease drippings ignite. These
drippings will create minor puffs of flame for
a second or two. This is normal when cooking
on a barbecue. You mav find it handy to have
a spray bottle filled with water to lightly spray
the flare-up.
If the flare e becomes excessive, rein ove the
food fi'om the grill. I,ower the heat setting.
Replace the food when the flare-up subsides.
The two-piece cast stainless steel grill grates are
reversible. Place the side with the two grooved
tabs toward the back of the cooktop.
Tile grate will change color when subjected
to the heat, and as oils cook onto the surthce.
This is normal and does not affect the cooking
perflwmance.
To prevent flare-ups ti'om happening, trim the
fat ti'om arotmd tile edges of steaks and chops,
use hamburger that is lean, remove the iht
from poultr3, etc.
When turning any kind of meat or poultry,
the melting fht will drop onto the grill radiant
and mav create a flare-up. If this happens,
use a long-handled spatula to move the fi)od
to another area.
Gourmet Radiant TM Tray
Flare ups are minimized because a Gom'met
Radiant ''_Tra> below the grille grate, directs
grease down to the drip pan befl_re it begins
to btlrll.
I=t I_
111
For best results, the grate should be seasoned
beflwe the first use. Seasoning will insure a
stick-resistant cooking surihce. If the grill has
not been used for a period of time, it should
be reseasoned.
To season the grill grate:
1 Clean the grate thoroughly with hot, soapy
water to remove any manufi_cturing oils, etc.
2 Pdnse with a mixture of 2 cups water and
1/2 cup white vinegar. Dry thoroughly.
3 Using a hea W cloth, iub vegetable oil over
the entire surthce of the rack. Do not use
corn oil, as it call get sticky.
4 Place grate into the grill housing. Turn the
bm'ner on to a medium setting. Turn the
burner off when the oil begins to smoke.
Allow grates to cool.
5 Repeat steps 3 and 4.
The grill is now ready for use.
One side of the grates (side A) is ridged and
should be tlsed ii)l" fi)ods where you want the
fht to rtm oil such as steak or hambuiger
patties. Tile ridges are sloped so the tht runs
toward the fi'ont of the grill, into a drain hole
and down to a drip tray below.
SideA
The other side of the grate (side B) is designed
fin" delicate foods that need more support
while cooking, such as fish.
Food cooked on this side achieves the same
flavor as tDod cooked on an outdoor grill. The
intense heat from the grill radiant caramelizes
the thts and juices that ate brought to the
surfhce of the food, giving it the barbecued
flavor.
This gas grill may cook slightly ihster than you
are tlsed to.
SideB
18
Page 19

Surface Cooking
Stainless Steel Range
Using the
grill
(on some modd,9
Remove the cover before lighting tile burne_:
Tile cover must be removed when using tile grill.
getore starting to cook on tile grill, be sure tile
drip tray and liners are in place and that you
have tile grill racks turned to tile side wm want
t0r cooking.
Preheat the grill tot 15 minutes with the
control knob set on HI.
NOTE: Tile hmger you preheat tile grill, tile
darker tile grill marks will be on your ti}od.
Dining cooking it may be necessary to a(!iust
the heat setting. The control knob may be set
to any position between HI and I,O.
For proper searing and browning tile grill
requires high heat.
_]th large pieces of meat or i)oultry you will
need to turn the heat to a lower heat setting
after tile t0od has been seared. This lower heat
setting will allow tile food to cook through
without bm'ning tile outside.
Marinades and barbecue sauce should be
added toward the end of cooking time. The
heat should be turned to low when sauces are
added.
I
NOTE: Tile grill will take approximately
45 seconds to ignite. Unlike the surtace
burne_, which use electric igniters, the
grill uses a glow bar ti)r ignition. It takes
approximately 45 seconds ti)r tile glow bar to
reach temperature. Gas is only supplied to tile
grill once tile glow bar reaches temperature.
Gourmet
Radiant TM
Tray
Do not leave the grill unattended while it is on.
When you are finished cooking, allow tile grill
and the drip trays to cool betore cleaning them.
They should be cleaned each time they are used.
Replace tile grill covei;
Models equipped with a g_ill have a Gourmet
Radiant _*Tray which distributes the heat from
the burners evenly across the grill area.
Tile tray rests on pins at tile ti'ont and tile back
of the g_ille opening. Be sure the tray is o_iented
to mate with front and rear support pins.
__Support Pins
19
Page 20

Surface Cooking
Stainless Steel Range
Before
using the
gwiddle
(on some modd, Q
* When turning the meat over, always use
a spatula as it will not puncture the meat
allowing the juices to lun out. This will help
to kee I) the meat juicy. Turn the meat only
once, as juices are lost when the meat is
repeatedly turned. Season or salt the meat
after it has been cooked.
" Be sure to trim any excess tht fl'om meat
or poultry. To prevent steaks or chops fl'om
cm'ling while they are being cooked, slit the
fht at(rand the edges at about 2" inter_als.
To test for doneness, make a small cut in the
center of the meat.
]lemove tile cover bet)re turlfing tile griddle oil
The griddle is inade fl'Oln Type 304 stainless
steel and highly polished to provide a smooth
cooking surtace. It is nornml fi_i" it to darken
with use as oils cook onto tile surface to
provide a stick-resistant base or "seasoi_ing."
The doneness of meat is affected by the
thickness of the cut. It is impossible to cook
a thin piece of meat to a rare doneness.
A steak should be at least l" thick to have it
turn out rare and juicy. The cooking time
is affected by the temperature of the meat
when wm start to cook it, the size and shape
of the cut and the kind of meat you are
cooking. The degree of aloneness desired
also affects the time.
The U. S. Department of Agriculture sa}:s,
"Rare beef is popular, but you should know
that cooking it to only 140°F means some
food poisoning oiganisms may survive."
(Source: Satb Food Book. Your Kitchen
Guide. USDA Rev,]mle 1985.)
Removethe center shipping
screw.Leavethetwo outer
levelingscrewsin place.
Griddlefluecover
The griddle is thern/ostaticallv controlled
and cycles on and off' to mailmfin tile set
ten/perature. A light will glow to indicate
the griddle is on.
The griddle assembly should not be removed
for clemfing.
Once tile unit is in position, tile rear center
shipping screw can be relnoved. It is located
beneath the griddle flue cover. Relnove tile
flue cover by lifting it straight up. Be careflfl
not to scratch tile backguard during remowd
of tile flue cover.
The two outer screws are leveling screws.
Do not remove these two screws, They can be
turned to level tile griddle or to provide a
torward slope to help grease and oils to drain
away froln tile tood being cooked. Atier using
the griddle a few tilnes you will be able to
judge tile slope best tor tile toods you are
cooking and your personal preference.
When replacing the griddle title covei, ensure
that tile cover slips to tile outside of tile ti'ont
and back inetal flanges of the fixed griddle
asselnblv. This will ensure a tight fit of the
ll/le cover.
0
2O
Page 21

Surface (;()()king
Stai_less Steel Range
Seasoning
the gwiddle
Using the
,uiddle
Before using the griddle for the first time,
it must be seasoned.
If the griddle has not been used for a period
of time, it should be reseasoned.
To season the griddle:
1 Clean the griddle thoroughly with hot, soapy
water to remove any protective coating.
2 Rinse with a mixture of l quart water and
1 cup white vinegar. Dry thoroughly.
3 Pour 1 teaspoon vegetable oil into the center
of the griddle, Do not use corn oil as it can
get sticky. Rub the oil over the entire sm'thce
of the griddle using a hea_ T cloth.
Before starting to cook 1)11the griddle, be
stlre the drip tra} and liners are in place.
Select the cooking temperature and preheat
for 15 minutes.
NOTE: _qlen the griddle is properl_ seasoned,
it can be used without an} additional shortening.
Howeve,. shortening can be used for flavor.
4 Turn the control knob to a medinm setting
(350°K). Ts*rn the heat off when the oil
begins to smoke. Allow the griddle to cool
5 Repeat step 3. Be sm'e to cover the entire
surthce with the oil.
6 Repeat step 4. Allow the griddle to cool.
Wipe the entire surthce of the griddle using
a hea\v cloth. Apply a ve5T thin lave*" of
vegetable oil. The griddle is now ready to use.
NOTE: The griddle will take approximately
4,,'5seconds to ignite. Unlike the sm'ihce bm'ners,
which use electric igniters, the griddle uses a
glow bar tiw ignition. It takes approximately
45 seconds %r the glow bar to *each
temperature. (;as is only supplied to the griddle
once the glow bar reaches temperature.
21
Page 22

Using the Ovens
Slainless Sleel Range
O_eYl Y(I(']gS
How to set
the oven
controls
To avoid possible burns, place the oxen racks
ill the correct position before }ou turn the
oxen on.
Tile correct rack position depends on the kind
of food and the browning desired.
The oven racks have stop-locks, so that when
placed correctly on the supports, thev will stop
beti)re coming colnpletely out, and will not tilt.
When placing and relnoving cookware, pull
the rack out to the buln I) on the rack sui)port.
To remove a rack, pull it toward you, tilt the
fl'ont end up and pull it out.
To replace, place the end of the rack on the
support, tilt up the fl'ont and push ill.
Therackstopqockpreventsthe
rackfrorotilting orbeingpulled
outofthe oven.
Toremove,pullrackoutandliftupthefront.
6AK_ eo_v BROIL C_AN
O000
OVE_
Select the desired oven mode by I)ushing, one
of the Mode Selector Buttons: BAKE, CONV,
BROil,, or CI,EAN.
2
Select the desired temperatm'e b} turning
the Oven Thermostat Knob.
o
Tile Oven light will glow and remain on until
the OFF selector button has been pushed or
the thern/osmt dial has been turned to the
OFF (O) position,
The Heating light will glow, The oven is
preheated to the set temperature when the
Heating light initially cycles off.
Turn the oven off by pushing the OFF Mode
Selector Button.
Oven Control
j
®
®
®
®
When roasting,usetheBor Crackposition.
22
Page 23

Using the Ovens
Slainless Sleel ICang'e
How to set
companion
07)gTI
controls
)it
(4t_ ran V'esonly)
How to set
companion
077#_1
control Jbr
proofing
)it
(48 ra*_geso*@,)
1 Select tile desired oxen nlode bx, I)ushing
one (if the Mode Selector Buttons: BAKE,
BROIl, or PROOE
2 Select tile desired oven ten/i)erature by
ttII'ning tile Oven Thern/ostat Knob.
• The Oven light will glow and renlain Oil until
the OFF selector button has been pushed or
tile thern/ostat dial has been turned to tile
OFF position.
• Tile oven is i)reheated to tile set teinl)erature
when the HEATING light cycles off.
3 Turn tile ()veil off by i)ushing tile OFF Mode
Selector Button.
Tile I)roofing teattIre nlaintains a warin,
non-drativ environn/ent usefli1 tor i)roofing
yeast-leavened l)rodticts.
1 Place the dough in a dish in the sn/all ()veil.
2 Push in the PROOF selector button (in the
leti hand side of the control panel above the
thernlostat dial.
• Tile OVEN light and oxen interior light
t(lI'n (In.
6V5 '6
ovu_
H_ATtN@
CompanionOvenControl
{500
OVEN
_ATIN@
CompanionOvenControl
• Tile HEATING light will not turn on.
• Tile thernlostat dial does not afl'ect tile proof
ten/perature.
3 Set a ininute tiiner for tile nlininluin proof
tin/e. When i)roofing is finished, push the
OFF selector button.
• To axoid lowering tile oxen teini)erature and
lengthening I)r°°fing, tin/e, do not (/pen tile
o,,en door (innecessarilv.
Proofing tin/e nlav be decreased when vou
use tile large ()veil at tile S}lllle (line you are
I)roofing.
Check bread i)roducts early to avoid
ovei=i) roollng.
NOT]?:: Do not use the proofing n/ode ti)r
wamling t()od or keeping ti)od hot. The i)roofing
oven ten/i)erature is not hot enough to hold
ti)o(ls at sali _ teini)eratures (above 140°F).
23
Page 24

Using the Ovens
5,'lair_less 5,'leel Range
Baking
pans/sheets
Prvheating
Use the proper baking })all. The type of finish
on the pan determines the amount of
browning that will occm'.
" Dark, rough or dull pans absorb heat
resulting in a browner, crisper crust.
Use this type ;or pies.
For even cooking and proper browning, there
must be enough room _br air circulation ill the
oven. Baking results will be better if baking
pans are centered as much as possible rather
than being placed to the Kont 05" to the back
of the oven.
Pans should not touch each other 05" the walls
of tile oven. _Mlow l - to 1 ½" space between
pans, between pans and the oven door, and the
back or sides of the oven.
Preheat the oven if the recipe calls fi)r it.
To preheat, set the oven at the correct
temperature--selecting a higher temperature
does not shorten preheat time.
* Shiny, bright and smooth pans reflect
heat, resulting in a lighter, more delicate
browning. Cakes and cookies require this
type of pan or sheet.
" (;lass baking dishes also absorb heat. When
baking in glass baking dishes, the temperature
may need to be reduced by 25 E
If vou use two racks, stagger the pans so one
is not directly above the other. Check the fl_od
on the bottom rack sooner than the minimum
time. The rood on the lower rack may cook
slightly fhster than the fk)ocl on the upper rack.
Preheating is necessar} for good results when
baking cakes, cookies, pastr} and breads.
Aluminum
jbil
Never entirely cover a rack with alunlilmln flsil.
This will disturb the heat circulation and result
in poor baking. A slnaller sheet of foil inav be
used to catch a spillover by placing it on a
lower rack several inches below the food.
24
Page 25

Using the Ovens
Stainless Steel Hang'e
What is
convection
cooking?
In a convection oven, a tim circulates the
heated air evenly, over and around the tood.
During convection cooking, both the broil
element and the bake element are energized
along with the convection tim. As a result,
fi)ods are evenly browned at lower
temperatures and in less time.
• Preheating is not necessary fi)r toods with
a bake time over 15 minutes.
• Food is heated taster in a convection oven.
When using the convection featm'e, manv
tyl)es of food can be cooked at lower
temperatures than those suggested fi)r
regular ovens.
• Good tot large quantities of baked foods.
• Good results with cookies, biscuits, brownies,
cream puff:s, sweet rolls, angel tood cake and
bread.
• Ideal fin" baked fi_ods cooked on two or three
shelves, Because heated air is circulated
evenly throughout the oven, fi)ods can be
baked with excellent results on two or three
racks at the same time, Multi-rack baking may
increase cook times slightly fin" some fi)ods,
but the overall result is time saved. Multi-rack
baking provides ve_y good results with
cookies, biscuits and other quickbreads.
• Recipe books often give times and
temperatm'es tot cooking in traditional
thermal ovens. Convection ovens make it
possible to reduce the temperature by 25°F.
• Check too(ls for doneness at the minimmn
suggested cooking time.
• Some package instructions fin" fl'ozen
casseroles or main dishes have been
developed using commercial convection
ovens. For best results in this oven, preheat
the oven and use the temperatm'e on the
package.
25
Page 26

Using the Ovens
Stainless Steel ICatzg'e
How to set
the ovens
jbr broiling
Befk)re using your convection ()veil, check
to see if your cookware leaves fooi/l it)i" air
ch'culation ill the oven. If you are baking with
several pans, leave space between them. Also,
be sure the pans do not touch each other or
the walls of the oven. Use the pan size
recommended in the recipe.
When baking cookies, you will get the best
results if win use a fiat cookie sheet instead
of a pan with low sides.
For recipes like oven-baJ_ed chicken, you should
use a pan with hlw sides. Hot air cannot circulate
well around %od in a pan with high sides.
_AKE _nOIL PRO0_
6ooo
OVEP,I
H_ATtN'a@
Metal and Glass
Any type of cookware will work in your
convection oven. However, metal pans heat
the iastest and are recommended fl)r
convection baking.
* Darkened or matte-finished pans will bake
faster than shiny palls.
* Glass or ceramic pans cook more slowly.
Paper and Plastic
Heat-resistant paper and plastic containers that
are recollllllended It)i" rise ill regular ()veils Call
be used in convection ovens. Plastic cookware
that is heat-resistant to temperatures of 400°F
call also be used.
6 .....o
ovEr_
HEATtN@OOn LOCKED
26
CompanionOven
(48" ranges only}
1 If the nleat has fist or gristle around the
edge, cut vertical slashes through both about
2" apart. If desired, the tht may be trimmed,
leaving a laver about 1/8" thick.
2 Place the meat or fish on the broiler grid
in the broiler pan. Always use the grid so
that any tat will drip into the broiler pan;
otherwise the juices may become hot
enough to catch on fire.
3 Position a shelf on the recommended shelf
position as suggested in the Broiling Guide.
4 Ch/se door. Your unit has been designed to
broil with the door closed.
5 Push in the BROIl, selector button on the
side of the control panel above the oven you
wish to use.
NOTE: A cooling tim will be activated when
the BROIl, selector button is pushed. This
cooling thn cools the oven controls when
broiling.
6 Turn the control knob below the selector
button to BROIl,. The broiler does not need
to be preheated fl)r in()st broiling. Howevelt
foods that cook quickl> such as thin strips of
OvenControl
Opendoorbroiling is
notpermitteddueto
excessivecontrolknob
temperature.
nleat or fish nlay require a short preheating
period of 2 to 3 ininutes to allow the food
surface to brown in the salne tilne the food
takes to be cooked throughout.
Turn the food only once during broiling. Tilne
the fllods for the first side according to the
Broiling Guide.
7 When broiling is finished, push in the OFF
selector button.
Page 27

Using the Ovens
,S'lainless Sleel Hang'e
Broiling
,guide
The size, weight,
thickness, starting
temperatm'e and
your pretbrence ot
aloneness will affect
broiling times. This
guide is based on
meats at retiJgerator
temperature.
"t The 15. l)@(s_lme_l o/
l£_'ic*dlun" says "lbt*v b(r/
is polmla_ but yo*_should
k_ow lhal coolc_*g it Iv o_()
1401 c mea_ _ome /ood
poi_m_i_g<eZ_ismsma3
s*l_'_i*m." (%o_t*_e: Sap, l'bM
B_)h. }bu_ Kilche_l (,ui&'.
{SDA l'_v. fit_e I9S5.)
i ®
Suggested shelf positions and cooking times are intended as general guidelines only. Experin]ent
with these settings fiw specific foods and your personal preference.
Food Thickness Position Minutes Minutes Comments
Bacon 1/2 lb. (abom D 3-5 3-5 Arrange in single layer.
Ground Beef 2 lbs. (8 patties) C 10-13 7-10 Space evenly. Up to 8
Well Done 1/2 to 3/4" patties take about the
Beef Steaks
Rare!
Medium
Well Done
Rare!
Medium
Well Done
Chicken
Bakery Products
Bread (Toast)
Toaster Pastries
English Muffins
Lobster Tails
Fish
Ham Slices
(precooked)
Pork Chops
Well Done
Quaaatity/ Shelf* 1st Side 2nd Side
8 thin slices)
thick same time.
1" thick
(1 to 1½ lbs.)
1½" thick
(2 to 2½ lbs.)
1 whole
(2 to 2½ Ills.),
split lengthwise
2 to 4 slices
1 pkg. (2)
2 (split)
2-4
(6 to 8 oz. each)
l-lb. fillets 1/4
to 1/2" thick
l" thick
2 (1/2" thick)
2 (1" thick),
about 1 lb.
c
c
c
c
c
B
B
D
D
D
C
C
C
c
c
7
8-10
Z --ZD
10
15
25
30-35
1½-2
1½-2
4-6
14-18
8-10
15
15-20
6-9
15
7-8
14-16
20-25
25-30
1/2
1/2
5-10
8-10
1/)-15
15-18
7
Steaks less than 1" thick
cook through bet6re
browning. Pan flying is
recolni//ended.
Slash fat.
Reduce time about 5 to
10 minutes per side fl)r
cut-up chicken. Brush
each side with melted
btltteI2 Broil skin-side-
down first.
Space evenb:. Place
English muffins cut-
side-up and brush with
butter, if desired.
Cut through back of
shell. Spread open.
Brash with melted bmtex
before broiling and after
haft ot broiling time.
Handle and turn very
carehdlv. Brush with
lemon butter bei6re
and during cooldng, if
desired. Preheat broiler
to increase browning.
Increase time 5 t(/10
minutes per side tbr 1½"
thick or home cured.
Slash ,qm
Lamb Chops
Medit,m
Well Done
Medit,m
Well Done
Wieners,
Sausages,
Bratwurst
"-s(,_,iz/,,,mz_i0,,I,,1_/_,,,>_i/,tio__,l,/,,,/lt,,,,i*io,,,. 27
2 (1" thick),
10 to 12 oz.
2 (1 ½" thick),
about 1 lb.
l-lb. pkg. (10)
c
c
c
c
c
8-10
12-15
10-13
17
6-8
4-7
8-10
10-12
12-14
1-4
Slash fat.
If desired, split in half
lengthwise; cut into 5
to 6" pieces.
Page 28

Self-Cleaning 27" Oven
Smir_less S_eel ICang'e
NOTE: When tile 27" oven is set _br self
cleaning, only tile surthce burners may be
used. Tile 12" oven, the griddle and/or the
grill cannot be used.
For tile first sel_:clean cycle, we recommend
venting your kitchen with all open window or
using a ventilation tim or hood.
Remove the broiler pan, broiler grid, all
cookware, probe and any aluminum fl_il ti'om
tile oven--they cannot withstand tile high
cleaning temperatures.
NOTE: Yore" oven is equipped with gray
porcelain-coated oven shelves. They may be
le_* ill tile oven during tile sel_clean cycle.
Soil outside tile gasket on tile ti'ont frame of
tile range and on tile door will need to be
cleaned by hand. (]lean these areas with hot
water, soap-filled scouring pads or cleansers
such as Soft Scrub _.Rinse well with clean
water and d W.
Do not clean tile gasket. The fiberglass
material of tile oven door gasket cannot
withstand abrasion. It is essential fbr the gasket
to remain intact. If you notice it becoming
worn or fi'ayed, replace it.
Wipe up any hea\ T spillovers on tile oven
bottol//,
Make sure tile oxen light bulb coxer is ill place
and tile oxen light is ott.
Wipeupheavysoilontheovenbottom.
How to
set oTye_t .for
self cleaning
Tile clean cxcle takes about 5 hours plus about
30 minutes to cool down.
1 Push ill tile CI,EAN selector button on tile
right hand side of the control panel aboxe
tile therlnostat dial.
2 Set tile therlnostat dial to CI,EAN.
• Cooling blower turns on.
• The OVEN light and HEATING light turn on.
• The DOOR I,OCKED light turns oil.
• The blower and the OVEN light will turn o[t
once the cycle has finished.
3 When cleaning has finished, push the OFF
selector button.
The door latch will unlock autolnaticallv atier
tile oven telnperamre talls below approx. 550°E
_KE cony 8_olL CLEAN
O000
OVEN
HEATIN_OOR LOCKED
OvenControl
28
Page 29

Self Cleaning 27" Oven
StaD_less Steel Hang¢
Companion
standard
c[eart
(48" raTt<*.so7@)
If white spots remain, remove them with
warm sudsy water and rinse thoroughly with
a vinegar and water mixture. These deposits
are usually a salt residue that cannot be
removed by the clean cycle.
If the oven is not clean after one clean cycle,
repeat tile cycle.
With proper care, the porcehin enamel finish
on tile inside of tile oven--top, bottom, sides,
back and inside of tile door--will stay new-
looking %r years.
Let the range cool before cleaning.
We recommend that you wear rubber gloves
when cleaning tile range.
Soap and water will normally do the job.
Heax T spattering or spillo\ ers may require
cleaning with a mild abrasive cleaner. Soap>
wet metal pads may also be used. Do not allow
food spills with a high sugar or acid content
(such as milk, tomatoes, sauerkraut, fruit juices
or pie filling) to remain on the surthce. They
may cause a dull spot even after cleaning.
You may notice some white ash in the oven.
Wipe it up with a damp cloth after tile (wen
cools.
If tile shelves become hard to slide, apply a
small amount of vegetable oil or cooking oil to
a paper towel and wipe tile edges of tile oven
shelves and racks with tile paper towel.
Precautions pour utiliser les produits
nettoyer les fours en aSrosol :
* Ne pulv(_risezjamais sur les contr61es
6lectriques et les commutatem_, car cela
peut occasionner un court circuit et
provoquer des _tincelles ou un incendie.
* Ne pennertezjamais a une pellicule de produit
a nettoyer de se fimner sur le thennocontact.
Celn petit occasionner t/lie mauvaise
tempt4rature du ibm" (le thennocontact est
situ(_ i?_gauche du fimr). Essuyez soigneusement
le theunocontact apIbs chaque nettoyage de
ibm; ell prenant soin de ne pas le d(4placer car
tout changement de position peut changer la
tempt4rilture de cuisson du foul:
Household ammonia may make the cleaning
job easier. Place l/2 cup ill a shallow glass o1"
potter} container ill a cold o\ ell overnight.
Tile ammonia fumes will help loosen tile
burned-on grease and food.
If necessary, you may use an oven cleaner.
Follow tile package directions.
Cautions about using spray-on oven cleaners:
* Do not spray on tile electrical controls and
switches because it could cause a short circuit
and result ill sparking or fire.
* Do not allow a film fl'om the cleaner to build
up on tile temperatm'e sensm_it could cause
tile oven to heat improperl> (The sensor is
located on tile lett-hand side of tile oven.)
Carefully wipe tile sensor clean after each
oven cleaning, being caretul not to move the
sensor as a change ill its position could affect
how the oven bakes.
* Do not spray any oven cleaner on tile
oven door, balldles o1" allv exterior sllri_tce
of tile oven, cabinets or painted surfhces.
Tile cleaner can damage these surfllces.
* Ne pulv&'isez aucun produit de nettoyage
sur la porte du Ibm', les poign(_es ou tome
surfime extg_riem'e du Ibm', les surihces
peintes ou la carrosserie de la cuisinii_re.
Le produit de nettoyage peut endommager
ces s ilrt_l ces.
* Vous pouvez placer les clayettes de flmr
(_maillg_es dims le flmr de 27" pendant l'auto
nettoyage.
* Porcelain-coated oven racks may be placed
ill the 27" oven during sell:clean.
29
Page 30

re and (;leaning
Slair_less Sleel ICa_g'e
Control
panel and
knobs
07) e 72
heating
elements
Stainless
steel
Clean up spatters with a dam I) cloth. Remove
heavier soil with warm, soapy water.
Do not use abrasives of any kind on the control
panel.
The control knobs may be removed for easier
cleaning. To remove a knob, pull it straight off
the stem. Wash the knobs in soap and water
hilt do not soak.
Do not clean the bake elements or the broil
elements. Any soil will burn ott when the
elements are heated.
Do not use a steel-wool pad; it will scratch
the surface.
To clean the stainless steel surtace, use
warm sudsv water or a stainless steel cleaner
or polish. Always wipe the surtace in the
direction of the grain. Follow the cleaner
instructions for cleaning the stainless steel
S/IYJ[_ICe.
OVEN
The bake elements can be litted gently to clean
the oven floo_: If spillovers, residue or ash
accumulate around the bake elements, gently
wipe around the element with waHn water:
To inquire about purchasing stainless steel
appliance cleaner or polish, or to find the
location of a dealer nearest you, please call our
toll-ti'ee number, 800.626.2002 or visit ge.com.
3O
Page 31

re and (;leaning
Stainless Steel Hang'e
Oven light
bulbs
NOTE: 7"heglass cove, sholdd be *Pmoved only when
the oven is _ompMel), _ooL l:U,a*izflg"latex gloves may
q/.fi, a better uip.
CAUTION: Before replacing the bulb,
disconnect electrical power to the oven at
the main tuse or circuit breaker panel.
Be sure to let the light cover and bulb cool
completely.
For your salety, do not touch a hot bulb with
bare hands or a damp cloth.
ATTENTION : Avant de remettre en place
l'ampoule, dObranchez l'alimentation
_lectrique du four au niveau du fusible
principal ou du tableau de disjoncteurs.
Assurez-vous de laisser refroidir complbtement
le couvercle de lumibre et l'ampoule.
Pore" w)tre s&m'it& ne touchez pas une ampoule
chaude 5 mains hues ou avec un lingo mouill&
To remove:
1 Turn the glass cover counterclockwise
1/4 turn tmtil the tabs of the glass cover
clear the grooves of the socket.
2 Using gloves or a d_y cloth, remove the bulb
by pulling it straight out.
To replace:
1 Use a new 130-volt Halogen bulb, not to
exceed 35 watts.
2 Using gloves or a dIw cloth, remove the bulb
ti'om its packaging. Do not touch the bulb
with bare fingers.
3 Push the bulb straight into the receptacle
all the way.
4 Place the tabs of the glass co\ er into the
grooves of the socket. Turn the glass cover
clockwise 1/4 turn.
Receptacle Socket
i i
i i
i i
_" Bulb
€
Glasscover
Receptacle
Usegloves
orcloth
t'br i,_@roved li£'hting" inside the oven, clean the g'lass
cover /h_quentl), usi_t_"a wet cloth. This shouhl be
done when the oven is compMdy cool
5 Reconnect electrical power to the oven.
Broiler pan
and Krid
After broiling, remove the broiler pan fl'om
the oven. Remove the grid from the pan.
Careflflly po/lr out the grease fl'om the pan
into a proper container. Wash and rinse the
broiler pan and grid in hot water with a soap-
filled or plastic scom'ing pad.
If food has burned on, sprinkle the grid with
detergent while hot and cover with wet paper
towels or a dishcloth. Soaking the pan will
rell/Ove btlrned-on foods.
The broiler pan may be cleaned with a
commercial oven cleaner. The grid is chrome;
do not rise an ()veil cleaner to clean it.
g/]r - lTlq YclqB
///]qlIII I II/l/'l\/\'I\/\\))
Both the broiler pan and grid can also be
cleaned in the dishwasher.
Do not store a soiled broiler pan and grid
anywhere in the range.
31
Page 32

re and (;leaning
Stainless Steel Hang'e
Sealed
assemblies
Slits
Usea sewingneedle,twist-tie
and/ortoothbrushto unclogthe
small holesand slits in the burner
headsandburnerrings.
Turn all controls OFF bet)re removing the
burner parts.
The bm'ner grates, bm'ner caps and burner
ring sub-assemblies can be lifted off, making
them easy to clean.
CAUTION: DO NOT OPERATE THE
BURNER WITHOUT ALL BURNER PARTS
IN PLACE.
MISE EN CAUSE : N'UTILISEZ PAS DE
BRI]LEUR QUI N'A PAS TOUTES SES
PII_]CES EN PLACE.
For proper ignition, make sure the small holes
in the burner rings are kept open. A sewing
needle or wire twist-tie works well to tmclog
them.
The slits in the burner heads of your cooktop
must be kept clean at all times for an even,
mflaampered flmne.
You should clean the stu'iace bm'ner routinely;
especially after bad spillove_s, which could clog
these openings.
To remove bm'ned-on food, soak the bm'ner
heads and tings in a solution of mild liquid
detergent and hot water fiw 20-30 minutes.
For II/OI'e sttlbborn stains, use a toothbiush.
Clean the bm'ner bases in place on the
cooktop.
To remove the burner parts:
1 I,ifl off the burner cap and bm'ner head.
2 Remove the burner ring locking nut using
a 1 ¼e" socket wrench_ crescent wrench or
channel-lock pliers.
3 i,itt off the burner ring. Do not remove the
burner bases,
Electr0de.._ The electrode of the
spark ignitor is behind
each burner. When one
burner is turned to
"ON" to light, all the
burners spark. Do not
attempt to disassemble
or clean around any bm'ner while another
burner is on. An electric shock mav result,
which could cause wm to knock over hot
cookware.
_k/. BurnerCap
BurnerHead
_ {Brass)
LocatorPin
_ urner Ring
1
j / BurnerRing
kecking Nut
(Aluminum)
/
LocatorPin
Pin
NOTE:Locaterpinfits
into burnerbasepinslot.
High OutputBurners
Electrode
. BurnerBase
Toaid reassembly,eachbrass
BurnerHeadismarkedwith a
clockface. ReplacetheBurner
Headwith the arrow pointing to
the rearof thecooktop{12o'clock
position).
32
gefi_re putting the bm'ner parts back, shake
out excess water and then dry them thoroughly
by setting them in a warm oven tor 30 ininutes.
To replace the burner parts:
Make sm'e all parts fl)r the correct burner are
firmly seated.
1 Align the locator pins on the bm'ner ring
into the labeled hole in the bm'ner base.
Seat in place.
2 ]?,el)lace the burner ring locking ntlt and
hand-tighten. Using the wrench or pliers,
turn the nut 1/4 turn to secure it in place.
3 Align the locator pin in the burner head into
the hole in the burner ring. Seat in place.
4 Replace the bm'ner caps.
Page 33

re and (;leaning
Stainless Steel Hang'e
Do not use a steel wool pad; it will scratch
the surface.
I,ilt off when cool. _v\ash burner caps in hot,
soapy water and rinse with clean water.
You may scour with a plastic scouting pad
to remove burned-on fi)od particles.
Dry them in a wam_ oven or with a cloth--
don't reassemble them wet. Replace the
burner caps.
Cast-iron burner grates should be washed
regularly and especially after spillovers.
_%_sh them in hot, soapy water and rinse
with clean water. Dry the grates with a cloth--
don't put them back on the cooktop wet.
To get rid of burned-on food, place the
grates in a covered container or plastic bag.
Add 1/4 cup ammonia and let them soak
ti)r 30 minutes. _%lsh, rinse well and dry.
The grates may also be cleaned in a
dishwasher.
Although they are durable, the grates will
gradually lose their shine, regardless of the
best care you can give them. This is due to
their continual exposm'e to high temperatm'es.
Burner Cap
Rubber Grate Feet
For stability, your grates have rubber feet
on each leg. If any of these rubber feet should
become damaged or lost, replace it with one of
the extra rubber feet supplied with yore" range.
Do not operate a burner for an extended
period of time without cookwaaee on the grate.
The finish on the grate may chip without
cookware to absorb the heat.
33
Page 34

Ca"re and Cleaning
Stainless Steel ICang'e
Drip trays,
tray
liners and
drain tubes
(on so.ze nzod_.h)
i,ocated beneath tile cooktop you will find
a drip tray and liner(s). Tile drip trays and
liners are made of stainless steel. Tile drip trays
aI'e on rollers so they are easy to FelllOVe and
replace.
To remove the drip tray liner, ptdl the drip tray
fiwward. If SOlnething has spilled into the tray,
it should be cleaned up as soon as possible to
prevent "baked on" food soil.
Grease fl'om the griddle or the grill drains
through the drain tubes into the trav and
into the liner below.
Do not allow tile grease to accumulate in tile
drip tray or liner as it can be a fire hazard.
Clean the drip tray and liner as soon as they
are cool. Clean with hot soapy water.
To remove tile drip tray, pull it torward to stop,
push in on tile release tabs located on each
side of tile trav and contilme to pull fl)rward.
To clean the drain tube use a soapy bottle
blush. A inild abi;Jsive cleaner such as Bon-Anfi ®
or Sott Sclub < can be used. For sulbborn stains,
use a soap-tilled scoui'ing pad or a harsh
abrasive cleaner such as COille(' oi" _.jax",
rubbing lightl> Rinse all parts thoroughl>
\%
34
Page 35

re and (;leaning
Slainless Sleel Hang'e
Griddle
(on some modeL_)
Thoroughl) clean tile griddle of grease and
food particles, usim,._ a S(luare-edged, spatula,
while it is still hot.
X4]i)e tile griddle with a dry, heavy; coarse cloth
to remove any remaining residue and food
pa rticl es.
If desired, wash with hot soapy water, rinse
and dry.
Once tile griddle has cooled, mb tile surtace
lightly with vegetable oil. Do not use corn oil
or cooking spra):s as they get sticky.
If the griddle is cleaned with anything other
than a dry, heavy; coarse cloth, it will need to
be reseasoned.
Ne_er flood tile hot griddle with cold water.
This could cause tile griddle to crack or waq_.
nnnnnnNnnnnnnnNnnn[
0
• D
Page 36

Clean the grill immediately after cooking.
Turn ott the burner. To protect your hand
fron/ steam and heat, wear a barbecue mitt.
Scrub the grill with a brass bristle barbecue
brush, frequently rinsing in a bowl of water:
The steam created sotiens the ti)od particles
and assists the cleaning process. The tood
particles will drop into the liner and drip tray.
Be sure to clean the drain tube, drip trav and
liner atier they have cooled.
(;lean the Gourmet Radiant TM Tray with hot
soapy water. Rinse and dry.
re and (;leaning
Stair_less Steel ICang'e
Bachg'uarzls
arzd shelf
Lilt-O lf
Overl Door
The backguards and shelf are made of
stainless steel.
Do not use a steel-wool pad; it will scratch
the surface.
(;lean with hot soapy water. Rinse and dry.
If the panel and shelf have tood soil
remaining, try a general kitchen cleane_; such
as Fantastik_ Simple (;teen _ or Formula 409_:'
The oven door is I'elllowlble foi" easier access
to the light bulb and cleaning.
Do _zot l!fl th_ door @ the handle.
To remove the door:
1 Fully open the door.
2 Each hinge has a hinge lock. Close the hinge
latches down against the door frame.
3 Firmly grasp the door at the top sides.
4 Close the door to the near-vertical position.
5 I,itt the door u I) and pull straight out.
For hard to clean soil use a standard stainless
steel cleaner such as Bon-Ami;: Cameo': or
Bar Keepers Friend<_ Apply cleaner with a
damp sponge, rinse thoroughly and dry. Alwax:s
sciub lightly in the direction of the grain.
Atter cleaning, use a stainless steel polish such
as Stainless Steel Magic<_
Hingelock
Pullthe hh_ge locks
down to unlock.
To replace the door:
1 Firmly grasp the door at the top sides.
This is critical.
2 Approach the range with the door angled
in a vertical position.
3 Guide the hinges into the slots.
4 Push the door in firmly while opening.
5 Once in position, open the door completely.
Push the hinge locks back in and toward the
tixmt trame.
36
Page 37

The Problenl Solver
Slai_less Sleel l_a_g'e
Questions ?
Be[bre you
call./br
service...
PROBLEM POSSIBLE CAUSE
BURNERS DO NOT
LIGHT OR SPARK
RANDOMLY
BURNERS HAVE,
YELLOW OR
YELLOW-TIPPED
FLAMES
BURNER FLAMES
VERY LARGE
OR YELLOW
BURNER CONTROL
KNOB WILL NOT
TURN
OVEN LIGHT
DOES NOT WORK
FOOD DOES NOT
BAI_; OR ROAST
PROPERLY
FOOD DOES NOT
BROIL PROPERLY
" Electrical plug is not plugged into a live power outlet.
o (_iIS not ttlrlled oil.
" Burner parts not replaced correctly.
, Holes in the simmer rings or slits ill the burner rings are clogged.
, Clogged orifice, or wet burners or electrodes.
, Burner parts not replaced correctly.
A. Yellow flames: Call for
service.
" If burner flames look like (A), call fl/r service. Normal burner flames
should look like (B) or (C), depending on the type of gas.
" If cooktop is connected to I.P gas, contact tile person who installed
your range or made tile conversion.
" When tile knob is at tile OFF position, it must be pushed in befl)re
it call be turned, and it can only be turned ill a cotmterclockwise
direction. Similarly, when the knob is in the L()W or X-HI
positions, it m ust also be pushed in to change flame settings.
* Tile light bulb is loose or defective. Tighten or replace the bulb.
" Tile switch operating light is broken. Call fl)r se_wice.
* Tile (well controls are improperly set. See tile "How to set your oven
flw baking or roasting" section.
* Incorrect cookware or cookware of improper size being used.
See the "How to set yore" oven fl)r baking or roasting" section.
* Use a fi)il tent to slow down browning during roasting.
* Tile oven control is not set at BROIl. Push in tile BRO]I_ selector
btltton fl)r tile ()veil yOtl want to rise.
* Improper shelf position being used. See tile Broiling Guide.
* Cookware is not suited flw broiling. Use tile broiling pan and grid
that came with your range.
* Ahmfinum fl)il used on the broiling pan and grid has not been fitted
properly and slit as recommended.
OI51SOl//e areas tile power (voltage) may be low. Preheat the broil
element fl)r 10 minutes. Broil fl)r tile hmgest period of time
recommended in the Broiling Guide.
B.Yellowtipsonoutercones:
NormalforLPgas.
C. Softblueflames: Normal
for natural gas.
.t
Page 38

The Problem Solver
Stainless Steel I:_anKe
Questions ?
Be[bre you
call./br
service...
PROBLEM POSSIBLE CAUSE
OVEN WILL NOT
WORK
OVEN WILL NOT
SELF-CLILAN
48" MODELS:
UNABLE TO USE THE
COMPANION OVEN,
GRIDDLE AND/OR
GRILL WHEN
SELF-CLEANING
"CRACKING" OR * This is normal. This is the strand of the metal heating and cooling
"POPPING" SOUND dm'ing both the cooking and deaning imlctions.
DURING CLEANING
EXCESSIVE SMOKING * Excessive soil, Press the OFF selector button. Open the windows to
OCCURS DURING rid the room of smoke. _%dt mltil the DOOR I_OCKED light goes
CLEANING off. Wipe up excess soil and reset the dean cycle.
STRONG ODOR FROM * An odor fi'om the insulation ar(mnd the inside of the oven is normal
SELF-CLEAN CYCLE flw the first ti_w times the oven is used. This is temporary;
OVEN NOT CLEAN * The oven was heavily soiled. Clean up hea\y spillovers beime starting
Af'TER A CLEAN the clean cvde. Heavily soiled ovens may need to sell:dean again.
CYCLE *' The oven controls are not properly set. See tile Sell'Cleaning section.
* Plug on the range is not completely inserted in the electrical outlet.
* A fuse in your home may be blown or the circuit breaker tripped.
. The ()\'ell controls ;ire IIot properly set.
*bThe oven controls _re set fi)r cle_ming. If necessary, _dlow the oven to
cool then open the door.
* The controls are not properly set.
*b_hen the o_en is set for cleaning, onl_ the sm'face burners ma_
be used. The companion oven, the griddle and/or the grill cannot
be used.
38
Page 39

Consumer Services
Stainless Steel I:_ang'e
With the purchase of your new Monogram appliance, receive the
assurance that if you ever need information or assistance from GE,
we will be there. All you have to do is call toll-free!
G E Answer
Center ®
In the USA:
800.626.2000
In-Home Repair
Service
In the USA:
800.444.1845
In Canada:
1.888.880.3030
For Customers
With Special
Needs'...
In the USA:
800.626.2000
Whatever yore" question about any Monogram major appliance, GE Answer Centei _:
ildormation service is available to help. Your call--and your question--will be answered
promptly and courteously. And you can call any time. GE Answer (:enter _ service is open
24 hours a da> 7 days a week.
OR
Visit our Website at: ge.com
In Canada, call 1.888.880.3030.
A GE consmner service professional will provide expert repair service, scheduled at a time
that's convenient for you. Many GE Consmner Service compan}_operated locations ofl_br
you service today or tomorrow, or at your convenience (7:00 a.m. to 7:00 pan. weekdays,
9:00 a.m. to 2:00 p.m. Saturdays). Our thctorv-trained technicians know your appliance
inside and out--so most repairs can be handled in just one visit.
GE offers a brochm'e to assist in planning a barrie>fl'ee kitchen for
persons with limited mobility.
Consumers with impaired hearing or speech who have access to a
TDD or a conventional teletypewriter may call 800.TDD.GEAC
(800.833.4322) to request inflwmation or service.
...... r "'°1
s_oN
Service Contracts"
In the USA:
800.626.2224
In Canada:
1.888.880.3030
Parts and
Accessories
In the USA:
800.626.2002
In Canada:
1.888.880.3030
You can have the secure tbeling that GE Consmner Service will still be there after w)ur
warrant,_ expires. Pro'chase a GE contract while your warranty is still in effect and you'll
receive a substantial discount. With a m ultipleuear contract, you're assm'ed of futm'e
service at today's prices.
Individuals qualified to service their own appliances can have parts or accessories sent
directly to their home. The GE parts system pro\ ides access to over 47,000 parts...and
all GE Genuine Renewal Parts are fully warranted. VISA, MasterCard and Discover cards
are accepted.
User maintenaaace instructions contained in this manual cover procedures intended to be
performed by any user. Other servicing generally should be referred to qualified service
personnel. Caution must be exercised, since improper servicing may cause unsafe operation.
39
Page 40

Notes
Stainless Steel I:_an_{'e
Page 41

Notes
Stainless Steel I:_an_{'e
4/
Page 42

Warranty
Stall, less Steel I_a_g'e
YOUR MONOGRAM RANGE WARRANTY
Staple sales slip or cancelled check here, Proof of original purchase
date is needed to obtain service under warranty. Please have serial
number and model number available when calling for service,
WHATIS
C 0 VERED
WHAT IS NOT
C 0 VERED
LIMITED ONE-YEAR WARRANTY
Fox" one year fl'om (late of original purchase,
we will provide, fl'ee of charge, parts and
service labor in your home to repair or
replace any part of the range that fidls
because of a manufilcturing de_bct.
_®®e®®ee®eee®ee®e®®®=®ee®ee00®®®m®ee®®eeeeeeeeee°
LIMITED FIVE-YEAR WARRANTY
Fox"five years fl'om the (late of original
pro'chase, we will provide, fl'ee of charge,
replacement gas surface burners if they fidl
in normal household use. (The grill, griddle
and o\ en burners are not included.) You
pay for the se_Mce trip to your home and all
se_Mce labor charges.
LIMITED LIFETIME WARRANTY
For the liibtime of the gray porcelain
enamel oven racks, we will provide, fi'ee of
cha_ge, replacement racks if they ihil in
* Service trips to your home to teach you
how to use the product.
* Discoloration of the griddle plate or
oven racks,
* Chipping of porcelain enamel grates or
oven racks.
* Replacement of house fuses or resetting
of circuit breakers.
* Incidental or consequential damage caused
by possible defects with this appliance.
* Damage after delivery.
* Damage to the product caused by accident,
fire, floods or acts of God.
normal household use. You pay fin" the
service trip to your home and all service
labor charges.
*®eeeeeeeee®®®e®ommoo®e®®e®oeeeeeooeeeeeeeeeeee®*
This warranty is extended to the original
pro'chaser and any succeeding owner flw
products purchased fl)r ordinary home use
in the 48 mainland states, Hawaii and
Washington, D.C. In Alaska the warranty is
the same except that it is I,IMITED because
you must pay to ship the product to the
service shop or fiw tile service technician's
travel costs to your hotne,
All warranw service will be provided bv
our Factory Service Centers or bv our
authorized' Customer Care: servicers
during normal working hours.
Should wmr appliance need service, during
warranty period or beyond, in the U.S.A.
call 800.444.1845. In Canada: 888.880.3030.
* Failure of the product if it is used for other
than its intended purpose or used
commercially.
* Improper installation, delivery or
maintenance.
If you have am installation problem, contact
your dealer or installer. You axe responsible
for providing adequate electricaJ, gas,
exhausting and other connecting fadlities
as described in the Installation Instructions
provided with the product.
* Product not accessible to provide
required service.
EXCLUSIONOFIMPLIEDWARRANTIES--Yoursole and exclusiveremedyisproductropa# as
provided in thisLimitedWarranty.Anyimplied warranties,includingtheimplied warranties
ofmerchantabilityorfitnessfor aparticularpurpose, are limited tooneyear ortheshortest
period allowed bylaw.
Some states do not allow the exclusion or limitation of incidental or consequential
damages, so the above limitation or exclusion may not apply to you. This warramy gives you
specific legal rights, and you may also have other rights which vary from state to state.
To know what your legal rights are in your state, consult your local or state consmner aLthirs
oL_ice or your state's Attorney (;elxeral.
Wa_rrantor: General Electric Company, Louisville, KY 40225
Page 43

X,_po±l:,_r_lumaodtui
uo.n_a!.__I d.tqsaott_O
!anpoa d aoumsuo D
saoue!lddv39
IIIII
Place
1st Class
I _etter
Stanq)
I Iere
General Electric Company
Warranty Registration Department
P.O. Box 32150
Louisville, KY 40232-2150
43
Page 44

Consumer Product Ownership Registration
Dear (]ustmner:
Thank you, for l)urchasing, our product and thank xou, for l)lacing,,v°ur confidence in us. _4e are proud to
have x()//_ls _1 ct/stoillev!
Follow these three steps to protect your new appliance investment:
/
Complete mid mail
your Consumer
Product Ownership
Regdstration today.
t]ave the peace of mind
of knowing we can
contact you in the
imlikelv event of a
sa/ctv modifi( ation.
After complethlg tiffs
registration, write your
model mad serial numbers
hi tiffs mmmal. _bu will
need this in/bnnation
should you require service.
The service mmd)er in tl_e
USA: 800.444.1845. In
Canada: 1.888.880.3030.
Read your Owner's
Manual carefully.
h will hel l) you
ot)erate yollr 11ew
al)t)liance properly.
3
Important: To ensure that your product is registered, mail the separate product registration card.
If the separate product registration card is missing, fold and mail the form below. No envelope is needed.
F()II) I/ERE
Consumer Product Ownership Registration
Product Model Serial
Range
Nil-. [] Ms. [] Mrs. [] Miss []
Fir_'I IL_'_'I I
Name I I I I I I I I I Name I I I I I I I I I I I I I I
Street I I
Address I I I I I I I I I I I I I I I I I I I I I I I I I I
AtX.#]lllllll]
I I I Izip I
(]itv I I I I I I I I I I I I I I I I State _ Code I I I I
l)at( Pla( ( d
,n,_i i el,o.e I-I,, I-I , ,Mol/th I I I [)a'_ _ Year I I I Niil//1)er I I I
Appliances commm_icadons from (;E Appliances ((;EA).
General Electric Compang Che(k h(l( if_ou do nol want Io le(:eix( conmmnications ]ram (;g,\_s car(fllll} select(d parmers.
GEConsumer &Industrial * Pleas_ plovide yam" e-nlail ad(h(ss Io lec(ixe, via (-mail, discounls, sp(cial o]}_s and olh(_ impoHanl
Louisville, KY z_0225
gecom FAII.URF FO COMPI.ETF: kNl) RE FURN FHIS (2-\RI) DOES NOT I)IMINISI t _,()L R X\ _.RRAN'P* RI(;I:I l'S.
Appliances 149-8°38° I
General Electric Compan 9
Louisville, KY 40225 17685 Flev. B 12-05 OFt
GE Consumer & Industriol
ge.com
F(n m(n_ ini_rmation alunu (;EA's pri_a(y and dala Hsag(polk) go io g( (Am and (li(k on "l HxaQ I oli(y"
o_ call 800.626.2224
T:\PE (;L()SEI)
Printed in the United States
I
I
I
I
 Loading...