

Page 1
dJ
wvvvv.GEAppliances.com
Safety Information .......... 9 3
Operating Instructions
Control and Indicator Settings . . .5, 6
I,oading and Using the X_'asher . .7, 8
Special h'asher Features ......... 4
Installation Instructions
Alcove or Closet Installation .... 19
Electrical Requirements ........ 10
Grounding Instructions ........ l 0
Installation Requirements ....... 9
Leveling the ¼'asher ........... 10
V(asher Connections for
Portable Model WSLPI 100 . . . 13-16
_'asher Connections tbr
Stationa U Models WSI£1100
and WSLMI 100 ........... 11,19
WSLS l 1O0
WSLP I l O0
WSLM l l O0
Troubleshooting Tips
Before You Call For Service . . 17-90
Status Indicators .............. ] 7
Consumer Support
Consumer Support ..... Back Cover
Product Registration ........ 91, 92
Warranty .................... 93
Write the model and serial
numbers here:
#
#
You can find them on a label
on the back of the washer.
175D1807P328 49-90063-2 72-02JR
Page 2

IMPORTANTSAFETYINFORMATION.
READALLINSTRUCTIONSBEFOREUSING.
..aWARNING.IForyoursafestheinforn,ationinthisn,anua,n,ustbefollowedton,inin,izetherisko.ire
or explosion, electric shock, or to prevent property damage, personal injury, or loss of life.
WATERHEATERSAFETY
Under certain conditions hydrogen gas may be produced in a water heater that has not been used for
two weeks or more. Hydrogen gas can be explosive under these circumstances.
If the hot water has not been used fin" two weeks or more, prevent the possibility of damage or iqjm y by
turning on all hot water fhucets and allowing them to mn fi)r several minutes. Do this befln'e using any
electrical appliance which is connected to the hot water s}:stem. This simple procedure will allow any
built-uI/hydrogen gas to escape. Since the gas is flammable, do not smoke or use an open flame or
appliance dm'ing this process.
This washer must be properly installed and located in accordance with the Installation Instructions before it is used.
_ PROPERINSTALLATION
• Install or store xdlere it Mll not be exposed • Properly ground washer to confl)rm with all
to temperatm'es below fl'eezing or exposed governing codes and ordinances. Follow details
to the x_eathei: in Installation Instructions,
YOURLAUNDRYAREA
• Keep the area underneath and around your
ai)pliances free of combustible materials such
as lint, paper; rags, chemicals, etc.
• Close supervision is necessar) if this appliance is
used b'_ or near children. Do not allow children to
play on, with, or inside this or any other appliance.
Use this •
appliance
only for its •
intended
purpose as
described in
this Owner's •
Manual.
WHENUSINGTHEWASHER
Never reach into washer while it is moving.
Wait tmfil the machine has completely stopped
befln'e opening the lid.
Do not use shaq) objects around the control
panel. They may damage it.
Do not mix chlorine bleach with ammonia or
acids such as vinegar and/or rust relnovei; Mixing
different chemicals can produce a toxic gas which
illav Catlse death.
Do not wash or d_y articles that have been
cleaned in, washed in, soaked in, or spotted
with combustible or explosive substances (such as
wax, oil, paint, gasoline, degreasers, dry-cleaning
solvents, kerosene, etc.) which ma) ig_fite or
explode. Do not add these substances to the _Jsll
_lter Do not rise or place these substances around
)our washer or (hTer during operation.
The laund_ y process can reduce the flame
retardancy of thbrics, To avoid such a result,
carefiflly fi_llow the gamlent manufiJcturer's
wash and care instructions,
• To minimize the possibili F of electric shock, tmi)lug
this appliance from the power sui)ply or disconnect
the washer at tile household distribution panel bv
removing tile fllse or switching off the drcuit
breaker before attempting mW maintenance or
cleaning. NOTE."Turning the washer off does NOT
disconnect the appliance fi'om the power SUl)ply:
• Never attempt to operate this appliance if it is
dmnaged, malfimctioning, partiall} disassembled,
or has missing or broken parts, including a damaged
cord or plug.
2
Page 3
_. WHENNOTIN USE
_- • Turn off water fimcets to relieve pressure on
hoses and valves and to minimize leakage if
a break or _uptm'e should occur. Check the
condition of the fill hoses; they may need
replacement afier 5 years.
www.GEAppliances.com
• Do not attempt to repair or replace any part of
this appliance tmless specifically recommended
in this Owner's Manual, or in published use_=
repair instructions that wm tm(le_tand and
have the skills to caHw out.
• geim+e discarding a washe_; or removing
it ti'om service, remove the washer lid to
prevent children ti'om hiding inside.
. _lls
• Do not tamper with controls.
",,b_ READANDFOLLOWTHISSAFETYINFORMATIONCAREFULLY.
1oV'\\ SAVETHESEINSTRUCTIONS
2
Page 4
Special washer features.
Before starting the washer:
• I,oad the laundr_ in the washe_:
• Add the detergent and rid)tic sotiener to the dispenser drawe_:
• Add bleach (if needed) to the bleach dispense_:
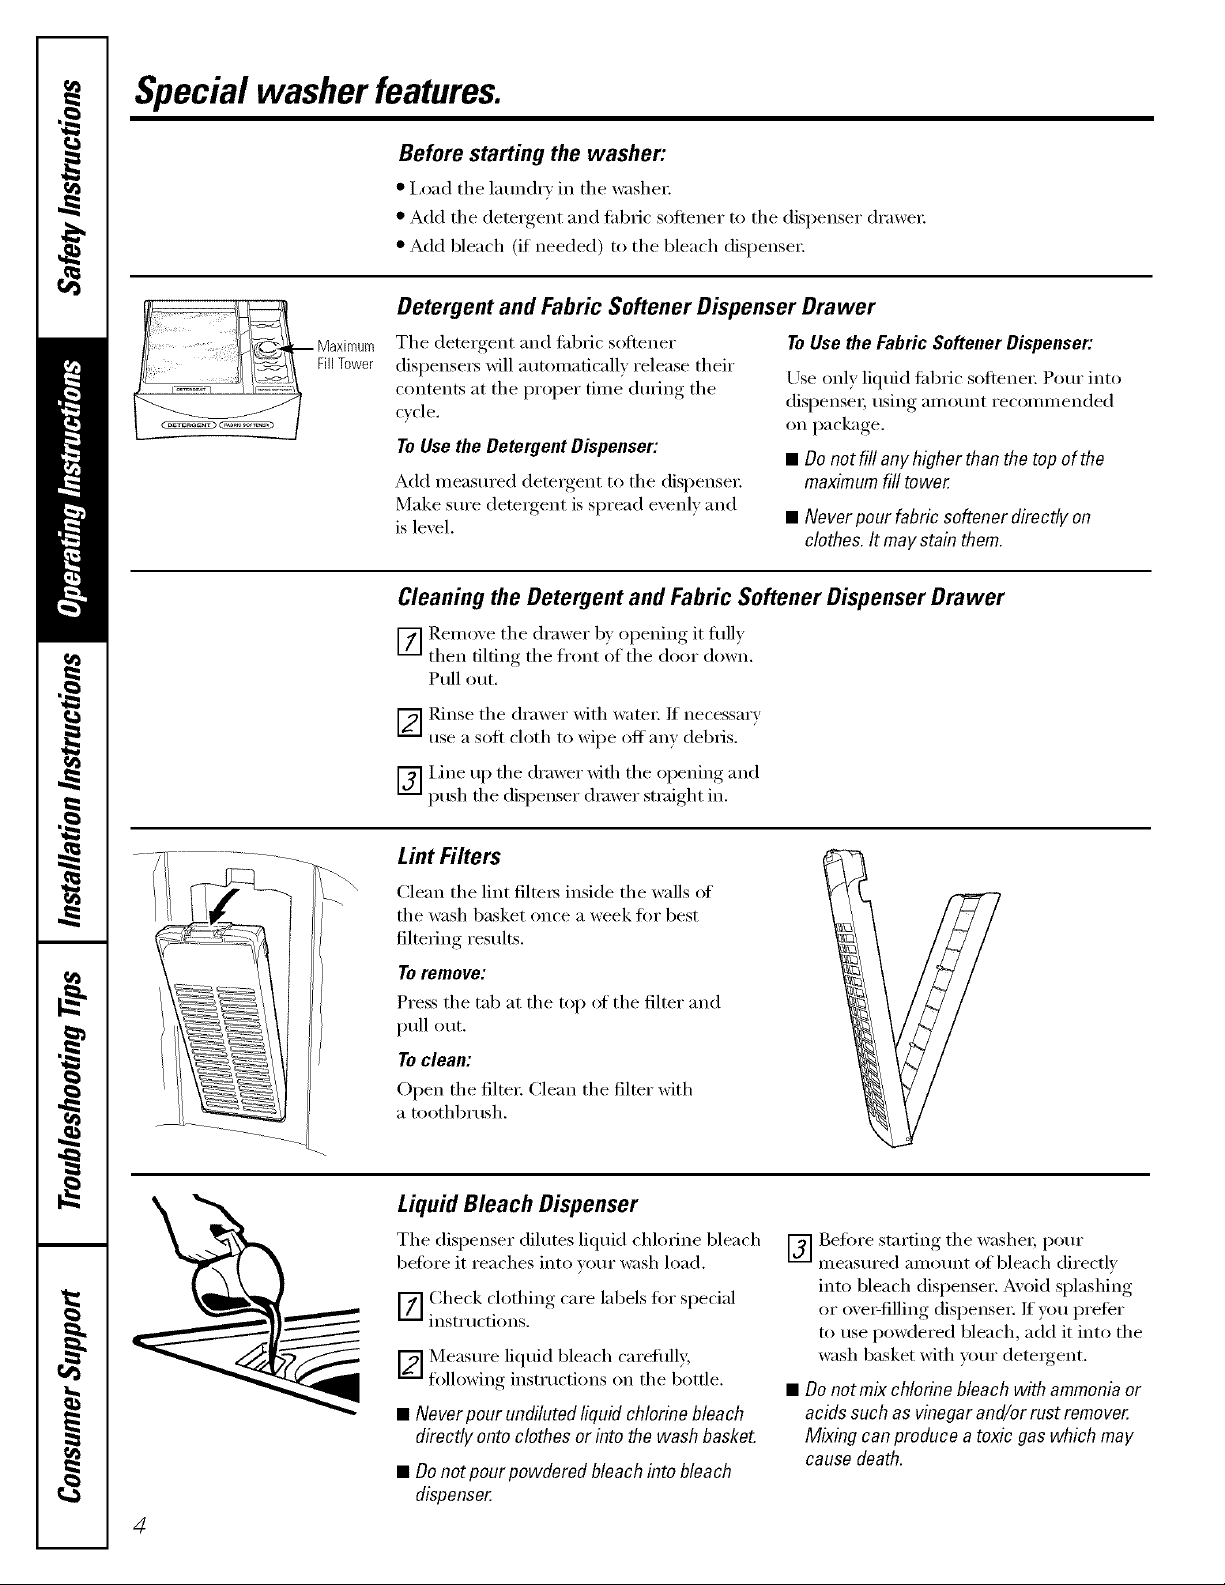
Detergent and Fabric Softener Dispenser Drawer
-- Maximule
FillTower
The detergent and fabric softener
dispensex_ will automatically release their
contents at the proper time during the
cycle.
ToUsethe DetergentDispenser:
Add measured detergent to the dispense_:
Make sm'e detergent is spread evenly and
is level.
Cleaning the Detergent and Fabric Softener Dispenser Drawer
ToUse the Fabric Softener Dispenser:
Use only liquid lid)tic soflene_; Pour into
dispense_; using amotmt recommended
on package,
• Oo notfillanyhigherthan the top of the
maximum fill tower
• Neverpourfabric softenerdirectlyon
clothes.Itmaystain them.
[Z] Remoxe the drawer b) o )enino it tully
then tilting the front of the door down,
Pull out.
_-] Rinse the drawer with water: If necessm T
use a soft cloth to wipe off any debris.
_] Line u I) the drawer xfifl_ the opening and
push fl_e dispenser (hmver straight in.
} _
Lint Filters
Clean the lint tilters inside the walls oI
the wash basket once a week fi)r best
filtering results,
Toremove:
Press the tal) at the top at the filter and
pull out.
To clean:
Open the filte_; Clean the filter with
a toothbrush.
Liquid Bleach Dispenser
The dispenser dilutes liquid chlorine bleach
betore it reaches into your wash load.
[-_ Check clothing care labels tot special
instructions.
[2--_ Measm'e liquid bleach carefiflly,
tallowing instructions on the bottle.
• Neverpour undilutedliquid chlorinebleach
directly onto clothesor intothe wash basket.
• Oonotpourpowdered bleachinto bleach
dispenser
4
[_] gefi)re starting the washe_; pore"
measm'ed amom_t of bleach directl)
into bleach dispenser. Avoid splashing
or ave>filling dispense_: If you preti_r
to use powdered bleach, add it into the
wash basket with yam" detergent.
• Oo notmix chlorine bleach with ammonia or
acids suchas vinegarand/or rust remover
Mixing canproducea toxic gaswhich may
cause death.
Page 5
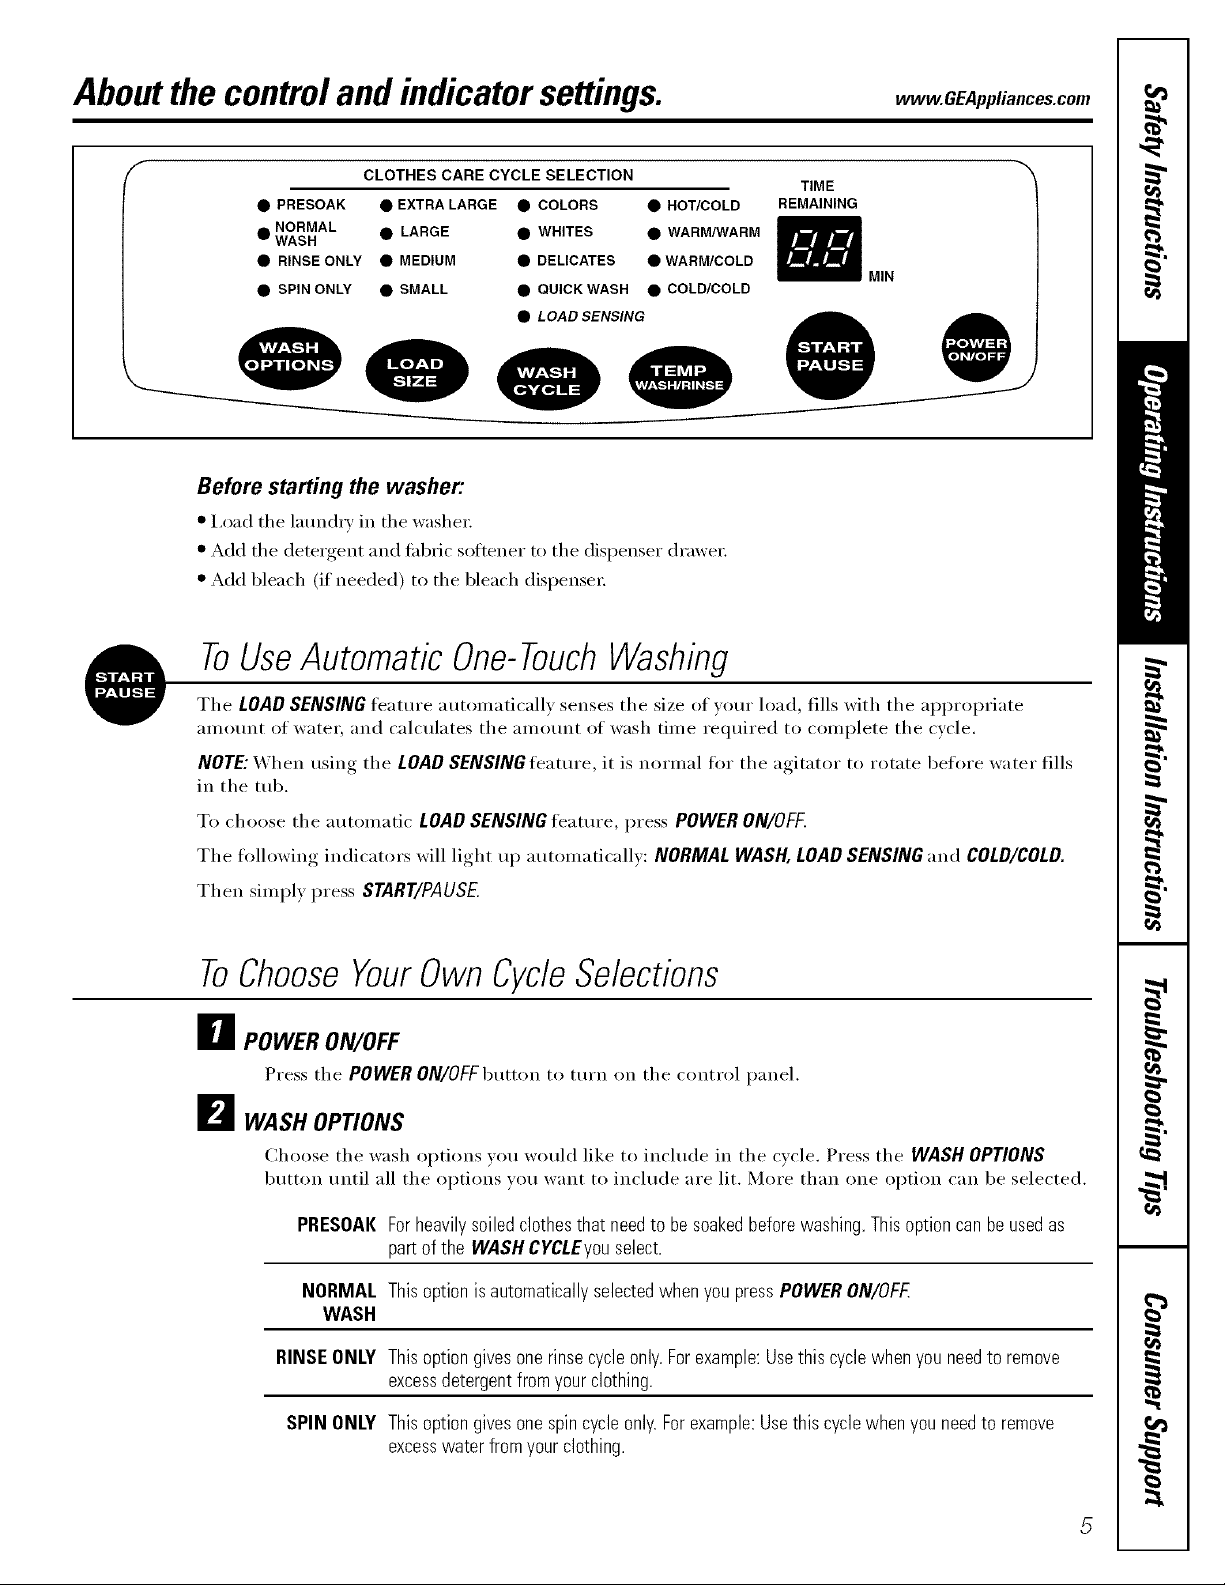
Aboutthe controland indicatorsettings, vvvvw.GEAppliances.com
CLOTHES CARE CYCLE SELECTION
• PRESOAK • EXTRA LARGE • COLORS • HOT/COLD REMAINING
NORMAL • LARGE • WHITES • WARM/WARM
WASH
• RINSE ONLY • MEDIUM • DELICATES • WARM/COLD
• SPIN ONLY • SMALL • QUICK WASH • COLD/COLD
• LOAD SENSING
TIME
MIN
Before starting the washer:
• I,oad the laund_' in the washer.
• Add tile detergent and flO)ric softener to tile dispenser drawer.
* Add bleach (if needed) to tile bleach dispense_:
ToUseAutomatic One-TouchWashing
Tile LOADSENSINGfeature automatically senses tile size of your load, fills with tile ai_propriate
amount of water, and calculates tile amount of wash time required to complete tile cycle.
NOTE: When using the LOAD SENSING fl_amre, it is normal for the agitator to rotate before water fills
in tile tub.
To choose tile automatic LOADSENSINGfeature, press POWER ON/OFF.
The fl)llowing indicators will light up automaticallv: NORMALWASH, LOADSENSINGand COLD/COLD.
Then simply press START/PAUSE
ToChooseYourOwn CycleSelections
_r_ POWER ON/OFF
Press tile POWER ON/OFFbutton to tm'n on tile control panel.
D WASH OPTIONS
Choose tile wash options }ou would like to include in tile Qcle. Press tile WASH OPTIONS
button until all tile options you want to include are lit. More than one option can be selected.
PRESOAKForheavilysoiledclothesthatneedto besoakedbeforewashing.Thisoptioncan beusedas
partof the WASHC¥CLEyouselect.
NORMAL ThisoptionisautomaticallyselectedwhenyoupressPOWERON/OFE
WASH
RINSEONLY Thisoptiongivesonerinsecycleonly.Forexample:Usethiscyclewhenyouneedto remove
excessdetergentfromyourclothing.
SPIN ONLY Thisoptiongivesonespincycleonly.Forexample:Usethis cyclewhenyouneedto remove
excesswater fromyourclothing.
Page 6
Aboutthecontrolandindicatorsettings.
D
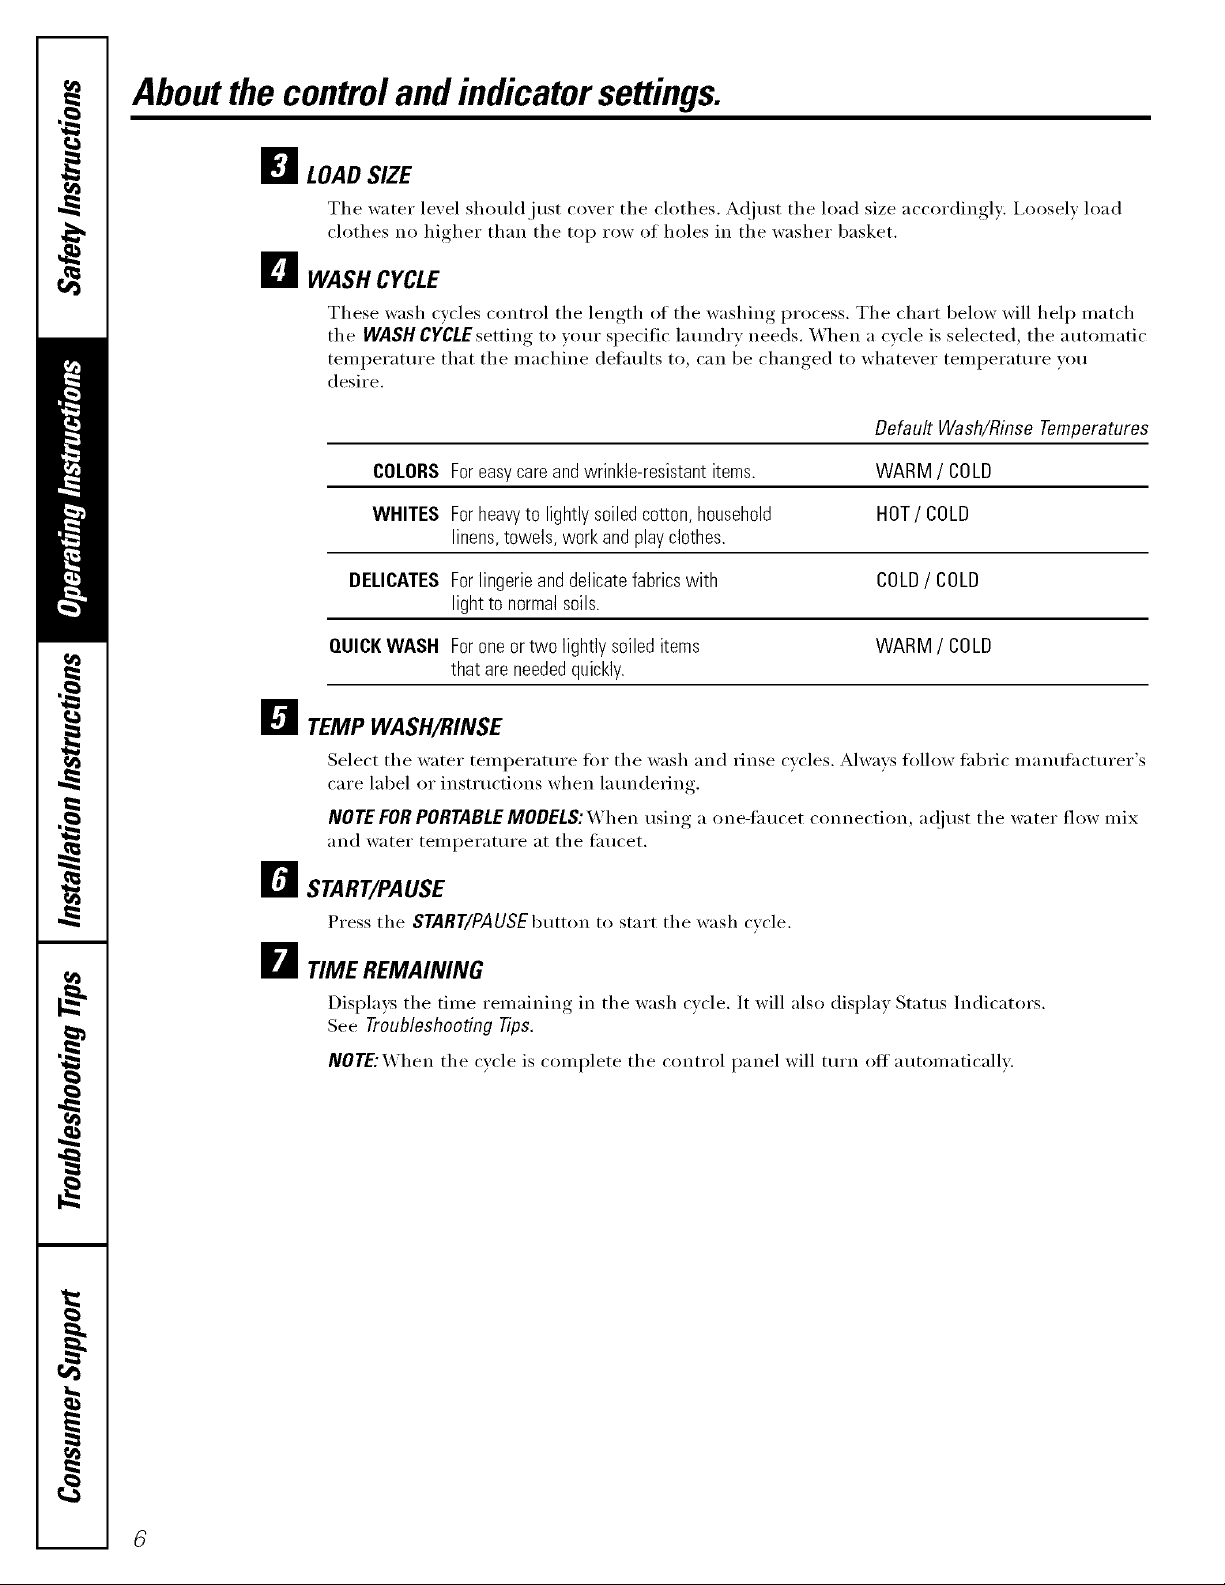
LOADSIZE
The water level should just cmer the clothes. Adjust the load size accordingly, i,oosel_ load
clothes no higher than the top row of holes in the washer basket.
El
WASH CYCLE
These wash cycles control the length of the washing process. The chart below will help match
the WASHCYCLEsetting to your specific la undry needs. When a cycle is selected, the a utomatic
temperature that the machine detaults to, can be changed to whatever temperature you
desire.
COLORSForeasycareandwrinkle-resistantitems. WARM/ COLD
WHITES Forheawto lightlysoiledcotton,household HOT/COLD
linens,towels, workandplayclothes.
DELICATESForlingerieanddelicatefabricswith COLD/ COLD
lightto normalsoils.
QUICKWASH Foroneor two lightlysoileditems WARM/ COLD
that areneededquickly.
Default Wash/RinseTemperatures
!i
TEMP WASH/RINSE
Select the water temperature for the wash and rinse cycles. Always fi)llow fabric manufacturer's
care label or inst_ uctions when laundering.
NOTEFORPORTABLEMODELS:When using a one-taucet connection, a(!just the water flow mix
and water temperature at the fimcet.
rt
START/PAUSE
Press the START/PAUSEbuttonto start the wash c_cle.
D TIME REMAINING
Displays the time remaining in the wash cxcle. It will also display Status Indicators.
See Troubleshooting Tips.
NOTE:_hen the cycle is complete the control panel will turn ott automatically.
Page 7
Loadingand usingthe washer.
Always follow fabric manufacturer's care label when laundering, wvvw.GEAppliances.com
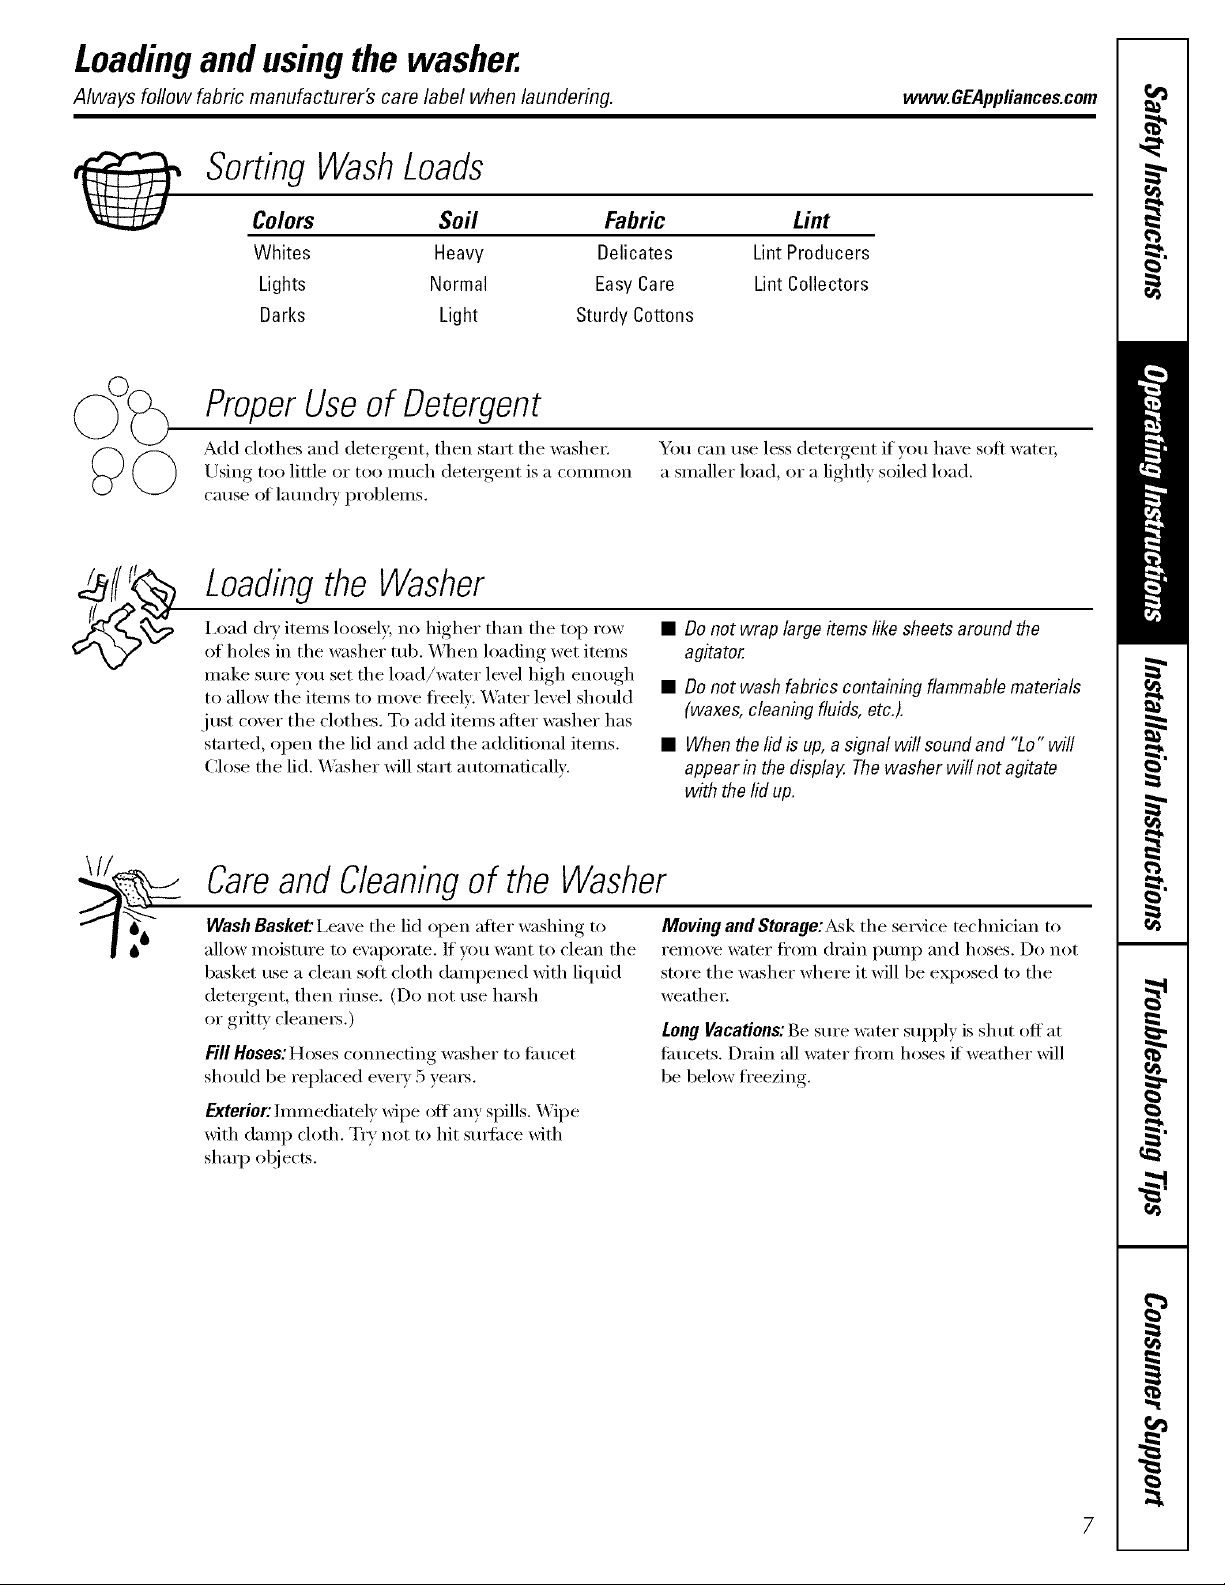
_ SortingWashLoads
Colors Soil Fabric Lint
Whites Heavy Delicates Lint Producers
Lights Normal Easy Care LintCollectors
Barks Light SturdyCottons
ProperUseof Detergent
Add clothes and detergent, then start the washe_:
Using too little or too much detergent is a conm/on
cause of latmdry problems.
Loadingthe Washer
i,oad dry items loosely, no higher than the top row
of holes in the washer tub. _,_]_en loading wet items
make sm'e you set the load/water level high enough
to allow the items to move fl'eelv: Water level should
just cover the clothes. To add items after washer has
started, open the lid and add the additional items.
Close the lid. Washer will start automaficalN:
You can use less detergent if)ou ha',e soft water,
a smaller load, or a lightly soiled load.
• Donot wrap largeitemslike sheetsaroundthe
agitator.
• Donot wash fabrics containingflammablematerials
(waxes,cleaningfluids,etc.).
• Whenthelid is up,asignalwill soundand "Lo" will
appearinthedisplag Thewasherwill not agitate
with thelid up.
Careand Cleaningof the Washer
WashBasket:I,eave the lid open after washing to
allow moistm'e to evaporate. If you want to clean the
basket use a clean soft cloth dampened with liqtfid
detergent, then rinse. (Do not use harsh
or gritS' cleaners.)
FillHoses:Hoses connecting washer to fi_ucet
should be replaced every 5 yea_.
Exterior:Immediately wipe off any spills. _]pe
with damp cloth. Try not to hit StllS_ilce with
shaq_ ol)j ects.
MovingandStorage:Askthe service technician to
I'eIIlOVe %;lteI" [i'OIIl (lI'_liIl l)tlIIll ) [lIl(l hoses. Do not
store the washer where it will be exposed to the
weathex:
LongVacations:Be sm'e water sui_ply is sh ut off at
timcets. Drain all water ti'om hoses if weather will
be below fi'eezing.
7
Page 8
Loadingand usingthe washer.
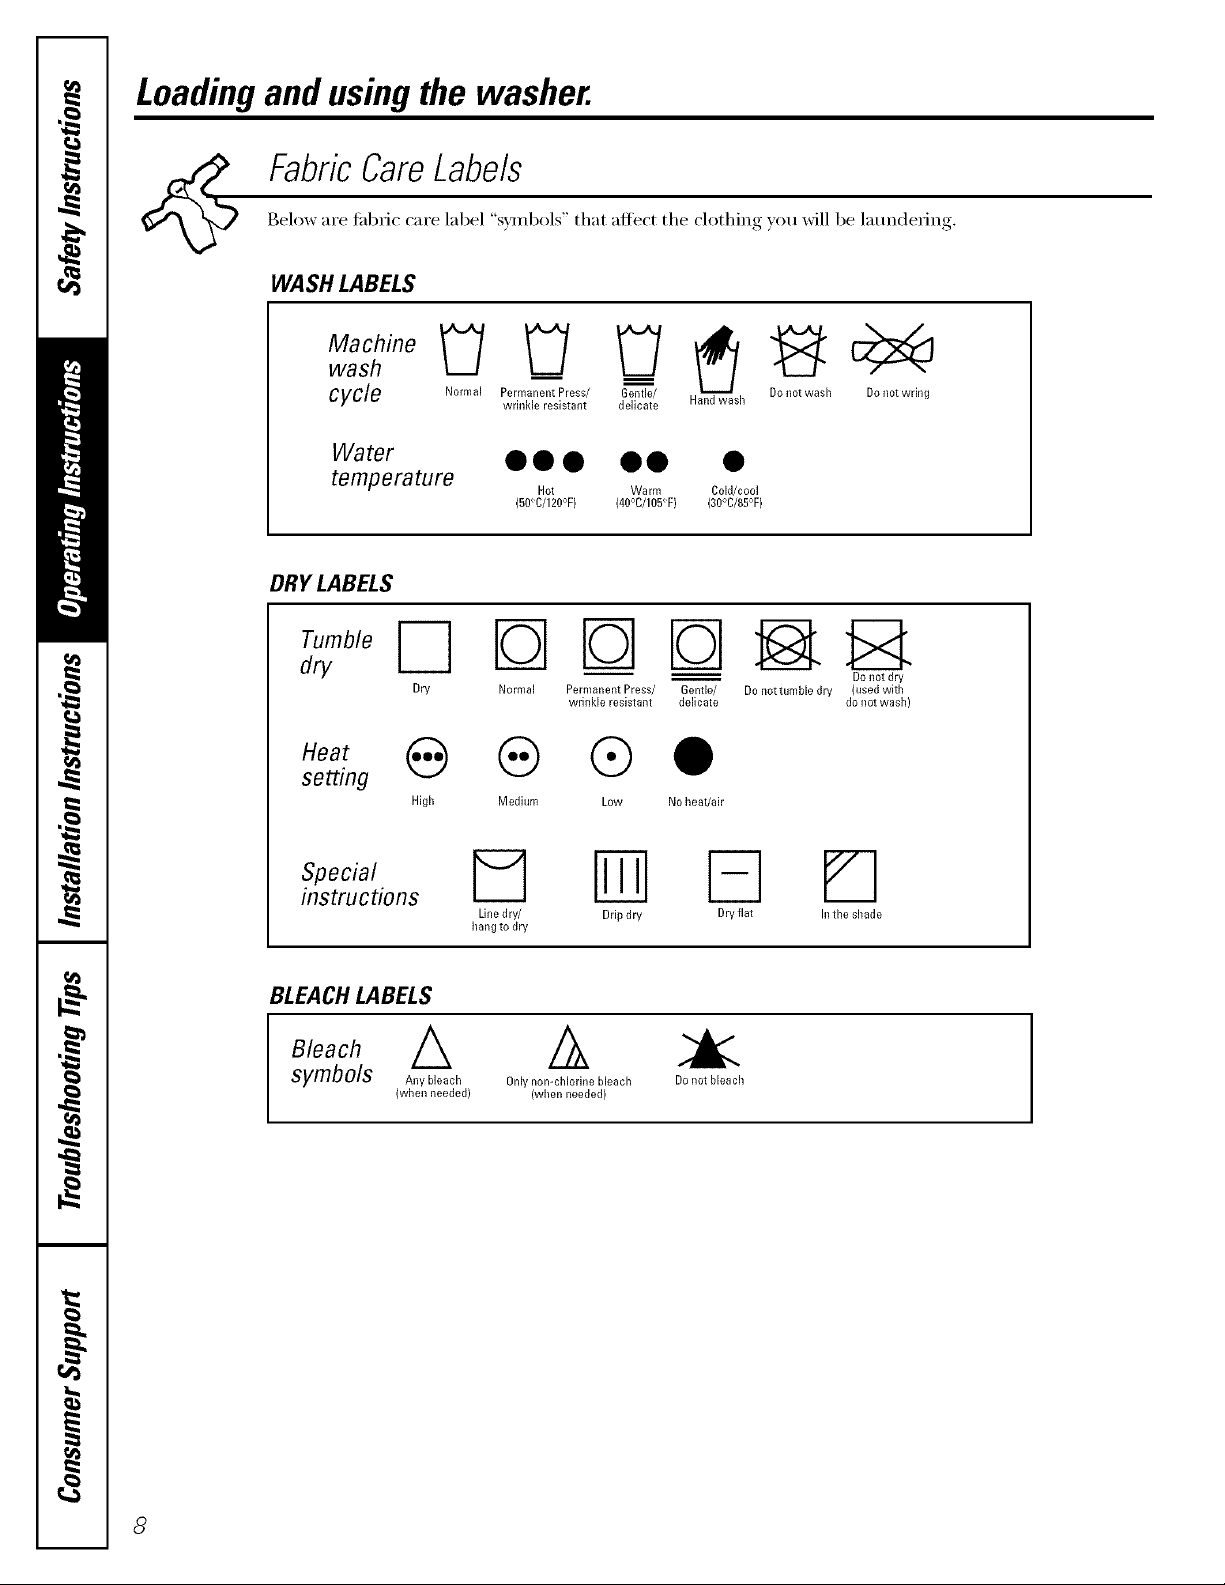
Below are rid)tic (-are label "syml)ols" that affect the ('l(_thing _on _dll be laundering.
FabricCareLabels
WASH LABELS
wash __ __
cycle Normal p.......... t Press/ Gentle"_/ Do ,lot wash Do ,lot wring
Water • • • • • •
temperature Hot W.... CoN/cool
DRY LABELS
Tumble D
dry
Dry
wrinkle resistant delicate Hand wash
(50"C/120°F) (40°C/105"F) (30°C/85°F)
Normal Permanent Press/ Gentle/ Do nottumbie dry (used with
wrinkle resistant deficate do not wash)
Do not dry
.o,, ® ® •
setting
High Medium Low No heat/air
Special
instructions
BLEACHLABELS
Bleach_., \ A
symuols Any bleacl_ Only ....... hlorine bleacll
(when needed) (when needed)
Line dry/ Drip dry Dry flat In the shade
hang to dry
Fq
Do not bleach
8
Page 9

Installation
Washer
Instructions
WSLS1100
WSLP1100 WSLM1100
I ffyou have questions,call 800-GECARESor visit our Website at: www.GEAppliances.com I
BEFORE YOU BEGIN
Read these instructions completely and carefully.
• IMPORTANT - S ,,ethese
instructions tot local inspector's use.
• IMPORTANT - Obse,,e ,ll
governing codes and ordinances.
• Note to Installer - Be sure to leave these
instructions with tile Consumer.
• Note to Consumer - Keep these instructions
tot fllture reference.
• Skill level - Installation of this appliance requires
basic mechanical skills.
• Completion time - 1 hour
• Proper installation is tile responsibili V of tile
installer.
• Product failure due to improper installation is not
covered under the Warranty.
• Note _ This appliance must be properly
grounded, and electrical setwice to the washer must
conli)rm with local codes and ordinances and tile
latest edition of the National Electrical Code,
ANSI/NFPA 70.
PLUMBING
• WATER PRF]SSURF]--Must be 10 p.s.i, minimum to
150 p.s.i, maximum dynamic pressure measm'ed at
faucet.
• WATER TEMPERATURE--Household water
heater should be set to deliver water at 120 ° to 150°F
(50 ° to 66°C) IN THE _;__SHER when HOT wash is
selected.
SHUT-OFF VALVES--Both hot and cold shut-off
wdves (faucets) should be supplied.
DRAIN--Water may be drained into a standpipe or
set tub. The discharge height MUST NOT BE LESS
THAN 30" nor more than 8' above tile base of tile
washeL Tile standpipe must be 1½" minimum inside
diameter and must be open to tile atmosphere.
RACK INSTALLATION
• Ensure washer is centered between tile rack sides.
PARTS SUPPLIED
WASHER LOCATION
_sher must be installed on firm flooring to minimize
vibration during spin cycles. Concrete flooring is best,
but wood base is sufficient providing floor sui)port
meets FHA standards. X4'asher should not be installed
on tugs or exposed to the weather.
Install or store where it will not be exposed to
temperatm'es below fl'eezing or exposed to tile
weather.
ELECTRICAL
This appliance must be supplied with tile voltage and
frequency indicated on tile rating plate (located on
tile back of tile washer), and connected to an
individual, propedy gro/mded branch circuit, protected
bv a 15 or 20 amp circuit breaker or time-delay fllse.
If the washer is plugged into the (hTer's 115 w)lt outlet,
then tile dryer needs to be on a dedicated circuit.
[_ Water Hoses (2)
[21Drain t lose
TOOLS REQUIRED
Pliers
[_ Cable Tie
[_ Rubber X_;ashers (4)
9
Page 10

Installation Instructions
A CAUTION: Before plugging ill washer, read the following electrical requirements.
ELECTRICAL REQUIREMENTS
A CAUTION: Forpersonal safety, do
not use an extension cord or adapter plug with this
appliance.
Do not, under rely circumstmlces, cut or remove the
third grounding prong from the power cord. Follow
National Electrical Codes or prevailing local codes
mad ordinances.
This appliance must be supplied with tile voltage and
frequency indicated on the rating plate (located on the
back of tile washer), and connected to an individual,
properly gr(mnded branch circuit, protected by a
15 or 20 amp circuit breaker or time-delav fllse.
If tile electric supply provided does not meet tile above
requirements, call a licensed electrician.
LEVELING THE WASHER--
STATIONARY MODELS
Before connecting tile hoses, tile washer must be lexel.
I exelino locks are located at tile bottom front of tile
• 0
left and right sides of the washer.
ITS FINAL LOCATION
I I_MAKE SURE THE WASHER IS IN I
[] PULL OUT THE LEVELING LOCKS
This releases tile spring loaded lexeliw,., feet. Tile
washer will automaticall_ lexel itself.
I
Insureproperground
existsbeforeuse
GROUNDING INSTRUCTIONS
This appliance inust be grounded. In tile event ot a
malflmction or breakdown, grounding will reduce
the risk of electric shock by providing a path of least
resistance tot electrical current.
This appliance is equipped with a cord having an
equipment gr(mnding conductor and a gro/mding
plug.
The plug nlust be plugged into an ai)i)ropriate outlet
that is i)roperly installed and gro/mded in accordance
with all local codes and ordinances.
A DANGER: hnl)rol)er connection ofthe
equipment-grounding conductor can result in a risk of
electrical shock. Check with a qualified electrician if
you are in doubt as to whether tile appliance is
properly gro/mded.
Do not m()dit_' plug with this appliance; if it will not fit
the outlet installed, have a proper outlet installed bv a
qualified electrician.
[] PUSH THE LEVELING LOCKS
BACK IN
Donotkickor steponthelevelinglocks.
10
Page 11

Installation Instructions
WASHER CONNECTIONS FOR STATIONARY MODELS
WSLS1100 AND WSLM1100
[] FLUSH WATER LINES
Run some water fi'om the hot and cold fimcets to flush
the water lines and remoxe particles that mi_,ht,., clog up
the water xflxe screens.
[] CONNECT TO WATER LINES
Connect the inlet hose ends to the HOT and COLD
water fimcets tightly by hand, then tighten another
mrn with pliers. Tm'n the water on and check fi)r leaks,
CONNECT DRAIN HOSE
[]
Fom_ a U shape on the end of the drain hose with the
hose pointed toward the drain. Place the hose in a
latmdrv mb or stnnd pipe and secure it with a cable tie
(not inchlded).
NOTE: If the drain hose is placed in a stand pipe
without tomfing a U shape, a siphoning action could
occm: There must be an air gap arotmd the drain
hose. A snug hose fit can also cause a siphoning action.
CableTie
Laundry Tub
[] CAREFULLY MOVE THE WASHER
TO ITS FINAL LOCATION
Cable Tie
Cable5e
StandPipe
[] PLUG THE POWER CORD INTO A
GROUNDED OUTLET
Insure proper groun/
exists before use
11
Page 12

Installation Instructions
WASHER CONNECTIONS FOR STATIONARY MODELS
WSLS1100 AND WSLM1100 (CONT.)
[] INSTALLATION CHECKLIST
Before starting the washer, check to make sure:
Main power is turned on.
The washer is plugged in.
The water fimcets are turned on.
The unit is level.
The drain hose is properly fled up.
There are no leaks at the fimcet, drain line
or washei;
[] RUN THE WASHER THROUGH A
COMPLETE CYCLE
Check for water leaks and proper operation.
[] REMOVE THE PROTECTIVE FILM
COVERING THE CONTROL PANEL
[] READ THE REST OF THIS
OWNER'S MANUAL
It contains _aluable and helpflfl infimnation that will
sa'_e _()11 [lille and iilonev.
OWNERS
MANUAL
NOTE: If yore" washer does not operate, please review
the Before YouCall For Service section.
ALCOVE OR CLOSET INSTALLATION
If _,om" washer is approxed fin" installation in an
alcoxe or closet, there will be a label on the back
of the machine describing reqtfirements.
• Minimum/clearances between washer and a(!jacent
walls or other suriaces are: 0" either side, _ " "2 front,
._tt I'e_l I'.
• Minimum vertical space fl'om floor to overhead
shelves, cabinets, ceilings, etc. is 96'.'
• Closet doors must be louvered or otherwise
ventilated and have at least 60 square inches open
area fl)r washer only, or if the closet contains both
a washer and dryer, doors must contain at least
120 square inches of open area equally distributed.
NOTE: The clearances stated on this label are
minimums. Consideration must be given to
providing adequate clearances fin" installation
and servicing.
[ ]
0
l 1
! !
Closet door
60sq.in.
(387.1sq. cm)
60 sq. in.
(387.1 sq. cm)
12
Page 13

Installation Instructions
WASHER CONNECTIONS FOR PORTABLE MODEL
WSLP1100--ONE-FAUCET CONNECTIONS
Use the hose connector provided with the washer for a
oile-t;i fleet (-onne('tion.
[] CONNECT TO VALVE INLET
TO CONNECT THE WASHER:
[] REMOVE THE UNI-COUPLE ®
HOSE FROM INSIDE THE
WASHER BASKET
Connection
Connector
COLDWater
Suppl,/
Uni-CouplerHose
Attach the COLD water supply connector to the
COLD water valve inlet (color BI,UE). Make sure
the washer is inside the connector befl)re
tightening.
[] TIGHTEN CONNECTOR
Tighten the connector; ensuring the threads are
aligned properly fin" tightest fit. Inspect for kinks
or binding of the hose.
NOTE: Do not remove the plastic cap fl'om the HOT
water inlet fi)r uni4'oupler connections as leakage may
OCC/II;
[] CONNECT TO WATER LINE
Attach the hose connector to the Lmcet adapter bv
pulling down on the locking collar while lifting up
on the connector tmtil it snaps into place. Make
sure the water filter provided is in place.
LockingCollar
Hose Connector
[] CONNECT DRAIN HOSE
Attach the drain hose to the rear of the washer.
Install the clamp on the drain hose and tighten
to I)rex ent leakage, of water.
13
Page 14

Installation Instructions
WASHER CONNECTIONS FOR PORTABLE MODEL
WSLP1100--ONE-FAUCET CONNECTIONS (CONT.)
[] MAKE SURE THE TEMPERATURE
SELECTOR IS SET AT COLD/COLD
[] SLOWLY TURN ON THE WATER
FAUCET ALL THE WAY TO THE
DESIRED TEMPERATURE
SETTING
[] PLUG THE POWER CORD INTO A
3-PRONG GROUNDED OUTLET
[] REMOVE THE PROTECTIVE FILM
COVERING THE CONTROL PANEL
[] INSTALLATION CHECKLIST
Before starting the washer, check to make sure:
Main power is turIled oil
The washer is plugged in.
The water fimcets are turned on.
The trait is level.
The_e are no leaks at the fimcet, dr;fin line
or washei:
The electrical power cord is on the back of the
W_I S 1/e I',
/
Insure proper ground
exists before use
14
Page 15

Installation Instructions
TO DISCONNECT THE WASHER:
[] TURN WATER FAUCET OFF
I_UNPLUG POWER CORD AND
RETURN IT TO THE STORAGE
AREA
[] PRESS THE RED WATER FLOW
BUTTON TO RELEASE THE
WATER PRESSURE
[] DISCONNECT FROM WATER LINE
Mo',e the locking collar down and pull the hose
connector down to disengage from the fimcet
adapter.
LockingCollar
Hose Connector
[] DRAIN WATER
Drain water from the hoses throu,,h the
hose connectoi',
WaterFI,
Button
Hose Connector
15
Page 16

Installation Instructions
WASHER CONNECTIONS FOR PORTABLE MODEL
WSLP1100--TWO-FAUCET CONNECTIONS
If vo/l have two sel);H'ate vdlter connections_ yo/li" washei"
can be connected to both the hot and cold water fimcets.
This kit can be i)urchased fi'om your dealer or fi'(>m Parts
and Accessories. In the United States, call 800.626.2002.
In Canada, consult the yellow pages fi)r yore" local Camco
n/in/bei:
TO CONNECT THE WASHER:
[] PLUG THE POWER CORD INTO A
3-PRONG GROUNDED OUTLET
I_CONNECT TO WATER LINE
Connect HOT and COLD water inlet hoses to the
HOT and COLD fimcets.
I_CONNECT DRAIN HOSE
Secure the drain hose to the sink or stand pipe.
Cable
Tie
/
Insure proper ground
exists before use
[] INSTALLATION CHECKLIST
Before starting the washer, check to make sure:
Main power is turned on.
[2_1The washer is plugged in.
F_IThe water timcets are turned on.
UJ The unit is level.
The drain hose is properly tied up.
U_lThere are no leaks at the timcet, drain line
or w;isheE
TO DISCONNECT THE WASHER:
I I_ TURN WATER FAUCETS OFF I
CableTie
16
Sink
StandPipe
I_UNPLUG POWER CORD AND
RETURN IT TO THE STORAGE
AREA
[] DISCONNECT THE DRAIN AND
WATER SUPPLY HOSES
Hang them on the stora(,e rack.
Page 17

Before you call for service.., vvww.GEAppliances.com
Troubleshooting Tips
Save time and money! Review the charts on the following
pages first and you may not need to call for service.
StatusIndicatots
• Press POWERON/OFFto mrn off the washer.
• Call for service.
When the cycle has stm'ted but water has not filled the wash basket
within 60 minutes, a signal will sound mid this code will be displayed.
• Make sure the incoming water thucets are on.
• Make sure the fill hoses are not clogged or kinked.
Power did not automatically turn off at the end of the cycle.
• Press POWERON/OFFto tm'n off the washer.
Water is not draining out of the washer.
• Make sure the drain hose is not kinked and is connected properly.
Wash load is mabalmaced.
• Distribute latmdrv evenlx in the basket.
• Make sure washer is lexel. See Leveling the Washer.
Washer lid is not closed.
• Ch)se lid.
Any time the total time required is more than 99 minutes,
this status indicator will be displayed.
/7
Page 18

Before you call for service...
Troubleshooting Tips
WATER POSSIBLE CAUSES WHAT TO DO
Too many suds Type of detergent • Switch to a lower sudsing detergent brand and fi,llow
instructions on package.
Very soft water • T_a less detergent.
Too much detergent • Measure your detergent careflfllv. Use less soap if you
have soft water; a smaller load, or a lightly soiled load.
Water leaks Fill hoses or drain hose is • Make sure hose connections are fight at fhucets and the
bnproperly commcted washing machine. Make sure the end of the drain hose
is cmTectly inserted in and secm'ed to the drain.
Household dJcaJn may • Check household l)lmnbing. You may need to call
be dogged a I_lumbe_:
Constmat water pressure • Tighten hoses at the fimcets and turn the water off
to the fill hoses at the after each use.
water source • Check condition of the fill hoses; thin mm need
replacement alter 5 veals.
Using too much detergent • Lrse less detergent. Lrse less soap if you have soft water;
in washer a smaller load, or a lightly soiled load.
Water temperature Water supply is turned off • Turn both hot and cold filucets fldlv on and make sure
is incorrect or improperly cmmected hoses are com_ected to correct fimcets.
Water valve screens are • TtlI'II off tile x_;itei" SOtlrce _ti](1 relilove the x_;ttei"
stopped up com_ection hoses fl'om the upper back of the washeI:
Remove screens and rise a brash or toothpick to clean the
screens in the machine. Reinstall screens, recommct the
hoses and turn the _;iter back on.
House water heater is • Make sure house water hearer is delivering water
not set properly at 120° F.-140°F. (48°C.-60°C.).
Water won't drain Drain hose is kinked or • Straighten drain hose and make sure washer is not
hnproperly commcted sitting on it.
• Top ot drain outlet should be less than 8 ft. above floon
18
Page 19

www.GEAppliances.com
OPERATION POSSIBLECAUSES WHAT TODO
Washer pauses in cycle The washer normally pauses
between washh_g steps
Washer won't operate Washer is unplugged • Make sure cord is I_lugged,, securely into a working outlet.
Water supply is turned off • Turn both hot and cold timcets fifth' on.
Controls are not set properly • Make sure all selections have been made.
Lid is open • Close lid and press START/PAUSE.
Circuit breaJcer/fuse is • Check house drcuit breakex_/flxses. Replace flxses or
tripped/blown reset breakex: _4'asher should have separate outlet.
Washer has not been • Press the POWER ON/OFFbutton.
turned on
PERFORMANCE POSSIBLECAUSES WHAT TODO
Colored spots Incorrect use of fabric • Check rid)rio sottener package for instructions and
softener follow directions for using, disl)enser.
• Pretreat stain and rewash.
Dye trmasfer • Soxt whites or lighfl) colored items from dark cohn_.
Grayed or yellowed Not enough detergent • Use more deteroent_ (especially with larger loads).
clothes
Lint or residue on Clothes are air or line dried • If _ou (hx not (Ix]' your ch)thes with a ch)thes dryex,
clothes your clothes mar retain more lint.
Hard water • Llse a water conditioner like Calgon brand or install
a wateF sottenex',
Water is not hot enough • Make sux'e watex" heater is delixefing watex" at
120°E-140°E (48 C.-6 C.).
Washer is overloaded • Select load size to match clothes load.
Dye trmasfer • Sort clothes by cohn: If tid_ric label stntes wash separate/f,
tmstnble d',es ma', be indicated.
Incorrect sorting • Separate lint producex_ fi'om lint collecting.
Washing too long • "_4_sh small loads fin" a shorter fiIue than larger loads.
Overloading • I,oad clothes no higher than the top row of holes in the
washer rob.
• Make sure load size selector matches clothes load size,
Incorrect use of fabric softener • Check Lid)tic soitener package fin" instructions and
fi_llow directions for using dispensex;
Pilling Result of normal wear on • _4qfile this is not caused by the washex, )ou can slow the
poly-cotton blends m_d Ifillim"_I_r°cess bx, washing,,gamxents inside out.
fuzzy fabrics
/9
Page 20

Before you call for service...
Troubleshooting Tips
PERFORMANCE(cont'd) POSSIBLECAUSES WHAT TODO
Snags, holes, team, rips Pins, snaps, hooks, shm'p • Fasten snaps, hooLs, buttons and zippe_.
or excessive wear buttons, belt buckles,
zippers, mad sharp objects and shaq) buttons.
left in pockets
Undiluted chlorine bleach • Check bleach package instructions fiw proper amount.
ChemicaJs like hair bleach • ]_nse items that may have chemicals on them befin'e
or dye, pennmmnt wave washing.
solution
Wrinkling Improper sorthag • Avoid mixing hea\y items (like work clothes) with
• Remove loose items like pins, objects in pockets
• Turn knits (which snag easily) inside out.
• Never add undiluted bleach to wash or allow clothes
to come in contact with undiluted bleach.
light items (like blouses).
• Try a lid)Tic sotteneI:
Overloading or • i,oad xot:tr,washer so clothes haxe enou,*h_ room
incorrect water level to move fl'eelv:
Repeated washing ha • Wash in wam_ or cold water:
water that is too hot
NOISE POSSIBLECAUSES WHAT TODO
Washer is noisy Washer is uneven • I,evel the washex: See Leveling the Washer.
Washer load is • Press the START/PAUSEbutton to stop the washe_; open
tmbalmaced the lid and redistribute the load evenly. Close the lid
and restart.
Washer is sitting too close • Pull washer away fl'om the wall; about 4" is needed.
to wall (causes knocking
dtu-hag cycle)
Dragging noise prior When using the LOAD • This is noxmal.
towater filling in SENSING feature, the
lfie tub agitator rotates before
water fills in the tub
OTHER POSSIBLECAUSES WHATTODO
Labels on the exterior
of the washer will not
peel off cleanly
2O
Occasionally the adhesive
used on the labels does
not release demlly
• Use a hair (hyer set at the lowest heat setting, directing
the air at the label for a short amount of time. This will
release the adhesive easily, without damaging the stmfhce
of the washe_:
Page 21

GE Service Protection Plus rM
GE, a name recognized worldwide ff)r quality and dependability, oflers you
Service Protection Plus '"--comprehensive protection o11 all your appliances--
No Matter What Brand!
Benefits Include:
• Backed by GE
• All brands covered
• Unlimited service calls
• All parts and labor costs included
• No out-of-pocket expenses
• No hidden deductibles
• One 800 number to call
You will be completely satisfied with our serxice protection or you ma) request your inonex back
on the reumilfing xalue of your contract. No questions asked. It's that silnple.
Protect your refl'igeratoi; dishwashei; washer and dlTei, range, TV, VCR and much more--any brmad!
Plus there's no extra charge for emergency service and low monthly financing is awfilable. Even icemaker
coverage and food spoilage protection is ottk_red. You can rest easy, knowing that all your valuable
household products are protected against expensive repairs.
We'll CoverAnyAppliance.
Anywhere. Anytime.*
race ,...-,..fide., e i. (;E..d ,.H ,._i. the _._.S.t..H-f*'ee.t aUU-t}Zt}-ZZZ°_
for Ill()I'e iilfov/i/_ltioil.
-*fld| ]tl_lnds cllv_ l(!d tip Ii) 2{) V([ll'S old, ill Ih(! (llnth/(!ntal 1.S.
Cut here
Please place in envelope and mail to:
General Electric Company
Warranty Registration Department
P.O. Box 32150
Louisville, KY 40232-2150
2/
Page 22

Consumer Product Ownership Registration
Dear Customer:
Thank you tbr purchasing our product and thank you for placing your confidence in us.
VFe are proud to haxe you as a customer'.
Follow these three steps to protect your new appliance investment:
Complete and mail
your Consumer
Product Ownership
Registration today.
tiave tile peace of
mind of kno_ing we
CHII CoIItHct VOI/ ill
the unlik{ ly event of a
satbty modification.
At)er mailing tile
registration below,
store this document
in a sati, place. It
contains intimnation
you will need should
you require service.
Our service mlmber is
800 GE CARES
(8t)0-432-2737).
Model Number Serial Number
Important: If you did not get a registration card with your
product, detach and return the form below to
ensure that your product is registered, or register
online at www.GEAppliances.com.
Consumer Product Ownership Registration
Read VOlll-()wller's
Manual carefilllv
It will help you
operate VOllr ll_XA,-
appliance properly.
, i
,.Cut here
Model Number Serial Number
@
Ms. Mrs. Miss
Firs1 ] ] Last]
Name I I I I I I I I I Nam+ I I I I I I I I I I I I
StI'+ + 1 ]
Address I I I I I I I I I I I I I I I I I I I I I I I I
AI>_.#l, , , , i i , I EqnailAddress
[)l_e l'la< +d
Monlh
()((IS< ] y W( Ill\, ' ] ws( (( (( ( p (s to S(_l](1 VOI/ illforll]aliOll.
Ch(<k h<re if you (Io nol want Ihis information.
GEAppliances
GEConsumer Products
General Eleclric Company
Louisville,Kentucky
www, GEApplialtces, com
22
I
I
Page 23

GE Washer Warranty.
All warranty service provided by our Factory Service
Centers, or an authorized Customer Care®technician.
Toschedule service, on-line, 24 hours a day, contact us
at www. GEAppfiances.com, or call 800-GE-CARES.
Staple your receipt here.
Proofof the original purchase
date is needed to obtain service
under the warrant_
For The Period Of." We Will Replace:
One Year Anypart of the washer which tifils due to a detect in materials or wor!unanship. During this
From the date of the full one-year warranty, GE will also provide, free of charge, all labor and in-home se_Mce to replace
original purchase the (lefecfive part.
FiveYears
Fromthedateofthe
originalpurchase
The transmission and electronics, if they should fifil due to a (lefect in materials or wor!unanship.
During this additional four-year limited warranty,you will be responsible fin" any labor or in-home
service costs.
What Is Not Covered:
• Service trips to your home to teach you how to use
the product.
• hnproper hastaJlation, delivery or maintenance.
• FaJhtre of the product if it is abused, misused, or used for
other than the intended purpose or used commercially.
• Dmnage after delivery.
• Replacement of house fuses or resetting of circuit
breakers.
• Dmnage to the product caused by accident, fire, floods or
acts of God.
• hacidentaJ or consequential dmnage caused by possible
defects with this appliance.
Thiswarrantyisextendedto theoriginalpurchaserandanysucceedingowner for productspurchasedforhomeusewithinthe USA.
InA/ask& thewarrantyexcludesthecost ofshippingorservicecallstoyourhome.
Some states do not allow the exclusion or h_nitation of incidental or consequential damages. This warranty gives you specific legal rights,
and you may also have other nghts which vary from state to state. Toknow what your legal nghts are, consult your local or state consumer
affairs office or your state _ Attorney General.
Warrantor:General Electric Company.Louisville,KY 40225
23
Page 24

ConsumerSupport.
Haxe a question or need assistance with )our appliance? Try the (;E Appliances _.Vebsite 24 hom_ a day
q l gEAppliancesWebsite www.GEAppliances.com
' any day of the xear'. For greater comenience and faster service, you can now download Owner's Manuals,
order parts, catalogs, or exert schedule set\ice on-line. You can also "_sk Our Team f Expert.
yO/lI" qtlestions, and so Illtlcl/iiloi'e,,,
O " S i.
ScheduleService
Expert GE repair sex_,ice is onl) one step away fl'om _our doox: Get on-line and schedule your service at
,,our comenience 24 hotu_ any dm of the year! Or call 800-GE-CARES (8(1(I-432-2737) during nomml
business hotu_.
www.GEAppliances.com
RealLifeDesignStudio www.GEAppliances.com
GE SUl)ports the Uni\'e_al Design concept--l)roducts, services and environments that can be used by
people of all ages, sizes and capabilities. We recognize the need to design fin" a wide range of ph):sical and
mental abilities and impaimmnts. For details of GE's Universal Design applications, including kitchen
design ideas for people with disabilities, check out our Websim today. For the hearing impaired, please call
800-TDD-GEAC (800-833-4322).
ExtendedWarranties www.GEAppliances.com
Purchase a (;E extended warrant_ and learn about special discounts that are axailable while your, warranla,
is still in effect. You can purchase it on-line an)time, or call 800-626-2224 during mmnal business hou_.
GE Consumer Home Serxices will still be there after your warrant} expires.
PartsandAccessories www.GEAppliances.com
Individuals qualified to se_'ice their own appliances can have parts or accessories sent directly to their
I "I
homes (VISA, MasterCard and Discover cards are accepted). Order on-line toda 5 24 hou_ eve_' day or
by phone at 800-626-2002 during nomml business hom_.
J
Instructions contained in this manual cover procedures to be performed by any user. Other servicing generally
should be referred to qualified service personnel Cautionmust be exercised, since improper servicing may cause
unsafe operation.
ContactUs www.GEAppliances.com
If you are not satisfied with the service you receive ti'om (;E, contact us on our _.Vebsite with all the details
including your phone ntlI/lbeI; or wlJte to: General Manage_; Custolner Relations
Register your new appfimace on-lbm_at your convenience! Timel_ product registration will allow fin"
l RegisterYourAppliance www.GEAppliances.com
' enhanced communication and prompt service under the terms of _our warranty should the need arise.
You may also mail in the pre-printed registration card included in the packing material, or detach and
use the tbnn in this Owner's Manual.
GE Appliances, Appliance Park
I,ouisville, KY 40225
Printed in Korea
 Loading...