

Page 1
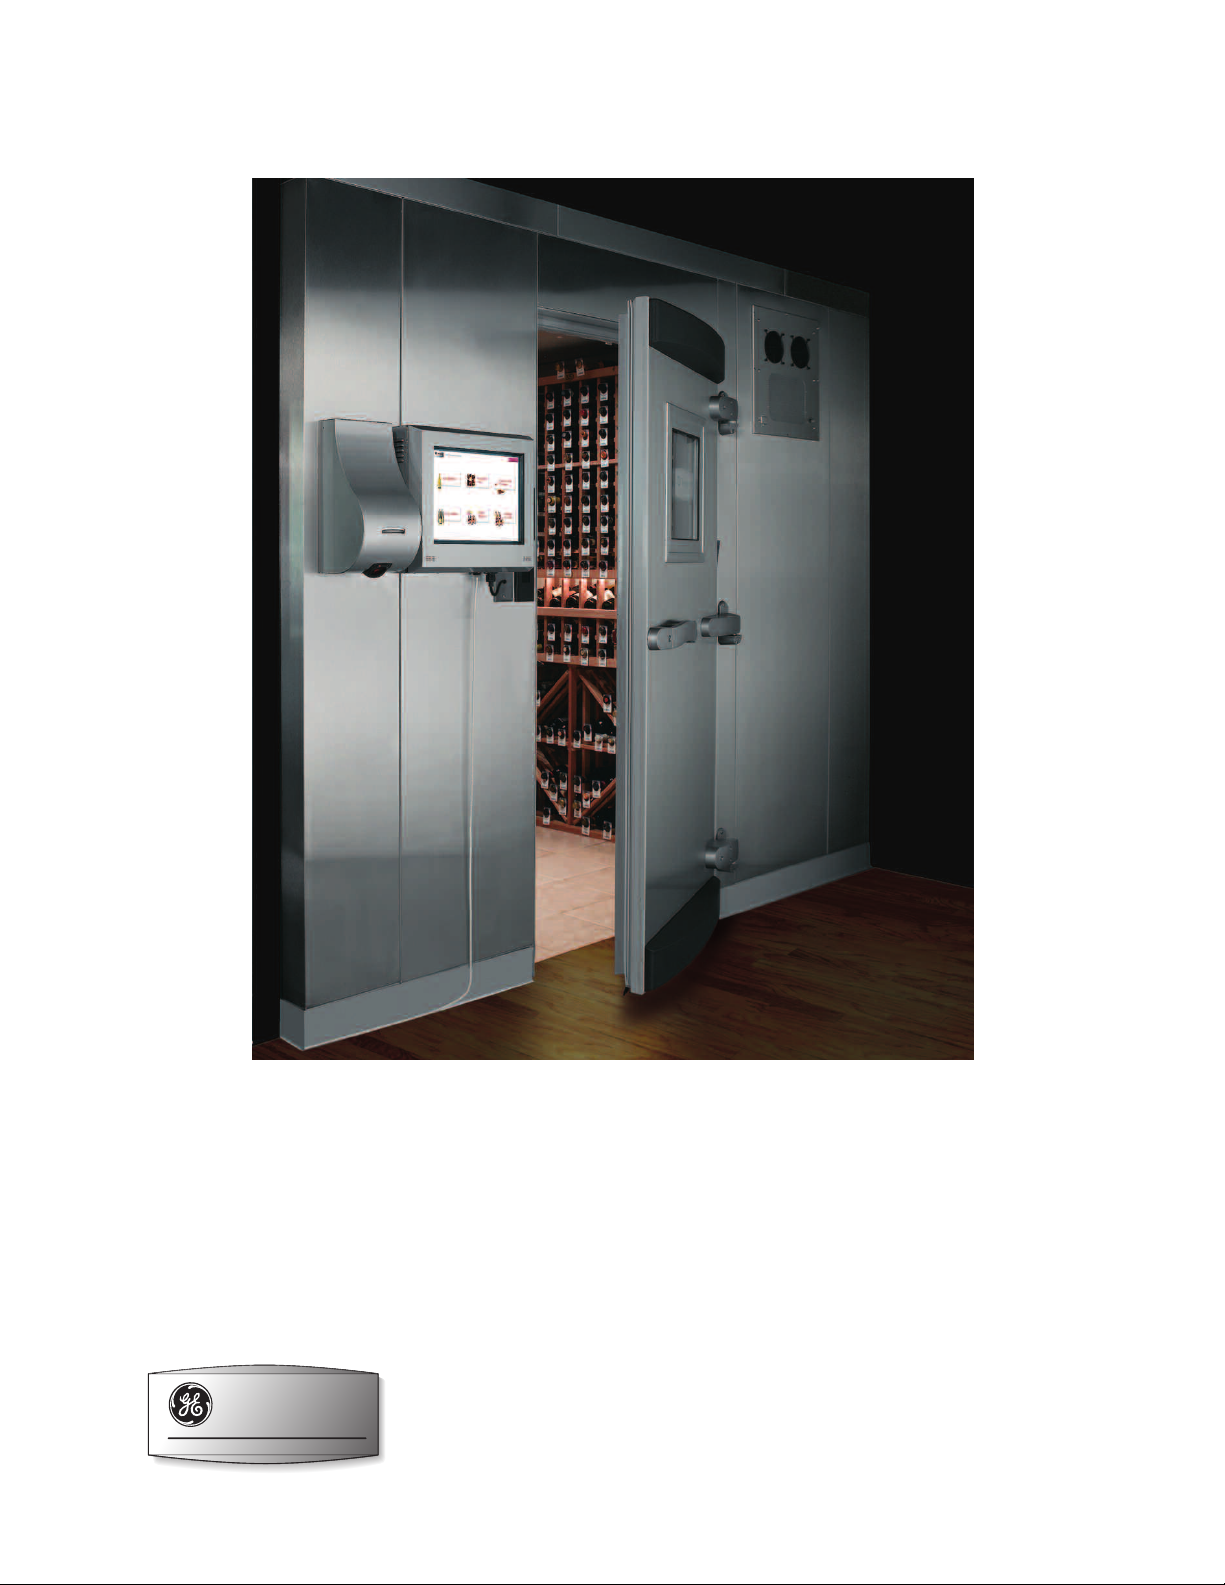
Monogram Wine Vault
Monogram
®
Owner’s Manual
Page 2
TABLE OF CONTENTS
Important Safety Information . . . . . . . . . . . . . . . . . . .4, 5
A Quick Tour of Your Wine Vault . . . . . . . . . . . . . . . .6, 7
The Cellar Management System . . . . . . . . . . . . . . .8–11
Key Parts and Controls . . . . . . . . . . . . . . . . . . . . . . . . . . . . . . . . . .9
Key Areas of the Cellar Management System . . . . . . . . . . .10
Tips for Stocking Your Cellar the First Time . . . . . . . . . . . . . .11
The Cooling System . . . . . . . . . . . . . . . . . . . . . . . . . .12–17
Lockable Entry Door . . . . . . . . . . . . . . . . . . . . . . . . . . . . .18
Redwood Wine Racks . . . . . . . . . . . . . . . . . . . . . . . .19–21
Interior Lighting System . . . . . . . . . . . . . . . . . . . . . .22, 23
e and Cleaning . . . . . . . . . . . . . . . . . . . . . . . . . . .24–27
Car
oubleshooting . . . . . . . . . . . . . . . . . . . . . . . . . . . . .
Tr
28–31
Consumer Services . . . . . . . . . . . . . . . . . . . . . . . . . . . . . .32
Warranty . . . . . . . . . . . . . . . . . . . . . . . . . . . . . . . . . . . .33–35
Appendix . . . . . . . . . . . . . . . . . . . . . . . . . . . . . . . . . . . .
Common Wine Terms . . . . . . . . . . . . . . . . . . . . . . . . . . . . . .36, 37
The Perfect Serve . . . . . . . . . . . . . . . . . . . . . . . . . . . . . . . . . .38, 39
36–39
Acquaint Yourself With Your New Wine Vault
Read this manual car
vault properly and enjoy the many unique features that your wine vault offers.
eep it handy for answ
K
more help, there is a list of toll-free consumer service numbers included in the back section
of this manual.
efully. It is intended to help you operate and maintain your new wine
s to your questions. If you don’t under
er
stand something or need
Save Time and Money
equesting service, please refer to the Troubleshooting section in this manual.
e r
Befor
It lists solutions to common questions and problems that you can correct yourself.
Write Down the Model and Serial Numbers
Model number
Serial number
Use these numbers in any correspondence
or service calls concerning your wine vault.
ault
er plate
, to the
ou will find them on the access cov
Y
on the inside w
bottom right of the door.
2
all of the wine v
________________________
________________________
Page 3
Well done!
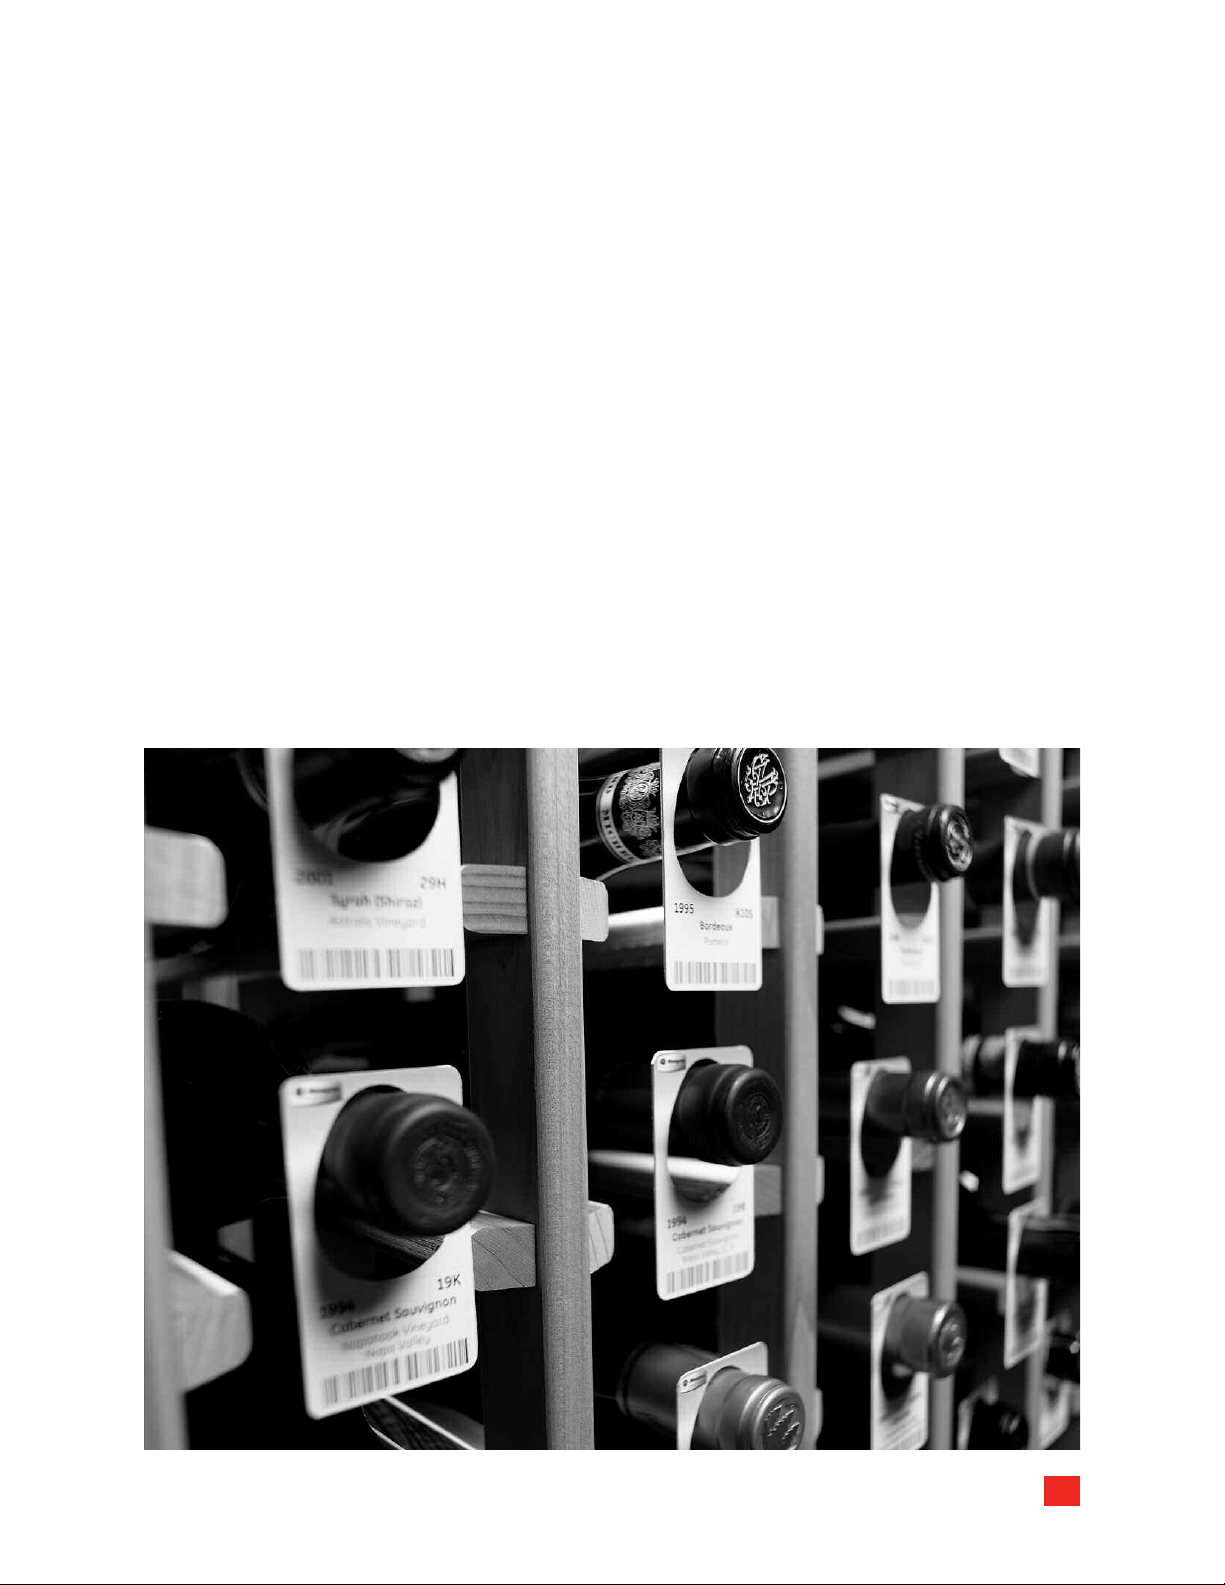
Superb wines deserve superb care. You’ve wisely chosen the
Monogram®Wine Vault to protect and showcase your collection.
This spacious, self-contained storage unit is designed to help you
protect your precious wine collection as it matures. From consistent
temperatures to total inventory control, the Monogram Wine Vault
manages your collection as if it were your personal sommelier. The
Monogram Wine Vault’s elegant design cradles and showcases your
precious inventory and creates a focal point for the enjoyment of
your wine collection.
3
Page 4
IMPORTANT SAFETY INFORMATION
WARNING!
When using electrical appliances, basic safety precautions should be followed,
including the following:
■ Use this wine vault for its intended purpose as described in the Owner’s Manual.
■
■ This wine vault must be properly installed in accordance with the Installation
■
Instructions before it is used.
■ Do not install the wine vault outdoors or expose it to outdoor conditions.
■
■ ATTENTION CONSUMER! This unit is designed for storing and cooling wine. Do not
■
store perishable foods in this unit.
■ This wine vault is not a storm shelter. Do not seek shelter in the wine vault during
■
inclement weather or during seismic activity.
■ Allow 4 feet clearance in fr
■
circulation.
■ Do not allow children to climb, stand or hang on the racks in the wine vault. They could
■
seriously injure themselv
■ Do not store or use gasoline or other flammable v
■
this or any other appliance.
■ Keep fingers out of "pinch point" areas around the door. Be careful closing the door
■
when children are in the ar
■ A qualified individual must perform any service to the wine vault. The warranty may
■
be voided if a non-qualified individual services the wine v
■ Do not put anything near or in front of the door that could block the door to the wine
■
vault and possibly trap one inside.
■ If standing w
■
approaching the wine vault.
■ Do not walk or store items on the roof of the wine vault. It is not designed to carry
■
additional w
■ Before replacing a burned-out light bulb, turn the motion sensor to off. See the Interior
■
Lighting System
ater is apparent, turn off the power at the main breaker before
eight.
section.
ont of the wine vault cooling unit to allow for proper air
es and damage the wine vault.
apors and liquids in the vicinity of
ea.
ault.
CAUTION: Light bulbs may be hot. (A burned-out light bulb may break when
being replaced.)
CAUTION: The scanner contains a Class II laser. Avoid long term viewing of
direct laser light. Looking directly into laser for extended periods of time may cause
eye damage.
4
Page 5
IMPORTANT SAFETY INFORMATION
WARNING!
When using electrical appliances, basic safety precautions should be followed,
including the following:
HOW TO CONNECT ELECTRICITY
Do not, under any circumstances, cut or remove the third (ground) prong from the
power cord. For personal safety, this appliance must be properly grounded.
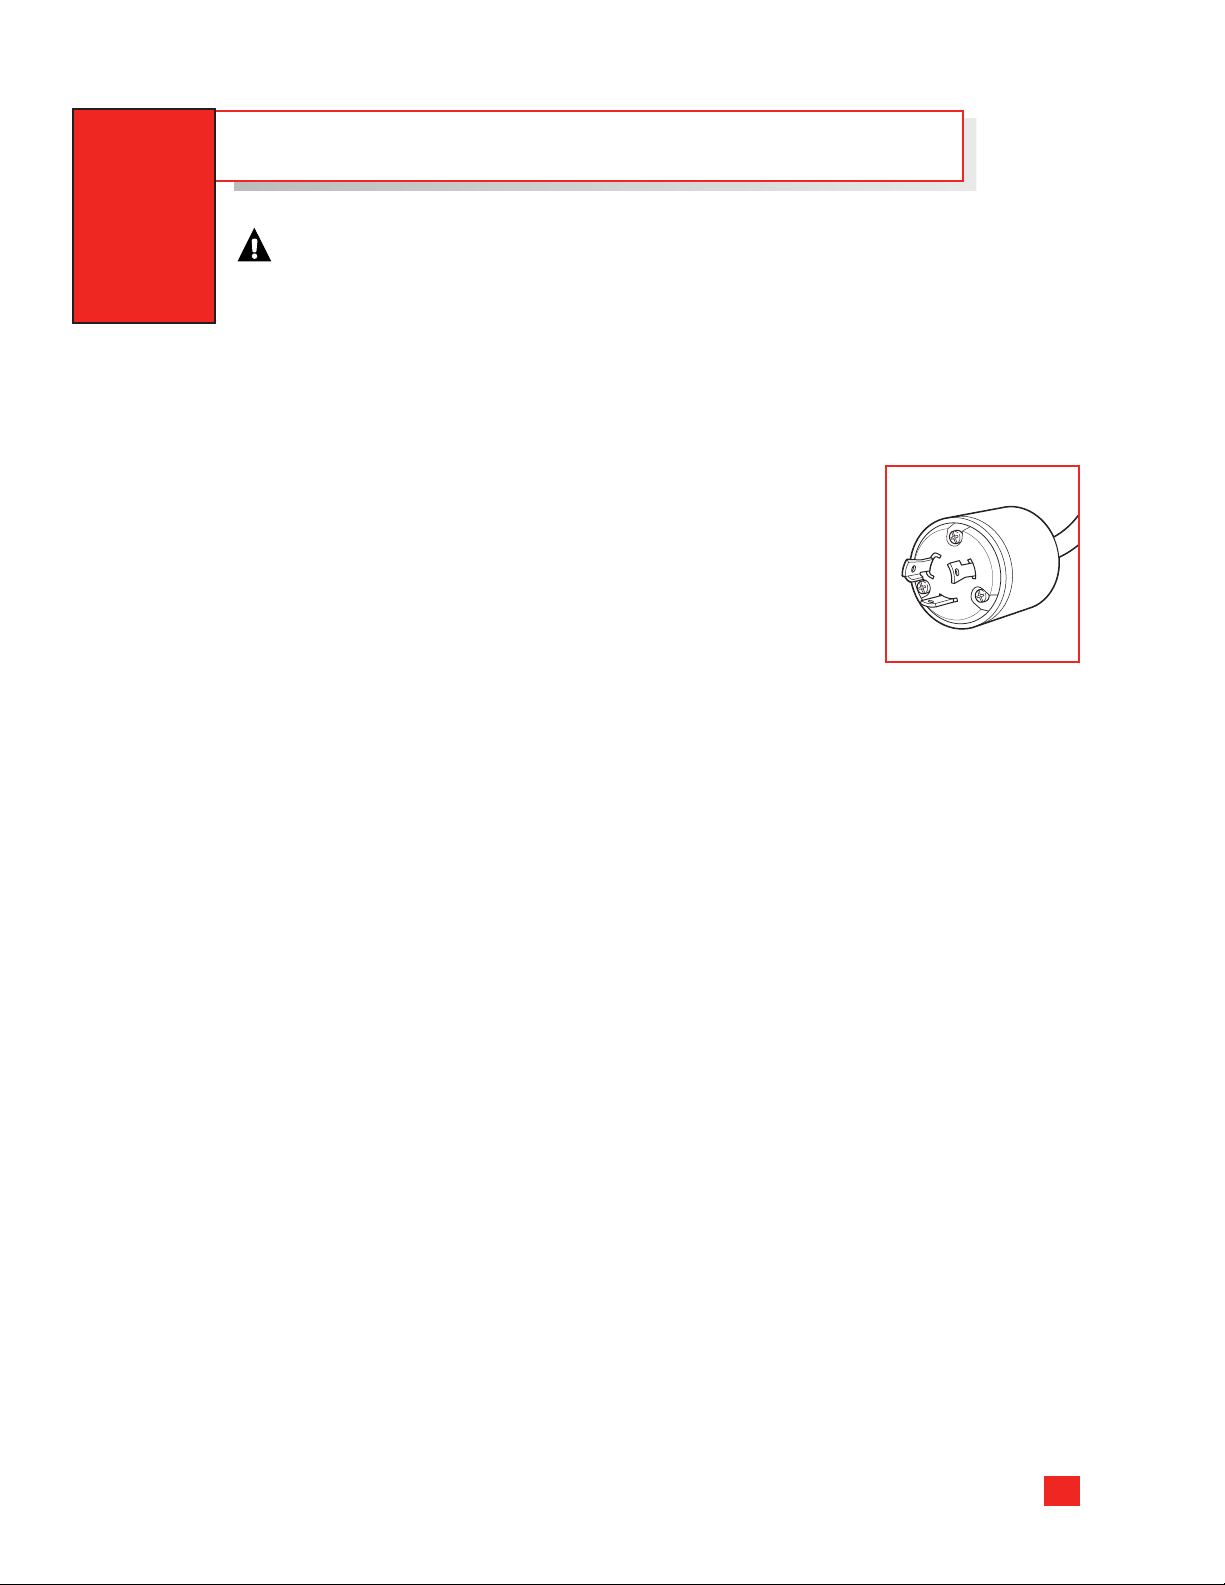
The power cord of this appliance is equipped with a twist-lock
3-prong (grounding) plug which mates with a specialized 3-prong
(grounding) wall outlet to minimize the possibility of electric shock
hazard from this appliance.
Have the wall outlet and circuit checked by a qualified electrician to
make sure the outlet is properly grounded.
Where a standard 2-prong wall outlet is encountered, it is your
personal responsibility and obligation to have it replaced with a
properly grounded 3-prong twist-lock wall outlet.
Do not use a GFI (Ground Fault Interruptor) for the wine vault outlet.
This unit must be plugged into a dedicated
DO NOT USE A PLUG DESIGNED FOR A 15-AMP or 20-AMP CIRCUIT.
DO NOT USE AN ADAPTER PLUG TO CONNECT THE COOLING UNIT TO
A 2-PRONG OUTLET.
DO NOT USE AN EXTENSION CORD WITH THIS APPLIANCE.
NOT BLOCK ACCESS TO THE ELECTRICAL OUTLET.
DO
Never unplug an appliance by pulling on the power cord. Always grip the plug firmly, turn
counterclockwise to unlock, and then pull straight out from the outlet.
Immediately r
damaged. Do not use a cord that shows cracks or abrasion damage along its length or
at either end.
epair or replace all power cords that have become frayed or otherwise
30-Amp, 120 VAC circuit.
READ AND FOLLOW THIS SAFETY
INFORMATION CAREFULLY.
SAVE THESE INSTRUCTIONS
5
Page 6
A QUICK TOUR OF YOUR WINE VAULT
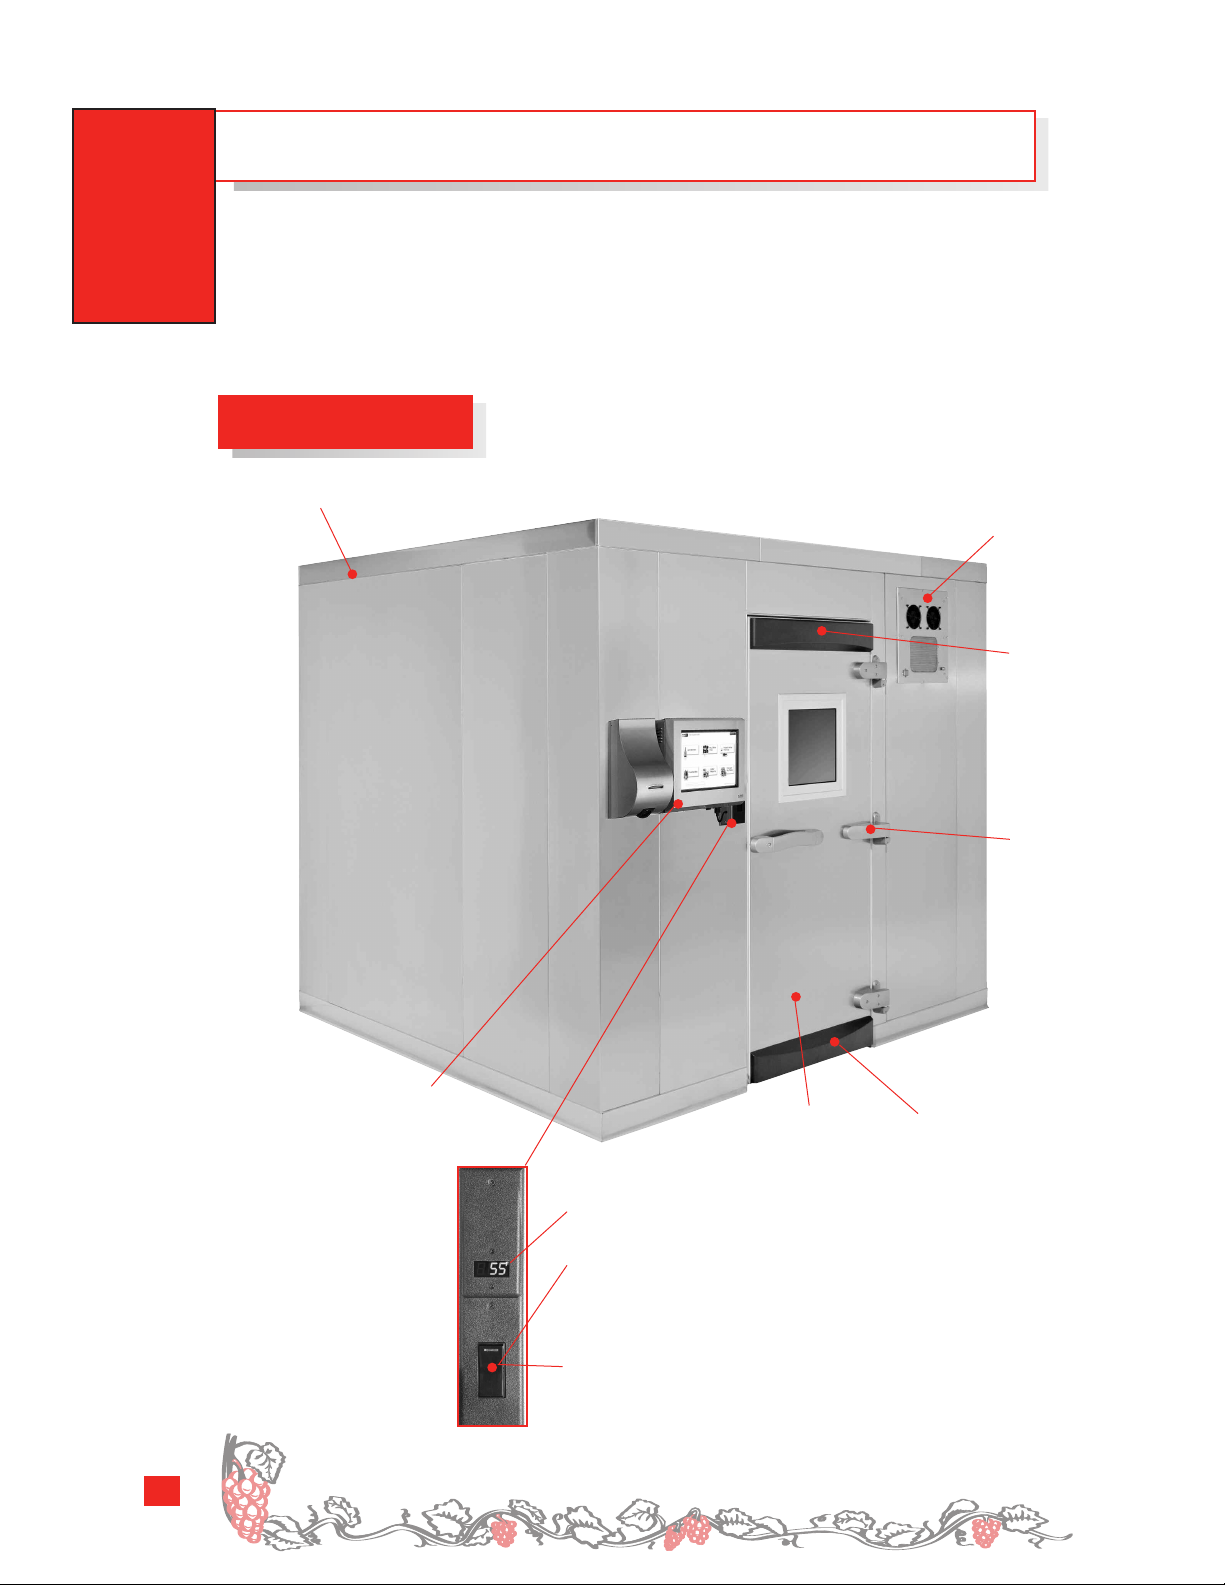
The illustrations below highlight many of the most important components of
your Monogram Wine Vault. Please take time to familiarize yourself with these
components; they will be referenced throughout this manual.
Exterior Features
Stainless steel
exterior panels
Cooling unit
Door
stop
Cellar
Management
System
Hydraulic
hinge
Appearance
y.
ar
may v
ockable
L
access door
Digital Temperature Display – Displays the current air
temperature within the wine vault.
Lighting Control – Switches the wine vault ceiling lighting on
and off. Switches the interior rope display lighting on or off
(in the ZWVT1000SR model only).
OR
Internal Outlet Control – This switch controls the internal outlet
that is located to the side of the door jamb
Door
stop
.
Blanc de noir means white wine made from red grapes, such as a sparkling wine
6
made fr
om Pinot Noir
.
Page 7
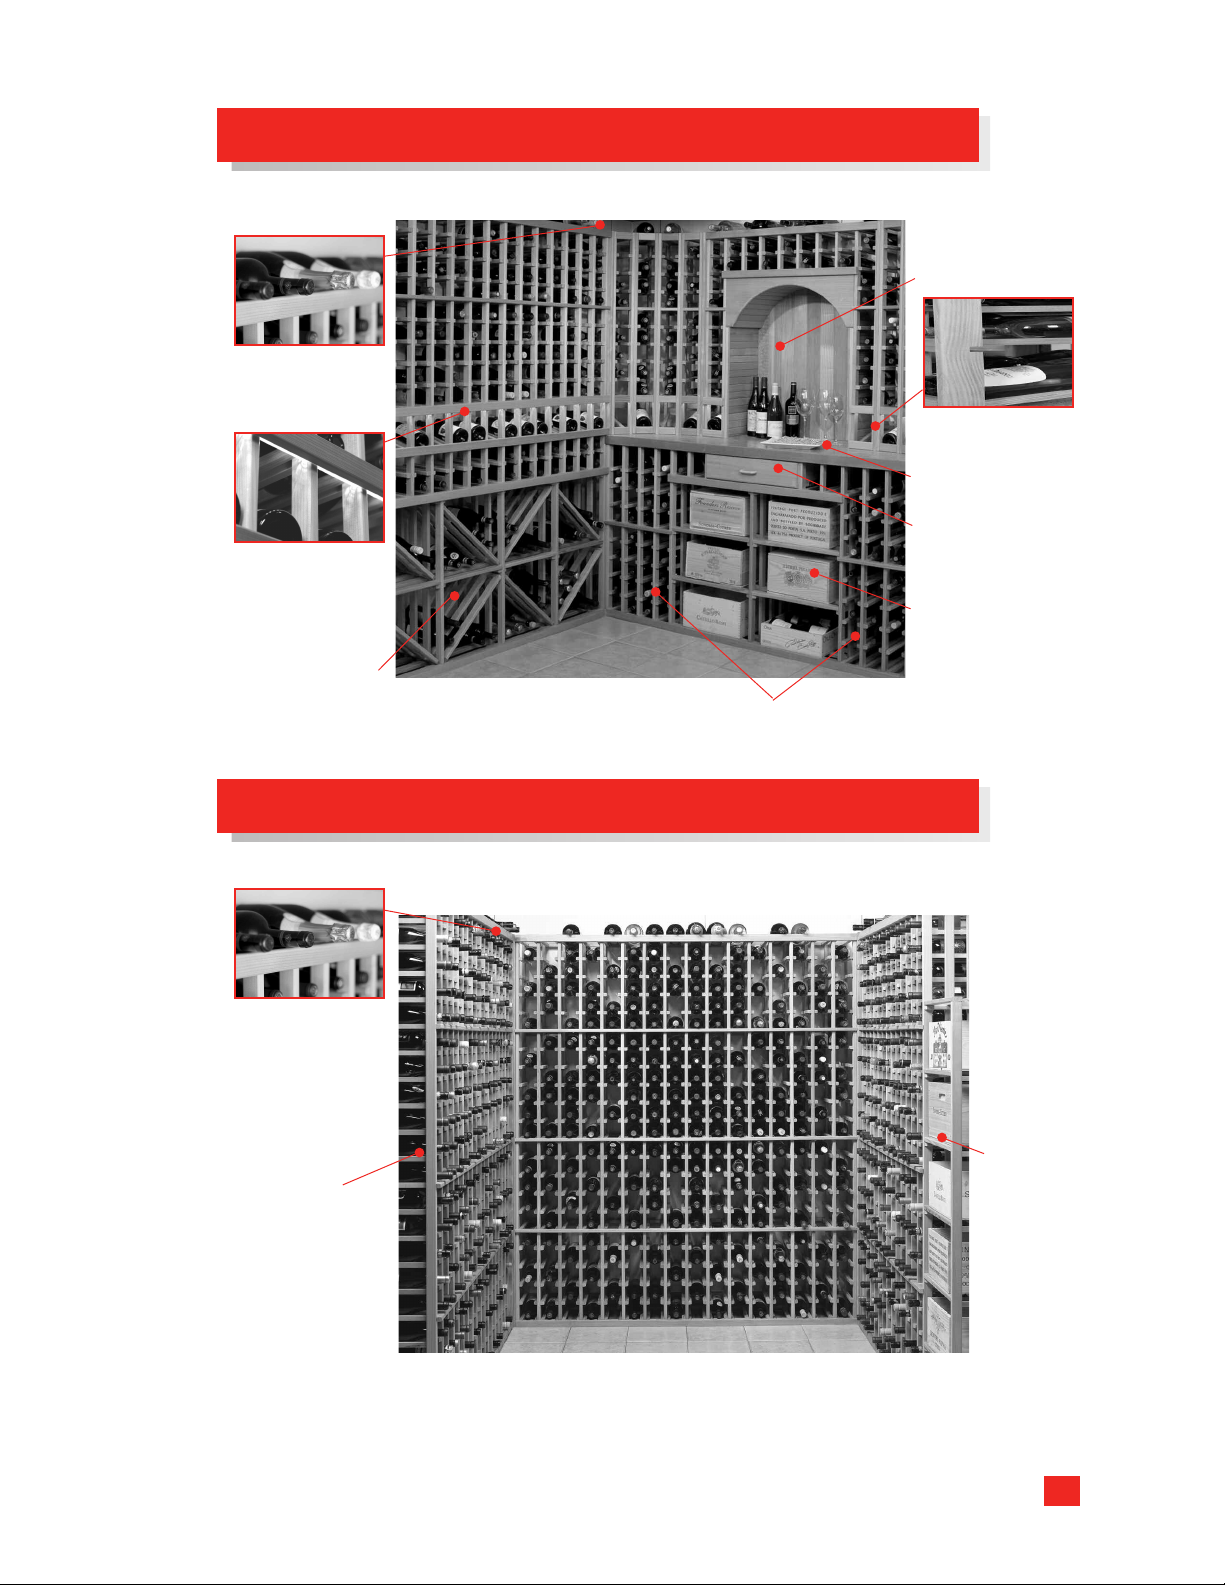
Interior Features – Tasting Racking System (model ZWVT1000SR)
Taster’s alcove
Storage for
magnum bottles
Inlaid cork countertop
Drawer for storage
Rope lighting
em shows
syst
off your wine
collection
of corkscrews and
other utensils
Storage shelves
for cases
Angled bottle
display racks
Diamond bins
Redwood storage racks hold a
variety of bottle sizes and cases
Double-deep
storage bins
Interior Features – Storage Racking System (model ZWVS1000SR)
Storage for
magnum bottles
ood
edw
R
storage racks
Case
storage
7
Page 8
THE CELLAR MANAGEMENT SYSTEM
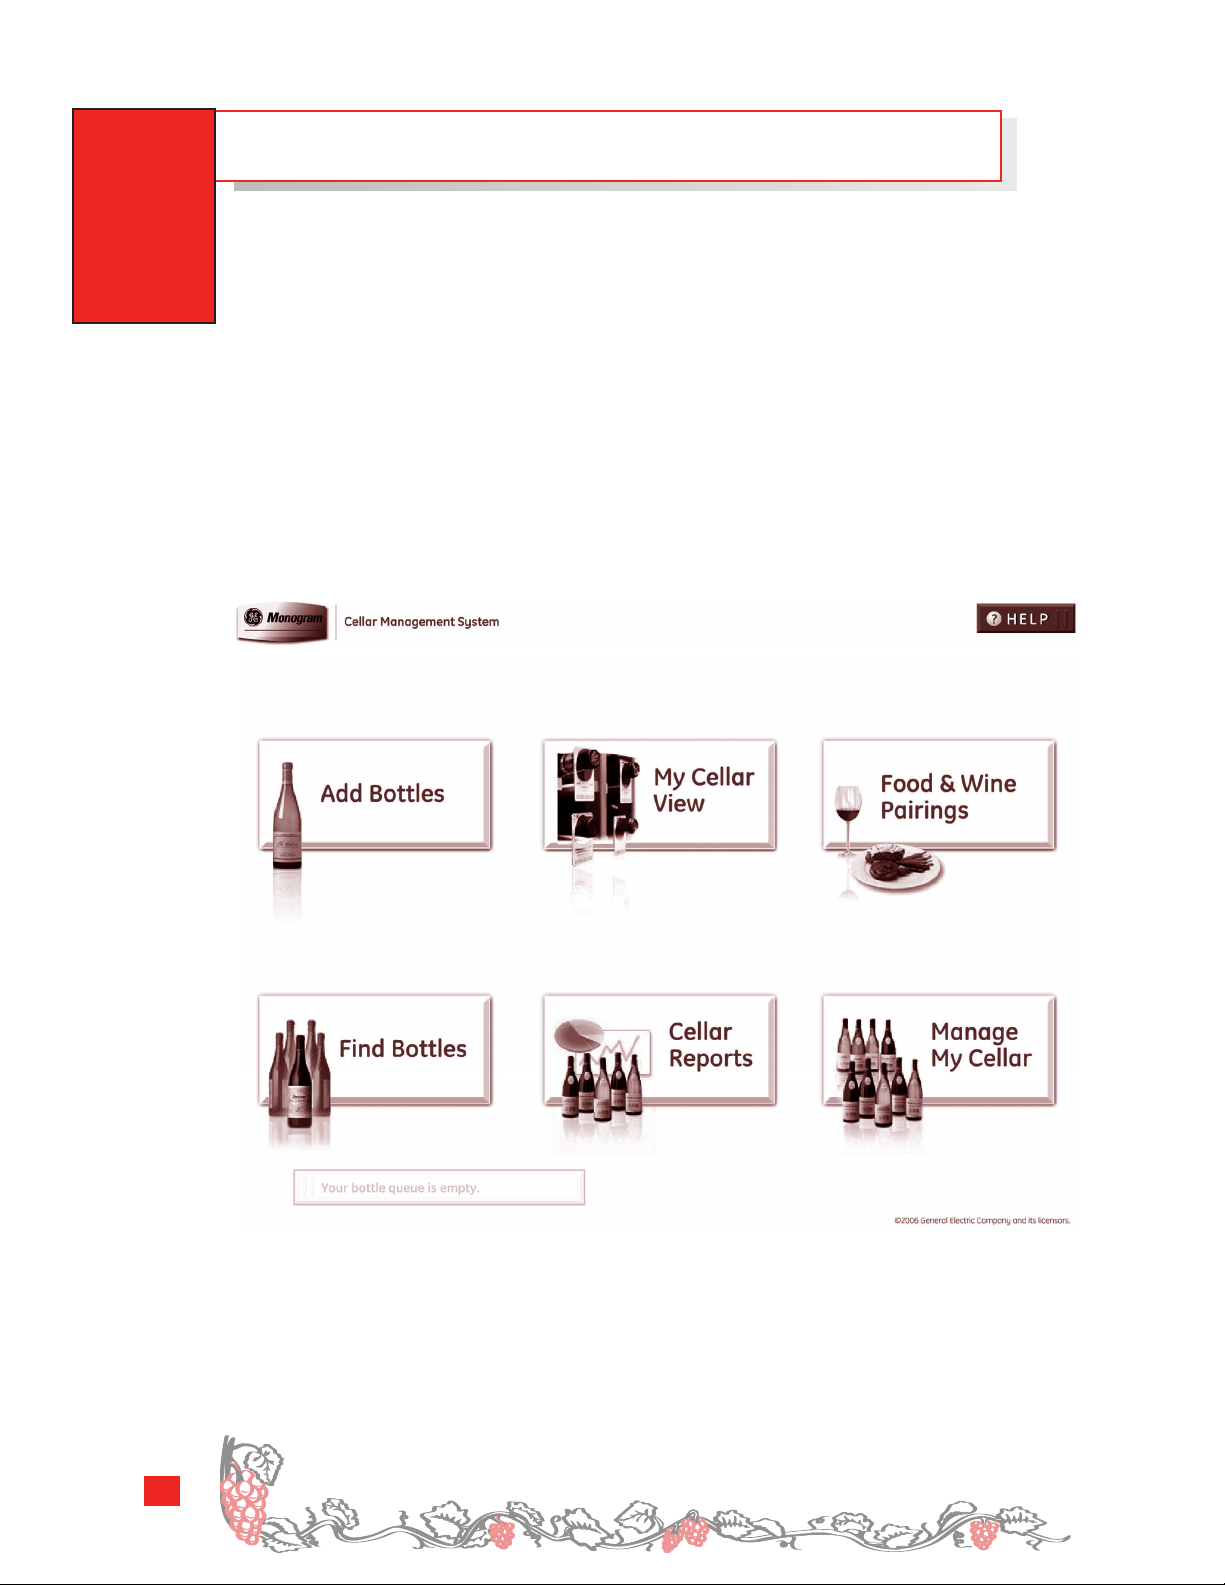
The GE Monogram®Cellar Management System is like your own personal wine expert,
always available to help you keep your wine collection in peak form and choose the
perfect wine for your enjoyment.
The system comes preprogrammed with information about thousands of wines.
It allows you to track individual bottles by country, appellation, producer, varietal,
designation, vintage, price and maturity. You can easily enter information about wines
that have not been preprogrammed into the system, such as local favorites. And, the
Cellar Management System will track wines that have reached maturity and are ready
to be enjoyed. The following section provides you with a brief overview of the many
functions of the Cellar Management System. For detailed information and instructions,
refer to the Cellar Management System Setup and Operation Guide.
8
Grapes were first planted in California in 1769 at Mission San Diego.
Page 9
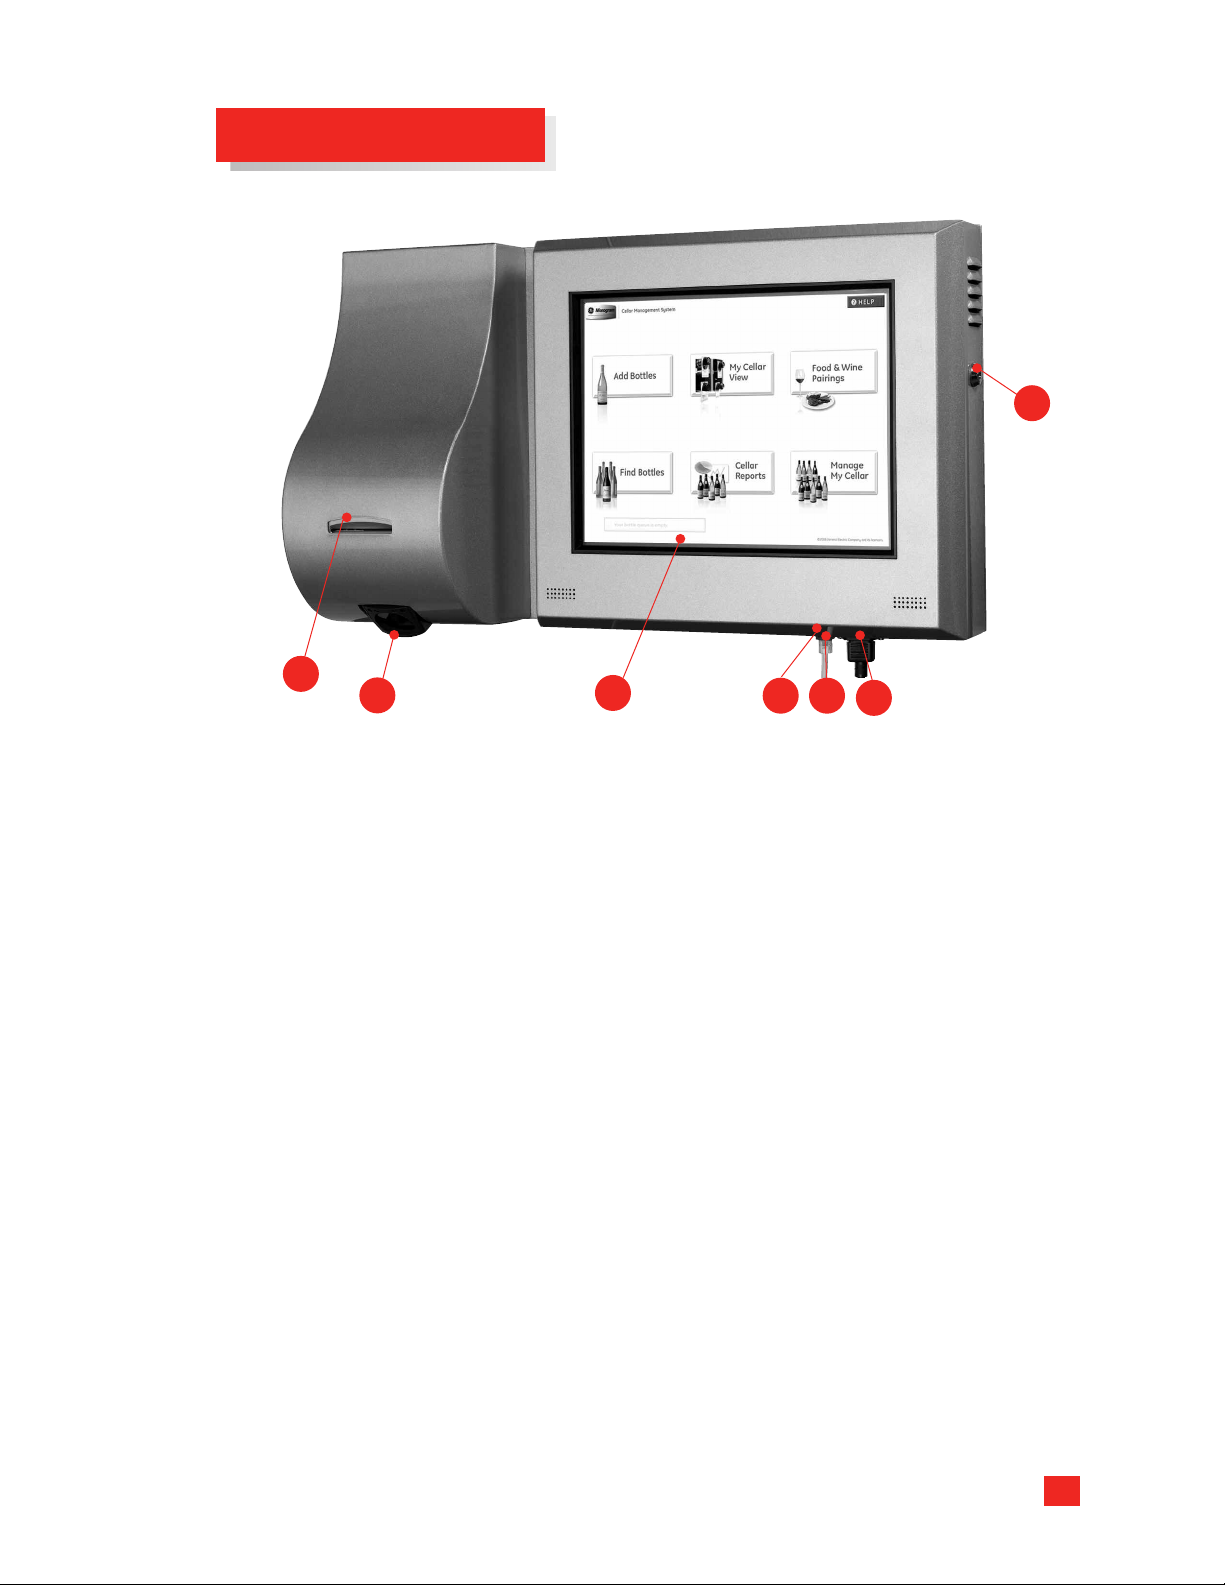
Key Parts and Controls
7
2
3
1 Color Touch Screen Console – Shows Cellar Management System data on
an easy-to-read color screen. Touch screen function simplifies interaction
with the system.
2 Thermal Label Printer – Thermal printer prints barcoded inventory labels with
tant information for each bottle to allow easy tracking.
impor
3 Scanner – Scan bottles as they are remov
4 Power Cord – Connects to the wine vault power system.
5 Ethernet Network Port – Connects to your home computer netw
6 External USB Port – Used for backup purposes.
7 Cellar Management System Certified Service Technician Lock – Do not attempt to
open this lock or ser
(877.234.9463) for service.
vice this computer
1
ed to take them out of inventory.
; it will void the warranty. Call 1.877.234.WINE
6 5
Appearance may vary.
4
ork.
9
Page 10
THE CELLAR MANAGEMENT SYSTEM
Note: The touch screen features a screen saver mode to conserve power and
maximize system life. The touch screen screen saver activates after six minutes
of no activity. When the screen saver is on, the scanner will be deactivated.
To activate the touch screen and scanner, touch the touch screen; they will
activate within 5 seconds.
Be sure to familiarize yourself with key areas of your Cellar
Management System.
Taking time to review the key functions and components of the Cellar Management
System before you begin will help you make use of many time-saving functions.
Add Bottles
■ The Bottle Lookup in the Add Bottles area is the easiest way to add a bottle. Enter any
■
information from the wine label to see all possible matches from a list of 20,000 wines.
Your selection is entered into the Add Bottles fields for you.
■ The Recent Bottles list displays the last 30 bottles entered into your system. Select a
■
bottle from the list to copy the information to the
Add Bottles fields.
■ Enter the countr
■
the
Add Bottles screen.
y and appellation first and your system will narrow your choices on
Find Bottles
■ The Bottle Lookup tool in Find Bottles is the quickest way to locate a bottle. Enter any
■
information from the wine label to see all of the possible matches in your inventory.
* Also, sear
ch by keyword or wine details to find bottles in your cellar with ease.
Remove Bottles
■ Remove bottles from your cellar in seconds by using the bottle scanner.
■
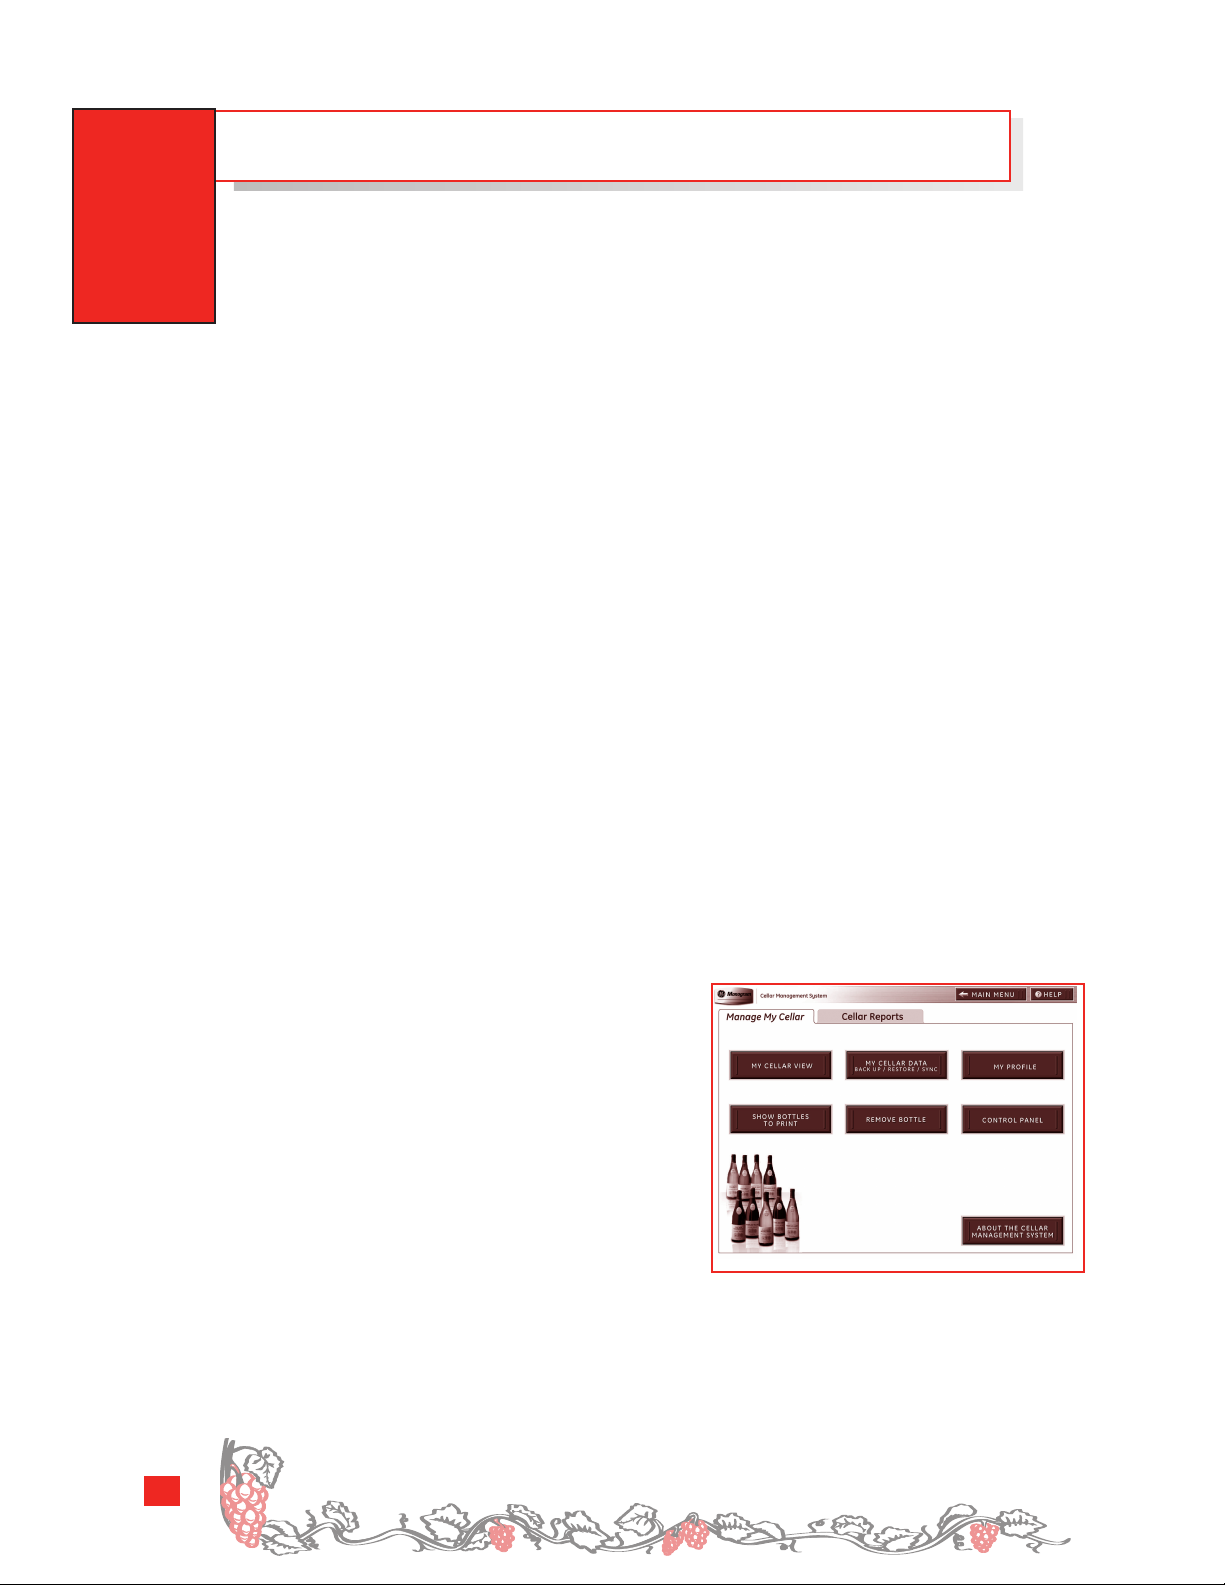
Manage My Cellar
My Cellar View
■ View color
■
bottles by color and maturity.
Back Up Y
■ Back up your wine data each week in the
■
Manage My Cellar area of your software. By
backing up this information, you ensure that
you alw
of your wine data.
eminder
R
access at your cellar and r
also save a copy of your wine data weekly to the GE central server.
-coded cellar diagrams indicating
our W
ine Data
ays hav
e an additional, curr
:
If you hav
e high-speed Internet
egister your wine v
ent copy
ault at www
.monogram.com.wine, GE will
10
In vino veritas [In wine is truth]. — Proverb
Page 11
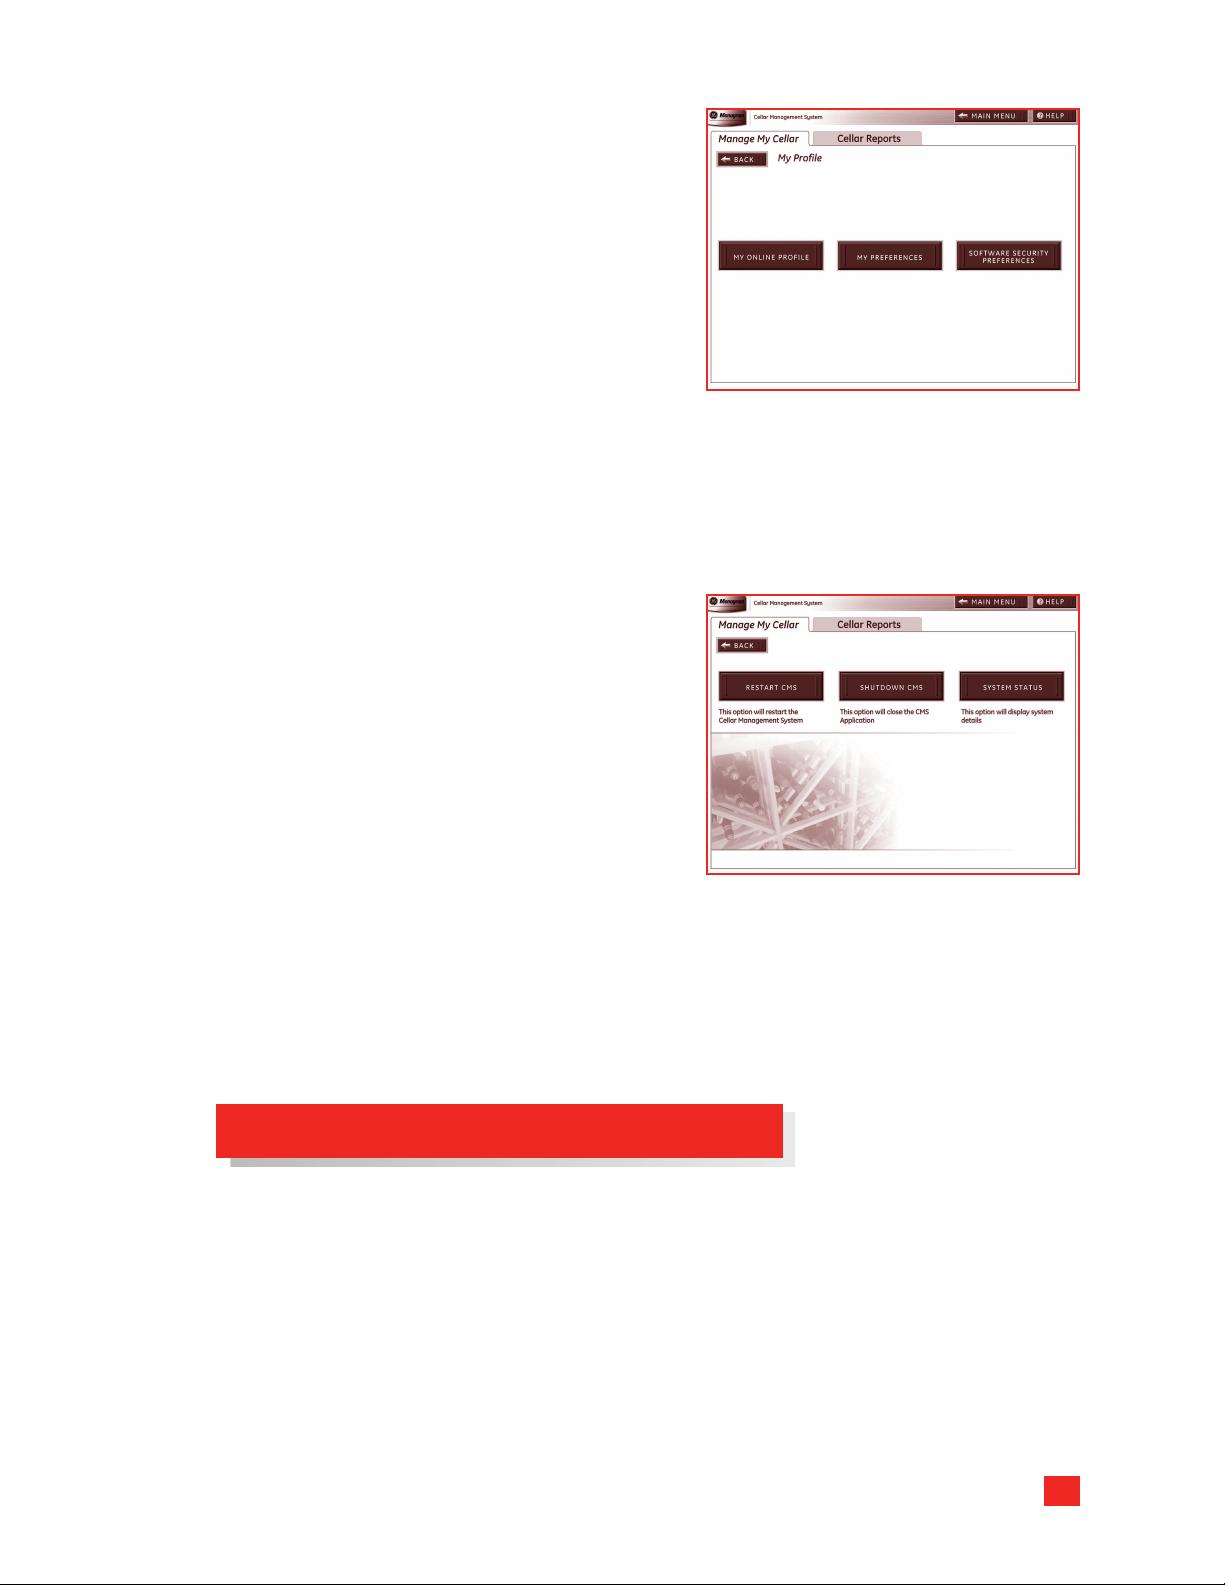
My Profile
■ View your profile information, including
■
confirmation of online access.
My Preferences
■ Change the style of your printed bottle label or
■
software preferences by going to the
My Cellar
Software Security Preference
■ The Software Security button located under
■
My Profile in the Manage My Cellar section
allows you to password-protect your software according to your preferences.
area of your software.
Manage
Control Panel
■ The Control Panel button located on the Manage My Cellar screen leads to the Restart,
■
Shutdown and System Status options.
Turning Off Your Machine
To Shut Down Your Machine
If you need to unplug or turn off your Cellar
Management System, use the
option to safely shut down the software.
Shutdown CMS
1. Select the Shutdown CMS button located in the
Control Panel area of Manage My Cellar. Your
software will automatically shut down. Next,
unplug your Cellar Management System.
To turn the CMS on again, plug it in.
Restart Instructions
If the touch screen does not r
seconds, the system may need to be restarted.
To Restart:
1. Select the Restart CMS button located in the Contr
The
Restart CMS function resets your software in the event of an error or data
oblems (bottles not displaying in the cellar view). Y
pr
shut down and restart upon your selecting this option.
espond after 45–60
ol Panelarea of
e will automatically
our softw
ar
Manage My Cellar.
Tips for Stocking Your Cellar the First Time
After becoming familiar with your cellar system, you’ll want to focus on stocking your
e some tips t
cellar as efficiently as possible. Her
bottle information into your system and place bottles into your cellar.
e ar
o help you sav
e time as you input
Plan Ahead Before Stocking or Inventorying Your Cellar
ganize like bottles before adding them to your cellar. Enter the bottle information
■ Or
■
once, and indicate the number of bottles on the
■ Arrange your work area to make bottles, bottle tags and empty boxes easily
■
accessible. Eliminate multiple trips to the cellar by placing tagged bottles in a bo
for transfer.
Add Bottles screen.
x
11
Page 12
THE COOLING SYSTEM
The cooling unit system is designed to maintain the set temperature under average
ambient conditions. Most wines will be stored in conditions of 50% to 70% humidity.
The unit will not remove excess humidity from the wine vault. In a humid climate, you
may need to find a means to remove humidity, such as a dehumidifier. In a dry climate,
you may need to find a means to add humidity, such as a fountain. The cooling system
gently cools the wine rather than quick chilling. Allow 48–120 hours for temperatures to
stabilize. This time may vary depending on starting temperature and quantity of wine
bottles added initially.
Temperature Setting
The unit can be set at any temperature within the acceptable wine-aging range of
50°F to 70°F ambient temperature. It is designed to cool 30°F cooler than the ambient
temperature of the exterior room, which should stay within the range of 45°F to 85°F.
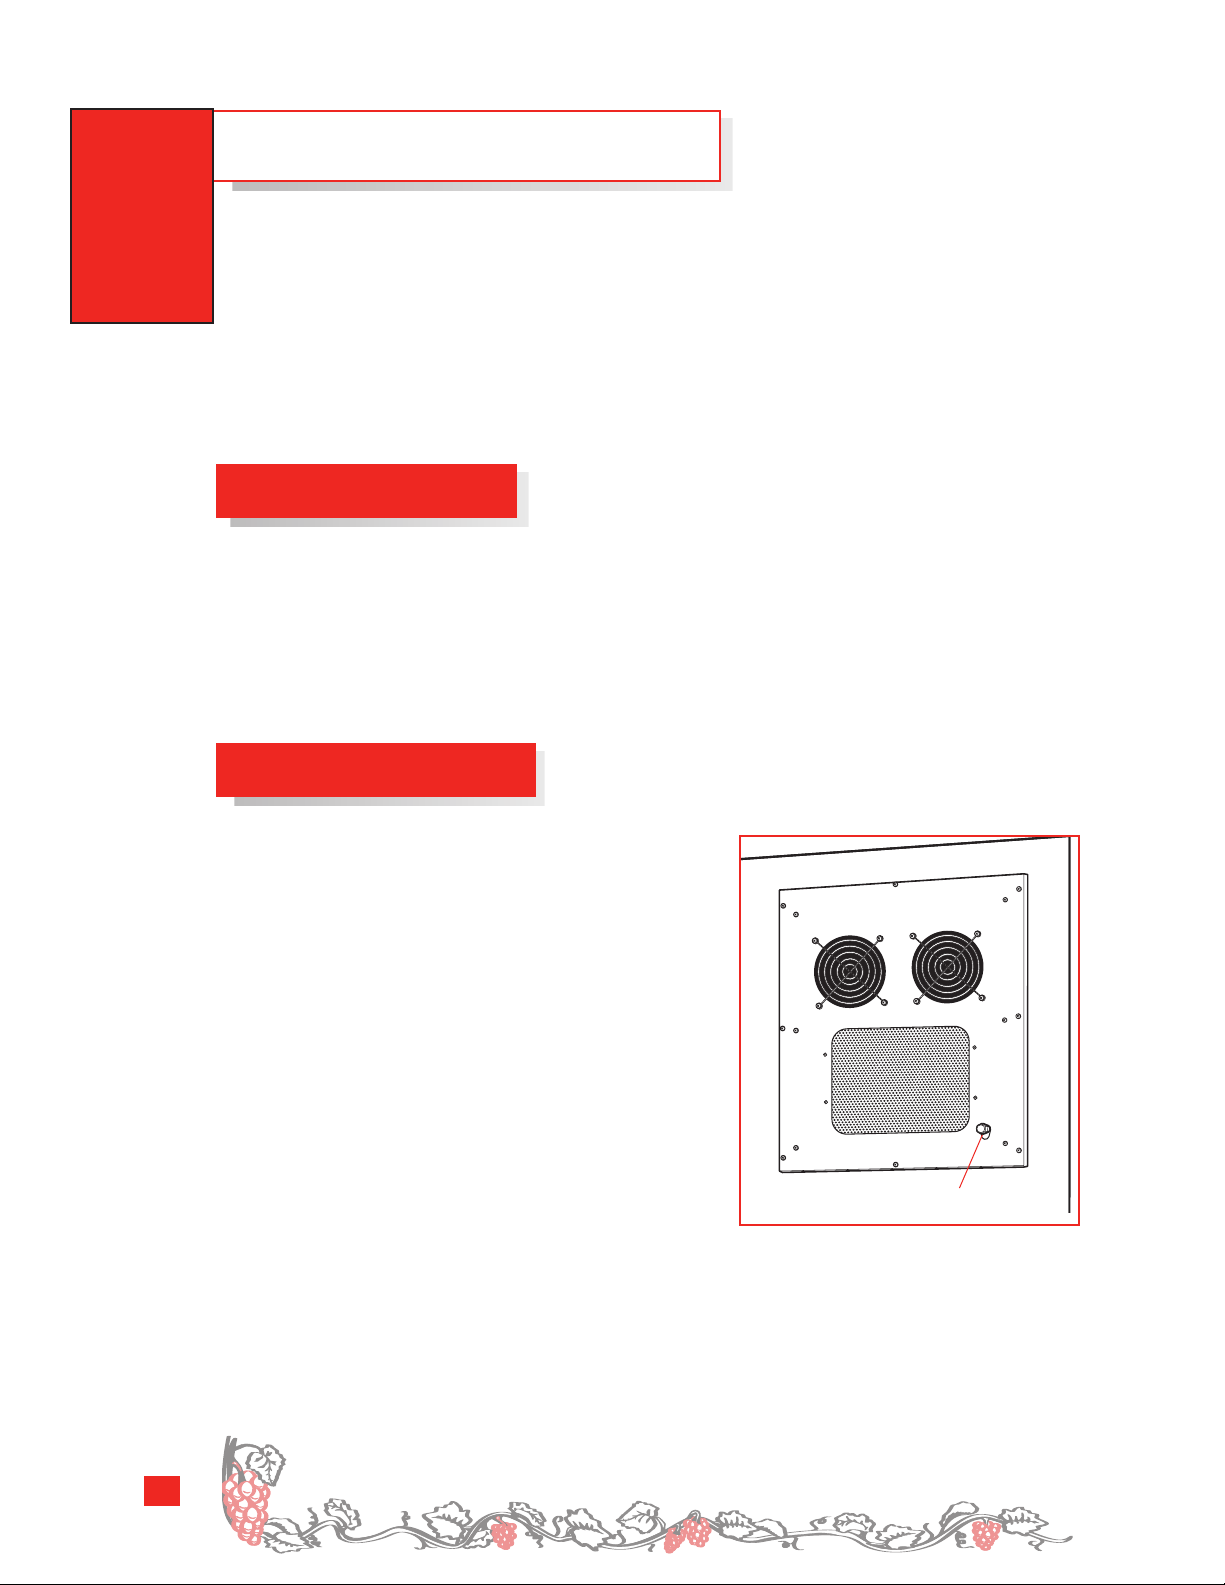
Drain Line Connection
All units are equipped with a drain port for
additional removal of excess condensation in
high humidity areas. A drain line may need to
be attached to allow the condensation to drain.
A means to catch the condensation will need to
be placed below the drain line.
ed by calling the
A drain line may be or
Monogram Wine Vault Line, 877.234.WINE
(877.234.9463). Or
der
der part # WR02X12181.
Drain line port
12
The 17th-century Benedictine monk, Dom Perignon, is credited with discovering cork as a
means t
o seal wine and champagne bottle.
Page 13
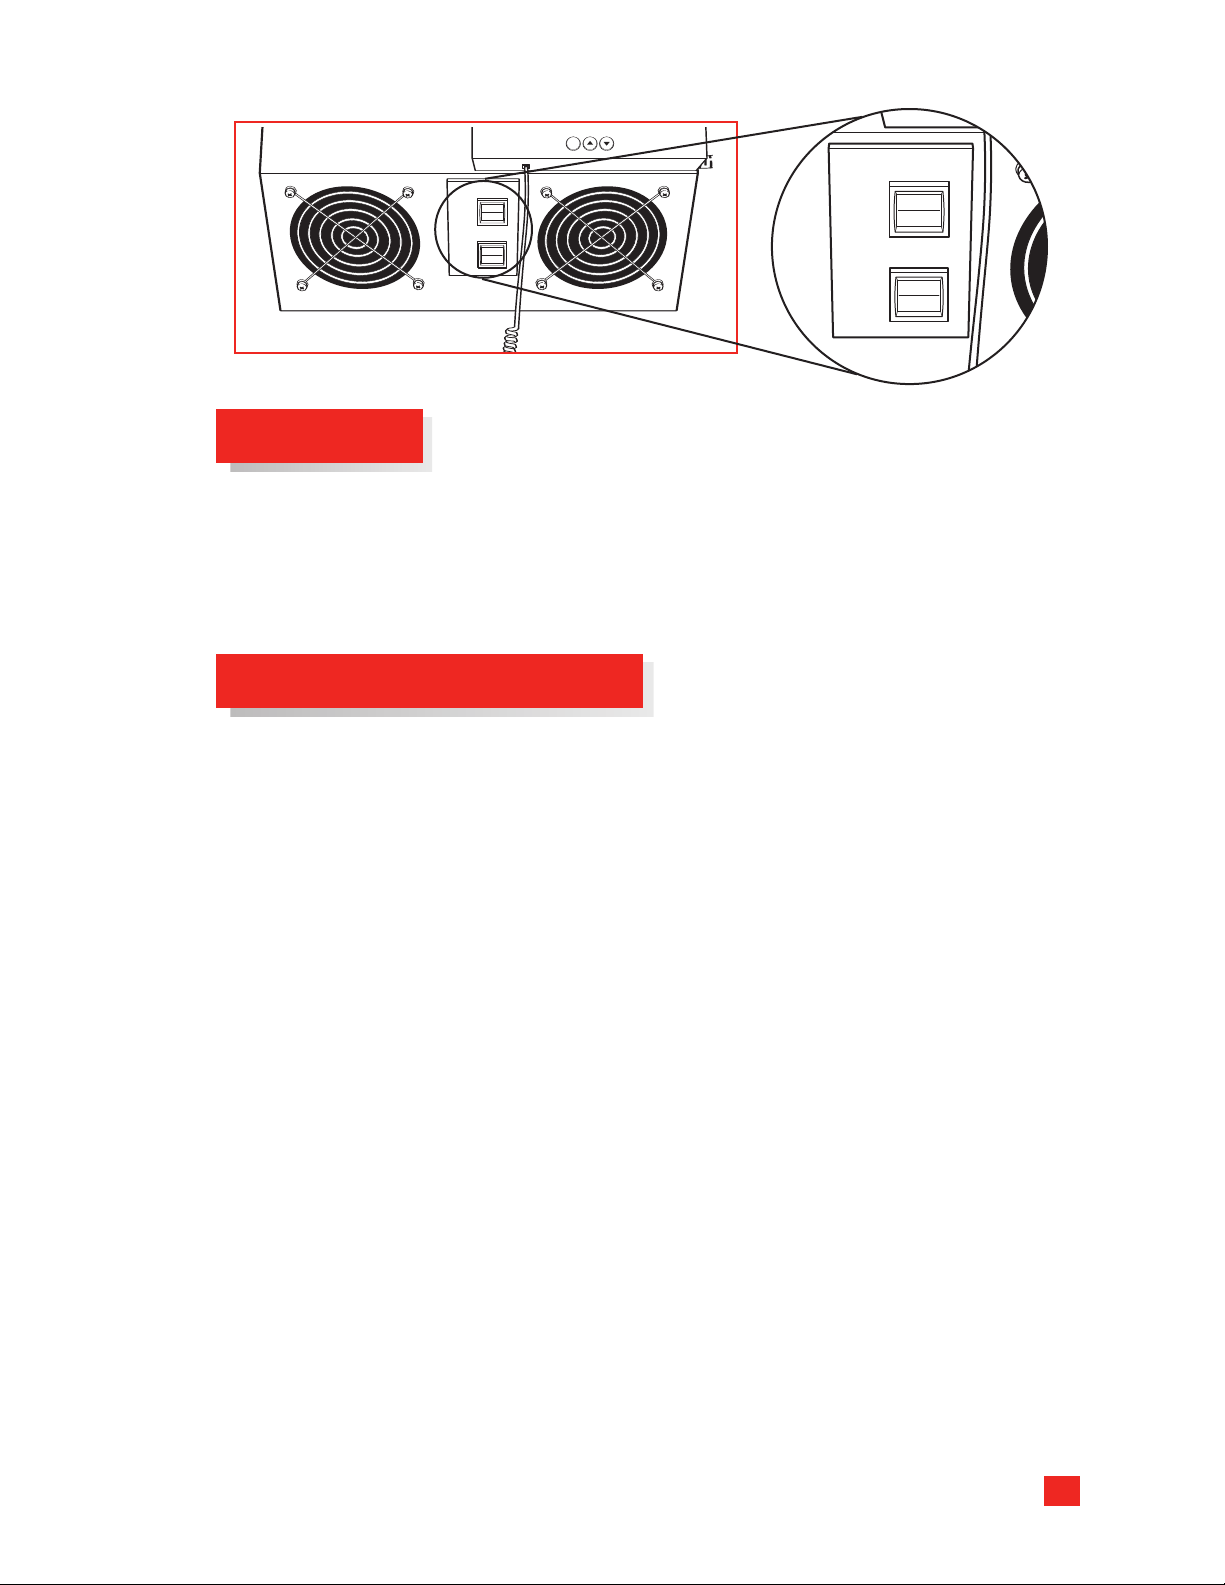
CONDENSATE
EVAPORATOR
ON
AUTO
POWER
ON
OFF
Power Switch
The Power Switch is the ON/OFF switch for the cooling system. When first turning the
unit on, there is a safety delay of 5 minutes. On the temperature display, a red LED light
will light up beside WINE to indicate that start-up has been initiated and that that the
thermostat is reading the liquid temperature. After 5 minutes, the red LED light beside
ON will light up.
Condensate Evaporator Switch
The ON position of the Condensate Ev
whenever water is pr
Evaporator S
witch activates the heating element at regular inter
esent in the evaporator pan. The AUTO position of the Condensate
aporator Switch activates the heating element
vals to remove excess
water from the evaporator pan, as needed.
In most environments, the Condensate Ev
position. If your wine v
ault is located in a dr
aporator Switch should be kept in the ON
y climate, excess w
ater may not accumulate
in the evaporator pan. In this case, turn the Condensate Evaporator Switch to the AUTO
setting to sav
e electricity.
13
Page 14
THE COOLING SYSTEM
Operating the Cooling System
The unit is set to 55°F at the factory. The temperature of wine caves in Europe is typically
55°F, the temperature wine collectors strive to match.
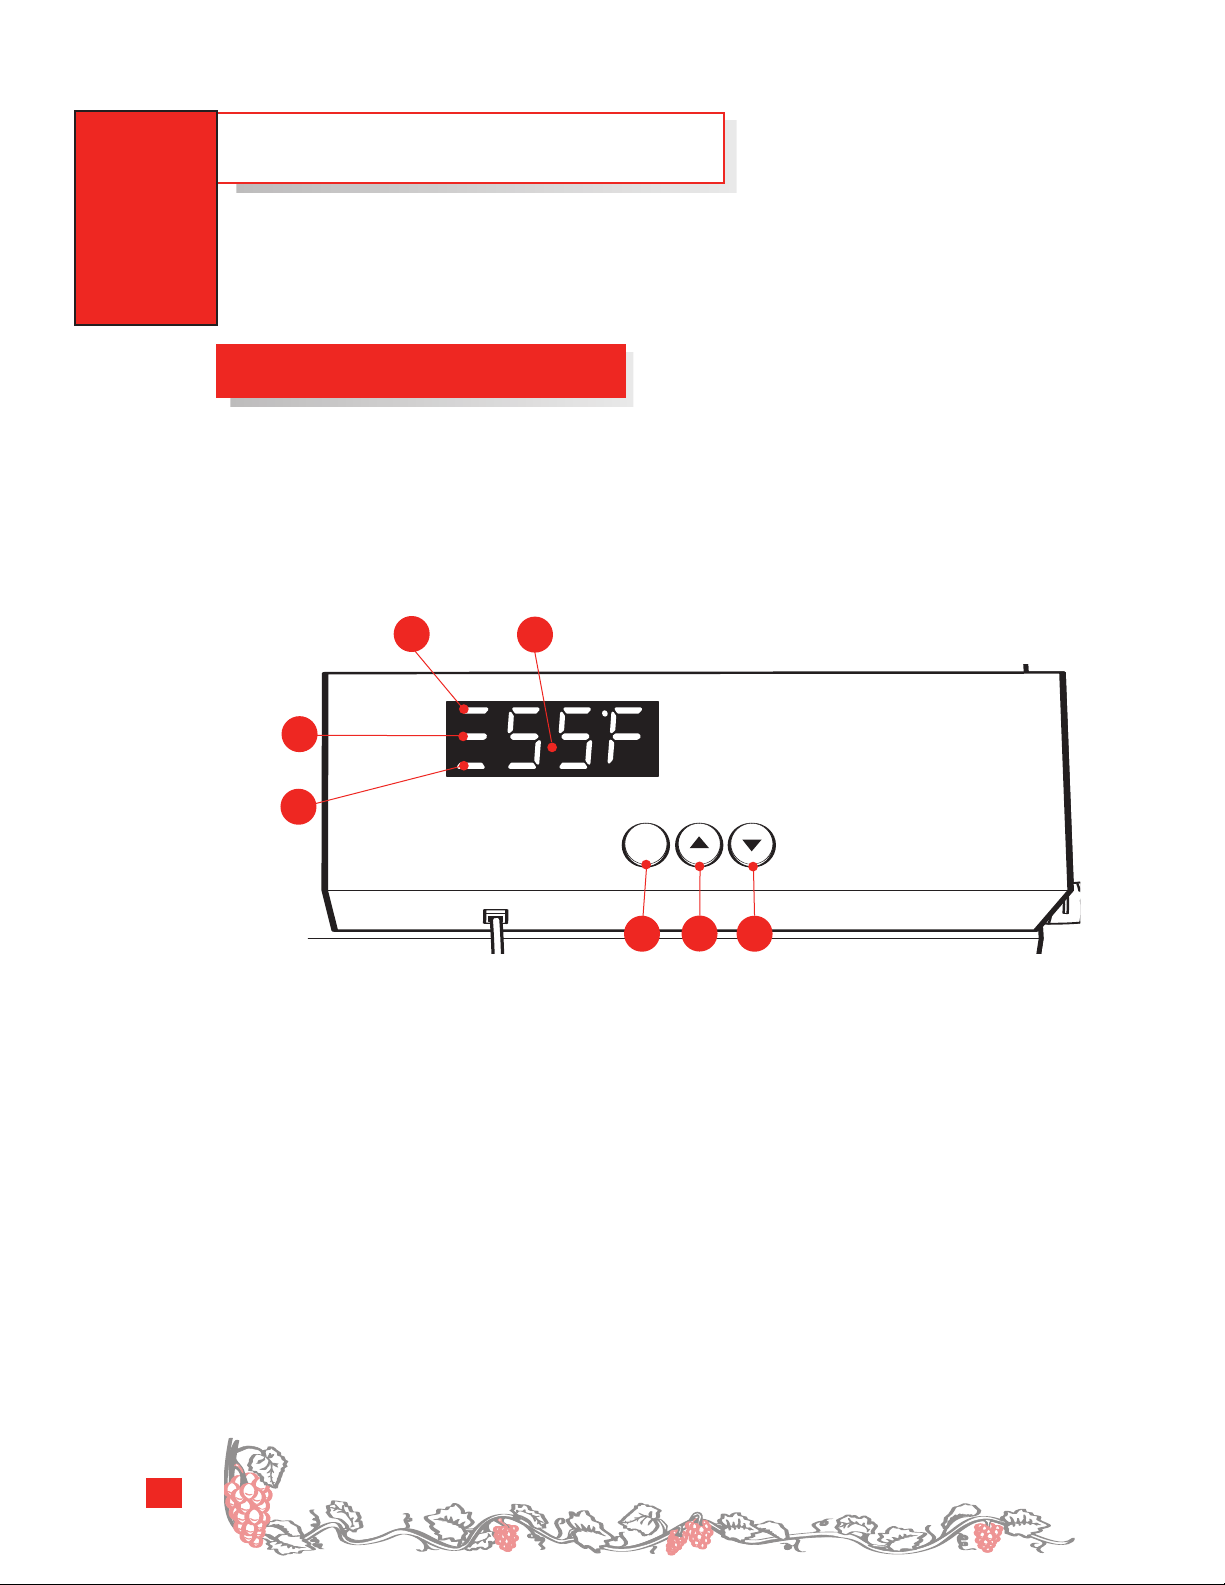
Pressing the SET button will display the set temperature. To increase or decrease the set
temperature, press and hold the SET button while pressing the UP arrow or DOWN arrow
until the desired temperature is displayed.
1
WINE
4
ON
SET
3
1 Wine Temperature Indicator – The red LED lamp beside WINE will light up when the
thermostat is reading the liquid temperature.
2 Wine Temperature Reading – The temperature of the water in the bottle as
detected by the pr
3 Temperature SET Indicator – A red LED lamp beside SET will light up while you are
adjusting the temperature.
4 Unit ON Indicator – A red LED lamp beside ON will light up every time the unit turns
on to run a cooling cycle.
2
obe.
TEMPERATURE
SET
6
5
7
14
on –
T Butt
SE
5
temperature .
6 UP Arrow Button – Press the UP arrow button while pressing and holding the SET
button to INCRE
DOWN Arr
7
the SET button to DECREASE the set temperature.
Only wines made in the Champagne region of France are true Champagnes. Bubbly wines
made elsewhere are sparkling wines.
Use in conjunction with the UP and DOWN arr
ASE the set temperatur
ow Butt
on –
ess the DOWN arr
Pr
e.
ow button while pr
to set the desir
ows
essing and holding
ed
Page 15

Additional Cooling System Features
To ensure efficient operation and a long service life, the cooling system also includes:
■ A built-in Defrost Cycle, which shuts the unit off periodically in order to prevent
■
frost buildup.
■ Heavy-duty circuitry to resist power surges.
■
15
Page 16
THE COOLING SYSTEM
Liquid Temperature Display
The cooling unit temperature display
indicates the
the wine vault, rather than the
temperature
liquid temperature in
air
in the wine vault. This
WINE
ON
SET
TEMPERATURE
SET
ensures optimal wine temperature
preservation and allows for temperature
adjustment betw
een 45°F and 85°F.
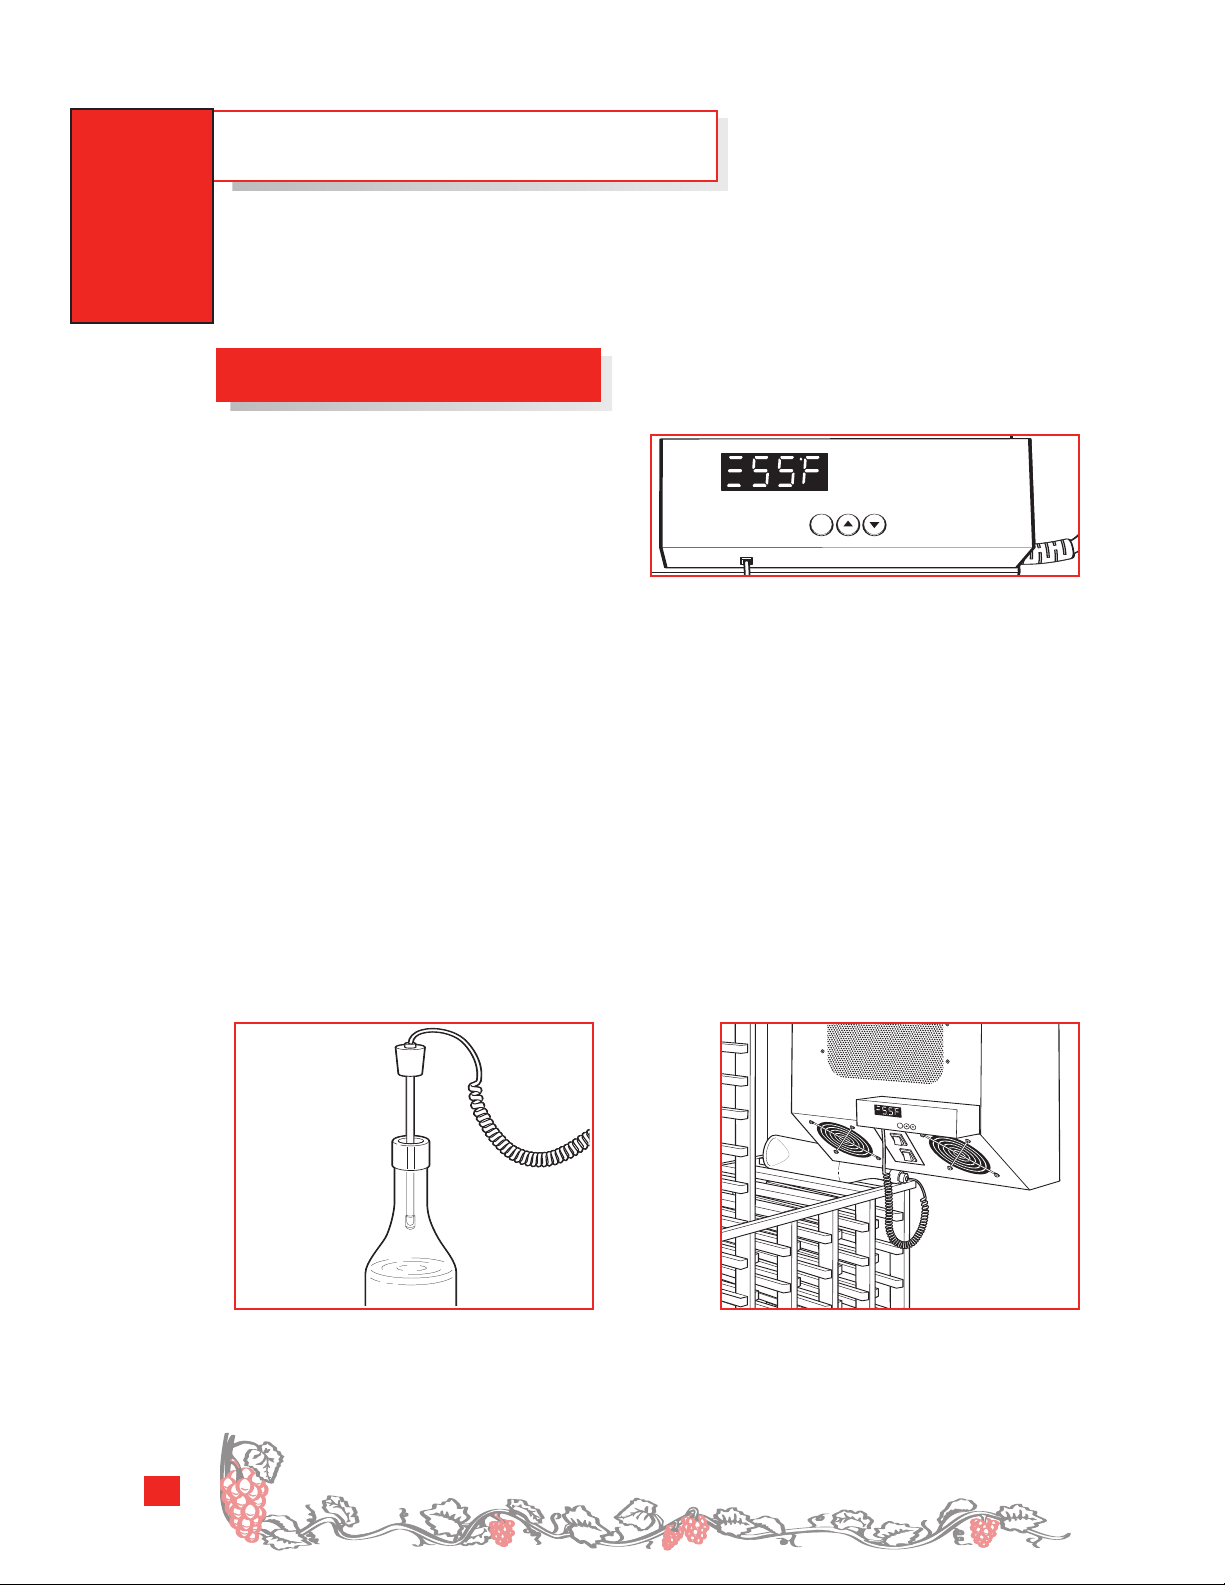
The liquid thermostat is equipped with a Self-Calibrating Probe, which contains a sensor
that communicates with the thermostat to ensure a consistent temperature.
To use the liquid thermostat:
Step 1:
Fill a clean, empty 750 ml wine bottle 3/4 full with room-temperature tap water.
Step 2: Place the bottle probe securely into the bottle.
Step 3: Place the bottle with probe in a central location out of the direct path of the air
coming from the cooling unit
(see recommended location) in your wine vault. Avoid
stretching the probe cord. It may become disconnected, resulting in the unit not
working properly.
16
Installing the probe in a bottle
Before the use of corks, jars were closed with a wad of leaves and mud.
ecommended location for pr
R
obe
Page 17
Vault Room Temperature Display
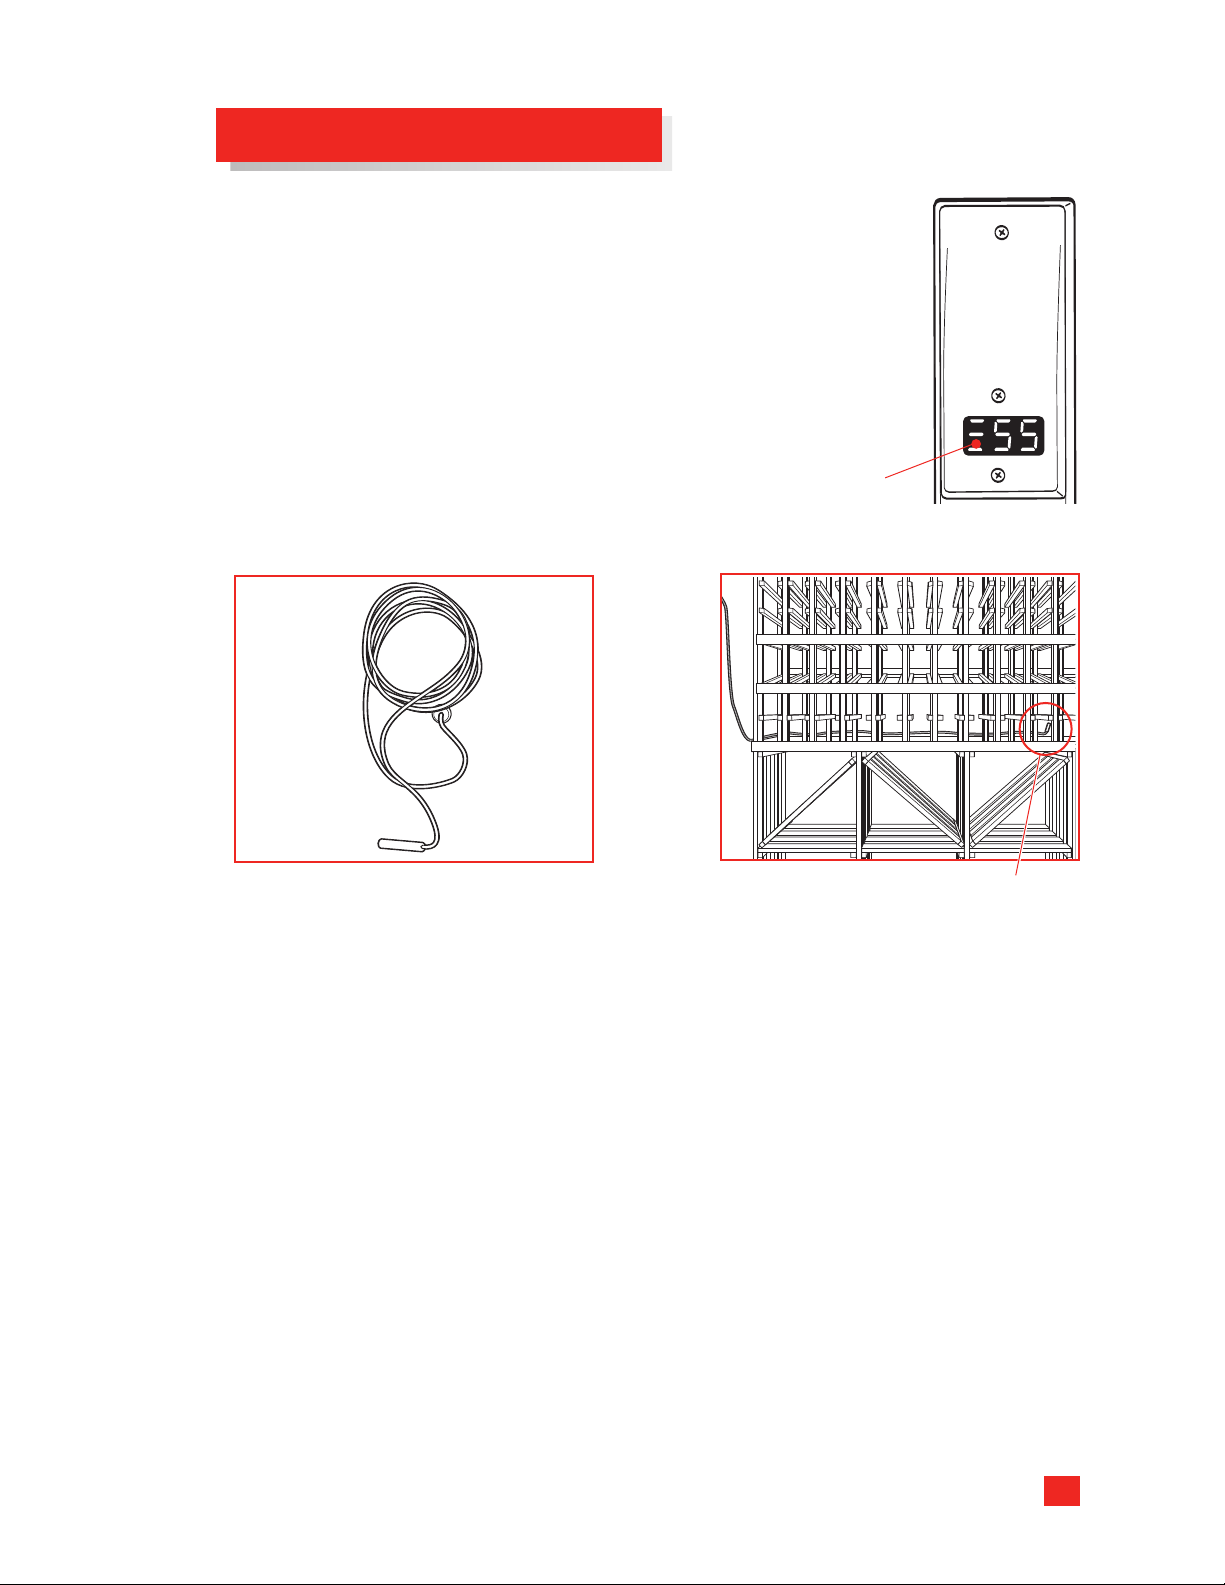
The wine vault features a digital temperature display on the exterior of
the vault, next to the door. This digital display shows the wine vault
temperature
monitored by the dry probe in the wine vault.
Weave the dry probe along the back of the racks so that the probe
end is located about twelve slots from the front wall. This placement
will provide a central temperature reading of the wine vault’s interior
air temperature.
surrounding the bottles. The ambient air temperature is
Vault room air
temperature display
air
Uncoil the dry probe...
...and weave it behind the racks to about 12
slots from the front wall.
Variance Between the Vault Room Temperature and the Liquid
Temperature Display
The temperatur
may differ from one another up to 10°F. The air temperature will vary due to the length
and frequency of door openings. Always refer to the liquid probe temperature readout
on the cooling unit for an accurate wine temperatur
NOTE: The air temperature will be cooler than the liquid temperature until
the optimum temperature balance is achieved.
es shown in the digital temperature display and liquid probe thermostat
eading.
e r
17
Page 18
LOCKABLE ENTRY DOOR
Your GE Monogram Wine Vault features a lockable, auto-closing door that is designed
to protect your wine collection from unauthorized access.
WARNING! Be careful closing and opening the door when children are in the area.
Keep fingers out of “pinch point” areas around the door.
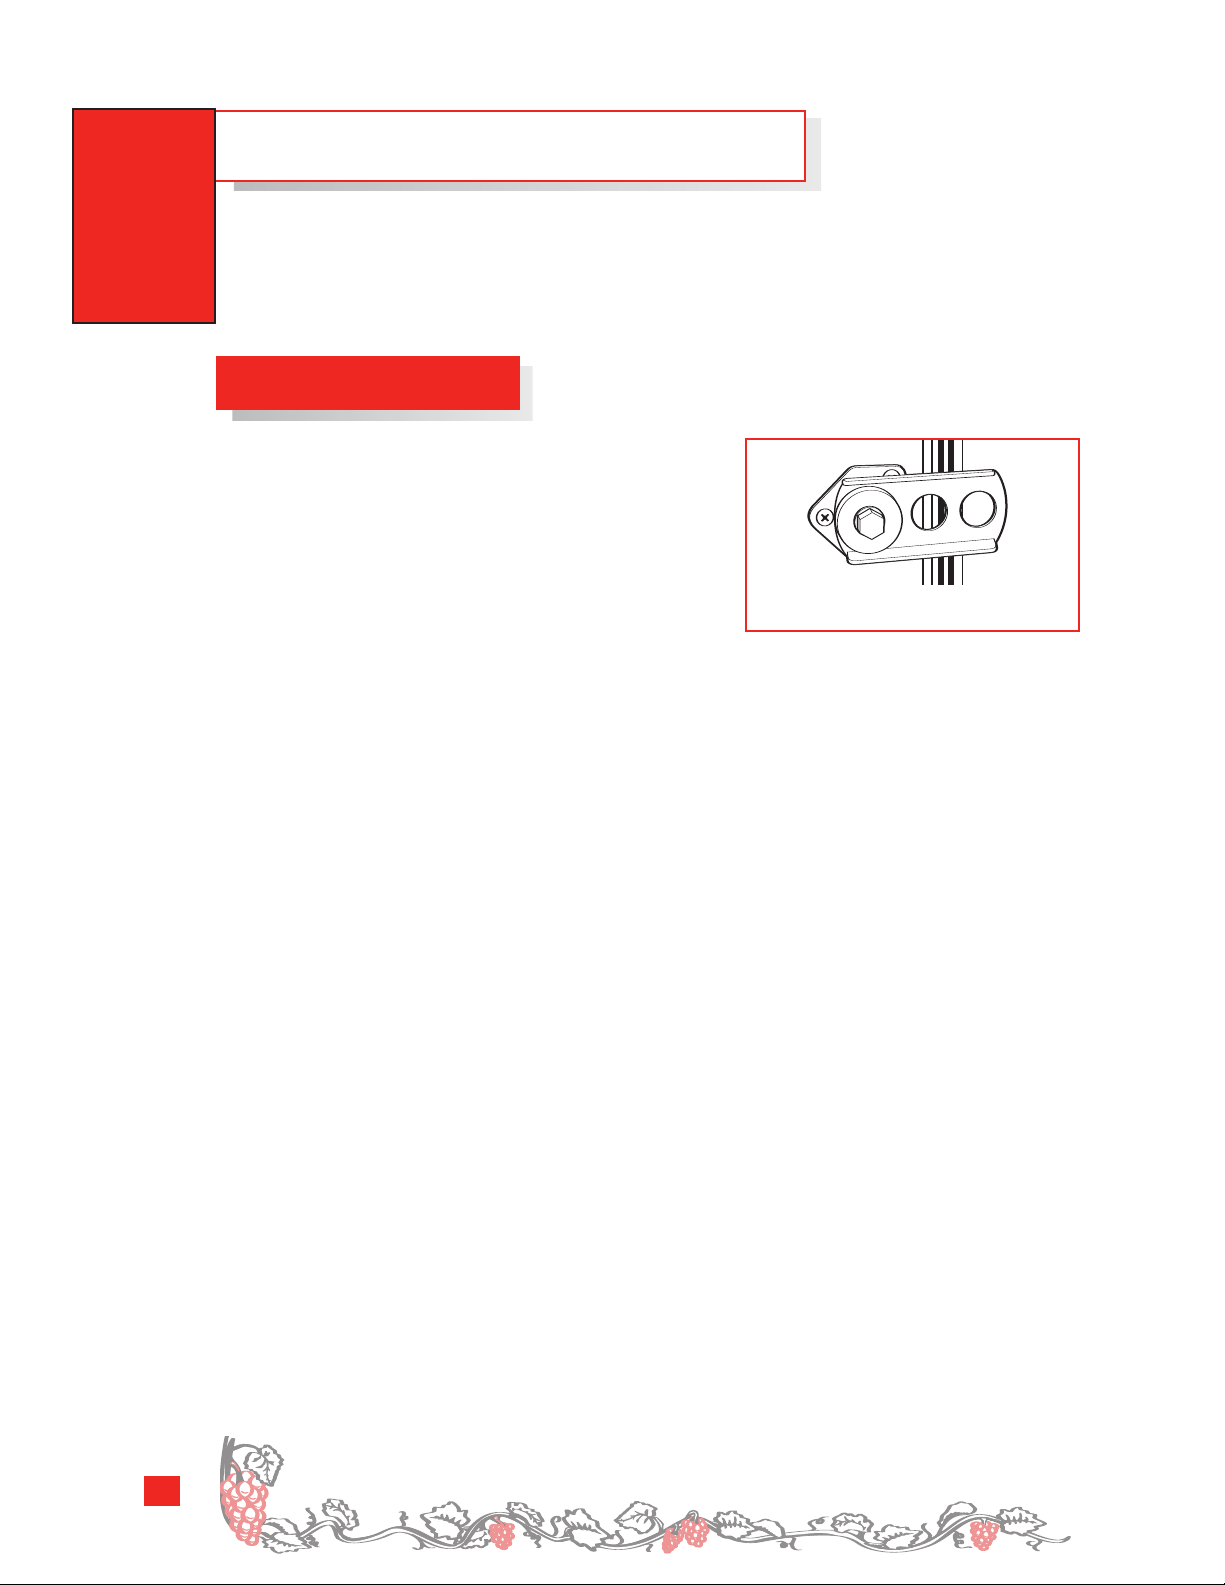
Interior Door Release
An inside safety door release will prevent anyone
from being locked inside the wine vault. Two keys
are included with your wine vault.
Additional keys (part # WR05X10020) may be
ordered by calling the Monogram Wine Vault Line,
877.234.
your local dealer. Always store keys in a safe place,
out of the reach of children.
WINE (877.234.9463) OR by contacting
Rotate up to unlock
18
More than 10,000 varieties of wine grapes exist today.
Page 19
REDWOOD WINE RACKS
The premium Heart of Redwood racks by Apex are sturdy and naturally
moisture-resistant, with the natural beauty of the finest select redwood.
These racks are designed to provide optimal air circulation while providing
an attractive and functional environment for accommodating various sized bottles.
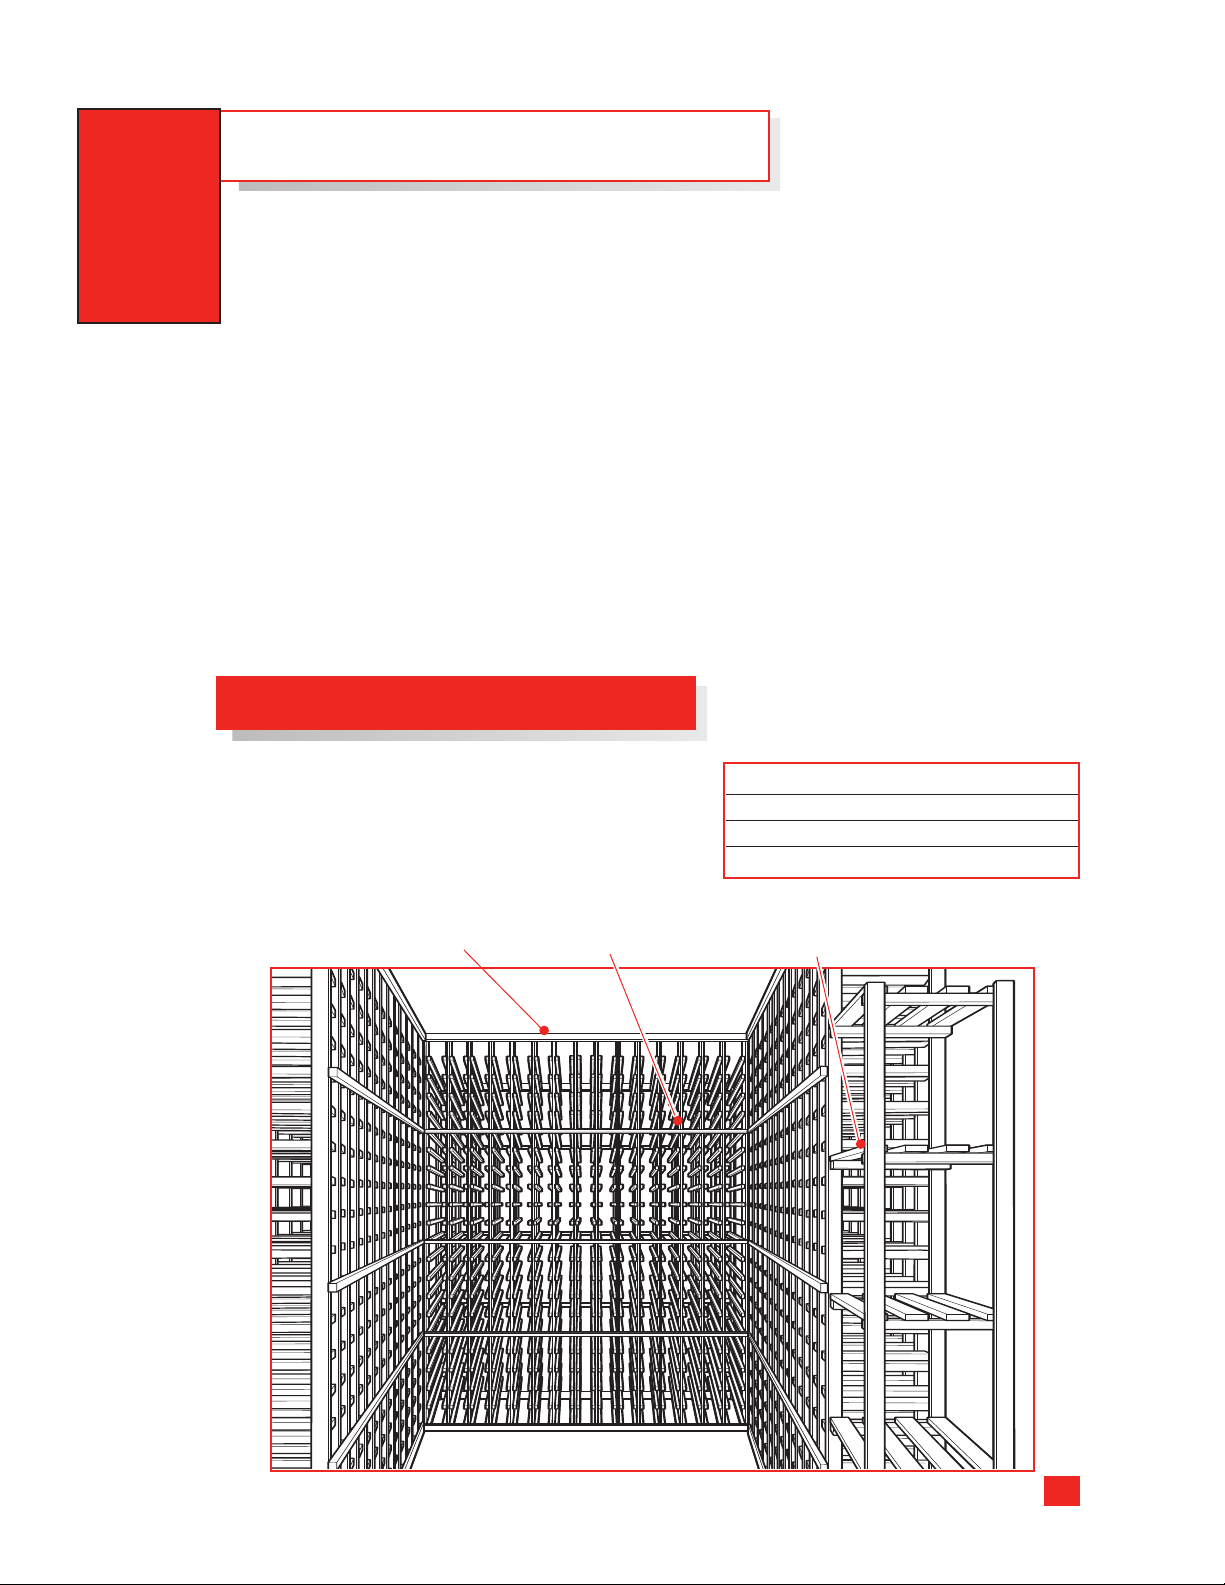
There are two types of racking systems:
Storage (model ZWVS1000SR) and
Tasting (model ZWVT1000SR).
Both racking systems are labeled to help identify the location of your wine bottle.
Note: The bin location labels are organized with letters indicating the row and numbers
on every fifth column.
Do not apply a stain or wood preservative to the redwood racks. The racks must be left
unfinished and unpolished to enable them to breath and flex. In addition, stain may cause
an odor within the wine vault.
The natural redwood will darken in color as it ages. A new unit will have lighter colored
racks; however, within a few months, the redwood racks will begin to darken to their
peak dark patina.
Storage Racks (model ZWVS1000SR)
Storage Racks are designed to store
individual bottles and cases of wine
and feature different sections to
accommodate a variety of bottle sizes.
Storage for
magnum bottles
Redwood storage racks
Storage Area Type Qty.
Magnum Bottle (1.5 L) 46
Single Bottle (750mL) 966
Bulk or Case Bins (15 750 mL Bottles) 60
Case
storage
19
Page 20
REDWOOD WINE RACKS
Tasting Racks (model ZWVT1000SR)
The Tasting Rack System offers attractive
racks with several unique display and
storage features.
Storage Area Type Qty.
Magnum Bottle (1.5 L) 41
Single Bottle (750 mL) 396
Display Bottle (750 mL) 38
Double-Deep Single Bottle (750 mL) 152
Diamond Bins (14 750 mL Bottles) 224
Double-Deep Bins (15 750 mL Bottles)
Diamond Bins
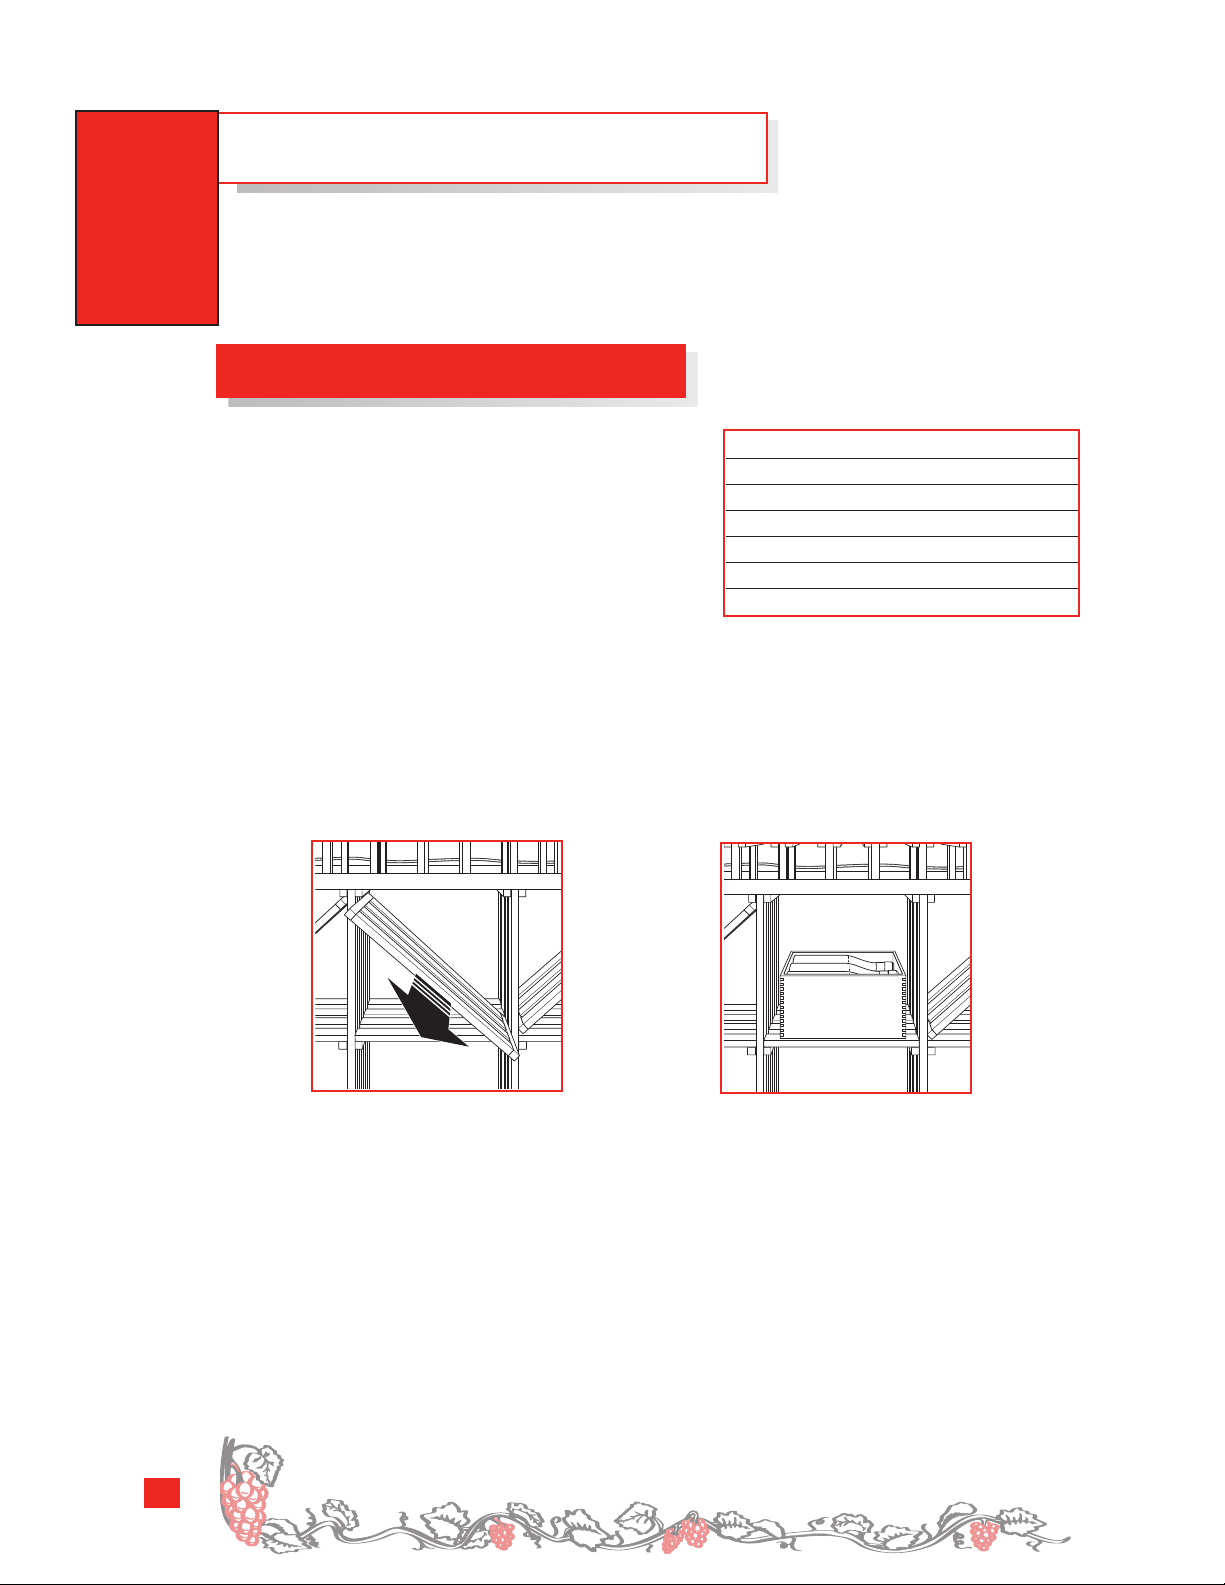
Convenient Diamond Bins are designed to accommodate most bottle sizes and also
e removable slats to allow r
featur
slat out to store cases; slide it back in for storing bottles of virtually any size.
oom for storing cases. Simply slide the angled divider
Remove the
angled divider slat
for storing cases.
180
20
The ancient Greeks called the god of wine Dionysus; the ancient Romans called him Bacchus.
Page 21
Taster’s Alcove
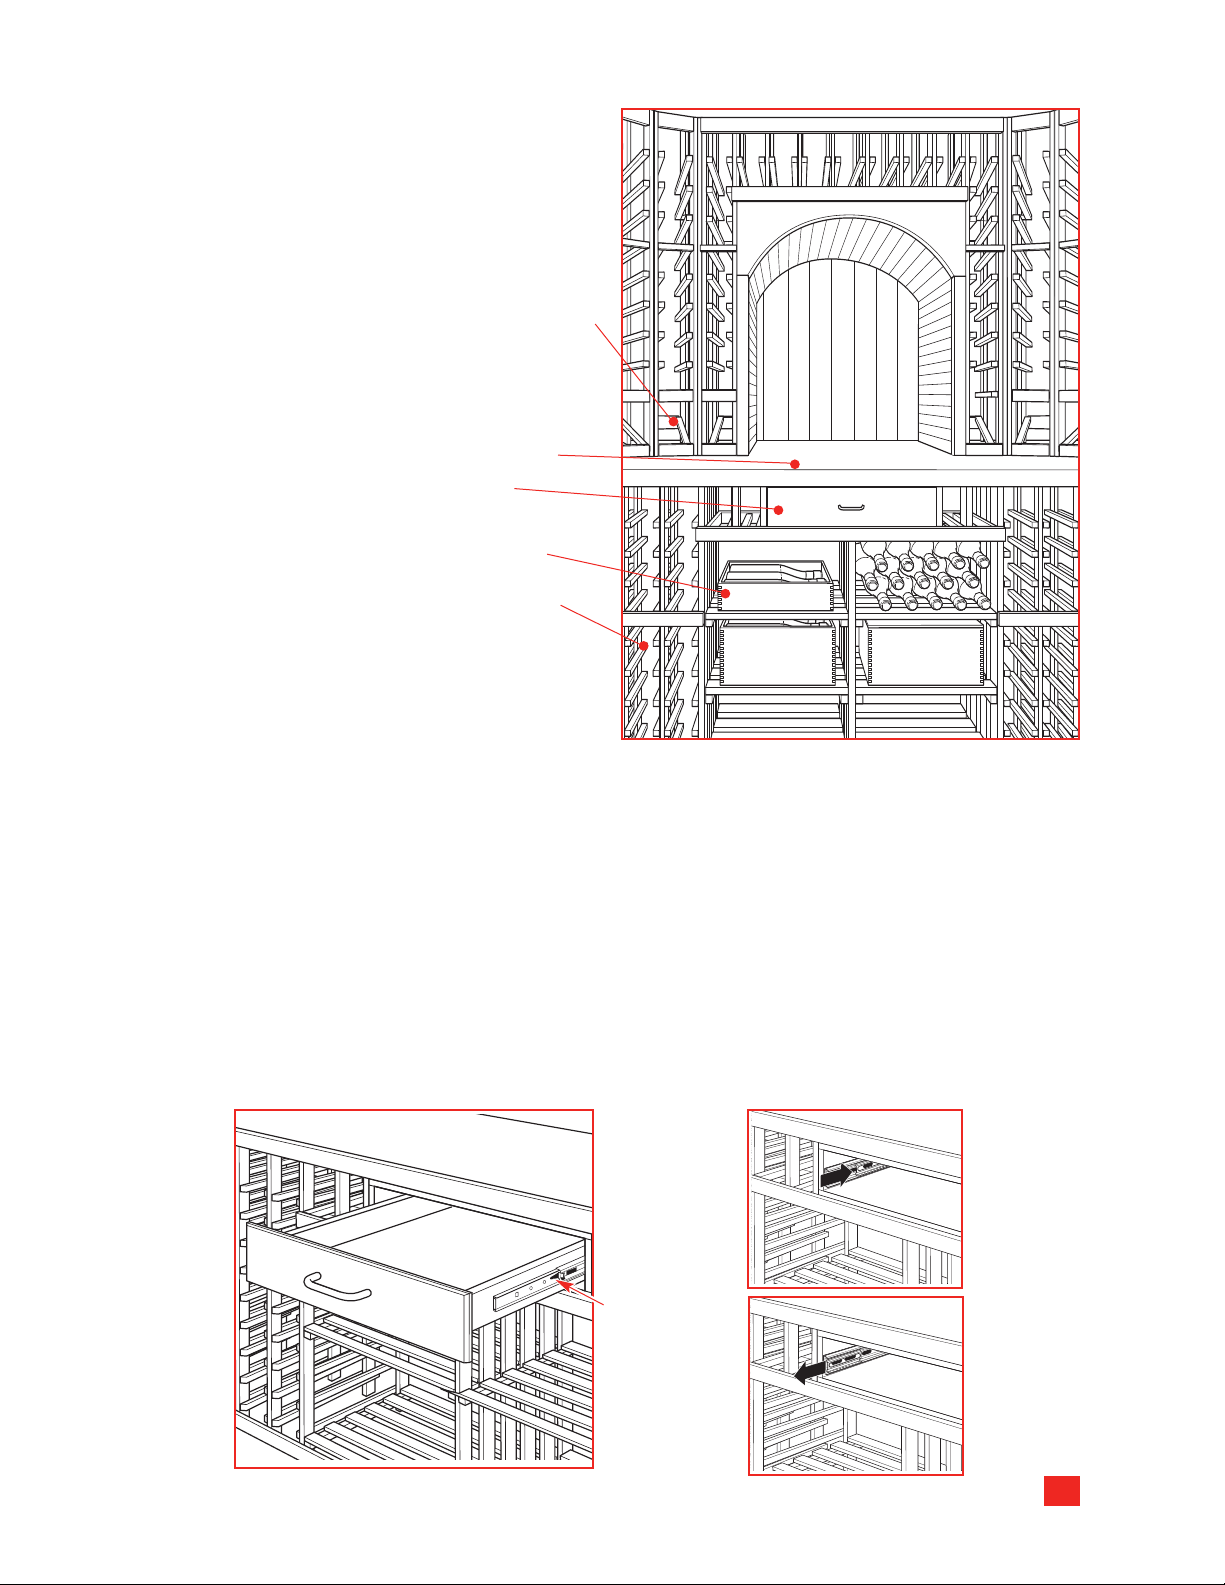
The Taster’s Alcove provides an
impressive setting for sampling or
sharing a glass with fellow wine
aficionados. Unique features include:
• Angled bottle display racks hold the
bottle at a 12° angle to showcase your
favorite bottles of wine while keeping
the cork moist (assuming that the
wine is in good condition and at
a proper fill level). This 12° angle also
helps disperse sediment.
• An elegant inlaid cork countertop.
• A removable storage drawer.
• Six display and storage shelves
designed to hold a case or up
to 15 bottles each.
• Double-deep bottle storage in the
single wine bottle bins under the
counter
top on the entire back wall.
To remov
1.
Pull the draw
e the storage drawer
er out to the STOP position.
:
2. Push the tab on the right drawer guide
down while pulling the tab on the left
guide up, and pull the drawer out.
To replace the st
Push the draw
1.
the unit
.
orage drawer:
er slide arm back into
2. Pull the small slide subassembly
completely forward.
3. Insert the sides of the drawer back into
the guides.
4. Push until the tabs lock into place.
Tab (push tab
down on right
er guide;
draw
pull tab up
on left draw
guide)
er
eplace,
o r
T
push draw
slide arm back
into unit
Pull small slide
sub assembly
completely
for
er
.
d.
ar
w
21
Page 22
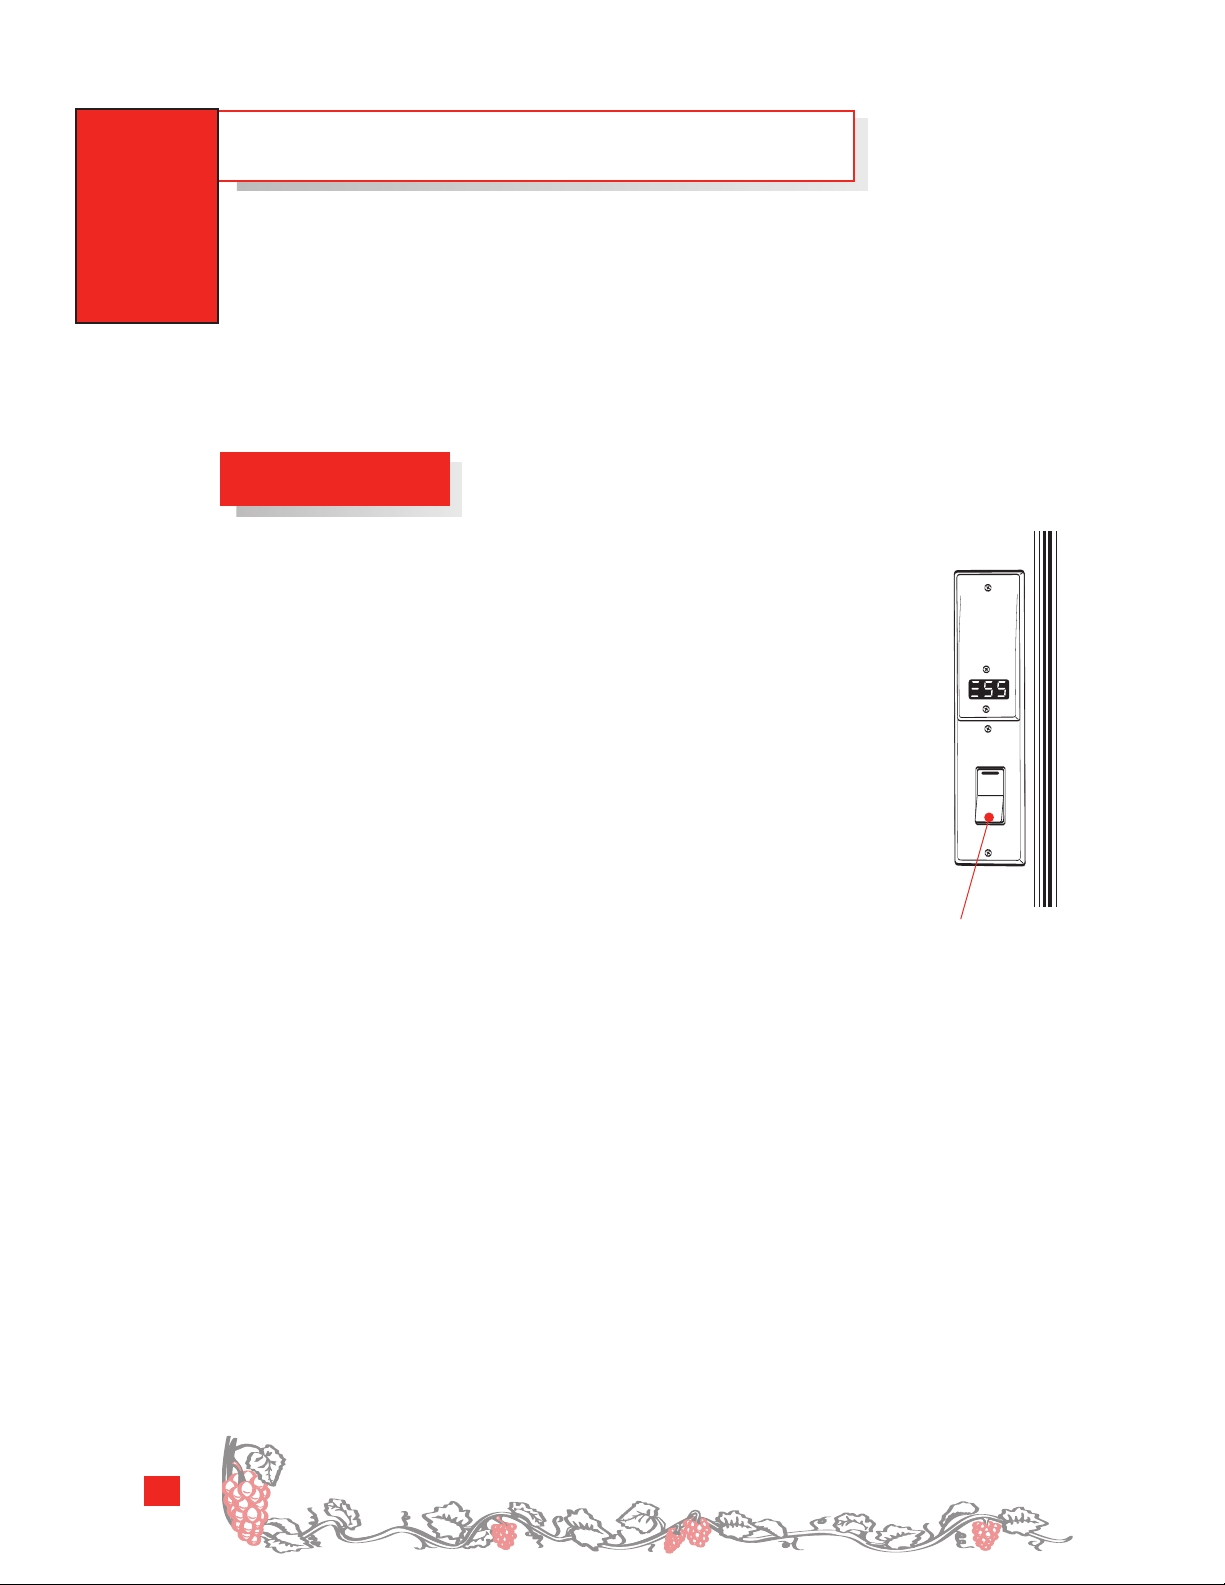
INTERIOR LIGHTING SYSTEM
Your wine vault features two separate interior illumination systems:
A Ceiling Lighting system with low-voltage halogen lamps which provide general lighting in
the interior of the wine vault.
A manually activated Rope Lighting system (on models with Tasting Rack ZWVT1000SR
only) is concealed behind the rack fronts to provide indirect lighting designed to enhance
the beauty of your wine collection.
Ceiling Lighting
The interior ceiling halogen lamps make it easy to view your wine
collection. The exterior rocker switch allows you to illuminate the wine
vault before entering. Remember to turn off the light when exiting the
wine vault. If the lights remain on for an extended period of time, they
may increase the overall wine vault temperature.
22
arietals ar
V
example, Pinot Noir or Riesling
e wines that use the name of the dominant grape fr
On/Off switch
for interior
ceiling lighting
om which it’s made, for
.
Page 23
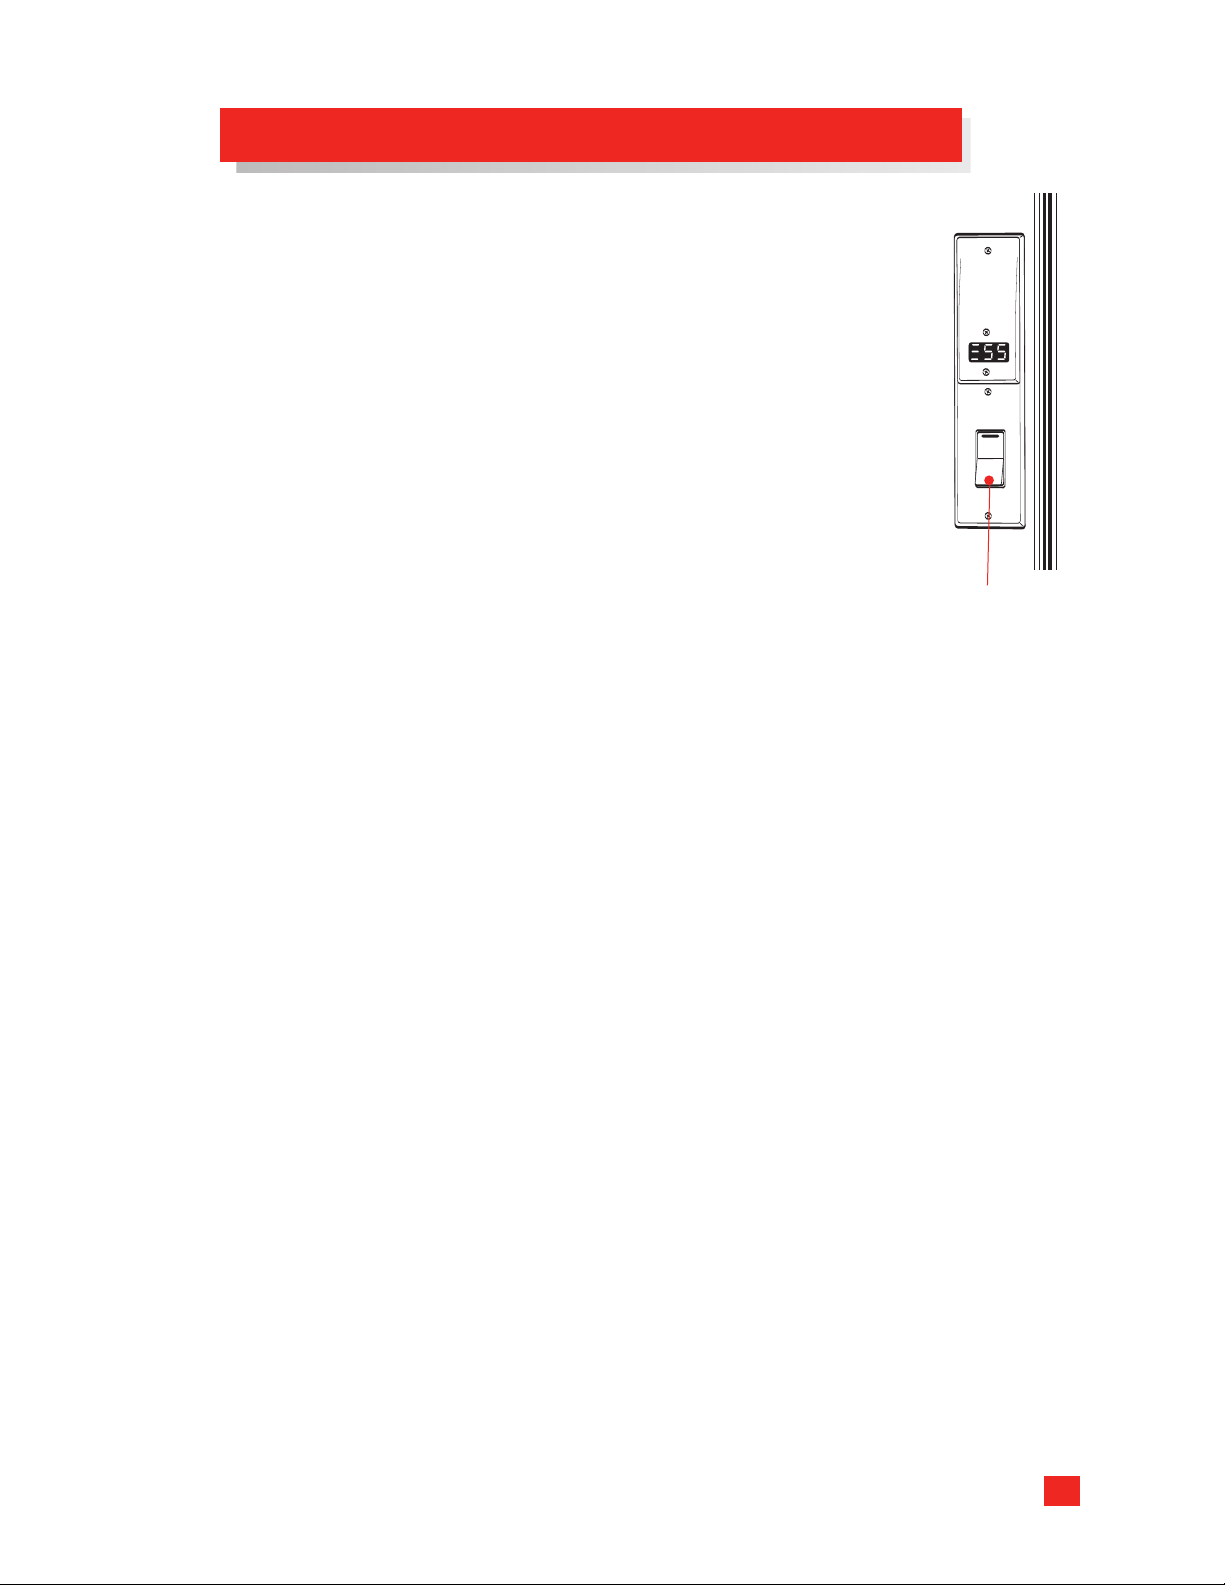
Rope Lighting System (with Tasting Rack model ZWVT1000SR only)
The rope lighting system is controlled with a rocker switch on
the exterior wall of the wine vault, next to the door. The rope
lights plug into an outlet on the interior of the wine vault, just
inside the door.
To Replace a Strand:
The bulbs within the rope light strands are designed for
a long service life and will likely never need replacing.
However, if a bulb or bulbs within a strand burn out or
are damaged, it is necessary to replace the entire strand
containing the defective bulb(s). Contact your dealer or
call the Monogram Wine Vault Line at 877.234.WINE
(874.234.9463) to schedule service.
On/Off switch
for interior rope
lighting
23
Page 24
CARE AND CLEANING
Your GE Monogram®Wine Vault is designed to give you many years of service with
minimal maintenance. To help ensure the continued beauty and durability of your wine
vault, please follow the Care and Cleaning instructions at the recommended intervals.
IMPORTANT: In the event of a power failure, you can maintain interior temperature
longer by keeping the door closed. Open the door only when necessary to avoid
the loss of cold air.
Recommended Cleaning Intervals for Key Components
The recommended cleaning intervals for certain components will vary from one
location to another, due to factors such as humidity or dust. Use the chart below as
a guideline for cleaning intervals; you may need to adjust the intervals depending on
your installation location. Refer to the following instructions for specific details on proper
e and cleaning procedur
car
Environment Stainless Steel drain line liquid probe
Basement or High Humidity Monthly Every 6 months Every 6 months
All Others Every other month
es.
Polish with Clean the Clean the
®
Magic
(if equipped)
24
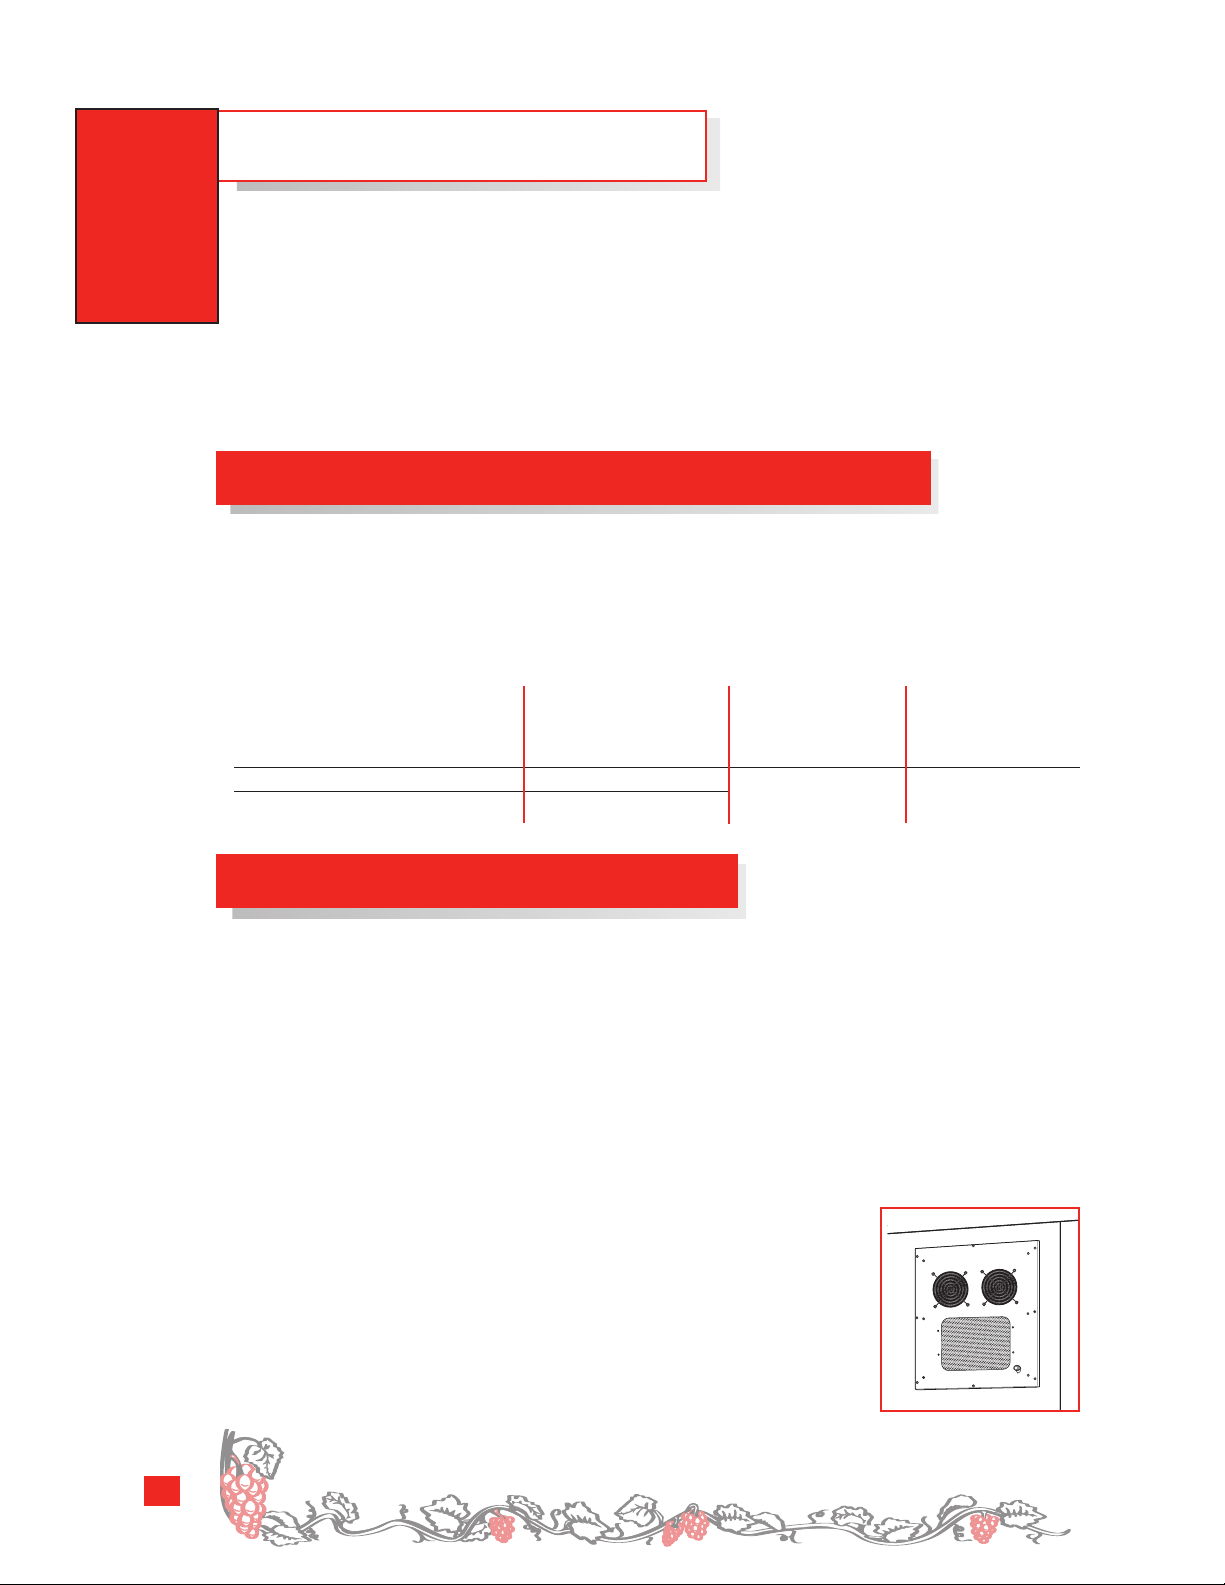
Cleaning the Exterior of the Wine Vault
eserve the fine finish, regularly polish the stainless steel exterior and handle with
To pr
stainless steel cleaner and the Monogram polishing cloth. S
Monogram polishing cloths are available through the
877.234.WINE (877.234.9463). For stainless steel cleaner, order part number WR97X10116.
For the Monogram polishing cloth, order part number WR97X10117.
■ To avoid scratching the fine finish of the stainless steel, wipe in the same direction as
■
the grain when polishing or cleaning any stainless steel surface.
■ Never use appliance wax or polish on the stainless steel.
■
■ Never use scouring pads, powdered cleaners, bleach, or cleaners containing bleach
■
because these products can scratch and damage the finish.
■ Using the hose on your vacuum cleaner, remove any dust off
■
the exterior cooling system vent every 6 months.
Robert Mondavi built the first new winery in Napa Valley, California, after the
appeal of pr
ohibition.
tainless steel cleaner and the
GE Monogram Wine Vault Hotline,
Page 25

Cleaning the Interior of the Wine Vault
The sealed system helps eliminate most airborne dust and contaminants when the wine
vault is left unopened. Under normal use, cleaning the inside would consist of vacuuming
the floor and the cooling system vent on the inside of the wine vault every six months.
Maintaining the Redwood Racks
To clean up spills, use a damp sponge with warm water and rinse thoroughly; then wipe
dry. Spilled wine may stain the redwood racks. Normal drops of wine add character to the
wine vault. To remove small stains, use a fine grit sanding sponge (150 grit is
recommended).
With normal usage, small marks or scratches may become visible on the natural redwood
racks. This gives your racks the warm character of the world’s finest wine cellars.
The racks are unfinished to allow them to breath and flex in the
refrigerated environment
■ Do not apply wood stain or wood preservative to the redwood racks.
■
■ Do not apply polish or w
■
.
ax to the redwood racks.
Cleaning the Interior Walls
To clean up spills or residue on the interior walls and behind the racks use a long handled
scrub brush or sponge with warm water and baking soda solution – about a tablespoon
(15 ml) of baking soda to 1 quar
oughly rinse and wipe dry.
Thor
t (1 liter) of water. This both cleans and neutralizes odor
s.
Cleaning the Inlaid Cork Countertop (Tasting Rack model ZWV
For regular cleaning, dampen a sponge with w
solution consisting of 1 par
■ Do not use scouring pads, pow
■
bleach because these pr
t vinegar to 4 parts warm w
dered cleaners, bleach, or cleaner
oducts can damage the count
arm water. For a str
ater.
er
onger cleaner
s containing
top.
S1000SR only)
, make a
25
Page 26
CARE AND CLEANING
Cleaning the Interior of the Wine Vault
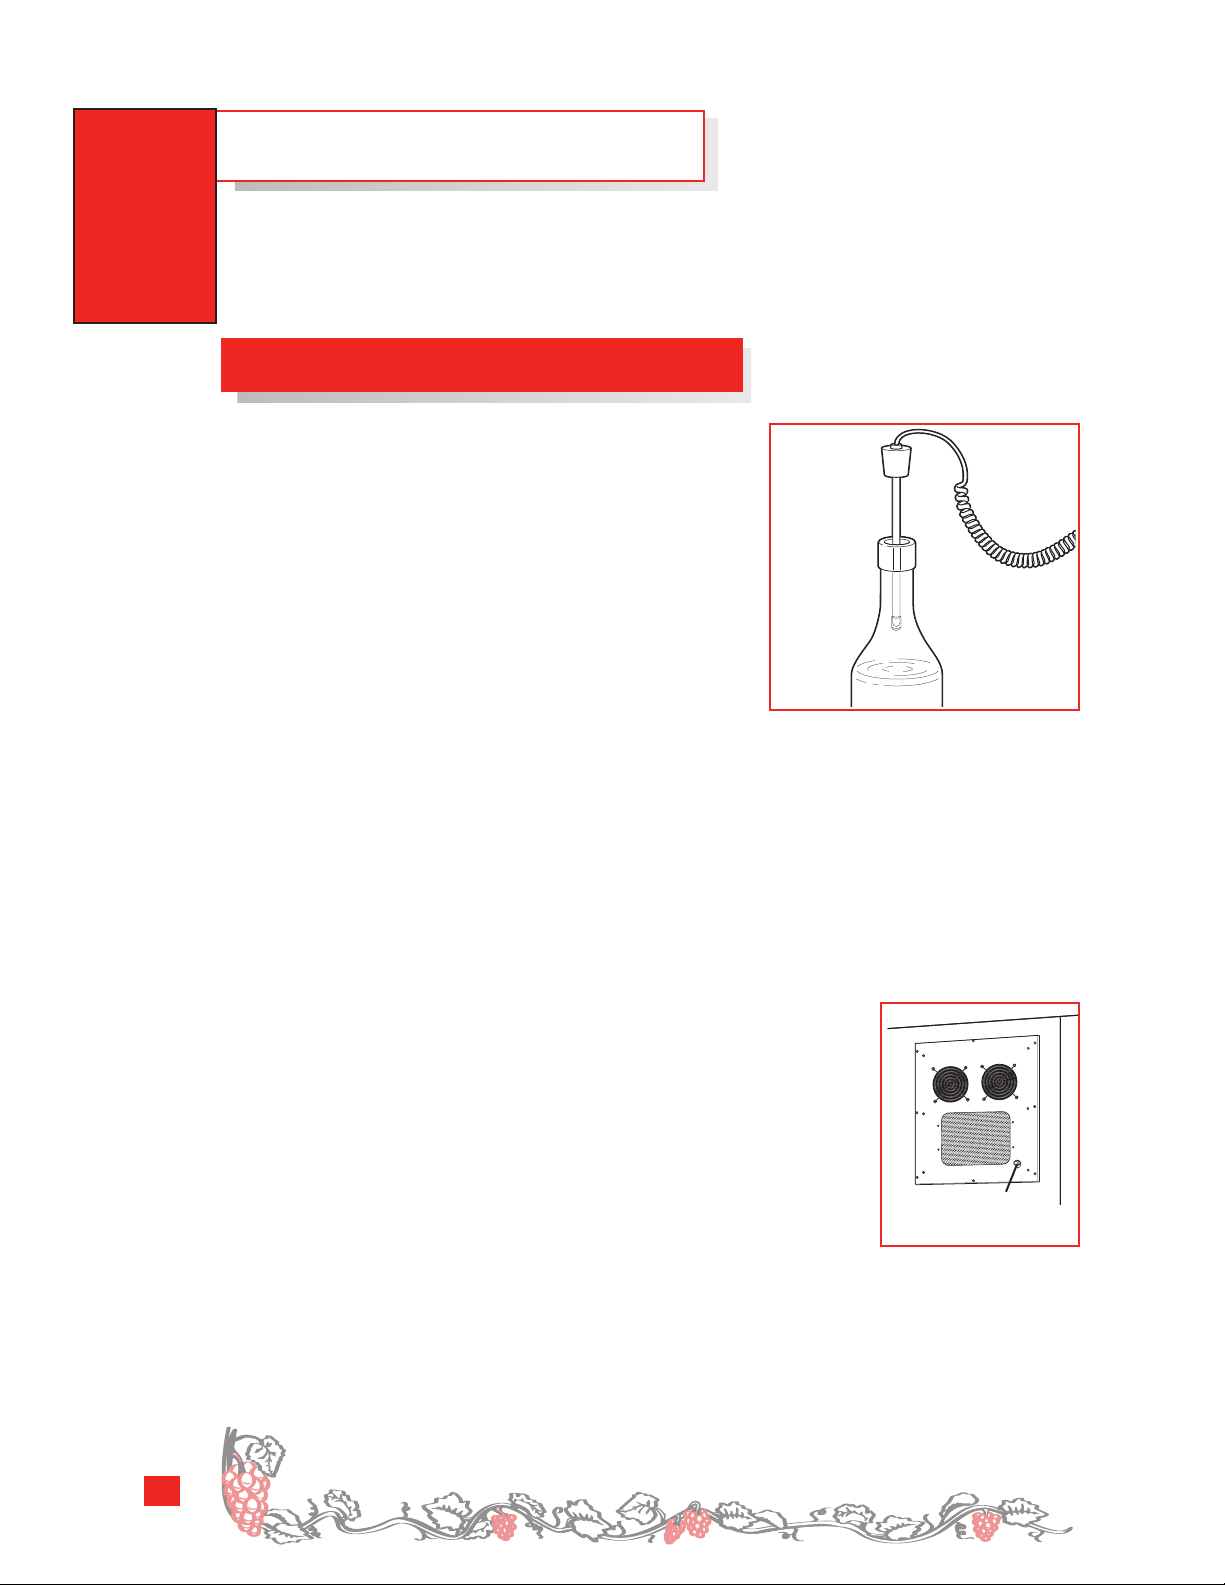
Cleaning the Liquid Probe
Step 1 Check the water level in the liquid probe every
6 months. Make sure that it is approximately 3/4 full.
Step 2 Use warm water and baking soda solution†to
clean the probe and wine bottle. This both
cleans and neutralizes odors.
Step 3 Rinse thoroughly and wipe dry.
TE:
NO
from the bottle used for the probe.
Cleaning the Door Gasket
Step 1 The vinyl gask
Step 2 Rinse well.
Step 3 After cleaning the door gasket, apply a thin layer of paraffin wax or petroleum
e that all wine residues are removed
Ensur
et may be cleaned with mild
soap and water, a baking soda solution or a mild scouring powder.
jelly to the door gasket at the hinge. This helps k
and bending out of shape.
eep the gasket from sticking
26
Cleaning the Drain Port
In the event that a drain line is attached to the drain port of your cooling unit,
follow the cleaning instructions below:
Step 1 Remove the drain line to check for clogs or debris
y 6 months.
er
ev
Step 2 Use warm water and baking soda solution†to clean
. This both cleans and
the drain line and drain buck
neutralizes odors.
tep 3
S
† Note:The r
Rinse thor
obe and drain por
the pr
(15 ml) of baking soda to 1 quart (1 liter) of water.
els made fr
Barr
om Fr
fr
oughly and wipe dry.
ecommended bak
t is appr
om American oak impart flavors different than barrels made
ench oak
.
et
ing soda solution for cleaning
ximately one tablespoon
o
Drain line por
t
Page 27
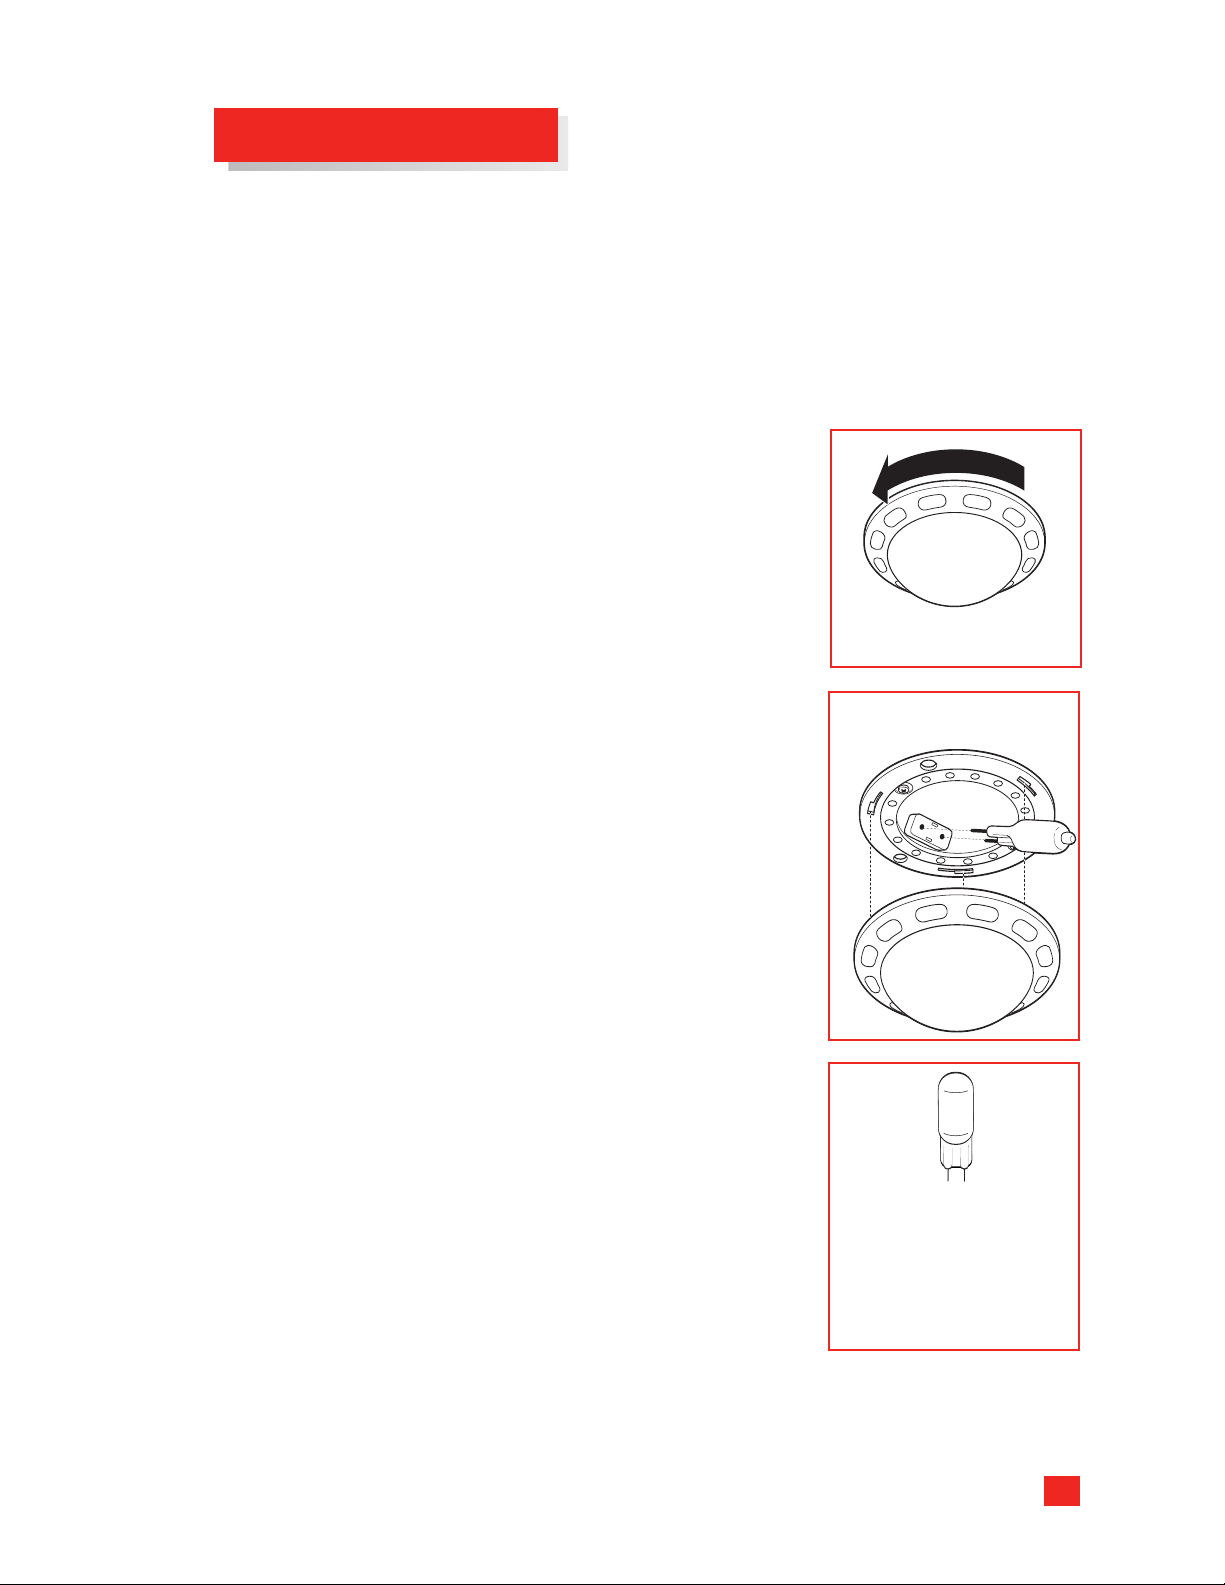
Replacing Halogen Bulbs
The halogen bulbs used in the ceiling lighting of the wine vault will provide years of
service under normal operating conditions. However, should a bulb burn out, refer to the
following instructions to replace the bulb.
WARNING!
Halogen bulbs generate intense heat. Be certain power is off and lamps have
sufficient time to cool before attempting to replace.
Bulbs may break during replacement. Be careful when removing or installing bulbs.
To replace a halogen bulb:
Step 1
Step 2 Twist the light shield counterclockwise to disengage
Step 3 Remove the burned out bulb by pulling it straight out
Step 4 To reinstall the light shield, align the three tabs on the
Step 5 Set the motion sensor switch to AUTO.
To order replacement bulbs, call the Monogram Wine Vault
Line at: 877.234.WINE (877.234.9463). The light bulb part
number is WR02X12174.
Set the motion sensor switch to OFF. To ensure
sufficient illumination, it may be necessary to use
an auxiliary light while replacing the bulb.
the lock
ing tabs, then pull straight down to remove.
and replace the bulb with a 12 VAC, G4 Base, Bi-Pin
10-watt maximum halogen bulb.
light shield with the slots in the light fixture. Twist the
shield clockwise until the tabs lock in place.
Remove the light shield to
access the bulb.
Pull the bulb straight out
from the socket.
C, G4 Base, Bi-Pin,
Use a 12 V
10-w
Light bulb par
o or
T
call the Monogram Wine
ault Line at 877.234.
V
A
att max. halogen bulb
WR02X12174.
der r
(877.234.9463).
t number is
eplacement bulbs,
.
WINE
27
Page 28
TROUBLESHOOTING
Normal Sounds You May Hear
Sound Source
Continuous humming. This is normal. The fan will make a humming sound when
the cooling unit is operating.
Whirring sound. This is normal when the cooling unit first comes on
and shuts off.
Ceiling Lighting
Ceiling lights do not come on.
Possible Cause Recommended Solution
Light bulb(s) need to See Care and Cleaning for instructions on replacing
be replaced. the bulbs.
Rope Lighting
Rope lights do not come on (ZWVT1000SR models only).
ossible Cause
P
Controls are set to OFF. Press the On/Off switch located outside, near the door.
The rope lights have Check the lower plug located on the inside of the wine
been unplugged.
Recommended Solution
ault, near the door.
v
One or more strands of the rope lights do not work
(ZWVT1000SR models only).
ossible Cause Recommended Solution
P
A strand has become Check the connectors on both ends of the unlit strands to
disconnected.
make sure that they are connected properly.
28
The indentation found on the bott
om of most wine bottles is called the punt.
Page 29
Redwood Racks
Racks show nicks, scrapes, or dents.
Possible Cause Recommended Solution
This is normal. A well-used wine vault will eventually gain the appearance
of a beautifully aged cellar. See Cleaning the Interior of
the Wine Vault.
Bottle fits loosely in rack.
Possible Cause Recommended Solution
Odd-shaped or Rotate the bottle.
odd-sized bottle.
See The
on bottle placement.
Cellar Management System for suggestions
Racks appear light in color.
Possible Cause Recommended Solution
This is normal. Newly installed racks will be light at first. As they age,
they will darken to their peak dark patina.
Entry Door
Door will not close completely or does not latch.
Possible Cause Recommended Solution
Foreign object holding the Check doorway for debris and other obstructions.
door open.
The door gasket may Reposition the door gasket. Make sure it is clean and
be out of position. pliable. See Cleaning the Interior of the Wine Vault.
The interior door latch may Rotate the interior door latch so that the door will close.
be in the lock
ed position.
29
Page 30
TROUBLESHOOTING
Cooling System
Cooling Unit does not operate.
Possible Cause Recommended Solution
Power switch set to OFF. Set power switch on cooling unit to ON.
Power cord unplugged. Make sure that the Cooling Unit power cord is plugged into
the grounded outlet.
Blown fuse or tripped Replace the fuse or reset the circuit breaker.
circuit breaker.
Wine Vault is too cold.
Possible Cause Recommended Solution
Thermostat not Adjust the thermostat on the cooling unit. Refer to the
set correctly. Cooling System section for details.
IMPORTANT: The unit must be plugged into a
30-amp
, 110-volt circuit.
Liquid probe in incorrect Make sure that the liquid probe is set up and positioned
location or not connected as described in the Cooling System section.
Exterior room temperature Increase temperature of the exterior room to between
is below 45
°F. 45°F and 85°F.
Wine Vault is too warm.
Possible Cause Recommended Solution
Temperature control not set Adjust the thermostat and allow 48–120 hours for the unit
to cold enough. reach the set temperature.
Warm exterior room. Adjust the temperature in the exterior room to
between 45°F and 85°F.
Foreign object holding the Check doorway for debris and other obstructions.
door open.
Frequent door openings. Minimize the length of time the door is left opened.
Liquid probe in incorrect Make sure that the liquid probe is set up and positioned
location or not connected. as described in the Cooling System section.
Object impeding airflow to Move any object that may be blocking the airflow in
the cooling unit. front of the cooling unit on the inside or outside of the
wine vault.
Warm wine bottles recently Allow 48–120 hours for the cooling unit to stabilize
added to the wine vault. the temperature.
30
ops of wine that slide down the sides of the glass when it is swirled are the legs.
The dr
Page 31

Compressor motor operates for long periods.
Possible Cause Recommended Solution
This is normal. Allow 48–120 hours for the unit to reach the set
temperature when first installed.
The cooling unit will run often due to its gentle
cooling operation.
Operation of the fan is normal, due to the large volume
of interior space that must be cooled.
Frequent door openings. Minimize the length of time the door is left opened.
Temperature control set at Check the thermostat to make sure that the temperature
the coldest setting. is set at the desired setting.
Foreign object holding the Check doorway for debris and other obstructions.
door open.
Moisture forms on the outside of the cooling unit.
Possible Cause Recommended Solution
Condensate Evaporator Set the Condensate Evaporator Switch to ON. See the
Switch set to A
UTO or OFF
.
Cooling Systemsection.
Extremely high humidity.
This is normal. Make sure that the Condensate Evaporator
Switch is set to ON.
Controlling humidity and temperature in the exterior room
with air-conditioning may eliminate this condition.
31
Page 32
CONSUMER SERVICES
With the purchase of your new Monogram Wine Vault, receive the
assurance that if you ever need information or assistance from GE,
we will be there. All you have to do is call—toll-free!
Monogram Wine Vault Line
Whatever your question about your Monogram®Wine Vault, the Monogram Wine Vault
Line is available to help. Your call—and your question—will be answered promptly and
courteously. The Monogram Wine Vault Line customer service is open Monday through
Friday, 8:30 A.M. to 11:00 P.M. ET, and Saturday and Sunday, 9:00 A.M. to 11:00 P.M. ET.
Call 877.234.WINE (877.234.9463).
In-Home Repair Service
Contact Monogram Wine Vault Line customer ser
purchased the Monogram Wine Vault for expert repair service, scheduled at a time that’s
convenient for you.
vice or the dealer from which you
For repair service to the redwood wine racks ONLY after the one-year warranty period
has ended, please contact APEX at 888-999-9749.
For Customers With Special Needs…
Consumers with impaired hearing or speech who have access to a TDD may call
800.TDD.GEAC (800.833.4322) to request information or service.
32
, complex finish is one sign of a great wine.
A long
Page 33
WARRANTY INFORMATION
YOUR MONOGRAM WINE VAULT WARRANTY
Staple sales slip or canceled check here. Proof of original purchase
date is needed to obtain service under warranty.
Warrantor in USA: General Electric Company, Appliance Park, Louisville, KY 40225
Should your product need service, during the warranty period or afterward, call the GE
Monogram Wine Vault line at 877.234.WINE (877.234.9463).
What is Covered For Products
General Electric Company (“GE” or “we” or “us”) warrants the Monogram Wine Vault against defects
in material or workmanship in the following manner:
GE MONOGRAM WINE VAULT WARRANTY
GE provides a limited warranty on only three major components of your GE Monogram Wine
Vault—the external shell, the cooling system, and the electronics products, as defined below. The
terms of those limited warranties are set forth below. NO OTHER ELEMENT OR COMPONENT OF THE
GE MONOGRAM WINE VAULT IS COVERED BY A GE WARRANTY.
This warranty is extended to the original purchaser and any successor owner for products
purchased for ordinary home use in the 48 mainland states, Hawaii and Washington, D.C.
In Alaska, the warranty is the same except that it is LIMITED because you must pay for the
service technician’s travel costs to your home.
All in-warranty service will be provided by GE Factory Service Centers or by GE-authorized
Customer Care servicers during normal working hours.
Defective parts may be replaced with new or rebuilt parts at our option.
EXTERNAL SHELL LIMITED WARRANTY
For a period of one (1) year from the date of original installation in the original location in Your
home, which must be done by a GE-authorized installer (the “Original Installation”), we will provide,
free of charge, parts and service labor in your home to either repair or replace, at our option, the
ont and ceiling foamed-in-panels only and the interior painted surfaces of the external shell
fr
that are defective in material or workmanship under normal home residential use and service
(a “Manufacturing Defect”).
COOLING SYSTEM LIMITED WARRANTY
For one (1) year from the date of Original Installation, we will provide, free of charge, parts and
service labor in your home to either repair or replace the cooling system, at our option, or any
t of it that fails because of a Manufacturing Defect,
par
the compressor part only, the applicable warranty period shall be five (5) years from the Original
Installation date, with service labor provided at Your expense after the first year of the warranty.
except that, for r
epair or replacement of
ELECTRONIC PRODUCTS LIMITED WARRANTY
For one (1) year from the date of Original Installation, we will provide, free of charge, parts and
service labor to either repair or replace, at our option, the electronic product (i.e., flat-screen
monitor
of a Manufacturing Defect. Service may, at GE’s option, be provided in your home or by having
you mail the electr
GE-authorized ser
, CPU, printer, bar code reader, integrated casing) or any part of it that fails because
onic pr
vicer
oduct in its original or equiv
.
alent packaging at our expense to a
33
Page 34
What Is Not Covered for Products
■ Service trips to your home to teach you how
■
to use the product.
amage to the product caused by accident,
■ D
■
ire, floods, war or Acts of God.
f
■ Failure of the product if it is used for
■
other than its intended purpose or used
commercially.
■ Improper installation, delivery, or
■
maintenance. If you have an installation
problem, contact your dealer or installer.
You are responsible for providing adequate
ventilation, electrical, plumbing, Internet,
telephone, and other connecting facilities,
and their configurations.
■ Warranty claims arising if and after the Wine
■
Vault is moved from its original installed
location.
■ Replacement of the light bulbs.
■
■ ALTERATION OF ANY SERIAL NUMBER OR
■
RATING PLATE VOIDS WARRANTY.
REPAIR OR REPLACEMENT AT GE’S OPTION AS PROVIDED UNDER THIS WARRANTY IS THE
EXCLUSIVE REMEDY OF THE CONSUMER. GE SHALL NOT BE LIABLE FOR ANY INCIDENTAL OR
CONSEQUENTIAL DAMAGES FOR BREACH OF ANY EXPRESS OR IMPLIED WARRANTY ON THIS
PRODUCT. EXCEPT TO THE EXTENT PROHIBITED BY APPLICABLE LAW, ANY IMPLIED WARRANTY
OF MERCHANTABILITY OR FITNESS FOR A PARTICULAR PURPOSE ON THIS PRODUCT IS LIMITED
IN DURATION TO THE DURATION OF THIS WARRANTY.
■ INCIDENTAL OR CONSEQUENTIAL DAMAGE
■
CAUSED BY POSSIBLE DEFECTS WITH THIS
APPLIANCE INCLUDING, WITHOUT
LIMITATION, LOSS OF WINE DUE TO
SPOILAGE OR OTHERWISE.
■ Product damage after installation other than
■
from a Manufacturing Defect.
■ Cosmetic damage caused during delivery or
■
installation.
■ Misuse, abuse, negligence, commercial
■
use, or modification of or to any part of
the Product.
■ Improper operation or maintenance,
■
including connection to improper
voltage supply.
■ Damage from attempted repair by other than
■
GE or GE-authorized servicers.
■ Replacement of house fuses or resetting of
■
circuit breakers.
34
PLEASE NOTE: GE IS NOT RESPONSIBLE FOR CONSEQUENTIAL, INCIDENTAL, OR SPECIAL
DAMAGES ARISING FROM DEFECTS IN THE MONOGRAM WINE VAULT OR CELLAR
MANAGEMENT SOFTWARE (WHETHER ARISING FROM THEIR MANUFACTURE, DESIGN,
DELIVERY OR INSTALLATION), AND INCLUDING, BY WAY OF EXAMPLE AND NOT LIMITATION,
CLAIMS OR DAMAGES ARISING FROM WINE SPOILAGE, SPILLAGE, BREAKAGE OR
RUINATION OF ANY KIND.
What Is and Is Not Covered for Software
LIMITED WINE INVENTORY SOFTWARE AND STORAGE
DEVICE WARRANTY
Limited Software Warranty. GE will provide remote technical support (online or telephone support
e for the period of one year fr
at our option) for any GE-supplied softw
GE warrants only that the software shall perform in accordance with the written support materials
supplied by GE with such software. GE’s sole and exclusive obligation for breach of the foregoing
arranty shall be to pr
w
not cover nonconformance due to (a) any modification, reconfiguration, or maintenance of the
formed by any other party than GE; (b) any use of the software on a system that does
e per
ar
softw
not meet GE’s minimum standards for such software; or (c) any hardware or non-GE software. GE
does not warrant that operation of the software will be uninterrupted, secure, or error-free or that
all errors will be corrected. GE further does not warrant that the information stored or transmitted
e is fr
by the softw
ar
ovide the error correction on a timely basis. The foregoing warranty does
om unauthorized modification.
ee fr
ar
om the date of pur
chase.
Page 35
Limited Storage Device Warranty. If the storage device (such as flash drive) on which the backup
GE Consumer & Industrial
Appliances
General Electric Company
Louisville, KY 40225
ge.com
data is stored is defective, GE will replace the device upon your written request to GE, including a
dated receipt or packing slip. A replacement device will be mailed to You within 60 days of GE’s
eceipt of Your request. You may be required to return the defective device at GE’s expense to an
r
ddress to be provided.
a
Disclaimer of Software Warranties. EXCEPT AS EXPRESSLY PROVIDED ABOVE, THE SOFTWARE
AND SERVICES ARE PROVIDED “AS-IS” AND, TO THE MAXIMUM EXTENT PERMITTED BY
APPLICABLE LAW, GE, ITS AFFILIATES, LICENSORS, PARTICIPATING FINANCIAL INSTITUTIONS,
THIRD-PARTY SOFTWARE, CONTENT OR SERVICE PROVIDERS, DISTRIBUTORS, DEALERS,
REPRESENTATIVES AND AGENTS (COLLECTIVELY, “REPRESENTATIVES”) DISCLAIM ALL
WARRANTIES, EXPRESS OR IMPLIED, REGARDING THE SOFTWARE OR SERVICES, DISK AND
RELATED MATERIALS, INCLUDING ANY WARRANTY OF FITNESS FOR A PARTICULAR PURPOSE,
TITLE, MERCHANTABILITY, AND NON-INFRINGEMENT. GE DOES NOT WARRANT THAT THE
SOFTWARE OR SERVICES ARE SECURE, FREE FROM BUGS, VIRUSES, INTERRUPTION, ERRORS,
OR OTHER PROGRAM LIMITATIONS. SOME STATES DO NOT ALLOW THE EXCLUSION OF IMPLIED
WARRANTIES, SO THE ABOVE EXCLUSIONS MAY NOT APPLY TO YOU. IN THAT EVENT, ANY
IMPLIED WARRANTIES ARE LIMITED IN DURATION TO 60 DAYS FROM THE DATE OF PURCHASE
OR DELIVERY OF THE SOFTWARE, AS APPLICABLE. HOWEVER, SOME STATES DO NOT ALLOW
LIMITATIONS ON HOW LONG AN IMPLIED WARRANTY LASTS, SO THE ABOVE LIMITATION MAY
NOT APPLY TO YOU. THIS WARRANTY GIVES YOU SPECIFIC LEGAL RIGHTS, AND YOU MAY HAVE
OTHER RIGHTS THAT VARY FROM STATE TO STATE.
All warranties or guarantees given or made by GE with respect to the Software or technical
support (1) are only for the benefit of the registered user of the Software or their legally designated
successor-in-interest, (2) shall be null and void if a registered user breaches any terms or conditions
of this warranty, and (3) may be modified with respect to subsequent Software upgrades or
modifications. You will be notified of any such warranty changes via the Internet as soon as
feasible; if you are not Internet-connected, your notification may be delayed.
Important Notice For Both Product and Software Warranties
SOME STATES DO NOT ALLOW THE EXCLUSION OR LIMITATION OF INCIDENTAL OR
CONSEQUENTIAL DAMAGES, OR ALLOW LIMITATIONS ON HOW LONG AN IMPLIED WARRANTY
LASTS, SO THE ABOVE LIMITATIONS OR EXCLUSIONS MAY NOT APPLY TO YOU. THIS WARRANTY
GIVES YOU SPECIFIC LEGAL RIGHTS, AND YOU MAY HAVE OTHER RIGHTS, WHICH VARY FROM
STATE TO STATE. TO KNOW WHAT YOUR LEGAL RIGHTS ARE IN YOUR STATE/PROVINCE, CONSULT
YOUR LOCAL/STATE/PROVINCIAL AUTHORITIES.
35
Page 36
APPENDIX–VINOLOGY
The following terms are commonly used in the wine industry and are also referenced
within this guidebook.
Wine Terms
Term Definition
APPELLATION The Appellation of Origin refers to the region in a country where the majority of
grapes used in a wine ar
DESIGNATION Refers to the vineyard producing the grapes or a unique producer label.
DRINK/HOLD A maturity status assigned to bottles which may be consumed now but will improve
with more aging.
DRINK A maturity status assigned to bottles which are in peak form and should be
consumed now for best results.
HOLD A maturity status assigned to bottles which should be allowed to mature to reach
their full potential.
IN DECLINE A maturity status assigned to bottles which have already passed their peak but may
still retain some value.
PAST A maturity status assigned to bottles which may not be drinkable due to loss of
quality.
VARIETAL Refers to the type of wine and is derived from the grape or vine type a wine is made
from, such as Cabernet Sauvignon or Pinot Noir.
VINTAGE The vintage date indicates the year the grapes used to make the wine are harvested.
Nonvintage wines are made from blends of grapes harvested in different years.
e grown.
36
Page 37
Bottle Sizes
The chart below describes the most common bottle types and sizes used for wine.
Individual regions may have additional sizes and names unique to that region.
Capacity Name Description
375 ml “Dessert Wine” Contains one-half a standard 750 ml bottle.
750 ml Bottle or “Fifth” Standard bottle size.
750 ml or
1.5 liters
1.5 liters Magnum Contains the equivalent to 2 bottles of wine.
3 liters
3 or 4.5
liters 4.5 liters (6 bottles) in Bordeaux.
4.5 liters
6 liters
6 liters
9 liters Salmanazar Contains the equivalent to 12 bottles or a case of wine.
15 liters
Champagne Most common sizes for Champagne.
Double Magnum Contains the equivalent to 4 bottles of wine and is twice as large as
the magnum.
Jeroboam Contains 3 liters (4 bottles) in Champagne and Burgundy and
Rehoboam Contains the equivalent to 6 bottles of wine and is used in Burgundy
and Champagne. For Bordeaux, see Jeroboam.
Imperial Contains the equivalent to 8 bottles of wine and is usually used for
Bordeaux and for Cabernet Sauvignon. In Burgundy and
Champagne, this size is called a Methuselah.
Methuselah Contains the equivalent to 8 bottles of wine. French champagne
bottled in a Methuselah is expected to age for a long time.
Nebuchadnezzar Contains the equivalent to 20 bottles and is the largest wine
container. Found most often in Burgundy and Champagne.
37
Page 38
APPENDIX–THE PERFECT SERVE
Serving up a fine wine is an art form unto itself. To maximize your artistic flair, the
following tips can help turn every wine into a masterpiece of the palate.
Choosing the Perfect Glass
The Right Glass for the Right Wine
While the variety of wine glass styles is almost as extensive as the number of different
wine varieties, there are four primary styles that are a must for wine aficionados:
Red wine glasses are taller and wider, allowing you to better appreciate the complexities
of the wine. There are two primary styles of red wine glasses.
Bordeaux glass is designed for rich, full-bodied red wines, such as Cabernets and
The
Merlots, and features a wide bowl that allows the wine to breathe and brings out the rich
aromas. The tall bowl lets the wine proceed directly to the back of the mouth, allowing for
maximum flavor.
Burgundy glass is recommended for other full-bodied wines, such as a Pinot Noir. Larger
A
than the Bordeaux glass, the Burgundy glass features a large bowl that allows the wine to
dispense to the tip of the tongue, making it easier to taste the sweetness of the wine.
White wine glasses are smaller to help keep the wine cool. A young, crisp white wine
should be served in a glass with an opening that’s slightly larger than the body of the
glass itself. This allows the wine to dispense at the tip and sides of the tongue, bringing
out the wine’s sweetness.
For more
allow the wine to dispense to the rear and sides of the tongue, allowing you to better
taste the bolder flavor.
mature white wines, you will want a taller, straighter glass. This type of glass will
38
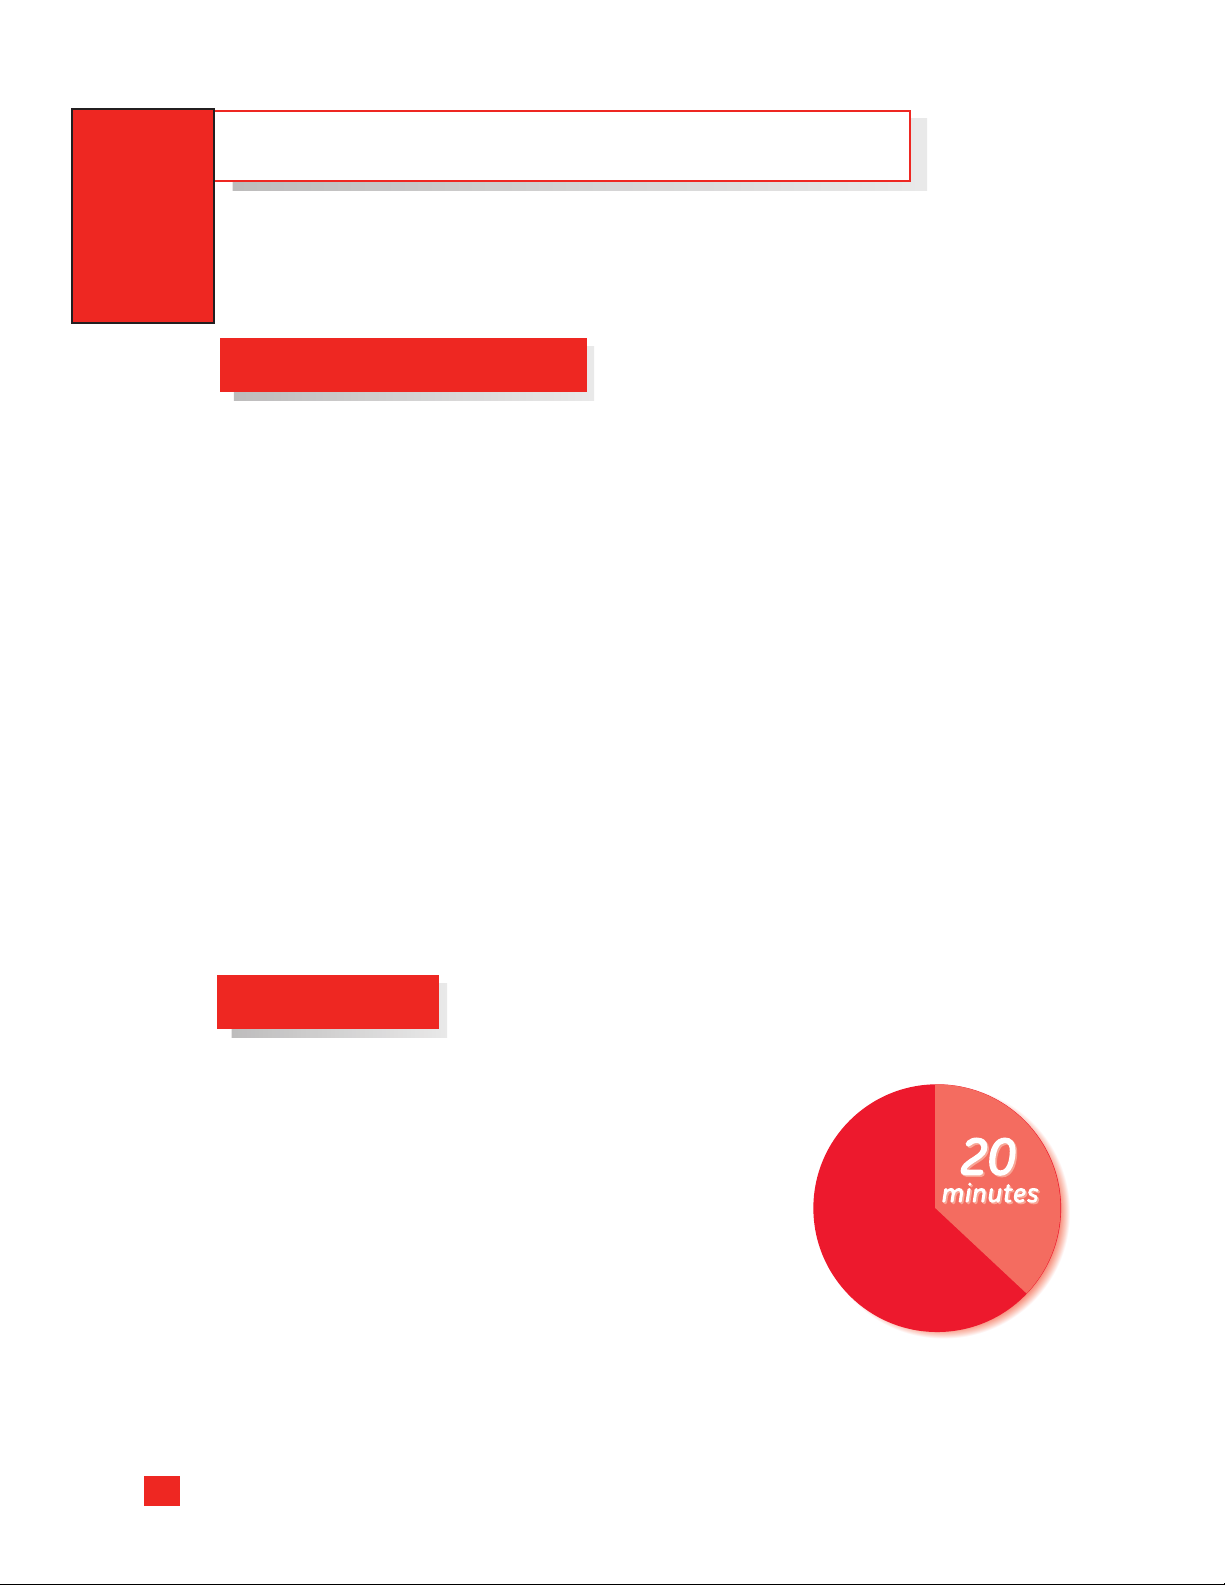
The 20/20 Rule
20/20 Rule of Thumb for Serving Temperatures
Your wine vault is designed to maintain an optimal wine
storage temperature of 55°F for both red and white wines.
To allow the wine to arrive at approximate serving
temperature, use the 20/20 rule of thumb.
When serving
before serving and place on the table. At the end of
20 minutes, a bottle of red wine should reach just below
average room temperature.
When serving
before serving and place in a bucket of ice and water. This
should chill the white wine down to the mid-40°F range.
red wines, remove the bottle 20 minutes
white wines, remove the bottle 20 minutes
Page 39
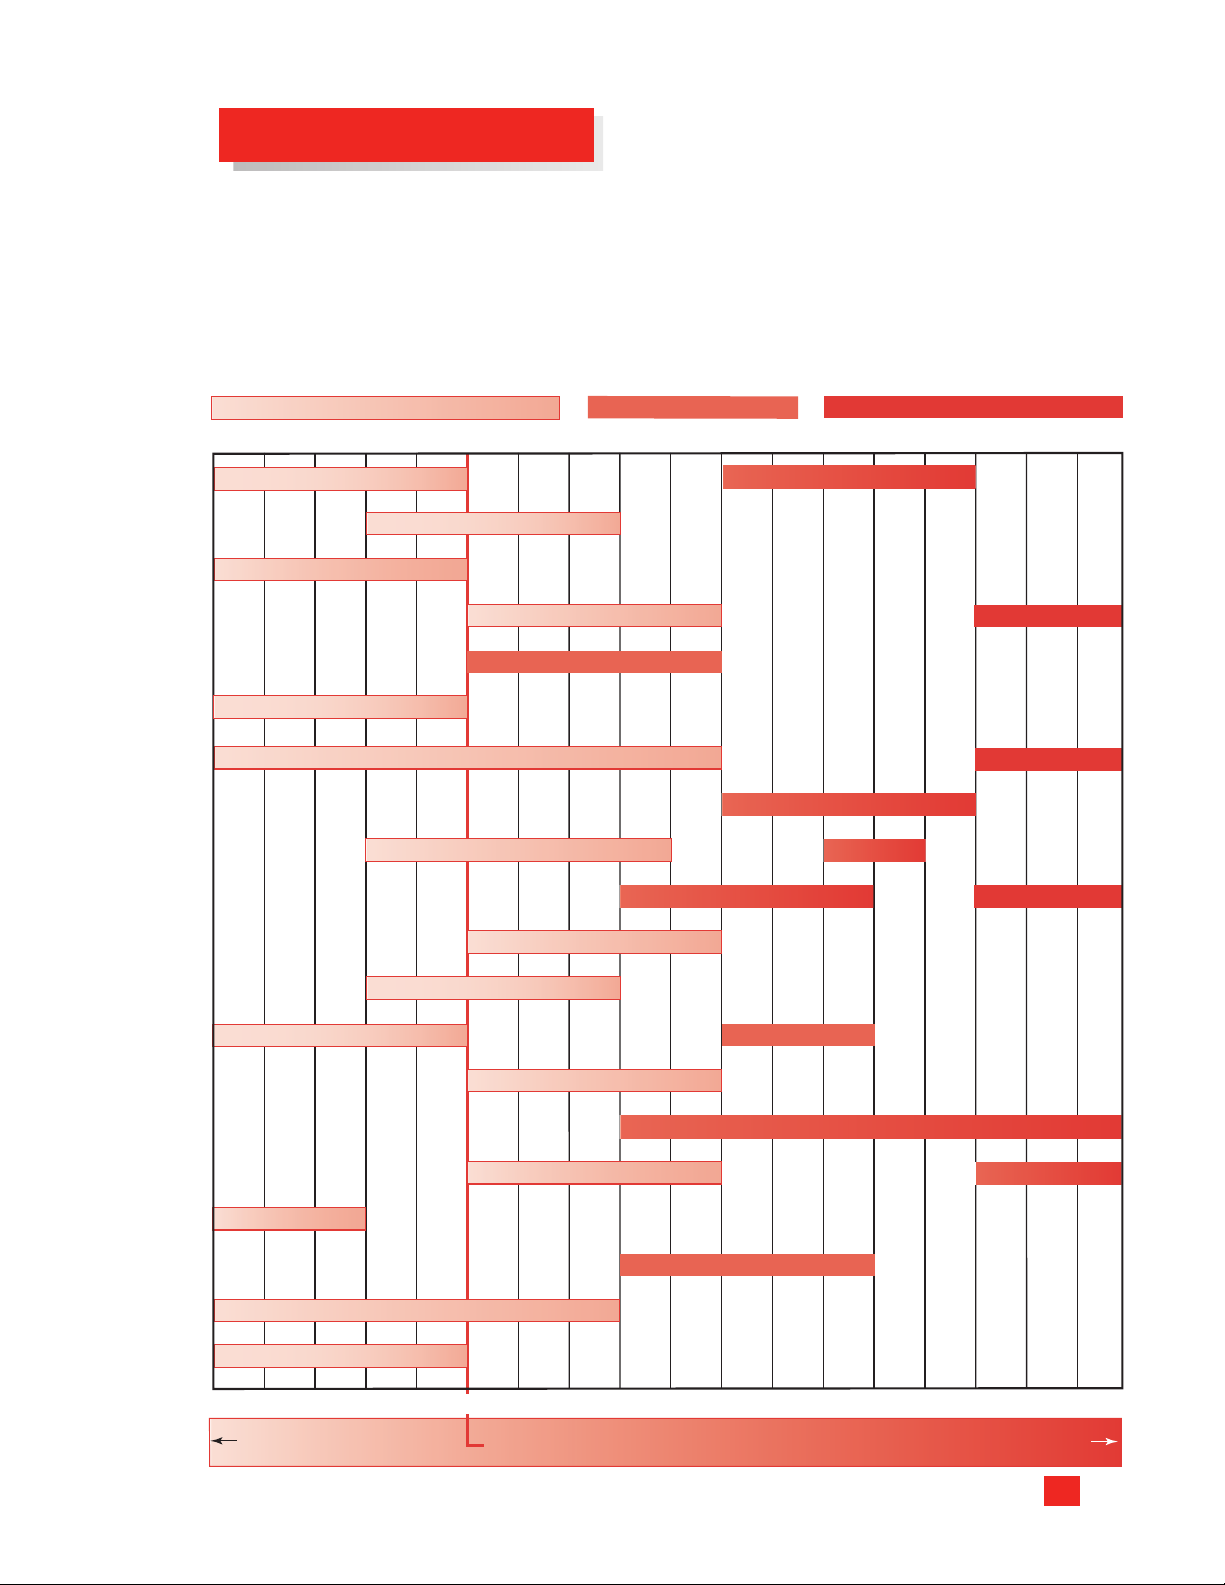
50°F 51°F 52°F 53°F 54°F 55°F 56°F 57°F 58°F 59°F 60°F 61°F 62°F 63°F 64°F 65°F 66°F 67°F 68°F
50°F 51°F 52°F 53°F 54°F 55°F 56°F 57°F 58°F 59°F 60°F 61°F 62°F 63°F 64°F 65°F 66°F 67°F 68°F
Rich, Full-Bodied Reds
Cabernet Sauvignon
Light-Bodied Whites
Chianti
Bardolino
Amarone
Sangiovese
Syrah
Côtes du Rhône Pinot Noir
Beaujolais Village
Merlot
Zinfandel
Room Temperature
Domestic Refrigerator
Temperature
Ideal Long-Term Storage
and Aging Temperature
Beaujolais Nouveau
Chablis
Gewürztraminer
Chardonnay
Dessert Wines
Pouilly Fuissé
Sauvignon Blanc
Vouvray
Dry and Off-Dry Whites
Fruity and Light-Bodied Reds
Pinot Grigio
Soave
Mâcon Villages
Viognier
Riesling
Champagne
White Zinfandel
Frascati
Ideal Serving Temperatures
The Monogram®Wine Vault is designed to store wine at the proper long-term storage
temperature of 55°F. Storage temperatures and serving temperatures can be quite
different. The temperature ranges shown below are the suggested serving temperatures.
Individual preferences may vary.
As a rule for both red and white wines, colder temperatures minimize and mellow the
wine’s flavor and bouquet. Warmer temperatures allow wines to open up and present
a bolder flavor and aroma.
able information courtesy of Brown-Forman.
T
39
Page 40

Models:
GE Consumer & Industrial
Appliances
General Electric Company
Louisville, KY 40225
ge.com
ZWVS1000SR, Storage Racking System
ZWVT1000SR, Tasting Racking System
49-60373-1
197D6634P001
12-06 JR
 Loading...