


GE WCVH6800J1WW, WCVH6800J1MS, WCVH6800J1MR, WCVH6800J1MB, WCVH6800J1BB Owner’s Manual

0
ge.com
Safety Instructions ............ 2,s
Operating Instructions
Cleaning the Washer ............. 11-13
Control Panels ..................... 4-5
Control Settings .................... 6-7
Features ......................... 8-10
Loading and Using the Washer ....... 10
Installation Instructions ..... 14-19
Drain Requirements ................. 17
Electrical Requirements .............. 17
Installing the Washer ............. 18, 19
Location of Your Washer ............. 15
Preparing to Install Your Washer ...... 14
Replacement Parts .................. 19
Rough-In Dimensions ................ 15
Unpacking Your Washer ............. 16
Water Supply Requirements .......... 17
Laveuses
La section frangaise commence _ la page 25
Lavadoras
La secci6n en espahol empieza en la p6gina 51
Troubleshooting Tips ........ 20-22
Consumer Support
Service Telephone Numbers . Back Cover
Warrants (Canada) ................. 2/4
Warrants (U.S.) ..................... 23
ENERGYSTAR
As an ENERGYSTAR®partner,
GEhas determined that this
product meets the ENERGYSTAR®
guidelines for energy efficiency.
Write the model and serial
numbers here:
Model #
Serial #
Youcan find them on a label on the
sideofthe washeE
175DI807P607 49-90339
12-07JR
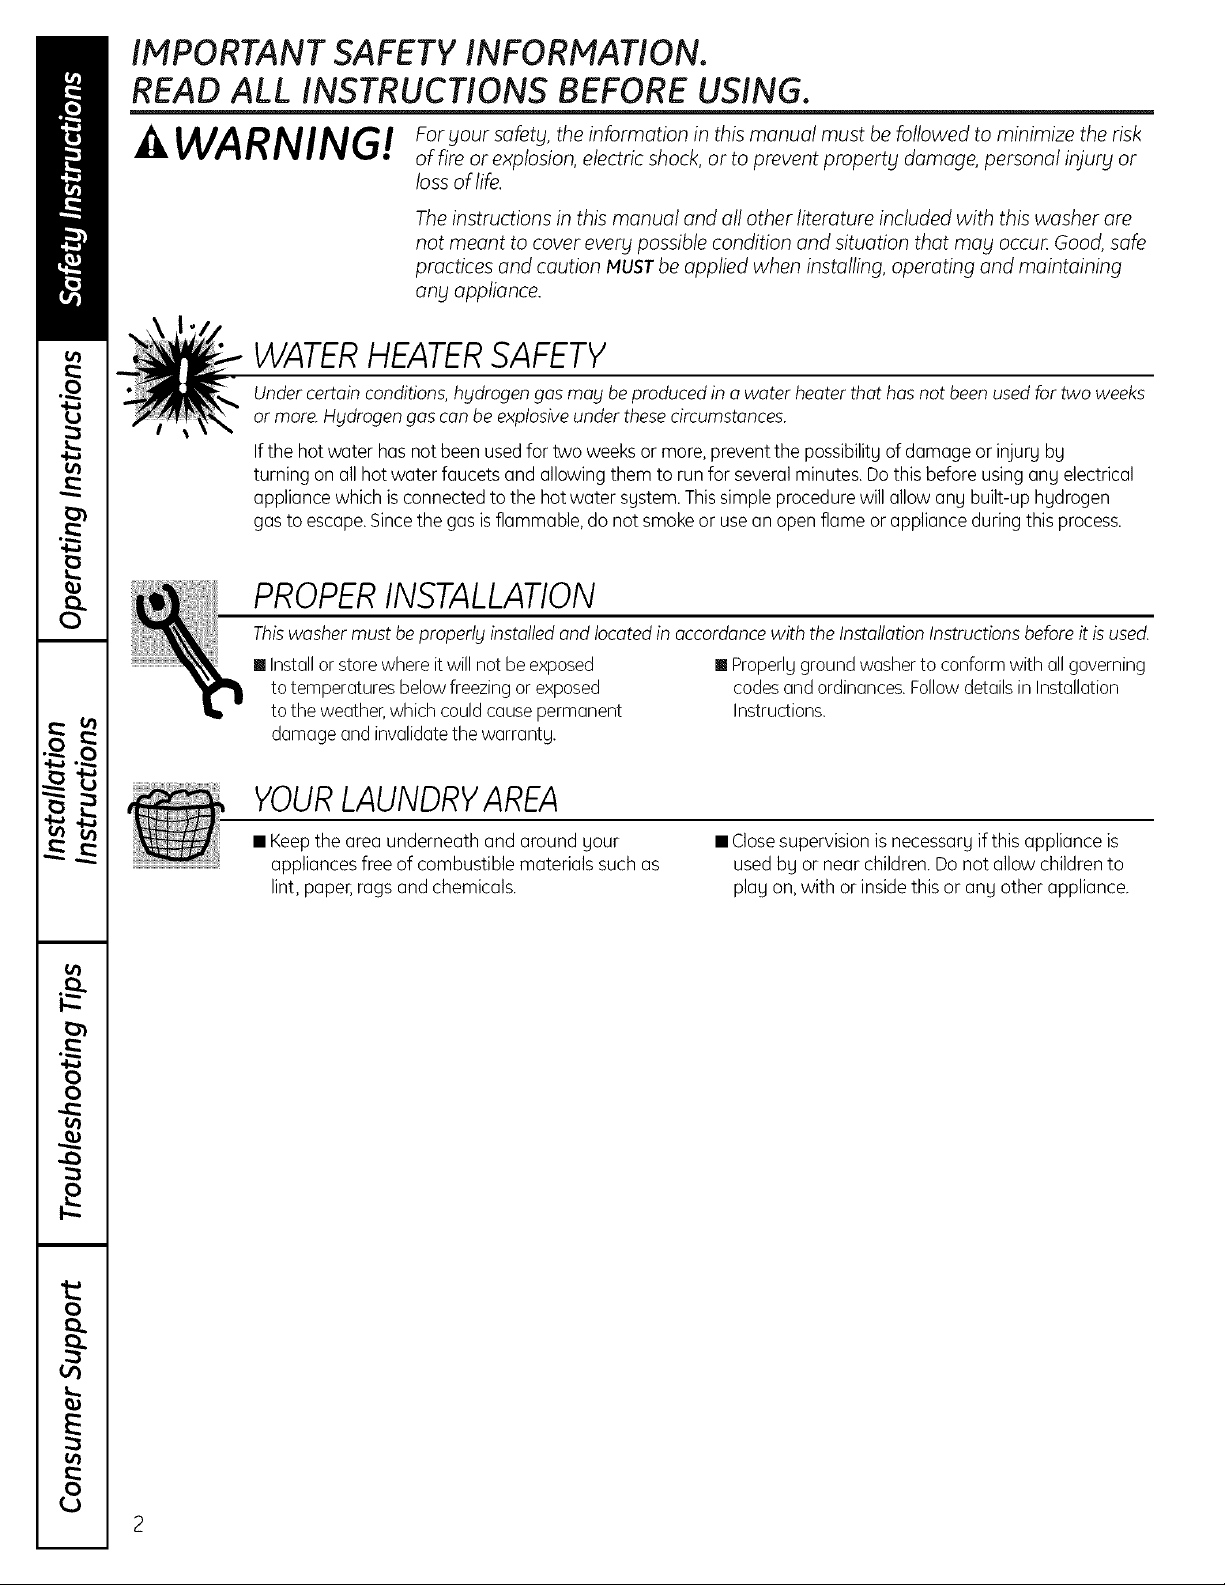
IMPORTANT SAFETY INFORHATION.
READ ALL INSTRUCTIONS BEFORE USING.
WAR NING! _oryoursafety,the_nformat_on_nth_smanualmustbefollowedtom_n_m_zether_sk
of fire or explosion, electric shock, or to prevent property damage, personal injury or
loss of life.
The instructions in this manual and all other literature included with this washer are
not meant to cover every possible condition and situation that may occun Good, safe
practices and caution MUST be applied when installing, operating and maintaining
any appliance.
WATERHEATERSAFETY
Undercertainconditions,hydrogen gas may beproduced in a water heater that has not been usedfor two weeks
or more.Hydrogen gascan beexplosiveunder these cimumstonces.
Ifthe hot water hasnot been usedfor two weeksormore,preventthe possibilityof damage or injury by
turning on all hot water faucets and allowing them to runfor severalminutes. Dothisbefore using ang electrical
appliancewhich is connectedto the hotwater system.Thissimpleprocedure will allow any built-up hydrogen
gasto escape.Sincethe gasis flammable,do not smokeor usean open flame orappliance during this process.
PROPERINSTALLATION
Thiswasher must be properly installedand located in accordancewith the InstallationInstructionsbeforeit is used.
II Installor storewhere itwill notbeexposed II Properlygroundwasherto conformwith all governing
to temperaturesbelow freezingor exposed codesand ordinances.FollowdetailsinInstallation
to the weather,which couldcausepermanent Instructions.
damage and invalidatethe warranty.
YOURLAUNDRYAREA
• Keep the urea underneath and around your
appliances free of combustible materials such as
lint, paper, rags and chemicals.
• Closesupervision isnecessary if this appliance is
used by or nearchildren.Do not allow children to
play on, with or insidethis or any other appliance.
Use this •
appliance
on!y for its
intended
purpose as
described in •
this Owner's
Manual
WHEN USINGTHEWASHER
• Never reach into washer while it is moving. • Never attempt to operate this appliance
Wait until the machine has completely stopped if it is damaged, malfunctioning, partially
before opening the door. disassembled, or has missing or broken parts,
Do not mix chlorine bleach with ammonia including a damaged cord or plug.
or acids such as vinegar and/or rust remover. • Do not slam the washer door closed. Do not tru
Mixing different chemicals can produce a toxic to force the door open when locked (LOCKED
gas which may cause death, indicator ON).This could result in damage to
Do not wash or dry articles that have been
cleaned in, washed in, soaked in or spotted •
with combustible or explosive substances (such as
wax, oil, paint, gasoline, degreasers, dru-cleaning
solvents, kerosene, etc.)which mag ignite or
explode. Do not add these substances to the
wash water. Do not use or place these substances
around gour washer or drger during operation.
The laundry process can reduce the flame
retardancg of fabrics. To avoid such a result,
carefully follow the garment manufacturer's
wash and care instructions.
the washeE
The washer is equipped with an electrical
overload protector. The motor will stop
if it becomes overheated. The washer will
automaticallg restart after a cool-down
period of up to 2 hours, if the washer
has not been manuallg turned off
during this time.
ge.com
To minimize the possibility of electric shock,
unplug this appliance from the power supplg
or disconnect the washer at the building's
distribution panel bg removing the fuse or
switching off the circuit breaker before attempting
ang maintenance or cleaning. NOTE:Pressingthe
power button does NOTdisconnect the appliance
from the power supplg.
WHEN NOT IN USE
• Turn off water faucets to relieve pressure on
hoses and valves and to minimize leakage if
a break or rupture should occur. Check the
condition of the fill hoses; GErecommends
changing the hoses everg 5 gears.
• Before discarding a washer, or removing it
from service, remove the washer door to prevent
children from hiding inside.
• Do not attempt to repair or replace ang part of
this appliance unless specificallg recommended
in this Owner's Manual, or in published user-repair
instructions that gou understand and have the
skillsto carrg out.
• Do not tamper with controls.
READANDFOLLOWTHISSAFETYINFORMATIONCAREFULLY
SAVE THESEINSTRUCTIONS
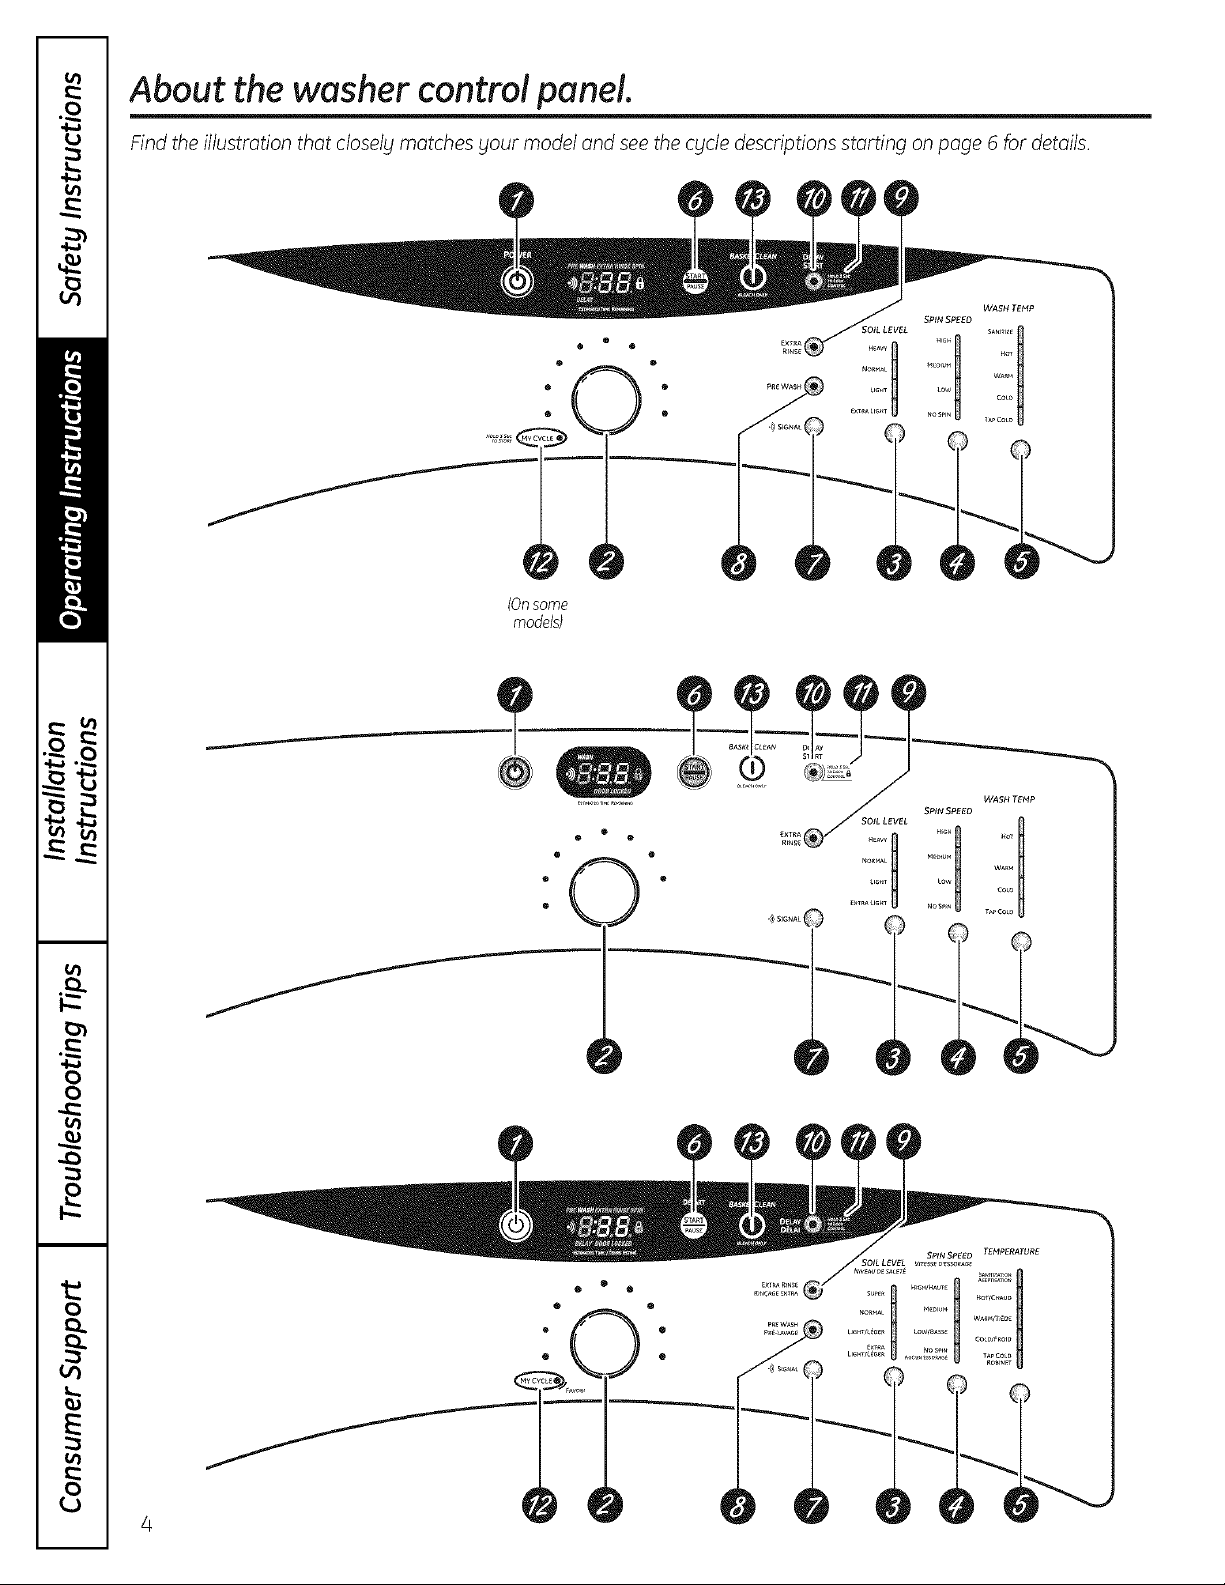
About the washer control panel.
Find the illustration that closely matches your model and see the cycle descriptions starting on page 6 for details.
(Onsome
models)
I
o
o
®
o
.(
o
o
)-

ge.com
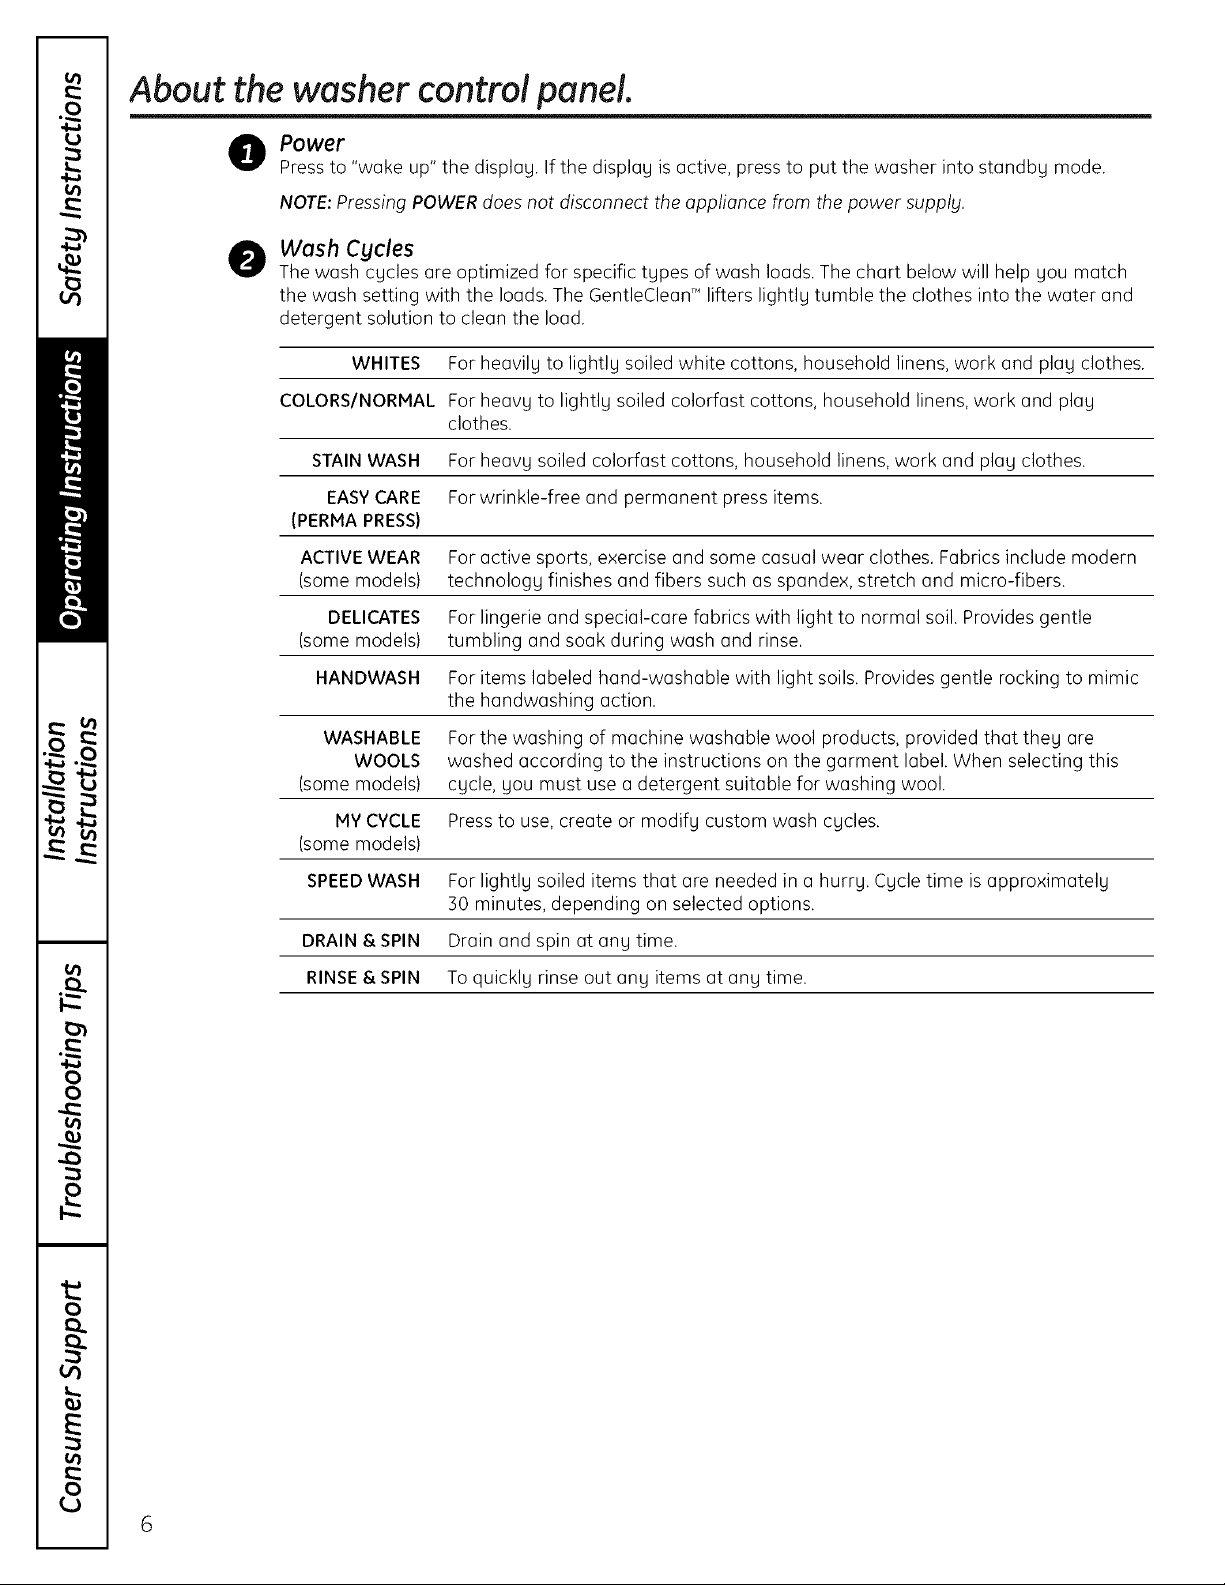
About the washer control panel.
O Power
Pressto "wake up" the display, If the display is active, press to put the washer into standby mode,
NOTE:PressingPOWER does not disconnect the appliance from the power supply,
Wash Cgcles
0
The wash cycles are optimized for specific types of wash loads, The chart below will help you match
the wash setting with the loads, The GentleCleanTM lifters lightly tumble the clothes into the water and
detergent solution to clean the load,
WHITES For heavily to lightly soiled white cottons, household linens,work and play clothes.
COLORS/NORMAL For heavy to lightly soiled colorfast cottons, household linens, work and play
clothes.
STAINWASH For heavy soiled colorfast cottons, household linens, work and play clothes.
EASYCARE Forwrinkle-free and permanent press items.
(PERMAPRESS)
ACTIVEWEAR For active sports, exercise and some casual wear clothes, Fabrics include modern
(some models) technology finishes and fibers such as spandex, stretch and micro-fibers.
DELICATES For lingerie and special-care fabrics with light to normal soil. Provides gentle
(some models) tumbling and soak during wash and rinse.
HANDWASH For items labeled hand-washable with light soils. Provides gentle rocking to mimic
the handwashing action.
WASHABLE Forthe washing of machine washable wool products, provided that they are
WOOLS washed according to the instructions on the garment label. When selecting this
(some models) cycle, you must use a detergent suitable for washing wool.
PlY CYCLE Pressto use, create or modify custom wash cycles,
(some models)
SPEEDWASH For lightly soiled items that are needed in a hurry. Cycle time is approximately
30 minutes, depending on selected options.
DRAIN &SPIN Drain and spin at any time.
RINSE& SPIN To quickly rinse out any items at any time.
Sail Level
Changing the SOIL LEVELincreases or decreases the wash time to remove different amounts of soil.
To change the SOILLEVEL,press the SOIL LEVELbutton until you have reached the desired setting.
You can choose between Extra Light, Light, Normal or Heavy soil.
Spin Speed
O
Changing the SPINSPEEDchanges the final spin speed of the cycles. Always follow the fabric
manufacturer's care label when changing the SPINSPEED.
To change the SPIN SPEED,press the SPIN SPEEDbutton until you have reached the desired setting.
Higher spin speeds are not available on certain cycles, such as Delicates.
Higher spin speeds remove more water from the clothes and will help reduce dry time, but may also
increase the possibility of setting wrinkles on some fabrics.
Wash Temp
0
Adjust to select the proper water temperature for the wash cycle. The prewash and rinse water is
always cold to help reduce energy usage and reduce setting of stains and wrinkles.
Follow the fabric manufacturer's care label when selecting the wash temperature.
To change the wash temperature, press the WASH TEMPbutton until you have reached the desired
setting. The Sanitized wash temperature is not available on certain cgcles, such as Delicates.
When selecting the Sanitize wash temperature, the washer increases the water temperature
to sanitize and kill more than 99% of many common bacteria found in home laundry. The sanitize
wash temperature is only available on Stain Wash and Whites wash cgcles. For best results, select
the heavy soil setting when using the Sanitize wash temperature setting.
NOTE:Thefirst 10 seconds of the wash fill is always cold. This feature assists in conditioning the fabric
and preventing stains from setting on garments.
START/PAUSE
O
Pressto start a wash cycle. If the washer is running, pressing it once will pause the washer and unlock
the dooE Pressagain to restart the wash cycle.
NOTE:tf the washer is paused and the cycle is not restarted within 2 hours, the current wash cycle will
be cancelled.
NOTE:The washer performs automatic system checks after pressing the STARTbutton. Water will flow
in/45 seconds or less.Youmay hear the door lock and unlock before water flows; this is normal.
ge.com
About the washer features.
NOTE:Features mag not be available on all washer models.
Cycle Signal
Usethe SIGNALbutton to change
the volume of the end of cycle signal.
Prewash ton some models)
0 PREWASH
Prewashisan extra wash before
the main wash. Useit for heavily soiled
clothes or for clothes with a care label
that recommends prewashing before
washing. Be sureto add high-efficiency
Pressthe button until you reach
the desired volume.
detergent, or the proper wash additive
to the prewash dispenser.
NOTE:When selecting prewash,
it is recommended to use powder
detergent in the main wash (detergent)
compartment.
O
EXTRA Extra Rinse
Usean extra rinsewhen additional rinsing
is desiredto remove excessdirt and
detergent from soiledloads.
Delag Start
Youcan delay the start ofawash cycle
for 10-18 hours,dependingonthemodel.
Pressthe DELAYSTARTbutton to choose
the number of hours you want to delay
the start of the cycle,then presstheSTART
button.The machine willcount down and
start automatically at the correcttime.
Lock
Youcan lock the controls to prevent any
selections from being made.Oryou can
lock the controls after you have started
a cycle.
Children cannot accidentally start
the washer bbltouching pods with
this option selected.
NOTE:If blouforgetto fully closethe door,
a remindersignal will beep remindingyou
to do so.
NOTE:Ifyou openthe door when the dela_l
iscountingdown, the machinewill enter
thepause state. Youmust closethe door
and pressSTARTagain in orderto restart
thecountdown.
Tolockthe washer,pressand hold
the DELAYSTARTbutton for 3 seconds.
Tounlock the washer controls, press
and hold the DELAVSTARTbutton for
3 seconds.
The control lock icon onthe display will
light up when it is on.
NOTE:The POWERbutton can still be
used when the machine is locked.
®
@
8
MV CYCLE (on some models)
Tosavea favoritecycle,setthedesired
settingsforwash cycle,soillevel,spinspeed
and washtemp settingsandholddown the
MVCYCLEbutton for3seconds.A beepwill
soundto indicatethe cycle hasbeensaved.
To useyour custom cycle, pressthe
MVCYCLEbutton beforewashing a load.
Tochangethe saved cycle, set the desired
settings and hold down the MVCYCLE
button for 3 seconds.
BASKET CLEAN
BasketClean isa cycle that freshens up
the inside of your washer Thecycle uses
bleach and more water to refresh your
washer.Use BasketClean once every
month to reduce odor and residuebuildup
insidethe washer
NOTE:Whenusing MY CYCLE,wash
options cannot be modified after the
cgcle has been started.
NOTE:If btou change wash options with
MYCYCLEbefore starting the chicle,the
MVCYCLElight will turn off and you will
be returned to the base cgcle.
Formoreinformation on BasketClean,
referto the Careand Cleaningsection on
page 11.
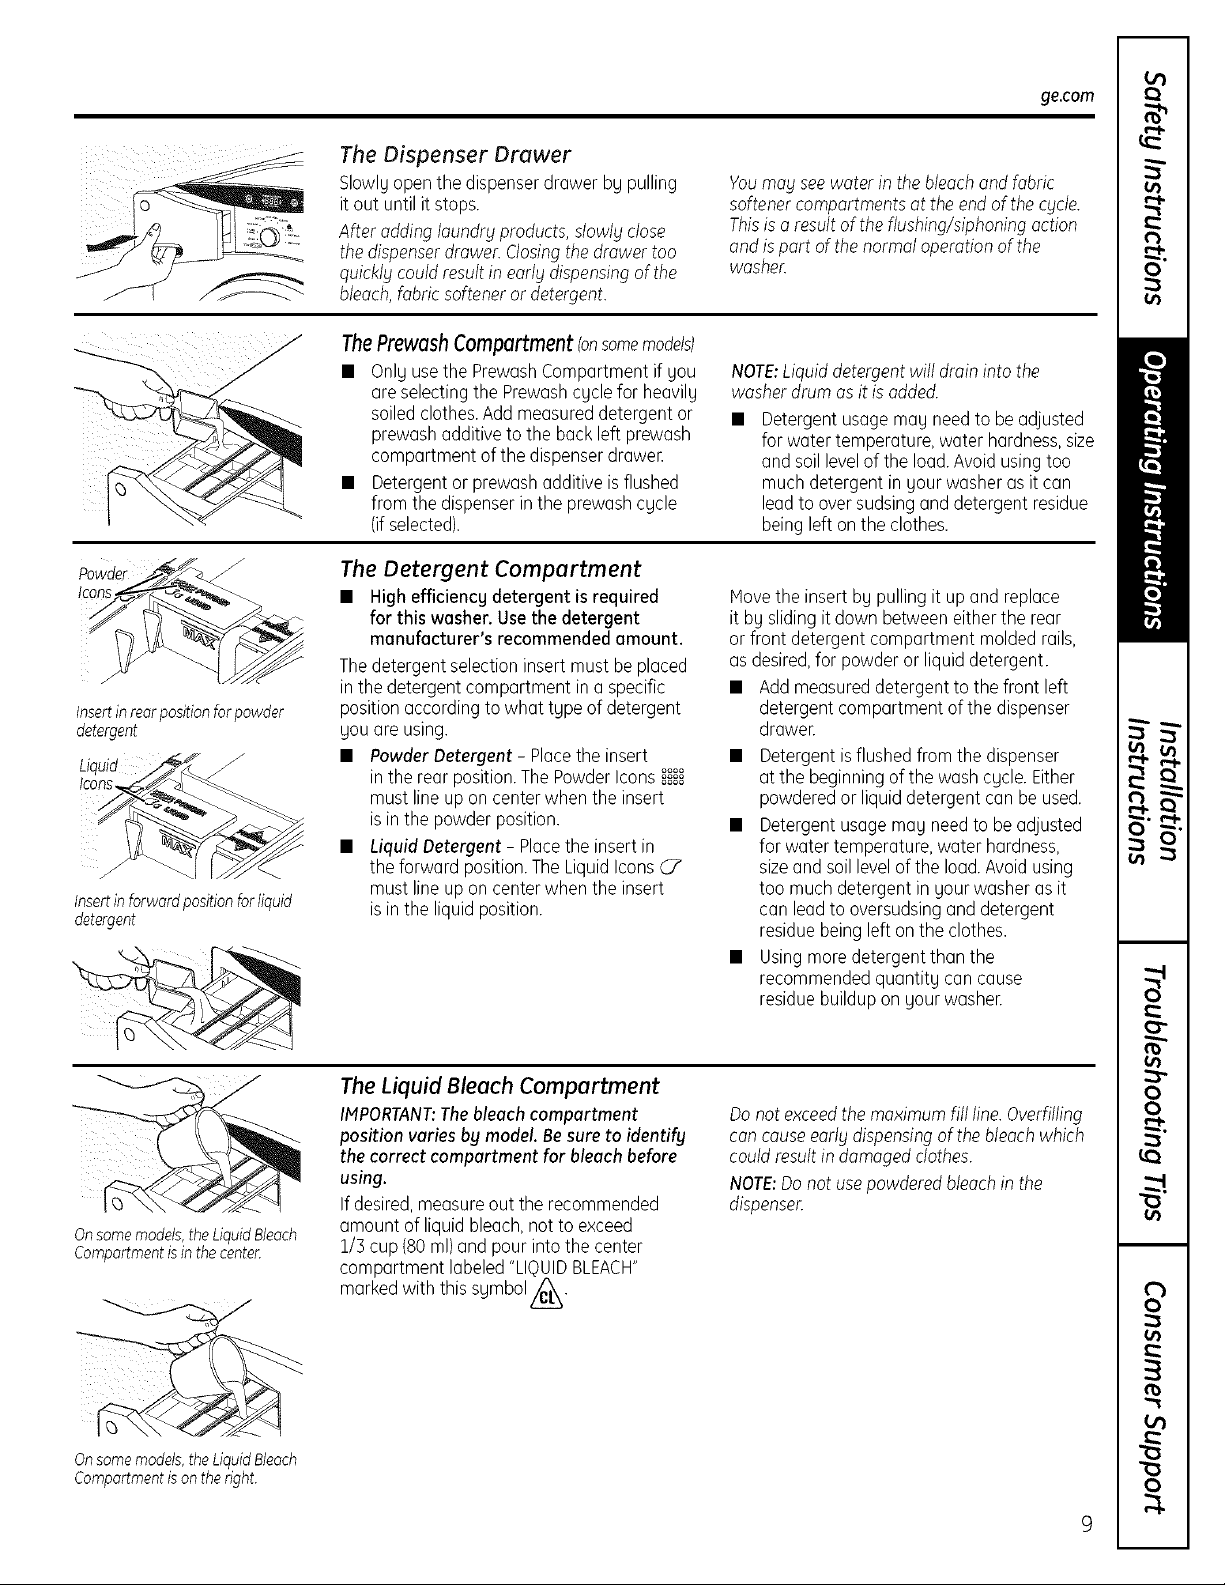
The Dispenser Drawer
Slowlyopen thedispenserdrawer bgpulling
it out untilit stops.
After addinglaundryproducts,slowly close
the dispenserdrawer.Closingthedrawertoo
quicklycouldresultin earlydispensingofthe
bleach,fabric softeneror detergent.
ThePrewash Compartment (onsomemodels)
• Onlyuse the PrewashCompartmentif you
are selectingthe Prewashcyclefor heavily
soiledclothes.Addmeasureddetergentor
prewashadditiveto the backleft prewash
compartment ofthe dispenserdrawer.
• Detergentor prewashadditiveisflushed
from the dispenserin the prewashcycle
(ifselected).
ge.com
Youmay seewaterin the bleachand fabric
softenercompartmentsat the endof the cycle.
Thisisoresultof theflushing/siphoningaction
and ispart of the normaloperationof the
washer.
NOTE:Liquiddetergentwill drain intothe
washerdrumasit is added.
• Detergentusagemay needto beadjusted
for water temperature,water hardness,size
and soillevelof the load.Avoid usingtoo
muchdetergent in yourwasher as it can
leadto oversudsingand detergent residue
beingleft onthe clothes.
owder
Insertin rearpositionforpowder
detergent
Liquid /
Icons
J
Insertinforwardpositionforliquid
detergent
Onsomemodels,theLiquidBleach
Comportmentisinthe center.
The Detergent Compartment
• Highefficiency detergent is required
for this washer. Usethe detergent
manufacturer's recommendedamount.
Thedetergentselectioninsert must beplaced
inthe detergentcompartment ina specific
positionaccordingto whattgpe of detergent
gouare using.
• PowderDetergent - Placethe insert
inthe rear position.ThePowderIconsoooo....
mustlineup on centerwhen the insert
isinthe powderposition.
• Liquid Detergent - Placetheinsertin
the forward position.TheLiquidIcons_"
mustlineup on centerwhen the insert
isinthe liquidposition.
QOQQ
The Liquid Bleach Compartment
IMPORTANT:Thebleachcompartment
position varies by model. Besure to identify
the correctcomportmentfor bleochbefore
using.
If desired,measureout the recommended
amount of liquid bleach,notto exceed
1/3cup (80ml)and pourinto the center
compartment labeled"LIQUIDBLEACH"
markedwith this sgmbol /_,.
Hovethe insert by pullingit up and replace
it by slidingit down betweeneitherthe rear
or front detergentcompartment molded rails,
asdesired,forpowderor liquid detergent.
• Addmeasureddetergentto the front left
detergent compartmentof the dispenser
drawer.
• Detergentisflushedfrom the dispenser
at the beginningofthe washcycle.Either
powderedor liquid detergentcan beused.
• Detergentusagemay needto be adjusted
for water temperature,water hardness,
sizeand soillevelof the load.Avoidusing
too much detergentin your washerasit
can leadto oversudsinganddetergent
residuebeingleftonthe clothes.
• Usingmoredetergentthan the
recommendedquantity cancause
residuebuilduponyour washer.
Donotexceedthemaximumfill line.Overfilling
concauseearly dispensingof the bleachwhich
couldresultindamagedclothes.
NOTE:Donotusepowderedbleachin the
dispenser.
Onsomemodels,theLiquidBleach
Compartmentisontheright.
About the washer features, gecom
TheFabric Softener Compartment
Dilutewith water to the maximumfillline.
Donotexceedthemaximum fillline.Overfilling
cancauseearlgdispensingof thefabricsoftener
which couldstainclothes.
NOTE:Donotpourfabricsoftenerdirectly
on thewash load.
Onsomemodels,theFabric
SoftenerCompartmentis
onthefight.
Onsomemodels,theFabric
SoftenerCompartmentis
inthecenter
IMPORTANT:Thefabric softener compartment
position varies by model.Besureto identify
the correct compartment for fabric softener
beforeusing.
Ifdesired,pour the recommendedamount
of liquidfabric softener into the compartment
labeled"FABRICSOFTENER."
Useonlg liquidfabric softenerin the dispensen
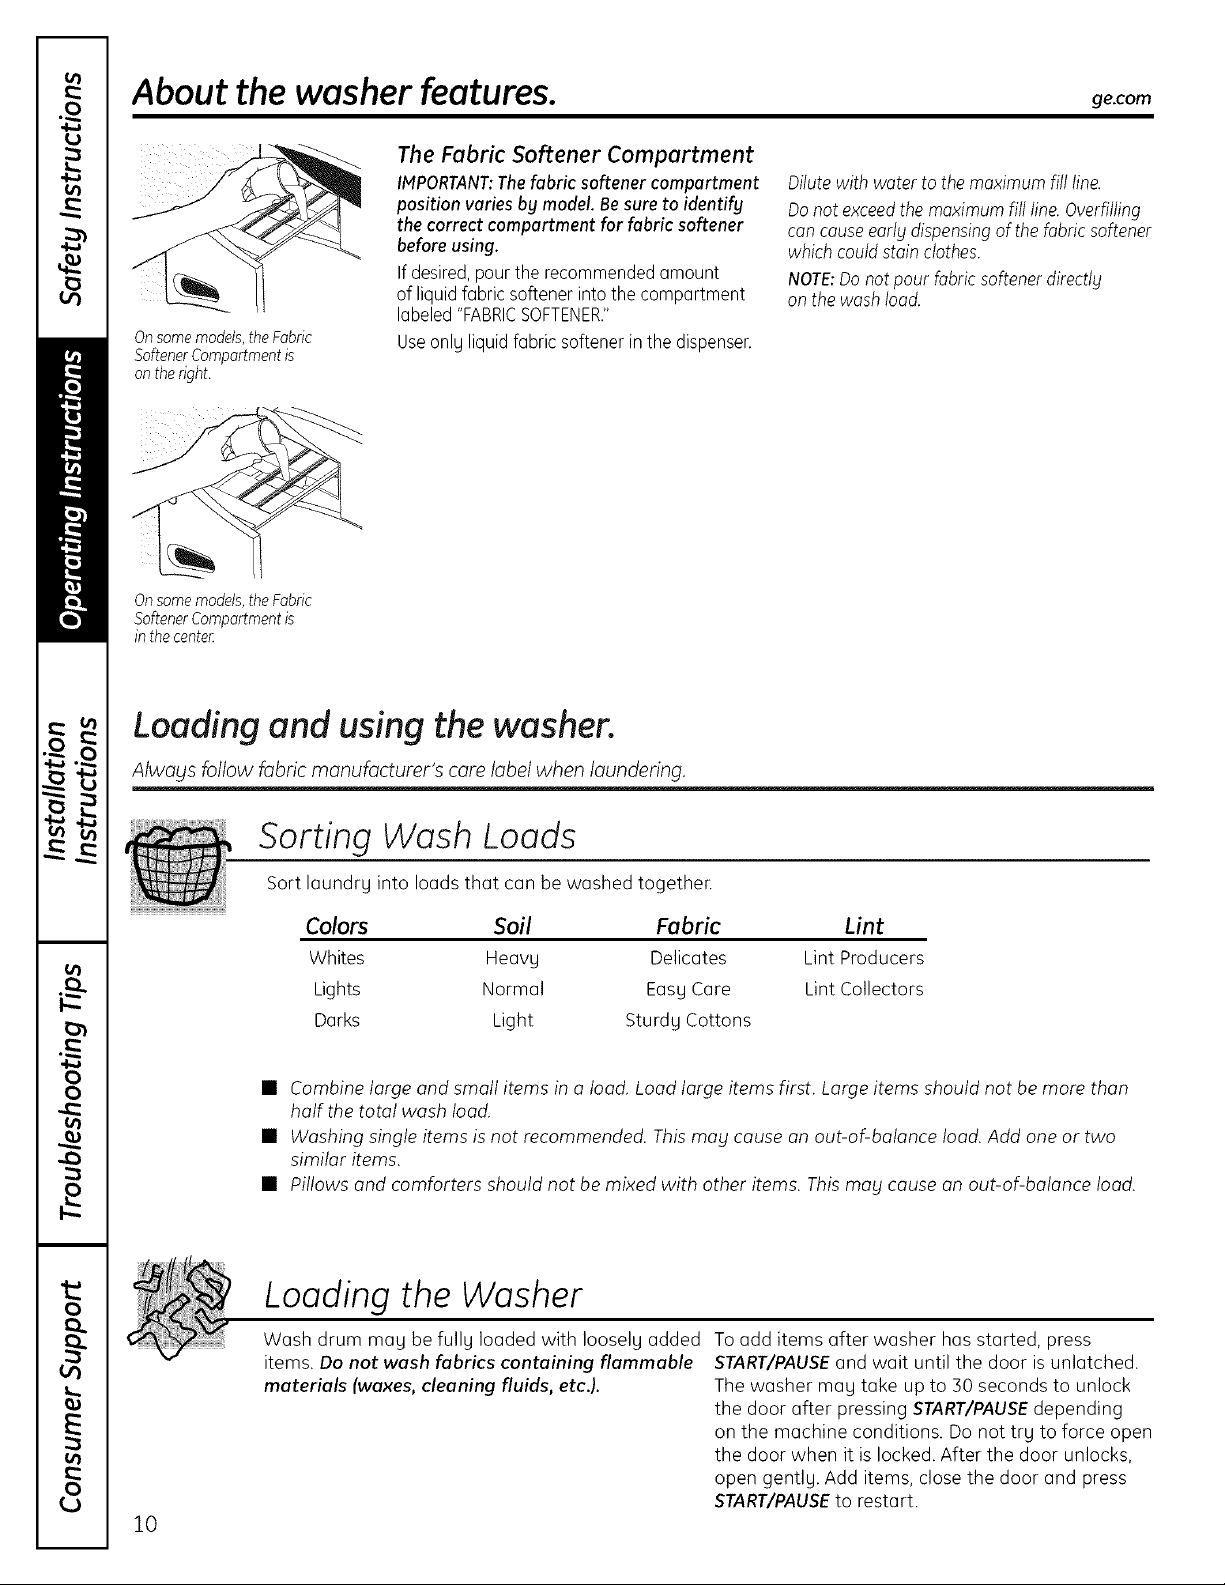
Loading and using the washer.
Afwoys follow fabric manufacturer's core tabef when laundering.
Sorting Wash Loads
Sort laundrg into loads that can be washed together.
Colors Soil Fabric Lint
Whites Heovg Delicotes Lint Producers
Lights Normal EasyCare Lint Collectors
Darks Light Sturdy Cottons
• Combine large and small items in o load. Load large items first. Large items should not be more than
half the total wash load.
• Washing single items is not recommended. Thismag cause an out-of-balance load. Add one or two
similar items.
• Pillows and comforters should not be mixed with other items. This mag cause an out-of-balance load.
Loading the Washer
10
Wash drum mag be fullg loaded with Iooselg added To add items after washer has started, press
items. Do not wash fabrics containing flammable START/PAUSEand wait until the door is unlatched.
materials (waxes, cleaning fluids, etc.). The washer mag take up to BOseconds to unlock
the door after pressing START/PAUSEdepending
on the machine conditions. Do not trg to force open
the door when it is locked. After the door unlocks,
open gentlg. Add items, close the door and press
START/PAUSEto restart.
Cleaning the washer, gecom
Care and Cleaning
Exterior: Immediately wipe off any spills. Wipe with damp cloth. Do not hit surface with sharp objects.
Moving and Storage: Ask the service technician to remove water from drain pump and hoses.
Do not store the washer where it will be exposed to the weather When moving the washer,
the tub should be kept stationary by using the shipping bolts removed during installation.
See Installation Instructions in this book. If these parts are not available, they can be ordered
by visiting our Website at ge.com or by calling 800.GE.CARES.
Long Vacations: Be sure water supply is shut off at faucets. Drain all water from hoses if weather will be
below freezing.
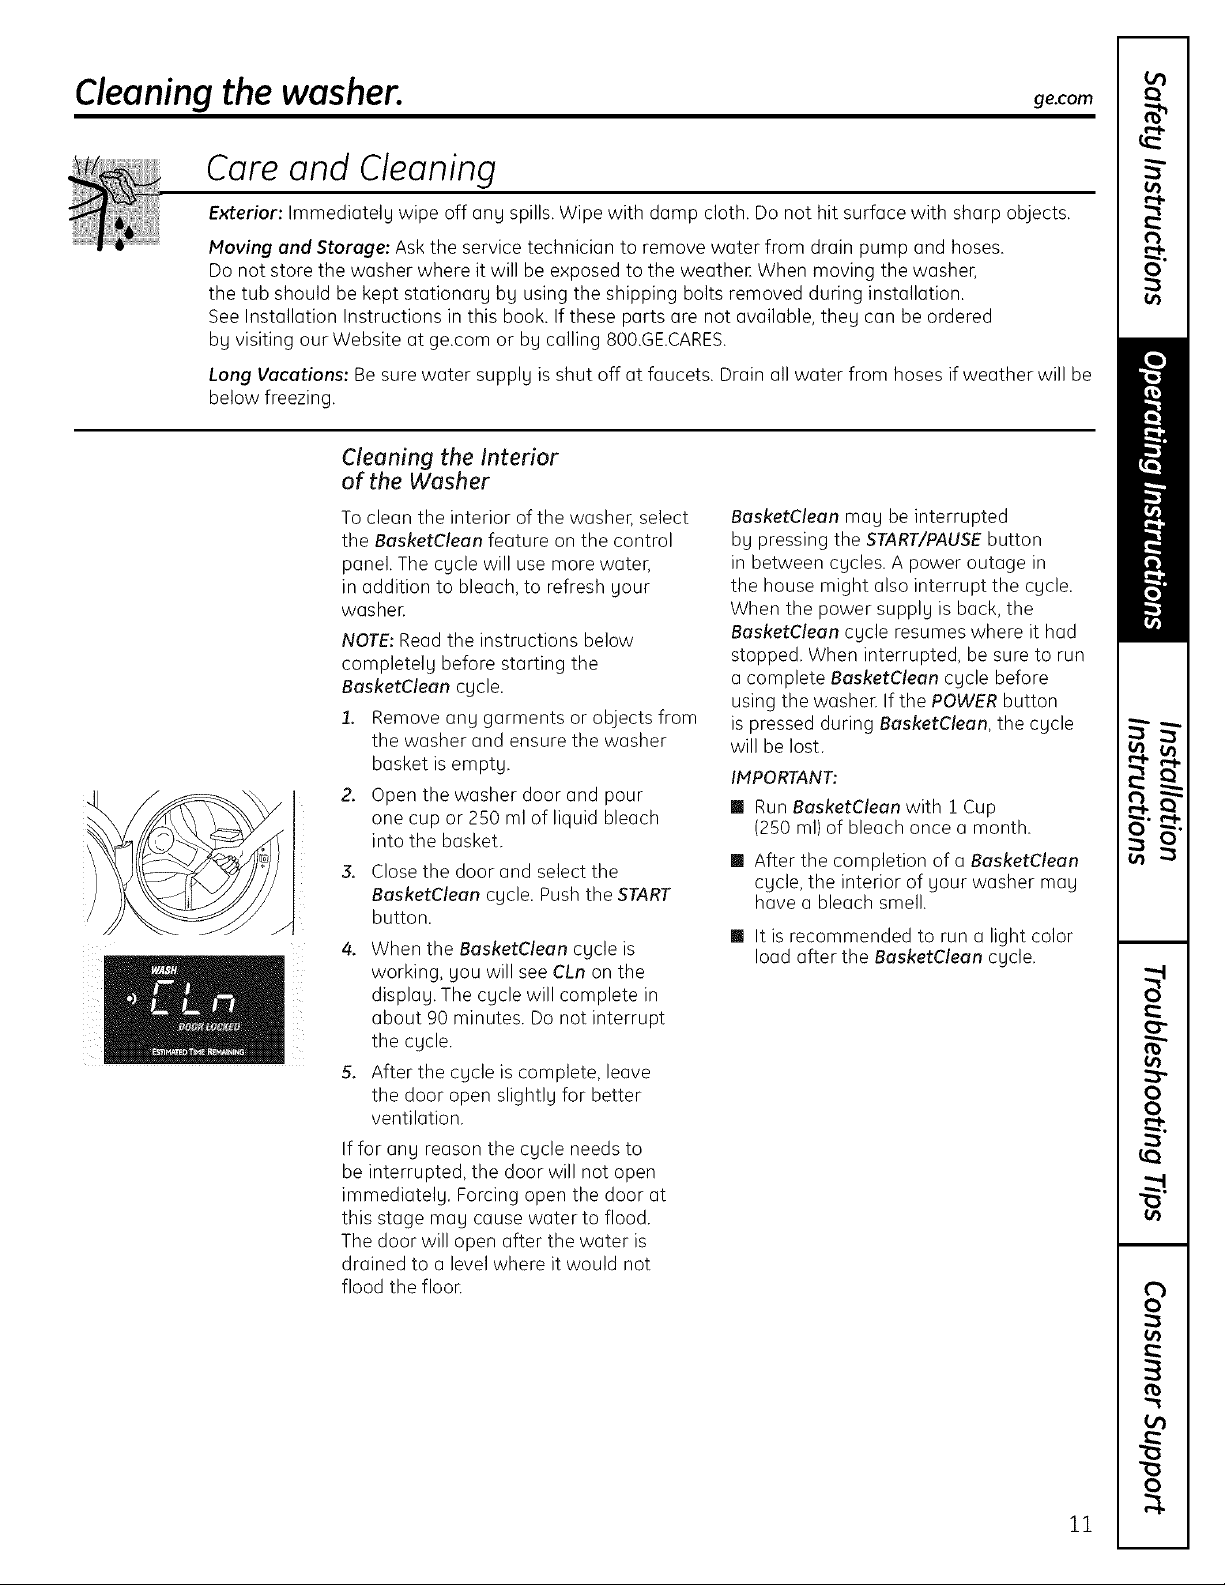
Cleaning the interior
of the Washer
To clean the interior of the washer, select
the BasketClean feature on the control
panel. The cycle will use more water,
in addition to bleach, to refresh your
washer.
NOTE:Read the instructions below
completely before starting the
BasketCleancycle.
1. Remove any garments or objects from
the washer and ensure the washer
basket is empty.
2. Open the washer door and pour
one cup or 250 ml of liquid bleach
into the basket.
3. Closethe door and select the
BasketClean cycle. Pushthe START
button.
4. When the BasketClean cycle is
working, you will see CLn on the
display. The cycle will complete in
about 90 minutes. Do not interrupt
the cycle.
5. After the cycle is complete, leave
the door open slightly for better
ventilation.
If for any reason the cycle needs to
be interrupted, the door will not open
immediately. Forcing open the door at
this stage may cause water to flood.
The door will open after the water is
drained to a level where it would not
flood the floor.
BasketClean may be interrupted
by pressing the START/PAUSE button
in between cycles. A power outage in
the house might also interrupt the cycle.
When the power supply is back, the
BasketClean cycle resumes where it had
stopped. When interrupted, be sure to run
a complete BasketClean cycle before
using the washer. If the POWER button
is pressed during BasketClean, the cycle
will be lost.
IMPORTANT:
II Run BasketClean with 1 Cup
(250 ml) of bleach once a month.
II After the completion of a BasketClean
cycle, the interior of your washer may
have a bleach smell.
II It is recommended to run a light color
load after the BasketClean cycle.
11
Cleaning the washer.
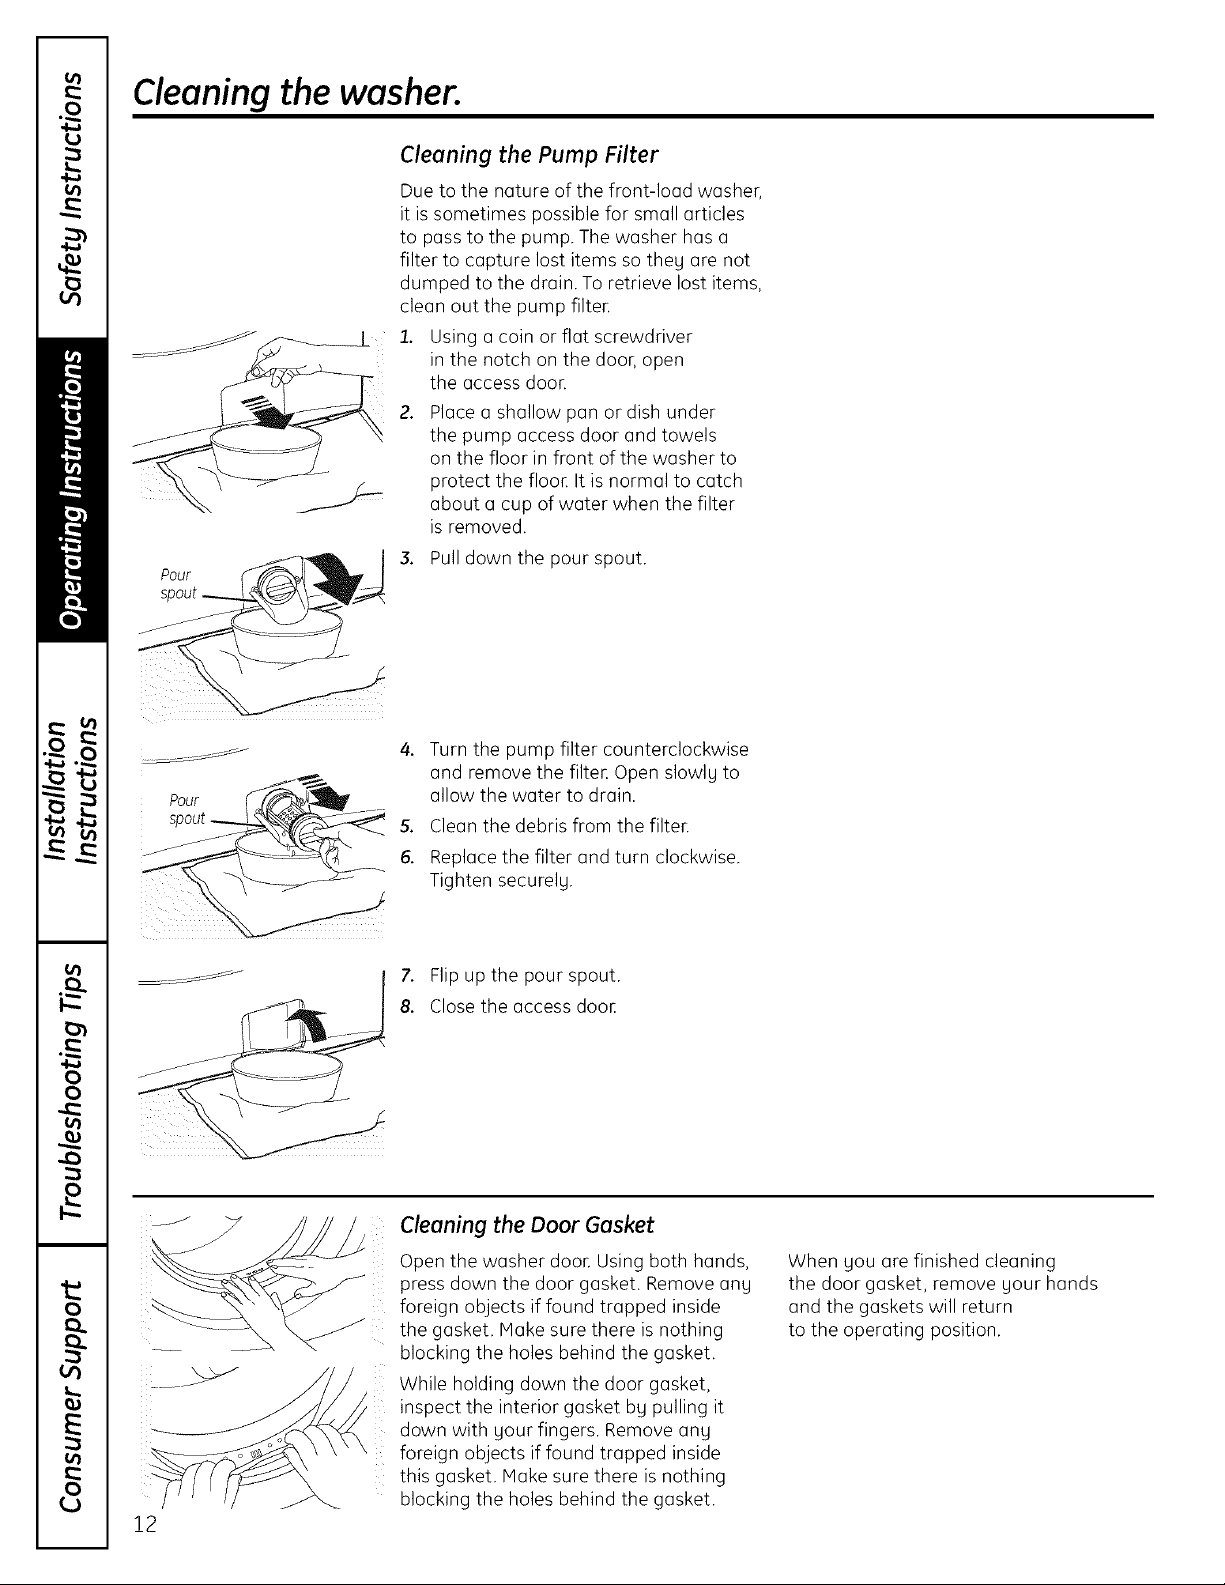
Cleaning the Pump Filter
Due to the nature of the front-load washer,
it is sometimes possible for small articles
to pass to the pump. The washer has a
filter to capture lost items so theg are not
dumped to the drain. To retrieve lost items,
clean out the pump filter.
Using a coin or flat screwdriver
in the notch on the door, open
the access door.
Place a shallow pan or dish under
the pump access door and towels
on the floor in front of the washer to
protect the floon It is normal to catch
about a cup of water when the filter
is removed.
Pour
3. Pulldown the pour spout.
Pour __ ......
12
4. Turn the pump filter counterclockwise
and remove the filter. Open slowlg to
allow the water to drain.
5. Clean the debris from the filter.
6. Replace the filter and turn clockwise.
Tighten securelg.
7. Flip up the pour spout.
8. Close the access doon
Cleaning the Door Gasket
Open the washer door. Using both hands,
press down the door gasket. Remove ang
foreign objects if found trapped inside
the gasket. Make sure there is nothing
blocking the holes behind the gasket.
While holding down the door gasket,
inspect the interior gasket bg pulling it
down with gour fingers. Remove ang
foreign objects if found trapped inside
this gasket. Make sure there is nothing
blocking the holes behind the gasket.
When gou are finished cleaning
the door gasket, remove gour hands
and the gaskets will return
to the operating position.
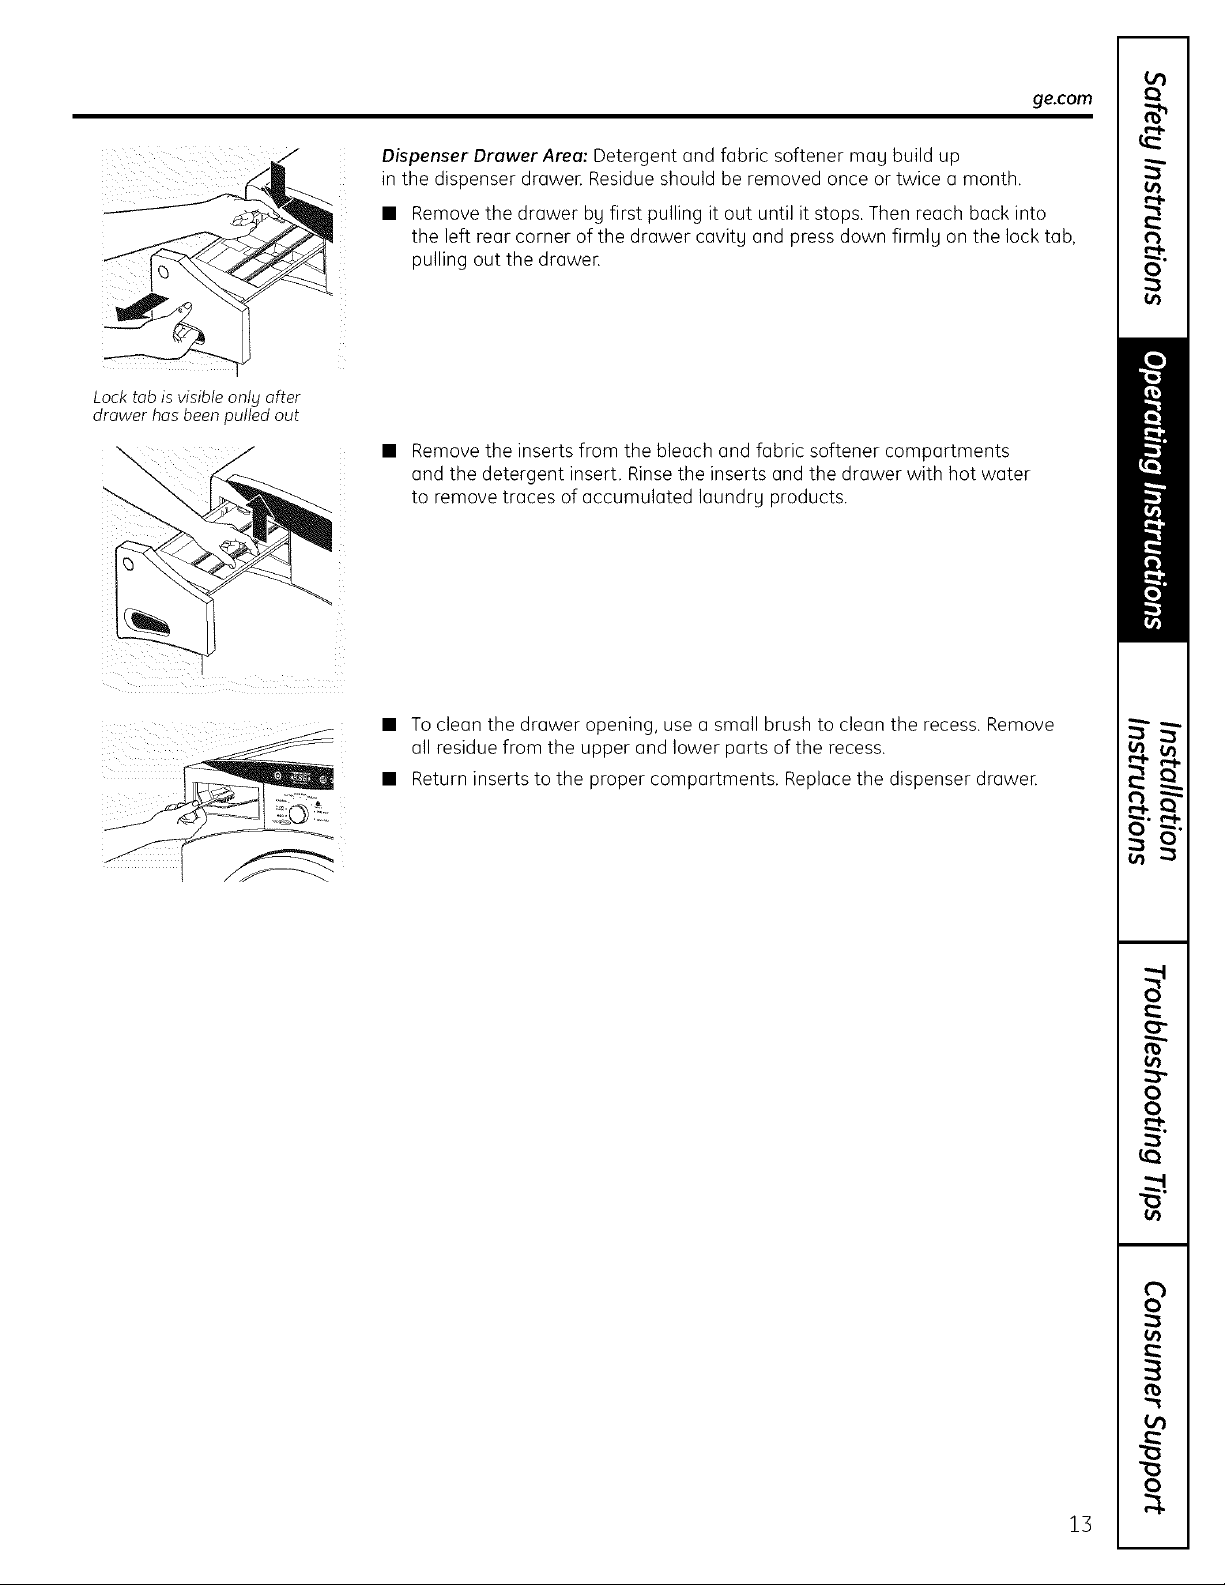
Lock tab is visible only after
drawer has been pulled out
ge.com
Dispenser Druwer Areu: Detergent and fabric softener mag build up
in the dispenser drawer. Residue should be removed once or twice a month.
• Remove the drawer bg first pulling it out until it stops. Then reach back into
the left rear corner of the drawer cavity and press down firml Uon the lock tab,
pulling out the drawer.
Remove the inserts from the bleach and fabric softener compartments
and the detergent insert. Rinse the inserts and the drawer with hot water
to remove traces of accumulated laundr U products.
• To clean the drawer opening, use a small brush to clean the recess. Remove
all residue from the upper and lower parts of the recess.
• Return inserts to the proper compartments. Replace the dispenser drawee
13
Installation
Washer
Instructions
In Canada, call 1.800.561.3344 or visitgeapplionces.co
I If gou have ang questions, call 800.GE.CARES(800.432.2737) orvisitour Websiteat:ge.com I
I
BEFOREYOU BEGIN
Read these instructions completelg and carefullg.
• IMPORTANT - Savetheseinstructions
for local inspector's use.
• IMPORTANT - Observeall governing
codes and ordinances.
• Note to Installer - Be sure to leave these
instructions with the ConsumeE
• Note to Consumer - Keepthese instructions
for future reference.
• Skill level - Installation of this appliance requires
basic mechanical and electrical skills.
• Completion time - i-3 hours
• Proper installation is the responsibility of the installer.
• Product failure due to improper installation is not
covered under the Warranty.
FOR YOUR SAFETY:
-_WARNING
TOOLS REQUIRED FOR
WASHER INSTALLATION
GII/4" nut driver
3/8" socket with ratchet
3/8" open-end wrench
GIAdjustable wrench or 7/16" socket with ratchet
GIAdjustable wrench or 9/16" open-end wrench
GIChannel-lock adjustable pliers
GICarpenter's level
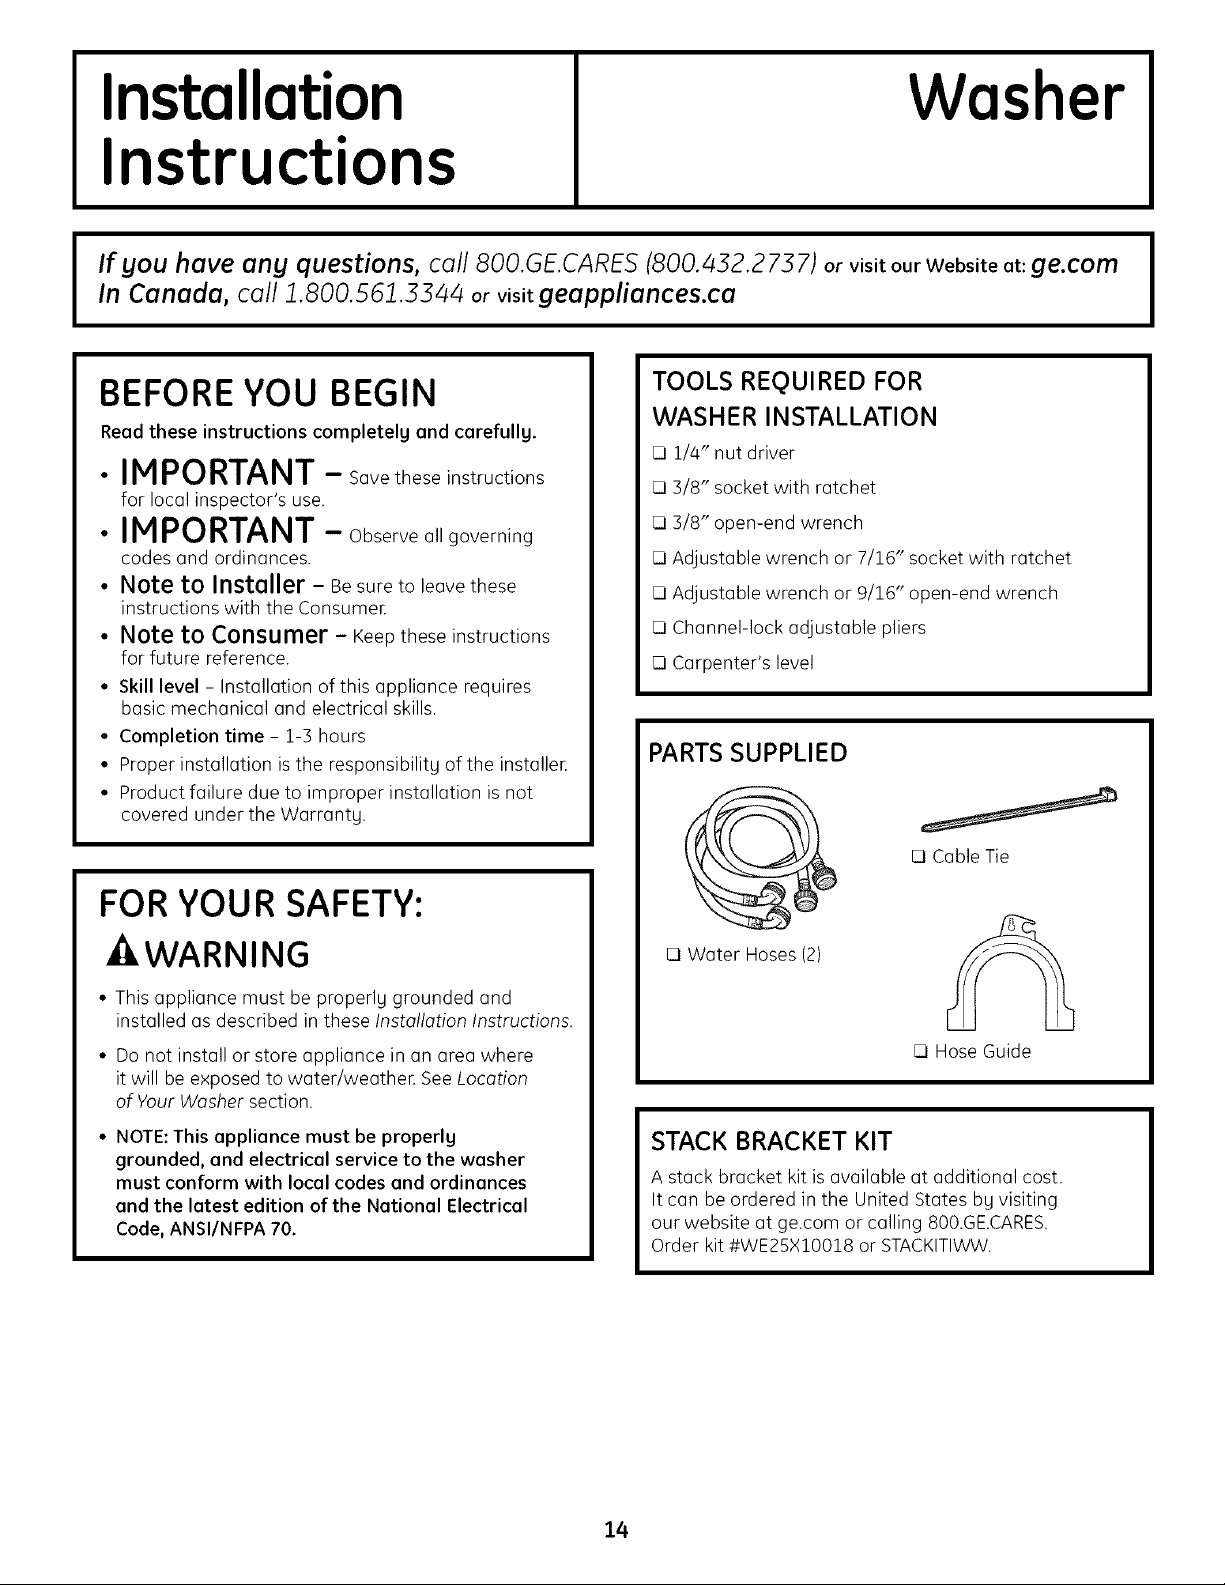
PARTS SUPPLIED
E] Cable Tie
G
CI Water Hoses (2)
• This appliance must be properlu grounded and
installed as described in these Installation Instructions.
• Do not install or store appliance in an area where
it will be exposed to water/weather. SeeLocation
of Your Washer section.
• NOTE: This appliance must be properlg
grounded, and electrical service to the washer
must conform with local codes and ordinances
and the latest edition of the National Electrical
Code, ANSI/NFPA 70.
CI Hose Guide
STACK BRACKET KIT
A stack bracket kit is available at additional cost.
It can be ordered in the United States bg visiting
our website at ge.com or calling 800.GE.CARES.
Order kit #WE25X10018 or STACKITIWW.
14
Installation Instructions
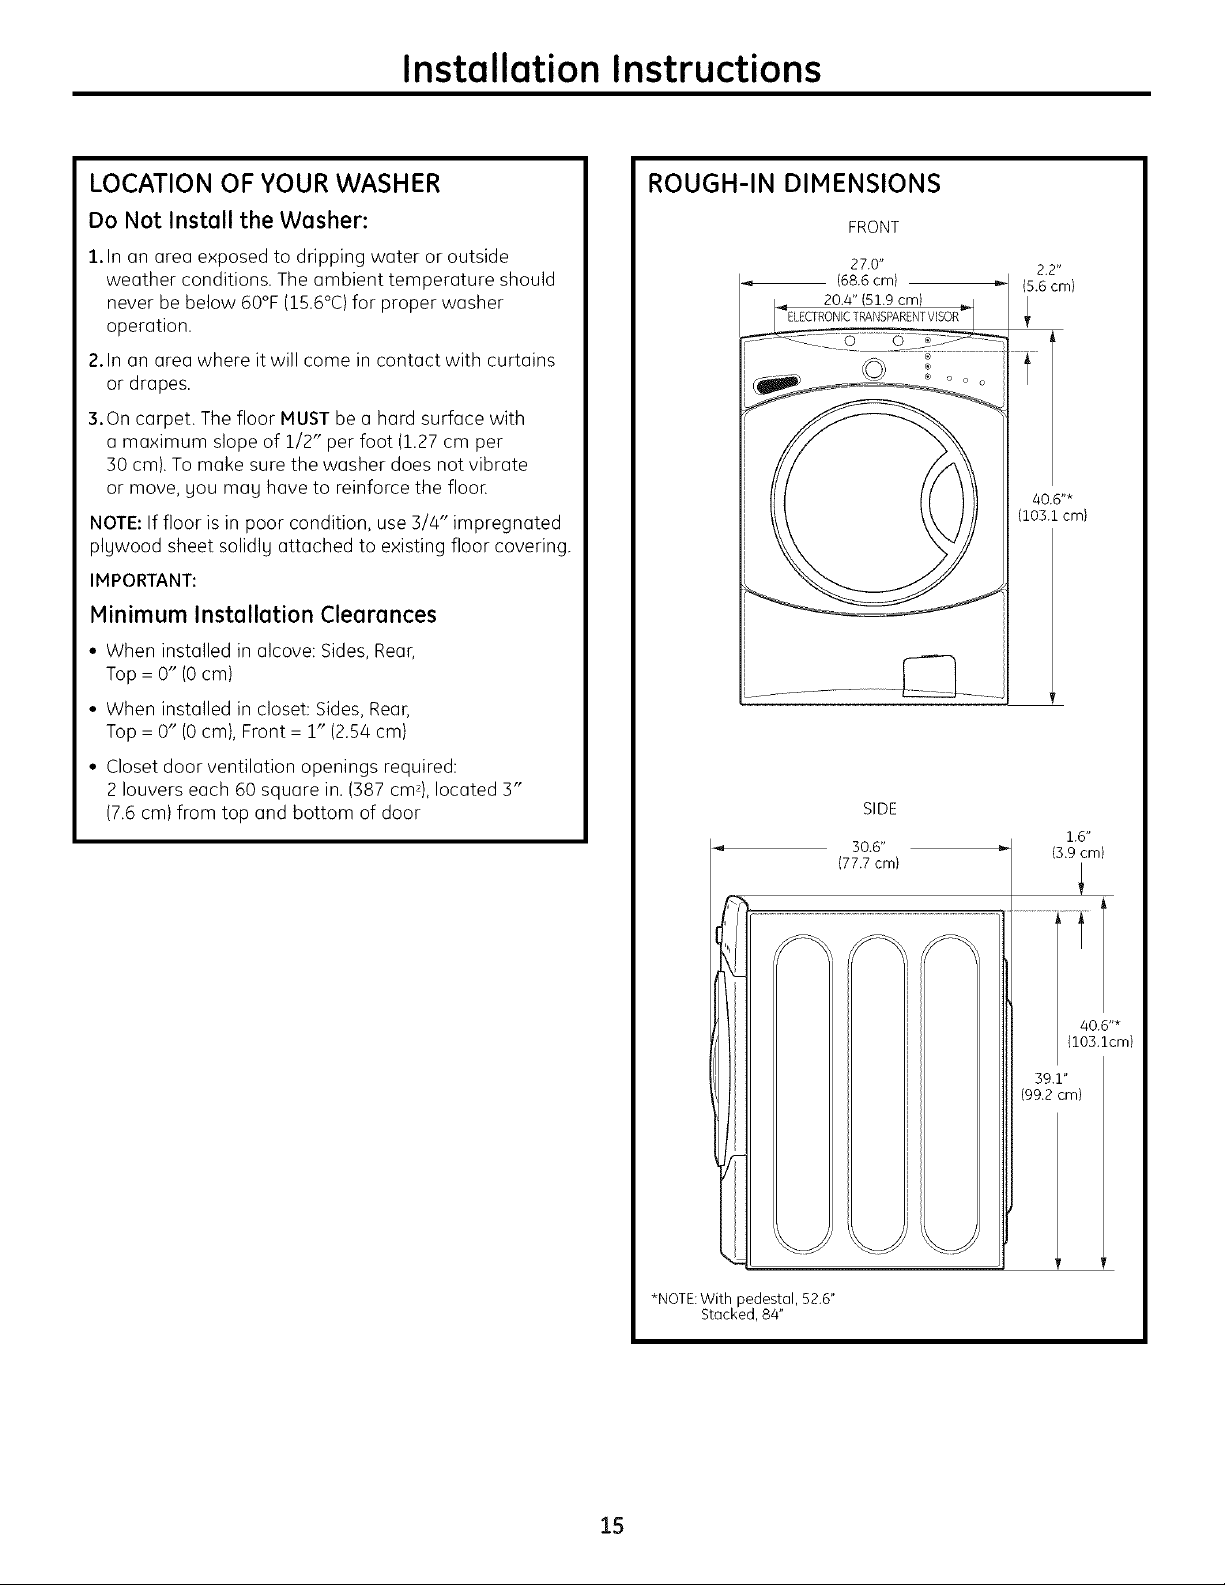
LOCATION OF YOUR WASHER
Do Not Install the Washer:
1.Inan area exposed to dripping water or outside
weather conditions. The ambient temperature should
never be below 60°F (15.6°C)for proper washer
operation.
2.Inan area where it will come in contact with curtains
or drapes.
3.On carpet. The floor MUSTbe a hard surface with
a maximum slope of 1/2" per foot (1.27 cm per
30 cm).Tomake sure the washer does not vibrate
or move, Uou mau have to reinforce the flooE
NOTE:Iffloor is in poor condition, use 3/4" impregnated
plywood sheet solidlu attached to existing floor covering.
IMPORTANT:
Minimum Installation Clearances
• When installed in alcove: Sides, Rear,
Top = O" (0 cm)
• When installed in closet: Sides,Rear,
Top = O" (0 cm), Front = 1" (2.54 cm)
• Closet door ventilation openings required:
2 louvers each 60 square in. (B87 cm2),located B"
(7.6cm) from top and bottom of door
ROUGH-IN DIMENSIONS
FRONT
27.0"
(68.6 cm)
20.4" (51.9 cm)
o o
SIDE
30.6"
(77.7 cm)
2_2"
(5.6 cm)
40.6"*
(103.1 cm)
(3.9 cm)
*NOTE: With pedestal, 52.6"
Stacked, 84"
15
40.6"*
(103.1cm)
39.1"
(99.2 cm)
Installation Instructions
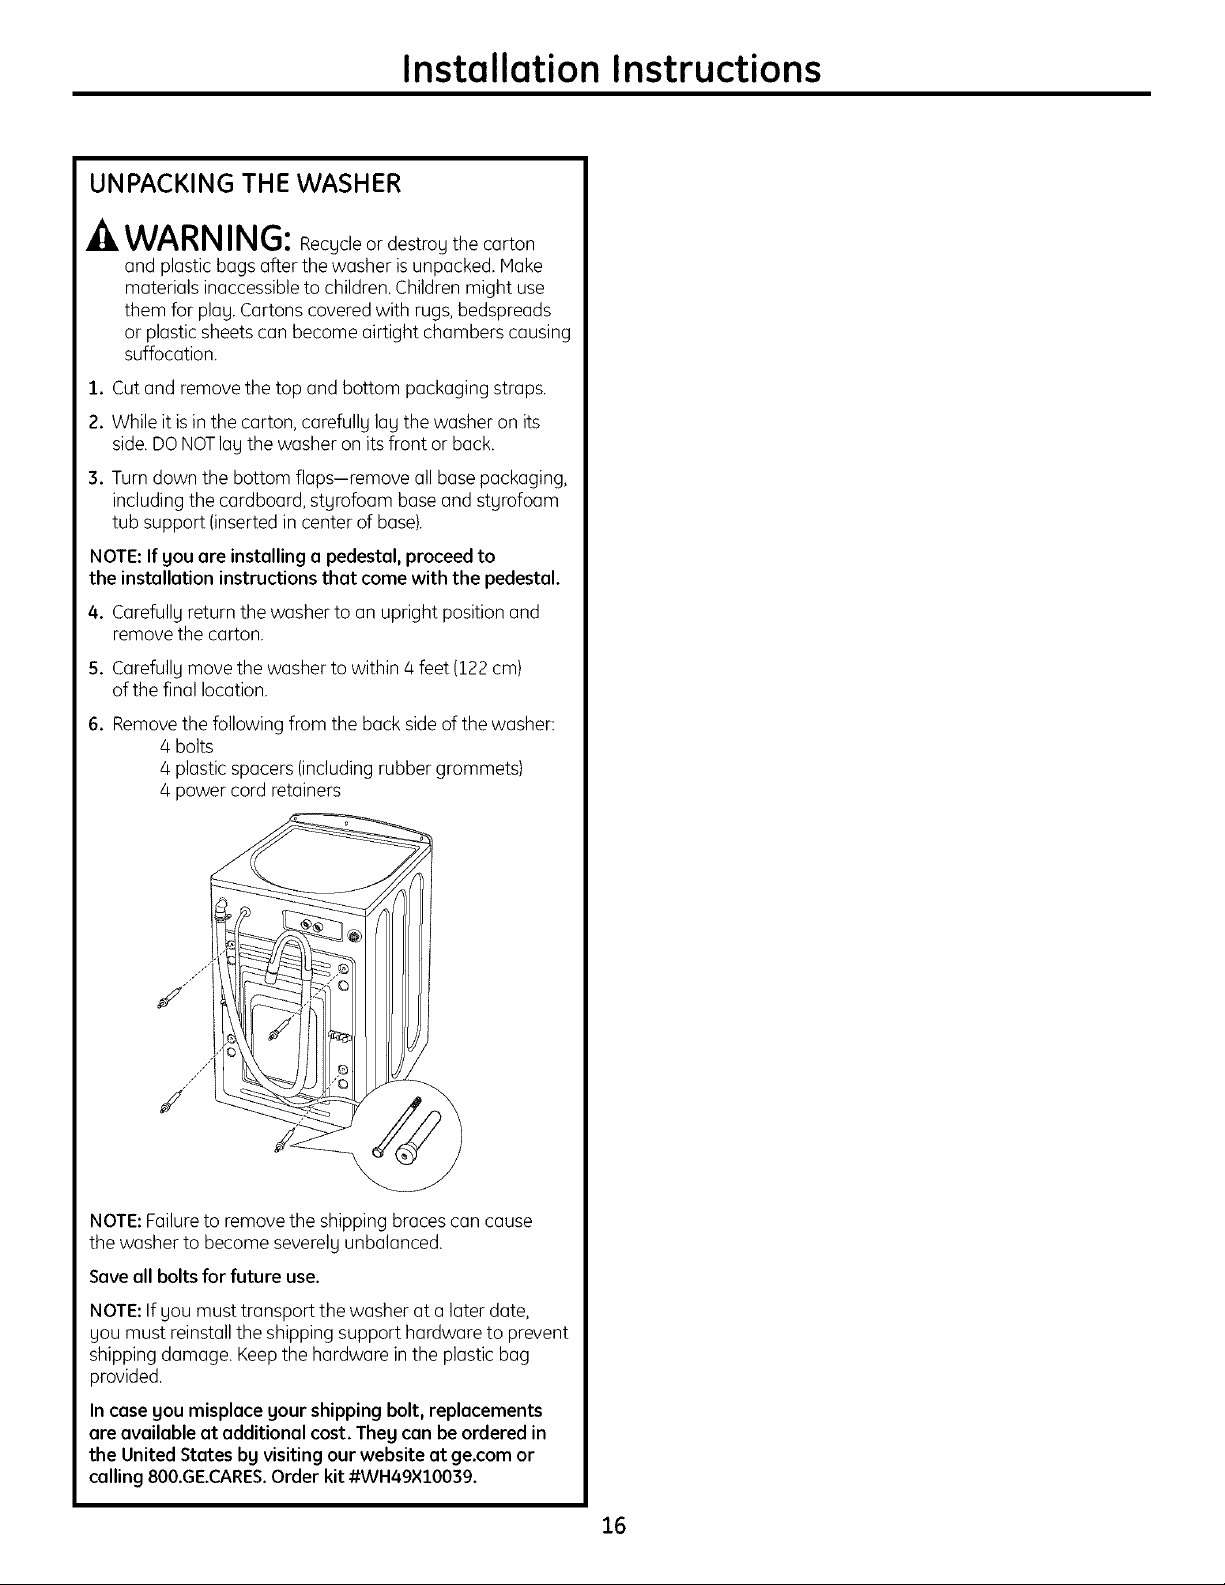
UNPACKING THE WASHER
-AWARNING: Recycleor destroy the carton
and plastic bags afterthe washer is unpacked. Make
materials inaccessibleto children.Children might use
them for play. Cartons coveredwith rugs,bedspreads
or plasticsheetscan become airtight chambers causing
suffocation.
1. Cut and removethe top and bottom packaging straps.
2. Whileit isin the carton, carefully lay the washer on its
side.DONOTlagthe washer on itsfront or back.
3. Turn down the bottom flaps-remove allbasepackaging,
including the cardboard, styrofoam base and styrofoam
tub support (insertedin center of base).
NOTE: If you are installing a pedestal, proceed to
the installation instructions that come with the pedestal.
4. Carefullyreturn the washer to an upright position and
remove the carton.
5. Carefullymove the washer to within 4 feet (122 cm)
of the final location.
6. Removethefollowing from the back sideof the washer:
4 bolts
4 plastic spacers (includingrubber grommets)
4 power cord retainers
NOTE:Failureto remove the shipping bracescan cause
the washer to become severelyunbalanced.
Saveall bolts for future use.
NOTE:If you must transport the washer at a later date,
you must reinstall the shipping support hardware to prevent
shipping damage. Keepthe hardware inthe plastic bag
provided.
Incase you misplace your shipping bolt, replacements
are available at additional cost. They can be ordered in
the United States by visiting our website at ge.com or
calling 800.GE.CARES.Order kit #WH49×10039.
16
Installation Instructions
ELECTRICAL REQUIREMENTS
Read these instructions completely
and carefully.
.A WARNING--TOREDUCETHERISKOF
FIRE,ELECTRICALSHOCKAND PERSONALINJURY:
• DO NOTUSEAN EXTENSIONCORDORANADAPTER
PLUGWITHTHISAPPLIANCE.
Washer must be electrically grounded in accordance
with local codes and ordinances, or in the absence
of local codes, in accordance with the NATIONAL
ELECTRICALCODE,ANSI/NFPA NO.70.
CIRCUIT- Individual, properly polarized and grounded
15-amp branch circuit fused with 15-amp time-delay fuse
or circuit breaker
POWERSUPPLY- 2-wire, with ground, 120-volt,
single-phase,60-Hz,Alternating Current.
grounded 3-prong receptacleto be
located sothe power supply cord
OUTLETRECEPTACLE- Properly _ _
is accessiblewhen the washer is
in an installedposition. I ('i-_
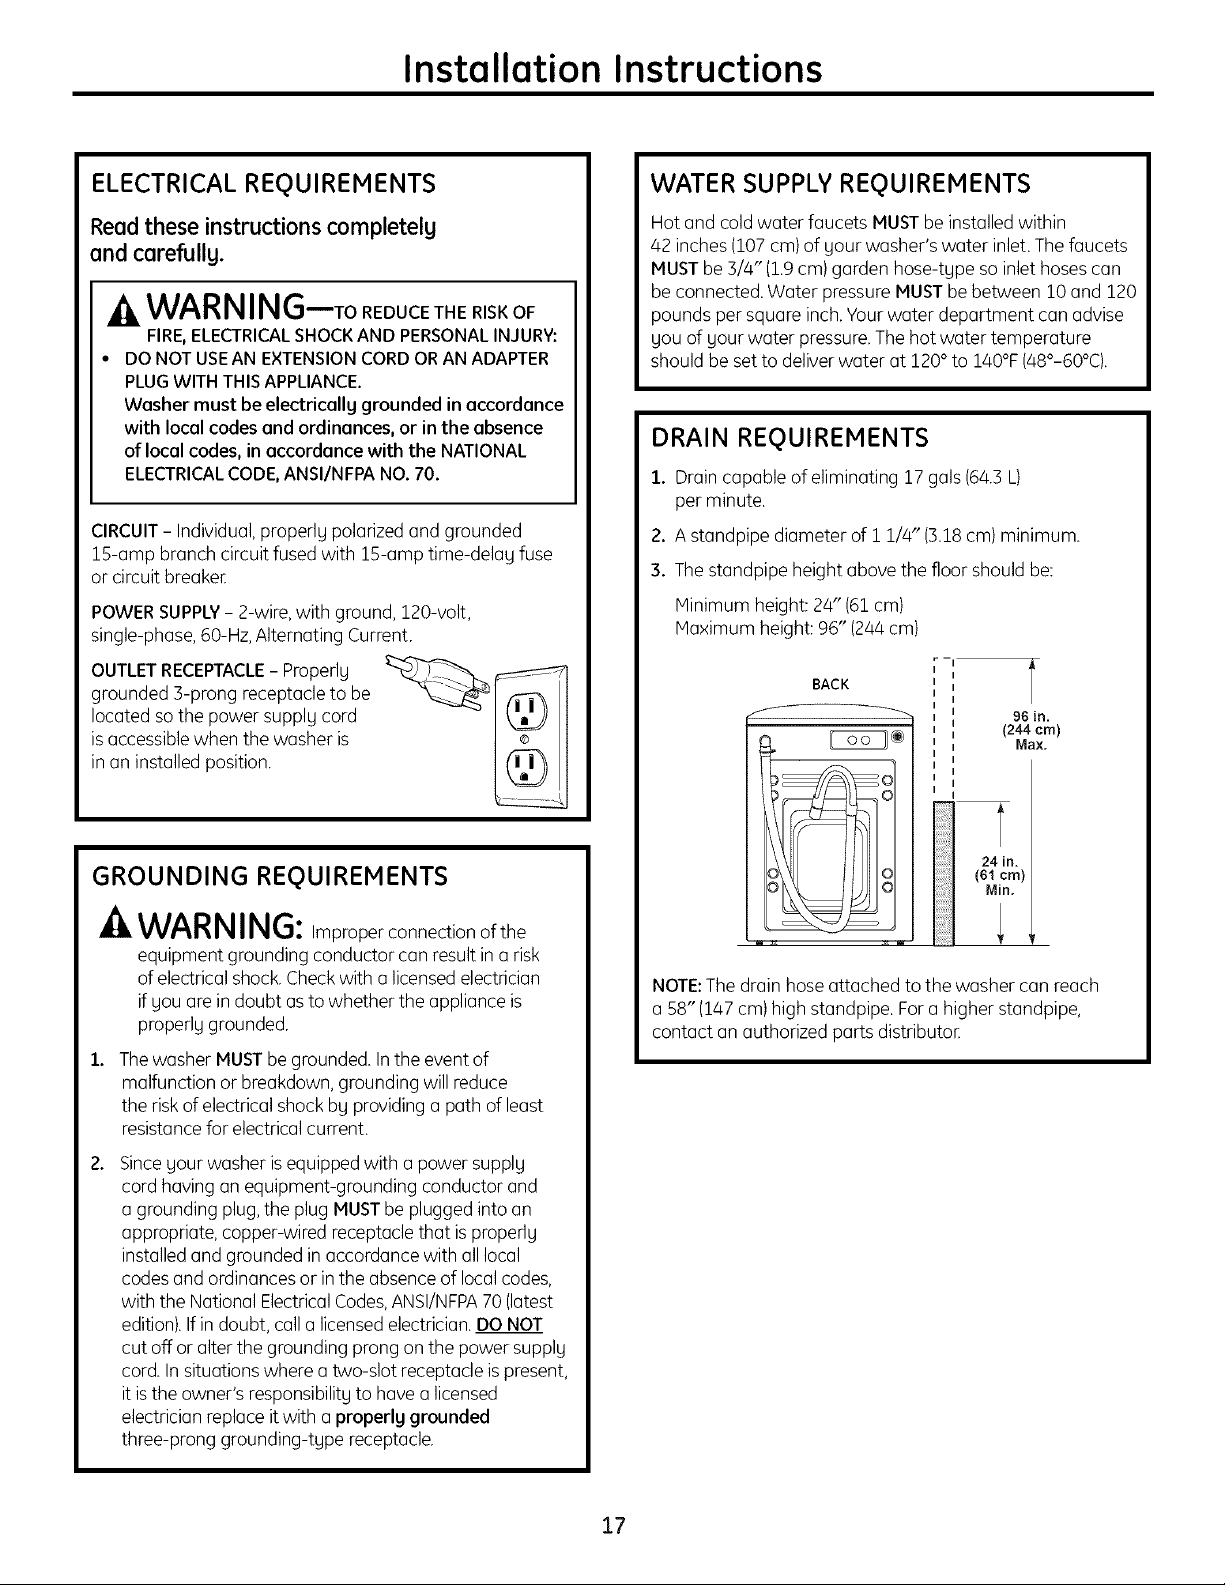
WATER SUPPLY REQUIREMENTS
Hot and coldwater faucets MUSTbe installedwithin
42 inches(107cm)of your washer's water inlet.Thefaucets
MUSTbe 3/4" (1.9cm)garden hose-type so inlet hoses can
be connected.Water pressureMUSTbebetween 10 and 120
pounds per square inch. Yourwater de )artment can advise
you of your water pressure.Thehot water temperature
should be set to deliver water at 120° to 140°F(48°-60°C).
DRAIN REQUIREMENTS
1. Drain capable of eliminating 17gals (64.3L)
per minute.
2. A standpipe diameter of i 1/4" (3.18cm) minimum.
3. The standpipe height above the floor should be:
Minimum height: 24" (61cm)
Maximum height: 96" (244cm)
r-- I
BACK
I
I
I
I
I
I
I
I
I
I
I
[
96 in.
(244 cm)
Max.
GROUNDING REQUIREMENTS
-AWARNING: ,mproperconnectionofthe
equipment grounding conductor can resultinarisk
ofelectricalshock.Checkwith a licensedelectrician
if you areindoubt asto whether the appliance is
properly grounded.
1. Thewasher MUSTbe grounded. Inthe event of
malfunction or breakdown, grounding will reduce
the riskofelectricalshock bg providing a path of least
resistancefor electrical current.
2.
Sinceyour washer isequipped with a power supply
cordhaving anequipment-grounding conductor and
a grounding plug,the plug MUSTbepluggedinto an
appropriate, copper-wiredreceptacle that isproperly
installedand grounded in accordancewith all local
codesand ordinances or in the absence of local codes,
with the National ElectricalCodes,ANSI/NFPA70 (latest
edition).If indoubt, call a licensedelectrician.DONOT
cut off oralter the grounding prong on the power supply
cord.In situationswhere a two-slot receptacleis present,
itisthe owner's responsibilityto have a licensed
electricianreplace it with a properly grounded
three-prong grounding-type receptacle.
NOTE:The drainhose attached to the washer can reach
a 58" (147cm)high standpipe. Fora higher standpipe,
contact an authorized parts distributon
17
Installation Instructions
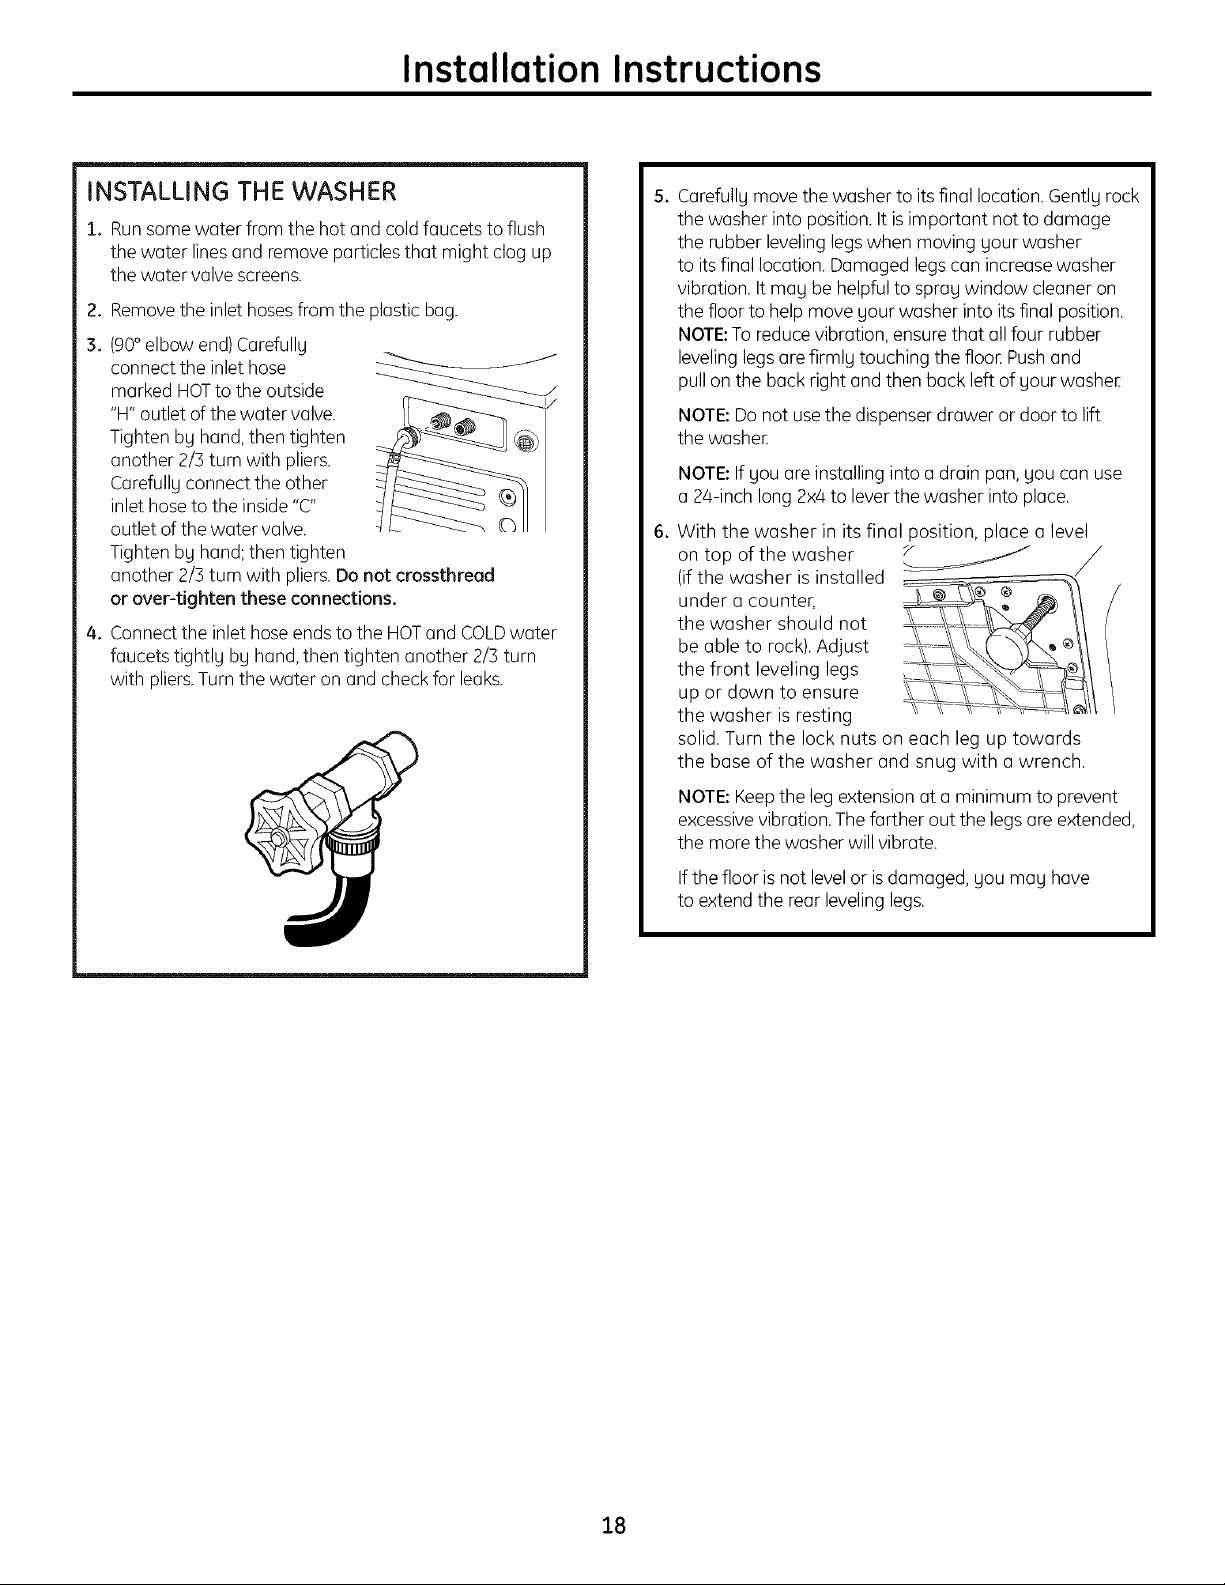
INSTALLING THE WASHER
1. Runsomewater from the hot and cold faucets to flush
the water lines and remove particles that might clog up
the water valve screens.
2. Removethe inlethosesfrom the plastic bag.
3. (gO° elbow end)Carefully
connect the inlet hose
marked HOTto the outside
"H" outlet of the water valve.
Tighten by hand,then tighten
another 2/3 turn with pliers.
Carefully connect the other
inlet hoseto the inside "C"
outlet of the water valve.
Tighten by hand;then tighten
another 2/3 turn with pliers.Donot crossthread
or over-tighten these connections.
4. Connectthe inlet hoseends to the HOTand COLDwater
faucets tightly by hand,then tighten another 2/3 turn
with pliers.Turnthe water on and check for leaks.
5,
Carefully move the washer to its final location. Gently rock
the washer into position.Itisimportant notto damage
the rubber leveling legswhen moving your washer
to its final location. Damaged legscan increasewasher
vibration. It man be helpfulto spray window cleaner on
the floor to help move your washer into its final position.
NOTE:To reducevibration, ensurethat all four rubber
levelinglegs are firmly touching the flooEPushand
pull onthe back right and then back left of your washeE
NOTE:Do not usethe dispenser drawer or door to lift
the washe_
NOTE:If you are installinginto a drain pan, you can use
a 24-inch long 2x4 to leverthe washer into place.
6,
With the washer in its final position, place a level
on top of the washer _ ../
(if the washer is installed
under a counter, _" _ _ //
the washer should not
be able to rock). Adjust
the front leveling legs _-_
up or down to ensure
the washer is resting
solid. Turn the lock nuts on each leg up towards
the base of the washer and snug with a wrench.
NOTE:Keepthe leg extensionat a minimum to prevent
excessivevibration. Thefarther out the legs areextended,
the more the washer will vibrate.
Ifthe floor isnot levelorisdamaged, you mag have
to extend the rear levelinglegs.
18
Installation Instructions
INSTALLING THE WASHER Icont.I
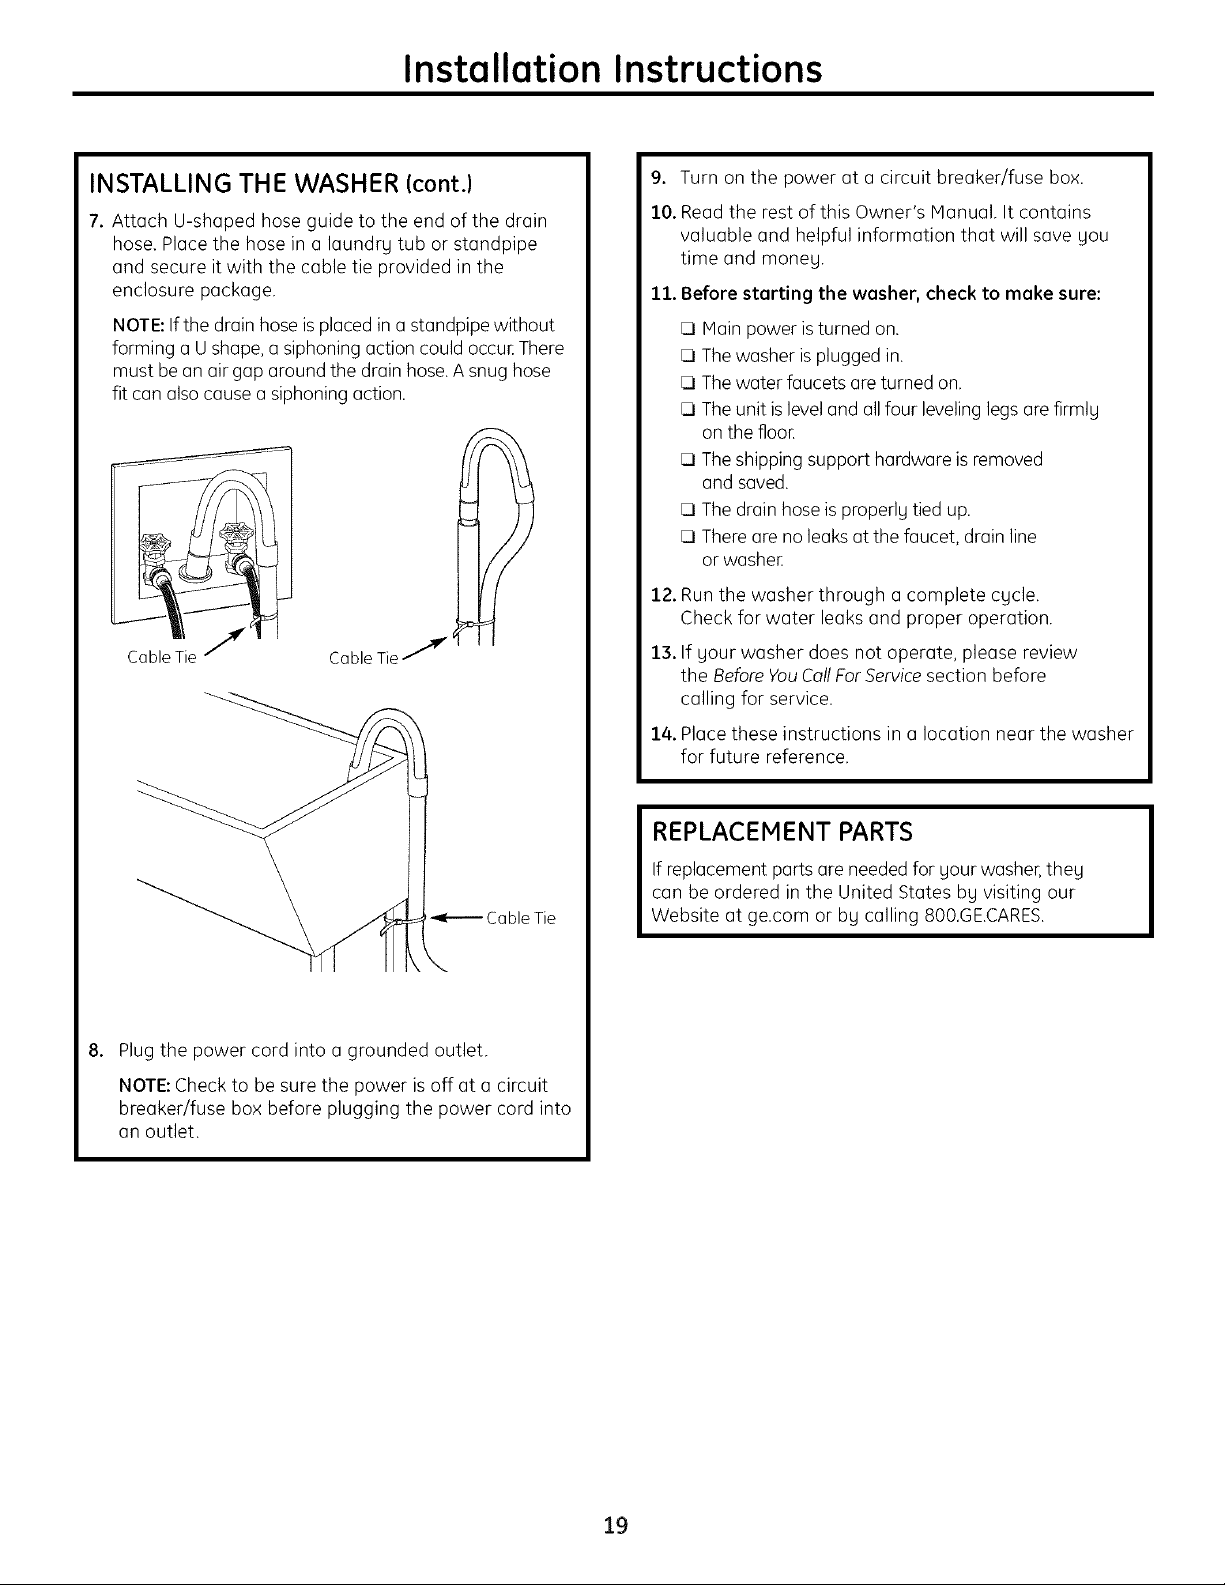
7. Attach U-shaped hose guide to the end of the drain
hose. Place the hose in a laundry tub or standpipe
and secure it with the cable tie provided in the
enclosure package.
NOTE:If the drain hose is placed in a standpipe without
forming a Ushape,asiphoning action could occur There
must be an air gap around the drain hose.Asnughose
fit can alsocause a siphoning action.
I
CableTie 7 Cable Tie 7
9. Turn on the power at a circuit breaker/fuse box.
10. Read the rest of this Owner's Manual. It contains
valuable and helpful information that will save you
time and moneg.
11. Before starting the washer, check to make sure:
CI Mainpower isturned on.
CIThewasher is plugged in.
CIThewater faucets are turned on.
CITheunit isleveland all four leveling legsare firmly
on the floor
CITheshipping support hardware is removed
and saved.
CIThe drain hose isproperly tied up.
E]Thereare no leaks at the faucet, drain line
or washer
12. Run the washer through a complete cgcle.
Check for water leaks and proper operation.
13. If your washer does not operate, please review
the Before YouCallFor Servicesection before
calling for service.
14. Place these instructions in a location near the washer
for future reference.
Cable Tie
8.
Plug the power cord into a grounded outlet.
NOTE:Check to be sure the power is off at a circuit
breaker/fuse box before plugging the power cord into
an outlet.
REPLACEMENT PARTS
If replacement parts are needed for your washer,they
can be ordered in the United States by visiting our
Website at ge.com or by calling 800.GE.CARES.
19
Beforeyou callfor service...
Troubleshooting Tips
Save time and money! Review the charts on the
following pages first and gou mag not need to call for
service.
Possible Cause What ToDo
Not spinning or agitating Drain hose is kinked or • Straighten drain hose and make surewasher is not
improperlg connected sitting on it.
Household drain mag • Checkhousehold plumbing, Youmag needto call
be clogged a plumbeE
Drain hose siphoning; drain hose • Ensurethere is an air gap between hose and drain,
pushed too far down the drain
Washer pump filter mag • Have gour pump filter cleaned,
beclogged • Clean pump filter ifwasher isequipped with access door,
Load isout of balance • Redistributeclothesand run drain & spinor rinse&spin.
• Increaseload sizeifwashing small load containing heavg
and lightitems.
Leaking water Door gasket is damaged • Check to see ifgasket is seated and not torn. Objects
left in pockets mag cause damage to the washer (nails,
screws, pens, pencils),
Door gasket not damaged • Water mag drip from the door when the door is opened.
This is a normal operation.
Check back left of washer • Ifthis area is wet, gou have oversudsing condition.
for water Use less detergent,
Fillhoses or drain hose is • Hake sure hose connections are tight at washer and
improperlg connected faucets and make sure end of drain hose is correctlg
inserted in and secured to drain facilitg.
Household drain meg • Check household plumbing. You mag need to call
be clogged a plumber,
Dispenser clogged • Powder soap mag cause clogs inside the dispenser and
cause water to leak out the front of the dispenser, Remove
dispenser and clear asneeded.
Not draining Drain hose is kinked or • Straighten drain hose and makesure washer isnot
improperlg connected sitting on it.
Household drain mag • Checkhousehold plumbing. Youmag needto call
be clogged a plumber,
Drain hose siphoning; drain hose • Ensurethere is an air gap between hose and drain.
pushed too far down the drain
Washer pump filter mag • Have gour pump filter cleaned.
be clogged • Clean pump filter if washer isequipped with access door,
Bad odor inside Washer unused for a long time, • Leavethe door slightlg open for the water to air drg.
gour washer not using recommended • Runa BasketClean cgcle.
Not spinning Drain hoseis kinkedor • Straighten drain hose and make sure washer isnot
20
qualitg of HEdetergent
or used too much detergent • Inthe caseof strong odor,goumag need to run
the BosketCleon cgcle morethan once.
,mproperlg connected sitting on it.
Household drain mag • Checkhousehold plumbing. Youmag needto call
be clogged a plumber,
Drain hose siphoning; drain hose • Ensurethere is an air gap between hose and drain.
pushed too far down the drain
Washer pump filter mag • Have gout pump filter cleaned.
be clogged • Clean pump filter if washer isequipped with access door,
Load isout of balance • Redistributeclothesandrundrain&spin or rinse&spin.
• Increaseload sizeifwashing small load containing heavg
and lightitems.
Door is open • Hake sure door is closed.
ge.com
Poss bleCa se
Incomplete cycle or timer
not advancing
Loud or unusual noise; Cabinet moving * Washer isdesignedto move 1/4" to reduceforces
vibration or shaking transmitted to the flooEThismovement isnormal.
Drain hose iskinkedor
improperlgconnected
Household drain mug * Checkhousehold plumbing. Youmay needto call
be clogged a plumbeE
Drain hose siphoning; drain hose * Ensurethere is an airgap between hose and drain.
pushed too far clown the drain
Washer pump filter mag * Have gour pump filter cleaned.
be clogged * Cleanpump filter ifwasher is equipped with access dooE
Automatic load redistribution * Timeradds 3 minutesto cgcle,machinehasredistributed
All rubber leveling legs are not • Pushand pull on the back right and then back leftof gour
firmlg touching the floor washer to check if it islevel.Ifthewasherisuneven,adjust
Unbalanced load • Opendoor and manuallg redistributeload.Tocheck
What To Do
• Straighten drain hose and make sure washer isnot
sitting on it.
the load once or twice.Thisis normal operation.Donothing;
the machine will finishthe wash cycle.
the rubber levelinglegsso theg are all firmlg touching the
floor and locked in place.Yourinstallershouldcorrect this
problem,
machine,run rinse and spinwith no load,Ifnormal,
unbalancewas caused bg load.
Clothes too wet Drain hose iskinked or * Straighten drain hose and make sure washer isnot
improperlg connected sitting onit.
Household drain mag * Checkhousehold plumbing. Youmag needto call
be clogged a plumber`
Drain hose siphoning; drain hose * Ensurethere is an airgap between hose and drain.
pushed too far down the drain
Washer pump filter mag * Cleanpumpfilter ifwasher is equipped with accessdoor,
be clogged
Load isout of balance * Redistributeclothesand run drain & spinor rinse&spin.
• Increaseload sizeifwashing small loadcontaining heavg
and lightitems.
Nopower/washer not Drain hose is kinked or * Straighten drain hose and makesure washer isnot
working or dead improperlg connected sitting on it.
Household drain mag * Checkhousehold plumbing. Youmag needto call
be clogged a plumber`
Drain hose pushed too far * Ensurethere is an air gap between hose and drain.
down the drain
Washer pump filter mag * Have gour pump filter cleaned.
be clogged * Clean pump filter ifwasher is equipped with access door`
Washer is unplugged * Hake surecordis pluggedsecurelginto a workingoutlet.
Water supplg is turned off * Turnboth hot and coldfaucets fullg on.
Circuit breaker/fuse is * Checkhouse circuit breakers/fuses.Replacefuses or
tripped/blown resetbreaker`Washer should have separate outlet.
Controls are not set properlg * Hold START/PAUSEbutton to start cgcle.
Automatic self sgstem checks * Firsttime the washer is pluggedin,automatic checks
occur`It mag take up to 20 secondsbefore gou can use
gout washer`This isnormal operation,
21
Beforeyou callfor service...
Possible Cause What ToDo
Waterdoesnotenter Automaticselfsgstemchecks •AfterSTARTispressed,thewasherdoesseveralsgstem
washer or entersslowly checks.Waterwill flow severalsecondsafter STARTis
pressed.
Water supplgisturned off • Turn on both hot and cold faucets fullg.
Water valve screensare • Turnoffthe water sourceand removethe water connection
stoppedup hosesfromthe upper backof the washer,Usea brush or
toothpick to cleanthe screensin the machine.Reconnect
the hosesand turn the water back on.
Snags,holes, tears, rips Pens,pencils, nails, screwsor • Removelooseitems from pockets.
or excessivewear other objects left in pockets
Pins,snaps,hooks,sharp • Fastensnaps,hooks,buttons and zippers.
buttons,beltbuckles,zippers
and sharpobjects left in pockets
Wrinkling Improper sorting • Avoid mixing heavg items (likework clothes)with
light items (likeblouses).
Overloading • Load gour washer so clothes have enough room
to move freelg.
Incorrect wash cgcle • Hatch Cgcleselectionto the tgpe offabric gou are
washing (especiallgfor easg careloads).
Repeated washing in • Wash in warm or cold wateE
water that is too hot
Graged orgellowed Not enough detergent • Use correct amount of detergent.
clothes
Colored spots Incorrectuseof fabric •Checkfabric softener package for instructions and follow
Water temperature Water supplg isimproperlg • Hake sure hoses are connected to correct faucets.
is incorrect connected
Not using HE(highefficiencg) • UseHEdetergent.
detergent
Hard water • Usehottest water safe for fabric.
• Usea water conditioner likeCalgon brand or install
a water softener,
Water is not hot enough • Hake sure water heater is deliveringwater at
120°-140°F (48°-60°C).
Detergent isnot • Trga liquid detergent.
dissolving
Dge transfer • Sort clothes by color,Iffabric label states wash separately,
unstable dges may be indicated.
softener directions for usingdispenseE
Dge transfer • Sort whites or lightlg colored items from dark colors.
• Promptlg remove wash load from washer.
House water heater is • Hake sure house water heater is delivering water
not set properlg at 120°-140°F (48°-60°C).
Slight variation This is normal • Due to the metallic properties of paint used for this unique
in metallic color product, slight variations of color mag occur due to viewing
angles and lighting conditions.
22
GE Washer Warranty. CForcustomerstheUnitedStates)
All worrantF service provided by our Factory Service Centers,
or on authorized Customer Carec_technician. To schedule service,
on-line, visit us at go.cam, or coil 800.GE.CARES (800.432.27,37).
Please have serial number and model number available when
calling for service.
Staple sour receipt here.
Proof of the original purchase
date is needed to obtain service
under the warranty.
We Will Replace:
OneVear Ang part of the washer which fails due to u defect in materials or workmanship. During this
From the date Of the limited one-gear warrants, GE will also provide, free of charge, all labor and related service
oniginolpurchase costs to replace the defective part.
• Service trips to sour home to teach Sou how to use
the product.
• Improper installation, delivery or maintenance.
• Failure of the product if it is abused, misused, or used for
other then the intended purpose or used commercially.
• Damage after delivery.
• Replacement of house fuses or resetting of circuit
breakers.
• Damage to theproduct caused by accident,fire,floods
or acts of God.
• Incidental ar consequential damage caused bg possible
defects with this appliance.
• Product not accessible ta provide required service.
Warranty. Any implied warranties, including the implied warranties of merchantability or fitness for a particular
I EXCLUSION OF IMPLIED WARRANTIES--Your sole and exclusive remedy is product repair as provided in this Limited I
purpose, are limited to one gear or the shortest period allowed by law.
This warranty is extended to the original purchaser and any succeeding owner for products purchased for home use
within the USA. If the product is located in on area where service by o GE Authorized Servicer isnot available, you may
be responsible for a trip charge or you may be required to bring the product to an Authorized GE Service location for
service. In Alaska, the warranty excludes the cost of shipping or service coils to your home.
Some states do not allow the exclusion or limitation of incidenta! or consequential damages. This warranty gives you
specific legal rights, and you may also have other rights which vary from state to state. To know what your legal rights
ore, consult your local or state consumer affairs office or your state's Attorney General.
Warrantor: General Electric Compung. Louisville, KY 40225
I
I
23
 Loading...