

Page 1
---------.___
Important Information i
Table of Contents
1
Hooking Up the VCR 2-6
Setting Up the VCR 7-9
Using the Remote Control 10-12
Playing a Tape 13-17
Recording a Program 18-26
References 27-29
Trouble Checks 30-31
Limited Warranty 32
Index 33
Page 2
Important Information
1 WARNiNG 1
To reduce the risk of
fire br shock hazard, do
not expose this VCR to
rain or moisture.
I
p!!!!!y
TO REDUCE THE RISK OF ELECTRIC SHOCK, DO NOT REMOVE
COVER (OR BACK). NO USER SERVICEABLE PARTS INSIDE.
psKoFmsKac
REFER SERVICING TO QUALIFIED SERVICE PERSONNEL.
A
This symbol indicates “dangerous This symbol indicates important
voltage” inside the product that
presents a risk of electric shock or
personal injury.
A
instructions accompanying the
product.
Cautions
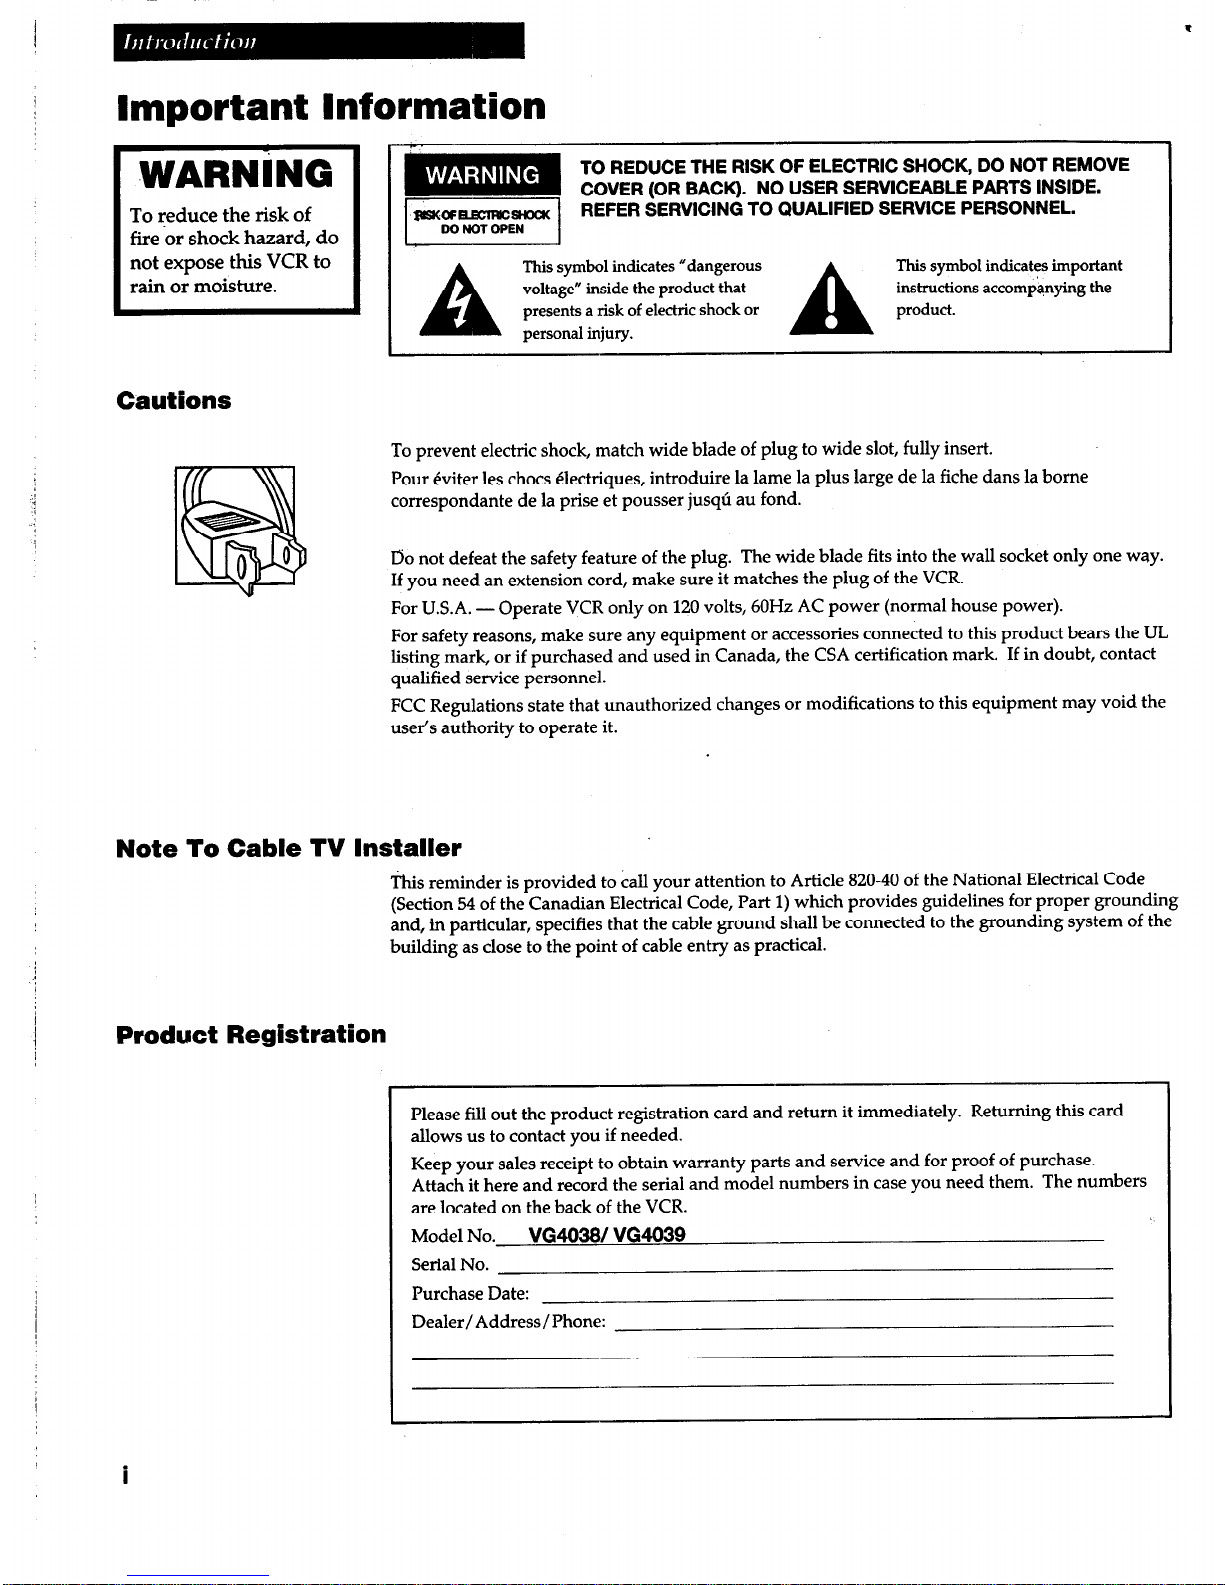
To prevent electric shock, match wide blade of plug to wide slot, fully insert.
Pour eviter les chocs electriques, introduire la lame la plus large de la fiche dans la borne
correspondante de la prise et pousser jusqu au fond.
Do not defeat the safety feature of the plug. The wide blade fits into the wall socket only one way.
If you need an extension cord, make sure it matches the plug of the VCR.
For U.S.A. - Operate VCR only on 120 volts, 60Hz AC power (normal house power).
For safety reasons, make sure any equipment or accessories connected to this product bears the UL
listing mark, or if purchased and used in Canada, the CSA certification mark. If in doubt, contact
qualified service personnel.
FCC Regulations state that unauthorized changes or modifications to this equipment may void the
user’s authority to operate it.
Note To Cable TV Installer
This reminder is provided to call your attention to Article 820-40 of the National Electrical Code
(Section 54 of the Canadian Electrical Code, Part 1) which provides guidelines for proper grounding
and, in particular, specifies that the cable ground shall be connected to the grounding system of the
building as close to the point of cable entry as practical.
Product Registration
I
Please fill out the product registration card and return it immediately.
Returning this card
allows us to contact you if needed.
Keep your sales receipt to obtain warranty parts and service and for proof of purchase.
Attach it here and record the serial and model numbers in case you need them. The numbers
are located on the back of the VCR.
Model No.
VG4038/ VG4039
Serial No.
Purchase Date:
Dealer/Address/Phone:
i
Page 3

Table of Contents
Important Information
Warnings, Cautions, Note to Cable TV Installer, and Product Registration- i
Hooking Up the VCR
Choosing a Hookup
Antenna or Cable System Without a Cable Box
Cable System With Cable Box to Unscramble All Channels
Cable System With Cable Box to Unscramble Pay Channels _
Connecting Two VCRs for Copying Tapes
Setting Up the VCR
Startup
Check Accessories with VCR
Insert Batteries in Remote
7
7
Turn on the TV and VCR
Place Channels in the VCR’s Memory
Add or Remove Channels from the VCR’s Memory
Use lV*VCR Button
Set the Time and Date
Using the Remote Control
Component, VCR, and TV Buttons
Controlling a VCR
Controlling a TV
Playing a Tape
Operating Instructions
Using the Playback Features
Auto Play Feature
Pause for Stop Action
Slow Motion
Picture Search
Frame Advance
Automatic and Manual Tracking
DISPLAY
Button
Time Counter _
Index Search
Go-To Search
Time Search
Commercial Scan
Recording a Program
Types of Recordings
Basic Recording - Operating Instructions
Watch a TV Channel While VCR is Recording a Different Channel
Recording Speeds
Recording Pause
One Touch Recording (OTR)
Recording While You’re Away
Select a Cable Box Viewing Channel
VCR Plus+ Recording
Timer Recording
Checking or Clearing Timer Recordings
Additional Recording Information
Using Two VCRs for Copying and Editing Tapes
References
10-11
12
12
13
14
14
14
14
15
15
15
16
16
17
17
17
18
18
18
19
19
20
21
22-23
24
25
25
26
Specifications
Cleaning the VCR
Location of Controls
Front and Back Panel
Display Panel
Trouble Checks
Limited Warranty
Index
27
27
28
29
30-31
32
33
1
Page 4

Choosing a Hookup
The hookups on pages 3 through 5 are divided into two hookup types: Basic (A) and Advanced (B).
The basic hookup shows the backs of TVs that have only an antenna/cable connection. It is the easier of
the two and additional accessories may not be needed.
The advanced hookup shows the VCR hooked up to a monitor/receiver (TV with audio and video jacks)
using a signal splitter. This connection may improve the picture quality as well as convenience of
operation.
Answer the questions to choose the hookup for your VCR.
1. How do you receive your TV signals?
Choose one answer from below.
A. Outside antenna - Turn to page 3.
B. Rabbit ears (set-top) and/or bow tie antenna - Turn to page 3.
C. Cable System - Go to question 2.
2. What type of Cable-TV system* do you have?
Choose one answer from below.
A. Cable without a box - Turn to page 3.
B. Cable box to unscramble all the channels - Turn to page 4.
C. Cable box to unscramble only pay channels, such as HBO, Showtime,
Cinemax, etc. - Turn to page 5.
*You may need to contact your local cable company for assistance.
Optional Hookups
How to hook up two VCRs for copying tapes?
A. Select a hookup by answering questions 1 and 2 above.
B. Then modify the connections as shown on page 6.
2
Page 5
3
AntermaorCableSystem WthoutaCable Box
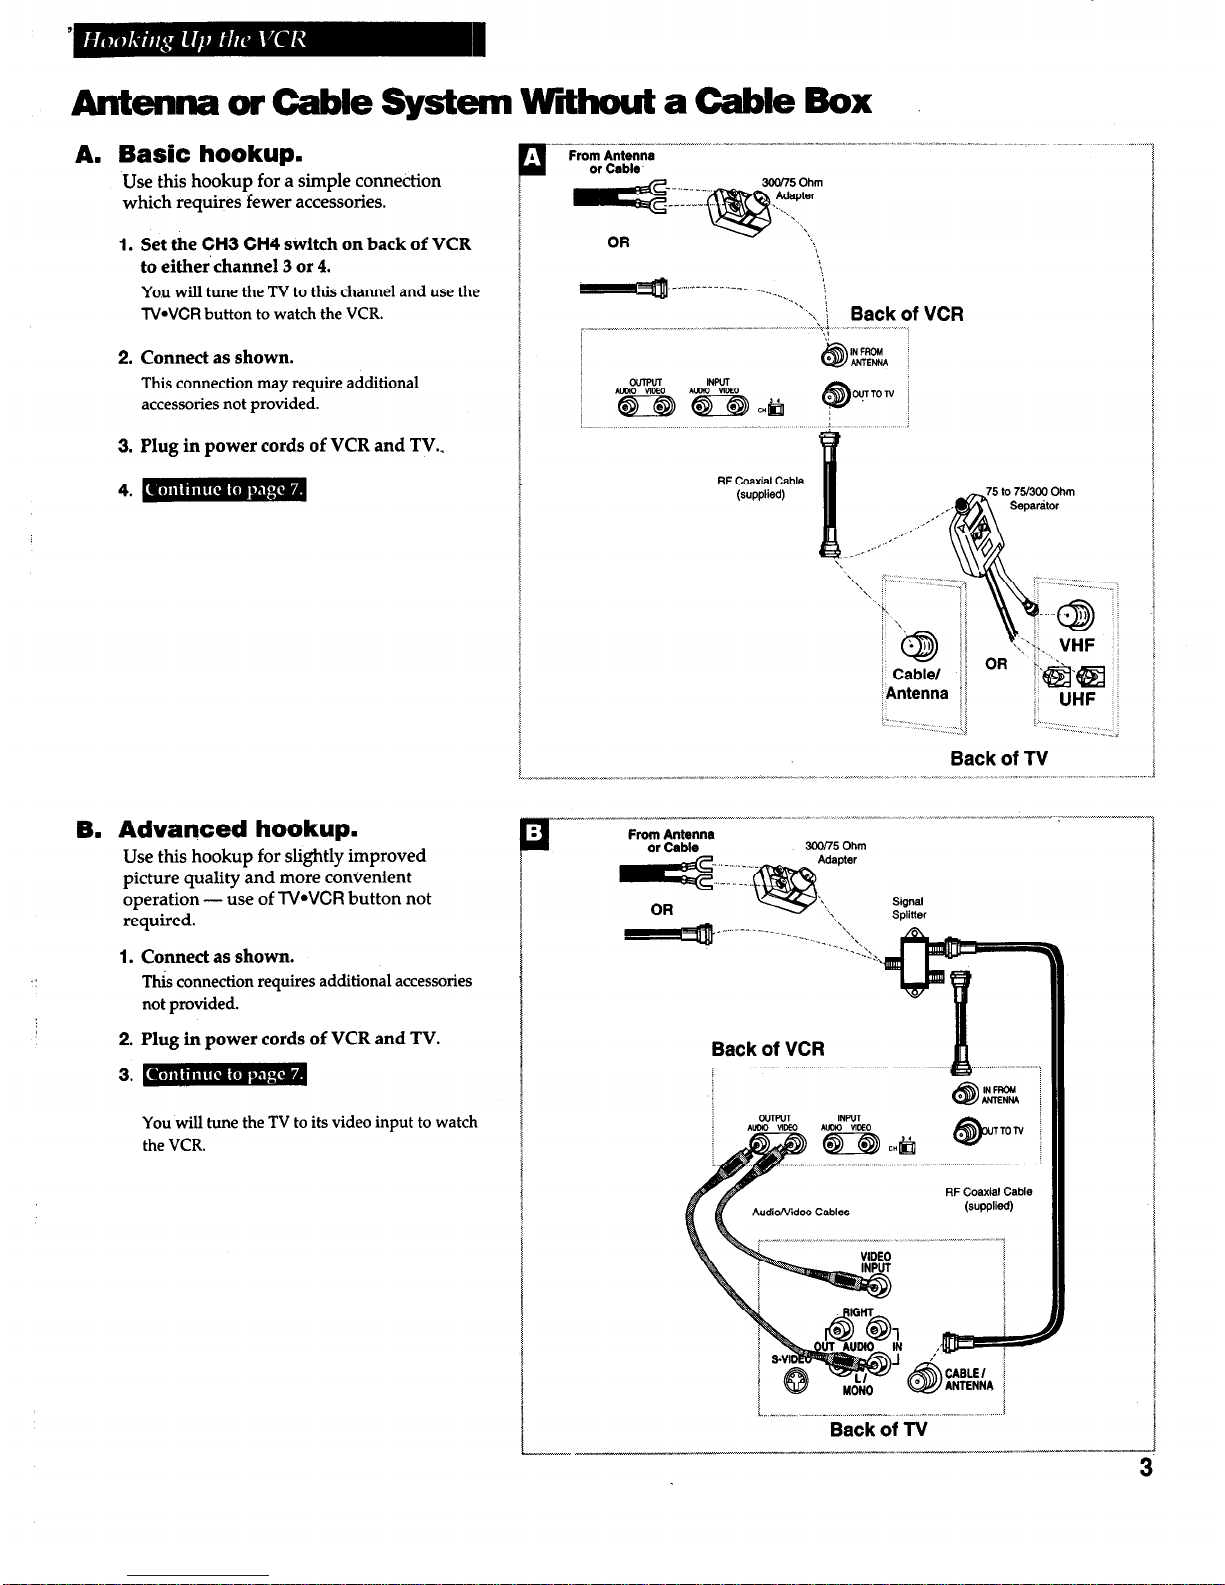
A. Basic hookup.
Use this hookup for a simple connection
which requires fewer accessories.
1. Set the CH3 CH4 switch on back of VCR
to either’ channel 3 or 4.
You will tune the TV to this channel and use the
lV*VCR button to watch the VCR.
2.
Connect as shown.
This connection may require additional
accessories not provided.
3. Plug in power cords of VCR and TV..
B. Advanced hookup.
Use this hookup for slightly improved
picture quality and more convenient
operation - use of TVWCR button not
required.
. .
1. Connect as shown.
Tl& connection requires additional accessories
not provided.
2. Plug in power cords of VCR and TV.
You will tune the TV to its video input to watch
the VCR.
RF Coaxial Cable
(supplied)
‘X.“,
_ 2:
;,
.,.‘j ,, ., I ,:
Back of TV
Audio/Video Cables
RF Coaxial Cable
(supplied)
I”. _, x ,,,.. _.^- ..^..^...--^ ” ..- .^.^.^ f
Back of TV
3
Page 6

Cable System With Cable Box to Unscramble All Channels
A. Basic hookup.
Use this hookup for a simple connection
which requires fewer accessories.
1. Set the CH3 CH4 switch on back of VCR
to either channel 3 or 4.
You will tune the TV to this channel and use the
TWVCR button to watch the VCR.
2.
Connect as shown.
This connection may require additional
accessories not provided.
3. Plug in power cords of VCR, TV, and
cable box.
4. -
B. Advanced hookup.
Use this hookup for slightly improved
picture quality and more convenient
operation - use of
TVWCR
button not
required.
1. Connect as
shown.
This connection requires additional accessories
not provided.
2. Plug in power cords of VCR, TV, and
cable box.
You will tune the TV to its video input to watch
the VCR.
From Cable
Cable Box
RF Coaxial
cable
RF Caaxlal Cable
(supplied)
of VCR
Back of TV
Cable Box
Back of VC’R
““..“““,^“,.^ .^ ,,... “___” ,x”,.”
AudkMdeo Cables
RF Coaxial Cable
(SUPPW
L”,-.-.,----.-.-----“..---.-““j
Back of TV
Page 7

Cable System With Cable Box to Unscramble Pay Channels
(such as HBO, ShowWe, Pay-Per-View, eta)
A. Basic hookup.
Use this hookup for a simple connection
which requires fewer accessories.
1. Set the
CH3 CH4 switch
on back of VCR
to either channel 3 or 4.
You will tune the TV to this channel and use the
TVWCR button to watch the VCR.
Cable Box
x”II,~,II”I”I.xII x-,
RF Coaxial
cable
Back
Cable
of VCR
2.
Connect as shown.
This connection may require additional
accessories not provided.
3. Plug in power cords of VCR, TV, and
cable box.
RF Coaxial Cable
(supplied)
i Cable/
,Antenna
. : : _ . ^ ,,
. ‘_
L,.: ._
,,
-nI,
Back of N
B. Advanced hookup.
Use this hookup
for
slightly improved
picture quality and more convenient
operation - use of TVWCR button not
required.
1.
Connect as shown.
Thii connection requires additional accestiries
not provided.
2. Plug in power cords of VCR, TV, and
cable box.
Cable Box
You will tune the TV to its video input to watch
the VCR. All pay channels are viewed through
the VCR.
AudioNideo Cables
Page 8
Connecting Tbo
VCRs for Copying Tapes
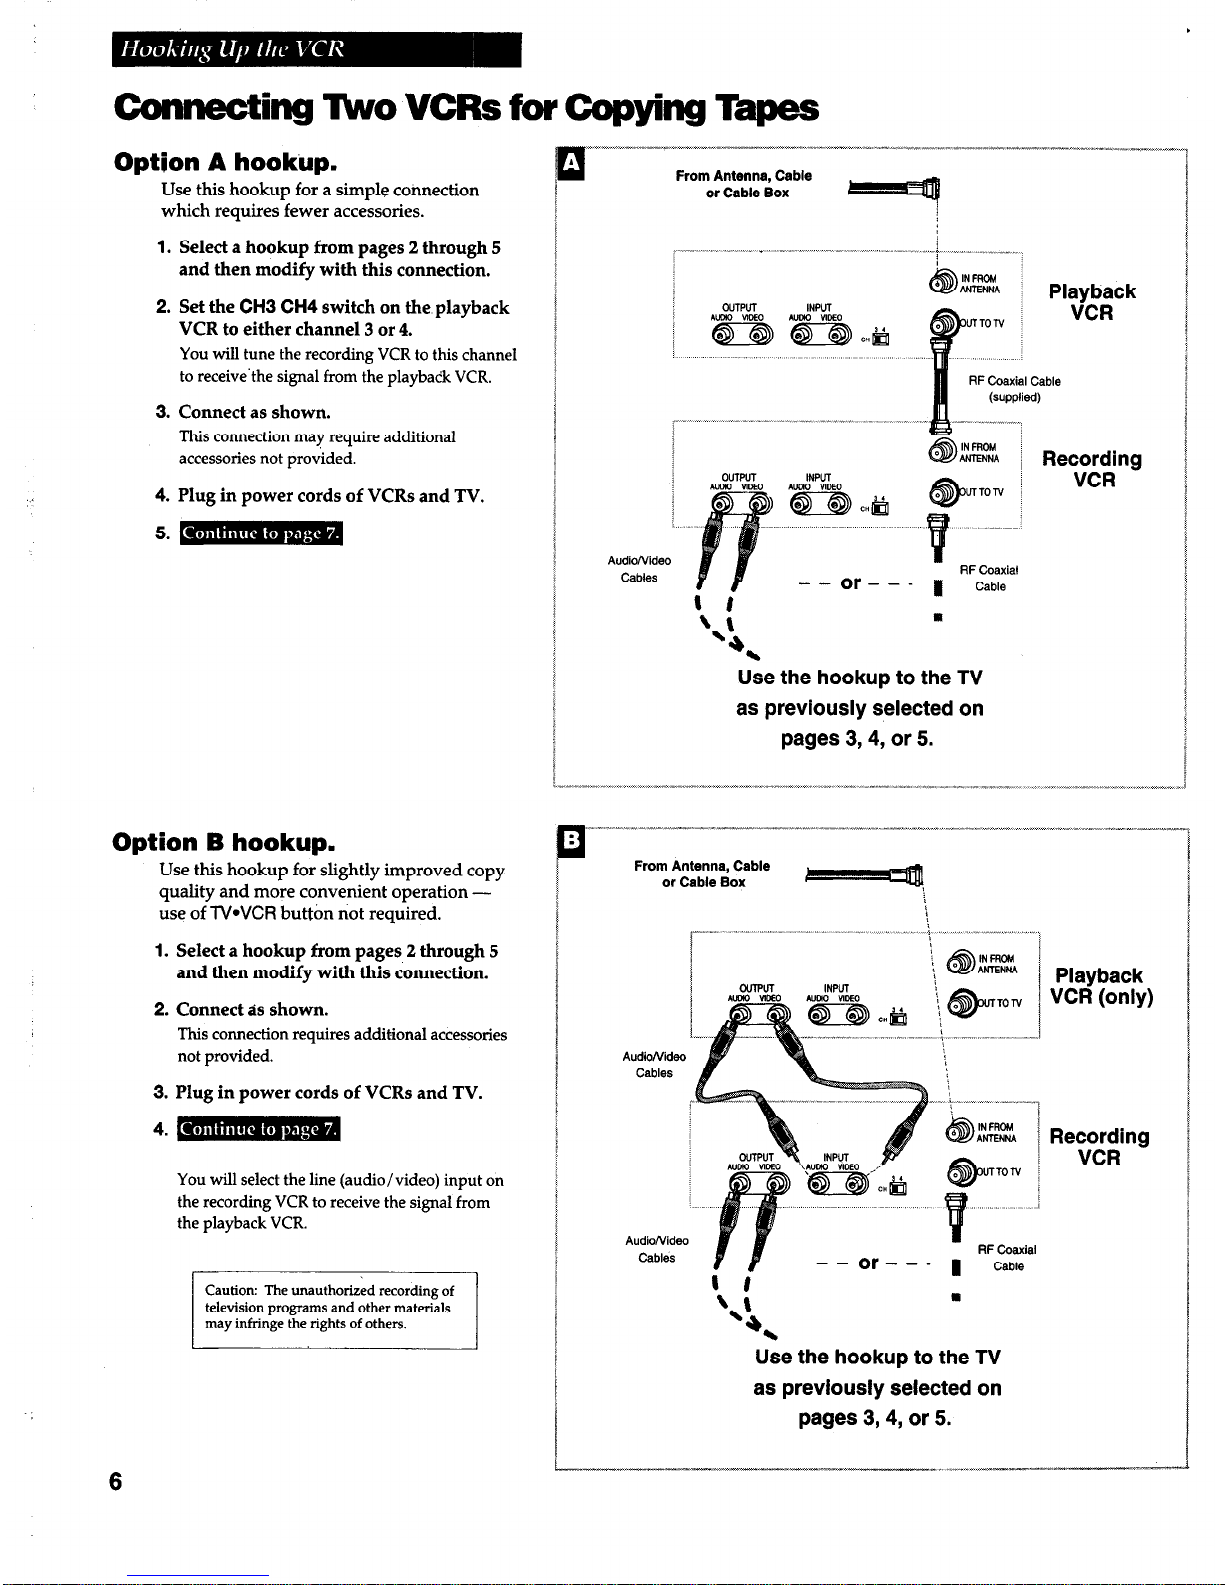
Option A hookup.
Use this hookup for a simple connection
which requires fewer accessories.
1.
Select a hookup from pages 2 through 5
and then modify with this connection.
2. Set the
CH3 CH4
switch on the playback
VCR to either channel 3 or 4.
You will tune the recording VCR to this channel
to receive’the signal from the playback
VCR.
3. Connect as shown.
This
connection may require additional
accessories not provided.
4. Plug in power cords of VCRs and TV.
5. m
,
Option B hookup.
Use this hookup for slightly improved copy
quality and more convenient operation use of TVWCR button not required.
1.
Select a hookup from pages 2 through 5
and then modify with this connection.
2. Connect as shown.
This connection requires additional accessories
not provided.
3. Plug in power cords of VCRs and TV.
4. m
You will select the line (audio/video) input on
the recording VCR to receive the signal from
the playback
VCR.
Caution: The unauthorized recording of
television programs and other materials
6
From Antenna, Cable
or Cable Box
Playback
VCR
RF Coaxial Cable
Recording
Audio/Video
Cables
Use the hookup to the TV
as previously selected on
pages 3,4, or 5.
From Antenna, Cable
or Cable Box
AudioNideo
Cables
TON
AudioNidea
IN FROM
i
ANTENNA
!
INPUT
Playback
VCR (only)
#
,lNFFlCM 1
ANTENNA
TON :
RF Coaxial
[ ;f
--Or--- I
Cable
a
‘J.
Use the hookup to the TV
as previously selected on
pages 3,4, or 5.
Recording
VCR
Page 9

Startup
I. Check accessories with VCR.
Coptact your dealer if any items are missing.
2 “AA” Batteries
Remote
(Stock No. 221298)
RF Coaxial Cable
(Stock No. 207417)
2. Insert batteries in remote.
3. Tlurn on the TV.
A. Turn on the TV.
B. If you used one of the basic hookups, tune the TV to the channel selected with the
CH3 CH4 switch on back of VCR.
If you used one of the advanced hookups, tune the TV to the TV‘s video input.
(See TV owner’s manual for details.)
4. IUrn on the VCR.
A.
Press
VCR1
on the remote.
continued on next page
Page 10

Startup
5. Place dhannels in the VCR’s memory.
Channels 2 through 13 including line input
(L)
are in the VCR’s
memory when you first turn it on. Pressing
CHANNEL
up or down
stops on these channels. To get additional channels available on
your antenna or cable system, you must use the
Auto-Search
Channels
feature of the VCR. If you ever change cable or antenna
signals, you may need to Auto-Search channels again.
A.
Press
VCR1
to set remote to control VCR.
B.
Press
MENU*PROG
on the remote to see
the VCR MAIN MENU
on the TV screen. If the menu does not appear on the TV screen:
l
Make sure TV is tuned to same channel as CH3 CH4
switch on VCR or the TV’s video input (refer to TV’s
manual).
b Press
VCR1
and then press
MENU*PROG.
l
If you use a basic hookup, check
VCR
indicator in display
panel - it should be on. Press
TVWCR
to turn it on.
l
Check the connections.
C.
Press 4 to select
CHANNEL SETUP.
D.
Press
1 to
begin
Auto-Search Channels.
Wait until the channel numbers stop changing. This takes about
one to two minutes. The TV will then tune to the lowest channel
found. Pressing
CHANNEL
up or down will select only the
active channels.
The VCR automatically selects
ANTENNA
or
CABLE
of the
Tuning Mode
feature in the
CHANNEL SETUP
menu. If you
need to change the setting manually, press 3.
6. Add or remove channels from the VCR% memory.
You may want to add or remove channels if some of the channels are
not active, have weak signals, or you do not want to watch them.
A.
Press
VCR1 .
B.
Press
MENU*PROG
on the remote to see the
VCR MAIN MENU
on the TV screen.
C. Press 4 to display the
CHANNEL SETUP
menu.
D.
Press 2 to display the
ADD/REMOVE CHANNEL
menu.
E.
Follow the directions on the screen.
F.
Add or remove more channels-by entering channel numbers or
using
CHANNEL
up and down buttons.
jY(R
1 VCR Plus+ Programming
2,Timer Programming
3 Review Programs
4 Channel Setup
CHANNEL SETUP
_ 1 Auto-Search Channels
2 AddlRemqve Channels
3 Tuning Node: ANTENNA
4 Sat./Cable Box Setup
0 Exit to Main Menu
I
VCR-MAIN MENU
CH 03
is presently ADDED
Page 11
Startup
7. Use TVeVCR button.
Skip this step if you used one of the advanced hookups.
When using one of the basic hookups, the
TWVCR
button lets you
switch between the picture coming from the VCR or television
channels. This button allows you to record a program on the VC.R
while watching another channel on the TV. Details are on page 18.
A.
Press
VCR1
to set the remote to control the VCR.
B.
Press
TVWCR
to see the picture from the VCR.
The
VCR
indicator lights in the display panel.
C.
Press
CHANNEL
up or down to change channels on the VCR.
The channel number changes on the TV screen.
D. Press
TVWCR
to see the TV channels.
The
VCR
indicator does not light in the display panel. Change
channels using the TV’s remote.
E.
Return the TV to the VCR viewing channel - CH3 or CH4.
F.
Press
VCR1
, then
TVWCR
to switch back to the picture
from the VCR.
8. Set the time and date.
Important:
Only model VG4039 is equipped with a clock on the
front display panel. Model VG4038’s clock must be set using the
on-screen display.
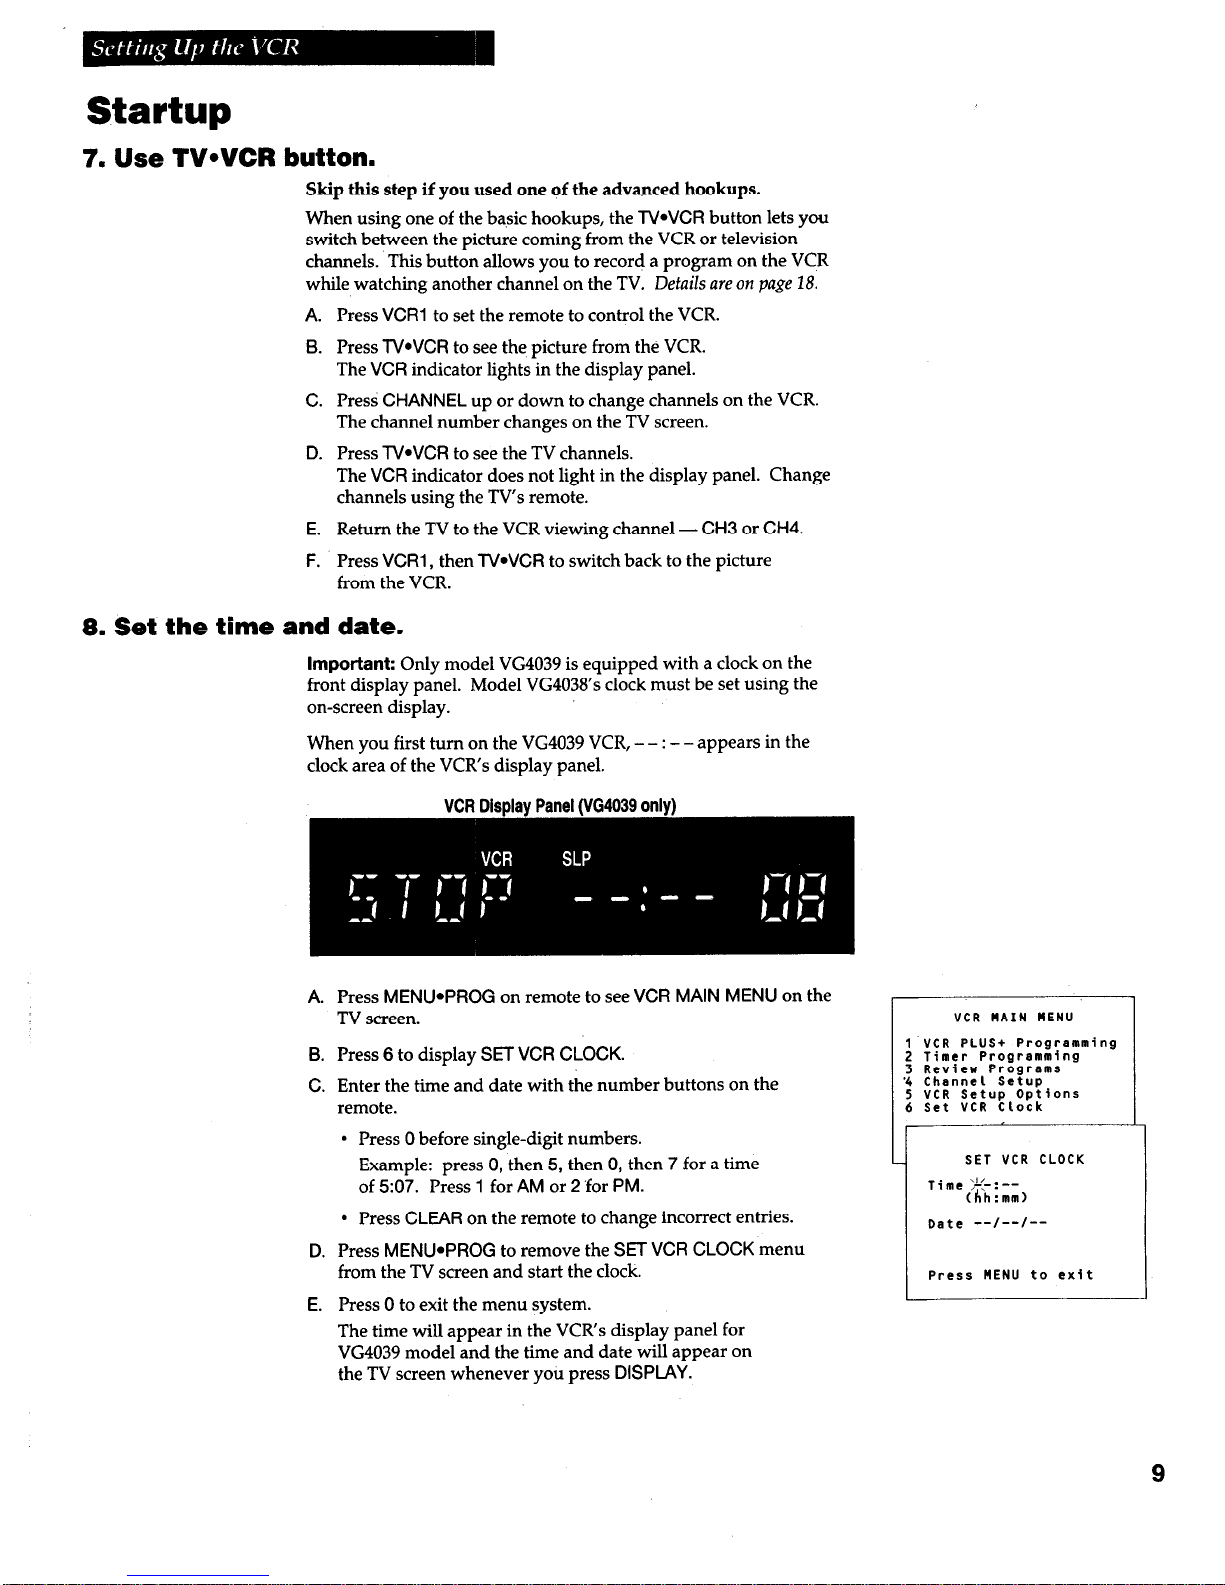
When you first turn on the VG4039 VCR, - - : - - appears in the
clock area of the VCR’s display panel.
VCR Disalav Panel NG4039
onlv1
A.
B.
C.
D.
E.
Press
MENU*PROG
on remote to see
VCR MAIN MENU
on the
TV screen.
Press 6 to display SET
VCR CLOCK.
Enter the time and date with the number buttons on the
remote.
l
Press 0 before single-digit numbers.
Example: press 0, then 5, then 0, then 7 for a time
of 507. Press 1 for
AM
or 2 ‘for
PM.
l
Press
CLEAR
on the remote to change incorrect entries.
Press
MENU*PROG
to remove the SET
VCR CLOCK
menu
from the TV screen and start the clock.
Press 0 to exit the menu system.
The time will appear in the VCR’s display panel for
VG4039 model and the time and date will appear on
the TV screen whenever you press
DISPLAY.
VCR MAIN MENU
1 VCR PLUS+ Programming
2 Timer Programming
3 Review ProgremS
'4 Channel Setup
5 VCR Setup Options
6 Set VCR Clock
I
SET VCR CLOCK
Time >L<-:--
(hh:mm)
Date --/--/--
Press MENU to exit
9
Page 12

Buttonis
OFF
0
Tv*VCR VCR 2
‘00
PLAY
REW.
El
0
b
STOP
0
REC-OTR F.ADV
F.FWD
D
.bb
PAUSE
0)
VOLUME
PREV. CH. CHANNI
0
MUTE
0
MENU CLEAR SPEED EDIT
0000
PROG
Component Buttons
Press one of the buttons to set the remote to operate that component.
TV
VCR2
Turns on a compatible GE, RCA,
Turns on a compatible GE, RCA,
or ProScan TV and sets the
or ProScan VCR and sets remote
remote to control the TV.
to control the VCR when it has
See page 12.
been setup. See
page 12.
VCR1
Turns on a compatible GE, RCA,
or ProScan VCR and sets remote
to control the VCR.
VCR Function Buttons
Press VCR1 (VCR2) to set remote to control the VCR to use the function
CHANNEL A/V
Selects next higher or lower
channel in the VCR’s channel
memory.
CLEAR
Resets time counter to 0:OO:OO.
Allows you to change entries
when setting the clock or VCR for
a VCR Plus+ or timer recording.
DISPLAY
Shows VCR operating displays
on the TV screen.
Displays the time counter.
EDIT
Signals two properly connected
VCRs to begin copying a tape.
See page 26.
F.ADV
(Frame Advance)
Lets you view one frame with
each press of the button when
tape is in stop-action pause.
F.FWD
(Fast Forward)
Fast forwards the tape when the
VCR is stopped.
Searches the picture in forward
motion during playback.
INPUT
Turns the line input (L) in VCR
display panel (VG4039 only) or
VIDEO IN on TV screen on or off.
Line input refers to the signal
coming from the component
connected to the audio/video
jacks on the back of the VCR.
MENU*PROG
Displays the VCR MAIN M’ENU
on the TV screen.
Removes a menu from the
screen.
Numbers
(0 through 9 & 100)
Select a channel up to 99 by
pressing two numbers.
Select a cable channel over 99 by
pressing 100 and then two
numbers.
Press the 100 button, then two
numbers to select a channel over
99.
Or, select a cable channel over 99
by pressing and holding 1 until
1 -- appears on the screen. Then
press the other two numbers.
OFF
Turns off VCR when remote is set
control the VCR.
10
continued on next page
Page 13

Buttons
VCR Function Buttons
(continued)
PAUSE
REW
(Rewind)
Rewinds the tape when the VCR
is stopped.
Pauses action for viewing during
playback.
Pauses recording to prevent
Searches the picture in reverse
recording of unwanted scenes.
motion during playback.
PLAY
Plays a tape.
SEARCH
Displays
INDEX, TIME
and GO-
TO SEARCH
menus on TV.
PREV. CH.
(Previous Channel)
Switches between two channels.
Select one channel and then select
another. Press PREV CH to
switch between the two channels.
Advances tape 60 or 120 seconds
during playback.
SLOW A/v
Used for slow-motion playback.
REC*OTR
Starts VCR recording.
Used for one touch recording
(OTR). See page 20.
SPEED
(Tape Speed)
Selects a recording speed
(SP, LP, SLP).
STOP
Stops the normal functions such
as record, playback, rewind, fast
forward, and pause of the VCR.
TRACKING ‘I/ A
Lets you manually reduce the
streaks that may appear on the
picture during play or pause.
Reduces picture “jitter” during
stop-action playback.
TV*VCR
Switches the picture signal so
that it either comes from the VCR
or the TV channel. See
page 9.
TV Function Buttons
Press the TV button to set remote to control a compatible TV.
Some buttons may not work with the TV.
CHANNELl/r
Selects next higher or lower
channel in the TV’s channel
memory when remote is set to
control a TV.
Numbers
(0 through 9)
Select a channel up to 99 by
pressing two numbers.
Select a cable channel over 99 by
pressing 100 and then two
PREV. CH.
(Previous Channel)
Switches between two channels.
Select one channel and then select
another. Press
PREV. CH.
to
switch between the two channels.
CLEAR
Removes menus or status
displays from the screen.
numbers.
VOLUME A/V
Press the, 100 button, then two
numbers to select a channel.over
99.
Raises and lowers sound of TV.
DISPLAY
Shows the status displays on the
screen.
Removes menus or displays from
the screen.
MUTE
Turns the TV sound on or off.
Or, select a cable channel over 99
by pressing and holding 1 until
1 -- appears on the screen. Then
press the other two numbers.
OFF
Turns off a compatible TV when
remote is set to control TV.
11
Page 14

Controlling a VCR
The VCR’s remote controls two compatible GE, RCA, or ProScan VCRs with the
VCR1 and VCR2 buttons. Most compatible VCRs automatically respond to
VCR1
without being programmed. If you own two compatible VCRs, test them to see if
VCR1
turns on both VCRs. If it does; then you may want to program this VCR to
respond to the
VCR2
button on the remote.
Program the VCR for remote control
Set the Remote
Control
feature of the VCR
to
the
VCR1
or
VCR2
position. The remote then controls the VCR
with either
the VCR1
or VCR2 button -whichever
position you select in the menu.
A.
Press
MENWPROG
to display the
VCR MAIN
MENU.
B.
Press 5 to display
SETUP OPTIONS.
C.
Press 2 to activate the
Remote Control
feature.
D.
Press
VCR1
or
VCR2
to change the setting and
program this VCR to respond to the
VCR1
or
VCR2
button -whichever you select.
:
t
5
1
SETUP OPTIONS
1 VCR Plus+ Setup
2 Remote Control: VCR1
3 Auto Play: ON
1 bress VCR2 to change
Important Reminder: Remember you must
press
VCR1
or VCR2 on the remote whichever you selected in the menu before the remote will operate this VCR.
Controlling a TV
The VCR’s remote is preprogrammed to control the basic functions of a compatible
GE, RCA, or ProScan TV.
Operate the TV
Test the TV buttons to see which ones may operate
your TV.
A.
Point the remote at the TV and press TV.
B.
Use the “TV Buttons” as described on page II.
Helpful Hint: Notice the difference
between the TV and VCR on-screen
displays. This is one way to tell if the
remote is set to control the VCR or the TV.
I
12
Page 15

Operating Instructions
To play a tape
1.
Turn on the TV and tune it to channel 3,4, or TV‘s video input to see the
picture from the VCR.
2. Insert a tape in the VCR.
VCR automatically turns on. Tape automatically begins playback if the safety
tab on the cassette has been removed and the
Auto Play
feature is turned on.
Press
PLAY,
if necessary.
Press
CHANNEL@TRACKING
on the VCR or
TRACKING
up or down on the
remote to remove any streaks from the picture if necessary.
Details qre on
page 15.
Press
STOP
on the VCR or remote.
Press
REWIND
on the VCR or
REW.
on the remote.
The VCR will automatically rewind the tape if it reaches the end of the tape
during playback. While rewinding, you can also press
POWER
on the VCR or
OFF
on the remote and the VCR will automatically turn off after rewinding.
7.
Press
EJECT
on the VCR to eject the tape once it is completely rewound.
13
Page 16

Using the Playback Features
Auto Play Feature
This feature lets you tell the VCR whether you want it to automatically start
playing a tape that is inserted with the safety tab removed.
1.
Press
MENU*PROG
on the remote to see the
VCR MAIN MENU
on
-the TV screen.
2. Press 5 to display the
SETUP OPTIONS
menu.
3.
Press
3 to
select
Auto Play: ON
or
OFF.
l
Select
ON
to have a tape with its safety tab removed start
playing automatically.
l
Select
OFF
if you do not want a tape with its safety tab removed
to start playing automatically.
Pause for Stop Action
This feature stops the tape in action and allows you to examine the details of
the scene. Stop action works best for tapes recorded in the SP or SLP speed.
1.
Press
PAUSE
during playback to stop the action.
2. Press
TRACKING
v or A on the remote or
CHANNEL*TRACKING
on the VCR to reduce any jittering of the picture.
3.
Press
PAUSE
or
PLAY
to return to playback.
The VCR will automatically switch from stop-action playback to
stop after a few minutes.
Slow Motion
You,can view the picture in slow motion during play or play pause.
SLOW
A and v allow you to change the speed. Sound is turned off during
slow-motion playback. Slow motion works best in the SP or SLP speed.
1.
Press
SLOW A to increase the
speed or v to decrease the speed.
2. Use
TRACKING
A or v on the remote or
CHANNELeTFiACKING on
the
VCR to remove any streaks from the picture.
3. Press
PLAY to
return to playback.
The VCR will automatically switch from slow-motion playback to
stop after a few minutes.
PiktUre Search
You can search a picture during playback by fast forwarding .or rewinding the
tape. Sound is turned off during picture search. The picture is best for tapes
recorded in the SP or SLP speed.
Fast Forward Search
1. Press
F.FWD
to search forward at a faster-than-normal speed.
2. Press
F.FWD
or
PLAY
to return to playback.
Rewind Search
Use FEW. instead of
F.FWD
for the same steps in “Fast Forward
Search.”
VCR MAIN MENU
1 VCR Plus+ Programming
2 Timer Programming
3 Review Programs
4 Channel Setup
5 VCR Setup Options
SETUP OPTIONS
1 VCR Plus+ Setup
2 Remote Control: VCR1
3 Auto Play: ON
0 Exit to Main Menu
14
Page 17

Using the Playback Features
DISPLAY Button
1.
Press
DISPLAY
to display the status of the VCR, channel
number, time counter, date, time, and tape speed on the TV
screen.
The time and date must be set before they are displayed. If you
do not press
DISPLAY
again, this display will time out.
2. Press
DISPLAY
again to continually display the time counter on
the TV screen. The time counter will appear instead of the time
in the VCR’s display panel (VG4039 only).
3. Press
DISPIAY
again to remove the time counter from the TV.
On model VG 4039 the time counter will remain in the VCR’s
display panel and no status displays will appear on the TV
screen. This is convenient for editing tapes.
4.
Press
DISPLAY
again to return to the normal display mode.
On model VG 4039 the clock will appear in the VCR’s display
panel and no status displays will appear on the TV screen.
Frame Advance (F.ADV Button)
Frame advance lets you view one stop-action frame after another. Frame
advance works best for tapes recorded in the SP or SLP speed.
1.
Press
PAUSE
to stop the action.
2.
Press
F.ADV
each time you want to view a frame of the scene.
3.
Press
PAUSE
or
PLAY
to resume normal playback.
Automatic Tracking
The VCR has automatic tracking which adjusts the picture when playing
back a tape recorded on another VCR. Automatic tracking is turned on
whenever a tape is inserted or the VCR’s power is turned on.
Manual Tracking
Occasionally, you may need to manually adjust tracking on a tape recorded
on a different VCR or camcorder. The
TRACKING
buttons on the remote or
CHANNEL*TWCKING
on the VCR are used when playing a tape. They have
no effect during recording.
When streaks or snow appear during normal or slow-motion playback,
press
TRACKING
up or down on remote or
CHANNEL*TRACKING
on VCR
for the best possible picture. During stop-action pause, use the
TRACKING
buttons to reduce picture jitter.
11/18/9i,
FPT lll:Zl-lAM SLP
. - - . - - - -
1
Time Counter Only
No Displays
15
Page 18

Using the Playback Features
Time Counter
The time counter shows the actual time it takes to record a program or play
back a segment of a prerecorded tape. It helps locate the beginning or end of
programs you taped. The time counter resets to 0:OO:OO whenever the tape is
ejected from the VCR.
For example, if a 30-minute program was recorded at the beginning of the tape,
you would:
1. Insert the prerecorded tape.
Seconds
Minutes
Hours
"
11 1
0:30:00
2. Press
DISPLAY
twice to display only the time counter on the TV
screen.
3. Press
F.FWD
on the VCR or
FF
on the remote to fast forward the
tape until the time counter reads 0:30:00.
4. Press
STOP.
This is the approximate end of the program and you can begin
recording at this spot.
5. Press
CLEAR
to reset the time counter to 0:OO:OO.
6. Press
DISPLAY
two times to remove the time counter from the
screen and return to the normal display mode.
Index Search
The VCR has a “VHS Index Search System” that automatically records an index
mark on the tape every time you stop and start recording. During playback
you can locate the program you want to play by the number of index marks.
The VCR will automatically locate the index number you select. The VCR will
search forward or reverse from the location you are on the tape.
1.
Insert the prerecorded tape and press
STOP.
INDEX SEARCH
Enter 1~ ,ex number
8,
'I\
Press FUD or REU
Press SEARCH to exit
2. Press
SEARCH
on the remote to display the
INDEX SEARCH
menu
on the TV screen.
3. Press two number buttons to enter the number of index marks you
want the VCR to search.
Press
CLEAR
on the remote to correct an entry.
4. Press
F.FWD
to search forward or
REW
to search in reverse.
5. Press
STOP
to stop index searching.
Some index marks may be missed by the VCR.
l
A mark too close to your location on the tape.
l
The mark at the beginning of a recorded segment of five
minutes or less.
l
The first index mark on the tape when you start at the
beginning of the tape.
16
Page 19

Using the Playback Features
Time Search
The VCR will search forward or reverse the amount of time you select from
the location you are on the tape.
1. Insert the prerecorded tape and press
STOP.
2. Press
SEARCH
on the remote twice to display the
TIME
SEARCH
menu on the TV screen.
3. Press number buttons to enter the amount of time in hours and
minutes you want the VCR to search.
Press
CLEAR
on the remote to correct an entry.
4. Press
F.FWD
on the VCR or remote to search forward or
REW
to search in reverse.
5. Press
STOP
to stop time searching.
Go-To Search
The VCR will search for the time counter reading you select and
automatically begin playing back the tape.
1.
Insert the prerecorded tape and press
STOP.
2. Press
SEARCH
on the remote three times to display the
GO-TO SEARCH
menu on the TV screen.
3. Press number buttons to enter the hour(s) and minute(s) of the
time counter reading you want the VCR to search.
Press
CLEAR
on the remote to correct an entry.
4. Press
F.FWD
to search forward or
REW
to search in reverse for
the time counter reading you entered.
5. Press
STOP
to stop go-to searching.
Commercial Scan (SEARCH Button)
This is useful for scanning commercials or short program segments.
1.
Press
SEARCH
once during playback to advance
the tape approximately 60 seconds.
I
TINE SEARCH
I
I
Enter,rrarch time
,9;30
I
2. Press
SEARCH
twice during playback to advance the tape
approximately 120 seconds.
Page 20

Types of Recordings
Your VCR provides different types of recording. These types are explained in the following sections:
Basic Recording - Operating Instructions
One Touch (OTR) Recording
Recording While You’re Away
VCR Plus+ Recording
Timer Recording
Using Two VCRs for Copying Tapes
Basic Recording
- Operating Instructions
To make a recoiding
Turn on the TV and tune it to the VCR viewing channel, either 3,4, or TV’s video input channel.
1. Insert a tape with safety tab in place.
2. Press VCR1 (VCR2) to set remote to control VCR.
3. If using one of the basic hookups, make sure the VCR indicator appears in the VCR’s
display panel. If not, press TVWCR to turn it on.
4. Select recording speed using SPEED on the VCR or remote.
The tape speed indicator appears on the TV screen.
5. Select the channel to be recorded.
The channel number appears on the TV screen.
6. Press REC*OTR to begin recording.
Watch a TV channel while VCR is recording a.different channel
1. Follow steps 1 through 6 above.
2.
If
using
one of the basic hookups, press TVWCR to switch to the TV channel. The VCR
indicator will turn off in the display panel.
3. Press TV to set the remote to control TV functions for a compatible TV.
4. Select the channel you want to watch with the TV’s channel buttons.
5. Press STOP on VCR or remote when recording is finished.
18
Page 21

Recording Features
Recording Speeds
Press
SPEED
on the VCR or remote to select a recording speed (SP, LP, or SLP). The speed you
select appears on the TV screen.
SP (Standard Play)
gives the best quality recording: That is why
most prerecorded, rental tapes are recorded in SP. Fewer
programs can be recorded on the tape. Special effects such as
pause, slow motion, picture search, and frame advance work well
in this speed.
LP (Long hay)
gives twice the recording time of tapes recorded in
SF’. Special effects in playback are not recommended in LP.
SLP (Super Long Play)
gives three times the recording time of
tapes recorded in SF’. Special effects such as pause, slow motion,
picture search, and frame
advance
work well in this speed.
Recording Pause
This feature allows you to prevent recording short passages of unwanted material.
Press
PAUSE
during recording to stop and start recording.
The VCR will automatically switch from pause to stop after a few
minutes.
19
Page 22

One Touch Recording (OTR)
One touch recording lets you record up to four hours without using the timer program feature. The VCR
will turn off automatically at the end of the recording.
/
I
SPEED REC*OTR
Operating Instructions
1.
2.
3.
4.
5.
6.
Turn on the VCR.
Insert a tape with safety tab in place.
Select the channel you want to record.
Select the desired recording speed using
SPEED
on the VCR or remote.
Press
f?EC*OTR
to activate recording.
Press
RECaOTk
repeatedly until the amount of recording time for the pro-
gram is displayed on the TV screen.
Each press of
REC*OTR
increases the time - 30 minutes up to 4 hours.
Press Recording
1-1 REC*OtR Time
RECORD LENGTH 1:00
CH 04
(30 Min)
(1 Hr)
1:30 (1 Hr, 30 Min)
2:do
(2
H=)
---
set length
I
3:oo
(3 Hrd / -ha
I
J
I .
-
4:oo
(4 H=)
cl
2
’
0:oo
(OTRTums Off)
The amount of time the VCR will record and the
REC
indicator appear in the VCR’s display panel
(X4039 only). Pressing
REBOTR
displays the
time remaining on the TV screen. Pressing
REC*OTR
again increases the amount of time.
Stopping a Recording in Progress
With the VCR: Press
POWER
and then
STOP
within a few seconds.
With the Remote: Press
VCR1 (VCR2)
and then
STOP
within a few seconds.
20
Page 23

Recording While You’re Away
Select Cable or Satellite Box Viewing Channel
(Required Onlv if All Channels Are Received From a Cable or Satellite Box)
After you select the cable or satellite receiver box viewing channel, the VCR will automatically enter the out&t channel of your cable
or satellite box in the
VCR PLUS+
and Timer Programming menus as the channel to be recorded. No VCR Plus+ setup is required
when you use a cable or satellite receiver box.
Operating Instructions
1.
Press
MENU*PROG
on the remote to display the
VCR MAIN MENU on the
TV screen.
2. Press 4 to display
CHANNEL SETUP
menu.
3. Press 4 to display
Sat./Cable Box Setup
menu.
4.
Press
1 when the Sat./Cable Box Setup
menu
appears.
5. Press two numbers on the remote to enter the output
channel of your cable or satellite box. Press 0 before
a single-digit number. For Example: Press 03 for
channel 3.
If you connected your cable or satellite box to the
VCR using the cable or satellite box’s
AUDIONIDEO
OUT jacks,
press
INPUT
on the remote to select the
VIDEO IN
option.
Press
CLEAR
to erase a number.
6.
Press
MENlJePROG
when you are finished. A
message appears which will time out, or press
MENU*PROG
to return to
CHANNEL SETUP
screen.
The VCR will now automatically enter the output
channel of your cable or satellite box and
CABLE as
the channel to be recorded in the
VCR PLUS+
and
Timer Programming
menus.
7. Exit the menu system by following directions at the
bottom of the screen.
VCR MAIN MENU
1 VCR PLUS+ Programming
2 Timer Programming
3 Review Programs
4 Channel Setup
CHANNEL SETUP
1 Auto-Search Channels
- 2 Add/Remove Channels
3 Tuning: CABLE
4 Sat./Cable Box Setup
I _
Is a cable or satellite
box being used with the
- VCR for
all
channels?
1 Yes, continue
Enter the channel
number for vieui?g the
sat./cab,lfLbox slgnal
Press 01-13 or INPUT
Press MENU to exit
I
Your VCR ui
11
n'ow
receive all
channels
from the Sat./cable
box on VCR CH 03
Press MENU to exit
21
Page 24

Recording While You’re
Away
(VCR Plus+* Recording)
VCR Plus+ Setup for Antenna or Unscrambled Cable Systems
(Not Requiring a Ca’ble Box)
A VCR Plus+ channel number is assigned for each broadcast or cable
channel. These numbersare listed in most publications that list PlusCode
numbers.
1. Prepare a worksheet for the VCR Plus+ channels that are different
than the channels you receive them on. Refer to the chart below for
standardized VCR Plus+ channel numbers.
Note 1: Check your local or cable listing for the channel number you receive this station on.
Note 2: Check your local listing for the broadcast or VCR Plus+ channel numbar assigned to this station.
2. Press MENU*PROG on the remote to display the VCR
MAIN MENU on the TV screen.
3. Press 5 to display S’ETUP OPTIONS menu.
.___
4. Press 1 to display VCR PLUS+ CHANNEL LIST menu.
VCR MAIN ,MENU
5. Using your worksheet, press two numbers to enter each
1 VCR Plus+ Programming
channel number you receive on a different channel than
2 Timer Programming
3 Review Programs
the assigned VCR Plus+ channel number.
4 Channel Setup
5 VCR Setup Options
If a channel in your area has been assigned more than one
VCR Plus+ channel number, enter that same channel
SETUP OPTIONS
number next to each VCR Plus+ channel number.
Press CHAN up or down to move the
VCR+ CH numbers up or down on the menu.
Press CLEAR on the remote to erase a number.
6. Press MENU*PROG when you are finished.
7. Press 0 to exist the menu system.
1-1
CABLE CH (or ANT.CH)
Press Cl4 UP/DN to select
Press MENU to exit
U.S.A. Lisf
35 American Movie Classics
39 Arts & Entertainment
57 Black Entertainment
54 Bravo
42 Cable News Network
45 Cinemax
98 Cinemax 2
37 The Discovery Channel
53 The Disney Channel
63 Entertainment Television
34 ESPN Sports Network
47 The Family Channel
33 Home Box Office
95 Home Box Office 2
96 Home Box Office 3
51 The Learning Channel
Standardized VCR Plus+ Channel Numbers
foi
Cable-TV
46 Lifetime
Canadian List
51 The Learning Channel
58 The Movie Channel
65 MeteoMedi@he Weather Network
48 Music Television
48 MuchMusic Network
49 The Nashville Network
67 #‘=Q-Y
Z~~~rnent 55 MusiquePlus
38 Nickelodeon
52 Nashville Network
64
72 Cable News Network-Headline News 73 NewsworldfCBC
The Nostalgia Channel
99 Quality Value Cable 90 House of Commons
53 Le Reseau des Sports
41 Showtime
61 Cable News Network, 43 The Sports Network
97 Showtime 2
70 Canadian Home Shoppiig Network 64
56 Canal Famille
Super Ecran
59 Sports Channel
52 Turner Network Television 69 Cathay Jntemational Television Inc
98 Super Ecran C
66 Telatino Network Inc
44 USA Network 46 TVS Montreal
68 Chinavision Canada Corp
62 Video Hits 1
60 Country Music Television 92 Viewer’s Choice 1
93 Viewer’s Choice 1 63 Family Channel
93 Viewer’s Choice 2
94 Viewer’s Choice 2 62 First Choice
94 Viewer’s Choice 3
55 96 First Choice Two 95 Viewer’s Choice 4 WGN Chicago
43 WTBS Atlanta 97 First Choice Three 71
Viion TV: Canada’s
Faith
Network
60 WWOR New York
91 La Chaine Fran&se 38 Youth TV, Canada Inc
22
*VCR Plus+ and PlusCode are trademarks of Gemstar Developnient Corporation.
Page 25

Recording While You’re Away (VCR Plus+ Recording)
The VCR Plus+ and timer program features let you program the VCR to record up to eight
different programs within a one year. period. Before using VCR Plus+ to record a program,
make sure that:
l
The clock is set correctly.
l
A tape with safety tab has been inserted with enough tape to record the programs.
l
The remote is set, to control the VCR - using VCR1 (VCR2).
l
The VCR is setup for VCR Plus+ programming.
- If you receive all channels through a cable box, select a cable box viewing channel on
page 21.
- If you do not use a cable box for all channels, complete VCR Plus+ Setup on
puge 22.
Setting a VCR Plus+ Recording
1. Press MENU*PROG on the remote to display the VCR MAIN
MENU on the TV screen.
2. Press 1 to display the VCR PLUS+ menu.
3. Press numbers on the remote to enter PlusCode number for
the program you want to record. VCR PlusCode numbers are
found in most local TV listings.
Press CLEAR on the remote to correct an entry.
4. Press MENU*PROG to enter the program.
If the VCR does not recognize the PlusCode number,
Unrecognized number... Please re-enter appears on the TV
screen. Check the number and enter it again.
5. Press 1, 2, 3, or 4 to select type of program.
1 One time - single program recorded once.
2 Daily - program recorded at same time every day.
3 Weekdays - program recorded at same
time Monday through Friday.
4 Weekly - program recorded at same time
once a week.
6. Select recording speed using the SPEED button.
7. Press CLEAR if you want to change the program End Time.
This feature allows you to extend the recording time on VCR
Plus+ programs. This option may be useful when recording
programs such as sporting events that could go past
scheduled broadcast times.
8. Press MENU*PROG to enter your program. A reminder
appears which will time out or you can press MENU*PROG to
return to the VCR MAIN MENU.
PROGRAMS OVERLAP may appear on the screen if you
entered two programs where the times overlap.
9. Repeat steps 2 - 6 for additional programs or press
MENU*PROG to remove the menu from the TV screen.
10.
Turn off the VCR
before recording time.
TIMER appears in the%R’s display panel.
11.
If using a cable box, leave it turned on and tuned to the
channel you want to record.
Stopping a Recording in Progress
With the VCR: Press
POWER, then STOP within a few seconds.
With
the Remote: Press VCR1 (VCR2), then STOP within a few
seconds.
VCR MAIN MENU
1 VCR Plus+ Programming
VCR PLUS+
Enter Plus Code number
(from,,TV listing)
+
How often should this
program record?
1 One time
2 Daily (every day)
3 Weekdays (Man - Fri)
4 Weekly (once/week)
PROGRAH 1 - ONE TIME
Channel CABLE
;;;r;i;;me %lO PM
03:35 PM
Start Date .1,1./21193 Sun
Tape Speed >,LP
Press CLEAR to correct
Press MENU to save
23
Page 26

Recording While You’re Away (Timer Recording)
The timer program and VCR Plus+ features lets you program the VCR to record up to eight
different programs within a one year period. Before setting the timer, make sure that:
l
The clock is set correctly.
l
A tape with safety tab has been inserted with enough tape to record the programs.
l
The remote is set to control the VCR - using
VCR1 (VCR2).
l
If you receive all channels through a cable box, select a cable box viewing
channel on
page 21.
Setting a Timer Recording
1.
Press
MENU*PROG
on the remote to display the
VCR MAIN
MENU.
2. Press 2 to display the
Timer Programming menu.
3. Press
1,
.2, 3, or 4 to select type of program.
1 One time
- single program recorded once.
2 Daily
- program recorded at same time every day.
3 Weekdays
- program recorded at same
time Monday through Friday.
4
Weekly
- program recorded at same time
once a week.
4. Press number buttons on the remote to enter the channel
number (or
INPUT
on remote to select line input), start time
jncluding
AM
or
PM,
end time, and start date of the record-
. ..Q> .*.
.-: @$s; Just follow the on-screen prompts.
LC’
‘I.
: 5.
6.
Press
CLEAR
on the remote to correct an entry.
If you receive all channels from a cable box and have
completed
Cable Box Setup,
the output channel of your cable
box and
CABLE
will automatically appear on the menu. See
page 21.
Select recording speed using the
SPEED
button on the remote
or VCR.
Press
MENU*PROG
to enter your program. A reminder
appears
which w@ time
out or you
can
press
MENlJ*Pf%OG
to return to the main menu.
PROGRAMS OVERLAP
may appear on the screen if you have
entered two programs where the times overlap.
Repeat steps 2-6 for additional programs or press
MENU*PROG
to remove the menu from the TV screen.
Turn off the VCR before recording begins.
TIMER
appears in the VCR’s display panel.
If using a cable box, leave it turned on and tuned to the
channel you want to record.
Stopping a Recording in Progress
With the VCR: Press
POWER,
then
STOP
within a few seconds.
With the Remote: Press
VCR1 (VCR2)
and then
STOP
within a
few seconds.
VCR NAIN NENU
1 VCR Plus+ Programming
2 Timer Programming
r
HOY often should this
program record?
1 One time
2 Daily
(every day)
3 Weekdays (Man - Fri)
4 Ueekly
(once/week)
PROGRAM 1 - ONE TIME
Channel
\I/
XT7
CABLE
PROGRAM 1 - O;NE TIME
Channel
Start Time $f:-_CABLE
II
PROGRAM 1 - ONE TIME
II
Channel 08 CABLE
Start Time ,q?:lO PM
End Time
i
zt:--
PROGRAM 1 - ONE TIME
Channel CABLE
;;y;i;;"'
i&,0 PM
03:35 PM
Start Date
Tape Speed
'll;lBf94 Fri
Press CLEAR to correct
Press NENU to save
Program 1
has been saved
24
Page 27

Recording While You’re
Away
(Timer Recording)
Checking or Clearing VCR Plus+ and Timer Recordings
1.
Press
MENU*PROG
on remote to display
VCR
MAIN MENU
on TV screen.
2.
Press 3 for
Review Programs.
Each
entered program is displayed for a few
seconds in sequence.
3.
Press
MENU*PROG
or 3 to display informa-
tion at a faster pace.
4. Press
CLEAR
on the remote when the program
you want to
erase appears on the screen.
Timer Recording From the VCR’s Line Input
The line. input refers to the signal coming from
the AUDIO
and
VIDEO IN
jaoks of the VCR. Recording from the line
input is convenient if you have a satellite receiver or similar
component attached to these jacks. To timer record from the
component connected to the VCR’s line input:
Press
INPUT
on the remote to enter
VIDEO IN
instead of the
channel number on the TV screen during timer
programming.
1 VCR Plus+ Programming
2 Timer Programming
3 Review Programs
PROGRAM 1 - ONE TIME
Channel
08 CABLE
;;;r;i;;me 02:lO PM
03:35 PM
Start Date 11118194 FI
Tape Speed SLP
PROGRAM 1 - ONE TIME
Channel &IDE0 .IN
;;;r;i:;me ,p-:--
mm:--
Start Date
- -, - - / - -
Tape Speed SLP
Press CLEAR to correct
Press MENU to exit
25
Page 28

Using ‘Fwo VCRs for Copying and Editing ~Tapes
Operating InStructions
(Refer
t0 hookup 0n
page 6.)
Use one VCR as the playback VCR and the other as the recording VCR. If you have two compatible VCRs, use the
AutoEditTM feature described below.
recording of television programs and other materials
may inhinge the rights of
1. Turn on the TV and VCRs.
2. Tune TV to the VCR viewing channel, either 3,4, or TV’s
video input.
3. If you have connected your VCR using Option A (page 6),
tune recording VCR to channel 3 or 4 - the one selected on
the back of the playback VCR.
If you have connected your VCR using Option B (page 6),
press
INPUT
on recording VCR’s remote to select the line
input.
4. Insert the tape you want to copy into playback VCR. Insert a
blank tape with safety tab in place into recording VCR.
5. Press
PLAY,
then
PAUSE
on playback VCR when you reach
the point on the tape or program where you want to begin
copying. If the tape was not recorded on the playback VCR,
streaks may appear and you may need to adjust
TRACKING.
6. Press
REC*OTR,
then
PAUSE,
on recording VCR.
7.
Press
PAUSE
buttons on both VCRs at the’same time to begin
copying the tape.*
8. Edit out segments that you do not want to copy by pressing
PAUSE
on recording VCR to stop copying the tape. Then,
locate the next segment you want to copy on playback VCR
by using
F.FWD, REWIND,
and
PLAY.
Press
PAUSE
on the
playback VCR. Press
PAUSE
at the same time on both VCRs
to resume copying.
9. Press
STOP
on both VCRs when you are finished.
* You may turn off the TV after the recording has started as it does
not have to be on to copy a tape.
Using Dual Remote with AutoEdit’”
Use this VCR as the recording VCR and set it to respond to VCR2 on the remote as
described on page 22. Use your other compatible VCR as the playback VCR, which should
respond
to VCR1 .
1.
Follow steps
l-
4 in the “Operating Instructions” above.
2. Press VCR2 on remote to control recording VCR. Press
REC*OTR, then PAUSE, to
put recording VCR in pause
mode.
3.
Press
VCR1
on remote to control playback VCR.
4.
Use
F.FWD, REW. and PLAY to
locate the point where you
want
to
begin copying. Press
PAUSE while
VCR is playing to
put playback VCR in pause mode.
5.
Press
EDIT on
remote; the VCRs will begin copying.
6. Press EDIT
again when you want to stop the tape from
copying.
7. Repeat steps 4 - 6 as needed.
8.
Press
VCRl, STOP, then VCR2, STOP, when you
are finished.
26
Page 29

Specifications
Format:
Record/Playback
System:
Video Signal System:
Antenna:
Tuner:
Type:
Power Requirement:
Power Consumption:
Dimensions:
Weight:
Storage Temperature
Range:
Operating
Temperature Range:
VI-IS
Video: I-Head
Audio: Mono record/ playback system
EIA standard: NTSC color
75-ohm external VHF/ UHF combined
antenna terminal
USA:
181 channels capability*
(125 cable channels)
Canada: 178 channels capability*
(122 cable channels)
AutoProgramming frequency synthesis
120V AC, 60 Hz
21 watts
3.5 inches high
(89.5 mm)
15.43 inches wide
(392 mm)
12.1 inches deep
(307.5 mm)
9.46 pounds
(4~3 kg)
- 220F to +149”F
+41”F to +10&F
*Check your cable company’s compatibility requirements.
Cleaning the VCR
Use a soft cloth or dusting attachment of your vacuum cleaner to dust your
VCR. Remove dust from the ventilation holes on the top, back, sides, and
bottom of the cabinet.
Plastic surfaces are easily scratched and can be marred by alcohol and various
solvents. Avoid excessive use of oil-based furniture polishes since the
materials used in the cabinet will accumulate more dust. We recommend using
a non-abrasive, anti-static cleaner and polisher.
Page 30

Location of Controls
Front Panel
Tape Compartment
Remote Sensor
CHANNEL*TRACKING
(Up
or
Down)
Selects next higher or lower channel in the VCR’s
channel memory.
Adjusts tracking when a tape is playing.
REC*OTR
Starts VCR recording.
Used for one touch recording (OTR).
Remote Sensor
EJECT
Press when the VCR is stopped to eject the
cassette.
Receives signals from the remote control. Aim the
remote at this.sensor with no objects between them.
REWIND
F.FWD
(Fast Forward)
Fast forwards the tape when the VCR is stopped.
Searches the picture forward during playback.
Rewinds the tape when the VCR is stopped.
Searches the picture in reverse during playback.
STOP
PAUSE
Pauses action for viewing during playback.
Pauses recording to prevent recording of
unwanted scenes.
Stops the normal functions such as record,
playback, rewind, fast forward, or pause.
SPEED
Selects a recording speed (SP,
LP, SLP).
PLAY
Plays a tape.
TV*VCR
POWER
Turns the VCR on or off.
Switches the picture signal so that it either comes
from the VCR or the TV channel. See page 9.
Back Panel
r ___-,--_, _.----^-.^._ --. --I^,-_“-_ .,” “. _ ^ ^,,^ ,,-- ^ “x ..I_ .-xI1
1
L
i
INFROM i
ANTENNA 1
CH3 4 Switch
Selects the channel to which you will tune the TV
to see the VCR picture if you connect the VCR
using one of the basic hookups.
IN FROM ANTENNA
Connector
Receives a signal from an antenna or cable system
when attached.
OUT TO TV
Connector
Passes signal to TV using the cable supplied.
VIDEO INPUT
and
AUDIO INPUT
Jacks
Receives signals from another component, like a
VCR or camcorder, when it is connected to these
jacks. Use
INPUT
on remote to select.
VIDEO OUTPUT
and
AUDIO OUTPUT
Jacks
Sends signals from VCR to another component,
like a VCR or camcorder, when it is connected to
these jacks.
continued on next page
28
Page 31

Location of Controls
The display panels for two VCRS are shown below. VCR model VG4038 has LED indicators that light
according to the status of the VCR. It is not equipped with a clock or channel indicator on the front display
panel. VCR model VG4039 has a flourescent digital display that indicates the status of the VCR. This model
comes equipped with a clock and channel indicator on the front display panel.
Display Panel for VG4038
8
I POWER VCR TIMER RECORD i
0 0 0
- :
1.-.-.-------...----..-..---...--..-.-.-,
POWER
Indicator
VCR
Indicator
Lights when the VCR is turned on.
Lights when using the
TVWCR
button.
RECORD
Indicator
When using one of the basic hookups:
Shows that the VCR is recording.
l
When
VCR
indicator is on, the picture comes
from the VCR.
TIMER
Indicator
Shows VCR is set for timer recording when VCR is
turned off. It will flash until the on-screen clock is
set.
l
When
VCR
indicator is off, picture is from the
television channels.
Display Panel for VG4039
Tape
Channel Number
-7
or L (Line Input Indicator)
Indicators
Indicator
or lime
Cassette-in
Indicator ( a )
Lights when a tape is in the VCR.
Channel Number
or
Line
Indicator
(L)
The channel number or line indicator
(L)
is
displayed.
L lights when you
press
INPUT
on the remote to
record from the
VIDEO IN
and
AUDIO IN
jacks.
Status
Indicators
Show what the VCR is doing.
PLAY
Playback
REC P
Record-pause
STILL
Play-pause
STILL
Frame advance
SLOW+
Slow motion
REW
Rewind
SRCH -
Reverse search
F-FWD
Fast forward
SRCH+
Forward search
STOP
TIMER
TAPE
Flashing
REC
Stopped
Timer programmed
Tape not inserted
Recording
Tape Speed
Indicators
(SP, LP, or SLP)
Press
SPEED
on remote to change.
Time or Time Counter
Press the
DISPLAY
button to switch between the
current time and time counter.
VCR
Indicator
Lights when using the
TV*VCR
button.
When using one of the basic hookups:
l
When VCR indicator is on, the picture comes
from the VCR.
l
When
VCR
indicator is off, picture is from the
television channels.
29
Page 32

Double Checks
Sometimes problems can be easily solved by checking a few basic things.
Check below before you call for help or take your VCR to an Authorized GE
VCR Servicenter.
Trouble
No power
~~__*,~_----,--~,~--,--,---~--,.,”~”~ “~“*~~
VCR does not respond to remote
__
~,-~~,~---~-
TV does not respond to remote.
VCR only responds to
VCR2
button on
remote
Poor or no picture for normal TV viewing
Snowy or no picture during playback
Streaks in picture during normal playback
Time counter not working or timer counter not
working in search modes
Will not record or play
Will not record
Here’s what to try:
y_m.,msw-----Pm_*__ -“ex*-* II-- II-- __Ix.I-_III,_,-,III1”~~,~~-,~ ^___ j_ _.._, _
___^II_y -,-_
^I__x__._
l
Plug VCR into an operating outlet.
l
Check connections.
.,_ ,_-1___-,,“_^ -,..I, IIQ,mw*-y” ..I. -_--lll*~a”~*~-~“~. __.A1*._“,ml** “,l.,vl”l, I _. _. .yI~_.~~,“-I”~.xm,l,” ,--^_ -,,,, _.~~_” ,-.--, __*mm,m.
l
Press
VCR1 (VCR2)
to set remote to control the VCR. See page 12.
l
Aim remote at VCR with no objects between them.
l
Change batteries.
xII”-“~--.-,. __^l”“l~---~~~~---~ --,Ix_, IIxI-xI-A”.A”I
~-“,-_“-_ -,-.-, ---_
l
Press TV to set remote to control a compatible TV. See page 22.
x.-^xIxIII.“,“.IxI ,,-, xI^Ix.,-xI ---II,“-” .~~ .,--- ----_““l_ll, ^----~~Ix-x”-” -,--,“-“.~,, ,j_x ,-_,-_ I x_x _ _x -“._-~,,
l
Check setting of
Remote Control: VCRlNCR2
feature. See page 22.
” __I_-,-- I,~ ^~ x_,“_ I”“-~,~.x-I^II.,~~~“.Ix. ,“,~xI--^x-LxI”x^LI,x ,, llj ~ ~,, ” ,,,., “, “““,- ,--_ ,~, .,“~“-~ L_“x ,,-___ _x __,--_- ” _,_,,” ,11
l
Press
TWVCR
to turn
VCR
indicator off.
l
Switch TV to an active channel.
l
Check antenna connections.
---- L.IxI-x.-“I .,,- “____,_., x^_ --,-_ ---,-__-^ -.,x;. I; “,,“,;_-” ~~xx^I^Ix^III-~^xIx^--^I^xx^I ,-x,“,^ ,,,- _,,~“-“,“-^ x,-x -_“x
l
Press
TVWCR
to turn
VCR
indicator on.
l
Check TV channel selected (3 or 4) to make sure it matches the channel
selected with CH3 CH4 switch on back of VCR.
l
Check TV’s fine tuning.
l
Check video cable connections between VCR and TV monitor.
l
Set TV monitor to video input channel.
l
Try another tape.
l
Some snow/streaks are normal during search; frame advance, slow motion,
and stop action playback
.__“__^ _,,_,” _--I --.,.-, “,--,- -I^xLIII^IIx _ ,,.,, l__““_--“~-~l-,“,,“- __ xxI,~ ^I__ _-_1- -^I^-----,------~“-,
l
Press one of the
TRACKING
buttons on the remote or
CHANNELaTRACKING
on the VCR to move streaks up or down and out of the picture.
l
Check tape - it may be worn out or of poor quality:
I”~“--.~~-___~-“----~,--~-,-~-~-~--_^^ -x;-x _--~~--“--
~-_~-~~“- j--
l
The time counter does not advance during unrecorded portions of tape.
When an unrecorded segment of tape is encountered, the time counter will
hold its count until recorded material is detected again.
l
A minus (-) will appear in front of the time if you rewind the tape farther
back than a counter reading of 0:OO:OO.
,emw-~__^““wL--
~---~--~~-_-_-“~,-_^/“~.~~,-,~-~~.~---~-~-~~ “-“+--.*
l
No cassette in VCR.
l
Eject and re-insert cassette.
l
Broken tape -try another cassette.
l
VCR is in pause mode. Press
PAUSE.
^ ^c___“_ “.I___ ,~“,_ -1x,. *,.w,.. _^ ,._ I,-l^“,-1,l--- em.,* *~m~e”a.AL--
I _““,“.^L,,“.^.^ ,,” “,___ _.~-,l_x_x-___x-l_I~~‘- -,11x “I_ “,“x”,
l
Safety tab removed from cassette.
l
Make sure thaline indicator does not appear on the TV screen for normal
recording from the VCR’s tuner. Press
INPUT
to turn off the line input.
_I_ ,_.,___ “,~“,^ ;___ xI_-“~-II_x_~~~“__“~__“,““~~~--” ___^-,-_ ^ _IX__-w “+_x--a- --,-I _“._.1I^X..
continued on next page
30
Page 33

Trouble Checks
Trouble
Here’s what to try:
Timer recording not made 1 l Cable box was not turned on at time recording was to begin.
or wrong program recorded 1 l Program entered incorrectly (wrong channel or times).
j
1
l
Power interruption. Reset clock. See puge 9.
l
Check-to see if time and date are correct - including
AM/PM.
f
i
l
Program exceeded tape’s length or tape was not rewound beforehand.
l
VCR was not turned off at the time recording was to start.
]
l
No tape in VCR or cassette’s safety tab broken off.
i
l
VCR ejects cassette when the end of the tape is reached during a timer
recording.
,-_ j, “~_x x1 ^_I__ _ ,. ” ;,___^^ _,...- “--I.x1I ^_,” X,_^“~_ ^_.. -1_1^ I”I^Ix”x-I^“-I.-~-“--ll-^I^.xI. ,,x_ ,; II,“.x.x.I”~,- --~ “~~““xl”~I”,~“xI^I~xII- .,-_ “__ _I ___,, ^““_,, ^ ___, ^x,_“^^” _--, ^
Incorrect time or date
1 l Clock was not set accurately (check
AM/PM
and date). See page 9.
-~--_L_LI_I_“___“--“x--~,-x,x_ ,---,, L ,__ j. ^“^x,“,“,--xIxxI~, ,.~.“‘.~,~,~“,~‘“x ,,_ x1-x ,~ ,., _ ,” ,,-, “, __“,,ji,,“,__ -I_ ,ii x x___ *,; --“-_x ---l,, I.,LXII”III” ,--I ,,jx-,x-_---_I___-_-_ “, ““X ,,I .” -“,a----%“”
VCR makes noise when stopped
1 l VCR is removing tape from heads. This is normal. The head cylinder inside
i
the VCR will continue to rotate for a few minutes after you put the VCR in
I the stop mode.
_Iu --___-_ ~~ -,-- w-.xI”Am- “~~x~IIII ,,“__ ,xxI.II..~“.x.“p,x~~x^ .,., _j 1 ,xI,~I,.,x _. ,. _“_- x ,__ ,. .“..,“-_m _“_ ,“,,“- -“,-
,,,,....” “xx,--xx .“,, ,“..
., ^ _“x”_^,x”^,x___, ^ . ,. ”
1,1 _-x ,, “~, . x.,_.
Will not AutoProgram active i l Check antenna connections.
channels correctly
1 l Check’Tuning Mode: CABLE/ANTENNA
feature. See puge 8.
w--,w,--“- __I-_--~.-- -_-I_ Ill”ix-” ““11,“,1 ___-- ^.“irxxlx”,a.Ye---xl,x-^,x.a”~~ ,,~-,“_, x,“~,,“I..,~.“.x,x”lxI~~~~ .“^“^xI^l,~,~“,-~,x ,-xl- X-XIIIXII.
,“x”--““I1; .j.;
” ,, ,“--,“l,j j_XI
Tape plays back in slow motion
l
Press
PLAY to
return to normal playback.
-,--,~“---” II--- --1-.-__ -,I -“Ix___ l_,,,_ ^” -x,x-” ,~XI”,,
xx x ,~“^_,“,,” x,xI,. ;_ _,_ IIII,~,, “__ ____,.~..,” ,,,, “---“~,-,_, ” ^” ” “,_“,“,_,_ xI ,~,.~
Cannot select channels over 69
.,.“t--C.bl h
,.“‘“,,““” _” “, ““- __- ___,”
a e c
annels over
69 can
only be selected if
Tuning Mode:
i
CABLE/ANTENNA
feature is set to
CABLE.
p ,“,,” ,-,- _ -__ _ “,” ,^ xIIIIx j,~~~“” ,,-- _ -.,, j ,,,,, -, ,, __ ,,~,“~--I-- _l_ _ ,~, “,_“_“~x,I,,~ ..“~“, .~-,““,-,--l,.
,” ,--,- “x--11
I~-“I~~~Lx~I~--~~-^--,-“l~“-~“,x^xI-~-~~”~,~,~~~“,
Cassette with safety tab removed does not start to i
l
Set Auto Play ON/OFF
feature to
ON.
Details are on puge 14.
play automatically
__-_ _,-__ ,.-_, __-~,--” xxwI_ x I^-xIIxxxI, -^ _“,-_x_--_“,.. . ..-. _--” -...; x _I,” x --“..” -,-x- --__1- -
No status displays appear on the TV screen when
4
I
l
Display off mode is selected. Press
DISPLAY. See
page 15.
you change channels, etc.
-““---L ___---* ~
_~---x _--. ““_~,---~
--P --me
31
Page 34

Limited Warranty
What your warranty covers:
l
Any defect in material or workmanship.
For how long after your purchase:
l
Ninety days for labor charges.
l
One year for parts.
l
The warranty period for rental units begins with the first rental.
What we will do:
l
Pay any Authorized GE VCR Servicenter the labor charges to repair your
VCR.
l
Pay any Authorized GE VCR Servicenter for the new or, at our option,
refurbished replacement parts required to repair your VCR.
How you get service:
l
Take your VCR to any Authorized GE VCR Servicenter. To identify your
nearest Authorized GE VCR Se¢er, ask your dealer, look in the
Yellow Pages, or call l-800-447-1700.
l
Show the service technician your evidence of purchase date.
l
Pick up your VCR when repairs are completed.
What your warranty does not cover:
l
Customer instruction. (Your Owner’s Manual clearly describes how to
install, adjust, and operate your VCR. Any additional information should
be obtained from your Dealer.)
0, Installation and related adjustments,
l
Signal reception problems not caused by your VCR.
l
Damage from misuse or neglect.
l
Cleaning of video/audio heads.
l
Remote control batteries.
l
A VCR that has been modified or incorporated into other products or is
used for institutional or other commercial purposes.
l
A VCR purchased or serviced outside the USA.
Product Registration:
l
Please comj?lete and mail the Product Registration Curd packed with your
VCR. It will make it easier to contact you should it ever be necessary.
The return of the card is not required for warranty coverage.
How state law relates to this warranty:
l
This warranty gives you specific legal rights, and you also may have
other rights that vary from state to state.
If you purchased your VCR outside the United States:
l
See your dealer for details.
32
Page 35

index
Accessories, Included.. ............................ .7
Add or Remove Channels
From Memory ........................................ .8
ADD/REMOVE CHANNEL
Menu .......... .8
Antenna Connections ........................... .2,3
AUDIO/VIDEO IN
Jacks
................. .6,25,28
AUDIO/VIDEO OUT
Jacks.. ........ .3-6,25,28
Auto Play
Feature ............................. .13,14
Auto-Search Channels
Feature ............. .8
AutoEditTM.. ............................................ .26
Backhanel................................................ 28
Batteries, Inserting in
Remote.. .............. .7
Buttons ................................................... .2-6
Component.. ................................... .lO
VCR.. ......................................
.10,11,28
TV.. ...................................................
.11
Cable Box Setup
Menu.. ...................... .21
Cable Box, Select Viewing Channel ..8,2 1
Cable System With Cable Box ......... .2,4,5
Cable System Without Cable
Box Connections ................................. .2,3
Card, Registration .....................................
i
CH3 CH4
Switch ............................... 3-6,2E
CHANNEL
Buttons ........................ .8,10,11
CHANNEL SETUP
Menu.. ...................... .8
CHANNEL*TRACKING Btittons13,14,15,28
Checking Timer
Recordings.. ............... .25
Checks, Trouble..
.............................. .30-31
Choosing a Hookup
:. .............................. .2
Cleaning the VCR.. ................................ .27
CLEAR
Button.. ............................. .9-11,16,
.......................................... 17,21,22,23,24,25.
Clearing Timer
Programs.. ................... .25
Commercial Scan.. ................................. .17
Connections.. ......................................... .2-6
Antenna .........................................
.2-3
Audio/Video Jacks
................... .2,3-6
Cable-TV ..................................... .2,4,5
Two VCRs.. .......................................
.6
Contents ....................................................
.l
Copying Tape, Connections..
................. .6
Copying Tapes ....................................... .26
Date and Time, Setting.. .......................... .9
Design Specifications ............................ .27
DISPLAY
Button .......................... .10,11,16
Display Panel ......................................... .29
Displays ................................................... .16
EDIT
Button ........................................ lo,26
Editing Tapes .......................................... .26
EJECT
Button ...................................
.13,28
F.ADV
(Frame Advance) Button.. .... lo,15
F.FWD
(Fast Forward)
Button ........................... .10,14,16,17,26,28
Frame Advance Feature.. ...................... .15
Front Panel.. ............................................ .28
Go-To Search Feature.. .......................... .17
Hookups
Antenna ......................................... .23
Audio/Video Jacks ................... .2,3-6
Cable-TV.. ................................... .2,45
Two VCRs
......................................... .6
IN FROM ANT
Connector.. ............. .3-528
INDEX SEARCH
Menu.. ........................ .16
Index Search ........................................... .16
INPUT
Button
....................... .9,10,24,25,26
Inserting/ Removing
a Tape.. ............... .13
Limited Warranty..
................................ .32
Line Input, Recording From..
..... .24,25,26
Location of Controls
Remote Control.. ........................ lo-11
VCR Back Panel
............................. ,28
VCR Display
Panel.. ...................... .29
VCR Front Panel ............................ .28
LP
Speed .................................................. 19
MENU PROG
Button.. ............... .8,9,10,14,
.....................................
21,22,23,24,25
MUTE
Button.. ................................... .lO,ll
Number Buttons
.......................... .10,11,12
OFF
Button .........................................
lo,11
One Touch Recording ........................... .20
Operating Instructions
Copying Tapes
............................... .26
One Touch
Recording.. ................. .20
Playing a Tape.. .............................. .13
Recording a Program.. .................. .18
Timer Recording..
.......................... .24
OTR (One Touch)
Recording ............... .20
OUT TO
TV Connector.. .................. .3-5,28
PAUSE
Button..
........
.10,11,14,15,18,26,28
Pause for Stop
Action.. .......................... .14
Pause, Recording
................................... .19
Picture Search ..........................................
14
PLAY
Button..
................
.10,11,13,14,15,26
Playback Features..
...........................
.14-17
Playing a Tape
................................... 13-17
POWER
Button ...................................... .28
POWER
Indicator ................................... 29
PREV. CH.
(Previous Channel)
Button ................................................
lo,11
Problems, Solving..
........................... .30,31
Product Registration ................................. i
RECORD
Indicator..
.............................. .29
Recording
Basic.. ............................................... .18
From Another VCR ....................... .26
One Program While
Watching Another..
..................... ,18
One Touch
(OTR). .......................... .20
Pause
................................................. 19
Speeds
...............................................
19
Timer .......................................... .24-25
Types Of ........................................... 18
VCR Plus+
................................. 22-23
Recording
...........................................
18-26
REC*OTR
Button.. ........ .10,11,18,20,26,28
Registration Card ......................................
i
Remote Control.. ................................
lo-12
Remote Control Buttons That
Control TV.. ...................................... lo-12
Remote Control Buttons
That Control VCR.. .......................... lo-12
Remote Control: VCRlNCRP
Feature..
................................................. .12
Remote Sensor.. ...................................... .28
Remote, Controlling TV.. ...................... .12
Remove or Add Channels From
Memory..
................................................. .8
REMOVE/ADD
CHANNEL Menu .......... .8
Removing/ Inserting
a Tape.. ............... .13
Review Programs Feature .................... .25
REW
(Rewind)
Button.. ................ 10,11,13,14,16,17,26,28
Safety Precautions
..................................... i
SEARCH
Button ..................... .10,11,16,17
Search, Go-To ......................................... .17
Search, Index
.......................................... .16
Search, Picture. ........................................ 14
Search, Time ............................................ 17
Search, Time-Counter. ............................ 16
Sensor, Remote ........................................ 28
Set VCR Clock Feature ............................. 9
Setting a Timer Recording..
.................. .24
Setting Up the VCR..
............................ .7-9
SETUP OPTIONS
Menu.. ................ .12,14
SLOW
Buttons.. ............................ .10,11,14
Slow-Motion Playback.. ........................ .14
SLP
Speed..
..........................
.
.................. .19
Solving Problems..
............................ .30-31
SP
Speed
................................................. .19
Specifications.. ........................................ .27
SPEED
Button ............... .10,11,18,20,24,28
Speeds, Recording
................................. .19
Startup..
.................................................. .7-9
Status Indicators .................................... .29
STOP
ButtonlO-ll,l3,16-18,20,25,26,28
Stop Action
Pause.. ................................ .14
Stopping Timer
Programs.. ............. .23,24
Table of Contents..
................................... .l
Time
Correcting..
....................................... .9
Display ..............................................
.9
Setting..
.............................................. .9
Time and
Date, Setting.. .......................... .9
Time Counter .................................... .16,17
Time Search ............................................ .17
Timer Recording
Checking and Clearing .................
.25
From VCR Line Input ...................
.25
Indicator..
........................................ .29
Recording.. ...................................... .24
Setting.. ............................................ .24
Stopping.. ........................................ .24
TIMER
Indicator..
................................... .29
Timer Recording.. .................................. ,24
TRACKING Buttons.. ......... .10,11,13-15,17
Tracking, Automatic and Manual..
..... .15
Trouble Checks..
............................... .30-31
Tuning Mode: Cable/Antenna
Feature
.. .
Turn On VCR
........................................... .7
TV Button .......................................
10,11,12
TV, Controlling with VCR Remote..
.. ..12
TV*VCR
Button..
.................. .9,10,11,18,28
VCR Controls
......................................... .28
VCR
Indicator.. .................................... .9,29
VCR, Cleaning.. ...................................... .27
VCR, Controlling with
VCR1 /VCR2 Button.. ........................... .I2
VCR Plus+ Recording
...................... .22,23
VCR, Turn
On .......................................... .7
VCR1
Button
..............
.8-10,12,18,23,24,26
VCR2
Button..
..........................
.10,12,18,23
VCRs Memory, Placing Channels..
....... .8
VCRs, Connecting for Tape Copying.
... .
VIDEO IN
Jacks ........................ . ...........
628
VIDEO OUT
Jacks..
........................... .3-628
VOLUME Buttons ........ -. ....................
10,ll
Warranty,
Limited ................................. .32
33
Page 36

For your nearest Home
Entertainment Dealer
or Authorized Servicenter
call toll-free in the U.S.A.
l-800-447-1700
Canadian Consumers Your toll-free numbers are:
English: l-800-522-0338
French: l-800-522-0445
If you would like a copy of this manual in French, please follow the
instructions below:
Si un livret d’instructions en fraru$s n’est pas inclus avec votre appareil,
vous pouvez en obtenir un (indiquer le numero de modele, votre nom, et
votre adresse) en vous adressant a:
Thomson Consumer Electronics
Attention: Canadian Operations
P.O. Box 0944
Indianapolis, IN 46206-0944
If your VCR needs service, please
contact your dealer or the nearest Servicenter
from the yellow pages. Please do not send
any products to the Indianapolis address listed
in this manual or on the carton. This will only
add delays in service for your product.
Thomson Consumer Electronics
600 N Sherman Dr, PO Box 1976
Indianapolis, IN 46206
@1994 Thomson Consumer Electronics, Inc.
Trademark(s)@ Registered
Mama(s) Registrada(s)
Printed in Singapore
Part Number 94VG4038/VG4039-1
20258570
.
 Loading...