

Page 1
GE Oil & Gas
Mooney
Installation, Operation and Maintenance Manual
Scope
This manual provides installation, operation, and maintenance
instructions for the Mooney Flowgrid regulator. Instructions for the
Mooney Series 20 Pilot will be found in a separate manual.
Table of Contents
Product Description ............................................................................1
Regulator Markings .............................................................................3
Nameplate Information .................................................................... 3
Principles of Operation ...................................................................... 4
Hydrostatic Testing .............................................................................5
Installation ............................................................................................... 6
Flowgrid* Regulator
Piping Details .......................................................................................... 7
Start-up and Operation .................................................................. 11
Maintenance ....................................................................................... 13
Troubleshooting ................................................................................. 15
Warranty ................................................................................................ 16
Product Support ................................................................................. 16
*
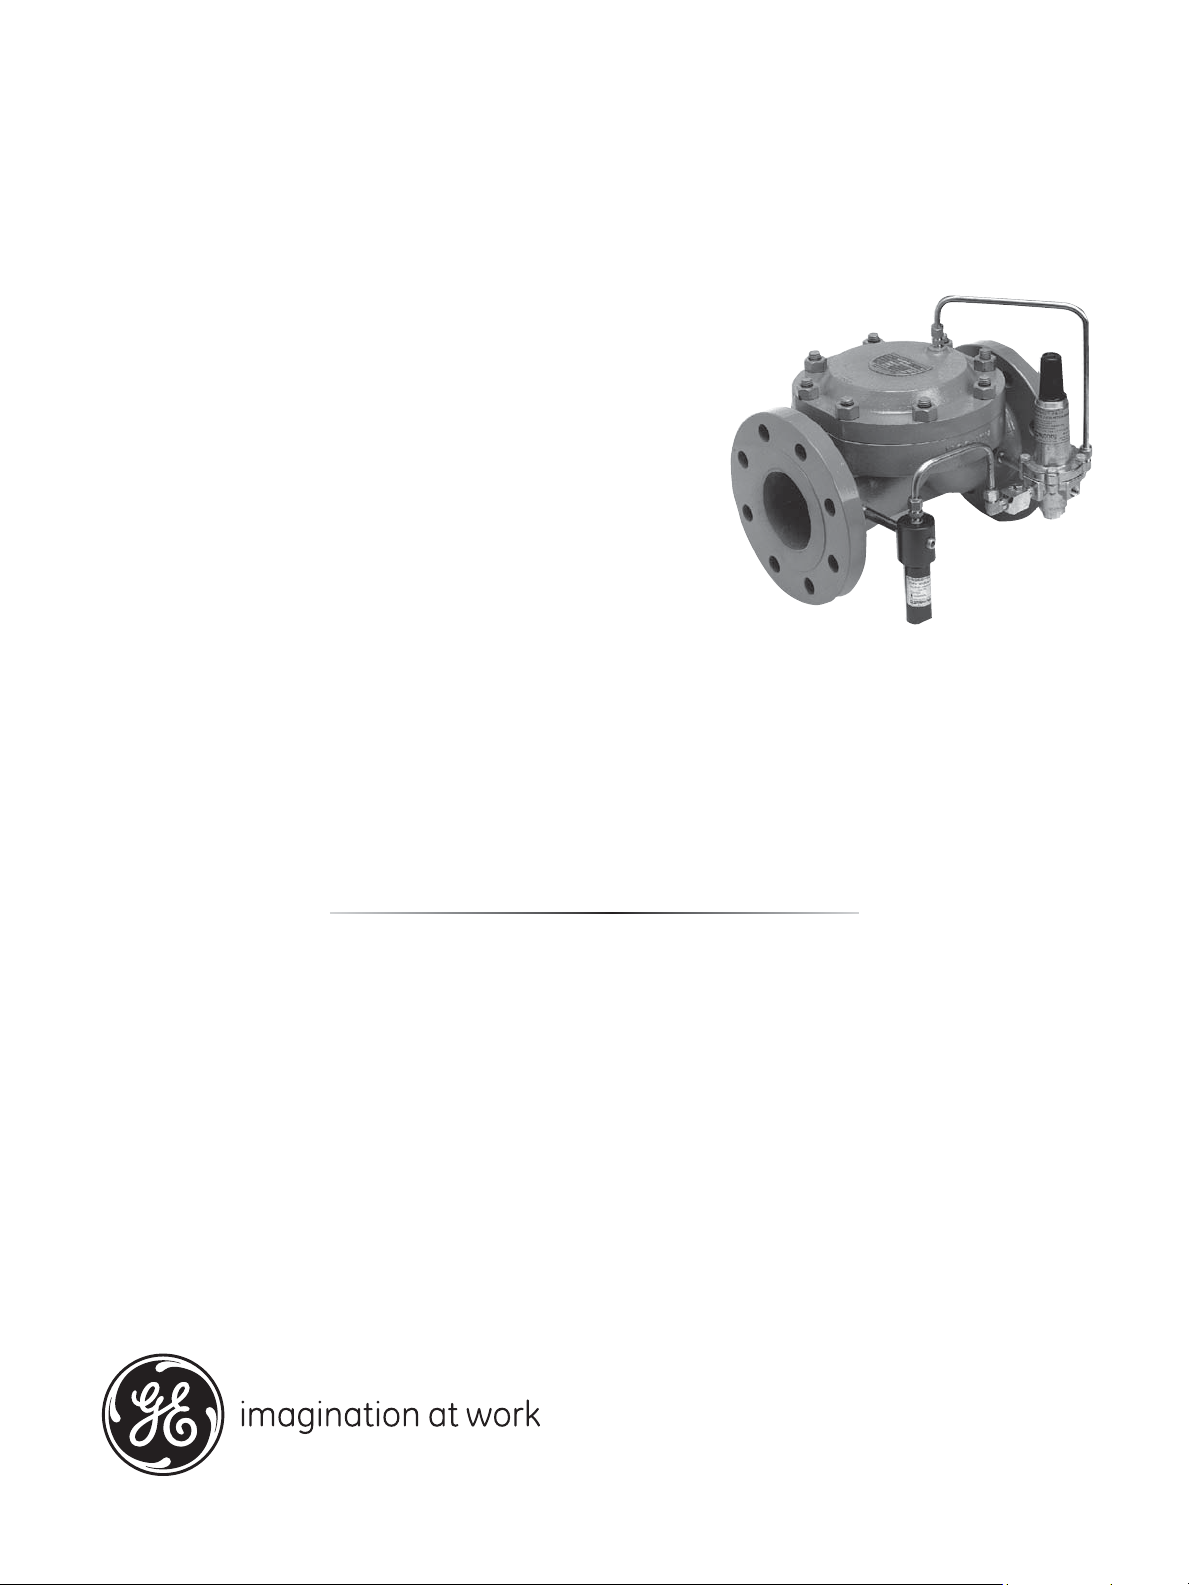
Product Description
The Mooney Flowgrid regulator is an easy to maintain
regulator designed to be used primarily with a self
contained pilot system. The Flowgrid regulator has
several unique features that add to its versatility such as:
■
In line maintenance
■
Replaceable trim
■
Reversible trim parts
■
Non stretching fabric reinforced diaphragm for
stability and fast response at all temperatures
■
Positive spring shutoff
■
Two-stage pressure drop to minimize noise and
provide cavitation protection
GE Oil & Gas has secured global PED EN 334 certification
for its Mooney Flowgrid regulators demonstrating our
commitment to quality and safety. The certification was
awarded by DVGW (the German Technical and Scientific
Association for Gas and Water), one of the world’s most
recognized industry certification bodies and the largest
gas and water industry certification agency in Europe.
GE Oil & Gas has also secured the following verifications;
ISO 9901, ISO 14001, CRN along with others ensuring the
safety and quality of the Mooney regulator.
Page 2
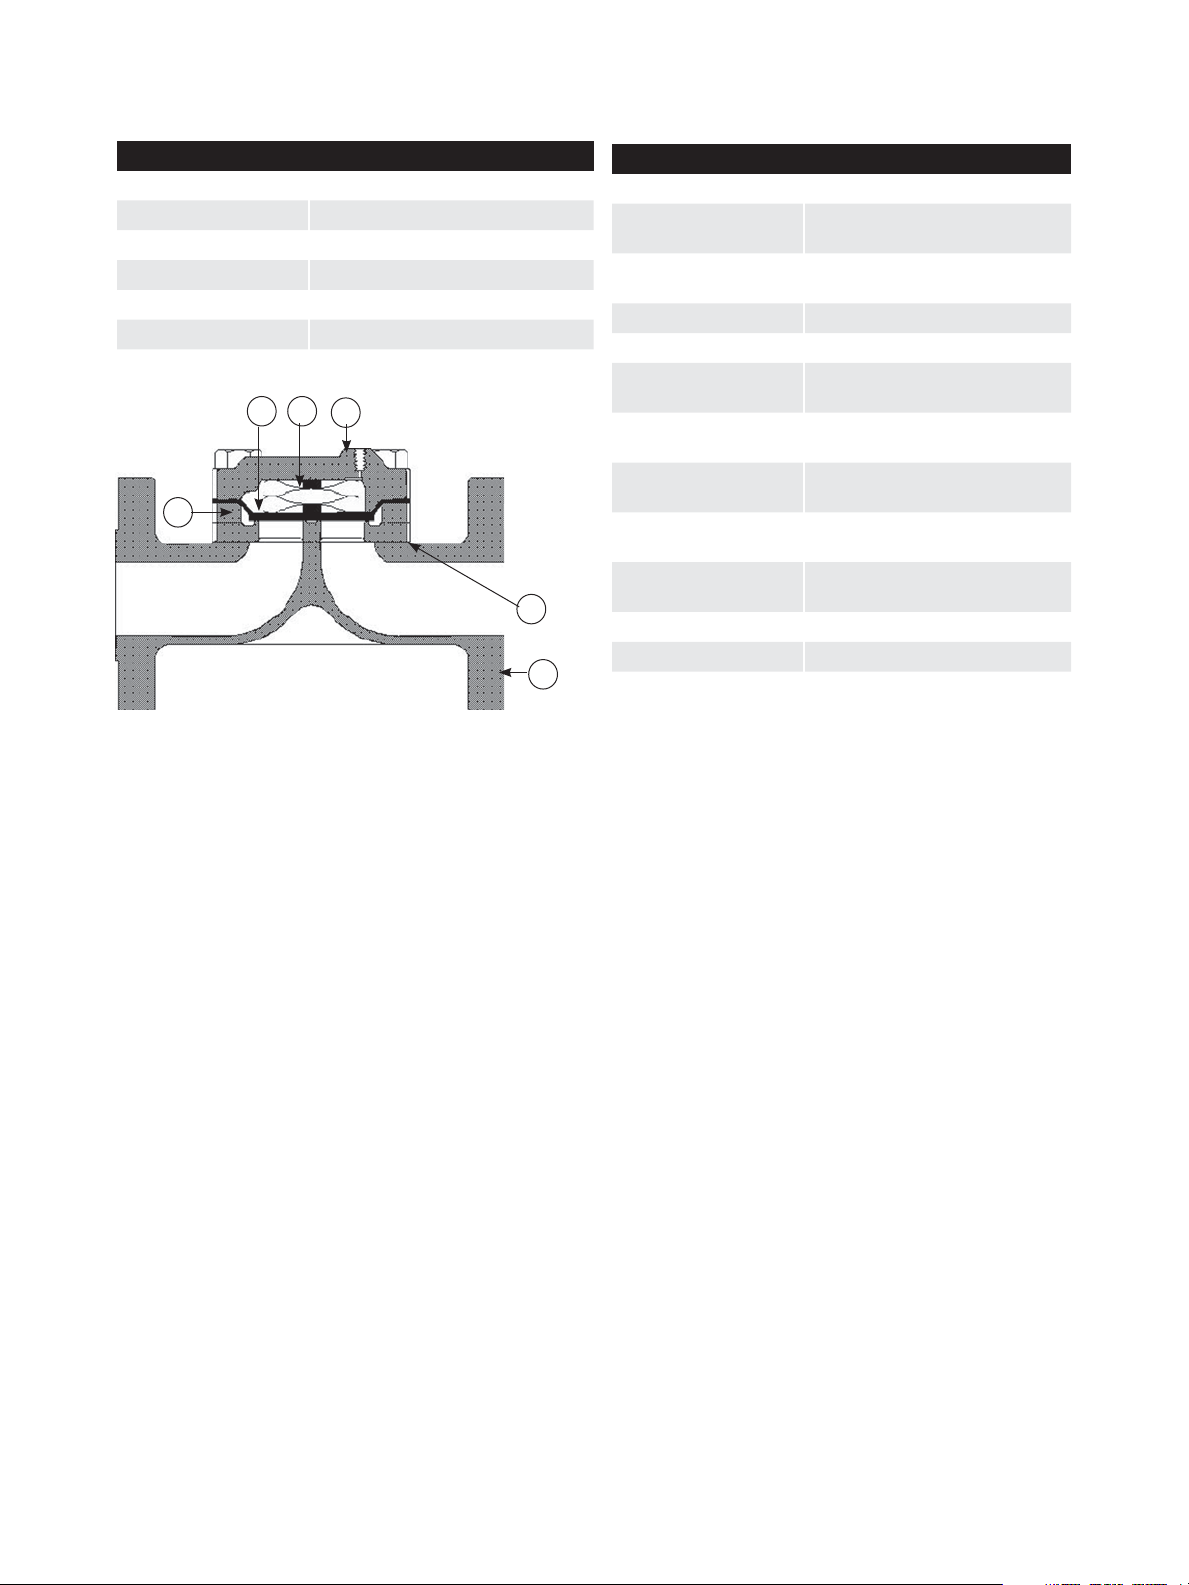
Table 1
Table 2
Materials of Construction
Body & Spring Case
Spacer
Throttle Plate
Diaphragm
O-Ring & Seals
Bolting
Spring
425
3
Figure 1 - Flowgrid Parts
ASTM A 216 WCB Carbon Steel
ASTM A 216 WCB Carbon Steel
17-4PH Stainless Steel
Nitrile/Nylon (Optional - Viton/Nylon)
Nitrile (Optional - Viton)
ASTM 193 GR B-7 or Equal
301 Stainless Steel
6
1
Specifications
Sizes
Body Style
End Connections
Temperature
Min/Max Temperature
Maximum Operating
Differential
Maximum Emergency
Differential
Minimum Differential
Cracking Differential
Maximum Inlet Pressure
Outlet Pressure Range
Flow Direction
Body Taps
1
Reverse flow by changing pilot connections and reversing spring case.
1” - 12” (DN 25 - DN300)
Single Port
10 inch and 12 inch Dual Ports
Screwed, Socket Weld
Flanged, Flangeless & Buttweld
-20°F to 150°F (-29°C to 66°C)
-40°F to 175° F (-40°C to 79° C)
800 psi (55.16 bar)
1000 psi (68.9 bar)
(unless limited by body rating)
Refer to individual product
specification sheets
Refer to individual product
specification sheets
1480 psig (102.1 bar)
(limited by flange or pilot rating)
Limited by pilot
Bi-Directional
1/4” - 18 NPT
1
All Mooney Flowgrid regulators have six main parts
(excluding bolting and O-rings); the body, throttle plate,
spacer, diaphragm, main spring, and spring case.
Although parts vary in size and design, all regulators
share the same principle of operation.
The body (1) is constructed with a single port (sizes
less than 10”) and a dual port (sizes greater than 10”).
The dual port design can provide redundant control if
equipped with dual pilots or be used with a single pilot
for maximum capacity.
The throttle plate (2) supports the diaphragm and
provides a machined surface that the diaphragm seals
against for bubble tight shutoff. Restricted capacity
plates of 35%, 50%, and 75% are available.
The spacer (3) creates a space between the throttle
plate and the diaphragm which forms a flow path
inside the regulator.
The fabric-reinforced diaphragm (4) is the main
working part of the Flowgrid regulator. The diaphragm
functions as both an actuator and the regulator
throttling element.
It is designed to provide stability, rangeability, and
fast response without stretching. It will not “take a set”
and is thick for durability and wear resistance.
The main spring (5) provides high frequency response,
proportional action for stability and a consistent
minimum differential regardless of temperature.
It also provides a positive closing force, which is
important in monitor regulation applications.
The spring case (6) is shaped to retain the main spring.
It provides a low volume cavity where loading pressure
from the pilot system is placed on top of the diaphragm
to control flow through the regulator.
2
Page 3

Regulator Markings
Front View
Figure 2 - Regulator Markings
Back View
Top View
1. American National Standards Institute (ANSI) pressure class rating of the regulator.
2. Line size of body.
3. ANSI pressure class rating of the flange.
4. Indication that the regulator has been hydrostatically tested according to code requirements.
5. The serial number is stamped on the spring case, spacer1, and body.
6. The Nameplate location.
7. The flow direction is marked on the spring case (“INLET” or “OUTLET”). Proper alignment assures that the diaphragm
guide on the Spring Case is aligned toward outlet side of the regulator.
8. The % Capacity tag indicates the capacity of the throttle plate (100%, 75%, 50%, & 35%) in the regulator.
1
NOTE: On all 1” regulators and 2” standard regulators the throttle plate itself is stamped.
Nameplate Information
Table 3
Item Definition
Mooney™ Flowgrid™ Regulator
Salt Lake City, UT USA
S/N
Size/Ends
ANSI Cl
YR
Max
Temp
°F/°C
Diff
Min/Max
Max
Inlet
psi
Bolt Torq
Ft-lbs/Nm
U.S. Pat. Nol 4,659,062
Canadian Pat. No. 1,250,207
FG-
psi
bar
Flowgrid
BLANK
SN
bar
FG
SIZE/END CONN
Registered name of regulator
CE Marking
Serial number assigned to regulator
Flowgrid Model description
Line size of bogy an type of end
connection
ANSI CL
American National Standards Institute
pressure class
MAX INLET
Maximum inlet pressure (psig)/(bar)
PRESSURE
Figure 3 - Flowgrid Nameplate
YR
Year manufactured
Minimum differential required to fully
DIFF/MIN/MAX
open regulator
Maximum allowable operating pressure
differential (psig)/(bar)
MAX F
TEMPERATURE
BOLT TORQ
FT-LBS/n-m
Maximum Operating Temperature in
degrees Fahrenheit
Recommended bolt torque for spring
case in foot pounds
3
Page 4

Principles of Operation
Pilot Supply Pilot Sense
Restrictor
Pilot Loading
Connection
Inlet Outlet
Figure 4 - Pressure Reducing Confi guration Fully Closed
Connection
Pilot Outlet
Connection
At no flow, when the outlet pressure is greater than the
set point of the pilot regulator, the pilot is closed and full
inlet pressure loads the spring case through the pilot
loading connection. In this condition the diaphragm is
closed tightly against the throttle plate. The pressure
differential across the outlet half of the diaphragm adds
to the spring force in closing the Flowgrid regulator
(Refer to Figure 4).
As demand for flow occurs in the downstream system
the outlet pressure drops, causing the pilot regulator to
open and start bleeding pressure out of the spring case
faster than it can enter through the restrictor. Reducing
the pressure above the diaphragm allows the inlet pressure to progressively lift the diaphragm off the throttle
plate, opening the regulator and satisfying the demand
for flow in the downstream system. (Refer to Figure 5).
Pilot Supply Pilot Sense
Restrictor
Pilot Loading
Connection
INLET
Inlet Outlet
Figure 5 - Pressure Reducing Confi guration Partially Open
Connection
Pilot Outlet
Connection
When demand for flow ceases or is reduced, the
downstream pressure increases causing the pilot
regulator to close. Inlet pressure continues to pass
through the restrictor until the control pressure equals
the inlet pressure. The spring force, plus the pressure
differential across the outlet half of the diaphragm
closes the diaphragm against the throttle plate, shutting
off the flow (Refer to Figure 4).
Adjustment of the restrictor affects the response rate,
stability, and sensitivity of the regulator. Smaller restrictor openings result in higher gain (sensitivity) and slower
closing speeds. Larger openings result in lower gain
(greater proportional band), greater stability and faster
closing speeds.
Pilot Supply Pilot Sense
Restrictor
Pilot Loading
Connection
Inlet Outlet
Figure 6 - Back Pressure Confi guration Fully Closed
4
Connection
Pilot Outlet
Connection
Pilot Supply
Restrictor
Pilot Loading
Connection
Inlet
Figure 7 - Back Pressure Confi guration Partially Open
Pilot Sense
Connection
Pilot Outlet
Connection
Outlet
Page 5
A back pressure regulator or relief regulator controls
upstream pressure instead of downstream pressure.
The control action in the pilot is the reverse of a pilot
for a pressure reducing regulator (increasing pressure
in the sense chamber opens the pilot regulator). At no
flow, when the inlet pressure is less than the set point
of the pilot regulator, the pilot is closed and full inlet
pressure loads the spring case through the pilot loading
connection. In this condition, the diaphragm is closed
tightly against the throttle plate. The pressure differential
across the outlet half of the diaphragm adds to the
spring force in closing the Flowgrid regulator (Refer to
figure 6).
As inlet pressure increases above the set point of the
pilot regulator, it will open and start bleeding pressure
out of the spring case faster than it can enter through
the restrictor. Reducing the pressure above the diaphragm allows inlet pressure to progressively
lift the throttling element off the throttle plate opening
the regulator and satisfying the demand for flow in the
upstream system (Refer to Figure 7).
When upstream pressure decreases, causing the pilot
regulator to close, pilot supply pressure continues to
pass through the restrictor until the control pressure
equals the inlet pressure. The spring force, plus the pressure differential across the outlet half of the throttling
element closes the diaphragm against the throttle plate,
shutting off the flow (Refer to Figure 6).
Adjustment of the restrictor affects the response rate,
stability, and sensitivity of the regulator. Smaller restrictor openings result in higher gain (sensitivity) and slower
closing speeds. Larger openings result in lower gain
(greater proportional band), greater stability and faster
closing speeds.
Hydrostatic Testing
All Flowgrid regulators are hydrostatically tested at the
factory prior to shipment according to ISA-S75.19-1989
and MSS-SP-61 standards. If it is necessary to retest the
regulator, follow one of the procedures listed below to
prevent damage to the diaphragm.
Option 1
1. Disconnect and remove all control line(s) and the
pilot from the Flowgrid regulator.
2. Loosen main spring case nuts in a crisscross pattern.
The main spring will lift the spring case as the nuts
are removed.
3. Remove main spring and diaphragm from regulator.
For all 1”, 2”, 4”, 6” (and 10”-V6) Flowgrid Regulators
4. Replace diaphragm with a used
diaphragm that has the thick padded
area cut out leaving the outer sealing
surface (see below).
This area removed
For 3” and 4” x 3” Flowgrid Regulators
4. Remove diaphragm but leave diaphragm O-ring in
place. Make sure O-ring is properly seated.
5. Reassemble spring case on Flowgrid regulator.
6. Tighten main bolts in increments using a crisscross
pattern. Torque bolting as indicated on regulator
nameplate (or refer to Table 6 Page 14).
7. Plug spring case loading port, pilot inlet and outlet
taps on Flowgrid regulator.
8. Refer to Table 4 for the maximum hydrostatic test
pressure of each Flowgrid regulator.
9. After hydrostatic test is completed follow the
Dissassembly, Cleaning, and Assembly procedures in
the Maitnenace section of this manual
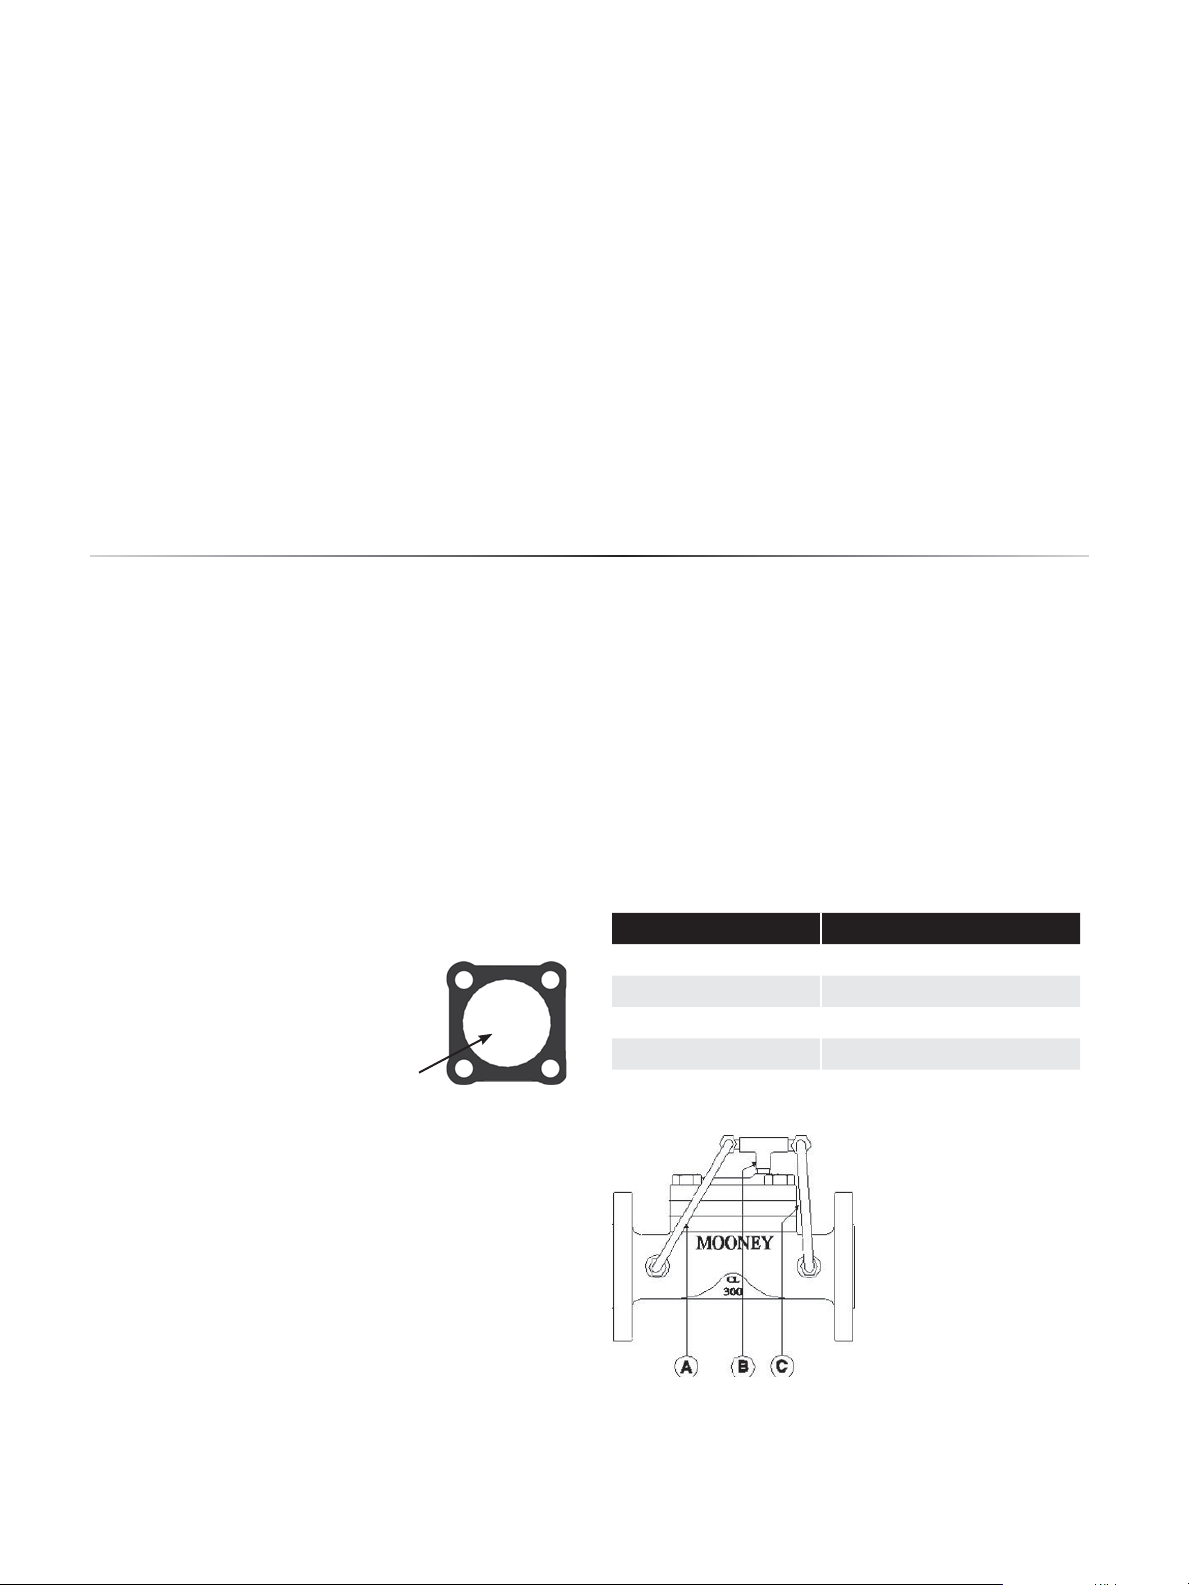
Option 2
1. Disconnect and remove all control line(s) and pilot from
the Flowgrid regulator.
2. Pipe regulator with the inlet, outlet, and loading
connections all common so that pressure is
equalized in the entire regulator during the
hydrostatic test (See Figure 8).
3. Refer to Table 4 for Maximum hydrostatic test
pressure of each Flowgrid regulator.
4. After hydrostatic test is completed follow the
Disassembly, Cleaning, and Assembly procedures
in the Maintenance section of this manual.
Table 4 - Maximum Hydrostatic Test Pressures
End Connection Max. Hydrostatic Test Pressure
Screwed & Socket Weld 2225 psi (153.41 bar)
150# Flange & Flangeless 450 psi (31.02 bar)
300# Flange & Flangeless 1125 psi (77.56 bar)
600# Flange & Flangeless 2225 pis (153.4 bar)
Flowgrid 250
1
The Flowgrid 250 is a ductile iron construction.
1
375 psi (25.86 bar)
Figure 8 - Flowgrid Tee Connections
A. Inlet connection on regulator body joined to “Tee”.
B. “Tee” connected to loading connection on spring case.
C. Outlet of “Tee” connected to outlet connection on
regulator
5
Page 6

Installation
1. PERSONNEL: Installation of the Flowgrid regulator
should be made by qualified personnel familiar with
high pressure piping and pilot operated regulators.
WARNING
Personal injury, equipment damage, or leakage due
to explosion of accumulated gas or bursting of pressure containing parts may result if this regulator is
overpressured or is installed where service conditions
could exceed the limits given in the specification of
this manual or on the nameplate, or where conditions
exceed any ratings of the adjacent piping or piping
connections. Verify the limitations of both regulator
and pilot to ensure neither device is overpressured.
To avoid such injury or damage, provide pressure
relieving or pressure limiting devices (as required
by Title 49, Part 192, of the U.S. code of Federal
Regulations, by the National Fire Codes of the
National Fire Protection Association, or applicable
codes) to prevent service conditions from exceeding
those limits. Additionally, physical damage to the
regulator/regulator could break the pilot off the main
regulator, causing personal injury and/or property
damage due to explosion of accumulated gas. To
avoid such injury and damage, install the regulator
in a safe location.
2. PRIOR INSPECTION: Inspect the main regulator,
pilot, and tubing for any damage that might have
occurred in shipping. Make sure the body, pilot lines,
and inlet piping are clear and free from foreign
material.
3. ORIENTATION: The Flowgrid regulator may be
installed in any position - the best position being one
that provides easiest access for pilot adjustment
and regulator maintenance.
4. SCREWED END REGULATORS: Apply pipe
compound to the male threads starting one or two
threads back from the end prior to assembling the
joint.
5. FLANGED END REGULATORS: Use suitable line
gaskets and good bolting practices with flanged
bodies. A crisscross pattern of incrementally
tightening the line bolts is recommended.
6. WELD END BODIES: Remove the Spring Case and
all trim parts including diaphragm and O-rings
before welding a buttweld and/or a socket weld
end Flowgrid regulator. Electric arc welding is
recommended to minimize heat build-up on the
body assembly. Reassemble regulator (refer to the
Maintenance section of this manual for Disassembly
and Assembly procedures) and pressurize with air
to check for leaks prior to putting the regulator in
service.
WARNING
Gas Regulators installed in confined or enclosed
spaces should be provided with adequate ventilation
to prevent the possibility of gas buildup or accumulation from leaks and venting. Leaks or vented gas
may accumulate causing personal injury, death,
or property damage. Pilot spring cases and the
regulator enclosure should be vented to a safe area
away from air intakes, or any hazardous location.
The vent lines and stacks must be protected against
condensation and clogging.
7. PILOT SUPPLY LINES: Run a 3/8” or 1/2”pilot supply
line from the regulator body connection on the inlet
side of the Flowgrid regulator to the pilot supply
Filter or directly to the pilot Restrictor.
NOTE: A shutoff regulator is not required in the supply
to the pilot, but if one is installed it should be a full
opening ball regulator type.
8. A TYPE 30 FILTER in the pilot supply line is recommended to clean dirt and other particulates that
could affect the restrictor or variable orifice in the
pilot. Use a 1/4” nipple to mount the filter to the
body tap on the Flowgrid regulator.
9. FILTER OUTLET: Run 3/8” tubing or 1/4” pipe from
the filter OUTLET port to the INLET side of the restrictor in the pilot system of the regulator. The TYPE
30/30A/30S FILTER has two OUTLET ports for ease of
tubing. Block the other port with the plug provided or
mount a gage to monitor inlet pressure if desired.
NOTE: To avoid galling when stainless steel to stainless steel connections are made use a lubricant (such
as NEVER SEEZ by Bostik). For best results Lightly
lubricate the female threads. Mixing the lubricant with
pipe dope is also acceptable. Do not exceed more than
1/4 turn past the point the threads start to bind.
10. PILOT GAS HEATERS (OPTIONAL): Pilot supply gas
can be heated to prevent the formation of ice or
hydrates in the pilot system. Pilot supply gas heaters
should be connected after the pilot filter (if one is
used). Do not directly heat to entire Flowgrid
regulator to prevent freezing; internal rubber
components can be heated beyond their max
temperature rating causing potential damage.
11. SENSE LINES (CONTROL LINES): Sense lines should
be run from the pilot mounted on the Flowgrid
regulator to a point 8 to 10 pipe diameters away
from the regulator (Refer to Piping Schematics). Use
Table 5 as a guide for the ideal tubing to use. Reduce
as necessary to connect to the pilot.
6
Page 7

Table 5 - Outlet Pressure
Outlet Pressure
Pilot Regulator
with:
Static Sense Line
1
(No Flow)
Sense Line w/Flow
1
The Flowgrid® Series 20 Pilot has a static sense line.
Less than 2 psi
(0.14 bar)
1/2” Pipe minimum 1/2” Tubing 3/8” Tubing
2
3/4” – 1” Pipe 1/2” Pipe 1/2” Tubing
2 – 5 psi (0.14
– 0.35 bar)
Greater than
5 psi (0.35 bar)
NOTE: The Sense line (control line) connection should
be 8-10 pipe diameters away from areas of turbulence
(such as regulators, reducers, and elbows) and should
have a full opening into the pipe free from burrs,
drill peels, and weld slag. Shutoff regulators are not
required in the control line(s), but if installed, they
should be of the full opening type. Gas velocity at the
sense line connection should not exceed 100 ft/sec
(30m/sec).
12. PILOT discharge: Run 3/8 inch tubing from the pilot
OUTLET port to the downstream piping or to the
connection provided on the outlet of the Flowgrid
Piping Schematics
1. Single Port Regulator (PRV)
2. Single Port Regulator (BPV)
3. Dual Port Regulator/Single Pilot/(PRV)
4. Dual Port Regulator/Single Pilot/(BPV)
5. Dual Port Regulator/Dual Pilot/(PRV).
6. Dual Port Regulator/Dual Pilot/(BPV)
1. Single Regulator/Single Pilot
(Pressure Reducing Regulator)
regulator as shown in the piping schematics.
(Refer to pages 7-10).
STANDBY MONITOR-NOTE: To ensure full capac-
ity of a Standby Monitor regulator station, it is
important that the pilot discharge of the upstream
regulator be connected downstream of the station
if the minimum pressure drop (across the entire
station) is below 60 psig (4.13 bar) (Refer to page 9
and page 12).
13. VENT REGULATORS AND GAUGE CONNECTIONS:
Vent regulators and gauge connections are recommended in the inlet and outlet piping to the Flowgrid
regulator. A gauge connection may be installed on
the loading pressure connection to the Spring Case
of the Flowgrid regulator. These would be a great
convenience during start up, maintenance, and
operation.
14. INTERSTAGE PIPING (WORKING MONITOR):
Please refer to page 10 for interstage piping and
sense line connection recommendations.
7. Standby Monitor with differential greater than
60 psig (4.13 bar)
8. Standby Monitor with differential less than
60 psig (4.13 bar)
9. Working Monitor
All drawings show installations with the Series 20 Flowgrid
pilot equipped with Type 24 restricting regulator & Type 30
Filter. Consult factory for installation schematics of other
manufacturer’s pilot on the Flowgrid regulator.
2. Single Regulator/Single Pilot
(Back Pressure Regulator)
1. Filter supply connected from inlet connection on regulator body to Type 30 Filter inlet.
2. Pilot supply from outlet connection on Type 30 Filter to Type 24 Restrictor inlet.
3. Type 24 Restrictor mounted to Inlet port of Series 20 Pilot.
4. Loading Port of Series 20 Pilot connected to Loading connection on Spring Case of Flowgrid regulator.
5. Sense line connecting Sense port on Series 20 Pilot to upstream (BPV) or downstream (PRV) piping.
6. Outlet port of Series 20 Pilot connected to Outlet connection of Flowgrid regulator.
7. Pilot cartridge in PRV mode (pressure reducing) BPV (back pressure/relief) mode.
7
Page 8

Piping Schematics (cont.)
3. Dual Port/Single Pilot (Pressure Reducing Regulator)
4. Dual Port/Single Pilot (Back Pressure Regulator)
5. Dual Port/Dual Pilot (Pressure Reducing Regulator)
NOTE: The dual port regulator offers redundant control with two separate control
loops. Ports #1 & #2 are piped identically.
6. Dual Port/Dual Pilot (Back Pressure Regulator)
1. Filter supply connected from inlet connection on regulator body to Type 30 Filter inlet.
2. Pilot supply from outlet connection on Type 30 Filter to Type 24 Restrictor inlet.
3. Type 24 Restrictor mounted to “Tee” connection.
3A. Type 24 Restrictor mounted to Inlet port of Series 20 Pilot.
4. Tee mounted to Inlet Port of Series 20 Pilot.
5. Loading Port of Series 20 Pilot connected to Loading connection on Spring Case (Port #1) of Flowgrid Regulator.
6. From “Tee” to Spring Case (Port #2) of Flowgrid regulator.
7. Outlet port of Series 20 Pilot connected to Outlet connection of Flowgrid regulator.
8. Sense line connecting Sense port on Series 20 Pilot to downstream (PRV) or upstream (BPV) piping
9. Pilot cartridge in PRV mode (pressure reducing) BPV (back pressure/relief) mode.
NOTE: Dual port regulators in 1” - 8” sizes have been discontinued. Schematics for reference only.
8
Page 9

Piping Schematics (cont.)
7. Standby Monitor with Differential Pressure Greater than 60 psi (4.13 bar)
Operating Regulator
Monitor Regulator
8. Standby Monitor with Differential Pressure Less than 60 psi (4.13 bar)
Operating Regulator
Monitor Regulator
1. Filter supply connected from inlet connection on regulator body to Type 30 Filter inlet.
2. Pilot supply from outlet connection on Type 30 Filter to Type 24 Restrictor inlet.
3. Type 24 Restrictor mounted to Inlet port of Series 20 Pilot.
4. Loading Port of Series 20 Pilot connected to Loading connection on Spring Case of Flowgrid regulator.
5. Sense line connecting Sense port on Series 20 Pilot to downstream piping.
6. Outlet port of Series 20 Pilot connected to Outlet connection of Flowgrid regulator.
6A. Outlet port of Series 20 Pilot connected to downstream piping.
7. Pilot cartridge in PRV mode.
8. Pilot supply from inlet connection on regulator body to Type 30 Filter inlet.
9. Pilot supply from outlet connection on Type 30 Filter to Type 24 Restrictor inlet.
10. Type 24 Restrictor mounted to Inlet port of Series 20 Pilot.
11. Loading Port of Series 20 Pilot connected to Loading connection on Spring Case of Flowgrid regulator.
12. Sense line connecting Sense port on Series 20 Pilot to downstream piping.
13. Outlet port of Series 20 Pilot connected to Outlet connection of Flowgrid regulator.
14. Pilot cartridge in PRV mode.
9
Page 10

Piping Schematics (cont.)
9. Working Monitor (Refer to schematic on page 13)
General recommendations: To reduce the adverse
effects on the sense signal due to high gas velocity and
turbulence:
■
Pipeline diameters may need to be increased in pipe
sections containing sense connections.
Pilot #1
Pilot #2
■
Gas velocity should be less than 100 ft/sec (30m/sec).
■
Sense connections should be 8-10 pipeline diamters
away from turbulent areas
■
Follow EN12186 piping specification
1st Stage Regulator
1st Stage Regulator
2nd Stage Regulator
1. Filter supply connected from inlet connection on regulator body to Type 30 Filter inlet.
2. Pilot supply from outlet connection on Type 30 Filter to Type 24 Restrictor inlet.
3. Type 24 Restrictor mounted to Inlet port of Series 20 Pilot (#1).
4. Loading Port of Series 20 Pilot (#1) connected to Loading connection on Spring Case of the
Flowgrid regulator.
5. Outlet port of Series 20 Pilot (#1) connected to Inlet port of the monitor Series 20 Pilot (#2).
6. Sense line connecting sense port on Series 20 Pilot to interstage piping.
7. Sense line connecting sense port on the monitor Series 20 Pilot (#2) to downstream piping.
8. Outlet port of Series 20 Pilot (#2) connected to Outlet connection of Flowgrid regulator.
9. Loading port on the monitor Series 20 pilot (#2) is plugged.
10. Pilot cartridges in PRV mode.
2nd Stage Regulator
11. Filter supply connected from inlet connection on regulator body to Type 30 Filter inlet.
12. Pilot supply from outlet connection on Type 30 Filter to Type 24 Restrictor inlet.
11. Pilot supply tubing from inlet connection on regulator body to Type 24 Restrictor inlet.
13. Type 24 Restrictor mounted to Inlet port of Series 20 Pilot (#3).
14. Loading Port of Series 20 Pilot (#3) connected to Loading connection on Spring Case of the
Flowgrid regulator.
15. Outlet port of Series 20 Pilot (#3) connected to Outlet connection of Flowgrid regulator.
16. Sense line connecting Sense port on Series 20 Pilot (#3) to downstream piping.
17. Pilot (#3) cartridge in PRV mode.
NOTE: In a working Monitor system with less than 25 psig (1.72 bar) differential across the second stage regulator the pilot supply (11) may be connected to
the piping upstream of the first stage regulator. This will improve the shutoff of the second stage regulator.
10
Page 11

Start up and Operation
The following procedures are suggested for start up of
the Flowgrid regulator Start up of the Flowgrid regulator
should be made by qualified personnel familiar with high
pressure systems and pilot operated regulators.
WARNING
The instruction manual for the PILOT(S) being used
should be consulted to ensure that the installation
and start up instructions for the pilot are followed.
Some pilots can be damaged if not installed and put
into operation correctly.
Pressure Reducing Regulator
1. Adjust the pilot restrictor to an intermediate opening
(a “4” setting on the Mooney Type 24 Restrictor).
2. Back off on the pilot adjusting screw to fully relieve all
the spring compression.
3. If installed, open hand regulator(s) in the control
line(s), and the pilot supply line.
4. Slightly open downstream block regulator or open
vent in piping downstream of the Flowgrid regulator.
5. Slowly open the upstream block regulator to pressurize the Flowgrid regulator and pilot system. The
Flowgrid regulator should lock up (shut off) with zero
pressure downstream.
6. Use vent in the downstream piping or slowly open
the outlet block regulators.
7. Slowly increase the pilot spring setting until some
flow is achieved through vent or into downstream
system. Adjust the pilot restrictor for stability and
performance as follows:
a. If the system is stable, adjust the pilot
restrictor to a more closed position (towards
MIN setting). Change the flow rate or increase
the pilot setting to check the operation of the
system during an upset.
b. If the system is stable, repeat step (a) until the
system is unstable (oscillating).
c. Now readjust the restriction to a more open
position (towards MAX setting) where the
system is stable.
d. Vary the flow rate over as wide a range as
possible to make sure the system will be
stable under all flow conditions.
NOTE: Adjustment of the restrictor affects the
response rate, stability, and sensitivity of the regulator. CLOSING the pilot restrictor (moving adjustment
towards MIN setting) will result in higher gain (narrow
the proportional band), more sensitivity, and slower
closing speeds. OPENING the pilot restrictor (moving
the adjustment towards MAX setting) will result in less
gain (widen the proportional band), less sensitivity,
and faster closing speeds.
8. Slowly increase the pilot spring setting until the
desired downstream pressure is achieved.
9. Slowly close the downstream block regulator or vent
to check the Flowgrid regulator for lockup (shut off).
10. Slowly open the downstream block regulator. to
begin normal operation
Back Pressure Regulator or Relief Regulator
1. Adjust the pilot restrictor to an intermediate opening
(a “4” setting on the Mooney Type 24 Restrictor).
2. Increase pilot spring compression to maximum or
some margin above desired setting.
3. If installed, open hand regulators(s) in the control
line(s), and the pilot supply line.
4. Check that the Flowgrid regulator is vented to
atmosphere or the downstream system is ready to
accept flow.
5. Open the downstream block regulator or open vent
in piping downstream of the Flowgrid regulator.
6. Slowly open the upstream block regulator to pressurize the Flowgrid regulator and pilot system.
The Flowgrid regulator should lock up (shut off) with
zero pressure downstream.
7. Slowly decrease the pilot spring setting until some
flow is achieved. The flow may only be through the
pilot system.
8. Adjust the pilot restrictor for stability and
performance as follows:
a. If the system is stable, adjust the pilot restrictor
to a more closed position (towards MIN setting).
Change the flow rate or increase the pilot
setting to check the operation of the system
during an upset.
b. If the system is stable, repeat step (a) until the
system is unstable (oscillating).
c. Now readjust the restriction to a more open
position (towards MAX setting) where the
system is stable.
d. Vary the flow rate over as wide a range as
possible to make sure the system will be stable
under all flow conditions.
NOTE: Adjustment of the restrictor affects the
response rate, stability, and sensitivity of the
regulator.
CLOSING the pilot restrictor (moving adjustment towards
MIN setting) will result in higher gain (narrow the proportional band), more sensitivity, and slower closing speeds.
OPENING the pilot restrictor (moving the adjustment
towards MAX setting) will result in less gain (widen the
proportional band), less sensitivity, and faster closing
speeds.
9. Slowly adjust the pilot spring setting until the desired
upstream pressure (relief setting) is achieved.
11
Page 12

Standby Monitor
NOTE: This procedure is based on the 1st Regulator
being the operating regulator and the 2nd regulator
being the monitor regulator.
1. Set operating pilot (#1) spring at the MAXIMUM
setting.
2. Set monitor pilot (#2) spring to the MINIMUM (zero)
setting.
3. Purge station and open outlet regulator or vent to
allow flow through the station
4. Slowly open inlet block regulator. Full inlet pressure
should be present at the Monitor Regulator and the
Monitor Regulator should be closed.
5. Increase the pilot spring setting of the Monitor
Regulator until the desired monitor override setting is
reached. Lock in pilot setting.
6. With some flow going through the station, begin to
lower the operating pilot setting of the Operating
Regulator until the desired outlet pressure is
achieved.
NOTE: When the set point of the Operating Regulator
becomes less than the set point of the Monitor
regulator, the interstage pressure will drop from
approximately full inlet pressure to 5-10 psi (0.35 -
0.68 bar) above the outlet pressure at low flow rates.
Checking Standby Monitor Operation
1. With flow going through the station, slowly increase
the setting of the Operating Regulator. When
the pressure reaches the setpoint of the Monitor
Regulator, the monitor should take control and the
interstage pressure should increase to almost full
inlet pressure.
2. Reduce the setting of the Operating Regulator
back to the required outlet pressure. The interstage
pressure should drop to 5-10 psi (0.35 - 0.68 bar)
above the outlet pressure as the Operating Regulator
takes control.
NOTE: When the differential across the entire station
(P1-P2) is less than 60 psig (4.13 bar) then alternate
outlet piping as shown below, is recommended for
added station capacity. This applies to the Series 20
Pilot only; consult with GE for applicability to other
manufacturer’s pilots.
Figure 9 - Standby Monitor Schematic
12
Page 13

Standby Monitor
Working Monitor
1. Purge station and open outlet regulator or vent to
allow flow through the station.
2. Set pilot (#3) to a high setting above desired setpoint.
3. Set pilot (#1) to a high setting above desired setpoint.
4. Set the Monitor pilot (#2) at a zero setting.
5. Set restrictor on Pilot (#1) at an intermediate opening
(a “4” setting on the Mooney Type 24 Restrictor).
6. Slowly open the inlet block regulator to station. The
1st Stage Regulator should remain closed as a result
of the Monitor Pilot (#2) being set to zero.
7. Increase the setting of the Monitor Pilot (#2) to the
desired pressure setting. If the regulator is unstable,
increase the restrictor opening until it becomes
stable.
8. Lower the setpoint of the 2nd stage regulator (Pilot
#3) to the desired outlet pressure setting. Tune the
restrictor on Pilot (#3) at this time. The 1st stage
regulator should open or begin to control the interstage pressure at the setpoint of Pilot (#1).
9. Adjust the setpoint of Pilot (#1) to achieve the desired
Interstage pressure. Tune the restrictor on Pilot (#1) at
this time.
10. Raise the setpoint of Pilot (#3) to verify the setpoint
of the Monitor Pilot (#2). Adjust if necessary. Check for
system stability and adjust the restrictor on Pilot (#1)
if required.
11. Return setpoint of Pilot (#3) to maintain the desired
outlet pressure.
Figure 10 - Working Monitor Schematic
NOTE: In a working Monitor system with less than 25 psig (1.72 bar) differential across the second stage
regulator the pilot supply may be connected to the piping upstream of the first stage regulator.
This will improve the shutoff of the second stage regulator.
Maintenance
Regulator parts are subject to normal wear and must
be inspected and replaced as necessary. The frequency
of inspection and replacement of parts depends on
severity of service conditions or the requirements of
local, state, and federal regulations. Be certain that the
name plates are updated to accurately indicate any
field changes in equipment, materials, service conditions, or pressure settings.
Before disassembly make sure the regulator has been
isolated from the process by closing block regulators on
the inlet and outlet sides of the regulator. Safely release
pressure and process fluid from body and pilot system.
Failure to complete these steps can result in personal
injury and property damage.
13
Page 14

Maintenance (cont’d)
Assembly
1. Disconnect control lines(s) and pilot supply line from
pilot system.
2. Loosen main spring case nuts in a crisscross pattern.
The main spring will lift the spring case as the nuts
are removed.
3. Remove spring, diaphragm/throttling element,
spacer, throttle plate and O-rings in that order.
4. Inspect all parts for wear and damage. Replace as
necessary.
NOTE: The periphery of the downstream (outlet)
portion of the throttling plate is the primary shutoff
surface and should be inspected most closely for wear
and damage. Nicks and/or wear on the support ribs
will usually not affect shutoff.
The outside “rib” on the downstream side of the throttle
plate is where shutoff takes place in the Flowgrid
Regulator.
NOTE: Nitrile O-rings can swell after disassembly
of a regulator that has been in service (due to
gas permeating the nitrile rubber). This does not
necessarily mean they must be replaced. Set O-ring
aside for several hours and it will gradually return
to normal size. Placing the O-ring(s) on ice will speed
the process considerably. Before placing the O-ring
back into service inspect for defects.
Cleaning
1. DO NOT clean O-ring grooves with sharp metal
tools. The bottom of the groove must have a
smooth finish to prevent leakage. The mating
surface of adjacent parts must also be smooth to
prevent leakage.
Assembly
NOTE: Do not lubricate diaphragm sealing surface.
1. Reassemble parts on the body per the assembly
drawing in the parts supplement for the particular
regulator size.
NOTE: Both the throttle plate and the diaphragm can
be rotated 180 degrees (not turned upside down) to
renew the shutoff capability if the inlet side is in better
condition than the outlet.
2. Tighten main bolts in increments using a crisscross
pattern. Torque bolting as indicated on regulator
nameplate (or refer to Table 6).
Bolting Torque Values
Clean Dry Bolts- Non-Lubricated
Table 6
Regulator Size Min. Torque
Ft/Lbs (n-m)
Flowgrid 250 20 (27.09)
1
1” (ALL)
2’ x 1” (ALL)
2” (ALL)
3” (ALL)
4” x 3” (ALL)
4” (ALL)
1
1
1
1
1
6” CL 150 & CL 300 Flanged 125 (169.28)
6” CL 600 Flanged 200 (270.86)
10” CL 150 & CL 300 Flanged 125 (169.28)
10” CL 600 Flanged 200 (270.86)
12” CL 150 & CL 300 Flanged 125 (169.28)
12” CL 600 Flanged 200 (270.86)
All Flowgrid Pilots 10 (13.54)
1
Refer to WARNING below.
WARNING
Lubricating and/or overtightening the bolting can
damage the Diaphragm in the 1” and 2” sizes of the
Flowgrid regulator.
WARNING
DO NOT replace the studs or nuts with any bolt or
stud and nut combination that does NOT have an SAE
Grade 7 or ASTM Grade B7 rating.
3. Reconnect the pilot system. Follow Start up
procedures when returning to operation.
25 (33.86)
25 (33.86)
60 (81.26)
125 (169.28)
125 (169.28)
125 (169.28)
14
Page 15

Troubleshooting
First Steps
1. Verify the regulator specifications fit the application
conditions.
Min/max inlet pressure, control pressure range &
min/max operating differentials should be checked
to make sure the regulator and pilot are designed to
operate in the present conditions.
2. Verify the regulator is piped correctly.
Even though the regulator may have operated in the
past, check that current piping connections match
recommendations on pages 7-10.
3. Verify the regulator is sized correctly.
Regulators operating below 10% or above 80% of
their maximum capacity given current application
conditions tend to have more problems. Consider
reduced capacity trim or a larger regulator in these
cases.
Potential Issues
Regulator does not shut off.
1. Refer to the failure mode chart to diagnose
potential causes.
2. Clean or replace regulator and pilot components as
necessary.
Erratic Control.
1. Check for damage, debris in the restrictor and
control pilot. Replace, clean and lubricate components as necessary. Consider pilot supply filtration
(Type 30 Filter).
2. Check for the potential of hydrate formation or
freezing liquids in the pilot system. If liquids are present consider gas conditioning before the pilot and/or
regulator, heating the supply gas to the regulator, or
heating the pilot supply gas (pilot gas heater).
3. Check the sense line location and assure it is away
from turbulent locations. Moving the sense line to a
new location often solves control problems.
4. Check to make sure needle regulators are not used
on any pilot system connections. Full opening type
such as ball regulators are recommended.
5. Check for pilot vent port blockage.
Instability & Speed of response issues.
1. Change restrictor setting. Refer to page 11.
2. Check the sense line location and assure it is away
from turbulent locations. Moving the sense line to a
new location often solves control problems. Factory
recommendation is 8-10 pipe diameters away from
sources of turbulence such as tee’s, elbows, reducers,
regulators, etc.
3. Check to make sure needle regulators are not used
on any pilot system connections. Full opening type
regulators are recommended.
4. Check for pilot vent port blockage.
The regulator will not regulate to set point or
“droops-off”.
1. Check for proper sizing. The regulator may be running
out of capacity during peak demand periods.
2. Adjust the restrictor to a higher gain (smaller) setting.
Refer to page 11.
The regulator fails open or fails closed.
1. Refer to the table below to diagnose failure modes.
Table 7
Failure Mode
Problem
Fail
Open
Fail
Closed
Damage to the flexible element X X
Damage to the flexible element on the
X
upstream side (less likely)
Damage to the flexible element on the
X
downstream side (more likely)
Debris between the flexible element and
X
the seat
Blockage of pilot supply pressure X
Blockage1 of the restrictor X
Blockage1 of the pilot supply line X
Loss of the sense line (PRV pilot) X
Loss of the sense line (Relief Pilot) X
Blockage1 of pilot discharge X
Pilot diaphragm rupture if (PRV pilot) X
Pilot diaphragm rupture if (BPV relief pilot) X
Blockage1 of pilot orifice X
1 Blockage can be caused by debris, hydrates, freezing or damage to the
component involved.
15
Page 16

Limited Warranty
Seller warrants that Products shall be delivered free from defects in material, workmanship and title and that Services shall be performed in a competent, diligent manner in accordance with any mutually agreed specifications. The warranty for Products shall expire
one (1) year from first use or eighteen (18) months from delivery, whichever occurs first, except that software is warranted for ninety (90)
days from delivery. The warranty for Services shall expire one (1) year after performance of the Service, except that software-related
Services are warranted for ninety (90) days. If Products or Services do not meet the above warranties, Buyer shall promptly notify Seller
in writing prior to expiration of the warranty period. Seller shall (i) at its option, repair or replace defective Products and (ii) re-perform
defective Services. If despite Seller’s reasonable efforts, a non-conforming Product cannot be repaired or replaced, or non-conforming
Services cannot be re-performed, Seller shall refund or credit monies paid by Buyer for such non-conforming Products and Services.
Warranty repair, replacement or re-performance by Seller shall not extend or renew the applicable warranty period. Buyer shall obtain
Seller’s agreement on the specifications of any tests it plans to conduct to determine whether a non-conformance exists. Buyer shall
bear the costs of access for Seller’s remedial warranty efforts (including removal and replacement of systems, structures or other parts
of Buyer’s facility), de-installation, decontamination, re-installation and transportation of defective Products to Seller and back to Buyer.
The warranties and remedies are conditioned upon (a) proper storage, installation, use, operation, and maintenance of Products, (b)
Buyer keeping accurate and complete records of operation and maintenance during the warranty period and providing Seller access
to those records, and (c) modification or repair of Products or Services only as authorized by Seller in writing. Failure to meet any such
conditions renders the warranty null and void. Seller is not responsible for normal wear and tear. The above sets forth the exclusive
remedies for all claims based on failure of or defect in Products or Services, regardless of when the failure or defect arises, and whether
a claim, however described, is based on contract, warranty, indemnity, tort/extra-contractual liability (including negligence), strict liability or otherwise. The warranties provided above are exclusive and are in lieu of all other warranties, conditions and guarantees whether
written, oral, implied or statutory. NO IMPLIED OR STATUTORY WARRANTY, OR WARRANTY OR CONDITION OF MERCHANTABILITY OR
FITNESS FOR A PARTICULAR PURPOSE APPLIES.
Product Support
Local support is available through our manufacturers representative and distributor network. Contact
the factory or refer to our web site for your support representative contact information. Factory support
is available from 8:00 AM to 4:30 PM MST Monday through Friday. Limited after hours support is also
available. Complete product specifications, parts lists, and flow calculation software is available on our
web site. www.ge.com/energy +1 801 487 2225 USA.
GE Oil & Gas
2822 S. 1030 West
Salt Lake City, UT 84119
T: +1 801.487.2225
F: +1 801.487.2587
mooney.inquiries@ge.com
Visit us online at: www.ge.com/energy
©2012, General Electric Company
All Rights Reserved
*Trademarks of General Electric Company
GEA 19583 Mooney Flowgrid IOM Manual
Rev 08.2012
 Loading...