

Page 1

Refrigerators
Safety Instruc_tions ........... 2, 3
For Australia and New Zealand . . .34
• Side by Side
Models21, 23, 25, 27and29
Operating Instructions
Additional Features ............ 11
Automatic Icemaker ........... 15
Care and Cleaning .......... 17, 18
Crispers and Pans ............. 14
CustomCool "* ............. 4, 7, 8
Freezer Compartment .......... 13
Ice and _¢\ater Dispenser ..... 16, 17
Refligerator Doors ............ 10
Replacing the Light Bulbs ....... 19
SheEes and Bins ........... 10-12
Temperature Controls ......... 4-6
TurboCool "* ................... 6
*¢\hter Fiher . .................. 9
Installation Ins'eruditions
For Australia and
New Zealand .............. 35-37
Preparing m Install
the Refligerator ............ 25-27
Removing and Replacing Doors . . .24
Trim Kits and Panels ........ 20-23
*¢\hmr Line Installation ...... 28, 29
Troubleshooting Tips ....... 31-33
Normal Operating Sounds ....... 30
C6te _ Cgte
Rdfrig&ateurs
La section fran_aise commence a la page 39
iado a iado
Frigorfficos
La seccidn on espa_e! empieza en la pagina73
Da un lato all'altro
Frigoriferos
La sezione in itafiano inizia alia pagina numero 109
Lade a Lade
Frigorfficos
0 capitulo em portugu6s tern inicio na pagina 145
Doppelseitige
Kfihlschi-finke
Write the model and serial numbers here:
Model #
Serial #
Find these mmg)ers on a label inside
the refl'igerator compartment at the
top on the right.
Die deutsche Anleitung befindet sich auf Seite 179
'Side-by-side'
Koelkasten
Instructies in het Nederlands vindt u vanaf pagina 213
Side by Side
uys[a
To E)_hrlvtK6 Keq0d_oto opx{(et azrl asM6o 247.
200D2600P054 49-80478 09-08Jfl
Page 2

IMPORTANTSAFETYINFORMATION.
READALLINSTRUCTIONSBEFOREUSING.
a, WARNING!
Use this appliance onlyfor its intended purpose as described in this Owner's Manual
SAFETYPRECAUtiONS
When using electrical appliances, basic safety precautions should be foflowed, including the following:
i)::This refl'igerator must be properly installed
and located in accordance with the Installation
Instructions beiore it is used. Also see the
How to Connect Electricity section.
:_;_Do not attempt to stand on top of the refl'igerator.
Doing st) may result in bodily iqjury or damage to
the refl'igera tot.
;;_Do not allow children to play with the refrigerator
or tamper with the controls.
i)_:Do not allow children to climb, stand or hang on
the shelves in the refl'igerator. Thev could damage
the refl'igerator and seriously it_jm'e themselves.
;_JiDo not touch the cold surfaces in the fl'eezer
compartment when hands are damp or wet.
Skin may stick t() these extremely cold surtaces.
::_¢Do not store or use gasoline or other flammable
vapors and liquids in the vicinity of this or any
other appliance.
::_]n refl'igerators with automatic icemakers, awfid
contact with the moving parts of the ejector
mechanism, or with the heating element located
on the bottom of the icemaker. Do not place
fingers or hands on the automatic icemaking
mechanism while the refl'igerator is i)lugged in.
i)::Installation of the icemaker must be done by
a qualified service technician.
::_KeeI) fingers out of the "pinch point" areas;
clearances between the doors and between the
doors and cabinet are necessarily small. Be carefifl
closing doors when children are in the area.
::_UnI)lug the refl'igerator before cleaning and
making repairs.
NOTE: We strongly recommend that any servicing be
performed bya qualified individual.
::_Before replacing a burned-out light bulb, the
refrigerator should be unplugged in order to avoid
contact with a live wire filament. (A bm'ned-out
light bulb may break when being replaced.)
NOTE: Setting either or both controls to O(off) doesnot
remove power to the h_?htcircuit.
::_¢Do not refreeze fl'ozen foods which have
thawed completely:
::_Always clean the CustomCooF Tray after
thawing food.
A DANGER!RISKOFCHILDENTRAPMENT
PROPERDISPOSALOFTHEREFRIGERATOR
Child entrapment and suffocation are not problems
of the past.Jtmked or abandoned refl'igeratm_ are
still dangerous...even if thev will sit fin" 'ijust a few
davs." If you are getting rid of wmr old refl'igerator,
please follow the insttuctions below to hel I) prevent
accidents.
Before You Threw Away YourOld Refrigerator
or Freezer:
?_:Take off the doors and discard separately,
::Ji::I,eave the shelves in place so that children may
not easily climb inside.
_: If the refl'igerator has a lock, make it mmsable.
2
Refrigerants
All refrigeration products contain refl'igerants,
which under federal law tnust be retnoved prior
to product disposal. If you are getting rid of an
old refl'igeration product, check with the company
handling the disposal about what to do.
Page 3

WARNING!
HOWTOCONNECTELECTRICITY
The power cord of this appliance is equipped with
an earthing plug which mates with a standard
earthed wall outlet to minimize the possibility of
electric shock hazard fl'om this appliance.
Have the wall outlet and circuit checked bv a
qualified electrician to make sure the outlet is
properly earthed.
Where an unearthed wall outlet is encountered,
it is vour personal responsibili V and obligation to
have it replaced with a properly earthed wall outlet.
The refrigerator should
always be plugged into
its own individual
electrical outlet.
This provides the
best performance
and also prevents
overloading house
wiring circuits which could cause a fire hazard fl'om
overheated wires. Please retk_r to the rating plate on
the refl'igerator fi)r the correct voltage, wattage and
fi'equency. If the product plug does not fit your
outlet, the product should be fitted with a new plug.
insureproperearthing I]====_:==
existsbeforeusing. II I_'_
Earthingplug ll
IMPORTANT."Therefitting of electric plugsand cables should
be doneby a quafified technician orserviceagenL Insome
countries therefitting of electricplugs and cables isonly
permitted when the work is completed bya quafified technician.
If the power supply cord becomes damaged, it must
be replaced bv a qualified service agent in order to
avoid a safety hazard.
Never unplug your refrigerator by pulling on the
power cord. Always grip plug firmly and pull straight
out fl'om the outlet.
Repair or replace immediately all power cords that
have become fl'aved or otherwise damaged. Do not
use a cord that shows cracks or abrasion damage
along its length or at either end.
When moving the refl'igerator away fl'om the wall,
be careflfl not to roll over or damage the power cord.
Mains lead replacement
If the mains lead on your refrigerator needs
replacing at any time, it must be replaced bv a
special lead which is obtainable fl'om your local
dealer. A charge will be made fin" the replacement
of the mains lead if wm have damaged the lead.
The refrigerator must be positioned so that the plug
is accessible.
READANDFOLLOWTHISSAFETYINFORMATIONCAREFULLY.
SAVETHESEINSTRUCTIONS
Page 4

Aboutthe temperaturecontrols
on CustomCoolTM models.(for other models,see nextpage)
Thetemperature controls are preset in the factory at 3°C for the refrigerator
compartment and -18°C for the freezer compartment. Allow24 hours for the
temperature to stabilize to the preset recommended settings.
Thetemperature controls can display both the SET temperature as weft as
the actual temperature in the refrigerator and freezer. The actual temperature
may vary slightly from the SET temperature based on usage and operating
environment.
Setting either or both controls to 0 (off) stops cooling in both the freezer and
refrigerator compartments, but does not shut off electrical power to the
refrigerator.
NOTE: The refrigerator is shipped with protective film covering the temperature
J
controls. If this film was not removed during installation, remove it now.
Tochange the temperature, press and release the + or -
pad, The SETlight will come on and the display will
show the set temperature. To change the temperature,
tap either the + or - pad tmtil the desired temperature
is displayed. Refl_igerator temperatures can be a(!iusted
between 1°C and 7°C and the fl'eezer temperatm'es can
be a(!justed between -21 °C and -14°C.
Once the desired temperature has been set, the
temperatm'e display will return to the actual refl_igerator
and fl'eezer tenlperatures alter 5 seconds. Several
a(!jtlstments Inay be requiied. Each dine w)u a(!just
controls, allow 94 hom_ fl)r the refligerator to reach the
temperature you have set.
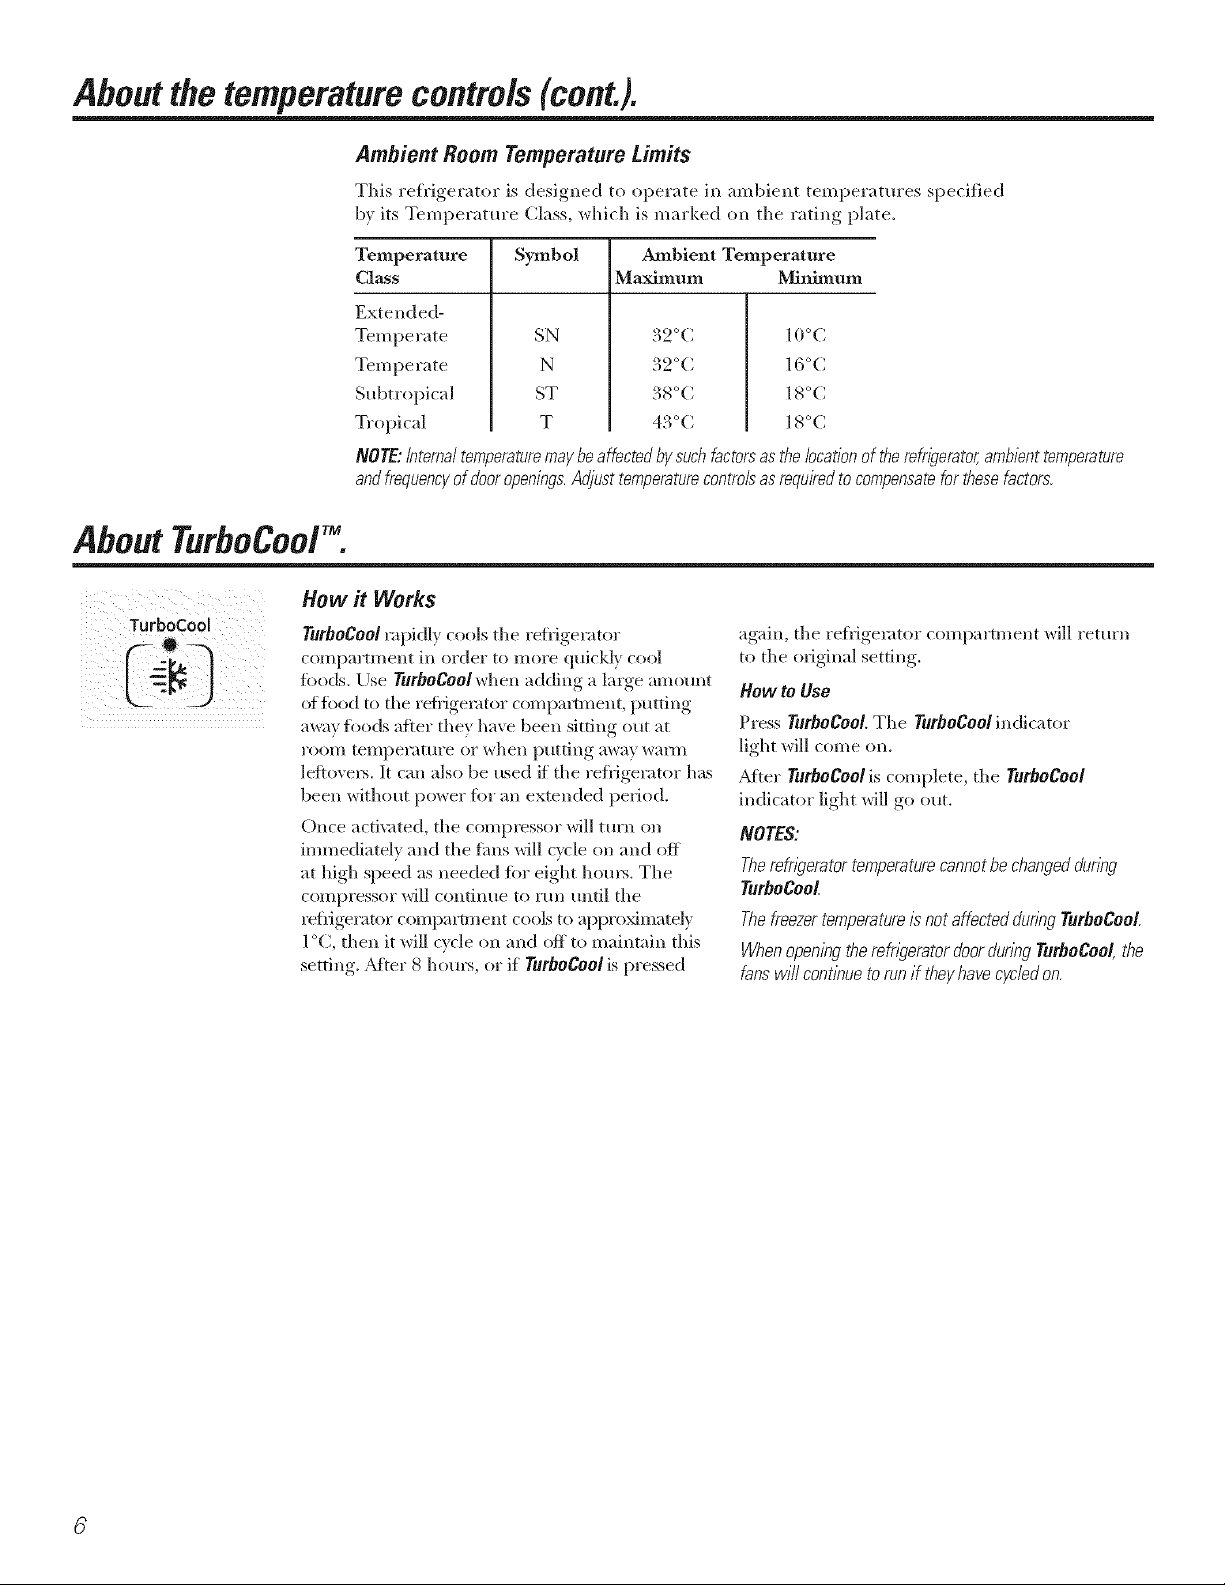
Ambient Room Temperature Limits
This refrigerator is designed to operate in ambient temperatures
specified bx its Temperatm'e Class, which is marked on the rating plate.
Temperature
Class
Extended-
Temperate
Temperate
Subtropical
Tropical
Symbol Ambient Temperature
SN
N
ST
T
Toturn the cooling system off, tap the + pad fi)r either
the reliigerator ()r the fl'eezer until the display sho_vs
0 (off). To turn the unitback on,press the - pad fl)r either
the refligerator or fl'eeze_; The $_'Tlight will ilhmfinate
on the side w)u selected. Then press the - pad again
(on the side where the $ETlight is ilhmfinated) and it
will go m the preset points ot -18°CIor the fl'eezer and
3°C fi)r the refligeratm; Seuing either or both controls
to 0 (off) stops cooling in both the fl'eezer and
refligerator compartments, but does not shut off
electrical power to the refl_igeratm:
Maximum Minimum
32 °C 10°C
32 °C 16°C
38 °C 18°C
43 °C 18°C
NOTE:/ntemal temperaturemay be affected by such factorsas the location of the refrigerator,
ambient temperatureandfiequency of door openings.Adjust temperaturecontrols as required
tocompensatefor these factors.
4
Page 5

Aboutthe temperaturecontrol&
The unit will have one of the temperature controls shown below:
Internal Temperature
Controls
InternalDialControl(0-9)
FREEZER _&,: FRESHFOOD
,Sco=_
ExternalSetPoint
Controls(0-9)
Adjust Temperature
J
O is Off / 5 is Norrnal / 9 is Coldest
The temperature controls are preset in the factory at 5 for both the refrigerator and
freezer compartments.
Toadjust the set point temperature, press the WARMER or COLDERbutton on either the
Freezer or Refrigerator side. The set point light will come on. Press WARMER or COLDER
until the desired setting is reached.
Several adjustments may be required. Each time you adjust controls, allow 24 hours after
each adjustment for the refrigerator to reach the setting you have selected.
Setting either or both controls to 0 stops cooling in both the freezer and refrigerator
compartments, but does not shut off electrical power to the refrigerator.
Control settings will vary based on personal preferences, usage and operating
conditions and may require more than one adjustment.
NOTE: The refrigerator is shipped with protective film covering the temperature controls.
If this film was not removed during instaflation, remove fl now.
Page 6
About the temperature controls (cont.).
Ambient Room Temperature Limits
This reh'ioerator,_ is designed, to operate in ambient temperatures specified
by its Temperature Class, which is marked on the rating plate.
AboutTurboCooY
How it Works
TurboCool
TmboCoo/rapidly cools the refl{gerator
compamnent in order to more quickly cool
fbods. Use Tmbogoo! when adding a laige amount
of fbod to the refl'igemtor compamnent, putting
away foods aAer they have been sitting out at
I'OOII/ teulperattlre or when ptltting away wall/l
lef{ovel_. It can also be used if the refldgerator has
been without power for an extended period.
Once acti_:lted, the compressor will turn on
immediately and the rims will cycle on and off
at high speed as needed %r eight h(_m_. The
compressor will continue to mn tmtil the
refl'igeramr compartment cools to appro_mately
1°(2, then it will cycle on and off to maintain this
setting. _Mter 8 horn% or if YurboCoo/ispressed
Temperature
Class
Extended-
Temperate
Temperate
Subtropical
Tropical
NOTE:tnterna/temperaturemaybeaffectedby such factorsas the locationof therefrigerator,ambienttemperature
andfrequencyof dooropenings.Adjusttemperaturecontro/sasrequiredto compensateforthesefactors,
Symbol Ambient Temperature
Maximum Minimum
SN
N
ST
T
32°C 10°C
32°C 16°(2
38°C 18°(2
43°C l 8°C
again, the refl{gemtor compartment will return
to the original setting.
How to Use
P*ess TmboCool. The TurboCool indicator
light will come on.
_Mter TurboCoo/is complete, the TurboCool
indicator light will go out.
NOTES:
Therefrigerator temperaturecannotbe changedduring
TurfloCool
Thefreezertemperatureisnotaffected dunng TurboCool.
Whenopeningthe refrl_Teratordoorduring TurbeCeo[ the
fans will continuetorun if theyhave cycledon.
Page 7

AboutCustomCool7(onsome models)
How it Works
The CustomCoolTM teature is a svstenl of
(laml)e_, a tim, a teml)eramre themfistor
and a heate_: Depending oil the flmcfion
selected, a combination of these will be
used to quickly chill items, thaw items or
@@®
rressChill $electTemp
hold the pan at a specific temperature,
How to Use
The pan is tightly sealed to prevent
the pan's teml)erature fl'om causing
temperature fluctuations in the rest
ot the retiigerator.
The controls tot this pan are located
at the top of tile retiigerator with the
teillpei'attli'e conti'ols.
ExpressThawTM
ExpressChilF
Empb' the pan. Place the (_hill/Thaw
0
tray in the pan with the metal plate
ti_cing down to chill and store items, or
with the metal plate tacing up to thaw
items. Place the items on the tray and
close the pan completely:
Select the ExpressYhawTM @,
@
pad. The display and SETlight will
come on. Tap the pad until the light
ai)pea_ next to the desired setting.
Use the chart to detemfine the best
setting to use.
::Ji::To stop a feattlre before it is finished,
tap that feature's pad until no options
are selecmd and the display is off.
.... SelectYempT__)ExpressChdl @ or
!i>During ExpressThaw and ExpressChill,
the displa} on the controls will count
down the time in the c_('le.
_: AJ'ter the ExpressThaw cycle is
complete, the pan Mll reset to the
MEATsetdng (-1 °C) to hel I) presei','e
thawed items until they are used.
_: The displayed actual temperature _ff
the CustomCoolpan may va U slightly
fl'om the SET temperature based on
usage and operating environment.
NOTE:Forfoodsafetyreasons,it is recommended
thatfoods be wrapped in p/ast/cwrap when using
F_xpmssTha_ Thiswill help contain meat juices
andimprove thawing performance.
7
Page 8

AboutCustomCoolY(onsome models)
CustomCoolTM Chart
NOTE: Results may vary depending on packaging, starting temperature and other food traits.
0.25 kg (4 hours)
::Ji::Hambu_ge_ (0.25 kg)
_: Individually _,Vrapped
Filet Mignon (025 kg)
0.50 kg (8 hours)
::Ji::Chicken Breasts (0.5 kg)
_: Minced Beef (0.5 kg)
::Ji::Steak (0.5 kg)
1.0 kg (10 hours)
_: Chicken Breasts (1.0 kg)
::Ji::Minced Beef (1.0 kg)
::Ji::Steak (1.0 kg)
1.50 kg (12 hours)
::Ji::Chicken Breasts (1.50 kg)
_: Minced Beef (1.50 kg)
::Ji::Steak (1.50 kg)
15 Minutes
::Ji::1 Beverage Can (355 ml)
_: 2 Small Juice Boxes
(175-240 ml each)
30 Minutes
::Ji::2 to 6 Beverage Cans (355 ml each)
_: 2 Plastic 590 ml Bottles of Beverage
::Ji::4 to 6 Small Juice Boxes
(175-240 ml each)
::Ji::3 Foil Juice Packets
_: Wine (750 ml bottle)
45 Minutes
:_::::2 I,iter of Beverage
::Ji::1.9 iJte_ of.Juice
_: Gelatin-1 package
Citrus Setting (6°C)
::Ji::Oranges, i,emons, I,imes, Pineapple,
Cantaloupe
_: Beans, ()lcumbe_s, Tomatoes,
Peppe_, Aube_gine, Squash
Produce Setting (I°C)
::Ji::Strawberries, Raspberries, t¢dwifl'uit,
Pea_, Cherries, Blackberries, Grapes,
Plums, Nectarines, Apples
_: _sparagus, Broccoli, Corn,
Mushrooms, Spinach, Cauliflower;
I<ade, Green Onion, Beetroot, Onions
Meat Setting (-I°C)
]law Meat, Fish and Poult_a,
8
Page 9

Aboutthe water filter.
o
RESETWATERFILTER
HOLD3 SECS
Water Filter Cartridge (on some models)
The water filter cartridge is located in the
back Upl)er right corner of the refi_igerator
COI/I l)a I'tlllent,
When to Replace the Filter
There is a rel)la('ement indicator light for the
water filter cartridge on the dispense_: This
light will turn orange to tell w)u that w)u need
to replace the filter soon,
The filter cartridge should be replaced when
the replacement indicator light, tm'ns red or if
the flow of water to the dispenser or icemaker
decreases.
Installing the Filter Cartridge
0 If you are replacing the cartridge, fit_t
remove the old one by slowly tm'ning it to
the left. De net pull down on the cartridge.
A small amotmt of water ill}l,vdrip down.
Fill the replacement cartridge Mth water
@
from the tap to allow for better flow fl'om
the dispenser immediately after
installation,
O Rtm water fl'om the dispenser fl)r
3 mimltes (al)out six lite_) to clear
the s):stem and prevent sputtering.
O Press and hold the RESETWATERFILTER
pad on the dispenser fiw 3 seconds.
NOTE: A newlxqnstalled water filter cartridge
may cause water to spurt ffom the dispensex:
Filter Bypass Plug
_)u must use the filter bypass plug when a
replacement filter cartridge is not available.
The dispenser and the icemaker will not
operate without the filter or filter bypass i)lug.
Replacement Filters:
To order additional filter cartridges, contact your
local distributor.
J
Place the top of flTecartridge up
inside the cartridge holder and
slowly turn it to the right.
IJnim,,_ ui ) the arrow on the cartridge, and
O
the cartridge hol(le_; place the top of the
new cartridge up inside the hol(lex; Do not
push it u l) into the holder:
Slowly tm'n it to the right tmtil the filter
cartridge stops. DO NOT OVERTIGHTEN. _s
you turn the cartridge, it will automatically
raise itself into position. Cartridge will
rotnte about 1/4 turn.
Page 10

Aboutthe refrigeratordoors.
Refrigerator Doors
The reti_igerator (loo_ may feel different than
the ones you are used to. The special door
opening/closing teattlI'e makes stlre the doo_
close all the way and are securely sealed.
X4]_en opening and closing the door you will
notice a stopposition. If the door is opened
past this stop point, the door will remain open
to allow VOII 1o load and tlnload food II/OI'e
easily. _4J_en the door is only partially open, it
will automatically close.
kmO
When the door is only partially open
it will automatically close.
Beyond this stop the door will
stay open.
The resistance xou feel at the stop position will
be reduced as the door is loaded with food.
Aboutthe shelvesand bins.
Not all features are on all models.
Refrigerator Door Bins and Freezer Door Tilt-Out Bins
Large Bins
The larger reti_igerator door bins and ti'eezer
flit-out door bins are a(!iustable.
Toremove: I,ifl the fl'ont of the bin straight up,
then 1N tlI) and ()tit.
Refrigeratorbin
Toreplace or relocate: Engage the back side of
the bin in the molded supports of the doox:
Then push down on the ti'ont (ff the bin.
gin will lock in place.
Small Bins
The snuggerhelps prevent tipping, spilling or
sliding oI small items stored on the door shel£
Place a finger on either side of the snugger
near the rear and move it back and torth to
fit u:,ur needs.
Freezer tilt-out bin
/0
To remove: i_ifi the fl'ont of the bin straight up
then out.
Toreplace: Position the bin above the
rectangular molded supports on the doo_:
Then slide the bin down onto the support
to lock it in place.
Bottle Retainer
The bottle retainex_ are a(!iustable and kee I)
tall items fl'om tipping ovex:
Toremove: i,ifi the fl'ont of the retainer straight
up, then lift it up.
Toreplace or relocate: Engage the back of the
bottle retainer in the molded supports on the
doo_: Then push down on the fl'ont of the
bottle retaine_:
Page 11

Press tab and pull shelf
forward toremove
Slide-Out Spillproof Shelf
The slide-out spillproot shelf alh)ws you to
reach items stored behind othe_s. The spedal
edges are designed to help prevent spills fl'()m
dripping to lower shelves.
To remove:
Slide the shelf out tmtil it reaches the stop,
then press down on the tab and slide the shelf
straight out.
Toreplaceorrelocate:
I.ine the shelf uI_ with the suI_ports and slide it
place. The shelf can be repositioned when
the door is at 90 ° or more. To reposifion the
shell; slide the shelf past the stops and angle
downward. Slide shelf down to the desired
OuickSpaceTM Shelf
This shelf splits in half and slides trader itself
tot storage of tall items on the shelf below.
This shelf can be removed and replaced or
relocated just like Slide-Out Spillproof Shelves.
position, line up with the sui)ports and slide
into place.
Make sure youpush theshelves all the way back in
before youclose the door
On some models, this shelf can not be used
in the lowest position.
Removable Beverage Rack
The bexera,,e rack is designed to hold
a bottle on its side. It can be attached to
any slide-out shelf.
i
Door Wine/Beverage Rack (onsomemodels)
This rack holds up to 5 cans, one bottle oI wine
or one 2-liter bottle oI soda.
The rack hangs from the sides of the
dairy bin.
To remove:
Empb the wine/bexerage rack.
Toinstall:
O i.ine up tile large part of the slots on
the top of the rack with the tabs trader
the shelf.
Then slide the rack back to lock it
m place.
Toreplace:
O Reattach the rack to the sides ot the bin.
Engage the back side of the bin in the
molded sui)i)orts on the dora; Then push
down on the fl'ont of tile bin. Tile bin will
lock into place.
Holding the bottom of the &fir)bin,
lift the fl'ont straight up, then lift up
and ()tit.
O To detach the rack fl'om the dairy bin,
pull the rack's side wires out of the holes
on each side of the dairx bin.
11
Page 12

Aboutthe shelvesand bins.
Not all features are on all models.
Deep Freezer Baskets
To remove, push the basket all the way to the
back of the fl'eeze_: Lift up until the back pins
are disengaged. I,ifl the entire basket up and
pull out.
The divider can be rise(1 to oi'ganize tO()d
packages. For large packages, simply told
down the divider.
Makesureyoupushthebasketsall thewayback
in beforeyouclosethedoor
Freezer Baskets
WARNING:Poorperformancemayoccurif freezer
basketsarenot use_Storageof itemsin the freezer
withoutusingbasketsmayresultinpoortemperature
performanceduetorestrictionsofairflow within the
freezercompartment.
\
i!¸ (/
To remove, slide out to the stop position, lift the
fl'ont past the stop position and slide out.
Makesureyoupushthebasketsall thewaybackin
beforeyouclosethedoor
Slide-Out Freezer Shelves
To remove, slide out to the stop position, lift the
fl'ont past the stop position and slide out.
) Fixed Freezer Shelves
i
There are two t)pes of fixed fl'eezer shelves.
To remove this type ot shelf:
0 Lift the shelf up at the left side.
0 Bring the shelf out.
To remove this type of shelf:
_Lifl up the left side of the shelf and slide it
• 0 0 • S •S 0 S
left int the center f the ,d_elf,_Ul) p rt,_.
WARNING:Poorperformancemayoccurif freezer
basketsarenot use_Storageof itemsin the freezer
withoutusingbasketsmayresultinpoortemperature
performanceduetorestrictionsof air flow within the
freezercompartment.
Makesureyoupushtheshelvesallthe waybackin
beforeyouclosethe door
12
Rotate the right side of the shelf up and
out of the shelf supi)orts.
Page 13

Aboutthe freezercompartment.
Loading the Freezer Compartment
I,oad so that at least 15 mm of space remains
clear between stacks of packages and 15 mm
[0 95 IIlIIl of space between the to l) of [lily
stack and anv shelf or basket above it,
Packages may hang over the fi'ont of shelves
but must remain 15 mm fl'om dome.
_: Food to be frozen must not be placed
in direct contact with tood in storage.
If food is to be frozen eve_ T day, it may
be necessary to reduce the quantity to
be fl'ozen.
_: If a quantity of food needs to be fl'ozen,
set the fl'eezer control to its coldest setting.
_Mter the food is fl'ozen, reset the fl'eezer
control to its initial position.
::Ji::Food is most qtfickly fl'ozen on the middle
three shelves of the ti'eezer comi)artment
and most slowly in the freezer door
shelves.
::Ji::Do not store commercially quick-fl'ozen
tood longer than the time recommended
bv the fl)od manufi_cturers.
_: If the power to the appliance is shut off tot
an extended time or if the refrigerating
system tails, do not open the doors unless
absolutely necessary. When it is necessary,
close them as quicl_ly as possible so the
frozen tood will stay ti'ozen as long as
possible.
_: The freezer door storage shelves marked
with a two-star label are only ai)i)ropriate
fl)r the storage of previously fl'ozen fl)od.
Effervescent drinks should not be stored in the
freezer compartment.
Freezer Performance
This Refrigerator/Freezer has an oxerall "Four Star" _ rating
Freezer peril)finance is classified b_ star ratings defined by ISO 8561 STANDARD AND
SUMMARY BEI,O_A :
CODE FREEZIN(;-I,OAD TEMR
(FOOD TEMPEIt%TURE)
Below -6°C.
(_ Below - 12°C.
[_ or _ Beh)w-18°C.
Howexer, these limited areas haxe a two star rating as permitted by the standard:
Models I,ocation of C_-_/Freezer Shelves
21, 23 Bottom fl'eezer basket and bottom
2 door shelves, top ti'eezer door shelf.
25 Shelf above the ice bucket, top freezer
door shelf and bottom 2 door shelves.
27 Shelf above the ice bucket, top freezer
door shelf and bottom 2 door shelves.
29 Bottom 2 freezer door shelves.
23 NON Top freezer door shelf.
DISPENSER
21YH, 23YH Shelf above the ice bucket and 4 door
21Y£, 23YE shelves.
GSX25 This model is not classified fi)r this
two star rating.
13
Page 14

Aboutthe crispersandpans.
Not all features are on all models.
Fruit and Vegetable Crispers
Excess water that may accumulate in the
bottom of the (h'awe_ should be wiped (hy:
Onsome models the bottom drawer has
a cover that slides back as the drawer is opened.
This allows flfll access to the (h'awe_: _&sthe
drawer is closed, the cover will slide torward
into its original position.
tIUM|D|'rYCON T ROL
Adjustable Humidity Crispers
Slide the control all the way to the J
(high) setting to provide high lmmidi_'
recommended tot most vegetables.
Convertible Meat Pan
The convertible meat pan has its own cold air
duct to allow a stream ot cold air fl'om the
fl'eezer compartment to flow to the pan.
The variable temperature control regulates the
air flow fl'om the Climate Keel)er. TM
Aboutcrisperremoval
Not all features are on all models.
Crisper Removal
The top ('fisl)e_ can easily be removed by
pulling the drawer straight out and lifting
the drawer up and over the step location.
If the door prevents you fl'oin taking out the
drawe_, fi_t t_wto remove the door bins.
If this does not offer enough clearance, the
refl_igerator will need to be rolled torward tmtil
the door opens enough to slide the (h'awet_
out. In some cases, when you roll the
refl_igerator out, you will need to move the
refrigerator to the lett or fight as vou roll it out.
Toremove the bottom crisper:
Slide the control all the wax to the _) (low)
settiw*,_to proxide lower humidi_ lexels
recommended fi)r most fl'uits.
Set the control to the _ (coldest) setfim* to
store fresh Illeats.
Set the control to _ (cold) to convert the
pan to nomml retiigerator temperature and
provide extra vegetable storage space. The coM
air (hlct is ttlrned off'. Variable settings between
these extremes can be selected.
Toreplace the bottom crisper:
Make sm'e all tom" ,swin,,_locks are in the
tmlock position.
Place the sides of the drawer into the
drawer SUl)ports, making sm'e the swing
locks fit on the drawer slots.
I,ock all ti_tu" swing locks by rotating them
to the lock position.
14
Pull the drawer out to the stop position.
0 Rotate all tom" _swim,_locks to the tmlock
position.
0 I,ifl the fl'ont oI the drawer up and out.
!
Page 15

Aboutthe automaticicemaker.
A newly-installed refrigerator may take 12to 24 hours to begin making ice.
Power Automatic lcemaker
Switch
Green
powerLight FeelerArm
f--
Pull the upper freezer shelf straight
out to access the icemake_ Always
besure to replace the shell The
shelf can be used for storage.
Icemaker
The icemaker will produce seven cubes per
cvcle--ai)proximatelv 100-130 cubes in a
2'4-hour period, dei)ending on fl'eezer
COlllpai'tlllent telllpei'attli'e_ i'ooi11 telllpei'attli'e_
nunlber of door openings and other use
conditions.
Toaccess the icemaker: Pull the shelf aboxe
the ice drawer straight out. Always be sure
to replace the shel£
If the reti_igerator is operated betore the water
cmmecfion is made to the icemake_; set the
power switch in the 0 position.
When the refrigerator has been com_ected
to the wamr suI)ply, set the power switch to
the Iposifion.
_)u Mll hear a buzzing sotmd each time the
icemaker fills with wam_:
The icemaker will fill with water when it cools
to -10 C. A newl}qnstalled refrigerator ma} take
12 to 24 hems to beg_n making ice cubes.
Throw away the first t0w batches of ice to allow
the water line to clear.
If ice is not used fl'equenfl}; old ice cubes will
become cloudy, taste stale and shrink.
If ice cubes get stuck in the icemake_; the green
power light will blink. To correct this, set the
power switch to 0 and remove the cubes. Set
the power switch to I to restart the icemaker.
_Mter the icemaker has been tin'ned on again,
there will be a delay of about 45 mimltes betore
the icemaker resumes operation.
NOTE."In homeswith lower-than-averagewater
pressure,you mayhear the icemaker cyclemultiple times
when making one batchof ice.
WARNING:Connecttopotablewater
suppiy onig Installation of the icemaker must be
done by a qualified service technician.
Be sm'e nothing interteres with the sweep
of the teeler amL
X&q_enthe bin fills to the lexel of the feeler am_,
the icemaker will stop I)r°ducing, ice. It is
nomlal tor sexeral cubes to be joined together.
Ice Storage Drawer
Toaccess ice, pull the drawer forward.
Toremove the drawer, pull it straight ()tit and
lift it past the stop location.
iiiI
15
Page 16

Aboutthe ice and water dispenser.(onsome models)
ToUsetheDispenser
SpillShelf
Select CUREDICE t_ t, CRUSHEDICE _._)
or WATER _).
Press tile glass gently against tile top ot tile ..............
dispenser pad/cradle.
The spill shelf is not selfMraining. To reduce
water spotting, the shelf and its grille should LIGHT
be cleaned regularly.
Dispenser Light (onsomemodels)
If no wateris dispensedwhentherefni?eratoris
first installed,theremaybeair in the waterline
system.Pressthedispenserpad/cradlefor at least
two minutestoremovetrappedairfromthewater
lineandto fill the watersystem.Toflushout
Quick Ice (onsomemodels)
impuritiesin the waterline, throwawaythe
first sixglassfulsof water
• a hur_; press this pad to
CAUTION:Neverput fingersoranyother
objectsinto the icecrusherdischargeopening.
Lockingthe Dispenser(onsomemodels)
.... QUICKICE production fi)r tile fi)llowing
• Press tile LOCKCONTROL
DoorAlarm (on some models)
l).df., e,,.ldst.1.,-k
thed pe,l e,'.,ld,',,,it,',,1
panel. To unlock, press
LOCKCONTROL
HOLD3SECS f))I .'4 seconds.
and hold the pad again
• T(, set tile almm, press this
This l)ad turns the night
light in tile dispenser on
and off. Tile light also
COllles on when tile
dispenser pad/cradle
is pressed. If this light
burns out, it should be
replaced with a 6 watt
12V maximum bulb.
X,\l/en }ou need ice in
speed up ice production.
This will increase ice
48 hem's or until xou press
tile l)ad again, .
pad/mtil tile indicator light
Important Facts About Your Dispenser
iJi::Do not add ice ti'om trays or bags to
the storage drawer. It may not crush or
dispense well.
_: Avoid ove_tilling glass with ice and use (ff
narrow glasses. Backed-up ice can jam tile
chute or cause tile door in tile chute to
fl'eeze shut. If ice is blocking the chute,
poke it through with a wooden spoon.
_: Beverages and foods should not be
quick-chilled in the ice storage (h'awe_:
Cans, bottles (:,r food packages in tile
storage drawer may cause tile icemaker
or auger to jam.
iJi::To kee I) dispensed ice fl'om missing
tile glass, put tile glass close to, but not
touching, the dispenser opening.
_))) {Ollles ( )n. This _,l_Hlll vvill
0O0R ALARM The light goes ()tit and the
iJi::Some crushed ice may be dispensed even
though you selected CUREDICE.This
hal)pens occasionally when a few cubes
accidentally get directed to the crushe_:
_: _Mter crushed ice is dispensed, some water
may dil I) fl'om tile chute.
_: Sometimes a small mound of snow will
total on the door in the ice chute. This
condition is nom/al and usually occui_
when um have dispensed crushed ice
repeamdly. Tile snow will eventually
e\;ll)Oi'ate.
CAUTION: Someproducts such as water icesshould
not be consumedtoocold
so/md if either door is
tot more than 3 minutes.
beel)ino,_ stops when you
close tile dooi:
open
16
Page 17

Ice Storage Drawer on
Dispenser Models
Toremove:
Set the icemaker power switch to the 0 (Off)
position. Pull the drawer straight out and
then lift past tile step position.
Toreplace:
_4q/en rel)lacino_ the drawex, be sure to press
it fired) into place. If it does not go all the
wa_ back remove it and rotate tile drke
mechanism 1/4 t/li'ii. Then push tile drawer
back a_*ain
Careand cleaningofthe refrigerator.
Cleaning the Outside
The dispenser drip area, beneath tile grille, shouM
be _il)ed dxT.Water left in this area may leave
deposits. Remove tile deposits by adding
mMiluted vinegar to the well, Soak tmtil the
Dispenser drip area.
deposits disappear or become loose enough
to IJnse awav.
The dispenser cradle (on dispenser models).
getore cleaning, open tile ti'eezer door part
way to prevent dispensing of ice or water when
cleaning. (:lean the cradle with a w;mn water
and baking soda solution--about 15 ml of
baking soda to 1 liter ot water: Rinse thoroughly
and wipe (h>
The door handles and trim. Clean with a cloth
dampened with soapy water; Dr) with a
soft cloth,
Keep the outsideclean. Wipe with a clean cloth
lightly dampened with kitchen appliance wax
or mild liquid dish detergent. D_y and polish
with a clean, soft ch)th.
Do not wipe the refngerator with a soiled dish cloth
or wet towel Thesemay leave a residue that can
erode the paint. Do not use scouring pads, powdered
cleaners, bleach or cleaners containing bleach
because these products can scratch and weaken the
paint finish.
Cleaning the Inside
Tohelp prevent odors,leave an open box of
baking soda in tile refligerator and ti'eezei"
COlllpai'tillents,
Unplug the refrigerator before cleaning. If this
is not practical, wring excess moisture out
of sponge or cloth when cleaning arotmd
switches, lights or controls.
Use w;mn water and baking soda solution-
about 15 ml of baking soda to one liter of
water: This both cleans and neutralizes odors.
Rinse and wipe (hT:
Useof any cleaning solution other than that which
isrecommended, especially those that contain
petroleum distillates, can crack or damage the
interior of the refrigerator.
Avoid cleaning cold glass shelves with hot water
because the extreme temperature difference
may cause them to break. Handle glass shelves
careful/_zBumping tempered g/ass can cause
it to shatter
Donot washanyplasticrefngeratorpartsin the
dishwasher
Thechili/thaw trayisdishwashersafe.
/7
Page 18

Careand cleaningofthe refrigerator.
Behind the Refrigerator
Be caretul when moving the refl_gerator away
fl'om the wall. _M1types ot floor coverings can be
damaged, particularly cushioned coverings and
those with embossed suYli_ces.
Pull the reflJgerator straight out and return it to
position by pushing it straight in. Moving the
reti_igerator in a side direction may result in
damage to the floor covering or refl_igerato_:
Preparing for Vacation
For long vacations or absences, relnove fi)od and
unplug the reti_igeratox: Clean the interior with a
baking soda solution of l 5 ml of baking soda to
1 liter ot water: I,eave the doms open.
Set the icemaker power switch to the 0 position
and shut off the water supply to the refl_igerato_:
Whenpushing therefrigerator back, make sure you
don't roll over the power cord or icemaker supply line.
If the temperatm'e can drop below fl'eezing, have
a qualified servicer drain the water supply system
to prevent serious prope m, damage due to
flooding.
Preparing to Move
Secure all loose items such as shelves and
drawe_s by taping them secm'elv in place
to prevent damage.
When using a hand truck to move the
refl_igeratm; do not rest the fl'ont or back of
the refrigerator against the hand truck. This
could damage the refl_igeratoi: Handle only
fl'om the sides of the refl_igeratoi:
Be sure the refrigerator stays in an upnght position
dunbg moving.
18
Page 19

Replacingthe lightbulbs.
Setting the controls to 0 (off) does not remove power to the light circuit.
Yourlight shield will look like
one of the following.
Tabs
OR
Pocket
Refrigerator Compartment--Upper Light
0 UnI)lug the refl'igerator.
@ The bulbs are located at the top of the
conq)artment, inside the light shield.
On some models, a screw at the fl'ont of
the light shield will have to be removed.
On other models, the screw is located
in the pocket located at the back ot the
light shield.
0 To remoxe the light shield, on some
models, press in on the tabs on the
sides of the shield and slide fin'ward
and out. On other models,just slide
the shield forward and out.
Refrigerator Compartment--Lower Light
This//ghtis/ocatodabove the topdrawer.
Unplug the refiigerato_:
@ Remove the convertible meat drawer
control knob by pulling straight out.
@ _Mter replacing the bull) with an
appliance bulb ot the same or lower
w'attage, replace the light shield and
sci'e_:s (on SOlne inodels). When
replacing the light shield, make sure
that the tabs at the back of the shield
fit into the slots at the back of the light
shield housing.
Plug the reli_igerator back in.
O _Mter replacing the bull) with an appliance
bulb of the same or lower wattage, replace
the shield and the knob.
Plug the " back in.
0 ' refl'igerator
0 lift the light shield up and pull it out.
Freezer Compartment
UnI)lug the reliigerato_:
@ Remove the sheffjust aboxe the light
shield. (The shelfxdll be easier to remoxe
if it is emptied fi_t.) On some models,
a screw at the top of the light shield will
need to be removed.
0 To rein xe the light shmld, press m on the
sides, and lift up and out.
() o" • " "
Dispenser
UnI_lug the refiigerato_:
@ The bulb is located on the dispenser under
the control panel. Remove the light bulb
b) turning it counterclockwise.
Replace the bull) with an appliance
bulb of the same or lower wattage,
and reinstall the light shield. When
reinstalling the light shield, make sure
the top tabs snap securely into place.
Replace the screw (on some models).
Reinstall the shelf and )hu,
0 ..... the
I
refrigerator back in.
Replace the bulb with a bulb of the same
size _lll(1 watta(*e
0 Plug the refrigerator back in.
19
Page 20

Trimkits anddecoratorpanels.
ForBuilt-In Style models
Read theseinstructions completely and carefully.
BeforeYouBegin
Some models are equipped with trim kits that allow you to install door panels.
Panels less than 6 mm thick
_._]_en installing wood panels less than 6 mm thick, you need to create a filler panel, such as 3 mm cardboard, that
will fit between the fi_ce of the door and the wood panel. If you are installing the pre-cut decorator panels, pre-cut
filler panels are included in the kit. The combined thickness of the decorator or wood panel and the filler panel
should be 6 ram.
Panels6mmtilick orless
6 i'rll'rlmax
19mm or Raised Panel
A raised panel design screwed or glued to a 6 mm thick backing, or a 19 mm routed board can be used.
The raised portion of the panel must be tid)ficated to pemfit clearances of at least 5.1 cm fl'om the handle
side fin" fingertip clearance.
Panels thicker than 6ram, up to 19 mm max, will require that the outer {4mm of panel perimeter be no thicker
than 6 mm.
Weightlimitationsfor custompanels:
RefrigeratorDoor 17kg max.
FreezerDoor 13kg max.
Panelsthickerthan6 mm
6 film leax
19mm
5.1cm
Clearance
HandleSide
Appearance
Panel
I
6mmThick
Backing
Refrigerator
Door
2O
Page 21

Dimensions for Custom Wood Panels
FreezerPanel
WithoutDispenser
Cut
out ,--_ F,,-3 mm
''
, i
.... .I
t
8mm
170.9cm
FRONT
_. 36.8cm ---,
FreezerPanel
With Dispenser RefrigeratorPanel
t
8mm
FRONT
36.8cm
85.4cm
1
3 MM "--_ _"-- out
170.9cm
FRONT
49.5cm - ---_
''
i ,
L. ....
Cut
t
8mm
The areas at the top of the panels need to be cut out of the panels.
21
Page 22

Insertingthedoorpanels.
Read these instructions completely and carefully.
0 Insert the Freezer Panel and Refrigerator Panel
Careiully push the ti'eezer panel in until it slides into
the slot behind the door handle. Push the filler panel
(required with some door panels) in behind the
decorator panel. Repeat ti)r reti_igerator panel.
0 Insert the Bottom Freezer Panel (on dispenser models).
Careflflly push the panel in until it slides into the (required with some door panels) in behind the
slot behind the door handle. Push the filler panel decorator panel.
Attach the Top Trim on the Freezer and Refrigerator Doors.
The Top Trim can be ti)und inside the reti_igerator each (loo_: Hand tighten only: Make sure that the
compartment, top of each panel fits snugly behind the lip of the
With a T-20 Torxddve_; attach the Top Trim, using Top Trim.
two screws on each Top Trim piece, to the top (ff
If your model has a dispense_; this step only applies
O )" " •
t the refri_erato_ panel and top freezer panel
Cut-Out
t
SideTrim
22
Page 23

O Install the Side Trim.
These pieces are rocked inside the ret_igerator
door handle.
Do not remove the protective film on the oualde of the Side
Tnm until the Side Trim is installed.
Fit the bottom of the Side TFim under the Bottom TFim
as illustrated.
Hold the Side TFim against the fl'ont ti_ce of the
decorator panels and fit the Side Trim under the Top
Trim, Make sure the Side TFhn is fitted correctly and
that w)u are satisfied with the appearance of all
the parts.
2,_?
Page 24

Removingandreplacing the doors.
When installing or moving the refrigerator, the doors may need to be removed in order to fit the refrigerator through
a doorway.
Removing the Doors
Make sure the doors are closed and the refrigerator is
unplugged.
0 Disconnect water line and wiring harness.
Near the lower hinge on the fl'eezer side, push in on the
collm_ at each end of the coupling, and pull the water
line robing fl'om the coupling. _Mso, disconnect wi_ing
harness. Pull the water line and the harness through the
lower rail.
0 Remove the hinge covers and the hinges.
In order to access the hinges, the hinge ('o\'e_ need to be
relnoved. Remove the cover b v grasping it on the sides,
near the back of the covei: Push back on the cover and
lift up at the back, then the fl'ont.
NOTE: DONOTusea screwdriverto removethe cover BECAREFUL
not tobreak the rear retainingtab on the hinge cover Removethe
hlbgesuslbga TorxT-20.
\
_ HingeCover
0 Remove the doors.
(:arefhllv rotate the door to 90? Guiding the disconnected
water line and wi_ing harness, lift the door straight up.
NOTE: Not rifting the doorstraight up may damagethebottom hinge.
Piecedoorson a protectedsurface.
/VOTE:Becareful not to pinch thewater tubing and the wire harness
at thebottom of the door
/VOTE:Donot a//ow the connectorto contact the floor Hardcontact
can damagetheconnector See"Replacingthe Doors."
Replacing the Doors
0 Place doors on bottomhinges.
X'_ith the door at 9()_'lower the door straight down onto
the bottom hinge. Careflflly close the (loo_:
NOTE: Not lowenbg the doorstralght down onto thebottom hinge
may damagethehinge.
/VOTE:Donote/low the connectorto contact the floor Hardcontact
can damagetheconnector
0 Replace top hinges and hinge covers.
Reinstall the top hinges using a Torx T-20. Replace the
hinge covei_. If the doo_ are not level, a(!itlst the bottom
_ight hinge with a 7/16" open ended wrench.
, Door
HingePin
24
0 Reconnect water line and wiring harness.
Insert water robing back into coupling, making sure the
tubing is pushed tier enough into the coupling so that wm
no longer see the mark on the tubing. Reconnect the
wiring harness.
0 Turnonthe water supplyand plug the refrigerator back in.
Connector
Page 25

Installation
Refrigerator
Instructions
BEFORE YOU BEGIN
Read these instructions completely and carefully.
• IMPORTANT - S_,,ethese
instructions for local inspector's use.
• IMPORTANT - Obset.e_,ll
governing codes and ordinances.
• Note to Installer - Be sure to leave these
instructions with the Constmter.
• Note to Consumer - KeeI) these instructions
ti)r fltture reference.
• Skill level - Installation of this appliance requires
basic mechanical skills.
• Completion time - Refligerator Installation
15 minutes
• Proper installation is the responsibility of the
installer.
• Product failure due to improper installation is not
covered under the Warranty.
Models 21,23,25,27 & 29
CLEARANCES
Allow the fl)llowing clearances tot ease ot installation,
proper air circulation and plumbing and electrical
COililectiollS:
21' mid 23' 25', 27' mid 29'
• Sides 4ram 4ram
• Top 25 mm 25 mm
• Back 13 mm 25 mm
DIMENSIONS
29
A* 1733mm
B 908mm
C** 912mm
27 25 23 21
1733mm 1733mm 1733mm 1733mm
908mm 908mm 908mm 908mm
879mm 879mm 738mm 738mm
WATER SUPPLY TO THE ICEMAKER
(ON SOME MODELS)
If the reliigerator has an icemaker, it will have
to be connected to a cold water line. An approved
water supply kit is awfilable at extra cost from vom"
local distributor.
Maxim um permissible inlet water pressm'e-8.2 bars.
Minimum permissible inlet water pressm'e-2.8 bars.
hastallation of the icemaker must be done bv a
qualified service technician.
REFRIGERATOR LOCATION
• Do not install the refligerator where the temperature
will go beh)w 16°C because it will not tun often enough
to maintain proper temperatures.
• Do not install the refligerator where the temperature
will go above 37°C because it will not perF(mn i)roperl>
• Install it on a floor strong enough to suI)port it fldlv
loaded.
D 1261mm
E 1273mm
F 1051mm
G 1386mm
H 1140mm
':I [eight does not include hinge.
**I)epth includes handle.
1271mm 1271mm 1156mm 1156mm
1255mm 1247mm 1232mm 1214mm
1093mm 1099mm 989mm 986mm
1381mm 1381mm 1361mm 1355mm
1150mm 1149mm 1023ram 994mm
7
I II.
Ii II #1 D I
1
iJ i I I
I I
I I
I I z I1_
iJ
25
Page 26

Installation Instructions
ROLLERS
The rollers have 3 purposes:
• Rolle_ a@lst so the door closes easily when opened
about hallway: [Raise the fl'ont about 5/8" (16 ram)
fl'om the flooi:]
• Rolle_ at!just so the refiJgerator is fi_mly positioned
on the floor and does not wobble.
• Rollet_ allow you to move the reti_igerator away from
the wall fi_r cleaning.
Final leveling a(!jtlstments should be made after the
reiiigerator has been installed.
To adjust the rollers on 25', 27' mad 29' models:
• Turn the roller
a(!justing sci'e_vs
dockwise to raise
the reti_igerato_;
comaterclockwise to
lower it. Use a 3/8"
hex socket or wrench,
or an ac!justable X
wrench, Rolleradjustingscrew
To adjust the rollers on 21' mad 23' models:
O Remoxe the base _rille by o )enmg the (loot_,
removino_ the screws at each end, and I_ullin°_ it
straight Otlt.
Turn the fl'ont roller ) I1 11
adjustino screws
clockwise to raise
the refl_igeratoi;
comlterclockwise to
lower it. Lse a 3/8
hex socket or wrench,
or an ac!justable
wrench. Roller adjusting screws
DOOR ALIGNMENT
_dter leveling, make sure that the reli_igerator door is 1/16"
higher than the ti'eezer doo_:
To align the doors, a(!iust the reliigerator doo_:
Using a 7/16" socket wrench, turn the door ac!justing
screw to the right to raise the dooi; to the left to h)wer
it. (A nyhm plug, imbedded in the threads of the pin,
prevents the pin ti'om turning unless a wrench is used.)
O _Mter one or two ttlI'ns of the wrench, open and close
the refiJgerator door and check the alignment at the
top ot the (loo_.
Refrigeratordoor
needsto beraised.
Toremovethe basegrille,
openthedoors,rernove
thescrewat eachendof
thebasegrilleandthen
pullthe grillestraightout.
7/16" SocketWrench]
@ RaiseI
These models also have rear a(!justable rollers so w,u
can align the reliJgerator with )'our kitchen cabinets.
Use a long-handled 5/16" socket wrench to turn the
scre_vs fi)r the rear rollei_-_clockwise to raise the
reli_igeratot; comlterclockwise to lower it.
0 Replace the base grille.
26
Page 27

Installation Instructions
DIMENSIONS AND SPECIFICATIONS
(for Built-In Style models)
l il/
178.4cm
o
o
91.4cm_"
61cm
81cm
Cabinet
Water Electrical
13mmGap+8 mm
WallPlates}
' J'b '
63.5cm
C0untertop
27
Page 28

Installation Instructions
INSTALLING THE WATER LINE
BEFORE YOU BEGIN
The water line installation is not warranted bv the
refligerator or icemaker manufacturer. Follow these
recommendations careflfllv to minimize the risk of
expensive water damage.
_'ater hammer (water banging in the pipes) in house
i)lmnbing can cause damage to refl'igerator parts and
lead to water leakage or flooding. Call a qualified
plmnber to correct water hammer betore installing
the water sui)ply line to the refl'igerator.
To prevent burns and product damage, do not hook
up the water line to the hot water line.
If wm use wmr refl'igerator before connecting tile
water line, inake sure the icelnaker power switch is
in the 0 (off) position.
Do not install the icemaker tubing in areas where
temi)eratures tall below fl'eezing.
When using any electrical device (such as a power
drill) during installation, be sure the device is
insulated or wired in a maimer to i)revent the hazard
of electric shock.
All installations must be in accordm_ce with local
plmnbhlg code requirements.
Installation of the icemaker must be done by a
qualified service tech_ficim_.
a, WARNING!Connect to potable
water sui)plv only.
[]
CONNECT THE TUBING TO THE
REFRIGERATOR (CONT.)
Some models hm e file refl'igerator comlection
at the end of tubing located outside the compressor
compartment access cover, On other models, the
COllll)I'essor COml)artment access coveF IlltlSt be rellloved
in order to access the refi'igemtor c(mnection at the
water valve,
On models using the
refl'igeration connection at
the water valve, remove the
plastic flexible cap,
Place the compression nut and tbrmle (sleexe) onto the
end of the tubing as shown,
Insert the end of the tubing into the water xalxe
connection as tier as possible. While holding the tubing,
tighten the fitting,
Fasten the tubing into the clamp proxided to hold it in a
vertical position, _%u ma} need to i)i) open the clamp,
One of the illustrations below will look like the
connection on your icemaker,
©
[] CONNECT THE TUBING TO THE
REFRIGERATOR
NOTES:
• Before making tile connection to tile refl'igerator,
be sure tile refl'igerator power cord is not
plugged into the wall outlet.
• We recommend installing a water filter ifwmr
water SUl)ply has sand or particles that could clog
the screen of the refrigerator's water wove. Install
it in tile water line near tile refl'igerator.
28
Clam
Typical
Compression
Nut
Ferrule
Tubing
Typical
CompressionNut
Ferrule
(sleeve)
Refrigerator
Reattach the access coxec
Refrigerator
onnection
Tubing
Page 29

Installation Instructions
[] TURN THE WATER ON AND PLUG
IN THE REFRIGERATOR
Arrange the coil of robing so that it does not vibrate
against the back of the refrigerator or against the
wall. Push the refl'igerator back to the wall.
[] START THE ICEMAKER
Set the icemaker power switch to the I position. The
icemaker will not begin to operate until it reaches
its operating temperatm'e of-9°C or below. It will
then begin operation automatically if the icemaker
power switch is in the I position.
switch_
NOTE: In lower water pressure conditions, the
water xalxe may turn on up to 3 times to delixer
enouoh water to the icemaker.
29
Page 30

Normal operatingsounds.
Newer refrigerators sound different from older refrigerators.
Modem refrigerators have more features and use newer
technology.
Do you hear what I hear? These sounds are normal.
HUMMM...
-- WHOOSH...
• The new high efficiency compressor may Hm faster
and hmger than your old refl'igerator and wm may
hear a high-I_itched hmn or pulsating sound while
it is operating.
• Sometimes tile refl-igerator runs tot an extended period,
especially when the doo_ are opened ti'equently. This
means that tile FrostGuardTM featm'e is working to
prevent fl'eezer bm'n and improve tood preservation.
• _m may hear a whooshing so/md when tile (loo_ close.
This is due to pressm'e equalizing within the refiJgeratm;
CLICKS, POPS,
CRACKS and CHIRPS
• You may hear cracking or i)oi)ping sotmds when tile
refrigerator is first plugged in. This hal)pens as tile
refrigerator cools to tile correct tell/l)erature.
• Electronic dampers click open and closed to provide
optimal cooling and energy savings.
• The compressor may cause a clicking or chirping
sound when attempting to restart (this could take
up to 5 minutes).
• The electronic control board may cause a clicking
sound when relays activate to control refrigerator
coIIll)OllelltS.
• Expansion and contraction of cooling coils during
and after defl'ost can cause a cracking or i)oi)ping
SO/llld.
WHIRl
• You may hear tile rims spinning at high speeds.
This hal)pens when the refrigerator is first i)lugged
in, when the doors are opened frequently or when
a large amotmt of tood is added to the refrigerator
or freezer comI)amnents. The rims are helping to
maintain tile correct temperatures.
• If either door is open for over 3 minutes, you may
hear the rims come on in order to cool the light
bulbs.
• The £ms change speeds in order to provide optimal
cooling and energy savings.
• You may hear the tim framing atter selecting one
of tile CustonlCool _ settings.
WATERSOUNDS
6
• The flow of refl'igerant through tile fl'eezer cooling
coils may make a gm'gling noise like boiling water.
• _'_ter dropping on tile defl'ost heater can cause a
sizzling, I)oI)ping or buzzing so/md dm'ing tile
defl'ost cvcle.
• A water dripping noise may occur during tile defl'ost
cycle as ice melts fl'om tile evaporator and flows into
tile drain pan.
• Closing tile door mav cause a gurgling sound due to
pressure equalization.
• On models with an icemake_; after an icemaking
cycle, you mav hear tile ice cubes dropping into
the ice bucket.
3O
Page 31

Beforeyoucall forservice...
Troubleshooting -tips
Save time and money/.Review the charts on the following
pages first and you may not need to call for service.
Possible Causes
Refrigerator does not Refrigerator in defrost cycle.
operate Either or both controls set
toO(off).
Refrigerator is unplugged. * Push the plug completely into the outlet.
The fuse is blown/circuit * Replace fllse or reset the breaker.
breaker is tripped.
The refrigerator is in *Unplug the refrigerator and I)lug, it back in.
showrooln mode.
What ToDo
• _'_fit about 30 minutes for defl'ost c_(le to end.
• Set the controls to a temperatm'e setdng.
Vibration orraftling Rollers need adjusting. * See Rollers.
(slight vibration
Motor operates forlong Normal when refrigerator * "_,_fit 94 hotu_ fin" the reflJgerator t() completely
periods or cycles on and is In'st plugged in. cool down.
off frequently. (Modem Often occurs when large * This is nomml.
refrigeratorswith more
storagespaceanda mnom_tsof food m'e
larger freezer require placed in refrigerator.
more operating time, Door left open. * Check to see if I)ackage, is holding, door open.
Theystartandstop Hot weather or frequent * This is mmnal.
often to maintain door openings.
even temperatures.)
Refrigeratororfreezer Temperature control not set * See About thecontrols.
compartment too warm cold enough.
Frostorice crystals Door left open. * Check to see if package is holding door (,pen.
onfrozenfood
(frostwithin package Too frequent or too long
is normal) door openhlgs.
Temperature controls set * SeeAbout thecontrols.
at the coldest setting.
Waacm weather or frequent * Set the temperatm'e control one step col(le_:
door openings. SeeAboutthe controls.
Door left open. * Check to see if I)ackage. is holding door open.
Automatic energy saver * This helps pre_ent condensation on the outside.
refrigeratorandfreezer system circulates warm
compartments liquid around front edge
feels warm o f freezer compaactment.
Automaticicemaker Icema_ker power switch * Set the power switch to the on position.
does not work is in the off position.
Water supply turned off or *See Insta//ingtbowater/ino.
notco,mected
Freezer compartment too warm. * _fit 24 horns tor the refl_igerator to completel) cool down.
Piled up cubes in the storage * i,e_el cubes b_ hand.
bin cause the icema_ker
to shut off.
Ice cubes stuck h, icemaker.
(Green power light on
icema_ker blinking).
• Turn off the icemake_, remove cubes and tm'n the
icemaker 1)ack on.
3/
Page 32
Beforeyoucall forservice...
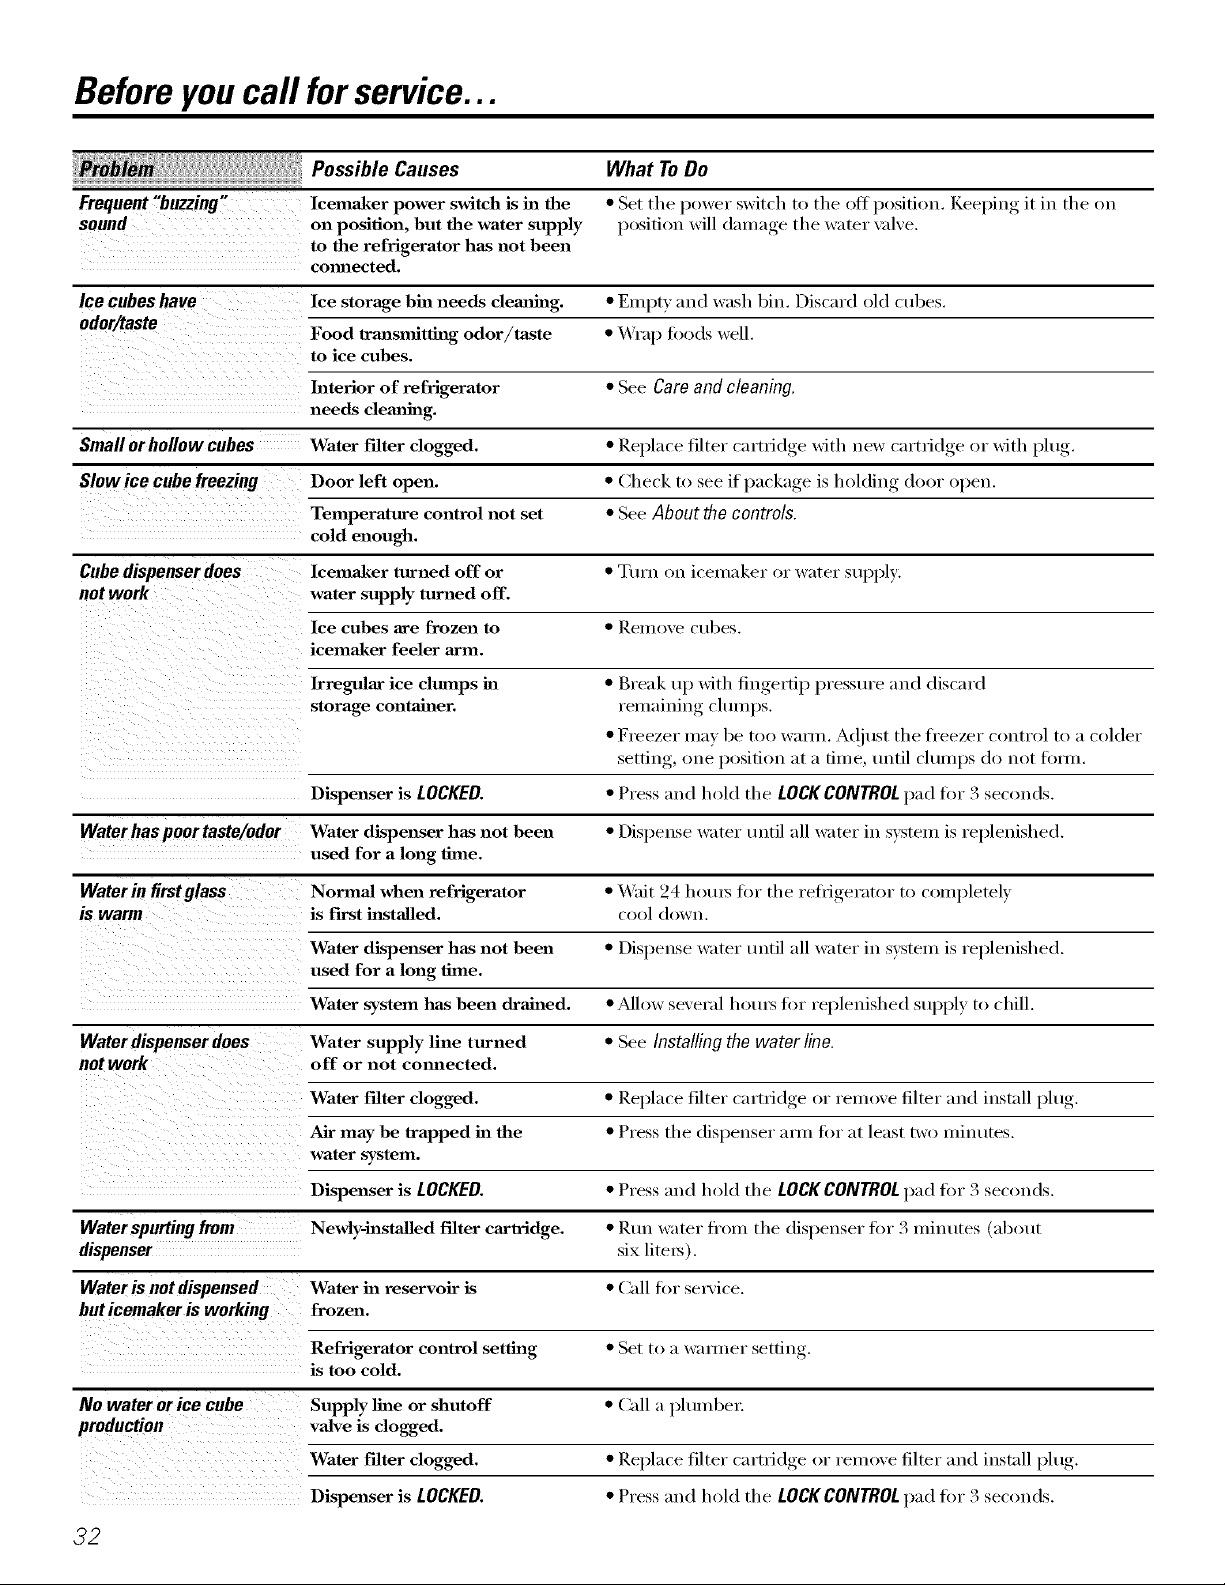
Possible Causes
Frequent "buzzing" Icema_ker power switch is in the
sound on position, but the water supply
to the refrigerator has not been
cmmected.
What ToDo
• Set the power switch to the ott position. Keelfin,,_ it in the on
position will damage the water xdxe.
Ice cubes have Ice storage bin needs clemfing. • Empty and wash bin. Discard old cubes.
odor/taste Food lrmlsmitthlg odor/taste • Wrap toods well.
to ice cubes.
Interior of refrigerator • See Careand cleaning.
needs clemfing.
Smaflorhollow cubes Water ffflter clogged. • Replace filter cartridge with new cartridge or with _lu,
Slowice cube freezing Door left open. • Check to see it l)ackage, is holding, door open.
Temperature control not set • See About the controls.
cold enough.
Cubedispenserdoes lcemaker turned off or • Turn on icemaker or water supply.
not work water supply turned off.
Ice cubes are frozen to • Remove cubes.
icema_ker feeler arm.
Irregular ice clmnps in • Break up with fingertip pressure and discard
storage contahmr, remaining, cluml)S.
• Freezer may be too \varln. A(!just the fl'eezer control to a colder
setting, one position at a time, until clumps do not finm.
Dispenser is LOCKED. • Press and hold the LOCK CONTROL 1):1(1fin 3 see(rods.
Waterhaspoortaste/odor Water dispenser has not been • Dispense water until all water in system is replenished.
used for a long time.
Waterin firstglass Normal _daen refrigerator • Wait 24 horus fin" the refi'igerator to completely
is warm is first hlstalled, cool down.
Water dispenser has not been • Dispense water until all water in system is replenished.
used for a long time.
Water system has been drained. • _dlow several hotu_ fin" replenished supply to chill.
Waterdispenserdoes Water supply line turned • See Installing the water line.
not work off or not comrected.
Water Filter clogged. • Replace filter cartridge or l'eÀllOVe filter and install pltlg.
Air may be lrapped in the • Press the dispenser ami fin" at least I_v(> minutes.
water system.
Dispenser is LOCKED. • Press and hold the LOCKCONTROL1):1(1 fin" 3 seconds.
Waterspurting from Newly-hlstalled filter cartridge. • I_tm water fl'om the dispenser fin" .'4Iniuutes (about
dispenser six liters).
Water is not dispensed Water in reservoir is • Call fi)r sex_'ice.
but icemaker is working frozen.
Refrigerator control setting • Set to a wamier setfiu
is too cold.
No water or ice cube Supply lille or shutoff • (_dl a ph/Iubel:
production valve is clogged.
Water Filter clogged. • Replace filter cartridge or remove filter and install plug.
Dispenser is LOCKED. • Press and hold the LOCKCONTROL1):1(1 fin 3 seconds.
32
Page 33

Possible Causes What ToDo
CUBED ICE was selected Last setting was * A few cubes were left in the crusher ti'onl the l)re'dous
but CRUSHED ICE CRUSHED ICE. setting. This is mnmal.
wasdispensed
Orange glowin Defrost heater is on. * This is n,nmal.
the freezer
Refrigerator has odor Foods trm_smitthag * Foods with smmg o(l(n_ should be tightl) wrapped.
odor to refrigerator. * Kee I) an open box of baking soda ill the refl_igerator;
replace e'_er_ three months.
Interior needs clemfing. * See Careand cleaning.
Ooornotc!osingproperly Door gasket on hinge side * Al)l)ly l)araflin wax to the ti_ce ot the gasket.
sticking or folding over.
A door bha is hitthag a shelf * Mo_e the door bin up one position.
inside the refrigerator.
Moisture forms on Not unusual dttring * "_,_ii)e surii_ce dry.
outside of refrigerator periods of high humidity.
Moisture collects inside Too frequent or too
(inhumidweather,air long door openhags.
carries moisture into
refrigerator when doors
are opened)
Interiorlightdoes No power at outlet. * Replace fuse or reset the breakei:
network
Light bulb burned out. * See Replacing the light bulbs
Water on kitchen flooror Cubes ja_mmed in chute. * Poke ice through with a wooden spoon.
onbottomoffreezer
Hotairfrombottom Normal air flow cooling motor.
of refrigerator ha the refrigeration process, it is
normal that heat be expelled ha the
area under the refrigerator. Some
floor cove_a_ are sensitive and _
discolor at these normal mad safe
temperatures.
Refrigeratornever Adaptive defrost keeps * This is n(lmml. The refl_igerator will cycle off after the
shu_ offbutthe compressor fronting during door remains closed fin" 2 hom_.
temperaturesareOK door opelmags.
Refrigerator beeping Door open. * Close (looI:
Foodisn'tthawing/chilling Packaging. * Increase time or re-l)ackage, ill plastic.
Wrong weight selected. * Select a larger weight.
Item with high fat content. * Select a larger weight.
Not using Chill/Thaw tray. * Place itelns on tray and alh)w space ill between itelns fi)r
Actualtemperaturenot Unit just plugged in.
equalto SettemPeramre Door open for too long.
Warm food added to refrigerator.
Defrost cycle is in process.
Select Temp feature is Refrigerator compartment
networking temperatttre control is set
at warmest setting.
better air flow.
• Allow 24 hom_ _'br s)'stem to stabilize.
• Mlow 24 hotu_ fin" system to stabilize.
• Mlow 24 houI5 fin" s):steln to stabilize.
• Mlow 24 houi_ fi)r systeln to stabilize.
• This is noi_nal. ]ii order to nfinilnize energy usage, the
Select Tempteattu'e is disabled when the reli_igei'ator
telnperature control is set at the wannest setting.
33
Page 34

Special Safety InstructionsforAustralia and New Zealand.
(in addition to other information in Owner's Manual)
IMPORTANTSAFETYINSTRUCTIONS
Toreduce the risk of personal injury or damage to propertg follow basic safe_/ precautions when using this
refrigerator, including the following:
When using any Electrical Product, basic precautions should always be followed, including the following:
READTHESEINSTRUCTIONSCAREFULLYBEFORE
USINGTHEREFRIGERATOR.KEEPTHEINSTRUCTIONS
HANDYFORFUTUREREFERENCE.
_7:IMPORTANT'Always operate the refl'igerator
fl'oIn a power source of the saine Voltage,
Frequency and Rating as indicated on the
refl'igerator identification plate, Operate the
refl'igerator fl'om an Earthed (Grotmded) 3 pin
power outlet flfllv accessible when the refl'igerator
is located in its normal operating position,
_::_Close supervision is necessary when any electrical
product is used by or operated near children or
infirm persons; young children should be
supervised to ensure that they do not play with the
refl'igera tot.
_::_IMPORTANT"Do not operate the refl'igerator with a
damaged Supply cord or Plug, If it is damaged it
I/ltlSt be replaced by the mantlf_lcttlrer, distributor
or its se_wice agent or a similarly qualified person
in order to avoid a hazard. Special tools are
required to replace the Supply flexible cord.
IAIA D IlII IlI I _.
cords. If it is necessary to use an extension cord,
prior to its use, make sure the extension cord is
safe to use, capable of handling the electrical load
of the product (refer to Product identification
plate) and has been checked and tested by )ore"
electricity supplier or a qualified technician,
To axoid becomino entangled in the cord, never
lay it throu(,h_ or along, a walkwm, or thoroughfi_re.,
_,;_Do not allow the cord to hang, oxer the edge, of a
bench top where it may be grabbed by children or
become entangled with the user,
34
Page 35

Installingthe WaterLbe
For Australian and New Zealand #Tstallation, read these instructions completely and carefully.
Before You Begin
:_;;IMPORTANT" Government legislation and Codes
in most States and Territories of Australia
require installation by a licensed plumber.
The installation inust conlolin to Australian
Standard AS 3500.1 _,V_ter SUl)ply.
::__'ater hammer (water banging in the pipes)
in house l)lumbing can cause damage to the
refl'igerator parts and lead to water leakage or
flooding. Call a qualified plumber to correct
water hammer before installing the water sui)ply
line to the refl'igerator,
Shut Off the Main Water Supply
Fox"models fitted with an icemake_; a water supply
kit (containing flexible robing and fitdngs) is
suI_plied with the refrigerator.
The water pressure must be between 138 and
827 kPa on models without a water filter fitted
and between 275 and 827 kPa on models with
a water filter fitted.
Turn Off the water and open a low tap to drain the
water fl'om the pipe.
COral)lying with the plumbing codes, install a
suitable branch fitting (not sui)plied ) to the cold
water suppl>
Extend the branch to a suitable location adjacent
to the refl'igerator when it is located in its operating
position. Terminate the branch with a shutoIt valve
(not SUl)plied ).
IlV]PORTANT" The shut-off wdve should be accessible
(such as in an ac!jacent cupboard, as close to the
wall as possible) when the refl'igerator is in its
normal operating position.
>:To prevent burns and refl'igerator damage, do
not hook up the water line to the hot water line,
i(;]f you use your refl'igerator before connecting the
water line, make sure the icemaker power switch
is set to the 0 position.
::7:Do not install the icemaker tubing in areas where
the temperatm'es tall below fl'eezing.
If wmr water SUl)ply pressm'e is higher than 690 kPa
dm'ing the day (if so, it mav reach higher levels at
night), install a suitable Pressm'e limiting wflve
(not supplied), after the shut-ott valve, inaking sure
the "flow arrows" on the body of the device lace the
same direction as the water flow.
If necessary, assemble a suitable fitting (not
SUl)plied ) to the Ul>stream end of the shutott valve
(or pressm'e limiting wdve) fin" attachment of the
fitting supplied with the water supply kit.
NOTE: PTFE tape should be used tot a water tight
seal when assembling all the above fittings.
Do net turn the water supply 0n at this time.
35
Page 36

Special InstallationInstructionsforAustralia andNew Zealand.
Installingthe WaterLine(cont.)
Connecting the Tubing to the Shutoff Valve
Attach the fitting with the male thread supplied
with the water supply kit to the shutoffvalve (or
pressure limiting valve, if fitted), and tighten.
NOTE: PTFE tape should be used for a water tight
seal when assembling all the above fittings.
Route the tubing through a hole drilled in the side
of the cupboard as close to the wall as possible.
Make sure there is sufficient length of tubing
[approximately 240 cm coiled into 3 turns of
approximately 25 cm] to allow the refrigerator
to move out from the wall after installation.
Connecting the Tubing to the Refrigerator
Before makingthe connection to the refrigerator, be
sure the power is turned OFFand the power cord is
disconnected from the Power Outlet.
If your refl'igerator does not include a water filter,
we recommend installing one in the water line
near the reli'igerator if vom" water supply has sand
or particles that could clog the screen of the
refl'igerator's water valve.
Insert and push the end of the tubing into the
fitting as tar as possible.
_]th the fl'ee end of the tubing located in a
suitable container, turn the main water supply
On and flush out the tubing tmtil the water is clear.
Turn Off the shutott valve atier approximately 1 litre
of water has been flushed through the tubing.
Attach the fitting with the female thread supplied
with the water supply kit to the water wflve and
tighten,
Insert and push the end of the tubing into the
fitting as tar as possible.
Fasten the tubing into the clamp provided to hold
it in position. You may need to pry open the clamp.
Reiilove the reflJgei'ator access cover.
Remove the plastic flexible cap from the water valve
(reti'igera tot connection).
36
Page 37

Turnthe Water On
Turn the water Oil at the shutoff valve.
Tighten any com_ection that leaks.
Replace the access cover and tighten all screws
(on some models).
Plug In the Refrigerator
Plug in the refl'igerator to the Power Outlet and
ttlrn O/l.
IMPORTANT'Alwaysoperate the Refl'igerator fl'om a
power source of the same Voltage, Frequency and
P,ating as indicated on the Refl'igerator
Identification Plate. Operate the Refl'igerator fl'om
an Earthed (Grotmded) 3 Pin Power Outlet flfllv
accessible when the refl'igerator is located in its
normal operating position.
Arrange the coil of tubing so that it does not
vibrate against the back of the refrigerator or
against the wall.
Start the Icemaker
Set the icemaker power switch to the I position.
The icemaker will not begin to operate until it
reaches its operating temperature of-9°(: or below.
It will then begin operation automatically if the
icemaker power switch is in the I position.
NOTE: In lower water pressure conditions, the water
valve mav turn on up to 3 times to make sure
enough water reaches the icemaker.
Push the refl'igerator back to the wall, making sure
the power cord and the water line tubing are not
trapped, entangled or squashed by the refl'igerator
(including the wheels) or wall.
37
Page 38

Notes.
38
Page 39

Mesures de s&urit_ ............... 40, 41
Fon_tionnement
Comparfiment cong_lateur ............ 51
CustomCool _'' ................. 49, 45, 46
Enuetien et nettoyage
du r_flig_rateur. .................. 55, 56
l_tagbres et bacs ................... 48-50
Le distribumm d'eau et de g]aqons . . .54, 55
I,e filue _ eau ....................... 47
I,es commandes .................. 49, 4,9,
I,es porms du r_flig_ramur. ............ 48
I,es firoirs et conmneurs fi l_gume ....... 59
Machine fi glaqons aummafique ........ 53
Remplacement des ampoules .......... 57
Retrait des conmneurs ................ 59
TmboCool _'_. ........................ 44
Installation
D_monmge et remontage des portes .... 69
Installation de la conduim d'eau ..... 65-67
Kits de moulures et
panneaux d_coratif_ ............... 58-61
Preparation ...................... 63-65
Conseils de d4Oannage ............ 69-72
Bruits de foncfionnement normaux ..... 68
Inscrivez les numerosde modele et deserie ici :
N° de modele
N° de serie
lls tigurent sur l'_tiquette qui se trouve _'ll'interieur
du compartiment r_tiJg_rateur en haute _'ldroite.
39
Page 40

MESURESDES[:CURIT[:IMPORTANTES.
LISEZD'ABORDTOUTESLESDIRECTIVES.
AVERTISSEMENT!
N'utilisez cet appareil #lectrom#nager que pour I'usage auquel il est destin#, comme expliqu# duns le present manuel.
MESURESDESECURITE
Lorsque vous utilisez un appareil #lectrique, observez toujours los mesures de s#curit# de base,
y compris los suivantes.
_ Vous devez bien installer et placer votre
rg_fl'igt)rateur, confi)rn/g_n_ent aux Instructions de
montage awmt de l'utiliser. Consultez (_galement
la section Comment raccorder au r_seau _lectrique.
::_;N'essayezjamais de monter sin" votre
rg_fl'igt)ratem'. Cela peut occasionner des blessm'es
corporelles et des dommages au rOfl'igOratem'.
i)_:Ne permettezjamais aux enfimts dejouer avec
votre rg_fl'igt)ratem" ou de modifier ses r_glages.
_,'_Ne permettezjamais aux enfimts de grimpet; de
monte_, de se tenir ou de se pendre aux (_tag&res
de votre rg_frigg_ratem', lls peuvent endommager
le rg_frigtqrateur et se blesser sg_rieusement.
::_ Ne touchezjamais les surfilces fl'oides duns le
compartiment cong_lation quand vos mains sont
humides ou mouillg_es. Votre peau peut coller ;'1
ces surtaces extr_mement froides.
::_Ne conservezjamais ou n'utilisezjamais d'essence
ou d'autres liquides ou gaz inflammables ;'1
proximit(_ de votre rg_frig(_rateur ou de tout autre
appareil (dectromg_nager.
_: Si votre r_qi-ig&'ateur est dot(_ d'tme machine ;'1
glaqons aUtolnatique &'itez le contact avec les piOces
inobiles du n/g_calfisme _jecteui; ou avec l'(dg_inei_t
chauflimt situ_ fi la partie inf_rieure de la nmchine fi
glagons. Ne posez pus les doigts ou les mains sin" le
m_canisme de la machine _'1gla(_ons pendant que le
r_qi_ig&'atem" est branch,.
::_ Un technicien de setwice qualifiO doit installer
la machine _'1gla_ons.
:_7Ne laissezjamais vos doigts darts des endroits off
ils risquent d'&tre pinct)s, i,'Ocartement entre les
portes et l'armoire est nOcessairement petit,
_Sstlrez-votls de fermer les portes si des enfimts
sont presents.
i)::DObranchez votre rOfl'igOratem" avant de le
nettover et de le rOparer.
NOTE:Nousvousrecommandonsfortementdefake
effectuertoutserviceparuntechnicienquafifi#.
;;__Avant de remplacer une ampoule brOl#e, vous devez
debrancher votre refrigerateur pour vous &'iter
d'entrer en contact avec tin [ilai//ent SOilS tension
(vous pouvez briser une lampe brt*dOe en essawmt
de la changer).
NOTE: Vousne couperez pus l'a/imentat/on #lectrique du
circuit de lum/Ore en toumant un ou tousles deux r@/ages
enposition 0 (arrgt).
::_Ne recongelezjamais des aliments congelg_s qui
out (_t(_complOtement d_gelg_s.
i)::Nettoyez tot!iotas le contenant CustomCoolTM apr_s
avoir d_gel_ les aliments.
DANGER!RISQUED'ENFERMERDESENFANTS
BONNEMISEAUREBUTDEVOTREREFRIGERATEUR
I,'enfermement et l'asphyxie des enfimts ne sont
pus des histoires du pass& I,es rOfi'ig&'ateurs jetOs
ou abandonng_s sont toqiours dangereux...m&me
s'ils ne doivent rester lfi que <<luelques jours,,.
Si vous vous dObarrassez de votre vieux rOfrigOratem;
suivez les instructions suivantes pour prOvenir
tout accident.
Avant de jeter votre vieux refrigerateur
ou congelateur :
::_i::Enlevez les portes etjetez-les sOparOment.
_: I,aissez les OtagOres montOes, pour Oviter que
des enfimts puissent tacilement monter duns
votre rOli'igOra tern'.
410 i_i::Si votre rOfrigOratem" a une serrure, cassez-la.
Refrigerants
Tousles appareils de r_ti'ig_ration contiennent des
rg_fl'igg_rants qui, confi)rm_ment aux lois ti=dg_rales,
doivent 6tre enlevg_s avant toute (_limination de
l'appareil. Si vous vous d_barrassez de vieux
appareils de r_fl'ig_ration, v&'ifiez, aupr&s de la
socig_t(_ qtfi s'occupe de lem" (_limination, ce que
vous devez filire.
Page 41
AVERTISSEMENT!
BRANCHEMENTELECTfllOUE
I,e cordon d'alimenmtion de cet appareil est
muni d'une fiche fl prise de terre qui se branche
sur une prise inurale raise fl la terre pour r&luire
au minimum le risque d'_lectrocution caus_ par
cet appareil.
Faites v&'ifier la prise murale et le circuit _lectrique
par un 6lectricien qualifi_ pour wins assurer que la
prise murale est bien raise _'lla terre.
Si vous avez une prise nlurale non raise fl la terre,
vous &tes personnellementresponsable et oblig_
de la fifire remplacer par unebonne prise murale
raise fl la terre.
Vous devez toqjours
brancher votre
r_ffig_rateur _'lsa
propre prise _lectrique.
i,e rendement de votre
r_ffig_ra te ur sera
meilleur et wins
_viterez ainsi de
surcharger les circuits
_lectriques et de surchaufler le cfiblage de votre
maison, avec tousles risques d'incendie connexes.
Veuillez consulter la plaque signal_tique de votre
rgMigg_rateur pour la tension, la puissance et la
fl'&luence correctes. Si la fiche de w)tre appareil
ne correspond pas _'lvotre prise ii/urale, vo/is devez
monter une nouvelle fiche sur w_tre appareil.
Assurez-vous qu'ulle
bonneraisea laterm IIf"_
existeavantd'utiliser II[Je e}
IMPORTANT:Vousdevezfakeeffectuer/aposedesnouvelles
fiches et nouveaux cordons d'ahmentation b/ectrique par un
blectricbn quafifibou un agentde service. Dans certains pays,
la pose de nouvelles fiches et nouveaux cordons d'a/imentation
blectriquen'est autorisbe que si erie a btb effectube par un
blectricien quafifib.
Si le cordon d'alimentation est endommag_, vous
devez le taire remplacer par un agent de service
qualifi_ pour _viter tout risque de s_curit_.
Ne d_branchezjamais votre r_frig_rateur en tirant
sur le cordon d'alimentation. Tenez toujours la fiche
refinement et enlevez-la de la prise en tirant tout
droit.
R_parez ou remplacez imm&liatement tout cordon
d'alimentation efliloch_ ou endommag_. N'utilisez
jamais de cordon fissur(_ ou us6 sur sa longueur ou
_'l l'une de ses extrg_mitg_s.
Pour (_carter w)tre rg_fl'ig_rateur du tour, taites
attention de ne pas (_craser ou d'endommager le
cordon d'alimentation.
gemplacement du cordon d'alimentation
(:haque lifts que vous d_sirez remplacer le
conducteur d'alimentation de votre rg_fl'ig_rateur,
wins devez le remplacer par un conducteur special
qui n'est disponible que chez votre revendeur local.
Vous devrez payer les fl'ais de remplacement
du conducteur d'alimentation si vous
l'avez endommag_.
Vous devez placer le refrigerateur darts un endroit ou
vous avez acces a la prise.
LISEZETSUIVEZSOIGNEUSEMENTCESMESURESDESECURITE.
CONSERVEZCESINSTRUCTIONS
41
Page 42

Lescommandesde temperaturedes
mod#.lesde CustomCool:M(pour les autres modOles,voir la page suivante)
La temperature est prO-rOglOe_ I'usine au numOro 3 °Cpour le compartiment
rOfrigOrateur et-18 °Cpour le compartiment congOlateur. Attendez 24 heures
que la tempOrature se stabifise aux temperatures recommandOes prO-r@lOes.
Le r@lage de tempOrature peut indiquer la tempOrature SET (r#glOe) ainsi
que la tempOrature r_elle dans le compartiment r#frigOrateur et dans le
compartiment congOlateur. La tempOrature SET (r_glOe) peut varier IOgOrement
de la tempOrature r_elle, selon I'utilisation et les conditions de fonctionnement.
Leplacement d'une ou des deux commandes sur 0 (ArrOt) arr_te le
refroidissement _ la fois dans les compartiments du r#frigOrateur et du
congOlateur mais ne coupe pas I'alimentation Olectrique du r_frigOrateur.
REMARQUE: Le rOfrigOrateur est expOdiOavec une pellicule de protection
J
couvrant les commandes de tempOrature. Si cette pellicule n'a pas Ot#retirOe
au cours de I'installation faites-le maintenant.
Pour changer la temperature, appuyez et relfichez le
bouton + ou - (Plus chaud et Plus fl'oid). I,e vovant SET
(aflichage) s'allmnera et l'aflichage indiquera la
temperature r_gl_e. Pour changer la temperature,
apptgez sin" la touche + (plus chaud) ou- (plus fl'oid)
jllSqtl'_'l ce qlle la temperature (l_sir_e apparaisse. I,a
temp_ratm'e du r_fl_ig&'atem" peut _tre _just_e entre
1° et 7 °Ccelle (Ill cong_lamm" entre -21 ° et -14 °C.
ixn_que la temp_ratm'e d_sir_e est r6gl_e, apr&s 5
secondes, la temp&'atm'e aflich_e retom'nera _'lcelle du
r_flJg&'atem" et du cong_latem: Plusiem_ ajustements
peuvent _tre n_cessaires. Chaque Ibis que vous ajustez
les commandes, attendez 24 hem'es pore" que le
r6fl_ig_ratem" atteigne la mmp&'atm'e que vous avez
s_lectimm_e.
Limites de temperature ambiante dans la piece
Votre r_lrig&'atem" est (on<u pour hmctionner dans les temp_ratm'es ambiantes
indiqu_es par sa Classe de temp_ratm'e qui est marquee sur sa plaque signal_tk, lue.
Classe de
temp&rature
Temp&'_e-
Etendue
Temp_r_e
Subtropicale
Tropicale
Symbole Temperature ambiante
SN
N
ST
T
Pour eteindre le systeme de refroidissement, appu,vez
bfi_vement sur le bouton + (plus chaud) du
r6flJg_ratem" ou du cong_latem'jusqu'fi ce que
l'aflichage indique 0 (Arr&t). Peurremettre rappareil
en marche,poussez sin" le bouton - (plus froid)
(Ill r_flJg_i'ateur ou (Ill cong_lamm: I,e w_vant
SET (aflichage) s'allumera du c6t6 que vous avez
s61ectioma6. Appuyez fi nouveau sur- (du c6t6 ot'_ le
vowmt SETest allure6) et la temp&'ature de l'appareil
passera sur la \:lleur pr&r_gl_e de -18 °Cpour le
cong_latem" et 3 °Cpour le rOfl_ig_ratem: I,'aflichage
d'un ou des deux boutons sin" 0 (Art&t) arr&te le
refl'oidissement darts les compartiments du
r_flJg&'atem" et du cong_latem" mais ne coupe
pas l'alimentation _lectfique du r_liig_ramm:
Maximale MinhnaJe
32 °C 10 °C
32 °C 16 °C
38 °C 18 °C
43 °C 18 °C
42
REMARQUE: La temp&ature interne peut gtre influenc_epar des facteurs tels que /'emplacement
flu r_frig&ateur, fa temperatureambiante et fa fr_quencedes ouverturesdeporte. Ajustez les boutons
de r@lage de temperature de mani_re_ compenserI'acfion deces facteurs.
Page 43

Lescommandesde temp#rature.
L'appareil est _quip# de I'une des commandes de temp#rature ci-apr#s "
Commandesde
temperatureinterne
Commandecadran
interne(0-9)
Commandesvaleursde
r#glageextemes(0-9)
FREEZER _&,: FRESHFOOD
,' co=_
Adjust Temperature
J
0 is Off / 5 is Normal / 9 is Coldest
Les commandes de temp#rature sont pr#-r#gl#es _ I'usine au num#ro 5 pour le
compartiment r#frig#rateur et le compartiment cong#lateur.
Pour r#gler la temp#rature de la valeur de r#glage, appuyez sur le bouton WARMER
(plus chaud) ou COLDER(plus froid) sur le cot# cong#lateur ou r#frig#rateur. Le voyant
de la valeur de r#glage s'aflume. Appuyez sur WARMER ou sur COLDERjusqu3 obtenir
la valeur souhait#e.
Vous aurez peut-#tre besoin d'ajuster plusieurs lois. Chaque lois que vous ajustez les
r#glages, attendez 24 heures apr#s chaque ajustement que le r#frig#rateur atteigne le
r#glage choisi.
Leplacement d'une ou des deux commandes sur 0 (Arr#t) arr#te le refroidissement
la lois darts les compartiments du r#frig#rateur et du cong#lateur mais ne coupe pas
I'alimentation #lectrique du r#frig#rateur.
Le reglage de la temp#rature varie selon vos preferences personnelles, votre usage et vos
conditions de fonctionnement et peut n#cessiter plus d'un ajustement.
REMARQUE : Le r#frig#rateur est exp#di# avec une pellicule de protection couvrant les
commandes de temp#rature. Si cette pellicule n'a pas #t# retir#e au cours de I'instaflation
faites-le maintenant.
43
Page 44
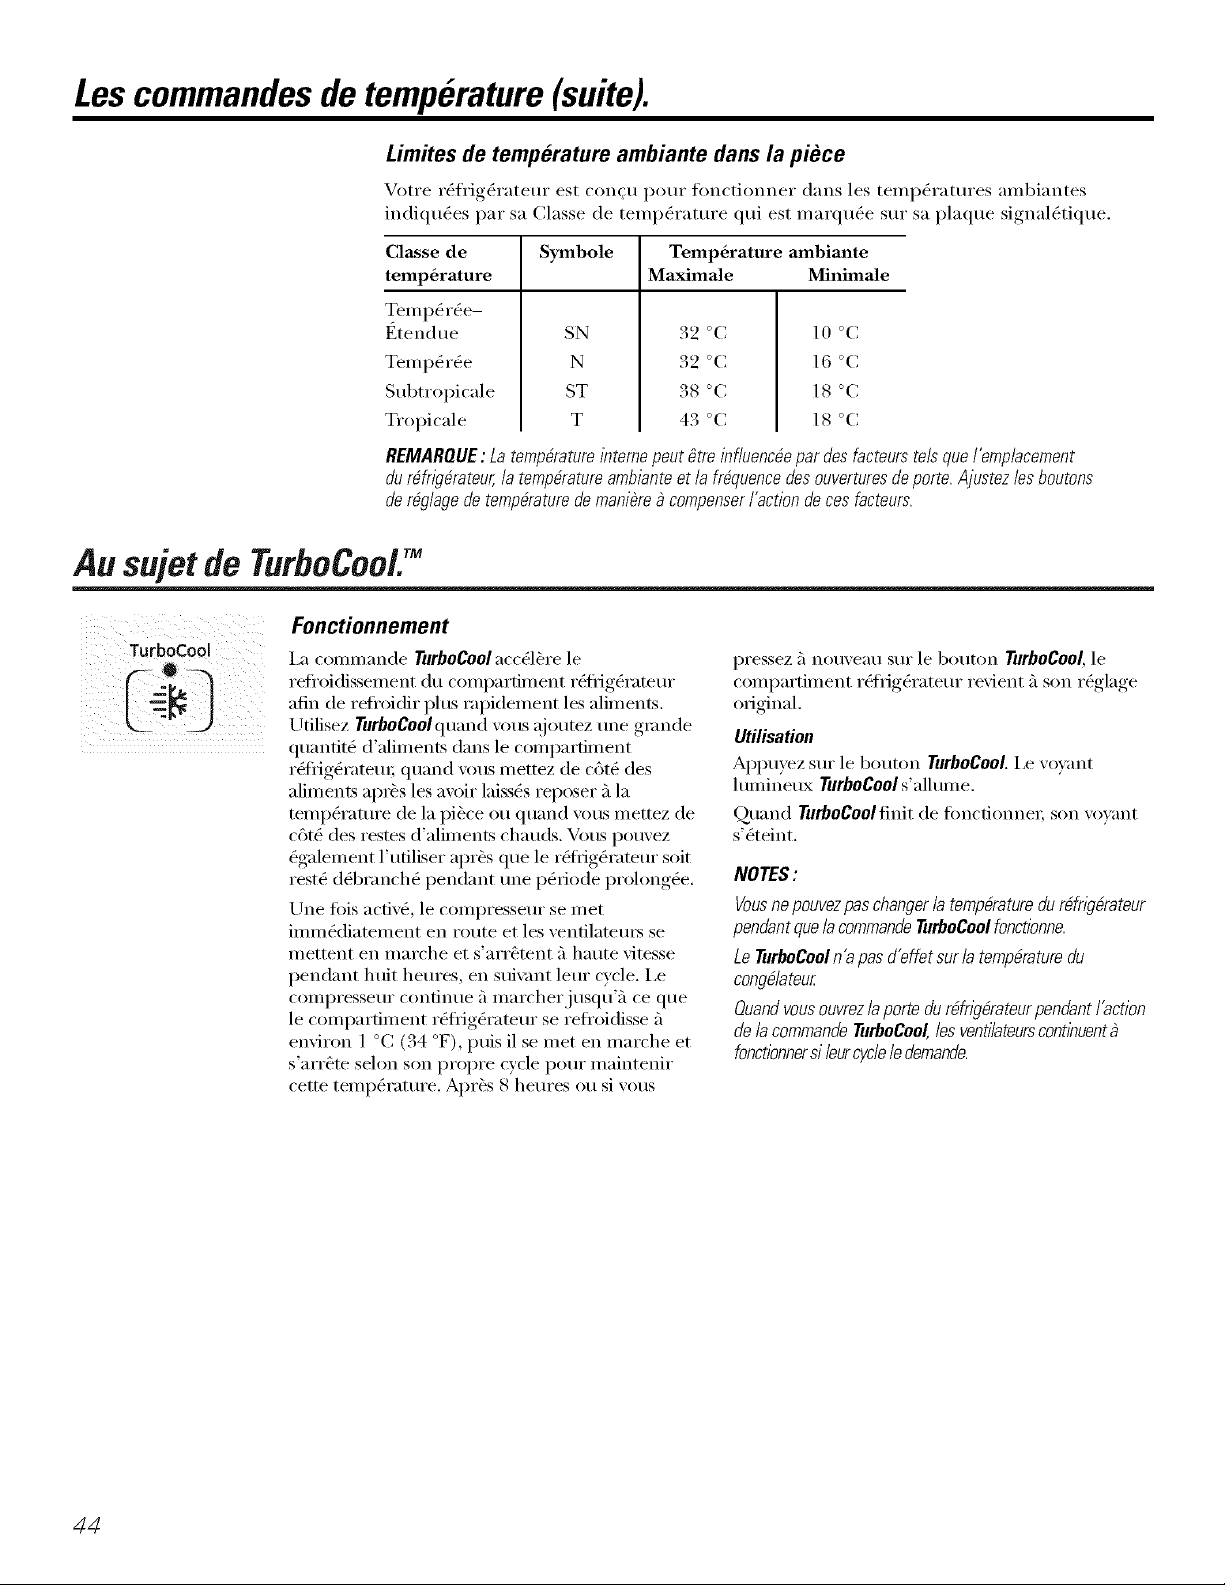
Lescommandesde temperature(suite).
Limites de temperature ambiante dans la piece
Votre r_frig_rateur est conqu pour ton('tionner dans les temperatures ambiantes
indiqug_es par sa Classe de tempg_rature qui est marqug_e sur sa plaque signalgM(, lue.
Classe de Symbole TempOrature ambiante
tempOrature Maximale Minhnale
Tern pg_r_e-
Etendue SN 32 °(3 10 °C
Tern pg_rg_e N 32 °C 16 °C
Subtropicale ST 38 °C 18 °C
Tropicale T 43 °C 18 °C
REMARQUE: La temperatureinterne peut gtre influenc_epar des facteurstels que l'emplacement
du r_frig&ateur, la temperatureamb/ante et la fr_quencedes ouverturesdeporte. Ajustez les boutons
de r@lage de temperature de mani_re_ compenser/'actionde ces facteurs.
Pu sujet de TurboCoo/.TM
Fonctionnement
TurboCool
I_ commande TurboCoolacc_l&re le
reti'oidissement du compartiment r6ti'igg_rateur
afin de refi'oidir plus rapidement les aliments.
Utilisez TurboCoolquand vous ajoumz une gmnde
quantit6 d'aliments dans le compartiment
r(qi'igg_rateu_; quand vous mettez de c6t(_ des
aliments almXS les avoir laissds reposer a la
tempg_ramre de la pi&ce ou quand vous mettez de
c6t6 des testes d'aliments chauds. Vous pouvez
_galement l'utiliser apr_s que le r6liig_rateur soit
rest_ d_branch_ pendant une p&iode prohmg_e.
Une Ibis acfiv(_, le compresseur se met
immg_diatement en route et les ventilatem_ se
mettent en marche et s'arr_tent fi haute vitesse
pendant huit heures, en sui\m_t leur cycle. I,e
COlllpi'essetlr contintle 5 illai'cherjtlsqtl'_'l ce que
le compartiment rg_li'igg_ramur se reli'oidisse 5
environ 1 °C (34 °F), puis il se met en marche et
s'arrbte sehm son propre cycle pour maintenir
cette temperature. Apr_s 8 heures ou si vous
pressez 5 nouveau sur le bouton TurboCool,le
comi)artiment r_frigg_rateur,.... re'dent _'_son rg_glage,,
original.
Utilisation
Appu_ez sur le bouton TurboCool.i,e xo_ant
lumineux TurboCools'all ume.
Quand TurboCoolfinit de fimcfionne_; son volant
s'_teint.
NOTES:
Vousnepouvezpas changerla tempbrature& rbfngbrateur
pendantque/a commandeTurboCoolfonctionne.
Le TurboCooln'apas d'effet sur /a tempbraturedu
congb/ateur
Ouandvousouvrez/a porte du rbfrlgbrateurpendant faction
de/a commandeTurboCool,/esventi/ateurscontihuent_
foncflonnersi /eurcycle/e demande.
44
Page 45
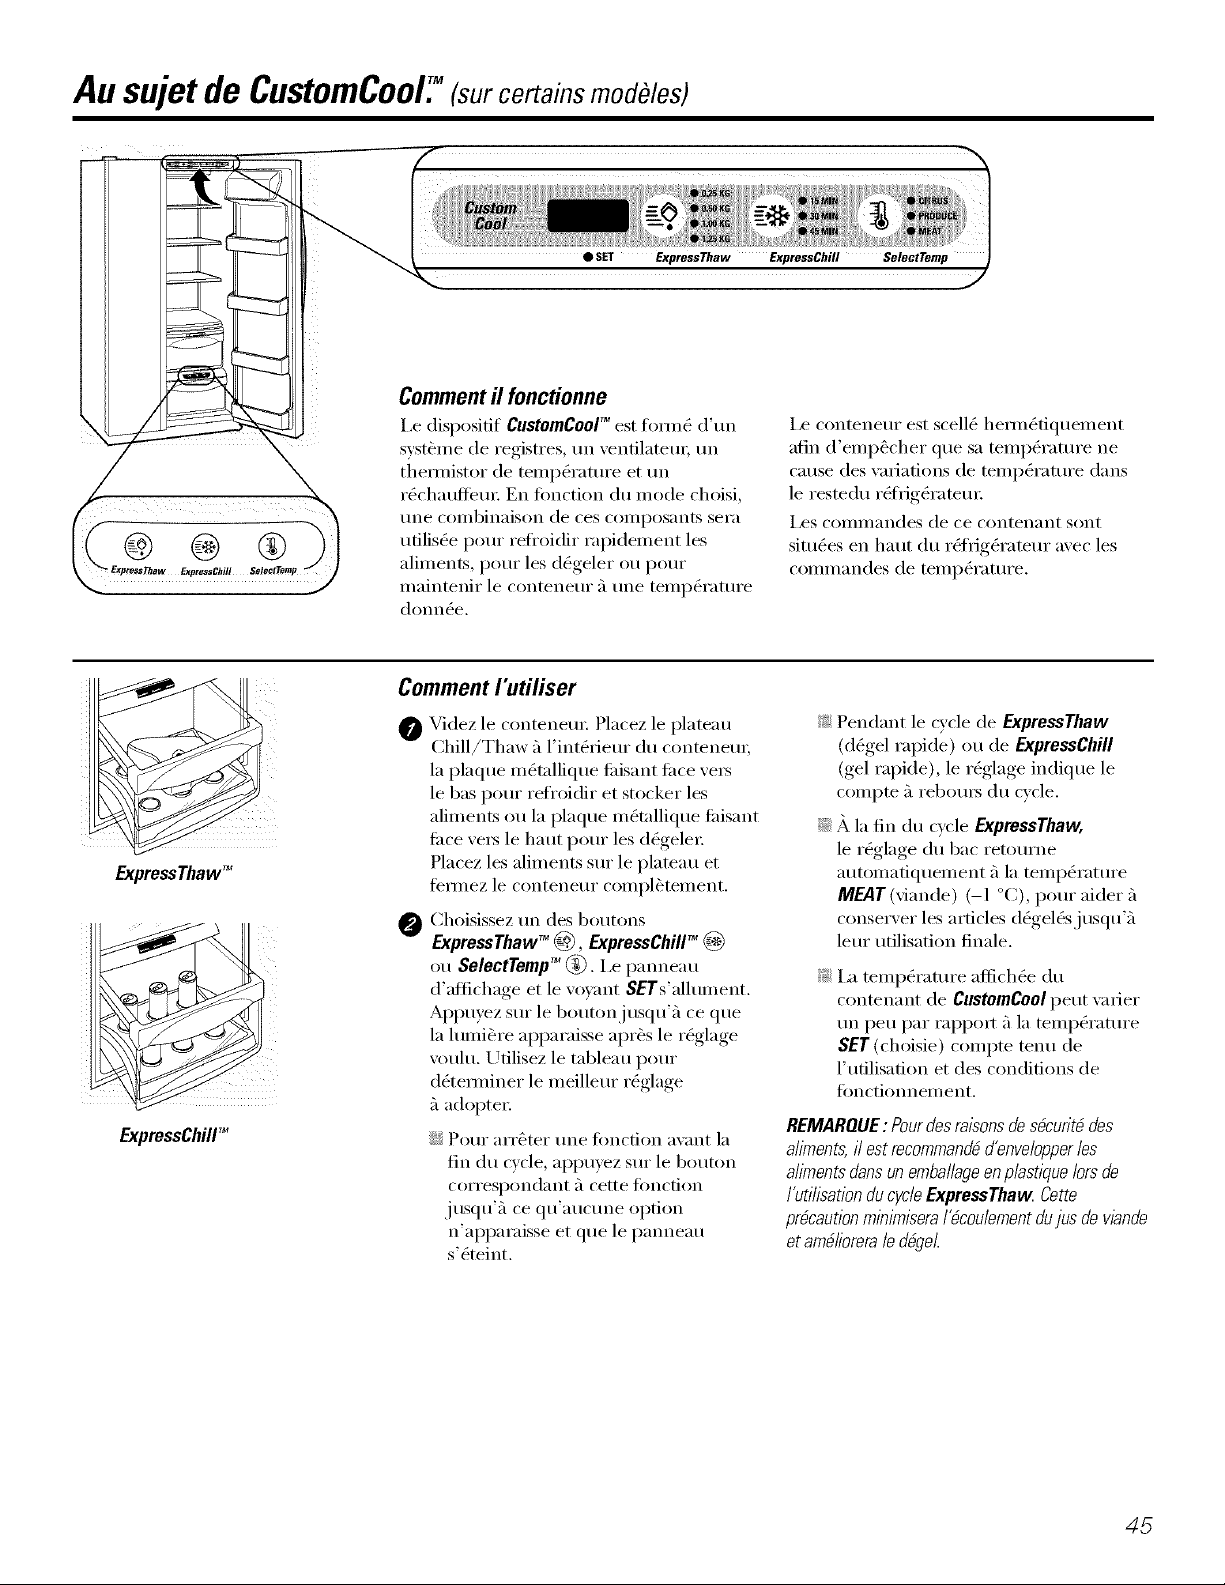
Au sujetde CustomCoolY(surce ainsmodOles)
O SET ExpressThaw ExpressChill SelectTemp
Commentil fonctionne
i,e dispositif CustomCool" est fimll_ (]'till
svst_lne de registres, till ventilateul; till
thelmistor de telnp&'ature et till
l'_chattflbUl; Ell timction du lnode choisi,
line colnbinaison de ces COillposants sei'a
ufilis_e pour refi'oidir rapidenlent les
alinlents, pour les dg_geler ou pour
lnaintenir le conteneur _'tune telnpg_rature
dollll_e.
I,e conteneur est scell_ hel_n_tiquelnent
afin d'enip_cher que sa tenlp_l'ature ne
cause des wtriations de telnp&'ature dans
le restedu l'_qi_ig_l'ateul:
I,eS COilli//_tndes de ce conten_tnt sont
situg_es ell haut du r_ti_igg_l'ateur avec les
conlniandes de tenip_ratul'e.
ExpressThaw"
ExpressChillTM
Comment I'utiliser
Videz le conteneul: Placez le plateau
t)
Chill/Thaw _'tl'int&_ieur du conteneul;
la plaque ln_tallique fltisant fitce vel_
le has pour refroidir et stocker les
alinlents ou la plaque ni(_tallique fitisant
fitce vel5 le haut pour les d(_gelel:
Placez les alinients sur le plateau et
temlez le conteneur conlpl&telnent.
Choisissez un des boutons
0
ExpressThaw" @ , ExpressChill" @
ou SelectTemp" _). I,e panneau
d'aflichage et le \'O_mlt SETs'alhnnent.
Appuyez sur le boutonj uSqtl'_'t ce title
la huni&l'e apparaisse apl'&S le l'_glage
voulu. Udlisez le tableau pour
d_tei_niner le nleilleur i'Oglage
_'tadoptei:
::J?::Pour ari'&ter une tonction avant la
fill du cycle, appuyez sur le bouton
COlTespondant _'t cette J[onc[ion
jusqu'fi ce qtl'atlCtlne option
n'apparaisse et que le panneau
s'_teint.
}i/:Pendant le cycle de ExpressThaw
(d_gel rapide) ou de ExpressChill
(gel rapide), le l'_glage indique le
conlpte ft rebouI_ du cycle.
::Ji::__ la fill du cycle ExpressThaw,
le l'(_glage du bac retourne
autolnatiquelnent _'tla telnp_rature
MEAT (viande) (-I °C), pour aider ft
conserver les articles d_gel_sjusqu'ft
leur utilisation finale.
_: I_t telnpg_rature affich_e du
contenant de CustomCoo/peut \ZtlJer
till peu par rapport ft la telnp&'ature
SET (choisie) conipm mllU de
l'utilisation et des conditions de
timctionnenient.
REMARQUE: Pourdesre/sonsde s_cur/t_ des
ailments,//est reecommand_d_nvelopper /es
ailments clansunernba//ageenp/ast/quelors de
f utilisation flu cycleExpressThaw Cette
precautionre/n/re/serel'_cou/ementdujus de wande
etare_/iorera/e d@eL
45
Page 46

Au sujetde CustomCool7(surcenainsmodOles)
Tableau CustomCoolTM
REMARQUE : les r_sultats peuvent varier en fonction de I'emballage, de la temp&ature initiale et les particularit_s
des autres aliments.
ExpressThaw
0,25 kg (4 heures)
::Ji::Pa\'Os de viande hachOe (0,25 kg)
_: Filet mignon emball_
indi\Jduellement (0,25 kg)
0,50 kg 18 heures)
::Ji::Poitfines de poulet (0,5 kg)
_: Boeuf hach_ (0,5 kg)
::Ji::Bifleck (0,5 kg)
1,0 kg (10 heures)
?_: Poitrines de poulet (1,0 kg)
::Ji::Boeuf hach_ (1,0 kg)
_: Bilteck (1,0 kg)
LSO kg (12 heures)
::Ji::Poitfines de poulet (1,50 kg)
_: Boeut hach_ (1,50 kg)
::Ji::Bitteck (1,50 kg)
15 Minutes
::Ji::1 canette de boisson (355 ml)
_: 2 petites boites dejus
(175-240 ml chacune)
30 Minutes
::Ji::2 ;'16 canettes de boisson
(355 ml chacune)
_: 2 bouteilles en plasfique de
590 ml de boisson
::Ji::4 ;'16 petites boites dejus
(175-240 ml chacune)
N 3 emballage dejus fi teuille
m (_tallique
::Ji::Vin (bouteille de 750 ml)
45 Minutes
_: 2 litre bouteille de boisson
::Ji::1,9 litres dejus
_: 1 paquet de g_latine
R6glage pour a_tunes (6 °C)
::Ji::Oranges, citrons, limes, ananas,
Illelons
_: HalJcots, concolllbi'es, toll/ates,
poivrons, aube_gines, COUlge
R6glage pour fruits et 16g-runes (1 °C)
::_i::Fraises, fl'amboises, kiwi, poires,
cerises, m fires, raisins, prunes,
nectaiJnes, poii/iiles
_: _spe_ges, brocoli, mais,
champignons, @inard, chou-fleu_;
chou fi_is(_,(_chalottes, betteraves,
oignons
R6glage pour les vim_des (-1 °C)
_: Viande, volaille et poisson crus
46
Page 47

Lefiltre a eau.
RESETWATERFILTER
HOLD3SECS
Ins&ez le dessus de la cartouche
darts le porte-cartouche et tourne-la
lentement vers la droite.
Cartouche du filtre g_eau
(sur certains modules)
I,a cartouche du filtre 5 eau se trouve darts le
coin droit arri_re sup_rieur du compartiment
i'(_fl'igt)i'ate ui:
Ouand remplacer le filtre
ILln vovant est situ(_ sur le pour indiquer le
remplacement de la cartouche du filtre 5 eau.
Ce vo)m_t devient orange pour w)us avertir de
remplacer bientgt le filtre.
Vous devez remplacer la cartouche de filtre
quand la lumi_I'e de l'indicateur devient
rouge ou quand le (l_bit de l'eau qui xa au
distibuteur d'eau ou au distributeur de glace
diminue.
Installation do la cartouche du filtro
O S'il s'agit d'une cartouche de
remplacement, enlevez d'abord l'ancienne
en la tournant lentement vein la gauche.
Ne tirezpas sur la cartouche. Un peu d'eau
peut s'(_coulei:
Remplissez la cartouche de remplacement
d'eau du robinet immg_diatement api'_s
l'installafion afin de pem/ettre un meilleur
dg4)it du distributeui:
Mignez la fl_che sur la cartouche et le
@
support de cartouche. Placez le haut de
la nouvelle cartouche ;'1l'int&_ieur du
support. No I'enfoncezpas darts le porte-
carto/iche.
To/lYnez la carto/iche lentei/lent vein la
droitejusqu'au point Ot'lla cartouche
s'arr&te. NESERREZPASTROPFORT
I,oiNque \'otis 1;I tournez, elle se lbve en
position automatiquement. I,a cartouche
tourne d'environ l/4 de tom:
O Faites couler l'eau du distributeur pendant
3 minutes (environ (3 litres) afin de
(l(_gager le syst_me et emp&'her
l'_claboussage.
O Pressez et maintenez enfimct)e la touche
RESETWATERFILTER(rgMfitialiser du filtre
5 eau) sur le distributeur pendant
3 secondes.
REMARQUE:/Jnecartouche de rechange qui
vient d'&ti'e installg_e peut faire _c/abeusser
l'eau sortant du distributeui:
Bouchon de derivation du filtre
d_rivation/ -"T
dufiltre
11fiult ufiliser le bouchon de d&i\:lfion du
filtre loINqu'une cartouche de remplacement
n'est pas disponible. I,e distributeur et la
machine ;'1gla(ons ne peuvent pas flmcfionner
sans le filtre ou sans le bouchon de dg_rivafion
du filtre.
Filtres de rechange :
Pour commander des cartouches
supplementaires, appelez votre
distributeurregional.
47
Page 48

Lesportesdu refrig&ateur.
Portes du refrigerateur
i,es portes de votre r(_fl'ig(q'ateur ne sent pas
tout fi fifit c()mme celles dont vous avez
l'habimde. Un s)'st(_me special d'ouveilure/
tennetm'e assure que les portes tennent
complOtement et hemlOtiquement.
T_
i,oi3que vous OtlViJi'ez et J[elIlleI'ez les portes,
Vtl/1s i'eil/ai'quei'ez qu'elles sent ill unies d' tlne
position d'arr_t.Sivous ouvrez la porte au-(lelfi
de cette posit.ion d'arr#t, elle restera ouvexte
afin de vous pemlettre de ranger et de prendre
_k=,4
Lorsque la porte est partiellement
ouverte, elle se ferme automatiquemen_
Au del_ de cette position d'arr#t la porte
restera ooverte,
vos aliments plus ti_cilement. I,o_que la porte
est partiellement ouverte, elle se temle
a UtOllla[iq t lellle nt.
f:tageres et bacs.
Los caract&istiques no sent pas toutes disponibles sur tous los modOles.
I,'impression de r_sistance que xous ressentez _'_
la position d'arr_t diminue lo_que des aliments
s(mt rang(_s darts la porte.
L'ergot
Bac de porte de rfifrig&ateur
/
Bac basculant de porte
de cong#lateur
de retenue
de boutei!le
Bacs de porte de refrigerateur et bacs basculants de porte de congelateur
Grandsbacs Petitsbacs
I
Veils potlvez r_gler les phls gx'ands ba(s de
porte de r_fi_ig&'atem" et les bacs basculants
de porte de cong_latem:
Retrait: Soulexez l'axant du bac tout droit xe_
le haut, puis soulexez et enlexez.
Remise en place ou changement de place :
Em,agez_, . l'arri(_re du bac darts les supports
moul_s de la porte. Puis poussez ;ei_ le has
l'a',ant (111 bac. I,e bac se fixe ell place.
Dispositif de retenue de bouteille
I,es dispositifs de retenue de bouteille sont
r(Xglables et emp_chent les articles d'tme
grande hautem" de bascule_:
Retrait:Soulevez l'a\mlt du disposifif
de retenue tout droit ve_ le haut, puis
souleveMe vei_ le haut.
Enl#vement: Soulevez l'awmt du bac droit vex_
le haut, puis enlevez.
Remise en place :Placez le bac at:l dessus des
soutiens moul_s rectangulaires de la porte.
Puis taites glisser le bac ve_s le bas darts le
support pore" le fixer ell place.
L'ergotaide fl emp_cher que de petits articles
plactqs sin" la clavette de la porte se renvei_ent,
coulent ou glissent. Mettez tm doigt de chaque
c6t_ de l'ergot pros de l'arriOre et fifites bouger
la clayette veI_ l'a\mlt ()u veI_ l'arfi(_re selon
vos besoins.
Pour remettre en place ou changer de place:
Engagez l'arribre du dispositif de retenue de
bouteille darts les supports moul_s de la porte.
Poussez ensuite l'a\:mt (h:_dispositif \'e_ le bas.
48
Page 49

_'tagere coulissante anti-deversement
Appuyez sur le taquet et tirez
I'#tag#re vers I'avant pour
I'enlever
(;rSce 5 l'(_tag_re coulissante anti<l&'e_en_ent,
vous pouvez atteindre des articles plactqs
derriere d'autres. Ses bords sp_ciaux sont
con(us pour elnp_cher tout d_vei_elnent
ve_s les _tag_res int>rieures.
Retrait :
l_2fitesglisser l'0tagt)re \'e_ l'ext0rieur
jusqu'5 ce qu'elle atteigne sa butg_e, puis
appuyez ve_ le has sur le taquet et tifites
glisser l'_tagt)re tout droit ve_s l'ext&_iem -
_'tagbre QuickSpaceTM
Vous pouvez diviser en deux cette 0tagt)re et
tifire coulisser sa pattie a\:mt sous sa pattie
artiste pour ranger des articles de haute taille
sur la _tagt)res du dessous.
Vous pouvez enlever cette clayette et la
remettre en place ou la placer comme line
_tag&re coulissante anfi<l_ve_ement.
Panier mobile a breuvage
I,e partier 5 breu\_ge est con(u pour contenir
une bouteille de c6t(_. Vous pouvez le fixer 5
n'importe quelle _tag&re coulissante.
Remise en place ou changement de place :
Mignez l'_tagt)re avec les supports et tifites
glisser en position, i,'_tagbre peut &tre
repositionn_e h)_que la porte est ouverte 5
90 ° ou plus. Pour ce tifire, tifites glisser l'(_tag0re
au-del5 des buttes et inclinez-la ve_5 le bas.
Faitesqa glisser ve_ le has 5 la position (l_sir_e,
alignez-la avec les supports et glissez-la
en position.
Prenezsoin depousser l_tagbre jusqu'au fond pour
reformer/a porte.
Dans certains i/lod0les, "_ot/s IIe potr_ez
pas utiliser cette _tagt)re darts la position
la plus basse.
Installation:
O Pdignez la pattie large des tentes au
solnnler du panier aux taquets qui se
trouxent sous la (_tag_re.
O Faites coulisser ensuite le partier pour
le fixer en position.
Support a bouteilles de vin/boissons (surcertains modOles)
Ce support peut contenirjusqu'a 5 canettes,
une bouteille de ",in ou tlne bouteille de soda
de 9 litres.
i,e support est accroch_ aux c6t_s du bac 5
produits laifie_.
Pour enlever :
O Videz le support.
O En tenant la pattie inl_riem'e du bac 5
produits laifie_, soulexez sa pattie axant
en ligne droite, puis tirez ve_s le haut et
l'extt)rieur
Pour (l_gaoer,mle suII))°rt du bac 15 )roduits
-- laitie_s, tirez sur les tiges lat0rales du
support pour les refirer des trous situ0s sin"
les cgt_s du bac.
Pour replacer:
Accrochez le support aux ('6t_s du bac.
O Engagez la pattie artiste du bac darts les
supports moul_s de la porte. Poussez
ensuite la pattie a\:mt du bac ve_ le has.
I,e bac se verrouillera en place.
49
Page 50
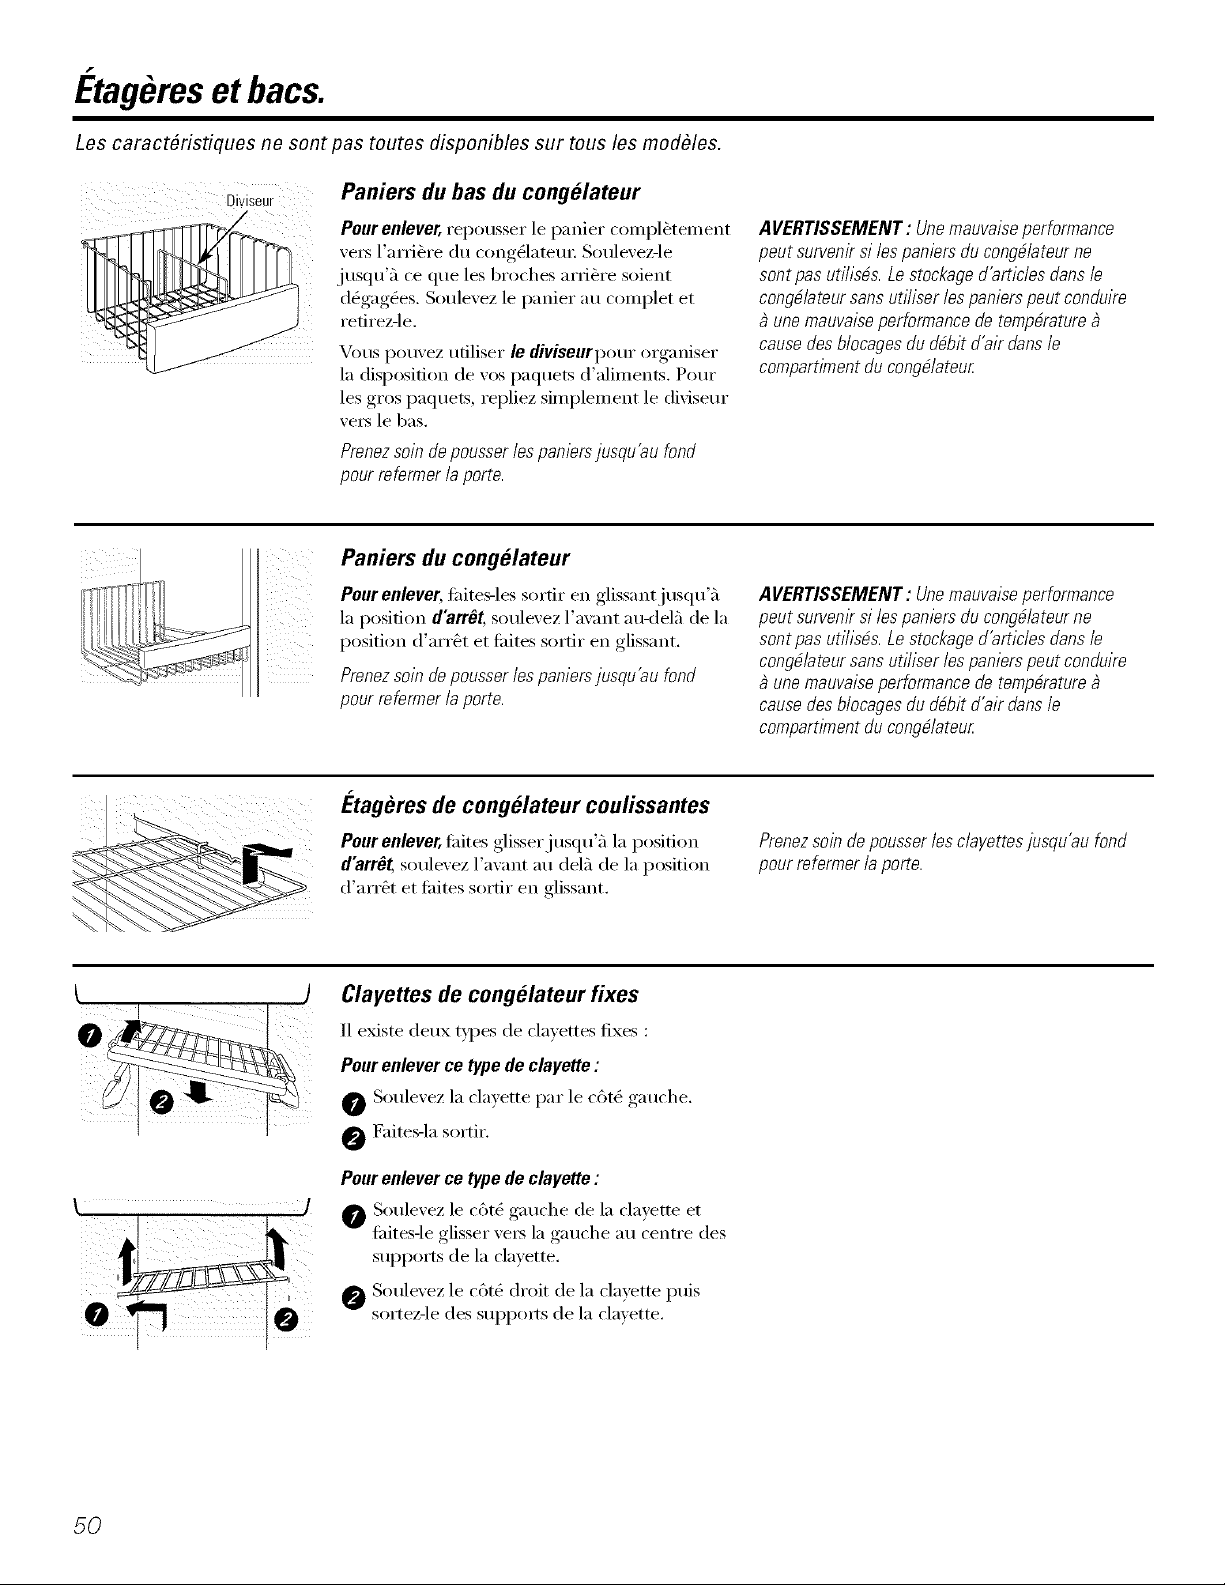
E:tagereset bacs.
Les caract#risfiques ne sont pas toutes disponibles sur tous les modbles.
Diviseur
Paniers du bas du congelateur
Pour enlever, repousser le partier compl6tement
ve_ l'arri_re du congOlatem: Soulevez-le
jusqu'5 ce que les broches arriOre soient
d_gag(_es. Soulevez le partier au complet et
retireMe.
Vous pouvez utiliser/O divisourpom" mganiser
la disposition de vos paquets d'aliments. Pore"
les gros paquets, repliez simplement le divisem"
veI_ le bas.
Prenezsoin depousser iespan/ors jusqu'au fond
pour refsrmer ia ports.
Paniers du congelateur
Pourenlever, fidtes-les sortir en glissantjusqu'5
la position d'arr6t, soulevez l'avant au-del5 de la
position d'arr_t et fidtes sortir en glissant.
Prenezsoin depousser lospaniers jusqu'au fond
pour refsrmer /a porte.
AVERTISSEMENT : Uns mauvaise performance
peut survenir si ies paniers du cong#/atsur ne
sont pas utiiis_s. Lestockags d'articies clansis
cong_/atsur sans utiiiser les paniers peut conduire
une mauvaise performance de tsmp_rature
cause des blocages du d@it d'air clans Is
compartiment du cong_/atsu_
AVERTISSEMENT: Unsmauvaissperformance
peutsurvenirsi iespaniersducongfi/atsurne
sontpasutiiisfis.Lestockagsd'artic/ssclansis
cong#/ateursansuti/issrisspanisrspeutconduire
unsmauvaissperformancedetempfirature
causedesbiocagssdud@it d'airclansie
compartlmentdu cong#/ateu_
_'tageres de congelateur coulissantes
Pour eulever, fidtes glisserjusqu'5 la position
d'arr#t soulevez l'a_ant au del5 de la position
d'arr_t et fidtes sortir en glissant.
Clayettes de congelateur fixes
II existe deux types de clavettes fixes :
Pour enlever ce type de clayette :
0 Soulevez la clavette par le c6t_ gauche.
[_2fite_la sortir.
Pour enlever ce type de clayette :
0 Soule_ez le c6tO gauche de la cla)ette et
fidtes-le glisser _e_s la gauche au centre des
supports de la clavette.
_ Soulevez le cgt(_ droit de la cla}ette puis
sortez-le des supports de la clmette.
Prenszsoindepousserlssclaysttssjusqu'aufond
pourrsfsrmeria porte.
5O
Page 51

Compartimentcongelateur.
Chargement du compartiment congelation
Rangez \'os aliment de mani_re 5 laisser
art moins 15 mm d'espace libre entre les
enq)ilements de paqttets et entre 15 mm
et 95 mm entre le hattt des empilements
et toute (_tag0re ou panier sittt(_ att-dessus
d'eux. Vous pouvez laisser dg_passer les
paquets de nourritttre de l'awmt des
(_tag_res, mais wins devez les (_carter de
15 mm des portes.
_: Vous tie devez pas placer w)s aliments fi
congeler en contact direct avec les
aliments fl'ais. Si w)us devez congeler des
aliments chaqtte jour, vous devez peut-_tre
rg_dttire la qttantit(_ d'aliments 5 congeler,
::Ji::Si volts devez congeler une grande qttantit_
d'aliments, r_glez la commande (lit
cong_latettr 5 sa temp&'ature la phts basse.
Une lois les aliments congel_s, r_glez 5
nouveatt la comnmnde (lit cong_lateur 5 sa
temp_ratttre normale.
::Ji::Volts congi_lerez phts tacilement les
aliments en les mettant sur les trois
(_tag_res (lit milieu 0tl compartiment
cong_lation et plus dilticilement en les
mettant darts les balconnets de porte
du cong_lateur.
Z: Ne conservezjamais d'aliments
rapidement congelg_s commercialement
phls longtenlps que le telnps recolnnmndg_
par les producteurs d'aliments.
Z: Si vous coupez l'alimentation (_lectfique
de votre rg_fl_ig&'ateur pendant une hmgue
durg_e, ou si le svst_me de rg_frig_ration
tOliibe elI p}lIIIIe_ n'ouvI'ez les portes qu'en
cas de ng_cessit(_ absolue. Si vous devez le
taire, refl_rmez-les le plus rapidement
possible de mani&re 5 conserver congelg_s
vos aliments le plus longtemps possible.
::Ji::i,es (_tag&res de stockage de porte du
compartiment cong_lation portant une
(_tiquette avec deux 0toiles ne conviennent
qll'all rangement d'aliments d@'l congel_s.
Vousno devez jamais stocker de boissons
gazeuses dartsle compartiment congelateur.
Performance du congelateur
Ce rg_ti_ig_rateur/cong_lateur,, comi)orte une classification "Quatre t_toiles" _ .
I,a perfi)nnance d'un congg_lateur est class_e par line classification d'g_toiles, comme dg_fini par
I'ISO 8561 I,ES NORMES ET I,E Rt_(L_PITUIATIF SONT PRt_CISt_S C]-DESSOUS :
CODE CONGt_I ATION-TEMPt_IL_tTURE
(TEMPt_It__TURE DES AI,IMENTS)
(_ Moins de -6 °C.
Moins de -12 °C.
ou _ N/loins de -18 °C.
Cependant, ces endroits limitg_s ont une notation de deux (_toiles pennise par la nonne :
Modbles
21,23
25
27
29
23 SANS
I)ISTRIBUTEUR
D'E,\U
2l'fl I, 2:4"13t
2 I_q_L,23_1<
GSX25
Emplacement des (-_g] Clayettes du compartiment
{ong('lation
Partier plus has du {ongdlatem; (qag6re supdrior
de porte el les 2 ('tagg'res plus has de porte.
12:tag-breau-dessus du ha( a gla<ons, dtag_"re supdrior
de porte el les 2 ('tagg'res plus has de porte.
12:tagbre au-dessus du ha( _'tglacons, dtag6re sup&'ior
de porte el les 2 ('tagg'res plus has de porte.
2 dmg6res plus has de porte du (ongdlatem:
l;:tagbre s_perior de porte.
Etag{r_ au-d{ssus du ha( _'tgla<ons et 4 ('tag{w_s de port_.
(',_ mod_'le n'est pas dassd pour {_tu notmion &ux dtoil_s.
51
Page 52

Lestiroirset conteneursa legume.
Les caract6risfiques ne sent pas toutes disponibles sur tous les mod#les.
Conteneurs g_fruits et legumes
Si une quantit_ d'eau excessi_ e s'accumule clans
le fbnd des tiroi_:%essuyez-les.
Sur certains modeles,le tiroir inf_trieur est muni
d'un couvercle q ui glisse vers l'a'ri_re loI3q ue le
firoh" est om_rt. Ceci permet un plein acc_s au
tiroi_: Iz)i_(tue le firoir est fermi, le comercle
glisse vers l'a\ant pour retourner fi sa position
initiale.
Conteneurs avec humidite variable
HUMtDITYCON YROL
Faites glisser la commande fi fired vets le r_glage
52_ (haut) pour tournir un (teg_'_ d'humidit_
_lev_ recommand_ pour la plupart des l_gumes.
Conteneur gl viande transformable
__'_°o.
_"/_,;99._-_ ]..e¢onteneur _'i,iande ,ransfl)rmable poss_de
kk J _ // a ' '1' ('') ' ''_'I' t (] ' _'j" _'( )j(] eI, _)J'(), e ,]_,i,, le (] , ,
;:::]l']t[;ilI'tl;;: e`lt I'1()II_"_ "_,'tte{lI" (/'eIltI'e," (',tIl_ 'e
Le reglage de temperaturevariable contr61e la
circulation d'air en pro',enance du r_gulateur
Climate Keeper. '_'
R6glez la commande fi timd vers le r_glage
(bas) pour fi)urnir un (teg_'_ d'humktit_ plus bas
recommand_ pour la plupart des fhfits.
R_glez la temperature fi la position _ (fl'oid
maximum) pour conser\er des viandes fi'aiches.
R6glez la temperature fi la position _3 (fi'oid)
pour mmener le contenant fi une tempemtm'e
normale de refl'igerafion et l'utiliser comme
espace suppl_mentaire i)our les legumes. Cela
coupe l'entr6e d'air fi'oid. Vous pomez choisir
une temp_mtm'e interm&tiaire entre ces deux
extrbmes.
Retraitdesconteneurs.
Los caract6r&fiquos no sont pas routes d&poniblos sur tous los modblos.
Enlevement des contenants
Vous pomez timilement enlever les bac fi l_gumes
sup_riem's en les fiI',mt (troit et en les soulevant au
dessus de leur position d'arrOt
Si la porte \2)tlS elnp6che d'enle_er les tiroiI_,
essayez d'abord d'enlever les bacs fi porte. Si la
porto n'olti'e pas assez d'espace libre, vous devez
rouler le r6fi'ig_ramur vei_ l'a\antjusqu'fi ce que
la porte S'Otlvre SilII]salrllrlent potli" \otis
permettre d'enle_er les firoirs. Partois, pour tidre
sortir le r6fl'ig_iateui; vous de_ez le tifire aller vers
la gauche ouvers la droim en le roulant.
Pour enleverle bac a legumesinferieur:
O Tirez le titbit en position d'arr_t.
O Faites totlrner les quatre verrotls ell position
de d_verrouillage.
0 Faites sortir le tiroir en soulevant son avant et
en tira/lt xers XOIIS,
Pourreplacer le baca legumesiM6rieur :
O _,;SIlI'ez-\ otis qIle les (ttlatre '_errotls soient en
position de d_errouillage.
O Placez les c6t_s du titbit dans les soutiens de
th'oil, en Veils }tSSili'}tntque les "_errotlS soient
sur les fentes du titbit
O Verrouillez les quatre verrous en les tournant
en position de xerrouillage.
l
52
Page 53

Machine a gla ons automatique.
II faut pr_voir entre 12 et 24 heures avant qu'un r_frig_rateur nouvellement install_ commence _ produire des glagons.
Interrupteur
d'alimentation
Machine _ gla_ons
Voyant t_rnoin vert
]]roiraglacons
Retirez I'#tagbre sup#rieure du
cong#lateur pour acc#der _ la
machine _ glacons. Assurez-vous
de toujours remplacer r#tagbre.
Vouspouvez utiliser I'fitag&e pour
le stockage.
i,a machine 5 glaqons produira environ
7 glaqons par cycle-soit environ
100M 30 glaqons tomes les 24 hem'es-selon
la temp&'amre du cong_latem; la temp&'amre
ambiante, la fl'&luence d'ouvertm'e des portes
et d'autres conditions d'ufilisafion.
Pour avo# acces a la machine a glagons : Faire
sortir l'_tag_re au-dessus du tiroir ;'1glace en la
firant tout droit. S'assm'er totljom_ de remettre
l'Otagbre en place.
Si vous Inettez votre r_liigtq'atem" en marche
awmt que la machine ;'1glaoms ne soit
alimelmae en eau, inettez l'interrupteur
d'alimentafion ;'1la position 0.
I,oi_que la conduite d'eau est raccordt)e
au i'0fl_ig0rateui; inettez l'ii_terrupteur
d'alimentafion 5 la position L
VOIIS entendrez t111 botli'donneli/ent chaqtle
lois que la machine 5 glaqons se remplit d'eau.
i,a machine 5 glaqons se remplit d'eau
lo_squ'elle atteint le point de -10 °C.
I1tiltlt pr_voir entre 12 et 24 heures a\_lnt
qu'm_ r_qi_igt)ratem" nou\'ellement install_
commence 5 produire des glaoms.
Jemz les premie_ lots de glaqons afin
d'_liminer les impm'et& provenant de la
conduite d'eau.
Si le bac ;'1glaqons est pleinjusqu'au ni\'eau du
bras rg_gulatem; la machine ;'1gla<ons s'arr&t de
produire des glaqons, ll est nomml que
plusiem_ gla<ons soient coll_s entre eux.
i,m_que wins n'utilisez pas souvent de glaqons,
les vieux glaqons perdent lem" transparence,
prem_ent tm goflt d_sagr&lble, et dimimmnt
de taille.
Si des glaqons se coincent darts la machine 5
glaoms, la lumi_re verte se inet _'1clignoter.
Pour corfiger cette situation, mettez
l'interrupteur ;'1la position 0 et enlevez les
glaoms. Remettez l'interruptem" 5 la position I
pore" remettre en marche la machine 5 glacons.
Apr&s l'avoir remise en marche, w_us dew'ez
attendre environ 45 minutes awmt que la
machine ;'1gla(,ons se remette ;'1fimctiom_e_:
REMARQUE: Danslosmaisons oOla pressionde l'eau
estp/us faible que /a norma/e,vousentendrez/a
machine_g/&on se remettre en marche_ plusieurs
reprisespour fabriquer un lot de g/a_ons.
AVERTISSEMENT:
Branchez uniquement _ une a/imentation d'eau
potable. Un technicien de service qualififi doit
installer la machine a glagons.
Tiroira glacons
kSStli'ez-\ otis qtle ilen lie gelle le i//OtlX, elllent
du bras r_gulatem:
Tiroir glgla_ons
Pour obtenir de la glace, tirez le tiroir xe_
l'a; Int.
Pour enlever le tiroir, firez-le tout droit et
soulexez-le au del5 de sa position d'arr#t.
53
Page 54

Ledistributeurd'eau et degla ons. (surcertainsmodOles)
Pour utiliser le distributeur
EtagGredetr0p-plein
S_lectionnez CUBED ICE I_) (glaoms),
CRUSHEDICE I_] (glace pilg_e) ou
WATER _j (eau).
Appuyez d()ucement le verre contre le hauL de
la plage/du r_ceptacle de distribution.
i,'_tao_)re_ de trop-plein n' est pas mtmie d' tm
systbme de drainage. Pore" r&luire les Laches
d'eau, vous devez nettoyer rg_guli_rement
l'_tag_re et sa grille.
S'il n'y a pas d'eau distribube lorsquele rdfnodrateur
est lhitlalement instal/b, i/y a peut-gtre de fak clansia
conduite fl'eau. Appwez sur la piage/ie rbceptaclede
distribution pendant deuxminutes au mimYnumpour
expuiser fair de ia conduite d'eau et rernpiir le
systbme d'eau.Afin d'biimlher iesdventue/ies
lYnpuretbsprovenant de la conduite d'eau,jetez
les six premiers verres d'eau.
ATTENTION: Ne mettezjamais ies dolgts ou
d'autres objets clansl'ouverture du distributeur
Verrouillagedudistributeur
(sur certains modbles)
Appuyez sur la touche
LOCKCONTROL (rGglage
dm errouillage) pendant
i i IiiiI
LOCKCONTROL
HOLD3 SECS
3 secondes pore" ",errouiller
le (list_ibutem" et le
pmmeau de r&,lage._, Pore"
(l&errouille_; appu)ez sin"
la touche et maintenez-la
enfoncee pendant encoi'e
5 sec(mdes.
Eclairage du distributeur
(sur certains modbles)
Cette touche allume et
, , _, _teint la I_clairage de nuit
:0:
LIGHT sur la plage/le r&ceptacle
allumez 6galement la
l'_clairage en appuyant
de distribution. Si cette
alnpoule brfile, vous devez
la remplacer par lille
ampoule de 6 watts,
12V au plus.
GlaGonsrapido (sur certains modOles)
Si xous axez besoin de
gla_,ons rapidement,
pom'aPPu}eZacc_l&i.ersin" cetteleurtouche
QUICKICE production. Vous
augmenterez ainsi la
production de glaqons
pendant 48 hem'es ou
jtlSqtl'_'l ce qtle rolls appuyez
_'1 no//\'e_ltl S/lI" cette to/iche.
Alarme de porte (surcerta_TsmodOles)
Pore" mettre en marche le
• signal sonore, appuyez sur
l'indicatem" lmnineux. Ce
signal smme si l'tme des
DOORAU_RM poltes reste omerte plus
de 3 minutes. I_ lumi_re
s'_teint et le signal sonore
s'an'_te quand xous tbmlez
la porte.
54
Renseignements importants concemant votre distributeur
_: N'ajoutez pas darts le bac a gla<ons des
glaoms non filblJqtles par w)tre machine _'l
glaqons. ]Is fisquent d'&tre difliciles fipiler
ou fi distfibuer.
_: t_vitez de trop remplir les verres de glagons
et d'utiliser des verres (_troits ou tr&s hauls.
I,e conduit peut se bloquer et le volet peut
geler et coincer. S'il y a des glacons qui
bloquent le conduit, edtes-les passer au
moven d'tme cuill&re en bois.
N Ne placez pas de boissons ou d'aliments
darts le bac _'_glaqons pour les rali'aichi_: I,es
boites, bouteilles et paquets alimentaires
peuvent coincer la machine fi glaqons ou
la \is sans fin.
i_)::J_din (lue la _,*lace distribute ne puisse
illanqtlei" le xerre, placer le xerre _'_proMmit_
mais sans toucher l'ouxertm'e du distributem:
_: M&me si vous avez s_lecfionn_ CUBEDICE
(gla<ons), il est possible que de la glace piler
tombe darts votre verre. Cela se produit de
tenlps fi autre loi_que plusieui_ glaqons sont
achelnin_s vei_ le broveui:
::_i::Api'_)s distribution de la glace pil_e, de l'eau
peut s'_couler du conduit.
::_i::Pai_ois, till peu de givre se timne sur le volet
du conduit a glace. Ce ph_nom&ne est
nomml et se produit ell g_n&'al apI'_)s des
distributions i'_p_t_es de glace pil_e, i,e givre
w_ _velmmllelnent _wq)oi'ei:
ATTENTION : Vousno devezpas consommer trop
froids certains produits comme ies g/aces _ i'eau.
Page 55

Timir glglace
Retrait: Mettez l'interrupteur (It] distributeur
de glace en position 0 (arr_t). Tirez le firoir
tout droit, puis soulevez-le pour d_passer la
position d'arrOt.
Remise en place: Pour remettre le droir en
place, prenez soin de le pousser fem/ement
en position. S'il n'entre pasjtlsqtl'atl fond,
enleveMe et fifites tourner le m_canisme d'tm
quart de tom: Poussez 5 nouveau le tiroir
jtlsqtl'atl fond.
Entretienet nettoyagedurefrigerateur.
Nettoyage de I'exterieur
ZolTe de ramasse-gou#es
du r#pardteu_
La zone de trop-plein du distributeursous la grille
de;rait _tre soigneusement essuy_e. Vous
pouxez _liminer les d_p6ts calcaires laiss_s par
les taches d'eau en ajoutant du vinaigre non
dilu_ au contenem: i_fissez tremperjusqu'5
ce que les d_pgts disparaissent ou soient
suflisamment ramollis pore" _tre _limin0s
par rinqage.
te receptacle de distribution (sur los modOles
distributour). A\ant le netto);_ge, OU;Tez la porte
du cong_latem" fi une position intem/_diaire
pore" emp_cher la distribution des glaqons ou
de l'eau din'ant le nettoyage, Nettovez le
rOceptacle au moven d'm_e solution tibde d'eau
et de bicaH)onate de soud_nviron 15 ml de
bicarbonam de soude par litre d'eau. Rincez
bien et esstlvez.
Nettoyage de I'interieur
Pour eviter les mauvaises odeurs,Mssez une
boite ouverte de bicarbonate de soude darts les
compartiments r(qYig&'ateur et cong_latem:
Oebranchez le refrig_rateur avant de le nettoyer.
S'il est trop diflicile de le fifire, essorez bien
votre chiflim Oil votre 0ponge potlI" enlever
l'exc_s d'eatl loiNqtle \'otis nettovez _ltl[OtlI" des
interruptem_, des lampes ou des commandes.
/Jtilisez tree solution d'eau ti&de et de
bicarbonate de soude-environ 15 ml de
bicarbonate de soude par litre d'eau-afin
de nettover tout en neutralisant les o(leui_.
Rincez et essuvez bien.
Lespoign_es deporte et leur garniture. Nettoye>
les au moven d'un linge humect_ d'eau
savonneuse. SOchez avec un chiffon doux.
Gardez I'exterieur du refrig_rateur propre. Essuyez-
le avec un linge propre 10g&rement humect_ de
cite pore" appareils _lectrom_nage_ ou d'tm
d_te_gent liquide doux pore" la wfisselle. S_chez
et polissez avec tm chiffon doux et propre.
N'essuyezpasle rbfn)brateur avecun chiffon 0 vaisselle
sa/eou uneserviette humide : i/s pourraient /aisserun
rbsiduqui endommagerait/a peinture.N'uti/isez pas de
tampons_ rOcurer,deproduits nettoyants enpoudre,
dejave//isants ou depro&its nettoyantscontenant un
jave//isant, carces produitspeuventrayer /a peinture
et /arendremol?_srOsistante.
L_tilisationde so&tionsnetteyantesautres
quecellesquenousrecommandons,plus
particuliOrementcellescentenantdesdistillats
depetrele peutfissurereuendemmagerrinterieur
durefrigerateur.
Ewtezdenettoyerlesbtagbresenverreencorefroides
dansdel'eauchaudecarellesrisquentdesecasser
causedel'bcartexcessifdetempbrature.Man/pulezies
btagbresenverreavecprudence.Sivouscognezleverre
trempb,ii pourraitsebriser
Nelavezaucunepibcedeplastiquedurbfwbrateurau
iave-vaisselle.
Leplateaurefroidissement/d@elpeut aller au
lave-va_sselle.
55
Page 56

Entretienet nettoyagedurefrigerateur.
Derriere le refrigerateur
Prenez un soin particulier hn_que vous (doignez
le r_fi_ig_rateur du ram: Tousles _'pes de
rev_teInents de sol peuvent _tre endommag_s,
particuli_rement ceux qui sont rembotm'g_s ou
dont la stuti_ce est gatdi'6e.
Tirez le r6fiig_ramur en ligne droite et, hn_que
vous le remettez en place, pousseMe ve_ le ram"
en ligne dr(tim. I,es d_placements lat_raux du
r_flJg0ratetn" pourraient endommager le
rev_tement de sol ou le r_fiig_ratem:
Depart en vacances
I,(n_que vous vous absentez pendant tree pg_fio(le
prolong_e, videz et dc)branchez le r0fl_ig0ratetu:
Nettovez l'int&fieur avec tree solution d'eau et
de bicarbonate de soude, 5 raison 15 ml de
bicarbonate par litre d'eau. I,aissez les
portes ou\'ertes.
Mettez l'interreptem" d'alimentntion de la
machine 5 glaqons 5 la position 0 et tem_ez
l'alimentntion d'eau au r6ffig_ratem:
Lorsquevousremettezlerbfngfirateurenp/aceenle
poussant,veiilez_ nepasle fake muiersurle cordon
d'alimentationousurla conduited'eaude lamachine
gla_ons.
Si la temp_ratm'e risque de descendre sous le
point de cong_lation, demandez 5 tm r_paratem"
de vidanger la conduite d'eau afin d'6viter les
d_gfits s_fieux causes par les inondations.
Demenagement
]mmobilisez tous les _l_ments amovibles, tels que
les _tngSres et les bacs, 5 l'aide de ruban adh_sif
pour _viter de les endommage_:
Si vous ufilisez tm chariot 5 main pore" d_placer
le r_flig_ratem; ne laissezjamais le de\m_t ou le
deni_ere du r_fiig_ramur reposer contre le
chariot. Cela pomTait endommager le
r_fl'ig_ratetu: Ne transportez le r6f_ig_rateur
clue par les cgt_s.
Assurez-vousclueler_fn)_rateur reste deboutpendantson
dbplacement
56
Page 57

Remplacementdesampoules.
Lorsque vous r@lez les commandes sur 0 (arr_t), I'alimentation _lectrique de I'ampoule n'est pas couple.
Votrepare-lumifire rassemblera
une des suivantes
ets
OU
P0che
Compartiment refrigerateur--lampe superieure
O D_branchez le r6flig&'atem:
O i,es ampoules se trouvent en haut du
compartiment, 5 l'intg_ieur du pare-
lumiOre. Sur certains modules, vous devez
enlever une ,,'is qui se trouve _'ll'a\mlt de
l'(_cran. Sur autres mod01es, enlever la vis
darts la poche qui se trouve 5 l'arfi&re du
pare-lumi0re.
0 Pour enlexer l'_cran 5 hmfiOre, sur certains
modules, appu) ez sin" les taquets situ_s de
cgt(: de l'_cran et fidtes sortir en fidsant
glisser vers l'a\mm Sin" d'autres mod01es
tidtes simplement glisser le pare-lmni(_re
vers l'avant et fidtes sortie:
O Apr_s avoir remplac6 l'ampoule par tree
O Rebranchez le r(_flig(_ratem:
Compartiment refrigerateur--lampe &f&ieum
Cette /umibre se trouve au dessus du tiroir d_n haut.
O D_branchez le r_fl_g_ratem:
Enlevez le bouton de r&,lage du tiroir 5
xian(le transflmnable en le tirant dr(fit.
O Apr&s await remplac_! l'ampoule par une
ampoule d'appareil _lectro-m_nager de
re&me puissance ou de puissance
inf_rieure, remettez le pare-lumi&re et les
\is (sin" certains mod&les). Pore" remettre le
pare-hmfi0re, assm'ez-vous que les taquets
qui se trouvent 5 l'arfi0re du pare-hmfi0re
aillent darts les trous qui se trouvent 5
l'arri0re du boitie_:
ampoule d'appareil _lectro-m&mger
de m_me puissance ou de puissance
infl_rieure, remettez en place l'_cran
d'g_clairage et le bouton.
O Soulexez l'(_cran d'g_clairage et enlexez-le 0 Rebranchez le rgffrigg_ratem'.
ell til';I lit.
Compartiment congelateur
O D_branchez le r_ffig_ratem:
O Enlexez l'(_tag_i'e qui se trouxejuste au
dessus de l'_cran d'&lairage (xous pouxez
enlever cette _tag&re plus ti_dlement apr&s
l'avoir vid_e). Sin" certains mod&les, wins
devez enlever tree vis qtfi se trouve en haut
de l'_cran d'_clairage.
Pore" enlever l'_cran d'(_clairage, appuyez
sin" les cgt6s et enlevez en soule\mm
O Remplacez l'ampoule par tree ampoule
d'appareil _lectro-m_nager de in&me
puissance ou de puissance infiXrieure,
puis remettre en place l'6cran
d'_clairage. Pore" remettre en place
l'6cran d'_clairage, assurez-vous que les
taquets du haut soient solidement fixg_s
en place. Remettez la vis (sin" certains
mod(_les).
0 Remontez l'_tagOre et rebranchez
le r_fl'ig(_ra teur.
Distributeur
O D6branchez le r6fdg&'atem:
I,'ampoule se trouve sur le distributeur
sous le pmmeau de r6glage.
Enlevez l'ampoule en la fifisant torn'net
darts le sens anti-horaire.
O Remplacez l'ampoule par tree ampoule
de re&me taille et de re&me puissance.
0 ]/ebranchez le r_frig(_rateur.
57
Page 58

Kits de moulureset de panneauxdecoratifs.
Pour les modOles encastr_s
Veuillez /ire toutes les directives attentivement.
Avantdecommencer
Certains modOles sont munis de garnitures qui vous permettent de monter des panneaux de porte.
Panneaux de moins de 6 mm d_paisseur
I,orsque vous installez des panneaux de bois mm_t moins de 6 mm d'_paissem; vous aurez besoin d'un panneau
de remplissage entre la porte et le panneau de bois, tel que du carton de 3 ram. Si wins installez un panneau
(l_coratif pr&coup_, un panneau de remplissage pr_4"oup_ est tourni darts le kit. I,'_paisseur totale du panneau
(l(_corafif ou de bois et du panneau de remplissage (hilt &tre de 6 ram.
Panneauxde 6 mmd'@aisseuroumoins
6 rrlrrl max
Panneau de 19mm ou sureleve
Vous pouvez ufiliser un panneau sm'(dev(_ viss_ ou coll(_ sur un panneau de base de 6 mm d'(_paissem; ou un
panneau fl'ais_ de 19 ram. I,a pattie sur_lev_e du panneau dolt _tre tifl)riqu_e de ti_qon 5 oIti_ir un d_gagement
pour les doigts d'au moins 5,1 cm du c6t_ de la poign_e.
i,es i)mmeaux qui ont plus de 6 mm d'g_i)aissetu;jusqu'5 19 mm maxi, ng_cessimnt que les 8 mm externes du
p&im_tre du panneau ne soient pas plus _pais que 6 ram.
Limitos do poids pour los pannoaux sur mosuro •
R#frig&ateur : 17kgmax.
Cong#lateur : 13kg max.
Panneauxdeplusde 6mmd'@aisseur
Panneaudebase
de6mm
r
D6gagement
de5,1cmdu
6 film leax
19mm
cot6dela
poign6e
Panneau
d_coratif
I
Portedu
rdrig6rateur
58
Page 59
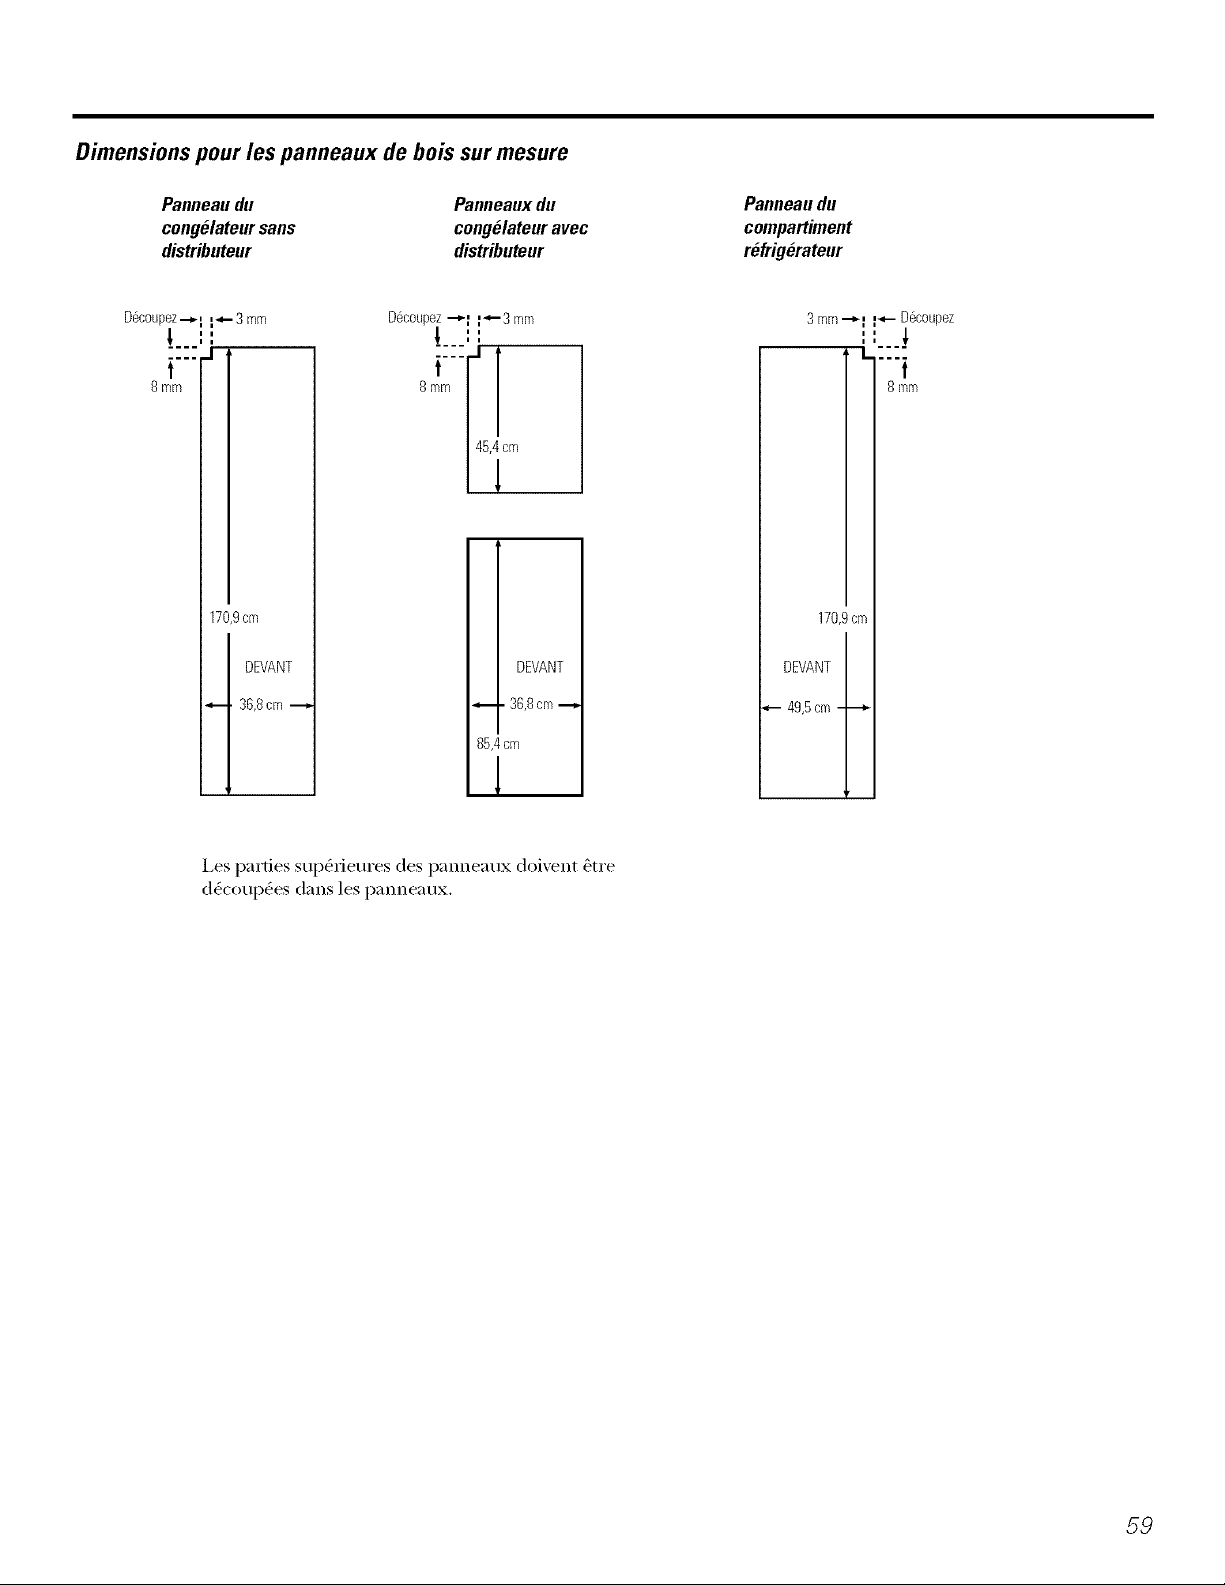
Dimensions pour les panneaux de bois sur mesure
Panneaudu Panneauxdu
cong#lateursans congelateuravec
distributeur distributeur
D6coupez--_I W-3 mm
'1, ''
i i
t
8mm
170,9cm
DEVANT
36,8cm
.36,8cm-
85,4cm
1
DEVANT
Panneaudu
compartiment
r_frigerateur
3mm"-_l l_- D6coupez
170,9cm
DEVANT
49,5cm - ---_
,, _.
i i
L. ....
8mm
t
I,es parties sui)_ieures des pam]eaux doi',ent &tre
d(_cotlp(_es dans les p_lnne_ltlx.
59
Page 60

Installationdespanneaux deporte.
Veuillez life toutes les directives attentivement.
0 Inserez les panneaux du congelateur et du refrigerateur.
Poussez d_licatement sur le panneau sup_fiem"
du congg_lateurjusqu'_'l ce qu'il soit insg_rb darts la
rainm'e derri&re la poigng_e de porte. Poussez le
pmmeau de remplissage (ng_cessaire avec certains
panneaux de porte) derri&re le panneau d_corafiE
Fakes la re&me chose avec le panneau du
r_q'rig_ratem:
@ Inserezle panneau inferieur du congelateur (surles modelesa distributeur).
Poussez d_licatement sin" le panneaujusqu'_'l ce
qu'il soit ins&'_ darts la rainm'e derriere la poign_e
de porte. Poussez le panneau de remplissage
(nOcessaire avec certains panneaux de porte)
derriere le pmmeau d_corafif.
@ Attachez la moulure superieure de la porte du congelateur et du refrigerateur.
I,a moulm'e sup&iem'e se trouve _'l l'intOriem" moulm'e. Serrez _'lla main seulement. _ssm'ez-vous
du compartiment du r&tiJg_ratem: que le haut de chaque panneau est bien alignO sous
_k l'aide d'une cl(_ fi tin,ion T-20, fixez les inoulures
supOriem'es en ufilisant deux vis en haut de chaque
Si xotre mod&le est dot_ d'tm distributem, cette
_tape ne s'applique qu'au panneau du r_fl_ig_ratem"
et au panneau sup&_iem _du cong_latetm
le rebord de sa moulm'e supg_riem'e.
Visde lamouluresup@rieure
Mouiure
lat6rale
D6coupure
MouJure
lat6rale
60
Page 61

O Installez la moulure laterale.
Ces pi_('es sont log_es _'ll'intOrieur de la poign_e
de porte du compartiment r_fFig_ratem;
N'enlevez pas /a pe/hcu/e protectrice qu/ se trouve
l'ext_rieur dela moulure lat_rale avant d'avok install_ la
moulure /at_rale.
]nsOrez la pattie int>t_ieure de la moulure latOrale
sous la moulure inf_i_ieure COlnme illustr_.
Maintenez la moulure lat&'ale contre la pattie awmt
des panneaux d_coratits, puis installez la moulure
lat&'ale sous la moulure sup_rJeure. _ssurez-\'ous que
la moulure lat&'ale est correctement install_e et que
vous _tes satistifit de l'aspect g_n&'al des pi_ces.
61
Page 62

Demontageet remontagedesportes.
Au cours de I'installafion ou du d#placement du r#frig#rateur, il peut Otre n#cessaire de d#monter les portes pour que
I'appareil puisse passer au travers d'une embrasure de porte.
Demontage des portes
Assurez-vous que les portes sont fermees et que le refrigerateur
est debranche.
D_branchez la conduite d'arrivee d'eau et le faisceau de cgble.
0
A proximit_ de la charni?_re inf6rieure (ltl c6t6 cong_latem;
repoussez les collie_ a chaque extr&nit_ du raccord puis s_parez
le [tl_31u (hi raccord. D(qbranchez (qgalement le faisceau de cfible.
Tirez le tmml et le taisceau de cfible 5 travels le rail infiq_iem:
Retirez les couvre-chamiOros et les chamieros.
Pour acc&ler a ux charni?_res, il est n_cessaire de redrer les c(mvre-
charni_res. Retirez le couvre-charniOre en le tenant par les cGtOs
ve_ sa pattie arriOre. Poussez sur le couvre-charniOre et soulevez-le
a l'arri?_re, puis a l'avant.
REMARQUE: N'UTILISEZPASde tournevlspour enleverle couvre-charnibre.
FAITESATTENTIONdenepas bnserle taquetde blocagearribre. Retirez/es
charnl_res_ /'aide de/'out//Torx 5211
Demontez les porte&
Avec pr6caufion, fidtes tourner la porte de 90_ Tout en guidant
le tt/}_ltl d'arfiv_e d'eau et le tilisceau de cfible qui ont _t_
d_bmnch_s, levez la porte verticalement.
REMARQUE: Si vousno levezpas laporte vertl?alement,vouspouvez
endommager/achamiOre/))f6rieure.P/acez/aporte sur unesurface
deprotection.
REMARQUE: Faitesattention dene paspincer/e tuyaud'arrivbe d'eau et /e
fa/sceaude cgb/ese trouvantauhas de/a porte.
REMARQUE: E-vitezque /eraccord de branchementne touche/e so/car un
contact bruta/risquede/'endommager Vok "Remp/acementdesportes".
Remontage des portes
Placez les portes sur les charni_res inf_rieures.
Avecla porte tidsant un angle de 9()_ abaissez-la directement sur
la charni_re inf_rieure. Femmz-la avec prOcaufion.
REMARQUE: Le fa/t deno pasabaisser /aporte directement sur /achamibre
infdrieurepeut /'endommager
REMARQUE: E-vitezque /eraccord de branchementne touche/e so/car un
contact bruta/risquede/'endommager
c_bles61ectriques
\
charni6re
Couverclede
Porte
Charniere
62
Remontez les charni#res sup#rieures ainsi que les couvre-charni#res.
Remontez les charni&res sup&_ieures a l'aide d'un outil Torx T-20.
Remontez les couvre-charniOres. Si la porte n'est pas hcnizontale,
ajustez la charni?_re inl_rieure droite a l'aide d'une cl_ plate de
7/1 6 po.
Rebranchez le tuyau d'arriv_e d'eau et le faisceau de c_ble.
]nsOrez le tmau darts le raccord en _ous assurant qu'il est
Stll_iSallli//ent eil][()iic(_ dans le i'accoi'd de telle J[;l¢OIl qtle
vous ne puissiez plus voir le repute sur le tm_m. ]/ebranchez
le tidsceau de cfible.
Ouvrez le mbinet d'eau et rebranchez le refrigerateur.
Raccordde
branchement
Page 63

Instructions
Refrig6rateur
d'installation
AVANT DE COMMENCER
Veuinez lire toutes les d£rectives attentivement.
• IMPORTANT - C,,nse,,e ,'es
instructions pour l'inspecteur local.
• IMPORTANT - Re pec e
oi'dollllallces et les codes locaux.
• Avis a 1 lnstallateur - _ssui-e>xous de laisser ces
iliStlllCtiOliS atl COlISOlIllIl[Ite/lI:
• Avis au consommateur - Conserxezces
instructions pour r_tbrence flmu-e.
• Niveau de comp6tence - I,'installafion de cet appa_eil
n_cessite des comp_tences m_caniques de base.
• Temps d'h_stallafion - Installation du r_ti_ig_ratem"
15 minutes
• I,'installatem" est responsable d'installer correctement
ce r_frig_ratem:
• Toute panne du produit due fi tree mau\zfise
installation n'est pas couverte par la garanfie.
Modeles 21, 23, 25, 27 et 29
DEGAGEMENTS
Pr&'oyez les d_gagements suivants pore" fi_ciliter
l'installation, la bonne ciivulation d'air et les
raccordements de plomberie et d'_lectricit_ :
21 et 23 pi 25, 27 et 29 pi
• C6t6s 4mm 4mm
• Dessus 25 mm 25 mm
• Ard_re 13 mm 25 mm
DIMENSIONS
29 27 25 23 21
A* 1733mm 1733mm 1733mm 1733mm 1733mm
B 908inln 908mm 908inln 908mm 908inln
C** 912Inln 879mm 879 Inln 738mm 738Inln
D 1261mm 12711nln 1271mm 1156mm 1156mm
ALIMENTATION D'EAU DE
LA MACHINE A GLA(;ONS
(SUR CERTAINS MODELES)
Si votre r_qi_ig_ratem" poss,)de une machine fi gla_:ons, il
tiltlt le brancher fi tlile conduite d'eatl fl'oide. Vous pouvez
acheter un kit d'alimentation d'eau homologu_ chez votre
distfibumur local.
Pression maMmum d'alimentation d eau-8,2 baL<
Pression minim mn d'alimentation d'eau-2,8 bai_.
I_ machine fi glaoms doit &tre instalOe par till technicien
de serxice qualifi_.
, c N
EMPLACEMENT DU RCFRIGI_RATEUR
• N'installezjamais wme rOfl_ig&'ateur darts un
emplacement ot'l la temp&'ature ambiante sera
infiXrieure fi 16 °C. 11ne se mettra pas en marche
suflisamment souvent pour maintenir des temp&'atures
convenables.
• N'installezjamais w)tre rbti_ig&'ateur darts tm
emplacement off la temp_ratm'e ambiante sera
sup&_ieure fi 37 °C. 11ne flmctionnera pas bien.
• ]nstallez w)tre r_frig_rateur sur un plancher
suflisamment solide pour le porter loI_qu'il est plein.
E 1273mm 1255mm 1247mm 1232mm 1214mm
F 1051mm 1093mm 1099mm 989mm 986mm
G 1386mm 1381mm 1381mm 1361mm 1355mm
H ll4Omm llSOmm l149mm 1023mm 994mm
* I.a hauteur n'inclut pas la charniiwe.
** I_a protondem: in(lut la poign('e.
I----- B-----t
J Ii II II D
ili i II
12 ll_lJ
63
Page 64

Instructions d'installation
ROULETTES
Les roulettes jouent trois r61es :
• Elles peuvent &tre rg_glg_espour que les portes se
retbm_ent autonmtiquen_ent lorsqu'elles sont _'lmoiti_
otl\'ertes. [R_glez le bord inl_Yietlr a\:lnt dtl
r_qi-ig&'atem" 5 15 mm du sol.]
• Elles peuvent &tre r_gl_es de mani&re fi pem_ettre fi
l'appareil de reposer solidement sin" le sol et
l'emp&cher ainsi d'oscille_:
• Elles vous permettent d'_loigner le r_fl-ig_ratem" du
ram" pore" le nettoyage.
Vous devez tifire les r_glages finaux d'horizontalit_ apr&s
l'installafion du r_fl'ig_ratem:
Pour r6gler les roulettes sttrles mod61es de 25, 27 et 29 pi :
• Tom'nez les vis de
r_glage des _x_ulettes
dm_s le sens horaire
pour faJre monter le
r(:fl_ig&'atem; dm_s le
sens m_ti-horaJre pour
le faJre descendre.
Utilisez tree cl(_ ou tree
douille de 3/8 po ou
une cl_ anglaise.
\
Visder@age
ALIGNEMENT DES PORTES
Apr_s avoir r6g16 les roulettes de nivellement, assurez-vous
que la porte du compartiment r_tiig&'atem" soit de 1,6 mm
plus (_lev(_que la porte de compartiment cong_latem-
Pour aligner les portes, rbglez la porte du compartiment
r_tiiggwatem:
0 _t l'aide cFtme cl(_ fi douille de 7/16 po, tom'nez la vis
de rg_glage de la porte vers la droite pore" relever la
porte, ou ve_s la gauche pore" l'abaisse_: (Une douille
de nylon, encastr&e dans les filets de la broche,
emp&chera cehfi-ci de torn'net si l'on ne se sert
pas d'tme cl(_.)
@ Api'_s a\'oir totlYne la cle tlne Oil deux t0is, OU\TeZ et
temmz la porte du compartiment rg_fl'igg_ratem" et
v&-ifiez l'alignement des portes _'_la pattie sup&-iem'e.
Laporte ducompartiment
_, rdrig6rateur dolt 6tre lev6.
Pour r6gler les roulettes sur les mod61es de 21 et 23 pi :
0 Enlexez la grille de la base en ouwant les portes,
enlexant les xis aux deux extrg_mitg_s et la tirant.
@ Tom'nez,., les vis de J
dm_s le sens horaire
pour faJre monter le _ (_
sens'm,fi-horaire pour J _, 6t " ;J
le faJre descendxe. -_---'_/_
Utilisez une cl(_ ou une X]
douille de 3/8 po
ou tree cl(_ anglaise.
0 Ces mod&les ont aussi des roulettes arri&res rg_glables,
pore" vous permettre d'aligner le rbliig&'atem" aux
am/oires de cuisine. Utilisez une cl(_fi douille fi long
manche de 5/16 po pore" torn'net les vis pour les
roulettes artiste, dm_s le sens horaJre pour fake
monter le r6frig6rateur, dmls le sens mlti-horaJre
pour le faJre descendxe.
O Remettez en place la g_ille de base.
Visder@age
Pourenleverlagrilledela base,
ouvrezlesportes,enlevezlavis
dechaqueextremitede la grille,
puistirezsurla grille.
_1_ vezCI6adouillede7/16po]
I
64
Page 65

Instructions d'installation
DIMENSIONS ET SPI_CIFICATIONS
(pour les modeles encastres)
,° // °
°IL
Electricit6
Dessusdu
de61cm
comptoirde
63,5cm
INSTALLATION DE LA
CONDUITE D'EAU
AVANT DE COMMENCER
I,'installation d'une conduite d'eau n'est pas exigOe
par le tabricant du r_fl'ig_rateur ou de la machine
5 gla(:ons. Respectez ces recoininandations
soigneusement afin de r_duire les risques de
dommages on_reux causes par l'eau.
I,es coups de b_lier (eau qui donne des coups dans
les tuyaux) dans la tm_mterie de la maison peut
endommager les pi_ces de votre r_frig_ratem; ainsi
que des flfites ou des inondations. Appelez tm
plombier certifi_ pore" corriger les coups de b_lier
avant d'installer la conduite d'eau de w)tre
r_fl'ig_ratem'.
Pore" pr_venir toute b_filure et tout dommage 5 w)tre
r_frig_ratem; ne branchezjamais la conduite d'eau 5
une canalisation d'eau chaude.
Si vous utilisez votre r6fl'ig6ratem" avant de brancher la
conduite d'eau, }lSS/li'ez-vo/is de laisser le COillilltlt}ltetli"
de la machine 5 glaqon en position O (art&t).
N'insmllezjamais les tuvaux de la machine 5 glaqons
dans des endroits ot'l la temp_ratm'e risque de
descendre en dessous du point de cong_lation.
Si vous utilisez tm outil _lectrique (comme tree
perceuse _lectrique) pendant l'installation, assm'ez-
vous que l'isolement ou le cfiblage de cet outil
emp&che tout danger de secousse _lectfique.
Vous devez procOder h toutes vos installations
conform_ment aux exigences de votre code local
de plomberie.
Un tech_ficien de service qualifi_ dolt installer votre
machine h glaqons.
A AVERTISSEMENT!
granchez tmiquement _'_tree alimenmfion d'eau potable.
65
Page 66

Instructions d'installation
INSTALLATION DE LA CONDUITE D'EAU (SUITE)
[] BRANCHEZ LE TUYAU ._,VOTRE
RI_FRIGF:RATEUR
REMARQUES :
• Avant de brancher le tuyau 5 votre rOfl'igOratem,
assurez-vous que le cordon d'alimentation
_lectrique du r_fl'ig_rateur ne soit pas branch_
sur la prise tam'ale.
• Nous wins recommandons de poser tm filtre 5
eau si votre alimentation d'eau contient du sable
ou des particules qui peuvent boucher la grille du
robinet d'eau de votre r_fl'ig_ratem', ]nstallez-le
sur la conduite d'eau pros de votre r_fl'ig_ratem',
Sin" certains modules de r_fl'ig_ratem's, le raccord
se trouve 5 l'extr_mit_ du tm_m situ_ 5 l'ext_riem"
de couvercle d'acc_s de compartiment du
compressem', Sin" d'autres mod01es, le couvercle
d'acc_s au compartiment du compressem" dolt _tre
retir_ pour acceder au raccord du r_fl'ig_ratem" au
robinet d'alimentation d'eau.
[] BRANCHEZ LE TUYAU A VOTRE
RI_FRIGERATEUR (SUITE)
Sin" les mod&les dot_s du raccord au robinet
d'alimentation d'eau, retirez le bouchon en
plastique flexible,
©
Placez l'_crou de compression et la hague
(manchon) 5 l'extr_mit_ du tmau comme indiqu_
darts l'ilhmtration.
]ns_rez l'extr_mit_ du tm_m dans le raccord du
robinet d'eau aussi profond_ment clue possible.
Tout en tenant le tuyau, serrez le raccord.
Fixez le tuvau dans le collier fl_urni pore" qu'il soit
maintenu en position verticale. I1 est possible que
vous ayez 5 ouvrir le collier.
L'un des sch6mas ci-dessous sera similaJre au
montage du raccord de votre r6frig6rateur.
Tuyau
Fixation
dutuyau _
Fixation du
tuyau
Ecroude
compression
Ilormal
CoNet
{manchon)
Raccorddur@igerateur
]_einettez le couxercle d'acc_)s.
66
Ecrou
co[rl
normal
Collet
(manchon)
Raccord du
r_frig6rateur
Tuyau
Page 67
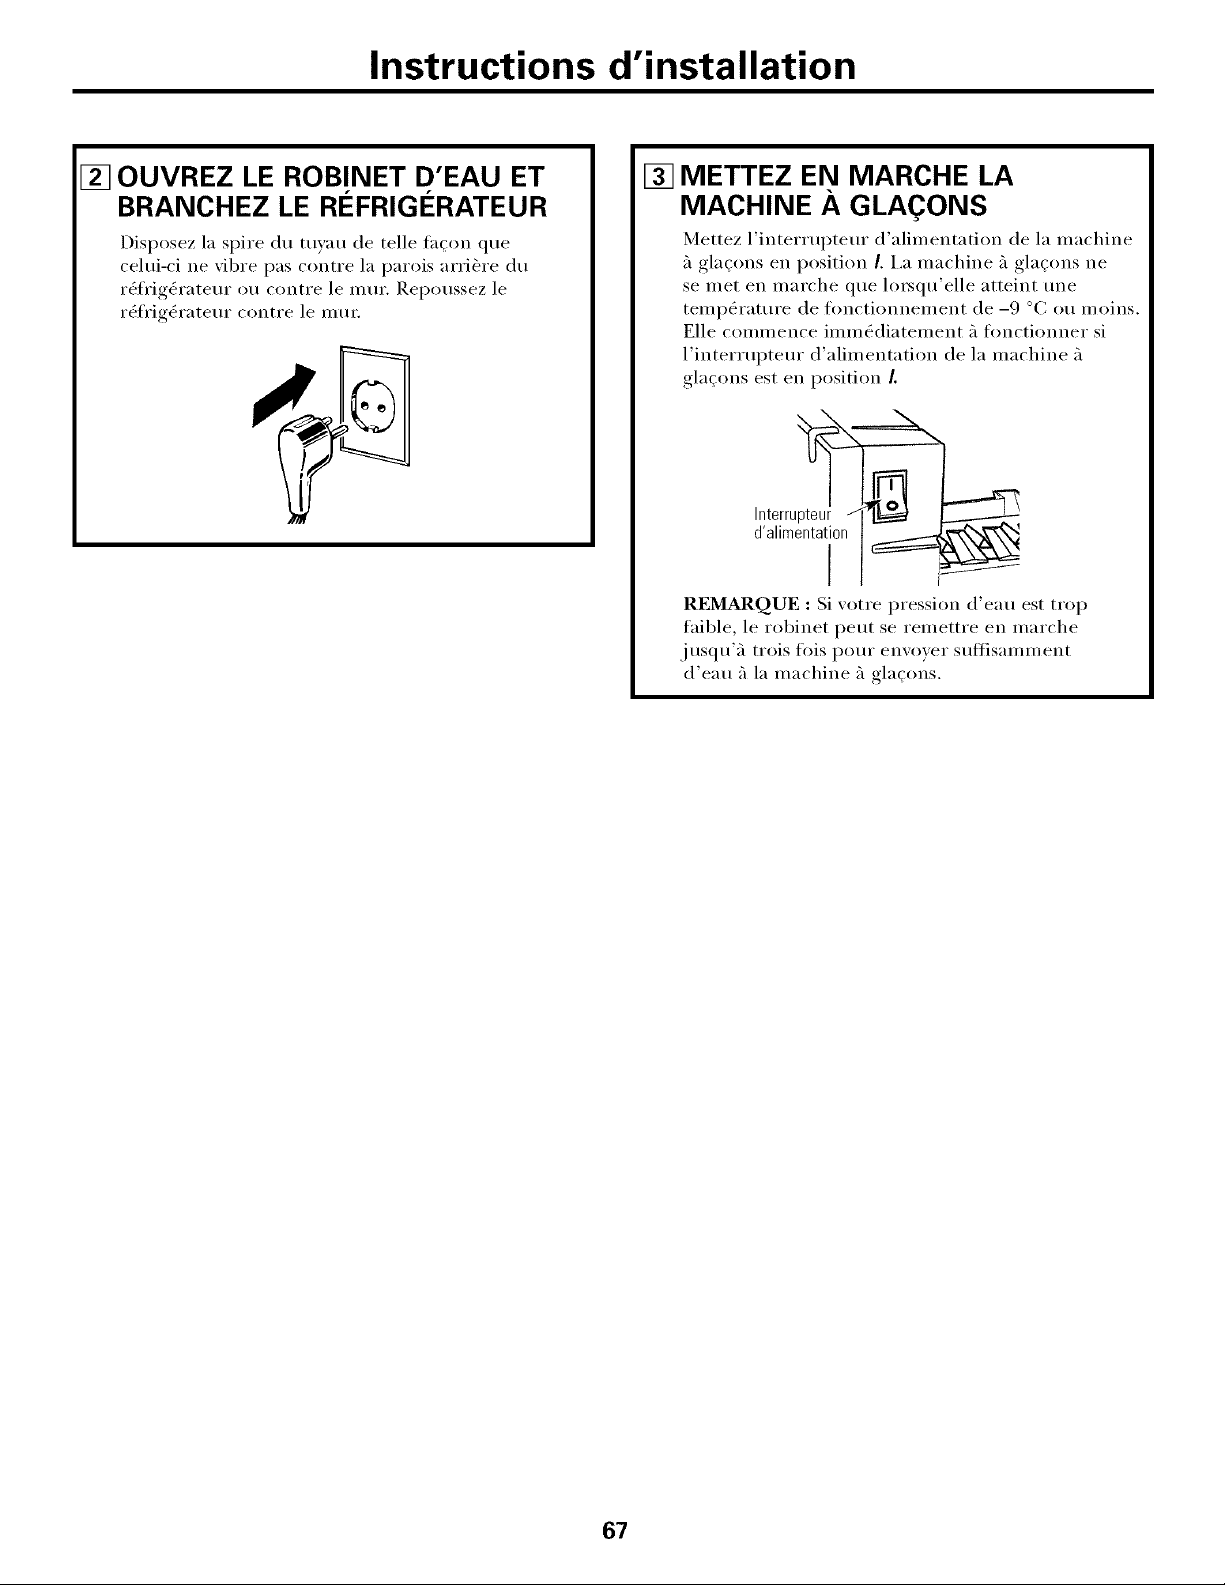
Instructions d'installation
[] OUVREZ LE ROBINET D'EAU ET
BRANCHEZ LE REFRIGI_RATEUR
Disposez la spire du tuyau de telle thqon que
celui-ci ne vii)re pas contre la patois artiste du
rg_fl'ig_rateur ou contre le ram'. ]_epoussez le
rg_fl'ig_ratem" contre le ram:
METTEZ EN MARCHE LA
[]
MACHINE A GLAqONS
Mettez l'inteHupteur d'alimentation de la machine
5 gla_:ons en position I. I,a machine 5 gla_ons ne
se met en marche que lo_qu'elle atteint une
tempg_ratm'e de timctionnement de -9 °C ou moins.
Elle commence immg_diatement 5 tonctionner si
l'inteHuptem" d'alimentation de la machine 5
glagons est en position /.
REMARQUE : Si votre pressure d'eau est trop
taible, le robinet peut se remettre en marche
.jusqu'5 trois Ibis pore" envovei" suftisaininent
d'eau 5 la machine 5 gla_ons.
67
Page 68

Bruitsnormauxde fonctionnement
Les r_fri@rateurs plus r_cents font des bruits cliff,rents de ceux
des anciens. Les r#fri@rateurs modemes pr#sentent plus de
fonctions et sont plus avanc#s sur le plan technologique.
Entendez-vous ce que j'entends ?Ces bruits sont normaux.
HUMMM...
-- OUUCH....
• I,e nouveau coml)resseur 5 rei_demei_t (_lev(_ peut
flmctionner phls longtelnl)s et phls vite que votre
ancien i'(_fl'ig&'ateur et w)us l)ouvez ei_tendre tm son
mo(lul(_ ou tm ronflement aigu pendant son
tonctionnei/lent.
• Prank)is le i'(_flJgg_i'ateur fi)ncti(mne pendant une l)<)rio(le
prohmg<qe, surtout lolsque les portes sont ouvertes
fl'&luemment. Cela signifie que la fimcfion FrostGuard"
est active I)our elnl)&her la brt_dure de cong_lation et
am_liorer la conselwafion des alin_ents.
• Vous i)ouvez eiKendre tm sifllemei_t lotsque les portes
se tem/ent. Cela vient de l'&luilibrage de i)ression darts
le r_frig_ratem:
CLICS, CLAQUEMENTS,
CRAQUEMENTS et
GRESILLEMENTS
OUIR !
• Vous pouvez ei_tendre les ventilateurs tourner
5 hautes vitesses. Cela se produit lorsque le
rg_fl'ig_rateur vient d'&tre branch(_, loi_que les portes
sont ouvertes fr&quelnlnent ou lors de l'ajout d'une
grande quantit_ d'aliments darts les {'omi)artiments
cong_lateur ou rg_fl'ig_rateur, i,es ventilateurs
l)erlnettent de inaii_tenir les bolmes teml)g_ratures.
• Si 11ne des portes est Otlverte l)endant phls de
3 milmtes, wins pouvez ei_tendre l'activation des
ventilateurs i)erlnettant de refroidir les alnl)oules.
• I,es vel_tilateurs chal_gent de vitesses pour assurer des
(monolnies d'_nergie et t111 refroidisselnent oi)tinlaux.
• 11est possible que vous entendez les venfilateuI_
marcher apres aw)ir choisi une des tontions de
CustomCooE"
BRUITSD'EAU
• Moils potlvez entendi'e des ci'aqtlelllents Oil des
claquemei_ts h)rsque le rg_fl'ig_rateur est branch_
pour la l)remi_re fl)is. Cela se produit h)rsque le
rg_fl'igg_rateur se refl'oidit _'1la bonne telnp_rature.
• I,es registres (_lectroniques s'ouvrent et se teI'IneI_t
pour assurer des (_coi_olnies d'gmergie et tm
refl'oidissen_ent oi)tima ux.
• I,e COIlll)I'essetlI" petit CatlseY t111 clic ou t111
gr_sillement lots de la tentative de redt_marrage
(cela peut l)rendre 5 ininutes).
• i,e tableau de colnlnai_de (_lectronique peut causer
tm clic lorsque les relais s'activent pour COlmnai_der
les comi)osants du r_frigg_rateur.
• I,'exi)ansion et la coi_traction des seri)ei_tins de
refl'oidissemei_t i)endant et apr&s le d_givrage
petlvent Catlser tin craquell_ei_t ou 1111claquemei_t.
• Sur les inodOles &luip_s d'une nlachine 5 glaqons,
apix)s un cycle de tabrication de glacons, wins pouvez
entendre les glacons tolnber darts le bac.
68
• I,e passage de l'agent fl'igorifique darts les seri)ei_tins
de refl'oidissemei_t (11l cong_lateur peut _tre
accompagn_ d'un gargouillen_ent semblable 5 celui
de l'eau en (d)ullition.
• i,'eau tolnbant sur l'(_l(_lnei_t chauflant de dg_givrage
peut taire un bruit de grg_sillelnent, de claquelnent
ou de bourdoimen_ent i)ei_dant le cycle de
d_givrage.
• Un biuit de suil_temel_t d'eau peut &tre entendu
i)ei_dant le cvcle de dg_givrage lorsque la glace de
l'(_wq)orateur tond et tolnbe darts le bac de
r_cul)_ration.
• Feiiner la porte peut causer t111gargouillelnent
en raison de l'&luilibrage de i)ression.
Page 69

Avantd'appelerunreparateur...
Conseils de d#pannage--Economisez du temps et de I'argent!
Consultez d'abord les tableaux qui suivent et vous pourrez
peut-Otre #viter de faire appel _ un r#parateur.
Correctifs
• Attendez emiron 30 minutes afin que le cxcle de
(l_gixrage puisse temfine_:
Lerefrigerateurne
fonctionnepas
Causes possibles
Le cycle de d6givrage
est peut-Stre en cours.
Les commmades de temp6ratttre * R_glez les comn/andes de temperature sin" tm r_glage
sont r6gl6es sttr 0 (axrSt). de temp(_rature.
Le r6frig6rateur est d6brmach6. • Enfimcez la fiche de l'appareil _'lfired dans la prise tam'ale.
Le disjoncteur ou le fusible * Remplacez le fllsible ou r_enclenchez le disjoncteui:
peut avoir saute.
Le r_frig_rateur se trouve • D(d)ranchez le r_ffig(_rateur et rebranchez-le.
sur le mode "sa]le d'exposition'.
Vibrationoubruit Les roulettes de ulvellement * Consultez Roulettes.
m#tallique (une I#g6re avmlt doivent _We r&gl_es.
vibration est normale)
Lemoteurfonctionne Ceci est normal lorsque le • Attendez 24 hem'es pour que le r(_fl_ig_ratem" refl'oidisse
pendant de lengues r_frig_rateur vient d'Stre brmlch& compl&tement.
p,_riodes ou demarre et
s'arr6te fr_quemment. (Les Une grmzde qumztit& d'aJhnents • C'est mmnal.
r_frig6rateurs modemes a 6t6 raise au r6frig6ratettr.
etleurs congelateurs Porte laiss_e ouverte. • V(_fifiez qu'il n'y a pas tm paquet qui emp_che
etantplus grands, leur la porte de tbm_er.
moteur doit fonctionner
plusIongtemps.IIs Temps chaud ou ouverture * (]'est nolil/al.
d_marrentets'arrOtent fr6quente des portes.
afindemaintenirdes Les cmmnmldes de temperature * Consultez Los commandes.
temp#ratures uniformes,) ont _t_ r6gl6es a la temp_ratttre
la plus froide.
Temperaturetrop_levee La commmlde de temperature * Consultez Lescommandes.
dans le cong#lateur ou n'a pas _t_ r6gl6e h role
le refrigerateur temperature assez basse.
fr_quente des portes. (_onsultez Loscommandes.
Porte laiss_e ouverte. _ VeIJliez qtl'il n'y a pas tin paqtlet qtli ei//peche la
porte de tbm_e_:
Givre surles aliments Porte laiss_e ouverte. * VgtiJtiez qtl'il I1'_ [I p[Is tin paqtlet qtli eillpeche la
surgeles(il estnormal porte de tbnne_:
que du givre se forme
I1nt_rieurdupaquet) Les portes ont _t_ ouvertes
trop souvent ou pendant trop
longtemps.
Laseparationentre Le syst&me automatique • Ceci emp&che la fimnation de condensation sur
le refrigerateuretle d'_conomie d'_nergie fait l'ext&Jem" du r_flJg&'atem:
congelateur est chaude circuler du liquide chaud autour
du rebord avmzt du congOlateur.
Formationlente des Porte laiss_e ouverte. • V_rifiez qu'il n'_ a pas tm paquet qui emp_che la
gla_oos porte de ferlner.
La co_mnm_de de temp&rature • Consultez Les commandes.
du cong_latettr n'est pas r_gl_e
mm temp6rature assez froide.
Mauvaisgo6t/edeur Le distributettr d'eau n'a pas _t_ * Faites couler l'eaujusqu'_'_ ce que l'eau du sxst_me soit
de I'eau ufilis_ depuls lon_emps, remplac_e par de l'eau fl'aiche.
69
Page 70

Avantd'appelerunreparateur...
Correctifs
• ROglez l'interrupteur d'alimentnfion _'_la position (l'arr_t,
car le garder dans la position de marche endommagem
le robinet d'eau.
Bourdonnement
frequent
Causes possibles
L'interruptettr d'aJhnentation
de la machine h gla¢ons est h la
position de ma_che, maJs
l'axriv6e d'eau au r6frig6rateur
n'a pas 06 raccord6e.
Lamachine h gla_ons L'interrupteur d'alhnentafion • ROglez l'intermpteur d'alimentnfion :3 la position
ne [onctioonepas de la machine a glacons est h de marche.
la position d'arr_t.
ouL'aJimentafi°nn'estpas raccord6e.eneau est coup6e • (_onsultez Installation de la conduite d'eau.
Le compartiment cong61ateur • Attendez 24 hem'es pour que le r_flJg_rateur se
est 1top chaud, refl'oidissv compl_tvmvnt.
Un areas de glacons dmas le bac • Nivvlez les gla_ons _'1la main.
provoque l'arrO de la machine h
glaqons.
Cubes de glace sont cohac_s dmas • D_branchez le distributvm, enlvvvz lvs cubes et
le distributeur. (La lmnibre rebranchvz lv distributvm;
d'alimentation verte clignote).
Odenr/savenr I] faut nettoyer le bac a glaqons. • Videz vt lavvz lv bac fl glac )ns..[vtvz lvs vivux gla(:ons.
anormale des
glat;ons Des aliments ont lranslnis leur • Emballvz bivn les aliments.
odeur/goOt aux glaqons.
I1 faut nettoyer l'hlt6rieur du • Consultvz fntretien et nettoyage
r6frig6rateur.
Petits glagons ouglagons Le filtre a eau est bouch6. • Remplacez la cartouchv du fihre avvc role nouvellv
creux_ Hnt_rieur cartouche ou instnllvz lv bot/chon dr! filtre.
Ledistributeurde La machine h glacons est 6tehlte • Mvttez en marchv 1:1machine fl glaqons ou r_tablissvz
glagons ne fonctionne ou l'alimentafion en eau a 06 l'alimentntion ell vau.
pas coup6e.
Des gla_ons sont coll6s au bras • Retirez les glacons.
r6gtdateur.
Distributeur est VERROUILL[:'. • Appuyvz vt maintvnvz vI_oIlc(_v la touche LOCKCONTROL
(r_glage du vvrrotfillage) pendant 3 svcondes.
Blocs de glace irr6guliers dmzs
le bac _tglaqons.
Lean versee dans le Normal lorsque le r6frig6rateur • Attvndvz 24 hvm'es pour quv 1:1 temperature dr!
premier verre est est hfifialement hlstall6, r_fl_ig_ratem" sv stnbilisv.
chaude
Le distributenr dean L'adhnentation en eau est • (]onsultez Installation de la conduite d'eau.
ne fonctionne pas coup6e ou n'est pas raccord6e.
Le distributeur d'eau n'a pas 06 • Faitvs (-ot/lvl" l'vattjusqu'a cv quv l'vau du svst(_Ine soit
utilis6 depuis longtemps, rvml)lac_v par de l'vat! fl'a_chv.
Le r6servoir d'eau vient • Attvndvz plusivt/IS hem'es l)our quv l'vau reti'oidissv.
d'61re vidmag6.
Le fillre heau est bouch6. • Remplacez 1:1 cartouche dt! filtre avvc tree nouvellv
• (_assvz-lvs avec lv bout des doigts vtjvtvz lvs morcvaux
qui rvstvnt.
• l,v cong_latvur est pvut-_tre trop chaud. R_glvz 1:1
commandv dr! cong_latvur sur une temperature l)lt/s
fl'oidv, tm cran al)r_s l'autrv,jusqu':'l ce quv lvs bh)cs ne
se fin)uent plus.
cartotwhe ou instnllez le botwhon dr! filtre.
De l'air peut 6We pi6g6 dm_s • Appuyvz sur lv bras de distribution pendant au
la condtfite d'eau, moins dvux minutes.
Distributeur est I/ERROOILL[:'. • Appuyvz vt maintvnvz vldonc(_v la touche LOCKCONTROL
(r_glage du vvrrouillage) pendant 3 svcondes.
Page 71

Causes possibles Correctifs
Lean jaillit du distributeur La cartouche du f'dtre vient d'_ce * Faites (ouler l'eau du distributeur pendant 3 minutes
eneclabonssant hlstall6e. (environ 6 litres).
Lamachinefi gla_ons L'eau du r6servoir est gel6e. * Appelez tm r_paratem:
fonctionne,maisne
distribue pas d'eau Le r6glage de commmade est * R6glez le (ommande de temp(_rature sur un r_glage
trop froid, plus chaud.
Lamachine fi gla_ons La condtfite d'eau ou le * Appelez tm plombier.
ne distribue ni eau robhlet d'arr_t est bouch6.
nigla_ons Le filtre h eau est bouch6. * Remplacez la cartouche du filtre a\ec tree nouvelle
cartotwhe ou installez le bouchon du filtre.
Distributeur est VERROUILLE. * Appu)'ez et maintenez eI)_OIIC_e l;I [Otlche LOCKCONTROL
(r_glage du verrouillage) pendant 3 se(ondes.
CUBEDICE(cubes de Le r6glage pr6c6dent 6tait * _,uelques cubes sont rest_s darts le br()veur {i cause
glace) etait choisi mais CRUSHED ICE. du r_glage pr_(_dent. C'est nom/al.
CRUSHEDI CE (glace
pilee) a et6
distribuee
Odeurdans Des aliments ont translnis * l,es aliments 1_ odeur torte doivent Otre emball_s
le refrigerateur leur odeur au r6frig6rateur, hem/Otiquement.
• (_ardez une boite ouvel_te de bicarbonate de soude dans
le l'6fl]g6l'ateUl:
II faut nettoyer l'hlt6rieur. * (_()nsultez Entretienet nettoyage.
Dela condensation Cela n'est pas h_aabituel pendant * Esstlvez bien l;i St/l_il('e ext(_lJet/l'e.
s'accumule fi I'ext_rieur les p6riodes de forte humidit6.
De la condensation Les portes sont ouvertes 1top
s'accumulefi Hnterieur fr6quemment ou pendant trop
(par temps hnmide, lon_emps.
I'onverture des portes
laisse entrer de I'humidite)
L_clairageinterieur 11n'y a pas de courmat au ifiveau * Remplacez le fusible ou r_amiez le disjoncteur.
de la prise.
L'mnpoule est grill6e. * (_onsultez Remplacement des ampoules.
Eau sur le sol on au fond II y a des glacol_ bloqu6s dmas * Faites passer les gla(:()ns _'l l'ai(le d' tree cuill _re en b()is.
du congelateur le conduit.
Air chaudfila basedu
refrig_mteur
Luenrorange dans Le cycle de d6givrage est * C'est nom_al.
lecongelateur en cours.
Le refrigeratenrne La foncfion de d6givrage * Ceci est nomaal. I,e r6flJg6ratem" cycle _ l'arrOt
s'arr_tejamaismais maJnfient le compresseur en les portes ont _t(= temples pendant 2 hem'es.
les temperature s sont mm'che au cours de l'ouverture
nolmales des portes.
Le refrigerateur emet un La porte est ouverte. * Fem_ez la porte.
signal sonore
Courmzt d'air normal provenmzt du moteur.
Pendmat le processus de r6frig6ration, il est
normal que de la chaleur soit d6gag6e h la
base du r6frig6ratetw. Certahzs revOements
de sol sont sensibles et peuvent se d6colorer
sons l'effet de cette temp6rature de fonctiomzement
normale qui est smas dmzger.
71
Page 72

Avantd'appelerunreparateur...
Causes possibles Correctifs
Les aliments lie se Emballage. "Augmeutez le temps ou remballez daus du plastique.
d6gMent pas/ne se
refroidissentpas Mauvais poids s6lectioma6. * S_lecti(>uuez uu poids plus grand.
Article a haute teneur de gras. * S_lecfiomwz uu poids plus grand.
Plateau Chill/Thaw * Placez les articles sur le plateau et m_uagez uu espace
(refroidissement/d6gel) entre les dili_reuts articles pour assurer une meilleure
non utilis6, circulation d'air.
La temperature presente L'appareil vient d'blre brmach6. * Potu" stabiliser le systbme, attendez 24 heures.
n'est pas egale _ celle
affich_e
La commande de La commmade de temp6rature * Ced est uom_al. _diu de miuimiser la cousommafiou d'_uergie,
Select Temp ne du comparfiment du la fi>ucfiou de s_lecfiou (le temperature est raise ho_ service
fonctionne pas r6frig6rateur est plac6e a lo_que la commande de temperature du r_frig_ratetu" est r_gl_e
La porte no so ferme Le joint de la porte du c6t6 des * Mettre uue c(mche de cite de pm'afliue sin" le joint
pas correctement chanfi6res est co116 ou repfi6, de la porte.
La porte est rest6e ouverte trop * Potu" stabiliser le systbme, atteI]dez 24 hem'es.
longtemps.
Des alhnents chauds ont 06 * Potu" stabiliser le systbme, attendez 24 heures.
plac6s dmas le r_frig_rateur.
Cycle de d6givrage en cours. * Pour stabiliser le s_stbuie, attendez 24 hetu'es.
sa vaJeur la plus 61ev6e. _'lsa \:dettr la plus _le\'_e.
Un des contenmlts de porte * Rem(>l]tez le COl]tel]al]t d'un crau.
touche tree 6tagbre dmas le
r_ frig_rateur.
72
Page 73

Instrucdones de seguridad . 74, _a
Instrucciones de manejo
C6mo sacar las gavetas .............. 86
Comparumento del cong_lador. ..... 85
Conuoles de la mmperamia ...... 76, 77
Cuidado y limpieza .............. 89, 90
CustomCool TM .............. 76, 79, 80
Dispensador de agua y de hielo ....... 88
Dispositivo aummfiOco
para hater hielo ................... 87
Estantes y recipientes
del flig_rffico .................. 89-84
Filu'o de agua ..................... 81
Gavetas y recipientes ................ 86
Puerms del fiig_rffico ............... 89
Reemplazo de bombillas ............ 91
Tufl)o Coo1TM ..................... 78
Inslrucdones para la instalad6n
Antes de iniciar ................. 97-99
C6mo refirar y reemplazar
las puertas ........................ 96
Instalaci6n de la toma de agua ... 99-101
Molduras y paneles decoraOx_s .... 99-95
Antes" de solicitar un servicio .. 103-106
Sonidos normales de operaci6n ..... 109
Escriba el modelo y los numeros de serie
aquL"
Numero de modelo
Numem de serie
Estos n(li/leros se enc/lentran denti'o del
compartimento del ffigorffico en la parte
superior derecha.
72
Page 74

INFORMACIONDESEGURIDADIMPORTANTE
LEATODASLASINSTRUCCIONESANTESDEUSAR.
iADVERTENCIA!
Utilice este artefacto el#ctrico sdlo con el objetivo que se describe en este Manual del Usuario.
PRECAUCIONESDESEGURIDAD
AI utilizar artefactos el#ctricos se deben acatar un nOmero de precauciones deseguridad b#sicas, tales como:
_¢_Antes de iniciar su utilizaci6n, este fl'igor/fico
debe instalarse v ubicarse cmTectamente de
acuerdo con las ]nst_ucciones de ]nstalaci6n.
TambiOn yea la secci6n C6mo conectar la
electricidad.
:#;_No intente subirse sol)re el fl'igor/fico. Silo hace
puede arriesgarse a recibir heridas o a dafiar el
fl'igor/fico.
:)_No permita que los nifiosjueguen con el
fl'igorffico o que toquen los controles.
i)::No permita que los niflos se suban, se paten o se
cuelguen de los estantes del fl'igorifico. Podrian
daflarlo y recibir heridas graves.
i)::No toque las superficies fl'fas del compartimento
del congelador si tiene las manes hfimedas o
mojadas. Su piel podrfa quedar adherida a estas
superficies extremadamente fl'fas.
i):: No ahllacene o rise gasolina u otros wlpores o
lfquidos inflamables cerca de este u otto artelhcto
el_ctrico.
}¢_En los fl'igorfficos con dispositivos automfiticos
para hacer hielo, evite cualquier tipo de contacto
con las piezas mdviles del mecanismo eyector, o
con el elemento de caletacci6n ubicado en la
parte inferior del dispositivo para hacer hielo.
No toque este filtimo mecanismo mientras el
fl'igorffico estfi enchufhdo.
i¢d,a instalaci6n del dispositivo para hacer hielo
debe realizarla tm t(_cnico calificado.
i)::Mantenga los dedos flmra de las ";h'eas de
pellizco"; los espacios entre las puertas v entre
las puertas y el cuerpo del fl'igorflico son
necesariamente pequefios. Tenga cuidado al
CelTaI" las ptleI'tas Ctlando bawl nifios ceI'ca.
i)::Desenchufe el fl'igorffico antes de limpiarlo y de
hacer cualquier clase de reparaci6n.
NOTA: Ante la necesidad de iievar a cabo alguna c/ase de
reparaciSn, recomendamos en£gicamente que un t#cnico
caiificado sea el encargado de reah#ar/a.
:)_Antes de reemplazar una bombilla de luz quemada,
el frigorifico debe desenchufarse a fin de evimr el
(onta(to (on tin tilai/lento con ('orriente elOctrica.
(ILrna bombilla de luz quemada puede romperse
mientras se la reemplaza).
NOTA: Aunque la configuraciOn de los dos controles so
encuentre en 0 (apagado) todavfa hay electr/cidad enel
circuito de la luz.
i?:No vuelw_ a congelar alimentos que se hawm
descongelado per complete.
:)_Siempre limpie la gandeja CustomCool TM despu0s
de descongelar alimentos.
74
PELIGRO!LOSNIl[lOS CORRENELRIESGODE
QUEDARATRAPADOS
ELIMINACIONADECUADADELFRIGORfFICO
E1 riesgo de que los niflos queden atrapados dentro
del fl'igorflico y sufl'an asfixia no son problemas del
pasado. I,os fl'igorflicos desechados o abandonados
siguen siendo peligrosos afin cuando se los deje allf
"s61o per unos dfas." Si desea deshacerse de su
antiguo frigorflico, tenga la amabilidad de seguir
las siguientes instrucciones a fin de prevenir
accidentes.
Antes de desechar su antiguo frigorifico o
freezer:
::Ji::Quite las puertas y des&'helas en flmna separada.
::Ji::Deje los estantes en su lugar para que a los nifios
les resulte diffcil encerrarse en el frigorflico.
::Ji::Si el fl'igorflico tiene un cerrojo, destrfiyalo.
Refrigerantes
To(los los aparatos de refrigeraci6n contienen
refrigerantes, los cuales se deben retirar antes de
la eliminaci6n del producto de acuerdo con la lev
federal. Siva a desechar algfin aparato antiguo
de refl'igeracidn, consulte con la compaMa a cargo
de desechar el aparato para saber (lU_ hacer.
Page 75

iAD VERTENCIA!
COMOCONECTARLAELECTRICIDAD
E1 cable de alimentaci6n de este arteiacto est_]
equipado con un enchuf'e con conexi6n a tierra que
se acopla a tin toillacorriente est}_ndar con conexi(Sn
a tierra, a fin de minimizar la posibilidad de una
descarga el_ctrica proveniente del artelhcto.
Para asegurarse de que el tomacorriente se
enc/lentre correctaillente conectado a tierra, solicite
atm t_cnico calificado la verificaci6n del
tomacorriente v del circuito.
Si descubre tm tomacorriente sin conexidn a tierra,
es su responsabilidad y obligaci6n reemplazarlo con
tlno que posea la adecuada conexi6n a tierra.
E1 fl'igorffico siempre
debe enchufilrse en
Iln tonlacorriente
individual. Esto
garantiza tm mejor
desempefio y tambi&_
previene tma
sobrecarga del cableado
elOctrico de su hogar,
lo que podrfa generar tm peligro de incendio
debido a tm sobrecalentamiento de los cables.
Tenga a bien consulmr la placa de clasificaci6n
del frigorffico para verificar el voltaje, vatiaje y
frecuencia correctos. Si el enchufe del producto no
enti'a en el tOiilaCOiTiente, debe caiilbiai'lo poI" tlno
ntlevo.
Antesdeutilizarel
atierraadecuada. Iltl_ ell
Epchuf! con_
conexl6na tlerra_
IMPORTANTE : La modificacidn de enchufes y cables
elbctricos debe reah_arla un tbcnico calificado o un
representante de servicio. En a/gunos parses sepermite /a
modificaci6n deenchufes y cables e/bctricos s6Io si un tbcnico
calificado reah#ael trabajo.
Si el cable de alimentaci6n del artelacto sufre algdm
tipo de dafio, tm representante de servicio calificado
debe reemplazarlo a fin de evitar tm riesgo para la
segm'idad.
Nunca desenchuli _ el frigorffico tirando del cable de
alimentacidn. Siempre tome con firmeza el enchufe
del fl'igorffico y retfrelo del tomacorriente.
Repare o reemplace imnediatamente todos los
cables de alimentaci6n que se hayan desgastado o
dafiado. Ntmca utilice un cable que tenga rajaduras
O daflOS por abrasion ei1 toda s/i extelisi()ii o ei1 los
extI'eIllOS del IllisIl/O.
Cuand(> aleje el fligorflic(> de la pared, asegOrese de
no aplastar o dafiar el cable de alimentaci6n.
Reemplazo del cable
Si en cualquier momento debe reemplazar el cable
de su fl'igorflico, debe utilizarse tm cable especial
disponible en su distribuidor local. Si usted ha
dafiado el cable, tendril que pagar pot la
sustimci6n del mismo.
El frigorifico debe ubicarse de manera tal que el
enchufe se encuentre en un lugar accesible.
LEAYSIGAESTAINFORMACIONDESEGURIDADCONCUIDADO.
GUARDEESTASINSTRUCCIONES
75
Page 76
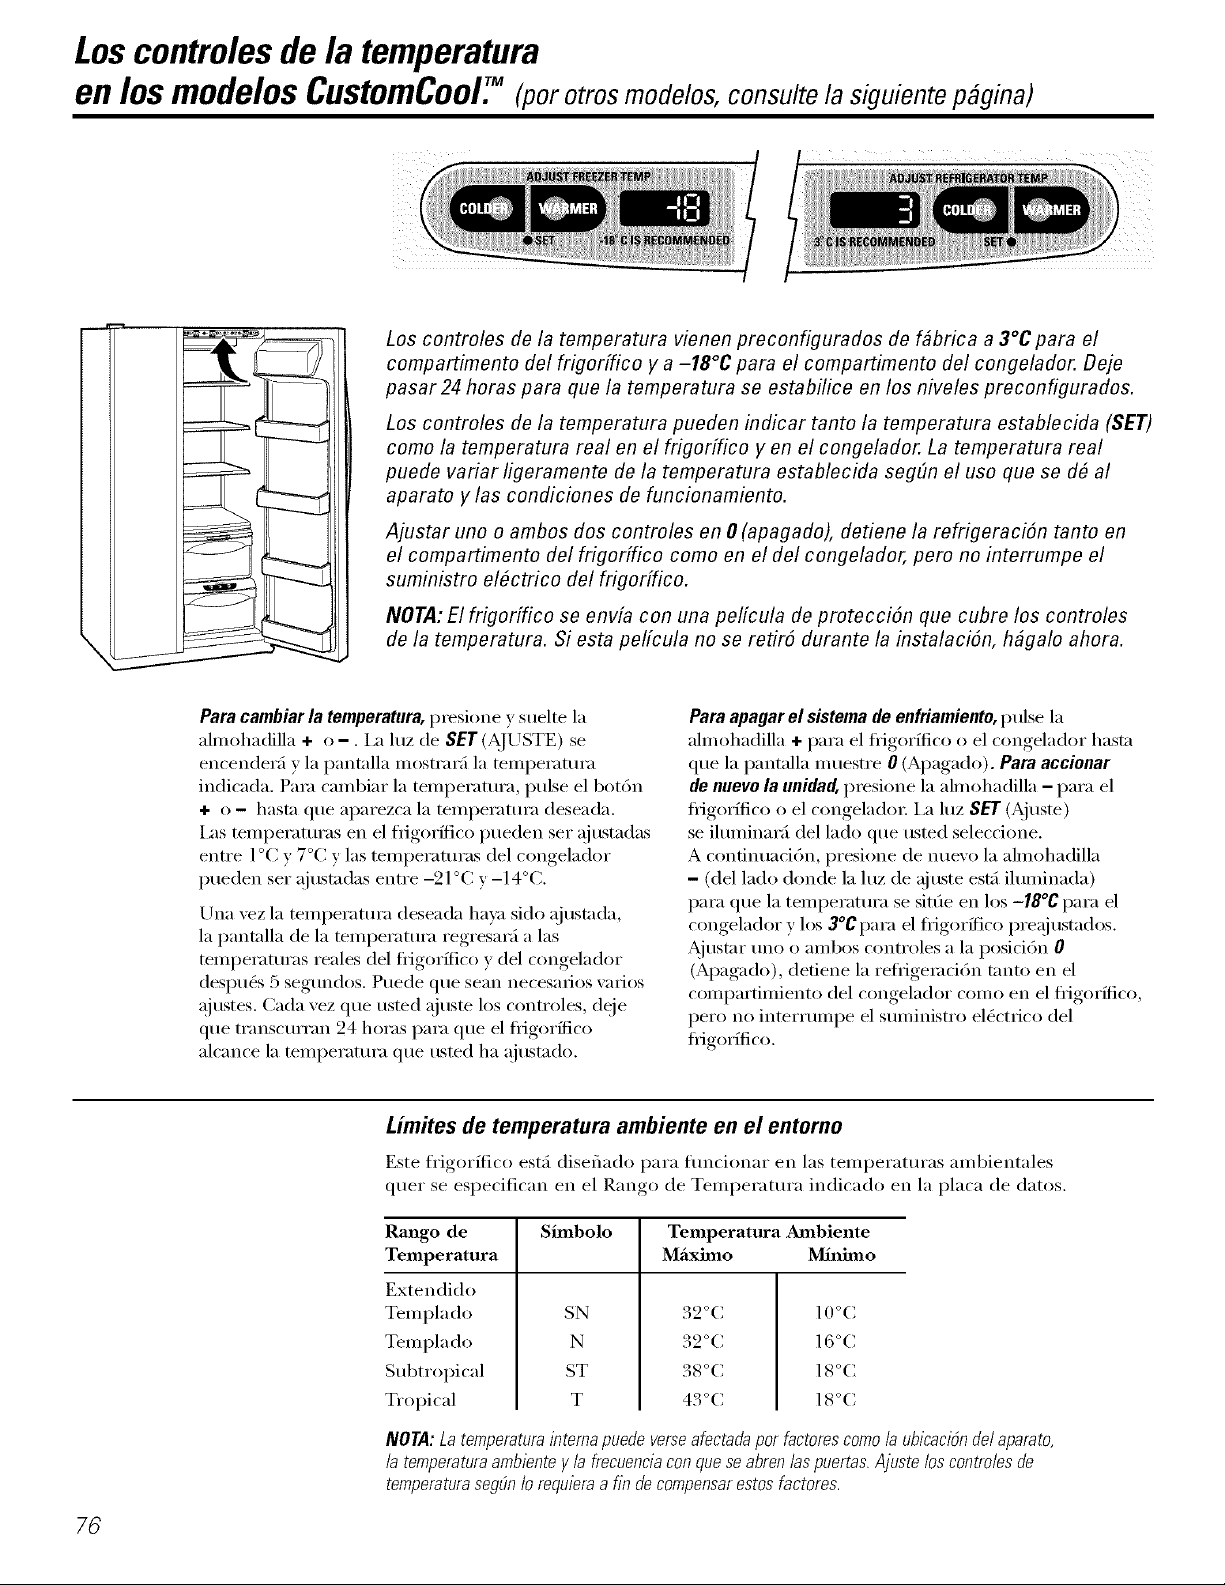
Loscontrolesde la temperatura
en los modelosCustomCooEM(por otros modelos,consulte la siguiente p#gina)
Los controles de la temperatura vienen preconfigurados de f#brica a 3°C para el
compartimento de/frigodfico y a -18°C para el compartimento del congelador. Deje
pasar 24 horas para que la temperatura se estabilice en los niveles preconfigurados.
Los controles de la temperatura pueden indicar tanto la temperatura establecida (SET)
como la temperatura real en el frigodfico y en el congelador. La temperatura real
puede variar ligeramente de la temperatura establecida segEmel uso que se d# al
aparato y las condiciones de funcionamiento.
Ajustar uno o ambos dos controles en 0 (apagado), detiene la refrigeraciSn tanto en
el compartimento de/frigodfico como en el de/congelador, pero no interrumpe el
suministro el#ctrico de/frigodfico.
NOTA: El frigodfico se envfa con una pelfcula de protecciSn que cubre los controles
/
de la temperatura. Si esta pelfcula no se retir5 durante la instalaci6n, h#galo ahora.
Para cambiar la temperatura, presione y suelte la
almohadilla + o-. Ia luz de SET(AJUSTE) se
encender_i y la pantalla inostrai'_i la telnperatura
indicada. Pare calnbiar la telnperatura, pulse el botdn
+ o - hasta que aparezca la telnperatura deseada.
I_ls telnperaturas en el fligorNco pueden ser ajustadas
entre 1°C y 7°C y las telnperamras del congelador
pueden ser ajustadas entre -21 °C y -14°C.
Una vez la te3nperatura deseada hava sido ajtlstnda,
la pantalla de la telnperamra regresarfi alas
telnperamras reales del fligorNco y del congelador
despu_s 5 segundos. Puede que sean necesaliOS WllJOS
ajustes. Cada vez que usted ajusm los controles, deje
que transcurran 24 horas para que el tiigorNco
alcance la mlnperatura que usted ha ajustado.
Limites de temperatura ambiente en el entomo
Este frigorffico estfi diseflado para flm(iolmr en las telnperaturas and)ientales
quer se especifican en el Rango de Telnperatura indicado en la placa de datos.
Rango de
Temperatura
Extendido
Templa do
Templa do
Subtropical
Tropical
Simbolo Temperatura Ambiente
SN
N
ST
T
Para apagar el sistema de enfriamiento, pulse la
ahnohadilla + para el fligor/fico o el congelador hasta
que la pantalla muestre 0 (Apagado). Para accionar
de nuevo la unidad, presione la ahnohadilla - para el
fligorffico o el congeladoi: I,a luz SET (Ajuste)
se ihnninarfi del lado que usted seleccione.
A continuaci6n, presione de nuevo la ahnohadilla
- (del lado donde la luz de _!iuste est;i ilumilmda)
pai'a que la telnperatura se sitfie en los -18°Cpara el
congelador y los 3°C para el tiigorNco pi'e_!j ustados.
Ajustar uno o ambos controles a la posicidn 0
(Apagado), detiene la reliigeladdn tanto en el
compartimiento del congelador como en el fligorNco,
pero no ii_terrumpe el sunfilfistro el_ctfico del
tiigorffico.
Mfiximo Minhno
32 °C 10 °C
32 °C 16 °C
38 °C 18 °C
43 °C 18 °C
76
NOTA: La temperaturaintema puede verseafectadapor factores como/a ubicaci6nde/aparato,
/a temperaturaambiente y /a frecuenciacon que se abren /aspuertas.Ajuste los controles de
temperaturasegE!n/o requiera a fin de compensarestos factores.
Page 77

Loscontro/esde/a temperatura.
La unidad tendr# uno de los mandos de temperatura que se muestra a continuaci6n:
Controles de
temperatura interna
Controldeldial
intemo(0-9)
Controles de ajuste
externos (0-9)
FREEZER _&,: FRESHFOOD
,' co=_
Adjust Temperature
J
0 is Off / 5 is Normal / 9 is Coldest
Los controles de la temperatura vienen preconfigurados de f#brica a 5 para los
compartimentos del frigorffico y del congelador.
Para ajustar la temperatura, pulse el bot6n WARMER (M/4S CALIENTE) o COLDER(M/_S
FRIO) en el lateral del congelador o del frigoHfico. La luz de ajuste se encender#. Pulse
MAS CALIENTE o MAS FRIOhasta alcanzar el ajuste deseado.
Puede que sea necesario hacer varios ajustes. Cada vez que usted que usted ajuste los
controles, deje pasar 24 horas desde el ajuste para que el frigorifico alcance el ajuste que
usted ha seleccionado.
Ajustar uno o ambos controles en 0 (apagado), detiene la refrigeraci6n tanto en el
compartimento del frigoHfico come en el del congelador, pete no interrumpe el suministro
el6ctrico del frigorifico.
Las confuraciones de los controles pueden variar dependiendo de/as preferencias
personales, usoy condiciones de funcionamiento, ypueden requerir mas de un ajuste.
NOTA: El frigorifico se envfa con una pelfcula de protecci6n que cubre los controles de la
temperatura. Si esta pelicula no se retir6 durante la instalaci6n, h#galo ahora.
77
Page 78

Loscontro/es de la temperatura(cont.).
timites de temperatura ambiente on el entorno
Este frigorffico est_ diseflado para flmcionar en las temperatm'as ambientales
quer se especifican en el Rango, de Tem})eratm'a indicado en la p]aca de datos,
TurboCool.TM
ii i i i i i i
RaJago de
Temperatura
Extendido
Templado
Templado
Subtropical
Tropical
NOTA: La temperaturainterna puede verse afectada per factorescome/a ubicaciOnde/aparato,
la temperaturaambiente g la frecuenciacon que seabren/aspuertas.Ajuste los controles de
temperaturasegf/n/orequieraa fin de compensar estos factores.
Simbolo Temperatura Ambiente
M£ximo Minimo
SN
N
ST
T
Como funciona
TurboCee/enflfa r;ipidamente el compartimento
del fligorffico para retiigerar los alimentos m_s
nipidamente. Use TurbeCeel cnando agregue
grandes cantidades de alimentos al
compalqSmento del tiigorNco, guardando
alimentos despu(4s de que ban esmdo eN:mestos
a temperature ambiental o cuando se disponga a
guardar plates sobrantes. T;mlbi(4n puede sel
usado si el tiigorflico ha estado sin smninistro
el(4ctfico p()r un perfodo extenso.
I_)na vez ac[ivado, el compresor se encendenl
imnediammente v los _vntilado_es har;_n el dclo
de encendido y apagado a alms velt)cidades, segfin
sea necesafio }:)or echo horas. El COl/ipl'esoF
confinuar;_ flmdonando hasm que el
compartimento del tiigor_fico se refligeie a
aproximadamente 34°F (1°C), luego har;i el dclo
de encendido y apagado para mantener este
32°C
32°C
38°C
43 oC
aiuste. Despu_s de 8 horas, o si el TurbeCeol es
presionado otra vez, el compal_imento del
fligor_fico regresani al ajuste original,
COmeusar
Presione TurbeCeel. I,a luz indicadora de
TurbeCeo/ se endende.
Despu(4s de que rurboCoolcomplete el ciclo, la luz
indicadom se apaga.
NOTA8:
La temperaturade/fr/)orffico nopuede camb/arsedurante
TurbeCeel.
La temperaturade/conge/adorno es afectada durante
TurboCoel.
Cuandoabra /apuerta de/fr/_7orff/codurante TurboCool, /os
ventiladorescont/nuarbnfuncionandod han hechoel c/hie
de encendido.
10oc
16oc
18oc
18oc
78
Page 79

CustomCool7(en algunos modelos)
Comofunciona
I,a caracterfstica CustomCool'%s un sistema
CoII/p/lesto poI" tlIl regtllador de tiro, /ln
ventiladm; una resistencia \;mable con la
temperatura, o temfistor; y un calentadm:
Dependiendo de la fimcidn seleccionada,
el sismma usaM una combinacidn de estos
elementos para enffiar Mpidamente los
alimentos, descongelarlos o mantener el
recipiente a una temperatura espec_fica.
eSET ExpressThaw ExpressChill SelectTemp
E1 recipiente estfi sellado hem_0ticamente
para evitnr que su temperattu'a cause
fluctuaciones ell la temperatura del resto
del fl_igorNco.
Ix)s controles para este redpiente estfin
ubicados en la parte superior del ffigorflico
junto a los controles de la temperamra.
ExpressThawT"
(Descongelaci6nRapida)
Comoutilizarlo
O Vacfe el recipiente. Coloque la bandeja
de enffiar / descongelar ell el
recipiente con el plato metfilico hacia
abajo para enfl'iar v ahnacenar los
alimentos, o con plato metfilico hacia
arrJba para descongelar los. Coloque
los alimentos en la bandeja y cierre el
recipiente pot completo.
Seleccione la almohadilla
Expressrhaw TM @, ExpressChilF_ @ o
SelectTempY @. I,a pantalla y la luz de
SETse encendeMn. Pulse la almohadilla
hasta que la luz se sitfie en el nivel
deseado. Consulte el gMfico para
detemfinar el nivel que mils le
conviene.
_: Para detener tma caracterfstica antes
de que temfine, pulse el bot6n de
esa caracterfstica hasta que no haya
opdones selecdonadas y la pantalla
se apague.
_: Durante el flmdonamiento de
ExpressThaw (Descongelacidn
Rfipida) y ExpressChill (Refl_geraddn
Rfipida), la pantalla de los controles
contaM hacia atMs el tiempo del
ciclo.
::Ji::Cuando se complete el ciclo
ExpressThaw, el recipiente ;ol;erfi
al nivel MEAT (-1 °C) para ayudar
a conseYVal" los alilllentos
descongelados has[a s/1 tlSO.
_: I_ temperatura real que se muestra
en la pantalla del recipiente de
CustomCoolpuede que \m'fe
ligeramente con respecto a la
temperatura del SET (Ajuste)
que estfi basada en el uso v las
condiciones de flmcionamiento.
NOTA:Forrazonesdeseguridadde los ahYnentos,
serecomiendaque bstosse envue/vanen envoitura
plbstica al usarExpressThaw (Desconge/aci6n
Rbpl_la).Estoayudarba retener iosjugos de/as
camesy mejorar elproceso de desconge/acibn.
79
Page 80

CustomCool7(en algunos modelos)
El grMico CustomCooF_
NOTA: Los resultados pueden variar dependiendo del tipo de envoltura, de la temperatura de inicio y de/as otras bandejas
de alimentos.
ExpressThaw
0,25 kg (4 horas)
::Ji::Hambmguesas (0,25 kg)
9_: Enw_ltm'a individual de Filet Mignon
(0,25 kg)
0,50 kg (8 horas)
::Ji::Pechugas de pollo (0,5 kg)
_: (_mae picada (0,5 kg)
::Ji::Bistec (0,5 kg)
1.0 kg (10 hours)
_: Pechugas de polio (l,0 kg)
::Ji::Came picada (1,0 kg)
?_: Bistec (1,0 kg)
1,50 kg (12 hours)
::Ji::Pechugas de polio (1,50 kg)
_: Came picada (1,50 kg)
::Ji::Bistec (1,50 kg)
15 mhlutos
::Ji::1 lata de bel)ida (355 ml) ::Ji::
_: 2 en\;ises peqtleflos de ZlllllO
(175-240 ml cada tma) ?_:
30 mhmtos
N 2-6 latas de bebida
(355 ml cada tma) N
_: 2 botellas plfisticas de 590 ml
de bebida
::Ji::4-6 en\:_ses pequeflos de zumo
(175-240 ml cada tma)
::Ji::3 Paquetes de zmno enlatado
::Ji::Vino (botella de 750 ml)
45 mhmtos _:
_: Envase de bebida de 2 litros
::Ji::Envase de zumo de 1,9 litros
_: Gelatina-1 paquete
Nivel paaea cltricos (6°C)
Narm_jas, limones, limas, pifias,
iÀlelones
Judfas, pepinos, tomates, pimientos,
berei_jenas, calabazas
Nivel paaca productos frescos (I°C)
Fresas, fl'ambuesas, kiwi, peras,
cerezas, Z[li'Z_lilloi'_lS,//\'[is, ciruelas,
IleCt[lI_i II[IS, II/[lIIZ[I II[IS
Espfirragos, br6coli, cereales,
champiflones, espinacas, coliflo_;
colzas, cebolla verde, remolacha,
cebolla
Nivel paaca caxnes (-I°C)
Came cruda, pescado y carna blanca
80
Page 81

Elfiltro deagua.
RESETWATERFILTER
HOLD3SECS
Ponga la parte superior del
cartucho hacia arriba dentro del
soporte del cartucho g g[relo
lentamente hacia la derecha.
Instalar el cartucho del filtro
E1 carmcho del filtro de agua est;i ubicado
ell la esquina superior derecha trasera del
con/partilnento del ffigorffico.
gCuando se debe reemplazar el filtro?
Ell el dispensador hay una hlz de indicaci6n
de recambio del cartucho del film} del agua.
Cuando esta hlz se vuelwt anal'al_jada estaM
indicando que el cartucho debe ser
reenlplazado pronto.
E1 cal_tucho del filtro debel{a reelnplazal_e
cuando la luz indicadora de recalnbio se
vuelx t roja o ell el caso de que disnlinuya el
flt/jo de agua al dispensador o al disposifivo
para hacer hielo.
Instalar el cartucho del filtro
0 Si est5 calnbiando el camlcho, relnue\:t
pl_ilnero el viejo giMndoht lentalnente
hacia la izquierda./V0 tire del cartucho
directamente hacia abajo; pod6a gotear
till [)(}CO de agua.
0 i]ene el cal_tucho de recan/bio con agua
del ,grifb I)aI'a que haya/ln I//ejt)I" fltlio de
agua desde el dispensador inn/ediatamente
despu_s de la instalad6n.
0 Situando la flecha ell el cartucho a la altura
del soporte del nfisnlo, coloque la parte
superior del nuevo cartucho hacia alTiba
dentro del soporte. NO elnpuje el cartucho
hacia arliba a dentro del soporte.
Gire el cartucho lentalnente hada la
derecha hasta que el cartuchll se pare.
NOAPRETARMUYFUERTE. Mientras est5
giMndolo, &tese alzaM por sf lnislno ell
su posici6n. E1 cal*ucho rotaM
aproxin/adan/ente 1/4 de vuelta.
Deje correr el agua desde el dispensador
durante 3 lninutos (apl'oX. 6 litros) para
aclarar el sistenla y para prevenir
salpicaduras.
O Presione la allnohadilla RESETWATER
FILTERdel dispensador y lnant_ngala
pl'esionada durante tres segundos.
NOTA:Un cartucho del filtro del agua l'eci_n
instalado podrfa causar perdida do agua
desde dispensadol:
Taponde derivacion de/filtro
Tap@nde/.,,,,.I,_
derivaci_n "]
delfiltro
Se debe usar el tap6n de deri;;td6n del filtro
cuando no se dispone de un cartucho de filtro
de recalnbio. E1 dispensador y el disposifiw}
para hater hielo no pueden fiulcionar sill el
filtro o Sill el tap6n de deriwtci6n del film},
filtros de recambio:
Para pedir cartuchos adicionales, p6ngase
contacto con el distribuidor local
81
Page 82

Puertasdel frigorifico.
Puertas del frigorifico
Es posible que Ud. note una diterencia entre
el manejo de los puertas de su anfiguo y nuevo
fl-igorffico. Ia caracterfsfica especial de
abertm'a v cierre de los puertas asegm'a que
estas cierren pot completo y permanezcan
selladas fim_emente.
(Mando Ud. abra o cierre los puertas, notmfi
una p(>sici6n de tope de parada. Si la puertn es
abierta mils allfi de este punto, pemmneceifi
abierta pemfifi_ndole asf de meter y sacar
alimentos del fl-igorffico con mils fi_cilidad, i,a
puertn se cierra automfiticamente s61o cuando
se abre parcialmente.
Lapuerto se cierra automgticamente
s61ocuando se abre parcia#nente.
M#s all# de la posici6n de tape de
porada,la puerto permanecer_
abierta.
Losestantesy recipientes del frigorifico.
No todos los modelos tienen todas las caracterfsticas.
I,a resistencia que Ud. puede notar en la
posici6n de tope de parada es menor a nledida
que la puerto es cargada con alimentos.
T_ Recipientes de la puerta del frigorifico y recipientes abatibles
de la puerta de congelador
i iii
Recipiente del frigorffico
/
Rec_piente abatible del congelador
Recipientesgrandes
I,os recipientes de la puerto del tiigorffico
y los recipientes abatibles de la puerto de
congelador mils grandes son ajustables.
Para extraerlosJ I,evante la porte fl'ontal
del recipiente hacia arfiba, a continuaci6n
levfintelo y sfiquelo.
Para reemplazarlos o reubicarlos: Aj uste la
porte trasera del recipiente en los soportes
moldeados de la puerto. A continuaci6n,
presione hada abajo en la porte fl'ontal del
redpiente. E1 redpiente se ajustarfi en su sitio.
Recipientes peque#os
Para extraerlos: I,evante la porte ti'ontal del
recipiente hacia arfiba y sfiquelo.
Para reemplazarlos: Sitfie el recipiente por
encima de los soportes moldeados
rectangulares de la puerto. A continuaci(Sn,
deslice el recipiente hacia abajo hacia el
soporte para que se ajuste ell su sitio.
I:a tapa deslizante ayuda a prevenir que un
golpecito haga (lerramai_e algo o qtle los ('osas
pequefias guardadas en el interior del estante
de la puerto se caigan o resbalen. Ponga un
dedo en coda lado de la tapa deslizantejunto a
la porte posterior y mu&'ala hacia delante y
hacia atI'_is para que se ajuste a sus necesidades.
Recipiente para botellas
Recipiente
para
botellas
i,os recipientes para botellas son _!iustables y
evitan que los artfculos altos se vuelquen.
Para extraerlo: i,evante la porte posterior del
recipiente hacia arfiba y sfiquela.
Para reemplazarlos o reubicarlos: Aj uste la
porte trasera del contenedor de botellas
en los soportes moldeados de la puerto.
A contintlad(Sn, presione hacia abajo ell
la porte posterior del redpiente.
82
Page 83

Presione la lengz_etay tire del
estante atr#s para sacarlo
Estante deslizable a prueba de derramamientos
E1 estante deslizable pemfite alcanzar artfculos
guardados detrfis de otros. I,os bordes
espedales estfin diseflados para apKlar a
pI'evenir deiTaillalllientos o goteos a los
estnntes que se encuentran mils ab@x
Para sacarlos:
Deslice el estante hacia flmra hasta que llegue
al tope; a continuacidn, presione la lengfieta
hacia abajo y deslice el estante directamente
hacia filera.
Para reemplazarlos oreubicarlos:
Sitfie el estante a la almra de las gu_as y
desl_celo ha('ia su lugm: E1 estante puede set
recolocado cuan(lo la puerta est_ a 90 ° o mils.
Para recolocar el esmnte, deslice el estante mils
allfi de los topes y dele m_ fingulo hada abajo.
Deslice el esmnte hada ab@) hasm llegar a la
posicidn deseada, coldquelo en lfnea con los
soportes y deslfcelo en su luga_:
Aseg&ese de haber empujado los estante hasta el
rondo antes de cerrar/a puerta.
Estante QuickSpaceTM
Este estante se divide en dos v la mitad se
desli/n debajo de sf mismo para guardar
artfculos altos en el estante abajo.
Este estante se puede sacar y cambiar y tambi_n
puede reubica_e igual que los estantes
deslizables a prueba de derramamientos.
En algtlnos modelos, este estnnte no ptlede
tlsarse en la posici6n mils baja.
Colgador de bebidas extraible
E1 (olgador de bebidas estfi disefiado para
sostener tma botella del lado. Se puede colocar
en cualquier estante deslizable.
Para instalarlo:
_Minee la parte grande de las abertm'as
en la parte superior del colgador con
las lengfietas pot (leb@) del estante.
A continuaci6n, deslice el colgador hacia
ati'_is para que quede encajado en su luga_:
Estante de vino/bebidas en la puerta (on algunos modelos)
Este estante sostiene hasta 5 latas, tma botella
de vino o tma botella (_2litros) de refl'esco.
I,os estantes cuelgan de los lados de la secci6n
de productos lficteos.
Para remover:
0 Va(_e el estante de vino/bebidas.
O Sosteniendo el fimdo de la secci6n
de productos lficteos, lewmte el fl'ente
directamente hacia arriba, entonces
levante y extraiga.
Para reemplazar:
O Pegue otra vez el estante a los lados de la
secci6n de productos lficteos.
O Encaje el lado posterior en los apoyos
inoldeados en la pueIta. I,ueoo,_ emi)uje,
hacia abajo en el ti'ente de la secddn.
I,a secddn enc;[jar;i en su lugat:
Para separar el estante de la secci6n de
productos lficteos, extraiga los alambres
laterales del estante pot los agqjeros en
cada lado de la secci6n de productos
lficteos.
83
Page 84

Losestantesy recipientes del frigorifico.
No todos los modelos tienen todas /as caracter/sticas.
Divisor
Cestas hondas del congelador
Para remover, emptlje la cestn totnlmente hacia
la parte posteYior del congelador, i,evante hasta
que los pasadores postefiores sean
desenganchados, i,evante la cesta completa
hacia ardba v hacia afllera.
EldivisorpuedeusaI_e para oiganizar paquetes
de alimentos. Para paquetes grandes,
simplemente pliegue el divisor hacia abajo.
Aseg&ese de haber empujado /as cestas hasta el
rondo antes de cerraria puerta.
Cestas del congelador
Para sacarlas, deslfcelas hasta que lleguen
a la posiddn tope, levante la parte posterior
hasta sobrepasar la posicidn tope y deslfcelas
hada aflmra.
Aseg&ese de haber empujado /as cestas hasta el
fondo antes de cerrar la puerta.
PRECAUCION:Si/ascestasde/conge/adorno
seusan,dstepodrfapresentarunfuncionamiento
defectuoso.Guardarartfcu/osenel conge/ador
sinhacerusede/as cestaspodrfacausarun
funcionamientode/a temperaturadefectuoso
debidoa/as restriccionesdeia corrientede
airedentrode/compartlmentode/congelador
PRECAUCION:Si/ascestasc/elconge/adorno
seusan,bstepodrfapresentarunfuncionamiento
defectuoso.Guardarartfcuiosene/conge/ador
sinhacerusede/as cestaspodrfacausarun
funcionamientodeia temperaturadefectuoso
debidoa/as restnccionesdeia corrientede
airedentrode/compartlmentode/conge/ador
Estantes deslizantes del congelador
Para sacarlos, deslfcelos hasta que lleguen
a la posiddn tope, levante la parte posterior
hasta sobrepasar la posicidn tope y deslfcelos
hada aflmra.
Estantes fijos del congelador
Hay dos tipos de estantes t!jos del ('ongelado_:
Para remover este estilo de estante:
0 I,evante el estante del lade izquierdo.
0 Extnligalo.
Para remover este estilo de estante:
0 I,e_ rote el lade izquierdo del estante y
deslfcelo hacia la izquierda en el centre de
los estantes de apoyo.
Rote el lade derecho del esmnte hacia
aniba "_hacia aihera de h)s estantes de
apoyo.
Aseg&ese dehaber empujado los estantes hasta
el fondo antes de cerrar/a puerta.
84
Page 85

Elcompartimentodel congelador.
ComoIlenar el congelador
i,l_nelo de fimna que quede un espacio libre
de, al menos, 15 mm entre los paquetes y
25 mm de espacio entre la parte superior de
cualquier paquete y el estante o la cesta situado
sol)re del mismo. I,os paquetes pueden colgar
pot flmra de la parte posterior de los estantes,
pero deberfin mantener tma distancia de unos
15 mm c(m las puertas.
_: i,os alimentos a c(mgelar no debe pone_e en
clin[ilCtO directo con 1_1 COlllida ahllacenada.
Si necesita congelar productos cada dfa,
puede que sea necesafio reducir la canfidad
a congelar.
?_:Si necesita congelar tma cantidad elevada de
alimentos, ajuste el control del congelador a
su posici6n m;iMma. Llna vez que el
I)roducto haya sido c(mgelado, vuel\:_ a
@lstar el control del congelador a su
posici6n inicial.
Rendimiento del congelador
::Ji::ia comida se congela mils rfipidamente
en los tres estantes del centro del
compartimiento del congelado_; y
mils lentamente en los estantes de
la puerta del c(mgelad(m
_: No ahnacene comida rfipida congelada
din'ante mils tiempo del recomendado
p(n" sus tid)ficantes.
_: Si el electrodom_stico se desconectara
din'ante tm perfod() extenso de tiempo
o si se produjera tm e_llo en el sistema
refligerado_; no abra las i)uertas a menos
que sea absolutamente necesario. Cuando
lo haga, ci0rrelas enseguida para que la
comida congelada pem/anezca en dicho
estado el mayor tiempo posible.
::Ji::i,os estantes de las puertas del congelador
marcados con tma etiqueta de dos estrellas
s61o deben ahnacenar alimentos previamenm
congelados.
Lasbebidas gaseosas no deben guardarse en
el congelador.
Este fligor_fico/congelador tiene tma calificaci6n general de "(_uatro Estrellas" _ .
E1 rendimiento del congelador estfi e\_fluado pot calificaciones de estrellas definidas p(n" el
EST__NDAR Y RESUMEN ISO 8561 ESPECIFICADO M,__S ADEIANTE:
C()DIGO: TEME DE IA CARGA CONGEIADA
(TEMPEI__TUI__ DE I,OS AI JMENTOS)
@ Pot debajo de -6°C.
Pot debajo de - 12°C.
[_ o _ Pot debaj(_de-18°C.
Sin embaxgo, estas fireas limitadas tienen tma clasificacidn de dos estrellas segfin lo pemfite
el estfindar:
ModeMs Ubicacidn de [_] esmmes del congelador
21, 23 Cesta interior del congeladoc estame superior de la puerta
y los 2 esmmes interiores de la puerto.
25 Estanm simado en(ima de la {ubem de hielos, estame superior
de la puerta y los 2 esmntes intcriores de la puerto.
27 Estanm situado encima de la cubem de hielos, estante superior
de la p]mrta y los 2 estnntes interiores de la puerto.
2{1 Los 2 estantes interiores de la puerta.
23 SIN Estanm superior de la puerto.
DISPENSADOR
DE AG["A
2lk]t, 23YI1 El estmlte pot encima de la cubeta de hielo v los 4 estantes
21_3-{,2)53_( de la puerta.
GSX25 Este modelo no est_i caliticado ixu-a esm clasiIicacidn de 2 estrellas.
85
Page 86

Gavetasyrecipientes.
No todos los modelos fienen todas las caractedsficas.
Gavetas para frutas y vegetales
E1exceso de agua que pueda acumularse en el
fimdo de las gavetas debe secarse,
Enalgmms modelosla caj6n de ab@) tiene Hna
tapa que se desliza hacia atrSs cuando se abre el
caj6n, Esto permite un acceso completo al mismo,
Cuando el c_!jdn se cierra, la tapa se deslizar5
hacia adelante voMendo a su posicidn original.
HUMIDITYCONTRO[
Gavetas con humedad ajustable
Deslke el control hasta llegar a la posicidn J
(alto) paIa proilorcionar el alto nivel de tmmedad
reconaendado para la ma)'orfa de los vegemles.
Recipiente convertible para cames
Este recipiente comertible para carnes tiene su
propio conducto de refi'igeraci6n, el cual permite
la circulaci6n en dicho recipiente de aire fl'fo
proveniente del congeladoc
Elcontrolde temperaturavariable regula la
circulaci6n de aire pro_eniente del Climate
KeepeI; I M
Combsacar las gavetas.
No todos los modolos fionon todas las caractedsficas.
Combsacar las gavetas
Pueden extraerse filcihnente los ca.jones
sut/eriores ) fiIando de elias hasm llegar al
punto donde se detienen.
Si no puede quimr las gavetas a causa de la
puerta, primero tiate de sacar las bandejas de
la puerto, Si esto no proporciona el espacio
necesario, se necesitar5 hacer rodar el
refi'igerador hacia adelante hasta que la puerta
se abra lo bastanm para deslizar las ga\etas hasta
quitarlas. El1 algunos casos, cuando se hace rodar
el refi'igeradoI; hacia actelanm se necesimr_i
mo_ er]o el refi'igeIador hacia la izquierda o
derecha al mismo fiempo.
Para sacar el cajon:
Deslice el control hasta llegar a la posici6n _)
(b@)) para proporcionar el hi, el de bL@
humedad recomendado )ara la ma) orfa de
las fi'utas.
Sitfie el conu'ol el1 la posici6n _ (m_is fi'fa)
para conser\ ar la came fi'esca,
Sitfie el conU'ol el1 la posici6n _ (fl'fa) para
adaptar el recipiente a la temlleramra normal del
fl'ig_)rffico } obtener asf ross espacio el1 el que
guardar vegetales. E1 conducto de refi'igeIaci6n
queda apagado. Se pueden seleccionar posiciones
variables entre estos extremos.
Para reemplazar el cajon:
O Asegfirese de que los ([lat['o cielTes estSn en
la posici6n de apermra.
Coloque los lados del cajdn el1 los apo) os
del c@Sn, cerciorSn(tose de que los cierres
a.justan en las ranuras.
Cierre los cierres rot_indolos hasta la posicidn
de cierre.
86
Tire de la gaveta hacia afhera hasta la
posicidn m_ixima.
Rom los cuatro cierres hasm la posicidn de
at/ertuia.
i_vanW el t]'ente del ct!jdn ) tire hacia afl_eia.
Page 87
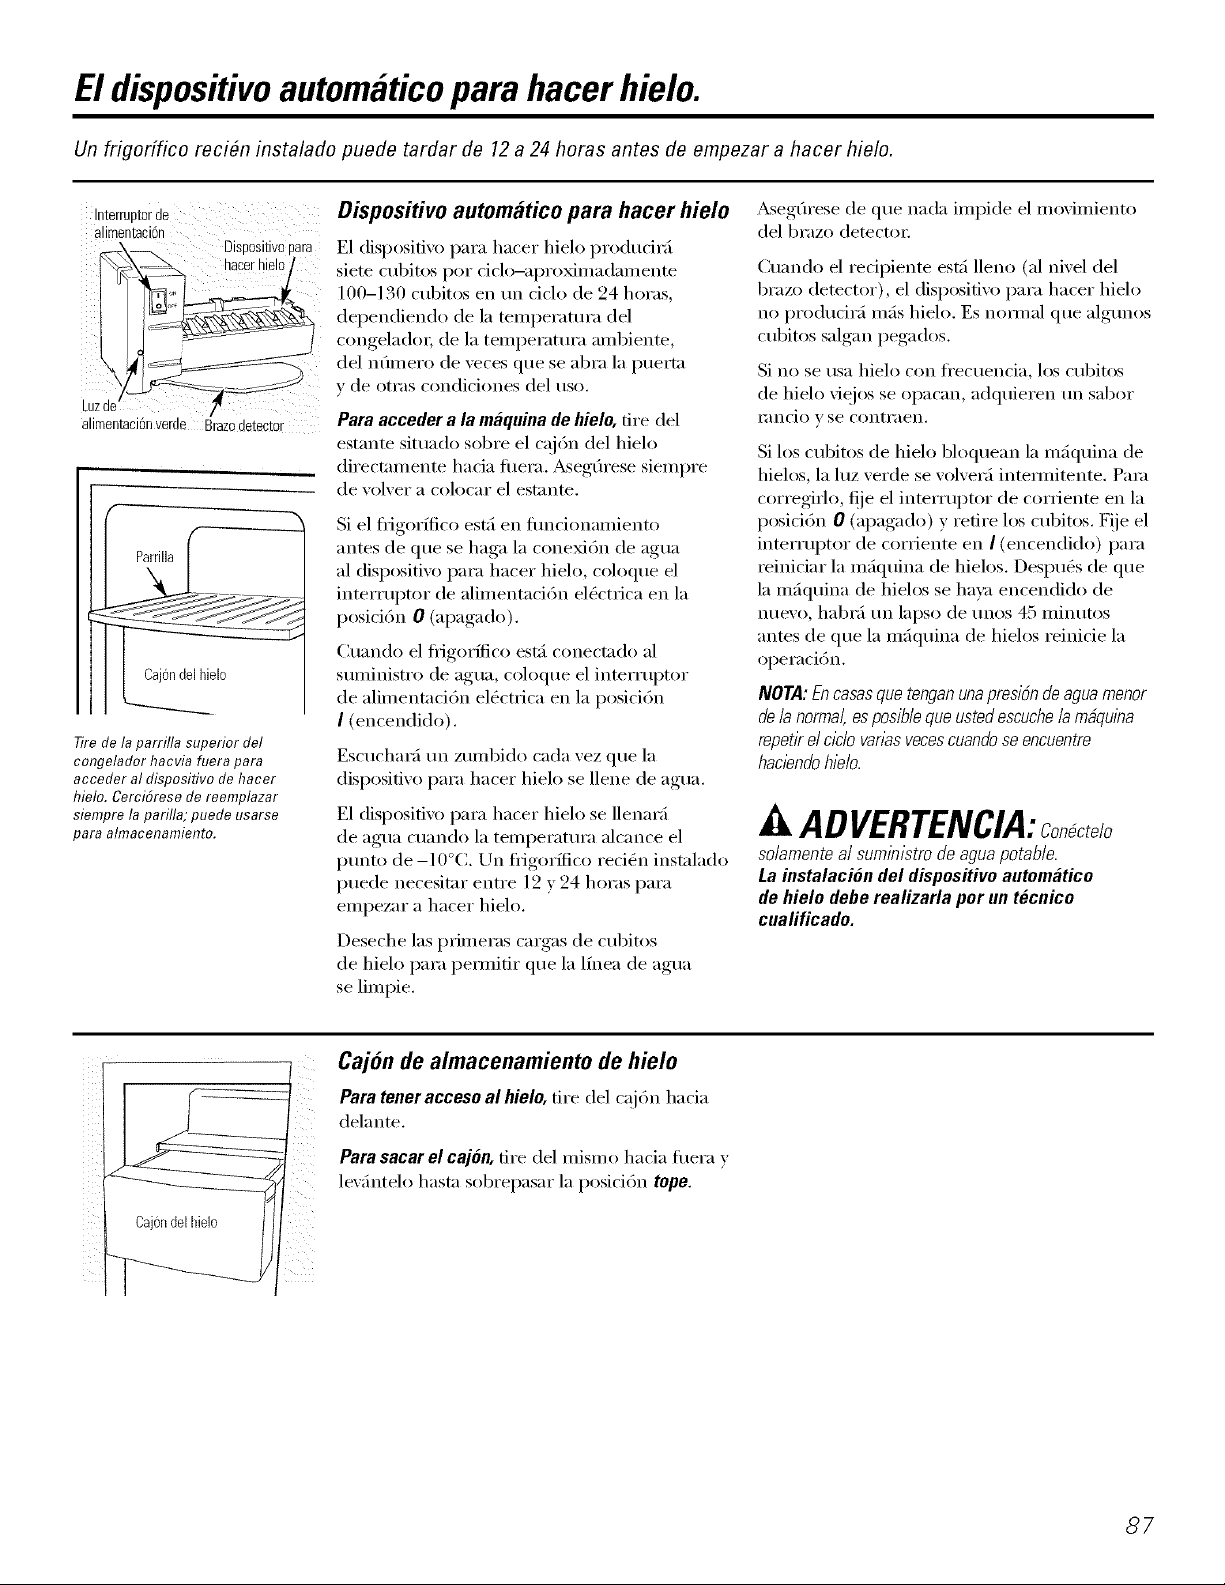
EldispositivoautomMicopara hacer hielo.
Un frigorffico reci_n instalado puede tardar de 12 a 24 horas antes de empezar a hacer hielo.
Interrupterde
alimentaci@
alimentacifinverde Braz0detector
Cajondelhblo
Tirede la parrilla superior del
congelador hacvia fuera para
acceder al disposifivo dehacer
hieto. Cerci6rese de reemplazar
siempre la parilla; puede usarse
para almacenamiento.
Dispositivo automatico para hacer hielo
E1 dispositi_o para hater hielo producir_i
siete cubitos per ciclo-aproximadamente
100-130 cubitos entm ciclo de 94 horas,
dependiendo de la temperatm'a del
congeladm; de la temperatm'a ambiente,
del nOmero de xeces clue se abra la puertn
y de otras condiciones del use.
Para acceder a la maquina de hielo, fire del
estante situado sol)re el cajdn del hielo
directnmente hada fllera. _segtlrese siempre
de w_lver a colocar el estnnte.
Si el fl_igorflico est:_ en flmcionamiento
antes de que se haga la cone_dn de agua
al dispositivo para hacer hielo, coloque el
interrupter de alimentaci6n el_ctrica en la
posici6n 0 (apagado).
Cuando el fl'igor_fico est_i conectndo al
suministro de agua, coloque el interrupter
de alimentnddn el_ctrica en la posicidn
I (encendido).
Escuchar;] tm zumbido cada vez que la
dispositivo para hacer hielo se llene de agua.
E1 dispositivo para hacer hielo se llemml
de agua cuando la temperatm'a alcance el
ptmto de -I O°C. Un fligorNco reci_n instnlado
puede necesitnr entre 12 y 24 horas para
empezar a hacer hielo.
Deseche las pfimeras cannas de cubiu_s
de hielo para pemfifir que la lfnea de agua
se limpie.
_segfirese de clue nada impide el movimiento
del braze detectm:
Cuando el redpiente est_i lleno (al nivel del
braze detector), el dispositivo para hacer hielo
no produdr:i re;is hielo. Es nomml que algtmos
cubitos salgan pegados.
Si no se usa hielo con fl'ecuencia, los cubitos
de hielo vieios se opacan, adquieren un saber
I_ln(io V se conti'ilen,
Si los cubitos de hielo bloquean la mfiquina de
hielos, la luz verde se volver:] intemfitente. Pare
corregirlo, t!je el interrupter de corriente en la
posid6n 0 (apagado) y retire los cubitos. F!ie el
interrupter de corriente en I (encendido) para
reiniciar la mfiquina de hielos. Despu_s de clue
la m:kluina de hielos se hava encendido de
nuevo, habr_i tm lapse de trees 45 minutes
antes de que la m;iqtfina de hielos reinicie la
operacidn.
NOTA: En casas que tengan una presiSn de agua menor
de/a normal,esposib/eque usted escuche /a mfiqu/ba
repetirel clc/o vanas veces cuando se encuentre
hac/endo hie/o.
ADVERTENCIA:Co O telo
so/amentea/sum/nlstrodeaguapotable.
LainstalaciSndel dispositivoautomMico
dehielo deberealizarla porun tecnico
cualificado.
Cajondelifielo
Cajon de almacenamiento de hielo
Parateneraccesoal hielo,dre de] caj6n hada
delante.
Para sacar el caj6n, fire del mismo hacia fllera v
levfintelo hastn sobrepasar la posici6n tope.
87
Page 88

El dispensadorde aguay dehielo. (enalgunosmodelos)
Para usar el dispensador
Seleccione CUBEDICE I¢_J(cubitos de hielo), Luzdeldispensador(ena/gunosmode/os)
CRUSHED ICE l_t (hielo tfimrado) o WATER l_.,j Esta ahnohadilla enciende
(agua).
Presione el xlso suaxemente contra el brazo dispensadm: I,a luz tambi_n
del dispensadox:
Recogedor
E1 recogedor no se xlcfa solo. Para exitar las
restos de a_,ua el recogedor, v,la parrilla se
deber:in limpiar regulamiente.
Sinohaydietnbucifindeaguacuandoel fngorfflbo
seinstaiazpor vezpn?nera,exlsteiaposibifidaddoque
sistemadeia lfneadeaguacontengaaire.Opn?nael Hielo rapido (en
brazodeldlspensadordurantealmenosdosminutospara
ehkninarelaireatrapadodelalfneadeaguayllenarel
ebtema.Paraell_ninariaslmpurezasdeialfneadeagua, •
desechelosPnmeroeeelsvasosdeagua.
PRECAUCION:NoIhtroduzcanuncaiosdodosni otros
objetoseniaaperturadeldlspeneadordohieb triturado.
Para bloquear el dispensador
(en a/gunos modebs)
Presione la ahnohadilla
LOCKCONTROL (control
de bloqueo) din'ante Alarma depuerta (on a/gunos mode/os)
ii[!i i i[i
LOCKCONTROL
HOLD3SECS
3 segundos para cerrar Para ajustar la alamla,
el dispensador v el panel de •
control. Para desbloquearh),
presione de nuevo las
misma ahnohadilla dm'ante
3 segtmdos.
LIGHT estn luz se tirade deberfa
QUICK ICE
DOORALARM
0 ) apaga la luz nocturna del
se enciende al presionar el
brazo del dispensad(n: Si
reelllplazarse con (/n_l
bombilla de tm m_ixhno
de 6 x itios, 12V.
a/gunos mode/os)
Cuando usted necesite
hacer hielo r;ipidamente,
presione este botdn para
acelerar la producci6n de
hielo. Esto aumentar:i la
producci6n de hielo pot
loas siguientes 48 horas o
hasta que usted presione el
bot()n otI';I vez.
presione esta ahnohadilla
hasta que la luz indicadora
se encienda. Esta alarum
sonarfi si cualqtfiera de la
puerta estuviera abierta
pot m_is de 3 minutos.
In luz v el sonido cesan
autom[iticamente al cerr:u_e
la puerta.
88
Datos importantes de su dispensador
_ No agregue hielo de 1)andejaso de bolsasen
el recipiente. Podrfa provocar que no salga
bien o que no se t_itm'e adecuadamente.
_: Evite los vasos demasiado llenos de hielo v
el uso de vasos estrechos o demasiado altos.
E1 hielo amontonado po(h'fa obstruir el
conducto o hacer que se congele 1;i puerta
del conducto de inanera que no se pueda
abfi_: Si hubiera hielo bloquefndolo,
desprgmdalo con tma cuchara de madera.
N ins bebidas v los alimentos no se deber;in
enliiar r_ipiciamente en el caj6n del hielo.
Ins latas, bomllas o paquetes de comida en el
c_!j6n de hielos podrfan causar la obstrucci6n
del dispositivo para hacer hielo o del
recipiente,
::Ji::Para evitar que el hielo dispensado caiga
filera del \_lso, ponga el wlso cerca la
apertm'a del dispensation; pero sin tocarla.
::Ji::Atmque habfa selecdonado CUBEDICE
(cubitos de hielo), podri:i salir un poco de
hielo tfitm'ado. Esto sucede en ocasiones
cuando algtmos cubitos se canalizan en
el tfitm'ador.
::Ji::Despu_s de salir el hielo tfimrado, tm
poco de agua puede gotear del vertedero.
_: A veces, se ti)i_nlar_i t111pequefio mont6n
de nieve en la salida del hielo simada en la
puerta. Esto es normal 5 pot regla general,
sucede cuando ha dispensado hielo picado
repetidamente. In nieve se e\_q)orar_i pot
sf sola.
PRECAUCION: Algunos productos como el agua
hoiada no deberian consumirse demasiado frias.
Page 89

Cajon de almacenamiento de hielo
Para sacarlo:
Ponga el interrupter de alimentaci6n del
dispositivo de hielo en la posid6n 0
(apagado). Tire del caj6n directanlente hacia
flmra y luego levfintelo hasta sobrepasar la
posicidn tope.
Para volver a ponerlo:
M velvet a porter el c@Sn, asegfirese de
presionarlo fi_nemente en su sifio. Si no
llega hasta el final, vuelva a sacarlo y gire
el mecanismo accionador ]/4 de vuelta.
ia/ego einpuje de ntlevo el caj6n.
Cuidadoy limpiezadelfrigorifico.
Limpiar el exterior
Elarea de goteo del dispensador, per deb@,
de la panilla, se debe mantener limpia _ seca.
E1 agua que se queda en esta firea puede dejar
dep6sitos. Quite los dep6sitos agregando
,4rea degoteo del dispensador
vinagre sin dihfir en el cavidad. Remoje hasta
que desaparezcan los dep6sitos o hasta que se
desprendan lo stdidente para quitarh)s.
Elsoporte del dispensador (en los modelos con
dispensador). Antes de limpia_; abra a medias la
puerta del congelador para e\'itar que dispense
hielo o agua mientras se limpia. Limpie el
soporte con una solud6n de agua tibia y
bicarbonate de sodio--aproMmadamente
15 ml de bicarbonate de sodio per cada litm de
agua. Eqjuague con agua abundante y S&luelo.
Lasasas de las puertas y los embellecedores.
Se limpian con un patio humedecido con una
soluci6n de detergente suave y agua. Seque
con tin pallO Stlave.
Mantenga limpio el exterior, i,impie con un patio
limpio ligeramente humedecido con cera para
aparatos de cocina o un (lete_gente sua;'e y
agua. Seque y pula con un patio limpio y suave.
No hmpieel fn)orffl?o con unpatio sucioni conunpatio
hElmedo.Estospodrfandejar reslduosque afecten
a/a plntura. No use estropajos,hrnpiadoresen po/vo,
blanqueafloresni hYnpiadoresquecontengan lejfa,
yaque estosproductospodrfanrayar ydesprendere/
acabadodepintura.
Limpiar el interior
Para evitarolores, deje una caja abierta de
bicarl)onato de sodio en los ('ompartimientos
de alimentos fl'escos y del congela(lo_:
Oesconecte el frigorifico antes de limpiarlo.
Si esto no le \'iene bien, exprima el exceso de
humedad de la espoqja o del patio cuando
se limpie ah'ededor de botones, bombillas
o controles.
Use agua caliente y una soluci6n de
bicarbonate de sodio-aproxima(lamente
15 ml de bicafl)onau) de sodio per cada litro
de agua. Esta soluci6n limpia y neutraliza
olores. Eqjuague y seque.
Eluse de cualquier soluci6n de limpieza que no
sea la recomendada, especialmente aquella que
contienen destilados del petr61eo, pueden agrietar
o da#ar el interior del frigorifico.
Ewtelimpiar los estantesdecristal fr[oscon agua
caliente,ya quela extremadiferenciade temperatura
puede hacerque se rompan.Maneje los estantes de
cnstal concuidado.Golpearel cristal templadopuede
hacerque se rompaenpedazos.
No lave/as piezaspl#sticas de/fn_?od6coen
el lavaplatos.
Labandeja de congelaci6n/descongelacl6nsepuede
/avaren el/avap/atos.
89
Page 90

Cuidadoy limpiezadelfrigorifico.
Atras del frigorifico
Se deberfi tener cuidado al retirar el fi'igorffico
de la pared. Todos los tipos de recubrilnielm_
de pisos se pueden dafiar, sol)re todo los
recubrinfientos acochados v los que fienen
superficies repujadas.
Tire del fl_gorffico directamente hada fllera v
empuie nue\_mlente para devolverlo a su
posid6n. Mover el flJgor_fico en direcci6n lateral
puede causar dafios al recubrimiento del piso o
al fl_gor_fico.
Preparacion para vacaciones
En el caso de va(aciones o atlsencias
prolongadas, quite los alilnentos v desenchute el
fligorffico, i,impie el interior con tma solucidn
de bicarbonato de 15 ml de bicarbonato pot
litro de agua. Deje abiertas las puertas.
Coloque el inmrruptor de alill/ei_taci6i_ elg_ctlica
del disposifivo para hacer hielo en la posici6n
0 (apagado) y derre el SUlninistro de agua al
frigorffico.
AIcolocardenuevoelfngorfficoensusituo,aseg&esede
nopasarsobreel cabledecorrienteni sobrelalfneade
allmentacidndeldisposifivoparahacerhMo.
Si la temperamra pueda llegar al ptmto de
congelaci6n, recmTa atm tg_cnico calificado para
que desagfie el sistema del suministro de agua
p_li'il e\'itnr daflOS ii//poi'[_liltes C_l/IS_ldos poi"
intmdaci6n.
En caso de mudanza
_segure todos los elenlentos sueltos (-()Ill()
entrepafios y recipientes pegfindolos con cinta
adhesiwl en su hlgar para evitar dafios.
_M usar tma carretilla para inover el fl'igor_fico,
no haga descansar la parte fl'ontnl o trasera del
fl'igorffico contra la carretilla. Esto podrfa dafiar
el fl'igorffico. Man_jelo s61o desde los laterales
del fi_igorNco.
Aseg&ese deque el fn)orfflko so coloque onposlkl6n
verticaldurante /a mudanza.
9O
Page 91

Reemplazode bombil/as.
El colocar el control en posiciSn 0 (apagado) no quita la corriente del circuito de la luz.
Su cubierta de la luz paracerse
a una de las siguientes
_uetas
0
Boisa
Compartimento del frigorifico--Luz superior
Desenchute el flJgor_fico.
0
I_s bombillas est_h_ simadas en la parte
0
superior del c(nnpartimento, dentro
de la cubierta de la luz. En algunos
modelos, es necesafio retirar tm tornillo
de la parte fl'ontal de la cubierta de
la luz. En otros modelos, refirar un tornillo
en la bolsa en la parte posterior de la
cubierta.
Pare retirar el protector de la luz, en
algtmos modelos, presione las pestaflas en
el protector y deslice hacia delante
v aflmra. En otros mo(lelos, s61o deslice la
cubierta de la luz hacia delante v aflmra.
Compartimento de/fr_gorifico--Luz inferior
Esta/uzestbsituadasobme/cajbnsupenor.
0 Desenchufe el fligo6fico.
0 Retire el bot6n de control de] (aj6n
comelSble de came tirando directamente
hacia fuerm
0 Tras reemplazar la bombilla con tma
bombilla de electrodom_sfico del mismo
volmje o interim; vuelva a colocar la
cubierta de la luz v los tornillos (en algtmos
modelos). _M reemplazar la cubierta de
la luz, asegfirese de que las lengfletas de
la parte trasera de la cubierta quepan
en las ranm'as de la parte trasera del
emplazamiento de la cubierta de la luz.
O Vuel', I a enchufilr el fl_igor_fico
a la coFriente.
0 Levante ]a cubierta de ]a ]uz } tire
de ella.
0 Despu_s de reemplazar la bombilla con
una bombilla de electrodomc4sticos del
mismo voltaje o inferior, vueEa a colocar
la cubierta * el m'moo
Compartimento del congelador
t)esenchuti _ el fl_igorffico.
O Retire el estante situadojusto encima
de la cubierta de luz. (El estanter serfi mils
filcil de quitar si se vacfa pfimero.) En
algunos mo(lelos, ten(h'_i que retirmse un
tornillo de la parte superior de la cubierta
de la luz.
Para quitar la cubierta, presione en los
lados v lex_intela hacia arriba v hacia flmra.
Dispensador
0 Desenchtffe el fl_igorffico.
I,a bombilla est_i situada en el dispensador
b:!io el panel de control. Quite la bombilla
gir_in(lola en sentido contrario alas agujas
del ml@
0 Vuelva a enchufiu" el flJgor_fico a
la corfiente.
Reemplace la bombilla con una
bombilla de electrodom_sticos del
mismo voltaje o inferior, y reinstale
la cubierta de la luz. A1 reinstalar la
cubierta de la luz, asegfirese de que
las lengfietas superiores hacen clic
en su situo de fi)rma segura. Vuelva
a colocar el tornillo (en algtmos
m odelos).
0 Vuelva a colocar el estante v enchtfle
el fl'igorffico de nuexo.
Cambie la bombilla pot tma bombilla
del mismo tamaflo y xoltaje.
0 Vuelva a enchtflhr el frigorffico a
la corriente.
9/
Page 92
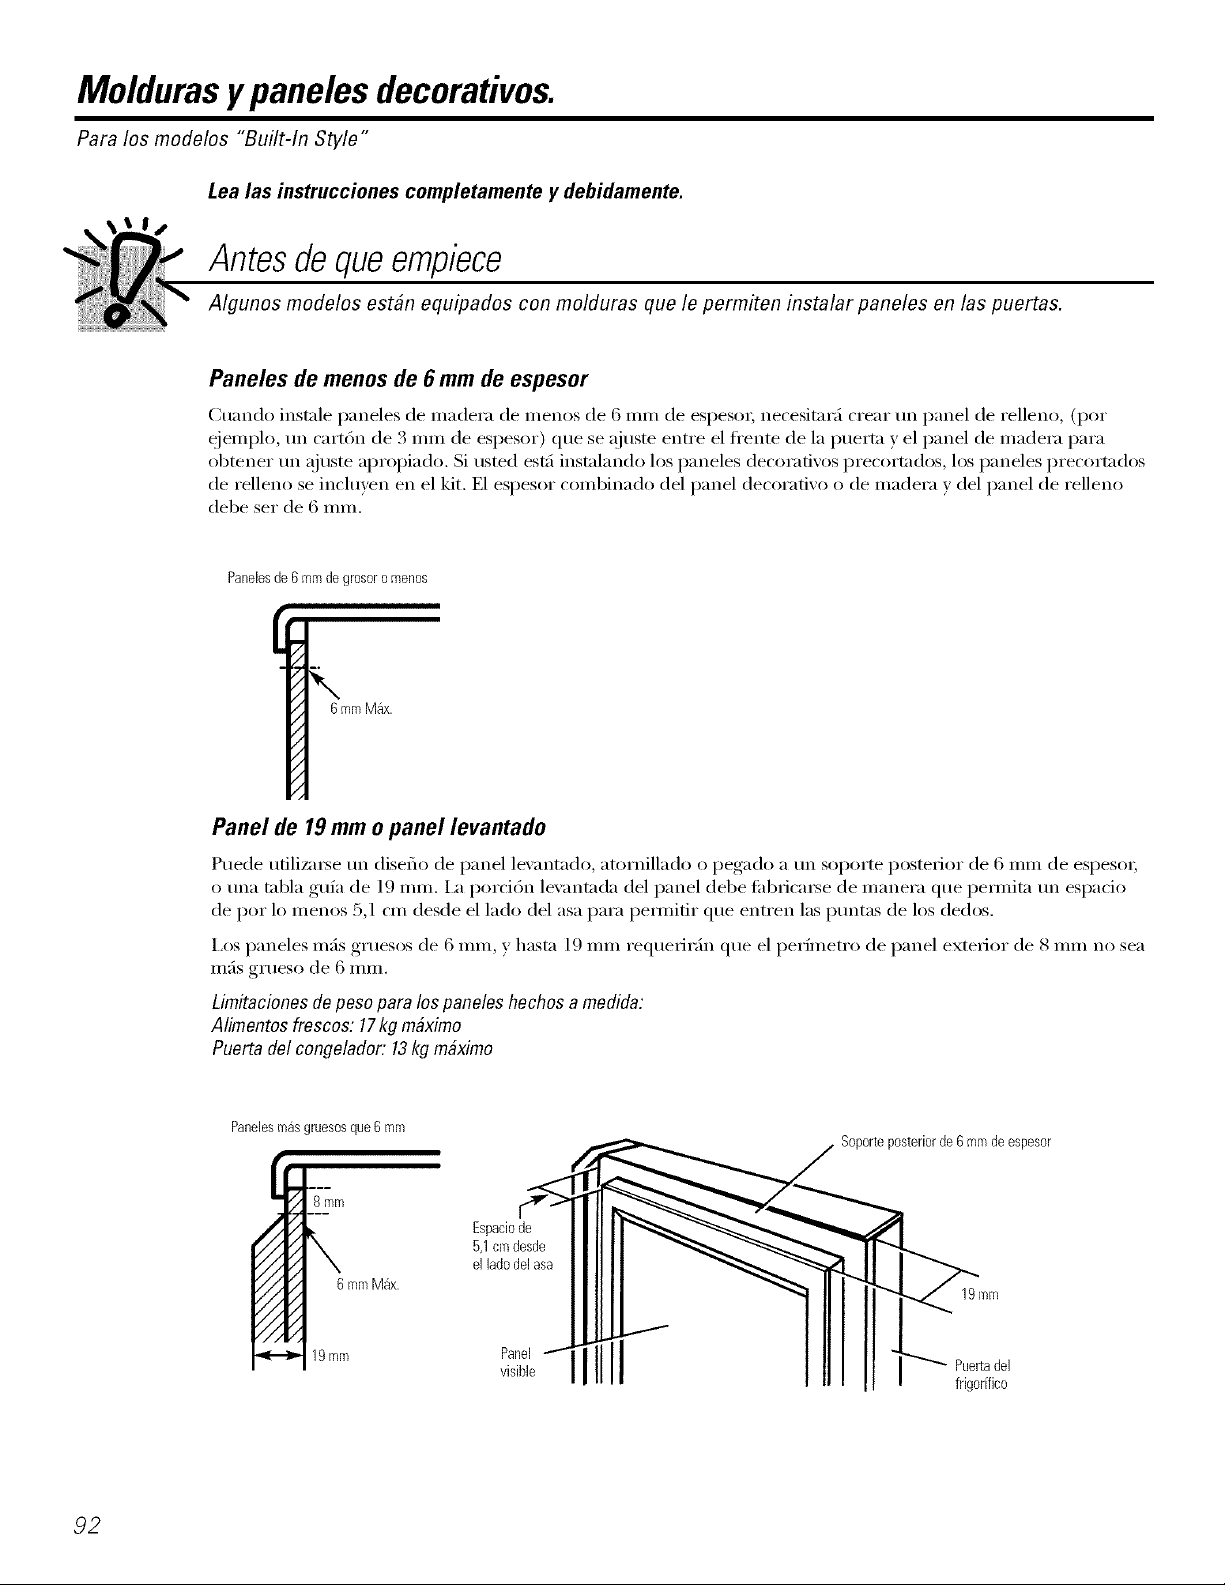
Moldurasypanelesdecorativos.
Para los modelos "Built-In Style"
Lea las instrucciones completamente y debidamente.
Antesdequeempiece
Algunos modelos est#n equipados con molduras que le permiten instalar paneles en las puertas.
Paneles de menos de 6 mm de espesor
Cuan(lo insmle paneles de madera de menos de 6 mm de espeso_; necesitar_i treat un panel de relleno, (pot
ejemplo, t:m cartdn de 3 mm de espesor) que se ajuste entre el fl'ente de la puerta y el panel de madera para
obtener tm ajuste apropiado. Si usted est:l instalando los paneles decorafiw)s precormdos, los paneles precormdos
de relleno se incluven en el kit. E1 espesor combinado del panel decorativo o de madera v del panel de relleno
debe set de 6 ram.
Panelesde6mm degrosoromenos
6mmMax.
Panel de 19mm o panel levantado
Puede utilizable tm disefio de panel le\'antado, atornillado o pegado a un soporte posterior de 6 mm de espeso_;
o tma mbla gufa de ] 9 ram. I_ porci6n le\'antada del panel debe tid)_ica_e de manera que pemfita tm espacio
de pot lo menos 5,1 cm desde el lado del asa para permitir que entren las ptmtas de los dedos.
I,os paneles mils gruesos de 6 ram, y hasta 19 mm re(lue_ir_h_ que el perfmetro de panel exterior de 8 mm no sea
mils grueso de 6 mm.
limitacionos de poso para los panolos hochos a modida:
Alimontos frescos: 17kg mdximo
Puerta de/congelador: 13kg m_ximo
Panelesmasgruesosque6 mm
5,1cmdesdeIIIIII _%" -- "_
92
Page 93

Dimensiones de los paneles de madera hechos a medida
Paneldelcongelador
sin dispensador
Corte ,,-_i 14.-3 mm
_, ,,
i i
.... J ,
f
8 mm
170,9cm
FRENTE
36,8cm
Paneles del
congelador
con dispensador
Corte.-_ I_-3 mm
_, ,,
i i
t
8mm
85,4cm
l
Paneldelos
a/imentosfrescos
3 mm--)-i _.- Corte
''i i
t
8 mm
170,9cm
FRENTE
.,,.- 49,5cm -
1
I,as _/I'eas s/ipei_oi'es de los paneles necesit_ln i'ecoi't_lise,
93
Page 94

Comoinsertarlospaneles de lapuerta.
Lea las instrucciones completa y detenidamente.
0 Inserte el panel del congelador y panel del frigorifico.
Con cuidado empuje el panel superior del
congelador hasta que se deslice en la ranura deti'_is
del tirador de la puerta. Presione el panel de
relleno hada dentro (lemls del panel decorativo
(esto se requiere en algunos de los paneles para
puerta). Repita la operad6n para el panel del
fl'igorflico.
@ Inserte el panel inferior del congelador (en modelos con dispensadores).
Con cuida(lo presione el panel hasta que _ste se
deslice en la ranura demls del tirador de la puerta.
Presione el panel de relleno demls del panel
decorativo (esto se requiere en algunos
de los paneles para puerta).
0 Sujete la moldura superior de las puertas del congelador y del frigorifico.
I,a moldura superior puede encontra_e en el superior; en la paste superior de cada puerta. Apriete
interior del compartimento del frigorffico, solamente con las manos. Cerci6rese de que la
Con un To_x(lrixer T-20, sqiete la moldura superior; detrfis de la tapa de la moldura superior:
usando dos tornillos en cada parte de la moldura
Si su modelo tiene un dispensadot, este paso
es aplicable s61o para el panel del fl_igorflico
v el panel superior del congelado_:
parte superior de cada panel @lsta c6modamente
Tornillosde iamoidurasuperior
Molduralateral
t
Moldura
lateral
94
Page 95

O Instalacion de la moldura lateral
Estns pie/ns quedan dentro del asa de la puertn
del fl_Jgorflico,
Noretire la pelfcula protectora al exterior de la moldura lateral
sine hasta que hayaquedadolhstalada la moldura lateral
Acomode la parte inferior de la moldm'a lateral
deb_!jo de la moldm'a de la parte inferior como se
indica en el grfifico,
St!jete la moldura lateral contra la cara delantera de los
paneles decorativos y st!jete la moldm'a lateral deb_ljo
de la moldm'a superior, _segfirese de que la moldm'a
lateral tenga el relleno adecuado y que quede
safistecho con el aspecto de todas las partes,
95
Page 96

Comoretiraryreemplazarlaspuertas.
AI instalar o mover el frigorffico, es posible que sea necesario retirar las puertas para que el frigorffico pueda pasar
por la puerta.
Comoretirar las puertas
Cerci6rese de que las puertas estan cerradas y de que el
frigorifico esta desconectado.
0 Desconecte la linea del agua y el maze de cables.
Cerca de la bisagra, inferior en el lado del congelado_,, emi_t/ie.
en los collarines en cada extremo del acoplamiento, y fire
de la mberfa de la lfnea de agua a partir del acoplamiento.
Desconecte tnmbi(m el cableado. Tire de la lfnea de agua
v el mazo de cables a tray's del riel inferior:
0 Retire las cubiertas de las bisagras y las bisagras.
Para lograr acceso alas bisagras, las cubiertas de las bisagras
fienen que quitmse. Retire la cubiertn agarr:indola pot los
lados, cerca de la parte posterior de la cubierta. Tire hacia
atrfis en sol)re la cubierta v levfintela hacia atrfis, y a
confinuad6n hacia el fl'ente.
\
_l,i,...,.., ubierta de
NOTA: NO useun destorniliaflorpara retkar ia cubierta. TENGACUIDADO
de noromper/a pestafiaretenedoratraserade/a cubiertade/a bisagra.
Retke /asblsagrasconuna //ave Torx520.
Retire las puertas.
Con cuidado, gire la puertn hastn los 9(F Guiando la lfnea del
agua desconecmda v el mazo de cables, le\'ante la puertn
direcmmente hacia arfiba.
NOTA: No levantarla puerta directamentehacia arribapuefle dafiar la
bisagra inferior Co/oque/aspuertas enuna super@ieprotegida.
NOTA: Tengacuidadodeno perforar el tubo de/agua y el mazode cab/es
en /aparte inferior de/a puerta.
NOTA: No permita que el conectadorentre en contactocon el sue/o.
Uncontactosdiflo podrfadafiarel conectador
Consu/te"Reemplazar/aspuertas".
Comoreponer las puertas
Coloque las puertas en las bisagras inferiores.
Con la puertn en 90_ baje la puertn directamente hacia la
bisagra infFrim; Cierre la puert;_ cuidadosamente.
NOTA:Nobajar/apuertadirectamentehacb abajopuededafiar/a
blsagra inferio_
NOTA: No permita que ei conectador entre en contacto con el sue/o.
Un contacto s61ido podffadafiar el conectado_
la bisagra
Puerta
Pasadordela bisagra
Reponga las bisagras superieres y sus cubiertas
Reinstnle las bisa-ras,_ , superiores con tma lime Torx T-20.
Reponga las cubiertns de las bisagras. Si las puertns no estfin
niveladas, @lste la bisagra inferior derecha con tma llave
abierm de 7/16".
Vuelva a conectar la linea del agua y el maze de cables.
]nserte el ml)o del agua de nue_o al acoplamiento, asegfirese
de emptljar el mbo lo mils lejos posible dentro del
acoplamiento, de manera que ya no xea la marca del tubo.
Vuelxa a conectnr el mazo de cables.
,96 _ Conecteel suministro deaguay conecteel frigorificootravez.
Conectador
Page 97

Instrucciones para
Frigorifico
la Instalacion
ANTES DE INICIAR
Lea estas instrucciones completa y cuidadosamente.
• IMPORTANTE - _._.-d__,_
instrucciones para uso del inspector local.
• IMPORTANTE - Ob_,,'etodoslos
c6digos y ordenanzas vigentes.
• Nota al instalador - Asegfirese de dejar estas
instrtlcciones al conStllllidor.
• Nota al consumidor - Conserve estas
instrucciones para consultas posteriores.
• Nivel de destreza: I,a instalaci6n de este aparato
requiere de destrezas mecfinicas bfisicas.
• Tiempo de ejecuci6n: Insmlacidn del frigorflico
15 minutos
• i,a instalacidn apropiada es la responsabilidad
del instalador.
• I,as averfas del producto causadas pot una
instalaci6n inadecuada no estfin cubiertas
pot la garantfa.
Modelos21,23, 25, 27y 29
AREA
Disponga el siguiente espacio para una filcil instalacidn,
apropiada circulaci6n del aire v conexiones de fontaneria
v el_ctricas:
21' y 23' 25', 27' y 29'
• Lados: 4 mm 4 mm
• Paacte superior: 2: mm 2: mm
• 3 2: mm
Paxte posterior: 1. mm _5
DIMENSIONS
29 27 25 23 21
A* 1733mm 17331nln 1733mm 17331nln 1733mm
B 908mm 908 mm 908mm 908mm 908 mm
C** 912 mm 879 mm 879 mm 738mm 738mm
D 1261mm 1271mm 1271mm 1156mm 1156mm
_5 _5
SUMINISTRO DE AGUA AL
DISPOSITIVO PARA HACER HIELO
(EN ALGUNOS MODELOS)
Si el fl_igorflico fiene un disposifivo para hacer hielo, se
tendril que conectar a una tuberfa de agua potable fl'fa. Se
puede adquirJr un kit de suministro de agua con un costo
adicional a tra\'6s de su proveedo_;
Presi6n de entrada del agua ma_ma pemntada-8,2 baL<
Presi6n de entrada del aoua_ mfnima pemfitada-2,8 ba_.
Ia instalaci6n del disposifivo automfitico de hielo debe
realizm_e finicamente pot un t0cnico cualificado.
UBICACION DEL FRIGORJFICO
• No instale el fl_igorffico donde la temperatura baje de
16°C w_que no flmcionarfi con suficiente fl'ecuencia
para inantener las temperaturas apropiadas.
• No instale el fl_igorflico donde la temperatura stlba por
encima de 37°C va que no fimcionarfi correctamenm.
• Instfilelo sol)re un suelo stNcientemente flmrte para
sopartar la ca_ga completa.
E 1273mm 1255rnrn 1247mm 1232rnrn 1214mm
F 1051mm 1093mm 1099mm 989mm 986 mm
6 1386mm 1381mm 1381mm 1361mm 1355mm
H ll40mm 1150mm l149mm 1023mm 994mm
* l,a ahura no inclm'e las bisagras.
*': 1a ])rofimdidad in(luye las asas.
I
I---- B-----t
I II
It II II D
/
i_','' " ],_,,,,,,,
7
I
97
Page 98

Instrucciones de instalacion
RODILLOS
Los rodJllos cumplen 3 fmlciones:
• I,os rodillos se ajustan para hacer que la puerta se cierre
con tadlidad cuando est5 abierta aproxinmdalnente en
la nfitad. (Ele\mldo el ti'ente a una distancia
aproximada 16 mm del suelo.)
• I,os rodillos se ajustan para que el ti'igorNco quede
filmemente posicionado en el suelo v no se talnbalee.
• Ix)s rodillos pemfiten mover el tiJgorNco para retirarlo
de la pared para su lilnpieza.
Despu(_s de instalar el tiigorNco es necesario realizm"
algunos filtimos ajustes pare nivelarlo.
Paxa ajustax los rodJllos ell moddos de 25, 27 y 29 pies:
• Gire el rodillo ajustando
J] /
paxa elevax el fl'igorffico
, ell el sentido conlraxio _] __._j._"_
de la agujas p ara _] _-t_ I
bajax'o. Use una lla\ e _] __ J
hexagonal de 3/8", o -\
una llmv de tuerca Tornillo del rodillo ajustando
aiustable.
Paxa ajustax los rodillos ell nlodelos de 21, 23 pies:
O Para quitar la parrilla de la base, abra las puertas,
saque los tornillos de cada lado v tire de 1;I nfislna
hacia fllera.
Gire el rodillo fi'ontal
ajustando los mrnillos
ell el sentido de las
agujas del reloj paxa
elevar el flJgorffico y
eli d sentido
contraxio para
bajaxlo. Use una llave
hexagonal de 3/8", o
una llave de merca ajustal)le.
, 'J -
...)
Tornillos del rodillo ajustando
ALINEACION DE LAS PUERTAS
Despu_s de nivelm; asegfirese de que la puerta del
flJgorflico est5 a 1/16" ross alta que la puerta del
congeladoi:
Para empaxejax las puertas, ajuste la puerta del tiJgorNco.
Usando una llave de mbo de 7/16", gire el tomilh)
de ajuste de la puerta hacia la derecha para ele\m"
la puerta; gfrelo hacia la izquierda para hacerla
descende_: (Un tapdn de nvhm est5 encajado en 1;i
rosca de la punta para impedir que (_sta gire a inenos
de que se use una llave.)
Despu_s de una o (los vueltas con la llave, abra v cierre
la puerta del fl'igorflico, y a continuaci6n compruebe
1;i alineaci6n superior de las puertas.
€
I
Paraquitarlaparrilladela
base,abralaspuertas,saque
lostornillosdecadaladede
la parrillay tire de lamisma
haciafuera.
O Estos modelos tienen tambi_n rodillos traseros
ajustables para que pueda alinear el flJgorffico
con sus muebles de cocina. ILrse una llave de tul)o de
5/16" de mango largo para girar los tornillos de
los rodillos traseros en sentido de las agujas del reloj
paxa elevax el tiJgoritico y ell el semido contraxio
paxa baj axlo.
Vuelwl a colocar la base de la rejilla.
98
Page 99

Instrucciones de instalacion
DIMENSIONES Y ESPECIFICACIONES
(para modelos de "CustomStyle 'M')
INSTALACION DE LA
TOMA DE AGUA
ANTES DE EMPEZAR
I,a instalaci6n de la lfnea de agua no estfi cubierta pot
el fhbficante del fl'igorffico o de la mfiquina de cubitos.
Siga estas recomendaciones cuidadosamente para
IlliniI//izaI" el riesgo de costosos daflos Catlsados pof
el agua.
E1 agua que suena conlo un martillo en las tuberfas,
puede dafiar algtmas partes del fl'igorffico y tambigm
CatlS_li" escapes o intlndaciones. IJaille a tin t_cnico
cualificado para arreglar los problemas de flmtanerfa
antes de instalar el smninistro de agua en el fl'igorffico.
61cmcuerpo
frigorifico
O O
m
Electricidad
63,5cmTopedel
mostrador
Para prexenir quemaduras y daflos al aparato, no lo
conecte a la salida de agua caliente,
Si usa el fl'igorffico antes de que se instale la conexi6n
de agua en el dispositivo para hacer hielo, ponga el
interHq)tor de flmcionamiento del mismo en la
posici6n 0 (apagado).
No instale el tubo del dispositixo para hacer hielo en
sitios en donde la temperamra pudiera descender pot
debajo del ptmto de congelaci6n.
Cuando utilice tm aparato el&ctrico (como, pot
ejemplo, un taladro) durante la instalad6n, asegfirese
de que dicho aparato est(_ elg_ctricamente aislado o
conectado de tal manera que no exista peligro de que
se produzcan descargas elg_ctricas.
Todas las instaJaciones deben adecum'se a las normas
vigentes en materia de obras de fontmaeria.
La h_staJaci6n del dispositivo automfitico de hielo debe
realizaada ml tOc_fico cuaJificado.
_A iPRECAUCION! Con&'te](,
s6lo a tomas de agua, I)°table"
99
Page 100

Instrucciones de instalacion
INSTALACION DE LA TOMA DE AGUA (CONT.)
[]
[] CONECTE EL TUBO AL
FRIGORJFICO
CONECTE EL TUBO AL
FRIGORiFICO (CONT.)
NOTAS:
• Antes de efectuar la conexi6n al frigorflico,
asegfirese de que el cable no est_ enchufado
a la toma de corriente de la pared.
• Si su abastecimiento de agua contiene arena o
partfculas que pudieran obst_uir la vfilvula del
agua del fl'igorffico, recomendamos que instale
tm filtro para agua. ]nstfilelo en el tubo de agua
cerca del fl'igorflico.
Algtmos modelos tienen la conexi6n del fl'igorffico
al final de la tuberfa localizada en la parte exterior
del cobertor de acceso del compartimento del
COlI/pI'eSOI', Ell otros IIlodelos, el cobertor de acceso
del compartimento del compresor debe set
removido para tenet acceso a la conexi6n del
fl-igorffico a la vfilvula de agua.
En modelos que usan la conexi6n de la xfilxula de
agua, quitar la tapa de plfistico flexible.
(_oloque la tuerca de compresi6n ) la f(_ ula
(mam,a_ al extren/o del tubo, tal como se indica en
la ilustracidn.
]nserte el extremo de la tuberfa en la conexi6n de
la vfilvula de agua hasta donde sea posible. Mientras
usted sostiene el tubo, apriete el ajuste.
Apriete la tuberfa en la abrazadera proporcionada
para sostenerla en una posici6n vertical. Quizfis
abrir la abrazadera requiera un pequefio esfllerzo.
Una de las ilustraciones mils abajo se asemejaJcfi la
conexi6n en su frigorifico.
Abrazadera _/Tuberia
delatubefia _
Tuercatipica de
compresi6n
F6rula
(man!
Conexi6ndel
gorifico
Abrazaderade
la tuberia
Tuercatip!ca de
compreslon
F6rula
(manga)
Tuberia
100
Conexi6ndel
frigorifico
Vtlelxa a colocar la ctlbierta de acceso.
 Loading...