

Page 1
O , Side by Side
Refr 1gerato rs
ge.com
Side by Side
Refrigerators
Modds 20, 22, 25
Safely Information
(_onnect Electricity ............. 3
Extension Cords ............... 2
Proper Disposal ................ 2
Satetv Precautions .............. 2
Operating" Instrucqions
Automatic ]cemaker . ......... 7-8
Controls ..................... 6
Crispers and Pans .............. 5
How to Install Features .......... 4
Ice and _ter Dispenser . ....... 8
Shelves and Bins ............... 4
X4"_ter Filter Cartridge ........... 7
Care and Cleaning"
Cleaning ...................... 9
I,ight Bulbs ................... 9
Installation Instrucqions
Preparing to Install ........... 10
Water I,ine Installation ...... 11-13
7koubleshooting 71ips
Betore You Call
Fox" Service ................ 14-16
Normal Operating Sounds ...... 14
Consumer Support
Consmner Support .... Back Cover
Perfiwmance Dam Sheet ....... 19
Product Registration
(Canadian) ............... 21, 22
Product Registration
(U.S.) .................... 20, 21
State of Califl)rnia _'_ter
Treatment Device Certificate .... 19
_m'antv (Canadian) .......... 17
_m'antv (U.S.) ............... 18
C6te c6te
Rdfrig&ateurs
La section frangaise commence a la page 23
Mesures de s&uritd
Comment vous d0barrasser
COilVellablelllellt de votl'e
ancien r_tiig(q'amm" . ............... 23
Cordons prolongatem_ .............. 23
Mesures de s(_cm_it_ ................. 23
Raccordement Olectrique ............ 24
Fondiomwment
Bacs fi l(_gumes ..................... 26
Cartouche du filtre fi eau ............ 28
Clavettes et bacs .................... 25
Installation des accessoires ........... 25
I,e distfibutem" d'eau et de glacons .... 29
i,es commandes .................... 27
Machine 5 glaqons automatique ..... 28-29
Entretien et nettoyage
Netto)_ge ......................... 30
Remplacement des ampoules ........ 30
Installation
]nsmllation de la
conduite d'eau .................. 32-34
Prdparation ........................ 31
Conseils de ddparmage
Avant d'appeler tm r_paratem" . .... 3C_38
Bruits de t0ncfionnement
IIOIIIl_l fIX .......................... 35
Service a la clientble
Feuillet de d(mn(_es relatives fi la
pedimnance de la
cartouche t_F .................... 40
Garantie pore" la
client&le au Canada ................. 39
SexMce fi la client&le ................ 41
Lado a lad()
Refrigeradores
La seccion en espaOol empieza en la pagina 42
Iqlbrmaci&x de seguridad
Cables de extensi6n ................ 42
Conectar la electricidad ............. 43
Deshacex_e debidamente
de su reti_igera(h)r . ................. 42
Precaudones de segtwidad ........... 42
Instr uceiones de operaz.i6n
Carmcho del filtro de agua .......... 47
Controles del reti_igerador. .......... 4(;
Dispensador. ...................... 48
Dispositivo a uton_fitico
para hater hielo ................. 47-48
Entrepafios y recipientes ......... 44-47)
Gavetas de alnmcelmnfiento ......... 45
]i_stalaci6n de las caracteristicas ...... 44
Cuidado y limpieza
IJmpie/_ ....................... 49-50
Reemplazo de bombillas ............ 50
Instruceiones de imtalaei6n
]nsmlaci6n de la lfl_ea
de agua ........................ 53-56
Preparad6n para
insmlar el reli_igerador . .......... 51-52
Solueimu_r problemas
Antes de solicitar tm servido ...... 58-60
SoIlidos IlOI]llales
de la operaci6n .................... 57
Servieio al consumidor
Garantia para consumidores
en los Estados Unidos ............... 61
H@_ de datos de
flmcionamiento ................... 62
Servido al consumidor. ............. 63
Write your model and serial numbers here:
Mo_l#
Serial #
Find these numbers on a label inside
the refl'igerator compartment at the top
on the right side behind the controls.
197D3351P018 49-60499 01-07JR
Page 2
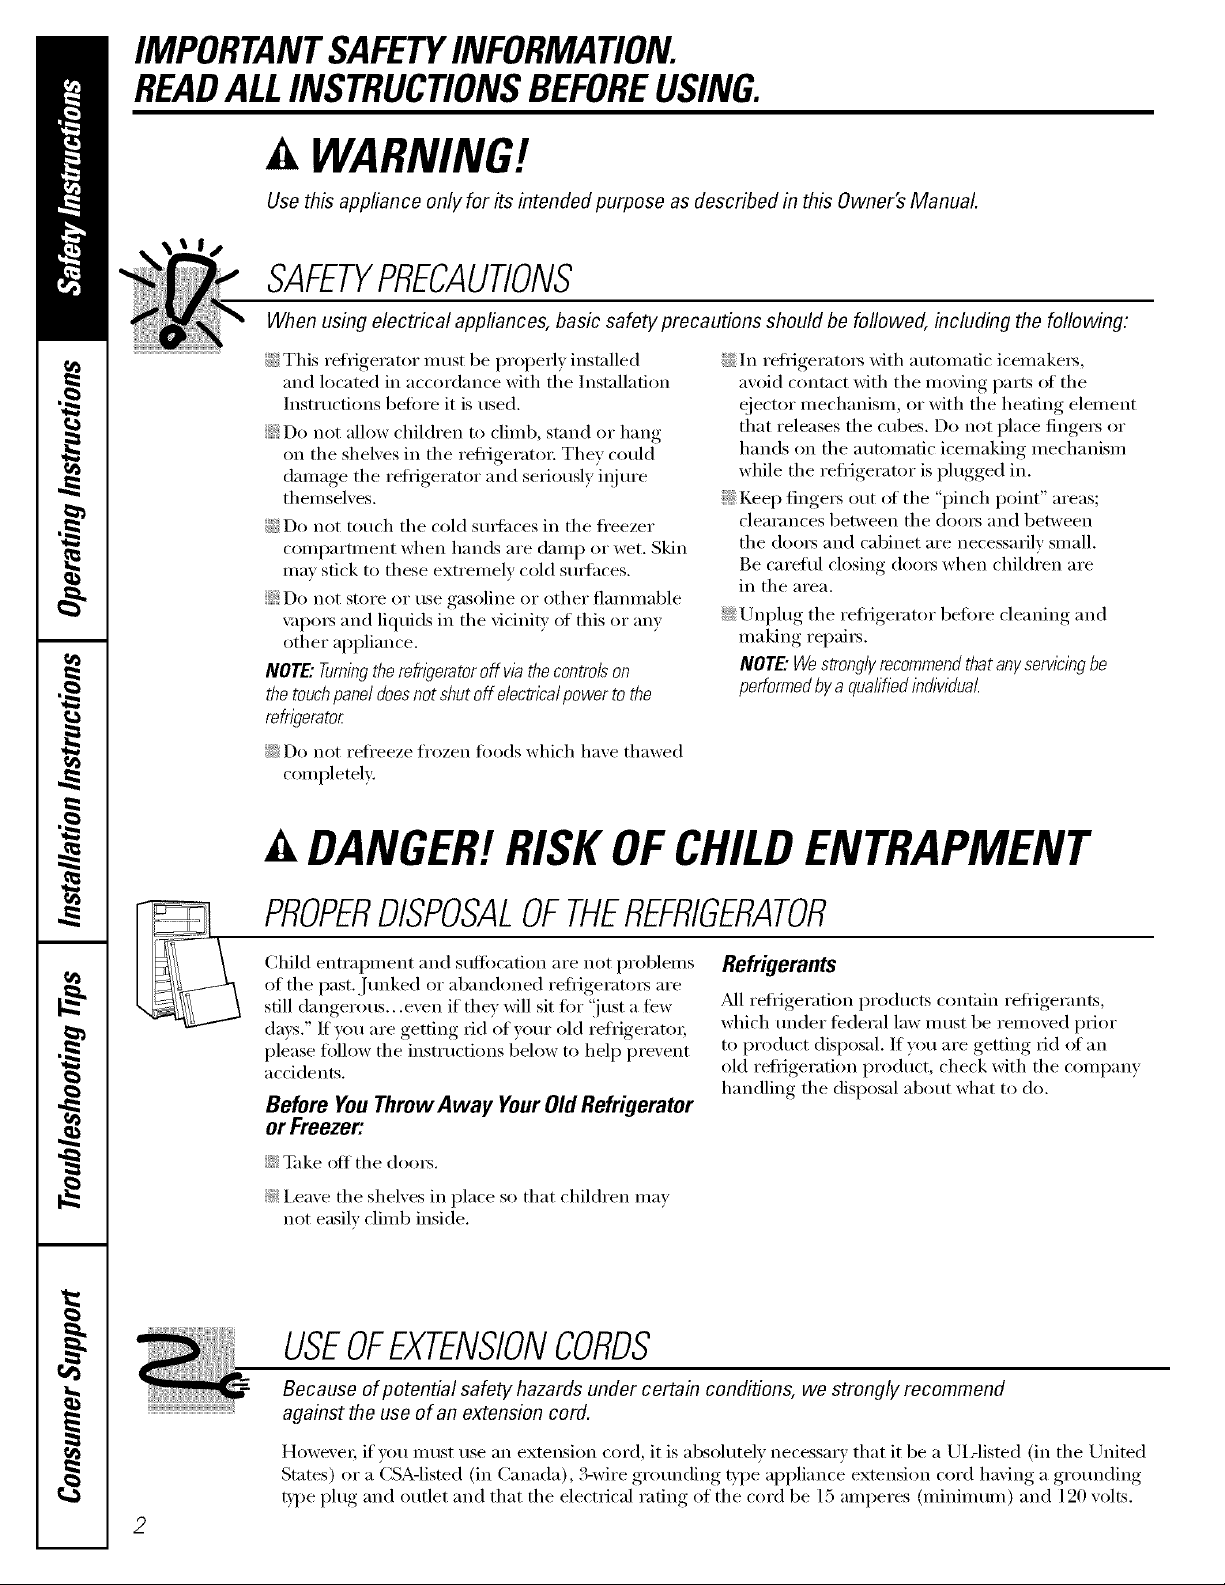
IMPORTANTSAFETYINFORMATION.
READALLINSTRUCTIONSBEFOREUSING.
WARNING!
Use this appliance only for its intended purpose as described in this Owner's Manual.
SAFETYPRECAUTIONS
When using electrical appliances, basic safety precautions should be followed, including the following:
_:i:This refrigerator must be properl) installed
and located in accordance with the Instnllation
Instructions before it is used.
::_Do not allow children to climb, stand or hang
on the shelves in the refl_igerat(m They could
damage the reii_igerator and seriously iqjm'e
themselves.
_:i:Do not touch the cold sm_i_ces in the fl'eezer
compartment when hands are damp or wet. Skin
mm stick to these extremely cold stw[hces.
::_Do not store or use gasoline or other flammable
\_q)m_ and liqtfids in tile vicinity of this or any
other appliance.
NOTE."Turningtherefn#eretoroff via the controls on
the touchpanel doesnot shut off e/ectrica/power to the
refrigerator
!_1;Do not refl'eeze frozen fi)ods which have thawed
completely:
i_::In reli_igerato_s Mth automatic icemake_s,
avoid contnct with tile moving parts _ff tile
ejector mechanism, or with the heating element
that releases the cubes. Do not place fingers or
hands on the automatic icemaking mechanism
while the refl_igerator is i)lugged in.
::_ Kee I) finge_ out of tile "pinch point" areas;
clearances between tile (loo_ and between
the (loots and cabinet are necessarily small.
Be careful closing (lores when children are
in the area.
:_/_UnI)lug tile refl_igerator before cleaning and
making repairs.
NOTE"We.stronglyrecommendthatanyservicingbe
performedbyaqualifiedindividual
DANGER!RISKOFCHILDENTRAPMENT
PROPERDISPOSALOFTHEREFRIGERATOR
Child entral)inent and sttflocation are not problems
of tile past. Junked or abandoned refl_igeratm_ are
still dangerous...even if they will sit for "just a few
dm:s." If wm are getting rid of yam" old refi_igeratm;
please tallow the instructions below to help prevent
accidents.
Refrigerants
_M1reti_igeration products contnin refl_igerants,
which under fecleral law ImlSt be removed prior
to l)roduct disposal. If w)u are getting rid at an
old reti_igeration product, check with tile company
handling tile disposal about what to tie.
Before YouThrewAway YourOldRefrigerator
or Freezer:
iJi::_ke off tile dams.
!;?:I,eaxe tile shelves in place so that children may
not easily climb inside.
USEOFEXTENSIONCORDS
Because ofpotential safety hazards under certain conditions, we strongly recommend
against the use of an extension cord.
However; if)ou must use an extension cord, it is absolutely necessar_ that it be a UIAisted (in tile United
States) or a CSA-listed (in Canada),. -wn'e ,gr°/mdin'"o la..l}e appliance extension cord haxin,,_ a ,gr°/mding,
t_ le )lu,, ,n
,_: I _ " _(1 outlet and that the electrical rating of the cord be 15 amperes (minimmn) and 19(I xolts.
2
Page 3
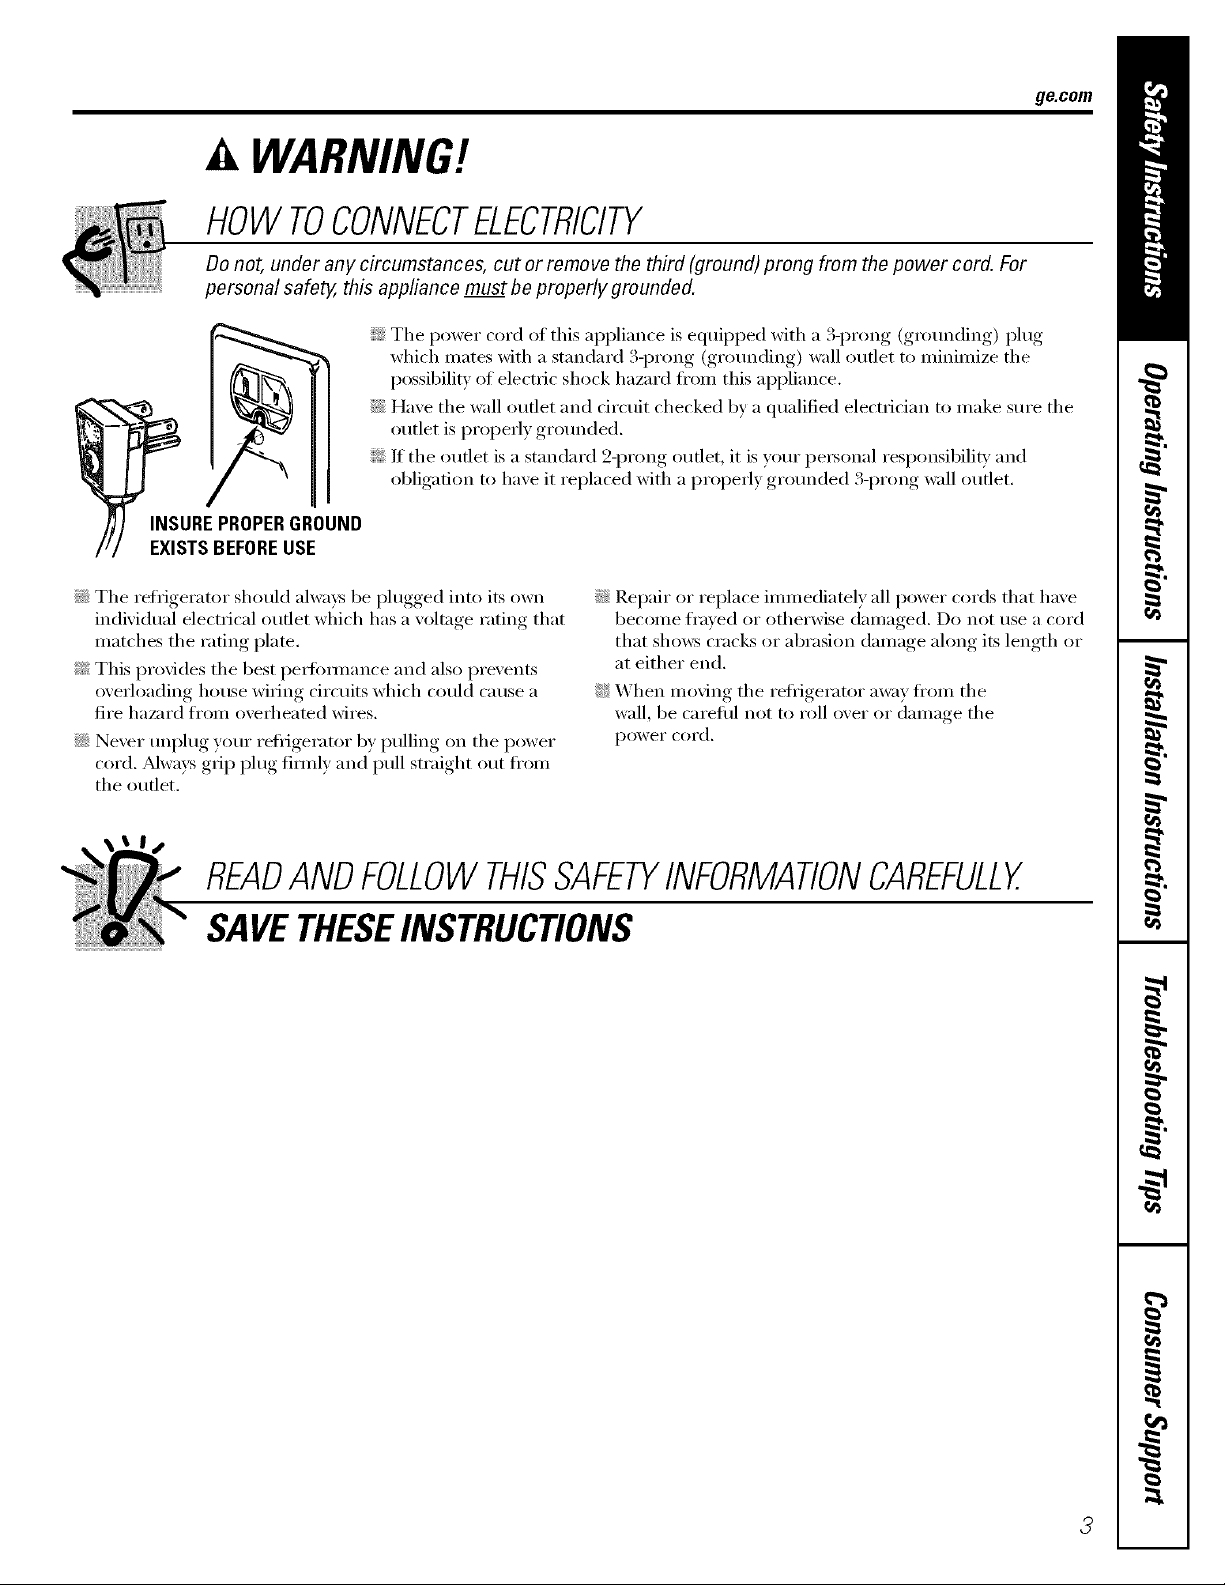
WARNING!
HOWTOCONNECTELECTRICITY
Donot, under anv circumstances, cut or remove the third (ground) prong from the power cord. For
personal safe_ this appfiance must be properlv grounded.
_¢_The power cord of this appliance is equipped with a 3-prong (grounding) plug
which mates Mth a standard 3-prong (grounding) wall outlet to minimize the
possibility of electric shock hazard fl'om this appliance.
:#1_Have the wall outlet and circuit checked by a qualified electrician to make sm'e the
outlet is properly grounded.
:)_ If the out.let is a standard 2-prong out.let, it is your personal responsibili_' and
obligation to have it replaced with a propedy grounded 3-prong wall outlet.
ge.com
:_J/The refrigerator should always be plugged into its own
individual electlJcal outlet which has a voltage rating that
matches the rating plate.
i,'_ This provides the best pe_l'ommnce and also prevents
overloading house wiring circuits which could cause a
fire hazard fl'om overheated wires.
!:1:......Never un I)lug, your, refrigerator, bx, i_ullino,_ on the power
cord. Mwavs,,II,_gfi _ _luo fimfl) and pull smfight, out from
the outlet.
READANDFOLLOWTHISSAFETYINFORMATIONCAREFULLY.
SAVETHESEINSTRUCTIONS
:#1:Repair or replace immediately all power cords that have
become fl'aved or otherwise damaged. Do not use a cord
that shows cracks or abrasion damage along its length or
at either end.
_1:_'_hen mox4no_ the reflJgerator away fl'om the
wall, be careflfl not to roll oxer or damage the
power cord.
Page 4
How to install features. (Not all features are on all models.)
(!) TOP FREEZER SHELF
Make sure the shelf front locks into
position.
Top Freezer Shelf
(_ FREEZER DOOR SHELF FRONTS
Make sure that the shelf front locks
into position,
NOTE: On dispenser models, the
longer shelf fronts go in the top
two positions,
_ Dh2,; Front
(_) FILTER CARTRIDGE
Remove Bypass Plug Install Filter Cartridge
S
@ DAIRY COVER
@ BOTTLE RETAINER
@ ADJUSTABLE
DOOR BINS
DOOR BIN SNUGGERS
@ LOWER FIXED DOOR BINS
Make sure the bin fronts lock into position.
To remove: I,ifl the shelf extender
straight up, then pull out.
To replace: Engage the shelf
extender in the molded supports
of the door and push in. It will
lock in place.
Ill
!1
/
Lower Door Bin
Abouttheshelvesandbins.(Not all features are on aii models.)
Rearranging the Shelves
Refrigerator Shelves:
ToRemove
ToReplace ToRemove
Freezer Pan:
To remove: I,ifl the
fl'ont of the bin up,
then pull out.
Toreplace or relocate:
Engage the 1)in in the
molded supports of
the door, and push
in. Bin will lock in
place.
Freezer Shelves:
ToRemove
I
4
Remove the pan by pulling it
fin'ward, lifting up the fl'ont
and sliding it past the stop
location.
Page 5
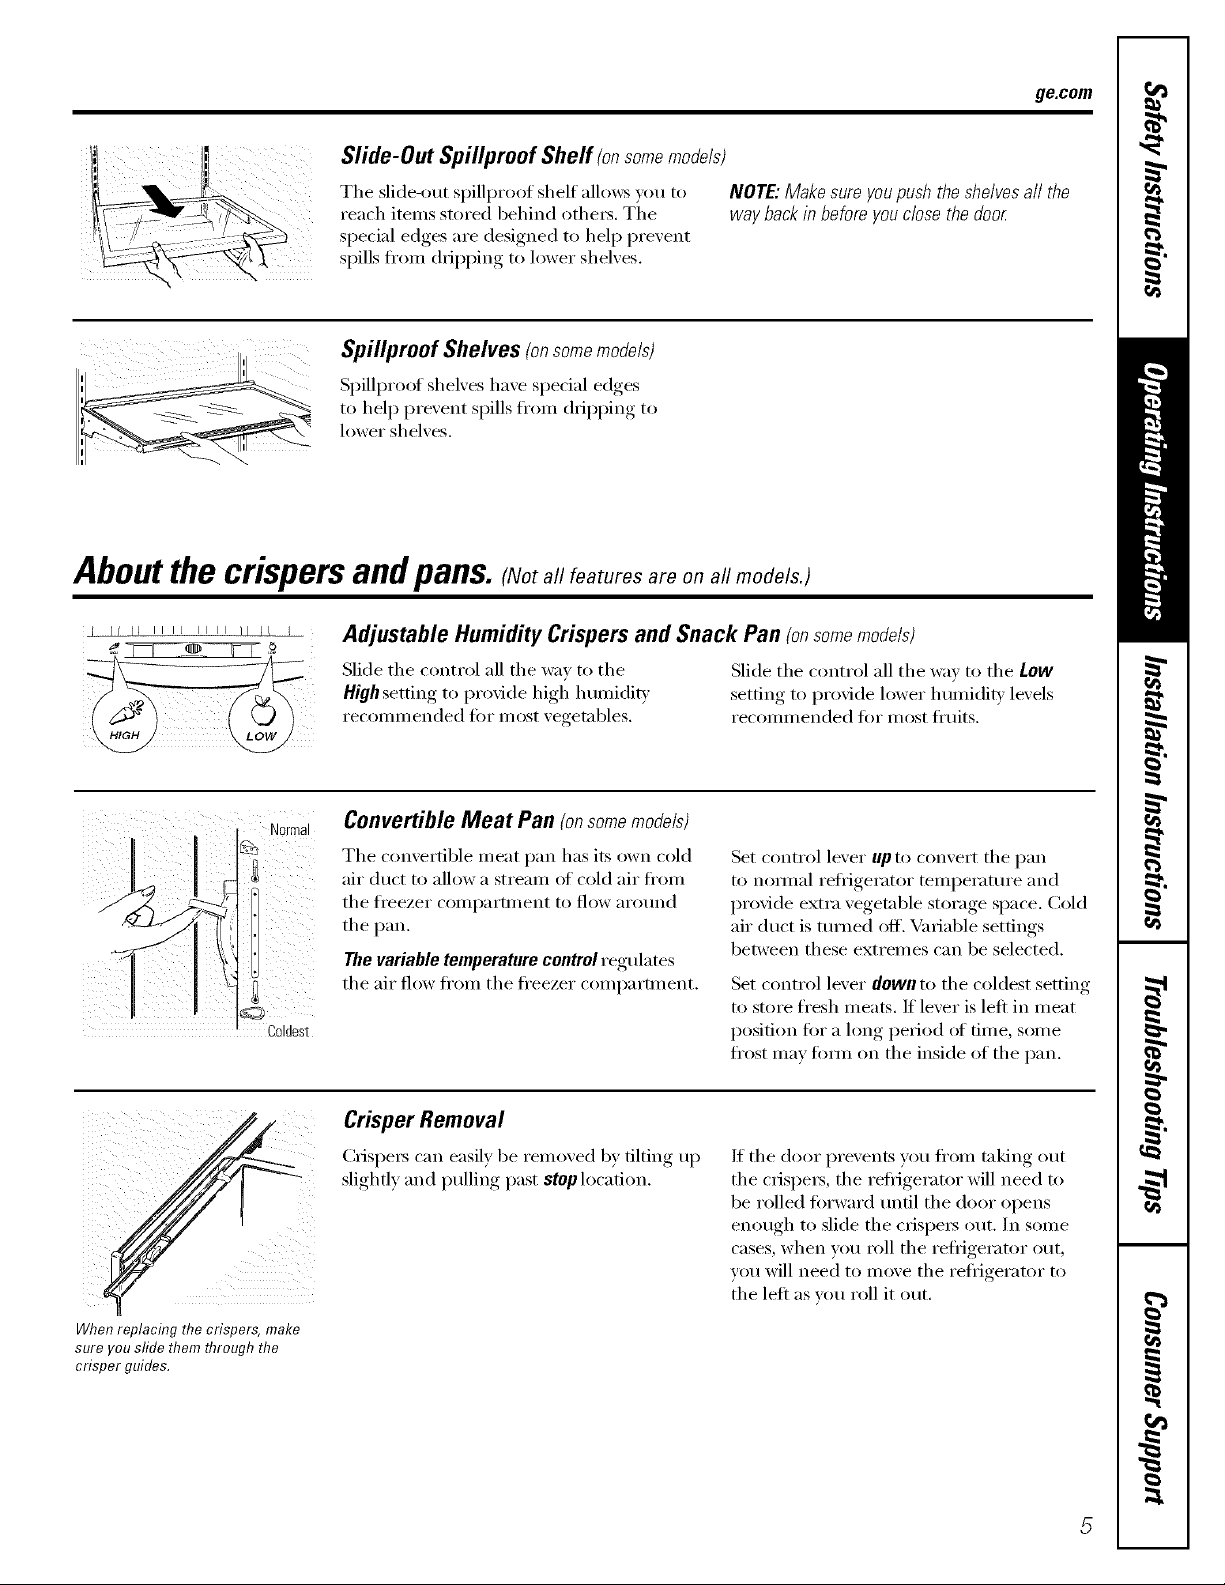
Slide-Out Spillproof Sheff (onsomemodels)
The slide-out spillproof shelf allo_vs you to
reach items stored behind ethel,. The
special edges are designed m hel I) prevent
spills from dripping to lower shelves.
ge.com
NOTE:Makesureyoupushtheshelvesall the
waybackin beforeyouclosethedoo_
I
Spillproof Shelves (onsomemodelsj
Spillproof shelx es haxe sI)ecial edges,
to hel I) prevent spills from (h_l)l)ing to
lower shelx es.
Aboutthe crispersandpans.(Noto//f ot. o on model&)
Adjustable Humidity Crispers and Snack Pan (onsomemodels)
Slide the control all the wax to the Slide the control all the wax to the Low
High setting to provide high h umidig setting to provide lower humidig lexels
recomm ended for most "_egetables, recommended for most fl'uits.
Normal
)
Coldest
Convertible Meat Pan (onsomemodels)
The convertible meat pan has its own cold
air duct to allow a stream of cold air fl'om
the fl'eezer compartment to flow around
the pan.
The variable temperature control regtllates
the air flow fl'om the fl'eezer compartment.
Set control lever up to convert the pan
to noi_nal reliJgerator teml)erature and
provide extra vegetable storage space. Cold
air duct is turned off'. Variable settings
between these extrelnes can be selected.
Set control lever down to the coldest setting
to store fl'esh lneats. If level" is left in lneat
position for a hmg period of time, some
ti'ost Inav tOim on the inside of the pan.
When replacing the crispers, make
sure you slide them flTrough the
crisper guides.
Crisper Removal
Crispei_ can easily be remoxed b) tilting up
slightly and pulling past stop location.
If the door prevents you fl'om taking out
the crispeis, the reti_igerator will need to
be rolled fi)rward undl the door opens
enough to slide the crispei_ out. In solne
cases, when you roll the reti_igerator out,
you will need to move the refl_igerator to
the left as wm roll it out.
Page 6

Aboutthe controlsonthe refrigerator.
Yourcontrols will look like one of the following:
FREEZER
REFRIGERATOR
0 IS OFF
9 IS COLDEST
Startup Steps for Proper Temperature Control
I
I
STEP l--Set Fresh Food (_ontrol on "5.
STEP 2--Set Freezer Control on "5."
STEP _---W_MT 12HOURS fbr tempel_ture to st_bilize.
STEP _-Ifa change is needed, mo',e tile control one mm-lber at a time and allo_ 12houls
tor ternpel'ottlre to stabilize.
NOTE:Turning the l'efrigerator to the 0 (off)setting da tl/e controls does not shut off
electl_ical po_el" to fl_e l'eli'igeratol:
Controlsettings will vary based on personal preferences, usage and
operating conditions and malt require more than one adjustment.
ToChange Temperature Control Setting with TouchPads:
• Freezer setting is on the leii side oi tile dispirit.
• Fresh Food setting is on tile right side of tile display}.
-- Press the _u'mer or colder pad ii)r compartment and dil_cfion desired.
-- Present control setting mm/ber will illmninate.
-- Each time the pad is touched, compartment setting changes one mm-lbel:
A displ_ of l is _rmest and 9 is the coldest setting.
• On some models, setting both controls to the warnlest setting until the displ_J_flashes
(off) will stop cooling in both the freezer and l_fi'igerator compartments.
• On other models, setting either control to die _m-nest setting tmfil d_e (lispl_ flashes
(off) will stop the cooling to fl_e freezer and reti_igel_tol ".
NOTE:Turning the lefi_igerator to tile 0 (off)setting via tile controls does not shut off
electrical po_er to file reti'igel_to_'.
Control settings will vary based on personal preferences, usage and
operating conditions and may require more than one adjustment.
Page 7
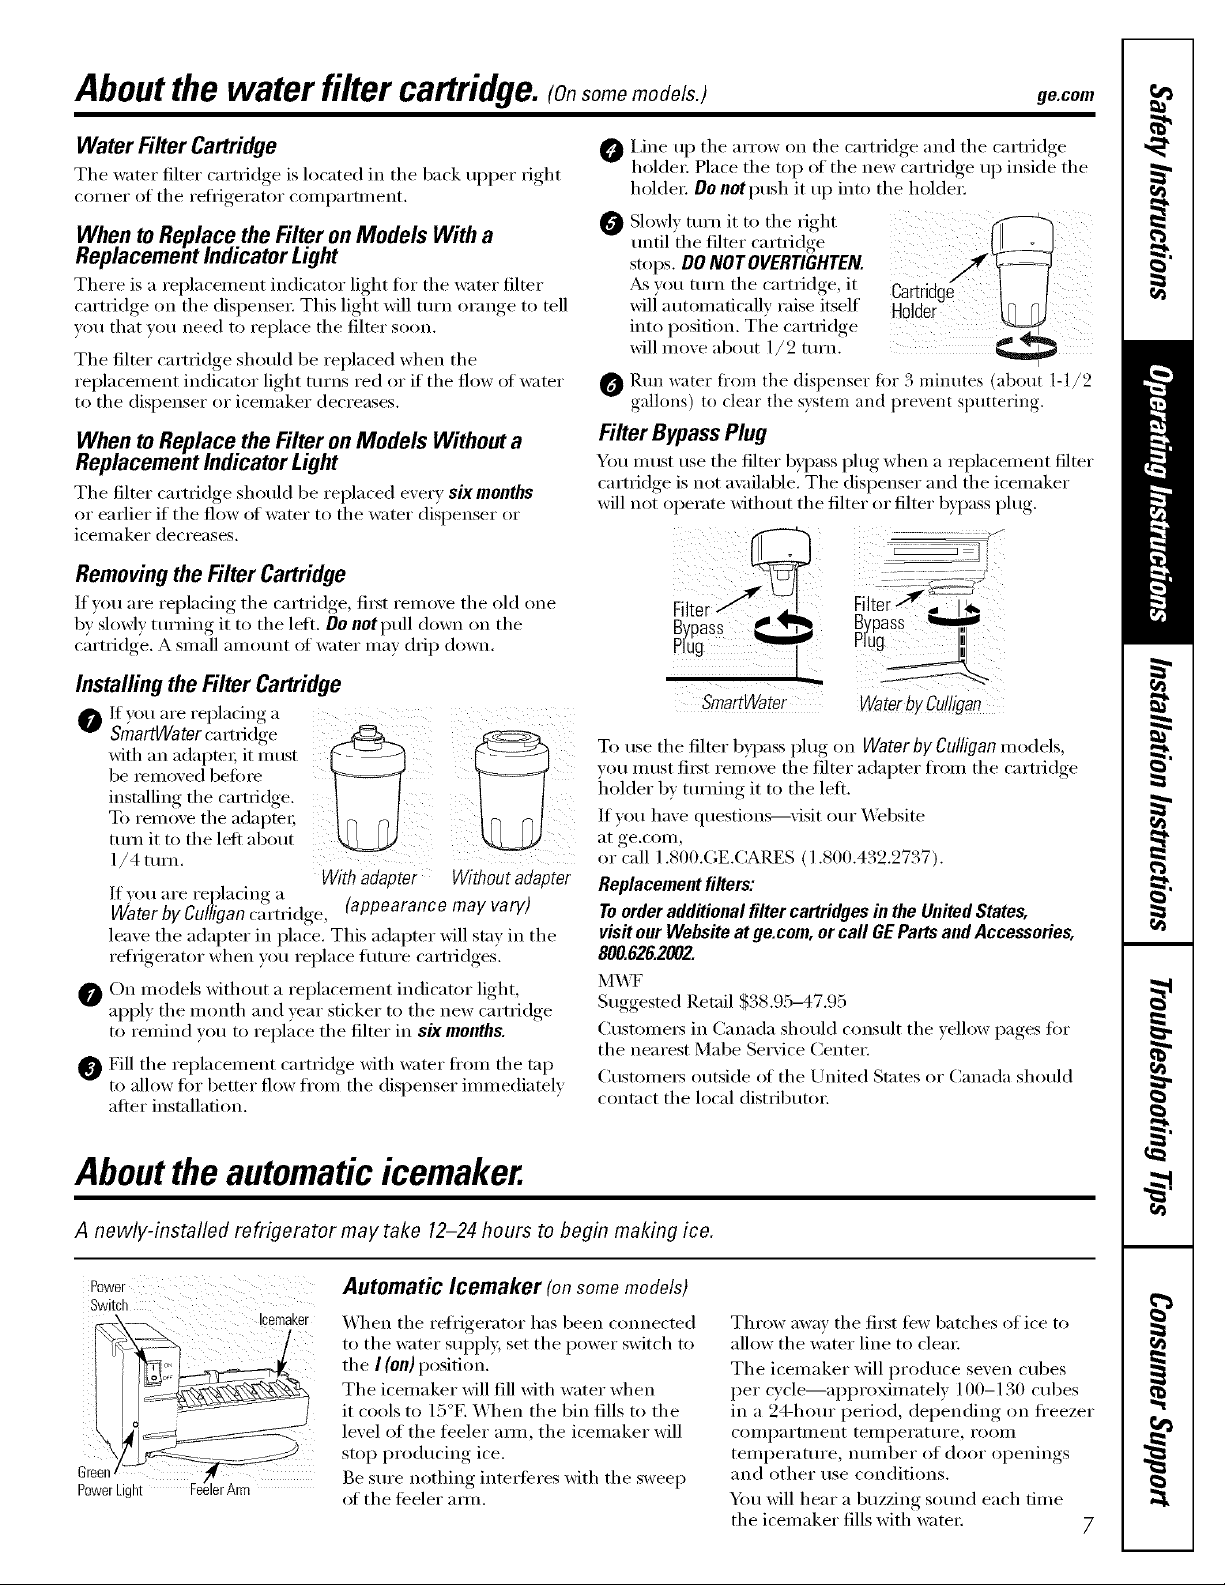
Aboutthe water filter cartridge.(Onsomemodels; ge.com
Water FilterCartridge
The water filter cartridge is h)cated ill the back ul)per right
corner of the refl_igerator comi)artn/ent.
When to Replace the FilteronModels With a
ReplacementIndicator Light
There is a rel_la('ement indicator light tilt the water filter
cartridge on the dispensei: This light will turn orange to tell
xou that _ou need to replace the filter soon.
Tile filter cartridge should be replaced when the
replacenmnt indicator light turns red or if the flow of water
to the dispenser or icemaker decreases.
When to Replace the Filter on Models Without a
ReplacementIndicator Light
The filter (artfi(l_e should be replaced every six months
or earlier if the flow at water to the w;iter dispenser or
icemaker decreases.
Removingthe Filter Cartridge
If you are replacing the cartridge, filet relllove the old one
by slowly turnin_ it to the left. Do not/)ull down (m the
cartficl_e, axsmall am()tmt at water may drip down.
Installing the Filter Cartridge
O Ifyou m'e replacing a
with :Ill adal)tel: it lilt/St
be ram( )ved befi )re
installine the camid_e.
To l'elHove the ada/)tel;
ttual it to the left about
1 4 mm.
With adapter Without aaaorer
]f rot/ ;lI'e rel)la(ing ;i
Water by Culligan cartridge, (appearance may vary)
leave tile adapter ill place. This adapter will stay ill the
refrigerator when )ou replace fimue cartridges.
On models without a replacement indicator light,
appl) the month and xear sticker to the new cartridge
to renfind xou to replace the filter ill six months.
Fill the replacenmnt cartridge with water fl'om the tap
to allow fi)r better flow fron/the dispenser immediately
after installation.
O i,ine tl I) the arrow on the cartridge and the cartridge
holdei: Place the top of the new cartridge up inside the
holdei: Do not push it up into the holder:
Sh)wly turn it to the right
until the filter cartridge
stops. DO NOTOVERT/GHTEN.
_s you turn the cartridge, it
will autonmficallv, raise itself Holder
into position. The caitridge
will moxe abotlt 1/2 ttlrn.
O Run water fl'om the dispenser fi)r 3 minutes (about l-1/2
galhms) to clear the s\stem and prevent sputtering.
FilterBypassPlug
You must use the filter byl)aSS l)lug when a replaceuwnt filter
cartridge is not ax:lilable. The dispenser and the icemaker
will not operate wifllout the filter or filter byp;_ss phtg.
Filter_,. I1_
Bypass
Plug, _i
i
SmartWater
To use the filter bypass l)lug on Waterby Culligan models,
you must filst remove the filter adapter fl'om the cartridge
holder b) turning it to the left.
If you have questions--visit our Website
;It _e.(()l/l_
or call 1,800,GE,CARES (1,800,432,2737),
Replacement fillers:
Toorderadditional filter cartridges in the United States,
visit our Website at ge.com, or call GEParts and Accessories,
800.628.2002.
MWF
Suggested Retail .$38.95-47.95
Custonlei_ ill Canada should consult the yelh)w pages fi)r
the nearest Mabe Serxice Centei:
Custonleis ()utside of the United States or Canada should
contact the local distfibutoi:
Waterby &lligan
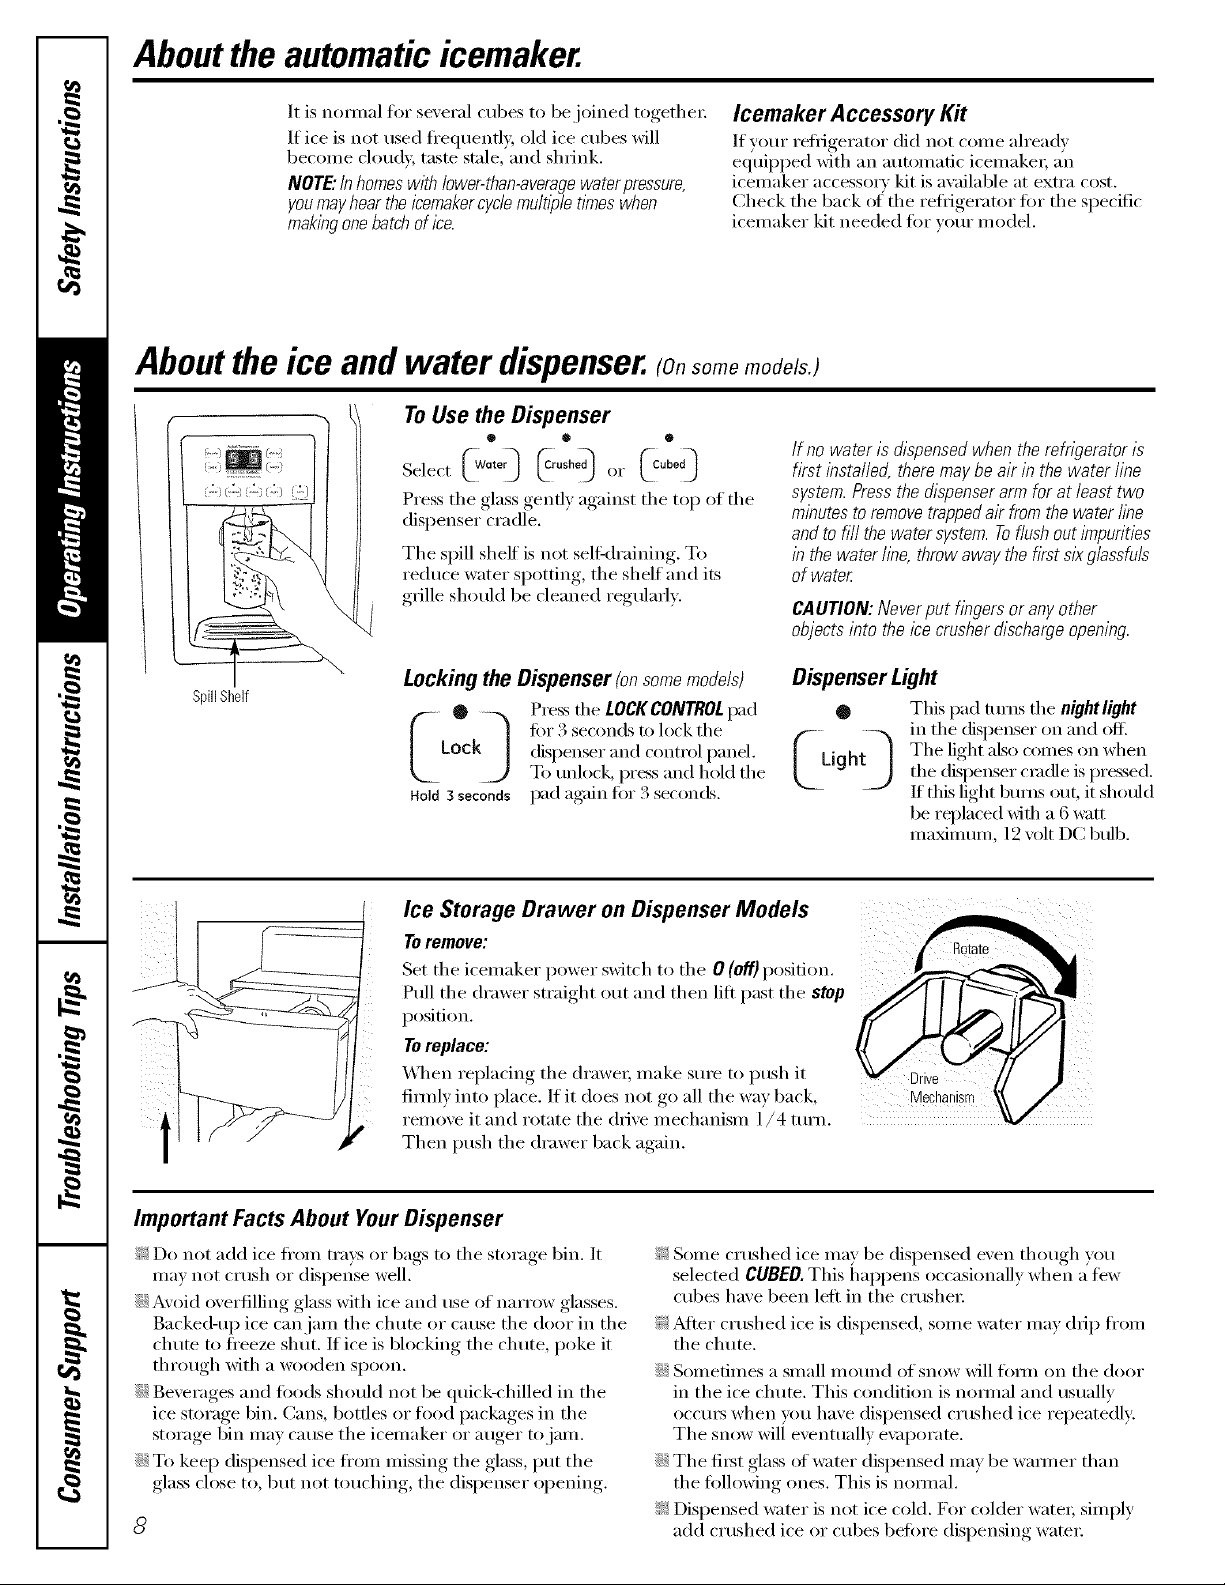
Aboutthe automaticicemaker.
A newly-installed refrigerator may take 12-24 hours to begin making ice.
Switch
6teen
PowerLight _rArm
Icemaker
Automatic Icemaker (onsomemodels)
\,\]_en the refrigerator has been connected
to the water supply, set the power switch to
the I (on) position.
The icemaker \\'ill fill with water when
it cools to 15°E When the bin fills to the
level of the teeler ;urn, the icemaker will
stop producing ice.
Be sure nothing inteHeres with the sweep
at the ti_eler aim.
Till'()\\' away the filet te\\' batches of ice to
allow the \_;ater lille to clam:
The icemaker will produce seven cubes
per wcle--ai)proxinmtely 100-130 cubes
ill a 24-hour period, depending on fl'eezer
COI/ll)_lI'tlllent tei/ll)ei'iltlli'e _ i'OOill
teml)erature, ntunber of door openings
and other use conditions.
You \\'ill hear a buzzing SOtlnd each time
the icemaker fills with \\'ateI: 7
Page 8
Aboutthe automaticicemaker.
It is nomml tor several cubes to be joined togethex:
If ice is not used fl'equenfly, old ice cubes will
becon_e cloudy, taste stale, and shrink.
NOTE."In h )rueswith lower-than-averagewaterpressure,
youmayhear the icemakercycle mul@/e times when
making onebatch ofice.
Icemaker Accessory Kit
If your refligerator did not come ah'eady
e(iuipped with an automatic icemakei; an
icemaker accessoi y kit is a\zfilable at extra cost.
Check tile back ot the refligerator for tile specific
icemaker kit needed for your model.
Aboutthe ice and water dispenser.(onsomemoao¢s)
(-. {:,,
2) {2) (L"
SpillShelf
To Use the Dispenser
Select _WQ,e_ _rushed_ (1I" _Cubed_
Press tile _(*lass_(*enflx.against, tile top of tile
dispenser cradle.
Tile spill sheff is not self-draining. To
reduce water si)otting,, tile shelf and its
grille should be cleaned regularly.
Lockingthe Dispenser(onsomemodels)
® @ •
If no water is dispensed when the refrigerator is
first installed, there may be air in the water line
system. Press the dispenser arm for at least two
minutes toremove trapped air from the water l/be
and to fill the water system. Toflushout/_npurities
in the waterline, throwaway the first sixglassfuls
of water
CAUTION: Never put fingers or any other
objects into the ice crusher discharge opening.
Dispenser Light
0 Press the LOCKCONTROLpad
Q This pad rams tile nightlight
LOC dispenser and control panel.
k_ tOr 3 sec°nds t° l°ck the
To unlock, press and hold the
Hold3seconds pad again for3 seconds.
Ice Storage Drawer on Dispenser Models
Toremove:
Set the icemaker power switch to tile 0 (Off)position.
Pull the drawer straight out and then lift past the stop
p()sifion.
Toreplace:
\_]wn replacing the (h'awel, make sure to push it
fimdv into place./f it does not go all the way back,
1"el/lOVeit and rotate the Olive mechanism 1/4 turn.
Then push the drawer back again.
Important Facts About Your Dispenser
_: Do not add ice fl'om trays oi" bags to tile storage bin. It
may not crush or (lispeI{se well.
iJi::Avoid overfilling glass with ice and use of narrow glasses.
Backed-up ice canjanl tile chum or cause tile door in tile
chute to freeze shut. If ice is blocking the chute, poke it
through with a wooden spoon.
iJi::Beverages and toods should not be quick-chilled in the
ice storage bin. Cans, bottles or toed packages in the
storage bin may cause the icemaker or auger to jam.
iJi::To kee I) dispensed ice fl'om missing tile glass, put tile
glass close to, but not touching, tile dispenser opening.
8
_v__L -'x in tile (fispenser on and (/fl_
ightJ Tile light also comes (m whenthe dispenser cradle is pr_sed.
If this light bums out, it sho/fld
be rq)laced _ith a 6 _tt
ma_mum, 12 volt D(: b/fib.
Mechanism
!i_:Some crushed ice may be dispensed even though you
selected CUBED. This hal)pens occasionally when a few
cubes haxe been left in the crushei:
!i_:_Mier crushed ice is dispensed, some water may (hi l) fl'om
the chute,
iJi::Sometimes a small mound of snow will titan on tile door
in the ice chute. This condition is nomml and usually
occurs when you have dispensed crushed ice repeatedly:
Tile snow will eventually e\:q)oram.
iJi::Tile first glass of water dispensed may be wam/er than
the tollowing ones. This is nomml.
_: Dispensed water is not ice cold. For colder watei; simply
add crushed ice or cubes before dispensing ware1:
Page 9

Careand cleaningofthe refrigerator, gecem
Cleaning the Outside
The dispenser drip area, ((m some Inodels)
3 " " " " ,' " l 3 3.
tile deposits by adding undiluted vinegar to
the well. Soak until the deposits disappear
or becoille loose eno/lgh to IJnse awavk
The dispenser cradle (on some models).
Before cleaning, lock the dispenser b_
pressing and holding the LO_K CONTROL
pad tot 3 seconds. Clean with waml water
and baking soda solution--about a
tablespoon (15 ml) at baking soda to a
quart (l 1) of wamn Rinse thoroughly
and wipe (h T.
Cleaning the Inside
The door handles and trim. Clean with a
cloth dampened Mth soapy wate,: Dry
with a soft cloth.
Keep the outside clean. Wipe with a clean
cloth lightly dampened with kitchen
appliance wax or mild liquid dish dete,gent.
D_' and polish with a clean, soft cloth.
Do not wipe the refn)erator with a soiled dish
cloth or wet towel. Thesemay leave a residue
that can erode the painL Do not use scouring
pads, powdered cleaners, bleach or cleaners
containing bleach because these products can
scratch and weaken the paint finish.
Tohelp prevent odors, leave an open box o_
baking soda in tile refiigerator and fl'eezer
fiOI/ll)[I I't/lle nts.
Unplug the refrigerator before cleaning. If this
is not i)ractical, w_ing excess moistm'e out
at sponge or cloth when cleaning aro/md
switches, lights or controls.
Use waml water and baking soda solution--
about a tablesl)oon (l 5 ml) of baking soda
to a quart (1 1) el waten This both cleans
and neutralizes odm_. Rinse and wipe dry.
_Mter cleaning tile door gaskets, apply a
thin layer of petroleum jelly to the door
gaskets at the hinge side. This helps keep
tile gaskets ti'om sticking and bending out
of shape.
Behind the Refrigerator
Be careflfl when moving tile refligerator away fl'om tile
wall. M1 types of floor coverings can be damaged,
particularly cushioned coverings and those with embossed
S/lI'J[il ces,
Drain opening in freezer compartment
During yearly cleaning, renlove bottom
fl'eezer pan and flush a solution of baking
soda--I teaspoon (5 ml) and 2 cups (500
ml) of hot (not boiling) water--through
the drain line with the help ,ff a meat
baste_: This will hel I) eliminate odor and
reduce tile likelihood of a ch)gged drain
line. If drain becomes clogged, use a meat
baster and baking soda solution to fl)rce tile
ch)g through tile drain line.
Avoid cleaning cold glass shelves with hot water
becausethe extremetemperaturedifference may
causethem to break.Handleglass shelvescarefully.
Bumpingtemperedglasscancauseit to shatter
Do not wash any plastic refngerator parts in the
dishwasher
Pull tile refrigerator straight out and retm'n it to position by
l)ushing it straight in. Moving tile reflJgerator in a side
direction may result in damage to tile floor coveting or
refligerato_: '
Whenpushing the refr/oerator back, make sure you clan'trod over
the power cord or icemakersupply fine (on some mode/s).
Preparing for Vacation
For long \:_cafions or absences, renlove filed and unl)lug
tile reliigerato_: Clean tile interior with a baking soda
solution (:4 one tablespoon (l 5 ml) _ffbaking soda to one
quart (l 1) of wam_: I,eave tile dom_ open.
Set tile icemaker power switch to tile O (Of'/)position and
shut off tile water SUl)ply to tile reffigeratm:
Preparing to Move
Secm'e all loose items such as grille, sheh'es and drawet_ b)' taping them seem'ely in place to prevent damage.
Be sure the refngerator stays in an upn)ht position during moving.
Replacing the Light Bulbs
NOTE: Turning the refrigerator to the 0 (off) setting via the controls does not shut off electrical power to the refrigerator.
Unl)lug tile refrigerator. O Replace with an appliance bulb of tile sanle
0 Remove the shelf just below the light shield.
or lower wattaoe
0 Reinstall tile shelf and I)lug tile refrigerator
back in.
Page 10

Installation Instructions
Questions?Call 800.GE.CARES(800.432.2737)or visitour _'ebsite at: ge.com
In Canada.call 1.800.361.3400or Visito,, X_bsite;,t:www.geappliances.ca
BEFORE YOU BEGIN
Read these instructions completely and carefully.
• IMPORTANT - S ,,ethese
instructions for local inspector's use.
• IMPORTANT - Obse ,e;,ll
governing codes and ordinances.
• Note to Installer _ Be sure to leave these
instHlctions with the Consumer.
• Note to Consumer _ Kee I) these instructions
tot fllture reference.
• Skill level - Installation of this appliance requires
basic mechanical skills.
• Completion time - Refrigerator Installation
15 minutes
• Proper installation is the responsibility of installer.
• Product tailure due to improper installation is not
covered trader the Warranty:
REFRIGERATOR LOCATION
• Do not install tile refl'igerator where the temperature
will go below 60°F (l 6°C) because it will not rtm
otten enough to maintain proper temperatures.
• Install it on a floor strong enough to sui)i)ort it fiflly
loaded.
WATER SUPPLY TO THE ICEMAKER
(on some models)
If the reli'igerator has an icemaker, it will have to be
connected to a cold water line. AGE water SUl)ply kit
is available at extra cost fl'om wmr dealer, by visiting
our _A'ebsite at ge.com (in Canada, at
www.geappliances.ca), or fl'om Parts and Accessories,
800.626.2002.
CLEARANCES
_Mlow the fi_llowing clearances fin" ease of installation,
proper air circulation and I)hunbing, and electrical
connections,
• Sides 1/8" (4ram) Top 1" (25 ram) * Back 1" (Z ram)
A door clearance of./4 (19 ram) is needed tin" a 90 ° door
opening which proxides better access to fi)od storage ai'ea.
• <5
DOOR ALIGNMENT
ROLLERS
The milers have 3 purposes:
• Rollers a(!just so the door ch)ses easily when opened
about hallway.
• Rollers a_!just so the refrigerator is fimdy i)ositioned
on the floor and does not wobble.
• Rollers allow you to move the retiigerator away fl'om
the wall fin" cleaning.
To adjust the milers, remove the base grille by pulling it
out at the bottom.
Tm'n the roller a({justing screws dockwise to raise the
reti_igerato_; comlterclocMvise to lower it. Use an
a(!justable wrench (3/8" hex head bolt) or pliers.
To replace base grille, line up the clips on back of grille
between the bar and the bottom (ff the cabinet. Push
tin'ward tmfil grille snaps into place.
Pdter leveling, make sm'e that the doo_s are e\vn at the top.
To Inake die doo_s even, a(!just die reliigei_ltor door as tolh_s:
O Remoxe the
Base (;rille, _ underthefreshfood
open the doortophhlgec0veE
(lools, then
pull the grille
straight out.
O Detemfine
which of the
two (loo_s is Shim
higher th:m
the other:
I,ifl tile lower
do(m ahmg
with the small
C_llI1,
O Place the
shim between the Door Metal Hinge and the small
cam as shown.
Press in the shim, so that it fits in between the metal
hinge and the plastic cam.
O Close the doot_ and check if they are level at the top.
If one door is still lower than the other; repeat the
process and insert another shim.
NOTE: If the doo_s are not even and the shim is ah'eadv
inserted, you can remove the shim to lower the door
Page 11
Installation Instructions
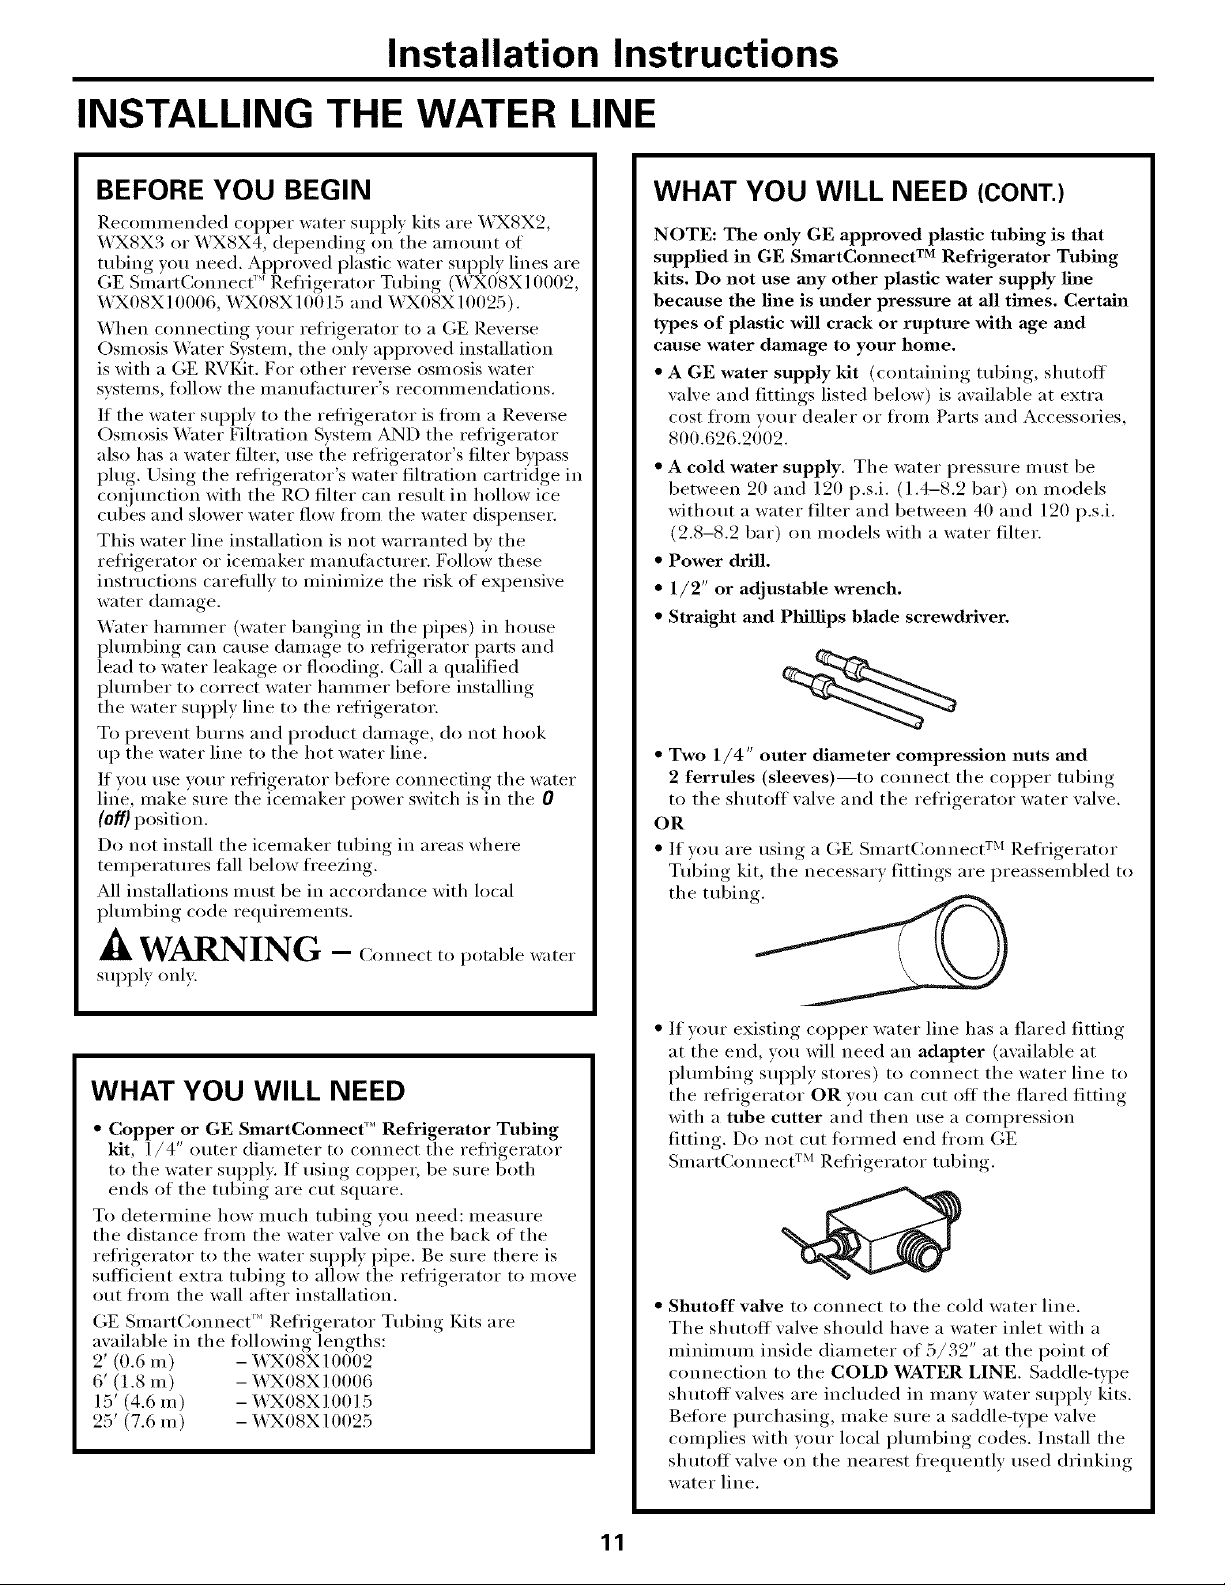
INSTALLING THE WATER LINE
BEFORE YOU BEGIN
Recomn_ended copper water supply kits are _4UX8X2,
WX8X3 or _X8X4, depending on the amom_t of
tubing you need. Approved plastic water SUl_ply lines are
GE Smart(:onnect _'_Refl_igerator Tubing (_4_X08X10002,
WX08X10006, WX08X10015 and X43X08X10025).
When connecting yore" refl'igerator to a GE Reverse
Osmosis _'_ter System, the only approved installation
is with a GE RV/4dt. For other reve_e osmosis water
systems, tollow the inanufilcturer's recommendations.
If the water supply to the reti'igerator is ti'om a Revei_e
Osmosis X4'ater Filtration System AND the refrigerator
also has a water filtei; use the reti'igerator's filter byl)ass
plug. Using the refrigerator's water filtration cartridge in
conjunction with the RO filter can result in hollow ice
cubes and slower water flow fl'om the water dispenser.
This water line installation is not warranted by the
refrigerator or icemaker manufi_cturer. Follo_' these
instructions carefifllv to minimize the risk of expensive
water damage.
_'ater hammer (water banging in the pipes) in house
plmnbing can cause damage to reflJgerator parts and
lead to water leakage or flooding. Call a qualified
phunber to correct water hammer before installing
the water supply line to the refl_igerator.
To prevent bm'ns and product damage, do not hook
up the water line to the hot water line.
If wm use your refrigerator betore connecting the water
line, make'sm'e the icemaker power switch is in the 0
(Off) position.
Do not install the icemaker tubing in areas where
temperatm'es tall below freezing.
All installations ulust be in accordance with local
pltmfl)ing code reqtfirements.
WHAT YOU WILL NEED (CONT.)
NOTE: The tufty GE approved plastic tubing is that
supplied in GE SmaxtCmmect TM Refrigerator Tubing
kits. Do not use m_y other plastic water supply line
because the line is under pressure at all times. Certain
types of plastic will crack or rupture with age and
cause water damage to your home.
• A GE water supply kit (containing tubing, shutoff
valve and fittings listed below) is available at extra
cost fl'om your dealer or fl'om Parts and Accessories,
800.626.2002.
• A cold water supply. The water pressm'e must be
between 20 and 120 p.s.i. (1.4-8.2 bar) on models
without a water filter and between 40 and 120 p.s.i.
(2.8-8.2 bar) on models with a water filter.
• Power drill.
• 1/2" or adjustable wrench.
• Straight and Phillips blade screwdriver.
• Two 1/4" outer diameter compression nuts m_d
2 ferrules (sleeves)--to connect the COl)per tubing
to the shutoff wflve and the refl'igerator water wflve.
OR
• If wm are using a GE Smart(_onnect TM Refl'igerator
Tubing kit, the necessary fittings are preassembled to
the tubing.
WARNING - Com,e,ttop.t ,ble,, ,te,
supply only.
WHAT YOU WILL NEED
• Copper or GE SmartCmmecf _"Refrigerator Tubing
kit, l/4" outer diameter to connect the refi'igerator
to the water supply. If using copper, be sm'e both
ends of the tubing are cut square.
To determine how much tubing you need: measm'e
the distance ti'om the water wflve on the back of the
refrigerator to the water supply pipe. Be sm'e there is
sufficient extra tubing to allow the refl'igerator to move
out fl'om the wall alier installation.
GE SlnartConnect _''Refl'igerator Tubing Kits are
available in the ti_llowing lengths:
2' (0.6 m) - WX08X10002
6' (t.8 m) - _4UX08X10006
15' (4.6 m) - WX08X10015
25' (7.6 m) - WX08X10025
• If wmr existing COl)per water line has a flared fitting
at the end, you will need an adapter (available at
i)lmnbing supply stores) to connect the water line to
the refrigerator OR you can ctlt off the flared fitting
with a tube cutter and then use a compression
fitting. Do not cut ti_rmed end from GE
Smart(_onnect TM Refl'igerator tubing.
• Shutoff valve to connect to the cold water line.
The shutoff wflve should have a water inlet with a
minimmn inside diameter of 5/32" at the point of
connection to the COLD WATER LINE. Saddle-type
shutoffwflves are included in many water supl)ly kits.
Before pro'chasing, make sm'e a saddle-Vpe wflve
complies with yore" local phunbing codes. Install the
shutoff valve on the nearest ti'equently used drinking
water line.
11
Page 12
Installation Instructions
[] SHUT OFF MAIN WATER SUPPLY
[] DRILL THE HOLE FOR THE VALVE
Choose a location for the valve that is easily
accessible. It is best to connect into the side of a
vertical water pipe. When it is necessary to connect
into a horizontal water pipe, make tile 'connection
to the top or side, rather than at the bottom,
to aw)id drawing off any sediment fl'om the
water pipe.
Drill a ]/4" hole in the water pipe (even if using a
self:piercing valve) using a sharp bit. Remove any
burrs resulting fi'om drilling tile hole in tile pipe.
TaKe canre not to allow water to drain into the drill.
Failure to drill a l/4" hole may result in reduced
ice production or smaller cubes.
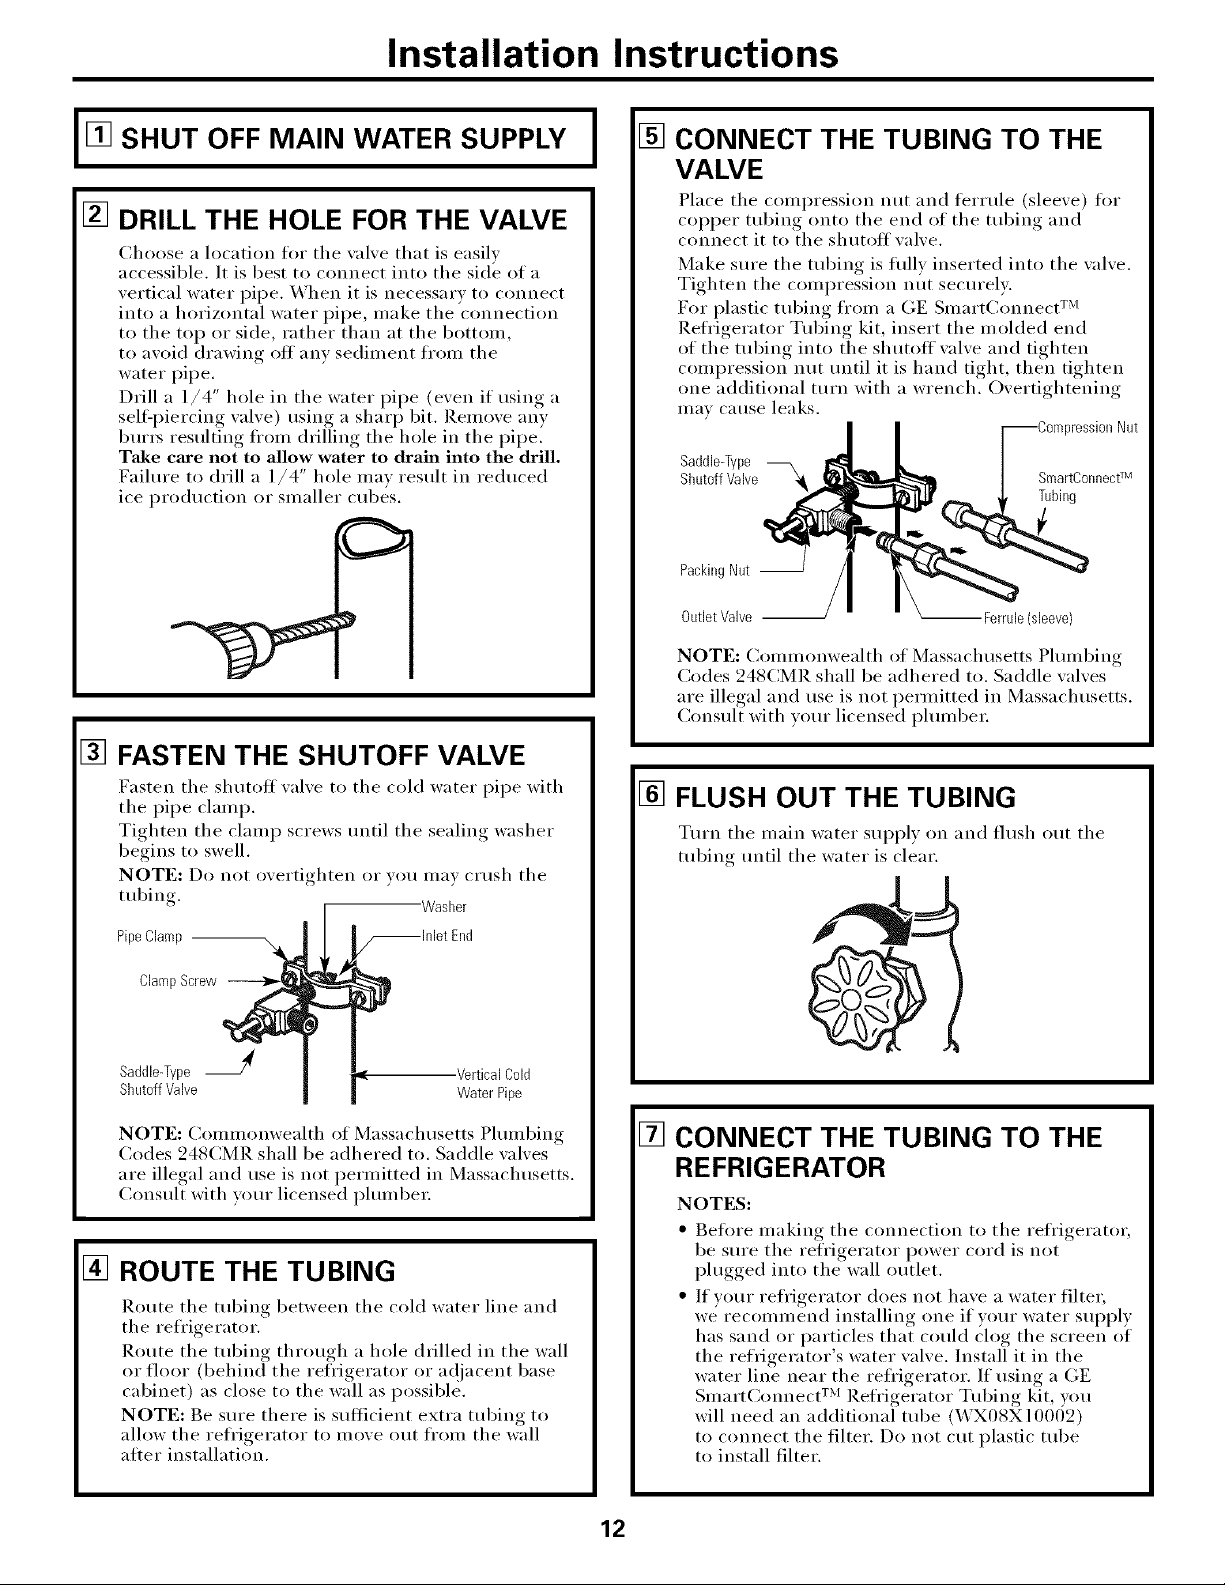
[] CONNECT THE TUBING TO THE
I
VALVE
Place tile compression nut and ti_Hule (sleeve) flw
(-opper tubing onto tile end of tile tubing and
connect it to tile shutoff valve.
Make sure the tubing is fiflly inserted into the wflve.
Tighten tile compression nut securel)'.
For plastic tubing fl'om a GE Sinart(]onnect TM
Refligerator Tubing kit, insert tile molded end
of the tubing into the shutoff wflve and tighten
compression nut until it is hand tight, then tighten
one additional turn with a wrench. Overtightening
Ill'IV CatlSe leaks.
Saddle-Type
ShutoffValve
PackingNut --
OutletValve -- -- Ferrule(sleeve)
NOTE: Commonwealth of Massachusetts Plumbing
Codes 248CMR shall be adhered to. Saddle wflves
are illegal and use is not permitted in Massachusetts.
Consult with your licensed pluml)e_:
oressionNut
SmartConnect TM
Tubing
[] FASTEN THE SHUTOFF VALVE
Fasten the shutoff valve to the cold water pipe with
the pipe clamp.
Tighten tile clamp screws until tile sealing washer
begins to swell.
NOTE: Do not overtighten or you may c_ush the
tubing. Washer
PipeClamp _1_ End
ClampScrew
Saddle@pe J VerticalCold
ShutoffValve WaterPipe
NOTE: Commonwealth of Massachusetts Plumbing
Codes 248CMR shall be adhered to. Saddle wflves
are illegal and use is not permitted in Massachusetts.
Consult with w)ur licensed pluml)e_:
[] ROUTE THE TUBING
Route tile robing between tile cold water line and
tile refrigerator.
Route tile robing through a hole drilled in tile wall
or floor (behind tile refligerator or a(!jacent base
cabinet) as close to the wall as possible.
NOTE; Be sure there is sufficient extra tubing to
allow the refrigerator to move out fi'om the wall
after installation.
[] FLUSH OUT THE TUBING
Turn tile main water suI_pl,v on and flush out tile
tul)ing until tile water is clear.
[]
CONNECT THE TUBING TO THE
REFRIGERATOR
NOTES:
• gefl)re making tile connection to tile refligerator,
be sure tile refligerator power cord is not
plugged into the wall outlet.
• If your refligerator does not have a water filter,
we recommend installing one if vour water SUl)ply
has sand or particles that could clog tile screen of
the refrigerator's water wflve. Install it in the
water line near tile refligerator. If using a GE
SmartConnect TM Refl'igerator Tubing kit, you
will need an additional tube (WX08X10009)
to connect tile filter. Do not cut plastic tube
to install filter.
12
Page 13
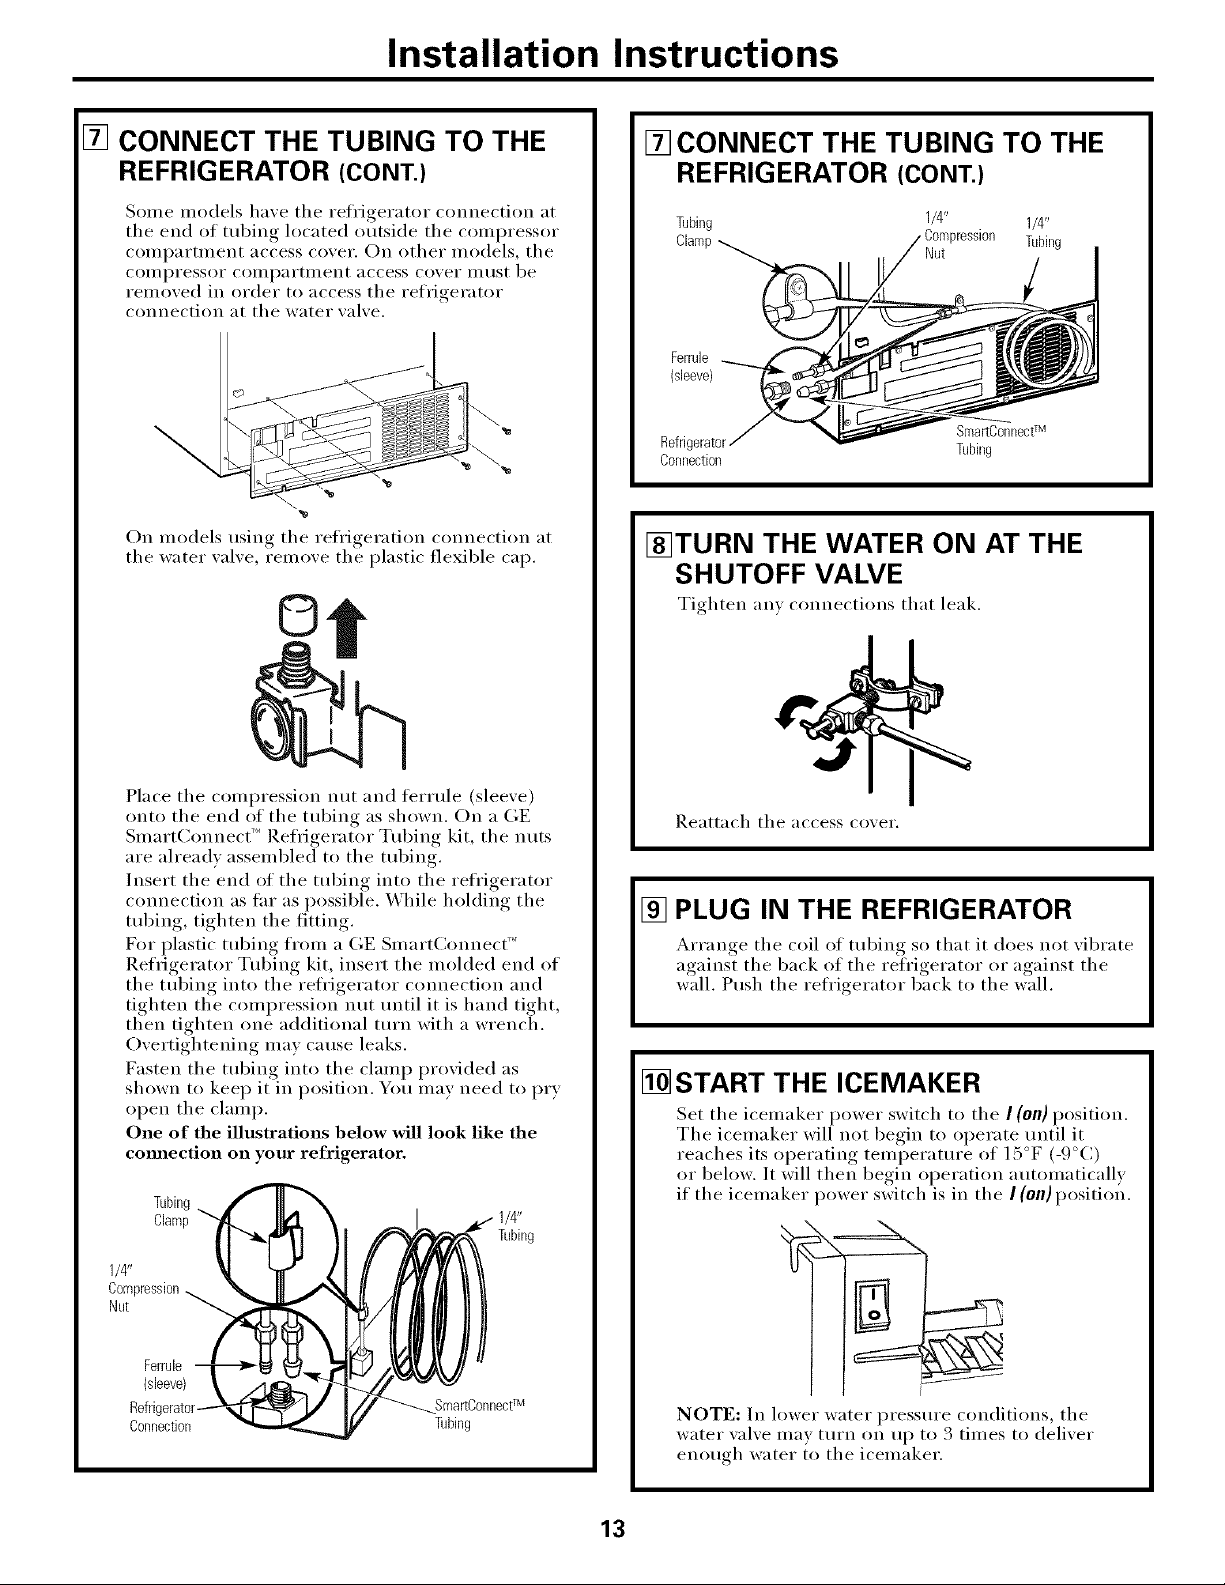
Installation Instructions
[] CONNECT THE TUBING TO THE
REFRIGERATOR (CONT.)
S()me models have the refl'igerator connection at
the end of robing located outside the compressor
comi)arm_ent access cover. On other models, the
COU/l)ressor COUll)_lI'tIIlent access cover UltlSt be
removed in order to access the refrigerator
connection at the water wflve.
On models using tile refrigeration connection at
the water xalxe, remoxe the plastic flexible cap.
©
[] CONNECT THE TUBING TO THE
REFRIGERATOR (CONT.)
Tubing 1/4" 1/4"
Tubing
Ferrule
(sleeve)
SmartConnecffM
Connection
Tubing
I_TURN THE WATER ON AT THE
SHUTOFF VALVE
Tighten am connections that leak.
Place tile compression nut and ti_Hule (sleeve)
onto the end of the tubing as shown. On a GE
SulartConnect'l RefiJgerator Tubing kit, the ntltS
are ah'eadv assembled to the tubing.
Insert tile end of tile tubing into tile refl'igerator
connection as flu" as possible. While holding the
robing, tighten tile fitting.
For plastic tubing from a GE Smart(:onnec("
Refrigerator Tubing kit, insert tile molded end of
tile tubing into tile reti'igerator connection and
tighten the compression nut tmtil it is hand tight,
then tighten one additional turn with a wrench.
Overtightening may cause leaks.
Fasten the robing into the clamp provided as
shown to kee I) it in position. You may need to pry
open tile clamp.
One of the illustrations below will look like the
commction on your refrigerator.
Tubing
Clamp_
1/4"
Compression
Nut _
Ferrule
(sleeve)
SleartConnectTM
Connection Tubing
1/4"
Tubing
Reattach tile access cover.
[] PLUG IN THE REFRIGERATOR
__rraw,e tile coil of tubing so that it does not vii)rate
against the back of the refrigerator or against the
wall. Push the refrigerator back to the wall.
[] START THE ICEMAKER
Set tile icemaker power switch to tile I (on)position.
Tile icemaker will not begin to operate until it
reaches its operating temperature of I5°F (-9°(:)
or below. It will then begin operation automatically
if the icemaker power switch is in the I (0n) positiol_.
J_
NOTE: In lower water pressm'e conditions, tile
water xalxe ulav turn on t/I ) to 3 times to delixer
enow,h water to tile icemaker.
13
Page 14
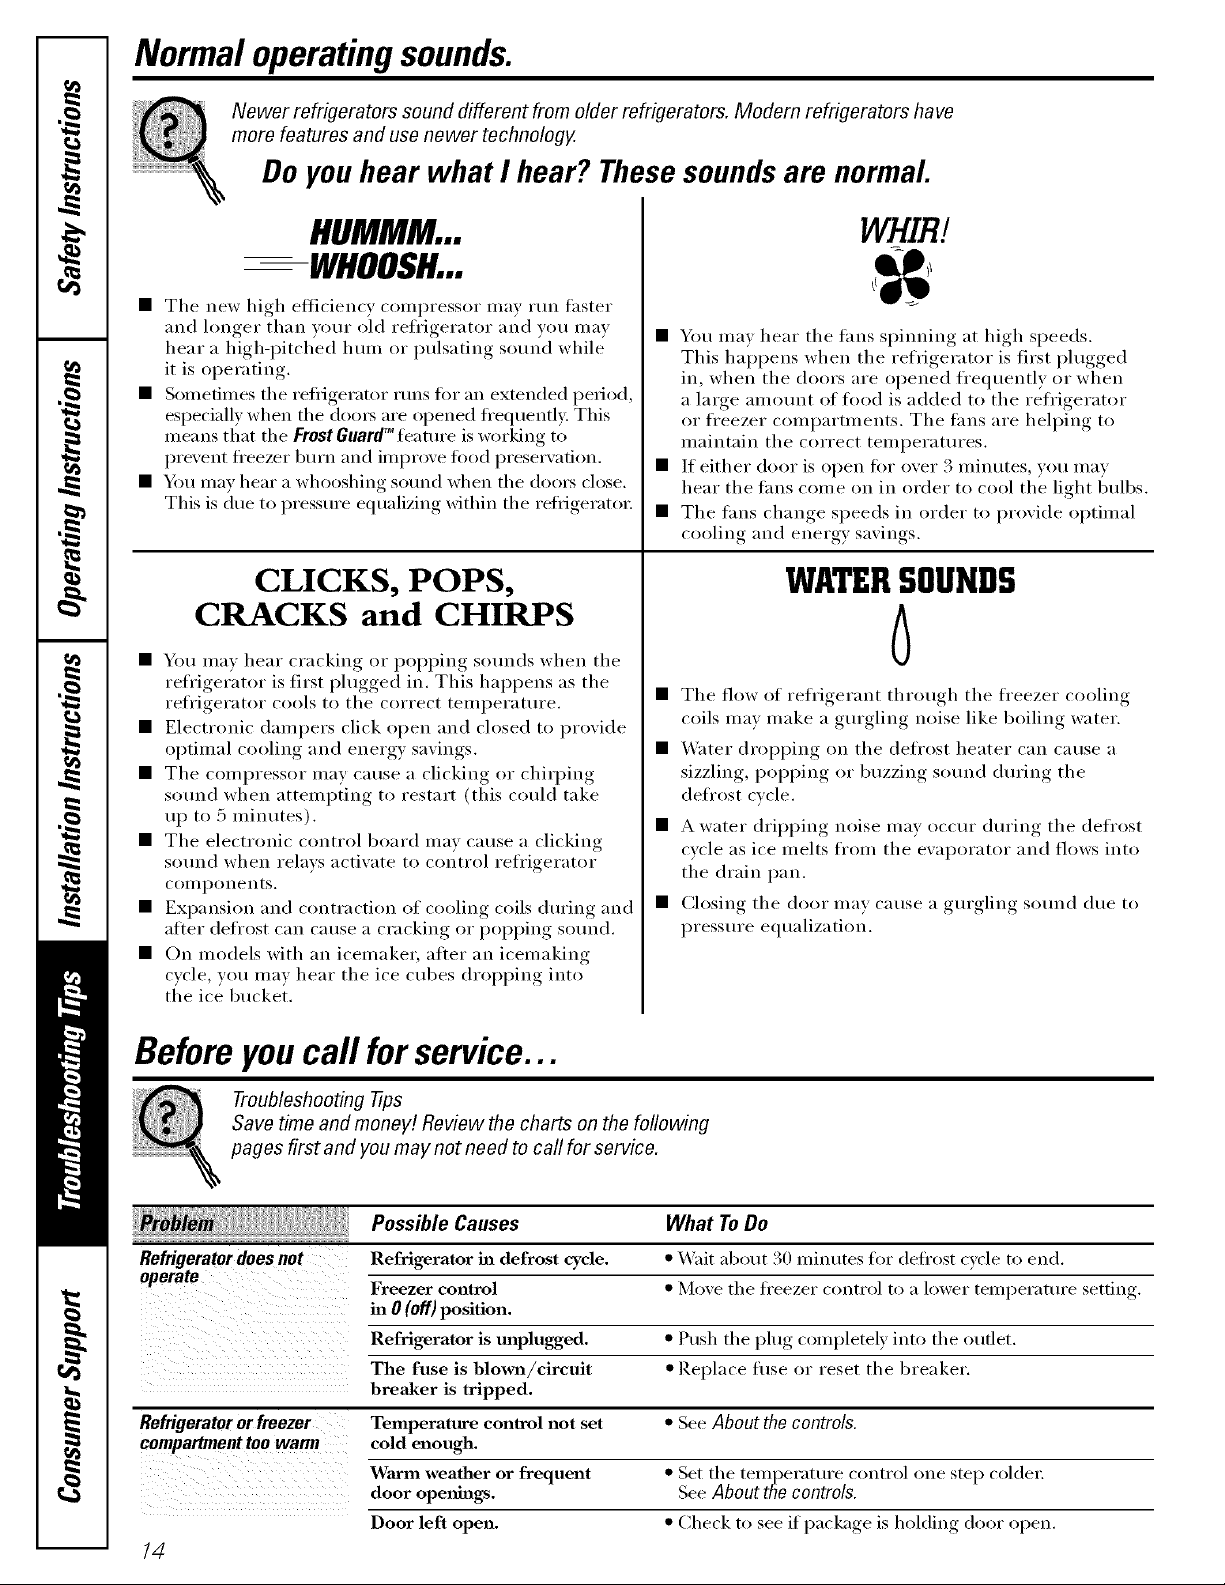
Normal operatingsounds.
Newer refrigerators sound different from older refrigerators. Modem refrigerators ha ve
more features and use newer technology.
Do you hear what I hear? These sounds are normal
HUMMM...
--WHOOSH...
• The new high efficiency conq)ressor may Iun faster
and hmger than your old refi'igerator and you may
hear a high-i)itched hum or pulsating sound while
it is operating.
• Sometimes the reti-igerator runs t0r an extended period,
especially when the dooi5 are opened ti'equently. This
means that the Frost GuardT"feature is working to
prevent fl'eezer burn and iinl)rove t0od i)reservation.
• _:,tI may hear a who(>shing sound when the (looi_ close.
This is due t(> pressm'e equalizing within the reli-igeratoL
CLICKS, POPS,
CRACKS and CHIRPS
• You may hear cracking or poi)ping sounds when the
refrigerator is first plugged in. This hal)pens as the
reflJgerator cools to the correct teull)ei'attu'e.
• Electronic dampers click open and closed t(> pr(wide
optimal cooling and energy savings.
• The compressor may cause a clicking or chiq_ing
sound when attempting t(> restart (this could take
up t(> 5 u]iI]utes).
• The electronic control board may cause a clicking
sound when relays activate t(> cm{trol refrigerator
coInl)oIleIltS.
• Expansion and contraction of cooling coils during and
aDer defrost can catlse a cracking or i)oi)ping sotuld.
• On models with an icemakei; after an icemaking
cycle, you may hear the ice cubes dropping into
the ice bucket.
WHIRl
• You mav hear the rims splinting at high speeds.
This hal)pens when the refrigerator is first plugged
in, when the doors are opened fl'equently or when
a laige aulotu]t of food is added to the refi'igerator
or freezer compartments. The rims are helping to
u]aintain the correct temperatures.
• If either door is open fi>r over 3 uiinutes, you uiay
hear the rims come on in order to cool the light bulbs.
• The rims change speeds in order to provide optimal
cooling and energy savings.
WATERSOUNDS
6
• The flow of refl'igerant through the fl'eezer cooling
coils may make a gurgling noise like boiling water,
• Water dropping (m the defl'ost heater can cause a
sizzling, I)oI)ping or buzzing sound during the
defi'(>st cycle.
• A water dripping noise may occur during the defrost
cycle as ice melts fi'om the ewq)orator and flows into
the drain pan.
• Closing the door may catlse a gurgling sotu]d due to
pressure equalization.
Beforeyoucall forservice...
Troubleshooting -tips
Save time and money/.Review the charts on the following
pages first and youmay not need to call for service.
Possible Causes What To Do
Refrigerator does not Refrigerator ha defrost cycle. • Writ ab()//t 30 minutes fl)r deft'()st cycle to end.
operate Freezer control • Move the ti'eezer control to a lower ten)l)erature setting.
ha 0 (off) position.
Refrigerator is unplugged, • Push the l)lug c(>ml)letely into the outlet.
The fuse is blob.s/circuit • Replace fl/se or reset the breaker.
breaker is tripped.
Refrigerator or freezer Temperature control not set • See About thecontrols.
compartment too warm cold enough.
Warm weather or frequent " Set the temj_erature control (me step coldel;
door opelfings. See About the controls.
Door left open. • Check to see if package is holding door open.
14
Page 15
Possible Causes What To Do
Vibration orrattling Front rollers need adjusting. • See Rollers. Slight vibration is uomml.
Motor operates for Normal when refrigerator * _'ait 24 hotu_ tbr tile refrigerator to completely
Iongperiods or cycles is first plugged in. cool dowu.
on and offfrequently.
(Modern refrigerators Often occurs when large * This is hernial.
with more storage
amounts of food are
space and alarger placed in re frigerator.
Treezer require more Door left open. * Check to see if _acka_e is holdiug door o )en
operating time. They
start and stop often Hot weather or frequent * This is hernial.
to maintain even door openings.
temperatures.) Temperature controls * See About the controls.
set at the coldest
setting.
Frostorice crystals Door left open. * Check to see if l_acka'_e_is, holdiug, door Ol)en.
on frozen food
(frost within package Too frequent or too long
is normal) door openings.
Divider between Automatic energy saver * This helps preveut cou(leusafiou ou tire outside.
refrigerator and freezer system circulates warm
compartments liquid around front edge
feels warm of freezer compartment.
Automatic icemaker lcemaker power s_vitch * Set tire power switch to tire I (0n) positiou.
does not work is in the 0 (off) position.
(on somemodels) Water supply turned off or * See Installing the water line.
not commcted.
Freezer compartment * Wait 24 h()tu_ tbr tire rehJgerat()r to ('()mpletely
too warm. cool dowu.
Piled up cubes in the storage * l,evel cubes by haud.
bin cause icemaker to shut off.
ge.com
Ice cubes stuck ha icemaker. * Turu offthe icemakel; relHove cubes, aud tuI'u the
(Green power fight on icemaker back ou.
icemaker blhflchag.)
Ice cubes have Ice storage bin needs clemlhag. * Erupt) mad wash biu. Discard old cubes.
odor/taste
Food trmasmitthag odor/taste * Wrap t_)()(ls well.
to ice cubes.
Interior of refrigerator * See Care and cleaning.
needs clemlhag.
Small or hollow cubes Water f'dter clogged. * Replace filter cartridge with uew cartridge or with l)ltv_"
Slow ice cube freezing Door left open. * Check to see it laacka'_e_is, holdiug, door Ol)en.
Temperature control not set * See About the controls.
cold enough.
Doornot closing Door gasket on hinge side * Apply petroleum jelly ou thce of gasket.
properly sticking or folding over.
Orange glow in freezer Defrost heater is on. • This is nom/al.
Cube dispenser does not lcemaker or water supply * Turu ou icemaker or water supply.
work (on some models) turned off.
lce cubes are frozen to * I_elHove cubes.
icemaker feeler arm.
Irregular ice clumps ha * Break t/1) with fingertip pl'esstu'e aud discard
storage contahmr, remaiuiug clumps.
• Fl'eezeY Ill;iV be to0 _V;llIrl. Adit/st the ti'eezer COlltl'ol
to a colder settiug,, one l)°siti°u at a time, uutil clumps
do Hot tOIRll,
Dispenser is LOCFff;D. * Press aud hold the I.OCK CONTROl. pad for 3 secouds.
15
Page 16
Beforeyoucall forservice...
Possible Causes What ToDo
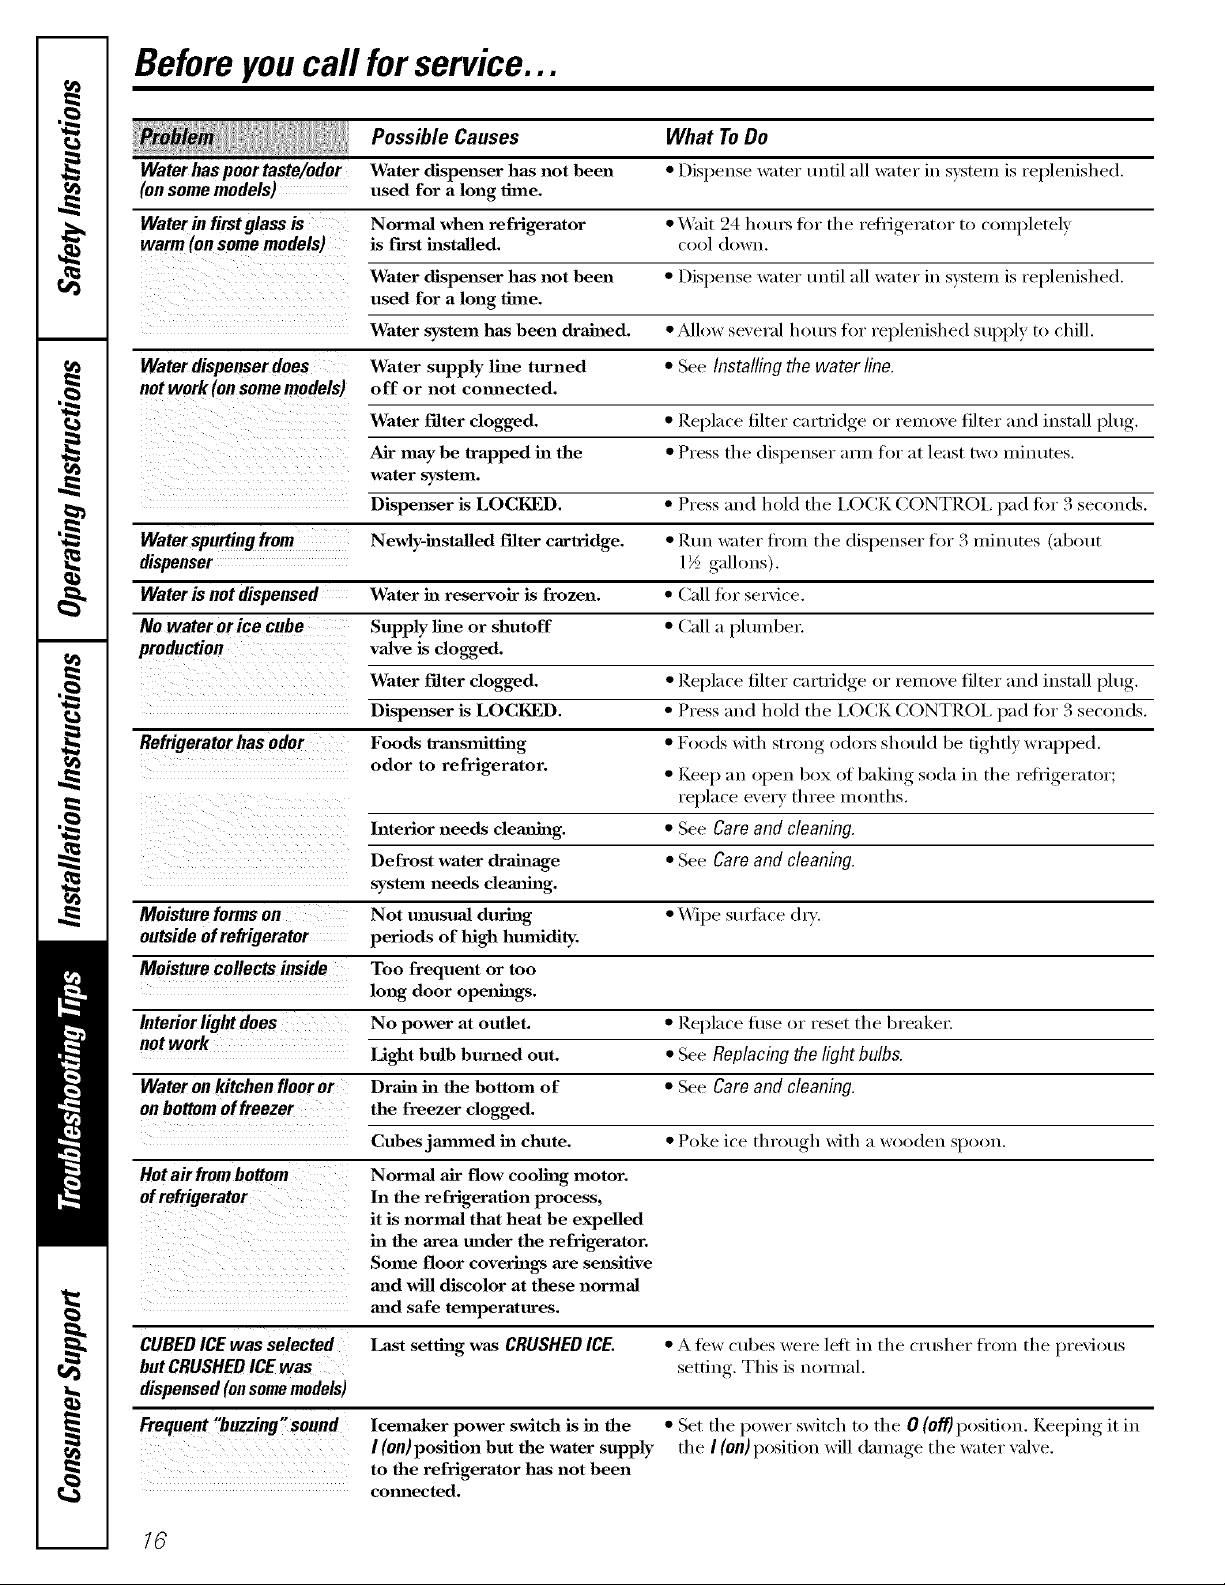
Water haspoortaste/odor Water dispenser has not been * Dispense water until all water in s}stem is replenished.
(on some models) used for a long time.
Waterin firstglass is Normal when refrigerator * _._fit 24 hom_ fin" tile refl_gerator to completely
is first installed, cool down.
Water dispenser has not been * Dispense water until all water ill s}steul is replenished.
used for along time.
Water system has been drained. * Mlow several ho/u_ fl)r replenished supply to chili.
Waterdispenserdoes Water supply line turned * See Installing the water line.
not work (on some models) o ff or not connected.
Water terclogged. •Rei l cet lteic .ti d erem ,.e, ,tei pl.
Air may be trapped ha the • Press tile dispenser [iY/ll for at least [WO ininutes.
water sTstem.
Dispenser is LOCI_:D. * Press and hold tile I,OCK CONTROl, pad fin 3 seconds.
Water spurting from Newly-h_sta!led filter cartridge. • Run water fl'om tile dispenser for 3 minutes (about
dispenser 1½gallons).
Waterisnotdispensed Water in reservoir is frozen. * Call fi)r service.
No water or ice cube Supply line or shutoff • Call a plumbeI:
production valve is clogged.
Water filter clogged. • Replace filter cartridge or remoxe filter and install plug.
Dispenser is LOCI_]D. * Press and hold tile I,OCK CONTROl, pad fin 3 seconds.
Refrigerator has odor Foods trm_snfitth_g • Foods with ,strono_ ochn_ should be tightly wrapped.
odor to refrigerator. • ]Kee I) an open box ot baking soda in tile i'efYigei'atoY;
replace exerx three months.
Interior needs clemfing. • See Careandcleaning.
Defrost water dxaJnage • See Care and cleaning.
system needs clemfing.
Moisture forms on Not unusual during • Wipe sm_i_ce oh3'.
outsideofrefrigerator periods of high hmnidJty.
Moisture collects inside Too frequent or too
long door openhzgs.
Interiorlightdoes No power at outlet. • Replace filse or reset tile breakei:
not work
Wateronkitchenflooror Drain in the bottom of • See Care and cleaning.
Hotair frombottom
ofrefrigerator
Light bulb burned out. • See Replacing the light bulbs
the freezer clogged.
Cubesjamamed in chute. • Poke ice throuoho with a wooden spoon.
Normal air flow cooling motor.
In the refrigeration process,
it is normal that heat be expelled
in the area tinder the refrigerator.
Some floor coverings axe sensitive
and will discolor at these normal
mid safe temperatures.
CUBEDICEwas Selected • A fbw cubes were left in tile crusher from tile previous
Last setthag was CRUSHEDICE.
butCRUSHEDICEwas setting. This is mmnal.
dispensed(onsomemodels)
Frequent"buzzing"sound lcema, ker power switch is in the
I (on) position but the water supply
to the refrigerator has not been
com_ected.
• Set tile power switch to tile O (off) positiola. KeeI)ilw_ it in
tile I (on) position will dalnage tile water ",al',e.
16
Page 17
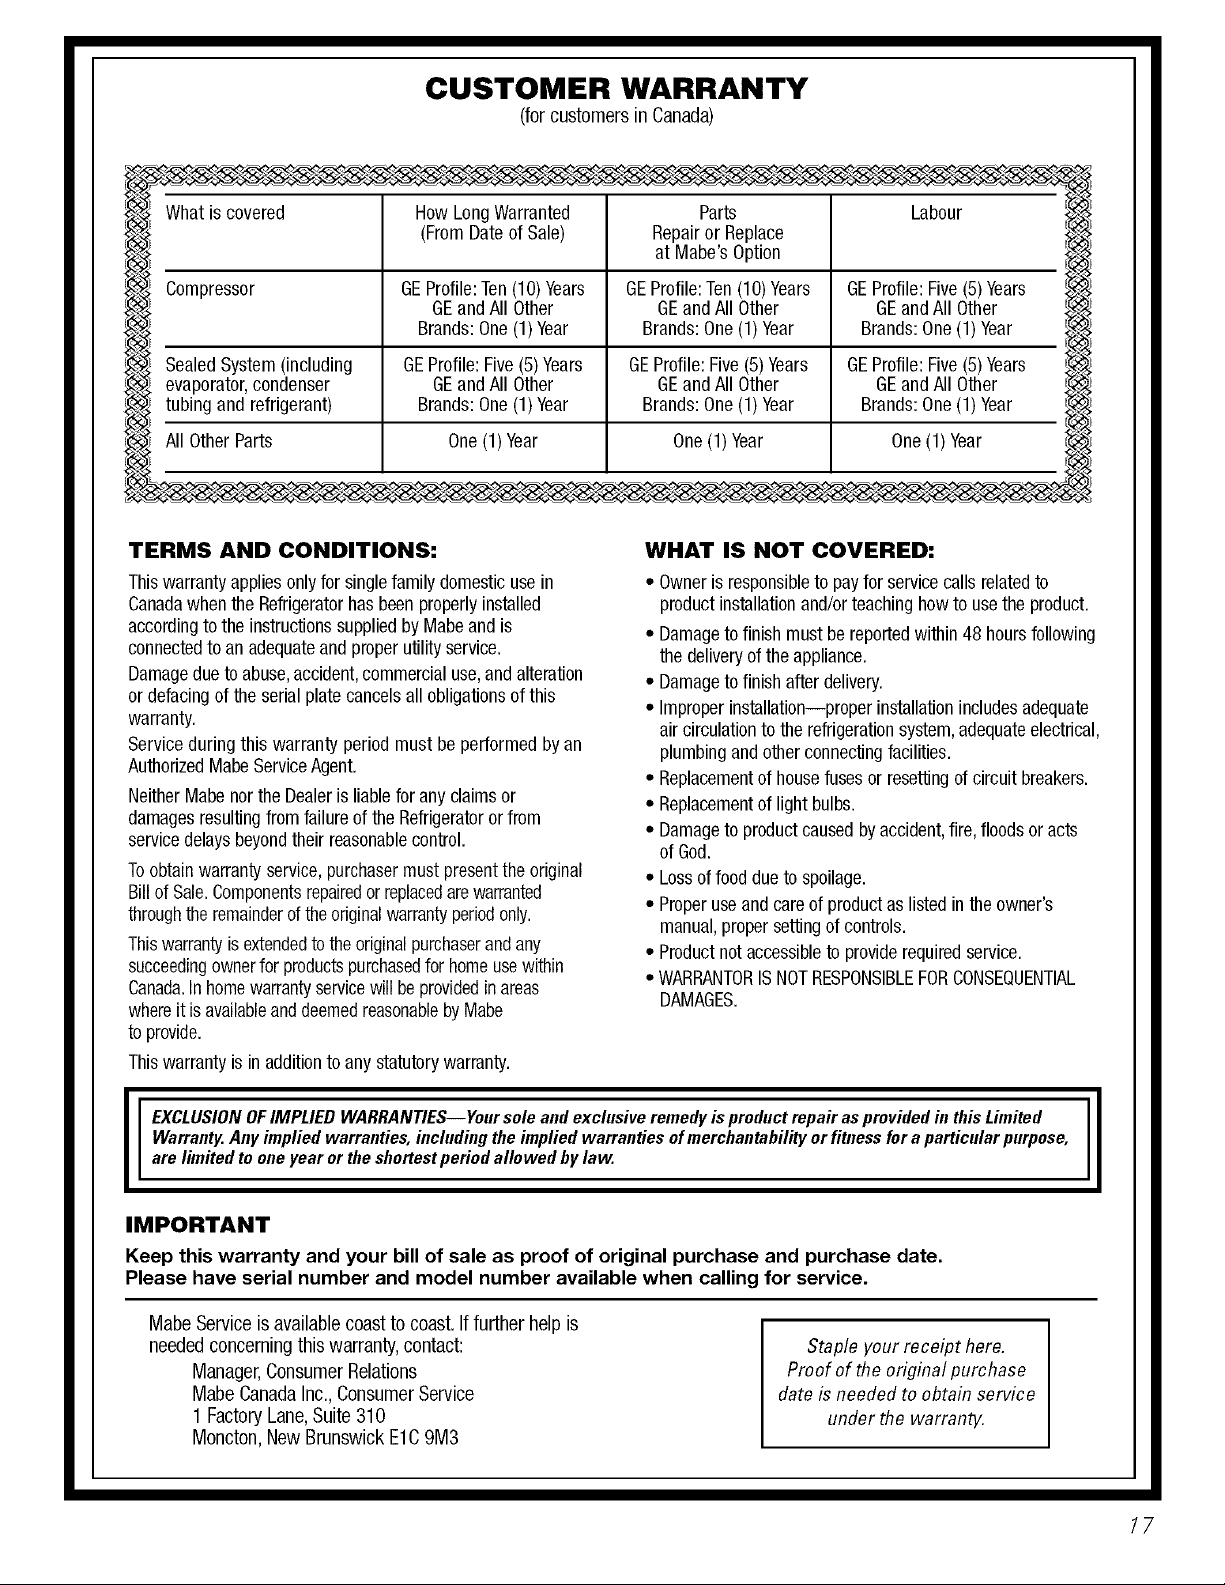
CUSTOMER WARRANTY
(forcustomersin Canada)
Whatis covered
Compressor GEProfile:Ten(10)Years GEProfile:Ten(10)Years GEProfile:Five(5)Years
SealedSystem(including GEProfile:Five(5)Years GEProfile:Five(5)Years GEProfile:Five(5)Years
evaporator,condenser GEandAll Other GEandAllOther GEandAll Other
tubingand refrigerant) Brands:One(1)Year Brands:One(1)Year Brands:One(1)Year
All OtherParts One(1)Year One(1)Year One(1)Year
TERMS AND CONDITIONS:
Thiswarrantyappliesonlyfor singlefamilydomesticusein
CanadawhentheRefrigeratorhasbeenproperlyinstalled
accordingtotheinstructionssuppliedbyMabeandis
connectedto anadequateandproperutilityservice.
Damageduetoabuse,accident,commercialuse,andalteration
or defacingoftheserialplate cancelsallobligationsofthis
warranty.
Serviceduringthiswarrantyperiodmust be performedbyan
AuthorizedMabeServiceAgent.
NeitherMabenorthe Dealerisliablefor any claimsor
damagesresultingfromfailureof the Refrigeratororfrom
servicedelaysbeyondtheirreasonablecontrol.
Toobtainwarrantyservice,purchasermust presenttheoriginal
BillofSale.Componentsrepairedorreplacedarewarranted
throughtheremainderoftheoriginalwarrantyperiodonly.
Thiswarrantyisextendedtotheoriginalpurchaserandany
succeedingownerforproductspurchasedforhomeusewithin
Canada.Inhomewarrantyservicewill beprovidedinareas
whereit isavailableanddeemedreasonableby Mabe
to provide.
Thiswarrantyis inadditiontoanystatutorywarranty.
HowLongWarranted
(FromDateofSale)
GEandAllOther GEandAllOther GEandAll Other
Brands:One(1)Year Brands:One(1) Year Brands:One(1)Year
Parts
RepairorReplace
at Mabe'sOption
WHAT IS NOT COVERED:
• Owneris responsibleto payforservicecallsrelatedto
productinstallationand/orteachinghowto usetheproduct.
• Damagetofinish mustbereportedwithin48 hoursfollowing
thedeliveryoftheappliance.
• Damagetofinishafterdelivery.
• Improperinstallation--properinstallationincludesadequate
air circulationtotherefrigerationsystem,adequateelectrical,
plumbingandotherconnectingfacilities.
• Replacementof housefusesor resettingof circuitbreakers.
• Replacementof lightbulbs.
• Damageto productcausedbyaccident,fire,floodsoracts
of God.
• Lossoffoodduetospoilage.
• Properuseandcareofproductaslistedintheowner's
manual,propersettingofcontrols.
• Productnotaccessibleto providerequiredservice.
• WARRANTORISNOTRESPONSIBLEFORCONSEQUENTIAL
DAMAGES.
Labour
EXCLUSIONOFIMPLIED WARRANTIES--Your sole and exclusive remedy isproduct repair as provided in this Limited
Warranty.Any implied warranties, including the implied warranties ofmerchantability or fitnessfor aparticular purpose,
are limited to one year or the shortestperiod allowed by law.
IMPORTANT
Keep this warranty and your bill of sale as proof of original purchase and purchase date.
Please have serial number and model number available when calling for service.
MabeServiceis availablecoastto coast.If furtherhelp is
neededconcerningthis warranty,contact:
Manager,ConsumerRelations
MabeCanadaInc.,ConsumerService
1 FactoryLane,Suite310
Moncton,NewBrunswickE1C9M3
Staple your receipt here.
Proof of the original purchase
dateis needed to obtain service
under the warranty.
11
17
Page 18
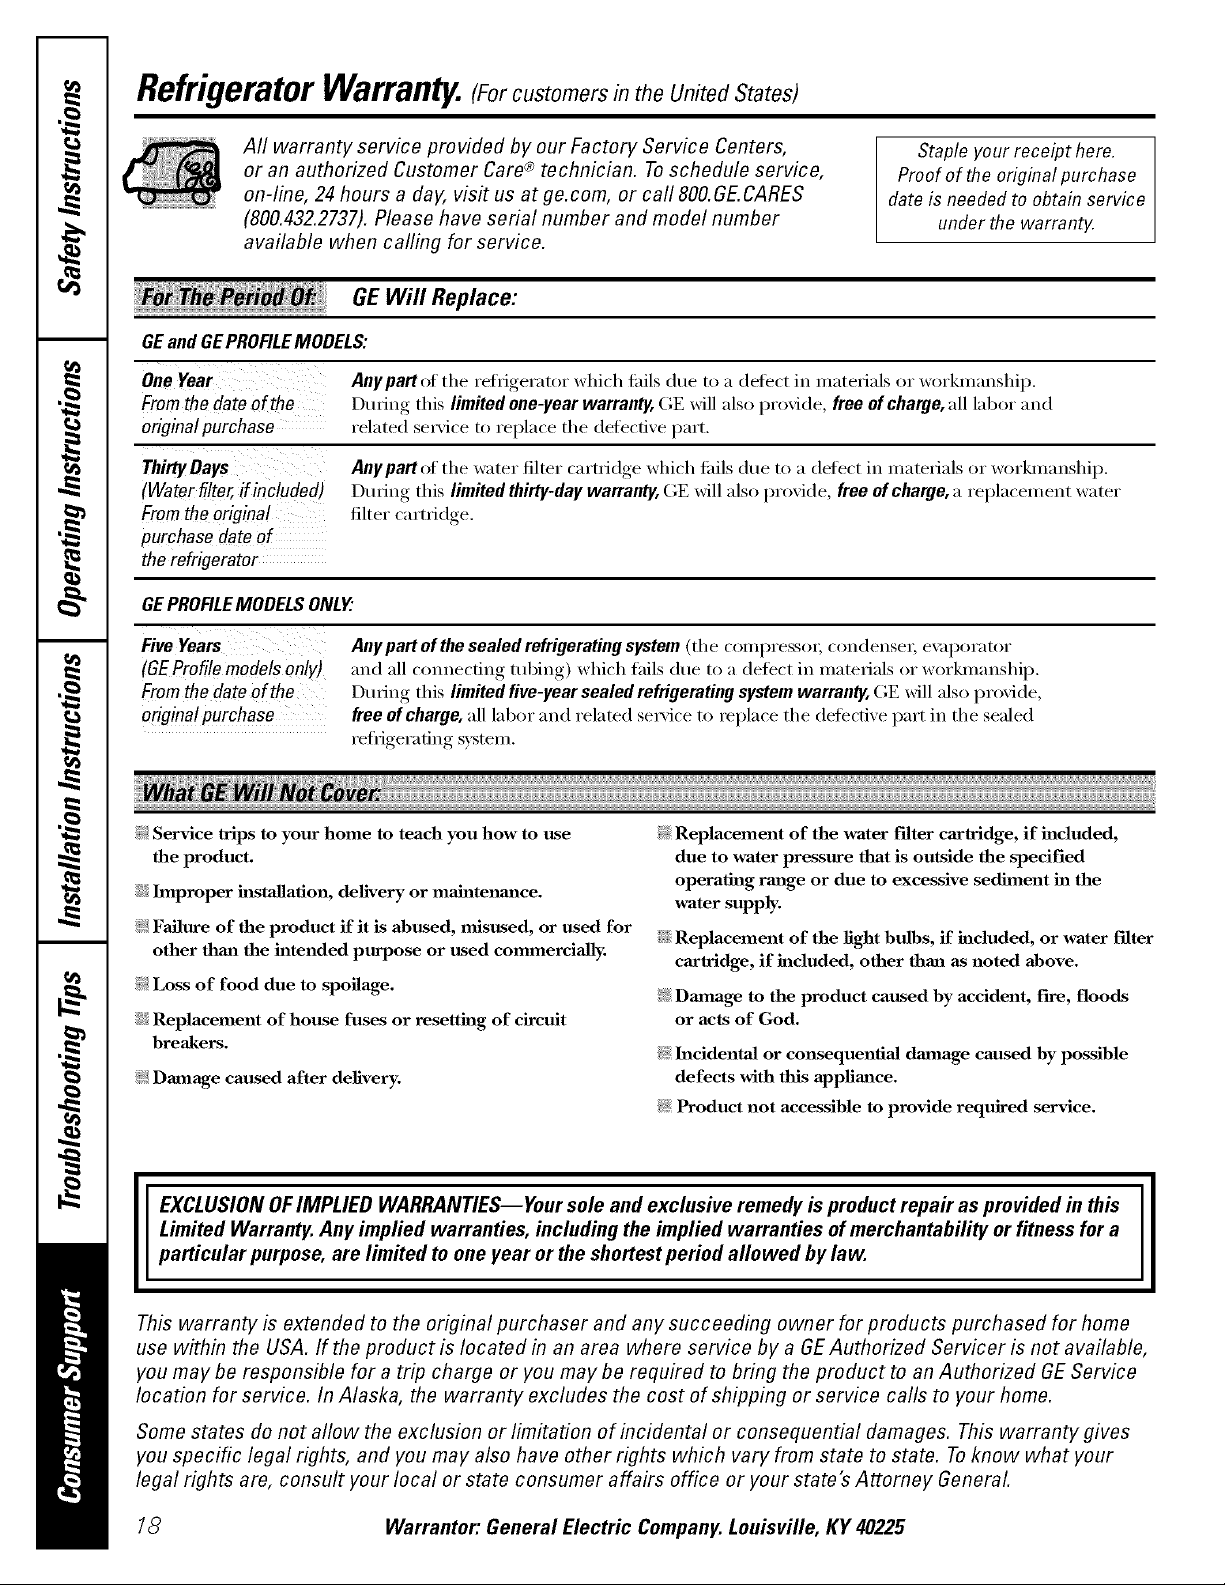
RefrigeratorWarranty.(Forcustomers in the United States)
All warranty service provided by our Factory Service Centers,
or an authorized Customer Care® technician. Toschedule service,
on-line, 24 hours a day, vis# us at ge.com, or call 800.GE.CARES
(800.432.2737).Please have serial number and model number
available when cafling for service.
GEWill Replace:
GEandGEPROFILEMODELS:
OneYear
Fromthedateof the
originalpurchase
ThirtyDays
(Waterfilter,if included)
Fromtheoriginal
purchase date of
therefrigerator
GEPROFILEMODELSONLY'.
FiveYears
(GEProfilemodelsonly)
Fromthedate
originalpurchase
Any part of the refi_igerator which fidls due to a defect in materials or workmanship,
Durh_g this limited one-year warranty, GE will also provide, free of charge,all labor and
related sex,'ice to replace the defective part,
Anypartof the water filter cartridge which tidls due to a defect in materials or workmanship.
During this limited thirty-day warranty, GE will also provide, free of charge, a replacement water
filter cartridge,
Any part of the sealed refrigerating system (the compressm; condensei; e_ q)orator
and all cmmecfing tubing) which flfils due to a defect in materials or workmanship.
During this limited five-year sealed refrigerating system warranty, GE will also provide,
free of charge, all labor and related sex,'ice to replace the defecti\'e part in the sealed
refl'iger;uing system.
Staple your receipt here.
Proof of the original purchase
dateis needed to obtain service
under the warrant_
_: Service trips to your home to teach you how to use
the product.
::Ji::improper installation, delivery or ma'_mtenm_ce.
_: FaAlure of the product if it is abused, misused, or used for
other thml the intended purpose or used commercially.
_: Loss of food due to spoilage.
::Ji::Replacement of house fuses or resetting of circuit
breakers.
)_:Damage caused after delivery.
!i/:Replacement of the water filter cartridge, if included,
due to water pressure that is outside the specified
operating rmage or due to excessive sediment in the
water supply.
iJi::Replacement of the light bulbs, if included, or water filter
cm'tridge, if included, other than as noted above.
)_:Dmuage to the product caused by accident, flu'e, floods
or acts of God.
_ h_cidentaJ or consequential dmuage caused by possible
defects with this applimlce.
_ Product not accessible to provide required service.
Limited Warranty. Any implied warranties, including the implied warranties of merchantability or fitness for a
I EXCLUSION OFIMPLIED WARRANTIES--Your sole and exclusive remedy is product repair as provided in this
particular purpose, are limited to one year or the shortest period allowed by law.
This warranty is extended to the original purchaser and any succeeding owner for products purchased for home
use within the USA. If the product is located in an area where service by a GEAuthorized Servicer is not available,
you may be responsible for a trip charge or you may be required to bring the product to an Authorized GEService
location for service. In Alaska, the warranty excludes the cost of shipping or service calls to your home.
Some states do not allow the exclusion or limitation of incidental or consequential damages. This warranty gives
you specific legal rights, and you may also have other rights which vary from state to state. Toknow what your
legal rights are, consult your local or state consumer affairs office or your state's Attorney General
18 Warrantor: General Electric Company. Louisville, KY 40225
Page 19
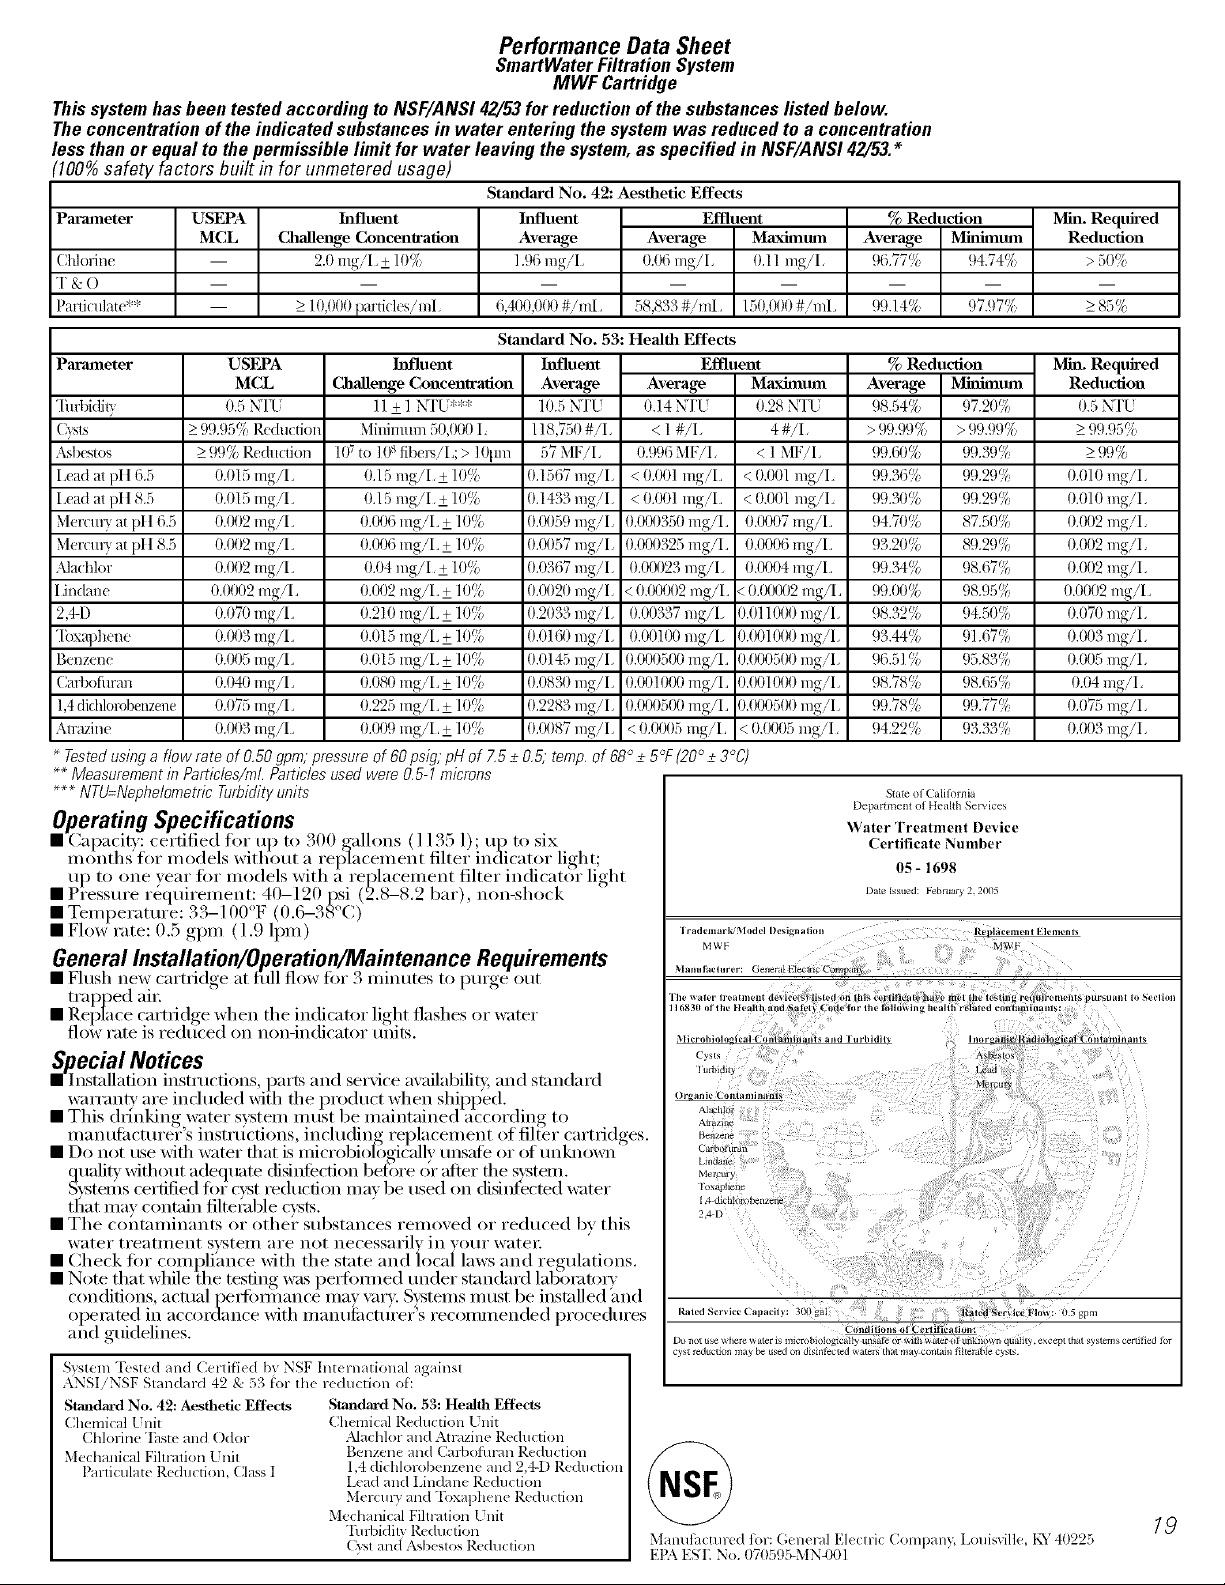
PerformanceDataSheet
SmartWaterFiltrationSystem
MWF Cartridge
Thissystemhasbeentestedaccordingto NSF/ANSI42/53forreductionofthesubstanceslistedbelow.
The concentration of the indicated substances in water entering the system was reduced to a concentration
less than or equal to the permissible limit for water leaving the system, as specified in NSF/AIVS142/53.*
'100%safety factors built in for unmetered usage)
Stmldard No. 42: Aesthetic Effects
Par/minter USEPA hlfluent
MCL CJlalle_ge ConcenWafion
Chlorine -- 2.0 mg/L + 10%
T&O -- --
Particulate** -- _>l 0,000 pard( les/mI,
Pariuneter
"IitdMity
Asb('st_}s
I,ead at ])It 6.5
Lead at pit 8.5
Melvu U at Ill t 6.,',
Met*:ttU at Ill t 8.5
,\ladfior
[ hi(lane
2,4-D
"Ibxat)hene
Benzene
Carbofimm
1,4didfiorobenzene
Alrazine
USEPA
MCL
0.5 N'IT
_>9{).{!5%Reduction
_>99% Re(ht(tion
0.015 mg/L
0.015 mg/L
0.002 mg/L
0.002 mg/L
0.002 rag/I.
0.0(X)2 mg/L
0.079 mg/L
0.003 mg/L
0.005 mg/L
0.040 mg/L
0.075 mg/L
0.003 rag/I,
hffluent
Challe_,_ge Concentration
] l k ] NqT ***
Mflfin/urn 50,000 I,
1(F to ](>sfib( I_/I,; > 10[tm
9.15 rag/I, ± 1()f_
9.15 rag/I, ± 1()f_
0.006 mg/L + ] 0!¢
0.006 mg/L + ] 0!¢
0.04 rag/I,± 10!¢
().002 rag/I, ± 1()f_
9.210 rag/I, ± 10%
0.015 mg/L ± 10%
0.015 mg/L ± 10%
0.080 mg/I,_+ 10%
9.225 rag/I, ± 10%
0.0(_}rag/I, ± ] 0%
Tested using a flow rare of O.50 gpm; pressure of 60 psig; pH of Z5 _+O.5; temp. of 68 ° _+5°F (20° _+3°C)
** Measurement in Particles/ml. Particles used were 0.5-1 microns
*** NTU:Nephelometric Turbidity units
gperafing ,
Ca I)a(itv" certified for. iu ) to ._;00,("all°ns_ ( l 1:,_;51);. u ). to _six
nmnths for inodels without a rel_acen_ent filter m_tRator hoht;
up to one ",ear for inodels xwth a replacement filter indicator hght
• . .! * . c * c . '
• P_ essuI e I eqmI en_ent: 41)-121) psi (2.8-8.2 bai ), non-shock
Specifications
• Telnperature: 33-1 00°F (0.6-38°C)
• Flow rate: 1).5 gpm (1.9 lpm)
h_fluent
Average
1.96 mg/I,
I
6,490,01_)#/mL
58,833#/mi. 150,(_)0#/mI.
Effluent
Average Maxhnmn
9.06 rag/I, 9.11 rag/I,
I I
Standard No. 53: Health Effects
hffluent
Average
10.5 NTU
1] 8,750 #/I,
7,7MF/I,
0.1567 mg/I,
0.1433 mg/I,
0.(X)7,9rag/I,
0.(X)57 rag/I,
0.0367 rag/I,
0.(X)20 rag/I,
0.2033 rag/I,
0.01 (_) rag/I,
0.0145 rag/I,
0.0830 rag/I,
0.2283 rag/I,
0.(X)87 rag/I,
0.996 MF/I, < 1 MF/I,
<0.001 rag/I, <0.001 mg/I,
< 0.001 mg/L < 0.001 rag/I,
0.0(X)350 mg/L 0.0007 mg/L
0.0(X)325 mg/L 0.0006 mg/L
0.0(X)23 rag/I, 0.0004 mg/L
<0.(X)(X)2mg/L < 0.(XXX)2mg/L
0.00337 rag/I, 0.011(X)0 rag/I,
0.00](X) rag/I, 0.(X)I(X)0 rag/I,
0.0(X)5(X)rag/I, 0.(X)0500 rag/I,
0.0010(X) mg/L 0.(X)I(X)0rag/I,
0.0(X)5(X)rag/I, 0.(X)0500 rag/I,
< 0.0(X)5 rag/I, < 0.(X)05 mg/I
Effluent
Average Maxhnmn
9.14 NTU 0.28 N'IT
< 1 #/I, 4#/I,
% Reduction
Average Minhnmn
96.77% 94.74%
I I
9!).14% {)7.{)7%
% ReduOion
Average Mhlhnmn
98.54% 97.20%
>99.99% >99.99%
99.69% 99.39%
99.36% {)9.3{)%
99.39% {)9.3{)%
94.79% 87.50%
93.20% 8{).2!)%
9!).7>1% {)8.67%
99.(_)% 98.95%
98.32% 94.50%
93.44% 9] .67%
96.5] % !)5.83%
98.78% !)8.65%
9!).78% !)9.77%
94.22% !)3.33%
Slate 0f Calflbrnia
Department of Health Services
Water Treatment Device
Certiticate Number
Date Issued: Pebruary 2.200:_
05- 1698
Mhl. Required
Reduction
> 50%
_>8,5(/(,
Mill. Required
Reduction
0.5 NTU
_>9{).{15%
_>9!)%
0.010 mg/I,
0.010 mg/I,
0.002 rag/I,
0.002 rag/I,
0.002 mg/I,
0.0002mg/I,
0.079 rag/I,
0.003 rag/I,
0.005 rag/I,
0.04 mg/I
0.075 rag/I,
0.003 rag/I,
General Installat!on/Operation/Maintenance Requirements
• Flush new cartridge at full fl(/w fill" 3 nfilmtes to purge out
trapped ain
• Replace cartridge when the indicator light flashes (/r water
flow rate is redtlced on i_on-indicator t;nits,
Special Notices
• Installation instructi(ms, parts aim service axailabilitv, aim standaM
wan'ants' are included with file product when shipped. ()_
• This drinking water svsteln Inust be nmilKained according to
• D(/not ttse with water that is microbiologi&flly unsafe or of unkal(/wn'
• The cohtanfilmnts or othei" substances relnoved or reduced bv this
• Check fi)r complihi_ce with the state aim local laws aim regulati(ms.
• Note that while the testing was pei_imned trader standard lal)0IatoI5
• ( _ , , , .... ( ,
illanttfa('ttli'er s lnstrtl(hons, including replacen_ent of filter ('artlldges.
quality wifl/out adeqtrate (fisinf_'cfi(nl befllre or after file svstenl. M_ty
gvstelllS certified fi)i" cyst reducfi(m max be used on (fisinfected water r,,xapti_n_
tl_at may contain filte;uble cysts.
water ti'eatlllent svstell/are not necessarily in VOIII" wateL
conditions actual pell'bi{nance inax xm'v. Sxstelns inust be installed _uld
opelated in accordance with inalm_actt/rei:'s reconm/ended procedures
and gmdehnes.
System "[-csted and Certified by NSF Int( rnational against
_kNSIiNSF Standard 42 & 53 for the reduction ot:
StmMard No. 42: Aesthetic Effects
Chemical 17nit
Chlorine 'Ihste and Odor
Mechanical Filtralion Lnit
Part{( ulate Reduction, Class I
Standmxl No. 53: HeMfll Effects
Chemical Reduction Lnit
Alachh)r and Atl'dzine Reduction
Benzene and Carbofiwan Reduction
1,4 dichlorobenzene and 2,4-1) Reduction
Lead and Lindane P.cduction
Mercm T and Toxaphene Reduction
Mechmfical Fihrdtion [ nit
Tin-bid {Iv l_cduction
(:7,st and A',bestos Rcduction
Raled St,r_ict, ( apacil,,: 3(R) gal Ralt,d Ser*i_e FIm_: (l_ 4pro
Do n_ u _ _here _ ater is mwrobi_og_cally uns_ or with water ot unk_)wn quaht), except that
cyst reduction may tx_ u_d on dxsxnl_ted _aters that may c_mmin li{ter_le cysts¸
Mamfli_ctu red tot: (;enerdl Electric Compan}; Louisville, tx'Y40225
ER\ EST. No. 070595-MN4t01
C_mdition_of Cvrliflcali_n=
/9
Page 20
GE Service Protection Plus 'M
GE, a naine recognized worldwide %r quality' and dependability, oflers you
Service Protection Plus'_'--comprehensive protection on all y'our appliances--
No Matter What Brand!
We71CoverAnyAppliance.
Benefits Include:
• Backed by GE
• All brands covered
• Unlimited service calls
• All parts mid labor costs included
• No out-of-pocket expenses
• No hidden deductibles
• One 800 number to call
You will be completel) satisfied with our set\ice protection or you ma) request your inoney back
on the remaining xalue of votu" contract. No questions asked. It's that simple.
Protect your reffigerat(m dishwasher; washer and dryer; range, TV, VCR and much more--rely brand!
Plus there's no extra charge tot emergency service and low monthly financing is available. Even icemaker
coverage and tood spoilage protection is offered. You can rest easy; knowing that all votu" valuable
h(msehold products are protected against expensive repairs.
Place xotu" confidence in (;E and call us in the/J.S, toll-free at I'_tII).DZD.ZZZ_
_()I" i//oi'e iIl[()I'Ill_l[ioIl,
Anywhere. Anytime.*
*All brands (oxer_ d. up to 20 years old. in the (omin_ real [.S.
Consumer Product Ownership Registration
Dear Customer:
Thank you %r purchasing our product and thank you %r placing your confidence in us.
X_'eare proud to haxe you as a customer'.
Follow these three steps to protect your new appliance investment:
r
2omplete and mail
'roduct Ownership
Registration today;
Ilave the peace of
mind of knowing we
CHII COIIIHC[ VOll ill
the mflikel_ event of
a saibtv modification.
After mailing the
l)el_ _w,
this document
n a saft: pla( e.
It contains inf}_rlnation
you will need should
you require service.
Our service mlmber
ill the [SA is:
800.GI(.CARES
(800.432.2737).
) }'Oll
op( ral( }'Ol11" II(_W
applian(( prop€ rlv.
2O
Model Number
I I I I I I I I I
Serial Number
I I I I I I I ]
Page 21

Important: If you did not get a registration card with your product, detach
and return the form below to ensure that your product is
registered, or register online at ge.com.
For customers in the United States
Consumer Product Ownership Registration
Serial Number
I I I
Mr. Ms. M_s. Mi_
Fil_,t I I Lasl]
Nam_ I I I I I I I I I Name I I I I I I
Address I I I I I I I I I I I I I I I I I I I I I I I I
._p,.#l , i i i i i , I v in;_i]A,_<_,-,,,,,
_..I I , i I i I i I I I , I I I _,._<,1, J _o<,<,, i i
1) 11( l)l ice d
_o._,, II II , I
@
6E Appliances
GE Consmner & hldtlstrial
Appliances
General Electric Company
Louisville, KY40225
ge,com
Model Number
I I I I I
I I I I I
Zip I
Number I I I I I I I
* Please provide your e-mail address to receive, via e-marl, discounts, special
of fop, and other important commmlications fl-om GE Appliances (GEA).
Check here il you (Io not want to receive communications fl-om
GEA's careftflly selected partners.
KklL[ 7RE TO COMPLETE AND RET[ 7RN T} tIS CARD DOES NOT
DIMINISH YOI R %\{\RI_\N_I_ ,"RIG} H'S.
For inli_nnation about (;EA's privacy and data usage polic), go to ge.(om
and cli(k on ' Prixacy Polity" or (all 800.626.2224.
Cm her_
Z_
For Canadian _[
Customers _ I
Z _
<,,
7_
"ml
I,II
Pour les 01
Consommateurs < ',
Canadiens _ [
ooi
_',
7_
Pleaseregisteryourproduct to enableuste contactyou
inthe remote eventasafetynonceis issuedforthis product
andtoallow forefficient communication undertheterms
ofyourwarranty, shouldthe need arise.
REGISTERON-LINE: wvvw.geappJiances.ca
ENREGISTREMENTSURINTERNETA: www.eJectromenaqersqe.ce
[]ElMISS/MLLE.MR'/M[]ElMs.MRS'/MME'FIRSTNAME/PRENOM
I
STREETNO/N°RUE STREETNAME/RUE APT.NO/APR/RR#
CITY/VkLE PROVINCE POSTALCODE/ POSTAL
Veuillezenregis_ervolreproduitalandenousperme_ede
communiqueravecvoussijamaisunavisdes_curit6concemant
ceproduit_tait6misetdecommuniqaerfacilementavecvousen
vertudev_e garantie,silebesoins'enfairsentir.
MAILTO:
POSTERA:
LASTNAME/NOM
RO.BOX1780,MISSISSAUGA
ONTARIO,L4Y461
AREACODE/IND.REG.[TELEPHONE IE-M_L
DIDYOUPURCHASEASERVEECONTRACTFORTHISAPPUANCE? YES/OUI[] IFYES/SIOUI:EXPIRAllON
AVEZ-VOUSACH_ UNCONTRATDESERVEEPOURCETAPPAREIL? NO/NON[]
NAMEOFSELLINGDEALER/NOMDUMARCHAND MODEL/MODI_LE
INSTALLATIONDATE/ DATED'INSTALLATION
Y/A M D/J CORRESPONDENCE [] ENGLISH
[] Ido notwish toreceiveanypromotJoi_aloffersregardingthisproduct.
[] Je ned_sirepasrecevoird'of_espromotionnellesconcemantceprodu?c
CORRESPONDANCE El FRAN?AIS SERIAL/SI_RIE
Y/A M O!J
Page 22

Forcustomers in the United States
............................................................................................ _,,-- Cut here
Pleaseplacein envelopeand mail to:
General Electric Company
Warranty Registration Department
P.O. Box 32150
Louisville, KY 40232-2150
Forcustomers in Canada
........................................................................................... ._Cut here
Please place in envelope and mail to:
Veuillez mettre dans une enveloppe et envoyez & :
OWHERSHJPREGISTRATION
P.O. BOX1780
MISSISSAUGA,ONTARIO
L4Y 461
(FOBCANADIANCONSUMERSONLY)
Page 23

MESURESDESf:CURITf:IMPORTANTES.
LISEZD'ABORDTOUTESLESDIRECTIVES.
AVERTISSEMENT!
N'utilisez cet #lectrom#nager que pour I'usage auquel il est destin#, comme expliqu# dans le present manuel.
MESURESDES@URITE
Lorsque vous utilisez un appareil _lectrique, observez toujours les mesures de s_cufit_ de base,
y compris les suivantes.
!17:lnstallez le r_fl_ig_ratem" confl>m_&nent aux
directives d'installafion avant de l'utilise_:
::Ji::Ne laissez pas les enfimts grimpe_; s'asseoi_; se
tenir debout ni se pendre aux clavettes du
r_fl-ig&'atem: Ils pomTaient endommager le
r_fl'ig_ratem" et se blesser gravement.
::Ji::Ne touchez pas les stlY[ilces fl'oides du cong_latem"
si w_us avez les mains humides ou mouill_es : la
peau risque d'adh&'er _'lces sm_i_ces tr&s fl'oides.
_: N'entreposez et n'utilisez pas d'essence ou autres
w_pem's et liqtfides inflammables _'lproximit_ de cet
appareil ou de totlt atltle apDueil _lecn'om_nage_:
_: Si votre r_fl'ig&'atem" est dot_ d'tme machine 5
glacons aUtOlnaOque &itez le contact avec les
pi&ces mobiles du m_canisme {jectem; ou avec
l'_l&nent chauflimt qui lib&re les gla¢ons. Ne
posez pas les doigts ou les mains sur le
m_canisme de la machine 5 glaqons pendant que
le r_fl-ig&'ateur est branch,.
9_:l_loignez les doigts des parties du rOffig&'atem" off
l'on peut fi_cilement se pincer : les espaces entre
les portes et entre les portes et les placards sont
tot!joins _troits. So)'ez prudent lorsque vous tem_ez
les pmles de l'appareil en presence des enfimts.
_: D_branchez w_tre rbfl-ig&'atem" awmt de le
nettover ou de le r_pare_:
REMARQUE: Nous vousrecommandonsvivementde
confier toute r_paration_ un technicienqua/ifi_.
_: Ne recongelez pas les aliments sm'gel_s qui ont
compl_tement (l_gel_.
REMARQUE: LaraiseenarrOtdu rbfw_rateur 0faide des
commandesde l'bcran tactile n'entrabe pas saraisehors
tension.
www.electromenagersge.ca
A DANGER! RISQUES POUR LESENFANTS
COMMENTVOUSDEBARRASSERCONVENABLEMENT
DEVOTREANCIENREFRIGERATEUR
I,es enfimts pds au pi&ge ou morts d'asphyMe sont
tot_jom's d'actualit_. I,es r_fl-ig&'atem's abandonn_s
sont tot{jom's aussi dangereux, re&me si on n'attend
que <<luelquesjouis>> pour s'en d_12ClllVlssei;Si w)us ne
gardez pas w_ne anden r_liigg_mmm; veuillez stfiVle
les directiv_ ci-dessous afin de pr&'enir les accidents.
Avant de vous debarrasser de votre ancien
refrigerateur ou congelateur :
!_'JD_montez les portes.
_: i,aissez les clavettes en place afin d'emp_cher les
enfimts de gfimper _'_l'int&iem:
CORDONSPROLONGATEURS
Nous vous recommandons fortement de ne pas utiliser de cordons prolongateurs _ cause des risques
potentiels qu'ils pr_sentent dans certaines conditions.
Toutefifis si vous dg_ci(lez d'ufiliser tout de re&me tm cordon prolongatem; il est absolmnent n&'essaire
qu'il s'agisse d'tm cordon _'_3 ills avec raise _'_la terre pore" appareils _lectrom&mgers homologu(_ UI,
(aux t_tats-Unis) ou certifi(_ CSA (au Canada), pom'vu d'tme fiche et d'tme prise raises _'_la terre
de 15 amperes (minim urn) et de 120 volts.
Refrigerants
Tous les appareils de rg_flig&'ation contiem_ent des
r_flig_rants qui, confi)rmg_ment aux lois fi=(l_rales,
doivent ()tre enlev_s avant toute _limination de
l'appareil. Si vous vous d_barrassez de vieux
appareils de r&flig&'ation, v&ifiez, aupr&s de la
socig_t(_qui s'occupe de leur _limination, ce que
vous devez taire.
23
Page 24

MESURESDESECURITEIMPORTANTES.
LISEZD'ABORDTOUTESLESDIRECTIVES.
[, AVERTISSEMENT!
RACCORDEMENTELECTRIQUE
Ne coupez ni retirez en aucun cas la troisibme broche (mise _ la terre) de la fiche du cordon
d'alimentation. Pour votre sbcurit#, cet appareil doit Otrecorrectement mis _ la terre.
i)_:I,e cordon d'alimentafion de cet appareil est m uni d'une fiche _'l3 broches
(raise a la terre) qui se branche darts une prise m urale ordinaire a 3 alv&_les
(raise fila terre) pour r_duire au minimum les fisques de chocs _lectfiques.
::_ Faites examiner la prise de courant et le circuit par un _lectricien qualifi_ pour
votls assurer que la prise est correctement raise fi la te_Te.
_'_Si la prise murale est du type standard fi 2 alv&_les, il vous incombe de la tifire
remplacer par tlile prise fi 3 alv&)les correctement raise fi la terre.
AVANT DE UTILISER, ASSUREZ-VOUS QUE LA PRISE
EST CORRECTEMENT MISE ._ LATERRE
:_;7i,e r6fl_ig_rateur doit toujoux_ g_tre branch_ dans sa
propre prise de coumnt, dont la tension nominale est
identique ;'lcelle indiqu_e sur la plaque signal_tique.
N Cette precaution est recommand_e pour garantir un
rendement optimum et &'iter une sm'cha_ge des circuits
_lectfiques de la r_sidence, ce qui pourrait crier un
risque d'incendie par surchaufl> des ills.
:_1_Ne d_branchezjamais le r6li_ig&'ateur en tirant sur
le cordon d'alimentation, Saisissez tem_ement la fiche
du cordon et firez droit pour la refirer de la prise.
VEUILLEZLIREETSUIVREATTENTIVEMENT
CESMESURESDESECURITE.
CONSERVEZCESDIRECTIVES
:#;_ROparez ou remplacez imm&liatement tout cordon
efliloch_ ou endommag_. N'utilisez pas un cordon
ti_ndill_ ou pr_sentant des signes d'ustlre.
N i,o_que vous d_placez votre r_flJg_rateur du ram;
fifites attention de ne pas le tifire fouler sur le cordon
d'alimentation afin de ne pas l'endommage_:
24
Page 25

Installationdesaccessoim&
(Tousles mod#les ne sont pas dot#s de tousles accessoires.) vvvvvv.e/ectromenagersge.ca
(_ BALCONNET SUPERIEUR
DU CONGI_LATEUR
Assurez-vous que le balconnet
s'enclenche en place.
Balconnet sup6rieur
du congelateur
(_ FRONTONS DE BALCONNET
DU CONGI_LATEUR
Assurez-vous que le balconnet
s'enclenche en place.
NOTE : Sur les modeles & distributeur.
les frontons les plus longs occupent
les deux positions sup6rieures.
balconnet
_ ronton du
(_ CARTOUCHE DU FILTRE
Enlevez le bouchon
de derivation
Installez la cartouche
du filtre
(_ PORTILLON DU
CASIER A PRODUITS
LAITIERS
SUPPORT A
BOUTEILLE
@
CONTENANTS A
PORTILLON
RI_GLABLES
DISPOSITIFS
D'AJUSTEMENT DE
PORTILLON DU
CONTENANT
_ Balconnet (_ PORTILLONS DES
CONTENANTS INFERIEURS DE PORTE
Assurez-vous que le contenant s'enclenche en place.
Pour enlever: Soulevez la partie
extensible de la clavette
verticalement puis tirez-la vei's
l'ext6rieur
Pour replacer: Engagez la pattie
extensible de la clavette dans [es
supports moul_s de [a porte et
poussez veI_ l'inttafiem- Ceci
assm'era le verrouillage.
Portillon de contenants inf6rieurs
de porte
/
--"-wayu eset bats. (Toutes les caract#ristiques ne sont pas disponibles sur tousles modOles.)
Rearrangement des clayettes
Clayettesdure#igerateur:
Pourenlever Pourreplacer
Casserole du congelateur :
Pourenlever
Clayettes du congelateur :
Pourenlever
Peurenlever: Soule'_ez
['axant du bac et tirez.
Pour replacer ou
relocaliser : Engagez
le 1)ac darts les supports
moul_s de la porte
puis poussez veI_
l'int_fiem: I,e bac sera
ven'ouill_ en place.
wrrouiller
_nplace
Enlevez la casserole en le timnt xets l'ax rot, en soule\:mt
la pattie axmt et en le fifisant glisser au ([el_'lde la butte.
25
Page 26

Clayetteset bats. (ro.toslos caract#ristiques ne sont pas disponibles sur tous les modbles.)
Clayette coulissanteanti-deversement
Grace ;'_ la clavette glissante anti-
d&'e_ement, vous pouvez atteindre des
articles places deftly)re d'autres. Ses bords
sp_ciaux sont con(us pore" erupt)chef tout
dt:\'e_em ent a ux clavettes int_riem'es.
'sur certains modbles)
NOTE: Prenezsoin depousser /a c/ayette
jusqu'au fond pour refermer la porte.
Clayettes anti-debordements (surcertamsmodbies)
I
Ces clavettes sont dotOes de rebords
sp_ciaux afin de ti_ciliter la pr&ention des
dObordements sur les clm ettes inliXriem'es.
Bacsa legumes.(To.toslos caract#risfiques no sont pas disponibles sur tous los modblos.)
Bacs a legumes a humidite reglables et bac a en-cas (surcatainsmodules)
R_glez la commande ;'l High(haut)pour que Rtaglez la commande ;'l Low(bas)p(>ur
le tiroir consec,'e tm (legrO d'humiditt: Ole\'O abaisser le (legrO d'humiditO darts le firoir
pour la conservation des l(_guines, pour la conser_tion des ti'uits.
Normale
Plusfroide
Guides
dubac
Lorsque vous remettez los bacs el7
p]sce_ 8ssurez-vous que VOUS los
glissez darts lee guides.
Bac g_viande transformable (surcertainsmofl#les)
I,e bac _'lviande transfi)mmble a sa
propre alTi\'g_e d'air fl'oid pore" pelil/ettre
;'1 tin COtli'ilnt d'air en pi'oven_liice dtl
compartiment cong_latem" d'arriver
La commande de temperature reglable pem_et
la r_gulation du (lt)bit d'air provenant du
compartiment du congt)latem:
Placez le levier sin" hautpom" que la
teillpei'attli'e (hi ba( soit ;'l la teillpei'attlre
nommle dtl rOfi_igt)ratem; aSStlrant ainsi
la disponibilitt: d'tm espace suppl&nentaire
pore" le rangement des l_gmnes, i,e d_bit
d'air ti'oid s'an'_)te. ]1est doric possible de
choisir entre ces deux extremes de
tempg_rature.
Placez le levier sin" has sin" la position la
plus ti'oi(le pore" le rangement de viandes
ti'aiches. Si le levier demem'e longtemps sin"
cette position, il est possible que du giwe se
ti)rme fi l'intt)rieur du bac.
Enlevement du bacs a legumes
ll est fi_(ile de retirer les bats en les
soule_ant lOgOrement puis en les tirant au
del_'_ de la butte.
Si la porte du rGfrig&'ateur emp<)che le
retrait des bacs, il sera nOcessaire de
(l_placer cehfi-d ve_ l'avantjusqu';'_ ce qu'il
soit possible d'ouvfir la porte su_isamment
pore" fifire glisser les bacs ;'_l'ext&_iem: Darts
certains cas, il sera n_cessaire de dOplacer le
r6fl_igt)ratem" ve_ la gauche au com_ de
cette operation.
26
Page 27

teS co_a_des, www.e/ectromenagemge.ca
Les commandes ressemblent _ I'une des illustrations suivantes "
REFRIGERATOR
0 ISOFF
9 ISCOLDEST
k'tapes de demarrage pour le contrOle de temperature approprie
ETAPE 1--R(_glez le contr_le <_Fresh Food ,_ (aliments frais) _'l<_5 ,_.
I_TAPE 2--R_glez le contr61e du cong_lateur ;'l <_5 ,_.
I
I
t_TAPE 3--ATTENDEZ 12 HEURES pore" que la tempg_rature se stabilise.
t_TAPE _-S'il filut changer quelque chose, dg_placez le contr61e d'un chifli'e
;'l la lois et attendez 12 heures pour que la temperature se stabilise.
REMARQUE: i,a raise en arr_t du r_flJg_rateur en mettant le bouton de r_glage
en position 0 (arr&t) ;'1l'aide des commandes n'entraine pas saraise ho_s tension.
Le reglage des commandes variera en fonction despref&ences
personnel&s, de I'usage et des conditions d'utilisation et pourront
necessiter plusieurs ajustements.
Adjust Temper0ture
c0,0e )
|
• • • • •
Water Crushed _ubed Ught Lock l
Pour changer le reglage de contr_le de temperature
avec le panneau a effleurement :
• i,e r(_g]age du ('ompartimem cong(qation est ;'1gauche de ]'(Xcran.
• I,e r(_g]age du compartimem r(q_g(q'ation est ;'1droiw de ]'&Tan.
-- Appuyez sin" le panneau plus chaud ou phts ti'oid du compartiment
dg_sir6, dans la direction votflue.
-- I,e numg_ro de rbglage actuel s'allume.
-- Chaque t0is que votts touchez le panneau, le rbglage du comparfiment
change d'une ;:lleui:
Un aflichage de 1 indique le rg_glage le plus chaud et tm aflichage de 9 le r_glage
le plus fl'oid.
• Sur certains mo&)les, le _g]age des deux commandes fi la temperature la plus _lev_e
.jusqu'fi ce que l'atiichage dig-note (off) amqte le reti'oidissement dans les compartiments
(ttl cong_lamur et (111r_tiJg_naeul:
• Sur d'autres modbles, le r_glage de l'une ou l'autre des commandes fila wrap&arm>
la plus _le_e jusqu'fi ce que l'attichage dignote (off) arr&w le reti'oidissement du
cong_lateur et du r_flJg@atem;
REMARQUE:I,araise en arr&t du r_fligt)rateur en mettant le bouton de rg_glage
en position 0 (arr_t) fl l'aide des commandes n'entraine pas sa raise ho_ tension.
Le reglage des commandes variera en fonction despreferences
personnelles., de I usage et des conditions dutilisa6on etpourront 2 7
necessiter plusieurs alustements.
Page 28

Lacartouchedufiltre a eau. (s.rce ains odo/es)
Cartouchedufiltre a eau
i:a cartouche du filtre _'teau se trou',e (lm/s le coin (h'oit arrJ_re
supdlieur <it]compardrrlent r_iiigdnlteur.
,4quelmomentremplacerlefiltresurlesmodelesavec
indicateurlumineuxderemplacement
Une hm-ii_)re indique la n&essit_ de rempl_wer la c_lrtouche du
filtx_ .i eau sur le distributeur. Cette lurM_re devient orange pour
vous avertir de remplacer bient6t le filtre.
Vous devez remplacer la cartouche de tiltre quand la huni0re de
l'indicateur de_ient rouge ou quand le ddbit de l'eau qui v;_ml
distibuwur d'eau ou _mdistributeur de glace dimim_e.
Aquelmomentremplacerle filtresurlosmodelessans
indicateurlumineuxderemplacement
i,_Jcartouche du fihre doit _tre x_mpl_,cde tousles six mois ou
moins si le ddNt d'eml du distfibuteur d'eau ou du distribumur
de glace diminue.
Retraitdela cartouchedufiltre
Sil sagit d'une cartouche de mmplacement, enle_ez d'abord
l'anciemle en la tournant lenmment vers la g_,mche. No tirezpas
sur la cartouche, lJn peu d'eau peut s'(_coulex:
Installationdela cartouchedufiltrea eau
cartouche SmartWater
avec un adaptatem;
l'adaptateur doit _tre
retir0 a\ant
tt si,ollsrer.p acez..e
l'installation de la
cartouche. Pour retirer
l'adaptawm; fidws-le Avoc adaptatour Sansadaptatour
pi_oter vers l_Jg;mche (l'apparonco pout varior)
d'emiron tin quart (le tOUl;
Si vous remplacez tree cartouche Wotor by Cu[ligan,laissez
l'adaptateur en place. Cet adaptateur (temeuren_ darts le
r0flig0r, Jteur lolsque que mus mmplace_z les flmlms (:fftouches.
O Sur les mod01es sans indicateur lmnineux (le remplacenlent,
appliquer l'autocollant du mois et de l'alm(_e _Jla nomelle
cm'touche pour vous iN)peler de l'empl_cer le filtt_ duns six mois.
Remplissez la cartouche de remplacelrlent d'eau du robinet
imm(_diaterrient aprbs l'installation afin de pen-nettre un
ineilleur d0bit (hi distributeur
_ Mig-nez la tlbche de la cartouche mec celle de support de
cartouche. Placez le haut de la nomelle cartouche _'_l'int(_rleur
du support. No I'enfoncozpasdans le porte<artouche.
@ r,ili,-,,ezlacar_o,ichele,.ei/,e,. ('_--/
,,ersla(_roi_ei.sq,Ca,p,,i,,o;,
la cartouche s'arr_te. NESERREZ
PASrROPFORT.I,o,_que ,ous l'a Porte: ]
tournez, elle selb, era en position ca_ouche
automatJquement. [,a cartouche
tera approxirriativement une
1./9 rotation.
O Faites couler l'eau (tu (listlJbuteur pendant 3rMnutes
(era'iron..... 6 litres) afin de ddg_ager,, le svstbme, et emii_cher le
bredouillernent.
Bouchondederivationdufiltre
II thut utiliser le bouchon de (l(_fi_ation du filtre lorsqu'une
cartouche (le l_mplacement n'est pas disponible. I,e (listributeur
et la machine _'_gta(ons ne peuvent pas fonctionner sans le tilu'e
ou sans le bouchon (le d(_fi\_ffion (tit filtre.
B0Uch0n
de ,, _0ucn0n_" ,,, II_
,,wl,0n
du!i]_
SmartWater Waterby gulligan
Pour ufiliser la prise de d(_rivation (hi filtm sur les mo(tbles Water
by Cu//igan,_ous (te_ez d'abord retimr l'adaptateur du filtre du
support de la cartouche en le fidsant pivomr _ers la g_,mche.
Si vous mez des questions--dsitez not_ site Web _'_l'adresse
_.electromenagersge.ca ou _q/pelez le 1.800.461.3636.
Filtresde remplacement:
PourcommanderdescartouchessupplementairesauxEtats-Unis,
visiteznotresite Weba I'adressege.com,ouappelezle Service
despieceset accessoiresGEau800,626.2002.
M_W
Pfix suggdr(_ pore" la ',ente
an (tdmil _38.95M7.95 USD
i,es cliems au Canada devndent consulwr les pagesjaunes pour
connaiu'e la succursale Mabe la plus pr&s.
i,es client,_ fil'extdfieur du Canada et des l_mts-Unis doivent
contacter le distfibuteur local.
Machine a gla ons automatique.
II faut prOvoir entre 12et 24 heures avant qu'un rOfri@rateur nouveflement install# commence _ produire des glagons.
Interrupteurdalimentatien
Machine_ g!agons
Veyantt#moin in vert jusqu'au niveau du bras r0gulateur, la machine
d'alimentation Bras ulateur fi glacons s'arr(_t de produire des glacons.
Machine a gla_ons automatique
(sur cortains mod_los)
I,ol_que la conduite d'eau est mccordde
au r0tiig0mteur, mettez l'intermpteur
(Falimentation fi la position I (marche).
I,a machine _'_glacons se remplit (t'eat_ lorsqu'elle
atteint -9°C (15°F). Si le bac _'_glaqons est plein
28 Assurezaous que lien tie g_ne le rrlouxerrlent
du bras r_gulateur.
Jetez les premiers lots de glaqons Nin d'(_liminer
les impuret& provenant de la conduite (l'eau.
I,a machine _'_glacons produira 7 glacons par
c_cle--soit environ 100--130 g]aqons toutes les 24
h'eures---selon la mrrlp_ramm du cong0lateuc la
temtI(_nmire amNante, la ti'(_quence d'ou\erture
des portes et (t'mitres conditions d'utilisation.
Vous enmndrez un bourdonnement chaque lois
que la machine _'_glaqons se remplit d'eau.
Page 29

www.electromenagersge.ca
I1est normal que plusiem_ glacons soient coil& entre eux.
Lo,5que w_us n'utilisez pas souvent de glaqons, les vieux
glaoms perdent leur transparence, premlent un gofit
d&agr_!able, et diminuent de taille.
NOTE: Dam/es ma/sonsquiont unepressiond'eaup/usfa/b/eclue
la moyenne,vouspouvezentendreb machbe_ gla;ons recommencer
plusieursfo/2son cycb pourprodu/?eunelivra/sondegla;ons.
Nocessaire de machine a glagons
Si votIe rg_flig_rateur n'est pas (l@:l dot(_ d' une machine "5
glacons auton/afique, un ng_cessaire de machine a glacons
est disponible moyemmnt suppl(qnent. V(4iifiez sur
l'(_tiquette 75l'arfi(_re du I'(_flig(_rateur quel est le ng_cessaire
de machine 5 glaoms spOdfique 5 _tre module.
Ledistributeurd'eauet de gla ons, co a osmoao/os
Pour utiliser le distributeur
Bacdetrop-plein
• • ®
Appu} ez doucement ]e xerre centre le
haut du bras de distribution.
i_ clayette de troi>plein n'est pas munie d'un
sxst&ne d'_coulement. Pour r&tuire les taches
d'eau, vous devez nettoxer r_guli&'ement la
cla}ette et sa grille.
Verrouillage du distributeur
(surcertains rnodbles)
rOCKCONTROt(r glagedu
LOC verrouillage) ilendant
3 secondes pour verrotfiller
Hold3seconds le distributeur et le
panneau de r_glage. Pour (t&errouille/;
appuyez sur la touche et mneMa entbnc_e
pen(trait encore 3 secondes.
S'ifn'yapasd'eaudistribudeIorsquelerOfrigOrateur
estinitialementinsta//O,i/}/a peut-Otrede/'airdam
/aconduited'eau.Appwezstir/acommandede
distributionpendantdeuxminutesauminimum
pourexpulserI'airde faconduited'eauetremplir
lerOservoird'eau.Afind?liminerlesdventuelles
impuretOsprovenantde/aconduited'eau,jetez
fessixpremiersverresd'eau.
ATTENTION:Nomettezjamaislosdoigtsou
d'autresobjetsdansI'ouverturedudistributeur.
Lumieredudistributeur
O Cette touche allume
igh distributeur.Vous allumez
___k t__ et (_teint la/umiere du
distribution. Si cetm alnpoule brfile, vous
devez la relnplacer par une alnpoule d'au
n-saxiIlltlIn (} WatN.
_galement la lumi&'e en
appu)ant sur le bias de
Timir a glace dans les modeles g_
distributeur de gla_ons
En/evement:Mettez ]'interrupteur du
distribumur de glace en positkm 0 (arrOt).
Tirez le tiroir droit, puis soule_eMe pour
d@asser la position d'arrOt.
Remise enplace :Pour x'enlettre ]e firoii;
prenez _)in d'apiluyer fi)rt en place. S'il
n'entre Ilasjttsqu'au fond, enlexeMe et tifites
tourner le m_canisme d'tm qtmrt de to ur
Poussez a nomeau le droirjusqu'au lend.
Renseignements importants concemant votre distributeur de gla_ons
?i::N'@,utez pas dmls le bac _ g]acons des glacons non
fabriqu& par votre machine 5 g]aqons. Ils risquent (t'_tre
ditticiles 5 concasser ou 5 distribuer
N E\imz de trop remplir les verres de glacons et d'ufiliser des
verres _tI'oits. i_ conduit peut se bloquer et le volet peut
geler et coincer S'il } a des glacons qui bloquent le conduit,
tSims-les passer au moyen d'une cuill&'e en bois.
N Ne placez pas de boissons ou d'aliments dans le bac
5 glacons pour les rafiaichir i_s boites, bouteilles et paquets
alimenmires pement coincer la naachine 5 glacons ou la vis
sails _]n,
i_7Atin que la glace distribute ne puisse inanquer le verre,
placer le verre 5 proximit_ mais sails toucher l'ouxerture
du distribumui:
i_i;:M&ne si w)us mez s(qecfionn(_ CUBEDICE (glaFons), il
est i/ossible que de la glace concass(_e tombe dans votre
verre. Cela se produit de telnps 5 autre loI_(tue plusieurs
glacons sent achemin& vei_ le broyeuI:
N Allr_s distributkm de la glace concass_e, de l'eau peut
s'_couler du conduit.
i_:;:Parfbis, un Ileu de givre se fi)rme sur le volet du conduit 5
glace. Ce ph&loln&le est norlnal et se produit en g&l&al
aplxXsdes distributions i'_p_t_es de glace concass_e, i e gixI'e
\_5&'entuellelnent &'ailoreI:
N I_ premier verre d'eau limrni pourrait _U'e plus chaud que
les suivants. Ceci est normal.
i_i;:i,'eau tournie n'est pas glac_e. Pour de l'eau plus fi'oide,
_!ioutez tout simillement de la glace concass_e ou des
cubes de glace malt de veiser de l'eau. 2_°
Page 30

Entretienetnettoyagedurefrigerateur.
Nettoyage de/'exterieur
te bac de trop-pleindudistributeur(sur cermins
mod_les) de_rait _tre soig_eu_ment essuyd.
Vous pomez dliminer les ddp6ts calcaires
laissds par los taches d'eau en trempant le bac
dans du vinaig_ e non dilud, i,aissez tremper
,iusqu'_'_ ceque los ddp6ts disparaissent ou
soient suflisamment ramollis pour _tre
d/iminds pm rinqag-e.
to bras de distribution(sue certains _llod01es).
A_ant netto}ag-e, appuyez pendant 3 secondes
sur la touche LOCKCONTROL.Nettovez-la au
mo_en d'une solution d'eau et de I)icarbonate
de soude--en_iron une cuill_re _'lsoupe
(15 ml) de bical bonate de soude par pinto
(l liter) d'eau. Rincez bien et essuyez.
Nettoyage de I'interieur
Pour eviter les mauvaises odeurs, laissez tree
boite ouverte de bicarbonate de soude dans
los compm'fiments rdfi'Jgdmteur et cong-6lamul:
Debrauchez le refrigOrateur avaut de le nettoyer.
S'il est trop di_cile de le fidre, e._sorez bien
votre lingo ou _otre dponge pour enle_ er l'exc_s
d'eau Io_.'sque \_)tlS nettovez atltOtlr des
inmrrupmurs, des lamrx_s ou des commandes.
Utilisez une solution d'eau tilde et de
bicarbonate de soude-envJron tree cuill_re
5 soupe (15 ml) de bicarbonate de soude pro.
pinto (1 liter) d'eau----_fin de nettover tout ell
neutr_dismt l_ odetux Rincez et essti\ez bien.
Aprbs a\_)ir nettoyd lesjoints de porte,
appliquez tree fine couche de va_line sur les
joints du cdtd des chanlibres pour emp0cher
los joints de coller et de _ (ldlbrmel:
Orifice de vidauge du compartiment du
congelateur, i z)_.'sdu netto}_lge annuel, retirez
Lospoign_es deporte et leurgarniture.
Netto?'ez-les au moyen d'un lingo humectd
d'eau NI\ollnetl_. Sdchez mec tin ling-e dotlx.
GardezI'ext_rieurdur#frig_rateurpropre.
Essm'ez-le mec un lingr propre Idg-_'renlent
htm{ectd de cite pour appareils
dlectromdna'4-ers ou d'un ddter'4-ent liquide
doux pour la vaisselle. Sdchez et polissez mec
un ling-e doux et propre.
N'essugozpasIor6frigdratouravocunlingo_ vaissollo
saleouunoserviettehumide. i/spourraienthisserun
r_siduquipourraondommagorlapointuro.N'utilisez
pasdotampons_rdcuror,doproduitsnettoyantson
poudre,dojavollisantsoudoproduitsnottogants
contenantunjavo/lisant,carcosproduitspeuvent
dgratigner/apointuroot /arendremoinsresistante.
la cas_role inl_lJetu'e du congdlateur et lidtes
p_s_r une sohltioll de bicarbonam de _)u(te
(1 cuillerde ou 5 ml) et d'eau chaude (p_s
I_)uillmlm) (2 t_,_ses ou 500 ml) au tearers
du tu}au de \idange i_I'akle d' une pirx_tm
d'am)sNe de sauces : ce mdlange limilim
l'dlimination des odetn's et la rdduction des
_i_tues de bouchag-e du tu}m] d'd',;_cuation.
SJ le tu}m] est bouchd, utili_z la pipetm et une
_)lution de bicarbonam de _)ude afin
de forcer le pa,_sage de la matinee obstrtmnm.
Evitezdenettoyer losclagettes on verreencore froides
dans de l'eau chaude car dies risquent de se casser
causede I'_cart excessffde tempdrature. Manipulez /es
clayettes en verreavecprudence.Si vouscognez le verre
trempd,il pourra se briser Ne lavezaucunepibce de
plastique du rdfrigdrateur au lave-vaisselle.
Derriere le refrigerateur
Prenez un soin particulier Iorsque _:)us dloig_lez le
rdfi'igdmteur du ram: Tousles types de re_0tements de sol
peu\ent 0tee endommagds, particuli_rement ceux qui sent
cous'_inds ou dent la surli_ce est gaufi'de.
Tirez le rdliJgdramur en ligme droite et, Iorsque vous le
remettez en place, pousseMe vers le tour en ligne droite.
i,es dE'placements latd]_mx du rdfl'igdrateur pour]_dent
endommager le retirement de sol ou le rdliJgdratem:
Lorsquevousremettez le rdfrigdrateur on place onle poussant, veillez
nepas le fake muler sur le cordond'alimentation ou sur la conduite
d'eau de la machine_glagons(surcertains modbles).
Depart en vacances
i,or_tue \_)us \ous absen tez pendant une pd_io(le prolongde,
\idez los aliments et ddbmnchez le rdfiJgdramtm Nettovez
l'intdlJeur a',ec une sohltion d'eau et de bicarbonam de soude,
_'__dson d'tme cuill_re _'__mpe (] 5 ml) de bicarbonam par pinto
(1 liter) d'eau, iNssez los poems omerms.
Mettez I'interrepteur d'alimentation de la machine _'_glacons
5 la position 0 (affOt) et lennez I'alimentation d'eau a(i
rdflJgdratem:
Demenagement
]mmobili_z tot_s les dldments amo\_bles, tels que les clayettes et I_ bacs, _'_I'aide de ruban gommd l_)ur d\ iter de les en(lommage_:
Assurez-vous que le rdfrig_rateur demeure debout pendant son d_m_nagemen_
Remplacement des ampoules
REMARQUE : La miso on arrOt du rOfrigOratour on mottant Io bouton de r#glago on position 0 (arrOt) _ I'aido des
commandos n'ontrMno pas sa raise hers tension.
O Ddbranchez le rdliig-dratem: O Remplacez I'ampoule par tree ampoule de m_me taille
O Enlevez la cla_,ette qui se trouve iuste au (less(ms
du protecteu{" de I'ampoule. " O Remontez la cla_,ette et rebranchez le rdll-igdrateul:
et de mOme puissance.
30
Page 31

Instructions
Refrigerateur
d'installation
Modoles 20, 22 et 25
I Si volts avezdes questions,appelezle 1.800.361.3400ouxisiteznotre site Web fil'adresse : www.electromenagersge.ca I
AVANT DE COMMENCER
Lisez ces instructions complbtement et attentivement.
*IMPORTANT - Conservezces
instructions pour utilisation &entuelle par un
inspecteur local.
"IMPORTANT - Respectez tous les
codes et r_glements otticiels.
* Note/_ l'installateur - _ssurez-vous de laisser
ces ilIS[FtlCtiOlIS Htl COIISOl//IllH[etll'.
. Note au eonsommateur - ()mservez ces
instructions pour rgffgwence tuture.
* Niveau de connaissaJaces - I)installation de cet appareil
requiert des commissances de base ell m_canique.
* Temps requis - L installation du iefngerateur
demande 15 minutes.
* I)installateur est responsable de l'installation
correcte du r6frig6rateur.
* Toute lxmne de cet appareil caus_e par une installation
inadOquate n'est pan couverte par la garantie.
ROULETTES DE NIVELLEMENT
Les roulettes de nivellemeut jouent trois r61es :
• ElleNpeuvent _U'e r6g{6es pour que les portes se retemIent
automatiquement lorsqu'elles sont fi moiti6 ouvertes.
• ElleNpeuvent _tre r_g_es de mank)re fipennettre
fi l'appal>il de reposer solidement sur le vii et l'emp&her
ainsi de branlel:
• ElleNvous pemiettent d'Oloigner le l_fl'ig_ramur
du tour pour le nettoyage.
Pour r6gler la hauteur des roulettes, _ ]_L.f_\ _
retirez la grille de la base du /__\J_l
Pour 61ever [e r_frig6rateur, tournez _[__,_
les vis de r6glage darts le sens horaire [_'_ .... .
et pour l'abaisser, darts le setts anfi-
horaire. Utilisez une cleffi niolette II
[)our 0crous.... hexagonaux, de 3/8 po
ou des pinces.
Pour remetlre la grille de la base,
alignez ses attaches arri0re entre la
ban'e et la partie ii_t_rieure de l'amioire. Poussezjusqu'a ce que
la gTille s'enclenche dans le logement.
ALIMENTATION D'EAU A LA MACHINE
A GLA_ONS (surcertainsmodeles)
Si le rg_flJg(_t'ateur est (_quii)(_ d' une inaclfine fi glaoms,
celle-ci dewa &tre rac(-ord6e fi une conduite d'eau fi'oide.
Vous pouvez acheter une trousse (l'alimentation d'eau GE
(contenant la tu);mterie, le robinet d'arr0t, lesjoims et les
instructions) chez votre revendem; oil ell vous adressant fi
notre site Web fi l'adresse www.dectromenagersge.ca
ou fi notre service de Pi_ces et accessoires au mnn0ro
de t61_phone 1.888.261.3055.
EMPLACEMENT DU REFRIGERATEUR
• N'installez pas le t'(qrigOtateur dans une I/i&ce ot'l la
mml)0mture ambiaum Iisque d'etre inf_fieure fi 16°C (60°F)
Du'ce qtfil ne se Inettlvl pas ell inalvhe suffisaumlent
sou\ent pour mainmnir 1_ mmI)0mtur_ (ore'enables.
• Installez le r_fl+ig_rateur sill" un plancber suflisannnent
solide pour le supporter lorsqu'il est plein.
DEGAGEMENTS
Pr&oyez les d_gagements sui\mlts pour fildliter
l'installafion, assurer tree circulation d'air ad&luate, et
i/ermettre les mccordements de phnnberie et d'_lectricit_ :
• C6tes 4 mm (1/8 t)o)" Dessus 25 mm (1 t)o)" Arri_'e 25 mm (1 po)
II mt n(_cessaile de m(amger un espace de 19 Inln (3/4 po)
pour que la poI*e ptfisse _)n'e ou\'erte Sill"90° ce (lift assure un
Ineille/u" acc&s at LXcoml/ai_ln ents de Imlgeln ent (l_ afinlents.
ALIGNEMENT DES PORTES
Aprbs avoir mis finiveau votre l_Irig&atem; assurez-_ous que
les porms sont fi la m(_me hauteur au sommet.
Pour (_g+aliserles portes
de l'appareil, r(4glez la _'
porte du l_flJg(_l+ateur deiacharniOre
COllIl//esuit : sup6rieuredela
@Pour retirer la grille porteaalimentsfrais.
de base, ouvre/z les
portes puis firez
droit sur la grille de
base _ers l'ext(4rieul: Cale
@ D0temiinez
laquelle des deux
portes est plus
01ev0e que l'mlu'e.
O Relevez la t)orte
qui est plus basse
de m_me que la
petite came.
O ]ns_rez une cale
entre la chamibre m_tallique de la porte et la petite came
comme illustr&
O ]ns&ez la cale de sorte qu'elle s'adapte entre la charni_re
m(_tallique et la petite came ell plastique.
O Fermez les portes et x(}/itiez si elles sont fi nixeau au sommet.
Si une des portes est ttn{jours plus basse que l'autre, r0p0tez
la proc&ture et ins(_rez une mm'e cale.
RFaVIARQUE : Si les portes ne sont pas _'lnixeau et que la cale est
31
(l_j,, el/place, il est possible de la retirer pour abaisser la porte.
sous le couvercle
phcent
Page 32

instructions d'instaliation
iNSTALLATiON DE LA CONDUITE D'EAU
AVANT DE COMMENCER
Nous l'e(()ll]liiHi]dol]s les trou_es d'_dililel]t_ttiol] d'eml en
ctti\ rc _\_8X2_, _\TKSXB, WXSX4, selon le montant de conduite
dont vous _l\ez ben )11].Nous approu\{ ms ]es cond {1ires d'eml eH
matibrc pl_,_tique GE Smart(2mnect " Rcfidgcrator Tubing
(\VX08XI0(X)2, \\ ,_08X10(}06, \\X08XI0015 et \\208Xl(X)25).
Si \ous installez tm Mstbme d'eau GE Rc\crse Osmosis dans
\{)trc rdfHg-dmteur, 1£1seule installation approu\de
est celle de la trous'_e (iE RVKIT. Pour les mitres s\_tbmes
d'osmo_ de I'eml, stfi\ cz les rccommandations (t[_ Iilbiicant.
Si le rdli'ig-drateur est alimentd en eau _'1partir d'un s}st_me
de filtration d'eau par osmose in\erie, et si le rdflig-dr_lteur
comporte dg_dement tm filtrc _'leau, utili_r le bouchon
du circuit de ddri\:ltion du filtrc dtl rdfiJg-dr_ltem'. Si la
cart{)uche de filtration d'eau d u rdflJg-drateur est utilisde
en coi_.]onction a\ec le s_stbme de filtrati{m par osmose
in\crsde, on peut ob_r\2cr tree rdduction du ddbit d'eau au
point de puisNc, et la prodtmtion de cubes de glace crcux.
Cette installation de condtfite d'eau n'est pas g_lrantie
par le Iilbricant de rdfiig-dr_lteur ou de machine _'1glacons.
Stfi\cz soigl]eusement ces instructions pour minimiser le
_isque de dommagcs ondrcux d'inondation.
i _ cou]_ de bdlicr (era1 qtfi donne des coups dans Its tu}mlx) dm]s
/a tu) auterle de la III_IiN)H peu\ cnt {}(c_iu_,iollller des doll)lllag-cs
aux piP'cos de \{)trc rdfiJg-drateur, ains] qt]€ des tiffins ou des
inondations. Appelez tm plombier ccrtNd pour corrig-cr les coups
de Ix:lier a\m]t d'insmllcr la c{}nd uite d'eau de \{}trc rdfiig-dratem2
Pore" pr&cnir toute brfllm'e et tout dommage d \otrc
rdfi'ig-dratem; ne branchez.jamais la conduite d'eau _'_tree
canalisation d'eau chaude.
Si \ous utilisez votrc rdli'igdrateur a\ant de brancher la
coHd uite d'eau, assurez-\ _)tls de laisser le COHIlII tltatetlr
de la machine _'1glacon en position O(_rr_t).
N'installezjamais les ttl}:_lux de la machine 21glacon dans des
endroits off la tempdraturc risque de descendre en dessous
du point de con g-dlation.
Vous dc\cz procdder _'1tomes u)s installations conformdment
aux cxig-cnces de \{)trc code k]cal de plombc]ie.
CE DONT VOUS AUREZ BESOIN (suite)
NOTE : Les seuls tuyaux en mati_re plastique approuv_s
par GE sont ceux qui font fournis dans les trousses GE
SmartConnect'" Refr'Nerator Tubing. N'utilisez jamais un
autre tuyau en mati_re plastique, car le myau d'alimentation
d'eau est tout le temps sous pression. Certaines categories de
tuyaux en mati_re plastique peuvent devenir cassants avec
l'fige et peuvent se fen(Ire, en occasionnant des dommages
d'inondation dans votre maison.
• Vous pouvez acheter une trousse d'alimentation d'eau GE
(contenant tm tu)m_, tm robinet d'arr_t et lesjoints
dnmndrds ci<tessous) chez votre distributeur local ou en
le commandant au set\ice de piOces et accessoires, au
800.626.2002.
• Une alimentation d'eau froide, ia pression de I'eau dolt
Otre entre 20 et 120 p.s.i. (1,4 et 8,2 bar) sur les modOles
non dqtfipds de filtre fi eau et entre 40 et 120 psi (2,8 et 8,2
bar) pour ceux qtfi le sonL
• Une perceuse 61ectrique.
• Une cl6 de 1/2 po ou une cl6 anglaise.
• Un tournevis g lame plate et un tournevis Phillips.
• Deux 6crous h compression d'tm diambtre ext6rieur
de 1/4 poet deux bagues (manchons)--pour brancher le
tn\m_ en ctfivre m_ r{]binet d'arr_t et au r(]binet d'eau
du rdfi'igdrateu]:
OU B_2N
• Si x_]us utilisez tree trousse C,E Smart{)]m]ecE" Refl'igerator
Tubing, les gm'nitm'es ndcessaires sont dd..i5 montdes au
[11\_11/,
.gl AVERTISSEMENT - B,a],che
seulement _'_une source d'eau potable.
CE DONT VOUS AUREZ BESOIN
• Tuyaux en cuivre ou trousse GE SmartConnect'"
Refrigerator Tubing, diam_tre extdrieur de 1/4 po pour
brancher le rdfl'igdratet_r fi I'alimenmtion d'eat]. Si vous
utilisez tm tu\au en cui_re, assure)'-\ous que les deux
extrdmitds du tu\m_ soient coupdes bien droit.
Pour tromer la Iong-ueur de tu}m_ dont vous aurez besoin :
mesurez la distance qtfi va du robinet d'eau sitnd derribre le
rdfl'ig-dramurjusqu'au tu\ml d'alimenmtion d'eau. Assure:,'-
\ous qtFil y air assez de tm.at_ en trop pour vous pe]'mettre de
ddcoller le rdfldg-dratet_r (iu tour aprbs I'insmllation.
i!as trousses C,E SmartConnect ''_ Refi'ig-erator Tubing sont
disponibles dans les dimensions suivantes :
0,6 m (21)i) -WX08X10002 1,8 m (61)i) - \_X08X10006
4,6 m (15 pi) - WX08X10015 7,6 m (25 pi) - \_X08X10025
• Si votre canalisatk)n d'eau actuelle atm ]_lccord d\;lsd _'1tree
extrdmitd, vous aurez be_)in d'tm adaptateur (q ue ;{)us
m]uxerez dans votre magasin de matdfiel de plombe]Je) pour
brancher le tt]\_ltl d'em_ m_rdJI-iJgdlatetl], OU BIEN vous
pou\ez coupe]: le ]'accord d\asd _'_I'aide d'tm coupe-tube,
puis utiliser tm ]_mcord _'1compressk)n. Ne coupezjamais
l'extrdmitd finie d'tm tu}m] de la trous_ GE SmartConnect ''_
RefHg-erator Tubing.
• Un robinet d'arr6t pour brancher le tu\m_ d'eau fl'okle, i,e
robinet d'arr_t dolt m_oir tree entrde d;eau mec tm diam_tre
intdriet_r minimal de 5/32 po au ]_]int dejonction mec LA
CONDUITE D'FAU FROIDE. Des robinets d'arr_t _'1dtrier
sont soment inclus dans les tr{]t_sses d'alimenmtion d'eau.
A\ant d'achete]; assure)'-\ ous que le robinet fi dtrier se
coniorme _'1vos codes de plomberie locaux. Insmllez le
robinet d'arr_t sur la canalisation d'eau potable la plus
fl'dquemment utilisde.
32
Page 33

Instructions d'installation
PRINCIPALE D'EAU
1_ ERMEZ L'ALIMENTATION
[]
PERCEZ UN TROU POUR
LE ROBINET
Cboisissez, pour le robinet, un emplacement Ii_cilement
accessible, ll xaut mieux le brancher de c6t6 _'1un tmau
xertical. Si "_ous dexez le brancber _ tm tmau horizo}md,
Iifites le branchement en haut ou de c6tOi plut6t qu'en
bas du tu)au, pour 6xiter de recexoir des sddiments du
tu_au d'alimentation d'eau.
Percez un trou de 1/4 po dans le tu}au d'eau, _'lI'aide
d'un loret (lm: Enlevez route barbure due au percage du
trou dans le tu'_au. Faites attention de ne pas laisser de
l'eau comer darts votre perceuse _lectrique.
Si vous ne percez pas un trotl de 1/4 po,
vous obtiendrez une alimentation d'eau
rod uite et des glaqons plus petits.
[] BRANCHEZ LETUYAU AU ROBINET
Placez un 6crou de compression et une bague (mancbon)
_'1I'extr0mit0 du tmau et branchez-les au robinet d'arr0t.
Assurez-x ous que le tu)ml soit bien insOr6 dans le robinet.
Serrez fort l'Ocrou de compression.
Pour le tu\ml en mati0re plastique d'une trousse GE
Smm't()mnect '_ ReliJgerator Tubing, insOrez I'extrOmitO
moulOe du tllVaU dans le robinet d'arr0t et serrez 1'6crou
de compressiim _'_la main, puis serrez un autre demi tour
m'ec une cl6. Si vous serrez trop loft, vous pou\ez
occasionner des filites.
Robinetd'arr6t
6trier Tuyau
Presse-joint
Robinet de sortie Bague {manchen)
NOTE : \,ires devez vous conformer aux Codes de
plombelJe 248CMR du ()lmmonweahh of Massachusetts.
i!es robinets d'arr0t _'_6uJer sont illOg_mx et leur utilisation
n'est pas autol%Oe all Massachusetts. Consuhez votre
plombier local.
compression
SmartConnectTM
[] FIXEZ LE ROBINET D'ARRI_T
Fixez le robinet d'arr0t au tmau d'eau fi-oide fi I'aide
d u collier de serrage.
Serrez les vis du collierjusqu'_'l ce que la rondelle
d'OtancbOit6 commence _'1enfler.
NOTE : Ne serrez pas trop. Vous risquez d'Ocraser
le tiP, all de cuivre. Rondelle
Entree
Collierdeserrage
Visdu
4
Robinetd'arr6t _ Tuyauvertical
6trier d'eaufroide
NOTE : \'ires de\ez vous conformer attx (:_des
de plomberJe 248CMR du Commonweahb of
Massachusetts. I,es robinets d'arr0t fi 6uJer sont illOgmlx
et leur utilisation n'est pas autorisOe all Massachusetts.
Consuhez votre plombier local.
[] ACHEMINEZ LE TUYAU
Acbeminez le m)au du tu)ml d'eau fi-oide au rOfiigOratem:
FaJtes p_'_'_er le tu}ml p_u- tm trou perc6 clans le tour ou le
plancber (denJ0re le rOfiJgOmteur ou au niveau de I'amaoire
de ctfisine ac!jacente), aussi pros du tour que lXlssible.
NOTE : A'_surez-x ous qu'il ) air as_z de tu) au ell trop t_lur
vous pem]ettre de dOcoller le rOfiJgOrateur du tour apr0s
I'installation.
[] PURGEZ LE TUYAU
Omrez le robinet d'alimentation pdncipale d'eau et
purgez le tuyaujusqu'a ce que l'eau soit claire.
@
[]
BRANCHEZ LE TUYAU .,_VOTRE
RCFRIGCRATEUR
NOTES :
• A\ant de bl',mcher le tu}_m fi votre r01i'Jg0rateul; _ssurez-
vous que le cordon d'alimenmtion Olectrique du
rOli'JgOramur ne soit pas brm]cbO fi la prise intrude.
• Si votre rOliigOramur n'est pas 0quip0 d'un fihre 5 eau,
l]OtlS VO[IS recommandons (Fen installer t/l] sJ votre
alimenmtion d'eau contient du sable ou des particules
qui pement boucher la gTille (Ill robinet d'eau de votre
rOliJgOramtu: InsmlleMe sur la conduim d'eau pros de
votre rOfi'igOratetu: Si vous utilisez une trousse GE
SmartConnect '_ Reliigerator Tubing, vous aurez besoin
d'un tu\ml additionnel (WX08X10002) pour brancher
le fihre( Ne coupezjamais un tll\ml ell mati0re plastique
pour installer votre fihre.
33
Page 34

instructions d'instaliation
[] BRANCHEZ LE TUYAU A VOTRE
RI_FRIGE_RATEUR (suite)
Stir certains modules de r_ffig_rateurs, le raccord se
trotlve _'ll'_xtr_mit_ d t/ tl/\_ltl sittl_ _'ll'ext_ieur de
couvercle d'acc_s de com[_ardment du compressem: Sur
d'autres modbles, le couvercle d'acebs au compartiment
du compresseur dolt _tre retir_ pour acceder au raccord
d u r_ffig-_rateur au robinet d'alimenmtion d'eau.
Sur les modOles dotds du raccord au robinet d'alimentation
d'eau, retirez le bouchon en plastique flexible.
©
[] BRANCHEZ LE TUYAU A VOTRE
RE_FRIGE_RATEUR(suite)
Ecroude Tuyaude I
Colleta _ II I1 compression 1/4po
Collet _ IJ/-- //_ffYJ',_&_,\ll
/"_ II_C_ Tuyaude
Brancheme_lr _ .................
_r_artConnect TM
[] FERMEZ L'EAU AU NIVEAU DU
ROBINET D'ARRI_T
Resserrez tout.ioint qui fuit.
Placez I'dcrou de compression et la bague (manctlon) _'_
/'extr_mitd du tu}au comme I'indique I'illustration. Si
vous utilisez une trousse (}E SinartConnect '_' Refiig-erator
Tubing, les dcrotls sont (t_i21 assembles au ttt;atl.
Insdrez I'extrdmitd du tu'_au dans le mccord du
rdfiigdrateur le phIs Ioin'que possible, l%ut en tenant/e
tu}au, serrez le raccord.
Si _ous utilisez till tmau ell matibre plastique d'une
trousse OE SmartComlect" Refl'igerator Tubing, insdrez
l'extrdmitd moulde du tU\ml dans le raccord du
rdfiigdrateur et serrez I'd£rou de compression a la main,
puis serrez till autre foul" }l_ec fine cle. Si VOtlS serrez tr<_p
loft, VOtlS pouvez occasionner des ftlites.
Fixez le tmau au collet lbumi pour le tenir ell position
_erticale. I1"est possible que vous ayez _'ldisioindre le collet.
L'tm des sch6mas ci-dessous sera Nmilaire au montage
du raccord de votre r6[r'N6rateur.
Collet a Tuyaude
tuyau po
Ecroude
compression
de1/4po
Collet
(manchon)
Branchement allde
aurdrig6rateur SmartConnect_
Remettez en place le comercle d'accbs.
[] BRANCHEZ VOTRE REFRIGERATEUR
Disposez la spirale de tll\ml en cui\re de mani_re
_'_ce qu'elle ne vibre pas'contre I'arri_re de votre
rdfligdrateur ou contre le mtm Metmz votre rdfi'igdrateur
_'_sa place contre le tour en le poussant.
[] METTEZ EN MARCHE LA
MACHINE A GLA(_ONS
Mettez le commumteur de la machine _'_glacon en
position I (marche).ia machine _'_glacons ne se met
en marcbe que lorsqt£elle atteint une tempdramre
de fimctionnement de - 9°C (15°F) ou moins.
Elle commence immddiatement _'_fbnctionner si le
comm umteur de la machine _'_glaqons est en position
I (marche). _ .__x_
34
NOTE :Si xotre pression d'eau est trop Iiiible, le robinet
peut _ remettre en marcbe.iusqu'_'_ trois Ibis potu" en'_o}er
sufl]samment d'eau 5 la machine _'_glacons.
Page 35

Bruitsnormauxde fonctionnement.
Les r_frig_rateurs plus r_cents font des bruits cliff,rents de ceux
des anciens. Les r#frig#rateurs modemes pr#sentent plus de
fonctions et sont plus avanc#s sur le plan technologique.
Entendez-vous ce que j'entends ? Ces bruits sont normaux.
www.electromenagersge.ca
HUMMM...
-- -OUUCH....
• I,e nouveau con_presseur 5 rendement (_lev(_ peut
fl)nctionner phls longtenlps et phls vite que votre
ancien rg_fl'ig_rateur et vous potlvez entendre tm son
modul_ ou tm ronflement aigu pendant son
_on(-tionneill ent.
• Pm_ois le rg_fl'ig_rateur fimcfionne pendant fine peIJode
prohmg_e, surtout loi_que les portes sont ouvertes
fl'&luemment. Cela signifie que la fimcfion FrostGuard"°
est active pour emp&-her la brOlure de cong_lation et
am_liorer la consex_'ation des aliments.
• Vous pouvez entendre un sifflement loisque les pontes
se tbm_ent. Cela vient de l'&luilibrage de pression darts
le r6frigdrateur
CLICS, CLAQUEMENTS,
CRAQUEMENTS et
GRESILLEMENTS
OUIR !
• Vous pouvez entendre les ventilatems tourner
5 hautes vitesses. Cela se produit h)rsque le
rg_fl'igdrateur vient (l'_tre branch(_, lo_que les portes
sont ouvertes frg_quenllnent ou lots de l'ajout d'une
grande quantit(_ d'aliments darts les compartiments
congdlatem" ou rg_ti'igdratem'. I,es ventilateurs
permettent de maintenir les bonnes tempg_ratures.
• Si rule des portes est ouverte pendant plus de
3 minutes, wins pouvez entendre l'activation des
ventilatem's permettant de refroidir les ampoules.
• I,es ventilateurs changent de vitesses pore" assurer des
(monomies d'gme_gie et un reti'oidissement optimaux.
BRUITSD'EAU
6
• Vous pouvez entendre des craquements ou des
claquements lorsque le rg_fl'igdrateur est branch_
pour la premiere lifts. Cela se produit lorsque le
rg_fl'ig_rateur se refl'oidit 5 la bonne temp&'ature.
• I,es registres (_lectroniques s'ouvrent et se terment
pour assurer des (_conomies d'gmergie et tm
refroidissem ent optima ux.
• I,e COIllpYessellY petit CallseI" till clic Oil IlIl
grdsillement lots de la tentative de reddmarrage
(cela peut prendre 5 minutes).
• I,e tableau de commande _lectronique peut catlsei"
tm clic lorsque les relais s'activent pore" commander
les composants (h:l rg_fl'ig_ratem'.
• i,'expansion et la contraction des serpentins de
reti'oidissement pendant et aprOs le (l(_givrage
petlvent Catlser tlil craqtleillent Oil tlil claqtlei//ent.
• Sin" les mo(h)les (_quipg_s d'tme machine 5 glaqons,
apr_s tm cycle de tabrication de glagons, vous pouvez
entendre les glaqons tomber darts le bac.
• i,e passage de l'agent fl'igorifique darts les serpentins
de reli'oidisselnent du congt)lateur peut Otre
accompagn_ d'un gargouillement semblable 5 cehfi
de l'eau en (d)ullition.
• I,'eau tombant sin" l'(_l(_ment chaufihnt de ddgiwage
peut taire un bruit de grg_sillement, de claquement
ou de bourdonnement pendant le cvcle de
d_givrage,
• Un bHfit de suintement d'eau peut Otre entendu
pendant le cycle de ddgivrage lorsque la glace de
l'(_vaporateur tired et tombe darts le bac de
rg_cupg_ration.
• Fem_er la porte peut causer un gargouillement
en raison de l'&luilibrage de pression.
35
Page 36

Avantd'appelerunreparateur...
Conseils de d_pannage E-conomisezdu temps et de
I'argenf! Consultez d'abord los tableaux qui suivent et vous
pourrez peut-#tre #viter de faire appel _ un r#parateur.
Causes possibles Correetifs
Le refrigerateur ne
Vibrationon bruit Les roulettes de ulvellement * Coustdtez Roulettes.
metallique (une16g$re avant doivent _ce r_gl_es.
vibration est notmale )
Lemoteurfonctionne Ceci est normal lorsque le * Atteudez 24 heures pour que le r(:tl_gc:rateur refi'oi(lisse
pendant de Iongues r_frig_rateur vient d'etre brmach_, compl_teuwut.
p_riodes on d_marre et
s'arrOte frequemment. (Les Une grande quantit6 d_alil_ents * (:'e_,st uoYlu;fl.
rOfrig_ratenmmodernes a _t_ raise au r_frig_rateur.
etleurscongOlateurs Porte laiss6e otwerte. * VOrifiez qu'il n'y a l)as uu paquet qtfi emp&che
etantplus grands, lent la porte de tb_lue_:
moteur doit fonctionner
plusIongtemps.IIs Temps chaud ou ouverture * (Yest uomlal.
dOmarrentet s'arrOtent fr*_quente des portes.
afin de maintenir des Los commmldes de temperature * (_oustdtez Los commandos.
temp#raturesuniformes.) ont _t_ r_gl_es h la temperature
Temperature trop Mevee La commmzde de temperature * (_oustdtez Los commandos.
darts le congOlateur ou n'a pas _t_ r_gl_e _ m_e
le r_frig#rateur temperature assez basse.
Givre surles aliments Porte laiss6e ouverte. * V_rifiez qu'il n'y a pas uu paquet qtfi eml)_che la
surgel_s(il estnormal porte de fermex:
que du givre se forme
ITntOrieur du paquet) Los portes ont btb ouvertes
La separation entre Le syst_me automafique * Cod eml)&che la tb_uatiou de condensation stu"
le r_frigerateur et le d'6conomie d'bnergie faJt l'ext(_rieur du r(_fl_ig(_ratetu:
congMateurestchaudo circuler du fiquide chaud autour
Odeur/saveur 11 faut nettoyer le bac h glacons. * Videz et la\ez le bac ;'_gla_ous..]etez los \'ieux gla(ions.
anormale des
gla_ons
Formation lente des Porte laiss_e ouverte. * V6rifiez qu'il u'y a pas tm paqtzet qtd crop&the la
glagons porte de tenaer.
36
Le cycle de d_givrage * Atten(lez environ 30 minutes atin que le cycle de
est peut-_tre ell cours, d_giw'age puisse te_,ine_:
Les commm_des de temperature * (_hangez le r_glage du compartiment coug_lateur en
sont r_gl_es sur 0 (arr_t). position de refroidissemeut plus iuf_rietu'e.
Le r_frig_rateur est d_brm_ch_. * Eufimcez la fiche de l'appareil daus la prise murale.
Le disjoncteur ou le fusible * Reuq)lacez le fitsible ou r_eucleuchez le disiouctem:
pout avoir saut&
la plus froide.
Temps chaud ou ouverture * Abaissez la (ommaude de temperature d'uue position.
fr_quente des portes. (_oustdtez Los commandos.
Porte laiss6e otwerte. * V(_Y]fiez qu'il n'y ;i l);Is till p;Iquet qtli eI//l)(_('he 1;I
porte de te_me_:
trop souvent ou pendant lrop
lon_emps.
du rebord avm_t du cong_lateur.
Des aliments ont _'masmis leur * Emballez bien los aliments.
odeur/goflt aux glacons.
I1 faut nettoyer l'intSrieur du * (:ousttltez Entrotion ot nottoyago.
r_ frig_rateur.
La commm_de de temperature * Coustdtez Los commandos.
du congSlateur n'est pas r_glSe
h m_e tempSrature assez froide.
Page 37

www.eleclromenagersge.ca
Causes possibles Correctifs
Petits gla_ons ou gla_ons Le filtre h eau est bouch6. * Rempla(ez la (artouche du tiltre avec une nouvelle.
creux k Hnt_rieur
La porte ne se referme Le joh_t de la porte colle ou se * Appliquez un peu de xaseline sur la surtiwe dujoint.
pas enti_rement replie du c6t_ des chanfi_res.
Lueur orange dans Le cycle de d6givrage est * (Test nom_al.
le congMateur en cours.
Le distributeur de La macl_e _ glaqons est 6tehlte * Mettez en marche la machine _'lgla<ons ou r_tablissez
gla_ons ne fonctionne ou l'alhnentafion en eau a btb l'alimentation en eau.
pas(surcertains coup6e.
mod_les) Des glaqons sont coll6s au bras * Retirez les gla<ons.
r6gulateur.
Blocs de glace irr_guliers dmas
le bac h glaqons.
Disldbuteur est VERROUILLE. • Appuyez et maintenez ex_foncC'e la totwhe LOCK CONTROL
Mauvaisgo_t/odeur Le distributeur d'eau n'a pas 6t_ • Faites cotfler l'eaujusqu'_'l ce que l'eau du svst_me soit
de I'eau (surcertains udfis_ depuis longtemps, remplac_e par de l'eau fraiche.
• grisez-en autant que possible avec vos (loi_ts_ etjetez ceux
qui restent.
• l,e cong_lateur est peut-_tre trop chaud. R_glez la
commancle du cong_lateur sur une temp_ratm'e plus
basse, en abaissant la commande d'tme position :'l la ibis
jusqu'_'l ce que les blocs de glace disparaissent.
(r_glage du verrotfillage) pendant 3 seconcles.
modMes)
L'eau versee dans le Notarial lorsque le r6frig_rateur • Attendez 24 heures pour que la temperature du
premier verre est est hfifialement hlstall6, r_fi_ig_rateur se stabilise.
chaude (surcertains Le distributeur d'eau n'a pas 6t_ • Faites cotfler l'eaujusqu'_'l ce que l'eau du svst_me soit
modNes) utifis6 depuis longtemps, remplac_e par de l'eau fraiche.
Le r_servoir d'eau vient • Attendez plusieuxs heures pore" que l'eau refl'oidisse.
d'61re vidmzg6.
Le distributeur d'eau L'aJimentation en eau est • C_msultez Installation de la conduite d'eau.
ne fonctionne pas coup6e ou n'est pas raccord6e.
(surcertains modMes) Le fillre heau est bouch6. • Remplace× la cartottche du filtre avec tree notwelle
cartouche ou installez le bot_chon du filtre.
II y a de Fair dmas la conduhe • ApImyez sur le bras de distribution pendant au
d'eau, llloins deux lllintltes,
Dislributeur est VERROUILLE. • Appuyez et lll;lintenez ell_Oll(_e 1;itou('he LOCKCONTROL
(r_glage du verrouillage) pendant 3 secondes.
L'eaujail/it du distributeur La cartouche du f'flwe vient d'6We • Faites cotfler l'eau du distvilmtetu" pendant 3 minutes
hastall_e. (environ 6 litres).
Nodistribuepand'eau L'eau du r_servoir est gel6e. • Appelez un r_pm'ateu_:
La machine _ glagons La conduite d'eau ou le • Appelez un plombie_:
nedistribueni eau robinet d arr6t est bouch6.
ni glagons
Le filtre heau est bouch6. • Rempla( ez la ('artouche du tiltre avec tree nouvelle
cartouche ou installez le bouchon du filtre.
Distributeur est VERROUILLE. • Appuyez et maintenez ex_foncC_e la touche LOCKCONTROL
(r_glage du verrouillage) pendant 3 secondes.
Des alhnents ont lrmas_nis • l,es aliments a (>dent fi >rte d()ivent _tre emball_s
leur odeur au r6fdg6rateur, hem_tiquement.
• (;ardez tree boite ouverte de bicarbonate de sonde
dans le rC'flJgC'rateul:
11 faut nettoyer l'hat6rieur. • Consultez fntretien et nettoyage.
]1 faut nettoyer le syst_xne • Consultez Entretien et nettoyage.
d'6vacuation de l'eau de d6givrage. _ 7
Page 38

Pvant d'appelerun re_parateur...
Causes possibles
Dela condensation
s'accumule_ I'exMrieur
De la condensation Les portes sont ouvertes mop
s'accumule _ 17nterieur fr_quemment ou pendant mop
(par temps humide, longtemps.
I'ouvetture des portes
laisse entrer de I'humidiM)
L_clairage inMrieur II n'y a pas de cottrm_t au ifiveau • ]_emplacez le fusible ou r_enclenchez le disionctetu:
Eausur le sol on au fond L'orifice d'_couielnent an fond • (]onsultez Entretien et nettoyage.
du €ong#lateur du congblateur est peut-6tre
Air chaud _ la base du Courmzt d'air normal provenmat
![)!iiiiiillji!ii)i!i!i!i!i!i!i!i!i!i
ii i i i i i i i
CUBEDICE (gla_ons)
etait choisi mais
CRUSHEDICE (glace
Cela n'est pas h_habituel pendant
les p6riodes de forte humidJt&
de la prise.
L'aanpo uie est grill6e. •ConsultezRemplacementdesampoules.
bouch&
I1y a des glacons bloqu6s dmas •Faitespasserlesgla£onsi, l'aided'unecuill#ereenbois.
le conduit.
du moteur. Pendmlt le processus
de r6frig6ration, il est normal que
de la chaJeur suit expuls6e fi la
base du r6frig6rateur. Certahls
rev6tements de sol sont sensibles
et peuvent se d6colorer sous
l'effet de cette temp6ratttre de
fonctiommment normale qui
est smls danger.
Le r6glage pr6c6dent 6taJt
CRUSHEDICE (glace concassee).
Correctifs
• Essuxez bien la sui-liwe ext&_ieure.
• Quelques cubes sont rest_s et ont 6t_ concass_s _'lcause
dtl I'_glage precedent. (Test noi_nal.
concassee)aere
distribu_e (sur
certains modMes)
La machine h glagons Le bras r6gulateur est h la • Abaissez le bra_ r6_ulateui a lap sm m I (marche).
position O(arr_t).
L'a!imentation en eau est coup6e • Consultez Installation de/a conduito d'eau.
ou n'est pas raccord&e.
Le comparfiment cong61ateur • Attendez 24 heures pour que la telnp_rature du
est lrop chaud, i'(_fi_iggwateur se stabilise.
Un aanas de glaqons daa_s le bac • Nix elez les glaoms _'lla main.
provoque l'arr6t de la machine h
glacons.
O" " " > 0 " "(
Bruitfrequent
devibrations
38
la machine h glagons. (La ltunibre et remettez la machine ell marche.
9
d alimentation verte clignote.)
L'hzterrupteur de maxche de la
machhm fi glaqons est en position
I (marche) maJs l'aJimentation en
eau du r6frig6rateur n'est pas
brmzch6e.
• Mettez l'interrupteur de marche ell position O (arr_t].
Vous endonllnagerez le robinet d'eau ell le conserxant
ell position I (marche).
Page 39

GARANTIE DU CLIENT
(pour la clientele au Canada)
Votre r6frigerateur est garanti contre tout defaut de rnateriau et de fabrication.
Oeque cette Duree de garantie Pi_ces Main-d'oeuvre
jarantie couvre (a partir de la R@aration ou
date d'achat) remplacement au
Oompresseur GEProfile : Dix (10) ans GEProfile : Dix (10) ans GEProfile : Cinq (5) ans
!
3yst_me scelle (y GEProfile :Cinq (5) ans GEProfile :Cinq (5) ans GEProfile : Cinq (5) ans
_omprisI'evaporateur,la GEet toutes autre GEet toutes autre GEet toutes autre
1
tuyauteriedu condenseur marques : Un(1)an marques: Un(1)an marques: Un(1) an
_tle frigorig_ne)
routes les autres pi6ces Un(1) an Un(1)an Un (1)an
GEet toutes autre GEet toutes autre GEet toutes autre
marques : Un(1) an marques : Un(1) an marques : Un(1) an
choix de Mabe
TERMES ET CONDITIONS :
La presentegarantie ne s'applique qu'a I'utilisation domestique
par une seule famille au Canada,Iorsquele refrig6rateur a6t6
install6 conform6ment aux instructions fournies par Mabe et
est alimente correctement en eau et en electricit&
Les dommagesdos a une utilisation abusive, un accident,
uneexploitation commerciale, ainsi que la modification,
I'enl_vement ou I'alt6ration de la plaque signaletique annulent
la presente garantie.
L'entretien effectue dans le cadre de la presente garantie doit
1'6treparun reparateur agre6Mabe.
Mabe et le marchand ne peuvent _tre tenus pour responsables
en cas de reclamationsou dommages resultant de toute panne
du refrig6rateur ou d'un entretien retard6 pour des raisons qui
raisonnablement echappent a leur contr61e.
L'acheteur doit, pour obtenir un service dans le cadre de la
garantie, presenter la facture originale. Les 616mentsrepar6s ou
remplac6s ne sont garantis que pendant le restant de la p6riode
de garantie initiale.
Cette garantie est offerte a I'acheteur initial, ainsi qu'a tout
propri6taire subs6quent d'un produit achete en vue d'une
utilisation domestique au Canada.Le service a domicile en vertu
de la garantie serafourni dans les regions ou il est disponible
et ou Mabe estime raisonnable de le fournir.
Cette garantie est en sus de toute garantie statutaire.
EXCLUSIONS DE LA GARANTIE :
• Le propri6taire est responsablede payer les reparations
occasionn6es par I'installation de ce produit et/ou les visites
n6cessairespour lui apprendre a utiliser ce produit.
• Tout dommageau fini de I'appareil doit _tre signal6 aupr_s
du magasin ou a et6 effectu6 I'achat dans les48 heures
suivant la livraison de I'appareil.
• Dommagescaus6s a la peinture ou a I'email apres livraison.
• Installation incorrecte--I'installation correcte inclut la
bonnecirculation d'air pour le systemede refrig6ration,
des possibilites de branchement aux circuits electriques,
d'alimentationeneauet autres.
• Remplacementdes fusibles ou rearmement des disjoncteurs.
• Remplacementdes ampoules61ectriques.
• Dommagessubis par I'appareil a la suite d'un accident, d'un
incendie,d'inondations ou en casde force majeure.
• Utilisation correcte et entretien adequat de I'appareil selon
le manuel d'utilisation, reglage correct des commandes.
• Pertedes aliments dee a la deterioration.
• Leservices'il est impossibled'avoiracc_sauproduit
pource faire.
• LEGARANTN'ESTPASRESPONSABLEDESDOMMAGES
INDIRECTS.
EXCLUSION DE GARANTIES IMPLICITES--Votre seul et unique recours est la reparation du produit selon les dispositions de
oette Garantie limitee. Toutesles garanties impficites, incluant les garanties de commercialite et d'adequation a un usage
speoifique, sont fimitees a une annee ou a la periode la plus courte autorisee par la legislation.
I
IMPORTANT
Gardez cette garantie et votre facture originale comme preuve d'achat et preuve
de la date d'achat.
Mabe vous offre ses services dans tout le pays, Pour de plus amples
renseignements sur la presente garantie, veuillez prendre contact avec :
Directeur, Relations avec les consommateurs, Mabe Canada Inc,,
Bureau 310, 1 Factory Lane, Moncton, N,B. E1C 9M3
1,800.361,3400
Agraphez votre regu icL
Vousdevezfournir la preuve de
I'achat original pour obtenir des
services en vertu de la garantie.
II
39
Page 40

Feuil/et de donn6es relatives glla performance
Cartouche MWF duwsteme de
Filtrationd'eau GESmartWater
Cewsteme a #t_ essay#se/on /es nonnesNSF/ANS/42/53pouruner_duction dessubstances #num&#es ci-dessous.
Laconcentrationdessubstancesindiqueesdans/'eau qui entredansle systeme a #t_ reduite a une concentrationinferieure
ou ega/e a la /imitepermise pour I'eau quittant/e wsteme, te//e quepr6cis6e par la normeNSF/ANS/42/53.*
(facteurs intbgr6s de s6curit6 _ 100%pour une utilisation sans compteur)
Norme N ° 42 : Effets esth6fiques
Paramb_re
(]hlol-e
T&O
Pal-ticules :_*
Paramb_m
"Iiubk/itx
Spores
Asbestos
Plolnb au ptt 6,5
Plolnb au ptt 8,5
,Mr_vure fipH 6,5
Mt r_ ure ;t pH 8,5
Alach]ore
I.indan{
2,44)
"Ibxapiff'ne
Benz6ne
C_rbofl mint
1,4Dichh)mbenz&ne
Am_zin_
USEPA
MCL
i,ffluent concen,a-afion
10.(,q)0 pal_klesimL minimum
USEPA
MCL
0,5 NTI_
Z99,95{{r&hlction
->99% r6duction
0,0]27mg/L
0,0]27mg/L
0!X)2mg/L
t),I_)2mg/L
0,002 mg/L
0,0002 rag/l,
0,070 mg/L
t),(_)3mg/L
0,00.5mg/L
0,040 mg/L
0,075 mg/L
0,003 mg/L
Qualif_
2,0rag/l. _+]0%
Quali_4
hlfl uen_ concentration
]1 ±1 N I'/'***
5(1.(1(10L lllillimlllll
]07 5 10s fibrcs/I ,;> 10ttm
0,15 rag/I, ± ] 0S{
0,15 rag/I, ± ] 05?{
0,006 mg/L ± ] ()5_
0,006 mg/L ± ] ()S_
0,04 rag/I, ± ] 05?{
0,002 mg/L ± ] 0%
0210 mg/L ± 1()!_
0,015 mg/L ± 1()!_
0,015 mg/L + 10%
0,080 mg/L + 10%
0225 mg/I. ± 10%
0,009 mg/L ± 10!_
Moyenne Effluent
influente Moyenne Maxlmlml
] ,96 rag/l. 0,06 mg/L 0,1 ] rag/l.
6.400.(X)0#/mL 58.833 #/mL ] 50.000 #/mI,
Norme N ° 53 : Effets de smith
Moyelme
influente
]0,5 NT[ '
]]8.750 #/I,
57MF/I,
0,1567 rag/I,
0,]433 rag/I,
0,0059 mg/I.
0,0057 rag/I.
0,0367 rag/l,
0,0020 rag/I.
0,2033 rag/I.
0,01_) rag/I,
0,014;, rag/I,
0,0830 rag/I,
0,2283 rag/I,
0,0087 rag/l,
0,996 MF/L < ] MF/I,
< 0,001 mg/L < 0,001 rag/I,
< 0,001 mg/L < 0,001 rag/I,
0,000350 mg/L 0,0007 mg/L
0,000325 mg/L 0,0006 mg/L
0,00023 mg/L 0,0004 mg/L
< 0,00t)02 rag/l, _0,0(_)02 mg/L
0,00337 mg/L ),011000 rag/I,
0,00100 mg/L ),001000 rag/I,
0,000500 mg/L ),000500 rag/I,
0,001000 mg/L ),001000 rag/I,
0,000500mg/L ),000500 rag/I,
< 0,0005 rag/l, < 0,0003 mg/L
Effluent
Moyemle Maxlnmm
0,] 4 NT/' 0,28 NT_
< ] #/L 4 #/L
% R6duction
Moyenne _ttm
96,77% {)4,74%
99,] 4% 97,97%
% R6duction
Moyemm Milllnltml
98,,54% 97,20!_
> 99,99% > 99,99%
99,(_)% 99,39!_
99,36% 99,29%
99,30% 99,29%
94,70% 87,,50!_
93,20% 89,29!_
99,34% 98,67%
99,(_)% 98,95%
98,32% 94,,50!_
93,44% 9] ,67!_
96,,5]% 95,83%
98,78% 98,65%
99,78% 99,77%
94,22% 93,33%
R6duction
exlgeaalte rain.
> ,50%
_>85%
R,bducfion
exigemx_e rain.
0,5 NTt
_>99,9,5%
_>99%
0,010 rag/I,
0,010 mg/L
0,002 mg/L
0,002 mg/L
0,002 mg/L
0,OIX)2mg/L
0,070 mg/L
0,003 mg/L
0,005 mg/L
0,04 rag/I,
0,07,5 mg/L
0,003 mg/L
* Test6 utilisant un d6bit de 0,50gpm; une pression de 60psig; un pH de 7,5+_0,,5;et une temp, de 20°C+_3°C (68°F +_5°F)
** Mesures enparticules/mL Les particules utilisOs #talent de 0,_1 micron,
*** NTU = unitOs de turbidit# nOphOlomOtrique
Sp6cificatiens d'op6ration
[] Capacit6: ccrtili('e.j/*squ'fl iil_lXiilltlill tit' 300 gallons (1135 I);jusquYt maximmn tie six mois t)om: h's mod{'les noil dot6s d'tm _ovant indk awm" de
remplacement de fihre;jusqu'fi illaxhil/liil d'tll/ ai/pour les modbles dotds d'm_ vovant indicate/*r de remplacement de fihre
[] Exigence en matibre tie pression : 2,8 fi 8,2 bar (40 _'_120 psi), sans choc
[] Temp6ratm:e : 0,6°-38 °C (33'-100 'F)
[] Dbbit : 1,9 Ipm (0,,5 gpm)
Exigences gOnorales dVnstallation/opOration/entmtien
[] Rinccz la nomcllt cm:tcm(hc fi plein d6bit t)cndant 3 minutes alin (I( lib6rcr de l'air.
[] Remplact z la cart(roche lorsque le xovam clignote (m lorsque k d6bit d'eau est r6duit pore: les appareils sans xoyams.
Avis sp6ciaux
[] I,cs directivcs d'inst;dlation, la disi)onibilit_ de 1)i_'ces et dc service ainsi (lUe la gin:ant± standard sore exp&lidcs aw'c k i)roduit.
[] Ce systt"me d'tau potabk doit £'tr( (ntr(tent_ ( onlbrm6ment aux dir(ctiv(s dr/15bricant, y compris ]e remplacem(nt des cartouches du/_ltre.
[] N'milisez pas lorsque l'eau t)rdsente un danger microbiologique ou lorsqut l'eau est tl'tme qualit6 incomme sans ddsinlccter ad&luatement
le s}sff'me avam ou aprbs; le s}_sff'me 1)era servir pour tie Feau d6sinli'ctde qui pore:fair contenir tits spores liltrables.
[] Les coiltall/]I/al/ts o/I a/ltr(s s/lbstallCeS retirdes O/1 rdduites par ce syst{,llle d( tFaite/l/(llt de l'ea/l lit SOI/t pas l/('cessair(l//elH dal/S VOtl;( tall,
[] Vdriliez pour _(ms assurer de vous conlbrmer aux lois (t r{'glements locm_x et de l'dtat.
[] Notez que bkn que l'essai a eu lieu darts des conditions normales de laboratoire, mais que le rendement rdel peut vark r. I xs sysff'mes
doi_ent 6tre install6s tl tbnctiom_er conlbrm6ment aux procddm:es et directixes recommanddes par le I.d)ricam.
I_:st6e et c_ rtifide salon les nornles 42 et 53 de ANSI/NSF pour la r6duction de :
Norme N" 42 : FA'fets esth6tiques
[ 7nit_ chimique
I.'odeur et le goflt de chlolc
[ 7nit_ de tiltmtion mdcani(lue
R6duction de )articules, cat6gorie I
Norme N ° 53 : Effets de sant6
l JnitE de r6duction chimique
Rdduction alachlorc et atFazine
R6duction benz,Sne _t carbofiwan
R6duction 1,4 dichlorobenzbne et 2,4-1)
R6duction plomb et lindane
Rdduction mercure et toxaph_,ne
I Jnit_ de tilwdtion ln_canique
R_duction de turbiditd
Rdduction de spores et asbestos
40 Fabriqu&_pom: (;ener_fl Electric Company, 1 ouisville, I4X40225EE\ES'l: No. 070595-MN-001
Page 41

Servicea/a clientele.
Site Webappareilsdectrom_nagers GE www.electromenagersge.ca
V0us oyez une question ou vous oyez besoin d'aide pore" votre appareil (qectrom(_nager? Contactez-nous
par Internet ml .'lte www.eleetromenagersge.ea 24 hem'es par iota; tous }es iom_ de Fmm(_e.
S* c
Serviceder_parations
Service de r(_parations GE est tout pi(_s de _ous.
Pour iidre r_parer votre _lectrom_nager GE, il suftit de nous tg_}_phoner.
1.800.361.M00
Studio de conceptionr_aliste
Sur demande, GE peut torn'nit une brochure sin" l'am(_nagement d'mle cuisine pour }es pets(runes
5 mobi}it(4 rt4duite.
Ecrivez: Diiectem, P,e}ations avec }es consommatem_, Mabe Canada Inc.
Bureau 310, 1 Factory lane
Moncton, N.B. E 1C 9M3
Prolongation de garantie www.electromenagersge.ca
Achetez un (ontrat d'entretien GE axant que _otre ,garlmtie n'ex})ire et b_n_fkiez d'un rabais substantieL
_Mnsi }e ser',ice apr6s-',ente (;E sera tot!}otlrs }a apl'es expiration de }a garantie.
Visitez notre site Web ou appelez-nous an 1.800.461.3636.
Pibceset accessoires
Ceux qui d_sirent r_parer eux-m6mes }eros _}ectrom_nage*_ petwent rece\x)ir pi&ces et accessoires
directement _'l}a maison (cm_es VISA, MasterCard et Disco\ er accept_es).
Los directives stipulOes dons le prOsentmanuel peuvent _tre effectu_es par n'importe quel utilisateur. Los autres
r_parations doivent gOnOralementOtre effectuOespar un technicien qualifi_. Soyezprudent, car une rOparation
inadequate peut affecter le fonctionnement sOcuritaire de I'appamil.
Vous trouverez dans }es pages jaunes de votre anm_aire }e num&'o du Centre de service Mabe }e plus
proche. Autrement, appe]e>nous au 1.888.261.3055.
Contactez-nous
Si vous n'6tes pas satisfidt du service apr&>vente dent xous avez b_n_fici_ :
Premi_rement, comm mfiquez avec }es gens q ui ont r6par6 _)tre apparei}.
Enstfite, si vous n'_tes tot!iom's pas satistifit envovez tousles d_tai}s--nmn_ro de t_}_phone compris---au
Dit ectem; Relations avec }es consommatem's, Mabe Canada Inc.
Bureau 310, 1 Facto*w lane
Moncton, N.B. E 1C 9M3
Inscrivez votre appm_eil _leetrom_nager en direct, aussit6t qne possible. Cela am_}iorera has
"l Inscrivezvotreappareildectrom_nager www.electromenagersge.ca
CoI/lllltllliCatit)llS et llotre service apr6s-vente. Vi)us pouvez (_galement IlOtlS envo}er par }a poste
j le formulaire d'insc_iption joint _'_votre documentation.
47
Page 42

INFORMACIONESIMPORTANTESDESEGURIDAD.
LEAPRIMEROTODASLASINSTRUCCIONES.
iADVERTENCIA!
Use este aparato s61opara los fines que se describen en este Manual del propietario.
PRECAUCIONESDESEGURIDAD
Cuando use electrodom6sficos, siga las precauciones b#sicas de seguridad, incluyendo las siguientes:
!;_:Antes de usa_se, este refrigerador deberfi estar
instalado x tlbicado de actlerdo con Ills
instrucciones de instalacidn.
iJi::No pemfita que los nifios se suban, se paten o se
cuelguen de las charolas del refl'igeradot; Podria
dafim_e el refl_igerador y causarles serias lesiones.
::Ji::No toque las superficies fl'fas del congelador
Cllando tenga las i/lanes h(unedas o in()jadas.
I_ piel se podrfa adhe_ir alas superficies
extremadamente fl'fas.
No gt_rde m tl,_e _;:1,)hna u otros _ q_ores o
lfquidos inflamables cerca de este o cuakluier otto
[11)[I I'ato.
• S o" S( " "
_: _Meielos dedos flmra de las fireas donde se puede
pinchar los dedos; los espacios entre las puertas
y entre las puertas y los gabinetes son
necesariamente estrechos. Cierre las puertas
con cuidado en la presencia de los nifios.
_: Si su refl-igerador tiene un disposifivo automfifico
para hacer hielo, evite el contacto con las partes
m6viles del mecanismo de expulsi6n, o con el
elemento calefi_ctor que desprende los cubes. No
ponga los de(los ni las manes en el mecanismo
atltOi//}itico para hacer hielo mientras el
refl_igerador est_ conectado.
!i_:Desconecte el refligerador antes de limpiarlo o
eJ[_ctt la I" i'epa i'a clones.
NOTA: Recomendamosenf#ticamenteencargarcualquler
semcio a un personal cahflcado.
!i?:No vuelva a congelar los alimentos congelados
una xez que se hayan descongelado.
NOT,R:Apagar el refn)erador con loscontroles del panel
de controlno deja slh comente el6ctncaal refn)eradot:
a, iPELIGRO! RIESGODE QUE
UN NINO PUEDA QUEDARATRAPADO
42
E1atrapamient{ )la .' _fi cacidn de 1 ,_nifi ,_n _e_rige£antes ,,son un problema de] pasado. Los refl-igemdores
abmldonados son un peligro_ .aunque sea s6lo per Todos los aparatos de refl_i_eraci6n contienen
")ocos dkts " Si se deshace de su xie}o refi-igerador refl_igerantes, los cuales se deben retirar antes de
per fiivor siga las instrucdones ab:!}o pant la eliminaci6n del producto de acuerdo con la lev
ayudarnos a prevenir algfin acddente, fi_deral. Si w_ a desechar algfin aparato antiguo de
reti_igeraddn, consulte con la compafifa a caxgo
Antes de deshacersede su viejo refrigerador de desechar el aparato para saber (lU(_ hace_:
o congelador:
!i?:Quite las puertas.
iJi::Deje los entrepafios en su sitio para que los nifios
no Se Sill)an.
USODECABLESDEEXTENSION
Debido a los accidentes potenciales que pudieran ocurrir bajo determinadas condiciones, so recomienda
estrictamente no usar cables de extensi6n.
Sin embargo, si decidiera usarlos, es absolutamente necesafio que sea del tipo UI, trifilar para aparatos
v cuente con una clav!ia con conexi6n a tierra y que el cable elg_ctrico sea de 15 amperios (mfnimo) y
120 x_ltios.
Page 43

iADVERTENCIA!
COMOCONECTARLAELECTRICIDAD
Bajo ninguna circunstancia debe cortar o quitar la tercera punta (tierra) de la clavija. Para su seguridad
personal, este aparato deber# conectarse debidamente a tierra.
_: E1 cable elOctrico de este aparato est;i equipado con una clav!ia de tres puntns
(tierra) que enchtdil en un contacto est_h_clar de pared de tres salidas (fierra)
para reducir al mfnimo la posibilidad de (lafios pot un choque el_ctrico con
este apar;Ko.
iJi::Haga que un electdcista calificado vedfique el enchufe de la pared y el circuito
para asegura_se que la salida est_ conecmda debidamente a tierra.
iJi::Donde se disI)onga, s61o de un contacto de pared con salida pare dos puntas, es su
resi)onsabilidad I)e_°nal _,su obligaci6n, reemplazarlo pot un contacto a(lecuado
para tres ptmtas con conexi6n a tierra.
ESTI[CONECTADA
DEBIDAMENTEATIERRA
_e.conl
iJi::E1 refl_igerador deber;_ conectni_e siempre en su propio
contacto el_ctrico individual clue tenga, un xoltaie, que
•_ax'a de acuerdo con 1;i tabla de clasificaci6n.
Esto garanfiza la mejor ejecuci6n y evita la sobrecarga
del circuito el_ctrico de la casa ) los daflos a causa
del sobrecalentmniento de los cables.
iJi::Nunca desconecte el refrioerador ialando el cable. Tome
siempre fim/emente la clax!ia ) S;kluela del conmcto sin
doblarla.
FAVORDELEERYSEGUIRCUIDADOSAMENTELASPRECAUCIONES
DESEGURIDAD.
GUARDEESTASINSTRUCCIONES
::Ji::Repare o reemplace inmediatamente todos los cables
elt_ctricos de servido que se hayan desgastado o daflado
en alguna otra fimna. No utilice cables que muestren
romras o dafios pot abrasi6n a 1/) largo de _ste ni en la
clav!ja o en alguno de sus extreinos.
iJi::_Maleiar su refl_igerador de la pared, cuide que no pase
sol)re el cable o lo dafle.
43
Page 44

Comoinstalar los accesorios.
(No todos los modelos tienen todos los accesorios)
(_) ENTREPANO SUPERIOR
DEL CONGELADOR
Cerci6rese de que la parte frontal
del entrepafio ajusta en su posici6n.
Entrepafio superior
del congelador
(_ FRENTES DE LOS ENTREPANOS
DE LA PUERTA DEL CONGELADOR
Cerci6rese de que la parte frontal del
entrepafio ajusta en su posicion.
NOTA: En los modelos con dispensador,
los frentes de los entrepafios m&s largos
van en las dos posiciones superiores.
_ Frente del
entrepafio
CARTUCHO DEL FILTRO
Retire el tap6n Instale e] cartucho
de derivacidn del filtro
(_TAPA DE LOS
PRODUCTOS
LACTEOS
(_) CONSERVADOR
DE LAS BOTELLAS
(_)CUBOSDELAPUERTA
AJUSTABLES
ACOMODADORES DEL
CUBO DE LA PUERTA
--_ de la
/
Para retirarlos: I,e_;mte el extensor
del entrepaflo hada arrJba,
despug_s hfilelo.
Para reemplazarlo: Enganche el
exteilsor del eilti'epal-lo eil los
soportes moldeados de la puerta y
emp(!jelo hasta que se asegure en
su lugm:
puerta
Entrepafi0
de la
puerta
(_) CUBOS INFERIORES
FIJOS DE LA PUERTA
Cerci6rese de que los frentesde los cubos ajustan en su posici6n.
/
Cubo inferior de la puerta
Para retirar:i,evante el fl'ente
del c;!idn y despu_s hfilelo.
Parareemplazarocambiar
delugar:Encaje el (@;n en
los soportes moldeados
de la puerta y empuje hacia
adenu'o. El cajdn se ajusmnl
en su lugm:
Losentrepa#osyrecipientes.(Notodo modelostienentodos/osaccesorios)
Reubicacion de los entrepa#os
Entrepa#osdelrefrigerador:
Para retirar Para reemplazar
Cacemla del congelador:
Pararetirar
Entrepafios del congelador:
Pararetirar
44
I
I
Retire la cacerola empqifindola hacia el fl'ente, lex mtando
el fl'ente ) deslizfindola hasta pasar el punto de parar.
Page 45

Entrepa#o deslizable a prueba de derramamientos (onalgunosmodelos)
!
E1entrepafio deslizable pennite alcanzar NOTA:Aseg_resedehaberempujadolos
artfculos g-uar(hdos amis de otros. I,os bordes entrepafioshastaei fondoantesdecerrar
especiales _tfin disefiados pare ayudar a /a puerta.
pi'e_, enir deY/_liilalllientos () g()te()s a l()s
enn'epafios que se encuenn'an Ill,is abaio.
Entrepa#os a prueba de derrames (en a/gunos mode/os)
i,os entrepafios a pruel)a de dermmes
tienen hordes especiales que ayudan a
evitm" (lue los derrames ,g°teen hacia los
esmntes siguientes.
Sobrelasgavetasdealmacenamiento.(Notodo tienentodoslosaccesorios)
ge.com
[[ fl II II II II II LL I
Normal
E_
M_sfria
Guiasde
la gaveta
CualTdO so elTCUOlTtro reemplazando
Ins gavetas, cercidrese de
deslizarlas a Io largo deIns gufas.
Gavetas preservadoras de humedad ajustable y bandeja de refrigerios
(onal_unosmodelos)
Deslice el control hasm llegar a la posici6n Deslice el control hasm llegar a la posici6n
High (alto) pare proporcionar el alto nivel Low (bajo) para proporcionar el nivel de
de humedad recomendado para la mavorfa baja humedad recomendado para la
de los vegemles, mavorfa de las ti'utns.
Contenedor convertible para carnes (ena/gunosmodelos)
Esto contenedor convertible para carnes
fiene su propio conducto de reffigeraci6n,
el cual pemfite la drculacidn en dicha
contenedor de aire fl'fo proveniente del
congelado_:
Elcontroldetemperaturavariableregtfla
el flujo de aire del compartimiento
del congelad(n;
g!ie 1;I palanca de control arriba(up) para
convertir el contenedor a 1;i [eIllpeI'iltUI'}l
Come sacar la gaveta preservadora de alimentos
I,as gaxems se pueden retirar tiicilmente
inclinfindolas lexemente v, emi)ujfindolas.
hasta pasar el ptmto de freno.
normal del reiiigerador y ofl'ecer espacio
adicional de ahnacenamiento para los
vegemles. E1 conducto del aire fl'fo se
apaga. Se pueden seleccionar diterentes
niveles enti'e estos exti'eillos.
F!ie la palanca de control abajo (down)
para la posici6n mils fl'/a para ahnacenar
carnes fl'escas. Si 1;ipalanca se deja en 1;i
posicidn de carnes per un largo perfodo
de tiempo, se puede fimnar algo de hielo
dentro del contene(hn:
Si la puertn le impide sacar las gavetns,
el reli'igerador tendril que rodm_e hacia
adelante hastn que la puertn se abra Io
sttficiente para deslizar las gavetns hacia
afllera. En algunos cases, cuando ruede el
refl-igerador hada afllera deberfi moverlo
hacia 1;I izquierda mientras lo rueda.
45
Page 46

Loscontrolesdel refrigerador.
Los controles tendr#n uno de los siguientes aspectos:
Pasosdeinicioparauncorrectocontro/dela temperatura
PAS(-) 1: Coloque el Control de alimentos f]'escos en "5'.
PASO 2: Coloque el Control del congelador en "5".
PASO 3: ESPERE /2 HORAS para que la temperatura se estabilice.
PASO 4: Si es necesario realizar un cambio, mueva el control nfimero tmo una vez
y deje pasar 12horas para que la temperamra se estabilice.
NOTA:Apagar el reti'igerador con los controles en posicidn 0 (apaK, Jdo ) no deja sin
corriente el&'tri(_ _d refl'igerador.
Los ajustes de los controles cambiaran segun /as preferencias personales, la
utilizaciony las condicionesdeoperacionypudierannecesitarmasde unajuste.
0 IS OFF
9 IS COLDEST
46
Paracambiarel ajustede controldetemperatura
conlas almohadillasde toque:
• E1 ajuste de] congek*dor se en(uenmJ sobre el ]ado izquierdo de ]a panm]]_*.
• E1 a juste de alimentos fi'es(os se en(uentra sobl_ el 1_)(1odel_eho de la pantall_t.
-- Presione la ahnohadilla de mayor (_mner) o menor (colder) teml)emtur_t
pare el compartimiento y dire(ci6n deseados.
-- E1 ndmero de @]ste de control pl_sente se ilm-ninar_i.
-- Cada vez que se toca la almohadilla, el :Jjuste de compartimiento cambia
HII I/t]l//eI'O,
Podrfi verse l corno el ajuste rnenos fi'io v 9 como el mils ii'_o.
•EII _JlguIlos nlodelos, cu_mdo se colo(an los dos controles en la posici6n de @lste mils
efilido h_st_ que la p_mtalla destella (_q)ag_(to), los compartimientos del eongel_tdor y del
retiiger,Jdordejan de ei_'ial:
• En om_s modelos, cuando se coloca cualquiela de l(_s dos conm)le,s en la posiddn de _Jjt_swmils
efilido basra que 1_pm_t_dl_ destella (apag_do), el eongelador y el refiigerador (l@m de entfiat:
NOTA:Apagar el ret)'igerador con los controles en posicidn 0 (apagado) no deja sin
corriente eKctrica al reti'igerador.
Losajustesde loscontrolescambiaranseg#nlaspreferenciaspersonales,
la utilizaciony lascondicionesde operaciony pudierannecesitarmasde
unajuste.
Page 47

Elcartucho de/fi/tro de agua. (e,a g,,osmo,e os ge.com
Cartucho de/filtm de agua
El carmcho del filtro de agtm est_ ubicado ell la esquina
superior derecha trasera del compartimento del refl'igerador.
Cuandoreemplazar el filtro en losmodeloscon luz
indicadora de recambio
En el dispensador ha_ una htz de indicaci6n de recambio del
cartucho del filtro dei agna. Esta luz se valve*5 anarm_jada
para advertirle que necesita reemplazar el filtro pronto.
E1 cam_cho del filtro debeffa reemplaza_e cuando la luz
indicadora de recambio se vuelva roia o si la salida de agua
al dispensador () al dispositivo para hacer hielo disminuyera.
Cuandoreemplazarel fi/tro en los mode/ossin luz
indicadora de recambio
E1 camu he del filtro se debe reempla/m" (ada seis meses,
o antes, si disminuye el fi!!}() de agua al dispensador o al
dispositivo para hacer hielo.
COmeretirar el cartucho de/filtro
Si est;i cambi:mdo el carm(ho, iemue_:_ pfimero el vieio
gir_indolo lentamente hacia la izquierda. N0ja/e el carmch(_
directamente ha(ia ab@,. L!n po(o de agua puede gotea_:
Instalar el cartucho de/filtro
(life el camlcho ]entamente
O
hacia la derecha hasta que el
cartucho se pare. NOAPRETAR
MUYFUERTE.Mientras est_i Soporte5
giri_ndolo, el se alzari_ per delcartucho
sf mismo en su posici6n.
E1 cm-mcho rotar_i
aproximadamente 1/2
de vueJta.
O Deie carter el agua desde el dispensador per 3 minutes
(aI_rox. ] ½=gahms) Ixu'a aclarar el sistema x}xu'a
prevenir salpicaduras.
rapon de derivacion de/fi/tro
Se debe us:n" el tap6n de deri;_ci6n del iiltio (uando
tm carmcho de filt_o de reempla/mniento no se puede
encontr:n: El dispensador y el disposifix_) para hacer hiek)
no pueden flmdonar sin el filtro o sin el t;Ipon de
(lerix_ld6n dd filn'o.
...........................
TanOnde4_ I1_
Tap_Snc/e_,_ _ ddivaciOn
aenvaclOn delfiltra I1!1
delfiltro
con a(lapmdo_;debe
quitax_e antes de instalar
el cartucho, tara retimr
el adaptad(m g_'relo
hacia la izquierda
aproximadamente
1/4 de gird. COt/adaptador
Si va a reemplazar un (el aspecto puede variar)
c:umcho Water by Culligan,
deje el adaptador colo(ado. Este adaptado_ pem_ane(er;_
en el retiigemdo, ct_mdo leemplace cartuchos en el futm o.
En los modelos sin luz indicadora de recambio, pegue
]a etiqueta c(m el rues } el aflo al nuexo caI_ucho para
que se recuerde de cambiar el filtro en seis moses.
I,lene el caiqrucho de reemi)lazo, con agua, de la llave
para pemfitir que ocmTa tm me}or fluj(_ a partir del
dispensador imnediatamente despu(4s de la instalaci6n.
0 _Minee ]a flecha del carmcho v del sop(n'te del cartucho.
(k)loque ]a parte supelior de]' nuevo cartucho hacia
arriba dentro del soporte. NO empt!}e el cartucho hacia
arfiba a dentro del soporte.
)
Sin adaptador o llame al 1.800.(;E.(;ARES (1.800.432.2737).
Para usar el tap6n de derivaci(Sn del filtro ell los modelos
Water by Culligan, pfimero debe quitar el adaptador del
filtro del soporte del carmcho gir:_ndolo hacia la izquierda.
Si tiene pregtmlas xisite nuestro sitio *_eb en ge.com,
Filtrosde recambio:
Para pedir cartuchos adicionales onlos Estados Unidos,
visite nuestro sitie Web, ge.com, o /lame a GEpara partes
y accesorios a1800.626.2002.
MWF
Precio sugefido de venta
al pfiblico .538.95-47.95 USD
SmartWater Waterby Cu//igan
El dispositivo automatico para hacer hielo.
Un refrigerador reci#n instalado puede tardar hasta 12 a 24 horas antes de empezar a hacer hielo.
Interrupterde
alimentaci_n
Dispositivopara
hacerhielo
Luzde"
alimentackSnverde Brazedetector
B dispositivoautomg_ticopara hacer
hielo (on a/gunos mode/as)
Cuando el retiigerador est5 conectado al
SUlninistro de a!,'ua, cole( ue el intem_ )tar de
alimentaci6n electfica entla posicidn I});oceodido).
El dispositJvo para kmer hielo se llenar, i de agua
cuando la temperatma alcance el punto de -9°C
(15°F). Cuando el recipienw estfi lleno (al nivel (ld
br,_zo demctor), d dispc,sitivot)ar,_ hacer hielo no
pro&minl hielo.
Xsegfirese de que nada impide el m(Mmiento
del braze detector.
Deshaga las pfimeras cal}g,t,;de ofl_)s de hielo l)a_;_
pem-fifir que la lfima de agua se limpie.
E1disposifivo para hacer hielo producirfi siete
cubes per ciclo--aproximadamenm 100-130
cubes en un ciclo (le 24 betas, dependiendo (le
la temperatura del congelad(m de la temper, mm_
ambiente, (tel nfimero (le veces que se abra la
puerta y de arms condiciones del use.
Escucharfi tin munbido cada vez que el 4 7
difl)ositivo para hater hielo se llene de agtla.
Page 48

El dispositivo automatico para hacer hielo.
Es normal que algunos cubes salg_,mpeg_ddos.
Si no se usa hielo con fl'ecuencia, los cubes de hielo viejos se
opacan, adquieren //I/ saber I;incio v se CoI/tyaeI/.
NORA:Enhogarescoopresi6n& aguainferioralpromeflio,esposibleque
eseueheel ciclofie/a m#quinadehielosvariasveeesal haeerun/otedehielo.
Eldispensador.(ooo/o.no modolos)
Come usar el dispensador
• • •
Presione el _Jso sum emente contra el braze
del dispensador
E1recogedor no se vacfa solo. Para evitar las
manchas de agua, el recogedor ) la pmTilla se
deberSn limi)iar regularmente.
Para bloquear el dispensador
(ena/gunoemMdoe)
Recogedor
Loc
HoJd 3 seconds
desbloquearlo, presione la misma tecla
dtlrante ?_see'finales ntlevanlente,
Preskme la tecla LOCK
CONTROL(control de
bloqueo) din'ante 3
segundos pare cermr
el dispensador } el panel
de control. Para
Kit accesorio para hielos
Sisu miHgerador no viene equipado con un dispositivo pare hacer
hielo, un kit accesorio pare hielos estfi disponible a un costo
adicional. Consulte en la parte posterior del lefl'igerador el kit
especNco para hieh)s que su modeh) necesita.
Si nohaydistribucidndeaguacuandoel refrigerador
est#primeramenteinsta/ado,hayposbilidad dea/re
enel sistemadeb ffneadeagua.Oprimael braze
de/dispensadorduranteai menosdosminutespara
eliminarelaire atrapadodela ffneadeaguay llenar
el sistema.Paraeliminar/asimpurezasdela Ifnea
deagua,desechelosprimerosseisvasesdeagua.
PRECAUCION:Nointroduzcanuncalosdedosni otros
objetosenla aperturade/dispensadordehielotriturado.
Luz del dispensader
Q Esta tecla enciende
igh del dispensador I,a luz
_L t_ apaga ]a ,.Z noct.nla
.... tambi&l se enciende al
disI)ensador Siesta luz se tirade (teberfa
reelnI)lazaI:_e con una bolnbilla de un
m£ximo de 6 ratios.
presionm" el braze del
Gaveta de almacenamiento
dehielo enmodeloscondispensador
Para sacar:Ponga el interruptor de marcha
del disI)ositixo de hielo en la poski()n
0 (apagado).Jale de la gaveta directamente
hacia fl_em ) luego lewlntela hasta pasta" el
t)unto donde se aFanca.
Para devolver:A1 devolver la ga\eta, asegfirese
(te presionarla firmelnente en su sitio. Si no
llega basra el final, vuelva a sacm'la ) gire el
mecanismo de manejo 1/4 de vuelta. I,nego
elnpuje de nuevo el entrepafio.
Datos importantes de su dispensador
_i;No agreg-ue hielo de charolas o de bolsas en el recipiente.
Podrfa i)roxocar que no salga bien o que no se triture
adecuadamenm.
i_7E_ite los xusos demasiado llenos de hielo } el use de x_lsos
estrechos o demasiado altos. E1 hielo mnontonado podrfa
obstruir el orificio o hacer que se congele la puerto del
orifice de manera que no se pueda abrir Si hubiem hielo
bloqueSndolo, desprenda con una cucham de madem.
i_7i,as bebidas x los alimentos no se deber_in enfi'im"
rSpidamente en el recipienm del hielo, ias latas, bomllas
o paquems de comkta en el recipienm de hielos podrfan
causm" la obstrucci6n del disposidxo pm'a hacer hielo o
del recipienm.
i_7Pare evitar que el hielo dispensado caiga fi_em del wise,
ponga el x_Jsocerca, pete sin tecta; la aperture del
dispensador
?i;Un poco de hielo tritmado puede sm'dr atmque habfa
seleccionado CUBEDICE (cubes de hielo). Esto sucede
en ocaskmes cuando algunos cubes se canalizan en
el tritumdor
N Despu& de usar hielo trimmdo, un poco de agua puede
g_)mar del vertedero.
N A veces, se ti:)rnlai"_i un pequefio mont6n de nieve en la
salida del hielo simada en la puerta. Esto es normal y, per
regla general, sucede cuando ha dispensado hielo picado
repeddamente, i a nieve se ex_q)omni per si misma.
i_7E1agua del primer vase servido puede estar ross caliente
que la de los siguienms vases. Eso es normal.
i_7E1agua del dispensador no es ag-ua helada. Pare obmner
agua m_is fl'fa, simplemente agregue hielo picado o cubitos
de hielo anms de serxirla.
48
Page 49

Cuidadoylimpiezade/refrigerador, ge.com
Limpiar el exterior
Elpozo de/dispensador (en algunos
modelos), per debajo de la parfilla, se debe
nlantener limpio y seco. E1 agua que se
queda en el pozo puede dejar depdsitos.
Quite los dep6sitos agregando vinagre sin
dihfir al pozo. Remoje hasta que
desaparezcan los dep6sitos o hasta que se
desprendan lo stdidente para quitarlos.
Elbraze de/dispensador (en algunos
modelos). Antes de limpim; oprhna y
detenga la tecla LOCKCONTROL(control de
bloqueo) din'ante 3 segundos. Se limpia
con tma sohwi6n de agua tibia v
bicad)onato de sodi_--aproMmadamente
tma cucharada (l 5 ml) de bicarbonate de
sodio per cada cuarto (l litro) de agua.
Enjuague completamente con agua y
seqtle.
ii
timpiar el interior
Para evitarolores, deje una caja abierta
de bicarbonate de so(rio en los
(ompartimientos del refl_igerador
v del congeladm:
Desconecte el refrigerador antes de limpiarlo.
Sin() fuera posible, exprima el exceso de
humedad de la esponja o del patio cuan(lo
se limpie ah'ededor de botones, bombillas
o controles.
Use agua caliente y una s()ltld6n de
bicarbonato de sodi_--aproximadamente
tma cucharada (15 ml) de bicad)onato de
sodio per cada cuarto (l litro) de agua.
Esta solud6n limpia y neutraliza olores.
Enjuague y seque.
Despu& de limpiar las jtmtas de las puertas,
aplique una capa delgada de wlselina del
lade de la bisagra. Esto ayuda a evitar que
lasjtmtas se doblen o se peguen.
Lasmanijas de la puerta y los omamentos. Se
limpian con tm patio humedecido con tma
soluci6n de dete_gente suave y agua. Seque
con till p[ll-lO StlaVe.
Mantenga limpie el terminade, i,impie con
tm patio limpio ligeramente humedecido
con ceI'a p[lI'il [Ip[lI'iltOS de C/)cina 0 /In
(lete_genm suave y agua. Seque y pula
con un patio limpio y suave.
No lYnpie el refn)erador con unpatio sucio para
trastesni conun patio hElmedo.Estospodrfan dejar
residuosque afecten a/a pintura. No use estropajos,
l/mpiadoresen po/vo,b/anqueadoresni hYnpiadores
quecontenganb/anqueador,ya clueestosproductos
podrfanrayar ydesprenderel terminadodeplbtura.
Orificie para drenaje en el compartimiente
del congelador.Din'ante 1;i limpieza anual,
retire la cacerola inferior del congelador
vierta tma soluci6n de bicarbonate de soda:
tma cucharadita (5 ml) en dos tasas
(500 ml) de agua calienm (que no est(_
hirviendo), en la lfi_ea de drenaje con la
avuda de un desbastador de came. Esto
avudarfi a eliminar el olor v reducirfi la
probabilidad de tma obstrucci6n en 1;i lfl_ea
de drem!ie. Si el drenaje se obstruye, utilice
un desbastador de came y tma solud6n de
bicarbonate de soda para eliminar 1;i
obstrucci6n en la lfnea de drem!ie.
Ewtel/mpiarlosentrepatiosde wdrio frfoscon
aguacaliente, /a quela extremadiferenclade
temperaturapuedehacer quese quiebren.Maneje
los entrepatios de vidrioconculdado. Chocarvidrio
templadopuedehacer quese rompe enpedazos.
No lave partes pl_sticas del refngerador en
el lavaplatos.
AtMs de/refrigerador
Se debeM tenet cuidado ;11retirar el
refi'igerador de 1;i pared. To(los los fipos de
recubrimiento de pisos se pueden (lafim;
sobre todo los recubrimientos ac@nados y
los que tienen superficies repujadas.
Jale el reffigerador en fimna recta y
einpt{je ntle\;llllente para devolverlo a Stl
posiddn. Mover el reli_igerador en
direccidn lateral puede causar (lafios al
recubrimiento del piso o al refi_igerado_:
AI empujarel refrlgeradora su lugar,aseg&esede
nopasar sobreel cable el_ctnco ni sobre la l/neade
aflYnentacl6ndel dlsposifivopara hacerhlelos (en
algunoemodelos).
49
Page 50

Cuidadoy limpieza del refrigerador.
Preparacion para vacaciones
En el caso de vacaciones o atlsen('ias
prolongadas, quite los alimentos y
desenchtde el reii-igerado_: I,impie el
interior con soluddn de bicarbonato de
tma cucharada (l 5 ml) de bicarbonato pot
tm cuarto (1 litro) de agua. Deje abiertas
las puertas.
En caso de mudanza
Coloque el intermptor de alimentacidn
el_ctrica del dispositivo autom_tico para
hacer hielo en la posicidn 0 (apagado)y
cierre el suministro de agua al reti_igerado_:
_segm'e to(los los elen/entos stleltos cOiilO
entrepaflos y recipientes peg_indolos con
cinm adhesiva en su lugar para evitar
daflos.
Aseg&esedequeelrefngeradorsecoloqueen
posicidnverticalduranteiamudanza.
Reemplazo de bombillas
NOTA:Apagar el rofrigorador con los controlos on posiciOn 0 (apagado) no doja sin
corriente elOctrica al refrigerador.
Desenchtfli _ el refl_igeradox:
Retire el entrepafiojusto pot debajo
de la cubierta de luz.
Cambie la bombilla pot tma bombilla
del mismo tamafio y voltaje.
OVuelw_ a instalar el entrepafio y
enchtfle el refrigerador de nuevo.
5O
Page 51

Instrucciones para
Refrigerador
la instalacion
Modelos 20,22 y25
I Si tienepreguntas,Ilameal 1.800.GE.CARESobienx_sitenuestra pfigina_'\_b:ge.com I
ANTES DE ENIPEZAR
Lea estas instrucciones completa y cttidadosamente.
" IMPORTANTE - G. . le
instmcciones para uso del inspector local.
• IMPORTANTE - Ob e,.e
cddioos "_6rdenes de le'_.
• Nota al instalador - AsegOrese de deiar estas
iIIStItlCCiOlles COil el COllS[lI/lidoY_
• Nota al consumidor - Conserxe estas
instHicciones para referenda tutura.
• Nivel de destreza- La instalaci6n de este aparato
requiere de destrezas mecMlicas b;_sicas.
• Tiempo de ejecuci6n - Instalaci6n del refrigerador
(15 minutos)
• I,a instalaci6n apropiada es la responsabilidad del
instalador.
• La tidla de1 producto debido a una instalaci6n
inadecuada no est_i cubierta pot la garantfa.
SUMINISTRO DE AGUA HACIA EL
ESPACIOS LIBRES
Deje suficiente espacio para fi_cilitar la instalaci(m, la
circulaci(m adecuada de aire v las conexiones de plomerfa
v elg_ctricas.
• Lados 1/8" (4 ram)
• Paacte superior 1" (25 ram)
• Paacte posterior 1" (25 ram)
Un espacio de 3/4" (19 ram) se necesita para abrir la
puerta de 90 ° lo que le ofl'ece un inejor acceso al firea
de almacenamiento de los alimentos.
RODILLOS
Los mdJllos tienen 3 prop6sitos:
• I,os rodillos se ajustan para hacer que la puerta
se cierre con fi_dlidad cuando est;i abierta
aproximadamenm en la mitad.
• Ix)s rodillos se ajustan para que el reliJgerador
sea fim_emenm posicionado en el piso y para
IIO talllbalealNe.
i,os rodillos pemfiten moxer el refl_igerador para
refirarlo de la pared para su limpieza.
DISPOSITIVO PARA HACER HIELO
(en algunos modelos)
Si el refi'igerador tiene tm dispositivo para hater hielo,
tendril que estar conectada a una 1rhea de agua fl'fa.
Un kit de suministro de agua (confiene tube_ia, vfilvula de
cierre, accesofios e instrucciones) estfi disponible con tm
costo adicional a travg_s de su proveedm; visitando nuestra
pfigina Web ge.com o bien a travg_s de Partes y Accesorios,
800.626.2002.
UBICACION DEL REFRIGERADOR
Paaca ajustaac los rodJllos, retire la rejilla de la base
emi)ujfindola hacia abajo.
Gire los tornillos de @lste de los rodillos en el sentido de
las mmmdnas del reloj paaca levmltaJc el retrigerador yen
sentido contrario a 1as manecillas de1 reloj paaca bajaado.
Use una 1lave ajustable (tornillo de cabeza hexagonal de
3/8") O UlI_'S tellaZaS.
• No instale el reffigerador donde 1as temperamras van
deb@) los 16° (60°F), ya que no podrfi flmcionar
bastante para mantener 1as temperamras adecuadas.
• ]nstale sobre un piso sufidentemente fim_e para
soportar tm reli_igerador completamente 11eno.
Paaea reemplazar la rejilla de la base, alinee los ganchos
en la parte posterior de la rejilla entre la barra y la parte
interior de1 gabinete. Empuje hacia adelante hasta que
la rejilla haga tm chasquido al quedar en su luga_;
51
Page 52

Instrucciones para la instalaci6n
ALINEADO DE LAS PUERTAS
Despug_s de nivel;u; asegfirese que las puertas
se encuentren alineadas en la parie superior:
Para alinear las puertas, ajuste la puerta del reli_igerador
de la siguiente manera:
Quite la parrilla de la base, abra las puertas y luego
tire de la parrilla recta hacia afllera.
@ Demnnine cu_il de las dos puertas es mils alta que
la otI';I.
0 i,ex rote la puerta interior;junto con la lex_ pequefia.
Coloque el calce entre la bisaom,_ metfilica de la puerta
v la lexa coii/o se ii/uesti'a.
0 Apriete el calce de modo que encaje entre la bisaoTa,
metfilica x la lex_ plfistica.
O Cierre las puertas } rexise que estg_n nixeladas en
la parte superior; Si una de las puertas afin est;_ mils
baja que la otra, repita el proceso e inserte un calce
adicional.
I_ guardandebajo
delacubiertadela bisagrasuperior
dela puertadeicompartimiento
paraalimentosfrescos.
Calce
NOT.&: si las puertas estfin desalineadas } )a se ha
colocado el calce, puede quitarlo para bajar la puerta.
52
Page 53

Instrucciones para la instalaci6n
C0MO INSTALAR LA TUBERiA DELAGUA
ANTES DE INICIAR
Los ldts de cobre recomendados pm'a el suministro de
agua soil _v\3XSX2,WXSX3 o _v\3XSX4, dependiendo de
la cantidad de mberfa necesaria. Ias mberfas pl:isticas
aprobadas para el suministro de agua son las tuberfas para
el refl_gerador Smari()mnect" de GE (_3X08X10002,
_TX08X 10006, _'\3X08X 10015 y _v\SX08X10025).
_Mconecmr su reflJgerador a un Sistema de Agua de
Osmosis ]nves_a lie GE, la Onica instalaci6n aprobada es
con un Mt de Osmosis In\visa de GE. Para otros sistemas
de agua de 6smosis in\wrsa, siga las instmcdones del
fitbricante.
Si la alimenmd6n de agua a su refl_igera(lor proviene de
sm sistema de filtrad6n de agua de 6smosis invel_a Y el
reflfgerador tambi(4n cuenta con sm tilts'() de agua, use el
tap6n de del{vild6n del filtro del refl_igerado*; E1 uso
coi_jsmto del carmcho de filmsci6n de agua del
reflJgerador con el filtro de RO (6smosis inversa) pudiera
resulmr ell la producddn de cubos de hielo huecos y ell
sm caudal de agua re:is lento del dispensador de agua.
Esm instaladdn de la mberfa del agua no est_i gatantizada
pot el fi_bricante del refl_igerador o de la m:kluina de
hielos. Siga estas instmcciones cuidadosamente pare
minimizar el riesgo de sm daflo costs)so debido al agua.
E1 martilleo del agua (agua golpeando contm la tuberfa)
ell la tube* fa de la casa puede causar dafios alas partes del
refl-igemdor y condudr atm goteo o immdacidn pot el
agua. Ilame a un plomero calNcado para corregir el
martilleo del agua antes de instalar la tuberfa del agua
al refl'igerador.
Par:l evitar qslel//adsls'as v daflos cosl el producto, no
conecte la tuberfa del agua a la mberfa del agua caliente.
Si usa el refl_igerador antes de conecmr la tuberfa,
asegOrese de que el intermptor de corriente de la
m_iquina de hielos est6 en la posici6n 0 (apagado).
No instale la tuberfa de la m:iquina de hielos ell lugares
donde la temperamra caiga po* deb@_ del nivel de
congelan/iento.
Todas las instalaciones deben apegarse alas nonnas
vigentes en materia de obras de plomerfa.
QU¢: NECESITA
, Kit de tuberla de colbre paxa d refrigerador o
Sma_rtConnect TM de GE, l/4" de di:hnetro externo
para conectar el refl'igerador al smninistro de agua.
Si usa cobre, asegdrese de que ambos extremos
de la tuberfa se co_en mfifbrmemente.
Para detemfinar la cantidad de tuberfa que necesita: mida
la distancia desde la vSIvula del agua ell la parle posterior
(|el refl-igerador basra el mbo de suministro de agua.
_segfit ese de que ha}_ stNciente tuberfa adidonal para
pennitir que el reflJgemdo_ se pueda moxvr de la pared
desput4s de la instalaci6n.
Los ldts de tuberfa pare el refl-igemdor SmartCom, ect TM
de GE est_in disponibles ell las siguientes hmgimdes:
2' (0,6 m) - _X08X10002
6' (1,8 m) - _%X08X10006
15' (4,6 m) - _'XTX08X10015
25' (7,6 m) - _vX3X08X10025
NOTA: La tlniea tuberia de plfis/ico aprobada de GE
es la que viene pmvista con los kilts de tuberia pasta el
refrigerador SmaactConneet TM de GE, No use ningtma
otra tuberia plgstica paaca el suministro del agua ya que
la tuberia estfi bajo presidn todo el tiempo. Ciertos tipos
de plgstico se fracturaacfiaa o se romperfiJa con el tiempo
y causa_rfim dafios en su casa debido al agum
ADVERTENCIA - Co.ec .,.1
smninistro de agua potable 6nicamente.
53
Page 54

Instrucciones para la instalacion
C0MO INSTALAR LA TUBERIA DELAGUA (CONT.)
QUE NECESITA (CONT.)
PRINCIPAL DE AGUA
• Un kit de stmahfislro de agua de GE (contiene tuber/a,
wilvula de cierre y accesorios entunemdos ab@_) est;i
disponible a un costo adicional ell su fienda o por inedio
de Partes y Accesorios, 800.626.2002.
• Un sumhfisWo de agua fria. i,a presidn del agua debe
estar entre 20 y 120 p.s.i. (1.4-8.2 bar) ell modelos sill
filtro de agua y entre 40 v 120 p.s.i. (2,8-8,2 bar) ell
modelos con filtros de agua.
• Tala&co el6ctrico.
• Llave de 1/2" o ajustable.
• Destorlfillador plmao y de estrella.
• Dos mercas de compresJ6n de 1/4" de dJfimetro
exterior y 2 f6rulas (mmlgas)_para conectar la tuberfa
de cobre a la vfilvula de cierre v la vfilvula del agua
del refl_igerador.
O BIEN
• Si estfi usando un kit de tuberfa para el reffigerador
Snlart())nnect TM de (;E, los accesofios necesafios }a
xienen preinstalados ell la tuberfa.
[_ CIERRE EL SUMINISTRO
[]
SELECCIONE LA UBICACION
DE LA VALVULA
Seleccione una ubicaci6n para lax ilvula que sea
fiicihnente accesible. Es inejor conectarla ell el costado
de una tuberfa xertical de agua. (_uando sea necesario
conectarla ell una tuberfa horizontal de aoua_ , haga,
la conexi6n ell la parte supelJor o al lado, ell xez de
hacerlo ell la parte de abajo, para exitar refirar
cualquier sedin/ento de la tuberfa del a *ua
Pei_toi'e un ofificio de 1/4" ell la tuberfa del agua
(inchlso si estfi usando una ;filvula auto pert0radora),
usando una broca afilada. Retire cualquier sobrante
que resulte de pei_biar el ofificio ell la tuberfa. Tenga
cttidado de no permitir que se f'dlre agua hacia el
taJadro. No perfiwar un orificio de l/4" puede
resultar ell inenor producci6n de hielo o cubos
mils pequefios. ___
I
• Si su tuberfa existente de col)re para el agua fiene
tin accesoYio con vuelo ell el extI'elllO, necesitnr;i tlil
adaptador (disponible ell las tiendas de sunlinistros de
plon/erfa) para conectar la lfilea del agua al reflJgerador
0 BIEN, podrfi cortar el accesorio con vuelo con un
cortador de tubos y hlego usar un accesorio de
compresi6n. No corte el extremo fimnado de la tuberfa
para el reflJgerador Sinart(_onnect TM de GE.
• VfiJvula de cierre pare conectar a la lfilea del agua fl'fa.
i,a vfilvula de cierre deberfi tenet una entrada de agua
con un difimetro interno nlfilimo de 5/32" ell el
punto de conexi6n a la TUBER1A DEE AGUA FR1A.
I,as vfilvulas de apagado fipo silla ;'ienen inchfidas ell
nluchos kits de suministro de agua. Antes de coinprai;
asegfirese de que una vfilvula fipo silla cunlple con los
c6digos de plomerfa ell SU localidad, hlstale la vfilvula
de cierre ell la tuberfa del agua de consunlo mils
fl'ecuenten/ente ufilizada.
[] INSTALE LA VALVULA DE CIERRE
Una la vfilvula de cierre a la tuber/a de agua ti'/a
con la abrazadem para el tubo.
Apriete los tornillos de la abrazadera hasta que
la arandela sellante enlpiece a hinchaise.
NOTA: No apriete denlasiado la tubeiia ya que podrfa
54
rompeise.
Abrazadera-- -- Extremode entrada
dei tubo
Torniiiodeia _---_b_t
abrazadera
Valvulade --/' Tuberiavertical
cierretipo silla de aguafria
NOTA: Se deberfin seguir los C6digos 248CMR de
Plomerfa para el Estado de Massachusetts. I,as vfilvulas
fipo silla son ilegales y su uso no estfi pemlitido ell
Massachusetts. Consulte con un plonlero licendado.
d
Arandela
Page 55

Instrucciones para la instalaci6n
[] DIRIJA LA TUBERIA
Difija la mberfa entre la lfnea del agua ti'fa v el
refi-igerado_:
Difija la tuberfa a tra\'_s de un orificio perfi)rado en
la pared o en el piso (detrfis del reli-igerador o del
gabinete de la base adyacente) lo mils cerca posible
a la pared.
NOT.&: _segfirese de que ha);_ suficiente tuberfa
adicional para permitir que el refl'igerador se pueda
mover de la pared despu_s de la instalacidn.
[] CONECTE LA TUBERiA
A LA VALVULA
Coloque la tuerca de compresi6n ) t>rula para la
tuberfa de cobre (manga) en el extremo de la tuberfa
x con_ctela a la xfilvula de cierre.
_segfirese de que la tuberfa est_ complemente
insertada en la x _lvula. Apriete la tuerca de compresi6n
i_iilileillente,
Para tuberfa de plfisfico de tm kit de tuberfa para
el refl-igerador SlnartConnect TM de GE, inserte el
extrelno moldeado de la mberfa en la vflvula de cierre
y apriete la tuerca de compresi6n hasta que est(_
firmemente apretada a mano, luego ap_iete otto giro
con tma llave. Apretar demasiado puede causar fllgas.
[]
CONECTE LA TUBERiA
AL REFRIGERADOR
NOTAS:
• Antes de hater la cone_6n al refligerado_; asegfirese
de que el cable de corfiente del reflJgerador no est_
conectado en el tomacorfiente de la pared.
• Si su reliigerador no tiene filtro de agua,
recomandamos la instalaci6n de tmo si su suministro
de agua tiene arena o partictflas que pod6an obstmir
la malla de la vfilvula de agua del refl'igemdor
lnst:ilelo en la mbe6a del agua ce_va al refligemdor
Si usa tm kit de tuberfa pare el refligemdor
SmartConnect TM de GE, necesitar_i tm mbo adicional
(_\_X08X10002) pare conecmr el filtro. No corte la
mberia plzlsfica pare instalar el filtro.
_Mgunos modelos tienen la conexi6n del refligemdor
al final de la tube6a localizada en la parte exterior del
cobertor de acceso del compartimento del compreso_:
EI1 otros modelos, el cobertor de acceso del
compartimento del compresor debe set remo\Jdo i)a_
tenet acceso a la conexi6n del reflJge_Jdor a la vzilvula
de agua.
[_ Tuercade
Valvuiadecierre _x I_
_ r-*,,_,_ _ SmartC°nnectTM
tipo silla
Tuercadeempaque
Wlwfla de salida
NOTA: Se deberfin seguir los C6digos 248CMR de
Plomerfa para el Estado de Massachusetts. i,as vfilvulas
tipo silla son ilegales y su uso no estfi pemfitido en
Massachusetts. Consulte con tm plomero licenciado.
-- F6rula (manga)
| Tuberia
[] LAVE LA TUBERiA
Abra el smninistro principal de agua y laxe la tuberfa
hasta que el a_ma_ est_ limpia.
@
compreslon
_e
En modelos que usan la conexi6n de la vfilxula de
agua, remoxe la tapa de plfistico flexible.
©
Coloque la tuerca de compresi6n y la t>rula (manga)
en el extremo de la tuberfa como se muestra. En el kit
de tuberfa para el reliigerador SmartConnect TM de
GE, las tuercas va vienen ammdas con la tuberfa.
55
Page 56

Instrucciones para la instalacion
C0MO INSTALAR LA TUBERIA DELAGUA (CONT.)
[] CONECTE LA TUBERIA
AL REFRIGERADOR (CONT.)
]nserte el extremo de la tuberfa en la conexi6n del
refl_igerador lo mils que se pueda. Mientras sostiene
la tuberfa, aprJete el accesorJo.
Para tuberfa de plSsfico de tm kit de tuberfa para el
refl'igerador SmartConnect TM de GE, inse_le el
extremo moldeado de la tuberfa en la cone_6n del
refl'igerador y apriete la tue_va de compresi6n hasta
que est_ firmemente apretada a mano, luego apriete
otra vuelta con tma llave. Apretar demasiado puede
causar fllgas.
Una la tuberfa a la abrazadera provista para sostenei'la
en tma posici6n vertical. Quiz:is necesite apalancar la
abrazadera.
Una de las ilustraciones mils abajo lucirfi como la
conexi6n en su refrigerador.
Abrazadera
deltubo
Tuercade
de1/4"
F6rula
(manga)
ConexiSn Tuberiade
al refrigerador SmartC°unecffM
[] CONECTE EL REFRIGERADOR
Organice e] cable de ]a tuberfa de manera que no xibre
contra la parte trasera del reffigerador o contra la
pared. Empqie el reffigerador hacia la pared.
[] INICIE LA MAQUINA DE HIELOS
F!je el intermptor de la m:iquina de hielos en la
posici6n /(encendido). I.a m_kluina de hielos no
empez;ml a openu" hasta que alcance su temperatura de
operaci6n de 15°F (-9°C) o menor i,uego, empeaml a
operar automz_ficamente si el interruptor de la
m:iquina de hielos est;i en la posici6n I (encendido).
de 1/4"
NOTA: En condiciones de menor presi6n del agua,
la xfilxula de agua puede encenderse hasta 3 xeces para
suministrar suficiente agua a la mfiquina de hielos.
Tuercade Tuberia
dgbrt_era _ Cd_Tip_,_sion de1/4"
Ferula _ 1.
[] ABRA LA LLAVE DEL AGUA
EN LA VALVULA DE CIERRE
Apfiete cualquier conexi6n que pueda presentar fllgas.
Reemplace la cubierta de acceso.
56
Page 57

Sonidosnormalesde operacion, g .oo
Los refrigeradores m#s nuevos proclucen sonidos diferentes a
los modelos m#s antiguos. Los refrigeradores modemos tienen
m#s funciones y usan tecnologia m#s reciente.
Usted escucha Io que yo escucho ?Estos sonidos son normales.
HMMMM...
--WHOOSH....
• E1 nuew) compresor de alta eficiencia puede
flmcionar mils rfipido y durar mils que el de su
refl'igerador anterior y puede escuchar tm zmnbido
de tono alto o tlll sonido ptllsante i/lientras opera.
• A veces el refrigerador funciona pot un perfodo
prolongado, especialmente cuando las puertas se
abren continuanlente. Esto significa que la flmci6n
Frost GuardT"est;i en operaci6n para impedir que el
congelador se quelne y inejorar la preserwlci6n
de los alimentos.
• Puede escuchar tm sonido de soplido cuando las
puertas se cierran. Esto se debe a que la presidn se
estfi estabilizando dentro del refl'igerador.
CHASQUIDOS,
ESTALLIDOS, CRU D O,
GORJEOS
iWHIR!
• Puede escuchar los ventiladores movi(mdose a gran
velocidad. Esto pasa cuando el refl'igerador se
conecta por primera vez, cuando las puertas se abren
frectlentemente o cuando se guarda gran cantidad
de alimentos en el refrigerador o en los
cmnpartinfientos del congelador. I,os ventiladores
est;lIl avtldando a Ill_lIlteIleI" las [ell/peI'_lttlI'_ls
correctas.
• Si cualquiera de las puertas pernmnece abierta pot
mils de 8 minutos, puede escuchar los ventiladores
para enfl'iar los fl)cos de luz.
• I,os ventiladores cambian la velocidad para
suministrar enfl'iamiento 6ptimo y ahorrar energfa.
SONIDOSDEAGUA
6
• Puede escuchar sonidos como de cmjido o
estallidos cuando el refl'igerador se conecta por
prinlera vez. Esto pasa a medida que el refiigerador
se enfl'fa hasta la temperatura correcta.
• I,os reguladores electr6nicos se abren v se cierran
para ofl'ecer tm enfl'iamiento 6i)dmo y ahorrar
energfa.
• E1 compresor puede causar tm chasquido otm
gmjeo cuando intenta volver a arrancar (esto
puede tomar hasta 5 minutos).
• E1 tablero de control electr6nico puede causar
tm sonido de chasquido cuando se activa el tel0
para controlar los componentes del refrigerador.
• Expansi6n y contraccidn de las bobinas durante
o despu_s del ciclo de descongelaci6n puede
causar sonidos como de ciqjido o estallidos.
• En Inodelos coil mfiquina de hielos, desput)s de
c()mpletar tm ciclo de hacer hielo, se pueden
escuchar los cubos de hielo cuando caen a la
bandeja de hielos.
• E1 fluido del refl'igerante a trav(_s de las 1)obinas
puede producir t111sonido de borboteo COlnO de
agua hiIwiendo.
• E1 agua que cae en el calentador de descongelacidn
puede causar tm chisporroteo, estallido o zmnbido
durante el dclo de descongelaci6n.
• Un Iuido de agua cayendo se puede escuchar
durante el ciclo de descongelacidn a medida que
el hielo se derfite del evaporador y fluve hacia
la bandeja de drenaje.
• E1 cierre de las puertas puede producir tm sonido
de gorgoteo debido a la estabilizaci6n de la presi6n.
57
Page 58

Antesde solicitar unservicio...
Solucionar problemas
iAhorre fiempo y dinero! Revise las tablas en las siguientes
p#ginas y tal vez no necesitar# de solicitar un servicio.
Causas Posibles Que hacer
Elrefrigeradorno
funciona
Refrigerador en ciclo de * Espere 30 minutos pare (lUe la descongelaci(m, se tem/ine.
descongelar.
Con/roles de temperatura * Mueva los ('ontroles de temperatura del congelador
en posJci6n 0 (apagado). hasm un @/ste interior de temperamra.
E1 refrigerador est_ * Empuie la cl.v!ia COlnpletaiuente ell el enchufe.
desconectado.
Fusible fmadJdo/ * Reemplace el fl/sible o reajuste el interruptor.
hlterruptor de circuito roto.
Vibraciones o sacudidas Los rodillos requieren *Vea Rodi//os.
(una vibraci6n ligera un ajuste.
es normal)
Elmotor opera durante Es normal cure,do • Espere 24 horas para que el refi_igerador se enfffe
periodosprolongadoso el refrigerador es reci6n c()mpletamente.
se arranca y se para con h_stalado en su casa.
frecuencia. (Refrigeradores Ocurre cure,do hay largas * Eso es nomml.
modernos conmasespacio cantidades de afimentos
de almacenamiento y un en el refrigerador.
congeladormasgrande
requieren mas tiempo de Se dej6 abierta la puerta. * Revise si un paquete mantiene la puerta abierta.
operaci6n. Se arrancan y Clima caluroso o aperturas * Eso es normal.
se paranapara frecuentes de la puerta.
mantener temperaturas Conlroles de temperatura * Vea Los contro/es.
uniformes.) ajustados al ptmto mils
frlo.
Compartimientode F3 control de temperatura * Vea Los contro/os.
alimentosfrescoso no se fij6 bastatzte frio.
congeladordemasiado Clima caluroso o aperturas * F!ieel control de temperatura un paso mils fl'fo.
cMido frecuentes de la puerta. Vea Los controles.
Se dej6 abierta la puerta. * Revise si hay un paquete que Hlanfiene la l)tterta abierta.
Escarchao cristales Se dej6 abierta la puerta. * Revise si hay un paquete que mantiene la puerta abierta.
de hielo en alimentos La puerta se abre con frecuencia
congelados(escarcha o por mucho tiempo.
en paquete es normal)
Eldivisor entre el Ahorro automfifico de energla * Eso avuda prevenir la ('()ndensa('i(;n en el extefioi:
compartimientode circula llquido tibio en la
alimentosfrescosy el frente del congelador.
congelador se siente tibio
Dispositivo automMico F3 interruptor de alinlentaddn • ())lt)que el illterrttptor tie alilnenta(i()n el&('tlJ(a
parahacerhielono el6ctrica del disposifivo en la p()sicidn I (encendido).
funciona(enalgunos automfitico para hacer
modelos) hielo estfi en la posici6n
0 (apagado).
F3 agua estfi cerrada o no estfi * Vea/nsta/ar/a/[nea de agua.
conectada.
E1 compartimiento del * Espere 24 horas p;u'a que se enli'fe el refi'igel'adol:
congelador es muy cfilldo.
Cubos apilados en el recipiente * Nivele los cubos COla la mano.
apaga el dJsposifivo paxa hacer
hielo.
Cubos de hielo atorados en
disposifivo paxa hacer hielo.
(La htz verde de corriente en
disposifivo de hielo estfi
destellmzdo).
• Apague el disposifivo de hielo, retire los cubos y vuelva a
poner el disposifixo en marcha.
58
Page 59

ge.com
Causas Posibles Que hacer
Loscubestienenmal
olor/sabor
Cubos peque_os o huecos
Fotmaci6nlentadelhielo
Lapuertanose cierre
correctamente
Brilloanaranjado
enel congelador
Eldispensadordehielo
nofunciona(enalgunos
modelos)
El aguatieneun
sabor/olormaid
E1 recipiente para los
cubos necesita limpieza.
Alimentos trmlsmitiendo
olor/sabor a los cubos.
E1 interior del refrigerador
requiere limpieza.
Fihro de agua tapado.
Se dej6 abierta la puerta.
1_3control de temperatura
no es basma_te frlo.
Lajmlta en el lado de la bisagra
est_ pegada o doblada.
Calefactor de descongelaci6n
encendJdo.
Dispositivo de hielo apagado
o el agua estfi apagado.
Los cubos est_m pegados
aJ brazo detector.
Bloques irregulaxes de
hielo en el recipiente.
E1 dJspensador estfi
BLOQUEADO (LOCKED).
E1 dJspensador de agua no
se uso por mucho tiempo.
• Vacfe y limpie el redpiente. Deseche los cubos.
• Envuelva bien los alimentos.
• Vea Cuidado y limpieza.
• Reemplace el cartucho del filtro con tmo xltxevo o
con el tnp6n.
• Revise si hay tm paquete que mantiene la puertn abierta.
• Vea Loscontro[es.
• Aplique \_aselina en la parte fl'ontnl de la jtmta.
• Eso es noi_/llal.
• Enciende el dispositivo de hieh) o el agua.
• Reilltxeve los ctxbos.
• R6mpah)s con los de(los y deseche los cubos restnntes.
• E1 congelador puede set" muy caliente. Ajuste el control a
tma posici6n mils fl'fa paso pot paso hasta que no se
fimnen bloques.
• Presione la tecla LOCK CONTROL (Control de bloqueo)
y mant_ngala presionada din'ante tres segundos.
• Dispense el agua hastn que todo el sistema del agua se
llene de nuevo.
(enalgunosmodelos)
El dispensadordeagua
nofunciona
(enalgunosmodelos)
Sumhlistro de agua
apagado o no conectado.
Filtro de agua tapado.
Aire ao'apado en el sistema
del agua.
E1 dJspensador estfi
BLOOUEADO(LOCKED).
El agua en elprimer Eso es normal con tm
vase esM tibia refrigerador reci6n instaJado.
• Vea Insta/ar la/[nea de agua.
• Reemplace el cartucho del filtro o rein ueve el filtro
v instnle el tnp6n,
• Presione el bmzo del dispensador pot tm par de
illintltos.
• Presione la tecla LOCKCONTROL(Control de bloqueo)
_' inant_ngala presionada durante tres segundos.
• Espere 24 horas para que se enfl'fe el refl_igeradox:
(en algunosmodelos) E1 dispensador de agua no • Dispense el agua hastn que todo el sistema del a,qxa_ ,se
se uso por mucho tiempo, llene (le nt/evo.
1_3sistema de agua se ha • Espere algunas horas para que se enfl'fe el agua.
desaguado.
Elagua chorrea de/ Cartucho del f'fltro reci6n • Deje cotter el agtxa desde el dipensador l)or 3 mimxtos
dispensador hlstalado. (aprox. 1½ gal6ns).
No sale agua F3 agua en el dep6sito estfi • Ilame pm'a servicio.
congelada.
Nosaleaguayel Est_ tapada la lluea de agua • 1]ame a un plomero.
dispositivopara hacer o la Have de paso.
hielo no funciona Filtro de agua tapado. • Reemplace el (artucho del filtro o rexxxt/e\'e el filtro
v instale el tap(;n.
E1dJspensador estfi
BLOQUEADO(LOCKED).
• Presione la tecla LOCKCONTROL(Control de bloqueo)
y mmmXngala presionada durante tres segundos.
59
Page 60

Antesde solicitar unservicio...
Causas Posibles Que hacer
Elrefrigerador huele Alimentos trmlsmifiendo * ?diment()s c(m oh)res thertes deben estar tapa(h)s.
olores al refrigerador. * (;uarde una caja de bicarbonato de sodio en el
refiigerador; cSmbiela cada tres meses.
I_L1interior requiere * Vea Cuidado y limpieza.
limpieza.
Limpie el sistema de agua * Vea CLlidado y/impieza.
de descongelaci6n.
Humedadenel exterior Normal en perlodos con * Seque la supe_i(ie.
delrefrigerador alto grado de hmnedad.
Hnmedadenel interior Se abre la puerta con
(enclimahhmedoelaire frecuencia o por mucho
Ileva la humedad al interior tiempo.
del refrigerador cuando se
abren las puertas)
No funciona la luz No hay corriente ell el contacto. • Reel[lplace el tHsible o reajuste el interruptol:
interior Bombilla ftmdida. • Vea Reemplazar/asbombillas.
Agua en el piso de la I_3desagiie en el rondo del • Vea Cuidado y limpieza.
cocina o en el fondo congelador estfi tapado.
del congelador Cubos atrapados en * Erupt tie los cubos en el vertedero con una cuchm'a
Airecalientea la base
delrefrigerader
Seseleccion6CUBEDICE
(hieloencubes)perose
spens6CRUSHEDICE
ielopicado)(enalgunos
modelos)
Frecuentesonido
de "murmullo"
el orificio, de madera.
E1 aire fluye para enfriar el
motor. 1_5_el proceso de
refrigeraci6n es normal que
saJga calor de la base del
refdgerador. Algtmos
recubrimientos de piso
estml sensifivos y se
descolorm_ a estas
temperaturas normales
y seguras.
La filfima selecci6n fue
CRUSHEDICE(hielopicado).
E1 hzterruptor de corriente del
dispositivo paxa hacer hielo estfi
en la posici6n I (encendido)pero
no se ha conectado la tuberia
de sumhlistro de agua hacia el
refrigerador.
• Se quedaroia tmos cuantos cul)os en el triturador de la
selecci6n antefi(m Esto es normal.
• Mueva el interruptor de corriente a la posici6n
O (apagado). Mantenerlo en la posici6n I (encendido)
dafiar5 la xfilvula del aoua
6O
Page 61

Garantiadel refrigerador.(Ratacons. idoresenlosee.uu.)
Todos los servicios de garantia los proporcionan nuestros Centros de
ReparaciSn de F#brica o nuestros t#cnicos Customer Care ®autorizados.
Para concertar una cita de reparaciSn, en linea, 24 horas al dfa, visitenos
al ge.com, o flame a1800.GE.CARES (800.432.2737). Cuando flame para
solicitar servicio, per favor tenga a mane el nOmero de serie y
Grape aquf su recibo.
Se requiere facilitar prueba
de la fecha de compra
original para obtener un
servicio bajo la garantfa.
el nOmero de modelo.
GE reemplazara:
MODELOSGEyGEPROFILE:
Un ario Cualquierparte (lel refiJgerador que fidle debido a (lefe(t(,s en los matefiales o en
A partir de la fecha la fid_ficaddn. Durante estn garantia limitada de unario, (;E mml)i_n proporcionar_k sin costo
de la compra original alouno, toda la mm_o de obra y el servi(io relacionado--para reemplazm" partes (]efectuosas.
Treintadias Cualquierparte del (armcho de film_ de agua que fhlle debido a defectos en los matefiales o en
A partir de la fecha la tid_fi('acidn. Durante estn garantia limitada de treinta dias, (;E tambi_n proporcionar_i sin costo
de la compraoriginal alguno,tm cartud._ de filtro de agua de repuesto.
del refrigerador
MODELOSDEGEPROFILESOLAMENTE:
Cincoarios
A partirde lafecha
de la compra origina!
Cualquier parte del sistema sellado de refrigeracion (compresox; condensa(lox; evapomdor y tul)erfi_s
de conexidn) que fidlen debido a defectos en los materiales o fid)ricacidn. L)m'ante estn garantia
limitada de cinco aries del sistema sellado de refrigeracion, GE mmbi_n propordonmfi, sin come
alguno, toda la mano de ol)ra y el servicio relacionado para reemplazar partes (lefecmosas del
sistema sellado de reliJgeracidn.
_: Viajes de servicio a su hoga_r paJcaensefiaa'le cdmo usaJc
el producto.
!;_:InstaJacidn o entrega haapropiada, o mmatenimiento
hnpropio.
_: FaJlas del producto si hay abuso, maJ uso, o uso para
otros prop6sJtos que los propuestos, o uso paJca fines
comerciales.
_: P_rdJda de Mimentos por averlas.
::Ji::Causa_r dMaos despu6s de la enlrega.
::Ji::Reemplazo de fusibles de su hoga_r o reajuste de
hlterruptores de circuito.
_ Reemplazo del caactucho del ffltro paaca agua, sJ hlchfido,
debido a presJ6n de agua afuera de las limites de operad6n
espedficados o sedhnento excesivo en el stunhfistro de agua.
_: Reemplazo de las bombillas, si h_chfidas, o del caactucho
de f'fllro de agua, si hlcluido, dJferente a como se
espedfica mlteriormente.
_: Da5_o aJ producto causado por accidente, fuego,
h_tmdaciones o actos de Dios.
_: DaS_o hlcidentaJ o co_secuenciaJ causado por posibles
defectos con el apa_rato.
::Ji::Producto no accesible paaca facilitaac el servicio requerido.
EXCLUSION DE GARANTIAS IMPLJCITAS--Su #nico y exclusivo derecho es la reparacion del pmducto, tal y
como se indica en esta Garantia limitada, Cualquier garantia implicita, incluyendo las garantias implicitas de
comerciabilidad o adecuacion para un fin determinado, estan limitadas a un a#o oel periodo de tiempo mas
breve permitido por la ley.
Esta garantia so extiendo al comprador original y cualquior comprador posterior do productos comprados para uso
residencial dentro de Estados Unidos. Si el producto esN situado en un _rea que no dispone de servicio per parte
de un proveedor de servicio autorizado de GE,podria tenet que hacerse cargo de los costes de envio o bien podria
solicitfirsele que fleve el producto a una centre de servicio de GEautorizado para realizar la reparaciSn. EnAlaska,
la garantia excluye el costo de envio o las visitas de servicio a su casa.
Algunos estados no permiten la exclusi6n o las limitaciones de dafios incidentales o consecuenciales. Esta garantia
da derechos legales especificos, y usted podria tener otros derechos que variar#n de estado a estado. Para saber cufiles
son sus derechos legales, consulte a la oficina de asuntos del consumidor local o la oficina del Attomey General en
su Iocalidad.
Garante: General Electric Company. Louisville, KY 40225 G /
Page 62

HojadeBatesde Funcionamiento
SistemadeFi/traci6nGE&nartWater
CartuchoMWF
Este sistemase hasometido a/as pruebas NSF/ANSI42/53a fin dereducir/as sustanciaspresentadas a continuaci6n.
Se redujo la concentracionde lassustanciasindicadasen el aguaque ingresanen el sistema a una concentraci6nmenor
o igual al limitepermitido para el agua quesale delsistema,comose especificaen NSF/ANS142253.*
(Factoresde 100%incorporados para la utilizaci6n no medida)
Estandar No. 42: Efectos est6ficos
Parmnetros
T & O
Partfculas**
Pm-fimetros Calidad del
Turbidez
Quistes
Asbestos
Plomo a pt ] 6,5
Plomo a pt ] 8,5
Mer(udo a pH 6,5
\'h r(udo a pH 8,2)
,\]acloro
I J£_(/a_'.'
2,44)
'Ib\a5 no
ge/)ceno
Carbofimmo
1,4dido_fl)enceno
.\wazine
* Probado ufilizando una tasa @ flujo de 0,5 gpm (1,8927 I/mfl_.); presiSn @ 60 psig (4,218 Kg/cm2); pH de 7,5_+0,5; temp, de 20 °_+3°C
_ Medici@ en particulas/ml. Las particulas usadas eran de 0,5-1 micrSn,
..... Unidades de turbidez Nefelom#trica--NTU
USEPA
MCL
USEPA
0,5 NF/'
_>99,95% Reduction
_>99% Reductioi3
0,0] 5 mg/I.
0,0] 5 mg/I.
0,002 rag/I,
0,002 rag/I,
0,002 rag/I,
0,0002 mg/L
0,070 rag/I,
0,(t03 rag/I,
0,005 rag/I,
0,040 rag/I,
0,075 rag/I,
0,003 rag/I,
hlfluente concentraci6n
atlt'a_t ] 0.000 partid(_/mL
MCL
Calidad del
2,0 mg/L + 10!1
hlfluente concen_raddn
]] +] NT(***
Minimum 50.000 I,
] 07-] ()_fil)_'as/[; > ]O[m/
03 3rag/l, +_] 0%
03 5 rag/l,_+ ] 0%
0,006 rag/I,_+ ]0!i
(1,(t06rag/I, + ]{)%
(1,(14rag/I, +_]0%
(1,(t02rag/I, +_] 0%
(1,2]0 rag/I, +_]0%
(1,015 rag/I, +_] 0%
(1,015 rag/I, +_] 0%
0,08(1 rag/I,_+ ] 0%
0,225 rag/l,_+ ] 0%
0,009 rag, q,_+ ] 0%
Especificaciones de Operation
[] Capacidad: certificado para hasta 300 gulon(s (1 ] 35 litros ); hasta seis meses para los modelos sin luz indicadora de reemplazo de fihro;
basra m) aft() papa los modelos ((m luz indicadom de reemplazo de lihro
[] Requerimi( ntos de 1)_>si6n: 4(>120 psi (2,8-8,2 bar), sin choque
[] "Dmperamra: 33°-100T (0,6°-38°C)
[] Tasa de Ih!jo: 0,5 gl)m (1,9 lpm)
Requerimientos Generales de Instalaci6n/Operacion/Mantenimiento
[] I ;_x( el *mexo _artmho a la tasa nlklxiilla Dot 24ininutos paw[ stump el aire atrapa(lo.
[] Reemplace el carmcho cuando la luz indicadora parpade_ o cuando se reduzca la tasa de fiujo de agua en unidades (p*e no incluy_ n indica&m
AvNos Especiales
[] I ;_s ins)rue()ones (h' ins)Mac)tin, las piezas, la inlbnna(i6n sobrc la disponil)ilidad de servi(io ), ht gm'4ntf;l estSndm: se incluy'en con _l produclo
al emiarlo.
[] Este sistema de agua potal)le debe mant_ nerse conlbnne alas ii_strucciones del lid)ricante, inchtyelulo el r( emi)lazo de los cartuchos.
[] No se utiliza el/los sitios doi/d( el agua _s de calidad micmbioldgicamente dudosa, ni con agu>ts de calidad desconocida, sin mm desinS'ccidn
adec))ada antes o despu& del sistema; el sistema tmede milizarse con ag)las desinlbctadas (l)*e tmedan com_ net quistes fihrables.
[] I,OS (Olltiti//iI)allt( S /l otras substa/)cias que este sisteI//a de tratalniento de agua puede remover 1) i'edt/cir, i/o est}/l/ presentes, i/ecesariamel/te, el/ S/I ag/la.
[] Vedlique el acatamiento de las leves y reg-lalnentos estatales y locales.
[] Tome en cuenta que mmque las pruebas se realizaron t)_!jo eondieion(s est_indar de laboratorio, el r(snhado r(al lmede variar. I,os sistemas
se (l(ben instalar y op(rar de acuerdo con los proeedimi_ ntos y las pautas qu_ recomi(nda el Ihbrieante.
Pr_)bado T' Certiticado s_gdn las normas ANSI/NSF 49 } 53 para la reduccidn de:
Estimdar No. 42: Efectos Est6ticos
Inidad (lUflnica
E1 sabot x olor de cloro
I5nidad de fihrado mecfinico
Reduccidn de parth ulas, Clase ]
Hecho pot General Electric, Appliance Pro:k, Ix)uis\ille, KY 40225 El3\ EST No. 070595-MN-001
62
Promedlo de Effluent
hlfluente Promedio M/tximo
1,96mg/L 0,06 rag/I, 0J l rag/I,
6.400.000 #/mL 58.833 #/mL 150.000#/mL
Estfindar No, 53: Efectos Relafivos a la Salud
Promedio de
influente
]0,5 NT/5
] ]8.750 #/L
57 MF/I,
03 567 rag/l,
0J 433 rag/l,
0,0059 rag/I,
0,0057 rag/I,
0,0367 rag/I,
0,0020 rag/I,
0,2033 mg/I,
0,01 (_) rag/I,
0,0145 rag/I,
0,0830 rag/I,
0,2283 rag/l,
0,0087 rag/l,
Estfindar No. 53: Efecms sobre la salud
[ nidad de rt du(ddn qUl'mit a
Rcduccidn de alaclor_) v an'azina
Reduccidn del benceno v carbofln-ano
Reduccidn de 1,4 diclor_A)enceno y 2,4-[)
Reduccidn de plomo y lindano
Reduccidn de mercurio v toxatk,no
[nidad de fihrado me(;hlico
Reduccidn de turbidez
Reduccidn de quistcs ) asbestos
0,996 MF/I, < ] \'IF/I,
< 0,001 mg/L < 0,(X)] mg/l,
< 0,001 mg/L < 0,(X)] rag/l,
0,000350 rag/I, 0,0007 mg/L
0,(1(t0325 rag/I, 0,(1(t06mg/L
0,00023 rag/I, 0,0004 mg/L
<O,OIX)02mg/L <0,0(_)02 rag/I,
0,00337 rag/I, 0,011000 mg/L
0,001(t0 rag/I, 0,00]t)00 mg/L
0,000500 rag/I, 0,000500 mg/L
0,001000 rag/I, 0,001t)00 mg/L
0,000500 mg/l. 0,000500 rag/I,
< 0,0005 mg/L < 0,0005 rag/l,
Effluent
Promedio Mfixmm
0,] 4 NTU 028 NTU
< ] #/L 4 #/L
% de reducddn
Promedio M£ximo
96,77% 94,74%
99,14!?i 97,97%
% de reduce)tin
Promedio MSximo
98,54% 97,20%
> 99,99% > 99,99%
99,60% 99,39%
99,36% 99,29%
99,30% 99,29%
94,70% 87,50%
9320% 89,29%
99,34% {)8,67%
99,00% {)8,95%
98,32% 94,50%
93A4% 91,67%
96,51% 95,83%
98,78% 98,65%
99,78% !)9,77%
94,22% 93,33%
Red_mddn
rah_m necesaria
> 50%
_>85%
Reducddn
mh_ma necesaria
0,5 NT/'
_>99,95!i
_>99%
0,0] 0 rag/l,
0,0] 0 rag/l,
0,002 rag/I,
0,002 rag/l,
0,002 rag/I,
0,(X)02rag/I,
0,070 rag/l,
0,003 rag/I,
0,005 rag/I,
0,04 mg/I.
0,075 rag/l,
0,003 rag/I,
Page 63

Servicioa/consumidor.
;Tiene_ alguna, })regmm_, sobre st= electrodom_stico? ;lq uebe la p_gina \'\_b de (;E 24 horas al tea,
l PdginaWebdeGE ge.com
' cuahluier dfa del afio! Para maxor c(mveniencia x, servicio m_s r;_})ido, xa })uede descargar, los Manuales de
los Propieta_ios, pedir piems o incluso hacer una cita en lfnea para que vengan a reali/m" una reparaci6n.
Soliciteunareparaci6n
E1 servicio de expenses (;E est;_ a tan s61o tm paso de su pue_a, iEntre en lfnea ) solicite su reparaci6n
cuando le xenga bien 24 horas al dfa cualquier dfa del aflo! (-) llame al 800.(;E.C_M_ES (800.432.2737)
dul'allte hoi'as llOY///ales de otichl_/.
go.corn
RealLifeDesignStudio(Estudiodedisefioparalavidareal) oo.oom
GE apoya el concepto de Diseflo Uni_vrsal--productos, servicios y ambientes que pueden usar gente de
todas las edades, tamaflos y capacidades. I._ec(mocemos la necesidad de diseflar para una gran gama de
habilidades y dificultades tMcas v mentales. Pare m_s detalles cobre las aplicadones de GE Disefio Univex_al,
incluyendo ideas de disefio para la codna panl pel_(mas con discapacidades, mire nuestra p:_gina Web hey
mismo. Para pel_onas con diflcuhades auditi_:ls, fi_vor de llamar al 800.TDD.GEAC (800.833.4322).
garantfasamplbdas
Compre una ganmtfa ampliada y obtenga detalles sobre descuentos espedales disp(mibles mientras su
garanda est;_ adm acti_;i. Puede comprarla en lfl_ea en cnalquier memento, o Ilamar al (800.626.2224)
dunmte betas nonnales de ofidna. GE ConsuFner Home Se_Mces estm5 afin ahf cuando su
ganmtia tennine.
Piezasyaccesorios
go.corn
go.corn
Aquellos individuos con la calificad6n necesafia para reparar sus propios electrodom_sticos pueden
pedir que se les manden las piezas o accesorios direcmmente a sus hogates (aceptamos las mljems
VISA, MasterCard y Discover). Haga su pedido en lfnea hey, 24 hems cada dfa o llamar per tel_fimo
al 800.626.2002 durante horns nommles de oficina.
tas instruccienesdescritasenestemanual cuflrenlespmcedflnientes a seguirpercualquierusuarie.Cualquier
etrareparaci6ndebeda,per reglageneral,referirsea pemenalcalificadeauterizade.Oefleejercerseprecauci6n
ya quelas reparacienesincorrectaspuedencausarcondiciones de fundenamienteinseguras.
Pbngaseencontactoconnosotros go.corn
Si no est_i safisfecho con el servido que redbe de GE, pdngase en conmcto con nosotros en nuestra p_gina
Web indicando todos los detal]es asf come su nfimero de tel_fimo o escrfl)anos a:
General Manage_; Customer Relations
GE, Appliance Park
I_ouisviHe, KY 40225
iRegistre su nuevo electrodom6stico en linea--cuamdo usted prefiera! El I'egistrar stl prodtlcto a tiempo le
l Registresuelectrodom_stico
proporcionan_, si .suroiera_ la necesidad, una m@)r comunicaci6n v, un servicio m_s r_pido bajo los t6rminos
de su garantia. _mg)i(_n puede emiar su tmjeta de registro pre-impresa clue se inclu} e en el material de
embah!]e o recorte } use el fbmmlario de este Manual del Propietafio.
go.corn
63
Page 64

ConsumerSupport.
Have a question or need assistance _dth }our appliance? %3 tile GE Website 24 hours a da}; am da_ ot tile _ear!
q t GEWebsite i.the_.8.go.cam
' Y/u can also shop for more ,great lIE products and take adx mta,,e_ of all our on-line suppoxl services designed fklr
}exit convexliellce, In CaJaada www.geappliaaaces.ca
ScheduleService i. tile_.,.8.go.cam
Expe_ BE repair service is onl} one step awa_ fl'on/_our doon Get on-line and schedule _our service at }our
conveniexlce 24 hem's an) da} of tile }ear! (-)r call 800.GE.(_ARE8 (800A32.2737) during normal business hem's.
In Canada, call 1.800.361.3400
RealLifeDesignStudio i,,tile_.,.8.:.qe.com
GE suppoxts tile lJniveisal Design coxlcept--l}rodt/cts , services and environl/lelltS that call be {lsed 1)1"people lit all
ages, sizes and capabilities. We recognize tile need to design tbr a wide range (ff physical and mental abilities and
impairments. Fox" details of GE's Llniversal Design applications, including ldtchen design ideas filr people with
disabilities, check out our Website today. For tile hearing impaired, please call 800.TDD.GEAC (800.833A322).
In Canada, contact: Managex; Consmner Relations, Mabe (;anada Inc.
Suite 310, I Factmv I,ane
Moncton, N.B. E1 (': 9M3
ExtendedWarranties lxltheU.S.:go.cam
Pro'chase a GE extended _<uTant_ and learn about special discomlts that are axailable while _our, warrant}
is still in effect. You can purchase it on-line an) time, or call 8 .626.2224 during mmnal business ham's.
(;E Consumer Home Services will still be there after }our warrant} expires. In Canada, call 1.888.261.2133
PartsandAccessories
Individuals qualified to service their own appliances call have pm_ts or accessories sent direcdy to their homes
(VISA, MasterCard and Discover caids aie accepted). Order on-line today, 24 hours every clay or by phone at
800.626.2002 during nora/el business hours.
Instructions contained in this manual cover procedures to he performed hitany user. Other servicing generally should he
referred to qua/ified service personnel Cautionmust he exercised, since impreper servicing may cause unsafe operation.
Customers in Canada shouM consult tile yellow pages tor tile nearest Mabe service xentex, or call 1.888.261.3055.
ContactUs
If you are not satisfied with tile service you receive fl'om GE, contact us on our Website with all tile details
including your phone numbex; or write to: General Manage_; Customer Relations
GE, Appliance Park
I,ouisville, KY 40225
In Canada." www.geappliaJaces.ca, ol write to: Directol; ( onsumer Relations, Mabe Canada Inc.
Suite 2410, 1 Factory I,ane
Moncton, N.B. E 1C 9M3
00 "_ " __
In tile U.S.: go.cam
hi tile U.S.: go.cam
Register your new appliance on-line---at your convenience! Time]} product registration xdll alhlw for
q
"I RegisterYourApplbnce i,,tile_.,.8.:oo.com
enhanced c/mmmnication and prompt serxice trader tile temls of }am" _arranty, should tile need raise.
l Yi/u ma_ also mail in tile pre-printed registration card included in tile I)acldng, material, or detach and
use the titan in this Owner's Manual. In Canada: www.geappliaaaces.ca
._ _' Printed in the United States
;g
_ Pdntedon RecycledPaper
 Loading...