

Page 1
—
How to
get
the best from
Your
Contentf
5.
Alllnlinll]ll F:~)il
An(i-Tip I>c\icc
Appli:lncc Rcgistril[ion
(’:lnn
in: Tips
C:Irc :IIICI [’lcilning
C-li)ck/Tinlcr
COIISIII1lCI
IJcil(llrcs
Mocicl :IIICI Scri:ll Nlinlbcrs -
oten
Scrviccs
17, Ix.
2(>
3.20
?
ii
~5--~()
()
31
().
7
?
I 2-24
Prehe~lting
Rotis(ing
Seli-Clciining
shelves
Thernlos(:it AdlLlstl~len{
Tinlec{ B:lkin:
Problclll
S:ll’ety Inslrllctions
Surface Cooking
Solver
Control”
Setlin:s
16
18. 10
97–24
~~ ](,
13
14,
15
30
3–5
10.
I 1
10
Use
and Care
of Models
RS734GP
RS744GP
light:
Bllll> Rcpl:lccnlerl[
OY”eIl
Vcll(
I 2.
4, 20
2X
(;E
Answer Center’
800.626.2000
Page 2
——
(Q:
—
—
m
,-——
.-
HELP US HELP YOU...
—
Before using your range,
Write
down the model
read this book carefully. and serial numbers.
It
is intended 10
and
muintain your new r-angc
pr(jpcrly.
Keep it
questi~)ns.
II’ you don’t
or
yc)ur phone
handy for
need more help, write (include
Consumer Affairs
Hotp(~int
Appliance Park
L(luisvit]e,
help
answers to
understand
number):
KY 40225
yoLI oper;l[e
something
your
find (hcnl
front
of the range
stor”age
Your Rarlge sec(it)n
These numbers
C’~)nsumer product
Registration
your range. Before
card, pletise write
here:
Model Number
Serial Number
Use these numbers in
correspondence” or
concerning yt)ur range.
drawer.
011 J
tabet (JI1
hchind
SeL> [he f;catut”c~ 01”
in this
are also c)n the
ownership
Card
tha[ ctinle
sending in this
these numbers
any
ser~’icc calfs
Y(lLI’
It
IF YOU NEED SERVICE
the
the
bt)t)k.
with
If you received
a damaged range...
Illlmcdi;.rtcly ct)ntact the deater (or
10U
i
Idcr) [hat sold
jou the
range,
Save time and money.
Before you request
service . . .
Check
the Problcrn Solver-
hack
ot this
mirl~)r. oper:~ting probfems
can correct yourset 1..
h(~ok. f[
fists
in
the
caLises
that
you
of
Tc) obtain service,
the hack
Wc’l”c
f>leased. fl
scrvicc
turther help.
FfRSrT. ct)rltact
apptiance. Expltiin
cuses,
{~t[tlis b(~(~k.
pl”OLld of C)LI1” service irnd want yoLl to
yoLI
this
see
[he Consuincr”
tor some reason you :uc
receive,
witf sc)tve
here tire
the
people who serviced your
why
three steps
you arc not pfcased. fn most
the
prt~btem.
Services page in
be
1101
hirppy wi(h
[() fo]it~w IC)I
the
Nf;x’r. i [’
de[ai
I;
fNAl,f.Y’. if’ your problem
yoLI
iuc slit] n(jt p]cascd.
I s--i
IIL:I u(fi n: j our f311(lnc nunlbcr’--to:
Millliig~r”, COI)SUIIICI Rclilt ioils
tiotp~~i nt
Appfi~u]cc P;lrk
[.(~uis~illc,
KY
40225
is
s(itl rl(~t
w;r-i[c al!
the
resolved, write:
2
Page 3
MPORTANT
SAFETY INSTRUCTIONS
Read all instructions before using your range.
IMI’ORTANT SAFETY NOTICE
The
California
Enforcement Act requires the Governor of
California
the state to cause birth
and
harm,
potential exposure to such substances.
The fiberglass insulation in self-clean ovens gives
off a very small
the cleaning cycle. Exposure
venting with an open window or using
or
hood.
fan
When using electrical appliances,
precautions should be followed, including the
following:
●
(Jse
this
as described in this manual,
●
Be sure your appliance is properly installed and
grounded by a qualified technician in accordance
with the provided installation instructions.
✍✎
●
Do not attempt to repair or replace any
part of your range unless it is specifically:
recommended in this book.
sh(.)uld be
●
Bef(!re
THk,
H()[
~erformin~
RANGE
SEHOLD
REM(3V1NG THE
THE
(:
WARNING—A1l
—
.-—
device
is properly engaged before you push
range back. Ptease
information in
—
this precaution
and
injury.
Safe
Drinking
to
publish a list of substances known to
defects
Water and
Toxic
or other reproductive
requires businesses to warn customers of
amount of carbon
appliance
only for
monoxide
can
be minimized by
a
ventilation
basic
safety
its
intended use
All
other
servicing
referred to a qualified technician.
any
POWER
service,
SLJPPi,Y
DISCONNECr~
AT
TH14;
DISTRIBIJT1ON PANI?l> BY
IRCUIT
FUSE OR
BREAKER.
SWIT(.:HING
ranges can tip and
injury could result. To prevent
accidental tipping of the range,
from abnormal usage including
excess loading of the oven door,
attach it to the wall or floor by
installing the Anti-Tip
supplied. Make sure the
securely into the
If
you pull the
wtill
for
any
range
reason.
refer to the Anti-Tip
the
back of this book. Failure to take
could
result in tipping of
device
chain
slot
in
[he dc}ice.
out from the
make
sure the
dekice
the
during
OFF
fits
the
liltl~t
‘m
●
Do not leave children alone—children should
not be left alone or unattended in an area where
appliance is in use. They should never be allowed
to sit or stand on any part of the appliance.
●
Teach children not to play with the controls
or any other part of the range.
●
Never leave the oven door open
not watching the range.
●
Always keep combustible wall
or drapes a safe distance from your range.
● Do not allow anyone to climb, stand or hang
on the door, drawer or range top. They could
damage the range and even tip it over, causing
severe personal injury.
● CAUTION: ITEMS OF INTEREST TO
CHILDREN SHOULD NOT BE STORED
CABINETS
BACKSPLASH OF A RANGE—CHILDREN
CLIMBING ON
ITEMS COULD BE SERIOUSLY INJURED.
● Never wear loose-fitting or hanging garments
while using the appliance. Flammable material
could
be ignited if brought in contact with hot
heating elements and may cause
.
m
—
pot holders touch hot heating
use a towel or other
catch fire on a
● Always keep dish towels, dish cloths, pot
holders and other linens a safe distance from
your range.
● Always keep wooden and plastic utensils
and canned food a safe distance away from
~our
range.
● For your safety, never
warming or heating the room.
● 1)() NOT STORE OR USE COMBIJSTIBLE
MArl’ltRIAI.S,
FLAMMABLE VAPORS AND LIQUIDS IN
‘rHk:
VICINITY OF THIS OK ANY OTHER
APPLIANCE.
ABOVE
. Use only dry
:
damp pot holders on hot
reSLlit
A RANGE OR ON THE
THE
RANGE TO REACH
pot
in burns from
bulky
cloth.
hot burnel:.
use
your appliance for
GASOLINE OR OTHER
when you are
coverings!
severe
curtains
burns.
holders—moist or
sur[’aces mav
steam.
Do not
etements. Do Ilot
Such
cloths
an
IN
]e;
ctin
—
————
3
.-—
Page 4
.———.—-
-—
——
--
--
—...———.——
.-.
-..
.,.
...
——.
—..
.—
,...
.--,
..,
_..
--,,.-.
_,--—.
.
—.--——.,,——-
..,
—,,
,--—.
,,
,-
....,-
!
●
m
●
Keep
hood and
good”
venting
e Do not
,
?$&
r:
,
@
<-.
cookie”
che[nic:~l
I;l:trnc
by closing the
control” to
let cooking grease or other
materials
,,
—= .,.
,’
—
b!
co}cring pan coinplctely
sheet
in
!’():lll~-typ~ c.x[ingu isher.
find to avoid
acc~lnlulate
*
Do
not use water on
Never
Stnother f7at]-tillg p;in on surfucc u~li(
01” Ilat [ray, or il’ :lyili!;lt)]c?, usc LL ~]ry
or
f~)dnl-type
the oven can be snlothercd conlplctel}
OFF or
IMPORTANT
grease
oven (foor”
filters
grease
in or near
pick [tp
by using a
a tlaming
with
extinguisher,
and turning
clean
to
lnilinl:li
fires.
flatnmabl(!
the rang(’.
grease fires+
pan.
well-fit[i!]g lid,
tht oven
dry cheln ical or
SAFETY INSTRUCTIc)NS
(Contifll[c(l)
n
* W?hen
.
1
e
using cooking or
oven, t~)lic)w the
),. ..,.
* . . . . . . . . . . . . . . ...
roasti~lg
r~lit[llll’iictu]~r.s
!,>..
4,.
,1
-..
bags in
dircc[ions.
. . . . . . . . . . . . . . . . . . I
tl~e
(’
.
1)() JIOi t~)ltch
sarface of’
.’:;i)ugh !()
I]uring :Ind :lfter use, do not
or other !’[ :~nlnlable
21reLls
ne:irhy
the
oven:
heating elements or interior
oven.
burn even though
I’hcse
lnd[eri
surface units or
;lltow
sufficient
surfaces
they arc dark
touch, or let
;lIs
Cont:lct surf:Lce
:]ny
tinle for
nlay
be
hoi
in
clo[.hin:
i
nteri[)r ilrr~i of
coolin g,”
col(~r.
a
units.
first.
a
* ,S ta[ld a~~ay
$)len
door. Hot air or steam
cause []urns
J I)o
not heat unopened
}]ressure
could
4
——
could
burst, causing an injury.
from the range
to hands, face and/or
build
up and the container
when
which
f’ood
containers.
opening
escapes
eyes.
th~’
t’ar]
.
Page 5
Surface Cooking Units
*
Use proper pan
equipped with one or more surface units of
different size. Select cookware having
bottoms large enough to cover the surface unit
heating element. The use of undersized cookware
will expose a portion of the heating element to
direct contact and may result in ignition of
clothing. Proper relationship of cookware to
will
burner
● Never leave the surface units unattended at
high heat settings.
greasy
● Be sure the drip pans and vent ducts are not
covered and are in place. Their absence during
cooking could damage range parts
● Do not use aluminum foil to line the drip pans
or anywhere in the oven except as described in
this book. Misuse could result in a shock, fire
hazard or damage to the range.
● Only certain types of glass, glass/ceramic,
earthenware or other glazed containers are
suitable for range-top service; others may break
because of the sudden change in temperature.
also improve efficiency.
spillovers
siz&This
Boilover
appliance is
causes smoking and
that may catch on fire.
and
wiring.
flat
. When flaming
foods are under the hood, turn
the fan off. The fan, if operating, may spread the
flame.
● Keep an eye on foods being fried at HI or
MEDIUM HI heat.
●
Foods for frying should be as dry as possible.
Frost on frozen foods or moisture on fresh foods
can cause hot fat to bubble up and over sides of
pan.
● Use little
f~or
effective shallow or deep-fat
frying. Filling the pan too full of fat can cause
spillovers
● If a combination of oils or fats will be used in
when food is added.
frying, stir together before heating, or as fats melt
slowly.
● Always heat fat slowly, and watch as it heats.
● Use deep fat thermometer whenever possible to
prevent overheating fat beyond the smoking point.
● Never try to move a pan of hot fat, especially a
deep fat fryer. Wait until the fat is cool.
● Always turn surface unit to OFF before
removing cookware.
●
To minimize the possibility of burns, ignition
of flammable materials, and spillage, the handle
of a container should be turned toward the center
of the range without extending over nearby
surface units.
● To avoid the possibility of a burn or electric
shock,
surface units are at OFF position and all
always be certain that the controls for
coils
cool before attempting to lift or remove the unit.
● Never clean the
cooktop
surface when it
is hot. Some cleaners produce noxious fumes
and wet cloths could cause steam burns if used
on a hot surface.
“
Do not immerse or soak the removable
surface
unih.
Do not put them in a dishwasher.
Do not self-clean the surface units in the oven.
—
all
are
SAVE
T~SE
mSTRUCTIONS
5
Page 6
FEATURES OF YOUR RANGE
?
?
?
?
???
?
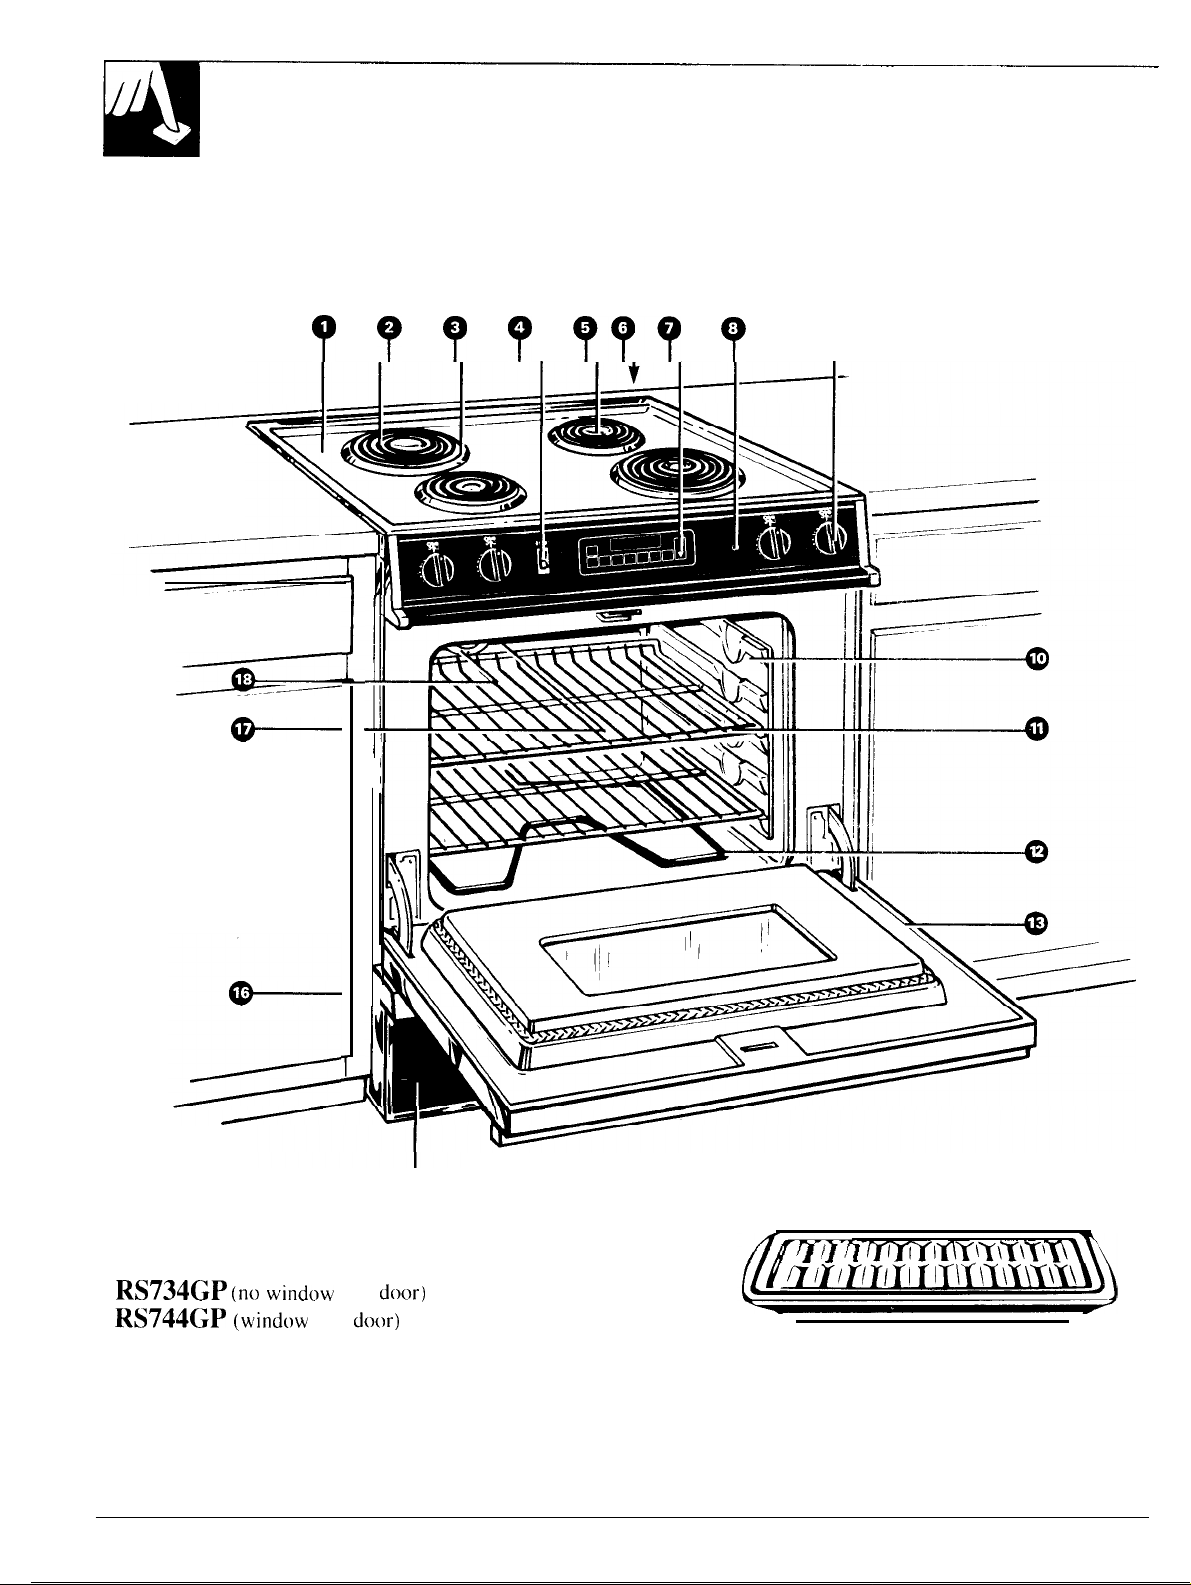
RS734GP
RS744GP (window
(no
window
6
in
in
door)
door)”
Page 7
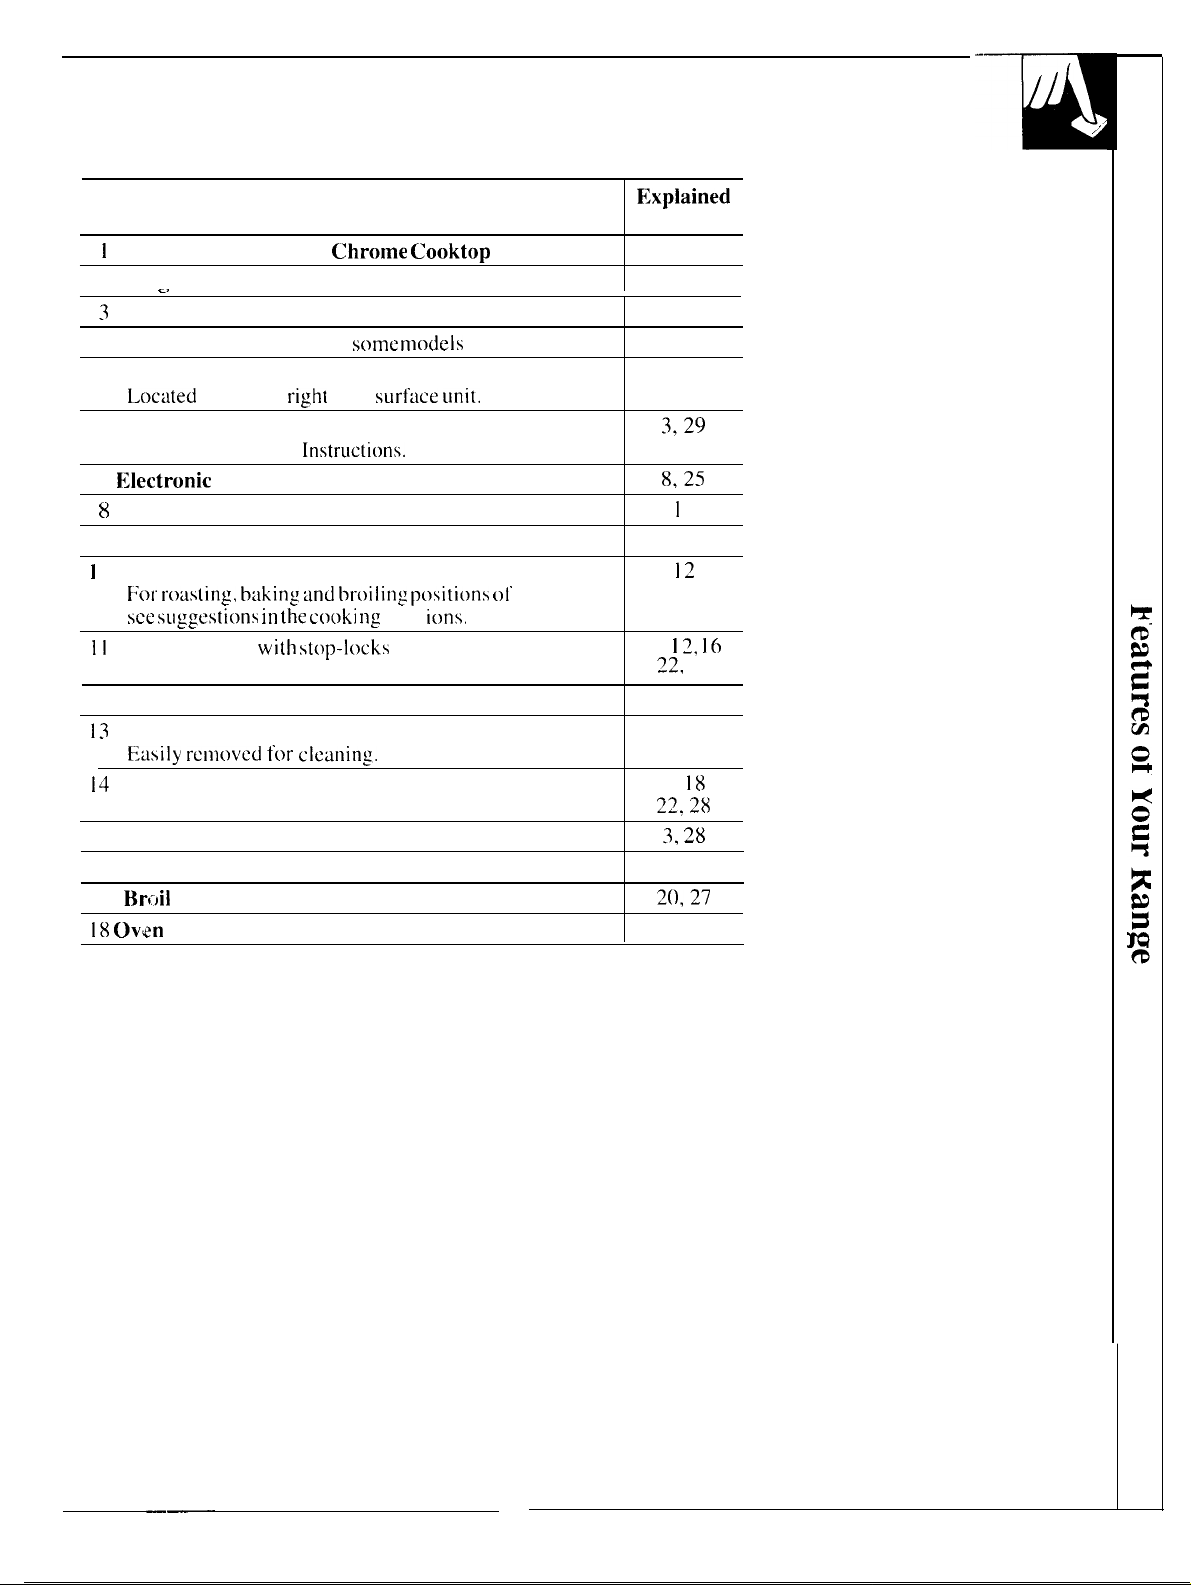
Feature Index
1
Porcelain or Brushed
2 P1ug-in Surface Units
c>
3
Drip Pans
4 Oven Light Switch
5 oven Vent
Located
6 Anti-Tip Device
See
7
I;lectronic
8
Surface “ON” Indicator Light
9 Surface Unit Control Knobs
I
() oven Shelf Supports
[;or ro~lsting, b:lking ilnd hroiling positions” 01”
see sllggestions in the cooki” ng
11
Oven Shelves
under the
the
Installation
Oven Control
with stop-locks”
Chrome Cooktop
on
some models
right
rear
surf:ice lmit.
Instrllctions.
sect
ions.
shelves.
F:xplained
on Page
5,25
5,26
5,26
12
4.26
3,29
8,25
I
()
10,25
12
4, I ~,
16
22,
27
,,
/
‘w
12 Bake Unit
13
Removable oven Door
—. —
E:lsily rcnlt~ved tt)r cicaning.
14
Broiler Pan and Rack
15 Storage Drawer
16 Model and Serial Numbers
I 7
Br,:~il
Unit
18 Ov@n
Light
27
22, 27
4,
18
22, 28
3, 28
2
20,27
12,28
——
—
7
Page 8
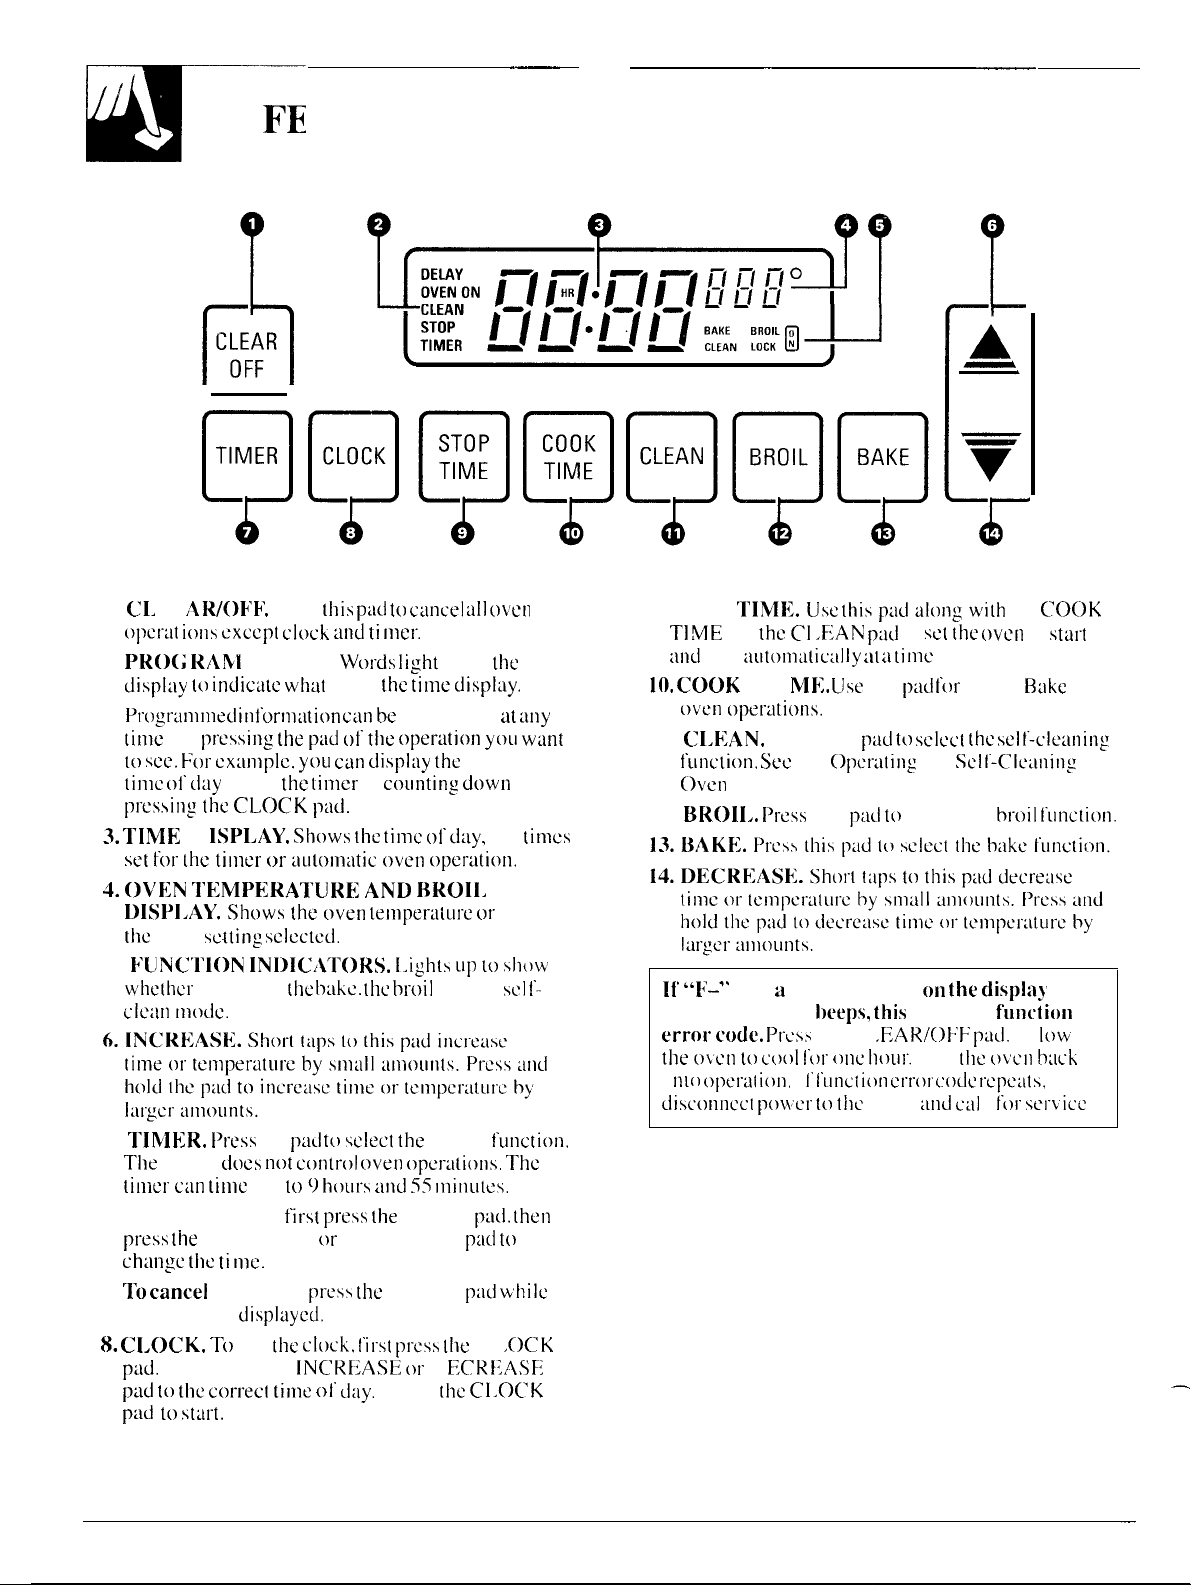
FEATURES OF YOUR OVEN CONTROL
r
1.
CI.
E;
AR/ok’k’.
opcr~lt ions cxccpt clock ~uld ti nler,
2. PR()(;
displ:ly (() indic~tle whtit
Progriinlnled
[in]c
to see. t:or cx:ul]plc. you cdn displ:ly the
tinlc of” (t:iy
pressing the CLCjCK p:I(l.
3. TIME;
set [or [he tilllcr or aulotll:iric t)vcn opcr;lti(~n.
4. 01’F;N Tk;MPI:RATURF; AND BROII,
DISPI,AY. Sh~)ws the oven
the
5.
P’UNC’1’ION INI)ICATOKS. 1,ights up to show
wtlc(tlct”
ctcilrl
RANI
by
pressing the p~id
white
1)
ISPI.AY. Shows the tinlc 01” cI:ly,
broil
sc{ting
oven is in
Illoctc.
STATUS.
intornl:ition” ciin
Press
this pii(l to CLUICCI Jll oven
\VC)rds light
is in
of
the operation” you w~]nt
the til~ler
sclectcLt.
the b:ike, the brc)il
is
telIlperLliLlt”e or
up in
the tinlc displ:~y.
be
displayed
counting dc)wn
01” the
‘-
the
tit :uly
current
by
the
SC] t-
tinlcs
-
-
@@@k
9. STOP’
TIME
ilnd
10. COOK
11.
12.
If’ “1~-”
and the control”
error code. f>rcss
the ()\cn to coot” I’ot” otle tl~)ur.
i
nlo opct.il[ ion.
ctis~’c)nncct pow;ct” t(l tflc
1’IMIZ.USC thisp~lcl~il~)tlgwith
or
the C] ,EAN
stop
:iutonl:ltic:~l Iy :It ii ti nlc
TIM
K;. Use
t)~en operiitions.”
CI.k;AN.
tun(:tion. Sec
[)ven section.
BKOI1,. Press
Press this
the
and a number flash on
f 1’
p:lli
this
pu~t to sctcct the selt-cle:uling
opct.:ltitlg
this
p:icl to
heeps, this
the (“f
I’unct ion
,[3AR/of;F. p:]~t.
error
oven
to
set the
you select.
p:Id for
Tithed
the
Sctl’-Cle~tning
select the
the displa~’
indicates
Put
the ()\ctl h:tck
c:octe repe:lts,
iuld CLII
the
COC)K
OVCI1
to
st:lt’t
B:Ike
ht”~)it function.
fun(:t ion
Al
tt)w
t
ft)i sctkicc
—
7.
TIMEIR. Press
The
tinier
tinlcr c:Ln tinle
To set the timer,
press the
ch}lnge the ti nlc.
T() cancel
“TIMER” is
8. CI,OCK. T()
piid.
Then press the
p:ld to the
P:ld to
dc)es not control” oven opet-;ltions,” The
INCREASE
the timer,
cort-ect tinlc 01” ~t:ly.
St2U”t.
8
this
p:il]
to
sctect the
up
tt) ‘) hours ;Ind 55 tninutcs.
first press the
t)r
DECREASE
press the
dispt~lycd.
set
the clock. first press the
INCRF3ASE or
TIMER
Press
tinier
TIMER
I)
I:CR?ZASFZ
the C1.OCK
function,
p:ict, then
p:l(t to
p:l~t while
Cl OCK
—
—
Page 9
—
OVEN CONTROL, CLOCK
Am
T~ER
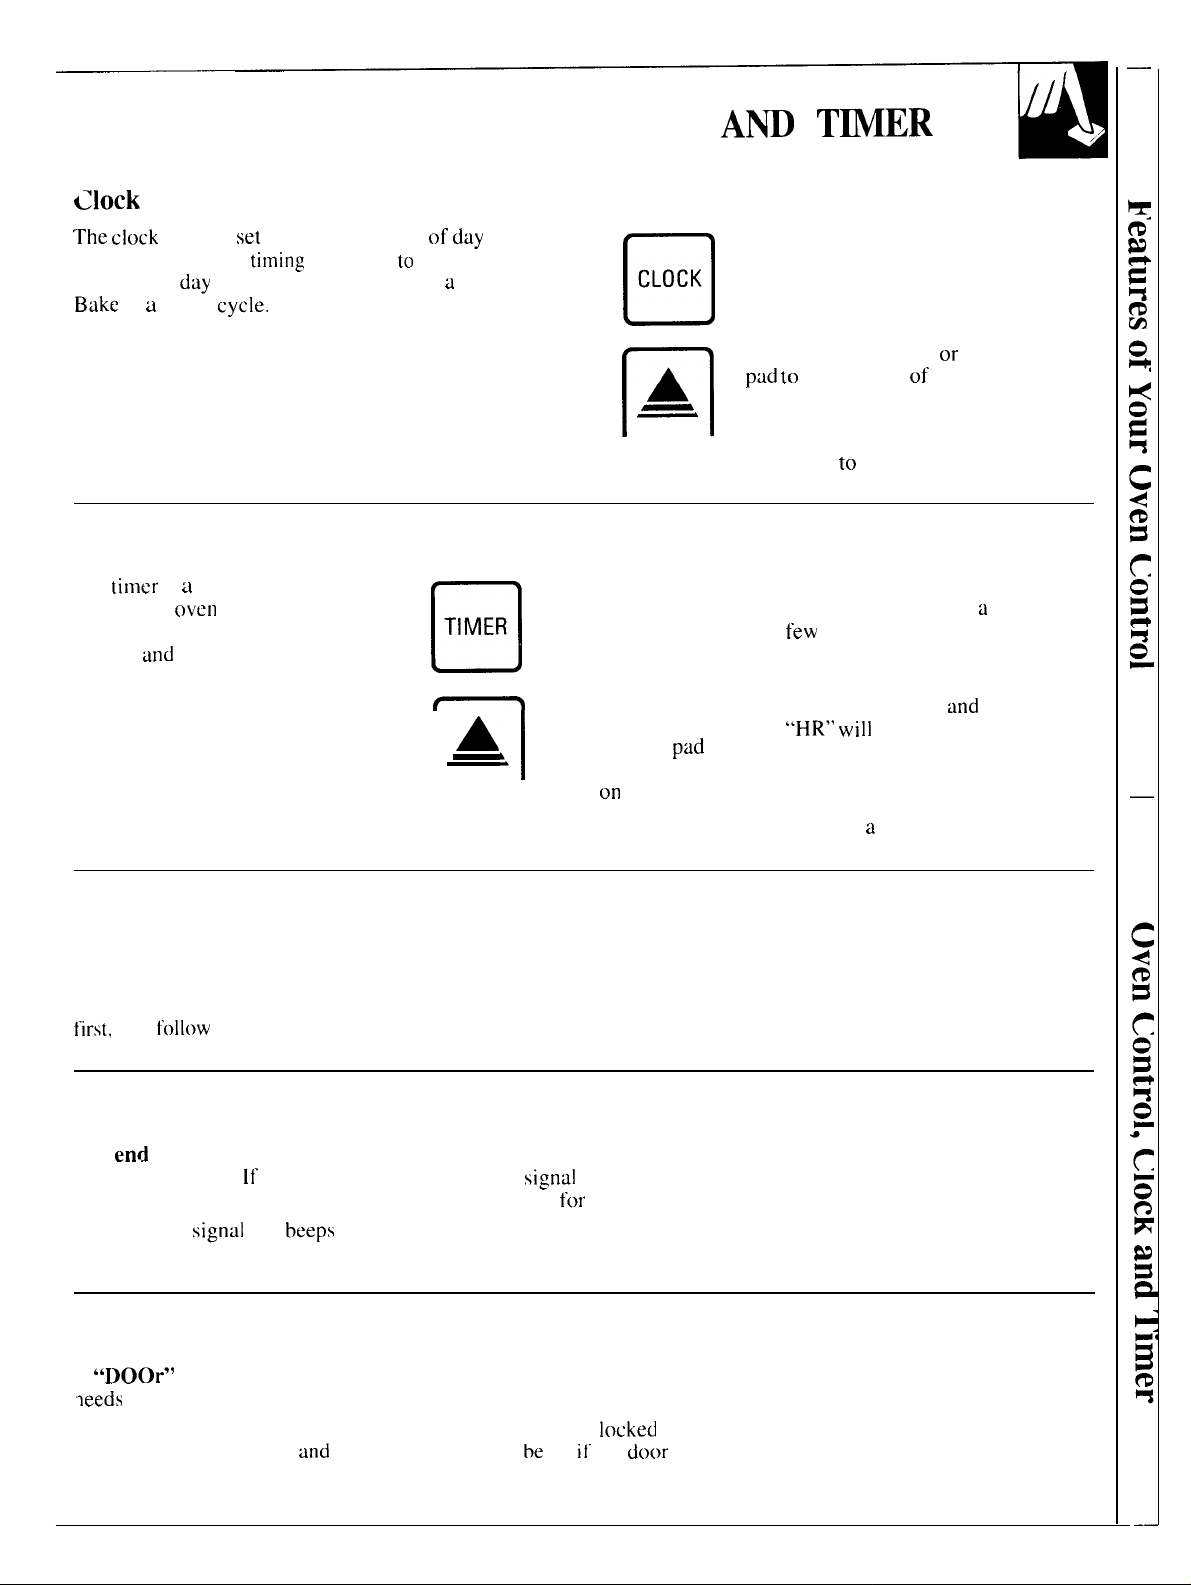
Clock
The clock
the automatic oven
The time of
Btike
must be
day
or a Clean
set
to the correct time of
timing
functions
cannot be changed during a Timed
cycle.
Timer
The
timer
is a minute timer; it does
not control
maximum setting on the timer is
9 hours
oven
and
55 minutes.
operations. The
day
for
to
work properly.
To Set the Timer
1.
TIMER
D
(—>
A
I
m
2. Press the
1
.
To Set the Clock
CLOCK
n
A
n
3. Press the CLOCK pad to start.
Press the
TIMER pad.
INCREASE or
DECREASE
set the amount of
time on the timer.
pad
1. Press the CLOCK pad.
2.
Press the INCREASE or DECREASE
pad to
to
set the time
The timer will start
automatically
few
seconds of releasing the
INCREASE or DECREASE pad.
The timer, as you are setting it,
will display hours
“HR” will
During the countdown, when the
timer reaches the last minute, the
display will change to seconds
only and
of
day.
within
be in the display.
a
single beep will sound.
a
and
minutes.
To Reset the Timer
If “TIMER” is showing, press the INCREASE or
DECREASE pad until the desired time is reached.
If “TIMER” is not showing,
first,
then
follow
the instructions above to set the timer.
press the TIMER pad
End of Cycle Tones
The
end
of cycle tone is a series of three beeps followed by one beep
every six seconds.
every six seconds, press and hold the CLEAR/OFF pad
To return the
CLEAR/OFF pad for ten seconds.
signal
If
you would like to remove the
that
beeps
every six seconds, press and hold the
Display Messages
— If “DOOr” appears in the display,
~eeds
to be closed.
If “LOCK” appears in the display,
position. BAKE, BROIL
is in the locked position.
and
COOK TIME cannot be set if the
the oven door is opened and
the oven door is in the
signal
for
To Cancel the Timer
Press the TIMER pad while the word “TIMER”
is displayed.
that beeps
ten seconds.
locked
door
9
Page 10
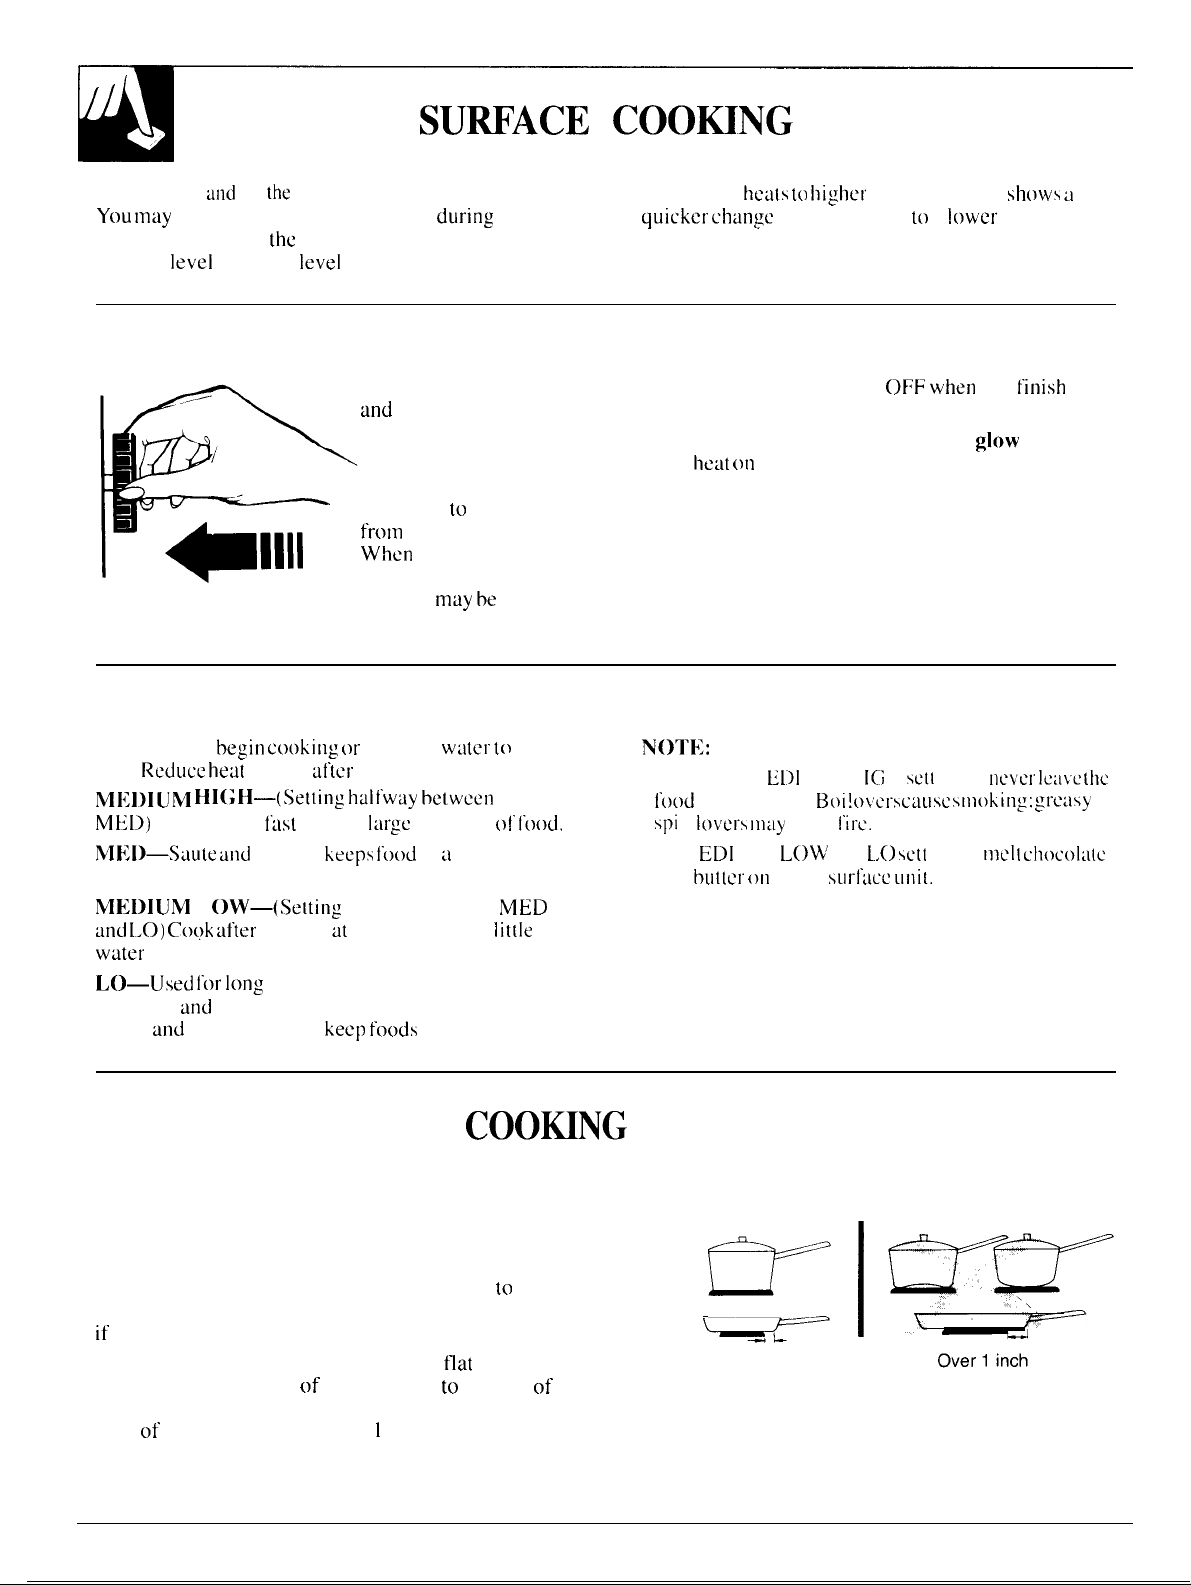
SU~ACE COOHNG
At both
You may
cooking, indicating
the heat
OFF
and
HI
the
control” “clicks” into position.
hear slight “clicking” sounds
the
control is keeping the unit at
level
or power
level
you set.
How to Set the Controls
Heat Setting Guide
Hi—Used to
boil.
Reduce hefit
Ml~]jlUM Hl(JH—(Se(ting
M13D)
Maintains a
Nlh][)—SJule and
boil or simmer.
MEJI)IUM
~nd 1.,0) Cook titter
wtiter
in covered pan.
L()—Used
tenderize
butter
and
begin co[)king or
setting Jttcr water boils.
haltw~y between
i’ast
boil on
brown; keCpS
I.
OW-(Settitlg
starting at H 1; cooks with I
I.or long
and
chocolate or to
slow cooking (simmering) to
develop flavors. Use this setting to melt
hallway between
keep foods
during
Push the knob in
and
turn in either
direction to the heat
setting you want.
The control must be
pushed in
from
When
any position other than
OFF, it
without pushing
to bring
lal”ge
food
to
set only
the OFF position.
the control is in
mtiy be
rotated
in.
water to
amounts
at a medium
warm.
a Nol-k;:
HI and
(JI’ I’()()d.
MED
it[le
Switching
quicker change
Be sure you turn control to
cooking.
The surface unit indicator light will
ANY
●
At H 1 and M
tood”
spi
1
●
At M
and
hea(s [o
than switching to a
hetit on
any surface unit is on.
lil>l
unattended,
lovers ]llay
F-III
huttcr on
U M
catch
1-OW
small
higher settings always
lower
OFF when
U M H
1(;
H
Bt~i!{~tcrs
and [,()
surl.ace uni[.
caLIsc
l’irc.
sctt
sett
i rigs,
slnoking: greasy
i rigs.
shows a
setting.
you
Finish
glow
when
ne>cr lca~e (hc
mcll chc)colatc
—
COO~NG
Cookware
Use medium- or heavy-weight cookware. Aluminum
cookware conducts heat faster than other metals.
Cast-iron and coated cast-iron cookware are slow to
absorb heat, but generally cook evenly at low
medium heat settings. Steel pans may cook unevenly
if
not combined with other metals.
For
best cooking results pans should be
bottom. Match the size of the saucepan to the size of
the surface unit. The pan should not extend over the
edge of the trim ring more than 1 inch.
flat
to
on the
10
TIPS
RIGHT
ml
*
Not over 1 inch
WRONG
Page 11

Deep Fat Frying
Do not
Frost
Keep
overfill cookware with
foods
bubble vigorously.
range and
hood
clean from
fat
that
may
spill
Watch food trying at
grease.
Wok Cooking
We recommend
flat-bottomed wok. They are
available at your
that you
local retail
use only
store.
a
Do not use woks
rings. Use
with or without the ring in
can
be dangerous. Placing the ring
over the surface unit will
build-up of heat
the porcelain
to
use
You could be seriously burned
the wok tipped over.
HOME CANNING TWS
Canning should be
—
pt)ts that exterld
drip
pun arc
not recommended
However, when canning with water-bath or pressure
canner, larger-diameter pots
bccuuse
pressure) are not
surround
boiling
ing the surfuce
done on surface units only.
heyo[l~ one
water
htirmtu]
inch
of.
for
most surface
may
be LIscd. This is
temperatures
to
cooktop surf:~ccs
units.
surface
(even undcl”
over
such
ullit.s
Cooking.
when
adding f~~od,
high temperatures.
that
have support
of these types of woks,
place,
cause a
that
will
damage
cooktop.
woks without the ring.
Do not try
if
HOWEVER, DO NOT USE
CANNERS OR OTHER LARGE DIAMETER POTS
FOR FRYING OR BOILING FOODS OTHER
THAN WATER. Most
and all
higher than boiling
cvcntuuliy
surface Llnits.
types OF
LARGE
syrLIp
or sauce
frying—cook at temperatures much
waler.
Such temperatures could
harm
cooktop
surfaces surrounding
DIAMETER
mixturcs-
Observe the Following Points in Canning
1. Bc sure
surface
allow the
use smaller diameter pots
2. For best results, use canners with
Canners with
toulld
with the surface unit
boil water.
E“lat-bottom
—
the
canner
unit. If your
canner
in enamelware) don’t make
canners are recommended.
tits
over the center
range
or its location does not
to be centered on the surface unit.
for
good canning results.
ilanged
or rippled bottoms
and take o
long time to
of’
flat
bottoms.
good
the
(often
contact
3. When canning, use recipes
reputable sources. Reliable recipes
~ire avaitable from
manufacturers
Ball and Kerr;
Agriculture Extension Service.
4. Remember that canning is a process that generates
large
amounts of steam. To avoid burns
or
heat,
be careful when canning.
NOTE::
take
hlive
be shortened by:
( I ) using a pressure canner,
(2) starting with
It your house has
longer than expected, even thou&h directions
been carefully followed. The process time
of. large
quantities of water.
the manufacturer of your canner:
of
glass
and
the United States Department of
IHOT
tap
and
procedures
and
jars
for
canning, such
low
voltage, canning
and
water for fastest heating
froni
procedures
from steam
as
may
will
11
Page 12

—
—
—
USING YOUR OVEN
Before Using
set [he III properly. l<cil~l ovct--[he
Oven (~on(rois” so you unclerst:ind how
2.
Check [he insid~>
lbur
Oven
dircc[ions
of
(h~: ()\cn. I.,()()k :It the shcl~es.
to
I’or the
usc (henl.
T:ike 21 pr~lcticc rLIn :It rcnlo~,ing ;uld rcpliicing (hei]-)
pl”opcrly. to :i\c
Slll”c’.
S[lll”dJ’ support.
—.—.
Oven Shelves
‘l’he
shelves
when
will stop before coming c~)nlpletely from the oven,
and will not
placing
“1’0 remove
the
stop-locks”
[tl~it (IIC
‘1.() rephlce tile Shelf’
[he
I’rent
under slop-lock” on shell’
;111 the
are
designed with
placed
correctly on the shelf
tilt when removing
food” on
them.
the shelf
:InLl
I i [t the i’rent 01 [be
she]
1’ is
cool” bcl’ore touching i~.
in
t’r[)nl
the oven. tilt
st{)p-loc.ks so
the
()\en.
supports,
fi)od from or
pLIll
i(
shel t’, Be cert:lin
the
shelf LIp :~t
:Inci slide the cur~cd extension u1’ the shell’
w;Iy
into
the
\LIpport.
olcn.
Then slicte the shcl~
that
they
t’oru:u ”ci
to
4.
Keep
this
cspccilll 1~ dltring
Ilcw OVCI1.
——
When pl:~cing
to
the ‘stop.”
stl(:tl’.
et
i n] i
then st
posit ion,” [>t:icc
idc
n:ltc rct~cb
hot~k b:l~lcl~ so )OU ciul relet” to i[,
(
Ile l’ir~[ ivrcks
cook\
v:irC” ot] tl shclt’, putl the shell’
ot
using Y(JUI
—
(hc co(>kw ~lrc on the
the
shct 1. h:ick in[() ttl~’ l)v~>n. This wi
i ng i
I]to
the
tl(~[ olen.
—
out
I t
Shelf Positions
Oven
Use
I,ight Switch
the switch on the
c(~ntr[)t p:tncl to
turn
the tight on :ind (~1’t’.,
12
Page 13

.-.
Adjusting the Oven Thermostat
Whtn
cooking
oven, use
therrnost?its. OVCI.
[he
factory setting
between an
not unusual. Your oven has been set correctly
factory and is more
which it
We
do not recommend the use of inexpensive
thermometers, such
store, to check the temperature
oven.
These
If you think the oven should be hotter or cooler,
you can adjust it yourself. To
change
the temperature,
7~0F
higher or
-.
recipe, then
(rive
Yell
5
be changed.
food for
time
given on recipes as a gLlide. ~J~en
old
and u new oven of 5 to 1 () minutes are
rcplaccd.
thermometers
]~wer than the telnper’atllre
bake.
;In i~ie:l 0[. how lnLlcb
the
~irst
time in your
a
period
of years.
and
the
ditferenccs
Iikcly
to be accurate than the
as
those
c:m
set
the oven temperature
The results of this “test”
may “drift” from
in timing
found
in the grocery
settin& of
vary by
decide
the temperature
your new
2040”
how much to
in
new
at
the
degrees.
y~)llr
should
shOLl]d
oven
To Adjust the Temperature:
1.
Press the BAKE pad.
BAKE
n
2. Select an oven temperature between
3. Immediately, before “ON” appears, press and
hold
the BAKE
display will
A
n
CLEAR
OFF
n
pad for about
change
to the oven adjustment display.
4. The oven temperature can be adjusted
up to
(+) 35°F.
cooler. Use the INCREASE
DECREASE
change in the red display.
5. When you have
press the CLEAR/OFF
to
the time of
oven
as
you would normally.
hotter or (–)
pad
made
day
5000F. and 5500F.
4 seconds. The time
35°F.
or
to
select
the desired
the adjustment,
pad to go back
display. Use
your
Your
oven
temperature is controlled very accurately using an oven
control
systcnl. We
oi.
weeks to
think an adjustment is necessary, see the
section in this book.
beColne
recommend that
tanli]iar
with
yoLIr
yoLI
operate the oven
new oven’s
Adjusting the
How to Set Your Oven for Baking
To
avoid possible burns,
correct position
r
BAKE
II
\
2. Press the INCREASE or DECREASE pad.
The last
display. Continue pressing
temperature is displayed.
J
oven
before
1.
Press the BAKE pad.
set temperature
place
the shelves in the
yoLI
turn the oven on.
appcurs
un(il the
in
desired
BAKING
periorlnance. ]1
the
tor a nLlmber
Oven
NOTE:
Clean
after a
Thermosta[
When
changing
displayed. When the oven reaches the temperature
you set, a tone will
~
I
77
I
This adjustment will not
temperatures. It will be retained in
power
you
the
CLEAR
OFF
To change oven temperature during the
BAK1’.
the INCREASE or DECREASE pad to get the
new temperature.
failure.
oven starts to heat, the word “ON”
temperature, starting
sound.
3. Press the CLEAR/OFF
baking is iinished and then remove
food from
oven.
1-
cycle, press the BAKE
affect Broil
memory
;~t loOOF.>” witl
pad
when
p’id ~nd
then
or
and
be
the
((’()/1/;//[/(,(/
/t(,.\’/
/)([,<(,
)
Page 14

How to Time Bake
TIMED BAKING
Your (~vcn can be set lo tuln
NOTF;: Before beginnins. nl;ike
shows (Ilc c~)rrcct ti nlc of (I:ly.
‘ro
set
the clock,
CLOCK
n
How to Set Immediate Start and Automatic Stop
Th~’
t)\cn will
sclcctc~t length ot” Ii nlc,
()~en wil
’110 avoid
c~)t”r-cct ~>~)sition before YOU
BAKE
~’1.OCK p~lcl.
or DEC’RI:~ASI{ paci
1)1’
diiy
is
pilci to
still-t.
(urn on inlnle(liate]y :u)c{ cook” l’ot” :1
I
luril ()~1’ :lul(lnltiticillly.
possible burns,
1.
011 anLl off”
sure the
I’irst pI”CSS
Press
displ~lyed. Press the C’LOC;K
At the
the INCRI~ASE
until
end of C()()k Tilllc
pl:lcc the
turn
:lli[otll~ltic:llly.
oven clock
the
correct (
shelves in
the t)ven on.
i
n~e
the
the
n
2.
l) EC
A
REASE~ pad
tcnlpetutur-c
until
is
clisptilyc(i.
desile~l
n
—
4. Press the
(Icsirc(i length of”
The w()[cIs TIMED
wit
th:it vou set :~nd the cc~ok tinlc th:tt Vou
5. A(
‘“et-fR:()()
INC.
REASE or [>E{C~R1”~ASIZ
baking t
I he
displ:iycd :llong
the cnd c)t’ Tinle(l B:ike. the ctispl~l)
(()()K TIM1~.. :Irld the (~vcrl witt turtl 01’1.
itlle
BAKE”
with
is
:lllLf
(I1c (~vcrl tcrllper”~lture
p:id
until
~tisplil}e~l.
“C()()K TIM E..
entered.
.
will
sh(~w
—
COOK ‘.
TIME
n
3
—
14
Page 15

How to Set Delay Start and Automatic Stop
Quick Reminder
1.
Press the BAKE
2. Press the INCREASE or DECREASE
select oven temperature.
3. Press the COOK TIME
4. Press the INCREASE or DECREASE
set the length of cooking time.
5. Press
6. Press the INCREASE or DECREASE pad
Delay Start and Automatic Stop is setting the
oven control to turn the oven on
specific time.
For example:
shortly
time at
To avoid possible burns,
correct position before you program the oven.
‘ n
BAKE
the
STOP TIME pad.
until desired stop time appears in display.
Let’s say it’s
aft~r 7:00.
325°F.
Here’s how:
1. Press the BAKE
pad.
pad to
pad.
pad
and
bake until
2:()()
and dinner time is
The-recipe suggests 3 hours
place
the shelves in the
pad.
II
2. Press the INCREASE or DECREASE
pad until “325°” is displayed.
A
n
m
I
TIME
(
3. Press
I
)
the
COOK TIME pad.
to
a
baking
5. Press the STOP TIME pad. ‘SET
STOP
TIME
n
\
The control automatically sets Stop Time by
adding the Cook Time to the time of day. In this
example, the time of day is
Time is 3 hours, Adding 3 hours to the time of
day equals
6. Change Stop Time from
the INCREASE pad until
appear in the display. The words “DELAY TIMED
BAKE” appear on the display.
At
4:00,
the oven starts to heat, the word “ON” and the
changing temperature, starting at
displayed. The oven will cook for the programmed
3 hours and shut
7. At the end or Timed Bake, the display will show
“OHR:OO
The end of cycle tone will sound. Press the
CLEAR/OFF pad to clear the display if necessary.
8. Remove food from the oven. Remember, even
though oven shuts off automatically, foods continue
cooking after controls are off.
NOTE:
eggs, fish, stuffings, poultry and pork should not
be allowed to sit out for more than one hour before
or after cooking. Room temperature promotes the
growth of harmful bacteria. Be sure that the oven
light
is off because heat from the bulb will speed
harmful bacteria growth.
STOP TIME” and the earliest Stop
Time you can set appear on the display.
In this example,
J
TIME” appear on the display.
5:00.
the oven will turn on automatically. When
off automatically at
COOK TIME” and the oven will turn off.
Foods that spoil easily such as
2:00
5:00
“7:00”
“5:00”
and “STOP
and the Cook
to
7:00
by pressing
and Stop Time
10O°F.,
7:00.
milk,
will be
4. Press the INCREASE pad until
in the display. Cook Time of 3 hours now appears
in display.
‘L3HR:00’”
appears
15
Page 16

For
best baking results,
Oven Shelves
follow
these suggestions:
BAKING
Arrange the oven
shelf or shelves
in the desired
locations while
the oven is cool.
The correct
position depends
on the kind of
food and
browning desired.
As a general rule,
the oven, on either the second or third shelf from the
bottom. See the chart
the
shelf
place
most
foods
in the middle of
for
suggested shelf positions.
Preheating
Preheat the oven if
means bringing the
temperature
the oven ~t the
higher temperature
before
the recipe calls for
oven
patting in
correct
let~ll~el-atut”c—select ing
does
it.
Preheat
up to
(he
specified
the food,
not shorten preheat
To
prchea[,
a
time.
set
~pe
of Food
Angel food
]
Biscuits or muffins
I
Cookies orcupcakes
Brownies B or C
Layer
Bundt
Pies or pie shells
Frozen pies
casseroles
Roasting
t~lclle:ltillg is ll~~~ss:il~ for good”
cakes,
cookies, pastry and
and roasts. preheut
without a preheat indicator
m
inutcs.
in the
~~vcn as
from
cscdping.
cake
cakes B or C
or p(JLInd
A
cakes A or B
.
i ng is not necessary,
I(cr the f)vcn
quickly as
is preheated
pt~ssible
Shelf Position
A
I
B
I
B
B or C
I
A (oncookie sheet)
B or C
A or B
l“CSLlltS
brc~cis. For n]ost
light
or tone. preheat I ()
to
orC
orC
wh~]] b:lkillg
casseroles
F-or
ovens
place the food
prevent heat
I
I
I
I
.-
Baking Pans
Use
the proper
pan determines the amount of browning
●
Dark, rough or
browner, crisper crust. Use this type for pies.
● Shiny, bright
in a lighter, more delicate browning. Cakes and
cookies require this type of pan.
● Glass baking dishes also absorb heat. When baking
in glass baking dishes, lower the temperature by
25°F. and
the recipe. This is not necessary when
casseroles.
baking
pan. The
dul I
pans absorb
and
smooth pans reflect heat, resulting
use the recommended cooking time in
type
of finish on the
that
he~t
resulting i n a
baking
will
pies or
occur.
16
Pan Placement
For
e~en
cookin:
enough
results will be better i I baking pans
much as possible rather
or to the back of
Pans
oven. Allow I to i Y inch space between pans as well
os
you use two shelves, stagger the pans so one is not
directly above the other.
room for
should
from the
and
proper browning. there must be
air
circulation in
than
the
oven.
not touch each other or the walls of the
back
of the oven. the door and the sides.
the oven. Baking
are
centered
being placed to the
as
front
11’
Page 17

Baking Guides
When using prepared baking mixes, follow package recipe or instructions
for
best baking results.
Cookies
When baking cookies,
sides) produce better-looking cookies. Cookies baked
in a jelly roll
darker edges and pale or light browning may occur.
Do not use a cookie sheet so large that it touches
walls
or the door of the oven.
For
best results during regular baking, use only one
cookie sheet in the oven at
position B or C.
Also see the Multi-Shelf baking section.
pan
flat cookie
(short sides al! around) may have
sheets (without
a
time on the shelf at either
Pies
For best
10
—
pans should be
[’or
from
results, bake pies in dark, rough or
produce u browner, crisper crust. Frozen
placed
on an aluminum cookie
baking
the
since
pie
the shiny
crust:
toil pan retlects heat aw~y
(he cookie sheet helps re[tiin
dLIll
pies
the
parls
in
s!lee[
it.
[’oil
Cakes
When baking cakes,
uneven baking
A
cake baked
recommended will usually he crisper, thinner
than
drier
rccolnnlended.
()~crtlow. Check
LIsed is the one recommended.
results and poorly shaped
in a pan
it should be. If
warped
or bent pans will
]argcr
than the recipe
baked
in a pan smaller than
it maj be undercooked and
the
recipe
to
make sure
the pan
producis.
batter
cause
and
may
size
Aluminum Foil
Never cover a shelf entirely with a large cookie sheet
or aluminum foil. This
circulation and result in poor baking. A
of
foil
may be used to
on a lower
shelf
several inches
will
disturb the
c~tch
a
spillover
below the
heat
smalter sheet
by placing it
food.
Don’t Peek
Set the timer
not open the door to
provide minimum and maximum baking times such as
“bake 30-40 minutes.”
for
the estimated cooking time and do
look
at your
food.
Most recipes
DO NOT open the door to check until the
minimum time. Opening the oven door frequently
during cooking allows heat to escape and makes
baking times longer. Your baking results may also
be affected.
17
Page 18

ROASTmG
.—
—
Roasting is cooking
poultry can be roasted uncovered
Roasting temperatures, which should be low and
steady,
keep spattering to a minimum.
Roasting
Therefore. oven controls are set for BAKE or Timed
Baking. (You may hear a slight clicking sound,
indicating
easy; just follow these steps:
1. Place the shelf in A or B position. No preheating
is necessary.
2.
Check
meut. Place
up, (or for poultry,
breast-side-up) on
trivet in d shallow pan.
The melting
baste the meat. Select a
pan
of the meat as possible.
(The broiler pan with
rack is
this. ) Line the broiler pan with aluminum foil when
using the pan for marinating, cooking with fruits.
cooking heavily cured meats, or basting food
during cooking. Avoid spilling these materials
inside the oven or inside the oven door.
(
is really a
the
the weight of the
as
close to the size
a
good pan for
3. Press the BAKE pad.
BAKE
by dry heat. Tender meat or
in your oven.
baking procedure
oven is working properly. ) Roasting is
it, fat side
a
ftit
will
used
for
meats.
II
4. Press the INCREASE or DECREASE
pad.
A
r
I
When the oven starts to heat, the word “ON” and
the changing oven temperature, starting at
will
be displayed. When the oven reaches the
temperature you set, a tone will sound.
The last oven set temperature
appears in the display. Continue
pressing until the desired temperature
is displayed.
100°F.,
5. Press the CLEAR/OFF pad when
CLEAR
n
Most meats continue to cook slightly while standing,
after being removed from the oven. Standing time
recommended for roasts is 10 to 20 minutes. This
allows roasts to firm up and makes them easier to
carve. Internal temperature will rise about 5° to
to compensate for temperature increase, if desired,
remove the roast from the oven sooner (at 5° to
less than the temperature in the Roasting Guide).
NOTE:
in the Baking section of this book, to turn oven on and
off
automatically.
Remember that food will continue to cook in the hot
oven and therefore should be removed when the
desired internal temperature has been reached.
To change oven temperature during roasting,
press the BAKE pad and then the INCREASE or
DECREASE pad to get new temperature.
roasting is finished.
You
may
wish to Time Bake, as described
10°F.;
10°F.
—
Frozen Roasts
Frozen roasts of beef, pork, lamb, etc., can be started
without thawing, but allow 10 to 25 minutes per
pound additional time (10 minutes per pound for
roasts under 5 pounds, more time for larger roasts).
18
Thaw most frozen poultry before roasting to ensure
even doneness. Some commercial frozen poultry can
be cooked successfully without thawing. Follow
directions given on package label.
Page 19

.-—
)uestions and Answers
Q. Is it necessary to
meat
thermometer’?
A.
C’hccki ng 1 he tin ishecl
the
conlpletion” of cooking” [iillc i> rcc(>nlnlcndcd.
check
Tcnlper:lturcs arc shown
For
roLIsts over 8 lhs., check
:tt h:l]f.-hour in(crv:lls tiftcr I1:LI 1’ the
tltis passed,
Q.
Why is my roast crumbling
carve
it’?
I’ype
-.
Meat
“cndcr cuts:
,;irl(~in (ip.
L.:111113
Vc;ll
Pork Itlin.
Hiinl,
l>oultry
Chicken or [>uck
Chicken
‘rLll’kCy
rih.
high c]uality
rump or l(lp
lcg
or bone-in shoulder:
Sh(lLlldCl”, Icg 01”
rih or Shoulder:!:
pl”CC()[)kCd
picccs
round:~:
Ic)in:;:
for doneness with
i
n~et”n:il
[empcriItLIre :11
in
the Roasting
with
thcrnlometer
cooking”
when
1 try
ROASTING
;:
a
Guide.
[itllc
to
I)ouencss
I<iu”c:
Mcdiu!l]:
Well
I)ollc:
I<iil”c:
Mcdiunl:
Welt
I){)nc:
well I)
OIIC:
well
1)
OIIC:
‘I’()
W;u”lll:
Well
DOIIC:
Wctt
[)
OIIC:
W’cli [.)
OIIC:
Q.
I){)
I need to preheat my oven each time 1
roast or poultry?
A. It is
r~u”ely rlcccssary to preheat
only
tot” VCIY sn~idl I C)LISLS,
your
which
oven. Preheat
cook” L1
short
length of” til;le.
Q.
When buying a roast, are there any special tips
that would help me cook it more
.4.
Yes.
Q.
Buy :1 r~~ost [is even
01”
bLly I“otl CCt l-otiSt\.
C;an
1
seal
the sides of my foil “tent” when
in thickness as possible.
evenlytz
roasting a turkey?
A.
Se~ltin: [he toit
unse~lted :It
ltlc
11’leilt.
will
sle;lnl the lllcat.
tows
the ilir (() circut:lte ~lnd
[.caving it
brown
GU~E
Approximate
in
,Miuutcs per
3
to 5
Ibs.
24–33
35–3’)
40-45
2 I --?5
25–30
30-.35
35-45
35-45
17-20 nlinu(cs
3
to 5 lbs.
35-40
35-40
to 15 Ibs.
10
1 X--25
Roasting ‘rime
Pound
6
to 8
1 8---?2
~~–~c)
30-35
20--23
~~-.~x
~x–~j
30-40”
30-40”
per
poLInc\
(LIIIJ
()}er 5
30-35
over 15
I
5-20
Ibs.
wcigh[)
Ibs.
11)s.
Internal
‘temperature
140’’ -- 1
I
I 70<’-
I 400-1
Isoo-t (300
I
1700-1
I 70”- 1
1 I
I 85”– 1900
1
50’’--
I 60(
1
Xs”
50’’”1”
70 ”-1
Xs”
Xoo
X()”
5“–t 200
Xs”--
1900
500”;”
In thigh:
I
8s0--
I
900
cook
”
a
‘E’.
“i”~’tle
U, S. ~cp:it”tnlent
I’()[)d p(~ist)ning t)rgunisnls nl:Iy
ot” Agric
Lilt
Llre s:iys
sllrvi~c.”
“RJrc beet’
(Source: Stit’c F()()d B()()k.–-Y()ur Ki[chcn Guide. I.JSIIA I<c\.
is
popLll Lu,
bLIl yoLI \hoLIld knt)w lh:Il cooking” it [() t)nly
I
June 1985. )
40”F. n]c:ins s~)nlc
19
Page 20

BROILING
llroiling
in the
s(cps
1.
2.
3.
4.
is cooking food by intense radiant heat from the upper broil unit
oven. Most
to keep spattering
If meat h~s f~[
slashes through both about 2 inches
desired,
1/8
inch thick.
Place meat
usc
rack so
juices may become
Positit)rl a
~ls sllggested
Leave door open to
broil stop position.
The door stays open
by itself. yet the
proper temperature is 1.
maintained in
BROIL
fish
and tender
and
smoking to a minimum.
or
&ristle
near
edge, cut
fat may
be trimmed. leaving
on broiler
tat
drips into broiler pan; otherwise
tlot
shelf
in the Broiling Go
5. Press the BROIL pad.
rock
in broiler
hot
enough to
on recommended
W
. . . .
Yfl
the
oven. .
cuts
of meat can be
vertical
apart. IF
layer
pun. Always
catch
fire.
shelf
ide.
,Jl:...
/0, ,
,,
. ,..,
r#
about
position
/
I
broiled.
Follow these
6.
Press the INCREASE
the
DECREASE pad
To
change
DECREASE pad once.
NOTE: Chicken
order
to
7. Turn
for
first side according to the Broiling
Turn
guide
thicknesses
times given for thinnest food. )
8.
When broil in: is finished
pad. Serve
oven to cool
from HI Broil to LO Broil, press the
and ham
cook food
food
food,
to preferred doneness. (Where two
without
only
once
then
usc
times given
and
times are
fo~d immediat~]y,
during meal f’or
pad for
HI
broil
or press
for
LO broil.
are broiled at LO broil in
overbrowning
during broiling. Time
given
together,
press (he
and leave pan outside
easiest cleaning.
it.
Guide.
for second side
use
CLEAR/OFF
foods
as a
first
0
Use of Aluminum Foil
You
can
LISC
aluminum foil 10 line
your broiler pan and broiler
However, you must
tightly to the
just like
the rtick.
mold
r;lck
and cut slits in it
rack.
the foil
Questions and Answers
Q.
When broiling, is it necessary to always use a
rack in the pan?
A.
Yes.
LJsing
the rack suspends
pan. As
thus keeping
t-ack find
spatter and smoking.
Q.
1)0 I need to grease my broiler rack to prevent
meat
A. No.
hea(,
metit
the
spray before cooking will make cleanup easier.
the
meat cooks, the juices
meat
drier. Juices
stay cooler, thus preventing excessive
f’rom
sticking?
The broiler
lhLIs
keeping the surface cool
from sticking to the surface. However,
broiler
ruck
is designed to
rack
lightly with u \
the
egetab]e cooking
Without
prevent fat
draining to
juices could become hot enough to
catch on fire. If jou do not cut the
s]
its,
meat over the
fall
into the pan,
are protectt?d
retlcct
broiler
enough
to prevent
the
slits,
and meat juices
the
broiler pan. The
yoLI
are frying, not
by
(he
spraying
the foil will
from
broiling.
Q. Whv
A.
Q.
A. No.
are my meats
the~
should”?
In some areas,
may be
low. in
for
10
tninutes
food in
recommended shelf position. Broil
period
Turn
,
Should I salt
evdporate. Alwuys
with tongs; piercing meat with a fork also
juices to escape. When
brush
oven.
Check to
of
time
food
only once during
Salt draws out the
each
side often with butter.
not
turning out as
the
power (voltage) to the range
[hese
cases, preheat the broil unit
before
indicated in the Broiling Guide.
the
plticing
see
if you
broit ing.
meat before broiling’?
-juices
and allows them to
salt
after
cooking. Turn
hroiling
l~rown
broiler pan with
are
using
the
for
longest
meat
~11 lows
poultry or fish.
as
20
-.—
—
Page 21

—
picrcint; the
4. II
Lfesircci,
or
brush with
E’()()d
~eef’
Steaks
R:ire
Mcdiunl
— Well
Dc)lle
<:ll”c
Mediunl
T
Chicken
13akerv Produ(’ts
Brciid ~ToiIst) 01-
T();IsIcI” P:lstrics
nlc[lt :ind tosing ,illi~es.
nlarin[lte
nle~its
or
chicken before hroiting.
bdrbecuc S:IUCC I:ist
Qu:lntitj
Thickness
and/or
— —.
1
inch [hick
( I
(()
I Y
Ibs.
)
I X inch thick
(2
[() 2Y Ibs.
1
wh(>le
(2 [() ?\/?
split
1
2 [() 4 slices
I
pk~. (2)
)
tbs.),
Icngthwisc
BROILING
5 to I ()
tninutes only.
—
F’irst Sidi’–”
lime,
———
(’
B
(’
13
GU~E
5.
When
~dgc:,
(J\en
(i. The
broiler
FIL)WCVCI”, I’CJI” \ery
hrt)wning, prchc~lt il. (Iesired.
7. I;rozcn stc:iks c’:in
the
oven shelf’
i
ncrc:lsi ng cooki” n: ti rne given
I 77
titncs per side.
———.
Scc(~nd Side
Nlinutts
—.
4:’
10
I
()
13
[’imc, Nlinutes
———
ILll”ll ()\’Cl”.
—.———.—
:u-r;]nging
tl;.lilg
~)V~I !he sides, which
wi(h I’iit
t>() 110(
dripping.
tlocs
4’/:
7
5
(1
II
7-X
I 4- t (>
2(.)--25
1 ()-t
5
1/?
5
rl(~t need
at
next lowest
x
~’()~)cl
on the pan, do not let
to be preheated.
[hin
t’(JOLls,
be
brc)ilccl
S(c:iks less th;~n
Lhrough bci’orc
I’rying
is
St:lsh tat.
t<educc
tinle
side Ii)r cut-up chicken. Brush
side
wi[h
Broit
skin-side-d(~wn
Sp:lcc evenly.
]nut’t’ins cLlt-side-Up :ind brLlsh
with
butter, i ! desired.
[’ut
(hrollgtl
OI>CI1.
Brush with
H:uldlc :Ind turn very c:uc~’ully’
tlr~lsh
with
.uld
during
Pt”chcdt
broiler 10
[ncrctisc
I’or I Y
inch thick or
could soil
or to
increiise
by
positionirlg”
shelf
position” ;lnd
i n
this gu i(ic
I inch [hick
browning.
recotnnlendcd.
tibt)ut S to 10 nlinLltes per
melted butter.
Iirst.
Place English
b:lck of
shell.
Incltcd but(cr betinc
Icnlon hut(et. bet’otc
cooking,”
titnc 5
it’
dcsire(t.
inct”e:lsc bt”ownin!’.
t(l 1()
nlinu[cs
bon]c
P:ln
Sprc;ld
cLII”cd hiull
Sl:lsh t’:lt
l:itty
the
cook”
c:lch
per
si(ic
I,amb
~.;hops
h4eLtiLtnl
well Done
Mcdiunl
—
Welt
Done
Wieners :ind
sinlillr prccookcd”
S:lLIS~~CS,
bt”itlwut”st
2
( 1 inch thick)
:Ibout 1 () to I ?
2
( I k< inch thick),
:~bou[
I lb.
i
-lb. pkg. ( I
())
()?.
Sl:lsh lat.
It’ desired, split
h~llf’
Icngthwisc;
6-inch
pieces.
s:tus:lgcs
CU[ in(()
in
S-to
21
Page 22

OPEWTING
THE SELF-CLEANING OVEN
(Normal Cleaning Time: 3 hours)
Before a Clean Cycle
Quick Reminder:
1.
Prepare the oven
2.
Close
the oven
3. Press the CLEAN pad.
4.
Press
the INCREASE or DECREASE pad
to set clean time.
1. Remove
and any
withs[and the
shelves may be
discolor
2.
Wipe up heavy soil on the oven bottom. If you
use
prevent staining.
3. Clean spatters or spills on oven
under
outside the door gasket and the
oven
detergent and hot water with a soap-filled steel
wool
mixture. This will help prevent a brown residue
from forming when the oven is heated. Buff
areas with a dry cloth.
the broiler pan, broiler rack, all cookware
alulninum foil f’rorn
high cleaning temperatures. (Oven
after
the self-clean cycle. )
soap, rinse thoroughly before self-cleaning to
II
-
u-
the front edge
cavity
(about
pad,
then rinse well with u vinegar and water
for
cleaning.
door.
the oven—
left
in oven.
Ir
of the oven vent,
one inch into the oven). Use
NOTE:
A. Oven l’rent
B.
Openings in Door
c.
Oven Door
D.
Oven Light
front frame
front
they
Shelves will
the door I iner
edge of the
cannot
Frame
(Jasket
(A),
these
Clean
top, sides
with soap
oven cleaners.
Make sure the oven light bulb cover (D) is in
Do not let water run down through openings (B)
in the top of the door. To help prevent water
from getting in these slots when cleaning, open
the door as far as it will go.
Do not rub or clean the door gasket
the fiberglass material of the gasket has an
extremely low resistance to abrasion. An intact
:ind
well-fitting oven door gasket is essential for
energy-efficient oven operation
results.
frayed or damaged in any way or if it has become
displaced on
4. Close the door and make
is
place,
cycle
Oven shelves
oven.
become hard to slide. Wipe
cooking oil
SI ide
Do
protectors in or near the self-cleaning oven. A
combination of
clean cycle
finish of.
Important
The oven
be set correctly for the clean
If
you notice the gasket becoming worn.
off.. Make sure the
Door latches automatically after
is set.
liowever,
after self-cleaning [o make
more easily.
not
use commercial oven cleaners or oven
temperatures may damage the porcelain
the
door must be
and
outside front of
and
water. Do not use abrasives or
the
door. you should have it replaced.
sure
the oven light (D)
may be
they will
any
oven.
oven I
cleaned in the self-cleaning
of
these
ight
dtirken, lose
the
shelf supports with
products plus the
closed and
cycle
oven
(C)—
and good
bulb cover is in
their
the
all controls must
to work properly.
door
place.
baking
the Clean
Iustcr and
shelves
high
—
22
-.
—
Page 23

flow
to Set Oven for Cleaning
Quick Reminder:
1.
Prepare the oven
2. Close the oven door completely.
3. Press the CLEAN pad.
4. Press
If the
cycle, the word “OFF” will appear in the display.
Allow additional time
to set the
NOT1;:
1.
Follow directions to prepare
CLEAN
the
INCREASE or DECREASE
until desired Clean Time appears.
oven is too hot
cycle.
Only one oven at a time
2.
Press
for
cleaning.
ond
you start to
for
cooling before you try
can
be self-cleaned.
the
oven
the CLEAN pad.
pad
sel a cleun
for
cleaning.
D
3.
A
--
n
—
Press the INCREASE
DE;CREASE pad
(’lean
Time is displayed.
or
until desired
Clean
Time is
Clean Time to anywhere between 2 and 4 hours,
depending on how dirty your oven is.
The self-c
“CLEAN” is displayed and the time for the Clean
cycle is set. The words “ON” and “LOCK” will
appear on the display. It will not be possible to open
the oven door until the temperature drops below
lock temperature and the LOCK light goes oft.
4. When the LOCK light is off, open the door.
~
STOP
TIME
II
The
word
“LOCK” will Ilash and
set
the
clean cycle
normully 3
le[in
cycle will automatically begin after
NOTE: You
clean cycle wi II be finished by pressing
the STOP TIME button.
‘bDOOr.’
will be displayed, the word
and
hours. You
can
find out when the
oven control will signal if
forget to close the oven door.
can change the
the
you
1’0
Stop a
CLEAR
OFF
Clean
1. Press the CLEAR/OFF pad.
Cycle
o
After Self-Cleaning
You may notice some white ash in the oven. Just wipe
it up with
If white spots remain, remove them with
steel wool
\/ineg:lr and water
a
salt
If
the oven is not clean after one clean cycle,
repeat the cycle.
NOTE: No
door automatically unlocks.
a
damp cloth after
pad.
Be sure to rinse thoroughly with
residue that
functions can be programmed before the
the
oven cools.
mixture. These deposits
cunnot
be removed by
the
(c(~tltitluc(i tle.xt [Jctgc)
a
soap-filled
a
are
usually
clean cycle.
2. Wait until the
tcmpcraturc.
door right away unless the oven temperature is
at a
safe level.
oven
has
cooled below
You will not be able to open the
locking
23
Page 24

OPEWT~G
.-
—
—
THE SELF-CLEANING OVEN
How to Set Delay Start of Cleaning
Quick Reminder:
1.
Prepare
2.
Close
3.
Press the
4. Press the INCREASE or DECREASE
until desired Clean Time appears.
5. Press the STOP TIME
6. Press the INCREASE or DECREASE pad
until desired Stop Time appears in the display.
Delav
Start is
.
cvcle
automatic
.
time of day.
oven
clock
1. Follow steps to prepare the oven for cleaning.
2. Press the CLEAN pad.
3. Press the INCREASE or DECREASE pad to enter
the Clean Time.
4. Press the STOP TIME pad. “SET STOP TIME”
and the earliest Stop Time you can set will appear
on the display.
the oven
the oven door completely.
CLEAN pad.
for
cleaning.
pad.
setting
the oven timer to start the clean
allv~t
a later time than the present
NOTE:
shows the correct time of day.
Before
beginning, make sure the
pad
(continued)
5. Press the INCREASE pad to change the Stop
6. When the LOCK light is off, open the door.
NOTE:
can find out when the oven is set to turn on by
pressing
The earliest Stop Time will be the Clean Time
selected plus the time of day.
Clean Time is three hours and the time of day is
6:00,
the Stop Time that appears on the display
will be
Time to a later time of day
If you set Stop Time at ! 1
cycle at
automatically.
The self-clean cycle will automatically begin
after “CLEAN” is displayed and the time for the
Clean cycle is set. The words “ON” and “LOCK”
will appear on the display. It will not be possible
to open the oven door until the temperature drops
below the lock temperature and the LOCK light
goes
9:()().
8:00
and end at 11
off.
During a delayed self-clean operation you
and
holding the CLEAN pad
For example:
if
desired.
:00,
oven will start clean
:00.
The door latches
For example:
for 3
seconds.
If the
Questions and Answers
Q. If my oven clock is not set to the correct time of
day,
can
I still self-clean my oven?
A.
If the
clock
is not set to the correct time of day you
will not be able to set a delay clean to end at a
specific time.
Q. Can I use commercial oven cleaners on any part
of my self-cleaning oven?
A. No
cleaners or coatings should be used around any
part of this oven.
thoroughly rinse the oven with water, wiping it
absolutc]y clean
the oven surface and damage metal parts the next
time the oven is automatically cleaned.
Q. What causes the hair-like lines on the enameled
surface of my oven?
A.
This is a
and cooling during cleaning. These lines do not
affect how your oven performs.
Q.
My oven shelves do not slide easily.
What is the matter?
A. After many cleanings, oven shelves
so
slide
dampen fingers with a small amount
and
contact shelf supports.
normal
clean they do not slide easily. To make shelves
more easily, after each self-cleaning function
rub lightly over sides of shelf where they
It you do use them
afterwards. the residue can scar
condition, resulting from heating
and
do not
may
become
of cooking oil
24
Q. What should I do if excessive smoking occurs
during cleaning?
A.
This is caused by excessive soil. Press the
CLEAR/OFF pad. Open windows to rid room of
smoke. Wait until the oven has cooled and the
word “LOCK” is
excess soil and reset the clean cycle.
Q. Is the “crackling” sound I hear during cleaning
normal?
A. Yes.
Q. Can I clean both ovens at the same time?
A. No.
Q. Should there be any odor during the cleaning?
A. Yes,
Q.
A.
Q. My oven shelves have become gray after the
A. Yes.
This is the sound of the metal heating and
cooling during both the cooking and cleaning
functions.
There is too much heat. The control only
allows one oven to clean at a time.
there may be a slight odor during the first few
cleanings. Failure to wipe out excessive
also cause a strong odor when cleaning.
Why do I have ash left in my oven after cleaning?
Some types of soil will leave a deposit which is ash.
It can be removed with a damp sponge or cloth.
self-clean cycle. Is this normal?
After the self-clean cycle, the shelves may
lose some
off in the display. Wipe up the
luster
and change to a deep gray color.
soil
might
Page 25

CARE
AND CI,EANING
Control
——
Panel and Knobs
.————
The
porcelain
sturdy
hl~t hreakahle
‘[his Iinish
enamel
is
i]~i(t-tt:sis[:lt](.
finish is
if’ misused.
t+(J\vever. ilny ilci~t l’(~()(.ts spillc~l
( SLICtl
:1S
t’1’llit
.jLliCCS. toll
vineg:l[-)
to
Sht)Ll Ici 11{)[ he pcrtllit(e(t
r~lllilirl on the tinish.
l:lto”
01”
If acids
\\flile
spill on
it is hot,
(he cooktop
(:
iL’ ;i cl! j
[ow’ct or cltlth [(~ \\i pc i{ llp ri ~tlt
:LW
C()()lC(t
Rins~’ ivell.
((())
//(!! !(1(/
:1> W
i
1(.’11 ttl~.’ \Ll i“t ”:icc !lil~
. Wilitl W’ 1 (tl \{
)11
II
/)(/,q(
I
)Lll) LlllLl \i’illCl”.
p;ipct”
E+’or
other spills such as
spattcrings, w:lsh wi(h sL):Ip
fat
itl]d
\\’ill~l” 01” ~]~:lllSi ng p(JWLtdrs iLt’t~!”
the
slIrlLIce h:is c~)olect.
P(JI
ish with :~ ctry cloth.
Rinse
wctt
25
Page 26

CAm
Surface Units and Drip Pans
AND CLEANING
(continued)
T()
clean
setting
the surface
for a
units, turn the control” to the highest
minute.
The coils will burn
off any
soil.
CAUTION
●
Do
not immerse the surface units in liquids of
●
Do not
cletin
the surface units
in a dishwasher.
any
kind.
* Do not bend the surface unit plug terminals.
●
Do not attempt to clean, adjust or in any way repair
the plug-in receptacle.
To
remove
the
drip pans
must be removed first. Make
completely
Receptacle
Lift the surface unit about I inch above the drip
and
pLlll
Do not lift the surface unit more than 1 inch.
If
you
you plug it back in.
Repeated lifting of the surface unit more
than 1 inch above the drip pan can permanently
damage the receptacle.
it out.
do, it
coo]
before touching them.
Sutiace
may not
for
cleaning, the surface units
sure the surface units are
Unit
Drip Pan
pun
lie flat on the drip pan when
To replace a surface
“
Replace the drip pan into the recess in the
cooktop.
Make
unit:
sure opening in the
pan
lines up
with the receptacle.
●
Insert the terminals of the surface unit through
the opening in the drip pan and into the receptacle
●
Guide the surface unit into place so it rests evenly.
Drip Pans
Remove the surface units. Then lift out the drip pans.
The drip pans
can
be cleaned by hand. Place them in
covered container (or a plastic bag) with 1/4 cup
ammonia to loosen the soil. Then scrub with a soap
filled
scouring pad if necessary. Rinse with clean
water and polish with a clean soft cloth.
The drip pans may also be cleaned in the dishwasher.
Clean the area under the drip pans often.
BLlilt-Llp soil,
Do not cover drip pans with foil.
to the receptacle could
especially grease, may
Using foil so close
cause
shock,
catch
fire
fire.
or
damage
to
the range.
CAUTION: Be
OFF
und
surface units are cool before attempting
sure
all
controls are turned to
to remove them.
a
—
Lift-Up Cooktop
Clean
the
area under the
cooktop
often.
Built-up
soil,
especially grease, may catch fire.
To make cleaning easier,
lifted up
and
supported in the up position.
the entire
cooktop
may be
Be sure all the surface units are turned off before
raising the
cooktop.
Dual support rods will hold the
cooktop up while you clean underneath it.
After cleaning under the
water and a clean
cloth,
cooktop
lower the
with hot,
cooktop. Be
soupy
careful
not to pinch your fingers.
Oven Vent
The oven is vented through an opening under the right
Never cover the opening with aluminum
foil
or any other material. This
would prevent the oven vent from working properly.
rear
26
surface unit.
&
-
—.——- .-. .–
c
li-~
Oven Vent
—
Page 27

Lift-Off Oven Door
The oven dour
bu[
it is
renl(~\ing :~nd
To remove the door,
inches [(~
that
wilt
firmly on ctich side and
door” str~light
NOTI{: Be c:irtt’ul not to pl:icc
h:lnds hetwccll
ovc]l door” t’r:unL’ :Is the Ili ngc L()(lld
sn:ip biick Lind
TO rcplaee the
thC
hin:c’s
positiotl.” I)osition” tll(; slots
!101[0111” f
the
hit]:cb. ‘[.I)cI) loWLr (I1c do(~[
slowly :i[ld c\cnlj
Ilingcs :It
Sll:lp
tlLICk :Igili
pull
thc~nl h:i(:k ()~[[.
is
removable,
he~vy. You may
replacing the
the
special stop position”
hold the door” (JpeI1.
up
the hinge
pinch Ii
door. nl:l~c S~ItLL
ill’~
in th~’
ii’
tll~’ dt)ol” >C]tl:LI”C 1~’
the
s:IIIIc (inlc.
11S1 IIIC ()\’Cll l’I”:llllC.
need
open
lift
:tnd 011” the hinges.
n:cr~.
spuc’iill $t{ II)
()\cr tooth
11’
help
dour.
it a
few
(.lrilsp
the
Lind thL>
in
IIic
l)\
Cl”
Ilin:.cs
TO
CLEAN THE DOOR:
Inside of door:
.—. .—.
.——
,
.,,,.,.,+>,,..,,,..,.,
,.
.,..-
f“:’”’
~ ,-~
T“”-
,i;,,
h
Outside
●
Use
clean
the
run
top
tnay also use a
~l~iul the ~tiiss 011
the door.”
●
Spi
ill
IIl:ltcri:its contili
L:LUSC ctis~(~lol”:lti(~ll :ind sholil(l hc
wi pcd
Sil!”l’:lL’C
●
1)0
clcatlsin~
abrasi~’es
the
NOTE:
01
oft” ~’tltll ttlt
.,
bilk~
cl(:iin
IC\id~lC. 01” :l\tl
ttlc hilkc
the lillit \\i(tl w:irm w:ltct-
of door:
soap and
oven door.” D(J not le[ w:lter
down through openings
of the
I I:lge 01.
i~tS,
not
door.
-
(hc broi I
unit
the
water to thoroughly”
the top, sides
do(~r.
nl:u”itl~idcs. frLl
[olllil(t) S~U~~\ :lllLt b:is[ illg
Lip i
n}nlcdi:ltcly. Whc’11
is
cool”. rle:ill
use
o\c
powders or harsh
on the outside of
I.)()
not
LIn
units
Ciltl bC tifted
otcn I’lc)or.
unit.
gentty wipL’ iil”oulld
and front (JI.
Rinse
glass cleilner
the
n i ng
:IL
illld
In
elean~)rs,
CIC:U)
the
it.
An! soi I w
:lI”C
tlCiltCd. T1lC
XClltl\’ to
-.
1 t
spi
:ICCLII1l LI
I;ltC :ll”OLll)d
welt.
outside
ids
in
Y(~LI
to
i t
nl:i!
ri IlsC.
b:ihe
unit
i I I
I toter,
the
(~1’
Ilut”!)
Oven Shelves
You may
cleanser following manufacturer’s directions.
cleaning. rinse the shelves with
with a
To remove heavy, burned-on soil,
tn:ly bc Llsed i(~! [(JW ing Inalluf:lcturcr.s directions.
After
oven shelves may be cleaned in
However,
hec(~tne hard to slide.
cooking” oil :ifter
m{)re
—
clean
the shelves with a mild abrasive
ctean cloth.
scrubbing,
they will darken,
self-cleaning to
easily.
~iistl
with
Wipe
clean wii(er ~nd dry
so:ipy
soupy
water,
self-cteaning
lose their luster and
the
shett
supports with
make
shelves SI
Inside
Gasket
mct:il piIds
rinse :Ind dry.
oven.
Aftct-
ide
Gasket
Outside
Gasket
i
27
Page 28

Broiler Pan and Rack
—
—
CAm
AND CLEANING
(continued)
After broiling,
Remove
grease in the
ritlse
If
with detergent
dishctoth.
while the meat is being served.
the rack from the pan. Carefully pour out the
the
food
has burned on, sprinkle the
remove the broiler
pan
into a proper container. Wash and
pan and
rack in hot soapy
and
cover with wet paper
That way, burned-on foods will soak loose
Oven Light Bulb
The
light
butb
is
tocated
on the
back wall of the oven. Before
reptacing
ctectrica]
main fuse or circuit breaker panel
or
etcctricat
completely before removing it. For
your safety, do not touch a hot bulb
with o
bulb will break.
the bulb, disconnect
power to the
unpt ug
the
range
outlet.
damp
I.et
cloth. If you do, the
range at
from the
the bulb cool
the
pan
from the oven.
water.
rack
white hot,
towets
or a
To remove:
● Unscrew the
the bulb.
1’0
replace:
Put in a new 40-watt appliance bulb.
NOTE:
is smaller
househotd
●
Instatl and
● Reconnect
the range.
cover
A 40-watt appliance bulb
than
a standard 40-watt
bulb.
tighten the cover.
etectricat
Do not store
Do not
and
power to
clean
remove
mlmy\l\T\~\~
a
soiled
in
broiter pan and
sctf-cleaning
[k
@
P
bulb
oven.
‘“:e’
‘\
~ { \
h
glass cover
rack in the oven.
3%
max. length
‘1
\
‘\
/
g;:,
,L;$;
-
a
Removable Storage Drawer
The
storage drawer is a good place to store cookware
and
bakeware.
material in the drawer.
Do not overload the
too heavy, it may slip
open the drawer, grasp the center of the
pull straight out.
The
storage drawer may be removed
the range.
To
remove:
the guide stops.
To replace:
drawer into
Glass
Surfaces
To
ctean
use a
glass cteaner.
potish
with a dry cloth. Do not
at tow the water
down inside openings in the
while cleaning.
Do not store
storuge
Put] the drawer straight out
Lift over the guide stops and
ptace.
the outside
gtass
Rinse
or
cteaner to run
ptastics and flummable
drawer. If the drawer is
off the track when opened. To
finish,
and
gtass
handte and
for cteaning
and
lift over
stide
~~:.
ET
.&~-
under
the
~
/
:.,
R
w
P(
To clean
soap and
Do not use cleansing powders or harsh abrasives
which may scratch the surface.
~/
“..~:
“~>:>
\’-\
,.>
w
both the inside and the outside:
water.
Rinse
,,
wet].
A
,’
‘
Wipe with
Metal Parts
Do not use steel
ammonia or commercial oven
cleaners. To safety clean surfaces;
‘/
wash, rinse
soft cloth.
woot,
and
then dry with
abrasives,
a
28
Page 29

—..—...—- ... __ ——-————
-. ..-. .-. -- —.. -—..——
‘-
Lor!g
s::re>~
——. _—..—
w
%%chai;$\
wasl,;;i’’~,,
Wal! Plate
“’./7
1---
L~J
.“, ,,
.:, .”
,”:’
1101
I
”1)1:!1
Tape
,’
!
——-—...—
——_...._..—————-—-
—.--.——
29
.———
I
1
Page 30

~
—
4
}
QUESTIONS?
USE THIS PROBLEM SOLVER
‘l;-”
AND A NUMBER
i
‘1.ASli
ON
THE DISpLAY
OVEN W ILL NOT WORK
——
OVEN LIGHT
DOES NOT WORK
FOOD DOES NOT
BROIL PROPERLY
FOOD DOES
OR BAKE PROPERLY
NOT
ROAST
POSSIBI.E;
● This is funclion error code. Press the CLEAR/OFF pad. AI1ow the oven to cool
hour. Place the oven
power to
—
●
The
plug
● The circuit
● The oven controls
● The
● The switch operatin~
● Oven not set on BROIL.
● Oven ternpertiture not set correctly.
● improper shelf position being used. See the Broiling Guide.
●
Necess:iry
● Food is being
● Cookwtire is not suited
●
Aluminllm f.t)i
and
slit &s
●
O\’en not se(
● Oven temperature not set correctly,.
●
Shcl f
● Incorrect cookw[lre or cookw[irc
● .4
f~)il tent W:IS
CA
IJShI
b:~ck
into operation.
the
oven and c~il for service.
on
(he r:inge
breuker
light
bulb is loose or defective. Tighten or replace.
prehe:iting
is
not
completely inserted in the electrical outlet.
in your house
are
not properly set.
the
oven light is broken. Call for service,
wits
not
done.
cooked on
ii hot
t’or
broiling.
p:ln.
I used on the broi I
has
been tripped, or a
ptin and r}lck
recomrnendcd.
on BAKE.
position is incorrect.
not
used
Scc the
when
Roasting or B tlking sect ion.
of
improper
nec~ied to slow’
If function error occurs
fuse
has been blown.
again,
has not been ti(ted properly
size
is being used.
down brt)wn
in:
during
ro~sti n:.
disconnect
one
——
CLOCK AND
M IN
LJTE/SECOND
TIMER DO NOT WORK
OVEN WILL NOT
SELF-CLEAN
OVEN DOOR WILL NOT
OPEN AFTER
SELF-CLEAN
THE
CYCLE
OVEN NOT CLEAN AFTER
THE CLEAN
CONTRO! BEEPS
l;
NTiRiNG
(3R S~
‘JP
If’ your
(;~;
Answer Center”
800.626
.20!)()
consumer information
need
CYCL.E
OVEN
TIME
more
AFTER
‘r!ME
hetp... catt, [olt
service
● Make sure
●
Check
●
See
the Oven Control, Clock
● The oven temperature is too high to set self-clean operation. Allow the
to cool
● See the Operating the Sell-Cletining
●
Oven
the
clcctric:d plug is plugged into ii live. properly grounded power outlet.
for L1 power
and
reset
must cool
out:tgc.
:ind
the
controls.
belov
locking tempcrtiturc.
Timer section of this
Oven section.
book,
——
●
Ov:n
controls not set properly.
● Heiivi
.
M T’ilis
free:
[y
soiled ovens
!{eavy
sp; ,if ,VC:
is remlndin~
shoL,ld
yo~! [o
rcc!uire 3 )5
to 4 hour
!Ie Cledned up
——.—
—
elItcI ~i
b:lk.~ tcmpel-:iturc.
C’lean
bef’orc
Time.
st:lrting
Cleun
cycle.
range
30
——-—
Page 31

We’ll
Be
There
In-Home Repair Service
80MEXARES(80M32-2737)
GEAnswer Center@
8086262000
kr
Customers With Special Needs...
800626.2000
800.(
j2(j.2000.
Service Contracts
80&626-2224
Parts
80@62&2002
andAccessories
Individuals qualified to service their ow appliances
—.
‘
l:i\c’
net’dc(l
i~olllt>. 0111 11:11-1
(
;elltlillt> f{t’llew:ll f’:ilts...;lll(f
t’
fS,\, hi:~slc’r(l;il{f :ltl(l l)iscoltl c211(Is :ilt ;t((t:f)lc(l.
~~;ir(s ot :Iccc’ssol-it’s st:llt (Iir<’([1)’ (()
S
s)stc’t)) f)lo\iclcs
:IC(CSS 10
:111
;~rt’ Iilfly fti~rti~tl tt(l.
()\t’t
c:~ti
lheil cover procedures intended to be performed by any user.
47,()()()
User maintenance instructions
Other servicing genera~y should be referred to qualified
service personnel. Caution must be exercised, since
improper servicing may cause unsafe operation.
contai~led
in this booklet
Page 32

:1
in LaFayette, G/
L—
: r— —
WHAT IS COVERED
‘ ~
1!
i
~
i,
———
Save proof of original purchase date such as your sales slip or
YOUR HOTPOINT RANGE
WARRANTY
cancelled
FULL ONE-YEAR WARRANTY
For one year from date of original
purchase, we will provide, free of
charge, parts and service labor in
your home to repair or replace
any
part of
because of a manufacturing defect,
the range that fails
check to establish warranty period.
This warranty is extended to
the original purchaser and any
succeeding owner for products
purchased for ordinary home use
in the 48 mainland states, Hawaii
and Washington,
warranty is the same except
is LIMITED because you must
to ship the product to-the service “
shop or for the service technician’s
travel costs to your home.
All warranty
provided by our Factory Service
Centers or by our authorized
Customer
normal working hours.
Should your appliance need
service during warranty period
or beyond, call 800-GE-CARES
(800-432-2737).
D.C,
sewice
Care’”
will be
servicers during
In Alaska the
that it
pav
WHAT IS NOT COVERED
Some states do not allow
may not apply to you. This warranty gives you specific legal rights, and you may also have other rights which vary from state to state.
To
know what your legal rights are in your state, consult your local or state consumer affairs office or your state’s Attorney General.
tk;e
exclusion or limitation of incidental or consequential damages, so the above limitation or exclusion
● Service trips to your home to
teach you how to use the product.
Read
your Use and Care
material.
questions about operating the
product, please contact your
dealer or cur Consumer Affairs
office at the address below, or call,
toll free:
GE Answer Center
800.626.2000
consumer information service
● Improper installation, if you
have an installation problem,
contact your dealer or
installer. You are responsible
for providing adequate electrical,
gas, exhausting and other
connecting facilities as described
If
you then have any
.—
in the Installation Instructions
provided with the product.
● Replacement of house fuses or “-”
resetting of circuit breakers.
● Failure of the product if it is IIsed
for other than its intended
purpose or used commercially,
. Damage to product caused
by accident, fire, floods or acts
of God,
WARRANTOR IS
RESPONSIBLE FOR
CONSEQUENTIAL DAMAGES.
NOT
Warrantor: General Electric Company
If further help is needed concerning this warranty, write:
Manager—Consumer Affairs, GE Appliances, Louisville, KY 40225
I
(
I
1
Printed
RS734cJ
RS74~.
 Loading...