

Page 1
C
.—
AluminumFoil
Anti-TipDevice
ApplianceRegistration
CanningTips
Care and Cleaning
ClocWTimer
Consumer Services
Energy-SavingTips
20
3,5
11
22-24
14
27
..—
—
use and care of ““
2
models
m524N
W525N
W525GN
5
B532GN
Features
Ins@llationInstructions
Leveling
Model and SerialNumbers
Oven
BaKng, Bating Guide
~roiling, BroilingGuide 20,21
I
Control Settings
Door Removal
Light; Bulb Replacement 15,22
Roasting,RoastingGuide 18,19
Thermostat Adjustment
VentDuct
Problem Solver
SafetyInstructions
Surface Cooking
Control Settings
Cookware Tips
Vgarranty
Back cover
6-9
5
5
2
15-21
16,17
15
22
23
22
25
3,4
10-13
10
12, 13
Page 2
iqead t13isbook Carefullye
Itisintended to help you operate
and maintainyournew range
properly.
Keepithandyfor answerstoyour
questions.
Ifyoudon’tunderstand something
or needmore help, write (include
yourphonenumber):
ConsumerAffairs
Hotpoint
AppliancePark
Louisville,KY40225
write down the model
and serial Hulnbers.
You’llfindthem ona labelon
thefront ofthe range behindthe
ovendoor.
Thesenumbers are also on the
Consumer ProductOwnership
RegistrationCard thatcame with
yourrange. Beforesendingin this
card, please writethese numbers
here:
Toobtainservice,seethe
ConsumerServicespageinthe
backof thisbook.
We’reproudofour serviceand
~lantyoutobe pleased. If
for some
reasonyouare nothappywiththe
serviceyoureceive,here are three
stepstofollowforfurtherhelp.
FIRST,contactthepeoplewho
servicedyourappliance.Explain
whyyouare not pleased. In most
cases, thiswill solvetheproblem.
NEXT, if youare stillnotpleased,
write allthe details—including
yourphone number—to:
Manager, ConsumerRelations
Hotpoint
AppJiancePark
Louisville,Kentucky40225
FINALLY,if yourproblemis still
notresolved, write:
Major Appliance
Consumer ActionPanel
20 North WackerDrive
Chicago,Illinois 60606
i
Page 3
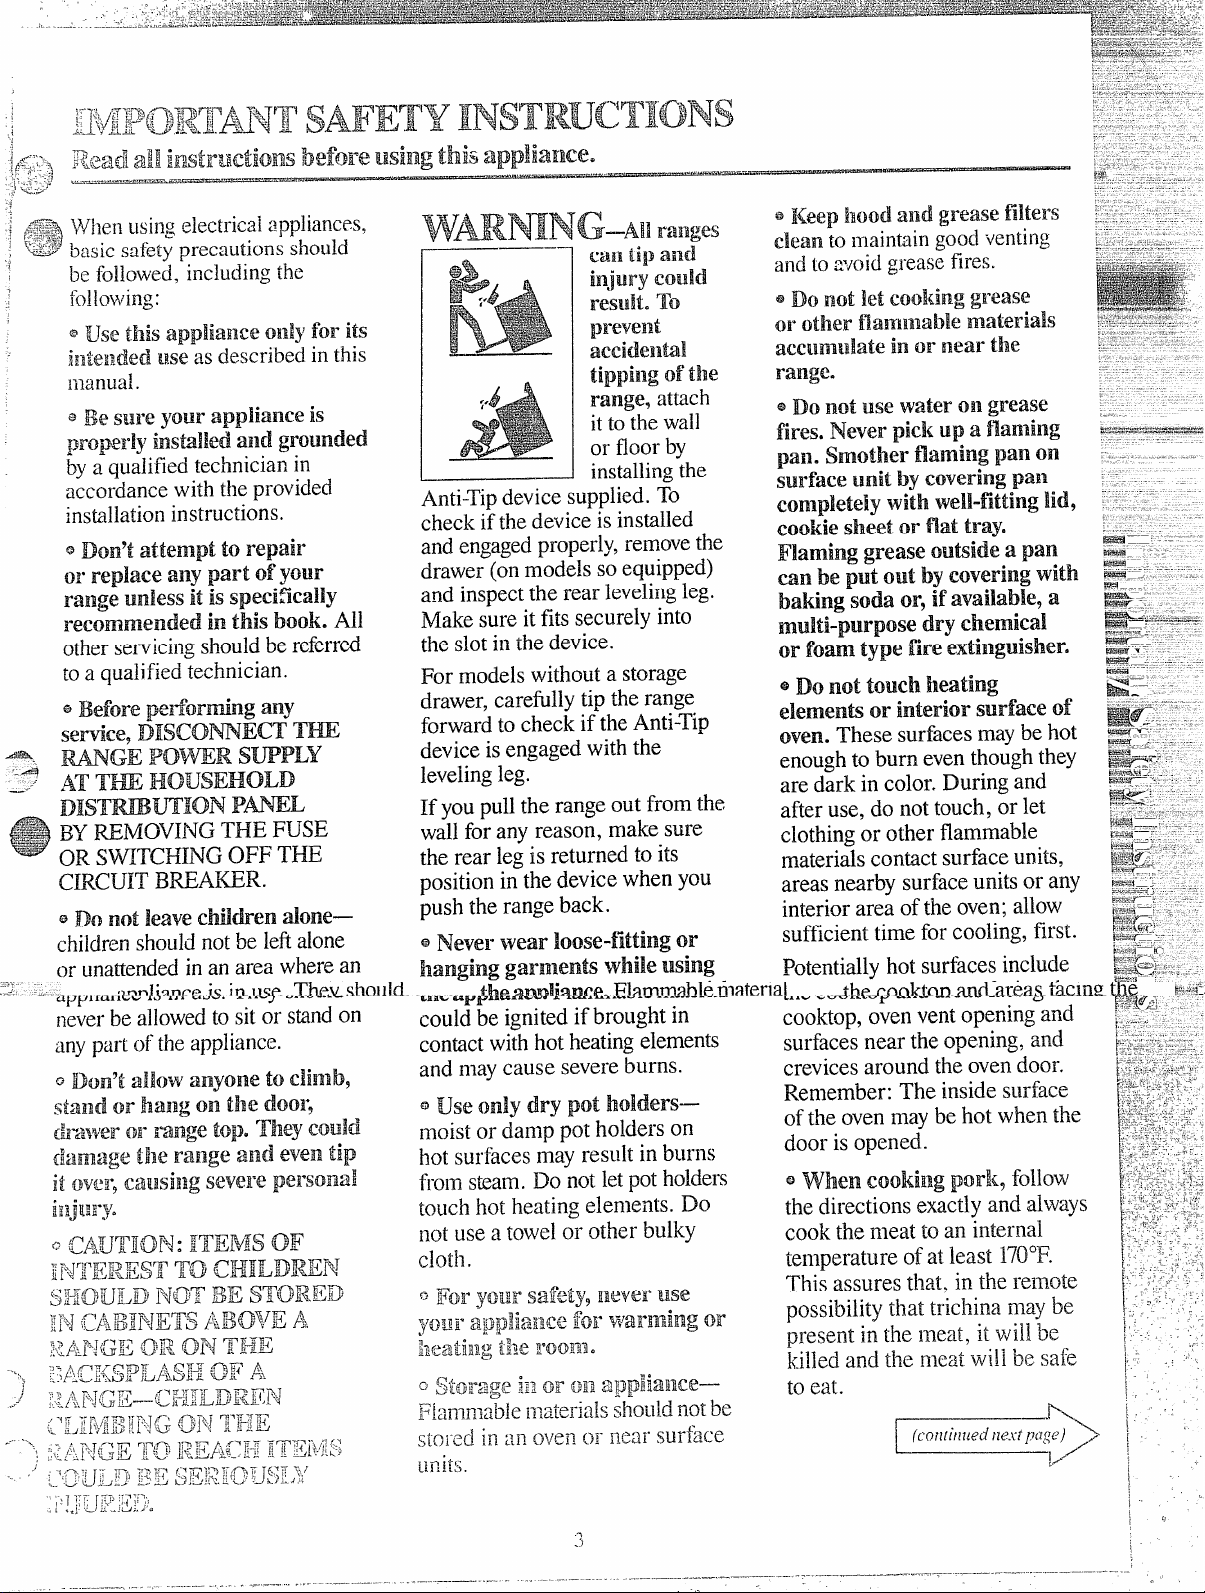
Anti-Tip device supplied. To
-__-
.....
check fi the device is
installed
andengagedproperly,removethe
drawer(on modelsso equipped)
and inspect the rear levelingleg.
Make sureit fits securelyinto
the slotin ihedevice.
For modelswithouta storage
drawer,carefilly tip the range
forwardto check if theAnti-Tip
deviceisengagedwiththe
levelingleg.
If you pullthe rangeout from the
wallfor any reason, make sure
the rear legis returned to its
positionin the devicewhen you
push the rangeback.
~Never EVearIoose-fitting or
hanging garlnenfi while using
theappfiance,Flmable material
could be ignitedif brought in
contactwithhot heatingelements
and maycause severeburns.
Quse only dry pot holders—
nloistor damp pot holders on
hot surfaces may result in burns
fi-olmsteam.Do notletpotholders
touchhot heatingelements. Do
not use a towelor other bulky
Cloth.
0 ~~~y~~]~~afety9EleY’erl~se
:yourappIia13cefor %Jar”mRingor
keati~l.gtile rooB23o
~~i~r~ge ;.~j~~~]~~~~p]~~]~~~——
Fla123-rna*bie nlater]a.s s)oLI1
“ i’ ~ “dnotbe
sto~-edin :Inovenor n(;arsurface
~L~l;*r
.Lo.
orother nallkllla[llenlaterials
aect]mlRlate
in01” neartile
range.
Do not IISe water032 g~+ease
@
fires.Never pie]<upa nanlillg
pall. smothernamingpall on
surfacetlnit bycoveringpa~l
Conlpleteiywith well-fitting!id9
Cookie
Sheet orflat tray.
R!aminggreaseOutiidea pan
canbe
putout by Coveringwith
bating soda or,ifavailable, a
multi-purposedrychemical
foamtype fireextinguished
or
@Do not touch heating
eiemenk orinteriorsurfaceof
oven.These surfacesmaybe hot
enough to burn eventhoughthey
are dark in color. Duringand
after use, do not touch,or let
clothingor other flammable
materialscontactsurfaceunits,
areas nearbysurfaceunitsor any
interiorarea of the oven;allow
sufficienttime for cooling,first.
Potentiallyhot surfacesinclude
the cooktopand areas facingthe
cooktop,ovenventopeningand
surfacesnear the opening, and
crevicesaround the ovendoor.
Remember: The inside s~~rface
ofthe ovenmaybe hot when the
door is opened.
@when Cookingporli9 follow
the directionsexactlyand a~ways
cook the meat to an internal
temperature of atleast 170°F.
This assures that, in the remote
possibilitythat trichina maybe
present in the meat, it will be
killedand the ~neatwill be
to eat.
~—
safe
h,
.?
.1
—— . . . . -. ———--- ----- —— --
—-—_——---------
-
———
.F-—
.—.———— -— —...
\
.
Page 4
~B~.~~
+..
--”
.
t..>
— ... ------.---———.-—---,—
—,—--.-—————--
o
SllrfaceCool<ingunits
@Stallci
Qpenillg
Steanl which escapesCan Callse
awayfrolll rangewk~ell
ovendool-. Hot air or
bllrElsto IIi%llds,face and/or
eyes.
aDonytileat Unopened food
coIlbiner’s
could buildupand the
inthe Oven. Ressure
eontiiner
could burst9causing an injury.
Keep ovenventduct
@
unobstructed.
Keep ovenfree from grease
=
buildup.
place oven shelf in desired
@
positionwhile ovenis Cool.If
she~vesmust be
hot, do not let pot holder contact
heating units in the oven.
@
Puliingoutshelf ~~~~~
sl~elfstopis a convenience in
lifting heavy foods. It isalso a
precautionagainstburns from
touchinghot surfaces ofthe
doororovenwails.
@when using cooking or
roastingbags in oven9follow
the manufacturer’sdirections.
=Do not useyour Ovento dry
newspapers. If overheated, they
can catch fire.
handIed when
@
Useproperpansixe—This
appliance is equipped with one
or more surface units of different
size. Select cookware having flat
bottoms large enough to cover
the surface unit heating element.
The use of undersized cookware
will expose a portion of the
heating element to di~ect contact
and may result in ignition of
clothing. Proper relationship of
cookware to burner will also
improve efficiency.
@Never
leavesurfaceuniti
unattendedat HI heatsettings.
Boilover causes smoking and
greasy
on fire.
@Be sure drip pans
Spillovers that may catch
andvent
duc~ arenot eo~~eredandare
in place.
cooking could damage range
parts and wiring.
@Don~tMse
linedrippans
Their absence during
aluminumfoil to
or anywherein
the ovenexceptasdescribed in
this book. Misuse could result in
a shock, fire hazard or damage
to the range.
@Only eer~iII types ofglass?
glass/eeramic9earthenwareor
other glazedco~ltainersare
@To avoid the possibility
of a burn oreleetrieShocILT
always be Certainthat the
controls
are
for‘ailsurfaceUlliti
atOFF position and all
coilsa~+ecoolbefore attempting
toliftor Felllovethe unit.
~Dongtimmerseor soak
removablesurfaceu~~iti.Don’t
putthem in a dishwasher.
@When flalningfoodsare
underthe Blood,turn the fan
off. The fan, if operati~3g9may
spreadthe flame.
~Foodsfor fryingshouldbe as
dryaspossible.
Frost on frozen
foodsor moistureon freshfoods
can causehot fatto bubbleup
and oversides ofpan.
@~T~~]~~tlefat for effective
shallow or deep-fatfrying.
Filling the pan too fill of fat can
cause spillovers when food is
added.
~If a.
conlbillationof oilsoR-
fatswillbe usedi~lfrying, stir
togetherbeforeheating, or as fats
meltslowly.
AIWaySheat fat slowly?and
~
watchas it heats.
.—-
‘.
,..
.- .
:>..,
~..
y.
“------
L
I
Page 5
ovencooking
.....,...———-—--
#
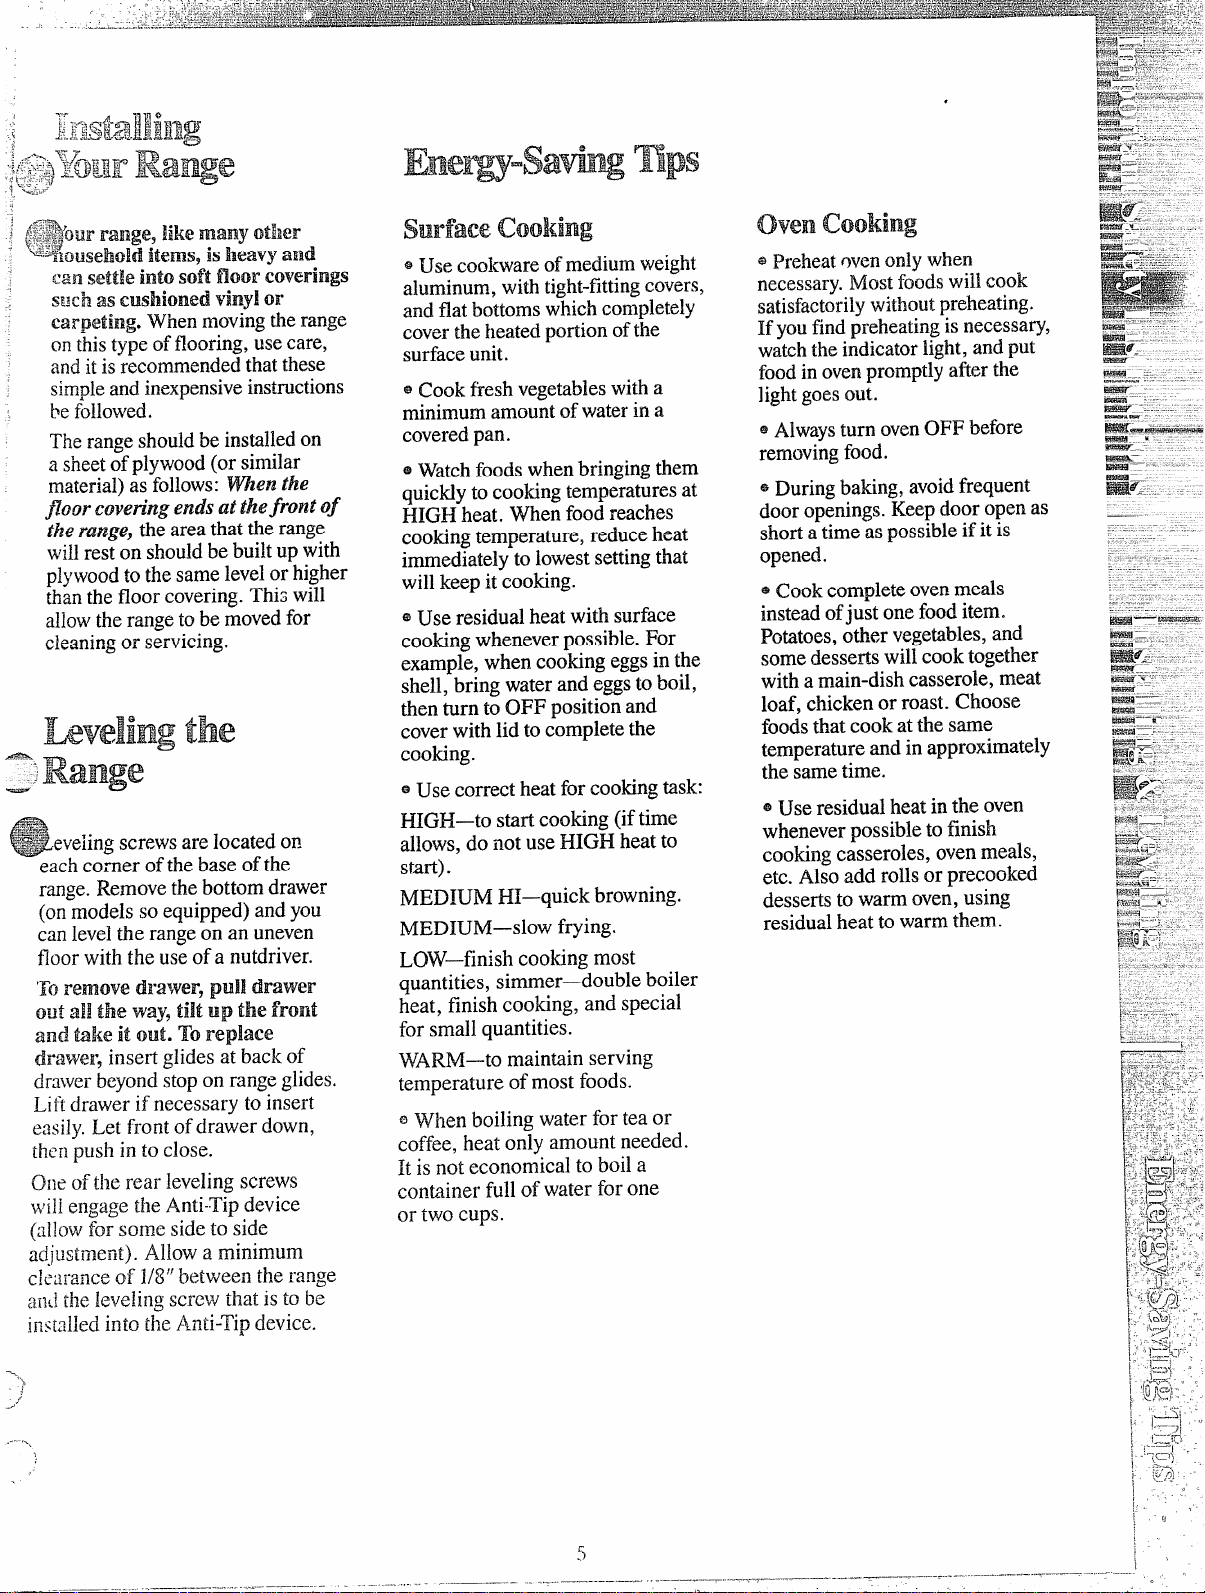
$!an settle intoSoitfloor :Overimgs
StlchasCushionedvinylor
carpeting.When movingthe range
onthistype offlooring,usecare,
andit isrecommendedthatthese
simpleand inexpensiveinstructions
~T~f~~~owled.
Therangeshouldbe installedon
a sheetofplywood(or similar
material)as follows:men #he
floor coveting ends~~t~~f-~~~of
Fl?erange, tie areathat therange
willreston shouldbe builtup with
~l}~woodto the samelevelor higher
k;n the floorcovering.This wfil
allowtherange tobe movedfor
cleaningor servicing.
evelingscrewsare located on
eachco~rnerofthebase ofthe
range.Removethe bottomdrawer
(onmodels so equipped) andyou
can level the rangeon an uneven
floorwith the useof a nutdriver.
To
removedraYver,pull drawer
~~f~~~~~~
and bke it out.
drawer,
way9 tilt up the front
T’ replace
insert glides at back of
dr~werbeyondstopon rangeglides.
Lift drawer if necessary to insert
easily.Let front of drawer down,
tllcnpush in to close.
@Use cookwareofmediumweight
aluminum, withtight-fittingcovers,
and flatbottomswhichcompletely
coverthe l~eatedportionof the
surfaceunit.
@Cook fresh vegetableswith a
minimumamountof waterin a
coveredpan.
@Watchfoodswhen bringingthem
quicuy to cookingtemperaturesat
HIGH heat. When food reaches
cookingtemperature, reduce heat
immediatelyto lowestsettingthat
willkeep it cooking.
@Use residual heat with surface
cookingwheneverpossible. For
example, when cookingeggsin the
shell, bring waterand eggsto boil,
then turn to OFF positionand
coverwith lid to completethe
cooking.
~Use correct heat for cookingtask:
HIGH—to start cooking (iftime
allows,do not use HIGH heat to
start).
MEDIUM HI—quickbrowning.
MEDIUM—slow frying.
LOW—finishcooking most
quantities, simmer—doubleboiler
heat, finish tooting, and special
for small quantities.
WARM—tomaintain serving
temperature of most foods.
e ~hen boiling waterfor tea or
coffee, heat only amount needed.
It is not economical to boil a
container full of water for one
or two cups.
@Preheatovenonlywhen
necessary.Mostfoodswill cook
satisfactorilywithoutpreheating.
If youfindpreheatingis necessary,
watchthe indicatorlight, andput
foodin ovenpromptlyafter the
lightgoesout.
@Alwaysturn ovenOFF before
removingfood.
~Duringba~~ng~avoidfrequent
door openings.Keep dooropen as
shorta time aspossibleif it is
opened.
@Cook completeovenreeds
insteadofjust onefooditem.
Potatoes,other vegetables,and
somedesserts willcook together
with a main-dishcasserole, meat
loaf, chicken or roast. Choose
foodsthat cook at the same
temperature and inapproximately
the sametime.
@Use residual heatin the oven
wheneverpossibleto finish
cookingcasseroles, ovenmeals,
etc. Also add rolls or precooked
desserts to warmoven, using
residualheat towarm them.
--..,
>
./
--”
5
Page 6
-.
.-5
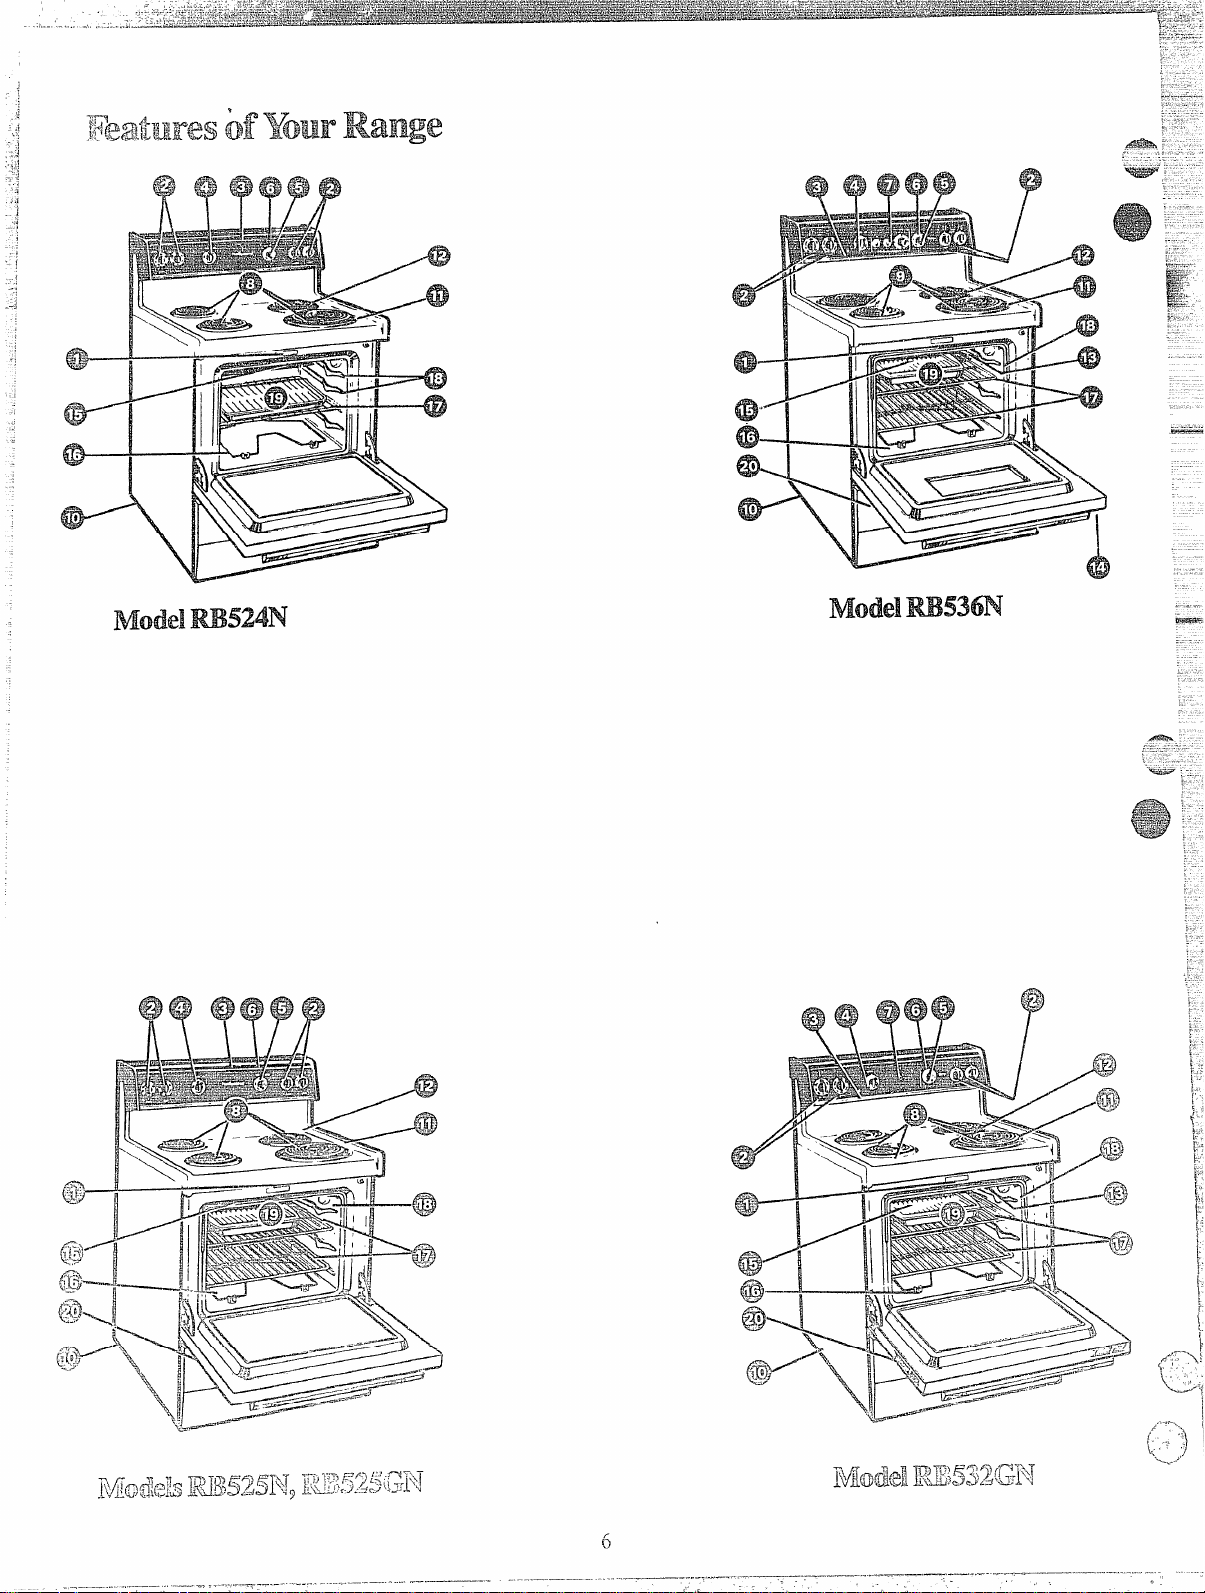
Modelm524N
MOd~Im53m
Page 7
..
.-,.._..——_—..--,.-
.-..—
.
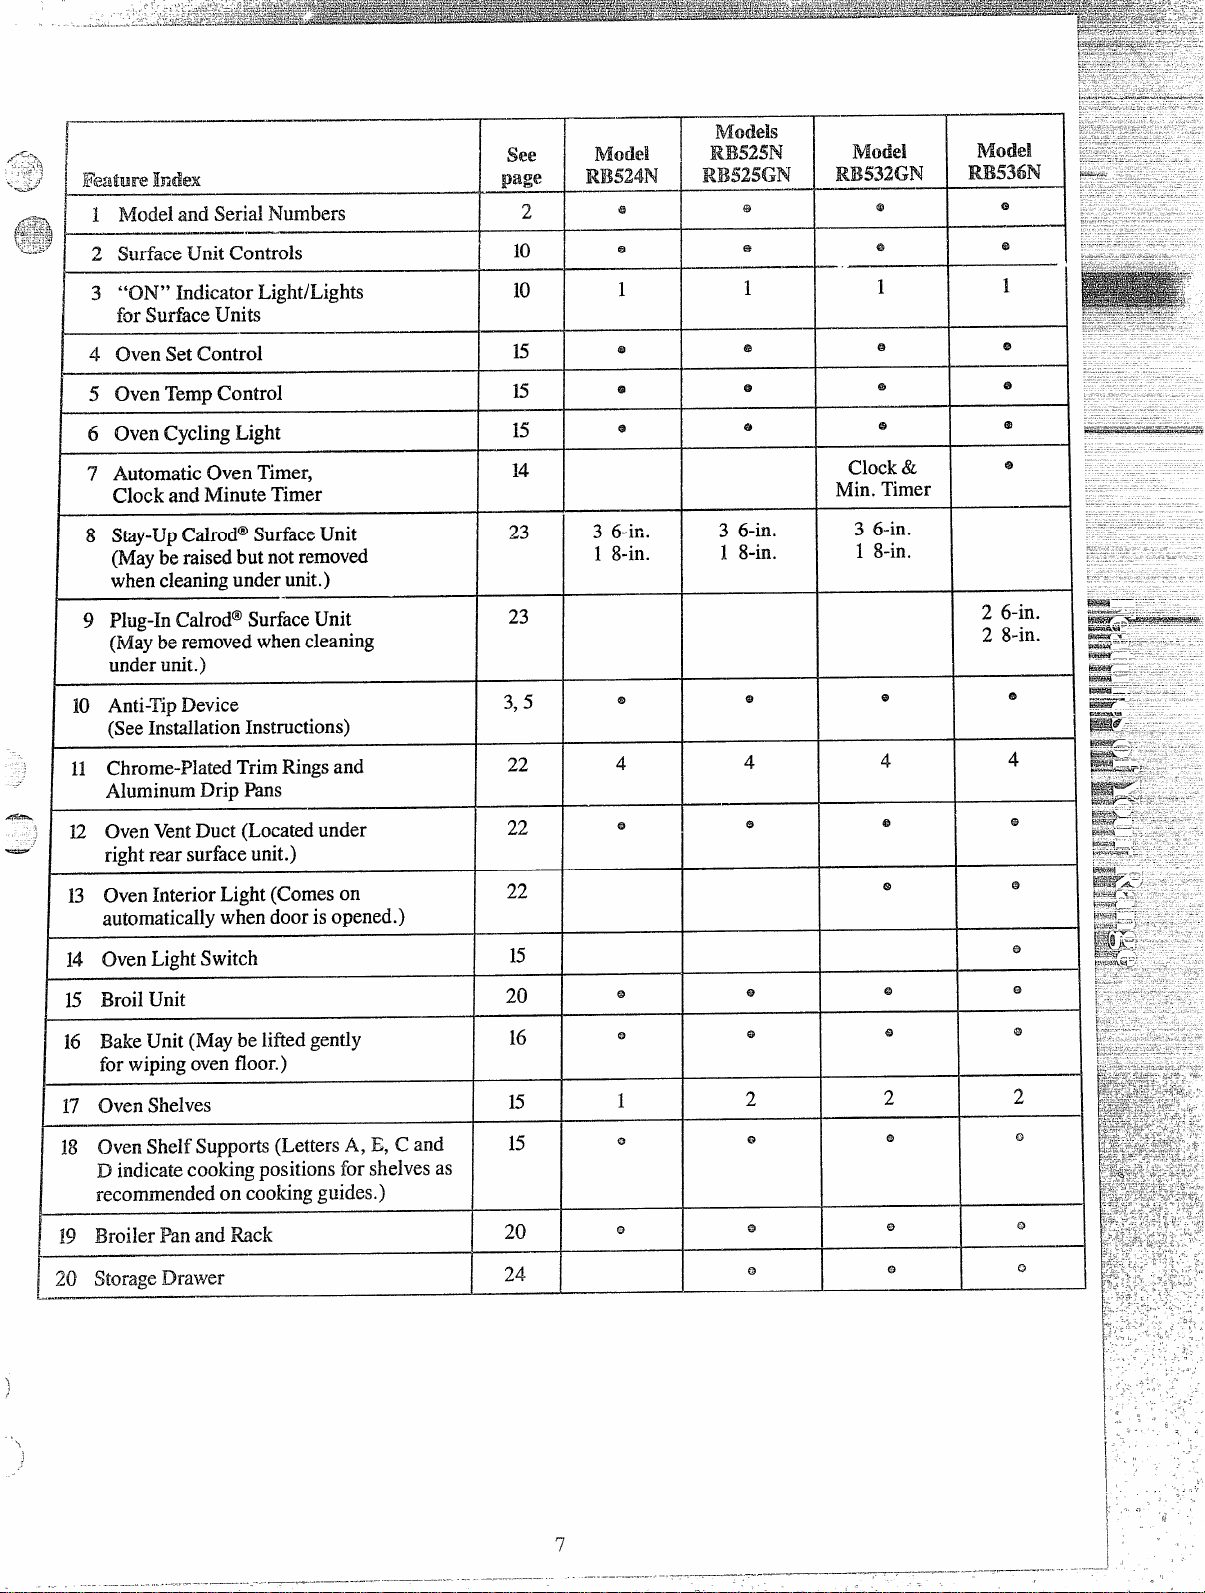
2 surfaceunitcontrols
forsurface units
~ OvenSet Control
5 OvenTempControl
6 OvenCyclingLight
7 AutomaticOven Timer,
Clock and MinuteTimer
8 Stay-UpCalrod@SurfaceUnit
(Mayberaisedbut notremoved
whencleaningunderunit.)
9 Plug-InCdrod” SurfaceUnit
(Mayberemovedwhencleaning
underunit.)
10 Anti-TipDevice
(SeeInstallationInstructions)
see
pdge
Model
R13524N
2
@
@
13 “ON” IndicatorLig13t/Ligh@
@
Model
RB532GN
@
—
ModeI
m536N
I
Clock&
Min.Timer
3 6-in.
1 8-in.
2 6-in.
2 8-in.
e
23
3,5
3 6-ifi.
1 8-in.
3 6-in.
1 8-in.
e
11 Chrome-PlatedTrimRingsand
AluminumDrip %s
U OvenVentDuct(Locatedunder
rightrear surfaceunit.)
13 OvenInteriorLight(Comeson
automaticallywhendoorisopened.)
14 OvenLightSwitch
15 BroilUnit
16 BakeUnit(Maybe lifiedgently
forwipingovenfloor.)
17 OvenShelves
18 OvenShelfSupports(LettersA, E, C and
D indicatecookingpositions for shelvesas
recommendedon cookingguides.)
19 BroilerRn and Mck
20 StorageDrawer
.—
22
22
22
20
15
15
20
24
15
16
4
1
4
2
4
e
2
.,”
7
---—
,
Page 8
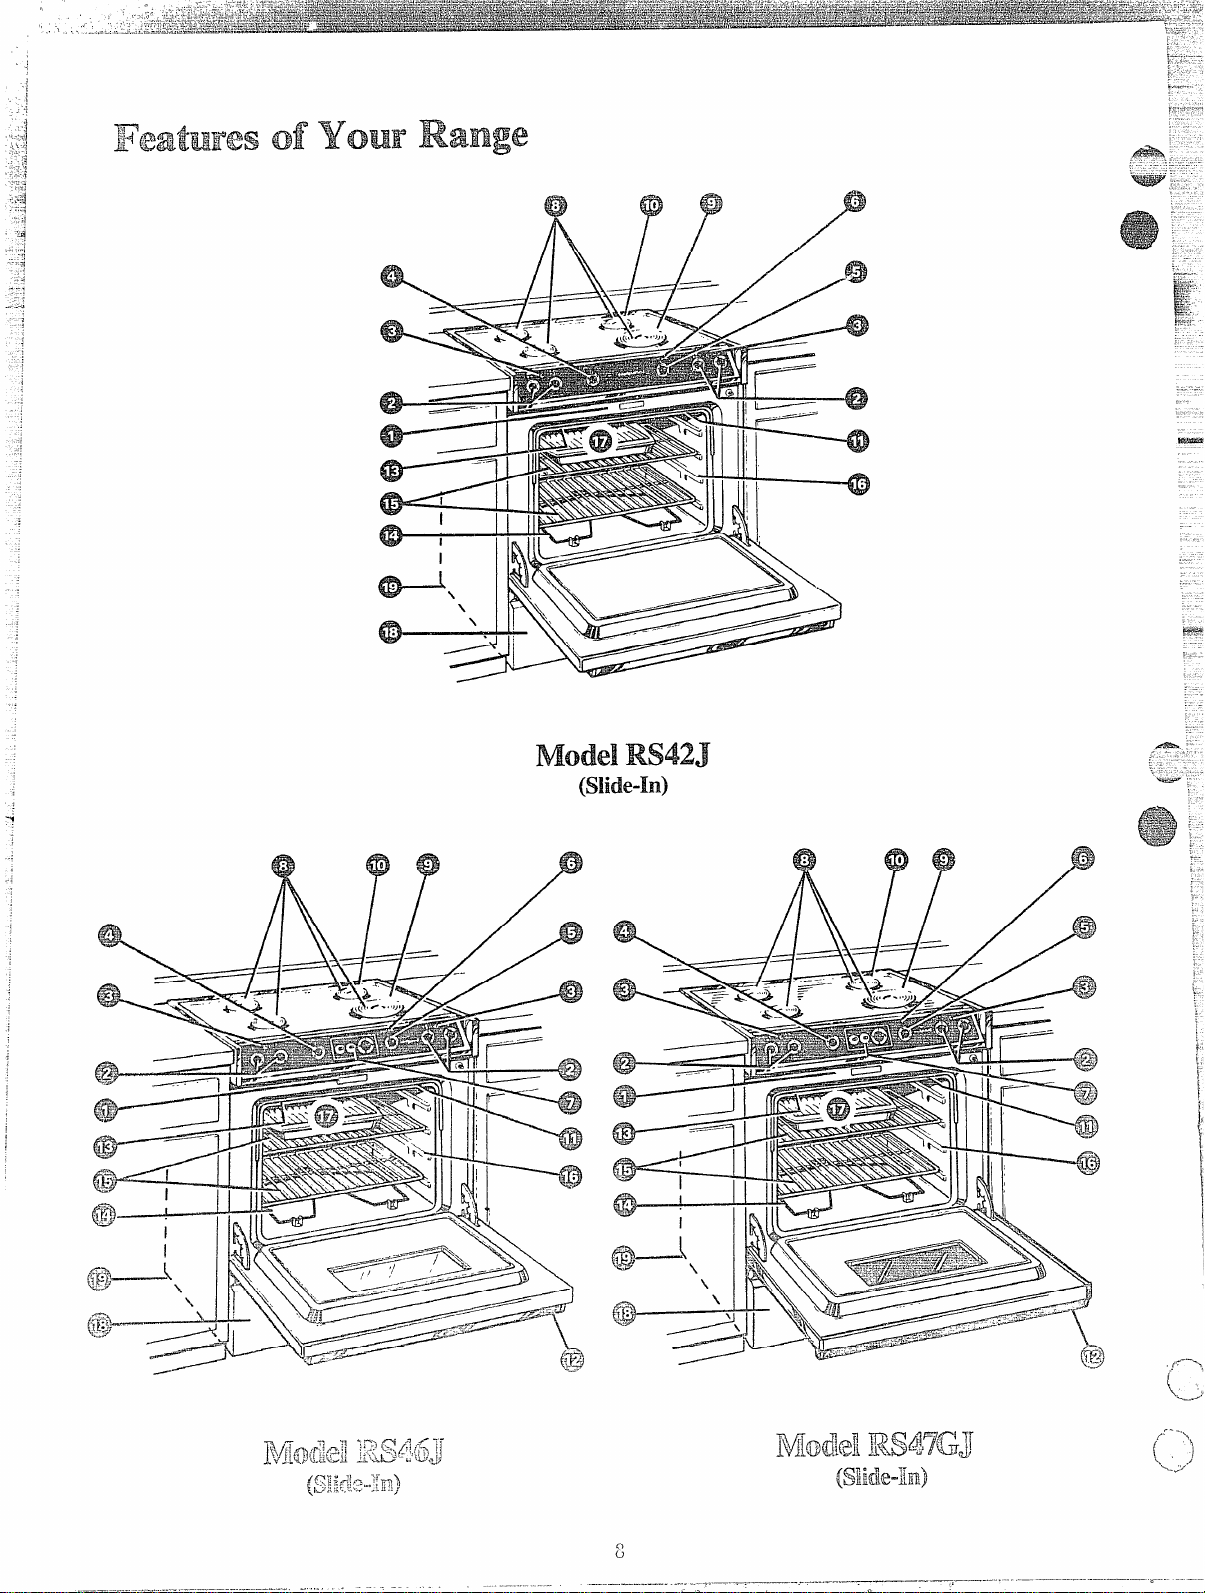
Model RS42J
(slide-In)
Page 9
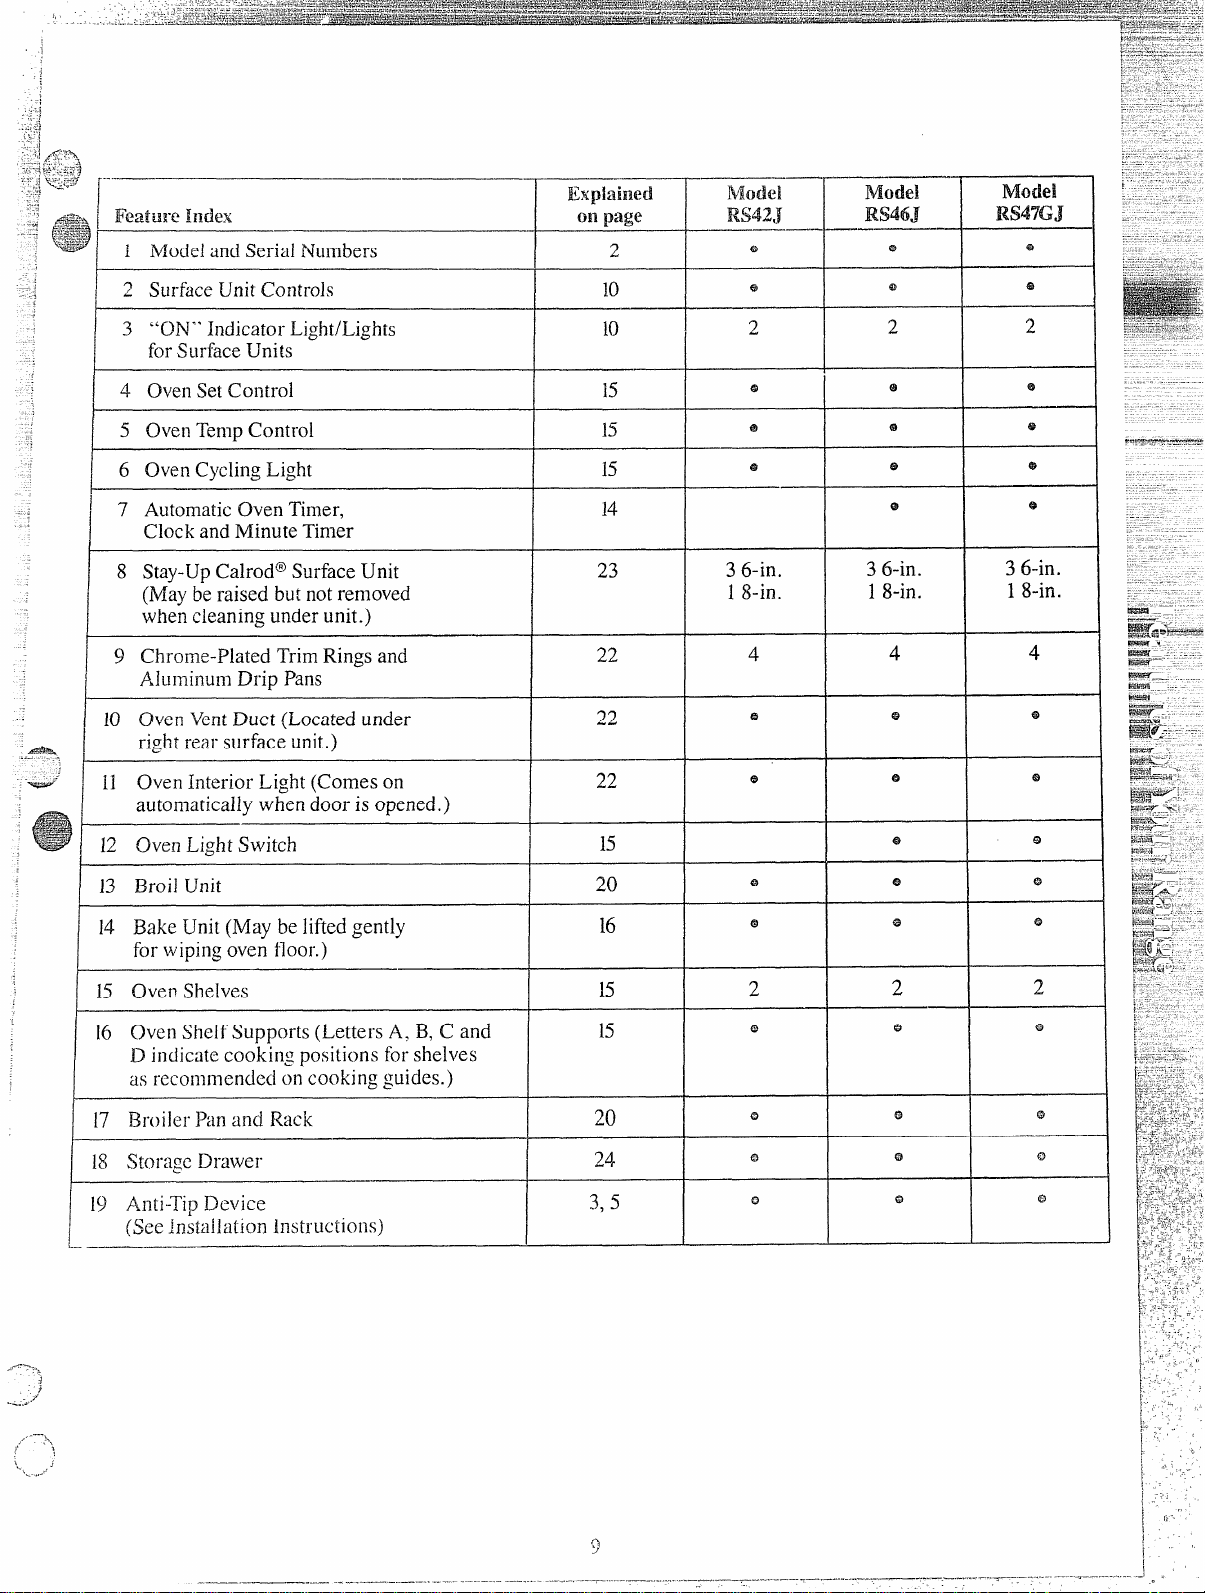
3 “ON”’Indicator Light/Lights
forSurfaceUnits
I
4 OvenSetControl
I
I 5 Oven TempControl
10
6 Oven CyclingLight
!
I 7 Automatic Oven Timer,
Clock andMinute Timer
8 Stay-UpCalrod@SurfaceUnit 23
I
(Maybe raised butnotremoved
whencleaning underunit. )
I
9 Chrome-Plated TrimRings and
I
AluminumDrip Pdns
1
10 Oven VentDuct (Locatedunder
right rear surface unit.)
11 Oven Interior Light (Comes on 22
automaticallywhen door is opened.)
I
13 Broil Unit
14 Bake Unit(May be liftedgently 16
for wipingoven floor.)
15 Over~Shelves
16 Oven ShelfSupports (Letters A. B,C and
D indicatecooking positions forshelves
as recommended on cookingguides. )
22
22
20
15
15
15
14
3 6-in.
18-in.
4
e
e
2
@
3 6-in.
18-in.
4
e
e
e
I
2
3 6-in.
18-in.
4
i
I
17 Broiler Pan and Rack
18 Storage Drawer
I
20
24
I 19An(i-TipDevice 3,5
(See Installation Instructions)
1
Q
4,
.
Page 10

surfaceCootingwith
g-
~~
~
::
~
~i,
i.
1
~
~
,
~
InfifiteHeatControb
Yoursurfaceunitsand controls
aredesignedtogiveyouan infinite
choiceofheat settingsfor surface
unitcooking.
Atboth OFF and HIGH positions,
thereis a slightnicheso control
“clicks”atthose positions;“click”
on HIGH marksthe highestsetting;
the lowestsettingis betweenthe
wordsWA~ andOFF. In a quiet
kitchenyoumay hear slight
“clicking”soundsduring cooking,
indicatingheat settings selected are
being maintained.
Switchingheatsto higher settings
alwaysshowsa quicker changethan
switchingto lowersettings.
Step 1: Grasp controlknob and
push in. (Knob appearancevaries.)
Step 2: Turn either clockwise or
counterclockwise to desired heat
setting.
Quickstartfor cook;~;g;
bringwatertoboil.
Fastfry,pan broil;
maintainfastboilon large
amountoffood.
Sauteandbrown;
maintainslowboilon
largeamountoffood.
Cook after startingat
HIGH; cookwith little
waterin coveredpan.
Steamrice, cereal;
maintainserving
temperatureof mostfoods.
NmE:
1. AtHIGH, MED HI, neverleave
foodunattended. Boiloverscause
smoking;
catch fire.
2. AtWARM, LOW,melt
chocolate,butter on small unit.
greasySpilloversmaY
.4.
-Ww.
control mustbe pushed into set
only fromOFF position.when
Controlisin anypositionother
than
OFF, it maybe romted
without pushing in.
Be sure you turn control to OFF
when youfinish cooking. An
indicator light will glow when
ANY heat on any surface unit ison.
‘,
,
t
Page 11

designedforcafiningpurposes.
....————..
..—--——--—.
Checkthe manufacturer’s
instructionsand recipesfor
preservingfoods.Be surecanner
isflat-bottomedandfitsoverthe
centerofyour surfaceunit. Since
canninggenerateslargeamountsof
steam,be carefulto avoidburns
fromsteamor heat. Canning should
onlybe doneon surfaceunits.
Q. can I Covermy drip pans tith
foil?
A. No. Clean as recommendedin
CleaningGuide.
Q. can I
equipment9like
on any surface Unik?
A. Cookwarewithoutflatsurfaces
isnot recommended.The lifeof
yoursurfaceunitcan be shortened
andthe rangetopcan be damaged.
fromthehigh heatneededfor this
typeofcooking.
Q. why am I not
I need from my uni@ even though
I have the knobs on the right
setting?
A.
and makingsure itis cool, checkto
makesure thatyourplug-inunits
are securelyfastenedintothe
surfaceconnection.
use specialcooking
an Orienbl wok~
getting the heat
Afterturning surfaceunit off
%Vhy does my Cookware tilt
Q.
when I place it
A. Becausethe surfaceunit isnot
fiat. Make surethat tie “feet” on
yoursurface unitsare sittingtightly
inthe rangetop indentationand the
reflectorring isfiat on therange
surface.
Q. why
my cookware coming Ofn
A. If youset your surfaceunit
higherthan required for the
cookwarematerial, and leaveit,
the finishmay smoke,crack, pop,
or burn dependingon the potor
pan. Also, a toohigh heat forlong
periods, and smallamountsof dry
food, may damagethe finish.
on the Solace dt?
isthe porcelainfitish an
‘:~;canningshouldbedone on
o
‘surfaceUnifi only.
Potsthat extend beyond1inch of
cookingelement’strim ring are not
recommended for most surface
cooking. However,when canning
with water-bathor pressure canner,
larger-diameter pots maybe used.
This is because boiling water
temperatures (evenunder pressure)
are not harmful to cooktopsurfaces
surrounding the surface unit.
HOWEVER, Do Nm USE
LARGE DIAMETER CANNERS
OR ~HER LARGE DIAMETER
Pm FOR FR~NG OR BOE~G
FOODS USHER
Syrt]p or sauce mixtures—
]do~t
:Indall types of frying—cook at
temperatures much higher than
~toilingwater. Such temperatures
could eve~]iua]lyharm coo~~op
---
SLII.faCeSstlrroundin~ surface units.
>
-.2
1-’
THANWATER.
incad%
1. Be surethe canner fitsoverthe
center ofthe surface unit. If your
rangeor its locationdoes not allow
the cannerto be centered on the
surfaceunit, use smaller-diameter
pots forgood canningresults.
2. Flat-bottomedcanners must
be used. Do not use cannerswith
flangedor rippled bottoms (often
foundin enamelware) because they
don’tmake enough contactwith the
surface unit and taketoo long to
boil water.
FJGHT
D
mQNG
3. When canning, use recipes and
procedures from reputable sources.
Reliablerecipes andprocedures are
availablefrom the manufacturer of
your canner; manufacturers of
glassjars forcanning,suchasBall
andKerr;andtheUnitedStites
Departmentof Agriculture
ExtensionService.
4. Rememberthatcanningis
aprocessthatgenerateslarge
amountsofsteam.Toavoidburns
fromsteamorheat, becareful
whencanning.
N~E: Ifyourrangeisbeing
operatedonlowpower
canning may take longer than
expected, even though directions
havebeen carefilly followed. The
process time wi~lbe shotiened by:
(1)using a
pressurecanner,and
(vol@ge),
(2)startingwithHOTtapwaterfor
fastest heating of large quantities
of water.
..
i
...-
Page 12

suE’facecookingGuide
.—
/:
j:
k
1
~
i
!
\
(
~
(
(
(
{
1.Usemedium-or heavy-weight
cookware.Aluminumcookware
conductsheat fasterthan other
metals.Cast ironand coatedcast
ironcookwareis slowto absorb
heat, butgenerallycooksevenlyat
LOWor ~ED settings.Steelpans
maycookunevenlyif notcombined
withother metals.
Cereal
Cornmeal, grits,
oatmeal
Coffee
Eggs
Cookedin shell
Fried sunny-side-up Covered
Fried overeasy Uncovered
Poached
Scrambledor omelets
iMeaL%,Poultry
Braised: Pot roastsof
beef, lamb or veal;
pork steaksand
chops
~in-fried: Tender
chops; thin steaks up
:03/4-inch; minute
steaks; hamburgers;
franksand saus:)ge;
thin fish fillets
Covered
Saucepan
Uncovered
Saucepan
Percolator
Covered
Saucepan
Skillet
Skillet
Covered
Skillet
Uncovered
Skillet
Covered
Saucepan
Covered
Skillet
uncovered
]killet
2. Toconservethe mostcooking
energy,pans should be ilat on the
-.. -
bottom,havestraightsidesand tight
fittinglids. Matchthesizeof the
saucepanto the sizeof~hes~]rface
unit. A panthat extendsmorethan
an inchbeyondtheedgeoftl]etrim
ringtraps heatwhichcauses
discolorationrangingfrom blueto
dark grayon chrometrim rings.
Directionsand Setting
toStart CookingYood Cookware
HIGH. In coveredpanbring
waterto boil beforeadding
cereal.
HIGH. Stir togetherwateror
milk, cocoa ingredients.
Bring justto a boil.
HIGH. Atfirst perk, switch
heatto LOW.
HIGH. Cover e~s withcool
water.Coverpan, cook
until steaming.
MED HI. Melt butter, add
e~s andcover skillet.
HIGH. Melt butter.
HIGH. In coveredpanbring
waterto a boil.
HIGH. Heat butteruntil light
goldenin color.
HIGH. In coveredpan bring
fruit and water to boil.
HIGH. Melt fat, thenadd meat.
Switch to MED HI tobrown
meat. Addwater or other liquid.
[+IGH.Preheat skiilei, then
~reaselightly.
3. Deep l~atFrying.Do notoverfill
kettlewith fatthatmayspillover
whenaddingfood.Frosty foods
bubblevigorot.isly.WatchfoGJs
fryingat hightemperaturesand
keeprangeand hoodcleanfrom
accum~~latedgrease.
SettingtoComplete
Cooking
LOWor WARM,then addcereal.
Finishtimingaccording
topackagedirections.
MED, tocook 1or 2 minutes
tocompletelyblend ingredients.
LOWto maintain gentle but
steadyperk.
LOW.Cook only3to 4
minutesfor softcooked;
15minutesforhard cooked.
Continuecooking at MED HI
until whitesarejust set, about
3to5 more minutes.
LOW,then addeggs.When
bottoms ofeggs havejust set,
carefullyturn overto cook other
side.
LOW.Carefullyadd eggs.
Cook uncoveredabout5
min~tesat MED HI.
MED. Adde~gmixture.
Cook, stirringtodesired
doneness.
LOW.Stir occasionallyand
check for sticking.
LOW.Simmer until fork
tender.
MED HI or MED. Brown and
cook to desired doneness,
turning overas needed.
Cerealsbubbleandexpandas
they cook; use large enough
saucepanto Preventboilover.
Milk boilsoverrapidly.Watchas
boilingpointapproaches.
Percolate8to 10minutesfor
8cups, less for fewercups.
Ifyoudonot cover skillet, baste
eggs with fat to cook topsevenly.
Removecookedeggswith slotted
spoonor pancaketurner.
Eggs continue to set slightly after
cooking. For omelet do not stir
last fewminutes. When set, fold
in half.
Fresh fruit: Use 1/4to 1/2cup
waterper poundof fruit.
Dried fruit: Use wateras package
directs, Time dependson whether
fruit has been presoaked. If not,
allowmore cooking time,
Meat can be seasonedand floured
beforeit isbrowned, if desired.
Liquid variations forflavorcould
be wine, fruit or tomatojuice or
meat broth.
Timing: Steaks 1to 2-inches: 1to
2 hours. BeefStew: 2 to 3 hours.
Pot Roast:2‘h to 4 hours.
Pan fryingis best for thin steaks
and chops. If rare is desired, preheat skillet before ~~ddi!lgmeat.
——
.. —.—..— .. ...-——...
(
/ --.,
(1
-.-~
--
-.
,<--,-.,,
-—=
::
:.
i
;.
\
I
.
Page 13

1,
Fried Chicken Covered
Panfried bacon
Sauteed:Less tender
thinsteaks (chuck,
round, etc.); liver;
thickor wholefish
Simmeredor stewed
meat; chicken;corned
beet smoked pork;
stewingbeet tongue;
etc.
%Sta
Noodlesor spaghetti
Puddings, Sauces,
Candies, Yrostings
%kgetables
Fresh
FSi)Zen
Soutced: Onions;
green peppers;
[iiUSh~!JnlS;celery;etc.
——.
I?;ce:3inf3Grits
., -
.. ...
..—.
—
Pressure
Cookeror
Canner
Uncovered
Saucepan
Covered
Saucepan
Covered
Saucepan
Uncovered
Skillet
Covered
Aaucepan
I
Cookware
Skillet
Uncovered
Skillet
Covered
Skillet
Covered
Dutch Oven,
Kettleor
Large
Saucepan
Small
Uncovered
Saucepan.
Use small
surfaceunit
Skilletor
Griddle
Covered
LargeKettle
or Pot
Directionsand Setting
toStartCooking
HIGH. Meltfat.Switchto
MED HI to brownchicken.
HIGH. In coldskillet, arrange
bacon slices. Cookjust
untilstartingtosizzle.
HIGH, Melt fat, Switch to
iMEDtobrownslowly,
HIGH. Cover meat with water
andcoverpan or kettle.
Cookuntil steaming.
wm. Allow10to15minutesto
meltthrough. Stir to smooth.
MED HI. Heatskillet 8to
10minutes. Greaselightly.
HIGH. In covered kettle, bring
saltedwater toa boil, uncover
andadd pasta slowlyso
boilingdoes not stop.
HIGH. Heat until firstjiggle is
heard.
HIGH. Bringjust to boil.
HIGH. Measure 1/2 to 1inch
tvaterinsaucepan. Add
;altand prepared vegetable.
ncoveredsaucepan bring
o boil.
+IGH. Measure water andsalt
as above. Add frozenblock
ofvegetable.Incovered
saucepan bring to boil.
HIGH, In skillet melt fat.
—.—
HIGH. Bring salted water to a
boil.
$etthlg toComplete
Cooking Comments
LOW.Cover skillet and
cookuntiltender.
Uncoverlast few minutes.
MED HI. Cook, turning
over as needed.
LOW.Coverandcook
until tender,
LOW.Cookuntilfork
tender. (Watershould
slowlyboil). For very large
loads, medium heat may
I
be needed.
Cook2 to3minutesperside.
MED HI. Cookuncovered
until tender.For large
amounts, HIGH maybe
neededto keepwater at
rollinghoi!throughout
entire cookingtime.
MED HI for foodscooking
10minutesorless.MED for
foodsover 10minutes.
LOW.Tofinish cooking.
MED. Cook 1pound 10
to 30 or moreminutes,
dependingon tenderness
of vegetable.
LOW.Cook accordingto
time onpackage.
MED. Addvegetable.
Cook until desired
tenderness is reached.
WARM. Coverand cook
according to time.
For crispdry chicken,coveronly
af@rswitchingto
minutes.Uncoverandcook,turning
occasionally10to 20minutes.
A moreattention-freemethod
is to startandcook at MED.
Meat maybe breadedor
—. .— 4,-.
LOWfor 10
marinatedin saucebeforefrying.
Add salt or otherseasoning
beforecooking if meathas not
beensmokedor otherwise
cured.
When melting marshmallows,add
milkor water.
Thick battertakes slightlylonger
time. fim overpancakeswhen
bubblesrise to surface.
Use largeenoughkettle to
preventboilover.Rsta doubles
in size wnencooked.
Cooker shouldjiggle 2 to 3times
per minute.
Stir frequently to prevent
sticking.
Uncoveredpan requires more
water andlongertime.
Break up or stir as needed while
cooking.
~rn overor stir vegetableas
necessary for evenbrowning.
Triple involumeafter cooking.
Time at WARM.Rice: 1cv.price
and 2 cups water—25minutes.
Grits: 1cup grits and 4 cups
water—40minutes.
1
I
j3
Page 14

Theautoma~ictimer and clockon
yourra]lgeare helpfuldevicesfiat
serveseveralpurposes. Theknob
locationson some rangemodels
mayvary and willlook likeone of
thetwo setsoftimers below.
Models:w53m, HJ,
wmJ
TosetCloclc
SET’THE CLOCK, pushthe
~
center knob in
handsto the correct time. (The
MinuteTimer pointer willmove
aiso, let knobout, turn the Timer
pointer to OFF.)
To set Minute mmer
The Minute Timer has been
combined withthe range clock.
Use it to timeall your precise
cookingoperations. You’ll
recognizethe Minute Timer as the
pointer which is different in color
and shape than the clock hands.
~ SET THE ~INUTE TI~E~,
turn the center knob, without
pushing in, untilpointer reaches
number of minutes you wish to
time. (Minutes are marked, up to
60, in the center ring on the clock.)
At the end of the set time, a buzzer
sounds to tellyou time is up. ~rn
~~nob,
withoutpushing in9until
pointerreachesOFF ar]dbuzzer
stops.
andturn the clock
me Bakeuses
Automatic“her
UsingAutomaticTimer,youcan
TIME BAKEwith theovenstafiing
immediatelyand turningoff atthe
StopTimeset or setboth DELAY
START(somemodelsmaysay
START)and STQPdialsto
automaticallystart andstopoven
at a latertime ofday.It takesthe
worry outof notbeinghometo
startor stoptheoven.
Settingthe dialsfor TIME BAKE
is explainedin detailon page 16.
Model W532GN
clock and Mnute her
This modelhas a timeof day clock
and minutetimer butdoes not have
STARTand S~P dialsneeded for
TIME BAKEfunction.
Quetiioma%ldhwem
Q.Howcan I 8NQmyMinu@
mmer
hmakemySwrface
aookfngemier?
A. YourMinuteTimer willhelp
timetoti cookingwhich includes
timeto boilfoodand change
tempra~reso Do notjudgecootig
timebyvisiblesteamonly.Food
wi~~cook in~overedeon~iners
eventhoughyoucan’tsee any
steam.
Q. Must the cRockbe set on
Corrwt time of &y when I tish
to use the Automatic her for
bating?
A. Yes,if youwish to set the
DELAYSTAR’ or S~P dialsto
turn on and offat settimes during
timed functions.
Q. can I use the Mnute mmex’
daring oven Cooting?
A. The Minute Timercan be used
during anycookingfinction. The
AutomaticTimers(DELAYSTART
and S~P dids) are used with
T~~~ BA~ finction
Q. can I Change the Clwk while
I’m me cooking in the oven?
A. No.
during any programthat uses the
oventimer. Youmust either stop
those programs or waituntil they
are finished beforechanging
Theclock cannot be changed
O~~y.
time.
Page 15

&*l 1. LOOkatthecontrols. Be sure
‘S::~:;you understandhowto setthem
properly.Readoverthe directions
for the Automatic Oven Timerso
youunderstanditsuse withthe
controls.
2, Checkoveninterior. Lookat
tie shelves.Tdcea practice run at
~~movingandreplacingthempmperly7
togivesure, sturdySUppOrt.
3. Readoverinformationandtips
thatfollow.
4. I<eepthisbook handy soyoucan
referto it, especiallyduring the
firstweeksofgettingacquainted
withyour range.
The controls forthe ovenare
marked OVEN SET and OVEN
TEMP. (Knob appearance varies.)
OVEN SET has settingsfor BAKE,
TIME BAKE (onmodels so
equipped), B~OIL and OFF. When
you-turnthe knob to the desired
setting, the proper heating units are
thenactivated for that operation.
OVEIqTE~P maintains the
temperature you set, from WA~~
(150°1J.)to B~OIL (550°F.).
The oven cyclingLight glows
untilthe ovenreachesyourselected
temperature,then goesoffand on
with theovenunit duringcooking.
P~HEATING the oven,evento
hightemperaturesettings,is speedy
—rarelymore.thanabout10finutes.
Preheatthe ovenonlywhen
necessary.Most foodswill cook
satisfactorilywithout preheating.
If youfind preheatingis necessary,
keep an eyeon the indicatorlight
and putfood in theovenpromptly
after lightgoesout.
The shelvesare designedwith
stop-locksso that when placed
correctly on the shelf suppo~,
they (a) will stopbeforecoming
completely from the oven,and (b)
till not tiRtwhen removingfood
from or placing food on them.
TO ~~OVE shelves with.these
type of shelf supports from the
oven, lift up rear of shelf, pull
forward with stop-locks along top
of shelf supports. Be certain that
she]f iscool before touching.
TO ~PLACE ti]ese shelvesin the
oven, insert shelf with stop-locks
resting on shelf supports. Push
shelf toward rear of oven; it will fall
i~~~~~]a~e.VJhen shelf is in proper
position, stop-locks on shelf will
~ull\lnder shelf su~qpor:when shelf
is pulled forwa~d.
Models M524N,
M525GN, M532GN, W536N
~ MMO~ shelvesfrom ovens
withthese type ofshelf supports,
pullthe shelftowardyou, tiltfront
end upwardandpullthe shelfout.
~ W.PLACEthese shelves in
oven,place shelf onsheIf support
with stop-locks(curved extension
under shelf) facingup and toward
rear of oven. T’fltup front andpush
shelftowardback ofovenuntil it
goespast “stop” onthe ovenwall.
Then lower the frontof shelfand
push itdl the wayback.
Both stylesof ovenshavefour shelf
suppo~ marked A (bottom), B, C
and D (top). Shelfpositionsfor
cookingfood are suggestedon
Baking,Roasting and Broiling
pages.
W525N,
ovenLi*t
(onmodelssoequipped)
The
lightcomesonautomatically
when tie door is opened. On mtiels
with ovenwindowuse switchto mm
light
On and off W~~~ ~00~ iS C~OS~.
Page 16

..
VJhencookinga foodfor[hefirst
timeinyotlrnewoven, usetime
givenon recipesas aguide. Oven
theri~~ostats,overa -periodofyears,
may“drift” fromthe factorysetting
anddifferencesin timingbetween
anold and a newovenof5 to 10
minutesare not unusual and you
maybeinclind to thinkthattie new
ovenis notperformingcorrectly.
However,yournewovenhasbeen
setcorrectly atthe factoryand is
moreapt tobe accuratethanthe
ovenit replaced.
Step 1:Place foodin oven,being
certain toleaveabout 1 inchof
spacebetween pansand wallsof
ovenfor goodcirculationof heat.
Closeovendoor. ‘Duringbaking,
avoidfrequentdoor openingsto
preventundesirableresults.
Step 2: Turn OVEN SET knob to
BAKEand OVENTE~P knob to
temperature on recipe or on Baking
Guide.
Step 3: Check food for doneness
at minimumtime on recipe, Cook
longerif necessary. Switch off heat
:lndremove foods.
that youset. ExamplesofImmediate
Start(oventurnson nowand you
setit toturn offautomatically)or
DelayStartand Stop(settingthe
oventoturn onautomaticallyat a
latertime and turnoffat a preset
stoptime) willbe described.
How b set tietik
SM* and Automatic stop
N~E: Beforebeginning make
surethe handsofthe rangeclock
showthe correct timeofday.
ImmediateStartis simplysetting
ovento startbakingnowand turning
offat a later timeautomatically.
~emernber, foodscontinuecooking
after controlsare off.
Step 1:Toset Stop Time, push in
knobon STOP dialand ~~rnpointer
to timeyou wantovento turn offi
for example6:00. The DELAY
STARTdial (somemodels maysay
START)should beat the same
positionas thetimeof dayon clock
Step 1:Toset start time, push ill
knab on DELAYSTARTdialand
turn pointerto timeyouwantoven
toturn on, for example3:30.
Step 2: Toset StopTime, push in
knobon STOPdial and turn pointer
totime you wantovento turn off,
for example6:00. This meansyour
recipe called fortwo and one-half
hoursof bakingtime.
N~E: Time on STOPdial must
be later than time shownon range
clock and DELAYSTARTdial.
Step 3: Turn OVEN SET knob to
TIME BAKE. Turn OVEN TE~P
knob to 250”F.or recommended
temperature.
Place food inoven, close the door
and automatically the ovenwill be
turned on and off at the times you
haveset. Turn OVEN SET to OFF
and remove food from oven.
OVEN INDICA~~ LIGHT(s) at
TIME BAKE settingmay work
differently than they do at BAKE
setting. Carefully recheck the steps
given above. If alloperations are
done as explained, ovenwill
operate as it should.
‘ion modelsequ.ip~~.edW’kl:
~~~~ ~~~(~.
I
Page 17

glasscookwaregen~rallyabsorb
heat, whichmayresultin dry,crisp
.
uverbrowning.For-best‘b;owning
results, we recornnlenddullbottom
sutiacesforcakepansandpieplates.
crusts. Reduceovenheat25”F.if
~ig~ter c~~Sts are desired.Rapid
browningofsomefoodscart be
achievedbypreheatingcast iron
cookware.
necessary,especiallyfor foods
whichcook longerthan 30 to40
minutes.For foodwith shofi
cookingtimes, preheatinggive~
bestappearanceandcrispness.
4. Open theovendoor to check
foodas littleas possibleto prevent.
unevenheatingandto saveenergy.
Shelf
IB
Position
B,AShinyMetal Panwith
B
B
A, B
B
A, B
A, B
B, A
A
B
A
A, B
B
A, B
B
B
B
B, C
B, C
B,C
B,C
Food Container
Bread
Biscuits(U-in. thick)
Coffeecake
Corn breador muffins
Gingerbread
Muffins
Popovers
Quickloaf bread
Yeastbread(2 loaves)
Plain rolls
Sweetrolls
,-
.
w’
Cakes
,1
(withoutshortening)
Angelfood
Jelly roll
Sponge
Cakes
Bundt cakes
Cupcakes
I
Fruit cakes
Layer
Layer,chocolate
Cookies
Brownies
Drop
Refrigcrti[or
~(Jl]cd or sliced
ShinyCookieSheet B, c
satin-finishbottom
Cast Ironor Glass
ShinyMetalPan with
satin-finishbottom
SninyMetalMuffin Pans
DeepGlassor Cast Iron Cups
Metalor GlassLoaf Pans
Metalor GlassLoaf Pans
ShinyOblongor MuffinPans
ShinyOblongor MuffinPans
Aluminumfibe Pan
MetalJelly Roll Pan
iMetalor Ceramic Pan
Metal or Ceramic Pan
ShinyMetal Muffin Parts
Metalor Glass Loaf or
TubePan
ShinyMetal Pan with
satin-finishbottom
ShinyMetal Pan with
satin-finishbottom
Metalor Glass Loaf Pans
Metulor Glass Pans
CookieSheet
CookieSheet
CookieSheet
Oven
Temperature
400°-4750
350°-4000
400°-4500
350°
400°-4250
375°
350°-3750
375°-4250
375°-4250
350°-3750
325°-3750
375°-4000
325°-3500
325°-3500
350°-3750
275°-3000
350°-3750
350°-3750
350°
325°-3500
350°-4000
400°-4250
375°-4000
Time,
Minutes
15-20
20-30
20-40
45-55
20-30
45-60
45-60
45-60
10-25
20-30
30-55
1O-M
45-60
45-65
20-25
2-4hrs.
20-35
25-30
40-60
25-35
10-20
6-12
7-12
Comments
Canned, refrigeratedbiscuitstake
2to4 minuteslesstime.
Preheatcast ironpan for crisp crust.
Decreaseabout5 minutes for muffin
mix, or bakeat 450”F.for25 minutes,
thenat 350”F.for 10to 15minutes.
Dark metalor glassgive deepest
browning.
For thin rolls, Shelf B maybe used.
For thin rolls, ShelfB maybe used.
Two-piecepan isconvenient.
Line pan with waxedpaper.
Paper liners producemore moist
crusts.
Use 300°F.andShelf B for small or
individualcakes.
Bar cookies from mix use sametime.
Use Shelf Cand increase temp.
25°F.to 50”F.for more browning.
Glassor Metal Rtn
GlassCustard Cups or Casserole
~sctin p;in of hoi water)
GlassCustard Cups or
~assero]c
~oilPanon Cookie Sheet A
;prcad to crust edges
A, B, C
B, A
A, B
A, B, C
A. B, c
B
B
B
B
B
..—
350°-400”
300°-3500
325°
400°-425”
325°-3500
400°-4250
400°-4250
450°
325°-4000
325°-3750
300°-3500
30-60
30-60
50-90
45-70
15-25
40-60
40-60
12-15
60-90
30-60
30-75
—
—.
Reducetemp. to300°F. for large
custard. Cook bread or rice pudding
with custard base 80 to 90 minutes.
Large pies use 400°F. and increase
time.
Toquickly brown meringue, use
400°F. for 8to 10minutes.
Custard fillingsrequire lower
temperature, longer time.
Increase time for large amount
or size.
—
Page 18

Roasting is tooting bydry heat.
Tendermeator pouh~ can be
roasteduncoveredin youroven.
Roastingtemperatures, which
shouldbelow and steady,keep
spatteringto a minimum. When
roasting,it is notnecessary to
sear, baste,cover or add water
to yourmeat.
Roastingis really a baking
procedureusedformeats.Therefore,
ovencontrols are set toBAKE.
(Youmayhear a slightclicking
sound, indicatingthe ovenis
workingproperly.) Roastingis
easy;just followthese steps:
Step 1:Check weight ofrneat, and
place,fatsideup,onroastingrack
ina shallowpan. (Broilerpanwith
rackis agoodpan forthis.)Line
broilerpanwithaluminumfodwhen
usingpanformarinating,cooking
withfruits,cookingheavilycured
meats,or forbastingfoodduring
cooking.Avoidspillingthese
materialsonovenlineror door.
Step 2: Place in oven on shelf in
A or Bposition. No preheating is
necessary.
I
Step 4: Most meatscontinue to
cookslightlywhilestanding,after
beingremovedfromthe oven.
Standingtime recommendedfor
roastsis 10to20 minutesto allow
roastto firm up andmake it easier
to carve. Internaltemperaturewill
riseabout5° to 10”F.;to compensate
fortemperature rise, if desired,
removeroastfromovenat 5°to IOW.
less thantemperatureon guide.
NOTE: Youmaywish to useTIME
BA~, as described onpage 16,to
turn ovenon and offautomatically.
~emember that foodwill continue
to cookin the hotovenandtherefore
shouldbe removedwhen thedesird
internaltemperature has been
reached.
For mozen Roask
@Frozen roasts ofbeef, pork,
lamb, etc., canbe started without
thawing,but allow 10to 25 minutes
per pound additionaltime (10
minutesper pound for roastsunder
5 pounds, more timefor larger
roasts).
o Thaw most frozenpoultry before
roasting to ensure evendoneness.
Some commercial frozenpoultry
can becooked successfullywithout
thawing. Followdirections given
on packer’s label.
Questiomand&weTs
A. Checkingthefinishedinternal
temperatureat thecompletionof
cookingtimeis recommended.
Temperaturesare shownin Romting
I
Guideon oppositepage. Forroasts
over8pounds, cookedat 300”F.
withreduced time, checkwith
thermometerat half-hourintervals
afierhalf thetime haspassed.
Q.
why ismy roastcrumbling
whenI try toCarve it?
A. Roastsare easierto slice if
allowedto cool 10to 20 minutes
afier removingfromoven. Besure
to cutacross the grainofthe meat.
Q.DoI needtopreheatmy
eachtimeI cooka roast
oven
or poultry?
A. It is rarely necessary topreheat
youroven, only forvery small
roasts, which cooka short length
oftime.
Q.when buying a roast,are
any special tipsthat would
there
helpme cookitmore evenly?
A. Yes.Buy a roast as evenin
thickness as possible,or buy rolled
roasts.
Step
3: Turn OVENSETtoBAI<E
andOVENTENIP‘to 325”F.small
potlltrymaybecooked at 375”F.
f~~best browning.
Page 19

laPositionovenshelfat Bfor
srndl-sizeroasts(3 to 7 lbs.) and
atA for larger roasts.
2.Place meatfat-sideup, orpoultry
breast-sideup, orIbroilerpan or
ether shallowpan with trivet. Do
notcover.Do notstuff poultry until
just beforeroasting. Use meat
3. ~emGvefatand drippingsas
necessary.Basteas desired.
4. Shnding time recommendedfor
roastsis10to20rnim.ttestoWowroast
to firm up andmake iteasier to
carve. Internaltemperaturewillrise
about5°to 10°F.;to compensate for
temperaturerise, ifdesired,remove
thermometerfor more accurate roast from ovenat 5°to 10”F.less
doneness. (Donot place
than temperature
onguide.
thermometerin stuffing.)
5.Wozenroast$canbe
conventionallyroastedbyadding
10to25 minutes per poundmore
timethan givenin guidefor
refrigeratedroasts. (10minutes
per~und forroastsunder5punds.)
Defrostpoultrybeforeroasting.
Oven ApproximateRoastingTime,
Wp’e
Meat
Tendercuts; rib, high quality sirloin tip,
rumpor topround*
Lamb Legor bone-inshoulder*
Vealshoulder, legor loin*
Pork loin, rib
Ham, precooked
Ham, raw
*Forbonelessrolledroasts over 6-inchesthick, add 5 to 10minutes per pound to times givenabove.
hultry
Chickenor Duck
~hicken pieces
orshoulder*
I
~rkcy
Temperature Doneness
325° Rare:
325° Rare:
325°
325°
325° ToWarm:
325°
325°
375°
325°
Medium: 30-35
WellDone: 35-45
Medium: 25-30
WellDone:
WellDone:
WellDone:
WellDone:
I
WellDone:
WellDone:
WellDone:
inMinutesper Wund
3 to 5-lbs.
24-30
21-25
30-35
35-45
35-45
10minutesper pound (anyweight)
Under 10-lbs.
20-30
3 to 5-1?)s.
35-40
35-40
10to 15-lbs.
20-25
Internal
TemyFature “F
6to$-lbs.
18-22
22-25
28-33
20-23
24-28
28-33
30-40
30-40
10to H-]bs.
17-20
Over 5-ibso
30-35 185°-1!300
OverE-lbs.
15-20
130°-140°
150°-1600
170°-1850 ,
130°-1400 ,
150°-1600
170°-185°
1700-180°
i70°-180°
1259-1300
170°
185°-1900
In thigh:
185°-190°
‘-.
/
,“
.
-\
‘.
.-
Page 20

Broilingis cookingfoodbyintense
~jr-
,.-..
y“=
—.-
radiantheat fromthe upperunitin
theoven,Mostfish and tender cuts
ofmeatcan be broiled. Follow
thesestepsto keepspatteringand
smokingto a minimum.
Step 1:If meathas fator gristlenear
edge,cutvertical slashesthrough
bothabout2“ apart. If desired, fat
maybetrimmed, leavinglayer
about 1/8”thick.
Step 2: Place meat on broilerrack
inbroilerpan which comes with
range.Alwaysuse rack sofatdrips
intobroiler pan; otherwisejuices
maybecomehotenough to catchfire.
Skp 3:Wsitionshelfonrecommended
shelfpositionassuggestedinBroiling
Guideon oppositepage. Most
broilingisdone on C position, but
ifyour rangeisconnected to208
volts, you may wish to use higher
position.
Step 4: Leavedoor ajar a fewinches
(exceptwhen broiling chicken).
The door stays open by itself, yet
he propertemperatureis maintained
in theoven.
Step 6: Turn foodonlyonceduring
cooking.Timefoodsfor firstside
per Broiling
Turn food,then usetimesgivenfor
secondside asa guideto preferred
doneness.(Where twothicknesses
and timesare giventogether,use
firsttimes givenforthinnestfood.)
Step %Turn OVEN SET knob
to OFF. Servefoodimmediately,
and leavepan outsideoventocool
during mealfor easiestcleaning.
1. If desired, broiler panmaybe
linedwith foiland broilerrack may
becoveredwith foil for broiling.
AL}VAYSBE CERTP.INTOMOLD
FOIL THOROUGHLY TO
BROILER RACK,AND SLIT
FOIL TOCONFORM WITH
SLITSIN RACK. Broiler racksare
designedto minimizesmokingand
spattering, andto keepdrippings
coolduring broiling. Stoppingfat
and meatjuices fromdrainingto
thebroiler panpreventsrack from
serving itspurpose, andjuices may
become hotenough tocatch fire.
2. DO NOTplace a sheet of
aluminum foilon shelf. Todo so
mayresult in improperly cooked
foods,damage to ovenfinishand
increase in heaton outsidesurfaces
oftheoven.
Guide.
Q.
why shouldI leavethedoor
closedWhenbroilingfchic~~n~?
A. Chicke~~istheonly food
recommendedforclosed-door
broiling.This isbecausechickenis ~.
relativelythickerthan otherfoods
youbroil. Closing the door holds
moreheat in theovenwhichallows
chickento cook evenlythroughout.
Q. when broiling,
isitnecessary
toalwaysuse 2 rack in the pan?
A. Yes.Usingthe rack suspends
themeat ovelthe pan. Asthe meat
cooks,thejuices fallintothe pan,
thuskeepingnleatdrier. JUiCeS
are protectedby therack and stay
cooler,thus preventingexcessive
spatterand smoking.
Q. Should 1
saltthemeatbefore
broiling?
A. No. Salt drawsout thejuices
and allowsthemto evaporate.
Alwayssaltafter cooking.Turn
meat with tongs;piercing meat
with a fork also allowsjuices to
escape. When broilingpoultry
or fish, brush each side often
with butter.
Q.why are my mea@not$Urnillg
outasbrown as theyshoIRld?
A. In some areas, the power
(voltage)to the range maybe ~OW.
In these cases, preheat the broil
unit for 10minutesbefore placing
broiler pan with food in oven.
Check to see ifyou are using the
recommended shelfposition. Broil
for longestperiod oftime indicated
in the Broiling
onlyonce duringbroiling.
Guide.Turnfood
---
.=+i.
.>
E
Page 21

IE1-oiIi3%gGllide
Broilikng
-
Q-”
F
..~g.::
-?:y&i-
--
01
t
r
bl}ster Tails
(6to8-oz. each)
I
R38nS!ices
(prccooketi)
I
1. Alwaysuse broilerpanand rack
ttlatcomes withyouroven.It is
designed to minimizesmoting and
spatteringbytrappingjuicesin the
shieldedlowerpart ofthe pan.
2, Oven doorshouldbe ajarfor dl
foods exceptchicken; there isa
Toslash,cut crosswise through 6=Broilerdoes notneed tobe
outerfatsurface just to the edgeof preheated. However,forveq tiin
themeat. Use tongsto turn meat
overto prevent piercing meat and
Iosingjuices.
foods,or to increasebrowning,
preheatif desired.
~. Erozen steah can be
4. Ifdesired, marinatemeatsor conventionallybroiledby
chickenbeforebroiling.Or brush
positioningthe ovenshelfat next
sgecial~o~itionond;or which withbarbecue saucelist 5 to 10 ~owestshelfpositionmd increasing
h~ldsd;or opencorrectly.
minutesonly.
3. For steaksand chops,slashfat 5. When arrangingfoodonpan,
evedy aroundoutsideedgesofmeat.
do notletfatty edgeshang over
sides, whichcould soilo~enwith 208volts,rare steaks
cookingtime givenin thisguide
1%times per side.
& Ifyour ovenis connectedto
may be brotied
fatdripping. bypreheatingbroil heakr and
positioningthe ovenshelfone
positionhigher.
Quantity and/or
‘FoQd
Bacon ‘A-1b.(about8
GroundBeef
Done
Well
Beef
Steaks
Rare
Medium
WellDone
Rare
Medium
WeilDone
Chicken 1whole
BakeryProducts
Bread (Toast)or
ToasterPastries
English Muffins
Tkickness
thin slices)
l-lb. (4patties)
1Ato %-in. thick
l-inch thick
(1to 1%-lbs.)
I%-in.thick
(2to 2%-lbs.)
(2to2%-lbs.),
split lengthwise
to4 slices
2
1pkg. (2)
2(split)
2-4
l-lb. fiilets H to c
Yz-in.thick
-in. thick
I
Shelf
fisition
I
I
I
IBI
I
FirstSide
‘fime, Minutes
I
c
I
c
c
c
c
c
c
c
A
c
c
B
I
3%
7
7
9
13
10
15
25
35 10-15 Reducetimes about 5 to 10minutesper
13-16
5
8 8 Increase times 5 to 10minutesper side
I
SecondSide
~me, Minutis
4-5
7
9
13
7-8
14-16
20-25
‘/2
Do not
turn over.
5
10
Comments
Arrangein single layer.
Spaceevenly.
Upto 8patties take aboutsametime.
Steaksless than 1inchcook through
before browning. Panfrying is
recommended.
Slash fat.
side for cut-upchicken. Brush each side
with meltedbutter. Broil with skin
downfirst andbroil with door closed.
Space evenly.Place Englishmuffins
cut-side-upand brush with butter, if
desired.
Cut through back of shell. Spread
open. Brush with melted butter
beforeand after half time.
Handle and turn verycarefully.
Brush with lemonbutter before and
during cooking if desired. Preheat
broiler to increase browning.
for 1%-inchthick orhome cured.
Slash fat.
., -
●
13
4-7
10
4-6
12-14
Slash fat.
If desired, split sausages in half
lengthwise; cut i~lto5 t~ 6-inch piecss.
—.
Page 22

Propercare andcleaningare
importantsoyour rangewillgive
youefficientaridsatisfactory
service. Followthesedirections
carefullyin caringfor yourrangeto
assuresafeandproper maintenance.
-.
—
Yourrangeisventedthrougha duct
locatedundertherightrear surface
unit. Cleanthe ductoften.
...-z ---
The porcelainenamel cooktopis
sturdybut breakableif misused.
This finishis acid-resistant.
However,any acid foodsspilled
(suchas fruitjuices, tomatoor
vinegar)shouldnot be permitted
toremain onthe finish.
cleati~ undertheRange
(onmodels equippedwith
bottomdrawer’)
The area underthe range ofmodels
equippedwith a bottom drawercan
be reached easily for cleaningby
removingthe bottomdrawer.To
remove,puil drawer out allthe way,
tiltup the frontand removeit. To
replace, insert glidesat back of
drawerbeyondstop on range glides.
Lift drawer if necessary to insert
easily.Let front ofdrawer down,
thenpush into close.
Removable oven Door
TOREPtiOVEdoor,opentoBROIL
position,or whereyoufeelhinge
slightly. Grasp door at sides;
catch
liftdoor upandawayfromhinges.
ToREPLACE,graspdooratsides.
Line up doorwithhingesantipush
door firmly i~to place.
.
w’
Toremove:
@Make sureunitis cool.
@Lifi up rightrear surfaceunit.
e Remove
@Lift out ovenventduct.
Toreplace:
@Place thepart over the ovenvent
locatedbelowthe cooktopwith
openingofthe duct underthe round
openingin the drip pan. It is
importantthat theduct is inthe
correct position somoisture and
vaporsfrom the ovencan be
released during ovenuse. N~E:
Never coverthehole in the oven
ventduct with aluminumfoilor
any other material. This prevents
the ovenvent from working
properly during any cookingcycle.
LampReplacement
(onmodelssoequipped)
CAUTION:Beforereplacing
your ovenlamp bulb, disconnect
the electricpowerforyourrange
atthe mainfuseor circuit
brealier panel. Besuretolet
thelampcoverandbulb cool
completelybeforeremoving
or
Iepiacingthem.
drip pan andring.
The ovenlamp (bulb)iscovered
with aglass r;~ovable coverwhich
isheld inplace with abail-shaped
wire.Removeovendoor,ifdesird,
to reachcovereasily.
T’ remove:
@Hold hand undercover so it
doesn’tfallwhen released. With
fingersof same hand, firdy push
back wire bailuntil itclears cover.
Lift offcover.DO N~ REMOVE
ANY SCREWS.
~Replacebulb with 40-watt home
appliancebulb.
To replace cover:
~Place it into groove of lamp
receptacle. Pull wire bail forward
to center ofcoveruntil it snapsinto
place. When in place, wire holds
coverfirdy. Be certain wire bail is
in depression in center ofcover.
~Connect electric power torange.
surface Udb
Clean the area under the drip pans
often. Built-up soil, especially
grease,
cleaning easier, stay-upunits lifi up
and lock in the upposition, and
plug-inunits are removable.
caution: Be sure all controls are
turned to OFF and surface umi~
are coolbefore attempting to lift
or remove
may catch fl~re.TOmake
them.
Afterliftingthe shy-upunitsor
removingplug-inuritis,removetile
trimringsanddrippansunderthe
~~nitsandcleanthemaccordingto
Page 23

\
-——.-..——---------.---
--.—-—-—.—.—L,
Youcan lift a stay-upunitupward
about6“and it willlock in theup
position.
Toreposition the Stiy-up Utit:
~Replacethe drip pan and trim
ring intothe recess in the cooktop.
*fit the trim ring in place overthe
drip pan. The drip pan must be
underthe trim ring.
@Guide the surfaceunit into place
so itfits evedy intothe trim ring.
Plug-inunits can be removed.
Terminals
@Firstplace the drippan, thenthe
trimring intothesurfaceunitcavity
foundon top ofthe cooktopso the
unitreceptacle canbe seen through
the openingin the pan.
~Insert theterminals oftheplug-in
unitthroughthe openingin the drip
pan and intothe receptacle.
@Guide the surfaceunit intoplace
so itfits evenlyinto the trim ring.
Note: The drip pan must be under
thetrim ring.
CAUTION
~Do notattemptto clean plug-in
surfaceunits in an automatic
dishwasher.
@Do not immerse plug-in surface
unitsin liquids ofany kind.
@Do notbend the plug-in surface
unitplug termhlals.
~Do notattempt to clean, adjust
or in any way repair the plug-in
receptacle.
Usetimegivenonrecipewhen
cwking firsttime.Oventhermostats,
in time,may“drifi” fromthe
factorysettinganddifferences in
timingbetweenarioldand anew
ovenof5 to 10minutes are not
unusual.If youfindhat yourfoods
consistentlybrowntoolittle.or too
much, youmaymakea simple
adjustmentin thethermostat
(OvenTemp)knob.
I
ml] knob Omshaft, look at back
ofknob and note Current setting
before making any ‘adjustment.
1. M offknob. Loosenboth screws
on backof knob.
2. Movepointerone notch in
desired direction. (On bobs where
pointeris fixed, movescrewthat is
betweenH~TER and COLDER
markings.)To increasetemperature,
turn towardWSE (or H~TER);
to decrease, turn towardLOWER
(orCOLDER).Thenumber of
degrees F.each notch represents is
indicatedon the back ofthe knob,
Tightenscrews.
3. Return knob to range, matching
flat area ofknob to shafi. Recheck
ovenperformance beforemalting
an additionaladjustment.
Page 24

PART
BakeUnit and
Bl”oiiunit
NIATERIALS~ USE
1
Do notcleanthebakeunitorbroilunit.Anysoilwillburnoffwhentheunitis heated.
NOTE: The bake unit is hjnged and can be lifted gent!yto clean the oven floor. If spillover,
GENERAL DIW.CTIONS
residue,or ashaccumula~aroundthebakeunit,gentlywipearoundtheunit withwarmwater.
Control Knobs:
Wnge Topand Oven
Outside Glass Finish
Metal, including
Brushed Chrome
Cooktop
Porcelain Enamel
and %inted Surfac#
I ~Soapandwater
1 @Soap-Filled Scouring Pad
~Commercial OvenCleaner
0 Dishwasher
o Nlild Soap and Water
0SoapandJvater
~Soapand Water
~PaperTowel
s DryCloth
J SoapandWater
Drainfat,coolpanand rackslightly.(Donotlet soiledpanandrackstandinoventocool,)
Sprinkleondetergent.Fillthepanwithwarmwaterandspreadclothorpapertoweloverthe
rack. Letpanandrackstandfora fewminutes.Wash;scourifnecessary,Rinseanddry.
OHION: Thebroilerpanand rackmayalsobecleanedina dishwasher.
Pulloffknobs.Washgentlybutdonot soak, Dryandreturncontrolstorangemakingsureto
matchflatareaontheknobandshaft.
Washallglasswithclothdampenedinsoapywater.Rinseandpolishwitha
knobsareremoved,donotallowwatertorundowninsidethe
DONOT
abrasives, ammonia, acidsor dry cloth.
commercial oven cleaners.
DO N~ USEovencleaners,
cleansing powders or harsh paper towelorclothto wipeup rightaway.Whenthe
abrasives. Thesemight surfacehascooled,washandrinse.Forotherspills,suchas
scratchthe surface.
USE steel woo], Tosafelycleansurfaces:wash,rinse,andthenpolishwitha
Ifacidsshouldspillontherangewhileit is hot,usea dry
fatsmatterings,etc., washwithsoapandwaterwhencooled
surfaceofglasswhilecleaning.
dry cloth.If
andthenrinse.Polish whhdry cloth.
Oven Doo@
OvenLiner:z
(CAUTION:Whenin use,
light bulbs can become
enoughto breakif
warm
touchd .wjthmoistcloth
or towel.Whencleaning,
avoidtouchingwarm
lampswithcleaning
~SoapandWater
~SoapandWater
~Soap-FilledScourjngPad
g CommercialOvenCleaner
DON~
cleansing powders or harsh page22.Use soapandwaterto thoroughlycleanboththe
abrasives.
Cool
USEovencleaners,
beforecleaning.
FOR LIGHTSOIL:Frequentwipingwithmildsoapandwater(especiallyaftercooking
meat)willprolongthetimebetweenmajorcleaning.Rinse
liner causes additional stains when
FORHEAVYSOIL:Choosea non-abrasivecleanerandfollowlabelinstructions,usingthin
layerof cleaner.Use ofrubber glovesisrecommended.‘Wipeor rublightlyonstubborn
spots.Rinsewell.Wipeoffanyovencleanerthatgetsonthermostatbulb.Whenrinsingoven
after cleaning,alsowipethermostatbulb.
Toremoveovendoorforeasier cleaning,seeinstructionson
insideandoutsjdeofdoor.Rinsewell.N~E: Soap left
on door liner causes additional stains when the oven
is reheated.
thoroughly. NT~E: Soap left on
ovenis reheated.
clothsif lampcoveris
removed.j
OvenVentDuct
@SoapandWater
RemovetheOvenVentDuctfoundunderthe right rear surfaceunit. Washinhot, soapywater
anddry and replace.(Openingshould matchopeningindrippan.)
Shelves e SoapandWater
@Soap-FilicdScouringPdd
QCommercialOvenCleaner
Calr[)d’”’
Unit Coils
~$()~:~g~~r~w~r
.
cIirt}ille-Piatc(3 o
‘pi.~filR;i]gs
$urfi~ce
QSoap andWater Forcleaning, removedrawerbypulling it all the wayopen, tilt upthefrontand lift out. Wipe
Soapand Water
QStiff-BristledBrush spatter will not“burn on” nexttimeyoucook. Toremove
Yourshelvescan becleanedbyusinganyandall mentionedmaterials.Rinsethoroughly
!Oremove
~arkcning and discoloration. When using for first time, test cleaner on small part of shelf and
:heck for discoloration before
DONOTUSE
:lea~~the surface
DONOT!~andlethe unit
before completely cooled.
DO N~ inlnlerse plug-i~l
units
\\,it]ldampclothor spongeand
all materials after cleaning. NOTE: Some commercial oven cleaners cause
completelycleaning.
dishwasher to
unitcoils.
Spattersand spills burnawaywhenthe cojlsare heated.At
theendofa meal, removeall utensilsfromthe Calrod” unit
andheatthe soiledunitsat HI. Letthe soil burnoffabouta
minuteandswitchthe unitsto OFF.Avoidgettingcleaning
malerialsonthe coils. Wipeoff anycleaningmaterials with
inanyIiindof liquid.
a damppaper towelbeforeheatingthe Calrod” unit.
replace.NeverUsehar.sllabrasives or scouring pads.
Cleanas describedbelow or in the dishwasher.Wipeall ringsafter eachcookingso unnoticed
“burned-on”spattersusc anyor all
QSoap-FiilcdScouringPad cleaningmaterials mentioned.Rublig/zt/ywithscouringpadto preventscratchingofthe
(Non-metallic)
surface.
/i!l;n.liElt!zll QSoapand Water COO1~>anslightly.Sprinkleon detergentand washor scourpan whh warmwater,Rinse and
Ilrip PZS15
@Soap-Fil]cdScouringPad
dry.In additi{~n,pan mayalso be cleaned in the dishwasher.
~PlasticScouring Pad
QDis11w3sher
‘Spil13~eof marinacics.fruit-juit’cs,.
~onla[osaucesandbastingmstcri~lscontainingacids maycause discoloration. Spilloversshouldbe wipedup
inlnledi~[c]y,wilhcare being [akcnnotto {ouchanyhotporiion of the oven.
—-—
lJJhent]l~surfiaceiscool, clean and
rinse,
A--
Page 25

- IPRoB~~~
....
.’ -
OVEN LIGHT
DOES Nm
I
I
WORK
POSSIBLE CAUSE AND mMEDY
Plug on rangeis not completelyinsetied in the electricaloutlet.
. . —
—— .
The circuitbre~er in yourhouse!~asbeen tripped, or a fusel~asbeen blown.
Ovencontrolsnot properly set.
Light
bulbis loose.
Bulbis defective.Replace.
Switchoperatingovenlightisbroken. Call for service.
OVEN SETbob not set atBROIL.
OVENTEMP knob not setat BROIL.
Door not lefiajar as recommended.
Improper shelf positionbeing used. Check BroilingGuide.
Necessary preheating wasnot done.
Food isbeing cookedon hot pan.
UtensiIsare not suitedfor broiling.
Aluminumfoil used on the broilpan rack has not been fittedproperly and slit
as recommended.
FOOD DOES NOT ROAST
ORBAKE PROPER~~
;
—
‘-I
CALROD@SURFACEUNITS
t40T FUN~IONING
PROPERLY
OVEN SET hob notset on B~.
OVEN TEMP hob not setcorrectly.
Shelfposition is incorrect. CheckRoasth~gor Baking Guides.
Oven shelfis notlevel.
lncor~ectcoob~are or cootiare ofimproper size isbeing used.
A foiltent was not used when needed to slowdown browningduring roasting.
Surface unitsare notplugged in solidly.
Trim rings/drip pans are not setsecurely in the rangetop.
Surface unit controls are not properly set.
‘.,
,,:
—.
1
‘>
9
~ “
I
2.5
Page 26

-,,..-.—_.
.
... —---------------—--———-----
..--—-
.-—,......————
_— .—-...—-———-—.—-——.-------.—-—
-,
,.
.. .....-.
d.,.
whateveryoLIrquestionaboutany
Hotpointmajor appliance,GEAnswer
Cente@ informationserviceisavailableto help.Yourcall-and your
question—willbe answeredpromptly
andcourteously.Andyoucan call any
time.GEAnswerCente# serviceis
open 24 hours a day7 daysaweek.
I’OLI~Hotpoint‘applia~ce,scheduled
.1a time that’sconvenientfor you.
fanyGE ConsumerServicecompany
operatedlocationsoffer youservice
todayor tomorrow,or atyourcon-
~crlience(700 a.m.to 700 p.m.weekda}-s,9:00 ~,nl,to
2:00 p.m. Saturdays).
OLtrfactory-trainedtechniciansknow
j(~~~rapplianceinsideand out-so
n~~~strepairscan be handledinjust
OIICvisit.
Youcan havethe semre feelingthat
GE ConsumerServicewillstillbe
thereafteryourHotpointproduct
warrantyexpires.Purchasea GE
contractwhileyourwarrantyis stillin
effectand you’llreceivea subsnntial
discount.Witi a multiple-yearcontract,you’reassuredof futuresemice
at today’sprices.
TelecommunicationDevicefor theDeaf
1=;.:,,:1
----%
.JL,
j
./’
,,+--,
.
.,
!~
\
~. ...
Upon request,wewillprovideBraille
controlsfor a varietyofHotpoint
appiiances,and a brochure to assistin
plan~linga barrier-freekitche~lfor
personswithlimited mobility.Tc>obu~inthese items,free of charge,c,AI
800.626.2000.
Conslllmers with impaired. heaying
speech who have accesstoa TDD
or
a cox~ve~ltiondteletypewriter may
01.
call 800-TDD-GEA.C(800-833-432~?)
to reciulestil?forlnation or sell~ice.
“
Page 27

YOURHQTPOINT RANGE
WARRANTY
Saveproofof original purchasedatesuch asyoursalessiipor cancelled checkto establishwarranty period.
FULL ONE-YEARWARRANTY Thiswarrantyis extendedto
original purchaserand any
Foroneyearfrom
purchase,we
date of original
will provide,free of
charge,partsandservicelabor
inyour hometo repairorreplace
anypart of the range that fails
becauseof a manufacturingdefect.
the
succeeding owner
for products
purchasedfor ordinaryhomeuse
48mainland states,Hawaii
inthe
andWashington,D.C.[n Alaskathe
warrantyisthe sameexceptthat it is
LIMITEDbecausevoumust oavto
ship the productto~heservic’eshop
orfor the servicetechnician’stravel
coststo your home.
All warrantyservicewill be provided
byour FactoryService Centers or
byour authorizedCustomer Care@
servicersduring normalworking
hours.
Lookin theWhite orYellowPages
of yourtelephone directoryfor
HOTPOINTFACTORYSERVICE,
GENERAL ELECTRIC-HOTPOINT
FACTORYSERVICE
Or HOTPOINT
CUSTOMERCARE” SERVICE.
i
WHATISNOTCOVERED
@Service trips to yourhome to
teach you howto usethe product.
youruseand caE material.
Read
[fyou then haveany questions
about operating the product,
please contactyour dealer orour
Consumer Affairs office atthe
address below,or call, foil free:
GE AnswerCente@
800.626.2000
consumer information service
@Replacement of housefuses or
resetting of circuit breakers.
~ Failureofthe product if it is used
for other than its intended purpose
or used commercially.
~ Damageto productcaused
by accident, fire, floods or acts
of God.
WARF4AN~R IS NOTRESPONSIBLE
FOR CONSEQUENTIAL DAMAGES.
~ Improper installation.
If you havean installation problem,
contact your dealer or installer.
Youare responsible for providing
adequateelectrical, gas,exhausting
and other connecting facilities.
Some states do notallowthe exclusionor limitationofincidental or consequential damages, so the above limitationorexclusion
may notapply to you. This warranty gives you specific legal rights, and you may also have other rights which vary from stateto state.
Toknow what your legal rights are in your state, consult your local or state consumer affairs office or your state’sAttorney General.
$?r~~:~~~Q~: ~@~~K~~ ~~~Ct~iC ~0~~~~~
Ii further help is ifieeded co~leerning this warranty, E’4vite:
kqallagev—c~ns!jn?er Affaii’s, GE $Ippliances, Louiswi!!e, KY 40225
.————.
m,. -Qm.- .-. = ~m,.- m.m .=.= 2————7.-.-.-J =G- .- =---- -- ..:
.--_-_=-_.--.L__a==”_%”_% .—
— -- ‘. --=--.-=-~ -—--. --.,r=. . . . .. .... . -——--
. ‘=--..—. :. -,.. .-—.— ._.,..—
_.-. ..—,.,,,
\’,
=?
:,. ,,,
(
.
--=’-’==-’’’-”’j 1
 Loading...