

Page 1
GE Healthcare
Amersham
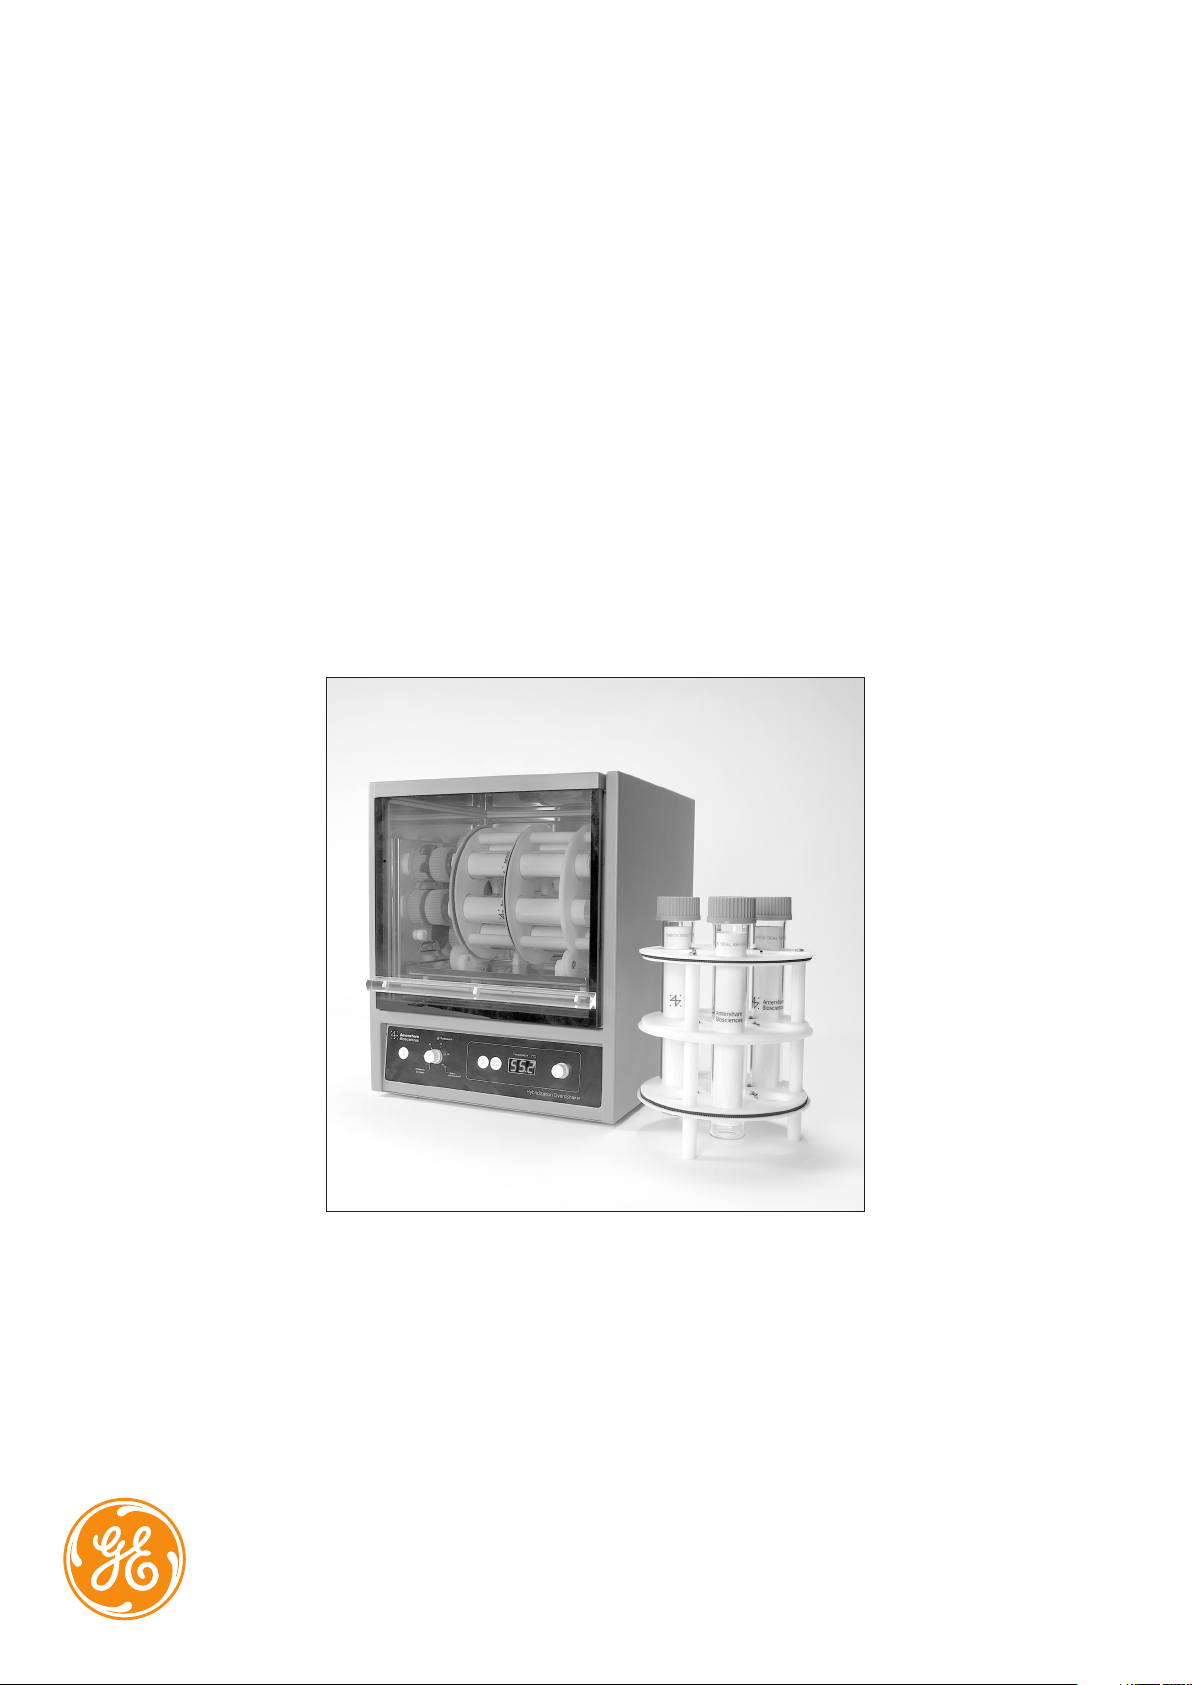
Hybridization oven/shaker
Product User Manual
Codes: RPN2510E
RPN2511E
RPN2512E
Page 2

Page finder
1. Legal 3
2. Introduction 4
3. Safety warnings and precautions 5
3.1. Electrical Installation 5
4. Specification 6
5. Setting up the Hybridization Oven/Shaker 7
5.1. Setting the oven temperature 7
5.2. Setting up the rotisserie 7
5.3. Setting up the platform shaker 8
6. Hybridization using the platform shaker 9
7. Hybridization using the rotisserie 10
7.1. Assembly of membranes into bottles 10
7.2. Hybridization 10
7.3. Membrane washing procedures 11
7.3.1. Radioactive Hybridizations 11
7.3.2. AlkPhos Direct Hybridizations 11
8. Maintenance/care/cleaning of the oven/shaker 12
8.1. Error codes/faults 12
9. Troubleshooting guide 13
Appendix 1. Products for electrophoresis 14
Appendix 2. Hybond membranes for nucleic acid applications 15
Appendix 3. Radioactive labeling systems 16
Appendix 4. Non-radioactive labeling and detection systems 17
Appendix 5. Products for autoradiography and chemiluminscent
detection 18
Appendix 6. Hybridization buffer 19
Appendix 7. Radiation safety products 20
RPN2510EUM Pagefinder Rev C 06/2007 2
Page 3

1. Legal
GE, imagination at work and GE monogram are trademarks of General Electric
Company.
Amersham, Alkphos Direct, ECF, ECL, ECL Plus, ECL Advance, Hybond,
Hypercassette, Hyperfilm, Hyperscreen, Hypertorch, Megaprime, Nick, Rapidhyb, Ready-To-Go, Rediprime, Sensitive and Trackertape are trademarks of GE
Healthcare companies.
All third party trademarks are the property of their respective owners.
© 2003–2007 General Electric Company – All rights reserved.
First published November 2003
All goods and services are sold subject to the terms and conditions of sale of the
company within GE Healthcare which supplies them.
A copy of these terms and conditions is available on request. Contact your local
GE Healthcare representative for the most current information.
http://www.gehealthcare.com/lifesciences
GE Healthcare UK Limited.
Amersham Place, Little Chalfont,
Buckinghamshire, HP7 9NA UK
RPN2510EUM Chapter 1 Rev C 06/2007 3
Page 4

2. Introduction
One of the most widely used techniques in the molecular biology field is the
immobilization of DNA and RNA onto a solid support membrane and subsequent
hybridizations with a specific single stranded probe, labeled to facilitate its
detection.
Using the GE Healthcare Hybridization Oven/Shaker ensures that the temperature
and shaking/rotation frequency, and hence the stringency of hybridization and
washing steps are rigidly controlled. This enables rapid and reproducible probing of
nucleic acids, and proteins immobilized on nylon and nitrocellulose membranes.
The GE Healthcare Hybridization Oven/Shaker is a multipurpose instrument
combining accurate temperature control with a choice of interchangeable
hybridization modes:
• Variablespeedrotisserie:holding7× 40 mm or 2 × 75 and 2 × 40 mm
hybridization bottles.
• Avariablespeedplatformshakerfor‘box’hybridizations,depurination,
denaturation and neutralization steps.
The instrument is:
• Economical: bottle hybridization minimizes probe volumes, reducing reagent
volumes and enhancing signal intensity.
• Precise: stringency of hybridization and washing steps are rigidly controlled,
ensuring reproducible results.
• Sensitive: validated protocols ensure optimal hybridization and washing steps,
enhancing multiple reprobing when using Hybond™ membranes.
• Safe: the double-glazed polycarbonate/acrylic door offers excellent thermal
insulation whilst minimizing radiation exposure.
• Convenient: small foot-print maximizes the use of limited laboratory space.
The instrument is suitable for use in conjunction with radiolabeled probes
using Rapid-hyb™ buffer, non-radioactive nucleic acid labeling and detection
systems such as AlkPhos Direct™, and protein labeling and detection systems
including ECL™, ECL Plus™ and ECL Advance™. Some protocols for use with these
applications are included in section 7.
RPN2510EUM Chapter 2 Rev C 06/2007 4
Page 5

3. Safety warnings and
precautions
If the equipment is not used in the manner described in this manual the
protection provided might be impaired
This equipment is designed to operate under the following conditions: -
For indoor use only
Use in a well ventilated area
Ambient temperature range + 5°C to + 40°C
Altitude to 2000 m
Relative humidity not exceeding 80%
Mains supply fluctuation not exceeding 10%
Over-voltage category II IEC60364-4-443
Pollution degree 2
Use with a minimum distance all around of 200 mm from walls or other items
The unit should be carried using both hands.
Never move or carry the unit when in use or connected to the mains electricity supply.
In the case of mains interruption, a fault or electrical failure, the unit will continue
to operate on restoration of the electricity supply or removal of the fault.
3.1. Electrical Installation
WARNING: Lethal voltages inside the Hybridization Oven casing. Always
switch the Hybridization Oven/Shaker off and remove the plug from the
electrical socket before performing any cleaning or maintenance of the
instrument.
IMPORTANT: The Hybridization Oven/Shaker has been supplied with a cordset and
plug. Check that the appropriate plug for your electrical supply has been included.
If there is any doubt consult a qualified electrician and inform your local GE
Healthcare sales office.
Should the plug require replacement in the future, the following information should
be noted:
The wires in the mains lead are coloured in accordance with the following code:
GREEN/YELLOW Earth
BLUE Neutral
BROWN Live
As the colours of the wires in the mains lead of this item may not correspond with
the coloured markings identifying the terminals in your plug, proceed as follows:
• Thewirewhichiscolouredgreen/yellowmustbeconnectedtotheterminalin
theplugwhichismarkedwiththeletter‘E’orbytheearthsymbolorcolours
green or green/yellow.
THIS INSTRUMENT MUST BE
EARTHED
• Thewire,whichiscolouredblue,mustbeconnectedtotheterminal,whichis
markedwiththeletter‘N’orcolouredblack.
• Thewire,whichiscolouredbrown,mustbeconnectedtotheterminal,whichis
marked‘L’orcolouredred.
• Fittheplugwiththeappropriatefuse.Alwaysreplacetheplugcover,neveruse
the plug without the cover.
The GE Healthcare Hybridization Oven/Shaker is intended for research use only
and not for any other purpose.
RPN2510EUM Chapter 3 Rev C 06/2007 5
IF IN DOUBT CONSULT A QUALIFIED
ELECTRICIAN
Page 6

4. Specification
Overall dimensions
Height: 17” (43.5 cm)
Depth: 15” (38.0 cm)
Width: 15” (38.0 cm)
Oven dimensions
Height: 8” (20.0 cm)
Depth: 9” (23.0 cm)
Width: 10” (25.0 cm)
Weight: 24 kg
Capacity (nominal): 18 litres
Temperature range: Ambient plus 5°C–80°C
Temperature precision: +/- 0.5°C
Temperature fluctuation: +/- 0.1°C (@37°C)
Power rating: 250 W
Over temperature cut-out: 1°C over set temperature
Temperature variation: < 0.25°C
Rotisserie speed: 2–10 rev/minute
Shaker platform speed: 5–70 strokes/minute
Electrical
Nominal Voltage/Hertz/Amp Product code
230V/50Hz/3.1A RPN2510E
110/120V/60Hz/4A RPN2511E
100V/50/60Hz/4A RPN2512E
Each instrument is supplied with 1 rotisserie (RPN2514),
6 hybridization bottles (RPN2516) and an instruction manual.
Accessories
Rotisserie, holds 7 × 40 mm hybridization bottles RPN2514
Rotisserie, holds 2 × 75 mm and 2 × 40 mm hybridization bottles RPN2515
Hybridization bottle, 260 × 40 mm (For rotisserie RPN2514, pack of 6) RPN2516
Hybridization bottle, 170 × 40 mm (For rotisserie RPN2514, pack of 6) RPN2517
Hybridization bottle, 240 × 75 mm (For rotisserie RPN2515, pack of 2) RPN2518
Hybridization mesh, 1 roll 21.5 cm × 10 m RPN2519
RPN2510EUM Chapter 4 Rev C 06/2007 6
Page 7
5. Setting up the Hybridization
Hybridisation Oven/Shaker
press
to set
Rotisserie
rotisserie
(rev/minute)
5
10
70
15
shake r
(strokes/minute)
8
60
2
30
4
45
6
0
Te mperatur e (
°C )
on
off
on
off
Oven/Shaker
1. Remove all packaging and place the Hybridization Oven/Shaker on a level
working surface, ensuring that there is sufficient room above the instrument to
allow the door to be opened fully.
2. Leave the unit to stand for a minimum of 3 hours. This will allow acclimation to
the new ambient temperature.
3. Plug the female end of the power cable into the Hybridization Oven/Shaker.
4. Connect the power cable to a suitably grounded electrical outlet. The correct
operating voltage of the Hybridization Oven/Shaker is found on the product
information label on the rear of the instrument.
5. Turn the Mains ON/OFF switch (1 on Fig 1) to the ON position.
6. The GE Healthcare Hybridization Oven/Shaker is now ready for use.
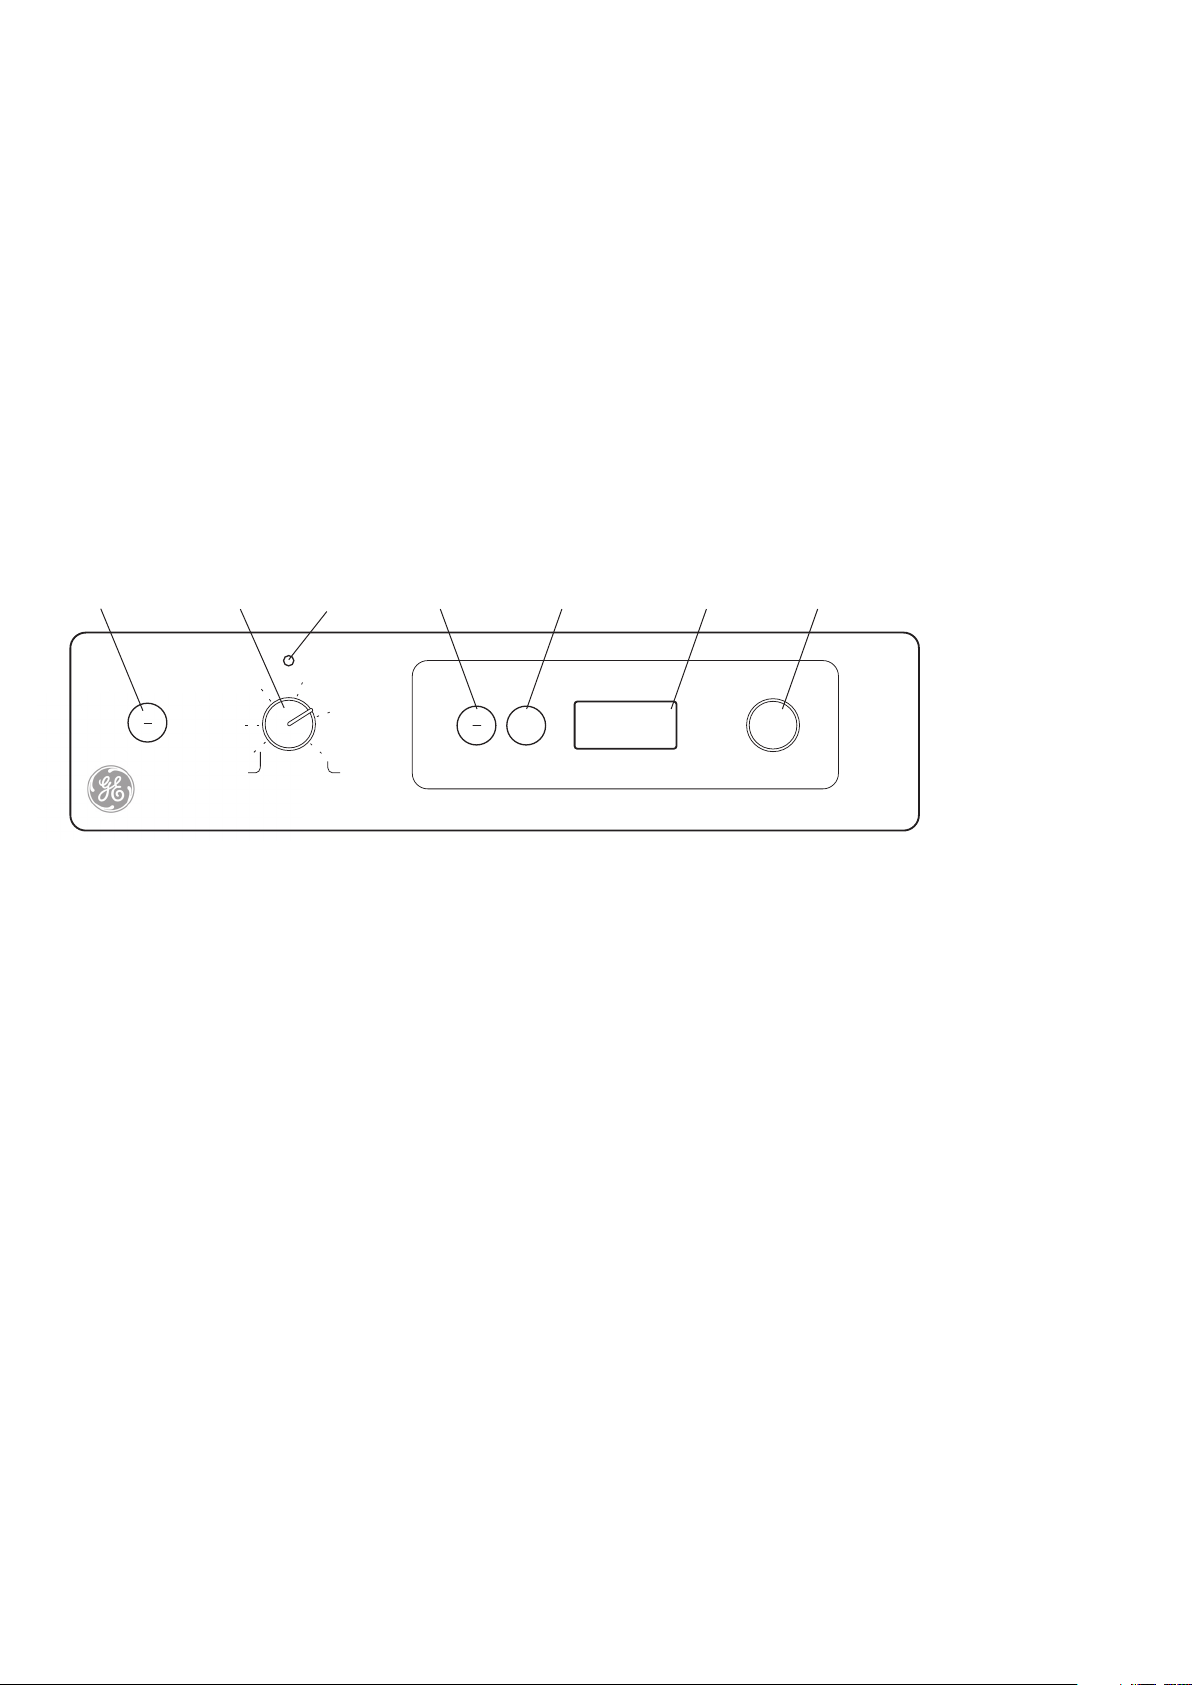
1 2 3 4 5 6 7
5.1. Setting the oven temperature
1. The Oven temperature controls are located on the right hand side of the control
panel (numbers 4 to 7 in figure 1).
2. To turn the temperature control ON press the on / off button (4). The LED display
(6) will show the current Oven temperature.
3. To set the temperature, press and hold the press to set button (5) and at
the same time rotate the temperature selector dial (7) until the required
temperature is shown on the digital display (6).
4. Release the press to set button (5) and the temperature display (6) will revert
back to the actual Oven temperature.
5. The set temperature can be viewed at any time simply by pressing and holding
the press to set button (6)
6. The oven will now automatically heat up to the set temperature.
5.2. Setting up the rotisserie
The rotisserie is installed in the Hybridization Oven/Shaker during transit. To use
the rotisserie for bottle hybridization, the following procedure should be adopted:
1. Lift up the oven door to its fullest extent to allow complete access to the oven
interior.
Fig 1. Diagram of instrument control
panel
Rotisserie/shaker controls
1. Rotisserie/shaker ON/OFF button
2. Rotisserie/shaker speed selector dial
3. Motor on indicator
Temperature controls
4. Temperature on/off button
5. Press to set button
6. LED temperature display
7. Temperature selector dial
Note: the Oven is fitted with automatic
digital over-temperature protection (see
Section 8.1. for more details).
2. Lift the rotisserie vertically out of the oven. Unpack and place on the bench.
3. Place the membranes to be hybridized into the required number of hybridization
bottles. Using the rotisserie as a stand for the bottles, place the bottles into the
rotisserie, pushing them down as far as they will go.
RPN2510EUM Chapter 5 Rev C 06/2007 7
NOTE: Always ensure that the weight
is evenly distributed on both sides
of the rotisserie. Place an empty
hybridization bottle into the other side
of the rotisserie as a counterbalance if
necessary.
Page 8

4. Place the rotisserie into the oven onto the rotation mechanism, ensuring that
the serrated bands at either end of the rotisserie locate onto the steel cogs
of the rotation mechanism at the rear of the oven. (B on figure 2). The plastic
flanges of the rotisserie locate on to the small wheels on the oven floor. Close
the oven door.
5. Ensure that the desired temperature has been set (see section 5.1).
6. The speed controls are on the left hand side of the control panel (numbers 1 to
3 in figure 1). Turn the Rotisserie/Shaker ON by pressing the on / off button (1).
The red indicator light (3) above the speed selector dial (2) will illuminate.
7. Turn the Rotisserie/Shaker speed selector dial (2) clockwise until the desired
rotation speed is reached (allowable values are 2–10 rpm).
The rotisserie will now start to rotate at the set speed.
8. When hybridization is complete turn the Rotisserie/Shaker OFF by pressing the
on / off button (1). The red indicator (3) will go out.
5.3. Setting up the platform shaker
During transit, the platform is stored vertically at the rear of the oven chamber. It
can remain in this position whilst the rotisserie is in use. To use the platform shaker
for‘sandwichbox’hybridizations,thefollowingprocedureshouldbeadopted:
1. Open the oven door to its fullest extent , lift the rotisserie vertically and store in a
safe place.
2. Lift the platform by its handle (A, see figure 2) from its storage position, slide it
forward and locate it on the rocking mechanism by placing the side pegs of the
platform into the retainers (D) on the side walls of the oven chamber. This action
seats the nylon blocks (C) on the underside of the platform on to the pegs (E)
protruding from the rocker mechanism at the rear of the oven.
3. Place the box in which the hybridization is being performed on to the shaker
platform and close the oven door.
4. Ensure that the desired temperature has been set (see section 4.1).
5. Turn the Rotisserie/Shaker ON by pressing the on / off button (1). The red
indicator light (3) above the speed selector dial (2) will illuminate.
6. Rotate the Rotisserie/Shaker speed selector dial (2) clockwise, until the desired
shaker speed is reached. Allowable values are 5–70 strokes per minute.
The shaker platform will now oscillate at the set speed.
7. When hybridization is complete turn the Rotisserie/Shaker OFF by pressing the
on / off button (1). The red indicator will go out (3).
CB A
C
B
Fig 2. Hybridization oven drive
components
E
RPN2510EUM Chapter 5 Rev C 06/2007 8
DD
Page 9

6. Hybridization using the platform
shaker
The Hybridization Oven/Shaker is compatible with the hybridization technologies
available from GE Healthcare. These include radioactive hybridizations using
Rapid hyb buffer and the range of non-radioactive systems for the labelling and
detection of proteins and nucleic acids (see appendix 1).
When using the platform shaker the hybridization and washing conditions
recommended in the appropriate GE Healthcare literature should
be used. The following protocol therefore provides a guideline. For specific
hybridization times and temperatures, refer to the relevant protocol booklet .
1. Prepare blots as recommended in the appropriate Hybond protocol booklet .
2. Set the oven temperature as described in section 5.1.
3. Place the membrane in a suitable box (or bag) and cover with sufficient
prehybridization buffer to ensure that the entire surface of the membrane is
covered. Recommended volume: surface area ratio is given in most protocol
booklets. Seal the box (or bag) securely.
4. Place the box (or bag) on the platform, set the oscillation speed to 30 strokes/
minute as described in section 5.3. Prehybridize for the required length of time.
5. Remove the box (or bag) from the oven and carefully add the labeled single
stranded probe (denaturation may be required post labelling refer to the
appropriate protocol booklet) to the prehybridization buffer.
6. Reseal the box (or bag) securely, replace it on the platform and hybridize for the
required length of time.
7. Remove the membranes and place in a clean box containing the first stringency
wash solution.
8. Increase the oscillation speed of the platform to 60 strokes/minute. Carry out
the recommended washing protocol at the appropriate temperature and for the
appropriate times.
NOTE: Do not pipette the probe solution
directly on to the membrane as this
may cause localized background.
RPN2510EUM Chapter 6 Rev C 06/2007 9
Page 10

7. Hybridization using the rotisserie
Several advantages are associated with performing hybridizations in bottles,
namely those of safety and economy as outlined in the introduction. However,
the use of bottles for hybridizations and washing procedures requires certain
adaptations to standard protocols.
7.1. Assembly of membranes into bottles
1. Add approximately 20 ml 2 × SSC buffer into the hybridization bottle. The
rotisserie acts as a convenient bottle stand.
2. Pre-wet the membrane in 2 × SSC buffer and loosely roll it up.
3. Insert the rolled up membrane into the bottle and replace the cap. Ensure
that the cap is screwed on securely, (hand tight plus a quarter turn). DO NOT
OVERTIGHTEN, or the thread of the cap can be damaged, leading to leakages.
4. Place the bottle on a flat surface and roll it gently in the opposite direction to
that in which the membrane is coiled. This rolling action causes the membrane
to uncoil, so lining the inner surface of the bottle.
However, studies at GE Healthcare laboratories using a wide range of hybridization
mesh technologies demonstrate a resulting loss of sensitivity due to partial
absorption of the probe into the mesh.
A nylon mesh (RPN2519) is available as an optional extra, as it can facilitate easier
handling of a number of blots and the more fragile nitrocellulose membranes.
These handling advantages should be considered against the potential loss of
sensitivity before use.
When a hybridization mesh is used in conjunction with the membrane, the
following procedure should be adopted:
5. Pre-wet the mesh alongside the membrane in 2 × SSC buffer and place the
prewetted membrane on top of the mesh. The mesh should be slightly larger
than the blot in all dimensions. Roll both up together, with the mesh on the
outside of the membrane, and insert into the bottle as described above (7.1.4.).
NOTE: If placing several small blots into
one bottle, prewet the membranes as
above, and space them out along the
length of the bottle with forceps.
NOTE: The use of a mesh in bottle
hybridizations to ensure uniform
contact between the membrane
surface and the buffer has been
recommended.
7.2. Hybridization
1. Set the required oven temperature as detailed in section 5.1.
2. Discard the 2 × SSC, used in the bottle to unroll the membrane, and replace
with prehybridization buffer. Recommended volumes are provided in most GE
Healthcare protocol booklets. Generally a minimum of 10–15 ml per 20 × 20 cm
blot is advised. Seal the bottle, avoiding overtightening.
3. Place the hybridization bottle(s) into the rotisserie (as detailed in section 5.2.) add
counterbalance bottles if necessary. Place the rotisserie into the oven so that
the bottles are rotating in the same direction as the membrane is rolled, see
Figure 3.
rotation of
membrane
Fig 3. Rotation of rotisserie
RPN2510EUM Chapter 7 Rev C 06/2007 10
Page 11

4. Prehybridize the membrane for the specified length of time at a rotisserie speed
of 4 rpm.
5. Following prehybridization, turn off the rotisserie, remove the rotisserie from the
oven. Add the labeled probe to the buffer, either by removing an aliquot of the
buffer, adding the probe and returning the aliquot to the bottle; or by adding the
probe directly into the bottle, avoiding the membrane.
6. Hybridize for the specified length of time at a rotisserie speed of 4 rpm.
7.3. Membrane washing procedures
Membranes can either be removed from the hybridization bottles and washed in a
box on the platform shaker (this is a more efficient procedure), or the washing
procedure may be carried out in the bottles. If the platform shaker is used, follow
the standard washing procedure mentioned in the appropriate protocol booklet.
If bottles are to be used it is necessary to modify the standard washing procedure.
Outlined in this section are the optimized washing protocols for radioactive
hybridizations and non-radioactive based hybridizations.
7.3.1. Radioactive Hybridizations
1. Carefully drain off the hybridization buffer, rinse the bottle and the membrane
thoroughly with 2 × SSC and discard.
2. Perform the following stringency washes in large volumes (100 ml minimum) of
the following solutions, at a rotisserie speed of 8 rpm:
2 × 10 minutes with 2 × SSC, 0.1% SDS at 65°C
1 × 15 minutes with 1 × SSC, 0.1% SDS at 65°C
2 × 10 minutes with 0.1 × SSC, 0.1% SDS at 65°C
(More washes over the same time period for each stringency condition can
improve background).
3. Remove the membrane from the bottle, drain off excess stringency wash, wrap
in SaranWrap™ and autoradiograph.
7.3.2. AlkPhos Direct Hybridizations
4. Drain off the hybridization buffer, rinse the bottle and the membrane thoroughly
with primary wash buffer and discard.
5. Perform the following stringency washes in large volumes (100 ml minimum) of
the following solutions, at a rotisserie speed of 8 rpm:
3 × 10 minutes with primary wash buffer solution at 55°C
3 × 5 minutes with secondary wash buffer at room temperature
6. Remove the membrane from the bottle and detect using the standard
procedures outlined in the protocol booklet.
NOTE: This last step is a high stringency
wash and should be omitted if related
sequences are to be probed.
NOTE: The room temperature washes
can be achieved by switching off
the oven and leaving the door open
whilst performing the washes or by
allowing the oven to cool down to room
temperature before performing the
final washes.
RPN2510EUM Chapter 7 Rev C 06/2007 11
Page 12

8. Maintenance/care/cleaning of
the oven/shaker
The GE Healthcare Hybridization Oven/Shaker is designed to provide trouble-free
operation. The base of the oven and the shaker tray act as a spills tray and will
contain any spillage that occurs during hybridization and washing procedures.
To ensure lasting operation the following instructions should be followed:
ALWAYS DISCONNECT THE HYBRIDIZATION OVEN/SHAKER FROM THE
ELECTRICAL SUPPLY BEFORE CLEANING OR DRYING THE INSTRUMENT.
1. Any leakage from the hybridization bottles or the sandwich boxes should be
cleaned up immediately. Do not allow any liquids to enter the drive mechanism.
2. Wipe away any liquids from inside and outside of the unit using soap and water
with a soft cloth or sponge.
3. Do not allow chemicals to remain on unit surfaces.
4. Never clean unit with abrasive pads or cleaners.
5. Never clean unit with acetone or chloroform.
Only spare parts supplied or specified by GE Healthcare or its agent should
be used. Fitting of non-approved parts may affect the performance of the
safety features designed into the instrument.
8.1. Error codes/faults
The Oven has built in fault diagnostics. If a fault occurs, this system will display
an error code in the LED display to help the service engineer rectify the problem.
Please see the table below for details of error codes and other faults. In the
unlikely event that a problem does occur, note down which code / fault you
observe and contact your nearest GE Healthcare Office for further assistance. If
you have your own service personnel available for repair, a comprehensive service
manual is available on request.
Fault Safety system in operation Fault displayed by
Temperature probe PT100 reading low Automatic over-temp system activated LED displays Err and 0.1 alternatively
Temperature probe PT100 reading high Automatic over-temp system activated LED displays Err and 0.2 alternatively
Triac fault Secondary relay control activated Top left dot flashes in display
Rotisserie / shaker motor stalled Cuts power to motor No movement seen but Rotisserie red
indicator light still on
Software crash Cuts mains power No temperature or motor motor power,
allLED’sblank
RPN2510EUM Chapter 8 Rev C 06/2007 12
Page 13

9. Troubleshooting guide
This section briefly summarizes some of the potential problems encountered during membrane hybridizations. More
complete troubleshooting guides are supplied in the pack leaflet that accompany each product.
Symptom
1. Membrane curling up in
hybridization bottle
2. High background
3. Weak signal
Cause
1.1. Incorrect orientation of bottle in
rotisserie
2.1. Probe concentration too high
2.2. Unincorporated 32P nucleotides not
removed
2.3. Insufficient blocking
2.4. Insufficient washing
3.1. No transfer from gel to membrane
3.2. Probe not labeled
3.3. Probe not denatured
Remedy
1.1. Ensure membrane is rolled up in
the same direction as the bottle is
rotating (see section 7.2)
2.1. Reduce probe concentration
2.2. Remove unincorporated
nucleotides
2.3. Use recommended hybridization
buffer or extend prehybridization
time
2.4. Increase number of buffer changes
during the washing stage or
increase stringency of final wash
3.1. Load extra lanes with control DNA.
Transfer can be checked by
restaining gel with ethidium
bromide. If large DNA fragments
are detected poorly, use a
depurination step (0.25 M HCI)
3.2. Check probe labelling before
hybridization. See protocol in probe
labelling booklet
3.3. Boil probe for 5 minutes before
adding to hybridization buffer
4. Patchy backgrounds
5. High background around edge of
membrane
3.4. Low specific activity of probe
3.5. Washes too stringent
4.1. Hybridization buffer or wash
solution not evenly covering
membrane
4.2. Damaged membrane
5.1. Damaged membrane
3.4. Review labelling conditions
3.5. Increase buffer salt concentration
and decrease temperature
4.1. Increase volume of hybridization
wash or solutions or use mesh (see
section 7.1. step 4)
4.2. Handle membrane carefully with
forceps
5.1. Use clean scissors or a sharp
scalpel to cut membrane
RPN2510EUM Chapter 9 Rev C 06/2007 13
Page 14

Appendix 1. Products for
electrophoresis
DNA Markers
Precise Sizing Digest of Natural DNAs
50 Base-pair 100 Base-pair KiloBase DRigest III
ladder ladder DNA marker 27-4060-01
27-4005-01 27-4007-01 27-4004-01
500a 2000a 10000 23130
450 1900 8000 9416
400 1800 6000 6557
350 1700 5000 4361b
300 1600 4000 2322
250 1500 3000 2027
200 1400 2500 1353
150 1300 2000 1078
b
100 1200 1500 872
50 1100 1000 603
1000 500 564
900 310
800 281
700 271
600 234
500 194
400 125
300 118
200 72
100
a not necessarily the largest size fragment possible, only the largest that is
readily distinguishable
b cos ends are located on these bands
c may not always be visible
d
c
Marker code number Recommended gel Loading amount (µg/lane) Heat before loading
27-4005-01 2% agarose/6% polyacrylamide 2.0 No
27-4007-01 1.5% agarose 2.0 No
27-4004-01 0.8% agarose 0.5 No
27-4060-01 1% agarose 0.5–1.0 60–65°C for 2 minutes
RPN2510EUM Appendix 1 Rev C 06/2007 14
Page 15

Appendix 2. Hybond membranes
for nucleic acid applications
Size Pack size Hybond N+ Hybond XL Hybond N Hybond NX Hybond ECL Hybond C Extra Hybond P
82 mm 50 discs RPN82B RPN82S RPN82N RPN82T RPN82D RPN82E
87 mm 50 discs RPN87B RPN87S RPN87N RPN87T
132 mm 50 discs RPN132B RPN132S RPN132N RPN132T RPN132D
137 mm 50 discs RPN137B RPN137S RPN137N RPN137T RPN137E
82 mm 50 gridded discs RPN1782B
87 mm 50 gridded discs RPN1787B
132 mm 50 gridded discs RPN1732B
137 mm 50 gridded discs RPN1737B
30 × 50 cm 5 sheets RPN3050B RPN3050S RPN3050N
9 × 10 cm 10 sheets RPN910D
10 × 10 cm 10 sheets RPN1010D
15 × 20 cm 10 sheets RPN1520B RPN1520S RPN1520N RPN1520T RPN1520D
20 × 20 cm 10 sheets RPN2020B RPN2020S RPN2020N RPN2002T RPN2020D RPN2020E RPN2020F
22.2 × 22.2 cm 10 sheets RPN2222B RPN2222S RPN2222N
14 × 16 cm 15 sheets RPN1416F
12 × 10 cm 20 sheets RPN1210B RPN1210S RPN1210N
15 × 10 cm 20 sheets RPN1510B RPN1510S RPN1510N
6 × 8 cm 50 sheets RPN68D
7 × 8 cm 50 sheets RPN78D
11.9 × 7.8 cm 50 sheets RPN119B RPN119S RPN119N
22.2 × 22.2 cm 50 sheets RPN2250B
22.5 × 22.5 cm 50 sheets RPN225B
115 × 73 mm 50 sheets RPN1576B
20 cm × 3 m 1 roll RPN203B RPN203S RPN203N RPN203D RPN203E
30 cm × 3 m 1 roll RPN303B RPN303S RPN303N RPN303T RPN303D RPN303E RPN303F
30 cm × 3 m 1 rolla RPN3032D
a = 0.2 µm pack size
RPN2510EUM Appendix 2 Rev C 06/2007 15
Page 16

Appendix 3. Radioactive labeling
systems
Labelling Technology Nucleotide Amount of Labelling Probe specific Recommended Product
system template time activity application code
(dpm/µg)
Rediprime™ II Random-prime dCTP only 25 ng 10 minutes 2 × 10⁹ membrane RPN1633
hybridization RPN1634
Ready-To-Go™ Random-prime dCTP only 10 ng–1 µg 5 minutes 2 × 10⁹ membrane 27-9240-01
DNA labelling hybridization
beads DNA labelling
Megaprime™ Random-prime any dNTP 25 ng 10 minutes 2 × 10⁹ membrane RPN1604
hybridization RPN1605
RPN1606
RPN1607
Nick translation Nick translation any dNTP 1 µg 2–3 hours 2 × 10⁹ production of N5000
large amounts N5500
of probe
RPN2510EUM Appendix 3 Rev C 06/2007 16
Page 17

Appendix 4. Non-radioactive
labeling and detection systems
Labelling and detection Sensitivity Time from Duration of Strip before Quantification Recommended application
system hybridization light output re-probing
to detection
AlkPhos Direct (RPN3690) 0.06 pg 1 hour 5 days yes no Single copy Southern and
Northerns
ECL Direct (RPN3000) 0.5 pg 1 hour 1–2 hours no no High target applications
eg. colony/plaques
RPN2510EUM Appendix 4 Rev C 06/2007 17
Page 18

Appendix 5. Products for
autoradiography and
chemiluminscent detection
Hyperfilm – high performance autoradiography films
Product description size number sheets code
Hyperfilm ECL 5 × 7 inches 50 28-9068-35
Hyperfilm ECL 18 × 24 cm 50 28-9068-36
Hyperfilm ECL 18 × 24 cm 100 28-9068-37
Hyperfilm ECL 8 × 10 inches 50 28-9068-38
Hyperfilm ECL 8 × 10 inches 100 28-9068-39
Hyperfilm ECL 24 × 30 cm 50 28-9068-40
Hyperfilm ECL 35 × 43 cm 50 28-9068-41
Hyperfilm MP 5 × 7 inches 50 28-9068-42
Hyperfilm MP 18 × 24 cm 50 28-9068-43
Hyperfilm MP 18 × 24 cm 100 28-9068-44
Hyperfilm MP 8 × 10 inches 50 28-9068-45
Hyperfilm MP 8 × 10 inches 100 28-9068-46
Hyperfilm MP 24 × 30 cm 50 28-9068-47
Hyperfilm MP 35 × 43 cm 50 28-9068-48
Hyperfilm MP Enveloped 18 × 24 cm 50 28-9068-50
Hypercassette™ – cassettes for autoradiography and light detection
Size Code (standard) Code (deep)
18 × 24 cm RPN11642 RPN11628
24 × 30 cm RPN11643
30 × 40 cm RPN11644 RPN11627
35 × 43 cm RPN11645
18 × 43 cm RPN11646
20 × 40 cm RPN11647
5 × 7 inches RPN11648
8 × 10 inches RPN11649 RPN11629
10 × 12 inches RPN11650
Hyperscreen™ – intensifying screens for 32P and
Size Code Quantity
18 × 24 cm RPN1662 1 pair
24 × 30 cm RPN1663 1 pair
30 × 40 cm RPN1664 1 pair
35 × 43 cm RPN1665 1 pair
18 × 43 cm RPN1666 1 pair
20 × 40 cm RPN1667 1 pair
5 × 7 inches RPN1668 1 pair
8 × 10 inches RPN1669 1 pair
10 × 12 inches RPN1670 1 pair
125
I autoradiography
Related Products
Product name Description Code
Hypertorch™ Battery powered LED darkroom torch, pack of 3 RPN1620
Sensitize™ Optimized preflash system RPN2051
RPN2510EUM Appendix 5 Rev C 06/2007 18
Page 19

Appendix 6. Hybridization buffer
Product name Pack size Code
Rapid-Hyb buffer
Rate enhanced hybridization buffer 125 ml RPN1635
for use with radiolabelled nucleic acid probes 500 m RPN1636
RPN2510EUM Appendix 6 Rev C 06/2007 19
Page 20

Appendix 7: Radiation safety
products
Product Description Product Dimensions Quantity Code Number
CDC storage box 240 × 140 × 130 mm 1 box RPN2032
Pipette guards Beta pipette guard, Gilson P20/100 1 guard RPN1544
Beta pipette guard, Gilson P200 1 guard RPN1545
Beta pipette guard, Gilson P1000 1 guard RPN1546
Multipack, 1 each of the above codes 3 guards RPN1556
Beta Radiation safety starter packs 1 pack RPN2052
Radioactive spills kit Radioactive spills kit 1 kit RPN2030
Radioactive spills kit (US only) 1 kit RPN2030US
Refill pack for radioactive spills kit 1 pack RPN2031
Refill pack for radioactive spills kit (US only) 1 pack RPN2031US
Safety screens Beta safety screen, 15°, 530 × 355 mm 1 screen RPN1536
Beta safety screen, 45°, 600 × 355 mm 1 screen RPN1537
Beta side/rear screen, 550 × 350 mm 1 screen RPN2034
Safety trays and liners Safety Trays
685 × 455 mm 1 tray RPN1534
685 × 530 mm 1 tray RPN2042
530 × 330 mm 1 tray RPN2043
1120 × 535 mm 1 tray RPN2063
565 × 535 mm 1 tray RPN2083
455 × 255 mm 1 tray RPN2093
Safety Tray Liners
to match tray 685 × 455 mm 25 liners RPN1528
to match tray 685 × 530 mm 25 liners RPN2048
to match tray 530 × 330 mm 25 liners RPN2058
to match tray 1120 × 535 mm 25 liners RPN2068
to match tray 565 × 535 mm 25 liners RPN2088
to match tray 455 × 255 mm 25 liners RPN2098
Beta heavy-duty tube rack 96 × 35 × 50 mm 1 rack RPN1543
Microcentrifuge tube racks 160 × 90 × 75 mm (for 1.5 ml tubes) 1 rack RPN1542
160 × 90 × 75 mm (for 0.5 ml tubes) 1 rack RPN2037
Beta Waste Safes and Bags Beta Waste Safes
400 × 240 × 220 mm 1 safe RPN1532
315 × 229 × 230 mm 1 safe RPN2038
150 × 120 × 100 mm 1 safe RPN2039
150 × 150 × 150 mm 1 safe RPN2082
Waste Safe Bags
to fit RPN1532 25 bags RPN2091
to fit RPN2038 25 bags RPN2090
to fit RPN2082 25 bags RPN2089
Beta Work Tank 540 × 400 × 500 mm 1 tank RPN2033
Redivial workstation 160 × 90 × 75 mm 1 workstation RPN1585
Work Boxes and Safe Storage Boxes Work Boxes
Beta Work Box, 185 × 115 × 80 mm 1 box RPN1539
Beta Safe Storage Box, 300 × 185 × 155 mm 1 box RPN1541
Work Box Inserts
32 × 1.5 ml tubes 1 insert RPN1540
32 × 2.0 ml tubes 1 insert RPN2035
32 × 0.5 ml tubes 1 insert RPN2036
RPN2510EUM Appendix 7 Rev C 06/2007 20
Page 21

21
Page 22

imagination at work
GE Healthcare
GE Healthcare offices:
GE Healthcare Bio-Sciences AB
Björkgatan 30, 751 84 Uppsala,
Sweden
GE Healthcare Europe GmbH
Munzinger Strasse 5, D-79111 Freiburg,
Germany
GE Healthcare Bio-Sciences Corp.
800 Centennial Avenue, P.O. Box 1327,
Piscataway, NJ 08855-1327,
USA
GE Healthcare Bio-Sciences KK
Sanken Bldg. 3-25-1, Hyakunincho,
Shinjuku-ku, Tokyo 169-0073,
Japan
For contact information for your local office,
please visit: www.gelifesciences.com/contact
GE Healthcare Limited
Amersham Place
Little Chalfont, Buckinghamshire,
HP7 9NA, UK
http://www.gehealthcare.com/lifesciences
RPN2510EUM Rev C 06/2007
 Loading...