

GE PVM9195SF3SS, PVM9195SF2SS, PVM9195SF1SS, PVM9195DF2CC, PVM9195DF2BB Owner’s Manual
...
0
GEAppliances.com
Safety Instructions ........ 2-9
0
Operating Instructions
Exhaust Features ........... 24, 25
Microwave Terms .............. 19
lyPlate Feature................ 16
Oven Features ............. ll, 12
Other Features ............. 20,21
Power Levels................... 19
Replacing the Light Bulb........ 24
Sensor Features............. 17-19
Time Features............... 1S-iS
Care and Cleaning ......... 22
Troubleshooting Tips
Before you call for Service...26-28
Consumer Support
Optional Kits .................... lO
Consumer Support .............. 32
Warranty ...................... 31
DVM7195
JVM7195
JNM7196
PVM9195
PNM9196
0
0
Write the model and serial numbers here:
Model #
Serial #
Youcan find them on a labelwhen the
door isopen.
Espafiol
For a Spanish version of this
manual, visit our Website at
GEAppliances.com.
Para consultar una version en
espa_ol de este manual de
instrucciones, visite nuestro sitio
de internet GEAppliances.com.
49-40705-1 11-14 GE

IMPORTANT SAFETYINSTRUCTIONS.
READ ALL INSTRUCTIONS BEFOREUSING.
A WARNING!
To reduce risk of burns, electric shock, fire, personal injury or exposure to excessive microwave energy.
PRECAUTIONS TOAVOID POSSIBLEEXPOSURE
TO EXCESSIVEMICROWAVE ENERGY
(e) Do Not Attempt to operate this oven with the door
open since open-door operation can result in harmful
exposure to microwave energy. It isimportant not to
defeat or tamper with the safety interlocks.
(b) Do Not Piece any object between the oven front
face and the door or allow soil or cleaner residueto
accumulate on sealingsurfaces.
Do Not Operate the oven ifit isdamaged. It is
particularly important that the oven door closeproperly
and that there isno damage to the:
(1)door (bent),
(2)hinges and latches(brokenor loosened),
(3)door sealsand sealing surfaces,
(d) The Oven Should Not be adjusted or repaired by
anyone except properly qualified servicepersonnel.
IMPORTANT SAFETYINSTRUCTIONS.
Usethisappliance only for its intendedpurposeas describedin thisOwner'sManual.
Whenusing electricalappliancesbasicsafety precautionsshould befollowed,including the following:
[] Read and follow the specific precautions in the
PRECAUTIONSTO AVOID POSSIBLEEXPOSURETO EXCESSIVE
MICROWAVE ENERGY section above.
[] Thisappliance must begrounded. Connectonly to a properly
grounded outlet. Seethe GROUNDINGINSTRUCTIONSsection
on page 8.
[] Installor locate this appliance only in accordance with the
provided installation instructions.
[] Becertain to place the front surface of the door 3" or more
back from the countertop edgeto avoid accidental tipping of
the appliance in normal usage.
[] Thismicrowave oven isnot approved or tested for marine
use.
[] Donot mount this appliance over a sink.
[] Donot operate this appliance if it hasa damaged power
cord or plug, if it isnot working properly,or if it has been
damaged or dropped.
[] Donot cover orblock any openings on the appliance.
[] Usethis appliance only for itsintended useasdescribed in
this manual. Do not use corrosivechemicals or vapors in this
appliance. Thismicrowave oven isspecificallydesigned to
heat, dry or cook food, and is not intended for laboratory or
industrial use.
[] Donot store this appliance outdoors. Donot use this
product near water-for example, in a wet basement, neara
swimming pool, near a sink or in similar locations.
[] Donot let cord hang over edge of table or counter.
[] Donot store anything directly on top of the appliance when
it is inoperation.
[] Keep power cord away from heated surfaces.
[] Do not immerse power cord or plug in water.
[] To reduce the riskof fire in the oven cavity:
- Do not overcook food.Carefully attend appliance when
paper, plastic orother combustible materials are placed
insidethe ovenwhile cooking.
- Removewire twist-ties and metal handlesfrom paper or
plastic containers before placing them inthe oven.
- Do not usethe oven for storage purposes.Do not leave
paper products, cooking utensilsor food in the oven when
not in use.
- If materials insidethe oven ignite, keep the oven door closed,
turn the oven off and disconnect the power cord, orshut
off power at the fuse or circuit breaker panel.If the door is
opened,the fire may spread.
[] Seedoor surface cleaning instructions in the Careand
cleaning of the microwave oven section of this manual. Do
not usecleaners with ammonia or alcohol on the microwave
oven. Ammonia and alcohol can damage the appearance of
the microwave.
[]
GEdoes not support any servicingof this microwave oven,
except as describedby the Consumer Support sections
of this manual. Donot attempt to servicethe microwave
oven yourself. If serviceis desired,this appliance should be
servicedonly byqualified service personnel. Contact the
nearest authorized servicefacility for examination, repair or
adjustment.
[]
Aswith any appliance, closesupervision is necessary when
used by children.
2 SAVETHESEINSTRUCTIONS
INSTRUCCIONES IIvlPORTANTES DE SEGURIDAD.
LEA PRilVlEROTODA LASINSTRUCCIONES. GEAppliances.com
iPRECAUCION!
Par su seguridad, la informaci6n contenida en este manual debe seguirse para minimizar el riesgo de incendio, explosi6n,
descarga eldctrica, exposici6n a energia microondas.
PRECAUCIONESPARA EVITAR POSIBLEEXPOSICION
A UNA EXCESIVAENERG[A DE MICROONDAS.
(u) No Intente operar este horno con la puerta abierta ya
que esto podrfa resultar en una exposici6n aenerg[a
microondas dahina. Esimportonte no cancelor ni
manipular de forma indebida losdispositivosde
seguridad.
(b) No SitFle ningOnobjeto entre la parte frontal del horno
y la puerto ni permita que se ocumule suciedad o
residuos limpios enlas gomas de cierre herm@ico.
(d No Use el homo siest6 dahado. Esespecialmente
importante que la puerta del homo secierre
correctamente y que no sedahe:
(!) la puerta (doblada),
(2)bisagras y pasadores (rotoso sueltos),
(3)sellosde la puerta y gomas de cierre herm@ico.
(dJ El homo no deberia ajustarse ni repararse par nadie
que no sea personal de servicioadecuadamente
calificado.
INSTRUCCIONES IMPORTANTES DE SEGURIDAD.
Use este electrodomdstico s61opara su prop6sito original, coma se describe en el Manual del Propietario.
AI usar artefactos eldctricos se deberdn seguir los precauciones bdsicas de seguridad, incluyendo Io siguiente:
[] Lea y obedezca las precauciones espec[ficas en la secci6n
de PRECAUCIONESPARA EVITARPOSIBLEEXPOSICIONA UNA
ENERG[AEXCESIVADE IvIICROONDASde arriba.
[] Esteelectrodom_stico debe estar conectado a tierra.
Con_ctelo s61oa una toma de corriente con toma de tierra.
Vea la secci6n de INSTRUCCIONESDETOMADETIERRAen la
p6gina 9.
[] Instaleo coloque este electrodom6stico siguiendo s61olas
Instrucciones de Instalaci6n provistas.
[] Aseg6resede colocar lasuperficiefrontal de la puerta 3"
o m6s atr6s del extremo de la base,a fin de evitar cddas
accidentales del electrodom6stico durante un usa normal.
[] Estehomo microondas no est6 aprobado ni evaluado para
usanaval.
[] Nomonte el electrodom#stico sabre un lavabo.
[] Nousar este electrodom#stico siel cable de corriente
o el enchufe han sufrido alg0n da5o, sino funciona
correctamente o si ha resultadodahado ose ha ca[do.
[] Nobloquee ni cubra cualquier abertura del
electrodom_stico.
[] D#a esteelectrodom#stico elusa para el cual fue
dise_ado 6nicamente, coma se describeen este manual.
Nouse productos qu[micos corrosivos ni vapores en este
electrodom#stico. Estehomo microondas rue diseBado
espedficamente para calentar, secar o cocinar comida, y no
para usaindustrial o en laboratorio.
[] Nouse este producto cerca del agua; par ejemplo, en un
s6tano hOmedo,cerca de una piscina,cerca de un lavabo o
en ubicaciones similares.
[] Nopermita que el cable se sostengasabre el extremo de la
mesada
[] Noguarde nada directamente sabre lasuperficie del homo
microondas cuando el mismo seencuentre funcionando
[] Noguarde este electrodom#stico al aire libre.
[] Mantenga el cable de corriente alejado de superficies
calientes.
[] Parareducir el riesgo de incendio enla apertura del homo:
- Nococine demasiado la comida. Presteatenci6n cuidadosa
al electrodom_stico cuando se coloca papel, pl6stico uotro
material combustible en el horno mientras se cocina.
- Quite lascintas de cierre con metal y lasasas met61icasde
losrecipientesde papel o pl6stico antes de introducirlos en el
homo.
- Noalmacene cosas enel horno. No deje productos de papel,
utensiliosde cocinar nicomida en el homo mientras no Io
est# usando.
-Si se incendiara algOnmaterial dentro, mantenga la puerta
del homo cerrada, apague el homo y desconecte elcable
de corriente el#ctrica,o apague la corriente en elfusible o
panel del diferencial.Sise abre la puerta el fuego podr[a
expandirse.
[] Lealas instrucciones delimpieza de la superficie de lapuerta
en la secci6nde Cuidadoy limpiezadel homo microondas
de este manual. No uselimpiadores que contengan
amon[acos o alcohol en elhorno microondas. Elamon[aco o
el alcohol pueden dahar elaspecto del homo microondas.
[] GEno respalda ning6n serviciot@cnicosabre estehomo
microondas, excepto coma se describe en las seccionesde
Soporte alConsumidor de este manual. Nointente reparar
el homo microondas usted mismo.Sies necesario reparar el
electrodom#stico, entonces el serviciodeber6 serrealizado
par una persona calificada del servicio t6cnico. Comun[quese
a una sucursal autorizada del servicio t#cnico para realizar
cualquier control, reparaci6n o ajuste.
[] AI igual que con cualquier electrodom#stico, sedeber6
realizar una supervisi6nde cerca si esusado par nihos.
GUARDEESTASINSTRUCCIONES
IMPORTANT SAFETY INSTRUCTIONS.
READ ALL INSTRUCTIONS BEFORE USING.
A WARNING!
IMPORTANT SAFETYINSTRUCTIONS.
[] Donot clean with metal scouring pads. Piecescan burn off the
pad and touch electrical parts involving riskof electricshock.
[] Thismicrowave oven isULlisted for installation over both gas
(lessthan 60,O00BTUtand electric ranges.
ARCING
If you see arcing, press the Cancel/Off pad and correct the
Arcing isthe microwave term for sparksin the oven.Arcing is
caused by:
[] Metalor foil touching the sideof the oven.
[] Foilnot molded to food.
[] Platesor disheswith metallic trim or glaze with a metallic
sheen.
FOODS
[] Donot pop popcorn inyour microwave oven unless ina special
microwave popcorn accessory or unlessyou usepopcorn
labeled for use in microwave ovens.
[] Some products such as whole eggs and sealed containers-for
example,closedjars-are able to explode and should not be
heated in this microwave oven. Suchuseof the microwave
oven could result in injury.
[] Donot boil eggs in a microwave oven.Pressurewill build up
insideegg yolk and will causeit to burst, possiblyresulting in
injury.
[] Operating the microwave with no food inside for more than a
minute or two may cause damage to the oven and could start
a fire. It increasesthe heat around the magnetron and can
shorten the life of the oven.
[] Foodswith unbroken outer "skin"such as potatoes, hot dogs,
sausages,tomatoes, apples, chicken liversand other giblets
and egg yolks should be pierced to allow steam to escape
during cooking.
[] Avoid heating baby food in glassjars, even
with the lid off. Make sureall infant food is thoroughly cooked.
Stirfood to distribute the heat evenly.Be careful to prevent
scalding when warming formula. Thecontainer may feel cooler []
than the formula really is.Always test the formula before
feeding the baby. []
[] Don'tdefrost frozen beverages in narrow-necked bottles
(especiallycarbonated beverages).Even if the container is
opened, pressurecan build up. This can causethe container to
burst, possiblyresulting in injury.
[] Thisover-the-range oven isdesigned for useover ranges no
wider than 36". It may be installedover both gasand electric
cooking equipment..
_roblem.
[] Metal,such as twist-ties, poultry pins orgold-rimmed dishes,in
the microwave.
[] Recycledpaper towels containing small metal pieces being
usedin the microwave.
[]
SUPERHEATEDWATER
Liquids,such as water,coffeeor tea are ableto be overheated
beyondthe boiling point without appearing to be boiling.Visible
bubbling or boiling when the containeris removed from the
microwave ovenisnot alwayspresent.THISCOULDRESULT
IN VERYHOTLIQUIDSSUDDENLYBOILINGOVERWHENTHE
CONTAINERISDISTURBEDORA SPOONOROTHERUTENSILIS
INSERTEDINTOTHELIQUID.
To reducethe risk of injury to persons:
- Do not overheat the liquid.
- Stirthe liquid both before and halfway through heating it.
- Do not use straight-sided container with narrow necks.
- After heating, allow the container to stand in the microwave
oven for a short time before removing the container.
- Useextreme care when inserting a spoon or other utensil
into the container.
[]
Hot foods and steam can cause burns. Becareful when
opening any containers of hot food, including popcorn bags,
cooking pouches and boxes.To prevent possibleinjury, direct
steam away from hands and face.
Donot overcook potatoes.Theycould dehydrate and catch
fire, causing damage to your oven.
Cookmeat and poultry thoroughly-meat to at least an
INTERNALtemperature of 160°Fand poultry to at least
an INTERNALtemperature of 180°F.Cookingto these
temperatures usually protects against foodborne illness.
4 SAVETHESEINSTRUCTIONS

INSTRUCCIONES IMPORTANTES DE SEGURIDAD.
LEA PRIMERO TODA LASINSTRUCCIONES.
iPRECAUCI6N!
INSTRUCCIONES IMPORTANTES DE SEGURIDAD.
[] Nolimpie con almohadillas met61icaspara fregar. Las piezas
podr6n quemar la almohadilla y tener contacto con partes
el6ctricas y producir riesgo de descargas el6ctricas
[] Estehomo de microondas est6 listado por UL para ser
instalado sobre estufas electricasy degas (memos de60,000
FORMACI6N DEARCO EL -CTRICO
Si ve que seforman arcoseldctficos,presione el bot6n Cancel/Off (borrar/apagado)y resuelvael problema.
Arco eldctficoesIoque,en la terminologia de losmicroondas,
describelaschispasen el homo.
[] Ha},un metal o papel de aluminio tocando el lateral delhorno.
[] Elpapel de aluminio no est6 envolviendo bien la comida.
[] Platoso la vajillascon bordes met61icosocon una capa de
brillo met61ico.
COMIDAS
[] No haga rosetas opalomitas de maiz enel microondas a no
serque est6 usando un accesorio especialpara prepararlas o
que est6 empleando rosetaso palomitas de maiz que indiquen
serv61idaspara el usode hornos microondas.
[] Algunos productos tales como huevos enteros y envases
sellados - por ejemplo: tarros de vidrio cerrados - pueden
explotar y por esto nose deben calentar en el homo
microondas. Dicho uso del horno microondas podr(_producir
lesiones.
[] No hierva huevos dentro de un homo microondas. Se
generar@presi6n dentro de layema del huevo que causara
que explote pudiendo, posiblemente,dahar a alguien.
[] Sise poneen marcha el microondas sin tenet comida en su
interior por m@sde un minuto o dos podr[an causarse dahos
al homo y podrfa empezar un fuego. Estohace aumentar
la temperatura alrededor del magnetr6n y puede reducir el
perfodo devida 0tildel homo.
[] Las comidas cocinadas en I[quidos(como la pasta)pueden
tenet cierta tendencia a hervir m(_sr@pidamenteque los
alimentos que contengan menos humedad. Siesto ocurre,
revise la secci6n deCuidadoy limpieza del homo microondas
donde encontrar@instrucciones en cuanto a la limpieza del
interior del microondas.
[] No caliente lacomida del beb6 enjarras decristal, incluso
siest6n destapadas. Aseg0resede que los alimentos de los
nihos est6nbien cocinados. Remuevala comida para distribuir
el calor de forma pareja.Tenga cuidado de que el niho no se
queme al calentar la lechede f6rmula. Elcontenedor puede
parecer m@sfr[ode Io que realmente est@la f6rmula. Pruebe
siempre la f6rmula antes de d@selaal beb6.
[] No descongele bebidas congeladas enbotellas de cuello
estrecho (especialmentebebidas carbonatadas). Incluso con el
contenedor abierto, podr[a generarse un aumento de presi6n.
Esto puede causar que el contenedor explote,Iocual podr[a
producir dahos personales.
BTU).
[] Estehomo puede instalarse encima de la cocina y est6
dise_ado para su uso sobrecocinas encimeras nom6s
anchas de 36". Puedeinstalarse sobreequipos para cocinar
de gaso el6ctricos.
[] Hayalg0n metal, como cintas de cierrecon metal, pinchos de
polio,o platos con decoraci6n de oro dentro del microondas.
[] Seest6 usando papel toalla reciclado que contienen pequehas
porciones de metal en elmicroondas.
[] AGUA SOBRECALENTADA
Liquidos, tales como agua, card, o td, se podrian sobrecalentar
mds alld delpunto de ebullici6n sin parecer que estdn
hirviendo. No siempre habrd burbujas o evidencia de que
el Ifquido estd hirviendo cuando se extrae el envase con el
Ifquidodel microondas. ESTOPODRfARESULTARENL[OUIDO5
PtUYCALIENTESDEREPENTECOMENZANDOA HERVIRY
A REBOSARSECUANDOELENVASEESMOVIDO0 SIUNA
CUCHARAUOTROUTENSILIOSELEINTRODUCEAL LIQUIDO.
Para reducir el riesgo de lesionespersonales:
- No sobrecaliente los Ifquidos.
- IVluevaelI[quido tanto antes como a mediados deltiempo de
calentamiento.
- No useenvasesde lados rectoscon cuellos estrechos.
- Despu_sdel calentamiento, permita que el envase
permanezca en el microondas por un tiempo corto antes de
remover el envase.
- Usecuidado extremo cuando inserte una cuchara u otto
utensilio en elenvase.
[]
Losalimentos calientes y el vapor puedencausar quemaduras.
Tengacuidado al abrir cualquier contenedor con comida
caliente, inclusobolsasde rosetas opalomitas de maiz, bolsas
o cajas de cocinar. Para prevenir posiblesdahos personales,
mantenga el vapor alejado de susmanos y rostro.
[]
No cocinedemasiado laspapas. Podriandeshidratarse e
incendiarse,causando dahos a su horno.
[]
Cocine la came y el polio porcompleto-la came hasta que
alcance una temperatura minima INTERIORde !60°F, y el polio
hasta una temperatura INTERNA minima de !80°F. Cuando
secocinan a estas temperaturas se evita la contracci6n de
enfermedades por intoxicaci6n.
GUARDEESTASINSTRUCCIONES
GEAppliances.com

IMPORTANT SAFETYINFORMATION.
READ ALL INSTRUCTIONS BEFOREUSING.
,AWARNING!
Make sure all cookwure used inyour microwave oven is
suitable for microwuving. Most glass casseroles,cooking dishes,
measuring cups,custard cups,pottery or china dinnerware which
does not have metallic trim or glaze with a metallic sheen can be
used.Somecookwure is labeled "suitable for microwuving."
[] Ifyou are not sure if udish ismicrowave-safe, usethis test:
Placein the oven both the dishyou are testing and a glass
measuring cup filled with I cup of water-set the measuring
cup either in or next to the dish.Microwave
30-/45seconds at high. Ifthe dish heats, it should not be used
for microwuving.
If the dish remains cool and only the water inthe cup heats,
then the dish is microwave-safe.
[] Ifyou use umeat thermometer while cooking, make sure it is
safe for use in microwave ovens.
[] Do not use recycled paper products. Recycledpaper towels,
napkins and waxed paper can contain metal fleckswhich may
cause arcing or ignite.Paper products containing nylon or
nylon filaments should be avoided, us they may alsoignite.
[] Somefoam trays (likethose that meat is packagedon)
have athin strip of metal embedded inthe bottom. When
microwaved, the metal can burn the floor of the oven or ignite
a paper towel.
[] Do not use the microwave to dry newspapers.
[] Not all plasticwrap issuitable for use in microwave ovens.
Checkthe package for proper use.
[] Papertowels, waxed paper and plasticwrap can be usedto
cover dishes inorder to retain moisture and preventsputtering.
Besure to vent plastic wrap so steam can escape.
[] Cookwure may become hot because of heat transferred from
the heated food. Potholders may be neededto handle the
cookware.
[]
"Bailable"cooking pouches and tightly closed plastic bugs
should be slit, piercedor vented usdirected by package. If they
are not, plastic could burst during or immediately after cooking,
possiblyresulting in injury.Also,plastic storage containers
should be at least partially uncovered because they form a
tight seal.When cooking with containers tightly covered with
plasticwrap, remove covering carefully and direct steam away
from hands and face.
[]
Usefoil only usdirected in this guide.TVdinners may be
microwuved infoil trays lessthan 3/#' high; remove the top
foil cover and return the tray to the box.When using foil in the
microwave oven, keepthe foil at least 1"away from the sides
of the oven.
[]
Plasticcookwure-Plustic cookware designedfor microwave
cooking isvery useful, but should be used carefully. Even
microwave-safe plastic may not be us tolerant of overcooking
conditions usare glass or ceramic materials and may soften
or char ifsubjected to short periods of overcooking. In longer
exposuresto overcooking, the food and cookwure could ignite.
Follow these guidelines.
1. Usemicrowave-safe plastics only and usethem in
strict compliance with the cookware manufacturer's
recommendations.
2. Donot microwave empty containers.
3. Donot permit children to useplastic cookware without
complete supervision.
THE VENT FAN
Thefan will operate automatically under certain conditions (see
Automatic Fanfeature).Take care to prevent the starting and
spreading of accidental cooking fireswhile the vent fan is in use.
[] Clean the underside of the microwave often.
Donot allow grease to build up on the microwave or the fan
filters.
[] Inthe event of a greasefire on the surface units below the
microwave oven, smother a flaming
pan on the surface unit by covering the pan completely with a
lid,a cookie sheet or a flat tray.
[]
Usecare when cleaning the vent fan filters.Corrosivecleaning
agents,such as lye-based oven cleaners,may damage the
filters.
[]
When preparing flaming foods under the microwave, turn the
fan on.
[]
Never leave surface units beneath your microwave oven
unattended at high heat settings. Boiloverscause smoking and
greasy spillovers that may ignite and spread ifthe microwave
vent fan is operating. To minimize automatic fan operation, use
adequate sizedcookware and use high heat on surface units
onlywhen necessary.
6 SAVETHESEINSTRUCTIONS

INSTRUCCIONES IMPORTANTES DE SEGURIDAD.
LEA PRIMERO TODA LAS INSTRUCCIONES.
J kiPRECAUCI6N!
AsegOresedeque todos los utensiliosde cocinaque use en su
homo sean aptospara microondas. Puedenusarsela mayofia
de las cazuelas,platos para cocinar,tazasde medir, tazasde
flanesy botesde cristal,o las vajillasde porcelana que no tienen
decoracionesmetdlicas o bamicescon brillo metdlico.Algunos
utensiliostienenla siguiente inscripci6n:"puede usarseen
microondas."
[] Sino est6 seguro de que un plato pueda usarse en el
microondas, haga esta prueba: Coloqueel plato que est6
probando y un vasode medir con 237 ml (1taza) de agua en
el homo - ponga la taza de medir dentro o al lado del plato.
Pongael microondas en marcha, a m6xima potencia, durante
30-45 segundos.Siel plato secalienta no deber[a usarse en el
microondas.
Siel plato semantiene fr[o ys61osecalienta la taza, entonces
el plato puede usarsede forma segura enel microondas.
[] Siusa unterm6metro de came al cocinar con microondag,
asegQresede que seaapto para ser usado en microondas.
[] Nouse productos de papel reciclado. Elpapeltoalla, las
servilletasy el papel decera recicladospueden contener
motas metc_licasque podrian causar laformaci6n de
arcos el6ctricos oincendiarse.Losproductos de papel que
contengan nil6n ofilamentos de nil6ntampoco deberian
usarseya que se podrian incendiar de igual modo.
[] Algunas bandejas de gomaespuma (como aquellas donde se
empaqueta la came) poseenuna tira fina de metal insertada
en la parte inferior.Sise usan enel homo microondas, elmetal
podr6 quemar el piso del homo o encender una toalla de
papel.
[] Nouse el horno microondas para secar el peri6dico.
[] Notodos losenvoltorios de pl6stico estc_npreparados para
uso enel horno microondas. Controle elpaquete para un uso
adecuado.
[] Algunas bandejas de pk_stico(como en lasque seempaqueta
la came) tienen una cinta fina de metal incrustada en el plato.
AIponerseen el microondas, el metal puede quemar elsuelo
del homo o incendiar un papel toalla.
[] Podr[ancalentarse losutensiliospor el calor transferido por los
alimentos calientes.Puede necesitar usar manoplas ce cocina
para manejar los utensilios.
AIutilizar con el microondas bolsas decocinar "que puedan
hervir",asfcomo cualquier bolsa deplc_sticofirmemente
cerrada, deberc_ncortarse, perforarse o proveer cualquier tipo
de ventilaci6n seg6n indique elpaquete. Encaso contrario,
el pl(_sticopodr[a explotar mientras secocina o despu_s,
pudiendo causar dahos fisicos.Ademc_s,losrecipientes
de plc_sticodeber[an permanecer,al menos,parcialmente
destapados ya que pueden sellarsefuertemente. Cuando
cocine con recipientes firmemente cubiertos confilm plc_stico,
retire lacubierta con cuidado y mantenga el vapor alejado de
sus manos y rostro.
Usepapel de aluminio s61ode la forma detallada en este
manual. Cuando usealuminio dentro de un homo microondas,
mantenga el aluminio,al menos, a una pulgada dedistancia
de loslaterales delhomo.
Utensiliosde pl(_stico--Losutensiliosde pl(_sticodiseBados
para su usoen microondas son muy pr6cticos, pero deben
usarse con cuidado. Incluso aquellos utensiliosautorizados
para su usoen microondas podrfan no set tan tolerantes
como el cristal o losmateriales de cer6mica en condiciones
de sobrecalentamiento y podr[an ablandarse o carbonizarse
al someterlos a per[odoscortos de sobrecalentamiento. En
exposiciones mc_slargas a sobrecalentamiento, la comida y los
utensilios podr[an incendiarse.
Sigaestas normas:
1. Usesolamente plc_sticosaptos para microondas y
2. Nointroduzca en el microondas recipientes
3. Nopermita que los nihosusen utensiliosde pk_sticosin
GEAppliances.com
0selos siguiendo estrictamente lasrecomendaciones del
fabricante de losutensilios.
ratios.
completa supervisi6n.
EL VENTILADOR EXTRACTOR
Elventilador se pondr6 en funcionamiento de forma
autom6tica bajo ciertas circunstancias (verfunci6n de
Ventilador AutomcXico). Prevenga elque empiece algOn
fuego al cocinar y que se extienda mientras el ventilador del
respiradero est6 en marcha.
[] Limpie a menudo la parte inferior del microondas. No
permita que se acumule grasa en el microondas o en los
filtros del ventilador.
[] Sila grasa se incendiara en las unidades de
la cocina (fogones) bajo el horno microondas, sofoque
cualquier sart6n en llamas de la unidad de cocina por
completo con una tapa, una bandeja de galletas o
cualquier otra bandeja plana.
GUARDEESTASINSTRUCCIONES
[] Tenga cuidado al limpiar los filtros del ventilador extractor.
Los productos de limpieza corrosivos, como los limpia-
hornos a base de lejia, pueden dahar los filtros.
[] Ponga en marcha el extractor cuando
est6 cocinando comidas con llama bajo el microondas.
[] Nunca deje las unidades de la cocina
(fogones) bajo su microondas sin atenci6n cuando se est_
trabajando a altas temperaturas. Cuando la comida entra
en ebullici6n se generan humos y se derraman grasas
que pudieran incendiarse y propagarse si el ventilador
del microondas est(_funcionando. Para minimizar el
funcionamiento del extractor autom6tico, use utensilios de
cocina de tamaho adecuado y use el fuego r6pido en las
unidades de la cocina (fogones) s61ocuando sea necesario.
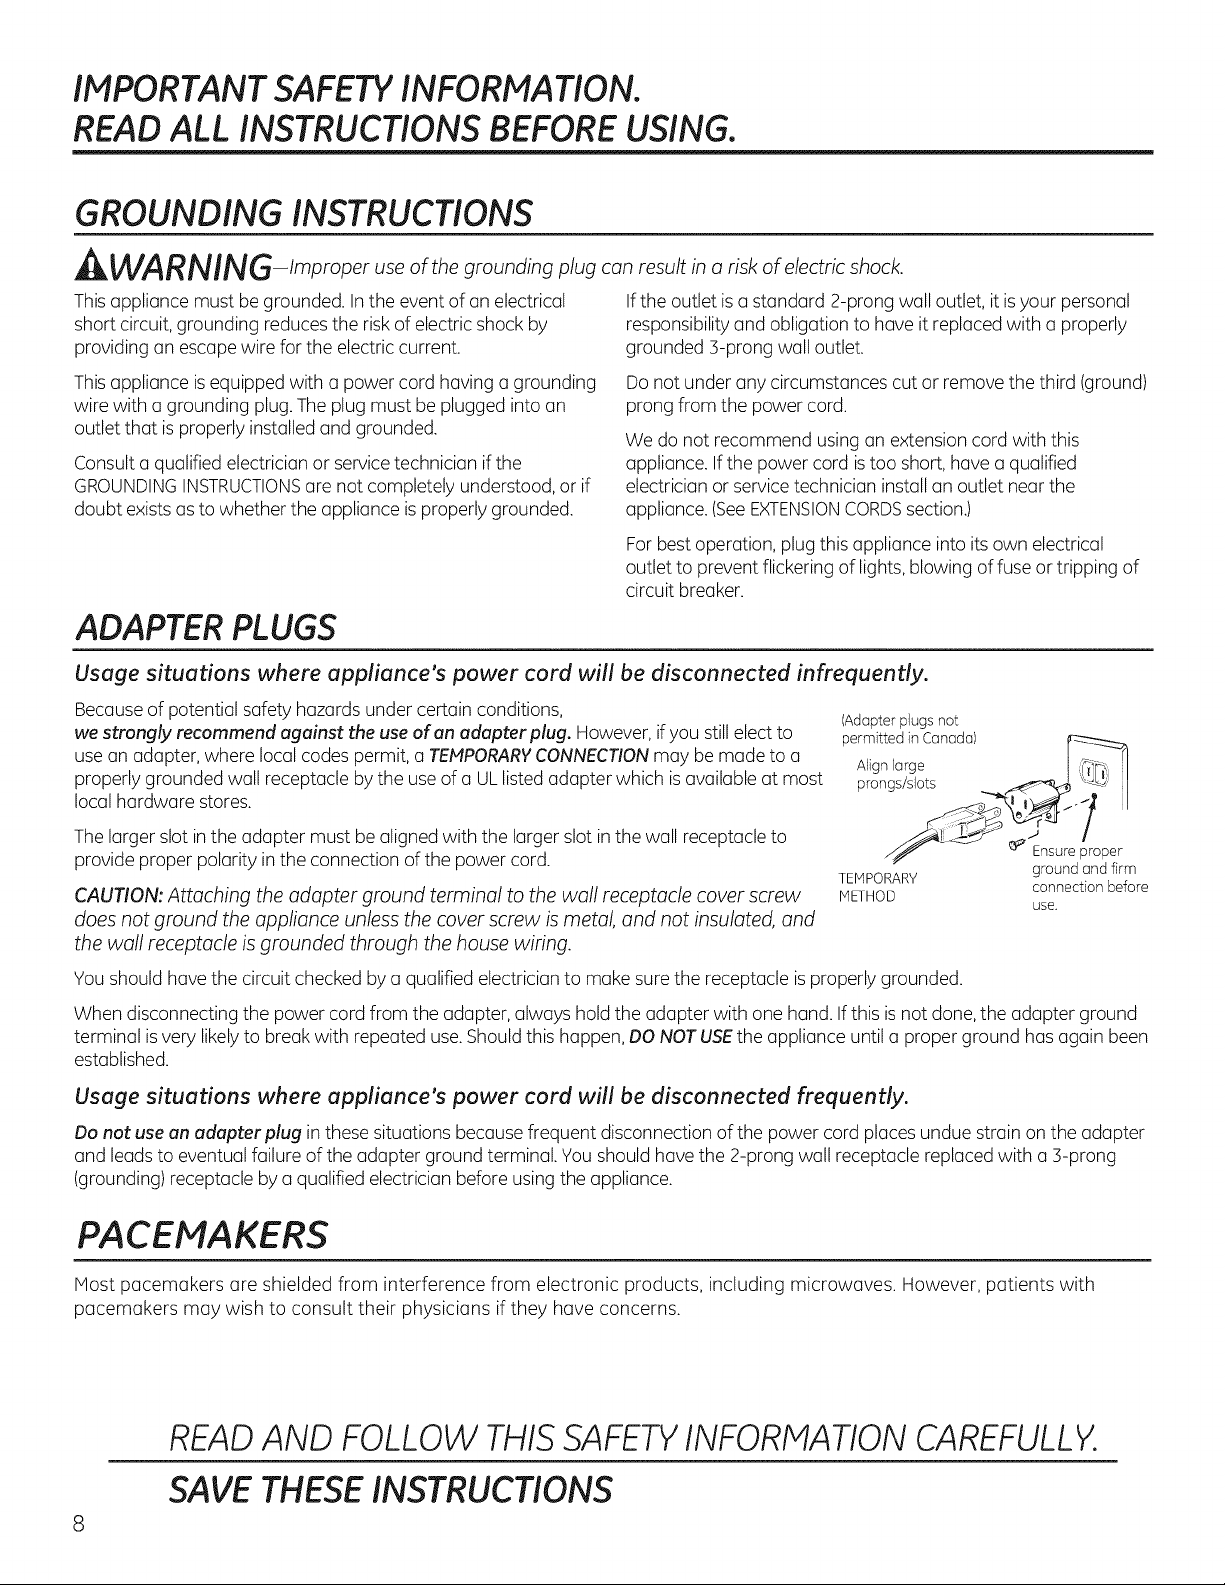
IMPORTANT SAFETY INFORMATION.
READ ALL INSTRUCTIONS BEFORE USING.
GROUNDING INSTRUCTIONS
A WARNING-Impr°neruseof the grounding plug can result in a risk of electric shock.
Thisappliance must be grounded. In the event of an electrical Ifthe outlet isa standard 2-prong wall outlet, it isyour personal
short circuit, grounding reduces the risk of electric shock by responsibilityand obligation to have it replaced with a properly
providing an escape wire for the electric current, grounded 3-prong wall outlet.
Thisappliance isequipped with a power cord having a grounding
wire with a grounding plug.Theplug must be plugged into an
outlet that isproperly installed and grounded.
Consulta qualified electrician or servicetechnician ifthe
GROUNDINGINSTRUCTIONSare not completely understood, or if
doubt exists as to whether the appliance is properly grounded.
ADAPTER PLUGS
Donot under any circumstances cut or remove the third (ground)
prong from the power cord.
We do not recommend using an extension cord with this
appliance. If the power cord is too short, have a qualified
electrician or service technician install an outlet near the
appliance. (SeeEXTENSIONCORDSsection.)
Forbest operation, plugthis appliance into its own electrical
outlet to prevent flickering of lights,blowing of fuse or tripping of
circuit breaker.
Usage situations where appliance's power cord will be disconnected infrequently.
Becauseof potential safety hazards under certain conditions,
we strongly recommend against the use of on adapter plug. However, ifyou stillelect to
use an adapter, where local codes permit, a TEMPORARY CONNECTION may be made to a
properly grounded wall receptacle by the use of a ULlisted adapter which is available at most
local hardware stores.
Thelarger slot inthe adapter must be aligned with the larger slot inthe wall receptacle to
provide proper polarity inthe connection of the power cord.
CAUTION: Attaching the adapter ground terminal to the wall receptacle cover screw
does not ground the appliance unless the cover screw is metal, and not insulated, and
the wall receptacle is grounded through the house wiring.
Youshould havethe circuit checked by a qualified electrician to make surethe receptacle is properly grounded.
When disconnecting the power cord from the adapter, always hold the adapter with one hand. If this isnot done, the adapter ground
terminal isvery likelyto break with repeated use.Should thishappen, DONOT USEtheappliance until a proper ground hasagain been
established.
(Adapter plugs not
permitted in Canada)
Alignlarge r% _]
prongs/slots f<c"_re _ _""_ I
J_" _ Ensure proper
TEMPORARY ground and firm
METHOD
connection before
use.
Usage situations where appliance's power cord will be disconnected frequently.
Do not use on odopterplug inthese situations becausefrequent disconnection of the power cord places undue strain on the adapter
and leadsto eventual failure of the adapter ground terminal. You should have the 2-prong wall receptacle replaced with a :3-prong
(grounding) receptacle by a qualified electrician before usingthe appliance.
PACEMAKERS
Host pacemakers are shielded from interference from electronic products, including microwaves. However, patients with
pacemakers may wish to consult their physicians if they have concerns.
READAND FOLLOW THISSAFETYINFORMATIONCAREFULLY.
SAVETHESEINSTRUCTIONS

INSTRUCCIONES IIvlPORTANTES DE SEGURIDAD.
LEA PRilVlEROTODA LASINSTRUCCIONES. GEAppliances.com
INSTRUCCIONES DE TOMA DE TIERRA
IkiADVERTENCIA!
El uso indebido del enchufe de tierra puede resultar en riesgo de descarga el_ctrica..
Esteelectrodom6stico debe estar conectado a tierra. Sise
produjera un cortocircuito, la toma de tierra reduce el riesgo
de descarga el6ctrica al proveer un cable de escape para la
corriente el6ctrica.
Esteelectrodom6stico est6 equipado con un cable de corriente
que dispone de un hilo para toma de tierra con un enchufe con
toma de tierra. Elenchufe debe estar conectado a una toma de
corriente que est6 debidamente instalada y con salida a tierra.
Consultecon un electricista cualificado o un t6cnico de
reparaciones sino entiende completamente las instrucciones
sobre latoma detierra, o situviese alguna duda sobre sisu
aparato est(_debidamente conectado a tierra.
Sila toma de corriente es un modelo estdndar de dos clavijas,es
su responsabilidad personaly su obligaci6n elreemplazarla por
una toma adecuada para tres clavijas con conexi6n a tierra.
Bajoninguna circunstancia debe cortar o quitar la tercera clavija
(tierra)del cable de corriente.
Nouse unenchufe adaptador con este electrodom6stico.
Nouse uncable extensor de corriente con
este electrodom6stico. Siel cable de corriente esdemasiado
corto, haga queun electricista cualificado o un t6cnico
de reparaciones instalen una toma de corriente cerca del
electrodom6stico.
Paraun mejor funcionamiento, enchufe este electrodom6stico
en una toma de corriente exclusiva para evitar parpadeos de luz,
fusiblesquemados o que salte el diferencial.
ADAPTADORES DE ENCHUFE
Situaciones de uso en que el cable de corriente del electrodom_stico ser5 desconectado con poca frecuencia.
Debidoa losposibles riesgossobre la seguridad bajo ciertas condiciones,recomendamos (Enchufesadaptadoresno
enfaticamente no usar adaptadores de enchufe. Sinembargo, si aOnelije usar un adaptador, perrnitidosenCanadd) r_.r_-_
cuando losc6digos locales Io permitan, se podr6 realizar una CONEXIONTEHPORARIAa Alinee lasparas/ _-..<_!, ',_L,L'_;I
un tomacorriente de pared de 2enchufes adecuadamente conectado a tierra, utilizando un ranuras largas ._.,,_"<_. i_ I
adaptador que figure en la lista de ULque se encuentre disponibleen la mayor[a de los localesde /!'
repuestos. _¢ _j_-- _-_ !
Laranura m6s larga del adaptador deber6 estar alineada con la ranura m6s larga en el _ isegureuna
tomacorriente de pared,a fin de brindar la polaridad adecuada en la conexi6n delcable de firme y adecuada
corriente. IVI_TODO antes del usa
PRSCAUCION:Conectar laterminal deladaptador con conexi6n a tierra altornillo de la cubierta
del tomacorriente no conecta el electrodom6stico a tierra, a menos que el tornillo de la cubierta sea de metal, y no est6aislado,y que
el tomacorriente est6 conectado a tierra a trav6s delcableado del hogar.
Contrate a un electricista calificado para que controle el circuito,a fin de asegurar que eltomacorriente est6 correctamente conectado
a tierra.
Cuando desconecte elcable de corriente del adaptador, siempre sostenga el adaptador con una mano. Encaso de no hacer esto,
es muy probable que laterminal deladaptador con conexi6n a tierra serompa con el uso repetido. Siesto sucede, NOUSEel
electrodom6stico hasta que sehaya establecido una conexi6n a tierra adecuada nuevamente.
Situaciones de uso en que el cable de corriente del electrodom_stico ser_ desconectado con frecuencia.
No use un adaptador de enchufe en estas situaciones,ya que una desconexi6n frecuente del cable decorriente representa un
esfuerzoexcesivo sobre eladaptador y conduce finalmente a unafalla de laterminal del adaptador con conexi6n a tierra. Deber6
solicitar a un electricista calificado el reemplazodel tomacorriente de 2 cables por uno de 3 cables (conconexi6n atierra),antes de
usar elelectrodom6stico.
TEFIPORARIO
cone×i6natierra
MARCA PASOS
La mayorfa de Ioas marca pasos estc_nprotegidos contra la interferencia de aparatos electr6nicos, incluyendo los microondas.
Sin embargo, cuando tengan alguna duda, los pacientes con marca pasos deben consutar con su m6dico.
FAVORDELEERYSEGUIRCUIDADOSAMENTEESTAINFORIACION
DESEGURIDAD.
GUARDEESTASINSTRUCCIONES

Optional kits
Available at extra cost from your GE supplier.
Filler Panel Kits
Filter Kits
[] JX52WH-White
[] JX52BL--Block
When replacing a 36" range hood, filler panel kits fill
in the additional width to provide a custom built-in
appearance.
For installation between cabinets only; not for end-of-
cabinet installation. Each kit contains two 3" wide filler
panels.
[] Sales No.JX81H--Recirculating Charcoal Filter Kit
Service No. WBO2X10956
Filter kits are used when the oven cannot be vented to
the outside.
See back cover to order by phone or at
GEApplianceparts.com.
10
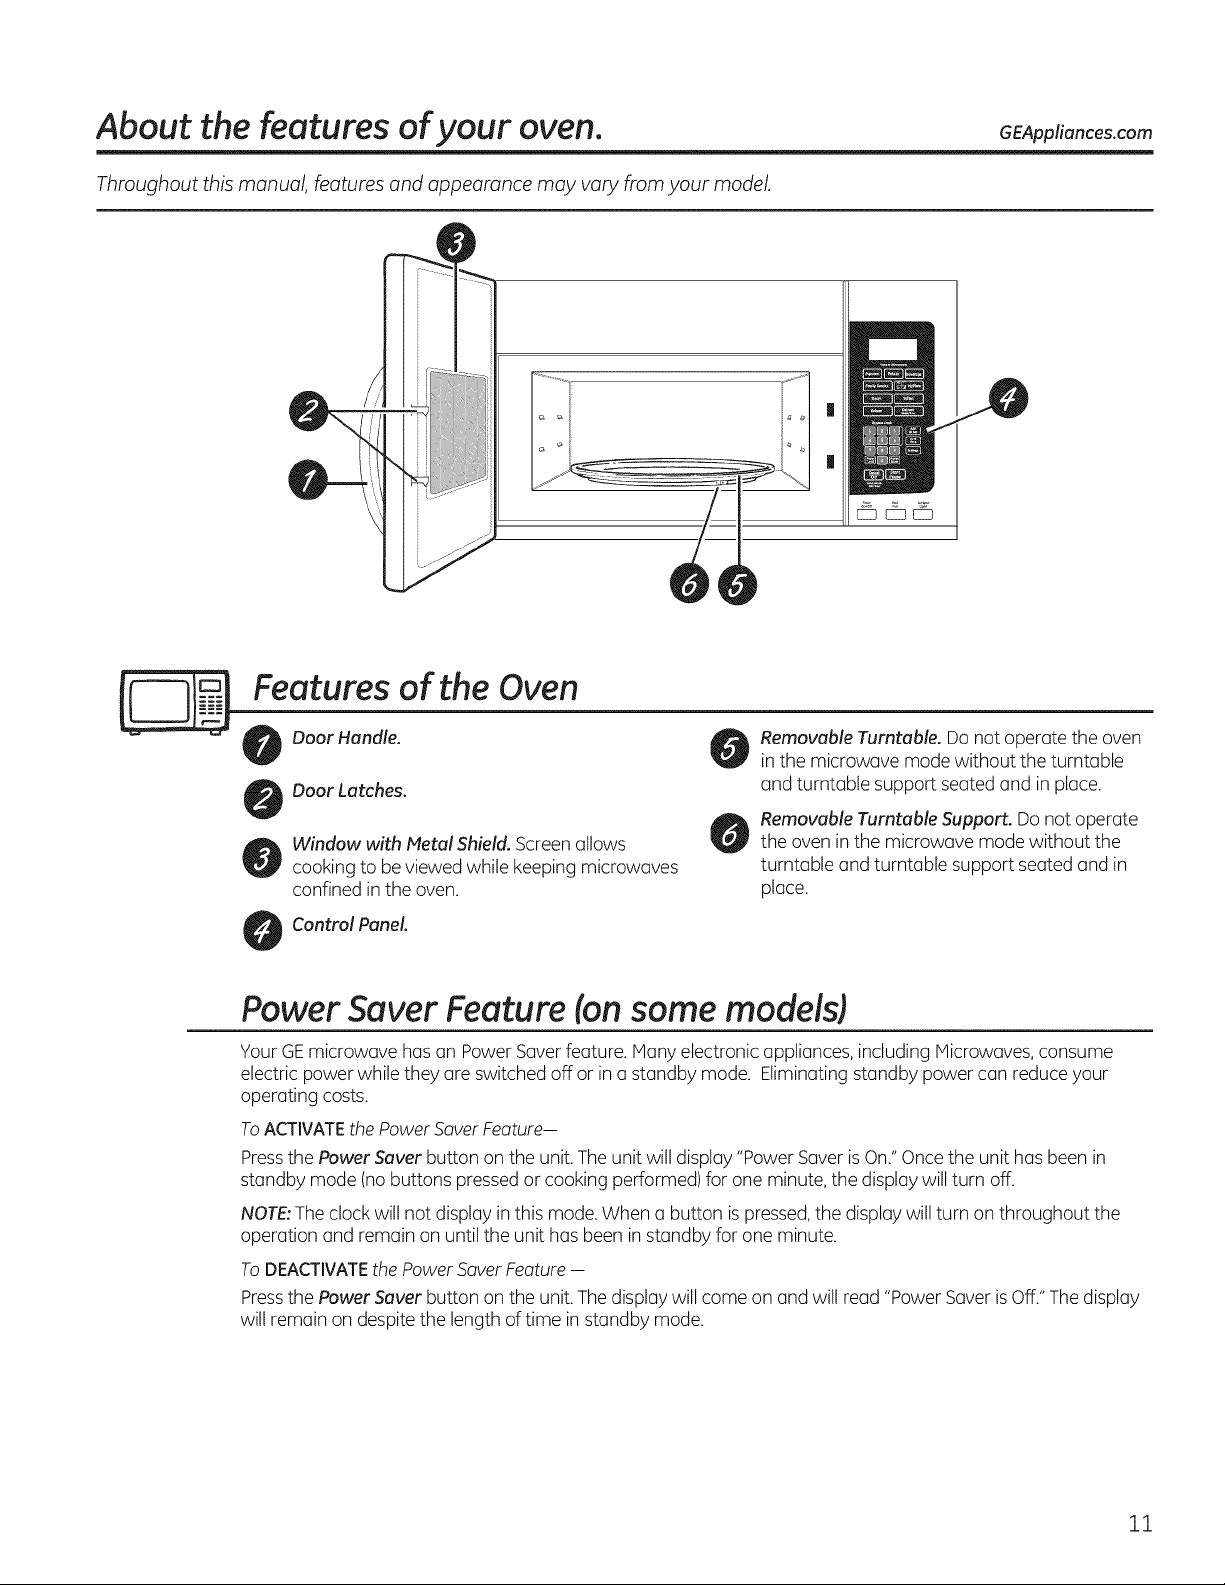
About the features of your oven. GEAppliances.com
Throughout this manual, features and appearance may vary from your model.
|
|
Features of the Oven
Door Handle.
Door Latches.
Window with Metal Shield. Screen allows
cooking to be viewed while keeping microwaves
confined in the oven.
Control Panel
Removable Turntable. Do not operate the oven
in the microwave mode without the turntable
and turntable support seated and in place.
Removable Turntable Support. Do not operate
the oven in the microwave mode without the
turntable and turntable support seated and in
place.
Power Saver Feature (on some modelsl
Your GEmicrowave has an Power Saver feature. Many electronic appliances, including Microwaves, consume
electric power while they are switched off or in u standby mode. Eliminating standby power can reduce your
operating costs.
ToACTIVATEthe PowerSaverFeature--
Pressthe Power Saver button on the unit.The unit will display "Power SaverisOn."Oncethe unit has been in
standby mode (nobuttons pressedor cooking performed) for one minute, the display will turn off.
NOTE:Theclock will not display in this mode.When a button ispressed,the display will turn on throughout the
operation and remain on until the unit has been in standby for one minute.
ToDEACTIVATEthe PowerSaverFeature --
Pressthe Power Saver button on the unit.The display will come on and will read "PowerSaverisOff."Thedisplay
will remain ondespite the length of time in standby mode.
11

About the cooking features of your
microwave oven.
_,eom1[_o,ten}
Reheatl[ _o_]
Express Cook
Lock Controls
Hold 3 Sec
Cooking Controls
Check the Convenience Guide before you begin.
Time Features
Press Enter
COOK TIME Amount of cooking time
DEFROST Time, Weight or lib Quick Defrost
SETTINGS
TIMER
POWER LEVEL Power level i to 10
ADD 30 SEC Starts immediately!
EXPRESSCOOK Starts immediately!
POPCORN Starts immediately!
BEVERAGE Starts immediately!
Sensor Features
Press Enter
REHEAT Starts immediately!
FAMILY SNACKS Enter pad to select Food
SOFTEN Enter pad to select Food
STEAM Enter pad to select Food
MyPtate Enter pad to select Food
POTATO Starts immediately!
Press number pads (1-6)
12
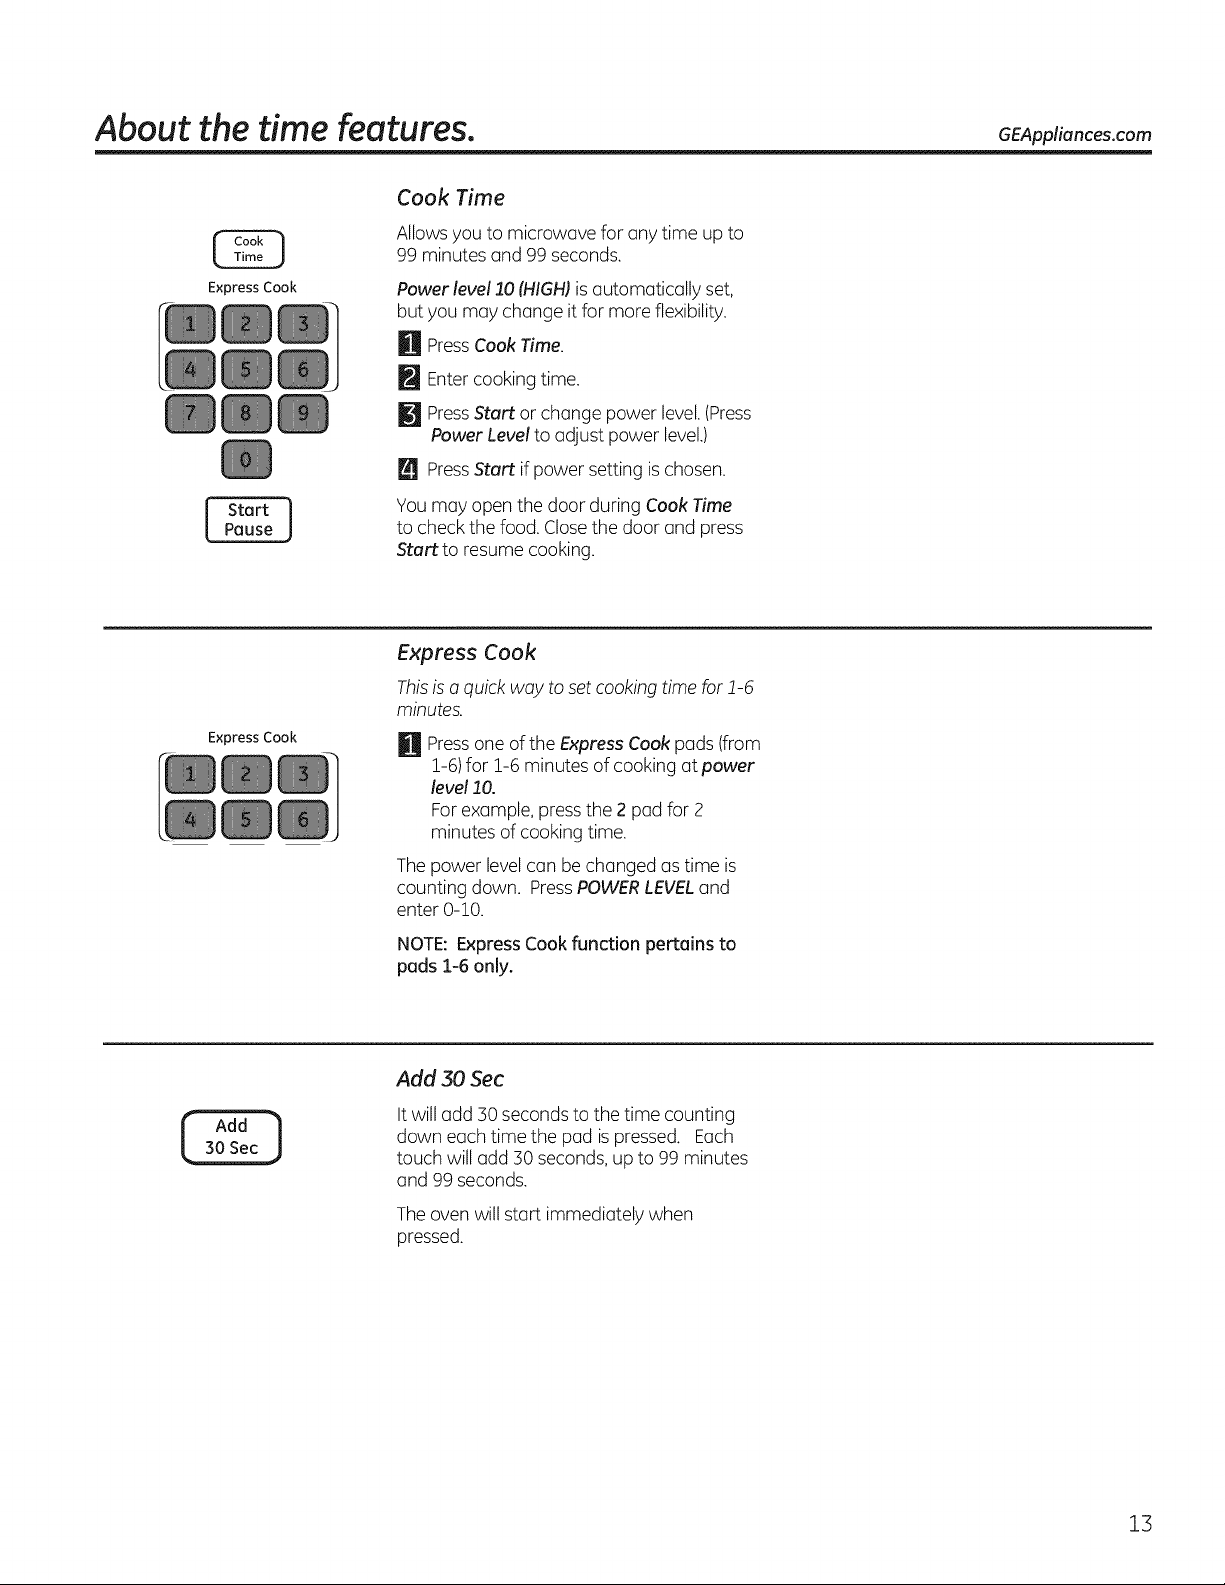
About the time features. GEAppliances.com
Cook Time
Allowsyou to microwave for any time upto
99 minutes and 99 seconds.
Express Cook
Express Cook
Power level 10(HIGH)is automatically set,
but you may change it for more flexibility.
H PressCookTime.
Entercooking time.
_lJ PressStart or change power level.(Press
Power Levelto adjust power level.)
L_JPressstart ifpower setting ischosen.
You may open the door during Cook Time
to check the food. Closethe door and press
Start to resume cooking.
Express Cook
Thisisa quick way to set cookingtime for !-6
minutes.
Pressone of the Express Cook pads (from
1-6)for 1-6 minutes of cooking at power
level 10.
Forexample, pressthe 2 pad for 2
minutes of cookingtime.
Thepower levelcan be changed as time is
counting down, PressPOWERLEVELand
enter 0-10.
NOTE: ExpressCook function pertains to
pads 1-6 only.
Add 30 Sec
It will add :SOsecondsto the time counting
down each time the pad is pressed. Each
touch will add 30 seconds,up to 99 minutes
and 99 seconds.
Theoven will start immediately when
pressed.
13
About the time features.
Defrost
[
Weight/Time
Express Cook
Start ]
Pause
Defrostincl Guide
Food
Breads, Cakes
Bread, buns, or rolls (1 piece) 1/4 rain.
Sweet rolls (approx.12 oz.) 2 to 4 min. Rearrange after half the time.
Fishand Seafood
Fillets, frozen (1 lb.) 6to 9 min.
)
Time Defrost
Allows you to defrost for a selected length
of time. Seethe Defrosting Guidefor
suggested times.(TimeDefrost and 1 Ib
Quick Defrost explained inthe About the
conveniencefeatures section.)
X Press DEFROSTtwice.
[] Enter defrosting time.
[] Press START.
L_]Turnthe food over after halfthe time.
At one half of selecteddefrosting time, turn
food over and break apart or rearrange
piecesfor more even defrosting.Shieldany
warm areas with small pieces offoil. Theoven
will continue to defrost ifyou don't open the
door and turn the food.
A dull thumping noisemay be heard during
defrosting. This isnormal when oven isnot
operating at High power.
Time Comments
Defrosting Tips
[] Foodsfrozenin paperor plastic can be
defrostedin the package.Closedpackages
shouldbe slit,pierced or ventedAFTER
food haspartially defrosted.Plasticstorage
containersshould be partially uncovered.
[] Family-size,prepackaged frozen dinners
can bedefrosted and microwaved. Ifthe
food is ina foil container, transfer it to a
microwave-safe dish.
[] Foodsthat spoil easily should not be
allowed to sit out for more than one
hour after defrosting. Roomtemperature
promotes the growth of harmful bacteria.
[] Formore even defrosting of larger foods,
such as roasts, useTime Defrost. Besure
large meats are completely defrosted
before cooking.
[] When defrosted,food should be cool
but softened in all areas. Ifstill slightly icy,
return to the microwave very briefly, or let it
stand a few minutes.
Fruit
Plastic pouch--1 or2 1to 5min.
(!0-oz. package)
Meat
Bacon (1lb.)
Franks (1 lb.)
Ground meat (1 lb.)
Roast: beef, lamb, veal, pork
Steaks, chops and cutlets
Poultry
Chicken, broiler-fryer, cut up
(2½ to 5 Ibs.)
Chicken, whole (2½ to 5 Ibs.)
Cornish hen
Turkey breast (4to 6 Ibs.)
2to 5min.
2to 5min.
4 to 6 min.
9to 13min.
per lb.
4to 8min.
per lb.
14 to 20 min.
20 to 25 min.
7to 13 min.
per lb.
3to 8min.
per lb.
Place unopened package in oven.Let stand Sminutes after defrosting.
Place unopened package in oven.Microwave just until franks can be separated.
Let stand 5 minutes, if necessary,to complete defrosting.
Turn meat over after first half of time.
Use power level10.
Place unwrapped meat in cooking dish.Turn over after first half oftime and
shield warm areas with foil.After second half of time, separate pieceswith table
knife. Let stand to complete defrosting.
Placewrapped chicken in dish.Unwrap and turn over after first half oftime. After
second halfof time, separate piecesand place in cooking dish.Microwave 2to 4
minutes more, if necessary.Let stand a few minutes to finish defrosting.
Placewrapped chicken in dish.After half the time, unwrap and turn chicken over.
Shieldwarm areas with foil.To complete defrosting, run cold water in the cavity
until giblets can be removed.
Place unwrapped hen in the oven breast-side-up. Turn over afterfirst half oftime.
Runcool water inthe cavity until giblets can be removed.
Place unwrapped breast in microwave-safe dish breast-side-down. After first half
of time, turn breast-side-up and shield warm areas with foil. Defrostfor second
half of time. Letstand i to 2 hours in refrigerator to complete defrosting.
14
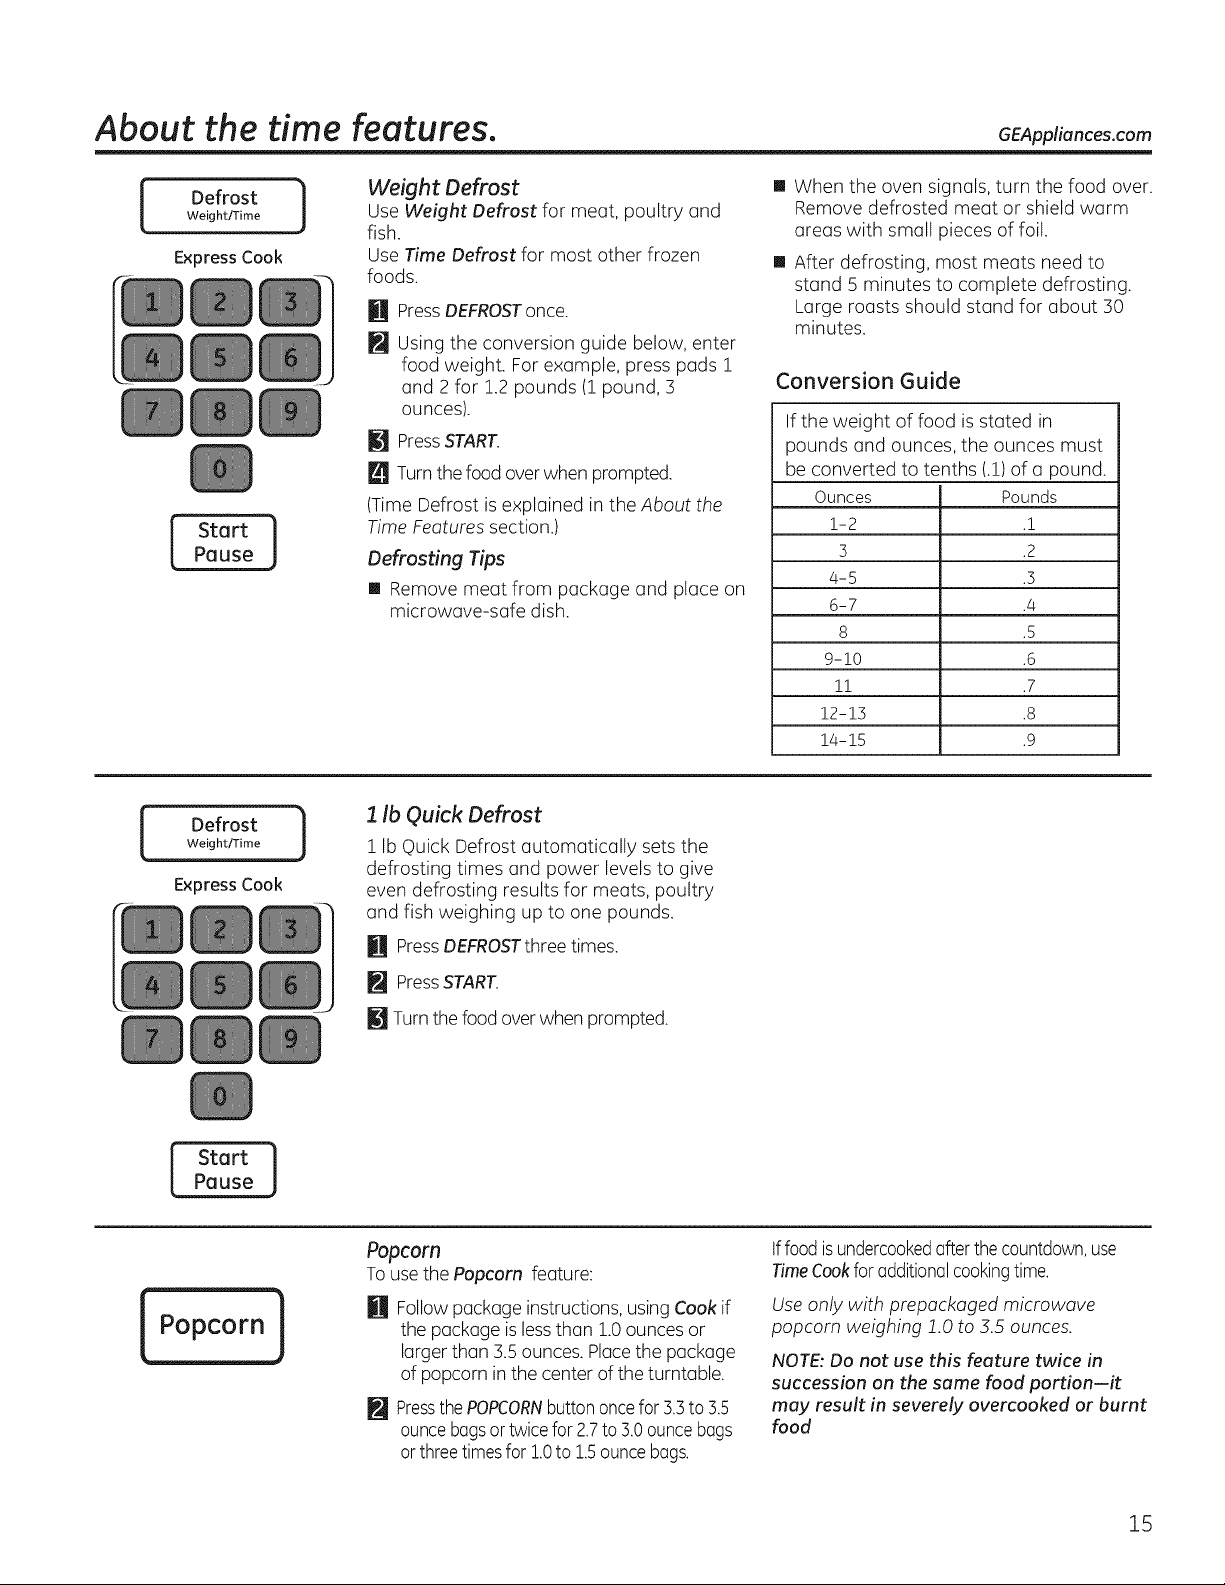
About the time features. GEAppliances.com
I Defrost iWeight/Time
Express Cook
StartPause ]
Weight Defrost
Use Weight Defrost for meat, poultry and
fish.
Use Time Defrost for most other frozen
foods.
Press DEFROSTonce.
[]
[]
Using the conversion guide below, enter
food weight. Forexample, press pads 1
and 2 for 1.2 pounds (1 pound, 3
ounces).
[] Press START.
Turnthefood over when prompted.
(Time Defrost is explained in the About the
Time Features section.)
Defrosting Tips
[] Remove meat from package and place on
microwave-safe dish.
[] When the oven signals, turn the food over.
Remove defrosted meat or shield warm
ureas with small pieces of foil.
[] After defrosting, most meats need to
stand 5 minutes to complete defrosting.
Large roasts should stand for about 30
minutes.
Conversion Guide
If the weight of food is stated in
pounds and ounces, the ounces must
be converted to tenths (.1)of u pound.
Ounces Pounds
1-2 .!
5 .2
4-5 .5
6-7 .4
8 .5
9-10 .6
!! .7
12-15 .8
14-15 .9
Defrost
t
Weight/Time
Express Cook
Start ]
_ Peuse
Popcorn J
J
1 Ib Quick Defrost
1 Ib Quick Defrost automatically sets the
defrosting times and power levels to give
even defrosting results for meats, poultry
and fish weighing up to one pounds.
[] PressDEFROSTthree times.
PressSTART.
_J_Turnthefood overwhen prompted.
Popcorn
Tousethe Popcorn feature:
U Follow package instructions, using Cook if
the package islessthan 1.0ounces or
larger than 3.5 ounces. Placethe package
of popcorn in the center of the turntable.
PressthePOPCORNbuttononcefor3.3to 3.5
ouncebagsortwicefor2.7to 3.0ouncebags
orthreetimesfor 1.0to 1.5ouncebogs.
tffoodisundercookedafterthe countdown,use
TimeCookforadditionalcookingtime.
Useonly with prepackaged microwave
popcorn weighing !.0 to 5.5 ounces.
NOTE:Do not use this feature twice in
succession on the same food portion-it
may result in severely overcooked or burnt
food
15

About the MyPlate Feature.
MyPlate /
Express Cook
Start ]
Pause _
NOTE: Do not use the sensor
features twice in succession on
the same food portion. If food
is undercookecl after the first
countdown, use Cook Time for
additional time.
MyPlate Feature
Allows you to microwave healthyfood choices
by servingsor with sensor.
H PressMvPlate pad.
Enter the food type. See Cooking Guide for
I_lyPlatebelow for codes or check the
display for food types.
M Enter the amount as prompted for non-
sensor food selections.
NOTE FOR SENSOR COOKING: for best
results do not open the door while cooking.
PressSTART.
NOTE FOR SENSOR COOKING: for best
results do not open the door while cooking
Fornon-sensor food, you may open the door
during cooking to check the food. Closethe
door and pressSTARTto resume cooking.
Cooking Guide for MyPlate Feature
NOTE: Use power level 10 unless otherwise noted.
First Choice Second Choice Third Choice
Grain Rice 1/2 cup, 1 cup, 1 1/2 cups
Oatmeal i to/4 packets
Popcorn loz, 3.0ozs, 3.5 ozs
Macaroni 1/2 cup, i cup, i 1/2 cups
Quinoa 1/2 cup, i cup, i 1/2 cups
Vegetables Asparagus Fresh, Frozen,Canned
Broccoli Fresh, Frozen
Green Beans Fresh, Frozen,Canned
Carrots Fresh, Frozen, Canned
Corn Fresh Whole Cobs (1 to 4), Frozen Kernel,
Canned
Peas Frozen,Canned
Potato Baking, Sweet
Spinach Frozen, Fresh,Canned
Ground Meat
Poultry Bone-in Chicken
Bonless Chicken
Seafood Whitefish
16
, Ti!apia
Salmon
About the sensor microwave features. GEApplionces.com
[
Soften
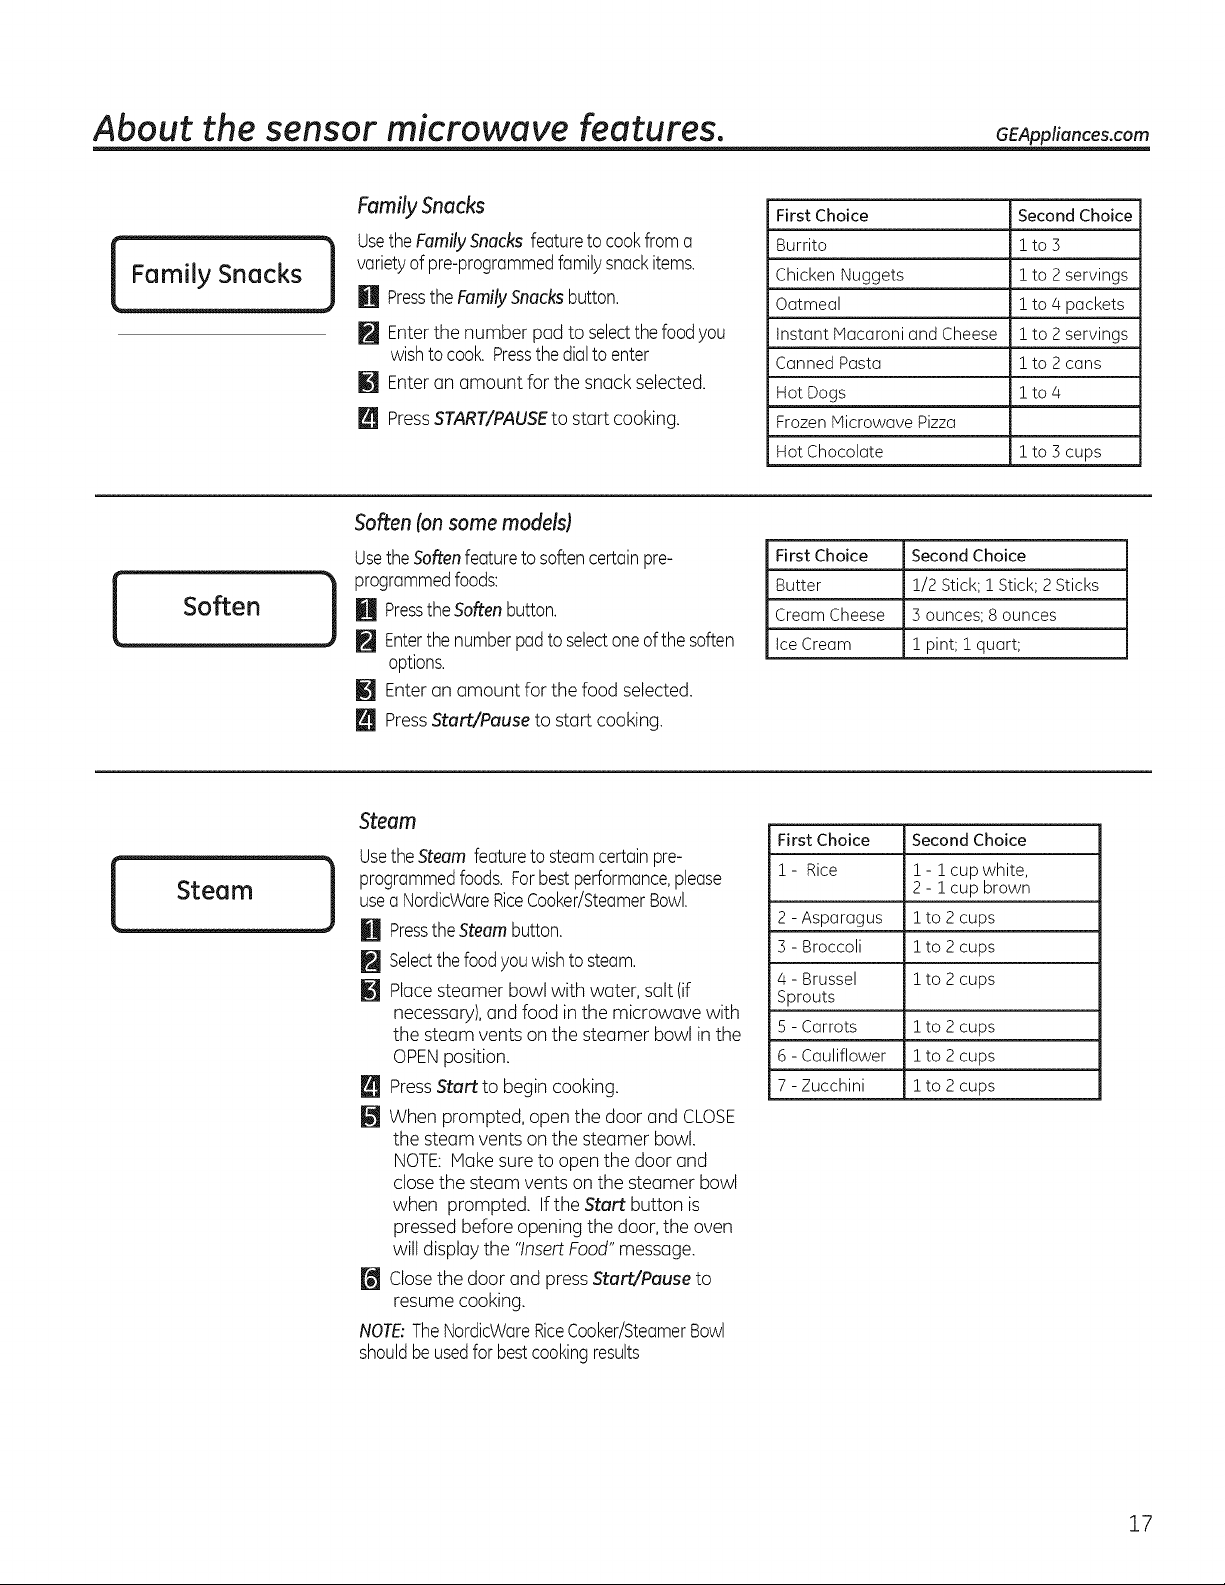
Family Snacks
UsetheFamilySnacksfeatureto cookfroma
varietyof pre-programmedfamilysnackitems.
U PresstheFamilySnacksbutton.
Enterthe number pad to selectthefoodyou
wishtocook.Pressthedialto enter
[] Enteran amount for the snack selected.
PressSTART/PAUSEto start cooking.
Soften (on some models)
Usethe Soften feature to soften certain pre-
programmed foods:
M Press the Soften button.
]
Enterthe number pad to select one of the soften
options.
[] Enter an amount for the food selected.
Press Start/Pause to start cooking.
First Choice Second Choice
Burrito i to 3
Chicken Nuggets i to 2 servings
Oatmeal i to 4 packets
Instant Macaroni and Cheese 1to 2 servings
Canned Pasta i to 2 cans
Hot Dogs i to 4
Frozen Microwave Pizza
Hot Chocolate i to 3 cups
First Choice Second Choice
Butter 1/2 Stick; ! Stick; 2Sticks
Cream Cheese 3 ounces; 8 ounces
ice Cream ! pint; ! quart;
Steam
UsetheSteamfeatureto steamcertainpre-
programmedfoods.Forbestperformance,please
useaNordicWareRiceCooker/SteamerBowl.
Pressthe Steam button.
H
Selectthefoodyouwishtosteam.
@
[]
Placesteamer bowl with water, salt (if
necessary),andfood in the microwave with
the steam vents onthe steamer bowl in the
OPENposition.
m
PressStart to begin cooking.
@
When prompted, open the door and CLOSE
the steam vents onthe steamer bowl.
NOTE:Hake sureto open the door and
close the steam vents on the steamer bowl
when prompted. Ifthe Start button is
pressedbefore opening the door, the oven
will displaythe "InsertFood"message.
[] Closethe door and press Start/Pause to
resume cooking.
NOTE:TheNordicWareRiceCooker/SteamerBowl
shouldbeusedforbestcookingresults
First Choice Second Choice
! - Rice ! - ! cup white,
2- i cup brown
2 - Asparagus i to 2 cups
5 - Broccoli i to 2 cups
/4- Brussel ! to 2 cups
Sprouts
5 - Carrots ! to 2 cups
6 - Cauliflower ! to 2 cups
7 - Zucchini ! to 2 cups
17
About the sensor mircrowuve features.
Reheat
Donot usetheshelveswhenmicrowavecooking.)
TheReheatfeaturereheatsservingsof previously
cookedfoodsora plateofleftovers.
U Placethe cupof liquidor coveredfood inthe
oven.PressREHEATonce,twice, orthree
times.Theovenstarts immediately.
Pressoncefor a plateof leftovers.
Presstwice fora pasta.
Pressthreetimes for 1/2to 2 cupsof
vegetables.
Theovensignalswhensteamissensedandthe
timeremainingbeginscountingdown.
Donot openthe ovendooruntiltimeiscounting
down.ifthedoorisopened,closeitand press
START/PAUSEimmediately.
Afterremovingfoodfromtheoven,stir,ifpossible,to
evenoutthetemperature.Reheatedfoodsmayhove
widevariationsintemperature.Someareasoffood
maybeextremelyhot.
Humidity Sensor
tffoodisnothotenoughofferthecountdownuse
CookTimeforadditionalreheatingtime.
SomeFoodsNot Recommendedfor UseWith
Reheat
tt isbestto useCookTimefor thesefoods:
Breadproducts.
Foodsthatmustbereheateduncovered.
Foodsthatneedtobestirredor rotated.
Foodscallingfora dry lookor crispsurfaceafter
reheating.
NOTE:Do not use this feature twice in
succession on the some food portion-it
may result in severely overcooked or burnt
food.
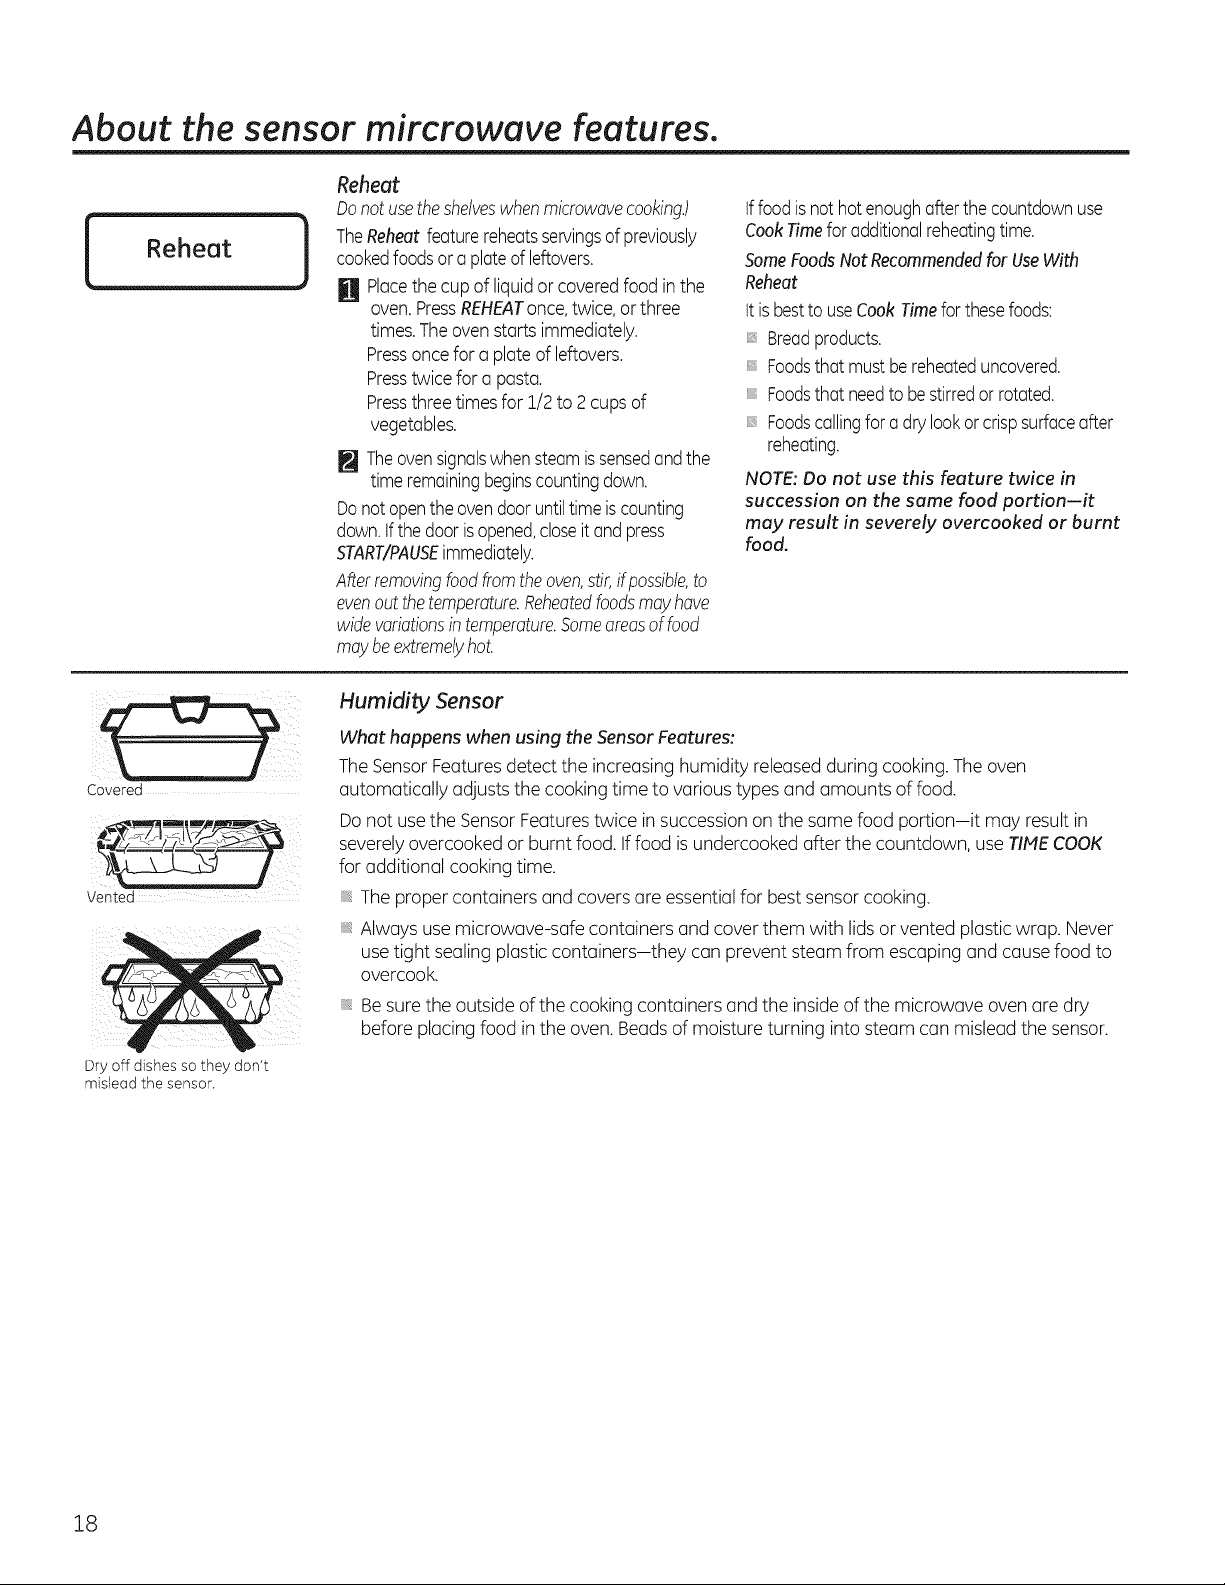
Covered
Vented
Dry off dishes so they don't
mislead the sensor.
What happens when using the SensorFeatures:
TheSensorFeatures detect the increasing humidity released during cooking.The oven
automatically adjusts the cooking time to various types and amounts of food.
Donot usethe Sensor Featurestwice in succession on the same food portion-it may result in
severelyovercooked or burnt food. If food isundercooked after the countdown, use TIMECOOK
for additional cooking time.
Theproper containers and covers are essentialfor best sensorcooking.
Always usemicrowave-safe containers and cover them with lidsor vented plastic wrap. Never
usetight sealing plastic containers-they can prevent steam from escaping and causefood to
overcook.
, Be surethe outside of the cooking containers and the insideof the microwave oven are dry
before placing food inthe oven. Beads of moisture turning into steam can mislead the sensor.
18
 Loading...