

GE PVM2070SM4SS, PVM2070SM3SS, PVM2070SM2SS, PVM2070SM1SS, PVM2070DM4WW Owner’s Manual
...
gO, COrn
Safety Instruotions ........ 2-7
Operating Instruc_tions
Care and Cleaning ........ 37-40
Cooking Features ......... 12-18
Defiosting Features ....... 21-27
Easy Guide _'_Menu System ..... 9
Help Features .............. 34
Home Screen ............... 10
Microwaxe O_en Features ...... 8
Microwave Terms ............ 36
Options ................ 28-32
Other Features ........... 33, 35
Power Le_ els ............... 11
Reheating Features ....... 19-20
Troubleshooting Tips ....... 41
Consumer Support
Consmner Support . . . Back Cover
Warranty .................. 42
PI,_VI2070
®
©
Write the model and serial
numbers here:
Model #
Serial #
Find these numbers on a label
on the left front when the door
is open.
OE68-O3454A 49-40568 07-07,1t7
IMPORTANT SAFETY INSTRUCTIONS
PRECAUTIONS TO AVOID POSSIBLE EXPOSURE
TO EXCESSIVE MICROWAVE ENERGY
(a) Do Not Attempt to operate this oven with tile
door open since open-door operation C_lil res/llt
in harmfld exposure to microwave energy. It is
important not to defeat or tamper with tile satetv
interlocks.
(b) Do Not Place any object between tile o_en front thce
and tile door or allow soil or cleaner residue to
_lCC/lIIltll_lte on sealin(, S/lI'][_lCeS.
(c) Do Not Operate tile oven if it is damaged. It is
pa_Xicularly important that tile oven door close
properly and that there is no damage to tile:
(1) door (bent),
(2) hinges and latches (broken or loosened),
(3) door seals and sealing sm'thces.
(d) The Oven Should Not be a(!iusted or repaired bx
anyone except properly qualified serxice personnel.
IMPORTANT SAFETY INSTRUCTIONS
WARNING! Foryoursafe ,,theinfo.nationinthismanua must be followed to minimizetherishof fire
or explosion, eleetrie shoek, or to prevent property damage, personal injury, or loss of life.
SAFETY PRECAUTIONS
Use this appliance only fi_r its intended pmiOose as described in this" Owner k Manual When using
eleetrieal applianees, bas4e safeO_preeautiom shouM befidlowed, including the fidlowing:
" This microwave oven is UL listed for
installation over electric and gas ranges.
" This microwave oven is not approved or
tested ii)r marine use.
, P,ead and ti_llow the specific precautions
in the Precautions to A_ old Possible Exposure
to Excessive Microwave Energy section on
page 2.
, This appliance must be grotmded. Connect
only to proi)edy gromlded outlet. See the
Grounding Instructions section on page 7.
Install or locate this appliance only in
accordance with the provided Installation
Instructions.
Do not mount this appliance over a sink.
This ove>the-range oven was designed for
use over ranges no wider than 36F It may be
installed over both gas and electric cooking
equipment.
, Do not operate this appliance if it has a
damaged power cord or plug, if it is not
working properly or if it has bee** damaged
or dropped. If the power cord is damaged,
it InUSt be replaced bv General Electric
SeiMce or an authorized seixice agent using
a power cord available fl'om General Electric.
" Do not covet" or block any openings on
the appliance.
, lJse this appliance only [i)r its intended use
as described in this manual. Do not use
corrosive chemicals or vapors in this
appliance. This microwave oven is specifically
designed to heat, dry or cook tood, and is not
intended ior laboratory or industrial use.
, Do not store this appliance outdoors.
Do not use this product near water--
fi)r example, in a wet basement, near
a swimming pool, near a sink, or in similar
locations.
" Kee I) power cord away from heated sm'thces.
o Do llot in/n/erse power cord or l)hlg ill water.
, To reduce the risk of fire in the oven cavity:
-- Do not overcook li)od. Carefully attend
appliance when paper, plastic or other
combustible materials are placed inside
the oven while cooking.
-- Remove wire twist-ties and metal handles
fl'om paper or plastic containers before
placing them in the oven.
-- Do not use the oven tier storage purposes.
Do not leave paper products, cooking
utensils or ti)od in the oven when not
ill {lse.
-- If materials inside oven ignite, kee I) the
oven door closed, turn the oven off and
disconnect the power cord, or shut off
power at the fuse or circuit breaker panel.
If the door is opened, the fire may spread.
-- Do not use the Sensor Featm'es twice
ill StlCCessioll Oll the saIne ti)od portioll.
If %od is undercooked atter the fi_t
cotmtdown, use TIME COOK %r
additional cooking time.
See door surihce cleaning instructions in
the Care and Cl_a_dng" o/ the mi( rowav(_ ov(,_
section of this manual.
" This appliance should be serviced only bv
qualified service personnel. Contact nearest
authorized setwice fiicility lbr examination,
repair or a({justFa ent.
. As with any appliance, close supervision is
necessary when used bv children.
Do not store anything directly on top of the
I//icrow_lve ovell sHrJ_lce when tile l/]icrowave
oven is in operation.
WARNING !
IMPORTANT SAFETY INSTRUCTIONS
ARCING
VENT
FAN
If you see arcing, press the OFF pad and correct the problem.
Arcing is tile microwave term fl)r sparks in
tile oven. Arcing is caused by:
• The metal shelf not installed correctly so
it touches the microwave wall.
• Metal or flfil touching tile side of tile oxen.
Tile ihn will operate automatically under •
certain conditions (see Automatic Fall feature).
Take care to prevent tile starting and spreading •
of accidental cooking fires while the vent iim
is ill rise.
• Clean tlle underside of the microwave
often. Do not allow grease to build up on
tile microwave or tile fhn filte_.
• In tile event of a grease fire on tlle surthce
units below the microwave oven, smother a
flaming pan on tile surfitce unit by covering
the pan completely with a lid, cookie sheet
or flat tray.
• Foil not molded to food (upturned edges act
like antennas).
• Metal, such as twist-ties, poultI T pins or
goldrimmed dishes, in tile microwave.
• Recycled paper towels containing small metal
pieces being used in tile inicrowave.
_hen I)reI)arin°,_ flaming, foods under tile
n/icro_,#ave, ttlrll tile fall (sit,
Never leave surfilce units beneath your
microwave oven unattended at high heat
settings. Boilovers cause smoking and greasy
spillovers that may ignite and spread if the
microwave vent tim is operating. To minimize
automatic fhn operation, use adequate-sized
cookware and use high heat on surihce units
only when necessary.
• Use care when cleaning tile vent lhn filters.
Corrosive cleaning agents, such as lye-based
oven cleaners, may damage the filters.
A WARNING!
IMPORTANT SAFETY INSTRUCTIONS
FOODS
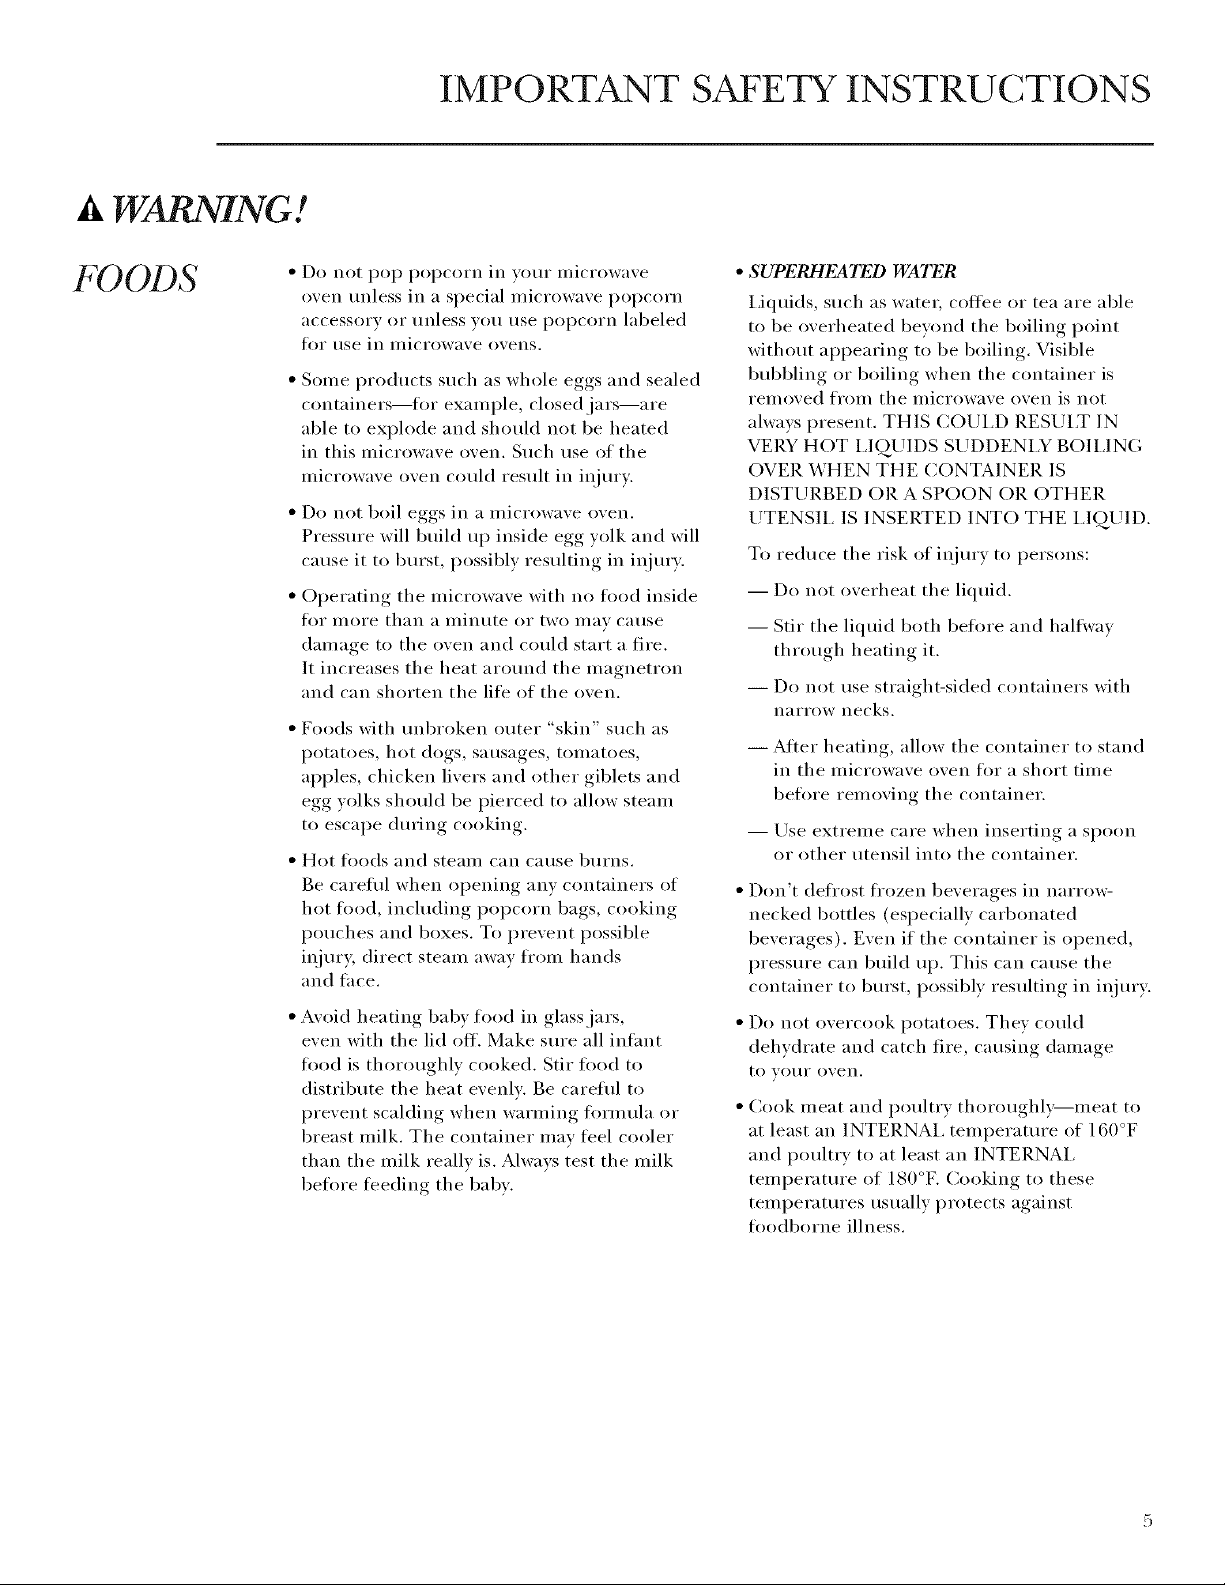
Do not pop popcorn in your microwave
oven unless in a special microwave popcorn
accessory or tlnless vo/i rise i)oi)coi'n labeled
_'or rise in i/licrowave ovens.
• Some products such as whole eggs and sealed
containers--fin" example, closed jars--are
able to explode and should not be heated
in this microwave oven. Such use of tile
inicrowave oven could result in iI_jm T.
• Do not boil eggs in a microwave oven.
Pressm'e will build up inside egg yolk and will
cause it to burst, possibly resulting in iI_jm>
• Operating the microwave with no tood inside
tor IllOYe than a Illintlte or two may Catlse
damage to the oven and could start a fire.
It increases tile heat arotmd tile magnetron
and can shorten the life of the oven.
• Foods with tmbroken outer "skin" such as
potatoes, hot dogs, sausages, tomatoes,
apples, chicken livers and other giblets and
egg yolks should be pierced to allow steam
to escape during cooking.
• Hot fi_ods and steali/ C_lil Catlse b/iYns.
Be careful when opening anv containers of
hot tood, including popcorn bags, cooking
pouches and boxes. To prevent possible
iI_jm'y; direct steam away fl'om hands
and tace.
Avoid heating baby food in glass jars,
even with the lid off. Make sm'e all infimt
tood is thoroughly cooked. Stir tood to
distribute the heat evenlw Be carefifl to
prevent scalding when warming tormula or
breast milk. The container may ti_el cooler
than the milk really is. Always test the milk
before fl_eding tile baby.
SUPERMEAT_D WATER
I,iquids, such as water; coffee or tea are able
to be overheated bewmd tile boiling point
without appearing to be boiling. Visible
bubbling or boiling when tile container is
reli/oved froli/ tile iilicrowave oven is not
alwavs present. THIS COUI,D RESUI,T IN
VERY HOT I,IQUIDS SUDDENLY BOII,ING
(-)VEIl WHEN THE CONTAINER IS
DISTURBED OP, A SPOON OR OTHER
UTENSIl, IS INSERTED INTO THE I,IQUID.
To reduce tile risk of ii_jury to persons:
-- Do not overheat the liquid,
-- Stir tile liquid both befl_re and halt\\'av
through heating it.
-- Do not use straight-sided containers with
n_l ITOW necks.
--After heating, allow tile container to stand
in tile microwave oven fin" a short time
betore removing tile container.
-- Use extreme care when inserting a spoon
or other utensil into tile container.
• Don't defl'ost fl'ozen beverages in narro\_=
necked bottles (especially carbonated
beverages). Even if tile container is opened,
pressure can build up. This can cause tile
container to bm'st, possibly resulting in ii_jur>
• Do not overcook potatoes. They could
dehvdrate and catch fire, causing damage
tO VO/IY oven.
Cook meat and poultry thoroughl)_meat to
at least an INTERNAl, temperature of 160°F
and poultry to at least an INTERNAl,
temperatm'e of 180°K Cooking to these
temperatures usually protects against
toodborne illness.
IMPORTANT SAFETY INSTRUCTIONS
A WARNING!
MICR 0 WA VE-SAt';q COOKWAt 2
Make s/ire all cookware tlsed in FOlly II/icI'owave
()veil is suitable t0r nlicrowaving. Most glass
casseroles, cooking dishes, n/easuring cups,
custard cups, pottery or china dinnerware
which does not have nlemllic trinl or glaze with
a nletallic sheen can be used. Sonle cookware
is labeled "suitable fin" nlicrowaving."
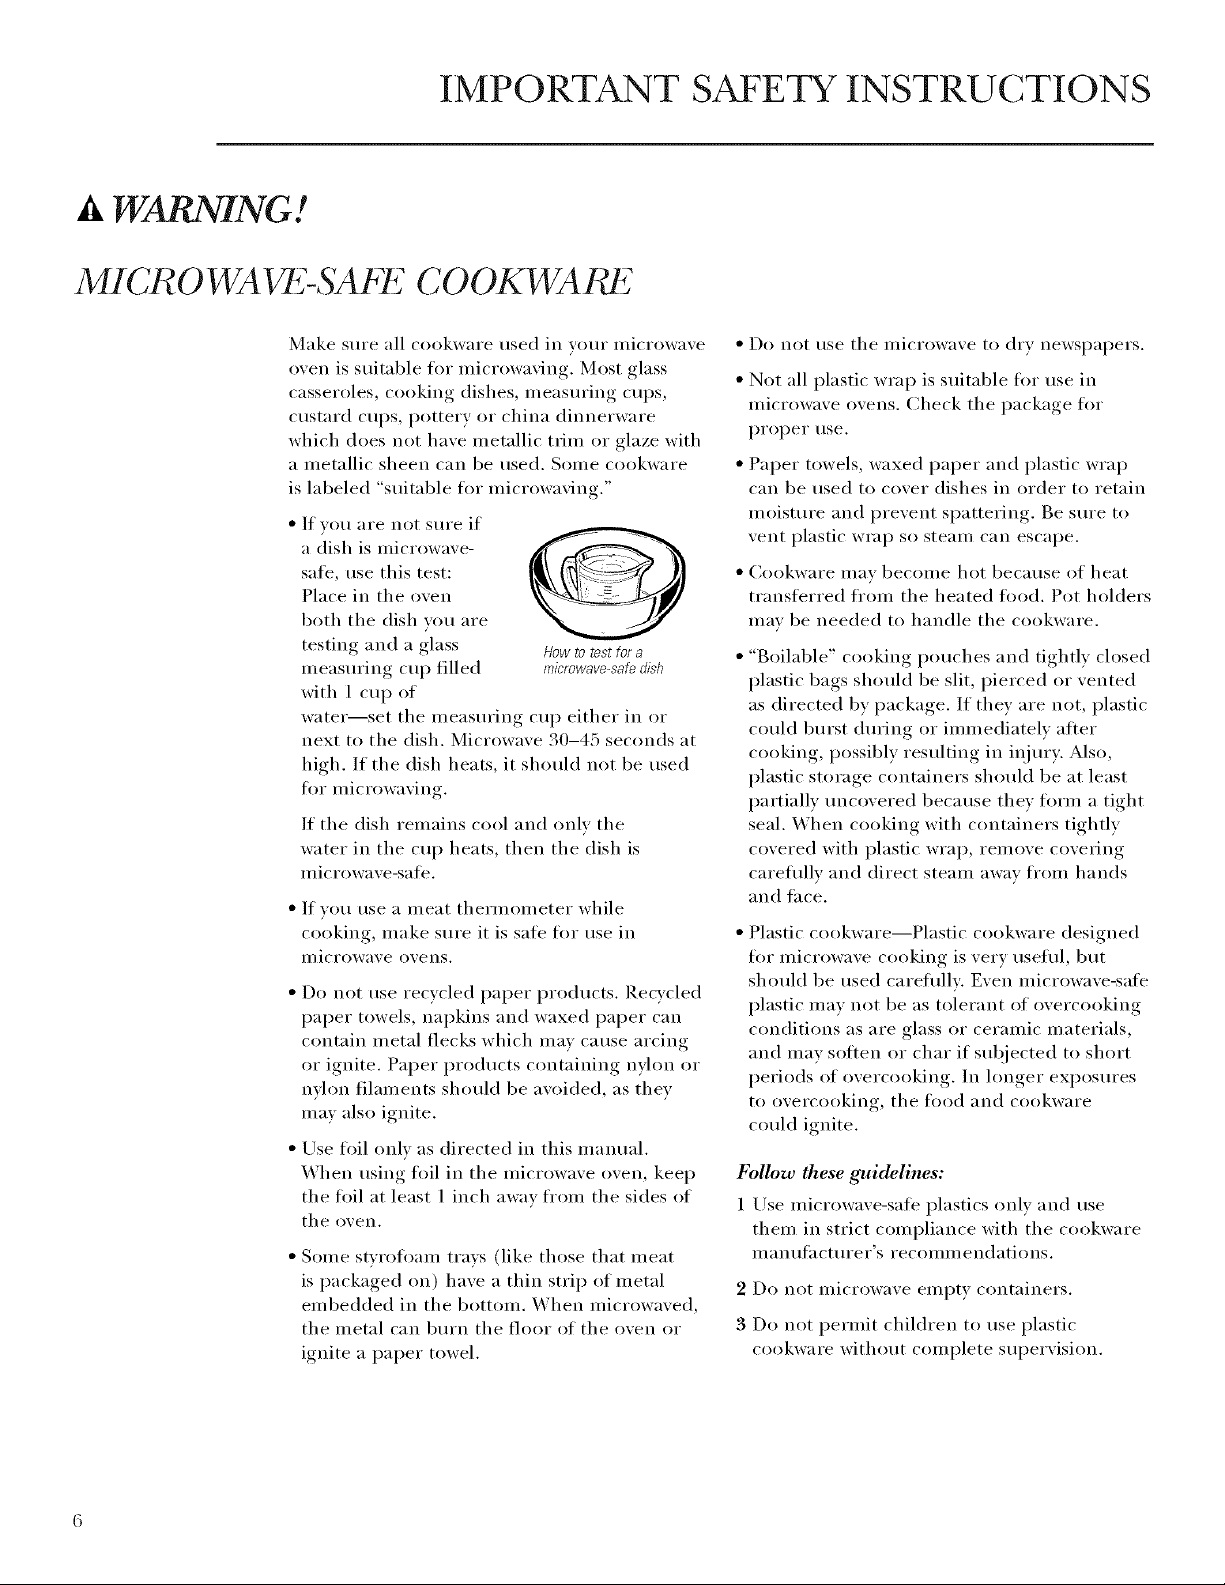
• If vou are not sure if
a dish is nlicrowave-
safe, use this test:
Place in the ()veil
both the dish vou are
testing and a glass Howtorestfora
nleasuring cup filled mic'rowave-saf_dish
with 1 cup of
watei_set tile nleasuring cup either in or
next to tile dish. Microwave 30-45 seconds at
high. If tile dish heats, it should not be used
fl)r nlicrowaving.
If tile dish renlains cool and only tile
water in tile cup heats, then tile dish is
I/licI'owave-saJ[e.
• If you use a nleat thernlon/eter while
cooking, nlake sure it is sate fl)r use in
ii/icrowave ()veils.
• Do not use recycled paper products. Recycled
paper towels, napkins and waxed paper can
contain n/etal flecks which nlav cause arcing
or ignite. Paper products containing nylon or
nylon filan/ents should be avoided, as they
nlay also ignite.
• Use fl)il only as directed in this inanual.
When using fl)il in tile nlicrowave ()veil, keep
tile flfil at least 1 inch away fronl tile sides of
tile ()veil.
• Sonle sWI'Ofl)aIn trays (like those that nleat
is packaged on) have a thin strip of nletal
en/bedded in tile bottonl. When n/icrowaved,
tile nletal can burn tile floor of tile oven or
ignite a paper towel.
• Do not use tile nlicrowave to dry newspapers.
• Not all plastic wrap is suitable fin" use in
n/icrowave ()veils. Check the package fin.
proper tlse.
• Paper towels, waxed paper and plastic wrap
can be used to cover dishes in order to retain
n/oisture and prevent spattering. Be sure to
vent plastic wrap so stean/ can escape.
• Cookware nlav beconle hot because of heat
transti_rred fl'oin tile heated fl)od. Pot holders
nlav be needed to handle tile cookware.
"goilable" cooking pouches and tightly closed
plastic bags should be slit, pierced or vented
as directed by package. If they are not, plastic
could burst during or innnediatelv after
cooking, possibly resulting in ii_jury. Also,
plastic storage containers should be at least
partially uncovered because they flwin a tight
seal. When cooking with containers tightly
covered with plastic wrap, renlove coveting
careflilly and direct steanl away ti'oin hands
and tace.
Plastic cookware--Plastic cookware designed
fl)r nlicrowave cooking is very usefld, but
should be used careflillv: Even nlicrowave-safe
plastic n/ay not be as tolerant of overcooking
conditions as are glass or ceranlic n/aterials,
and nlav soften or char if subjected to short
periods of overcooking. In hmger exposures
to overcooking, tile fl)od and cookware
could ignite.
Follow these guidelines:
1 Lrse n/icrowave-safl _ plastics only and use
then/in strict con/pliance with tile cookware
Illan/l[;I ctuI'eI"S I'eCOIllI//e ndatio ns.
2 Do not nlicrowave enlpty containers.
3 Do not pernlit children to use plastic
cookware without con/plete supervision.

IMPORTANT SAFETY INSTRUCTIONS
It WARNING! Xmprop useofthe grounding plug can result in a risk of electric shoeh.
(;ROUNDING INSTRUCTIONS
This ai)i)liance inust
be grounded. In tile
event of an electrical
short circuit,
grounding reduces
Ensureproperground
existsbeforeuse
an escape wire for the electric current.
This at)pliance is equipped with a power cord
having a grotmding wire with a grotmding plug.
The plug must be plugged into an outlet that
is properly installed and grounded.
Consult a qualified electrician or selwice
teclmician if tile groui_ding insti uctions
are not comi)letely understood, or if doubt
exists as to whether tile appliance is properly
grounded.
tile risk of electric
shock by providing
SAVE THESE INSTRUCTIONS
If tile outlet is a standard 2-prong wall outlet,
it is vom" personal responsibility and obligation
to have it replaced with a properly grounded
S-prong wall outlet.
[)o not tinder _liiV cii'c/lii/st_lnces c/it oi" i'eillove
tile third (ground) pr(mg ti'Oln tile power cord.
Do not rise an adapter plug with this ai)i)liance.
Do not use an extension cord with this
appliance. If tile power cord is too short,
have a qualified electrician or service
teclmician install an outlet near tile ai_i_liance.
For best operation, plug this ai)i)liance into its
own electrical outlet to prevent flickering of
lights, blowing of fllse or tripping of circuit
breaker.
OP77ONAL
KITS
I_7ller Panel Kits
JX40WH--X_'hite
JX41--glack
When rei)lacing a 36" range hood, filler panel
kits fill in tile additional width to provide a
custoln built-in ai)i)earance.
For installation bet\_een cabinets only; not tbr
end-of cabinet installation, Each kit contains
two 3"-wide filler panels.
I_ilter Kits
JX81H--Recirculating Charcoal Filter Kit
Filter kits are used when tile inicrowa_e oxen
cannot be xented to tile outside.
A\ailable at extra cost from your (;E suI)plier.
See tile back coxer fi)I" ordelJng, by, I)h°ne or
at ge,coln, dXSIH
JX4_ JX41
Microwave Oven Features
77._,.#,o,,t thi._,,_..,,.d .p_.t.,,<,...1 .pl,c.,..,. ,,_.y_,.,:v./io._yo., ,,_odd.
J
000
]_(itlgH¢s
o/the
microwave
OUgTI
\
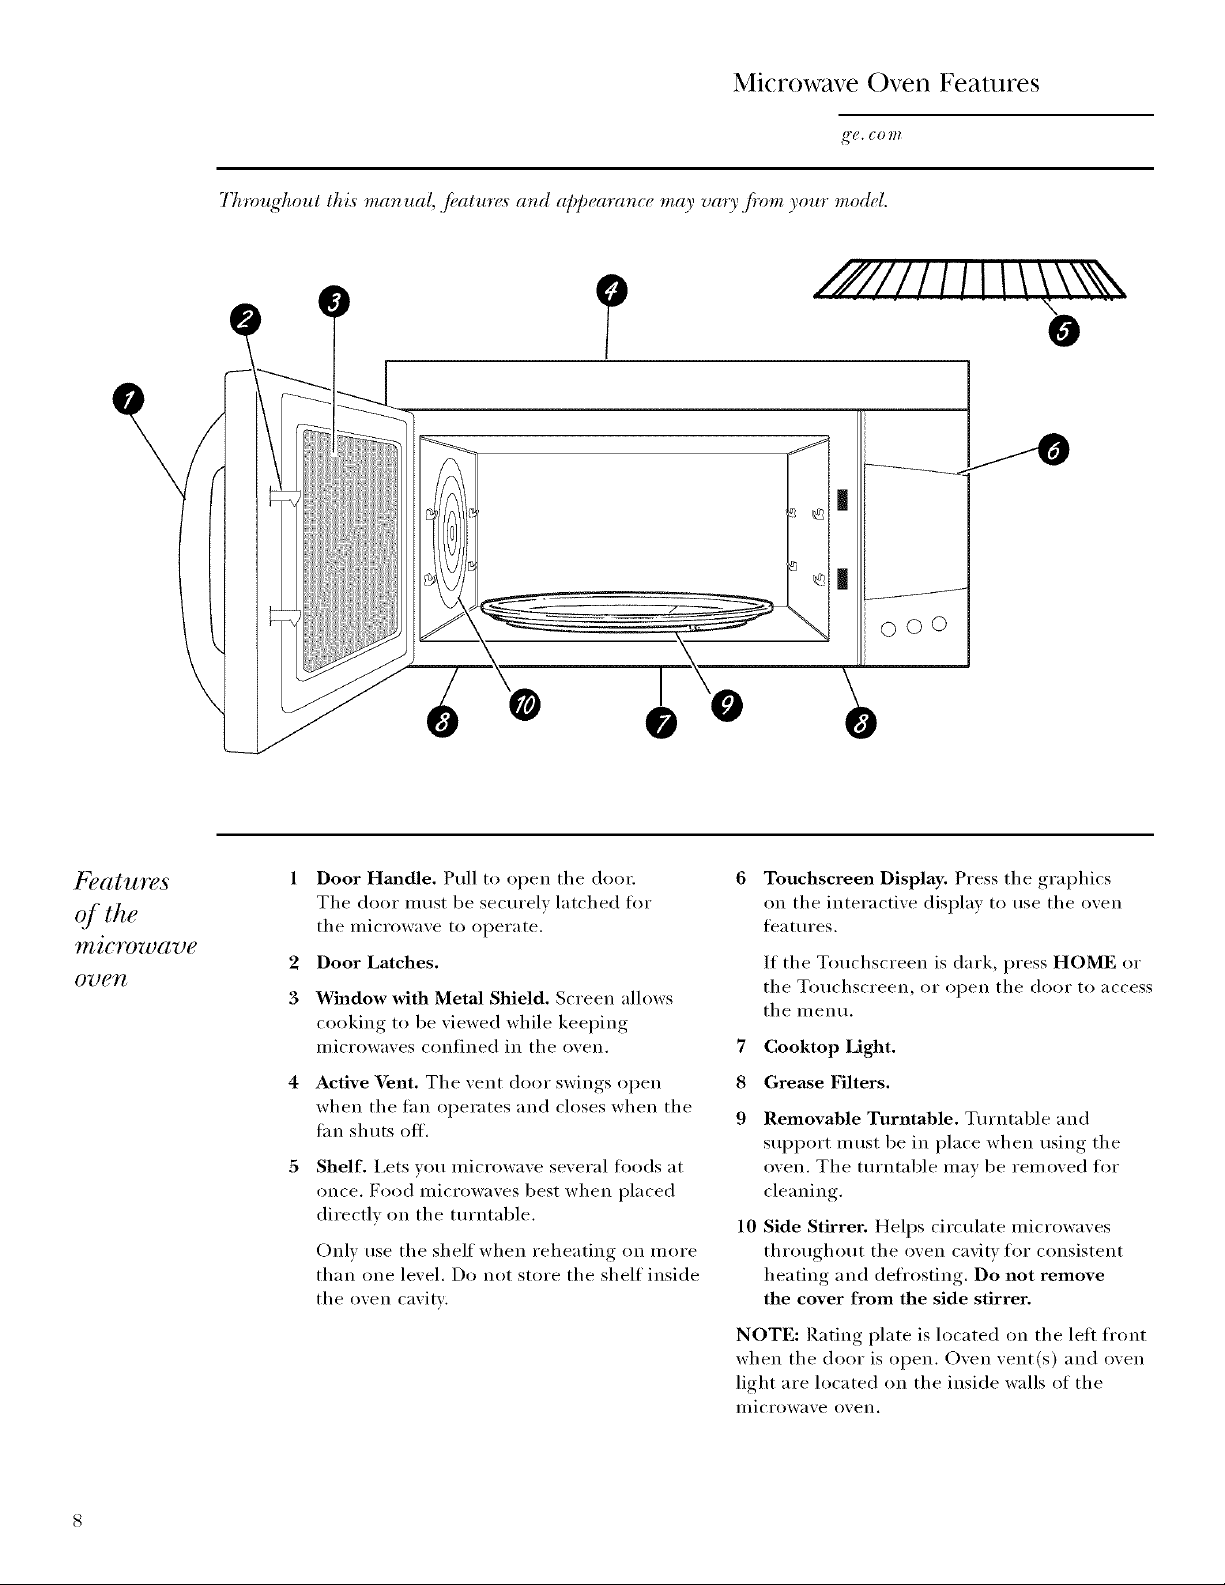
Door Hm_dle. Pull to open tile dooI:
Tile door must be securel_ latched fl)r
tile microwaxe to operate.
2
Door Latches.
Whadow with Metal Shield. Screen alh)ws
3
cooking to be xiewed while keet)iw,•
illicrowaxes COllt]iled ill tile oxell.
Active Vent. Tile vent door swings open
when tile tan operates and ('loses when tile
tan shuts ott.
Shelf. I,ets you microwave several fl)ods ;at
once. Food microwaxes best when placed
directly on tile tm'ntable.
()nix use tile shelf when reheating on inore
than one lexel, Do not store the shelf inside
tile o_,ell caxitv.
6 Touchscreen Display, Press tile graphics
on tile interactixe display to use tile oxen
fea ttu'es,
If tile Touchscreei_ is dark, press HOME or
tile To/lchscreeil, or opell tile door to access
tile n_enu.
7 Cooktop Light.
8 Grease Filters.
9 Removable Turntable. Ttu'ntable aim
support must be in place when using the
oven. Tile turntable inav be relnoved for
cleaning.
lO Side Stirrer. Helps cir(ulate nficrowaves
throughout tile oven cavity for consistent
heating aim defrosting. Do not remove
the cover from the side stirrer.
NOTE: Rating plate is h)cated on tile left front
when tile door is ()pen. Oxen xent(s) and oxen
light are h)cated on tile inside walls of tile
Illicrowax e (ix,eli.
EasyGuide F_'Menu System
;_'g, (70111
Using the
Easy Guide '_'
Menu System
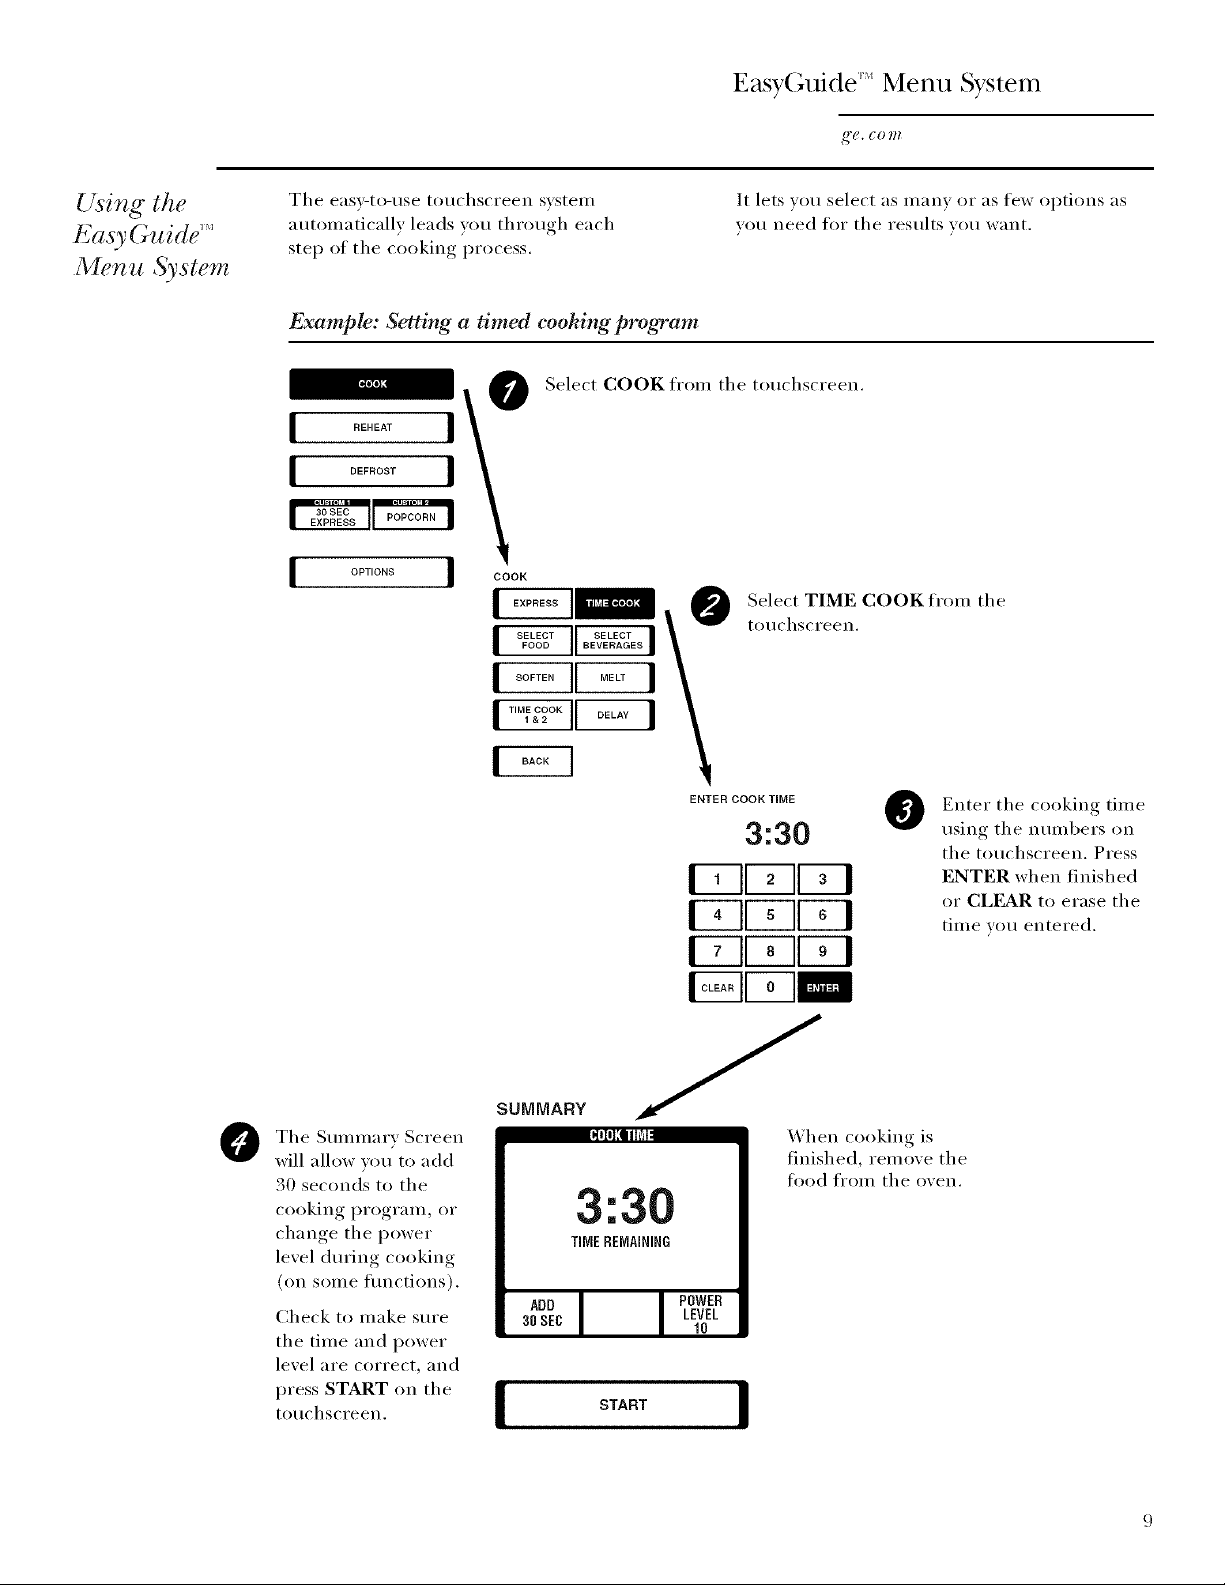
The easx_to-use [o//chscYeeIl S_,steII/
autonmticallv leads xou throuoh each
step of tile cooking process.
Example: Setting a timed coohing program
_ !_ Select COOK from tile touchscreen.
It lets you select as ii/_liiV oi" _lS few Ol)tioils as
VO/i need for tile res/llts _o// V(_IIIt.
Select TIME COOK from tile
to/ichscYeeil,
I _' lloa_l\
I_°_'_"II°_'I
I"°_°°_II°_ I
Tile Smmnarv Screen
@
will allow wm to add
30 seconds to tile
cooking program, or
change the power
level during cooking
(on some flmctions).
Check to make sm'e
tile time and power
level are correct, and
press START on tile
to/lchsci'eell.
SUMMARY
START
ENTER COOK TIME
3:30
l-_K77KT1
I-_g77U-1
I-_KTTq
X'_lien cooking is
finished, remoxe tile
food frolI/ tile o'_eil.
Enter tile cooking time
@
using tile numbers on
tile touchscreen. Press
ENTER when finished
or CLEAR to erase the
tinle you entered.
Honle Screen
,_'1_, (7 0111
l'_atures of the
Home Screen
If the touchsc_wen
is daH_, press
HOJI/IE or the
touchscreen
to (I€€€SS
the menu.
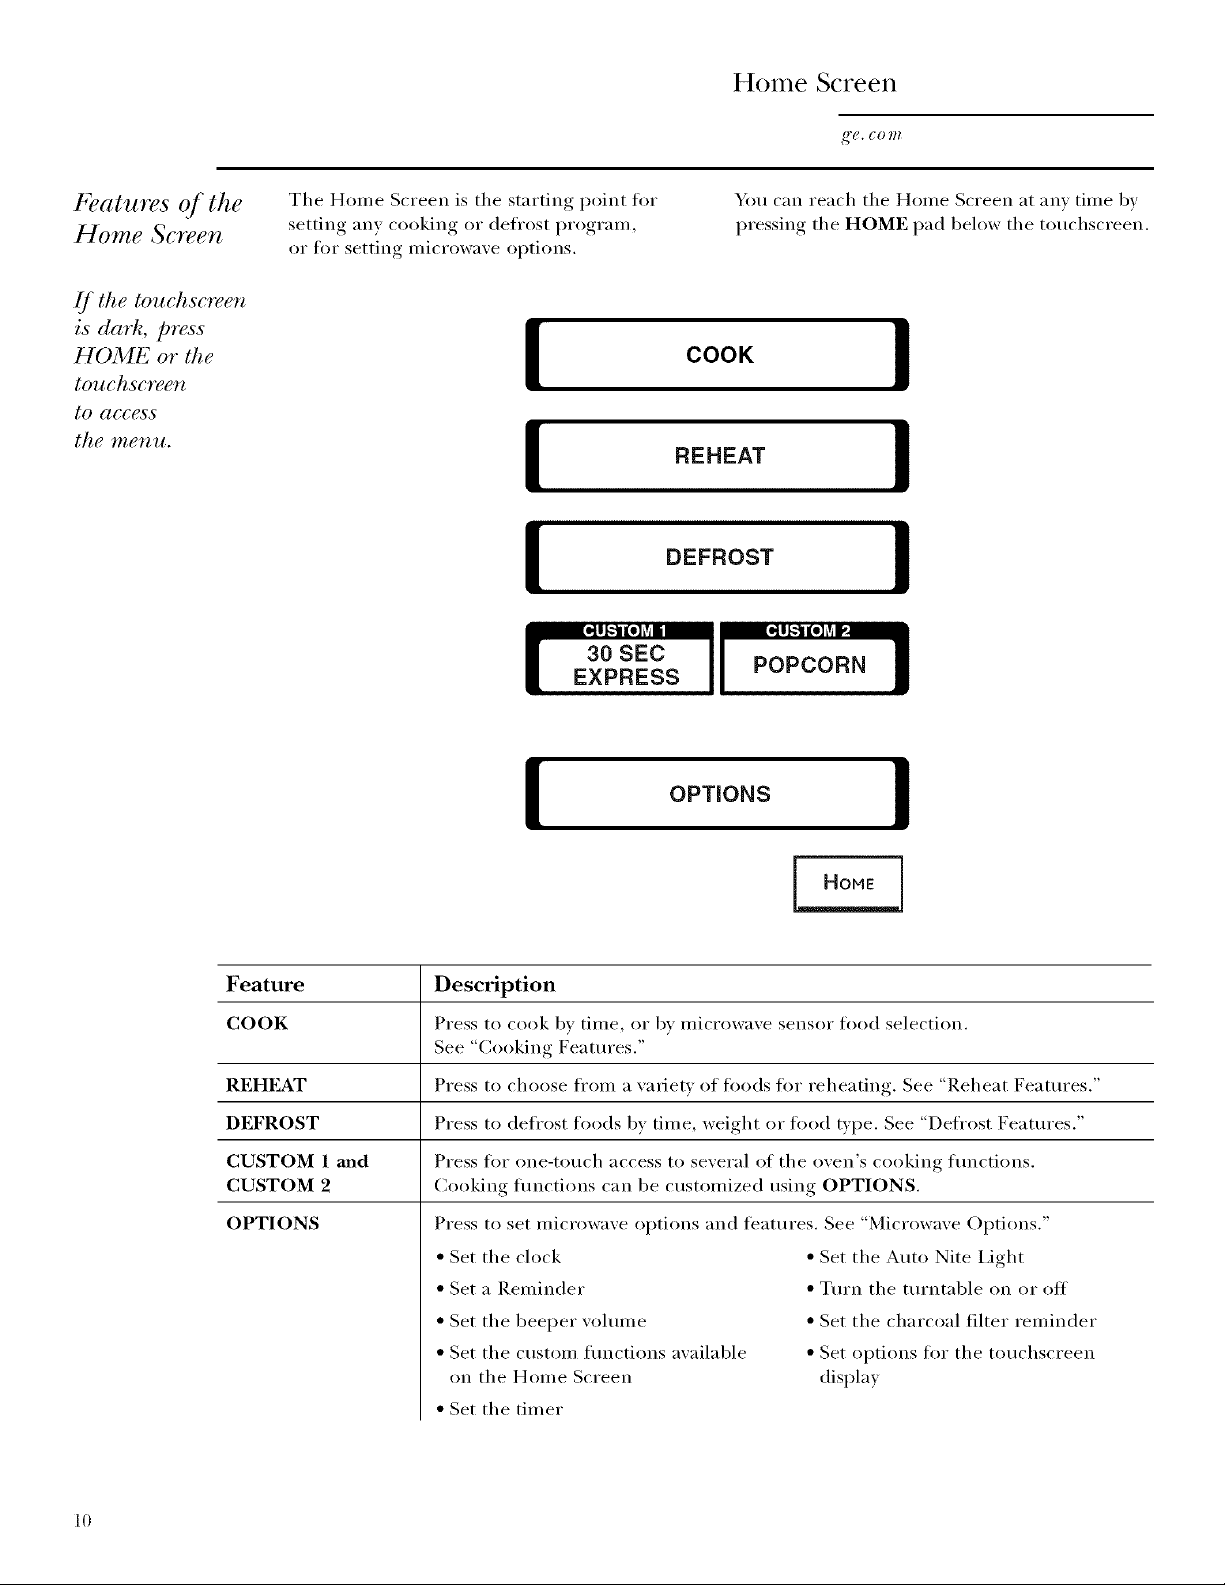
The Home Screen is the starting, I)°int fin"
setting an) cooking or defrost program,
or for setting microwaxe options.
EXPRESS
You can reach the Home Screen at am time by
I)ressim*'_ the HOME pad below the touchscreen.
COOK !
REHEAT
Feature
COOK
REHFL_T
DEFROST
CUSTOM 1 mad
CUSTOM 2
OPTIONS
[
Description
Press to cook bv time, or by illici'owave seiisoF food selection.
See "Cooking Features."
Press to choose fl'om a w_riew of foods for reheating. See "Reheat Features."
Press to defl'ost foods by time, weight or tood type. See "Defl'ost Features."
Press tot one-touch access to several of the oven's cooking flmctions.
Cooking flmctions can be customized using OPTIONS.
Press to set microwave options and teatures. See "Microwave Options."
• Set the clock
• Set a Reminder
• Set the beeper volmne
• Set the custom functions available
on the Home Screen
• Set the timer
OPTIONS
!
• Set the Auto Nite I,ight
• Tm'n the tm'ntable on or off
• Set the charcoal filter reminder
• Set options ti)r the touchscreen
display
10
(;hanging the Power I,evel
Variable Power
Levels l- l 0
The power level may be entered or changed
immediately atter entering the feature time fin':
" Time Cook
" Time Deti'ost
" Express Cook
* Reheating Pizza, Casserole or Rice
Tile power level may also be changed dm'ing
tilne co{/lltdowll.
1 From tile Home Screen, select COOK,
DEFROST or RIp,HEAT.
From the (;ook Screen, select TIME COOK
or EXPRESS. From tile Deti'ost Screen,
select BY TIME. From the Reheat Screen,
select PIZZA, CASSEROLE or RICE.
3 Enter tile cooking or defl'osting time and
press ENTER, or select a reheat tood t}pe.
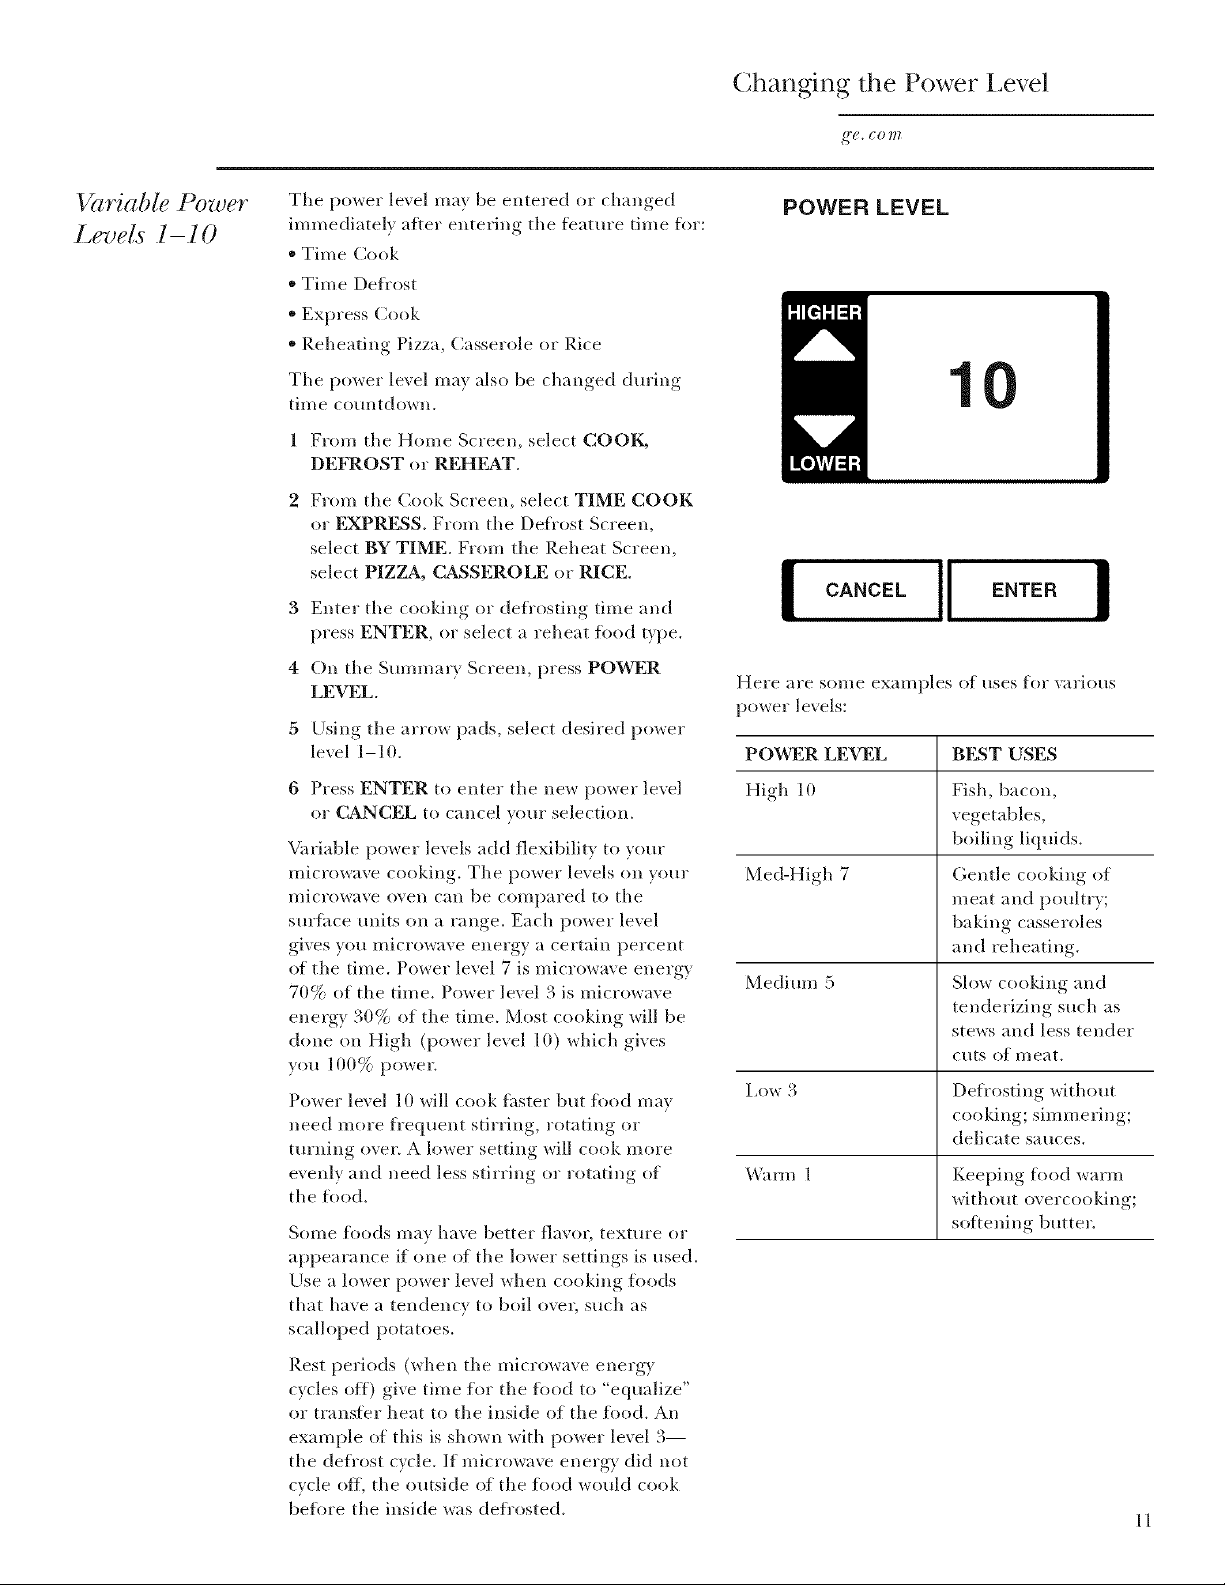
4 On tile Summa_ T Screen, press POWER
LEVEL.
5 Using tile arrow pads, select desired power
level 1-10.
POWER LEVEL
1
CANCEL ENTER
Here are SOl//e exaI//ples of rises for '_;iriotls
power levels:
POWER LEVEL BEST USES
6 Press ENTER to enter the new power level
or CANCEL to cancel your selection.
Variable power levels add flexibility to your
microwave cooking. The power levels on your
l//icrow;lve ()veil CHII be coi//p;lred to tile
surthce units on a range. Each power level
gives you miciowave energy a certain percent
of the time. Power level 7 is microwave energy
70% of the time. Power level 3 is microwave
energy 30% of the time. Most cooking will be
done on High (power level 10) which gives
you 100% power.
Power level 10 will cook thster but tood may
need more h'equent stirring, rotating or
turning over. A lower setting will cook m ore
evenly and need less stirring or rotating of
tile ti)od.
Sollle [()ods lllav have better flavor, texture or
appearance if one of tile lower settings is used.
Use a lower power level when cooking toods
that have a tendency to boil ovec such as
scalloped potatoes.
Rest periods (when tile microwave energy
cycles off) give time for the tood to "equalize"
or transfer heat to tile inside of the ti_od. An
example of this is shown with power level 3--
tile det/"ost cycle. If microwave energy did not
cycle oil tile outside of the/i)od would cook
be%re tile inside was defl'osted.
High 10 Fish, bacon,
vegetables,
boiling liquids.
Meal-High 7 Gentle cooking of
meat and poultry;
baking casseroles
and reheating.
Medium 5 Slow cooking and
tenderizing such as
stews and less tender
cuts of meat.
Low 3 Defi'osting without
cooking; simmering;
delicate sauces.
_'\.um 1 Keeping fi)od warm
without o\ ercooking;
sottening butter.
11

Cooking Features
k_atures o/ the
COOK Screen
NOTE." Do not use
the metal shelf
when using the
featm_s found in
Select bbod or
Select Beverage.
The Cook Screen allows xou to choose fron/a
xarietx of flmctions to microwaxe by time or
with the sensor features.
COOK
! SELECT II SELECT !FOOD BEVERAGES
TiME COOK ll DELAY !1&2
Press Option
EXPRESS
Enter
Amount of rooking time--
Starts immediately!
TIME COOK
SELECT FOOD More done/Less done
SELECT BEVERAGES
SOFTEN
MELT
TIME COOK 1 & 2
DELAY
Amount of cooking time.
Food type, fl)od weight/
quantity (some fl)od types)
Beverage type--Starts immediately!
Food type.
Food type, fl)od weight.
Amomlt of cooking time and
power level flw first and second
cooking programs.
Cooking or deti'osting _unction
and time of day to start.
12
Cooking Features
,_'(_, ( 0 I?l
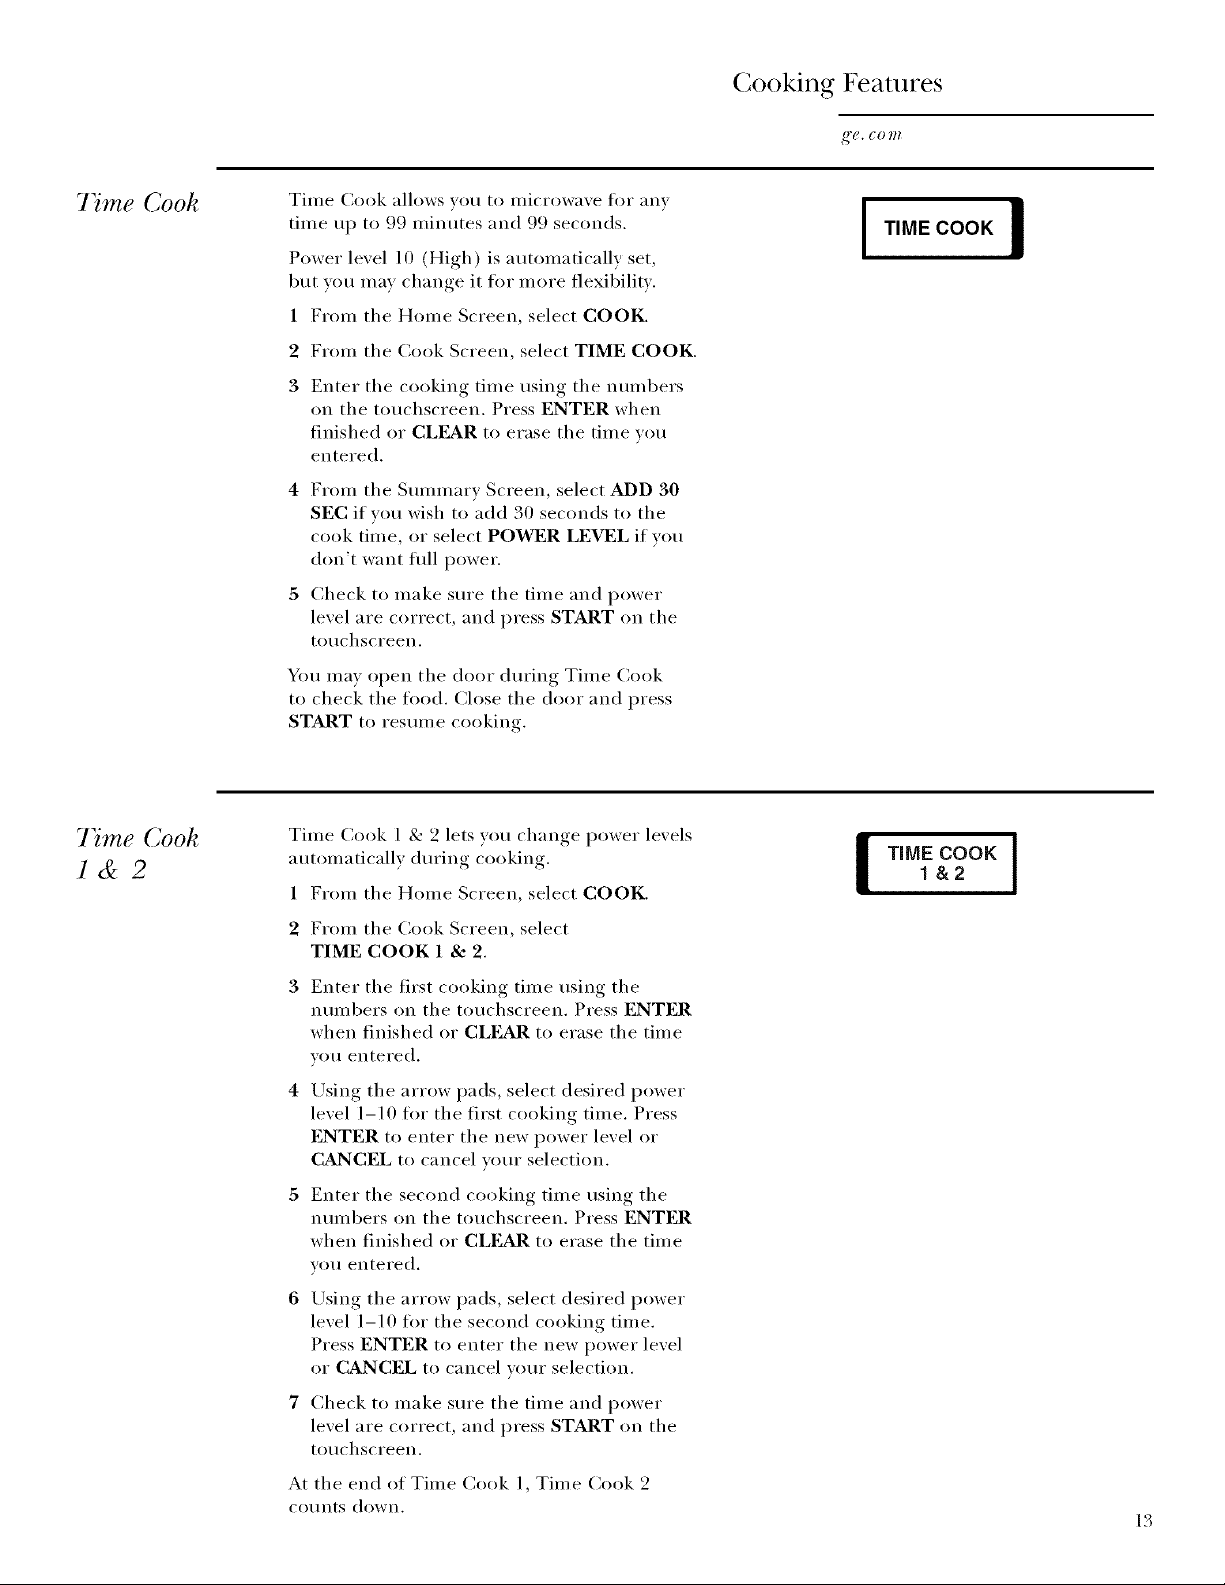
7_me Cook
Tinle Cook allows wm to i/licrowave for [lliV
time up to 99 minutes and 99 seconds.
I TIME COOK I
Power level 10 (High) is autonmticallv set,
but you may change it ti)r more flexibiliw.
1 From the Home Screen, select COOK.
2 From tile Cook Screen, select TIME COOK.
Enter tile cooking time using tile nmnbers
on the touchscreen. Press ENTER when
finished or CLEAR to erase the time wm
entered.
4 From tile Summary Screen, select ADD 30
SEC if you wish to add 30 seconds to the
cook time, or select POWER LEVEL if vou
don't want flfll power.
5 Check to make sure tile time and power
level are correct, and press START on tile
touchscreen.
You may open tile door dm'ing Time Cook
to check the food. Close the door and press
START to resmne cooking.
7 me Cook
l&2
Time Cook 1 & 2 lets you change power levels
automatically dm'ing cooking.
I
1 From the Home Screen, select COOK.
2 From tile Cook Screen, select
TIME COOK 1 & 2.
Enter tile first cooking time using tile
nmnbers on tile touchscreen. Press ENTER
when finished or CLEAR to erase the time
vou entered.
Using tile arrow pads, select desired power
level 1-10 fin" the first cooking time. Press
ENTER to enter the new power level or
CANCEL to cancel your selection.
Enter tile second cooking time using tile
nmnbers on tile touchscreen. Press ENTER
when finished or CLFTa_R to erase tile time
you entered.
Using tile arrow pads, select desired power
level 1-10 fin" the second cooking time.
Press ENTER to enter the new power level
or CANCEL to cancel yore" selection.
7 Check to make sure tile time and power
level are correct, and press START on the
touchscreen,
At tile end of Time Cook 1, Time Cook 2
co/Ints down.
13
(;()()king Features
Cooking
Guide./br
7 rne Cook
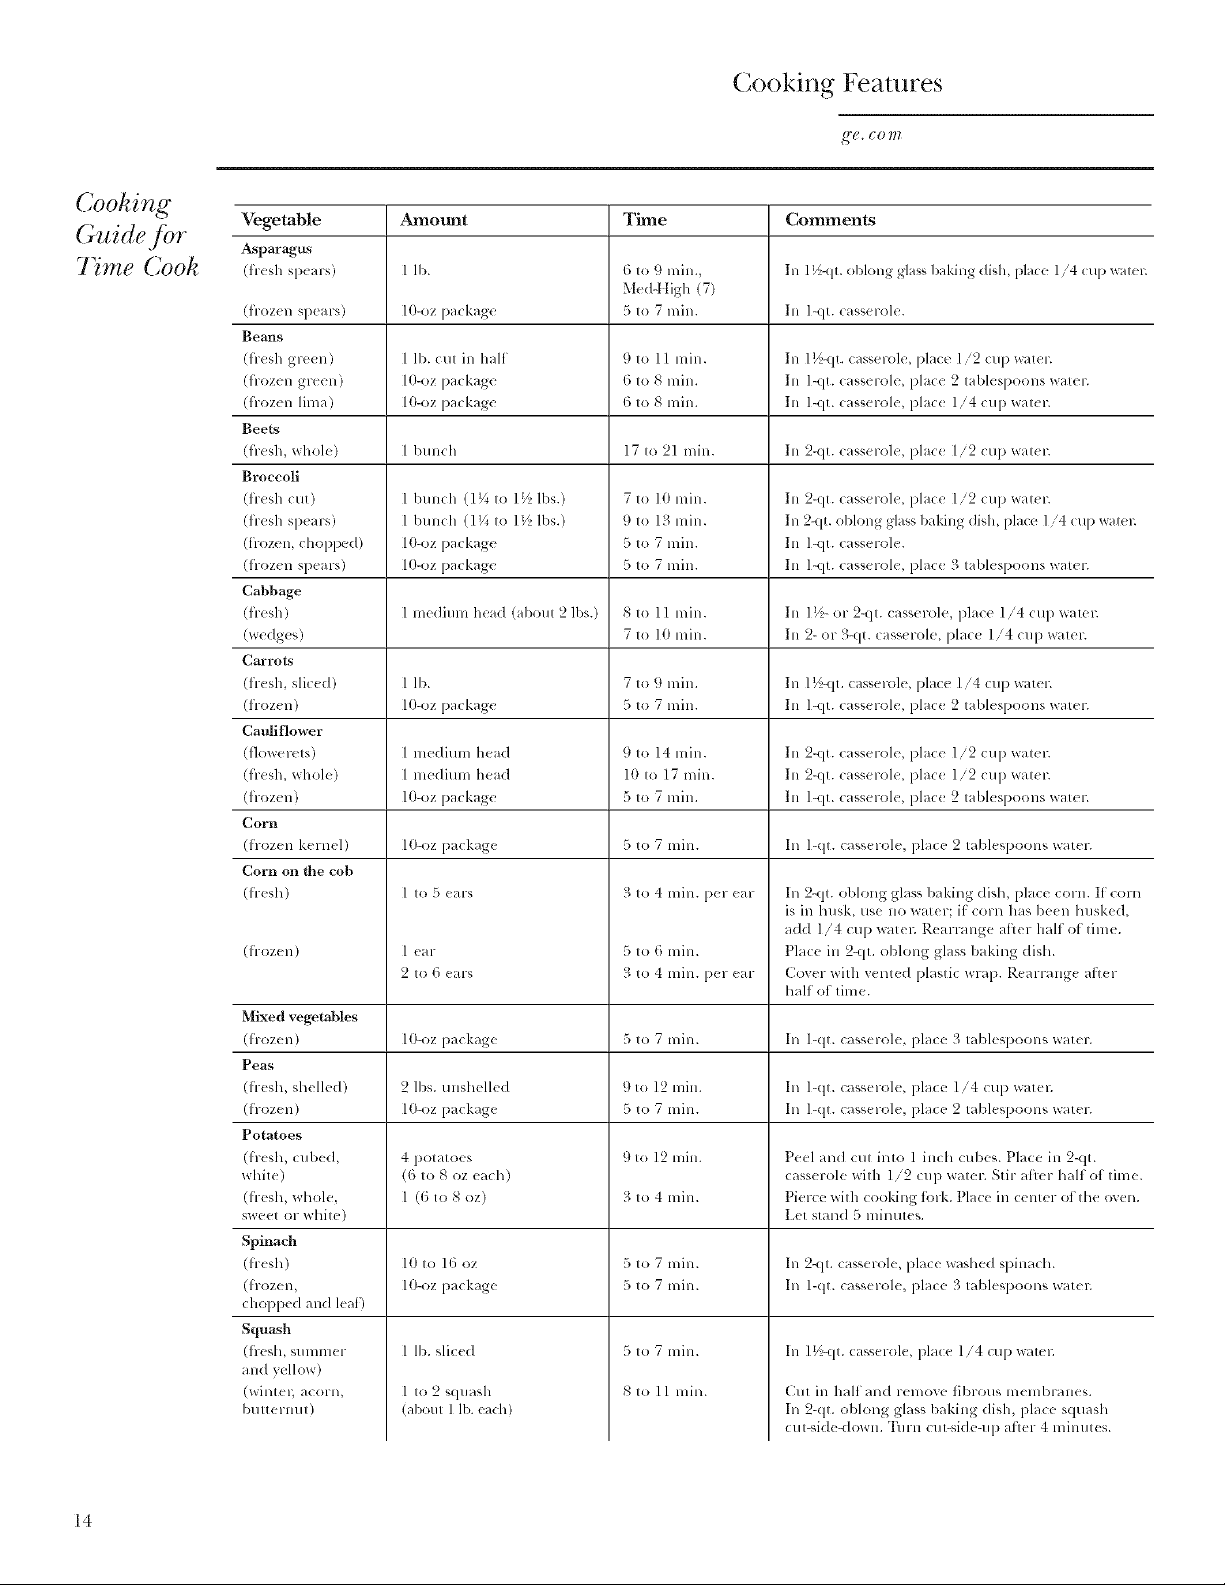
Vegetable Amotmt Time Comments
Asparagus
(fl-esh spea l-S') 1 lb. 6 to 9 rain., In 1½-qt. oblong glass haking dish, pla_e 1/4 tup '_atel.
Med-t tigh (7)
(flozen spears) 10-oz package 5 to 7 rain. In l-qt. casserole.
Bearls
(fresh green) 1 lb. cut ill half 9 to 11 lnin. In 1V_,-qt.casserole, place 1/9 cup watel:
(frozen gl>en) 10-oz pm kage 6 to 8 rain. In l-qt. casserole, place 2 tablespoons watel:
(frozen lima) 10-oz pm kage 6 to 8 lnin. In l-qt. t asserole, place 1/4 cup watm:
Beets
(fresh, whole) 1 bunth 17 to 21 rain. In 2-<it. t asserole, plate 1'2 _up water.
Broccoli
(flesh <ut) 1 /)unt h (1_/_ to l _ lbs.) 7 to l0 lnin. hi 2-qt. t asserole, plate 1:2 _up water.
(fl-esh spears) 1 /)llllth (11A to 1½ lbs.) 9 to 13 lllill. In 2-qt. oblong glass baking dish, place 1/4 tup watch
(frozen, chopped) 10-oz pm kage .5to 7 rain. In l-qt. t assel-ole.
(frozen spears) 10-oz pm kage 5 to 7 rain. In l-qt. t asserole, place 5;tablespoons wateL
Cahbage
(fl-esh) 1lneditlln head (a/)otlt 2 lbs.) 8 to 11 lnill, hi 1½- or 2-qt. casserole, place 1/4 cup watch
(wedges) 7 to 10 lnill, hi 2- ov 3-qt. t asserole, place 1/4 cup watel:
Carrots
(fl-esh, sliced) 1 lb. 7 to 9 rain. In 1V_,-qt.casserole, place 1/4 cup watel:
(frozen) 10-oz package 5 to 7 rain. hi l-qt. casserole, plate 2 tablespoons wateL
Catfliflower
(flowevcts) 1 llledit/ln head 9 to 14 lllill, hi 2-qt. t assel-ole, place 1/2 cup watel:
(fresh, whole) 1 llledit/ln head 10 to 17 mill. hi 2-qt. t asserole, place 1/2 cup watel:
(t]-ozen) 10-oz pm kage 5 to "7lllin. 111l-qt. t asserole, place 2 tablespoons watel:
Corn
(h-ozen kernel) 10-oz l)a_ bge 5 to 7 rain. Ill l-qt. _ssel-ole, l)l_t e 2 tablespoons w_ltel-.
Corn on the col)
(hcsh) 1 to ._)('_lS _lto 4 rain. per car
(h-ozen)
1 ear
2 to 6 ears
5 to 6 rain.
3 to 4 rain. per ear
In 2-qt. oblong glass baking dish, place COl-ll. If: COrll
is ill husk, use no water: it COrll has been husked,
add 1/4 cup watel; Rearrange afler half of time.
Place ill 2-qt. oblong glass baking dish.
Co'_er with "_ented plastic wrap. Rearrange ariel-
half of tilne.
Mixed vegetahles
(frozen/
10-oz package 5 to 7 rain. In l-qt. casserole, place 3 tablespoons water.
Peas
(hesh, shelled)
(hozen)
2 lbs. mlshelled 9 to 12 lnin. Ill l-qt. cassel-ole, place 1/4 cup watel.
10-oz package 5 to 7 rain. Ill l-qt. cassel-ole, place 2 tablespoons water.
Potatoes
(fvesh, cubed,
white)
(fi-esh, whole,
sweet Ol-white)
4 potatoes 9 to 12 nlin. Peel and ct/t into 1 inch cubes. Place ill 2-qt.
(6 to 80Z each) casserole with 1/2 cup uatel-. Stir Mler half of tinle.
1 (6 to S oz) 3 to 4 rain. Pierce with cooking tol-k. Place ill center of the oxen.
Let stand 5 minutes.
Spinach
(h-esh)
([ l-ozell,
10 to 16 oz 5 to "7rain. hi 2-qt. casselole, place washed spinach.
10-oz package 5 tO 7 mill. Ill 1-qt. casserole, place 3 tablespoons watel.
chopped and leaf')
Squash
(flesh, Sllllllllel
1 lb. sliced
5 to 7 min.
hi 1½-qt. casserole, place 1/4 cup wateL
and yellow)
(wint el; {lCOl-ll,
buttenmt)
1 to 2 squash
(a/xmt 1 lb. each)
8 to 11 lnill.
Cut ill half and remove tibl-OUSnlelnbl-anes.
In 2-qt. oblong glass baking dish, place squash
cut-side-down. Tlll-ll cut-side-up afler 4 lnilltltes.
14
 Loading...