

GE STS22ICMARWW, PTS25SBMBRBS, PTS25LBMBRWW, PTS25LBMBRCC, PTS25LBMBRBB Owner’s Manual
...
©
www.GEAppliances.com
S_fety Information
Adapler Plugs ..................... 4
Connect Electricity ................ 4
Extension Cords ................... 3
Pz'oper DLsposal ...................... 3
Safety Precautions ................. 2
Operating lmtructions
Additional Features ................ 8
Automatic Icemaker ............... 9
Controls ......................... 5
Shelves and Bins ................. 6, 7
Crispers and Pans ............... 8, 9
Care and Cleaning
Care and Cleaning ............ 1O, 11
Replacing the Lightbulbs .......... 12
Installation Instructions
Prepaling to Install
the Refrigeralor .................. 1,3
Reversing the Door Swing ..... 18-2.3
Water Line Installation ........ 14-17
Models 22,25
Troubleshooting Tips
Refore You Call For Servace .... 25, 26
Normal Operating Sounds ......... 24
Consumer Support
Consumer Support ....... Back Cover
Product Re_slratinn ........... 27, 28
Warranty tor Canadian Customers . .29
Warranty for U.S, Customers ....... 30
Writethemodelandserial numbershere:
.e.,,
Serial#
Find these numbers on the gray label
on the leh side, near the top of the
retiJgerator t:Olltpar tnlent.
200D2462PO01
:::::::::::::=
:iiiiiiiiiiiiiiiiiiiiiiii
il ¸ _
f_2;iiiiii i_iiiii!iiiiiiiiiiiiiiiiiiiiiiiiiiiiiii_i_
:_. iiiii_ _ii!iiiiii_iiiiiii
49-60103 02-01 d,rl

IMPORTANTSAFETYINFORMATION.
READALLINSTRUCTIONSBEFOREUSING.
WARNING!
Usethisapplianceonly foritsintendedpurposeasdescribedinthis Owner'sManual
SAFETYPRECAUTIONS
Whenusing electricalappliances,basicsafetyprecauttbns should be followed,includingthefollowing:
:_ This refrigerator must he proper_ installed
and located in accordance with the Installation
Instructions hefbre it is used.
_ Do not allow children to climb, stand or hang
on die shelves in the rl.4iigmrator, They could
damage file refrigerator and seriously injure
themsek'es.
Do not totldz die cold surtaces in the ti'e c_zer
cnmpanrnent when hands are damp or wet. Skin
may stick to these extremely cold surf_aces.
@ Do riot store or use _asnline or other tlanmmble
x-apors and liquids in tile vicinity of this or any
()flier appliance.
In refkigerators with anu)inatic icemakers,
avoid contact with the moving parts of the
ejector mechanism, or with the heating element
that releases the cubes. Do not pl_e fingers or
hands on the automatic icemaking mechanism
while the refi'igerator k_plugged in.
Keep finge_ out of the "pinch txfint" areas;
clem'ances between the doors and hetween
the doors and cabinet are necessarily small.
Be caretul dosing doors when children are
in the area.
Unplug the rdbigta-ator before cl_raning and
making repairs.
NOTE:Westronglyrecommendthatanysewicingbe
performedbyaqualifiedindividual
Setting either or both controls ta)the 0 (off)
[x)sifinn does not remove power to the light
chcnit.
Do not refi-ec_ze t;_)zen foods w|fich have
thmved completely.
2
www.GEAppliancescom
A DANGER!RISKOFCHILDENTRAPMENT
PROPERDISPOSALOFTHEREFRIGERATOR
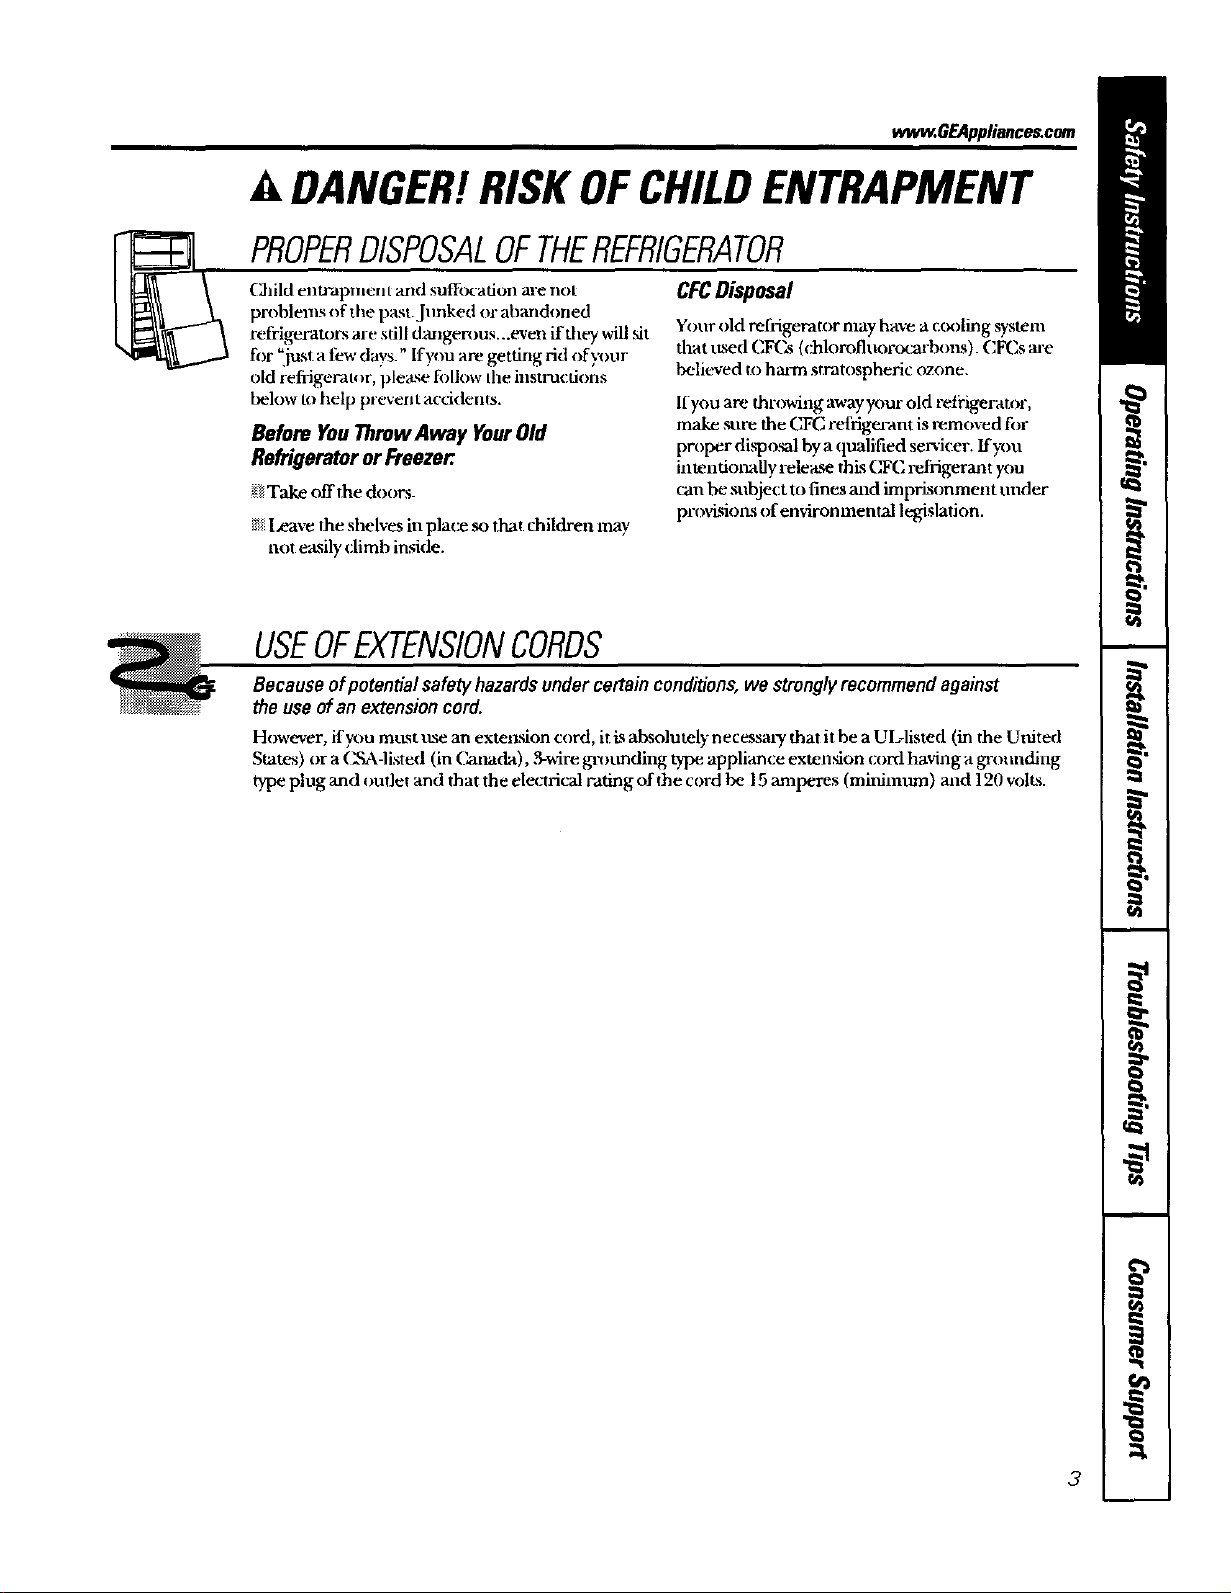
Child elllY&plllei1 [Rnd Suff(xa[Joi1arenot
problems of the past.Junked or abandoned
refrigerators are sdll dailgen)us...even if they will sit
for "just a few days." If you are getting rid ofyoor
old refrigeralor, ple_L_efi)llow the instnactions
below to help preverJt acddents.
Before YouThrowAway Your Old
Refrigerator or Freezer.
_ Take off lhe doors.
l_ave Ihe shelves in place so that children may
not easilyclimb inside.
CFCDisposal
Yotw old refrigerator may have a _x×)ling system
fl_at ttsed C_Cs (,:hlorofl uoro(_-boz_). CFCs ate
believed u)hatTn stratospheric ozone.
If you are throwing away your old retVlgerat_)r,
make sore the CFC refrigea-ant is removed for
proper disposal by a qualified servicer, ffyou
intentionally release this (_C refrigerant you
can be subject to fines mad impl:hsonmem under
pr ovisiol_s of environ menial legislation.
USEOFEXTENSIONCORDS
Because ofpotential safety hazards undercertainconditions, we strong/y recommend against
the use ofan extensioncord.
However, if you mtLStttse an extel_sion cord, it is absolutely necessm'y that it be a ULqisted (in the Uitited
States) or a C.%\4isted (in Catmda), _wire ga_unding .type appliance extension cord having a gq'ounding
type plug and outlet and that the electrical rating of the cord be 15 anaperes (minimum) mad 120 volts.
3

IMPORTANTSAFETYINFORMATION.
READALLINSTRUCTIONSBEFOREUSING.
A WARNING!
HOWTOCONNECTELECTRICITY
Do not, underany circumstances,cutor remove the third (ground)prong from the power cord. For
personal safe_ this appliance mustbeproperly grounded.
The power cord of this appliance is equipped with a
3.-prong (grounding) plug which mates _*]th a
standard 3-prong (grounding) wall oudet to
nfinirnize the t_)ssibilJty of'electric _zea:k hazard
from this appliauce.
Have the vrall outlet and circuit chec.ked by a
qualified electrician to make sure the oudet is
properly gaxmnded.
ff the outlet isa statzdard 2-prong outlet, it is your
personal r_spoLxsibilily and obliffation to have it
replaced with a properly gromaded 3-prong w-a]l
oudet.
The refrigerator should alwa_ be plugged into its
own individual electrical outlet which h_._ a vohage
rating that matches the radng p "late.
"Ibis provides dze I_st peribl'mance and also
prevents overloading house wiring circuits which
could cattse a fire hazard fixma overheated _ires.
Never unplug your refrigerator by pulling on the
lX)wer cord. Always grip plug fitxnly and pull sUaight
out from the outlet.
Repair or replace immediately all _)wer cords that
have become frayed or otherwise damaged. I_) not
use a cord that shows (a'aclcsor abraskm damage
along its length or at eidaer end.
When moving the retiigerau)r away from the
wall. be careful not to ron over or damage the
power cord,
USEOFADAPTERPLUGS(Adapt_rpluganotpermittedinCanada)
Because of potential safety hazards under certain conditions, we strongly recommend against
the use of an adapter plug.
However. if you must use an "adapter, where local
codes perufit, a tempomq cmmection may be made
to a properly grotmded 2-prong wall oudet by u_
ofa UlAisted adapter available at most local
hal'dware stores.
The la_er slot in the adapter must be aligned with
the ku'ger slot in the _s"alloudet to provide proper
polarity in the connection of the l:x)wer cord.
When di._on nec dng the power cord from the
adapter, al_-ays hold the adapter in place with one
hand while pulling the power cord plug with die
other hand. If this is nut done, the adapter ground
terminal is rely likely to break _*ithrepeated u_'.
If the adapter gt'ound termimd breaks, DO NOTUSE
the refiigerator until a proper ground has been
established.
Attaching the adapter groundterminal to a waft outlet
coverscrew does not ground the applianceunlessthe
coverscrewis metal and not insulated, and the wall
outlet is groundedthroughthe house wl_'ing.Youshould
havethecircuit checkedby a quafified electrician tomake
surethe outlet is properlygrounded.
READANDFOLLOWTHISSAFETYINFORMATIONCAREFULLY.
SAVETHESEINSTRUCTIONS

Aboutthe controlson the refrigerator. .,, .e plin,.es'co
The controls will look like one of the following:
f
/
J
Initially, set the refrigerator control at 5 and the freezer control at 5 and
allow 12hours for the temperature to stabilize.
Several adjustments may be required. Adjust the controls one increment
at a time, and allow 12hours after each adjustment for the refrigerator
to reach the temperature you have set.
Setting either or both controls to 0 stops cooling in both the refrigerator
and freezer compartments but does not shut off electrical power to
the refrigerator.
Touch pad controls
• Setting either control at 0 will automatically set the other control at O.
The zeros will blink until you set the controls.
• If both controls are set at 0 and either COLDER pad is pressed, the
controls will automatically reset to 5.
Control settings will vary based on personal preferences, usage and
operating conditions and may require more than one adjustmenL
Locking the Controls Ionsomemodels)
This feattzre allo_,'s you to lock tile conu-ols
the settings cannot be changed.
Tolock the cco_rols:
O .'+ztthe controls to the desired sethngs.
Press and hold the l<')okpad tor 3
seconds.
When the controls are h)cked, tire indicator
light will come on and the conm)l settings
will not be displayc, d.
Tounlock the controls."
Pregs and hold the lock pad for 3 secon cLs_
Aider index'king the conu'ols, the ,_ttings
will be displayed, the lock indicator fight
will go out. and the ,_ttings can he changed.
Aboutthe shelvesandbins,
Not all features are on all models.
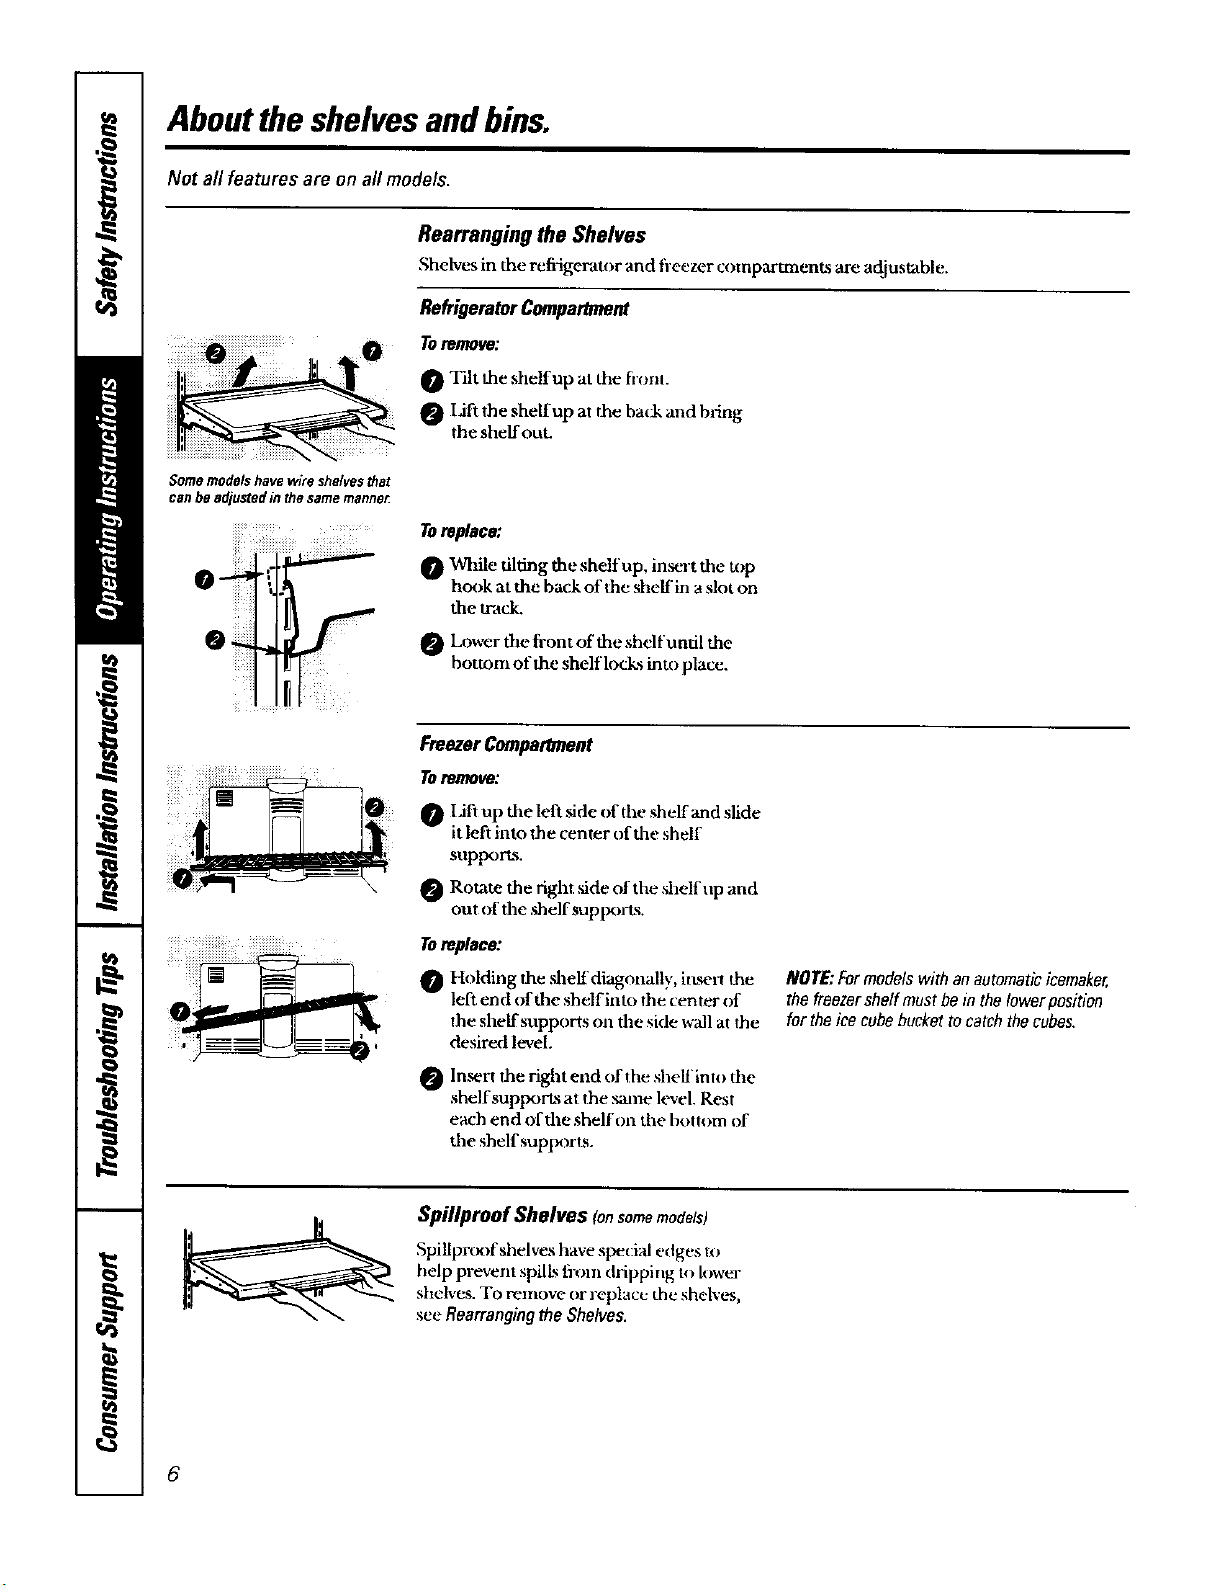
Rearranging the Shelves
Shelves in the refiigerator and freezer compartments are adjustable.
Refrigerator Compartment
Toremove:
0 Tilt the shelf up at the h'ont.
Lift the shelf up at the ba_:k and bl'ing
the shelf out.
Somemodelshave_re shelvesthat
canbeadjustedin thesamemanne_
TOrep/ace,"
While dlfing the shelf'up, in,_r t the top
hook at the back of the shelf in a slnt on
the mack.
Lower tile front of the shelf until the
bottom of the shelf'locks into place.
FreezerCompartment
Toremove:
0 Lift up die left _de of the shelf and slide
it left into the center of the shelf
supports.
Rotate the right ,side of the shelf tip and
out nf the shelf sup|×)rts.
Toreplace:
Holding the Mlelf diagc, naily, itu_.,n the
left end (ffthe shelf into the center of+
the shelf snpports on the side w-,dl at the
desired level.
Inert the right end (ff the sheUinto the
shelf supports at the same level. Rest
each end of the shelf on the bottom of
die shelf supfx)rts.
Spillproof Shelves (onsomemodels)
Spillplxxffshelves have spedal edges tx)
help prevent spilL_ fix)m dripping to lower
shelves. To reinove or ]'el)lace the sheh't,%
see Rearranging the Shelves.
NOTE:Formodelswith an automatic icemaker,
the freezershelf must be in the lower position
for theice cubebucket to catch the cubes,
6
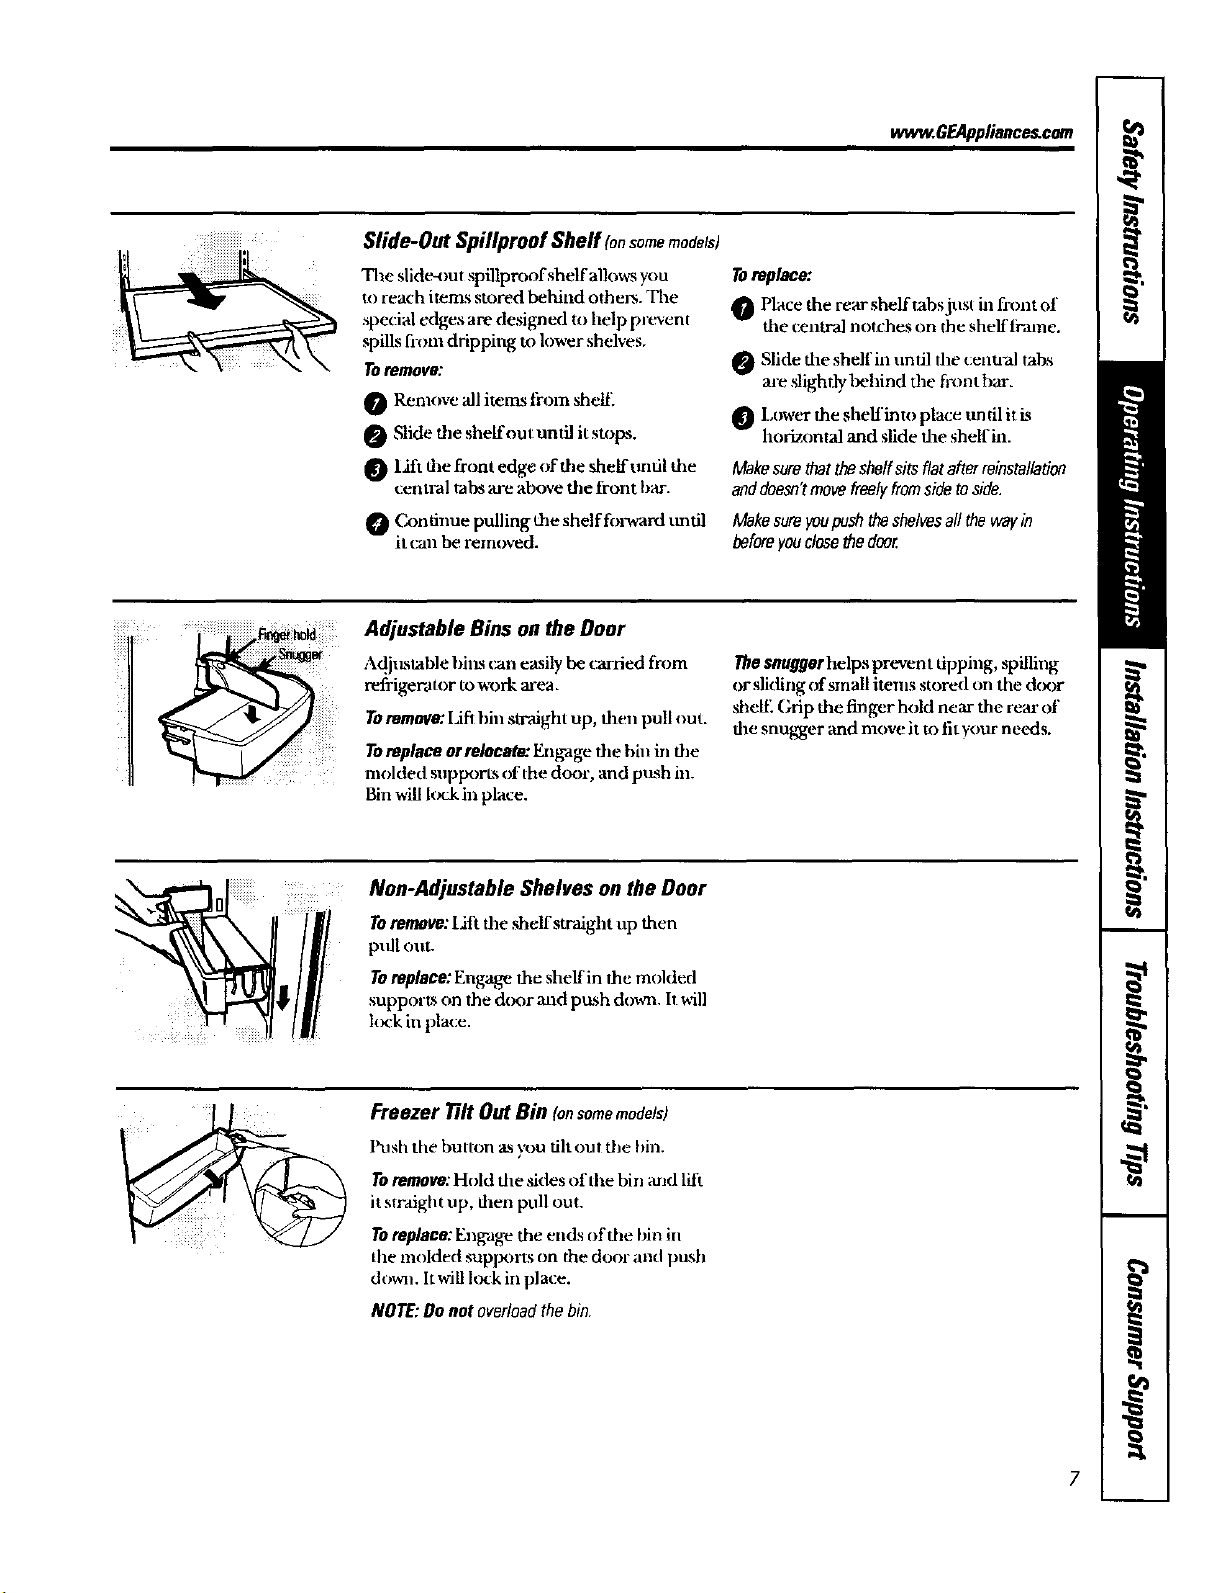
Slide-Out Spillproof Sheff (onsomemodels)
The slide-out spillproofshelf allows you
to reach items stored behind others. The
_pecial edges are designed to help prevent
spills from dripping to lower shelves.
Toremove:
O Renmve 'all itezrLsfrom sheik
Slide tile sheffout until it StOl_S.
Lift the front edge of die shelf ttnfil the
cenuul tabs"are above the front bar.
Continue pulling the shelf forward tmtil
it can be removed.
vvww.GEAppliancescem
Toreplace:
Place the rear shelf tabsjus! in front of
the central nut_'hes on _he shelf ii-,une.
_ Slide flee shell'in un til the cenu;al tabs
are slightly behind the fix)nt bat-.
Lower the shelf lind place tm til it kg
horizontal and slide flee shelf in.
Makesurethattheshelfsits flat after reinstallation
anddoesn'tmovefreelyfromsidetoside.
Makesureyoupushriteshelvesall thewayin
beforeyouclose_e deer.
.....
Adjustable Bins on the Door
Adjuslable bil_s (;all easily be carried from
refrigerator to va)rk area.
Toremove:Ihfi hie stvaight up, then pull out.
Toreplace orrelocete: E_zgage the hh_ in the
molded supports of the dc_)r, and push hz.
Bin will lock in place.
Non-Adjustable Shelves on the Door
T0remo_:lJfttheshelfstraightupthen
pull nut.
Toreplace: Engage the shelf in the molded
supports on the d_x_r mad push down. h will
hx'k in place.
Freezer Tilt Out Bin (onsomemodels)
lkzsh the buuon ms)x)u flit out the bin.
Toremove: Hold the skies of the bin and litt
it straight up, d_en pull out.
Toreplace: Engage the ends of the bin in
the molded suplx)rts on the door and push
dowll. It will lock in place.
NOTE:Do not overloadthe bin.
Thesnuggerhelps prevent tipping, _illing
or slkting of small items stored on the tk×)r
,shell'. (;tip the finger hold near the rc_arof
the snugger and move it u) fit your nec_ls.
7
Aboutthe additional features.
Not all features are on all models.
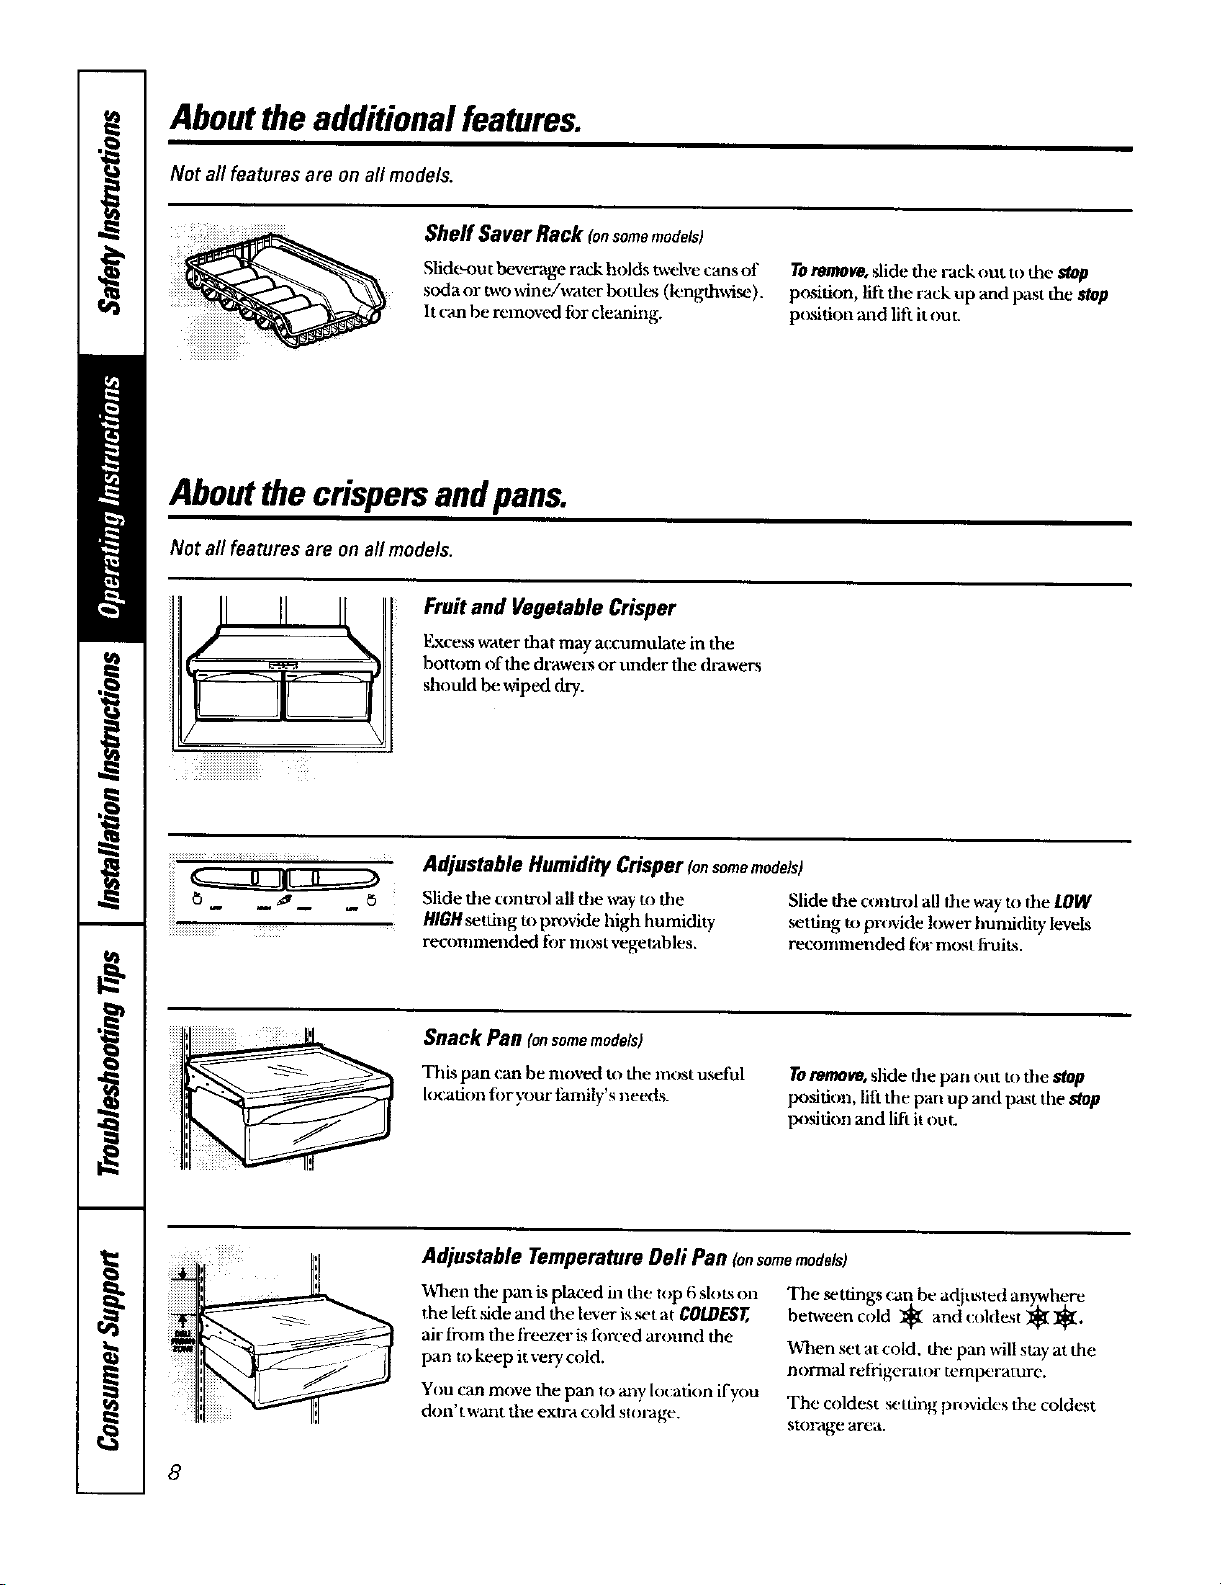
Sfide-ou t b*.werage rack holds twelve cans of
s :,da or two wineA_rater b<)tdt_ (lengthwL_)
Shelf Saver Rack lonsomemodels)
It can be removed tor clemaing.
Aboutthecrispersandpans.
Not all features are on all models.
Fruit and Vegetable Crisper
Excess ++raterthat may accumulate in the
bottom ¢,f the dl-awet_ or under the drawers
should be wiped dry'.
; i: ii iiiiiiiiiiiiiiiiiiiiiiiiiiiiiiiiiiiiii i
Toremove,slide file Fack out to the Mop
position, lift the rack up and past the stop
p(xsition and lift it ou
iiiii -°
iliiiiiiiiiiiiiiiiiiiiiiiiiiiiiil_ _iiiiiii_iiii__
!iii!ii!
Adjustable Humidity Crisper ton somemodels)
Slide tile control all the way to the
HIOHsetting to pzx)vide high humidity
recon.nended for lltost vegetables.
Slide the conrail all the way to the LOW
,setting _t)provide lower humidity levels
recommended tbr most fruits.
Snack Pan (onsomemodels)
This pan (:an be movtxt to the most useful
I x_tUon for xx)ur tanuly s _ee_ts.
Toremove,slide the part out to the Mop
IXXslfion, lift the pan up anti past the Mop
posidon and lift it out.
Adjustable Temperature Deli Pan (onsomemodels)
When the pan is placed in the top 6 slots on
the left +sideand the lever is set at COLDEST,
air fi'om the fi'eezer is forced m'ound the
pan to keep it very.cold.
You can move the pan to m_y Iocadon ifyou
d m want the exwa cold su)t'age.
The +tfings (:at+,be adjtLsted an'rwhere
between cold _ and coldest _l[]_l[.
When set at cold, the pan ,+411stay at the
_torma] refiiger, tlor tempe2rattu-e.
The coldest setdng pr,)vides the coldes't
storage area.
8
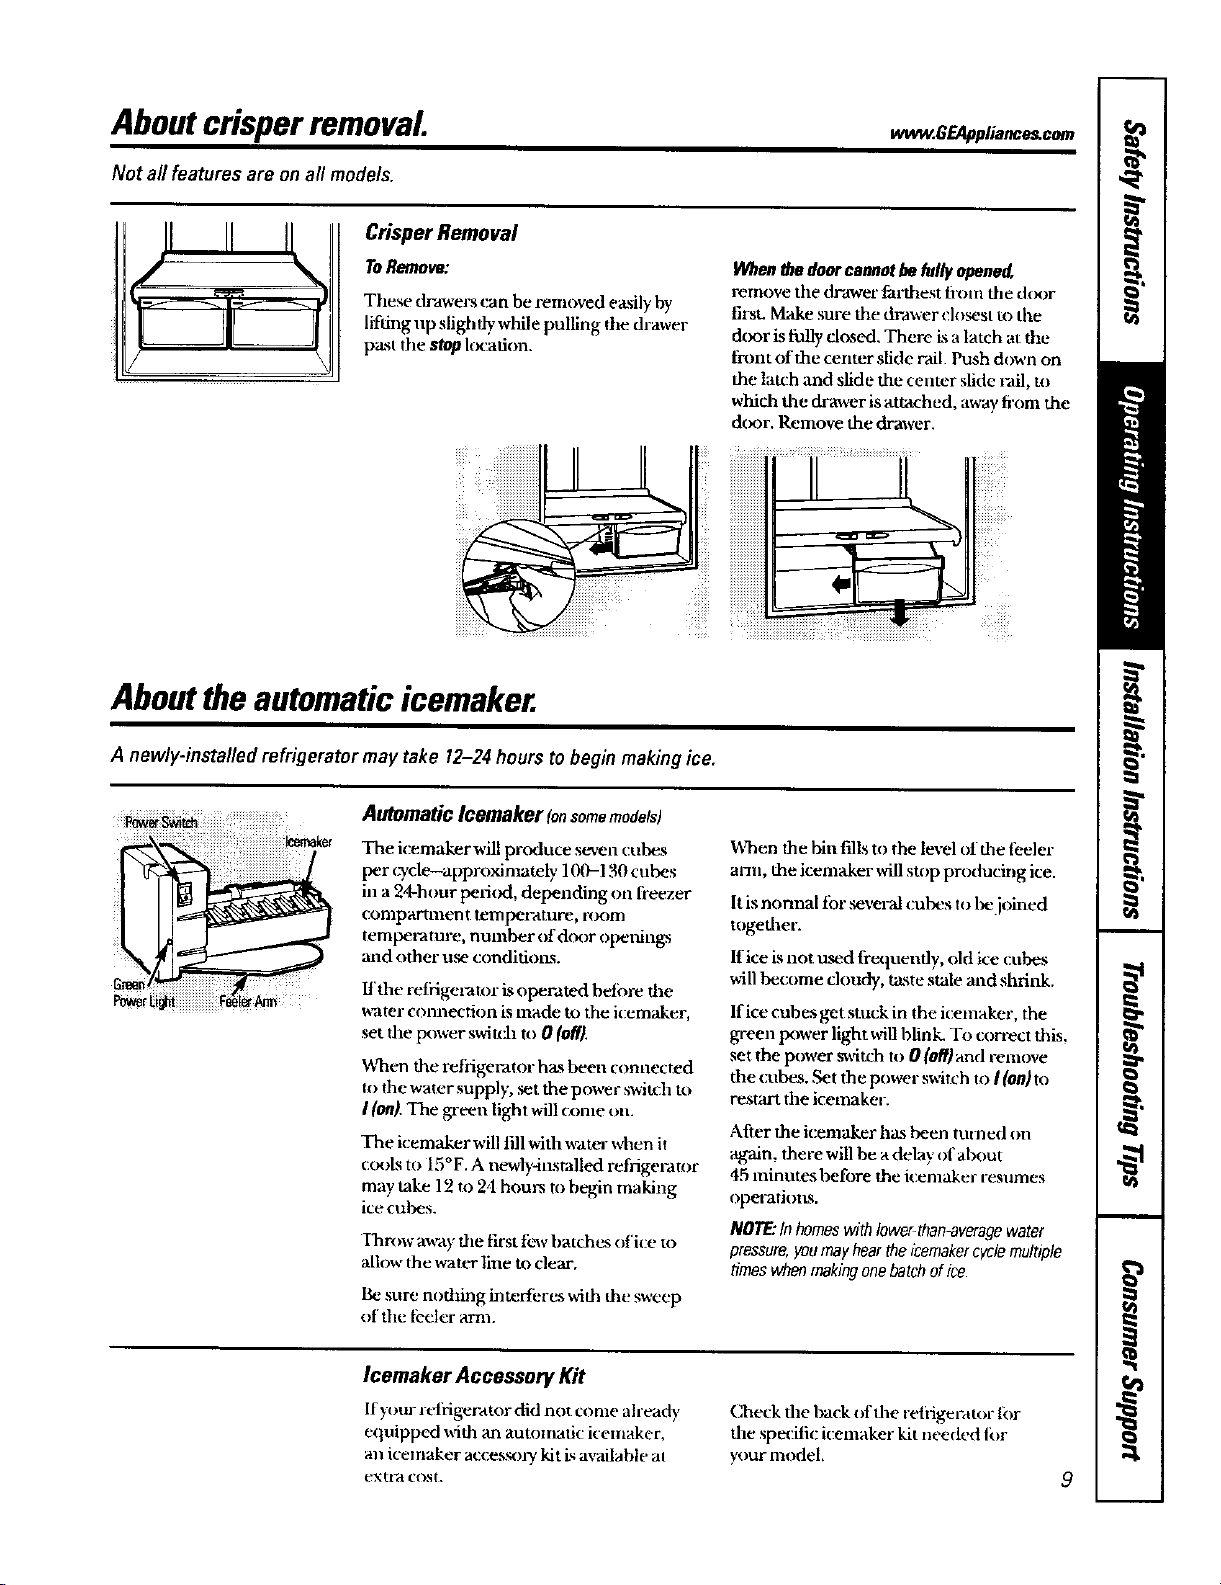
Aboutcrisper removal wwvv.GEApplianne com
Nora//features are on all models.
Crisper Removal
ToRemove:
These dr_awers can be removed easily by
lifting up sligh flywhile pulling tile drawer
past tile stop k_'afion.
VVhnnthedoorcannotbe fully opened,
remove the drawec _rthest ti'ouz file d_)or
first. Make sure the drawer closest to the
&)or is fully closed, There Lsa latch at the
thmt of the center slide rail. Push down on
the latch and slide the center slide rail, to
which the drawer is attached, away lixan the
door. Remove the drawer.
Aboutthe automatic icemaker.
A newly.installed refrigerator may take 12-24 hours to begin making ice,
Automatic Icemaker (onsomemodels)
The icemaker will produce seven cubes
t_'r (Tcle-approxinaately 100-130 cubes
in a 24-hour period, depending on freezer
ConlpaFtnlen t tempel-ature, r¢)om
temperature, number of d_)or openings
mad other use condifiot_s.
If the reti'igezator ksoperated betore the
w-ater connection is made to the icemaker,
set the t)ower switch to 0 (off1.
When the refrigerator has been conuected
to the water supply, set. the power s_'itch to
I(nn). The green light will come Oil.
The icemaker will till with _vater when it
cc_)ls to 15 ° F. A newly-installed refrige]-atnr
may take 12 to 2,t hours to begin makiug
ice cubes.
Ihrow mx-aythe first f_zavhatches of ice to
annw the water line to clear.
Be sure nothing interfi_res with the sweep
of the f_eler arm.
When the bin fills to the level of the feeler
arm, the icemaker _¢dlstop producing ice.
It is normal tor several cubes to be joined
together.
If ice ksnot u_d frequently, o d ice cubes
win become cloudy, taste stale and shrink.
Ifice cubes get stuck in the icemaker, the
green power light will blink. To correct this,
set the ix)wer m_4tch to 0 (off) and renlove
the cxtbes..Set the power switch to I (on)to
restart the icemaker.
After the icemaker has been turned on
again, there will be a delay of about
45 minutes before the k:emaker resumes
operati oiL%,
NOTE:In homeswith lower-than-averagewater
pressure,youmayheartheicemakerc_le multiple
timeswhenmaklhgonebatch of ice
Icemaker Accessory Kit
If )oltr reti'igecator did not come already
equipped with an automatic kelnaker,
an icemaker acce_,_)t), kit _ available at
ex tl*d COst,
Check the hack of the re|iS.gel*,ttor lk_r
the specifuzicemaker kit needed for
your model
9
Careand cleaning oftherefrigerator.
Cleaning the Outside
Thedoorhandlesandtrint(;lean witha
cloth dampened with soaW _,,-ater.Dry
_dth a soRcloth.
Keep the outside clean. Wipe with a clean
doth figh_ °dampened with mild liquid
dish detergenl. Dry v,5th a clean. _)ft cloth.
Cleaning the Inside
Tohelppreventodors,leave an ()pen box of
baking s(_la in the reti'iger-ator and fi'eezer
eolnpm-tmenLs.
Unplugthe refrigeratorbeforecleaning.If this
is not practical, v,a-ing excess moisture out of
SF<,nge or cloth when cleaning around
switches, lighls or controls.
Use _rann water and baking _)da _)lufiot_--
alzout a tablesp(x)n ( 15 ml) of baking soda
u) a quart (l liter) otk_ater. This both cleans
and neutralizes odors. Thoroughiy rit_se
and wipe dr)'.
Donot wipe the refrigerator with a soiled dish
cloth or wet towel Thesemayleavea residue
that can erode the paint. Do not usescouring
pads,powdered cleaners,bleach or cleaners
containing bleachbecausetheseproductscan
scratch and weaken thepaint finish.
Avoid cleaningcoldglass shelves(onsome
models)with hot water becausethe extreme
temperaturedifferencemay causethem to break.
Handleglassshelvescarefully.Bumping
temperedglasscan causeit to shatter.
Donot washanyrefrigeratorpartsin the
dishwasher.
Washice traysin lukewarm wateronly--
do not put themin an automaticdishwashez
Condenser
There is no need tbr routine condenser
clemaings in normal home operating
environments. Hnwever, in environments
that may be particularly dttsty or gre a.sT,the
condenser should he cleaned periodic;ally
fbr efficient reli'igerat(w operation.
Cleaningthe condenser:.1]te condenser is
located inside dte hack of the refiigemror.
To access it, first un plug the reliigerau)r,
then remove the cover, The condenser Ls
on the right side.
10
 Loading...