

GE Profile 21, Profile 23, Profile 25, Profile 27, Profile 29 Owner's Manual And Installation
vvvvw.GEAppliances.com
Safety Information
Adapter Plugs ................... 4
Connect Electricity ............... 4
Extension Cords ................. 3
Proper Disposal ................. 3
Safety Precautions ............... 2
Operating lnstructions
Additional Features ............. 11
Automatic Icemaker ............ 13
Care and Cleaning ........... 15, 16
CustomCooV M ................ 6, 7
Ice and Water Dispenser ...... 14, 15
Refrigerator Doors ................
Replacing the Light Bulbs ....... 17
Shelves and Bins .............. 9, 10
Storage Drawers ................ 12
Temperature Controls ........... 5
Water and FreshSaver TM Filters .... 8
Installation Instructions
Preparing to Install
the Refrigerator ............. 18, 19
Removing and Replacing Doors . .25
Trim Kits and Panels ......... 20 24
Water Line Installation ....... 26-29
Troubleshooting Tips
Before You Call For Service ...31-33
Normal Operating Sounds ....... 30
Consumer Support
Consumer Support ...... Back Cover
Performance Data Sheet ......... 37
Product Registration ......... 39, 40
State of California Water
Treatment Device Certificate ..... 38
Warranty (Canadian) ........... 35
Warranty (U.S.) ................ 36
Writethemodelandserial numbershere:
Model #
Serial#
[:ind thcsc/mmbers on a label inside
lhu 1 _'fl'i_.q'[ltOl conlpal-tlll('n( _ll lhU
t_,pIm the zight side
Models 21, 23, 25,27, and 29
Profile C6te fi C6te
R frig4rateurs
Lasection fran_aise commence b la page 42
Profile Lado a Lado
Refrigeradores
ta secci6n en espafiot empieza en !a-pagi_8.
200D2600PO02Rev. 1
IMPORTANTSAFETYINFORMATION.
READALLINSTRUCTIONSBEFOREUSING.
A WARNING!
Use this appliance only for its intended purposeas described in this Owner's Manual
SAFETYPRECAUTIONS
When using electrical appliances, basicsafely precautions shouldbe followed, including thefollowing:
UThis refrigerator must be properly installed
and located in accordance with the Installation
Instructions before it is used.
• Do not allow children to climb, stand or hang
on the shelves in the refrigerator. They could
damage the refrigerator and seriously injure
themselves.
• Do not touch the cold surfaces in the freezer
compartment when hands are damp or wet. Skin
may stick to these extremely cold surfaces.
• Do not store or use gasoline or other flammable
vapors and liquids in the vicinity of this or any
other appliance.
• In refrigerators with automatic icemakers,
avoid contact with the moving parts of the
ejector mechanism, or with the heating element
that releases the cubes. Do not place fingers or
hands on the automatic icemaking mechanism
while the refrigerator isplugged hi.
II Keep fingers out of the "pinch point" areas;
clearances between the doors and between
the doors and cabinet are necessarily small.
Be careful dosing doors when children are
hi the area.
• Unplug the refiSgerator before deaning and
making repairs.
NOTE:Weslror_ recommendthatanyservicingbe
performedbyaqualifiedindividual
• Setting either or both controls to 0FFdoes not
remove power to the light circuit.
• Do not refreeze frozen foods which have
thawed completely.
IIAlwaysdean the CustoraCoolTMTray after thawing
food.
2
v,44n_.GE.Appliances.com
DANGER! RISK OFCHILD ENTRAPMENT
PROPERDISPOSALOFTHEREFRIGERATOR
Child entrapment and suffocation are not problems
of the past.Junked or abandoned refrigerators are
still dangerous...even if they will sit for "just a few
days," If you are getting rid of your old refrigerator,
please follow the instructions below to help prevent
accidents.
Before You Threw Away YourOld Refrigerator
or Freezer.
iTake offthe doors.
• Leave the shelves in place so that children may
not easily climb inside.
CFCDisposal
Your old refrigerator may have a cooling system
that used CFCs (chlorofluorocarbous). CFCs are
believed to harm stratospheric ozone.
ffyou are throwing awayyour old refrigerator, make
sure the CFC refrigerant isremoved for proper
disposal by a qualified servicer. If you intentionally
release this CFC refrigerant you can be subject to
fines and imprisonment under provisions of
environmental legislation.
USEOFEXTENSIONCORDS
Because of potential safety hazards under certain conditions, we strongly recommend against the use
of an extension cord.
However, if you must use an extension cord, it is absolutely necessmy that it be a UL-listed (in the umted
States) or a GSA-listed (in Canada), 3-wire grounding type appliance extension cord having a grounding
type plug and outlet and that the electrical rating of the cord be 15 amperes (minimum) and 120 volts.
3
IMPORTANTSAFETYINFORMATION.
READALLINSTRUCTIONSBEFOREUSING.
A WARNING!
HOWTOCONNECTELECTRICITY
Do not, under any circumstances,cut or remove the third(ground)prong from the power cord. For
personal safe_ this appliance must be properly grounded.
The power cord of this appliance is equipped with
a 3-prong (grounding) plug which mates with a
standard 3-proug (grounding) wall outlet to
minimize the possibility of electric shock hazard
from this appliance.
Have the wall outlet and circuit checked by a
qualified elecu-ician to make sure the oudet is
properly grounded.
If the outlet isa standard 2-prong outlet, it isyour
personal responsibility and obligation to have it
replaced with a properly grounded 3-prong wall
outlet.
The refrigerator should always be plugged into its
own individual electrical outlet which has a voltage
rating that matches the rating plate.
This provides the best performance and also
prevents overloading house wiring circuits which
could cause a fire hazard from overheated wires.
Never unplug your refi-igemtor by pulling on the
power cord. Always grip plug firmly and pull straight
out fxom the outlet.
Repair or replace immediately all power cords that
havebecome flayed or otherwise damaged. Do not
use a cord that shows cracks or abrasion damage
along its length or at either end.
When moving the refi'igemtor away fi'om the
wall, be careful not to roll over or damage the
power cord.
USEOFAOAPTERPLUGS(AdapterplugsnotpermittedinCanada)
Because of potential safety hazards under certain conditions, we strongly recommend against
the use of an adapter plug.
However, if you must use an adapter, where local
codes permit, a temporaryconnectionmay be made
to a properly grounded 2-prong wall outlet by use
of a UL-listed adapter available at most local
hardware stores,
The larger slot in the adapter most be aligned with
the larger slot in the wall outlet to provide proper
polarity in the connection of the power cord.
When disconnecting the power cord from the
adapter, always hold the adapter in place with one
hand while pulling the power cord plug with the
other hand. ff this is not done, the adapter ground
terminal is very likely to break with repeated use.
If the adapter ground terminal breaks, DONOT
USEthe refrigerator until a proper ground has
been established.
Attachingtheadaptergroundterminaltoa walloutlet
coverscrewdoesnot groundtheapplianceunlessthe
coverscrewismetal,andnotinsulated,andthewall
outletisgroundedthroughthehousewiring.Youshould
havethecircuitcheckedbyaquafifiedelectriciantomake
suretheoutletisproperlygrounded.
READANDFOLLOWTHISSAFETYINFORMATIONCAREFULLY
SAVETHESEINSTRUCTIONS
4

About the temperature controls.
The temperature controls are preset in the factory at 37°F for the
refrigerator compartment and O°F for the freezer compartment. Allow
24 hours for the temperature to stabilize to the preset recommended
settings.
The temperature controls can display both the SET temperature
as well as the actual temperature in the refrigerator and freezer. The
actual temperature may vary slightly from the SET temperature based
on usage and operating environment.
Setting either or both controls to OFF stops cooling in both the freezer
and refrigerator compartments, but does not shut off electrical power
to the refrigerator.
NOTE: The refrigerator is shipped with protective film covering the
temperature centre/s, If this film was not removedduring installation,
remove it now
Tochangethetemperature,press and release the
WARMERorCOLOERpad.The SETlight willcome on
and the display will show the set temperature. To
change the temperature, tap either the WARMER
or COLOERpaduntil the desired temperature is
displayed. Refrigerator temperatures can be
adjusted between 34°F and 44°F and the freezer
temperatures can be adjusted between-6°F and
+6°F.
Once the desired temperature has been set,
the temperature display will return to the actual
refrigerator and freezer temperatures after
5 seconds. Several adjustments may be req_.
Each time you adjust controls, allow 24 hours for the
refrigerator to reach the temperature you have set.
Toturn the cooli_g system off,tap the WARMERPad
for either the refi'igerator or the freezer until the
displayshows O/:ETotern theunitbach on, press the
COLDERpad for either the refrigeratororfreezer.
The SETlight willilluminate on the side you
selected. Then press the COl._ERpadagain (on the
side where the SErlight is illuminated) and itwill go
to the preset points of g'Ffur the freezer and 3"/'F
forthe refrigerator. Setting either or both controls
to OR:stops cooling in both the freezer and
refrigerator compartments, but does not shut
offelectrieal power to the refrigerator,
PerformanceAir FlowSystem
The Perforce Air-Flow System is designed to
maximize temperature control in the refrigerator
and freezer compartments. This unique special
feature consists of the Air Tower along the top and
back walls of the refrigerator and the Air Tunnel on
the bottom portion of the freezer rear wall. Placing
food in front of the louvers on these components
will not affect performance. Although the Air Tower
and the Air Tunnel can be removed, doing so will
affect temperature performance. (For removal
instructions, on-fine, 24 hours a day, contact us at
www.GEAppliances.com or call 800GE-CARES.)
5
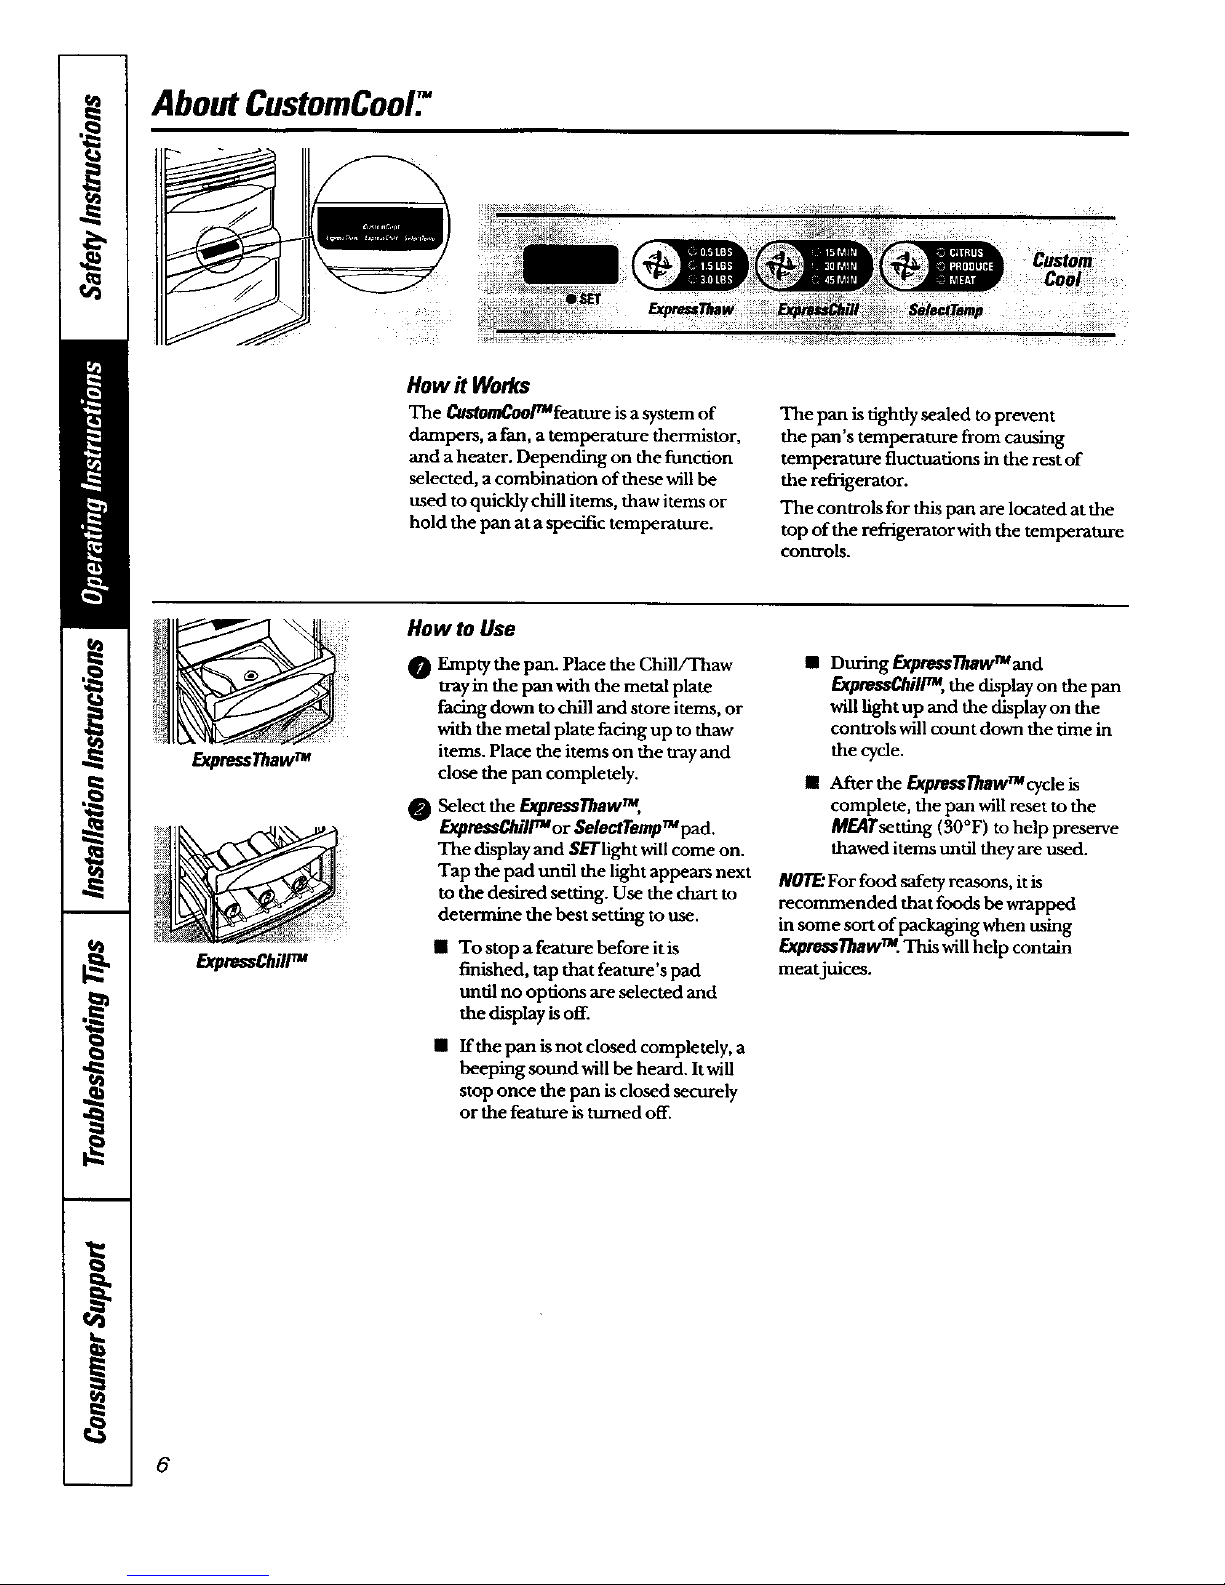
AboutCustomCool7
ExpressThawTM
Howit Works
The C,gstom_Jo/_ feature is a system of
dampers, afan, a temperature thermistor,
and a heater. Depending on the function
selected, a combination of these will be
used to quickly chill items, thaw items or
hold the pan at a specific temperature.
The pan is tightly sealed to prevent
the paws temperature from causing
temperature fluctuations in the rest of
the refrigerator.
The controls for this pan are located at the
top of the refrigerator with the temperature
controls.
ExpmssChillTM
How to Use
O Empty the pan. Place the Chill/Thaw
tzay in the pan with the metal plate
facing down to chill and store items, or
with the metal plate facing up to thaw
items. Place the items on the tray and
close the pan completely.
Select theExptessThaw TM,
ExptessChill_or SelectTemprMpad.
The display and SETlight willcome on.
Tap the pad until the light appears next
to the desired setting. Use the chart to
determine the best setting to use.
• To stop a feature before it is
finished, tap that feature's pad
until no options are selected and
the disphayisoff.
• If the pan isnot dosed completely, a
beeping sound will be heard, hwill
stop once the pan isdosed securely
or the feature is turned off.
• During ExpressThawm and
ExpressChilFat,the displayon the pan
will light up and the display on the
controls will count down the time in
the c/de.
• After the ExpressThawT_c/cleis
complete, the pan willreset to the
MEATsetfing(30°F) to help preserve
thawed items until they areused.
NOTE."For food safety reasons, it is
recommended that foods be wrapped
in some sort of packaging when using
ExprossThaw TM. This will help contain
meat juices.
6
vvwz_.GEAppliance_com
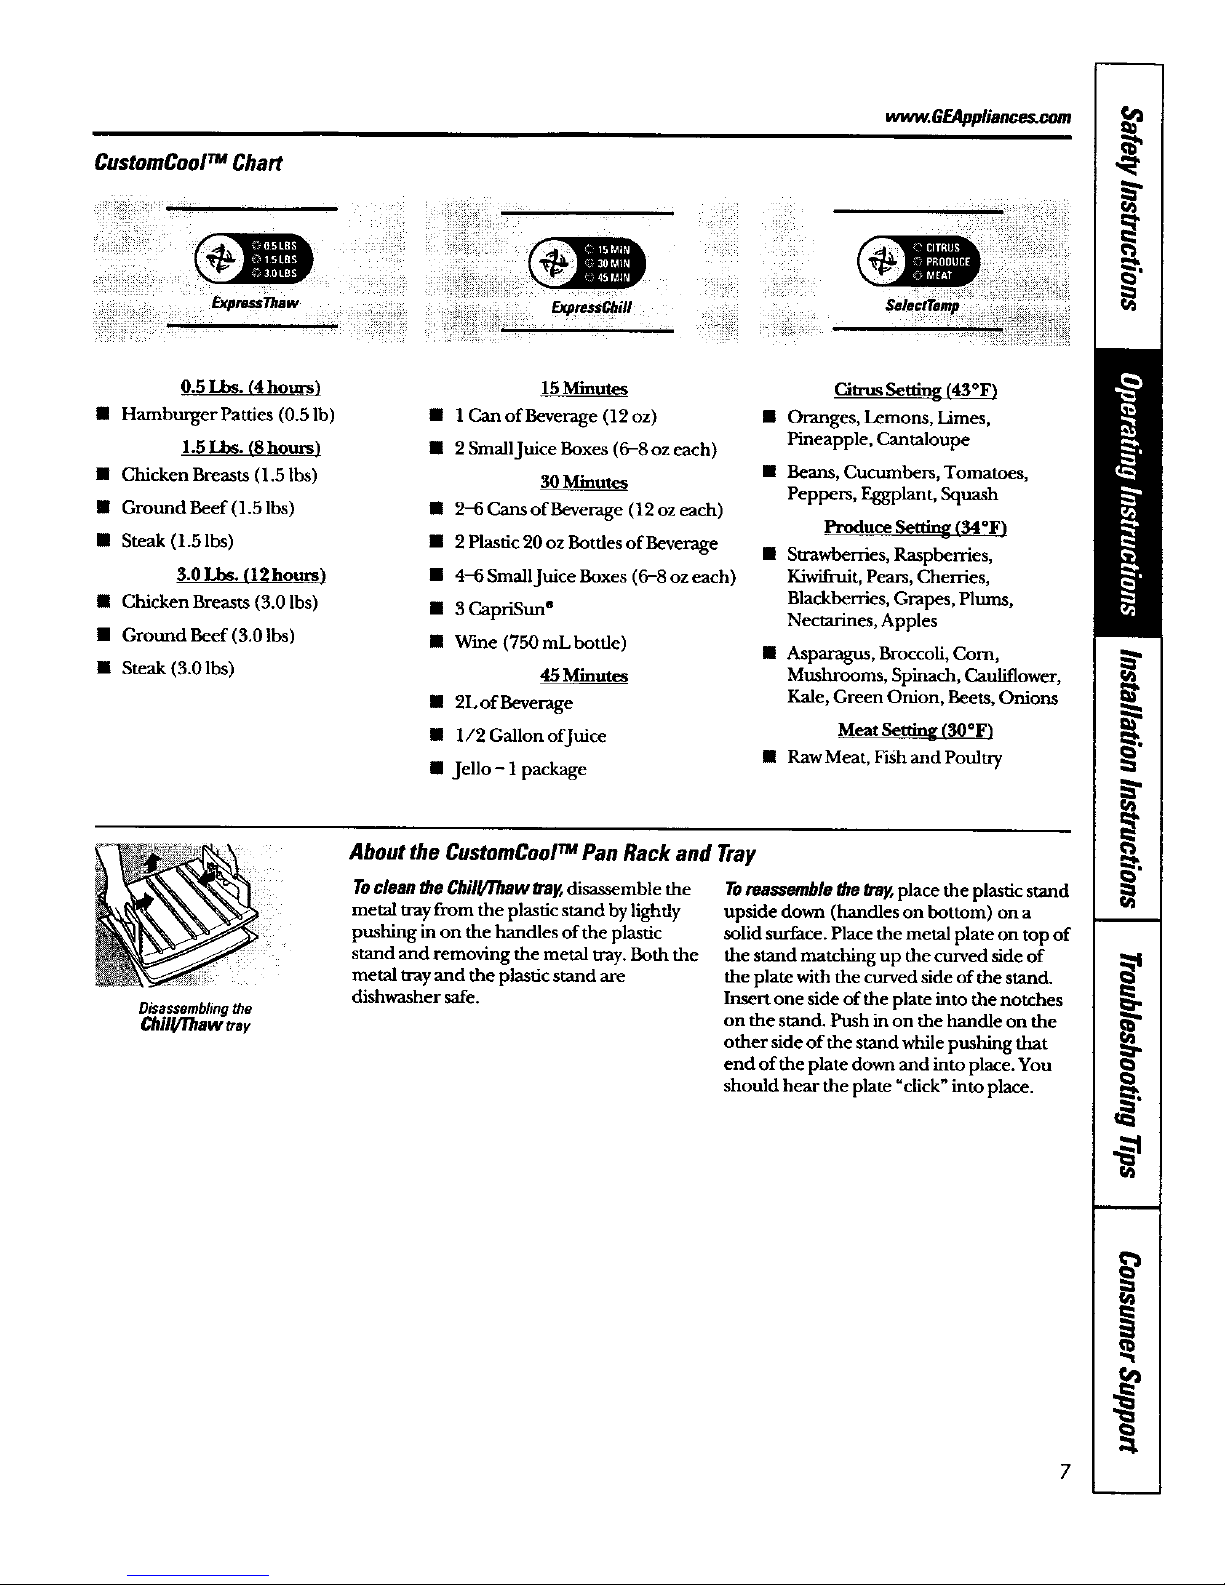
CustomCool TM Chart
0.5 Lbs. 14hours)
• Hamburger Patties (0.5 lb)
1.5 Lbs. 18 hours)
• Chicken Breasts (1.5 Ibs)
• Ground Beef (1.5 lbs)
• Steak (1.51bs)
3.0 Lhs. (12 hours)
• Chicken Breasts (3.0 lbs)
• Ground Beef (3.0 lbs)
• Steak (3.0 lbs)
15 Minutes
• 1 CanofBeverage (12oz)
• 2SmallJuiceBoxes (6-8ozeach)
30 Minutes
• 2-6CansofBeverage (12ozeach)
• 2 Plastic 20 oz Bottles of Beverage
• 4-6 SmallJulce Boxes (6-8ozeach)
• 3 CapriSun e
• W'me (750mLbotfle)
45 Minutes
• 2L of Beverage
• 1/2 Gallon ofJuice
• Jello- 1 package
Citrus Setting (43°F)
• Oranges, Lemons, Limes,
Pineapple, Cantaloupe
• Beans, Cucumbers, Tomatoes,
Peppers, Eggplant, Squash
Produce Setting_ (34°F)
• Strawberries, Raspberries,
Kiwifiafi t, Pears, Cherries,
Blackberries, Grapes, Plums,
Nectarines, Apples
• Asparagus, Broccoli, Corn,
Mushrooms, Spinach, Cauliflower,
Kale, Green Onion, Beets, Oniom
Meat Setting_I_O*F)
• RawMeat, Fishand Poultry
Disassemblingthe
Chil!/Thawtray
About the CustomCool TM Pan Rack and Tray
Toclean the Chil_Thaw _rav,disassemble the
metal tray from the plastic stand by lightly
pushing in on the handles of the plastic
stand and removing the metal tray. Both the
metal tray and the plasdc stand are
dishwasher safe.
Toreassemblethe flay,place the plastic stand
upside down (handles on bottom) on a
solid surface. Place the metal plate on top of
the stand matching up die curved side of
the plate with the curved side of the stand.
Insert one side of the plate into the notches
on the stand. Push in on the handle on the
other side of the stand while pushing that
end of the plate down and into place. You
should hear the plate "click" into place.
7
Aboutthe water and FreshSaverTM filters.
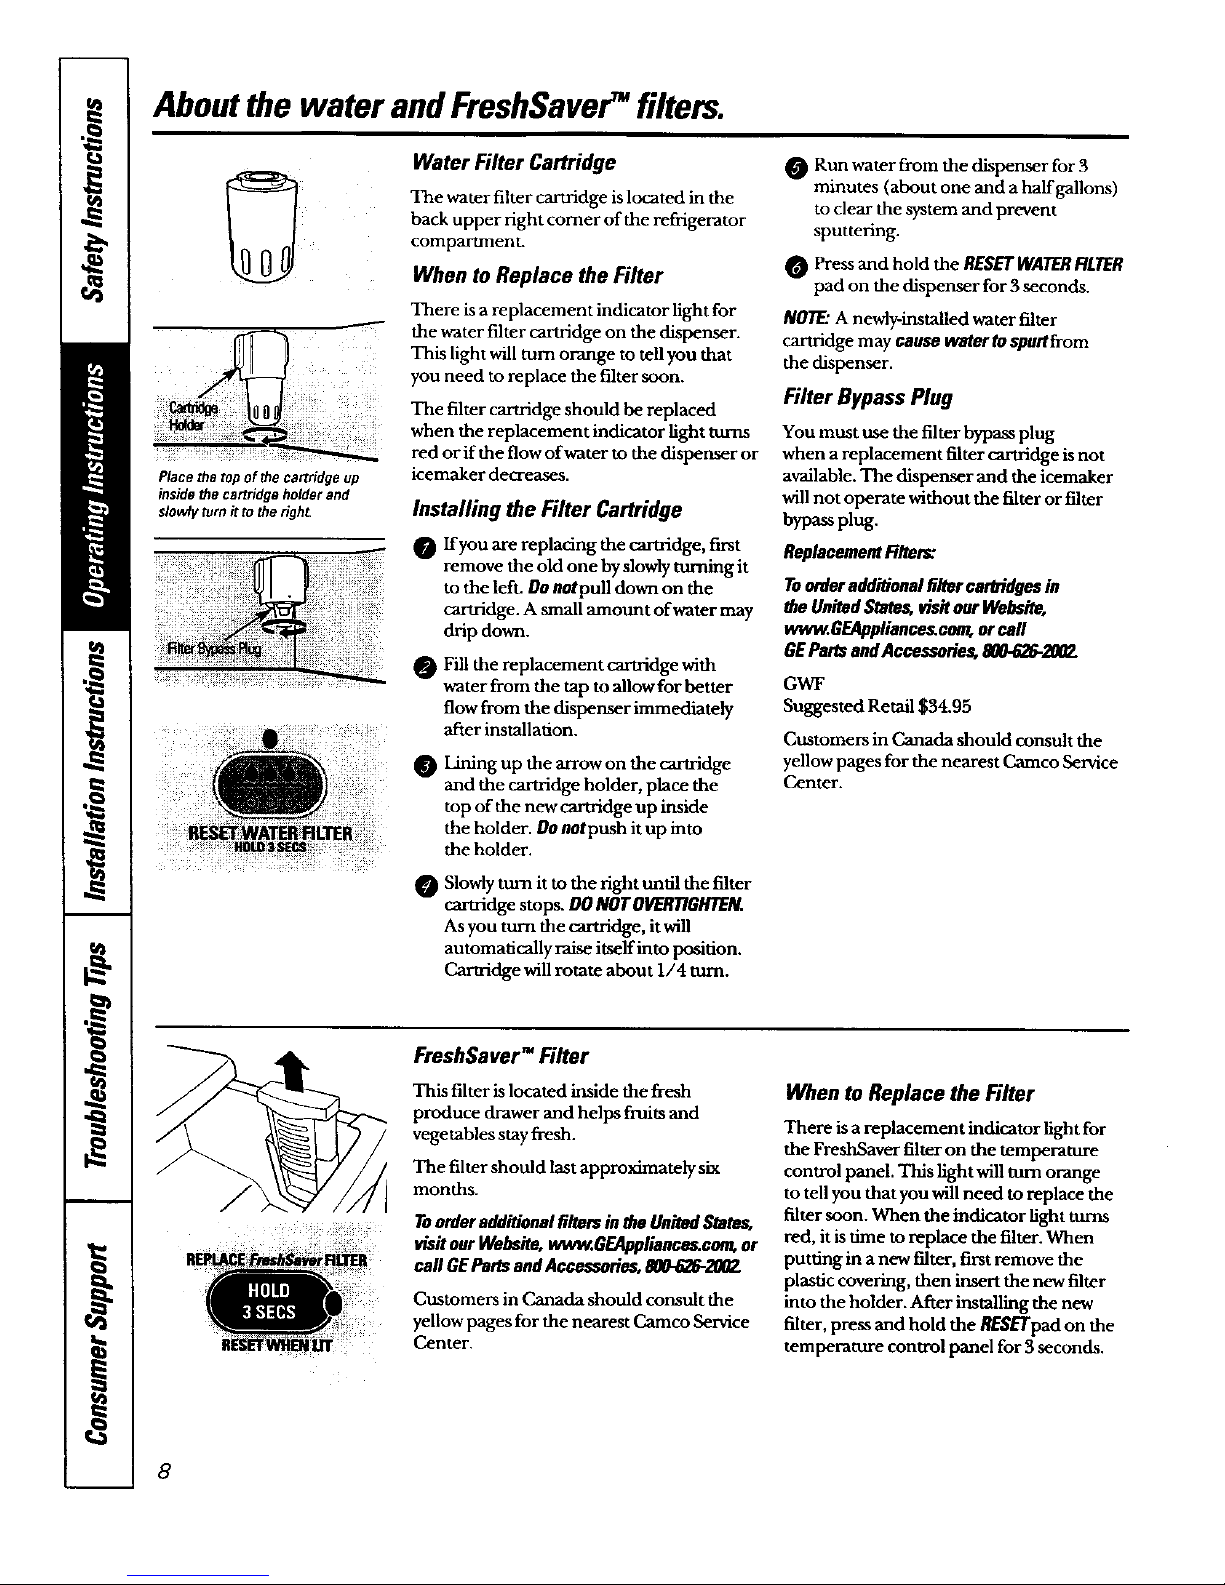
Place the top of the cartridge up
inside the cartridge holder and
slowly turn it to the right
Water Filter Cartridge
The water filter cartridge is located in the
back upper right comer of the refrigerator
compartment.
When to Replace the Filter
There is a replacement indicator light for
the water filter cartridge on the dispenser.
This light will tom orange to tell you that
you need to replace the filter soon.
The filter cartridge should be replaced
when the replacement indicator light turns
red orif die flow of'_rater to the dispenser or
icemaker decreases.
Installing the Filter Cartridge
O ffyou are replacing the cartridge, first
remove die old one by slowly turning it
to the left. Do notpull down on the
cartridge. A small amount of water may
drip down.
Fill the replacement cartridge with
water from the tap to allow for better
flow from the dispenser immediately
after installation.
.... _ Lining up die arrow on the cartridge
and the cartridge holder, place the
top of the new cartridge up inside
the holder. 0o nntpnsh it up into
the holder.
Slowlyturn it to the fight until the filter
cartridgestops. DONOTOVF-.RTIGHTEN.
As you turn die cartridge, it will
automatically raise itself into position.
Cartridge willrotate about 1/4 turn.
Run water from the dispenser for 3
minutes (about one and a half gallons)
to clear the system and prevent
sputtering.
Press and hold the RESETWATERFILTER
pad on the dispenser for 3 seconds.
NOTE."A newly-'mstalled water filter
cartridge may causeI_ter to spua from
die dispenser.
Filter Bypass Plug
You must use the filter bypass plug
when a replacement filter caru'idge is not
available. The dispenser and the icemaker
will not operate without the filter or filter
bypassplug.
ReplacementRlters:
Toorderadditionalfilter cer_idgse in
the UnitedStates,visitour Website,
ww_.GEApplianse_cem, or cell
GEPartsandAccessories,800-626-_0Z
GWF
Suggested Retail $34.95
Customers in Canada should consult the
yellow pages for the nearest Camco Service
Center.
FreshSaver" Filter
This filter is located inside the fresh
produce drawer and helps fruits and
vegetables stay fresh.
The filter should last approximately six
months.
Toorderadditionalfilters in theUnitedStates,
v_it our Website,ww_.GEAppliaace_cen_ or
call GEPartsandAccessories,800-626-200_
Customers in Canada should consult the
yellow pages for the nearest Camco Service
Center.
When to Replace the Filter
There is a replacement indicator light for
the FreshSaver filter on the temperature
control panel. This light will turn orange
to tell you that you will need to replace die
filter soon. When the indicator light turns
red, it is time to replace the filter. When
putting in a new filter, first remove the
plastic covering, then insert the new filter
into the holder. After installing the new
filter, press and hold the RESETpad on die
temperature control panel for 3 seconds.
8
Aboutthe shelvesand bins.
Not all features are on all models.
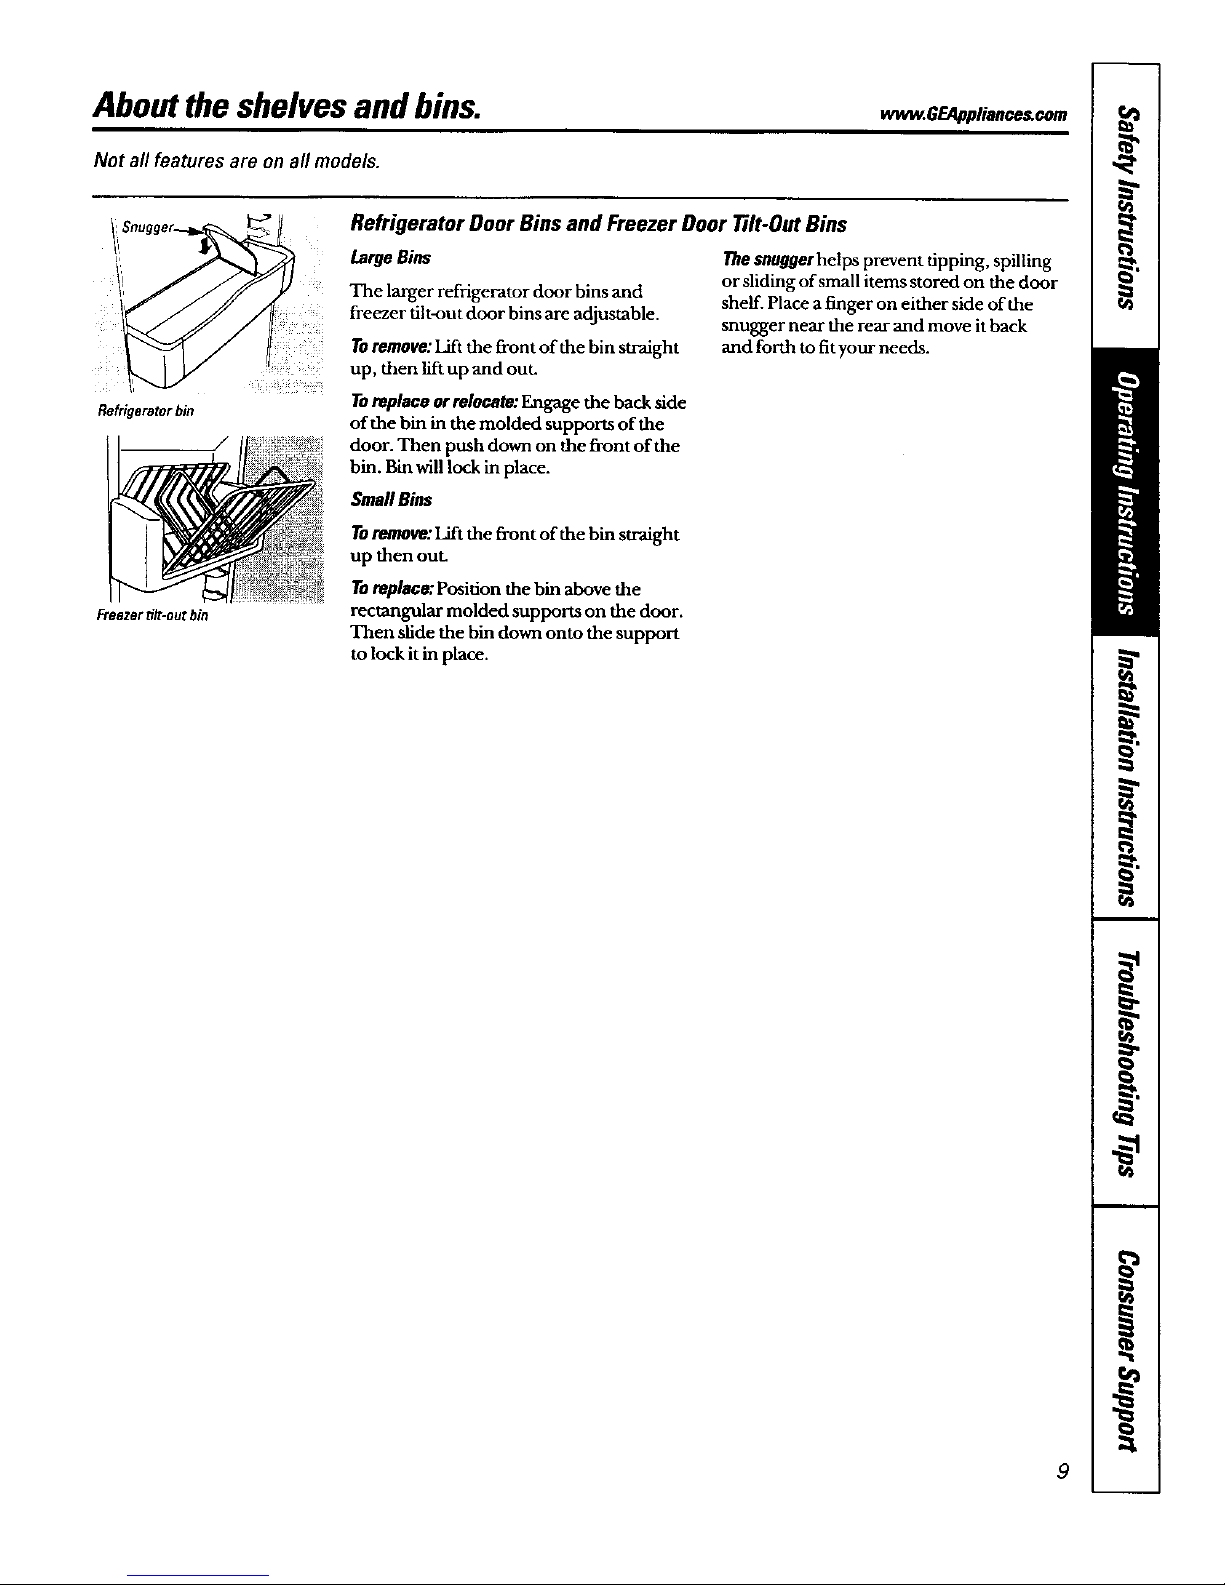
Refrigerator Door Bins and Freezer Door Tdt-Out Bins
Refrigerator bin
Freezer [#t-out bin
LargeBins
Thesauggerhelps prevent tipping, spilling
The larger refrigerator door bins and
freezer tilt-out door bins are adjustable.
Toremove:Lift the front of the bin straight
up, then lift up and out.
Toreplace orrelocate: Engage the back side
of the bin in the molded supports of the
door. Then push down on the tiont of the
bin. Bin will lock in place.
Small Bins
or sliding of small items stored on the door
shelf. Place a finger on either side of the
snugger near the rear and move it back
and forth to fit your needs.
Toremove: Lift the front of the bin straight
up then out.
Toreplace:Position the bin above the
rectangular molded supports on the door.
Then slide the bin down onto the support
to lock it in place.
9
Abouttheshelves and bins.
Not all features are on all models.
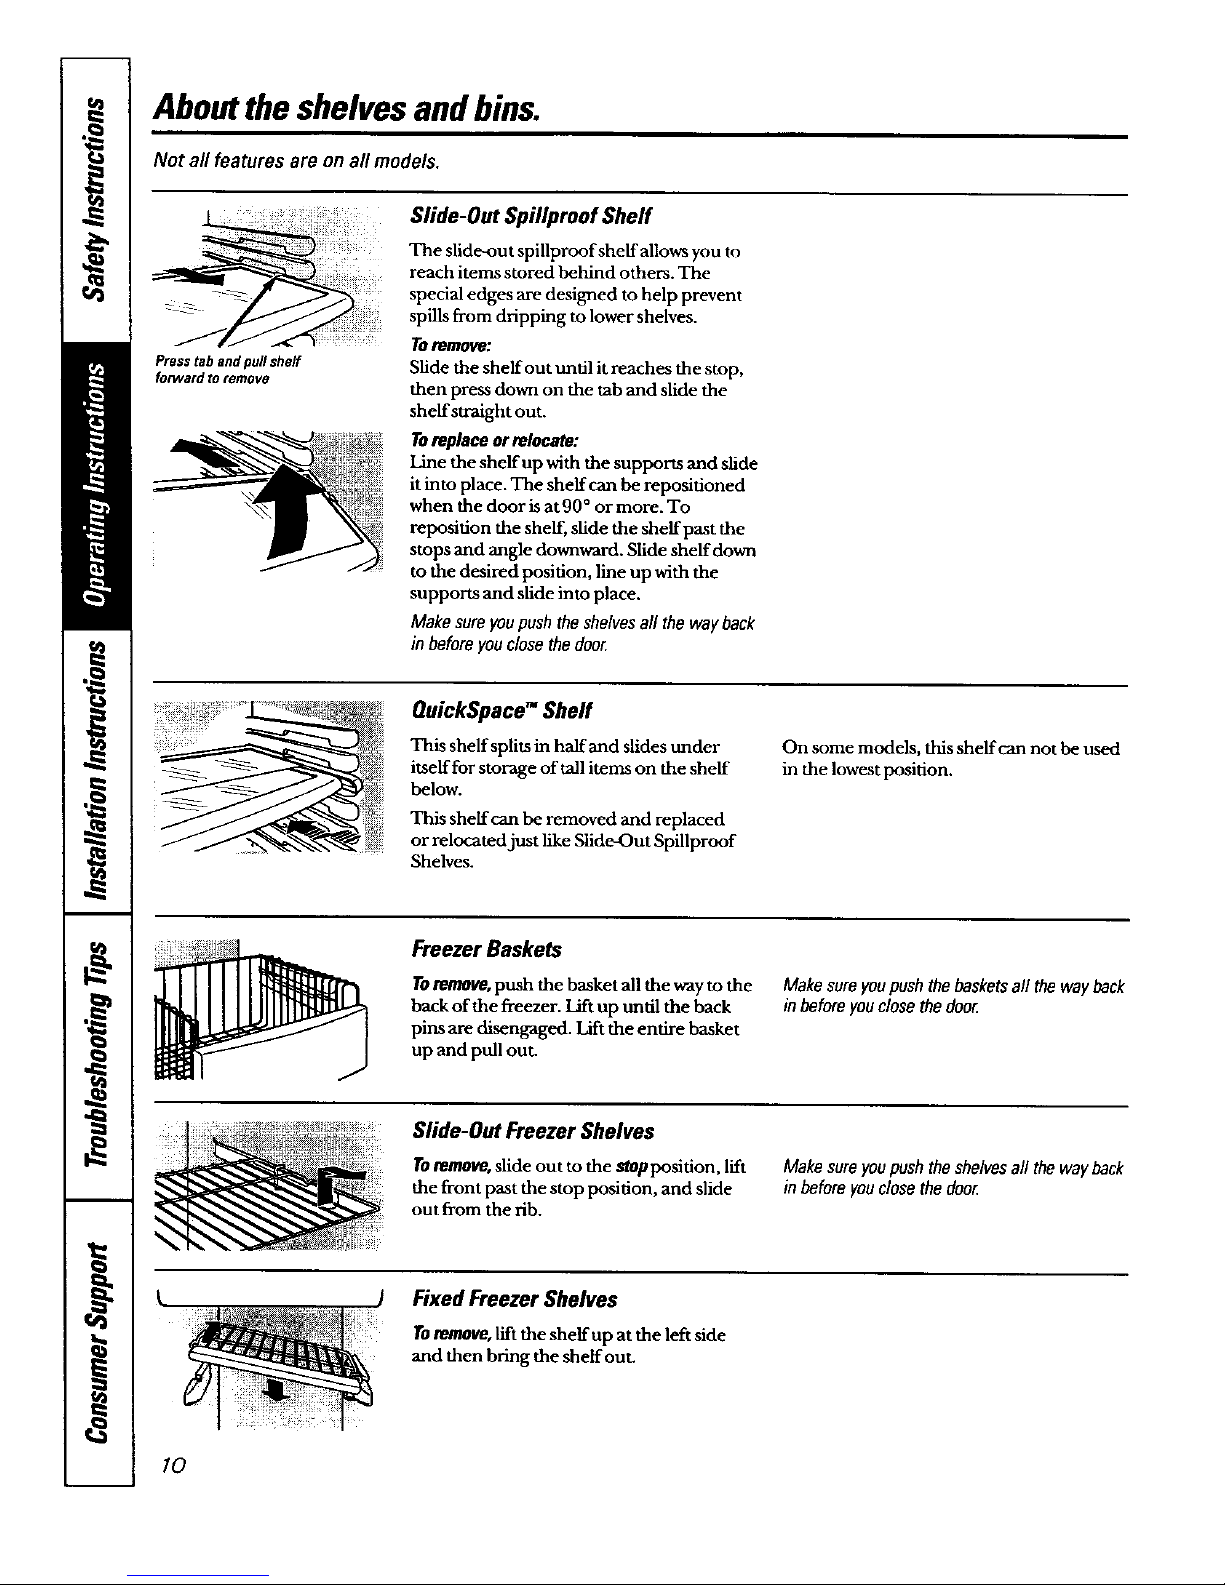
Slide-Out Spillproof Shelf
Press tab and pull shelf
forward to remove
The slide-out spillproof shelf allows you to
reach items stored behind others. The
special edges are designed to help prevent
spills from dripping to lower shelves.
Toremove:
Sfide the shelf out until it reaches the stop,
then press down on the tab and slide the
shelf straight out.
Toreplace or relocate:
Line the shelf up with the supports and slide
it into place. The shelf can be repositioned
when the door is at 90 ° or more. To
reposition the shelf, slide the shelf past the
stops and angle downward. Slide shelf down
to the desired position, line up with the
supports and slide into place.
Make sure youpush theshelvesaft the way back
in before youclose the doo_
QuickSpace" Sheff
This shelf splits in half and slides under
it.sell'for storage of tall items on the shelf
below.
This sheffcan be removed and replaced
or relocated just like Slide-Out Spillproof
Shelves.
On some models, this shelf can not be used
in the lowest position.
Freezer Baskets
Toremove,push the basket all the way to the
back of the freezer. Lift up until the back
pins are disengaged. Lift the entire basket
up and pull out.
Makesure youpush the basketsall the wayback
in before youclosethe door.
Slide-Out Freezer Shelves
Toremove,slide out to the stopposition, lift
the front past the stop position, and slide
out from the rib.
Make sure youpush theshelvesall the wayback
in beforeyouclose the door.
Fixed Freezer Shelves
Toremove,lift the shelf up at the left side
and then bring the shelf out.
10
About the additional features. , .GEAppli,, ,,oom
Not all features are on all models.
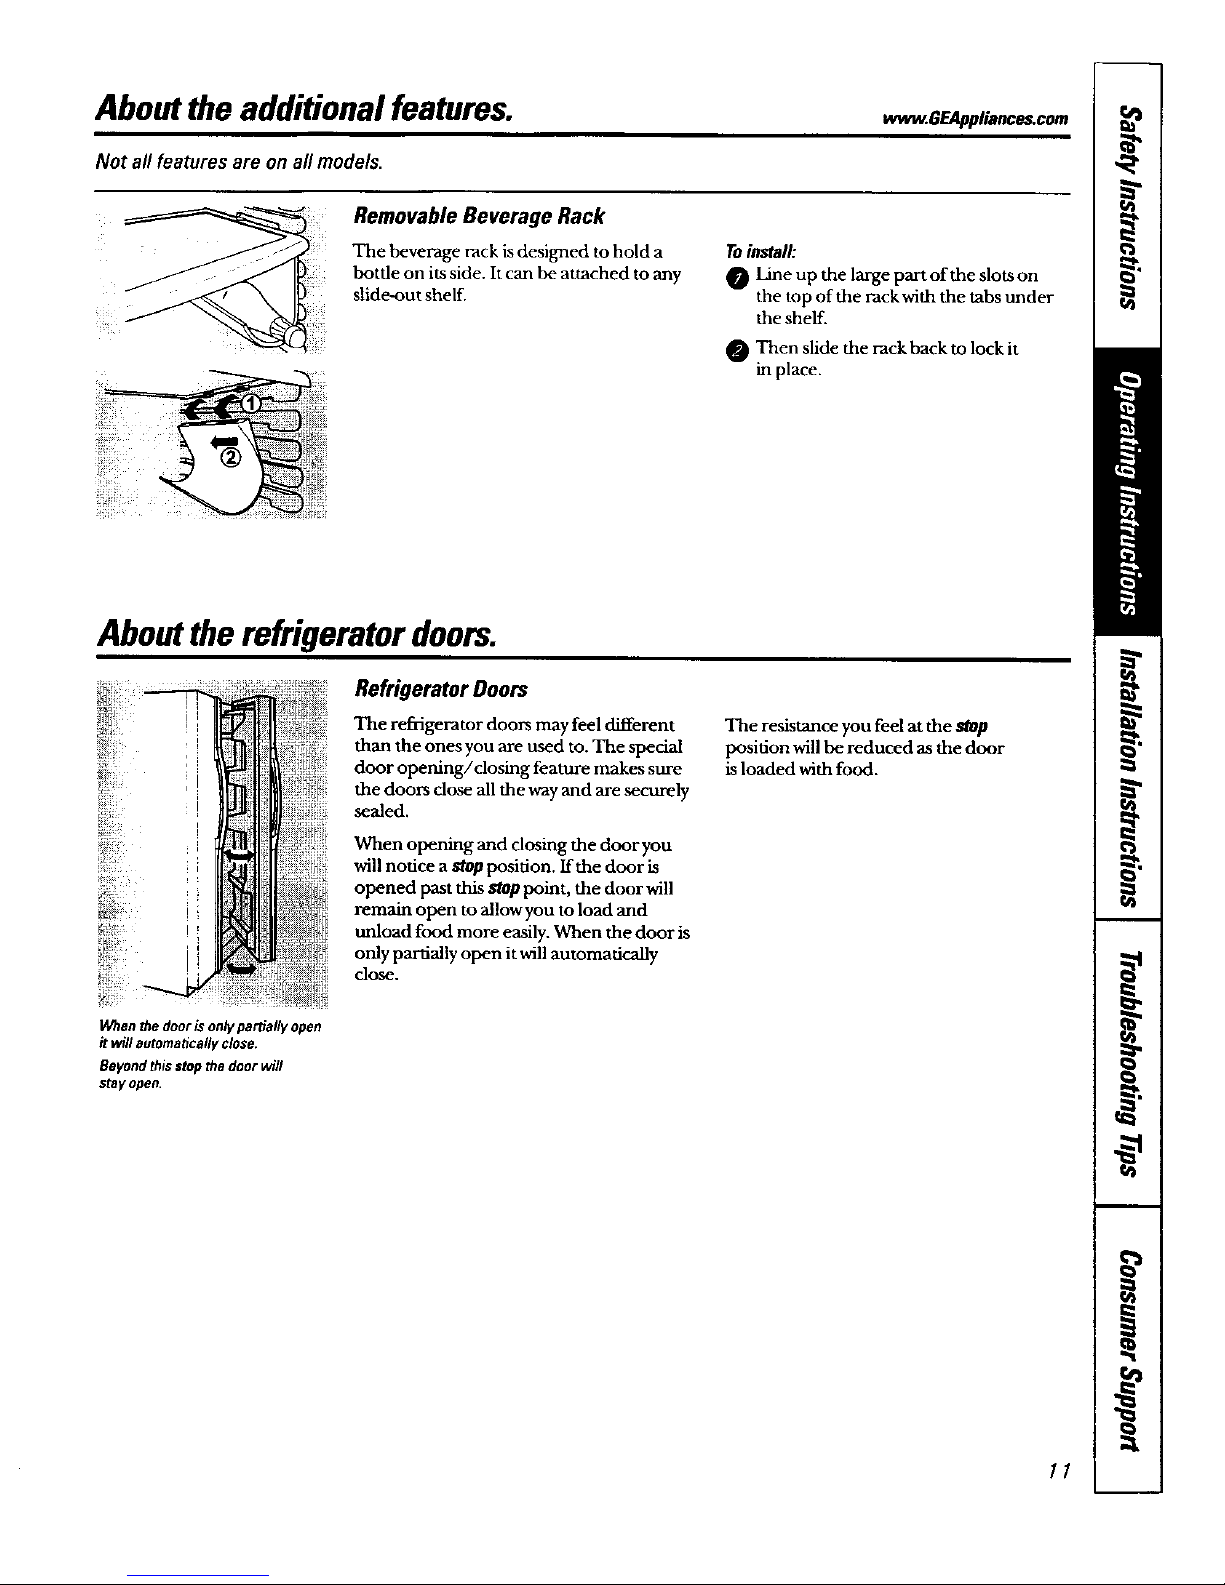
Removable Beverage Rack
The beverage rack is designed to hold a
bottle on its side. It can be attached to any
slide-out shelf.
Toinstall:
lane up the large part of the slots on
the top of the rack with the tabs under
the shelf.
0 Then slide the rack back to lock it
in place.
Aboutthe refrigerator doors.
Refrigerator Doors
The refrigerator doors may feel different
than the ones you are used to. The special
door opening/clo_mg feature makes sure
the doors dose all the way and are securely
sealed.
When opening and closing the door you
will notice a stopposition. If the door is
opened past this stoppoint, the door will
remain open to allowyou to load and
unload food more easily. When the door is
only partially open it will automatically
dose.
The resistance you feel at the stop
position will be reduced as the door
is loaded with food.
When the door is only partially open
it will automa6cally close.
Beyond this stop the door will
stay open.
11
Aboutthe storagedrawers.
Not all features are on all models.
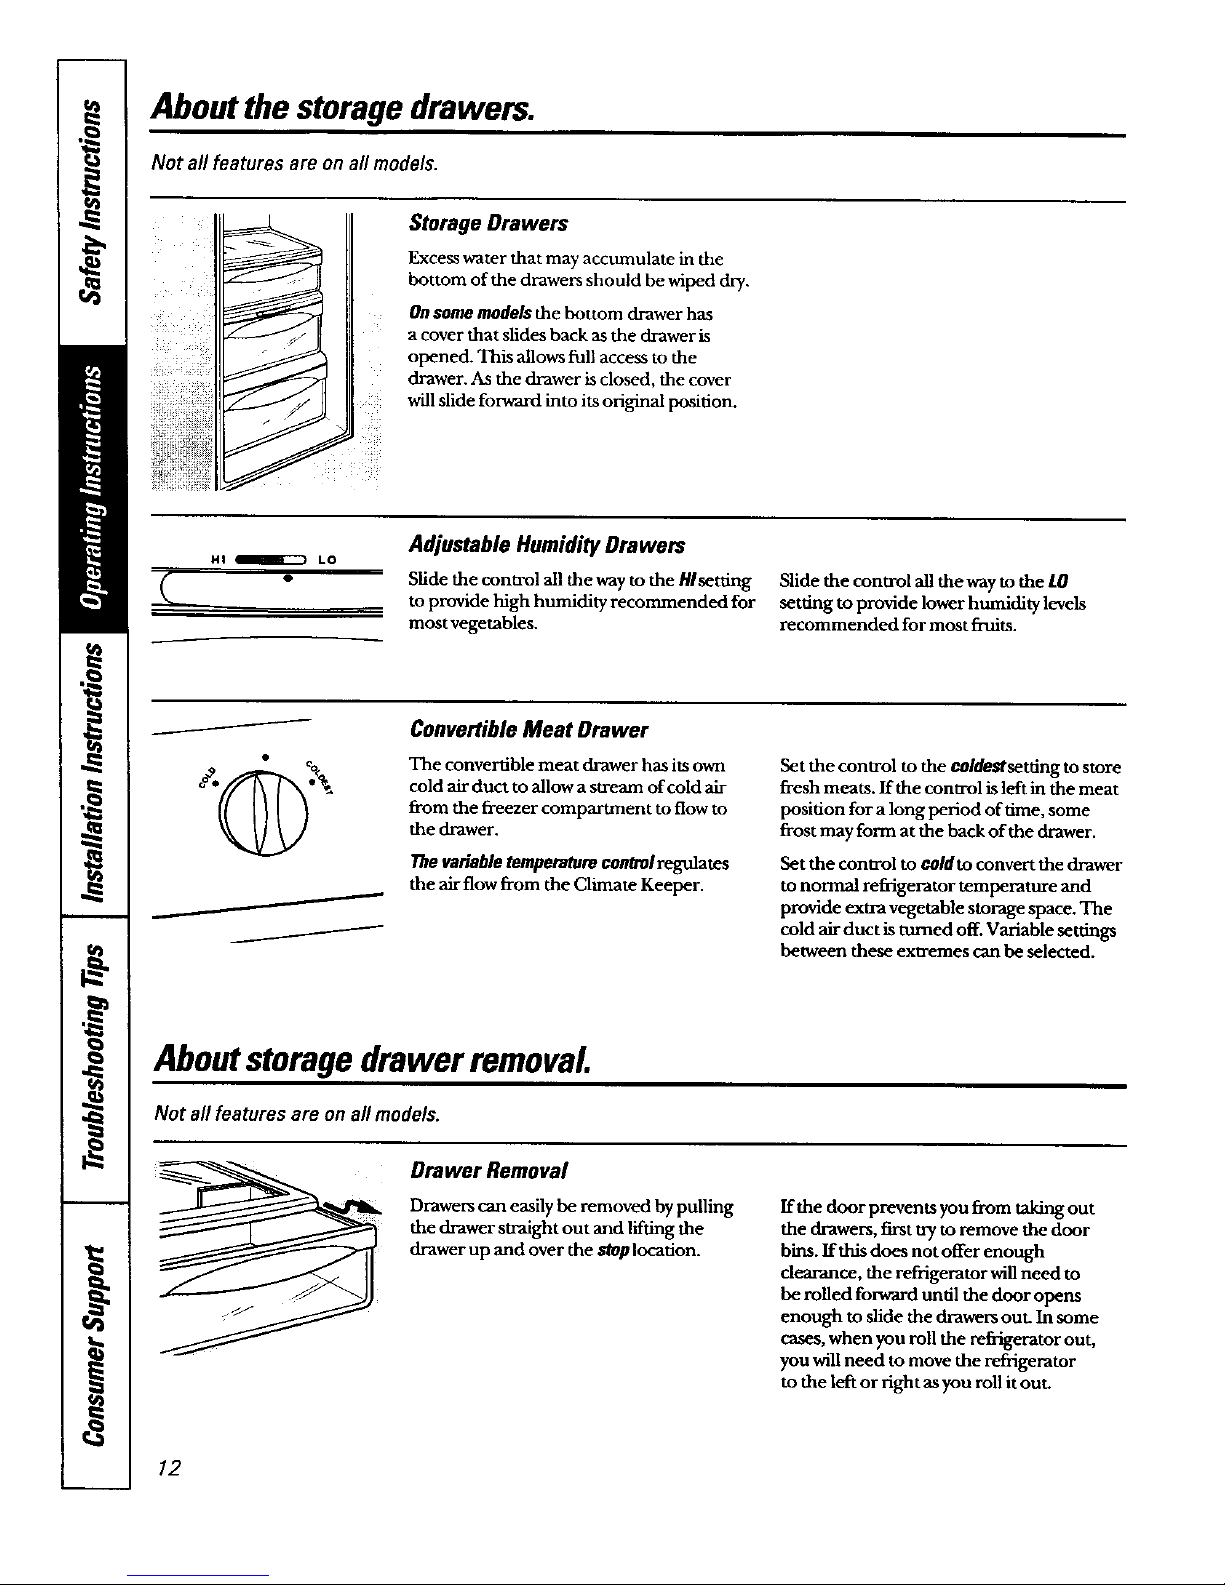
Storage Drawers
Excess water that may accumulate in the
bottom of the drawers should be wiped dry.
Onsomemodelsthe bottom drawer has
a cover that slides back as the drawer is
opened. This allows full access to the
drawer. As the drawer is closed, the cover
will slide forward into its original position.
(.
HI _ LO
Adjustable Humidity Drawers
Slide the control all the way to the HIsetting
to provide high humidity recormnended for
most vegetables.
Slide the control all the way to the LO
setdng to provide lower humidity levels
recommended for most fruits.
f
J
Convertible Meat Drawer
The convertible meat drawer has its own
cold air duct to allow a stream of cold air
from the freezer compartment to flow to
the drawer.
Thevariabletemperaturecontrol_gulates
the air flow from the Climate Keeper.
Set the control to the coldestsettingtostore
fresh meats. If the control is left in the meat
position fora long period of dine, some
frost may form at the backof the drawer.
Set the control to goldto convert the drawer
to normal retkigemtor temperature and
provide extra vegetable storage space. The
cold air duct is turned off. Variable settings
between these extremes can be selected.
Aboutstoragedrawerremoval
Not all features are on all models.
Drawer Removal
Drawers can easily be removed by pulling
the drawer straight out and lifting the
drawer up and over the stop location.
If the door prevents you from taking out
the drawers, first try to remove the door
bins. If this does not offer enough
clearance, the refrigerator will need to
be rolled forward until the door opens
enough to slide the drawers out. In some
cases, when you roll the refrigerator out,
you will need to move the refrigerator
to the left or right as you roll it ouL
12
About the automaticicemaker. .. . EAmia.ce.co
A newly-installed refrigerator may take 12 to 24 hours to begin making ice.
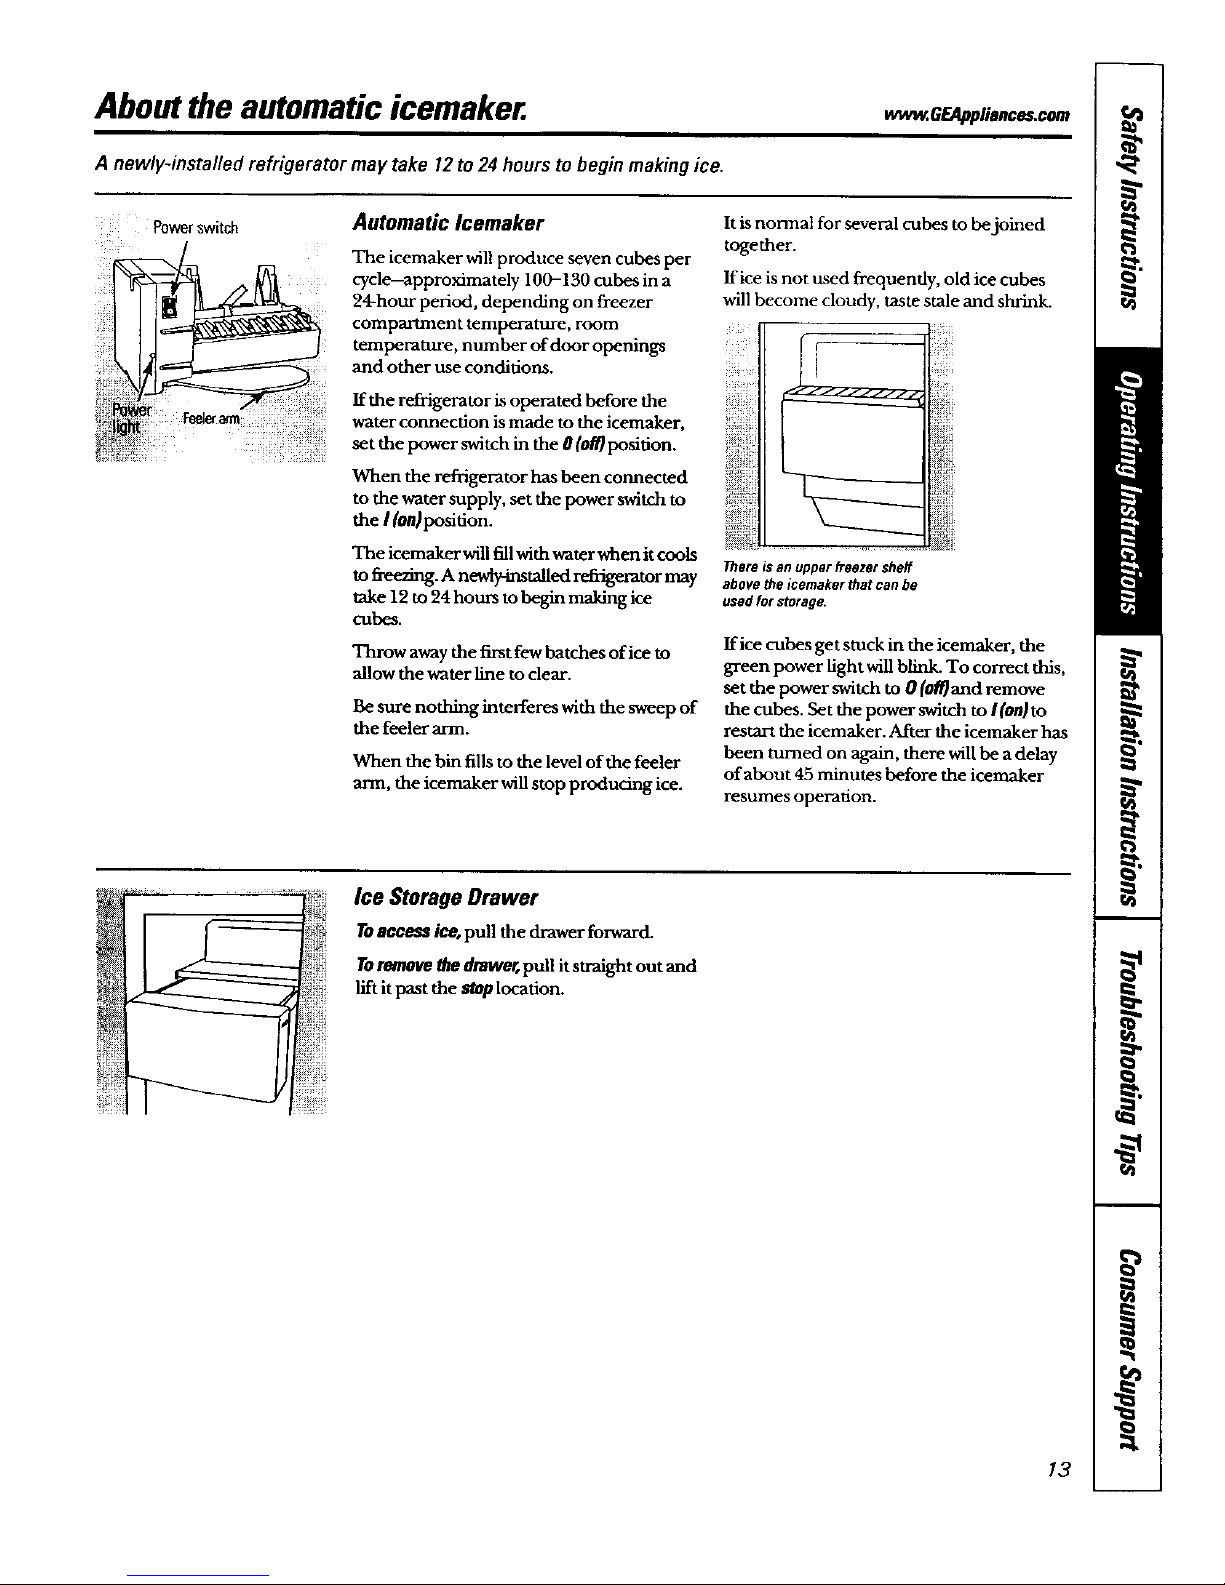
Powerswitch Automatic Icemaker It isnomlat for several cubes to bejoined
together.
The icemaker will produce seven cubes per
cycle-approximately 100-130 cubes in a
24-hour period, depending on freezer
compartment temperature, room
temperature, number of door openings
and other use conditions.
I£ the refrigerator is opei_ted before the ill I
_'m:i water connection is made m the icemaker,
set the power switch in the O(off)position .....
When the refrigerator has been connected
to the water supply, set the power switch to
the I (0n)position.
The icemaker will fill with water when it cools
to fi-ee_g. A newt_imtalled refrigerator may
take 12 to 24 hours to begin making ice
cubes.
Throw away the first few batches of ice to
allow the water line to clear.
Be sure nothing interferes with the sweep of
the feeler arm.
When the bin fills to the level of the feeler
arm, the icemaker will stop producing ice.
If ice is not used frequendy, old ice cubes
will become cloudy, taste stale and shrink.
There is an upper freezer sheff
above the icemaker that can be
used for storage.
If ice cubes get stuck in the icemaker, the
green power light will brink. To correct this,
set the power switch to 0 {otOand remove
the cubes. Set the power switch to I (on)to
restart the icemaker. After the icemaker has
been turned on again, there will be a delay
of about 45 minutes before the icemaker
resumes operation.
Ice Storage Drawer
Toaccessice, pull the drawer forward.
TOremove the drawer, pull it straight out and
lift it past the stop location.
13
 Loading...