

GE PNRQ15FBL00, PNRQ20FBB00, PNRQ20FBL00, PNRQ20FWW00, PXRQ15F00 Installation Guide
INSTALLATION INSTRUCTIONS
For use with models GXRV10, GXRM10, PNRQ15, PNRQ20,
PNRV12 (beginning on page 1) and PNRV18 (beginning on page 4)
INSTALLATION NOTES
• Use pipe thread_ealing rope (provided) on threaded
COIlnefiliOIlS.
• Tubing may be cot 1o desired length.
• When connecting Ihe kit to a refligerator water dispenser,
a slightly lower dispenser water pressure may be noticed.
• It is normal for tile GREEN light to flash on tile faucet monitor
when tile icemaker or dispenser calls for water (on some
models).
• Before installing the icemaker ki_ install the ReverseOsmosis
Filtration System according tothe installation instructions,
This is llormal.
• Storage tank
• Tank adapter
• 6 ft. 3/8" orange robing
• 2 "lee fit/ings with
push-to-connect ends
KIT CONTENTS
• Brass tubing adapter, nut and
washer asseInhly
• 33 IL 3/8" blue robing
• Pipe lhread tape
• 1 ft. 3/8" orange robing
TOOLS AND MATERIALS REQUIRED
• Ufilily knife
• Pliers and adjuslablejaw wrench
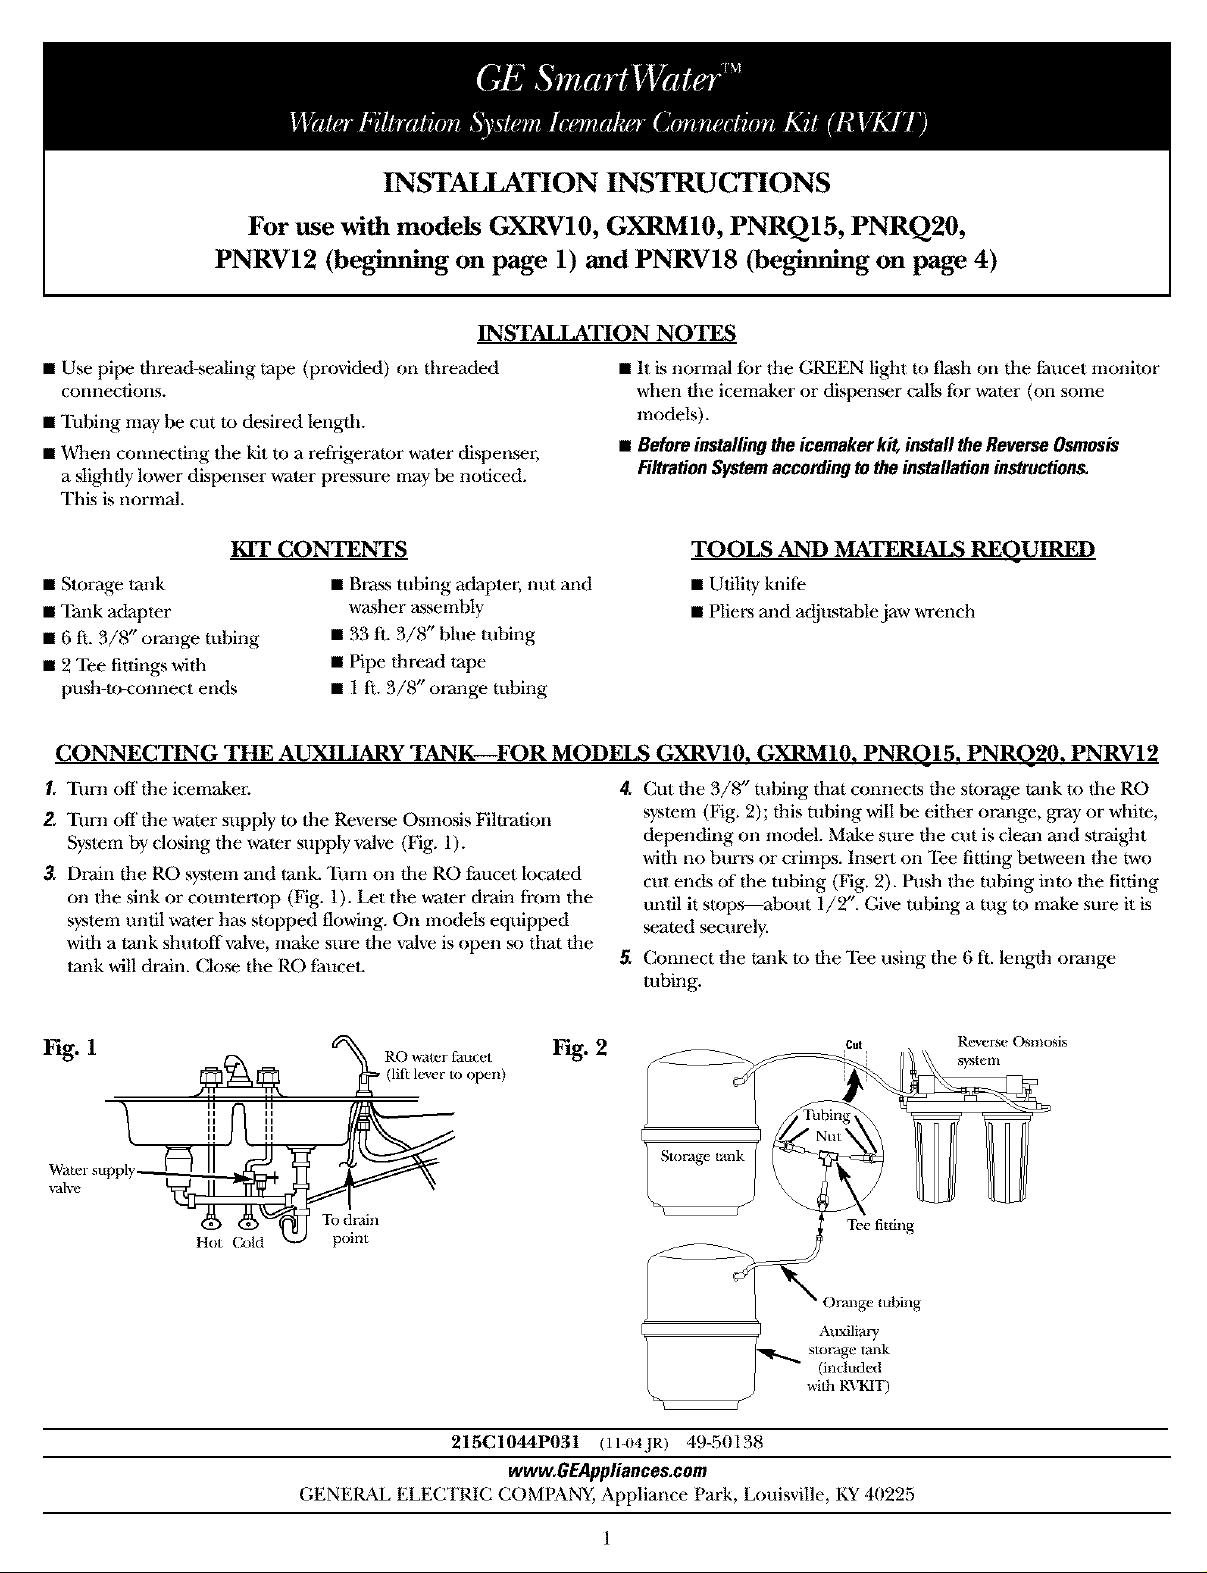
CONNECTING THE AUXILIARY TANK FOR MODELS GXRV10, GXRM10, PNRQ15, PNRQ20, PNRV12
I, Turn off file iceInaker.
2 Turn off the water supply m tile Reverse Osmosis Fihra/ion
System by closing the water supply valve (Fig. 1).
3, Dr'ain the RO system and tank. Ttlrn Oil file RO faucet located
on Ihe sink or counterlop (Fig. 1). Let tile water drain fkom tile
s_teIn until water has stopped flowing. On models equipped
wifll a tank shomffvalve, make sure tile valve is open _) that tile
tank will drain. (lose tile RO fauceL
Cut the 3/8" tubing that coIlnefils the storage tank to Ihe RO
s_teIn (Fig. 2); this robing will be either orange, gray or while,
depending on model Make sure the cot is clean and straight
widl IlO burrs or crimps. Insert on "lee titling between tile two
cut ends of tile robing (Fig. 2). Push Ihe tobing into lhe fitting
until it slops--about 1/2". Give robing a lug m Inake sure it is
seated securely.
5.
ConIlect tile tank to file Tee osiIlg file 6 ft. lengfll orange
robing.
Fig. 1 _)_ _ RO watt'r faucet
H H
H H
H H
H H
!! ,,
*_lveWatersuppl_To drain
(lift lever to open)
215C1044P031 (II-04JR) 49-50138
GENEtb\L ELECTRIC COMPANY, Appliance Park, Louisville, KY 40225
Fig. 2
Smrage tmik
www.GEAppliances.com
Reverse Osmosis
_in
Iut
Tce fitdng
Auxilim T
storagetm_k
(induded
with R'_NIT)
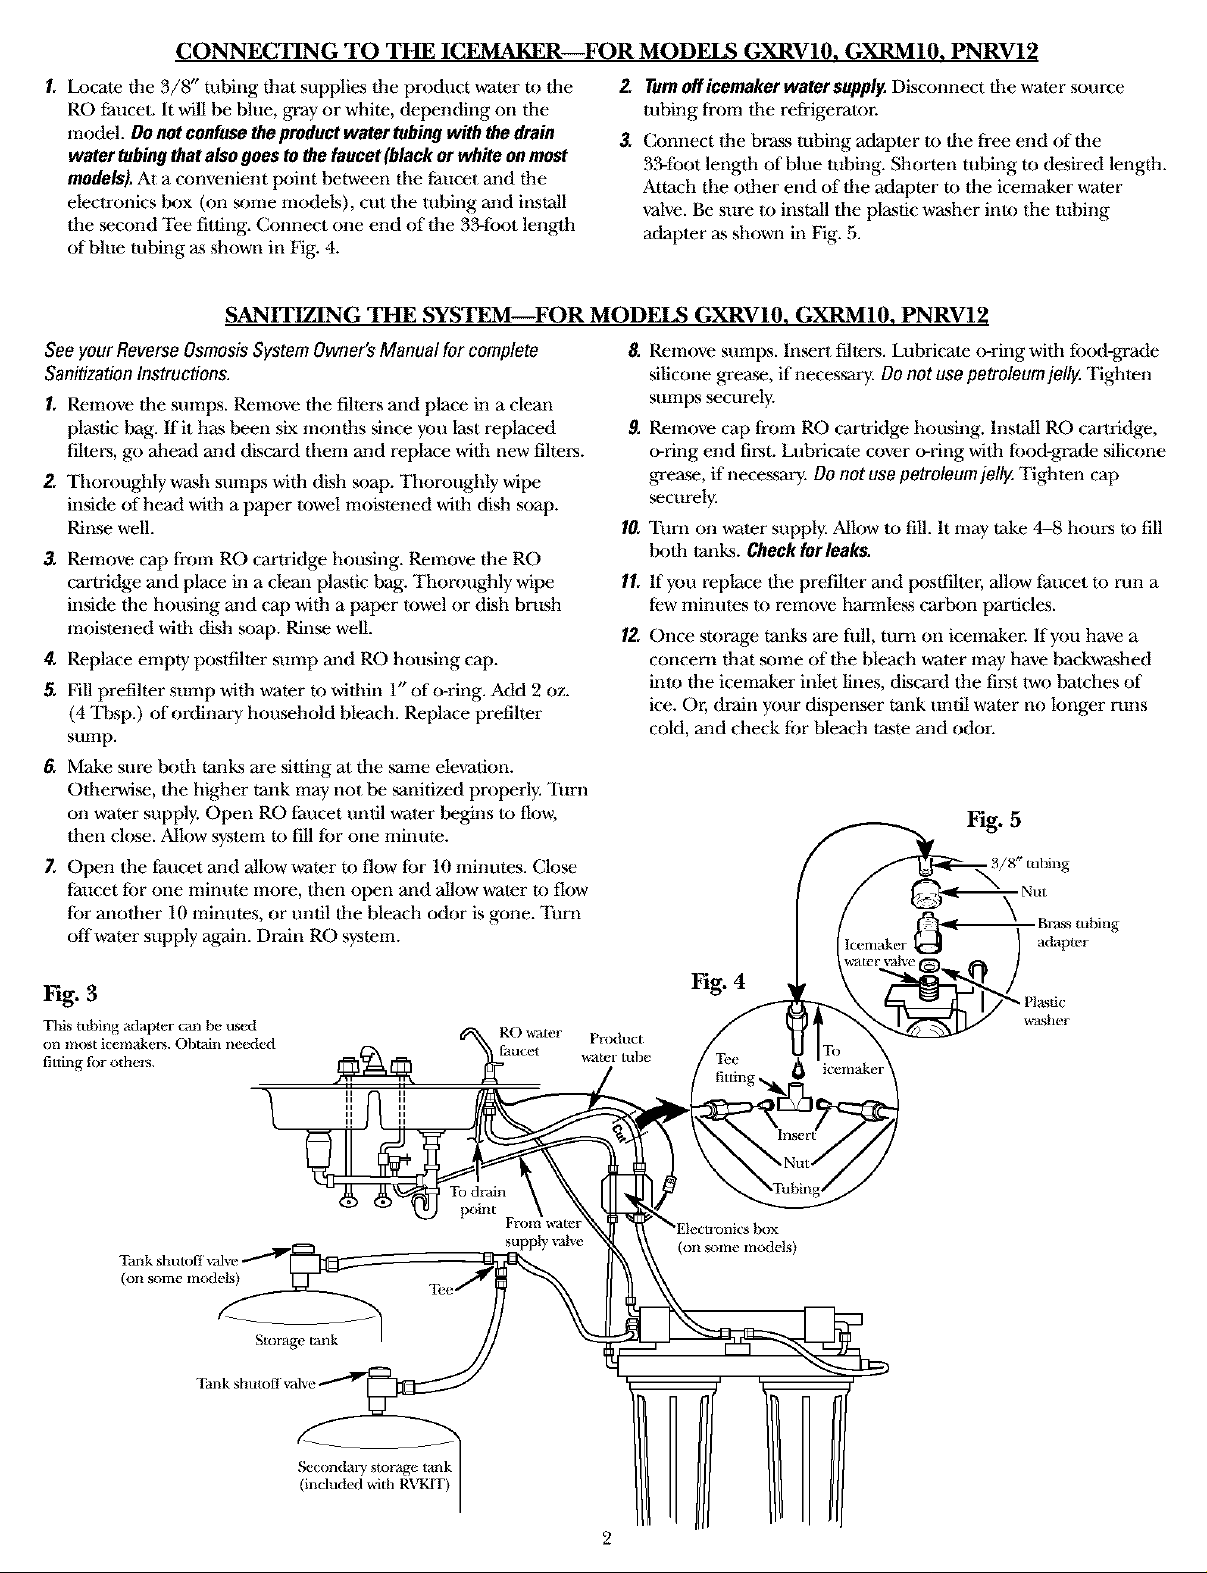
CONNECTING TO THE ICEMAKER FORMODELS GXRV10, GXRM10, PNRV12
L Locate the 3/8" robing that supplies file product water to ltle
RID fauco. It will be bhm, gray or white, depending on tile
model. DOnotconfuse the product water tubing with the drain
water tubing that also goes to the faucet (black or white onmost
models), At a convenient point between tile faucel and the
eleclronics box (oil mine models), cut tile robing and install
tile second Tee filling. Connect one end of the 33-foot lenffih
of blue robing a_sshown in Fig. 4.
2. Turoofficemakerwatersuppl_Disconnectdmwatersource
tubing from dm reffigeralor.
3. Connect lhe brass tubing adapter to tile flee end of the
3Nfoot length of bhm tubing. Shorten tubing to desired lengfll.
Attach the other end of file adapter to the icemaker water
valve. Be sure lo install tile plastic washer into tile tubing
adapter as shown in Fig. 5.
SANITIZING THE SYSTEM FOR MODELS GXRV10, GXRM10, PNRV12
See your Reverse Osmosis System Owner's Manual for complete 8, Remove sumps. Inert fillers. Lubricate o-ring with food-grade
Sanitization Instructions.
L Remove lhe sumps. ReInove the filters and place in a clean
plastic bag. flit has been six months since y_u last replaced
fillers, go ahead and discard dram and replace wilh new fillers.
2 Thoroughly wash sumps with dish soap. Thoroughly wipe
inside of head wifll a paper towel moistened wifll dish soap.
Rinse well.
3. Remove cap froIn RID cartridge housing. ReInove the RID
cartridge mid place in a cleml plastic tyag. Thoroughly wipe
inside the housing and cap with a gaper towel or dish brash
moistened wiflldish map. Rin_ well.
4, Replace empty poslfilter suInp and RO housing cap.
5, Fill prefilter sunlp with water to wilhfil 1ppof o-ring. Add 2 oz.
(4 Tbsp.) of ordinary household bleach. Replace prefilter
sump.
6. Make sure t_th tanks are sitting al tile _me elevation.
Olherwi_, Ihe higher tank may not be _nitized properly. Turn
oil water supply. Open RO faucet until water begins m flow,
then close. Allow system to fill fbr one minute.
Z Open Ihe faucet and allow water to flow for 10 minutes. Clo_
f_tucet fi)r one minute more, Ihen open mid allow water lo flow
for anolher 10 minutes, or until tile bleach odor is gone. "Ibm
offwater supply again. Drain RO system.
silicone g-tease, if necessa_. DOnot use petroleum jellg Tighten
sumps securely.
9.
Remove cap from RO cartridge housing, lnslall RID carlridge,
o-ring end first. Lubricate cover o-ring wilh fbod%rrade silicone
grease, if necessary. DO not use petroleum ]ellg Tighten cap
securely.
10.
TurIl oil water supply. Allow m fill. It may lake 4-8 hours m fill
boil, ranks. Check forleaks,
11.
If y_u replace die prefiher and postfiher, allow faucet m run a
few lninules |O reInove harmless carbon panicles.
12.
Once storage tanks are filll, turn Oil icemaker, lfyou have a
concern that some oflhe bleach water may have badkwashed
inlo the iceInaker iIflet lines, discard Ihe first two balches of
ice. Or, dr'din your dispenser tank until water IlO longer runs
cold, and check for bleach taste and odor.
Br,tss robing
adap_r
Hg. 3
This tubing adapter can be nsed
On ill(k_t icvmakcrs. Obtain iwed¢.d
tilting for otheix.
(on some medals)
Storage rank
Secondal'y storage tank
(included w5th R'_]glT)
4
Plastic
Product
_atcr tubv
Tee
titting ,,_1
To drain
point
supply _-alve
J
w&she r
 Loading...