

GE PHS925ST2SS, PHS925ST1SS, PHB915SD1SS Owner’s Manual

0
og
4.z
¢2
i
i
C2.
0
GEAppliances.corn
Safety Instructions ............................ 2-5
Operating Instructions
Kitchen Timer .......................................... 11
Oven ............................................... 10-27
Adjust Oven Thermostat .............................. 15
Baking or Roasting .................................... 15
Broiling, Broiling Guide ................................ 14
Controls ............................................... 10
Convection Oven ................................. 16, 17
Preheating and Pan Placement ....................... 13
|
Probe ................................................. 18
Sabbath Feature ...................................... 27
Self-Cleaning ...................................... 22, 23
Slow Cookand Warming Features ....................... 20
Special Features .................................. 25, 26
Steam Clean .......................................... 24
Timed Baking and Roasting ........................... 19
Warming Drawer ..................................... 21
Surface Units......................................... 6-9
Cookware .............................................. 9
Glass Cooktop ......................................... 8
Warming Zone ......................................... 7
Care and Cleaning
Aluminum Foil..................................... 3, S, 15
Control Panel ......................................... 28
Glass Cooktop ..................................... 33, 54
Lift-Off Oven Door..................................... 50
Light ................................................... 29
Oven Floor ............................................. 32
Oven Heating Elements ................................ 32
Racks ................................................. 31
RemovableWarming Drawer/Drawer Pan................ 32
Storage Drawer ....................................... 32
Surfaces .............................................. 28
Vent ................................................... 32
Next Step Control
EspaBol
ForaSpanishversion of this manual, visit
our Website at GEAppliances.com.
Paraconsultar una version en espaflol
de este manual de instrucciones, visite
nuestro sitio de internet
GEAppliances.com.
In Canada:
www.GEAppliances.ca
Printed in the United States
Troubleshooting Tips .......................... 35-39
Accessories ........................................ 41
Consumer Support
Consumer Support ........................... Back Cover
Warranty .............................................. 45
Write the model and serial
numbers here:
Model #
Serial #
You can find them on a label
behind the drawer or behind the
lower oven door on the front of
the range frame.
49-80665-110-12GE
Printe( on
Recycled Paper

IMPORTANT SAFETY INFORMATION.
READ ALL INSTRUCTIONS BEFORE USING.
[A WARNING ]
Read all safety instructions before using the product. Failure to follow these instructions may result in fire, electric shock,
serious injury or death.
ANTI-TIP DEVICE
To reduce the risk of tipping the
range, the range must be secured
_p-Over Hazard
A child or adult can tip the range and be killed.
Verify the anti-tip bracket has been properly installed
and engaged.
Ensure the anti-tip bracket is re-engaged when the range
is moved.
Do not operate the range without the anti-tip bracket in
place and engaged.
Failure to follow these instructions can result in death or
serious burns to children or adults.
in the bracket. On some models, the storage drawer or kick panel can be
AntPTip_ I !' _ I removed for easy inspection. Ifvisual inspection is not possible, slide the
Bracket -_-- ; !
i i range forward, confirm the anti-tip bracket is securely attached to the floor
.J---...,_,I or wall, and slide the range back so the rear leveling leg is under the anti-tip
by a properly installed anti-tip
bracket. See installation instructions
shipped with the bracket for
complete details before attempting
to install.
For Freestanding and Slide-in
Ranges
To check if the bracket is installed
and engaged properly, look
underneath the range to see that
the rear leveling leg is engaged
__// If the range is pulled from the wall for any reason, always repeat this
Leveling Leg _ _ procedure to verify the range is properly secured by the anti-tip bracket.
Freestanding and Slide-In Ranges Never completely remove the leveling legs or the range will not be secured
to the anti-tip device properly.
Countertop or
WoodBlock TOcheck if the bracket is installed and engaged properly, slide the range
Anti-T-- For installation instructions of the bracket, visit GEAppliances.com (in
Bracket Canada, GEAppliances.ca).
Oven
Drop-In Ranges
For Drop-In Ranges
forward, confirm the anti-tip bracket issecurely attached to the rear of the
range, and slide the range back so that the anti-tip bracket slides just under
the countertop or wood block attached to the rear wall.
If you did not receive an anti-tip bracket with your purchase, call
1.800.626.8774 to receive one at no cost (in Canada, call 1.800.561.3344).
iAWARNINOjIMPOnTANTSAFmYNOTICE
TheCaliforniaSafe Drinking Water and ToxicEnforcementAct requiresthe Governorof Californiato publish a list of substances
known to thestate to causecancer,birth defectsor other reproductive harm, and requires businessesto warn customers ofpotential
exposure tosuchsubstances.
Thefiberglassinsulation in self-cleanovens givesoff a verysmallamount of carbon monoxide during the cleaning cycle.Exposurecan
be minimized by venting with anopenwindow or usinga ventilation fan or hood.

GEAppliances.com
jA WARNING j GENERAL SAFETYINSTRUCTIONS
Foryour safety, the information in this manual must be followed to minimize the risk of fire, explosion, electric shock, or to
prevent property damage, personal injury, or loss of life.
This unit has been tested and found to comply with the limits for a class B digital device, pursuant to Part 18 of the
FCC rules. These limits are designed to provide reasonable protection against harmful interference in a residential
installation. This unit generates, uses and can radiate radio frequency energy and, if not installed and used in
accordance with the instructions, may cause harmful interference to radio communications. However, there is no
guarantee that interference will not occur in a particular installation. If this unit does cause harmful interference to
radio or television reception, which can be determined by turning the unit off and on, the user is encouraged to try
to correct the interference by one or more of the following measures:
o Reorient or relocate the receiving antennae.
o Increase the distance between the unit and receiver.
• Connect the unit into an outlet or a circuit different from that to which the receiver is connected.
CAUTION!
Persons with a pacemaker or similar medical device should exercise caution when using or standing near an
induction unit while it is in operation. The electromagnetic field may affect the working of the pacemaker or similar
medical device. It is advisable to consult your doctor or the pacemaker manufacturer about your particular situation.
Usethis appliancefor its intendedpurposeasdescribedinthis
Owner'sManual.
Besureyour applianceis properlyinstalledandgroundedbya
qualifiedinstallerinaccordancewith theprovidedinstallation
instructions.
Donot attempt to repairor replaceany partofyour range unless
it is specificallyrecommendedin this manual.Allother servicing
shouldbetransferredto a qualifiedtechnician.
Beforeperformingany service,unplugtherange or disconnect
the power supplyatthe householddistributionpanelby removing
thefuseorswitchingoff the circuitbreaker.
Donot leavechildrenalone-children shouldnot beleft alone
or unattended inan area whereanapplianceis in use.They
shouldneverbe allowedto climb,sitor stand on any part of the
appliance.
A CAUTION:Donotstoreitemsofinteresttochildren
abovearangeoronthe backguardof a range-children climbing
on the rangeto reachitemscouldbeseriouslyinjured.
Useonlydry pot holders-moist ordamp pot holderson hot
surfacesmay resultin burnsfrom steam.Donotlet pot holders
touch hot surface unitsor heatingelements.Donot useatowel
or other bulkyclothinplaceof pot holders.
Neveruseyourappliancefor warming or heatingthe room.
Donottouch the surfaceunits,the heatingelementsor the
interiorsurfaceof the oven.Thesesurfacesmay be hotenough
to burn eventhough they aredark in color.Duringand after use,
do not touch,or let clothingor otherflammable materialscontact
thesurfaceunits,areasnearbythe surface unitsor any interior
area ofthe oven;allowsufficienttime forcoolingfirst.Other
surfacesof the appliancemaybecomehot enoughto cause
burns.Potentiallyhot surfacesincludethe cooktop,areasfacing
thecooktop,oven vent opening,surfacesnearthe openingand
crevicesaround theovendoor.
Donot heatunopenedfood containers.Pressurecouldbuildup
and thecontainercouldburst,causingan injury.
Donot usealuminum foil to linethe drip pansor anywhere inthe
oven,exceptasdescribedin this manual.Misusecouldresultin
damageto the rangeandshockor fire hazard.
Avoidscratchingor impactingglassdoors,cooktopsorcontrol
panels.Doingso may leadto glassbreakage.Donot cookon a
product with brokenglass.Shock,fireor cuts mayoccur.
Cookmeatand pou!trythoroughly-meat to at leastan internal
temperatureof 160 Fandpoultryto at leastan internal
temperatureof 180°F.Cookingto thesetemperaturesusually
protectsagainst foodborneillness.
[A WARNING j KEEPFLAMMABLE MATERIALSAWAY FROM THERANGE.
Donotstoreor useflammable materialsinanovenor near
the cooktop,includingpaper,plastic,potholders,linens,wall
coverings,curtains,drapesandgasolineor otherflammable
vaporsand liquids.
Neverwear loose-fittingor hanginggarmentswhile using
the appliance.Thesegarments may igniteifthey contact hot
surfaces,causingsevereburns.
Donotletcookinggreaseor otherflammablematerials
accumulate in or nearthe range.Greaseinthe ovenoronthe
cooktopmay ignite.
_,Cleanventilatinghoodsfrequently.Greaseshouldnot be allowed
to accumulate onthe hood or filter.
3

IMPORTANT SAFETY INFORMATION.
READ ALL INSTRUCTIONS BEFORE USING.
JA J
In WARNING 1IN THEEVENTOFA FIRE,TAKETHEFOLLOWINGSTEPS
TOPREVENTTHE FIREFROM SPREADING:
, Do not usewater on grease fires. Never pick up a flaming
pan. Turn the controls off. Smother a flaming pan on a
surface unit by covering the pan completely with a well-
fitting lid,cookie sheet or flat tray. Use a multi-purpose dry
chemical or foam-type fire extinguisher.
, If there isa fire in the oven during baking, smother the
fire by closing the oven door and turning the oven off or
by using a multi-purpose dry chemical or foam-type fire
extinguisher.
, If there isa fire in the oven during self-clean, turn the oven
off and wait for the fire to go out. Do not force the door
og.p__.Introduction of flesh air at self-clean temperatures
may lead to a burst of flame from the oven. Failure to
follow this instruction may result in severe burns.
iA WARNING j COOKTOPSAFETYINSTRUCTIONS
Never leave the surface units unattended at medium or
high heat settings. Boilovers cause smoking and greasy
spillovers that may catch on fire.
Never leave oil unattended while frying. If allowed to
heat beyond its smoking point, oil may ignite, resulting
in fire that may spread to surrounding cabinets. Use a
deep fat thermometer whenever possible to monitor oil
temperature.
To avoid oil spillover and fire, use a minimum amount of
oil when shallow pan-frying and avoid cooking frozen
foods with excessive amounts of ice.
Only certain types of glass,glass/ceramic, earthenware
or other glazedcontainers are suitable for cooktop
service;othersmay break because of the sudden
change in temperature.
To minimizethe possibilityof burns,ignition of
flammable materials and spillage,the handle of a
container should beturned toward the center of the
range without extending over nearby surface units.
When preparing flaming foods under a hood, turn the
fan on.
[A WARNING JGLASS COOKTOP SAFETYINSTRUCTIONS
(some models)
Use care when touching the cooktop. The glass surface
of the cooktop will retain heat after the controls have
been turned off.
Do not cook on a broken cooktop. If glass cooktop
should break, cleaning solutions and spillovers
may penetrate the broken cooktop and create a
risk of electric shock. Contact a qualified technician
immediately.
Avoid scratching the glass cooktop. The cooktop can be
scratched with items such as knives, sharp instruments,
rings or other jewelry and rivets on clothing.
iiiiiiiiiiii_i;i
UseCERAHABRYTE®ceramic CooktopCleanerand
CERAHABRYTE®Cleaning Padtoclean the cooktop.
Wait until the cooktop cools and the indicator light
goes out before cleaning.Awet sponge or cloth on a
hot surface can cause steam burns.Somecleaners
can produce noxiousfumes ifapplied to a hot surface.
NOTE:Sugarspillsare an exception.They should be
scraped off while still hotusing an oven mitt and a
scraper.Seethe Cleaningthe glasscooktop section for
detailed instructions.
Read and follow all instructions and warnings on the
cleaning cream label.

[A WARNING [OVEN SAFETYINSTRUCTIONS
GEAppliances.com
Stand away from the range when opening the oven
door. Hot air or steam which escapes can cause burns
to hands, face and/or eyes.
Keep the oven vent unobstructed.
Keep the oven free from grease buildup. Grease in the
oven may ignite.
Place oven racks in desired location while oven is cool.
If rack must be moved while oven is hot, do not let pot
holder contact hot heating element in oven.
When using cooking or roasting bags in the oven,
follow the manufacturer's directions.
[,&WARNING
(Some models)
The self-cleaning feature operates the oven at temperatures high enough to burn away food soils in the oven.
Follow these instructions for safe operation.
Before operating the self-clean cycle, remove pans,
shiny metal oven racks and other utensils from the
oven. Only gray or black porcelain-coated oven racks
and drip pans may be left in the oven. Do not use
self-clean to clean other parts, such as shiny drip pans
or bowls.
Before operating the self-clean cycle, wipe grease and
food soilsfrom the oven. Excessive amount of grease
may ignite, leading to smoke damage to your home.
] SELF-CLEANING OVEN SAFETYINSTRUCTIONS
Pull the oven rack to the stop-lock position when
loading and unloading food from the oven. This helps
prevent burns from touching hot surfaces of the door
and oven walls.
Do not leave items such as paper, cooking utensils or
food in the oven when not in use. Items stored in an
oven can ignite.
Do not use aluminum foil to line the oven bottom. Foil
may trap or reflect heat, leading to a shock or fire
hazard.
If the self-cleaning mode malfunctions, turn the oven
off and disconnect the power supply. Have it serviced
by a qualified technician.
Do not clean the door gasket. The door gasket is
essential for a good seal. Care should be taken not to
rub, damage or move the gasket.
Do not use oven cleaners. No commercial oven cleaner
or oven liner protective coating of any kind should be
used in or around any part of the oven.
WARNING JWARIVllNGDRAWER/LOWEROVENDRAWERSAFETY
INSTRUCTIONS(somemode sl
The purpose of the warming drawer isto hold hot
cooked foods at serving temperature. Bacteria will grow
in food while it is below 140°F. Do not put cold food
in warming drawer. Do not heat food for more than 2
hours. Failure to follow these instructions may result in
foodborne illness.
Do not leave paper products, plastics, canned food or
combustible materials in the drawer. They may ignite.
Do not touch the heating element or the interior surface
of the drawer. These surfaces may be hot enough to
cause burns.
Usecare when opening the drawer. Open the drawer a
crack and let hot air or steam escape before removing or
replacing food. Hot air or steam that escapes can cause
burns to hands, face and/or eyes.
Do not use aluminum foil to line the lower drawer. The
foil will trap heat below, and upset the performance
of the oven. Foil can melt and permanently damage
the drawer bottom. Damage from improper use of
aluminum foil is not covered by the product warranty.

Using the surface units,
How Induction Surface Cooking Works
Induction coils under the glass cooking surface produce
a magnetic field that generates heat in ferrous metals
that are in close proximity. The glass cooking surface is
not heated directly since it is not a ferrous metal, but the
glass may eventually become hot from the pan. Induction
surface coils are more efficient and will heat much faster
than conventional electric and gas cooking surface cooking
products.
CAUTION:
. The induction cooking elements may appear to be coolwhile
turned ONand after they have been turned OFF.Theglass
surface may be HOTfrom residualheat transferredfrom the
cookwareandburnsmay occur.
. DONOTTOUCHHOTCOOKWAREor PANSdirectly with hands.
Always use mitts or pot holdersto protect hands from burns.
. DONOTSLIDEcookware acrossthe cooktop surface. Doing
somay permanently damage the appearance of the ceramic
cooktop.
[A WARNING i IRE HAZARD: Never leave the range unattended with the cooktop on medium or highsettings. Keep flammable items away from the cooktop. Turn off all controls when
done cooking. Failure to follow these instructions can result in fire, serious injury or
death.
Throughout this manual, features and appearance may vary from your model.
Surface Unit Cook Settings
The cooktop offers !9 power levels.Power
levelsrange from LOto HI in precise half-step
increments. For example: L, 1,11/2,2, 21/2and
upto H.
Power Level"L",the lowest setting, is
Thepower levelwith a fraction
indicatesthe additional
half-step setting. Youmay
hear clicking sounds indicating
the control ismaintainingyour
desiredsetting.
recommended for "KeepWarm."
Thepower levelincreasesone-half level with
each touch.
Single Surface Unit--Cook Settings
To turn one single surface unit:
[] Touch the ON/OFFpad; then touch the
(+1/(-1pad.
[] Usethe (+)/10pad to choose the desired
power setting.
r3] Toturn off a single surface unit, touch the
ON/OFFpad again.
To usethe Melt feeture:
Touch the ON/OFFpad;then touch MELT.
The element will automatically setto a
predetermined setting.
To usethe Power Boil feature:
Touch the ON/OFFpad;then touch Power
Boil.Theelement will automatically set to a
predetermined setting.
To use the Simmer feature:
Touch the ON/OFF pad; then touch SIMMER.
Theelement will automatically set to a
predetermined setting. Adjust using the (+)/(-)
pad to increase or decrease the simmer rate.

SELECT
Using the Warming Zone
The WARMING ZONEis located in the back
center of the glass surface.
To use the WARMING ZONE:
[-_ Touch the WARMING ZONE ON/OFF pad.
[27 To select the desired control setting, touch
the SELECT pad once for low (L),twice for
medium (M)or three times for high (HI.
To turn off the WARMING ZONE:
GEAppliances.com
For best results, all foods on the WARHING
ZONEshould be covered with a lid or aluminum
foil.
Always use pot holders or oven mitts when
removing food from the WARMINGZONE,as
cookware will behot.
, Donot use plastic wrap to cover food. Plastic
may melt onto the surface and be very
difficult to clean.
Touch the WARNING ZONE ON/OFF pad.
IAWARNING FOOD POISON HAZARD: Bacteria may grow in food at temperatures below 140°F.
Alwuys sturt with hot food. Do not use wurm settings to heut cold food.
Do not wurm food for more then 2 hours.
Fuilure to follow these instructions muy result in foodborne illness.
. Useonly cookware recommended for top-of-
range cooking.

Using the surface units.
For Models With a Glass Cooktop
Theglasscooktop features heating units
beneath a smooth glass surface.
NOTE:Aslight odor is normal when a new
cooktop is usedfor the first time. It iscaused
bythe heating of new parts and insulating
XJever COOK 3irect, )n _ne gloss
Alwa_ s use COOKwore.
Always place the pan in the center of
the surface unit you are cooking on.
materials and will disappear in a short time.
Thesurface unit may cycle on and off to
maintain your selectedcontrol setting.
It issafeto place hot cookware on the glass
surface even when the cooktop is cool.
Avoid placing anything on the surface unit until
it has cooledcompletely.
Water stains (mineraldeposits)are
removable using the cleaning cream or full-
strength white vinegar.
Useof window cleaner may leave an
iridescentfilm on the cooktop. The cleaning
cream will remove this film.
What Type of Pans Are Required?
Do not slide cookware across the cooktop because
it can scratch the glass-the glassis scratch-resistant,
not scratchproof.
Don't store heavy items above the cooktop.
Ifthey drop onto the cooktop, they can
cause damage.
Donot usethe surface as a cutting board.
Use flat-bottomed pans.
Use a griddle.
i_111%x_i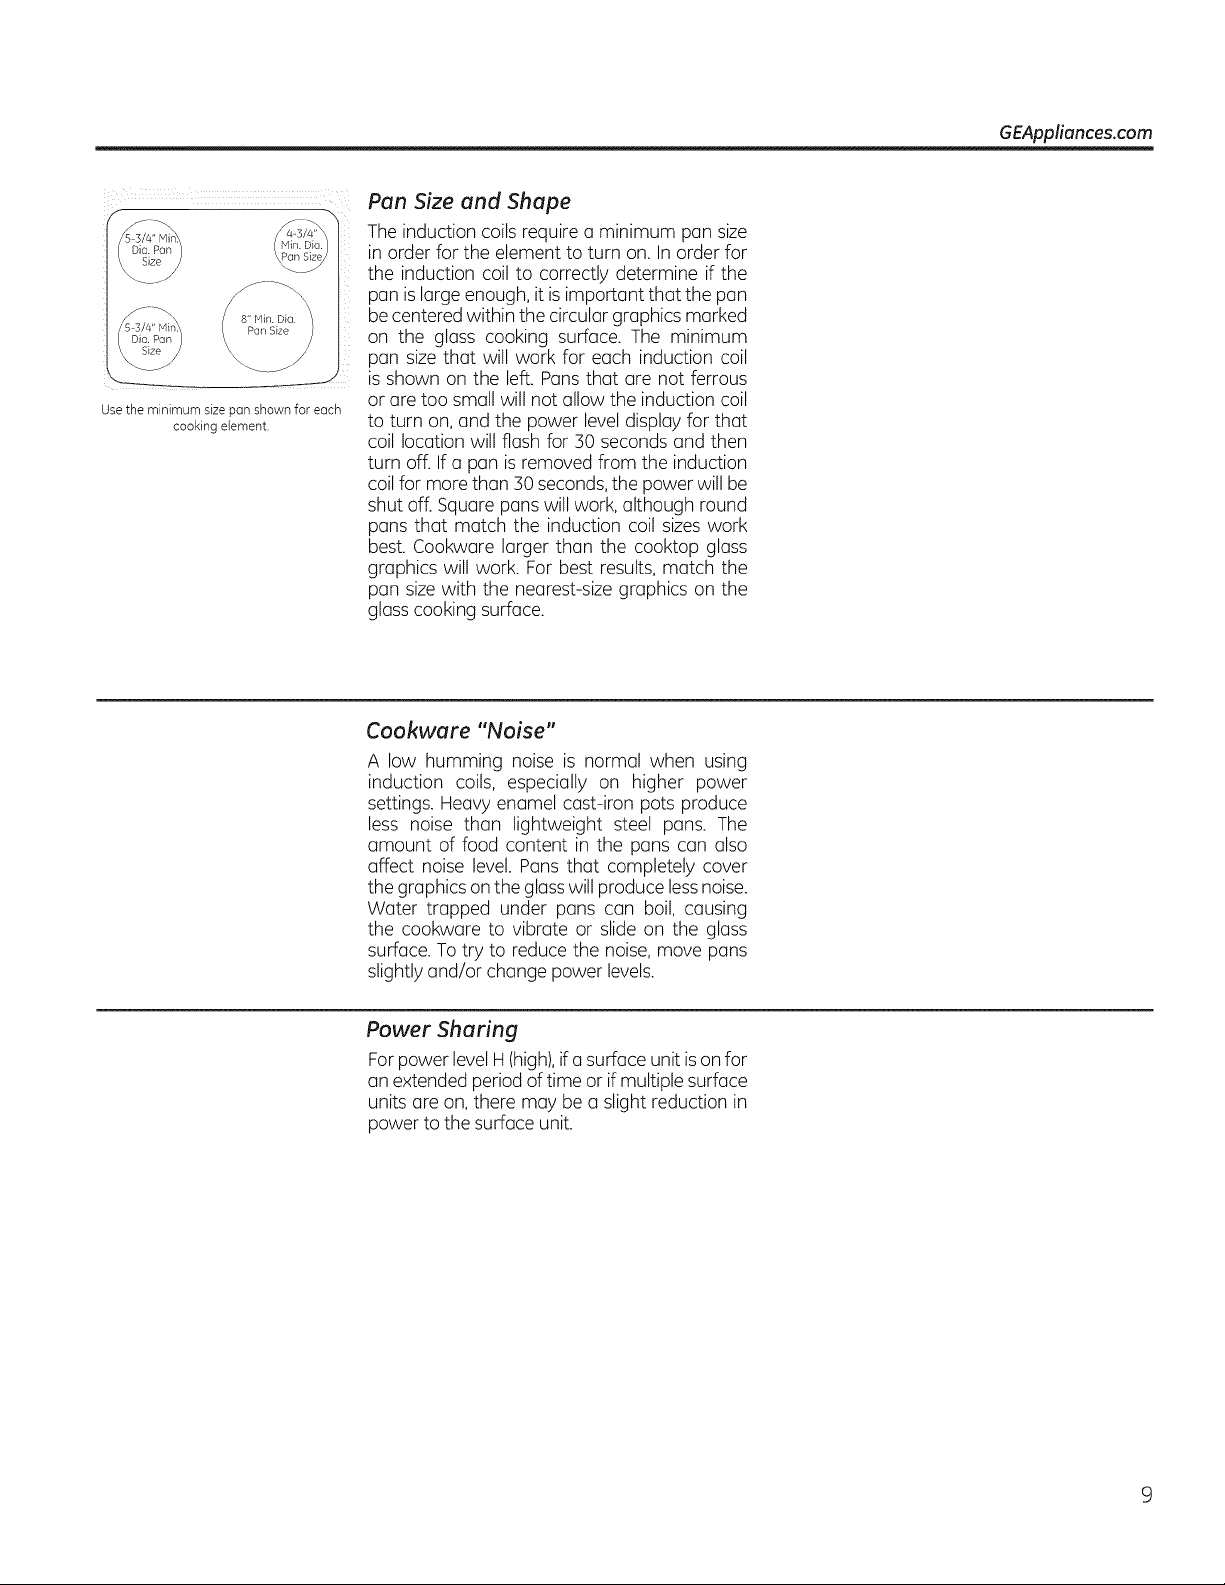
Use the minimum size pun shown for each
cooking element
GEAppliances.com
Pan Size and Shape
The induction coils require a minimum pan size
in order for the element to turn on. In order for
the induction coil to correctly determine if the
pan islargeenough, it isimportant that the pan
be centered within the circular graphics marked
on the gloss cooking surface. The minimum
pan size that will work for each induction coil
is shown on the left. Pansthat are not ferrous
or are too small will not allow the induction coil
to turn on, and the power leveldisplay for that
coil location will flash for 30 seconds and then
turn off. If a pan is removed from the induction
coilfor morethon 30 seconds,the power will be
shut off.Square pans will work, although round
pans that motch the induction coil sizes work
best. Cookwore larger than the cooktop gloss
graphics will work. For best results,match the
pan sizewith the nearest-size graphics on the
glosscooking surface.
Cookware "Noise"
A low humming noise is normal when using
induction coils, especially on higher power
settings. Heavy enamel cost-iron pots produce
less noise than lightweight steel pans. The
amount of food content in the pans can also
affect noise level. Pans that completely cover
the graphics onthe glosswill produce lessnoise.
Water trapped under pans con boil, cousing
the cookware to vibrote or slide on the gloss
surface. Totry to reduce the noise, move pans
slightlyand/or change power levels.
Power Sharing
Forpower levelH(high),if a surface unit is on for
an extended period of time or if multiplesurface
units are on,there may be a slight reduction in
power to the surface unit.

Usingthe oven controls.
Throughout this manual, features and appearance may vary from your model
_BROILHI/LOPod __TIMERON/OFFPods
iiii ii ii!! ii!!iiiiiliii ii!! ii!!iiiiiiiii!
Touchthis pad to selectthe broilfunction. Seethe Touchto setthe kitchentimer.
How toSettheOvenfor Broilingsection. Seethe UsingtheKitchenTimersection
BAKE Pad
Touchthis pad to selectthe bakefunction.See
the How to SettheOvenforBakingsection.
............................................................to setthe amount oftime youwant your food
CONVECTIONCOOKPad
Usesafan to circulate air in theoven.Seethe
Usingtheconvectionovensection.
WARM Pad
Touchto keepcookedfoods warm.
Seethe How to Setthe Ovenfor Warmingsection.
SLOW COOK Pad
Touchfor long hoursof unattended cooking.
Seethe How to Setthe Ovenfor SlowCook
section.
PROBEPad
Touchwhen usingthe probeto automatically
cook to a desired internalfood temperature.
Seethe UsingtheProbesection.
SELFCLEAN Pad
iiiiiiii_!i!i!i!il
Touchto self-cleanthe oven.
Seethe UsingtheSelf-CleaningOvensection.
STEAM CLEANPad
Touchthis pad for easiercleaning of light soiling
off the oven cavity or door..Seethe Usingsteam
cleansection.
CLEAR/OFFPad
WARMmNG
I DRAWER I
ON/O_FJ
Touchto cancelALL ovenoperationsexceptthe
clockandtimer.
COOKTIME TIMEPad
Touchthis pad and then touch the number pads
to cook.Theovenwill shut offwhen the cooking
time has run out.
DELAYSTARTPad
Touchthis pad to setthe ovento start
automatically at a time you set.
CLOCKPad
NOTE:Whensettingtimes,you aresettinghours
and minutesonly.Thelowesttimeyou cansetis
oneminute.
Theclock must be setto the correct time of day
for the automatic oventimingfunctionsto work
properly.Thetimeof daycannot be changed
during a timed bakingorself-cleaningcycle.
See Toset the clock section.
Ifyour oven was set for a timed oven operation
and a power outage occurred, the clockand all
programmed functions must bereset.Thetime
of day will flash in the display when there has
been a power outage.
WARMING DRAWER pod
Thewarming drawer will keep hot, cooked
foods at servingtemperature. Always start with
hot food. Seethe Usingthe warming drawer
section.
10
STARTPad
Mustbetouched to start any cookingor cleaning
function.
OVENLIGHT Pad
Touchto turn the ovenlightson or off.
CONTROLLOCKOUT
Thecontrol pads can be locked sothey cannot
be activated when touched. Seethe How to
LockOut the Controlssection.

Using the clock, kitchen timer, and control lockout. GEAppliances.com
To Set the Clock
TIMER
TIMER
ON
TheKitchenTimer isin hours and
minutes.
TheKitchenTimerdoesnot controloven
operations.Themaximum settingonthe
KitchenTimeris9 hoursand 59minutes.
OFF
Theclock must be set to the correct time of day
for the Delay Start functions to work properly.
Thetime of day cannot be changed during
a delayed cooking or a delayed self-cleaning
cycle.
Touch the CLOCKpad.
%
Touch the number pads until the correct
r21
time of day is shown in the display. Ifthe
number pads are not touched within one
minute after you touch the CLOCKpad,
the display revertsto the original setting. If
this happens,touch the CLOCKpad and
enter the time of day.
To Set the Kitchen Timer
Touch the TIMERON pad.
%
]
Touch the number pods until the amount
[]
of time you wont shows in the display.For
example,to set 2 hours and 45 minutes,
touch 2, 4 and 5 inthat order.Ifyou make
a mistake,touch the TIMEROFFpad and
begin again.
r_ Touch the STARTpad.
After touching theSTARTpod,SETdisappears;
this tellsyou the time iscounting down, although
the display does not change until oneminute
has passed.Secondswill not be shown inthe
display untilthe lost minute iscounting down.
r-_ Touch the STARTpad until the time of day
shows in the display.This enters the time
and starts the clock.
Tocheck the time of day when the display is
showing other information, touch the CLOCK
pad.Thetime of day shows until another pad
istouched. Tochange the time format orturn
off the clock display,seetheSpecialFeatures
section.
[] When the kitchentimer reaches:00,the
control will beep 3 times followed by one
beep every 6 seconds untilthe TIMEROFF
pad istouched.
The6-secondtone can be cancelled by
following the stepsinthe Specialfeaturesof
your ovencontrol section under Tonesat the
Endof o TimedCycle.
TIMER
ON
TIMER Touch the TIMEROFFpad.
OFF
i:ii_!!!!!_!_'i!!!!ii_i!i!iiii!!ili;i;iiiiiiii!!!ill¸i!!!IJilil;i;i;ilili!_i¸ii!;i;i;i;i;i;i;iiii!!i;i¸i¸i!;iiiii!!ii!i
,s,
To Reset the Kitchen Timer
If the display isstillshowing the time remaining,
you may change it by touching the TIMERON
pad,then touching the number pads sothat the
time you want appears in the display.
To Cancel the Kitchen Timer
How to Lock Out the Controls
Control Lockout will allow you to lock out the
touch pads so they cannot be activated when
touched.
Tolock/unlock the controls:
[Z] Touch and hold the Control Lockout pad
for 3 seconds. Theoven display will show
"Loc On Loc".
Tounlockthe control, touch and hold the
Control Lockout pad for 3 seconds.The
oven display will show "Loc OFFLoc".
If the remaining time isnot in the display (clock,
delay start or cooking time are inthe display),
recall the remaining time by touching the
TIMERON pad and then touch the number
pads to enter the new time you want.
When this feature ison, the touch pads will not
respond except for the Clear/Off pad.
11

Usingthe oven.
Toavoid possible burns,place the racks in the desired position before you turn on the oven.
Before you begin...
Therackshavestops,sothat when placed
correctlyonthe supports,theywill stop before
comingcompletelyout andwill nottilt.
When placing and removing cookware, pull the
rack out until it stops.
On some models,the bake heating element
isunder the oven floor. Never placecooking
utensils,baking stones, foil,or any other items
on the ovenfloor.
The number of rack positions may
vary by model.
Neverplace cooking utensils,bakingstones,
foil,or any other itemson the ovenfloor.
Toremove a rack, pull it toward you,tilt the
front end up and pull it out.
Toreplace, place the end of the rack (stop-
locks)on the support, tilt up the front and push
therackin.
[A CAUTION
BURNHAZARD:Avoid touching the hot door
surface when using the oven rack in the lowest
position.Always use 2 hands and 2 mitten pot
holders to move the rack.Pullthe rack out a
few inches and then carefully graspthe sidesof
the rack to pull it out the rest of the way.
Front
Rail
Fully Open Position "
3rasp here
Extension Rack
When placing and removing cookware,
always pull the rack out by its upper front
rail to its fully open position.
Do not extend the rack quickly. Food may
slide off the front of the rack.
To remove the rack:
[Z] Hake surethe rack is pushed all the way
_ntothe oven so that side paddles on the
rack from disengaged with oven support.
r_ Slidethe rack toward you to the bump
(stop position) on the rack support.
[] Firmlygrasp both sidesof the rack frame
and the slidingrack,tilt the front end up
and pull it out.
NOTE:When handling the extension rack, do
not allow the sliding portion to fall open. This
can damage the slides.
To replace the rack:
[Z] Firmly grasp both sidesof the rack
frame and the sliding rack.
Placethe curved end of the rack (stop-
r21
locks)onto the oven supports,tilt up the
front of the rack and push it in asfar as it
will go.
[A CAUTION
Never use the rack when its frame is not fully
inserted in the oven and locked into position.
When the rack isproperly installed and
locked into position,the locking sidepaddles
on the rack frame will click-lock into place
on the oven supports. If the side paddles
did not click-lock into position, repeat the
stepsabove and make surethe side paddles
have been correctly cleaned and lubricated.
SeeExtensionRackin the Careand cleaning
section.
12

Aluminum Foil
GEAppliances.com
/xTlZllflll_S_iflflrl[irlriil_iill_i\i\_X,
EP
%-
Rockposition for baking 4 oyer
cokes.
Do not use aluminum foil to line oven bottoms.
The foil will trap heat below and upset the
performance of the oven. Foil can melt
and permanently damage the oven bottom.
Damage from improper use of aluminum foil is
not covered by the product warranty.
Foil may be used to catch spills by placing a
sheet on a lower rack, several inches below
the food. Do not use more foil than necessary
and never entirely cover on oven rack with
aluminum foil. Keep foil at least 1-1/2" from
ovenwalls to prevent poor heat circulation.
Preheating and Pan Placement
To avoid possible burns, place the racks in the
desired position before you turn on the oven.
Preheatthe ovenifthe recipecallsfor it.Preheating
is necessaryfor good results when bakingcakes,
cookies,pastriesandbreads.
tfbakingfourcakelayersatthe sametime,placetwo
layerson rackC and two layerson rackE.Stagger
panson the rack so one is not directly abovethe
other,tfusingtheextensionrack,placeitintheCrack
position.
Angel food cake,for example, should be baked
on the lowest rack position. Follow recipe
recommendations and package directions
on prepackaged and frozen foods for pan
placement. Adjust rack position to tailor results.
For example, if you find that the surface of
cookies, muffins or cakes comes out lighter
than desired try baking on a higher rack position
next time. Pans should not touch each other
or the walls of the oven. When baking on
multiple racks, stagger the pans so one is not
directly above the other. Leave approximately
Baking results will generally be better if food
is centered in the oven as much as possible.
However, performance with certain foods may
improve if baked on an upper or lower rack
1.5" between pans and from the front, back
and sides of oven wall. See the section on
"Convection cook" mode for information about
pan placement for multi-rack baking.
position.
How to Set the Oven for Baking or Roasting
rTl TouchtheBAKEpad.
[] Touch the number pads until the desired
temperatureisdisplayed.
[] TouchtheSTARTpad.
[_ The oven will start automatically.The displaywill
show the changingtemperaturestarting at IO0°F.
(Thetemperaturedisplaywill start to changeonce
theoventemperaturereachesIO0°F.)Whentheoven
reachesthe selectedtemperature,the ovencontrol
will beepseveraltimesand thedisplaywill showthe
oventemperature.
Roasting Guide
Meots
Beef
Rib Roast (4-8 Ibs) Rare 325°F 130-140°F
Beef Tenderloin (2-6 Ibs)
Pork
Lomb
Bone-In, Boneless (3-5 Ibs)
Bone-In (5-9 Ibs)
Boneless (4-7 Ibs)
Poultry
Whole Chicken (5-7 Ibs)
Turkey, Whole, unstuffed* (10-24 Ibs)
Turkey Breast (4-6 Ibs)
*Stuffed birds generally require additional roosting time. Shieldles and breast with foilto prevent over-browning and
drying of skin. Check stuffing temperature with othermometer to ensure it has reached o minimum temperature of 160°F.
NOTE: You may hear the convection fan (on
some models) while the oven is preheating.The
fan will stop after the oven is preheated and
the display shows your set temperature. This is
normal.
To changethe oventemperatureduring the BAKE
cycle,touchtheBAKEpadandthenthenumberpads
to getthenewtemperature.
[] Checkfoodfor alonenessat the minimumtime
ontherecipe.Cooklongerifnecessary.
r_ Touch the CLEAR/OFFpad when baking is
finished,and then removethe food from the
oven.
Oven Temp Internal Temp
Medium 325°F 145-150°F
Rare
Medium
Medium
425°F
325°F
325°F
375°F
350°F
325°F
325°F
130-140°F
160°F
150°F
150°F
170°F
170-180°F
170°F
13

Usingthe oven.
Leave the door open to the broil stop
position, The door stays open by
itself,yet the proper temperature is
maintained in the oven.
ThesRe,weight,thickness,
starting temperature and
your preferenceof doneness
will affect broiling times. This
guide is based on meats at
refrigerator temperature.
t To protect against foodborne
illness, ensure that temperatures
of meat and poultry products meet
or exceed the USDA minimum
recommended temperatures for
food safety. For more information
see: www.isitdoneyet.gov or call
the USDA meat and pultry hodine
at 1-888-674-6854.
How to Set the Oven for Broiling
Youroven has two broilsettings. UseHI Broilfor
thinner cuts of meat or poultry where searing/
[] Placethe food on a broiler grid in a broiler
pan designed for broiling.
surface browning isdesired. UseLOBroilto cook
thicker cuts of meat thoroughly without over
browning them.
Adjust rack position to adjust the intensity of
heat to the food. Placingfood closer to the broil
element increasesexterior browning of the food,
but also increases spattering and the possibility
[] Followsuggested rack positions in the
Broiling Guide,
r_ Touch the BROILHI/LO pad once for HI
Broil.
Tochange to LOBroil, touch the
BROILHI/LO pad again.
of fats igniting. Thicker foods and foods that
need to be cooked through thoroughly should
be broiled on a rack position farther from the
broiler or on LObroil.
[] Touch the STARTpad.
[] When broiling is finished,touch the
CLEAR/OFFpad.
Use a pan designed for broiling. Broil pans are
designed to minimize smoking and spattering
by collecting fat and juices in the shielded lower
part of the pan.
Broiling Guide
Preheatthe broiler for2 minutes to improveperformance.
Food Doneness Thickness RackPosition* Comments
Beef Rare Steaks - E or F (foodshould be 1"
Medium Steaks - E(food should be 3"
Well Done Steaks -
Chicken
Fish Fillets D or E (food should be 3" Handle and turn very
Pork Chops Well Done D (foodshould be 6" To prevent curling of
*For double ovens,use rack position A for the smaller,2-rock-position oven. If your range
is connected to 208 volts, rare steaks may be broiled by preheating the broiler and
positioning the oven rack one position higher.
Typeor
1" thick to 3" from broil element}
3/4" to 1" thick to 4" from broil element}
3/4" to 1" thick
ior Ground Beef Patties
Breast, boneless
Breast, bone-in
1/2" to 1" thick
3/4" thick
D or E (food should be S"
to 5" from broil element}
C(food should be 8"
to 9" from broil element}
C(food should be 7"
to 8" from broil element)
to 6" from broil element/ carefully.
to 7" from broil element} meat, slash fat at 1"
Steaks lessthan 1"
thick are difficult to
cook rare. They cook
through before browning.
To prevent curling of
meat, slash fat at 1"
intervals.
Broil skin-side-down
first.
intervals.
14

Adjust the oven thermostat--Do it yourself! GEApplionces.com
You may find that your new oven cooks differently than the one it replaced. Use your new oven for a few weeks to
become more familiar with it. If you still think your new oven is too hot or too cold, you can adjust the thermostat
yourself.
Do not use thermometers, such as those found in grocery stores, to check the temperature setting of your oven. These
thermometers may give readings that vary 20-40 degrees.
NOTE:This adjustment will only affect baking and roasting temperatures; it will not affect broiling or self-cleaning
temperatures. The adjustment will be retained in memory after a power failure.
To Adjust the Thermostat
r!] Touch the BROILHI/LO and BAKEpads at
the same time until the display shows SF.
r_ Touch the BAKEpad. A number shows in
[]DDDD
[]DDDD
the display.
Double Ovens: Toadjustthe upper oven
thermostat, touch the upper oven BAKE
pad.Toadjust the lower oventhermostat,
touch the lower oven BAKEpad.
Theoventemperature can be adjusted up
@
to (+)35°F hotter or (-)35°F cooler.Touch
the number pads the same way you read
them. For example,to change the oven
temperature !5°F, touch 1 and 5.
Touch the BAKEpad, again,to alternate
between increasing and decreasing the
oven temperature.
Whenyou have made the adjustment,
%
touch the STARTpad to go back to the time
of day display.Useyour oven asyou would
normally.
The type of margarine will affect baking performance!
Most recipes for baking have been developed using high-fat products such as butter or margarine (80% fat).
Ifyou decrease the fat, the recipe may not give the same results as with a higher-fat product.
Recipe failure can result if cakes, pies, pastries, cookies or candies are made with low-fat spreads.
The lower the fat content of a spread product, the more noticeable these differences become.
Federalstandards require products labeled "margarine" to contain at least 80% fat byweight. Low-fat spreads,onthe other hand,
contain lessfat and more water. The high moisture content ofthese spreads affects the texture and flavor of baked goods. For best
resultswith your old favorite recipes, usemargarine, butter orstickspreadscontaining at least 70% vegetable oil.
15

Usinq the convection oven.
Convection Fun Operation
In a convection oven, a fun circulates hot air
over, under and around the food.
Thiscirculating hot air isevenlydistributed
throughout the oven cavity.Asa result,foods
(Ire evenlycooked and browned-often in less
time with convection heat.
Theoven has an Auto Recipe'_Conversion
Feature.Thisfeature automatically reduces the
set baking temperatures by 25° in convection
cook mode. Foods bakeinthe same amount of
time at a lower temperature setting.
Convection Cook
CONVECTION
_!i__i___!i_i_i_i!_i_i!_i_CO__OKii_I__i_i_i_i__i_(_
The convection oven comes with one
convection cook mode and can be used
for Multi-Rock Convection Baking or !-Rock
Convection Baking.
Multi-Reck Convection Baking
NOTE:Onsome models, the fan is designed
to rotate in both directions,with a pause in
between.Thisis normal.
Theconvection fan shuts off when the oven
door isopened. DONOTleavethe door open
for long periods of time while using convection
cooking or you may shorten the lifeof the
convection heating element.
i-F]_i
@
............................. " \4
Multi-rack aosition.
iii_!ii
ilT1!p-Irq FqI-q ¸
i i!i
i¸ / CLEARIi¸
OFF ! ¸¸
Because heated air is circulated evenly
throughout the oven,foods can be baked with
excellent results using multiple racks.
ivlulti-rack baking may increase cook times
slightly for some foods but the overall result
istime saved. Cookies,muffins, biscuits and
other quickbreads givevery good resultswith
multi-rack baking.
1-Reck Convection Baking
When convection baking with only I rack,place
the food so that it iscentered inthe oven.
How to Set the Oven for Convection Baking
[Z] Touch the CONVECTIONCOOKpadfor
convection cooking.
[_ Touch the number pads to set the oven
temperature.
r3] Touch the STARTpad.
NOTE:Ifthe Auto Recipe'_'Conversion Feature
ison, it will automatically reducethe set regular
baking temperature by approximately 25°F
to the appropriate convection temperature
in convection bake mode. SeeAuto RecipeM
Conversionin the SpecialFeaturessection.
Tochange the oven temperature, touch the
CONVECTIONCOOKpad and then the number
pads to set the new temperature.
When baking on :3racks,place extension rack
in the second (B)position,another rack in the
fourth (D)position and the third rack in the sixth
(F)position.
Fortwo-rack baking,placeextension rack in the
second (B)rack position.Placethe other rack in
the fifth (E)rack position.
When the oven starts to heat,the changing
temperature, starting at 100°F,will be displayed.
When the oven reachesthe temperature you
set,3 beepswill sound.
r_ Touch CLEAR/OFFpad when finished.
You will hear a fan while cooking with
convection.Thefan will stop when the door is
opened,but the heat will not turn off.
You may hear the oven clicking during
baking.This isnormal.
16

Cookware for Convection Cooking
Beforeusingyour convection oven, check to see
if your cookware leaves room for air circulation
in the oven. Ifyou are baking with several pans,
leave space between them. Also, be sure the
pans do not touch each other or the walls of the
oven.
Paper and Plastic
Heat-resistant paper and plastic containers that
are recommended for usein regular baking can
also be used for convection baking but should
not be used at temperatures higher than the
temperature recommended by the cookware
manufacturer. Plastic cookware that is heat-
resistant to temperatures of 400°F can also be
used.
GEAppliances.com
Metal and Glass
Anytype of cookware will work inyour convection
oven; however, metal pans heat the fastest and
are recommended for convection baking.
Darkened or matte-finished pans will bake
faster than shiny pans.
Glassor ceramic pans cookmore slowly.
For recipes like oven-baked chicken, use a pan
with low sides. Hot air cannot circulate well
around food in a pan with high sides.
Use pans with low or no sides when baking
in convection cook mode. Hot air cannot
circulate well around food in a pan with high
sides.When baking cookies, you will get the
best results if you use a flat cookie sheet
instead of a pan with low sides.
17

Using the probe.
For many foods, especially roasts and poultry, internal food temperature is the best test for doneness. The temperature
probe takes the guesswork out of roasting by cooking foods to the exact alonenessyou want.
NOTE:Failure to fully insert the probe into the
meat may result in poor cooking performance
because the probe will sensethe oven air vs.the
food temperature.
Never leaveyour probe inside the oven during
a self-cleaning or broil cycle.
Do not store the probe in the oven.
For roasts with no bone, insert the probe into
the thickest part of the roast. For bone-in ham
or lamb, insert the probe into the center of the
lowest large muscle.
Insertthe probe into the center of dishes such as
meat loaf or casseroles.
Insert the probe into the thickest part of the
breast of a whole turkey or chicken. Not all
locations within the meat cook at the same
rate. It is a good idea to check the temperature
at other locations with u meat thermometer
once cooking has stopped to ensure safe
temperatures have been reached in all areas
of the meat. For example, when cooking a
chicken or turkey place the probe in the breast
but also check the temperature in the leg and
thigh with u meat thermometer when the probe
temperature has been reached.
The temperature probe has a
skewer-like probe at one end and
a plug at the other end that goes
into the outlet in the oven.
[A CAUTION
To prevent burns, do not unplug the probe from
the oven outlet until the oven has cooled.
Use of probes other than the one provided with
this product may result in damage to the probe
or oven control.
Use the handles of the probe and plug when
inserting and removing them from the food and
outlet.
Pli
/
and remove label
To avoid damaging your probe, do not use
tongs to pull on the cablewhen removing it.
Toavoid breaking the probe,makesurefood is
completely defrosted before inserting.
After preparing the meat and placing it on a
trivet or a broiler pan grid,follow these directions
for proper probe placement.
Insert the probe completely into the meat. It NOTE:Self-cleanandBroilsettings will not work if
should not touch bone, fat or gristle, the temperature probe is plugged in.
IT1ITIE]I-qE]
IT1E]ITIFTIE]
IT1ra E] rqE]
DE]DE]E]
18
How to Set the Oven For Baking/Roasting
(onsomemodels)
Ell Insertthe probe fully into the food.
[] Plug the probe into the outlet in the oven.
Make sure it's pushed all the way in. Close
the ovendoor. Make surethe probe cableis
not touching the broil element.
Touch the PROBEpad. Display will show
@
"SetProbe Temp."
Touch the number pads to set the desired
%
internal food or meat temperature. The
maximum internal temperature for the food
that you can set is200°F.
[] Touch the STARTpad.
r6l Touch the BAKEor CONVECTIONpad.
r_ Touch the number pads to set the desired
oventemperature.
[] Touch the STARTpad.
The word PROBE will display if the probe is
inserted into the outlet and you have not set a
probe temperature and touched the STARTpad.
Touch the PROBE pad to recall the probe
temperature or BAKE or CONVECTION pad to
recallthe oventemperture.
When Using the Probe
For the probe temperature, after the internal
temperature of the food reaches 100°F, the
changing temperature will be shown in the
display.
[] When the internal temperature of the food
reaches the number you have set, the
probe and the oven turn off and the oven
control signals.To stop the signal,touch the
CLEAR/OFFpad. Use hot pads to remove
the probefrom the food. Donot use tongs
to pull on it-they might damage it.
If the probe is removed from the oven while
probe cooking, the oven will automatically
turn off after I minute.
Tochange theoventemperature duringthe Bake/
Roastcycle, touch the BAKE or CONVECTION
pad and then the number pads to set the new
temperature.
You can use the Kitchen Timer even though
you cannot use timed oven operations while
usingthe probe.
See Baking or Roasting section and Broiling
Guide for internal temperatures for meats and
more information on how to protect against
foodborne illness.

Using the timed baking and roasting features. GEAppliances.com
NOTE: Foods that spoil easily-such as milk, eggs, fish, stuffings, poultry and pork-should not be allowed to sit for more
than 1 hour before or after cooking. Room temperature promotes the growth of harmful bacteria.
Be sure that the oven light is off because heat from the bulb will speed harmful bacteria growth.
How to Set an Immediate Start and Automatic Stop
DDD[]D
DDD D
DDDD[]
E]DDD[]
DDD D
[]DD[]D
Theoven will turn on immediately and cook
for a selected length of time.Atthe end
of the cooking time the oven will turn off
automatically.
[Z] Touch the BAKEor CONVECTIONCOOK
pad or other desired cookingfunction.
[] Touch the number pads to set the desired
oven temperature.
r3] Touch the STARTpad.
[] Touch the COOKTIMEpad.
NOTE:Ifyour recipe requires preheating, you
may need to add additional time to the length of
the cooking time.
[] Touch the number pads to set the desired
length of cooking time. The minimum
cooking time you can set is ! minute.
The oven temperature that you set and
the cooking time that you entered willbe
in the display.
How to Set a Delayed Start and Automatic Stop
Theoven will turn on at the time of day you set,
cook for a specific length of time and then turn
off automatically.
Make surethe clock showsthe correct time of
day.
[] Touch the DELAYSTARTpad.
Touch the number pads to set the time of
day you want the oven to turn on and
start cooking.
[] Touch the STARTpad.
Touch the BAKEor CONVECTIONCOOK
pad or other desired cookingfunction.
Touch the number pads to set the desired
oven temperature.
[-_ Touch the STARTpad.
[Z] Touch the COOKTIMEpad.
NOTE:Ifyour recipe requirespreheating,you
may need to add additional time to the length
of the cooking time.
r_] Touch the number pads to set the desired
length of cooking time. Theminimum
cooking time you can set isi minute.
r6] Touch the START pad.
Theoven willturn ON,and the displaywillshow
the cookingtimecountdown and the changing
temperature starting at 100°F.(Thetemperature
displaywillstart to changeoncethe oven
temperature reaches100°F.)When the oven
reachesthe temperatureyou set,5short beeps
willsound.
Theovenwill continue to cookfor the set
amount of time, then turn off automatically.
r_ Touch the CLEAR/OFFpad to clear the
display ifnecessary.Remove the food from
the oven. Remember,eventhough the
oven turns off automatically, food left in
the oven will continue cooking after the
oven turns off.
Theoven temperature that you set and
the cooking time that you entered will be
in the display.
rg] Touch the STARTpad.
NOTE:Ifyou would liketo check the times
you have set,touch the DELAYSTARTpad to
check the start time you have set or touch the
COOKTIMEpad to checkthe length of cooking
time you have set.
When the oventurns ONatthe time of day
you set,the displaywill show the cooking time
countdown andthe changing temperature
starting at 100°F.(Thetemperature displaywill
start to change oncethe oven temperature
reaches 100°F.)When the oven reaches the
temperature you set,beepswill sound.
Theoven will continue to cook for the set
amount of time, then turn off automatically.
[] Touch the CLEAR/OFFpad to clear the
display ifnecessary.Remove the food from
the oven. Remember,eventhough the
oven turns off automatically, food left in
the oven will continue cooking after the
oven turns off.
19

Using the slow cookand warming features.
How to Set the Oven For Slow Cook
Slow Cook is designed for long hours of unattended
cooking.
r-qFqFqr-qD3
r-qr-qD3Fqr-q
FY] Touch the SLOW COOK pad.
[-_ Touch the number pod to select the desired
setting - 1for Poultry or 2 for Meats. UseMeats if
you are unsure which setting to use.
I-_ Touch the number padsto setthedesired length
of cooking time. The cooking time must be at
least 3 hours,up to !! hours 59 minutes.
[-_ Touch the STARTpad.
NOTE:If a power outage occurs while the oven is in
SlowCook,the range will shut off.
Slow Cook Guide
Food
Beef
Chuck Roast
Beef Ribs
Poultry
Whole Chicken
Chicken Pieces
Pork
Boneless Blade
Roast
Country Style
Pork Ribs
Pork Chops
Soup
Vegetable Beef
Soup
Chili
Quantity Position Setting (Hours)
3-3_/2Ibs. C Meats HI 5-6 hrs.
3_Yz-4Ibs. C Meats HI 3-4 hrs.
4 Ibs.
8 pieces
(approx. 3 Ibs.)
3-4 Ibs.
3V_-4 Ibs.
4-8 Ibs.
4 quarts
4 quarts
Rack Food Time
LO8-10 hrs.
LO6-8 hrs.
C
C
c
c
c
c
c
Poultry HI4-5 hrs.
Poultry HI3-4 hrs.
Meats HI 5-6 hrs.
Meats HI 3-4 hrs.
Meats HI 3-4 hrs.
Meats HI 4-5 hrs.
Meats HI 3-4 hrs.
LO 7-9 hrs.
LO5-6 hrs.
LO8-10 hrs.
LO6-8 hrs.
LO6-8 hrs.
LO8-10 hrs.
LO6-8 hrs.
Comments
Add 1/2 cup liquid.
Place ribs in o single layer.
Add 1/2 cup liquid.
Best submerged under o sauce
to prevent surface drying.
Add 1/2-2 cup liquid.
Place ribs in o single layer.
Place chops in o single layer.
Make sure beef chunks
are submerged.
Submerge beans
to prevent surface drying.
How to Set the Oven For Worming
Guideline Tips
The slow cook program uses o complex series of
temperature cycling to obtain the best results. For this
reason,it isrecommendedthat the slow cookprogram be
allowed to run without cancellingor restarting. Restarting
the slaw cook feature while it is in progress may result in
overcookedmeat.
For juicy and tender meat, choose cuts of meat such
as chuck roost or o boneless blade most. Leaner cuts
of meat, such as top round, ore drier and may need
additional liquid.
Useonly gloss and ceramic dishes.Metal pats and pans
tend to transfer the heat into the foods too quickly.
Match the quantity of food to the size pan. Fill the pan
about 3/4 futl for best results. Toolarge o pot allows the
steam to escape,causingfoods to dry out.
Always cover the pot with o lid or aluminum fail.
A wide range of recipesmay be used in the slaw caak
feature. For best results some adjustments may need
to be mode. For smaller sized recipes, begin checking
at minimum time. For large recipes or when doubling
recipes,foods may be cooked for longer periods oftime.
When the stow cook feature completes, the oven will
automatically switch to "warm" made. If additional stow
caak time is desired, this worm mode may be used to
obtain the extra time.
[WARM] [Ti
The WARM feature keeps cooked foods hot.
This feature is not designed to reheat cold food.
To use the WARM feature, touch the WARM
pad and then the START pad.
iii ii[ STARTiii
[] Touch the number pads to set the desired
length of cooking time.
[] Touch the WARM pad.
[] Touch the STARTpad.
To use the WARM feature after Timed Buking,
follow these steps:
[Z] Touch the bake mode of cooking.
[] Touch the number pads to set the oven
NOTE: Plastic containers, lids or plastic wrap will
melt #placed in the oven. Melted plastic may
not be removable and is not covered under your
warranty.
temperature
I-_ Touch the COOKTIMEpad.
iA WARNING i FOOD POISON HAZARD: Becterie mey grow in food et temperetures below 140°F.
• Alweys stert with hot food. Do not use worm settings to heet cold food.
Do not worm food for more then 2 hours.
Feilure to follow these instructions mey result in foodborne illness.
20

Using the warming drawer. GEAppliances.com
WARNING .AlwaysstartwithhotfoodDonotusewarmsettingstoheatcoldfood
j ,_ FOODPOISONHAZARD.Bacteriamay grow in food at temperatures below ! 40°K
, Do not warm food for more than 2 hours.
Failure to follow these instructions may result in foodborne illness.
The warming drawer will keep hot, cooked foods at serving temperature. Always start with hot food.
Do not use to heat cold food other than crisping crackers, chips or dry cereal.
To Use the Warming Drawer
WARMING iiiii
I DRAWER liiiii
_iiii
........ iiii
Touch the WARMING DRAWER ON/OFFpad.
"Set Warming Drawee' begins to blink. Touch
the WARMING DRAWER SETTING pad to set the
warming drawerto "HI","STD",or "LO".
Tocancel,touch the WARMINGDRAWERON/
OFFpad.
NOTE:TouchingtheCLEAR/OFFpad does not
turn off the warming drawer.
When Using the Warming Drawer
Thewarming drawer will keep hot, cooked
foods warm. Always start with hot food. Do
not useto heat cold food other than crisping
crackers,chips or dry cereal.
Do not line the warming drawer or pan
with aluminum foiL Foil is an excellent heat
insulator and will trap heat beneath it. This
will upset the performance of the drawer and
could damage the interior finish.
Allowapproximately 25 minutes for the
warming drawer to preheat.
Do not put liquidor water in the warming
drawer.
Allfoods placed in the warming drawer
should be covered with a lid or aluminum
foil. When warming pastries or breads, the
cover should be vented to allow moisture to
escape.
Foodshould be kept hot in its cooking
container or transferred to a heat-safe
serving dish.
NOTE:Plasticcontainers or plastic wrap will
melt if indirectcontact with the drawer, pan
or a hot utensil Melted plastic may not be
removable and is not covered underyour
warranty.
Removeservingspoons, etc.,before placing
containers inwarming drawer.
Temperature Selection Chart
Tokeepseveraldifferentfoodshot,setthecontrolto
thefood needingthehighestsetting.
Thetemperature,type andamountof food,and
thetimeheldwill affect the qualityofthefood.
Repeatedopeningofthe drawerallows
thehot airto escapeandthe food to cool.
With largeloadsit maybenecessary
to usea higherwarming drawersetting and
coversomeof the cookedfood items.
Donot useplasticcontainersorplasticwrap.
To Crisp Stale Items
Placefood in low-sideddishesor pans.
Preheaton LOsetting.
To Warm Serving Bowls and Plates
{, CAUTION j
Disheswillbe hot.Usepot holdersor mittswhen
removinghot dishes.
Towarm servingbowlsand plates,set thecontrol
on LO.
Food Type Control Setting
Casserole STD
Chili HI
Pizza STD
Potatoes,baked HI
TortillaChips LO
Waffles LO
Checkcrispnessafter45 minutes.Addtimeas
needed.
Useonly heat-safedishes.
Ifyou want to heatfinechina,pleasecheck
with the manufacturer of the dishesfor their
maximum heattolerance.
Youmaywarm empty servingdisheswhile
preheatingthe drawer.
21

the sdf-clean feature.
Wipe up heavy soil on the oven
bottom.
Before a Self-Clean Cycle
[A WARNING i
FIREHAZARD:Wipegrease and heavy soil from
the oven bottom beforeself-cleaning.Failureto
do so may result in an oven fire.
Werecommendventingyour kitchenwith an
openwindow or usinga ventilationfan or hood
duringthe firstself-cleancycle.
Removeany broilerpan,broilergrid,probe,all
cookwareandanyaluminum foilfromthe oven.
NOTE:
Ifyour ovenisequippedwith shiny,silver-
coloredovenracks,we recommend you
removethem beforeyou begintheself-clean
cycle.Theymay remaininthe ovenduringthe
self-cleancycle,but they will darken,losetheir
lusterand become hardto slide.
Ifyour ovenisequippedwith gray porcelain-
coated ovenracks,theymaybeleft in the oven
during theself-cleancycle.
Soilon the front frame of the range and outside
thegasketon thedoorwill needto becleaned by
hand.Cleantheseareaswith hotwater, soap-filled
steel-woolpadsor cleanserssuchasSoftScrub_.
Rinsewellwith cleanwater and dry.
Donot cleanthe gasket.Thefiberglassmaterialof
theovendoor gasketcannotwithstand abrasion.
It isessentialfor thegasketto remainintact.Ifyou
notice itbecomingworn or frayed,replaceit.
Hake surethe ovenlight bulbcover isin placeand
theoven lightisoff.
IMPORTANT:Thehealthof somebirdsis
extremelysensitiveto the fumes givenoff during
theself-cleaningcycleof any range.Hove birdsto
anotherwell-ventilatedroom.
Thesurface unitsare automaticallydisabled
duringthe self-cleancycle.
DN1D ID
@DD N1
How to Set the Oven for Self-Cleaning
Theovendoorsmustbe closedandallcontrolsset
correctlyforthe cycletoworkproperly.
[] Touchthe SELFCLEANpad.
[] If a time otherthan thedefaulttimeis
needed,usethe number pads and enterthe
desiredcleantime.
Youcanchangethe cleantimeto anytime
between3 hoursand 5hours,dependingon how
dirtyyour ovenis.
r_ Touchthe STARTpad.
Theoven door locksautomatically.The display
willshowthecleantimeremaining.Itwill not
be possibleto open theovendoor until the
temperaturedropsbelowthe locktemperature
and LOCKED/DOOR_ goesoff inthe control
display.
Theword LOCKED/DOOR_ will flashand a
beepwill soundifyou setthe cleancycleand
forget to closethe ovendoor.
Tostop a clean cycle,touch the CLEAR/
OFFpad.When LOCKED/DOOR_ goesoff,
indicatingthe ovenhascooledbelowthe
lockingtemperature,you willbeableto open
the door.
22

The oven doors must be closed and all controls set correctly for the cycle to work properly.
How to Delay the Start of Self-Cleaning
[Z] Touch the DELAYSTART pad. [] Touch the START pad.
DDD[]D
DDDDD
Usingthe number pads, enter the time of
[]
dayyou want the clean cycle to start.
Touch the STARTpad.
@
Touch the SELFCLEANpad.
%
Theoven door locksautomatically. It will not
be possible to open the oven door until the
temperature drops below the locktemperature
and LOCKED/DOOR_ goes off inthe control
display.
GEAppliances.com
DDDDD
DDDDD
[] Usethe number pads and enter the
desiredclean time.
Youcan change the clean time to anytime
between 3 hoursand 5 hours,depending on
how dirty your oven is.
After a Self-Clean Cycle
Youmay notice some white ash in the oven.
Wipe it up with adamp cloth after the oven
cools.
If white spots remain, remove them with a
soap-filledsteel wool pad and rinsethoroughly
with a vinegarand water mixture.
Thesedeposits are usually a salt residuethat
cannot be removed by the clean cycle.
If the oven is not clean after one clean cycle,
repeat the cycle.
You cannot set the ovenfor cooking until the
oven is cool enoughfor the door to unlock.
While the oven isself-cleaning,youcan touch
CLOCKto display the time of day.To return to
the clean countdown, touch SELFCLEAN.
Standard Racks
If they become hard to slide,wipe their side
edgesand the oven rack supports with cooking
oil.
Extension Rack
If it becomes difficult to slide,seeExtension
Rackinthe Careand cleaning section. Donot
spray extension rack with cooking spray or
other lubricant sprays.
If it becomes hard to remove or replace, wipe
the oven rack supports with cooking oil.Do not
wipe cooking oil on the slides.
NOTE:After the firstself-cleancycle,thegray
stainlesssteel surfaceswill change color on
enameledextensionrocks.Thisisnormal. It is
not recommended to self-dean nickel extension
racksas thewhole rock will discolorbecauseof
theself-cleantemperatures.
23

Using Steam Clean.ransomemode s
CAUTION the oven bottom becomes hot
[_ ] During the steam clean cycle,
enough to cause burns. Wait
until the cycle is over (30 minutes) before wiping the
inside surfaces of the oven. Failure to do so may result
in burns.
The Steam Clean cycle makes it easier to clean light soiling
off the standard-clean porcelain oven interior.
To Begin Steam Clean Cycle:
[Z] Removeracks and accessoriesfrom the
oven cavity. Donot placecookware or
other items in the oven during the Steam
Clean cycle.
Pour i cup (8oz.)room-temperature water
[21
onto the recessed area of the oven bottom.
Do not add cleaning solutions or chemicals
of any kind to the water. Onlyadd water
when usingthe Steam Clean cycle. Donot
add water when using the Self-Clean cycle.
Closethe door.
Pour 8 ounces of water onto the
oven floor.
iSTEAMiCLEAN
@
Pressthe Steam Clean pad; then press
%
Start.
The oven door locksautomatically. A
@
30-minute cycle will begin to count down
on the display.Itwill not be possibleto
open the oven door until the cycle endsor
you press the Clear/Off pad and the door
unlocks.
When the Steam Clean cycle iscomplete,
@
the door will unlock,theoven control will
beep,andthe Steam Clean light will blink.
Pressthe Clear/Offpad and open the door.
The oven bottom and remaining water will
D
still be very warm at the end of the cycle.
This isnormal.
Removesoilsusing a scrub brush or nylon
r?l
scouring pad.Asoap-filledsteelwool pad
may be usedonly on the porcelain oven
interior.The useof abrasive padswill
scratch the door glass.Donot wipe soilor
water onto the door gasket.
The range should be at room temperature before beginning
the Steam Clean cycle. If the oven is too hot, "hot" will
appear on the display and the cycle will not activate until the
oven cools down.
The Steam Clean cycle performs best on new spills or soils.
Burned-on food ismore difficult to remove.
[] Removeany remaining water with adry
cloth or sponge.
[] Leavethe door open to air dry.
IMPORTANTNOTES:
. If a steam clean cycle isinitiated without
water, pressthe Clear/Offpad to end the
cycle.Wait for the range to coolto room
temperature before pouring water into the
recessedareaand initiating another steam
cycle.
. Do not open the door duringthe Steam
Cleancycle.An error beep will sound upon
opening the door.
. PressClear/Offpad at any time to end the
cycle.
. If mineral deposits remain in the oven
bottom after cleaning, use a cloth or sponge
soaked in vinegar to remove them.
. Somewater may drip from the bottom of
the oven door. Ifthis happens, wipe it up at
the end of the cycle.
. Thedoor gasket may bewet when the
Steam Clean cyclefinishes.Thisisnormal.
Donot cleanthe gasket.
. If soil still remains after cleaning the oven,
seethe Careand cleaning of the range
sectionof the Owner's Hanual for additional
options.
24

Special features ofyour oven control. GEApp,ancoscom
Your new touch pad control has additional features that you may choose to use. The following are the features and how
you may activate them.
The special feature modes can only be activated while the display is showing the time of day. They remain in the control's
memory until the steps are repeated.
To enter a special feature for either oven, you must first touch the upper oven BROIL HI/kO and BAKE pads at the same
time. The lower oven BROIL HI/kO and BAKE pads will not activate special features.
When the display shows your choice, touch the START pad.
Fahrenheit or Celsius Temperature Selection
Yourovencontrolis setto usethe Fahrenheit
temperatureselections,butyou may changethis
to usetheCelsiusselections.
[] Touchthe COOKTIMEandBROILHI/LO
padsagain at the sametime.Thedisplaywill
show C (Celsius).
_i_I_!!I__i!i_i!_:_i_ _iii_i_i__i_i:_i_ill_ii
[] Touchthe upperoven BROILHI/L.Oand
BAKEpadsutthe sametimeuntilthe display
showsSF.
I-ffl Touchthe COOKTIMEand BROILHI/LO
padsat the sgmetime.Thedisplaywill show
F (Fahrenheit/.
Tones at the End of a Timed Cycle
At the end of a timed cycle, 3 short beeps will
sound followed by one beep every 6 seconds
until the CLEAR/OFFpadistouched. This
continual 6-second beep may be cancelled.
Tocancelthe 6-second beep:
Touch the upper oven BROILHI/LO and
BAKEpadsat the same time until the
display shows SF.
Touchthe BROILpad.Thedisplay shows
[]
CONBEEP(continuousbeep).Touchthe
BROILpad again.Thedisplayshows BEEP.
(Thiscancelsthe one beep every 6 seconds.)
r_ Touch the START pad.
Tone Volume
[-_ Touchthe STARTpad.
(_ii_ii_iI_i__-_ !_iiiiii_ii__ii__ii
This feature allows you to adjust the tone
volumes to a more acceptable volume. There
are three possible volume levels.
[Z] Touch the upper oven BROILHI/LO and
BAKEpadsat the same time until the
display shows SF.
r_ Touch the COOKTIMEpad. The display will
show STDBEEP.This isthe middle volume
level.
Touch the COOKTIMEpad again.This
changes the volume leveleach time the
pad istouched, and a tone will sound to
provide an indication of the volume level.
Choosethe desiredsound level (LOBEEP,
STDBEEP,HIBEEP,orOFF).
r_ Touch the STARTpad to activate the level
shown.
25

Special features ofyour oven control.
12-Hour, 24-Hour or Clock Blackout
Your control issetto usea 12-hour clock.
If you would prefer to have a24-hour military
time clock or black out the clock display,follow
the steps below.
[Z] Touch the upper oven BROILHI/LO and
BAKEpadsat the same time until the
display shows SF.
Touch the CLOCKpad once.Thedisplay
r2]
will show 12h. Ifthis is the choiceyou
want, touch the STARTpad.
Auto Recipe T"Conversion
_ _ ii i ii iii
i_ilii__i__ ii: i_ii_
_!_!i_ ii_illi_ _ i_i_ii_
When using convection bake,the Auto Recipe,M
Conversionfeature can automatically convert
entered regular baking temperatures to
convection baking temperatures. The display
will not show the converted temperature. Itwill
always show the temperature entered.
To activate or deactivate the feature:
Touch the CLOCKpad again to change to the
2Q-hour military time clock.Thedisplaywill
show 24 h. Ifthis isthe choice you want, touch
the STARTpad.
Touch the CLOCKpad again to black out the
clock display.The display will show OFF.If this is
the choice you want, touch the STARTpad.
NOTE:Ifthe clockisin the black-out mode,you
will not beableto usetheDelay Start function.
r_ Touch the CONVECTIONCOOKpad until
the display shows CONON (Conversion
On)or CONOFF(ConversionOff)as
desired.
r-_ Touch the START pad.
_ii¸ :4 DELAyli5:/
ill:i__!iii__:i_ !::__i_i!ill
r_ Touchthe upper oven BAKEand BROIL
HI/LO pads at the same time until the
display shows SF.
12-Hour Shutdown
With this fe.ature,should you forget
and leave the oven on, the control will
automatically turn off the oven after 12
hours during baking functions or atter 3
hours during a broil function.
If you wish to turn OFF this feature, follow
the steps below.
I-f] Touch the upper oven BROIL HI/LO and
BAKE pads at the same time until the
display shows SF.
[_ Touch the DELAY START pad until no
shdn (noshut-off) appears inthe
display.
[] Touch the STARTpad to activate the no
shut-off and leave the control set inthis
special features mode.
26

Using the Sabbath feature. (u erand/owerovensl
(Designedfor useon theJewishSabbathand Holidays) (onsomemodels) GEAppliances.com
TheSabbath feature can be used for baking/roasting only. It cannot be usedfor convection,broiling,self-cleaningor Delay Start
cooking.
NOTE:Theovenlightcomesonautomatically(onsomemodels)whenthedoorisopenedandgoesoffwhenthedoorisclosed.Thebulbmayberemoved.See
theOvenLightReplacementsection.Onmodelswitha lightswitchonthecontrolpanel,theovenlightmaybeturnedonandIdton.
How to Set for Regular Baking/Roasting
) 16-1FTiI-qEZ]I-q5¸
When the display shows D, the
oven is set in Sabbath. When the
display shows DC, the oven is
baking/roasting.
Hake sure the clock shows the correct time of day
and the oven is off.
[] Touch and hold both the upper oven BROILHI/
LOand BAKE pads,at the same time, until the
display shows SK
NOTE:tf bake or broil appears in the display, the
BROILHI/LO and BAKEpads were not touched
at the same time.Touchthe CLEAR/OFFpad
and begin again.
[] Tap the DELAYSTARTpad until SAbbAtH
appears in the display.
r-_ Touch the STARTpad and D will appear in the
display.The oven isnow in Sabbath mode.
[] Touch the BAKE pad.Nosignal will be given.
[_ Using the number pads, enter the desired
temperature between !70°F and S50°F.No
signal or temperature will begiven.There is no
default temperature.
[] Touch the STARTpad on the corresponding
oven.
[] After a random delay period of approximately
50 secondsto ! minute,DC will appear in the
displayindicatingthat the oven isbaking/
roasting. If _ doesn't appear in the display,
start again at Step 4.
Toadjust the oven temperature, touch the BAKEpad,
enter the new temperature using the number pads
and touch the STARTpad.
NOTE:TheCLEAR/OFFand COOKTIMEpads
are active during the Sabbath feature.
iji[ii[ CLEAR5C5
ilI_ iii _!i ii_ i _i:
I OELAvI
DD[]DD
DD[]DD
How to Exit the Sabbath Feature
Z] Touchthe CLEAR/OFFpad.
Ifthe oven iscookinq, wait for a random delay
period of approximately 50 seconds to !
minute, until only D is inthe display.
J-_ Touch and hold both the BROILHI/LO and
BAKEpads,at the same time, until the display
shows SF.
Tapthe DELAYSTARTpad until 12 shdn or no
shdn appears in the display.
How to Set for Timed Baking
NOTE:Thisprocedure must take place BEFOREthe
Sabbath begins to be able to use the Timed Bake
feature during the Sabbath (the unit should NOT be
put into Sabbath mode during a Time Bake.
lake sure the clock shows the correct time ofday
and the oven is off.
77 Touch and hold both the upper oven BROILHI/
LOand BAKE pads,at the same time, until the
display shows SK
NOTE:tf bake or broil appears in the display, the
BROILHI/LO and BAKEpads were not touched
at the same time.Touchthe CLEAR/OFFpad
and begin again.
Choose12shdn, indicating that the oven will
automatically turn off after 22hours or no
shdn, indicating that the oven will not
automatically turn off after !2 hours.
PressSTARTwhen the option that you want is
r-_
'"' in the display (22shdn or no shdn).
NOTE: Ira power outageoccurredwhile the oven
was in Sabbath,the ovenwill automatically turn off
and stayoff even when the power returns.Theoven
control must be reset.Some modelswill resume
Sabbath mode;however, opening the door will
activate the oven light.
[_ Using the number pads,enterthe desired
temperature.
[_ Pressthe STARTpad on the corresponding
oven.
[Z] PressCOOKTIMEFORthecorresponding oven.
[-_-] Pressthe number padsto set the desired length
of cooking time between 1minute and 9 hours
and 59 minutes.
E_ presstheSTARTpad.
Pressthe BROILHI/LO pad to change the
beeper setting to bEEP(the default setting is
Continuous Beep,which shows in the display as
ConbEEP).
r-_ press the START pad to save the changes.
r_ press the BAKE pad.
27
 Loading...