

Page 1

Safety Information .............. 2
Warranty ......................... 7
Assistance / Accessories ....... 8
Using The Range
Surface Units ......................10
How to Set .........................10
Cookware for Induction Cooktop ....11
Oven Controls ......................12
Special Features ...................14
Sabbath Mode .....................15
Oven Racks ........................16
Aluminum Foil and Oven Liners .....17
Cookware ..........................17
Cooking Modes ....................18
Cooking Guide .....................19
Care and Cleaning
Cleaning the Range – Exterior ......20
Cleaning the Range – Interior .......21
Cleaning the Glass Cooktop .........22
Maintenance .......................24
Owner’s Manual
PHB920 - 30" Free-Standing Range
Troubleshooting Tips ..........26
Electric Induction Free-Standing and Slide-In
Ran ges
For a Spanish version of this
manual, visit our Website at
GEAppliances.com.
Para consultar una version
en español de este manual
de instrucciones, visite
nuestro sitio de internet
GEAppliances.com.
Write the model and serial
numbers here:
Model # __________________
Serial # ___________________
You can find them on a label
behind the door or drawer.
Printed in the United States
49-80765 07-15 GE
Page 2
IMPORTANT SAFETY INFORMATION.
READ ALL INSTRUCTIONS BEFORE USING.
WARNING
Read all safety instructions before using the product. Failure to follow these instructions may result in fire,
electrical shock, serious injury or death.
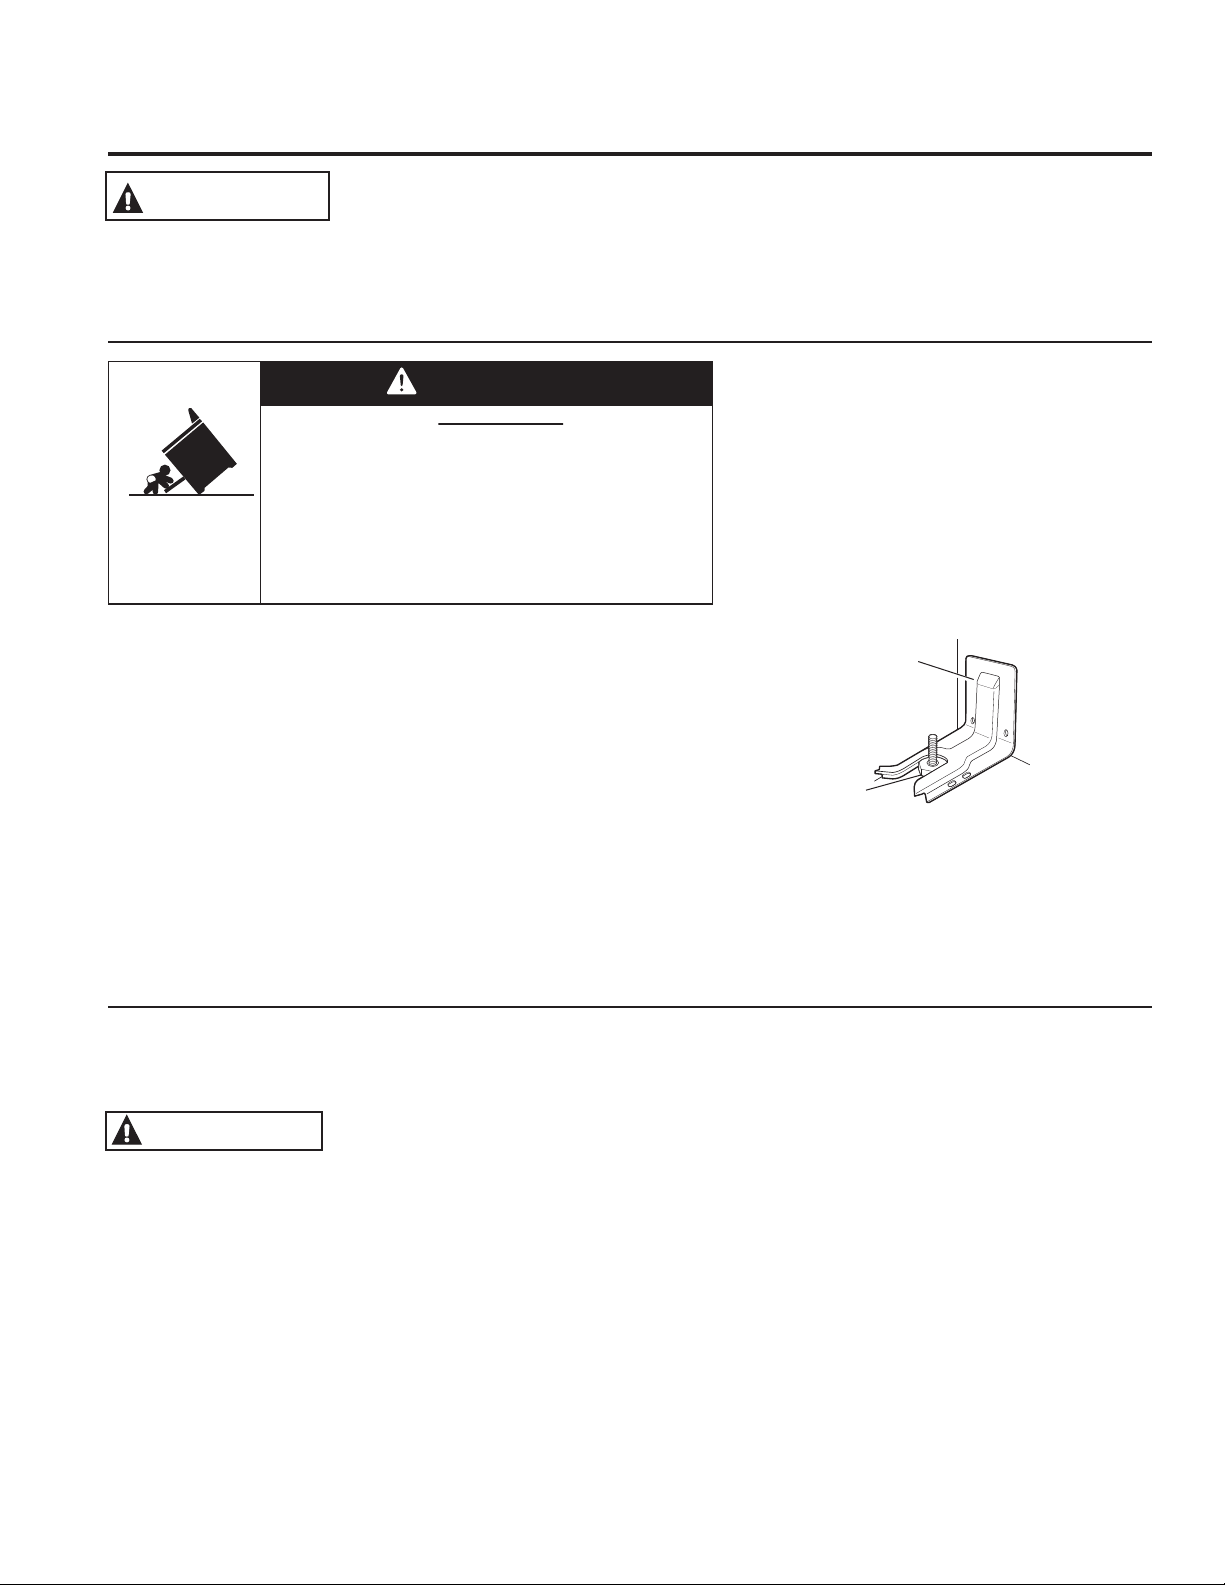
ANTI-TIP DEVICE
WARNING
Tip-Over Hazard
A child or adult can tip the range and be killed.
SAFETY INFORMATION
is engaged in the bracket. On some models, the storage
drawer or kick panel can be removed for easy inspection.
If visual inspection is not possible, slide the range forward,
confirm the anti-tip bracket is securely attached to the floor
or wall, and slide the range back so the rear leveling leg is
under the anti-tip bracket.
If the range is pulled from the wall for any reason, always
repeat this procedure to verify the range is properly secured
by the anti-tip bracket.
Never completely remove the leveling legs or the range will
not be secured to the anti-tip device properly.
Verify the anti-tip bracket has been properly installed
and engaged.
Ensure the anti-tip bracket is re-engaged when the range
is moved.
Do not operate the range without the anti-tip bracket in
place and engaged.
Failure to follow these instructions can result in death or
serious burns to children or adults.
To reduce the risk of tipping the range,
the range must be secured by a properly
installed anti-tip bracket. See installation
instructions shipped with the bracket for
complete details before attempting to install.
For Free-Standing and Slide-In Ranges
To check if the bracket is installed and
engaged properly, look underneath the
range to see that the rear leveling leg
Anti-Tip
Bracket
Leveling Leg
Free-Standing and Slide-In Ranges
STATE OF CALIFORNIA PROPOSITION 65 WARNING
The California Safe Drinking Water and Toxic Enforcement Act requires the Governor of California to
publish a list of substances known to the state to cause cancer, birth defects or other reproductive harm,
and requires businesses to warn customers of potential exposure to such substances.
WARNING This product contains one or more chemical known to the State of California to
cause cancer, birth defects or other reproductive harm.
Self-clean ovens can cause low-level exposure to some of these substances, including carbon monoxide,
during the cleaning cycle. Exposure can be minimized by venting with an open window or using a
ventilation fan or hood.
SAVE THESE INSTRUCTIONS
2
49-80765
Page 3
SAFETY INFORMATION
WARNING
This unit has been tested and found to comply with the limits for a class B digital device, pursuant to Part 18
of the FCC rules. These limits are designed to provide reasonable protection against harmful interference in a
residential installation. This unit generates, uses and can radiate radio frequency energy and, if not installed
and used in accordance with the instructions, may cause harmful interference to radio communications.
However, there is no guarantee that interference will not occur in a particular installation. If this unit does
cause harmful interference to radio or television reception, which can be determined by turning the unit off and
on, the user is encouraged to try to correct the interference by one or more of the following measures:
Ŷ
Reorient or relocate the receiving antennae.
Ŷ
Increase the distance between the unit and receiver.
Ŷ
Connect the unit into an outlet or a circuit different from that to which the receiver is connected.
GENERAL SAFETY INSTRUCTIONS
CAUTION
Persons with a pacemaker or similar medical device should exercise caution when using or standing
near an induction unit while it is in operation. The electromagnetic field may affect the working of
the pacemaker or similar medical device. It is advisable to consult your doctor or the pacemaker
manufacturer about your particular situation.
Ŷ Use this appliance only for its intended purpose
as described in this Owner ’s Manual.
Ŷ Be sure your appliance is properly installed and
grounded by a qualified installer in accordanc e
with the provided installation instruc tions.
Ŷ Do not attempt to repair or replace any par t of
your range unless it is specifically recommended
in this manual. All other servicing should be
transferred to a qualified technician.
Ŷ Before perfor ming any ser vice, unplug the range
or disconnect the power supply at the household
distribution panel by removing the fuse or
switching off the circuit breaker.
Ŷ Do not leave children alone —children should not
be left alone or unattended in an area where an
appliance is in use. They should never be allowed
to climb, sit or stand on any part of the appliance.
Ŷ
Ŷ Use only dr y pot holders — moist or damp pot
Ŷ Never use your appliance for warming or heating
CAUTION: Do not store items of
interest to children above a range or on the
backguard of a range— children climbing on the
range to reach items could be seriously injured.
holders on hot surfaces may result in burns from
steam. Do not let pot holders touch hot surface
units or heating elements. Do not use a towel or
other bulky cloth in place of pot holders.
the room.
Ŷ Do not touch the sur face units, the heating
elements or the interior surface of the oven.
These surfaces may be hot enough to burn
even though they are dark in color. During and
after use, do not touch, or let clothing or other
flammable materials contact the surface units,
areas nearby the surface units or any interior
area of the oven; allow suf fic ient time for cooling
first. Other sur fac es of the appliance may
become hot enough to cause burns. Potentially
hot surfaces include the c ook top, areas facing
the cooktop, oven vent opening, surfaces near
the opening and crevices around the oven door.
Ŷ Do not heat unopened food containers. Pressure
could build up and the container could bur st,
causing an injury.
Ŷ 'RQRWXVHDQ\W\SHRIIRLORUOLQHUWRFRYHUWKH
oven bottom or anywhere in the oven, except as
described in this manual. Oven liners can trap
heat or melt, resulting in damage to the product
and risk of shock, smoke or fire.
Ŷ Avoid scratching or impacting glass doors, cook
tops or control panels. Doing so may lead to
glass breakage. Do not cook on a product with
broken glass. Shock, fire or cuts may occur.
Ŷ Cook meat and poultr y thoroughly— meat to
at least an internal temperature of 160°F and
poultry to at least an internal temperature of
180°F. Cooking to these temperatures usually
protects against foodborne illness.
49-80765
SAVE THESE INSTRUCTIONS
3
Page 4
IMPORTANT SAFETY INFORMATION.
READ ALL INSTRUCTIONS BEFORE USING.
WARNING
Ŷ Do not store or use flammable materials in
an oven or near the cooktop, including paper,
plastic, pot holders, linens, wall coverings,
curtains, drapes and gasoline or other flammable
vapors and liquids.
Ŷ
Never wear loose-fitting or hanging garments while
using the appliance. These garments may ignite if
they contact hot surfaces causing severe burns.
SAFETY INFORMATION
KEEP FLAMMABLE MATERIALS AWAY FROM THE RANGE
Failure to do so may result in fire or personal injury.
IN THE EVENT OF A FIRE, TAKE THE FOLLOWING
WARNING
STEPS TO PREVENT INJURY AND FIRE SPREADING
Ŷ Do not use water on grease fires. Never pick up
a flaming pan. Turn the controls off. Smother a
flaming pan on a surface unit by covering the
pan completely with a well-fitting lid, cookie sheet
or flat tray. Use a multi-purpose dry chemical or
foam-type fire extinguisher.
Ŷ If there is a fire in the oven during baking,
smother the fire by closing the oven door and
turning the oven off or by using a multi-purpose
dry chemical or foam-type fire extinguisher.
Ŷ Do not let cooking grease or other flammable
materials accumulate in or near the range.
Grease in the oven or on the cooktop may ignite.
Ŷ Clean ventilating hoods frequently. Grease
should not be allowed to accumulate on the hood
or filter.
Ŷ If there is a fire in the oven during self-clean, turn
the oven off and wait for the fire to go out. Do
not force the door open. Introduction of fresh air
at self-clean temperatures may lead to a burst
of flame from the oven. Failure to follow this
instruction may result in severe burns.
WARNING
Ŷ
Never leave the surface units unattended at
medium or high heat settings. Boilovers cause
smoking and greasy spillovers that may catch
on fire.
Ŷ Never leave oil unattended while frying. If allowed
to heat beyond its smoking point, oil may ignite
resulting in fire that may spread to surrounding
cabinets. Use a deep fat thermometer whenever
possible to monitor oil temperature.
Ŷ
To avoid oil spillover and fire, use a minimum
amount of oil when shallow pan-frying and
avoid cooking frozen foods with excessive
amounts of ice.
COOKTOP SAFETY INSTRUCTIONS
SAVE THESE INSTRUCTIONS
4
Ŷ Only certain types of glass, glass/ceramic,
earthenware or other glazed containers are
suitable for cooktop service; others may break
because of the sudden change in temperature.
Ŷ To minimize the possibility of burns, ignition of
flammable materials and spillage, the handle of a
container should be turned toward the center of
the range without extending over nearby surface
units.
Ŷ When preparing flaming foods under a hood, turn
the fan on.
49-80765
Page 5
SAFETY INFORMATION
WARNING
Ŷ Use care when touching the cooktop. The glass
surface of the cooktop will retain heat after the
controls have been turned off.
Ŷ Do not cook on a broken cooktop. If glass
cooktop should break, cleaning solutions and
spillovers may penetrate the broken cooktop and
create a risk of electric shock. Contact a qualified
technician immediately.
Ŷ Avoid scratching the glass cooktop. The cooktop
can be scratched with items such as knives,
sharp instruments, rings or other jewelry, and
rivets on clothing.
WARNING
Ŷ Stand away from the range when opening the
oven door. Hot air or steam which escapes can
cause burns to hands, face and/or eyes.
Ŷ Do not use the oven if a heating element
develops a glowing spot during use or shows
other signs of damage. A glowing spot indicates
the heating element may fail and present a
potential burn, fire, or shock hazard. Turn the
oven off immediately and have the heating
element replaced by a qualified service
technician.
Ŷ Keep the oven vent unobstructed.
Ŷ Keep the oven free from grease buildup. Grease
in the oven may ignite.
Ŷ Place oven racks in desired location while oven
is cool. If rack must be moved while oven is hot,
do not let pot holder contact hot heating element
in oven.
GLASS COOKTOP SAFETY INSTRUCTIONS
OVEN SAFETY INSTRUCTIONS
®
Ŷ Use CERAMA BRYTE
and CERAMA BRYTE® Cleaning Pad to clean
the cooktop. Wait until the cooktop cools and
the indicator light goes out before cleaning. A
wet sponge or cloth on a hot surface can cause
steam burns. Some cleaners can produce
noxious fumes if applied to a hot surface. Note:
Sugar spills are an exception. They should be
scraped off while still hot using an oven mitt and
a scraper. See the Cleaning the glass cooktop
section for detailed instructions.
Ŷ Read and follow all instructions and warnings on
the cleaning cream label.
Ŷ When using cooking or roasting bags in the
oven, follow the manufacturer’s directions.
Ŷ Pull the oven rack to the stop-lock position when
loading and unloading food from the oven. This
helps prevent burns from touching hot surfaces
of the door and oven walls.
Ŷ Do not leave items such as paper, cooking
utensils or food in the oven when not in use.
Items stored in an oven can ignite.
Ŷ 1HYHUSODFHFRRNLQJXWHQVLOVSL]]DRUEDNLQJ
stones, or any type of foil or liner on the oven
floor. These items can trap heat or melt, resulting
in damage to the product and risk of shock,
smoke or fire.
ceramic Cooktop Cleaner
49-80765
SAVE THESE INSTRUCTIONS
5
Page 6

IMPORTANT SAFETY INFORMATION.
READ ALL INSTRUCTIONS BEFORE USING.
WARNING
The self-cleaning feature operates the oven at temperatures high enough to burn away food soils in the
oven. Follow these instructions for safe operation.
Ŷ Do not touch oven surfaces during self-clean
operation. Keep children away from the oven
during self-cleaning. Failure to follow these
instructions may cause burns.
Ŷ
Before operating the self-clean cycle, remove pans,
shiny metal oven racks and other utensils from the
SAFETY INFORMATION
oven. Only gray porcelain-coated oven racks may
be left in the oven. Do not use self-clean to clean
other parts, such as drip pans or bowls.
Ŷ Before operating the self-clean cycle, wipe
grease and food soils from the oven. Excessive
amount of grease may ignite leading to smoke
damage to your home.
SELF-CLEANING OVEN SAFETY INSTRUCTIONS
Ŷ If the self-cleaning mode malfunctions, turn the
oven off and disconnect the power supply. Have
it serviced by a qualified technician.
Ŷ Do not clean the door gasket. The door gasket is
essential for a good seal. Care should be taken
not to rub, damage or move the gasket.
Ŷ Do not use oven cleaners. No commercial oven
cleaner or oven liner protective coating of any kind
should be used in or around any part of the oven.
SAVE THESE INSTRUCTIONS
6
49-80765
Page 7

Thank You! ... for your purchase of a GE Brand appliance.
Register Y our Appliance: Register your new appliance on-line at your convenience!
www.geappliances.com/service_and_support/register/
Timely product registration will allow for enhanced communication and prompt service under the terms of your warranty,
should the need arise. You may also mail in the pre-printed registration card included in the packing material.
GE Electric Range Warranty
GEAppliances.com
All warranty service is provided by our Factory Service Centers, or an authorized Customer Care® technician.
To schedule service, on-line, visit us at www.geappliances.com/service_and_support/, or call 800.GE.CARES
(800.432.2737). Please have serial number and model number available when calling for service.
Servicing your appliance may require the use of the onboard data port for diagnostics. This gives a GE factory
service technician the ability to quickly diagnose any issues with your appliance and helps GE improve its products
by providing GE with information on your appliance. If you do not want your appliance data to be sent to GE, please
advise your technician not to submit the data to GE at the time of service.
For the period of one year from the date of the original purchase. GE will provide any part of the range which fails due
to a defect in materials or workmanship. During this limited one-year warranty, GE will also provide, free of charge, all
labor and in-home service to replace the defective part.
WARRANTY
What GE will not cover:
Ŷ Service trips to your home to teach you how to use
the product.
Ŷ Improper installation, delivery or maintenance.
Ŷ Failure of the product if it is abused, misused,
modified or used for other than the intended purpose
or used commercially.
Ŷ Damage to the glass cooktop caused by use of
cleaners other than the recommended cleaning
creams and pads.
Ŷ Damage to the glass cooktop caused by hardened
spills of sugary materials or melted plastic that
are not cleaned according to the directions in the
Owner's Manual.
Ŷ Replacement of house fuses or resetting of circuit
breakers.
Ŷ Damage to the product caused by accident, fire,
floods or acts of God.
Ŷ Damage to finish, such as surface rust, tarnish, or small
blemishes not reported within 48 hours of delivery .
Ŷ Incidental or consequential damage caused by
possible defects with this appliance.
Ŷ Damage caused after delivery.
Ŷ Product not accessible to provide required service.
Ŷ Service to repair or replace light bulbs, except for
LED lamps.
EXCLUSION OF IMPLIED WARRANTIES
Your sole and exclusive remedy is product repair as provided in this Limited Warranty. Any implied warranties,
including the implied warranties of merchantability or fitness for a particular purpose, are limited to one year or the
shortest period allowed by law.
This warranty is extended to the original purchaser and any succeeding owner for products purchased for home use
within the USA. If the product is located in an area where service by a GE Authorized Servicer is not available, you
may be responsible for a trip charge or you may be required to bring the product to an Authorized GE Service location
for service. In Alaska, the warranty excludes the cost of shipping or service calls to your home.
Some states do not allow the exclusion or limitation of incidental or consequential damages. This warranty gives you
specific legal rights, and you may also have other rights which vary from state to state. To know what your legal rights
are, consult your local or state consumer affairs office or your state’s Attorney General.
Staple your receipt here. Proof of the original purchase
date is needed to obtain service under the warranty.
Warrantor: General Electric Company. Louisville, KY 40225
Extended Warranties: Purchase a GE extended warranty and learn about special discounts that are available while
your warranty is still in effect. You can purchase it on-line anytime
www.geappliances.com/service_and_support/shop-for-extended-service-plans.htm
or call 800.626.2224 during normal business hours. GE Consumer Home Services will still be there after your
warranty expires.
49-80765
7
Page 8

Have a question or need assistance with your appliance?
Try the GE Appliances Website (www.geappliances.com/service_and_support/) 24 hours a day, any day of the
year! For greater convenience and faster service, you can now download Owner’s Manuals, order parts or even
schedule service on-line.
Schedule Service: Expert GE repair service is only one
step away from your door. Get on-line and schedule your
service at www.geappliances.com/service_and_support/
Or call 800.GE.CARES (800.432.2737) during normal
business hours.
Parts and Accessories: Individuals qualified to service their
own appliances can have parts or accessories sent directly
to their homes (VISA, MasterCard and Discover cards are
accepted).Order on-line today , 24 hours every day or by
phone at 800.626.2002 during normal business hours.
Instructions contained in this manual cover procedures
to be performed by any user. Other servicing generally
should be referred to qualified service personnel. Caution
must be exercised, since improper servicing may cause
unsafe operation.
ASSISTANCE / ACCESSORIES
Real Life Design Studio: GE supports the Universal
Design concept of products, services and environments
that can be used by people of all ages, sizes and
capabilities. We recognize the need to design for a wide
range of physical and mental abilities and impairments.
For details of GE’s Universal Design applications,
including kitchen design ideas for people with disabilities,
check out our Website today. For the hearing impaired,
please call 800.TDD.GEAC (800.833.4322).
Remote Connectivity: For assistance with oven wireless
network connectivity (for models with remote enable),
please call 1.800.220.6899.
Contact Us: If you are not satisfied with the service you
receive from GE, contact us on our Website with all the
details including your phone number, or write to:
General Manager, Customer Relations
GE Appliances, Appliance Park Louisville, KY 40225
Accessories
Looking For Something More?
GE offers a variety of accessories to improve your cooking and maintenance experiences!
To place an order visit us online at:
www.GEApplianceParts.com (U.S.) or www.GEAppliances.ca (Canada)
or call 800.626.2002 (U.S.) 800.661.1616 (Canada)
The following products and more are available:
Accessories
Small Broiler Pan (8 ¾” x 1 ¼” x 13 ½“) WB48X10055 (US) 222D2097G001 (Canada)
Large* Broiler Pan (12 ¾” x 1 ¼” x 16 ½“) WB48X10056 (US) 222D2097G002 (Canada)
XL** Broiler Pan (17” x 1 ¼” x 19 ¼“) WB48X10057 (US) Not available in Canada
Parts
Oven racks Part numbers vary by model
Oven elements Part numbers vary by model
Light bulbs Part numbers vary by model
Cleaning Supplies
CitruShine Stainless Steel Wipes WX10X10007
CERAMA BRYTE® Stainless Steel Appliance Cleaner PM10X311
CERAMA BRYTE® Cleaning Pads for Ceramic Cooktops WX10X350
CERAMA BRYTE® Ceramic Cooktop Cleaner WX10X300
CERAMA BRYTE® Ceramic Cooktop Scraper WX10X0302
Kit (Kit includes cream and cooktop scraper) WB64X5027
*The large broiler pan does not fit in 20”/24” ranges.
**The XL broiler pan does not fit in 24” wall ovens, 27”drop ins or 20”/24” range
How to Remove Protective Shipping Film and Packaging Tape
Carefully grasp a corner of the protective shipping film
with your fingers and slowly peel it from the appliance
surface. Do not use any sharp items to remove the film.
Remove all of the film before using the appliance for the
first time.
8
To assure no damage is done to the finish of the
product, the safest way to remove the adhesive from
packaging tape on new appliances is an application of
a household liquid dishwashing detergent. Apply with a
soft cloth and allow to soak.
NOTE: The adhesive must be removed from all parts. It
cannot be removed if it is baked on.
49-80765
Page 9

Notes
49-80765
9
Page 10
Surface Units
How Induction Surface Cooking Works
Induction coils under the glass cooking surface produce
a magnetic field that generates heat in ferrous metals
that are in close proximity. The glass cooking surface is
not heated directly since it is not a ferrous metal, but the
glass may eventually become hot from the pan. Induction
surface coils are more efficient and will heat much faster
than conventional electric and gas cooking surface
cooking products.
How to Set
FIRE HAZARD: Never leave the range unattended with the cooktop on medium or high
WARNING
To turn on a single surface unit:
1. Touch the On/Off pad; then touch the + or - pad.
Touching the + pad will set the burner to its highest
setting; touching the - pad will set the burner to its
lowest setting.
2. Use the + or - pad to adjust to the desired power
setting.
settings. Keep flammable items away from the cooktop. Turn off all controls when done
cooking. Failure to follow these instructions can result in fire, serious injury or death.
CAUTION:
Ŷ The induction cooking elements may appear to be cool
while turned ON and after they have been turned OFF.
The glass surface may be HOT from residual heat
transferred from the cookware and burns may occur.
Ŷ DO NOT TOUCH HOT COOKWARE or PANS directly
with hands. Always use mitts or pot holders to protect
hands from burns.
Ŷ DO NOT SLIDE cookware across the cooktop surface.
Doing so may permanently damage the appearance
of the ceramic cooktop.
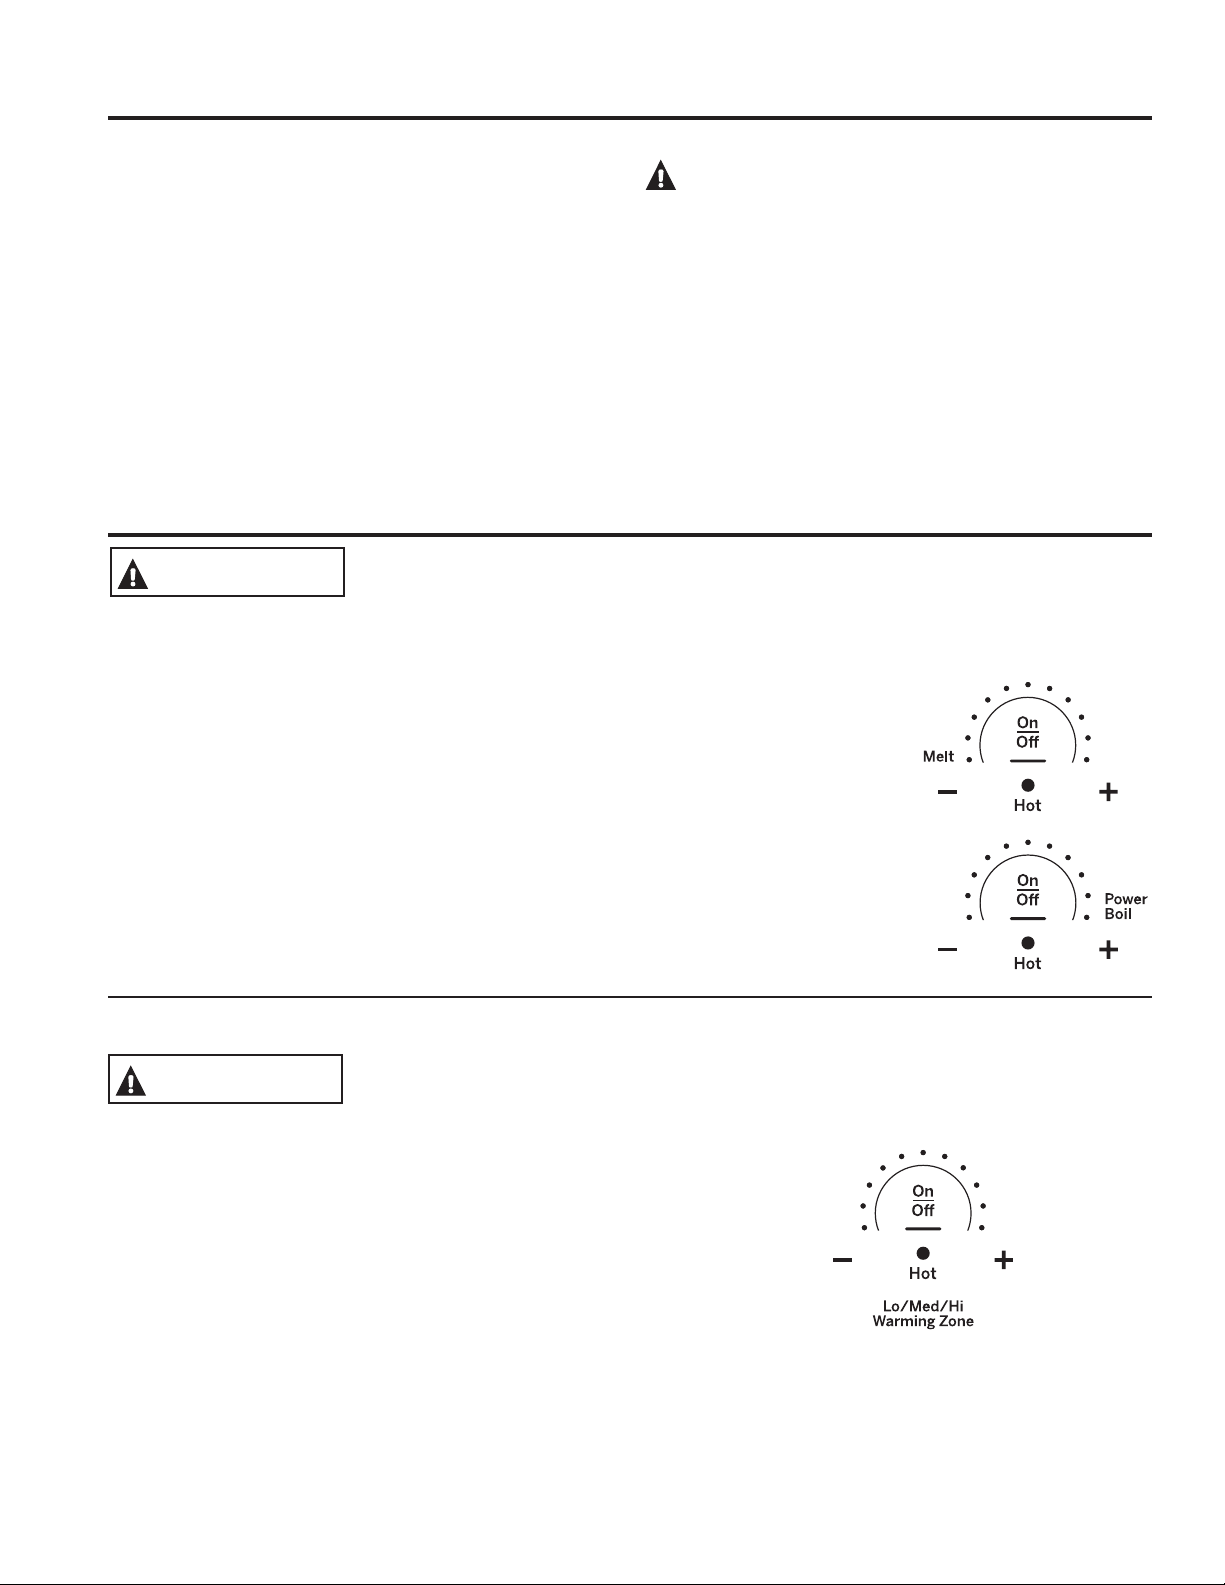
To use the Power Boil or Melt features:
Touch the On/Off pad for
the corresponding burner.
For power boil, press +; for
melt, press -. The element
will automatically set to a
predetermined setting.
USING THE RANGE: Surface Units / How to Set
Using the Warming Zone
FOOD POISON HAZARD: Bacteria may grow in food at temperatures below 140°F.
WARNING
The Warming Zone is located in the back center of the
glass surface.
To use the Warming Zone:
1. Touch the Warming Zone On/Off pad.
2. Use the + or - pad to choose the desired power setting
(Lo/Med/Hi).
To turn off the Warming Zone:
Touch the Warming Zone On/Off pad.
Ŷ $OZD\VVWDUWZLWKKRWIRRG'RQRWXVHZDUPVHWWLQJWRKHDWFROGIRRG
Ŷ 'RQRWXVHZDUPVHWWLQJIRUPRUHWKDQKRXUV
10
49-80765
Page 11
Cookware for Induction Cooktop
What Type of Pans Are Required?
You must use a ferrous pan when using the induction
coils on this range. The warming zone is not an induction
coil and will work with any type of cookware. You
can verify your pan is ferrous if a magnet sticks to it.
Quality cookware with heavy bottoms made of cast iron,
magnetic stainless steel and enameled steel work best.
For best results, use pans with flat bottoms. Woks that
do not have flat bottoms in close contact to the glass
surface will not work. Some pans are made especially for
induction cooking.
Place only dry pans on the surface elements. Do not
place lids on the surface elements, particularly wet lids.
Wet pans and lids may stick to the surface when cool.
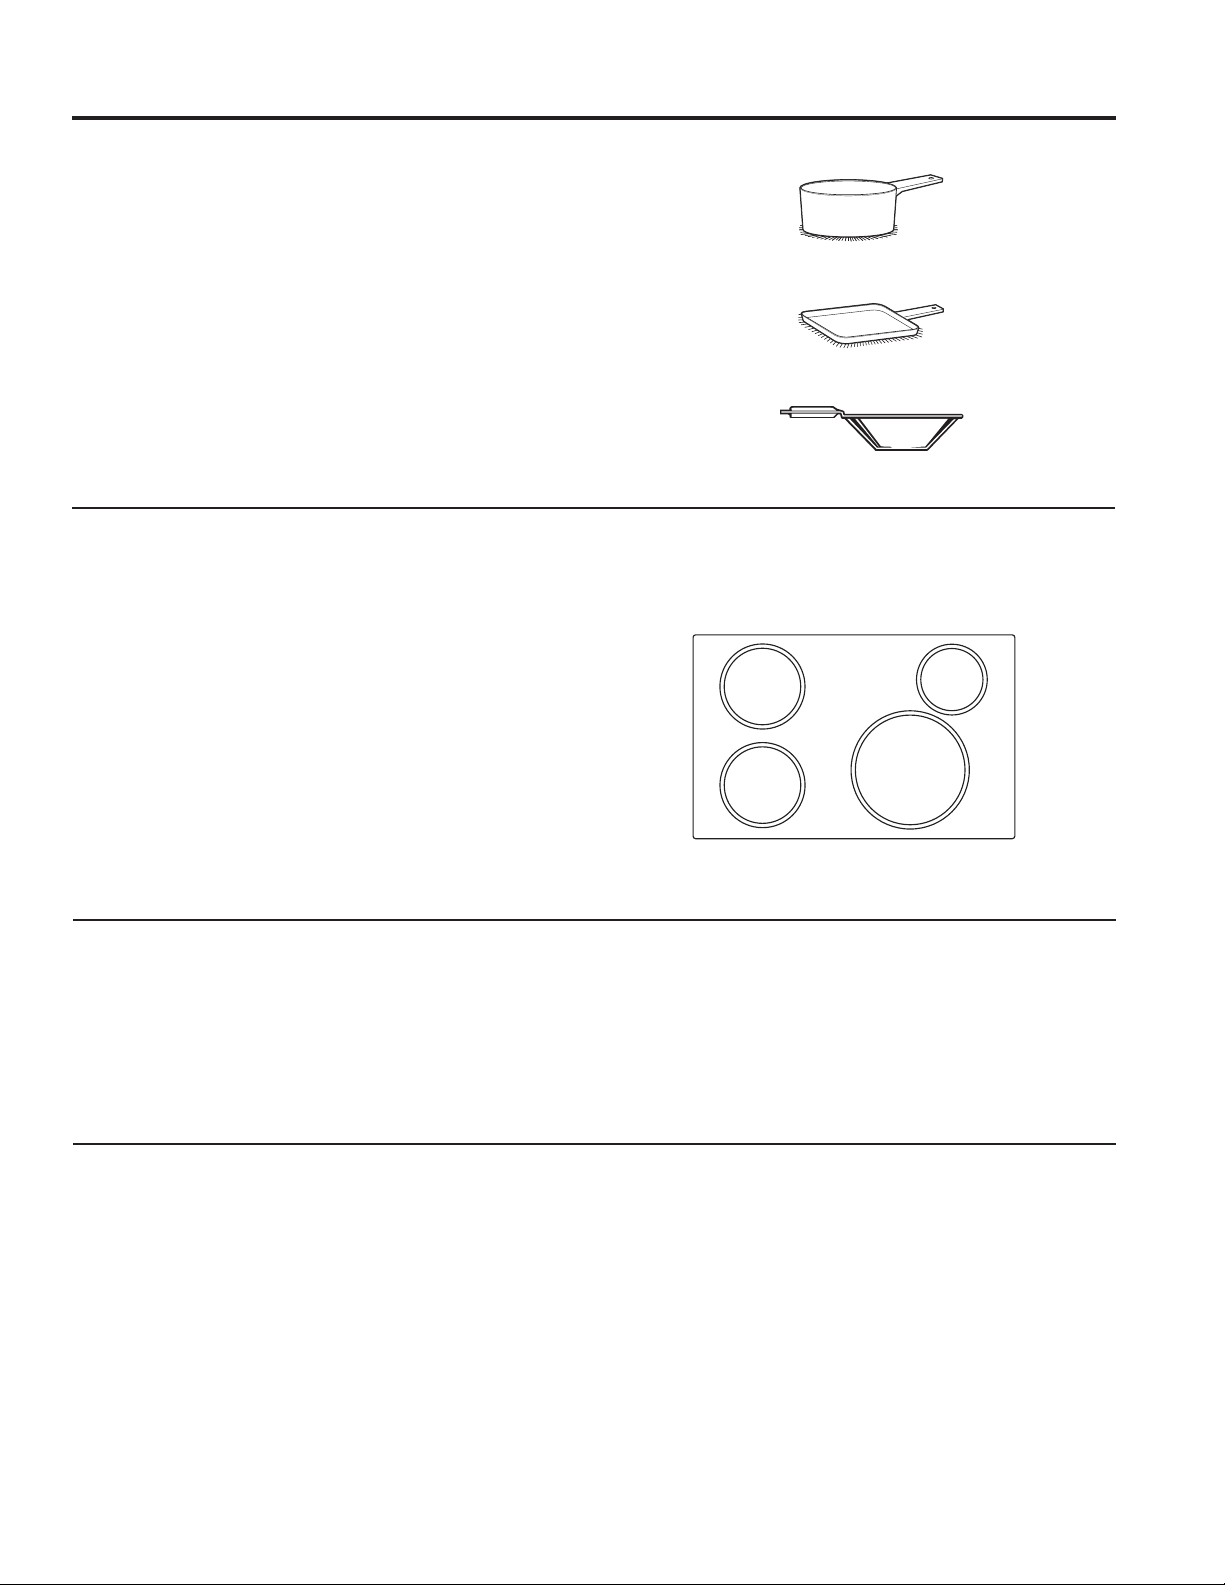
Pan Size and Shape
The induction coils require a minimum pan size in order
for the element to turn on. In order for the induction coil
to correctly determine if the pan is large enough, it is
important that the pan be centered within the circular
graphics marked on the glass cooking surface. The
minimum pan size that will work for each induction coil
is shown on the left. Pans that are not ferrous or are too
small will not allow the induction coil to turn on, and the
power level display for that coil location will flash for 30
seconds and then turn off. If a pan is removed from the
induction coil for more than 30 seconds, the power will
be shut off. Square pans will work, although round pans
that match the induction coil sizes work best. Cookware
larger than the cooktop glass graphics will work. For
best results, match the pan size with the nearest-size
graphics on the glass cooking surface.
Use flat-bottomed pans.
Use a griddle.
Use a flat-bottomed wok.
8” Min. Dia.
Pan Size
4-3/4”
Min. Dia.
Pan Size
5-3/4” Min.
Dia. Pan
Size
5-3/4” Min.
Dia. Pan
Size
Use the minimum size pan shown for each
cooking element.
USING THE RANGE: Cookware for Induction Cooktop
Cookware “Noise”
A low humming noise is normal when using induction
coils, especially on higher power settings. Heavy enamel
cast-iron pots produce less noise than lightweight steel
pans. The amount of food content in the pans can
also affect noise level. Pans that completely cover the
graphics on the glass will produce less noise. Water
Power Sharing
For power level H (high), if a surface unit is on for an
extended period of time or if multiple surface units are
on, there may be a slight reduction in power to the
surface unit. Water under pans may also cause the
controls to reduce the power delivered to the cookware.
49-80765
trapped under pans can boil, causing the cookware
to vibrate or slide on the glass surface. Water under
pans may also cause the controls to reduce the power
delivered to the cookware. To try to reduce the noise,
move pans slightly and/or change power levels.
11
Page 12
Oven Controls
USING THE RANGE: Oven Controls
259
1 687
10 1112 13
34
12
49-80765
Page 13

Oven Controls
USING THE RANGE: Oven Controls
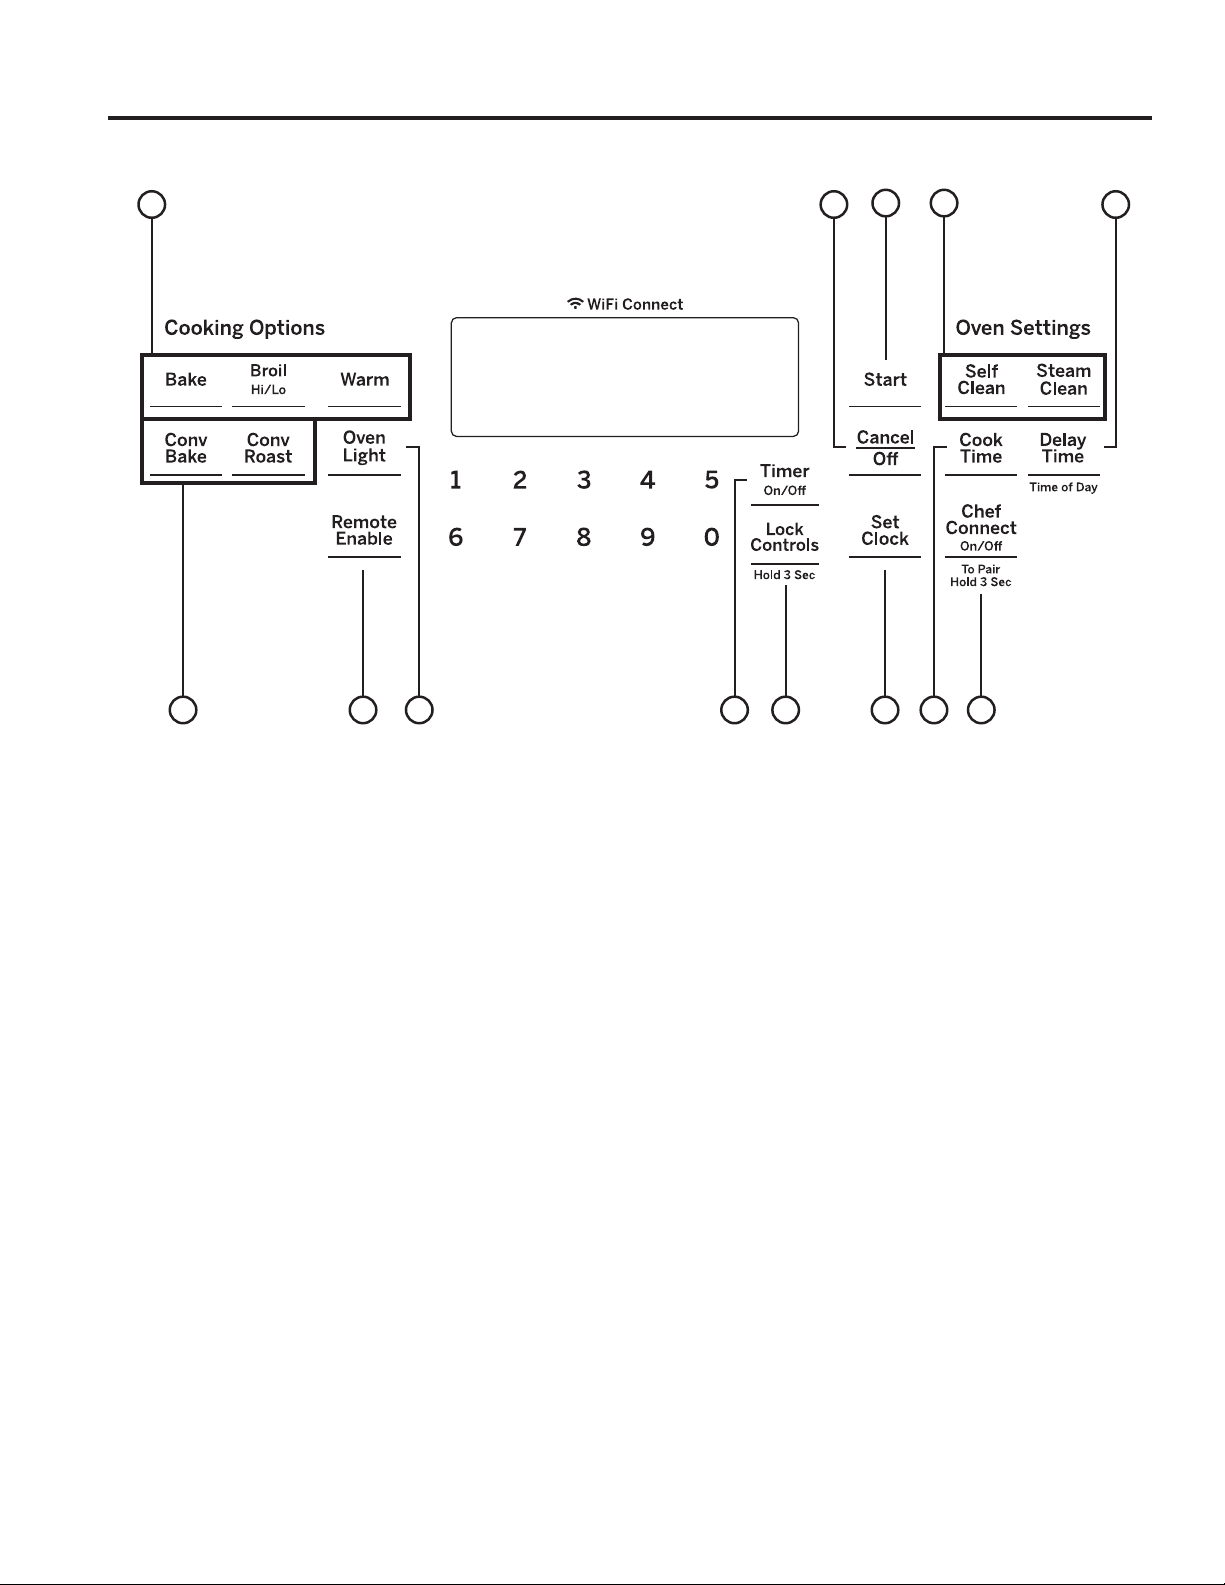
1. Convection Cooking Modes:
cooking modes use increased air circulation to improve
performance. The type of benefit depends on the
mode. Your oven has the following convection cooking
modes: Convection Bake and Convection Roast. See
the Cooking Modes section for more information.
Convection
2. Traditional Cooking Modes: Your oven has
the following traditional cooking modes: Bake, Broil Hi/
Lo, and Warm. See the Cooking Modes section for
more information.
3. Clean: Your oven has two cleaning modes: Self Clean
and Steam Clean. See the Cleaning the Oven section
for important information about using these modes.
4. Start: Must be pressed to start any cooking,
cleaning, or timed function.
5. Cancel/Off: Cancels ALL oven operations except
the clock and timer.
6. Cook Time: Counts down cooking time and turns
off the oven when the cooking time is complete. Press
the Cook Time pad, use the number pads to program
a cooking time in hours and minutes, then press Start.
This can only be used with Bake, Convection Bake,
and Convection Roast.
7. Clock: Sets the oven clock time. Press the Set
Clock pad, then use the number pads to program the
clock. Press Start to save the time.
8. Timer On/Off: Works as a countdown timer.
Press the Timer On/Off pad and the number pads
to program the time in hours and minutes. Press the
Start pad. The timer countdown is complete. To turn
the timer off press the Timer On/Off pad.
9. Delay Time: Delays when the oven will turn on.
Use this to set a time when you want the oven to start.
Press the Delay Time pad and use the number pads
to program the time of day for the oven to turn on
then press Start. Press the desired cooking mode and
temperature then press Start. A Cook Time may also
be programmed if desired. Follow the directions under
Cook Time for setting this feature. This can only be
used with Bake, Convection Bake, Convection Roast,
and Self-Clean.
NOTE: When using the Delay Time feature, foods that
spoil easily—such as milk, eggs, fish, stuffings, poultry
and pork—should not be allowed to sit for more than
1 hour before or after cooking. Room temperature
promotes the growth of harmful bacteria. Be sure that
the oven light is off because heat from the bulb will
speed harmful bacteria growth.
10. Oven Light: Turns the oven light on or off.
11. Lock Controls: Locks out the control so that
pressing the pads does not activate the controls. Press
the Lock Controls pad, for three seconds to lock or
unlock the control. Cancel/Off is always active, even
when the control is locked.
12. Remote Enable (on some models): Allows
you to control your oven remotely. To be able to start
the oven remotely, press the Remote Enable pad, and
“Remote” will be lit in the display. The oven can now
be remotely started with a connected device. Opening
the oven door or pressing the Remote Enable pad
will remove “Remote” from the display and prevent
you from being able to turn the oven on remotely. If
“Remote” is not shown in the display, you are still able
to change the oven settings or turn the oven off. After
using the oven, remember to verify that the “Remote”
icon is displayed if you wish to start the oven remotely
in the future. For instructions on how to connect your
oven, see the "Connecting your WiFi Connect Enabled
oven" instruction sheet.
13. Chef Connect: This is a Bluetooth
for use with other compatible Chef Connect enabled
products like an over-the-range microwave oven or
range hood. To pair those products to the range, press
and hold the Chef Connect pad for 3 seconds and
follow the corresponding instructions included with the
mating Chef Connect enabled product if needed. The
range will cancel pairing mode after two minutes if no
mating device is detected.
®
pairing feature
49-80765
13
Page 14

Special Features
There are several different special features on your range.
Ŷ 7RHQWHUWKH6SHFLDO)HDWXUHVPHQXSUHVVWKHBake and Broil pads at the same time and hold for three
seconds. "OFFSEt" will appear in the display.
Ŷ 6FUROOWKURXJK6SHFLDO)HDWXUHVPHQXXVLQJWKH8 pad for down and the 3 pad for up.
Ŷ 7RVHOHFWDIHDWXUHWRFKDQJHRUWRFRQILUPDFKDQJHSUHVVWKH0 pad.
Ŷ 7RFDQFHODFKDQJHDQGUHWXUQWRWKH6SHFLDO)HDWXUHVPHQXSUHVVWKH6 pad. To exit the Special Features
menu, press the 6 pad again.
Adjust the Oven Temperature (OFFSEt)
This feature allows the oven baking and convection
baking temperature to be adjusted up to 35ºF hotter
or down to 35ºF cooler. Use this feature if you believe
your oven temperature is too hot or too cold and wish to
change it. This adjustment affects Bake and Convection
Bake modes. No other cooking modes are affected.
Using the number pads to navigate as described above,
select "OFFSEt". A number between positive and
negative 35 will display. Use the 8 or 3 pads to increase
or decrease the offset value. Save and confirm by
pressing the 0 pad.
End of Timer Signals (End tonE)
This is the tone that signals the end of a timer. The tone
USING THE RANGE: Special Features
can be continuous (Con bEEP) or one repeating beep
(bEEP). A continuous setting will continue to sound a
tone until a button on the control is pressed.
Fahrenheit or Celsius Temperature Display
(dEg Unit)
The oven control is set to use Fahrenheit temperatures
(F), but you can change it to use Celsius temperatures (C).
Clock Display (Cloc diSP)
This feature specifies whether the clock appears in the
display. It may be On or Off.
Auto Recipe Conversion (Auto rEciPE)
When using Convection Bake cooking, Auto Recipe
Conversion will automatically convert the regular baking
temperatures entered to convection bake cooking
temperatures when turned on. Note that this option does
not convert convection bake cooking times, it only converts
temperatures. This feature may be turned On or Off.
Sound Volume (Sound)
This feature allows the oven tone volume to be adjusted
between high (Hi), medium (Reg), low (lo), and off (Off).
The control will sound the oven tone at the new volume
level each time the sound level is changed.
12-hour Shutoff (2H ShutoFF)
This feature shuts the oven down after 12 hours of
continuous operation. It may be enabled or disabled.
Clock Configuration (Cloc cFg)
This feature specifies how the time of day will be
displayed. You can select a standard 12-hour clock (12 H)
or 24-hour military time (24 H).
14
49-80765
Page 15
Sabbath Mode
The Sabbath mode feature complies with standards set forth by Star K. Some of these standards that will be noticed
by the consumer include the disabling of tones, disabling of oven lights, and delays of about 30 seconds to one
minute on display changes. Only continuous baking or timed baking is allowed in the Sabbath mode. Cooking in the
Sabbath mode is a two-step process, first the Sabbath mode must be set and then the bake mode must be set.
USING THE OVEN: Sabbath Mode
Setting the Sabbath Mode
1. Press the Bake and Broil pads at the same time and
hold until the special features menu is displayed.
2. Use the 3 or 8 number pads to scroll through the
special features until “SAbbAth” is displayed and then
press 0. Refer to the graphic in the Special Features
section to see how the number keys are mapped.
3. Use the 3 or 8 number pads to scroll through the
options until “On” is shown in the display, then press
the 0 number pad to save the setting. Press 6 to exit
the Special Features menu. A single bracket “]” will
appear in the display indicating that the Sabbath mode
is set. The clock will not be displayed. Continuous
bake or timed bake can now be programmed.
Starting a Continuous Bake
1. Press the Bake pad.
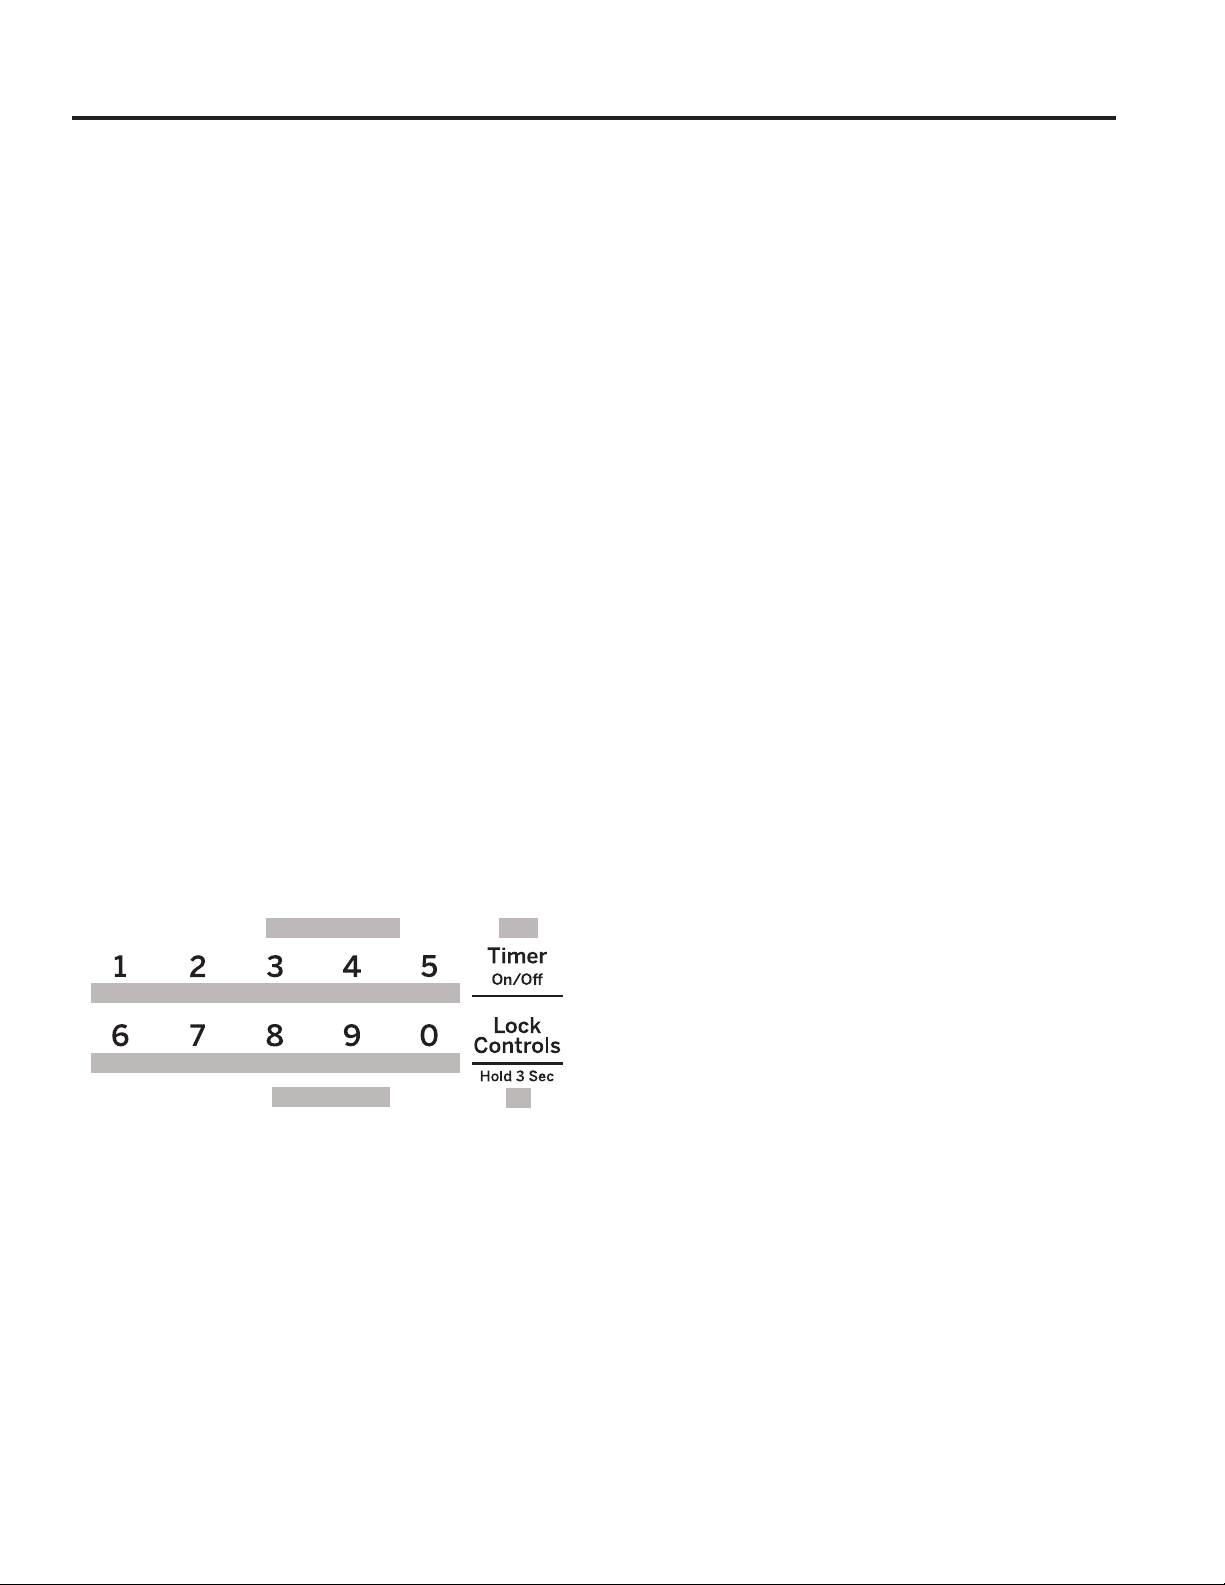
2. If the desired temperature is 350F, press Start. If
a different cooking temperature is desired, use the
1 through 5 number pads or Timer pad to select a
preset cooking temperature, then press Start. Refer
to the graphic below to determine which pad sets the
desired cooking temperature.
After a delay, a second bracket “] [“ will appear in the
display indicating that the oven is baking.
Temperature (°F) 400
170
2h
1 = 170° F, 2 = 200° F, 3 = 250° F, 4 = 300° F, 5 = 325° F, Timer = 400° F
200
2.5h
6 = 2 hours, 7 = 2.5 hours, 8 = 3 hours, 9 = 3.5 hours,
250
3h
0 = 4 hours, Lock Controls = 6 hours
300
3.5h
Time (hours)
325
4h
6h
Adjusting the Temperature
1. Press Bake, use the 1 through 5 number pads and
the Timer pad to select a different preset cooking
temperature, and press Start.
2. Since no feedback is given during temperature
change, an oven thermometer can be used to confirm
temperature changes.
Starting a Timed Bake
1. Press the Bake pad.
2. If the desired temperature is 350F, use the 6 through
0 number pads or the Lock Control pad to select
a cooking time. If a cooking temperature other
than 350F is desired, use the 1 through 5 number
pads or the Timer pad to select a preset cooking
temperature, then select the cooking time. Refer to
the graphic on this page to determine which pad sets
the desired cooking temperature and cooking time.
3. Press Start.
After a delay, a second bracket “] [“ will appear in the
display indicating that the oven is baking. When the cook
time expires, the display will change back to a single
bracket “]” indicating that the oven is no longer baking.
No tone will sound when the cook time is complete.
Exit the Sabbath Mode
Exiting the Sabbath mode should be done after the
Sabbath is over.
1. Press Cancel/Off to end any bake mode that may be
running.
2. Press Bake and Broil pads at the same time and
hold until the Special Features menu is displayed.
3. Use the 3 or 8 number pads to scroll through the
special features until “SAbbAth” is displayed, then
press 0.
4. Use the 3 or 8 number pads to scroll through the
options until “OFF” is displayed and press 0 to save
the setting. Press the 6 number pad to exit the
Special Features menu.
49-80765
Sabbath Mode Power Outage Note
If a power outage occurs while the oven is in Sabbath
Mode, the unit will return to Sabbath Mode when power
is restored, however the oven will return to the off state
even if it was in the middle of a bake cycle when the
power outage occurred.
15
Page 16
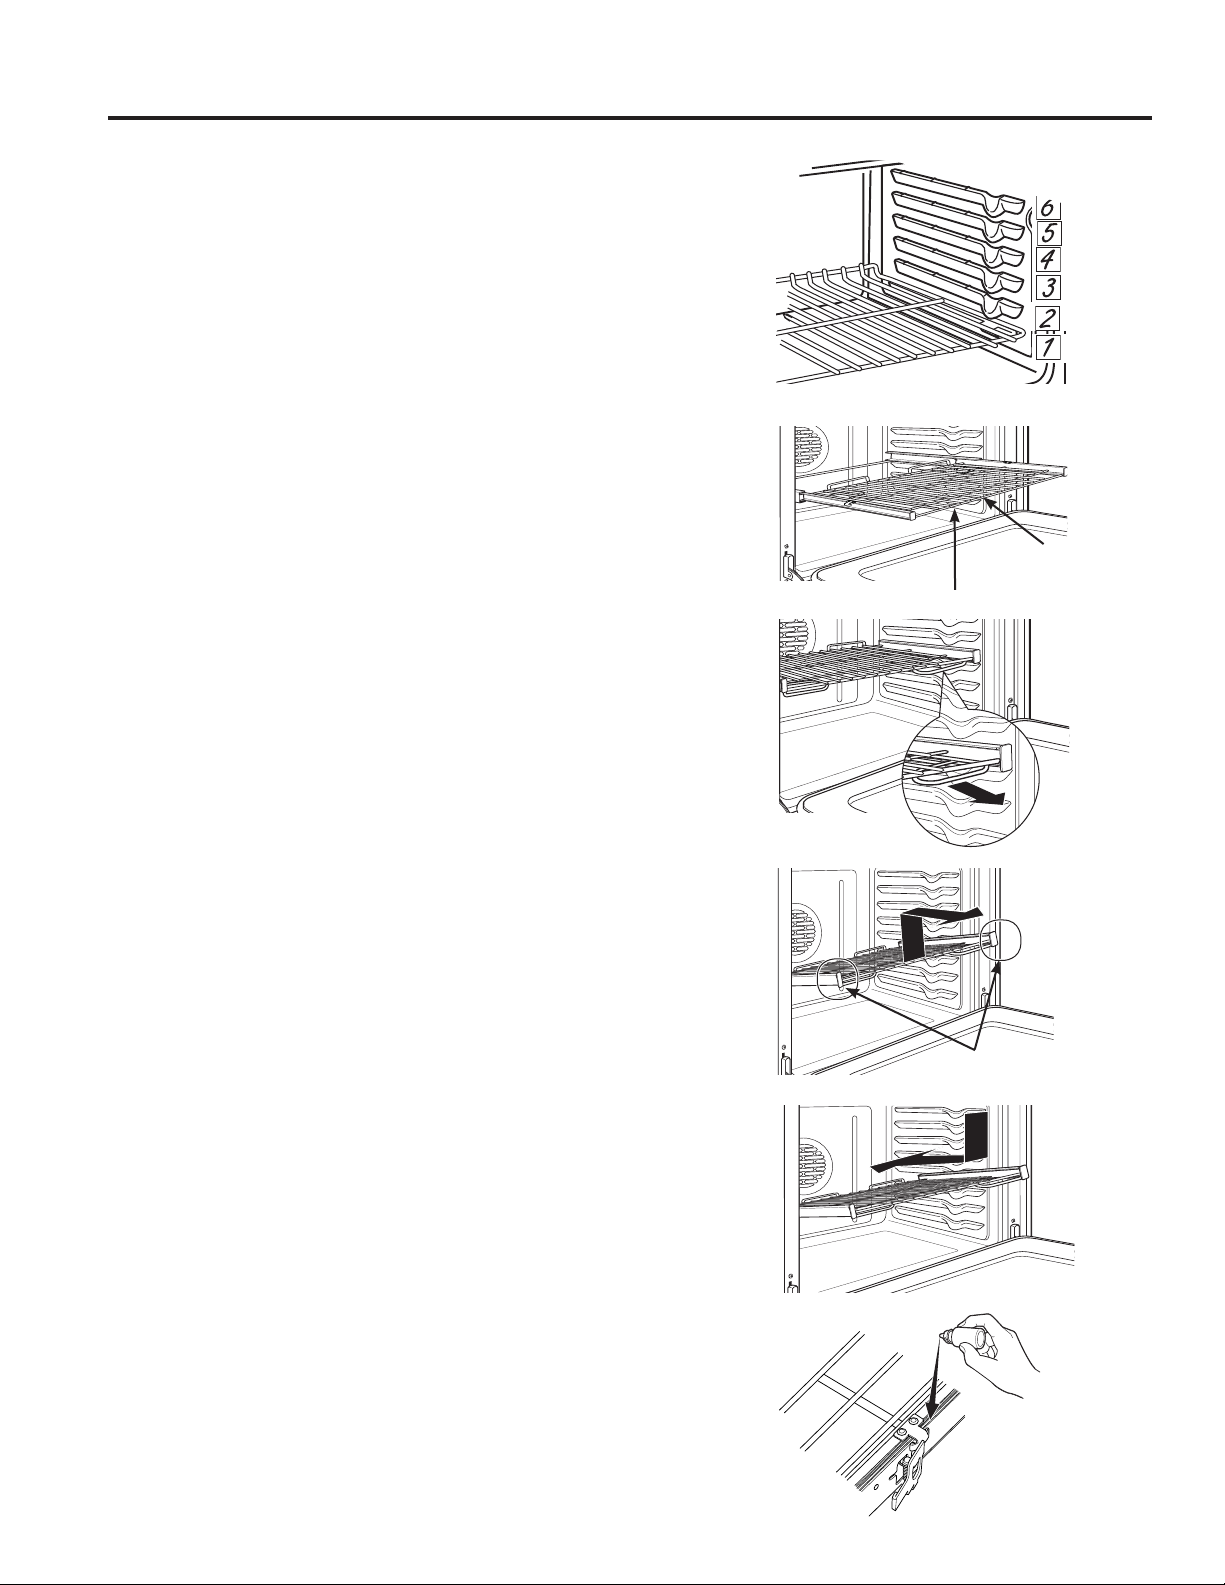
Oven Racks
Recommended rack positions for various types of
foods are provided in the Cooking Guide. Adjusting
rack position is one way to impact cooking results. For
example, if you would prefer darker tops on cakes,
muffins, or cookies, try moving food one rack position
higher. If you find foods are too brown on top try moving
them down next time.
When baking with multiple pans and on multiple racks,
ensure there is at least 1½" between pans to allow
sufficient space for air to flow.
Your Oven may have extension racks and/or traditional
flat racks.
To avoid possible burns, place the racks in the desired
position before you turn the oven on.
Extension Racks
Always pull the rack out by its upper front rail to its fully
open position, when placing or removing cookware.
If extension racks are difficult to extend, lubricate the
racks with the graphite lubricant provided with your
USING THE RANGE: Oven Racks
oven. Remove the rack from the oven, remove debris in
the side tracks with a paper towel, shake the graphite
lubricant and place 4 small drops on the two bottom
tracks of the left and right sides. Open and close the
rack several times to distribute the lubricant.
To order additional graphite lubricant, read the
Assistance and Accessories section at the beginning of
the manual.
The number of rack positions may vary by model.
Upper Front
Rail
Fully Open Position
To Remove An Extension Rack:
1. Make sure the rack is pushed all the way into the
oven so that side paddles on the rack disengage from
the oven support.
2. Slide the rack toward you to the bump (stop position)
on the rack support.
3. Firmly grasp both sides of the rack frame and the
sliding rack, tilt the front end up and pull it out.
To Replace An Extension Rack:
1. Firmly grasp both sides of the rack frame and the
sliding rack.
2. Place the curved end of the rack (stop-locks) onto the
oven supports, tilt up the front of the rack and push it
in as far as it will go.
If extension racks are difficult to replace or remove, wipe
the oven rack supports with cooking oil. Do not wipe oil
on the rack slides.
To Lubricate the Paddle:
Shake lubricant and apply to the moving parts of the
paddle mechanisms as shown.
Grasp here
16
49-80765
Page 17

Aluminum Foil and Oven Liners
CAUTION: Do not use any type of foil or oven liner to cover the oven bottom. These items can trap
heat or melt, resulting in damage to the product and risk of shock, smoke or fire. Damage from improper use
of these items is not covered by the product warranty.
Foil may be used to catch spills by placing a sheet on a lower rack, several inches below the food. Do not use more
foil than necessary and never entirely cover an oven rack with aluminum foil. Keep foil at least 1-1/2” from oven walls
to prevent poor heat circulation.
Cookware
Cookware Guidelines
The material, finish, and size of cookware affect baking
performance.
Dark, coated and dull pans absorb heat more readily
than light, shiny pans. Pans that absorb heat more
readily can result in a browner, crisper, and thicker crust.
If using dark and coated cookware check food earlier
than minimum cook time. If undesirable results are
obtained with this type of cookware consider reducing
oven temperature by 25º F next time.
Shiny pans can produce more evenly cooked baked
goods such as cakes and cookies.
Glass and ceramic pans heat slowly but retain heat well.
These types of pans work well for dishes such as pies
and custards.
Air insulated pans heat slowly and can reduce bottom
browning.
Keep cookware clean to promote even heating.
USING THE RANGE: Aluminum Foil and Oven Liners / Cookware
49-80765
17
Page 18

Cooking Modes
Your new oven has a variety of cooking modes to help you get the best results. These modes are described below.
Refer to the Cooking Guide section for recommendations for specific foods. Remember, your new oven may perform
differently than the oven it is replacing.
Baking and Roasting Modes
Select a mode for baking and roasting based on the
type and quantity of food you are preparing. When
preparing baked goods such as cakes, cookies, and
pastries always preheat the oven first. Follow recipe
recommendations for food placement. If no guidelines
are provided, center food in the oven.
Bake
The bake mode is intended for single rack cooking. This
mode uses heat primarily from the lower element but
also from the upper element to cook food. To use this
mode press the Bake pad, enter a temperature, and
then press Start. Preheating is generally recommended
when using this mode.
Convection Bake Multi Rack
The Convection Bake Multi Rack mode is intended
for baking on multiple racks at the same time. This
USING THE RANGE: Cooking Modes
mode uses heat primarily from the rear element, when
available, but also heat from the upper and lower
elements, along with air movement from the convection
fan to enhance cooking evenness. Your oven is
equipped with Auto Recipe Conversion, so it is not
necessary to convert the temperature when using this
mode. Baking time might be slightly longer for multiple
racks than what would be expected for a single rack. To
use this mode press the Convection Bake pad, enter a
temperature, and then press Start. Always preheat when
using this mode.
Convection Roast
The Convection Roast mode is intended for roasting
whole cuts of meat on a single rack. This mode uses
heat from the lower, upper, and rear elements along
with air movement from the convection fan to improve
browning and reduce cooking time. It is not necessary to
convert temperature. Check food earlier than the recipe
suggested time when using this mode or use a meat
probe. To use this mode press the Convection Roast
pad, enter a temperature, and then press Start. It is not
necessary to preheat when using this mode.
Warm
To use this mode, press the Warm pad then press
Start. Cover foods that need to remain moist and do
not cover foods that should be crisp. Preheating is
not required. Do not use warm to heat cold food other
than crisping crackers, chips or dry cereal. It is also
recommended that food not be kept warm for more
than 2 hours.
Broiling Modes
When broiling, the door should remain OPEN. Monitor
food closely while broiling. Use caution when broiling
on upper rack positions as placing food closer to the
broil element increases smoking, spattering, and the
possibility of fats igniting. For best performance center
food below the broil heating element.
Try broiling foods that you would normally grill. Adjust
rack positions to adjust the intensity of the heat to the
food. Place foods closer to the broil element when a
seared surface and rare interior is desired. Thicker foods
and foods that need to be cooked through should be
broiled on a rack position farther from the broiler or by
using Broil Lo.
Broil Hi
The Broil Hi mode uses intense heat from the upper
element to sear foods. Use Broil Hi for thinner cuts of
meat and/ or foods you prefer less done on the interior.
To use this mode press the Broil pad once and then
press Start. It is not necessary to preheat when using
this mode.
Broil Lo
The Broil Lo mode uses less intense heat from the upper
element to cook food thoroughly while also producing
surface browning. Use Broil Lo for thicker cuts of meat
and/or foods that you would like cooked all the way
through. To use this mode press the Broil pad twice and
then press Start. It is not necessary to preheat when
using this mode.
18
49-80765
Page 19
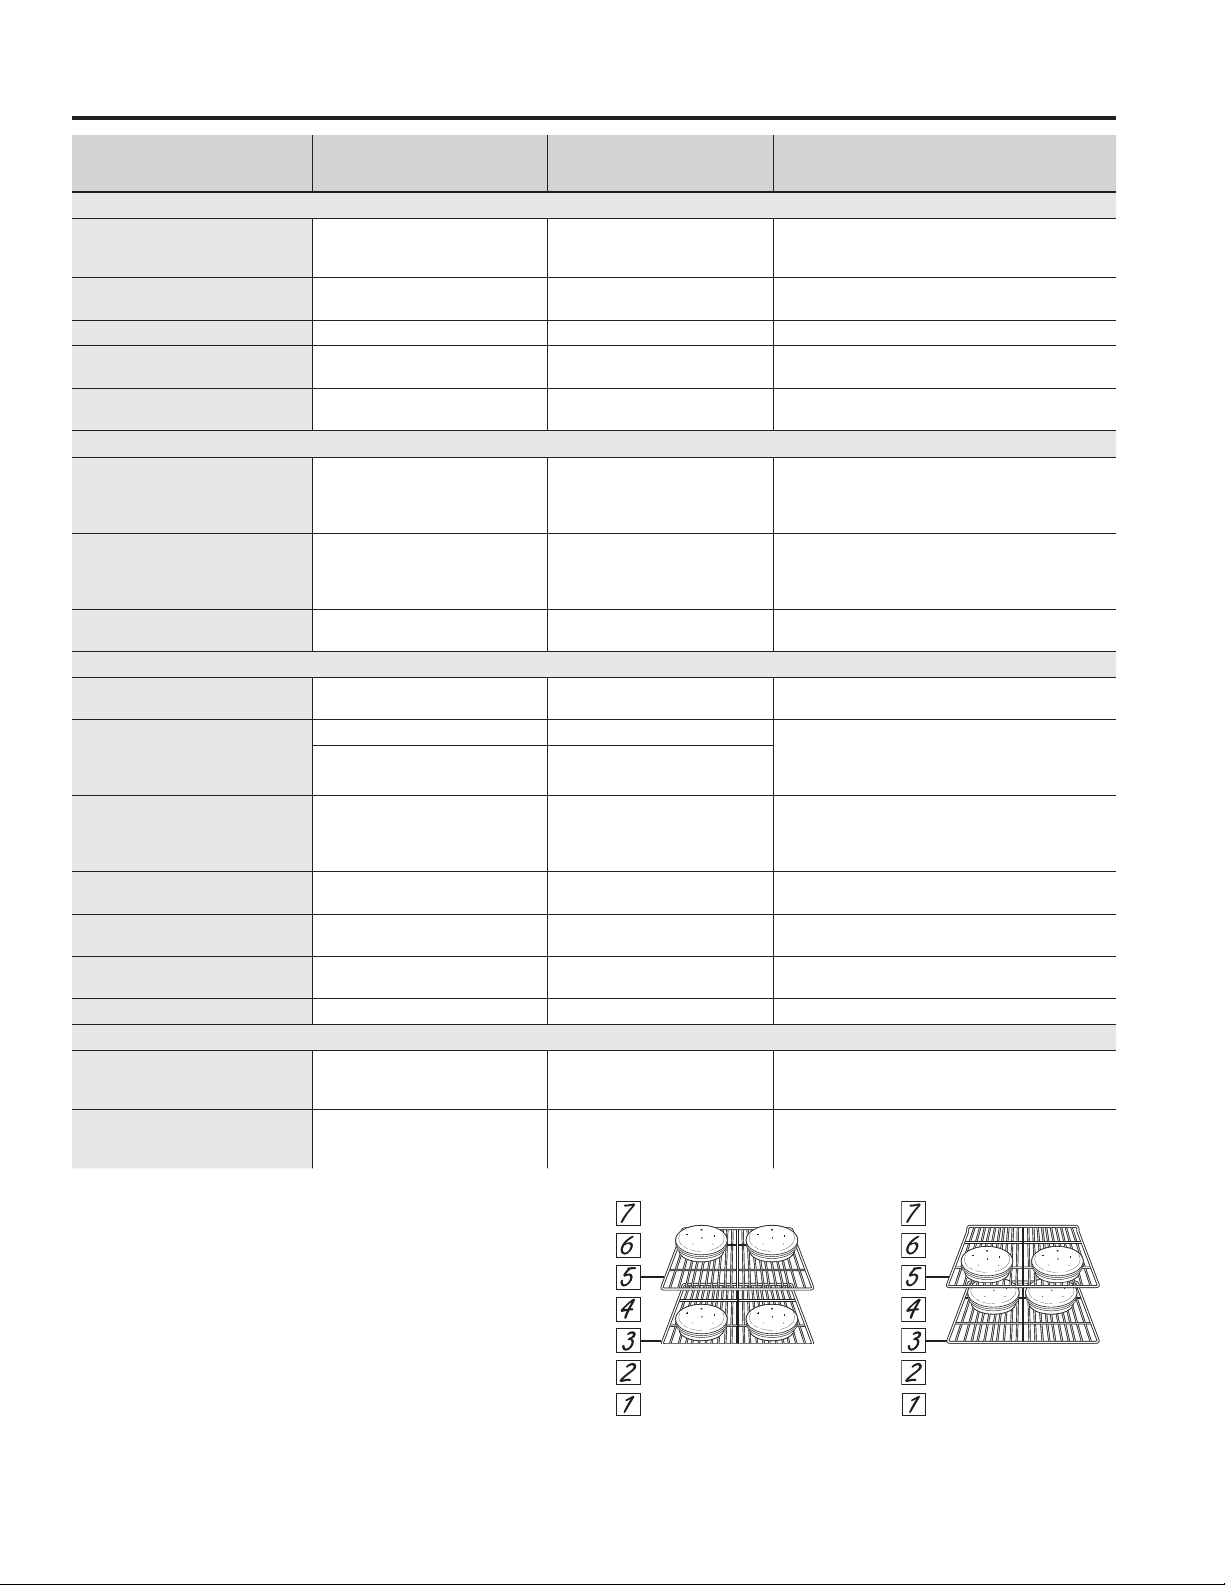
Cooking Guide
USING THE RANGE: Cooking Guide
FOOD TYPE
Baked Goods
Layer Cakes, sheet cakes,
bundt cakes, muffins, quick
breads on a Single Rack
Layer cakes* on Multiple
Racks
Chiffon cakes (angel food) Bake 1 Use shiny cookware.
Cookies, biscuits, scones on a
Single Rack
Cookies, biscuits, scones on
Multiple Racks
Beef & Pork
Hamburgers Broil Hi 6
Steaks & Chops Broil Hi 6
Roasts
Poultry
Whole chicken
Bone-in chicken breasts, legs,
thighs
Boneless chicken breasts
Whole turkey
Turkey Breast
Fish Broil Lo
Casseroles Bake 4
Frozen Convenience Foods
Pizza, potato products,
chicken nuggets, appetizers
on a Single Rack
Pizza, potato products,
chicken nuggets, appetizers
on Multiple Racks
RECOMMENDED
MODE(S)
Bake 3 Use shiny cookware.
Bake
Convection Bake
Bake 3 Use shiny cookware.
Convection Bake
Bake
Convection Roast
Bake
Convection Roast
Broil Hi 2 If breaded or coated in sauce avoid Broil Hi modes.
Broil Lo
Bake
Broil Lo
Bake
Bake
Convection Roast
Bake
Convection Roast
Bake 4 Use shiny cookware.
Bake
Convection Bake
RECOMMENDED
RACK POSITION(S) ADDITIONAL SUGGESTIONS
3 and 5
3 and 5
2, 4, and 6
Use a broil pan; move food down for more done-
ness/less searing. Watch food closely when broiling.
For best performance center food below the broil
Use a broil pan; move food down for more done-
ness/less searing. Watch food closely when broiling.
For best performance center food below the broil
3 or 4
3 or 4 Use a low sided pan such as a broil pan.
2 or 3
2 or 3
1 or 2 Use a low sided pan such as a broil pan.
2 or 3 Use a low sided pan such as a broil pan.
6 (1/2 thick or less)
5 (>1/2 inch)
3 and 5 Use shiny cookware.
Use a low sided pan such as a broil pan. Preheating
Broil skin side down first. Watch food closely when
broiling. For best performance when broiling, center
Move food down for more doneness/less searing
and up for greater searing/browning when broiling.
For best performance when broiling, center food
Watch food closely when broiling. For best perfor-
mance center food below the broil heating element.
Ensure adequate airflow
(see illustration below).
Ensure adequate airflow.
heating element.
heating element.
is not necessary.
food below the broil heating element.
below the broil heating element
*When baking four cake layers at a time with traditional
bake, use racks 3 and 5.
*When baking four cake layers at a time with convection
bake, use racks 3 and 5.
Cook food thoroughly to help protect against food
borne illness. Minimum safe food temperature
recommendations for food safety can be found at
www.IsItDoneYet.gov. Make sure to use a food
thermometer to take food temperatures.
49-80765
Rack position for Traditional
Bake, cakes in front of rack 3
and back of rack 5
Rack position for Convection
Bake, cakes in back of rack 3
and front of rack 5
19
Page 20
Cleaning the Range – Exterior
Be sure all controls are off and all surfaces are cool before cleaning any part of the range.
If your range is removed for cleaning, servicing or any reason, be
WARNING
Control Lockout
If desired, the touch pads may be deactivated before
cleaning.
See Lock Controls in the Oven Controls section in this
manual.
Clean up splatters with a damp cloth.
Control Panel
It’s a good idea to wipe the control panel after each use.
Clean with mild soap and water or vinegar and water,
rinse with clean water and polish dry with a soft cloth.
sure the anti-tip device is reengaged properly when the range is
replaced. Failure to take this precaution could result in tipping of
the range and can result in death or serious burns to children or
adults. Do not use oven cleaners, abrasive cleansers, strong liquid
cleansers, steel wool, plastic scouring pads, or cleaning powders on
the interior or exterior of the range.
You may also use a glass cleaner.
Remove heavier soil with warm, soapy water. Do not use
abrasives of any kind.
Reactivate the touch pads after cleaning.
Do not use abrasive cleansers, strong liquid cleansers,
plastic scouring pads or oven cleaners on the control
panel—they will damage the finish.
Range Exterior
Clean with a mild soap and water or vinegar and water
solution. Rinse with clean water and dry with a soft cloth.
When cleaning surfaces, make sure that they are at
room temperature and not in direct sunlight.
If stain on the door vent trim is persistent, use a mild
abrasive cleaner and a sponge-scrubber for best results.
Painted Surfaces
Painted surfaces include the sides of the range and the
doors, and top of control panel. Clean these with soap and
water or a vinegar and water solution.
CARE AND CLEANING: Cleaning the Range – Exterior
Stainless Steel Surfaces
Do not use a steel wool pad; it will scratch the surface.
To clean the stainless steel surface, use warm sudsy
water or a stainless steel cleaner or polish. Always wipe
the surface in the direction of the grain. Follow the cleaner
instructions for cleaning the stainless steel surface.
Cleaners with oxalic acid such as Bar Keepers Friend Soft
Cleanser™ will remove surface rust, tarnish and small
Spillage of marinades, fruit juices, tomato sauces and
basting liquids containing acids may cause discoloration
and should be wiped up immediately. Let hot surfaces
cool, then clean and rinse.
Do not use commercial oven cleaners, cleaning powders,
steel wool or harsh abrasives on any painted surface.
blemishes. Use only a liquid cleanser free of grit and rub in
the direction of the brush lines with a damp, soft sponge.
To inquire about purchasing cleaning products including
stainless steel appliance cleaner or polish read the
Assistance and Accessories sections at the beginning of
this manual.
20
49-80765
Page 21

Cleaning the Range – Interior
The interior of your new oven can be cleaned manually or by using Self Clean.
Spillage of marinades, fruit juices, tomato sauces and basting liquids containing acids may cause discoloration and
should be wiped up immediately. Let hot surfaces cool, then clean and rinse.
Manual Cleaning
Do not use oven cleaners, abrasive cleaners, strong
liquid cleansers, steel wool, scouring pads, or cleaning
powders on the interior of the oven. Clean with a mild
Steam Clean Mode
Steam clean is intended to clean small spills using water
and a lower cleaning temperature than Self-Clean.
To use the Steam Clean feature, wipe grease and soils
from the oven. Pour one cup of water into the bottom of
the oven. Close the door. Press the Steam Clean pad
Self Clean Mode
Read Self-Cleaning Oven Safety Instructions at the
beginning of this manual before using Self Clean Mode.
Self clean uses very high temperatures to clean the oven
interior. The oven door will lock when using this feature.
Before operating the self-clean cycle, wipe up grease and
soils from the oven. Remove all items from the oven other
than enameled (dark color) racks. Shiny or silver racks
and any cookware or other items should all be removed
from the oven before initiating a self-clean cycle. Close
the door. Press the Self Clean pad and a default selfclean time is displayed. The clean time can be changed
to any time between 3:00 and 5:00 hours by using the
number pads to enter a different time and pressing Start.
For heavily soiled ovens, the maximum 5 hour clean time
is recommended. If you wish to use the default time, press
the Start pad immediately after pressing the Clean pad.
The oven will turn off automatically when the self-clean
cycle is complete. The door will stay locked until the oven
has cooled down. After the oven has cooled down wipe
any ash out of the oven.
We recommend venting your kitchen with an open
window or using a ventilation fan or hood during the first
self-clean cycle.
soap and water or vinegar and water solution. Rinse with
clean water and dry with a soft cloth. When cleaning
surfaces, make sure that they are at room temperature.
and then press Start. The oven door will lock. You can
not open the door during the 30 minute steam clean as
this will decrease the steam clean performance. At the
end of the steam clean cycle the door will unlock. Wipe
out any excess water and any remaining soil.
Soil on the front frame of the range and outside the
gasket on the door will need to be cleaned by hand.
Clean these areas with hot water, soap-filled steel-wool
pads or cleansers such as Soft Scrub®. Rinse well with
clean water and dry.
Do not clean the gasket. The fiberglass material of
the oven door gasket cannot withstand abrasion. It is
essential for the gasket to remain intact. If you notice it
becoming worn or frayed, replace it.
Make sure the oven light bulb cover is in place and the
oven light is off.
IMPORTANT: The health of some birds is extremely
sensitive to the fumes given off during the self-cleaning
cycle of any range. Move birds to another wellventilated room.
On Some Models:
The surface units are automatically disabled during the
self-clean cycle. Wait until the self-clean cycle is finished
to set and use the surface units.
CARE AND CLEANING: Cleaning the Range – Interior
Racks
All racks can be washed with warm, soapy water.
Enameled (not shiny) racks can be left in the cavity
during self clean.
Oven Heating Elements
Do not clean the bake element or the broil element. Any
soil will burn off when the elements are heated.
The bake element is not exposed and is under the oven
floor. Clean the oven floor with warm, soapy water.
49-80765
Racks may be more difficult to slide, especially after
a self-clean. Put some vegetable oil on a soft cloth or
paper towel and rub onto the left and right edges.
Wipe up heavy soil on the oven bottom.
21
Page 22
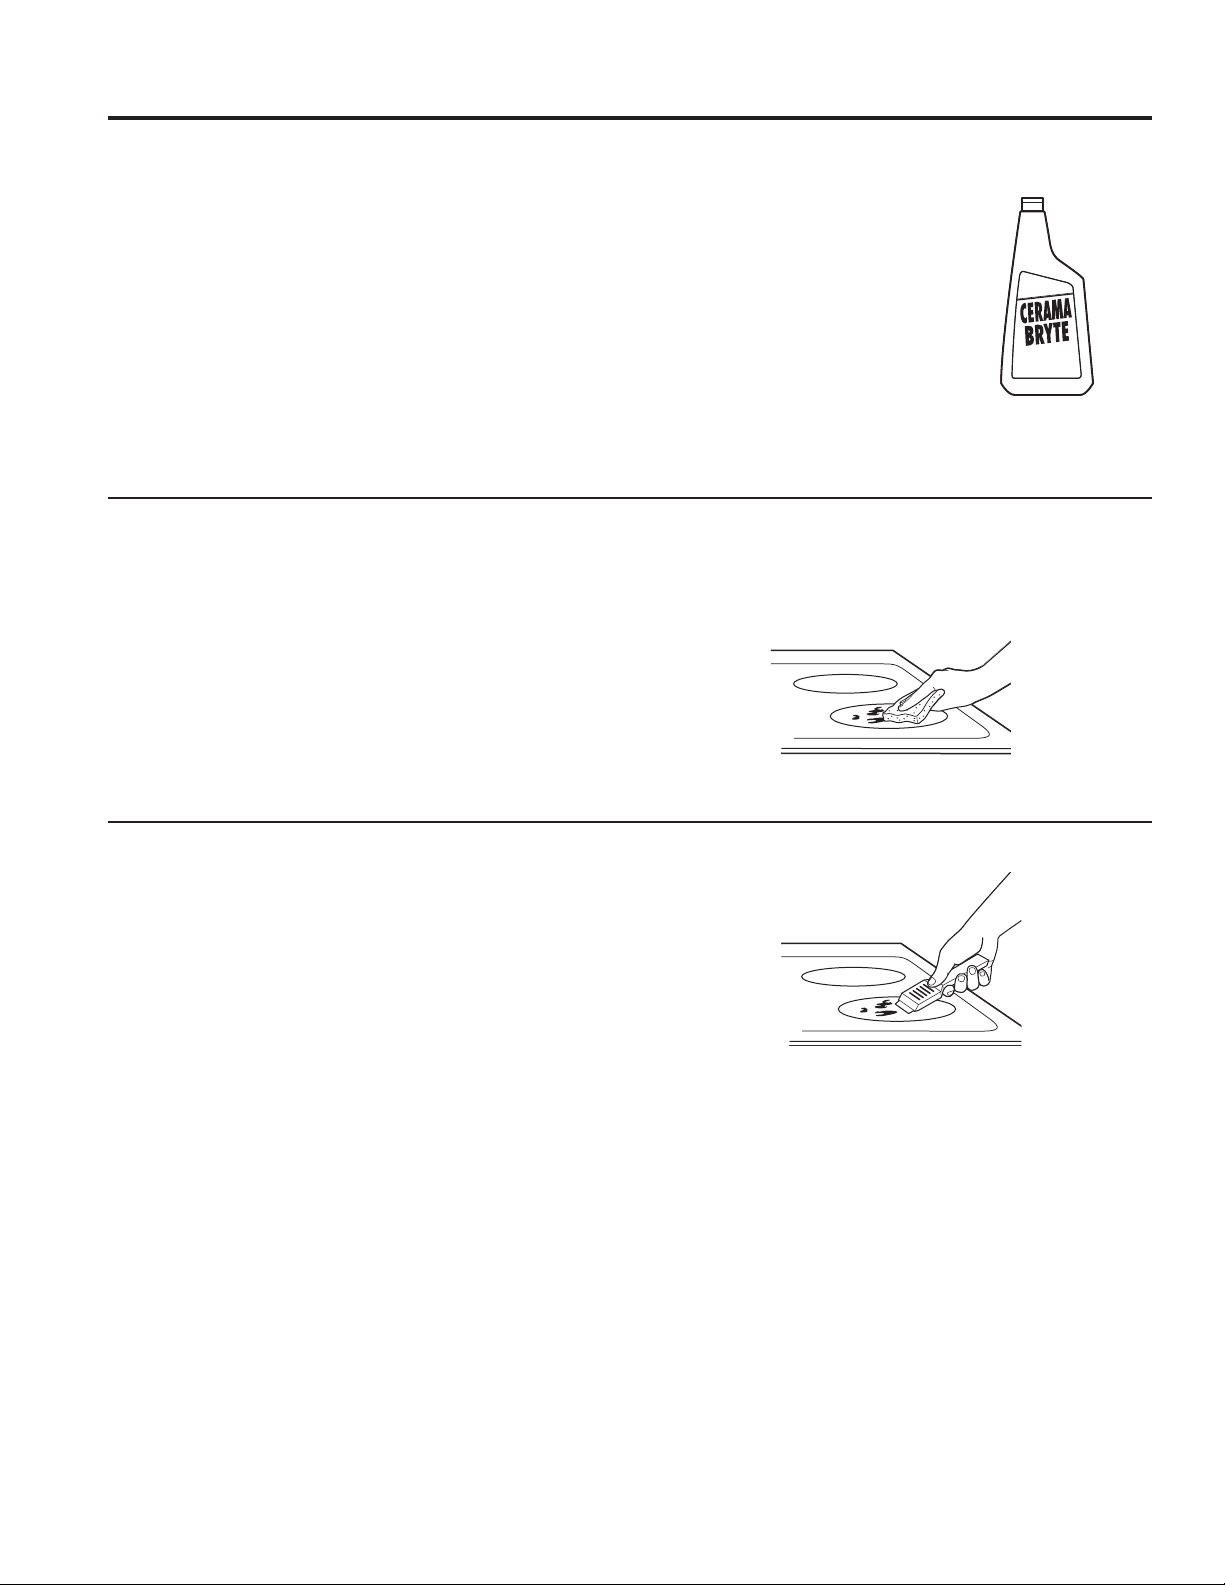
Cleaning the Glass Cooktop
Normal Daily Use Cleaning
ONLY use CERAMA BRYTE® Ceramic Cooktop Cleaner
on the glass cooktop. Other creams may not be as
effective.
To maintain and protect the surface of your glass
cooktop, follow these steps:
1. Before using the cooktop for the first time, clean it
with CERAMA BRYTE® Ceramic Cooktop Cleaner.
This helps protect the top and makes cleanup easier.
2. Daily use of CERAMA BRYTE® Ceramic Cooktop
Cleaner will help keep the cooktop looking new.
3. Shake the cleaning cream well. Apply a few drops of
CERAMA BRYTE® Ceramic Cooktop Cleaner directly
to the cooktop.
Burned-On Residue
NOTE: DAMAGE to your glass surface may occur if you
use scrub pads other than those recommended.
1. Allow the cooktop to cool.
2. Spread a few drops of CERAMA BRYTE® Ceramic
Cooktop Cleaner on the entire burned residue area.
3. Using the included CERAMA BRYTE® Cleaning Pad
for Ceramic Cooktops, rub the residue area, applying
pressure as needed.
4. If any residue remains, repeat the steps listed above
as needed.
4. Use a paper towel or
CERAMA BRYTE® Cleaning
Pad for Ceramic Cooktops
to clean the entire cooktop
surface.
5. Use a dry cloth or paper towel
to remove all cleaning residue.
No need to rinse.
NOTE: It is very important that
you DO NOT heat the cooktop
until it has been cleaned
thoroughly.
5. For additional protection, after all residue has been
removed, polish the entire surface with CERAMA
BRYTE® Ceramic Cooktop Cleaner and a paper towel.
Use a CERAMA BRYTE® Cleaning
Pad for Ceramic Cooktops.
Clean your cooktop after each
spill. Use CERAMA BRYTE®
Ceramic Cooktop Cleaner.
Heavy, Burned-On Residue
1. Allow the cooktop to cool.
2. Use a single-edge razor blade scraper at approximately
a 45° angle against the glass surface and scrape the
CARE AND CLEANING: Cleaning the Glass Cooktop
soil. It will be necessary to apply pressure to the razor
scraper in order to remove the residue.
3. After scraping with the razor scraper, spread a few drops
of CERAMA BRYTE® Ceramic Cooktop Cleaner on the
entire burned residue area. Use the CERAMA BRYTE®
Cleaning Pad to remove any remaining residue.
4. For additional protection, after all residue has been
removed, polish the entire surface with CERAMA
BRYTE® Ceramic Cooktop Cleaner and a paper towel.
The CERAMA BRYTE® Ceramic Cooktop Scraper and all
recommended supplies are available through our Parts Center.
See instructions under “Assistance / Accessories” section.
NOTE: Do not use a dull or nicked blade.
22
49-80765
Page 23
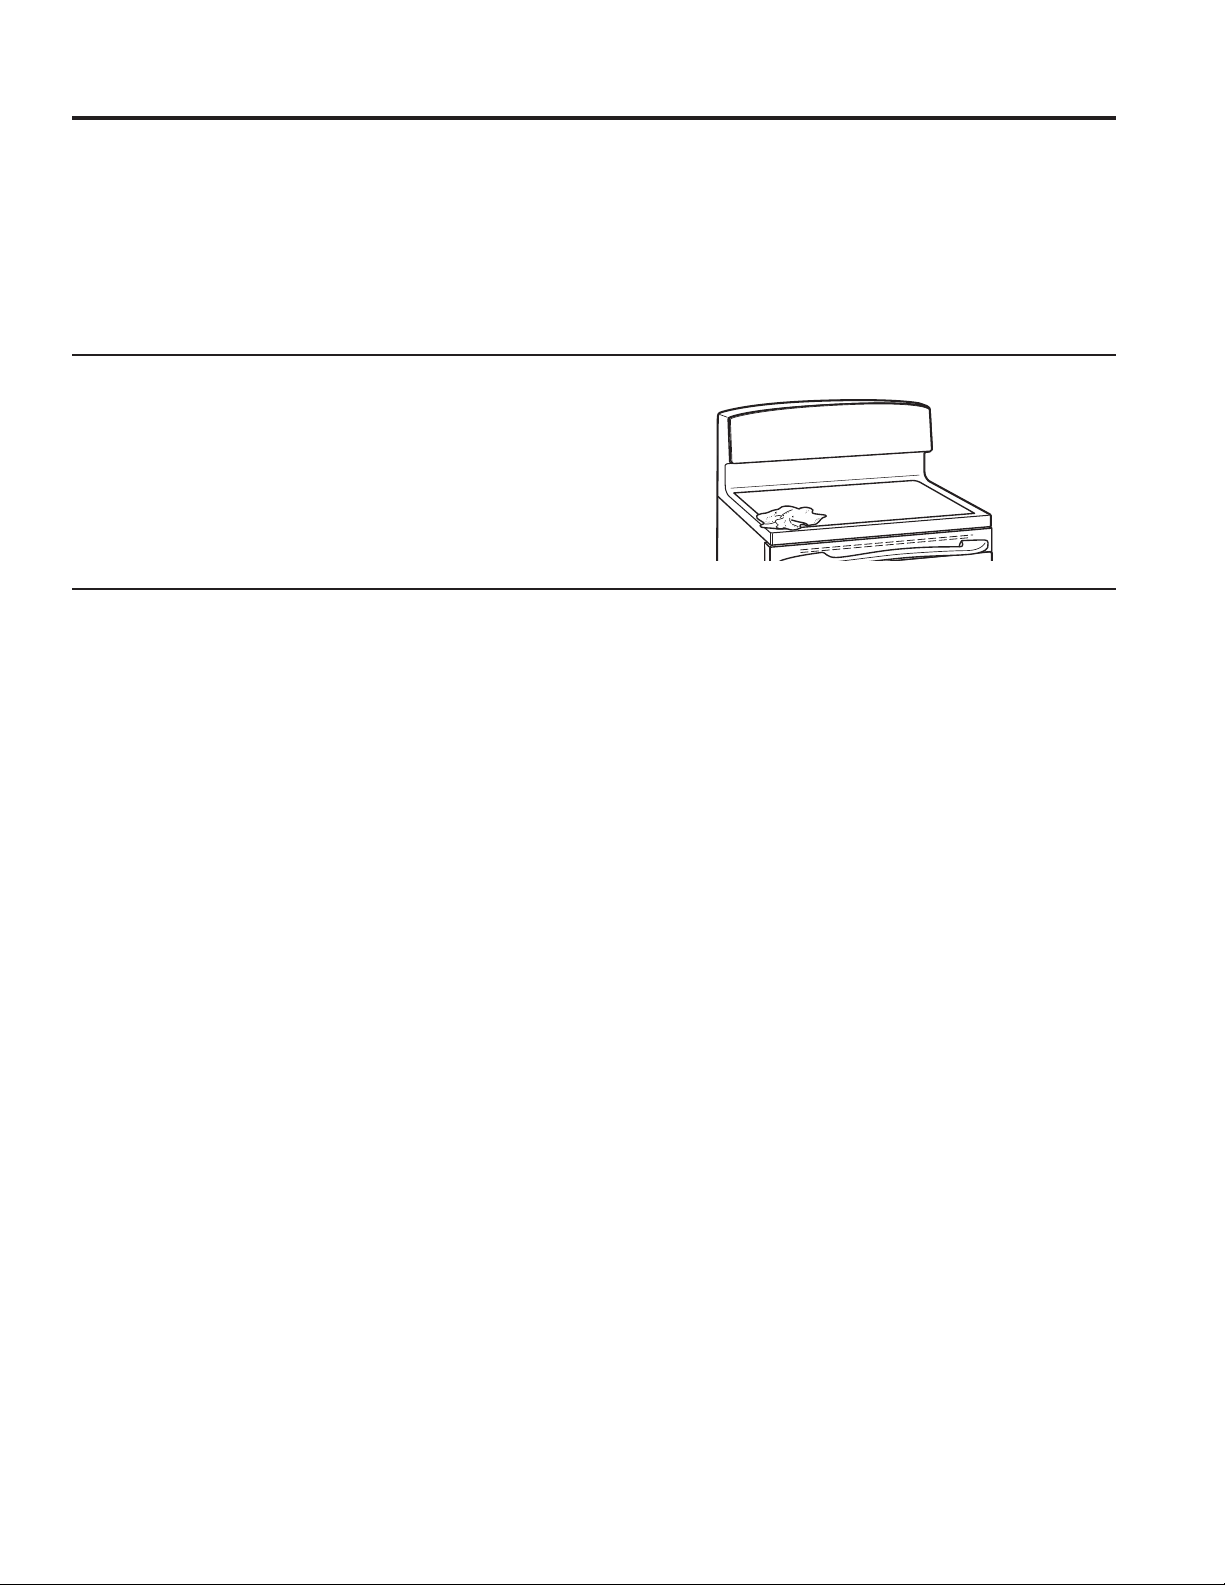
Cleaning the Glass Cooktop (Cont.)
Metal Marks and Scratches
1. Be careful not to slide pots and pans across your
cooktop. It will leave metal markings on the cooktop
surface.
These marks are removable using the CERAMA
BRYTE® Ceramic Cooktop Cleaner with the CERAMA
BRYTE® Cleaning Pad for Ceramic Cooktops.
Cooktop Seal (on some models)
To clean the cooktop seal around the edges of the glass,
lay a wet cloth on it for a few minutes, then wipe clean
with nonabrasive cleaners.
Damage from Sugary Spills and Melted Plastic
Special care should be taken when removing hot substances to avoid permanent damage of the glass surface.
Sugary spillovers (such as jellies, fudge, candy, syrups) or melted plastics can cause pitting of the surface of your
cooktop (not covered by the warranty) unless the spill is removed while still hot. Special care should be taken when
removing hot substances.
Be sure to use a new, sharp razor scraper.
Do not use a dull or nicked blade.
2. If pots with a thin overlay of aluminum or copper
are allowed to boil dry, the overlay may leave black
discoloration on the cooktop.
This should be removed immediately before heating
again or the discoloration may be permanent.
NOTE: Carefully check the bottom of pans for roughness
that would scratch the cooktop.
CARE AND CLEANING: Cleaning the Glass Cooktop
1. Turn off all surface units. Remove hot pans.
2. Wearing an oven mitt:
a. Use a single-edge razor blade scraper (CERAMA
BRYTE® Ceramic Cooktop Scraper) to move the
spill to a cool area on the cooktop.
b. Remove the spill with paper towels.
3. Any remaining spillover should be left until the surface
of the cooktop has cooled.
4. Don’t use the surface units again until all of the
residue has been completely removed.
NOTE: If pitting or indentation in the glass surface has
already occurred, the cooktop glass will have to be
replaced. In this case, service will be necessary.
49-80765
23
Page 24
Maintenance
SHOCK OR BURN HAZARD: Before replacing oven light bulb, disconnect the electrical
WARNING
CAUTION
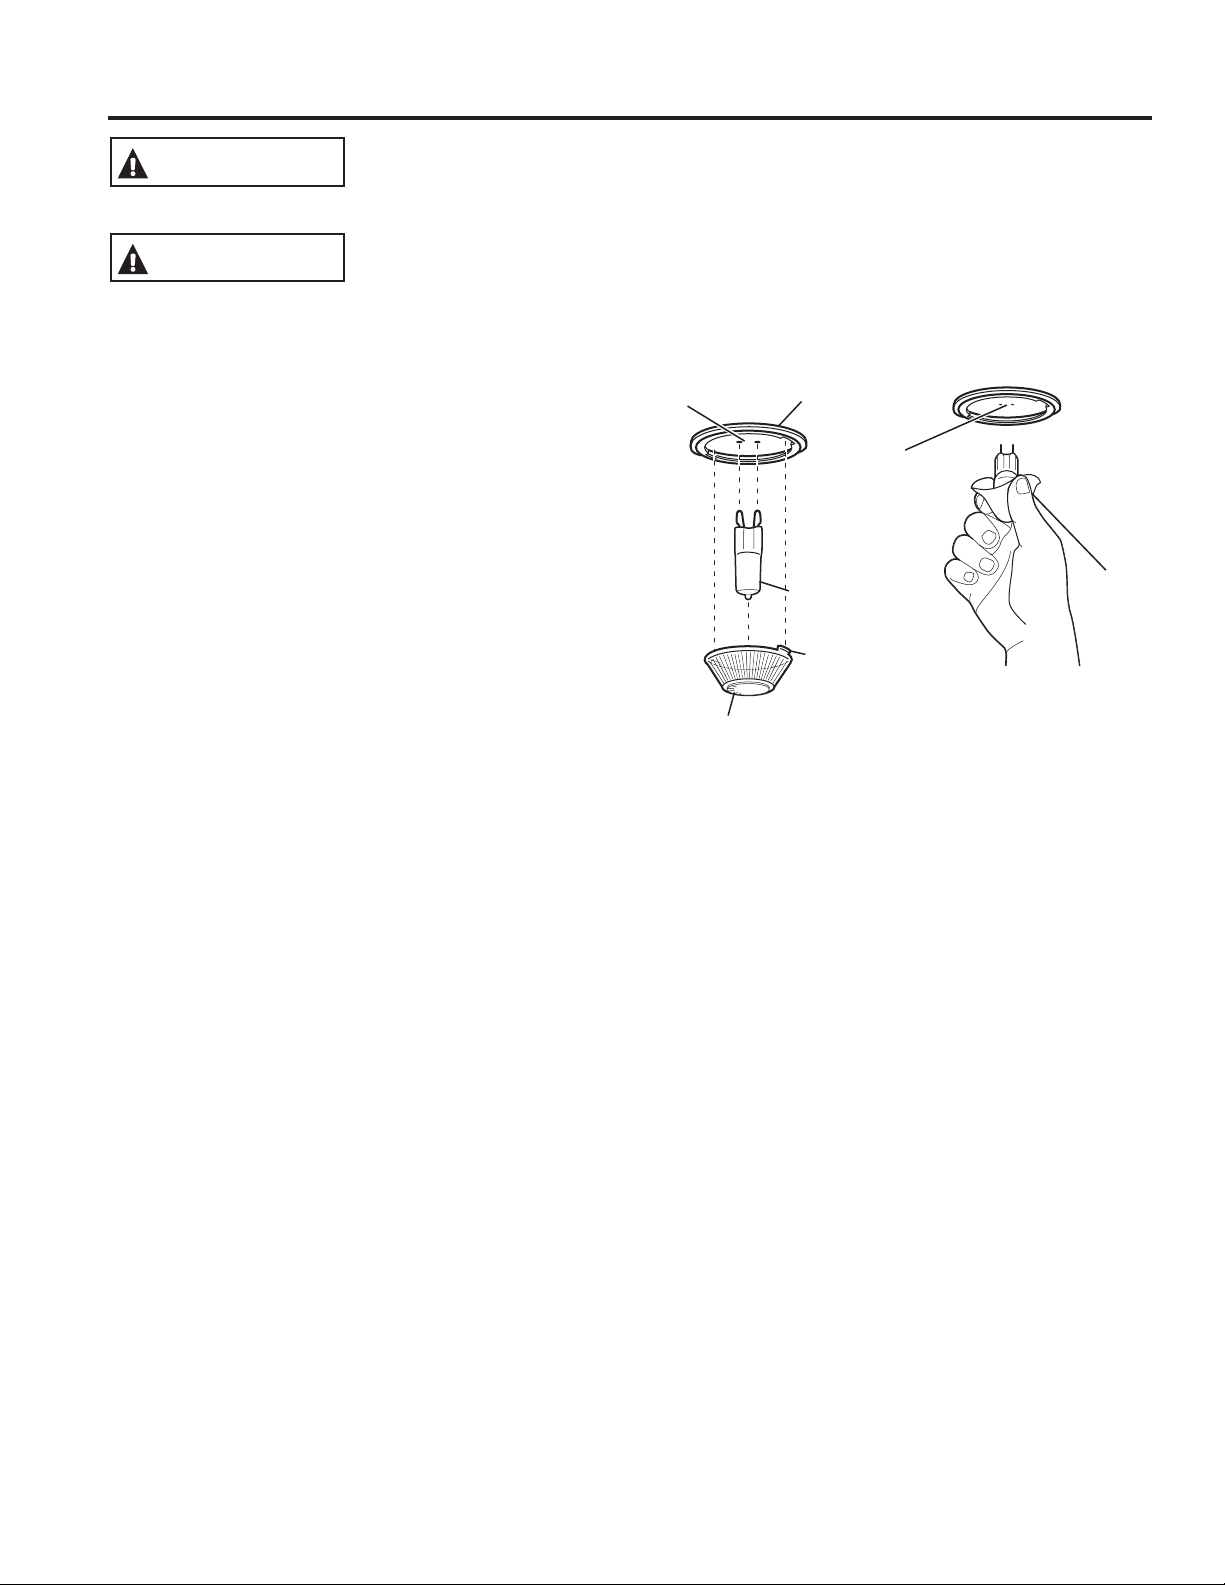
Oven Light Replacement (on some models)
To remove:
1. Turn the glass cover counterclockwise 1/4 turn until
the tabs of the glass cover clear the grooves of the
socket. Wearing latex gloves may offer a better grip.
2. Using gloves or a dry cloth, remove the bulb by
pulling it straight out.
To replace:
1. Use a new 120/130-volt halogen bulb, not to exceed
50 watts. Replace the bulb with the same type of bulb
that was removed. Be sure the replacement bulb is
rated 120 volts or 130 volts (NOT 12 volts).
2. Using gloves or a dry cloth, remove the bulb from its
packaging. Do not touch the bulb with bare fingers.
CARE AND CLEANING: Maintenance
Oil from skin will damage the bulb and shorten its life.
3. Push the bulb straight into the receptacle all the way.
4. Place the tabs of the glass cover into the grooves of
the socket. Turn the glass cover clockwise 1/4 turn.
For improved lighting inside the oven, clean the glass
cover frequently using a wet cloth. This should be
done when the oven is completely cool.
5. Reconnect electrical power to the oven.
power to the range at the main fuse or circuit breaker panel. Failure to do so may result
in electric shock or burn.
BURN HAZARD: The glass cover and bulb should be removed when cool. Touching hot
glass with bare hands or a damp cloth can cause burns.
Receptacle
Glass cover
Socket
G9 Bulb
Tab
Receptacle
Use
gloves or
cloth
24
49-80765
Page 25
Maintenance (Cont.)
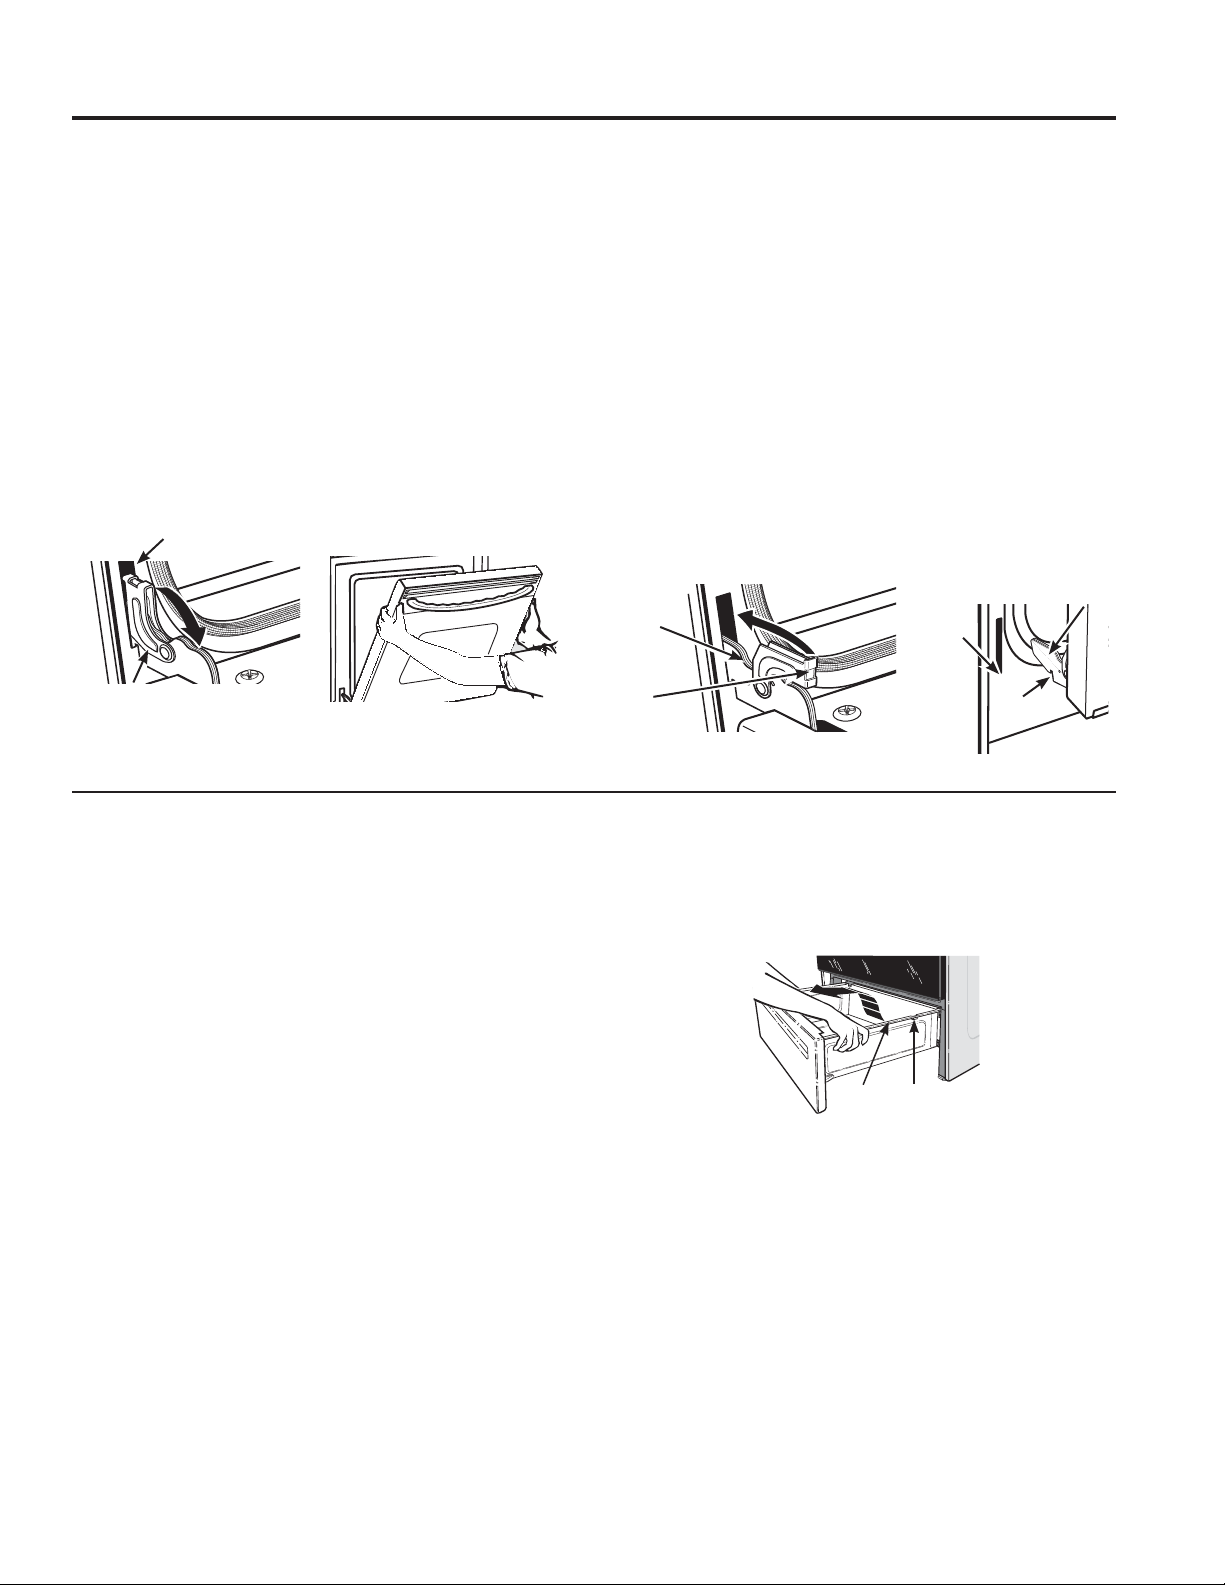
Lift-Off Oven Door
The door is very heavy. Be careful when removing and lifting the door.
Do not lift the door by the handle.
To rem ov e th e doo r:
1. Fully open the door.
2. Pull the hinge locks down toward the door frame, to
the unlocked position. A tool, such as a small f latblade screwdriver, may be required.
3. Firmly grasp both sides of the door at the top.
4. Close door to the door removal position. The door
should be open approximately 3" with no obstruction
above the door.
5. Lift door up and out until both hinge arms are clear of
the slots.
Slot
To repl ac e th e doo r:
1. Firmly grasp both sides of the door at the top.
2. Starting on the left side, with the door at t he same
angle as the removal position, seat the indentation of
the hinge arm into the bottom edge of the hinge slot.
The notch in the hinge arm must be fully seated into
the bottom of the slot. Repeat for right side.
3. Fully open the door. If the door will not fully open, the
indentation is not seated correctly in the bottom edge
of the slot.
4. Push the hinge locks up against the front frame of the
oven cavity, to the locked position.
5. Close the oven door.
Hinge
arm
Bottom
edge of
slot
CARE AND CLEANING: Maintenance
Hinge arm
Hinge lock
Pull hinge locks down to unlock
Removal position
Storage Drawer Removal (on some models)
To remove the drawer:
1. Pull the drawer out until it stops.
2. Lift the front of the drawer until the stops clear the
guides.
3. Remove the drawer.
To replace the drawer:
1. Place the drawer rails on the guides.
2. Push the drawer back until it stops.
Hinge
lock
Push hinge locks up to lock
Indentation
3. Lift the front of the drawer and push back until the
stops clear the guides.
4. Lower the front of the drawer and push back until it
closes.
49-80765
25
Page 26
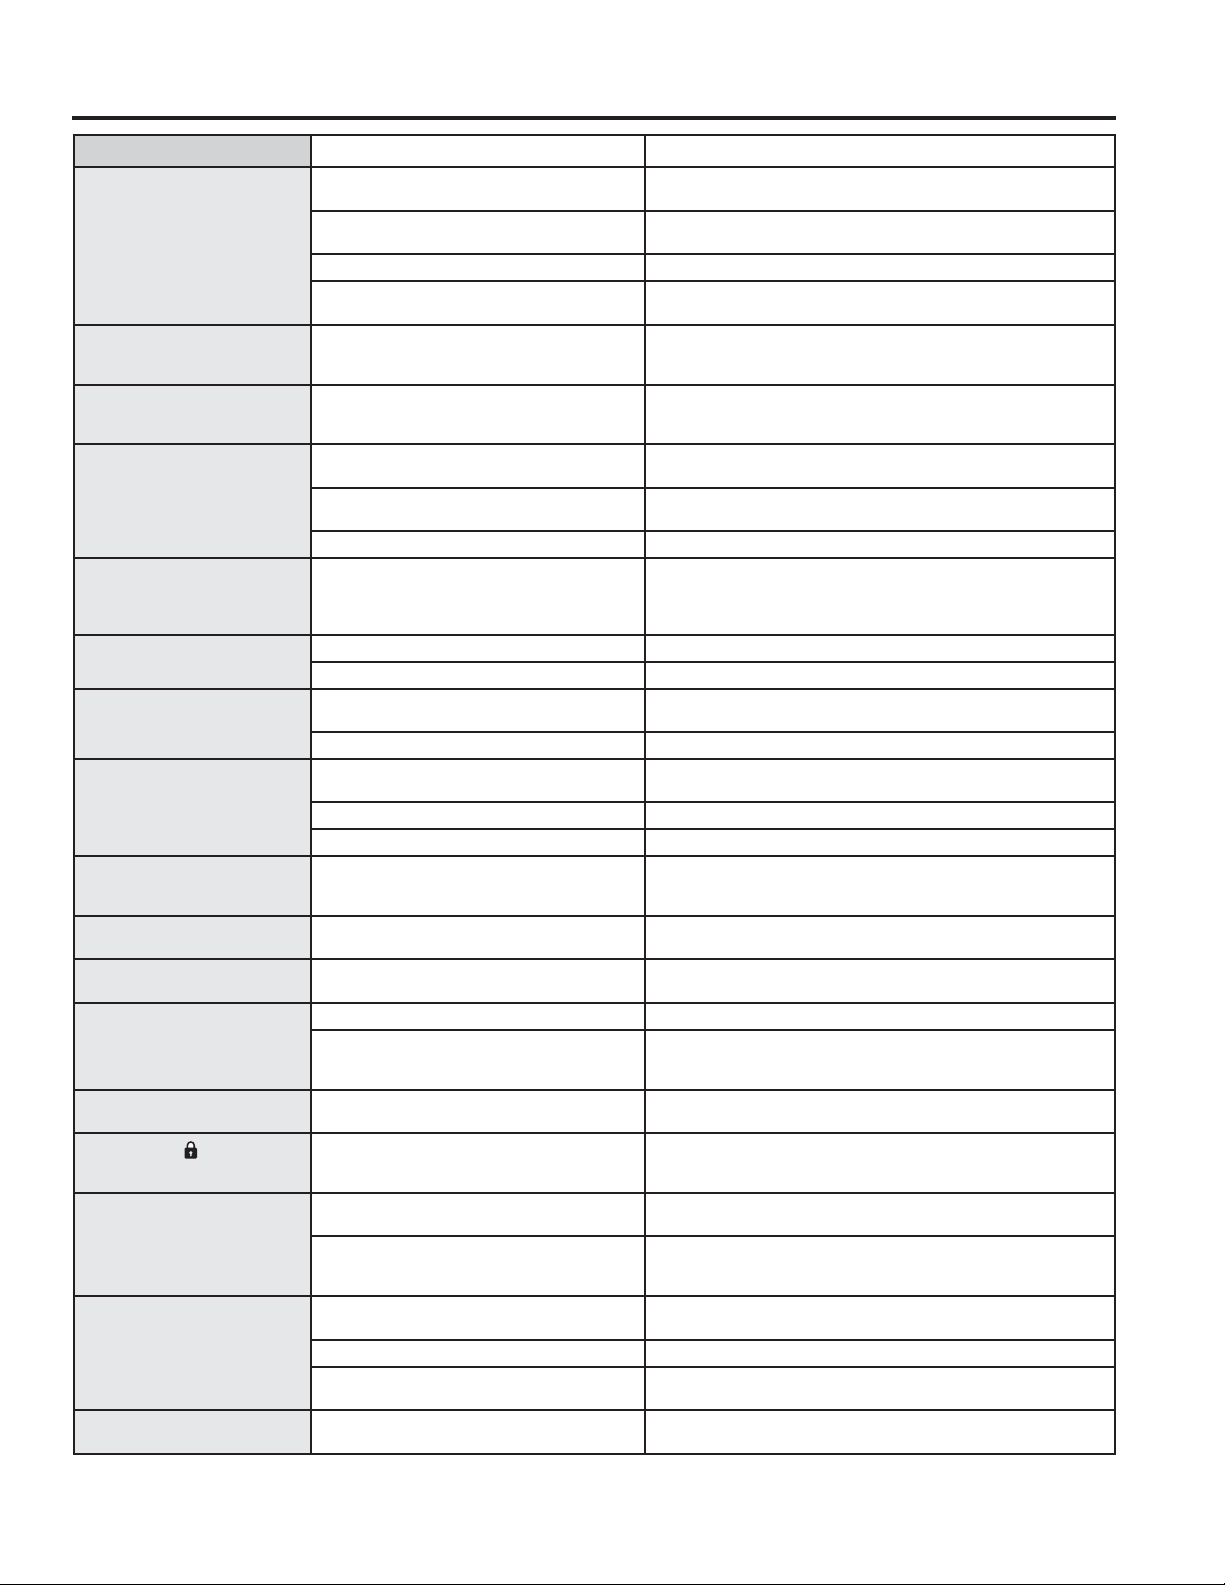
Troubleshooting tips ... Before you call for service
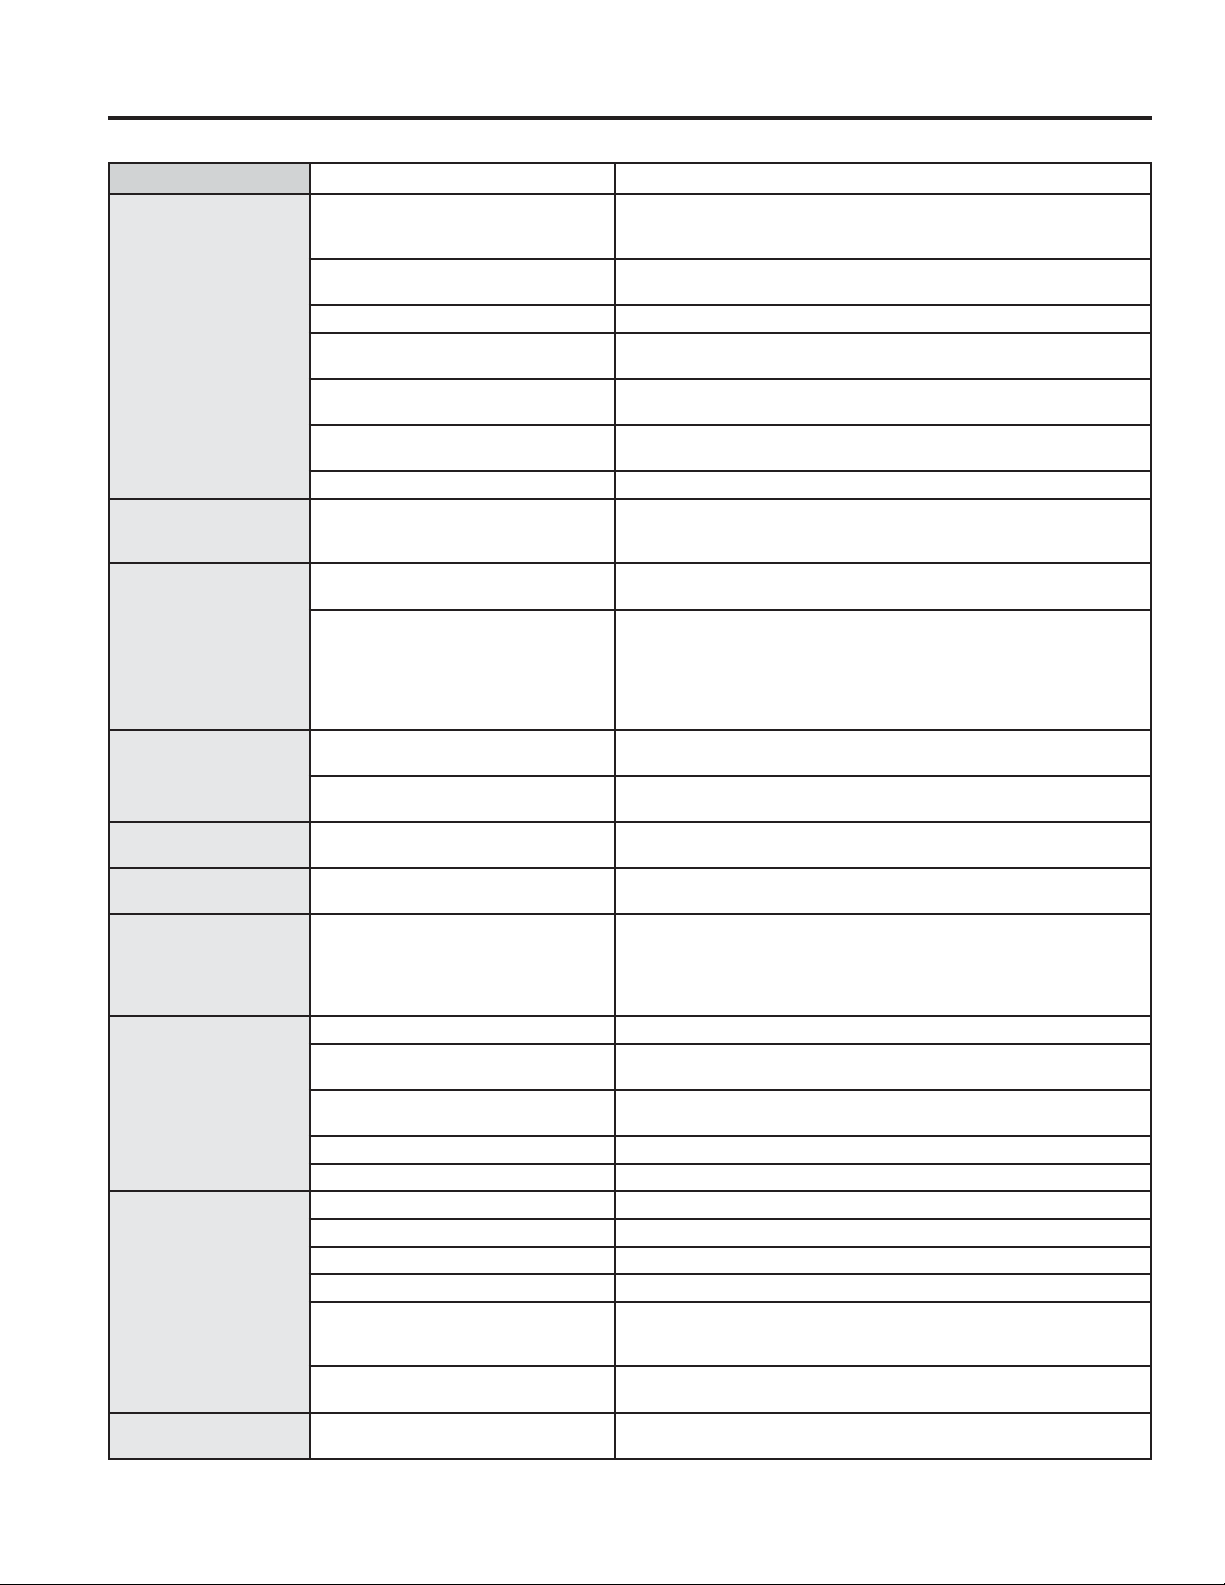
Save time and money! Review the charts on the following pages first and you may not need to call for service.
Problem Possible Cause What To Do
Surface units do not
work properly or
flashing power setting.
Surface unit setting
TROUBLESHOOTING TIPS
changed or turned off
unexpectedly.
Scratches (may appear
as cracks) on cooktop
glass surface.
Areas of discoloration
on the cooktop.
Plastic melted to the
surface.
Pitting (or indentation)
of the cooktop.
My new oven doesn't
cook like my old one.
Is something wrong
with the temperature
settings?
Food does not bake
properly.
Food does not broil
properly.
Oven temperature too
hot or too cold.
Improper cookware being used. Wrong pan type. Use a magnet to check that cookware is induction-
Pan is too small. Pan size is below the minimum size for the element. See the Pan size
Pan not positioned correctly. Center the pan in the cooking zone.
Pan is not in full contact with glass
surface.
In some areas, the power (voltage)
may be low.
A fuse in your home may be blown
or the circuit breaker tripped.
Cooktop controls improperly set. Check to see that the control is set properly. Press On then + or High cooktop temperature. Allow the internal fan to cool the cooktop. Check if pan boiled dry.
Incorrect cleaning methods being
used.
Cookware with rough bottoms being
used or coarse particles (salt or
sand) were between the cookware
and the surface of the cooktop.
Cookware has been slid across the
cooktop surface.
Food spillovers not cleaned before
next use.
Hot surface on a model with a lightcolored cooktop.
Hot cooktop came into contact with
plastic placed on the hot cooktop.
Hot sugar mixture spilled on the
cooktop.
Your new oven has a different
cooking system from your old oven
and therefore may cook differently
than your old oven.
Oven controls improperly set. See the Cooking Modes section.
Rack position is incorrect or rack is
not level.
Incorrect cookware or cookware of
improper size being used.
Oven temperature needs adjustment. See the Special Features section.
Ingredient substitution. Substituting ingredients can change the recipe outcome.
Oven controls improperly set. Make sure you select the appropriate broil mode.
Improper rack position being used. See Cooking Guide for rack location suggestions.
Food being cooked in a hot pan. Make sure cookware is cool.
Cookware not suited for broiling. Use a pan specifically designed for broiling.
Aluminum foil used on the broiling
pan and grid has not been fitted
properly and slit as recommended.
In some areas the power (voltage)
may be low.
Oven temperature needs adjustment. See the Special Features section.
compatible. Use a flat induction-capable pan that meets the minimum
size for the element being used. See the Pan size and shape section.
and shape section. Use smaller element.
Pan must be flat.
Cover pan with a lid until desired heat is obtained.
Replace the fuse or reset the circuit breaker.
Scratches are not removable. Tiny scratches will become less visible in
time as a result of cleaning.
To avoid scratches, use the recommended cleaning procedures. Make
sure bottoms of cookware are clean before use, and use cookware with
smooth bottoms.
See the Cleaning the glass cooktop section.
This is normal. The surface may appear discolored when it is hot. This
is temporary and will disappear as the glass cools.
See the Glass surface—potential for permanent damage section in the
Cleaning the glass cooktop section.
Call a qualified technician for replacement.
For the first few uses, follow your recipe times and temperatures carefully.
If you still think your new oven is too hot or too cold, you can adjust the
temperature yourself to meet your specific cooking preference. See the
Special Features section. NOTE: This adjustment affects Bake, and
Convection Bake temperatures; it will not affect Broil or Clean.
See the Cooking Modes section and Cooking Guide.
See the Cookware section.
If using aluminum foil conform to pan slits.
Preheat the broil element for 10 minutes.
26
49-80765
Page 27
Troubleshooting tips (Cont.) ... Before you call for service
Problem Possible Cause What To Do
Oven does not work or
appears not to work.
“Crackling” or “popping”
sound.
Why is my range making a
"clicking" noise when using
my oven?
Clock and timer do not work. A fuse in your home may be blown or the
Oven door is crooked. The door is out of position. Because the oven door is removable, it sometimes gets out of
Oven light does not work. Light bulb is loose or defective. Tighten or replace bulb.
Oven will not self-clean. The temperature is too high to set a self-
Oven will not steam clean. Display flashes HOT. Allow the oven to cool to room temperature and reset the
Excessive smoking during
clean cycle.
Excessive smoking during
broiling.
Oven door will not open after
a clean cycle.
Oven not clean after a clean
cycle.
"LOCK DOOR" flashes in the
display.
DOOR LOCK
when you want to cook.
“F— and a number or letter”
flash in the display.
Display goes blank. A fuse in your home may be blown or the
Oven or cooktop will not stay
set.
light is on
Plug on range is not completely inserted in
the electrical outlet.
A fuse in your home may be blown or the
circuit breaker tripped.
Oven controls improperly set. See the Using the Oven section.
Oven is in Sabbath Mode. Verify, that the oven is not in Sabbath Mode. See the Special
This is the sound of the metal heating
and cooling during both the cooking and
cleaning functions.
Your range cycles the heating elements by
turning relays on and off to maintain the
oven temperature.
circuit breaker tripped.
Plug on range is not completely inserted in
the electrical outlet.
Oven controls improperly set. See the Using the kitchen timer section.
Pad operating light is broken. Call for service.
clean operation.
Oven controls improperly set. See the Cleaning the Oven section.
Oven controls improperly set. See the Using Steam Clean section.
Oven door is not closed. Make sure you close the door to start steam clean cycle.
Excessive soil or grease. Press the Cancel/Off pad. Open the windows to rid the room of
Food too close to burner element. Lower the rack position of the food.
Oven too hot. Allow the oven to cool below locking temperature.
Oven controls improperly set. See the Cleaning the Oven section.
Oven was heavily soiled. Clean up heavy spillovers before starting the clean cycle.
The self-clean cycle has been selected but
the door is not closed.
The oven door is locked because the
temperature inside the oven has not
dropped below the locking temperature.
You have a function error code. Press the Cancel/Off pad. Allow the oven to cool for one hour. Put
If the function code repeats. Disconnect all power to the oven for at least 30 seconds and
circuit breaker tripped.
The clock is turned off. See the Special features section.
Oven is in Sabbath Mode. Verify that the oven is not in Sabbath Mode. See the Special
Function error. Disconnect all power for at least 30 seconds and then reconnect
Make sure electrical plug is plugged into a live, properly grounded
outlet.
Replace the fuse or reset the circuit breaker.
Features section.
This is normal.
This is normal.
Replace the fuse or reset the circuit breaker.
Make sure electrical plug is plugged into a live, properly grounded
outlet.
position during installation. To straighten the door, re-install the
door. See the "Lift-Off Oven Door" instructions in the "Care and
Cleaning" section.
Allow the oven to cool and reset the controls.
controls.
smoke. Wait until the LOCKED light goes off. Wipe up the excess
soil and reset the clean cycle.
Heavily soiled ovens may need to self-clean again or for a longer
period of time.
Close the oven door.
Press the Cancel/Off pad. Allow the oven to cool.
the oven back into operation.
then reconnect power. If the function error code repeats, call for
service.
Replace the fuse or reset the circuit breaker.
Features section.
power. If repeating, call for service.
TROUBLESHOOTING TIPS
49-80765
27
Page 28
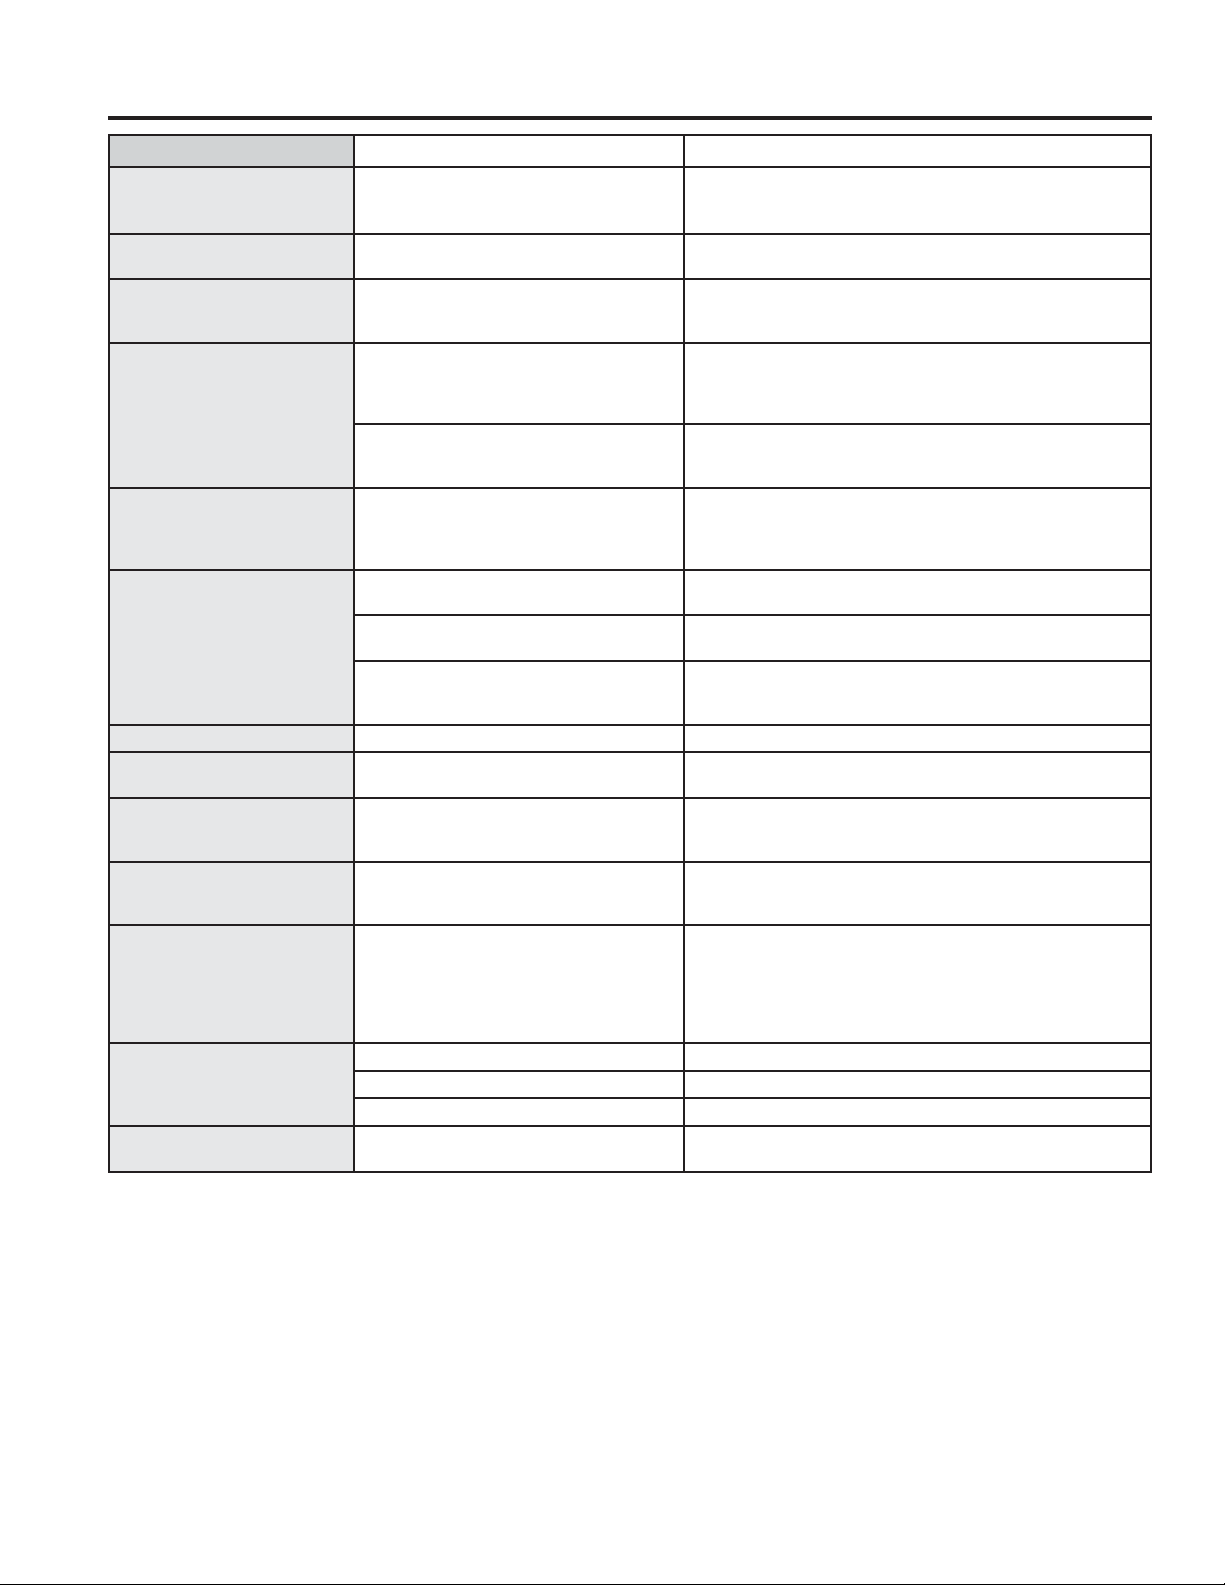
Troubleshooting tips (Cont.) ... Before you call for service
Problem Possible Cause What To Do
Power outage, clock flashes. Power outage or surge. Reset the clock. If the oven was in use, you must reset it by
“Burning” or “oily” odor
emitting from the vent.
Strong odor. An odor from the insulation around the
Fan noise. A convection fan may automatically
My oven door glass appears
to be "tinted" or have a
TROUBLESHOOTING TIPS
"rainbow" color. Is this
defective?
Sometimes the oven takes
longer to preheat to the
same temperature.
Display flashes. Power failure. Reset the clock.
Unable to get the display to
show “SF”.
Control signals after
entering cooking time or
start time.
Oven racks are difficult to
slide.
Steam from the vent. When using the ovens, it is normal
Excessive condensation in
the drawer.
Water remaining on oven
floor after Steam Clean cycle.
This is normal in a new oven and will
disappear in time.
inside of the oven is normal for the first
few times the oven is used.
turn on and off.
A cooling fan may automatically turn on
and off.
No. The inner oven glass is coated with
a heat barrier to reflect the heat back
into the oven to prevent heat loss and
keep the outer door cool while baking.
Cookware or food in oven. The cookware or food in the oven will cause the oven to take
Number of racks in oven. Adding more racks to the oven will cause the oven to take
Different cooking modes. The different cooking modes use different preheat methods to
Oven control pads were not touched
properly.
You forgot to enter a bake temperature
or cleaning time.
The shiny, silver-colored racks were
cleaned in a self-clean cycle.
to see steam coming out of the
oven vents. As the number of racks
or amount of food being cooked
increases, the amount of visible steam
will increase.
Liquid in drawer. Remove liquid.
Uncovered foods. Cover food with lid or aluminum foil.
Temperature setting too high. Reduce temperature setting.
This is normal. Remove any remaining water with a dry cloth or sponge.
pressing the Cancel/Off pad, setting the clock and resetting
any cooking function.
To speed the process, set a self-clean cycle for a minimum of
3 hours. See the Cleaning the Oven section.
This is temporary and will go away after several uses or a
self-clean cycle.
This is normal. The fan is designed to operate intermittently to
maximize cooking evenness. The convection fan will operate
during preheat of the bake cycle. The fan will turn off after the
oven is heated to the set temperature. This is normal.
This is normal on some models. The cooling fan will turn
off and on to cool internal parts. It may run after the oven is
turned off.
This is normal. Under certain light or angles, you may see this
tint or rainbow color.
longer to preheat. Remove items to reduce preheat time.
longer to preheat. Remove some racks.
heat the oven for the specific cooking mode. Some modes will
take longer than others (i.e. convection bake).
The Broil Hi/Lo and Bake pads must be touched at the same
time and held for 3 seconds.
Touch the Bake pad and desired temperature or the Self
Clean pad and desired clean time.
Apply a small amount of vegetable oil to a paper towel and
wipe the edges of the oven racks with the paper towel. Do not
spray with Pam
This is normal.
®
or other lubricant sprays.
28
49-80765
 Loading...