

GE PFSS6SKXASS Owner’s Manual
rno at
Safety Instructions ........... 2,s
Operating Instructions
Care and Cleaning ................ 7, 8
Controls ............................ 4
Crispers and Pans ................... S
Freezer Compartment ............... 6
Replacing the Light Bulbs ............ 8
ii
0
Shelves and Bins .................... 4
Installation Instructions
Installing the Refrigerator ....... 10-12
Preparing to Install
the Refrigerator ..................... 9
Reversing the Door Swing ...... 13-16
Troubleshooting Tips ...... 17-19
Normal Operating Sounds .......... 17
moffatapplian ces.ca
Models 20 and 22
Consumer Support
Consumer Support ................. 24
Product Registration ............ 21, 22
Warrantg .......................... 23
Write the model and serial
numbers here:
Model #
Serial #
Find these numbers on a label
on the right side, near the top of the
refrigerator compartment.
200D9366PO05
49-60540 01-08 JR
IMPORTANT SAFETY INFORMATION.
READ ALL INSTRUCTIONS BEFORE USING.
WARNING!
Use this appliance only for its intended purpose as described in this Owner's Manual.
SAFETYPRECAUTIONS
When using electrical appliances, basic safety precautions should be followed, including the following:
_',_Thisrefrigerator must be properlg installed
and located in accordance with the Installation
Instructions before it isused.
:€;Donot allow children to climb,stand or hang
on the shelves in the refrigeratoETheg could
damage the refrigerator and seriouslginjure
themselves.
::_:_Donot touch the cold surfaces in the freezer
compartment when hands are damp or wet.
Skinmag stick to these extremelg cold surfaces.
_,'_:Donot store or usegasoline or other flammable
vapors and liquidsin the vicinitg of this or ang
other appliance.
Keepfingers out of the "pinch point" areas;
clearances between the doors and between
the doors and cabinet are necessarilgsmall.
Becareful closing doors when children are
in the area.
:_:_Inrefrigerators with automatic icemakers,
avoidcontact with the moving parts of the
ejector mechanism, or with the heating element
that releasesthe cubes. Do not place fingers or
hands on the automatic icemaking mechanism
while the refrigerator is plugged in.
i:_Unplugthe refrigerator before cleaning and making
repairs.
NOTE:Westrongly recommend that any servicing
beperformed b_la qualified individual.
:_:_Setting either or both controls to the off position
doesnot remove power to the light circuit.
_:_tDonot refreezefrozenfoods which have
thawed completelg.
DANGER! RISK OF CHILD ENTRAPMENT
PROPERDISPOSAL OF THE REFRIGERATOR
Childentrapment and suffocation are not problems of
the past. Junked or abandoned refrigerators are still
dangerous_.evenif theg will sit for '_justa few dags."
If gou are getting rid of gour old refrigerator,please
follow the instructions below to help prevent
accidents.
Before You ThrowAway Your Old
Refrigerator or Freezer:
i_:_:Takeoff the doors.
i_:Leavethe shelves in place so that children mag not
easilgclimb inside.
Refrigerants
All refrigeration products contain refrigerants,
which under federal law must be removed prior
to product disposal. If gou are getting rid of an
old refrigeration product, check with the compang
handling the disposal about what to do.
USEOF EXTENSION CORDS
Because of potential safety hazards under certain conditions, we stronglg recommend against
the use of on extension cord.
However,if gou must use an extension cord, it isabsolutelg necessarg that it be a CSAcertified,3-wire
grounding tgpe appliance extension cord having a grounding tgpe plug and outlet and that the electrical rating
of the cord be 15 amperes (minimum)and 120volts.
moffatappliances.ca
WARNING!
HOW TO CONNECT ELECTRICITY
Do not, under any circumstances, cut or remove the third (ground)prong from the power cord.
For personal safety, this appliance must be properlg grounded.
The power cord of this appliance is equipped
with a ]-prong (grounding)plug which mates
with a standard ]-prong (grounding)wall outlet
to minimizethe possibility of electric shock hazard
from this appliance.
Have the wall outlet and circuit checked bg a
qualified electrician to make surethe outlet is
properlg grounded.
Where a standard 2-prong wall outlet is encountered,
it is gour personal responsibilitgand obligation to
have it replaced with a properlg grounded 3-prong
wall outlet.
The refrigerator should alwags be plugged into its
own individual electrical outlet which hasa voltage
rating that matches the rating plate.
USEOFADAPTERPLUGS
Adapter plugs are not permitted in Canada.
Thisprovides the best performance and alsoprevents
overloading house wiring circuits which could cause
a fire hazard from overheated wires.
Never unplug gour refrigerator bg pulling on the
power cord.Always grip plug firmlg and pull straight
out from the outlet.
Repairor replaceimmediatelu all power cords that
have become fraged or otherwise damaged. Do not
use a cord that shows cracks or abrasion damage
along its length or at either end.
When moving the refrigerator awag from the
wall, be careful not to rollover or damage the
power cord.
READAND FOLLOWTHISSAFETYINFORMATIONCAREFULLY
SAVETHESEINSTRUCTIONS

About the controls.
Adjust Freezer Adjust Refrigerotor
Temperature Temperoture
9 is Coldest
Initially, set the refrigerator control at 5 and the freezer control at 5. Allow 24 hours for the temperature
to stabilize. Several adjustments may be required. Adjust the controls one increment at a time, and allow
24 hours after each adjustment for the refrigerator to reach the temperature you have set. Setting the
refrigerator control knob to 0 stops coo!ing in both the refrigerator and freezer compartments, but does
not shut off electrical power to the refrigerator.
About the shelves and bins.
Not all features are on all models.
Rearranging the Shelves
Shelves in the refrigerator compartment are adjustable.
Refrigerator Compartment
Toremove:
0 Removeall itemsfrom the shelf.
Some models have wire shelves
that con be adjusted in the same
manner.
-f
Tilt the shelf up at the front.
Liftthe shelf up at the back and
bring the shelf out.
Toreplace:
_! While tilting the shelf up, insertthe top
hook at the back of the shelf in a slot
on the track,
0 Lowerthe front of the shelf until the
bottom of the shelf locksinto place.
Non-Adjustable Shelves on the Door
Toremove: Lift the shelf straight up, then
pull out.
Toreplace: Engagethe shelf in the molded
supports on the door and push down.
It will lock in place.
4
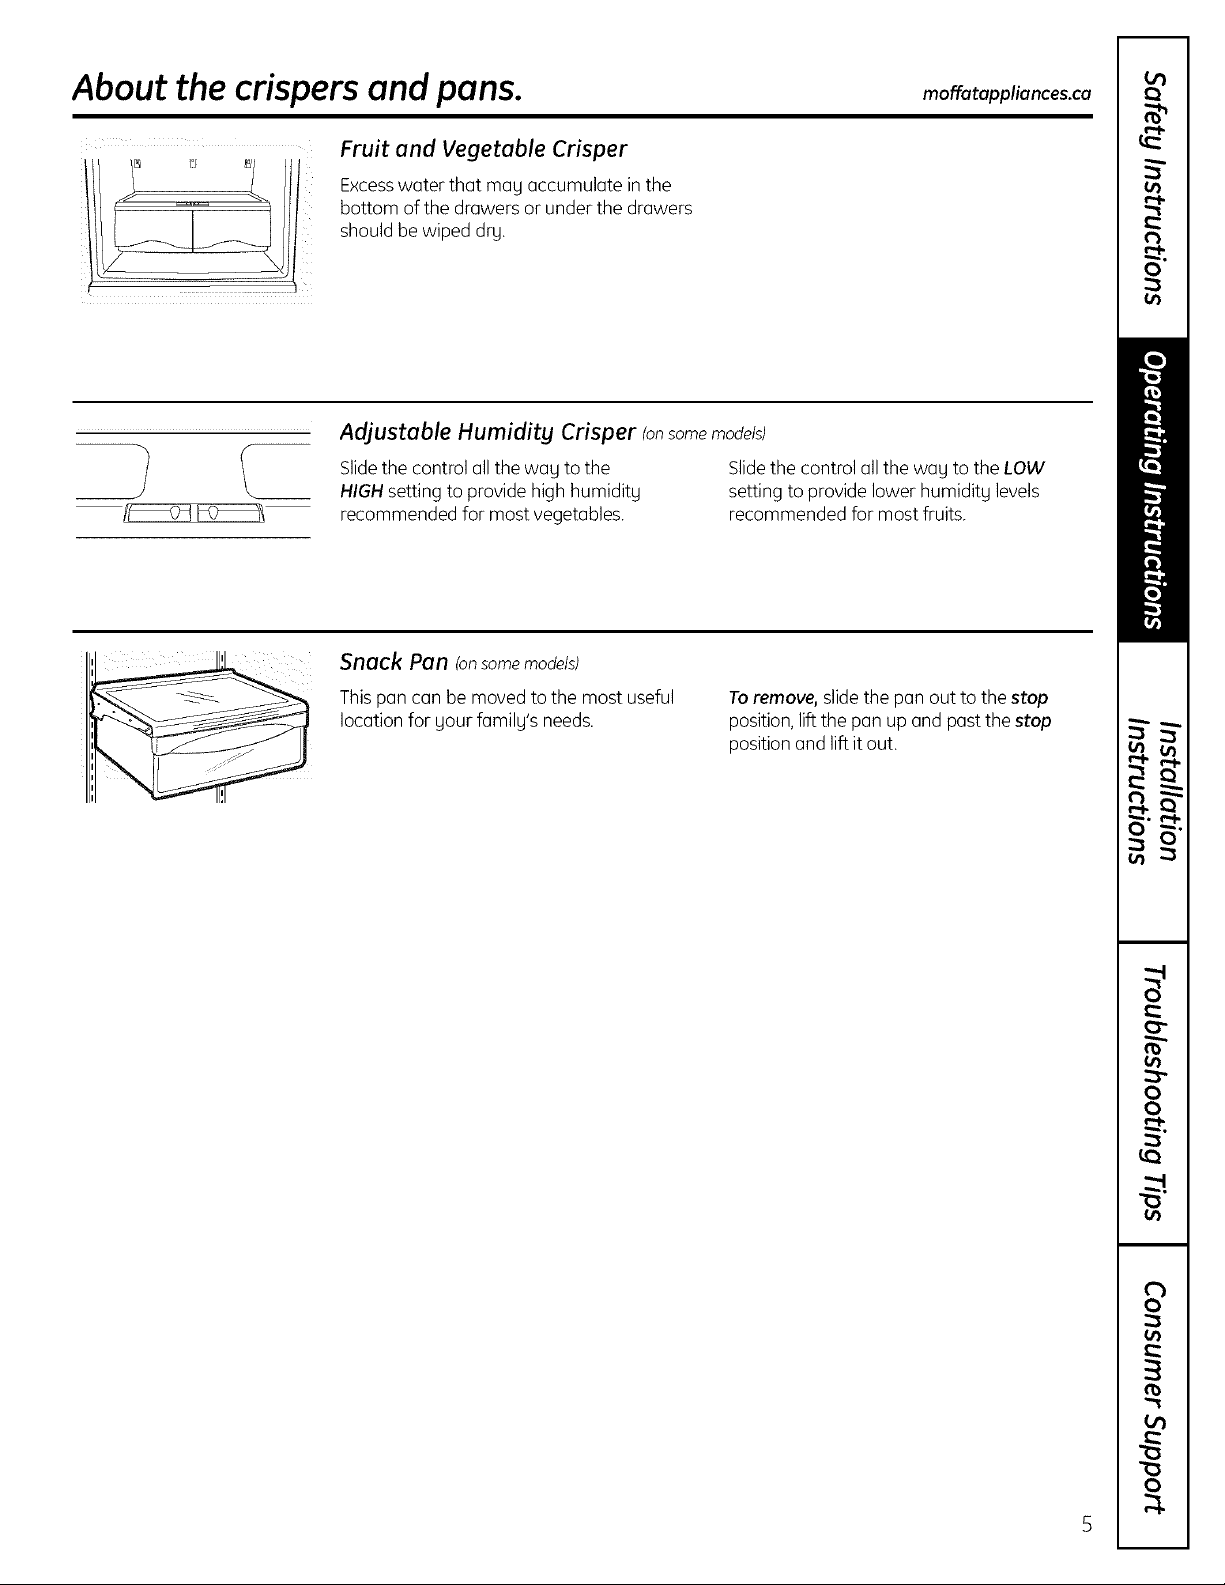
About the crispers and pans. mo otopp.oncesco
Fruit and Vegetable Crisper
Excesswater that mag accumulate in the
bottom of the drawers or under the drawers
should be wiped drg.
Adjustable Humidity Crisper Ionsome models)
Slidethe control all the wag to the Slidethe control all the wag to the LOW
HIGHsetting to provide high humiditg setting to provide lower humiditg levels
recommended for most vegetables, recommended for most fruits.
Snack Pan (onsomemodels)
This pan can be moved to the most useful
location for gour familg's needs.
Toremove, slide the pan out to the stop
position,lift the pan up and past the stop
position and lift it out.
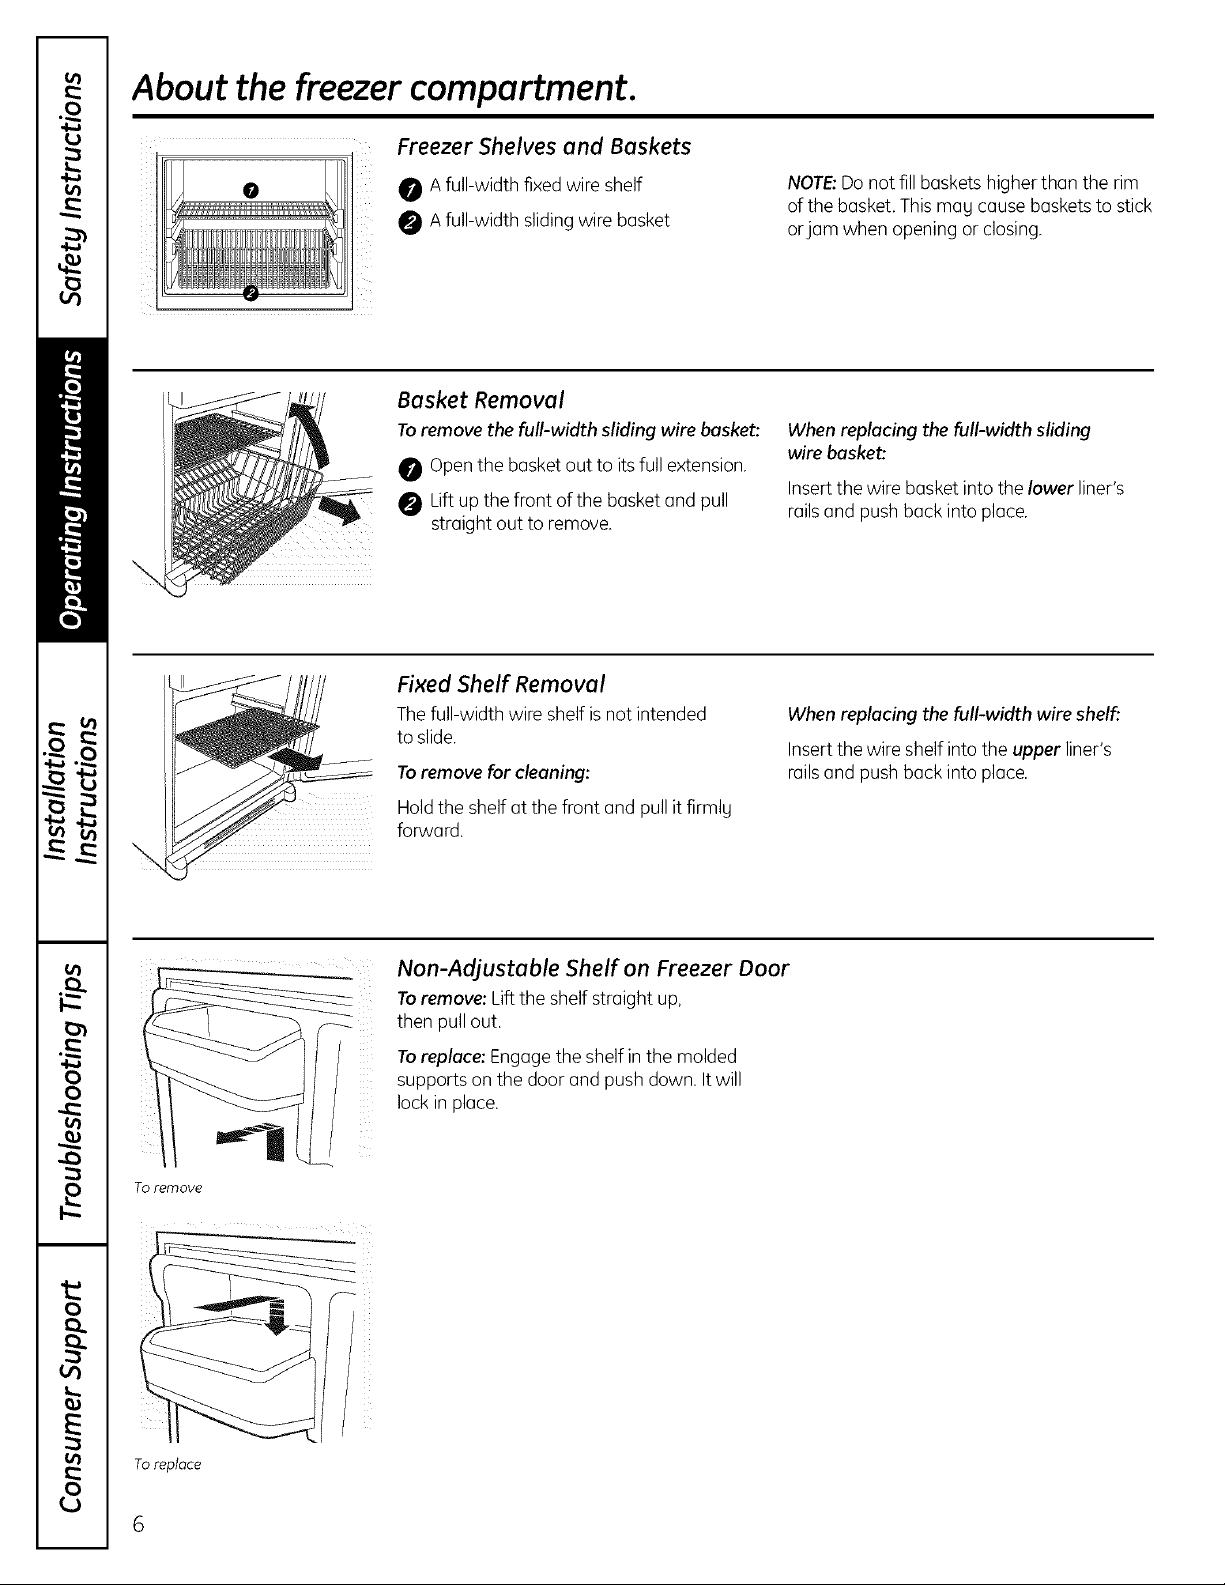
About the freezer compartment.
Freezer Shelves and Baskets
0 A full-width fixed wire shelf
0 A full-width slidingwire basket
Basket Removal
Toremove the full-width sliding wire basket:
Openthe basketout to its full extension.
Lift up the front of the basket and pull
straight out to remove.
Fixed Shelf Removal
Thefull-width wire shelf isnot intended
to slide.
Toremove for cleaning:
NOTE:Do not fill baskets higher than the rim
of the basket. This may causebaskets to stick
orjam when opening or closing.
When replacing the full-width sliding
wire basket:.
Insertthe wire basket into the lower liner's
railsand push back into place.
When replacing the full-width wire shelf:
Insert the wire shelfinto the upper liner's
railsand push back into place.
\
To remove
Holdthe shelf at the front and pull it firmlg
forward.
Non-Adjustable Shelf on Freezer Door
Toremove: Lift the shelf straight up,
then pull out.
Toreplace: Engagethe shelf in the molded
supports on the door and push down. Itwill
lock in place.
To replace
6
Careand cleaning of the refrigerator, mo atappliancesca
Cleaning the Outside
Thedoor handlesand trim. Clean with a
cloth dampened with soapy water. Dry with
a soft cloth. Do not usewax on the door
handles and trim.
Keepthe outside clean. Wipe with
a clean cloth lightly dampened with kitchen
appliance wax or mild liquiddish detergent.
Dry and polishwith a clean,soft cloth.
Cleaning the Inside
Tohelp prevent odors, leave an open box
of baking soda in the refrigerator and freezer
compartments.
Unplug the refrigerator before cleaning.
Ifthis is not practical, wring excess moisture
out of sponge or cloth when cleaning around
switches, bightsor controls.
Use an appliance wax polish on the inside
surface between the doors.
Usewarm water and baking soda solution-
about a tablespoon (15ml) of baking sodato
a quart (1liter)of wate_Thisboth cleans and
neutralizesodors. Rinseand wipe dry.
Do not wipe the refrigerator with a soiled
dish cloth or wet towel. These may leave
a residue that can erode the point. Do not
use scouring pads, powdered cleaners,
bleach or cleaners containing bleach
because these products con scratch
and weaken the point finish.
After cleaning the door gaskets, apply a thin
lager of petroleumjelly to the door gaskets
at the hinge side.This helpskeepthe gaskets
from sticking and bending out of shape.
Avoid cleaning cold gloss shelves with hot
water because the extreme temperature
difference may cause them to break.
Handle gloss shelves carefully. Bumping
tempered gloss can cause it to shatter
Do not wash any plastic refrigerator ports
in the dishwasher.
Behind the Refrigerator
Becareful when moving the refrigerator
awag from the wall.All tgpes of floor
coveringscan be damaged, particularly
cushioned coverings and those with
embossedsurfaces.
Raisethe levelinglegs located at the bottom
front of the refrigerator.
Pullthe refrigerator straight out and return it
to position bg pushing it straight in. Moving
the refrigerator in a sidedirection mag
result in damage to the floor covering
or refrigerator.
Lower the leveling legs untiltheg touch
the floor.
When pushing the refrigerator back, make
sure you don't roll over the power cord or
icemaker supply line (on some models).
Careand cleaning of the refrigerator.
Preparing for Vacation
Forlong vacations or absences,remove
food and unplug the refrigerator.Cleanthe
interior with a baking soda solution of one
tablespoon (15ml) of baking soda to one
quart (1liter)of wateE Leavethe doors open.
Preparing to Move
Secureall loose items such asbase grille,
shelvesand drawers bg taping them
securelg in placeto prevent damage.
When using a hand truck to move the
refrigerator,do not rest the front or back
of the refrigerator against the hand truck.
This could damage the refrigeratoEHandle
onlg from the sidesof the refrigeratoE
If the temperature can drop below freezing,
have a qualified servicer drain the water
suppl Usystem Ion some models) to prevent
serious propertg damage due to flooding.
Be sure the refrigerator stags in an upright
position during moving.
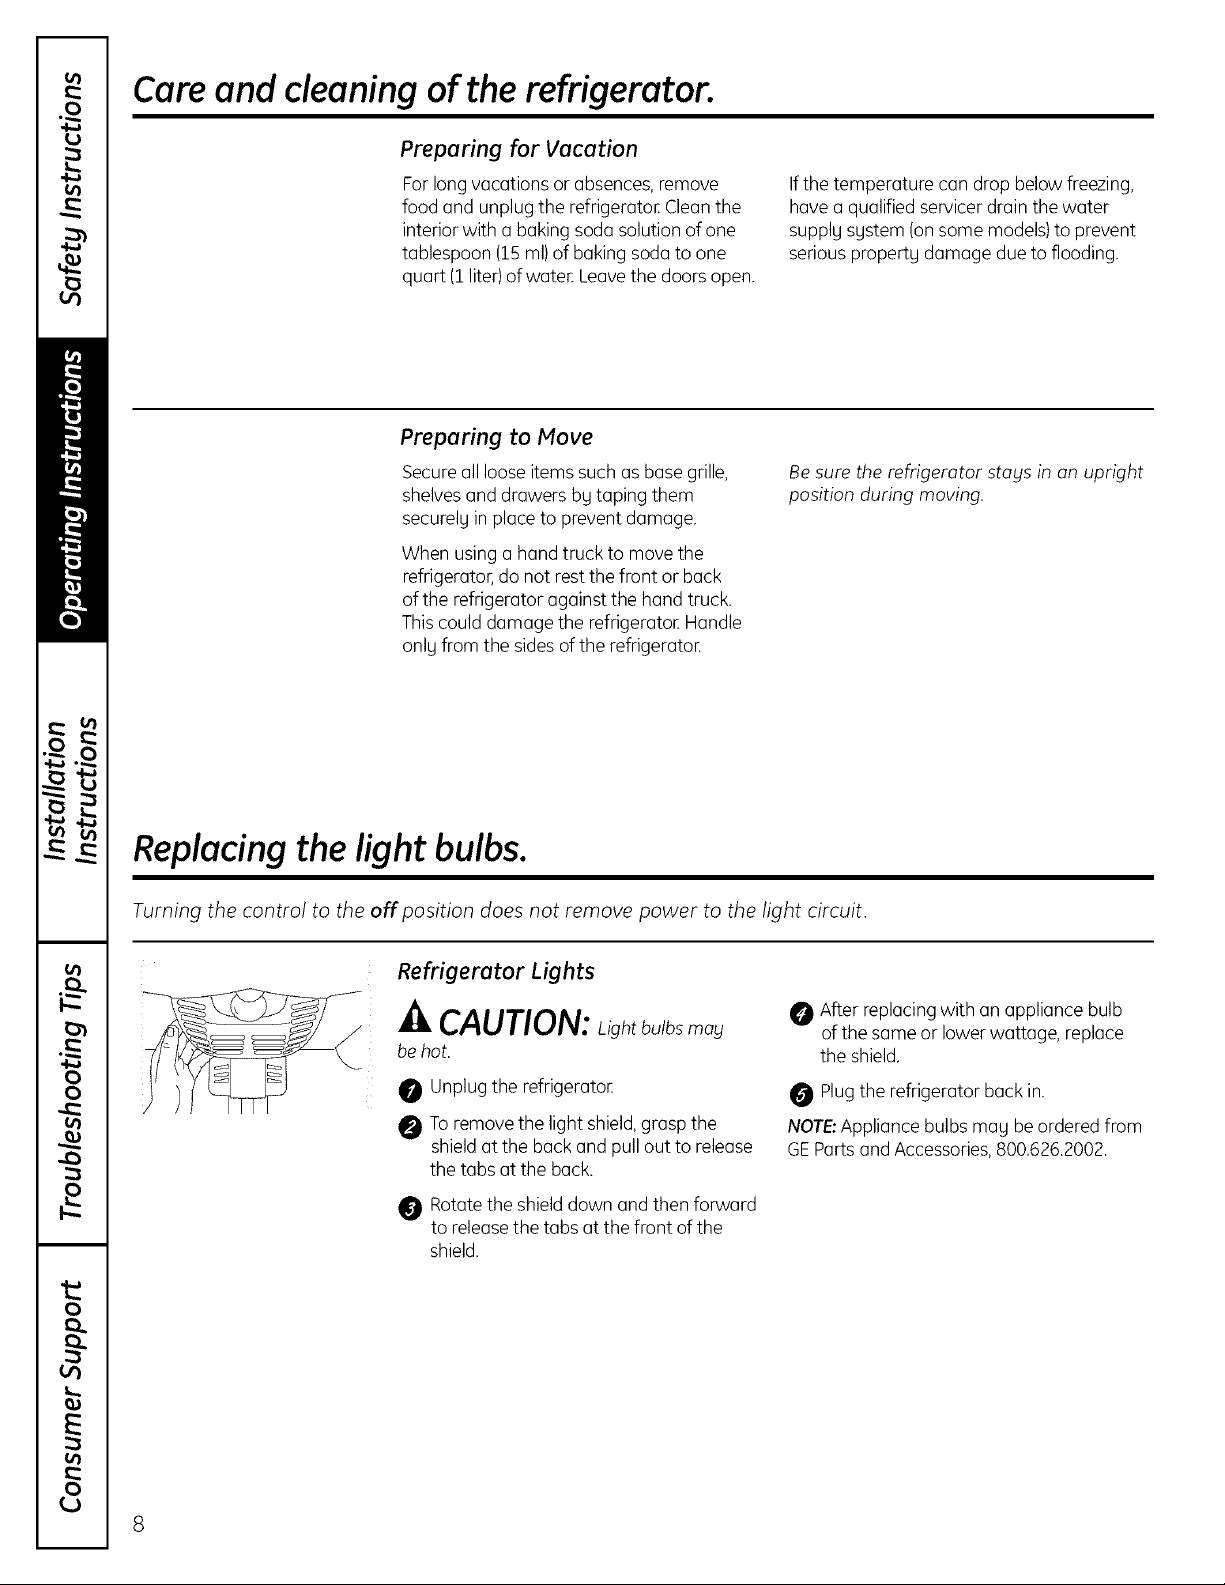
Replacing the light bulbs.
Turning the control to the off position does not remove power to the light circuit.
Refrigerator Lights
CAUTION: Light bulbsmay
be hot.
O Unplugthe refrigerotoE
O Toremove the light shield,grasp the
shieldat the back and pull out to release
the tabs at the back.
Rotatethe shield down and then forward
to releasethe tabs at the front of the
shield.
After replacing with an appliance bulb
of the same or lowerwattage, replace
the shield.
Plugthe refrigerator back in.
NOTE-Appliancebulbs mag be ordered from
GEPortsand Accessories,800.626.2002.
8
Installation
Refrigerator
Instructions
I Questions? Call 1.800.561.3344 or Visit our Website at: moffatappliances.ca I
BEFORE YOU BEGIN
Read these instructions completely and carefully.
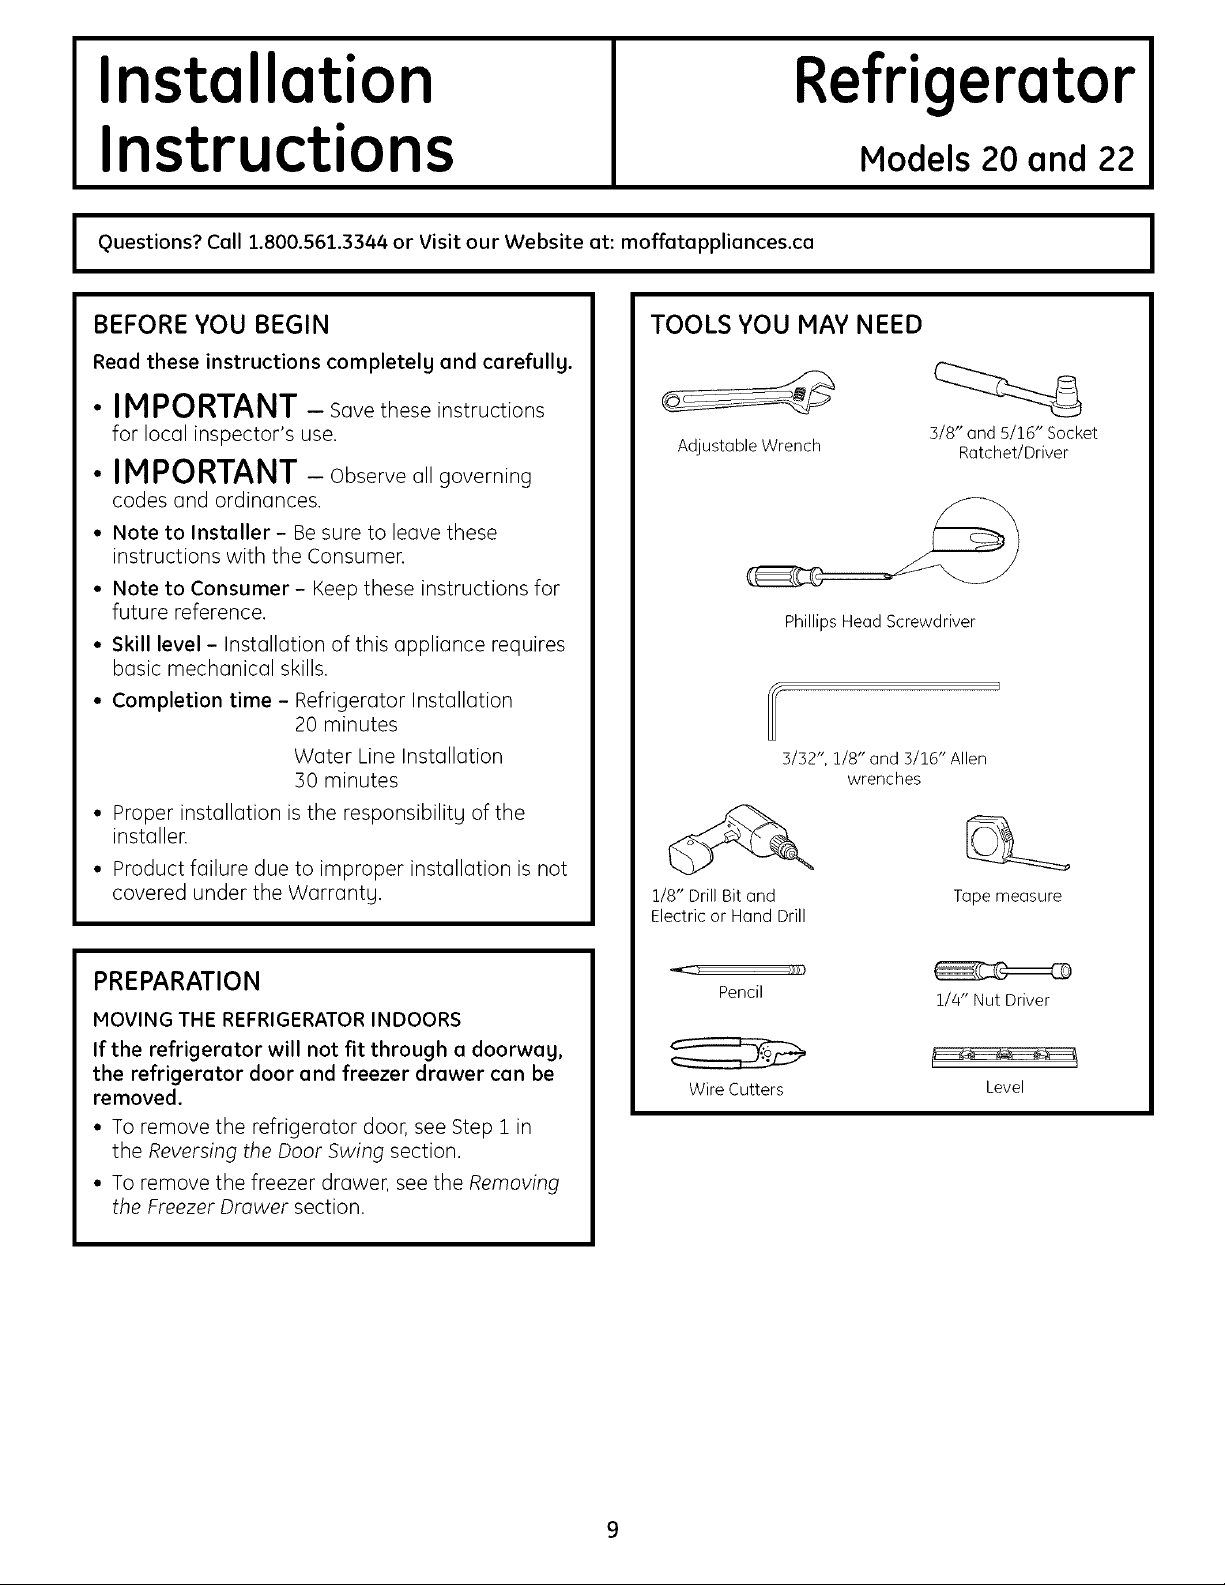
TOOLS YOU MAY NEED
Models 20 and 22
• IMPORTANT - Savetheseinstructions
for local inspector's use.
Adjustable Wrench
3/8" and 5/16" Socket
Ratchet/Driver
• IMPORTANT - Observeallgoverning
codes end ordinances.
• Note to Installer-Be sure to leavethese
instructions with the Consumer.
• Note to Consumer- Keep these instructions for
future reference,
• Skill level - Installation of this appliance requires
basic mechanical skills.
• Completion time - Refrigerator Installation
20 minutes
Water Line Installation
30 minutes
Phillips Head Screwdriver
3/32", 1/8" and 3/16" Allen
wrenches
• Proper installation is the responsibilitg of the
installer.
• Product failure due to improper installation is not
covered under the Worrontg.
PREPARATION
MOVING THE REFRIGERATOR INDOORS
If the refrigerator will not fit through a doorwag,
the refrigerator door and freezer drawer can be
removed.
• To remove the refrigerator door, see Step 1 in
the Reversing the Door Swing section.
• To remove the freezer drawer, see the Removing
the Freezer Drawer section.
1/8 Dnll Btt and
Electric or Hand Drill
Pencil
Wire Cutters
Tape measure
1/4" Nut Driver
Level
Installation Instructions
INSTALLING THE REFRIGERATOR
REFRIGERATOR LOCATION
• Do not install the refrigerator where the temperature
will go below 60°F (16°C)because it will not run often
enough to maintain proper temperatures.
• Do not install the refrigerator where the temperature will
go above 100°F(37°C)becauseitwill not perform properlg.
• Installit on a floor strong enough to support it fullg loaded.
CLEARANCES
Allowthe following clearancesfor ease of installation,proper
air circulation and plumbing and electricalconnections.
Standard Depth
Models
Sides 1/8" (3mm)
Top 1" (25 mm)
Back 1" (25 mm)
[] PLUG IN THE REFRIGERATOR
On models with an icemaker, before plugging in
the refrigerator, make sure the icemaker power
switch is set to the O (off) position.
See the grounding
information attached
to the power cord.
Hove the refrigerator to its final location.
I r2-1PUTTHE REFRIGERATORIN PLACE
[] LEVEL THE REFRIGERATOR
Adjustable legs at the front corners of the
refrigerator should be set so the refrigerator is
firmlg positioned on the floor, and the front is
raised just enough that the door closes easilg
when opened about halfwag.
To adjust the leveling i _ _.. _
legs, turn the legs _.
clockwise to raise the .
counterclockwise to
lower it.
refrigerator, _l_
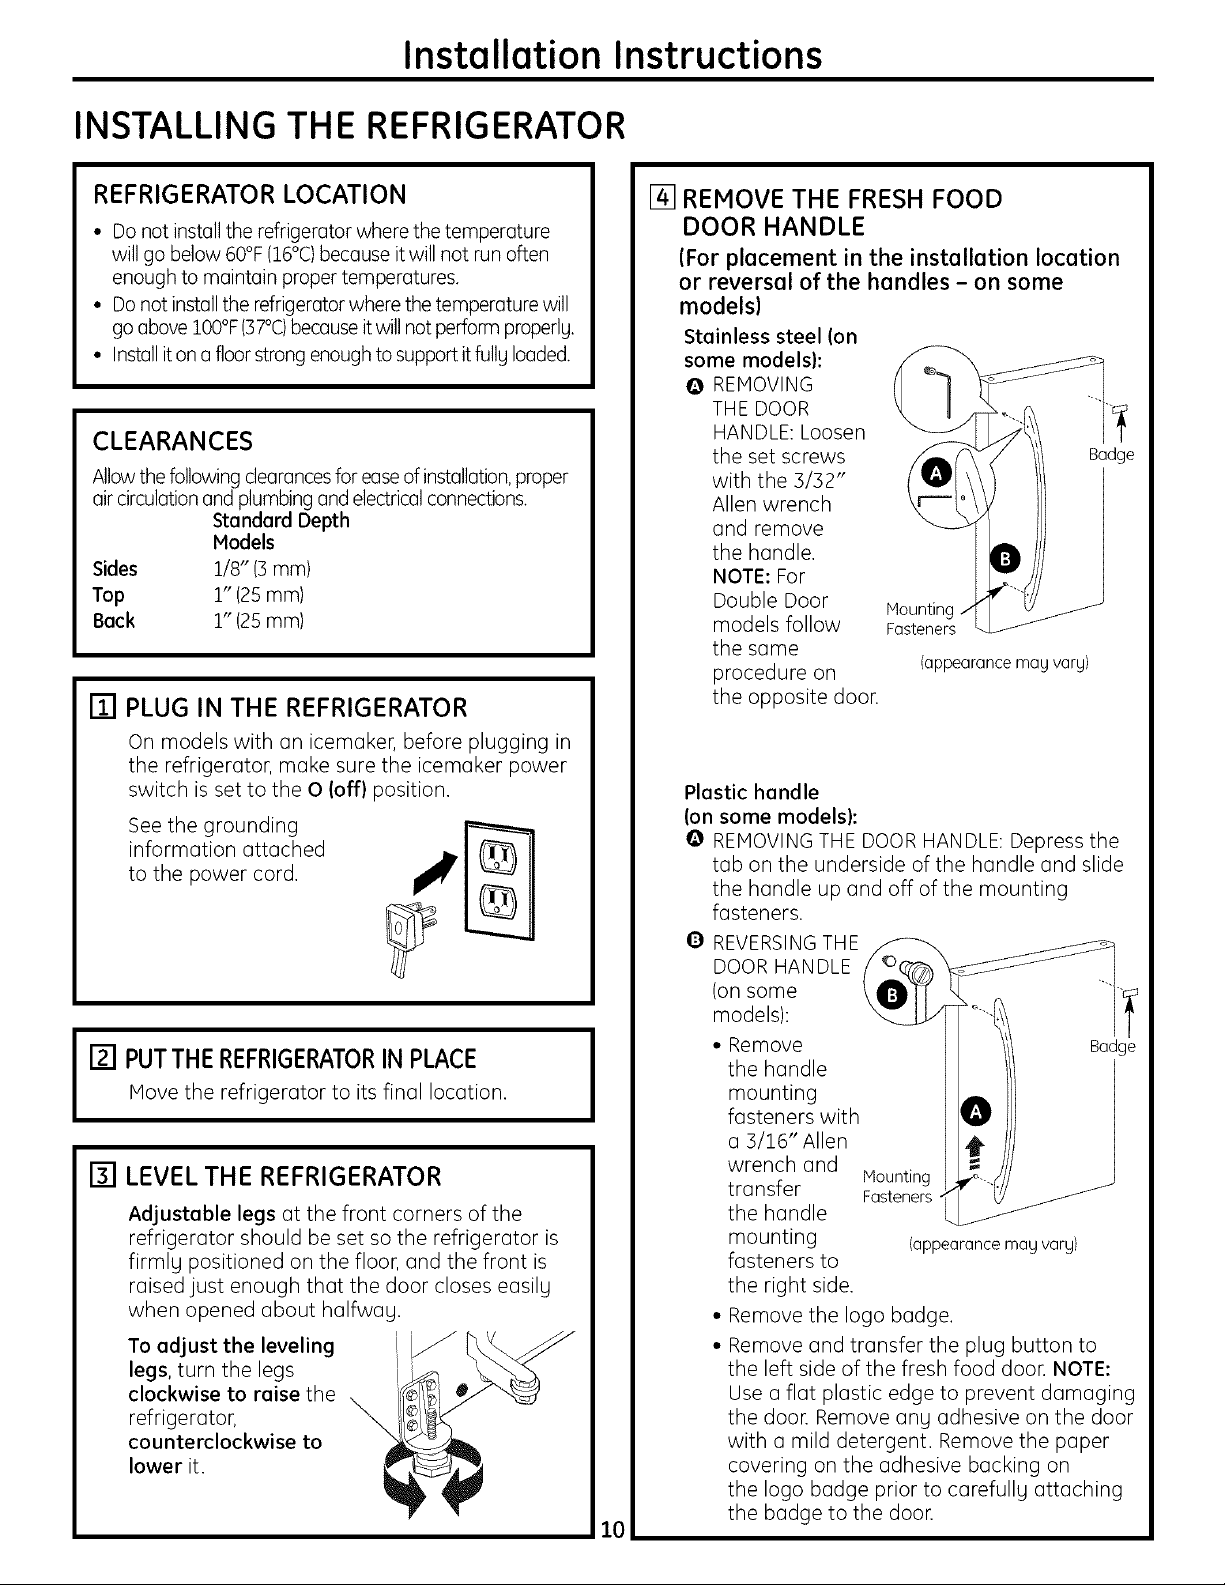
[] REMOVE THE FRESH FOOD
DOOR HANDLE
IFor placement in the installation location
or reversal of the handles - on some
models)
Stainless steel (on
some models):
Q REMOVING
THE DOOR
HANDLE: Loosen
the set screws
with the 3/32"
Allen wrench
and remove
the handle.
NOTE: For
Double Door Haunting
models follow Fasteners
the same
procedure on
the opposite door.
Plastic handle
(on some models):
Q REMOVING THE DOOR HANDLE: Depress the
tab on the underside of the handle and slide
the handle up and off of the mounting
fasteners.
Q REVERSINGTHE
DOOR HANDLE
(on some
models):
• Remove
the handle
mounting
fasteners with
a 3/16" Allen
10
wrench and
transfer
the handle
mounting
fasteners to
the right side.
• Remove the logo badge.
• Remove and transfer the plug button to
the left side of the fresh food door. NOTE:
Use a flat plastic edge to prevent damaging
the door. Remove ang adhesive on the door
with a mild detergent. Remove the paper
covering on the adhesive backing on
the logo badge prior to carefullg attaching
the badge to the door.
Haunting
Fasteners
Badge
(appearance mag varg)
J
(appearance mag varg)
Installation Instructions
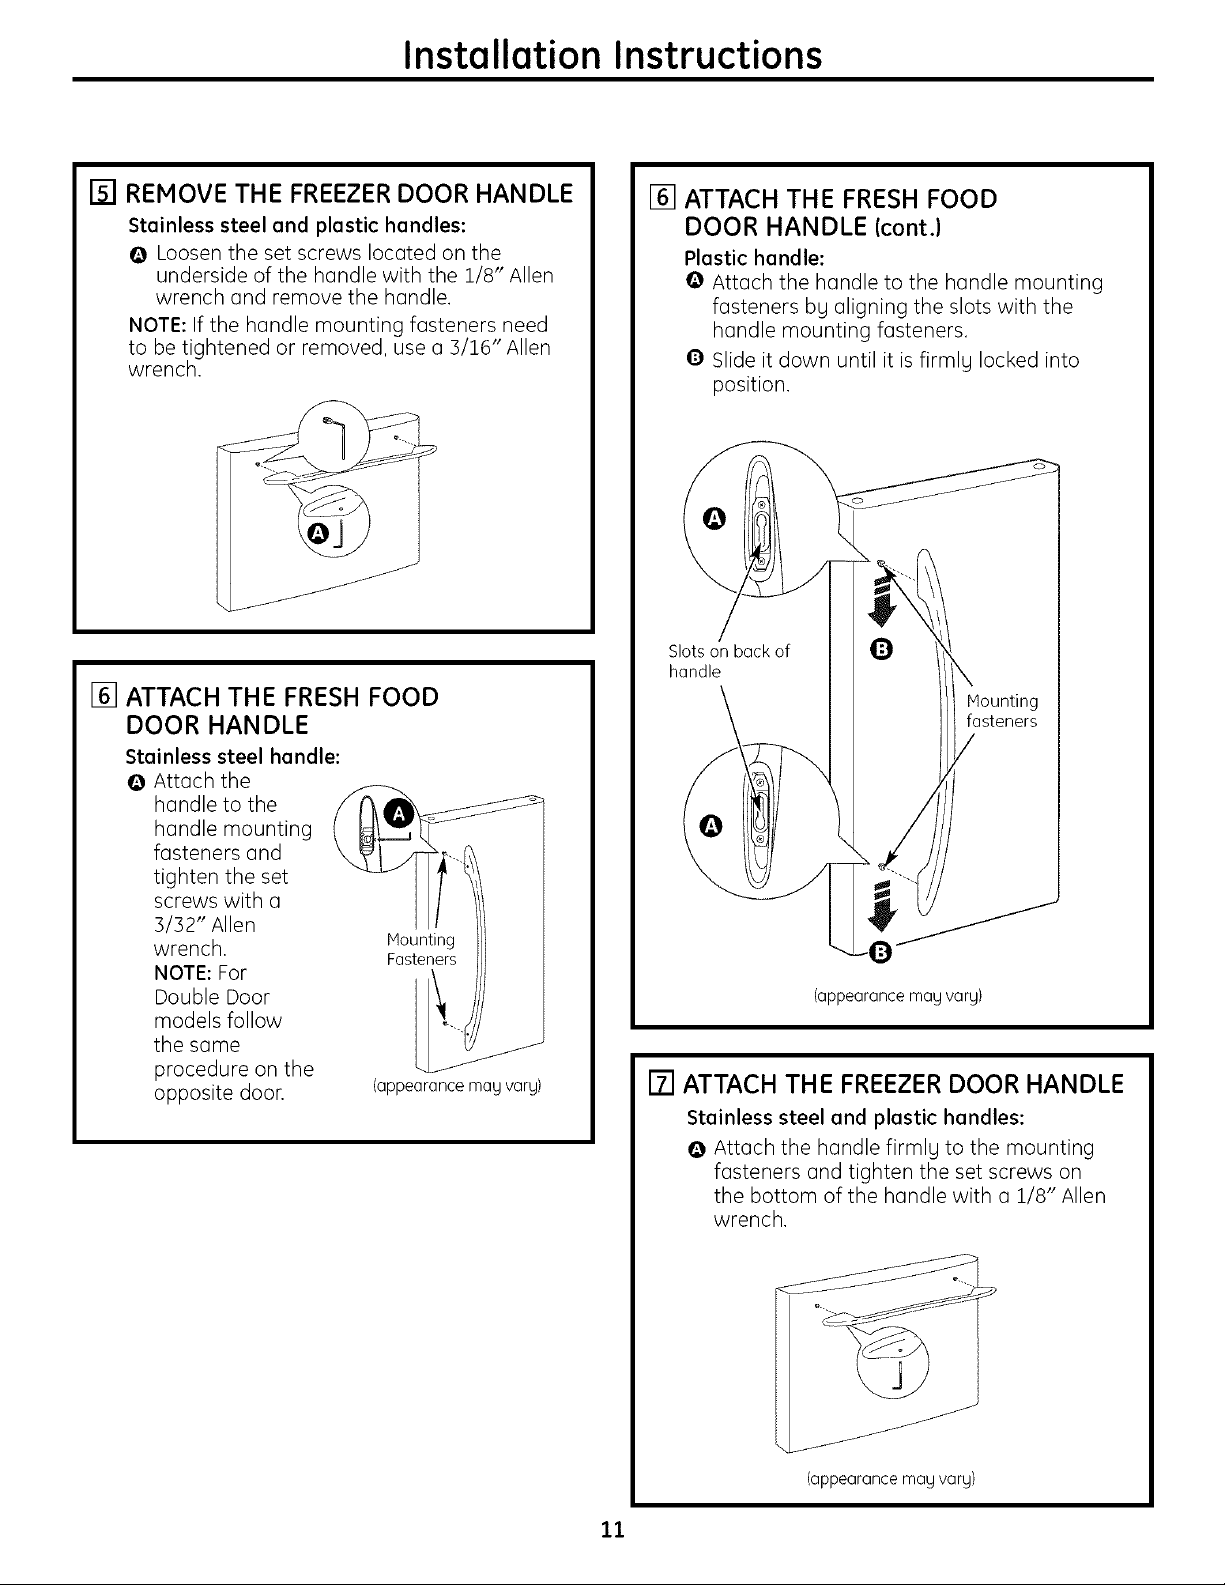
[] REMOVE THE FREEZER DOOR HANDLE
Stainless steel and plastic handles:
O Loosen the set screws located on the
underside of the handle with the 1/8" Allen
wrench and remove the handle.
NOTE: If the handle mounting fasteners need
to be tightened or removed, use a 3/16" Allen
wrench.
[] ATTACH THE FRESH FOOD
DOOR HANDLE
Stainless steel handle:
O Attach the
handle to the
handle mounting
fasteners and
tighten the set
screws with a
3/32" Allen
wrench.
NOTE: For
Double Door
models follow
the same
procedure on the
opposite door.
Hounting
Fasteners
(appearance may vary)
[] ATTACH THE FRESH FOOD
DOOR HANDLE (cont.)
Plastic handle:
@ Attach the handle to the handle mounting
fasteners bg aligning the slots with the
handle mounting fasteners.
O Slide it down until it is firmlg locked into
position.
Slots
on back of
handle
(appearance may vary)
\
Haunting
fasteners
/
[] ATTACH THE FREEZER DOOR HANDLE
Stainless steel and plastic handles:
@ Attach the handle firmlg to the mounting
fasteners and tighten the set screws on
the bottom of the handle with a 1/8" Allen
wrench.
11
(appearance may vary)
Installation Instructions
INSTALLING THE REFRIGERATOR(cont.)
[] LEVEL THE REFRIGERATOR
The leveling legs have 2 purposes:
1) Leveling legs adjust so the refrigerator is
firmlg positioned on the floor and does not
wobble.
2) Leveling legs serve as a stabilizing broke
to hold the refrigerator securelg in position
during operation and cleaning, The leveling
legs also prevent the refrigerator from
tipping.
[] Remove the grille bg removing the two Phillips
head screws.
[] SET THE CONTROLS
Set the controls to the recommended setting.
[.EOOMME.O OCO...O'SETT..OS]
Adjust Freezer Adjust Refrigerator
Temperature Temperature
[] Turn the leveling legs clockwise to raise
the refrigerator, counterclockwise to lower it.
./i CAUTION: To avoid possible
personal injurg or property damage,
the leveling legs must be firmlg touching
the floor.
[] Replace the base grille bg inserting the two
Phillips head screws.
12
Installation Instructions
REVERSINGTHE DOOR SWING
IMPORTANT NOTES
When reversing the door swing:
NOTE: Door swing is not reversible on stainless
steel models.
• Read the instructions all the way through before
starting.
• Parts are included in the door hinge kit.
• Handle parts carefully to avoid scratching paint.
• Set screws down by their related parts to avoid
using them in the wrong places.
• Provide a non-scratching work surface for
the doors.
IMPORTANT: Once you begin, do not move the
cabinet until door-swing reversal is completed.
These instructions are for changing the hinges
from the right side to the left side-if you ever want
to change the hinges back to the right side, follow
these same instructions and reverse all references
to left and right.
• Once door swing is finalized, ensure the logo
badge is properly aligned and permanently
secured to the door by removing the adhesive
cover on the back side. NOTE: A replacement
logo badge is included in the hinge kit,
Unplug the refrigerator from its electrical outlet.
Emptg all door shelves, including the dairg
compartment.
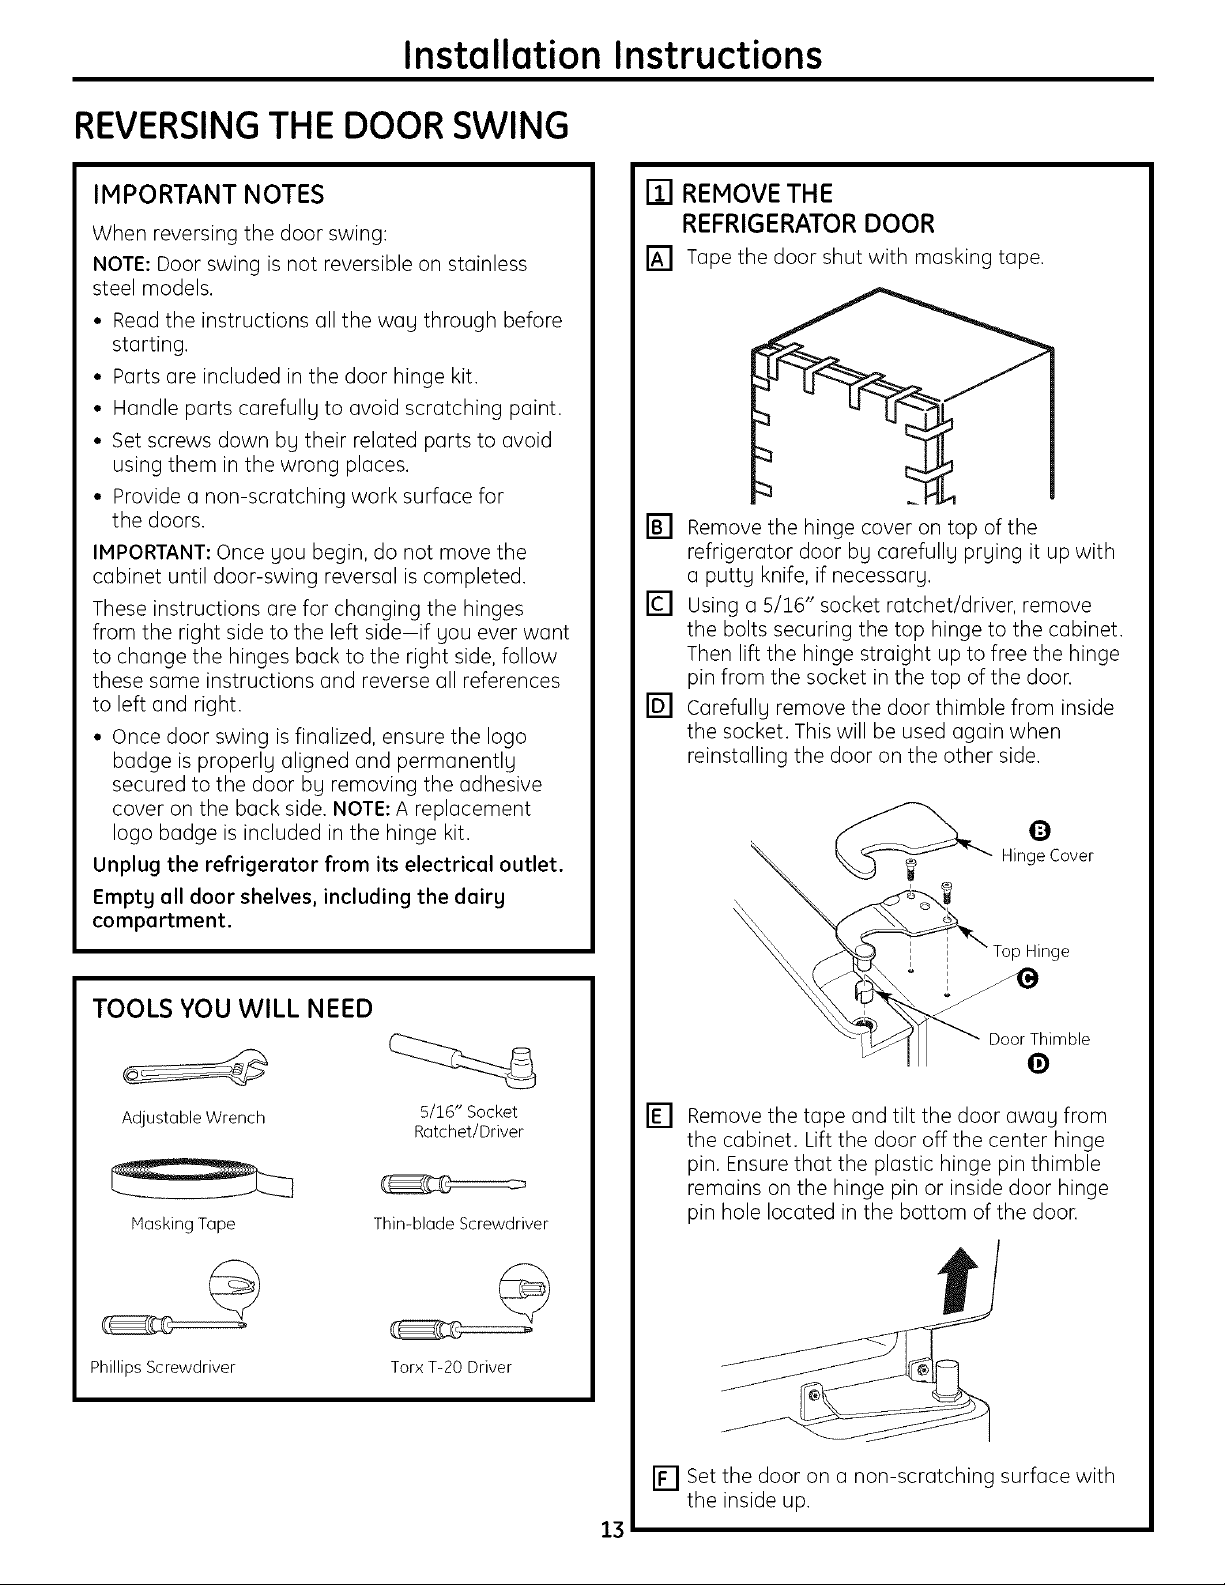
[] REMOVE THE
REFRIGERATOR DOOR
[] Tape the door shut with masking tape.
[] Remove the hinge cover on top of the
refrigerator door by carefullg prying it up with
a putty knife, if necessary.
[] Using a 5/16" socket ratchet/driver, remove
the bolts securing the top hinge to the cabinet.
Then lift the hinge straight up to free the hinge
pin from the socket in the top of the door.
[] Carefully remove the door thimble from inside
the socket, This will be used again when
reinstalling the door on the other side.
_ Hin2C°ver
I ? Top Hinge
TOOLS YOU WILL NEED
Adjustable Wrench 5/16" Socket
Masking Tape
Ratchet/Driver
Thin-blade Screwdriver
@ ©
Phillips Screwdriver
Torx T-20 Driver
[]
Remove the tape and tilt the door away from
the cabinet. Lift the door off the center hinge
pin. Ensure that the plastic hinge pin thimble
remains on the hinge pin or inside door hinge
pin hole located in the bottom of the door.
[] Set the door on a non-scratching surface with
the inside up.
13
Installation Instructions
REVERSINGTHE DOORSWING (cont.)
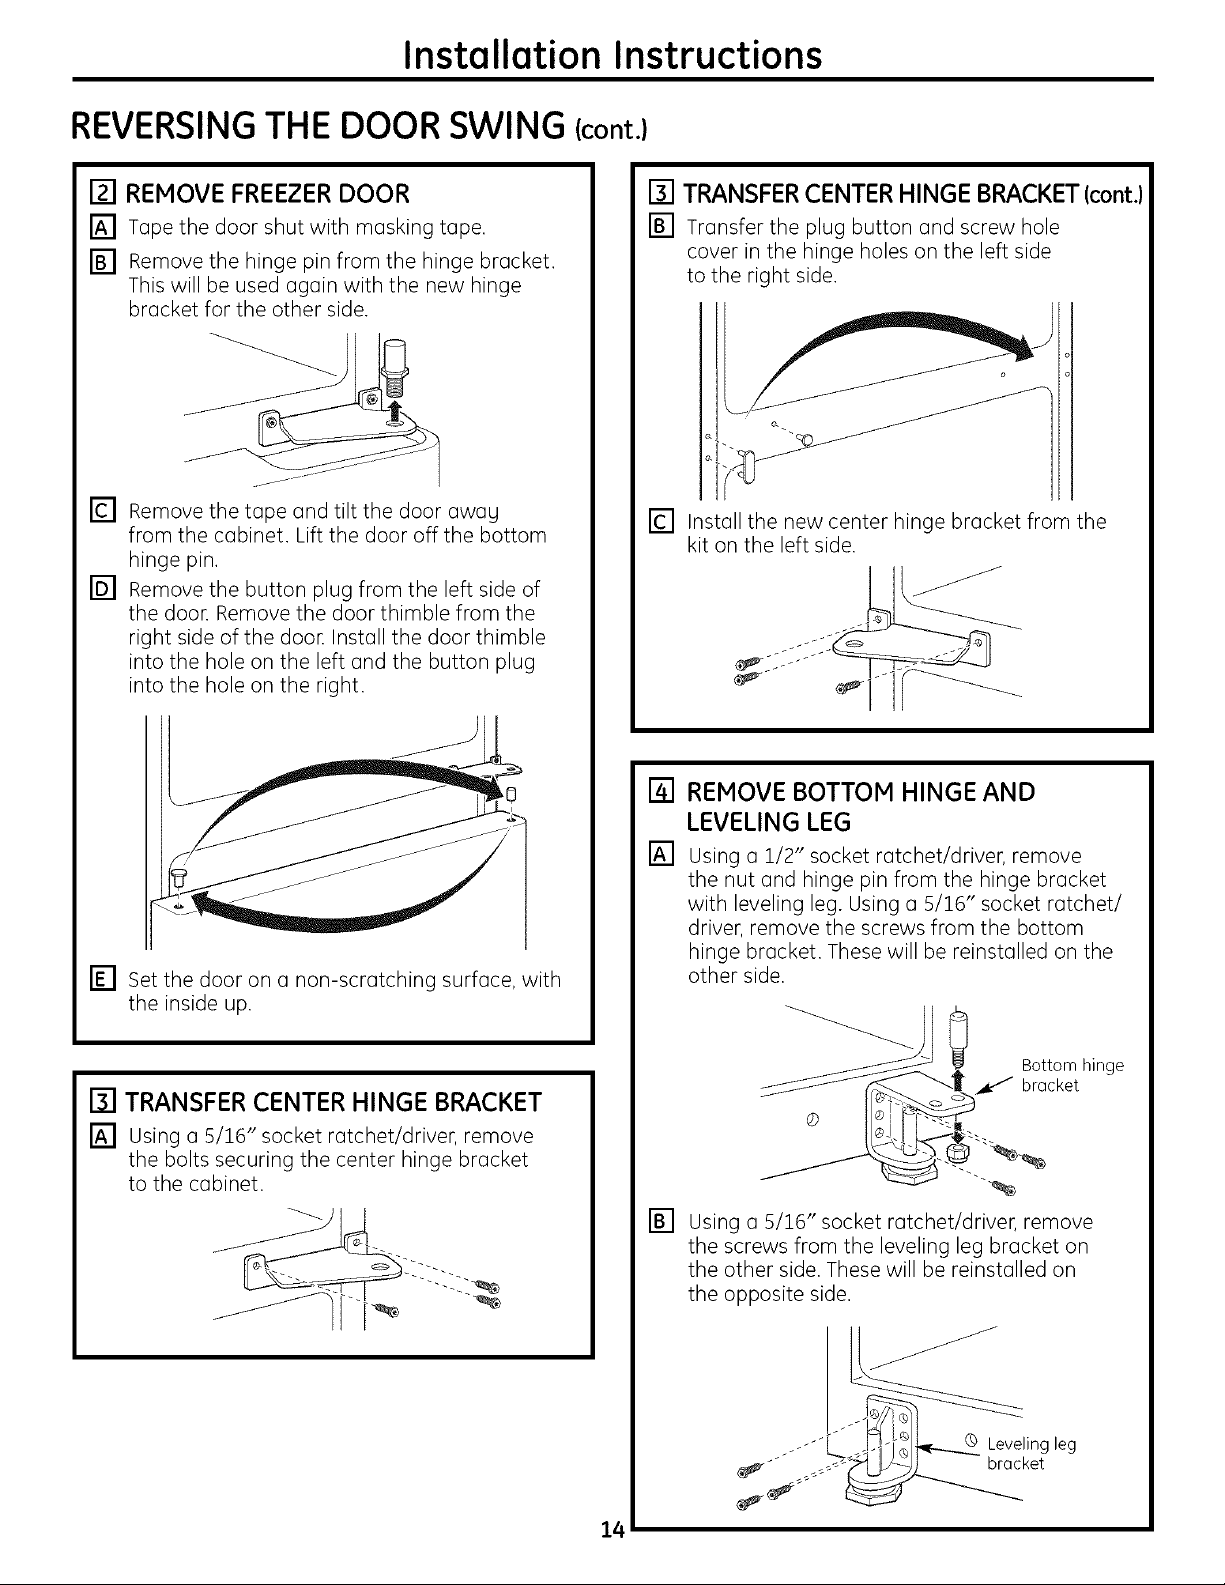
[] REMOVE FREEZERDOOR
[] Tape the door shut with masking tape.
[] Remove the hinge pin from the hinge bracket.
This will be used again with the new hinge
bracket for the other side.
[] Remove the tape and tilt the door awag
from the cabinet. Lift the door off the bottom
hinge pin.
[] Remove the button plug from the left side of
the door. Remove the door thimble from the
right side of the door. Install the door thimble
into the hole on the left and the button plug
into the hole on the right.
[] TRANSFER CENTERHINGE BRACKET(cont.)
[] Transfer the plug button and screw hole
cover in the hinge holes on the left side
to the right side.
[] Install the new center hinge bracket from the
kit on the left side.
[] Set the door on a non-scratching surface, with
the inside up.
[] TRANSFER CENTER HINGE BRACKET
[] Using a 5/16" socket ratchet/driver, remove
the bolts securing the center hinge bracket
to the cabinet.
[]
REMOVE BOTTOM HINGE AND
LEVELING LEG
[]
Using a 1/2" socket ratchet/driver, remove
the nut and hinge pin from the hinge bracket
with leveling leg. Using a 5/16" socket ratchet/
driver, remove the screws from the bottom
hinge bracket. These will be reinstalled on the
other side.
[] Using a 5/16" socket ratchet/driver, remove
the screws from the leveling leg bracket on
the other side. These will be reinstalled on
the opposite side.
14
I _hng leg
Installation Instructions
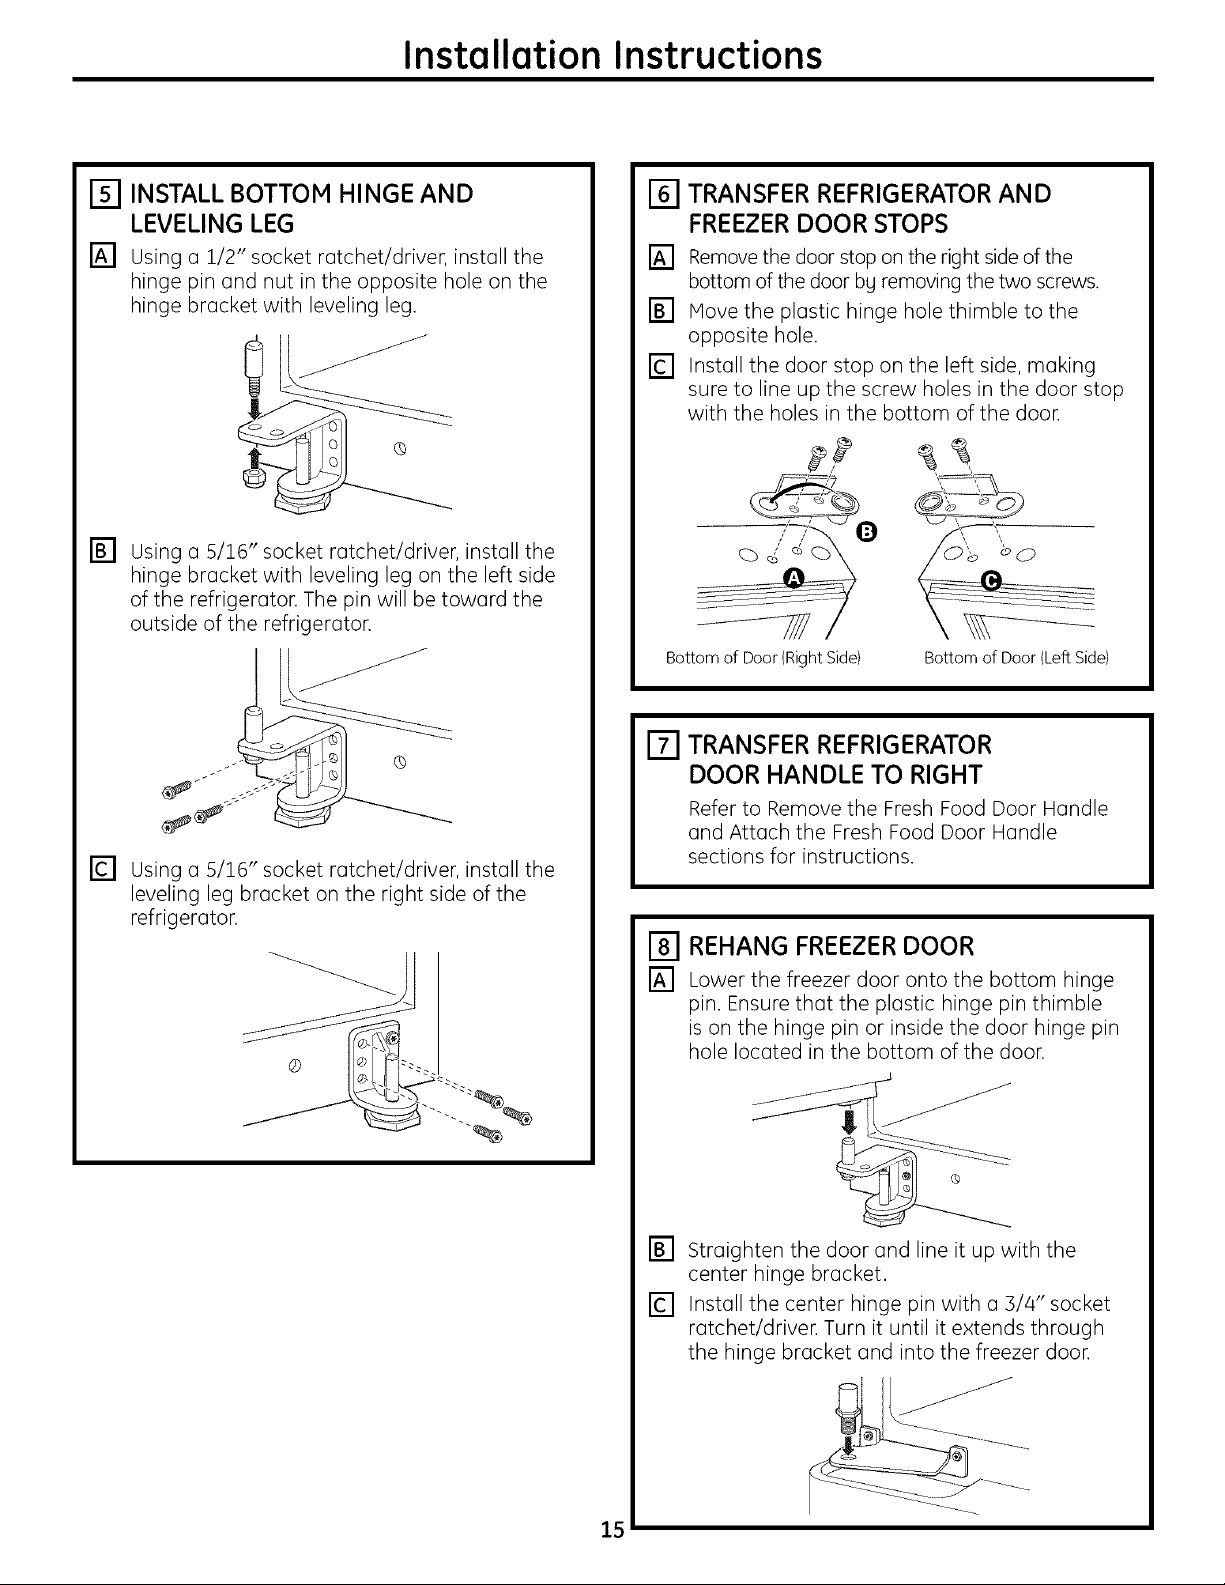
[] INSTALL BOTTOM HINGE AND
LEVELING LEG
[] Using a 1/2" socket ratchet/driver, install the
hinge pin and nut in the opposite hole on the
hinge bracket with leveling leg.
[] Using a 5/16" socket ratchet/driver, install the
hinge bracket with leveling leg on the left side
of the refrigerator. The pin will be toward the
outside of the refrigerator.
[] Using a 5/16" socket ratchet/driver, install the
leveling leg bracket on the right side of the
refrigerator.
TRANSFER REFRIGERATOR AND
FREEZER DOOR STOPS
[] Remove the door stop on the right side of the
bottom of the door bg removing the two screws.
[] Move the plastic hinge hole thimble to the
opposite hole.
[] Install the door stop on the left side, making
sure to line up the screw holes in the door stop
with the holes in the bottom of the door.
Bottom of Door (Right Side) Bottom of Door (Left Side)
ITI TRANSFER REFRIGERATOR
DOOR HANDLE TO RIGHT
Refer to Remove the Fresh Food Door Handle
and Attach the Fresh Food Door Handle
sections for instructions.
[] REHANG FREEZERDOOR
[] Lower the freezer door onto the bottom hinge
pin. Ensure that the plastic hinge pin thimble
is on the hinge pin or inside the door hinge pin
hole located in the bottom of the door.
[] Straighten the door and line it up with the
center hinge bracket.
[] Install the center hinge pin with a 3/4" socket
ratchet/driver. Turn it until it extends through
the hinge bracket and into the freezer door.
15
 Loading...