

GE PFSS6SMXASS, PFSS6PKXASS Owner’s Manual
Ln
ge.com
Safetg Instructions ........... 2,s
N
E
0
0
Operating Instructions
Automatic Icemaker ............... 20
Care and Cleaning ............. 21, 22
Control for LCD Models .......... 4-11
Control for Non-LCD Models .... 12, 1:3
Crispers and Pans ................. 18
Dispenser ......................... 14
Freezer ............................ 19
Fresh Food Storoge Options .... 16, 17
Replacing the Light Bulbs .......... 23
Water Filter ........................ 15
Installation Instructions
Installing the Refrigerator ....... 26-33
Installing the Woter Line ........ 34-36
Preparing to Instoll
the Refrigerator ................ 24, 25
Troubleshooting Tips ...... 37-41
Normal Operating Sounds .......... 37
Consumer Support
Consumer Support ........ Back Cover
Performance Data Sheet ........... 49
Product Registration
for Canadian Customers ........ 45, 46
Product Registration
for U.S. Customers ............. 43, 44
State of California Water
Treatment Device Certificate ....... 50
Warrantg for Canadian
Customers ......................... 48
Warrantg for U.S. Customers ....... 47
Profild" Model 26
Cong_lateur inf_rieur
R frig rateurs
La section frangaise commence 5 la page 51
Congelador inferior
Refrigeradores
La secci6n en espa_ol empieza en la p6gina 95
4.--
Write the model and serial
numbers here:
Nodal #
Serial #
Find these numbers on a label
on the left side, near the middle
of the refrigerator compartment.
225D2649PO01 49-60552 04-08JR
IMPORTANTSAFETYINFORMATION.
READALL INSTRUCTIONSBEFOREUSING.
WARNING!
Use this appliance only for its intended purpose as described in this Owner's Manual.
SAFETY PRECAUTIONS
When using electrical appliances, basic safety precautions should be followed, including the following:
This refrigerator must be properly installed
and located in accordance with the Installation
Instructions before it is used.
Donot allow children to climb, stand or hang
on the shelvesinthe refrigerator.They could
damage the refrigerator and seriously injure
themselves.
Donot touch the cold surfaces in the freezer
comportment when hands ore damp or wet.
Skinmay stick to these extremely cold surfaces.
Donot store or use gasolineor other flammable
vapors and liquidsin the vicinity of this or any
other appliance.
Keepfingers out ofthe "pinch point" areas;
clearancesbetween the doorsand between
the doors and cabinet ore necessarily small.
Becareful closing doorswhen children ore
inthe area.
Inrefrigerators with automatic icemokers,
ovoid contact with the moving ports of the
ejector mechanism, or with the heating element
that releasesthe cubes. Do not place fingers or
handson the automatic icemoking mechanism
while the refrigerator is plugged in.
Unplugthe refrigerator before cleaning and making
repairs.
NOTE:Westrongly recommend that any servicing
beperformed bg a qualified individual.
Donot refreezefrozen foods which hovethawed
completely.
DANGER! RISK OF CHILD ENTRAPMENT
PROPERDISPOSAL OF THE REFRIGERATOR
Childentrapment and suffocation ore not problems
of the post. Junked or abandoned refrigerators ore
still dongerous...evenif they will sit for 'Just o few
days." Ifyou ore getting rid of your old refrigerator,
pleasefollow the instructions below to help prevent
accidents.
Before You Throw Away Your Old
Refrigerator or Freezer:
;;Take offthe doors.
Leavethe shelves in place sothat children may not
easily climb inside.
Refrigerants
All refrigeration products contain refrigerants,
which under federal low must be removed prior
to product disposal. If you ore getting rid of on old
refrigeration product, check with the company
handling the disposal about what to do.
USEOF EXTENSION CORDS
Because of potential safety hazards under certain conditions, we strongl_l recommend against the use
of on extension cord.
However,if you must useon extension cord, it isabsolutely necessarythat it be a UL-listed(inthe United States)
or o CSAcertified (inCanada),3-wire grounding type appliance extension cord having o grounding type plug
2
and outlet and that the electrical rating of the cord be 15 amperes (minimum) and 120volts.
WARNING!
HOW TO CONNECT ELECTRICITY
Do not, under ong circumstonces, cut or remove the third (ground) prong from the power cord.
For personol sofetg, this opplionce must be properlg grounded.
ge.col_
Thepower cord of this appliance is equipped
with a 3-prong (grounding)plug which mates
with a standard 3-prong (grounding)wall outlet
to minimizethe possibility of electric shock hazard
from this appliance.
Have the wall outlet and circuit checked by
a qualified electrician to make sure the outlet
isproperly grounded.
Where a standard 2-prong wall outlet is encountered,
it is your personal responsibility and obligation to
have it replaced with a properly grounded 3-prong
wall outlet.
Therefrigerator should always be plugged into its
own individual electrical outlet which hasa voltage
rating that matches the rating plate.
Thisprovides the best performance andalso prevents
overloading house wiring circuits which could cause
a fire hazard from overheated wires.
Never unplug your refrigerator by pulling
on the power cord. Always grip plugfirmly
and pull straight out from the outlet.
Repairor replace immediately all power cords that
have become frayed or otherwise damaged. Do not
usea cord that shows cracks or abrasion damage
along its length or at either end.
When moving the refrigerator away from the wall,
be careful not to roll over or damage the power cord.
READAND FOLLOWTHISSAFETYINFORMATIONCAREFULLY.
SAVETHESEINSTRUCTIONS
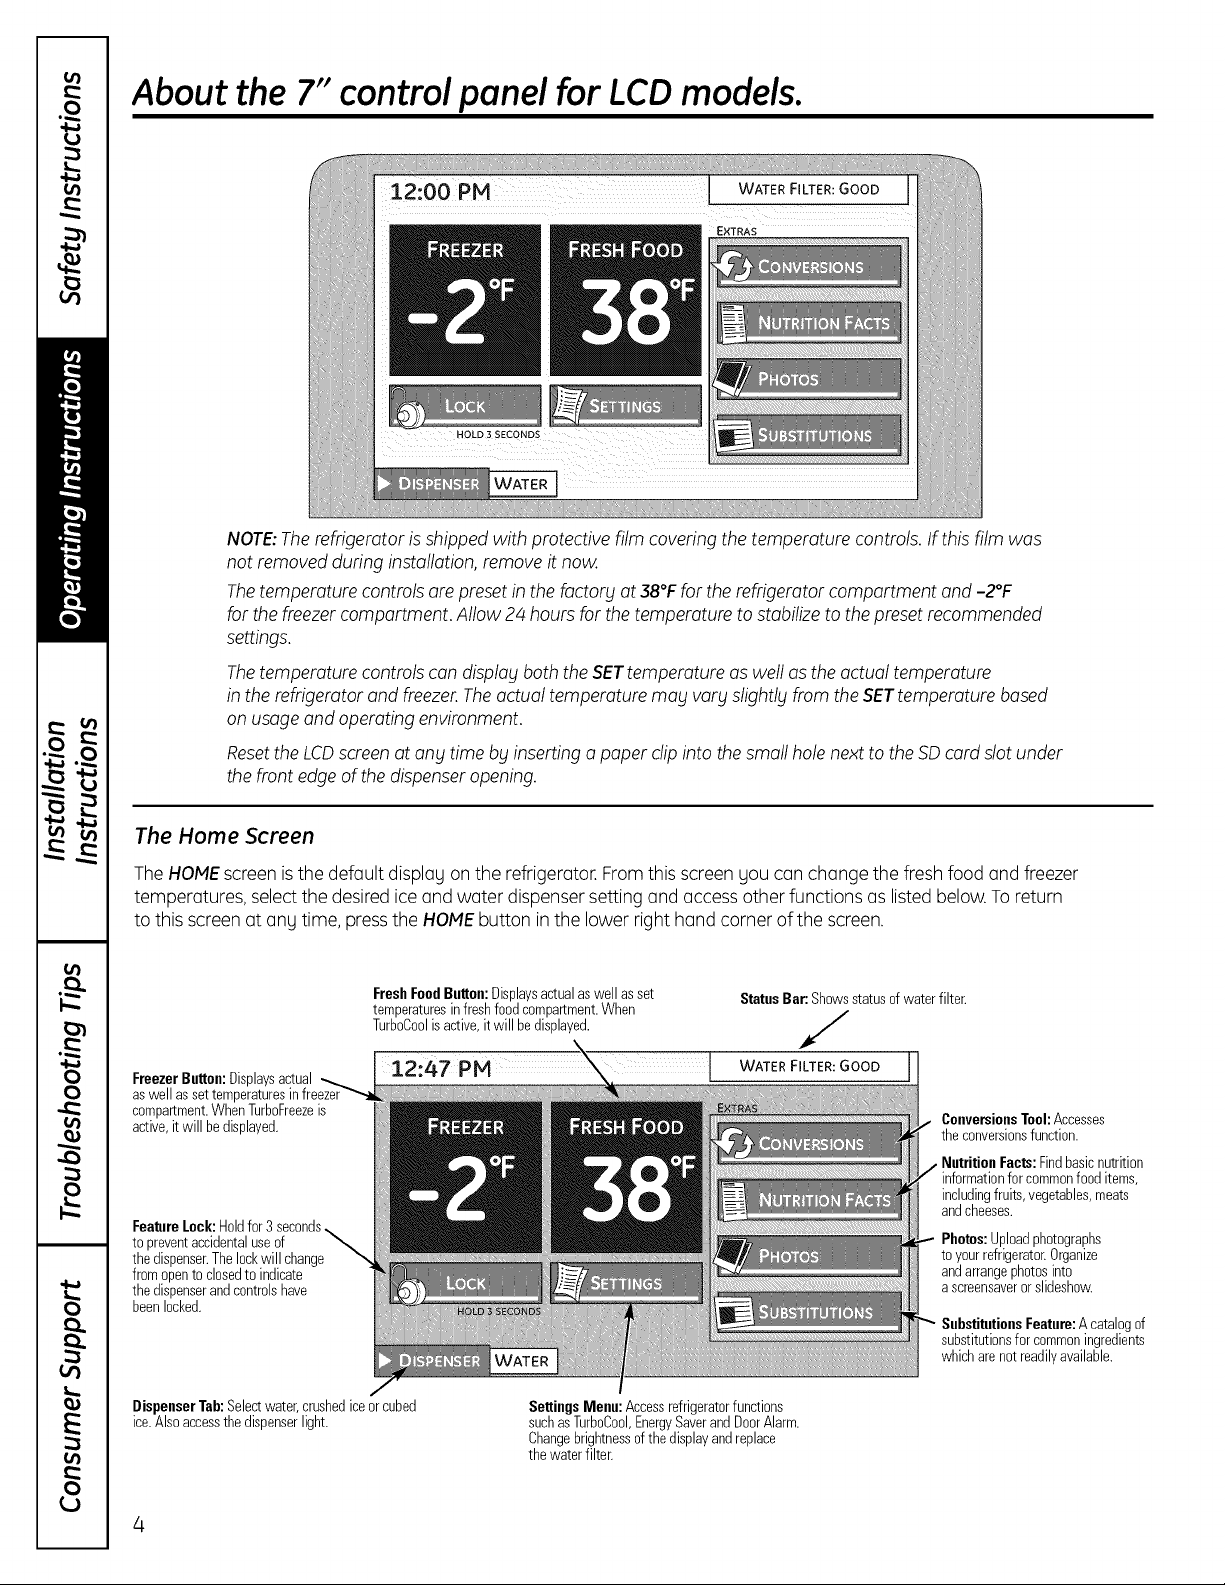
About the 7" controlpanel for LCDmodels.
NOTE: The refrigerator is shipped with protective film covering the temperature controls. If this film was
not removed during installation, remove it now.
The temperature controls are presetin the factory at 38°F for the refrigerator compartment and -2°F
for the freezer compartment. Allow 24 hours for the temperature to stabilize to the preset recommended
settings.
Thetemperature controls con displog both theSETtemperature as well asthe actual temperature
in the refrigerator and freezer.Theactual temperature mog vorgslightlg from the SETtemperature based
on usageand operating environment.
Resetthe LCDscreenat ong time bginserting o paperclip into the small holenext to the5D card slot under
the front edgeof the dispenseropening.
The Home Screen
The HOMEscreenisthe defoult displog on the refrigerotor. Fromthis screen gou con chonge the fresh food ond freezer
temperotures, select the desirediceond woter dispenser setting ond occess other functions os listed below.Toreturn
to this screenot 0% time, pressthe HOMEbutton inthe lower right hond corner of the screen.
FreezerButton:Displaysactual
aswell as settemperatures
compartment.WhenTurboFreezeis
active,itwill bedisplayed.
FeatureLoci(:Holdfor3
topreventaccidentaluseof
thedispenser.Thelockwill change
fromopento closedtoindicate
thedispenserandcontrolshave
beenlocked.
FreshFoodButton:Displaysactualaswell asset
temperaturesinfreshfood compartment.When
TurboCoolisactive,itwill be displayed.
12:47 PM
StatusBar:Showsstatusofwaterfilter.
7
WATERFILTER:GOOD
/
ConversionsTool:Accesses
theconversionsfunction.
NutritionFacts:Findbasicnutrition
informationforcommonfooditems,
includingfruits,vegetables,meats
andcheeses.
Photos:Uploadphotographs
toyourrefrigerator.Organize
andarrangephotosinto
ascreensaverorslideshow.
SubstitutionsFeature:Acatalogof
substitutionsforcommoningredients
whicharenotreadilyavailable.
DispenserTab:Selectwater,crushediceorcubed
ice.Alsoaccessthedispenserlight.
4
SettingsMenu:Accessrefrigeratorfunctions
suchasTurboCool,EnergySaverandDoorAlarm.
Changebrightnessofthedisplayandreplace
thewaterfilter.
Screen functions, gecom
Home Screen
O FREEZERButton
UpandDownArrows
tosettemperature
WATER FILTER: GOOD
SAVEButton
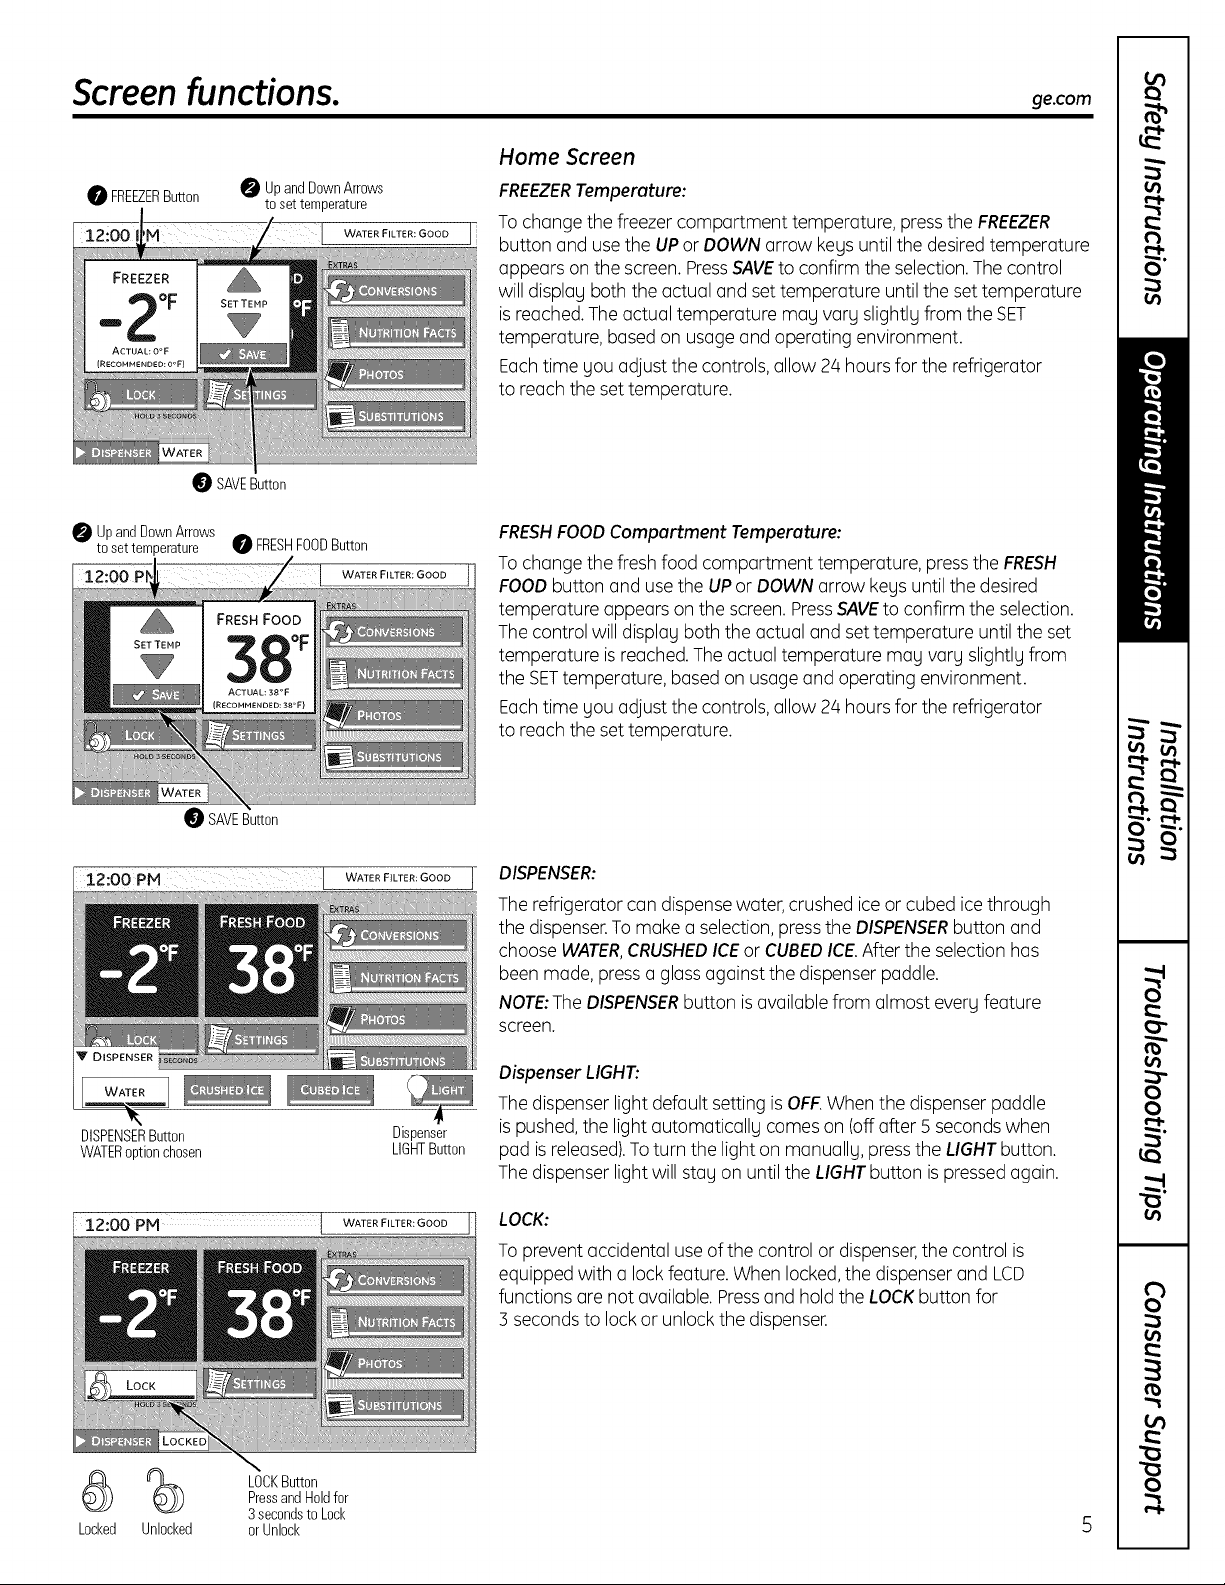
FREEZERTemperature:
To change the freezer compartment temperature, pressthe FREEZER
button and usethe UP or DOWN arrow kegs until the desired temperature
appears on the screen.PressSAVEto confirm the selection.The control
will displag both the actual and set temperature until the set temperature
is reached.Theactual temperature mag vorg slightlg from the SET
temperature, based on usageand operating environment.
Eachtime gou adjust the controls, allow 24 hours for the refrigerator
to reach the settemperature.
UpandDownArrows
tosettemperature _ FRESHFOODButton
WATER FILTER: GOOD
SAVEButton
12:00 PM WATER FILTER: GOOD ]-
DISPENSERButton Dispenser
WATERoptionchosen LIGHTButton
FRESHFOODCompartment Temperature:
To change the fresh food compartment temperature, press the FRESH
FOOD button and use the UPor DOWN arrow kegs until the desired
temperature appears on the screen. Press SAVE to confirm the selection.
The control will displag both the actual and set temperature until the set
temperature is reached. The actual temperature mag varg slightlg from
the SETtemperature, based on usage and operating environment.
Each time gou adjust the controls, allow 24 hours for the refrigerator
to reach the set temperature.
DISPENSER:
The refrigerator can dispensewater, crushed iceor cubed icethrough
the dispenser.To make a selection, pressthe DISPENSERbutton and
choose WATER,CRUSHEDICEor CUBEDICE.Afterthe selection has
been made, pressa glassagainst the dispenser paddle.
NOTE:TheDISPENSERbutton isavailablefrom almost evergfeature
screen.
Dispenser LIGHT:
The dispenser light default setting is OFF.When the dispenser paddle
is pushed,the light automaticallg comes on (offafter 5 seconds when
pad is released).Toturn the light on manuallg, pressthe LIGHT button.
The dispenser lightwill stagon until the LIGHTbutton is pressedagain.
LOCK
Locked Unlocked
LOCKButton
PressandHoldfor
3secondsto Lock
orUnlock
WATER FILTER: GOOD
LOCK:
To prevent accidental useof the control or dispenser,the control is
equipped with a lockfeature. When locked,the dispenser and LCD
functions are not available. Pressand hold the LOCKbutton for
5 secondsto lockor unlock the dispenser.

Screenfunctions.
12:00PM [
WATER FILTER: GOOD
0 NutritionFactsButton
12:00 I WATERF,LTER:
CONVERSIONS
Pressthe CONVERSIONSbutton on the HOMEscreento convert from one
unit and/or value to another. Usethe UPand DOWN arrow keusto choose
the amount and/or units needed.
Conversions
Button
ChoosepoRion
Chooseunit
NUTRITION FACTS
Pressthe NUTRITIONFACTSbutton on the HOMEscreento seenutrition
information. Six options along with an alphabet displau are shown on
the screen. Selectone of these ingredients or scroll by page or alphabet
character to proceed.The LEFTand RIGHTarrow keys on the display
allow Uouto scroll left or right on the top or bottom displau.Togo back
to the HOMEscreen,pressthe HOMEbutton.
0 Chooseingredientorletter
FACTS
NUTRITION FACTS
Apple
Serving Size 138g
Calories 72
Calories from Fat 0
Amount Per Serving %DV*
Total Fat 0g 0%
Sat Fat 0g 0%
Tl_ns Fat 0g 0%
Cholesterol 0g 0%
6 ScrollLeft
Sodium lmg 0%
Total Carbs !9g 6%
Dietarg Fiber 3g !2%
Sugm_ 14g
Protein 0g
Vitamin A 75
Vitamin C 63
Calcium 8
Iron 0.17
* Percent Dailg Values (DV) are
based on a 2,000 calorie diet.
Number
ScrollPage
orAlphabet
ScrollRight
ge.com
12:00PM [ WATER FILTER: GOOD
ak_er<_::> f _ O Photos
Spe Re_ 0 Insert Button
Select internal photosavailable
photos memory forupload(Max.30)
ALLButton NONEButton
toSelectAll to Deselect
Photoson AllPhotos
SDCard onSDCard
SDCard
Photos MemoryMeter:
storedin Totalnumberof
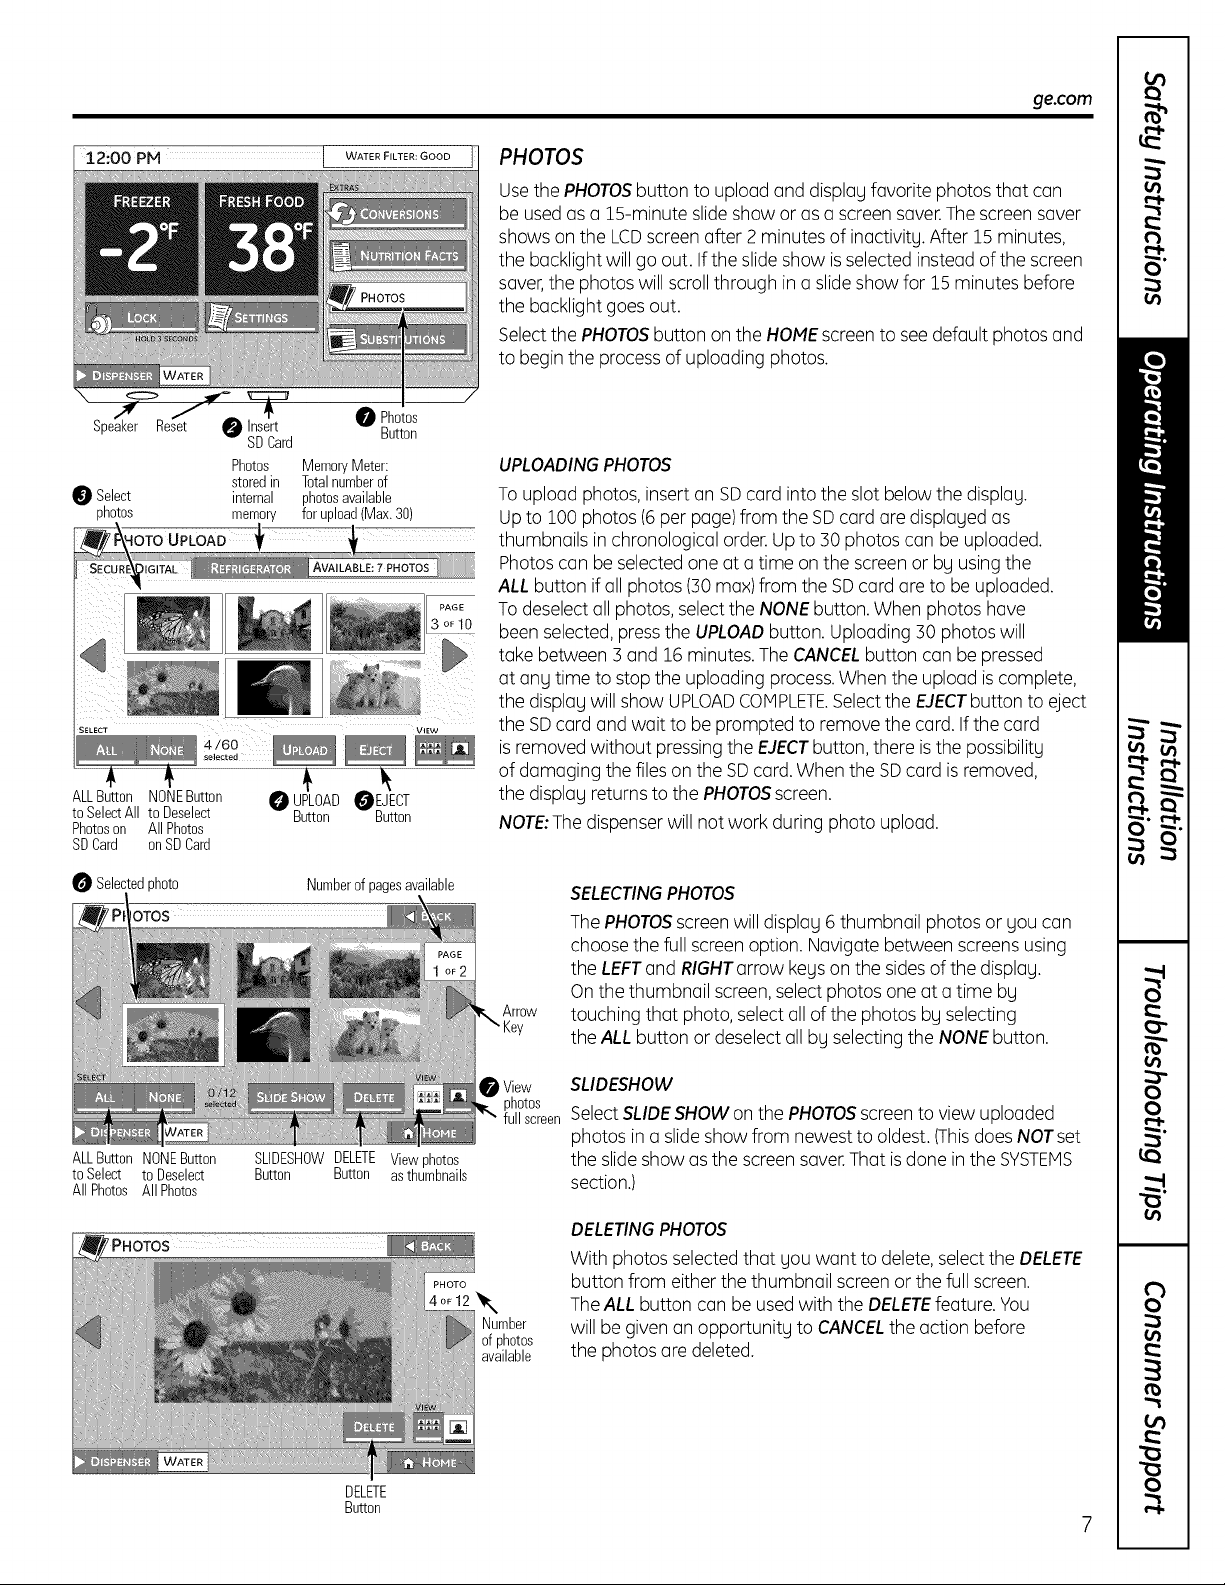
PHOTOS
Usethe PHOTOSbutton to upload and display favorite photos that can
be used asa 15-minute slideshow or asa screen saver.Thescreen saver
shows on the LCDscreen after 2minutes of inactivity. After 15 minutes,
the backlight will go out. If the slideshow isselected instead of the screen
saver,the photos will scrollthrough ina slideshow for 15 minutes before
the backlight goes out.
Selectthe PHOTOSbutton on the HOMEscreen to seedefault photos and
to begin the processof uploading photos.
UPLOADINGPHOTOS
To upload photos, insert an SDcard into the slot belowthe display.
Upto 100 photos (6 per page)from the SDcard are displaued as
thumbnails in chronological order. Upto 30 photos can be uploaded.
Photos can be selectedone at a time on the screen or by usingthe
ALL button if all photos (30max)from the SD card are to be uploaded.
To deselectall photos, selectthe NONEbutton. When photos have
been selected, pressthe UPLOADbutton. Uploading 30 photoswill
take between 3 and 16 minutes. TheCANCELbutton can be pressed
at any time to stop the uploading process.When the upload iscomplete,
the display will show UPLOADCOHPLETE.Selectthe EJECTbutton to eject
the SDcard and wait to be prompted to remove the card. If the card
is removed without pressingthe EJECTbutton, there isthe possibility
of damaging the files on the SDcard. When the SDcard isremoved,
the display returns to the PHOTOSscreen.
NOTE:Thedispenserwill not work during photo upload.
Selectedphoto
OTOS
ALLButton NONEButton SLIDESHOWDELETEViewphotos
toSelect to Deselect Button Button asthumbnails
AllPhotos AllPhotos
Numberofpagesavailable
Arrow
Key
View
photos
full screen
Number
of photos
available
SELECTINGPHOTOS
The PHOTOSscreenwill display 6 thumbnail photos or you can
choose the full screen option. Navigate between screens using
the LEFTand RIGHTarrow keyson the sidesof the display.
On the thumbnail screen,select photos oneat a time by
touching that photo, select all ofthe photos by selecting
the ALL button or deselectallby selectingthe NONEbutton.
SLIDESHOW
SelectSLIDESHOW on the PHOTOSscreento view uplooded
photos in a slideshowfrom newest to oldest. (Thisdoes NOTset
the slide show asthe screensaver.That isdone in the SYSTEMS
section.)
DELETINGPHOTOS
With photos selectedthot you want to delete,select the DELETE
button from either the thumbnail screen or the full screen.
TheALL button can be usedwith the DELETEfeature.You
will be given an opportunity to CANCELthe action before
the photos are deleted.
DELETE
Button
7
Screenfunctions.
12:00 PM
0 Selectan
ingredient
_2:ooPM
WATER FILTER: GOOD
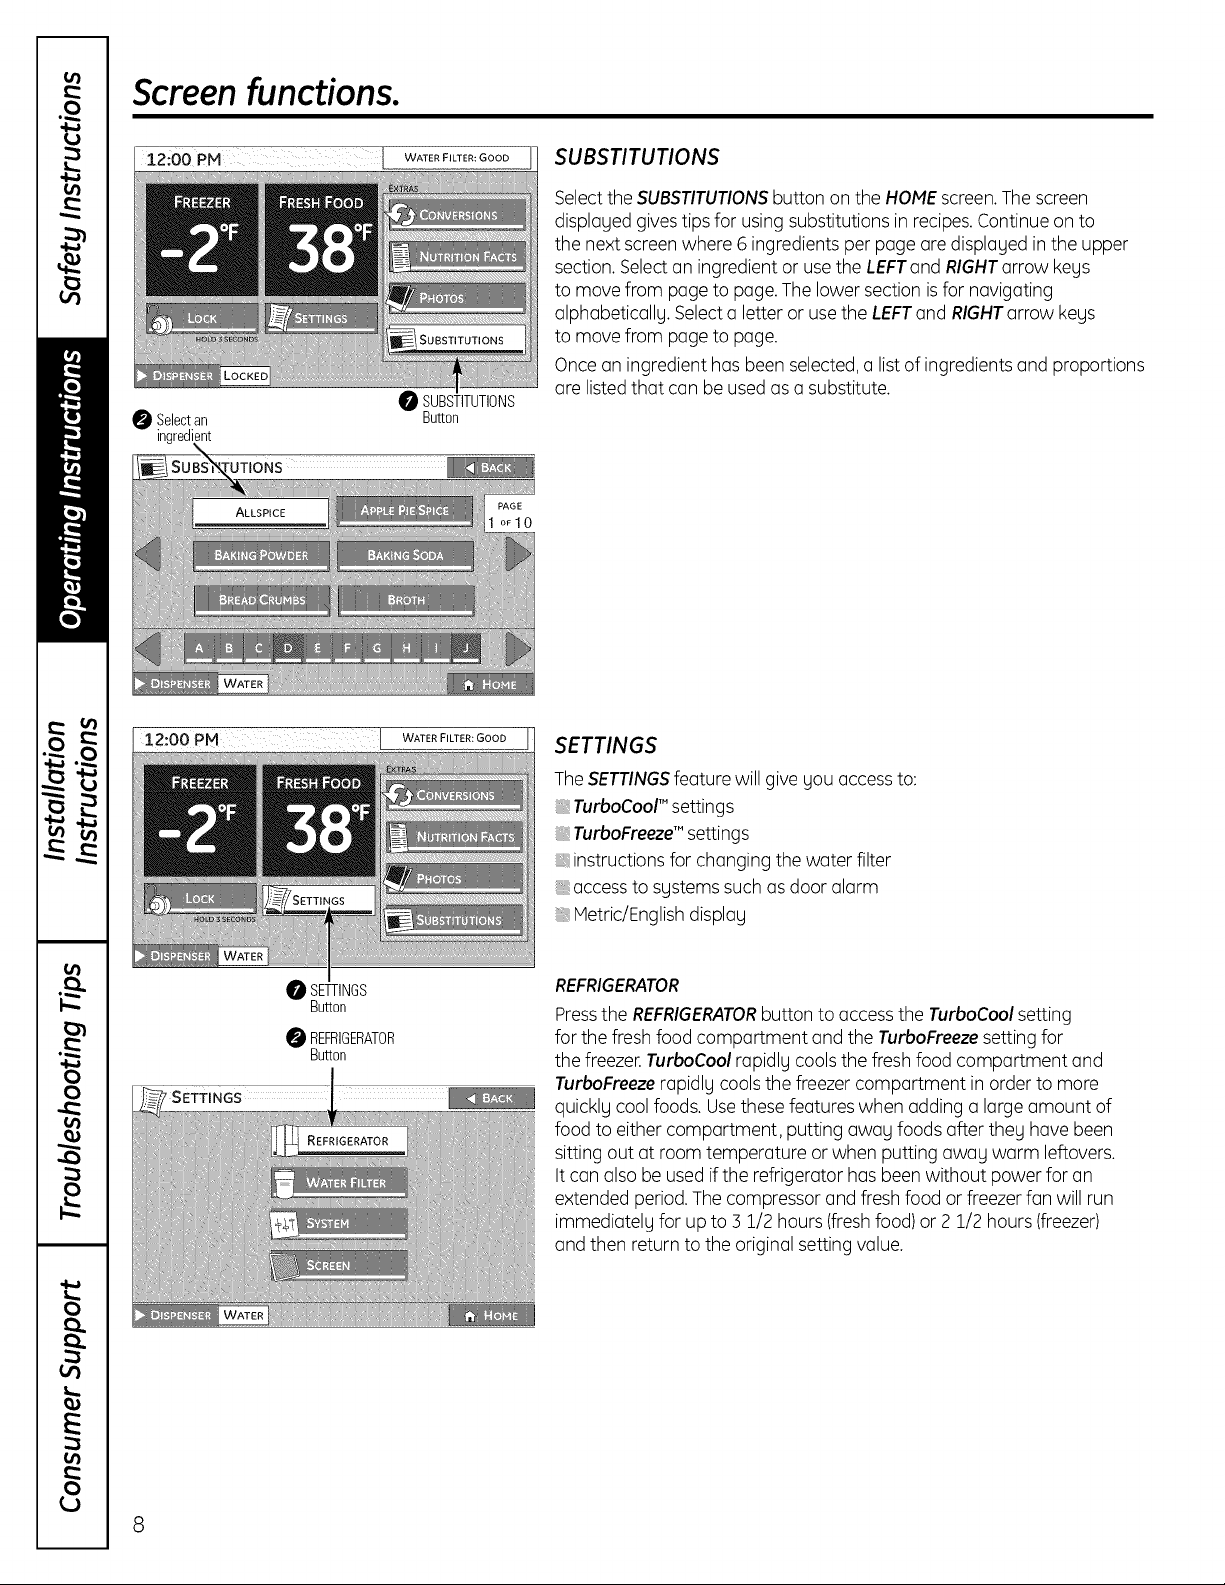
SUBSTITUTIONS
Button
WATER FILTER: GOOD
SUBSTITUTIONS
Selectthe SUBSTITUTIONSbutton on the HOMEscreen.Thescreen
displayed givestips for using substitutions in recipes.Continue on to
the next screenwhere 6 ingredients per page are displayed in the upper
section. Selectan ingredient or usethe LEFTand RIGHTarrow kegs
to move from pageto page. The lower section isfor navigating
alphabetically. Selecta letter or usethe LEFTand RIGHTarrow kegs
to move from pageto page.
Oncean ingredient has been selected,a listof ingredientsand proportions
are listedthat can be used asa substitute.
lO
SETTINGS
'SETTINGS
O SETTINGS
Button
REFRIGERATOR
Button
TheSETTINGSfeature will give you accessto:
TurboCool'" settings
TurboFreeze'"settings
instructions for changing the water filter
accessto sgstemssuch asdoor alarm
Metric/Englishdisplay
REFRIGERATOR
Pressthe REFRIGERATORbutton to accessthe TurboCool setting
for the fresh food compartment and the TurboFreezesetting for
the freezer.TurboCool rapidlu cools the fresh food compartment and
TurboFreezerapidlu cools the freezer compartment in order to more
quicklu cool foods. Usethese features when adding alarge amount of
food to either compartment, putting awau foods after theu have been
sitting out at room temperature or when putting awau warm leftovers.
It can also be used ifthe refrigerator has been without power for an
extended period.The compressor and freshfood or freezerfan will run
immediatelu for up to 3 1/2 hours (freshfood)or 2 1/2 hours (freezer)
and then return to the original setting value.
8
REFRIGERATOR
0 TURBOCOOL
Button
12:00 PM l WATERnLTE.:GOOO
ge.com
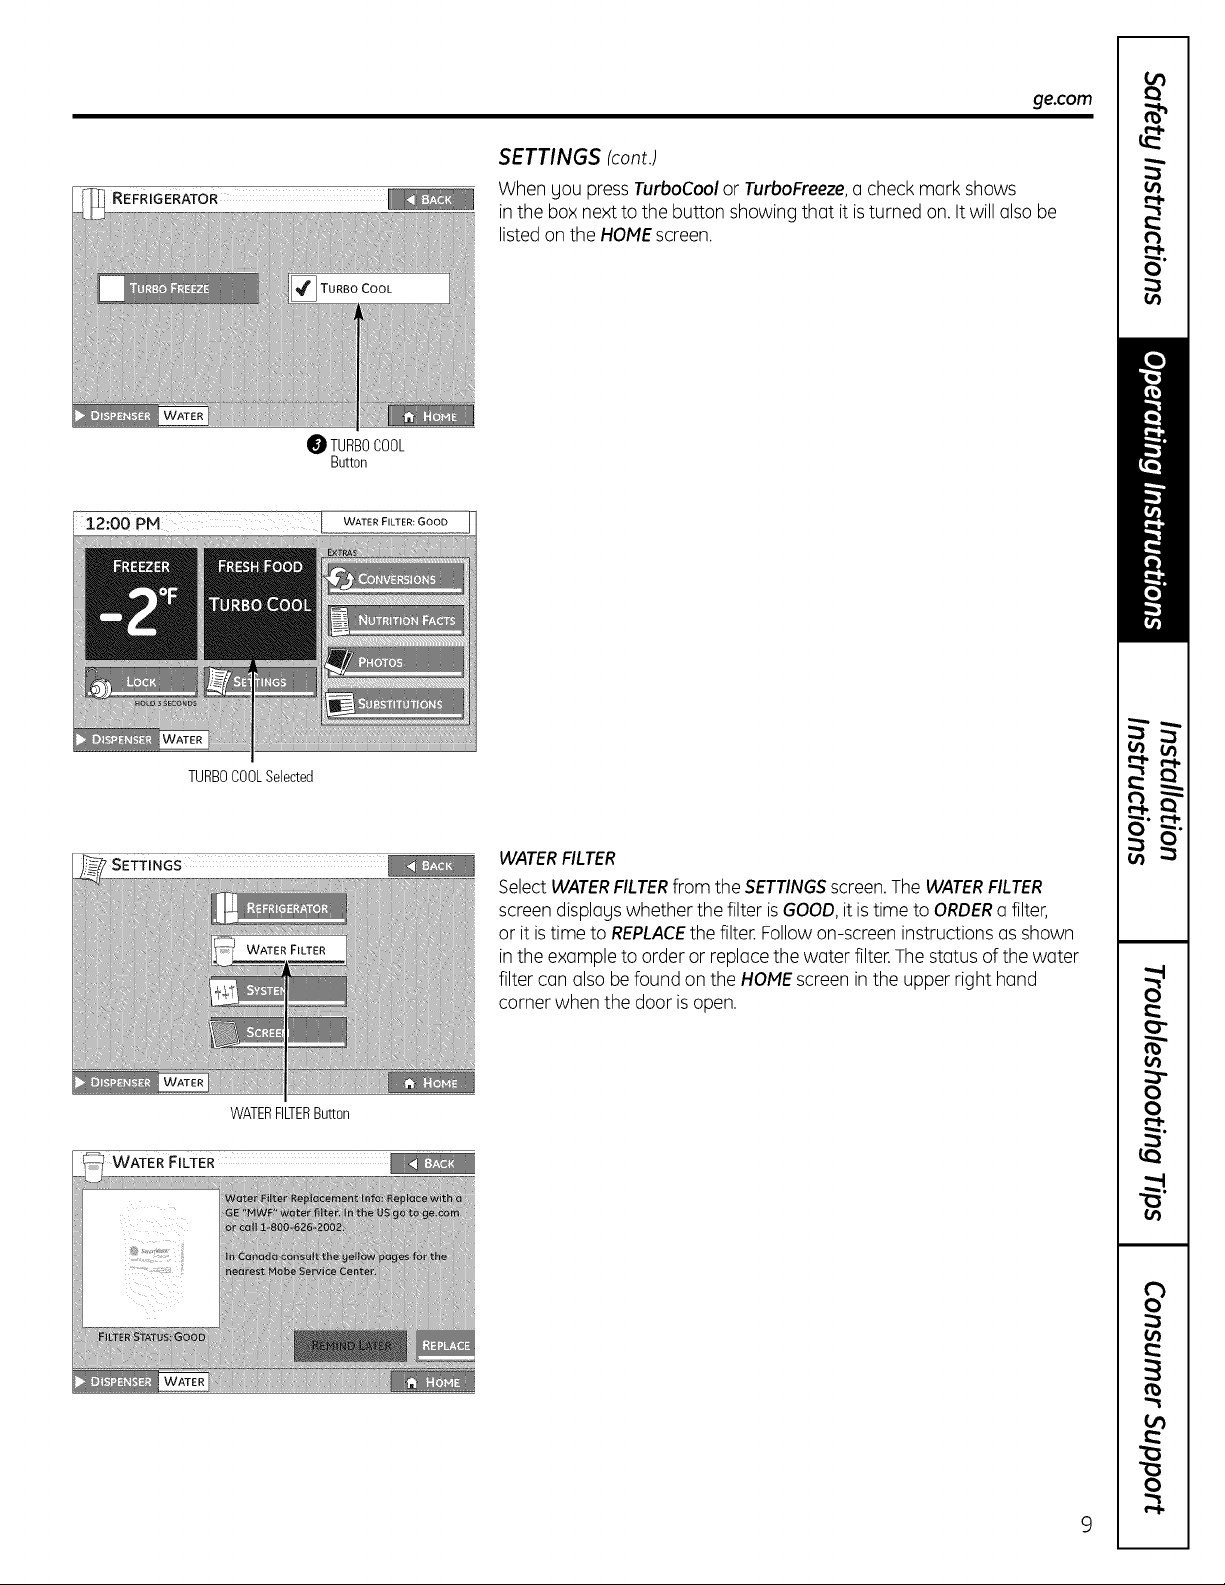
SETTINGS (cont.)
When gou press TurboCool or TurboFreeze,o check mork shows
in the box next to the button showing thot it is turned on.Itwill also be
listed on the HOMEscreen.
7SETTINGS
WATER FILTER
TURBOCOOLSelected
WATERFILTER
Select WATERFILTERfrom the SETTINGSscreen,TheWATERFILTER
screen displauswhether the filter isGOOD,it is time to ORDERafilter,
or it is time to REPLACEthe filter. Follow on-screen instructions as shown
in the example to order or replace the water filter.Thestatus of the water
filter can also befound on the HOMEscreen in the upper right hand
corner when the door isopen.
WATERFILTERButton
Screenfunctions.
' SETTINGS
DOOR SYSTEM
ALARM Button
Button
ENERGYSAVER
Button
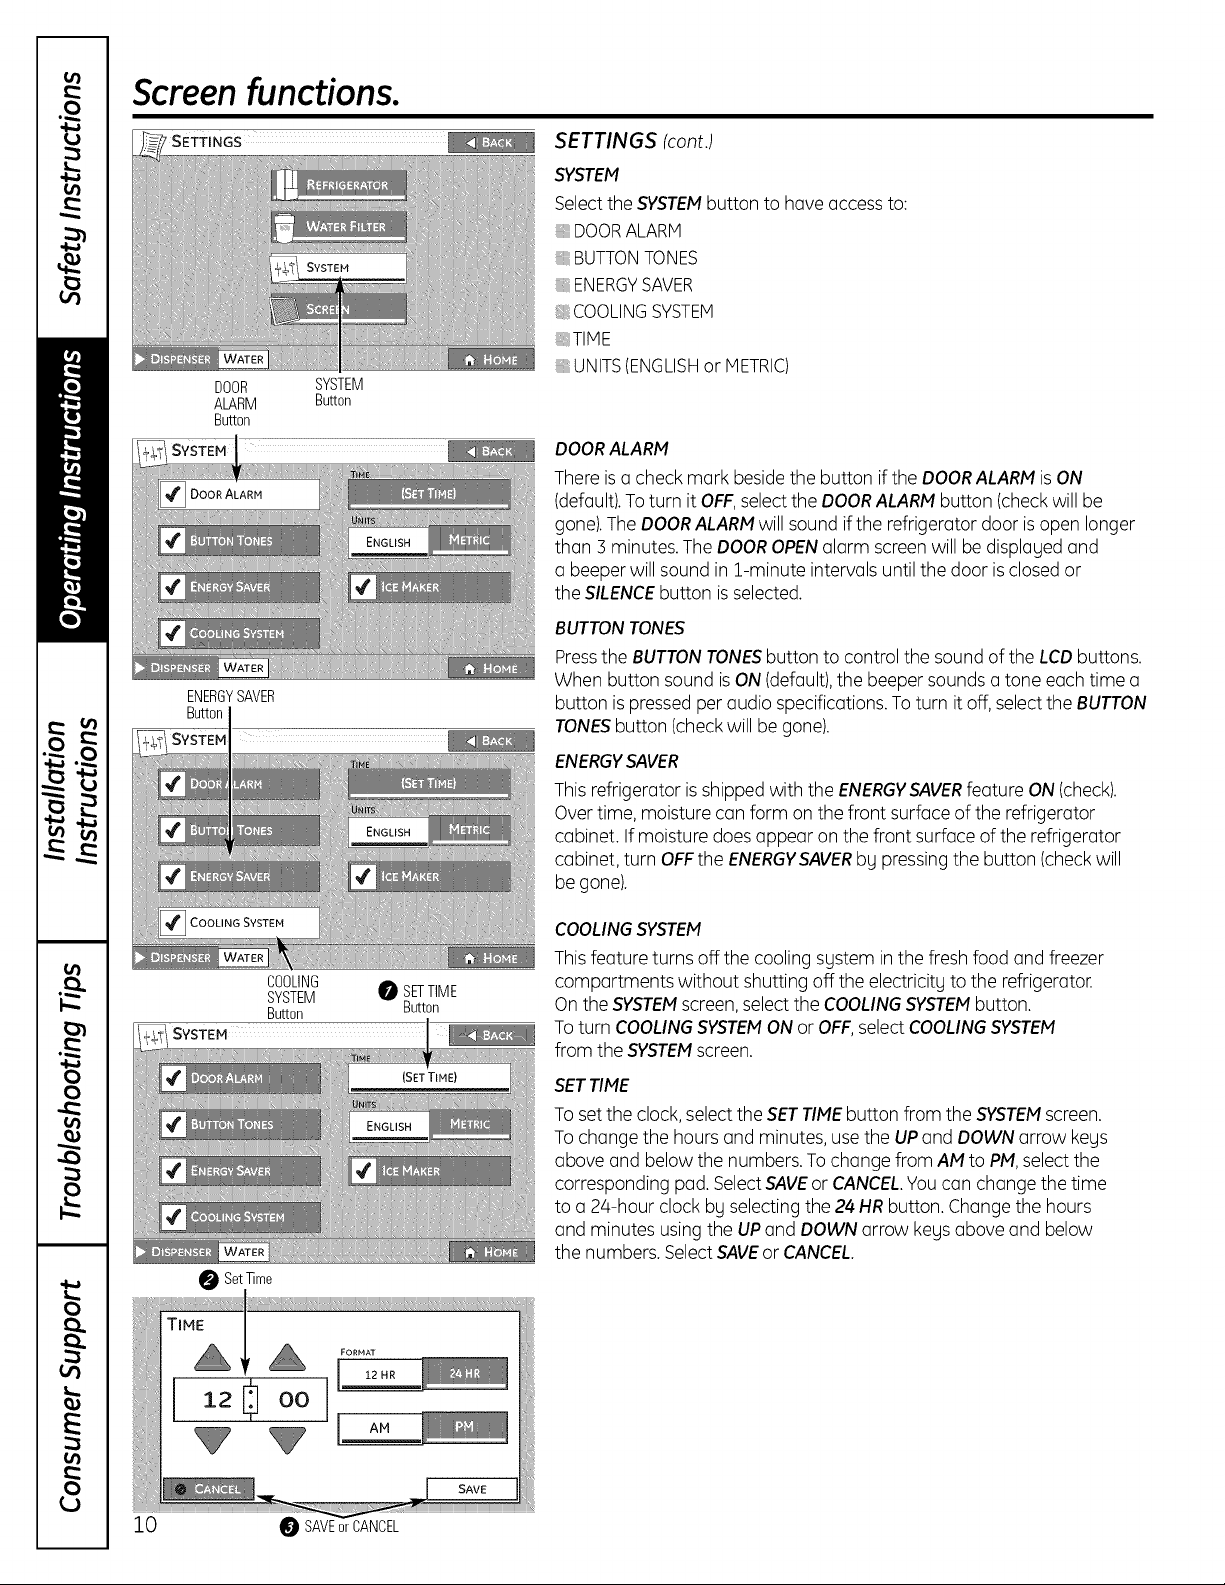
SETTINGS (cont.)
SYSTEM
Selectthe SYSTEMbutton to have accessto:
DOORALARM
BUTTONTONES
ENERGYSAVER
@COOLINGSYSTEM
:TIHE
UNITS(ENGLISHor METRIC)
DOORALARM
There is a check mark besidethe button if the DOORALARMis ON
(default).Toturn it OFF,selectthe DOORALARMbutton (checkwill be
gone).The DOORALARMwill sound ifthe refrigerator door isopen longer
than 3 minutes. TheDOOROPENalarm screenwill be displaged and
a beeperwill sound in Z-minute intervals untilthe door isclosedor
the SILENCEbutton is selected.
BUTTONTONES
Pressthe BUTTONTONESbutton to control the soundof the LCDbuttons.
When button sound isON(default),the beeper sounds a tone each time a
button is pressed per audio specifications.To turn it off,selectthe BUTTON
TONESbutton (checkwill be gone).
ENERGYSAVER
This refrigerator is shipped with the ENERGYSAVERfeature ON(check).
Overtime, moisture can form on the front surface of the refrigerator
cabinet. If moisture doesappear on the front surface of the refrigerator
cabinet, turn OFFthe ENERGYSAVERbg pressing the button (checkwill
be gone).
O Set ]]me
COOLING
SYSTEM 0 SETTIME
Button Button
COOLINGSYSTEM
This feature turns off the cooling sgstem in the fresh food and freezer
compartments without shutting off the electricitg to the refrigerator.
On the SYSTEMscreen,selectthe COOLINGSYSTEMbutton.
Toturn COOLINGSYSTEMON or OFF,selectCOOLINGSYSTEM
from the SYSTEMscreen.
SETTIME
To setthe clock,select the SETTIMEbutton from the SYSTEMscreen.
To change the hours and minutes, usethe UPand DOWN arrow kegs
above and below the numbers.To change from AM to PM,selectthe
corresponding pad. SelectSAVEor CANCEL.Youcan change the time
to a 24-hour clock bg selecting the 24 HR button. Changethe hours
and minutes using the UPand DOWNarrow kegs above and below
the numbers. SelectSAVEor CANCEL.
10 @ SAVEorCANCEL
ge.com
SYSTEM
12:00 PM I
METRIC
Button
ICEMAKER
Button
WATER FILTER: GOOD
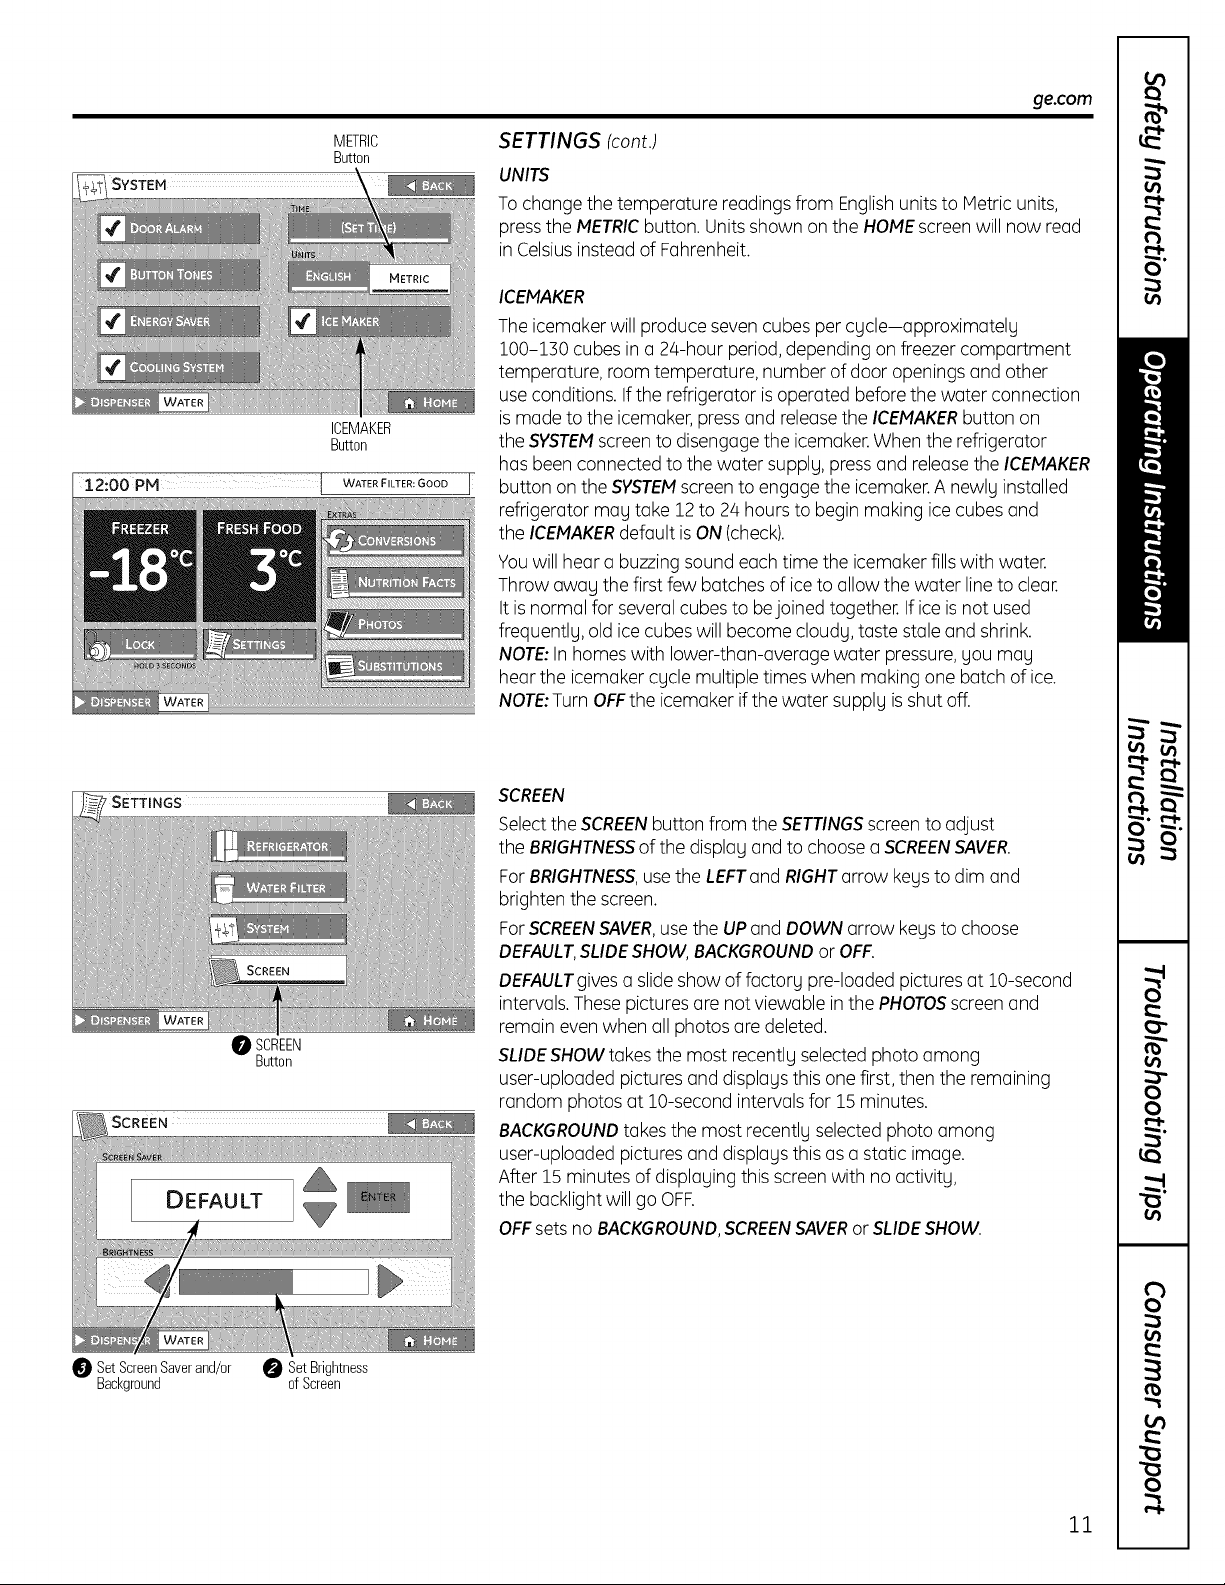
SETTINGS (cont.)
UNITS
To change the temperature readings from Englishunits to Metric units,
pressthe METRICbutton. Unitsshown on the HOMEscreenwill now read
in Celsiusinsteadof Fahrenheit.
ICEMAKER
The icemaker will produce seven cubes per cycle-approximately
100-130 cubes in a 24-hour period,depending on freezer compartment
temperature, room temperature, number of door openings and other
useconditions. Ifthe refrigerator isoperated beforethe water connection
is madeto the icemaker,pressand releasethe ICEMAKERbutton on
the SVSTEMscreento disengagethe icemaker.When the refrigerator
has been connected to the water supply, press and releasethe ICEMAKER
I button on the SVSTEMscreento engagethe icemaker.A newly installed
refrigerator may take 12 to 24 hoursto begin making ice cubes and
the ICEMAKERdefault isON (check).
Youwill hear a buzzingsound each time the icemaker fillswith water.
Throw away the first few batches of iceto allow the water line to clear.
It is normal for severalcubes to bejoined together. If iceisnot used
frequentlg, old ice cubes will become cloudy, taste stale and shrink.
NOTE:In homes with lower-than-average water pressure,you may
hear the icemaker cycle multiple times when making one batch of ice.
NOTE:TurnOFFthe icemaker ifthe water supply isshut off.
'SETTINGS
0 SCREEN
Button
SetScreenSaverand/or O SetBrightness
Background ofScreen
SCREEN
Selectthe SCREENbutton from the SETTINGSscreen to adjust
the BRIGHTNESSof the display and to choose a SCREENSAVER.
ForBRIGHTNESS,usethe LEFTand RIGHTarrow keys to dim and
brighten the screen.
ForSCREENSAVER,usethe UP and DOWN arrow keysto choose
DEFAULT,SLIDESHOW,BACKGROUNDor OFF.
DEFAULTgives a slideshow of factory pre-loaded pictures at 10-second
intervals.Thesepictures are not viewable in the PHOTOSscreen and
remain even when all photos are deleted.
SLIDESHOW takesthe most recently selected photo among
user-uploaded picturesand displays this one first, then the remaining
random photos at 10-second intervals for 15 minutes.
BACKGROUNDtakes the most recently selected photo among
user-uploaded picturesand displays this as a static image.
After 15 minutes of displaying this screen with no activity,
the backlight will go OFF.
OFFsets no BACKGROUND,SCREENSAVERor SLIDESHOW.
11

About the controlwith temperature settings for non-LCDmodels.
f
TURBO FREEZE TURBO COOL
Hold 3 sec Hold 3 sec
for Turbo Freeze or Turbo Coo
(Hold 3 sec (Hold 3 sec
to Reset Filter} to Lock Control)
NOTE:Therefrigerator is shipped with protective film coveringthe temperature controls. If this film was
not removed during installation, remove it now.
Thetemperature controls are presetin the foctorg at38°Ffor the refrigerator compartment and -2°F for
the freezercompartment. Allow 24 hoursfor the temperature to stabilizeto the presetrecommendedsettings.
Thetemperature controls con displogboth the SETtemperature as well as the actual temperature in the
refrigerator and freezer.Theactualtemperature mog vorg slightlg from theSETtemperature basedon usage
and operating environment.
ADJUST
REFRIGERATOR
{Hold 3 sec
for Turbo Cool)
FREEzERADJUST
{Hold 3 sec
for Turbo Freeze)
Changing the Temperature
Tochange the temperature, pressand
releasethe ADJUSTFREEZERor ADJUST
REFRIGERATORpad. Thedisplag will
show the actual temperature. Tochange
the temperature, tap either the ADJUST
FREEZERorADJUSTREFRIGERATORpad
untilthe desired temperature isdisplaged.
Oncethe desiredtemperature has been
set, the temperature displag will return
to the actual refrigerator and freezer
temperatures after 10 seconds.Several
adjustments mag be required.
Eachtime gou adjust controls, allow
24 hoursfor the refrigerator to reach
the temperature gou haveset.
12
About TurboCoolTM and TurboFreeze.TM rNon-LCOmodelsOnly) ge.com
ADJUST
,REFRIGERATOR
{Hold 3 sec
for Turbo Cool)
ADJUST
FREEZER
{Hold 3 sec
for Turbo Freeze)
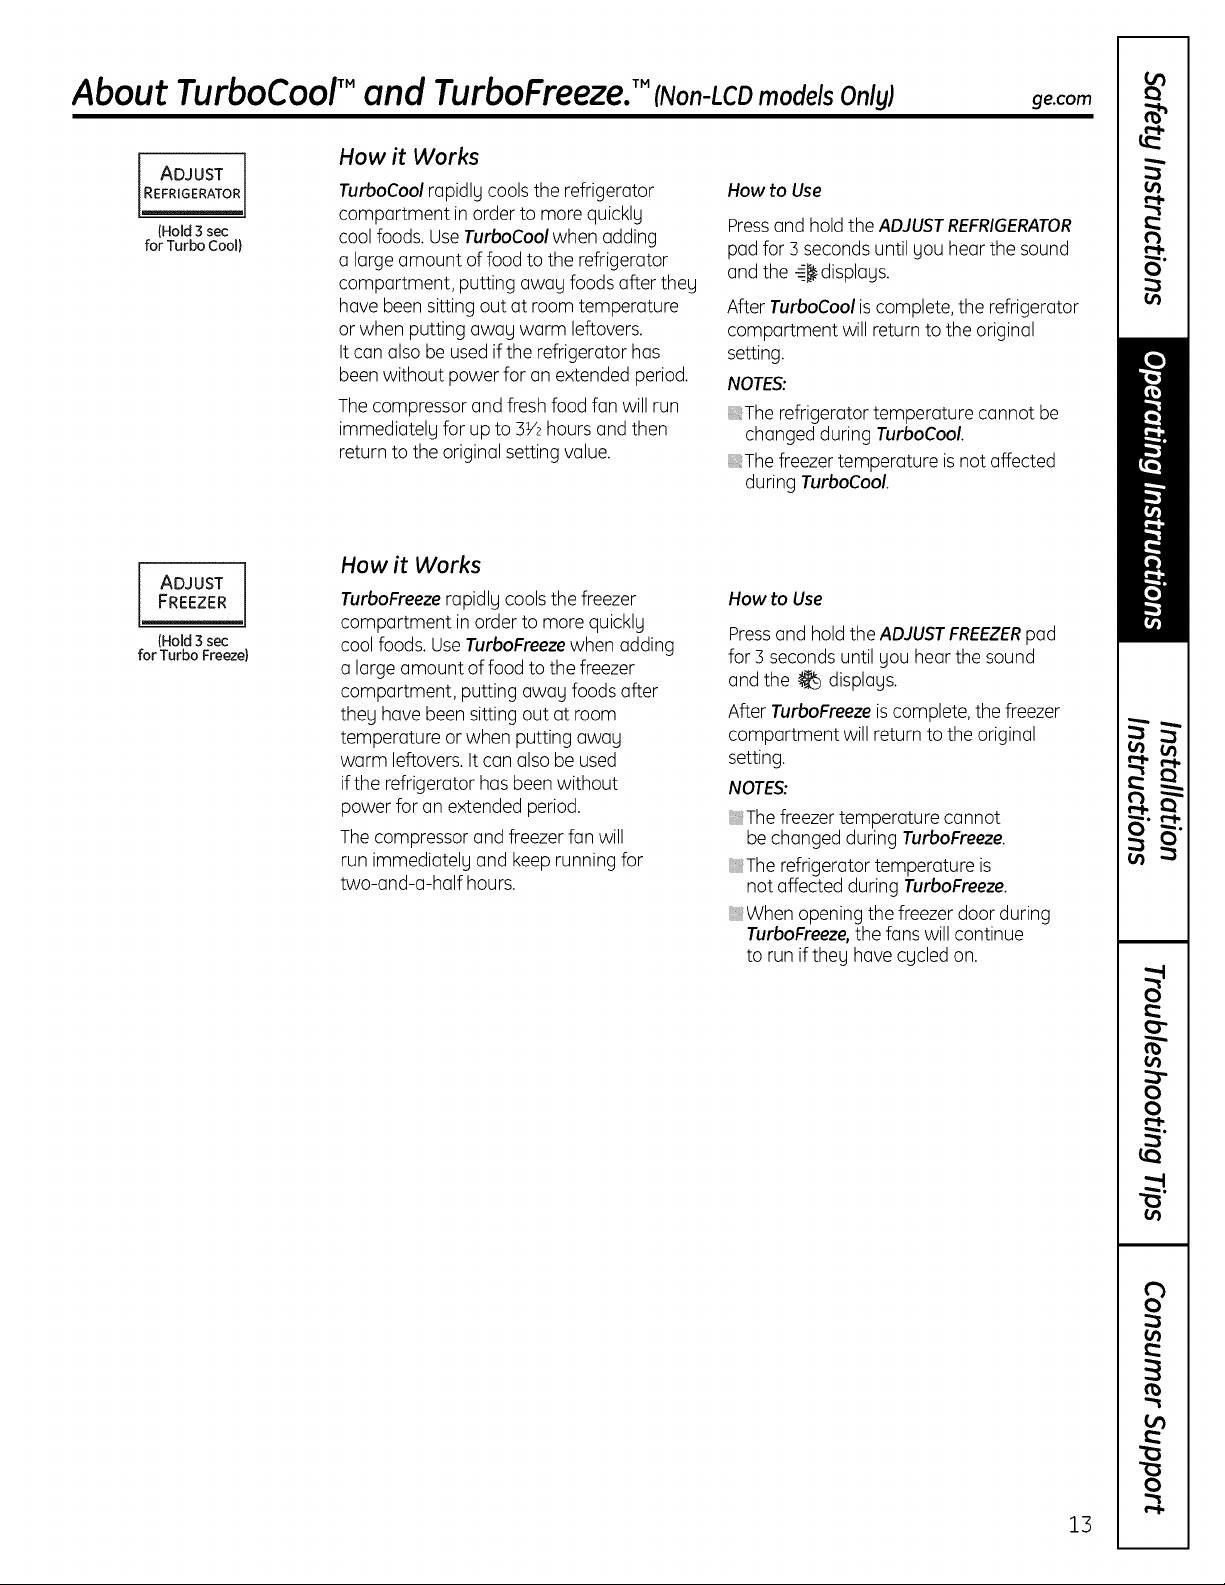
How it Works
TurboCool rapidly cools the refrigerator
compartment in order to more quickly
cool foods. UseTurboCoolwhen adding
a large amount of food to the refrigerator
compartment, putting away foods after they
have been sitting out at room temperature
or when putting away warm leftovers.
It can also be used ifthe refrigerator has
been without power for an extended period.
The compressor and fresh food fan will run
immediately for up to 3V2hours and then
return to the original setting value.
How it Works
TurboFreezerapidly cools the freezer
compartment in order to more quickly
cool foods. UseTurboFreezewhen adding
a large amount offood to the freezer
compartment, putting away foods after
they have been sitting out at room
temperature or when putting away
warm leftovers. It can also be used
ifthe refrigerator hasbeenwithout
power for an extended period.
The compressor and freezerfan will
run immediately and keep running for
two-and-a-half hours.
How to Use
Pressand hold the ADJUSTREFRIGERATOR
pod for 3 seconds until you hear the sound
and the -I_ displays.
After TurboCool is complete, the refrigerator
comportment will return to the original
setting.
NOTES:
_The refrigerator temperature cannot be
changed during TurboCool.
_The freezertemperature isnot affected
during TurboCool.
How to Use
Pressand hold the ADJUSTFREEZERpod
for 3 seconds until you hear the sound
and the _ displays.
After TurboFreeze iscomplete,the freezer
compartment will return to the original
setting.
NOTES:
_The freezer temperature cannot
be changed during TurboFreeze.
_The refrigerator temperature is
not affected during TurboFreeze.
_When opening the freezer door during
TurboFreeze,the fans will continue
to run if they have cycled on.
13
About the dispenser. (Non-LCDmodels OnlyJ
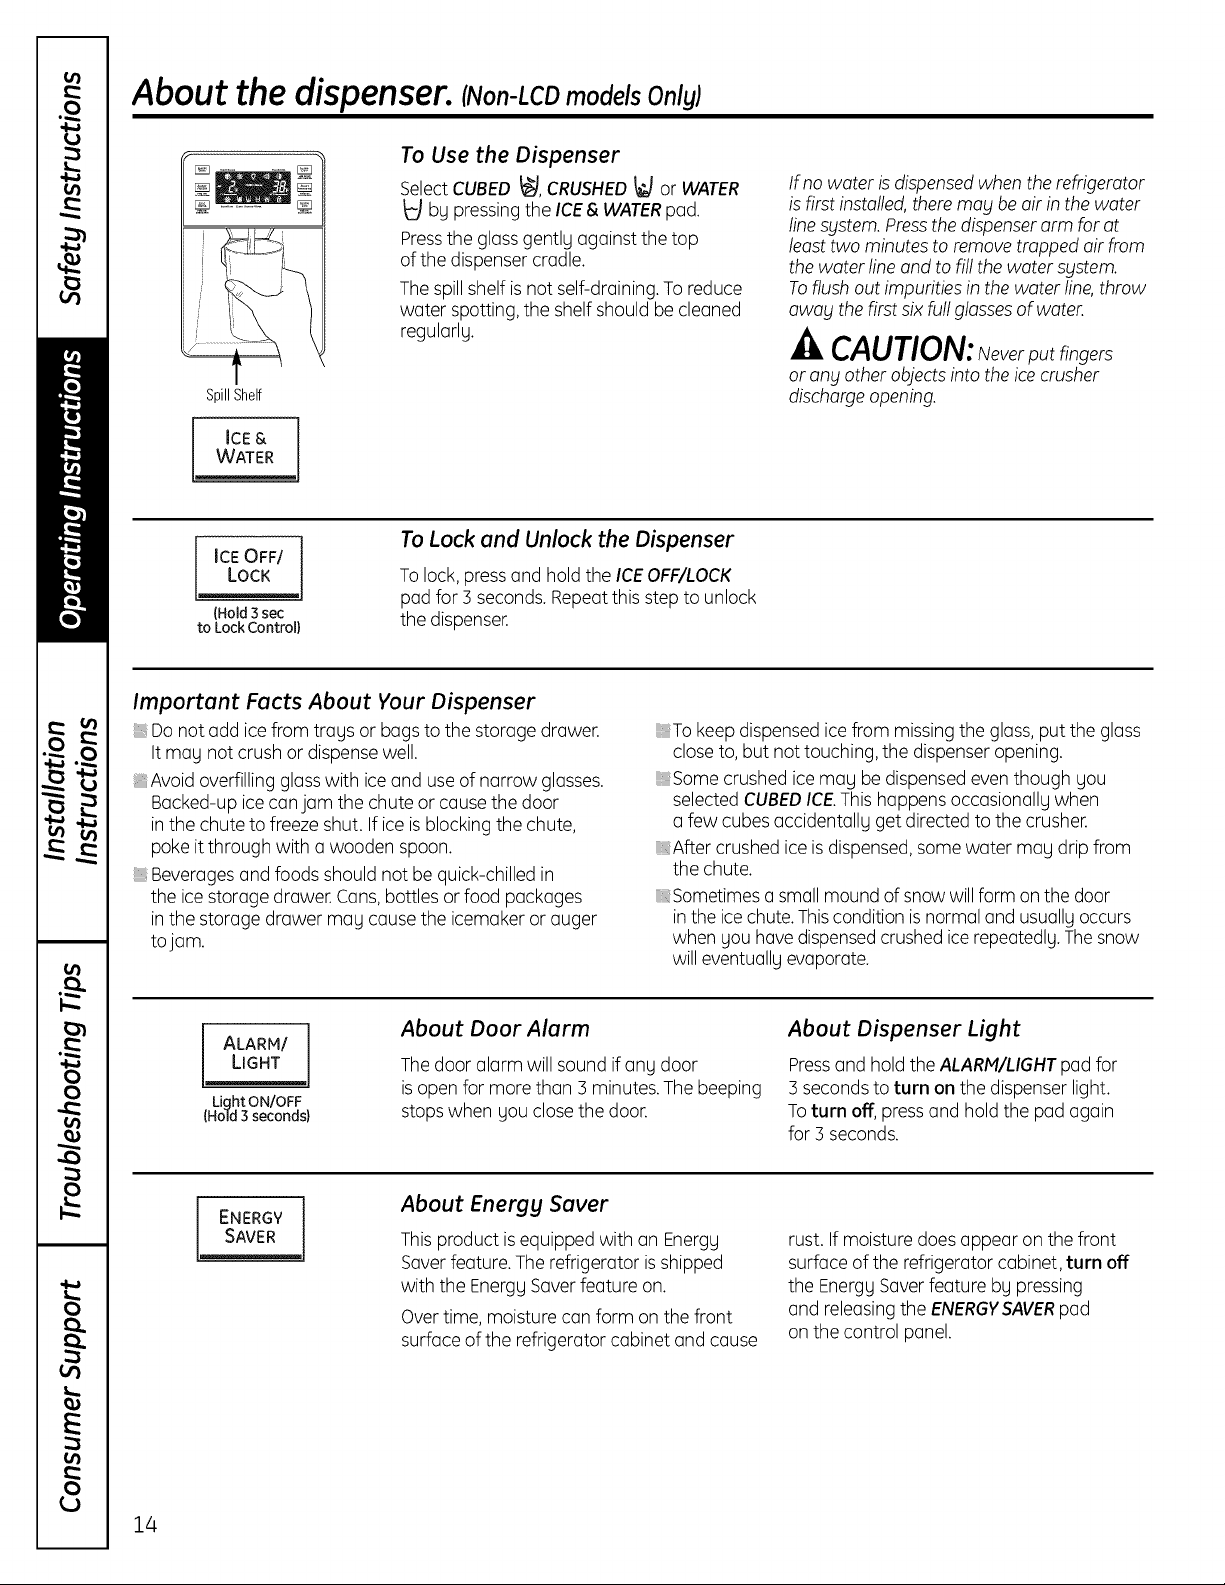
To Use the Dispenser
SelectCUBED_, CRUSHED_ or WATER
_J by pressingthe ICE& WATERpad.
Pressthe glass gently against the top
of the dispenser cradle.
Thespill shelf isnot self-draining.Toreduce
water spotting, the shelf should be cleaned
regularly.
SpillShelf
WATER
ICE&
If no water is dispensedwhen the refrigerator
isfirst installed, theremay be air in the water
linesystem. Pressthe dispenserarm for at
leasttwo minutes to remove trapped air from
thewater line and to fill the water sustem.
Toflush out impurities in thewater line,throw
away the first six fullglassesof water.
CAUTION:Neverputfingers
or any other objectsinto the icecrusher
dischargeopening.
LOCKICEOFF/
To Lock and Unlock the Dispenser
Tolock, pressand hold the ICEOFF/LOCK
{Hold 3 sec
to Lock Control)
pad for 3 seconds. Repeatthis step to unlock
the dispenser.
Important Facts About Vour Dispenser
Donot add icefrom trays or bagsto the storage drawer.
It may not crush or dispensewell.
_Avoid overfilling glasswith iceand use of narrow glasses.
Backed-up icecanjam the chute or cause the door
in the chute to freeze shut. If ice isblocking the chute,
poke it through with awooden spoon.
Beveragesand foods should not be quick-chilled in
the ice storage drawer. Cans,bottles or food packages
in the storage drawer may cause the icemaker or auger
tojam.
About Door Alarm
ALARM!
LIGHT
Light ON/OFF
{Hold 3 seconds)
Thedoor alarm will sound ifany door
isopen for more than 3 minutes.The beeping
stopswhen you closethe door.
_To keepdispensedicefrom missingthe glass, put the glass
close to, but not touching, the dispenser opening.
_Some crushed icemay bedispensed eventhough you
selectedCUBEDICE.Thishappens occasionally when
a few cubes accidentally get directed to the crusher.
_After crushed ice is dispensed,some water may drip from
the chute.
_Sometimes a small moundof snow will form onthe door
in the icechute.Thiscondition is normal and usually occurs
when you have dispensedcrushedice repeatedly.The snow
willeventually evaporate.
About Dispenser Light
Pressand hold the ALARM/LIGHTpadfor
3 secondsto turn on the dispenser light.
Toturn off, press and hold the pad again
for 3 seconds.
14
ENERGY 1
SAVER J
About Energy Saver
Thisproduct isequipped with an Energy
Saverfeature. Therefrigerator is shipped
with the Energy Saverfeature on.
Overtime, moisture can form on the front
surface of the refrigerator cabinet and cause
rust. If moisture does appear on the front
surface of the refrigerator cabinet, turn off
the EnergySaver feature by pressing
and releasingthe ENERGVSAVERpad
on the control panel.

About the water filter, ge.com
Cartridge
Holder
FilterZ
Bypass _ _
Plug
Water Filter Cartridge
Thewater filter cartridge islocated
in the back upper right corner of
the refrigerator compartment.
When to Replace the Filter
Thefilter cartridge should be replacedwhen
indicated on the control panel.Followthe
screen instructions shown in WATERFILTER
in theAbout the 7" LCDContro!Pane!for LCD
Modelssection.
I
Installing the Filter Cartridge
0 If gou are replacingthe cartridge, first
remove the old one bg slowlg turning
it counterclockwise. A small amount
of water mag drip down.
Filter Bgpass Plug
Youmust usethe filter bgpass plug when
a replacement filter cartridge is not available.
The icemaker will not operate without
the filter or filter bgpassplug.
Replacement Filters:
To order additional filter cartridges
in the United States, visit our Website,
ge.com or call GE Parts and Accessories,
800.626.2002.
Filter ModelMWF
Customersin Canada should consult
the gellow pagesfor the nearest Mabe
ServiceCenter.
Zi,CAUTION:,fairhasbeen
trapped in the system,the filter cartridgemay
be ejectedasit is removed.Usecaution when
removing.
Removethe protective foil from the end
of the cartridge.
Liningup the arrow on the cartridge
and the cartridge holder,place the top
of the new cartridge up insidethe holder.
Donot push it up into the holder.Slowlg
rotate the cartridge clockwise until it
stops.As gou turn the cartridge, it will
automaticallg raise itself into position.
Cartridge will rotate about 1/4 turn.
Do not overtighten.
Runwater from the dispenserfor
O
] minutes (about lY2 gallons)to clear
the sgstem and prevent sputtering.
SeeToUsethe Dispensersection.
NOTE:A newlg installed water filter
cartridge mag cause water to spurt
from the dispenser.
15
About the fresh food storage options.
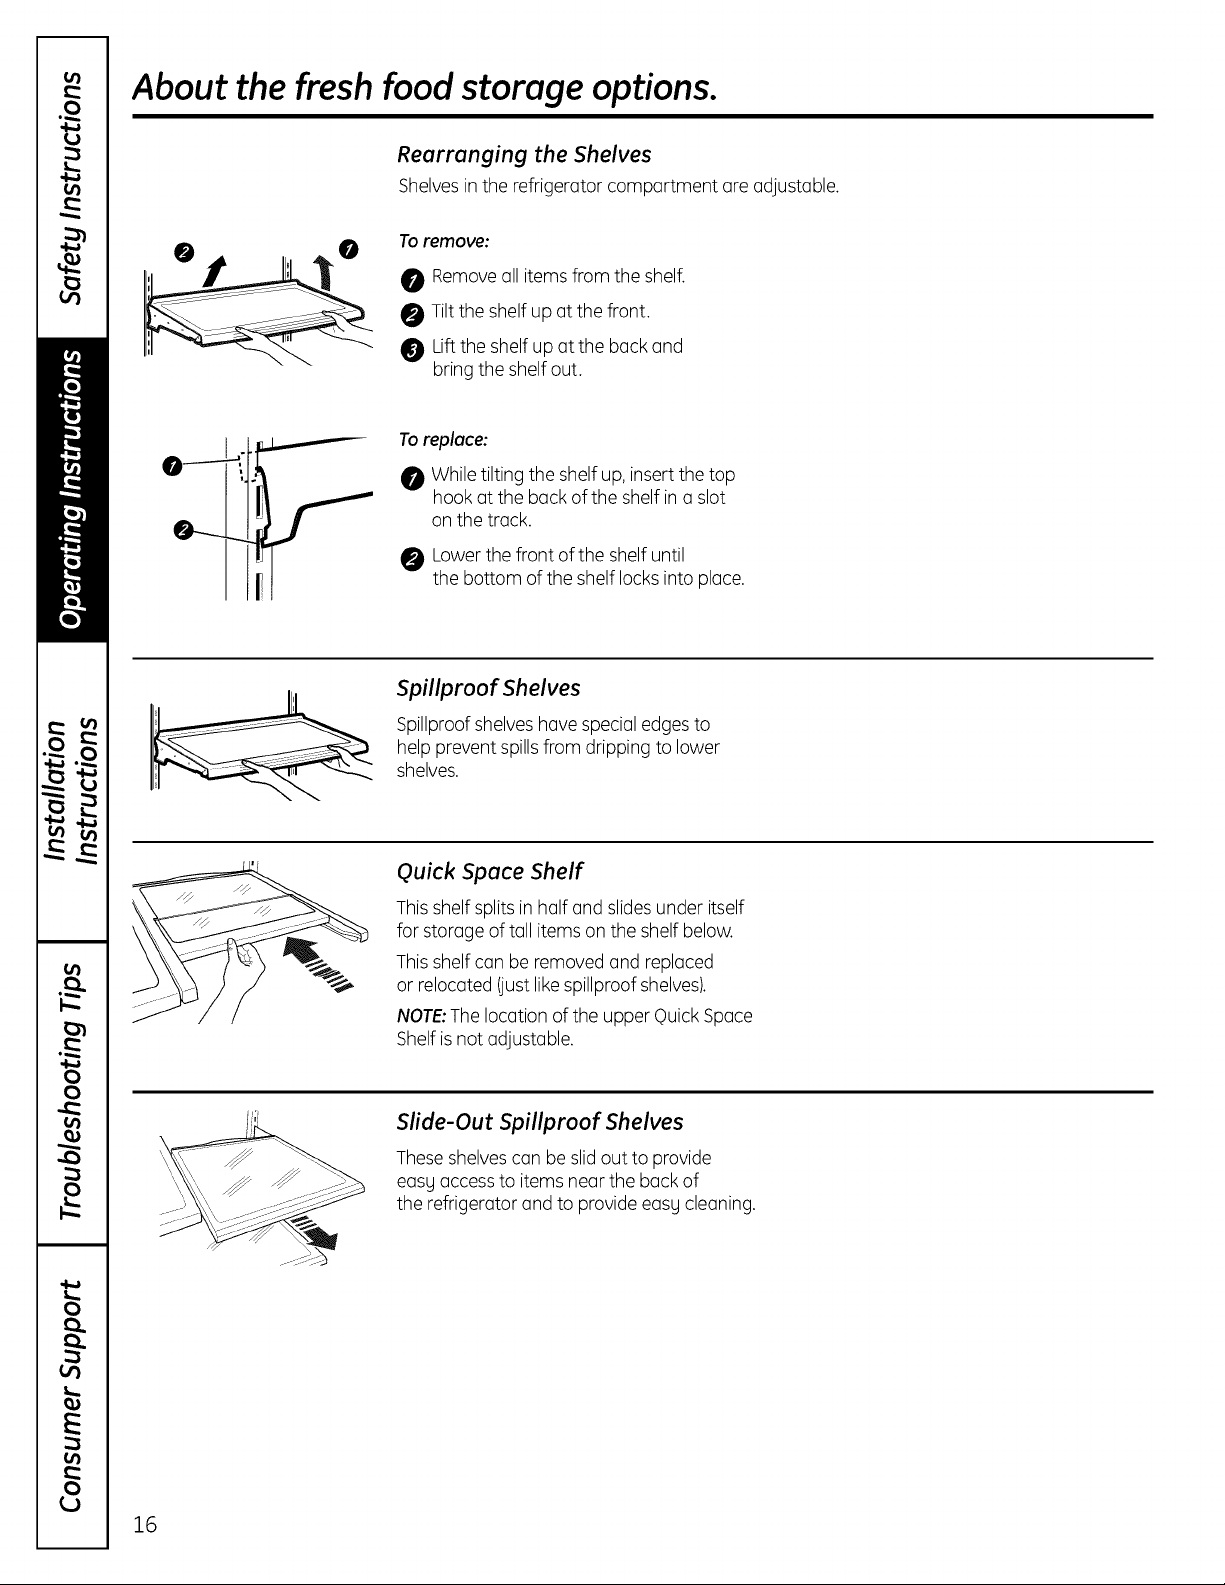
Rearranging the Shelves
Shelvesinthe refrigerator comportment ore adjustable.
Toremove:
0 Removeoil itemsfrom the shelf.
Tilt the shelf up at the front.
0 Liftthe shelf up at the back and
bring the shelf out.
Toreplace:
While tilting the shelf up, insert the top
hook at the back of the shelf in a slot
on the track.
Lowerthe front ofthe shelfuntil
the bottom of the shelf locksinto place.
Spillproof Shelves
Spillproofshelves hovespecial edgesto
help prevent spillsfrom dripping to lower
shelves.
Quick Space Shelf
Thisshelf splitsin half and slides under itself
for storage of toll items on the shelf below.
Thisshelf con be removedand replaced
or relocated (just likespillproofshelves).
NOTE:The location of the upper QuickSpace
Shelfis not adjustable.
Slide-Out Spillproof Shelves
Theseshelvescon be slidout to provide
o)
easg accessto items near the back of
the refrigerator and to provide easg cleaning.
16
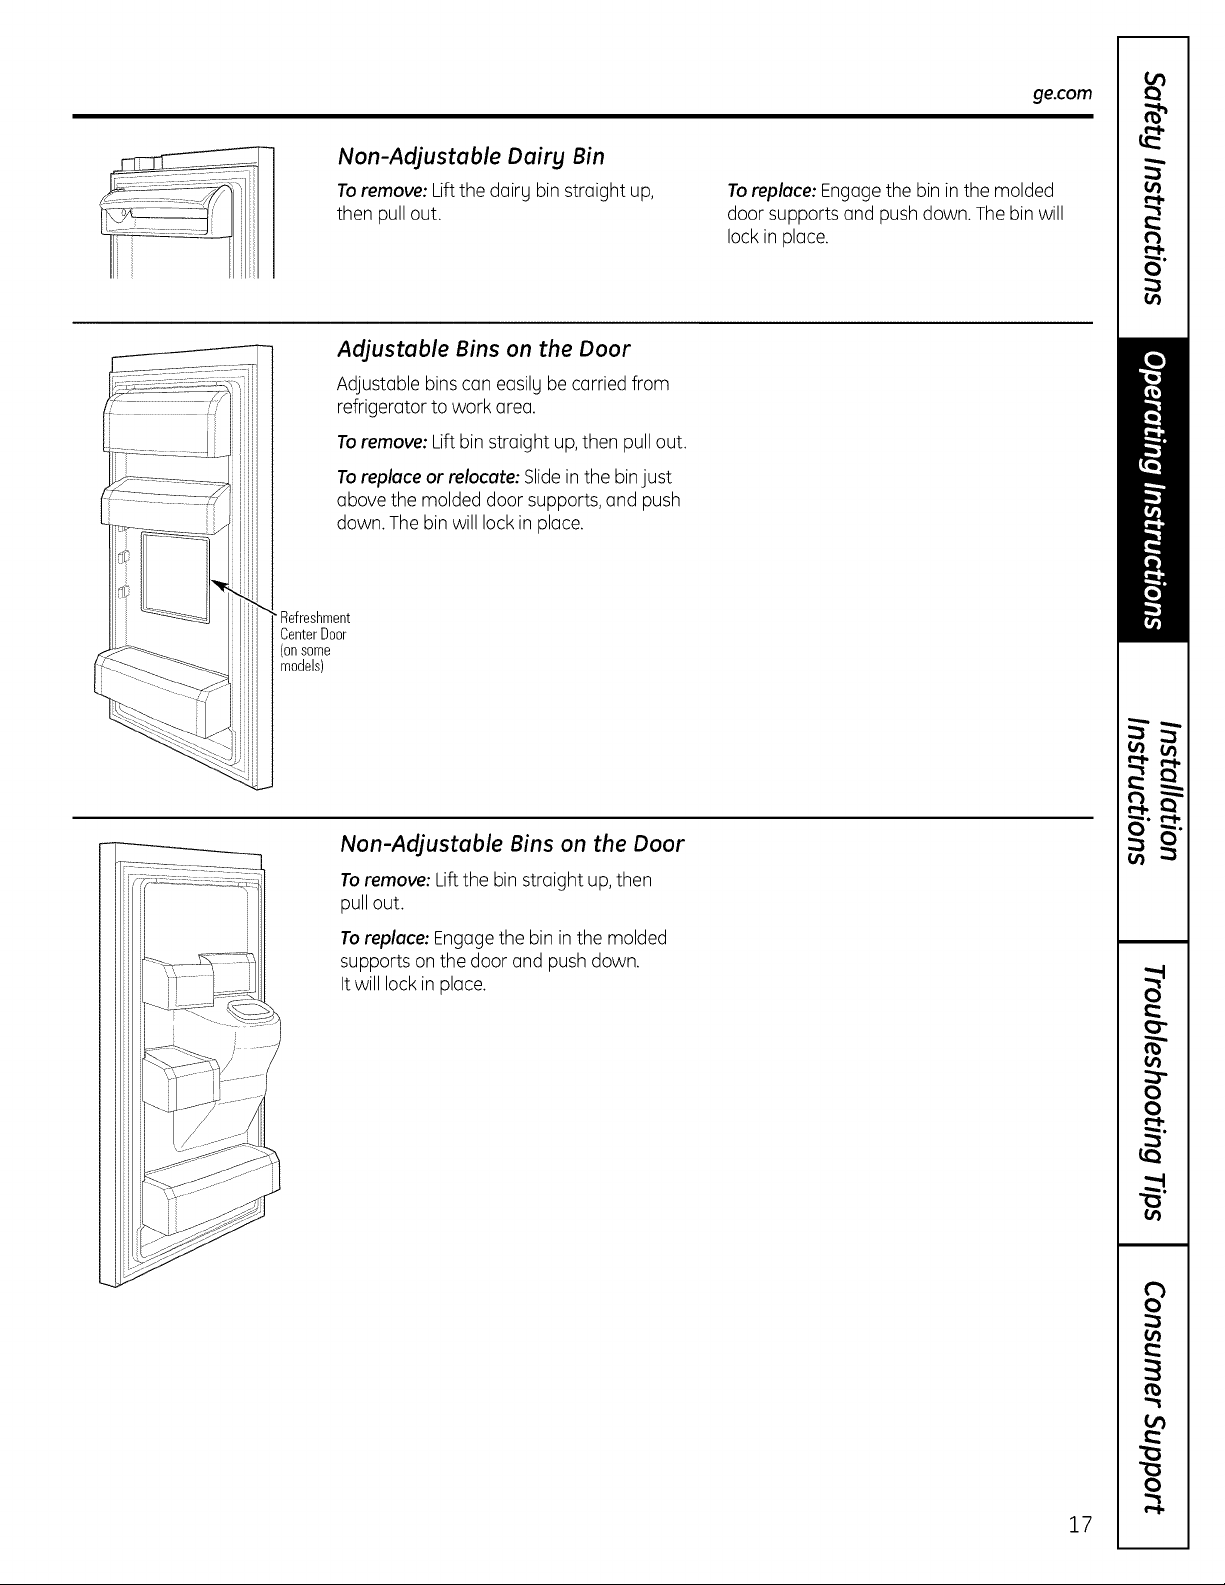
Non-Adjustable Dairy Bin
Toremove: Liftthe dairg bin straight up,
then pull out.
Adjustable Bins on the Door
Adjustable binscan easilybe carried from
refrigerator to work area.
Toremove: Liftbin straight up,then pullout.
Toreplace or relocate: Slidein the binjust
above the molded door supports,and push
down. Thebin will lock in place.
Refreshment
Center Door
(on some
models)
ge.com
Toreplace: Engagethe bin in the molded
door supports and push down. Thebinwill
lock in place.
Non-Adjustable Bins on the Door
Toremove: Lift the bin straight up,then
pull out.
Toreplace: Engagethe bin in the molded
supports on the door and pushdown.
It will lock in place.
17
About the crispers and pans.
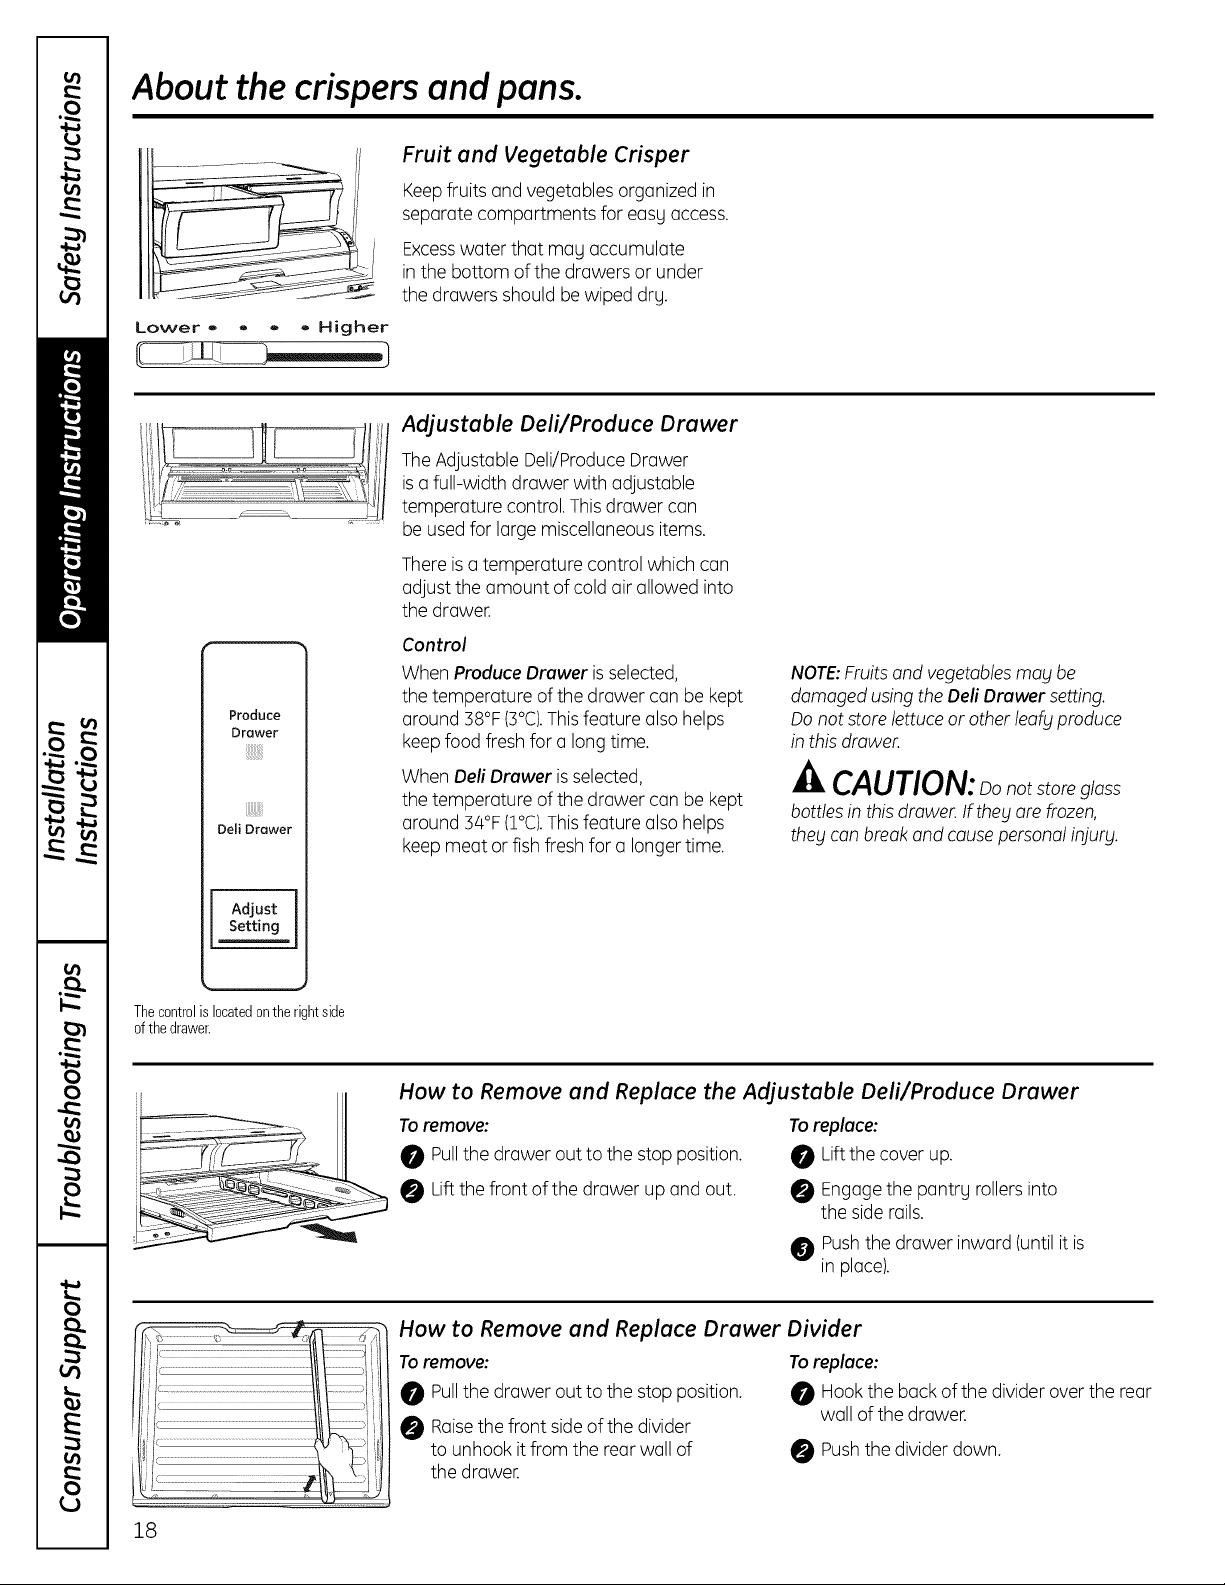
Fruit and Vegetable Crisper
Keep fruits and vegetables organized in
separate compartments for easg access.
Excess water that Tag accumulate
in the bottom of the drawers or under
the drawers should be wiped drg.
Lower o . ,, - Higher
Adjustable Deli/Produce Drawer
................ J_Ji
L.............................................._ ................................................;_ !
Produce
Drawer
iii!i!ii!i!!
Dell Drawer
TheAdjustable Deli/ProduceDrawer
isa full-width drawer with adjustable
temperature control.Thisdrawer can
be usedfor largemiscellaneous items.
Thereis a temperature control which can
adjust the amount of cold air allowed into
the drawer.
Control
When Produce Drawer is selected,
the temperature of the drawer can be kept
around 38°F(3°C).Thisfeature also helps
keepfood fresh for o long time.
When DeftDrawer isselected,
the temperature of the drawer can be kept
around 34°F(1°C).Thisfeature also helps
keepmeat or fish fresh for a longertime.
NOTE:Fruitsand vegetables ma_j be
damaged using the Deli Drawer setting.
Do not store lettuce or other leof_jproduce
in this drawer.
CAUTION: notstoreglass
bottles in this drawer. Ifthe_j ore frozen,
theg con break and cause personal injurg.
m
Adjust
Setting
J
Thecontrolis locatedontherightside
ofthedrawer.
How to Remove and Replace the Adjustable Deli/Produce Drawer
Toremove:
0 Pullthe drawer out to the stop position.
0 Liftthe front of the drawer up and out.
Toreplace:
Lift the cover up.
Engagethe pantrg rollersinto
the side rails.
Pushthe drawer inward (until it is
in place).
How to Remove and Replace Drawer Divider
Toremove:
Pullthe drawer out to the stop position.
Raisethe front sideof the divider
to unhook it from the rear wall of
the drawer.
To replace:
Hook the back of the divider over the rear
wall of the drawer.
Pushthe divider down.
18

About the freezer, ge.com
I[!t
/!
Freezer Basket and Drawer
0 Basket.
0 Drawer.
Basket Removal
Toremove:
_! Remove Freezer Bin, (Seebelow.)
Pullbasketout to the stop position.
Tilt up the rear of the bin.
Lift it out to remove.
Basket Divider Removal
Toremove:
Pullbasketout to the stop position.
Tilt up the rear of the bin.
Lift it out to remove.
Toreplace:
Placethe basket into the rail assemblg.
Toreplace:
Hookthe top corners of the divider over
the holeof the basket.
Drawer Removal
To remove:
Pullthe drawer out to the stop position.
Removeboth side knobswith a flat-head
screwdriver (asshown at left).
Tilt up the rear of the drawer and lift
drawer up and out.
Non-Adjustable Bin in the Freezer
Toremove: Pullthe brackets upward until
Uouhear a clicking sound and remove
the bin.
Toreplace:
Pullboth railsout to the stop position.
Placethe drawer onto the rails and hook
the support intothe slotslocated on
the sideof the drawer.
Replacethe sideknobs and push
the drawer back into place.
WARNING: oonotlosetheside
knobs during disassemblgsincetheg mag
present o choking hozord to children.
Toreplace: Hookthe endsof the bin into
both brackets and push down until the bin
locksinto place.
19
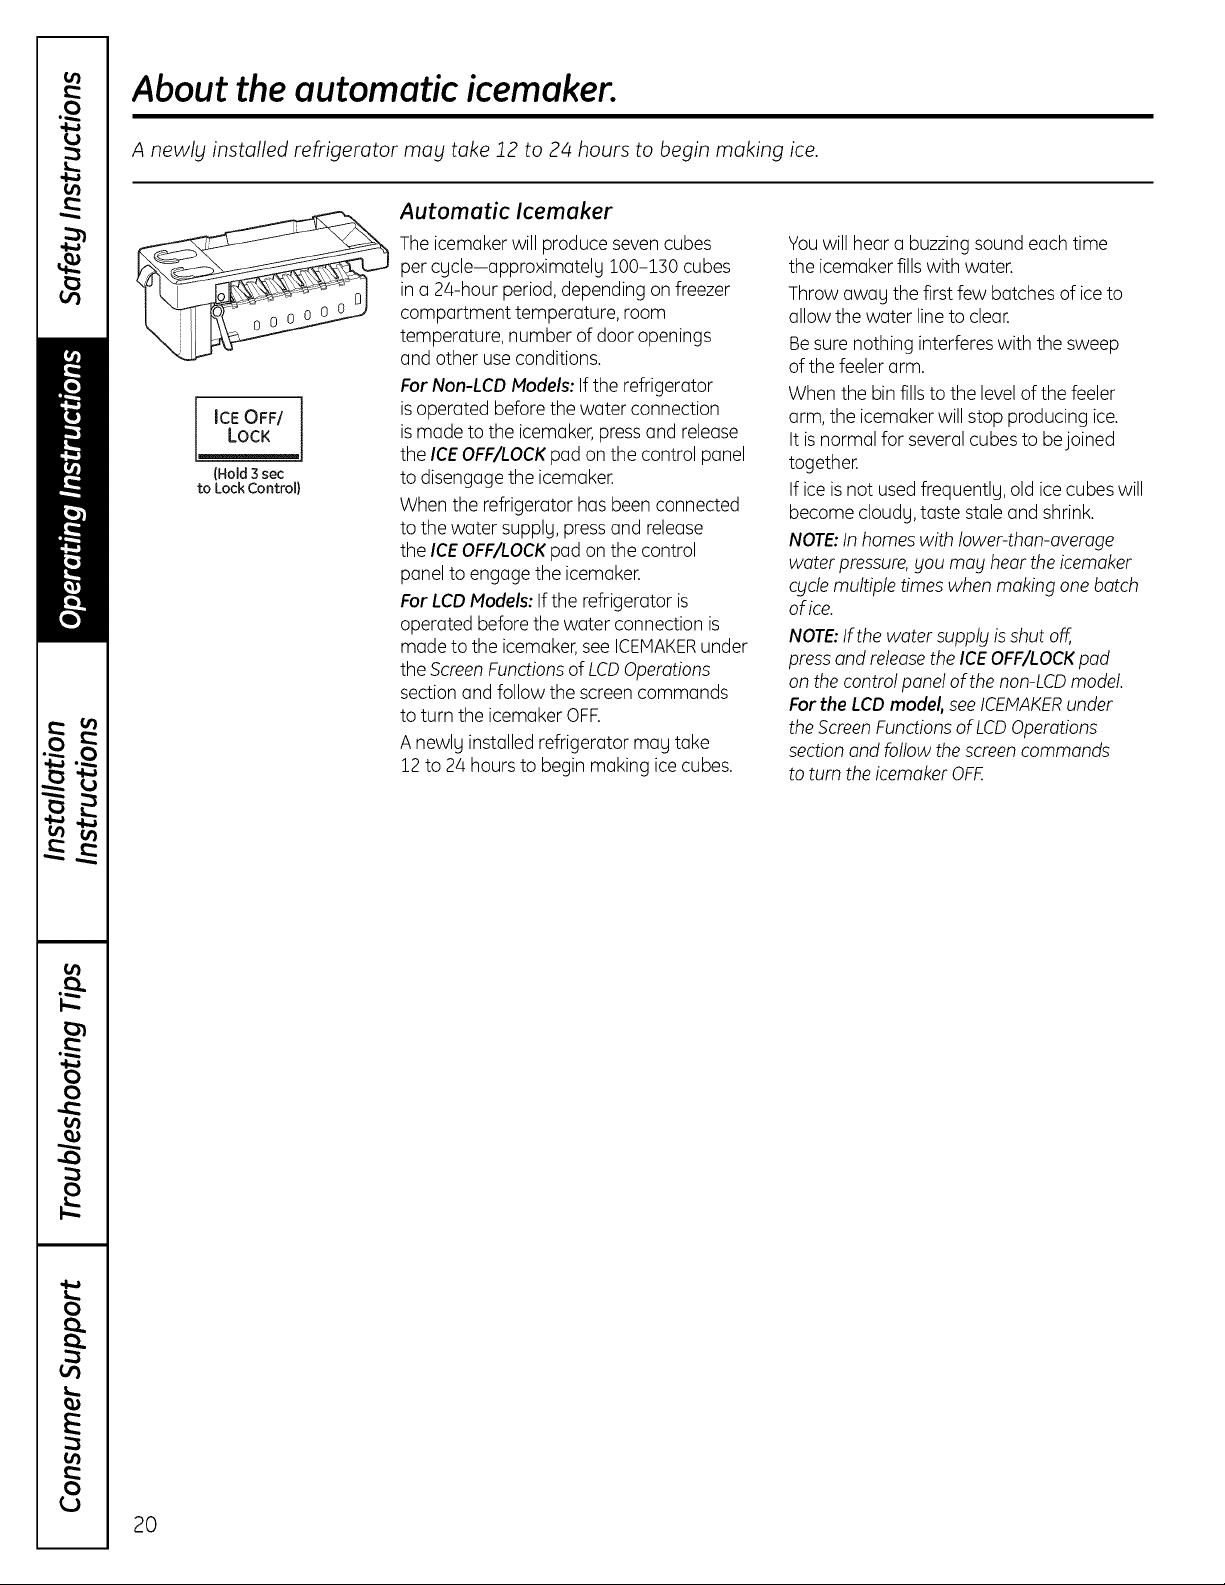
About the automatic icemaker.
A newly installed refrigerator may take J2 to 24 hours to begin making ice.
Automatic Icemaker
ICE OFF/
LOCK
{Hold 3 sec
to Lock Control}
The icemakerwill produce sevencubes
per cycle-approximately 100-150 cubes
in a 24-hour period,depending on freezer
compartment temperature, room
temperature, number of door openings
and other useconditions.
For Non-LCDModels: If the refrigerator
isoperated before the water connection
ismade to the icemaker,pressand release
the ICEOFF/LOCKpad on the control panel
to disengagethe icemaker.
When the refrigerator has been connected
to the water supplg, pressand release
the ICEOFF/LOCKpad on the control
panel to engage the icemaker.
For LCOModels: Ifthe refrigerator is
operated beforethe water connection is
made to the icemaker,seeICEMAKERunder
the ScreenFunctionsof LCDOperations
sectionand follow the screen commands
to turn the icemaker OFF.
A newlg installed refrigerator mag take
12 to 24 hours to begin making icecubes.
Youwill hear a buzzingsound each time
the icemaker fillswith water.
Throw awag the first few batches of iceto
allow the water line to clear.
Besure nothing interfereswith the sweep
of the feeler arm.
When the bin fills to the levelof the feeler
arm, the icemakerwill stop producing ice.
It is normal for severalcubes to bejoined
together.
If ice isnot used frequentlg, old ice cubes will
become cloudg,taste stale and shrink,
NOTE:Inhomes with lower-than-overage
water pressure,gou mag hear theicemaker
cgde multiple timeswhen makingone botch
of ice.
NOTE:Ifthe water supply isshut off,
pressand releasethe ICEOFF/LOCKpod
on the control panel of the non-LCDmodel.
Forthe LCOmodel, seeICEHAKERunder
theScreenFunctionsof LCDOperations
sectionand follow the screencommands
to turn the icemaker OFF.
20
Care and cleaning of the refrigerator, ge.com
Cleaning the Outside
Thedoor handles and trim. Cleanwith
a cloth dampened with soapy water. Dry
with a soft cloth. Do not usewax on the door
handlesand trim.
Keepthe outside clean. Wipewith a clean
cloth lightly dampened with kitchen
appliance wax or mild liquid dishdetergent.
Dry and polish with a clean,soft cloth.
Do not wipe the refrigerator with a soiled
dish cloth or wet towel. These may leave
a residue that con erode the paint. Do not
usescouring pads, powdered cleaners,
bleach or cleaners containing bleach
because these products con scratch
and weaken the paint finish.
Cleaning the Inside
Thestainless steel panels and door
handles.
Stainlesssteel (onsome models)con be
cleaned with a commercially available
stainlesssteel cleaner.A spray-on stainless
steel cleanerworks best.
Donot use appliance wax or polish
on the stainlesssteel.
Silver-accented plastic parts. Wash parts
with soap or other mild detergents. Wipe
cleon with a sponge,damp cloth or paper
towel.
Donot scrub with steel-wool pods or other
abrasive cleaners.
Tohelp prevent odors, leaveon open box
of baking soda in the refrigerator and freezer
comportments.
Unplug therefrigerator before cleaning.
If this is not practical, wring excessmoisture
out of sponge or cloth when cleaning around
switches, lights or controls.
Usean appliance wax polishon the inside
surface between the doors.
Usewarm water and baking soda solution-
about a tablespoon (15ml)of baking soda
to a quart (1liter)of water.This both cleans
and neutralizesodors.Rinseand wipe dry.
After cleaning the door gaskets, apply a thin
layer of petroleumjelly to the door gaskets
at the hinge side.This helpskeepthe gaskets
from sticking and bending out of shape.
Avoid cleaning cold glass shelves with hot
water because the extreme temperature
difference may cause them to break.
Handle gloss shelves carefully. Bumping
tempered glass can cause it to shatter.
Do not wash any plastic refrigerator parts
in the dishwasher.
Silver-accented plastic parts. Wash ports
with soapy water.Wipe cleon with a sponge,
damp cloth or paper towel.
Do not scrub with steel-wool pods or other
abrasive cleaners.
21
Care and cleaning of the refrigerator.
Behind the Refrigerator
Becareful when moving the refrigerator
away from the wall. Alltypes of floor
coveringscan be damaged, particularly
cushioned coverings and those with
embossedsurfaces.
Raisethe levelinglegs located at the bottom
front of the refrigerator.
Pullthe refrigerator straight out and return it
to position by pushing it straight in.Moving
the refrigerator ina sidedirection may result
Preparing for Vacation
Forlong vacations or absences,remove
food and unplug the refrigerator. Clean
the interior with a baking soda solution of
one tablespoon (15ml)of baking sodato one
quart (1liter)of water. Leave the doors open.
Non-LCDModels: Turn on the IceOff feature
by pressingand releasing the ICEOFF/LOCK
pad on the control panel (the _ icon
displays)and shut off the water supply
to the refrigerator.
in damage to the floor covering or
refrigerator.
Lowerthe leveling legsuntil they touch
the floor.
When pushing the refrigerotor hock,
moke sure _jou don't roll over the power
cord or icemaker suppl_j line Ion some
models) ond ensure the anti-tip brocket
is engoged (if equipped).
LCDModels:Turn offthe icemaker by
following the screen commands shown
in the LCDControlssection.
If the temperature can drop below freezing,
have a qualified servicer drain the water
supply system (on some models)to prevent
serious property damage due to flooding.
Preparing to Move
Secureall looseitems such as basegrille,
shelvesand drawers by taping them
securelyin placeto preventdamage.
When using a hand truck to move the
refrigerator,do not rest the front or back
ofthe refrigerator against the hand truck.
This could damage the refrigerator.Handle
only from the sidesof the refrigerator.
Be sure the refrigerotor stMJS in on upright
position during moving.
22
Replacing the light bulbs, ge.com
Refrigerator Lights
An authorized technician will need to replace
the LEDlight.
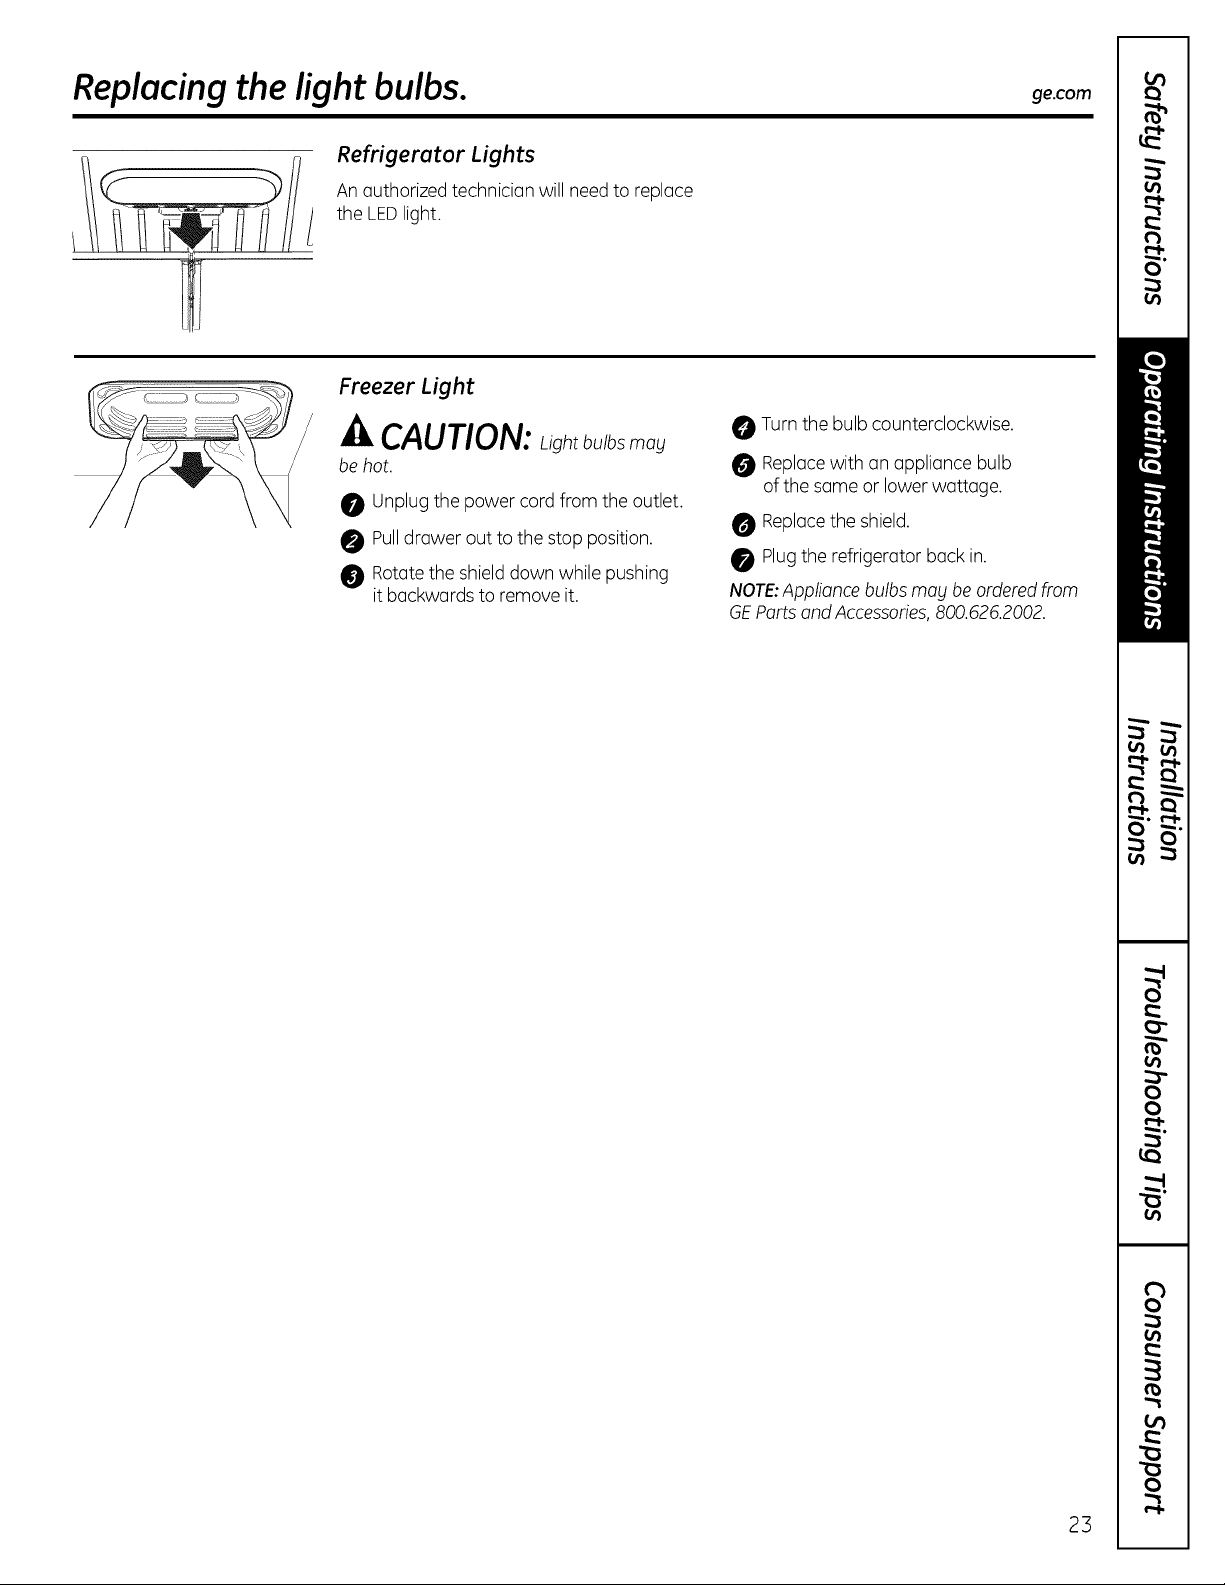
Freezer Light
_k CAUTION: Lightbulbsmoy
be hot.
O Unplugthe power cord from the outlet.
O Pulldrawer out to the stop position.
Rotatethe shield down while pushing
it backwards to remove it.
Turnthe bulb counterclockwise.
Replacewith an appliance bulb
of the same or lower wattage.
O Replacethe shield.
Plugthe refrigerator back in.
NOTE:Applionce bulbsmoy be ordered from
GEPorts ond Accessories,800.626.2002.
23
Installation
Refrigerator
Instructions
Questions? Cell 800.GE.CARES (800.432.2737) or Visit our Website et: ge.com
In Cenede, cell 1.800.561.3344 or Visit our Website et: www.geeppliences.ce
BEFORE YOU BEGIN
Reedthese instructions completely end carefully.
• IMPORTANT- Savetheseinstructionsforlocal
inspector's use.
• IMPORTANT-Observe allgoverningcodesand
ordinances.
• NotetoInstaller-Besuretoleavetheseinstructionswith
theConsumer.
• Note to Consumer- Keepthese instructionsfor future
reference.
• Skilllevel- Installationof this appliance requiresbasic
mechanical skills.
• Completion time- RefrigeratorInstallation 20 minutes
Water Line Installation30 minutes
• Properinstallation is the responsibilityof the installer.
• Productfailuredue to improper installation isnot covered
under the Warranty.
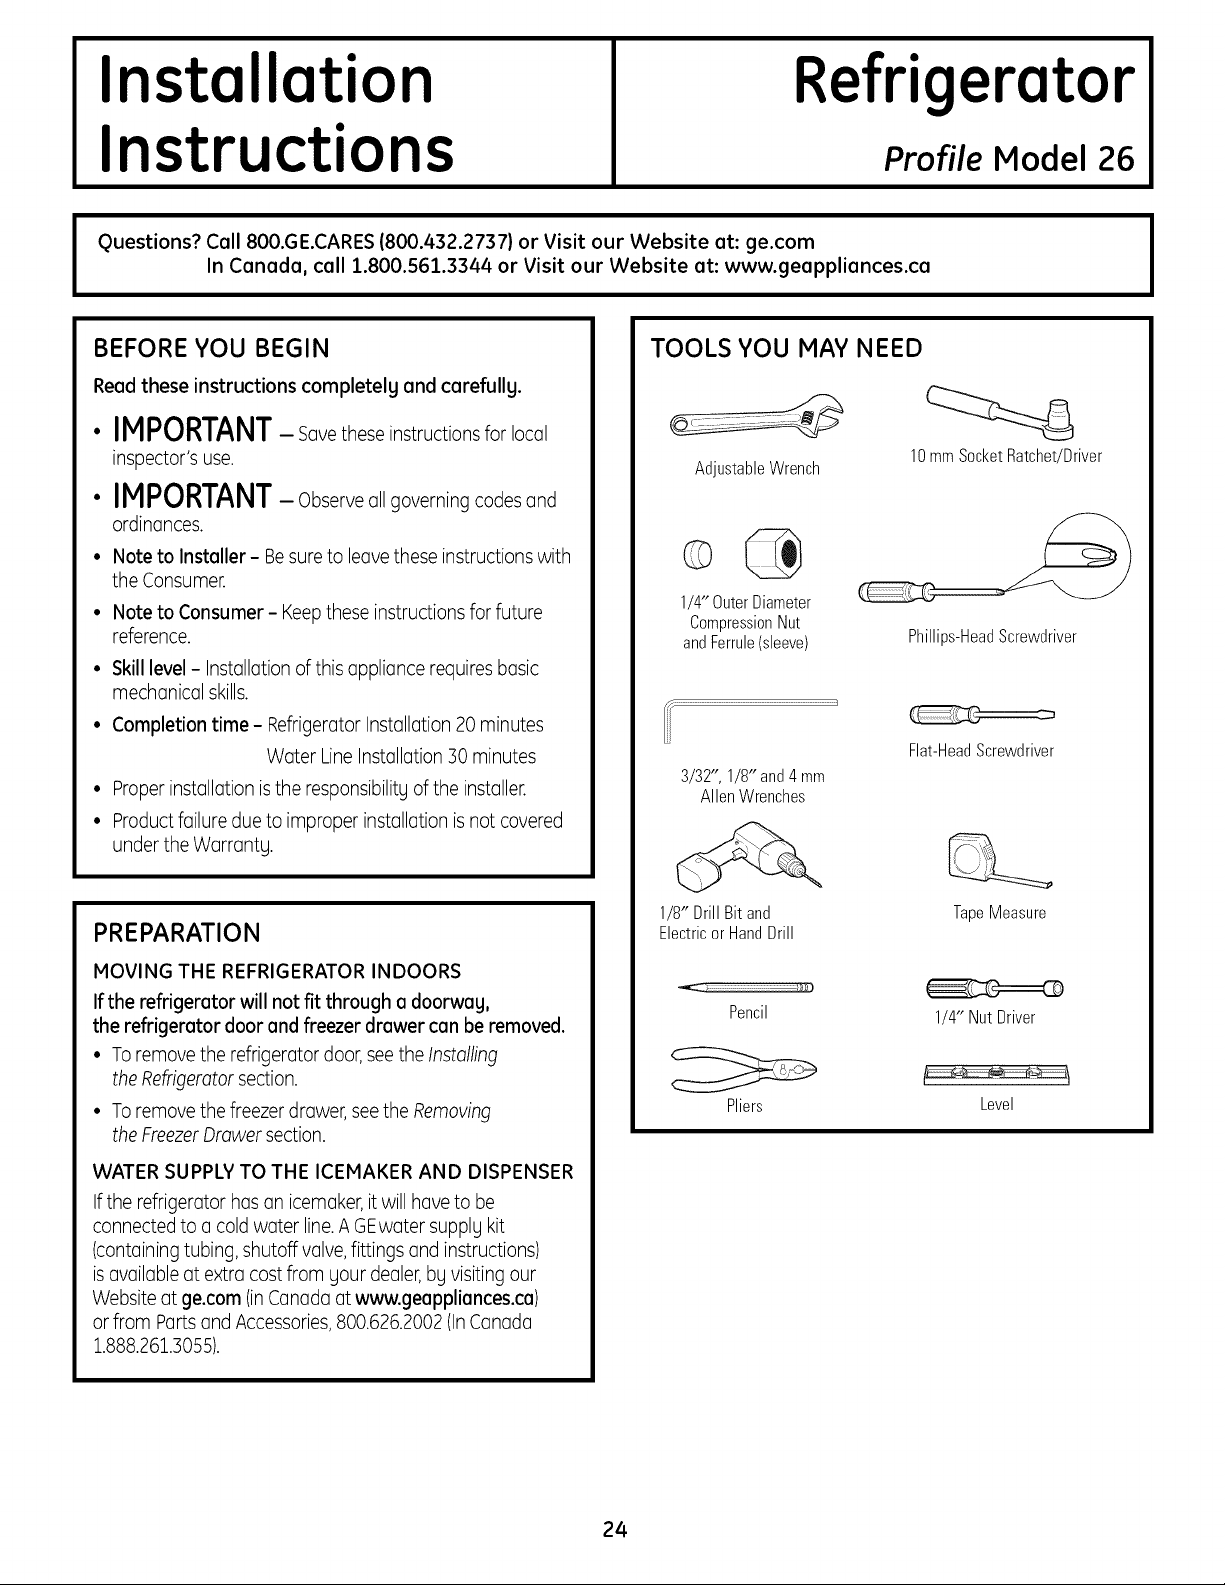
TOOLS YOU MAY NEED
AdjustableWrench
1/4" OuterDiameter
CompressionNut
andFerrule(sleeve)
3/32", 1/8" and4mm
AllenWrenches
Profile Model 26
10mm SocketRatchet/Driver
Phillips-HeadScrewdriver
Flat-HeadScrewdriver
PREPARATION
MOVING THE REFRIGERATOR INDOORS
Ifthe refrigerator will not fit through o doorwey,
the refrigerator door and freezer drawer can be removed.
• Toremove the refrigerator door,see the Installing
the Rdrigerotor section.
• Toremove the freezer drawer,see the Removing
the FreezerDrawersection.
WATER SUPPLYTO THE ICEMAKER AND DISPENSER
Ifthe refrigerator has an icemaker,itwill have to be
connected to a coldwater line.AGEwater supply kit
(containingtubing, shutoff valve,fittings and instructions)
isavailable atextra cost from your dealer,by visiting our
Websiteat ge.com (inCanadaat www.geappliences.ca)
or from PartsandAccessories,800.626.2002(InCanada
1.888.261.3055).
1/8" Drill Bit and
ElectricorHandDrill
................};}'T)
Pencil
Pliers
Tape Measure
1/4" Nut Driver
Level
24
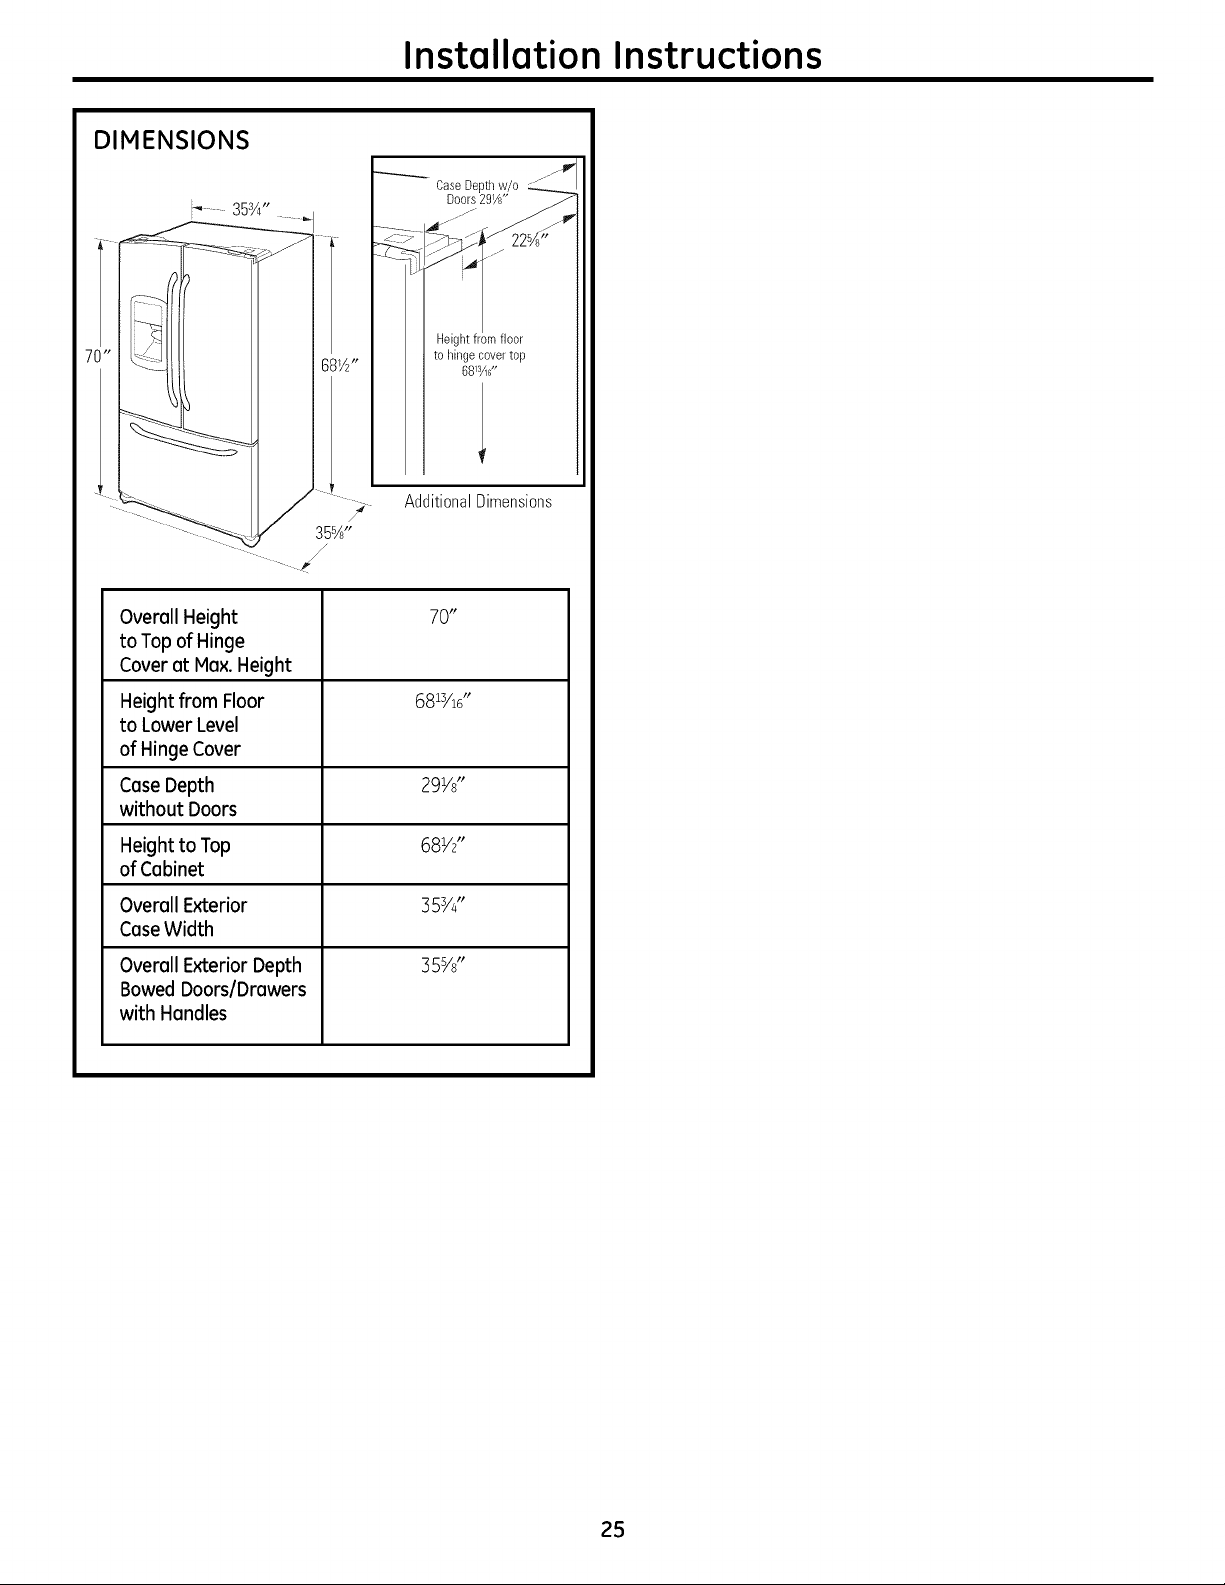
DIMENSIONS
Overall Height 70"
to Top of Hinge
Cover at Max. Height
Installation Instructions
Heightfrom floor
to hinge covertop
6813A6,,
AdditionalDimensions
Height from Floor 6813/16"
to Lower Level
of Hinge Cover
Case Depth 29Vs"
without Doors
Height to Top 68V2"
of Cabinet
Overall Exterior 353/4"
CaseWidth
Overall Exterior Depth 35S/s"
Bowed DoorslDmwers
with Handles
25
Installation Instructions
INSTALLING THE REFRIGERATOR
REFRIGERATOR LOCATION
• Do not installthe refrigerator where the temperature will
go below 60°F(16°C)because it will not run often enough
to maintain proper temperatures.
• Do not installthe refrigerator where the temperature will
go above IO0°F(37°C)becauseit will not perform properly.
• Installit on a floor strong enough to support it fully loaded.
CLEARANCES
Allowthe following clearancesfor ease of installation,proper
air circulation and plumbing and electrical connections.
Sides 1/8" (3 mm)
Top 1"(25mm)
Back 1"(25mm)
REMOVINGTHEREFRIGERATORDOORS
• IMPORTANTNOTE:This refrigerator is35s/8"deep.
Doors and passageways leading to the installation
location must be at least 36" wide in order to leave
the doors and handles attached to the refrigerator
while transporting it into the installation location.
If passageways ore lessthan 36", the refrigerator
doors and handles con easily be scratched and damaged.
Thetop cop and doors can be removed to allow the
refrigerator to be safely moved indoors. Start with Step 1.
• If it is not necessary to remove doors, skip to Step 9. Leave
tope and all packaging on doors until the refrigerator is in
the final location.
• NOTE:Usea podded hand truck to move this refrigerator.
Placethe refrigerator on the hand truck with a side
against the truck. We strongly recommend that
TWO PEOPLEmove and complete this installation.
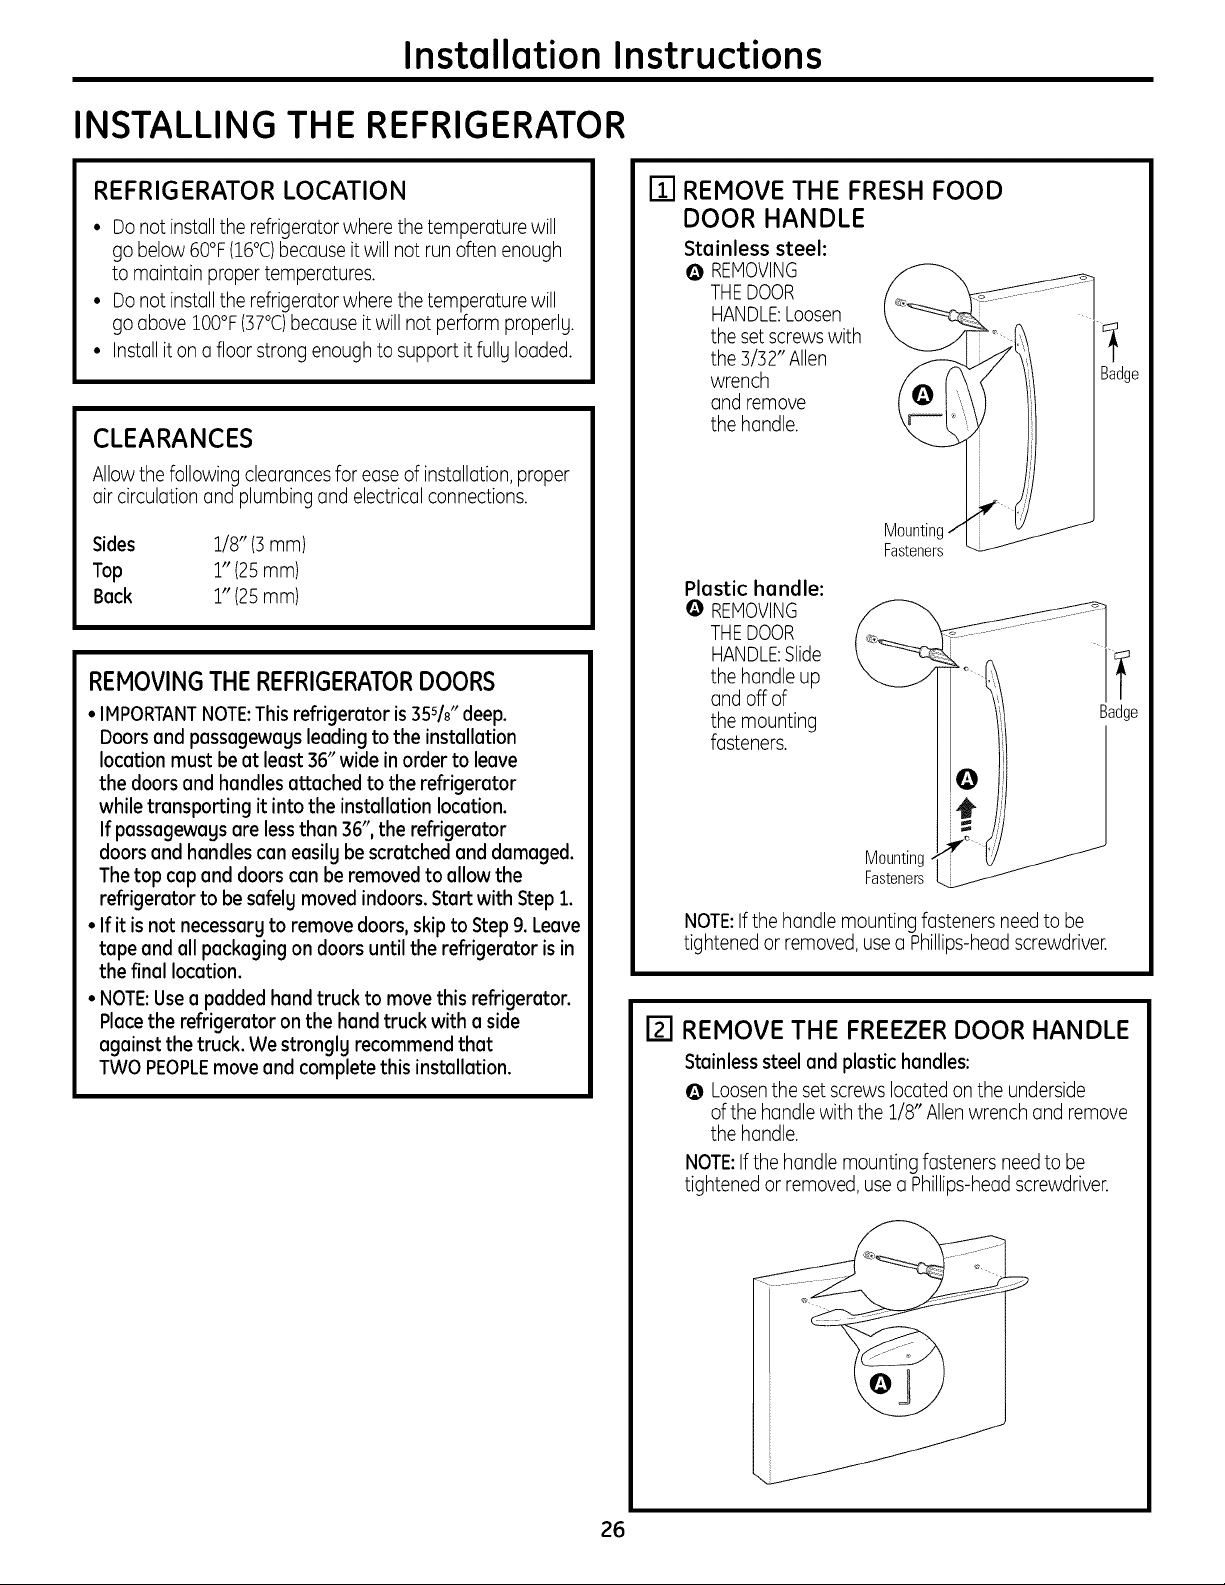
ITI REMOVE THE FRESH FOOD
DOOR HANDLE
Stainless steel:
@ REMOVING
THEDOOR
HANDLE:Loosen
the set screwswith
the 3/32" Allen
wrench
and remove
the handle.
Plastic handle:
@ REMOVING
THEDOOR
HANDLE:Slide
the handle up
and off of
the mounting
fasteners.
NOTE:Ifthe handle mounting fasteners need to be
tightened or removed,use a Phillips-headscrewdriver.
Badge
r_l REMOVE THE FREEZER DOOR HANDLE
Stainless steel and plastic handles:
@ Loosenthe setscrews located onthe underside
ofthe handle with the 1/8" Allen wrench and remove
the handle.
NOTE:Ifthe handle mounting fasteners needto be
tightened or removed, use a Phillips-headscrewdriver.
A
26
Installation Instructions
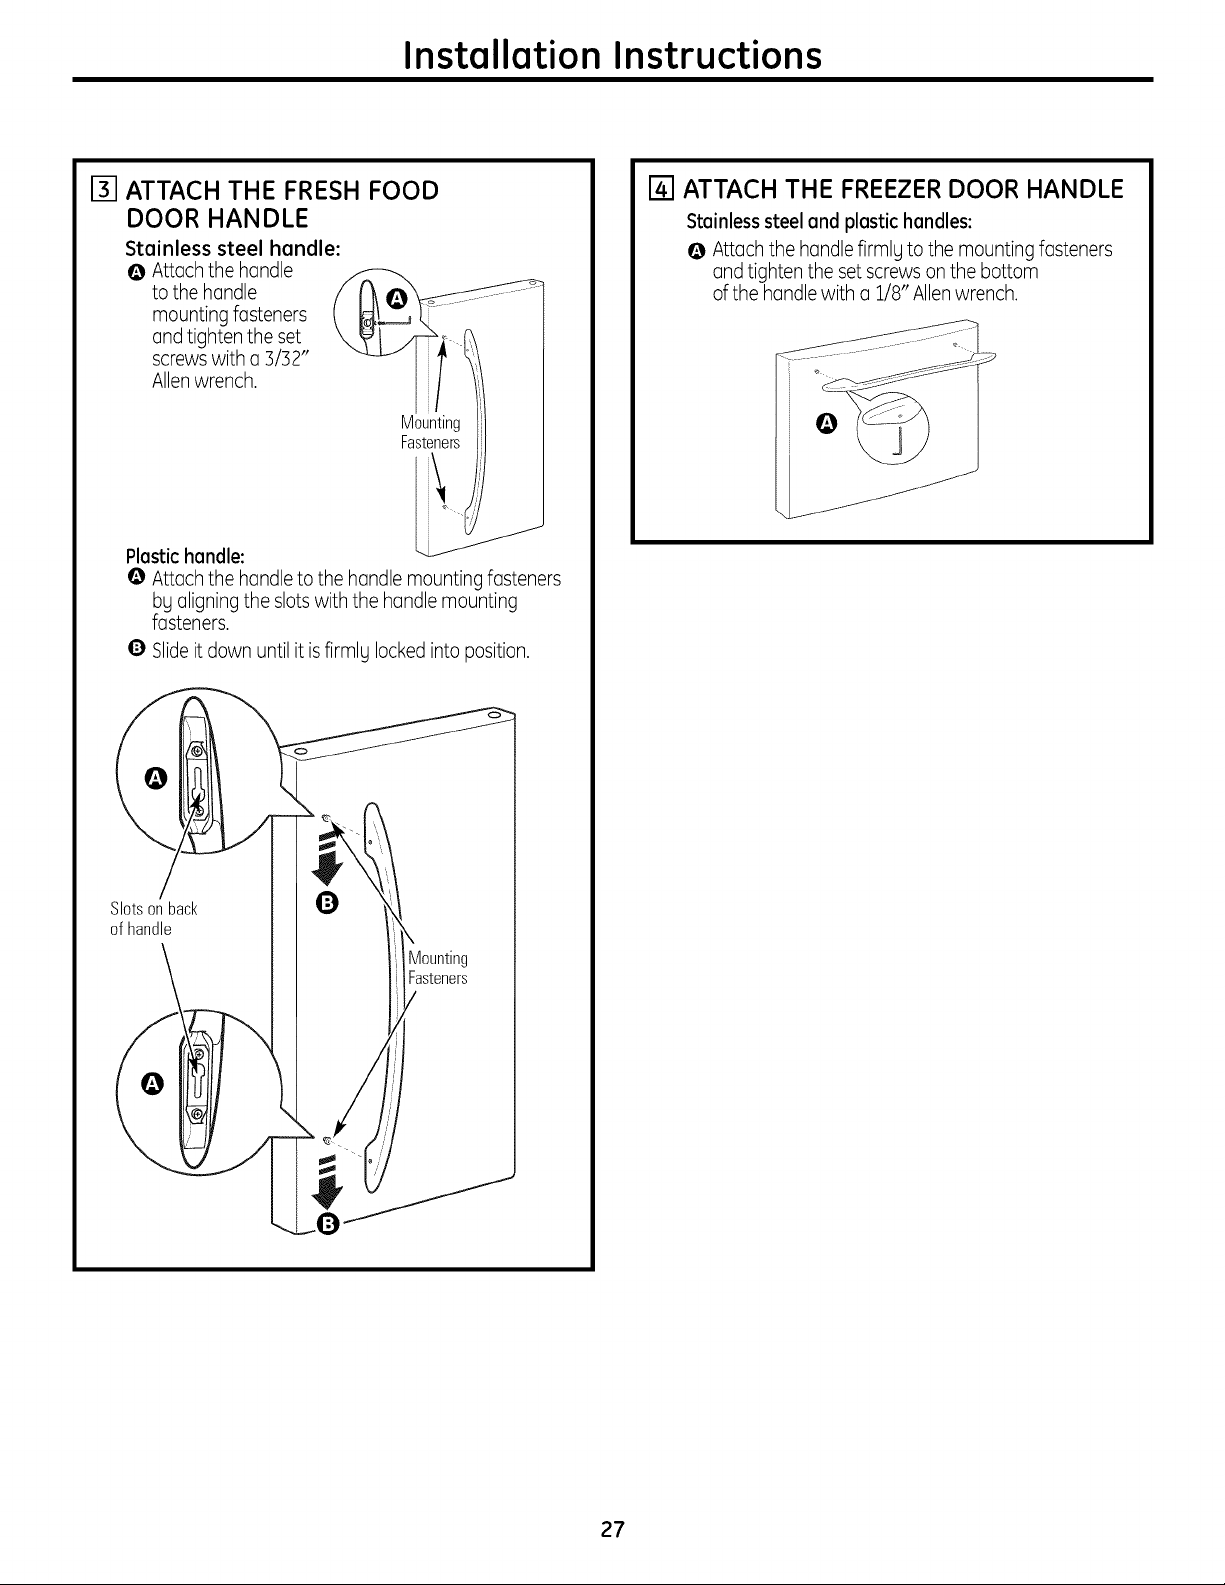
I-fl ATTACH THE FRESH FOOD
DOOR HANDLE
Stainless steel handle:
@ Attachthe handle
to the handle
mounting fasteners
and tighten the set
screwswith a 3/32"
Allenwrench.
Mounting
Fasteners
Plastic handle:
@ Attachthe handle to the handle mounting fasteners
bg aligning the slotswith the handle mounting
fasteners.
Slideitdown until it is firmlUlockedinto position.
[] ATTACH THE FREEZER DOOR HANDLE
Stainless steel and plastic handles:
@ Attach the handle firmlg to the mounting fasteners
and tighten the setscrewson the bottom
of the handle with a 1/8" Allenwrench.
Slotsonback
of handle
27
Installation Instructions
INSTALLING THE REFRIGERATOR (cont.)
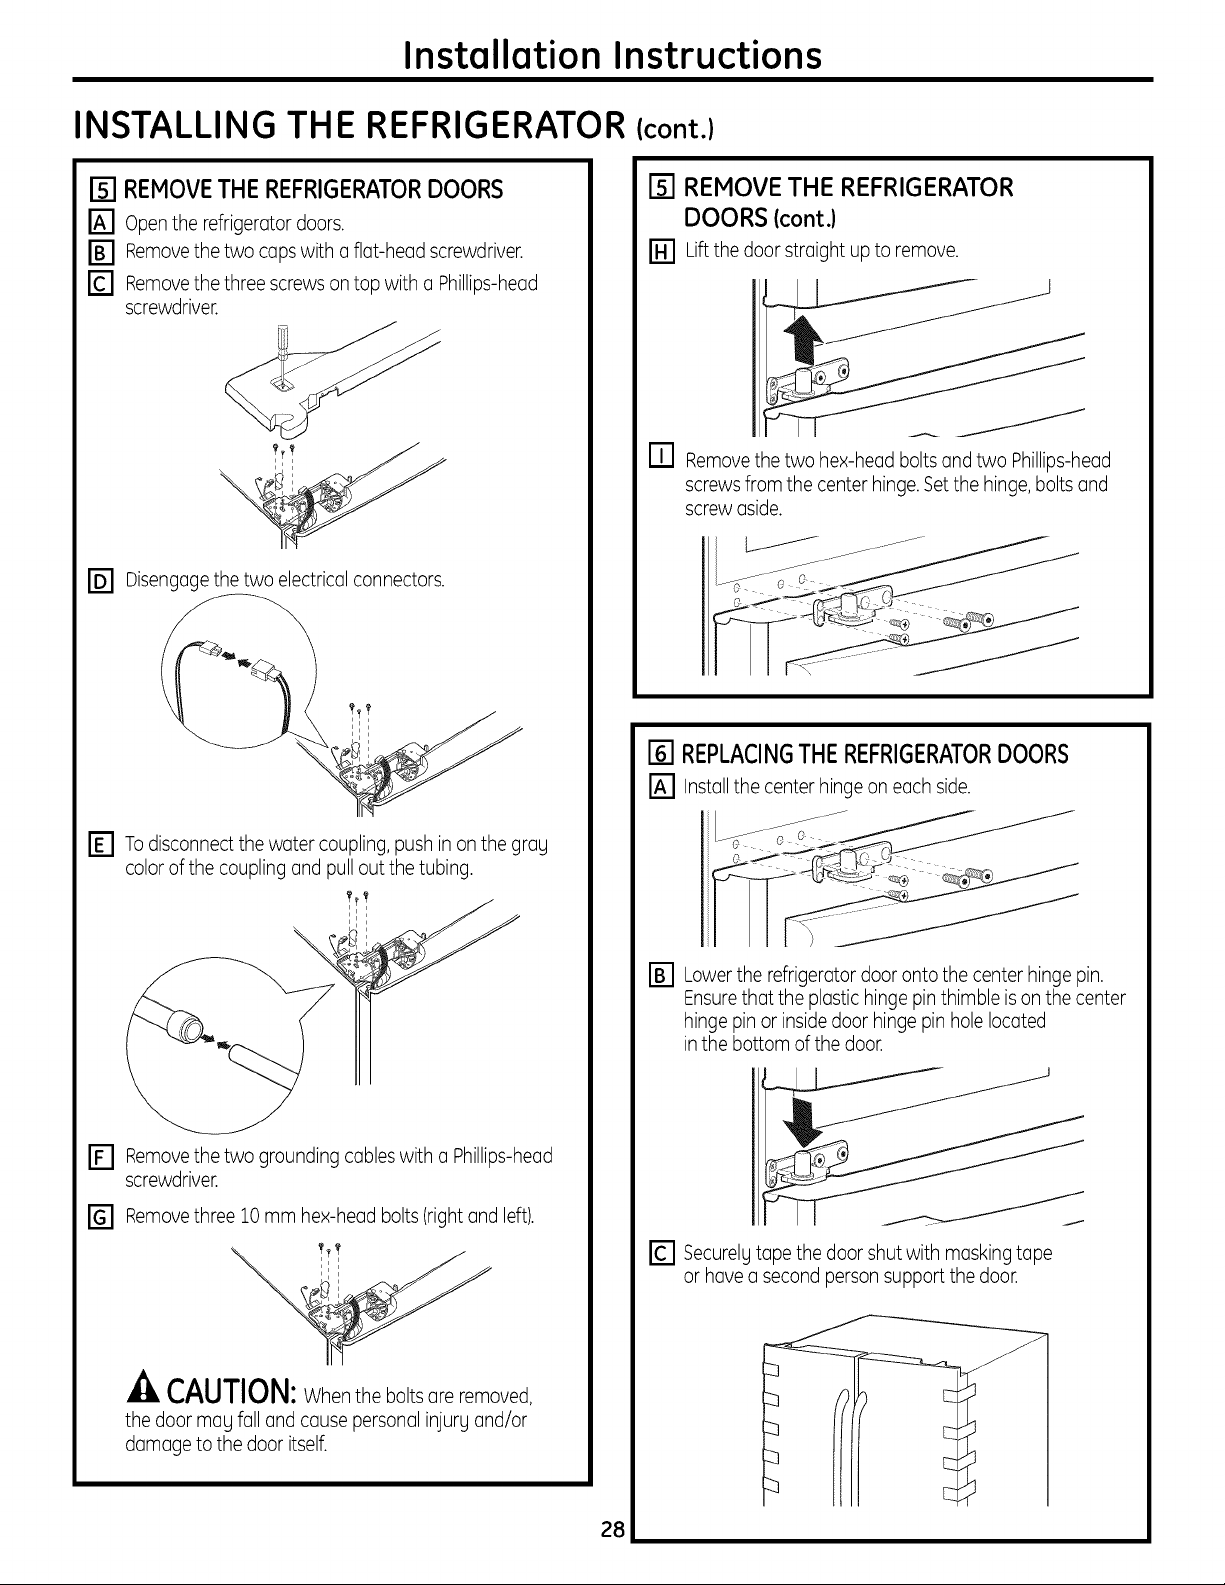
13]REMOVETHE REFRIGERATORDOORS
_'l Openthe refrigerator doors.
[] Removethe two caps with a flat-head screwdriver.
[] Removethe three screwson top with a Phillips-head
screwdriver.
Disengagethe two electricalconnectors.
@
r_l REMOVE THE REFRIGERATOR
DOORS (cont.)
[] Liftthe door straight up to remove.
FI Removethe two hex-head bolts and two Phillips-head
screws from the center hinge.Setthe hinge, bolts and
screw aside.
[] REPLACINGTHE REFRIGERATORDOORS
_1 Installthe center hinge on each side.
r_ Todisconnect the water coupling, push in on the grag
color of the coupling and pull out the tubing.
\
Removethe two grounding cableswith a Phillips-head
screwdriver.
Removethree 10 mm hex-head bolts (right and left).
CAUTION:When the bolts are removed,
the door mag fall and cause personalinjurg and/or
damage to the door itself.
Lowerthe refrigerator door onto the center hinge pin.
Ensurethat the plastic hinge pinthimble ison the center
hinge pin or inside door hinge pin hole located
inthe bottom of the door.
rc1 Securelgtape the door shut with masking tape
or have o second personsupport the door.
28
Installation Instructions
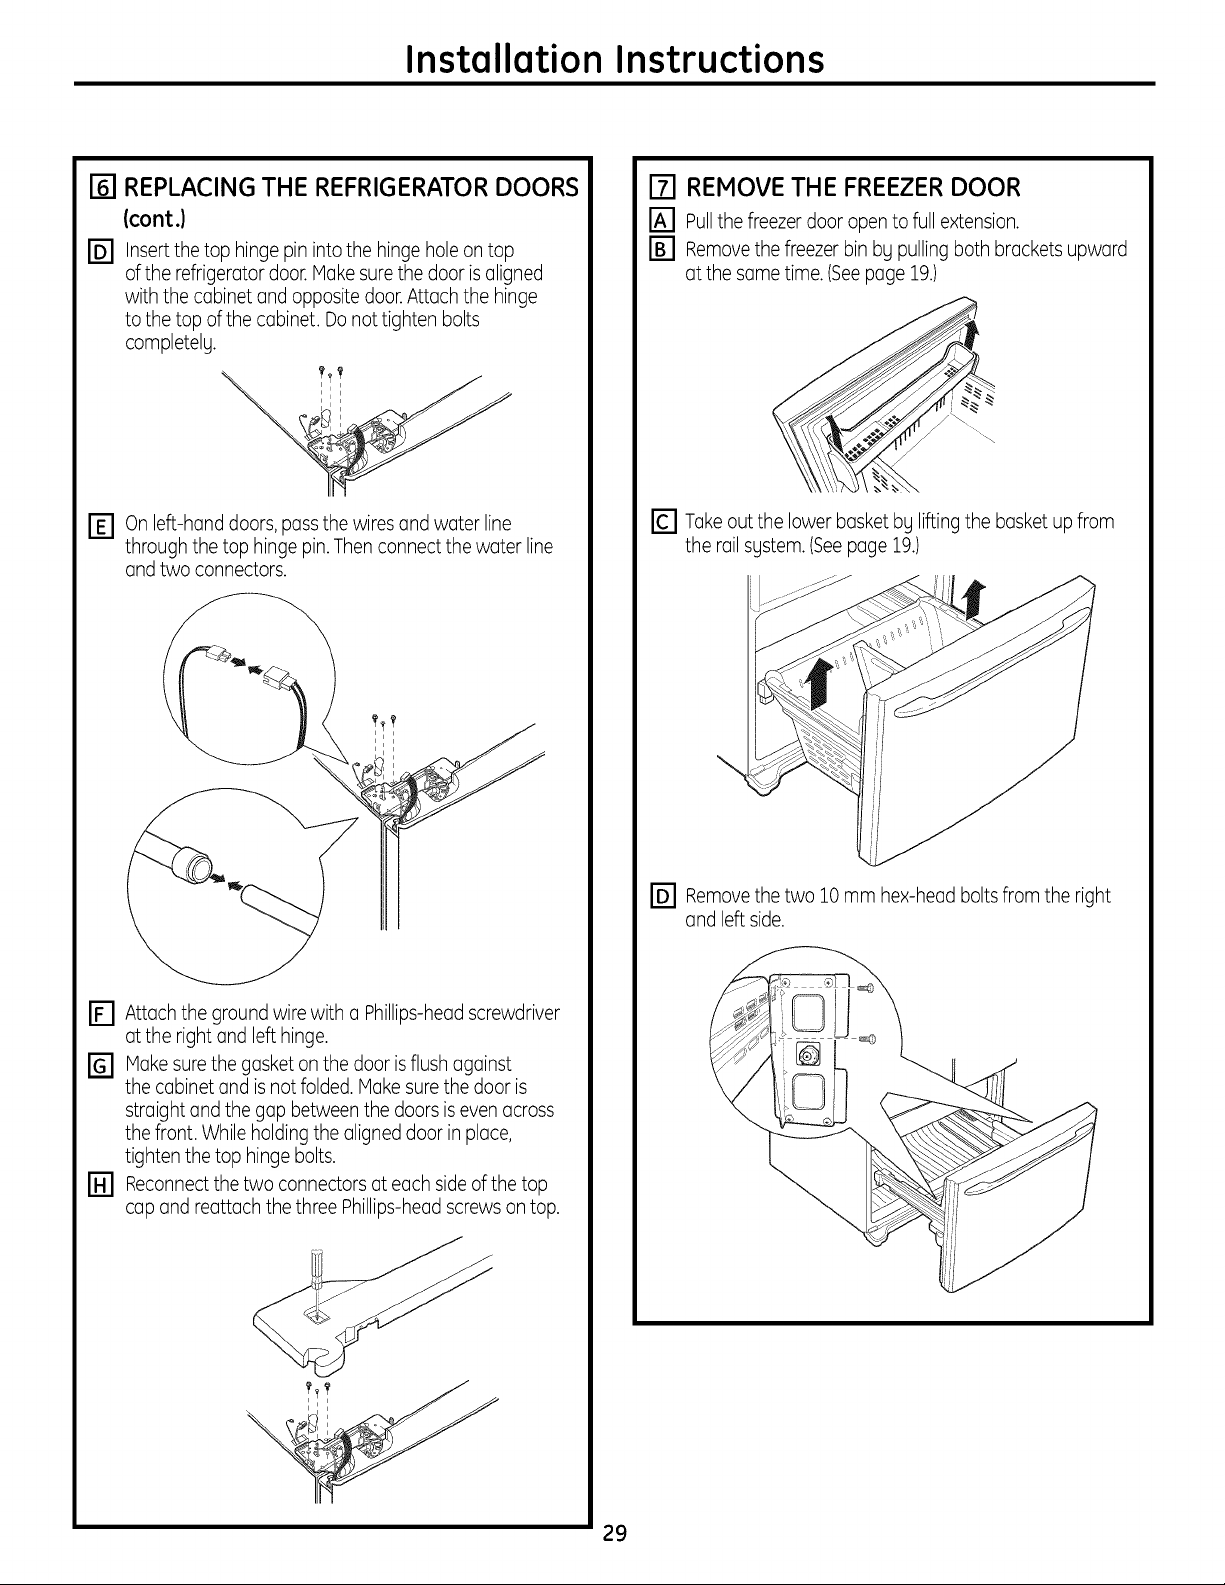
[] REPLACING THE REFRIGERATOR DOORS
(cont.)
[] Insertthe top hinge pininto the hinge hole on top
of the refrigerator door.Makesurethe door isaligned
with the cabinet and opposite door.Attach the hinge
to the top of the cabinet. Donot tighten bolts
completelg.
[] On left-hand doors, passthe wires and water line
through the top hinge pin.Then connect the water line
and two connectors.
i
i
i
171REMOVE THE FREEZERDOOR
_'1 Pullthe freezer door open to fullextension.
Removethe freezerbin bg pulling both brackets upward
at the same time.(Seepage 19.)
Fc1 Takeout the lower basketbg liftingthe basket up from
the rail sgstem.(Seepage 19.)
r_ Attach the ground wire with a Phillips-headscrewdriver
at the right and left hinge.
[] Makesure the gasket on the door isflush against
the cabinet and is not folded. Makesure the door is
straight and the gap between the doors iseven across
the front. While holding the aligned door in place,
tighten the top hinge bolts.
rill Reconnectthe two connectors at each sideof the top
cap and reattach the three Phillips-headscrewsontop.
\
Removethe two 10 mm hex-head boltsfrom the right
and left side.
29
Installation Instructions
INSTALLING THE REFRIGERATOR (cont.)
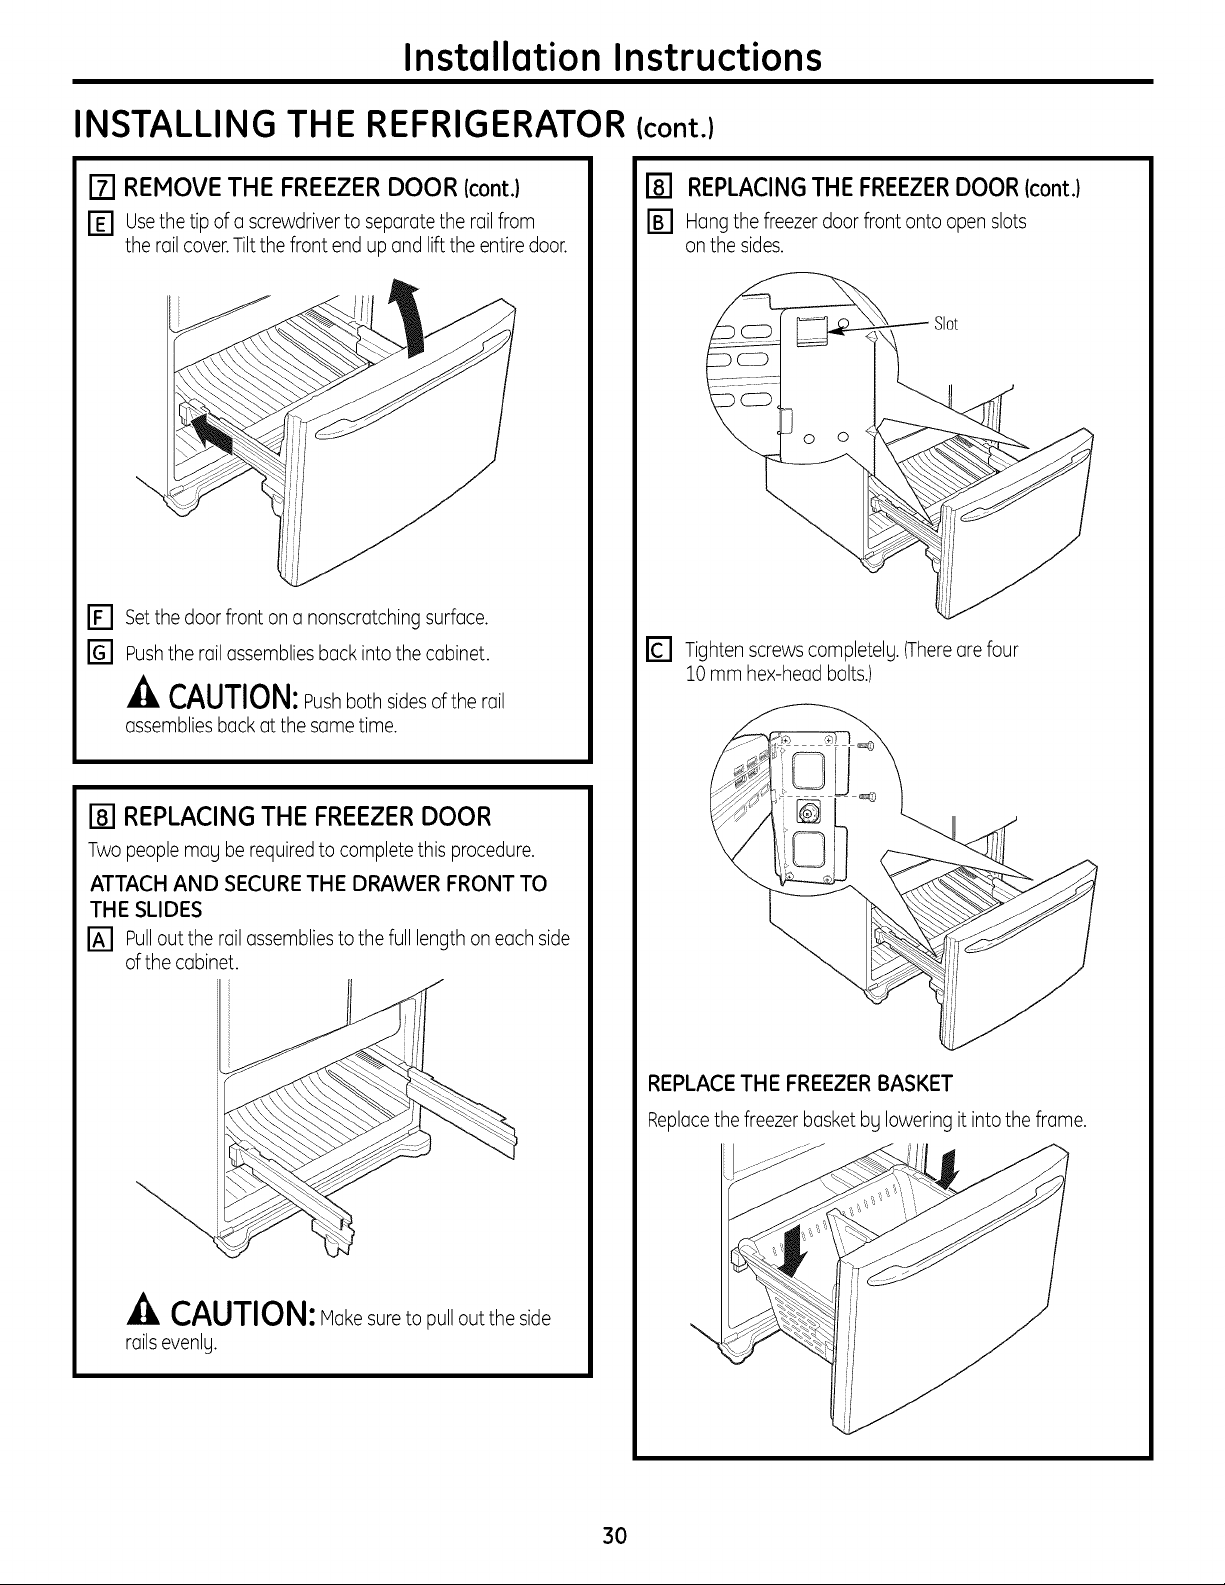
[] REMOVE THE FREEZER DOOR (cont.)
[] Usethe tip of a screwdriver to separate the railfrom
the railcover.Tiltthe front end up and liftthe entiredoor.
[] Setthe door front on a nonscratching surface.
[] Pushthe rail assembliesback into the cabinet.
-& CAUTION:Pushboth sidesof the rail
assembliesback at the same time.
[] REPLACINGTHE FREEZERDOOR(cont.)
[] Hungthe freezer door front onto open slots
on the sides.
Slot
r_ Tighten screwscompletely. (Therearefour
10 mm hex-head bolts.)
REPLACING THE FREEZERDOOR
Two people may be requiredto complete this procedure.
ATTACH AND SECURE THE DRAWER FRONT TO
THE SLIDES
_'1 Pullout the rail assembliesto the full length on each side
of the cabinet.
CAUTION: Makesureto pull out the side
railsevenly.
REPLACE THE FREEZER BASKET
Replacethe freezer basket by lowering it into the frame.
3O
 Loading...