

GE PFS22SBSASS, PFS22MISAWW, PFS22MISABB, PFS22MBSAWW, PFS22MBSABB Owner’s Manual
...
www.GEAppliences.com
Safety Instructions ........... 2, 3
N
©
Operating Instructions
Additional Features ............. 9
Automatic lcemaker . .......... ]2
Controls .................... 4-6
Crispers and Pans ............. ]0
Freezer . ..................... 11
Shelves and Bins ............. 8, 9
Water Filter . .................. 7
Care and Cleaning ........ 13-15
Installation Instructions
Installing the Refl'igerator . . . .17-2]
Installing the Water IJne ..... 31-33
Preparing to Install
the Refligerator . .............. ]6
Removing and Replacing the
Freezer Drmver . ........... 22, 2?,
Reversing the Door Swing
(Single Door Refrigerator
Models only) .............. 24-27
Rein oving and Replacing
the Doors (Double Door
Refiigerator Models only) .... 28-30
Models 20 and22
Cong_lateur inf_rieur
Rdfrig&ateurs
Lasection frangaise commence k la page 47
Congelador inferior
Refrigeradores
La seccidn en espa_ol empieza en la pagina 89
Troubleshooting Tips ._4-_ 8
Normal Operating Sounds ._4
Consumer Support
Consumer Support ..... Back Cover
Perfbrmance Data Sheet ........ 45
Product Registration
fl)r Canadian Customers ..... 41,42
Product Registration
fl)r U.S. Customers ......... 39, 40
Warranty ti)r Canadian
Customers ................... 43
Warranty ti)r U.S. Customers ..... 44
Write the model andserial
numbershere:
Model #
Serial #
Find tl_( s( mmlb( rs on a lab(l
on th( right sid(, n(ar th( to 1)of
th( refi'ig(rator coml)artm(nt.
...... 3 3
3828JL8069A 197D4618PO05 49-60361 04-05JR
READALL INSTRUCTIONSBEFOREUSING
WARNING!
Usethis appliance only for its intended purpose as described in this Owner'sManual
SAFETYPRECAUflONS
Whenusing electrical appliances,basic safety precautions shouldbefollowed, includingthe following:
This r(_fl_igcrau)r musl ])c ])ro])(_r]? insml]cd
and ]ocamd in ac(ordancc wid_ d_c Insl_d]adon
[nslruclions ])(_f(n'(_ il is used.
Do not a]]o_x children to c]imb, stand or hang
on th( sh(hx s in th( r(]i'ig(rat(m The) (ould
damag( th( r(]i'ig(rator and s(rious]) i1_jm'(
th( ms( Iv("s.
[)o not touch th( co]d sur]iices in th( ]]'((z(r
col/l])artl/lont w]lon ]lallds ill'() (Jail/l) or _\_ot.
Skin ma) stick to thes(cxtr(m(]) co]d sur]aces.
Do not stor( or us( gaso]in( or oth(r flammab](
x_q)ors and ]]quids in th(vicinil) of this or an)
oth(r a])])]ianc(.
_ K(e]) fing(rs out ofth( "])inch point" areas;
(]oarmlcos b()D,\con the doors and bol_,vo( n
th( doors and cabin( t ar(nec(ssaril) sma]l.
B( car(fid dosing doors wh(n chi]dr( n ar(
in th( ar(a.
111r( ]i'ig( ra|ors widl automatic ic( mak_ rs,
av(/id contact will1 t]l( moving ])arts of th(
(jector mechanisn/, or with th( h( ating (]( m( nt
that r(l(as( s th( cub(s. Do not ])lac( ring( rs or
hands (111ttl( atttomatic k'emaking m( chart]sin
/\hi]( th( r(]i'ig(rator is ])]ugg( d in.
Un])]ug th( r(]i'ig(rator be]or( c]eaning and
making r( pairs.
NOTE."We,stronglyrecommendthatanyservicingN
performedbya qualifiedindividual.
_ tting ( ith( r or both con tro]s to 0 (off) do(s
not r( mov( pow(r to th( ]ight cir(uit.
Do not r(]i'((z( ]i'oz( n ]oods which hay(
thaw( d com])]et(]).
DANGER!RISK OFCHILDENTRAPMENT
PROPERDISPOSALOFTHEREFRIGERATOR
Child (ntra])m(nt and su]ti)cafion ar( not prob]( ms
of th( past. Jtmk( d or abandon( d r( ]i'ig-( rators ar(
still dmlg('rous...cv(n if the)w]]] si| ]k)r 'ijust a ]i:w
da) s." If you at( g( tting rid of your o]d r( ]]'ig( ratoc
i)]ease ]ol]ow th( imtructions b(]ow to hell) i)r('vcnt
accid( nts.
Before YouThrowAway YourOld Refrigerator
Refrigerants
AI] r( ]_'ig( ration products contain r( ]_'ig( rants,
which tmd(r ]i d(ra] ]my must b( r( mov(d prior
to product disposa]. If)ou ar( g( tting rid of
an o]d re]i'ig( radon product, check will1 th(
coral)an) hand]]rig th( dis])osa] about what
to do,
or Freezer."
'Iak(_ (/1t"111cdoors.
L(:avc 111(:she]yes in ])]ac(: so din1 chi]dr(:n ma)
nol casil) (limb insk](:.
USEOFEXTENSIONCORDS
Because of potential safety hazards under certain conditions, we strongly recommend against
the use of an extension cord.
t t(/x_cv(:l; i]')(/u nmsl use an (:xmnsi(in cord, il is a])so]um]) nec(:ssa D dial il bc a UIAislcd (in 1t1(: Unimd
States) or a CSA cerliii(:d (in Canada), 3-wire grounding l)])(: a])])]ianc(: extorts]on (:(/1"(t hax4ng a grounding
1",1)(:I)]ug and c, tll](:! alld l]lal 11/(: (4(x:lrica] ralillg of 111(:c()rd ])(: 15 al//I)(:r(:s (n/ininmm) and 120 roils.
ww_.GEAppliances.com
WARNING!
HOWTOCONNECTELECTRICITY
Do not, under any circumstances, cut or remove the third (ground) prong from the power cord.
For personal safety, this appliance must be properly grounded.
Th{ t)o_x r cord of this applianc( is equipp( d
with a 3-prong (gromlding) plug which mat{s
with a standard 3-prong (gl'ounding) wall outlet to
minimiz{ th( t)ossibilil} of( k ctric shock hazard
ti'om this al)l)lian(x.
tlmx th(/_;,ll outl( t and circuit ch(ck(d b? a
qualified ( k ctrician to make sur( the outkt is
prop(rl) groun& d.
Wh(r( a standard 2-prong wall outkt is
( ncomu( r( d, it is )our p( rsonal r(sponsibilit) and
obligation to hax_" it r( placed with a prop(rl)
gTotmd( d 3-prong wall outl( t.
Th( r( ti'ig{ rator should ahx;,}_ be tfluggcd into its
own individual ( k ctrical outkt _hich has a xx>ltag{
rating that match( s th( rating plate.
"I]ds provid( s th( b(st pertbrnlanc( and also
pre_ his o_ rloading hous( wiring circttits which
could cans( a fir{ hazard l_'om ox_'rh( at( d wir( s.
Nex_r mq)lug your r{ ti'ig{ rator b) pulling on th{
I)(,_ r cord. Ah_,}_ gq+ip plug firml) and pull
straight out t]'on/ th( outl( t.
Repair or r( plat( imm(diatel) NI po_xx r cords that
ha_ b(com( th,}(d or oth( rwis( damag{ d. I)o not
use a cord that sho_:s cracks or abrasion damag{
along its kngth or at ( idl( r (rid.
Wh(n mo_ing th( r( t_'ig{'rator m_'u) t_'om tile
/_all, b( car( rid not to roll o_r or damag( th(
])o_\x)r co/'{|.
USEOFADAPTERPLUGSrAda ter nat ermittedinCa,adaJ
Because of potential safety hazards under certain conditions, we strongly recommend against
the use of an adapter plug.
tt(mvx_'J; if you nmst us( an adapt( J; where local
cod(s p( rmiL a temporary connection ,ha) b( mad(
to a t)rop{ rl) gT(mnd{ d 2-t)rong/xall outl( t b) us{
ota UIAist{ d adat)t{ r m_,ilabl{ at most local
har(hx_u'{ stor{ s.
Th{ hu'g{ r slot ill th( a(tapt{ r must b{ aligll{ d widl
th( hu'g( r slot in tile/_:,ll outkt to provi& t)rop( r
polarit} in th( corm( orion of the po_xx r cord.
Wh{n dis('onn{ cting the t)ow( r cord t]'om th{
a{tal)t{ l; ah_,)_ hold th{ a(tal)t{ r ill t)h,c{ widl on{
hand whil( t)ulling the t/o_x r cord t)lug widl tile
oth{r hand. If this is not doll{, th{ adallt{ r ground
t{rminal is x_r) lik{ 1) to br{ak with r{i){ at{ d us{.
If th{ adapter gromld terminal br( aks, DO NOTUSE
th{ r{ t_'ig{ rator mull a I)rOl){ r gr(mnd has b{{n
( stal)lish( d.
Attaching theadapterground terminal toa wall outlet
coverscrewdoesnotground theapplianceunlessthe
coverscrewis metal, andnot insulated,and the wall
outlet isgroundedthroughthehousewiring. Youshould
havethe circuit checkedbya qualified electricianto make
surethe outlet isproperlygrounded.
READANDFOLLOWTHISSAFETYINFORMATIONCAREFULLY.
SAVETHESEINSTRUCTIONS
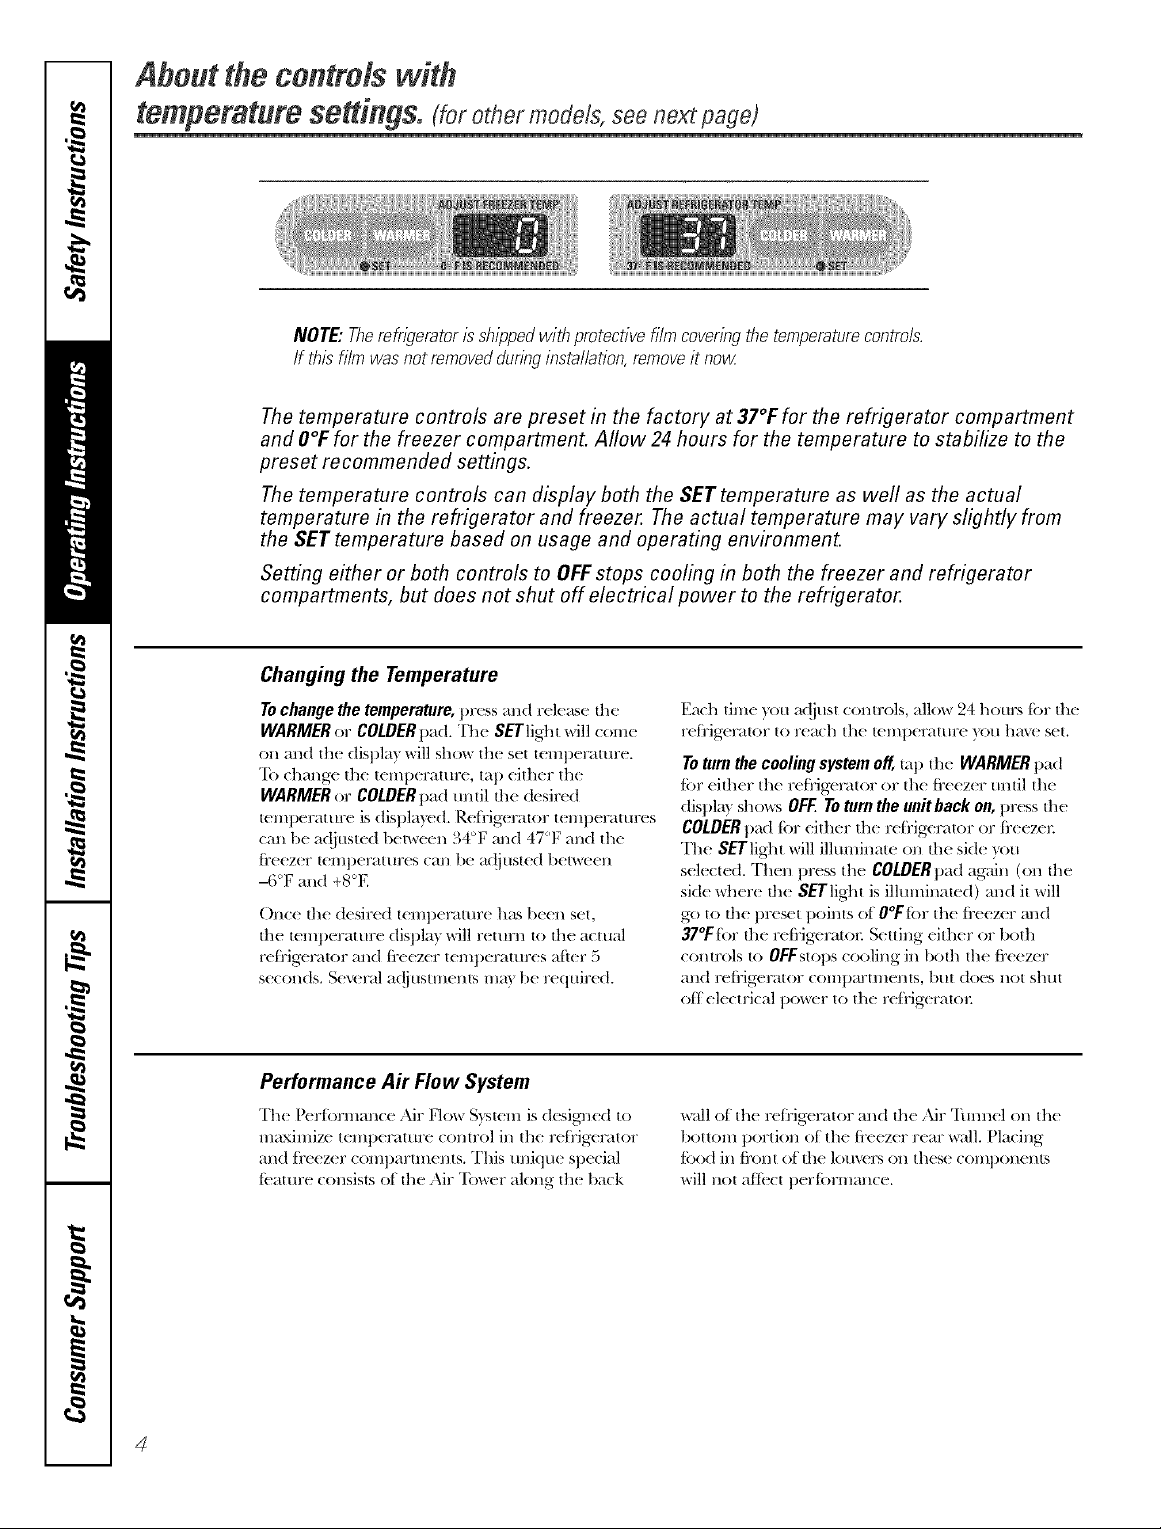
About the controls with
temperature settings. (for ot,_er models, see next page)
NOTE."Therefrigeratorisshippedwithprotectivefilmcovering#retemperaturecontrols.
If thisfilm wasnotremovedduringinstallation,removeit now
The temperature controls are preset in the factory at 37°F for the refrigerator compartment
and O°F for the freezer compartment. Allow 24 hours for the temperature to stabilize to the
preset recommended settings.
The temperature controls can display both the SET temperature as weft as the actual
temperature in the refrigerator and freezer. The actual temperature may vary slightly from
the SET temperature based on usage and operating environment.
Setting either or both controls to OFF stops cooling in both the freezer and refrigerator
compartments, but does not shut off electrical power to the refrigerator.
Changing the Temperature
To change the temperature, press and rdcas(_ d_c
WARMER or COLDER pad. 'D,v SETlight will coin(
on and th(dJspla) will sh()_ th( s('t t('mp(ratur('.
"[}:,('hang( th( ttmptraturt,tapt]thtrth(
WARMER or COLDER pad tmdl d,c &shvd
t(mp( ratur( is display( d. R(J]'ig(rator t( m])( ratur( s
can I)( a(!iust( d l)( tw(( n 34°F and 47°F and thv
[i'( (Z(I" t( IIl])(I'attlY(s ('all b( a(!itlst(d B(Iw((H
-(FF and +8°E
()no( d_( d(sir(d t( ml)(ramr( has b((n s(t,
th(" t( mp(ratur(displa) will r( tm'n to th( actual
r( [J'Jg( rator m_d [i'((z(r t( m])(ratur( s a[i(r 5
s( ('onds, S( v( ral a(!iustm( nts ma) l)( rvq uh'( d.
Performance Ak Flow System
Th( P( ribrman(( Air Iq(>w S) st(m is d(sigl_(d to
maximiz( t( ml)(ralm'( ('onlro] in th( r(_J'ig(rator
and ii'(( z( r ('oral)aftra( nts+ This tmiqu( sp( ('ial
i( amre ('onsists of d_( Air 'Ibw( r along d,( back
Each tim( you a(!just controls, all(,w 24 hours ti)r th(
F(_]'J_(Fat()r to r(a('h th( t(H_I)(FatHY( )<oft ha',,x s(t.
To turu the cooliug system off, mp d,( WARMER pad
ti)r (ith(r th( r(fl'ig(rator or th( ti'( (z(r troth th(
displa) sh(,_x_sOFF. To turu the mdt baek on, pr(ss th(
COLDER pad _)r (ida( r d_( r( _'ig( rmc>r or _i'( ( z( J:
Th( SETlight will ilhtminat( on dw ski( you
s(l(('t(d. Th(n pr(ss th( COLDERpad again (on th(
ski( wh(r( d_( SETlight is illuminat(d) and it will
go to d_( pros( t I)Oints of O°Ft6r th( ti'( ( zcr and
37°Fibr th( r( fi'ig( rato_: S( uing (ith( r or both
controls to OFFstol)s cooling in both the ti'( ez( r
Hlld I'( []'i_'( I'HtOf COHII)Ht'tl,I( 11|S, b[l[ dO(S /lOt sN[It
off( l( (tri('al l)O_X r to the reii'ig(rato,:
wallof d_( r( t]'ig( rator and d_( Air 'Iimn( ] on d_(
bottom portion of th( fi'( (z(r r(ar wall. Placing
ti)od in fi'ont of file l()uv( rs on th(s( ('oral)on( nts
will not att( (t i)( rli)rman('(.
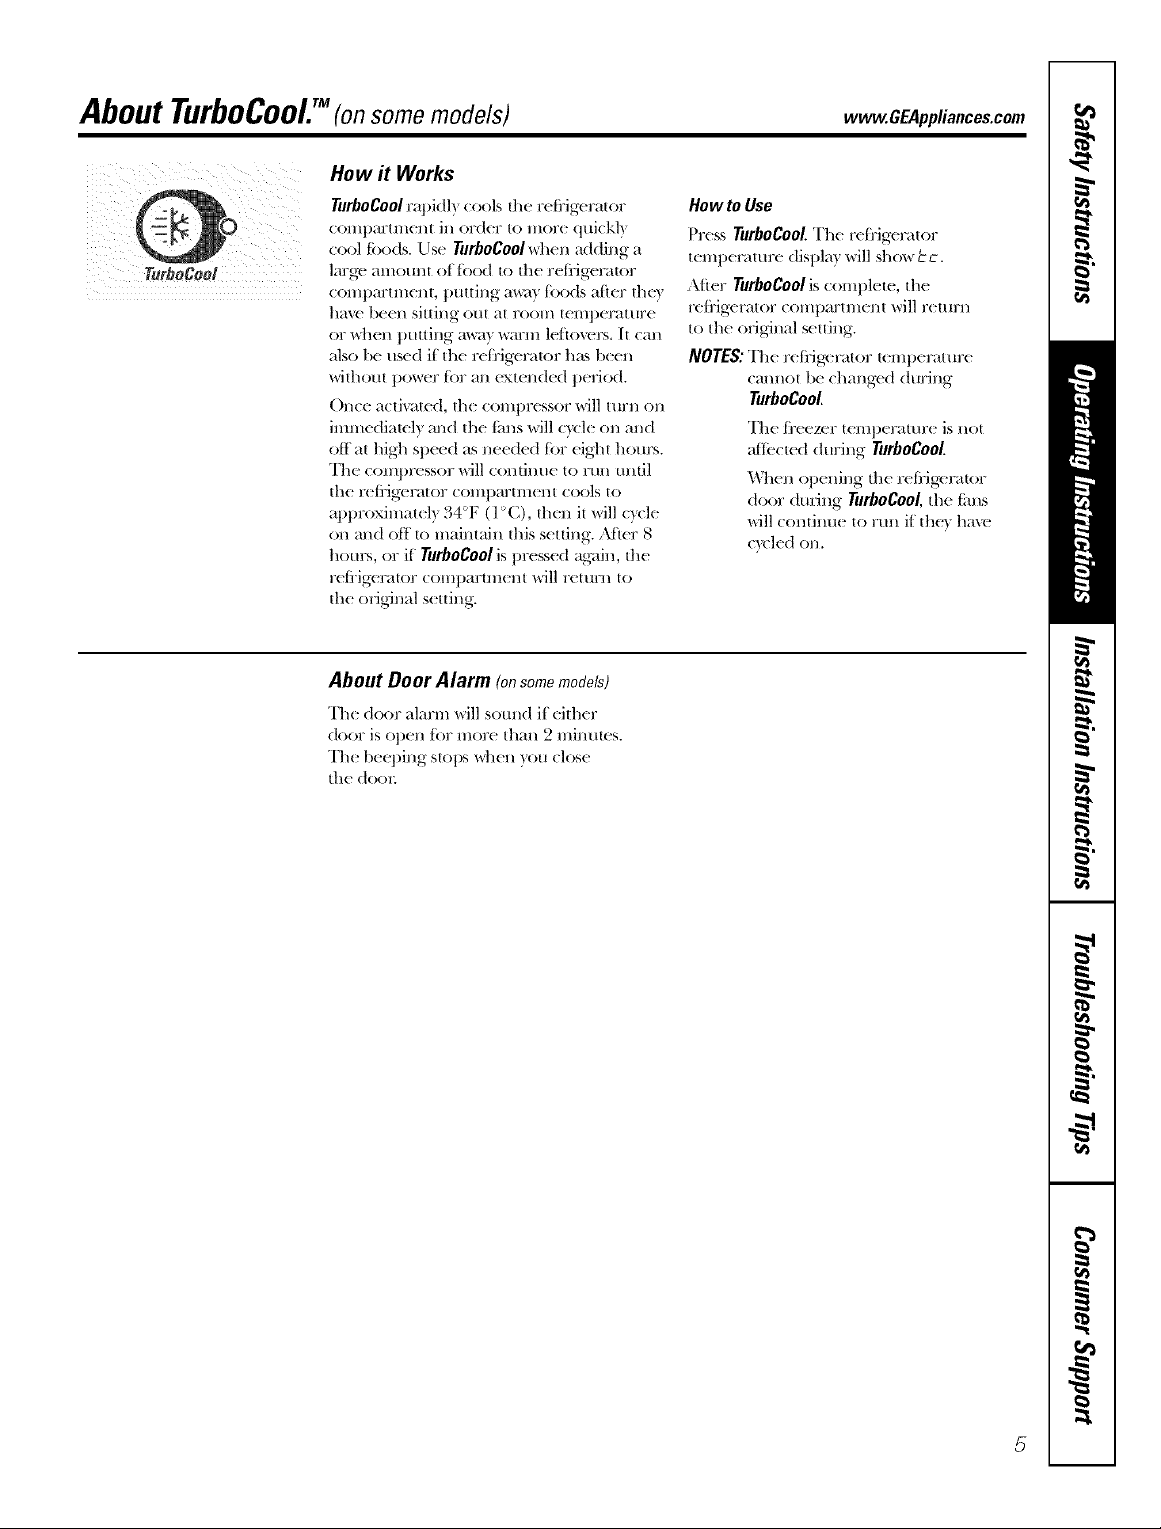
AboutTurboCooLTM(onsome models) ww_.GEAppliances.com
How # Works
HowtoUse
th'(ss TurboCool.Th( r(l_'ig(rator
t( ml)(mmr( disl)la ) will show cco.
After TurboCooliscompl( t(, th(
rcli'ig( rater coral)aftra( nt will r(mrn
to th< original st uing.
NOTES:Th( r( [i'ig( rotor t( ml)(ratur(
cam_ot b( chang(d during
TurboCool.
Th( t/'((/(l" [( I/It)(I'H[HI'( is 11()[
al]k cted during T#rboCool.
Wh(n opening th( Jx'ti'ig( rater
door during r.rboCootthe liras
will continu( to rim if the) hay(
c)('l( d on,
TurboCoe/
ii i i i i i i i i
TurboCool ral)idl ) (ools th( r( [i'ig-c rator
coml)arml(nt in or(kr to mot((]uick])
co(,l ti>_,ds.List TurboCoolwhcnadding a
large amount ofl_x)d to the rcli'igcrator
cOral)aftra(hi , lmt)ing m\_l) l_)ods allot the}
];av( l)((n sitli}'_#-otH at tool); t('n;])(rattu'(
or _h('n lmUing awa> warm ](.l_ovc.rs. It can
also b( us(d if th( r(l_'Jg(rator has b((n
without ])owcr l})r an cxt< nd(d ])criod.
One( activated, th( COml)r(ssor will turn on
immcdiat(l) and the liras will c)cl( on and
off at high st)( ( d as n( (d(d t_)r (ight hours.
Th( tempt( ssor will contintt( to run tmdl
th( Jx ti'ig( rater coml)artm(nt cools to
al)l)r()ximat( 1) 34°F (I°C), th(n it will cycle
on and off to maintain this s( tting. Al_(r 8
hours, or if TurOoCoo/is t)r( ss( d again, th(
r( ti'ig+( rater coml)arm_( nt will return to
th( origdnal s( uing.
About Door Alarm (onsomemodels)
Th( door alaml will sound if (ith(r
door is ot)(n ti)r more than 2 minut(s.
Th( b( (ping stops wh(n you ('los(
th( doo_:
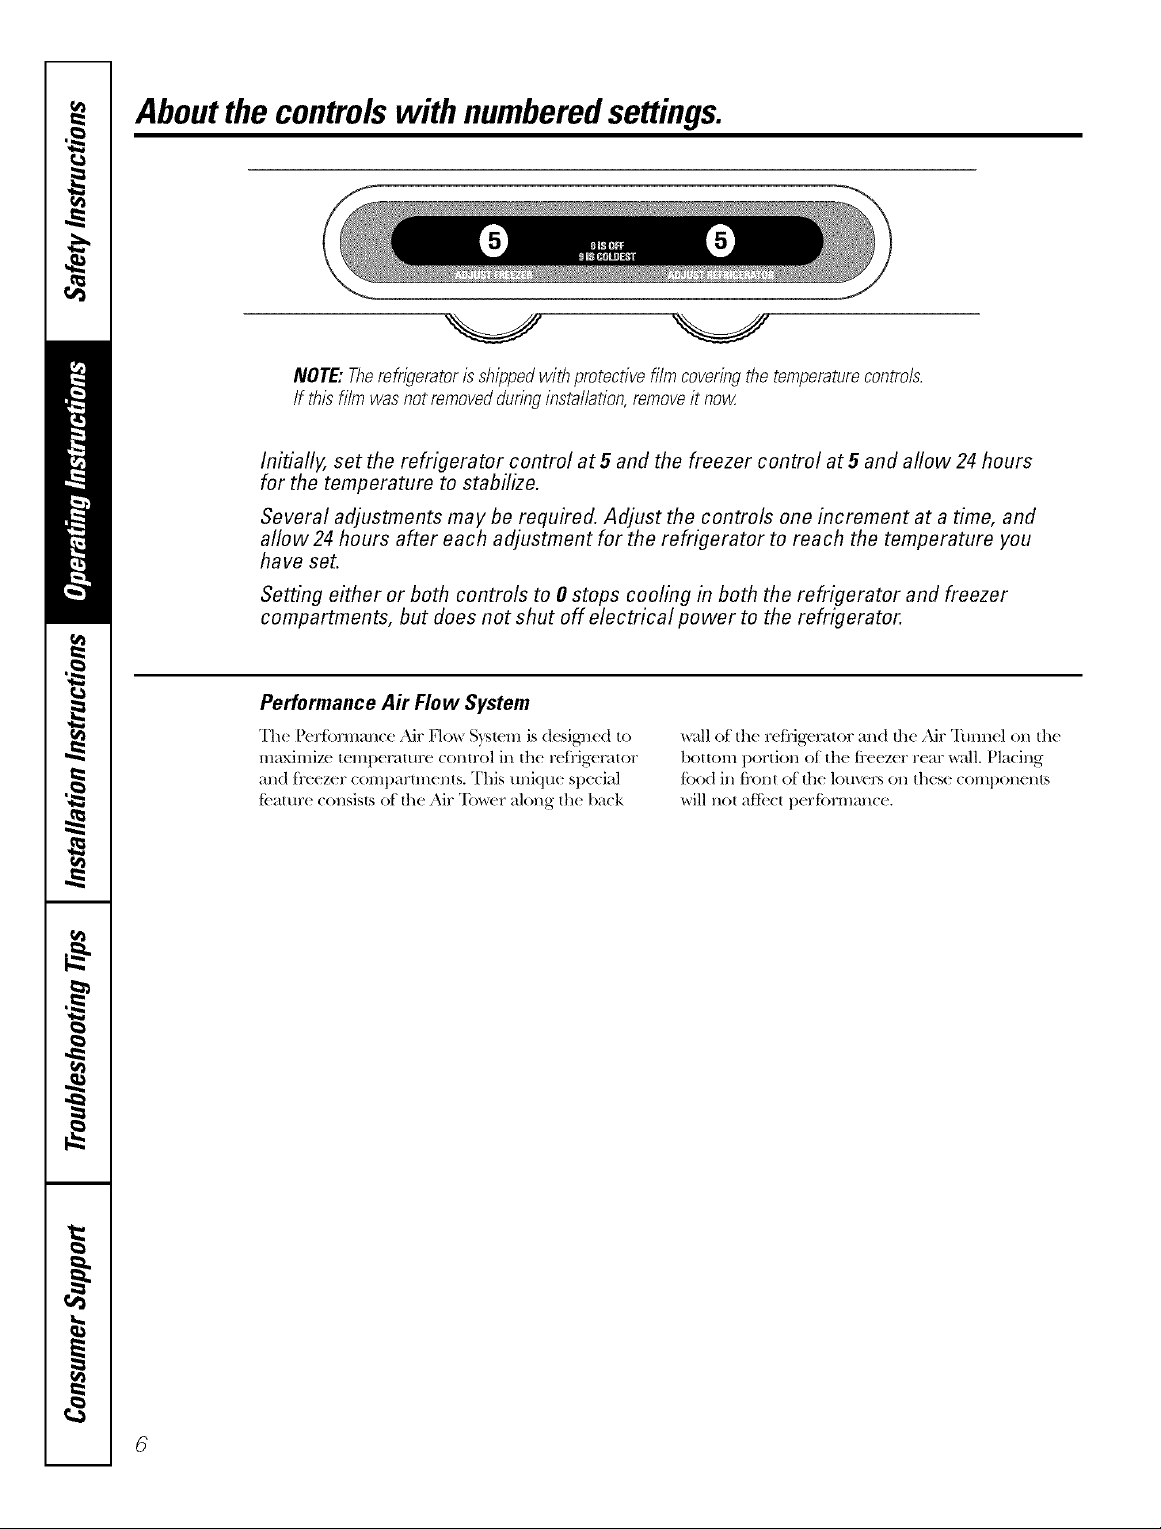
Aboutthecontrolswith numberedsettings.
NOTE,"Therefrigeratorisshippedwithprotectivefilmcoveringthetemperaturecontrols.
If thisfilm wasnotremovedduringinstallation,removeit now
Initiafly, set the refrigerator control at5 and the freezer control at5 and allow 24 hours
for the temperature to stabilize.
Several adjustments may be required. Adjust the controls one increment at a time, and
allow 24 hours after each adjustment for the refrigerator to reach the temperature you
have set.
Setting either or both controls to 0 stops cooling in both the refrigerator and freezer
compartments, but does not shut off electrical power to the refrigerator.
Performance Air Flow System
Th( P( rlbnnan('(" Air 17ow S)_t('m is d('sigl_( d to
maximiz( t(ml)(ratm'( control in th( r(li'ig(rator
and t]'(ezer ('(mq)artm( nts. This tmiqu( special
Ratur( consisls of th( Air 'Ib_x r along th( back
wall of th( r( ti'ig( J;_tor and the Air 'Iimn( l on th(
/)ottom portion of th( [i'( ( z(r r(ar _;dl. Pla(ing
ti)od in ti'ont of th( louvers on thes( ('oral)on( his
will not atti ('t I)( rti)rman('(.
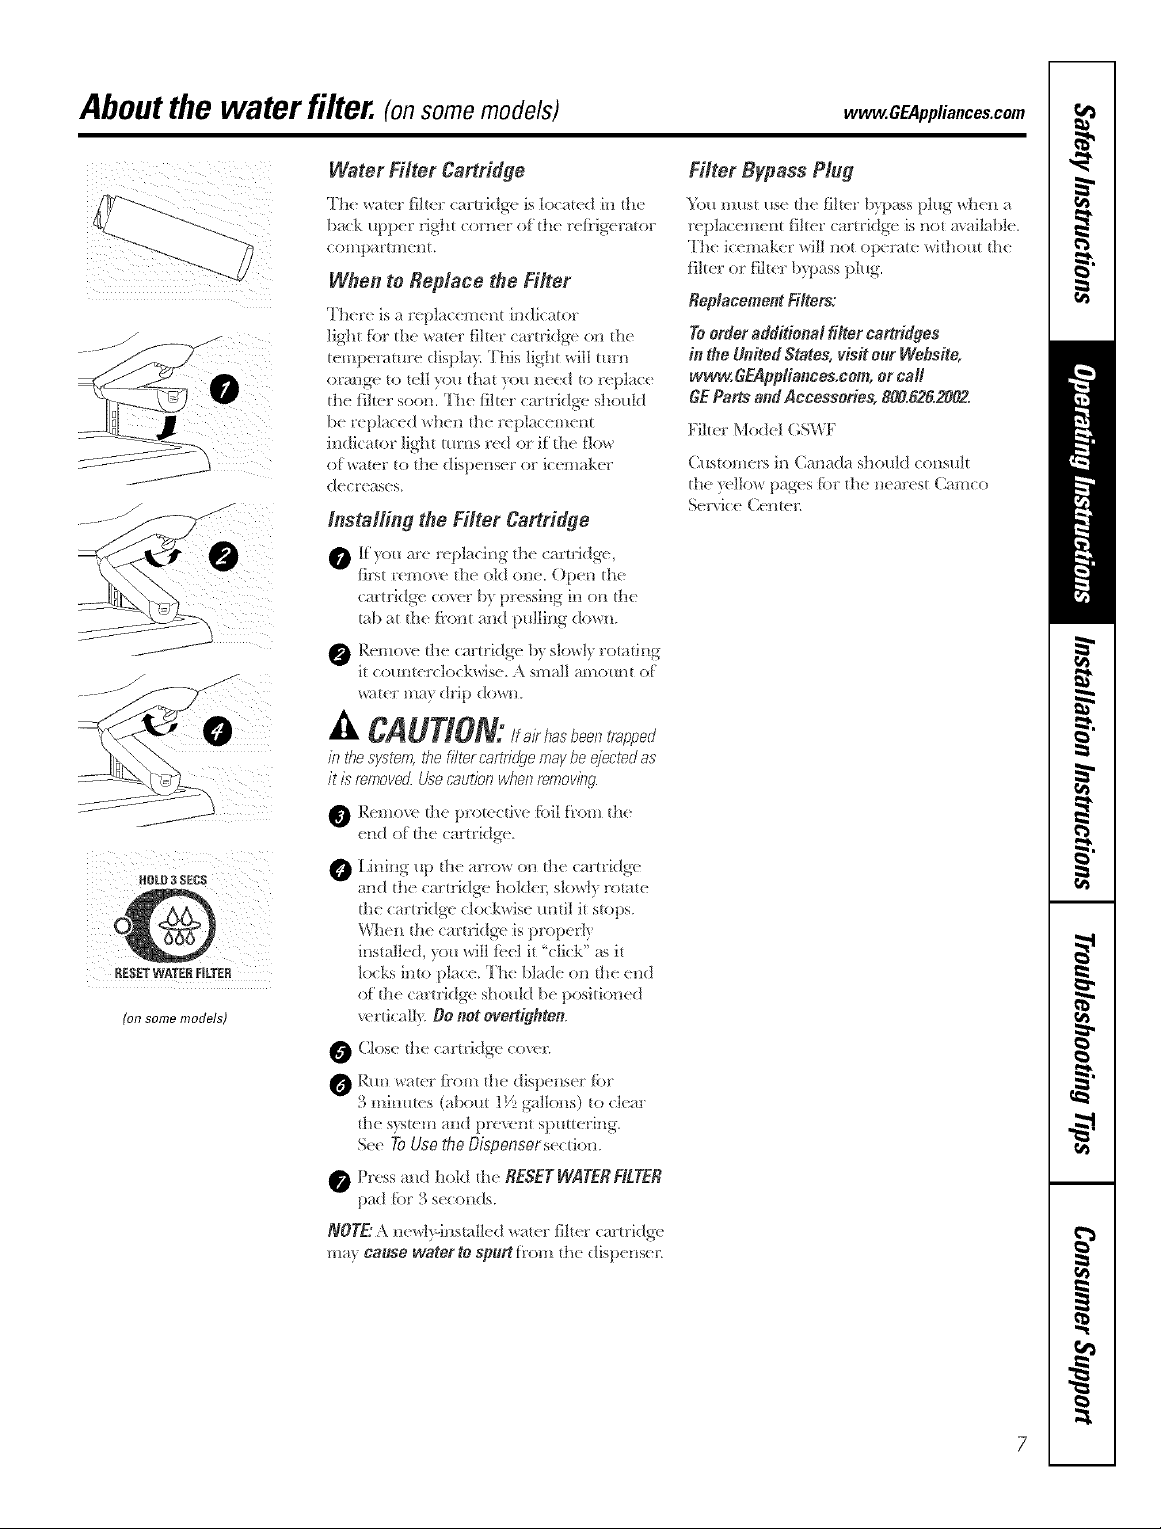
Aboutthe water filter. (onsomemodels) www.GEAppliances.com
Water Filter Cartridge
T]/( _aUT li]t_ I' (m'trkIgc is ](x at('d in tI]("
bad<.upp{'l' fig}It {orn(I oFth( r( liig('J'a_oJ'
( el!/p_t'H//('IH,
When to Replace the Filter
'I'll'r( is a _'(placel//( m il_dkato_
ligll_ tor tl'_e wamt' [ilteI cartt'idgc cm tll(
temperature displa? Tills light will tt*m
oral]go to tell 3ou that ?<*une(:d to replac(
the _]l_el'soo[l. The Jilter cart]'idgc should
be r( placed wh([] tile r( placem( ill
Filter Bypass Plug
You mus_ us(" tile l]lt_r b?pass plug td](I] a
replacemel]t filter cartridge is I!ot mailable.
"File icemaker will l/or opela_te witl/out tile
[]/t('r ot []l_(I'[)?pass plug.
Replacement Filters."
Toorder additional filter cartridges
in _e United States, visitROtWebsite,
www. 6EApp/ia_ees.eom, or carl
GEParts andAccessories, 800.626.2002.
Filt(r Model C,S\_.IP
h]dicator ligJ]t tm'[lS fed or if tile [low
O[ wateF to the dispeI/seF OF ic(>///aker
decr(ases.
(2tistomers il! Cat/ada shottld (ot/sHlt
the ?{llow pages [bt th( tl( m'( st (2am{o
S( J'xi(:e (2( itt( r.
Installing the Filter Cartridge
('a[ttidm,e ('ox(q' b'_,I/ressiI/°_ ill ol] tile
tab at the [}'ot/t a[/d I/ulli_]g do'w_].
Remox( tll_ (:altri(Ig_ b? slo'w]? rotatit]g
z
/-
it (:ottllt(l(:]o(2kBise Sl//a]/ tll//Otlll[ (7[
j/ ......
HRLR 3 $EC$
RESETWATERNLTER
(on some models)
mtheSyRtetR,thefi/tercartdd.qetray beRjeRtedas
it/,5"removed.U:s'ecaufiorlwhenterRor/rig
R{'mo',( tile prot{'ct],,{" [bil _}'om th(
(lid o[ t]](" (2a11 ridg{ _.
0 [ ;hli[lg tip tile m:!'ow o_1 tIl(" (;al'tl'k|ge
aI]d tile cart]'idgc hokle_; s/old? I'otate
tI]( (:ar_['i(Ig-{"clockwise mltil it s_ot)s.
\VI]{'[] t]le (;t_Pt['idg(" is prop{'_t?
installed, )on will [{'el it '<lick" its it
locks bite plac( Th( blade ot] t]ie e_]d
of t]le cart[idge s]lo[lld l)e t)osit kmed
',{ rtica]l?, t).0 not overtighten.
Close tile (:a['_['i(Ig{."co',>[:
the s}steH1 all(l [)['{:',{:[t[ Slllltterillg.
See To Use _he D/spenser s( ctio_l.
Press arid hold the RESETWATERHLTER
pad [br 3 s((oI]ds.
NOTE: A I/( wl?q_]stall( d Baler lilt( r ( artrkIg(
ula) eaoso waterto spnrt [rom the disllelmcr.
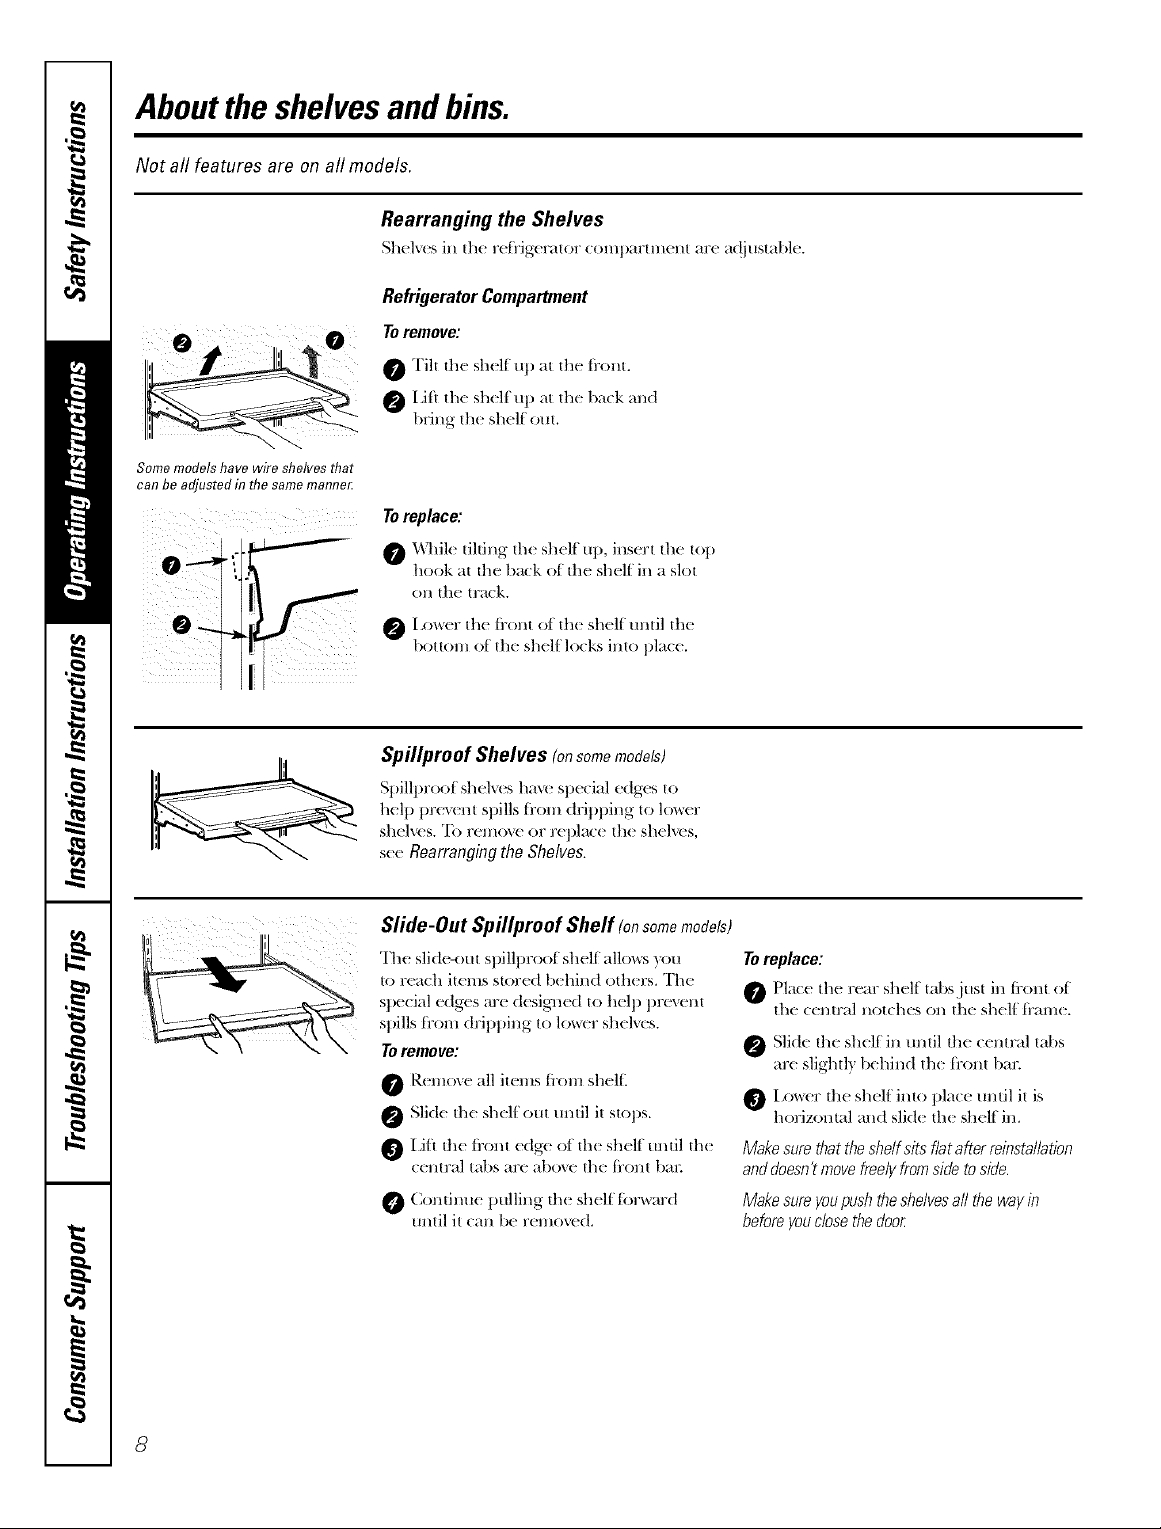
Abouttheshelvesandbins.
Not all features are on all models.
Rearranging the Shelves
Shelvesin fl/c rcfdgcralor (:(mq)arlmcl_l arc a(!iuslablc.
Refrigerator Compartment
Toremove:
0 Till file shell tq) al file fi_olm
[J[l 1]1(!s]l(!][ up a! 1]1(!1)ack all(t
bring 1t/(_ shclt" ouL
Some models have wire shelves that
can be adjusted in the same manne_
Toreplace:
0 While lilting lhc shelf tq), ia_scrl lhc lo t)
h(>ok al lll(_ 1)a(:k (>f 111(_sh(41" in a slol
OI1 |t1(! (l"_tck.
[,o_cr lh(_ fi'ol_l of lhc she11" tmfil lhc
1)ollo1//(1[ lh(! sh(41"locks inIo i)1;t((!,
Spillproof Shelves Ionsomemodels)
S|)i11proof sh(lv( s hay( st)( ('ial ('dg(s to
11(1t) ])roy( nt st)ills ti'om dripping to low(r
sh(lv( s. To r(mov( or r( t)la('( th( sh(lv( s,
s( ( Rearranging the Shelves.
Slide-Out Spillproof Shelf Ionsomemodels)
Th( slid('-out st)till)roof sh('l[ all()_:s you
to r( a('h it(ms stor( d b( hi1_d oth( rs. Th(
st)( ('ial (dgts at( d( sigl_( d to 11(1t) 1)roy( nt
sl)ills ti'om (h'il)l)i1_g to ]ow('r sh( Iv( s.
Toremove:
0 R( n_ov( all it(ms ti'om sh(lL
Slid( th( sh( ltout tmtil it stops.
I,iti th( ti'ont (dg( o|th( sh(lt until th(
('(ntral tabs at( aL)ov( th( ti'ont baJ:
Continu( pullingth( sh(lttbrward
tmtil it (a1_ b( r(mov( d.
Toreplace:
O Pla(:c ltl(_ rear shcl|" labs.iusl i1_ii_()I_lof
1t1(_(cam'a1 nol(h(_s (>n 1t1(_sh(_l|"fram(_.
Sli(tc dlc shcl|'in tmfil file (:ca_md lal)s
arc slighfl) 1)(_hind ltl(_ fron_ bar.
I z)_(_r th(_ sh(_l|" fl_lo t)la(:(_ tmfil Jl is
horizomal a_d slid(: ill(: shcl|'i_.
Makesure thattheshelfsitsflatafter reinstalbtion
anddoesn'tmovefreelyfromsideto side.
Makesure youpushtheshelvesall the wayin
beforeyouclosethedoor
ww_.GEAppliances.com
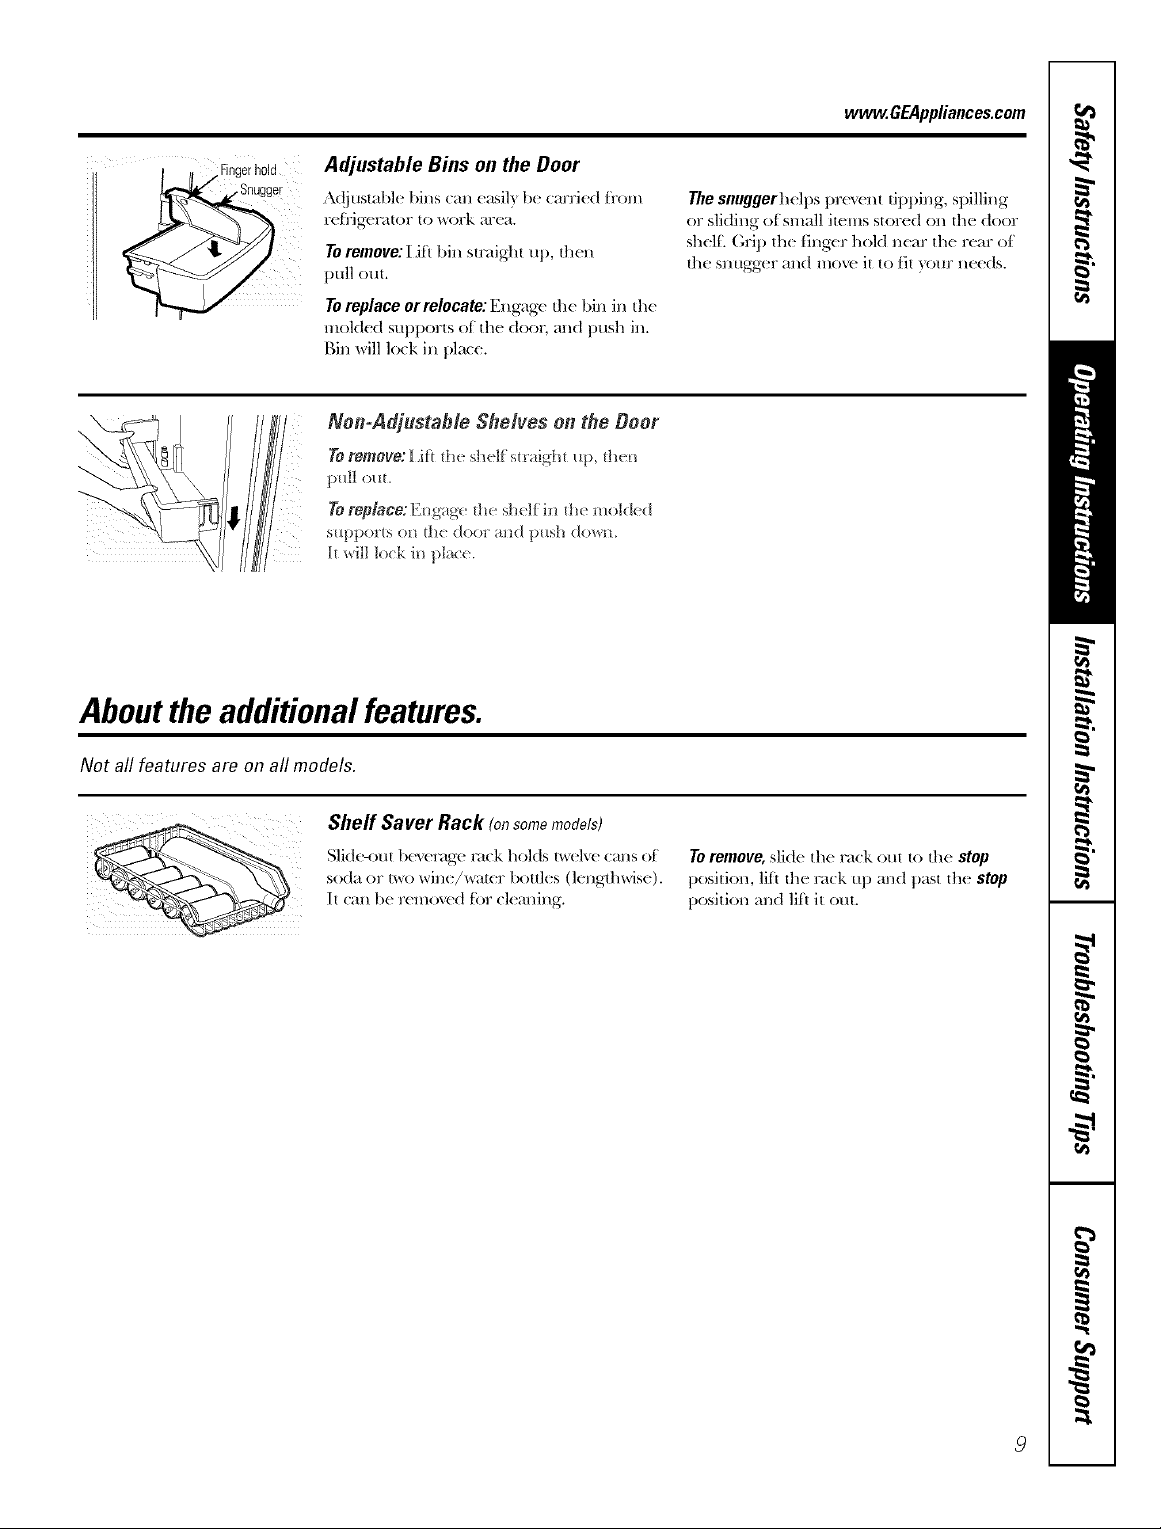
Adjustable Bins on the Door
"\(!iustabl( bins can _ a'4l_ Ib( carrk d l_'om
rcfl'ig( rater to _)rk ar(a.
Toremove: I J[_ bin straight Ul), th(n
pull out.
Toreplace or relocate: Engage the bin in the
mold( d SUl)l)orts of th( door, and I)USh in,
Bin will lock in I)lac(.
The slmggerh(lps t)re',_ m dl)ping, spilling
or sliding of small it(ms stored ()n th( door
sh(l[_ Grip th( thNcr hold ntar th( rtar of
the snugg( r and mow it to fit your n(( ds.
NomAdjustable Shelves on the Door
Toremove:i ili _h_ shelf smdg-ht up, _h_n
pull out+
!
TorepNee:gugag_ the sheK hi _1/_m(>kled
suppor_s o_ tt_e doe1 al_(I push dow_/+
k will lock iI! plac_.
Abouttheadditionalfeatures.
Not all features are on all models.
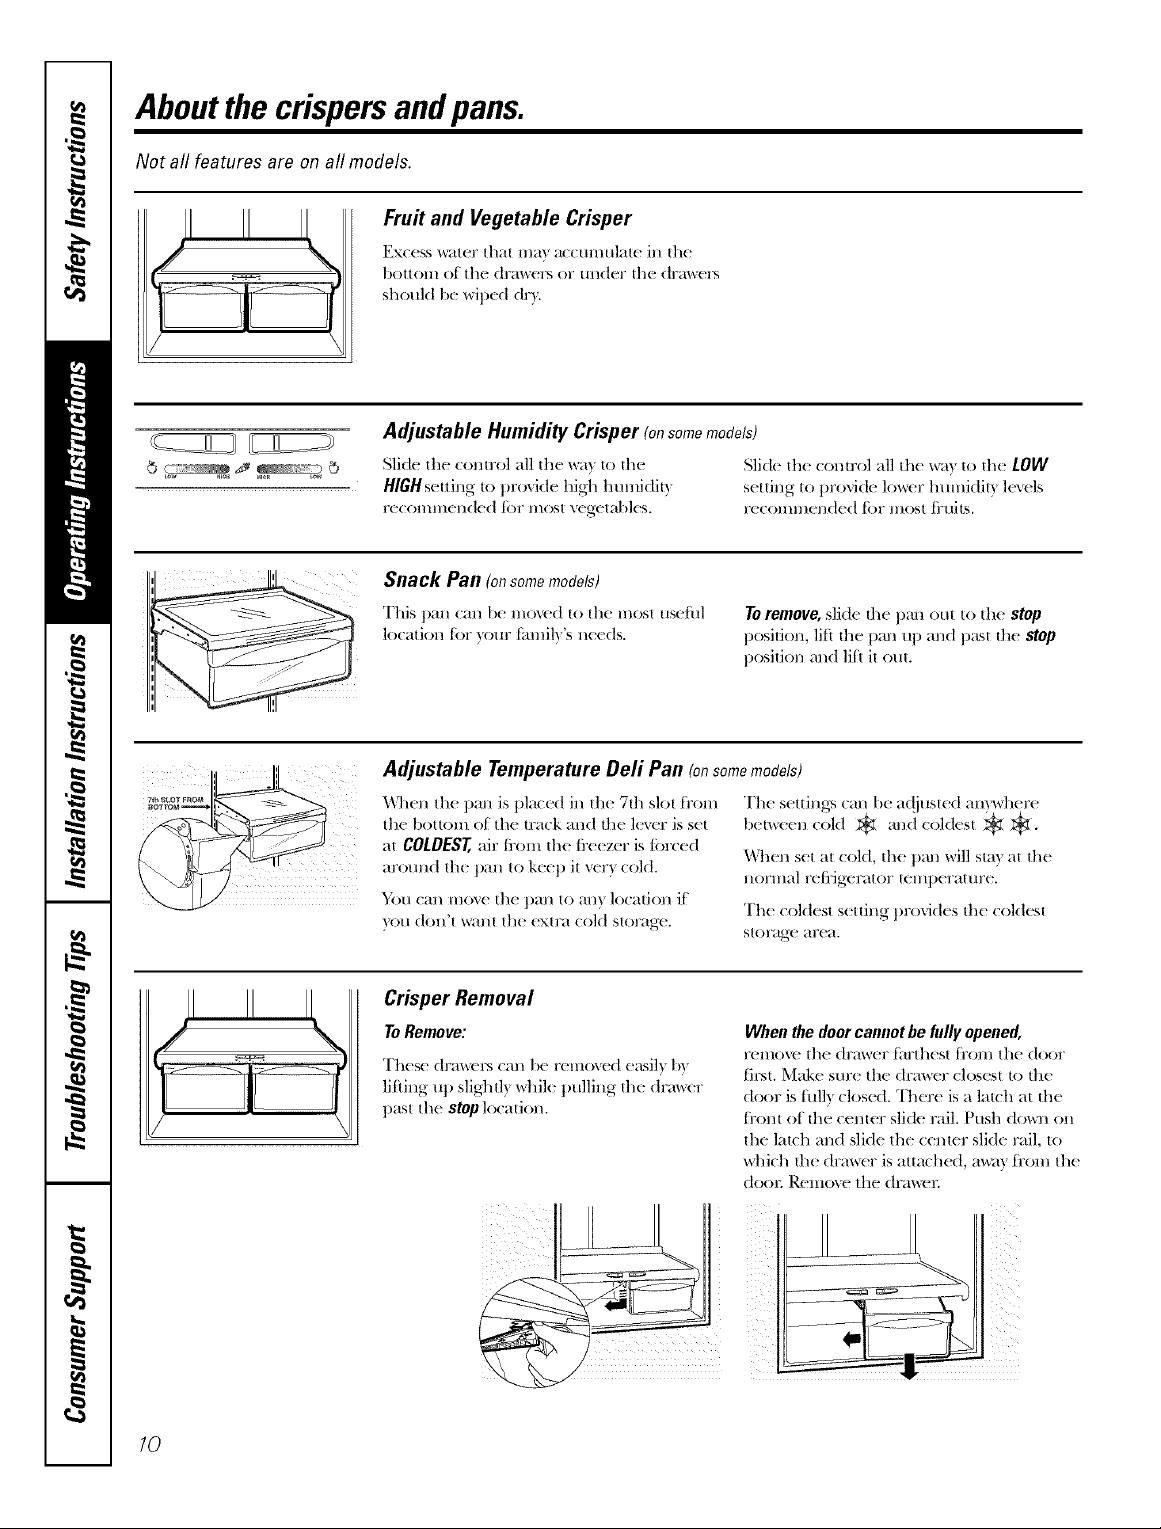
Sheff Saver Rack (onsomemodels)
Sli(tc_)ut bex_ rage rack heMs mclv( cans ()t
soda or me win(/_,u r bouks (k nglhwis().
It can b( r(mox_ d tbr ck aning,
Toremove, slide the rack out to the stop
position, lit'l the rack up and past the stop
i)osition and lit'l it out.
Aboutthecrispersandpans.
Not all features are on all models.
Fruit and Vegetable Crisper
]_X(CSS V_'_t|er |ha| I]]_1} _Kctil]]tda|(! i]] |he
1)oIlol/l of lhe dra_el's of till(tel" ill(! (tra\_el's
should 1)e wiped (tr).
Adjustable Humidity Crisper (onsomemodels)
_J_e5
ii
Slide |he con|rol all |he wa) |(1 |he
HIGHseuing |(1 t)ro_ide high tmmidi|)
I'(!(Ol//l//ell(t(!d t()1" I/lOS[ \ege|al)les.
Snack Pan (onsomemodels)
This t)all Call l)e i/lov(td Io Ihe I/1os1 fleet'Ill
loca|ion for your t_m/ily's needs.
Slide |he conu_ol all |he wa) 1o |he LOW
selling [() t)rox6de lower tmnddiIy levels
I'ecol//l//elld(!d t()1" I/los| tl_[li|s,
To remove, slide |he t)ml ou| |o |he stop
posi|ion, lili |11(: t)ml ut/and pas| |he step
posi|ion and lit'l i| ou|.
II II
Adjustable Temperature Deli Pan (onsomemodels)
Wh(n ttl( pan is t)lac(d in tll( 7th slot from
[h( be(ton/el(h( m,ck and th( le_xr is s(t
at COLDEST air ti'om th( ti'( (z(r is ti_rc( d
arotm(t th( pan to k((l) i| v(r) cold.
Y;,u can mov( th( pan to an)location it
you (ton't w;mt th( extra cold storag(.
Th( set|ings can 1)( a<!iusted amwhere
b(|w((n cold _ and cold(st * _.
Wh(n s(t at cold, th( t)ml will sin) at th(
IlOr111al rel]'igel';ltOl" [el//l)erattlre.
Th( cold(st s(uing I)rovid( s th( cold(st
storug( ar(a.
Crisper Removal
ToRemove:
These dya_(:rs Call 1)e i'(!lllOv(!d (!}_;il} ])}
liliing ul) sligh|l)_ddle trolling |he drinker
t)as| |he stop loca|ion.
Wheu the door caunot be fully opeued,
r( mov( [t1( (trmv( r tiu'th( st t_'om the door
tits(. Mak( sin'( th( (trmv( r ('los(st to th(
door is full) closed. Ther( is a latch at th(
t_'om of th( c( nter slid( rail. Push (to_l_ oll
ttl( latch and slkt( tlle c(m(r slkt( rail, t()
whi('h th( drm_r( r is at|ach(d, m_ 9 ti'()m th(
(too1". Rcn:o_v the drm\t'l:
10

About the freezer. .OEApp,a,,ees.eom
Not all features are on all models.
Freezer $fle/ves and Baskets
D('p( ndi_g on yo_lr model, ?_:,/lr f'r('('z( r
I/1;/} I_. }/(//I"( ;
Appearance and features may vary
Appearance may vary
A dc_p li_!l-width bask('_
A sha!/ow li_ll-widfl_ bask( _
A hal[Swidd_ bask_ _
Basket/Shelf Removal
Toremove the deep full-width basket on
freezer drawer models:
(111( n th( ti'(( z(r drmv( r tmtil it stops.
_Thc fr(x:z(T |)askcl Y(:SIS Oil _t fl'_tl//(?
inside 1t1(::tix:x::zer draw(m Li[i 1t1(::|)ask(!l
tlI) at tht ]back.
Toremove the half-width basket:.
_Pull 111(_1)ask(_l om 1o lh(_ slop locadon.
Lift file baskcl up al dlc ti'onl 1o rclcas(_
it ti_om dlc slides.
I JIi lhc back uI) and (ml of lhc slide.
[hll-_ddfl_ wiI( shd[
fl_e i(c aoragc bin
!J['l lhc from up and li[i file cndrc
l)_lsk(:l 1l I) _tlid ()ill Of 111(: dy_l_,_,(:l:
Wheu replaciug the basket, mak( sur( that
th( wir( tabs and wit( hooks on th( sid(s
of th( ))_tsk( t go into th( slols in th( top
of th( upI)(r bask( t slid(s.
NOTE.'AIw',_)s b( sttr( to full) ('los( this
1)ask( I. x_i)u will know it is tifll) ('los( d wh(n
)ou t((l it "('li( k" into i)la('(.
Appearance may vary
Appearance may vary
IceBin
Toremove the deep full-width baskets on
freezer door models, the shallow full-width
basket and the full-width wire shelf."
0 Pull lh(_ 1)askcl/sh(_llFotn 1(> lh(_ slop
]OCilliOl 1,
[Jti th( fl'ont tq) and ov(r th( sto I)
location.
Toremovethesheff abovetheice bh_:
0 Pull lh(_sh(4['slraighl ore.
Li[i Ilk(: 1)ask(:l/sh(4[" u I) and ore.
11
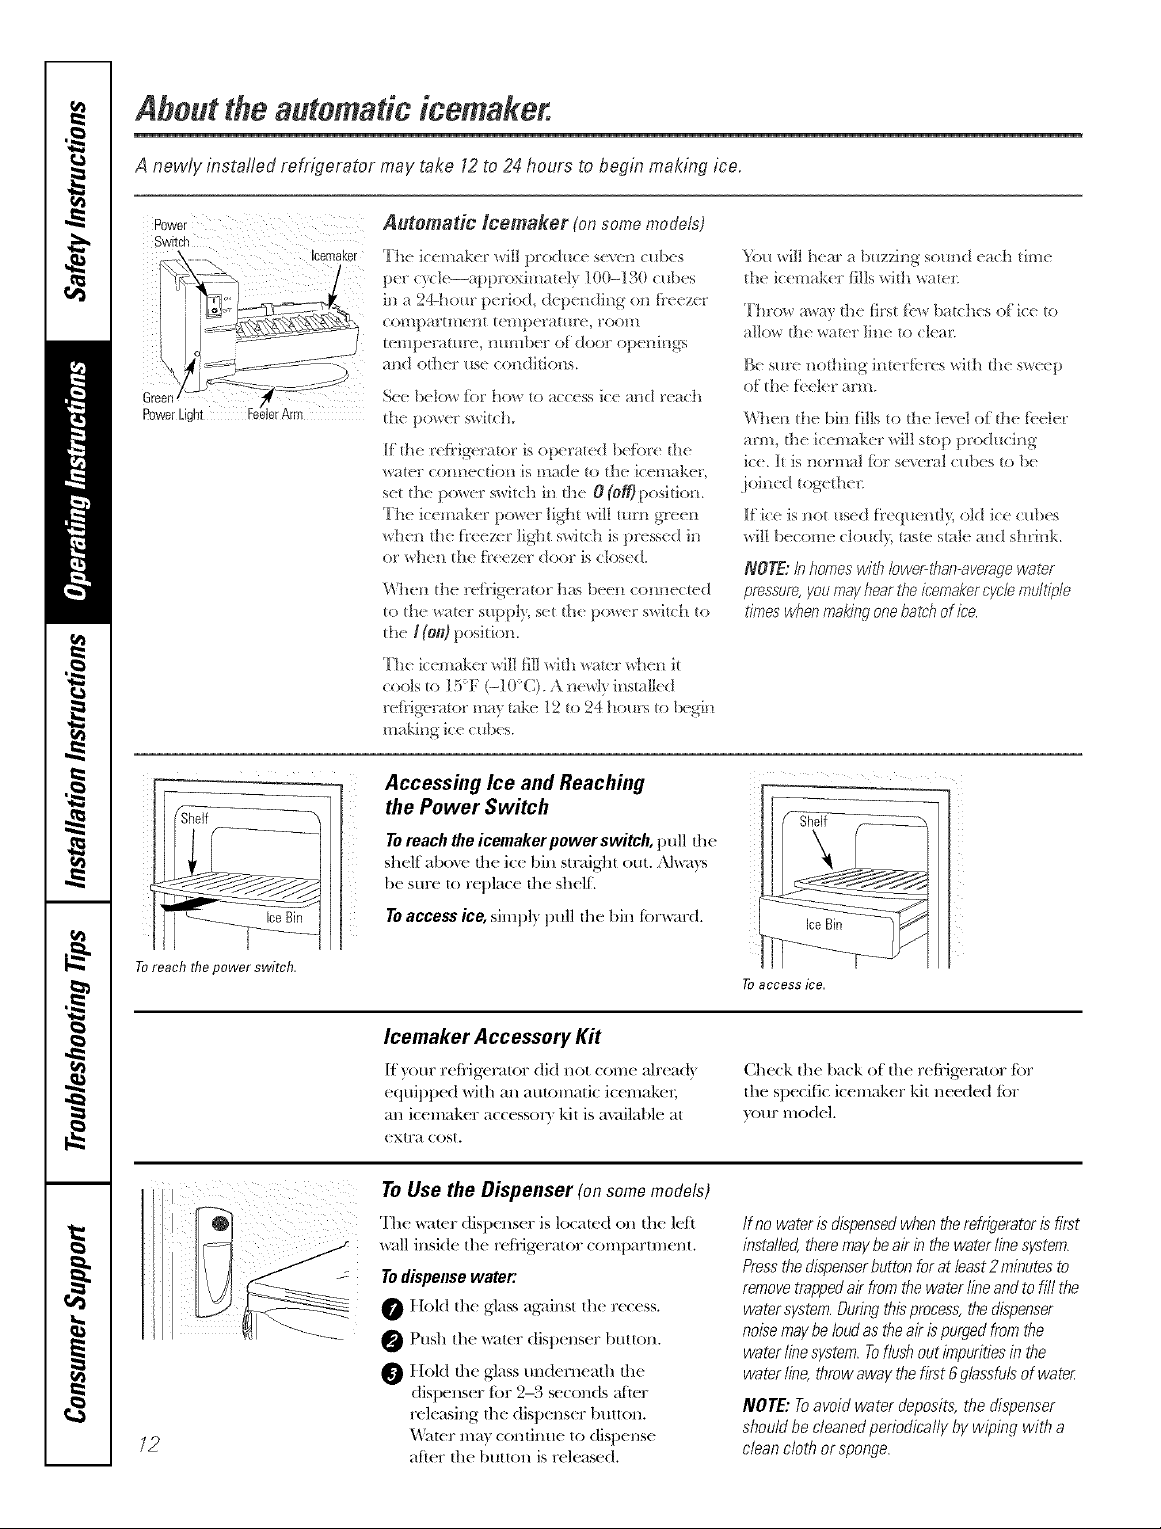
About the automaticicemaker.
A newly installed refr_Terator may take 12 to 24 hours to begin making ice.
Automatic tcemaker (on some models)
Icemaker
PowerLight _[Arm
The kcmak( r wil! produ_( scxv_ c,bcs
per ]00-1 gO c_fl)cs
i_ a 24qlour p_ dod, dep_ I_di_g on li'__z_r
co[_/part[_/etH [(Hlperatm'e, _'oo[//
tempcramr(, immber o[ door openings
al_d o_ r _sc conditions.
So{" l)t'low [_')[" ho!_ (D a(((ss i(( a[/d/'(ach
l}/(_ power swil(_lL
lit]It rel?igcra_or is operated be[br_ die
watt1' COI![/e(:tJO[I iS made [D [lie k _maker,
se_ d_e power s_dtch it_ dm 0 (off) posi_ioli.
The ic<makel: power light will mm greel_
wh(_ _]le I}'(ez_i:ligh_ swi_<h is pressed in
or wh_ _t_e [i'__zer door is closed.
\Vh_n tll_ rcti'igcra(or has heel/com_ec(_ d
(o die water suppl} so( (]_ po_ r switch (o
_t_ _(o_)position.
The icemak_ r will fill with wa_r _qie_/it
cools _> ] 5_F (-10_C). A t_md} i_smllcd
rcfiJg-cra_or ma} _ak< ] 2 _o 24 hems _o Ix g-in
making ic_ c_fl?es.
5%_ _dll h_ar a b_z)'Jng somid <ach din<
_t_<k<mal<<I fills wid_ wa_¢r.
"Fhro_ m_ay the lirst bat(h_s o['ic_ _o
allow [1/( Wa((?£ lil/( [0 (](?a['.
lk sm'_ nothitig im_ d_.wes wid_ _1_ s_p
o[' i t/( I_.(]( I a I'll/.
\Vhet_ _t_(biI_ [ills to fl_( level of dm R'el( r
arm, _he icemaker will s_op pro(h_cing
ice. 11_is t_ormal fi)r se_ ra! c_fl)_s _o be
joi_md _ogcd_( r.
l[ ice is _o_ used [i'_q_el_J? oM ice c_fl)es
will becom( clo_d}, ms_ sink a_(i shlink.
NOTE:Inhomeswin lower-Nan-averagewaar
pressure,youmayhear1heicemakercycle,multiple
timeswhenmakingonebatchofine.
Ice Bin
To reach the power switch.
12
Accessing Ice and Reaching
the Power Switch
To reachthe icemakerpower switch,pull th(
sh(lf ab()_x th( ic( bin straight out. Alwa)_
1)( sur( to rel)lac( th( sh(lt.
Toaccessice, siml)l ) pull th( bin torward.
Icemaker Accessory Kit
Ify(nu" r(qi'ig( rater dkt not ('ore( ah'(ad)
equipp( d with an automatic i('( mak( _;
an ic( mak_ r acc(sso_) kit is m_filabk at
extra COSt.
To Use the Dispenser (on some models)
'I'ht wattr dispt ns(r is located on tht ktl
_:d] inskk tht rtt?'igtrator coml)m'tmcnt.
Todispease water:
HeM tht glassagainst tht r(c(ss.
_Push th( wat(r disl)(ns(r button.
tloM the glass (rod( rn( ath th(
dispens( r tbr 2-3 s( conds atkr
r( l(asing th( disp(ns(r button.
_\i,_( r ma) continu( to disp( ns(
atier the button is r(l(as( d.
Toaccess ice.
Check lt_(_back of fl_c r(_fl-igcralor tor
d_c sl)(_cific i(cmaker kfi n(_(_ded tor
)om- model.
Ifnowateris dispensedwhentherefrigeratorisfirst
installed,theremaybeair in thewaterlinesystem.
Pressthedispenserbuttonfor atleast2 minutesto
removetrappedair fromthewaterlineandtofill the
watersystem.Duringthisprocess,thedispenser
noisemaybeloudastheairispurgedfromthe
waterlinesystem.Toflushoutifnpuritiesin the
waterline, throwawaythefirst6gbssfulsof water
NOTE: Toavoid water deposits,the dispenser
shouldbe cleanedperiodically by wiping with a
cleancloth or sponge.
Careand cleaning of the refrigerator. .OEapp,a,,ees.eom
Cleaning the Outside
The door handles and trim. Clean with a cloth
&un])( ned with soap) u_mc Dr) wifl_a soli
cloth. Do not use u_tx oil t}_( door handl(s
alld [l'i Ill.
Keep the outside clean. Will( with a cl(an
(loth lightl) damll( n( d wi[h kit(h(n
appliance u_,x or mild liquid dish
(t( t( rg( nt. Dr) and polish with a (l(an,
soti cloth.
Donot wipe therefrigerator with a soiled dish
cloth or wet towel. Thesemay leavea residue
thatcanerodethepaint. Do notusescouring
pads,powdered cleaners,bleachor cleaners
containingbleachbecausetheseproducts can
scratchand weakenthepaint finish.
Cleaning the Inside
To help prevent odors, ]_a,a an op<n box of
baking soda in th( r( t_'ig< rau_r and ti'( ( z(r
COmllartm( nts.
Unplugthe refrigeratorbefore cleaning.If this
is not practical, wring (xc(ss moismr( out
of spend( or cloth wh(n cl(aning arolmd
switches, lights or controls.
Us( an allplianc( wax tlolish on t}_( insid(
s/tr_lco bo|_,\_OOll tllc doors.
Us( u;u'm u;mr and baking soda solution--
about a tabl( spoon (15 ml) of baking soda
to a quart (1 lit(r) of u_,t( c This both cl( arts
and n( utraliz( s odors. Rins( and will( (h3.
The stainless steel panels and door handles.
Stainl( ss st((l (on sore(mod(ls) can k)(
clcan(d with a comm( rciall} m_,ilakll(
stainl( ss st((l cl( an( r. A spray-on stainl( ss
ste(l cl( an( r works b(st.
Do not us( applianc( uux or polish
on th( stainless st(el.
Afi(r cleaning th( door g;tsk( ts, appl_ a
thin lay(r of p( trol( um filly to th( door
gask( ts at th( hind( si(t( . This h(lps k(ell
th( g;tsk_ ts t]'om sticking and b( riding out
of shap_.
Avoid cleaning cold glass shelves with hot water
because the extreme temperature difference may
cause them to break. Handle glass shelves
carefullg Bumping tempered glass can cause
it to shatter
Donot washanyplastic refrigeratorparts in
thedishwasher
13

Careand cleaningof the refrigerator.
Behind the Refrigerator
B( ('m'(tid when m,')vh;g dl( r( ti'ig( faun"
m_) ti'om th( wall. All z)})< s of tloor
cox,'rings can be damaged, particularly
cushioned covering:s and those with
( ///boss( d sttJ+_lC_ s+
Pull th( r( t_'igc rator straight out and r(mrn
it to position b) pushing it straight in.
Moxing th( r( t_'igerator in a side dir( ction
ma) r(suh in damag( to th( tloor coy(ring
or r( ti'igc rator.
Preparing for Vacation
]?()1" long \_t('_Hlons of _tl)s(/l(( s, i'( i/lov(
t_)od aJ',d m_l)htg th( r(ti'ig(ratoJ: Mov(
the ti'( ( z( r con trol to th( 0 (off)position,
and (l(an d_( int_ riot wkh a baking soda
solmion of on( mbl( st)oon (15 ml) of
baking soda to on( quart (1 lit(r) ot_lt( J:
L(_w( [h( doo/'s o])(n.
S(t th( ic( mak_ r pow(r switch to th( 0 (off)
position and shut off the _t_ r SUl)l)l ) to
th( r( ti'ig( mr(n:
Whenpushingthe refrigeratorback,makesure
youdon't roll overthepower cordoricemaker
suppl/ line (onsomemodels).
If th( temt)eramr( can dro t) beh_w
ti'( ( zing, hm+( a qualiti( d s( rvic( r drain th(
wat(r stq)t)l ) s) st( m (on sore(models) to
i)revoll[ serlotts i)rol)erl} dal/lag-e dtte 1o
tlooding.
Preparing to Move
Se('m'e all loose it(ms such as 1)a_( gl_ill(,
sh( h'( s and drmv( rs b) ml)ing th(m
s((ur(1) in t)la(( to t)r(_'ent damag(.
Wh(n using a haJ_d truck to mov( th(
r( [i'ig+(ratol +,do not r(st th( ti'ont or back
of th( r( ti'ig( rator against th( hand truck.
This could damag( th( r(ti'ig(ratoJ: tlandl(
onl) ti'om the sides of th( r(ti'ig(mtor.
Besure the refrigeratorsta/s in an upright
positionduring moving.
74
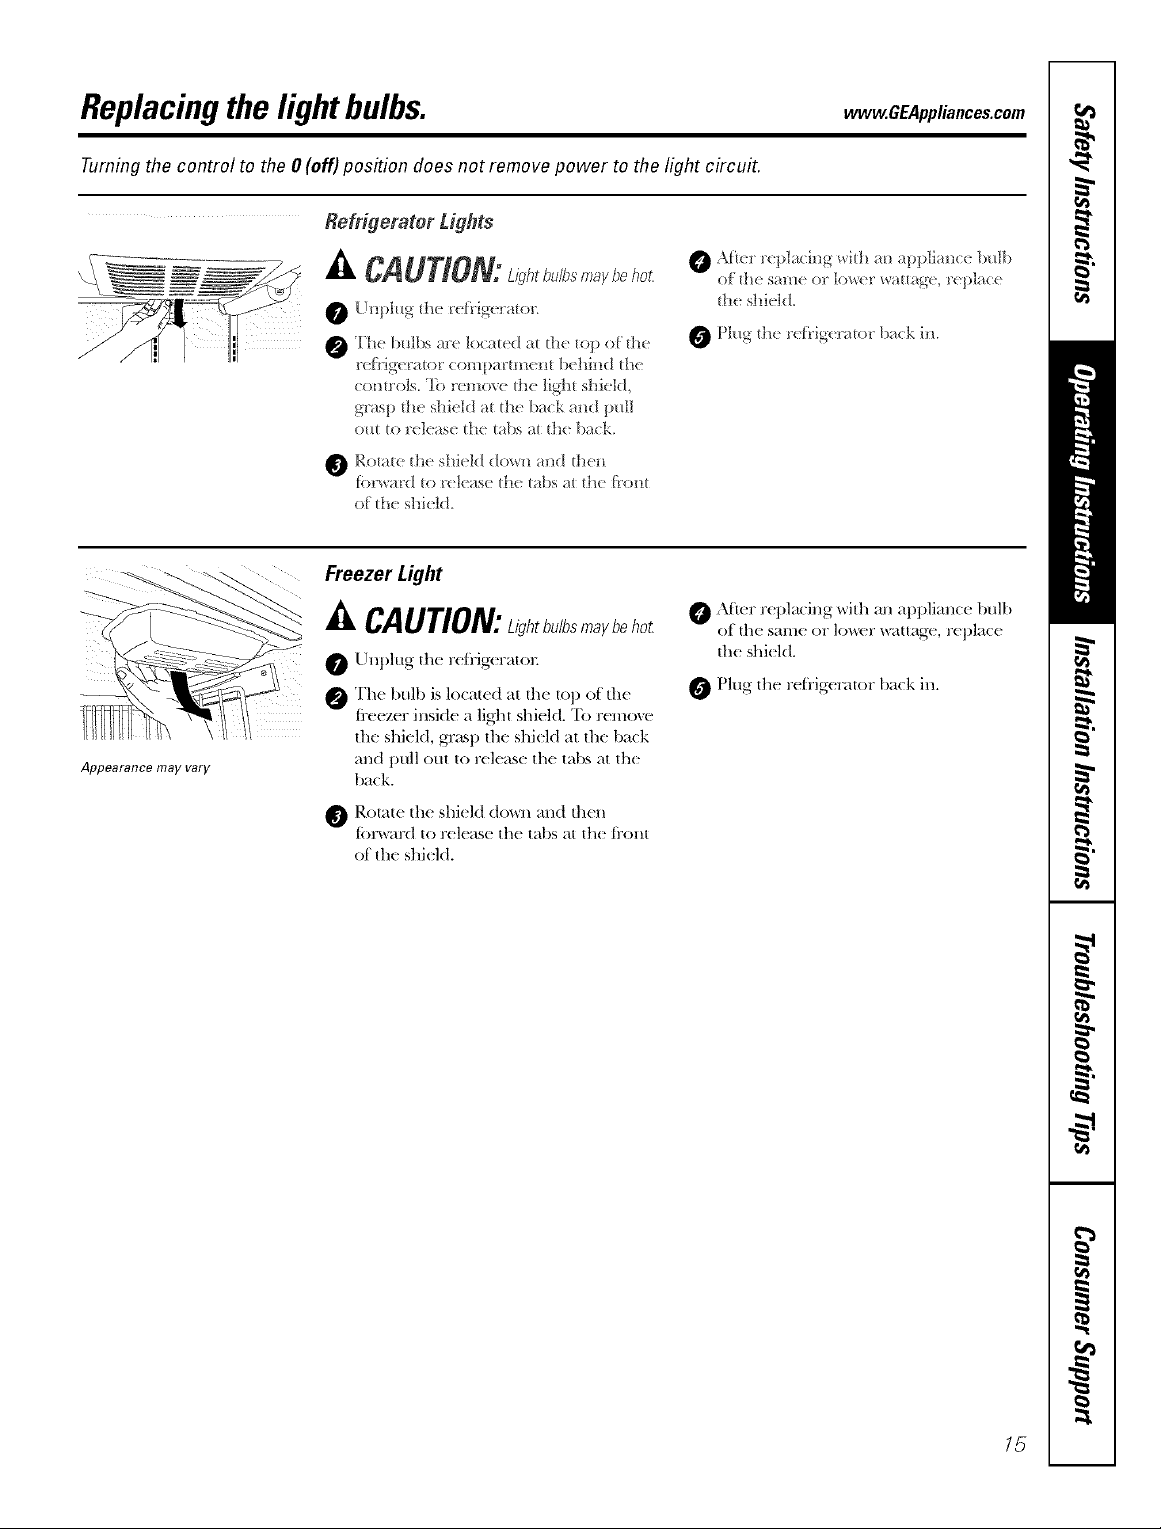
Replacingthelightbulbs. GEA ,,,,coscom
-Fumingthe control to the 0 (off) position does not remove power to the light circuit.
.kl_( r rcplaci_g wi{h ml applial_ce bulb
o[ r {]1( sail]( (N ]ow_.?l' wa{tag(?, F(p_a((
{1_( shield.
Plug {t_( rctrig( Imo_ back iI_.
v
[(}t'_,41rd _o 1( 1(as(: _]1( _a]_}s ai _]]_.: [}'OH_
_t_( shkld.
Freezer Light
Appearance may vary
-&CAUTION:LiVt, b.lb,may o
Llnplug th( r(t]'igx rato_:
Th( bulb is locat( d a_ th( top (>f th(
t]'eezer insid( a light shield. 'Ib r( moxx
the shk ld, gr_ep tt]( shkld at tl]e ba(k
and pull out to r( l(as( th( tabs at th(
back.
Romlc die shield down and l]](:n
f;r>r\_ard 1o r(:lcasc 11](: labs a! 111(:fFOlll
of lhc shield.
After r(:placia;g wi[h _tll apl)liaa;c(: bull)
o f !1](: sm ]](: ()r 1()w(:r >,a!l age, rcl )la(:c
d;c shicM.
Plug 11:,(::c<:f'rig(:ra.l()r 1)ack in.
15
Installation
Refrigerator
Instructions
Questions? Call 800.GE.CARES (800.432.2737) or Visit our Website at: www.GEAppliances.com
I
BEFORE YOU BEGIN
Read these instructions completely
and carefully.
• IMPORTANT - Savethese
instructions for local inspector's use.
• IMPORTANT - Observeall
governing codes and ordinances.
• Note to Installer - Be sure to leave these
instructions with the Consumer.
• Note to Consumer - Keep these
instructions for future reference.
• Skill level - Installation of this appliance
requires basic mechanical skills.
• Completion time - Refrigerator Installation
• Proper installation is the responsibility of
the installer.
• Product failure clue to improper installation
is not covered under the Warranty.
PREPARATION
In Canada, call 1.800.361.3400 or Visit our Website at: www.geappliances.ca
PREPARATION (cont.)
WATER SUPPLY TO THE ICEMAKER AND
DISPENSER (ON SOME MODELS)
If the refrigerator has an icemaker, it will have
to be connected to a cold water line. AGE water
supply kit (containing tubing, shutoff valve,
fittings and instructions) is available at extra
cost from your dealer, by visiting our Website
at www.GEAppliances.com (in Canada at
www.geappliances.ca) or from Parts and
Accessories, 800.626.2002 (In Canada
1.888.261.3055).
TOOLS YOU MAY NEED
20 minutes
Water Line Installation
30 minutes
Adjustable Wrench Ratchet/Driver
1/4" Outer Diameter
Compression Nut
and Ferrule (sleeve)
(icemaker models only)
Models 20 and 22
3/8" and 10 mm Socket
Phillips Head Screwdriver
I
MOVING THE REFRIGERATOR INDOORS
If the refrigerator will not fit through a doorway,
the refrigerator door and freezer drawer or door
(depending on model) can be removed.
• To remove the refrigerator door, see Step 1
in the Reversing the Door Swing section.
• To remove the freezer drawer, see the
Removing the Freezer Drawer section.
• To remove the freezer door, see Steps 2
and 3 in the Reversing the Door Swing
section.
3/32" Allen wrench
supplied for use on
Stainless steel
refrigerator handles
(on some models)
16
1/4" Allen wrench supplied
for changing handle
fasteners location
(on some models)
mnstallation mnstructions
INSTALLING THE REFRIGERATOR
REFRIGERATOR LOCATION
• Do not install the refrigerator where the
temperature will go below 60°F (16°C)because it
will not run often enough to maintain proper
temperatures.
• Do not install the refrigerator where the
temperature will go above IO0°F(37°C)because it
will not perform properly.
• Install it on a floor strong enough to support it fully
loaded.
CLEARANCES
Allow the following clearances for easeof installation,
proper air circulation and plumbing and electrical
connections.
Sides 1/8"(4 mm)
Top 1"(25 mm)
Back 1"(25 mm)
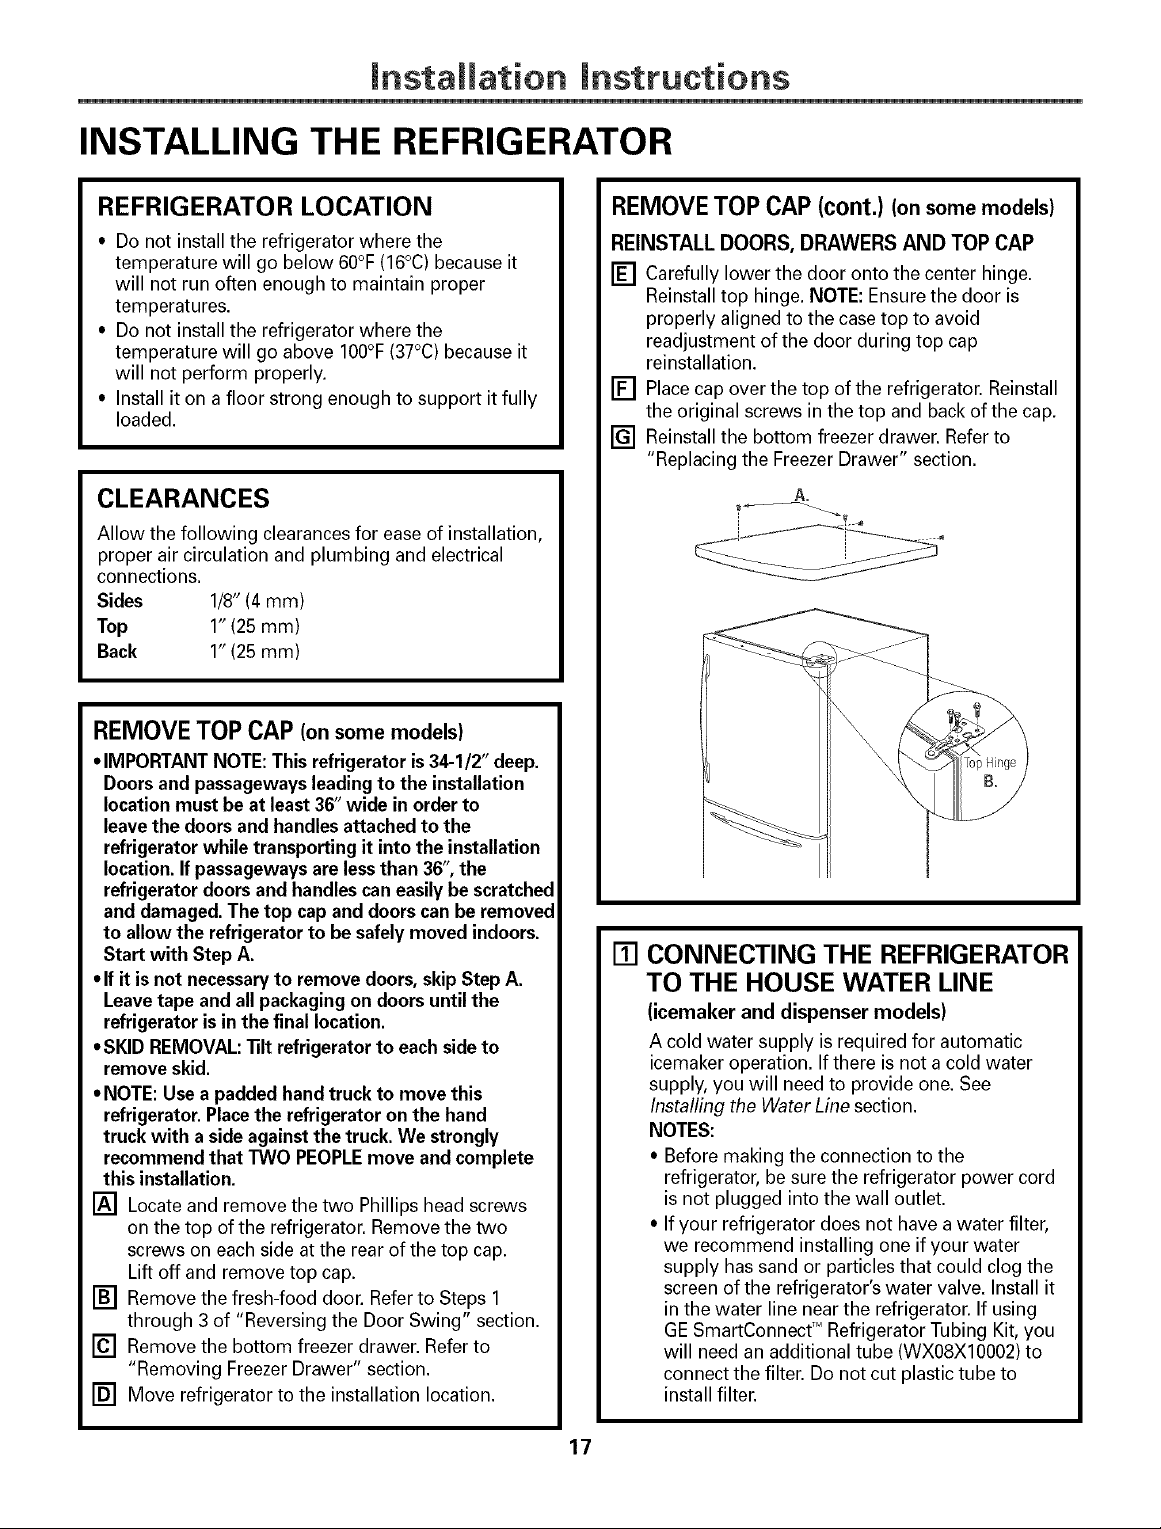
REMOVE TOP CAP (onsomemodels)
• IMPORTANTNOTE:This refrigeratoris 34-1/2" deep.
Doorsand passagewaysleadingto the installation
locationmust be at least 36"wide in order to
leavethe doors and handlesattached to the
refrigeratorwhile transporting it into the installation
location.Ifpassagewaysare lessthan36",the
refrigeratordoors and handlescaneasilybe scratched
and damaged.The top cap and doorscanbe removed
to allow the refrigeratorto be safely moved indoors.
Start with Step A.
• Ifit is not necessaryto remove doors, skipStep A.
Leavetape and allpackaging on doors untilthe
refrigeratoris in the final location.
• SKID REMOVAL:lilt refrigeratorto eachsideto
remove skid.
• NOTE:Use a padded handtruck to move this
refrigerator.Placethe refrigerator on the hand
truck with a side againstthe truck. We strongly
recommendthat TWO PEOPLEmove and complete
this installation.
[] Locate and remove the two Phillips head screws
on the top of the refrigerator. Remove the two
screws on each side atthe rear of the top cap.
Lift off and remove top cap.
[] Remove the fresh-food doom.Referto Steps 1
through 3 of "Reversing the Door Swing" section.
[] Remove the bottom freezer drawer. Referto
"Removing FreezerDrawer" section.
[] Move refrigerator to the installation location.
REMOVE TOP CAP (cont.) (onsomemodels)
REINSTALL DOORS, DRAWERS AND TOP CAP
[] Carefully lower the door onto the center hinge.
Reinstall top hinge. NOTE: Ensure the door is
properly aligned to the case top to avoid
readjustment of the door during top cap
reinstallation.
[] Place cap over the top of the refrigeratom:Reinstall
the original screws in the top and back of the cap.
[] Reinstall the bottom freezer drawer. Refer to
"Replacing the FreezerDrawer" section.
A.
CONNECTING THE REFRIGERATOR
[]
TO THE HOUSE WATER LINE
(icemaker and dispenser models)
A cold water supply is required for automatic
icemaker operation. If there is not a cold water
supply, you will need to provide one. See
Installing the Water Line section.
NOTES:
• Before making the connection to the
refrigeratom;be sure the refrigerator power cord
is not plugged into the wall outlet.
• If your refrigerator does not have a water filtem;
we recommend installing one if your water
supply has sand or particles that could clog the
screen of the refrigerator's water valve. Install it
in the water line near the refrigerator. If using
GE SmartConnectTM Refrigerator Tubing Kit, you
will need an additional tube (WXOSXIO002)to
connect the filter. Do not cut plastic tube to
install filtem;
17
Installation Instructions
INSTALLING THE REFRIGERATOR (cont.)
[] CONNECTING THE REFRIGERATOR
TO THE HOUSE WATER LINE
(cont.)
[] If you are using copper tubing, place a
compression nut and ferrule (sleeve) onto
the end of the tubing coming from the
house cold water supply.
If you are using the GE SmartConnect TM
tubing, the nuts are already assembled to
the tubing.
[] If you are using copper tubing, insert
the end of the tubing into the refrigerator
connection, at the back of the refrigerator,
as far as possible. While holding the
tubing, tighten the fitting.
If you are using GE SmartConnect TM
tubing, insert the molded end of the
tubing into the refrigerator connection,
at the back of the refrigerator, and tighten
the compression nut until it is hand tight.
Then tighten one additional turn with a
wrench. Overtightening may cause leaks.
[] Fasten the tubing into the clamp provided
to hold it in position. You may need to pry
open the clamp.
[] TURN ON THE WATER SUPPLY
(icemaker and dispenser models)
Turn the water on at the shutoff valve
(house water supply) and check for
any leaks.
[] PLUG IN THE REFRIGERATOR
On models with an icemaker, before
plugging in the refrigerator, make sure
the icemaker power switch is set to the
O (off) position.
One of the illustrations below will look like
the connection on your refrigerator.
Icemaker-Ready models
1/4" g
Copper Clamp
Tubing
1/4"
3ression
Nut
(sleeve)
Tubing jerator
Icemaker-lnstalled Models
Refrigerator Ferrule
1/4'
Compression
Nut
Connection
'Tubing
See the grounding information attached
to the power cord.
[] PUT THE REFRIGERATOR
IN PLACE
Move the refrigerator to its final location.
Tubing Clamp
18
JnstaJJation instructions
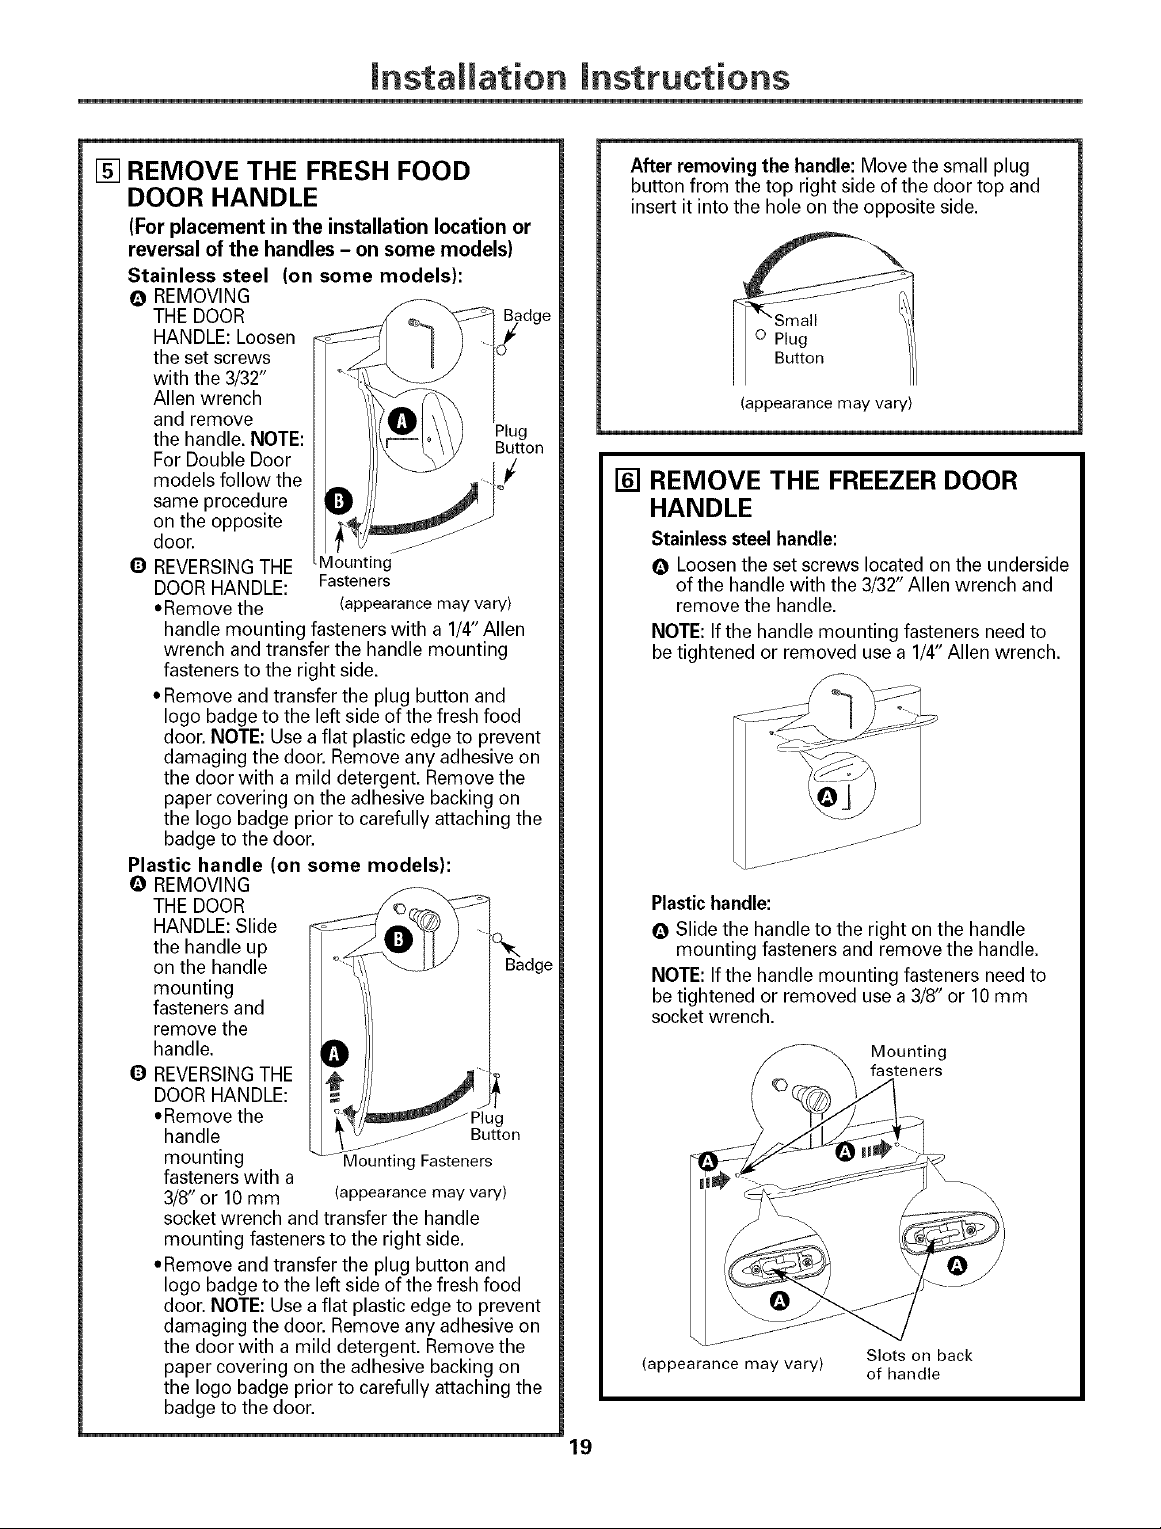
[] REMOVE THE FRESH FOOD
DOOR HANDLE
(For placement in the installation location or
reversal of the handles - on some models)
Stainless steel (on some models):
@ REMOVING
THE DOOR
HANDLE: Loosen
the set screws
with the 3/32"
Allen wrench
and remove
the handle. NOTE: Plug
For Double Door
models follow the
same procedure
on the opposite
door.
O REVERSINGTHE Mounting
DOORHANDLE: Fasteners
•Remove the (appearancemay vary)
handle mounting fasteners with a 1/4"Allen
wrench and transfer the handle mounting
fasteners to the right side.
• Remove and transfer the plug button and
logo badge to the left side of the fresh food
door. NOTE: Use a flat plastic edge to prevent
damaging the door. Remove any adhesive on
the door with a mild detergent. Remove the
paper covering on the adhesive backing on
the logo badge prior to carefully attaching the
badge to the door.
Plastic handle (on some models):
@ REMOVING
THE DOOR
HANDLE: Slide
the handle up
on the handle
mounting
fasteners and
remove the
handle.
0 REVERSINGTHE
DOORHANDLE:
•Remove the
handle Button
mounting Mounting Fasteners
fasteners with a
3/8" or 10 mm (appearancemay vary)
socket wrench andtransfer the handle
mounting fasteners to the right side.
•Remove and transfer the plug button and
logo badge to the left side of the fresh food
door. NOTE: Use a flat plastic edge to prevent
damaging the door. Remove any adhesive on
the door with a mild detergent. Remove the
paper covering on the adhesive backing on
the logo badge prior to carefully attaching the
badge to the door.
Button
Badge
After removing the handle: Move the small plug
button from the top right side of the door top and
insert it into the hole on the opposite side.
0 Plug
Button
(appearance may vary)
[] REMOVE THE FREEZER DOOR
HANDLE
Stainlesssteel handle:
O Loosen the set screws located on the underside
of the handle with the 3/32" Allen wrench and
remove the handle.
NOTE:If the handle mounting fasteners need to
be tightened or removed use a 1/4" Allen wrench.
Plastichandle:
O Slide the handle to the right on the handle
mounting fasteners and remove the handle.
NOTE:If the handle mounting fasteners need to
be tightened or removed use a 3/8" or 10mm
socket wrench.
Mounting
fasteners
(appearance may vary)
Slots on back
of handle
19
Installation Instructions
INSTALLING THE REFRIGERATOR (cont.)
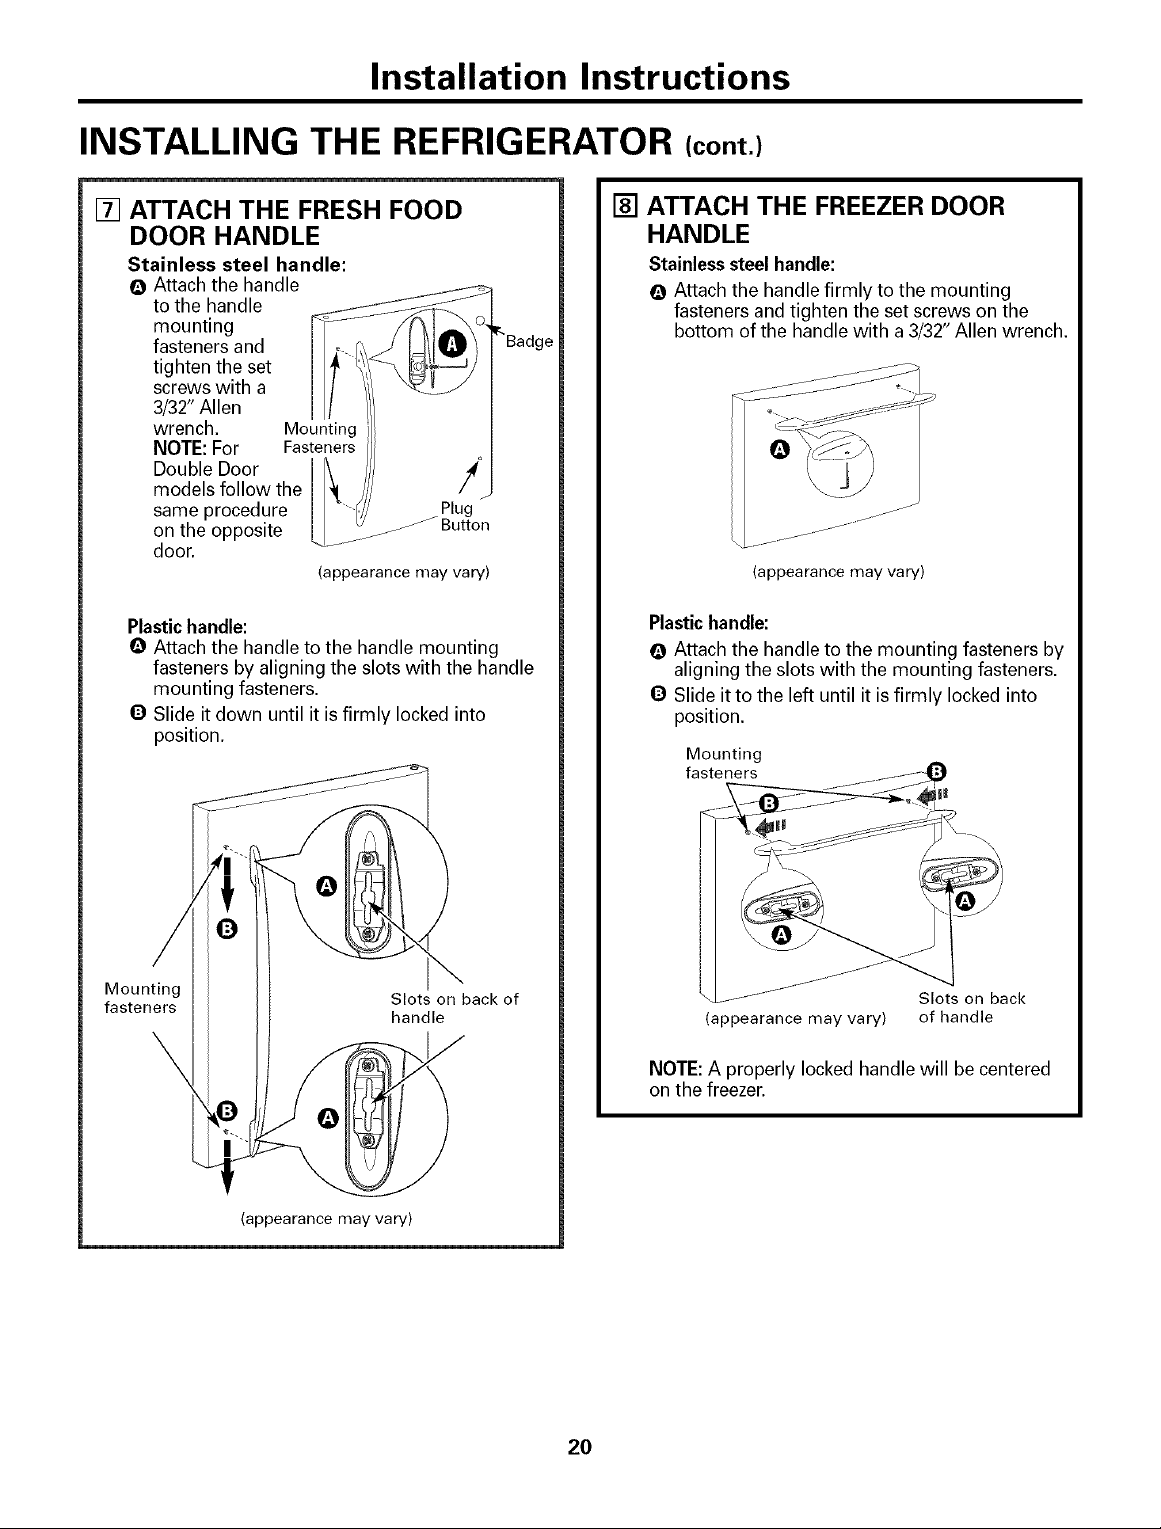
[] ATTACH THE FRESH FOOD
DOOR HANDLE
Stainless steel handle:
O Attach the handle
to the handle
mounting
fasteners and
tighten the set
screws with a
3/32" Allen
wrench. Mounting
NOTE: For Fasteners
Double Door
models follow the
same procedure Plug
on the opposite _ Button
door.
(appearance may vary)
Plastichandle:
Q Attach the handle to the handle mounting
fasteners by aligning the slots with the handle
mounting fasteners.
O Slide it down until it is firmly locked into
position.
[] ATTACH THE FREEZER DOOR
HANDLE
Stainlesssteel handle:
O Attach the handle firmly to the mounting
fasteners and tighten the set screws on the
bottom of the handle with a 3/32" Allen wrench.
(appearance may vary)
Plastichandle:
Q Attach the handle to the mounting fasteners by
aligning the slots with the mounting fasteners.
O Slide itto the left until it is firmly locked into
position.
Mounting
fMst_t_rngI
0
(appearance may vary)
Slots on back of
handle
III
Slots on back
(appearance may vary) of handle
NOTE:A properly locked handle will be centered
on the freezer.
2O
Installation Instructions
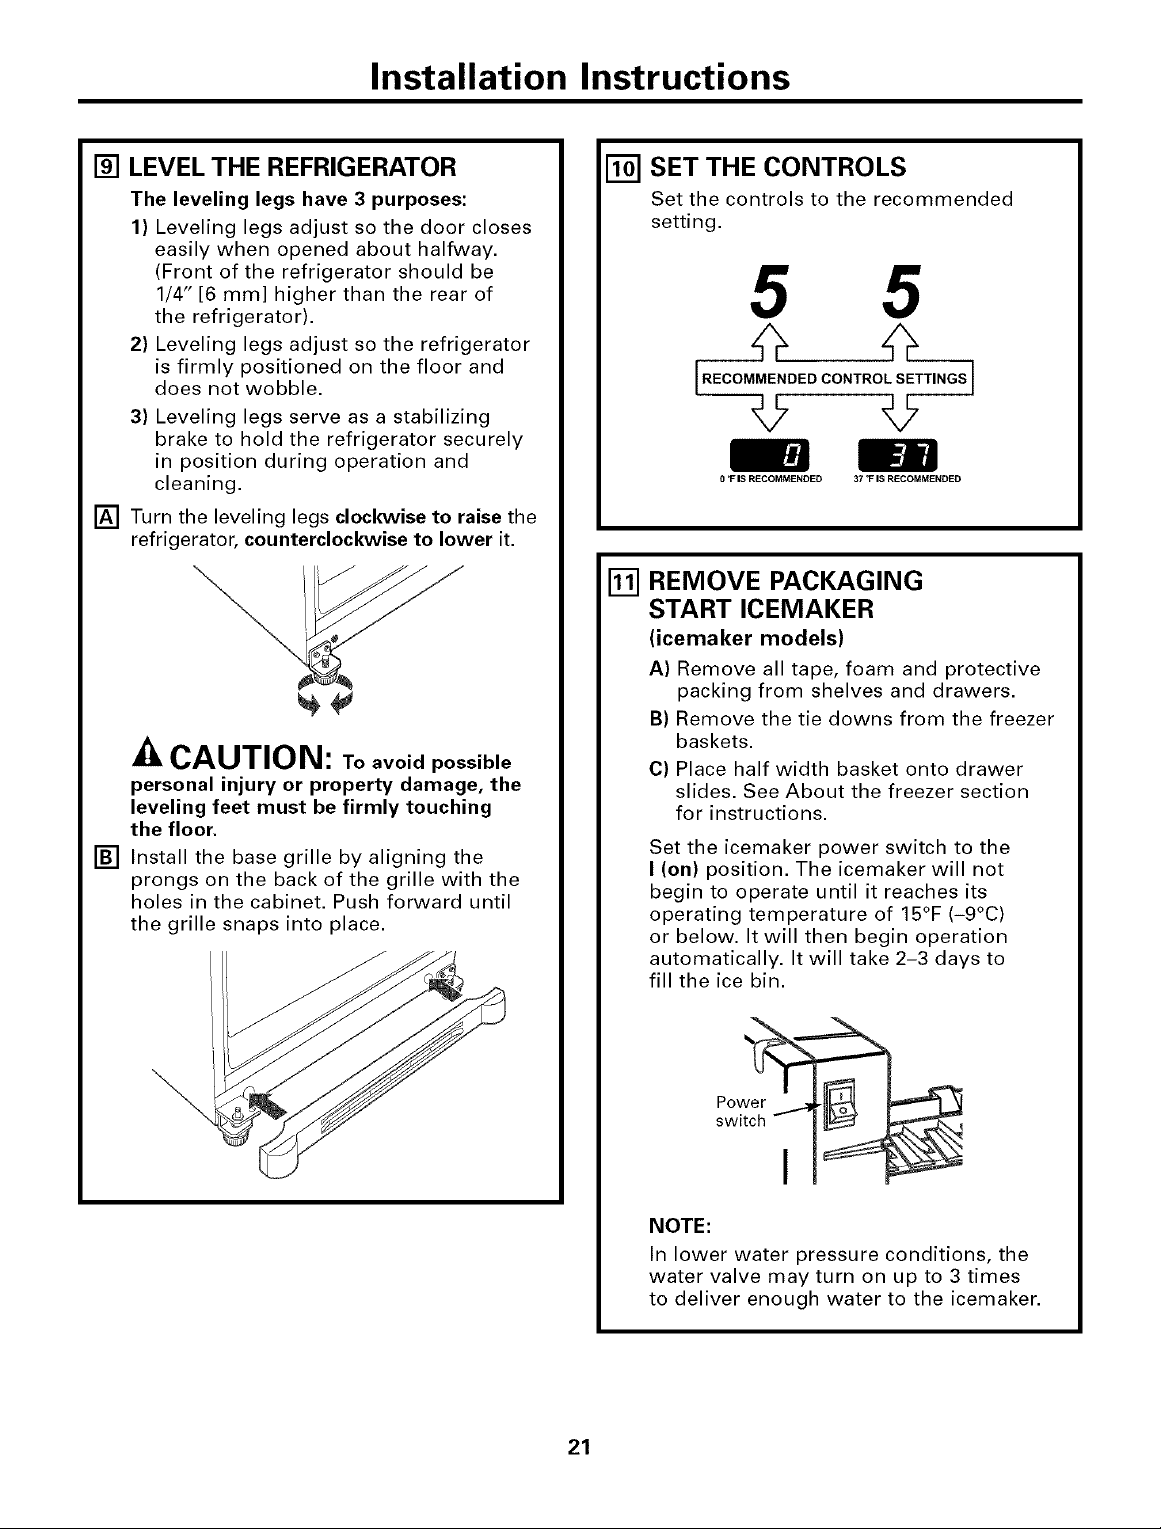
[] LEVEL THE REFRIGERATOR
The leveling legs have 3 purposes:
1) Leveling legs adjust so the door closes
easily when opened about halfway.
(Front of the refrigerator should be
1/4" [6 mm] higher than the rear of
the refrigerator).
2) Leveling legs adjust so the refrigerator
is firmly positioned on the floor and
does not wobble.
3) Leveling legs serve as a stabilizing
brake to hold the refrigerator securely
in position during operation and
cleaning.
[] Turn the leveling legs clockwise to raise the
refrigerator, counterclockwise to lower it.
-& CAUTION: Toavoidpossible
personal injury or property damage, the
leveling feet must be firmly touching
the floor.
[] Install the base grille by aligning the
prongs on the back of the grille with the
holes in the cabinet. Push forward until
the grille snaps into place.
IT0] SET THE CONTROLS
Set the controls to the recommended
setting.
5 5
RECOMMENDED CONTROL SETTINGS
0 _FIS RECOMMENDED 37 "FIS RECOMMENDED
_] REMOVE PACKAGING
START ICEMAKER
(icemaker models)
A) Remove all tape, foam and protective
packing from shelves and drawers.
B) Remove the tie downs from the freezer
baskets.
C) Place half width basket onto drawer
slides. See About the freezer section
for instructions.
Set the icemaker power switch to the
I (on) position. The icemaker will not
begin to operate until it reaches its
operating temperature of 15°F (-9°C)
or below. It will then begin operation
automatically. It will take 2-3 days to
fill the ice bin.
21
NOTE:
In lower water pressure conditions, the
water valve may turn on up to 3 times
to deliver enough water to the icemaker.
mnstallation mnstructions
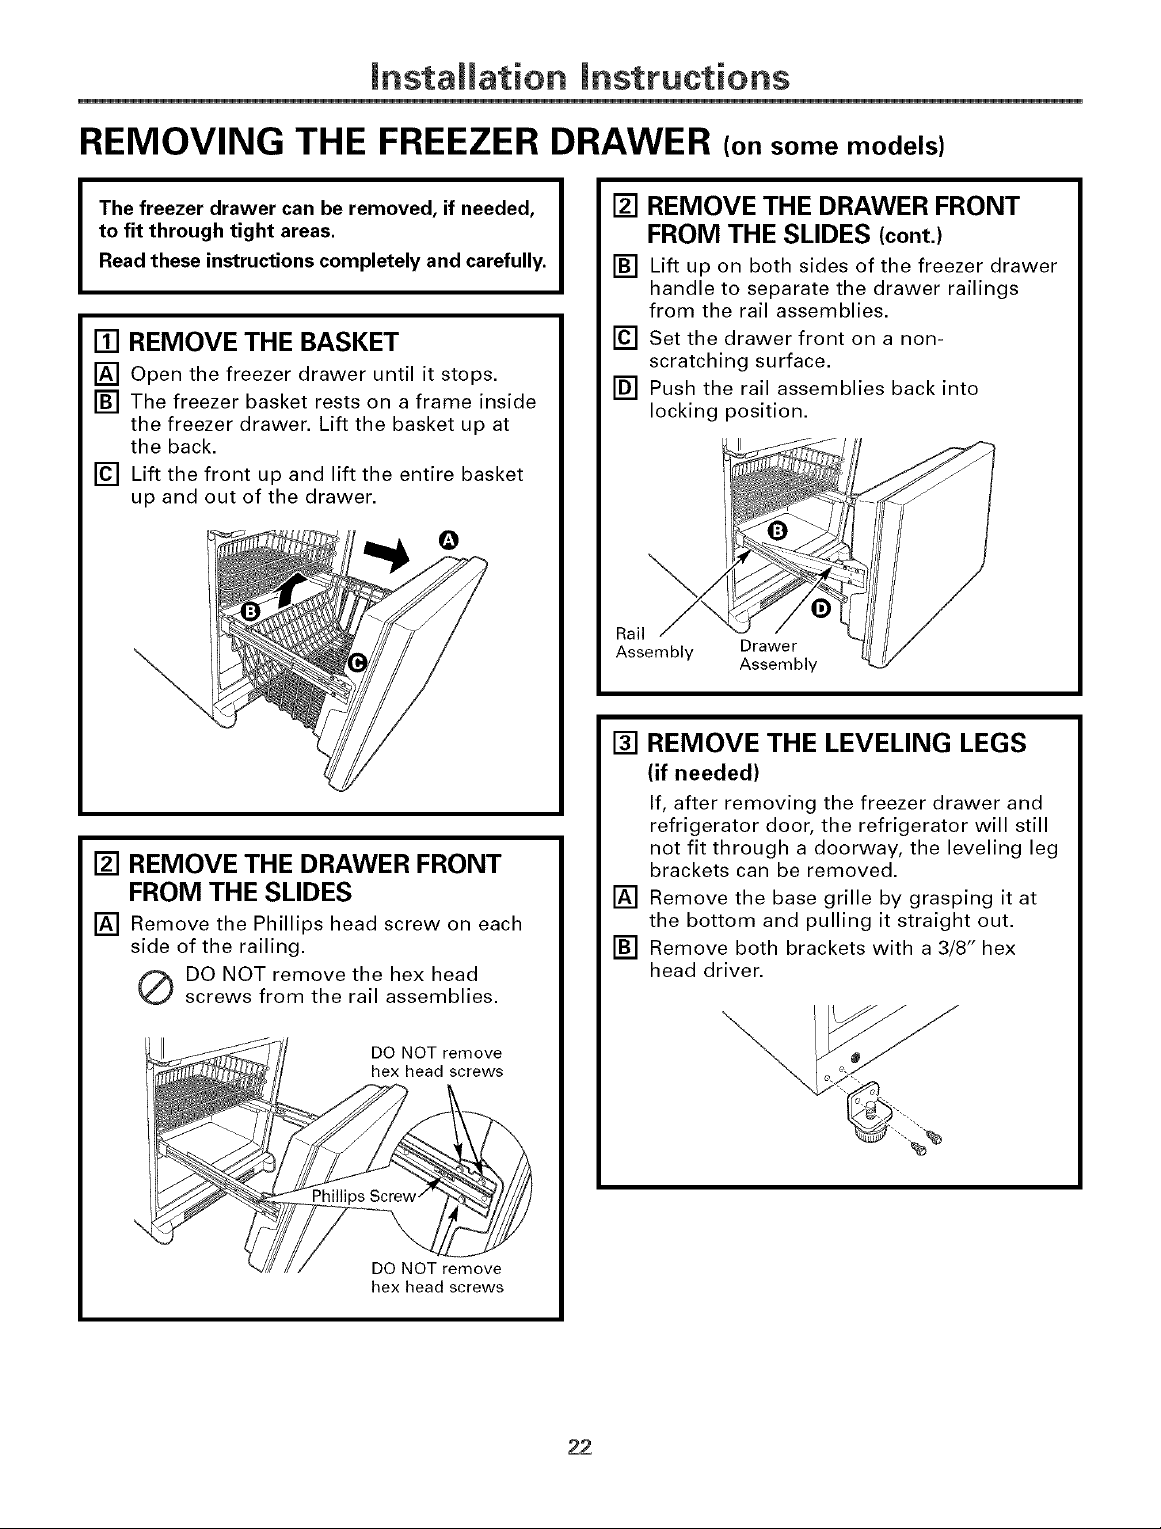
REMOVING THE FREEZER DRAWER (on some models)
The freezer drawer can be removed, if needed,
to fit through tight areas.
Read these instructions completely and carefully.
[] REMOVE THE BASKET
[] Open the freezer drawer until it stops.
[] The freezer basket rests on a frame inside
the freezer drawer. Lift the basket up at
the back.
[] Lift the front up and lift the entire basket
up and out of the drawer.
[] REMOVE THE DRAWER FRONT
FROM THE SLIDES
[] Remove the Phillips head screw on each
side of the railing.
Q DO NOT remove the hex head
screws from the rail assemblies.
[] REMOVE THE DRAWER FRONT
FROM THE SLIDES (cont.)
[] Lift up on both sides of the freezer drawer
handle to separate the drawer railings
from the rail assemblies.
[] Set the drawer front on a non-
scratching surface.
[] Push the rail assemblies back into
locking position.
Rail
Assembly Drawer
Assembly
[] REMOVE THE LEVELING LEGS
(if needed)
If, after removing the freezer drawer and
refrigerator door, the refrigerator will still
not fit through a doorway, the leveling leg
brackets can be removed.
[] Remove the base grille by grasping it at
the bottom and pulling it straight out.
[] Remove both brackets with a 3/8" hex
head driver.
DO NOT remove
hex head screws
DO NOT remove
hex head screws
22
mnstallation mnstructions
REPLACING THE FREEZER DRAWER (on some models)
o Two people may be required to complete
I
this procedure.
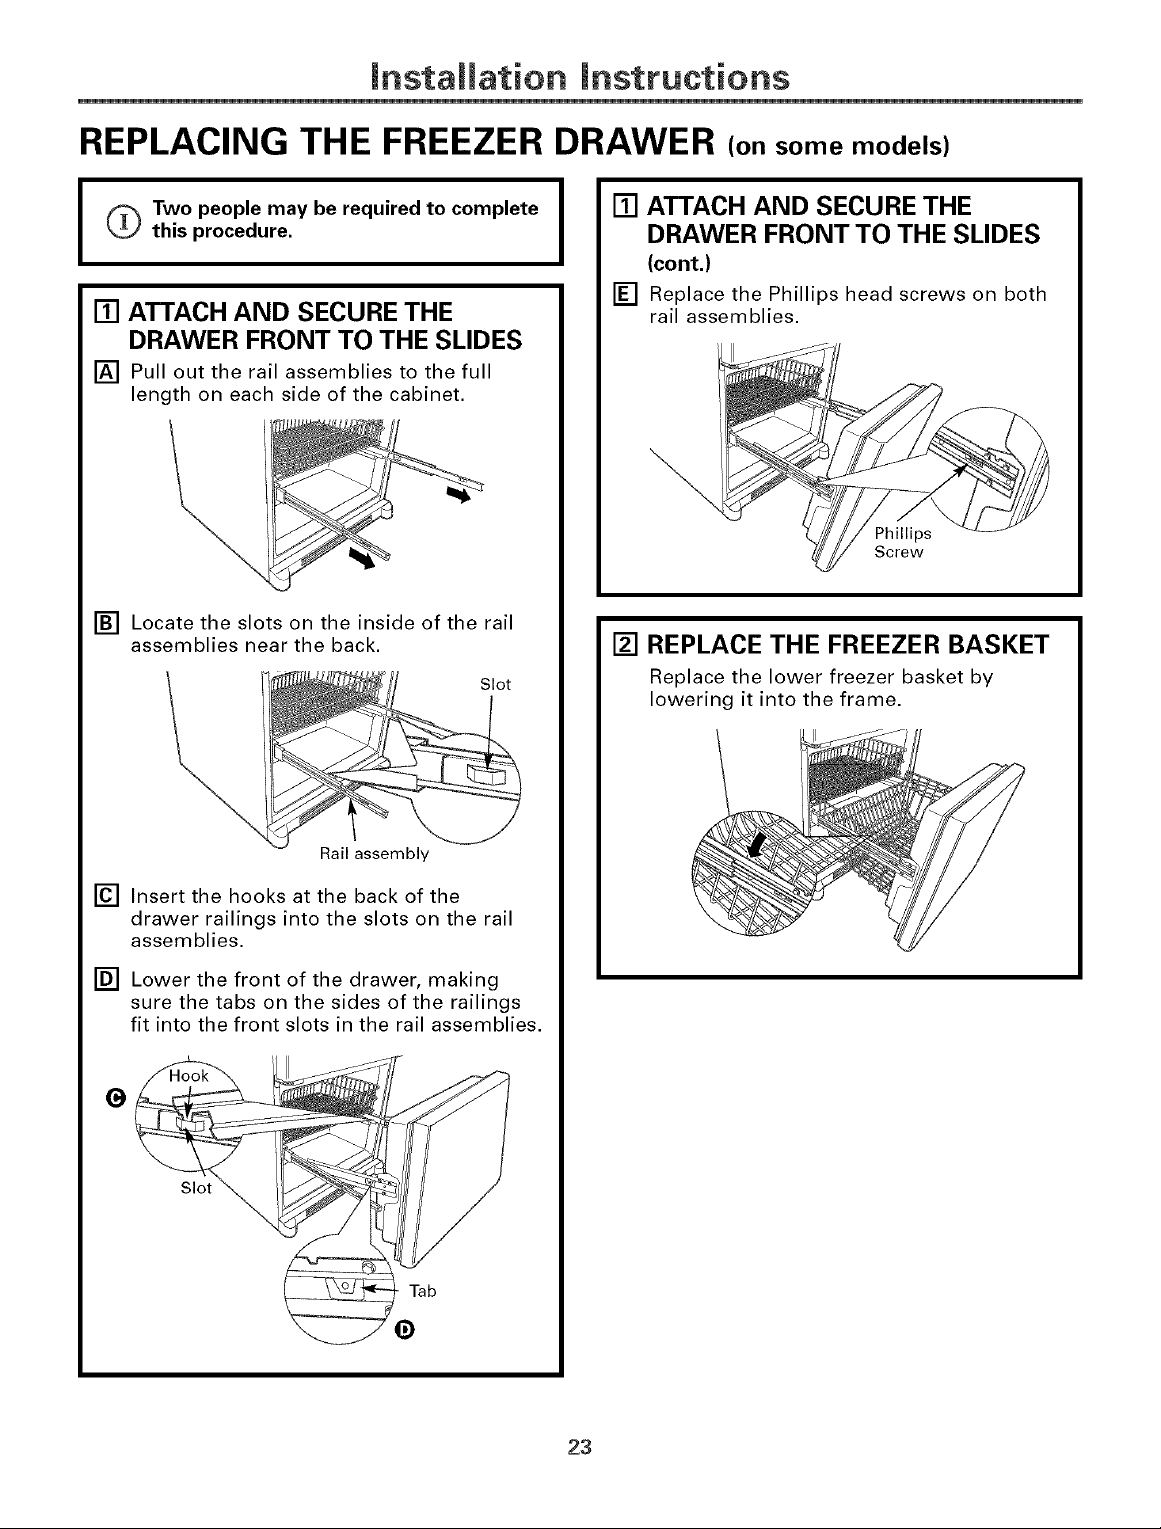
[] ATTACH AND SECURE THE
DRAWER FRONT TO THE SLIDES
[] Pull out the rail assemblies to the full
length on each side of the cabinet.
[] Locate the slots on the inside of the rail
assemblies near the back.
Slot
[] ATTACH AND SECURE THE
I
DRAWER FRONT TO THE SLIDES
(cont.)
[] Replace the Phillips head screws on both
rail assemblies.
Phillips
Screw
[] REPLACE THE FREEZER BASKET
Replace the lower freezer basket by
lowering it into the frame.
Rail assembly
[] Insert the hooks at the back of the
drawer railings into the slots on the rail
assemblies.
[] Lower the front of the drawer, making
sure the tabs on the sides of the railings
fit into the front slots in the rail assemblies.
G
Slot
Tab
23
mnstallation mnstructions
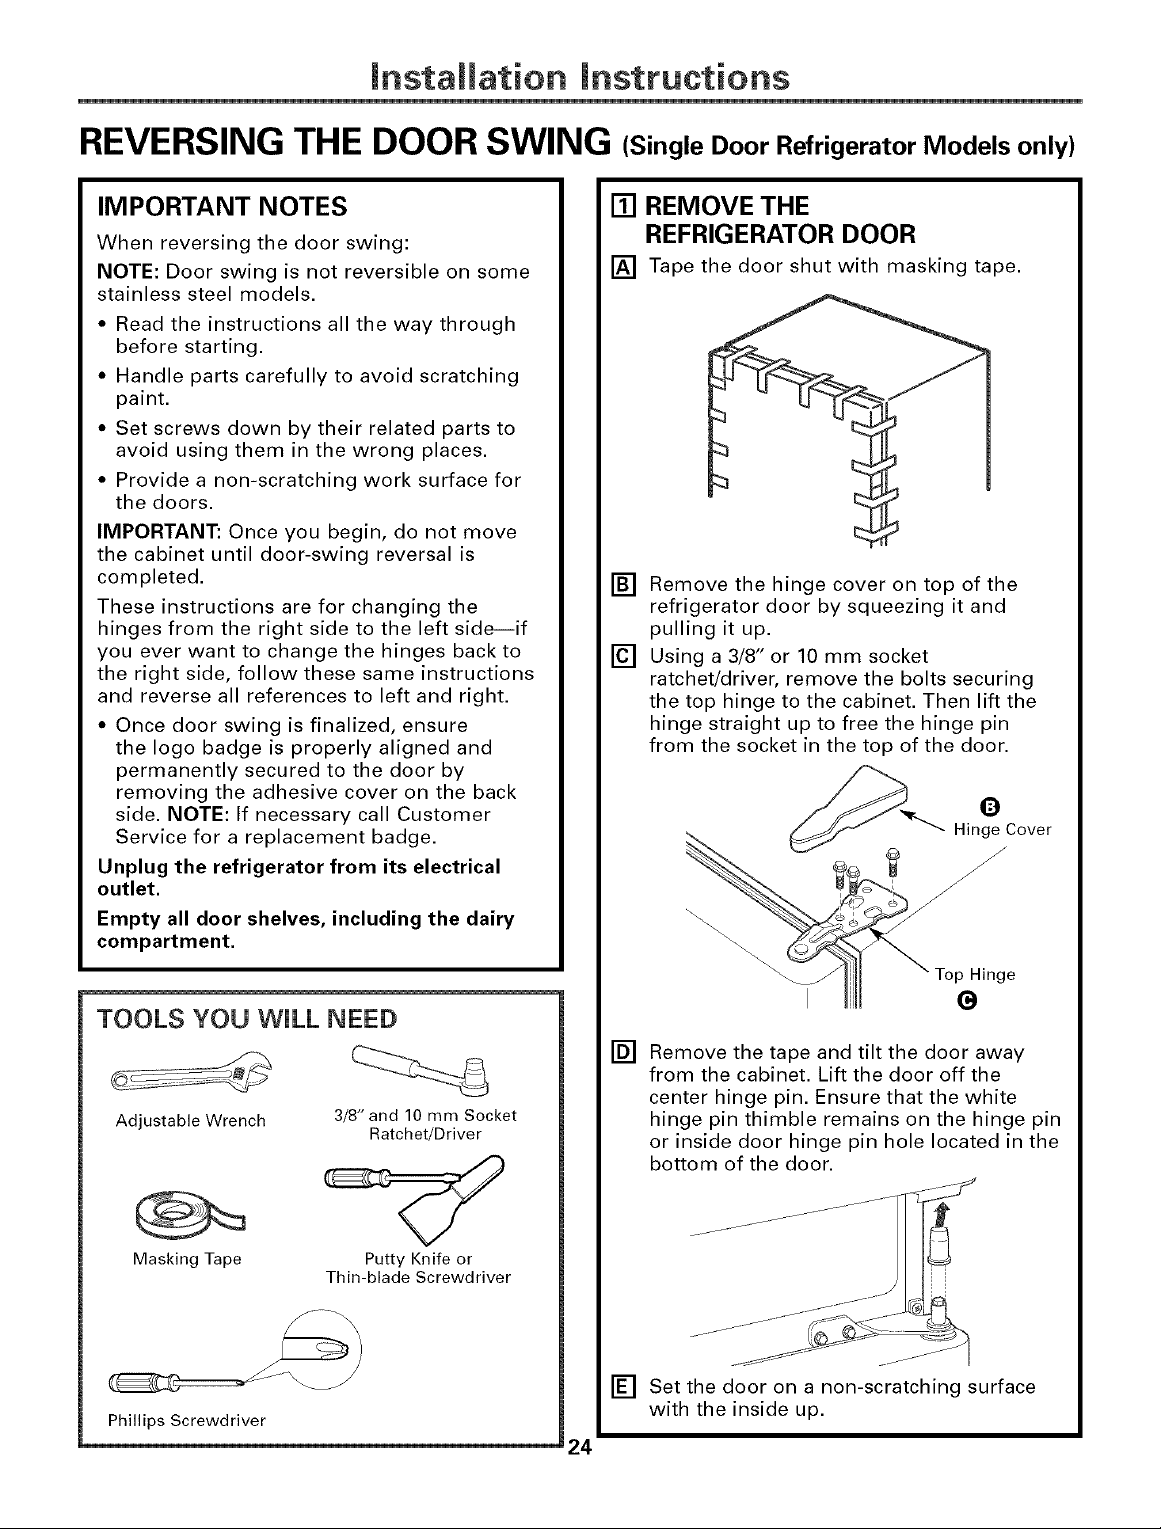
REVERSING THE DOOR SWING (Single Door Refrigerator Models only)
IMPORTANT NOTES
When reversing the door swing:
NOTE: Door swing is not reversible on some
stainless steel models.
• Read the instructions all the way through
before starting.
• Handle parts carefully to avoid scratching
paint.
• Set screws down by their related parts to
avoid using them in the wrong places.
• Provide a non-scratching work surface for
the doors.
IMPORTANT: Once you begin, do not move
the cabinet until door-swing reversal is
completed.
These instructions are for changing the
hinges from the right side to the left side--if
you ever want to change the hinges back to
the right side, follow these same instructions
and reverse all references to left and right.
• Once door swing is finalized, ensure
the logo badge is properly aligned and
permanently secured to the door by
removing the adhesive cover on the back
side. NOTE: If necessary call Customer
Service for a replacement badge.
Unplug the refrigerator from its electrical
outlet.
Empty all door shelves, including the dairy
compartment.
[] REMOVE THE
REFRIGERATOR DOOR
[] Tape the door shut with masking tape.
[] Remove the hinge cover on top of the
refrigerator door by squeezing it and
pulling it up.
[] Using a 3/8" or 10 mm socket
ratchet/driver, remove the bolts securing
the top hinge to the cabinet. Then lift the
hinge straight up to free the hinge pin
from the socket in the top of the door.
O
Hinge Cover
TOOLS YOU WiLL NEED
Adjustable Wrench 3/8" and 10 mm Socket
Masking Tape Putty Knife or
Phillips Screwdriver
Ratchet/Driver
Thin-blade Screwdriver
24
[]
Remove the tape and tilt the door away
from the cabinet. Lift the door off the
center hinge pin. Ensure that the white
hinge pin thimble remains on the hinge pin
or inside door hinge pin hole located in the
bottom of the door.
[]
Set the door on a non-scratching surface
with the inside up.
Installation Instructions
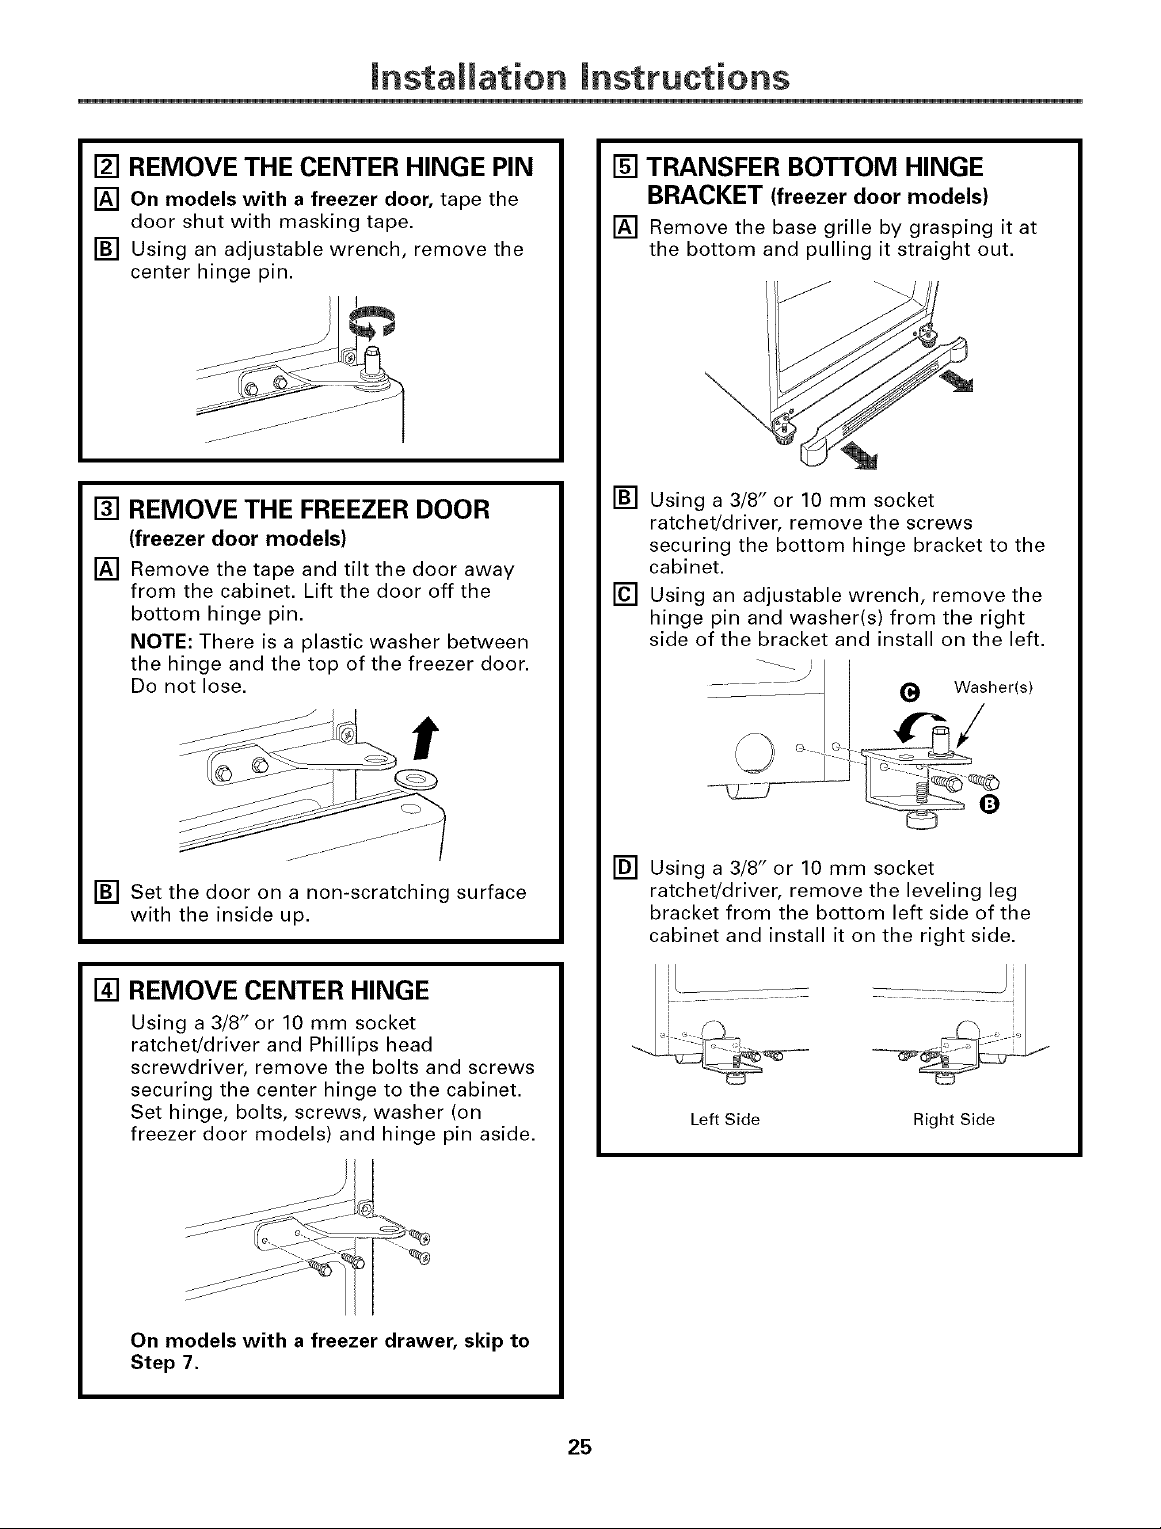
[] REMOVE THE CENTER HINGE PIN
[] On models with a freezer door, tape the
door shut with masking tape.
[] Using an adjustable wrench, remove the
center hinge pin.
[]
REMOVE THE FREEZER DOOR
(freezer door models)
[]
Remove the tape and tilt the door away
from the cabinet. Lift the door off the
bottom hinge pin.
NOTE: There is a plastic washer between
the hinge and the top of the freezer door.
Do not lose.
[] TRANSFER BOTTOM HINGE
BRACKET (freezer door models)
[] Remove the base grille by grasping it at
the bottom and pulling it straight out.
[] Using a 3/8" or 10 mm socket
ratchet/driver, remove the screws
securing the bottom hinge bracket to the
cabinet.
[] Using an adjustable wrench, remove the
hinge pin and washer(s) from the right
side of the bracket and install on the left.
...... J _ Washer(s)
[] Set the door on a non-scratching surface
with the inside up.
[] REMOVE CENTER HINGE
Using a 3/8" or 10 mm socket
ratchet/driver and Phillips head
screwdriver, remove the bolts and screws
securing the center hinge to the cabinet.
Set hinge, bolts, screws, washer (on
freezer door models) and hinge pin aside.
On models with a freezer drawer, skip to
Step 7.
[] Using a 3/8" or 10 mm socket
ratchet/driver, remove the leveling leg
bracket from the bottom left side of the
cabinet and install it on the right side.
Left Side Right Side
25

mnstallation mnstructions
REVERSING THE DOOR SWING (cont.)
[] TRANSFER BOTTOM HINGE
BRACKET (freezer door models, cont.)
[] Install the bottom hinge bracket on the
left side of the cabinet.
[] Replace the base grille by aligning the
prongs on the back of the grille with the
holes in the cabinet. Push forward until
the grille snaps into place.
[] INSTALL CENTER HINGE
[] Transfer the plug button and screws in
the hinge holes on the left side to the
right side.
[] Install the center hinge on the left side.
[]
TRANSFER FREEZER DOOR STOP
(freezer door models)
Remove the door stop on right side of the
[]
bottom of the freezer door by removing
the two screws.
[]
Move the plastic hinge hole thimble to the
opposite hole.
Install the door stop on the left side.
[]
Bottom of Freezer Door
(Right Side)
Bottom of Freezer Door
(Left Side)
[] HANG THE FREEZER DOOR
(freezer door models)
Lower the freezer door onto the bottom
hinge pin, then shut the door, making
sure to align the door with the cabinet.
Make sure the gasket on the door is flush
against the cabinet.
26
installation instructions
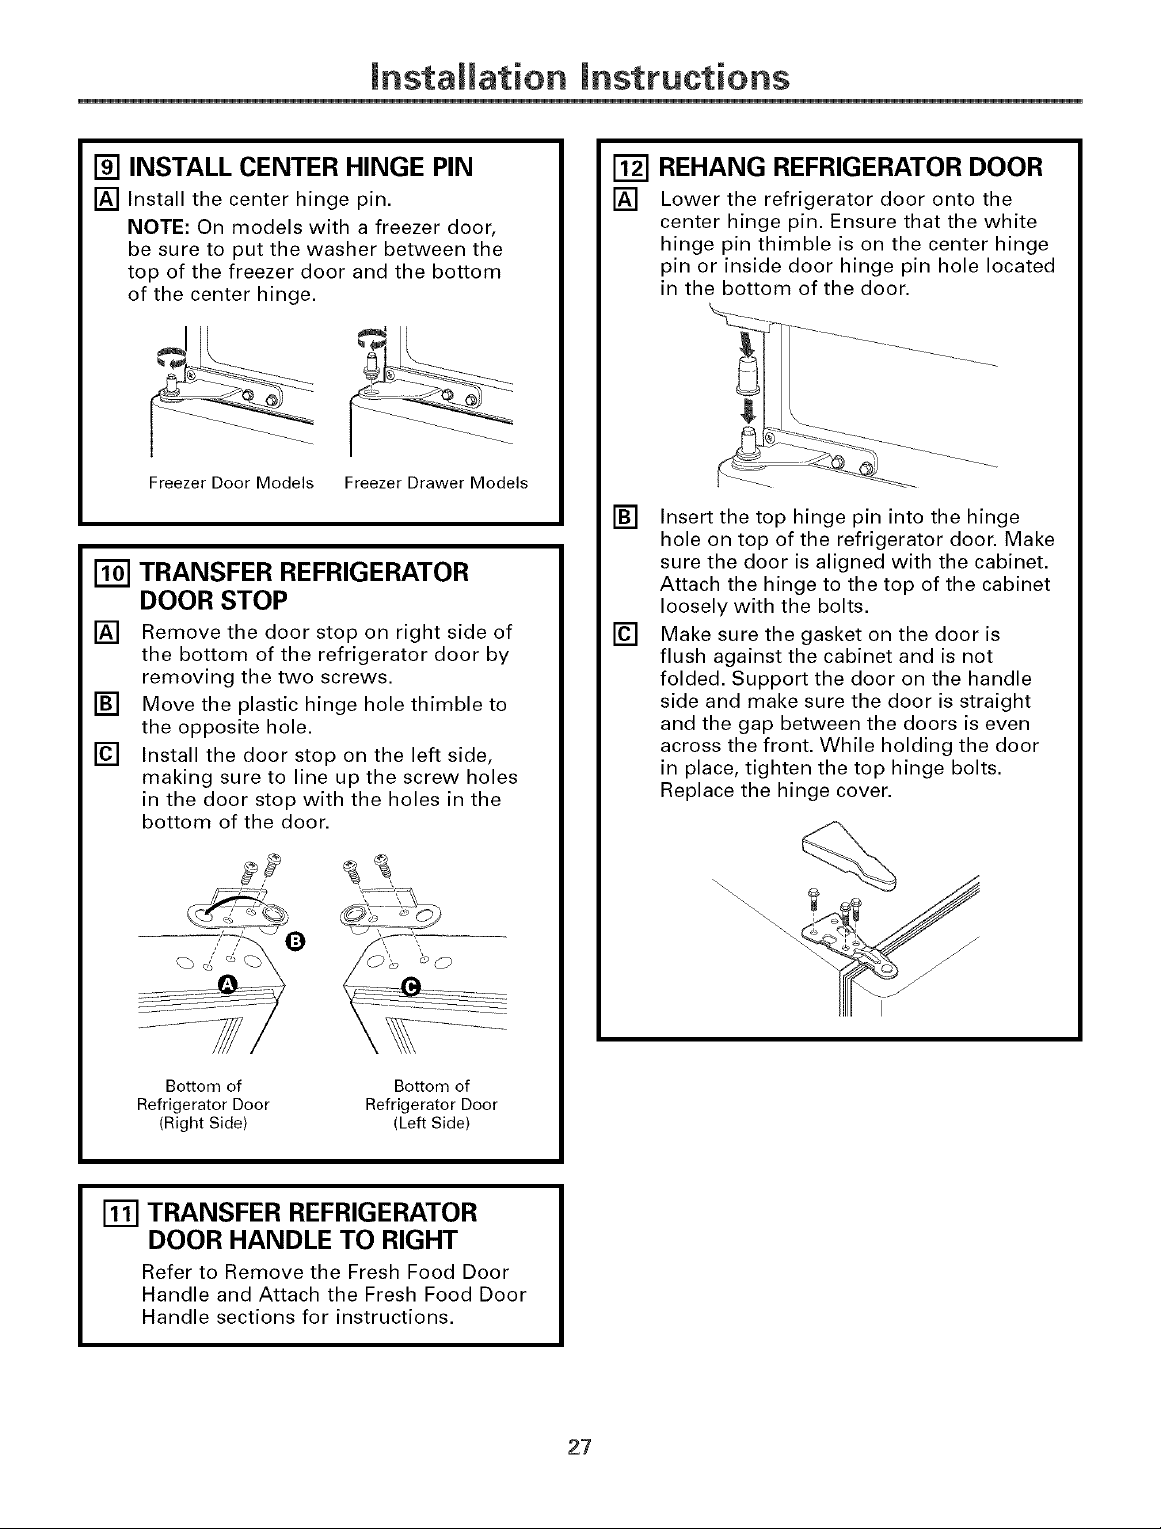
[] INSTALL CENTER HINGE PIN
[] Install the center hinge pin.
NOTE: On models with a freezer door,
be sure to put the washer between the
top of the freezer door and the bottom
of the center hinge.
Freezer Door Models Freezer Drawer Models
TRANSFER REFRIGERATOR
[]
DOOR STOP
[]
Remove the door stop on right side of
the bottom of the refrigerator door by
removing the two screws.
[]
Move the plastic hinge hole thimble to
the opposite hole.
[]
Install the door stop on the left side,
making sure to line up the screw holes
in the door stop with the holes in the
bottom of the door.
[] REHANG REFRIGERATOR DOOR
[] Lower the refrigerator door onto the
center hinge pin. Ensure that the white
hinge pin thimble is on the center hinge
pin or inside door hinge pin hole located
in the bottom of the door.
[]
Insert the top hinge pin into the hinge
hole on top of the refrigerator door. Make
sure the door is aligned with the cabinet.
Attach the hinge to the top of the cabinet
loosely with the bolts.
[]
Make sure the gasket on the door is
flush against the cabinet and is not
folded. Support the door on the handle
side and make sure the door is straight
and the gap between the doors is even
across the front. While holding the door
in place, tighten the top hinge bolts.
Replace the hinge cover.
Bottom of Bottom of
Refrigerator Door Refrigerator Door
(Right Side) (Left Side)
[] TRANSFER REFRIGERATOR
DOOR HANDLE TO RIGHT
Refer to Remove the Fresh Food Door
Handle and Attach the Fresh Food Door
Handle sections for instructions.
27
Installation Instructions
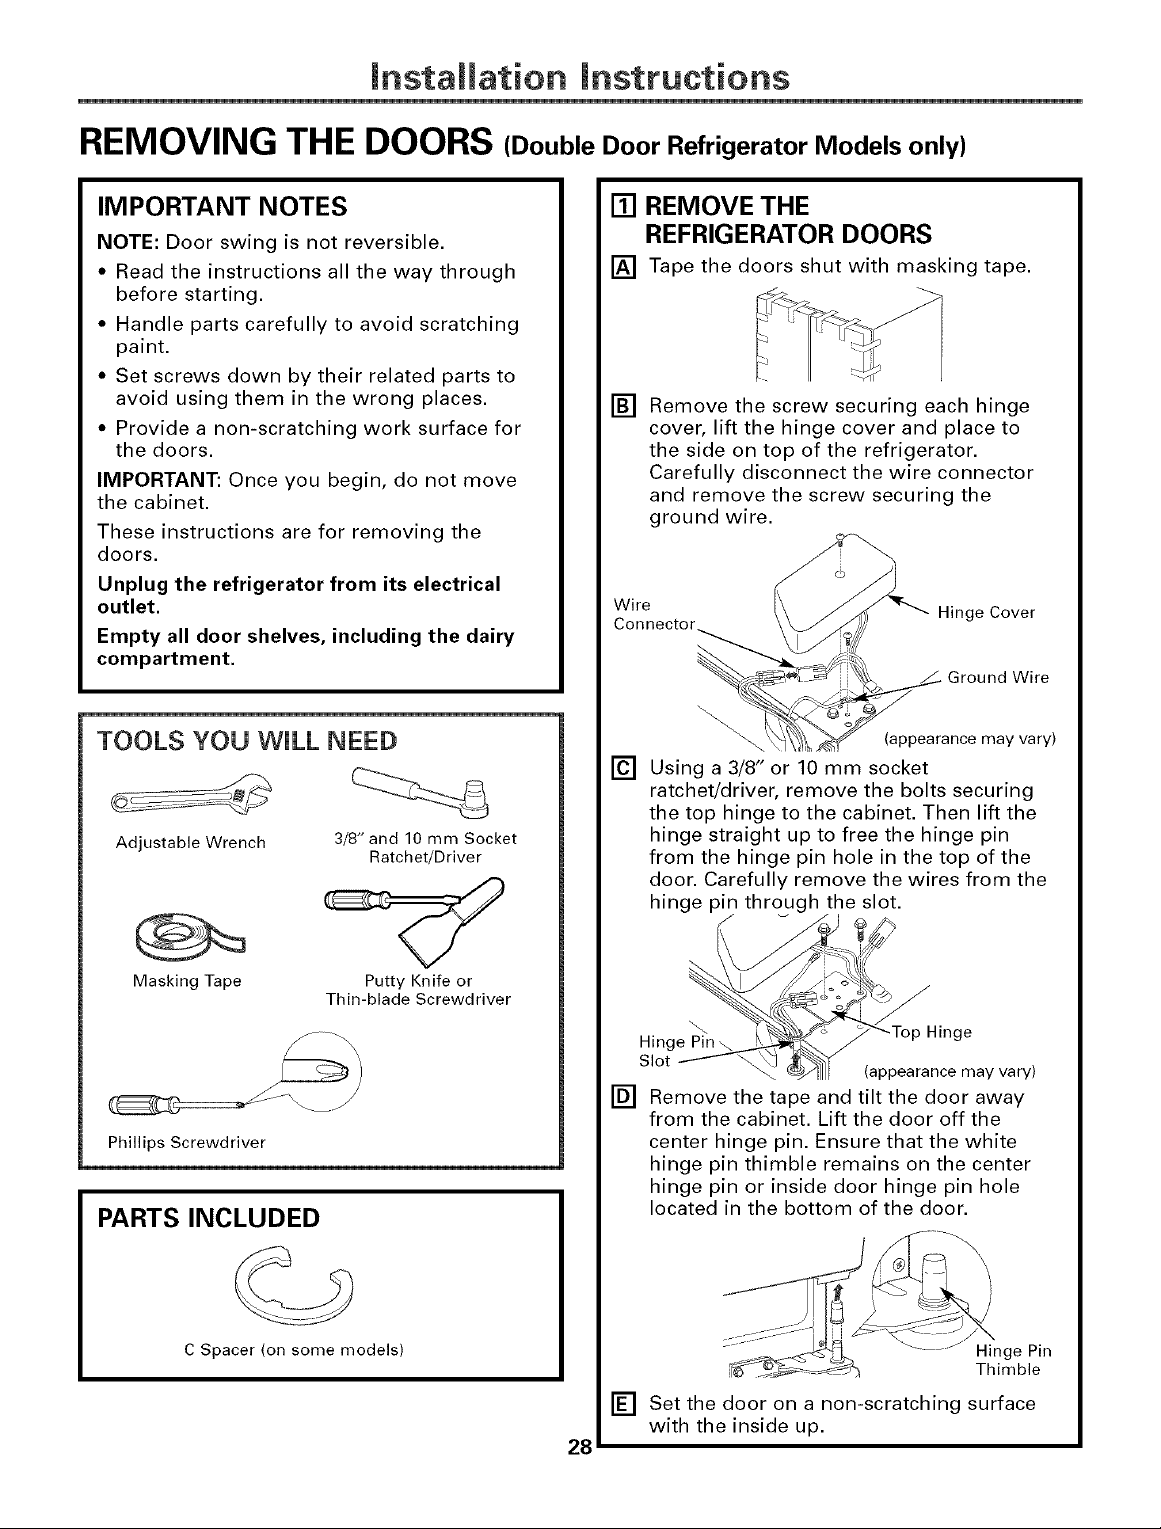
REMOVING THE DOORS (Double Door Refrigerator Models only)
IMPORTANT NOTES
NOTE: Door swing is not reversible.
• Read the instructions all the way through
before starting.
• Handle parts carefully to avoid scratching
paint.
• Set screws down by their related parts to
avoid using them in the wrong places.
• Provide a non-scratching work surface for
the doors.
IMPORTANT: Once you begin, do not move
the cabinet.
These instructions are for removing the
doors.
Unplug the refrigerator from its electrical
outlet.
Empty all door shelves, including the dairy
compartment.
TOOLS YOU WiLL NEED
Adjustable Wrench 3/8" and 10 mm Socket
Ratchet/Driver
[] REMOVE THE
REFRIGERATOR DOORS
[] Tape the doors shut with masking tape.
[]
Remove the screw securing each hinge
cover, lift the hinge cover and place to
the side on top of the refrigerator.
Carefully disconnect the wire connector
and remove the screw securing the
ground wire.
Wire
Connector_
[]
Using a 3/8" or 10 mm socket
ratchet/driver, remove the bolts securing
the top hinge to the cabinet. Then lift the
hinge straight up to free the hinge pin
from the hinge pin hole in the top of the
door. Carefully remove the wires from the
hinge pin through the slot.
_'_""- Hi nge Cover
_i_. _ .J_ Ground W
"__arance may vary)
re
Masking Tape Putty Knife or
Thin-blade Screwdriver
Phillips Screwdriver
PARTS INCLUDED
C Spacer (on some models)
Hin tg___Te°P a_ icnege ay vary)
[]
Remove the tape and tilt the door away
from the cabinet. Lift the door off the
center hinge pin. Ensure that the white
hinge pin thimble remains on the center
hinge pin or inside door hinge pin hole
located in the bottom of the door.
[] Set the door on a non-scratching surface
28
with the inside up.
Hinge Pin
Thimble
Installation Instructions
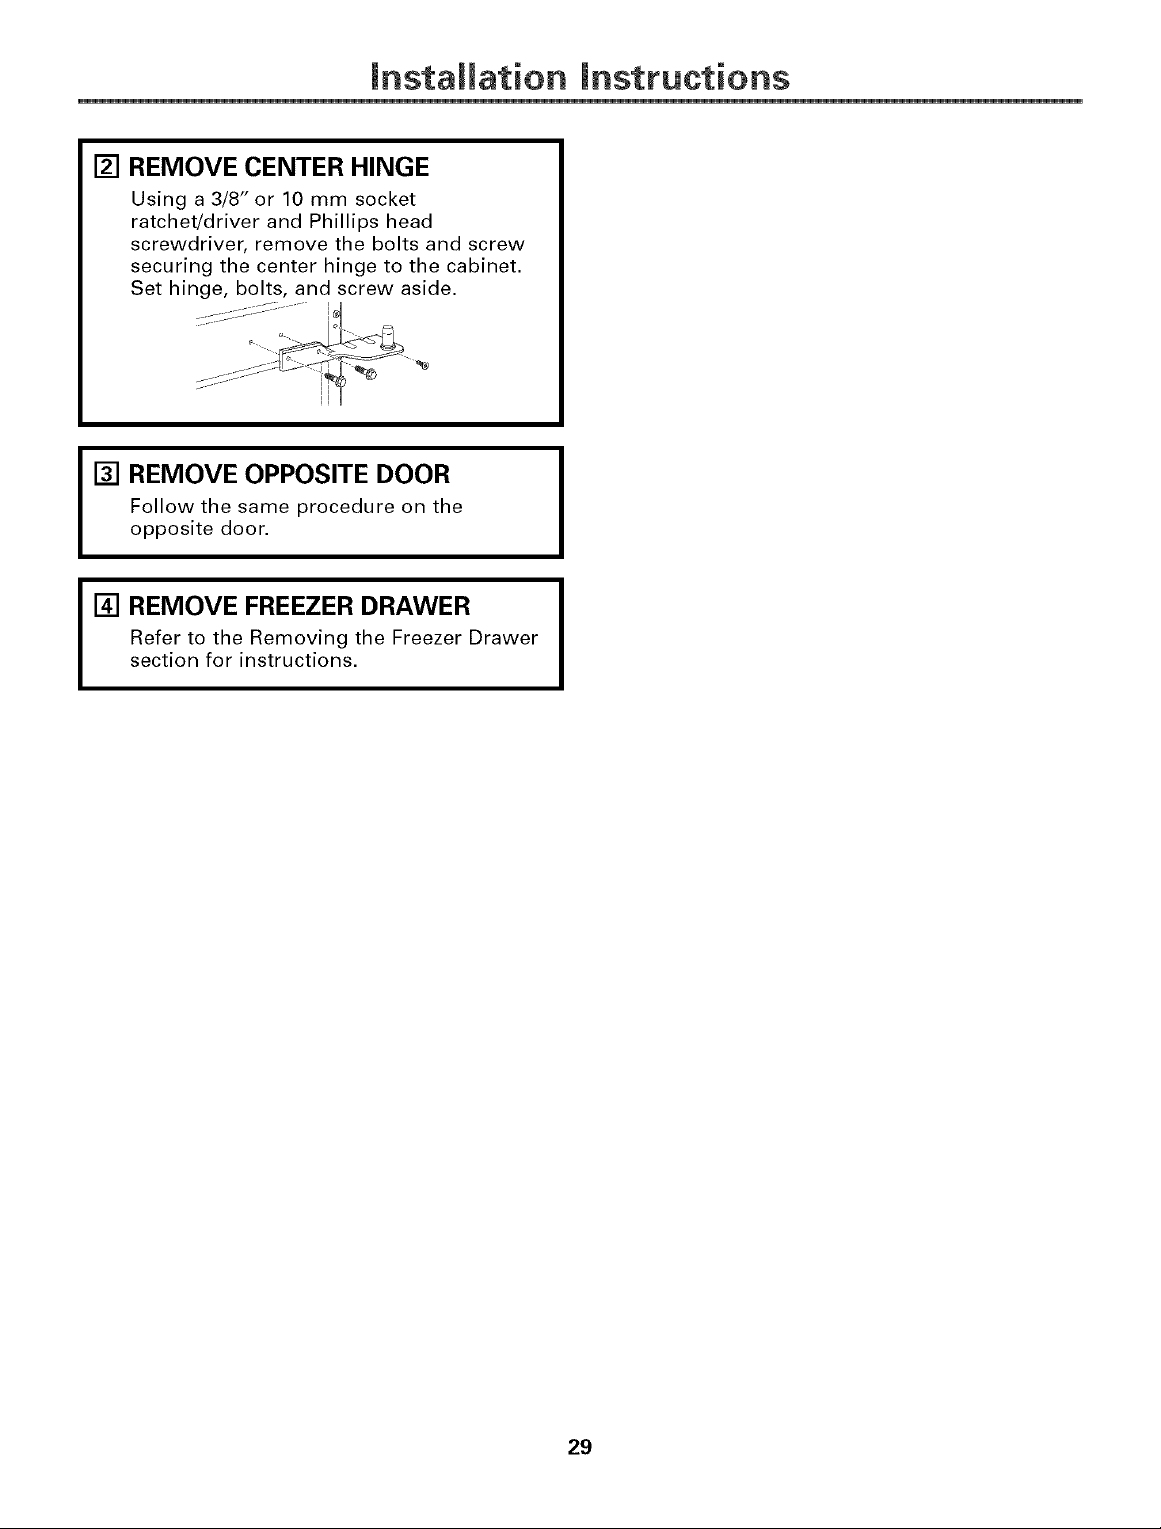
[] REMOVE CENTER HINGE
Using a 3/8" or 10 mm socket
ratchet/driver and Phillips head
screwdriver, remove the bolts and screw
securing the center hinge to the cabinet.
Set hinge, bolts, and screw aside.
[] REMOVE OPPOSITE DOOR
Follow the same procedure on the
opposite door.
[] REMOVE FREEZER DRAWER
Refer to the Removing the Freezer Drawer
section for instructions.
29
Installation Instructions
REPLACING THE DOORS (Double Door Refrigerator Models only)
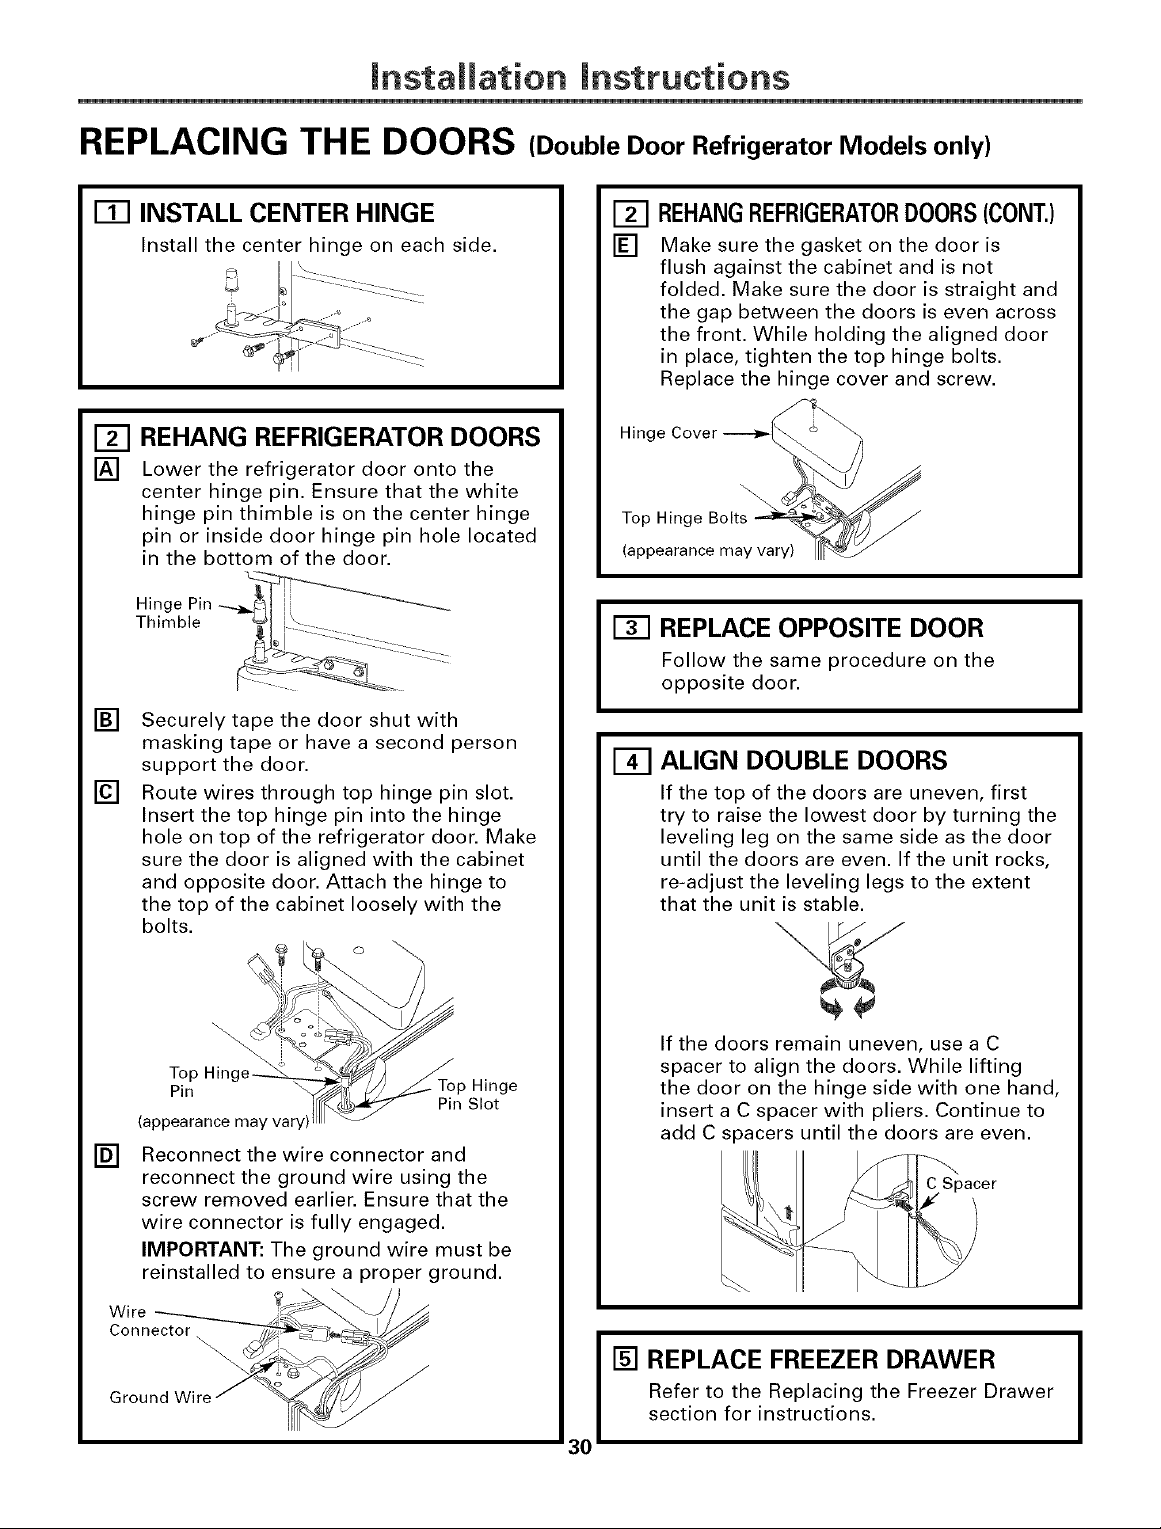
m INSTALL CENTER HINGE
Install the center hinge on each side.
REHANG REFRIGERATOR DOORS
[]
[]
Lower the refrigerator door onto the
center hinge pin. Ensure that the white
hinge pin thimble is on the center hinge
pin or inside door hinge pin hole located
in the bottom of the door.
Hinge Pin
Thimble
[]
Securely tape the door shut with
masking tape or have a second person
support the door.
[]
Route wires through top hinge pin slot.
Insert the top hinge pin into the hinge
hole on top of the refrigerator door. Make
sure the door is aligned with the cabinet
and opposite door. Attach the hinge to
the top of the cabinet loosely with the
bolts.
[] REHANGREFRIGERATORDOORS(CONT.)
[] Make sure the gasket on the door is
flush against the cabinet and is not
folded. Make sure the door is straight and
the gap between the doors is even across
the front. While holding the aligned door
in place, tighten the top hinge bolts.
Replace the hinge cover and screw.
Hinge Cover -------__
REPLACE OPPOSITE DOOR
Follow the same procedure on the
opposite door.
ALIGN DOUBLE DOORS
[33
If the top of the doors are uneven, first
try to raise the lowest door by turning the
leveling leg on the same side as the door
until the doors are even. If the unit rocks,
re-adjust the leveling legs to the extent
that the unit is stable.
•
(appearance may vary
[] Reconnect the wire connector and
reconnect the ground wire using the
screw removed earlier. Ensure that the
wire connector is fully engaged.
IMPORTANT: The ground wire must be
reinstalled to ensure a proper ground.
Wire _ _'_/)/,_
Con
Ground Wire __
If the doors remain uneven, use a C
spacer to align the doors. While lifting
the door on the hinge side with one hand,
insert a C spacer with pliers. Continue to
add C spacers until the doors are even.
Spacer
[] REPLACE FREEZER DRAWER
Refer to the Replacing the Freezer Drawer
section for instructions.
 Loading...