

GE SDL20KCSABS, PDW22SISASS, PDW22SCRBRSS, PDS22SISARSS, PDS22SISALSS Owner’s Manual
...
wvvvv.GEAppliances.com
Safety InsTtrudions ........... 9 3
N
©
Operating Instru_tions
Additional Features ............. 9
Automatic Icemaker . .......... 19
Controls .................... 4-6
Crispers and Pans ............. 10
Freezer ...................... 11
Shelves and Bins ............. 8, 9
_'ater Filter ................... 7
Care and Cleaning ........ 13-15
Installation Instructions
Installing the Refligerator . . . .17-91
Installing the _4'ater Line ..... 98-30
Preparing to Install
the Refligerator . .............. 16
Removing and Replacing the
Freezer Drawer ............ 99, 93
Reversing the Door Swing .... 24-27
Troubleshooting Tips ....... 31-35
Normal Operating Sounds ...... 31
Models20 and22
Cong_lateur inf>rieur
R frig&ateurs
La section fran_aise commence a la page 43
Congelador inferior
Refrigeradores
La seccion en espa#ol empieza enlapagina 83
Consumer Support
Consumer Support ..... Back (',over
Performance Data Sheet ........ 41
Product Registration ........ 37, 38
Warranty for Canadian
Customers ................... 39
_'arrantv for U.S. Customers ..... 40
Write the model and serial
numbers here:
Model #
Serial #
Find these numbex_ on a label
on the right side, near the top of
the refl'igerator compartment.
3828JL8012C 197D4618PO04 49-60355 !2-04 Jfl

IMPORTANTSAFETYINFORMATION.
READALLINSTRUCTIONSBEFOREUSING.
A WARNING!
Use this appliance only for its intended purpose as described in this Owner's Manual.
SAFETYPRECAUTIONS
When using electrical appliances, basic safety precautions should be followed, including the following:
This refl'igerat )r must be i)roi)erl ) installed
and located in accordance with the Installation
hlstrucfions before it is used.
Do not allow children to climb, stand or hang
on the shelves in the refl-Jgeratm: They could
damage the refl-Jgerator and seriously iqjm'e
themselves.
Do not touch the cold sm'fi_ces in the fl'eezer
compartment when hands are damp or wet.
Skin max stick to these extremely cold SUll'ilces.
_ Do not store or use gasoline or other flammable
wq)ors and liquids in the vicinity of this or anv
other appliance.
Keep finge_ out of the "pinch point" areas;
clearances between the doms and between
the (loo_s and cabinet are necessarily small.
Be carefld closing doms when children are
in the area.
In refl'Jgeratms Mth automatic icemake_s,
avoid contact with the moving parts of the
ejector mechanism, or with the heating element
that releases the cubes. Do not place finge_s or
hands on the automatic icemaking mechanism
while the reti-Jgerator is plugged in.
Uni)lug the reflJgerator befin'e cleaning and
making repairs.
NOTE: Westrong/}/recommendthat anyservicingbe
performedby a quaddedindividual
Setting either or both controls to 0 (off) does
not remove power to the light circuit.
Do not refl'eeze fl'ozen foods which have
thawed completely.
A DANGER!RISKOFCHILDENTRAPMENT
PROPERDISPOSALOFTHEREFRIGERATOR
Child entrapment and suffocation are not problems
of the i)ast..ltmked or abandoned reli'igeratm_ are
still dangerous...even if they will sit for 'ijust a few
days." If you are getting rid of yore" old refligeratm;
please follow the instructions below to hel I) prevent
accidents.
Before YouThrewAway YourOldRefrigerator
or Freezer:
_ke off the dome.
i.eaxe the shehes in place so that children may
not easih climb inside.
Refrigerants
All refiigeration products contain refiigerants,
which under fe(leral law must be removed prior
to product disI)osal. If you are getting rid of
an old reliigeration product, check with the
company handling the disposal about what
to do.
USEOFEXTENSIONCORDS
Because of potential safety hazards under certain conditions, we strongly recommend against
the use of an extension cord.
However, if you must use an extension cord, it is absoluteh necessary that it be a Ui_-listed (in the United
States) or a CSA certified (in Canada), B-wire ,gr°tmding, t_,l)e appliance extension cord having a gmtmding
t)pe I)hw-, and outlet and that the electrical ratim,., of the cord be 15 amperes (minimum) and 12(1 xolts.

www.GEAppliances.com
a, WARNING!
HOWTOCONNECTELECTRICITY
Donot, under any circumstances, cut or remove the third (ground) prong from the power cord.
For personal safety this appliance must be properly grounded.
The power cord ot this appliance is equipped
with a 3-prong (grounding) plug which mates
with a standard 3-prong (grounding) wall outlet to
minimize the possibili Fot electric shock hazard
fl'om this appliance.
Have the wall outlet and circuit checked by a
qualified electrMan to make sure the outlet is
properly grounded,
_'here a standard 2-prong wall outlet is
encountered, it is your l)e_onal responsibili_' and
obligation to have it replaced with a properly
grounded 3-prong wall outlet.
The reli-igerator should always be plugged into its
own individual electrical outlet which has a w)ltage
rating that matches the rating plate.
This provides the best pedommnce and also
prevents overloading house wiring circuits which
could cause a fire haa_rd fl'om overheated wires.
Never unplug your refrigerator by pulling on the
power cord. Mways grip plug firefly and pull
straight out from the outlet.
]),el)air or replace immediately all power cords that
have become fl'ayed or otherwise damaged. Do not
use a cord that sho_:s cracks or abrasion damage
along its length or at either end.
\4]_en moving the refrigerator away fl'om the
wall, be carefld not to roll over or damage the
power cord.
USEOFADAPTERPLUGS(Adapterpl.gsnotpermittedinCanada)
Because of potential safety hazards under certain conditions, we strongly recommend against
the use of an adapter plug.
However; if win, must use an adapte_, where local
codes pemfit, a temporary connection may be made
to a properly grounded 2-prong wall outlet by use
of a UIAisted adaptor a\_dlable at most local
hardwai'e stoi'es.
The linger slot in the adapter must be aligned Mth
the larger slot in the wall outlet to provide proper
polarity in the connection of the power cord.
When disconnecting the power cord fl'om the
a(lapte_; always hold the adapter in place with one
hand while pulling the power cord plug with the
other hand. If this is not done, the adapter ground
temfinal is ve_' likely to break with repeated use.
If the adapter ground temfinal brea!<% DO NOTUSE
the refl-igerator until a proper ground has been
established.
Attaching the adapter ground terminal to a wall outlet
cover screw does not ground theapphance unless the
cover screw is metal, andnot insulated,and the wall
outlet is grounded through the house wiring. Youshould
have the ckcuit checkedby a quafified electrician to make
sure theoutlet is proper/)/grounded.
READANDFOLLOWTHISSAFETYINFORMATIONCAREFULLY.
SAVETHESEINSTRUCTIONS
3
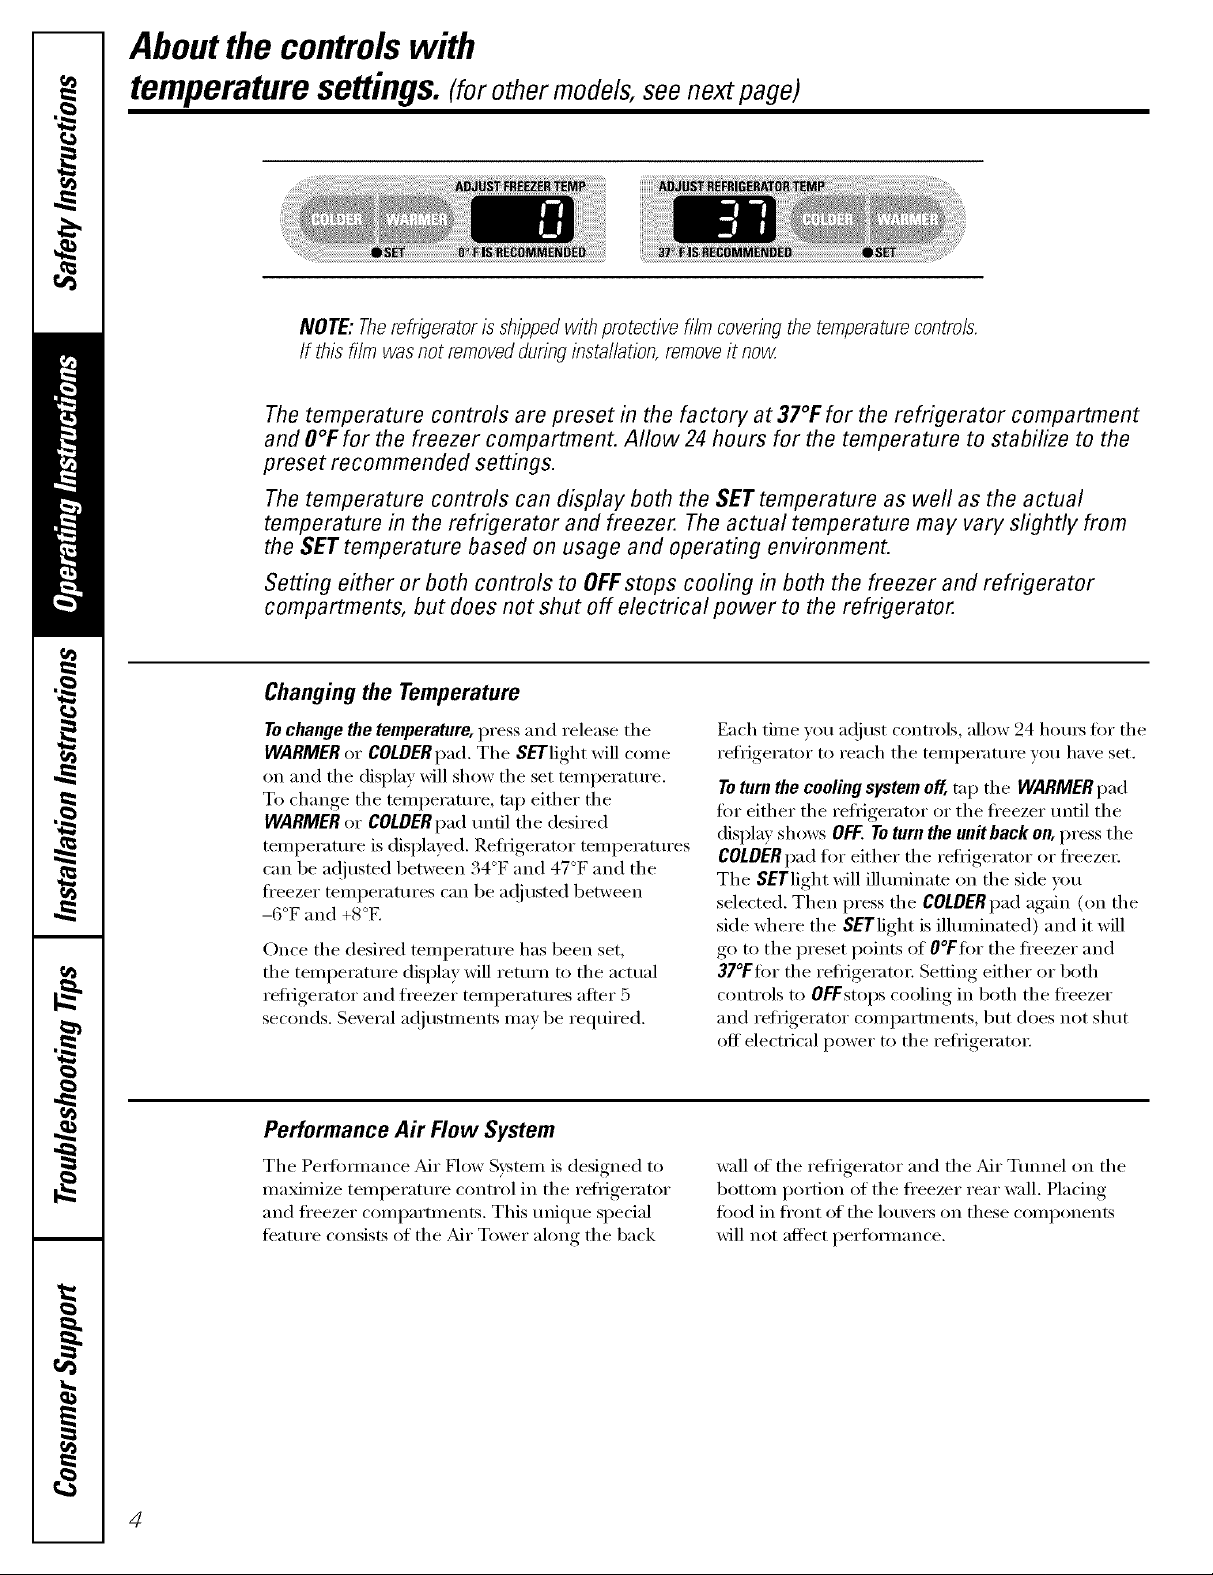
Aboutthe controlswith
temperaturesettings.(forother models, see next page)
NOTE: Therefrigeratoris shipped with protective film coveringthe temperaturecontrols.
If this film was not removedduringinstallation,removeit now
Thetemperature controls are preset in the factory at 37°1:for the refrigerator compartment
and O°Ffor the freezer compartment. Allow24 hours for the temperature to stabilize to the
preset recommended settings.
Thetemperature controls can display both the SET temperature as well as the actual
temperature in the refrigerator and freezer. The actual temperature may vary slightly from
the SETtemperature based on usage and operating environment.
Setting either or both controls to OFFstops cooling in both the freezer and refrigerator
compartments, but does not shut off electrical power to the refrigerator.
Changingthe Temperature
To change the temperature, press and release tile
WARMER or COLDER pad. The Sk'Tlight will con/e
oil and the display will show the set teml)erature.
To change the teml)eramre, tap either the
WARMER or COLDER pad tmfil the desired
temperature is displayed. Refl_igerator temperatures
can be ac!justed between 34°F and 47°F and the
fl'eezer teInl)eratures can be ac!justed between
-(3°F and +8°K
Once the desired temperature has been set,
the temperature display will return to the actual
refl]gei'ator and freezer teil/perattlres after 5
seconds. Several a(!iusttnents Ill}l)' be required.
Performance Air Flow System
The Pedbmmn('e Mr How System is designed to
maximize temperatm'e control in the refl_igerator
and ti'eezer compartments. This tmique special
ti_atm'e consists of the _dr Tower along the 1)ack
Each time you at!just controls, allow 24 horns fin" the
refrigerator to reach the temperature you have set.
To turn the cooling system off, mp tile WARMER pad
fin" either the refi_igerator or the ti'eezer tmtil the
display shows OFF.Toturn the unitbackon, press the
COLDERpad for either the refl_igerator or fl'eezet:
The SETlight will illmninam on the side you
selected. Then press the COLDERpad again (on the
side where the SETlight is illuminated) and it will
go to the preset points of O°Ffiw the fl'eezer and
37°Ffi)r the reflJgeratm; Setting either or both
controls to OFFstops cooling in 1)oth the ti'eezer
and refrigerator compartments, but does not shut
off electrical power to the refl_igerat(n:
wall of the refrigerator and the Air Tmmel on the
bottom portion of the fl'eezer rear wall. Placing
ti)ocl in fl'ont of the lou\'e_ on these components
will not affect perfbmmnce.
4

About TurboCooL"M(on some models) vvww.GEAppliances.com
How # Works
How to Use
Press TurboCool,The refrigerator
temperatm'e display will show _c.
_Mter TurboCoolis complete, the
reflJgerator compartment will return
to the original setting.
NOTES:The refligerator temperatm'e
cannot be changed dining
TurboCooZ
The fl'eezer temperature is not
affected (huJng TurboCooL
_4]_en opening the refrigerator
door (lining YurboCoot the tiros
will continue to rim if they have
cycled on.
TurboCool
TurboCoolrapidly cools the retiigerator
colnl)artinexlt ixl order to inore quickly
cool fi)ods. Use TurboCool when adding a
large amount of toed to the refligerator
compartment, putting away fi)o(ls after they
have been sitting out at room temperature
or when putting away wam_ leflovexs. It can
also be used if the retiigerator has been
without power for an extended period.
Once acfi\:_md, the compressor will turn on
immediately and the tm_s will cycle on and
off at high speed as needed tbr eight hom_.
The compressor will continue to rtm tmfil
the refligerator compartment cools m
approximately 34°F (l °C), then it will cycle
on and off to maintain this setting. _Mter 8
houI_, or if TurboCoolis pressed again, the
refl_gerator compartment will return to
the original setting.
About Door Alarm (onsomemodels)
The door alam_ will sotmd if either
door is open fl)r more than 2 minutes.
The beeping stops when w)u close
the (loo_:

Aboutthe controlswith numberedsettings.
NOTE: Therefrigeratoris shippedwith protectivefilm coveringthe temperaturecontrols.
If this film was not removedduringinstallation,removeit now
Initially, set the refrigerator control at5 and the freezer control at5 and allow24 hours
for the temperature to stabilize.
Several adjustments may be required. Adjust the controls one increment at a time, and
allow24 hours after each adjustment for the refrigerator to reach the temperature you
have set.
Setting either or both controls to 0 stops cooling in both the refrigerator and freezer
compartments, but does not shut off electrical power to the refrigerator.
Performance Air Flow System
The Pe_tmmance _Mr Flow System is designed to
maximize temperattu'e control in the refl_igerator
and fl'eezer compamnents, This tmique special
teatm'e consists of the _dr Tower along the back
wall ot the refligerator and the _dr Tmmel on the
bottom portion of the fl'eezer rear wall. Placing
fi)od in fl'ont of the lou\'e_ on these components
will not affect perfi)m_ance.

Aboutthe water filter.(onsomemodels) www.GEAppliances.com
i i ii i_
Water Filter Cartridge
The water filter cartridge is located in the
back Ul)l)er right corner of the refl-igerator
coiili)_l i'tlilent,
When to Replace the Filter
There is a replacement indicator
light fin" the water filter cartridge on the
temperature display This light will mrn
orange to tell you that you need to replace
the filter soon. The filter cartridge should
be replaced when the replacement
indicator light tm'ns red or if the flow
of water to the dispenser or icemaker
decreases.
Installing the Filter Cartridge
O ]f yot:l are replacing the cartridge,
fi_t remove the old one. Open the
cartridge cover by pressing in on the
tnb at the ti'ont and pulling down.
O Remoxe the cartridge b) slowly rotating
it c()tmterch)ckwise. A small amotmt of
water may drip down.
Filter Bypass Plug
You must use the filter 1upass I)lug when a
replacement filter cartridge is not a\:filable.
The icemaker will not operate without the
filter or filter bypass plug.
Replacement Filters:
To order additional filter cartridges
in _e United States, visit our WebsRe,
www.GEAppliances.com,or call
GE Parts and Accessories, 800.626.2002.
Filter Model (;S_¥F
Customei_ in Canada should consult
the yellow pages fin" the nearest Camco
Service Center:
J
RESETWATERFILTER
(on some models)
A CAUTION:/fa, hasbeentra ed
in thesystem,the fi/tercartridgemaybeejectedas
it isremovecLUsecautionwhenremoving.
0 ]_,emo',e the i)rotecti',e foil from the
end of the cartridge.
IJning up the arrow on the cartridge
and the cartridge holder; slowly rotate
the cartridge clockwise tmtil it stops.
_]_en the camidge is propedy
installed, you will ti_el it "click" as it
locks into place. The blade on the end
of the cartridge should be positioned
vertically; Do not overtighten.
Close the cartridge covex;
O Rim water fl'om the dispenser fin.
3 minutes (about 11/'_)gallons) to clear
the system and prevent sputtering.
See To Use the Dispensersection.
Press and hold the RESETWATERFILTER
pad fin" 3 seconds.
NOTE°A newl_-instnlled water filter cartridge
may cause water to spurt from the dispense_:

Aboutthe shelvesandbins.
Not all features are on all models.
Rearranging the Shelves
S S Y _ "
hel;e,_ in the refi_i_e_ato_ ('()ml)artment are a(!iustable
Refrigerator Compartment
Toremove:
: o
0 Tilt the shelf up at the fi'ont.
0 I,ifl the shelf ul) at the back and
bring the shelf ()tit.
Somemodelshavewireshelvesthat
canbeadjustedinthesamemamTe_
Toreplace:
_,_hile tiltino_ the shelf u ), insert the tel )
0
hook at theback of thelsheff in a slot
(m the track.
0 I,ower the fi'ont of the shelf until the
bottom of the shelf locks into place.
Spillproof Shelves (onsomemode/s)
Spillproof shelves have special edges to
hel I) prevent spills fl'om dripping to lower
shelves. To i'elnove oi" replace the shelves,
see Rearranging the Shelves,
Slide-Out Spillproof Shelf (onsome models)
The slide-out spillproof shelf allows you
to reach items stored behind otheis. The
spedal edges are designed to hel I) prevent
spills from dripping to lower shelves.
Toremove:
0 Reinove all items from shell
0 Slide the shelf ()tit until it stops.
iift the fl'ont edge of the shelf until the
central tabs are above the fl'ont bai:
0 Continue pulling the shelf torward
until it can be removed.
Toreplace:
0 Place the rear shelf tabs just in fi'ont of
the central notches on the shelf fl'ame,
Slide the shelf in until the central tabs
are slightly behind the fl'ont bar.
0 i,ower the shelf into place until it is
horizontal and slide the shelf in.
Make surethat the shelf sitsflat after reinstallation
anddoesn't move freely fromside to side.
Make sureyoupush the shelvesall the wayin
before youclose the door

www.GEAppliances.com
Fingerhold
tugger
Adjustable Bins on the Door
A(!justable bins can easily be carried fi'om
retiJgerator to work area.
Toremove: lift bin straight up, then
pull out.
Toreplace or relocate: Engage the bin in the
molded supports of the doox; and push in.
Bin will lock in place.
Non-Adjustable Shelves on the Door
Toremove: Lilt the shelf straight up, then
ptdl out.
Toreplace: Engage the shelf in the molded
stlpports on the door and push down.
It will lock in place.
]'he snugger helps prevent tipping, spilling
or sliding of small items stored on the door
shelf. (;_ip the finger hold near the rear ot
the snugger and move it to fit your needs.
Aboutthe additional features.
Not all features are on all models.
Shelf Saver Rack (onsomemodels)
Slide-out beverage rack holds twelve cans of
soda or two wine/wamr bottles (lengthwise).
It can be removed tot cleaning.
Toremove, slide the rack out to the stop
position, lift the rack uI) and past the stop
position and lift it out.

Aboutthe crispersandpans.
Not all features are on all models.
Fruit and Vegetable Crisper
Excess water that ma) accunmlate in the
bottom of the (h'awe_ or under the (h'awe_
should be wiped dr);
Adjustable Humidity Crisper (onsomemodels)
Slide the control all the way to the Slide the control all the wax to the LOW
HIGHsetting to proxide high humidit_ .settin,,., to proxide lower humidity, lexels
recommended fi)r most xegetables, recommended fi)r most fl'uits.
Snack Pan (on some models)
II II
This pan can be mo_ed to the most useflfl
location fin" )ore" fmnil)'s needs.
To remove, slide the pan out to the stop
position, lilt the pan u l) and past the stop
position and lift it out.
Adjustable Temperature Dell Pan (onsomemodels)
When the pan is placed in the 7th slot fl'om
the bottom of the track and the lever is set
at COLDEST, air fl'om the fl'eezer is torced
around the pan to kee I) it ve_ T cold.
You can move the pan to any location if
wm don't want the extra cold storage.
The settings can be a(!justed anywhere
1)et_ven cold _ and coldest _1 _.
X,_]_en set at cold, the pan will stay at the
nom_al refligerator temperatm'e.
The coldest setting provides the coldest
storage area.
Crisper Removal
ToRemove:
These (h'awex_ can be removed easily 1)y
lifting up slightl)while pulling the drawer
past the stop location.
When the door cannot be fully opened,
rein(_x'e the drawer fi_rth est froln the door
first. Make sure the drawer closest to the
door is fifllv closed. There is a latch at the
fl'ont of the center slide rail. Push down on
the latch and slide the center slide rail, to
which the drawer is attached, a_v fl'om the
dora: ReInove fl_e drawer
10

Aboutthe freezer, www.GEAppliances.com
Not all features are on all models.
Freezer Shelves and Baskets
Depending on your model, your fi'eezer
Ill[ly feattlI'e:
Appearance and features may vary
Appearancemayvary
O A deep fllll-width basket
A shallow fllll-width basket
0 A half:width basket
Basket/Sheff Removal
Toremove the deep full-width basket on
freezer drawer models:
0 Open tile freezer drawer until it stops.
@ Tile fl'eezer basket rests on a fl'anle
inside tile fl'eezer (h'awe_; i,ift tile basket
up at tile back.
Toremove the half-width basket:
0 Pull tile basket out to tile stop location.
@IJtt tile basket up at tile ti'ont to release
it from the slides.
Tab
Lift the back up and out of the slide.
A flfll-width wire shelf
O A shelf aboxe tile ice storage bin
0 Lilt tile fl'ont up and lilt tile entire
basket up and out of tile (h'awe_:
When replacing the basket make sure that
tile Mre tabs and wire l/oo]_; on tile sides
of tile basket go into tile slots in tile top
of the upper basket slides.
NOTE:Mw'avsbe sure to fiflly close this
basket. You will know it is fifllv closed when
w)u teel it "click" into place.
Appearance mayvary
Appearance mayvary
Toremove the deep full-width baskets on
freezer door models, theshallow full-width
basket and the full-width wire shelf."
O Pull tile basket/shelf out to tile stop
location.
IJfl tile fl'ont up and oxer tile stop
location.
Toremove the shelf above the ice bin:
Pull tile shelf straight out.
Lift tile basket/shelf up and out.
11
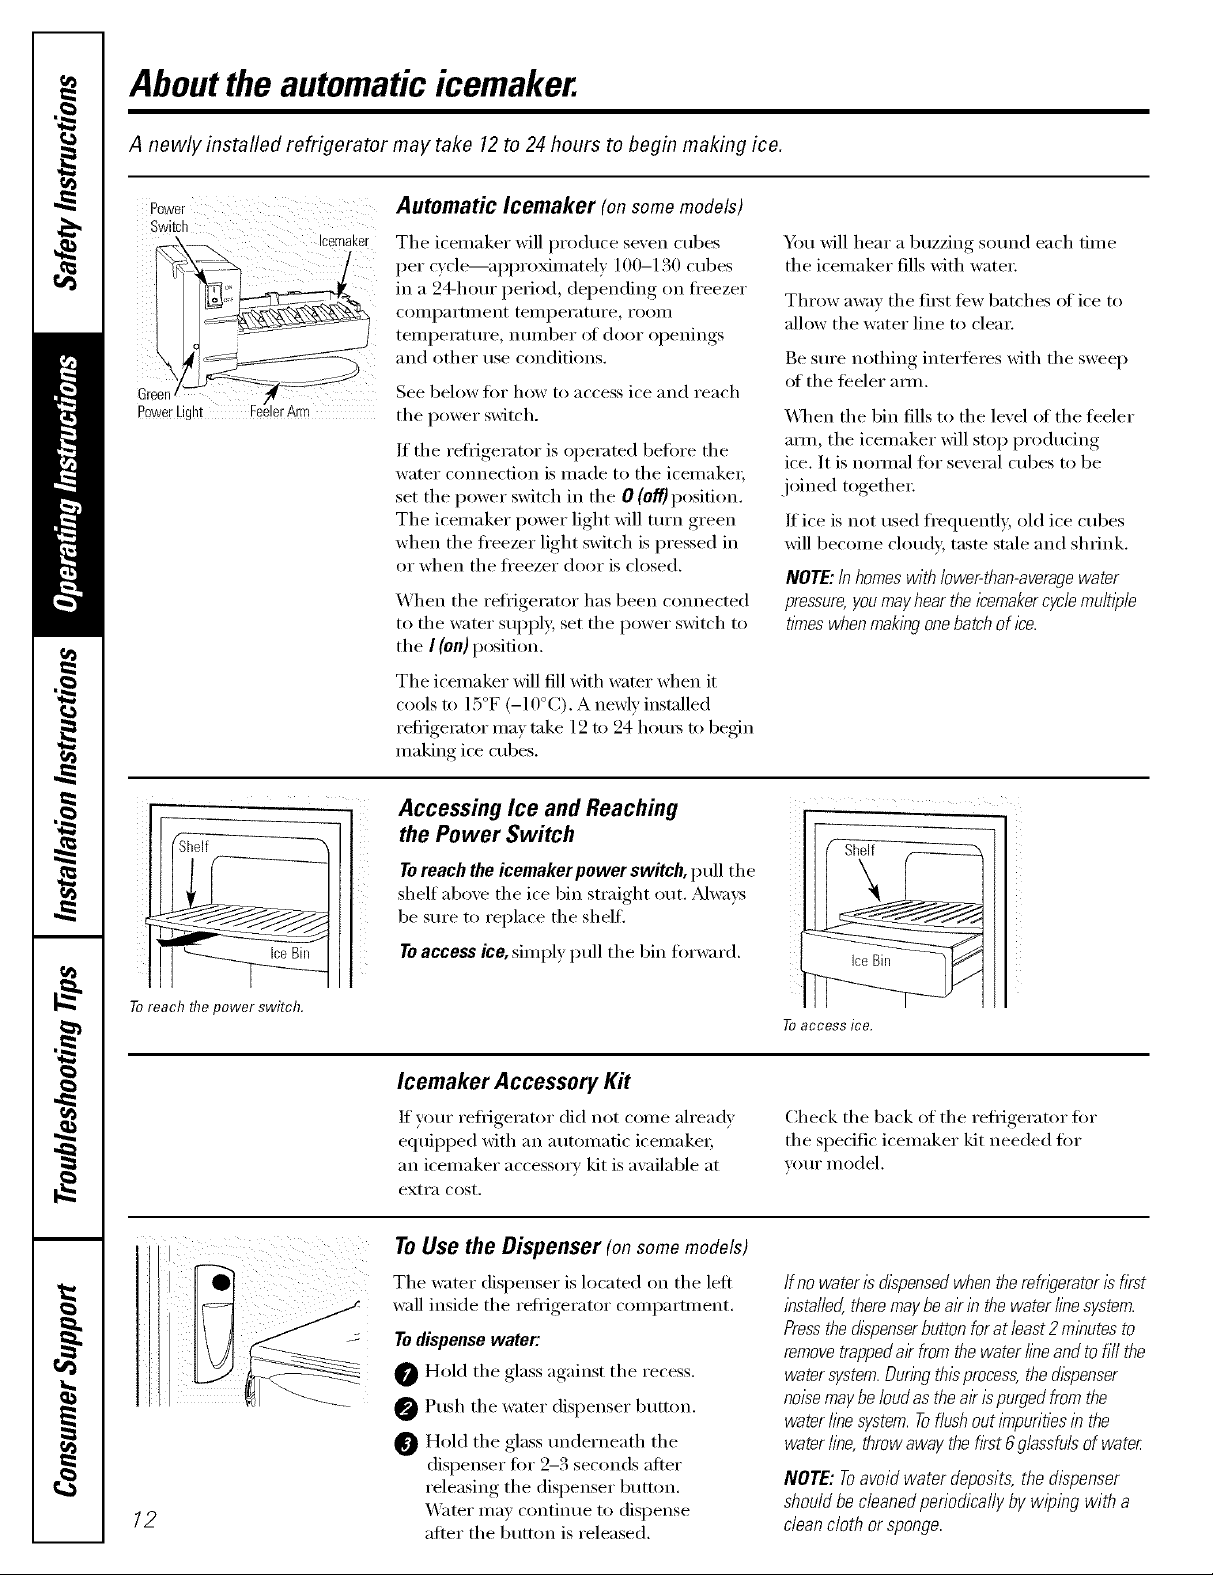
Aboutthe automaticicemaker.
A newly installed refrigerator may take 12to 24 hours to begin making ice.
Power Automatic lcemaker (onsomemodels)
Switch
¸¸¸¸¸¸¸¸¸¸¸¸¸¸¸¸¸¸
PowerLight eeer rm
The icemaker will produce se;en cubes
per c) cle_ai)i)roxinmtel,_ 100-130 cubes
in a 94-hour i)efiod, depending (m fl'eezer
COillpai'tlllent teillpei'att/i'e, i'OOill
temperatm'e, nmnber of door openings
and other use conditions.
See below for how to access ice and reach
the power switch.
If the refl_igerator is operated before the
water cmmection is made to the icemake_;
set the power switch in the 0 (off) position.
The icemaker power light will mrn green
when the fl'eezer light switch is pressed in
or when the fl'eezer door is closed.
When the reflJgerator has been connected
to the water sui)ply, set the power switch to
the I (on) position.
Tile icemaker Mll fill Mth water when it
cools to 15°F (-10°C). A newly installed
refi_igemtor may take 12 to 24 hems to beg_n
making ice cubes.
Y)u will hear a buzzing sotmd each tilne
the icemaker fills with water;
Throw away the first ti_w batches of ice to
allow the water line to clem:
Be sm'e nothing interti_res with the sweep
of the libeler amL
_&]_en the bin fills to the level {ff the teeler
aml, the icemaker will stop producing
ice. It is nomml ti)r several cubes to be
joined together:
If ice is not used frequenfl 5 old ice cubes
will become cloud}; taste stale and shrink.
NOTE: Inhomes with lower-than-averagewater
pressure,you mayhear theicemakercyclemu/t))/e
tknes whenmaking onebatchof ice.
Toreach the power switch.
i;i iiiiii!!iiiiiiiiiii!!i iii iii!i
12
Accessing Ice and Reaching
the Power Switch
Toreach the icemaker power switch, pull the
shelf above the ice bin straight out. _Mwaxs
be sure to replace the shell
To access ice, simply pull the bin fiwward.
Icemaker Accessory Kit
If your refligerator did not come ah'eadv
equil)ped with an automatic icemake_;
an icemaker accessory kit is available at
exti'a cost.
To Use the Dispenser (onsomemodels)
The water dispenser is located on the left
wall inside the reii_igerator compartment.
To dispense water:
Hold the glass against the recess.
Push the water dispenser button.
Hold the glass tmderneath tile
dispenser Ira" 2-3 seconds alier
releasing the dispenser button.
Water InaV continue to dispense
alter the buttoI_ is released.
7-0 aCCeSS ice,
Check the back of the refl_igerator for
the spedfic icemaker kit needed fi)r
VOI.II" nlodel.
If nowateris dispensedwhentherefwemtorisfirst
installed,theremaybeairin thewaterlinesystem.
Pressthedispenserbuttonforat/east2minutesto
removetrappedair fromthewaterfineandtoill/the
watersystem.Duringthisprocess,thedispenser
noisemaybeloudastheairispurgedfromthe
waterlinesystem.Toflushouti_npuritiesin the
waterline,throwawaythefirst6glassfulsofwater
NOTE:Toavoidwater deposits,thedispenser
shouldbecleanedperiodicaflyby wipingwitha
cleancloth orsponge.

Careand cleaningofthe refrigerator, vvww.GEAppliances.com
Cleaning the Outside
The doorhandles and trim. Clean with a cloth
daml)ened with soapy water: Dry with a sott
cloth. Do not use wax on the door handles
and trim.
Keep the outside clean. _A]l)e Mth a clean
cloth lightly dampened Mth kitchen
appliance wax or mild liqlfid dish
detergent. D_3' and polish with a clean,
soft cloth.
Do not wipe the refngerator with a soiled dish
cloth or wet towel Thesemay leave a residue
that can erode the pa/n_ Do not usescouring
pads,powdered cleaners, bleach or cleaners
contein/ng bleach because these products can
scratch and weaken the paint finish.
Cleaning the Inside
The stainless steel panels and doorhandles.
Stainless steel (on some models) can be
cleaned with a commerdallv available
stainless steel cleanex: A spray-on stainless
steel cleaner works best.
Do not use appliance wax or polish
on the stainless steel,
Tohelp prevent odors, leave an open be× _:,t
baking soda in the reflJgerator and fi'eezer
COIIII)_I I'[ll/ents.
Unplug the refrigerator before cleaning. If this
is not practical, wring excess moisture ()tit
of sponge or cloth when cleaning arotmd
switches, lights or controls.
Lrse an appliance wax polish on the inside
sml'hce between the do(n_.
Use warn/ water and baking soda solution--
about a tnblesl)oon (15 ml) of baking soda
to a quart (l liter) oI water: This both cleans
and neutralizes odo_. Rinse and wipe (h_'.
_Mter cleaning the door gaskets, apply a
thin layer of petrolemnjelly to the door
gaskets at the hinge side. This helps kee I)
the gaskets ti'om sticking and bending out
of shape.
Avoid cleaning cold glass shelves with hot water
because the extreme temperature difference may
cause them to break. Handleglass shelves
carefull_z Bumping tempered g/ass can cause
it to shatter
Donot washanyplasticrefrigeratorpartsin
thedishwasher
/3
 Loading...