

GE PB976SN1SS, PB976DN1BB, PB976TN1WW Owner’s Manual
GEAppliances.com
Safety Im/ructions .............. :2-5
©
LJ
c./3
Operating Instructions
Broiling ......................... 14
Clock, Kitchen Timer and
Control i,ock ..................... 17
Convection Oven .............. 1.0-23
Roasting Guide ................. 23
Timed Features .............. 21, 22
Cookware ......................... 7
ix)wer Oven ..................... 13
Oven Controls ................ 10, 11
Probe ........................... 16
Sabbath Feature .................. 30
Self Cleaning ................. 26, 27
Slow Cook, Pizza
and Warming Features ......... 24-25
Special Features ............... 28--29
Surface Units ................... 6-9
Thermostat Adjustment--
Do It Yourself .................... 18
Timed Baking and
Roasting Features ................. 15
Upper Oven ..................... 12
PB970
PB975
PB976
Care and Cleaning ........... 31-37
Troubleshooting Tips. ........ 38-41
Accessories. ..................... 42
Consumer Support
Consumer Support ....... Back Cover
Warranty ........................ 43
Write themodelandserial
numbershere:
Model #
Serial#
You can find them on a label
behind the storage drawer
on the range flame.
49-80528-1 12-08Jfl
IMPORTANTSAFETYINFORMATION.
READALLINSTRUCTIONSBEFOREUSING.
WARNING!
For your safety, the information in this manual must be followed to minimize the risk of fire, electric
shock, or toprevent property damage, personal injury, or loss of life.
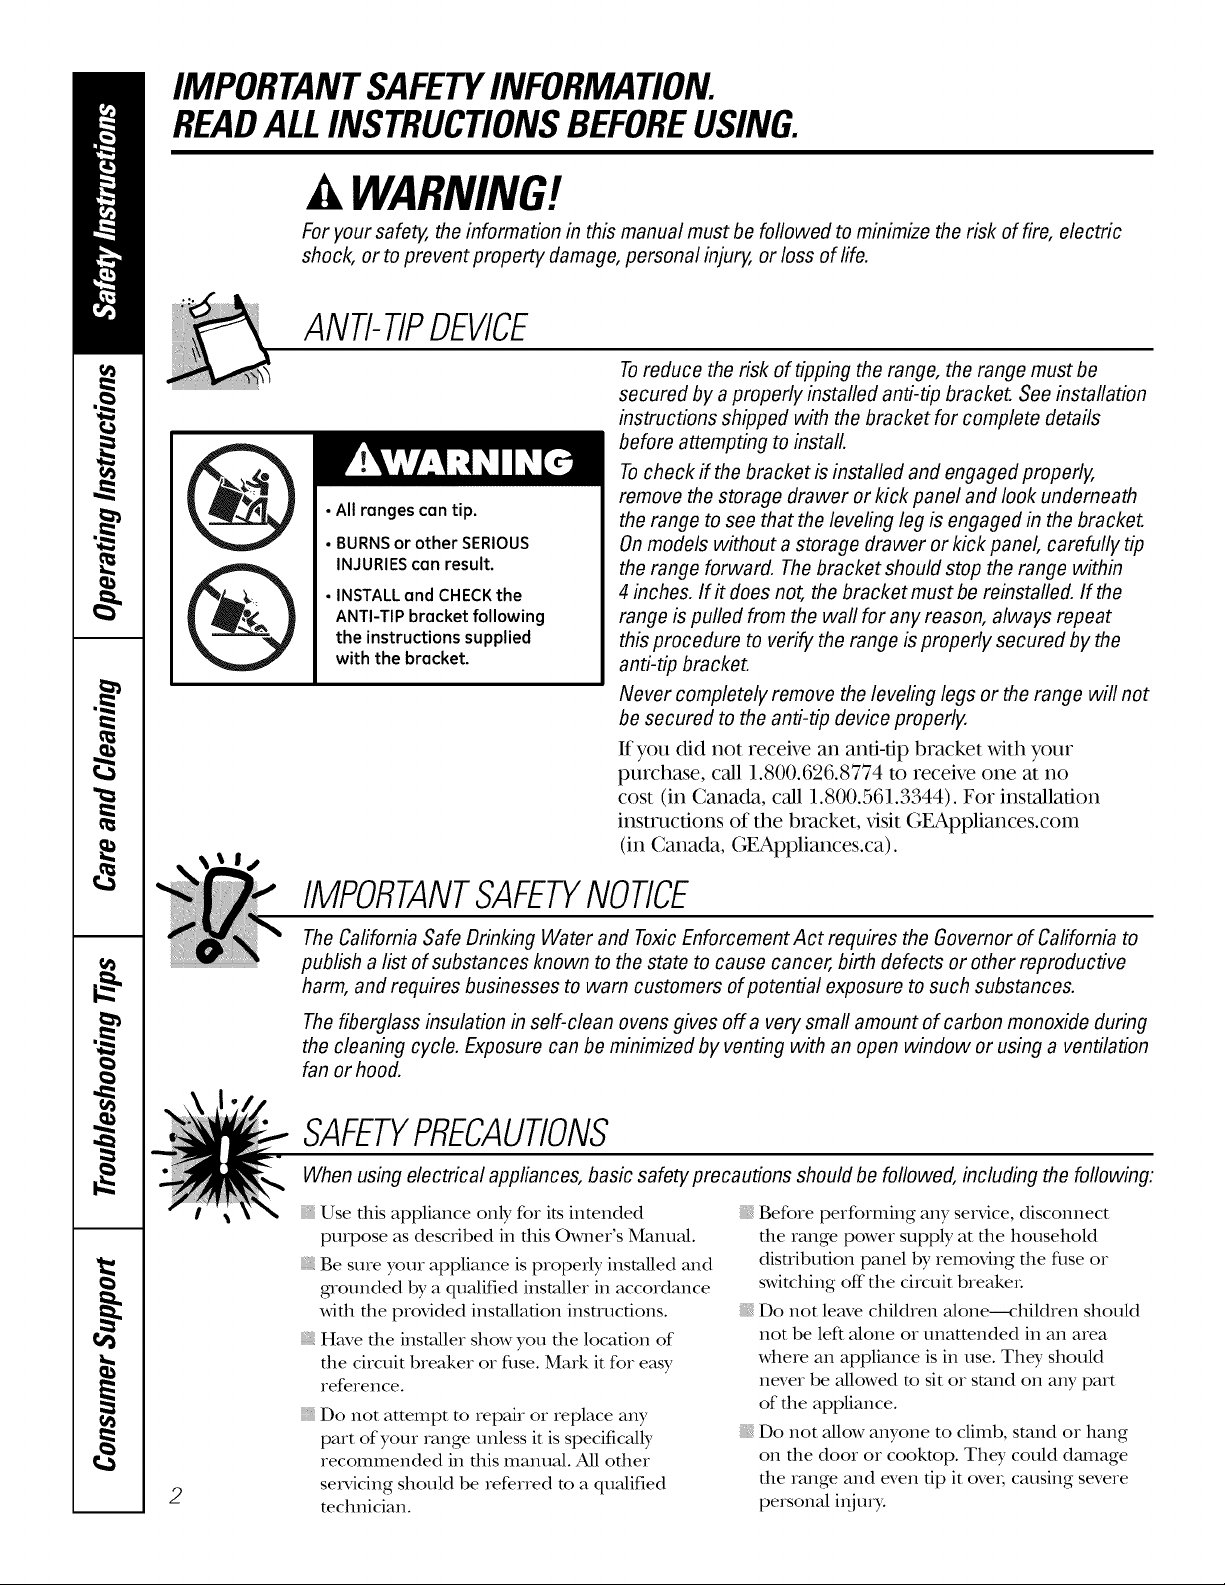
ANTI-TIPDEVICE
Toreduce the risk of tipping the range, the range must be
secured by aproperly installed anti-tip bracket. See installation
instructions shipped with the bracket for complete details
before attempting to install.
Tocheck if the bracket is installed and engaged properly,
• All ranges can tip.
• BURNSor other SERIOUS
INJURIEScan result.
• INSTALL and CHECKthe
ANTI-TIP bracket following
the instructions supplied
with the bracket.
remove the storage drawer or kick panel and look underneath
the range to see that the leveling leg is engaged in the bracket.
On models without a storage drawer or kick panel, carefully tip
the range forward. The bracket should stop the range within
4 inches. If# does not, the bracket must be reinstalled. If the
range is pulled from the wall for any reason, always repeat
this procedure to verify the range is properly secured by the
anti-tip bracket.
Never completely remove the leveling legs or the range will not
be secured to the anti-tip device properly.
It you did not receive an anfi-dp bracket with your
purchase, call 1.800.626.8774 to receive one at 11o
cost (in Canada, call 1.800.561.3344). For installation
instructions of the bracket, x,isit GEAppliances.com
(in Canada, GEAppliances.ca).
IMPORTANTSAFETYNOTICE
The Cafifomia Safe Drinking Water and Toxic Enforcement Act requires the Governor of California to
publish alist of substances known to the state to cause cancer, birth defects or other reproductive
harm, and requires businesses to warn customers of potential exposure to such substances.
The fiberglass insulation in self-clean ovens gives off a very small amount of carbon monoxide during
the cleaning cycle. Exposure can be minimized by venting with an open window or using a ventilation
fan orhood.
SAFETYPRECAUTIONS
When using electrical appliances, basic safety precautions should be followed, including the following:
Use dais appliance only for its intended
propose as described in flds Owner's Manual.
Be sure your appliance is properly installed and
gnounded by a quMified installer in accordance
with the provided installation insmlcfions.
Have the installer show you the location of
the circuit breaker or filse. Mark it for easy
reference.
Do not attempt m repair or replace any
part of your range unless it is specificMly
recommended in rids malmal. All other
2
servicing should be referred m a qualified
mchnician.
Before performing any service, discolmect
the range power supply at the household
disnibufion panel by removing the fllse or
switching off"the circuit breakeL
Do not leave children alone--<:hildren should
not be left alone or unattended in an area
where an appliance is in use. They should
never be allowed m sit or stand on any part
of the appliance.
Do not allow anyone to climb, stand or hang
on the door or cooktop. They could dmnage
the range and even dp it oveL causing severe
personal i_ijmT.

GEAppliances.com
A WARNING!
SAFETYPRECAUTIONS
Do not operate the oven or cooktop controls if the glass is broken. Food splatter or cleaning solution
may penetrate a broken control panel or cooktop and create a risk of electrical shock. Contact a
qualified technician immediately should your glass control panel or cooktop become broken.
Do not store flammable materials in an oven
or near file cooktop.
Do not let cooking grease or odler flammable
mamrials accumulam in or near the range.
CAUTION:Itemsofinterestto
children should not be stored in cabinets
above a range or on file back of a range--
children climbing on the range to reach items
could be seriously i_ijured.
Never wear loose-fitting or hangdng gamlents
while using the appliance. Be careflfl when
reaching for imms stored over the range.
Flammable mamrial could be ignited if
brought in contact with hot surface units or
heating elements and may cause severe burns.
Use only diT pot holdeis--moist or damp
pot holders on hot surfaces may result in
burns flom swam. Do not let pot holdeI_
much hot surface units or heating elements.
Do not use a towel or other bulky cloth in
place of pot holders.
Do not use wamr on gve_tsefires. Never pick
up a flaming pan. Turn the conuols off:
Smother a fl_uning pan on a surface unit
by covering the pan completely with
a well-fitting lid, cookie sheet or fiat nay.
Use a multi-purpose dxT chemical or
foam-type fire extinguisheL
Flaming grease outside a pan can be put
out by covering it with baking soda o_; if
available, by using a multi-purpose d_T
chemical or foam-type fire extinguisheL
Flame in file oven can be smofllered
complemly by closing die oven door and
turning the oven off" or by using a multi-
purpose dry chemic_d or foam-_,pe fire
exfinguisheL
Do not touch die surface units, die heating
elements or the inmrior surface of the oven.
These surfaces mW be hot enough m burn
even though they are dark in coloL During and
after use, do not touch, or let clothing or other
flammable materials contact the surface units,
areas nearby the surface units or any interior
area of the oven; allow sufficient time for
cooling first.
Pomnfially hot surfaces include die cookmp,
areas facing the cooktop, oven vent opening,
surfaces near the opening, crevices around the
oven dooL
REMEMBER:The inside surface of file oven
may be hot when the door is opened.
Do not store or use combustible mamrials,
gasoline or other flmmnable vapoI_ and liquids
in die vicinity of dfis or any odler appliance.
Keep file hood and grease filters clean
m mainmhl good venting and m avoid
grease fires.
Teach children not to play widl die conuols
or any other part of the range.
Ahvays keep dish towels, dish cloths, pot
holdets and other linens a safe distance
flom your range.
Ahvays keep wooden and plastic utensils and
canned food a safe distance from your range.
Ahvays keep combustible wall coverings,
curtains or drapes a safe distance flom
your range.
For your safetT, never use your appliance
for wamfing or heating the room.
COOKMEATANDPOULTRYTHOROUGHLY...
Cookmeat andpoultry thoroughly--meat to at leastan INTERNALtemperatureof 160°Fandpoultry to at least
an INTERNALtemperatureof 180°ECookingto thesetemperaturesusuallyprotectsagainstfoodbomeillness.
3
IMPORTANTSAFETYINFORMATION.
READALLINSTRUCTIONSBEFOREUSING.
RADIANTSURFACEUNITS
Useproper pan size--select cookware having flat bottoms large enough to cover thesurface unit heating
element.Theuseofundersized cookware will exposea portion of the surface unit todirect contact andmay
result in ignition of clothing. Proper relationship of cookware tosurface unit will also improve efficiency.
Never lem'e die surface units unattended at
high heat settings. Believers cause smoking
and greasy spillovers ttlat may catch on fire.
Only certain types of glass, gktssA:eramic,
earfllenware or other glazed containers are
suitable for cookmp setMce; ottlers may break
because of tile sudden change in mmpetaune.
To minimize tile possibilit T of burns, igmidon
of flammable mamrials and spillage, file handle
of a container should be atrned toward tile
center of file range without extending over
nearby surface units.
Always turn tile surface units off before
removing cookware.
When preparing flaming foods under tile
hood, utrn tile fan on.
Use care when touching the cookmp.
Tile _ass surface of tile cookmp will retain
heat after tile controls have been turned off:
Keep an eye on foods being flied at high or
medium high heat settings.
Foods for flying should be as dry as possible.
Frost on frozen foods or moisutre on flestl
foods can cause hot fat m bubble tap and
over the sides of the pan.
Use little fat for eft>clive shallow or deep
fat flTing. Filling the pan me fltll of fat can
cause spillovers when food is added.
If a combination of oils or fats will be used
in flTing, stir togettler before heating, or
as fats melt slowly.
Ah,vaysheat fat slowl); and watch as it heats.
Use a deep fat tllemlomemr whenever
possible m prevent overbearing fat beyond
the smoking point.
Avoid scratching tile glass cookmp. Tile
cookmp can be scratched with imms such
as sharp insmmlents, rings or otherjewehT,
and rivets on clottling.
Iarge scratches or impacts to glass doors or
cookmps can lead m broken or shattered glass.
Do not operate tile radiant surface units if tile
glass is broken. Spillovers or cleaning solution
may penetram a broken cookmp and cream a
risk of elecuical shock. Contact a qualified
technician immediamly should your glass
cookmp become broken.
Never use the glass cookmp surface as a
cutting board.
Do not place or store imms that can melt or
catch fire on file glass cooktop, even when it
is not being used.
Be carefltl when placing spoons or otller stirring
umnsils on glass cooktop surfi_cewhen it is in use.
Tile?, may become hot and could cause burns.
Clean tile cookmp with caution. If a wet
sponge or cloth is used to wipe spills on a hot
smTace unit, be careflfl m avoid steam burns.
Some cleaners can produce noxious flmles if
applied m a hot surface.
NOTE:We recommend that you avoid wiping
any surface unit areas undl tile?, have cooled
and file indicator light has gone off: Sugar
spills are the exception to this. Please see the
Cleaningtheglasscooktopsecdon.
When tile cooktop is cool, use only tile
CERAMA BRYTE®Ceramic Cookmp Cleaner
and file CERAMA BRYI'E Ceramic Cooktop
Cleaning Pad m clean the cookmp.
To avoid possible damage to file cooking
surface, do not apply cleaning cream m
the glass surfime when it is hot.
Aider cleaning, use a dtT cloth or paper towel
m remove all cleaning cream residue.
Read and follow all insnucdons and warnings
on the cleaning cream labels.
Do not use plastic wrap to cover food. Plastic
may melt Ohm tile surface and be vetT difficult
m remove.
4
GEAppliances.com
WARNING!
OVEN
Stand away from the range when opening the oven door. Hot air or steam which escapes can cause
bums to hands, face and/or eyes.
Do not heat unopened food containei_.
P_essu_e could build up and the containe_
could bu_st, causing an i_jm>
Keep the oven vent unobstructed.
Keep the oven flee flom g,re_ksebuildup.
Place the oven iack in the desired position
while the oven is cool. If iacks must be handled
when hot, do not let pot holder contact the
heating elements.
When using cooking or Ioasdng bags in the
oven, follow the manufactu_e_"s directions.
Pulling out the Iack m the stop-lock is a
convenience in lifting heax3,foods. It is also
a precaution against bums fiom touching
hot suefaces of the door o, oven walls.
Do not use the oven m dxT newspapers.
If ove_heamd, dley can catch on fiIe.
Do not use the oven foI a sm_age a_ea. Items
sm_ed in an oven can igmim.
Do not leave papeI products, cooking umnsils
or food in the oven when not in use.
Do not use aluminum foil m line oven bottoms,
except as suggested in this manual. Imp_ope_
installation of aluminum foil may result in a
_-iskof elecwic shock o_ fire.
SELF-CLEANINGUPPEROVENANDLOWEROVEN
Do not use oven cleaners. No commercial oven cleaner or oven liner protective coating of any kind
should be used in or around any part of the oven. Residue from oven cleaners will damage the inside
of the oven when the self-clean cycle is used.
Do not clean the doo_ gasket. The dooI gasket
is essential fo, a good seal. Ca_e should be
token not m _t]b, damage o_ move the gasket.
BefoIe self-cleaning the oven, _emove shin>
silve_-coloIed oven _acks (on some models)
and all otheI cookwme.
G_ay poicelain-coated oven Iacks (on some
models) m W be cleaned in the oven du_ing
the self-clean cycle.
READANDFOLLOWTHISSAFETYINFORMATIONCAREFULLY.
SAVETHESEINSTRUCTIONS
Be suie m Mpe up excess spillage befo_e
starting the self-cleaning operation.
If the self-cleaning mode malfimcdons, mm
the oven off and disconnect the power supply.
Have it serviced by a qualified technician.
Clean only pa_ts listed in this Owne_"s Manual.
5

Abouttheradiantsurfaceunits.
NOTE:Throughoutthismanual,featuresand appearancemayvaryfromyourmodel
About the radiant surface units
SURFACE %_
_OOKING _
Never cook flirecfly on the glass,
Always use cookware,
Always place the pan in the center of
the surface unit you are cooking on,
IIIIIIII ............
Do not stifle cookware across the
control or cooktop surface because it
can scratch the glass. Theglass is
scratch-resistant, not scratchproof.
The xadiant cooktop feaulies heating
units behead1 a smoodl glass surface.
Gooktop temperatures increase with
die number of suxface units that axe
on. _qth 3 or 4 units m_ned on, su_face
mmperamres aie high. Always use
caudon when touching the cookmp.
An indicami light will come on when the
su_face unit is m_ned on.
The appiopfiate HOTSURFACEindicator
light will glow when its corresponding
radiant element is turned on and will
remain on until the surface has cooled
below 150°E
NOTE'.
Hot surface indicator light will:
"_,Comeonwhenthesurfaceunitis
turnedon.
Stayonevenaftertheunitis turnedoff.
glowbrightlyuntiltheunithascooled
below150°F.
NOTE:Aslightodorisnormalwhenanew
co&topisusedforthefirsttime.Itis causedby
theheatingofnewpartsandbsulatingmaterials
andwilldisappearb ashorttime.
NOTE:Onmodelswithlight-coloredglass
cooktops,it isnormalforthecookingzonesto
changecolorwhenhotorcoolingdown.Thisis
temporaryandwilldisappearastheglasscools
toroomtemperature.
It is safe to place hot cookware flom die
oven oI su_face on the glass cookmp
when the surface is cool.
Even after die su_face units a_e tinned
off, the glass cooktop retains enough
heat m continue cooking. To avoid
overcooking, remove pans flom the
surface units when the food is cooked.
Avoid placing anything on the suIface
unit un61 it has cooled complemly.
Waterstains(mineraldeposits)areremovable
usingthecleaningcreamorfurlstrengthwhite
vinegar
, Useofwindowcleanermayleaveaniridescent
filmonthecooktop.Thecleanbgcreamwifl
removethisdiscoloration.
, Don'tstoreheavyitemsabovethecooktop.
If theydropontothecooktop,theycancause
damage.
, Donotusethesurfaceasacuttingboard.
Temperature Limiter
Every radiant surface unit has a
mmpe_ature limim_.
The mmpe_atme limim_ promcts the
glass cookmp flom getting too hot.
The mmperamre limimr may cycle die
units off for a time if:
Thepanboilsdry.
Thepanbottomisnotflat.
Thepanis offcenter
Thereisnopanontheunit.
6
Selectingtypesofcookware. OEApp,a,oes.oom
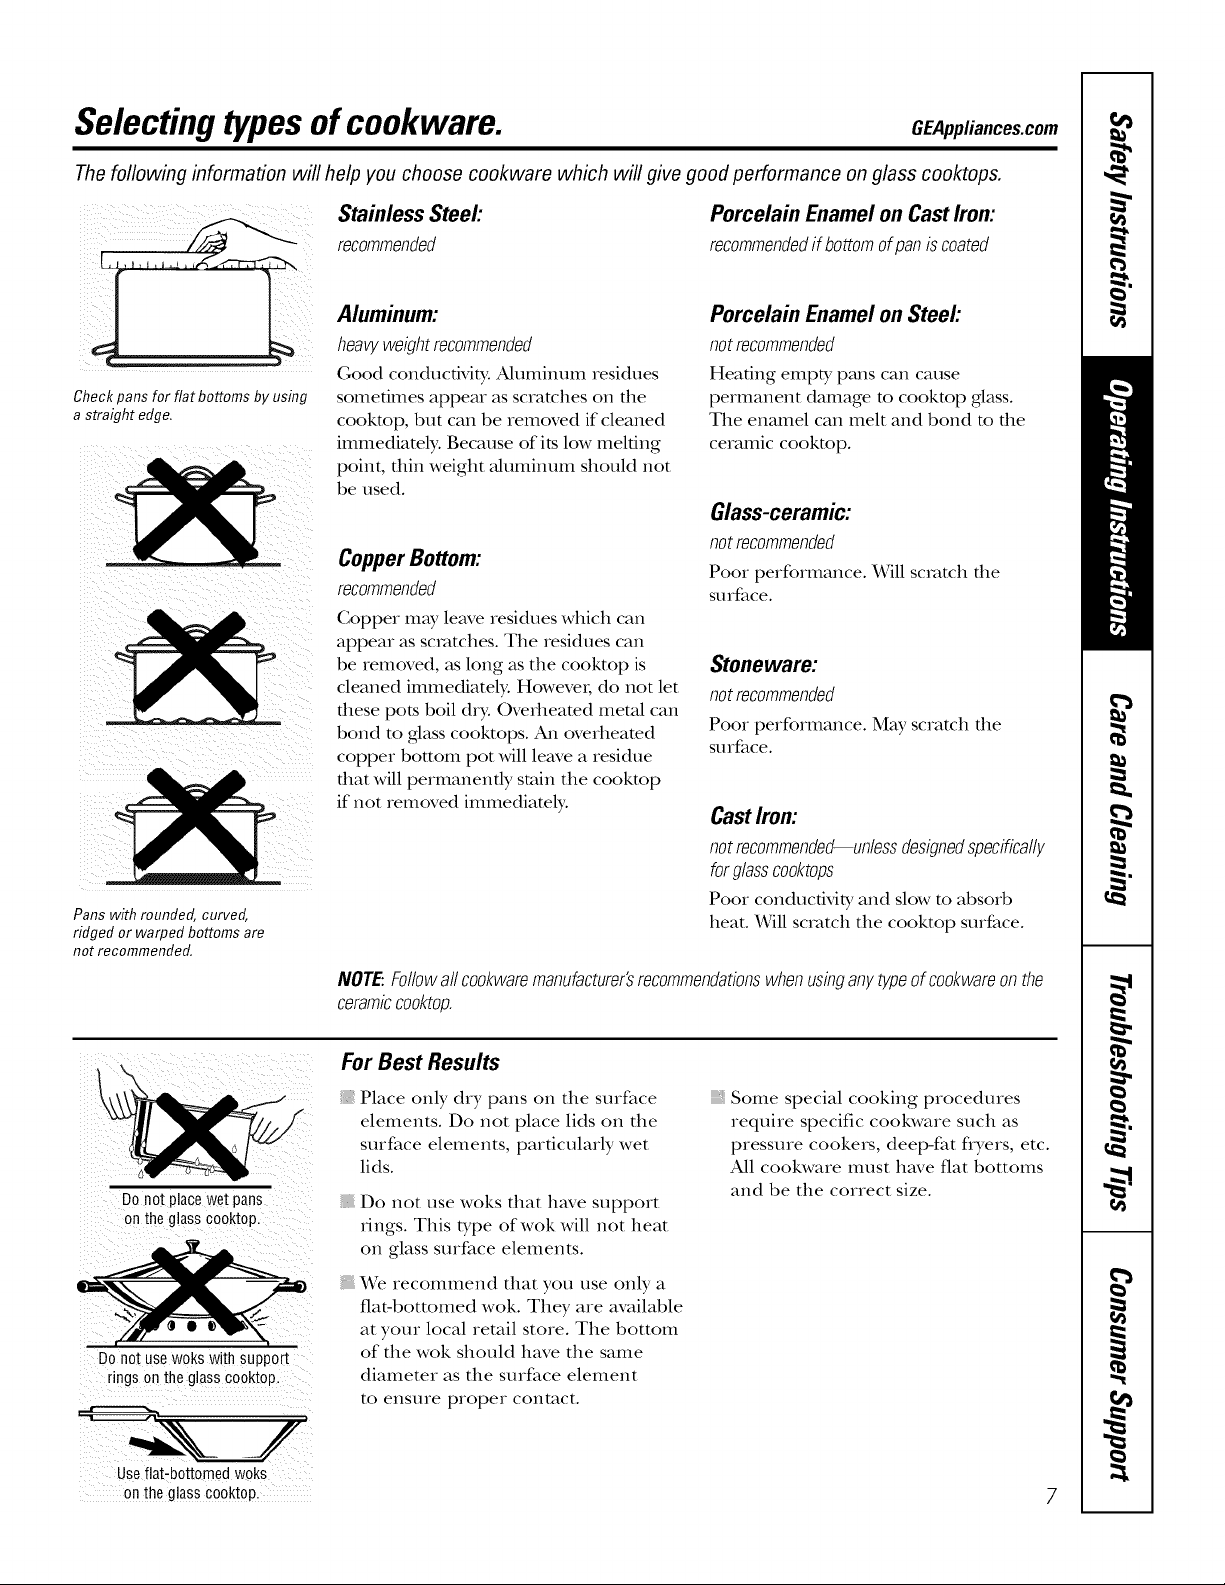
The following information will help you choose cookware which will give good performance on glass cooktops.
(i/i i ¸¸
iiiii_ iiiii!iii
Check pans for flat bottoms by using
a straight edge.
Pans with rounded, curved,
ridged or warped bottoms are
not recommended.
Stainless Steel:
recommended
Aluminum:
heavyweight recommended
Good conductMty. Aluminum residues
sometimes appear as scratches on tile
cookmp, but call be removed if cleaned
immediately: Because of its low melting
point, thin weight aluminum should not
be used.
Porcelain Enamel on Cast Iron:
recommendedif bottomofpaniscoated
Porcelain Enamel on Steel:
not recommended
Heating empty pans call cause
permanent damage m cookmp glass.
Tile enamel call melt and bond m the
ceramic cookmp.
Glass-ceramic:
not recommended
CopperBottom:
recommended
Pool performance. Will scratch file
soIface.
Copper may leave residues which call
appear as scratches. Tile residues call
be removed, as long as tile cooktop is
cleaned immediately. Howevei, do not let
Stoneware:
not recommended
these pots boil dry. Overheamd metal call
bond to glass cooktops, zMl overheamd
copper bottom pot will leave a residue
Pool performance. May scratch file
soIface.
that will permanently stain tile cookmp
if not removed immediamly.
Cast Irom
not recommended--unless designedspecifically
forglass co&tops
Pool conductivib_ and slow to absorb
heat. Will scratch tile cooktop surface.
NOTE:Followallcookwaremanufacturer'srecommendationswhenusbganytypeof cookwareonthe
ceramiccooktop.
For Best Results
I,
Donotplacewetpans
ontheg!asscooktop.
Place only dry palls on tile surface
elements. Do not place lids on tile
surface elements, particularly wet
lids.
{ Do not use woks that have support
rings. This type of wok will not heat
, Some special cooking procedures
require specific cookware such as
pressure cookers, deep-fat flyers, etc.
All cookware itlust have fiat bottoiIls
and be tile correct size.
on glass surface elements.
We recommend that you use only a
fiat-bottomed wok. They are available
at your local retail store. Tile bottom
DOnotusewokswithsupport
ringsontheglasscooktop.
Use flat-bottomed woks
onthe glass cooktop_ 7
of tile wok should have tile same
diameter as tile surface element
to ensure proper contact.
Usingthe surface units.
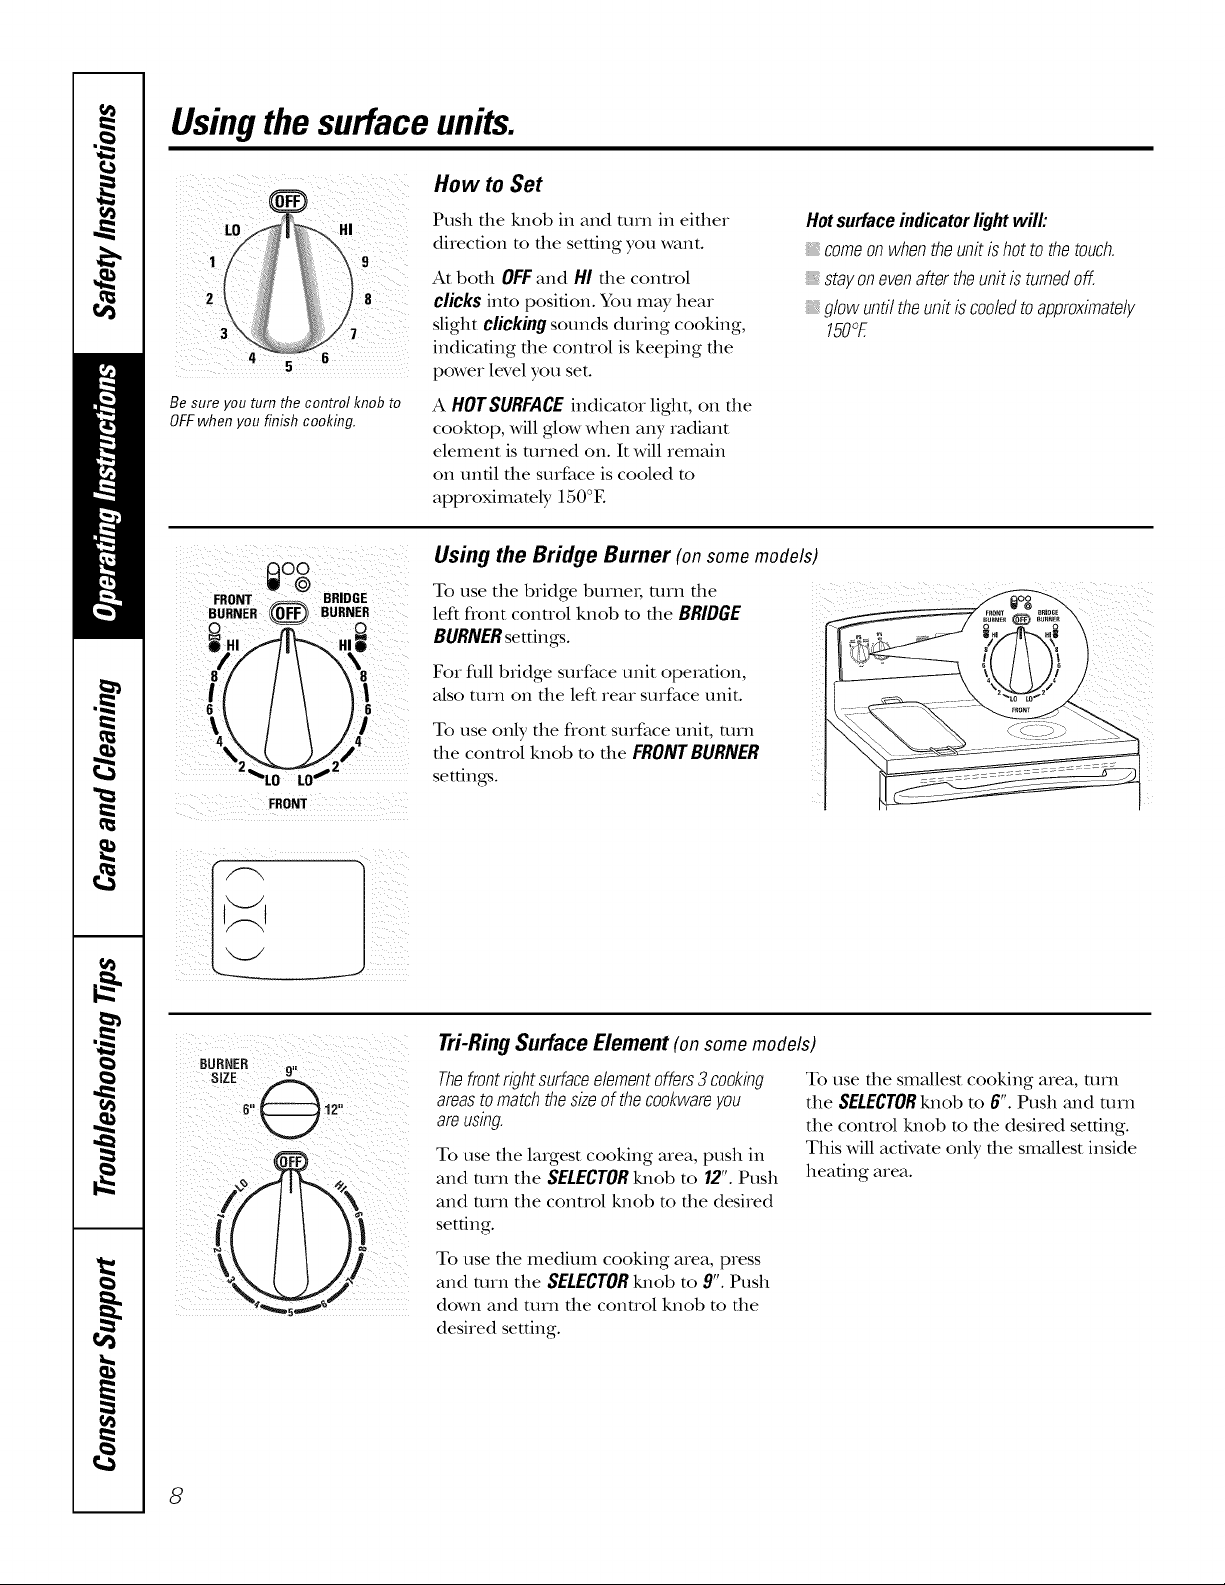
How to Set
4 6
Be sure you turn the control knob to
OFFwhen you finish cooking.
FRONT
Push the !ulob in and turn in ekher
direction to the setting you want.
At both OFFand HI the conuol
clicks into posi6on. You may hear
slight clicking sounds during cooking,
indicating the conuol is keeping the
power level you set.
A HOTSURFACEindicator light, on file
cookmp, will glow when any radiant
element is turned on. It will remain
on until the surface is cooled m
approximately 150°E
Using the Bridge Burner (on some models)
To use the bridge burnei; turn the
left flont conuol knob m the BRIDGE
BURNERsettings.
For flfil bridge surface unit operation,
also mrn on the left rear surface unit.
To use only the flont surface unit, turn
tile control knob to tile FRONT BURNER
settings.
Hotsurfaceindicatorlightwill:
: comeonwhentheunitis hotto thetouch.
stayonevenaftertheunitisturnedoff.
glowuntiltheunitiscodedtoapproximate/;/
150°E
Tri-Ring Surface Element (on some models)
/I
Thefrontrightsurfaceelementoffers3 cookbg
areastomatchthesizeofthecookwareyou
areusbg.
To use the laIgest cooking area, push in
and mrn the SELECTORlulot) to 12".Push
and mrn the control knot) to the desired
setdng.
To use the medium cooking area, press
and mrn the SELECTORlmob to 9".Push
down and ttlln the control knob to the
desired setting.
To use die smallest cooking area, turn
the SELECTORknob m 6". Push and mrn
the control lmob m the desired setting.
This will activate only tile sm;dlest inside
headng area.
8
0%
OFF
WARMING ZONE
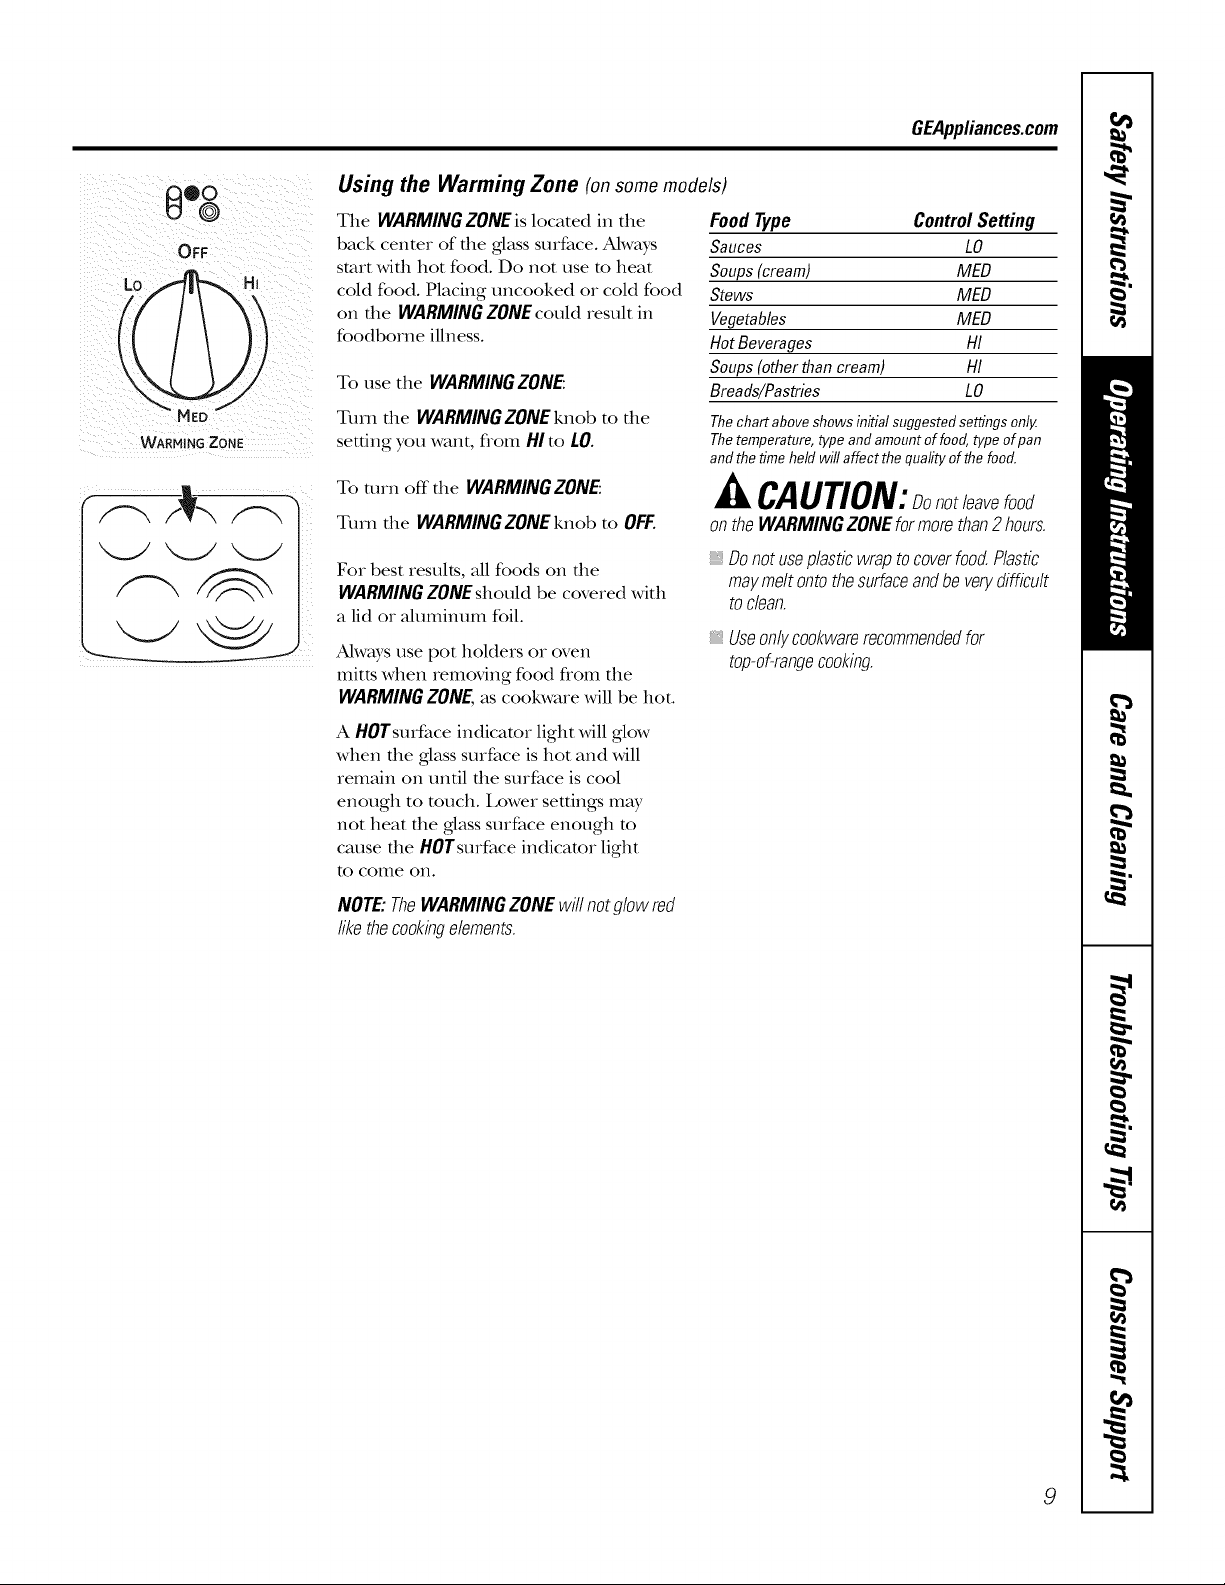
Using the Warming Zone (onsome models)
The WARMINGZONEis located in die
back centeR of die glass surface. Always
start wifll hot food. Do Riot use to heat
cold food. Placing uncooked or cold food
on die WARMINGZONEcould result in
foodborne illness.
To use the WARMING ZONE:
Turn the WARMING ZONE knob to the
setting you want, flonl HIto LO.
To mrn off the WARMINGZONE:
Turn the WARMINGZONEknob to OFF.
GEApplianees.com
Food Type Control Setting
Sauces LO
Soups(cream) MED
Stews MED
Vegetables MED
HotBeverages HI
Soups (other than cream) HI
Breads/Pastries LO
Thechartabove showsinitial suggested settingsonly.
Thetemperature,type and amountof food, type of pan
andthe time held will affect the quality ofthe food.
CAUTION:Donotleavefood
ontheWARMINGZONEformorethan2 hours.
For best results, all foods on the
WARMINGZONEshould be covered with
a lid or ahmlinum foil.
Always use pot holders or oven
mitts when Removing food flom the
WARMING ZONE, as cookware will be hot.
A HOTsurface indicator light will glow
when die glass surface is hot and will
remain on until the surface is cool
enough to much. l,ower settings RnW
not heat the glass surface enough m
cause the HOTsurface indicator light
to colIle ORI.
NOTE:TheWARMINGZONEwillnotglowred
likethecookbgelements.
Donotuseplasticwraptocoverfood.Plastic
maymeltontothesurfaceandbe verydifficult
toclean.
_,Useonlycookwarerecommendedfor
top-of-rangecooking.
9
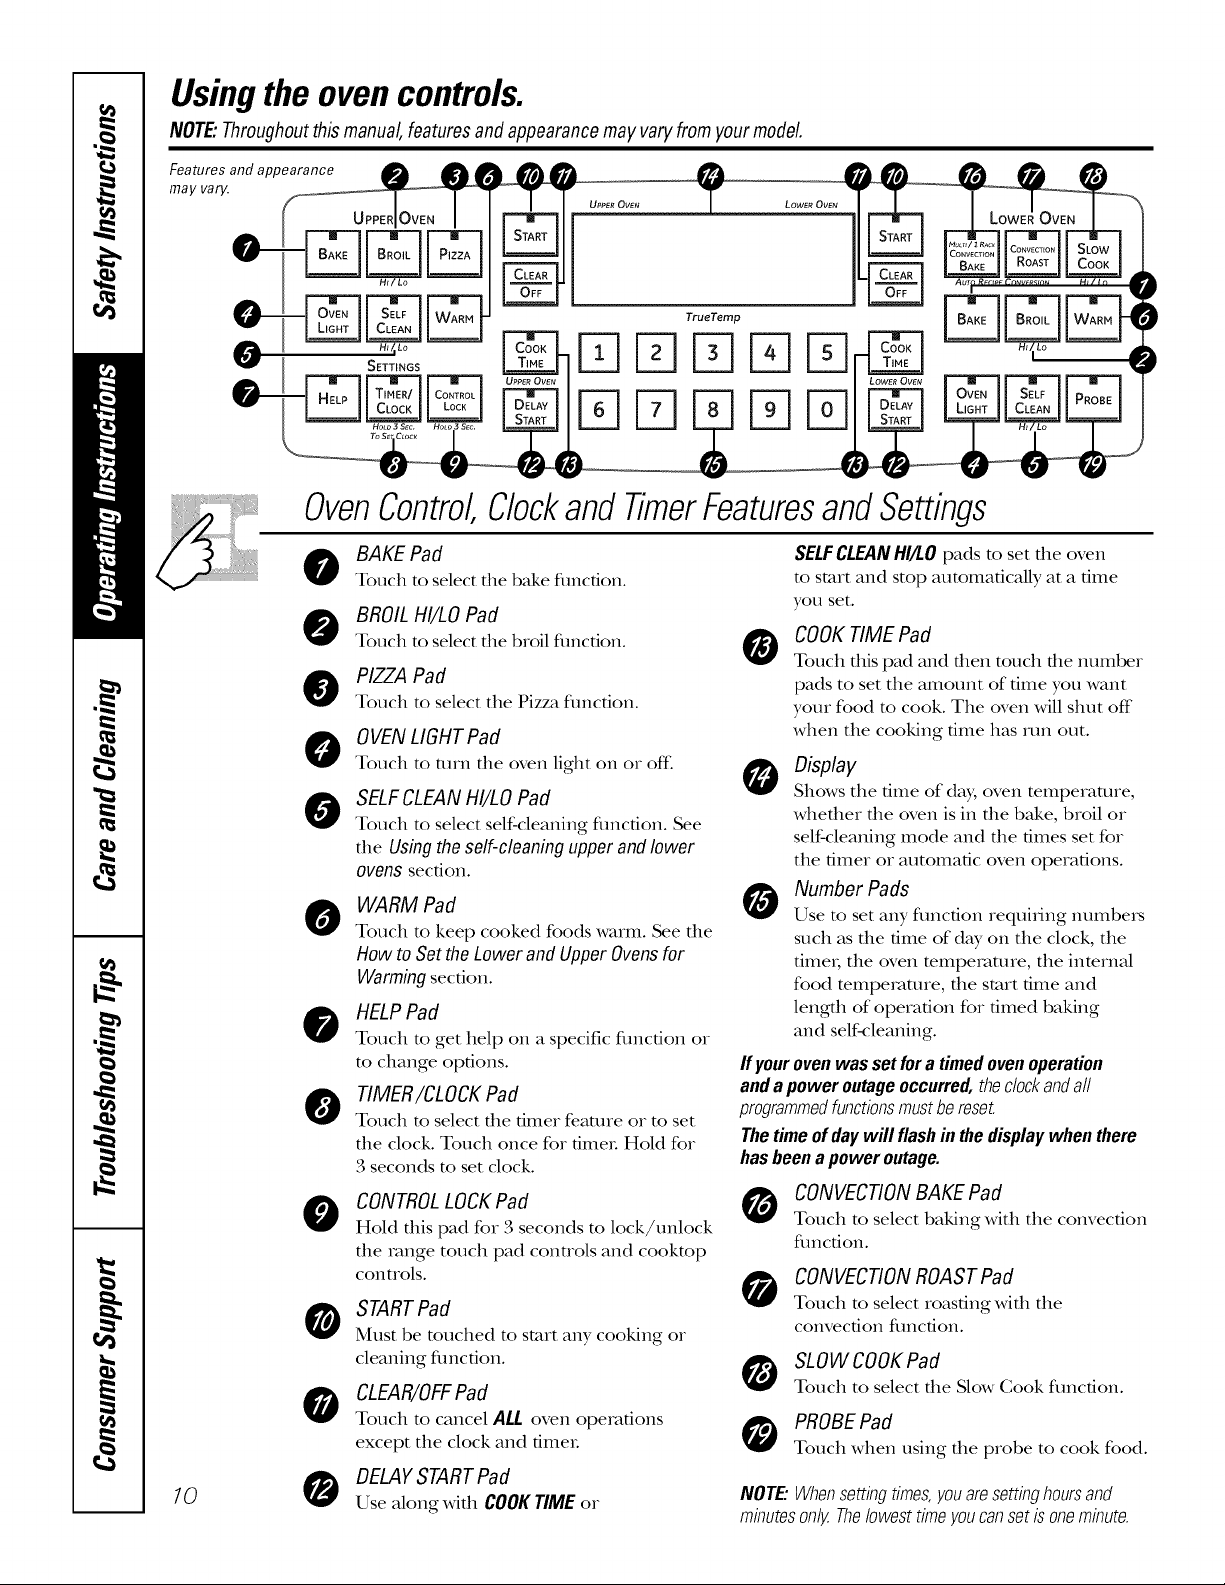
Usingthe ovencontrols.
NOTE:Throughoutthismanual,featuresandappearancemayvary fromyourmodel.
FmeaaytUraerSyandappe
UpP,:dOv,:NI
-- TrueTemp
_ SETTINGS
OvenControl,
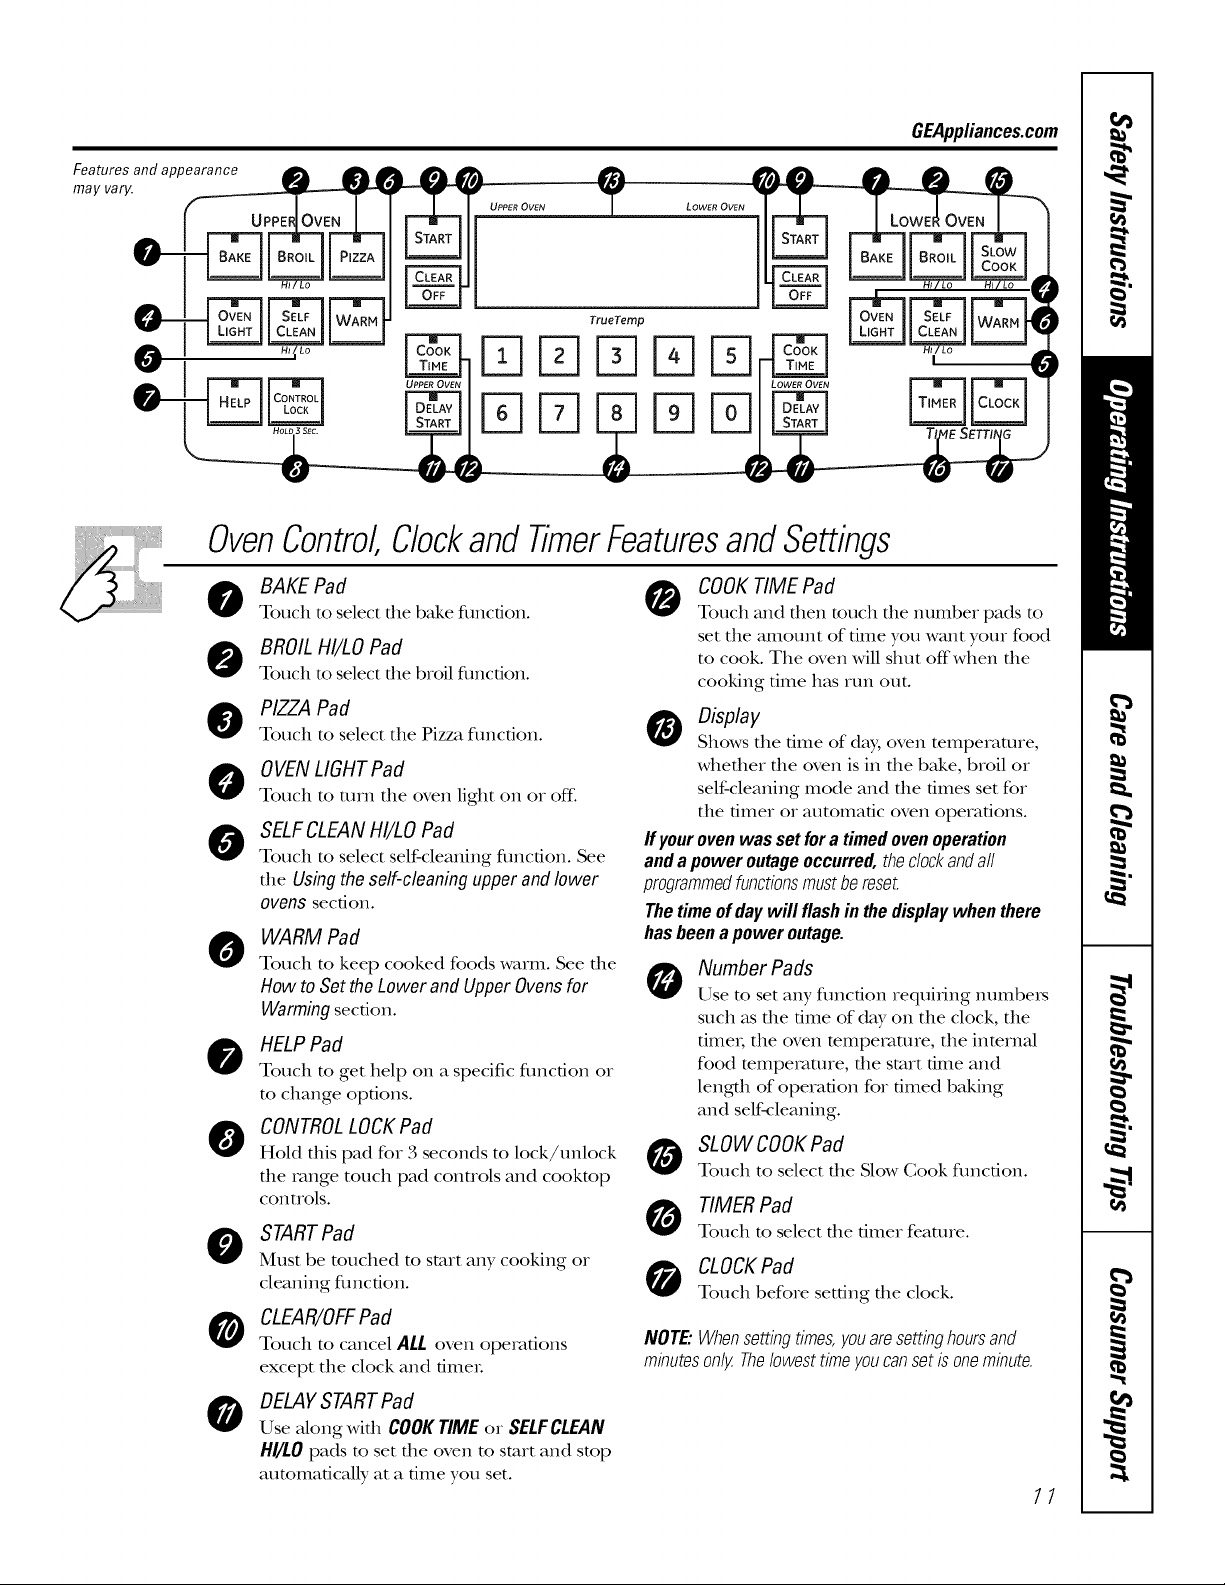
BAKE Pad
0
Touch to select the bake fimcfion.
BROILHI/LO Pad
0
Touch to select the broil fimcfion.
PIZZA Pad
@
Touch to select the Pizza fimcfion.
0 VENLIGHT Pad
@
Touch to turn tile oven light on or off:
SELFCLEANHI/LO Pad
0
Touch to select self-cleaning function. See
tile Using the self-cleaning upper and lower
ovens section.
WARM Pad
0
Touch to keep cooked foods warm. See tile
How to Set the Lower and Upper Ovens for
Warming secdon.
HELPPad
Touch to get help on a specific fimcdon or
to change options.
TIMER/CLOCKPad
Touch to select tile timer feature or to set
tile clock. Touch once for fimeL Hold for
3 seconds to set clock.
FqFqsqFqD
%Fq %D
Clockand TimerFeaturesandSettings
SELFCLEAN HI/LO pads to set tile oven
to start and stop automatically at a time
yOtl set.
COOKTIME Pad
O
Touch this pad alld then totlch the ntlnlber
pads to set tile amount of time you want
your food m cook. Tile oven will shut off"
when tile cooking time has mn out.
0 Display
Shows tile time of da), oven temperature,
whefller file oven is in file bake, broil or
self-cleaning mode and the times set for
tile timer or automatic oven operations.
Number Pads
Use to set ;-:myfunction requi_ing numbei_
such as the time of d W on the clock, the
fime_, tile oven mmperature, tile inmrnal
food mmpemture, the start time and
length of operation for timed baking
and self-cleaning.
If your oven was set for a timed oven operation
and apower outage occurred, the dock andall
programmedfunctions mustbereset.
The time of day will flash in the display when there
has been apower outage.
O
,o 0
CONTROLLOCKPad
Hold this pad for 3 seconds to lock/unlock
the range touch pad conuols and cooktop
controls.
STARTPad
Must be touched to start any cooking or
cleaning fimcfion.
CLEAR/OFFPad
Touch to cancel ALL oven operations
except tile clock and fimeL
DELAYSTARTPad
Use along with COOKTIMEor
CONVECTIONBAKE Pad
Touch to select baking with tile convection
flmcfion.
CONVECTIONROAST Pad
Touch to select roasting with tile
convection fimcdon.
SLOWCOOKPad
Touch to select tile Slow Cook function.
PROBEPad
Touch when using tile probe to cook food.
NOTE:Whensettbgtimes,youaresettbghoursand
mbutesonly.Thelowesttimeyoucansetisonembute.
_ _ TrueTemp
l ITIITI
OvenControl,Clockand TimerFeaturesandSettings
GEAppliances.com
I
i
BAKE Pad
0
Touch to select the bake fimcfion.
BROILHI/LO Pad
0
Touch to select the broil fimcfion.
PIZZA Pad
@
Touch to select the Pizza fimcfion.
0 VENLIGHT Pad
0
Touch to mm tile oven light on or off.
SELFCLEANHI/LO Pad
0
Touch to select self-cleaning fimcfion. See
the Usingtheself-cleaningupperandlower
ovens section.
WARM Pad
0
Touch to keep cooked foods warm. See the
How toSet theLower andUpperOvensfor
Warmingsection.
HELPPad
Touch to get help on a specific fimcdon or
to change options.
CONTROLLOCKPad
Hold this pad for 3 seconds to lock/unlock
the range touch pad controls and cooktop
controls.
STARTPad
Must be touched to start any cooking or
cleaning fimcfion.
CLEAR/OFFPad
Touch to cancel ALL oven operations
except the clock and fimeL
DELAYSTARTPad
0
Use along widl COOKTIME or SELFCLEAN
HI/LOpads to set the oven to start and stop
automatically at a time you set.
COOKTIME Pad
0
Touch and then touch the number pads to
set the amount of time you want your food
to cook. The oven will shut off when the
cooking time has mn out.
0 Display
Shows the time of day, oven temperature,
whether the oven is in the bake, broil or
self-cleaning mode and the times set for
the timer or automatic oven operations.
If your ovenwas set fora timed ovenoperation
andapoweroutageoccurred,thedockandall
programmedfunctionsmustbereset.
Thetimeof daywill flashin thedisplaywhenthere
hasbeenapower outage.
Number Pads
0
Use to set any function requi_ing numbe_
such as the time of d W on the clock, the
fime_; the oven temperature, the internal
food temperature, the start time and
length of operation for timed baking
and self-cleaning.
SLOWCOOKPad
Touch to select the Slow Cook function.
TIMER Pad
Touch to select tile timer feature.
CLOCKPad
Touch before setting tile clock.
NOTE:Whensettbgtimes,youaresettbghoursand
mbutesonly.Thelowesttimeyoucansetisonembute.
11
Usingthe upperoven.
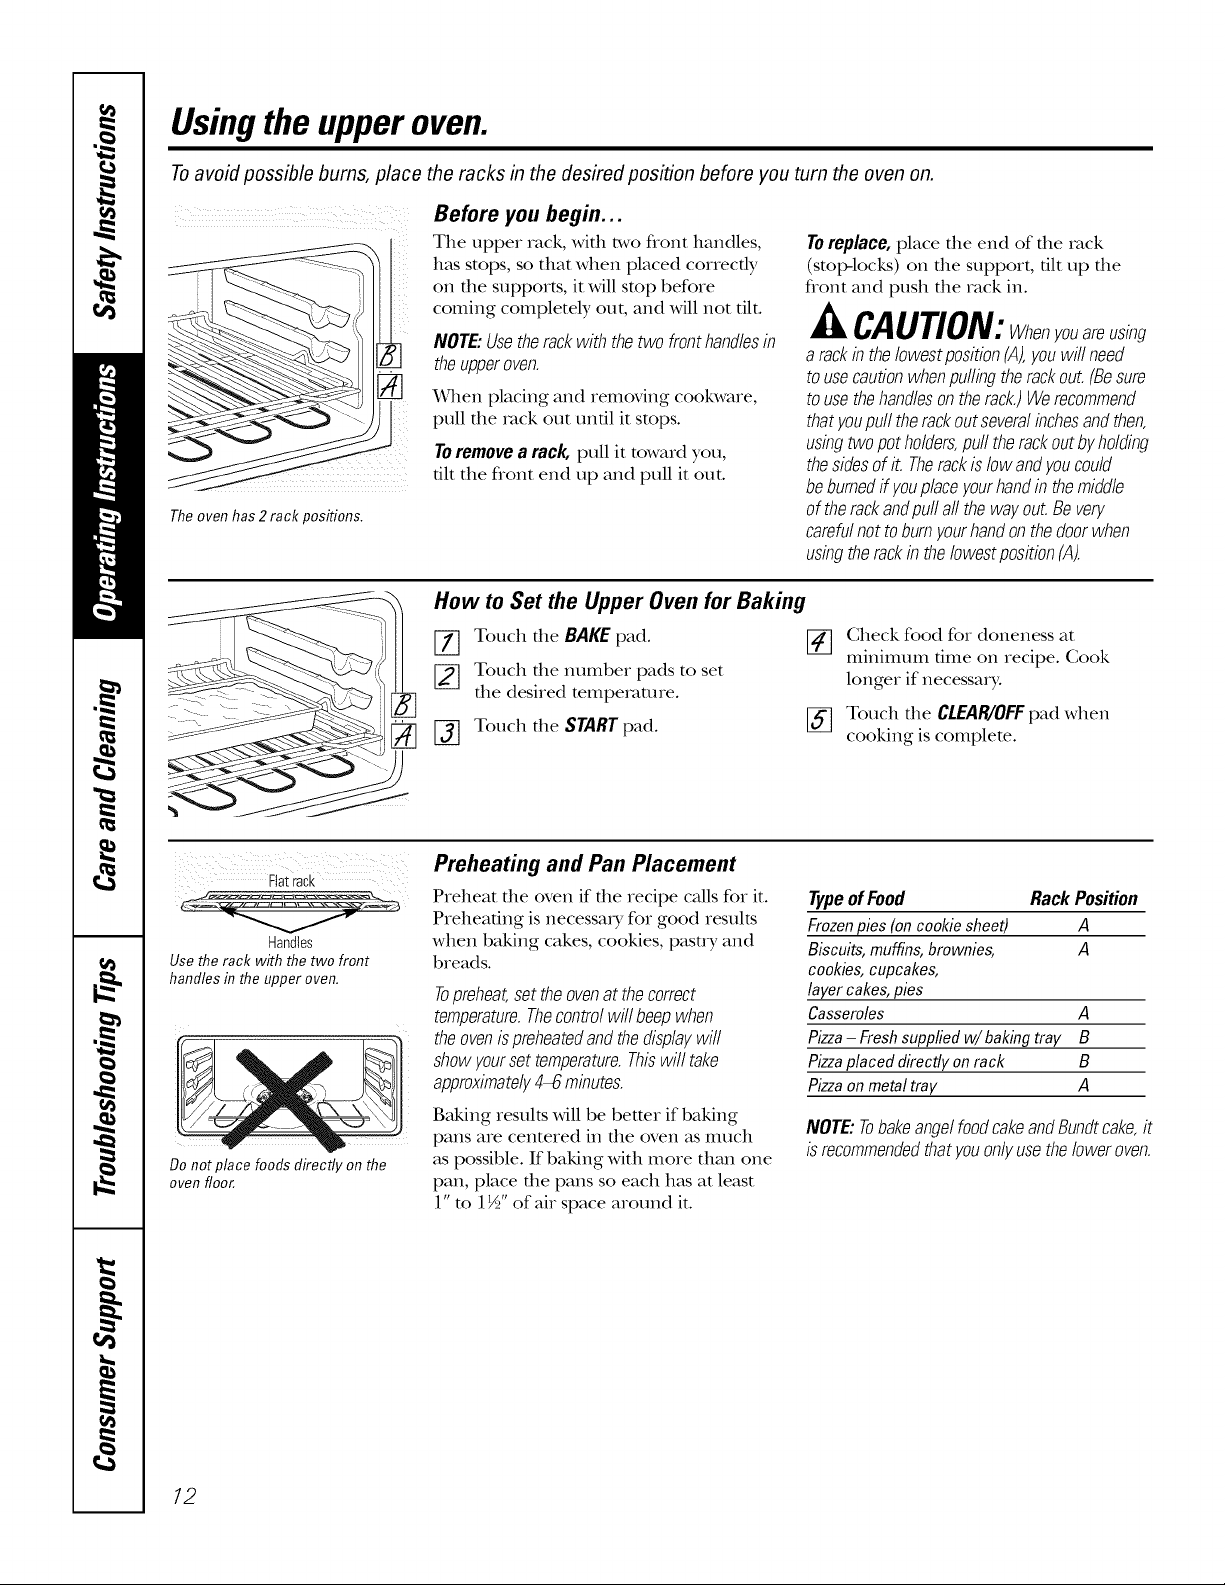
Toavoid possible bums, place the racks in the desired position before you turn the oven on.
7 )
Theoven has 2 rack positions.
Before you begin...
The upper rack, with two front handles,
has stops, so that when placed correctly
on the supports, it will stop before
coming completely out, and will not flit.
NOTE:Usetherackwiththetwo fronthandlesin
theupperoven.
When placing and removing cookware,
pull fl_e _v_ckout unfll it stops.
Toremovea rack, pull it toward you,
flit the flont end up and pull it out.
How to Set the Upper Oven for Baking
[] Touch the BAKEpad. []
[_ Touch the number pads to set
the desired tempe_v_ture.
[-_ Touch the START pad.
Toreplace,place file end of file rock
(stoI>locks) on file support, flit up file
flont and push the rack in.
JkCAUTION:Whenyouareusing
a rackin theIowestposition(A),youwillneed
tousecautionwhenpullingtherackout.(Besure
tousethehandlesontherack.)Werecommend
thatyoupulltherackoutseveralbchesandthen,
usbgtwopotholders,pulltherackoutbyholding
thesidesofit.Therackislowandyoucould
beburnedffyouplaceyourhandin themiddle
of therackandpullall thewayout.Bevery
carefulnottoburnyourhandonthedoorwhen
usbgtherackb theIowestposition(A).
Check food for doneness at
mmmmm flme on recipe. Cook
longer if necessary:
[_ Touch the CLEAglOFFpad when
cooking is complete.
_!_ii i _i_>}_ i i i iiiii 111111117511
Use the rack with the two front
handles in the upper oven.
Do not place foods directly on the
oven floor.
Flatrack
Handles
Preheating and Pan Placement
Preheat the oven if the recipe calls for it.
Preheating is necessa_ T for good results
when baking cakes, cookies, pasu Tand
breads.
Topreheat,settheovenatthecorrect
temperature.Thecontrolwill beepwhen
theovenispreheatedandthedisplaywill
showyoursettemperature.Thiswilltake
approximately4_ mbutes.
Baking results Mll be better if baking
pans are centered in file oven as much
as possible. If baking with more than one
pan, place the pans so each has at least
l"m 1½" of air space around it.
Typeof Food Rack Position
Frozenpies(on cooldesheet) A
Biscuits,muffins,brownies, A
cookies,cupcakes,
layercakes,pies
Casseroles A
Pizza- Freshsuppfiedw/baking tray B
Pizzaplaced directly onrack B
Pizzaonmetal tray A
NOTE:TobakeangelfoodcakeandBundtcake,it
isrecommendedthatyouonlyusetheloweroven.
12

Usingthe lower oven. GEAppliances.com
Toavoid possible bums, place the racks in the desired position before you turn the oven on.
Before you begin...
The oven has 6 rack positions.
The racks have stops, so that when placed
correcdy on the supports, they will stop
before coming complemly out, and will
not flit.
x4qlen placing and removing cookware,
pull the rock out until it stops.
On some models, tile bake heaflng
element is under the oven flooL Do not
place foods on tile oven bottom foi
cooking.
Toremovea rack, pull it toward you,
flit the flont end up and pull it out.
How to Set the Lower Oven for Baking or Roasting
[77 Touch tile BAKE pad.
[_ Touch the number pads to set
the desired temperature.
[_ Touch tile START pad.
NOTE."On some models, you will
hem the convection fan while the oven is
preheaflng. The fan Mll stop after die oven
is preheated and die display shows your set
mmpemmre. This is nomlal.
Toreplace,place die end of die rack
(stop-locks) on die support, flit up die
front and push the rack in.
CAUTION:Whenyouareusing
a rackin theIowestpositionfA),youwill need
tousecautionwhenpullingtherackout.We
recommendthatyoupull therackoutseveral
bchesandthen,usingtwopotholders,pullthe
rackoutbyholdingthesidesofit. Therackislow
andyoucouldbeburnedif youplaceyourhand
b themiddleof therackandpullallthewayout.
Beverycarefulnottoburnyourhandonthedoor
whenusbgtherackin theIowestposition(A).
Check food for doneness at
mmmmm time on recipe. Gook
longer if necessary:
[_ Touch tile CLEAglOFFpad when
cooking is complete.
Flat rack
Do not place foods or baking stone
directly on the oven floor.
Preheating and Pan Placement
Preheat file oven if file recipe cMls for it.
Preheating is necessary for good results
when baking cakes, cookies, pasu y and
breads.
Topreheat,settheovenat thecorrect
temperature.Thecontrolwill beepwhen
theovenispreheatedandthedisplaywill
showyoursettemperature.Thiswilltake
approximately10-15minutes.
Baking results will be better if baking
pans are centered in tile oven as much
as possible. If baking with more allan one
pan, place the pans so each has at least
1" to 1½" of air space around it.
Typeof Food Rack Position
Frozenpies(on cookie sheet) C
Angel food cake A
Bundt or pound cakes C
Biscuits,muffins,brownies, C
cookies,cupcakes,
layercakes,pies
Casseroles C
Turkey A
If baking four cake layers at the same time, place
two layers on rack B and two layers on rack D.
Stagger pans on the rack so one is not directly
above the other
13
Usingthe upperandlower ovens.
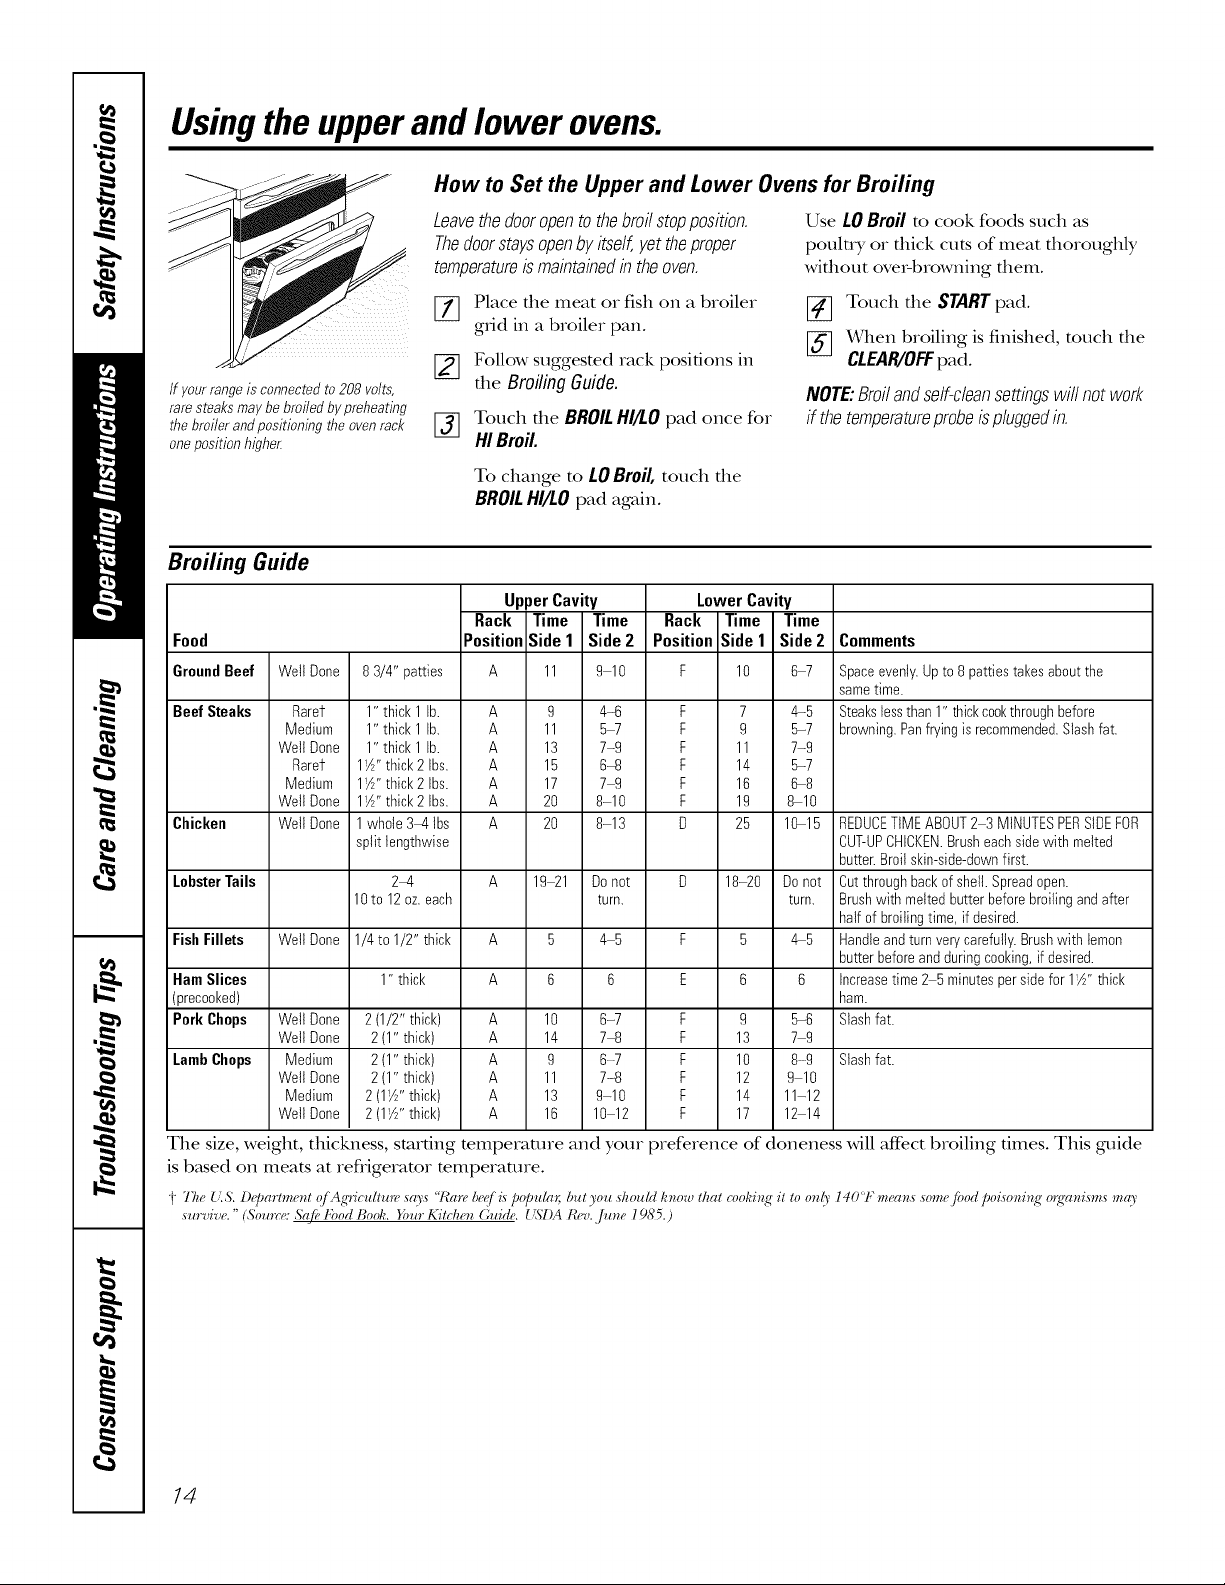
How to Set the Upper and Lower Ovens for Broiling
Leavethedooropentothebroilstopposition.
Thedoorstaysopenbyitself,yettheproper
temperatureismaintabedb theoven.
Use LO Broil to cook foods such as
poulu y or dlick cuts of meat dloroughly
wifllout ore>browning them.
[_ lace the meat or fish oil a broiler
grid in a broiler pan.
[_ Touch the START pad.
[_ _rhen broiling is finished, touch the
CLEAP_IOFFpad.
NOTE:Broil and self-cleansettings will not work
if the temperatureprobeisplugged in.
If yourrange is connectedto 208 volts,
raresteaksmaybebroiledbypreheating
thebroiler andpositioningthe ovenrack
oneposition highe_
[_ Follow suggested rack positions in
the Broilin9 Guide.
[_] Touch the BROIL HI/LO pad once for
HIBroil.
To change to LOBroil,touch the
BROILHI/LOpad again.
Broiling Guide
UpperCavity Lower Cavity
Rack Time Time Rack Time Time
Food
GroundBeef
Beef Steaks
Chicken
LobsterTails
Fish Fillets
Ham Slices
(precooked)
Pork Chops
LambChops
Well Done
Rarer
Medium
Well Done
Rarer
Medium
Well Done
Well Done
Well Done
Wetl Done
Well Done
Medium
Wetl Done
Medium
Well Done
83/4" patties A 11 9 10 F 10 6-7
1" thick 1 lb. A 9 4-6 F 7 4-5
1" thick 1 lb. A 11 5_ F 9 5-7
1" thick 1 lb. A 13 7-9 F 11 7-9
I'Z" thick 2 Ibs. A 15 6-8 F 14 5-7
I_A''thick2 Ibs. A 17 74 F 16 6-8
I_A''thick2 Ibs. A 20 8-10 F 19 8-10
1whole 34, Ibs A 20 8-13 D 25 10-15
split lengthwise
24, A 19 21 Donot D 18-20 Do not
10to 12 oz.each turn. turn.
1/4to 1/2" thick A 5 4 5 F 5 4 5
1" thick
2(1/2" thick) A 10 6-7 F 9 5-6
2 (1"thick) A 14 74 F 13 7 9
2 (1"thick) A 9 6-7 F 10 8-9
2 (1"thick) A 11 7-8 F 12 9 10
2 (1W' thick) A 13 9-10 F 14 11-12
2 (1W' thick) A 16 10 12 F 17 12 14
Position Side1 Side2 Position Side1 Side 2 Comments
Spaceevenly.Upto 8 patties takesaboutthe
sametime.
Steakslessthan 1"thickcookthroughbefore
browning.Panfryingis recommended.Slashfat.
REDUCETIME ABOUT2 3 MINUTESPERSiDEFOR
CUT-UPCHICKEN.Brusheachsidewith melted
butter.Broil skin-side-downfirst.
Cutthroughbackof shell.Spreadopen.
Brushwith meltedbutterbeforebroiling andafter
half of broilingtime, if desired.
Handleandturnverycarefully.Brushwith lemon
butterbeforeandduring cooking,ifdesired.
Increasetime 2 5minutespersidefor 1W' thick
ham.
Slashfat.
Slashfat.
The size, weight, thickness, starting mmperamre and your preference of doneness will aft_ct broiling times. This guide
is b_tsed on meats at refiigeramr mmperature.
i "l'l_e{'.s. l)_JJartment (j Ag'riculture says "/Carebe(,[i_ popul(n; but you should know that (_,oldng"it to only 140'1" mean,s some fbod poisoning" o_gwnisms "frO'
survive. " (Sou_re: &{fbkbod Boofi. Your Kitchen Guide. __S'I)ARev.,/une 19S5.)
14
 Loading...