

Page 1

GE Oil & Gas
21000 Series
Masoneilan* Top Guided Globe Valve with
Lo-dB* / Anti-cavitation capabilities
Instruction Manual
GE Data Classification : Public
Page 2

THESE INSTRUCTIONS PROVIDE THE CUSTOMER/OPERATOR WITH IMPORTANT PROJECT-SPECIFIC
REFERENCE INFORMATION IN ADDITION TO THE CUSTOMER/OPERATOR’S NORMAL OPERATION
AND MAINTENANCE PROCEDURES. SINCE OPERATION AND MAINTENANCE PHILOSOPHIES VARY,
GE (GENERAL ELECTRIC COMPANY AND ITS SUBSIDIARIES AND AFFILIATES) DOES NOT ATTEMPT
TO DICTATE SPECIFIC PROCEDURES, BUT TO PROVIDE BASIC LIMITATIONS AND REQUIREMENTS
CREATED BY THE TYPE OF EQUIPMENT PROVIDED.
THESE INSTRUCTIONS ASSUME THAT OPERATORS ALREADY HAVE A GENERAL UNDERSTANDING
OF THE REQUIREMENTS FOR SAFE OPERATION OF MECHANICAL AND ELECTRICAL EQUIPMENT
IN POTENTIALLY HAZARDOUS ENVIRONMENTS. THEREFORE, THESE INSTRUCTIONS SHOULD
BE INTERPRETED AND APPLIED IN CONJUNCTION WITH THE SAFETY RULES AND REGULATIONS
APPLICABLE AT THE SITE AND THE PARTICULAR REQUIREMENTS FOR OPERATION OF OTHER
EQUIPMENT AT THE SITE.
THESE INSTRUCTIONS DO NOT PURPORT TO COVER ALL DETAILS OR VARIATIONS IN EQUIPMENT
NOR TO PROVIDE FOR EVERY POSSIBLE CONTINGENCY TO BE MET IN CONNECTION WITH
INSTALLATION, OPERATION OR MAINTENANCE. SHOULD FURTHER INFORMATION BE DESIRED
OR SHOULD PARTICULAR PROBLEMS ARISE WHICH ARE NOT COVERED SUFFICIENTLY FOR THE
CUSTOMER/OPERATOR'S PURPOSES THE MATTER SHOULD BE REFERRED TO GE.
THE RIGHTS, OBLIGATIONS AND LIABILITIES OF GE AND THE CUSTOMER/OPERATOR ARE STRICTLY
LIMITED TO THOSE EXPRESSLY PROVIDED IN THE CONTRACT RELATING TO THE SUPPLY OF THE
EQUIPMENT. NO ADDITIONAL REPRESENTATIONS OR WARRANTIES BY GE REGARDING THE
EQUIPMENT OR ITS USE ARE GIVEN OR IMPLIED BY THE ISSUE OF THESE INSTRUCTIONS.
THESE INSTRUCTIONS CONTAIN PROPRIETARY INFORMATION OF GE, AND ARE FURNISHED TO THE
CUSTOMER/OPERATOR SOLELY TO ASSIST IN THE INSTALLATION, TESTING, OPERATION, AND/OR
MAINTENANCE OF THE EQUIPMENT DESCRIBED. THIS DOCUMENT SHALL NOT BE REPRODUCED IN
WHOLE OR IN PART NOR SHALL ITS CONTENTS BE DISCLOSED TO ANY THIRD PARTY WITHOUT THE
WRITTEN APPROVAL OF GE.
Page 3

Table of Contents Page
IMPORTANT: SAFETY WARNING .......................................................... .................................................1
1. INTRODUCTION .................................................................................................................................. 2
2. GENERAL 2
3. UNPACKING ......................................................................................................................................... 2
4. INSTALLATION..................................................................................................................................... 2
5. AIR PIPING 3
6. BODY DISASSEMBLY ........................................................................................................................... 3
6.1 THREADED TRIM ...............................................................................................................................................3
6.2 QUICK-CHANGE TRIM ....................................................................................................................................3
7. MAINTENANCE/REPAIR ..................................................................................................................... 3
7.1 THREADED SEAT RING REMOVAL ..............................................................................................................3
7.2 BUSHING REMOVAL ........................................................................................................................................4
7.3 LAPPING SEATS .................................................................................................................................................4
7.3.1 THREADED TRIM.............................................................................................................................4
7.3.2 QUICK-CHANGE TRIM ..................................................................................................................4
7.4 Lo-dB PLUG .........................................................................................................................................................5
7.5 PLUG STEM PINNING ......................................................................................................................................5
7.6 PACKING BOX .....................................................................................................................................................6
7.6.1 KEVLAR/PTFE PACK. RING (STANDARD) ...............................................................................6
7.6.2 EXPANDED GRAPHITE P. RING (OPTION)..............................................................................6
7.6.3 LE PACKING (LOW EMISSION) (OPTION) ...............................................................................7
7.7 SOFT SEAT PLUG ...............................................................................................................................................8
8. VALVE BODY REASSEMBLY ................................................................................................................ 8
8.1 THREADED TRIM ...............................................................................................................................................8
8.2 QUICK-CHANGE TRIM ....................................................................................................................................9
8.3 HIGH PRESSURE & ANGLE DESIGN ..........................................................................................................9
9. ACTUATORS ......................................................................................................................................... 9
9.1 TYPES 87/88 ACTUATORS .............................................................................................................................9
10. BELLOWS SEAL ASSEMBLY ............................................................................................................... 9
10.1 BELLOWS VALVE DISASSEMBLY............................................................................................................14
10.1.1 THREADED TRIM ....................................................................................................................... 14
10.1.2 QUICK-CHANGE TRIM ............................................................................................................14
10.2 REPAIR .............................................................................................................................................................15
10.2.1 PLUG / STEM BELLOWS / BONNET EXTENSION S/A ................................................ 15
10.3 PLUG AND SEAT RING SEATING SURFACES ....................................................................................16
10.4 BONNET REASSEMBLY ..............................................................................................................................16
10.5 VALVE BODY REASSEMBLY ......................................................................................................................16
10.6 ACTUATOR TO BODY S/A AND PLUG STEM ADJUSTMENT .......................................................16
Page 4
Safety Information
Important - Please Read Before
Installation
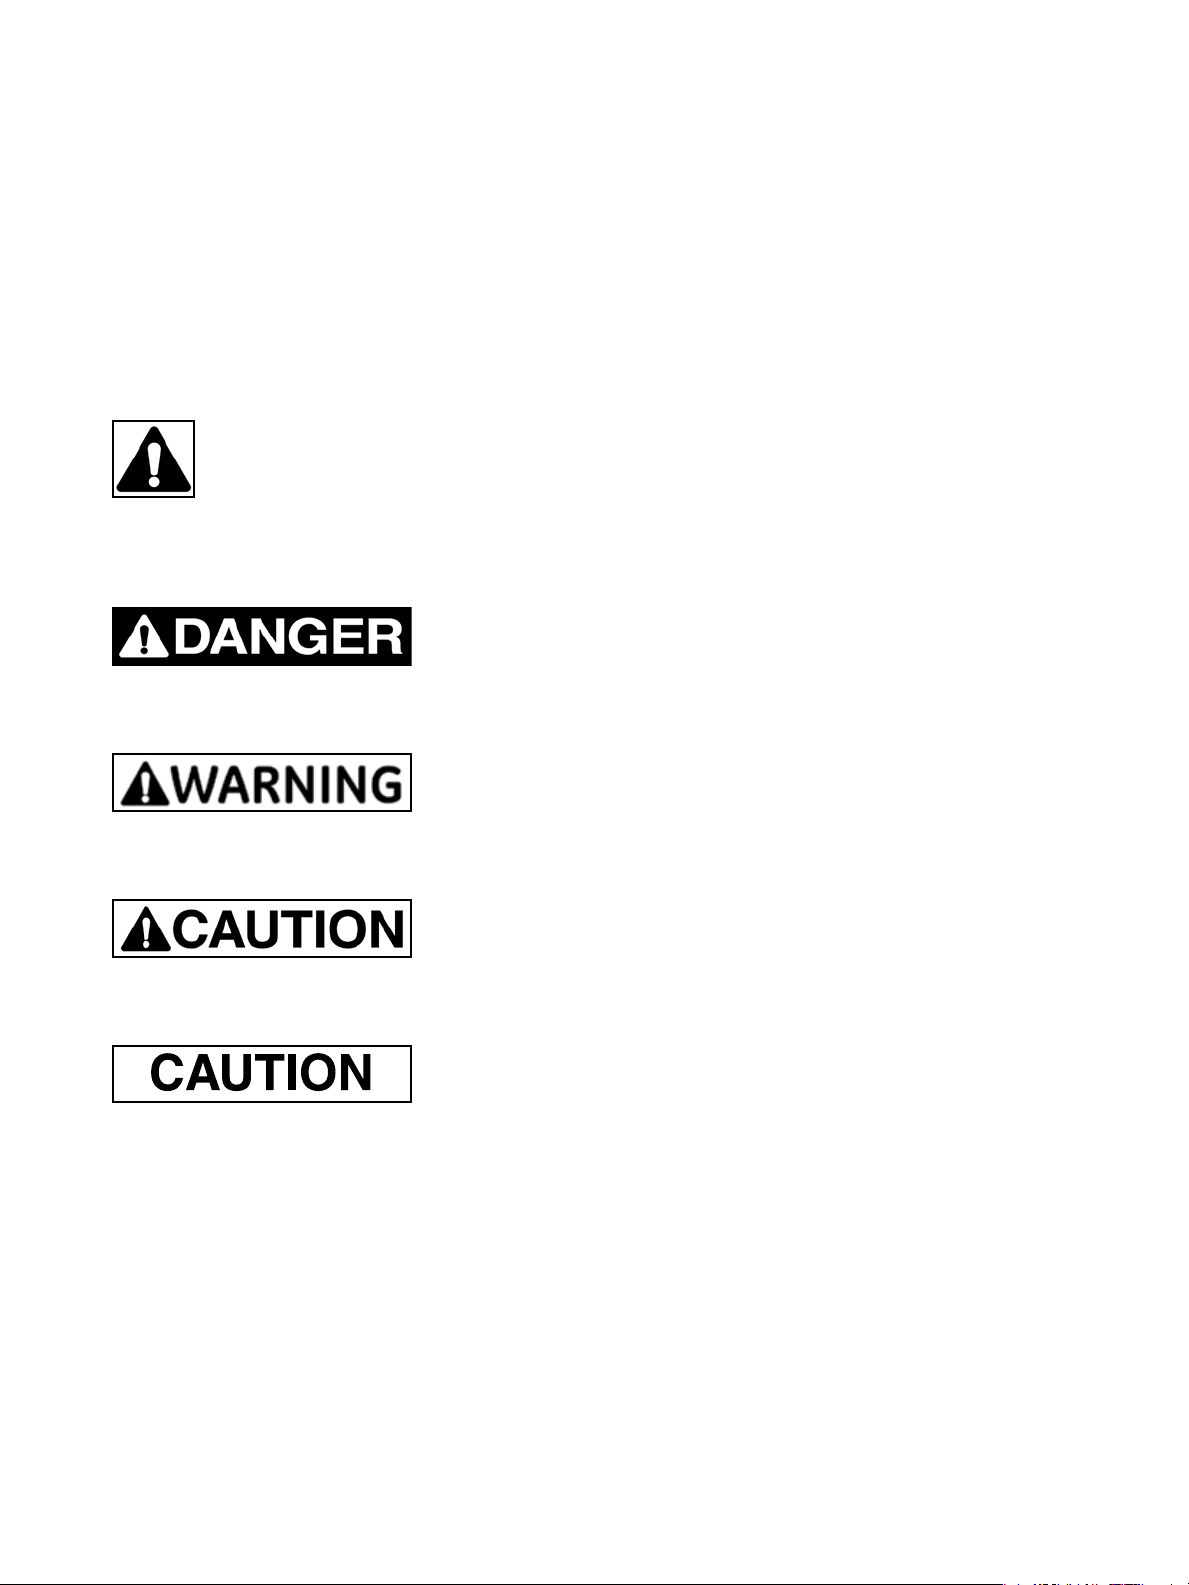
The 21000 Series Control Valves instructions contain DANGER, WARNING, and CAUTION labels, where necessary, to
alert you to safety related or other important information.
Read the instructions carefully before installing and maintaining your control valve. DANGER and WARNING hazards
are related to personal injury. CAUTION hazards involve
equipment or property damage. Operation of damaged
equipment can, under certain operational conditions, result
in degraded process system performance that can lead to
injury or death. Total compliance with all DANGER, WARN-
ING, and CAUTION notices is required for safe operation.
This is the safety alert symbol. It alerts you to potential
personal injury hazards. Obey all safety messages that
follow this symbol to avoid possible injury or death.
Indicates a potentially hazardous situation which, if not
avoided, could result in death or serious injury.
About this Manual
• Theinformationin this manual is subjecttochangewithout
prior notice.
• Theinformationcontainedinthismanual,inwholeorpart,shall
not be transcribed or copied without ’s written permission.
• Pleasereportanyerrorsorquestionsabouttheinformationin
this manual to your local supplier.
• These instructions are written specifically for the 21000
Series Control Valves, and do not apply for other valves
outside of this product line.
Warranty
Items sold by General Electric are warranted to be free from
defects in materials and workmanship for a period of one
year from the date of shipment provided said items are used
according to GE's recommended usages. GE reserves the right
to discontinue manufacture of any product or change product
materials, design or specifications without notice.
This instruction manual applies to the
The control valves MUST BE:
• Installed, putintoserviceandmaintainedbyqualifiedand
competent professionals who have undergone suitable
training.
• Under certain operating conditions, the use of damaged
equipment could cause a degradation of the performance
of the system which may lead to personal injury or death.
• Changesto specifications,structure,andcomponentsused
may not lead to the revision of this manual unless such
changes affect the function and performance of the product.
21000 Series Control Valves.
Indicates a potentially hazardous situation which, if not
avoided, could result in serious injury.
Indicates a potentially hazardous situation which, if not
avoided, could result in minor or moderate injury.
When used without the safety alert symbol indicates a
potentially hazardous situation which, if not avoided, could
result in property damage.
Note: Indicates important facts and conditions.
• All surrounding pipe lines must be thoroughly flushed to
ensure all entrained debris has been removed from the
system.
© 2014 General Electric Company. All rights reserved.
Masoneilan 21000 Series Top Guided Globe Valve | 1
Page 5

1st
2nd
1st
2nd
3rd
4th
5th
6th
Actuator Type
87 Spring Diaphragm
Air to Close
88 Spring Diaphragm
Air to Open
Body
Series
21
Plug Type
0. Undefined
1. Contoured
6. Soft Seat
7. Single Stage
Lo-dB/
Cavitation
Containment
8. Double Stage
Cavitation
Containment
9. Double Stage
Lo-dB
1. lntroduction
The following instructions should be thoroughly reviewed
and understood prior to installing, operating or performing
maintenance on this equipment. Throughout the text,
safety and/or caution notes will appear and must be strictly
adhered to, otherwise, serious injury or equipment malfunction
could result.
GE has a highly skilled After Sales Department available for startup, maintenance and repair of our valves and component parts.
Arrangements for this service can be made through your local GE's
Masoneilan representative or sales department. When performing
maintenance use only Masoneilan replacement parts. Parts
are obtainable through your local representative or spare parts
department. When ordering parts, always include Model and Serial
Number of the unit being repaired.
2. General
These installation and maintenance instructions apply to all sizes
and ratings of the 21000 Series control valves regardless of the
type of trim used.
21000 Series single ported top guided control valves are designed
with built in versatility making them well-suited to handle a wide
variety of process applications.
Standard construction offers a contoured plug (21100 Series) with a
threaded seat ring or a quick change seat ring. The heavy top plug
guiding provides maximum support to ensure plug stability.
A series of reduced area trim is available to provide wide flow
range capabilities in all valve sizes.
Tight Shutoff Class IV leakage is standard. Optional constructions
(one of which is the 21600 Series soft seat plug) meet IEC 534-4 and
ANSI/FCI 70.2 Class V and Vl requirements.
An optional Low Emission LE® Packing is available to assure
compliance with the fugitive emission containment requirements.
Replacing the conventional plug with the single stage Lo-dB
design (21700 Series) provides excellent noise attenuation or
anti-cavitation performance.
The 21800 Series double stage anti-cavitation valve is derived
from the 21700 single stage anti-cavitation valve through a
modification to the cage and plug. Substitution of the standard
Flow
Characteristics
0. Undefined
1. Linear
2. Equal
Percentage
3. Modified
Percent
Figure 1 - Numbering System
cage with an anti-cavitation cage permits the pressure drop to
be split between the two stages efficiently.
The 21900 Series double stage Lo-dB valve is also derived from
the 21700 single stage Lo-dB valve through a modification to the
cage and plug. Substitution of the standard cage, with a LodB cage permits the pressure drop to be split between the two
stages efficiently.
In the 21800/21900 Series designs, enlargement of the plug head up
to the cage diameter permits simultaneous throttling of the plug C
and the cage Cv. It also provides optimum allocation of the pressure
drop between the two stages along the entire plug travel.
Recommended spare parts required for maintenance are listed
in the Parts Reference table on page 17. The model number,
size, rating and serial number of the valve are shown on the
identification tag located on the actuator. Refer to Figure 1 for the
21000 series numbering system.
Seat Type
0. Undefined
4. Quick Change
5. Threaded
Optional
Configuration
A Angle Body
BS Bellows
Seal
EB Extension
Bonnet
C Cryogenic
Extension
Bonnet
3. Unpacking
Care must be exercised when unpacking the valve to prevent
damage to the accessories and component parts. Should any
problems arise, contact your local GE's Masoneilan representative
or sales department.
4. lnstallation
4.1 Before installing the valve in the line, clean piping and
valve of all foreign material such as welding chips, scale,
oil, grease or dirt. Gasket surfaces should be thoroughly
cleaned to ensure leak-proof joints.
4.2 To allow for in-line inspection, maintenance or removal of
the valve without service interruption, provide a manually
operated stop valve on each side of the 21000 Series
valve with a manually operated throttling valve mounted in
the by-pass line (See Figure 2).
4.3 The valve must be installed so that the controlled
substance will flow through the valve in the direction
indicated by the flow arrow located on the body.
• Withcontouredplug(21100/21600)
or Lo-dB plug (21700/21900) :flow-to-open
• Onanti-cavitationdesign(21700/21800) :ow-to-close
v
2 | GE Oil & Gas © 2014 General Electric Company. All rights reserved.
Page 6
CAUTION
WARNING
CAUTION
WARNING
4.4 For heat-insulated installation, do not insulate the valve
CAUTION
WARNING
CAUTION
WARNING
CAUTION
WARNING
bonnet. Take necessary protective measures relate to
personal safety.
5. Air Piping
The actuators are designed to accept 1/4" NPT air supply piping.
1
/4" OD tubing (4 x 6 mm) or equivalent for all air lines. If the
Use
supply air line exceeds 25 feet in length (7 meters) or if the valve
is equipped with volume boosters, then 3/8" tubing (6 x 8 mm) is
preferred. AII connections must be free of leaks.
Do not exceed supply pressure indicated on serial plate located on
the yoke of the actuator.
6. Body Disassembly
Access to the internal components of the body should be
accomplished with the actuator removed. To remove the
actuator from the body, refer to the actuator instruction Ref.
GEA19530 for a type 87/88 multispring actuator.
Prior to performing maintenance on the valve, isolate the valve
and vent the process pressure. Shut off the supply air line and the
pneumatic or electric signal line.
6.1 Threaded Trim (Figure 12 or 14)
After removing the actuator, disassemble the body using the
following procedure :
A. If there is a leak detector connection on the lateral NPT
port of the bonnet, disconnect this piping as well.
B. Remove body stud nuts (10).
C. Remove bonnet (8), and plug stem (1) and plug (16) sub-
assembly together as one unit.
Note: Spiral wound body gaskets (11) are standard in the
21000 Series design and it is imperative that a new gasket
be installed each time the valve is disassembled.
D. Remove packing flange stud nuts (3), packing flange (4)
and packing follower (5).
E. Remove plug (16) and plug stem (1) sub-assembly from the
bonnet (8).
6.2 Quick-Change Trim (Figure 13 or 15)
After removing the actuator, disassemble the body using the
following procedure:
A. If there is a leak detection connection on the lateral NPT
port of the bonnet, disconnect this piping as well.
B. Remove body stud nuts (10).
C. Remove bonnet (8), and plug stem (1) and plug (16) sub-
assembly together as one unit.
D. Since the cage (13), seat ring (14) and seat ring gasket (15) are
held in place by the bonnet, they may now be removed.
Note: Spiral wound gaskets (11 & 15) are standard in the
21000 Series design and it is imperative that new gaskets be
installed each time the valve is disassembled.
E. Remove packing flange stud nuts (3), packing flange (4)
and packing follower (5).
F. Remove plug (16) and plug stem (1) sub-assembly from
the bonnet (8).
Care must be taken to avoid damage to the plug and plug
guide.
G. Remove old packing (6) [and optional lantern ring (7) if a
leak detection connection has been installed]. Refer to
Figure 5.
H. All components may now be inspected for wear and service
damage. After determining the maintenance required,
proceed to the appropriate Section of this instruction
manual.
7. Maintenance & Repair
The purpose of this section is to provide recommended
maintenance and repair procedures. These procedures assume
the availability of standard shop tools and equipment.
7.1 Threaded Seat Ring Removal (Figure 12 or 14)
Threaded seat rings (14) are installed tightly by the
manufacturer, and after years of service they may be difficult
to remove.
To facilitate removal, seat ring wrenches can be fabricated
to engage the seat ring lugs and adapted to a standard
wrench. If the seat ring is exceptionally resistant to removal,
the application of heat or penetrating oil should be helpful.
Care must be taken to avoid damage to the plug and plug
guide.
F. Remove old packing (6) [and optional lantern ring (7) if a
leak detection connection has been installed]. Refer to
Figure 5.
G. Bonnet (8), plug (16), bushing (12) and seat ring (14) may
now be inspected for wear and service damage. After
determining the maintenance required, proceed to the
appropriate Section of this instruction manual.
© 2014 General Electric Company. All rights reserved.
When using heating devices, ensure that proper safety
practices are observed. Flammability and toxicity of the
process fluid must be considered and proper precautions
taken.
7.2 Bushing Removal
The bushing (12) is press fit into the bonnet and does not
normally require replacement. If necessary, it may be pulled
or machined out. When machining the bushing out, care must
be taken to maintain proper dimensions and tolerances in the
Masoneilan 21000 Series Top Guided Globe Valve | 3
Page 7

CAUTION
WARNING
CAUTION
WARNING
CAUTION
WARNING
bonnet. These will be furnished upon request.
CAUTION
WARNING
CAUTION
WARNING
7.3 Lapping Seats
Lapping is the process of working the valve plug against
the seat ring with an abrasive to produce a close fit. If
valve leakage is excessive, lapping becomes necessary. The
plug and seat ring seating surfaces should be free of large
scratches or other defects, and the contact surfaces of the
seats should be as narrow as possible. This may require
dressing both parts in a lathe. The seating surface angle of the
plug is 28 degrees and the seat ring is 30 degrees (relative to
the centerline axis). A good grade of fine grinding compound
is required for the lapping operation.
The compound should be mixed with a small quantity of
lubricant such as graphite. This will slow the cutting rate
and prevent tearing of the seating surfaces. The amount
of lapping required depends on the materials, condition of
seating surfaces, and accuracy of machining. lf a short period
of lapping does not visibly improve seating, there is usually no
advantage in continuing as excessive lapping may result in
rough seats. The only remedy is replacement or re-machining
of one or both parts. When lapping new plugs and seat rings,
begin with a medium fine (240 grit) and finish with a finer
grade (600 grit).
Note: Lapping should produce a line contact area, not the
entire surface, due to the difference in seat angles.
Before lapping, the plug and stem sub-assembly must be
concentric. (See pinning operation, section 7.5).
7.3.1 Threaded Trim (Figure 12 or 14)
1. CIean body gasket surface areas.
2. When seat has been removed, ensure that the sealing
surface in the body bridge and the threads are
thoroughly cleaned.
Note: A sealant compatible with the process should be
applied sparingly to the seat ring threads and sealing
shoulder.
3. lnstall and tighten seat ring using fabricated wrench
used for removal.
Do not over-tighten. Do not strike seat ring lugs
directly. This could distort the seat ring resulting in seat
leakage.
4. Apply lapping compound on the plug at several spots
equally spaced around the seating area.
5. lnsert the stem and plug sub-assembly carefully into
the body until it is seated.
6. Place bonnet (8) on the body and fasten the bonnet to the
body using four body stud nuts (10) spaced equally apart.
Apply slight pressure and tighten evenly.
Do not tighten nuts to final torque specifications at
this time. The bonnet is used temporarily for guiding
purposes only.
7. lnsert two or three pieces of packing (6) into the packing
box to assist in guiding the stem and plug during lapping.
8. Screw a drilled and tapped rod with a T-handle onto the
plug stem and secure with a locknut (see Figure 4).
Note: As an alternative, drill a hole through a flat steel
plate and fasten to the plug stem using two locknuts.
9. Apply slight pressure on the stem, and rotate the stem
in short oscillating strokes (around 8 to 10 times).
Repeat this step as necessary.
Note: The plug should be lifted and turned 90° each
time before repeating Step (9). This intermittent lifting is
required to keep the plug and seat ring concentric during
lapping.
Avoid over-lapping as this can cause damage to
the seating surface rather than improve leakage
performance.
10.After completion of the lapping operation, remove bonnet
and plug. The seating area of the seat ring and the plug
must be cleaned of all lapping compound in preparation
for reassembly. Do not remove seat ring.
7.3.2 Quick-Change Trim (Figure 13 or 15)
1. CIean body gasket surface areas.
2. Install a new seat ring gasket (15) and insert seat ring
(14) in the body.
Note: Gasket (15) is temporarily placed to hold the seat
ring during lapping.
It is imperative to use a new gasket or a test part
having the same geometrical characteristics in
order to ensure the correct position of the seat ring
during lapping.
This gasket (or similar part) can be kept after lapping
for future use.
The gasket used for lapping must not be reused for
the body reassembly.
3. Apply lapping compound at several spots equally
spaced around the seating area of the seat ring.
4. Insert the cage (13) into the body.
5. lnsert the stem and plug sub-assembly carefully into
the body until it is seated.
6. PIace bonnet (8) on the body.
Ensure that the seat ring (14), cage (13) and bonnet (8)
are properly aligned.
4 | GE Oil & Gas © 2014 General Electric Company. All rights reserved.
Page 8

7. Fasten the bonnet to the body using four body stud
CAUTION
WARNING
CAUTION
WARNING
nuts (10) spaced equally apart. Apply slight pressure
and tighten evenly.
Do not tighten nuts to final torque specifications at
this time. The bonnet is used temporarily for guiding
purposes only.
8. Insert two or three pieces of packing into the packing box
to assist in guiding the stem and plug during lapping.
9. Screw a drilled and tapped rod with a T-handle onto the
plug stem and secure with a locknut (see Figure 4).
Note: As an alternative, drill a hole through a flat steel
plate and fasten to the plug stem using two locknuts.
10. Apply slight pressure on the stem, and rotate the stem
in short oscillating strokes (around 8 to 10 times).
Repeat this step as necessary.
Note: The plug should be lifted and turned 90° each
time before repeating Step (10). This intermittent lifting
is required to keep the plug and seat ring concentric
during lapping.
11. After completion of the lapping operation, remove
bonnet and internal parts. The seating area of the
seat ring and the plug must be cleaned of all lapping
compound in preparation for reassembly.
7.4 Lo-dB PIug (Figure 8, 14 or 15)
The procedures used for performing maintenance on a valve
equipped with Lo-dB plugs (21700/21800/21900 Series) are the
same as those used for Threaded or Quick Change Trim.
B. Screwing Stem to Plug
•
Hold the plug (with vise jaw assembly) in a vise.
•
Lock two nuts against each other on the end of the new
plug stem, and screw the stem solidly into the plug using a
wrench on the upper nut.
When properly assembled, the reference mark (see Section A
above) should be flush with the end of the plug guide.
C. Drilling the New Parts
• If the plug is already fully drilled (typical for 440 C hardened
stainless steel material or solid Stellite or Equivalent), then
drill the stem to the same diameter (Diameter C in Figure 9)
as the plug shank hole.
• Iftheplugguideareahasacentermark,
PIace the plug guide on a V-block and use a suitable drill
size to either:
— Match the hole size in the plug, or
— Match Diameter C (see Figure 9)
Drill through the plug-stem assembly.
• Ifthe plug guide area does not have any hole or any
center mark,
— Measure Dimension D based on the plug guide diameter
and stem diameter (see Figure 9).
— PIace the plug guide on a V-block, and make a center
mark on the plug guide area using a center punch.
— Drill through the plug-stem assembly using a suitable size
drill bit.
In all cases after drilling: Remove any burrs from the plug
guide hole by making a slight chamfer.
Maintenance of the plug should be limited to cleaning of the
ports and the procedures defined under Sections 7.3 (Lapping)
and 7.5 (Pinning) as required.
7.5 PIug Stem Pinning
Plug stem pinning in the field may be required for the following:
— Replacing existing plug and stem, or
— Replacing existing stem only
Replacing Plug and Stem
If it is necessary to replace the plug, then the plug stem
must be replaced at the same time. The original pin hole in
an existing stem will not provide the necessary fit, and might
seriously impair the strength of the assembly.
A. Reference Marking on the Plug Stem
Measure the depth of the pilot recess in the plug (Dimension X
in Figure 9), and make a reference mark on the plug stem at the
same distance from the thread.
Note: While pinning is being performed, care must be taken not
to damage the seating surface or plug guide. Always use a soft
metal or plastic vice jaws with cylindrical features to hold the
plug guide area (see Figure 9).
D. Pinning the Plug-Stem Assembly
1.
Select the correct size pin based on the plug guide diameter
and stem diameter (see Figure 9). Apply a small amount of
grease on the pin and hand assemble it into the hole in the
plug.
2. Press fit the pin into the hole using a hammer. Complete
the pinning operation by taking care to ensure that the pin
is recessed by the same amount at both sides (see Figure
9).
3. After the plug has been pinned, it should be placed in a
lathe to ensure it is concentric with the stem.
If the assembly is not running true, then the stem should
be placed in a collet with the plug guide against it and the
plug should be adjusted. Alignment of plug stem can be
performed by means of a soft faced mallet.
Replacing Existing Stem Only
A. Removing Existing Pin and Stem
1.
Place the plug guide on a V-block and use a drift punch to
drive out the old pin.
Note: If it is necessary to drill out the pin, use a drill bit
slightly smaller than the pin diameter.
2. Hold the plug guide in a vise (see note on opposite side of
page).
3. Lock one nut against another at the end of the plug stem.
© 2014 General Electric Company. All rights reserved.
Masoneilan 21000 Series Top Guided Globe Valve | 5
Page 9

CAUTION
WARNING
CAUTION
WARNING
Using a wrench on the lower nut, unscrew the stem from the
CAUTION
WARNING
plug. The stem is removed by turning it counter-clockwise.
B. Screwing Stem to Plug
Refer to step B of the previous section on “REPLACING PLUG
AND STEM”.
C. Drilling the New Stem
PIace the plug guide on a V-block and use a suitable size drill
bit to drill the stem (use the hole in the plug as a guide).
Note: If the hole in the plug guide has been slightly damaged
while removing the old pin, choose a drill bit and a pin with a
slightly larger diameter than the normal pin.
D. Pinning
Select the correct size pin based on the plug guide diameter
and pin hole diameter. Proceed as described in part D of the
previous section, taking care not to damage the plug guide
area.
Ensure plug stem alignment following the pinning operation.
7.6 Packing Box (Figures 12 to 15)
Packing box maintenance is one of the principle action items
of routine servicing. Tightness of the packing is maintained
by packing compression. Compression is achieved by evenly
tightening the packing flange nuts (3) against the packing flange
(4). Care must be taken not to over tighten as this could prevent
smooth operation of the valve. If all compression is used up and
the valve leaks, then new packing is required.
Valve must be isolated and the pressure vented before
performing packing box maintenance.
Proceed as follows :
7.6.1 Braided PTFE with Carbon or Aramid Core
(Standard) (Figures 12 to 15)
Note: The Braided PTFE/Carbon or Aramid packing rings
have a skive cut allowing packing replacement without
disconnecting the plug stem from the actuator connector
or actuator stem.
A. Loosen and remove packing flange nuts (3).
B. Lift the packing flange (4) and packing follower (5) up
the valve stem.
Note: They may be taped in place to keep them out of
the way before proceeding.
C. By means of a hooked instrument, remove packing (6)
ensuring not to damage the sealing surfaces of the
packing box or plug stem.
Note: On valves equipped with an optional lubricator
connection, the lantern ring (7) must also be removed to
gain access to lower packing rings.
D. Replace packing rings (6).
Note: Assemble and compress rings one at a time into
packing box. The skive cut of each packing ring must be
placed about 120 degrees apart.
Note: On valves equipped with an optional lubricator
connection, refer to Figure 10 for correct amount of
rings to place under the lantern ring (7).
E. Replace packing follower (5) and packing flange (4).
F. Replace and tighten packing stud nuts (3).
Do not overtighten.
G. Place valve back in service and only tighten packing as
necessary to stop external leakage.
Note: In an emergency, string packing may be used as
a temporary repair only. It must be replaced with the
correct packing as soon as possible.
7.6.2 Flexible Graphite Rings (Optional - See Figure 6)
Note: Flexible graphite packing rings replacement may
require disconnecting the plug stem from the actuator stem
and removal of the actuator if rings are not skive cut.
A. Remove actuator from the body S/A. Refer to actuator
instruction Ref. GEA19530 for a type 87/88 actuator.
B. Loosen and remove packing flange nuts (3).
C. Remove packing flange (4) and packing follower (5)
from the plug stem.
D. By means of a hooked instrument, remove packing (6)
ensuring not to damage the sealing surfaces of the
packing box or plug stem.
Note: On valves equipped with an optional lubricator
connection, the lantern ring (7) must also be removed to
gain access to lower packing rings.
E. Replace new packing set (6); first assemble a back-
up ring (Graphite Filament Yarn braided ring), then
the flexible graphite rings (smooth rings), and finally
another braided back-up ring (refer to Figure 6).
Note: Assemble and compress rings one at a time into
packing box.
Note: On valves equipped with an optional lubricator
connection, refer to Figure 10 for correct arrangement
according to valve size.
F. Assemble packing follower (5) and packing flange (4).
G. Assemble and tighten packing stud nuts (3).
Do not overtighten.
H. Proceed to appropriate instructions for actuator and
valve assembly adjustment.
I. Place valve back in service and only tighten packing as
necessary to stop external leakage.
*
7.6.3 LE
The Masoneilan LE (Low Emissions) Packing from GE is a
high performance packing system capable of containing
fugitive emissions well below the specifications of the
most severe recommendations. It is also available in a
firesafe configuration.
Packing (Optional - See Figure 7)
6 | GE Oil & Gas © 2014 General Electric Company. All rights reserved.
Page 10

The packing is provided as a set of five pieces. It consists of
CAUTION
WARNING
two adapter rings and three V-rings. An alternating pattern
of Perfluoroelastomer (PFE) and long carbon fiber filled
Teflon (PTFE) V-rings are used.
Applied properly, this packing exhibits very little cold flow
(or creep). Consequently, it can effectively prevent fugitive
emissions leaks from a control valve. The LE Packing
system can directly replace conventional packing,
requiring no modification to the control valve or actuator.
A spring loaded, two-piece follower assembly is used to
maintain a constant load on the packing, and is necessary
for thermal cycling applications. As the definition of thermal
cycling can vary, and processes are potentially subject to
unpredicted thermal gradients, LE Packing is only available
with the spring loaded follower.
Installation should be performed as detailed in the
following paragraphs.
7.6.3.1 Preparation
7.6.3.1.1 Stem
Inspect stem for any nicks or scratches on the
surface finish. Reject the stem for any of these
reasons as they may damage packing.
Note: A properly etched part number on the stem in
the packing area will have no adverse effect on the
performance of the packing.
Stem finish should be 3-7 AARH (Ra 0,1/0,2).
7.6.3.1.2 Packing Box
Note: Bonnets that have a lube hole or leak detection
port are unacceptable for use with the packing
arrangement shown in Figure 7.
Packing box should be clean and free of burrs, rust,
and any foreign matter. Parts can be cleaned with
denatured alcohol.
Note: Packing box finish should be 125 AARH (Ra 3,2)
or better.
The packing box may be bored or honed oversize by
up to 0.015" (0.38 mm) above the nominal diameter
to improve the finish. For instance, a nominal 0.875"
(22.22 mm) packing box may be bored or honed up
to 0.890" (22.60 mm) and the LE Packing will still seal
properly.
Packing box must be finished to the bottom of the
bore.
7.6.3.1.3 Packing
Inspect packing rings. Do not use packing if any
nicks or scratches on packing are observed.
Check packing and ensure that it is in the proper
arrangement (see Figure below). PFE material can
be identified by the gloss black molded finish. PTFE
material has a dull black machined finish.
PTFE - female adapter
PFE - V -Ring
PTFE - V-Ring
PFE - V -Ring
PTFE - male adapter
7.6.3.1.4 Spring Loaded Follower
The spring loaded follower consists of an upper and
lower follower and eight (8) disc springs (see Figure
below). The springs are installed inside the lower
follower and positioned alternately. The assembly
is held together by tape, which must be removed
before installation.
Upper
Scribe
Mark
Follower
Disc
Springs
Lower
Follower
7.6.3.2 Packing Installation
a. The packing must be lubricated with Krytox
®
fluorinated grease prior to installation (Krytox GPL206 or
equivalent).
b. Packing should be lubricated as a set (not
individually) to minimize getting lubricant
between the rings.
c. Packing should be lubricated with a generous
application to the O.D. and I.D. of the packing set.
Note: All exposed surfaces of the packing set must be
covered with the lubricant.
d. PFE/PTFE is to be installed as a set. Carefully slide
the packing set down the stem. Do not cock or
force the packing on the threads.
If the packing set separates while on the stem,
do not remove. Continue installing the remaining
pieces to put the set back together.
e. Gently press the packing into the packing box. Do
not tap the packing down into the box.
f. The spring loaded follower is installed on top of the
packing. This follower is installed as an assembly held
together by tape. This tape should be removed after
assembly. Proper assembly of the packing box will
leave the top of the Lower Follower 0.25 - 0.50 inches
(6 to 13 mm) above the bonnet.
A groove is scribed into the O.D. of the upper
follower. The packing flange is tightened evenly
until the top of the Lower Follower aligns with the
scribe mark (groove) in the Upper Follower.
Note: This is the optimum loading for this packing.
Further tightening will shorten life of the packing.
Thread locking compound can be used on packing
nuts.
g. The packing should be checked for leakage.
h. Packing load should be checked after the valve has
© 2014 General Electric Company. All rights reserved.
Masoneilan 21000 Series Top Guided Globe Valve | 7
Page 11

CAUTION
WARNING
CAUTION
WARNING
CAUTION
WARNING
cycled approximately 500 times. Adjust if necessary.
CAUTION
WARNING
CAUTION
WARNING
CAUTION
WARNING
No further adjustment should be required for the life
of the packing.
7.7 Soft Seat Plug (Figure 3)
The soft seat plug used in the 21000 Series valve has a
replaceable insert. To remove and replace the insert, proceed
as follows.
The shank OD is the plug guide. Extreme care must be taken to
prevent scoring or marring this surface. Failure to do so could
result in damage to the guide bushing and destruction of the
plug. Two flats are provided for holding.
A. Loosen set screw until the head of the set screw is flush
with the OD of the shank.
Note: On 3/4"‑ 2" size valves, the plug tip has a machined
slot into which a bar can be inserted for removal. On 3"‑ 6"
size valves, the plug tip has two machined holes into
which a tool (fabricated with appropriate size pins) can be
inserted for removal.
B. Carefully place plug sub-assembly into a soft jaw vise,
holding the plug by the flats provided on the upper end of
the shank.
When using a vise to hold the plug, extreme care must be
taken not to damage the plug shank.
C. Using the appropriate tool, unscrew plug tip (counter-
clockwise) from the shank sub - assembly.
D. Remove insert O-ring (for valve sizes 3"- 8" only) and insert
retainer. Discard existing insert and O-ring.
E. Thoroughly clean all remaining metallic components
and install new insert and O-ring as follows (according to
valve size):
For 3/4"- 2" valves :
a. Place new insert on shank and insert retainer as
shown in Figure 3.
b. lnstall plug tip into shank sub-assembly. Hand tighten
and ensure plug tip seats evenly against insert.
For 3" - 8" valves:
a. Apply a light coat of lubricant to the O-ring and install on
insert retainer.
Ensure any lubricant used is compatible with service
conditions.
b. Install new insert on insert retainer and assemble as
shown in Figure 3.
c. Install plug tip into insert retainer sub-assembly
insuring the plug tip seats evenly on the insert.
F. Carefully place the plug sub-assembly into a soft jaw vise,
holding the plug by the flats provided on the upper end of
the shank.
When using a vise to hold the plug, extreme care must be
taken not to damage the plug shank.
G. Using the appropriate tool used during disassembly, firmly
tighten the plug tip.
The plug tip must be tightened, allowed to set for
approximately 4 hours, re-tightened, allowed to set another
4 hours, then tightened one more time. The purpose of this
tightening sequence is to allow the insert material to “cold
flow” into place on the plug sub-assembly.
H. Following the above tightening sequence, securely
tighten the set screw down into the plug. Plug is ready for
assembly into the valve.
8. Valve Body Reassembly
After completion of the required maintenance, the valve should
be reassembled using the following procedures:
Note: If any of the following steps were completed during
maintenance, then proceed to the next step.
8.1 Threaded Trim (Figure 12 or 14)
A. CIean all gasket mating surfaces.
B. Apply a small amount of sealant to the seat ring threads
and sealing shoulder. Install seat ring into valve body.
Note: A sealant compatible with the process should be
applied sparingly.
C. lnstall and tighten seat ring using wrench used for removal.
Do not over-tighten. Do not strike seat ring lugs directly.
This could distort the seat ring resulting in unwarranted
seat leakage.
D. Carefully install plug and stem assembly.
Note: Valve should be lapped before final assembly. See
Section 7.3.
E. Install body gasket (11).
Note: Spiral wound body gaskets (11) are standard in the
21000 Series design. It is imperative that a new gasket be
installed each time the valve is disassembled.
F. Assemble bonnet (8) and body stud nuts (10). Bonnet must
be positioned so the packing flange studs are at 90° to the
flow center line.
8 | GE Oil & Gas © 2014 General Electric Company. All rights reserved.
Page 12

CAUTION
WARNING
CAUTION
WARNING
3
/4" - 2" Valve Sizes 3" - 8" Valve Sizes
CAUTION
WARNING
CAUTION
WARNING
CAUTION
WARNING
Tighten nuts (10) until metal to metal contact is obtained
with proper bolt torque. Refer to Figure 11 for proper bolt
torque and tightening sequence specifications.
G. lnsert packing (6) [and lantern ring (7) on valve equipped
with an optional lubricator connection]. Refer to Section
7.6 for proper packing assembly procedure for standard
or optional designs.
H. Install packing follower (5) and packing flange (4).
I. lnstall packing flange stud nuts (3).
Do not overtighten (See Section “7.6. Packing Box”).
J. If a leak detection connection was installed, connect it on
the lateral NPT port in the bonnet. If not, ensure that the
1/4" NPT plug remained in place (Figure 5).
K. For actuator assembly and plug stem adjustment , proceed
to the actuator instruction Ref. GEA19530 for a type 87/88
actuator.
I. Install packing flange stud nuts (3).
Do not overtighten (See Section “7.6. Packing Box”).
J. If a leak detection connection was installed, connect it on
the lateral NPT port in the bonnet. If not, ensure that the
1/4" NPT plug remained in place (Figure 5).
K. For actuator assembly and plug stem adjustment , proceed
to the actuator instruction Ref. GEA19530 for a type 87/88
multispring actuator.
8.3 High Pressure & Angle Design (Figures 16 & 17)
Standard trim is used within these optional body configurations.
Refer to the applicable sections within this instructions manual.
9. Actuators
9.1 Types 87/88 Actuators
Refer to Instruction Ref. GEA19530 for removal, maintenance,
assembly and adjustment.
10.Bellows Seal Assembly
8.2 Quick-Change Trim (Figure 13 or 15)
A. CIean all gasket mating surfaces.
B. Install seat ring gasket (15) and seat ring (14).
Note: Spiral wound gaskets (11 & 15) are standard in the
21000 Series design. It is imperative that a new gasket be
installed each time the valve is disassembled.
C. Install cage (13).
D. Carefully install plug and stem assembly.
Note: Valve should be lapped before final assembly. See
Section 7.3.
Note: For 2" valves with Cv 30 Lo‑dB / Anti‑Cavitation trim
only, steps C and D must be reversed such that the plug
and stem assembly is installed prior to the cage.
E. Install body gasket (11).
F. Assemble bonnet (8) and body stud nuts (10) and tighten.
Bonnet must be positioned so the packing flange studs
are at 90° to the flow center line.
Care must be taken to ensure that the cage, seat, and
bonnet are properly aligned in the body. Cage should be
installed with parts at lower end, near seat ring. Tighten
nuts (10) until metal to metal contact is obtained with
proper bolt torque. Refer to Figure 11 for proper bolt
torque and tightening sequence specifications.
G. lnsert packing (6) [and lantern ring (7) on valve equipped
with an optional lubricator or leak detection connection].
Refer to Section 7.6 for proper packing assembly
procedure for standard or optional designs.
H. Install packing follower (5) and packing flange (4).
SINCE THIS IS A SEALING
BELLOWS, THE PLUG STEM SHOULD NEVER BE TURNED UNDER
ANY CIRCUMSTANCES.
There is a built-in anti-rotation feature, consisting of a double flat
surface machined on the plug stem that slides into a rectangular
slot machined in the upper bushing (30) of the bellows (see Figure
19 - Section a).
IT IS IMPORTANT TO DISCONNECT THE ACTUATOR FROM THE
VALVE BEFORE CHANGING THE ACTUATOR ROTATIONAL POSITION.
Figure 2 - Typical Installation
Skirt &
Insert
Retainer
Set
Screw
Plug Tip
Figure 3 - Soft Seat Plugs (Optional)
Flats
Shank
Set
Screw
Insert
Retainer
Insert
Flats
O-ring
Plug
Tip
© 2014 General Electric Company. All rights reserved.
Masoneilan 21000 Series Top Guided Globe Valve | 9
Page 13

Figure 5 - Lubricator Connection (Optional)
T-Handle
Lock Nut
Figure 4 - Seat Lapping Device
Braided
Back-up Rings
®
Figure 7
LE
(Low Emission) Packing Arrangement (Optional)
Flexible
Graphite
Rings
Figure 6 - Flexible Graphite Rings Arrangement (Optional)
Figure 8
Lo-dB (Type 21900) and Anti-cavitation (Type 21800) Double
Stage Trim (Optional)
10 | GE Oil & Gas © 2014 General Electric Company. All rights reserved.
Page 14
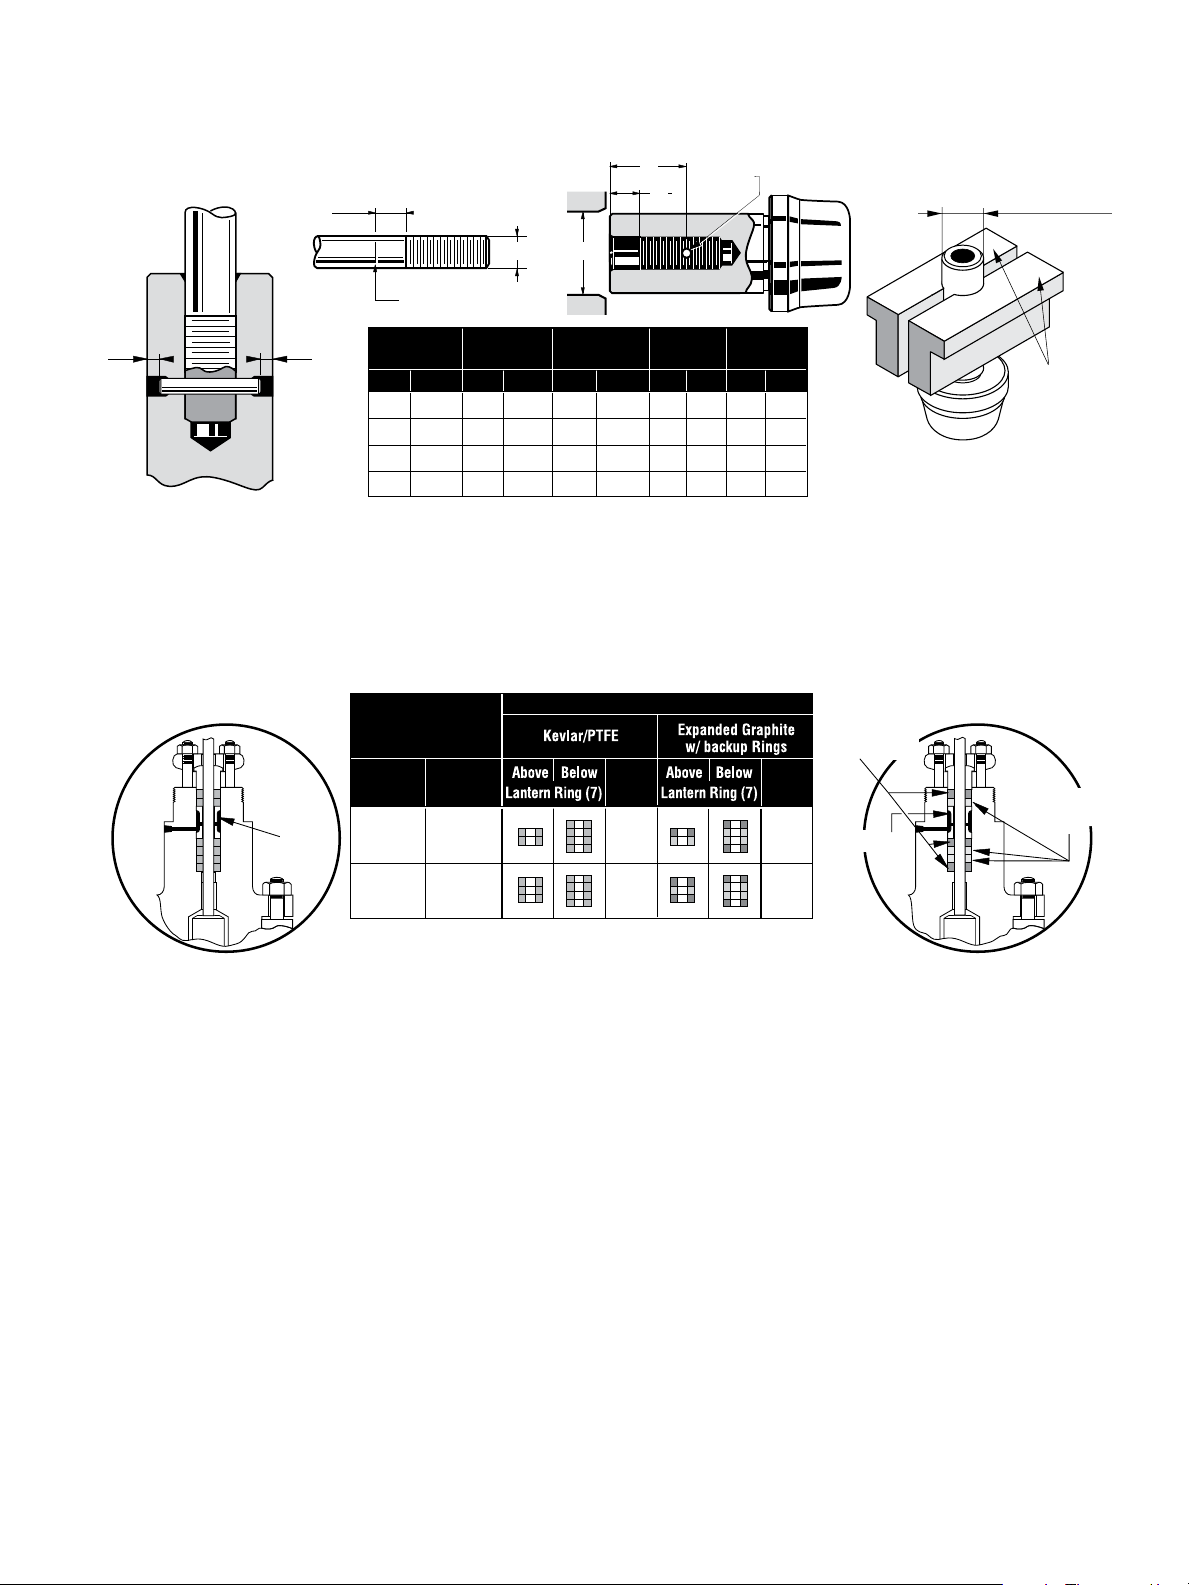
X
Reference Mark
D
C Dia.
X
Cylindrical machining
diameter of the jaws =
plug guide diameter “A”
AB
==
Packing box with Kevlar/PTFE
packing rings
Lantern
Ring
(7)
Plug Guide
Dia. “A”
in.
.87
1.50
2.38
2.75
Valve
Size
in.
3/4 to 4
6 to 8
mm
22.22
38.10
60.32
69.85
mm
20 to 100
150 to 200
Plug Stem
Dia. “B”
in.
1/2
1/2
3/4
3/4
mm
12.70
12.70
19.05
19.05
Pin Hole
Dia. “C”
in.
.138
.138
.197
.197
mm
3.50
3.50
5.00
5.00
Figure 9 - Plug Stem Pinning
Quantity of Packing Rings (6)
Total
6
7
“D” “X”
mm
in.
32
1.25
32
1.25
1.88
47.5
1.88
47.5
in.
.50
.50
.75
.75
mm
13
13
19
19
Total
6
7
Packing box with
Flexible Graphite packing rings
and Back-up rings
Braided
Back-up Rings
Lantern
Ring
(7)
Soft metal
or plastic
vise jaws
Flexible
Graphite Rings
Figure 10 - Packing Ring Arrangements with Optional Lubricator Connection
© 2014 General Electric Company. All rights reserved.
Masoneilan 21000 Series Top Guided Globe Valve | 11
Page 15

Assembly Torque Requirements
Valve
Size
1
&
1- 1/2
900
31
230 250
34
Min.
daN.m
Carbon Steel Bolting
Max.
Ft. Lbs.
daN.m
Ft. Lbs.
ANSI Class
Stud (9)
150 - 300
600
4,5
33 37
5
1/2” -13 NC - 2A
26
192 207
28
1- 1/4” - 8 NC - 2A
Size Qty
8
12
1500
35
260 295
40
1” - 8 NC - 2A 4
2500
40
295 370
50
5,5
40 48
6,5
150
300
600
8
60 63
8,5
5/8” -11 NC - 2A 6
19
140 148
20
3/4” -10 NC - 2A 8
150 - 300
600
8,5
63 70
9,5
5/8” -11 NC - 2A 8
28
207 220
30
1” -8 NC - 2A 8
150 - 300
600
8,5
63 66
9
5/8” -11 NC - 2A 12
28
207 221
30
1” -8 NC - 2A 12
8
60 63
8,5
5/8” -11 NC - 2A 6
23
170 184
25
Min.
daN.m
Stainless Steel Bolting
Max.
Ft. Lbs.
daN.m
Ft. Lbs.
3,5
26 30
4
26
192 207
28
4,5
33 37
5
23 *
170 * 184 *
25 *
7
52 59
8
28
207 221
30
9
66 74
10
Req’d. Torque
28
207 221
30
Valve Size
ANSI Class
Bolting Requirements
Minimum Maximum Pre-Load
Torque Requirements
inch mm Qty. Size (inch) Lbs.Ft N.m Lbs.Ft N.m Lbs.Ft N.m
150 & 300 4 1/2"-13NC-2A 25 34 66 89 5 7
.75 & 1
1.5 & 2
20 &
25
40 &
50
1.5 40 2500 8 7/8"-9NC-2A 100 136 300 407 30 41
2 50 2500 8 1-1/8"-7NC-2A 160 217 640 868 60 81
80
3
4 100
6 150
8 200 150 - 600 12 1-1/4"-8NC-2A 235 319 1200 1627 100 136
600 4 1/2"-13NC-2A 25 34 66 89 5 7
900 & 1500 4 1"-8NC-2A 125 169 560 759 45 61
2500 4 1"-8NC-2A 125 169 560 759 45 61
150 & 300 8 1/2"-13NC-2A 25 34 66 89 5 7
600 8 1/2"-13NC-2A 25 34 66 89 5 7
900 & 1500 8 7/8"-9NC-2A 100 136 300 407 30 41
150 & 300 6 5/8"-11NC-2A 45 61 132 179 10 14
600 8 3/4"-10NC-2A 80 108 230 312 20 27
900 & 1500 8 1-1/8"-8NC-2A 225 305 830 1125 75 102
150 & 300 8 5/8"-11NC-2A 45 61 132 179 10 14
600 8 1"-8NC-2A 125 169 560 759 45 61
900 & 1500 8 1-1/2"-8NC-2A 400 542 2100 2847 115 156
150 & 300 12 5/8"-11NC-2A 45 61 132 179 10 14
600 12 1"-8NC-2A 125 169 560 759 45 61
Notes: 1. Do not exceed Maximum Torque values listed.
2. Tighten in increments until required torque levels are reached.
3. Reject assembly if metal-to-metal contact is not achieved after reaching Maximum Torque.
4. Torque requirements shown are for standard B7 studs and 2H nuts.
Bellows Bonnet Assembly Torque Requirements
Bolting Requirements
Minimum Maximum Increments Pre-Load
Qty. Size (inch) Lbs.Ft N.m Lbs.Ft N.m Lbs.Ft N.m Lbs.Ft N.m
8 1/2"-13NC-2A 20 27 30 41 5 7 5 7
8 5/8"-11NC-2A 25 34 55 75 10 14 5 7
1
2
3
5
Notes: 1. Do not exceed Maximum Torque values listed.
2. Tighten in increments noted until required torque levels are reached.
3. Torque requirements shown are for standard B7 studs and 2H nuts.
4
1
2
Figure 11 - Bolting Torques and Tightening Sequence
3
6
4
Torque Requirements
4
1
8
6
5
3
7
2
8
4
10
1
12
6
2
5
9
3
7
11
12 | GE Oil & Gas © 2014 General Electric Company. All rights reserved.
Page 16

Figure 12
Threaded Seat Ring - Contoured Plug - Full Capacity
Figure 13
Quick Change Trim - Contoured Plug - Full Capacity
Figure 14
Threaded Seat Ring - Lo-dB Plug
Quick Change Trim - Lo-dB Plug
Figure 15
PARTS REFERENCE
Ref. Part Name Ref. Part Name Ref. Part Name
l 1 Plug Stem
2 Packing Flange Stud
3 Packing Flange Stud Nut
4 Packing Flange
5 Packing Follower
l 6 Packing
7 Lantern Ring (optional)
8 Bonnet
l Recommended spare parts
© 2014 General Electric Company. All rights reserved.
Only on Quick Change Trim
*
9 Body Stud
10 Body Stud Nut
l11 Body Gasket
12 Plug Guide Bushing (Incl. w/ref. 8)
l13 Cage *
l14 Seat Ring
l15 Seat Ring Gasket *
l16 Plug
l17 Plug Pin
18 Body
19 Drive Nut
Masoneilan 21000 Series Top Guided Globe Valve | 13
Page 17

Figure 16 - 21000 Series
CAUTION
WARNING
3/4" to 2" Valve Sizes ANSI Class 900 to 2500
10.1 Bellows Valve Disassembly (Figure 19)
Note: Spiral wound gaskets are standard in the 21000 BS
Series design. IT IS RECOMMENDED THAT NEW GASKETS ARE
INSTALLED EACH TIME THE VALVE IS DIS ASSEMBLED.
10.1.1 Threaded Trim
After removing the actuator, disassemble the body S/A
using the following procedure:
• Disconnect the leak-off circuit from the bonnet (if this
option is included). Remove nuts (27) and bonnet studs
(26) from the bonnet (25).
• Remove packing flange stud nuts (3), packing flange (4)
and packing follower (5). Remove bonnet (25).
• Remove existing packing (6).
• Remove body stud nuts (10).
• Remove bonnet extension (29), stem bellows S/A (30)
and plug (16) at the same time.
• Remove the plug pin (17), then remove the plug (16)
from the plug stem (30). (See section 10.2.1.1 for
unpinning the plug stem).
• Remove stem bellows S/A (30) by the top of the bonnet
extension (29). If necessary, disengage the upper
bushing of assembly (30) using a screwdriver in the
groove provided for this purpose.
Figure 17 - Angle Body Design
3/4" to 6" Valve Sizes ANSI Class 150 to 600
3/4" to 2" Valve Sizes ANSI Class 900 to 2500
Be careful not to damage the seating surfaces of the
bellows bushing.
• Remove the bonnet and spacer gaskets (28) and the
body gasket (11).
• Bonnet extension (29), plug (16), guide bushings and seat
ring (14) may now be inspected for wear and service
damage. After determining the maintenance required,
proceed to the appropriate section of these instructions.
10.1.2 Quick-Change Trim
Removal of the quick-change trim is accomplished using
the same procedures as removal of the threaded trim.
However, after the bonnet extension (29) has been
removed from the body, remove the cage (13), the seat
ring (14) and the seat ring gasket (15).
10.2 Repair
The purpose of this section is to provide recommended
maintenance and repair procedures. These procedures assume
the availability of standard shop tools and equipment.
10.2.1 Plug/Stem Bellows/Bonnet Extension S/A
Plug stem pinning in the field may be required for:
14 | GE Oil & Gas © 2014 General Electric Company. All rights reserved.
Page 18

• Replacing existing plug and stem-bellows S/A
• Replacing stem-bellows S/A only
If the plug needs replacing, the stem-bellows sub-
assembly should be replaced at the same time.
The original pin hole in a stem which is being reused
sometimes prevents a satisfactory result being obtained and
can also weaken the plug-stem assembly.
If the stem-bellows sub-assembly is being replaced, the
new assembly can be fitted on an existing plug as long as
it is in good condition and the removal of the pin has not
deformed the hole or damaged it in any other way.
Note: Always use soft metal vise jaws to hold the plug
guide surface. Failure to take this precaution could result
in damage to the plug guide surface during pinning (see
Figure 18).
Be careful not to damage the plug seating surface during
pin removal and assembly operations.
10.2.1.1 Unpinning the Plug Stem
• Pull and hold the plug (16) out of the bonnet
extension (29) to allow access to the plug pin (17).
Place the plug guide on a V-block.
Note: A lower mechanical stop has been provided to
prevent damage of the bellows during this step.
• Using a drift punch, drive out the existing pin (17).
Note: If it is necessary to drill out the pin, use a drill
bit slightly smaller than the pin diameter. Be careful
not to damage the hole of the plug guide.
• Lock two nuts against each other on the end of
the plug stem, and use a flat spanner on the lower
nut to prevent rotation while unscrewing the plug
from the stem. The plug is removed by turning it
counter-clockwise.
• Remove the two nuts from the plug stem. Complete
step 10.1.1.
• Inspect the parts and carry out any necessary
repairs, then reassemble the stem-bellows subassembly (30) through the upper hole in the bonnet
extension (29) (see section 10.2.1.2).
10.2.1.2 Mounting of the Plug-Stem/Bellows S/A into
the Bonnet Extension
• Clean all contact surfaces of the bonnet extension
(29) and the plug-stem/bellows S/A.
• Assemble a new gasket (28) on the upper flange of
the bonnet extension.
• Insert the new stem-bellows S/A through the top
hole into the bonnet extension (29).
• Pin the plug on the stem (See section 10.2.1.3).
10.2.1.3 Plug Stem Pinning
Replacing Plug and Stem/Bellows S/A
A. Screw Stem into Plug
– Lock two nuts against each other on the end of the
plug stem and use a flat spanner on the upper nut
to prevent rotation of the stem-bellows S/A. Screw
the plug onto the lower part of the stem while
inserting the plug shank into the guide bushing (12) in
the bonnet extension (29).
– Pull and hold the plug (16) out of the bonnet extension
(29) to allow access to the plug pin (17).
B. Drilling the New Parts
• Iftheplugisalreadyfullydrilled,
(typical for 440C hardened stainless steel material or
solid Stellite or Equivalent), then drill the stem to the
same diameter (Diameter C in Figure18) as the Plug
Shank Hole.
• Iftheplugguideareahasacentermark,
Place the plug guide on a V-block and use a suitable
size drill to either:
– Match the hole size in the plug, or
– Match Diameter C (see Figure 18),
– Drill through the plug-stem assembly.
• Iftheplugguideareahasnohole or any center
mark,
– Measure Dimension D based on the plug guide
diameter and stem diameter (see Figure 18).
– Place the plug guide on a V-block, and make a
center mark on the plug guide area using a center
punch.
– Drill through the plug-stem assembly using a
suitable size drill bit.
In all cases after drilling: Remove any burrs from
the plug guide hole by making a slight chamfer.
C. Pinning the Plug-Stem Assembly
– Select the correct size pin based on the plug guide
diameter and stem diameter (see Figure 18). Apply
a small amount of grease on the pin and handassemble it into the hole in the plug.
– Press fit the pin into the hole using a hammer.
Complete the pinning operation by ensuring that
the pin is recessed by the same amount from both
sides (see Figure 18).
Replacing Stem/Bellows S/A Only
A. Screw Stem into Plug
– Refer to paragraph A of the previous section
“REPLACING PLUG AND STEM/BELLOWS S/A”.
B. Drilling the New Stem
– Place the plug guide on a V-block and use a
suitable size drill bit to drill the stem (use the hole
in the plug as a guide).
Note: If the hole in the plug guide has been slightly
damaged while removing of the old pin, choose a drill
bit and a pin with a slightly larger diameter than the
normal pin.
C. Pinning
– Select the correct size pin based on plug guide
diameter and pin hole diameter. Proceed as
described in Paragraph C above, taking care not to
damage the plug guide area.
© 2014 General Electric Company. All rights reserved.
Masoneilan 21000 Series Top Guided Globe Valve | 15
Page 19

CAUTION
WARNING
Plug Guide
Dia. “E”
mmin.
22.227/8
38.101 1/2
60.322 3/8
69.852 3/4
Plug Stem
Dia. “F”
mm
in.
12.70
1/2
12.70
1/2
19.05
3/4
19.05
3/4
Pin Hole
Dia. “C”
in.
.138
.138
.197
.197
mm
3.50
3.50
5.00
5.00
“D” “L”
mm
in.
42
1.65
55
2.17
70
2.75
70
2.75
in.
.70
1.25
2.00
2.00
mm
18
32
50
50
29
Pull plug out of the Bonnet
Extension (29) for access to
the plug pin
16
Cylindrical machining
diameter of the jaws
=
plug guide diameter “E”
Soft metal
or plastic
vise jaws
30
28
Figure 18 - Unpinning and Pinning of the Plug to Stem
10.3 Plug and Seat Ring Seating Surfaces
It is not possible to lap the plug and seat ring seating
surfaces after the bellows has been assembled to the
stem.
If the seat ring shows signs of minor wear, it should be turned
on a lathe to clean up the worn area. The seating surface of
the seat ring is 30 degrees from centerline axis. However, no
more than 0.010 in. (0.25 mm) of material should be removed.
In cases where the seat ring cannot be repaired, or if the plug is
also damaged the only alternative is to replace both parts.
Lower Mechanical Stop
to Protect the Bellows
=
L
=
E Dia.
17
C Dia.
D
F Dia.
Plug and Plug Stem-Bellows S/A Stem
Assembly of the No. 6 actuator on a bellows seal valve requires
a three-sectioned coupling. Follow coupling instructions as
described for the No. 10, 16 and 23 actuators.
The bellows assembly causes a “spring back” effect. Measure this
plug spring back before referring to Instruction Ref. GEA19530. Be
sure to add this spring back length to the over seat adjustment.
10.4 Bonnet Reassembly
Place new gasket (28) into the groove of the bonnet spacer.
Install the bonnet (25) and assemble nuts (27) and studs (26).
Bonnet must be positioned so the packing flange studs are at a
90° angle to the flow centerline.
Refer to table in Figure 11 for proper bolt torque and
tightening sequence.
10.5 Valve Body Reassembly
Refer to instructions stated in Section 8 for the specific trim
type involved.
10.6 Actuator to Body S/A and Plug Stem
Adjustment
Refer to instruction Ref. GEA19530.
16 | GE Oil & Gas © 2014 General Electric Company. All rights reserved.
Page 20

aa
2
22
3
4
5
6
25
31
28
28
27
26
9
10
11
12
19
Section a
(✚) 30 (✚) 29
DETAIL OF THE PLUG
STEM ANTI-ROTATION
DEVICE
17
18
13
14
15
16
Threaded Trim detail
Quick Change Trim
Figure 19 — 21000 BS Valve
PARTS REFERENCE
Ref. Part Name Ref. Part Name Ref. Part Name
l 1 Plug Stem
2 Packing Flange Stud.
3 Packing Flange Nut
4 Packing Flange
5 Packing Follower
l 6 Packing
9 Body Stud
10 Body Stud Nut
l11 Body Gasket
12 Guide Bushing
n 13 Cage
l14 Seat Ring
lRecommended Spare Parts + These parts included in welded subassembly n Quick change trim only
n 15 Seat Ring Gasket
l16 Plug
l17 Plug Pin
18 Valve Body
19 Drive Nut
22 Plug Stem Locknut
25 Valve Bonnet
26 Bonnet Stud
27 Bonnet Stud Nut
l28 Bonnet Spacer Gasket
29 Bonnet Extension Assembly
+ Upper Flange
+ Spacer
+ Lower Flange
30 Bellow and Stem Assembly
+ Stem
Guide Bushing
+ Bellows
+ Upper Adapter (Bellows)
+ Lower Adapter (Bellows)
31 1/8" NPT Plug
© 2014 General Electric Company. All rights reserved.
Masoneilan 21000 Series Top Guided Globe Valve | 17
Page 21

DIRECT SALES OFFICE LOCATIONS
AUSTRALIA
Brisbane:
Phone: +61-7-3001-4319
Fax: +61-7-3001-4399
Perth:
Phone: +61-8-6595-7018
Fax: +61 8 6595-7299
Melbourne:
Phone: +61-3-8807-6002
Fax : +61-3-8807-6577
BELGIUM
Phone: +32-2-344-0970
Fax: +32-2-344-1123
BRAZIL
Phone: +55-11-2146-3600
Fax: +55-11-2146-3610
CHINA
Phone: +86-10-8486-4515
Fax: +86-10-8486-5305
FRANCE
Courbevoie
Phone: +33-1-4904-9000
Fax: +33-1-4904-9010
GERMANY
Ratingen
Phone: +49-2102-108-0
Fax: +49-2102-108-111
INDIA
Mumbai
Phone: +91-22-8354790
Fax: +91-22-8354791
New Delhi
Phone: +91-11-2-6164175
Fax: +91-11-5-1659635
ITALY
Phone: +39-081-7892-111
Fax: +39-081-7892-208
JAPAN
Chiba
Phone: +81-43-297-9222
Fax: +81-43-299-1115
KOREA
Phone: +82-2-2274-0748
Fax: +82-2-2274-0794
MALAYSIA
Phone: +60-3-2161-0322
Fax: +60-3-2163-6312
MEXICO
Phone: +52-5-310-9863
Fax: +52-5-310-5584
THE NETHERLANDS
Phone: +0031-15-3808666
Fax: +0031-18-1641438
RUSSIA
Veliky Novgorod
Phone: +7-8162-55-7898
Fax: +7-8162-55-7921
Moscow
Phone: +7 495-585-1276
Fax: +7 495-585-1279
SAUDI ARABIA
Phone: +966-3-341-0278
Fax: +966-3-341-7624
SINGAPORE
Phone: +65-6861-6100
Fax: +65-6861-7172
SOUTH AFRICA
Phone: +27-11-452-1550
Fax: +27-11-452-6542
SOUTH & CENTRAL
AMERICA AND THE CARIBBEAN
Phone: +55-12-2134-1201
Fax: +55-12-2134-1238
SPAIN
Phone: +34-93-652-6430
Fax: +34-93-652-6444
UNITED ARAB EMIRATES
Phone: +971-4-8991-777
Fax: +971-4-8991-778
UNITED KINGDOM
Wooburn Green
Phone: +44-1628-536300
Fax: +44-1628-536319
UNITED STATES
Massachusetts
Phone: +1-508-586-4600
Fax: +1-508-427-8971
Corpus Christi, Texas
Phone: +1-361-881-8182
Fax: +1-361-881-8246
Deer Park, Texas
Phone: +1-281-884-1000
Fax: +1-281-884-1010
Houston, Texas
Phone: +1-281-671-1640
Fax: +1-281-671-1735
* Masoneil an and Lo-dB are r egistered tr ademarks of t he General Ele ctric Compa ny.
Other company names and product names used in this document are the registered trademarks or trademarks of their respective owners.
© 2014 General Ele ctric Compa ny. All rights res erved.
GEA19821A 04/2014
 Loading...