

Page 1

Installation Guide
LuminationTM LED Luminaire
LEL Series - for HTEK/TEK Mounting
BEFORE YOU BEGIN
Read these instructions completely and carefully.
Wear work gloves to prevent dirt and oil
from being transferred to the luminaire.
WARNING/AVERTISSEMENT
RISK OF ELECTRIC SHOCK
• Turn power off before inspection, installation or removal.
• Properly ground electrical enclosure.
RISK OF FIRE
• Follow all NEC or IEC local codes.
RISK OF INJURY
• Luminaire may fall down if not locked into mounting track
properly.
RISQUES DE DÉCHARGES ÉLECTRIQUES
• Coupez l’alimentation avant d’inspecter, installer ou déplacer le luminaire.
• Assurez-vous de correctement mettre à la terre le boîtier d’alimentation électrique.
RISQUES D’INCENDIE
• Respectez tous les codes NEC ou IEC ainsi que les et codes locaux applicables.
RISQUES DE BLESSURE
• Le luminaire pourrait tomber s’il n’est pas verrouiillé en place correctement aux
rails de montage.
Save These Instructions
Use only in the manner intended by the manufacturer. If you have any questions, contact the manufacturer.
1
Page 2
Track
Lock Lock
Mechanical xing knob
A
ON
OFF
B
1 2
0
Mechanical
xing knob
Circuit
selector knob
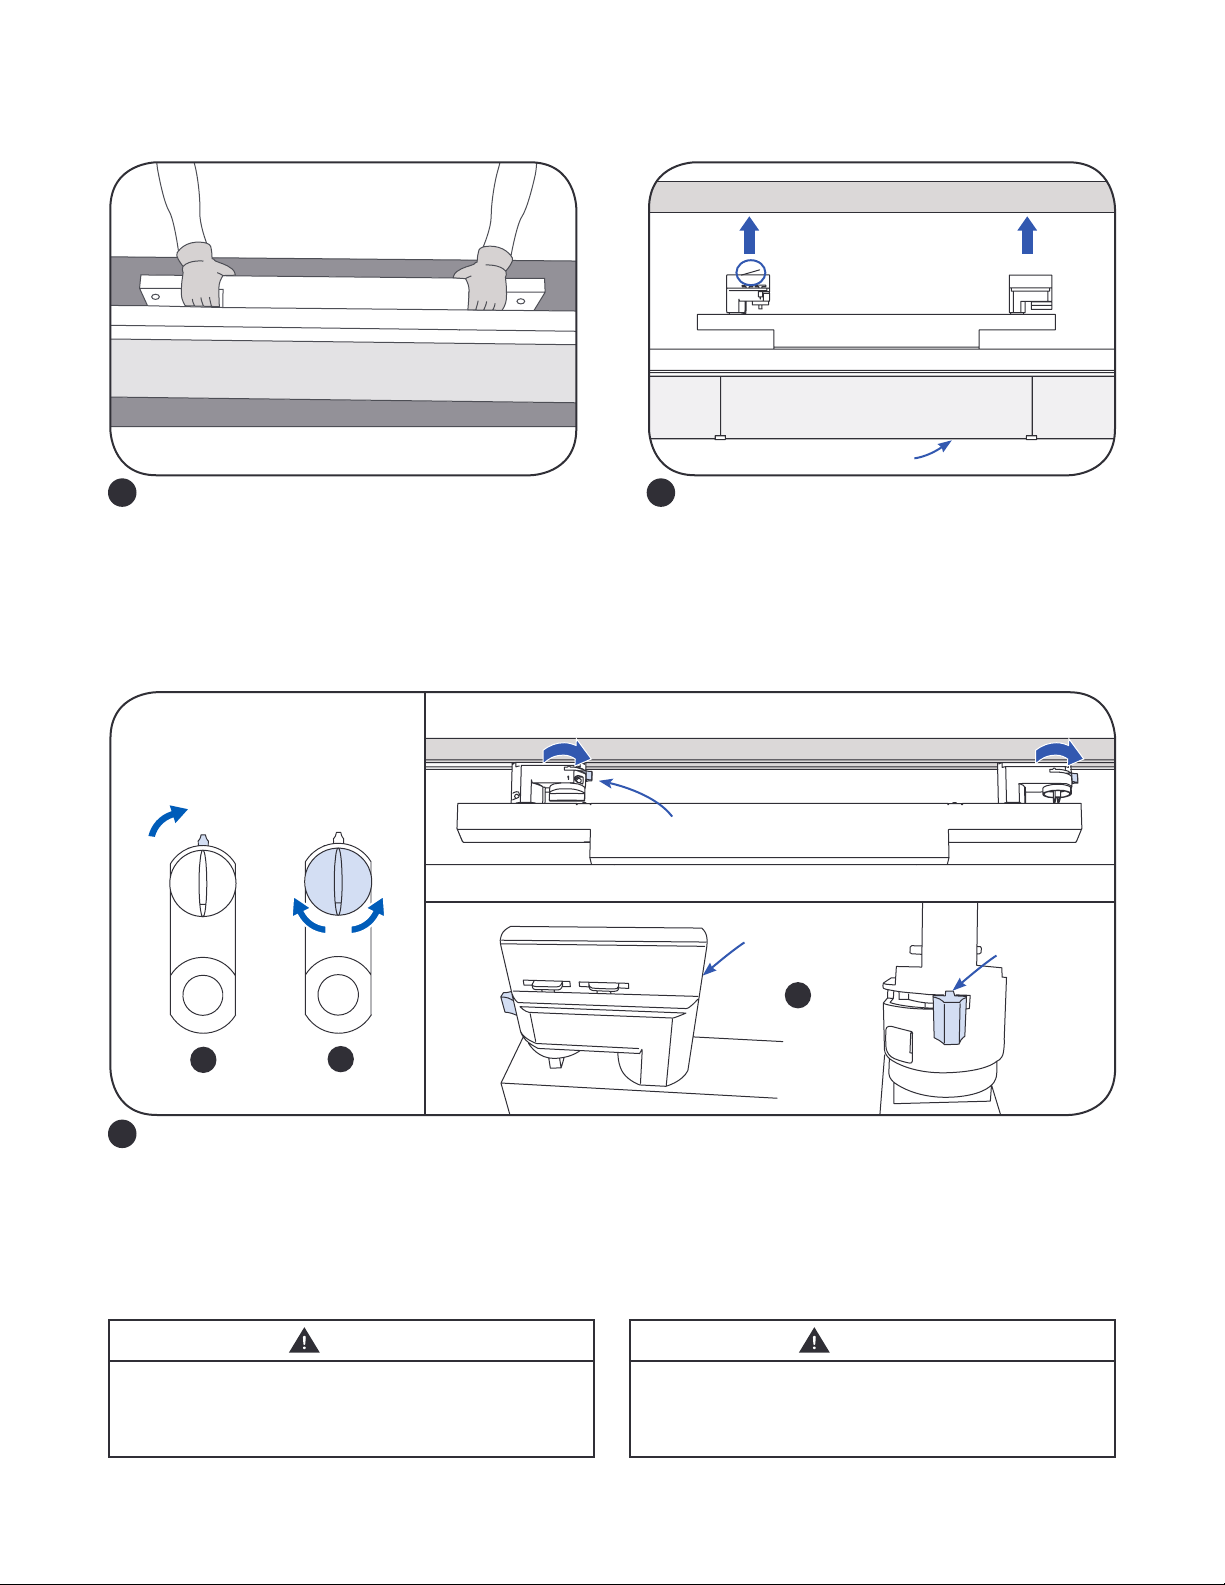
Luminaire Installation
Track
1
Unpack unit from packaging. Properly inspect for
defects before installing.
RISK OF DAMAGE: Make sure the luminaire is only
carried out by holding two ends of gear box. Do
not touch the light guide when removing the xture
from the packaging or during the installation.
Adapter with
metal pin
Gearbox
Light guide
Ensure alignment lines on luminaire and
2
Dummy
adapter
adaptors are parallel and insert xture vertically
into track.
3
RISK OF DAMAGE
• Remove protective lm on Light Guide after installation.
• Do not touch Light Guide to avoid dirt, oil and ngerprints.
Dummy adapter
Cavity stopper
C
(A) On both adapters, rotate mechanical xing knob clockwise to ON position to lock xture to track.
(B) On adapter with metal pin on top, select the desired circuit with the circuit selector knob.
(C) For the dummy adapter without the metal pin, need to turn mechanical xing knob clockwise to the
cavity stopper as shown above.
CAUTION: Must turn mechanical xing knobs to the right position to prevent the luminaire from falling off
without locking.
CAUTION
ATTENTION
RISQUE DE DOMMAGES
• Retirez le lm protecteur du luminaire après son installation.
• Ne touchez pas la surface émittrice du luminiaire pour éviter
les saletés, graisses ou empreintes digitales.
2
Page 3

Luminaire Removal
Clips
To remove xture put Circuit Selector to 0 and Mechanical Knob to off. Then, while tilting xture, remove luminaire
marked side rst. Carefully check the clips are still in the right positions after removing the protective lm. If the clips fall
down, need push them back to the right positions.
Luminaire Inter-connection & Alignment (Continuous Mounting)
Inter-connector
Light Guide Clip
Put the inter-connector on the top of two
1 2
luminaires, and make sure that the slot of the
inter-connector crosses the two end caps.
This device complies with Part 15 of the FCC Rules. Operation is subject to the following two conditions: (1) This device may not cause
harmful interference, and (2) this device must accept any interference received, including interference that may cause undesired
operation. CAN ICES-005 (A) / NMB-005 (A)
Note: This equipment has been tested and found to comply with the limits for a Class A digital device, pursuant to part 15 of the FCC
Rules. These limits are designed to provide reasonable protection against harmful interference when the equipment is operated in a
commercial environment. This equipment generates, uses, and can radiate radio frequency energy and, if not installed and used in
accordance with the instruction manual, may cause harmful interference to radio communications. Operation of this equipment in
a residential area is likely to cause harmful interference in which case the user will be required to correct the interference at his own
expense.
Push the inter-connector into the luminaires.
Remove the protective lm, and insert the Light
Guide clip between the two Light Guides.
All trademarks are the property of their respective owners. Information provided is subject to
change without notice. All values are design or typical values when measured under laboratory
conditions. Current, powered by GE is a business of the General Electric Company.
© 2019 GE.
www.currentbyge.com IND314 (Rev 03/29/19)
 Loading...