

Page 1
0
GEAppliances.com
Safety Instructions ........ 2-9
0
Operating Instructions
Exhaust Features ........... 24, 25
Microwave Terms .............. 19
lyPlate Feature................ 16
Oven Features ............. ll, 12
Other Features ............. 20,21
Power Levels................... 19
Replacing the Light Bulb........ 24
Sensor Features............. 17-19
Time Features............... 1S-iS
Care and Cleaning ......... 22
Troubleshooting Tips
Before you call for Service...26-28
Consumer Support
Optional Kits .................... lO
Consumer Support .............. 32
Warranty ...................... 31
DVM7195
JVM7195
JNM7196
PVM9195
PNM9196
0
0
Write the model and serial numbers here:
Model #
Serial #
Youcan find them on a labelwhen the
door isopen.
Espafiol
For a Spanish version of this
manual, visit our Website at
GEAppliances.com.
Para consultar una version en
espa_ol de este manual de
instrucciones, visite nuestro sitio
de internet GEAppliances.com.
49-40705-1 11-14 GE
Page 2

IMPORTANT SAFETYINSTRUCTIONS.
READ ALL INSTRUCTIONS BEFOREUSING.
A WARNING!
To reduce risk of burns, electric shock, fire, personal injury or exposure to excessive microwave energy.
PRECAUTIONS TOAVOID POSSIBLEEXPOSURE
TO EXCESSIVEMICROWAVE ENERGY
(e) Do Not Attempt to operate this oven with the door
open since open-door operation can result in harmful
exposure to microwave energy. It isimportant not to
defeat or tamper with the safety interlocks.
(b) Do Not Piece any object between the oven front
face and the door or allow soil or cleaner residueto
accumulate on sealingsurfaces.
Do Not Operate the oven ifit isdamaged. It is
particularly important that the oven door closeproperly
and that there isno damage to the:
(1)door (bent),
(2)hinges and latches(brokenor loosened),
(3)door sealsand sealing surfaces,
(d) The Oven Should Not be adjusted or repaired by
anyone except properly qualified servicepersonnel.
IMPORTANT SAFETYINSTRUCTIONS.
Usethisappliance only for its intendedpurposeas describedin thisOwner'sManual.
Whenusing electricalappliancesbasicsafety precautionsshould befollowed,including the following:
[] Read and follow the specific precautions in the
PRECAUTIONSTO AVOID POSSIBLEEXPOSURETO EXCESSIVE
MICROWAVE ENERGY section above.
[] Thisappliance must begrounded. Connectonly to a properly
grounded outlet. Seethe GROUNDINGINSTRUCTIONSsection
on page 8.
[] Installor locate this appliance only in accordance with the
provided installation instructions.
[] Becertain to place the front surface of the door 3" or more
back from the countertop edgeto avoid accidental tipping of
the appliance in normal usage.
[] Thismicrowave oven isnot approved or tested for marine
use.
[] Donot mount this appliance over a sink.
[] Donot operate this appliance if it hasa damaged power
cord or plug, if it isnot working properly,or if it has been
damaged or dropped.
[] Donot cover orblock any openings on the appliance.
[] Usethis appliance only for itsintended useasdescribed in
this manual. Do not use corrosivechemicals or vapors in this
appliance. Thismicrowave oven isspecificallydesigned to
heat, dry or cook food, and is not intended for laboratory or
industrial use.
[] Donot store this appliance outdoors. Donot use this
product near water-for example, in a wet basement, neara
swimming pool, near a sink or in similar locations.
[] Donot let cord hang over edge of table or counter.
[] Donot store anything directly on top of the appliance when
it is inoperation.
[] Keep power cord away from heated surfaces.
[] Do not immerse power cord or plug in water.
[] To reduce the riskof fire in the oven cavity:
- Do not overcook food.Carefully attend appliance when
paper, plastic orother combustible materials are placed
insidethe ovenwhile cooking.
- Removewire twist-ties and metal handlesfrom paper or
plastic containers before placing them inthe oven.
- Do not usethe oven for storage purposes.Do not leave
paper products, cooking utensilsor food in the oven when
not in use.
- If materials insidethe oven ignite, keep the oven door closed,
turn the oven off and disconnect the power cord, orshut
off power at the fuse or circuit breaker panel.If the door is
opened,the fire may spread.
[] Seedoor surface cleaning instructions in the Careand
cleaning of the microwave oven section of this manual. Do
not usecleaners with ammonia or alcohol on the microwave
oven. Ammonia and alcohol can damage the appearance of
the microwave.
[]
GEdoes not support any servicingof this microwave oven,
except as describedby the Consumer Support sections
of this manual. Donot attempt to servicethe microwave
oven yourself. If serviceis desired,this appliance should be
servicedonly byqualified service personnel. Contact the
nearest authorized servicefacility for examination, repair or
adjustment.
[]
Aswith any appliance, closesupervision is necessary when
used by children.
2 SAVETHESEINSTRUCTIONS
Page 3
INSTRUCCIONES IIvlPORTANTES DE SEGURIDAD.
LEA PRilVlEROTODA LASINSTRUCCIONES. GEAppliances.com
iPRECAUCION!
Par su seguridad, la informaci6n contenida en este manual debe seguirse para minimizar el riesgo de incendio, explosi6n,
descarga eldctrica, exposici6n a energia microondas.
PRECAUCIONESPARA EVITAR POSIBLEEXPOSICION
A UNA EXCESIVAENERG[A DE MICROONDAS.
(u) No Intente operar este horno con la puerta abierta ya
que esto podrfa resultar en una exposici6n aenerg[a
microondas dahina. Esimportonte no cancelor ni
manipular de forma indebida losdispositivosde
seguridad.
(b) No SitFle ningOnobjeto entre la parte frontal del horno
y la puerto ni permita que se ocumule suciedad o
residuos limpios enlas gomas de cierre herm@ico.
(d No Use el homo siest6 dahado. Esespecialmente
importante que la puerta del homo secierre
correctamente y que no sedahe:
(!) la puerta (doblada),
(2)bisagras y pasadores (rotoso sueltos),
(3)sellosde la puerta y gomas de cierre herm@ico.
(dJ El homo no deberia ajustarse ni repararse par nadie
que no sea personal de servicioadecuadamente
calificado.
INSTRUCCIONES IMPORTANTES DE SEGURIDAD.
Use este electrodomdstico s61opara su prop6sito original, coma se describe en el Manual del Propietario.
AI usar artefactos eldctricos se deberdn seguir los precauciones bdsicas de seguridad, incluyendo Io siguiente:
[] Lea y obedezca las precauciones espec[ficas en la secci6n
de PRECAUCIONESPARA EVITARPOSIBLEEXPOSICIONA UNA
ENERG[AEXCESIVADE IvIICROONDASde arriba.
[] Esteelectrodom_stico debe estar conectado a tierra.
Con_ctelo s61oa una toma de corriente con toma de tierra.
Vea la secci6n de INSTRUCCIONESDETOMADETIERRAen la
p6gina 9.
[] Instaleo coloque este electrodom6stico siguiendo s61olas
Instrucciones de Instalaci6n provistas.
[] Aseg6resede colocar lasuperficiefrontal de la puerta 3"
o m6s atr6s del extremo de la base,a fin de evitar cddas
accidentales del electrodom6stico durante un usa normal.
[] Estehomo microondas no est6 aprobado ni evaluado para
usanaval.
[] Nomonte el electrodom#stico sabre un lavabo.
[] Nousar este electrodom#stico siel cable de corriente
o el enchufe han sufrido alg0n da5o, sino funciona
correctamente o si ha resultadodahado ose ha ca[do.
[] Nobloquee ni cubra cualquier abertura del
electrodom_stico.
[] D#a esteelectrodom#stico elusa para el cual fue
dise_ado 6nicamente, coma se describeen este manual.
Nouse productos qu[micos corrosivos ni vapores en este
electrodom#stico. Estehomo microondas rue diseBado
espedficamente para calentar, secar o cocinar comida, y no
para usaindustrial o en laboratorio.
[] Nouse este producto cerca del agua; par ejemplo, en un
s6tano hOmedo,cerca de una piscina,cerca de un lavabo o
en ubicaciones similares.
[] Nopermita que el cable se sostengasabre el extremo de la
mesada
[] Noguarde nada directamente sabre lasuperficie del homo
microondas cuando el mismo seencuentre funcionando
[] Noguarde este electrodom#stico al aire libre.
[] Mantenga el cable de corriente alejado de superficies
calientes.
[] Parareducir el riesgo de incendio enla apertura del homo:
- Nococine demasiado la comida. Presteatenci6n cuidadosa
al electrodom_stico cuando se coloca papel, pl6stico uotro
material combustible en el horno mientras se cocina.
- Quite lascintas de cierre con metal y lasasas met61icasde
losrecipientesde papel o pl6stico antes de introducirlos en el
homo.
- Noalmacene cosas enel horno. No deje productos de papel,
utensiliosde cocinar nicomida en el homo mientras no Io
est# usando.
-Si se incendiara algOnmaterial dentro, mantenga la puerta
del homo cerrada, apague el homo y desconecte elcable
de corriente el#ctrica,o apague la corriente en elfusible o
panel del diferencial.Sise abre la puerta el fuego podr[a
expandirse.
[] Lealas instrucciones delimpieza de la superficie de lapuerta
en la secci6nde Cuidadoy limpiezadel homo microondas
de este manual. No uselimpiadores que contengan
amon[acos o alcohol en elhorno microondas. Elamon[aco o
el alcohol pueden dahar elaspecto del homo microondas.
[] GEno respalda ning6n serviciot@cnicosabre estehomo
microondas, excepto coma se describe en las seccionesde
Soporte alConsumidor de este manual. Nointente reparar
el homo microondas usted mismo.Sies necesario reparar el
electrodom#stico, entonces el serviciodeber6 serrealizado
par una persona calificada del servicio t6cnico. Comun[quese
a una sucursal autorizada del servicio t#cnico para realizar
cualquier control, reparaci6n o ajuste.
[] AI igual que con cualquier electrodom#stico, sedeber6
realizar una supervisi6nde cerca si esusado par nihos.
GUARDEESTASINSTRUCCIONES
Page 4
IMPORTANT SAFETY INSTRUCTIONS.
READ ALL INSTRUCTIONS BEFORE USING.
A WARNING!
IMPORTANT SAFETYINSTRUCTIONS.
[] Donot clean with metal scouring pads. Piecescan burn off the
pad and touch electrical parts involving riskof electricshock.
[] Thismicrowave oven isULlisted for installation over both gas
(lessthan 60,O00BTUtand electric ranges.
ARCING
If you see arcing, press the Cancel/Off pad and correct the
Arcing isthe microwave term for sparksin the oven.Arcing is
caused by:
[] Metalor foil touching the sideof the oven.
[] Foilnot molded to food.
[] Platesor disheswith metallic trim or glaze with a metallic
sheen.
FOODS
[] Donot pop popcorn inyour microwave oven unless ina special
microwave popcorn accessory or unlessyou usepopcorn
labeled for use in microwave ovens.
[] Some products such as whole eggs and sealed containers-for
example,closedjars-are able to explode and should not be
heated in this microwave oven. Suchuseof the microwave
oven could result in injury.
[] Donot boil eggs in a microwave oven.Pressurewill build up
insideegg yolk and will causeit to burst, possiblyresulting in
injury.
[] Operating the microwave with no food inside for more than a
minute or two may cause damage to the oven and could start
a fire. It increasesthe heat around the magnetron and can
shorten the life of the oven.
[] Foodswith unbroken outer "skin"such as potatoes, hot dogs,
sausages,tomatoes, apples, chicken liversand other giblets
and egg yolks should be pierced to allow steam to escape
during cooking.
[] Avoid heating baby food in glassjars, even
with the lid off. Make sureall infant food is thoroughly cooked.
Stirfood to distribute the heat evenly.Be careful to prevent
scalding when warming formula. Thecontainer may feel cooler []
than the formula really is.Always test the formula before
feeding the baby. []
[] Don'tdefrost frozen beverages in narrow-necked bottles
(especiallycarbonated beverages).Even if the container is
opened, pressurecan build up. This can causethe container to
burst, possiblyresulting in injury.
[] Thisover-the-range oven isdesigned for useover ranges no
wider than 36". It may be installedover both gasand electric
cooking equipment..
_roblem.
[] Metal,such as twist-ties, poultry pins orgold-rimmed dishes,in
the microwave.
[] Recycledpaper towels containing small metal pieces being
usedin the microwave.
[]
SUPERHEATEDWATER
Liquids,such as water,coffeeor tea are ableto be overheated
beyondthe boiling point without appearing to be boiling.Visible
bubbling or boiling when the containeris removed from the
microwave ovenisnot alwayspresent.THISCOULDRESULT
IN VERYHOTLIQUIDSSUDDENLYBOILINGOVERWHENTHE
CONTAINERISDISTURBEDORA SPOONOROTHERUTENSILIS
INSERTEDINTOTHELIQUID.
To reducethe risk of injury to persons:
- Do not overheat the liquid.
- Stirthe liquid both before and halfway through heating it.
- Do not use straight-sided container with narrow necks.
- After heating, allow the container to stand in the microwave
oven for a short time before removing the container.
- Useextreme care when inserting a spoon or other utensil
into the container.
[]
Hot foods and steam can cause burns. Becareful when
opening any containers of hot food, including popcorn bags,
cooking pouches and boxes.To prevent possibleinjury, direct
steam away from hands and face.
Donot overcook potatoes.Theycould dehydrate and catch
fire, causing damage to your oven.
Cookmeat and poultry thoroughly-meat to at least an
INTERNALtemperature of 160°Fand poultry to at least
an INTERNALtemperature of 180°F.Cookingto these
temperatures usually protects against foodborne illness.
4 SAVETHESEINSTRUCTIONS
Page 5

INSTRUCCIONES IMPORTANTES DE SEGURIDAD.
LEA PRIMERO TODA LASINSTRUCCIONES.
iPRECAUCI6N!
INSTRUCCIONES IMPORTANTES DE SEGURIDAD.
[] Nolimpie con almohadillas met61icaspara fregar. Las piezas
podr6n quemar la almohadilla y tener contacto con partes
el6ctricas y producir riesgo de descargas el6ctricas
[] Estehomo de microondas est6 listado por UL para ser
instalado sobre estufas electricasy degas (memos de60,000
FORMACI6N DEARCO EL -CTRICO
Si ve que seforman arcoseldctficos,presione el bot6n Cancel/Off (borrar/apagado)y resuelvael problema.
Arco eldctficoesIoque,en la terminologia de losmicroondas,
describelaschispasen el homo.
[] Ha},un metal o papel de aluminio tocando el lateral delhorno.
[] Elpapel de aluminio no est6 envolviendo bien la comida.
[] Platoso la vajillascon bordes met61icosocon una capa de
brillo met61ico.
COMIDAS
[] No haga rosetas opalomitas de maiz enel microondas a no
serque est6 usando un accesorio especialpara prepararlas o
que est6 empleando rosetaso palomitas de maiz que indiquen
serv61idaspara el usode hornos microondas.
[] Algunos productos tales como huevos enteros y envases
sellados - por ejemplo: tarros de vidrio cerrados - pueden
explotar y por esto nose deben calentar en el homo
microondas. Dicho uso del horno microondas podr(_producir
lesiones.
[] No hierva huevos dentro de un homo microondas. Se
generar@presi6n dentro de layema del huevo que causara
que explote pudiendo, posiblemente,dahar a alguien.
[] Sise poneen marcha el microondas sin tenet comida en su
interior por m@sde un minuto o dos podr[an causarse dahos
al homo y podrfa empezar un fuego. Estohace aumentar
la temperatura alrededor del magnetr6n y puede reducir el
perfodo devida 0tildel homo.
[] Las comidas cocinadas en I[quidos(como la pasta)pueden
tenet cierta tendencia a hervir m(_sr@pidamenteque los
alimentos que contengan menos humedad. Siesto ocurre,
revise la secci6n deCuidadoy limpieza del homo microondas
donde encontrar@instrucciones en cuanto a la limpieza del
interior del microondas.
[] No caliente lacomida del beb6 enjarras decristal, incluso
siest6n destapadas. Aseg0resede que los alimentos de los
nihos est6nbien cocinados. Remuevala comida para distribuir
el calor de forma pareja.Tenga cuidado de que el niho no se
queme al calentar la lechede f6rmula. Elcontenedor puede
parecer m@sfr[ode Io que realmente est@la f6rmula. Pruebe
siempre la f6rmula antes de d@selaal beb6.
[] No descongele bebidas congeladas enbotellas de cuello
estrecho (especialmentebebidas carbonatadas). Incluso con el
contenedor abierto, podr[a generarse un aumento de presi6n.
Esto puede causar que el contenedor explote,Iocual podr[a
producir dahos personales.
BTU).
[] Estehomo puede instalarse encima de la cocina y est6
dise_ado para su uso sobrecocinas encimeras nom6s
anchas de 36". Puedeinstalarse sobreequipos para cocinar
de gaso el6ctricos.
[] Hayalg0n metal, como cintas de cierrecon metal, pinchos de
polio,o platos con decoraci6n de oro dentro del microondas.
[] Seest6 usando papel toalla reciclado que contienen pequehas
porciones de metal en elmicroondas.
[] AGUA SOBRECALENTADA
Liquidos, tales como agua, card, o td, se podrian sobrecalentar
mds alld delpunto de ebullici6n sin parecer que estdn
hirviendo. No siempre habrd burbujas o evidencia de que
el Ifquido estd hirviendo cuando se extrae el envase con el
Ifquidodel microondas. ESTOPODRfARESULTARENL[OUIDO5
PtUYCALIENTESDEREPENTECOMENZANDOA HERVIRY
A REBOSARSECUANDOELENVASEESMOVIDO0 SIUNA
CUCHARAUOTROUTENSILIOSELEINTRODUCEAL LIQUIDO.
Para reducir el riesgo de lesionespersonales:
- No sobrecaliente los Ifquidos.
- IVluevaelI[quido tanto antes como a mediados deltiempo de
calentamiento.
- No useenvasesde lados rectoscon cuellos estrechos.
- Despu_sdel calentamiento, permita que el envase
permanezca en el microondas por un tiempo corto antes de
remover el envase.
- Usecuidado extremo cuando inserte una cuchara u otto
utensilio en elenvase.
[]
Losalimentos calientes y el vapor puedencausar quemaduras.
Tengacuidado al abrir cualquier contenedor con comida
caliente, inclusobolsasde rosetas opalomitas de maiz, bolsas
o cajas de cocinar. Para prevenir posiblesdahos personales,
mantenga el vapor alejado de susmanos y rostro.
[]
No cocinedemasiado laspapas. Podriandeshidratarse e
incendiarse,causando dahos a su horno.
[]
Cocine la came y el polio porcompleto-la came hasta que
alcance una temperatura minima INTERIORde !60°F, y el polio
hasta una temperatura INTERNA minima de !80°F. Cuando
secocinan a estas temperaturas se evita la contracci6n de
enfermedades por intoxicaci6n.
GUARDEESTASINSTRUCCIONES
GEAppliances.com
Page 6

IMPORTANT SAFETYINFORMATION.
READ ALL INSTRUCTIONS BEFOREUSING.
,AWARNING!
Make sure all cookwure used inyour microwave oven is
suitable for microwuving. Most glass casseroles,cooking dishes,
measuring cups,custard cups,pottery or china dinnerware which
does not have metallic trim or glaze with a metallic sheen can be
used.Somecookwure is labeled "suitable for microwuving."
[] Ifyou are not sure if udish ismicrowave-safe, usethis test:
Placein the oven both the dishyou are testing and a glass
measuring cup filled with I cup of water-set the measuring
cup either in or next to the dish.Microwave
30-/45seconds at high. Ifthe dish heats, it should not be used
for microwuving.
If the dish remains cool and only the water inthe cup heats,
then the dish is microwave-safe.
[] Ifyou use umeat thermometer while cooking, make sure it is
safe for use in microwave ovens.
[] Do not use recycled paper products. Recycledpaper towels,
napkins and waxed paper can contain metal fleckswhich may
cause arcing or ignite.Paper products containing nylon or
nylon filaments should be avoided, us they may alsoignite.
[] Somefoam trays (likethose that meat is packagedon)
have athin strip of metal embedded inthe bottom. When
microwaved, the metal can burn the floor of the oven or ignite
a paper towel.
[] Do not use the microwave to dry newspapers.
[] Not all plasticwrap issuitable for use in microwave ovens.
Checkthe package for proper use.
[] Papertowels, waxed paper and plasticwrap can be usedto
cover dishes inorder to retain moisture and preventsputtering.
Besure to vent plastic wrap so steam can escape.
[] Cookwure may become hot because of heat transferred from
the heated food. Potholders may be neededto handle the
cookware.
[]
"Bailable"cooking pouches and tightly closed plastic bugs
should be slit, piercedor vented usdirected by package. If they
are not, plastic could burst during or immediately after cooking,
possiblyresulting in injury.Also,plastic storage containers
should be at least partially uncovered because they form a
tight seal.When cooking with containers tightly covered with
plasticwrap, remove covering carefully and direct steam away
from hands and face.
[]
Usefoil only usdirected in this guide.TVdinners may be
microwuved infoil trays lessthan 3/#' high; remove the top
foil cover and return the tray to the box.When using foil in the
microwave oven, keepthe foil at least 1"away from the sides
of the oven.
[]
Plasticcookwure-Plustic cookware designedfor microwave
cooking isvery useful, but should be used carefully. Even
microwave-safe plastic may not be us tolerant of overcooking
conditions usare glass or ceramic materials and may soften
or char ifsubjected to short periods of overcooking. In longer
exposuresto overcooking, the food and cookwure could ignite.
Follow these guidelines.
1. Usemicrowave-safe plastics only and usethem in
strict compliance with the cookware manufacturer's
recommendations.
2. Donot microwave empty containers.
3. Donot permit children to useplastic cookware without
complete supervision.
THE VENT FAN
Thefan will operate automatically under certain conditions (see
Automatic Fanfeature).Take care to prevent the starting and
spreading of accidental cooking fireswhile the vent fan is in use.
[] Clean the underside of the microwave often.
Donot allow grease to build up on the microwave or the fan
filters.
[] Inthe event of a greasefire on the surface units below the
microwave oven, smother a flaming
pan on the surface unit by covering the pan completely with a
lid,a cookie sheet or a flat tray.
[]
Usecare when cleaning the vent fan filters.Corrosivecleaning
agents,such as lye-based oven cleaners,may damage the
filters.
[]
When preparing flaming foods under the microwave, turn the
fan on.
[]
Never leave surface units beneath your microwave oven
unattended at high heat settings. Boiloverscause smoking and
greasy spillovers that may ignite and spread ifthe microwave
vent fan is operating. To minimize automatic fan operation, use
adequate sizedcookware and use high heat on surface units
onlywhen necessary.
6 SAVETHESEINSTRUCTIONS
Page 7

INSTRUCCIONES IMPORTANTES DE SEGURIDAD.
LEA PRIMERO TODA LAS INSTRUCCIONES.
J kiPRECAUCI6N!
AsegOresedeque todos los utensiliosde cocinaque use en su
homo sean aptospara microondas. Puedenusarsela mayofia
de las cazuelas,platos para cocinar,tazasde medir, tazasde
flanesy botesde cristal,o las vajillasde porcelana que no tienen
decoracionesmetdlicas o bamicescon brillo metdlico.Algunos
utensiliostienenla siguiente inscripci6n:"puede usarseen
microondas."
[] Sino est6 seguro de que un plato pueda usarse en el
microondas, haga esta prueba: Coloqueel plato que est6
probando y un vasode medir con 237 ml (1taza) de agua en
el homo - ponga la taza de medir dentro o al lado del plato.
Pongael microondas en marcha, a m6xima potencia, durante
30-45 segundos.Siel plato secalienta no deber[a usarse en el
microondas.
Siel plato semantiene fr[o ys61osecalienta la taza, entonces
el plato puede usarsede forma segura enel microondas.
[] Siusa unterm6metro de came al cocinar con microondag,
asegQresede que seaapto para ser usado en microondas.
[] Nouse productos de papel reciclado. Elpapeltoalla, las
servilletasy el papel decera recicladospueden contener
motas metc_licasque podrian causar laformaci6n de
arcos el6ctricos oincendiarse.Losproductos de papel que
contengan nil6n ofilamentos de nil6ntampoco deberian
usarseya que se podrian incendiar de igual modo.
[] Algunas bandejas de gomaespuma (como aquellas donde se
empaqueta la came) poseenuna tira fina de metal insertada
en la parte inferior.Sise usan enel homo microondas, elmetal
podr6 quemar el piso del homo o encender una toalla de
papel.
[] Nouse el horno microondas para secar el peri6dico.
[] Notodos losenvoltorios de pl6stico estc_npreparados para
uso enel horno microondas. Controle elpaquete para un uso
adecuado.
[] Algunas bandejas de pk_stico(como en lasque seempaqueta
la came) tienen una cinta fina de metal incrustada en el plato.
AIponerseen el microondas, el metal puede quemar elsuelo
del homo o incendiar un papel toalla.
[] Podr[ancalentarse losutensiliospor el calor transferido por los
alimentos calientes.Puede necesitar usar manoplas ce cocina
para manejar los utensilios.
AIutilizar con el microondas bolsas decocinar "que puedan
hervir",asfcomo cualquier bolsa deplc_sticofirmemente
cerrada, deberc_ncortarse, perforarse o proveer cualquier tipo
de ventilaci6n seg6n indique elpaquete. Encaso contrario,
el pl(_sticopodr[a explotar mientras secocina o despu_s,
pudiendo causar dahos fisicos.Ademc_s,losrecipientes
de plc_sticodeber[an permanecer,al menos,parcialmente
destapados ya que pueden sellarsefuertemente. Cuando
cocine con recipientes firmemente cubiertos confilm plc_stico,
retire lacubierta con cuidado y mantenga el vapor alejado de
sus manos y rostro.
Usepapel de aluminio s61ode la forma detallada en este
manual. Cuando usealuminio dentro de un homo microondas,
mantenga el aluminio,al menos, a una pulgada dedistancia
de loslaterales delhomo.
Utensiliosde pl(_stico--Losutensiliosde pl(_sticodiseBados
para su usoen microondas son muy pr6cticos, pero deben
usarse con cuidado. Incluso aquellos utensiliosautorizados
para su usoen microondas podrfan no set tan tolerantes
como el cristal o losmateriales de cer6mica en condiciones
de sobrecalentamiento y podr[an ablandarse o carbonizarse
al someterlos a per[odoscortos de sobrecalentamiento. En
exposiciones mc_slargas a sobrecalentamiento, la comida y los
utensilios podr[an incendiarse.
Sigaestas normas:
1. Usesolamente plc_sticosaptos para microondas y
2. Nointroduzca en el microondas recipientes
3. Nopermita que los nihosusen utensiliosde pk_sticosin
GEAppliances.com
0selos siguiendo estrictamente lasrecomendaciones del
fabricante de losutensilios.
ratios.
completa supervisi6n.
EL VENTILADOR EXTRACTOR
Elventilador se pondr6 en funcionamiento de forma
autom6tica bajo ciertas circunstancias (verfunci6n de
Ventilador AutomcXico). Prevenga elque empiece algOn
fuego al cocinar y que se extienda mientras el ventilador del
respiradero est6 en marcha.
[] Limpie a menudo la parte inferior del microondas. No
permita que se acumule grasa en el microondas o en los
filtros del ventilador.
[] Sila grasa se incendiara en las unidades de
la cocina (fogones) bajo el horno microondas, sofoque
cualquier sart6n en llamas de la unidad de cocina por
completo con una tapa, una bandeja de galletas o
cualquier otra bandeja plana.
GUARDEESTASINSTRUCCIONES
[] Tenga cuidado al limpiar los filtros del ventilador extractor.
Los productos de limpieza corrosivos, como los limpia-
hornos a base de lejia, pueden dahar los filtros.
[] Ponga en marcha el extractor cuando
est6 cocinando comidas con llama bajo el microondas.
[] Nunca deje las unidades de la cocina
(fogones) bajo su microondas sin atenci6n cuando se est_
trabajando a altas temperaturas. Cuando la comida entra
en ebullici6n se generan humos y se derraman grasas
que pudieran incendiarse y propagarse si el ventilador
del microondas est(_funcionando. Para minimizar el
funcionamiento del extractor autom6tico, use utensilios de
cocina de tamaho adecuado y use el fuego r6pido en las
unidades de la cocina (fogones) s61ocuando sea necesario.
Page 8
IMPORTANT SAFETY INFORMATION.
READ ALL INSTRUCTIONS BEFORE USING.
GROUNDING INSTRUCTIONS
A WARNING-Impr°neruseof the grounding plug can result in a risk of electric shock.
Thisappliance must be grounded. In the event of an electrical Ifthe outlet isa standard 2-prong wall outlet, it isyour personal
short circuit, grounding reduces the risk of electric shock by responsibilityand obligation to have it replaced with a properly
providing an escape wire for the electric current, grounded 3-prong wall outlet.
Thisappliance isequipped with a power cord having a grounding
wire with a grounding plug.Theplug must be plugged into an
outlet that isproperly installed and grounded.
Consulta qualified electrician or servicetechnician ifthe
GROUNDINGINSTRUCTIONSare not completely understood, or if
doubt exists as to whether the appliance is properly grounded.
ADAPTER PLUGS
Donot under any circumstances cut or remove the third (ground)
prong from the power cord.
We do not recommend using an extension cord with this
appliance. If the power cord is too short, have a qualified
electrician or service technician install an outlet near the
appliance. (SeeEXTENSIONCORDSsection.)
Forbest operation, plugthis appliance into its own electrical
outlet to prevent flickering of lights,blowing of fuse or tripping of
circuit breaker.
Usage situations where appliance's power cord will be disconnected infrequently.
Becauseof potential safety hazards under certain conditions,
we strongly recommend against the use of on adapter plug. However, ifyou stillelect to
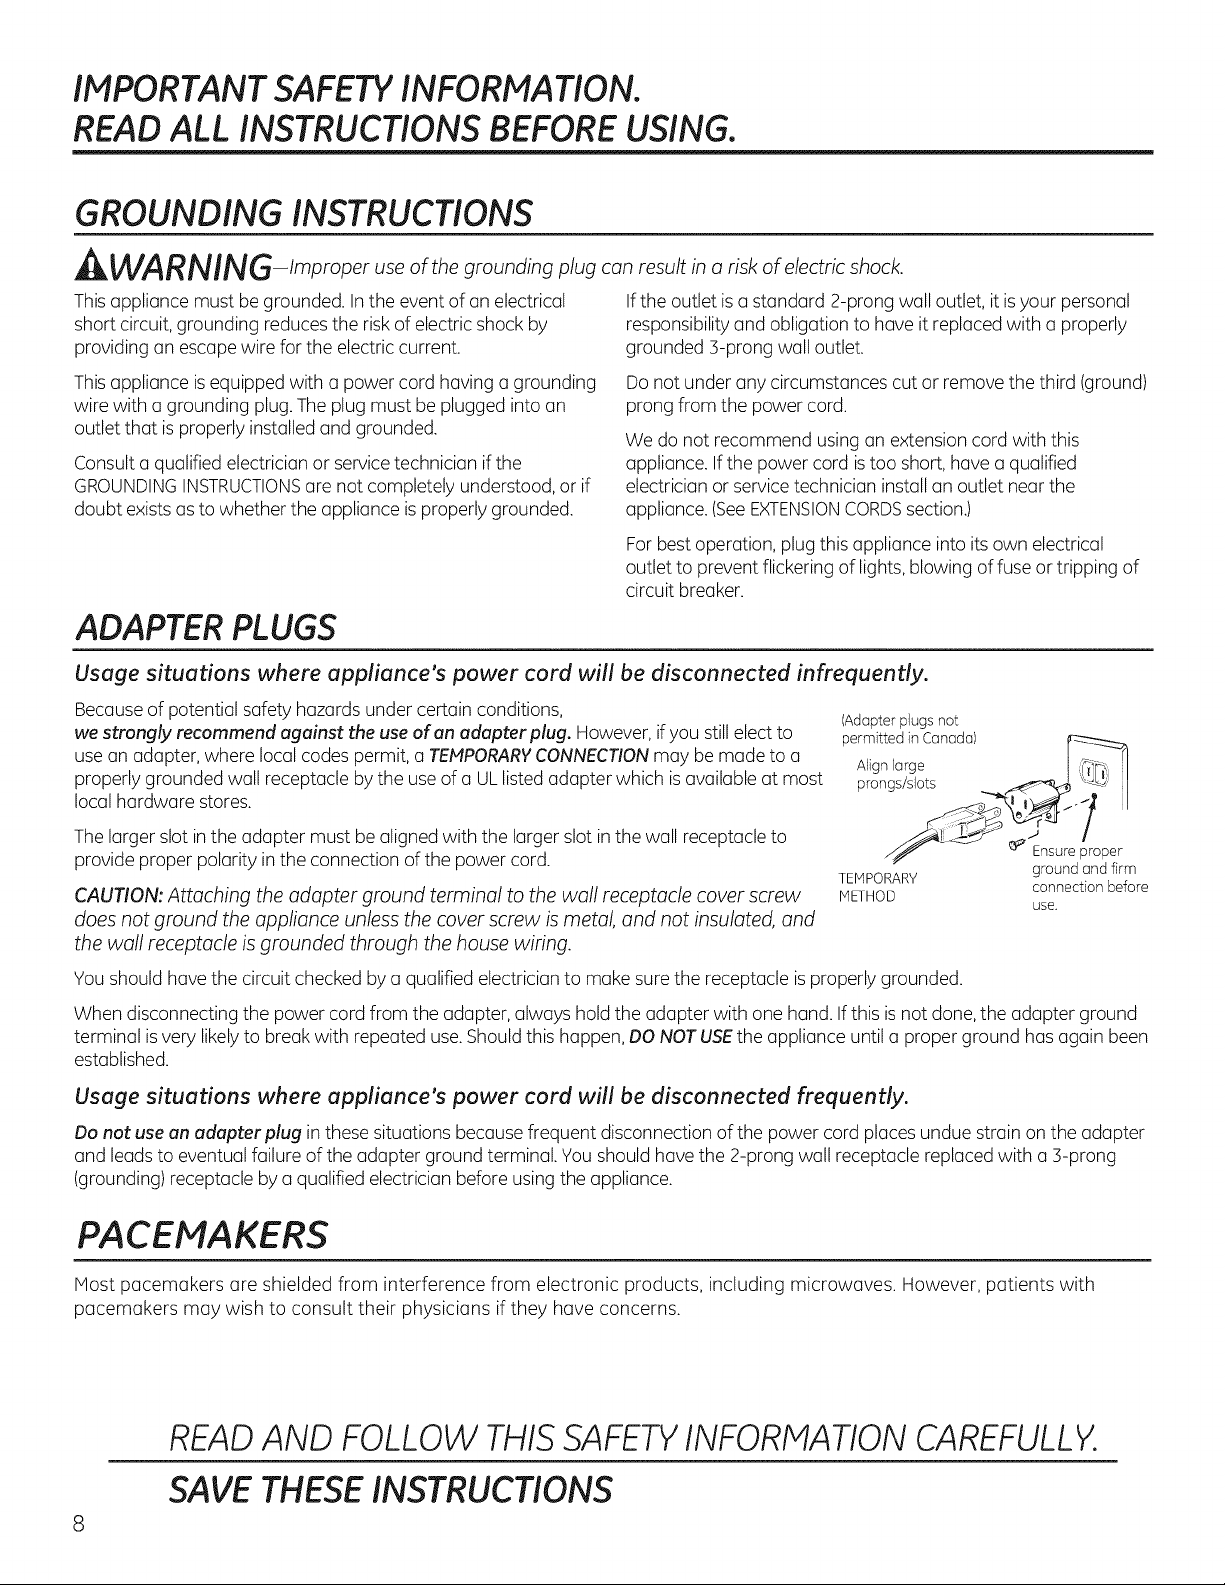
use an adapter, where local codes permit, a TEMPORARY CONNECTION may be made to a
properly grounded wall receptacle by the use of a ULlisted adapter which is available at most
local hardware stores.
Thelarger slot inthe adapter must be aligned with the larger slot inthe wall receptacle to
provide proper polarity inthe connection of the power cord.
CAUTION: Attaching the adapter ground terminal to the wall receptacle cover screw
does not ground the appliance unless the cover screw is metal, and not insulated, and
the wall receptacle is grounded through the house wiring.
Youshould havethe circuit checked by a qualified electrician to make surethe receptacle is properly grounded.
When disconnecting the power cord from the adapter, always hold the adapter with one hand. If this isnot done, the adapter ground
terminal isvery likelyto break with repeated use.Should thishappen, DONOT USEtheappliance until a proper ground hasagain been
established.
(Adapter plugs not
permitted in Canada)
Alignlarge r% _]
prongs/slots f<c"_re _ _""_ I
J_" _ Ensure proper
TEMPORARY ground and firm
METHOD
connection before
use.
Usage situations where appliance's power cord will be disconnected frequently.
Do not use on odopterplug inthese situations becausefrequent disconnection of the power cord places undue strain on the adapter
and leadsto eventual failure of the adapter ground terminal. You should have the 2-prong wall receptacle replaced with a :3-prong
(grounding) receptacle by a qualified electrician before usingthe appliance.
PACEMAKERS
Host pacemakers are shielded from interference from electronic products, including microwaves. However, patients with
pacemakers may wish to consult their physicians if they have concerns.
READAND FOLLOW THISSAFETYINFORMATIONCAREFULLY.
SAVETHESEINSTRUCTIONS
Page 9

INSTRUCCIONES IIvlPORTANTES DE SEGURIDAD.
LEA PRilVlEROTODA LASINSTRUCCIONES. GEAppliances.com
INSTRUCCIONES DE TOMA DE TIERRA
IkiADVERTENCIA!
El uso indebido del enchufe de tierra puede resultar en riesgo de descarga el_ctrica..
Esteelectrodom6stico debe estar conectado a tierra. Sise
produjera un cortocircuito, la toma de tierra reduce el riesgo
de descarga el6ctrica al proveer un cable de escape para la
corriente el6ctrica.
Esteelectrodom6stico est6 equipado con un cable de corriente
que dispone de un hilo para toma de tierra con un enchufe con
toma de tierra. Elenchufe debe estar conectado a una toma de
corriente que est6 debidamente instalada y con salida a tierra.
Consultecon un electricista cualificado o un t6cnico de
reparaciones sino entiende completamente las instrucciones
sobre latoma detierra, o situviese alguna duda sobre sisu
aparato est(_debidamente conectado a tierra.
Sila toma de corriente es un modelo estdndar de dos clavijas,es
su responsabilidad personaly su obligaci6n elreemplazarla por
una toma adecuada para tres clavijas con conexi6n a tierra.
Bajoninguna circunstancia debe cortar o quitar la tercera clavija
(tierra)del cable de corriente.
Nouse unenchufe adaptador con este electrodom6stico.
Nouse uncable extensor de corriente con
este electrodom6stico. Siel cable de corriente esdemasiado
corto, haga queun electricista cualificado o un t6cnico
de reparaciones instalen una toma de corriente cerca del
electrodom6stico.
Paraun mejor funcionamiento, enchufe este electrodom6stico
en una toma de corriente exclusiva para evitar parpadeos de luz,
fusiblesquemados o que salte el diferencial.
ADAPTADORES DE ENCHUFE
Situaciones de uso en que el cable de corriente del electrodom_stico ser5 desconectado con poca frecuencia.
Debidoa losposibles riesgossobre la seguridad bajo ciertas condiciones,recomendamos (Enchufesadaptadoresno
enfaticamente no usar adaptadores de enchufe. Sinembargo, si aOnelije usar un adaptador, perrnitidosenCanadd) r_.r_-_
cuando losc6digos locales Io permitan, se podr6 realizar una CONEXIONTEHPORARIAa Alinee lasparas/ _-..<_!, ',_L,L'_;I
un tomacorriente de pared de 2enchufes adecuadamente conectado a tierra, utilizando un ranuras largas ._.,,_"<_. i_ I
adaptador que figure en la lista de ULque se encuentre disponibleen la mayor[a de los localesde /!'
repuestos. _¢ _j_-- _-_ !
Laranura m6s larga del adaptador deber6 estar alineada con la ranura m6s larga en el _ isegureuna
tomacorriente de pared,a fin de brindar la polaridad adecuada en la conexi6n delcable de firme y adecuada
corriente. IVI_TODO antes del usa
PRSCAUCION:Conectar laterminal deladaptador con conexi6n a tierra altornillo de la cubierta
del tomacorriente no conecta el electrodom6stico a tierra, a menos que el tornillo de la cubierta sea de metal, y no est6aislado,y que
el tomacorriente est6 conectado a tierra a trav6s delcableado del hogar.
Contrate a un electricista calificado para que controle el circuito,a fin de asegurar que eltomacorriente est6 correctamente conectado
a tierra.
Cuando desconecte elcable de corriente del adaptador, siempre sostenga el adaptador con una mano. Encaso de no hacer esto,
es muy probable que laterminal deladaptador con conexi6n a tierra serompa con el uso repetido. Siesto sucede, NOUSEel
electrodom6stico hasta que sehaya establecido una conexi6n a tierra adecuada nuevamente.
Situaciones de uso en que el cable de corriente del electrodom_stico ser_ desconectado con frecuencia.
No use un adaptador de enchufe en estas situaciones,ya que una desconexi6n frecuente del cable decorriente representa un
esfuerzoexcesivo sobre eladaptador y conduce finalmente a unafalla de laterminal del adaptador con conexi6n a tierra. Deber6
solicitar a un electricista calificado el reemplazodel tomacorriente de 2 cables por uno de 3 cables (conconexi6n atierra),antes de
usar elelectrodom6stico.
TEFIPORARIO
cone×i6natierra
MARCA PASOS
La mayorfa de Ioas marca pasos estc_nprotegidos contra la interferencia de aparatos electr6nicos, incluyendo los microondas.
Sin embargo, cuando tengan alguna duda, los pacientes con marca pasos deben consutar con su m6dico.
FAVORDELEERYSEGUIRCUIDADOSAMENTEESTAINFORIACION
DESEGURIDAD.
GUARDEESTASINSTRUCCIONES
Page 10

Optional kits
Available at extra cost from your GE supplier.
Filler Panel Kits
Filter Kits
[] JX52WH-White
[] JX52BL--Block
When replacing a 36" range hood, filler panel kits fill
in the additional width to provide a custom built-in
appearance.
For installation between cabinets only; not for end-of-
cabinet installation. Each kit contains two 3" wide filler
panels.
[] Sales No.JX81H--Recirculating Charcoal Filter Kit
Service No. WBO2X10956
Filter kits are used when the oven cannot be vented to
the outside.
See back cover to order by phone or at
GEApplianceparts.com.
10
Page 11
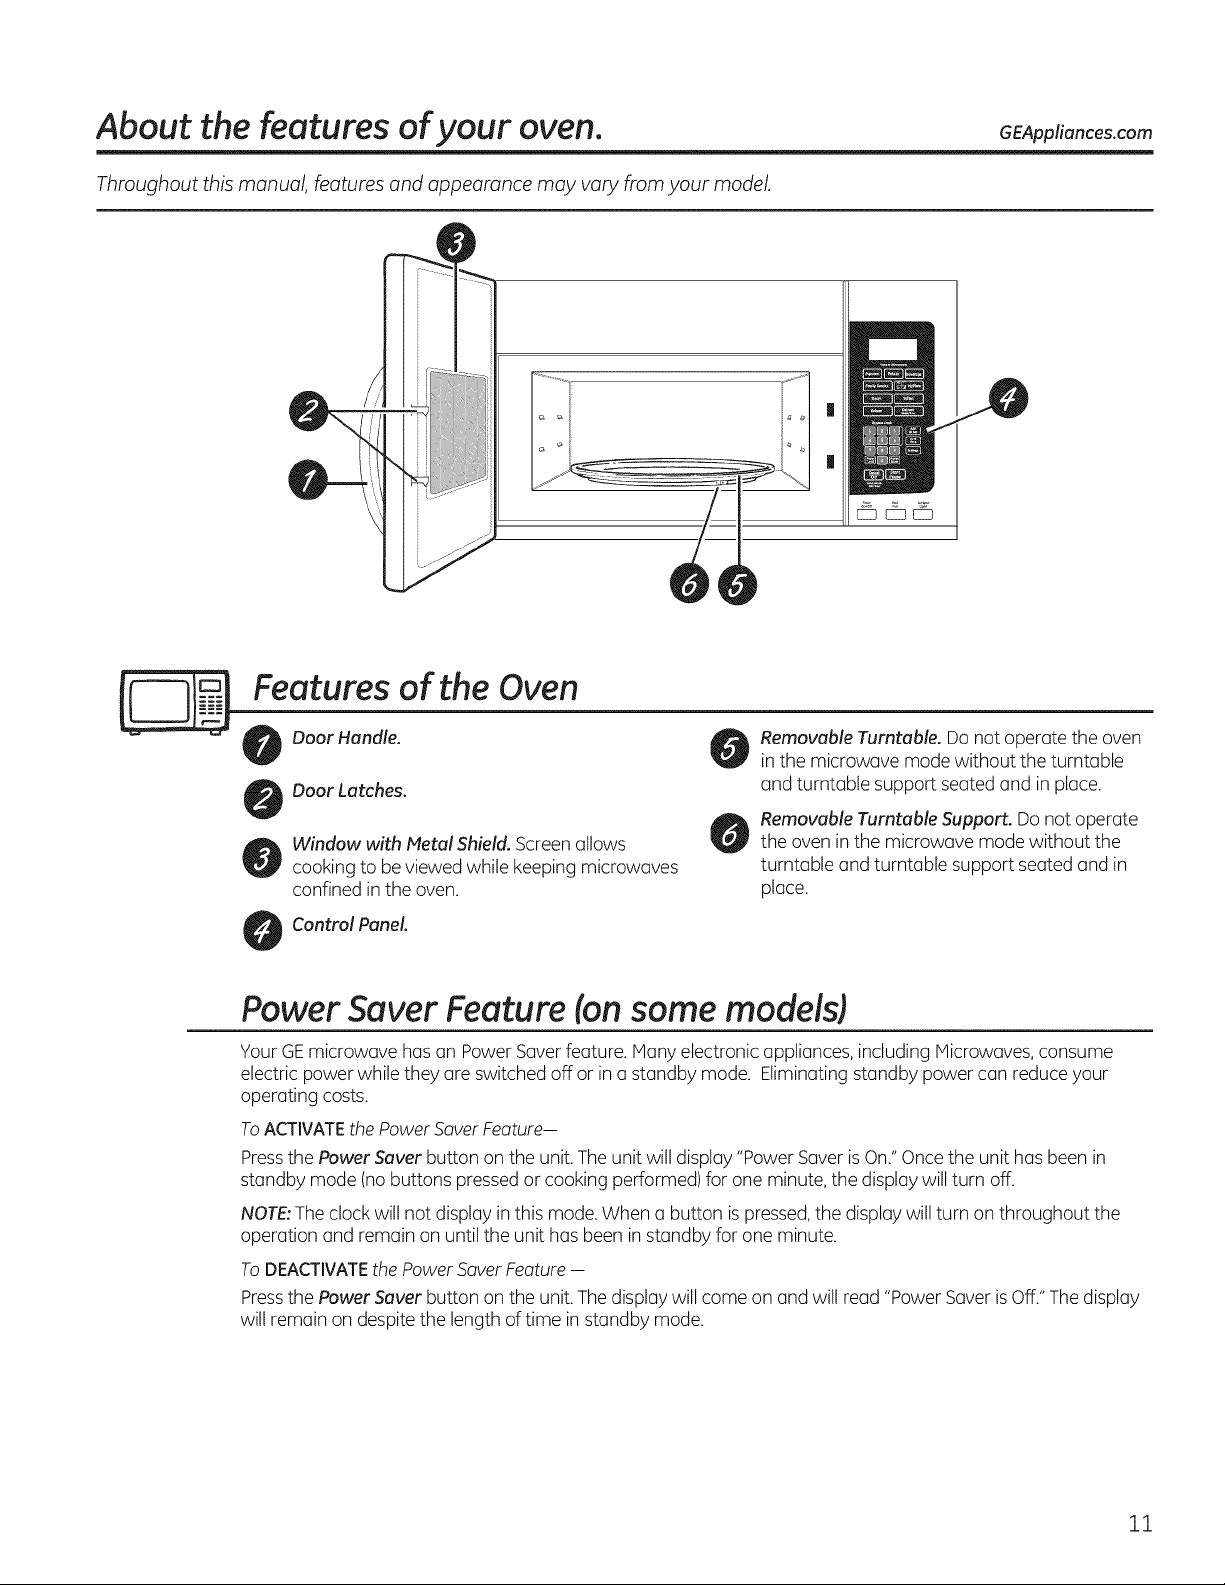
About the features of your oven. GEAppliances.com
Throughout this manual, features and appearance may vary from your model.
|
|
Features of the Oven
Door Handle.
Door Latches.
Window with Metal Shield. Screen allows
cooking to be viewed while keeping microwaves
confined in the oven.
Control Panel
Removable Turntable. Do not operate the oven
in the microwave mode without the turntable
and turntable support seated and in place.
Removable Turntable Support. Do not operate
the oven in the microwave mode without the
turntable and turntable support seated and in
place.
Power Saver Feature (on some modelsl
Your GEmicrowave has an Power Saver feature. Many electronic appliances, including Microwaves, consume
electric power while they are switched off or in u standby mode. Eliminating standby power can reduce your
operating costs.
ToACTIVATEthe PowerSaverFeature--
Pressthe Power Saver button on the unit.The unit will display "Power SaverisOn."Oncethe unit has been in
standby mode (nobuttons pressedor cooking performed) for one minute, the display will turn off.
NOTE:Theclock will not display in this mode.When a button ispressed,the display will turn on throughout the
operation and remain on until the unit has been in standby for one minute.
ToDEACTIVATEthe PowerSaverFeature --
Pressthe Power Saver button on the unit.The display will come on and will read "PowerSaverisOff."Thedisplay
will remain ondespite the length of time in standby mode.
11
Page 12

About the cooking features of your
microwave oven.
_,eom1[_o,ten}
Reheatl[ _o_]
Express Cook
Lock Controls
Hold 3 Sec
Cooking Controls
Check the Convenience Guide before you begin.
Time Features
Press Enter
COOK TIME Amount of cooking time
DEFROST Time, Weight or lib Quick Defrost
SETTINGS
TIMER
POWER LEVEL Power level i to 10
ADD 30 SEC Starts immediately!
EXPRESSCOOK Starts immediately!
POPCORN Starts immediately!
BEVERAGE Starts immediately!
Sensor Features
Press Enter
REHEAT Starts immediately!
FAMILY SNACKS Enter pad to select Food
SOFTEN Enter pad to select Food
STEAM Enter pad to select Food
MyPtate Enter pad to select Food
POTATO Starts immediately!
Press number pads (1-6)
12
Page 13
About the time features. GEAppliances.com
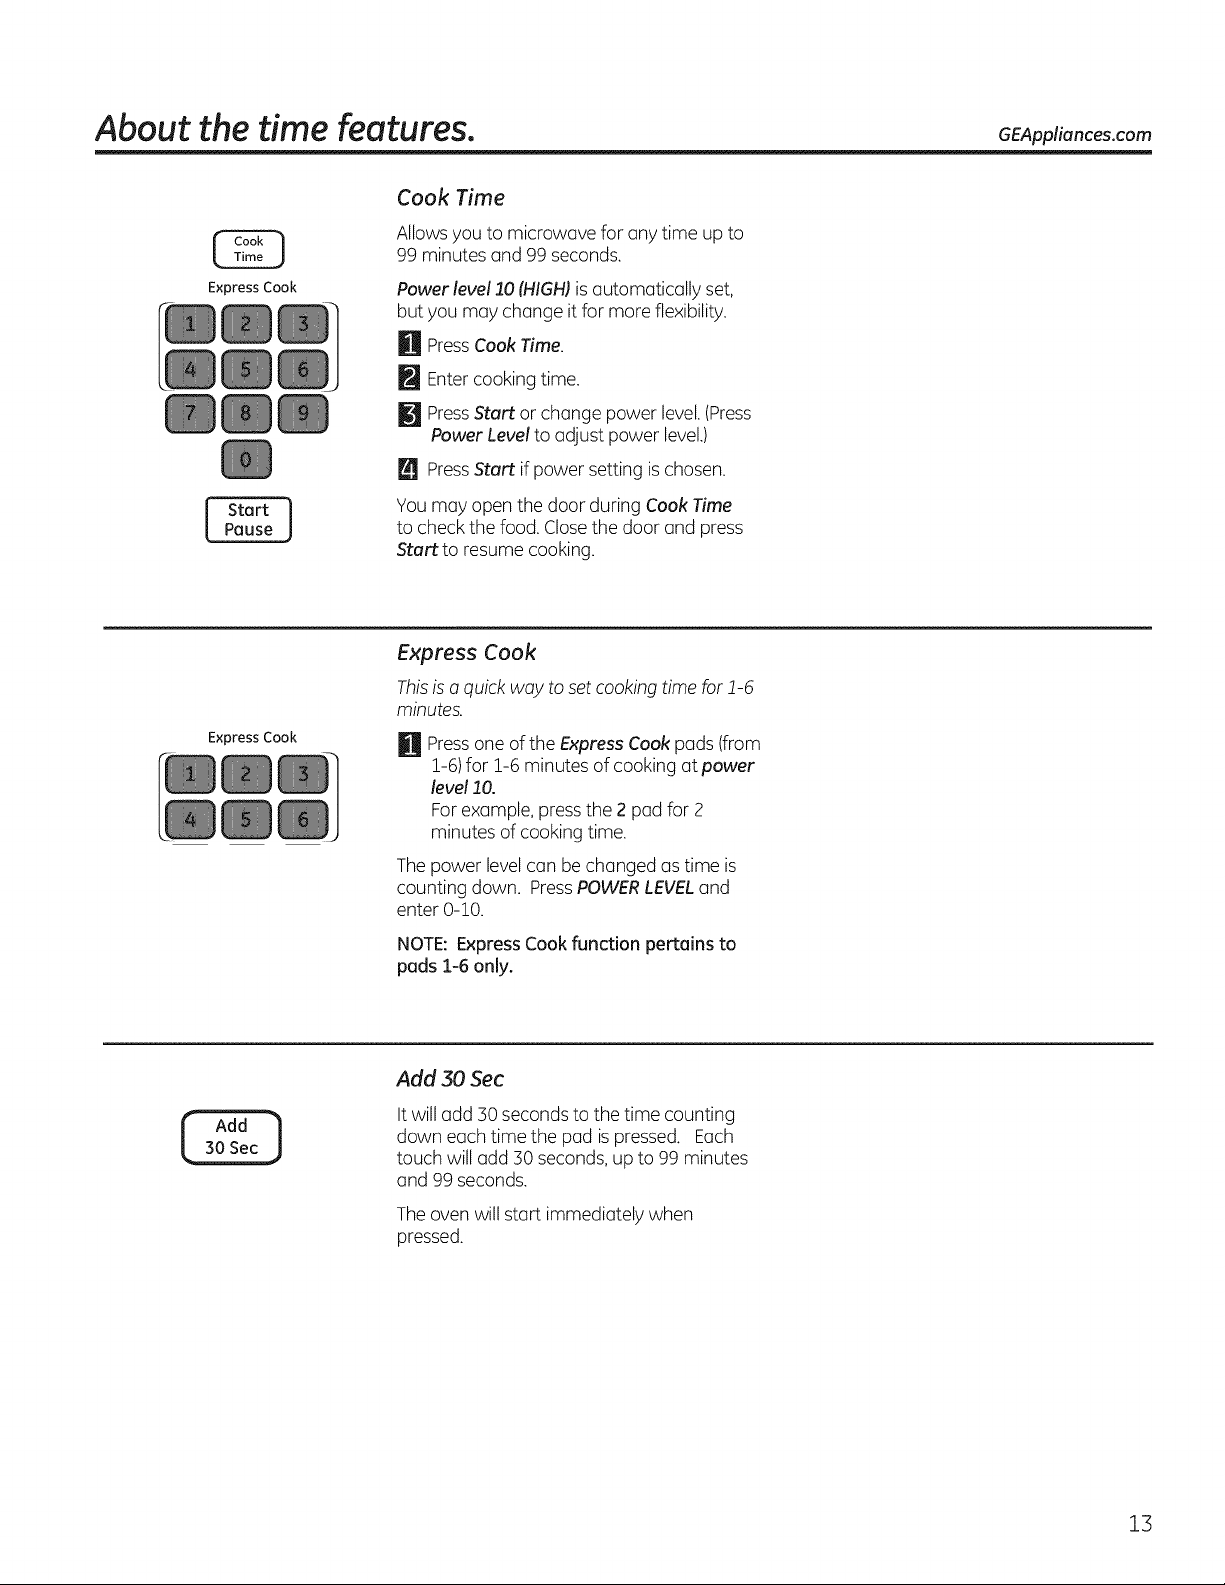
Cook Time
Allowsyou to microwave for any time upto
99 minutes and 99 seconds.
Express Cook
Express Cook
Power level 10(HIGH)is automatically set,
but you may change it for more flexibility.
H PressCookTime.
Entercooking time.
_lJ PressStart or change power level.(Press
Power Levelto adjust power level.)
L_JPressstart ifpower setting ischosen.
You may open the door during Cook Time
to check the food. Closethe door and press
Start to resume cooking.
Express Cook
Thisisa quick way to set cookingtime for !-6
minutes.
Pressone of the Express Cook pads (from
1-6)for 1-6 minutes of cooking at power
level 10.
Forexample, pressthe 2 pad for 2
minutes of cookingtime.
Thepower levelcan be changed as time is
counting down, PressPOWERLEVELand
enter 0-10.
NOTE: ExpressCook function pertains to
pads 1-6 only.
Add 30 Sec
It will add :SOsecondsto the time counting
down each time the pad is pressed. Each
touch will add 30 seconds,up to 99 minutes
and 99 seconds.
Theoven will start immediately when
pressed.
13
Page 14
About the time features.
Defrost
[
Weight/Time
Express Cook
Start ]
Pause
Defrostincl Guide
Food
Breads, Cakes
Bread, buns, or rolls (1 piece) 1/4 rain.
Sweet rolls (approx.12 oz.) 2 to 4 min. Rearrange after half the time.
Fishand Seafood
Fillets, frozen (1 lb.) 6to 9 min.
)
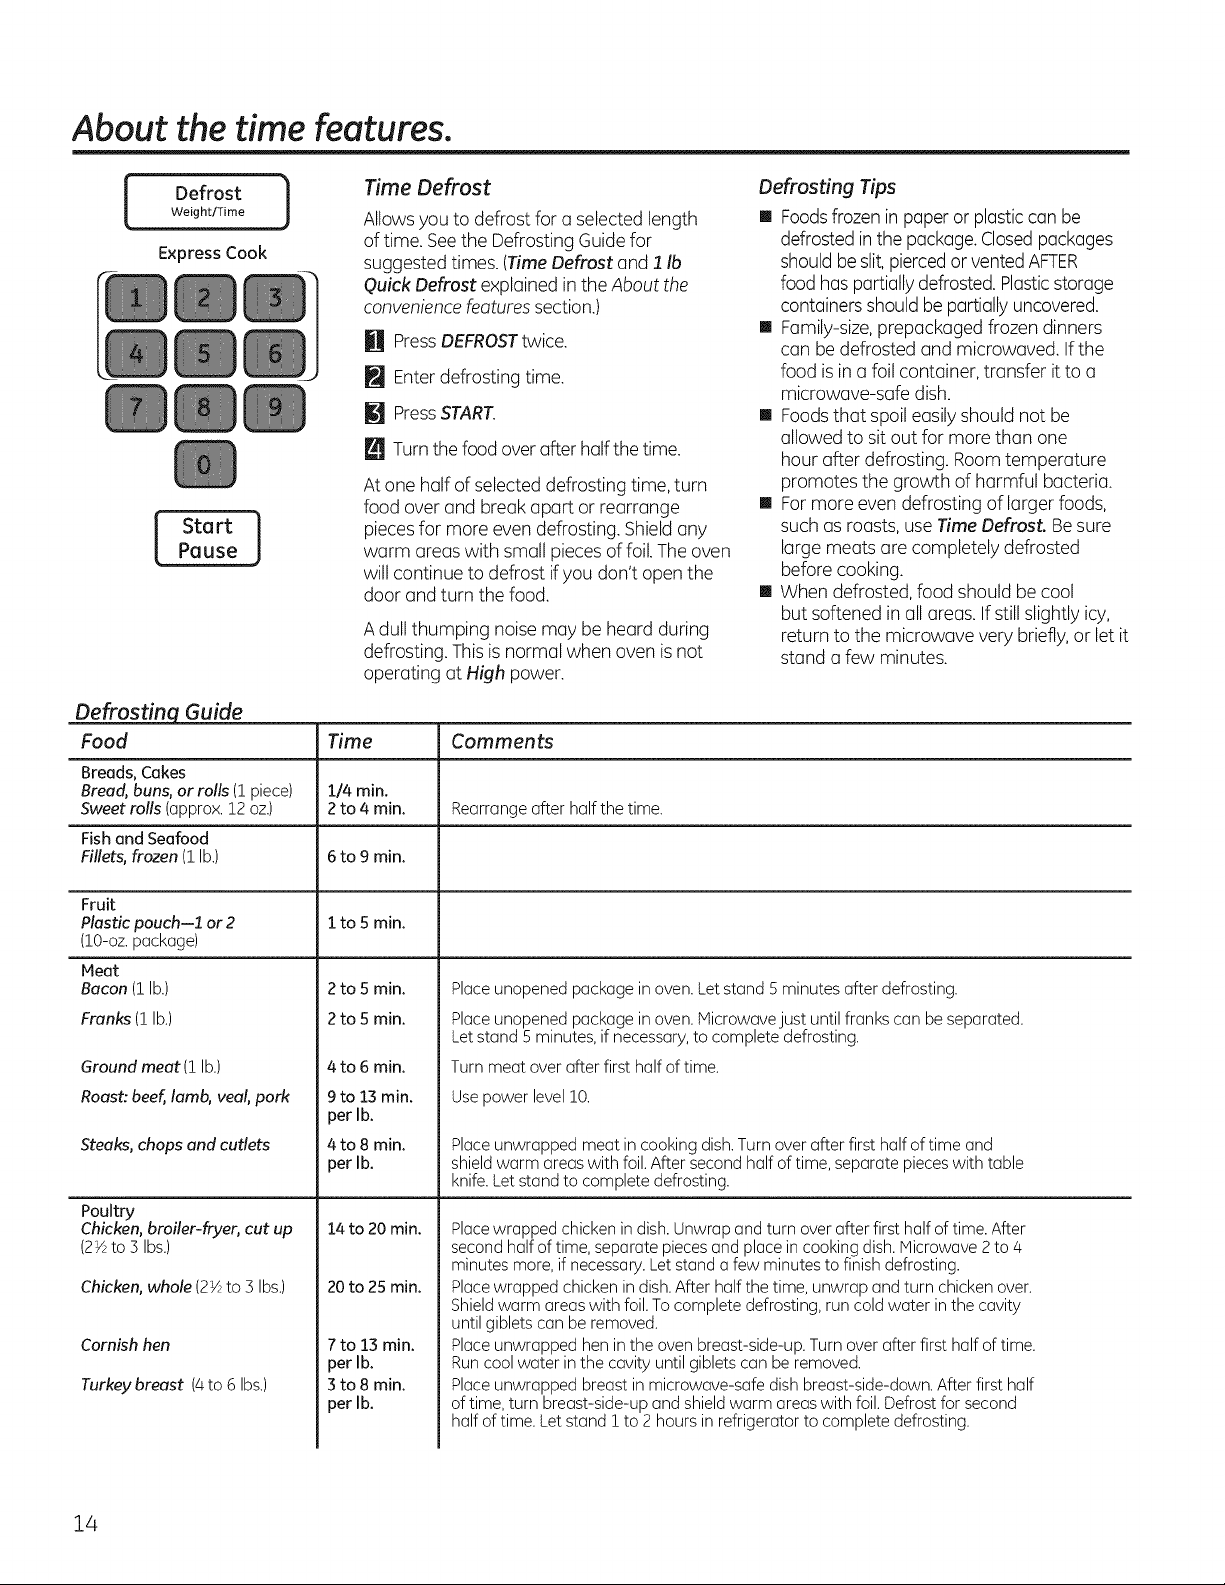
Time Defrost
Allows you to defrost for a selected length
of time. Seethe Defrosting Guidefor
suggested times.(TimeDefrost and 1 Ib
Quick Defrost explained inthe About the
conveniencefeatures section.)
X Press DEFROSTtwice.
[] Enter defrosting time.
[] Press START.
L_]Turnthe food over after halfthe time.
At one half of selecteddefrosting time, turn
food over and break apart or rearrange
piecesfor more even defrosting.Shieldany
warm areas with small pieces offoil. Theoven
will continue to defrost ifyou don't open the
door and turn the food.
A dull thumping noisemay be heard during
defrosting. This isnormal when oven isnot
operating at High power.
Time Comments
Defrosting Tips
[] Foodsfrozenin paperor plastic can be
defrostedin the package.Closedpackages
shouldbe slit,pierced or ventedAFTER
food haspartially defrosted.Plasticstorage
containersshould be partially uncovered.
[] Family-size,prepackaged frozen dinners
can bedefrosted and microwaved. Ifthe
food is ina foil container, transfer it to a
microwave-safe dish.
[] Foodsthat spoil easily should not be
allowed to sit out for more than one
hour after defrosting. Roomtemperature
promotes the growth of harmful bacteria.
[] Formore even defrosting of larger foods,
such as roasts, useTime Defrost. Besure
large meats are completely defrosted
before cooking.
[] When defrosted,food should be cool
but softened in all areas. Ifstill slightly icy,
return to the microwave very briefly, or let it
stand a few minutes.
Fruit
Plastic pouch--1 or2 1to 5min.
(!0-oz. package)
Meat
Bacon (1lb.)
Franks (1 lb.)
Ground meat (1 lb.)
Roast: beef, lamb, veal, pork
Steaks, chops and cutlets
Poultry
Chicken, broiler-fryer, cut up
(2½ to 5 Ibs.)
Chicken, whole (2½ to 5 Ibs.)
Cornish hen
Turkey breast (4to 6 Ibs.)
2to 5min.
2to 5min.
4 to 6 min.
9to 13min.
per lb.
4to 8min.
per lb.
14 to 20 min.
20 to 25 min.
7to 13 min.
per lb.
3to 8min.
per lb.
Place unopened package in oven.Let stand Sminutes after defrosting.
Place unopened package in oven.Microwave just until franks can be separated.
Let stand 5 minutes, if necessary,to complete defrosting.
Turn meat over after first half of time.
Use power level10.
Place unwrapped meat in cooking dish.Turn over after first half oftime and
shield warm areas with foil.After second half of time, separate pieceswith table
knife. Let stand to complete defrosting.
Placewrapped chicken in dish.Unwrap and turn over after first half oftime. After
second halfof time, separate piecesand place in cooking dish.Microwave 2to 4
minutes more, if necessary.Let stand a few minutes to finish defrosting.
Placewrapped chicken in dish.After half the time, unwrap and turn chicken over.
Shieldwarm areas with foil.To complete defrosting, run cold water in the cavity
until giblets can be removed.
Place unwrapped hen in the oven breast-side-up. Turn over afterfirst half oftime.
Runcool water inthe cavity until giblets can be removed.
Place unwrapped breast in microwave-safe dish breast-side-down. After first half
of time, turn breast-side-up and shield warm areas with foil. Defrostfor second
half of time. Letstand i to 2 hours in refrigerator to complete defrosting.
14
Page 15
About the time features. GEAppliances.com
I Defrost iWeight/Time
Express Cook
StartPause ]
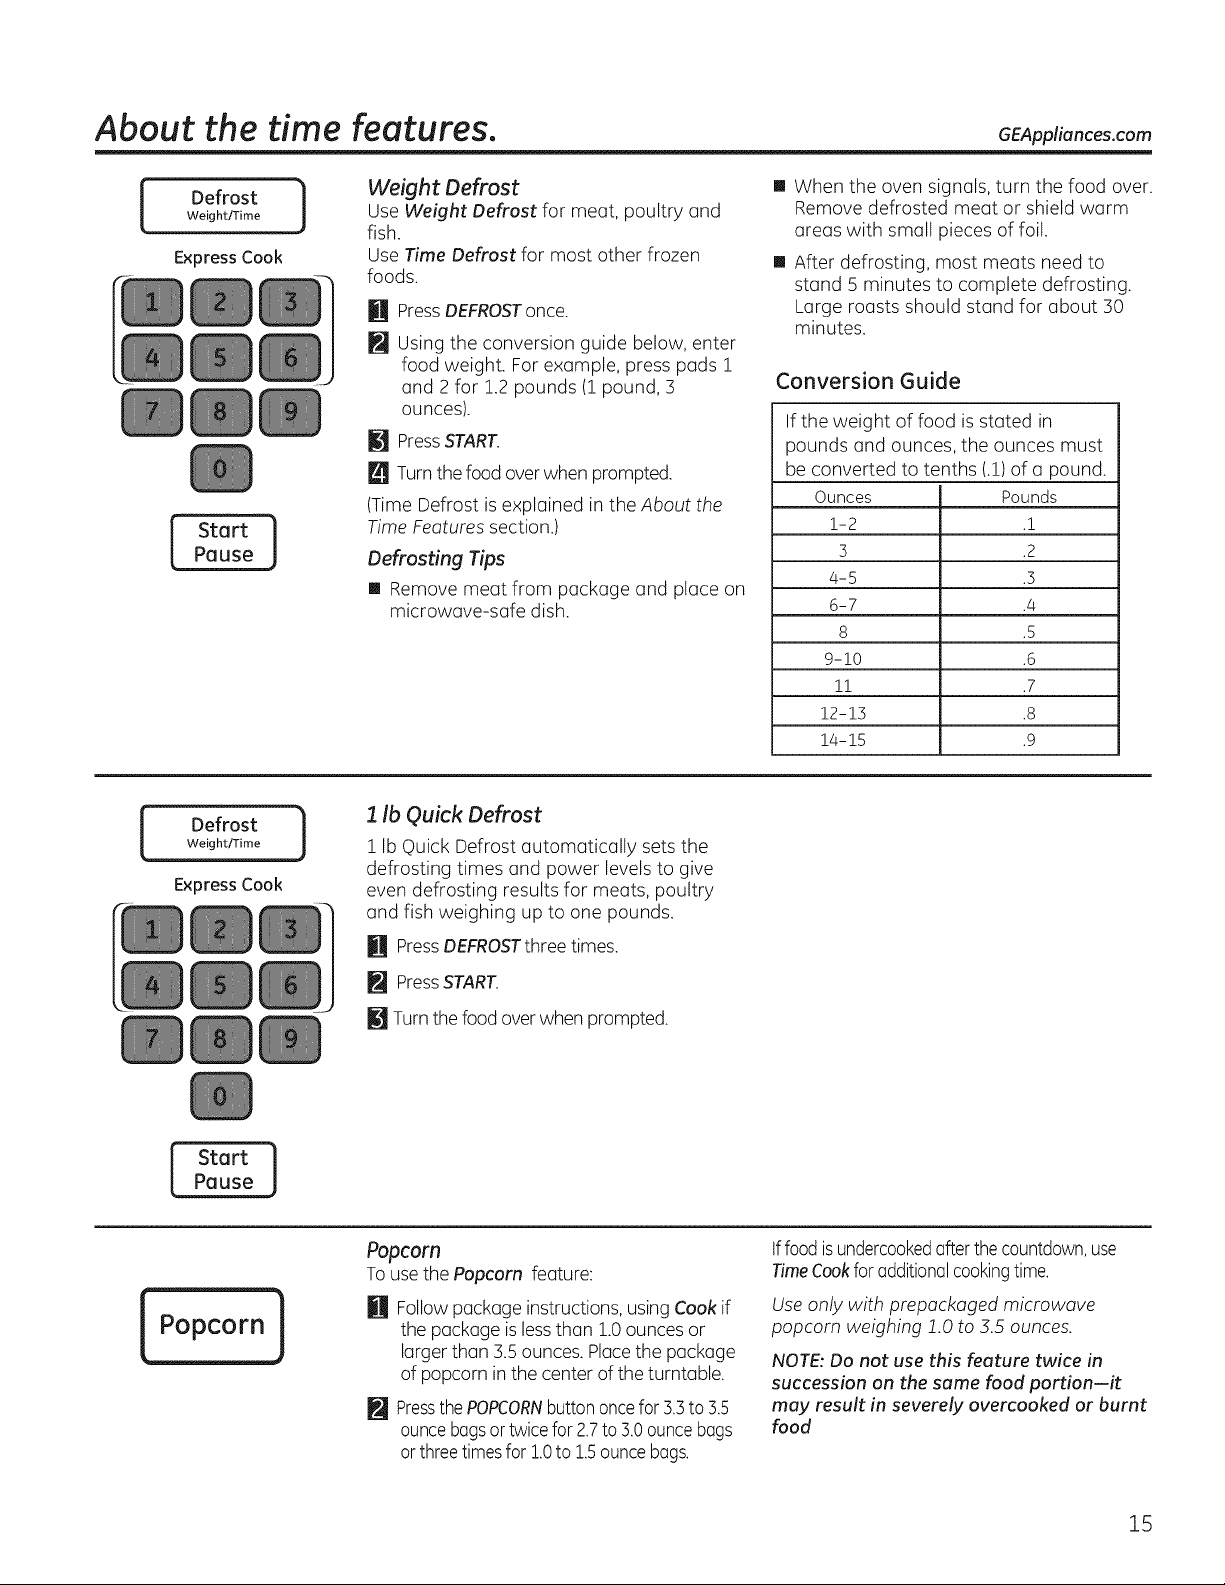
Weight Defrost
Use Weight Defrost for meat, poultry and
fish.
Use Time Defrost for most other frozen
foods.
Press DEFROSTonce.
[]
[]
Using the conversion guide below, enter
food weight. Forexample, press pads 1
and 2 for 1.2 pounds (1 pound, 3
ounces).
[] Press START.
Turnthefood over when prompted.
(Time Defrost is explained in the About the
Time Features section.)
Defrosting Tips
[] Remove meat from package and place on
microwave-safe dish.
[] When the oven signals, turn the food over.
Remove defrosted meat or shield warm
ureas with small pieces of foil.
[] After defrosting, most meats need to
stand 5 minutes to complete defrosting.
Large roasts should stand for about 30
minutes.
Conversion Guide
If the weight of food is stated in
pounds and ounces, the ounces must
be converted to tenths (.1)of u pound.
Ounces Pounds
1-2 .!
5 .2
4-5 .5
6-7 .4
8 .5
9-10 .6
!! .7
12-15 .8
14-15 .9
Defrost
t
Weight/Time
Express Cook
Start ]
_ Peuse
Popcorn J
J
1 Ib Quick Defrost
1 Ib Quick Defrost automatically sets the
defrosting times and power levels to give
even defrosting results for meats, poultry
and fish weighing up to one pounds.
[] PressDEFROSTthree times.
PressSTART.
_J_Turnthefood overwhen prompted.
Popcorn
Tousethe Popcorn feature:
U Follow package instructions, using Cook if
the package islessthan 1.0ounces or
larger than 3.5 ounces. Placethe package
of popcorn in the center of the turntable.
PressthePOPCORNbuttononcefor3.3to 3.5
ouncebagsortwicefor2.7to 3.0ouncebags
orthreetimesfor 1.0to 1.5ouncebogs.
tffoodisundercookedafterthe countdown,use
TimeCookforadditionalcookingtime.
Useonly with prepackaged microwave
popcorn weighing !.0 to 5.5 ounces.
NOTE:Do not use this feature twice in
succession on the same food portion-it
may result in severely overcooked or burnt
food
15
Page 16

About the MyPlate Feature.
MyPlate /
Express Cook
Start ]
Pause _
NOTE: Do not use the sensor
features twice in succession on
the same food portion. If food
is undercookecl after the first
countdown, use Cook Time for
additional time.
MyPlate Feature
Allows you to microwave healthyfood choices
by servingsor with sensor.
H PressMvPlate pad.
Enter the food type. See Cooking Guide for
I_lyPlatebelow for codes or check the
display for food types.
M Enter the amount as prompted for non-
sensor food selections.
NOTE FOR SENSOR COOKING: for best
results do not open the door while cooking.
PressSTART.
NOTE FOR SENSOR COOKING: for best
results do not open the door while cooking
Fornon-sensor food, you may open the door
during cooking to check the food. Closethe
door and pressSTARTto resume cooking.
Cooking Guide for MyPlate Feature
NOTE: Use power level 10 unless otherwise noted.
First Choice Second Choice Third Choice
Grain Rice 1/2 cup, 1 cup, 1 1/2 cups
Oatmeal i to/4 packets
Popcorn loz, 3.0ozs, 3.5 ozs
Macaroni 1/2 cup, i cup, i 1/2 cups
Quinoa 1/2 cup, i cup, i 1/2 cups
Vegetables Asparagus Fresh, Frozen,Canned
Broccoli Fresh, Frozen
Green Beans Fresh, Frozen,Canned
Carrots Fresh, Frozen, Canned
Corn Fresh Whole Cobs (1 to 4), Frozen Kernel,
Canned
Peas Frozen,Canned
Potato Baking, Sweet
Spinach Frozen, Fresh,Canned
Ground Meat
Poultry Bone-in Chicken
Bonless Chicken
Seafood Whitefish
16
, Ti!apia
Salmon
Page 17
About the sensor microwave features. GEApplionces.com
[
Soften
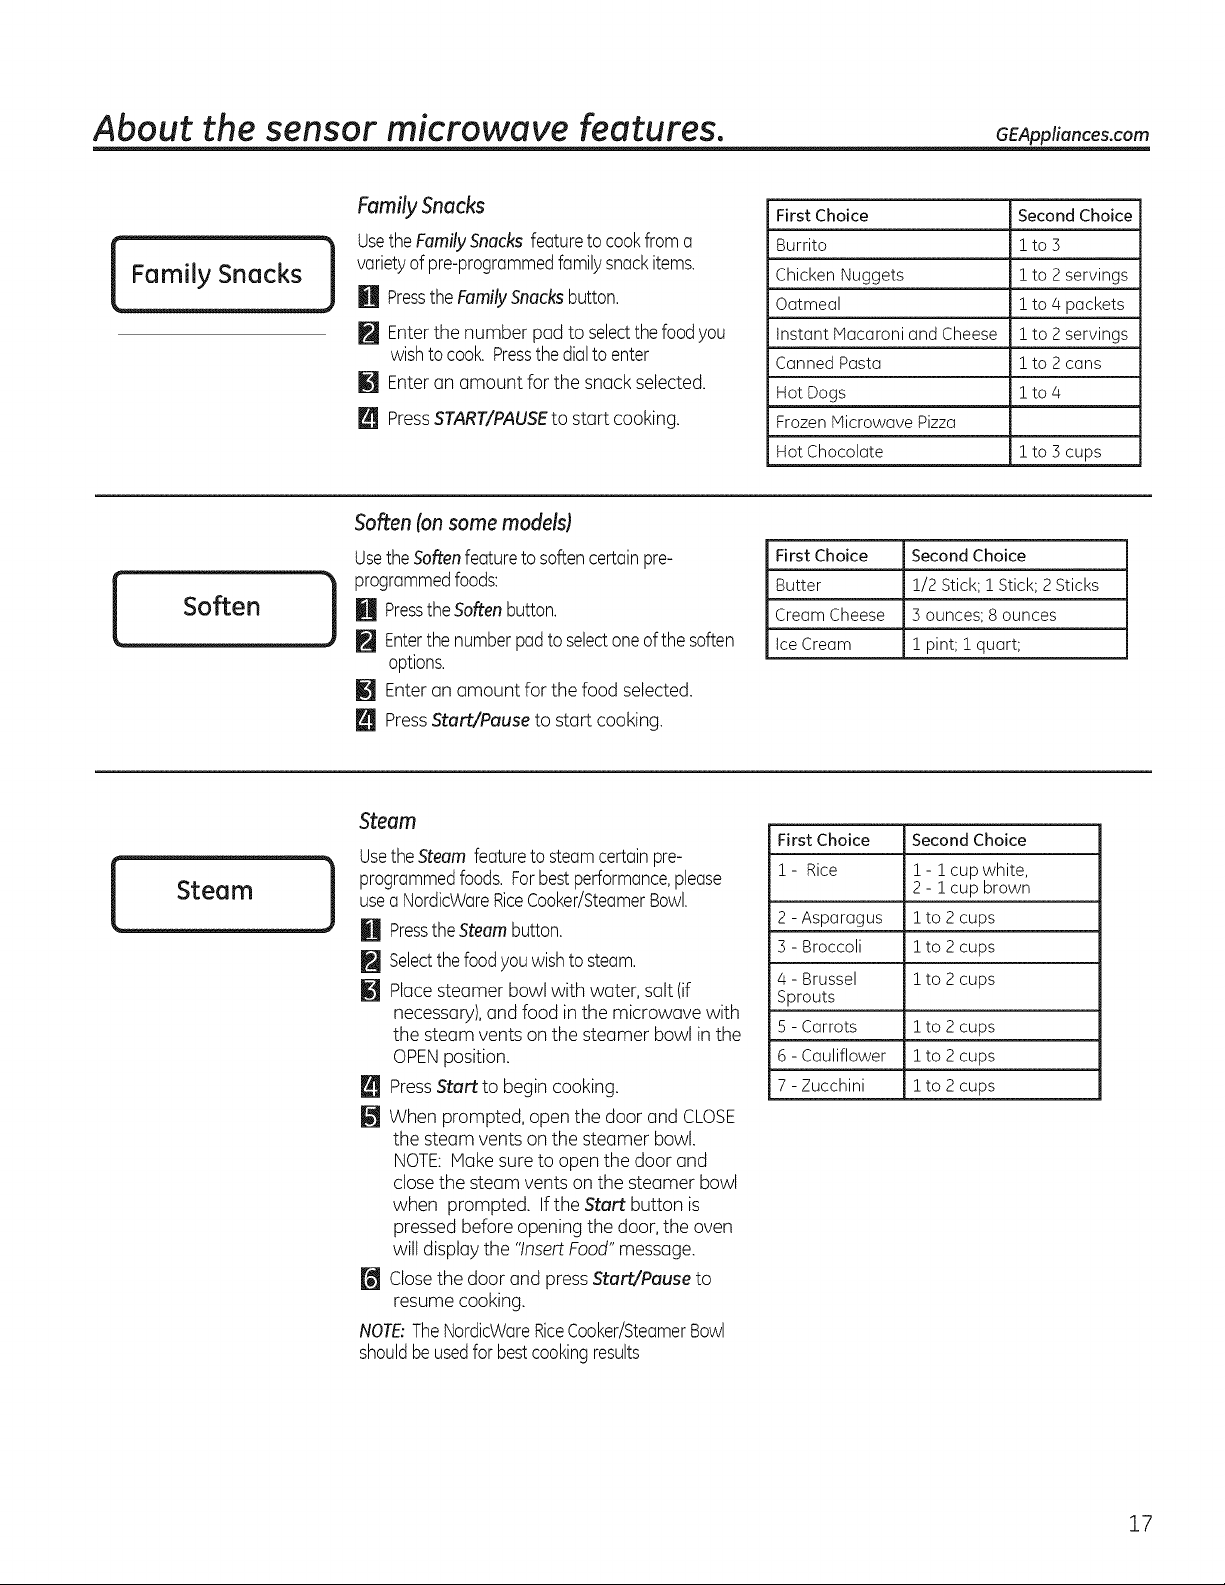
Family Snacks
UsetheFamilySnacksfeatureto cookfroma
varietyof pre-programmedfamilysnackitems.
U PresstheFamilySnacksbutton.
Enterthe number pad to selectthefoodyou
wishtocook.Pressthedialto enter
[] Enteran amount for the snack selected.
PressSTART/PAUSEto start cooking.
Soften (on some models)
Usethe Soften feature to soften certain pre-
programmed foods:
M Press the Soften button.
]
Enterthe number pad to select one of the soften
options.
[] Enter an amount for the food selected.
Press Start/Pause to start cooking.
First Choice Second Choice
Burrito i to 3
Chicken Nuggets i to 2 servings
Oatmeal i to 4 packets
Instant Macaroni and Cheese 1to 2 servings
Canned Pasta i to 2 cans
Hot Dogs i to 4
Frozen Microwave Pizza
Hot Chocolate i to 3 cups
First Choice Second Choice
Butter 1/2 Stick; ! Stick; 2Sticks
Cream Cheese 3 ounces; 8 ounces
ice Cream ! pint; ! quart;
Steam
UsetheSteamfeatureto steamcertainpre-
programmedfoods.Forbestperformance,please
useaNordicWareRiceCooker/SteamerBowl.
Pressthe Steam button.
H
Selectthefoodyouwishtosteam.
@
[]
Placesteamer bowl with water, salt (if
necessary),andfood in the microwave with
the steam vents onthe steamer bowl in the
OPENposition.
m
PressStart to begin cooking.
@
When prompted, open the door and CLOSE
the steam vents onthe steamer bowl.
NOTE:Hake sureto open the door and
close the steam vents on the steamer bowl
when prompted. Ifthe Start button is
pressedbefore opening the door, the oven
will displaythe "InsertFood"message.
[] Closethe door and press Start/Pause to
resume cooking.
NOTE:TheNordicWareRiceCooker/SteamerBowl
shouldbeusedforbestcookingresults
First Choice Second Choice
! - Rice ! - ! cup white,
2- i cup brown
2 - Asparagus i to 2 cups
5 - Broccoli i to 2 cups
/4- Brussel ! to 2 cups
Sprouts
5 - Carrots ! to 2 cups
6 - Cauliflower ! to 2 cups
7 - Zucchini ! to 2 cups
17
Page 18
About the sensor mircrowuve features.
Reheat
Donot usetheshelveswhenmicrowavecooking.)
TheReheatfeaturereheatsservingsof previously
cookedfoodsora plateofleftovers.
U Placethe cupof liquidor coveredfood inthe
oven.PressREHEATonce,twice, orthree
times.Theovenstarts immediately.
Pressoncefor a plateof leftovers.
Presstwice fora pasta.
Pressthreetimes for 1/2to 2 cupsof
vegetables.
Theovensignalswhensteamissensedandthe
timeremainingbeginscountingdown.
Donot openthe ovendooruntiltimeiscounting
down.ifthedoorisopened,closeitand press
START/PAUSEimmediately.
Afterremovingfoodfromtheoven,stir,ifpossible,to
evenoutthetemperature.Reheatedfoodsmayhove
widevariationsintemperature.Someareasoffood
maybeextremelyhot.
Humidity Sensor
tffoodisnothotenoughofferthecountdownuse
CookTimeforadditionalreheatingtime.
SomeFoodsNot Recommendedfor UseWith
Reheat
tt isbestto useCookTimefor thesefoods:
Breadproducts.
Foodsthatmustbereheateduncovered.
Foodsthatneedtobestirredor rotated.
Foodscallingfora dry lookor crispsurfaceafter
reheating.
NOTE:Do not use this feature twice in
succession on the some food portion-it
may result in severely overcooked or burnt
food.
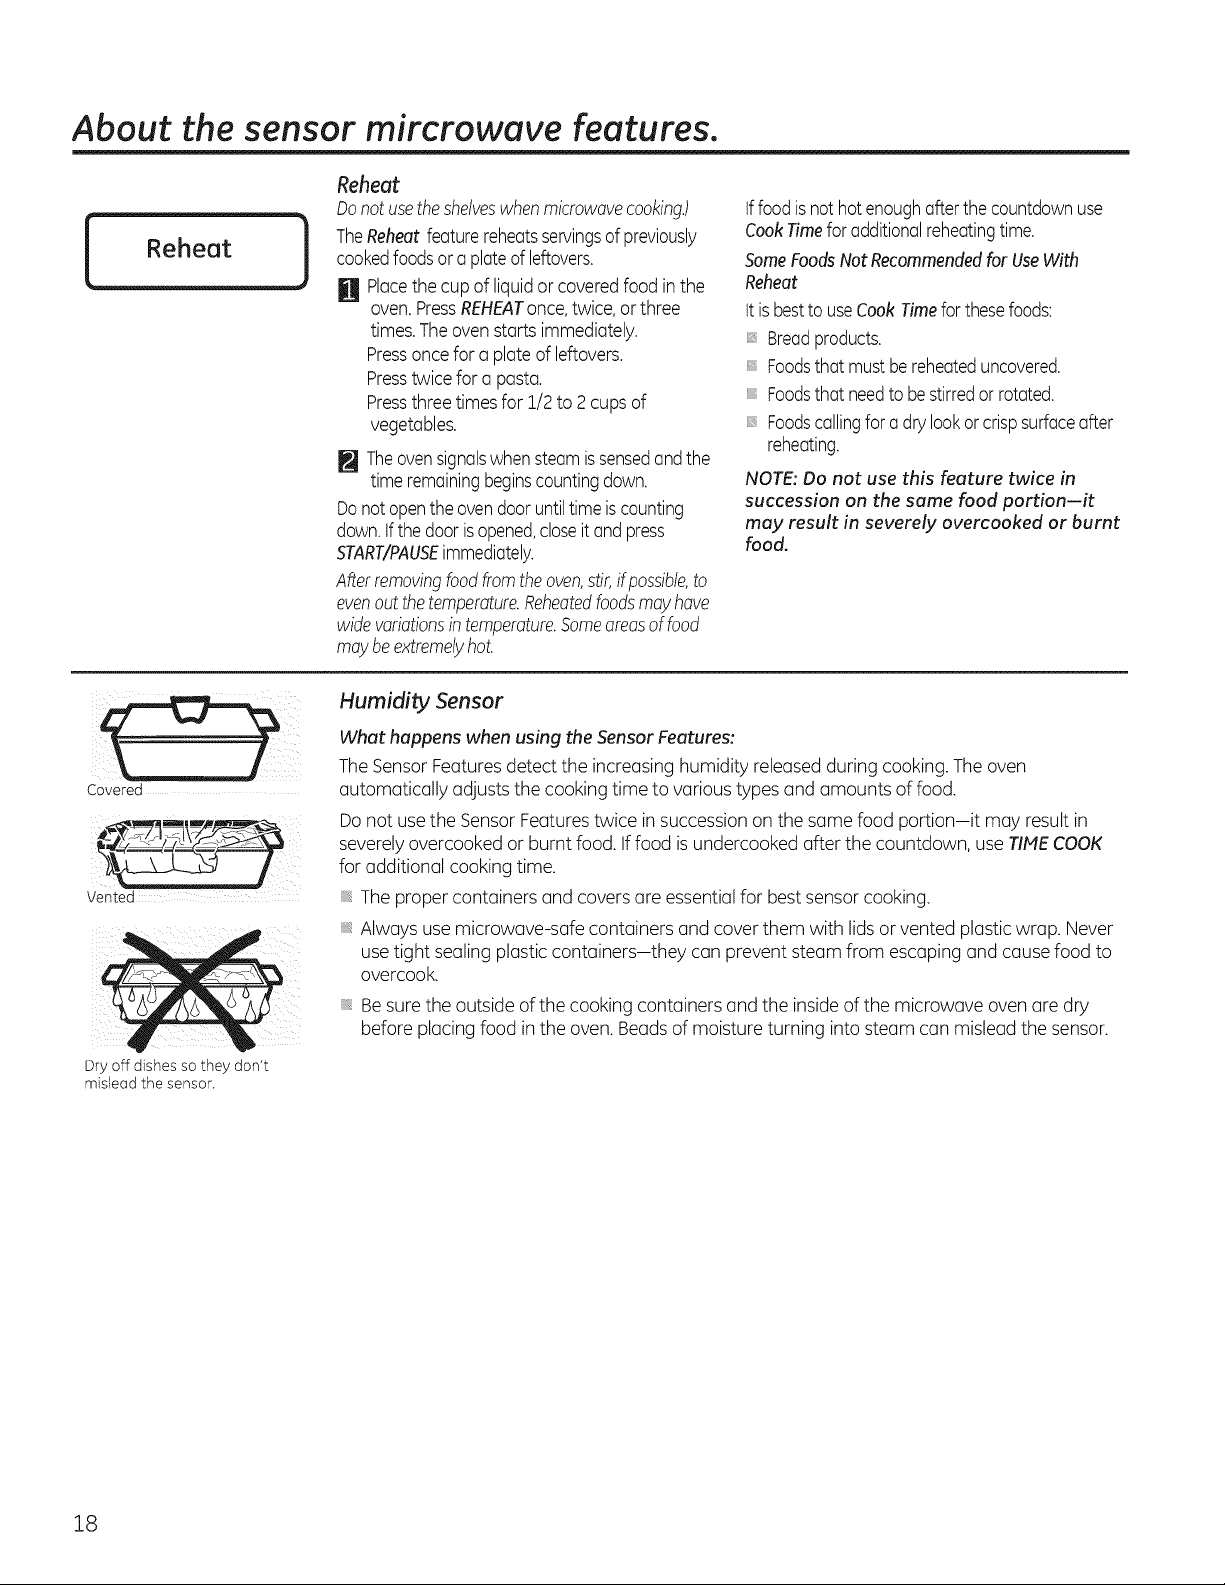
Covered
Vented
Dry off dishes so they don't
mislead the sensor.
What happens when using the SensorFeatures:
TheSensorFeatures detect the increasing humidity released during cooking.The oven
automatically adjusts the cooking time to various types and amounts of food.
Donot usethe Sensor Featurestwice in succession on the same food portion-it may result in
severelyovercooked or burnt food. If food isundercooked after the countdown, use TIMECOOK
for additional cooking time.
Theproper containers and covers are essentialfor best sensorcooking.
Always usemicrowave-safe containers and cover them with lidsor vented plastic wrap. Never
usetight sealing plastic containers-they can prevent steam from escaping and causefood to
overcook.
, Be surethe outside of the cooking containers and the insideof the microwave oven are dry
before placing food inthe oven. Beads of moisture turning into steam can mislead the sensor.
18
Page 19

@
Express Cook
Start ]
. Pause
Changing the Power Level
Thepower levelmay be entered or changed
after entering the time for CookTime.
H PressCook Time button once.
Entercooking time.
M EnterPower Level.
PressStart.
Variable power levelsadd flexibilityto
microwave cooking.Thepower levelson the
microwave oven can be compared to the
surface unitson a range. Eachpower level
givesyou microwave energy a certain percent
of the time. Power level Z ismicrowave
energy 70%of the time. Power level3 is
energy 30%of the time. Mostcooking will be
done on High(power level 10) which givesyou
100% power.Power level 10 will cook faster
but food may need more frequent stirring,
rotating or turning over.A lower setting will
cook more evenlyand need lessstirring or
rotating of the food. Somefoods may have
better flavor,texture or appearance if one
of the lower settings isused.Usea lower
power levelwhen cooking foodsthat have
a tendency to boil over,such asscalloped
potatoes.
GEAppliances.com
Restperiods (when the microwave energy
cycles off)give time for the food to "equalize"
or transfer heat to the inside of the food. An
example of this is shown with power level 3-
the defrost cycle.If microwave energy did not
cycle off,the outside of the food would cook
before the inside was defrosted.
Hereare some examplesof usesfor various
power levels.
High 10: Fish,bacon, vegetables,boiling
liquids.
Med-High 7: Gentle cookingof meat and
poultry; baking casserolesand reheating.
Medium 5: Slowcooking and tenderizing for
stews and lesstender cuts of meat.
Low 2 or 3: Defrosting; simmering; delicate
sauces,
Worm 1: Keepingfood warm; softening
butter.
NOTE: Youcanalso changethe power level
during many cooking modes by pressing the
power level buttonentering a valid power
level.
Microwave terms.
Term Definition
Arcing Arcing is the microwave term of sparks in the oven. Arcing is cause by:
Covering Covers hold in moisture, allow for more even heating and reduce cooking time. Venting plastic warp or covering with wax paper allows
Shielding In a regular oven, you shield chicken breasts or baked foods to prevent over-browning. When microwaving, you use small strips of foil
Standing Time When you cook with regular ovens, foods such as roasts or cakes are allowed to stand to finish cooking or to set. Standing time is
Venting After covering a dish with plastic wrap, you vent the plastic wrap by turning back one corner so excess steam can escape.
. metal or foil touching the side of hte oven.
. foil that is not molded to food (upturned edges act like antennas).
. metal such as twist-ties, poultry pins, gold-rimmed dishes.
. recycled paper towls containing small metal pieces.
excess steam to escape.
to shield thin parts, such as the tips of wings and legs on pountry, which would cook before larger parts.
especially important in microwave cooking. Note that a microwaved cake is not placed on a cooling rack.
19
Page 20

About the other features.
Cooking Complete Reminder
Toremind you that you havefood in the oven,
the oven will display YOURFOODISREADYand
beep once a minute untilyou either open the
oven door or pressthe Cancel/Off button.
Clock
Pressthe Settings button to enter the time of day.
[] Pressthe Settings button two times.
Enter the appropriate time of day.
J_l PressSettings to select AM or PM.
LF_Presssettings to accept the time.
Start/Pause
Inaddition to starting many functions, START/PAUSE
Start I
allows you to stop cooking without opening the door
or clearing the display.
Cancel
Off
Cancel
Off
Lock Controls
Hold 3 Sec
Surface
Light
I,
Timer
On/Off
NOTE: The TIMERindicator
will be lit while the timer is
operating.
]
Cancel/Off
Press the CANCEL/OFF button to stop and cancel
cooking at any time.
Control lock out
You may lock the control panel to prevent the oven
from being accidentally started during cleaning or
being usedby children.
Tolock or unlock the controls, pressand hold the
Cance!/Off button for about three seconds.When
the control panel is locked,CONTROLLOCKEDwill be
displayed briefly anytime a button or dial ispressed.
Surface Light
PressSURFACELIGHTonce for bright light, twice for
the night light or a third time to turn the light off.
Timer
TheTimer operates as a minute timer and can
be usedat any time, evenwhen the oven is
operating.
H Pressthe TIMERon/off button.
_-_ Entera time.
M Pressthe TIMERon/off button to start.
Tocancel, press the TIMER on/off button.
When time isup,the ovenwill signal.
Toturn off the timer signal,press TIMERon/off.
20
Page 21

Turntable On/Off
GEAppliances.com
Vent
Fan
For best cooking results, leave the turntable
on. It can be turned off for large dishes.
_j_ Press the Settings button three times.
N Select ON or OFFas prompted.
Sometimes the turntable can become too hot
to touch.
Sound Level
Use to set the beeper volume level.
j_ Press the Settings button five times.
N Press0 for mute, press 1for low, press2
for normal and press 3for loud.
Display Speed
The scroll speed of the display can be
changed.
j_ Press the Settings button six times.
Vent Fan
The vent fan removes steam and other
vapors from surface cooking.
PressVENTFANonce for boost fan speed,
twice for highfan speed,three times for
medium fan speed,four times for low fan
speedor five time to turn the fan off.
NOTE:The FAN indicator will be lit while
the fan is operating.
Becareful touching the turntable during and
after cooking.
Somecooking modes do not allow the
turntable to be turned off.
Press! for Slowest
2for Slow
3for Normal
4 for Fast
5for Fastest
Automatic Fan
An automatic fan feature protects the
microwave from too much heat rising from
the cooktop below it.It automatically turns
on if it sensestoo much heat.
Ifyou have turned the fan onyou may
find that you cannot turn it off. Thefan will
automatically turn off when the internal
parts are cool. It may stay onfor 30 minutes
or more after the cooktop and microwave
controls are turned off.
Auto Night Light
The Auto Night Light can be set to come on and
gooff at desiredtimes.
H Pressthe Settings button four times.
Press0 to turn offthe Auto Night Light or
press ! to set the Auto Night Light or press2
to review the Auto Night Light settings.
M If setting Auto Night Light,enter a valid time of
day for the Auto Night Light to turn ON.
Display Language
Use to select to displayed language.
Press the Settings button seven times.
_'_ Press 1 for English and press 2 for
Spanish..
L_ SelectAM or PMfor ONtime.
Entera valid time of day for the Auto Night
Lightto turn it OFF.
r_ SelectAM or PMfor OFFtime.
N PressSettings to confirm the settings entered.
21
Page 22

Care and cleaning of the oven.
Helpful Hints
An occasional thorough wiping with a solution of baking soda and water keepsthe insidefresh.
Be sure the power is off before cleaning any part of this oven.
/ _ i _i iii iiii ii iiii ii iiii _ How to Clean the Inside
Walls, Floor, Inside Window, Metal and Plastic Parts on the Door
Somespatters can be removed with a paper towel; others may require a damp cloth. Remove
greasy spatters with a sudsy cloth, then rinsewith a damp cloth. Donot use
abrasive cleaners or sharp utensilson oven walls.
Never use a commercial oven cleaner on any part of your microwave.
Removable Turntable and Turntable Support
To prevent breakage, do not place the turntable into water just after cooking. Wash itcarefully
in warm, sudsy water or in the dishwasher. Theturntable and support can be broken ifdropped.
Remember,do not operate the oven inthe microwave mode without the turntable and support
seated and in place.
Shelves
Cleanwith mild soapand water or in the dishwasher.
Do not clean in a self-cleaning oven.
How to Clean the Outside
we recommend against using cleaners with ammonia or alcohol, as they can damage the
appearance of the microwave oven. Ifyou choose to use a common household cleaner, first
apply the cleaner directly to a cleon cloth, then wipe the soiled area.
Case
Cleanthe outside of the microwave with a sudsycloth. Rinseand then dry.Wipe the window clean
with a damp cloth.
Control Panel
Wipewith a damp cloth. Drythoroughly. Do not use cleaning sprays,large amounts of soap and
water, abrasives orsharp objects on the panel-they can damage it. Somepaper towels can also
scratch the control panel.
Door Panel
Beforecleaning the front door panel, make sure you know what type of panel you have.Referto
the eighth digit of the model number. %" isstainless steel,"E" isslate gray, and "B","W" or "C"are
plastic colors.
Stainless Steel (onsome models)
Thestainlesssteel panel can becleaned with StainlessSteelHagic or a similar product using a
clean,soft cloth.Apply stainlesscleaner carefully to avoid the surrounding plastic parts. Do not use
appliance wax, polish,bleach or products containing chlorine onStainlessSteelfinishes.
Plastic Color Panels
Usea clean,soft, lightly dampened cloth, then dry thoroughly.
Door Seal
It'simportant to keepthe area clean where the door seals againstthe microwave. Useonly mild,
non-abrasive detergents applied with a clean sponge or soft cloth. Rinsewell.
Bottom
Cleanoff the grease and dust onthe bottom often. Usea solution of warm water and detergent.
22
Page 23

Shelf(onsome models). ppliance .com
]i ii i ii !iiii i iiiiii iii
NOTE: Only use the shelf
when reheating on more
than one level. DONOT
store the oven shelf in the
microwave.
AWARNING ARCING:
If you see arcing, press
the Cancel/Off button and
correct the problem.
For best results
Shelf (on some models)
Only use microwave shelf when reheating on
more than one level. DONOTstore the oven
shelf in the microwave.
How to Use the Shelf When Microwoving:
, Hake sure the shelf is positionedproperly
insidethe microwave to prevent damage to
the oven from arcing.
. Donot use a microwave browning dish on
the shelf. The shelf could overheat.
, Donot usethe oven with the shelf on the
microwave floor. Thiscould damage the
microwave.
• Usepot holders when handling the shelf- it
may be hot.
• Donot usethe shelf when cooking popcorn.
• Do not use the shelf with Sensor Cooking
or Reheat
Food microwaves bestwhen placedon the
turntable or on the shelf in the lower position.
Use lower shelf supports when cooking one
oblong or oversized dish.
Usethe upper shelf supports for two-level
cooking.
Shelf and Reheating
Switch places after 1/2 time
To reheat on 2 levels or
Switch places after 1/2 time
To reheat 2 dishes on the lower level:
El Multiplyreheat time by 1 1/2.
Switch ploCes_ice
p_ Switch places after 1/2the time.
To reheat on 3 levels (onsome models)
Uneven results
Uneven results
No Load
24evelreheating
• i Doublethe reheating time.
N Switch placestwice and give the dishes a 1/2
turn during reheating. (Placedense foods,
or those that require (] longercook time, on
the upper shelf first. )
23
Page 24

Replacing the light bulb,
@
Cooktop Light/Night Light
Replace with a 120 volt, 25 or 50 watt (max.)
halogen bulb. Order WB36X10213 from your
GEsupplier.
_j_ To replacethe cooktop light/night light, first
disconnect the power at the main fuse or
circuit breaker panel,or pull the plug.
Remove screw.
[] Removethe screw from the side of the light
compartment cover and lower the cover
until it stops.
About the exhaust feature.
Charcoal filter (on some models).
m
Vent Fan
Thevent fan has two metal reusablevent filters.
Modelsthat recirculate air back into the room
also usea charcoal filter.
N Besurethe bulb is cool before removing.
Breakthe adhesiveseal bygently
unscrewing the bulb.
Screw inthe new bulb, then raisethe light
cover and replace the screw. Connect
electrical power to the oven.
Reusable vent filters
(on oil models).
I
Reusable Vent Filters
Themetal filters trap grease released byfoods
on the cooktop. Theyalsoprevent flames from
foods on the cooktop from damaging the inside
of the oven.
Removing and Cleaning the Filters
Toremove, slidethem to the rear usingthe
tabs. Pulldown and out.
Toclean the vent filters,soak them and then
swish around in hot water anddetergent. Don't
use ammonia or ammonia products because
they will darken the metal. Lightbrushing can
be used to remove embedded dirt.
Rinse,shakeand letdry before replacing.
Forthis reason,the filters must always be in
place when the hood isused.Thevent filters
should becleaned once a month, or as needed.
Toreplace, slidethe filters into the frame slots
on the back of each opening. Pressup and to
the front to lock into place.
24
Page 25

About the exhaust feature. GEAppliances.com
Charcoal Filter
SalesNo. JX81H
Service No. WBO2X10955
Thecharcoal filter cannot be cleaned. It must
be replaced. Order Part No. WBO2X20956from
your GEsupplier.
If the model isnot vented to the outside,the
air will be recirculated through a disposable
charcoal filter that helpsremove smoke and
odors.
To Remove the Charcoal Filter
Thecharcoal filter should be replaced when it is
noticeably dirty or discolored (usuallyafter 6 to
!2 months, depending on usage).See"Optional
Kits,"page 10,for more information.
@
Remove 2 grille screws to remove
the grille.
Toremove the charcoal filter, first disconnect
power at the main fuse or circuit breaker, or pull
the plug.Remove the top grille by removing the
two screws that hold it in place.
You may need to open the cabinet doors to
remove the screws.
To Install the Charcoal Filter
Toinstall a new charcoal filter, remove plastic
and other outer wrapping from the new filter.
Insertthe top of the filter up and into the
grooves on the inside of the top opening. Push
the bottom of the filter in until it restsin place
behind the tabs.
Lift the filter at the bottom until it comes free of
the tabs. Slidethe filter down and out.
li i.llllllllI
25
Page 26

Before you call for service...
Things That Are Normal With Your Microwave Oven
, Moisture on the oven door (]nd w(]lls while
cooking. Wipe the moisture off with (]
p(]per towel or soft cloth.
, Moisture between the oven door p(]nels
when cooking cert(]in foods. Moisture
should dissip(]te shortly (]fter cooking is
finished.
, Ste(]m or v(]por esc(]ping from (]round the
door.
, Light reflection (]round door or
outer c(]se.
, Dimming oven light (]nd ch(]nge in
the blower sound (]t power levels other
th(]n high.
, Dullthumping sound while oven is
oper(]ting.
, TV-r(]dio interference might be noticed
while using the microw(]ve. Similar
to the interference c(]used by other sm(]ll
(]ppli(]nces, it does not indic(]te (] problem
with the microw(]ve. Plug the microw(]ve
into (] different electric(]l circuit, move
the r(]dio or TV(]s f(]r (]w(]y from the
microw(]ve (]s possible
or check the position (]nd sign(]l of
the TV/r(]dio (]ntenn(].
NOTE: If your displ(]y is off check to see if
your Power S(]ver fe(]ture/Zero St(]ndby
button is eng(]ged.
26
Page 27

Before you call for service... GEAppliances.com
Troubleshooting Tips
Save time and money! Review the charts on the following
pages first and you may not need to cull for service.
Possible Causes What To Do
Ovenwill notstart A fuse in your home may be • Replacefuse or reset circuit breaker.
Control panel lighted, Door not securelyclosed. • Open the door and close securely.
yet oven will not start
blown or the circuit breaker
tripped.
Power surge. • Unplug the microwave oven, then plug it back in.
Plug not fully inserted into well . Make surethe :]-prong plugon the oven isfully inserted
outlet, into wall outlet.
Door not securely closed. • Open the door and close securely.
Power Saver button not engaged.. Push the Power Saver button soit is pressed in.
Start/Pause button not pressed • PressStart/Pause.
after entering cooking selection.
Another selection entered • PressCancel/Off.
already in oven and Cancel/Off
button not pressed to cancel it.
Cooking time not entered after . Make sureyou have entered cooking time after pressing
pressing Time Cook. Cook Time.
Cancel/Off was pressed • Resetcooking program and pressStart/Pause.
acddentally.
Foodweight not entered after • Makesureyou have entered food weight after selecting
selecting AUTO DEFROSTor AUTODEFROSTor FASTDEFROST.
lib Quick DEFROST.
Foodtype not entered after . Make sureyou have entered a food type.
pressing AUTOCOOK.
CONTROLLOCKED The control has been locked. . Pressand hold Cancel/Offfor about 3 seconds
appears an display to unlock the control.
Floor of the oven is warm
even when the oven has
not been used
Youhear an unusual
low-tone beep
The cooktop light islocated . This isnormal.
below the oven floor.When
light is on, the heat it produces
may make the oven floor get warm.
You have tried to change
the power level when it is
not allowed.
. Many oftheoven'sfeaturesarepresetand
cannotbe changed.
27
Page 28

Before you call for service...
Possible Causes What To Do
Vent fan comes on
automatically
SENSOR ERROR appears
on the display
The vent fan automatically turns
on to protect the microwave if it
senses too much heat rising from
the cooktop below.
When using a Sensor feature,
the door was opened before
steam could be detected.
Steam was not detected in a
maximum amount of time.
. Thisis normal.
Do not open door until steam issensedand time
isshown counting down on the display.
UseCOOKTIIVlEto heat for more time.
28
Page 29

Notes. GEAppliances.com
29
Page 30

Notes.
30
Page 31

GEMicrowave Oven Warranty.
All warranty service provided by our Factory Service Centers, or
an authorized Customer Care®technician. To schedule service,
online, contact us at GEAppliances.com, or call 800.GE.CARES
(800.432.2757). Please have serial and model numbers available
when calling for service.
GE Will Choose to Replace or Service:
One Year In the event of service,GEwill provide any part of the microwave oven which fails due to a
Fr°mthed°teoforigind I defect in materials or workmanship. During this limited one-year warranty, GEwill also
theprovide,unit isfreeserviced,of charge, all labor and related service costs to replace the defective part when
For the above limited warranty: Toavoid any trip charges,you must take the microwave ovento a GeneralElectricCustomerCare®
servicerand pick it up following service.In-home serviceisalso available,butyou must pay for the servicetechnician'stravel costs to
your home.
What GE Will Not Cover:
[] Service trips to your home to teach you how to use the
product.
[] Improper installation, delivery or maintenance. If you have
an installation problem, contact your dealer or installer.
You are responsible for providing adequate electrical,
exhausting, and other connecting facilities.
[] Failure of the product or damage to the product if it is
abused, misused (for example, cavity arcing from wire
rack or metal/foil), or used for other than the intended
purpose or used commercially.
[] Replacement of house fuses or resetting of circuit
breakers.
[] Damage to the product caused by accident, fire, floods or
acts of God.
[] Incidental or consequential damage caused by possible
defects with this appliance.
[] Damage caused after delivery.
[] Product not accessible to provide required service.
[] Service to repair or replace light bulbs, except for LED
lamps.
[] Damage to the finish, such as surface rust, tarnish, or
small blemishes not reported within 88 hrs of delivery.
Staple your receipt here.
Proof of the original
purchase date is needed
to obtain service under
the warranty.
EXCLUSION OF IMPLIED WARRANTIES--Your sole and exclusive remedy is product exchange as provided
in this Limited Warranty. Any implied warranties, including the implied warranties of merchantability or
fitness for a particular purpose, are limited to one year or the shortest period allowed by law.
This warranty is extended to the original purchaser and any succeeding owner for products purchased for home
use within the USA.
Some states do not allow the exclusion or limitation of incidental or consequential damages. This warranty gives
you specific legal rights, and you may also have other rights which vary from state to state. To know what your
legal rights are, consult your local or state consumer affairs office or your state's Attorney General.
Exclusion of implied warranties: Except where prohibited or restricted by law, there are no warranties, whether
express, oral or statutory which extend beyond the description on the face hereof, including specifically the implied
warranties of merchantability or fitness for a particular purpose.
Warrantor: General Electric Company. Louisville, KV 40225
31
Page 32

Consumer Support.
GEAppliances Website G EAppliances.corn
Have a question or needassistancewith your appliance?Try the GEAppliancesWebsite 2/4hours a day,
any day of the year! Forgreater convenience and faster service,you can now download Owner's Manuals,
order parts,catalogs, or even scheduleserviceon-line.You can also "AskOur Teamof Experts....
your questions,and so much more...
Schedule Service GEAppliances.corn
Expert GErepair service is only one step away from your door. Get on-line and schedule your service at
your convenience any day of the year! Or call 800.GECARES(800.432.2737) during normal business hours.
RealLifeDesignStudio GEAppliances.com
GEsupports the Universal Designconcept-products, servicesand environments that can be used by
people of all ages,sizesand capabilities. We recognize the need to design for a wide rangeof physicaland
mental abilities and impairments. Fordetails of GE'sUniversalDesignapplications, including kitchen design
ideasfor people with disabilities,checkout our Website today. Forthe hearing impaired, pleasecall 800.TDD.
GEAC(800.833.4322).
ExtendedWarranties
Purchase a GEextendedwarranty and learn about special discounts that are available while your warranty
isstill ineffect. You can purchase it on-lineanytime, orcall 800.626.2224during normal businesshours.
GEConsumer Home Serviceswill still be there after your warranty expires.
Partsand Accessories
Individuals qualified to service their own appliances can have parts or accessoriessent directly to their homes
(VISA,MasterCardand Discovercards are accepted).Order on-line today, 24 hours everyday or
by phone at 800.626.2002 during normal businesshours.
Instructions contained in this manual cover procedures to be performed by any user. Other servicing
generally should be referred to qualified service personnel. Caution must be exercised, since improper
servicing may cause unsafe operation.
Contact Us
If you are not satisfied with the serviceyou receivefrom GE,contact us on our Website with all the details
including your phone number, or write to: General Manager,Customer Relations
GEAppliances,Appliance Park
Louisville,KY40225
GEAppliances.corn
GEApplia ncepa rts.com
GEAppliances.corn
Register Your Appliance GEAppliances.corn
Register your new appliance on-line--at your convenience! Timely product registration will allow for
enhanced communication and prompt service under the terms of your warranty, should the need arise.
You may also mail inthe pre-printed registration card included in the packing material.
Printed in Malaysia.
Page 33

0
L.
GEAppliances.com
Instrucciones de seguridad. .2- s
Instrucciones de operaci6n
Funci6n de extractor ........ 20, 21
Terminologia de microondas ... 16
Funci6n MyPlate ............... 12
Funciones de su homo ......... 7, 8
Resto de las funciones ...... 16, 17
Nivel de Potencia ............... 19
Cambio de bombillas ............ 24
Funciones con sensor ....... 15-15
Tiempo de Cocci6n ........... 9-11
Cuidado y limpieza ..... 18, 19
Consejos para la soluci6n
de problemas
Antes de Ilamar al servicio
de reparaciones ............. 22-24
DVM7195
JVM7195
JNM7196
PVM9195
PNM9196
1.2
0
K
Soporte ul consumidor
Accesorios opcionales ............. 6
Soporte al consumidor .......... 28
Garantia ....................... 27
Escriba los n(_meros de modelo y
de serie aqui:
NElmero de modelo
NElmero de serie
Estos n0meros est6n en una etiqueta
en el interior del horno.
49-40705-I 11-14 GE
Page 34

INSTRUCCIONES IMPORTANTES DE SEGURIDAD.
LEA PRih'IEROTODA LAS INSTRUCCIONES.
iPRECAUCiON!
Par su seguridad, la informaci6n contenida en este manual debe seguirse para minimizar el riesgo de incendio, explosi6n,
descarga eldctrica, exposici4n aenergfa microondas.
PRECAUCiONES PARA EVITAR POSIBLEEXPOSICION
A UNA EXCESIVAENERG[A DE MICROONDAS.
(a) No Intente operar este horno con la puerta abierta ya
que esto podrfa resultar en una exposici6n aenerg[a
microondas dahina. Esimportonte no cancelor ni
manipular de forma indebida losdispositivosde
seguridad.
(b) No SitFle ningOnobjeto entre la parte frontal del horno
y la puerto ni permita que se ocumule suciedad o
residuos limpios enlas gomas de cierre herm@ico.
(cJ No Use elhomo siest6 dahado. Esespecialmente
importante que la puerta del homo secierre
correctamente y que no sedahe:
(!) la puerta (doblada),
(2)bisagras y pasadores (rotoso sueltos),
(3)sellosde la puerta y gomas de cierre herm@ico.
(dJ El homo no deberia ajustarse ni repararse par nadie
que no sea personal de servicioadecuadamente
calificado.
INSTRUCCIONES lh'IPORTANTESDE SEGURIDAD.
Use este electrodomdstico s61opara su prop6sito original, coma se describe en el Manual del Propietario.
AI usar artefactos eldctricos se deberdn seguir las precauciones bdsicas de seguridad, incluyendo Io siguiente:
[] Lea y obedezca las precauciones espec[ficas en la secci6n
de PRECAUCIONESPARA EVITARPOSIBLEEXPOSICIONA UNA
ENERG[AEXCESIVADE IvIICROONDASde arriba.
[] Esteelectrodom_stico debe estar conectado a tierra.
Con_ctelo s61oa una toma de corriente con toma de tierra.
Vea la secci6n de INSTRUCCIONESDETOMADETIERRAen la
p6gina 9.
[] Instaleo coloque este electrodom6stico siguiendo s61olas
Instrucciones de Instalaci6n provistas.
[] Aseg0resede colocar lasuperficiefrontal de la puerta 3"
o m6s atr6s del extremo de la base,a fin de evitar cddas
accidentales del electrodom6stico durante un usa normal.
[] Estehomo microondas no est6 aprobado ni evaluado para
usanaval.
[] Nomonte el electrodom#stico sabre un lavabo.
[] Nousar este electrodom#stico siel cable de corriente
o el enchufe han sufrido alg0n da5o, sino funciona
correctamente o si ha resultadodahado ose ha ca[do.
[] Nobloquee ni cubra cualquier abertura del
electrodom_stico.
[] D#a esteelectrodom#stico elusa para el cual fue
dise_ado 0nicamente, coma se describeen este manual.
Nouse productos qu[micos corrosivos ni vapores en este
electrodom#stico. Estehomo microondas rue diseBado
espedficamente para calentar, secar o cocinar comida, y no
para usaindustrial o en laboratorio.
[] Nouse este producto cerca del agua; par ejemplo, en un
s6tano hOmedo,cerca de una piscina,cerca de un lavabo o
en ubicaciones similares.
[] Nopermita que el cable se sostengasabre el extremo de la
mesada
[] Noguarde nada directamente sabre lasuperficie del homo
microondas cuando el mismo seencuentre funcionando
[] Noguarde este electrodom#stico al aire libre.
[] Mantenga el cable de corriente alejado de superficies
calientes.
[] Parareducir el riesgo de incendio enla apertura del homo:
- Nococine demasiado la comida. Presteatenci6n cuidadosa
al electrodom_stico cuando se coloca papel, pl6stico uotro
material combustible en el horno mientras se cocina.
- Quite lascintas de cierre con metal y lasasas met61icasde
losrecipientesde papel o pl(_sticoantes deintroducirlos en el
homo.
- Noalmacene cosas enel horno. No deje productos de papel,
utensiliosde cocinar nicomida en el homo mientras no Io
est# usando.
-Si se incendiara algOnmaterial dentro, mantenga la puerta
del homo cerrada, apague el homo y desconecte elcable
de corriente el#ctrica,o apague la corriente en elfusible o
panel del diferencial.Sise abre la puerta el fuego podr[a
expandirse.
[] Lealas instrucciones delimpieza de la superficie de lapuerta
en la secci6nde Cuidadoy limpiezadel homo microondas
de este manual. No uselimpiadores que contengan
amon[acos o alcohol en elhorno microondas. Elamon[aco o
el alcohol pueden dahar elaspecto del homo microondas.
[] GEno respalda ning0n serviciot@cnicosabre estehomo
microondas, excepto coma se describe en las seccionesde
Soporte alConsumidor de este manual. Nointente reparar
el homo microondas usted mismo.Sies necesario reparar el
electrodom#stico, entonces el serviciodeber6 serrealizado
par una persona calificada del servicio t6cnico. Comun[quese
a una sucursal autorizada del servicio t#cnico para realizar
cualquier control, reparaci6n o ajuste.
[] AI igual que con cualquier electrodom#stico, sedeber6
realizar una supervisi6nde cerca si esusado par nihos.
GUARDEESTASINSTRUCCIONES
Page 35

INSTRUCCIONES IMPORTANTES DE SEGURIDAD.
LEA PRIMERO TODA LASINSTRUCCIONES.
iPRECAUCI6N!
INSTRUCCIONES IMPORTANTES DE SEGURIDAD.
[] Nolimpie con almohadillas met61icaspara fregar. Las piezas
podr6n quemar la almohadilla y tener contacto con partes
el6ctricas y producir riesgo de descargas el6ctricas
[] Estehomo de microondas est6 listado por UL para ser
instalado sobre estufas electricasy degas (memos de60,000
FORMACI6N DE ARCO EL -CTRICO
Si ve que seforman arcoseldctficos,presione el bot6n Cancel/Off (borrar/apagado)y resuelvael problema.
Arco eldctficoesIoque,en la terminologia de losmicroondas,
describelaschispasen el homo.
[] Ha},un metal o papel de aluminio tocando el lateral delhorno.
[] Elpapel de aluminio no est6 envolviendo bien la comida.
[] Platoso la vajillascon bordes met61icosocon una capa de
brillo met61ico.
COMIDAS
[] No haga rosetas opalomitas de maiz enel microondas a no
serque est6 usando un accesorio especialpara prepararlas o
que est6 empleando rosetaso palomitas de maiz que indiquen
serv61idaspara el usode hornos microondas.
[] Algunos productos tales como huevos enteros y envases
sellados - por ejemplo: tarros de vidrio cerrados - pueden
explotar y por esto nose deben calentar en el homo
microondas. Dicho uso del horno microondas podr(_producir
lesiones.
[] No hierva huevos dentro de un homo microondas. Se
generar@presi6n dentro de layema del huevo que causara
que explote pudiendo, posiblemente,dahar a alguien.
[] Sise poneen marcha el microondas sin tenet comida en su
interior por m@sde un minuto o dos podr[an causarse dahos
al homo y podrfa empezar un fuego. Estohace aumentar
la temperatura alrededor del magnetr6n y puede reducir el
perfodo devida 0tildel homo.
[] Las comidas cocinadas en I[quidos(como la pasta)pueden
tenet cierta tendencia a hervir m(_sr@pidamenteque los
alimentos que contengan menos humedad. Siesto ocurre,
revise la secci6n deCuidadoy limpieza del homo microondas
donde encontrar@instrucciones en cuanto a la limpieza del
interior del microondas.
[] No caliente lacomida del beb6 enjarras decristal, incluso
siest6n destapadas. Aseg0resede que los alimentos de los
nihos est6nbien cocinados. Remuevala comida para distribuir
el calor de forma pareja.Tenga cuidado de que el niho no se
queme al calentar la lechede f6rmula. Elcontenedor puede
parecer m@sfr[ode Io que realmente est@la f6rmula. Pruebe
siempre la f6rmula antes de d@selaal beb6.
[] No descongele bebidas congeladas enbotellas de cuello
estrecho (especialmentebebidas carbonatadas). Incluso con el
contenedor abierto, podr[a generarse un aumento de presi6n.
Esto puede causar que el contenedor explote,Iocual podr[a
producir dahos personales.
BTU).
[] Estehomo puede instalarse encima de la cocina y est6
dise_ado para su uso sobrecocinas encimeras nom6s
anchas de 36". Puedeinstalarse sobreequipos para cocinar
de gaso el6ctricos.
[] Hayalg0n metal, como cintas de cierrecon metal, pinchos de
polio,o platos con decoraci6n de oro dentro del microondas.
[] Seest6 usando papel toalla reciclado que contienen pequehas
porciones de metal en elmicroondas.
[] AGUA SOBRECALENTADA
Liquidos, tales como agua, card, o td, se podrian sobrecalentar
mds alld delpunto de ebullici6n sin parecer que estdn
hirviendo. No siempre habrd burbujas o evidencia de que
el Ifquido estd hirviendo cuando se extrae el envase con el
Ifquidodel microondas. ESTOPODRfARESULTARENL[OUIDO5
PtUYCALIENTESDEREPENTECOMENZANDOA HERVIRY
A REBOSARSECUANDOELENVASEESMOVIDO0 SIUNA
CUCHARAUOTROUTENSILIOSELEINTRODUCEAL LIQUIDO.
Para reducir el riesgo de lesionespersonales:
- No sobrecaliente los Ifquidos.
- IVluevaelI[quido tanto antes como a mediados deltiempo de
calentamiento.
- No useenvasesde lados rectoscon cuellos estrechos.
- Despu_sdel calentamiento, permita que el envase
permanezca en el microondas por un tiempo corto antes de
remover el envase.
- Usecuidado extremo cuando inserte una cuchara u otto
utensilio en elenvase.
[]
Losalimentos calientes y el vapor puedencausar quemaduras.
Tengacuidado al abrir cualquier contenedor con comida
caliente, inclusobolsasde rosetas opalomitas de maiz, bolsas
o cajas de cocinar. Para prevenir posiblesdahos personales,
mantenga el vapor alejado de susmanos y rostro.
[]
No cocinedemasiado laspapas. Podriandeshidratarse e
incendiarse,causando dahos a su horno.
[]
Cocine la came y el polio porcompleto-la came hasta que
alcance una temperatura minima INTERIORde !60°F, y el polio
hasta una temperatura INTERNA minima de !80°F. Cuando
secocinan a estas temperaturas se evita la contracci6n de
enfermedades por intoxicaci6n.
GUARDEESTASINSTRUCCIONES
GEAppliances.com
Page 36

INSTRUCCIONES IMPORTANTES DE SEGURIDAD.
LEA PRIMERO TODA LASINSTRUCCIONES.
AiPRECAUCION!
AsegOresedeque todos los utensiliosde cocinaque useen su []
homo sean aptospara microondas. Puedenusarsela mayoria
de las cazuelas,platos para cocinar,tazasde medir, tazasde
flanesy botesde cristal,o las vajillasde porcelana que no tienen []
decoracionesmetdlicas o bamices con brillo metdlico.Algunos
utensiliostienenla siguiente inscripci6n:"puede usarseen
microondas."
[] Sino est@seguro de que un plato pueda usarse enel
microondas, haga esta prueba: Coloqueel plato que est6
probando y un vasode medir con 2:37ml (! taza) deagua en
el homo - ponga la taza de medir dentro o al lado del plato.
Pongael microondas en marcha, a m6xima potencia, durante
30-45 segundos.Siel plato secalienta no deberia usarse en el
microondas.
Siel plato se mantiene frio y s61osecalienta la taza, entonces
el plato puede usarsede forma segura enel microondas.
[] Siusa unterm6metro de came al cocinar con microondas),
aseg@esede que seaapto para set usado enmicroondas.
[] Nouse productos de papel reciclado. Elpapeltoalla, las
servilletasy el papel decera recicladospueden contener
motas metdlicas que podrian causar laformaci6n de
arcos el6ctricos oincendiarse.Losproductos de papel que
contengan nil6n ofilamentos de nil6ntampoco deberian
usarseya que se podrian incendiar de igual modo.
[] Algunas bandejas de gomaespuma (como aquellas donde se
empaqueta la came) poseenuna tira fina de metal insertada
en la parte inferior.Sise usan enel homo microondas, elmetal
podr@quemar el piso delhomo o encender una toalla de
papel.
[] Nouse el horno microondas para secar el peri6dico.
[] Notodos losenvoltorios de pl@sticoestc_npreparados para
uso enel horno microondas. Controle elpaquete para un uso
adecuado.
[] Algunas bandejas de pl@stico(como en lasque se empaqueta
la came) tienen una cinta fina de metal incrustada en el plato.
AIponerseen el microondas, el metal puede quemar elsuelo
del homo o incendiar un papel toalla.
Podriancalentarse losutensiliospor el calor transferido por los
alimentos calientes.Puede necesitar usar manoplas ce cocina
para manejar los utensilios.
AIutilizar con el microondas bolsas decocinar "que puedan
hervir', as[como cualquier bolsa de pl(_sticofirmemente
cerrada, deberc_ncortarse, perforarse o proveer cualquier tipo
de ventilaci6n seg6n indique elpaquete. Encaso contrario,
el pl(_sticopodria explotar mientras se cocina o despu@s,
pudiendo causar dahos fisicos.Ademc_s,losrecipientes
de pl@sticodeberian permanecer,al menos,parcialmente
destapados ya que pueden sellarsefuertemente. Cuando
cocine con recipientes firmemente cubiertos confilm pl@stico,
retire lacubierta con cuidado y mantenga el vapor alejado de
sus manos y rostro.
Usepapel de aluminio s61ode la forma detallada en este
manual. Cuando usealuminio dentro de un homo microondas,
mantenga el aluminio,al menos, a una pulgada dedistancia
de loslaterales delhomo.
Utensiliosde plc_stico--Losutensiliosde plc_sticodiseBados
para su usoen microondas son muy prc_cticos,pero deben
usarse con cuidado. Incluso aquellos utensiliosautorizados
para su usoen microondas podrian no ser tan tolerantes
como el cristal o losmateriales de cerc_micaen condiciones
de sobrecalentamiento y podrian ablandarse o carbonizarse
al someterlos a per[odoscortos de sobrecalentamiento. En
exposiciones mc_slargas a sobrecalentamiento, la comida y los
utensilios podr[an incendiarse.
Sigaestas normas:
1. Usesolamente plc_sticosaptos para microondas y
Oselossiguiendoestrictamente las recomendaciones del
fabricante de losutensilios.
2. Nointroduzca en elmicroondas recipientes
ratios.
3. Nopermita que los nihosusen utensilios de plc_sticosin
completa supervisi6n.
EL VENTILADOR EXTRACTOR
Elventilador se pondr@en funcionamiento de forma
autom@tica bajo ciertas circunstancias (vetfunci6n de
Ventilador Automckico). Prevenga el que empiece algL]n
fuego al cocinar y que se extienda mientras el ventilador del
respiradero est4 en marcha.
[] Limpie a menudo la parte inferior del microondas. No
permita que se acumule grasa en el microondas o en los
filtros del ventilador.
[] Sila grasa se incendiara en las unidades de
la cocina (fogones) bajo el homo microondas, sofoque
cualquier sart6n en llamas de la unidad de cocina pot
completo con una tapa, una bandeja de galletas o
cualquier otra bandeja plana.
GUARDEESTASINSTRUCCIONES
[] Tenga cuidado al limpiar los filtros del ventilador extractor.
Los productos de limpieza corrosivos, como los limpia-
hornos a base de lejia, pueden dahar los filtros.
[] Ponga en marcha el extractor cuando
est6 cocinando comidas con llama bajo el microondas.
[] Nunca deje las unidades de la cocina
(fogones) bajo su microondas sin atenci6n cuando se est_
trabajando a altas temperaturas. Cuando la comida entra
en ebullici6n se generan humos y se derraman grasas
que pudieran incendiarse y propagarse si el ventilador
del microondas est(_funcionando. Para minimizar el
funcionamiento del extractor autom@tico, use utensilios de
cocina de tamaho adecuado y use el fuego r@pidoen las
unidades de la cocina (fogones) s61ocuando sea necesario.
Page 37

INSTRUCCIONES IIvlPORTANTES DE SEGURIDAD.
LEA PRilVlEROTODA LASINSTRUCCIONES. GEAppliances.com
INSTRUCCIONES DE TOMA DE TIERRA
IkiADVERTENCIA!
El uso indebido del enchufe de tierra puede resultar en riesgo de descarga el_ctrica..
Esteelectrodom6stico debe estar conectado a tierra. Sise
produjera un cortocircuito, la toma de tierra reduce el riesgo
de descarga el6ctrica al proveer un cable de escape para la
corriente el6ctrica.
Esteelectrodom6stico est6 equipado con un cable de corriente
que dispone de un hilo para toma de tierra con un enchufe con
toma de tierra. Elenchufe debe estar conectado a una toma de
corriente que est6 debidamente instalada y con salida a tierra.
Consultecon un electricista cualificado o un t6cnico de
reparaciones sino entiende completamente las instrucciones
sobre latoma detierra, o situviese alguna duda sobre sisu
aparato est(_debidamente conectado a tierra.
Sila toma de corriente es un modelo estdndar de dos clavijas,es
su responsabilidad personaly su obligaci6n elreemplazarla por
una toma adecuada para tres clavijas con conexi6n a tierra.
Bajoninguna circunstancia debe cortar o quitar la tercera clavija
(tierra)del cable de corriente.
Nouse unenchufe adaptador con este electrodom6stico.
Nouse uncable extensor de corriente con
este electrodom6stico. Siel cable de corriente esdemasiado
corto, haga queun electricista cualificado o un t6cnico
de reparaciones instalen una toma de corriente cerca del
electrodom6stico.
Paraun mejor funcionamiento, enchufe este electrodom6stico
en una toma de corriente exclusiva para evitar parpadeos de luz,
fusiblesquemados o que salte el diferencial.
ADAPTADORES DE ENCHUFE
Situaciones de uso en que el cable de corriente del electrodom_stico ser5 desconectado con poca frecuencia.
Debidoa losposibles riesgossobre la seguridad bajo ciertas condiciones,recomendamos (Enchufesadaptadoresno
enfaticamente no usar adaptadores de enchufe. Sinembargo, si aOnelije usar un adaptador, perrnitidosenCanadd) r_.r_-_
cuando losc6digos locales Io permitan, se podr6 realizar una CONEXIONTEHPORARIAa Alinee lasparas/ _-..<_!, ',_L,L'_;I
un tomacorriente de pared de 2enchufes adecuadamente conectado a tierra, utilizando un ranuras largas ._.,,_"<_. i_ I
adaptador que figure en la lista de ULque se encuentre disponibleen la mayor[a de los localesde /!'
repuestos. _¢ _j_-- _-_ !
Laranura m6s larga del adaptador deber6 estar alineada con la ranura m6s larga en el _ isegureuna
tomacorriente de pared,a fin de brindar la polaridad adecuada en la conexi6n delcable de firme y adecuada
corriente. IVI_TODO antes del usa
PRSCAUCION:Conectar laterminal deladaptador con conexi6n a tierra altornillo de la cubierta
del tomacorriente no conecta el electrodom6stico a tierra, a menos que el tornillo de la cubierta sea de metal, y no est6aislado,y que
el tomacorriente est6 conectado a tierra a trav6s delcableado del hogar.
Contrate a un electricista calificado para que controle el circuito,a fin de asegurar que eltomacorriente est6 correctamente conectado
a tierra.
Cuando desconecte elcable de corriente del adaptador, siempre sostenga el adaptador con una mano. Encaso de no hacer esto,
es muy probable que laterminal deladaptador con conexi6n a tierra serompa con el uso repetido. Siesto sucede, NOUSEel
electrodom6stico hasta que sehaya establecido una conexi6n a tierra adecuada nuevamente.
Situaciones de uso en que el cable de corriente del electrodom_stico ser_ desconectado con frecuencia.
No use un adaptador de enchufe en estas situaciones,ya que una desconexi6n frecuente del cable decorriente representa un
esfuerzoexcesivo sobre eladaptador y conduce finalmente a unafalla de laterminal del adaptador con conexi6n a tierra. Deber6
solicitar a un electricista calificado el reemplazodel tomacorriente de 2 cables por uno de 3 cables (conconexi6n atierra),antes de
usar elelectrodom6stico.
TEFIPORARIO
cone×i6natierra
MARCA PASOS
La mayorfa de Ioas marca pasos estc_nprotegidos contra la interferencia de aparatos electr6nicos, incluyendo los microondas.
Sin embargo, cuando tengan alguna duda, los pacientes con marca pasos deben consutar con su m6dico.
FAVORDELEERYSEGUIRCUIDADOSAMENTEESTAINFORIACION
DESEGURIDAD.
GUARDEESTASINSTRUCCIONES
Page 38

Accesorios opcionales.
Disponibles en su distribuidor GEpar un costa adicional.
Accesorios de panel de relleno
JX52WH--BIonco
JXS2BL--Negro
AI cambiar la tapa de una cocina encimera de
36" los accesorios de paneles de relleno ocupan
el espacio adicional proveyendo un aspecto de
montaje a medida,
$61opara instalarse entre armarios, no pueden
instalarse al final de los armarios. Coda accesorios
contiene dos paneles de reneno de :S".
Accesorios de filtros
NOde Venta.JX81H--Kit defiltro de corb6n
vegetal de recirculaci6n
NOde ServicioWBO2X!0956
Los accesorios de filtros se usan cuando el homo
no puede tenet una salida al exterior.
Los accesorios de filtros estdn disponibles a un
costa adicional en su abastecedor GE.Para pedir,
Ilame a GEo visite nuestro sitio Web, GEAppliances.
cam (consulte la p6gina trasera).
Page 39

Las funciones de su homo.
Su modelo puede tener otras caracterfsticas y apariencia que las ilustradas en este manual.
|
|
Funciones del homo
GEAppliances.com
Tirador.
Enganches de puerta.
Ventana con escudo met_lico. La ventana
permite ver coma se cocinan los alimentos y
evita que salgan microondas del homo.
Panel de control
Dispositivo giratorio extraible. No ponga en
marcha el homo en el modo microondas sin que
est6n la base y el soporte de la base colocados
en su lugar.
Soporte Extraible del Plato Giratorio. Noutilice
el homo en el mode de microondas sinel plato
giratorio y elsoporte del plato giratorio, ubicados
en sus lugares correspondientes.
Funci6n de Ahorrador de Paranoia (an al unos modelos)
Su homo microondas GEcuenta con unafunci6n deAhorrador dePotencia.Huchos electrodom_sticos
electr6nicos, incluyendolos barnes microondas, consumen corriente el_ctrica mientras est@ndesconectados y en
el mode de espera.Eliminarel consume del mode de espera puede reducir loscastes sabre el usa.
Para ACTIVARlaFunci6n deAhorrador de Potencia-
Presioneel bot6n Power Saver (Ahorrador de Potencia)en launidad. Launidad exhibir@elmensaje "Power Saver
isOn"(Ahorro de Energ[aest@Activado).Unavez que la unidad haya estado en mode de espera (sin que se haya
presionado ning0n bot6n ni realizado una cocci6n)durante un minute, la pantalla seapagar&
NOTA:Elreloj no seexhibir@eneste mode. Cuando sepresione un bot6n, la pantalla seencender6 a Io largo
del funcionamiento y permanecera encendida hasta que la unidad haya estado en mode de espera durante un
minute.
Para DESACTIVARla Funci6ndeAhorrador dePotencia -
Presioneel bot6n Power Saver (Ahorrador de Potencia)en launidad. Lapantalla seencenderBy se leer@"Power
SaverisOff" (Ahorrode Energ[aesta Apagado).La pantalla permanecera encendida, a pesar dela extensi6n de
tiempo en el mode de espera.
Page 40

Acerca de las funciones de cocci6n
de su homo microondas.
Reheat][ ]
Express Cook
Lock Controls
Hold 3 Sec
Controles de Cocci6n
Consulte /a Gu[ade Acciones Convenientes antes de comenzar.
Funciones del Temporizador
Presione Ingresar
COOKTiME (Tiempo de Cocci6n) Cantidad de tiempo de cocci6n
DEFROST(Descongelar} Hora, Peso o DescongeDci6n R6pida de ! Ib
SETTINGS(Configuraciones}
TIMER(Temporizador}
POWER LEVEL(Nivel de potencia} Nivel de potencia de ! a !0
ADD 30 SEC (Agregar 30 segundos} iComienza de inmediato!
EXPRESSCOOK (Cocci6n Express} iComienza de inmediato!
POPCORN (Palomitas de Maiz} iComienza de inmediato!
BEVERAGE(Bebida} iComienzade inmediato!
Funciones Convenientes
Presione Ingresar
REHEAT(Recalentar) iComienzade inmediato!
FAMILYSNACKS{RefrigeriosFamiliares) PresionelateclaparaseteccionarlaComida.
SOFTEN(Ablandar) Presionelatecla paraseteccionarlaComida.
STEAM(Vapor} PresionelateclaparaseteccionarlaComida.
MyPtate PresionelateclaparaseteccionarlaComida.
POTATO(Papa} iComienzade inmediato!
Presione Ds tecDs num6ricas (!-6)
Page 41

Acerca de las funciones de! temporizador. GEAppliances.com
Cook Time (Tiempo de Cocci6n)
Lepermitecocinarenel hornomicroondaspar
cualquiertiempohasta99minutosy 99segundos.
Express Cook
I Start i
Express Cook
Powerlevel10(High)(Niveldepotencia10(High))
seconfiguradeforma automStica,peroIopuede
modificarparaunamayorflexibilidad.
H PresioneCOOKTIMEffiempodeCocci6n).
tngreseeltiempodecocci6n.
N PresioneSTART(tniciar)ocambieelnivelde
potencia.
L_ presioneSTART(tniciar)sih configuraci6nde
potenciayaseseleccion6.
Puedeabrirlapuertodurantelafunci6nCOOK
TIME(TiempodeCocci6n)paracontrolarla
comida.Cierrelapuertoy presioneSTART(tniciar)
parareanudarlacocci6n.
Express Cook (Cocci6n R6pida)
Estoesunaformardpidaparaconfigurareltiempo
decoccidnentre1y 6minutos.
Ill presioneunadelasteclasdeExpressCook
(Cocci6nRSpida)(de1a 6)paraunacocci6n
deentrei y 6 minutosenelniveldepotencia
10. Porejemplo:presionelatecla2 paraun
tiempodecocci6nde2minutos.
Elniveldepotenciasepuedemodificarmientras
seest6realizandola cuentaregresiva.Presione
POWERLEVEL(NiveldePotencia)e ingreseuna
opci6ndel0 al10.
NOTA:Lafunci6nExpressCook(Cocci6nR@ida)
seaplica s61oconlas teclas1a 6.
Add 30 Sec (Agregar 30 segundos)
Agregar@30 segundos a lacuenta regresiva
coda vez que la tecla se presione. Codavezque
presione, se sumar6n 30 segundos, hasta 99
minutos y 99 segundos.
Elhornocomenzar@afuncionardeinmediato
cuandosepresione.
Page 42

Acerca de las funciones de! temporizador.
[
Weight/Time
Express Cook
Defrost
Start ]
Pause
)
Descongelaci6npor Tiempo
kepermitedescongelarduranteunperfodo
detiemposeleccionado.Consultelostiempos
sugeridosenlaGufadeDescongelaci6n.Time
Defrost (Descongelaci6nporTiempo)y1Ib
QuickDefrost(Descongelaci6nR6pidade1 Ib)se
explicanenlasecci6nAcercadelasFunciones
Convenientes.)
X PresioneDEFROST(Descongelar)dos veces.
[] tngreseeltiempodedescongelaci6n.
[] PresioneSTART(tniciar).
L_ D6vueltalacomidaunaveztranscurridala
mitaddeltiempo.
Unaveztranscurridoeltiempodedescongelaci6n
seleccionado,d6vueltalacomidaysepare
o reorganicelostrozosdecomidaparauna
descongelaci6nm6spareja.Cubracualquier6tea
calientecontrozospequer_osdepapeldealuminio.
Elhomosecontinuar6descongelandosinoabrela
puertayda vueltala comida.
Esposiblequeseescuchenruidosdegolpes
secosduranteladescongelaci6n.Estoesnormal
cuandoelhomo noest6funcionandoenelnivelde
potenciaHigh(Alto).
Conse]ospara laDescongelaci6n
m Lascomidascongeladasenpapelo pl6sticose
podr6ndescongelarenel paquete.Lospaquetes
cerradossedeber6ncortar,perforaroventilar
LUEGOdequelacomidasehayadescongelado
parcialmente.Losenvasesdepl6sticose
deber6ndescubrirenformaparcial.
I Lascomidasdetam@ofamiliarempaquetadas
previamentesepodr6ndescongelarycocinar
enelhomomicroondas.Silacomidase
encuentraenelenvasedepapeldealuminio,
trasladelamismaaunplatoparausoseguro
enelhomomicroondas.
m Lascomidasqueseechana perdercon
facilidadnosedeber6ndejarreposarporm6s
deunahoraluegodeladescongelaci6n.La
temperaturaambienteestimulaeldesarrollode
bacteriasnocivas.
m Paraunadescongelaci6nm6sparejade
comidasm6sgrandes,talescomoasado,use
TimeDefrost (Descongelaci6npor Tiempo).
Aseg0resede quelascarnesquedentotalmente
descongeladasantesde cocinar.
m Unavezdescongelada,lacomidadeberiaestar
friaperoablandadaentodaslas@eas.Sia0n
est6unpococongelada,vuelvaa colocarlaen
elhomomicroondasmuybrevemente,odeje
reposarlamismaporunospocosminutos.
Gu[a de Descongelaci6n
Comida riempo Comentarios
Panes, Tortas
Panes, buffuelos o panecJllos (1 trozo) 1/4 de min.
Pastefitos (12 onzas aprox.) 2 o 4 min. Vuelva a ordenar luego de la mitad del tiempo.
Pescado y Hariscos
Lomos, congelados (1Ib.I 6 a 9 rain.
Fruta
Bolsa de pl6stico--1 o 2 I a 5 min.
(Paquete de 10onzas.)
Came
Tocino (1lb.) 2 a 5 min.
Salchiehas Tipo Frankfurt (1 lb.) 2 a 5 min.
Came picada (i lb.)
Asar: bile, eordero, ternera, cerdo
Bistecs, ehuletas de cerdo y eordero
Ave
Polio, parilla-freidora, corte
(2v_a 3 Ibs.)
finalizar ladescongelaci6n.
Polio, entero (2_/_a 3 Ibs.)
se puedan retirar los menudos.
Gallina de Cornualles
Pechuga de pavo (a a 6 Ibs.)
4a6min.
9 o 13 min.
por lb.
408 min.
por lb.
14 a 20 mJn.
20 a 25 min.
7 a 13 min.
porlb.
3 a 8 min.
porlb.
Coloque el paquete cerrado en el horno. Deje reposar por 5 minutos luego de la descongelaci6n.
Coloque el paquete cerrado en el homo. Cocine en elhomo microondas basra que las salchichas tipo Frankfort
se puedan separar. Deje reposar pot 5 minutos, de set necesario, para completar la descongelaci6n.
D6 vuelta luego de la primera mitad de tiempo.
Use el nivel de potencia 10.
ColoquelacameaOnenvueltaen elplatodecocci6n.D6vueltaluegodelaprimeramitaddetiempoy cubralas
6reascalientesconpapelde aluminio.Luegodelasegundamitaddeltiempo,separelostrozosconun cuchillode
mesa.Esperehastaquesecompletela descongelaci6n.
Coloque el polioenvuelto en el plato. Desenvuelva y d6 vuelta luego de la primera mitad de tiempo. Luego
de lasegunda mitad de tiempo, separe los trozos y coloque los mismos enel plato de cocd6n.
Codne en el homo microondas entre 2 y 4 minutos m6s, sies necesario. Deje reposar por unos pocos minutos para
Coloque el polio envueito en el plato. Luego de la mitad del tiempo, desenvuelva y d6 vuelta el polio. Cubra las
partes calJentes con papel dealuminJo. Para completar la descongelaci6n, deje correr agua fr[a en lacavidad hasta que
Coloquelagallinasindesenvolverenel homoconla pechugahaciaarriba.D6vueltaluegodela primeramitad
detiempo.Dejecotteragua porlacavidadhastaquesepuedanquitarlosmenudos.
Coloquelapechugasindesenvolveren elplatoparausoseguroenelhomo microondasconlapechugahacia
abajo.Luegode la primeramitaddetiempo,d6vueltalapechugahaciaarribay cubralaspartescalientescon
papeldealuminio.Descongeledurantelasegundamitaddeltiempo.Dejereposarentrei y 2horasenel reffigerador
paracompletarladescongelaci6n_
10
Page 43

GEAppliances.com
Defrost
I
Weight/Time
Express Cook
StartPause ]
]
Auto Descongelaci6n
Use Auto Defrost (AutoDescongelaci6n)pare
carnes,ayesy pescado.
UseTimeDefrost (Descongelaci6nporTiempo)
para la mayorfade lasdemoscomidas
congeladas.
X PresioneDEFROST(Descongelar)unavez.
[] Usandola guia deconversi6nquaaparecea
continuaci6n,ingreseel pesode lacomida.
Porejemplo:presionelasteclas i y 2 para
1.2libras (1libra, 3 onzas).
[] PresioneSTART(tniciar).
D@vueltalacomidacuandoseindique.
(TimeDefrost(Descongelaci6nporTiempo)se
explicaen la secci6nAbout the time features
(sobrelas funcionesdel temporizador))
Consejos para la Descongelaci6n
m Retirela carne del paquetey coloquela misma
en el plato delmicroondas.
m Cuandoel hornod@lasepal,d@vueltala
comida.Retirelacame descongeladao cubra
laspartescalientescon trozos peque_osde
papalaluminio.
m Luegode descongelar,la mayorfade las
carnesnecesitanreposardurante Sminutos
para completar la descongelaci6n.AIasar
durantetiempo prolongadosedeberiadejar
reposarpor enosS0minutos.
Table de conversi6n
;i el peso de lacomida se calcula en libras
/ onzas,las onzas deberdn convertirse a
:16cimas(.1)de libra.
onzas libra
1-2 .!
3 .2
4-5 .5
6-7 .4
8 .5
9-10 .6
!! .7
12-13 .8
14-15 .9
t
Weight/Time
Express Cook
Defrost
Start
Pause
]
J
Descongelaci6n R6pida de 1 Ib
1 Ib QuickDefrost(Descongelaci6nR6pidade
i lb.)configuraautomc_ticamentelostiempos
de descongelaci6ny nivelesde potenciapara
producirresultadosparejosde descongelaci6n
concarnes,avesy pescadosquepesen hasta
una libra.
PresioneDEFROST(Descongelar)tresveces.
[] PresioneSTART(tniciar).
[] D6vueltalacomidacuandoseindique.
Popcorn (Palomitas de Maig
Para usar la funci6n de Popcorn (Palomitasde
Mafz):
Sigalasinstruccionesdel paquete, usando
Auto Cook (AutoCocci6n)si el paquete pesa
menos de 1.0onzaso superalas3.5onzas.
Coloqueel paquete depalomitas de ma[z
en el centrodel plato giratorio.
Presioneel bot6n POPCORN(Palomitasde
m
Hafz)una vezpara bolsasde 3.3 a 3.5onzas
o dos races pare bolsasde 2.7a 3.0onzas
o tres races pare bolsasde 1.0a 1.5onzas.
Si lacomida no se cocina luego de laprimera
cuenta regresiva,useTime Cook (Cocci6npor
Tiempo)para adicionar tiempo.
Uses61opalomitas de mdz empaquetadas
previamente parahornosde microondas qua
pesenentre 1.0y 3.5onzas.
NOTA:No useesta funci6n dos vecesseguidas
en la misma porci6n de comida; esto podr6
hacer que la comida sesobrecaliente de forma
excesiva.
11
Page 44

Sobre la funci6n MyPlate
MyPlate J
Express Cook
StartPause j
NOTA: No use losfunciones del
sensor dos veces seguidas con la
misma porci6n de comida. Sila
comidano secocinaluegodela
primeracuentaregresiva,useel
TEt4POR!ZADORDECOCCt0N(TIME
COOK)paraadicionartiempo.
Funci6n MyPlate
Lepermite cocinar comidassaludablesen el
microondaspor porcioneso consensor.
U Presionela tecla MyP/ate.
Ingreseeltipo de comida. LealaGuiade
m
Coccidnpara MyPtateacontinuaci6n para
conocer losc6digos o consulteen la
pantalla lostipos decomida.
_L1 Ingresela cantidad como seindica para
seleccionesdecomida sin sensor.
NOTAPARACOCCIONCONSENSOR:para
obtenermejores resultados,no abra la
puerta mientrascocina.
PresioneSTART(Iniciar).
Paracomidassinsensor,puede abrirla puerta
durante lacocci6npara controlar lacomida.
Cierrela puertay presioneSrART(Iniciar)para
reanudar la cocci6n.
Guia de Cocci6n
NOTA: Use nive! de
para MyPlate
potencia lo a menosque se indiquede otto manera.
Primeru Secundu Elecci6n Terceru Elecci6n
Elecci6n
Cereal I - Arroz 1/2 taza, 1 taza, 1 1/2 tazas
2 - Arena ! a 4 paquetes
3 - Palomitas de iVlaiz ! onza, 3.0 onzas, 3.5 onzas
4 - Macarrones i/2taza,i taza,i i/2tazas
L _ 5 -Quinoa _ i/2taza,i taza,i i/2tazas
Verduras i - Esparragos Frescas,Congeladas, Enlatadas
2 - Br6coli Fresco, Congelado
3 - FrUolesVerdes Frescas, Congeladas, Enlatadas
/4- Zanahorias Frescas, Congeladas, Enlatadas
5 - Mafz Choclo Fresco (! a 4),Granos Congelados,
Enlatado
6 - Guisantes Frescas, Congeladas, Enlatadas
7 - Papas AI Homo, Batata
8 - Espinaca Frescas, Congeladas, Enlatadas
Came Picada
Ave ! - Polio con Huesos
2 - Polio Deshuesado
Mariscos ! - Pescado Blanco
2 - Tilapia
3 - Salm6n
12
Page 45

Acerca de las funciones dei microondas con sensor. GEAppliances.com
[
Soften
Family Snacks (Reffigerios Familiares)
Uselafunci6nFamilySnacks(RefrigeriosFamitiares)
paracocinarentreunavariedadderefrigeriosfamitiares
programadospreviamente.
JJJJPresioneelbot6nFamilySnacks(Refrigerios
Familiares).
tngreselateclanum6ricaparaseleccionaruna
de lasochoopcionesderefrigerios.
[] tngreseunacantidadparaelrefrigerio
seleccionado.
PresionelateclaSTART/PAUSE(tnicio/Pausa)para
iniciarlacocci6n.
Soften (en algunos modelos)
Uselafunci6nSoften(Ablandar)paraablandar
ciertascomidasprogramadaspreviamente:
JjJJPresioneelbot6nSoften(Ablandar).
]
tngreselateclanum6ricaparaseleccionaruna
delasopcionesparaablandar.
[] tngreseunacantidadparalacomida
seleccionada.
PresionelateclaSTART/PAUSE(tniciar/Pausar)
parainiciarlacocci6n.
First Choice Second Choice
Burrito i to 3
Chicken Nuggets i to 2 servings
Oatmeal i to 4 packets
Instant Macaroni and Cheese 1to 2 servings
Canned Pasta i to 2 cans
Hot Dogs i to 4
Frozen Microwave Pizza
Hot Chocolate i to 3 cups
First Choice Second Choice
Butter 1/2 Stick; 1 Stick; 2 Sticks
Cream Cheese 3 ounces; 8 ounces
Ice Cream 1pint; i quart;
Steam (Vapor)
Uselafunci6nSteam(Vapor)paraciertascomidas
programadaspreviamente.Paraun mejor
rendimiento,utiliceunRecipienteparaArroz/
VaporeraNordicWare.
H Presioneelbot6nSteam(Vapor).
Seleccionelacomidaquedeseecocinaralvapor.
[] Coloqueelrecipienteconagua,sal(sies
necesario),y comidaenelhomomicroondas
conlasventilacionesdevaporenelrecipiente
en laposici6nOPEN(Abierta).
PresioneSTART(tniciar)parainiciarlacocci6n.
_1_Cuandoseindique,abrala puertayCtERRElas
ventilacionesdevapordelrecipiente.
NOTA:Aseg0resedeabrirla puertay cerrar
lasventilacionesdevaporen elrecipientepara
vaporcuandoseleindique.SilateclaSTART
(tniciar)es presionadaantesdeabrir lapuerta,
el homomostrar@el mensajede"tntroducir
Alimentos'.
[] Cierrelapuertay presioneSTART/PAUSE(iniciar/
Pausar)parareanudarlacocci6n.
NOTA:Sedeberiausarel RecipienteparaArroz/
VaporeraNordicWareparaobtenermejores
resultados.
Primera Elecci6n Secunda Elecci6n
i- Arroz i- itaza blanca,
2- i taza marr6n
2 - Esp6rrago 1 a 2 tazas
3 - Br6coli 1a 2 tazas
4 - Repollitos de ia 2 tazas
Bruselas
5 - Zanahorias 1 a 2 tazas
6 - Coliflor ia 2 tazas
7 - Calabacines 1 a 2 tazas
13
Page 46

Acerca de las funciones del microondas con sensor.
Reheat (Recalentar)
(Nouse losestantes a/cocinarcon elmicroondas.)
Lafunci6nReheat(Recalentar)vuelveacalendarlas
porcionesdecomidascocinadaspreviamenteo un
platode restosdecomida.
ill ColoquelatazadeIfquidoocomidacubiertaen
elhomo.PresioneReheat(Recalentar)una,dos
o tresveces.Elhomoseiniciadeinmediato.
Presioneunavezparaun platoderestosde
comida.
Presionedosvecesparaunapasta.
Presionetresvecespara1_a 2tazasde
verduras.
[] Elhornoemiteunasepalcuandoseproduce
vapory eltiemporestantecomienzalacuenta
regresiva.
Noabra lapuertohastaqueseest@realizando
lacuentaregresiva.Siseabrela puerto,cierrela
mismay presioneStart/Pause(tniciar/Pausar)de
inmediato.
Sensorde humedad
kuegoderetirarla comidadelhomo,reubique,sies
posible,paraemparejarlatemperatura.Loscomidas
recalentadaspodrdntenetampliasvariacionesde
temperatura.Algunaspartesdela comidapodrdn
estarextremadamentecalientes.
Sila comidanosecocinaIosuficienteluegode
lacuentaregresiva,useCookTimeffiempode
Cocci6n)paraadicionartiempoderecalentamiento.
AlgunasComidasNoRecomendadaspara Usocon
Recalentamiento
EsmejorusarCookTimeffiempo deCocci6n)para
estascomidas:
Productosconpan
Comidasquesedebenrecalentarsinestar
cubiertas
Comidasquesedebenrevolvero reubicar
Comidasquedebentenerunaspectosecoouna
superficiecrocanteluegoderecalentar
Agujereado
Cubierto
Seque los platos pora que no
enga_en al sensor.
Qu@sucedecuando usa los FuncionesdeSenson
TheSensorFeatures detect the increasing humidity released during cooking.The oven
automatically adjusts the cooking time to various types and amounts offood.
Donot usethe Sensor Featurestwice in succession on the same food portion-it may result in
severelyovercooked or burnt food. If food isundercooked after the countdown, use CookTime
ffiempodeCocci6n)for additional cooking time.
Theproper containers and covers are essentialfor best sensorcooking.
Always usemicrowave-safe containers and cover them with lidsor vented plastic wrap. Never
usetight sealing plastic containers-they can prevent steam from escaping and causefood to
overcook.
, Be surethe outside of the cooking containers and the insideof the microwave oven are dry
before placing food inthe oven. Beads of moisture turning into steam can mislead the sensor.
14
Page 47

GEAppliances.com
@
Express Cook
Start ]
. Pause
C6mo Modificar el Nivel de Potencia
Elnivel de potencia sepuede ingresar o
modificar luego de introducir el tiempo de
Cocci6n.
_j_ Presioneel bot6n CookTimeffiempode
Cocci6nlunavez.
[] Ingreseel tiempo de cocci6n.
M IngresePower Level(Nivelde Potencia)
cuando seindique.
PresioneStart/Pause (Iniciar/ Pausad.
Losnivelesde potenciavariablessuman
flexibilidada la cocci6nen elmicroondas.Los
nivelesde potenciadel homo microondas
sepuedencomparar con las unidadesde
superficiede unacocina.Cada nivelde potencia
le proveeenergfade microondasdurante
un cierto porcentajedeltiempo.ElNivelde
Potenda Zes energfade microondasel 70%
deltiempo.ElNivelde Potenda 3 esenergfa
de microondasel 30%del tiempo. Lamayorfa
de lascoccionessehar6nen High(Alto)(nivel
de potencia :].0),Iocual lebrinda elZ00%de
potencia.Power level 10 (Nivelde potencia lOI
har6 la cocci6n m6s r6pido pero ser6 necesario
revolver, rotar o dar vuelta lacomida con
mayor frecuencia. Una configuraci6n inferior
har6 la cocci6n m6s pareja y se necesitar6
revolver y rotar menos la comida. AIgunas
comidas podr6n tener mejor sabor, textura o
aspecto sise usa una de las configuraciones
inferiores.Useun nivelde potenciainferior al
cocinarcomidascontendenciaa her@,tales
coma papas en escalope.
Losperbdos de descanso(cuandolosciclos
de energfade microondasfinalizan)brindan
tiempo para quelacomida "equipare"o
transfieracaloral interiorde lacomida.Un
ejemplodeesto semuestraconel nivel de
potencia 3-el ciclode descongelamiento.Sila
energfadel microondasno finaliz6elciclo,la
parteexterna de lacomidasecocinar6antes
de queel interiorest_descongelado.
Estosson ofgunosejemp/osdeusadediferentes
nivetesdepotencia:
Alto 10: Pescado,tocino,verduras,Ifquidosen
hervor.
Media-Alto 7:Cocci6nsuavede cameyave;
cacerolaspara horneadoy recalentar.
Medio 5:Cocci6nlentay ablandamientopara
guisadosy cortesdecame menostiernos.
Ba]o2 o3: Descongelar;hervira fuego lento;
platosdelicados.
Caliente1:C6momantenerla comidacaliente;
c6mo ablandar lamanteca.
NOTA:Tambi6npuedemodificarel nivelde
potenciadurante muchosmodosde cocci6n,
presionandoel bot6nde nivelde potenciae
ingresandoun niveldepotenciav61ido.
Terminologia
de microondas.
Definici6n
Area el6ctrico Elarco eldctricoes Io que,en laterminologla de losmicroondas, describelaschispas en elhomo. Elarco
e ctricoseproducecuondo
i_ metal o papel de aluminio en contacto con el lateral delhomo.
Papelde aluminio no moldeado a la comida (losextremos doblados act0an como antenas).
metales, tales como precintos, pinchosde ave, oplatos con rebordes dorados.
i toallas de papel reciclable que contengan peque_os trozos demetal.
Cubierto Lascubiertas mantienen la humedad dentro,permitiendo un calentamiento mc_sparejo y reduciendo el
tiempo de cocci6n. Cuando seagujerea el envoltorio de plestico ose cubre con papel decera se permite la
salida delvapor.
Resguardar Enun horno convencional,setapan o resguardan las pechugas de polio olas comidas horneadas para
que no sedoren demasiado. AI usar el microondas, usepequehas cintas de papel dealuminio para cubrir
...... partes finas,como las puntas de las alas en lasayes,que podrian cocinarse antes que laspartes mayores.
Tiempode Cuando cocina enhornos regulares, las comidas como losasados o pastelesse dejan reposar para
reposo que acaben de cocinarse o se asienten. Eltiempo de reposo esespecialmente importante al cocinar con
.................................de enfriamiento.
Abrir Una vezque haya cubierto un plato con film pk_stico,deberc_abrir un orificio desplegando una
respiraderos esquina para que pueda escapar el vapor.
microondas. Tenga en cuenta que un pastel cocido en homo microondas no secoloca en un estante
15
Page 48

Acerca dd resto de las fundones.
Recordatorio de Cocci6n Completa
Start I
Cancel
Off
Para recordarle que coloc6 comida en el homo,
este 01timo mostrar6 YOUR FOOD IS READY
(Su Comida Esta Preparada) y ernitira un pitido
Clock (Reloj)
Presioneet bot6n Settings (Configuraciones) para ingresar
la hora detdie.
[] Presione el bot6n Settings (Configuraciones) dos
veces.
Ingresela horadetd[acorrecta.
M PresioneSettings (Configuraciones) para seleccionar
AMo PM.
Start/Pause (Iniciar/ Pausad
Ademcis de iniciar muchas funciones, Start/Pause
(tniciar/Pausad le permite dejor de cocinor sin obrir
Iopuerto ni reinicior Iopontollo.
Cancel/Off (Canceler/Apagad
Presione el bot6n Cancel/Off(Cancelar/Apagad
para detener y cancelar la cocci6n en cualquier
momento.
una vez por minuto hasta que abra el horno
o presione el bot6n Concel/Off(Cancelar/
Apagar).
PresioneSettings (Configuraciones) paraaceptarla
bore.
Cancel
Off
Lock Controls
Hold 3 Sec
Surface
Light
I,
Timer
On/Off
NOTA:Elindicador de
tiempo se iluminar5 mientras
el temporizador est6
funcionando.
16
]
Control Lock-Out (Bloqueo del Control)
Puedebioquear etpanelde control para evitarqua el
homo seinicie deforma accidental durante la limpieza
o seausadopor ni_os.
Parebloquearo desbloquearloscontroles,mantenga
presionadoCancel/Off(Cancelar/Apagad durante
Surface Light (Luz Superficial)
PresioneSurface Light (Luz Superficial) una vezpara
octivor Io luzbrillante, dos veces poro octivor Ioluz
nocturno o uno tercero vezparo opogor Ioluz.
Timer (Temporizadod
Eltemporizadorfunciona como un temporizador por
minutos y puede ser usado en cualquier momento, induso
cuando el homo estci funcionando.
H Presione el bot6n Timer On/OffO-emporizador
Encendido/ ApagadoL
Ingrese un tiempo.
M Presione el bot6n Timer On/ Off O-emporizador
Encendido/Apagado) para comenzar.
unostres segundos.Cuandoetpanel decontrol
est6bloqueado,aparecer6 Control Locked (Control
Bloqueado)brevementeen cualquiermomento en qua
un bot6n odial seen aresionad
Paracancelar, presioneel bot6n Timer On/Off
ffemporizador Encendido/ Apagado). Cuando el
tiempo concluya, el temporizador emitir6 una serial.
Paraapagar la serial del temporizador, presione
Timer On/Offffemporizador Encendido/ Apagado).
Page 49

GEAppliances.com
A veces, es posible que el plato giratorio se
coliente demasiado coma pura que se puedu
tocar.
Sedebera tener cuidado de no tocor el plato
giratorio durunte y luego de la cocci6n.
Algunos modelos de cocci6n no permiten que el
plato giratorio se apugue.
Presione0 puro mudo, presione1 puro bojo,
presione2 para normal y presione3 para
fuerte.
Presione1para LoMdsLento
2paraLento
3paraNormal
4,paraR@ido
5paraLoMdsR@ido
Automatic Fan
An automaticfanfeatureprotectsthe
microwave from toomuch heatrisingfrom
the cooktop below it.Itautomaticallyturns
on ifitsensestoo much heat.
Vent
Fan
Encendido/ Apagado del Plato
Giratorio
Pora obtener mejores resultudos en sucocci6n,
deje el pluto giratorio encendido.
_J_ Presione el bot6n Settings (Configuraciones)
tresveces.
Seleccione ON (Encendido) u OFF(Apagado)
segOn se indique.
Nivel de Sonido
Use esto funci6n pora configurar el nivel de
volumen del pitido.
H Presione el bot6n Settings (Configuraciones)
cinco veces
Velocidad de la Pantalla
Lavelocidaddedesptazamientodela pantaltase
puedemodificar.
Presioneetbot6nSettings(Configuraciones)seis
veces.
Vent Fan
The vent fan removes steam and other
vapors from surface cooking.
PressVENTFANonce for boost fan speed,
twice for highfan speed,three times for
,
)
medium fan speed,four times for low fan
speedor five time to turn the fan off.
NOTE:The FAN indicator will be lit while
the fan is operating.
Ifyou have turned the fan onyou may
find that you cannot turn it off. Thefan will
automatically turn off when the internal
parts are cool. It may stay onfor 30 minutes
or more after the cooktop and microwave
controls are turned off.
Auto Night Light (Luz Nocturna Autom_tica)
PuedeconfigurarAuto Night Light (LuzNocturna
Autom(Iticu) para que seencienda y apague en los
momentos quedesee.
_j_ Presioneetbot6n Settings (Configuraciones)
cuatro veces.
Presione0 para apagar Auto NightLight (Luz
Nocturna Autom@ica)o presione1 para
configurar Auto Night Light(LuzNoctura
Autom@ica),opresione 2para revisarlas
configuraciones deAuto Night Light(Luz
Nocturna Autom@ica).
N Siconfigurar@Auto Night Light(LuzNocturna
Autom@ica),ingreseuna hora del dia v61ida
Idioma en Pantalla
Use esta funci6n para seteccionar et idioma en
pantalta.
Presione et bot6n Settings (Configuraciones)
slate races.
Presione 1 para Ingl6s y presione 2 para Espa_oL
para que Auto Night Light(LuzNoctura
Autom6tica) seencienda
SeteccioneAIMo PMpara ettiempo de
encendido.
Ingreseuna hora detdiav6tida para que Auto
m
Night Light(LuzNocturna Autom6tica)se
apague.
SeleccioneAIMo PlMparaettiempo de
lil
apagado.
PresioneSettings (Configuraciones)para
N
confirmar lasconfiguraciones ingresadas.
17
Page 50

Cuidado y limpieza dd homo°
Conse]os pr6cticos
Para mantener el interior fresco paseleun patio con una soluci6n de agua y bicarbonato s6dico de
cuando en cuando.
AsegOresedeque estdapagado (eno_ antes de limpiar cualquier parte de estehomo.
C6mo limpiar el interior
Paredes, suelo, ventana interior y piezas de pl6stico de la puerta
Algunas salpicaduras pueden limpiarse con un papel toalla,otras pueden necesitar un patio
h0medo. Ouite lassalpicaduras con un patio enjabonado y adare con un patio h0medo. Nouse
limpiadores abrasivos ni utensilios afilados en lasparedes del homo.
Nunca useun limpiador comercial de homo en ninguna parte del microondas.
Base giratofia extraible y soporte de base giratofia
Para que no serompa, no ponga el plato giratorio en aguajusto despu6s decocinar. Limpielocon
cuidado en agua tibia conjab6n oen el lavavajillas.Elplato giratorio y
el soporte pueden romperse sise caen. Recuerdeno hacer funcionar elhomo en el
modo microondas sin eldispositivo giratorio y el soporte colocadosen su lugar.
Estantes
Limpielocon agua yjab6n suave o en el lavavajillas.
No Iolimpie si tiene un homo autolimpiable.
18
C6mo Limpiar el Exterior
Norecomendamosetusode limpiadoresconamoniacoo alcohol,ya quepuedenda_aretaspectodet
homomicroondas.Sioptapot usarunlimpiadorcasero,primeroapliqueetlimpiadordirectamenteenun
paho limpio,luegolimpieetdreasucia.
La caja
Limpie la parte extema del homo de microondas con un patio humedecido con aguajabonosa.
Enju6guela y luego s6quela. P6sele un patio humedecido limpio a la ventana pard limpiarla.
Elpanel decontrol
P6seleun patiohumedecidopara limpiar.Sequecompletamente.Nouseesprayslimpiadores,grandes
cantidadesdedetergentey agua,abrasivosuobjetosfilosossobreel panel,yaque Iopodrfadaflar.
Algunastoallasde papelpodrfantambi6ndaflar el paneldecontrol.
Paneldepuerta
Antesde limpiarelpanelde puertafrontal,aseg0resedeque sabequ6tipode paneltiene.Consulteel
octavodfgitodeln0merode modelo."S"esaceroinoxidable,"L"esCleanSteely "B","W"o "C"soncolores
pl6sticos.
Aceminoxidabletenalgunos moddos;
ElpaneldeaceroinoxidablepuedelimpiarseconStainlessSteelHagic o unproductosimilar,utilizando
un patio suavey limpio.Apliqueel limpiadordesuperficiesdeaceroinoxidablecuidadosamentepara
evitartocar laspiezasde pldsticoquerodeanal acero.Noutilicecera,pulimento,lejfaniproductosque
contenganclorinaen acabadosenaceroinoxidable.
Panelespl4sticosdecolor
Utiliceunpatiosuave,limpioy ligeramentehumedecidoy,a continuaci6n,sequebientoda lazona.
Lossellosdela puerta
Esimportantemantenerel 6readondela puertasesellaconel homodemicroondaslimpia.Solamenteuse
detergentesnoabrasivossuavesaplicadosconunaesponjalimpiao conunpasosuave.Enjuaguebien.
El fondo
Limpielagrasay elimineelpolvodelfondoa menudo.Useunasoluci6ndeagua c61iday detergente.
Page 51

Cuidado y limpiezadel homo. GEAppliances.com
Panelesplasticos de color
Utilice unpaho suave, limpio y ligeramente humedecido y, a continuaci6n, sequebien toda lazona.
Los sellosde la puerto
Esimportante mantener el 6rea donde la puerta se sella con el homo de microondas limpia. Solamente usedetergentes no
abrasivos suavesaplicados con una esponja limpia ocon un paho suave. Enjuaguebien.
El fondo
Limpie lagrasa y elimine elpolvo del fondo a menudo. Use una soluci6n de agua calida y detergente.
Estantefenalgunos modelos).
L E ZEEZ (
NOTA: Usesolamente
el estante cuando est6
recalentando en m6s de
un nivel. NO guarde eleste
del homo dentro del homo
microondas.
_kADVERTENCIA DE
ARCOS ELECTRICOS:
Sise observan arcos
el6ctricos, presione la tecla
Cancel/Off (Cancelar/
Apagar) y corrUa el
problema.
Para mejores resultados
Estante (enalgunos modelos)
Usesolamente el estante de homo
microondas cuando est6 recalentando en
m6s de un niveLNOguarde el estante del
homo dentro del homo microondas.
C6mo Usar el Estante Cuando Est6Cocinando
pot Microondas:
, AsegSresede queel estante sea posicionado
adecuadamente dentro del horno
microondas para prevenir daho al horno
debido a arcos el6ctricos.
, Nouse un plato para dorar de horno
microondas en el estante. Elestante podr[a
sobrecalentarse.
• Nouse el homo con elestante en elpisodel
homo microondas. Estopordr[a dahar el
homo microondas.
• Usemanoplas de cocina para manipular el
estante - 6ste puede estar caliente.
• Nouse el estante cuando cocine palomitas
de ma[z.
• Nouse el estante con SensorCooking
(Cocci6ncon Sensor)ni Reheat(Recalentar).
Food microwaves bestwhen placedon the
turntable or on the shelf in the lower position.
Use lower shelf supports when cooking one
oblong or oversizeddish.
Usethe upper shelf supports for two-level
cooking.
Estante y Recalentado
Intercamie las posidones despu6sde1/2 tiempo
Para recalentar en 2 niveles o
Intercambie los posiciones despu6s dell2 tiempo
Para recalentar 2 platos en el nivel inferior:
_ll Multipliqueeltiempo de recalentadopar 1 1/2.
N Intercambie las posicionesdespu6s
de 1/2 tiempo
Intercambie los posiciones dos veces
Para recalentar en 3 niveles (en algunos
modelos):
i)(
Resultados desiguales
Resultados desiguales
Dupliqueel tiempo de recalentado.
!
(
Recalentado de 2 niveles
Sin Cargo
H
Intercambie lasposicionesdos vecesy d61e
a losplatos 1/2 vuelta durante el
recalentado. (Coloquecomidas espesas,o
aquellas que requieran mc_stiempo de
cocci6n, en elestante superior primero.)
19
Page 52

Cambio de bombillas.
@
Quite el tomillo.
Luz de encimera/luz nocturna
C6mbiela par una bambilla hal6gena de
220 voltios, 25-50 watt (maxJ. Pida
WB36X10213 de su suministrador GE.
BII Paracambiar la luz de encimera/luz
nocturna, primero desconecte la corriente
del fusible principal odel panel de
diferencial o estiredel enchufe.
Quite eltornillo del lateral de lacubierta del
compartimiento de la bombilla y baje la
cubierta hasta que pare.
La funci6n de extractor.
Filtro de carb6n vegetal
/en algunos modelos)
@
Ventilador extractor
Elventilador extractor tiene dos filtros de metal
reutilizables.
Losmodelos que hacen recircular el aire
de nuevo a la habitaci6n tambi6n usan unfiltro
de carb6n vegetal.
AsegOreseque la bombilla est(_fr[aantes de
retirarla. Rompa elselloadhesivo
desenroscando con cuidado la bombilla.
Enrosquela nueva bombilla,luego levante
la cubierta y vuelva a poner eltornillo.
Conecteel homo a la corriente el6ctrica.
Filtros de extractor reutilizables
(entodos los modelos).
I
20
Filtros de extractor reutilizables
Losfiltros met61icosatrapan la grasa liberada
par la comida en la cocina encimera.Tambi6n
evitan que los llamas
de la cocina encimera puedan dahar en interior
del horno.
C6mo Quitar y Limpiar los Filtros
Para quitarlos, usando las lengOetas,desl[celos
hacia atrc_s.Estirehacia abajo y afuera.
Para limpiar losfiltros del extractor, emp6pelos
y pc_selosde un lado a otro en agua con
detergente. No useamoniaco niproductos que
Iocontengan ya que oscurecerian el metal.
Sepueden cepillar ligeramente para quitar
suciedad pegada. Acl@elos,sacSdalosy d6jelos
secar antes de volverlosa poner.
Paresta raz6n,losfiltros deben estar siempre
en su lugar cuando se est6 usando lacampana.
Losfiltros del extractor deben limpiarse una vez
al meso segOnsea necesario.
Pare volver a colocarlos, deslicelosfiltros
en losmarcos par la parte trasera de cada
apertura. Presionehacia arriba y hacia la parte
frontal para ajustarlos ensu lugar.
Page 53

La funci6n de extractor. GEAppliances.com
Filtros de carb6n vegetal
N ° de Venta JX81H
N ° de Servicio WBO2X10955
El filtro de carb6n vegetal no puede limpiarse.
Debe cambiarse par otro. Pida el recambio
No. WBO2X10955 de su suministrador GE.
Siel modelo no realiza laextracci6n al exterior,
el aire recircularc_a trav6s de un filtro decarb6n
vegetal no reutilizableque ayuda a quitar olores
y humos.
C6mo quitar el filtro de carb6n vegetal
Elfiltro de carb6n vegetal deber[acambiarse
cuando est@visiblemente sucio o descolorido
(normalmente tr@s6o !2 meses,segOnel uso).
Consulte" accesorios opcionales" en la pagina
6 para obtener mas informaci6n.
o
Retire la parrilla superior quitando
los dos tornillos que Josujetan.
Para quitar el filtro de carb6n vegetal, primero
desconecte la corriente del fusible principal o
del panel de diferencial o estire del enchufe.
Retire la parrilla superior quitando los dos
tornillos que Iosujetan.
Puedeset que necesiteabrir laspuertas del
armario para quitar lostornillos.
C6mo instalar el filtro de carb6n vegetal
para instalar un nuevo filtro de carb6n
vegetal, retire elpk_sticoy cualquier otto
envoltorio del nuevo filtro.
Introduzca la parte superior del filtro hacia
arriba y dentro de loshuecos en la parte interior
de la apertura superior.Apriete la parte inferior
del filtro hacia dentro hasta que se coloque tras
las pestaflas.
Levante el filtro de la parte inferior hasta que
se liberede laspestahas. Desliceel filtro hacia
abajo y hacia fuera.
21
Page 54

Antes de llamar al serviciode reparaciones...
Cosas normales de su horno microondas
Humedad en la puerta y paredesdel horno al
cocinar. Frotela humedad con una toallita de
papel o un paho suave.
iiiiiiiiii[_i_
Humedad entre los paneles de las puertas
del horno al cocinar determinados alimentos.
Lahumedad sedisipar6 poco despu6sde
terminar de cocinar.
Elvapor se escapapor la puerta.
Unaluzde reflexi6n alrededor de la puerta o
en la periferia de la caja del homo.
iiiiiiiiii[_i_
Laluzdel homo se debilita y el sonido del
soplador cambia cuando seusan nivelesde
potencia diferentes al alto.
iiiiiiiiii[_i_
Unsonido sordo degolpe cuando el homo
de microondas est6 en operaci6n.
, AIusar horneado por convecci6n,asado por
convecci6n u horneado r6pido combinado
con un precalentamiento, la puerta del homo
debe ser abierta y el tiempo de cocci6n
establecido despu6sdel precalentado o
el homo apagar6 el elemento de cocci6n
despu6s de Zhora.
, Sepuede notar una interferencia de
televisi6ny radio mientras seusa elhomo
de microondas. Similara lainterferencia
casada por otros electrodom6sticos, Iocual
no indica un problema. Conecteel homo
de microondas en un tomacorriente de un
circuito diferente,mueva la televisi6n o el
radio tan lejosdel homo de microondas
como sea posibleo inspeccione la posici6n
de la antena de la televisi6n o elradio.
NOTA: Sila pantalla est6 apagada, controle
que el bot6n de la funci6n Power Saver/
Zero Standby (Ahorrador de Potencia/
Interrupci6n en Cero) est6 activado.
22
Page 55

Antes de llamar al serviciode reparaciones... GEAppliances.com
Resoluci6nde Problemas
iAhorretiempo y dinero! Reviselostobias en losp6ginas
siguientesy tal vez no necesiteIlamar alserviciode
reparaci6n.
Elhomo no se inida
Elpanel de control est6
iluminadoo pero el homo
a_n no se inJcia
Causas Pasibles
Esposible que un fusible de su • Reemplaceel fusibleo reinicie el disyuntor.
hogar se haya quemado o que
el disyuntor se haya desconectado.
Pico de tensi6n
El enchufe no est6 totalmente
insertado en el tomacorriente.
La puerto no est6 cerrada de
forma segura
El bot6n Energy Saver (Ahorro
de Energia) no est6 activado.
La puerto noest6 cerrada
de forma segura.
La tecla Start/Pause (Iniciar/
Pausar) nose presion6 luego de
ingresar la configurad6n de la
cocd6n.
Otra selecci6nya ingresada en
el homo y el bot6n Clear/Off
Borrar/Apagar) no sepresionaron
para cancelar la misma.
Eltiempo de cocci6n no se ingres6, AsegOresede haber ingresado eltiempo de cocci6n luego
luego de presionar Cook Time de presionar Cook Time (Tiempode Cocci6n).
(Cocci6n porTiempo).
CLEAR/OFF(Borrar/Apagar) no
se presionaron para cancelar
la misma.
Ou_ Hacer
• Desenchufe elhomo microondas; luego vuelva a enchufarlo.
, Aseg@esede que el cable de 3 patas del homo est6
completamente insertado en eltomacorriente.
Abra la puerto y cierre la misma de forma segura.
, Empujeel bot6n Power Saver (Ahorrador de Potencia)de odo
que sea presionado.
• Abra la puerta y cierre la misma de forma segura.
, PresioneStart/Pause (Iniciar/Pausad.
• PresioneCancel/Off{Cancelar/Apagad.
• PresioneCancel/Off(Cancelar/Apagar).
Bloqueo del Control
aparece en la pantalla
Elpiso del homo est6
caliente incluso cuando
el homo no rue usado.
Escucha un atipico
pitido en tono bajo
Eltiempo de cocci6nno se
ingres6 luego de presionar Auto
Defrost (Auto Descongelaci6n)
o 1 Ib Quick Defrost
(Descongelaci6nR6pida de I lb.)
Tipo de comida no ingresado
luego de presionar Auto Cook
(Auto Cocci6n).
El control fue bloqueado. , Hantenga presionado Cancel/Off (Cancelar/Apagad por
La luz de la cocina est6 ubicada , Esto es normal.
debajo del piso del homo. Cuando
la luz est6 encendida, el color que
produce puede hacer que el piso
del homo est6 caliente.
Intent6 cambiarel nivel de , Muchasde las funciones del homo fueron previamente
potencia cuando no es permitido, configuradas y no sepueden modificar.
, AsegOresede haber ingresado elpesode la comida luego de
seleccionar Weight Defrost (Descongelaci6npar Peso)o
1 Ib Ouick Defrost (Descongelad6n R6pida de I lb.).
, AsegOresede haber ingresado untipo de comida.
unos tres segundos para desbloquear el control.
23
Page 56

Antes de//umar u/ serviciode repuruciones...
Causas Posibles Qu6 Hacer
El ventiludor de Io_
ventilaci6n se enciende
de forma autom_tica
SENSORERROR
aparece en la panta#a
Elventilador de la ventilaci6n se . Esto es normal.
enciende de forma autom6tica al
sentir demasiado calor
proveniente de la cocina que se
encuentra debajo.
AIusar una funci6n con Sensor,
la puerta fue abierta antes de
que se pudiera detectar el vapor.
No se detect6 vapor en una
cantidad de tiempo md×ima.
* Noabra la puerta hasta que sedetecte el vapory el tiempo
se muestre encuenta regresiva en la pantalla.
. UseCook Time (Cocci6n pot Tiempol para calentar durante
mds tiempo.
24
Page 57

Notas. GEAppliances.com
2S
Page 58

Notas.
26
Page 59

Garantia de su hornomicroondas de GE.
Todo el servicio de gamntia se suministra par media de
nuestrosCentros de Servicio de Fdbrica o un t4cnico autorizado
porCustomer Care@. Para programar un servicio, en-linea,
visitenosen GEAppliances.com o llama a 800.GE.CARES
(800.452.2737). Cuando so-licite servicio par favor tenga
disponible el nOmero de serie y modulo.
Engrape aqui su recibo.
Para qua la garantia cubra
/osservicios se necesita
elcomprobante original de
lafecha de compra.
GE Reemplazar(7 o Brindar(7 Servicio T_cnico:
Si es necesario el servicio t6cnico, GEreemplazar6 cualquier porte del homo microondas que
Desde Io fecha de Io falle debido a un defecto en los materiales o la fabricaci6n. Durante esta garantfa limitada de un
compro Origina/ aria, GEtambi6n proveer6, sin costa, todo eltrabajo y los castes del servicio relacionado con el
reemplazo de la porte que presente defectos.
Viojes del t_cnico del servicio a su hogor poro ensefforle
sabre c6mo usor el producto.
, Instolad6n, entrego o montenimiento inodecuodos.Si
tiene un problemo con Ioinstolod6n, comuniquese con su
vendedor o instalador. Usted esresponsoble de brindor
instolodones odecuodos de conexi6n el_ctrico, escape u
otras instalodones de conexi6n.
, Foliodel producto o doffo sabre elproducto si seproduce un
obuso,usainodecuodo(par ejemplo:arco el_ctricoen una
covidod de Iorejillo ometal/papal de oluminio),o usa diferente
poro el cuolrue diseffodoo usacomerdol.
, Daffos ocosionodos sabre el producto par occidente,
incendio, inundociones o cot6strofes noturoles.
, Doffos consecuentes o incidentoles cousodos par posibles
defectos sabre este producto.
, Doffo cousodo despu_s de Io entrego.
, Producto no occesible pora brindor el servicio requerido.
, Solicite el servicio t_cnico poro reporor o reemplazor los
16mporos, excepto los 16mporos LED.
, Doffos sabre el ocobodo, tales coma 6xido sabre la superfi-
cie, deslustres o manchos pequeffos no informodos dentro
de los 48 hares luego de Io entrego.
, Reemplozode fusibles de Io coso o reinido de disyuntores.
EXCLUSION DE GARANT[AS IMPL[CITAS--Su (1nice y e×clusivo derecho es el cembio del producto, tel y coma
se indicu en estu Gerentie Limitede. Cuelquier gerentie implicitu, incluyendo los gerenties implicites de
comerciebilided o edecuuci6n pure un fin determinedo, est_n limitedes e un erie o el periodo
de tiempo m_s breve permitido par le lay.
Esta garantia se extiende al comprador original y cualquier comprador posterior de productos comprados para
usa residencial dentro de Estados Unidos. Algunos estados no permiten la exclusi6n o los limitaciones de dahos
incidentales o consecuenciales. Esta garantia do detaches legales espedficos, y usted podfia tenet arras derechos
que variardn de estado a estado. Para saber cudles son sus detaches legales,
consulte a la oficina de asuntos del consumidor local o la oficina del Attorney General en su Iocalidad.
Exclusi6n de garantias implicadas: Excepto donde estd prohibido o restringido par la lay, no hay garantias,
expresas, orales o estatutarias qua extiendan mds alld de la descripci6n espedfica, incluyendo espedficamente los
garantfas implicadas de mercantibilidad o propiedad para un prop6sito particular.
Gerente: General Electric Company. Louisville, KY 40225
27
Page 60

Soporte al consumidor.
Pdgina Web de GEAppliances GEAppliances.com
/ Desearealizaruna consulta o necesita ayuda con su electrodom6stico7 ilntente a trav6s del SitioWeb de
Electrodom6sticosde GElas 2/4horas del d[a,cualquier d[adel a_o! Paramayor convenienciay un servicio
m6s r6pido,ahora puededescargar el Manualdel Propietario,ordenar piezas,cat61ogoso incluso un servicio
programado a trav6s de Internet.Tambi6n puede hacer suspreguntas a "AskOurTeam of Experts" (Preg0ntelea
Nuestro Equipode Expertos),y macho m6s.
Programaci6ndelServicioTdcnico GEAppliances.com
Elservicio de reparaci6n de expertos de GEest6 a s61ounpaso de su puerta, jCon6ctesea trav6s de Internet
y programe suservicio a su conveniencia cualquier dia del aBo!O Ilamea1800.GE.CARES(800./432.2737)
durante el horario comercial habitual.
RealLifeDesignStudio
(Estudio de diseho para la vida real) GEAppliances.com
GEapoya el concepto de DiseBoUniversal-productos, servicios y ambientes que pueden usargente de todas las
edades,tamaBos y capacidades. Reconocemosla necesidad de diseBar para una gran gama de habilidades y
dificultades fisicasy mentales. Param6s detallessobre lasaplicaciones de GEDiseBoUniversal,incluyendo ideas de
diseBopara la cocina para personas con discapacidades, mire nuestra p6gina Web boy mismo. Parapersonas con
dificultades auditivas, favor de Ilamar a1800.TDD.GEAC(800.833./4322).
Garantias Extendidas
Adquiera una garantfa extendida de GEy aprenda sobredescuentos especialesque est6n disponibles mientras
sugarantfa aOnest6 vigente. Lapuede adquirir a trav6s de Internet encualquier momento o Ilamando al
800.626.2224durante el horatio comercial habitual. LosServiciospara el Consumidor Hogareho deGEa0n estar6n
all[cuando su garantfa caduque.
GEAppliances.com
Piezasy Accesorios GEApplia nce Pa rts.com
Individuoscalificados para realizar el servicio t6cnico de suspropios electrodom6sticos podr6n solicitar el envio de
piezaso accesoriosdirectamente a sus hogares (seaceptan las tarjetas VISA,iVlasterCardy Discover).Ordene boy a
trav6s de Internet, las 24horas deld[a o en forma telef6nica Ilamando a1800.626.2002,durante el horatio comercial
habitual.
Las instrucciones que figuran en este manual cubren los procedimientos que ser6n realizados por cualquier
usuario. Otros servicios t6cnicos generalmente deberian set derivados a personal calificado del servicio. Se
deber6 tenet cuidado, ya que una reparaci6n indebida podr6 ocasionar que el funcionamiento no sea seguro.
P6ngase en contacto con nosotros GEAppliances.com
Sino est6 satisfecho con el servicio que recibe de GE,p6ngase en contacto con nosotros en nuestra p6gina Web
indicando todos los detalles as[ como su nOmero de tel6fono o escr[banos a:
General Manager, Customer Relations
GEAppliances,Appliance Park
Louisville,KY40225
Registre Su Electrodom_stico GEAppliances.corn
Registre su electrodom6stico nuevo a trav6s de Internet - ia su convenienda! Un registro puntual de su
producto permitir6 una mejor comunicaci6n y un servicio m6s puntual de acuerdo con los t6rminos de su
garantia, en caso de surgir la necesidad, mambi6n puede enviar una carta en la tarjeta de inscripci6n pre-
impresa que se incluye con el material empaquetado.
Printed in Malaysia.
 Loading...