

Page 1
GEAppliances.com
Saj'e_ lnstrudions .2-3
Operating Inslrudions
Auto Features ......... 20
Care and
Cleaning .......... 33, 34
Changing the
Power I ,e\'el .......... 13
Cooking Guide ..... 15, 16
Deti'osting Guide ...... 18
Exhaust Feature .... 36, 37
Features of Your
Microwave Oven .... 11, 12
Microwave Temps ...... 39
Other Features .... 25-31
Replacing Bulbs ....... 35
Sensor Features .... 21-94
Time Features ..... 14-19
Tmubleshnmting
Tips .............. :_8,:¢.)
Things That Are
Nomml _,\ith Your
Microwaxe Oxen ....... 39
Consumer Support
(h)nsumer
Support ...... Back Cover
Optional t¢dts ......... 10
Product
Registration ....... 41, 42
Warranty ............. 43
Espa_d
For a Spanish \'e_ion ot this
manual, visit our Website at
GEAppliances.com.
PaI'a COiiS/ll[_li" tlIla veiNioil
en espafiol de este manual
de instrucciones, visite
nuestro sitio de internet
GEAppliances.com.
,ig_U3660
,f!'M)6/O
k)
Write the model and serial numbers here:
Model #
Serial #
Find these mlmt)ers on a label inside
the ov(?l1,
164D3370P274 49-40344 06-03JR
Page 2
IMPORTANTSAFETYINFORMATION.
READALLINSTRUCTIONSBEFOREUSING.
WARNING!
For your safe_ the information in this manual must be
followed to minimize the risk of fire or explosion, electric
shock, or to prevent property damage, personal injury,
or loss of life.
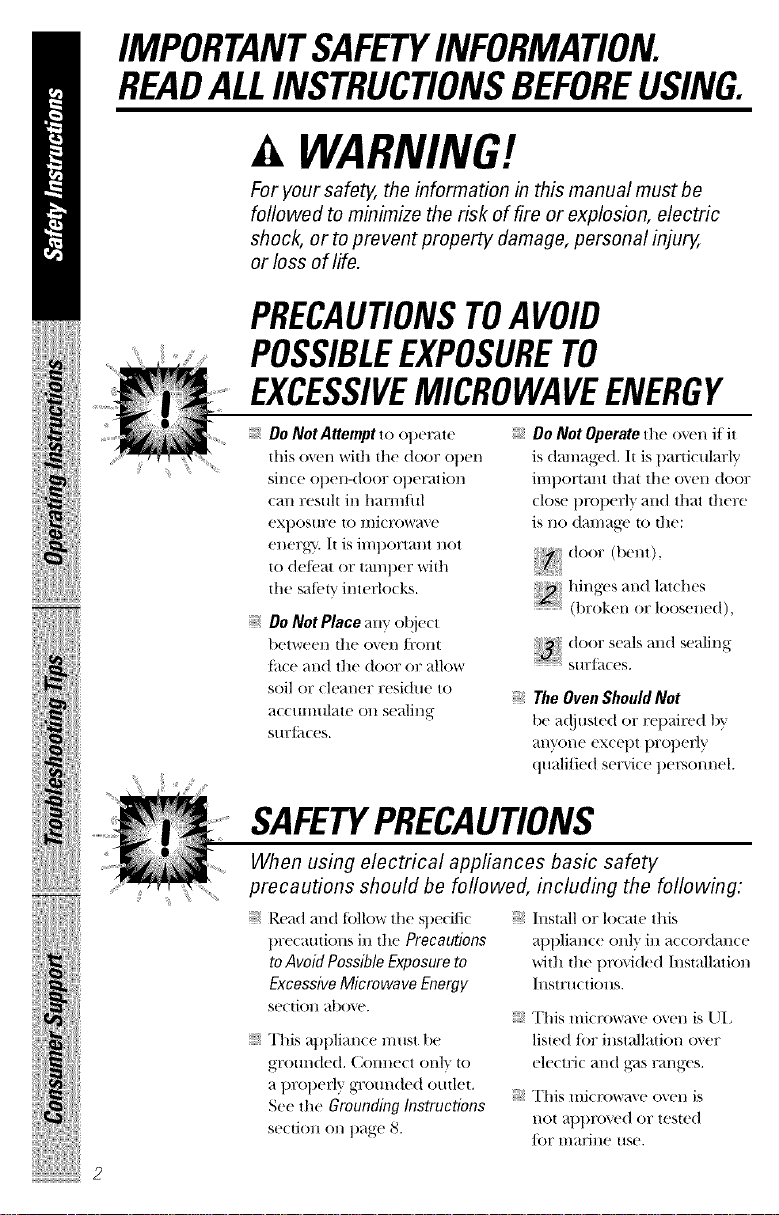
PRECAUTIONSTOAVOID
POSSIBLEEXPOSURETO
EXCESSIVEMICROWAVEENERGY
i!iiiii_i++iiiiiiiiHi+!iHHHili!iiii
+
SAFETYPRECAUTIONS
When using electrical appfiances basic safety
precautions should be followed, including the following:
i+iii!ili+i+!Xiii+!!ili+i,ii!+!+iii+++i
Do Not Attempt to ot)et'_lt(,
this oven with the door open
sin((' op('n-(|oor op('t'_ttJ()l/
(ml r('su]t in harmful
('xl)ostlr(' to IlIiCI'OW_I\ (,
('n('l?g_. It is il//t)ortallt 1101
to delL'at or tmnl)er with
the saI['t'_ interlocks.
Do Not Place any ol)iect
between the oven/i:ont
thce and the door or allow
soil or (le;mer residue to
_l((tmmlatc on sealing
S/ll;[ilCeS.
Re_(t and tallow the spe(ifi( Install or lo(ate this
precautions in the Precautions
to Avoid Possible Exposure to
Excessive Microwave Energy
s('(t Jan _d)o\'('.
This appliance must Lie
groun(h'd. (]Ollll(_Ct onlv [o
a properly grounded outlet.
See the Grounding Instructions
section on page 8.
Do IVotOperate the oven if it
is (lamagc(I. It is particularly
il/l])OFt_tl/t that the O\ell door
close properly and that there
is no (tamag(' to th(_:
........................(broken or loosencd),
S[ I17{_t( (fS.
The Oven Should Not
be a(!iusted or rel)aitx'd t)y
m_yone except properly
qualified service persom_el.
appliance only in accordance
with the t)rovided Installation
I1 ISWtlCiions.
This mictx)wm e oxen is LlI
listed Jar installation o\er
electric and g_s ranges.
This mictx)wm e o',en is
no[ _l])[)l'ov('d ()r tested
][)l" lIl_tl_ille [ISe.
Page 3
vvvvw.GEAppliance_com
Use this appfiance only for its intended purpose as described in this
Owner's Manual
I)o not lnount this applian(e o\er
a sink.
This oxeFthe-nulge oxen _s_tsdesiglled
tar use o_er ranges no wider tllall 36."
It may be installed o_vr both g'as and
ele(tric (ooking equil)inent.
Do not operate this applian(e if it has
a damaged power (ord or plug, if it is
not working properb;, or if it has been
damaged or dropped. If the power
cord is danlaged, it must be repla(ed
bv (',eneral Electric Service or an
authorized service agent using a
power cord m_dlable/i:om (',eneml
Electric.
I)o not co_er or block any openh/gs
(Ill tile appliance.
Use this appliance only tar its
intended use as described in this
nlanual. Do not use corrosive
chen/i(als or vapors ill this applian(e.
This n/i(rowmv ()_'n is specifi(ally
desiglled to heat, (tr_ or cook tood,
and is not intended/or laboratory
or industrkd use.
Do not store this apl)liance outdoors.
1)O I]Ot list. ` this t)rod/Ict Ile_tr w_ttel _
tar example, ill a wet basen/ent, near
a .swinlnling pool, near a sink or in
similar locations.
Kee t) power cord away ti'onl heated
S/lrtilces.
Do not ilnmerse power cord or
phlg in water.
Do not store anything directly on top
of tile l//icrowa_e ()sell stlrJitce whell
tile n/icrowme o_.el/is ill operation.
"Ib red uce tile risk of fire in tile
oven cavity:
--I)o not overcook tood. Carefllllv
attend appliance when paper, plastic
or other COl//btlstible l//aterials are
placed inside tile o_en while cooking.
--Remove wire twist-ties and metal
handles ti'on/paper or plastic
containers betore t)lacing thenl in
tile oven.
--Do not use tile o_vn tor storag+e
purl)oses. Do not leave paper
pro(huts, cooking utensils or/ood
i]l tilt`' ovell \'dlell llOt i]l use.
--If nlaterials in.qde tile ()_vn ignite,
keep tile oven door closed, turn tile
oven off and disconnect tile power
cord, or shut off t)ower at tile fl_se or
circuit breaker panel. If tile door is
opened, the fire nla} spread.
--Do I/at use tile SellS(M? IZeatures
twice in suc(ession (Ill tile same load
portion. If/ood is undercooked atier
tile first t`om/tdown, use Time Cook
tot additional t`ooking tin/e.
See door sur/itt, e (leaning illstrut, tiolls
in the Care and cleaning of the
microwave oven set` lion el this n/a]lual.
This a])pliance must only be serviced
_g qualified selMce personnel.
(',omact nearest authorized service
thcilitv/or examination, repair or
a(!jusHnent.
As with ally appliance, close
S/lller_isioll is lie( eSS_tFVwhell
used by (hildren.
ilii!iiiiii!/ii!iiiil i
3
Page 4
IMPORTANTSAFETYINFORMATION.
READALLINSTRUCTIONSBEFOREUSING.
WARNING!
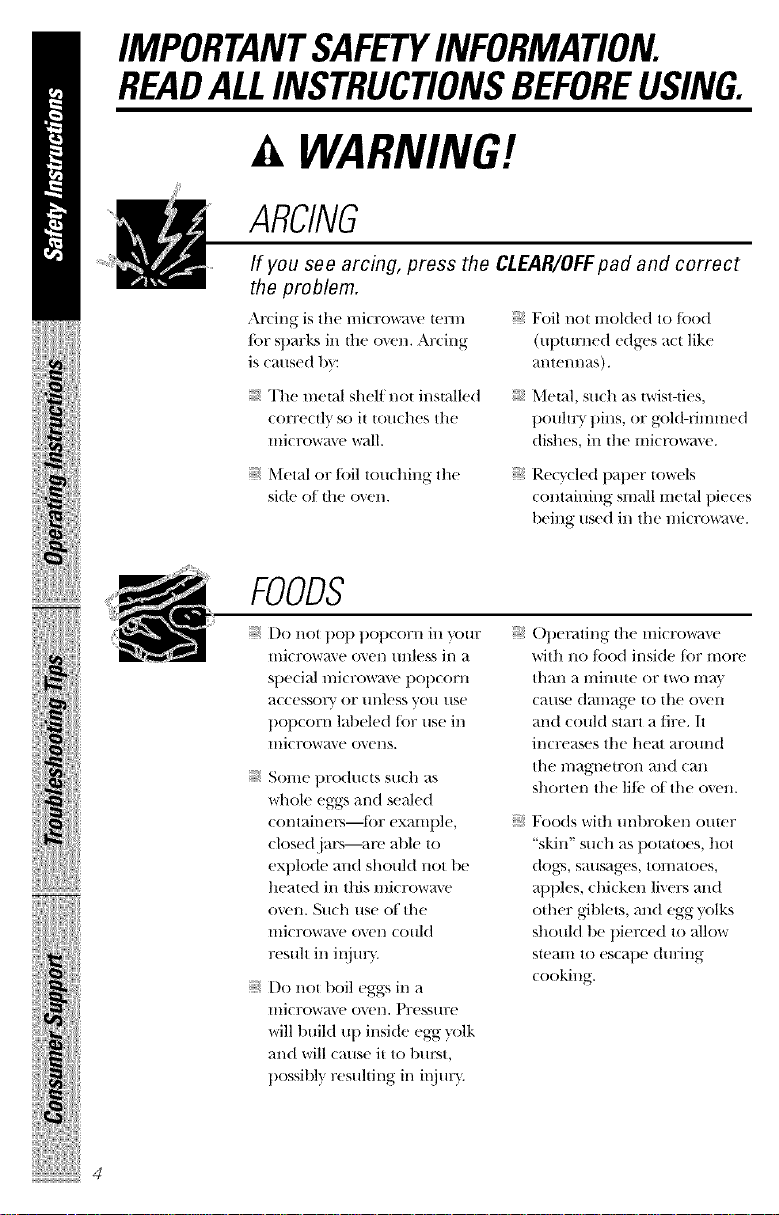
ARCING
If you see arcing, press the CLEAR/OFFpad and correct
the problem.
Arcing is the ]l/i( ]7ow_lve [el_i/] ;_ Foil not molded to/ood
/or sparks in the o_,wn+Arcing (upturned edges act Hike
is caused by: antem/as).
The metal shelf not installed ;_ Metal, such as twist-ties,
(orrectlv so it touches tl/e poultr} pins, or gold-rimmed
microwave wM1. dishes, in tile microwm e.
FOODS
i!iiiiii++iiiiiiii/i+!iHHiiii!iiii
+
iiiii!ili+i+!Xiiii!!i/i+i,ii!+!+iiiiiii
Metal or/oil touching the
side of the o_en.
Do not poll popcorn ill YOre:
lIliCl?OW_l_eO_el/ tulh'ss ill a
special mi(rowave pol/(orn
a(cessorv or tmless you use
t/Ol/(orn labeled {br use in
lIliCl'OW_l_ e O_ ellS.
Sol/le t)Fo(hIcIS S/lOll _lS
whole eggs and sealed
containers t_)r examl/le,
closed,jars--_m • able to
explode and should not be
he_ted ill this microwave
oven. Su(h use of tile
llliCl?OW_l_+_' 0_+_'1/ (otlld
resuh in in jm+y.
I)o not boil eggs in _
llliCl?Ol%we ovel/. Pl?eSS/ll?e
will build up inside egg }x)lk
and will cause it to bm'st,
possibly resulting in in jmT'.
;+ Recycled tlaper towels
containing small metal pieces
being used in the microwave.
()pemting tile mierow_v
with no/ood inside tot more
thaH _ If/illtlte OF t/vo 111_1_,
C_l/Ise d_ll//age to the ovell
and could start _ fire. It
increases the heat al?O/ll/d
tl/e magnetron and (an
shorten tile li/_' of tile o\en.
Foods with tll/l)]?okel/O/lter
"skill" such as potatoes, hot
dogs, sausages, tomatoes,
apples, chicken livers and
other giblets, and egg yolks
should be t/ierced to allow
steaiil to escape dtlrillg
cooking.
Page 5
vvvvw.GEAppliance_com
SUPERHEATEDWATER
Liquids,such as water,
coffee,or tea, are able to be
overheatedbeyondthe boiling
point without appearingto be
boiling.Visiblebubblingor
boiling when the containeris
removedfrom themicrowave
ovenis notalways present
THISCOULDRESULTIN VERY
HOTLIQUIDSSUDDENLY
BOILINGOVERWHENTHE
CONTAINERIS DISTURBEDOR
ASPOONOROTHERUTENSIL
ISINSERTEDINTOTHELIQUID.
To reduce the risk ofiq)ury
to persons:
--Do not o\erheat the lktuid.
--Stir tile liquid both betbre
and hal(ivay thro/lgh
healing it.
--Do not use straight-sided
containers with narrow
necks.
--,Mier headng, allow tl_e
container to s[alld ill tile
I//ic1x)W_I_,_' (._,_'l/ tor a short
tinle t)et_)re removing the
containeE
--Use extreiile care when
inserung a spoon or other
tltensil illtO |he container.
A\ oid healing bah} tk)od in
gla.,-,,,jars, e\ en with tile lid
o/E Make sure all intimt/k)od
is thoroughly cooked. Siir
/k)od to distribute the heat
('_'l/]}. Be care/ul to Ill, wen|
scalding when warming
/_)rnmla or breast milk. The
conlainer lllitv/['el cooler
than tl_e milk really is. Alwm_'_
test the lnilk be/[)re teeding
tile bal)_,.
;+ Don't de/i'ost/:cozen
be\ ('t_gt'S ill n_ll;1X)w-
ne(ked bottles (espe(ially
( arbonated be_'rages).
l_iv('n if tile container is
opened, lm'ssm:e call build
up. This can cause the
comainer to burst, possibly
resuhing ill il/.jm>
:_ Itot/k)ods and steam can
cause bin:us. Be caretifl when
opening any containers oI
hot/k)od, ilwludillg pop(orn
bags, cooking pouches and
boxes. "Ib prevent possible
iqjm T, dire_ t steam away
/i'om hands and til(e.
1)O llOt O_,tTC()()k potatoes.
The_ couM dehydrate and
catch/ire, causing dan/age
to VO/lr ()_,t'11.
Cook meat and potdtr}
thoroughl}mmeat to
at least an IN I'ERNAI_
temperature of 160°F
and t)o/lltFv to at least an
INTERNAI ten/perat t n:e
of 180°F. Cooking to
these mmperamres
usually protects ag_dnst
/k)od-borne illness.
i_ii;;iiiiii{ii!iiiii!;++fii;ii
iiiiili iiiiiii!
iii+il iiilli
!iiiiiiiii+i_iii'+iiii!ii
5
Page 6
IMPORTANTSAFETYINFORMATION.
READALLINSTRUCTIONSBEFOREUSING.
WARNING!
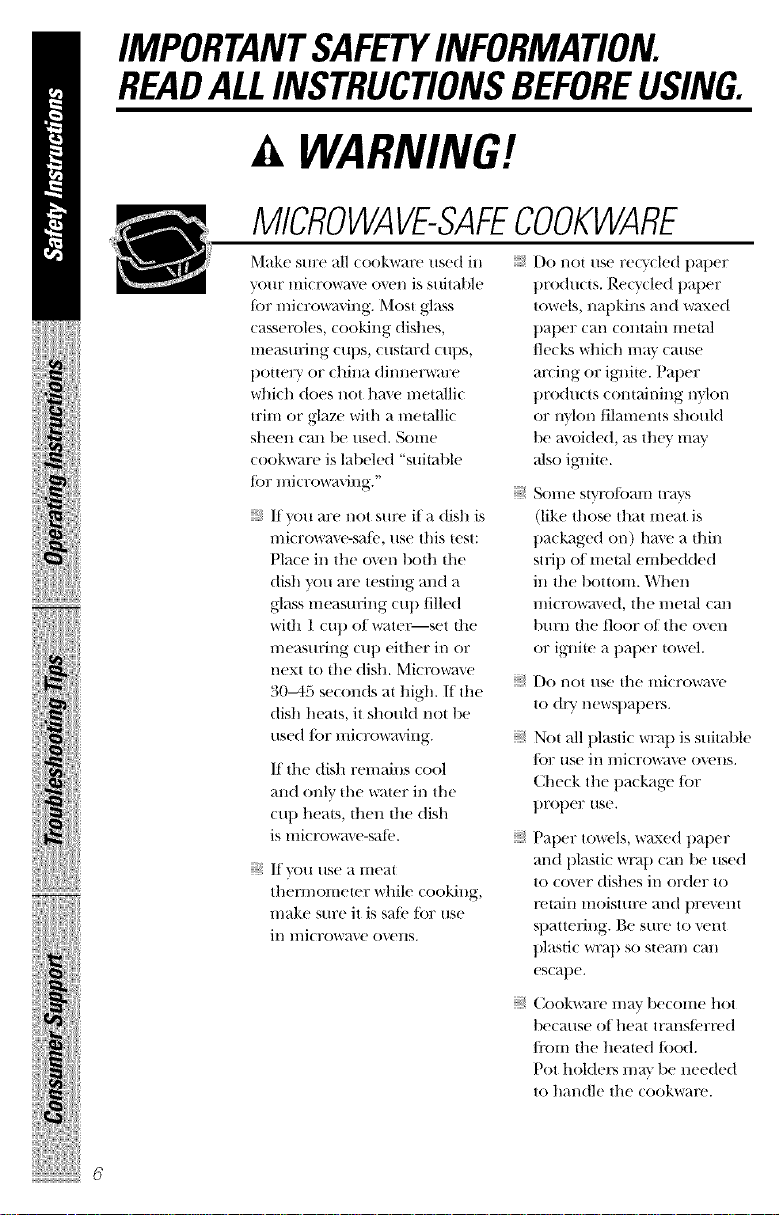
MICROWAVE-SAFECOOKWARE
iiii!i}i_)i{ii!]i/i_]ii!_!_iiiiiii
Make sm:e all cook\v_.l'e [tse(t ill
VOIIF IlliCI'OW;-I_,_' 0_,_'I/ iS s/titable
tbr microwaving. Most glass
casseroles, cooking dishes,
llle;-IS/l]il/g ClipS, C/IS|_t_l'(t Ctlt)S ,
t)otteF_ ` OF chilla (lil/llerwa]?e
whi(h does not ha\ e metallic
trim or glaze with a metallic
sheell call be/lsed. S()lIle
(ookware is labeled "suitable
tot microwaving."
_¢ If you are not sure if a dish is
l/liCl?OW_l\ e-sa](*, use this lest:
Place in the oven both the
dish you are testing and a
glass measmffng (u t) filled
with 1 cup of watetmset the
measuring cup either in or
next to the dish. Micmwa\ e
30M5 seconds at high. If the
dish heats, it shouM not be
used lot microw;Mng.
If the dish remains cool
and only the water in the
cup heats, theH the dish
is microwave-sat_'.
If\xm use a meat
thermometer while cooking,
make sure it is sate tot use
ill l//i(FOWa\ e o\'eHs.
Do not use reQ'cled t)aper
twoducts. Recycled paper
towels, napkins and waxed
t)al)er can contain metal
flecks which may cause
arcing or iglfim. Pal)er
t)Fod/IcIS (Olltail/illg I/}loI/
or n\'lon/ilaments should
be a\ oided, as they lnav
also ig_fite.
Sol//e stvl'o/oaIll [)?_IVS
(like those that meat is
pa(kaged on) hmv a thin
StlJp of metal embedded
iH the t)ottom. When
l//i(l'OVva_,e(t, the ll/etal call
bum the floor of the o\eH
or igmite a paper towel.
1)0 I/Or /lse the II/i(Fov¢ove
to (tF_' newNmt)ers.
Not all plastic wra l) is suitable
/or use in microwave ovens.
Check the package/or
t)Foper Hse.
Paper towels, waxed paper
and plastic wrap can be used
to coww dishes in order to
retaiH moisture and l)re_'Ht
sl)attering. Be stir(' to vent
plastic wrap so steam Call
escape.
Cookwal?e ll/av becollle hot
because of heat translbrtx,d
/i'om the heated/ood.
Pot holders ma\ be needed
to handle the (o()k'w[-II_'.
Page 7
vvww.GEAppliance_com
"Boilalfle" cooking pouches
and tightly closed plastic
bag':, should be slit, piet',.ed
or vented as directed 1)_
package. If th( 3 are not,
plastic could burst dining or
immediately atier cooking,
possibly resulting in il_im T.
,\lso, plastic storage
containers should tie at least
partially tlnco_'l;ed t)ecatlse
tht\v/kmn a tight seal. When
cooking with containers
tightly covered widl plastic
WF}It) , Yen/ove covelJng
carefllllv and direct steam
}l\*,r?lv]i'Olll hallds all(| ]i_€e.
Use/_)il onh as directed in
this nlalm_d. TV dimmers may
be microwmvd in t_)il trm_'_
less allan 3/4" high; remo_v
tile top/t)il cover and return
tile trm to the box. When
using/_)il in tile microwave
oxen, kee t) the toil at least
1" away/t'om the sides of
tile o\ ell.
Plastic cook\*,rare Plastic
cookv4at'e (lesiglle(t tot
microwa\ e cooking is veW
use/ul, but should be used
caretidlv E_cn microwave-
sale' plastic ma} not be as
tolerant of o\ ercooking
(onditions as ;+It'+.'glass or
(eramic materials and may
solien or (hm: if su[!jected
to short pe+Jods of
overcooking. In longer
exposures to o_vrcooking,
the R)od and cookware
could igllim.
Follow these guidelines.
[.+Ise I//i ( 1X ),*_rave-sa f "e
.....................plasti(s only and
use them in su:ict
coml)liance widl
the cookware
l//allllt_lct/IFel)S
recol//l//endations.
Do not mi(ro,,axe
.....................el/It )I y ( O1 ltaillers.
oo,l(,tt,el .it,hil,tt'ell
.....................to /Ise plasti( ( ook'_*,ralTe
witho/lI ( Ol//t)lete
Sill )eF\+ision,
7
ilii!iiiiii!!+'+i+'ii!iiiil i+
Page 8
IMPORTANTSAFETYINFORMATION.
READALLINSTRUCTIONSBEFOREUSING.
WARNING!
Improper use of the grounding plug can result in a risk of
electric shock.
GROUNDINGINSTRUCTIONS
This appliance must be gromaded. In the e_'nt of an elecUJc:d
short circuit, Wotmding reduces the risk of electric shock b_
providing an escape wire tk)r the electric cm:rent.
This appliance is equil)ped with a power cord having a g_xmnding
wire with a ga'otm(ting 1)lug. The 1)lug must tie plugged into an
oudet that is properl} installed and Wom_ded.
Consuh a quali[ied electrician or ser_Jce technician if the gT(mnding
instructions are not completely tmderstood, or if doubt exists as to
whether the al)l)liance is tm)t)erly gT(mnded.
If the outlet is a standard 2-truing wall outlet, it is your personal
responsibility and ot)ligation to ha_e it replaced with a t)rot)erly
grom:ded 3-prong wall outlet.
Do not trader any circmnstances cut or remo_e the third (Womld)
prong ti'om the power cord.
Do not use an adapter t>lug with this appliance.
Do not use an extension cord with this al)pliance+ If the 1)ower
cord is too short, hm e a qualified electrician or service technician
install an outlet near the appliance.
For best ot)emtion, t)lug this appliance into its own electrical
outlet to 1)t'event flickering of lights, blowing of fltse or trit)t)ing
of circuit breaker.
+iii!ili+i+!Xiii+!!i/i+:,ii!+!+iii+++i/
Page 9
www.GEAppliances.com
THEVENTFAN
Tile tiUl will operaw auton/atie_dly raider certain collditions
(see _\lltOl//atic Fan ]_'attlt_'). "Ihke care to pt_'\'e]lt tile starting and
spreading of accidental (ooking (ires \_]lile tile Vellt ]:,In is ill IIse.
;¢ Clean tile underside oI tile microwave often. Do not allow grease
to build up on tile ://icFowa\ e or the [illl fillets.
;_ Ill the e'_/'llt of a g):ease fire on tile suri_,tce units _'l(m the
llliCt'()_'vr_|ve O_/'ll, ,',l/It)tiler a ilal//illg pan on the stlrlilee/lnit b\
(ovel_llg- the pall completely with }t lid, a €ookie sheet or a fiat tlF_|v.
:_ Use care whell €leaning tile veilt ]itn [ilters. Corrosive €leaning
agents, such as 1}v-based oven cleaner.,,, ma} damage tile tihers.
:_ When preparing flau/ing tbods under tile miero_,\ e, turn tile
tiln o11.
;_ Nmvr letup' sur/it(e units beneath yore: lnicrowa_v oxen
unattended at higll heat setth/gs. Boilovers cause smoking and
greasy spillo\ ers that :ha} ig)fite and spread if tile ini( ro,,*,_l\e
vent/m/is operating. "Ib minimize automatic thn opet_,tion,
use adequate-sized cookware and use high heat on sur/itce m/its
only \vhen necessary.
READANDFOLLOWTHISSAFETY
INFORMATIONCAREFULLY.
SAVETHESEINSTRUCTIONS
!iii!_i:iiii:i
9
Page 10
Aboutoptionalkits.
iiiiiiii¢_iiiiiililiiiiiiliiiiii_i_i_i_i_i_i'
_iiili_!iiil
_iiiiljiiiiWiiiiiiiiiiii!iiiiiiii
OPTIONALKITS
Filter Kits
JX81B - Recirculating Charcoal Filter Kit
Filt('r kits _]7('/ls('d W]l('n t]l(' H/i(F()W_\ (' O\'('ll (_tllllOt |)(' v('nt('d
to the otltsid('.
Av_dlable at extra cost from _'our (',I_ sul)plie_:
70
Page 11
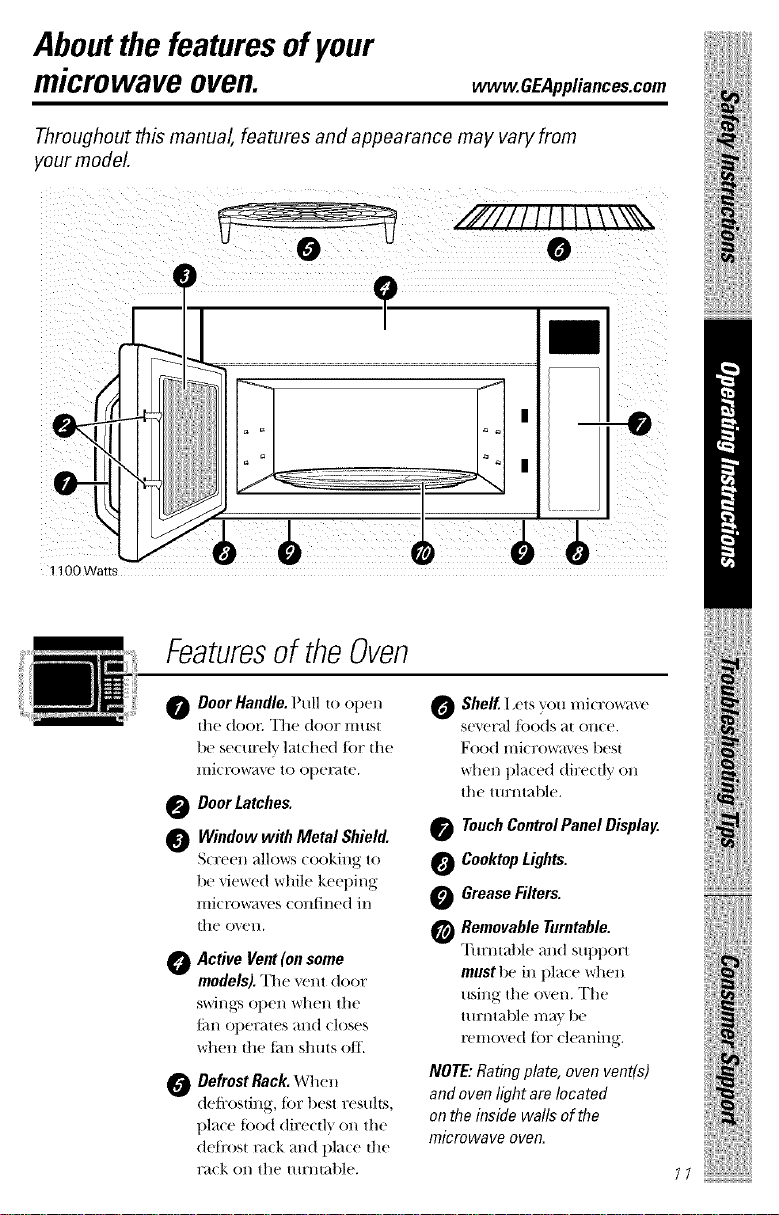
Aboutthefeaturesofyour
microwaveoven.
Throughout this manual, features and appearance may vary from
your model
vvww.GEAppliances.com
/////I I I I I I \ \ \\%\
0 O
?
' -0
I
1100 Watts
Featuresof the Oven
O Door Handle. Pull to open
the door. "I'll(' door must
bc securclv latched Jar the
0 Door Latches.
Window with Metal Shield.
Screen ;d]/)ws cooking to
be viewed while keeping
llliCI'owdvt's COlltin('d ill
t]l(' o_ ('ll,
O Active Vent (on some
models). The "_ent door
sv_ril/grN open v_rhen the
t_ll/ Opel;at(s _tll(t (loses
_r]_ the thn shuts off.
Defrost Rack Whell
0
deflx)sting, tor best results,
place toed (lirectl'_ on the
deIi'ost m(k mid plale the
r_t(k on the tllrlltallle.
O Shelf. I ,ets you microls_ve
S('V(T_I| ]Dods at alice.
Food microwaves best
when placed directly on
tile turntable.
TouchControl Panel Display.
O Cooktop Lights.
O Grease Filters.
0 Removable Turntable.
Turntable mM support
must be ill place when
using tile o\en. The
ttll:nt:aLfle llla_ be
removed {or cleaning.
NOTE: Rating plate, oven vent(s)
and oven light are located
on the inside walls of the
microwave oven.
ilii!iiiiii!/ii!iiiil_i_
11
Page 12
iiii!iiiiii:i i i
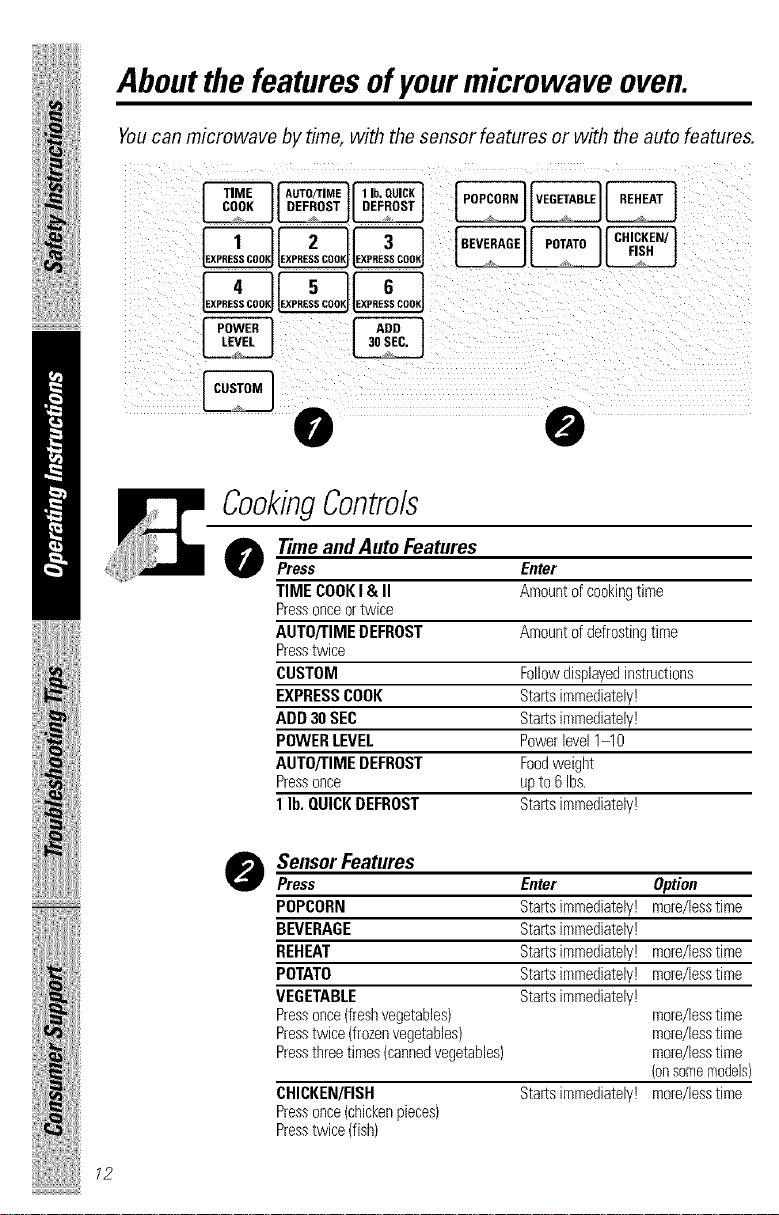
Aboutthe features of yourmicrowave oven.
Youcan microwave bytime, with the sensor features or with theauto features.
0 0
CookingControls
O TimeandAuto Features
Press Enter
TIME COOKI & II Amountof cookingtime
Pressonceor twice
AUTO/TIME DEFROST Amountof defrostingtime
Presstwice
CUSTOM Followdisplayedinstructions
EXPRESSCOOK Starts immediately!
ADD 30 SEC Starts immediately!
POWER LEVEL Powerlevel 1-10
AUTO/TIME DEFROST Foodweight
Pressonce upto 6 Ibs.
1 lb. QUICKDEFROST Starts immediately!
!iiiiii it
;;;;;;;;;;;;;;;;;;;;;;;;;;;;;;;;;;;;;;;_
12
O SensorFeatures
Press Enter Option
POPCORN Starts immediately! more/lesstime
BEVERAGE Starts immediately!
REHEAT Starts immediately! more/lesstime
POTATO Startsimmediately! more/Jesstime
VEGETABLE Startsimmediately!
Pressonce(freshvegetables) more/lesstime
Presstwice (frozenvegetables) more/lesstime
Pressthreetimes (cannedvegetables) more/lesstime
CHICKEN/FISH Starts immediately! more/lesstime
Pressonce(chickenpieces)
Presstwice (fish)
(onsomemodels)
Page 13
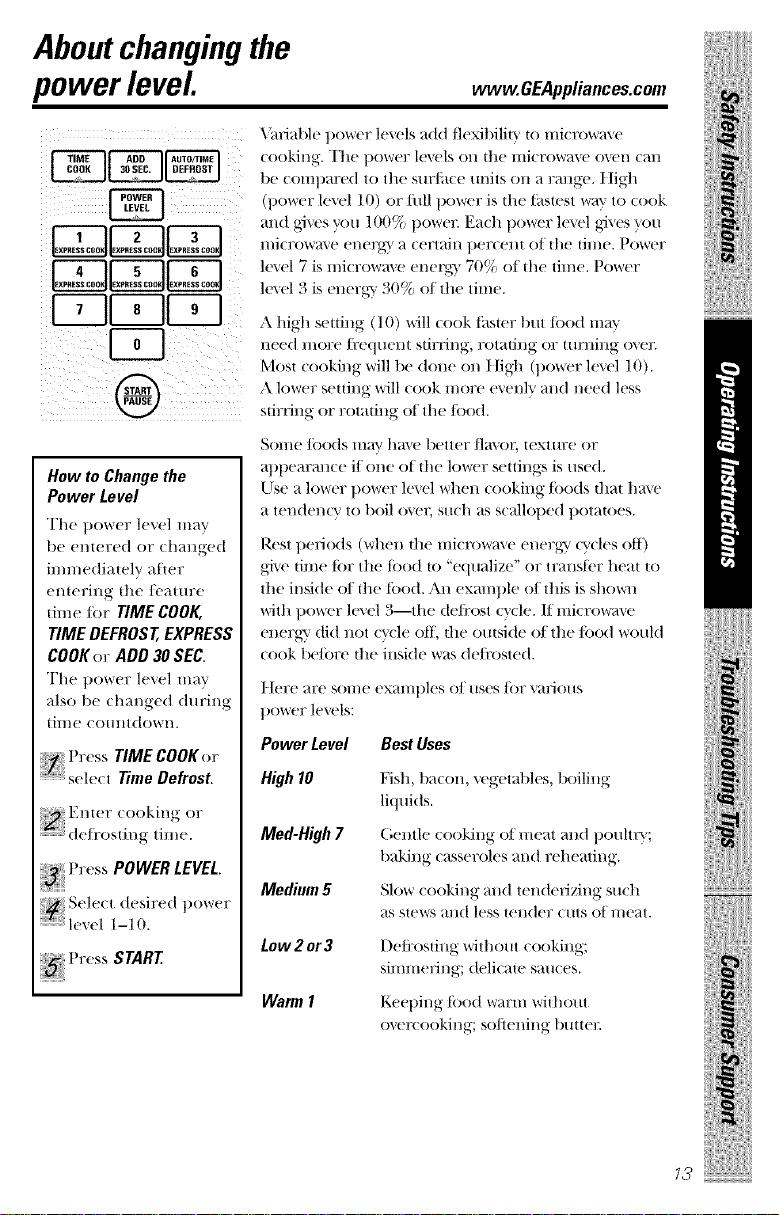
Aboutchanging the
power level. vvww.GEAppliances.com
_uiable power levels add flexibility to micmwa\ e
looking. "Itle t)owel? le_,els Oll the Illi( FOW_lx, e ox, en (_lll
be ( ompared to the surf_t(e units on a range. I ligh
(power level 10) or lull l/ower is till' t_tstest v+_p_'to look
and ,gives you 100_/c power. Ea(h l/ower level gives you
1o.+,2ooollo.,.aco°J
4 5
I..........JI.........
I, II Ir-
@
How to Change the
Power Level
The power level may
be emered or changed
immediately after
entering tile/('ature
time tbr TIME COOK,
TIME DEFROST, EXPRESS
COOK or ADD 30 SEC.
The Rowe]? level _II_]_r
also be (hanged during
time (Olllltdown.
I; l _e,s TIME COOKor
sele/t Time Defrost.
P ( ss POWER LEVEL
ii +++_+iii_
ll/i(Fow}l_,e ('nel\g} _i(ertain t)er(ent ot die time. POWeF
le\ el 7 is mi(rowmv energ-} 70% ot the time. POWeF
le\ el 3 is energy 30% of tile time.
A high setting (10) will cook tipster t)/lt R)od ill:a'_
need more fl?equem stirring, 17otatillg or turning o\eJ:
Most cooking will be done on I/igh (power level 10).
A lower setting will cook more e_enly and need less
stirdng or rotating of tile/i)()(/.
Sollle ]i)ods iil_lV have better ]lavol, lextllre or
appearance if one of the lower settings is used.
Use a lower power level when cooking/i)o(ts dlat have
a tendency to boil or(q; su(h as scalloped potmoes.
Rest t)elJo(ts (whell tile llliclx)wa\ e energ_ (?'cles oIt)
gi_e time ti)r tile ti)o(t to "equalize" or translbr heat to
tile inside of tile too(t. All exmnple of this is shown
with power h'\ el 3--the de/i'ost cycle. If mi(rowave
energy' did not cv(le ott, die outside of tile/ood wouM
cook be/ore tile inside was (/e/i'osted.
I {el?e }tl?e SOl/le ex}tllltlles of/Ises tk)l" "_}tliO[iS
poweF levels:
Power Level Best Uses
High10
Med-High7
Medium5
Low2or3
WarmI
Fish, tlacon, vegetat)les, boiling
liquids.
(',entle cooking of meat and t)oultlT;
baking casseroles and reheating.
Slow cooking and tenderizing such
as stev<'_alld less tender ellis of meat.
I)efl:osting without cooking;
silmnefing; delicate sauces.
Keeping tbod warm without
o_vr(ooking; softening buuer.
!iiiilIii!i!l+
ilii!ii:iii?+ i+:ii!iiiil i
7?
Page 14
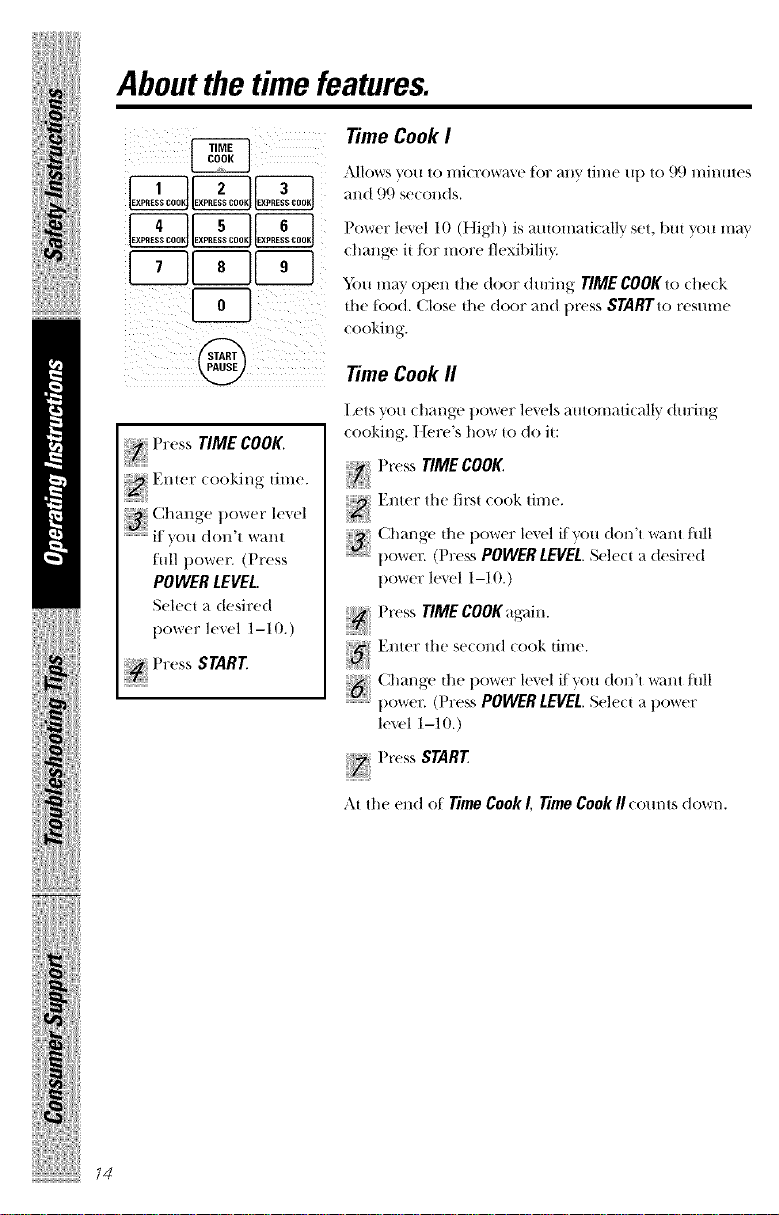
iii iHiil!iiii!ili
Aboutthetimefeatures.
P (ss TIMECOOK.
Time Cook I
,\Hows "_otl to l]/i( ]7()_r;'l_,(_ t(}F ;'111_' ti]]/(_ I| t) tO ()(.) minutes
and 99 se((mds.
]?()_r(_]:lme110 (t ]igh) is automau{ ally set, but you may
(h}lllg{! it for IlIOF{! tlexibilh}
"_bu may open the door (tu]Jng TIME COOK to check
the tood. Clos(' the door and t)ress STARTto resume
( ooking.
Time Cook II
Iets you cl]ang{ • power l{'\ els automatically during
( ooking. I/{'re's how t() do it:
Press TIME COOK.
full t}owe_ (Press
POWER LEVEL.
S(,h,(-t a desired
pOW{'I"l{'v{'l 1-10.)
Press STARE
iiii!i}i_)X{i{i!!i/i_i,ii!_!_iiiiiii/
.....................power, (Press POWERLEVEL Sekxt a desired
power level 1-10.)
Press TIME COOK a_,_,,in.
<,
Enter the se((md (ook time.
.....................t)ower. (Press POWER LEVEL. Sele(t a t)OW(!F
l{'\'{'l 1-10.)
STARE
At the end of Time Cook I, Time Cook II (omits dowl/,
Page 15
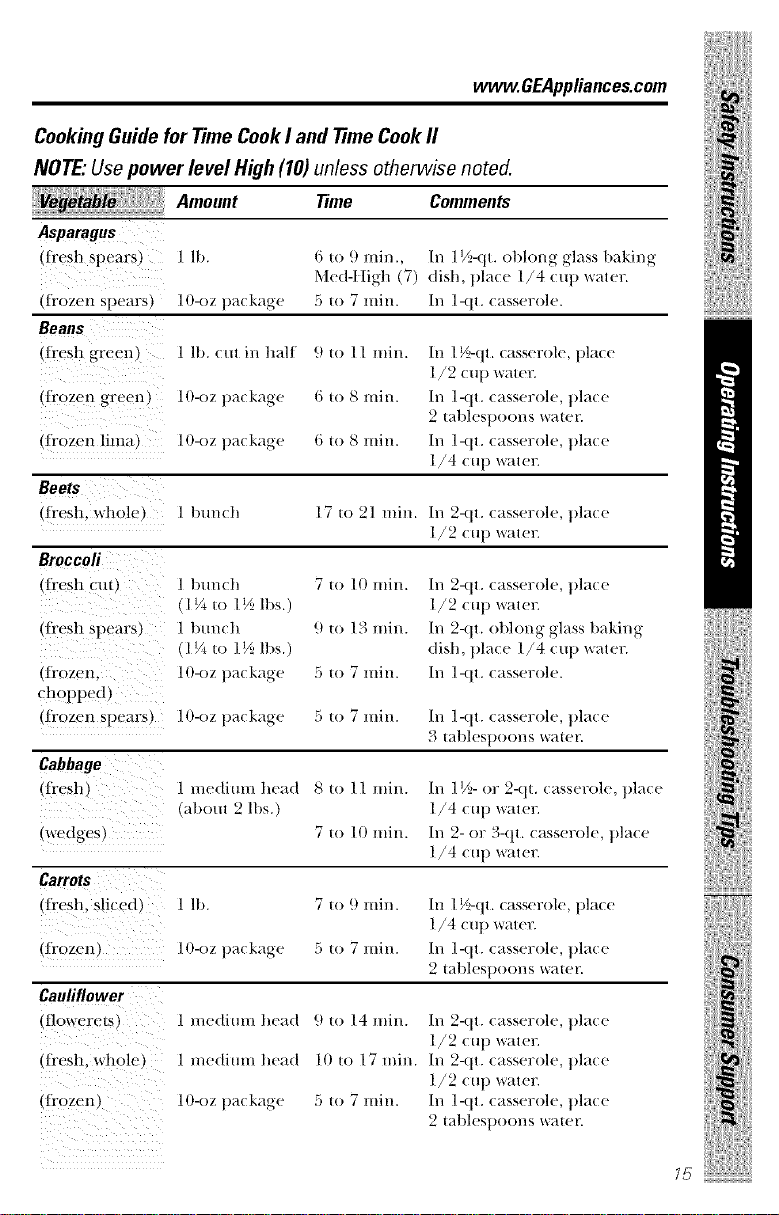
vvww.GEAppliances.com
CookingGuidefor Time Cook I and time Cook II
NOTE,"Use power level High (10) unless otherwise noted.
amo,,,t T me Comme,ts
Asparagus
(!i+¢S!1spears)
(frozen spears)
Beans
(ficesh green)
(frozm_ green)
(fl+ozen lima)
Beets
(fl+esh, Mlole)
Broccafi
(fl'esh cut)
(ficesh spem's)
(fl+ozen,
chopped)
(lk+ozen spears)
Cabbage
(fl+esh)
(wedges)
Carrots
(fl+esh, s!ic_ d) 1 lb.
(fl+ozen) 10-oz t)a( kage
Caufiflower
(I!owerets)
(fl+esh, w!lole )
(fl+0ze n)
l lb. 6 to 9 rain., In ll/z-(lt, oblong glass baking
Med-lligh (7) dish, t)la(e 1/4 (up water.
lO-oz pa(kage 5 t() 7 rain. In 1-qt. (asserole.
1 lb. cutinhalI 9t77 11 rain.
In 1½-qt. casserole, place
1/2 cup water.
lO-oz t)ackage 6 1778 rain.
In 1-qt. casserole, place
2 tablest)o(ms water.
lO-oz pa(kage 6 t778 rain.
In 1-qt. casserole, place
1/4 cup wate+:
1 btmch 17 to 21 rain. In 2-(it+ 7asserole, t)la(e
1/2 (u t) water.
1 t)tmch 7 to 10 rain.
(1V+ to 1½ lbs.)
1 tmmh 9 to 124rain.
(1V+ to 1½ lbs.)
lO-oz pa(kage 5 t(7 7 rain.
lO-oz package 5 t77 7 rain. In 1-qt. casserole, place
1 medimnhead 8to 11 rain.
(al)out 2 lbs.)
7 to 10 rain.
7 to 9 rain.
5 to 7 min.
1 medium head 9 to 14 rain.
1 medimnhead lOto 17rain.
lO-oz pa( kage 5 to 7 rain.
In 2-qt. casserole, place
1/2 cup water.
In 2-qt. ot)l(mg glass baking
dish, place 1/4 cup water.
In 1-qt. casserole.
.'4tablest)oTms water.
In 1K,- or 2-qt. casserole, place
1/4 cut) water.
In 2- or 3-qt. casserole, place
1/4 cup ware+:
In 1½-qt. casserole, place
1/4 cup ware+:
In 1-qt. casserole, place
2 tablespoons water.
In 2-qt. casserole, place
1/2 cup water.
In 2-qt. casserole, place
1/2 cup water.
In 1-qt. casserole, place
2 tablest)oons water.
!iiiilIii+
iiiiili iiiiiii+
iii++il iiilli
!iiiii}}ii+}_iii++iiii+ii
75
Page 16
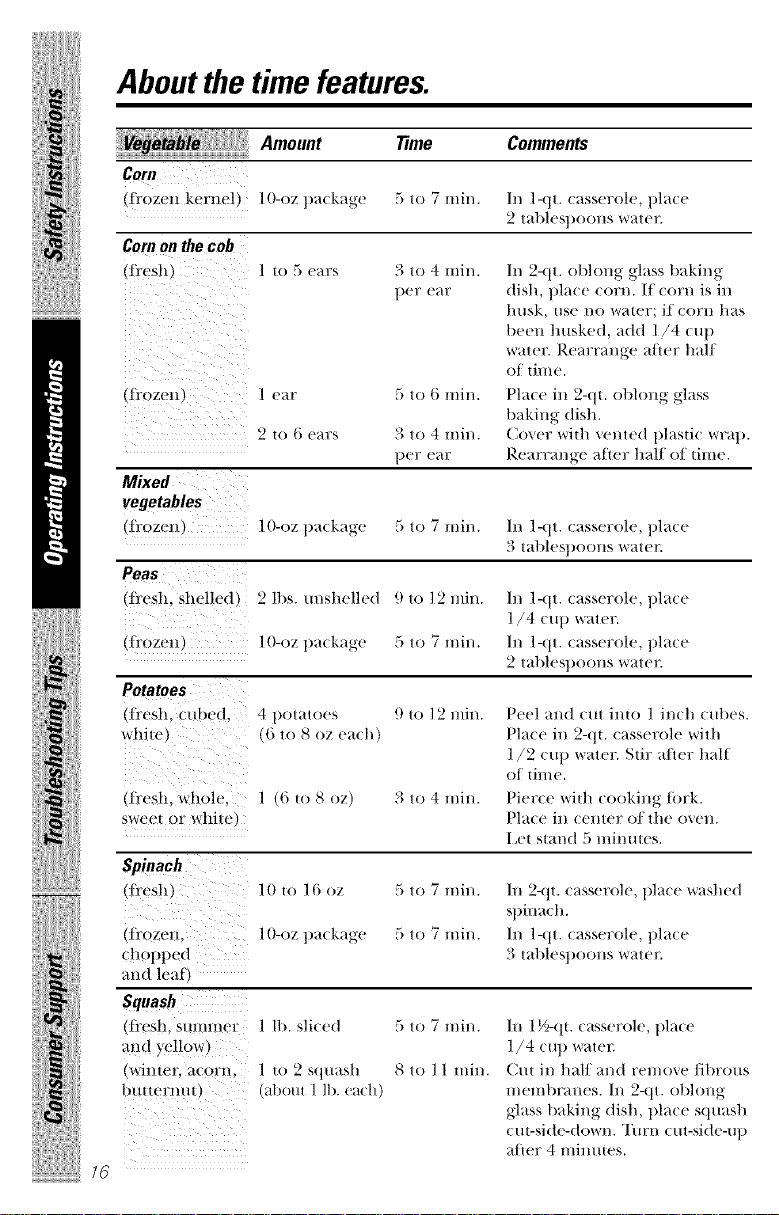
iii iHiil!iiii!ili
Aboutthetimefeatures.
Corn
tf_'ozen kernel l O-oz ])a(kage 5 to 7 rain. In 1-qt. casserole, t)la(e
Corn on the cob
(iresht ] to 5 ears 3 to 4 rain. /n 2-qt. obloug glass baking
(lrozen ] ea_ 5 to 6 rain. Place in 2-q_. oblong glass
Mixed
vegetables
!lrozen lO-oz pa(kage 5 to 7 rain. /n l-qt. casserole, ])L_(e
Peas
tlicesh. _helled) 2 lbs. unshelled 9 to ] 2 rain. In ]-ql. (asserole. ])]a(e
(ft'ozen 10-oz package 5 to 7 rain. In l-qt. casserole, place
Potatoes
]i'esh. tithed. 4 pOl;llOeS
whiw. '6 to 8 oz ca(h)
lt'esh, whole. ] _ _o 8 oz) 3 to 4 rain.
.sweel or while,
Spinach
(ti'esh •
iiii!i}i_!X{q{i!!i/i_i,ii!_!_iiiiiii
lrozell.
chol)pcd
and leat
Squash
(li'esh, summer
m:td yellow)
(whl|er, aCOrll,
btHternut)
/8
Amount Time Comments
per ear dish, t)lace corn.// (orn is iu
2 _() 6 ears 3 to 4 rain. Cover wid_ xented plastic wrap.
per ear Rearrange atier half of lime.
9 to ] 2 rain.
10 _o 16 oz 5 to 7 rain.
lO-oz package 5 to 7 rain.
l lb. sliced 5 to 7 min.
] to 2 squash 8 to l 1 rain.
al)ottt ] lb. each)
husk, use no _'v'_lt('r; it (or]l l]_{S
beeu husked, add 1/4 cup
water. R('arrm_ge a/ler half
of _ime.
baking dish.
3 lablespooHs _*_r_lte]_
1/4 cu t) _ater.
5' lablespooHs wale/_
Peel and cut imo 1 inch cut)es.
Place in 2-(V. casserole with
1/2 clip water. Stir after half
of time.
Pier(e _i_t_ cooking tork.
Pla(e in (enter o/the oven.
I.ei stand 5 minmes.
In 2-qt. casserole, t)lace washed
spinach.
In 1-qt. casserole, t)lace
3 tablesl)oons water:
In 1½-qt. casserole, t)lace
1/4 cup water.
Cut in half and remove/ibrous
membranes. In 2-qt. oblong
glass baking dish, place squash
cut-side-down. "Ihrn cut-side-up
alter 4 mim_tes.
Page 17
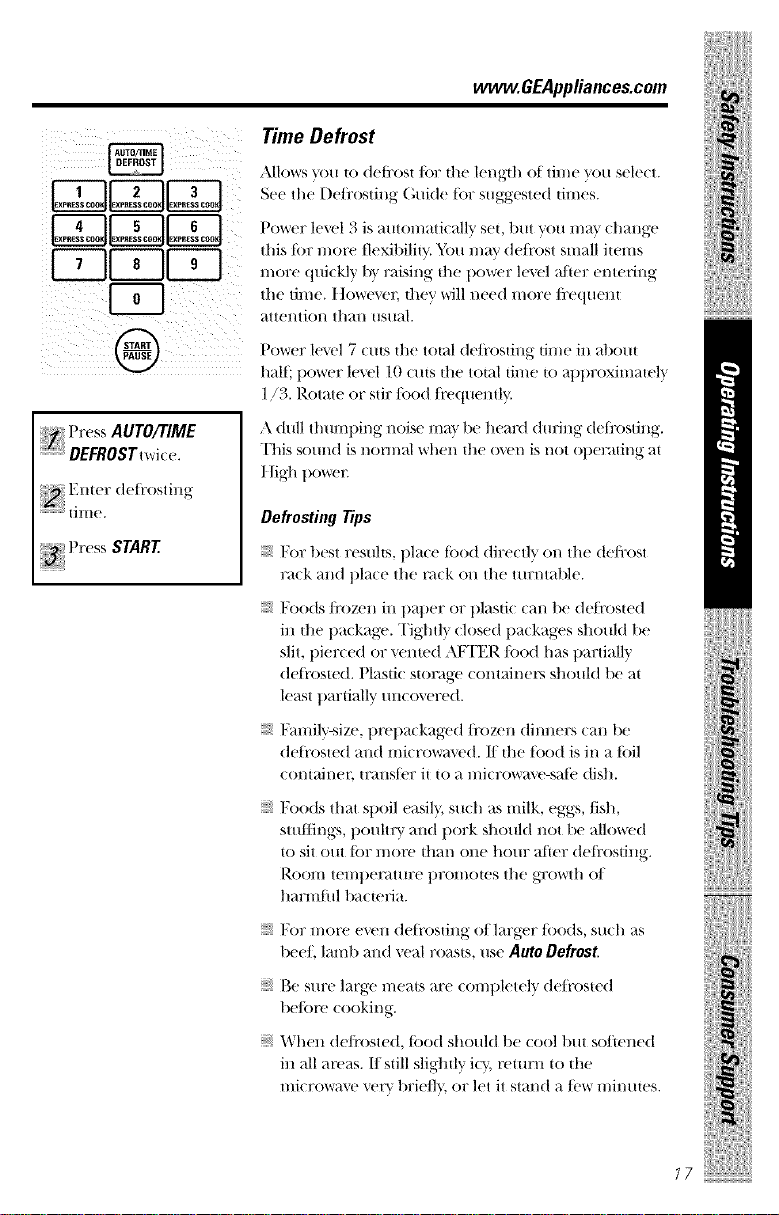
Time Defrost
Allows _m 1o defl:os{ lot the length of time you select.
See the I)e/i'osting (;uide tot suggested times.
Lo oooL°o ooo3
Press AUTO/TIME
"_DEFROSTtwi( e.
Enter deti'osting
::::::' Pr( ss START
Power level 3 is automatk all}' set, t)/lt yoll 1//_} ( hange
this tor more tlexit)ilit_. You may deli'ost small iwms
more quickly 1)_raising die 1)ower lexel alder entering
the thne. t]owevec they mll need more/i:equen{
attel/tiOl/ thall IIS/lal.
Power level 7 cuts the total de/i'osting time in _d)out
halP, power h'vel 10 (uts the total time to al)t)roxim;_tely
1/3. Rotate or stir/ood/i'e(tuently.
A dull tlmml)ing noise ma} be hemxl (truing delix)sting.
This s(mnd is normal when the oven is not ot)erating at
I tigh t)oweE
Defrosting Tips
For best resuhs, l)lace tood directly on the de/i'ost
rack mid place the m(k on the turntable.
I;oods/i'ozen in paper or t)lasti( (m_ t)e deli'osted
in die 1)a(kage. Tightly (losed 1)a(kages should be
slit, pierced or venmd A/zI'ER/ood has partially
deJi'osted. Plasti( s{orage containers should be at
least partially mlco\ere(t.
I:mnily-size, prepackaged/i'ozen dinners can be
deli'oswd and mierow_l_v(t, ff the tood is in a loll
eOl/t_il/eF |l;allst('l; it 1o a H/iCFOW_\'e-sa[(' dish.
vvvvw.GEAppliance_com
!iiiilIii!i!ll
Foods that spoil easil}, such as milk, eggs, fish,
smtfings, pouhry and 1)ork should not be allowed
|o sit out tot more than one hour atier deti:osting.
Room telnt)e_mu:e t)romotes the gTowth of
hm:mfl|l 1)_1(te}ia.
For more even deIi'os|ing oI larger foods, such as
1)eeI, laml) mid xeal roasts, use Auto Defrost.
Be sm:e large mea|s are completely deti'os|ed
be/ore cooking.
When de/i'osted, tood should be (ool but softened
in all areas. If still sligh|ly icy, remr|l t() |he
microw;_v very briefl}, or let it stand _/_'w mbmtes.
ilii!iiiiii? i:ii!iiii
77
Page 18
iii iHiil!iiii!ili
Aboutthetimefeatures.
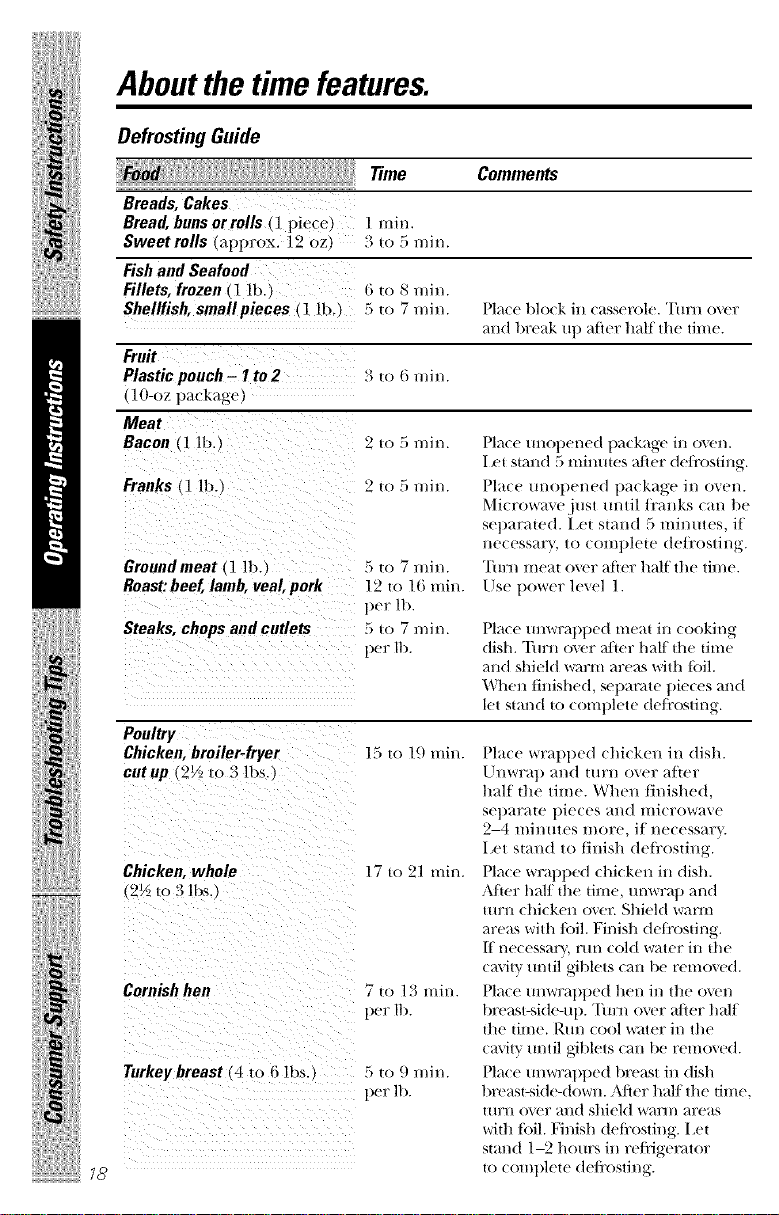
Defrosting Guide
Breads, Cakes
Bread, buns or rolls ( ] piece,
Sweetrolls tapprox. ]2 oz
Fish and Seafood
Fillets, frozen ( 1 lb.
Shellfish, small pieces (1 ]lx_
Fruit
Plastic pooch - I to 2 :4m 6 rain.
(10-oz package,
Meat
Bacon (l lb.) 2 u) 5 rain. Place tmOllened tla(kage in oven.
Franks I lb.,
Groundmeat (1 lb.
Roast:beef,lamb,veal,pork
Steaks, chops and cutlets
Poultry
Chicken,broiler-fryer
cutup _2_/,m 3 lbs,
Chicken, whole 17 to 21 rain.
(2V_,to 3 lbs. I
iiii!i}i_!X{ii!!i/i_i,ii!_!_iiiiiii
Cornish hen 7 m 13 rain.
Turkey breast (4 io 6 lbs.} 5 to 9 rain.
_8
Time Comments
] 1|1i1|.
3 u_ 5 min.
f_ to _ u|il/.
5 m 7 rain. Place block iu casserole. Turu o\er
m_d break up after half Ill(' time.
Let stand 5 minute._ after de/i'ostiug-.
2 =(i 5 rain. Place UllOt)el/ed t)_lckage ill ovel/.
5 to 7 min.
12 to 16 min.
per ill.
5 u, 7 miu.
per It)
15 to 19 rain.
per It/
per 11>
Microwm+ejusl tmlil/_'aDks c;m be
separated, l.ct stand 5 mintHes, if
lleuess;ll-}, 10 cO/ill)|eIe (teJi'oblil/g.
TIIFI/l/le;*I o\er alice ha|| lhe lil//e.
klse power lmel 1.
Place m_wrat)tled meat in cooking
dish. Tm:n o_vr a(ter hall the time
and shield v_u_m areas with loll.
When finished, set)anm' pieces and
let stand to comlllete deJir)sting.
Place wrapt)ed chicken in dish.
Unwrap and turn over alter
half the time. When tinished,
setlarate pieces and microwave
2-4 mimnes more, if necessar}.
let stand to tinish (lel_:osting.
Pla(e wratlt)ed chicken in dish.
Alter half the time, tmwra t) and
turn chicken oxer. Shield warm
areas with loll. Finish deli'osting.
[t necessal'v, r/ln cold water ill tile
( }l_+iFvruntil giblets can lie removed.
Place tmwrat)tle(t hen in the oven
km'ast-side-up. Turn over after half
the time. Run cool _;iter in the
cavity tmtil giblets can Lie remoxed.
Pla(e tmwral)t)ed klreast in dish
breast-side-down. After half the time,
turn o_vr and shieM _s_u'm areas
with loll. Nnish deli'osting. I ,et
stand 1-2 hours in re/iigemtor
to COml)lete de/i'osting.
Page 19
www.GEAppliance_com
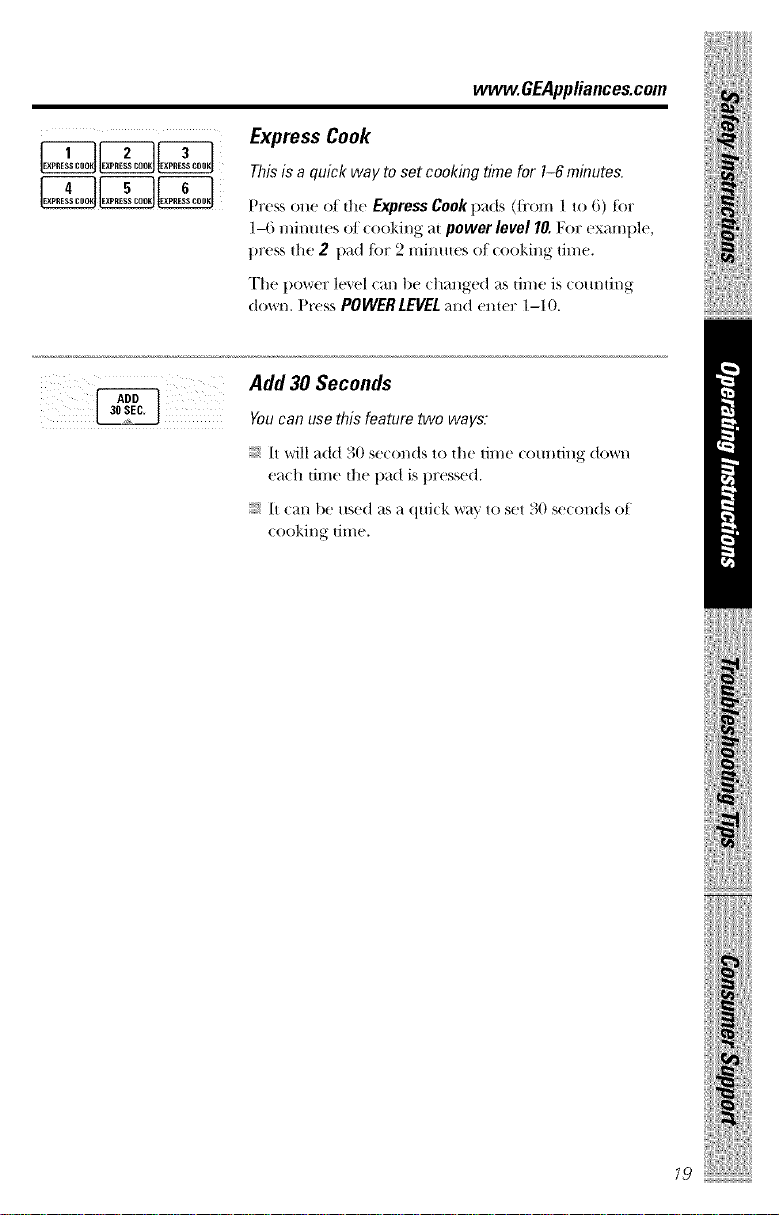
Express Cook
_7_ _ a quick way_ set cookmg time _r 1-6 mmu_s.
Pre._'_ one of tile Express Cook pads (fl'om 1 to 6) tot
14; minutus o/(()()king at power level 10. For e×aml)le,
tm'._ the 2 pad/_)r ,2 mimm's o/(ooking dmc.
The power h'v('l cm_ t1(' chang('d as din(' is com_ting
down. Pr('ss POVVfRLEVfL and enter 1-10.
Add 30 Seconds
You can use this feature two ways,
It will add .30 secon(ts to the time c()tmdng down
each time the t)ad is pressed.
It cm/be t_,e(I as a quick way to set 30 se(onds of
(ooking ume.
!iiiilIii!i!ll
!iii! iiiiiiii
79
Page 20
iii iHiil!iiii!ili
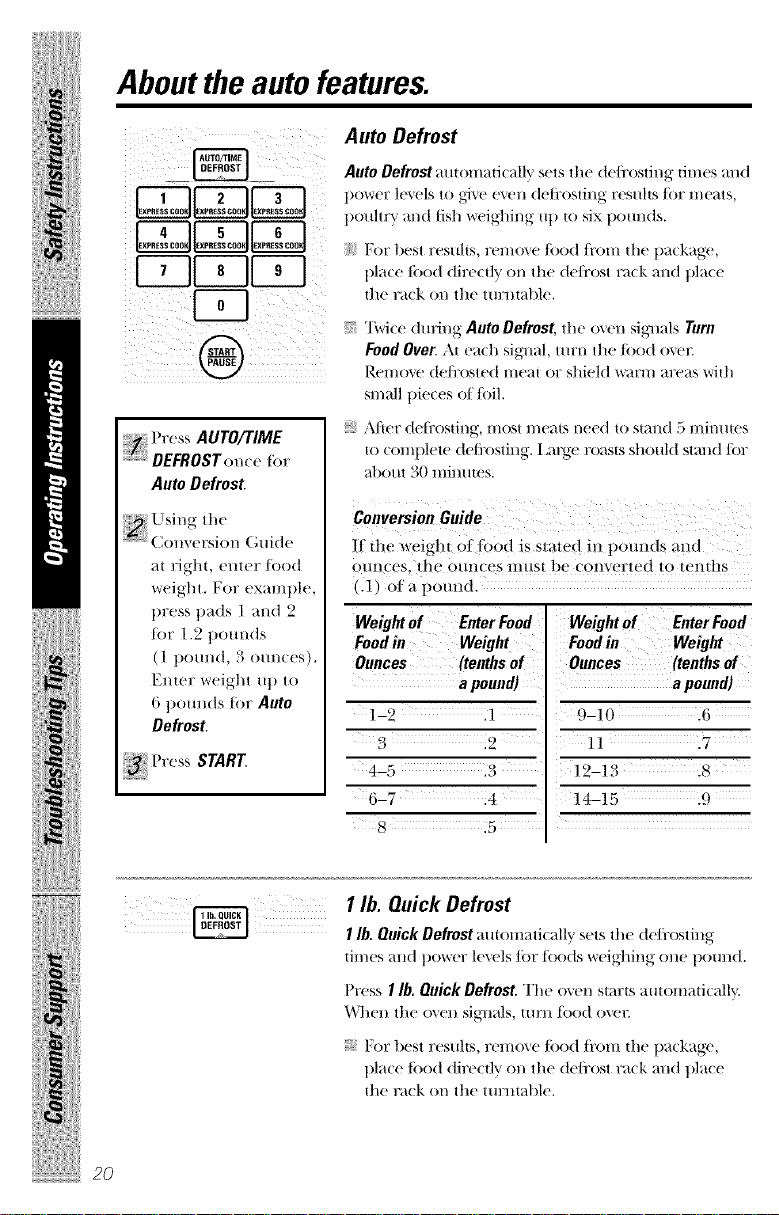
Abouttheautofeatures.
i} 2 3
LoLo.Ilox,°oLo.I
1-711' I1' I
Press AUTO/TIME
DEFROSTon(e tbr
Auto Defrost.
(;uide
m rib-hi, enter/ood
weirhi. For exmuple,
pre.',s ] )ads 1 ;rod 2
ior 1.2 polmds
1 p()/ll/d. 30lIl|C(_s
EI/teF Weig]ll lip lO
_ipoln=ds [or Auto
Defrost
I're._,_START
Auto Defrost
Auto Defrost automatk ally sets the deli'osting times and
powel? le'_els to gi'_e e'_en defix)sting results tor meats,
1)o[lhv_ r_lnd fish weighh/g u I) |o six t)Oullds.
For best results, remove todd ti'om fl_e pa(kage,
pla(e tbod dire(tlv on the deli'ost ra(k and pla(e
tile ra(k on tile tUrlltable.
"I\vice during Auto Defrost, the o\en sigl_als Turn
food Over. At eadl sig_al, mrn the/oDd o_v_
R('mo_ de/i:osted meat or shield warm area_, with
small pieces of/oil.
;_ Alier deti:osdng, most meats need to stand 5 minutes
_o complete defix)sting, i,arg_ roasts should strand tor
about 30 lllin[IteS.
Conversion Guide
It dw weight el tbod is stated in l)otmds m_d
ounces, dw ounces mus_ be comer_ed to wmhs
.1) era potmd.
Weight of Enter Food
Food in Weight
Ounces (tenths of
apound)
1-2 .1
3 .2
4-5 .3
6-7 .4
.5 '
Weight of Enter Food
Foodin Weight
Ounces (tenths of
apound)
9-10 .6
11 .7
]2-]3 .a
14-15 .9
iiii!ili_i_!Xiiii[!i/i_iii!_!_iiiiiii
2O
I lb. Quick Defrost
I lb. Quick Defrost autoulatk ally sets the de/i:osting
times and power le\'els/or toods weighing one pound.
Press I lb. Quick Defrost. The o,,en starts automati(allv.
Whell tile o\ell sigaluls, IIlI'n ff)o(t ()\'('It
:_ For best resuhs, remo\e/ood/i'()m the 1)a(kage,
place todd direcdv on the de/i'ost rack and place
die ra(k on tile turmable.
Page 21
Aboutthesensorfeatures.
Humidity Sensor
What happens when using the Sensor Features:
'['lie SellS01" ]¢e;-itul"es dete(t the in(teasing humid|t}
Covered
Vented
Dry off dishes so they
don't mislead the sensor.
released dm-ing (ooking. The o_'n automatically
a(!iusts the cooking time to _mJous t}pes m_d amomlts
of/ood.
Do not /ls(! 111(_ S(?I/S()F ]Te_Hllres [wi((t ill Sll(((t._,ion
on the stone tood t)ortion--it may result in Sev(!rely
over(ooked or |)/llTnt tood. It tood is/lnder(ooked
alier the comltdown, use TimeCookt)n" additional
cooking time.
The proper coma|nets and covers are essential tDr
best sensor cooking.
Alw_l_i,4/lse iili€l'ow_l_,-s_d_, contail/eFs _tl/(t €()tel; tllelll
with lids or \'creed plastic wrap. Nu_er use tight sealing
plastic containcrs--tll_\v can i)lx'_'nt steam fi'on/
escaping and cause |ood to o_ercook.
Be sm:e the outside of the cooking containers and the
inside of the microwm e o\en are dry belore placing
|ood in the o\en. Beads of moisture turning into
steam can mislead the sensor.
vvww.GEAppliances.com
!@ii!i!l:
ilii!ii:iii!/ii!iiiil i
27
Page 22
iii iHiil!iiii!ili
Aboutthesensorfeatures.
'i
Use only with prepackaged
microwave popcorn weighing
3.0to 3.5 ounces.
NOTE: Do notuse the
metal sheff when using
the Popcorn feature.
NOTE: Do not use
this feature twice in
succession on the
same food portion--
it may result in severely
overcooked or burnt food.
Popcorn
How to Use the Popcorn Feature
Foll(m t);_,,kag-e insmutiona, using Time Cook
_ it'the t)a( kage is less than 3.0 om_(es or larg-er
Ill t / ;).:) o/ l((S. I l t(_ lhe l)a(ka_,-e ot t)Ot)(OFIl
ill the (enteF of the l//i(l:OW_l_e.
Press POPCORNtor a regular size (3.0 to 3.5 oz)
.....................bag ot pop(orn. The o'_en smr_a immediately.
If you open the door while POPCORNia (lisl)l_lyed,
m_ error mess;_ge will al)t)e_m Close _l/e door and
pr'esa START
l/t_)od is un(h'r(ooked _ti('r" the countdown use
7_me Cook t_)r additional cooking time.
How to Adjust the Popcorn Program to Provide
a Shorter or Longer Cook time
If}_)u find diat tile br_md oft)opcorn }_)u use
Hn(tel])Ol)S Ol? over',.ooks COllSiStelltl}, }'Oil (_tl/_l(l(t Ol:
subtract 20_40 seconds to the automad€ t_ot)t)ing dine.
Toadd time:
Al_ert)ressing POPCORN,press 9within ill(?_lr's[
){0 seconds _dter the oven atal:{S/()r _tl/ex{]:_.
20 seconds.
iiii!ili_i_!iiiqii!!ili_i,ii!_!_iiiiiii
22
Press 9agvdn to add anod_er 10 seconds (total
31) se(onds additional time).
Tosubtract time:
idler pressing POPCORN, lmess 1 withill ill(? _ll'St
30 seconds a/let _t_e oven starts ti/r 20 seconds less
cooking 6me.
Pr'ess I a_,_din to reduce cooking lime another
10 seconds (total 30 ae(onds less time).
Page 23
NOTE:Donotuse
this featuretwice in
successionon the
samefood portion-
#may result inseverely
overcookedor burnt food.
www.GEAppliance_com
Beverage
Press BEVERAGE(m_e t(_ heat an 8-10 oz (/l t) of (office
or Ot]ler 1)e_,er'_l_e.
Drinks heated with the Beverage feature may be very hot.
Remove the container with care.
H:f()()(] iS {lllder( ooke(t _t_[er [he eolll)tdov_rl: {Ise
_me Cook for additiollal (ookillg time.
Reheat
How to Use the Reheat feature:
!iiiilIii!i!ll
@START
For reheating single servings
of +reviously cooked foods or
a plate of leftovers,
NOTE: Do not use the
metal shelf when using
the Reheat feature.
NOTE: Do not use
this feature twice in
succession on the
same food portion-
# may result in severely
overcooked or burnt food.
o'_el/. Press REHEATolI( e, {wi(e or []lree fillies.
The oxen stm:ts immediately. Press once for a
plate of leflo\ er's. Press twice for pasta (8-12 oz).
Press three times {_)r vegetables (1/2 to 2 cups).
The o',en sig_,als '_r]'_'' _['_''1 iS S'I'S''_ _']'_' [*/''
.....................ume remaining beg{us (o/mdng down.
Do Hot opel) tile ovel) door tll)ti] til/le is e()tll)tillg
down. If the door is opened, close it and press
START immediatelv.
After removing foodfrom the oven,stir,if possible, to even
out the temperature. Reheated foods may have wide
variatimrsin temperature. Some areas may be extremely hot.
l//ood is not hot enough a/ier the (ountdown use
_me Cook/or additional reheating time.
How to Change the Automatic Settings:
Toreduce time by 10%:
Press I wilhill 30 seconds a[ier pr'essing the REHEATpad.
Toadd 10%to cooking time:
Press 9 wi|hill 30 s('col)ds a[b.T pressing the REHEATpad.
Some FoodsNot Recommended For Use With Reheat'.
It is best to use time Cook/or these/oods:
:_ Bread pr'o(tucts.
:_ Foods that must be r'eheamd m)(o_'re(t.
;_ Foods that need to be stirr'ed or rotated.
;_ Foods calling t_)r a dry look or (fis t) surtil(e
atier reheadng.
('It'of.q,lidor(o.ered i,,,he
ilii!iiiiii!!¢ii!iiii
23
Page 24
iii iHiil!iiii!ili
Aboutthesensorfeatures.
ONE TOUCH SENSOR
Sensor cooking gives you
easy,automatic results with
a variety of foods (see the
Cooking Guide below).
NOTE: Do not use the
metal shelf with Sensor
Cooking.
NOTE: Do not use
this feature twice
in succession on the
same food portion--
it may result in severely
overcooked or burnt food.
Sensor Cooking
Vegetables, Potatoes, Fish, Chicken Pieces
_,/C Place (oxered food in the oven. Press the food
pad. For xegetables, press die VEGETABLEpad
once ft)r {i'esft veg-etables, |wi(e {()r flx)zeH
veg-etables, or tftree times t_)r (mined vegetables.
For (hicken or fish, press d_e CHICKEN/FISH pad
once ft)r chi_ ken pie(es or twice ft)r fisft.
Tfte o_'n starts ill1111ediatt'lv.
time remaining t)eg+ns counting down. "[hrn or
stir the food if ne(essm'_
Do I/Or opell the o_,ell door/llltil |il//e is (o1111|i11_
down. If the door is opened, close it and press
STARTimmediate]_
H:_()()d is tlilder(ooked after |he (OIA]Itdovqll [Ise
7_me Cook t_)r additional (ooking |ime.
How to ChangetheAutomatic Settings(automatic
settingsfor canned vegetables cannotbeadjusted
onsomemodels):
"_bu can adjust die cooking time ft)r _dlft)ods |o
sui| _r()_r personal taste.
Toreduce time by 10%:
Pr'ess 1 witftin 30 secollds after pressing the ft)od pad.
Toadd 10%to cookingtime:
Pr'ess 9 within 30 seconds after pressing the ft)od pad.
CookingGuide
iiii!i}i_)X{i{i!!i/i_i,ii!_!_iiiiiii
Canned Vegetables 4-16 oz Coxer with lid or xented plasti( wrap.
Frozen Vegetables 4-1 () oz Foll()_v ])_.(k_lge il/strH( tioI/s for adding
Fresh Vegetables 4-16 oz Add 1/4 (up wa|er per serxing.
Potatoes 8-32 oz Pier(e skin with fork. I la(e po|a|oes
Fish 4-1() oz (_()xer with xellled plasti( v_rr_lp,
Chicken Pieces 2-8 pieces Coxer with xell|ed plasti( _*/r_lp.
24
Amount Comments
vvr_l|er. (;(>x_er wi|ft lid or xented plasti( _'_rr_lp.
Coxer with lid or xented t)lasdc wrat).
OI/ tfte ttlrlltable.
Page 25

Otherfeatures your
model may have.
7 ili iiii ii iii
!i_ i _i i
vvww.GEAppliances.com
Custom
"I]w CUSTOMI);_d_IiIows VOlt tO S_I'_(! VOIIF l/lOSt
fl'equemly used settings. (Sensor looking seuings
(allllOt 1)(? saved.)
To set and save a setting:
Press the CUSTOMpad.
Set the mn/mnt of (ooking dine.
.....................amomaticall_ be set it'_ou do not change it.)
Pr(ss the CUSTOMpad.
}imr custom setting will be remembered tor fimm'
oHe touch use.
"Ik)clear tile custom setting, press and hold the
CUSTOM pad tor 2 seconds.
Help
hints. Press HELP:flwn sele(t _ ti_mn:e pad.
!iiiilIii!i!ll
Cooking Complete Reminder
To remind you th:at You have toDd in the o\'cll,
the ()'_vn will display FOODISREADYand t)ee 1) once
_t lI/illllte /ll/ti] _'()ll either ot)el/tile O_,/'l/ door or
press CLEAR/OFF.
Clock
Press CLOCKto set the time of (t_r¢.
Press CLOCK.
_ l_nter the time of (lm.
_!i Sele(t ,\M or PM.
To (he(k the time of da} while mi(rov_'a',,4ng,
press CLOCK.
ilii!iiiiii?_i;ii!iiiil_i_
25
Page 26
iii i+!iiii!ili
Otherfeatures yourmodel may have.
___AUTO/TIME 1Ib. QUICK
iiEBiVr
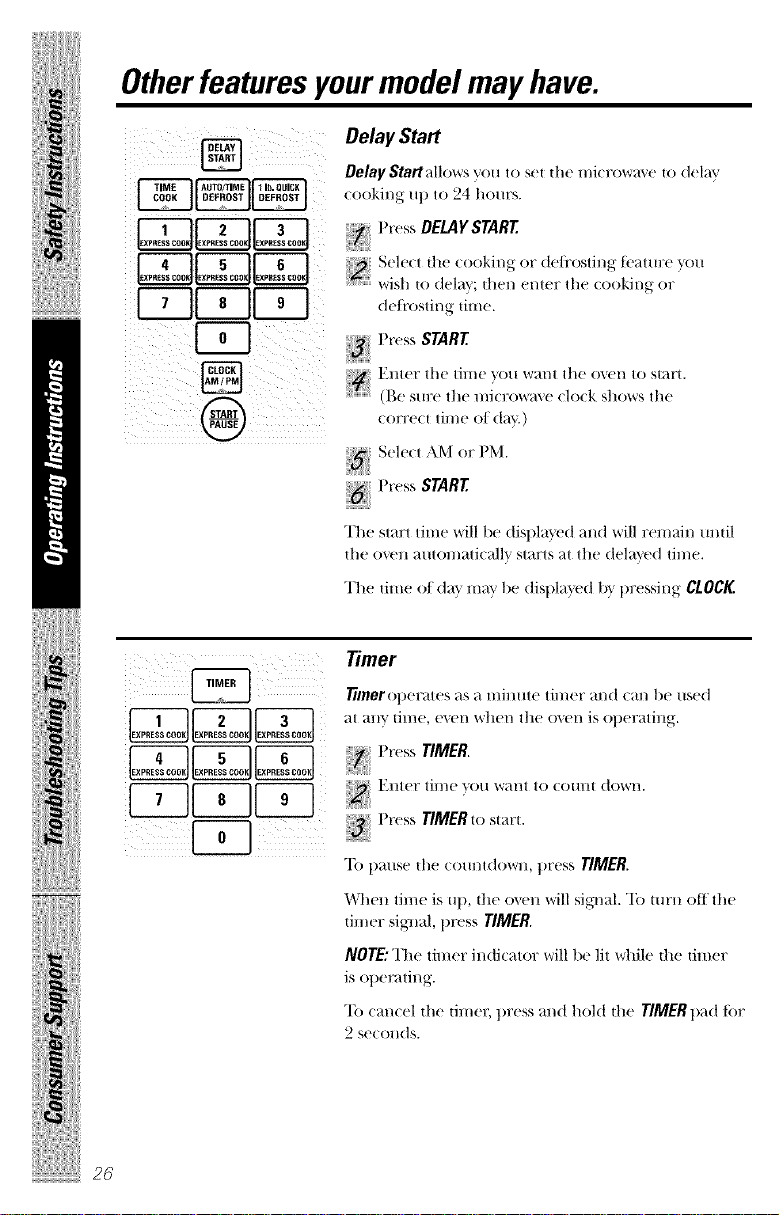
Delay Start
Delay StartMlows you to set the l//i( lx)w_l_,(! {o delay
_ooking ul) to 24 hours.
,,,+++DEW+'START
_ Sele(t the (ooking or deti'osting t_attn:e "_ou
.....................wish to delay; then enter the (ooking or
deti'osting time.
Press START
Enter the thne you W_lllt the oxen to st+re.
+"'+.....................(Be sure the n/i(rowaxe (lo(k shox_rs the
eorre(t thne of d_l_'.)
-_ Sele(t AM or PM.
i,,++START
The start time vdll be displa}ed and will ren/ain until
tile ovell atttolnati(allv starts at the delayed til//e.
The time ot da} m+ly be displa_ed 11}pressing CLOCK
i_i_i_i_i_iiii__i__i__II_:I_I_
+iii!ili+i+)Xiii+!!i/i+i,ii!+!+iii+++i
2_
Timer
_merot)erates _zs_ HliHute timer m_d cm_ be used
;_tany time, e_x'n when the o_x'n is ot)crating.
Press TIMER.
Enter thne "_ou w+,nt to (omit dOWl/.
I','+,,+TIMER,,,+,+,+,'t.
TO pa/lse tile eo/lntdowil, t)t'ess TIMER.
When thne is Ul), the oven will si_ml. To mrn off the
timer si_lal, press TIMER.
NOTE: The timer indi(+_tor will be lit \_hile the timer
is ot)emting.
"Ib (:an(el tile timer, press and hold the TIMER pad tor
2 secollds.
Page 27
; )2
www.GEAppliances.com
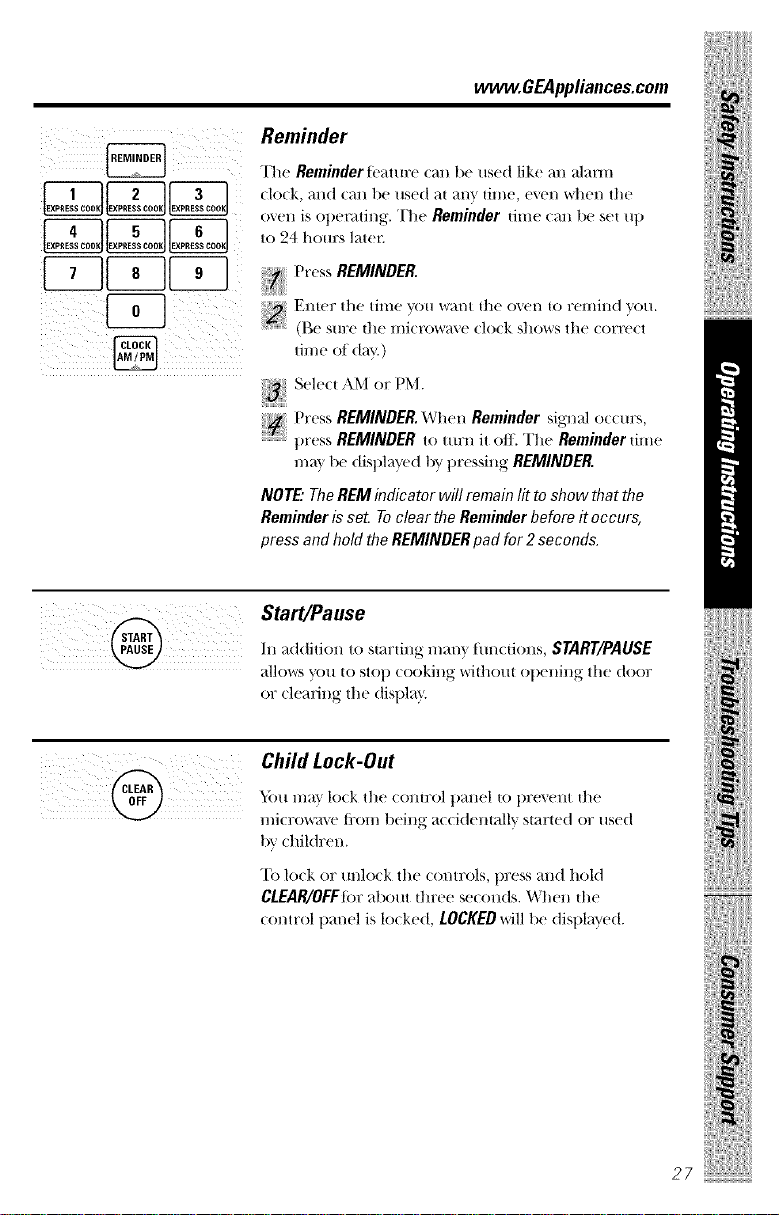
Reminder
"I]le Reminder t_ature (an be used like an ;flann
(lo(k, and (an be used at am, time, e'_en vd_en the
"_ 5; r • "" "
0 '12!111_ Opel_ltll/_,. [']1( Reminder {llIl(? (all |)e Se{ lip
• 5;to 24 hour,_ later.
Pr( ss REMINDER.
(B(? S[I1X? |11(? II/i( FOW_I_,(_ do(k shows the (orre(t
time of day.)
i;_ Sele(t ,\M or PM.
) "5;"
[ rt, s REMINDER. _]h(!l/Reminder signal occurs,
press REMINDER to mrn it off. The Reminder time
may bc displayed by pressing REMINDER.
NOTE,"The REM indicator will remain lit to show that the
Rmninder is seL To clear the Rmninder before it occurs,
press and hold the REMINDER pad for 2seconds.
Start/Pause ,
In addition to starting many tun(fions, START/PAUSE
;fllows you _o stop cookiHg wifl_om opeHiHg the door
or clearing the displa}
!iiiilIii!i!ll
Child Lock-Out
_()111/1_1} lo(k the COlltlX)] ])allel [o plX!V(!llt |]1(!
mi(r(mme fi:om being a((idemally started or used
by (hildren.
To lo(k or unlo(k the (ontrols, press and hold
CLEAR/OFFtor about three s(!(oHds. _ h(!ll |he
((mtrol t)ane] is lo(ked, lOCKED will be displayed.
ilii!iiiiii,!!¢ , ,ii!iiiil i
27
Page 28

iii i+!iiii!ili
Otherfeatures yourmodel may have.
Turntable
FOF best (ookil/_ FeStlltS, ]e_l"_(' the ttll3/t_t|)le o11, ]t (_tl/
be turned oil f(>r large dishes. Press TURNTABIEto mrn
the turntable on or ()t_
Sometimes the turntable can become too hot to touch.
Be (arethl tou(hing the turntable (lurhlg and after
(()()king.
VentFan
The v('nt tim removes steam and other vapors fl:om
sure_ce cooking.
Press VENTFANonce |i)r high lira speed, twice/or
me(titan lira speed, a third time/or low lira speed,
or a/om:th time to ttmJ, the tim oil
Press the VENTFAN BOOSTt)ad tor extra tm_ st)eed.
Automatic Fan
+iii!ili+i+)Xiii+!!i/i+i,ii!+!+iii+++i
!iii !!iii !i;i!i i!
28
All _ttli()IIlati( |;tl/ |i?_tttll:e ])l:Otecis the IIli(TOW;+l\ e
|i'om too much heat rising fl:om the cookto 1) below it.
It atltomati(Mlv tm:ns on ;+itlox_,speed if it senses too
much heat.
IfVO/l ]1_\ e ttlrl/e(t the |i_ll oi1, yO/l l//_l_'/il/d that VO/l
cmmot tm:n it oil The lira will automatically tm:n off
\'+hell the illterl/_d parts _++re cool. It 1//_1+_ St_l'v Oil tD17
?)0 lililltlteS or lilOl?e _1[(_17 the cookto I) _t1/(t lilicI'ow;+l\ e
(?()Iltl?()|S atl' ttlrlJ, e(| oil
Surface Light
Press SURFACELIGHT on( e tot bright light, twi(e t_)r
the night light, or three times to tm'n the light ot_
Page 29

_ i¸
]
www.GEAppliance_com
Options
Press the OPrlONSpad muhil)le times u) Q(le through
the available options.
Auto NiLe Light
The Auto NiLe Lightcan t)e set to come on and go ott
at desired times. To set the timer:
t'ressI.
Emer the time of (ta} tor the light to (ome on.
_i SelectAMor PM.
t'resstheOPnONSt,_,d
ff
(
E_,,er,tie,,,,_eof(,_._*_,rtileI,_tl,.,+oo*_
Sele,_.'+MorP_,'_.
Presstl,eO,'_,ONSt/_,,'.
To review tile nile light settinh% press 2 atier selecting
tile Auto NiLe Light option.
To turn tile nile ligIlt oil', press 0 after selecting die
AutoNiteLightoption.
Beeper Volume
The beeper sound h'\ el (an be a(!jusu'd. (ff_oose 0-3
/or mute to loud.
Charcoal Filter Reminder
The Charcoal Filter Reminder is a 180-day timer to
remind you _r]_(']_ t() change the (har(oal tilter.
Press 0 to turn tile reminder olE Press 1 to set the
reminder. Press 2 to reset tile reminder.
!iiiilIii!i!l+
Display Language
The language/or the scrolling display may be set
at either English or Stlanish. Press 1tor English or
2 tot Stlanish.
Display On/Off
You (an (]loose to tm:n the (lock disllla } on or o/E
Press 0 to tm:n the display olE Press I t() turn the
disl)la } on.
Display Speed
The scroll speed ot the disjllay can be (hanged.
Sele(t 1-5 Jot slowest to tilstest s(roll speed.
!iii!_iiiiii+i
29
Page 30

iii iHiil!iiii!ili
Otherfeatures yourmodel may have.
How to Use the Sheff
When Microwaving
Make sure tile shelf is
positioned properly
inside the microwave
to prevent (lalllage to
tile o_en tkom arcing.
I)o not use a
l//i_ row_l_ e browlling
dish on the shel/_ The
shelf could overheat.
[)0 llOt use the o_,en
with the shelf on the
microwa_ • floor.
This (ould (t_m_ge
the lIli( l'ow_l_, e.
Shelf
Food microwt_'s best when placed on the mrnt:d)le
or on tile shelf in the lower position.
Onl_ use the shelf when reheating on more than one
level. Do not store the shelt insMe the oxen era'it}.
For best results
Uneven results
2-level reheating
Llse pot holders when
handling the shell
it may be hot.
I)o not use the shelf
when cooking
pOp( ol'n.
I)o not use tile shelf
iiii!ili_:_!:iiqii!!i/i_i,ii!_!_iiiiiii
with Sensor Cooking
or Reheat.
30
Page 31

Switch places after 1/2 time
vvvvw.GEAppliance_com
Shelf and Reheating
Toreheaton21evels
OR
Toreheat2 dishes on the lower level:
;o
ilIlll
Switch places after 1/2 time
S'Wi|( 1/ t)]_t((tS ;_lft(tF 1/2 the time.
iiiiiiiiiiiiiiiiiii
31
Page 32

iii iHiil!iiii!ili
Microwave terms.
i!Ii i
Z _
ii i i i i
Covering
Shielding In a regular oxen, you shiel(t (hi(ken breasts or baked too(ts _o
Standing Time Xffhen you (ook v,ith regular oxens, foo(ls su(h as roasts or (akes
Venting After eoxering a dish with plastic w17_tl), "}'oil_,ell| the plasti( wrap
Definition
•\rcing is the l/]i( l'OW_l\'e |el1/] t()F st)arks in the o\'en. _\rcing is
¸¸
caused by:
the metal shelf being installed incorrecily and touching
Ill{} lllieFowa\ e w_dls.
metal or/oil touching the side of the oven.
toil that is not molded to tood (upturned edges act like
al l|elll laS).
metal such a_, iwist-ties, poultry pins, gold-lJlnlned dishes.
reQaled paper towels comaining small metal pieces.
Co_ers hold in moisture, allow/or more e_'n heating and reduce
cooking time. _('lltillg plastic wrap or cox e_ing with w_l_-ipaper
_lll()_rS ex(ess stealll to es(ape.
t)revent oxe_:l,rowning. When mi(rowax_ng, yr(}_l/IS_ small strips
of foil to shiekt thin par_s, such as ihe tips of wing.,, _.l/d legs Oll
poultry, whi(h woHld cook 1)eli)re larger t)arts.
are allowed to stand to finish cooking or to set. Standing time is
(st)eei_dlT* iml)ortam in mierowaxe (ooking. Note that a
"mi(rowa',ed (ake is 1J,ot pla(ed on a (oolilJ, g ra(k.
1)_' Hll?l/il/_" l)_l( k Olle (Ol_l/eF SO ex(ess s[e_ll// (_tl/ es( _tt)(!.
iiii!i}i_)X{i{i!!i/i_i,ii!_!_iiiiiii/
Page 33

Careand cleaningof
themicrowaveoven.
Helpful Hints
An oc_ _sion_d thorough wiping with _t solution oJ
t)aking soda and water keeps the inside flesh.
NOTE"Be certain thepower is off before cleaning any
part of this oven.
How to Clean the Inside
vvww.GEAppliances.com
!iiiilIii!i!l:
7
Walls, Floor, Inside Window, Metal and Plastic Parts
on the Door
_()I/K' sp_lttet's (_tl/|)e 1;e]//o'_e(t with _t ])_l})_'t" towel;
others m m require _1dmnp cloth. Rcmov(' glx'a_y
spatters with a sud.,,y cloth; then rinse with a damp
cloth. Do :J,ot use abrasive clem_ers or shaq) utensils
on ()\'{'11 _dls.
Never use a commercial oven cleaner on any part of
your microwave.
Removable Turntable and Turntable Support
To prcvcm t)rcakagc, do not l)la(c dl(' mrmabh' imo
water.just after cooking. Wash it carefl_lly in warm,
sud.,,y water or in die dislm_sheJ_ The turntable m_d
support can be broken if dropped. Remember do not
operate the o\'e:J,without the turntable and support
in pla( e.
Sheff
Clem_ widl mild soap and wa|(?l: or in the dishw_tsll(!E
Do not clean in a self-cleaning oven.
Defrost Rack
Clean with mil(t soap and water or in the top ra(k oI
the (tisllwashcl_
ilii!ii+iii!!¢+ii!iiiil i
33
Page 34

iii iHiil!iiii!ili
Care and cleaning ofthe microwave oven.
How to Cleanthe Outside
Werecommendagainstosieg cleanerswith ammoniaor
alcohol,as they can damagethe appearanceof the microwave
oven.ffyouchoosetouseacommonhouseholdcleaner,
firstapplythe cleaner directlytoa clean cloth, thenwipe
the soiledarea.
Bottom
Clean offthe grease and dust (m the bottom often/.
I_se a sohttion of warm water and (letelgent.
Case
Clean th( oulsi(le of the miero_m_' with a su(N} cloth. Rinse
and then (hT> _,'_l[)e tile _in(low (lean _lith a damp (loth.
ControlPanel and Door
Wipe _itll a damp cloth. Dry thoroughl}. Do not use
cleaning sim_s, large amounts of soap and watel; abrasiws
or shinl) ol)j((l_ on tile panel--the} call (lamage it.
Some paper towels can also scratch the control panel.
DoorSeal
[t's ]ii/portant to kee D tile area (leall whel'e tlle (IOOF
seals ag',linst the microwav('. ILs( only mild, non-abrasive
(l(teLgents applie(I _dth a dean sponge or soft (loth.
Rills( va:l].
iiii!i}i_)X{q{i!!i/i_i,ii!_!_iiiiiii
34
Staieless Steel (onsome models)
Donot useasteel-woodpad,it will scratchthe surface,
To clean the stail/less steel sur fa(e, use a hot, damp doth
_itll a mild (letergent suitable tor staiilless steel snrfimes.
Us(! a dean, hot, damp cloth to remo_e soap. DI) _ith a (h),
dean cloth.
ff tood soil remains, uy a general kit(:hen (:leanel:
For har(Iqo-clean soil, use a standard stainless steel (:leal/el;
such as B(m-,\mi _ or CameoS:
Apply deaner with a damp sponge. Use a (:lem/, hot, damp
cloth to remo_e cleanei: Dr} with a dry, (:lean cloth..\lw_Ex'_
scrub lightly ill tile direction of tile grain.
Alter (:leanillg, use a stainless steel polish, su(:h as Stainless
Steel Magi(_i Re, ere Copper and Staildess Steel (leane¢
or Wenol NI Puq)ose M(tal I)olishq Follow tile pro(luet
insm/etions for (leaning tile stainless steel surface.
Page 35

Replacing the light bulbs. vvww.GEAppliances.com
Cooktop Light/Night Light
Replace the burned-out bulb with a 120volt, 20-watt
halogen bulb (WB36X10213), available from your
GEsuppfier.
Remove screw
the plug.
Remoxe the S_:]:_ ra_ the right edge of the light
(o'_er _tl/d t)/IS]l Oll tl'te left edge of tl'te (over
tO 0t)(!11.
Be sm:e file l_ulb(s) to be repla(ed are (ool l_efore
0 remo'_ing After breaking the adhesi'_e seal,
remo'_e the bulb b) pulling straight out. Replace
with the same size and type bulb.
RMse the light shield and repla( e the s( rew.
Comaect ele¢trical t)OW(!F tO the oxen.
!iiiilIii!i!ll
iiiiili iiiiiii!
iii_il_iiilli
!iiiiiiiiiii_iii'_iiii!ii
25
Page 36

iii iHiil!iiii!ili
Abouttheexhaustfeature.
Charcoal Filter
(on some models)
Reusable Grease Filters
(on all models)
The Vent Fan
The \'ellt {_ln has 2 lIletM r('usab](' gl'('_ls('/i]t('l'.',.
Mod('ls that rc(ir( ul_lt(' air l);l(k into the roon/also use
_1(hmxo_d li]t('l_
Reusable Grease Filters
The metal fil{ers trap grease ruleased bv/()ods on tile
(:ooktot). "I'h(_ Mso t)rcv('nt/lames/i'om toods (m tile
cookto l) ti'ol// (t;-illl_lgJng th(' inside o/the l//i( I'OW;'I\ ('.
For this r('_s(m, the Jilters must A[ ,WA_% b(' ill l)la( e
wh('n th(' hood is us('d. The gl:(",_s(" tilt('rs should bc
(leaned on((' _ month, or _s needed.
Removing and Cleaning the Filter
Toremove, slide it to the outside using the tab. Pull it
down and out.
Toclean the grease filter, s(l_& it ml(t then s'wish it
_ll'O/tlld ill hot _%r_lt('F _t,nd (let('rg('nt. Don'{ use
;mm/()nk_ or ;mHnonia t)ro(tu(ts because th(_ will
darken the metal. I,igh_ brushing (an be used to
remove embedded dirt.
iiii!ili_i_)iiiiii!!i/i_i,ii!_!_iiiiiii
36
Rinse, shake ;rod let it dry belore r('placing.
Toreplace, slide die/ilmr ill the ti'mne slo{ at tile out_ide
of {lie opening. Pull ut) and in to lock into place.
Page 37

1 Il
Remove grille screws
to remove the grille.
www.GEAppliance_com
Charcoal Filter (on some models)
Thecharcoalfiltercannotbecleaned./tmust bereplaced.
OrderPartNo.WB2XI0733fromyourGEsupplier.
If the model is not vented to the outside, the air will
be re(ir(ulated through a (tisl)osa_fle (hmxo_d fihcr
that helps rcmo_, smoke mid odors.
"I]le char(oal tilter should be replaced \_hen
it is noti(c_d/ly' dirty or discolored (usually a/icr
{'_--I2 months, dependh N on hood usage).
ToRemove Charcoal Filter
To remov(' the char(o_fl filter, disconnect power at the
main/use or circuit breaker pmlel or pull tile plug.
Rcmo_e the tot) g-cille by' removing the S__X'_rs<}_ t() t)
of the gTillc that hold it in t)la(c and sliding the gTillc
to the left (ot/ening tile door makes g_dllc removal
e;_sier). Slide the filter |OWt-IIxts ill(' ti'ont ()f tllG ovcn
_tn(t F('l//o\ (' it.
ToInstall Charcoal Filter
!iiiilIii!i!l+
'Ib install a _r filter, remoxe l/lasd( and other outer
"wrapping ti'om the l_r filter.
Insert the tilter into the top opening of the oven as
shown. It will rest at m/angle on 2 side supl/ort rolls
mid in ti'ont of the tJght rear tab. Replace the g_Jlle
and screw.,,.
ilii!ii+iii!ii+ii!iiiil i
37
Page 38

iiiiiiiii%i
Beforeyou call for service...
Troubleshooting -tips
Save time and money! Review the charts on the following pages
first and you may not need to call for service.
Possible Causes What To Do
Oven will not start
Floor of the oven is warm,
even when the oven has
trotbeen used
"LOCKED"appears on The con_'ol has been Press m_d hoht CLEAR/OFF
the display locked. /or about 3 se(-ouds to
"SENSORERROR" ]_t?lieli using a Sensor 1)o not open door tnltil
appearsonthe display feature, file door was Meal/l is Sellsed tll/d lil/le
Youhearan unusual,
low-tonebeep
Food amount too large
for Sensor Reheat
A fuse hi your houm may Replace fl_se or reset
be blown or the circnit circuit 1)reaker.
breaker tripped.
Power surge. Unplug the nlicrov_ave
oxen; then phlg it back in.
Plug not fully hlserted
hlto wall oudet.
Make sure the 3-prong
phlg on tile oven is dilly
inserted into wall outlet.
The cooktop light is
located below the oven
floor. _len the light is
on, the heat it produces
may make file oven floor
get warm.
opened before stemn is .q/own countiug down
could be detected, on the disl)lay.
Stemn was not detected Use ]71noCook to ]mat
ill UlaXilIUllll amount ]()r//lore lime.
of fium.
You have tried to start
file Remhlder without
a valid time of day.
You have tried to start
file Auto Nite Light
without a valid thne of
day entered for the on-time
mid off-time.
You have tried to chmlge
die power level when it is
not allowed.
Seusor Reheat is for
sil_gle servhlgs of
reconunended foods.
"Itlis is normal.
tll/|o(k i]|(' (olliro|.
Start over and enter a
_;_lid time of (lax.
Start over and enter a
_;_li(ttime of (lax.
Many o/tile ov('n's _('attlres
are pr('set and cmlnot be
changed.
Use time Cook t6r large
all/O/liltS ()_ _()od.
33
Page 39

www.GEAppliance_com
Things That Are Normal With Your Microwave Oven
Su'mn or _q)()rcs(_q)ingIi'omat(randthe (loot_
l.ightretie(tJonaround door or outer (_s('.
I)imming oven light and chang(' in the blow(T SO/Ill(| _1|
power le\'('ls other than high.
I)ull flmmping s(mnd while oven is oper_ting.
"IS"!radio intcr/('rcnce might be noti(ed while using the
l//i(row_lv('. Similar to the inter/('rcnce (;rased b_ ()tiler small
al)plimwes, it does not indicate _ prolflem with |]le IIli(TOVv_l\e.
Plug the l//i( lTOW_lVCinto ;_difl('rent electti( al cir( uit, move
the m(tio or "IV ;_s/iu; mvm {i'om th(' l/li(']7ow_l\'c _ls possibh',
or check the position and sigllal of the TV!mdio antcmm.
iiiiiiiiiiiii!iiiiiiiiiiiiiiiiil/
39
Page 40

!iii_!ili!i
i-..
iili@Xiiii/ili,iiiiii/
iiiiiiiiiiiiiiiiiiii 40
Page 41

GE Service Protection Plus TM
(;E, a name recognized worldwide tor quality and (lepel_dability,
offers x_O[l SClTx_Jce Protection Phlsr_--(?oH/l)rellellsive ])rote(tiOll Oll
all yore: applian( es--No Matter What Brand!
Benefits Include:
• Backed by GE
• All brmlds covered
• Unlilnited service calls
• All parts mid labor costs hlcluded
• No out-of-pocket expenses
• No lfidden deductibles
• One 800 number to call
xJ_)ll will be completely satisfied x_idl our serxice prot_cdou or you ma_ request your
lilOlle x, ba_k Oll tlle relllailling vallle of vo/tr (Olltra(t. No q/testions asked. It's that silIlple.
Protect your refi:igerator, dishwasher washer and dr}e_; range, TX;VCR and much more--
rely brmld! Plus dlere's no extra charge tor emergency service and low momhly financing
is a_ailable. E_en icemaker coverage and/ood spoilage protection is o/]i'red. 51m can rest
easy, knowing that all your valuable household products are prowcwd against expensive
repairs.
Place xour confidence in (;E and call us in the U.S. tolM'ree at 800.626.2224
tor more iniormation.
*-M1ln;mds coy< led, up Io 20 years old, in II'le continental U.S.
We'll CoverAnyAppliance.
Anywhere. Anytime.*
._. (.:__.,_,_.....
Please place in envelope and mail to:
General Electric Company
Warranty Registration Department
P.O. Box 32150
Louisville, KY 40232-2150
47
Page 42

Consumer Product Ownership Registration
I)em: Customer:
Thank v(m tor t)m:chasing our t)rod uet and thank you lot t)laeing yore: confidence in us.
_;'e are t)rolld to haxe vo/| as a (llStOl/ler!
Follow these three steps to protect your new appliance investment:
your Consumer
Product O_mership
Complete mid mail
Registration today.
l laxe the pe_l_ e of
mind of knowing
we (all COllta(t
sou in the mflJkelv
event of a sate?t\'
moditication.
the registration
1)clew, store this
After mailing
do( HIIlel/| ill a sat_
place. It (ontains
intbrmafion mu will
need should you
require service.
()ur service munber
is 800.(;E.(_.\I_IS
(800.432.2737).
Manuid caret ullv.
It will hel t ) you
P.ead v(mr ()wner's
ot)er_He yoIlr lleW
applian(e t)rot)erl).
Model Number Serial Number
ill li II lili iilll II II II
hnportant: If you did not get a registration card with your product, detach
and return the form below to ensure that your product is
registered, or register online at _nnv.GEApplim_ces.com.
._.<.%,JJL,':,:.
Consumer Product Ownership Registration
I ........... I I,, ,,,, ,I
Nil-. [] Ms. [] Mrs. [] Miss []
First I Last I I
Nallle I i i I i i I i i Nallle i I i i I I I I i i I I i
Model Number Serial Number
Street] ]
Address I I I I I I I I I I I I I I I I I I I I I I I I I I
Apt. # I I I I I I I I I E-mail Address*.
I I I,l it' I I
Cit_ I I I I I I I I I I I I I State (_ode I I I I
l)at( Phl(ed [n [is(
Phone
Mo,_,t,L_J Da,L_J _,rL_M _,,,,,t,erl,, I-I,, I-I,, , I
* Please proxide your e-mail address to receive, vime-mail, discounts, special
O GEAppliances
GEConsumer Products
General Electric Company
Louisville, Kentucky
ww_GEAppfiances com
42
ottbrs and other iml)ortant conmumications t]-om (;E Appliances ((;ILk).
[ Check here itvou do not warn to receive commtmications fi-om G1LVs
carcfiflly selected pamlel'_.
FAILI JRE T() COMPLETE AND RE'F[ RN TIIIS CAR1) D()ES N(YF
DIMINISt ] YOI JR _,\(\I_L\N'IY PdGt rrS.
For more intin-malion ab<_ut (;l_\'s priv_ty and data usage poll(?; go to
m_w.GEAppliances.com and click on 'Privacy Poli(y" or call 800.626.2224.
Page 43

GEMicrowave Oven Warranty.
iiiiiiii!!liii:iii!iii
Aft warranty service provided by our
Factory Service Centers, or an authorized
Customer Cares technician. To schedule
service, on4ine, 24 hours a day, visit
us at www. GEAppliances. corn, or call
800.GECARES (800.432.2737).
Staple your receipt here.
Proof of the original
purchase date is needed
to obtain service under
the warrant_
GE Will Replace:
From the date of the d,.d:_,_t J]J]]J[it(,['][l|5 or vvork]H[i|JsbJp. [}l|['l]Jg tlJi5 full
origmal purchase one-year warrant, (;E will a|so provid(,, free of charge,
all labor mid rck_wd s('rvi((' (osls 1(7rcp_dr or rcpla(c
lhc ([cJ;t,ctivc ])ar|.
Second Through Tenth Year The magnetron tube, i( the ]//aKllClr(71/ ltlbc IS|Is due 1(7
From the date of the _t(]cJ_.+clill matel'ials or xvorkl/lallsl/i]), l)udn_ 1]fis
original purchase additional nine-year limited warran$ you 'will be
I'cs])oH_il)](' t(71" m iv ];d)(Tr or l'('l_lt('(t s('rvi((' ((TSl_.
Service trips to your home to teach
you how to use the product.
bnproper hlstallafion, delivery or
lllaintenance.
Failure of the product if it is abused,
misused, or used for other than
the hltended purpose or used
conunerdally.
Replacement of die cooktop
light bulbs.
Thiswarranty is extended to the original purchaser and any succeediegowner for productspurchased
for ordinary home use within the USA, InAlaska, the warranty excludes thecost of shipping or service
calls toyour home,
Some states donot allow the exclusionor limitation of incidental or consequential damages,so the
above limitation or exclusionmay not apply to you. This warrantygives youspecific legal rights, and
you may also haveother rights which vary from state tostate. Toknow what yourlegal rights are,
consult your local or state consumer affairs office or your state's Attorney General
Replacement of house fuses or
resetting of clrcult breakers.
Dmnage to die product caused by
accident, fire, floods or acts of God.
Inddental or consequential dmnage
caused by possible defects wifll fills
appliance.
Dmnage caused after delivery.
;iiiiiiiiiii_Jiiiii!ilWiil!iii
iiiiii!iiiiii !ii iili!
iiiiiiiiii: li
liiii_il;iiiY_iijiiiii'_
Warrantor: General Electric Company. Louisville, Kit 40225
43
Page 44

ConsumerSupport.
GEAppliancesWebsite GEAppliances.com
I lave a question or need assistan(e with your appliance? "Iiy the GE Appliances D,'_'bsite
94 hours a da> ally day of the year! For greamr (onv(.nietl(e atl(l fi_ster sel_Jce, };Olleail
nl)w dl)wnload Owner's Manuals, order parts, (amlogs, or even s(hedule sel_i(e on-line.
xl_)ll Call also "Ask ()llr "Ibam of Experts _'' your questions, and so mu(h more...
ScheduleService
Expert GE repair s(rvic( is only one st(p away ti-om your doe1= Get on-line and
S( I (1 VO1 "se-v(e / votr(o \el l(e24hollrsallvdavofth( vear!()l-(all
800.(;E.C&RI{S (800.432.2737) during normal busin( ss hours.
GEAppliances.com
RealLifeDesignStudio GEAppliances.com
GEsupports the [ hfiversal Design (on(eptIproducts, ser_,J(esand emironments that
(an be used IV people of all ages, sizesand capabilities. D,\_re(ognize the need to
design t})ra wide range of php, i(al and mental abiliti( s and impairnlents. For details
of GE's [ Jtli'vcrsalI)esign applk ations, in( luding kit*Thendesign ideas ti)r people with
disabilities, (he(k out our X_,i'bsitemda> D_r the hearing impaired, please call
800.TDD.(;EAC (800.833.4322).
ExtendedWarranties
Purchase a GE extended warranb, and learn about special discounb, that are available
while your wan-antv is still in ett;:'_ t. Y}m (an pur(hase it on-line anytime, or call
800.626.2224 during normal business hours. GE Consumer Itome SelaJ(es will
still be dlere alter your warramy expires.
PartsandAccessories
Individuals qualified to ser'dce their own applian(es (an hme parts or a((essories
sent dire(tN to flleir homes (VISA, MasterCard and Dis(over (ards are accepmd).
Order on-line toda B 24 hours eve W day or b? phone at 800.626.2002 during normal
business hours.
Instructionscontainedin this manual coverprocedures to be performed byany user.
Otherservicing generally should be referred toqualified service personnel.Caution
mustbe exercised, since improperservicing may cause unsafe operation.
GEAppliances.com
GEAppliances.com
ContactUs
If you are not satistied with the serxi(x you r( ceiv( fi-om (;E, contact us on our Websin.
with all tile details in(luding your phone numt)en or write to:
Gen(ral Manager; Customer Relations
GE Applian(es, Applian(e Park
Louisville, KY 40225
GEAppliances.com
RegisterYourAppliance GEAppliances.com
Register ),our new appfiance on-line--at your convenience! Timely product registration
will all_)w t})r enhanced communi(ation and prompt servi(e tmd(r the ternls ofvl_ur
warrant); should tile need arise. "_}mmav also mail in tile pre-printed registration (ard
in(luded in the pa(king material.
Printedin Korea
Page 45

©
©
°v.,,q
©
©
GEAppliances.com
de segurMad .2-.)
Instru_ones de operad6n
(_ambio el ni\vl
de potencia ......... 13
C(m/o reemplazar
las bombillas ......... 35
Cuidado v
limpieza ......... 33, 34
Fm_ddn de
extractor . ........ 36, 37
Ftmciones
automfificas ......... 20
Funciones de
sensor . .......... 21-24
Ftmciones de
S/I hoi'no de
microondas ...... 11, 12
Ftmciones de
tiempo .......... 14-19
Gufa de coccidn .15, 16
Gtlla paI'a
descongelaci6n ...... 18
Otras flmciones . . . 95-31
Tg_mfinos del
microondas ......... 32
....... c (
Antes de Ilamar
al servido de
,_IOaradones ...... 38, 39
Cosas nommles
de su homo de
microondas ......... 39
So[_)rteal ormsvJmiclcn"
(;arantfa ............ 43
Kits opcionales ....... 10
Soporte al
(_onsmnidor....Cubierta
Tl'aseI'a
JVM3660
,]VM3670
Anote aqui los numeros de mode/o
y de serie:
Numero de modelo
Numero de serie
I x)s en(OlltFar_ ell tllla etiq/leta al
abrir la pm'rta.
164D3370P274 49-40344 06-03JR
Page 46

INSTRUCCIONESIMPORTANTESDESEGURIDAD.
LEAPRIMEROTODALASINSTRUCCIONES.
iPRECAUCION!
Porsu seguridad,la informaciSncontenidaeneste manualdebe
seguirsepara minimizarelriesgo deincendio,explosiSn,descarga
el#ctrica, exposiciSnaenergfamicroondasopara evitar dafios
a la propiedad,lesionespersonalesop#rdida de vida.
PRECAUCIONESPARAEVITAR
POSIBLEEXPOSICIONAUNA
EXCESIVAENERGiADEMICROONDAS.
iiiii!ilii_i:ii::iiii:,i!
ii_iiii'iiii!_!_ii'i!_iil
iiiiiYi ii!!::ii
iiii!W_iiiiYiiiiliiilii!i_ii'
I[I
No Intente opcrar csw homo
(on h_ puerta _ff)i('rm }_ qm,
csto podrfa rcsuh_r en una
exposi(i6n a energf_
mi_ roondas dafiina. Es
importante no (an(elar ni
manipular de/_)rma indebida
los disposid_os (te segm_(t_(t.
No Siteie ningdn ol!jeto emre
la parw/i'omal del horno v la
])ll(']7|_l I/i ])(,l'llli|_t (ill(' s('
_CIIIIIlll(' SIICi('(]_t(| 0 r('._idllos
lhnpios en las gomas (te
(ierre herm('tico.
;_ No Use el homo si estfi
daflado. Es especkdmente
impormme que la puerta de]
homo se (ierre (orr('(tan/ellte
y que no sc dafie:
.........................(FOIOS 0 s/leltos),
........................._'()H/_tS (te (l(!lTe
herm(,dco.
;_El homo no deberia _justarse
ni rel)m:m:',e pot nadie que
llo StM ])('l'SOl/_d (|(' S('l'_lcJo
ade(uadamente (_difi(a(lo.
INSTRUCCIONESIMPORTANTES
DESEGURIDAD.
Cuandouse electrodom#sticos, debe seguir precauciones de
seguridad b#sicas, incluyendo las siguientes:
l,e_ v obedez(_ 'as Insm,e o (o,o(tue este
precauciones especfl_cas
en ,a seccidn de Precauciones
para evitar posible exposicifn
a una energfa excesiva de
microondas de arriba.
Este e,e(tro(tom('sd(o (tebe
estar conectado _ tierr_.
Condctelo s61o _ tma toma
de corfiente con toma de
tierl_l. _'_I'a seccidn de
Instrucciones de toma de
fierra en k, p_gdna 8.
elecu'odom4sdco sigtfiendo
s6,o ,as Instrucciones de
Insta,acion t)ro_Jslas.
Este homo de microondas
est_i 'istado por UI t)ar_ ser
insta'a(Io sobre estu_ss
e,e(tri(-as y (te ga_,eH rallgos.
Este homo de microondas
no h_ sido a( eptado ni
pfx)ba(to p_ll?_l IISO IlIHlJI/().
Page 47

vvvvw.GEAppliance_com
Use este aparato sSIopara los fines que se describen en este manual
: NO II/ont( este el((IFodolI/es[ico sobl'e/tl/
ffegadero.
N Este horno puede instalarse encima de la
coci_m y estfi diseflado para su uso sot)r(
(o(iIl_k _, ell(imeras i/o II/(L _}allchas de 36".
Puede iilstalarse sobr( equipos para
coci_mr de g',_so el&tricos.
: No usar este el(ctrodom&dco si el cable
d( (orrieme o el enchut_ han suMdo
algdn daflo, si i1o filllCiOl/a (;orrectamente
o si ha resuhado dafiado o se ha cafdo.
Si el cable de corfiente ha sido daflado,
deb( scr reemplazado pot el Se_Mcio
Reparaciones (l( General Nectfic ((;E
Servi(e) o/LH ageme de/'{'p_llTaCioIleS
a/ltOlJZa([o elI/plem/do tlI/cable de
corfieme que General Electric liene
a su dispobicidlL
: No (ubra _;i bl,.}quee nil/gram apertura de
este electro(Iom('sti( o.
@ Use este aparato s61o para los tines
q/te s( (les(ribell el/estP lnalma]. No its(,
pro(l/lctos q/tfl//k;os lfi \'apores (orrosix_}s
ell este electrodonldstk:o. Este horllo
microon(las €_tfiesp(cflicamel]te (liseflado
para (al(%tal, secar o cO(il/ar (olnida y i/o
para S/l/lSO illd/tstlJa] 0 en lal)oratorlo.
No ahnacene esm electrodom&dco al ail_'
lil)re. No Itse cste produ(to ccrca dcl
aguaIpor cjemplo, en un sdtano m(!iado,
cerca de una alberca, cerca (le ull
fi'egadero o en htgares sin]ilares.
N Mamenga el cable (le corrlente akjado de
superficies calientes.
@ No sumelja el cable (le corriente ni el
el"_chutb en agua.
: Pma r{'ducir el 15esgo (le incendio en la
aperture del homo:
--No cocine (lem_tsiado la comida. Preste
atcncidn cui(la(Iosa al electrod(}n/{:stico
( uand(} s{' (olo(a papcl, ])]fisti(o/t (}tro
I//_II{Ti_II ( omb/tslibl{' CH C1 hOl'l/O l//i{'l/tl'aS
se ((}cina.
--(_uite las cint_t,, (1( cierrc con m(tal y las
asas metfilicas (le los re(ipientes (I( papel o
plfisti( o m]t{s de intro(Incifl(}s el/ el horn(}.
--No almaccI_( cosas en cl horno. N(} de j{'
pr(}(Inctos (le pap{q, UtCl]silios dc ( (}cinm"
Hi ( (}H'Ii(I_I CI/ {'] ]/(}l'I/(} ///]C1]IIT_IS l](} ](} {'St{;
[]SHI/do.
--Si se incendiara algdn mat( fial (1(nm},
mantenga la puerta del homo c( rt'ada,
apague el h(}rno y desconecm el cable de
(orrielHP el(,( tlJ(;a, (}apague la (;(}rriellte
en el fllsil)le o panel (tel diik,rcncial. Si se
abre ]a p/terra c] flu'g(} ])o(h'fa cxpan(lirs(.
--No utilice las (alPa( tcrIsli(as (l{' _{'l/S{}l"(lOS
\{'CCS ( ons('{/lti\[/s i'll 1_1 II/isIntl p(}r(i6n dc
((}n/ida. Si la ( omi(la ii(} s( ha (o(ina(lo
p(}r cOral)let(} despu& (1( la primera
( uenta regr{'sixa, use la timcidn Tiloo Cook
para tiempo de c(}c(i6]] a(li(i(mal.
Revise las insmt( (Jones de limpicza dc
la superficic (Ic ]a pu(rta en la sc((i6n
Cuidadoylimpieza del homo microondas
dr' {'s[{' l/]all/t_t].
I.as repamciones (le este electrod(}m&tico
deberi:m ser realizadas s61o p(}r personal
cualificado. P6ngase en contacto c(}n el
( ('11117(} de serxicio alll{}liz_do///_IS ( ercal/o
para su redsidn, reparacidn o @lsw.
N E1 us{}(le cualquier electrodom{Tsdco p(}r
parte de nifios (1(berfa set"SUl)ervisad(} (le
(er(a pot uH a(htlt(}.
N No ahnacene nada direcmmeme encima
de la superficie (t(1 mkToon(las cuand(}
estd eli (}])eracidn.
3
Page 48

INSTRUCCIONESIMPORTANTESDESEGURIDAD.
LEAPRIMEROTODALASINSTRUCCIONES.
iPRECAUCIOIV!
FORMACIONDEARCOELECTRICO
Si ve que se forman arcos el#ctricos, presione el botSn
CLEAR/OFF(borrar/apagado) y resuelva el problema.
Arco cl&tri( o es lo que, en la ;_ El papc] de ahunink) no cstfi
temlinolog/a de los microondas,
describe las chispas en el horno.
E1 arco el0ctrico se produce
cuando:
El estame metfilico no est_i
instalado correctamente v
toca la pared del microondas.
t ta} m/metal o papel de
ahllninio tocando el lateral
del horno.
envolviendo bien la comida
(hay hordes doblados hacia
anJba que _tC[/]_tll COIIIO
amenas.)
t lay algdn metal, con/o cintas
de cierre con nletal, pin( hos
de polio, o platos con
decol_mi&n de ()Ix) delltl:O
del n/icroondas.
Se estfi usando papel toalla
reciclado que contienen
pequeflas porciones de
llletal ell el llliCFoondas.
iiiii!ilii iii :iiii!i!
ii iiiiiiii!! iii! iil
g
iiiiiYi ii!!iiii
iiii!W iiiiYiiiiliiilii!i ii
COMIDAS
No l/agv_ rosems o palomitas
de mafz ell el microondas a
no s('l" (tile es[(' [is_:tlldo [Ill
accesolJO especial ])alTa
prepm:arlas o que estd
en/pleando rosetas o
palomitas de mafz que
indiquen set vSlidas para el
HSO (|e hornos lIliCFoondas.
Algunos t/roductos conlo las
yemas de huevo y lx'cipientcs
sellados--tlor ejemplo, jan:as
l erradas--podrfan ext)lotar
V no (leben calental'se ell el
horno micmondas. Si se usa
de esa/orma el homo
lIliCl'OOIldaS p/ledell c_t/is_tl'se
daflos pel'sonales.
No l/ier_ hllt'vos dentro
de m/homo microondas.
Se generar_i presi&n dentro
de la ven/a del huevo que
causal_i que explore
pudiendo, posiblenlente,
daflar a algtden.
;_ 8i Se pOlle el/l//al?cha el
llliCroondas Sill teller coli/ida
ell S/l int('lJor pot l/l_lS de/111
nlinuto o dos podrfm/
(ausarse daflos _fl horno v
podl/a empezar un/ilego.
Esto hace allIllenlar la
temllemtura alrededor del
nlag_ letr611 y p _led e red _lcir
el perfodo de _{(ta fitil del
|lOFnO.
;_ Deberfa cortarse la "piel"
externa de aquellos
alililell[OS que IXO la tengall
rota/omo las papas,
salchi( has, en/butidos,
tonlates, mm/zanas, hfgados
de polio y (teln_is menudillos
d(' _l_,_'S V g('I//_tS (1(' ]I/I(WOS_
para peru/itir la salida de
vapor mienm_s se cocinml.
Page 49

vvww.GEAppliance_com
AGUASOBRECALENTADA
Liquidos,tales comeagua,caf_,
o t_,se podriansobrecalentar
m_s all_delpunto deebullici6n
sin parecerque est_nhirviendo.
No siemprehabr_ burbujas o
evidencia deque elliquido est&
hirviendocuandose extrae el
envasecon el liquido del
microondas.ESTOPODRiA
RESULTARENLiQuIDOSMUY
CALIENTESDEREPENTE
COMENZANDOA HERVIRYA
REBOSARSECUANDOEL
ENVASEESMOVIDO0 SI UNA
CUCHARAU OTROUTENSILIO
SELEINTRODUCEAL L[QUIDO.
Para reducir el riesgo de
lesiones perSOl_P.les:
-- No sobrecaliente los
liquidos.
-- Mueva el lfq/ftdo tamo ames
como a mediados del dempo
de cal('l/tallliel/tO,
-- No/lse ellvP.ses (|e ]p.dos
recI()s con tile]los estrechos.
-- I)espuds del calentamiemo,
pel_llita q/le ('1 ell%iS('
pe]_lllal/ez(a ell ('1 mictx)olldas
p()l _/1I/ ti('lllpO COF|O _Illt('S de
]'('I//OV('F ('1 (']I_&IS( ',
-- Use c/fidado extremo
cuando inserte mla cuchm:a
u otto meHsilio en el em'ase.
No caliente la comida del
bekx', en jart_ts de ofistal,
incluso si est_n desmpada_,.
Aseg(lrese de que los
alilnemos de h)s lliflos esff'll
bien cocinados. R('m/leva la
comida pare distfibuir el calor
de {onIla parqia. "Ii'n_
cuidado de que el niflo no se
queme al calemar la lethe de
{bmmla. E1 (ontenedor pue(te
parecer mils 1i5o de lo que
realmente estd la/_3mmla.
Pl u('t)e siemlm' la {bmmla
antes de dfirsela al beb('.
;_ No descong-ele bet)idas
(ongeladas en bowllas
de cuello esti'x'cho
(especiahilellte bet)idas
carbonamdas). Incluso con
el contenedor abierto, po(lrfa
g('nerarse m/mmlemo de
t)_x'sidn. Esto tmede causar
que el (X)l/telledor explore,
lo cual 1)o(ItSa producir
dafios personales.
;_ I ,os alimemos calientes v
el wq)or pue(len causar
quema(tm:as. Tenga c/fi(ta(Io
al at)fir cualquier contcnedor
(on (omida (alieme, incluso
bolsas de rosetas o palomitas
de mafz, bolsas o (_!jas de
(o(illar. [)a]?a pFeV('llir
posibles daflos personales,
mantcng_ el wq)or ahjado
de sus manos v rostro.
:_ No cocine demasiado las
papas, t)o(It_an deshidratar.se
e incendiarse, causan(to
dafios a S/I horl/o.
;_ Cocine la carney el polio pot
(OI/It)I('IO_H (_t171/(' h_tst:d
que ah ante mla m*nl)ermm_
mflfima IN FEI_()R de 160°K
v el pollo hasm mm
tcmt)e_mn:a INTERNA
minima de 180°E Cuando se
cocinan a estas temperamras
se cvita la contraccidn de
enl_'mmdades t)or
imoxi(acidn.
!i i i! ii:iiiHiiil
5
Page 50

INSTRUCCIONESIMPORTANTESDESEGURIDAD.
LEAPRIMEROTODALASINSTRUCCIONES.
iPRECAUCIOIV!
UTENSILIOSDECOCINA
PARAMICROONDAS
ii iiii'iiii! ! ii'i! iil
g
iiiiiYi ii!!iiii
iiii!W iiiiYiiiiliiilii!i ii'
Abegfirese de que to(los los
utensilios de cocina que use
ell sit hOFltO st!all aptos pku-a
l/licrooltdas. Ptledell/is}//'se la
ma}orf}l de las c_/zuelas, platos
para cocinm; tazas de medir
tazas de flanes y bores de cfistal,
o las \}!}illas de porcelm_a que
ltO tienen decoraciones ii/etalicas
o bamices c(m brillo met_ilico.
Algtmos utensilios tienen la
siguieme inscripcidn: "puede
usarse e1/microol/das."
Si l_o estfi seguro de que un
plat() pueda usarse en el
microondas, h_tga esta prueba:
Coloque el plat() que estd
probando y ui_ vaso de medir
con 237 ml (1 taza) de agua en
el homo - ponga la mz_ de
medir dentro o al lado del
plat(). Ponga el microondas en
mardm, a n/(_xima potencia,
dul";.mte 3()M5 segundos. Si el
plat() se calien ta, no deberfa
ttsarse ell el i/licrooltdas.
Si el plato se mantiene ti'fo
y sdlo se calienta la taza,
entonces el plat() puede
usarse de [[)Fllla segura elt
el iqr/icr()()ndas.
Si Lisa/tit [eFinoil/etlx) tie calTite
al cocinar asegfirese que sea
till() seguro para tlsarse ell
II()ITII()S l//iCFOOl/das.
No use productos de papel
reciclado. E1 papel t_)alla, las
servilletas y el papel de cera
reciclados ])tic!dell col/teller
motas metfilicas que podrian
catlsar la ]Orl/laci61/de arcos
eldctricos o incendi_u-se.
Los productos de papel que
C()lltel/_'dl/ Ililol/ 0 tllalIlelltos
de nildn mmpoco del)erf_m
usarse }_tque se podrfm_
incendiar de igual modo.
Ngmtas band(jas de plfisdco
(conlo ell las qtle se
empaquem la came) tienen
tma cinta lina de metal
incrustada en el plat_). A1
ponerse ell el IIlicroolldas,
el metal puede quemar el
suelo del horno o incendiar
tin papel toalla.
No rise Stl hOl'llO lllic1x)olldas
para secar periddicos.
No to(Io film pbistico puede
ttS_llTSe t+ll llOl'llOS l//iCl'OOIl(l_/s.
Rt'_ise el ttso adecuado del
paquete.
Pueden usarse papel toalla,
papel encerado y film pl_istico
para los recipientes de torma
que remngan la humedad y
para prevenir _dpicaduras.
Asegflrese de pro\_'er tma
lorma de ventilacidn para
que el \apor pueda escapar
del film pl_isfico.
Podrfm_ calemarse los
utensilios por el calor
transfbrido pot los alimentos
(alientes. Puede ne(esitar usar
manoplas de cocina pm_a
lllalt(jal7 los/ltensilios.
Page 51

vvww.GEAppliance_com
I,as bolsas de cocinar que
puedan hervir y cu:dq/fier
bolsa de pl_isfico firmemente
cen:ada, debe_Sp.ll Corlarse,
pill( ]/al?Se 0 prov('e]?
(ualquier tipo de vcnlilaci6n
que indique el paquete. En
caso commrio, el plfistico
podria explorer mientras se
cocina o despu('s, ]mdiendo
cm_sar dafios ffsicos. Adew,_is,
los recipiemes de plfistico
debetSan permanecer,
al lilellOS, parciah//eilte
destapados ?,'aque ]meden
sellarse flmrtemente. Cuando
cocine c()H recipiclltes
_i]311('Hl('I'lt("cul)iertos COIl
film plfis6co, retire la
c/lbierta con C/lidado v
mamenga el _vll)or ahjado
de S/IS l/l_.l/()S V FOS[FO,
Use papel de aluminio s61o
de la/orma detallada en este
manu;fl. I as comidas tSpidas
preparadas p/le(|ell l//eteFSe
en el microondas en
bandqjas de ahmfinio de
menos de 3/4" de almm.
Quite la cubierta de ;duminio
_r.vug'halas a porter dentro de
la (_ja. Cuando use _flmninio
denu:o de un homo
micmondas, mantenga el
aluminio, ;fl menos, a ima
t)ulg_da de distancia de los
laterales del horno.
;_ Utensilios de plfistico--
I ,os utensilios de plfistico
(|JS('I_IH(]OS 1)_117_t SIl [IS() ('1/
micmondas son mm
]mlcticos, ])ero (leben usarse
(on c/fidado. Incluso aquellos
utensilios autofizados 1)am su
/ISO 1'11 I//iclx)olldas poOl?fall
no ser mn tolemmes como el
crisml o los mamriales de
cetSmica en condiciones de
sol)tvcalentamiento y t)odrfan
ablandarse o cart)onizarse al
sometcrlos a perfodos cortos
de sobre(alentamiento.
En exposMones mils largvls
a sol)txx alentamiento,
la comida v los utensilios
])odrfan in( endiarse.
Siga estas normas:
Use solameme plfislk os
aptos para llliCl?Oolldas
v uselos siguiendo
eswict:ali/ente ]as
recomendaciones
del tid)ficante de los
IItellsilios.
!-;, No introd/tz(a en el
,l- lIlicrool/das recii)ientes
VaClOS.
No ] er nita (p e los
0 - s s s
1111103 113(!1/ /ltellslh03 ( (_
plfistico sin comph'ta
SUl)crvisidn.
7
Page 52

INSTRUCCIONESIMPORTANTESDESEGURIDAD.
LEAPRIMEROTODALASINSTRUCCIONES.
ii_iiii'iiii!_!_ii'i!_iil
iiiiiYi ii!!iiii
iAD VERTENCIA!
El usoindebidodel enchufede tierrapuederesultar enriesgo
dedescargael#ctrica.
INSTRUCCIONESDETOMADETIERRA
Este electrodomdsdco debe estar conectado a tierm. Si se lm_dujem
un cortocircuito, la toma de tiered1 reduce el riesgo de descm:g'a
eldctfica al proveer ml cable de escape para la corfiente eldctrica.
Este electrodomdstico estfi e(luipado con m_ cakde de (orrieme que
dis])on(' (|(' Hll hilo ]);-u';-_ tOlIllt (|(' tierr_ (on/111 (ql( hH](' (o11 t()li/il
de tierra. H en(huli_, debe estm: (one(ta(to a m_a toma de (orriente
que estd debidmnentc instalada v con sMida a tierra.
Consuhe con m_ elect_Jcista cualilicado o m J,t('cnico de
reparaciones .si11o entiende completamente las il/S|l?llCCiOlleS sobre
la toma de tierm, o si tm_ese algtma duda sobre si su aparato estfi
debidamente conectado a derra.
Si la toma de con:iente es tm modelo est_indar de dos clm+!jas, es su
responsabilidad personal y su oMig_cidn el reemplazarla por mm
toma _de( ua(t_ para tres clm_j_s con conexidn a tierr_.
B;tjo ningm_a cir( m_stancia debe (ortar o quitar la ter(era (la_!jt_
(derm) del (td)le de corrientc.
No use m_ en(hu/_' a(t_ptador (on este elect_x)domg'sd(o.
No/ISC/In C_l|)le (_XtCI/SOF dc (ol'li(_I/[C c()ll cstc ('lc( u'odolI/£_sti(o.
Si el (_ff_le de (orneme es demasiado (otto, haga que m_
ele(tficista cualifi_ _do o m_ t(x nko de repm_(iones instalen mm
tOlm_ de (orfiente cerca del ele(trodomdsfico.
Pare tm mqjor flmcionamiemo, enchtd(' este electrodom('sti( o
('11 HII_I1o1//_t (|(' CO171J('ll|(' cx_ lusiv_ ])ara e_.it:ar pa_'])_:t(teos de luz,
fl_sikdes quemados o que sahe el dit_'ren(ial.
iiii!W:iiiiYiiiiliiilii!i_ii'
Page 53

www.GEAppliances.com
ELVENTILADOREXTRACTOR
E1 vcmilador se pond_5 en flmdonamiento de t_mna autom_iti( a
b_!io (iertas circllllSt:ctntias (vet fllnci6n tie Vcntilador A/ltoln_tico}.
Prevenga el que empiece algdn flmgo al cocinar y que se extienda
mientras el vcntilador del respiradero est_i en marcha.
:_ I _impie a mem_do la parte in{_'rior del microondas. No permita
que se acmmde gmsa en el micmondas o en los tiltms del
vcntila(to_
N Si la grasa se incendiara en las mfidades de la co(ina (/_)g-ones)
b_!jo el homo microondas, so/oque cualquier sartdn en llamas de
la unidad de cocina por completo con mla tapa, mm ban&ja de
g_dletas o cualquier otra ban&ja plana.
:_ "Ibnga cuidado al limpiar los/iltros del vemilador extmctol:
I ,os pmductos de lhnpieza corrosivos, como los limpia-hornos
a base de l_jfa, tmeden daflar los/ihros.
:_ Pong_l en marcha el extractor cuando estd c()cinando comidas
con llama b@) el microondas.
:_ Nm_a d@' las mfidadcs de la cocim, (/_)goncs) b_!jo su
microondas sin atenci6n cuando se estd trabajando a _Otas
temperamras. Cuando la comida entra en ebullicidn se generan
humos y se derraman wasas que pudieran incendiarse y
propag_u:se si el _entilador del mi( roondas estfi flmcionando.
Para minimizar el flmcionamiento del extractor autom_itico, use
mensilios de cocina de tamaflo adecuado v use el fl_ego r_ipido
en las mfidades de la cocina (/k)gones) s61o cuando sea
necesario.
FAVORDELEERYSEGUIR
CUIDADOSAMENTEESTA
INFORMACIONDESEGURIDAD.
GUARDEESTASINSTRUCCIONES
_iiiiiiiii!iiii/iiiiii_iiiiiii!!ii
iiiiili{Hii_iiiiiii!iiiii_i
9
Page 54

Kits opcionales.
KITSOPCIONALES
Kits de filtros
JX81B- Kit de filtro de carbon vegetal de recirculacion
I,os kits de filtros se usan cuando el homo no puede tenet
una salida al exterior:
Disponibles en su distribuidor GE pot tm costo adicional.
iiiiiiiiiiiiii_i//
iiiiiiliii!i!
iii!ii_i!i!i!i!!ill
/0
Page 55

desu homo.demicmondas: vvww.GEAppliances.com.
Su modelo puede tener otras caracterfsticas y apariencia que las ilustradas
en este manual
0
?
J
| -0
|
1100 Vatios
Funcionesdelhomo
O Mango de/a puerta.Thx' dc ella
para abfir la puerta. I ,a puerta
debe estherdebidamente
(errada para quc el
II/iCl'OOI?([aS fltncioI/e.
0 Eeganohesde/a puerta.
Ventani//aconcobertura
metalioa.I,a panmlla p( rmile
qtlt' tlSte(I ptl('d_l \('r lo q/w
(odnm al ticmpo qm,
ln_lllti('i/e ]_L_IIIi(YOOIK]_I_
0 Ventilaoionaotiva(enalgunos
modelos).I _a})u(rta (I(
wntila(idn gira y qm'(l_ _tbicrta
(/l_indo 1'I vei)til_dor co///i('llZa
a JFttllCiOl]_iI" y st' (ierl'_t c/t_il/do
el _,emilador para de fimcional:
O Estante de descongelado.
Ctl_tn([o S( (?II(II(I/IF(?
desc(mgelm_do, para mcjores
rt,sult_/d()s, coloque los
alimentos directam(nte sobre
el estante (k descongelado y
coloque el estante en el plato
g_r_to_o.
O Estante.I._ l)(rmil( cocinar
alimcntos al mismo dcmpo.
l_('jof (/t_/lldo ('st_in (O]O(_(IOS
direct_uncnt(' ('n el pl_ilo
gJr_toY[o.
Panelde visualizaeioe de control
detoque.
O Luoesde/a estufa.
0 Filtmsparagrasa.
Platomovible.E1 plato g_mtorio
el apovo dehee estar
(O]OCFt([OS i'll S/I 1/l_I" (/l_lI)([O
ustc(I est(' usm_do el horno.
E1plato g_ratod(_ pue(l_ set
rt'movido pm:a limpiaflo.
NOTA:Elplato,/as vontanillas fie
ventilaciSny la luz del microondas se
encuentran Iocalizadosen /asparedes
intemas delhomo demicroondas.
11
Page 56

Acercadelas funciones
desuhomodemicmondas.
Ustedpuede cocinar afimentos en su microondas auxifi#ndose del fiempo,
con los sensores, o con las funciones autom#ticas.
i! i ii i iii !ii ii
i i i
iiii!W_iiiiYiiiiliiilii!i_ii'
0
ControlesdecocciGn
Funcionesdel tiempo y automaticas
0
Presione Entre
TIME COOKI & II tcoccio,por tiempoI& II) Cocci(_npot tiempo
Presioneuna o dosveces
AUTO/TIME DEFROST Cantidadde tiempode
(descongelacicnautomJdetiempo) descongelaciGn
Presionedosveces
CUSTOM (funcicnparaaiustespersonalestSigalas instruccionesenla pantalla
EXPRESSCOOK(cocdc.expresa) iComienzainmediatamente!
ADD 30 SEC(agregar3Osegundos) iComienzainmediatamente!
POWER LEVEL(.iveldepotencia) Nivelde potenciaentre 1-10
AUTO/TIME DEFROST Pesodel alimento
(descongelaciollautom,/detiempo) hasta6 libras
Presioneunavez
1 lb. QUICKDEFROST iComienzainmediatamente!
(descongelacioarapidade1libra)
Funcionesde sensores
0
Presione Entre Opcion
POPCORN(rosetasdemaiz) iComienzainmediatamente! Mas/menos tiempo
BEVERAGE(belddas) iComienzainmediatamente!
REHEAT(recalentar) iComienzainmediatamente!Mas/menos tiempo
POTATO(papast iComienzainmediatamente! Mas/menos tiempo
VEGETABLE(vegetalest iComienzainmediatamente!
Presioneunavez(vegetalesfrescos) Mas/menos tiempo
Presionedosveces(vegetalescongelados) Mas/menos tiempo
Presionetresveces(vegetalesenlatados) Mas/menos tiempo
CHICKEN/FISH (poHo/p_ado)iComienzainmediatamente! Mas/menos tiempo
Presioneunavez(pedazosde polio)
Presionedosveces(pescado)
(enaigunosmodeios)
Page 57

Cambioel niveldepotencia, vvww.GEAppliances.com
I _os niveles de potencia vari_d)les amplfan sus
TIME ADD
LoLo,II°x,,,LoJ
[ F-I[ I
U;-I
Come eambiar los niveles
de potencia
Los niv(.h.s de pown(ia
ptle(]('H S(!t" l't_iStl'_t(]OS 0
(ambiados imncdiatament(
despu_s de haber
registrado la fun(i6n de
tiempo pm-a TIME COOK
((o((idn pot ticmpo),
TIMEDEFROST(ticmpo de
dcs(,mgcla(idn), EXPRESS
COOK((o( d6n cxprcsa)
o ADD 30SEC (agrcguc
30 s(_dtmdos ). El nivcl (h'
potcn(ia tmnbi&l pucd("
ser caml)iado (h)tante el
tonteo rcgresiv<) del
tiempo.
Pr( sione TIME COOK
(Eo((idn por tiempo)
o s(lc((ion( el Tinle
Defrost (fi( mpo de
d( s(ong( laEi6n).
d( s(ong( la( i6n.
{_<. Pr( si,,n( POWERLEVEL
............(hive 1de poten(ia).
_ Sehx(ionc (I nivel de
poten(ia d( s(ado dcl
1 al 10.
Pr(sion( START
(ini(io).
posibilidades de (o( (i6n en el mi(roondas. I ,os nixeles
de ])Otel/tia (711 (_1 hOFI/O (]c H/it 1X)OII(]_IS pIl(Xt(?l/s(!17
comparados con las mfidades de superficie en un
*_mgo. Alto (nivel de potencia 10) o a capacidad
m_ixima es la tbnna mils rq)ida de co(inar y le da
un 100% de poten(ia. (:ada nixel dc pOtCll(ia le
propor(iona ell(}l'g]*a l//i(rOOl/(]as 111/(ierto pol'(el/t_tie
del tiempo. El nixel de pot(mcia 7 es energ-fa
mi(roondas 70% del tiempo. El nixel de poten(ia
3 es cllerg_'a mi( roondas 30%. del ticmpo.
[In @lste _dto (10) (ocina m_is rSpidamente, pcro
qHiZ_tS SII _dllll(!ll|O 11(!( (_sit(? s(!Y l//ovido o Kirado 1D;_s
_l'(!(/I(!I/t(!I//OIH(L I _t_ HIWq()l_l_'t d(! SHS ( OCCiOII(}S S(?F_tl/
heEhas en All() (t ]igh), en el nivE'l de potenEia 10.
I ,os _!justes mils bajos Eo(inan con mayor mfi/ormidad
v el alimento no necesita ser movido o g_m(to tan
/i'E'Euentemente.
,\lgmios alimemos quiz_is tengan un mEjor s_d)or, mm
I/IE_i()F [E'XtllFa 0 /IIlH }I])_IlJCI/CiH IIl}/S _Hl_lcti\'_l si St' /IS_Ill
a.jllstes IIlellOFeS. Use Illl//ivel l//ellOr de polellCia
€rlando ¢ocille alilI/elllOS qlle iielldell a hervi]; cOIIlO
papas al gmtdn.
I_os pe_5odos de descanso (cuando los ciclos de
energfa del microondas estfin suspendidos) dan
tiempo a los alimentos a que se "e( ualiEen" o a que
mmsfieran Ealor haEia los alimentos Ee)'canos. tin
tjemplo de esto es m()strado con el nivcl de potencia 3
---con el ciclo de descongEqacidn. Si la energ_'a del
_//icrOOll(las i1o descallSO, la parm exterlla de los
alil//el/tOS Se cocil/alTtl allies de q/le el c(_ll[l?() sp ]lava
descongelado.
A continuacidn le presentamos algm_os Ejemplos de la
/orma en que se usan los _mdos nivcles de potencia.
Nivel de
potencia
Alto 10 (High)
Altomedio7
(Med-High)
Medio5
(Medimn)
Ba]o2-3 (Low)
fibio 1 (Warm)
Mejores usos
PE'SEado, tOEinO, VE'gE'taIE's,lfquidos
hervidos.
Cocci6n h'vc de tames y a\ es; guisos y
alimemos recalemados.
Cocci6n lenta y sua\ e, como estoti_dos
y alimentos ligeros.
DescongE'laci6n sin cocci6n; alimentos
helMdos a flmgo lento, salsas delicadas.
Para mantener alimentos tibios
sin cocinarlos demasiado; para
suavizar o derrefir mamequilla.
li ii
73
Page 58

Acerca de las funcionesde tiempo.
!ii!l ii! !l+
] ie.ume TIME COOK.
(((>((iOll p(>F tiel>/p(>).
_ l_)l/tl_ ' U1 pl_lIl(q?
uempo de (oc(i6n.
Cambie el nivcl de
pomncia si usmd no
desea usar el nivel pot
deti'cto. (Presione
POWER LEVEL [nivel
dc potcndal.
Sekxdone m_ ni_vl
de potencia deseado
de 1 a 10).
1 _e. u>ne START
(ini(io).
CocciOnpor tiempo I
i_( ])(tl_l/>ite ((>(il/aF t)(>17 (tlal(Jtliel _ ]a])so llama
99 mimm>s yr {){) S(_g_l_ _(I()S"
El nixcl dc potcncia 10 (Alto) estfi _!justa(to
;1/11(>]/>_t|i(_11/>(!1/1(_, p(!lX) listed pll(_(te (alll|)i_.rl(>
si desea mmx)r flexibilidad.
Usted puede _d)rir la puerto durame el TIMECOOK
(co(ci6n por tiempo) 1)a_ inspec(ionar el alimento.
Cierre la puerto y presione START (inMo) para
reini(iar la co((idn.
Coccionpor tiempo II
I c pcnnitc (amt)im" los niw'les de potcn_ la
autom_iticamentc durante la (o((idn. A (ontinua(i6n
la/_mna en que se ha((':
{Presi(m({}{ rlMf COOK (( o( (i6n pot tiempo).
Entre el t)dmcr tiempo de (o(ci(m.
(_ (_amt)ie el nixel de poten(ia si usted no desea usar
el nixcl pot ( efi:xrto.(t re,_ one POWERLEVEL (nixel
de poten(ia). Sele(cione m_ ni_vl de poten(ia
deseado de 1 a 10).
"'"' ) S," •
t r_, _(>_1( TIME COOK (coc(idn por tienq)o) otra xez.
E _tr( (1 s(g 1( o ienlpo dc (oc(i6n.
m_iximo. (l)rcsi(mc POVVERLEVE_ (nixcl dc
potencia). Selcccione un nixcl de potcn(ia de
1 a 10).
) S
iiii!W:iiiiYiiiiliiilii!i_ii
t re_umc START(ini(io).
A1 final de Time Cook I, Time Cook II ((,nicnza ima
(/t(!11tZcl l'(!_TeSiX, a.
Page 59

vvvvvv.GEAppliance_com
Guiade coccionpara CoccionportiempoI y CoccionportiempoII
NOTA:Useelniveldepotenciamaxima(High)(10)a noser quese indiqueIocontrario.
Cantidad Tiempo Comentarios
Esp_rragos
(fl'cscos) ] lb. [)( (3 a 9 mill.
M_ &\Ito (7)
((ongelados) I)aqu( t( d(
Frijoles
('¢c! d(s ti'cS(OS )
l0 ol_zas
1 lb., cortados De 9 a
De 5 a 7 rain.
pot la mim<t 11 rain.
('_erdes
c0ngela(!os)
(blancos
c(mgelados)
Remolacha
(f!'esca,entera) 1 manojo
Paque_e de De 6 a 8 rain.
10 (mzas
Paquete de
De 6 a 8 rain. En cazuelas (le 1 cuar(o (1( libras,
l 0 onzas
De 17 a En cazuelas de 2 cuartos,
91 mira (:oloque 1/2 taza (le agua.
Brocoli
(ties(9) 1 manojo
De 7 a 10 min.
(I)< 1V_al 1:/_,Ibs.)
(esDirrago s 1 manojo
De 9 a 13 rain.
t}escos) (De 1V*al1V_,lbs.)
(cortado e!l ])aqu((( d(
pedazos, 10 (mzas
c0nge!ad0s)
(esp_irragos Paqu( ted(!
cmlgelados) 10 onzas
Repo!!o
(fi'es{ O) L'na (:abeza
ll/(?dial/a
(2 hbra, aprox.)
(Picad0)
Zanahofias
(ti'cscas, picadas ) 1 lb.
De 5 a 7 rain.
De 5 a 7 mill.
De8allmin.
[)e7a 10rain.
De 7 a 9 rain.
De 5 a 7 rain.
10 (mzas
En platos de homear oblongos
(le 1½ cuartos, coloque 1/4 (le
/ilia taza de agtta.
Cazuelas de l cuarto.
En cazuelas (le ] ½ cuartos,
coloque 1/2 taza de agua.
En cazuelas (le 1 cuarto de libras,
coloque 2 cucharas de agua.
coloque 1/4 taza de agua.
E:I (aztlclas (|c 2 (uartos,
coloque ]/2 taza (le agua.
En platos (le hornear oblongos
(le 2 cuartos, coloque 1/4 (le traa
taza de agua.
Cazuelas de l cuarto.
El/ (azt:mlas d( ] (Har'.o,
(X)Io(]/t(_ 3 (:{t(hal+as (](! a_/ta.
En cazuelas (1( 1_ 6 2 cuartos,
(;o]o(]lte 1/4 (le tll/a laza (l( agtla.
El/ (aZlldaS d( 2 o 24 CtLarlos,
(;o]o(]/t(_ ],/4 (](_ tll/a taza (te ag/ta.
En cazuelas de 1½cuartos,
coloque 1/4 de tma taza (te agua.
Ell (:azuelas (le 1 ctlarto,
coloque 2 cud_aradas de agua.
Coliflor
(on Ilorc(imiento ) L'na (abeza
111( (]ial/a
(('ntero, [k'es_o) Una cab(za
ll?e(lial/a
((:onge!ad0) ])aqu( t( de
10 (mzas
De 9 a 14 min.
De 10 a
17 min.
De 5 a 7 mill.
En (azllclas de 2 ( tlalT[OS,
coh)que ]/9 taza (le agua.
En (azttelas de 2 (uartos,
coloqtte ]/2 taza <le agua.
En cazuelas de 1 cuarto,
2 cuchara(tas (te agua.
15
li+ ii
!i i+i! ii:+iiH++il+
Page 60

Acerca de las funcionesde tiempo.
Maiz
(cono'elados) Paquet_ de l)e 5 a 7 rain. En _azuelas de 1 (uarto de libras,
Maiz enmazorca
(ycrdcsfiescos) De 1 a 5
(congelados) 1 mazorca
!
Vegetales
mezclados
((0nge!ad0s) Paquete de
Chicharos o
guisantes
(frescos sin 2 lbs., eF_ stts
vainas) ._tim_s
(con: gmlados)_ Paqu('te de
Papas
(fi'escas, (ubit0s, 4 papas
blancas) (de 6 a 8 oz.
(ti'escas, ent(ra, 1 (de 6 a 8 oz.)
dulce 0 blanca)
iiii!W:iiiiYiiiiliiilii!i ii
Espinaca
(fl'esca) De ] 0 a 16 oz.
(congelada, 1a(luete de
cortaday bolas) I0 onzas
Cantidad fiempo Comentarios
10 onzas (oloque 2 ( u(haradas de agna.
mazorcas
I)e 2 a 6
IllaZOF( aS
10 onzas
10 onzas
ca(la /1110)
I)e3 _4min.
pol" l/l_lZOl'( a
De 5 a 6 rain.
Ik a _4 rain.
p()F I/I_IZOF( as
I)e 5 a 7 rain. E_ cazuelas de 1 cuarto,
I)e 9 a 12 rain.
I)e 5 a 7 rain.
I)e 9 a 12 rain.
I)e 3 a 4 mill.
I)e 5 a 7 rain.
I)e 5 a 7 rain.
Coloque el mafz en m_ plat()
d(' hoI'Ile}ll7 oblOllg'O d(' 2 c/IaI'tOS.
Si el ii/alZ est_i ei/l/lazol'cas 11o
use agua, si ha sido desgranado
agregue 1/4 de agua. Cambie de
posici6n (]espu& de transcurrido
la mitad (lel tiempo.
Coloque el mafz en Hit plato de
horlleal7 oblollgo de 2 c/lartos.
C/lbya COD /llla elIvoltttlTa
pl_stica. Cambie de posicidn
despuds de transcm:rido la
mitad del tiempo.
(oloque 3 (u(haradas (l,:_agua.
Ell cazuelas de 1 c/lal?tO,
coloque 1/4 taza de agua.
En cazuelas de 1 cuarto,
coloque 2 cucharadas de agna.
Pele v torte ell ctlbitos (le
1 pul'gada. Ez_ cazuelas de
2 cuartos, coloque 1/2 taza
de _,gua. Mueva despuds de
trai_scm:rido la mitad del tiempo.
PelTlore coil telle(lol7 (le cocina.
Coloque en el centro del homo.
D(jelo descansar por 5 I/lilllltOS.
(:oloque la espinaca lmv_(la en
/171}1 C}_Z/le]}l de 2 C/IH1 tOS.
En cazuelas de 1 cuarto,
coloque 3 cucharadas de agua.
(fi'esca, reran9 1 lb. cormda
y amafi!!a ) et_ t@'tdas
(invierno, De 1 a 2
calabaza) calabazas
(cerca de 1 lb.
(ada HIlO)
I)e 5 a 7 rain. En cazuelas de 1V_,cuartos,
coloque 1/4 taza de ;,gna.
De 8 a 11 rain. (orte pot la mitad y remueva
membnmas fibrosas. En un plat()
de holTnear oblongo (le 2 cuartos,
coloqtte la calabaza con la i)arte
cortada orientada hacia ab@).
Cambie posicidn de 4 minutos.
Page 61

I' !1'-1
r-v]
@
Presione AUTO/TIME
.......DEFROSTdos xe( es.
Entre el fieml)o
(te des( Ol lg(_la( i(*)n.
3 l'resione START
(illi(io).
vvvvvv.GEAppliance_com
Tiempode descongelacion(TIME DEFROST)
i,(' pcrmite des(ongclar pot los lapsos (111('ust('d
sclc((iom'. Vet la (;ufa (h' I)es(ongelado para los
lapsos sttgcridos.
E1ni\('l de poteI_cia 3 _iene preseleccionado, pero
usted puede cambiarlo para ma)or flcxibilidad. Usted
puede descongelar artfculos pequefios m_is rSpidamente
aumentando el niv('l de potencia desptt('s de seleccionar
el tieml)O. Sill embargo, 8st()s necesitar_in mils atencidn
de lo usttal.
E1ni_'l tie potencia 7 red(ice el tiempo de
descongclamiento en la mired; el nix_'l de potencia l 0
re(h_ce el tiempo t()tal en aproximadamente 1/3.
Rote y gJre el alimento ti'ecltentenlent('.
Es posible que listed escuche itii sonido sordo (h_rante
el proceso de (lescollg,:._lai//iento. ]_ZstPsonido es Ilorlllal
cuando el homo no estfi operando a plena capacidad.
Ideassol)ree!descougelamieuto
Para m(jores resuhados, coloque los alimemos
directamente sobre el estante de descongelado y
coloque el estante ell el plat() girat()rio.
I.os alimentos congelados ell papel o phistico pueden
set descongclados en el inmrior de los mismos. I.os
paquetes qtte est('n herm('ticamente cerrados (leben
set perf[)rados o ',_.,ntilados I)ESPUI_S de qtte ha}an
sido parciahnente descollgelados. I.os emases plfisticos
debell estar pOT Io iil(!llOS parcialmente abiert()s.
I.os alimentos empaquetados congclados de tamafio
Jhmiliar pueden set descongelados y cocinados en el
microondas. Si el alimento estfi ellvuelto ell papel de
ahmfinio, transHdralo a itn plat<) de microondas.
No permim que alimem()s que se dafian Ncilmente,
COH/O leche, hIl('_.OS, pescado, rellel/os, carI/eS lie _/\_.'S
y cerdo (llte(len a la intemperie poT mils de ima hoTel
despu('s de haber sido descongelados. I a mmperamra
ambiental pronm(,vc el crecimient() de bacteria nocixv_.
Pal'H lograr tllI (lescongela]//iellt/) Ill,iS Itl/i[[)lTI//e ell
('as() (le carlleS, cordero v terllero, rise Auto Defrost
(I)cscongela( i6n aut()m_tica).
Ccr(idr('s(' de (ill(` p('dazos (h' (arnc grandes cst('n
t()t_lh/lel/te (l(_s(oll_('la(los allt('s dr' (o(iIlarlos.
Cuando est('n descongelados, los alimentos (leben
estar tiSos pero Ill/i_}.)I'Ill('lI/('l/t(" SILH\_.'S.Si a(lll est;/ll
ligeramena' collgelados, regrdselos al microondas pot
un laps<) COT(O,o d(jelos a la intemperie pot unos
i//ill/lt()s.
li ii
77
Page 62

Acerca de las funcionesde tiempo.
Guia de descongelamiento
fiempo
Panes, tortas, pan, panecillos (1 pedazo) / rain.
Panecillos dtdces (Aprox. ]2 onz_Js) De 3 a 5 rain.
Pescados y fi/ete de mariscos,
mariscos cougelados (l libr_L l)e i; a 8 rain.
pedazos peque_os (i librJ) i)t, 5 a 7 rain.
Fnltas
Bolsas plasticas- de 1-2 De 3 a (i rain.
Lpaquew_ de 10 on/_
Canles
Tocino l li1)i_0 Ik' 2 a 3 min.
Perritos calientes De 2 a 5 rain.
Caruemo/ida (1 libn0 De 7, a 7 mill
TEOZOSdo Cal'lle paEa asfl£_ l_ it ] (_illil/.
coR/ero, telllero, cerdo },, ,*- IiH/,
Bistec. chuleta, croqoeta De 5 a 7 rain.
Co£11edo aves
Pollos, cortad_ para heir o asar
a la parrilla (de 2½ J 3 [ibm.',
Polio entero (de 2½ ;_ 3 libras
por libla
De 13 a 19 mill
De/7 a 21 mill
De 7 a / 3 min.
a,lli,,apeqooO,
I)c 3 a 9 mill
Pechuga fie pavo (d,, 4 :_ 6 lib_e,
por libra
Comentarios
C(>loque los peda/os en uI/a ca£_'rola. \'l)ltt,t.
y de_memb_e despu_s de t_;msolrl-ido la
mitad del tiempo.
Coloque el paq/lelt" no abiel'tO el/ el hOl'llO.
D(_jelo deso mgelar por 5 mimm_s.
Coloque el paquelc no abit'l'tO el/ t'l hol'l_O.
(](>(ill(' en el ITIJ(I_)I)II(]_I__,hasta que st' ptlt'(]_l/
Sel);l/;l/ [)_jcIos repo_ll pllr _'3iY_illtlt()s_ _,i es
_ece_u'io, p;U;_ compleuu" la descongeladdn.
"_ohOela despu(,s de habe_ tcan_,omido la
mitad del tiempo.
[se el Mxvl de p(m,ncia 1.
Coloque la ca_ne sin la emolm_a en el plato
de coccidn. _bh6ela despu('s de habc_
tm_somido la mitred del fiempo y pmteja las
;11t,_s cfilidas (3)1//Ilia elwolttll_l. Ctlandl)
teft//ille, _pal't' los pedazos y d_:je q/le se
descongcle tl )t;lll//el/te.
Coloqul el polio elw0elto en un plato.
[)e_mvuelva y x_ltee despu('s de haber
tl_lllSCiilTJdl) la l//it_ld del liel//p<). CHal/dl)
ha_l tetl//inado, sopai_, los pedazos y ct )cine
en el microondas de 2 a 4 minulos
a(li(io_m/es, si es necesafio. D_jelo hasm
qlle telmille de des(t)ngelalNe.
Coloqne el pollo elwtlelt(_ en m_ plato.
[)e_pu_s de haber t_;ms(am_do la mired del
tiempo, de_,mu{,l\;do y \oh6elo. t)mteja las
;1/t'_ cfilid;_s (I)l/ /Ilia ell\ohtll_l. -l_,l'lllil/l de
descongt!la/ Si es nec(!sa/Jo, dt:je cH(!I a_/la
hla en las (a_idades h_la (pie los memMillos
ptledan set i_ l/lit\idol.
Coloqne la Ddlfim de_.mtlelta en i1 llo_no
con 13o_ libra la pechugu hacia anJb;_. I)ebpu_s
de haber nans(a_rrido la mitad del tiempo,
x_ll6ela. Si es necesafio, dt'je cac_ afft/a hf;_ en
las _midades hasla q_le los memldillos puedan
Sel 1t,l//O\ idos.
Coloqne la pechtNu desenvtmlm en el plato
con la pechuga hada ab@_. Desp/l(,s de habe_
mmscm fido la mitad del fiempo, x_lt(,ela y
plX)lt,ia las fil't,_s cfilidas con/Ina ell_t)lt/ll_/.
"lbmfine de descongt,la_ [)t:je po_ l d 2 hocas
en el rcfligc_;_d(w pal'a complem_ la
descongcla(:i6n.
Page 63

vvvvw.GEAppliance_com
CocciOnExpresa (EXPRESSCOOK)
Esta es una forma r_pida de ajustar el cocciSn por tiempo
de I a 6minutos.
Pre.sione uno de los botones de EXPRESS COOK (cocci6n
exl)res_ 0 (de ] _16) 1)_u_l un cocci&n pot tiem])o de ] a 6
mimHos en el nivel de potencia 10. Pot ejemph), psx'sione
5'1bot&n 2 t)_m_2 minutos 5|(' (o((idn pot ti('mpo.
E1nivcl (h' ])ot('n( i_ t)u('d(' set camt)iado dtlr_ull(' el
(ont('o r('gr('si_). Prcsionc 5'1POWERLEVEL (hive] de
])ols'n(i_l) V 5'nil'(' [11/ v_llor ('IlII'€' ] V 10.
A_ada 30 segundos(ADD 30 SEC.)
Usted puede usar esta funciSn de dos formas diferentes:
I ,a misma agreg,_l 30 segml(Ios al deml)o de conteo
regresivo cada vez que el 1)otdn es pr('sionado.
Puede ser usa&) como mla manera rill)ida i)am
@_smr 30 segm_dos de 5occi&n pot tiemt)o.
li ii
_iiiiiiiii!iiii/iiiiii_iiiiiii!!ii
iiiiilliHii iiiiiii!iiiii i
19
Page 64

Acerca de la funcion automMica.
DescongelacionAutomMica(AUTODEFROST)
i.a I)cs(ongclaci6n ,\utomfiti(a (AutoDefrost)_justa los
ti(mpos d( (lescongela(i6n } los nixcl(s de pOtel"_(Ja Data
pITOpOl'(iot/al7 i'(Stl]'.ados d( (I( SCOllg( ]_/(](*}i/tlllifi)l'I]r/es p{ll'a
cames, a_'s y pesca(Ios que pes(n hasm seis libnts.
Para m@w(s resullados, r(mueva los alimentos de su
( Illpaqtle[ad/tl_a, co]o(tu( dil'eclaIl/(I]l{? sol)F( {1 {slaI][e
de descongclado y coloque d estante en el plato g_ratorio.
:: Dos v(ces (hmmte la Descong(lacidn Automfifica
(Auto Defrost), (1 homo hat'.! una serial para Cambiar la
Posicidn del alimemo (rureFoodOveO.Ante la ocm:rencia
ii!_ ]) °es (} ]e
/ AUTORIMEDEFROST
(Dcsc ongclad6n
Amom_ti( a/de Tiempo)
/tll_'t \CZ p_tl+_t
Oesooege/aoioe
Automatioa.
L s:mdo la (;ufa dc
(iomersi(n_ en la labia
de la dcredta. Cltll'C u]
I)ev;O d{_l _ll]l/tel/tl,}. Pox
{']t!ttll)](), I)FU'4iOI//' |OS
botonex1 v 2 t}ara 1.2
libras (1 libr;_
3 ottz_s). El|lrl _,l t)cso
basra 6 libras para
Oesooegelaoion
Automatioa.
I're,dou{ START
(inicio).
de cada serial, _s_ltee d alim(nto. P,cmueva la came
descongelada o (:ubra las fireas cfilidas con pe(lazos de
papel pequeflos.
N Despuds de haber sido (l(scongela(tas, la ma}orfa
de las cames necesimn 5 mimttos para ( ompletar la
des(ongeladdn. I,os pe(lazos (1( (arne para asar grm_des
(leben quedarse pot 30 mimHos aproximadalnente.
Guia de conversiSn
Si el peso del alimcmo _iez'tc dado en ]ibras _ onzas, las
OIlZ,_tSdeben bet (om'er|idas a d&ilnos (0.l) de libras.
Peso de/ Entre el
alimento peso de/
en onzas alimento
(decimos
de libras)
1-2 U.1
3 0.2
4-5 0.3
6-7 0.4
b 0.5
Pesodel Entreel
alimento pesode/
en onzas alimento
(decimos
delibras)
9-10 0.6
11 0.7
12-13 0.es
14-15 0.9
iiii!W iiiiYiiiiliiilii!i ii
/ii ii ii ii ili i
DescongelacionRapidade I libra
(1 LB.QUICKDEFROST)
I.a I)cs({mgclati6n P,:il)ida (It' 1 libra (1lb. QuickDefrost)
_!]tlStl/_ltltOtll_it]Call/{'I/t{'](}Sticmpos (Ic des( (}l]gclaci6n }
los niwlcs (h: p(}a'n(i_ para alimt'm{}s quc pese]] una libra.
Prcsiom' 1 lb. QUICK DEFROST E1 h(}rn(} (omienza
_ltlt(}til:_ti{_lll/t'nt{'. ()lan(Io 1'1 h(}rl/(} ]/aga /Ilia st'flail,
vohee el alimento.
Para I/l('jOITeS res/thados, rem/te\'_l los alinlent(}s (]e
su empaquetadura, coloque directamente sobre el
estante de descongelado y coloque el estame en el
plato giratorio.
Page 65

Acercade/asfuncionesdesensores,www.GEAppliances.com
Sensor de humedad
Que sucede cuando usa las funciones de sensores:
i._s _llH(lOI]es de SeHSo]Tes d(_|('(|_Hl e] _llllilel]to eH
la ]mmedad liberad_l din:ante la (o((idn. El homo
Cubierto
Ventilad0
Seque los plat0spara evitar
un funcionanliento erroneo
de parte de lossens0res.
ajusta la coccidn pot tiemt)o autom_ticamente para
varios tipos y cantidades de alimentos.
No utJlJce las flmciones de Sensor dos veces
(oI/s(!(/ltixas el/ l}t lIliSl//_t ])or(:i(3n (te (OlIlid_L P/lede
res/l][_tl; el/ (]tie los _tlil//el/[OS Se (?OCill(fll el/ ex( eso
o s(! qHel/lell. Si la (omida 110 Se ]la cOCilladO por
(ol//])leto desp/l('s de 1_t ( tlel/[_t l?egTesi'%'t,/ise la
timci6n Bme Cook para fieml)o de cocci6n adicional.
Colllar COil el/v_tses al)rol)iados y cobertores es
( SellCi_t] |)ara o|)[el/el; los II/(_iol'es l'estllt_tdos ell
la sensoria de la ( o((idn.
Sielilpre Hse (!l/'_ts(!s t_t|)lJ(_tdos para set Hs_tdos
en microondas v ctibralos con tat)as o em'olmras
plfisticas xemiladas. Nmlca use emases ])l_isticos
herm('ti(_mleme (errados--esto puede evimr que
1'1V_IpOF ('SC_Ip(' V C_I[IS_tI" q/l(' lOS _tlilIlel/tOS Se
COCil/el/ excesiv_tl//ellt e.
Cercidrese de (tue el exterior de los enw_ses de
coccidn y la parle interna del microondas est('n
secos _tllleS de colocar el alililento el/ el hoFllO.
Ix)s ])Ill/lOS ]ll]lIledos p/ledell COl/Vel?lil?Se ell
V_t])O1; V ])/ledell Calls_tr [111 fllllCioI/alIliel/[O
err()l/eO de parte de los sellsores.
li ii
21
Page 66

Acerca delas funcionesde sensores.
iii ¸
Use solamente con rosetas
de maiz para microondas
que hart sido empaquetadas
previamente de 3,0a3,5
onzas de peso.
NOTA: No use el estante
de metal cuando use la
funciSn de Popcorn
(rosetas de maiz),
NOTA: No utilice esta
funciSn dos veces
consecutivas en la
misma porciSn de
comida. Puede resultar
en que los alimentos se
cocineR en exceso o se
quemen.
iiii!W iiiiYiiiiliiilii!i ii
Rosetas de maiz
Como asar la fancion de rosetas de maiz
Siga l_s insu:u((iones en la emp_l(luem(hml,
usando Time Cook si el pa(luete pesa menos
de 3,0 onzas o ma_or de 3,5 onzas. Colo(lUe
1'1t)aq u('t(" cn ('l (ctJ,tro (t('l mi(roondas.
Presione POPCORNpm:a bols_s (te rosettes (t(
mafz de tamaflo regtdar (de o,0 a 5,5 onz is).
El horno comienza imnediatamente.
Si usted abre la ptterta mientras POPCORN est_i
sien(to mostrado en la pamalla, y un mensaje de
error apare(e, cierre la puerta y presione START
(inicio).
Si la comida no se ha cocinado pot completo
desl)uds (le la cuenta regresiva, use la fimcidn
Time Cook pare tiem])o de coccidn a(ticional.
Como ajustar el Programa de Popcorn (rosetas de maiz)
para proporcionar ml cocci6n por tiempo mayor o menor.
Si ustcd note (in( • la m_u:(_ (h' l_s ros('tas (t(' m_ffz
(lue usted ha coml)rado estella o revienta mils lenta
o m_is rfil)i(lamente (tue lo normal, usted pue(te
agregar o sustraer de 20 a 30 segtmdos con el
tiel//])o de reventado atltOl//_tJco.
Para agregar tiempo:
Dcspuds d(' 1)r('sionar POPCORN, pr('sione 9 d('ntro
(h' los 1)rim('ros 30 segundos desl)u('s de (tue el
microondas (omien(e par_, 20 segm_(tos _,di(ionales.
Presione 9 otr_ vez y agregue otros 10 segm/dos
(t)ar_ m/total de 30 segm/dos (te tiemt)o _(ti(ional).
Para snstraer tiempo:
I)espu('s de presionar POPCORN, presiom' 1 (t('l/tl;/)
de los primeros 30 segundos destmds de que el
mi(r()()nd_s (omieme t)ara sustraer 20 segundos
del (o((idn t)or tiem])o.
Pr('siom' I ()tr_ vez t)m:a re(tu( ir 1'1 (o((idn t)or
tielnpo otros 10 segm_dos (t)ar_ m_ total de
30 segm_(tos de tiemt)o sustr_ffdo).
Page 67

NOTA: No utilice esta
funcidn dos veces
consocutivas on la misma
porcidn de comifla. Puefle
resultar on que los
alimentos se cocinen en
exceso o se quemen.
}
Pararec_/entamientode
serviciosindividualesde
comidacocinadaprewamen[e
0 t][} I)lal:o (le SOl3rame.
NOTA: No use el estanto
de metal cuanflo use la
funcidn deReheat
(recalentamiento).
NOTA: No utilico osta
funcidn dos veces
consecutivas en la misma
porcidn de comida. Puede
resultar on que los
alimentos so cocinen
on exceso o se quemen.
vvvvw.GEAppliance_com
Bebidas
Presione BEVERAGE(bebi(!as)una wz para calenmr una mza
de 8 a 10onzas de ca[__u otra bebida.
LasbebidascalentadasasandolaFanci6ndeBebidaspaeden
resu/tarextremadamenteca/ientes.Remaevaelenvasecon
caidado.
Silacomida no seha cocinado poTcompleto despu& de la
cuenta regresiv4,use la thncidn TimeCookpara fiempo de
cocd6n adicional.
Recalentamiento
Comoasarla fancionderecalentamiento:
Coloquela taza(lel%ddo oalimentocubierloenel
h(,'no. Presione PREHEATuna, (los o n'esre(( s.
E1]/Ol'l/O COl//iellZa ii/l_/ediatal//ellt('.
Pl'esiol/e tll/a vez para t111plato de alimel/to sobFal/te.
Presione dos woes para pasta (8 a ]2 onzas).
Presione n'(.s_vcespara _egetales (una tazamedia a dos
tazasllenas).
:O: E1homo hate una serial cuando los sensor(s dele(:tan
*,apo]7 ) el lieltlpo l'(!slal/le (Ol_/i(!l/za (:l COl/leo l'(!glTCSiVo.
No abra la puerta (]elhomo hasta que el conteo de tiempo
regrt.si_oha}a comenzado. Si la puerta esabierta, ci&rela y
presione STARTinmediammente.
Despaesderemoverlosalimentosde/homo,maevalos,sies
posible,paraqaelatemperataraseaaniforme.Losalimentos
recalentadospoedentenerampliasvariacionesmrtemperatara.
A!gunasareaspodrianestarextremadamentecalientes.
Sila(omi(!a no estfisufi(icntt'mcntc (alit'ntc despu(:s de
la('uenta regresiwhuse time Cookdempo adi(ional para
recalenta*:
Comocambiarlosajastesaatomaticos:
Parareduciretfiempoenun!0%:
I'r('sion(' Id('ntro de 30 s('gtmdos (h'spu& d(' presionar ('l
bot6n de REHEAT(recalenmmiento).
Paraagregar10%altiempodecocci6n:
Pr('sion('9d(,nlro de 30 s('gundos d('spu(;sd(' pl'('si(mar('l
bot6nREHEAT(recalenmmiento).
Noserecomiendaqueciertosalimentosseanrecalentados.
Esm£jor usar TimeCook(Cocd6n pot tk.mpo) para ('sos
aliinentos:
Panes
Alimentos que debe/"SeTrecalenmdos descubiertos.
Alimel/tos que l/ecesitm/set I//O_.J(I()SOvoheados.
: Alimentosque requieren lucir secos o con superficies
crt!jienms despu& del recalentado.
li ii
23
Page 68

Coccionsensorial.
ONE TOUCH SENSOR
___VEGETABLE POTATO CH/CsKEN/
7;-1
La cocci6n sensorial le
Drooorcloea resu]tados
rficiles _"resultados
aummaticos con una amplia
gama de al memos (Vet ]a
Guiade Cocc on mas
adelante}
NOTA: No use el estante
met#fico con la CocciSn
Sensorial
NOTA: No utilice esta
funci6n dos veces
consecutivas en la
misma porci6n de
comida. Puede resultar
en que los alimentos se
cocinen en exceso o se
quemen.
Guia de Cocci6n
Sensor Cooking
Vegetales, papas, pescados, pedazos de polio
_ ColoquE' ('1_tlin/emo (ubiE'ru) E'n E'l borne, l'rE'sionE'
E' )OIOH a[ittleHl(). |)ar_l VE'gE't_/lt's ];l'('siol/(' E'] [)()t6H
VEGETABLE(wgE'lah's) ttn_ w/para '_egt'tales,
fi-es('os, dos veces para vegetah's (ong('lados o/rt's
q',. t's t)al'a "_t'getah's t'nlatad,.)s. Para poll() () }ws(ado,
prt'siom' el bo/dn CHICKEN/FISH (p_'sc_E]o/polh))
ul/_ vez }ml'_ pollo o (los _v(('s lmr_ pes(m/o. El
]/or]lo coHlitqtza illl/_t'Elia/aH_t'Htt'.
}_) E1 homo hate tma serial cuando los sensores
dete( m_} vapor } el/iempo restante comienza el
(()Ill(_O I-egTesi'_o. (;ire o Hl/l(!'_a (!1 a]il_lelllo si es
i/e(:esario.
NO _/bi'a 13 _)LiE!rla (]c] 1/o1"11o llas[_/ (ltlE! E!] COIl|CO (]C
liempo regresivo haya comenzado. Si la puerta est_i
abierla, cidrrela } presion( STARTinmediatamente.
Si la comida no se ha cocinado por completo dest)u('s
de la (u,._nta regresi_u use la [imcidn Time Cook para
tiempo de (a)ccidn adi(:iotml.
Comocmnbiar los ajostes aotomaticos (los ajostes
aotomaticos para los vegetales enlatados no poeden set
cambiados en algonos modelos):
L stE'd p/tcdc _!justar cl ficmpo dE' (oc(idn para mdos los
alilI/el/tOS para _!jtlstarse a sits preJi_,ren(ias personales.
Para reducir el tiempo on 10%:
Presione I dt'Im:o de 30 segundos despu& (1t' h_ber
presionado el botdn de alimento.
Para agrogar 10% al tiompo do cocci6n:
Presione 9 denu-o dE' 3(1 segtmdos dE'spu& de h_l)er
presionado el botdn de alimet_to.
iiii!W:iiiiYiiiiliiilii!i ii
Vegetales enlatados I)E 4 a 16 onzas Ctd)ra (on tma tapa o tma Envohma plfisti(a
Vegetales congelados I)E 4 a 16 onzas Siga las insuucciones en la emohtlra dE1
Vegetales frescos I)( 4 a 16 onzas gTeguE_ 1/4 dE lma copa de agua pot
Papas I)E 8 a 32 onzas PE rfi)rE con mx (:ubiEHo. Coloqt_E las [)alias
Pescado I)E 4 a 16 onzas Cobra con tma en_,olttu-a [)lfistica _,Entilada.
Pedazos depollo I)E 2 H 8 Di(_zHs Clll)l-a con tma en_,oltma plfistica _,Entilada.
Cantidad Comentarios
",Enlilada.
Drodncto Dma ag_egar agua. (;ulna con mm
tapa o en',ohtlra pk_sti(a xentila(la.
racidn. Cub_a con una mpa o envohm-a
Dlfistica ventilada.
En E1 mo giratorio.
Page 69

Otrasfunciones que su modelo
podria tener, vvww.OEAppliances.com
Ajuste personal (CUSTOM)
E1 bot6n CUSTOM 1( permit( guardar sus ttm(ioncs
mrs ti'ecuem(m(nt( tlsadas. (i,as timcion(s d( _just_
d(t (()((iOH (Oil S( I/S()I7 I/O ptlU(]UII S(l? _'/[_'tlX/_'t(]HS.)
Para seleccionar y guardar um_ selecci6n:
) S"
t r(, 1on( el bot6n CUSTOM.
_: Sele((io _e la cantidad de tiempo de cocci&n.
>:_Sele((ione (1 nix(1 ( e t ore _(i t s 1(5( (sea
::::::: (El lll'_(!l l/laXlII/(5 I(H/(? ( a( o t)or ( ete(to al
usle(t no cambia esm wflor.)
1'/Presi(me el bot6n CUSTOM.
ii!::!!!!!!i__
Su flmci6n personal s(rfi recordada (n el flmu:o con
s61o tocar un botdn.
Pan'_ borml la s(lccci6n personiticada, pr(sione x
sost,, riga presionado el bot6n CUSTOM t)or 2 s,.gtmdos.
Ay dau(HELP) , s
_:l,ot,-,n_,_,HELP(_,,,_,_,_,,,,,(,,,_,_,,,l_,t,_,,,,_l'_,
informad6n e ideas dfiles. Presione HELP enton(es
sele((ione el 1)ot(nl (le tun(i(nL
li ii
!i__;i_iiiil;_ii!_ii__71__i_i_
Recordador de coceiOn terminada
Pk|I'H l't'('()l'(/H1 lt' (ttt(' ttst('d ti('Ile _l]I/l('llt()s i'll (tl l]ol'l/O,
el hor_o mostrarg FOOD IS READY (el alimento estg
list()) y hart tm pitido m_a _ez pot minuto basra que
ttsted abra la puerta del homo o presione CLEAR/OFF
(bormr/apagar).
Reloj (CLOCK)
lhesionc CLOCK(reloj) para sele(donar ]a hora
dcl dfa.
Presione CLOCK.
J_
Selec(ione AM o PM.
!_! Presione START (inicio).
{
PalTa illSt)e((iOllar el tiel//t)o del dia II/i(_ll|l?_tS S(!
en(uentra usando el horriD, presione CLOCK,
25
Page 70

Otrasfunciones quesu modelo puede teneT.
Inicio Retrasado (DELAYSTART)
ii¸I/ ([![
AUTO/_IME _ b QUCg
Esta _tlll(i()l/]e petlIlite tlsar e] Hli(rOOl/(]as ])ara
ret]TasaF la (o((iol/has{a _4 ho]:as.
Presione DELAYSTART (inicio rem_sado).
Sele(cione la flnlci&n de cocci&n o descongela(i()n
(IH(! /ISI(!( ( (!S(!(?)Y!llT;-is;-ir, (!l/tOll((!s el/H'(! (?1 I (!I/It)()
de coc(idn o des(ongela(i&n.
Presione START (inicio).
_ 1_:,m-(,l;,h,)1_,_,q,1,,1,_t,,,ld(.._(._,q,1,,,,lh,),.o
i11i(ie. ((](!1_1 i()lY!S(! ( (! ([/11! (!l 1// (FOOl/( aS t ell(_
la hora del dfa (orre(ta).
_ Seleccione AM o PM.
......... ) S"
t re, ume START (inicio).
Ia hora de ini_ io serfi mostrada y permane_ er_i
en la t)antalla (]el homo hasta que la (o((idn o
des(ongeladdn (omieme auton/_hi(amente.
Usted t)uede _'r la hora del dia t)resionando CLOCK.
Sincronizador (TIMER)
iiii!W_iiiiYiiiiliiilii!i_ii
a(ll/ (/l_tl/do (!1 hoFllO (!s|_t (!1/ opeFaciol/.
...........................................(0111(!0 l'(!gl'(!SlX, O ( 011111?11((}.
} Presio _e TIMERpara dar inicio.
Para pausar el c/mteo regresixo, presione TIMER.
Cuando el conteo termine, el homo har_i una sefla.
Para suspender la simroniza(i6n, presione TIMER.
NORA:E1 indi(ador del simronizador (star_i
(nc(ndido mientras el simronizador estfi en
operaci6n.
Para (allcelar la Sill( rOlliZa(iOll, pl:eSiOl/( _r SOSI(!I/g'_t
presi/mado el 1)ot(m TIMER pOT 2 segm_dos.
o " "
Page 71

www.GEAppliances.com
Recordador (REMINDER)
l_a ItIll(i()llde re(ord:ador piled(' set llsada (OlilO
un rclojdc alarma, y pro'de set usada en cuakluicr
nlonlcHto,at]n(uando el horl:o estfi siendo
operado. El |icmpo de] rccordador puo(h' set
scle((ionado ]las|a por 24 horas.
:_: P (sio :( REMINDER.
li' ii
iI _i;i_i_ii__ili_iI_i_
_!i__i__i__;!i@_ii_i_i_i_i_i;;ii_!__il!_ii
le re( uerde. (Cer(i6rese de que el reh)j del
l/lJ( FOolldas tJelle ]a hora (OlTe(ta de] (lla.)
: _ Seleccione AM o PM.
Presione REMINDER. (;uando la seftal de
Reminder ocurra, presione REMINDER para
apagarla. El liempo re(ordado puede ser
I//OSIY_tdo (!1/ la palllalla si listed presiOlla
REMINDER.
NOTA:Elindicador REM--Recordador--permanecer#
encendido para mostrade que la funciSn de Reminder
est_ on la memoria.Para borrar la funci6n a recordar
antes de que la misma ocurra, presione ysostenga el
bet6n REMINDERper 2 segundes.
START/PA USE finicio/pausa)
A(lem_is de ini(iar mu(has bin(Jones, START/PAUSE
(ini(io/pausa) le permite detener la (o((i6n sin
operar la puerta o sin borrar la xisualiza(i6n.
Cierre para nifios (child lock-out)
Uswd puede (errar las hm(iones del panel de
(Olltrol t)ara exitar (pie los nil-tOS p/l(!d_tl/ op(!l'_l17
el I//i(FOOIId_Is _1( (id(!l/tFthll(!l/t(!.
Para cerrar o abrir los comroles, presione y
sostenga presionado CLEAR/OFF (borrar/apagar)
por tres segm:dos. Cuando el panel de (ontrol
est5 cerrado, LOCKED apare(erfi en la pamalla.
27
Page 72

Otrasfunciones que su modelopodria tener.
!ii!l ii! !l+
Plato giratorio (TURNTABLE)
Para m@m's rcsuhados, (hjc cl plato giratorio
COl/eCta(to. El ii/islllO ])1rode ser descollecta(to
para platos grandes. Presione TURNTABLE (plato
giratorio) para conectarlo o desconectarh).
A veoes el plato giratorio puede calentarse tanto que
no es reoomendable tocarlo.
T('nga (uidado cuando toque cl plato giralorio
d re:ante y despu('s de (o(inar en ,51.
Ventilador (VENT FAN)
]_1 "_el/tiladoF rellHle'_e los _apoFes (t_' ]a StlpeF_i(ie
d/! (o(ina.
Presione VENTFAN (V(,ntilador) una vez para
xelo(idad mfixima dcl xemilador, dos +,c(cs para
velo(idad media, tres veces para xclocidad l)_!ia y
cuatro veces para apagarlo.
Presione el bot&n VENT FAN BOOST (V(,ntilaci&n
adicional) para aumentar la velocidad
adicionalmenle.
Ventilador automatico (automatic fan)
Esta tim(i&n prot('g(' 1'1mi(roondas dc (1/1(`
dcmasiado (ah)r s(' a( umuh' dcb@) (h' la ('stu/i_.
E1 mismo s(' en(i('nd(' autonlklticanl('Ht(' si sient('
IIl/ICho calor.
iiii!W_iiiiYiiiiliiilii!i+ii
i;!!ill i (ii
;;;;;;;;;;;;;;;;;;;;;;;;;;;;;;;;;;;;;;;_2(9
Si ha encendido el ventilador quiz_is usted note
que no lo puede apagat: El ventilador se apaga
autom_iticamente cuando las partes internas estfin
ti'fas. Pue(te estar encendi(to pot 30 mimltos o mils
(lesl)uds de (tue el microondas v la estuth est('n
apagados.
Luzde superficie (SURFACELIGHT)
Prcsiom' cl bot6n SURFACE LIGHT (luz dc
SUl)crli(ic ) una _cz t)ara luz 1)rillanm, dos _('(('s
para la hlz llOCttlrlla o tres veces t)ara apagarla.
Page 73

www.GEAppliance_com
Opciones(OPTIONS)
l'resione el bot6n de OPTIONS (opciom's) m(dtiples ve_ t's
para hacer el ciclo a tra%s tit: las opciones disponibles.
Luznocturna automatica (AutoNile Light)
I,a luz nocturna automatica puede set _just:Jtta pm'a que se
en(iend_l y se apague a horas esl)e(ffi(:Js.
Para _!jnstar el sincronizador:
Pres( e I,
Entre la hera de1 ilia a la que usled desea qtte
la hlz se e1/( e11( _l.
Select ( _ t AM o PM.
i_P _es ( m el bot6n OPTIONS.
_ Emre la hera de1 (lfi'_a la que usled desea
_' que 1_ luz se ai)ague.
Selecciont AM o PM.
i
_ I)res ( _ee bou'm OPTIONS,
Para revism" los @_stes (le 1;_luz no(tm-n:_, presione
2 th'spu('s tit: sele))ionar la opci6n de Luznocturna
automMica (Auto Ni'.e I JghO.
Para apagm la ftm(iUm, presione 0 desptt& tie selec) ionar
la opcidn tit: Luz nocturaa automMica (Auto Nile I,ight).
Volumon del pito (Beeper Volmno)
E1hi, el de sonido de] pit() puede SeT @is(ado. Es( (!ia entre
0 v 3 l)ar?J escoger emre Mttte (Mudo) y alto.
Recordador de filtro de carb6n (Charcoal Filter Reminder)
E1Recordador de filtro de carbon ((haT) oa] l;i]ter
Reminder) est;i @_stado tit' tiil)ri)a para que le re(uerde
qu( usted debe cambiarh) despu& de 180 dias. Presione
0 para apagarlo. Presione I para seleccionarlo. Presione
2 para re@lstar el recordadot:
Idioma do pantalla (Display Language)
E1idioma pm'a la visualiza) i(m en l>Jpanmll?_ puede SeT
cambiado entre ingl& y espaflol.
Presione / para ingl('s y 2 para espafiol.
Pantalla encendida apagada (Display On/Off)
Usted puede escoger el_(ender la visualiza(idn del
reloj o apag_u:lm Presione 0 para apagarla. Presione
I para ence*Merla.
Velocidad de la visualizacion (Display Speed)
I.a _elo) i(l:_d tit' visu;dizm i(m a ".ravds de los men(ts de
la pantalla puede set ( mnbi:Jtta. Sele()ione emre
] V _) pHI'H H/IIIIt'I/tHI" dr: I//H_()I" a llltq/Ol',
li ii
_iiiiiiiii!iiii/iiiiii_iiiiiii!!ii
iiiiili{Hii iiiiiii!iiiii i
29
Page 74

Otrasfunciones que su modelopuede tener.
!ii!l ii! !l:
Como usar el estante
cuando usted se
encuentra cocinando
en el microondas
C('r(i6rcsc (t(, que el
('siant(' ('sta (olo(a(to
apropiadamcntc cn el
microonda_ para
prcvenir que el al'(o
dafle el homo.
No use m: plato de
(tOFar 0 |)lx)n(t'al) ('n
1'] ('stallt('. I_:] ('sta]lte
p()(h;la SO|)Ft'( al('ll {ars('.
No use ('l homo con
el ('st:ant(' ('11 el ])is()
(tel microondas. Esto
podr/a daflar el piso
de] microondas.
Use soswnedores
para las o]las cuan(to
est(' man(:jando el
('st ant ('--ya q/l('
podr/a esmr muy
calieme.
No [IS(' (!1 es|a]lte
( H_llldO (()(ill(!
FOS(!taS d(! l//_tlZ.
Estante
cuando son colocados en el plato g_ratorio o en
el cstam(' ('nla t)osi(i6n :mls b_!ja.
$61o use el estame al recalemar en ross de m_ nivel.
No almacene el estante al imerior de la cavidad del
homo.
Para mejor resultado
Resultados irregulares
Recalentamiento de dos niveles
No ilse el eslante
C[I[I]I(]O cocine con
el SelISOF 0 C/l_.n(|o
recalieme alimentos
(REHEAT).
Page 75

Cambie de lugares despu6s de
transcurrido la mitad del tiempo.
W
Cambie de lugares despu6s de
transcurrido la mitad del tiempo.
vvvvw.GEAppliance_com
Estante y Recalentamiento
Para recalentar en 2 niveles
0
i Para recalentar2platos en los dos niveles
inferiores:
g _)01; ] 1/2.
(3arabic lugar deslmdS de l/2 hora.
li' ii
31
Page 76

Terminologiade microondas.
in!ii Definicion
Arcoel_cttico E1 ar(o el&td(o cs lo que, en la wnninolog_a de los mi(roondas,
(tes(ribe las (hispas en el homo. E1 _mo el(,(td(o se t)rodu(e
cuando:
el csmme de metal sc h_ insmla(lo de form_ in(orre(ta v
esifi to(_llldo las p_lFe(l('s (tel l//i(l:Ool/d_ts.
hay m_ metal o t)_pel de almninio to(m_do el lateral del
homo.
Z_
Cuhierto i _s ( ubiertas mantienen la ]mme(l_d dentro, t)ennitiendo m_
Res_uardar En m_ homo (onxen(ional, se tapan o resguardan las pe(hugas de
7iempode C,,m_do ((,(ina en hornos regulates, ]as comidas ,(,too los asad(,s
reposo o paswles se (t@m rel)osar para (tue acaben de (ocinarse o se
el pal)el de _dmninio no estfi enx()lviendo bien la (omi(k_
(hay hordes doblados hacia arriba (lUe actdan (omo antenas).
hay _dgdn meted, como cintas de (ierre con meted, t)inchos
de 1)olh), o t)lams (on de(or_(i()l_ (te oro.
hay papel _oalla re(iclado (lue comiene t)equeflas piezas
(te lll(!t _lL
(alemamiemo mils t)ar@_ y redu(iendo el tiempo de cocci()n.
Cuando se agt!jerea el emolmrio de p15sti(o o se cubre (on pat)el
de (era se t)ermite la s_lida del X_l)Or.
pollo o las (()nli(l;_s ]lOrll(';_(tas })_:tl'_l (lu(_ no se dorell (lemasi_do.
Xl usar el microondas, use pequefias cintas de pat)el de ahmfinio
para ( ubrir 1)arws finas, (omo las tmmas de las _las en las a_es,
qll(! pOdFl_/ll ( O(ill_/17s(! _lll{(?s (1/1(! ]_ts ])_tl:{(?s III_I}()F(!S.
_tSi(_llt(!l/. H tien/])o (]e re])oso es (_s])(_(iahIlellI(' iliiport_lll|(! _11
('o('illaF ('01/l//i('rOolld_ts,. "[('ll_)l, ('1/('[l('ll|21 (I[l("/ill p_lst(!] ( o(ido (_1/
hol_l/O l//i(?l;OOlld_ts 11o s(! (olo(_t (!1/ Illl (!s[_tll[(! d(! (!ll[lJ_tlIli(!l/[O.
Abrir Llna ,_ez (tue haya (ubierto m_ t)lam (on fihn p15sti(o, deber5 abrir
iiii!W iiiiYiiiiliiilii!i ii
respiraderos m_ orificio dest)legando mm esquina t)am (lUe t)ue(t_ es(_t)ar
el xat)or.
Page 77

Cuidadoylimpieza
delhomo.
Consejospractices
PaFa lllal/tell('F e] illteFiOf _l'eS(O ])as(']e till pal+|O
COn una so]u(i(m de agua y bi(arbonato s&di(o de
Ctl_llldo (!1/ (tl_llld().
NOTA: Asegurese de qne este apagado (en off) antes
de limpiar cualqnier parte de este homo.
Come limpiar el interior
Paredes, suelo, ventana interior y piezas de plastico
de la puerta
Algunas salpi(aduras pue(len limpiarse (on un
papel toalla, otras pueden ne(esitar un patio
h(mmdo. ()uite las salpi_ aduras con un patio
e_jak)()_(t() _raclare (on un patio hfimedo.
No use limpiadores abrasivos ni mensilios afilados
en las paredes del horno.
Nnnoa use un limpiador oomeroial de homo on
ninguna parte del mioroondas.
Base giratoria extraible y soporte de base giratoria
t)ara que I1O st' l:OlIlpa, I1O pOllga t'l plato gJratol:io
en aguajusto despu('s de (o(inan I fmpiela con
(uidado en agua tibia (on jab&n o en el lavav_!jillas.
El plato giratorio y el soporte pueden romperse si
se cacti. Recuerde, no ponga ell marcha el horllo
sin que el plato giramrio y el soporte est('n
em _!jadas en su lugar.
Estante
I,impielo c()n agua yjab&n suave o en el lavavajillas.
No la limpie si tiene un homo autolimpiable.
Estante de descongelado
I,im])ie (on jat)&n suaxe y agua o en el estame
superior del laxaplatos automfiti(o.
vvww.GEAppliances.com
li ii
33
Page 78

Cuidadoylimpiezadelhomo.
iiii!W iiiiYiiiiliiilii!i ii
Comolimpiar el exterior
No recomendamos el oso de limpiadores con amoniaco
o alcohol, t'a que poeden da#ar el aspecto del homo
microondas. Si opta por osar on limpiador casero,
primero apliqoe el limpiador directamente en on
paso limpio, &ego limpie el area socia.
Parte inferior
I,impie la grasa y el polvo de la parte intbrior a
memldo. Use m_a solucidn de agua templada y
detergeme.
Caja
Liml)ie la })arte externa del microondas con tm patio
jabonoso. ,\(l_relo (on un patio hflmedo y s&/uelo.
Pase ml trapo hfimedo por la ventam_ Ilara limpiarla.
Panel de control y poerta
P_isele tm ]lafto hflmedo. Sdquelo completameme.
No use puh'erizadores de limpieza, mocha camidad
de agua yjabdn, abrasivos u ol)jetos afilados en el
panel--podrfan dafiarlo. Algunas toallas de papel
tambi('n pueden ra?ar el panel de control.
Sellante del homo
Es iIllpOltallte i//ai/tel/er el firea doll(le la puerta se
sella comra el microondas siempre limpia. Use s61o
detergentes s/la_,es, iio al)rasivos, y alllfquelos (on
m/a esIl(n_ja limllia otm patio suave. AclSrela bien.
Acero inoxidable (on algunos moflelos)
No use una esponja meMIt_a,rayaM & superficie.
Para limpiar las superficies de acero inoxidal)le,
use un patio taliente, m(!jado con ml detergente
sua\ e. Use till patio limpio, calieme y m({jado para
quitar eljabdn. Seque con tm I)afio seco y liml)io.
Si quedan manchas, interne usar m_ limpiador
general de cocina.
Para manchas diffciles, use tm limpiador normal
de acero inoxidable como gon-Ami ® o Cameo ®.
Pfsele tm limpiador con tma esp(mja mojada. Use
ttl/patio limpio, caliente y mojado para quitar el
limpiador. Seque c(m un patio seco y limpio. Frote
siempre ligeramente en la direccidn del (lib/_jo de
la superlicie.
Deslnt('s de limpiar, t;se un pt;lidor de acero
inoxidable (omo Stainless Steel Magic®,Revere
Copper y StaiMess Steel Cleaner _">,o Wenol All
Pro'pose Metal Polish ®.Siga las indicaciones
del prod ucm para la limllieza de superficies
de acero inoxidable.
Page 79

Comoreemplazar las bombillas, vvvvw.GEAppliances.com
Luz de la estufa/Luz Noctuma
Reemplace la bombilla quemada con una bombilla
de halogeno de 120 voltios, 20 vatios (WB36XI0213),
disponible en su suministrador GE.
Remueva el tomillo
ij primcro (tes< <m_ tie la (orrienw del tusible
prin(ipal o del panel de di[_ren(ial o estire
del en( lmI_.
(_)uite el mrnillo del lado dere( ho de la
( ubierta dcl (ompartimicuto de la bombilla v
b@_ el lado izquierdo de la cubierta ]lasla que
])are.
li ii
Ccr(i6rese de ( ue la bombilla (s) a set
Despuds de romper el sello adhesivo, remueva
la bombilla tirando directamente hacia afuera.
Rcen/place con el nlisn/o tipo y tan/aflo de
bombilla.
I_exame el protector de luz _ reemplace el
tornil]o. (_()l/(?(?t(_ 1_t energl'a el('(Ii:i(a a] horllO.
S S S S S
ili
35
Page 80

Lafuncion de extractor.
Filtro de carb6n vegetal
(enalgunosmodelos)
Filtros de extractor reutilizables
(en todos los modelos).
!!!
iiii!W iiiiYiiiiliiilii!i ii
Ventilador extractor
I ,a "_entila(lor extra(tor tiene dos filu:os de metal
reutilizal)les.
I_()S ll/Od(_]()S q/l(? h}t((!F l?(?(?ircIllal? el aire de nll(fVO
a la habitaci&n usan un tihro de carb&n "_egeml.
Filtros de extractor reutilizables
Ios tiltros mct_licos atrapan la grasa lit)erada pot la
(omida en la cocina encimera. Tambi('n evitan (lue
las llan/as de la cocina encimera puedan dafiar el/
interior del homo.
Por esm raz6n, los fihros deben estar SIEMPRE en
$/1 hlg-ar C/l_tndo Se estd IIS_tl/do 1_t C_tl//p_tl/_t. Ix)s
tihros del extractor (leben limpiarse mla vez al rues
o segt'ul sea necesario.
COmequ#ar y limpiar los filtros
Para quitarlos,/_san(to las leng/ietas, desl/(elos ha(ia
air,is. Estire ha(ia abajo y atuera.
Para limpiar los filtros del extractor, empfipelos 7_
])_IS('I()S (|(' /11/ lado a OtlTO ('n _19/1_t (ol1 (l('tt'lTg('nt('.
No /ISe allloniaco 11i ])rod/lctos qlle lo contengall
ya que oscurecerfan el n/eml. Se pueden cet)illar
ligeramente para quitar suciedad pegada.
Aclfirelos, sac(_(talos y d(jelos secar ames de
voherlos a porter.
Para volver a colocar/os, deslice los tihros en los
mar(os ])or la ])art(' trasera (h' (ada al)(Tttlt'a.
Pr('siom' ha(ia arriba y ha(ia la ])art(' t_'ontal ])ara
@lstarlos en su lugar.
Page 81

Retire la parrilla superior quitando
los tornillos que Io sujetan.
vvvvw.GEAppliance_com
Filtros de carbon vegetal (enalgunosmodelos)
El filtro de carbon vegetal no puede limpiarse. Debe
cambiarse por otto. ,°ida el recambio No. WB2X10733
de su suministrador GE.
Si el modelo no realiza la exu:acci6n al exwriot;
el aire re(ircularfi _1lr_lvds de un filtro de (_lrt)6n
vegetal no remilizable que ayu(ta a quitar olores
v lmmos.
El fihro de carb6n xegetal deberfa (:ambiarse
(tl_tlldo (!sift visi|)lel//ellle Sll(io o des(olorido
(normahnente tras 6 6 12 meses, segdn el uso).
COmequitar el filtro de carbon vegetal
I
Pat's1 (tuilm: el tihro de (arb6n _egeml, t)rimero
desconecte la corrieme del fusible principal o
del panel de di/i'rencial o esiire del enchuti'.
UZ_
Retire la parrilla sttperior quitando los tornillos
en la parte sttperior de la parrilla q ue 1o sqjemn.
Puede ser que necesite abrir las puertas del
armario para quitar los tornillos. I)eslice el/iltro
h_ci_ 1_ pm:te {_'ontal del horno y sfiquelo.
li ii
COmeinstalar el filtro de carbon vegetal
Pat'_ instalar ml nuevo/iltro de (m:l)dn vegetal,
retire el phlsti(o y (ualquier otro envoltorio del
nuevo filtro.
Inserte el filtro en la apermra superior del horno
(omo se muesu:a. Des(mlsm:_i en ml _ingulo detrfis
de 1_ r@lla pl;is6ca en dos lengfietas laterales de
soporw yen {_'ente de la lengiiem trasera dere(ha.
&ueha a eolocar la rqjilla y los tornillos en
stt htgat_
37
Page 82

Antes de Ilamar al servicio de reparaciones...
iii!iii!ii
Elhorno no sepone Puede.que se haya fundido Cmubie el htsible o reconecw
en marcha un fusible de su casa o que ('1diDren(ial.
EIsuelo del homoesM La luz delaen_e_a estfi Esto es mwmal.
templado,incluso s_tuada bajo el suelo del homo.
cuando el homo no Cuando la luz estfipuesta, el
se ha nsa#o calor que produce puede
(BLOQUEADO) bloqueado. CLEAR/OFFduram(:
apareceenlapantalla
apareceen_pantalla
Ustedescuchaunpitido
taroydetonobajo
Lacan#daddealimento
esdemadadograndepara
elRecalentamientocon
SensorfSensorReheat)
38
ResoluciSn de Problemas
iAhorre tiempo y dinero! Revise la tabla en esta p#gina
y tal vez no necesite Ilamar al servicio de reparaciSn.
Posibles causas Qu# hacer
haya saltado el diferencial.
Apagon de corlaente. D('se]/( hufi' d homo
El enchufe no esta ,%('gdrese de uue ('1etu'lud_'
completanlente msertado de 3 (lavijas 11(_1homo (sld
en la toma de cornente (o111p[([i/l/lelll(' itls(Tl:/(Io 1'1/
de la pared, la P.)ma de (orlieule de 1;1
calentar el suelo del homo.
"LOCKED" El control ha sido
"_ENSORERROR"
Cuando usted estfi usando la
funci6n de sensor, la puerta
estaba abierta, antes de que
el vapor pudiera set
detectado.
No file detectando vapor
en d tiempo mltximo.
Usted ha intentado haiciar
d Renfinder (Reeordador)
sin un tiempo del dia valido.
Usted ha intentado iniciar la
Luz Nocturna Automfitica
(AutoNiteIJght)sin un
tiempo del dia vfilldo para
tiempo de eneendido y
apagado.
Usted ha intentado cambiar
d _fivelde potencia cuaaldo
no es permifido.
La fuoci6o de Recaleotanfiento
con Sensor (Sensor Reheat) es
para raciones h_divlduaJes de
aliraeotos recomendados.
mJtToOll(l_Ls(I1 ]a (orl_eHl/' \
xudlvalo a en(huthr.
pm°ed.
PrLNiOl/e "_ l]]i|]/lell_it
3 segun(los l)ara (lesbloquear
el eol/HToL
No abra la puerta h_tsta que
d vapor sea (letecmdo y el
((mteo regresi_o (lel dempo
st l///test/'e eI/la pantalla.
Use _me Cook (cocci61_ por
dempo) para ealentar una
\I'Z ll/_iS.
Col//iei/(;e otra vez y el/tl'e tlI/
dempo y/m (Ira _filidos.
Col/li(I/(;e otra \ez y ( Htl'e [11/
tiempo y/m (lia _ilidos.
Muehas de las flm(:iones (lel
]/OrllO SOI) preprogralnadas y
no pueden ser eambiadas.
Use//me Cook (cocei6n por
dempo) para eantidades de
alimentos grandes.
Page 83

www.GEAppliance_com
Cosas normales de su homo micmondas
S_dcval)or(|c_igu_1dc _d_'c(]c(]ordc I_il)ucrta.
Sc _'cIl@1m_a luz"dln'dcdordc la <;!jaexterior:
A nivclcsdc potcn<i_1(p_cno s<'_1clm_vor I_i]uzi11tcriorpicrdc
bHllo v <_mlbia cl sonido dcl vcntilado_:
Ruido sordo de golpes mientras el horno est_i en
_ilncion_ll//icnto.
Pueden notar'se inter/t'rx'nci:ls en la TV/n_dio cuando el
mic_x)ondas estfi en ma_'(ha. Esto es t)arecido a las intert('rencias
causadas t)or oux)s electtx)domdsticos t)equefios, no es indicati_x)
de llillglin woblema con el microondas. Ellclm/b el microolldas
a otro circuito elO(t_ico, muc_ la TV tan ah_jada del mi(_x)ondas
como sea ]_osible o _'cvise la posicidn y la serial de la m_tena de la
radio o "I'_
iiiiHiHH ii!
29
Page 84

iiiii!ilii_,i,_ii_iiiii!,i!
ii_iiii'iiii!_!_ii'i!_iil
iiiiiYi_ii!!iiii
iiii!W_iiiiYiiiiliiilii!i_ii'
Page 85

Notas_
iii!_iiiiiiiii
47
Page 86

iiiii!ilii_,i,_ii_iiiii!,i!
ii_iiii'iiii!_!_ii'i!_iil
iiiiiYi_ii!!iiii
iiii!W_iiiiYiiiiliiilii!i_ii'
Page 87

GarantiadeHomoMicroondasGE.
Todos los servicios de garantia los
proporcionan nuestros Centros de
ReparaciSn de F#brica o nuestros t#cnicos
Customer Care® autorizados. Para
concertar una cita de reparaciSn, en line&
24 horas al dia, p6ngase en contacto con
nosotros en wwwGEAppliances.com, o
flame al 1.800.GE.CARES.
Grape aqui su recibo. Se
requiere facilitar prueba
de la fecha de compra
original para obtener un
servicio bajo la garantfa.
GE reemplazara:
Un afie
Desde la fecha de la
compra original
Delsegundo al decimoafin
Desdelacompra original
delproducto
iiiiiiili_
V,*,,orop..ac,,,,a,.',o_p._a .oe,*..o,o_._,.o,.e,.',o_oi_:_,_
Cualquierrecambio de] homo mi(roondas que/_dle
(t('t)i(l() a un d('[i.'cto ('n sus materiales o en sit
t:al)rica(-i6n. Durant(' ('st(' afio de garantia completa,
(;E propor(ionarfi, sin costo adicional, (-ostos d(, mann
d(' (}])1_1v (ostos F('la(iollados (o11 ('1S('F_I(io ('11 SII 11()_117
pa]:a F('('l//plazaFlaS pal:t('s (t(']('(tllosas.
El magnetron, si el tut)o magm('tr6n tidlas(' (l('l)i(t() a un
(t('/b(to en sus mat(,rial(,s o ('n su t_d)ri(-a(i(m. Durant('
estos nueve a_os adicionales de garantia, usted s(,rfi
responsabl(' (t(' cual(lui('r (ostos de mann (t(' ol)ra o
(ostos r(,lacionados (on ('1 s(,rvi(io.
e,,,e,_..eco,.ous.,"e,_ro_.c,o. re*_,o_e,o,_"_ore...'e,.
mm_te_mnlento hnproplo, acddente, fuego, h_m_dadones
.so,o ro o ,to
los propuestos, o sl se usa con fines causado por poslbles defectos
comerdales, con el aparato.
Reemplazo de bombillas de la luz de Dahos causados despu_s de la
la estufa, entrega.
Estagarantlaseextlandealcompradororiginaly acualqularproplatarioqueIosucedaparael casode
productoscompradosparausodom_sticoenlosEstadosUnidos.EnAlaska,ustedtendr9quepagarel
fletedelproductoo loscostosdevlajedeltbcnicodeserviciohastasuhoga_
Algunos estados nopermiten la exclusiSno limitaciSn de dafios incidentaleso consecuenclales. Esta
garantla leproporcionaderechoslegales especfficos, ypuede tener otros derechos quepueden variar
de unestado a otro. Paraconocer losderechos legalesde su estado, consulte consu oficina local de
asuntos de/consumidor o al procuradorgeneral de su estado.
Garantizador: General Electric Company. Louisville, KY 40225
43
Page 88

Soporteal consumidor.
P6ginaWebdeGEAppliances GEAppliances.com
4Tknc alguna pregunm sol)re su ek ctrodom&d( o? iPmeb_ la pdgina _'\_b de GE Appli m( es
24 hol_s d dia, cualquier dfa del aflo! Para mayor convcniencia y '_'Bicio ross r@ido, va puede
descargar los Manuales de los Propiemlios, pedir piezas o induso hater una cita en lfl_e_ pro.,
que _x'ngm_a rcaliz _r una rcpantcidn. '[hmbi6n puede "Ask Our qbam of Expelxs rv''
(Preguntar a nuesuo equipo de expem_) sobrc cualquier cuestidn y mucho mS.s...
Soliciteunareparaci6n GEAppliances.com
El sepdcio de _xp_ tu_s GE (sty1a tan s6lo un paso d( su pu( rla. iEnu( en lfnea v solicil_
su r{ palv_(:i6n (:nan(In le v_nga bien 24 horas al dfa cualquier dfa (kl afio! () llame al
800.GE.(2\RES ,2......
RealLife DesignStudio
(Estudiodedisefioparala vidareal) GEAppliances.com
(;E ap_?_l el concepto de Disefio I hfi'an_al--pr_ductos, servicios y ambientes que pueden
usm genre de to&e, las edades, tatllaflos y (apa(idades. Rcconocemos la nec_qdad de
disefiar pm-a una gtv,n gwma de habilidades y difi( ultades tgkas y mentales. Pm'a re{ks
demlles (obre las aplicaciones de GE Disefio I hlivcrsal, indmendo idea.', de disefio para
la codna pm'a persona.,, con discalw idades, mir,v nueswa pggina X_kd)hW misrule. Pare
persona.', con ditk ulmdes audifivas, thvor de llamar al 800.'II)D.GI_\C (800.833.4322).
(800.4.,2.21:) t ) (llll'_llll{? hoI'as llOrlllales de ofidna.
garantfasamplbdas
(2mlpre una gurantfi_ ampliada y obtcnga detalk s sobre descuentos especiales
disponibles mientrus su garanU'a est_i a(In a( th'u. Puede (omprarla en lfnea en
(ualqllier momento, o llamar al (800.626.2224) durunte [lorkts normales lie otk ina.
(;E Consumer Itome Servk es estar5 afm ahi (uando su ganmtfu termine.
GEAppliances.com
Piezasy accesorios GEAppliances.com
Aquellos indi'dduos con la calificacidn necesaria para reparar sus propios
ele( trodomdsti( os pueden pedir que se les manden las pieza.s o ac( esorios
dire(tamenm a sus hogures (a( epmmos las tmjetas VISA, MasterCard y Dis(_r_cr).
Ilaga su pedido ell h'nea 111)>24 horus cada dill o llamar pot wldfbno al 800.626.2002
dm-unte horas normales de oticina.
Losinstruecionos descritason esto manual cubron losproeedimientosa seguir por
cualquier usuario. Cualquierotra reparacifin deberia, pot regla general, referirse a personal
ealifieado antorizado.Debe ejercerse preeaueion ya que /asreparaciones incorreetas
pueden cansar condiciones de funeionamientoinsegnras.
PSngaseencontactoconnosotros GEAppliances.com
Si no estfi satislbcho con el serxicio que recibe de (;E, pdngase en contacto con
nosotros en nuesU-u p(tgina _Wb indicando todos Ins detalh's asf como su ndmero
de tel('fono o es( rfbanos a: (;eneral Manager, Cllstotllet Relations
GE Applian( es, Applian( e Park
Louisqlle, KY 40225
Registresu electrodom#stico GEAppliances.com
iRegisl-re su nuevo electrodom6sfico en llnea--cuando ttsted prefiera! El registrar su
produ( to a tJ,:mpo le propordonar(t, si sm-gi_ ra la he( esidad, una re(jot (onumi( addn
v un set"_J(io mils rSpido bajo los t(Tininos lie Sll gP.l'Utltl'u. "Iambidn I)uede enviar su
i;lljt,r;l dr" registro pr(qmpresa que s{' in( luye cn el material dc embal@'.
[mpreso en Corea
 Loading...