

GE JVM3670WF05, JVM3670SF04, JVM3670SF03, JVM3670SF001, JVM3670CF05 Owner’s Manual
...
GEAppliances.com
Saj'e_ lnstrudions .2-3
Operating Inslrudions
Auto Features ......... 20
Care and
Cleaning .......... 33, 34
Changing the
Power I ,e\'el .......... 13
Cooking Guide ..... 15, 16
Deti'osting Guide ...... 18
Exhaust Feature .... 36, 37
Features of Your
Microwave Oven .... 11, 12
Microwave Temps ...... 39
Other Features .... 25-31
Replacing Bulbs ....... 35
Sensor Features .... 21-94
Time Features ..... 14-19
Tmubleshnmting
Tips .............. :_8,:¢.)
Things That Are
Nomml _,\ith Your
Microwaxe Oxen ....... 39
Consumer Support
(h)nsumer
Support ...... Back Cover
Optional t¢dts ......... 10
Product
Registration ....... 41, 42
Warranty ............. 43
Espa_d
For a Spanish \'e_ion ot this
manual, visit our Website at
GEAppliances.com.
PaI'a COiiS/ll[_li" tlIla veiNioil
en espafiol de este manual
de instrucciones, visite
nuestro sitio de internet
GEAppliances.com.
,ig_U3660
,f!'M)6/O
k)
Write the model and serial numbers here:
Model #
Serial #
Find these mlmt)ers on a label inside
the ov(?l1,
164D3370P274 49-40344 06-03JR
IMPORTANTSAFETYINFORMATION.
READALLINSTRUCTIONSBEFOREUSING.
WARNING!
For your safe_ the information in this manual must be
followed to minimize the risk of fire or explosion, electric
shock, or to prevent property damage, personal injury,
or loss of life.
PRECAUTIONSTOAVOID
POSSIBLEEXPOSURETO
EXCESSIVEMICROWAVEENERGY
i!iiiii_i++iiiiiiiiHi+!iHHHili!iiii
+
SAFETYPRECAUTIONS
When using electrical appfiances basic safety
precautions should be followed, including the following:
i+iii!ili+i+!Xiii+!!ili+i,ii!+!+iii+++i
Do Not Attempt to ot)et'_lt(,
this oven with the door open
sin((' op('n-(|oor op('t'_ttJ()l/
(ml r('su]t in harmful
('xl)ostlr(' to IlIiCI'OW_I\ (,
('n('l?g_. It is il//t)ortallt 1101
to delL'at or tmnl)er with
the saI['t'_ interlocks.
Do Not Place any ol)iect
between the oven/i:ont
thce and the door or allow
soil or (le;mer residue to
_l((tmmlatc on sealing
S/ll;[ilCeS.
Re_(t and tallow the spe(ifi( Install or lo(ate this
precautions in the Precautions
to Avoid Possible Exposure to
Excessive Microwave Energy
s('(t Jan _d)o\'('.
This appliance must Lie
groun(h'd. (]Ollll(_Ct onlv [o
a properly grounded outlet.
See the Grounding Instructions
section on page 8.
Do IVotOperate the oven if it
is (lamagc(I. It is particularly
il/l])OFt_tl/t that the O\ell door
close properly and that there
is no (tamag(' to th(_:
........................(broken or loosencd),
S[ I17{_t( (fS.
The Oven Should Not
be a(!iusted or rel)aitx'd t)y
m_yone except properly
qualified service persom_el.
appliance only in accordance
with the t)rovided Installation
I1 ISWtlCiions.
This mictx)wm e oxen is LlI
listed Jar installation o\er
electric and g_s ranges.
This mictx)wm e o',en is
no[ _l])[)l'ov('d ()r tested
][)l" lIl_tl_ille [ISe.
vvvvw.GEAppliance_com
Use this appfiance only for its intended purpose as described in this
Owner's Manual
I)o not lnount this applian(e o\er
a sink.
This oxeFthe-nulge oxen _s_tsdesiglled
tar use o_er ranges no wider tllall 36."
It may be installed o_vr both g'as and
ele(tric (ooking equil)inent.
Do not operate this applian(e if it has
a damaged power (ord or plug, if it is
not working properb;, or if it has been
damaged or dropped. If the power
cord is danlaged, it must be repla(ed
bv (',eneral Electric Service or an
authorized service agent using a
power cord m_dlable/i:om (',eneml
Electric.
I)o not co_er or block any openh/gs
(Ill tile appliance.
Use this appliance only tar its
intended use as described in this
nlanual. Do not use corrosive
chen/i(als or vapors ill this applian(e.
This n/i(rowmv ()_'n is specifi(ally
desiglled to heat, (tr_ or cook tood,
and is not intended/or laboratory
or industrkd use.
Do not store this apl)liance outdoors.
1)O I]Ot list. ` this t)rod/Ict Ile_tr w_ttel _
tar example, ill a wet basen/ent, near
a .swinlnling pool, near a sink or in
similar locations.
Kee t) power cord away ti'onl heated
S/lrtilces.
Do not ilnmerse power cord or
phlg in water.
Do not store anything directly on top
of tile l//icrowa_e ()sell stlrJitce whell
tile n/icrowme o_.el/is ill operation.
"Ib red uce tile risk of fire in tile
oven cavity:
--I)o not overcook tood. Carefllllv
attend appliance when paper, plastic
or other COl//btlstible l//aterials are
placed inside tile o_en while cooking.
--Remove wire twist-ties and metal
handles ti'on/paper or plastic
containers betore t)lacing thenl in
tile oven.
--Do not use tile o_vn tor storag+e
purl)oses. Do not leave paper
pro(huts, cooking utensils or/ood
i]l tilt`' ovell \'dlell llOt i]l use.
--If nlaterials in.qde tile ()_vn ignite,
keep tile oven door closed, turn tile
oven off and disconnect tile power
cord, or shut off t)ower at tile fl_se or
circuit breaker panel. If tile door is
opened, the fire nla} spread.
--Do I/at use tile SellS(M? IZeatures
twice in suc(ession (Ill tile same load
portion. If/ood is undercooked atier
tile first t`om/tdown, use Time Cook
tot additional t`ooking tin/e.
See door sur/itt, e (leaning illstrut, tiolls
in the Care and cleaning of the
microwave oven set` lion el this n/a]lual.
This a])pliance must only be serviced
_g qualified selMce personnel.
(',omact nearest authorized service
thcilitv/or examination, repair or
a(!jusHnent.
As with ally appliance, close
S/lller_isioll is lie( eSS_tFVwhell
used by (hildren.
ilii!iiiiii!/ii!iiiil i
3
IMPORTANTSAFETYINFORMATION.
READALLINSTRUCTIONSBEFOREUSING.
WARNING!
ARCING
If you see arcing, press the CLEAR/OFFpad and correct
the problem.
Arcing is the ]l/i( ]7ow_lve [el_i/] ;_ Foil not molded to/ood
/or sparks in the o_,wn+Arcing (upturned edges act Hike
is caused by: antem/as).
The metal shelf not installed ;_ Metal, such as twist-ties,
(orrectlv so it touches tl/e poultr} pins, or gold-rimmed
microwave wM1. dishes, in tile microwm e.
FOODS
i!iiiiii++iiiiiiii/i+!iHHiiii!iiii
+
iiiii!ili+i+!Xiiii!!i/i+i,ii!+!+iiiiiii
Metal or/oil touching the
side of the o_en.
Do not poll popcorn ill YOre:
lIliCl?OW_l_eO_el/ tulh'ss ill a
special mi(rowave pol/(orn
a(cessorv or tmless you use
t/Ol/(orn labeled {br use in
lIliCl'OW_l_ e O_ ellS.
Sol/le t)Fo(hIcIS S/lOll _lS
whole eggs and sealed
containers t_)r examl/le,
closed,jars--_m • able to
explode and should not be
he_ted ill this microwave
oven. Su(h use of tile
llliCl?OW_l_+_' 0_+_'1/ (otlld
resuh in in jm+y.
I)o not boil eggs in _
llliCl?Ol%we ovel/. Pl?eSS/ll?e
will build up inside egg }x)lk
and will cause it to bm'st,
possibly resulting in in jmT'.
;+ Recycled tlaper towels
containing small metal pieces
being used in the microwave.
()pemting tile mierow_v
with no/ood inside tot more
thaH _ If/illtlte OF t/vo 111_1_,
C_l/Ise d_ll//age to the ovell
and could start _ fire. It
increases the heat al?O/ll/d
tl/e magnetron and (an
shorten tile li/_' of tile o\en.
Foods with tll/l)]?okel/O/lter
"skill" such as potatoes, hot
dogs, sausages, tomatoes,
apples, chicken livers and
other giblets, and egg yolks
should be t/ierced to allow
steaiil to escape dtlrillg
cooking.
vvvvw.GEAppliance_com
SUPERHEATEDWATER
Liquids,such as water,
coffee,or tea, are able to be
overheatedbeyondthe boiling
point without appearingto be
boiling.Visiblebubblingor
boiling when the containeris
removedfrom themicrowave
ovenis notalways present
THISCOULDRESULTIN VERY
HOTLIQUIDSSUDDENLY
BOILINGOVERWHENTHE
CONTAINERIS DISTURBEDOR
ASPOONOROTHERUTENSIL
ISINSERTEDINTOTHELIQUID.
To reduce the risk ofiq)ury
to persons:
--Do not o\erheat the lktuid.
--Stir tile liquid both betbre
and hal(ivay thro/lgh
healing it.
--Do not use straight-sided
containers with narrow
necks.
--,Mier headng, allow tl_e
container to s[alld ill tile
I//ic1x)W_I_,_' (._,_'l/ tor a short
tinle t)et_)re removing the
containeE
--Use extreiile care when
inserung a spoon or other
tltensil illtO |he container.
A\ oid healing bah} tk)od in
gla.,-,,,jars, e\ en with tile lid
o/E Make sure all intimt/k)od
is thoroughly cooked. Siir
/k)od to distribute the heat
('_'l/]}. Be care/ul to Ill, wen|
scalding when warming
/_)rnmla or breast milk. The
conlainer lllitv/['el cooler
than tl_e milk really is. Alwm_'_
test the lnilk be/[)re teeding
tile bal)_,.
;+ Don't de/i'ost/:cozen
be\ ('t_gt'S ill n_ll;1X)w-
ne(ked bottles (espe(ially
( arbonated be_'rages).
l_iv('n if tile container is
opened, lm'ssm:e call build
up. This can cause the
comainer to burst, possibly
resuhing ill il/.jm>
:_ Itot/k)ods and steam can
cause bin:us. Be caretifl when
opening any containers oI
hot/k)od, ilwludillg pop(orn
bags, cooking pouches and
boxes. "Ib prevent possible
iqjm T, dire_ t steam away
/i'om hands and til(e.
1)O llOt O_,tTC()()k potatoes.
The_ couM dehydrate and
catch/ire, causing dan/age
to VO/lr ()_,t'11.
Cook meat and potdtr}
thoroughl}mmeat to
at least an IN I'ERNAI_
temperature of 160°F
and t)o/lltFv to at least an
INTERNAI ten/perat t n:e
of 180°F. Cooking to
these mmperamres
usually protects ag_dnst
/k)od-borne illness.
i_ii;;iiiiii{ii!iiiii!;++fii;ii
iiiiili iiiiiii!
iii+il iiilli
!iiiiiiiii+i_iii'+iiii!ii
5
IMPORTANTSAFETYINFORMATION.
READALLINSTRUCTIONSBEFOREUSING.
WARNING!
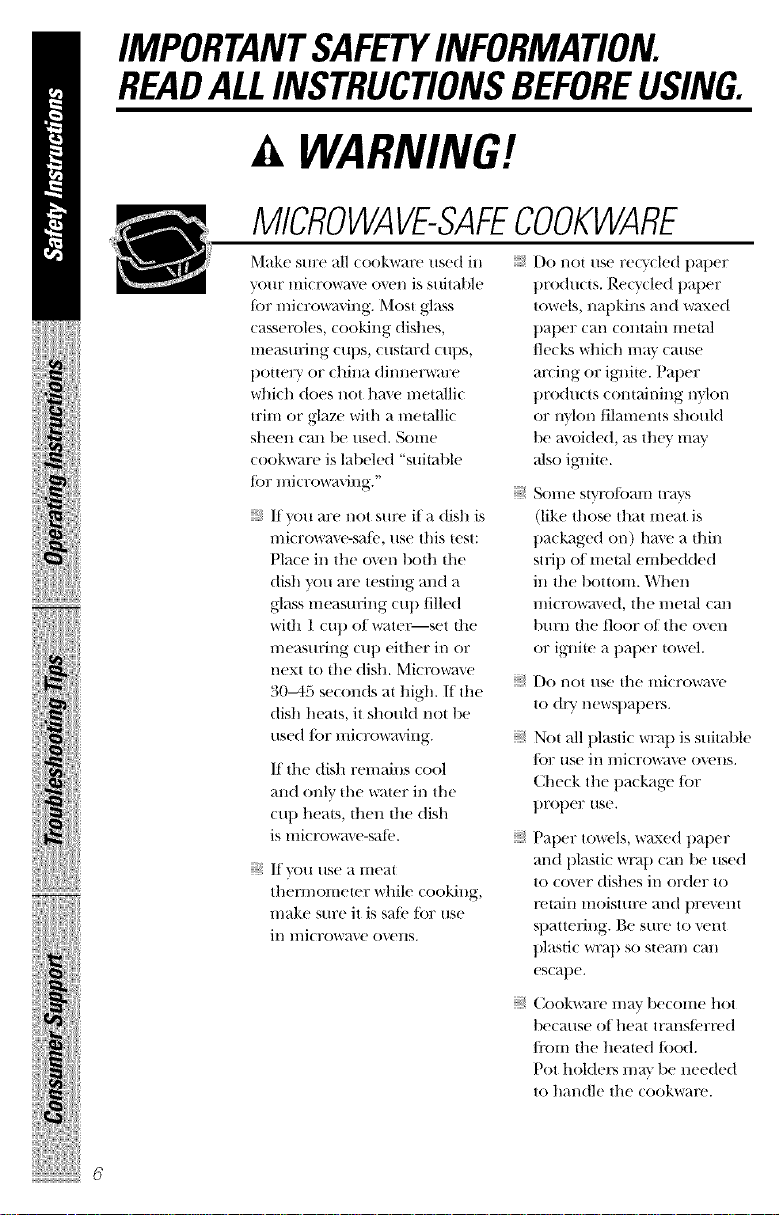
MICROWAVE-SAFECOOKWARE
iiii!i}i_)i{ii!]i/i_]ii!_!_iiiiiii
Make sm:e all cook\v_.l'e [tse(t ill
VOIIF IlliCI'OW;-I_,_' 0_,_'I/ iS s/titable
tbr microwaving. Most glass
casseroles, cooking dishes,
llle;-IS/l]il/g ClipS, C/IS|_t_l'(t Ctlt)S ,
t)otteF_ ` OF chilla (lil/llerwa]?e
whi(h does not ha\ e metallic
trim or glaze with a metallic
sheell call be/lsed. S()lIle
(ookware is labeled "suitable
tot microwaving."
_¢ If you are not sure if a dish is
l/liCl?OW_l\ e-sa](*, use this lest:
Place in the oven both the
dish you are testing and a
glass measmffng (u t) filled
with 1 cup of watetmset the
measuring cup either in or
next to the dish. Micmwa\ e
30M5 seconds at high. If the
dish heats, it shouM not be
used lot microw;Mng.
If the dish remains cool
and only the water in the
cup heats, theH the dish
is microwave-sat_'.
If\xm use a meat
thermometer while cooking,
make sure it is sate tot use
ill l//i(FOWa\ e o\'eHs.
Do not use reQ'cled t)aper
twoducts. Recycled paper
towels, napkins and waxed
t)al)er can contain metal
flecks which may cause
arcing or iglfim. Pal)er
t)Fod/IcIS (Olltail/illg I/}loI/
or n\'lon/ilaments should
be a\ oided, as they lnav
also ig_fite.
Sol//e stvl'o/oaIll [)?_IVS
(like those that meat is
pa(kaged on) hmv a thin
StlJp of metal embedded
iH the t)ottom. When
l//i(l'OVva_,e(t, the ll/etal call
bum the floor of the o\eH
or igmite a paper towel.
1)0 I/Or /lse the II/i(Fov¢ove
to (tF_' newNmt)ers.
Not all plastic wra l) is suitable
/or use in microwave ovens.
Check the package/or
t)Foper Hse.
Paper towels, waxed paper
and plastic wrap can be used
to coww dishes in order to
retaiH moisture and l)re_'Ht
sl)attering. Be stir(' to vent
plastic wrap so steam Call
escape.
Cookwal?e ll/av becollle hot
because of heat translbrtx,d
/i'om the heated/ood.
Pot holders ma\ be needed
to handle the (o()k'w[-II_'.
vvww.GEAppliance_com
"Boilalfle" cooking pouches
and tightly closed plastic
bag':, should be slit, piet',.ed
or vented as directed 1)_
package. If th( 3 are not,
plastic could burst dining or
immediately atier cooking,
possibly resulting in il_im T.
,\lso, plastic storage
containers should tie at least
partially tlnco_'l;ed t)ecatlse
tht\v/kmn a tight seal. When
cooking with containers
tightly covered widl plastic
WF}It) , Yen/ove covelJng
carefllllv and direct steam
}l\*,r?lv]i'Olll hallds all(| ]i_€e.
Use/_)il onh as directed in
this nlalm_d. TV dimmers may
be microwmvd in t_)il trm_'_
less allan 3/4" high; remo_v
tile top/t)il cover and return
tile trm to the box. When
using/_)il in tile microwave
oxen, kee t) the toil at least
1" away/t'om the sides of
tile o\ ell.
Plastic cook\*,rare Plastic
cookv4at'e (lesiglle(t tot
microwa\ e cooking is veW
use/ul, but should be used
caretidlv E_cn microwave-
sale' plastic ma} not be as
tolerant of o\ ercooking
(onditions as ;+It'+.'glass or
(eramic materials and may
solien or (hm: if su[!jected
to short pe+Jods of
overcooking. In longer
exposures to o_vrcooking,
the R)od and cookware
could igllim.
Follow these guidelines.
[.+Ise I//i ( 1X ),*_rave-sa f "e
.....................plasti(s only and
use them in su:ict
coml)liance widl
the cookware
l//allllt_lct/IFel)S
recol//l//endations.
Do not mi(ro,,axe
.....................el/It )I y ( O1 ltaillers.
oo,l(,tt,el .it,hil,tt'ell
.....................to /Ise plasti( ( ook'_*,ralTe
witho/lI ( Ol//t)lete
Sill )eF\+ision,
7
ilii!iiiiii!!+'+i+'ii!iiiil i+
IMPORTANTSAFETYINFORMATION.
READALLINSTRUCTIONSBEFOREUSING.
WARNING!
Improper use of the grounding plug can result in a risk of
electric shock.
GROUNDINGINSTRUCTIONS
This appliance must be gromaded. In the e_'nt of an elecUJc:d
short circuit, Wotmding reduces the risk of electric shock b_
providing an escape wire tk)r the electric cm:rent.
This appliance is equil)ped with a power cord having a g_xmnding
wire with a ga'otm(ting 1)lug. The 1)lug must tie plugged into an
oudet that is properl} installed and Wom_ded.
Consuh a quali[ied electrician or ser_Jce technician if the gT(mnding
instructions are not completely tmderstood, or if doubt exists as to
whether the al)l)liance is tm)t)erly gT(mnded.
If the outlet is a standard 2-truing wall outlet, it is your personal
responsibility and ot)ligation to ha_e it replaced with a t)rot)erly
grom:ded 3-prong wall outlet.
Do not trader any circmnstances cut or remo_e the third (Womld)
prong ti'om the power cord.
Do not use an adapter t>lug with this appliance.
Do not use an extension cord with this al)pliance+ If the 1)ower
cord is too short, hm e a qualified electrician or service technician
install an outlet near the appliance.
For best ot)emtion, t)lug this appliance into its own electrical
outlet to 1)t'event flickering of lights, blowing of fltse or trit)t)ing
of circuit breaker.
+iii!ili+i+!Xiii+!!i/i+:,ii!+!+iii+++i/
www.GEAppliances.com
THEVENTFAN
Tile tiUl will operaw auton/atie_dly raider certain collditions
(see _\lltOl//atic Fan ]_'attlt_'). "Ihke care to pt_'\'e]lt tile starting and
spreading of accidental (ooking (ires \_]lile tile Vellt ]:,In is ill IIse.
;¢ Clean tile underside oI tile microwave often. Do not allow grease
to build up on tile ://icFowa\ e or the [illl fillets.
;_ Ill the e'_/'llt of a g):ease fire on tile suri_,tce units _'l(m the
llliCt'()_'vr_|ve O_/'ll, ,',l/It)tiler a ilal//illg pan on the stlrlilee/lnit b\
(ovel_llg- the pall completely with }t lid, a €ookie sheet or a fiat tlF_|v.
:_ Use care whell €leaning tile veilt ]itn [ilters. Corrosive €leaning
agents, such as 1}v-based oven cleaner.,,, ma} damage tile tihers.
:_ When preparing flau/ing tbods under tile miero_,\ e, turn tile
tiln o11.
;_ Nmvr letup' sur/it(e units beneath yore: lnicrowa_v oxen
unattended at higll heat setth/gs. Boilovers cause smoking and
greasy spillo\ ers that :ha} ig)fite and spread if tile ini( ro,,*,_l\e
vent/m/is operating. "Ib minimize automatic thn opet_,tion,
use adequate-sized cookware and use high heat on sur/itce m/its
only \vhen necessary.
READANDFOLLOWTHISSAFETY
INFORMATIONCAREFULLY.
SAVETHESEINSTRUCTIONS
!iii!_i:iiii:i
9
Aboutoptionalkits.
iiiiiiii¢_iiiiiililiiiiiiliiiiii_i_i_i_i_i_i'
_iiili_!iiil
_iiiiljiiiiWiiiiiiiiiiii!iiiiiiii
OPTIONALKITS
Filter Kits
JX81B - Recirculating Charcoal Filter Kit
Filt('r kits _]7('/ls('d W]l('n t]l(' H/i(F()W_\ (' O\'('ll (_tllllOt |)(' v('nt('d
to the otltsid('.
Av_dlable at extra cost from _'our (',I_ sul)plie_:
70
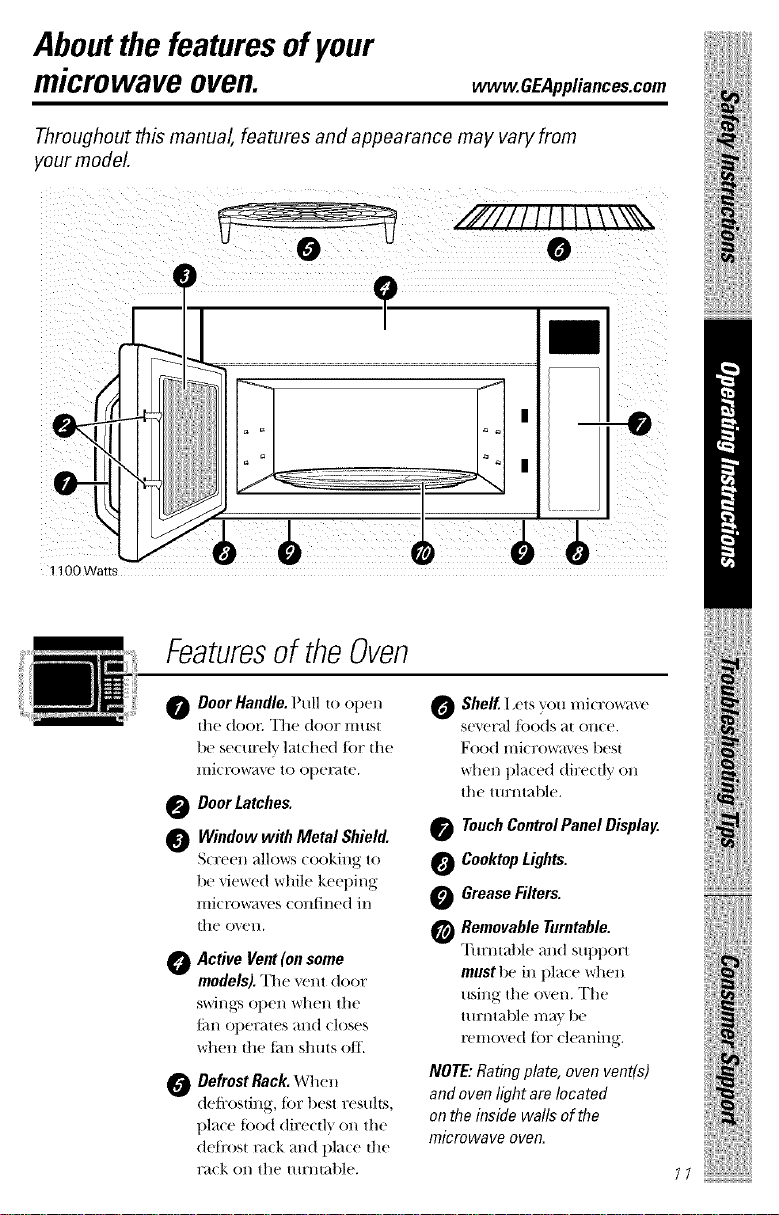
Aboutthefeaturesofyour
microwaveoven.
Throughout this manual, features and appearance may vary from
your model
vvww.GEAppliances.com
/////I I I I I I \ \ \\%\
0 O
?
' -0
I
1100 Watts
Featuresof the Oven
O Door Handle. Pull to open
the door. "I'll(' door must
bc securclv latched Jar the
0 Door Latches.
Window with Metal Shield.
Screen ;d]/)ws cooking to
be viewed while keeping
llliCI'owdvt's COlltin('d ill
t]l(' o_ ('ll,
O Active Vent (on some
models). The "_ent door
sv_ril/grN open v_rhen the
t_ll/ Opel;at(s _tll(t (loses
_r]_ the thn shuts off.
Defrost Rack Whell
0
deflx)sting, tor best results,
place toed (lirectl'_ on the
deIi'ost m(k mid plale the
r_t(k on the tllrlltallle.
O Shelf. I ,ets you microls_ve
S('V(T_I| ]Dods at alice.
Food microwaves best
when placed directly on
tile turntable.
TouchControl Panel Display.
O Cooktop Lights.
O Grease Filters.
0 Removable Turntable.
Turntable mM support
must be ill place when
using tile o\en. The
ttll:nt:aLfle llla_ be
removed {or cleaning.
NOTE: Rating plate, oven vent(s)
and oven light are located
on the inside walls of the
microwave oven.
ilii!iiiiii!/ii!iiiil_i_
11
iiii!iiiiii:i i i
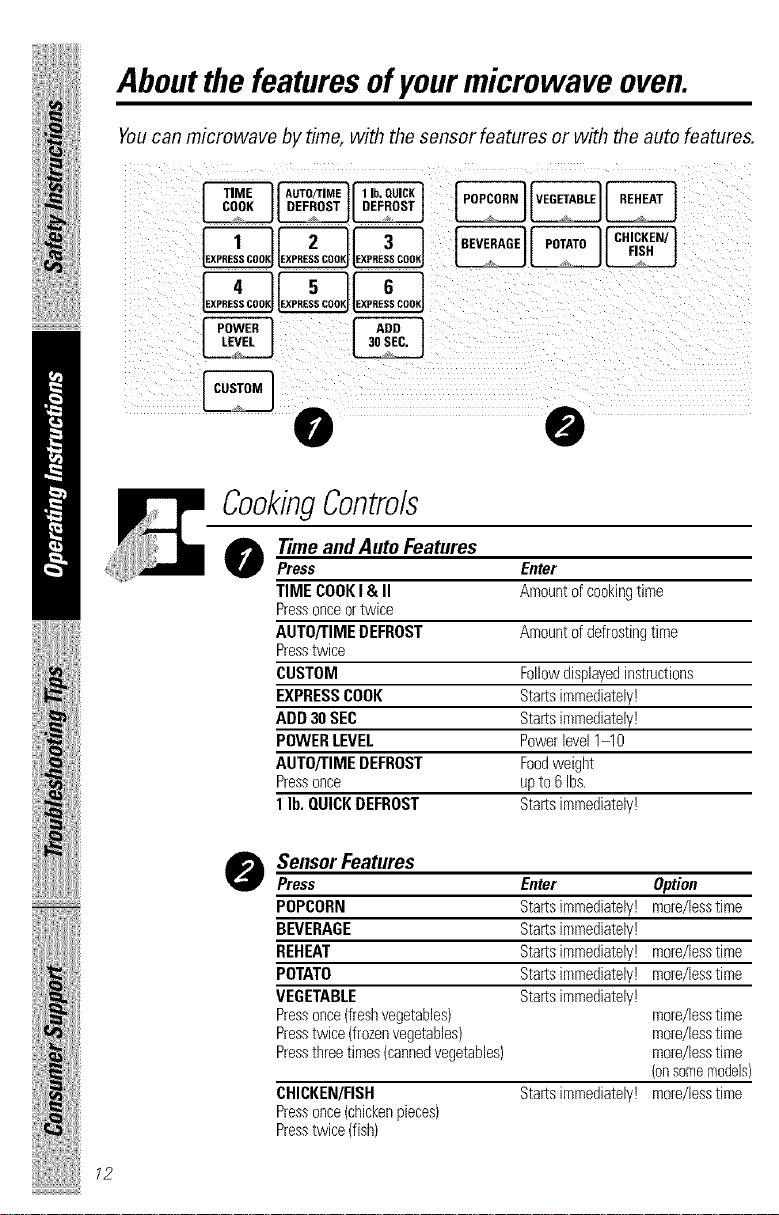
Aboutthe features of yourmicrowave oven.
Youcan microwave bytime, with the sensor features or with theauto features.
0 0
CookingControls
O TimeandAuto Features
Press Enter
TIME COOKI & II Amountof cookingtime
Pressonceor twice
AUTO/TIME DEFROST Amountof defrostingtime
Presstwice
CUSTOM Followdisplayedinstructions
EXPRESSCOOK Starts immediately!
ADD 30 SEC Starts immediately!
POWER LEVEL Powerlevel 1-10
AUTO/TIME DEFROST Foodweight
Pressonce upto 6 Ibs.
1 lb. QUICKDEFROST Starts immediately!
!iiiiii it
;;;;;;;;;;;;;;;;;;;;;;;;;;;;;;;;;;;;;;;_
12
O SensorFeatures
Press Enter Option
POPCORN Starts immediately! more/lesstime
BEVERAGE Starts immediately!
REHEAT Starts immediately! more/lesstime
POTATO Startsimmediately! more/Jesstime
VEGETABLE Startsimmediately!
Pressonce(freshvegetables) more/lesstime
Presstwice (frozenvegetables) more/lesstime
Pressthreetimes (cannedvegetables) more/lesstime
CHICKEN/FISH Starts immediately! more/lesstime
Pressonce(chickenpieces)
Presstwice (fish)
(onsomemodels)
Aboutchanging the
power level. vvww.GEAppliances.com
_uiable power levels add flexibility to micmwa\ e
looking. "Itle t)owel? le_,els Oll the Illi( FOW_lx, e ox, en (_lll
be ( ompared to the surf_t(e units on a range. I ligh
(power level 10) or lull l/ower is till' t_tstest v+_p_'to look
and ,gives you 100_/c power. Ea(h l/ower level gives you
1o.+,2ooollo.,.aco°J
4 5
I..........JI.........
I, II Ir-
@
How to Change the
Power Level
The power level may
be emered or changed
immediately after
entering tile/('ature
time tbr TIME COOK,
TIME DEFROST, EXPRESS
COOK or ADD 30 SEC.
The Rowe]? level _II_]_r
also be (hanged during
time (Olllltdown.
I; l _e,s TIME COOKor
sele/t Time Defrost.
P ( ss POWER LEVEL
ii +++_+iii_
ll/i(Fow}l_,e ('nel\g} _i(ertain t)er(ent ot die time. POWeF
le\ el 7 is mi(rowmv energ-} 70% ot the time. POWeF
le\ el 3 is energy 30% of tile time.
A high setting (10) will cook tipster t)/lt R)od ill:a'_
need more fl?equem stirring, 17otatillg or turning o\eJ:
Most cooking will be done on I/igh (power level 10).
A lower setting will cook more e_enly and need less
stirdng or rotating of tile/i)()(/.
Sollle ]i)ods iil_lV have better ]lavol, lextllre or
appearance if one of the lower settings is used.
Use a lower power level when cooking/i)o(ts dlat have
a tendency to boil or(q; su(h as scalloped potmoes.
Rest t)elJo(ts (whell tile llliclx)wa\ e energ_ (?'cles oIt)
gi_e time ti)r tile ti)o(t to "equalize" or translbr heat to
tile inside of tile too(t. All exmnple of this is shown
with power h'\ el 3--the de/i'ost cycle. If mi(rowave
energy' did not cv(le ott, die outside of tile/ood wouM
cook be/ore tile inside was (/e/i'osted.
I {el?e }tl?e SOl/le ex}tllltlles of/Ises tk)l" "_}tliO[iS
poweF levels:
Power Level Best Uses
High10
Med-High7
Medium5
Low2or3
WarmI
Fish, tlacon, vegetat)les, boiling
liquids.
(',entle cooking of meat and t)oultlT;
baking casseroles and reheating.
Slow cooking and tenderizing such
as stev<'_alld less tender ellis of meat.
I)efl:osting without cooking;
silmnefing; delicate sauces.
Keeping tbod warm without
o_vr(ooking; softening buuer.
!iiiilIii!i!l+
ilii!ii:iii?+ i+:ii!iiiil i
7?
iii iHiil!iiii!ili
Aboutthetimefeatures.
P (ss TIMECOOK.
Time Cook I
,\Hows "_otl to l]/i( ]7()_r;'l_,(_ t(}F ;'111_' ti]]/(_ I| t) tO ()(.) minutes
and 99 se((mds.
]?()_r(_]:lme110 (t ]igh) is automau{ ally set, but you may
(h}lllg{! it for IlIOF{! tlexibilh}
"_bu may open the door (tu]Jng TIME COOK to check
the tood. Clos(' the door and t)ress STARTto resume
( ooking.
Time Cook II
Iets you cl]ang{ • power l{'\ els automatically during
( ooking. I/{'re's how t() do it:
Press TIME COOK.
full t}owe_ (Press
POWER LEVEL.
S(,h,(-t a desired
pOW{'I"l{'v{'l 1-10.)
Press STARE
iiii!i}i_)X{i{i!!i/i_i,ii!_!_iiiiiii/
.....................power, (Press POWERLEVEL Sekxt a desired
power level 1-10.)
Press TIME COOK a_,_,,in.
<,
Enter the se((md (ook time.
.....................t)ower. (Press POWER LEVEL. Sele(t a t)OW(!F
l{'\'{'l 1-10.)
STARE
At the end of Time Cook I, Time Cook II (omits dowl/,
vvww.GEAppliances.com
CookingGuidefor Time Cook I and time Cook II
NOTE,"Use power level High (10) unless otherwise noted.
amo,,,t T me Comme,ts
Asparagus
(!i+¢S!1spears)
(frozen spears)
Beans
(ficesh green)
(frozm_ green)
(fl+ozen lima)
Beets
(fl+esh, Mlole)
Broccafi
(fl'esh cut)
(ficesh spem's)
(fl+ozen,
chopped)
(lk+ozen spears)
Cabbage
(fl+esh)
(wedges)
Carrots
(fl+esh, s!ic_ d) 1 lb.
(fl+ozen) 10-oz t)a( kage
Caufiflower
(I!owerets)
(fl+esh, w!lole )
(fl+0ze n)
l lb. 6 to 9 rain., In ll/z-(lt, oblong glass baking
Med-lligh (7) dish, t)la(e 1/4 (up water.
lO-oz pa(kage 5 t() 7 rain. In 1-qt. (asserole.
1 lb. cutinhalI 9t77 11 rain.
In 1½-qt. casserole, place
1/2 cup water.
lO-oz t)ackage 6 1778 rain.
In 1-qt. casserole, place
2 tablest)o(ms water.
lO-oz pa(kage 6 t778 rain.
In 1-qt. casserole, place
1/4 cup wate+:
1 btmch 17 to 21 rain. In 2-(it+ 7asserole, t)la(e
1/2 (u t) water.
1 t)tmch 7 to 10 rain.
(1V+ to 1½ lbs.)
1 tmmh 9 to 124rain.
(1V+ to 1½ lbs.)
lO-oz pa(kage 5 t(7 7 rain.
lO-oz package 5 t77 7 rain. In 1-qt. casserole, place
1 medimnhead 8to 11 rain.
(al)out 2 lbs.)
7 to 10 rain.
7 to 9 rain.
5 to 7 min.
1 medium head 9 to 14 rain.
1 medimnhead lOto 17rain.
lO-oz pa( kage 5 to 7 rain.
In 2-qt. casserole, place
1/2 cup water.
In 2-qt. ot)l(mg glass baking
dish, place 1/4 cup water.
In 1-qt. casserole.
.'4tablest)oTms water.
In 1K,- or 2-qt. casserole, place
1/4 cut) water.
In 2- or 3-qt. casserole, place
1/4 cup ware+:
In 1½-qt. casserole, place
1/4 cup ware+:
In 1-qt. casserole, place
2 tablespoons water.
In 2-qt. casserole, place
1/2 cup water.
In 2-qt. casserole, place
1/2 cup water.
In 1-qt. casserole, place
2 tablest)oons water.
!iiiilIii+
iiiiili iiiiiii+
iii++il iiilli
!iiiii}}ii+}_iii++iiii+ii
75
iii iHiil!iiii!ili
Aboutthetimefeatures.
Corn
tf_'ozen kernel l O-oz ])a(kage 5 to 7 rain. In 1-qt. casserole, t)la(e
Corn on the cob
(iresht ] to 5 ears 3 to 4 rain. /n 2-qt. obloug glass baking
(lrozen ] ea_ 5 to 6 rain. Place in 2-q_. oblong glass
Mixed
vegetables
!lrozen lO-oz pa(kage 5 to 7 rain. /n l-qt. casserole, ])L_(e
Peas
tlicesh. _helled) 2 lbs. unshelled 9 to ] 2 rain. In ]-ql. (asserole. ])]a(e
(ft'ozen 10-oz package 5 to 7 rain. In l-qt. casserole, place
Potatoes
]i'esh. tithed. 4 pOl;llOeS
whiw. '6 to 8 oz ca(h)
lt'esh, whole. ] _ _o 8 oz) 3 to 4 rain.
.sweel or while,
Spinach
(ti'esh •
iiii!i}i_!X{q{i!!i/i_i,ii!_!_iiiiiii
lrozell.
chol)pcd
and leat
Squash
(li'esh, summer
m:td yellow)
(whl|er, aCOrll,
btHternut)
/8
Amount Time Comments
per ear dish, t)lace corn.// (orn is iu
2 _() 6 ears 3 to 4 rain. Cover wid_ xented plastic wrap.
per ear Rearrange atier half of lime.
9 to ] 2 rain.
10 _o 16 oz 5 to 7 rain.
lO-oz package 5 to 7 rain.
l lb. sliced 5 to 7 min.
] to 2 squash 8 to l 1 rain.
al)ottt ] lb. each)
husk, use no _'v'_lt('r; it (or]l l]_{S
beeu husked, add 1/4 cup
water. R('arrm_ge a/ler half
of _ime.
baking dish.
3 lablespooHs _*_r_lte]_
1/4 cu t) _ater.
5' lablespooHs wale/_
Peel and cut imo 1 inch cut)es.
Place in 2-(V. casserole with
1/2 clip water. Stir after half
of time.
Pier(e _i_t_ cooking tork.
Pla(e in (enter o/the oven.
I.ei stand 5 minmes.
In 2-qt. casserole, t)lace washed
spinach.
In 1-qt. casserole, t)lace
3 tablesl)oons water:
In 1½-qt. casserole, t)lace
1/4 cup water.
Cut in half and remove/ibrous
membranes. In 2-qt. oblong
glass baking dish, place squash
cut-side-down. "Ihrn cut-side-up
alter 4 mim_tes.
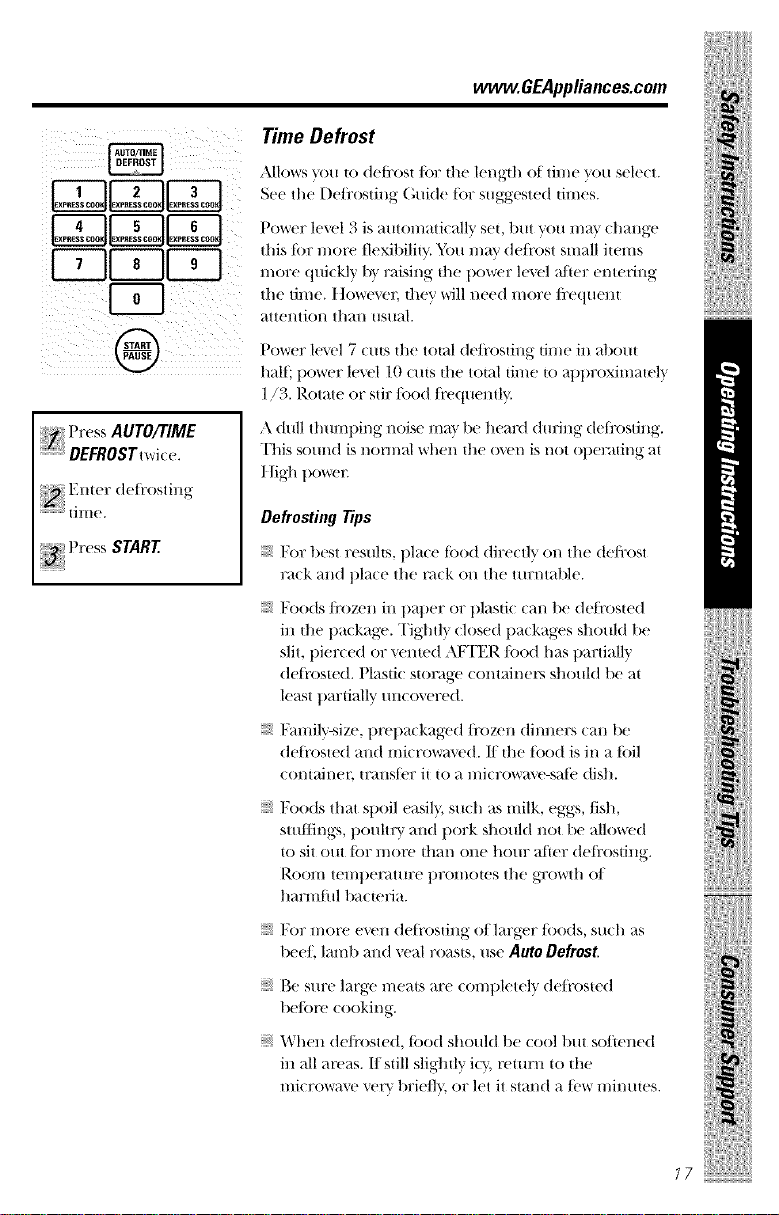
Time Defrost
Allows _m 1o defl:os{ lot the length of time you select.
See the I)e/i'osting (;uide tot suggested times.
Lo oooL°o ooo3
Press AUTO/TIME
"_DEFROSTtwi( e.
Enter deti'osting
::::::' Pr( ss START
Power level 3 is automatk all}' set, t)/lt yoll 1//_} ( hange
this tor more tlexit)ilit_. You may deli'ost small iwms
more quickly 1)_raising die 1)ower lexel alder entering
the thne. t]owevec they mll need more/i:equen{
attel/tiOl/ thall IIS/lal.
Power level 7 cuts the total de/i'osting time in _d)out
halP, power h'vel 10 (uts the total time to al)t)roxim;_tely
1/3. Rotate or stir/ood/i'e(tuently.
A dull tlmml)ing noise ma} be hemxl (truing delix)sting.
This s(mnd is normal when the oven is not ot)erating at
I tigh t)oweE
Defrosting Tips
For best resuhs, l)lace tood directly on the de/i'ost
rack mid place the m(k on the turntable.
I;oods/i'ozen in paper or t)lasti( (m_ t)e deli'osted
in die 1)a(kage. Tightly (losed 1)a(kages should be
slit, pierced or venmd A/zI'ER/ood has partially
deJi'osted. Plasti( s{orage containers should be at
least partially mlco\ere(t.
I:mnily-size, prepackaged/i'ozen dinners can be
deli'oswd and mierow_l_v(t, ff the tood is in a loll
eOl/t_il/eF |l;allst('l; it 1o a H/iCFOW_\'e-sa[(' dish.
vvvvw.GEAppliance_com
!iiiilIii!i!ll
Foods that spoil easil}, such as milk, eggs, fish,
smtfings, pouhry and 1)ork should not be allowed
|o sit out tot more than one hour atier deti:osting.
Room telnt)e_mu:e t)romotes the gTowth of
hm:mfl|l 1)_1(te}ia.
For more even deIi'os|ing oI larger foods, such as
1)eeI, laml) mid xeal roasts, use Auto Defrost.
Be sm:e large mea|s are completely deti'os|ed
be/ore cooking.
When de/i'osted, tood should be (ool but softened
in all areas. If still sligh|ly icy, remr|l t() |he
microw;_v very briefl}, or let it stand _/_'w mbmtes.
ilii!iiiiii? i:ii!iiii
77
iii iHiil!iiii!ili
Aboutthetimefeatures.
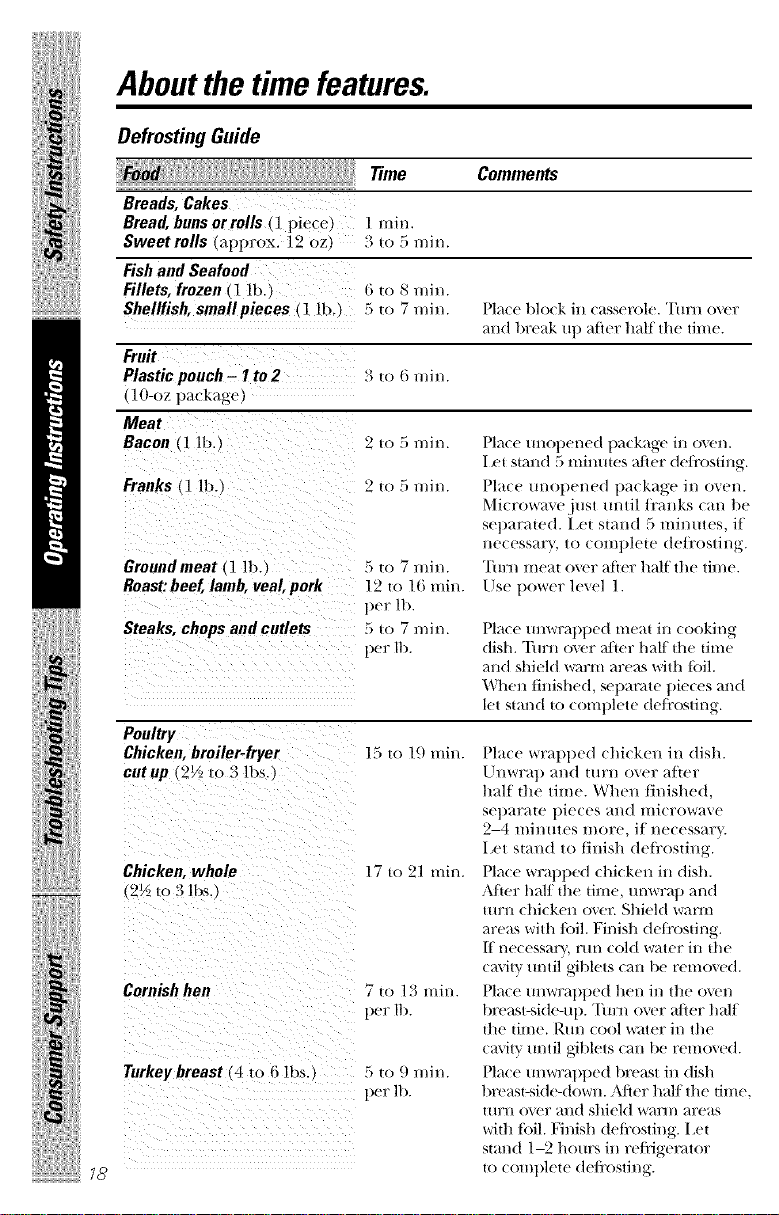
Defrosting Guide
Breads, Cakes
Bread, buns or rolls ( ] piece,
Sweetrolls tapprox. ]2 oz
Fish and Seafood
Fillets, frozen ( 1 lb.
Shellfish, small pieces (1 ]lx_
Fruit
Plastic pooch - I to 2 :4m 6 rain.
(10-oz package,
Meat
Bacon (l lb.) 2 u) 5 rain. Place tmOllened tla(kage in oven.
Franks I lb.,
Groundmeat (1 lb.
Roast:beef,lamb,veal,pork
Steaks, chops and cutlets
Poultry
Chicken,broiler-fryer
cutup _2_/,m 3 lbs,
Chicken, whole 17 to 21 rain.
(2V_,to 3 lbs. I
iiii!i}i_!X{ii!!i/i_i,ii!_!_iiiiiii
Cornish hen 7 m 13 rain.
Turkey breast (4 io 6 lbs.} 5 to 9 rain.
_8
Time Comments
] 1|1i1|.
3 u_ 5 min.
f_ to _ u|il/.
5 m 7 rain. Place block iu casserole. Turu o\er
m_d break up after half Ill(' time.
Let stand 5 minute._ after de/i'ostiug-.
2 =(i 5 rain. Place UllOt)el/ed t)_lckage ill ovel/.
5 to 7 min.
12 to 16 min.
per ill.
5 u, 7 miu.
per It)
15 to 19 rain.
per It/
per 11>
Microwm+ejusl tmlil/_'aDks c;m be
separated, l.ct stand 5 mintHes, if
lleuess;ll-}, 10 cO/ill)|eIe (teJi'oblil/g.
TIIFI/l/le;*I o\er alice ha|| lhe lil//e.
klse power lmel 1.
Place m_wrat)tled meat in cooking
dish. Tm:n o_vr a(ter hall the time
and shield v_u_m areas with loll.
When finished, set)anm' pieces and
let stand to comlllete deJir)sting.
Place wrapt)ed chicken in dish.
Unwrap and turn over alter
half the time. When tinished,
setlarate pieces and microwave
2-4 mimnes more, if necessar}.
let stand to tinish (lel_:osting.
Pla(e wratlt)ed chicken in dish.
Alter half the time, tmwra t) and
turn chicken oxer. Shield warm
areas with loll. Finish deli'osting.
[t necessal'v, r/ln cold water ill tile
( }l_+iFvruntil giblets can lie removed.
Place tmwrat)tle(t hen in the oven
km'ast-side-up. Turn over after half
the time. Run cool _;iter in the
cavity tmtil giblets can Lie remoxed.
Pla(e tmwral)t)ed klreast in dish
breast-side-down. After half the time,
turn o_vr and shieM _s_u'm areas
with loll. Nnish deli'osting. I ,et
stand 1-2 hours in re/iigemtor
to COml)lete de/i'osting.
www.GEAppliance_com
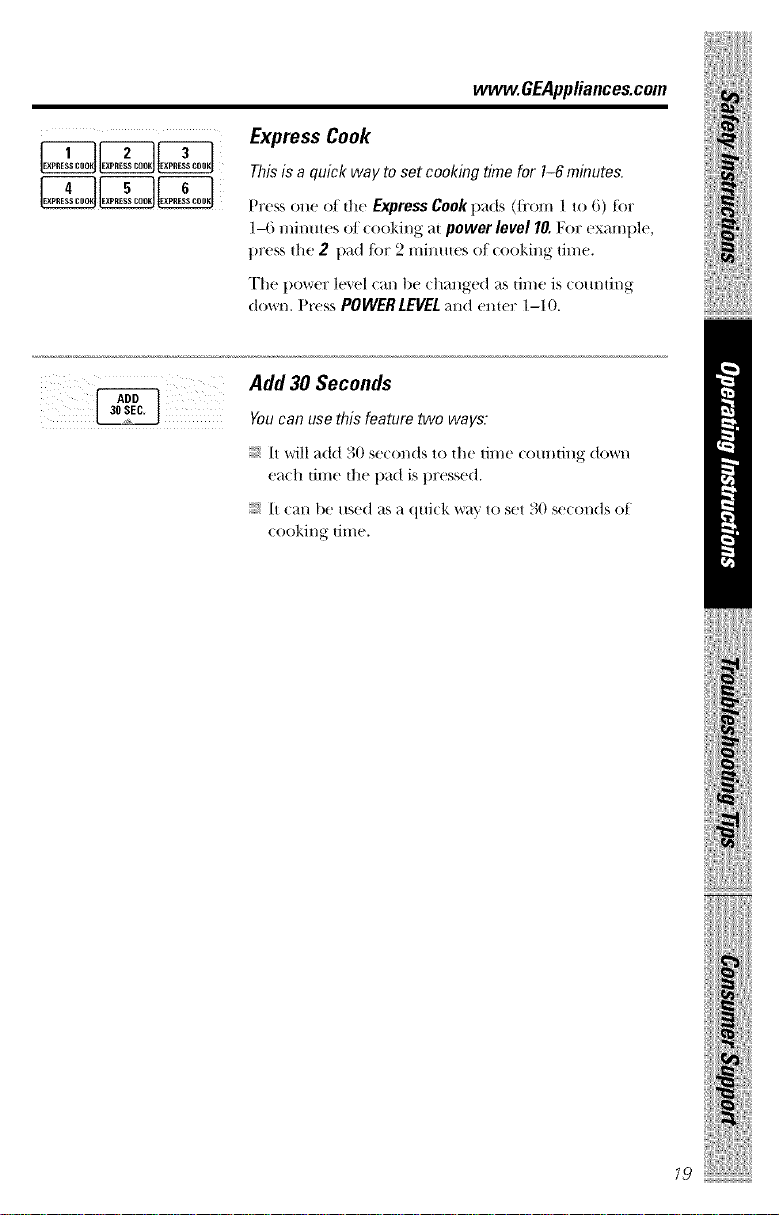
Express Cook
_7_ _ a quick way_ set cookmg time _r 1-6 mmu_s.
Pre._'_ one of tile Express Cook pads (fl'om 1 to 6) tot
14; minutus o/(()()king at power level 10. For e×aml)le,
tm'._ the 2 pad/_)r ,2 mimm's o/(ooking dmc.
The power h'v('l cm_ t1(' chang('d as din(' is com_ting
down. Pr('ss POVVfRLEVfL and enter 1-10.
Add 30 Seconds
You can use this feature two ways,
It will add .30 secon(ts to the time c()tmdng down
each time the t)ad is pressed.
It cm/be t_,e(I as a quick way to set 30 se(onds of
(ooking ume.
!iiiilIii!i!ll
!iii! iiiiiiii
79
iii iHiil!iiii!ili
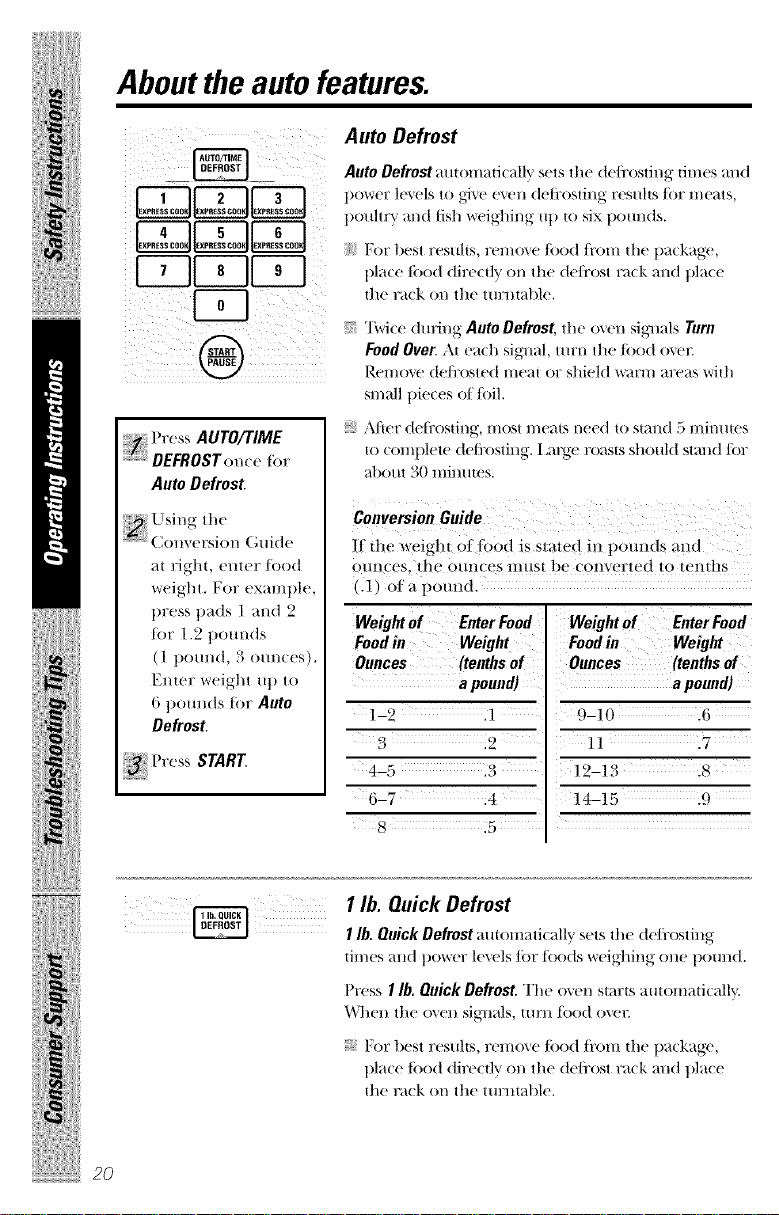
Abouttheautofeatures.
i} 2 3
LoLo.Ilox,°oLo.I
1-711' I1' I
Press AUTO/TIME
DEFROSTon(e tbr
Auto Defrost.
(;uide
m rib-hi, enter/ood
weirhi. For exmuple,
pre.',s ] )ads 1 ;rod 2
ior 1.2 polmds
1 p()/ll/d. 30lIl|C(_s
EI/teF Weig]ll lip lO
_ipoln=ds [or Auto
Defrost
I're._,_START
Auto Defrost
Auto Defrost automatk ally sets the deli'osting times and
powel? le'_els to gi'_e e'_en defix)sting results tor meats,
1)o[lhv_ r_lnd fish weighh/g u I) |o six t)Oullds.
For best results, remove todd ti'om fl_e pa(kage,
pla(e tbod dire(tlv on the deli'ost ra(k and pla(e
tile ra(k on tile tUrlltable.
"I\vice during Auto Defrost, the o\en sigl_als Turn
food Over. At eadl sig_al, mrn the/oDd o_v_
R('mo_ de/i:osted meat or shield warm area_, with
small pieces of/oil.
;_ Alier deti:osdng, most meats need to stand 5 minutes
_o complete defix)sting, i,arg_ roasts should strand tor
about 30 lllin[IteS.
Conversion Guide
It dw weight el tbod is stated in l)otmds m_d
ounces, dw ounces mus_ be comer_ed to wmhs
.1) era potmd.
Weight of Enter Food
Food in Weight
Ounces (tenths of
apound)
1-2 .1
3 .2
4-5 .3
6-7 .4
.5 '
Weight of Enter Food
Foodin Weight
Ounces (tenths of
apound)
9-10 .6
11 .7
]2-]3 .a
14-15 .9
iiii!ili_i_!Xiiii[!i/i_iii!_!_iiiiiii
2O
I lb. Quick Defrost
I lb. Quick Defrost autoulatk ally sets the de/i:osting
times and power le\'els/or toods weighing one pound.
Press I lb. Quick Defrost. The o,,en starts automati(allv.
Whell tile o\ell sigaluls, IIlI'n ff)o(t ()\'('It
:_ For best resuhs, remo\e/ood/i'()m the 1)a(kage,
place todd direcdv on the de/i'ost rack and place
die ra(k on tile turmable.
Aboutthesensorfeatures.
Humidity Sensor
What happens when using the Sensor Features:
'['lie SellS01" ]¢e;-itul"es dete(t the in(teasing humid|t}
Covered
Vented
Dry off dishes so they
don't mislead the sensor.
released dm-ing (ooking. The o_'n automatically
a(!iusts the cooking time to _mJous t}pes m_d amomlts
of/ood.
Do not /ls(! 111(_ S(?I/S()F ]Te_Hllres [wi((t ill Sll(((t._,ion
on the stone tood t)ortion--it may result in Sev(!rely
over(ooked or |)/llTnt tood. It tood is/lnder(ooked
alier the comltdown, use TimeCookt)n" additional
cooking time.
The proper coma|nets and covers are essential tDr
best sensor cooking.
Alw_l_i,4/lse iili€l'ow_l_,-s_d_, contail/eFs _tl/(t €()tel; tllelll
with lids or \'creed plastic wrap. Nu_er use tight sealing
plastic containcrs--tll_\v can i)lx'_'nt steam fi'on/
escaping and cause |ood to o_ercook.
Be sm:e the outside of the cooking containers and the
inside of the microwm e o\en are dry belore placing
|ood in the o\en. Beads of moisture turning into
steam can mislead the sensor.
vvww.GEAppliances.com
!@ii!i!l:
ilii!ii:iii!/ii!iiiil i
27
iii iHiil!iiii!ili
Aboutthesensorfeatures.
'i
Use only with prepackaged
microwave popcorn weighing
3.0to 3.5 ounces.
NOTE: Do notuse the
metal sheff when using
the Popcorn feature.
NOTE: Do not use
this feature twice in
succession on the
same food portion--
it may result in severely
overcooked or burnt food.
Popcorn
How to Use the Popcorn Feature
Foll(m t);_,,kag-e insmutiona, using Time Cook
_ it'the t)a( kage is less than 3.0 om_(es or larg-er
Ill t / ;).:) o/ l((S. I l t(_ lhe l)a(ka_,-e ot t)Ot)(OFIl
ill the (enteF of the l//i(l:OW_l_e.
Press POPCORNtor a regular size (3.0 to 3.5 oz)
.....................bag ot pop(orn. The o'_en smr_a immediately.
If you open the door while POPCORNia (lisl)l_lyed,
m_ error mess;_ge will al)t)e_m Close _l/e door and
pr'esa START
l/t_)od is un(h'r(ooked _ti('r" the countdown use
7_me Cook t_)r additional cooking time.
How to Adjust the Popcorn Program to Provide
a Shorter or Longer Cook time
If}_)u find diat tile br_md oft)opcorn }_)u use
Hn(tel])Ol)S Ol? over',.ooks COllSiStelltl}, }'Oil (_tl/_l(l(t Ol:
subtract 20_40 seconds to the automad€ t_ot)t)ing dine.
Toadd time:
Al_ert)ressing POPCORN,press 9within ill(?_lr's[
){0 seconds _dter the oven atal:{S/()r _tl/ex{]:_.
20 seconds.
iiii!ili_i_!iiiqii!!ili_i,ii!_!_iiiiiii
22
Press 9agvdn to add anod_er 10 seconds (total
31) se(onds additional time).
Tosubtract time:
idler pressing POPCORN, lmess 1 withill ill(? _ll'St
30 seconds a/let _t_e oven starts ti/r 20 seconds less
cooking 6me.
Pr'ess I a_,_din to reduce cooking lime another
10 seconds (total 30 ae(onds less time).
NOTE:Donotuse
this featuretwice in
successionon the
samefood portion-
#may result inseverely
overcookedor burnt food.
www.GEAppliance_com
Beverage
Press BEVERAGE(m_e t(_ heat an 8-10 oz (/l t) of (office
or Ot]ler 1)e_,er'_l_e.
Drinks heated with the Beverage feature may be very hot.
Remove the container with care.
H:f()()(] iS {lllder( ooke(t _t_[er [he eolll)tdov_rl: {Ise
_me Cook for additiollal (ookillg time.
Reheat
How to Use the Reheat feature:
!iiiilIii!i!ll
@START
For reheating single servings
of +reviously cooked foods or
a plate of leftovers,
NOTE: Do not use the
metal shelf when using
the Reheat feature.
NOTE: Do not use
this feature twice in
succession on the
same food portion-
# may result in severely
overcooked or burnt food.
o'_el/. Press REHEATolI( e, {wi(e or []lree fillies.
The oxen stm:ts immediately. Press once for a
plate of leflo\ er's. Press twice for pasta (8-12 oz).
Press three times {_)r vegetables (1/2 to 2 cups).
The o',en sig_,als '_r]'_'' _['_''1 iS S'I'S''_ _']'_' [*/''
.....................ume remaining beg{us (o/mdng down.
Do Hot opel) tile ovel) door tll)ti] til/le is e()tll)tillg
down. If the door is opened, close it and press
START immediatelv.
After removing foodfrom the oven,stir,if possible, to even
out the temperature. Reheated foods may have wide
variatimrsin temperature. Some areas may be extremely hot.
l//ood is not hot enough a/ier the (ountdown use
_me Cook/or additional reheating time.
How to Change the Automatic Settings:
Toreduce time by 10%:
Press I wilhill 30 seconds a[ier pr'essing the REHEATpad.
Toadd 10%to cooking time:
Press 9 wi|hill 30 s('col)ds a[b.T pressing the REHEATpad.
Some FoodsNot Recommended For Use With Reheat'.
It is best to use time Cook/or these/oods:
:_ Bread pr'o(tucts.
:_ Foods that must be r'eheamd m)(o_'re(t.
;_ Foods that need to be stirr'ed or rotated.
;_ Foods calling t_)r a dry look or (fis t) surtil(e
atier reheadng.
('It'of.q,lidor(o.ered i,,,he
ilii!iiiiii!!¢ii!iiii
23
iii iHiil!iiii!ili
Aboutthesensorfeatures.
ONE TOUCH SENSOR
Sensor cooking gives you
easy,automatic results with
a variety of foods (see the
Cooking Guide below).
NOTE: Do not use the
metal shelf with Sensor
Cooking.
NOTE: Do not use
this feature twice
in succession on the
same food portion--
it may result in severely
overcooked or burnt food.
Sensor Cooking
Vegetables, Potatoes, Fish, Chicken Pieces
_,/C Place (oxered food in the oven. Press the food
pad. For xegetables, press die VEGETABLEpad
once ft)r {i'esft veg-etables, |wi(e {()r flx)zeH
veg-etables, or tftree times t_)r (mined vegetables.
For (hicken or fish, press d_e CHICKEN/FISH pad
once ft)r chi_ ken pie(es or twice ft)r fisft.
Tfte o_'n starts ill1111ediatt'lv.
time remaining t)eg+ns counting down. "[hrn or
stir the food if ne(essm'_
Do I/Or opell the o_,ell door/llltil |il//e is (o1111|i11_
down. If the door is opened, close it and press
STARTimmediate]_
H:_()()d is tlilder(ooked after |he (OIA]Itdovqll [Ise
7_me Cook t_)r additional (ooking |ime.
How to ChangetheAutomatic Settings(automatic
settingsfor canned vegetables cannotbeadjusted
onsomemodels):
"_bu can adjust die cooking time ft)r _dlft)ods |o
sui| _r()_r personal taste.
Toreduce time by 10%:
Pr'ess 1 witftin 30 secollds after pressing the ft)od pad.
Toadd 10%to cookingtime:
Pr'ess 9 within 30 seconds after pressing the ft)od pad.
CookingGuide
iiii!i}i_)X{i{i!!i/i_i,ii!_!_iiiiiii
Canned Vegetables 4-16 oz Coxer with lid or xented plasti( wrap.
Frozen Vegetables 4-1 () oz Foll()_v ])_.(k_lge il/strH( tioI/s for adding
Fresh Vegetables 4-16 oz Add 1/4 (up wa|er per serxing.
Potatoes 8-32 oz Pier(e skin with fork. I la(e po|a|oes
Fish 4-1() oz (_()xer with xellled plasti( v_rr_lp,
Chicken Pieces 2-8 pieces Coxer with xell|ed plasti( _*/r_lp.
24
Amount Comments
vvr_l|er. (;(>x_er wi|ft lid or xented plasti( _'_rr_lp.
Coxer with lid or xented t)lasdc wrat).
OI/ tfte ttlrlltable.

Otherfeatures your
model may have.
7 ili iiii ii iii
!i_ i _i i
vvww.GEAppliances.com
Custom
"I]w CUSTOMI);_d_IiIows VOlt tO S_I'_(! VOIIF l/lOSt
fl'equemly used settings. (Sensor looking seuings
(allllOt 1)(? saved.)
To set and save a setting:
Press the CUSTOMpad.
Set the mn/mnt of (ooking dine.
.....................amomaticall_ be set it'_ou do not change it.)
Pr(ss the CUSTOMpad.
}imr custom setting will be remembered tor fimm'
oHe touch use.
"Ik)clear tile custom setting, press and hold the
CUSTOM pad tor 2 seconds.
Help
hints. Press HELP:flwn sele(t _ ti_mn:e pad.
!iiiilIii!i!ll
Cooking Complete Reminder
To remind you th:at You have toDd in the o\'cll,
the ()'_vn will display FOODISREADYand t)ee 1) once
_t lI/illllte /ll/ti] _'()ll either ot)el/tile O_,/'l/ door or
press CLEAR/OFF.
Clock
Press CLOCKto set the time of (t_r¢.
Press CLOCK.
_ l_nter the time of (lm.
_!i Sele(t ,\M or PM.
To (he(k the time of da} while mi(rov_'a',,4ng,
press CLOCK.
ilii!iiiiii?_i;ii!iiiil_i_
25
iii i+!iiii!ili
Otherfeatures yourmodel may have.
___AUTO/TIME 1Ib. QUICK
iiEBiVr
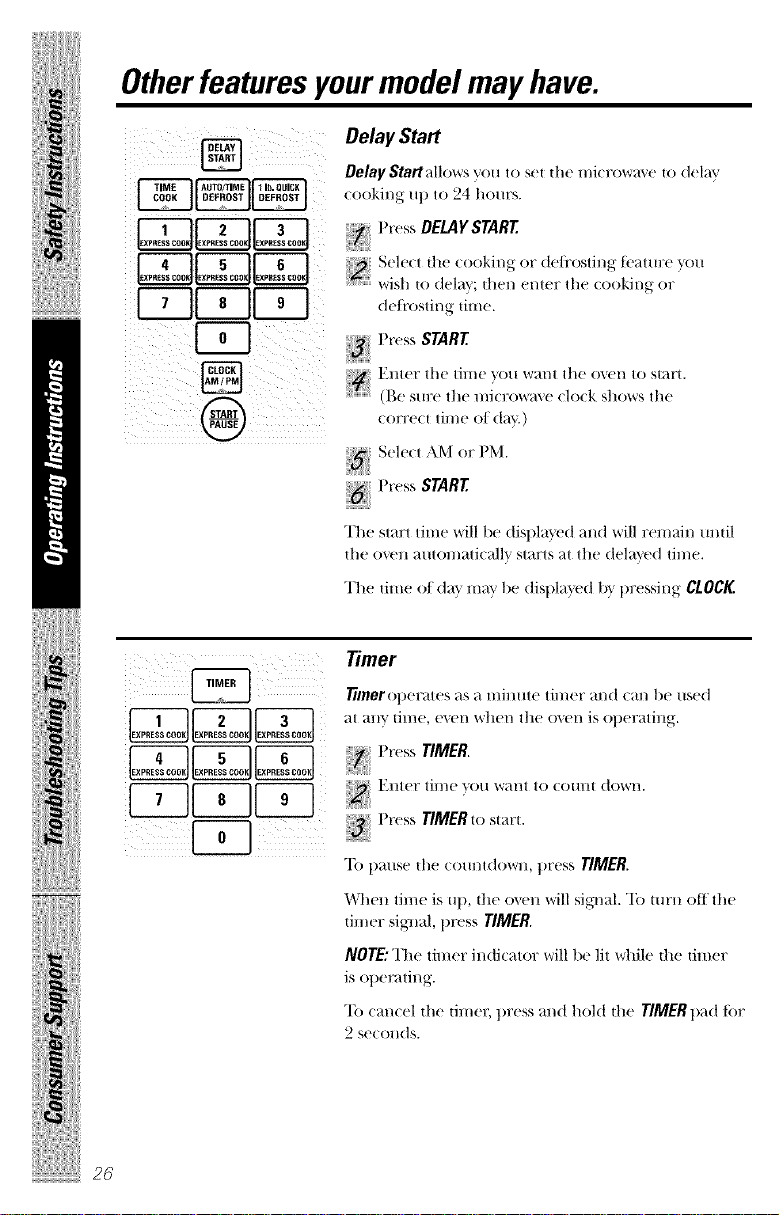
Delay Start
Delay StartMlows you to set the l//i( lx)w_l_,(! {o delay
_ooking ul) to 24 hours.
,,,+++DEW+'START
_ Sele(t the (ooking or deti'osting t_attn:e "_ou
.....................wish to delay; then enter the (ooking or
deti'osting time.
Press START
Enter the thne you W_lllt the oxen to st+re.
+"'+.....................(Be sure the n/i(rowaxe (lo(k shox_rs the
eorre(t thne of d_l_'.)
-_ Sele(t AM or PM.
i,,++START
The start time vdll be displa}ed and will ren/ain until
tile ovell atttolnati(allv starts at the delayed til//e.
The time ot da} m+ly be displa_ed 11}pressing CLOCK
i_i_i_i_i_iiii__i__i__II_:I_I_
+iii!ili+i+)Xiii+!!i/i+i,ii!+!+iii+++i
2_
Timer
_merot)erates _zs_ HliHute timer m_d cm_ be used
;_tany time, e_x'n when the o_x'n is ot)crating.
Press TIMER.
Enter thne "_ou w+,nt to (omit dOWl/.
I','+,,+TIMER,,,+,+,+,'t.
TO pa/lse tile eo/lntdowil, t)t'ess TIMER.
When thne is Ul), the oven will si_ml. To mrn off the
timer si_lal, press TIMER.
NOTE: The timer indi(+_tor will be lit \_hile the timer
is ot)emting.
"Ib (:an(el tile timer, press and hold the TIMER pad tor
2 secollds.
; )2
www.GEAppliances.com
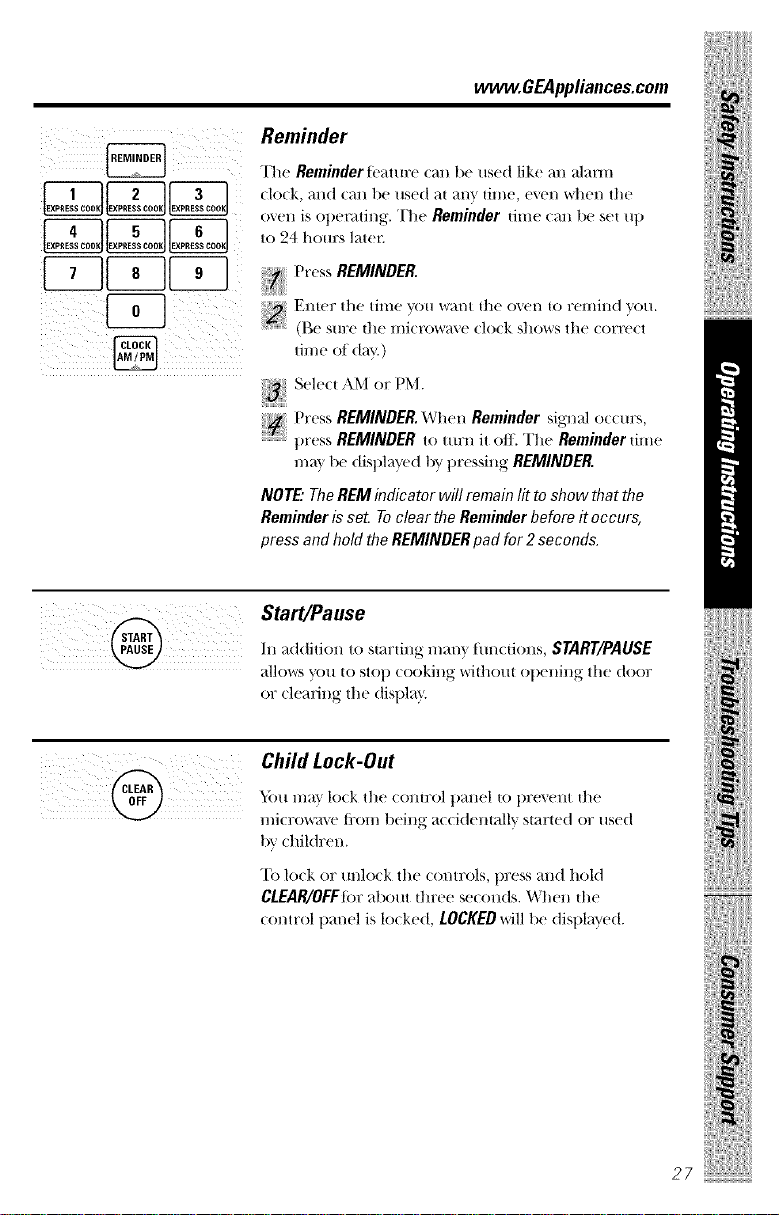
Reminder
"I]le Reminder t_ature (an be used like an ;flann
(lo(k, and (an be used at am, time, e'_en vd_en the
"_ 5; r • "" "
0 '12!111_ Opel_ltll/_,. [']1( Reminder {llIl(? (all |)e Se{ lip
• 5;to 24 hour,_ later.
Pr( ss REMINDER.
(B(? S[I1X? |11(? II/i( FOW_I_,(_ do(k shows the (orre(t
time of day.)
i;_ Sele(t ,\M or PM.
) "5;"
[ rt, s REMINDER. _]h(!l/Reminder signal occurs,
press REMINDER to mrn it off. The Reminder time
may bc displayed by pressing REMINDER.
NOTE,"The REM indicator will remain lit to show that the
Rmninder is seL To clear the Rmninder before it occurs,
press and hold the REMINDER pad for 2seconds.
Start/Pause ,
In addition to starting many tun(fions, START/PAUSE
;fllows you _o stop cookiHg wifl_om opeHiHg the door
or clearing the displa}
!iiiilIii!i!ll
Child Lock-Out
_()111/1_1} lo(k the COlltlX)] ])allel [o plX!V(!llt |]1(!
mi(r(mme fi:om being a((idemally started or used
by (hildren.
To lo(k or unlo(k the (ontrols, press and hold
CLEAR/OFFtor about three s(!(oHds. _ h(!ll |he
((mtrol t)ane] is lo(ked, lOCKED will be displayed.
ilii!iiiiii,!!¢ , ,ii!iiiil i
27
 Loading...