

Page 1

Use and Care & Installation Guide
Downdraft Vent System
Models: JVB93
JVB96
GE Appliances
Safety Instructions ................2
Operating Instructions, Tips
Canning ...............................................3
Controls ...............................................3
Cooking Tips........................................3
Care and Cleaning
Blower..................................................4
Grease Filter ........................................4
Problem Solver .......................4
Installation............................5–11
Ductwork Table ...................................8
Plan Ductwork .....................................8
Plan Wiring..........................................9
Install Ductwork ................................10
Install Wiring .....................................10
Consumer Support
Warranty.............................Back Cover
Page 2

2
READ AND FOLLOW THIS SAFETY INFORMATION CAREFULLY.
READ AND SAVE THESE INSTRUCTIONS
SAFETY PRECAUTIONS
IMPORTANT SAFETY INFORMATION.
READ ALL INSTRUCTIONS BEFORE USING.
WARNING – TO REDUCE THE RISK OF FIRE,
ELECTRIC SHOCK OR INJURY TO PERSONS,
OBSERVE THE FOLLOWING:
A. Use this unit only in the manner intended
by the manufacturer. If you have questions,
contact the manufacturer.
B. Before servicing or cleaning unit, switch
power off at service panel and lock the service
disconnecting means to prevent power from
being switched on accidentally. When the
service disconnecting means cannot be
locked, securely fasten a prominent warning
device, such as a tag, to the service panel.
C. Do not use this unit with any solid-state speed
control device.
D. This unit must be grounded.
CAUTION – For general ventilating use only.
Do not use to exhaust hazardous or explosive
materials and vapors.
WARNING –
TO REDUCE THE RISK OF
INJURY TO PERSONS IN THE EVENT OF A RANGE
TOP GREASE FIRE, OBSERVE THE FOLLOWING*:
A. SMOTHER FLAMES with a close-fitting lid,
cookie sheet or metal tray, then turn off the
burner. BE CAREFUL TO PREVENT BURNS.
If the flames do not go out immediately,
EVACUATE AND CALL THE FIRE
DEPARTMENT.
B. NEVER PICK UP A FLAMING PAN—
You may be burned.
C. DO NOT USE WATER, including wet
dishcloths or towels—a violent steam
explosion will result.
D. Use an extinguisher ONLY if:
1. You know you have a Class ABC
extinguisher, and you already know
how to operate it.
2. The fire is small and contained in the
area where it started.
3. The fire department is being called.
4. You can fight the fire with your back to
an exit.
* Based on “Kitchen Firesafety T
ips” published
by NFPA.
WARNING – TO REDUCE THE RISK OF A
RANGE TOP GREASE FIRE:
A. Never leave surface units unattended at high
settings. Boilovers cause smoking and greasy
spillovers that may ignite. Heat oils slowly on
low or medium settings.
B. Always turn hood ON when cooking at high
heat or when cooking flaming foods.
C. Clean ventilating fans frequently. Grease
should not be allowed to accumulate on fan
or filter.
D. Use proper pan size. Always use cookware
appropriate for the size of the surface
element.
WARNING – TO REDUCE THE RISK OF FIRE,
ELECTRIC SHOCK OR INJURY TO PERSONS,
OBSERVE THE FOLLOWING:
A. Installation work and electrical wiring must be
done by qualified person(s) in accordance
with all applicable codes and standards,
including fire-rated construction.
B. Sufficient air is needed for proper
combustion and exhausting of gases through
the flue (chimney) of fuel burning equipment
to prevent back drafting. Follow the heating
equipment manufacturer’s guideline and
safety standards such as those published by
the National Fire Protection Association
(NFPA), and the American Society for
Heating, Refrigeration and Air Conditioning
Engineers (ASHRAE), and the local code
authorities.
C. When cutting or drilling into wall or ceiling,
do not damage electrical wiring and other
hidden utilities.
D. Ducted fans must always be vented to the
outdoors.
WARNING – TO REDUCE THE RISK OF FIRE,
USE ONLY METAL DUCTWORK.
•
Do not attempt to repair or replace any part of
your hood unless it is specifically recommended
in this guide. All other servicing should be
referred to a qualified technician.
Page 3

SERVICING
NOTE: BE SURE ELECTRICAL POWER IS
OFF BEFORE SERVICING THE UNIT.
It may be necessary to remove the downdraft blower
system from the cabinet in order to service components
such as the blower motor or air vent mechanism.
Disconnect power to the cooktop and remove it first.
Reverse the steps in the Install the Downdraft section
to remove the downdraft from the cabinet.
Service parts are available from your local GE
distributor or from a GE Service and Parts Center.
CAUTION: Be careful when raising or lowering
the downdraft. Be sure pots, pot handles and other
objects are clear of the downdraft cover and cannot
be struck or tipped by the downdraft being raised.
• To avoid injury, make sure there are no fingers
around the downdraft cover when it is lowered.
• Keep hands and fingers away from all
downdraft parts.
USING YOUR DOWNDRAFT VENT SYSTEM
Controls
Turn the downdraft blower
ON by pressing down on
the activating switch. The
air vent will rise.
The blower can be ON or
OFF and its speed can be
adjusted with the recessed
knob on the right side of
the air vent.
Turn the downdraft
blower OFF by pressing
the activating switch
again. The air vent will
go down and the blower
will shut off.
NOTE: For most convenient operation, set the
blower to your favorite speed. The blower will come
on to this speed whenever the activating switch is
pressed and the air vent rises.
Safety Instructions Servicing Using Vent System Cooking Tips
Knob
COOKING TIPS
• The high-capacity performance of this downdraft
system can increase the cooking times for some
foods. It may take longer to reach high cooking
temperatures if the downdraft is turned on to high
right away. Adjust the fan speed for best cooking
results.
For best results when heating oil for deep frying or
when boiling water, use the front surface units or wait
until the water is boiling or the oil is at frying
temperatures before turning on the downdraft.
• The downdraft may not completely capture all the
steam from pans on the front burners.
Canning
When canning foods in a water-bath canner, a gentle
but steady boil must be maintained continuously for
the required time. When canning foods in a pressure
canner, the pressure must be maintained continuously
for the required time.
Use of the blower at a high speed when canning may
reduce the temperature enough to stop boiling. While
canning, we recommend using the downdraft at LOW
speed and using the front surface unit.
3
Page 4

Grease Filter
The efficiency of your downdraft depends on a clean
filter. Frequency of cleaning depends on the type of
cooking you do. Grease filters should be cleaned at
least once a month. Never operate the downdraft
without the filters in place.
To remove: Pull the filters out by grasping them and
pulling straight up.
To clean: Soak and then agitate in a hot detergent
solution. Light brushing may be used to remove
embedded soil. Rinse, shake and remove moisture
before replacing.
With careful handling, the filter will last for years.
If replacement becomes necessary, order the part
from your dealer.
NOTE: The filters are different sizes. Be sure to
replace them with the longer filter on the left.
When replacing the filters, the long one goes in the
left side.
4
CARE AND CLEANING
Blower Painted or Metal Surfaces
1. DISCONNECT THE DOWNDRAFT
POWER SUPPLY BY REMOVING THE
POWER CORD FROM THE RECEPTACLE.
2. Remove the blower cover.
3. Use a vacuum hose to clean the blower.
Do not immerse the blower in water.
4. Replace the blower cover.
5. Reconnect the power supply.
Clean greasy surfaces frequently, using a mild
detergent. Do not use abrasive cloth, steel wool
pads or scouring powder because they will mar
the surface.
Stainless Steel Surfaces (on some models)
Do not use a steel wool pad; it will scratch the
surface.
To clean the stainless steel surface, use warm, sudsy
water, a stainless steel cleaner such as Kleen King
®
,
or an all-purpose liquid or spray cleaner. Always
scrub in the direction of the grain. Rinse thoroughly
with a sponge or cloth and clean water. Dry with a
soft, clean cloth. After cleaning, use a stainless steel
polish, such as Stainless Steel Magic
®
, Revere
Copper and Stainless Steel Cleaner
®
or Wenol All
Purpose Metal Polish
®
. Follow the product
instructions for cleaning the stainless steel surface.
QUESTIONS?
USE THIS PROBLEM SOLVER
PROBLEM POSSIBLE CAUSE
FAN DOES NOT WORK • The vent must be fully extended before the downdraft will work.
• The blower control knob must be turned in a clockwise direction to turn
the blower on.
Page 5
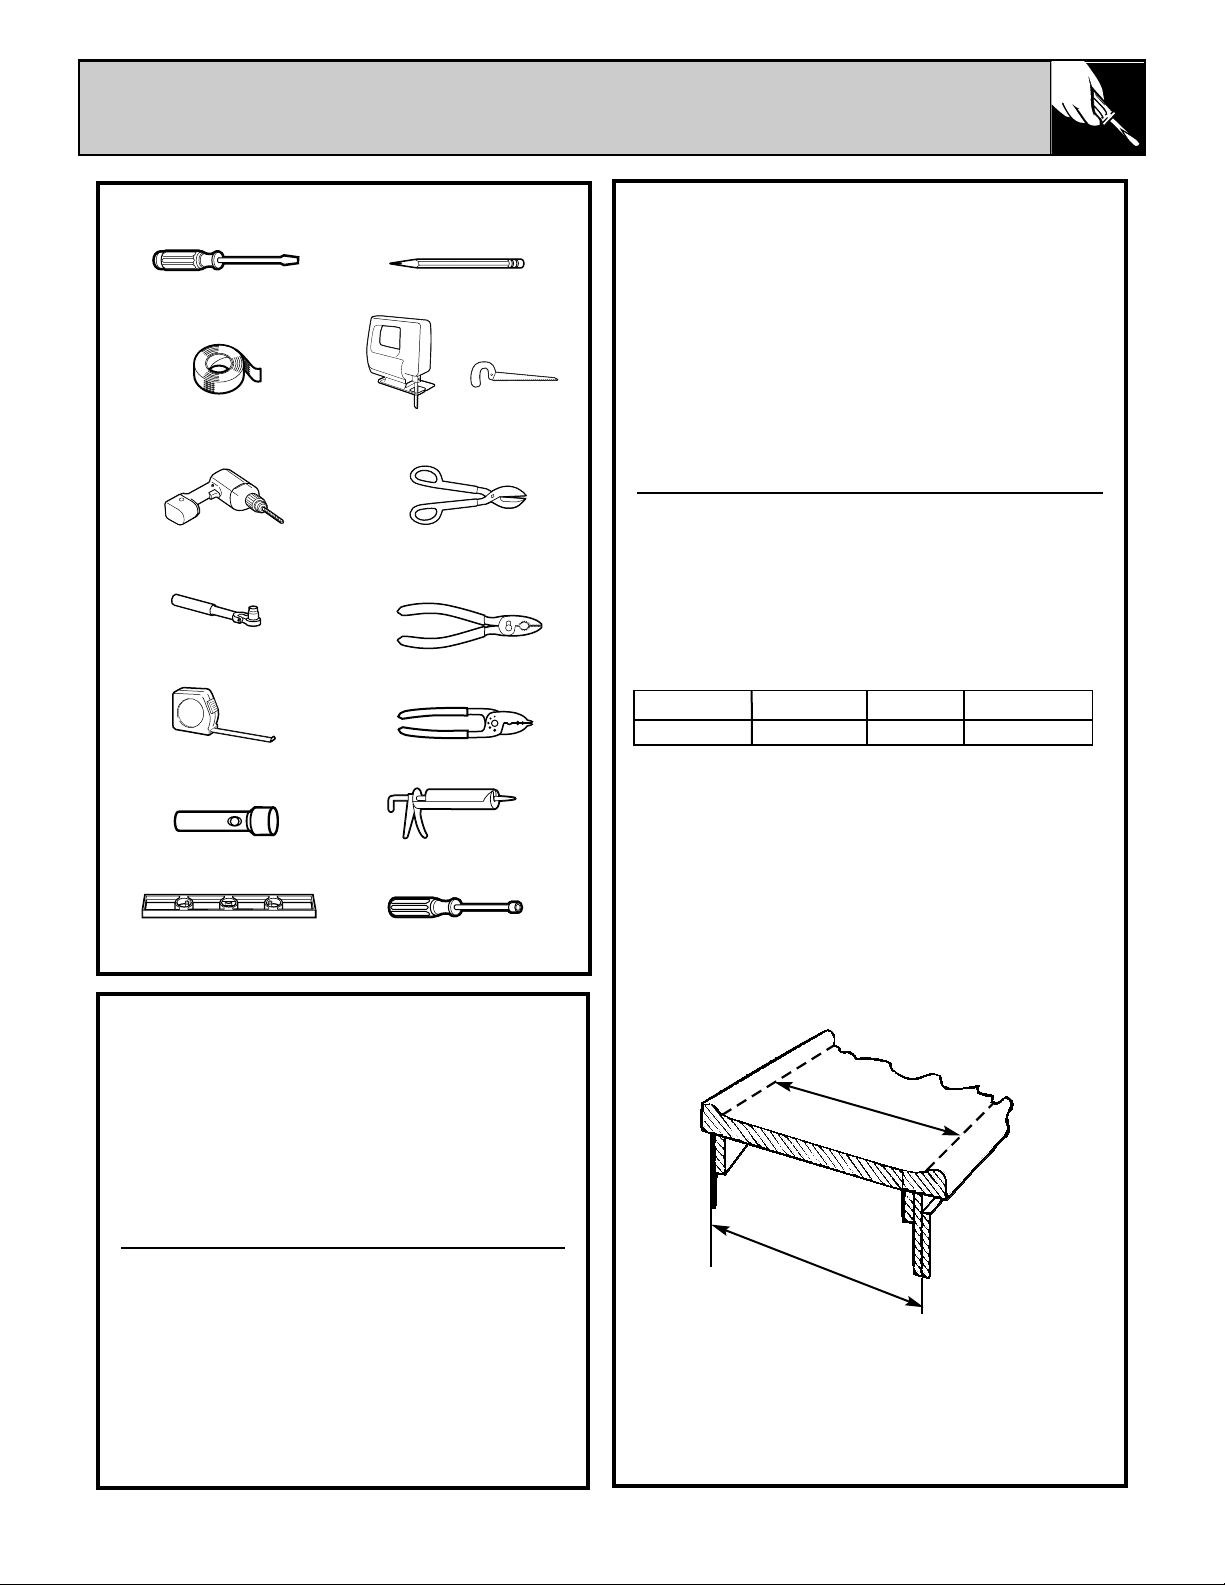
Tools You Will Need
5
INSTALLATION INSTRUCTIONS
Before Starting Installation,
Check the Following
Requirements
This downdraft blower system is designed to
be used to exhaust smoke and odors when
cooking with all GE electric and sealed burner
gas cooktops (not approved for standard
burner gas cooktops). It can be mounted in
either an island or peninsula location.
Requirements for an approved
installation
• 26″ minimum cabinet depth
• 26″ minimum from the back of the
downdraft to the front of the countertop
• 23
1
⁄2″ minimum FLAT countertop surface
NOTE: JGP932S, JP350SC, JP930SC and
JP938SC require 23
5
⁄8″ flat surface area.
• Plan the placement of the electrical outlet box
carefully. It should NOT be installed on the back
wall of the cabinet because it may interfere with
the downdraft. It should be installed on a side
wall or adjacent cabinet. Make sure it is within
reach of the unit’s 2-ft. long power cord and
conforms to all local codes.
Install a standard wiring box with a 3-pronged
outlet.
• Plan the location of the gas supply pipe (for
gas cooktops) carefully to avoid interference
with the downdraft installation.
Specifications
This unit can be easily installed following these
basic steps:
• Cut out the countertop opening.
• Install the downdraft in the cabinet.
• Connect the ductwork and electrical.
• Install the cooktop.
Take Measurements
Refer to the cooktop installation instructions for
dimensions of cooktop, countertop cut-out, and
cabinet requirements.
• The 30″ models will fit in most 30″ wide
cabinets and the 36″ models will fit in most 36″
wide cabinets.
• To install a cooktop with this downdraft, the
cabinet depth must be 26″ minimum.
A countertop with a raised lip may not allow
enough flat countertop for a proper installation.
Before starting installation, review the following
pages carefully.
Cutout dimension and illustrations are given for
30″ and 36″ cooktops.
Flat counter
area
26″
Minimum 26″
Cabinet depth required
(continued next page)
Flat blade and Phillips
screwdrivers
Pencil
Duct tape
Saw (saber or keyhole)
(OR other depending upon material
)
Electric Drill
Metal Snips
(in some applications)
1/4″ Through 7/16″
Pivoting Hex Socket
Pliers
Tape measure
Wire stripper
Flashlight
Caulking
Level
1/4″ Through 7/16″
Nut Driver
VOLTS AMPS CFM DUCT
120 4.0 500 3
1
⁄
4 X 10
Page 6
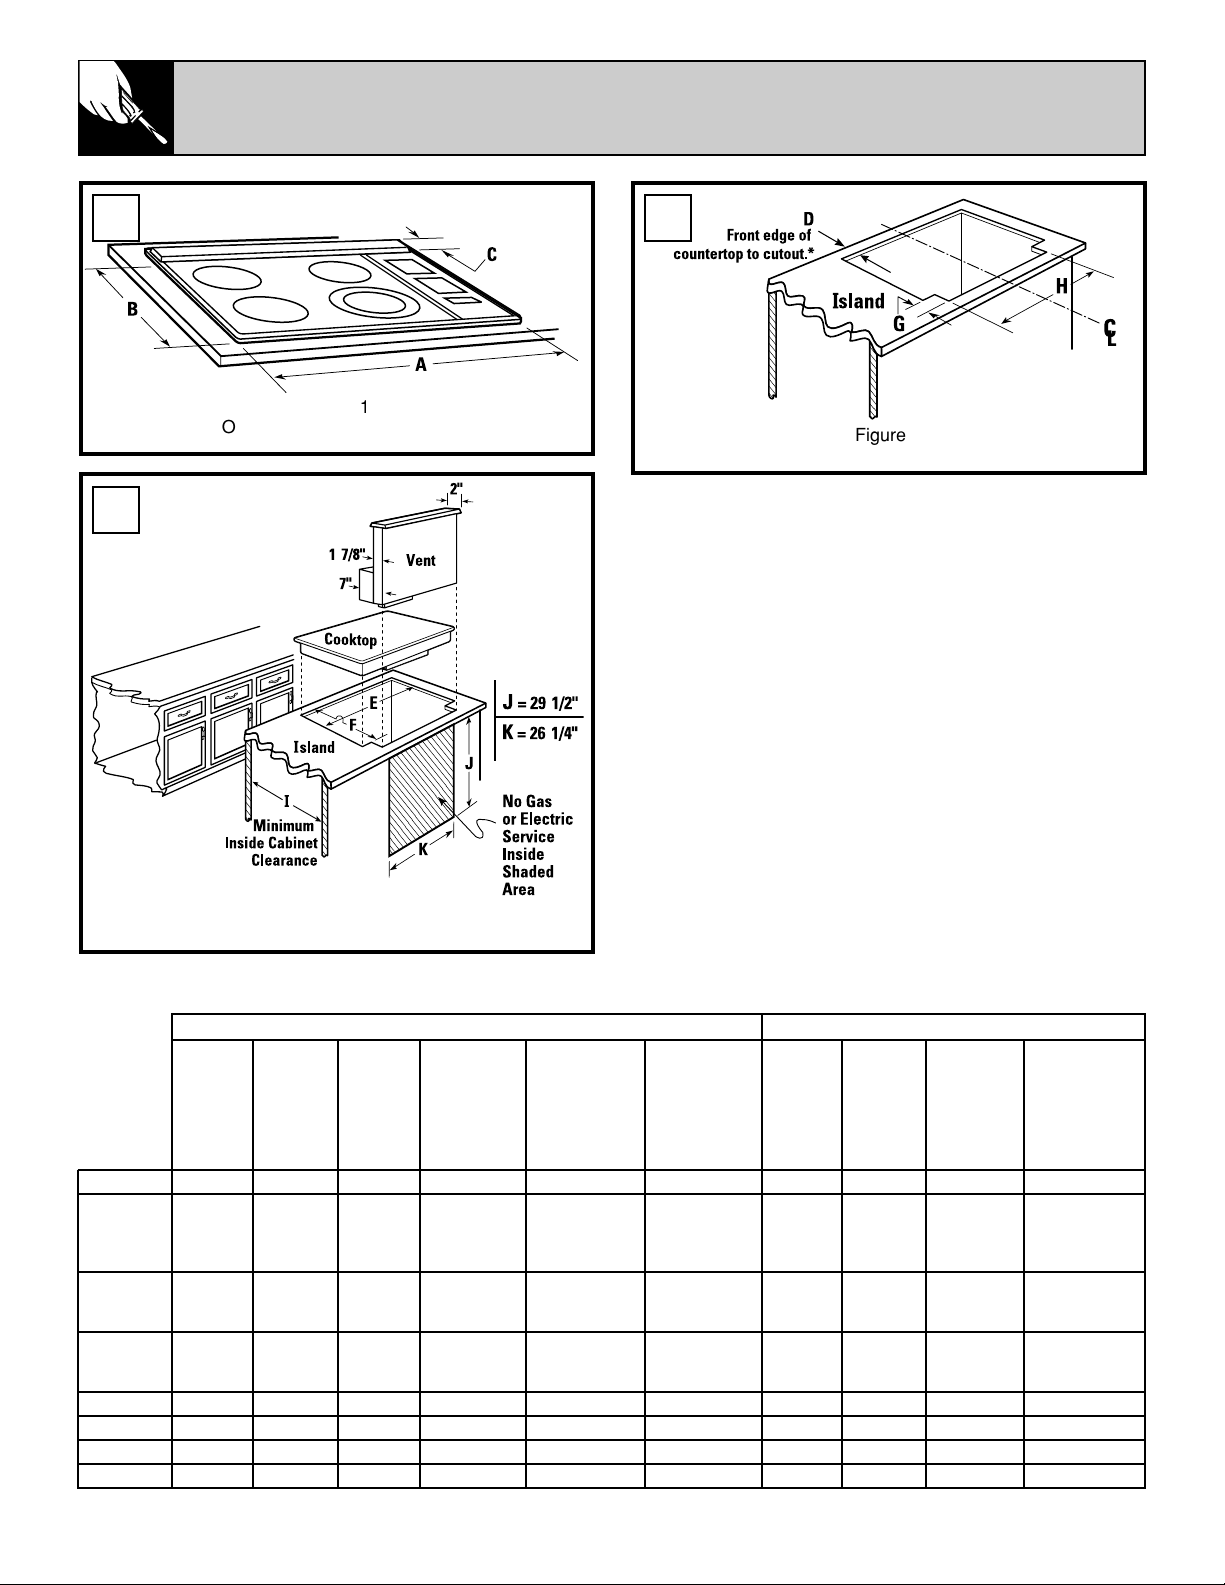
30″ COOKTOPS/DOWNDRAFT UNITS
JVB93
Figure 2
Overall Cutout Dimensions
;
Figure 3
Cutout for Vent
Figure 1
Overall Cooktop Dimensions
1
2
3
NOTE: AGAINST-THE-WALL INSTALLATIONS ARE LIMITED DUE TO DIMENSION REQUIREMENTS.
REFER TO DETAILS BELOW.
PLANNING INSTALLATION (Note: 26″ deep cabinets required) PREPARING CUTOUT
A B C B&C D I EF G H
(Figure 1) (Figure 1) (Figure 1) (Figure 1) (Figure 3) (Figure 2) (Figure 2) (Figure 2) (Figure 3) (Figure 3)
Min. Setback— Downdraft
Cooktop Cooktop Depth Front Edge Min. Req’d. Cooktop Cooktop Add’l Depth Cutout Width
Overall Overall Vent Cktop + Cntrtop to Front Inside Cabinet Cutout Cutout Req’d for Req’d from
Model No. Width Depth Depth* D.D. Vent Edge of Cutout** Clearance Width Depth Downdraft Centerline
JP326 301⁄4″ 211⁄4″ 21⁄8″ 233⁄8″ 21⁄2″ 227⁄16″ 281⁄2″ 195⁄8″ 23⁄4″ 271⁄16″
JP340
JP350 293⁄4″ 207⁄8″ 21⁄8″ 23″ 21⁄2″ 227⁄16″ 281⁄2″ 195⁄8″ 21⁄2″ 271⁄16″
JP930
JP938
JP350SC
JP930SC 297⁄8″ 211⁄2″ 21⁄8″ 235⁄8″ 21⁄2″ 227⁄16″ 281⁄2″ 195⁄8″ 25⁄8″ 271⁄16″
JP938SC
JGP328
JGP933 30″ 21″ 21⁄8″ 231⁄8″ 21⁄2″ 227⁄16″ 281⁄2″ 195⁄8″ 25⁄8″ 271⁄16″
JGP933S
JGP336 30″ 21″ 21⁄8″ 231⁄8″ 21⁄2″ 227⁄16″ 281⁄2″ 195⁄8″ 25⁄8″ 271⁄16″
JGP932 293⁄4″ 21″ 21⁄8″ 231⁄8″ 21⁄2″ 227⁄16″ 281⁄2″ 195⁄8″ 25⁄8″ 271⁄16″
JGP930S 30″ 211⁄4″ 21⁄8″ 233⁄8″ 21⁄2″ 227⁄16″ 281⁄2″ 195⁄8″ 23⁄4″ 271⁄16″
JGP932S 297⁄8″ 211⁄2″ 21⁄8″ 233⁄4″ 21⁄2″ 227⁄16″ 281⁄2″ 195⁄8″ 23⁄4″ 271⁄16″
*Includes 1/8″ gap between cooktop and vent trim.
**Required to maintain UL or AGA approvals.
6
Page 7
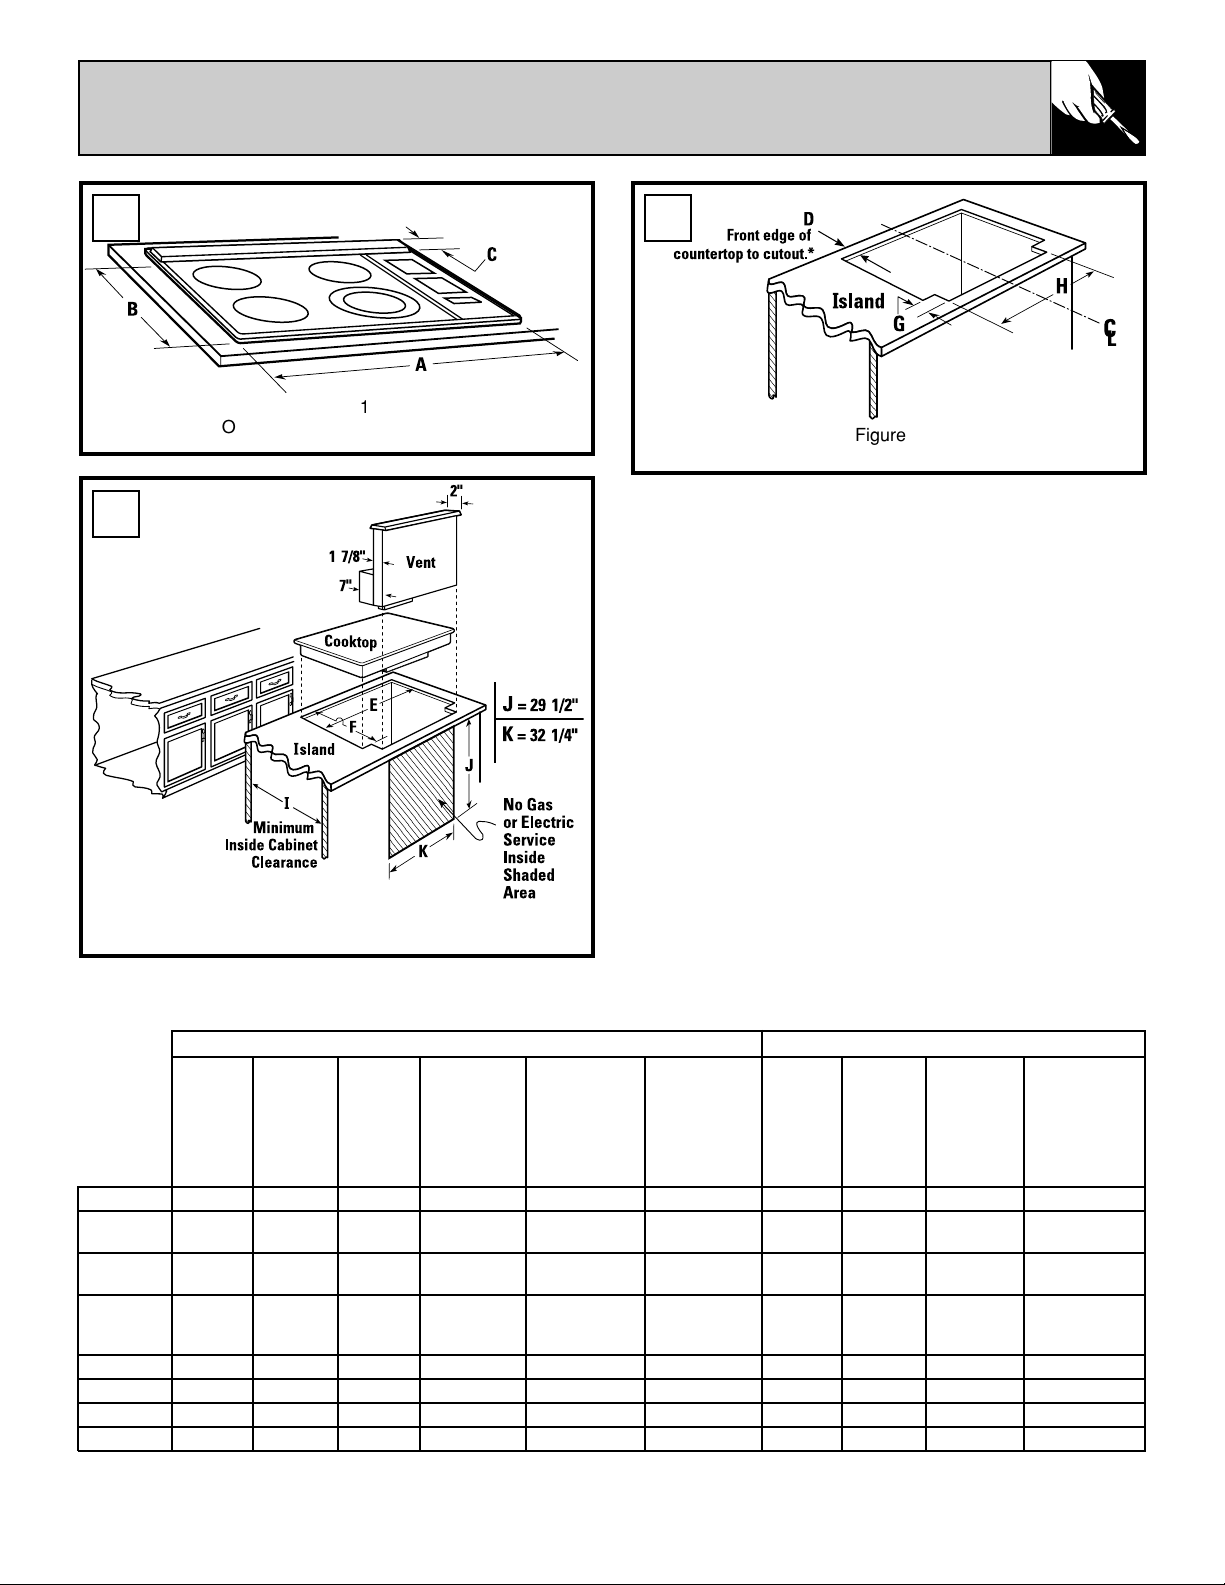
7
36″ COOKTOPS/DOWNDRAFT UNITS
JVB96
Figure 2
Overall Cutout Dimensions
;
Figure 3
Cutout for Vent
Figure 1
Overall Cooktop Dimensions
1
2
3
NOTE: AGAINST-THE-WALL INSTALLATIONS ARE LIMITED DUE TO DIMENSION REQUIREMENTS.
REFER TO DETAILS BELOW.
PLANNING INSTALLATION (Note: 26″ deep cabinets required) PREPARING CUTOUT
A B C B&C D I EF G H
(Figure 1) (Figure 1) (Figure 1) (Figure 1) (Figure 3) (Figure 2) (Figure 2) (Figure 2) (Figure 3) (Figure 3)
Min. Setback— Downdraft
Cooktop Cooktop Depth Front Edge Min. Req’d. Cooktop Cooktop Add’l Depth Cutout Width
Overall Overall Vent Cktop + Cntrtop to Front Inside Cabinet Cutout Cutout Req’d for Req’d from
Model No. Width Depth Depth* D.D. Vent Edge of Cutout** Clearance Width Depth Downdraft Centerline
JP626 351⁄2″ 21″ 21⁄8″ 231⁄8″ 21⁄2″ 2211⁄16″ 337⁄8″ 191⁄8″ 27⁄8″ 331⁄16″
JP960
36″ 203⁄8″ 21⁄8″ 221⁄2″ 21⁄2″ 2211⁄16″ 337⁄8″ 191⁄8″ 21⁄2″ 331⁄16″
JP968
JP960S
JP968S
361⁄8″ 21″ 21⁄8″ 231⁄8″ 21⁄2″ 2211⁄16″ 337⁄8″ 191⁄8″ 25⁄8″ 331⁄16″
JGP628
JGP963
36″ 21″ 21⁄8″ 231⁄8″ 21⁄2″ 2211⁄16″ 337⁄8″ 191⁄8″ 27⁄8″ 331⁄16″
JGP963S
JGP636 36″ 21″ 21⁄8″ 231⁄8″ 21⁄2″ 2211⁄16″ 337⁄8″ 191⁄8″ 27⁄8″ 331⁄16″
JGP960S 36″ 211⁄4″ 21⁄8″ 233⁄8″ 21⁄2″ 2211⁄16″ 337⁄8″ 191⁄8″ 27⁄8″ 331⁄16″
JGP962 36″ 207⁄16″ 21⁄8″ 229⁄16″ 21⁄2″ 2211⁄16″ 337⁄8″ 191⁄8″ 25⁄8″ 331⁄16″
JGP962S 36″ 21″ 21⁄8″ 233⁄16″ 21⁄2″ 2211⁄16″ 337⁄8″ 191⁄8″ 23⁄4″ 331⁄16″
*Includes 1/8″ gap between cooktop and vent trim.
**Required to maintain UL or AGA approvals.
Page 8
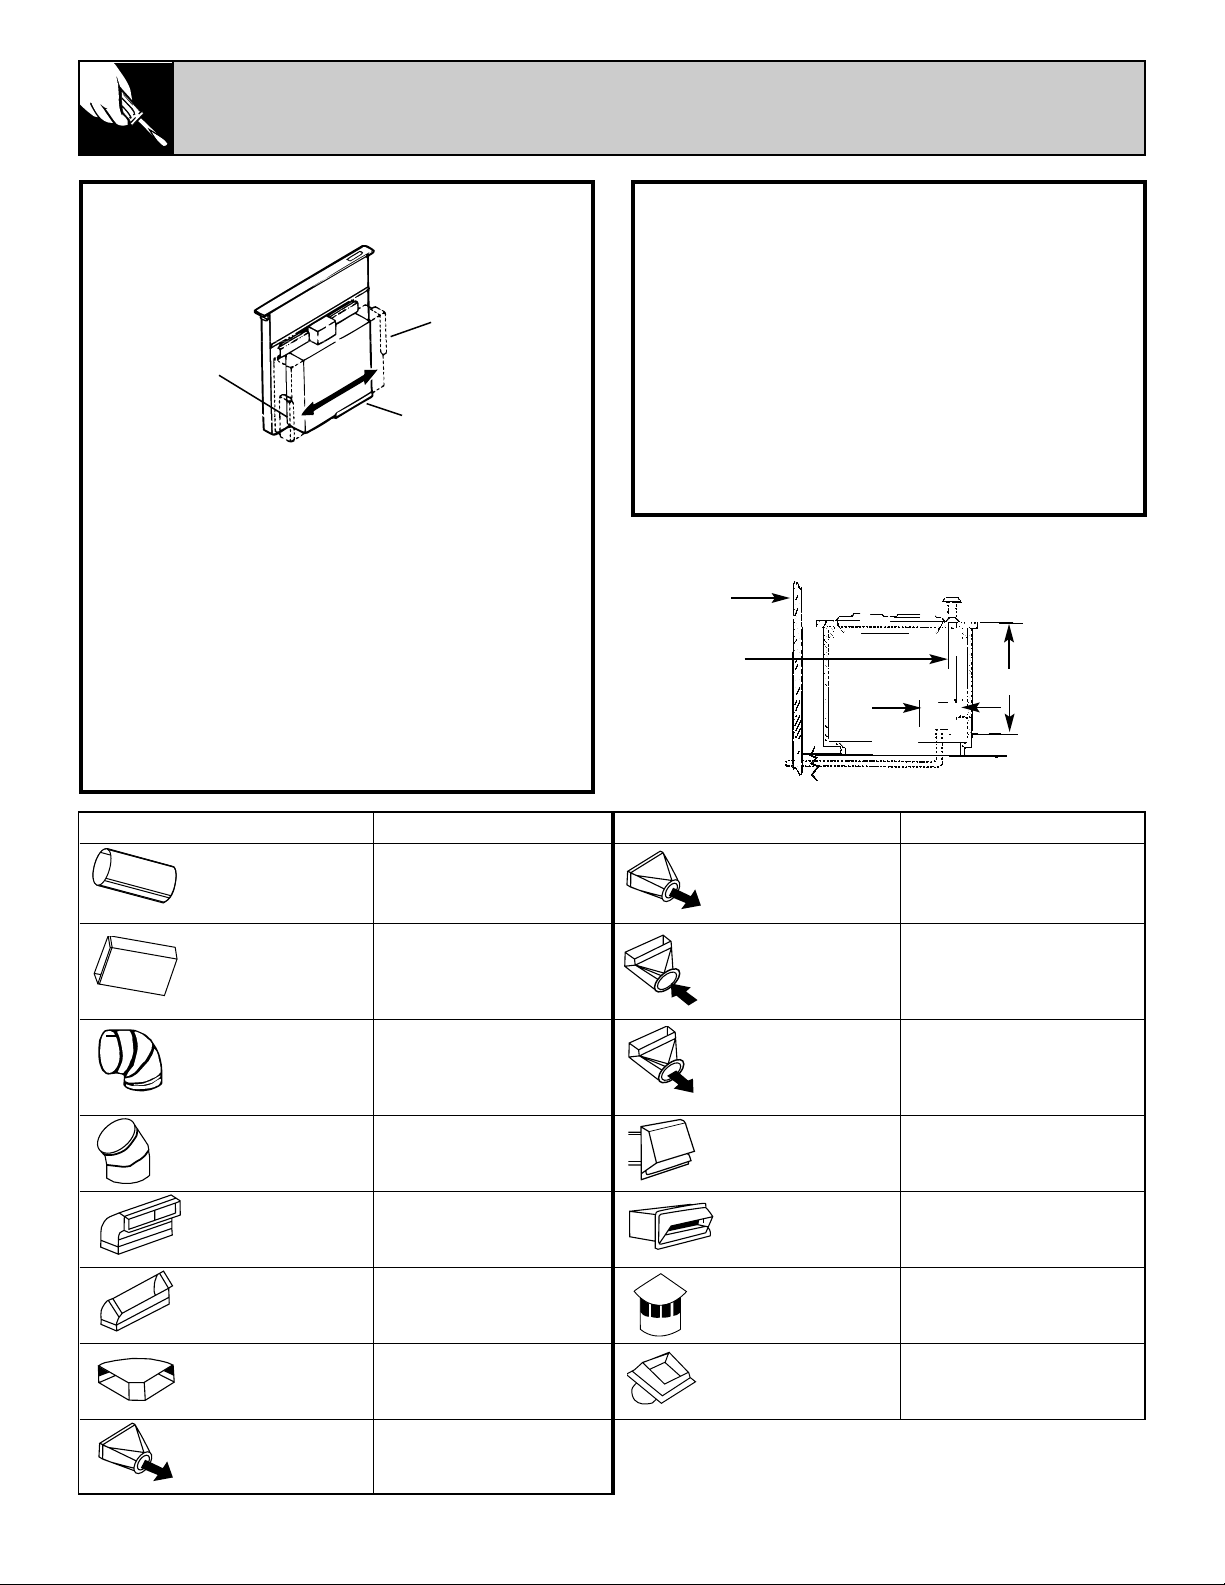
INSTALLATION INSTRUCTIONS
(continued)
8
Plan the Ductwork
1. This downdraft blower system is designed
for use with 31⁄4″ x 10″ ductwork (can be
transitioned to 6″ round). Three different
discharge directions are available with side--to-side
adjustment for accurate alignment of ductwork.
2. For best performance: Choose the ducting
option which allows the shortest length of
ductwork and a minimum number of elbows and
transitions. Check location of floor joists, wall
joists, wall studs, electrical wiring or plumbing
for possible interference.
NOTE: The unit is shipped with the 3
1
⁄4″ x 10″
discharge facing DOWN. See the Changing
Blower Direction section, if necessary.
Steps to Determine Flexible Ducting’s
Equivalent Length
1. Measure the actual amount of offset
(Maximum 3″ recommended). The effect upon
airflow is dependent upon the amount of offset.
2. Calculate the equivalent ducting allowances
using:
( ___ in. offset) x (14 Ft. per inch)
= ___ Ft. equivalent length.
3. Ensure that the total equivalent length of
ducting does not exceed the maximum
recommendation of 100 feet.
Right
discharge
Down discharge
(as shipped)
Left discharge
Duct Pieces Equivalent Length* Duct Pieces Equivalent Length*
31⁄4″ x 10″
6″ Round to 6″ Round 5 ft.
Straight
1 ft. (per foot length)
Transition
6″ Round
to 3
1
⁄4″ x 10″
3
1
⁄4″ x 10″ 1 ft. (per foot length) Transition
20 ft.
Straight 90° Elbow
31⁄4″ x 10″
to 6″ Round
6″ 15 ft. Transition
12 ft.
90° Elbow 90° Elbow
6″ Round
6″ Wall Cap 21 ft.
45° Elbow
9 ft.
with Damper
31⁄4″ x 10″
3
1
⁄4″ x 10″ Wall Cap 27 ft.
90° Elbow
16 ft.
with Damper
3
1
⁄4″ x 10″ 6″ Round
45° Elbow
5 ft.
Roof Cap
20 ft.
3
1
⁄4″ x 10″ 6″ Round
90° Flat Elbow
24 ft.
Roof Vent
24 ft.
6″ Round
to 3
1
⁄4″ x 10″ 7 ft.
Transition
SHOULD NOT EXCEED 100 EQUIVALENT FT.
*Equivalent lengths of duct pieces are based on actual tests conducted by
GE Evaluation Engineering and reflect requirements for good venting
performance with a downdraft rated at 500 CFM.
291/2″
Venting Island to Outside Wall
Wall
7″
24″ Power Cord
provided
(on right-hand side)
Page 9
9
Plan the Wiring
1. The downdraft blower system draws 4 AMPS
and requires a 120 VAC, 60 Hz circuit.
2. The unit has a 2 ft. long power cord with a
3-pronged plug. Plan to provide a grounded
outlet in a location which will allow the unit’s
power cord to reach. The outlet cannot be
located on a back wall. The outlet needs to be
mounted on the side wall of the cabinet or it
could be on the back wall of an adjacent cabinet
with access through an opening in the side wall.
(Based on local codes.)
Preparation
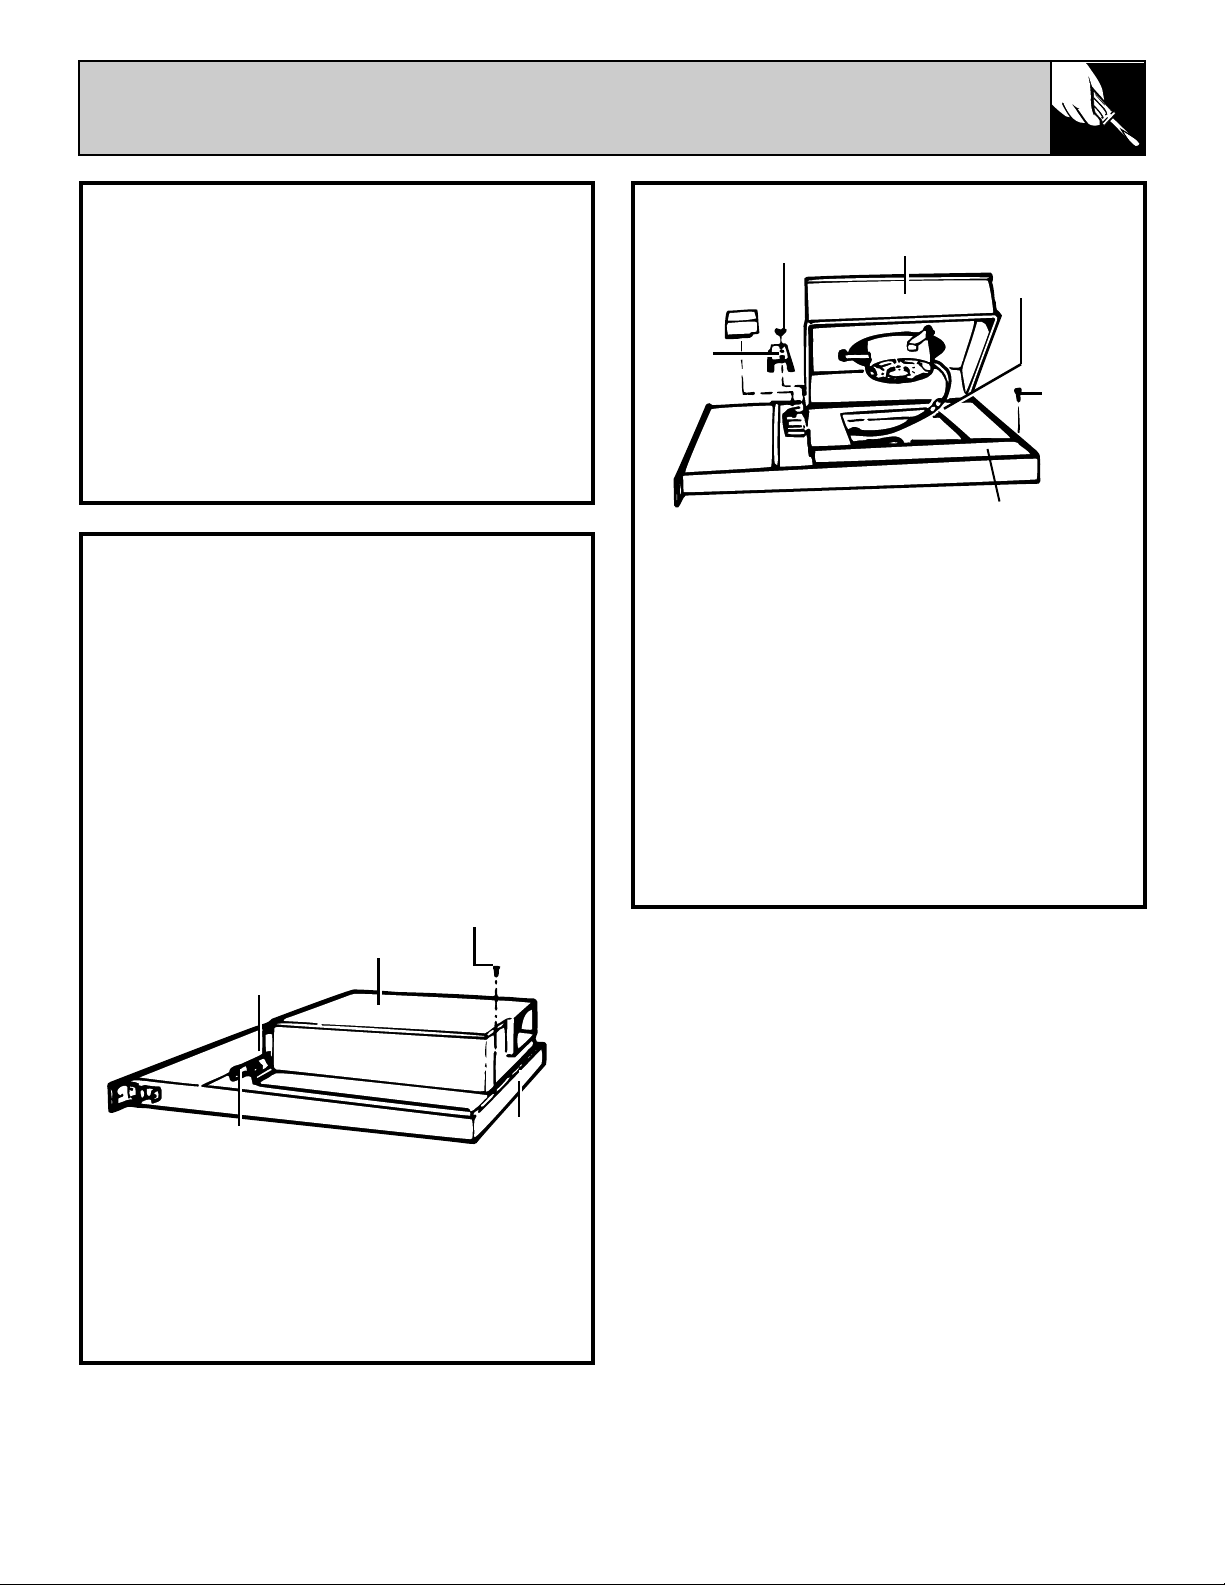
Changing Blower Discharge (Optional)
The blower is shipped with its discharge facing
DOWN. Follow these steps ONLY if:
• The position of the blower discharge needs to
be moved so the ductwork does not interfere
with the floor joists, plumbing or wiring below.
• It is necessary to rotate the blower discharge
to the RIGHT or LEFT.
Place the unit on its back on a table or work
surface.
DOWN DISCHARGE–
Moving Blower Left or Right
1. Loosen the 4 nuts and 2 clamp channels.
2. Slide the blower to the desired position.
3. Use the supplied cover plate to close the
open space (if any).
4.
Tighten the nuts to secure the top of the blower
and use the sheet metal screws through the
bottom flange to secure the bottom of the blower.
Nuts
Clamp channel
Bottom
flange
Blower
Sheet metal screw
LEFT OR RIGHT DISCHARGE
1. Remove the 4 nuts and 2 clamp channels.
2. Loosen the screws holding the gear motor
cover and slide it away from the blower.
3. Carefully lift the blower and disconnect the
motor plug if necessary. Reposition the blower
and reconnect the motor plug.
4. Use the supplied cover plate to close any
open space.
5. Replace the clamp channels and use the nuts
to secure the blower in its new position.
6. Reposition the gear motor covers and tighten
the screws.
7. Use sheet metal screws through the bottom
flange to secure the bottom of the blower.
Cover plate
Sheet
metal
screw
Motor plug
Blower
Clamp
channel
Nut
(continued next page)
Page 10
10
INSTALLATION INSTRUCTIONS
(continued)
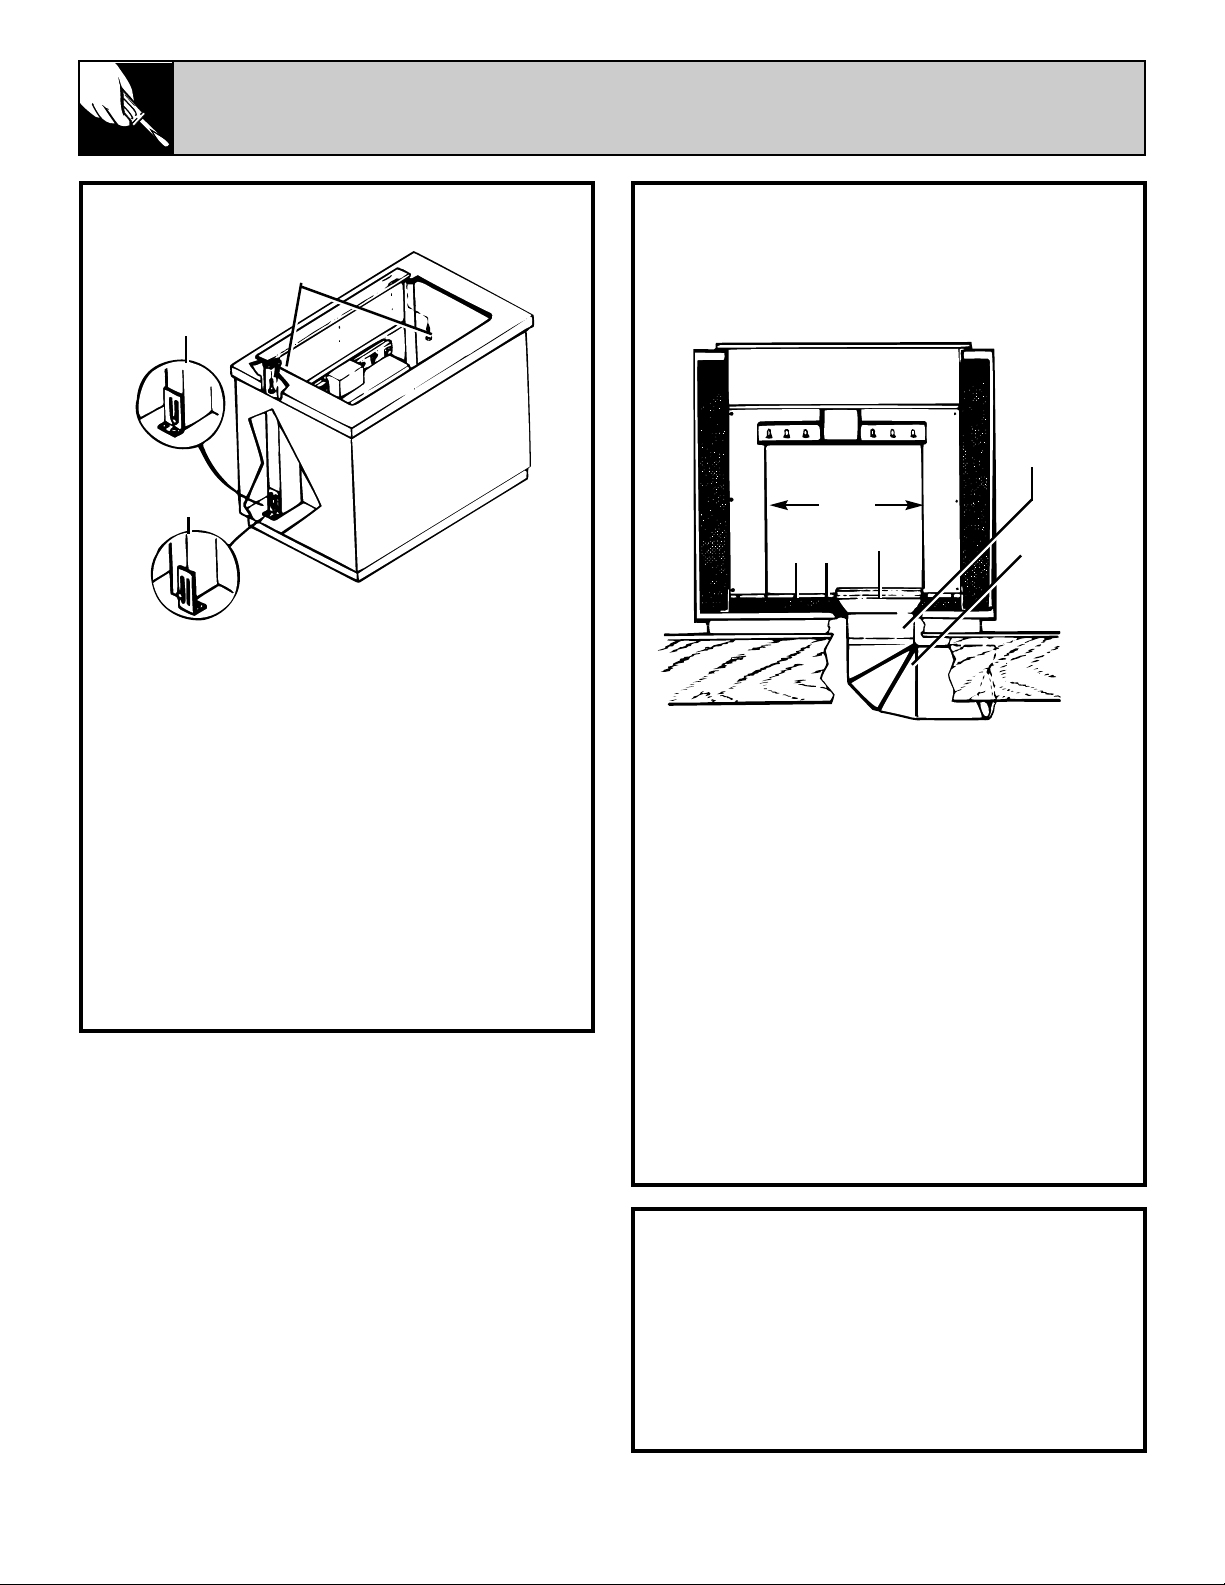
Install the Downdraft
1. Set the downdraft into the opening. Extend
the leveling brackets to the floor of the cabinet
so the downdraft sits straight. (NOTE: Leveling
brackets can be removed and reattached in
other positions. The bottom flange may have to
face inward in tight cabinet installations.)
2. Secure the downdraft to the countertop
as follows: Hold the downdraft against the back
of the countertop cut-out and tighten the 2
mounting screws (one on each end of unit) on
the underside of the countertop. Use a wood
shim between the screw and the underside of
granite countertops.
3. Screw the leveling brackets to the bottom of
the cabinet. Tighten the screws holding the
leveling bracket to the unit on each side.
Install the Electrical Wiring
1. Mount a standard wiring box, with
3-pronged outlet, inside the cabinet. Make sure
the downdraft’s power cord can easily reach it.
2. Run the appropriate power cable into the
cabinet and connect it to the outlet.
3. Plug the downdraft’s power cord into
the outlet.
Install the Ductwork
CAUTION–BEFORE CUTTING A HOLE
IN CABINET FOR DUCTWORK: Check for
interference with floor joists, wall studs,
electrical wiring or plumbing.
1. Cut the hole in the cabinet as well as holes
in the wall or floor as necessary.
2. Mount the roof or wall cap and work back
toward the cabinet, attaching all ductwork,
elbows and transitions as previously planned.
Tape all ductwork connections to make them
secure and air tight.
3. Connect the ductwork (and transition,
if required) to the downdraft. If necessary,
LOOSEN wing nuts and screws that hold the
blower in place, and slide the blower left or right
to meet the ductwork. Retighten the screws and
wing nuts.
NOTE: A 3
1
⁄4″ x 10″ collar is provided for
installers who prefer to rivet the cutwork to the
unit. This will allow the blower to be removed
and replaced easily in service situations without
disturbing the ductwork.
Leveling bracket–
flange facing out
Leveling bracket–
flange facing in
Mounting screws
Collar
3
1
⁄4″ x 10″
to 6″ RD.
Transition
6″ RD.
Elbow &
ductwork
Blower
Screws
Page 11
11
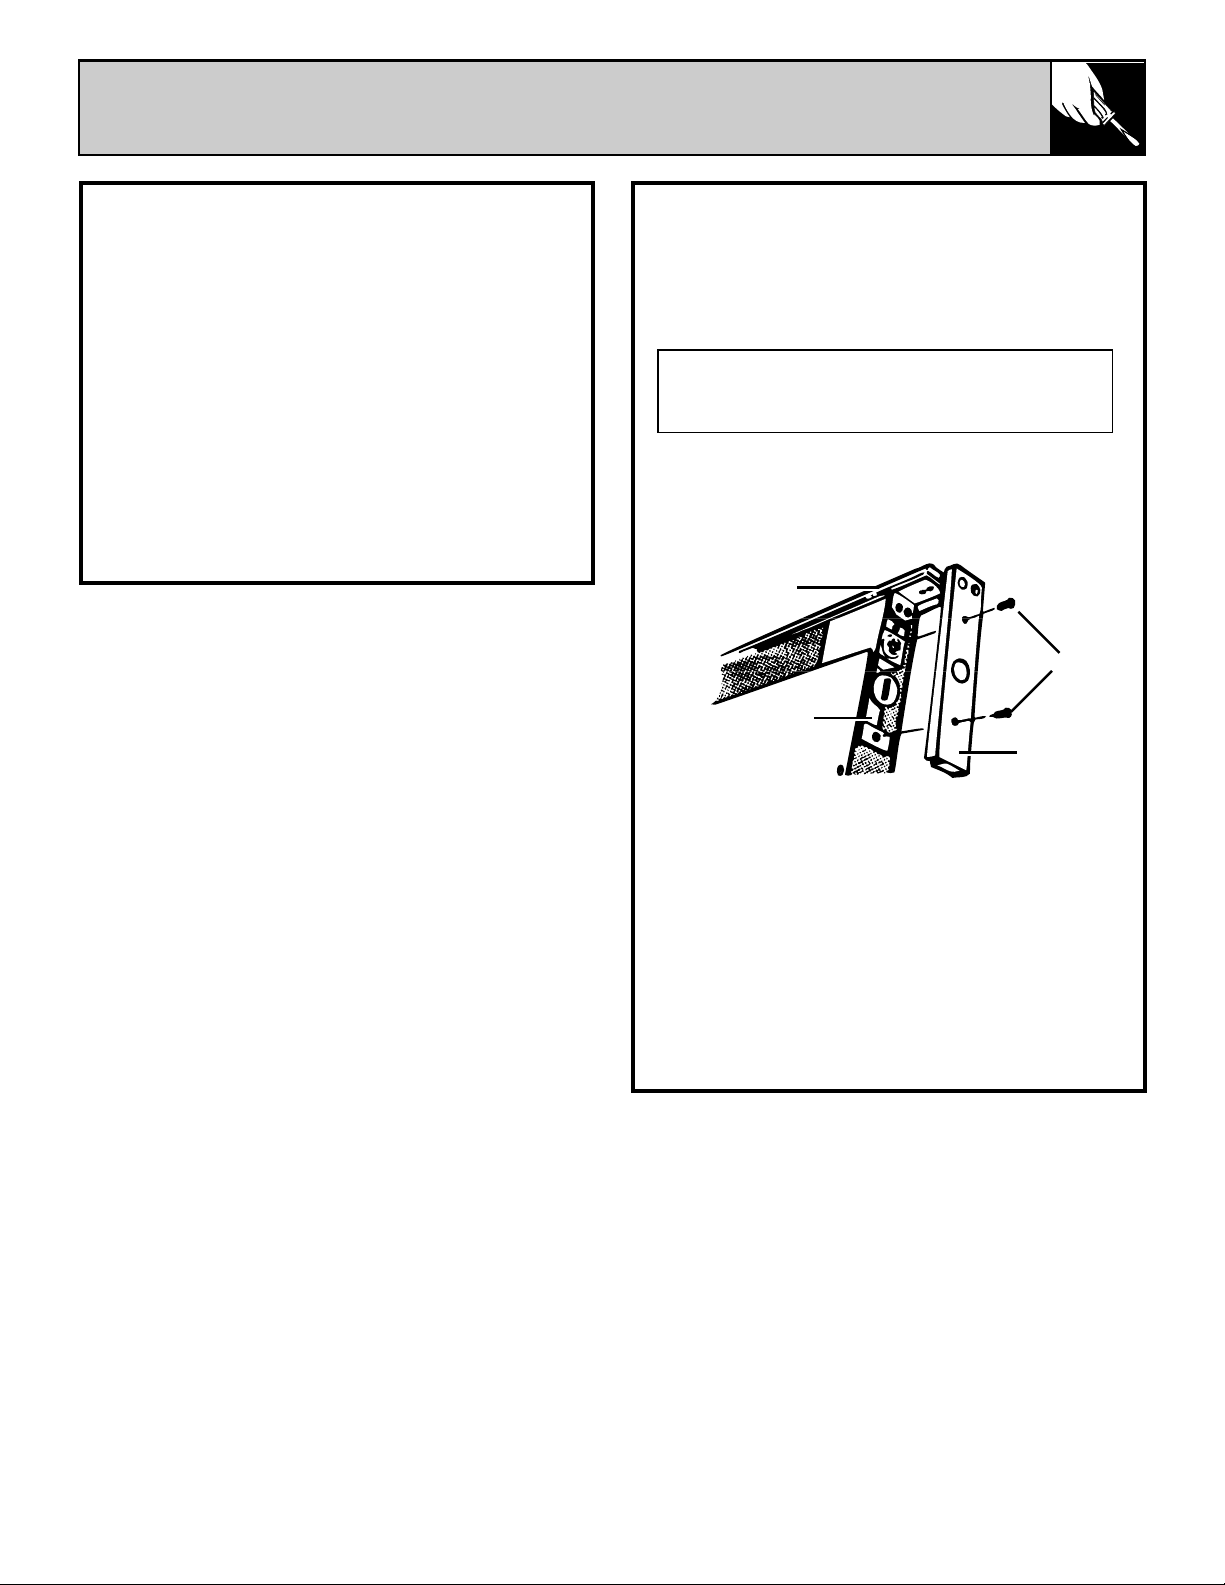
Adjust the Switch
The downdraft is factory-adjusted for proper
operation. However, shipping and handling may
affect the positions of the activating switch.
To adjust position of activating switch:
1. If the downdraft is plugged into the electrical
outlet, unplug it.
2. Lift the air vent straight up and cock it
slightly so it remains in the UP position.
3. Remove the switch cover from the right end
of the air vent.
4. Loosen the 2 screws holding the switch
bracket in place. Position the switch bracket so
that the activating switch just comes in contact
with the underside of the switch membrane.
Tighten the screws.
5. Replace the switch cover, gently lower the
air vent into the chimney and plug in the power
cord. Reconnect the electrical power and check
operation.
WARNING: To avoid possible electrical
shock, personal injury or death—
disconnect electrical power.
Install the Cooktop
• With the Downdraft in the “Down” position,
place the cooktop into the cutout.
• Push the cooktop back until the back edge of
the cooktop just barely touches the front edge of
the downdraft cover.
• Using a dime as a thickness gauge, align the
cooktop so that there is a minimum uniform gap
of 0.05″ (the thickness of a dime) between the
cooktop and the downdraft cover.
NOTE: Do not force the downdraft cover to
move rearward when aligning the cooktop. This
may cause the downdraft cover to impact and
damage the cooktop when the vent is raised and
lowered.
Switch
bracket
Switch
cover
Screws
Switch membrane
Page 12
WHAT IS COVERED
FULL ONE-YEAR WARRANTY
For one year from date of original
purchase, we will provide, free of
charge, parts and service labor in
your home to repair or replace
any part of the downdraft system
that fails because of a
manufacturing defect.
This warranty is extended to
the original purchaser and any
succeeding owner for products
purchased for ordinary home use in
the 48 mainland states, Hawaii and
Washington, D.C. In Alaska the
warranty is the same except that it
is LIMITED because you must pay
to ship the product to the service
shop or for the service technician’s
travel costs to your home.
All warranty service provided by
our Factory Service Centers, or an
authorized Customer Care
®
technician. To schedule service,
on-line, 24 hours a day, visit us at
GEAppliances.com, or call
800.GE.CARES (800.432.2737).
WHAT IS NOT COVERED
• Service trips to your home
to teach you how to use the
product.
• Improper installation, delivery
or maintenance.
If you have an installation
problem, contact your dealer or
installer. You are responsible for
providing adequate electrical,
exhausting and other
connecting facilities as
described in the Installation
Instructions provided with the
product.
• Replacement of the
replaceable filters.
• Replacement of house fuses or
resetting of circuit breakers.
• Failure of the product if
it is used for other than its
intended purpose or used
commercially.
• Damage to product caused by
accident, fire, floods or acts
of God.
• Incidental or consequential
damage caused by possible
defects with this appliance.
• Damage caused after delivery.
Some states do not allow the exclusion or limitation of incidental or consequential damages, so the above limitation or exclusion
may not apply to you. This warranty gives you specific legal rights, and you may also have other rights which vary from state to state.
To know what your legal rights are in your state, consult your local or state consumer affairs office or your state’s Attorney General.
Warrantor: General Electric Company. Louisville, KY 40225
JVB93 JVB96
164D3333P139
49-8904-4
99 04 2007F
02-03 JR
YOUR DOWNDRAFT SYSTEM
WARRANTY
Staple sales slip or cancelled check
here. Proof of original purchase date
is needed to obtain service
under warranty.
Printed in the United States
 Loading...