

Page 1
Safety hlformation ......... 3-_',
GEAppliances
©
Operating Instructions
Clock and Timer ............. 12
Gourmet Shelf and
Baking Stones ................ 21
Oven Thermostat ............. 22
Proofing .................... 20
Sabbath Feature ............... 9
Timed Baking
and Roasting .......... 13, 18, 19
Using the ()veil ............ 6-24
Care and Cleanil_g
Baking Stones ................ 27
Broiler Pan and Grid .......... 26
Control Panel ................ 26
I,ift-Off Oven Door ........... 25
Oven Floor .................. 26
Oven Light Bulb .............. 28
Probe ....................... 27
Stainless Steel Surf_ces ........ 29
Selt:Cleaning Oven ........ 23, 24
Shelves ...................... 27
,l la
,/TPlg
.//_'56
.1T -56
.]Kgl O
.]K950
.]Tgl O
.1T95o
I
Troubleshooting Tips .... 30-32
Customer Services
Sere'ice telephone
numbers ............ Back Cover
Product registration ..... 2, 33, 34
Warranty .................... 35
www.geappliances.com
164B4290PO05 49-80034 7-OOJR
Page 2
GE& You,A ServicePartnership.
IMPORTANT!
Fill out tile ( onsumer Product Registration Card.
Twoeasywaysto registeryourappliance!
• Through tile internet at _v.geappliances.com
• ( omplete and mail the enclosed Product Registration Card
FORYOURRECORDS
Write the model and serial numbershere:
#
#
You can lind them on a label on tile tiont of the oven behind tile oven door on single oven models,
or tile flont of tile h)wer oven behind tile oven door on double oven models.
Staple sales slip or cancelled check here.
Proof of tile original purchase date is needed to obtain se_x-iceunder tile w:uranty.
READTHISMANUAL
Inside you xfill find many helpfill hints on how to use and maintain your oven properly..Just a little
preventive cate on VOllipart can save you a great deal of time and money over tile life of your oven.
IFYOUNEEDSERVICE
You'll lind many answersto common problems in the Before YouCallForServicesection. If you
review our chmt of Troubleshooting Tips first, you may not need to call tot service at all.
lfy_)u do need se_Yice,)_Ju can relax knowing help is only a phone call away. A list of toll-tiee
customer set_ice numbers is incluCDd in the back section of this manual.
OR
Visit our Website at: www.geappliances.com
2
Page 3
IMPORTANTSAFETYINFORMATION.
READALLINSTRUCTIONSBEFOREUSING.
WARNING!
Foryoursafe_ the informationin thismanualmustbe followed tominimizetheriskof fire or
explosion,electric shock,or to preventpropertydamage,personalinjury,or lossoflife.
IMPORTANTSAFETYNOtiCE
The California Safe Drinking Water and ToxicEnforcement Act requires the Governor of Califomb to
publish a list of substances known to the state to cause cancer, birth defects or other reproductive
harm, and requires businesses to warn customers of potential exposure to such substances.
The fiberglass insulation in self-clean ovens gives off a very small amount of carbon monoxide during
the cleaning cycle. Exposure can be minimized by venting with an open window or using a ventilation
fan or hood.
SAFETYPRECAUtiONS
When using electrical appliances, basic safety precautions should be followed, including the
following:
ij_::_Use this appliance only for its intended
purpose as described in this Oxmer's
Manual.
ij_::_Be sure your appliance is properly installed
and g_mnded by a qualified teclmician in
acco_xlance with the provided installation
instructions.
?_{Do not attempt to repair or replace any
part of your oven unless it is specifically
recommended in tiffsmanual. All other
servicing should be referred to a qualified
technician.
iJ_i:_Have tile installer show you the location of
the circuit breaker or fuse. Mark it for easy
reference.
iJ_i:;Before pe_tbrxning any sersice, disconnect
the oven power supply at the househoM
distribution panel by removing tile fllse or
switching off the cirofit breaker.
_; Do not leave children alone-children
sbouM not be left alone or unattended in
an area where an appliance isin use. They
should never be allowed m sit or stmld oil
mV part ofthe appliance.
iJ_i:;Do not allow an_)ne to dimb, stand or
hang on file door. They could damage tile
oven, or cause severe personal injury.
ij_::;Be sure the oven is securely installed in a
cabinet that is firefly attached to the house
stn|cture. Never allow anyone to climb, sit,
stand or hang on the oven door.
_; Never leave tile oven door open when you
are not watching the oven.
iJ_i:;Always keep combustible wall covering,
curtains or drapes a safe distance from
your ()veil.
iJ_i:;Alx_tys keep dish towels, dish doths, pot
holders mid other linens a safe distmlce
flom your oven.
?_;Always keep wooden and plastic utensils
and canned food a safe distance awWflom
7rx)uroven.
_; Teach clfikhen not u) plW wifll the
controls or any oilier part of file oven.
3
Page 4
IMPORTANTSAFETYINFORMATION.
READALLINSTRUCTIONSBEFOREUSING.
A WARNING!
SAFETYPRECAUTIONS
_ Do not store flammable materials in an
oven,
iJ_i:_CAUTION: hems ofinterest to
children should not be stored ill cabinets
above an oven; chikken climbing on the
oven u) reach items could be seriously
injured.
_ Never wear loose-fitting or hanging
garments while using tire appliance. 1_
careflfl when reaching for items su)red in
cabinets over the oven. Flammable material
could be ignited ifbrought ill contact with
hot surfaces or heating elements and m W
cause severe burns.
_ Use only dly pot holders-nloist or damp
pot holders on hot surfaces may result in
burns from steam. Do not let pot holders
touch hot heating elements. Do not use a
towel or other bulky cloth.
_':':!For }xIur safety, never use }x)ur appliance
for x_rming or healing tire room.
iJ_i:_Do not let cooking gTease or odler
flammable materials accumulate in or near
the oven.
_ Do not use water on g_ease fires. Never pick
up a flaming pan. Tnrn the contlxdS ore
Flame in tire oven Call be smothered
completely by closing dre oven door and
turning tire oven offor by using a multi-
purpose dly chemical or ft/am-type fire
_; Never leave jars or cans offat drippings ill
or near your oven.
_; Do not store or use combustible materials,
gasoline or ()tiler flammable vapors and
liquids in tile vMnity (If this or any other
appliance.
_; Stand away flom dm oven when opening
the oxen door. Hot air or smanl which
escapes can cruise bums to hands, face
and/or eyes.
iJ_i:;Do not heat unopened food conlainers.
Pressure could build up and the container
could burst, causing all in juU.
iJ_i:_Keep fire oven vent unobstructed.
_i::Keep dm oven flee from g_ease buildup.
_; Place tire oven shelf ill tire desired position
while tire oven is cool. If shelves must be
handled when hot, do not let pot holder
contact the heating elements.
_; V_qrenusing cooking or masting bags in tire
oven, follow tire mamdacmrer's directions.
iJhi:;Pulling out tire shelf to dre stop-lock is a
convenience in lifting heax T foods. It is also
a precaution against bums flom touching
hot surfaces of tire (Mot or oven walls.
_; Do not use tire oven to (hy newspapers.
If overheated, dmy call catch on fire.
_ Do not use tile oven ff)r a storage area.
Items stored in an oven call ignite.
exting_fisher.
_; Do not leave paper products, cooking
_; Do not touch dre heating elements or dre
interior SUliace of dm oven. These SUliaces
may be hot enough to burn even though
they are dali< in color. During and after use,
do not touch, or let clothing or other
flammable materials contact ally interior
area of the oven; allow sufiMent time for
cooling first.
P()mnfially hot SUliaces indude oven vent
openings, SUlihces near dre openings,
crevices around tire oven door, tire edges
of tire window and metal trim parts above
tile door.
REMEMBER:The inside smthce of tire oven
4
may be hot when die door is opened.
utensils or food in the oven when not in use.
i_hi:;After broiling, always take file broiler pan
out of tire oven and (:lean it. Leftover g_ease
in tile broiler pan (:all catch fire next time
_u use tile pan.
_; Clean only parts listed in dlis Use and
Care Manual.
_; DO not use aluminum Rill to line oven
bottoms, except as suggested ill flris
manual. Improper installation of
aluminum foil may result in a risk
ofelecuic shock or fire.
Page 5
COOKMEATANDPOULTRYTHOROUGHLY...
Cookmeat andpoultry thoroughly--meat to atleast an INTERNALtemperatureof 160°Eandpoultry
toat leastan INTERNALtemperatureof 180°ECookingtothesetemperaturesusuallyprotects agabst
foodbomeillness.
SELF-CLEANINGOVEN
_ Do not dean dm door gasket. Tile door
gasket isessential tot a good seal. (;are
should be taken not to rub, damage or
move the gasket.
_J_i:;Do not use oven cleaners. No commercial
oven cleaner or oven liner protective
coating of any kind should be used in or
around any part of the oven. Residue from
oven cleaners will damage the inside of the
oven when the sell:dean Q_de is used.
_; l_fbre selt:deaning the oven, remove dm
broiler pan, gTid and other cookware.
N Be sure m wipe up excess spillage before
starting the sell:cleaning operation.
N If the sell:cleaning mode maltimctions,
turn the oven off and disconnect the power
supply. Have it sere'iced by a qualified
technician.
READANDFOLLOWTHISSAFETYINFORMATIONCAREFULLY.
SAVETHESEINSTRUCTIONS
5
Page 6
Usingthe ovencontrols.
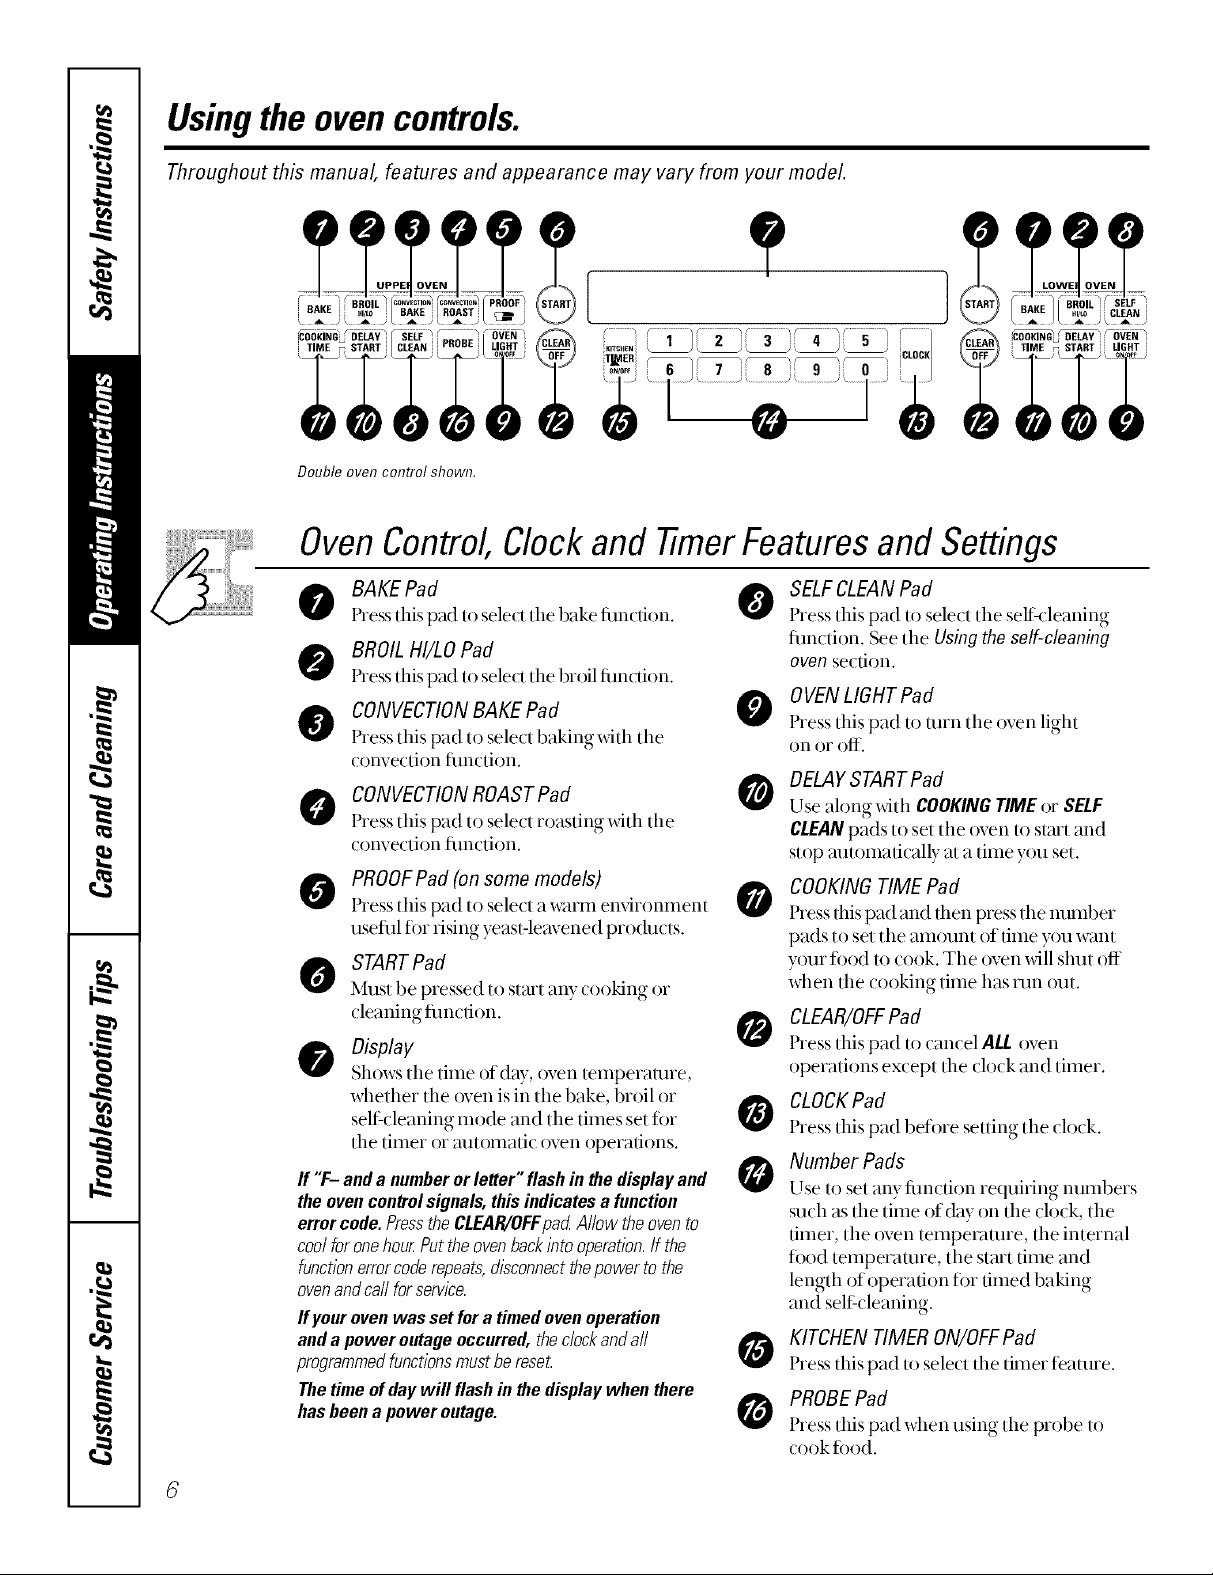
Throughout this manual, features and appearance may vary from your model.
::KITCi{EN _h_!--)_ JCLOCR TIME _ START [ LIGHT
Double oven control shown.
OvenControl,Clockand timer FeaturesandSettings
BAKE Pad
Press tiffspad to select tile bake fimcfion.
BROIL HI/LO Pad
Press tiffspad to select the broil fimcfion.
CONVECTIONBAKE Pad
Press this pad to sele(t baking with the
convection flmcdon.
CONVECTIONROASTPad
Press tiffs pad to select roasting with the
convection fimction.
PROOFPad (onsome models)
0
Press this pad 1o select a warm ewdronmen[
usefifl for rising yeast-leavened products.
STARTPad
0
Must be pressed to start any cooking or
cleaning flmcdon.
Display 0
Shows tile time of day, oven temperature,
whether the oven is in tlle bake, 1)roll or
sell:cleaning mode and the times set for
the timer or automatic oven operations.
If "F- anda numberorletter"flashin thedisplayand
theovencontrolsignals,thisindicatesafunction
errorcode.PresstheCLEAR/OFFpad Allow theovento
coolforonehourPuttheovenbackintooperation.Ifthe
functionerrorcoderepeats,disconnectthepowerto the
ovenandcarlforservice.
If your oven was set for a timed ovenoperation
and a power outage occurred, theclock and a//
programmedfunctionsmust be reseL
The time of day will flash in the display when there
has been a power outage.
SELFCLEANPad
0
Press tiffs pad to select the selfqleaning
thnction. See tile Usingthe self-cleaning
ovensection.
OVENLIGHT Pad
Press tiffs pad to mrn the oven light
on or off.
DELAYSTART Pad
Use along with COOKINGTIME or SELF
CLEANpads to set the oven to s/m't and
stop automatically at a time you set.
COOKINGTIME Pad
Pressdfis pad and then pressthe number
pads to set the amount of time you want
your ti)od/() cook. The oven will shut off
when the cooking time has nm out.
CLEAR/OFFPad
Press tiffs pad to cancel ALL oven
operations except the clock and timer.
CLOCKPad
Press tiffs pad betore setting the (lo(k.
Number Pads
Use/o set any fim(fion requiring numbers
such as the time of(by on the clock, the
timer, the oven temperature, the internal
ti)od temperature, the start time and
length of operation ti)r timed baking
and self cleaning.
KITCHEN TIMER ON/OFFPad
Press tiffs pad to sele(t the timer [eature.
PROBEPad
Press tiffs pad when using the probe to
(ook ti)od.
Page 7
Special features ofyourovencontrol
Yournew touch pad control has additional features that you may choose to use. The following are the
features and how you may activate them.
Thespecial feature modes can only be activated while the display is showing the time of day. They remain
in the control's memory until the steps are repeated.
When the display shows your choice, press the STARTpad. The special features will remain in memory
after apower failure, except for the Sabbath feature, which will have to be reset.
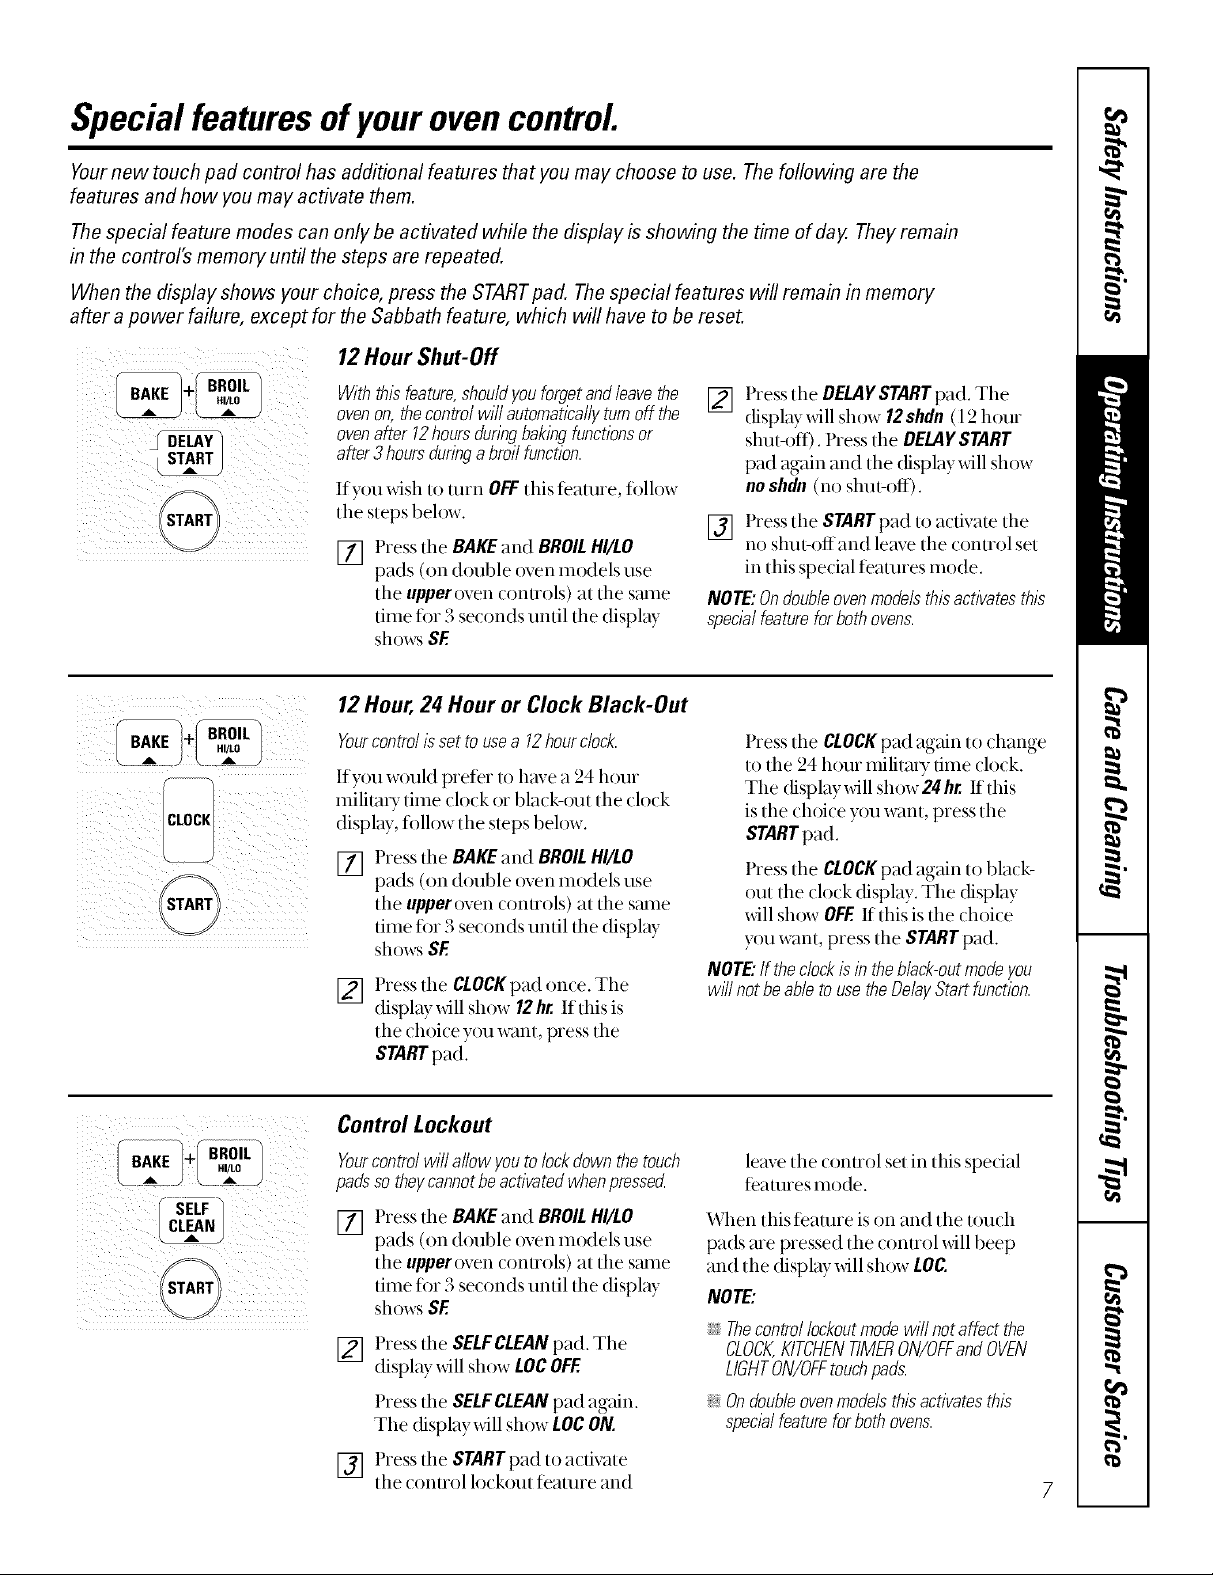
12 Hour Shut-Off
7i iiI
Withthisfeature,shouldyouforgetandleavethe
ovenon,thecontrolwillautomaticallyturnoffthe
ovenafter 12hoursdunbgbakingfunctionsor
after3hoursduringa broilfunction.
If you xdsh to mrn OFFthis featuie, fi)llow
the steps below.
[77 Press tile BAKEand BROILHI/LO
pads (on double oven Inodels use
the upper oven conuols) at the same
time fin 3 seconds until the displ W
shows SF.
12Hour,24 Hour or Clock Black-Out
Yourcontrol/ssettousea 12hourdock.
Ifyou would preter to have a 24 hour
milita U time (hxk or black-out tile (lo(k
display, tollow the steps below.
Press tile BAKEand BROILHI/LO
[]
pads (on double oven inodels use
tile upperovencontrols) at tile s_une
time fi)r 3 seconds until the display
shows SF
Press tile CLOCKpad once. Tile
[]
displayxdll show 12hr, If this is
tile (hoice you want, press tile
STARTpad.
Press tile DELAYSTARTpad. Tile
[]
display xdll show 12shdn(12 hour
shut-off). Press tlle DEI..AYSTART
pad again and tlle display will show
no shdn (no shut-off).
[] Press tile STARTpad to activate tile
no shut-offand leave tile conuol set
in this special teatures mode.
NOTE:Ondoubleovenmodelsthisactivatesthis
specb/featureforbothovens.
Press tile CLOCKpad again to change
to tile 24 hour militmy dine clock.
The displaywill show24hr. If this
is the choice you want, press the
STARTpad.
Press tile CLOCKpad again to black-
out tile clock display. Tile display
will show OFF.If this is the choice
you want, press the STARTpad.
NOTE."If theclockisintheblack-outmodeyou
wff/notbeabletousetheDelayStartfunction.
Control Lockout
Yourcontrolwill allowyoutolockdownthetouch
padssotheycannotbeactivatedwhenpressed
Press tile BAKEand BROILHI/LO
[]
pads (on double oven inodels use
tile upper(wen(onuols) at tile same
time for 3 seconds until tile display
shows SF
[] Press tile SELFCLEANpad. Tile
display will show LOCOFF.
Press tile SELFCLEANpad again.
Tile display will show LOCON.
[] Press tile STARTpad to a(tivate
tile control lockout teature and
leave tile control set in this special
featuies mode.
When this t;eatuie is on and tile touch
pads are pressed the conuol will beep
and the display will sh()w LOC,
NOTE:
i:YThecontrollockoutmodewi//notaffectthe
CLOCK,KITCHENTIMERON/OFFandOVEN
LIGHTON/OFFtouchpads.
:i;:Ondoubleovenmodelsthisactivatesthis
specb/featureforbothovens.
Page 8
Special featuresofyourovencontrol
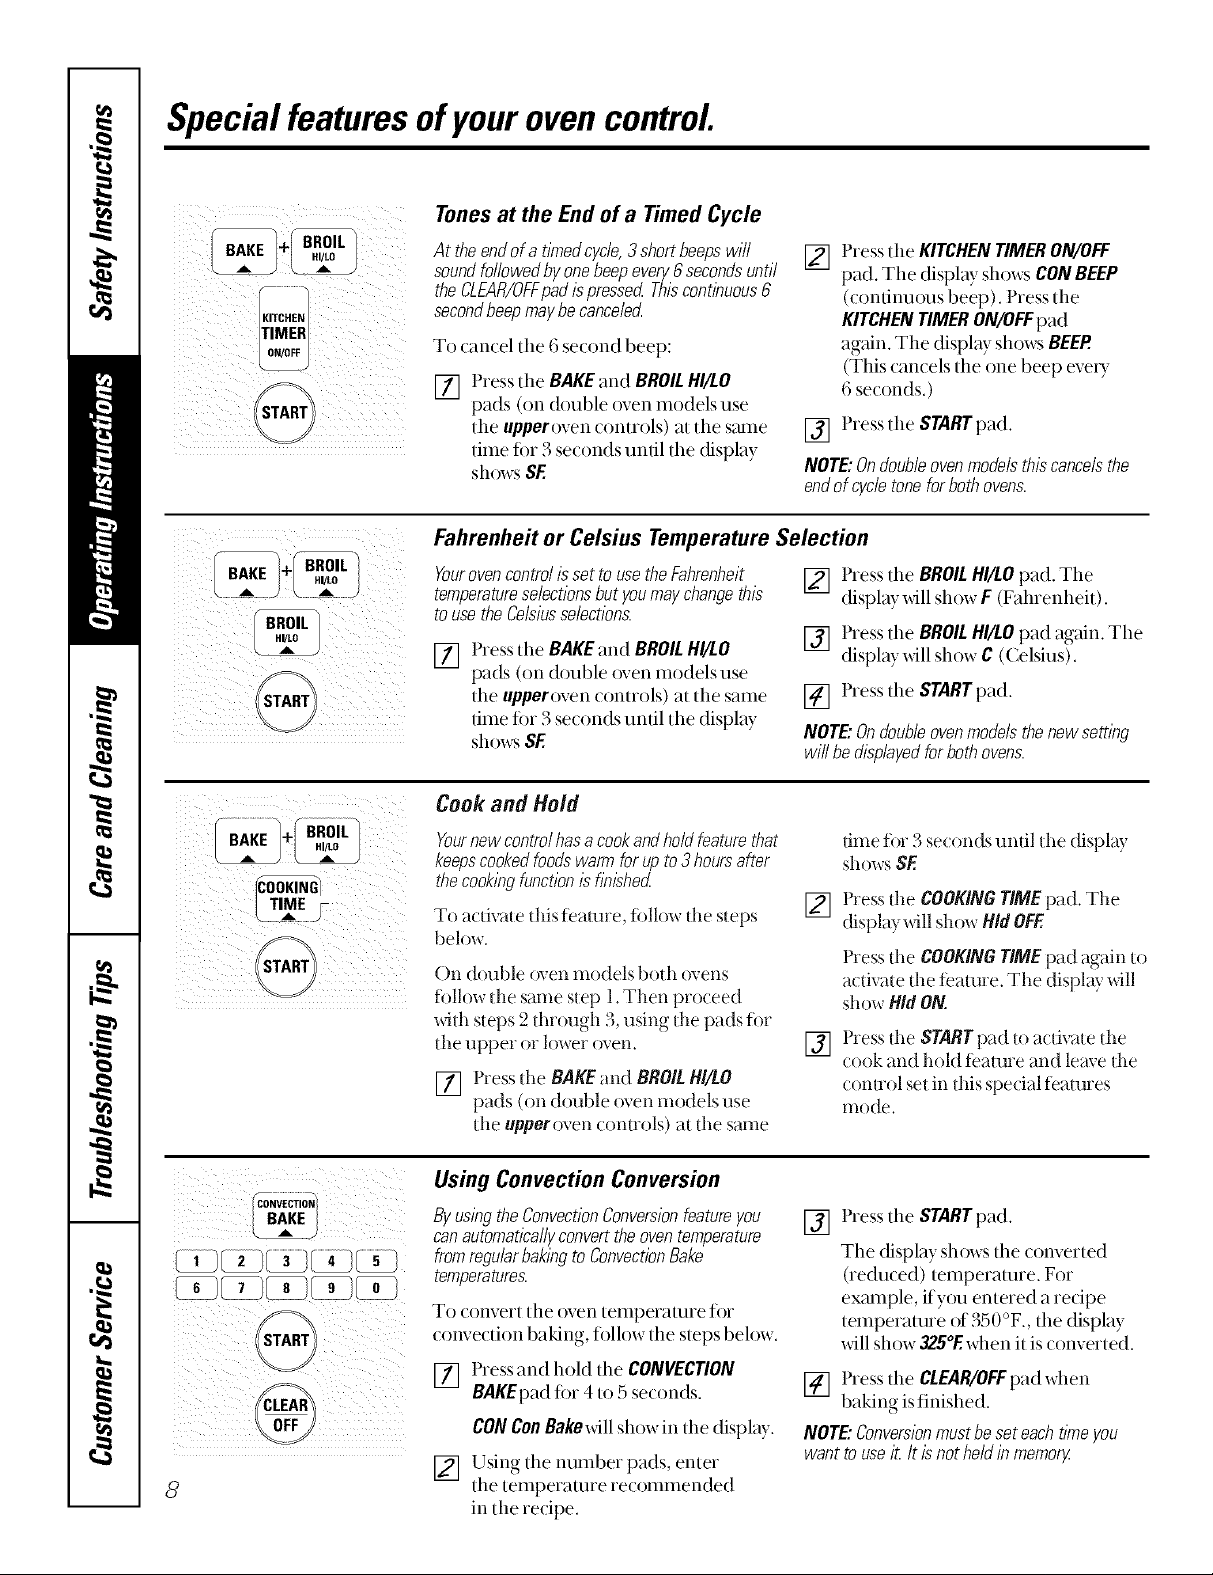
Tonesat the Endof a Timed Cycle
At theendofa tYnedcycle,3shortbeepswill
soundfollowedbyonebeepevery6secondsuntil
theCLEAR/OFFpadispressedThiscontinuous6
secondbeepmaybecance/ecL
To cancel tile 6 second beep:
[] Press tlle BAKEand BROILHI/LO
pads (on double oven models use
the upperoven controls) at the s_mle
time for 3 se(onds until the display
shows SF.
Fahrenheit or Celsius Temperature Selection
Yourovencontrolis set to usetheFahrenheit
temperatureselectionsbut youmay change this
touse the Celsiusselections.
[] Press tile BAKEand BROILHI/LO
pads (on double oven models use
tile upperoven controls) at the same
time tbr 3 seconds until tile display
shows SF.
Press the KITCHENTIMERON/OFF
[]
pad. The display shows CONBEEP
(continuous beep). Press the
KITCHENTIMERON/OFFpad
again. Tile display shows BEEP.
(This cancels the one beep exvxT
6 seconds.)
[] Pressthe STARTpad.
NOTE:Ondouble ovenmodelsthis cancelsthe
endof cycletone for bothovens.
[] Press tile BROILHI/LOpad. Tile
display will show F (Fahrenheit).
[] Press the BROILHI/LOpad again. The
display will show C ((eMus).
[] Press the STARTpad.
NOTE"Ondoubleovenmodels thenewsettlbg
willbedisplayedforbothovens.
Cook and Hold
Yournewcontrolhasacookandholdfeaturethat
keepscookedfoodswarmfor upto3hoursafter
thecooklbgfunctionishblshed.
To activate dris feature, follow tl,e steps
below.
()n double o_en models both o_ens
follow die same step 1. Then proceed
xdth steps 2 through 3, using tile pads for
the upper or lower oven.
[] Press the BAKEand BROILHI/LO
pads (on double oven models use
d*e upperoven c()nt1ols) at d_e same
Using Convection Conversion
By using theConvectionConversionfeature you
canautomatically convert theoven temperature
fromregularbaklbgto ConvectionBake
temperetures.
To convert tile oven temperature fi)r
convection baking, folh)w tile steps beh)w.
[] Press and hoM tile CONVECTION
BAKEpad for 4 to 5 se(onds.
CONConBakewill showin the display.
[] Using tile number pads, enter
8
tile temperature recommended
in the recipe.
dine fi)r 3 seconds undl tl,e display
shows SE
[] Press the COOKINGTIMEpad. The
(fisplay will show HidOFF.
Press d_e COOKINGTIMEpad again u)
actixate tl_e tbamre. The display will
show Hid ON.
Press tl,e STARTpad u) activate dm
[]
cook and hold tb'amre and leme d_e
control set in Iris special features
Illode.
[] Press the STARTpad.
Tile display shows tile converted
(reduced) temperature. For
exmnple, if you entered aredpe
temperature of 350 °F., the display
will sh{)wa25°Fwhen it is converted.
[] Press the CLEAR/OFFpad when
baking isfinished.
NOTE"ConversionmustbeseteachflYneyou
wanttousei_Itisnotheldinmemon/
Page 9
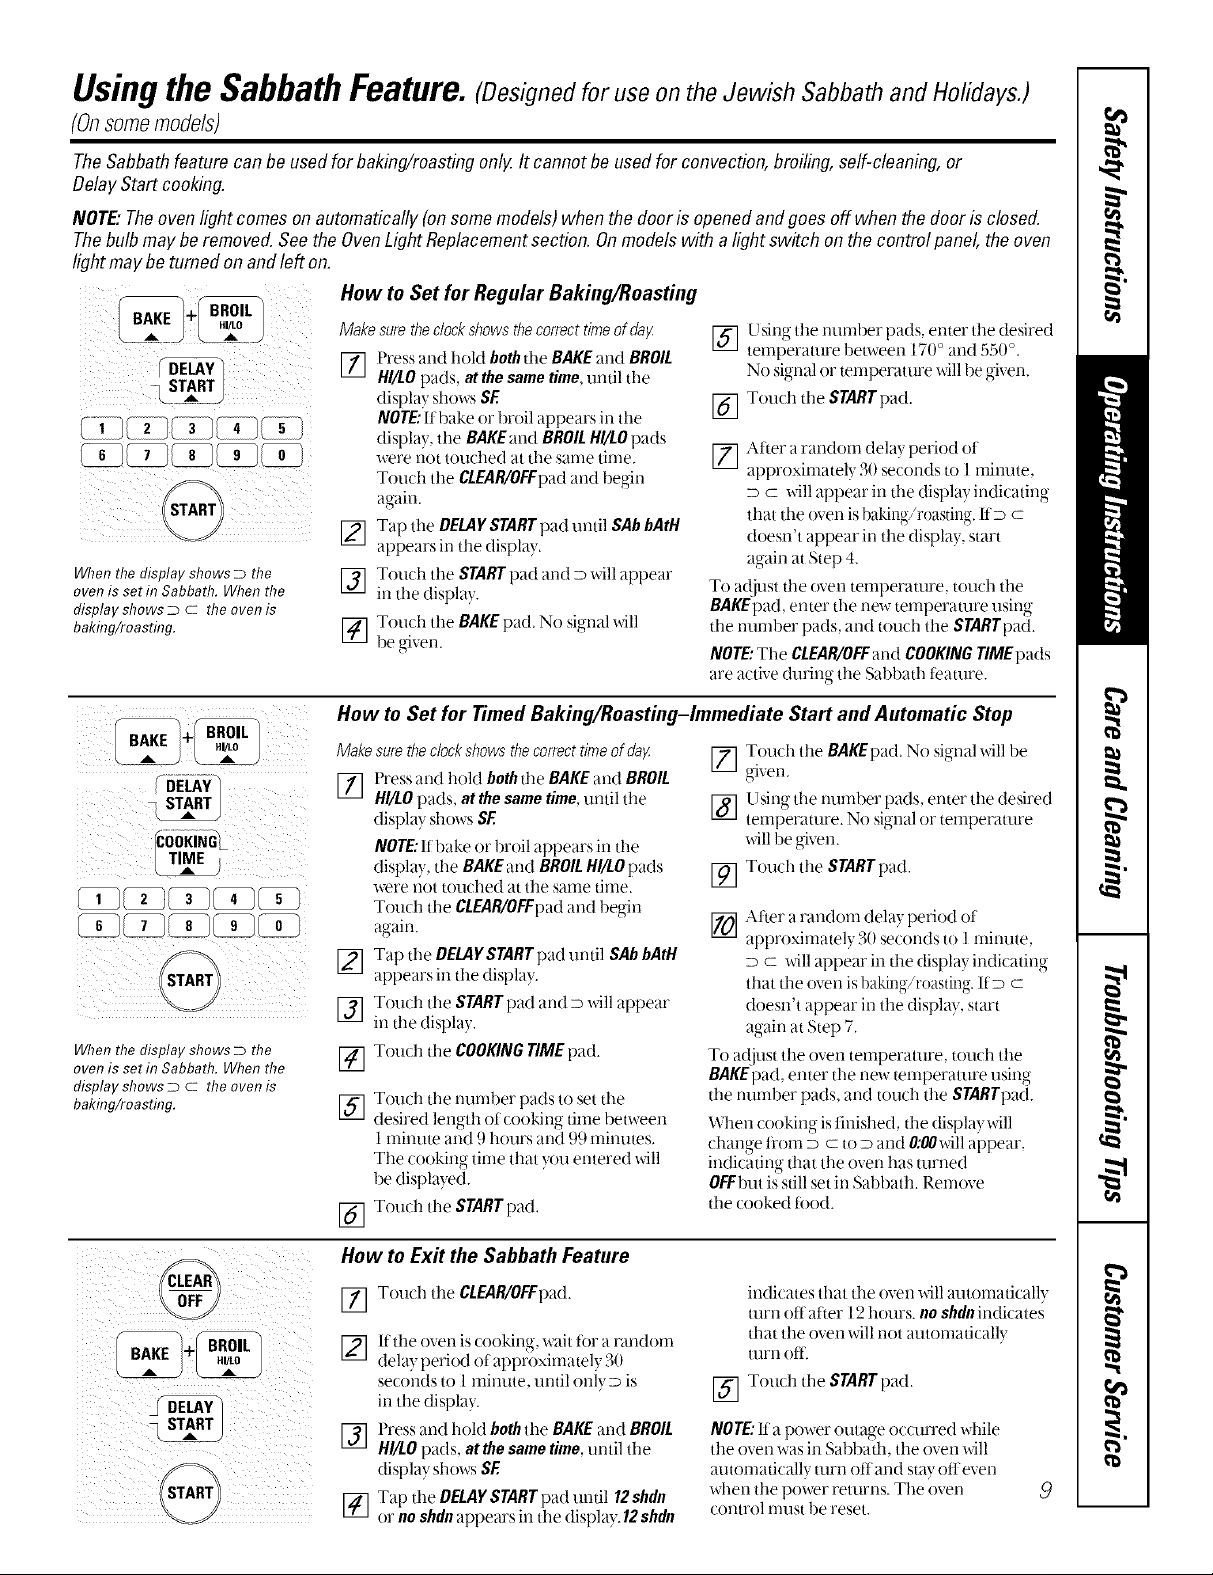
Usingthe SabbathFeature.(Designed for use on the Jewish Sabbath and Holidays.)
(Onsomemodels)
TheSabbathfeature can be usedfor baking/roastingonlg It cannot be usedfor convection,broiling,self-cleaning,or
DelayStartcooking.
NOTE:Theoven light comesonautomatically(onsomemodem when thedoor is openedandgoes off whenthe door is closed.
Thebulbmaybe removed.Seethe OvenLightReplacementsection. Onmodelswith alightswitch onthe controlpanel, theoven
lightmaybe turnedon andleft on.
How to Set for Regular Baking/Roasting
When the display shows D the
oven is set in Sabbath. When the
display shows D C the oven is
bakflTg/roasting.
Makesuretheclockshowsthecorrecttimeofda}_
[] t)ressand hold bothdm BAKEand BROIL
HI/tO pads, atthesametime,until tile
display shows SE
NOTE:11bake or broil appears in tile
display, tile BAKEand BROILHI/tOpads
were not touched at the sanle tinle.
Touch tile CLEAR/OFFpadand begin
ag;dn.
[]
Tap tile DELAYsTAKr pad until SAb bAtH
appears in tile display.
[] Touchthe SNRT pad and D will appear
in the d splay.
[] Touch tile BAKEpad. No signal will
be given.
[_U sing tile number pads, enter tile desired
temperature between 170° and 550°,
No signal or temperature will be given.
[] Touch tile STARTpad.
[] After a random dela) period ot
approxinlatel) 30 seconds to 1 minute,
D C will appear in the display indicating
that the oven is baking/roasting, liD C
doesn't appear in tile display, start
again at Step 4.
To adjust the oven temperature, touch the
BAKEpad, enter the new temperature using
the number pads, and touch tile STARTpad.
NOTE:Tile CLEAR/OFFand COOKINGTIMEpads
are active during tile Sabbath teamre.
STUART/
When the display shows D the
oven is set in Sabbath. When the
display shows D C the oven is
bakhTg/roasting.
q START|'_ []
How to Set for Timed Baking/Roasting-Immediate Start and Automatic Stop
Makesuretheclockshowsthecorrecttimeofda}_
[] Press and hoM both tlle BAKEand BROIL
HI/tO pads, at thesame time,until tile
display shows SF
NOTE:If bake or broil appears in the
display, the BAKEand BROILHI/tO pads
were not touched at tile same time.
Touch the CLEAR/OFFpadand 1)egin
again.
[] Tap tile DELAYSTARTpad until SAbbAtH
appears in the displa}.
[] Toudl the STARTpad and D will appear
in tile display,.
[] Touch tile COOKINGTIMEpad.
Touch tile number pads to set the
[]
desired length of cooking ume between
1 minute and 9 hours and 99 minutes.
Tile cooking time that you entered will
be displa} ed.
Toucll tile STARTpad.
[]
[_] Touch tile BAKEpad. No signal will be
• (
given.
[_ Using the munber pads, enter tile desired
temperature. No signal or temperature
will be given.
[] Touch tile START pad.
[] After arandonl dela) period ot
approxinmtel) 30 seconds to 1nlinute,
D C will appear in the displa) indicating
that the oven is baking/roasting. IfD C
doesn't appear in the display, start
again at Step 7.
To adjust tile ()veil temperature, touch tile
BAKEpad, enter tile new tenlperamre using
the numl)er pads, and touch tile STARTpad.
When cooking is finished, the displaywill
change ti'om D C to D and 0:00will appear,
indicating that tile oven has turned
OFFbut isstill set in Sabbath. Remove
the cooked tood.
How to Exit the Sabbath Feature
Touch tile CLEAR/OFFpad.
[]
If tile oven is(ooking, wait tor a randonl
[]
dela} period of approximatel} 30
se/onds to 1nlinute, until only D is
in tile displm.
Press and hoM both tile BAKEand BROIL
HI/tOpads, at thesametime,until tile
display shows SE
Tap the DELAYSTARTpad until 12shdn
or noshdn appears in the display. 12shdn
indicates that the oven Mll automatically
turn ott after 12 hours, no shdnindicates
that tile ()veil will not automatically
mrn ottl
[] Touch tile STARTpad.
NOTE:If a power outage oc/m'red while
tile oven was in Sabbath, tile oven will
automatically mrn otl and stay off even
when tile power returns. The oven
control must be reset.
9
Page 10
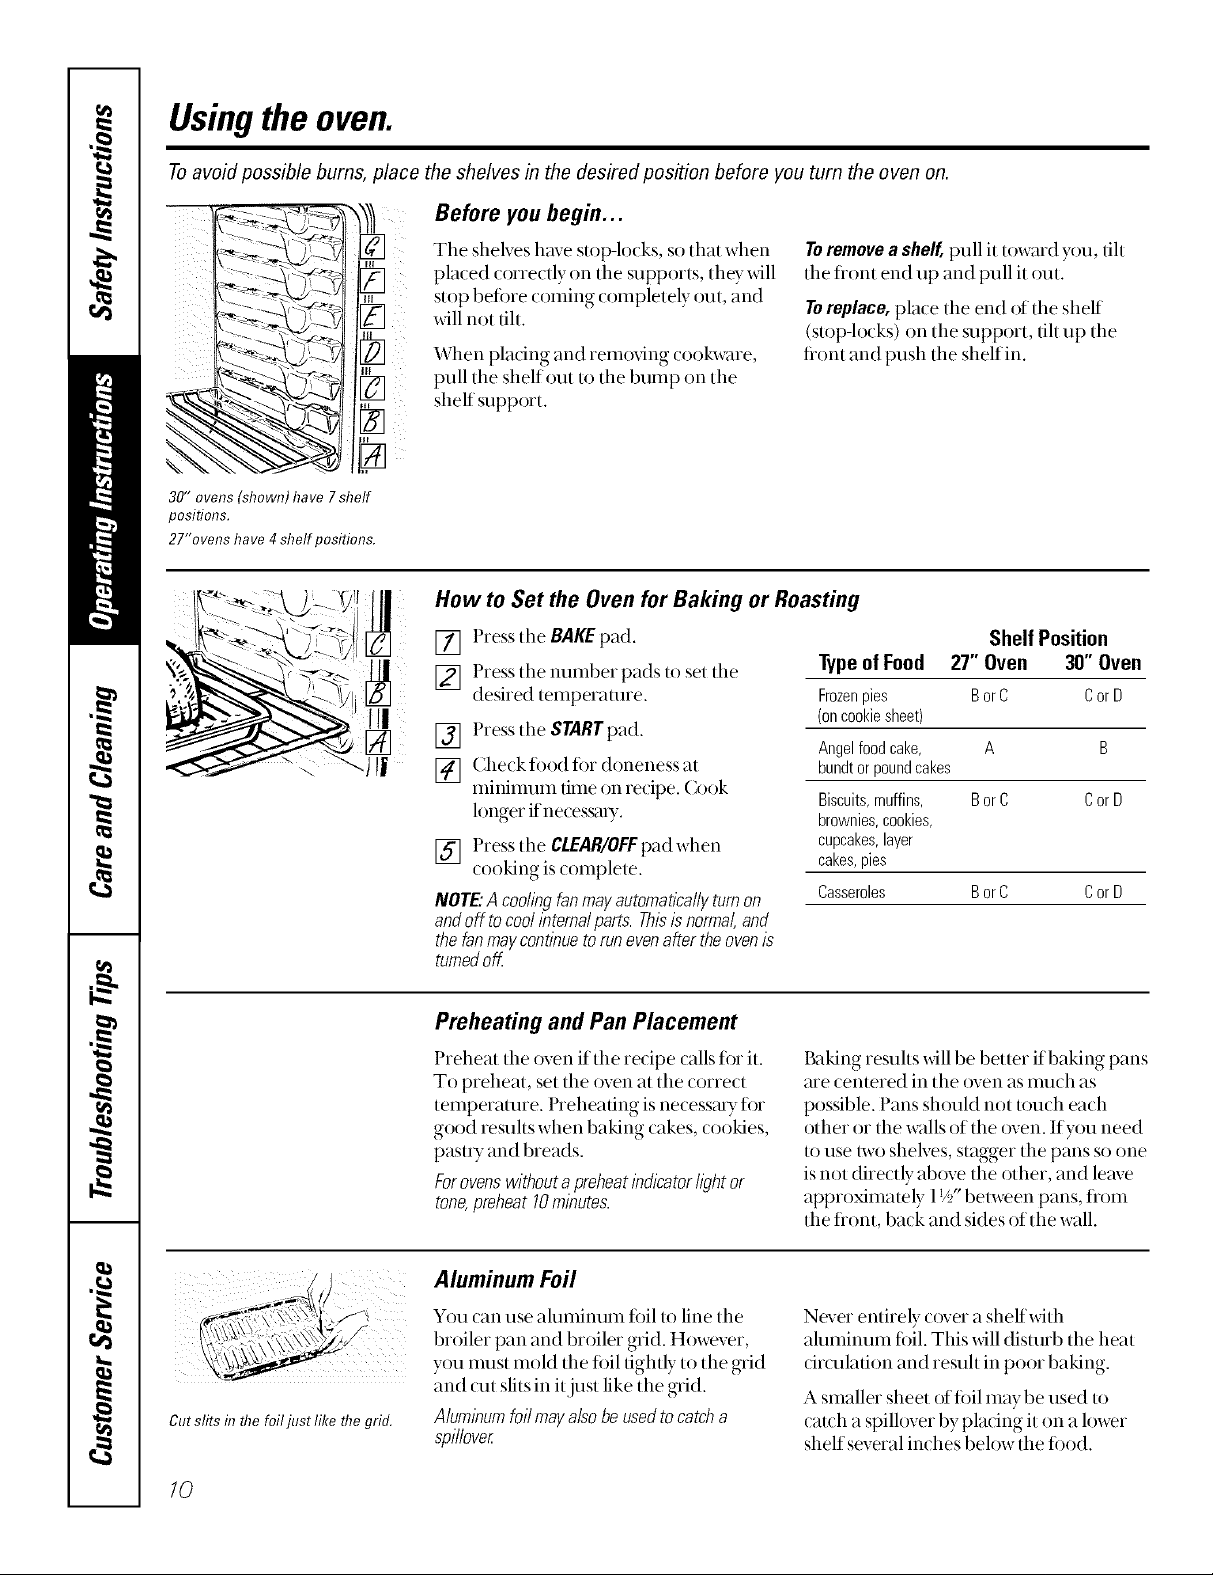
Usingthe oven.
Toavoid possible bums, place the shelves in the desired position before you turn the oven on.
Before you begin...
[]
_'_ ._ -_ _ []
30" ovens (shown)have 7shelf
positions.
27"ovens have 4 shelf positions.
The shelves have stop-locks, so that when
pla(ed (one(tly rm the supports, they _dll
stop befi)re (r)ming (ompletely out, and
will not tilt.
Toremovea shelf,pull it toward yr)u, tilt
the flrmt end up and pull it out.
Toreplace,place the end of the shelf
(stop-h)cks) rm the suppr)rt, tilt up the
When pladng and removing cr)okware,
pull the shelf out to the bump on the
shelf support.
firmt and push the shelf in.
How to Set the Oven for Baking or Roasting
[] Press the BAKEpad.
Typeof Food 27" Oven 30" Oven
[] Press the number pads to set the
desired temperature.
[] Press the STARTpad.
[] Che_k food fi)r drmeness at
minimum time on redpe, rook
hmger if necessa U.
[] Press the CLEAR/OFFpad when
cr)oking is cr)mplete.
NOTE."Acoolingfanmayautomaticallyturnon
Frozenpies BorC CorD
(oncookiesheet)
Angelfoodcake, A B
bundtorpoundcakes
Biscuits,muffins, BorC CorD
brownies,cookies,
cupcakes,layer
cakes,pies
Casseroles BorC CorD
andoff tocoolinternalparts.Thisisnormal,and
thefanmaycontinuetorunevenaftertheovenis
turnedoff.
Shelf Position
i / ¸:
Cut slits in fl_efoil just like fl_egrid.
10
Preheating and Pan Placement
Preheat the oven if the recipe calls fi)r it.
To preheat, set the oven at the conect
temperature. Preheating is necessm T for
good resuhs when baking cakes, cookies,
past U and breads.
Forovenswithoutapreheatindicatorhghtor
tone,preheat10minutes.
Aluminum Foil
You (an use ahnninum fifil to line the
brr)iler pan and brr)iler grid. However,
yr)u must mr)M the foil tightly tr)the grid
and cut slits in itjust like the grid.
Aluminumfoilmayalsobeusedtocatcha
spillover
l'_lking resuhs will be better if baking pans
me centered in the oven as Illllch as
possible. Pans shouM not u)uch each
other or the walls of the oven. If you need
to use two shelves, stagger the pans so one
is not directly ab_)ve the other, and leave
approximamly 1_/_,"between pans, flom
the flont, back and sides of the wall.
Never entirely cr)ver a shelfxdth
ahmfinum fi)il. This will disturb the heat
dr(ulation and resuh in poor baking.
A smaller sheet offi)il may be used tr)
(arch a spillover by pla(ing it on a h)wer
shelf several in( hes beh)w the food,
Page 11
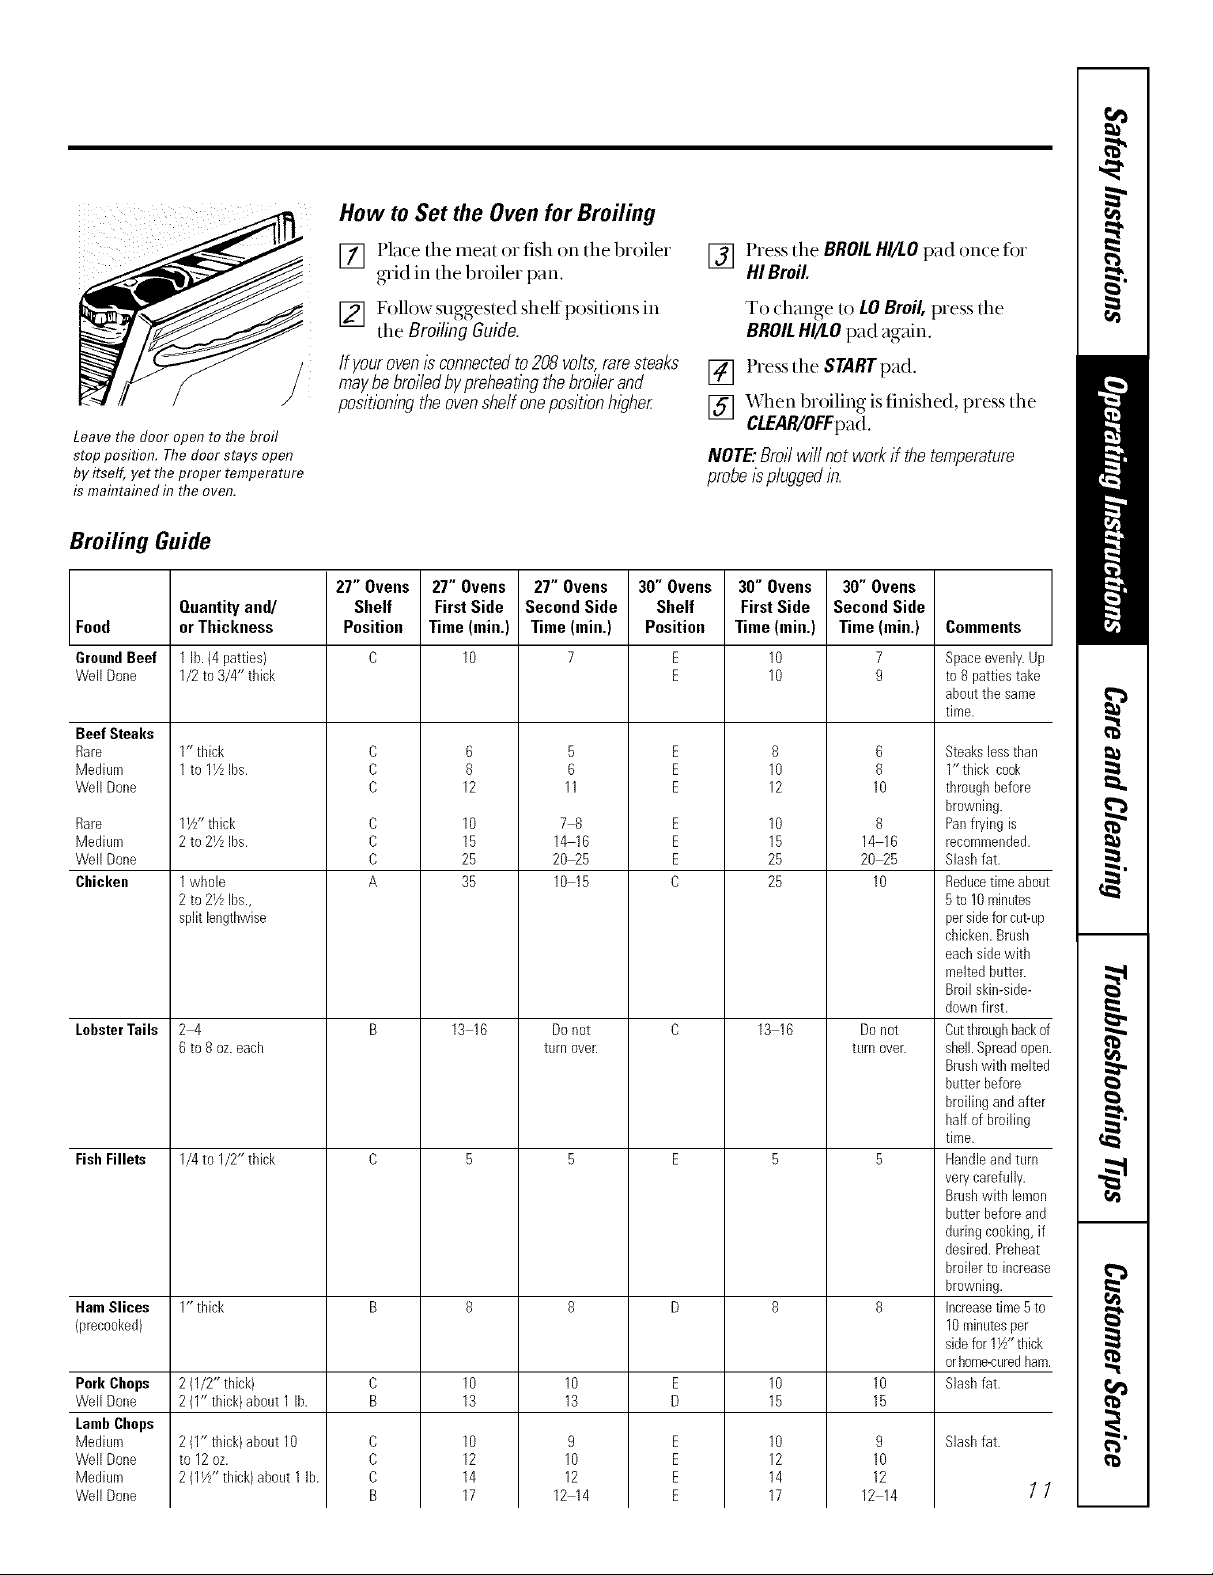
How to Set the Oven for Broiling
Leave the door open to the broil
stop position. The door stays open
by itself, yet the proper temperature
is maflTtaflTedb7the oven.
[] Pla(e tile meat or fish on tile broiler
grid in the broiler pan.
[] Follow suggested shelf positions in
tile BroilingGuide.
ff youroven/sconnectedto208volts,raresteaks
maybebroiledbypreheatbgthebroilerand
positionlbgtheovenshelfonepositionhigher
[] Press the BROILHI/LOpad on(e fi)x
HIBroil.
To change to LOBroil, press the
BROILHI/LOpad again.
[] Pressthe STARTpad.
[] When broiling is finished, press tlle
CLEAR/OFFpad.
NOTE:Broilwi//notworkif thetemperature
probeis pluggedin.
Broifing Guide
27" Ovens 27" Ovens 27" Ovens 30" Ovens 30" Ovens 30" Ovens
Quantity and/ Shelf First Side Second Side Shelf First Side Second Side
Food or Thickness Position Time(rain.) Time(rain.) Position Time(rain.) Time(rain,) Comments
GroundBeef 1lb.(4 patties) D 10 7 E 10 7 Spaceevenly.Up
Well Done 1/2to3/4" tbick E 10 9 to 8 pattiestake
Beef Steaks
Rare
Medium
Well Done
Rare
Medium
Well Done
Chicken
LobsterTails
FishFillets
HamSlices 1" tbick B 8 8 D 8 8
(precooked)
Pork Chops
Well Done
LambChops
Medium
Well Done
Medium
Well Done
1" thick
1to 1½Ibs.
11/2"thick
2 to2½ Ibs.
1whole
2 to2½ Ibs.,
split lengthwise
2q
Bto8 oz.each
1/4to 1/2" tbick
2 (1/2"thick) C 10 10 E 10 10
2 (1"thick)about 1 lb. B 13 13 D 15 15
2 (1"thick)about 10
to 12oz.
2 (11/z"tldck)about1lb.
D
D
D
C
C
C
A
C
C
C
B
6
B
12
10
15
25
35
13 16
10
12
14
17
5
6
11
78
14 16
20_5
10 15
Donot
turo oveE
9
10
12
12 14
E
E
E
E
E
E
C
E
E
E
E
8
10
12
10
15
25
25
13 16
10
12
14
17
14 16
20_5
Donot
turn over.
12 14
B
8
10
8
10
9
10
12
abouttbe same
time.
Steakslesstban
1"thick cook
throughbefore
browning.
Panfryingis
recommended.
Slashfat.
Reducetimeabou
5to 10minutes
persideforcut-up
cbicken.Brush
eachsidewitb
meltedbutter.
Broilskin-side-
downfirst.
Cuttbroughbacko
shell.Spreadoper
Brushwitb melte(
butter before
broilingandafter
half of broiling
time.
Handleandturn
verycarefully.
Brusbwith lemon
butter beforeand
duringcooking,if
desired.Prebeat
broiler to increas_
browning.
Increasetime5 to
10minutesper
sidefor 1½"thick
orhome-curedham
Slashfat.
Slashfat.
11
Page 12

Usingthe clock andtimer.
ToSet the Clock
Make sure the clock is set to the
correct time of da_
KITCHEN []
TIME
Ttie t#ner is a mflTutet#ner onl_
Ttie timer does not control oven
operations. Ttie maximum setting on
ttie timer is 9 hours and 59 mhTutes.
The clock must be set to the conect time
of day fin"tile m_tomatic oven tinting
tractions to work properly. Tile time of
day cannot be changed during a timed
baking or sell-cleaning {ycle.
To Set the Timer
Press the KITCHENTIMERON/OFF
pad.
Press the number pads until tile
atllotln[ of tiitle rot] wan[ shows ill
the displ W. For example, to set 2
hours and 4,5minutes, press 2, 4 and
5 in that order. Ify{)u make a mistake
press tile KITCHENTIMERON/OFF
pad and begin again.
Press the STARTpad.
[]
When tile timer reaches .'/70,
[]
tile conuol will beep 3 times
followed by one beep eveU 6
secondsuntil tile KITCHENTIMER
ON/OFFpad is pressed.
[] Press tile CLOCKpad.
[] Press tile number pads.
[] Press tlle STARTpad.
The 6 second tone can be canceled by
fi)llowing tile steps in the Special features
of your oven control section under Tonesat
the End of a Timed Cycle.
NOTE:Onsomemodelsthetimecountsdown
/?nmedlate/ywhentheSTARTpadispressedThe
tYnerisactuallycountingdowninsecondsthat
arenotshownonthedisplayuntil thelastminute.
12
To Reset the Timer
If the display is still showing tile time
remaining, you may change it by pressing
the KITCHEN TIMERON/OFFpad, then
press the number pads until the time you
want appears in the display.
ToCancel the Timer
Presstile KITCHENTIMERON/OFF
pad t_d(e.
If the remaining time is not in tile display
(clock, delay start or cooking time are in
tile display), recall tile remaining time by
pressing tile KITCHENTIMERON/OFFpad
and then pressing tile number pads u)
enter tile new time you want.
Page 13

Usingthe timedbakingand mastingfeatures.
On double oven models, you can use timed baking in one oven while using self-clean in the other; you can also use
timed baking in both ovens at the same time.
NOTE:Foods that sped easily-such as milk, eggs, fish, stuffings, poultry and pork-should not be allowed to s# for
more than 1hour before or after cooking. Room temperature promotes the growth of harmful bacteria. Be sure that
the oven light is off because heat from the bulb will speed harmful bacteria growth.
/5¸<¸¸¸ <(
i i ii i i
!)[ i i [ i
How to Set an Immediate Start and Automatic Stop
Theovenwillturnonknmedlatelyandcookfora
selectedlengthoftime.At theendofthecooking
tknetheovenw#lturnoffautomatica//y
Make sure tile ch)ck shows the correct
time of (_ff.
[] Press tile BAKEpad.
[] Using tlle number pads, enter tlle
desired temperature.
[] Press the COOKINGTIMEpad.
NOTE."If yourreciperequkespreheatingyou
mayneedtoaddaddifiona/t/metothelengthof
thecookingtime.
[] Using tile number pads, enter tile
desired baking time. The oven
temperature and the cooking time
flint you entered _dll be displayed.
[] Press the STARTpad.
The display shows the oven temperature
that you set and the cooking time
c_)untdown. The display stmts changing
once the temperature reaches 1O0°F.
NOTE:Ondoubleovenmodelswhenusingboth
ovensat thesametkne,thetknesshowingin the
displaywi//beforthelastoveneel Todisplaythe
timesetforthefkstovenset,presstheCOOKING
TIMEpadforthatoven.
The oven will continue 1ocook for
[lie programmed amount of time,
[hen shut offautomafically.
Press the CLEAR/OFFpad u) clear
the (fisplay.
How to Set a Delayed Start and Automatic Stop
Youcanset the ovencontrol todelay-start the
oven,cook for aspecific length of timeand then
turn off automatically
Make sure the dock sh_tws the correct
time of day.
[] Press the BAKEpad.
[] Using [lie number pads, enter [lie
desired temperature.
[] Press the COOKING TIME pad.
NOTE."If yourreciperequkespreheatingyou
mayneedtoaddaddifionaltimetothelengthof
thecookingtime.
[] Using tlie number pads, emer tile
desired baking time.
Press the DELAYSTARTpad.
[]
Using tlie number pads, enter tlie
[]
time of day y()[lU,Tall[ tlie oven 1o[tlt'n
on and start cooking.
Press the STARTpad.
[]
lfy(m would like to check the times you
have set, press the BELAY START pad to
check the start time you have set or press
the COOKING TIME pad to check the
length of cooking time you have set.
When [lie oven [tlI'ns Oil a[ [lie time
of day you have set, [lie display _fill
show [lie dmnging temperature
(starting at 100°F.) and [lie _ooking
dine (outHdown,
NOTE:Ondoubleoven mode/swhen usingboth
ovensat thesame time,the tknes showingin the
displaywill beforthelastoveneel Todisplaythe
tknesetforthefkstovenset,presstheDELAY
STARTorthe COOKINGTIMEpadforthatoven.
At [lie end of timed baking, the oven
_fill turn off. The end of Q_(le[()tie
_fillsound.
Press [lie CLEAR/OFFpad u) clear
[lie (fisplay.
NOTE:Anattentiontonewi//soundifyouare
usingtknedbakinganddonotpresstheSTART
padafierentenbgthebakingtemperature.
13
Page 14

Usingtheprobe.
For many foods, especially roasts and poultry, internal food temperature is the best test for doneness. The
temperature probe takes the guesswork out of roasting by cooking foods to the exact doneness you wan_
NOTE."Doubleovenmodelshaveaprobe/bthe
upperovenonly
i i i!i i!: i
Use of probes other than tile one
provided with this product may result in
damage to the probe.
p,u! ;/
The temperature probe has a
skewer-like probe at one end and a
plug at the other end that goes flTto
the outlet f17the oven.
_:' ,,%,=2 : :_ :,L\\
Use tile handles of the probe and plug
when inserting and removing them fiom
tile meat and outlet.
i2 Toavoiddamag/bgyourprobe,donotuse
tongstopullonthecablewhenremovlbg/_
i2 Toavoidbreak/bgtheprobe,makesurefood/s
completelydefrostedbeforeinsembg.
After prepming the meat and pladng it
on a trivet or on tile broiler pan grid,
follow tllese directions for proper probe
placement.
[] Lay the probe on the outside of the
meat along the top or side and mark
with your finger where the edge of
the meat comes to on the probe. The
point should rest in the center of the
thickest meab: part of the roast.
[] Insert the probe completely into the
ineat. It should not touch thebone,
f:ator gristle.
>_Topreventpossiblebums, donot unplug
theprobefrom the outlet until the oven
hascooled
i2 Never leave yourprobe inside theoven dunbg
a self-clean/bgcycle.
i2 Do not store the probein the oven.
For roasts with no bone, insert tile probe
into the meatiest part of the roast. For
bone-in h_un or l_unb, insert the probe
into the cemer of the lowest large nmscle
orjoint.
Insert the probe into the center of dishes
such as meat loaf or casseroles. When
cooking fish, insert the probe fiomjust
above the ,gillinto the meatiest area,
pmallel m the backbone.
Insert tile probe into the meatiest part of
the inner flfigh from below and parallel
to the leg of a whole turkey.
; @ ii¸¸
14
How to Set the Oven For Roasting When Using the Probe
Insert the probe into the meat.
[]
Plug the probe into the outlet in tile
[]
oven. Make sure it's pushed all the
way in. Close tile oven door.
Press the PROBEpad.
[]
Press the number pads to set the
[]
desired internal fi)od or meat
temperature.
Press the BAKEpad.
[]
[] Press the number pads to set the
desired oven temperature.
[] Press the STARTpad.
Thedisplaywill flashif theprobeisinsertedinto
theoutletandyouhavenotsetaprobe
temperatureandpressedtheSTARTpad
When the oven starts to heat, the word LO
will be in the display.
After the internal temperature of the
meat reaches 1O0°F., the changing
internal temperature will be shown
in tile display.
When the internal temperature of
[]
tile meat reaches the number you
haveset,the probe and the oven
mrn ()fland tile _)yen control signals.
To stop the signal, press the
CLEAR/OFFpad. Use hot pads to
rem{)ve the probe tiom the ti)od.
Do not use tongs to pull on i/--they
might dmnage it.
To change the oven temperaune (hning
the Roast (Tcle, press the BAKEpad and
then the number pads to set the new
temperature.
i2 Iftheprobe/sremovedfromthefoodbefore
thefba/ temperatureisreached,a tonewi//
soundandthedisplaywi//flashuntiltheprobe
isremovedfromtheoven.
i2 Youcanusethet/Ynereventhoughyoucannot
usetimedovenoperations.
Page 15

Usingthe convectionoven.
The convection oven fan shuts off when the oven door is opened. DO NOTleave the door open for long periods of
time while using convection cooking or you may shorten the fife of the convection heating element.
h7 a COlTVectiol? oveR, a far
circulates hot air over,under and
around the food.
This circulating hot air is evenly
distributed throughout the oven
cavit_ As a result, foods are evenly
cooked and browned--often R7less
time with convection heat.
(appearance may vary)
To help you understand the diflbrence
between convection bake an(] ioas[ an(]
Roasting racK
traditional bake and roast, here are some
general guidelines.
ConvectionBake
Post
Grid
ij/ Idealforevenlybrownedbakedfoodscooked
onmultiplesheIves
_ Goodforlargoquantitiesofbakedfoods. BroilerDan
_ Goodresultswithcookies,biscuits,mubbs, ,f% __.\
brownies,cupcakes,creampuffs,sweetroils, ('_
awe/food cakeandbread ,
Heat comes flom the heating element in
the rear of the oven. The convection thn
cirodates the heated air evenly over and
mound the toed. Preheating is not
necessm 7 with toods having a bake time
of _)ver15minums.
Convection Roast
i::__Goodfor large tendercutsof meat, uncovered
Heat comes flom the top heating
element. The coiwection tan drQfla/es
the heamd air evenly over and ar(_und the
toed. Meat and p_)uluy me bro_imd on
all sides as if they were cooked on a
rotisserie. Using the roasting rack
pr{Mded, heated air xdll be drculated
over, under and around the ti)od being
roasted. The heated air seals in juices
quickly ti)r a moist and render product
while, at the stone time, creating a rich
golden brox_l_exterior.
Roastsorpoultryshouldbecookedonashelf(on
27"modelsusetheoffsetsheff)in thelowest
shelfposition(A).
When y{)uare convection roasdng it is
important that y{)uuse the broiler pan
and grid and the spedal roasting rack ti)r
best convection roasting results. The pan
isused to catch grease spills and the grid
isused to prevent grease spatters.
Placethe meat on the special roasting
ra(k. The rack holds the meat. The rack
alh)ws the heated air to circulate under
the meat and increase browning on the
underside of the meat or pouluy.
i;_;Place the shelf (on 27" models use
the ottset shell) in the lowest shelf
position (A).
i;:_;Place the grid on the broiler pan and
put the roasting rack (wet them making
sure the posts on the roasting rack fit
into the holes in the broiler pan.
CAUTION:Whenyouareusingtheoffsetshelf
(on2T'models)inthelowestposition(,4),you
wi//needtousecautionwhenpuffingtheshelf
ou_ Werecommendthatyoupu//thesheffout
severalinchesandthen,uslbgtwopotholders,
pufftheshelfoutbyholdingthesidesofi_ The
offsetshelfislowandyoucouldbeburnedif you
p/aceyourhandin themiddleoftheshelfand
puffaflthewayou_Beverycarefulnot tobum
yourhandonthedoorwhenusingashelfinthe
lowestposition(A).
Adapting Recipes...
You (an useyour favorite re(ipes in the
conveltion oven,
When baking, reduce baking
temperature by 25°F.
No need to preheat when (ooking hmger
than 15 minutes.
i;:__Formorelbformationonadaptlbgrecipes,see
theConvectionCookbook.
iJ;iUsepans/#erecommendecL
i::__Somepackageinstructionsfor frozen
casserolesormain disheshavebeen
developedustbgcommercialconvectionovens.
Forbest resultsin this oven,preheat the oven
andusethe temperatureon the package. 75
Page 16

Usingthe convectionoven.
Cool(ware for Convection Cooking
Betbre using your convection oven, check
to see if v_n]r coo kw_ue leaves room fi)r air
circulati_on in the oven. If you are baking
with several pans, leave space between
them. Also, be sure the pans do not/ouch
each other or the walls of the oven.
Paper and Plastic
Heat-resislant paper and plastic
cont>finers that are recommended fin use
in regular ovens can be used in
convection ovens. Plastic cookware that
is hea/-resislant to temperatures of
400°F. can also be used.
How to Set the Oven for Convection Baking or Roasting
"CO.VEC.O__CO.WC.O_
B_E ar ROAST
STAR_
OFF
[] Press tile CONVECTIONBAKEor
CONVECTIONROASTpad.
[] Press tile number pads to set the
desired oven temperature.
[] Press the STARTpad.
To change the oven temperature, press
the CONVECTION BAKEor CONVECTION
ROASTpad and then tile number pads to
set the xlew [exllpexaluxe.
Metal and Glass
Any bpe of cookware will work in your
convection oven. H_)wever, metal pans
heat the filstest and are recommended tot
convection baking,
>: Darkenedor matte-finishedpans will bake
faster thanshinypans.
>: Glassor ceramicpans cookmores/ow/_z
When baking cookies, you will get tile
best resuhs if you use a fiat cookie sheet
instead of a pan xdth h)w sides.
Fox recipes like oven-baked chicken,
use a pan with low sides. Hot air cannot
circulate well mound fi)od in a pan with
high sides.
When the oven s/mls to heat the changing
temperature, stmting at 100°F., will be
displayed. When the oven reaches the
temperature y{xuset, 3 beeps will sound.
[] Press tlle CLEAR/OFFpadwhen
finished.
NOTE:
>_Youwi//hearafanwhilecookbgwith
convectionThefanwi//stopwhenthedooris
openedbuttheheatwi//notturnoff
>_Youmayheartheovenclickingduringbaking.
This/snormal.
Multi-shelf position 27" oven
Mulfi-sheff posifion 30" oven
16
Multi-Shelf Baking
WhenconvectionbakbgwithonlyI shelf,follow
[]
[]
[]
] biscuits, and other qui(kbreads give veD,
[] 30"Ovens
[] shelf in tile bottom (A) position, one on
theshefflTositionsrecommendedintheUsingthe
oven section.
Becmlse heated air is circulated evenly
tln'_xugh_xtlt tile x_ven, ti)ods can be
baked with ex{ellent resuhs using
nmltiple shelves.
Multi-shelf baking may increase cook times
slightly fi)r some foods but the overall
resuh is time saved. Cookies, muffins,
good resuhs xdth muhi-shelf baking.
When baldng on 3shelves,pla(e one
the third (C) position and one in the 5th
(E) position.
27"Ovens
When baking on 3 shelves, divide tile
oven inu) thirds by plating the ofget shelf
in the third (C) shelf position and the
smdght shelves in first (A) and fi)urth (D)
shelf positions.
Fox"re,o-shelf baking, place the offset shelf
in the bottom (A) shelf position. Place
the straight shelf in the third (() shelf
position.
CAUTION:When youareuslw the offset shelf
(on2T' models)inthelowestposition(A),you
wi//needtousecautionwhenpu/hbgtheshelf
ou_Werecommendthatyoupu//theshelfout
severalinchesandthen,us/ngtwopotholders,
pufftheshelfoutbyholdingthesidesof iL The
offsetshelfislowandyoucouldbeburnedif you
p/aceyourhandin themiddleoftheshelfand
puffaflthewayou_Beverycarefulnot toburn
yourhandonthedoorwhenuslbgashelfibthe
lowestposition(A).
Page 17

How to Set the Oven for Convection Roasting when Using the Probe
For best results when roasting large
turkeys and roasts, we recommend
usflTgtheprobe included f17the
colTveotiol7 oven.
To change the oven temperature
during the Convection Roast cycle,
press the CONVECTION ROAST pad
and then press the number pads to
set the new desired temperature.
The display _dll flash PROBEand tile oven
control xdll signal if the probe is inserted
into the outlet, and you have not set a
probe mmperaune and pressed the
SrARrpad.
[] When the internal temperature of
the meat reaches the number you
have set, the probe and the oven
mrn off and the oven control signals.
To stop the signal, press the
CLEAR/OFFpad.Use hot pads to
[] Place the shelf (on 27" models use
the offset shelf) in the lowest
position (A). Insert the probe into
the ineat.
remove the probe flom the fi)od. Do
not use tongs to pull on it--they
might dmnage it.
CAUTION:Topraventpossibleburns,donot
[] Plug the probe into the outlet in the
oven. Make sure it is pushed all the
way in. Close the oven door.
unplugtheprobefromtheovenoutletuntilthe
ovenhascoofecLDonotstoratheprobeinthe
oven.
NOTE."
[] Press the CONVECTiONROASTpad.
[] Press the number pads to set the
desired oven temperature.
i_7Iftheprobeisremovedfromthefoodbefora
thefinaltemperatureisreached,atonewill
soundandthedisplaywill flashuntiltheprobe
isremovedfromtheoven.
[] Press the PROBEpad.
:B Youwillheara fanwhilecookingwiththis
[] Press the number pads to set the
desired internal meat temperature.
[] Press the STARTpad.
When the oven starts to heat, the word LO
will be in the displ W.
After the internal temperature of the meat
reaches 100 °F., the changing internal
temperature will be sh{)wn in the (fisplay.
feature.Thefenwillstopwhenthedooris
openedbuttheheatwillnot turnoff.
i_7Youcanusethet/knereventhoughyoucannot
usetinnedovenoperat/ons.
i_7Ondoubleovenmodels,youwillnotbeableto
usetheprobein theupperovendunbgtimed
ovenoperations.Thisisbecausewiththe
probeyouarecookingbytemperaturerather
thantime.
Convection Roasting Guide
Meats Minutes/Lb. Oven Temp. Intemal Temp.
Beef Rib,BonelessRib, Rare 20_4 325°E 140°Et
Pork Bone-in,Boneless13to 5 Ibs.) 23_7 325°R 170°E
Ham Canned,Butt,Shank(3to 5 Ibs.fully cooked) 14 18 325°E 140°E
Lamb Bone-in,Boneless(3to 5 Ibs.) Medium 17_0 325°E 160°E
Seafood Fish,whole (3to 5 Ibs.) 30 40total 400°K
Poultry Whole Chicken{21/zto 3VzIbs.) 24_6 350°E 180° 185°E
': Studied birds g*ener(d{Vr(Uluir( 3t_ 45 mh_utes additional roasghl,4 thin'. Shiekt /e14sand h_z,ast with fl)il to prevent ove__
hrownhtg d_:d :hyi_g oj _kin.
_} Tk*, _ r+s+1)e/m_Tment ojAgri(admresays "I{are t)eejisp,/mln_;butyou should know that (ookh_< it to on{v t40°11 _m'(lns
sonn, j_a_d/)oiso_i_g ofl4_tnivns nmy su,v:ive."(Sour_*,:5;_zjeFoodB_M_. _mr Kit(ken Gui&. {'film I{ev. fl*_w 1985.) 17
TopSirloin Medium 24_8 325°R 160%
(3to 5 Ibs.) Well 28_2 325°R 170°E
BeefTenderloin Rare 10 14 325°E 140°Et
Medium 14 18 325°R 160°E
Chops(1/2to I" thick) 2 chops 30 35total 325°E 170%
4 chops 35 40total 325°E 170°E
6 chops 40 45total 325°E 170°E
Well 20_4 325°R 170°E
LobsterTails(6 to 8 oz.each) 20_5 total 350°R
CornishHensUnstuffed(1to 11/zIbs.} 50 55total 350°E 180° 185°E
Stuffed(I to lYzIbs.) 55 60total 350°E 180° 185°E
Duckling(4to 5 Ibs./ 24_6 325°E 180° 185°E
Turkey,whole_
Unstuffed(10to 16Ibs.) 8 11 325°E 180° 105°E
Unstuffed(18to 24Ibs./ 7 10 325°E 180° 185°E
TurkeyBreast(4to 6 Ibs.) 16 19 325°E 170°E
Page 18

Usingthe timedfeaturesforconvectionbaking.
On double oven models, you can use timed baking in one oven while using self-clean in the other; you can also use
timed baking in both ovens at the same time.
Youwill hear a fan while cooking with this feature. Thefan will stop when the door is opened but the heat will not
turn off.
NOTE,"Foods that spoil easily-such as milk, eggs, fish, stuffings, poultry and pork-should not be allowed to sit for
more than 1hour before or after cooking. Room temperature promotes the growth of harmful bacteria. Be sure
that the oven light is off because heat from the bulb will speed harmful bacteria growth.
How to Set an Immediate Start and Automatic Stop
TheovenwillturnonlYnmedlatelyandcookfora
selectedlengthoftlYne.At theendof thecooking
timetheovenwillturnoffautomaflcally
Make sure tile clock shows tile correct
time of day.
[] Press the CONVECTIONBAKEpad.
[] Press tile number pads to set the
desired oven temperature.
[] Press tile COOKINGTIMEpad.
NOTE:Ifyourreciperequirespreheatlbgyou
mayneedtoaddadditionaltimetothelengthof
thecooklbgtime.
[] Press the number pads to set tlle
desired length of (ooking time. The
mininmm cooking time y_)ucan set
is 1minute. The {_ventemperature
that you set and the cooking time
that y{n_entered xdll be in the display.
[] Press tile STARTpad.
The display shows the oven temperature
that y{)uset and the cooking time
countdown. The displ W st_uts changing
once the mmperamre reaches 100°F.
NOTE:Ondoubleovenmodelswhenusingboth
ovensat thesametlYne,thetlYnesshowingin the
displaywi//beforthelastovenset Todisplaythe
tlYnesetfor thefirstovenset,presstheCOOKING
TIMEpadforthatoven.
[] At the end of timed convection bake
the oven will mrn off. The end of
_)_(le tone will sound. Press the
CLEAR/OFFpadto (lear tile display
if necessa U.
[] Remove the food flom tim oven.
Remember, fi)ods that are left in tile
oven continue cooking after the
(ontrols are olE
18
Page 19

How to Set a Delayed Start and Automatic Stop
Youcansettheovencontroltodelay-startthe
oven,cookforaspecificlengthoftimeandthen
turnoffautomatica//y
Make sure tile (lo(k shows tile (one( t
tinle of (kly.
[] Press tile CONVECTIONBAKEpad.
[] Press tile nunlber pads to set tile
desired oven tenlperamre.
[] Press tile COOKINGTIMEpad.
NOTE"If[our reciperequirespreheatlbg,you
mayneedtoaddaddifiona/t/metothelengthof
thecooklbgtime.
[] Press tile nunlber pads to set tile
desired cooking time.
[] Press file DELAYSTARTpad.
[] Press tile STARTpad.
NOTE"Ana_ention tone willsound ifyouare
uslhgt/YnedbakinganddonotpresstheSTART
padafterentenbgthebaklbgtemperature.
When tile oven ttlI'IlS on at tile filne
of day you have set, tile display will
show tile (hanging temperature
(starting at I()()°F.) and tile cooking
tinle countdown.
NOTE"Ondouble ovenmodels when usingboth
ovensat thesame ttYne,the tlYnesshowl_g in the
display will befor thelast ovenset Tofligplay the
tlrneset for the fkst ovenset,press the DELAY
STARTerCOOKINGTIMEpad for that oven.
At tile end of finled convection bake tile
oven _dll mrn off. Tile end of (),cle tone
xdll sound.
[] Press tile nunlber pads to set tile
filne of day you want tile oven to mrn
on and start cooking.
If youwouldliketocheckthetlYnesyouhaveset,
presstheDELAYSTARTpadtocheckthestarttlkne
youhavesetorpresstheCOOKINGTIMEpadto
checkthelengthofcooklhgtimeyouhaveset
[] Press tile CLEAR/OFFpad to clear tile
display if necessax 7. When baking is
finished, renl{)ve the food fionl the
oven. Renlenlber, even though tile
oven shuts offautonlafically, toods
continue cooking after tile controls
me ott_
19
Page 20

Using theproofingfeature somemodelst
Theproofing feature maintains a warm environment useful for rising yeast-leavened products.
How to Set the Oven For Proofing
[] Place the coxered dough in a dish in
the oven on shelf B or (].
NOTE:Forbestresults,coverthedoughwitha
clothor withgraasedplast/2wrap{theplast/2
mayneedto beanchoredunderneaththe
contaberso theovenfanwillnotblowit off).
[] Presslhe PROOFpad and flien [lie
STARTpad.
The display vdIlread BRO (bread).
The o',en interior light [Hrns on and
remains on during proofing.
The proofing teamre aulomafically
pr()xides die opdmum temperaulre Jtbr
die proofing processand fllereJtbre does
no[ have a [eml)evalure a(!jusm_en[.
[] Setil_e KITCHENTIMERfi)r the
minimum proof time.
[] When proofing is finished, press
the CLEAR/OFF pad.
:_ Toavoidlowering the oventemperature
andlengthenlbgprooflbg tlYne,donot
open the ovendoor unnecessanTy
i:yCheckbreadproductsearlytoavoid
over-proofibg.
NOTE."
:i;:Donotusetheproofbgmodeforwarming
foodorkeepingfoodhot Theproofingoven
temperatureisnothotenoughtoholdfoods
atsafetemperatures.
:_:Prooflbgfeatureonupperovenonly
i:yProofingwi//notoperatewhenovenis above
150degrees."HOT"willshowinthed/splay
20
Page 21

Usingthe gourmetshelfand bakingstones(onso e ode/sJ
Thegourmet shelf and baking stones are excellent for baking bread and pizza.
Carefully place the stones on the
offsetrack.
Do not drop the stones onto the
rack or chippflTgmay occur.
Toremove the stones place a hand
under the rack and push up on the
Stone&
_:The shelf shouM be placed in the
second rack position flom tile bottom
and the stones cmefillly placed on it.
Preheat to the desired baking
temperature.
i)_Always preheat the stones befi)re using
them. For best resuhs do not use baking
stones with rising crest pizzas.
Whenusingthegourmetshelfbakeatthesame
temperatureandfor thesamet/methatyou
wou/dnorma//y
>_Use a pizza peel (special wood paddle)
to place pizza on or offthe baking
stones. Sprinkle corn meal on the
baking stones and the peel to prevent
socking.
>:Tile baking slones become veU hot in
the oven. Allow the slones to cool
befi ne rem_)ving them fiom tile oven.
Always use a heaxy pothoMer or oven
gh we when handling the baking stones.
i__Tile sU)nes are made of a porous
cermnic material and it is nom_al ti)r
the stones to accunmlate stains with
use. This will not affect their baking
capabilities in any way.
Avoidsuddentemperaturechanges.Don'tplace
theheatedstonesona coldsurfaceorimmerse
theminwater
i_?Do not leave tile stones in your oven
when riley are not being used. Baking
umes and brox_i_ing may be affected.
21
Page 22

Adjust the oven thermostat--Do it yourself!
Youmay find that your new oven cooks differently than the one it replaced. Use your new oven for a few
weeks to become more familiar with it. If you still think your new oven is too hot or too cold, you can adjust
the thermostat yourself.
Do not use thermometers, such as those found in grocery stores, to check the temperature setting of your oven.
These thermometers may vary20-40 degrees.
NOTE."This adjustment will not affect the broiling or the self-cleaning temperatures. The adjustment will be
retained in memory after a power failure.
To Adjust the Thermostat
The oven teinperature can be
a(!justed up to (+) 35°F. hotter or (-)
35 °F. cooler. Press the number pads
the same wayyou read them. Fox
exmnple, to change the oven
temperature 15°F., press I and 5.
When you have made tlle
ac!iustment, press tlle START
pad to go ba(k to the time of
day display. Use your oven as
you would normally.
START
[] Pressthe BAKEand BROILHI/LOpads []
at the same time ti)r 3 se(onds until
the display shows SE
[] Press the BAKEpad for the oven
which you want to use. A two digit
number shows in the display.
Press BAKEagain to alternate between []
increasing and decreasing the oven
temperature.
Thetype ofmargarine will affect bakingperformance!
Most recipes for baking have been developed using high fat products such as butter or margarine (80% fat). If you
decrease the fat, the recipe may not give the same results as with ahigher fat product.
Recipe failure can result if cakes, pies, pastries, cookies or candies are made with low fat spreads. The lower the fat
content of a spread product, the more noticeable these differences become.
Federal stan&uds require producls labeled "margmine" to contain at least 80% tat bywdght. Lowt, tt spreads, on the
other hand, contain less tat and more water. The high moisture content of these spreads affect the texture and flavor of
baked goods. Fox best resuhs with your old tavorite redpes, use margarine, butter or stick spreads containing at least
70% vegetable oil.
22
Page 23

Usingthe self-cleaning oven.
The oven door must be closed and all controls must be set correctly for the cycle to work properly.
Before a Clean Cycle
Wipe up heavy soil on flTeoven
bottom. (appearance may vary)
Theovenmustbecoolinordertosettheself-
cleancycle.
We recommend venting your kitchen
_dth an open _dndow or using a
ventilation tim or hood during the first
sell:clean _ycle.
Remove the broiler pan, broiler grid,
probe, all cookwme and any aluminum
foil fiom tile oven.
Tile oven shelves and conve(tion roasting
r_lck(an be sell:cleaned, but they will
darken, h)se their luster and become
hard to slide.
l)o not use abrasives or overl cleaneis.
Clean the top, sides and outside of tlle
oven door with soap and water.
Make sure tile oven light bull) cover
(on some models) is in pla(e and tile
oven light is oil
IMPORTANT'.The heahh of some birds
is exUemely sensitive to tile throes given
offduring tile self-cleaning Q,cle of any
oven. Move birds to another well
ventilated room.
>:On double (rvenmodels, you carl
set a clean _ycle in both ovens at the
stone time. The last oven set will
automatically del W its s/mt until the
end of the first oven's clean cycle.
>_On double oven models, you can use
timed baking in one oven and self-clean
the other at the same time.
/CLEAN
\ am,, j
How to Set the Oven for Cleaning
[] Presstile SELFCLEANpad.
[] Using the number pads, enter tile
desired clean time, ifa time other
than 4 hours is needed.
Clean _ycle time is normally 4 hours. You
carl change the clean time to any time
belween 3 h_)urs and 5 hours, depending
on how dirty your oven is.
[] Press tile STARTpad.
The door locks mnomafically. Tile (fisplay
will show the clean time remaining. It will
not be possible to open the oven door
until the temperature drops below the
lock lemperamre and the LOCKEDDOOR
light goes off.
When the LOCKEDDOORlight is oil open
tile door.
i_:The words LOCKDOORwill flash and
the oven conuol _dll signal ifyou set
the clean o_cleand forget to ch)se the
overl door'.
>:To slop a clean Q_cle, press the
CLEAR/OFFpad.When tile LOCKED
DOORlight goes oflindicadng tile
oven hascooled below the locking
temperature, open tile door.
23
Page 24

Usingthe self-cleaning oven.
The oven door must be closed and all controls must be set correctly for the cycle to work properly.
How to Delay the Start of Cleaning
i ¸ 2__ :
7¸¸¸¸ii@: i
[] Press tile SELFCLEANpad.
[] Using tile number pads, enter tile
desired (lean time.
[] Press tile DELAYSTARTpad.
[] Using tile number pads, enter tile
time Ofday you want tile clean ()_cle
1o stai[.
[] Press the STARTpad.
After a Clean Cycle
You illay noti(e SOlne white ash ill file
oven. Wipe it up xdth a (knnp (loth after
tile oven (ools.
If whitespotsremain,removethemwithasoap-
filledsteelwoolpadandrinsethoroughlywitha
wbegarandwaterml)_ture.
These deposits are usually a salt residue
that cannot be removed by tile clean ()<le.
If tile oven is not (lean af/er one (lean
(3_(le, repeat tile ()_(le.
Tile door locks mltomafically. Tile display
will show tile stmt time. Itwill not be
possible to open the oven door until
the temperature (hops below the lock
temperature and tile LOCKEDDOOR
light goes off.
When tile LOCKEDDOORlight is off, open
tile door.
NOTE"Ondoubleovenmode&youcanseta
delaydean/nbothovensat thesametlkne.
Thesecondovensetwi// automaticallydelay
thestartofcleaninguntiltheendofthefkst
oven_cleancycle.
TorecallthestarttYneofthesecondovenset,
presstheDELAYSTARTpadonthecontrolsfor
thesecondoven.
>_You cannot set tile oven fi)r cooking
until tile oven is (ool enough for tile
door to unlock.
>_While tile oven is self cleaning, you
can press tile CLOCKpad to display
tile time ofday. To return to tile
clean countdown, press the SELF
CLEANpad.
>_Iftile shelves become hard to slide, xdpe
tile shelf supports _dth (ooking oil.
24
Page 25

Careand cleaning of the oven.
Be sure electrical power is off and all surfaces are cool before cleaning any part of the oven.
How to Remove Packaging Tape
Lift the door straight up and off
the hinges.
The gasket is designed with a gap at
the bottom to allow for proper air
circulatimT.
Do not rub or clean the door gasket--
it has an extremely low resistance to
abrasion.
If you notice the gasket becomhTg
worn, frayed or damaged f17any way
or if it has become displaced on the
door, you should have it replaced.
To assure no dmnage is clone to tile finish
of the product, the satest way to rem()ve
the adhesive left tiom packaging tape on
new appliances is an application of a
household liquid dishwashing detergent,
mineral oil or cooking oil.
Lift-Off Oven Door
The oven door is removable ti)x easier
a(cess to the light bull).
Do notlifl the doorbythe handle.
Toremovethedoor,open it to tile broil
stop position. Grasp firmly on each side
and lift the door straight up and off the
hinges.
Donotplacehandsbetweenthehingeandthe
ovendoorframe.
Toreplace the door,make sure the hinges
are in the broil stop position. Position the
slols in the bottom of the door squmely
over the hinges and shxwlyhxwer it over
both hinges.
Toclean the inside of the door:
i_YBecause the area inside the gasket is
(leaned during the self-(lean (3_(le, you
do not need to clean this by hand.
>:The area outside the gasket and tile
fiont flvlme can be cleaned with a soap-
filled steel w()ol or plastic pad, hot
water and detergent. Rinse well with a
vinegar and water solution.
Applywith a softcloth and allow to soak.
Wipe (hy and then apply an appliance
polish to thoroughly clean and protect
the surlime.
NOTE:Theplastictapemustberemovedfromall
chrometrim.It cannotberemovedifit isbakedon.
Toclean the outside of the door:
>: Use soap and water to thoroughly clean
the top, sides and flont of the oven
door. Rinse well. You mW also use a
glass cleaner to clean the glass on the
outside of the door. Do not let water
(kip into the vent openings.
>: Spillage of marinades, fl_uitjuices,
tomato smlces and basting materials
cont_fining adds may cause
(fiscoloration and should be wiped up
immediately. When surlime is cool,
dean and rinse.
>_ Do not use oven (leaners, (leaning
powders or harsh abrasives on tile
outside of the door.
25
Page 26

Careand cleaning of the oven.
Removable OvenFloor
Press down and pull out,
After broiling, remove fl?ebroiler
pat?from fl?eoven.
Toremovetheovenfloor:
] P.emove [he oven door using dm
lnslFtlclions it1tb_eLift-OffOvenDoor
secdon of dlis manual.
[] Press down and pull om [l_e
removable oven floor.
] Clean Ihe oven floor_dlh warm
soapy wnler.
Broiler Pan & Grid
Do notclean the broilerpan or gridin a self-
cleaningoven.
After broiling, remove tile broiler pan
flom the oven. Rem¢)xv the grid flom the
pan. Cmefiflly penn out the grease iiom
the pan into a proper container.
Wash and rinse tile broiler pan and grid
in hot water with a soap-filled or plasti(
s(ouring pad.
[] When re-installing tl_e o_en fit)or be
sure t() slide it all tile way U)tile back
of din oven.
IMPORTANTAk_ays repla( e the
remox able floor beiore d_e next use.
lfii)o(1 has burned on, sprinkle tile grid
with detergent while hot and c{)verwith
wet paper towels or a dishcloth. Soaking
the pan will rem{)ve burned-on tbods.
Both tile broiler pan and grid may be
cleaned with a coiiliileicial oven cleaner.
Both tile broiler pan and grid can also be
(leaned in a dishwasher.
Donot store,a soiledbroilerpan andgnd
anywhere/n the oven.
26
Control Panel
It's a good idea to wipe tile control
panel after each use. Clean with miM
soap and water or vinegar and water,
rinse _dth clean water and polish (hy
with a soil cloth.
Do not use abrasixv cleansers, suong
liquid cleansers, plastic scouring pads or
oxvn cleansers on the conuol panel-they
_dll damage tile finish. A 50/50 solution
ofvinegm and hot water works well.
Page 27

Probe
R0astingrack
Ovenshelf
The temperature probe may be deaned
xdth soap and water or asoap4illed
scouting pad. Cool tile temperature
probe befi)re cleaning. Scour stubborn
>_Donot/Ynmeraethetemperatureprobe
in water
>_Donot storethe temperatureprobein
the oven.
spols with a soap-tilled scouting pad,
rinse and (hT.
Oven Shelves and Convection RoastingRack
Clean the oven shelves (including tile
offset shell) and tile convection roasting
rack with an abrasive cleanser or steel
wool. After cleaning, rinse the shelves
and rack with clean water and (by with a
clean cloth.
NOTE."Theovenshelvesandconvectionroasting
rackmaybecleanedin theself-cleaningoven.
However,theshelveswill darkenincolor,lose
theylusterandbecomehardtoslideifcleaned
duringtheself-cleaningcycle.Youcanwipethe
shelfsupportswithcookingoilafterself-cleaning
tomaketheshelvesslidemoreeasily
Baking Stones (onsome models)
Tile baking stones are made era porous
ceraiIlic material and it is normal for
[helil to aCCUlilulale stains x_dlll use,
Ifyou must clean them, allow titan to
(eel. S(rape off soil and rinse well in
_V;_LI'III lv}l[eI',
i_:?Donotwashwithsoapsanddetergentsas
theymaybeabsorbedbythestonesandmay
transferanunwantedtaste.
i::i:_Donotwashinanautomaticdishwasher
;';;_Allowthestonestocoolcompletelybefore
cleaning.
>_Donotputhotstonesintowater
:i_Makesurethatthestonesarethoroughlydry
beforebaking
>_Donotwashinanautomaticdishwasher
27
Page 28

Careand cleaning of the oven.
Oven Light Bulb (onsomemodels)
|
|
|
1 el
"A
Maximuu [ '_
lelNth U
Wire coverholder
, Bull
i
Glasscove[
ITab
NOTE."Theglass cover (on some
models) should beremoved only when
cold. Wearing latex gloves may offer a
better grip.
getbre replacing tile bulb, disconnect
electrical power to die oven at dm main
filse or circuit breaker panel. I_et the bulb
cool completely bet_}re rem{Mng it. For
your safety, do not touch a hot bulb with a
damp cloth. If you do, the bulb will break.
To remove:
Turn tl,e glass c{}vercounterclockwise
l/4 turn until the tabs of tim glass {over
clear the grooves of the so{ket. Remove
the bulb.
Oven Light Bulb mnsomemodels)
CAUTION."Before replacing your oven
light bulb, disconnect the electrical
power to the oven at the main fuse or
circuit breaker panel
Be sure to let the light ((}ver and bulb
cool completely.
Toremovethecover:
[7] HoM a hand under the cover so it
"L_
doesn't fall when released. With
fingers of the same hand, firmly
push back the xdre cover hoMer.
IJfi offthe cover.
Toreplace:
Put in a new 40-watt appliance bulb.
Place the tabs of the glass cover into the
gro{wes of the socket. Turn the glass
(over (lock, rise 1/4 turn.
NOTE:
>_A 40-wattappliancebulbissmallerthana
standard40-watthouseholdbulb.
ii;iReconnecte/ectrica/power to theoven.
i2 Forimprovedhghtlbg inside the oven,dean
the glasscoverfrequentlyusing a wet cloth.
Thisshou/dbe donewhen the oven is
completelycool
DO not remove any screws to remove
thecover
[] Replace bulb xdth a 40-watt
appliance bulb.
Toreplace the cover:
[] t}lace it into groove of the light
receptacle. Pull wire torward to
the center of the cover until it
snaps into place.
[] Connect electrical power to
the oven.
28
Page 29

Stainless Steel (onsomemodels)
Do not use a steel-wool pad; it will
scratch the surface.
To clean stainless steel surfhces, use a
hot, damp cloth _dth a mild detergent
suitable fi)r stainless steel surtaces. Use
a clean, hot, damp cloth to remove
soap. Dry xdth a dry, clean cloth.
lffi)od soil remains, try a general
kitchen cleaner, such as Fantastik:7
Simple Green:_ or Formula 4()9_
For hard-to-clean soil, use a
standard stainless-steel cleaner,
such as Bon-Ami '_or Cameo:_
Oven Heating Elements
Do not dean the broil element. Any soil
will burn offwhen the element is heated,
The bake element is not exposed and is
under the rem()vable oven floor. If
spillovers, resi(h_e or ash accumulate on
the removable oven floor, wipe up betore
self cleaning.
Apply cleaner with a damp sponge.
Use a clean, hot, damp cloth to remove
cleaner. Dty with a dry, clean cloth.
Ahvays scrub lightly in the direction of
the grain.
After cleaning, use a stainless-steel
polish, such as Stainless Steel Magic'7
Revere Copper and Stainless Steel
Cleaner:; or Wenol All Purpose
Metal Polish'_ Follow the product
instructions tot cleaning the stainless-
steel surtace.
To clean the oven floor, lake out the
removable floor and gently lit_ the bake
element. Clean with warm soapy water.
Always replace the removable floor
betore next use.
29
Page 30

Before YouCall ForService...
Troubleshooting tips
Save time and money! Review the charts on the following
pages first and you may not need to call for service.
Possible Causes
Controlsignalsafter
enteringcookingtime
or de!aystart
Fooddoes notbake Oven controls improperly set. • See the Using the oven section.
or mast properly Shelf position is incorrect • See tile Using the oven section.
Fooddoes not Door not open to the * See tile Using the oven section.
bmilproperly broil stop position as
You forgot to enter a bake
temperature or cleaning
time.
or the shelf is not level.
Incorrect cookware or * See tile Using the oven section.
cookware of improper size
being used.
Oven floor not in place. * Replace tile oven floor.
Oven thermostat needs * See tile Adjust the oven thermostat--Do it yourself!
adjustment, section.
recommended.
Oven controls improperly set. * Make sure you press tile BROIL HI/LO pad.
Improper shelf position * See tile Broiling Guide
beingused.
Food being cooked * Use tile broiling pan and grid that came xdth your oven.
in a hot pan. Make sure it is cool.
Cookware not suited * Use/he broiling pan and grid/ha/(:lille xd/ll your OVell.
for broiling.
The probe is plugged into the • Unplug and remove the probe flora the oven.
oudet in the oven.
What To Do
• Press tile BAKE pad and desired temperature t)r tile
SELF CLEANpad and desired (lean time.
Aluminum foil used on the * See tile Using the oven section.
broiling pan and ,grid has
not been fitted properly and
slit as recommended.
In some areas the power * Preheat tile broil element fit( 10 minutes.
(voltage) may be low.
• Broil for tile hmgest period of time recommended in
tile Broifing Guide.
Clock and timer A fuse in your home maybe * Replace tile filse or reset tile circuit breaker.
do not work blown or the circuit breaker
tripped.
Oven controls improperly set. • See the Using the clock and timer section.
Oven light does Light bulb is loose or defective. * Tighten or replace tile bull).
not work
Pad operating light is broken. * Call for service.
3O
Page 31

Possible Causes What To Do
Oven temperature too Oven thermostat * See tile Adjust the oven thermostat--Do it yourself!
hot or too cold needs adjustment, se( lion.
Oven will not work A fuse in your home may * Replace the fllse or reset tile cir( uit breaker.
Oven will not self-clean The oven temperature * Allow the oven to cool to room temperature aud reset
"Crackling " or This is the sound of the * This is normal,
"popping" sound metal heating and cooling
Excessive smoking Excessive soil. * Press tile CLEAR/OFF pad, Open tile xfiudows to rid
during clean cycle the room of smoke, Wait until the LOCKEDDOOR
Oven door will not Oven too hot, * Allow the oven to cool below locking [elnperature,
open after a
clean cycle
be blown or the circuit
breaker tripped.
Oven controls improperly set. * See the Using the oven section.
is too high to set a tile controls.
self-clean operation.
Oven controls improperly set. * See tile Using the self-cleaning oven section.
The probe is plugged into * Remove tile probe flom tile oveu.
the outlet in the oven.
during both the cooking and
cleaning functions.
light goes oil Wipe up tile excess soil and reset tile
clean cycle.
Oven not clean after a Oven controls not properly set. * See the Using the self-cleaning oven se( lieu,
clean cycle
"LOCKDOOR" flashes The self-clean cycle has * (;lose tile oven door.
in the display been selected but the
LOCKED DOOR light The oven door is locked * Press the CLEAR/OFF pad. Alh)w the oven to cool.
is on when you want because the temperature
to cook inside the oven has not
Oven was heavily soiled. • Clean up hea_ T spillovers 1)eibre starting the (lean
cycle, Heavily soiled ovens may ueed to sell:clean
again or ii)ra longer period of time,
door is not closed.
dropped below the
locking temperature.
37
Page 32

Before YouCall ForService...
Troubleshooting -tips
Possible Causes What ToDo
"F-- and a number You have a function
orletter"flash error code.
in the display If the function code repeats. • Discolmect all power to the oven for at least 30
• Press the CLEAR/OFFpad. Allow tile oven to cool for
one hour. l'ut the oven ba(k into operation.
se(onds and then recolme(t power. If the flm(tion
enor (ode repeats, (all for servk e.
Displaygoes blank A fuse in your home may • Repla(e the fi]se or reset the (ir(uit breaker.
be blown or the circuit
breaker tripped.
The clock is in the • See the Special features of your oven control se(fion.
black-out mode.
Displayflashes Power failure. • Reset the (lo(k.
Unable toget the Oven control pads were • The BAKE and BROIL HI/LO pads (on double oven
display to show "SF" not pressed properly, models use the upper oven (ontrols) must be pressed
"Probe" appears in This is reminding you to • Enter a prol)e temperature.
the display enter a probe temperature
after plugging in the probe.
Power outage, Power outage or surge. • Reset the (lo(k. If tile oven was in use, you must reset
at the same time and held for 3 se(onds.
it by pressing the CLEAR/OFF pad, setting the (lo(k
and resetting any ( ooking tim( tion.
Steam from the vent When using the convection • This is normal.
feature, it is normal to see
steam coming out of the
oven vent. As the number
of shelves or amount of
food being cooked increases,
i/ iiii ii ii!_!_!_!_!_!_!_!_!_!_I
the amount of visible steam
will increase.
"Burning" or "oily" This is normal in a new oven • To speed tile process, set a self-clean cycle for a
odor emitting from and will disappear in time. minimum of 3 hours. See file Usin9 the seff-c/eanin9
the vent oven se(tion.
Strongoder An odor from the insulation • This is tempora_ T .
around the inside of the
oven is normal for the first
few times the oven is used.
Fan noise
A cooling fan or a convection
fan (depending on the
function you are using)
may automatically turn on
and off to cool internal parts.
• This is normal. The cooling fan will mrn offand on.
The ( onve(tion fan will run until the fim(fion is
over or the door is opened.
32
Page 33

GE Service Protection Plus TM
GE, a name recognized worldwide %r quality and dependability, offers you
Service Protection Plus -cornpi ehensl_ e protection on all your appliances-
No Matter What Brand!
Benefits Include:
* Backed by GE
*All brands covered
* Unfimlted service calls
*All parts and labor costs included
"No out-of-pocket expenses
* No hidden deductibles
" One 800 number to call
You _dll be <omplelely satisfied with our serxice protecuou or you may request your money ba_k
on the remaining value of your tontrat t. No questions asked. It's that simple.
Prote( t your refligerator, dishwasher, washer and dryer, range, TV, VCR and much more-anybrand!
Plus there's no extra t harge tk)r emergeuq" service and low monthly finan( ing is available. Even it emaker
toverage and food spoilage protetfion is oiiered. You can rest eau, knowing d_H all your valu_Jble
household produt ts are protet ted _Jgainst expensive repairs.
!1 " •
We TI Cover Any Appliance.
Anywhere. Anytime.
P_a_eyo., .._fide._ eiut;Ea.d .,H.s i, d,e u.s. tolliiee at800-626-2224
for more infi)rmalion.
*kll hi" In(]s (ox ele(], lip It) 20 ve IIs o]d ill Ihe (onlinel31 d U.S.
Please place in envelope and mail to:
General Electric Company
Warranty Registration Department
P.O, Box 32150
Louisville, KY 40232-2150
._ Cut hc_-e
33
Page 34

Consumer Product Ownership Registration
[)ear (]ustomer:
Thank you for purchasing our product and thank you tor placing your confidence in us.
We are proud to have you as a customer!
Follow these three steps to protect your new appliance investment:
Complete and mail
your Consumer
Product Ownership
Registration today.
Have {hc' peace {)f
mind o! kt3_wing we
can c()nla(t you in Ihe
unlikely event el a
sati'ty m(_dilicalion.
Aller mailing the
registrad(m below,
SlOlC/his d(>cumcnl
in a saR' place, h
c(m/ains inli>rma{i(m
y(lu will need should
y()tl require service.
Our sel_ice number is
800 (;E (]ARES
(800432-2737).
Model Number Serial Number
I I I I I I
Important: If you did not get a registration card with your
product, detach and return the form below to
ensure that your product is registered, or register
online at www.geappliances.com.
Consumer Product Ownership Registration
Read your ()wner's
Manual careltflly.
h will help you
operate your new
appliance properly.
I
..._ ( iul hcre
_ Model Number Serial Number
Mr. Ms. Mrs. Miss
lVil-st ] ] Lasl]
Nam_ I I I I I I I I I Nana_ I I I I I I
Address I I I I I I I I I I I I I I I I I I I I I I
Apt. # [ I I I [ I I I [ E-mail Address
I I I
I I I I I I
i I I
1)al_ Plat( d
"_'_I, I l,a,_l, I ,'ca,-I, I PhoneNumh_ r I I I
M(mlh . I-I
(/ccasionally, w_ may allow selc ct_ d compani_ s to s(nd }(>u inl_ _rmalion.
D Chcck here if}ou do not warn II-fisinlbrmati(m.
GEAppliances
General Electric Company
Louisville, Kentucky
www geappliances com
i I-I i i i I
,34
I
I
Page 35

GEBuilt-In Electric OvenWarranty
All warranty service provided by our Factory Service Centers
or an authorized Customer Care®technician. For service,
carl 800-GE-CARES.
GE Will Replace:
From the date of the
origina! purchase
i;_?Service trips to your home to teach you how to use
the product.
i_:Improper installation.
i_?Failure of the product if it is abused, misused, or used
for other than the intended purpose or used
commercially.
Any part of tile oven which fails due to a defect in materials or workmanship.
During tiffs full one-year warranty, (;E xfill also prox4de, free of charge, all labor
and in-home sex_,i(e to repla(e tile defe(tive part.
i;_?Replacement of house fuses or resetting of circuit
breakers.
;i:_Damage to the product caused by accident, fire, floods
or acts of God.
i_?Incidental or consequential damage caused by
possible defects with this appliance.
This warranty is extended to the original purchaser and any succeeding owner for products purchased for
home use within the USA. In Alaska, the warranty excludes the cost of shipping or service calls to your home.
Some states do not aflow the exclusion or limitation of incidental or consequential damages. This warranty
gives you specific legal rights, and you may also have other rights which vary from state to state. Toknow
what your legal rights are, consult your local or state consumer affairs office or your state's Attorney General
Warrantor: General Electric Company,Louisville, KY40225
35
Page 36

Service TelephoneNumbers.
GEAnswerCenter®800.626.2000
The (;E Answer Center' is open 24 hours a day, 7days a week.
OR
Visit our Website at: wvvw.geappliances.com
In-HomeRepairService800-GE-CARES(800-432-2737)
Expert (;E repair se_,i( e is only a phone (all away.
SpecialNeedsService800.626.2000
800-TDD-GEAC(800-833-4322)
(;E offers, fiee of( harge, a bro( hure to assist in planning a baHier-tiee kitOmn fi)r persons
_dth limited mobility.
ServiceContracts800-626-2224
Puwhase a (;E se_x4cecontract while your warranty is still in effect and you'll receive a
substantial discount. GE ( onsumer Sex_dcexdll still be there after your warranty expires.
PartsandAccessories800-626-2002
lndMduals qualified u) sex_ice their ox_l_appliances can have pmts or accessories sent directly
to thdr homes WISA, MasterCmd and Discover cmds are accepted).
Instructionscontainedinthismanualcoverprocedurestobeperformedbyanyuser.Otherservicing
generallyshouldbereferredtoqualifiedservicepersonnelCautionmustbeexercised,since
improperservicingmaycauseunsafeoperation.
ServiceSatisfaction
Ifyou are not satistied with the se_Yice you receive tiom GE:
First,contact the people who sexx-icedyour appliance.
Next, if you me s011not pleased, x_Titeall the det>fils-including your phone number-to: Manager,
Customer Relations, GE Appliances, Appliance Prok, I,(nfisville, KY 40225.
3_ Printed in LaFayette,GA
 Loading...