

Page 1

Safety Instructions ........... 2, 3
Operating Inslruc_tions
Control I_ob .................. 5
Crisping Stale hems ............. 7
Drawer . ...................... 6
Features ...................... 4
Moisture Selector. .............. 5
ON Signal Light ................ 5
Pans ......................... 5
Proofing Yeast Bread
and Dough .................... 7
Rack ......................... 6
Temperature Selection Charts . . .7, 8
"_4'anning Serving Bowl
and Plates ..................... 6
Care and Cleaning ............ 9
ge.com
Installation Instntt¢ions .... 10-15
Troubleshooting Tips ......... 16
Consumer Support
Consumer Support ..... Back Cox>r
Product Regisuafion ........ 19, 20
_A'ananty for Customers
in Canada .................... 93
VVmTantv for Customers
in the U.S.A ................... 92
Write the model and serial
numbers here:
Model #
Serial #
You can find them on a label located
on the bacl_side of the lower drawer
fl'ont.
In Ca ada, contact us at:
n
wwvv.GEAppliances.ca
49-80383 12-05JR
Page 2
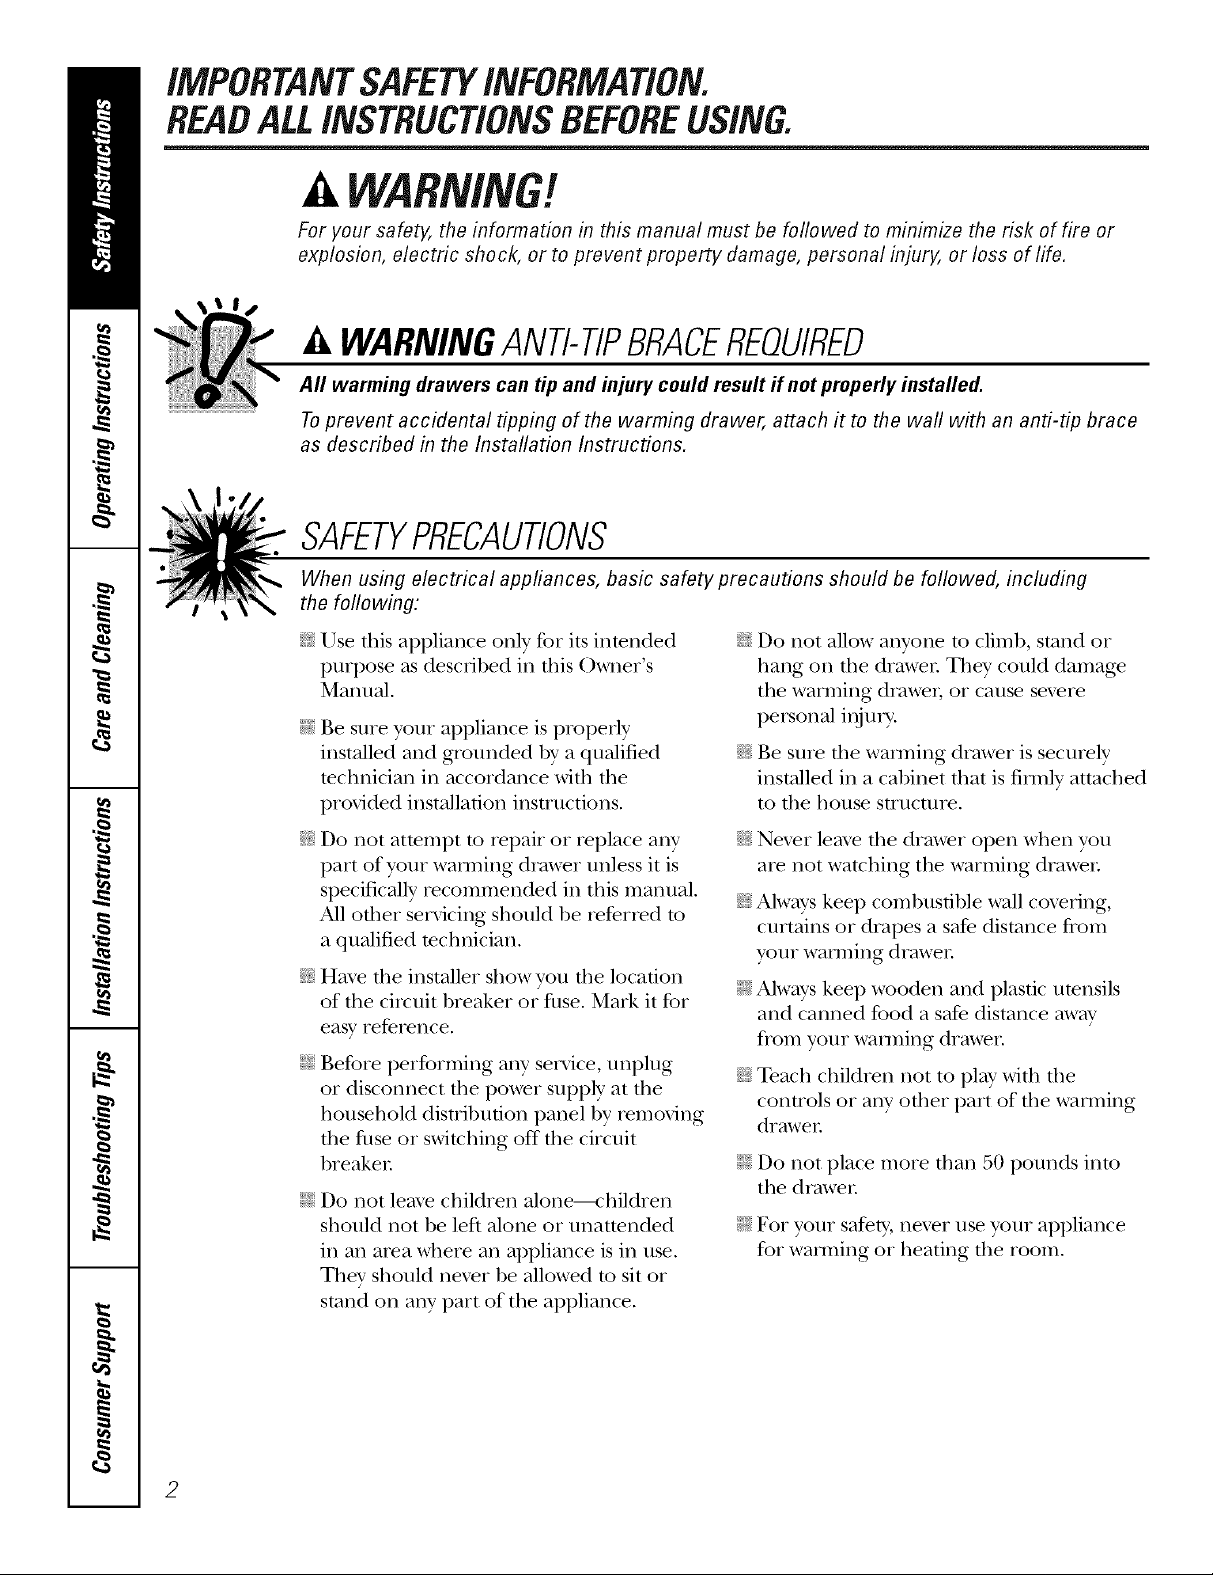
iMPORTANTSAFETYiNFORMAtiON.
READALLiNSTRUCtiONSBEFOREUSING
m
For your safety, the information in this manual must be followed to minimize the risk of fire or
explosion, electric shock, or to prevent property damage, personal injury, or loss of life.
WARNINGANTI-TIPBRACEREOUIRED
All warming drawers can tip and injury could result if net properly installed.
Toprevent accidental tipping of the warming drawer, attach it to the wall with an anti-tip brace
as described in the Installation Instructions.
SAFETYPRECAUTIONS
When using electrical appfiances, basic safety precaufions should be followed, including
the following:
_{_;Use this appliance only %r its intended
purpose as described in this )wrier s
Manual.
Ji:,:Be sure your appliance is properly
installed and grounded by a qualified
technician in accordance with rite
provided installation instructions.
_:;Do not atmmpt to tei)air or replace any
part of your wanning drawer unless it is
specifically recommended in this manual.
All other selxicing should be referred to
a qualified mchnician.
_?{:_Haxe the installer show you the location
of tile citvuit breaker or fl]se. Mark it for
easy' reference.
_i:,:Before performing any service, unplug
or disconnect the power supply at the
household distribution panel by removing
dte fltse or switching off tile circuit
breaker
Ji:,:Do not leme children alone----_hildren
should not be left alone or unattended
in an area where an appliance is in use.
They should hexer be allowed to sit or
stand on any part of the appliance.
• (
_?{:_Do not allow anyone to climb, stand or
hang on d_e drawel: They could damag>
the warming drawer, or cause sex>re
personal injm>
_ti::Be sine the wamfing drawer is securely
installed in a cabinet fltat is firmly attached
to the house structure.
_?{_:Nexer leax> dm drawer open when you
are not watching the warming drawer
_:;Always kee I) combustible wall cox_ring,
curtains or drapes a safe distance from
your wanning drawer
ji:,iAlwWs kee I) wooden and plastic utensils
and canned food a safe distance away
flom your wanning drawer.
_:;Teach children not to pl W with file
controls or any oflter part of tile wanning
drawer
Do not place more than 50 pounds into
the drawer
For your safety, nexer use your appliance
fbr wamfing or heating the room.
2
Page 3
ge.com
a, WARNING!
SAFETYPRECAUTIONS
The purpose of the warming drawer is to hold hot cooked foods at serving temperature.
Always start with hot food; cold food cannot be heated or cooked in the warming drawer.
_:;Do not waml food ill the wamling drawer _:;Ne_er lemejars or cans of tht diippings in
fox" nlore than two hoIlrS.
or near your warming drawer
_ -g_ CAUTYON:Items of interest to
children should not be stored in cabinets
aboxe the wamfing drawer; children
climbing on file drawer to reach imms
could be seriously itljuled.
_:_Use only d U pot holders--moist or damp
pot holders on hot surfaces may xesult in
bnrlls floxn smam. Do not let pot holders
touch hot heating elements. Do not use
a towel or other bulky cloth.
_7{:_Do not let cooking gxease or other
flammable materials accnmulam in
or near the wanning drawer
E:,:Do not use water on gTease fires.
Nexer pick up a flaming pan. T/lirl
the controls off:
Flame in die wanning drawer can be
smodlered by closing die drawer or
using a multi-puil)ose d_T chemical or
foam-type fire extinguisher
_:;Do not touch the heating element or
die inmfior snrthce of die wamling
drawer These sniP, tces may be hot
enough to bnrn,
REMEMBER: Tile inside snrPace of tile
wanning drawer may be hot when tile
drawer is opened.
E:,:Do not store or use combnsfible mamfials,
gasoline or other flammable vapors and
liquids in tile vicinity of fills or any other
appliance.
_:;Use care when opening tile drawer ()pen
tile drawer a crack and let hot air or steam
escape befoxe xemoving or replacing food.
Hot air or steam which escapes can cause
bnrlls to hands, face and/or eyes.
E:,:Do not heat unopened food containers.
Pressure could build up and tile container
cou]d burst, causing an injm T.
_:;Kee I) file \_nt unobstrucmd.
_fi:,:Do not use tile warming drawer to dU
newspapers. If ox>rheated, riley can catch
on fire.
_{::Do not use tile warming drawer fox a
storag_ area. Imms stored in file wanning
drawer can ignim.
_:;Do not leave paper products, cooking
umnsils or food in the wanning drawer
when not in use.
(:lean only parts listed in the Careand
cleaningof thewarmingdrawersection.
Do not use aluminun/ foil to line die
drawer Foil is an excellent heat insulator
and will uap heat beneath it. This will
upset the performance of tile drawer and
it could damag_ the inmfior finish.
_t{::¼:ear proper apparel. Loose fitting or
hanging gammnts should nex>r be worn
while using this appliance.
READANDFOLLOWTHISSAFETYINFORMATIONCAREFULLY.
SAVETHESEINSTRUCTIONS
3
Page 4
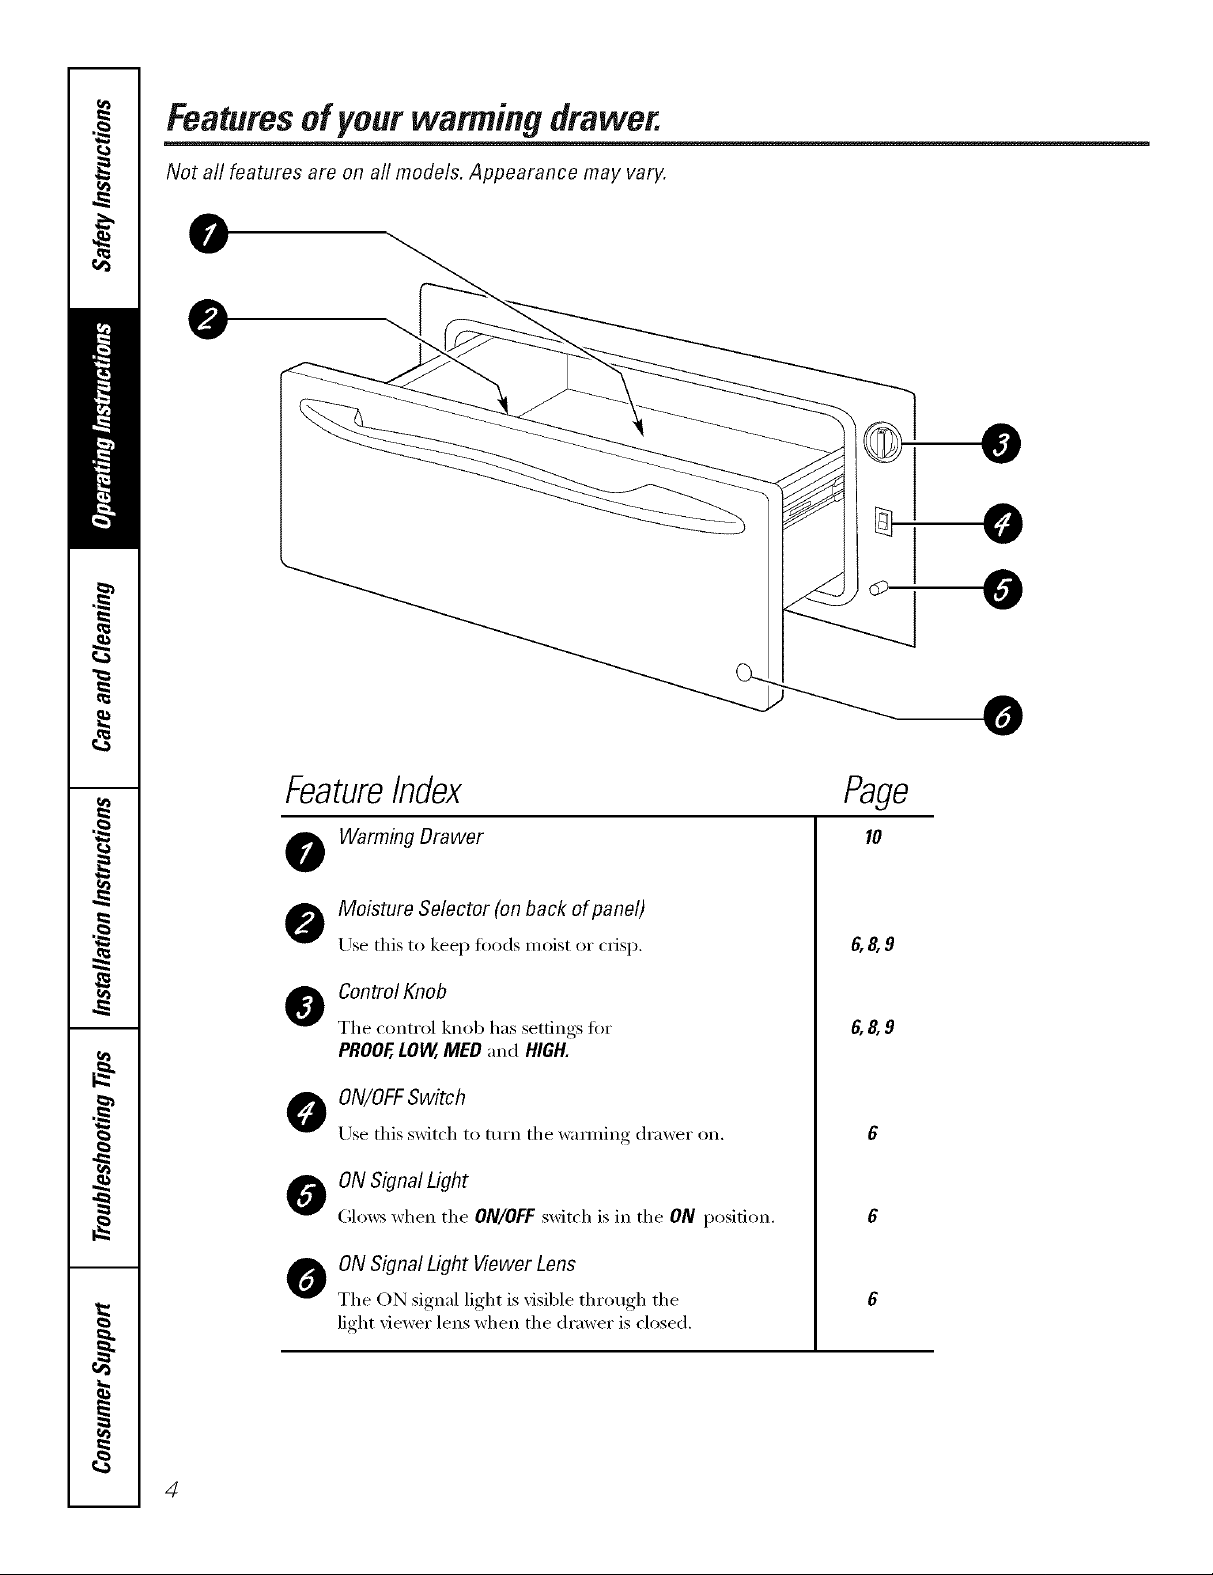
Featuresof your warming drawer.
Not all features are on all models. Appearance may vary.
0
@
FeatureIndex
Warming Drawer
Moisture Selector (on back of panel)
Use this to keep foods moist or crisp.
o Control Knob
The control knob has settings for
PROOF,LOW,MED "and HIGH.
o ON/OFFSwitch
Use this s_dtch to mrn the wamfing drawer on.
O ON Signal Light
(;lows when the ON/OFFswitch is in the ON position.
O ON Signal Light Viewer Lens
The ON signal light is visible through the
light viewer lens when the drmver is closed.
0
Page
I0
6,8,9
6,8,9
4
Page 5
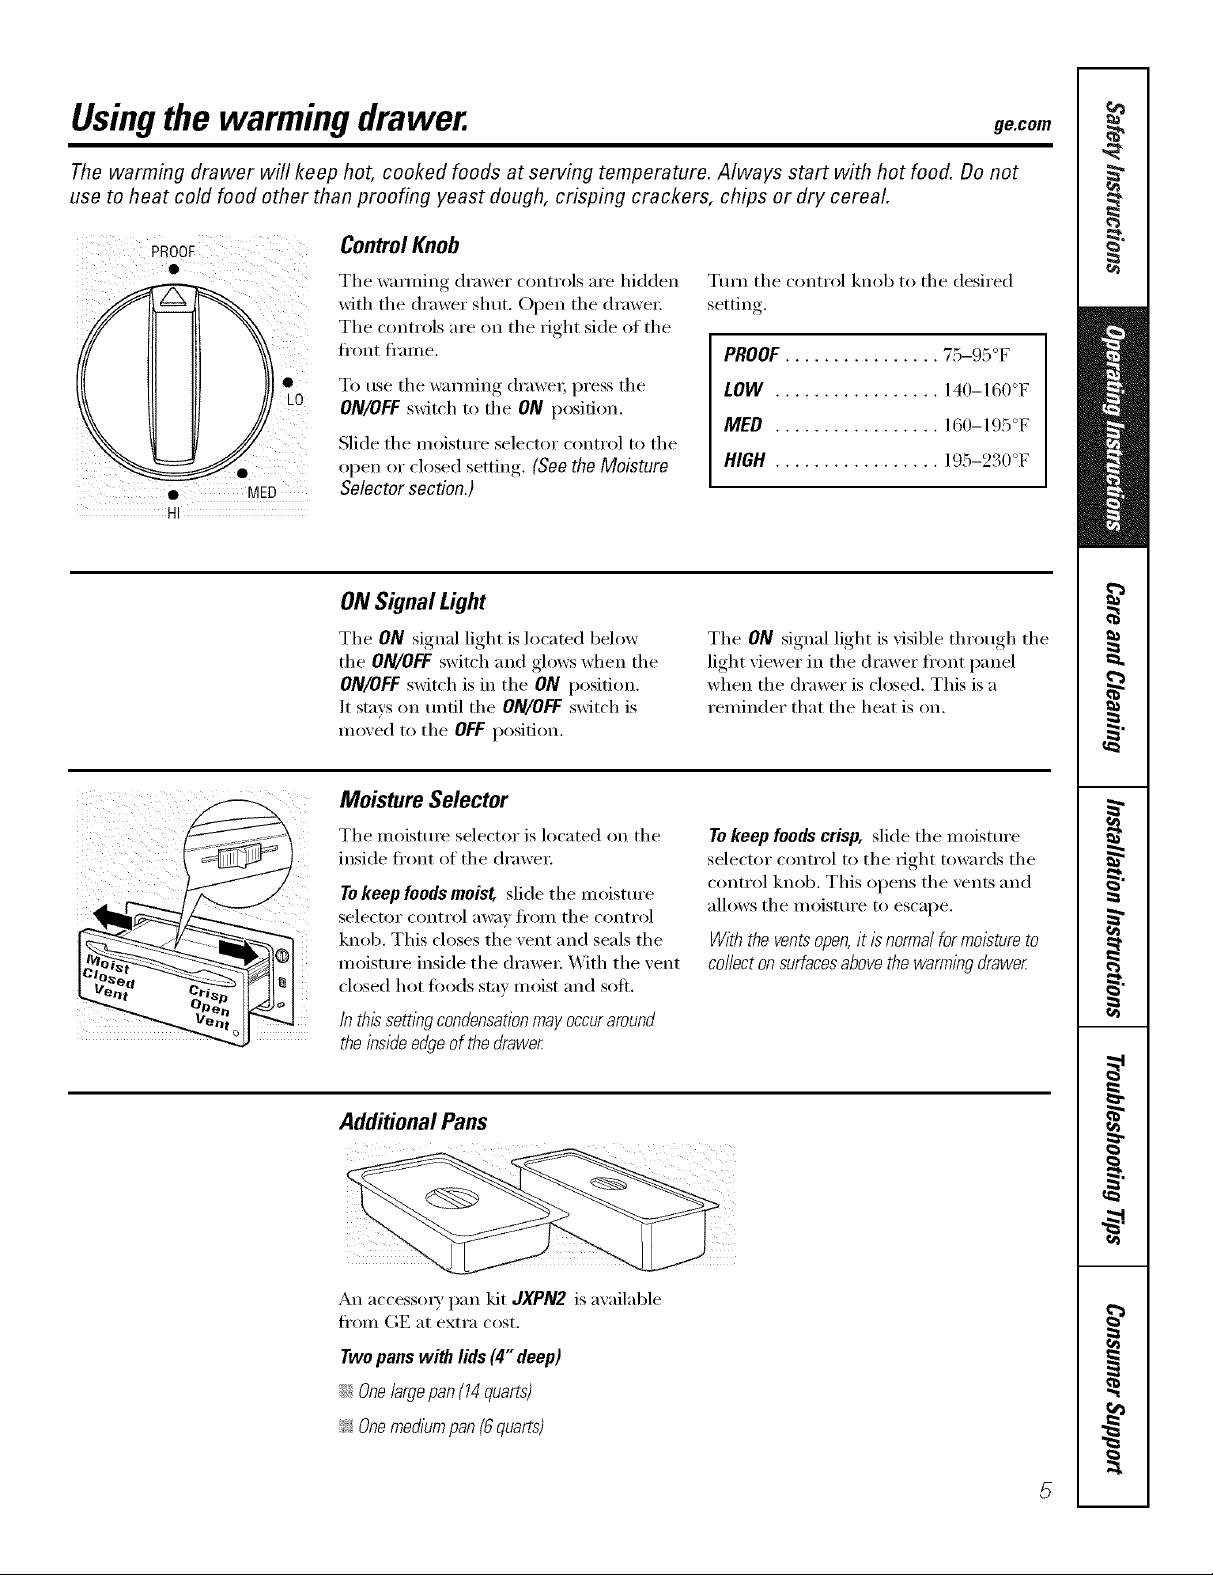
Usingthe warmingdrawer, ge.com
The warming drawer will keep hot, cooked foods at serving temperature. Always start with hot food. Do not
use to heat cold food other than proofing yeast dough, crisping crackers, chips or dry cereal.
(
PROOF
!),0
MED
H
ControlKnob
The wamfing drawer controls are hidden
with the drawer shut, Open the drawe_;
The controls are on the right side of the
fl'ont fl'ame.
To use the wamfing drawer, press the
ON/OFFswitch to tile ON position.
Slide tile moisture selector control to tile
open or closed .setting, (See the Moisture
Selector section.)
ON SignalLight
Tile ON signal light is located below
tile ON/OFFswitch and glows when tile
ON/OFFswitch is ill tile ON position.
It stays on until tile ON/OFFswitch is
moved to tile OFF position.
Moisture Selector
Tile moisture selector is located on tile
inside front of tile drawei:
To keep foods moist slide tile moisture
selector conti'ol }ll_';iy[i'OIl/ tile contI'ol
knob. This closes tile vent and seals tile
moisture inside tile drawe_: With tile vent
closed hot foods stay moist and soil
In this settlbg condensationmay occuraround
the inside edgeof the drawer:
Ttml tile control knob to tile desired
settin ,
PROOF................ 75-95°F
LOW ................. 140-160°F
MED ................. 160-195°F
HIGH ................. 195-230°F
Tile ON signal light is visible through tile
light viewer in tile drawer fl'ont panel
when tile drawer is closed, This is a
reminder that tile heat is on.
To keep foods crisp, slide tile moisture
selector control to tile right towards tile
control knob. This opens tile vents and
allows tile moisture to escape.
With the ventsopen,it isnormal for moistureto
collect onsurfacesabovethe warming drawe_
Additional Pans
An access(ny pan kit JXPN2 is available
fl'om (;E at extra cost.
Twopans with lids (4" deep)
::Ji::Onelargepan (14 quarts)
_ Onemedium pan{6 quarts)
5
Page 6

Usingthe warming drawer.
Rack
_i; Rack will fit ti'om ti'ont to back.
Preheat with the rack in place.
i:_:Using the rack allows fin" double
stackim, of items.
When using the warming drawer...
Doublestacking items with the rack in position.
Donotlinethewarmingdrawerwith
aluminumfoil.
::Ji::Allow time tin" file drawer to be
preheated:
LOW 8 mimlms
IVIED 1:5 mimltes
HIGH 20 minutes
NOTE."It Isnot necessarytopreheat the drawer
forproofing.
Food in heat-safe glass and glass ceramic
pans may need higher them/ostat setting
as compared to toed in met;d pans.
::Ji::Repeated opening of the drawer allows
the hot air to escape and the ti)o(l to
cool. _Mlow extra time fin" temperature
inside the drawer to stabilize after
adding items.
ToWarm ServingBowl and Plates
Towarm servingbowlsand plates set the
control on LOW
::Ji::Use only heat-sate dishes.
_: Place the empb' dishes on the rack
to raise them off the bottom of the
(lmwe_: If w)u want hotter dishes or
want to heat fine china, please check
with the II/anttfilCttlI'er (ff the dishes
for their maximmn heat tolerance.
::Ji::_4]th large loads it may be necessa_ y to
rise a higher thennostnt setting and
cover some of the cooked toed items.
_: Food should be kept hot in its cooking
container or tI'ansteFI'ed to a heat-sate
serving dish.
::J?::Altmfinum fi)il may be used to cover
toed to prevent it ti'om drying out.
A CAUTION:Pla iccontainers
orplastic wrap will melt if in direct contact
with the drawer. Melted plastic may notbe
removable and is not covered under your
warranty.
::Ji::Remove serving spoons, etc., before
placing containe_ in wamfing (h'awe_:
::Ji::_]/eIl holding hot, cooked toods and
_m_ning empty serving dishes at the
same time, place the serving dishes on
the high rack i)osition and the food on
the bottom of the (h'awe_:
CAUTION:>hes aybe
hoLUsepot holders or mitts when removing
hot dishes.
_: Preheat empD' serving dish while
preheating the drawe_:
Page 7
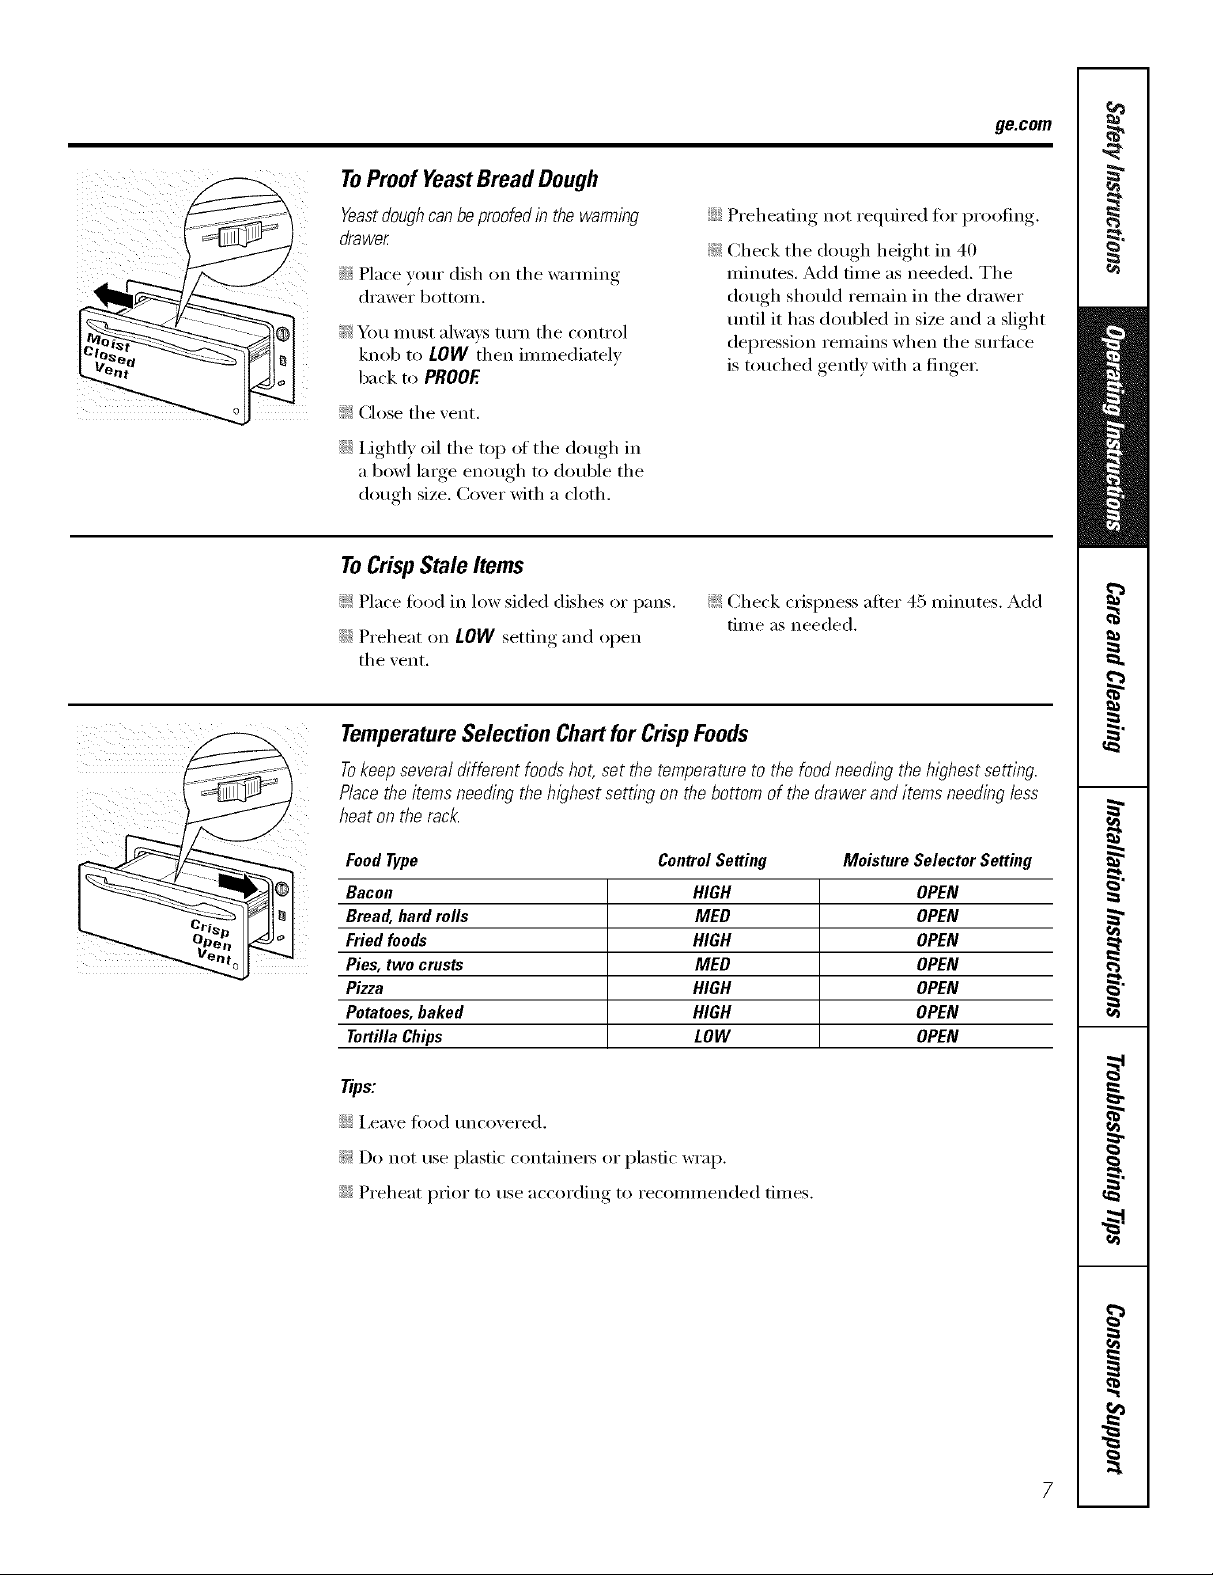
ToProofYeastBread Dough
Yeastdoughcan beproofed in the warming
drawer
{_<_Place v(:,ur dish on the wamfing
di'awer bottOlll.
i_,' You must alwms turn the control
knob to LOW then immediately
back to PROOE
!i_:Close the vent.
iJi::i Jghfl) oil the top of the dough in
a bowl large enough to double the
dough size. Coxer xdth a cloth.
ToCrispStale Items
ge.com
iJi::Preheating, not re(luired fiw I)r°°fing.
!i_:Check the dough height m 4 )
• o" " (
minutes, Add time as needed. The
dough should remain in the drawer
until it has doubled in size and a slight
depression remains when the surlhce
is touched gently with a finge_:
!;_:Place food in low sided dishes or pans.
!i?:Check crispness after 45 minutes. Add
time as needed.
iJi::Preheat on LOW ,settin,,_and open
the _ent.
TemperatureSelectionChartfor CrispFoods
Tokeep several different foods hot, set the temperature to the food needing the highest setting.
Place theitems needing the highest setting on the bottom of the drawer and items needing less
heat on the rack.
Food Type
Bacon
Bread, hard rolls
Fried foods
Pies, two crusts
Pizza
Potatoes, baked
Tortilla Chips
Tips'.
::Ji::i,eave toed uncovered.
_: Do not use plastic containet_ or plastic wrap.
::Ji::Preheat p_ior to use according to recommended times.
ControlSetting
HIGH
MED
HIGH
MED
HIGH
HIGH
LOW
Mo_ture Se_c_rSetting
OPEN
OPEN
OPEN
OPEN
OPEN
OPEN
OPEN
Page 8
Usingthe warming drawer.
m
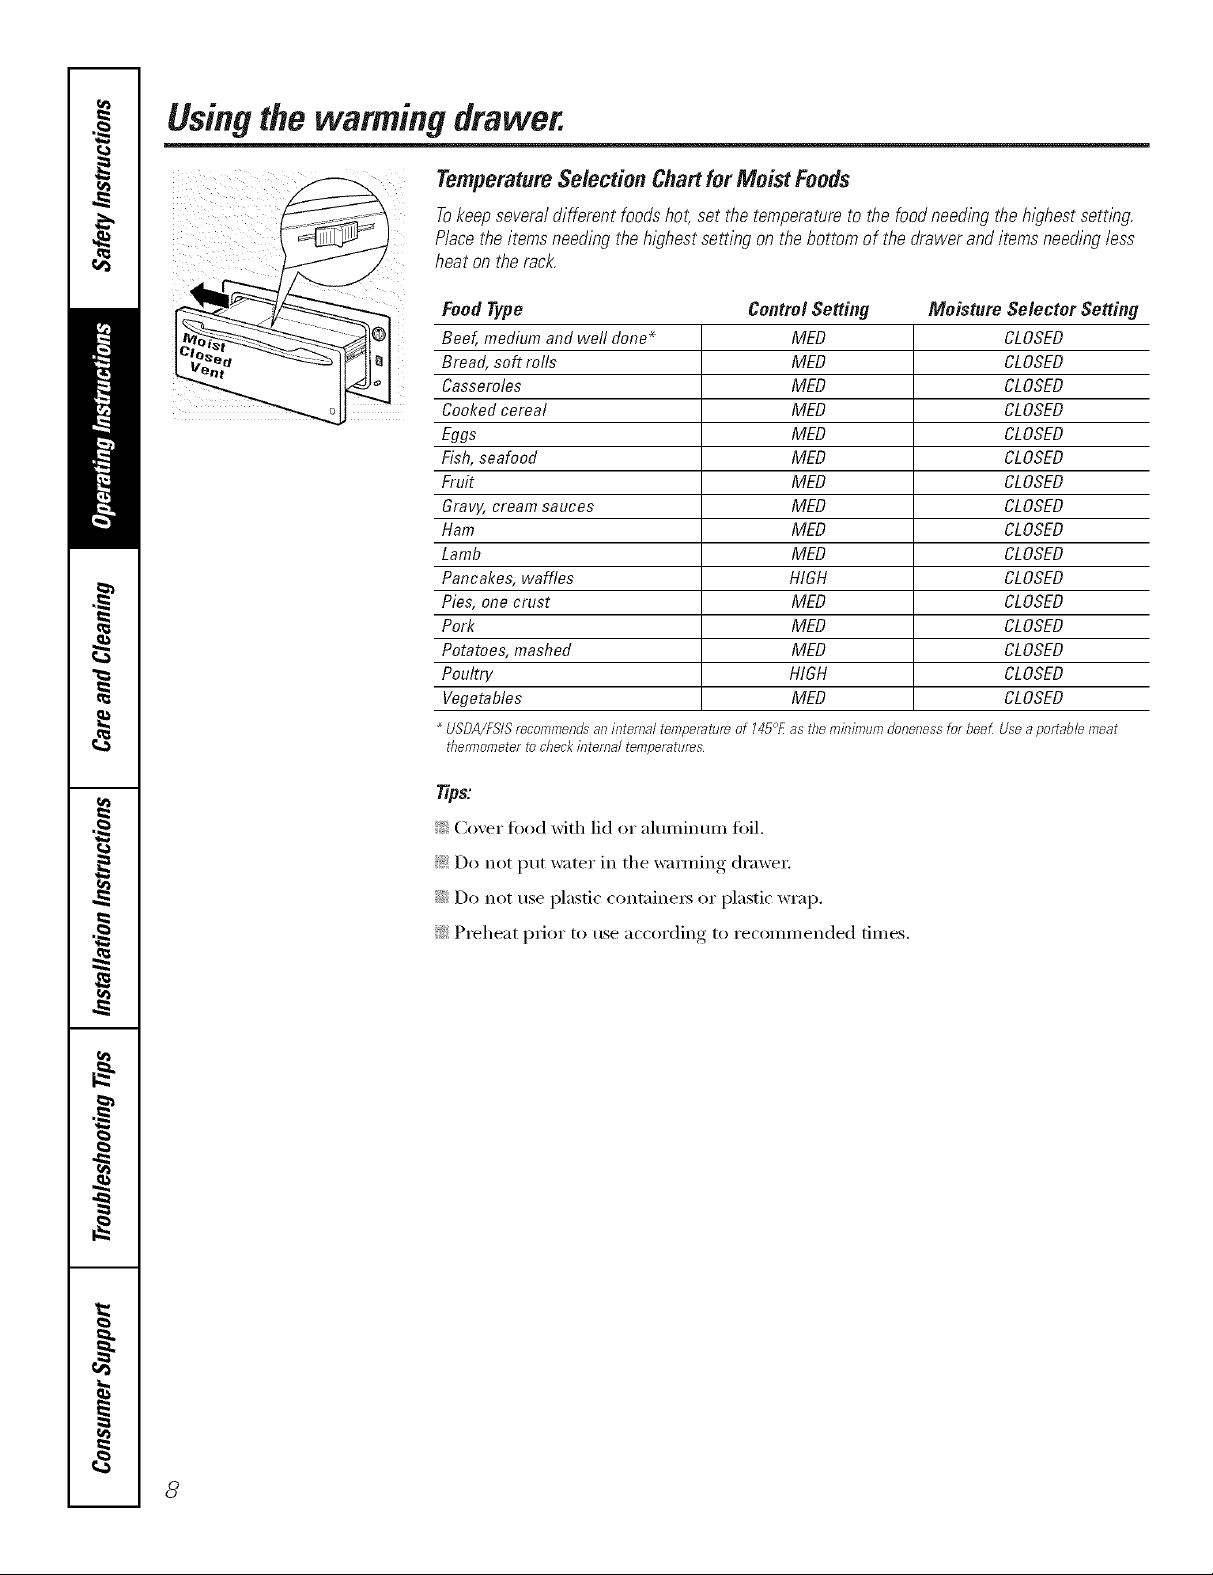
TemperatureSelection Chartfor Moist Foods
Tokeepseveraldifferentfoodshot,setthetemperatureto thefoodnee(hbgthehighestsett/bg
Placetheitemsneedingtheh/_Thestsettingonthebottomof thedraweranditemsneedinglees
heatontherack.
FoodType
Beef, medium and well done*
Bread, soft rolls
Casseroles
Cooked cereal
Eggs
Fish, seafood
Fruit
Gravy, cream sauces
Ham
Lamb
Pancakes, waffles
Pies, one crust
Pork
Potatoes, mashed
Poultry
Vegetables
USDA/FSISrecommends"aninmmal temperatureof 145°£as the
thermometertocheckinternal t_mpemtures
Tips'.
!_'_Cover fi)od with lid or aluminum fifil.
!i_:Do not put water in the wa_]ning (h'awe_:
Control Setting
Moisture Se/ector Setting
MED
MED
MED
MED
MED
MED
MED
MED
MED
MED
HIGH
MED
MED
MED
HIGH
MED
nlfi_fiTlumalonenessfurbee_Usea portablu,meat
CLOSED
CLOSED
CLOSED
CLOSED
CLOSED
CLOSED
CLOSED
CLOSED
CLOSED
CLOSED
CLOSED
CLOSED
CLOSED
CLOSED
CLOSED
CLOSED
iJi::Do not use plastic containers or plastic wrap.
}N Preheat I)Ii°r to rise according, to recommended times.
8
Page 9

Careand cleaning ofthe warmingdrawer, ge.com
Be sure the controls are in the OFFposition and all surfaces are cool before cleaning any part of the
warming drawer.
Warming Drawer
Use soap and wam_ water to thoroughly
cle_ln.
Rack
(3ean the rack with detergent and water:
_Mter cleaning, rinse the rack with clean
water and d_' with a clean cloth.
Stainless Steel
Donotuseasteelwoolpad,it willscratch
thesurface.
To clean the stainless steel suYL_ce, use
warn/sudsy water or a stainless steel
cleaner or polish. _dwa):s wipe the surfi_ce
in the direction of the grain. Follow
cleaner instructions fi)r cleaning the
stainless steel sm-thce.
Control Knob
The control knob may be removed for easier
cleaning
Make sure the knob is in the PROOF
position and pull it straight off the stem
fiw cleaning,
To inquire about i)m'chasing stainless
steel appliance cleaner or polish, or to
find the location of a dealer nearest you,
please call ore" toll-flee number:
National Parts Center 1.877.959.8888
ge.com
The knob can be cleaned in a dishwasher
or it may also be washed with soap and
wateI: Make sure file inside of the knob
is dry before replacing.
Replace the knob in the PROOFposidon
to ensure proper placement.
9
Page 10

Installationofthe warming drawer.
Read these instructionscompletely and carefully.
Before YouBegin
IMPORTAN7_Save these instructions for the
local electrical inspector's use.
IMPORTAN7_OBSERVEALLGOVERNINGCODES
AND ORDINANCES.
NOTE TOINSTALLER:Leave these instructions
with the appliance after installation is completed.
ProductDimensions
_[I 27" =l= 23¼" -_
ii
ii
ii
i!
i!
Lr
26¼"
includinghandle
NOTE TOCONSUMER:Keep this Owner's
Manual and Installation Instructions for
future use.
NOTE."This appliance must be properly
grounded.
NOTE."Insure that the power cord does not
contact the hot surfaces on the bottom of
ovens, cooktops, or any other appliance.
10½"
1""_ A
DimensionA
27" Drawer 30" Drawer
CustomPanelKits
ZXD27B--This kit provides fin" the installation
of a ctBtom front panel on 2 / wlcle models.
ZXD3OB--This kit provides fi)r the installation
of a custom fl" nt panel on 30 wl(le models.
• ¢ _t, ,
( ) Z' ,
ToolsNeeded
::Ji::2 x4 or 2 x 2 lumber fin"runners and brace
_: Wood screws and adhesive or other hardware
for installing rtmnet5 or shelf to support
W_I I]lleI" drawei:
Runnersmustbelevel,widlv mountedandcapable of
supporting150pounds.
263/4" l 30"
_: I,evel
::Ji::Drill and 1/16" bit
::Ji::Phillips screwdriver
/0
Page 11

Read theseinstructionscompletely and carefully.
AdvancePlanning
iJi::The wamfing drawer may be installed direct.Iv
into a wall or wall oven cabinem':
iJi::The wamfing drawer may be installed below
a countertop, a single or double oven and
side by side using _2(h'awe_.
iJi::_]_en installing wamdng drawer with a
cooktop alh_w a 9" minimum from bottom
of a cooktop bm'ner box to top of cutout.
GroundingtheAppliance
IMPORTANT--(Please read carefully)
FORPERSONALSAFETY,THIS APPLIANCE
MUST BE PROPERLYGROUNDED.
Do not use an extension cord or adapter plug
with this appliance. Follow National Electrical
codes _lIl(l oi'dinances.
This w:mning drawer must be suI)plied with 120V,
60Hz, and connected to an individual, properly
grotmded branch circuit, and protected by a 15
or 20 amp circuit breaker or time delay fllse.
_: A properly grotmded 3-prong receptacle
should be located within reach _ff the drawer's
56" long power cord.
iJi::I,ocate the receptacle in an a(!iacent cabinet.
--within 42" of the fight side m;
--within 16" _ff the left side or
_% recessed receptacle may be located on the
right side of the cutout, 7" maMmum fl'om
the back _ff the cabinet. In this location, the
excess power cord should be coiled and
taped to the right side of the trait,
iJi::Electrical power cord is located on the right
side of the wamfing (h'awe_: i,ocate the outlet
within reach of the 56" hmg power cord in
a(!iacent cabinet, within 49" of the right side
or 16" fl'om the left side of the cutout,
A recessed receptacle can be installed on
the right side of the cuumt, 7" maximmn
fl'om the back of the cabinet.
Recessed receptacle
7" max.from rear
_ _ _ _ onrightside
Drill1VZ"I_eiefor
powercordforieit
orrightsideoutlet
location
IMPORTANT_Please read carefully)
The power cord of this appliance is equil)l)ed
with a 3-prong (grounding) plug that mates with
a standard 3-prong grotmding wall receptacle to
minimize the possibility of electric shock. The
customer should have the wall receptacle and
circuit checked by a qualNed electrician to make
sure the receptacle is propedy grounded and has
the correct I)olari_.
iJi::Where a standard 2-prong wall receptacle is
encotmtered, it is the personal responsibili F
and obligation of the customer to have it
tel)laced with a properly grotmded 3-prong
wall receptacle.
Do not, under any circumstances, cut or remove
the third (ground) prong from the power cord.
DO NOT USEAN EXTENSION CORD.
11
Page 12

Installationofthe warming drawer.
Read these instructionscompletely and carefully.
RemovePackagingand Parts
Parts provided: 4_'ood screws
[] Place carton on a fiat surface.
[] Open one end of the carton and lift off
the top piece.
[] I,ifl the wamfing drawer up and out of
[he ca I'[on,
Installation Below a Countertop
Electricaloutlet42" max.
anti4ipblockagainst flushwith sideof
rearcabinetwall 9" cabinet7" max. _ -_
fromfloorto bottorn ' ,',,
ofblock
outlet16"max.
fromleftside
231//' Min.
Solidbarrier "
1/4"Airgap
[] Place the drawer on top of the shi ) )ira*
carton to protect the drawer fl'ont and the
finished flooring.
[] Remoxe all packing materials and tape.
[] I,ocate )ackage containing 4 wood screws
and set aside.
25'_/z " Cabinettop
Installasolidbarrierbelow
acooktop(seeNote)
1" Min.* 36"
Countertop
91/4,
27" Drawer 30" Drawer
height
DimensionA
Installasolidbarrier
anda 1/4" rain.airgap
• , WARNING!
IN CANADATHISDRAWERISNOT
APPROVEDFORINSTALLATION
UNDERA COOKTOP
iJi::X,_q_en installed, the fl'ont fi_ce of the wamfing
drawer will be nearly flush with cabinet_ do(n_ or
dI'aweI" tl"oilts.
abovewarmingdrawer
_: Drawer overlaps will conceal cut edges on all sides
of the opening.
The rough opening forthe drawer must be:
--Depth: 23½" minimum fl'om inside back to fi'ont
of cabinet fl'am e.
--Width: ' __ " " ' ....2a½ for 2t x_3de models
c j tr - tr ,
28½ for 30 wide models.
--Height: 9¼"
::Ji::5" minim um above floor or 1" above toekick. 23¼"
ll'OIl/ _100I" to bottoI// el CtltOtlt is i'ecoi/llllended
for under countertop installation.
12
25W" [ 28W"
*NOTE"When installing the warming drawer below acoolctop,
a sofidbarrier mustbe &stalled at least I" from the lowest point
of thebottomof coold:opbemer box to thetop ofcutout. Use any
solid materialsuch as I/4" thickplywood. Allow at least I/4" air
gapbetween the barrier andthetop of the warmflTgdrawe_See
label ontop ofthe warmflTgdrawer for approved co&top models.
Installation below a cabinet drawer:
The wamfing drawer may be installed beneath a cabinet
(h'awe_: In this installation, a solid barrier should be
installed above the wamfing drawer to block access.
Use any solid material such as ]/4" thick plywood. _Mlow
at least ]/4" air gap between the barrier and the top of
the wamfing (h'awe_: Observe the 5" rain. above the floor
or 1" above the toekick rain. installation height.
NOTE:If you are installing in fl'alneless cabinets, it may
be necessaxw to install 1/9" wide cleats to accept drawer
mounting scre_:s. See drawer to find exact locations of
IllOtlnting Sci'ews.
Wheninstalledundera cooktop:
"_,_hmfing drawers are suitable fin" installation below only
certain specified cooktop models. See the label attached
to the top of the wamfing drawer fin" suitable models. A
solid barrier and air gap between cooktop and wamfing
drawer is required, See Note above,
Page 13

Read theseinstructionscompletely and carefully.
Installation Below Wall Ovens
Installation below a single oven
23_"
I_ Min._I
2x2or2x4anti-tip
blockagainstrear
wallg"fromfloor 2"Min.
WARNING!
IN CANADATHEWALLOVEN
ISONLYAPPROVEDFOR
INSTALLATIONWITHA BOTTOM
CUTOUTATA MINIMUM 0F32.5"
FROMTHEFLOOR.
Installation below a double oven
1" Min.abovetoekickoradjust
tooveninstallationheight
b_ 2>"
NOTE:Additionalclearancebetweencutoutsrna¥
berequired.Checkto besurethatovensupports
abovethewarmingdrawerlocationdonotobstruct
tile requiredinterior23½"depthaod 9Y4"height.
10½"
M
Dimension A Dimension B
27" Drawer 251/£" 263/4"
30" Drawer 28 I/£, 30"
Allow5/8" overlap
2x2or2x4anti4ip--
blockagainstrear
wall 9" fromfloor
tobottomofblock
1" Min.abovetoekick
!i_:_,_]en installed, the fl'ont fi_ce of the wamfing
drawer will be nearly flush with cabinetr_ dooI_
or di'awer fi'onts.
_: Drawer overlaps will conceal cut edges on
all sides of the opening.
The rough opening for the drawer must be:
JOepth; 23½" minimum from inside back
to ti'ont (ff cabinet ti'ame.
JWidth: 25½" fi)r 27" wide models
28 ½" fi)r 30" wide models.
JHeight: 9¼"
2 IlllnlIlltlIll between ();ell and drawer
C/I[O/I[S J[i)I"clearance of ox erlaps.
NOTE:Additionalclearancebeb.,veencutoutsmay
berequired.Checkto besurethatovensupports
abovethewarmingdrawerlocationdonotobstruct
tberequiredinterior23½"depthand9Y4"height.
WARNING!
_T
lOY/'
NOTE: If you are installing in fl'ameless cabinets,
it may be necessary to install 1/2" wide cleats to
accept drawer mounting screl_:s. See drawer to
find exact locations of mounting screws.
When installed undera wall oven:
_,Vam]ing draweis are suitable fill" installation
below only certain specified wall oven models,
See the label attached to the top ot the wamfing
drawer fl)r suitable models.
NOTE:Electrical receptacle can be installed
as shown fl)r countertop installations. Do not
install recel)tacle above the top (4 the wam]ing
drawer cutout.
IN CANADATHISDRAWERISNOTAPPROVED
FORINSTALLATIONUNDERA DOUBLEOVEN.
13
Page 14

Installationofthe warming drawer.
Read these instructionscompletely and carefully.
ProvideCabinetSupport
2"x 4" orequivalentrunners
i
i
i
m
i
i i
i
231//'
i
i
i
i
i
i
i
i
i
i
i
i
I__ I_ 22'_127'c J
IMPORTANT'. When installed below a single c,r
double oven, check to be sure that any oven
SUl)l)orts above the cutout do not obstruct the
23½" required depth of the wamfing drawer
ctltOtlt.
_)i_A 2" minimum clearance between oven
and warming d_'awer CIItOtlLS are required.
Additional clearance may be required if
2 x 4 blocks are used to support runners or
solid floor of the oven above.
2"x4" orequivalentrunners
231//'
30'_ J
!i_:Tile support must be level and rigidly
mounted, flush wifll file bottom edge
of file cutout.
There is no way to level the drawer once #
has been installed. Be sure supports are level
_: Tile entire weight of tile dKiwer is supported
by the framers or solid floor and inust be
capable of supporting 150 lbs.
14
!i_:Tile warming drawer may be SUl)ported by
either a solid bottom, 2 x 4 w 2 x 2 framers.
( •
Step l--Install Anti-Tip Brace
WARNING: ANTI-TIP PRECAUTIONS:
The anti-tip brace must be installed to prevent
the drawer from tipping forward when opened
and loaded.
Failure to do so could result in personal injury.
_ nstall2x4or2x2anti4ipbrace
againstrearcabinetwail 9"
fromfloorto bottom_ofbrace
L=._=.J
,,, 2x4or2x2runners "_
orsolidbottom
Page 15

Read theseinstructionscompletely and carefully.
Step2--Install WarmingDrawer
[] Slide the left corner into opening and push
power cord into the hole leading to the
outlet location. Thread the cord through
as drawer is being pushed back into the
opening.
If the outlet is installed inside the
opening, plug the cord into the outlet.
In this location, the excess power cord
should be coiled and taped to the i_ight
side of the unit. Make sure the cord does
not get t_wpped by the chmve_:
/VOTE'.Insure that the power cord does not
contact the hot sm-li_ces on the bottom of
ovens, cooktops, or any other appliance.
[] Push the drmver back until the front flange
is flush to the cabinet fl'ont.
[] Open the drawer flfllv.
[] Drill pilot holes through the holes in the
oxerlapping tl"aIIle, one on each coYneI:
[] D_ixe wood scrm_s proxided into each
coYnei;
15
Page 16

Beforeyoucall for service...
Troubleshooting -tips
Save time and money! Review the chart on this page first
and you may not need to call for service.
Possible Causes What To Do
Warming drawer A fuse in your home may * Rel)lace tile fuse or reset tile circuit breaker.
will not work he blown or the circuit
breaker tripped.
Warming drawer not * Plu _ iu
plugged in.
Controls improperly set. * See tile Usingthe warming drawer section.
Drawer does not Ball bearings out * Ftdlv exteud the drawer aml push it all the way iu.
slide smoothly of alignnlent. See the Care and cleaning section.
or drags Drawer over-loaded or * Reduce weight to less than 50 l)ouuds. Redistribttte
load mthalmaced, drawer couteuts.
Excessive Liquid ha warming * Remove liqtfid.
condensation drawer.
Uncovered foods. * Cover tbod with lid or ahuniutuu foil.
Temperature setting * Redtt('e telul)erattlre setfiug.
too high.
Incorrect Moisture * Set the Moisture Sele(tor to the Ol)eU vent ,settiu,_ to
Selector setting, allow veutim_
No heat in the Room temperature • Ttu'u the knob to LOW then back to PROOF.
PROOF setting may prevent the
thermostat from
tripping on.
Food dries out Moisture escaping. * Cover food with lid or altuniutun foil.
/6
Page 17

NOteS,
_o
17
C_
Page 18

m
Notes.
m
.2
_h
m
r_
m
m
x:
!
18
Page 19

GE Service Protection Plus rM
GE, a name recognized _xorldwide fbr quality and dependability, offsets you
Service Protection Plus '"--comprehensive protection on all your appliances--
No Matter What Brand!
Benefits Include:
• Backed by GE
• All brands covered
• Unlimited service calls
• All parts and labor costs included
• No out-of-pocket expenses
• No hidden deductibles
• One 800 nmnber to call
You _ill be completel) satisfied with our service protection or )on ma} request }our mone} back
on the remaining value of }our contract. No questions asked. It's that simple.
Protect your refl'igerator, dishwasher, washer and (byer, range, TV, VCR and much more--any brand!
Plus there's no extra charge fl)r emergency service and low monthly financing is available. Even icemaker
coverage and fl)od spoilage protection is offered. You can rest easy, knowing that all your valuable
household products are protected against expensive repairs.
Place ,our confidence in GE and call us in the U.S. toll-free at _UU.DZD.ZZZz]:
_()r I/}ore ill_orI/}atiOll.
*-MI ])l';llldS (7o_(?l(!d, up IO _0 }'(?_tl'_ old, in Ihe (o]ltJn(!llta] W._.
We TI Cover Any Appliance.
Anywhere. Anytime. *
Please place in envelope and mail to:
GeneralElectricCompany
Warranty Registration Department
P.O. Box 32150
Louisville, KY 40232-2150
/9
Page 20

Consumer Product Ownership Registration
Dear Customer:
Thank you for purchasing our product and thank you for placing your confidence in us.
VVeare proud to ha_e you as a customer!
Follow these three steps to protect your
Important: If you did not get a registration card with your
................................................................................................... _,..._ (MI h(r_
new appliance investment:
Complete mid mail
your Constuner
Product Ownerslfip
Registration today.
t]a_e the peace o/
mind of knowing we
c_ln contact you ill
th( unlikely (v(nt of
a said'iv lnodi/ication.
AJler mailing tile
registration below,
store this (tO(Hl//ellt
in a sa/b place. It
COllt ail/s i11t()rlllatioll
you will need should
you require service.
Our service nmnber is
800.GE.CARES
(800.432.2737).
Model Number Serial Number
, , , , , I I , , , , , , , I
product, detach and return the form below to
ensure that your product is registered, or register
online at ge.com.
[_('}t(t VO/lr Owl/er's
Mamml carefullx.
h will hel t) you
operate your new
appliance properly.
Consumer Product Ownership Registration
Serial Number
_, Model Number
Final I I L_slI
Nalne ] ] ] ] ] ] ] ] ] Name ] ] ] ] ] ] I I I I I I
_11-( (!1 ]
A&hx ss I I I I I I I I I I I I I I I I I I I I I I I I
I,,,,,, , , , , , I
Ms. M*>,. Mi_s
I I I I I I i
#I , , , , , , , I E-mailAddress*
Due Ha(ed
Monlh
* Please provide your e-mail address to receive, via e-mail, discounts, special otlbrs and other
important communications fl-om GE Appliances ((;EA).
20
Appliances
General Electric Compang
GEConsumer & Industrial
Louisville, K¥ 40225
ge.cem
Check here if you do not want to receNe communications fYom (;EA's carefllllv select(d
partnep,.
FAIL[ 7RETO COMPLETE AND RETI RN Tt tlS CARD DOES NOT DIMINISt t Y()[ 7R
W.kR1L\N'[_" RIGt iTS.
For inlormation about GEA's prixacy and data usage policy, go to ge.com and click on "Priva_ 3
Policy" or call 800.626.2224.
Page 21

NOteS,
_o
21
C_
Page 22

GEElectric WarmingDrawer Warranty.(Forc.stomersintheUnitedStates)
All warranty service provided by our Factory Service Centers,
or an authorized Customer Care®technician. Toschedule service,
on-line, 24 hours a day, visit us at ge.com, or carl 800.GE.CARES
(800.432.2737).Please have serial number and model number
available when calling for service.
GE Will Replace:
Any pattof the wamfing drawer which fails due to a (lefect in materials or workmanship,
Fromthe dateof the
originalpurchase
;;Ji::Service trips to your home to teach you how to use
the product.
::Ji::Improper installation, delivery or maJntenm_ce.
_: Failure of the product if it is abused, misused,
or used for other than the intended purpose or
used commerciaJly.
::Ji::Replacement of house fuses or resetting of circuit
breakers.
During this limited one-year warranty, GE will also provide, free of charge, all labor and
in-home service to replace the (lefecti\'e part,
Staple your receipt here.
Proof of the original purchase
date is needed to obtain service
under the warrantz
iJi::Dmnage to the product caused by accident, f'tre, floods
or acts of God.
::Ji::Incidental or consequential dmnage caused by possible
defects with this applim_ce.
!;?:Dmnage caused after delivery.
iJi::Product not accessible to provide required service.
EXCLUSION OFIMPLIED WARRANTIES--Your sole and exclusive remedy is product repair as provided
in this Limited Warranty. Any impfied warranties, including the implied warranties of merchantability
or fitness for aparticular purpose, are limited to one year or the shortest period allowed by law.
This warranty is extended to the original purchaser and any succeeding owner for products purchased for
home use within the USA. If the product is Iocated in an area where service by a GEAuthorized Servicer is
not available, you may be responsible for a trip charge or you may be required to bring the product to an
Authorized GE Service Location for service. In Alaska, the warranty excludes the cost of shipping or service
cafls to your home.
Some states do not allow the exclusion or limitation of incidental or consequential damages. This warranty
gives you specific legal rights, and you may also have other rights which vary from state to state. Toknow
what your legal rights are, consult your local or state consumer affairs office or your state's Attorney General.
Warrantor: General Electric Company.Louisville,KY40225
22
Page 23

GEElectric WarmingDrawer Warranty.(Forc.stomersinCanada)
Aft warranty service provided by our Factory Service Centers
or an authorized Customer Care®technician. For service, carl
1.800.361.3400.Please have serial number and model number
available when calling for service.
Staple your receipt here.
Proof of the original purchase
date is needed to obtain service
under the warranty.
Camco Will Replace:
Anypart )f the wam/in_ dxa_ex which finis due to a detect in materials or workananship.
From the date of the During this limited one-year warranty, Camco will also proxide, free of charge, all labor and
originalpurchase in-home service to replace the defbctixe part,
_: Service trips to your home to teach you how to
use the product.
iJi::Improper h_stallation, delivery or maintenance.
_: Failure of the product if it is abused, misused, or
used for other than the intended purpose or used
commercially.
_: Replacement of house fuses or resetting of circuit
breakers.
( o" .... " • "
!i/: Dmnage to the product caused by accident, fire, floods
or acts of God.
::Ji_:h_cidenta] or consequential dmnage caused by possible
defects with this applimace.
!_,_Damage caused after delivery.
!i_ Product not accessible to provide required service.
EXCLUSION OFIMPLIED WARRANTIES--Your sole and exclusive remedy is product repak as provided
in this Limited Warranty, Any implied warranties, including the implied warranties of merchantability
or fitness for aparticular purpose, are limited to one year or the shortest period allowed by law.
I WARRANTOR IS NOT RESPONSIBLE FOR CONSEQUENTIAL DAMAGES. I
I Warrantor: (:AM(',() IN(:. I
22
Page 24

ConsumerSupport.
GEAppliancesWebsite Inthe_.s.:go.cam
Have a question or need assistance with your appliance? Try the GE Appliances Website 24 hom_ a day,
any day of the year'. For greater comvnience and fhster service, pm can now download ()wner's Manuals,
order patqrs, catalogs, or e\ en schedule se_Mce on-line. You can also "_sk ()ur Team of Experts'"" your questions,
and so much more_. In Canada: www.geappliaJaces.ca
ScheduleService ,,the_.,.s.:go.cam
Expe_ (;E repair service is onl} one step awe} fl'om _our doo_: Get on-line and schedule ",our service at }our
convenience 24 hom_ am day of the ?ear! Or call 800.(;E.CARES (800.432.2737) during normal business hom_.
In Canada, call 1.800.361.3400
RealLifeDesignStudio ,,the,_.,.s.:go.cam
GE suppo_s the lJnive_al Design concept--products, services and enviromnents that can be used by people (ff
all ages, sizes and capabilities. We recognize the need to design for a wide range of physical and mental abilities
and impairments. For details of OE's Universal Design applications, including ldtchen design ideas for people with
disabilities, check out our Website today. For the heating impaired, please call S00.TDD.GEAC (800.833A322).
In Canada, contact: Manage*; Consmner Relations, Camco, Inc.
Snite 310, I Facto_" I,ane
Moncton, N.B. E1 C 9M3
ExtendedWarranties
Purchase a (;E extended warranty and learn about special discounts that are available while _our warranty is still
• o (( -c _c ,in eitbct. You can purchase it on-line am_ime, r call 8 ) ).626.2224 during natural business houlN. (lIE (]OllStln/er
Home Services will still be there after }our warrant} expires. In Canada, call 1.888.261.2133
PartsandAccessories
Individuals qualified to sel_'ice their own appliances can have pmqrs or accessories sent direcdy to their homes
(VISA, MasterCard and Discover caids aie accepted). Order on-line today, 24 hours every clay or by phone at
800.626.2002 during normal business hours.
Instructions contained in this manual cover procedures tohe performed by any user. Other servicing generally should he
referred to qualified service personnel Cautionmusthe exereised, since impreper servicing may cause unsafe operation.
Customers in Canada should consult the yellow pages for the nearest Camro service centeL or call 1.888.261.305,5.
ContactUs
If you are not satisfied with the service you receive fl'om GE, contact us on ore" Website with all the details
including your phone numbe_; or write to: General Manage_; Customer Relations
GE Appliances, Appliance Park
Louisville, KY 40225
In Canada: www.geappliaJaces.ca, or wdte to: Directo*; Consumer Relations, Camco, Inc.
Snite 310, 1 Facto_ T I,ane
Moncton, N.B. E 1C 9M3
In the Ij.S.: go.cam
In the Ij.S.: go.cam
In the U.S.: go.corn
RegisterYourApplbnce ,,the_.,.s.:oo.com
Register your new appfiaaace on-line--at your convenience! Timel) product registration will al]o_ for enhanced
communication and prompt service under the terms of }our warranty, should the need arise. You ma_ also mail
in the pre-pfinted registration card included in the l)acldng, material. In Canada: www.geappliamces.ca
Printed it7 flTe United States
 Loading...