

Page 1

GE Appliances
JKD910
JTD910
Owner’s Manual
Warming Drawer
Electric
164D3333P163 49-8933-1 05-00 JR
350A4502P201
www.geappliances.com
Safety Information
Anti-Tip Device . . . . . . . . . . . . . . 3
Safety Precautions . . . . . . . . . 3, 4
Operating Instructions
Control Knob . . . . . . . . . . . . . . . .6
Crisping Stale Items . . . . . . . . . .8
Drawer . . . . . . . . . . . . . . . . . . . . . .7
Features . . . . . . . . . . . . . . . . . . . . .5
Moisture Selector . . . . . . . . . . . . .6
ON Signal Light . . . . . . . . . . . . . .6
Pans . . . . . . . . . . . . . . . . . . . . . . . . 6
Proofing Yeast Bread
and Dough . . . . . . . . . . . . . . . . . .8
Rack . . . . . . . . . . . . . . . . . . . . . . . .7
Temperature Selection
Charts . . . . . . . . . . . . . . . . . . . .8, 9
Warming Serving Bowl
and Plates . . . . . . . . . . . . . . . . . . .7
Care and Cleaning
Control Knob . . . . . . . . . . . . . . 10
Rack . . . . . . . . . . . . . . . . . . . . . . 10
Stainless Steel . . . . . . . . . . . . . . 10
Warming Drawer Pan . . . . . . . . 10
Installation . . . . . . . . . . . 11–16
Troubleshooting Tips . . . . . 17
Customer Service
Product Registration . . . . . . . . . .2
Service Telephone
Numbers . . . . . . . . 2, Back Cover
Warranty for Customers
in Canada . . . . . . . . . . . . . . . . . . 19
Warranty for Customers
in U.S. . . . . . . . . . . . . . . . . . . . . . 18
Page 2
Customer Service Troubleshooting Tips Installation Instructions Care and Cleaning Operating Instructions Safety Instructions
2
Inside you will find many helpful hints on how to use and maintain your warming drawer
properly. Just a little preventive care on your part can save you a great deal of time and money
over the life of your warming drawer.
READ THIS MANUAL
GE & You, A Service Partnership.
FOR YOUR RECORDS
Write the model and serial numbers here:
#
#
You can find them on a label on the right side of the cavity. Remove the pan to access this label.
Staple sales slip or cancelled check here.
Proof of the original purchase date is needed to obtain service under the warranty.
You’ll find many answers to common problems in the
Before You Call For Service
section.
If you review our chart of
Troubleshooting Tips
first, you may not need to call for service at all.
If you do need service, you can relax knowing help is only a phone call away. A list of toll-free
customer service numbers is included in the back section of this manual. Or,
in the United States
,
you can always call the GE Answer Center®, at 800-626-2000, 24 hours a day, 7 days a week.
In Canada
, call 1-800-361-3400.
OR
Visit our Website at:
www.geappliances.com
IF YOU NEED SERVICE
IMPORTANT!
Fill out the Consumer Product Registration Card.
Two easy ways to register your appliance!
■ Through the internet at www.geappliances.com
■ Complete and mail the enclosed Product Registration Card
Page 3
Safety Instructions Operating Instructions Care and Cleaning Installation Instructions Troubleshooting Tips Customer Service
IMPORTANT SAFETY INFORMATION.
READ ALL INSTRUCTIONS BEFORE USING.
WARNING!
For your safety, the information in this manual must be followed to minimize the risk of fire or
explosion, electric shock, or to prevent property damage, personal injury, or loss of life.
When using electrical appliances, basic safety precautions should be followed, including the
following:
■Use this appliance only for its intended
purpose as described in this Owner’s
Manual.
■Be sure your appliance is properly installed
and grounded by a qualified technician in
accordance with the provided installation
instructions.
■Do not attempt to repair or replace any
part of your warming drawer unless it is
specifically recommended in this manual.
All other servicing should be referred to a
qualified technician.
■Have the installer show you the location
of the circuit breaker or fuse. Mark it for
easy reference.
■Before performing any service, unplug
or disconnect the power supply at the
household distribution panel by
removing the fuse or switching off
the circuit breaker.
■Do not leave children alone—children
should not be left alone or unattended in
an area where an appliance is in use. They
should never be allowed to sit or stand on
any part of the appliance.
■Do not allow anyone to climb, stand or
hang on the drawer. They could damage
the warming drawer, or cause severe
personal injury.
■Be sure the warming drawer is securely
installed in a cabinet that is firmly attached
to the house structure.
■Never leave the drawer open when you
are not watching the warming drawer.
■Always keep combustible wall covering,
curtains or drapes a safe distance from
your warming drawer.
■Always keep wooden and plastic utensils
and canned food a safe distance away
from your warming drawer.
■Teach children not to play with the
controls or any other part of the warming
drawer.
■Do not place more than 50 pounds
into the drawer.
■For your safety, never use your appliance
for warming or heating the room.
SAFETY PRECAUTIONS
All warming drawers can tip and injury could result if not properly installed.
To prevent accidental tipping of the warming drawer, attach it to the wall with an anti-tip brace
as described in the Installation Instructions.
WARNING
ANTI-TIP BRACE REQUIRED
3
Page 4
Customer Service Troubleshooting Tips Installation Instructions Care and Cleaning Operating Instructions Safety Instructions
4
IMPORTANT SAFETY INFORMATION.
READ ALL INSTRUCTIONS BEFORE USING.
The purpose of the warming drawer is to hold hot cooked foods at serving temperature.
Always start with hot food; cold food cannot be heated or cooked in the warming drawer.
■Do not warm food in the warming drawer
for more than two hours.
■
CAUTION:
Items of interest to children
should not be stored in cabinets above
the warming drawer; children climbing
on the drawer to reach items could be
seriously injured.
■Use only dry pot holders—moist or damp
pot holders on hot surfaces may result in
burns from steam. Do not let pot holders
touch hot heating elements. Do not use a
towel or other bulky cloth.
■Do not let cooking grease or other
flammable materials accumulate in or
near the warming drawer.
■Do not use water on grease fires. Never pick
up a flaming pan. Turn the controls off.
■Flame in the warming drawer can be
smothered by closing the drawer or using
a multi-purpose dry chemical or foam-type
fire extinguisher.
■Do not touch the heating element or the
interior surface of the warming drawer.
These surfaces may be hot enough to burn.
■
REMEMBER:
The inside surface of the
warming drawer may be hot when the
drawer is opened.
■Do not store or use combustible materials,
gasoline or other flammable vapors and
liquids in the vicinity of this or any other
appliance.
■Never leave jars or cans of fat drippings in
or near your warming drawer.
■Use care when opening the drawer. Open
the drawer a crack and let hot air or steam
escape before removing or replacing food.
Hot air or steam which escapes can cause
burns to hands, face and/or eyes.
■Do not heat unopened food containers.
Pressure could build up and the container
could burst, causing an injury.
■Keep the vent unobstructed.
■Do not use the warming drawer to dry
newspapers. If overheated, they can catch
on fire.
■Do not use the warming drawer for a
storage area. Items stored in the warming
drawer can ignite.
■Do not leave paper products, cooking
utensils or food in the warming drawer
when not in use.
■Clean only parts listed in the
Care and
cleaning of the warming drawer
section.
■Do not use aluminum foil to line the
drawer. Foil is an excellent heat insulator
and will trap heat beneath it. This will upset
the performance of the drawer and it could
damage the interior finish.
WARNING!
SAFETY PRECAUTIONS
READ AND FOLLOW THIS SAFETY INFORMATION CAREFULLY.
SAVE THESE INSTRUCTIONS
Page 5
5
Safety Instructions Operating Instructions Care and Cleaning Installation Instructions Troubleshooting Tips Customer Service
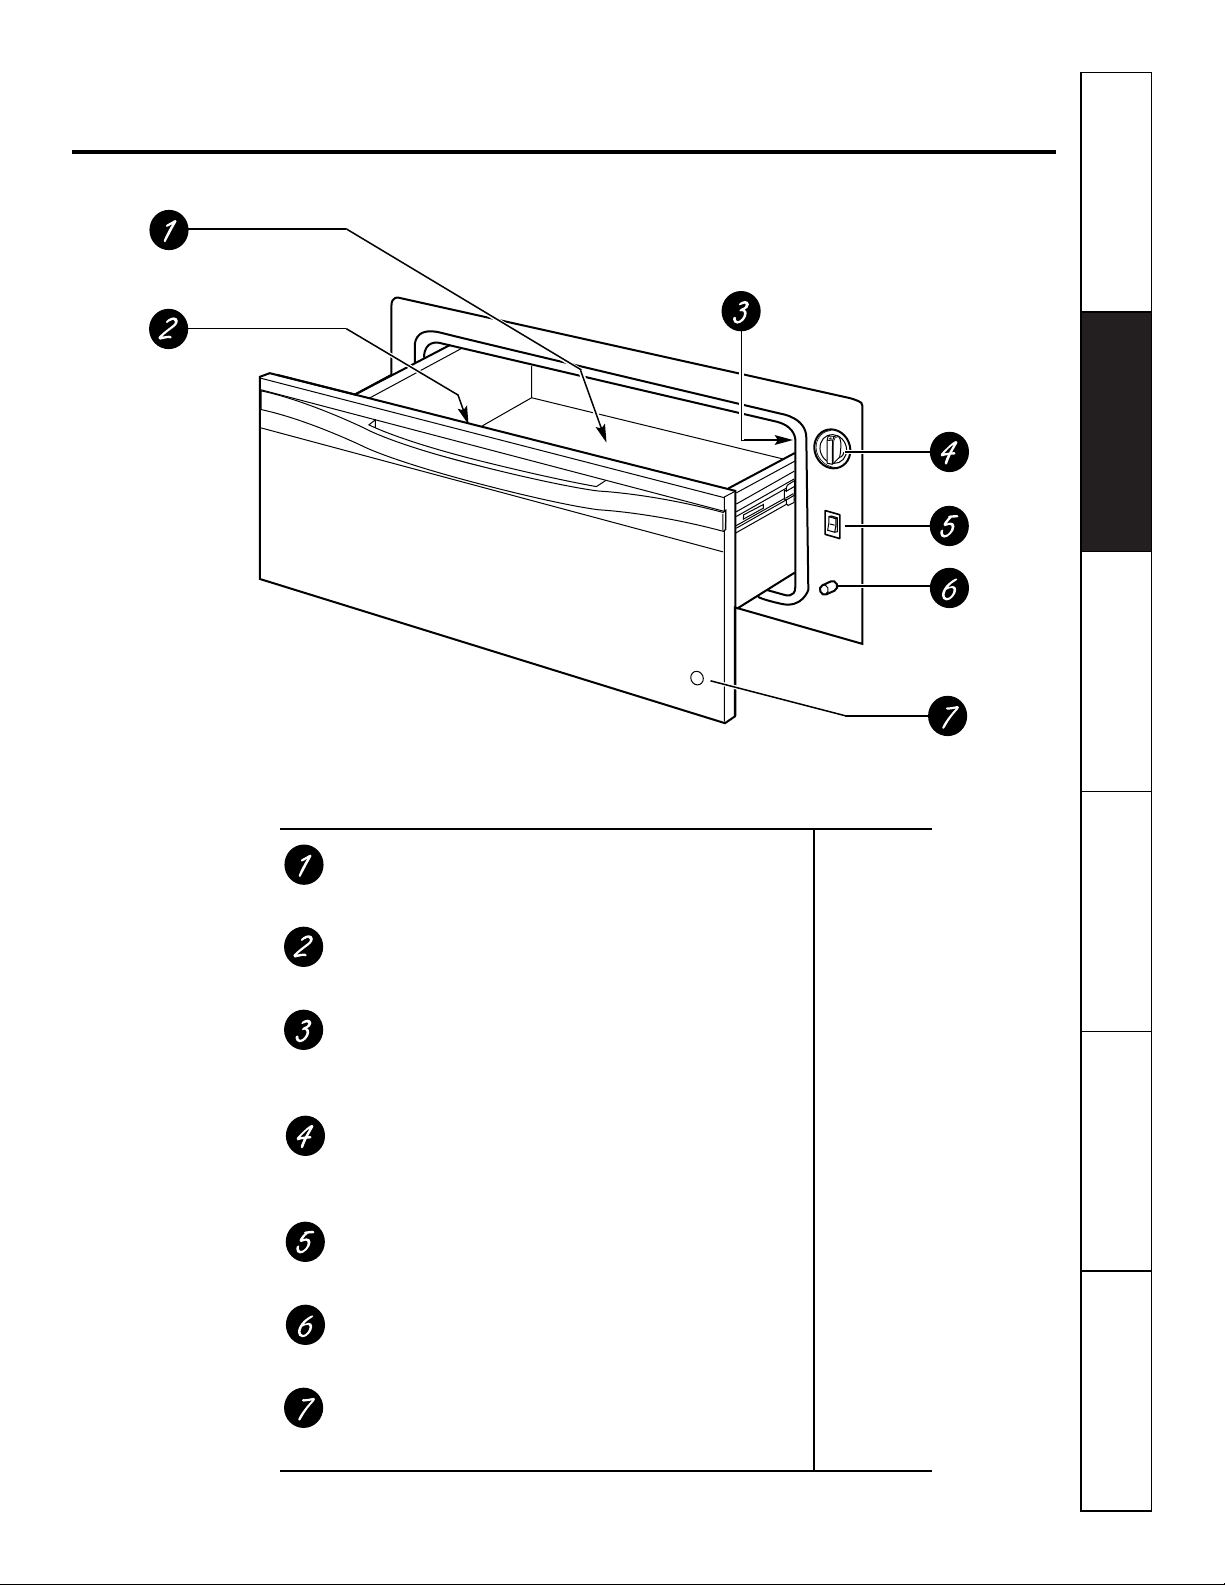
Features of your warming drawer.
Not all features are on all models. Appearance may vary.
Feature Index Page
Warming Drawer Pan
Removable for cleaning.
10
Moisture Selector (on back of panel)
Use this to keep foods moist or crisp.
6, 8, 9
Model and Serial Numbers
On a label on the right side of the cavity
2
(remove pan to access).
Control Knob
The control knob has settings for
6, 8, 9
PROOF, LOW, MED
and
HIGH.
ON/OFF Switch
Use this switch to turn the warming drawer on.
6
ON Signal Light
Glows when the
ON/OFF
switch is in the ONposition.
6
ON Signal Light Viewer Lens
The ON signal light is visible through the
6
light viewer lens when the drawer is closed.
Page 6
Customer Service Troubleshooting Tips Installation Instructions Care and Cleaning Operating Instructions Safety Instructions
6
Using the warming drawer.
The warming drawer will keep hot, cooked foods at serving temperature. Always start with hot food.
Do not use to heat cold food other than proofing yeast dough, crisping crackers, chips or dry cereal.
Control Knob
The warming drawer controls are hidden
with the drawer shut. Open the drawer.
The controls are on the right side of the
front frame.
To use the warming drawer, press the
ON/OFF
switch to the ONposition.
Slide the moisture selector control to the
open or closed setting.
(See the Moisture
Selector section.)
Turn the control knob to the desired
setting.
PROOF
. . . . . . . . . . . . . . . . . . 75–95°F
LOW
. . . . . . . . . . . . . . . . . . . . 140–160°F
MED
. . . . . . . . . . . . . . . . . . . . 160–195°F
HIGH
. . . . . . . . . . . . . . . . . . . 195–230°F
ON Signal Light
The ONsignal light is located below the
ON/OFF
switch and glows when the
ON/OFF
switch is in the ONposition. It
stays on until the
ON/OFF
switch is moved
to the
OFF
position.
The ONsignal light is visible through the
light viewer in the drawer front panel
when the drawer is closed. This is a
reminder that the heat is on.
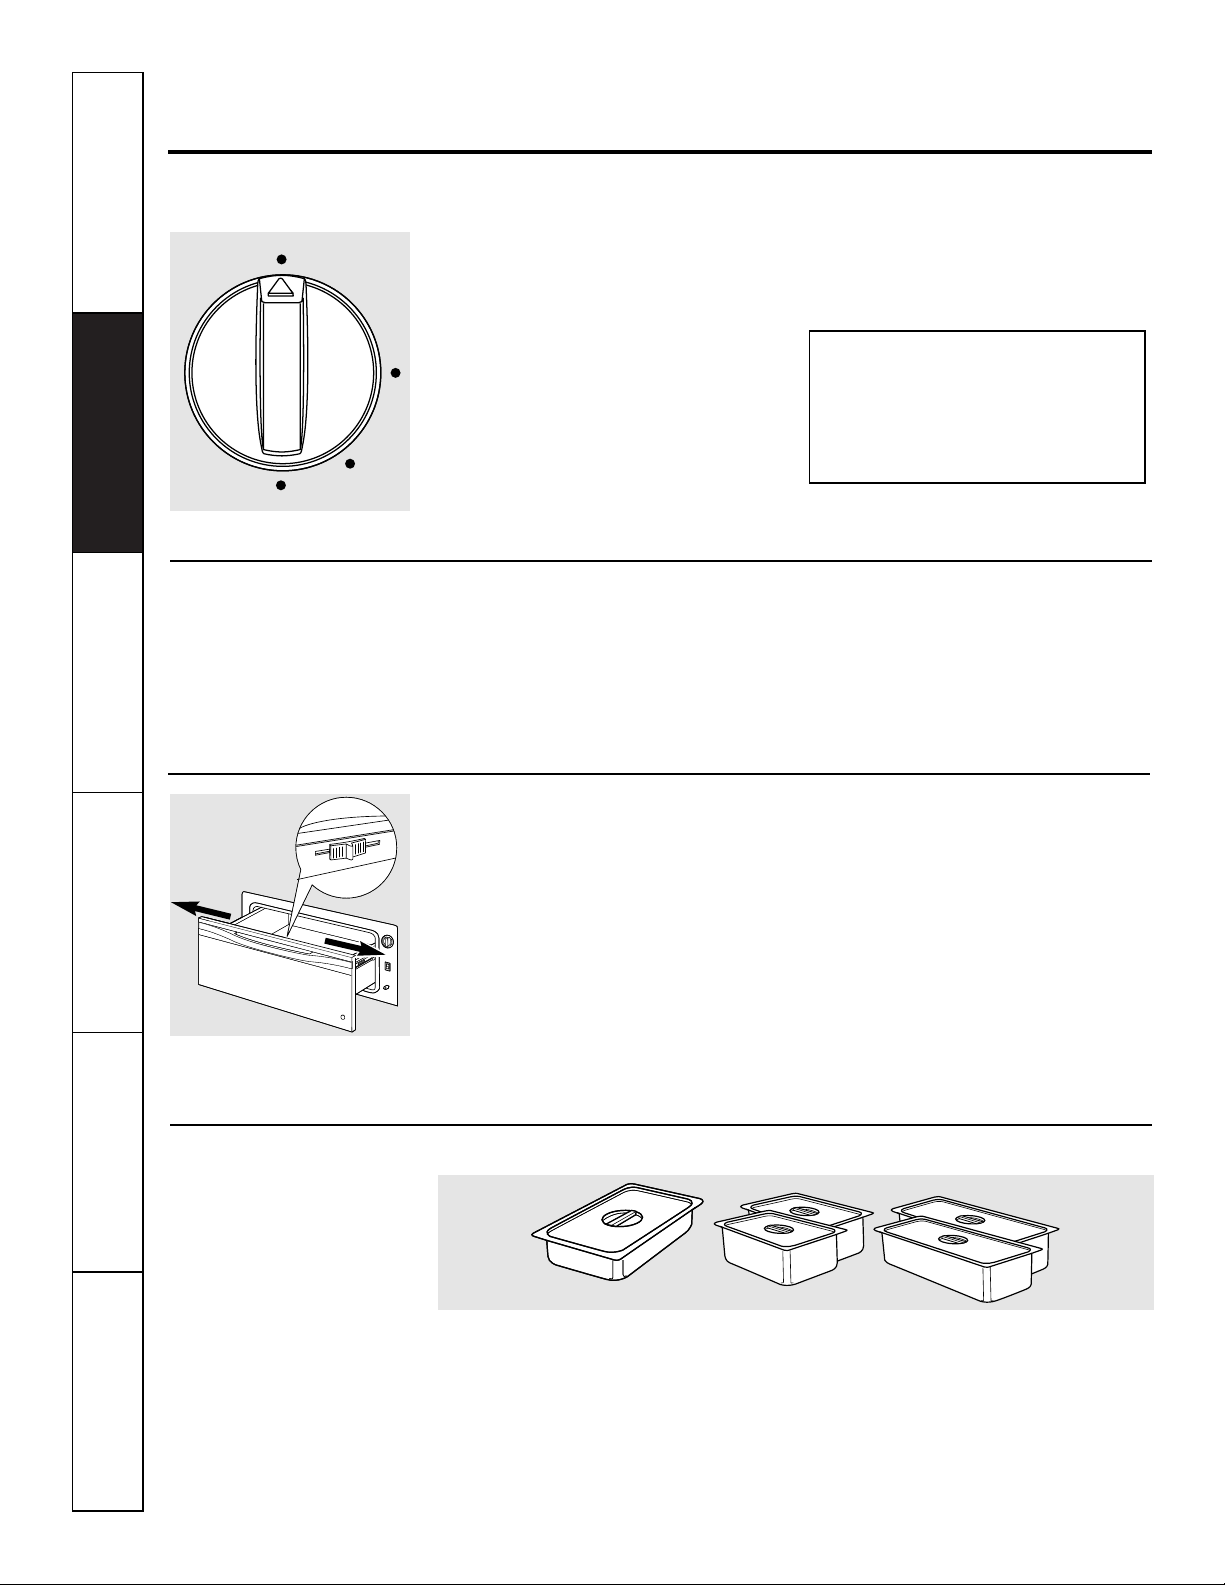
Additional Pans
An accessory pan kit
JXPN1
is available
from GE at extra cost.
Five commercial pans with lids (4” deep)
■
One large pan (14 quarts)
■
Two medium pans (6 quarts each)
■
Two small pans (3 quarts each)
Moisture Selector
The moisture selector is located on the
inside front of the drawer.
To keep foods moist,
slide the moisture
selector control away from the control
knob. This closes the vent and seals the
moisture inside the drawer. With the vent
closed hot foods stay moist and soft.
In this setting condensation may occur around
the inside edge of the drawer.
To keep foods crisp,
slide the moisture
selector control to the right towards the
control knob. This opens the vents and
allows the moisture to escape.
With the vents open, it is normal for moisture to
collect on surfaces above the warming drawer.
PROOF
HI
MED
LO
Moist
Moist
Closed
Closed
Vent
Vent
Crisp
Crisp
Open
Open
Vent
Vent
Page 7

7
Safety Instructions Operating Instructions Care and Cleaning Installation Instructions Troubleshooting Tips Customer Service
To Warm Serving Bowl and Plates
To warm serving bowls and plates set the
control on LOW.
■Use only heat-safe dishes.
■Place the empty dishes on the rack to
raise them off the bottom of the
drawer. If you want hotter dishes or
want to heat fine china, please check
with the manufacturer of the dishes for
their maximum heat tolerance.
■Preheat empty serving dish while
preheating the drawer.
■When holding hot, cooked foods and
warming empty serving dishes at the
same time, place the serving dishes on
the high rack position and the food on
the bottom of the drawer.
CAUTION: Dishes may be hot. Use pot holders
or mitts when removing hot dishes.
When using the warming drawer…
Do not line the warming drawer with
aluminum foil.
■
Allow time for the drawer to be
preheated:
LOW
8 minutes
MED
15 minutes
HIGH
20 minutes
NOTE: It is not necessary to preheat the drawer
for proofing.
Food in heat-safe glass and glass ceramic
pans may need higher thermostat setting
as compared to food in metal pans.
■Repeated opening of the drawer allows
the hot air to escape and the food to
cool. Allow extra time for temperature
inside the drawer to stabilize after
adding items.
■With large loads it may be necessary to
use a higher thermostat setting and
cover some of the cooked food items.
■Food should be kept hot in its cooking
container or transferred to a heat-safe
serving dish.
■Aluminum foil may be used to cover
food to prevent it from drying out.
CAUTION: Plastic containers or plastic
wrap will melt if in direct contact with
the drawer. Melted plastic may not be
removable and is not covered under
your warranty.
■Remove serving spoons, etc., before
placing containers in warming drawer.
Rack
■Rack will fit from front to back.
■Preheat with the rack in place.
■Using the rack allows for double
stacking of items.
Double stacking items with the rack in position.
Page 8

Customer Service Troubleshooting Tips Installation Instructions Care and Cleaning Operating Instructions Safety Instructions
8
Using the warming drawer.
To Proof Yeast Bread Dough
Yeast dough can be proofed in the warming
drawer.
■Place your dish on the warming drawer
pan bottom.
■You must always turn the control
knob to
LOW
then immediately back
to
PROOF.
■Close the vent.
■Lightly oil the top of the dough in a
bowl large enough to double the
dough size. Cover with a cloth.
■Preheating not required for proofing.
■Check the dough height in 40 minutes.
Add time as needed. The dough
should remain in the drawer until it has
doubled in size and a slight depression
remains when the surface is touched
gently with a finger.
To Crisp Stale Items
■Place food in low sided dishes or pans.
■Preheat on
LOW
setting and open
the vent.
■Check crispness after 45 minutes. Add
time as needed.
Temperature Selection Chart for Crisp Foods
Food Type Control Setting Moisture Selector Setting
Bacon HIGH OPEN
Bread, hard rolls MED OPEN
Fried foods HIGH OPEN
Pies, two crusts MED OPEN
Pizza HIGH OPEN
Potatoes, baked HIGH OPEN
Tortilla Chips LOW OPEN
Tips:
■Leave food uncovered.
■Do not use plastic containers or plastic wrap.
■Preheat prior to use according to recommended times.
To keep several different foods hot, set the temperature to the food needing the highest setting.
Place the items needing the highest setting on the bottom of the drawer and items needing less
heat on the rack.
Moist
Moist
Closed
Closed
Vent
Vent
Crisp
Crisp
Open
Open
Vent
Vent
Page 9

9
Safety Instructions Operating Instructions Care and Cleaning Installation Instructions Troubleshooting Tips Customer Service
Temperature Selection Chart for Moist Foods
Food Type Control Setting Moisture Selector Setting
Beef, medium and well done* MED CLOSED
Bread, soft rolls MED CLOSED
Casseroles MED CLOSED
Cooked cereal MED CLOSED
Eggs MED CLOSED
Fish, seafood MED CLOSED
Fruit MED CLOSED
Gravy, cream sauces MED CLOSED
Ham MED CLOSED
Lamb MED CLOSED
Pancakes, waffles HIGH CLOSED
Pies, one crust MED CLOSED
Pork MED CLOSED
Potatoes, mashed MED CLOSED
Poultry HIGH CLOSED
Vegetables MED CLOSED
* USDA/FSIS recommends an internal temperature of 145°F. as the minimum doneness for beef. Use a portable meat thermometer to check internal
temperatures.
Tips:
■Cover food with lid or aluminum foil.
■Do not put water in the warming pan.
■Do not use plastic containers or plastic wrap.
■Preheat prior to use according to recommended times.
To keep several different foods hot, set the temperature to the food needing the highest setting.
Place the items needing the highest setting on the bottom of the drawer and items needing less
heat on the rack.
Moist
Moist
Closed
Closed
Vent
Vent
Page 10

Care and cleaning of the warming drawer.
Be sure the controls are in the OFF position and all surfaces are cool before cleaning any part
of the warming drawer.
Warming Drawer Pan
Most cleaning can be done to the pan
with the pan in place in the drawer.
However, the pan may be removed if
further cleaning is needed.
Open the drawer fully. Using the finger
grasp holds on the side of the drawer, lift
the pan up and out.
Use soap and warm water to thoroughly
clean.
Rack
Clean the rack with detergent and water.
After cleaning, rinse the rack with clean
water and dry with a clean cloth.
Stainless Steel
Do not use a steel wool pad; it will scratch the
surface.
Clean with hot soapy water. Rinse and dry.
If food soil remains, try a general kitchen
cleaner, such as Fantastik®, Simple
Green® or Formula 409®.
For hard to clean soil use a standard
stainless steel cleaner such as Bon-Ami®
or Cameo®. Soils can also be soaked
several hours with wet towels. Apply
cleaner with a damp sponge, rinse
thoroughly and dry. Always scrub lightly
in the direction of the grain.
After cleaning, use a stainless steel polish such
as Stainless Steel Magic®.
Control Knob
The control knob may be removed for easier
cleaning.
Before removing the knob for cleaning,
please note that it is in the
PROOF
position.
Wash the knob in soap and water or a
vinegar and hot water solution but do
not soak.
Dry and replace the knob.
10
Customer Service Troubleshooting Tips Installation Instructions Care and Cleaning Operating Instructions Safety Instructions
Page 11

Safety Instructions Operating Instructions Care and Cleaning Installation Instructions Troubleshooting Tips Customer Service
11
Installation of the warming drawer.
Read these instructions completely and carefully.
Before You Begin
IMPORTANT: Save these instructions for the
local electrical inspector’s use.
IMPORTANT: OBSERVE ALL GOVERNING CODES
AND ORDINANCES.
NOTE TO INSTALLER: Leave these instructions
with the appliance after installation is completed.
NOTE TO CONSUMER: Keep this Owner’s
Manual and Installation Instructions for
future use.
NOTE: This appliance must be properly
grounded.
NOTE: Insure that the power cord does not
contact the hot surfaces on the bottom of
ovens, cooktops, or any other appliance.
Tools Needed
■2 x4 or 2 x 2 lumber for runners and brace
■Wood screws and adhesive or other hardware
for installing runners or shelf to support
warmer drawer.
Runners must be level, rigidly mounted and capable of
supporting 150 pounds.
■Saw
■Level
■Drill and 1/16″bit
■Phillips screwdriver
Custom Panel Kits
ZXD27B—
This kit provides for the installation of a
custom front panel on 27″wide models.
ZXD30B—
This kit provides for the installation of a
custom front panel on 30″wide models.
Product Dimensions
27″ 231⁄4″
9″
1″
A
10
1
⁄2″
26
1
⁄4″
Including handle
Dimension A
27
″
Drawer 30″Drawer
26
3
⁄
4
″
30
″
Page 12

Installation of the warming drawer.
Read these instructions completely and carefully.
Advance Planning
■The warming drawer may be installed directly
into a wall or wall oven cabinetry.
■The warming drawer may be installed below a
countertop, a single or double oven and side by
side using 2 drawers.
■When installing warming drawer with a cooktop
allow a 2″minimum from bottom of a cooktop
burner box to top of cutout.
■Electrical power cord is located on the right
side of the warming drawer. Locate the outlet
within reach of the 56″long power cord in
adjacent cabinet, within 42″of the right side
or 16″from the left side of the cutout.
A recessed receptacle can be installed on
the right side of the cutout, 7″maximum
from the back of the cabinet.
Grounding the Appliance
IMPORTANT—(Please read carefully)
FOR PERSONAL SAFETY, THIS APPLIANCE
MUST BE PROPERLY GROUNDED.
Do not use an extension cord or adapter plug
with this appliance. Follow National Electrical
codes and ordinances.
This warming drawer must be supplied with 120V,
60Hz, and connected to an individual, properly
grounded branch circuit, and protected by a 15
or 20 amp circuit breaker or time delay fuse.
■A properly grounded 3-prong receptacle
should be located within reach of the drawer’s
56″long power cord.
■Locate the receptacle in an adjacent cabinet.
■—within 42″of the right side or,
■—within 16″of the left side or
■—A recessed receptacle may be located on the
right side of the cutout, 7″maximum from the
back of the cabinet. In this location, the excess
power cord should be coiled to the right side
of the unit using the cord clip provided.
IMPORTANT—(Please read carefully)
The power cord of this appliance is equipped with
a 3-prong (grounding) plug that mates with a
standard 3-prong grounding wall receptacle to
minimize the possibility of electric shock. The
customer should have the wall receptacle and
circuit checked by a qualified electrician to make
sure the receptacle is properly grounded and has
the correct polarity.
■Where a standard 2-prong wall receptacle is
encountered, it is the personal responsibility
and obligation of the customer to have it
replaced with a properly grounded 3-prong
wall receptacle.
Do not, under any circumstances, cut or remove
the third (ground) prong from the power cord.
DO NOT USE AN EXTENSION CORD.
Recessed receptacle
7″max. from rear
on right side
Drill 1
1
⁄2″hole for
power cord for left
or right side outlet
location
Customer Service Troubleshooting Tips Installation Instructions Care and Cleaning Operating Instructions Safety Instructions
12
Page 13

Read these instructions completely and carefully.
Remove Packaging and Parts
Parts provided:
■4 Wood screws
Place carton on a flat surface.
Open one end of the carton and lift off
the top piece.
Lift the warming drawer up and out of
the carton.
Place the drawer on top of the shipping
carton to protect the drawer front and the
finished flooring.
Remove all packing materials and tape.
Locate package containing 4 wood screws
and set aside.
Installation Below a Countertop
■When installed, the front face of the warming
drawer will be nearly flush with cabinetry doors
or drawer fronts.
■Drawer overlaps will conceal cut edges on all
sides of the opening.
The rough opening for the drawer must be:
—Depth:
23
1
⁄2″minimum from inside back to
front of cabinet frame.
—Width:
25
1
⁄2″for 27″ wide models
28
1
⁄2″for 30″ wide models.
—Height:
9
1
⁄4″
■5″minimum above floor or 1″above toekick.
23
1
⁄4″from floor to bottom of cutout is
recommended for under countertop
installation.
NOTE:
If you are installing in frameless cabinets,
it may be necessary to install 1/2″wide cleats to
accept drawer mounting screws. See drawer to
find exact locations of mounting screws.
When installed under a cooktop:
Warming drawers are suitable for installation
below only certain specified cooktop models.
See the label attached to the top of the
warming drawer for suitable models.
Electrical
outlet 16″
max. from
left side
Electrical outlet 42″
max. from right side
1
1
⁄2″Cabinet top
2″Min.*
25″
9″
7″
9
1
⁄4″
23
1
⁄2″ Min.
36″
Countertop
height
A
Dimension A
27
″
Drawer 30″Drawer
25
1
⁄
2
″
281⁄
2
″
Electrical outlet
flush with side of
cabinet 7″ max.
Install 2x4 or 2x2
anti-tip block
against rear
cabinet wall 9”
from floor to
bottom of block
* NOTE: When installing warming drawer with
a cooktop allow a 2″minimum from bottom of a
cooktop burner box to top of cutout.
13
Safety Instructions Operating Instructions Care and Cleaning Installation Instructions Troubleshooting Tips Customer Service
Page 14

Installation of the warming drawer.
Read these instructions completely and carefully.
Installation Below Wall Ovens
■When installed, the front face of the warming
drawer will be nearly flush with cabinetry doors
or drawer fronts.
■Drawer overlaps will conceal cut edges on all
sides of the opening.
The rough opening for the drawer must be:
—Depth:
23
1
⁄2″minimum from inside back to
front of cabinet frame.
—Width:
25
1
⁄2″for 27″ wide models
28
1
⁄2″for 30″ wide models.
—Height:
9
1
⁄4″
—
Allow 2″minimum between oven and drawer
cutouts for clearance of overlaps.
NOTE:
If you are installing in frameless cabinets,
it may be necessary to install 1/2″wide cleats to
accept drawer mounting screws. See drawer to
find exact locations of mounting screws.
When installed under a wall oven:
Warming drawers are suitable for installation
below only certain specified wall oven models.
See the label attached to the top of the warming
drawer for suitable models.
NOTE:
Electrical receptacle can be installed
as shown for countertop installations. Do not
install receptacle above the top of the warming
drawer cutout.
23
1
⁄2″
Min.
2x2 or 2x4 anti-tip
block against rear
wall 9” from floor
to bottom of block
1″Min. above toekick or adjust
to oven installation height
A
B
Oven
cutout
NOTE:
Additional clearance between cutouts may
be required. Check to be sure that oven supports
above the warming drawer location do not obstruct
the required interior 23
1
⁄2″depth and 91⁄4″height.
Installation below a single oven
2″Min
1″Min. above toekick
NOTE:
Additional clearance between cutouts may
be required. Check to be sure that oven supports
above the warming drawer location do not obstruct
the required interior 23
1
⁄2″depth and 91⁄4″height.
Installation below a double oven
Dimension A Dimension B
27
″
Drawer 251⁄
2
″
263⁄
4
″
30″Drawer 281⁄
2
″
30
″
2x2 or 2x4 anti-tip
block against rear
wall 9” from floor
to bottom of block
9″
2″
Min.
Allow 5/8”
overlap on
all sides
10
1
⁄2″
23
1
⁄2″
Min.
Allow 5/8″overlap
on all sides
A
Oven
cutout
23
1
⁄4″
10
1
⁄2″
B
9″
9
1
⁄4″
23
1
⁄4″
9
1
⁄4″
Customer Service Troubleshooting Tips Installation Instructions Care and Cleaning Operating Instructions Safety Instructions
14
Page 15

Safety Instructions Operating Instructions Care and Cleaning Installation Instructions Troubleshooting Tips Customer Service
15
Read these instructions completely and carefully.
Step 1—Install Anti-Tip Brace
WARNING: ANTI-TIP PRECAUTIONS:
The anti-tip brace must be installed to prevent
the drawer from tipping forward when opened
and loaded.
Failure to do so could result in personal injury.
Install 2x4 or 2x2 anti-tip brace
against rear cabinet wall 9″
from floor to bottom of brace
2x4 or 2x2 runners
or solid bottom
9″
Provide Cabinet Support
IMPORTANT:
When installed below a single or
double oven, check to be sure that any oven
supports above the cutout do not obstruct the
23
1
⁄2″required depth of the warming drawer
cutout.
■
A 2″minimum clearance between oven
and warming drawer cutouts are required.
Additional clearance may be required if
2 x 4 blocks are used to support runners or
solid floor of the oven above.
■
The warming drawer may be supported by
either a solid bottom, 2 x 4 or 2 x 2 runners.
■
The support must be level and rigidly
mounted, flush with the bottom edge
of the cutout.
■
There is no way to level the drawer once it
has been installed. Be sure supports are level.
■
The entire weight of the drawer is supported
by the runners or solid floor and must be
capable of supporting 150 lbs.
23
1
⁄2″
22″
27″
2″x 4″or equivalent runners
23
1
⁄2″
25″
30″
2″x 4″or equivalent runners
Page 16

Installation of the warming drawer.
Read these instructions completely and carefully.
Step 2—Install Warming Drawer
Slide the left corner into opening and push
power cord into the hole leading to the
outlet location. Thread the cord through as
drawer is being pushed back into the
opening.
If the outlet is installed inside the opening,
plug the cord into the outlet. Coil power
cord and install it in the clip on the right side
of the unit. Make sure the cord does not get
trapped by the drawer.
NOTE:
Insure that the power cord does not
contact the hot surfaces on the bottom of
ovens, cooktops, or any other appliance.
Push the drawer back until the front flange
is flush to the cabinet front.
Open the drawer fully.
Drill pilot holes through the holes in the
overlapping frame, one on each corner.
Drive wood screws provided into each
corner.
Customer Service Troubleshooting Tips Installation Instructions Care and Cleaning Operating Instructions Safety Instructions
16
Page 17

17
Safety Instructions Operating Instructions Care and Cleaning Installation Instructions Troubleshooting Tips Customer Service
Before You Call For Service…
Troubleshooting Tips
Save time and money! Review the chart on this page
first and you may not need to call for service.
Problem Possible Causes What To Do
Warming drawer
A fuse in your home may • Replace the fuse or reset the circuit breaker.
will not work
be blown or the circuit
breaker tripped.
Warming drawer not • Plug in.
plugged in.
Controls improperly set. • See the
Using the warming drawer
section.
Drawer does not
Ball bearings out • Fully extend the drawer and push it all the way in.
slide smoothly
of alignment. See the
Care and cleaning
section.
or drags
Drawer over-loaded or • Reduce weight to less than 50 pounds. Redistribute
load unbalanced. drawer contents.
Excessive
Liquid in warming • Remove liquid.
condensation
drawer pan.
Uncovered foods. • Cover food with lid or aluminum foil.
Temperature setting • Reduce temperature setting.
too high.
Incorrect Moisture • Set the Moisture Selector to the open vent setting to
Selector setting. allow venting.
No heat in the
Room temperature • Turn the knob to
LOW
then back to
PROOF.
PROOF setting
may prevent the
thermostat from
tripping on.
Food dries out
Moisture escaping. • Cover food with lid or aluminum foil.
Page 18

For The Period Of: GE Will Replace, At No Charge To You:
One Year Any part
of the warming drawer which fails due to a defect in materials or workmanship.
From the date of the
During this
full one-year warranty,
GE will also provide,
free of charge,
all labor and
original purchase
in-home service to replace the defective part.
GE Electric Warming Drawer Warranty.
(For Customers in the United States)
All warranty service provided by our Factory Service Centers
or an authorized Customer Care
®
technician. For service,
call 800-GE-CARES.
■Service trips to your home to teach you how to
use the product.
■Improper installation.
■Failure of the product if it is abused, misused, or
used for other than the intended purpose or used
commercially.
■Replacement of house fuses or resetting of circuit
breakers.
■Damage to the product caused by accident, fire,
floods or acts of God.
■Incidental or consequential damage to personal
property caused by possible defects with this appliance.
What GE Will Not Cover:
This warranty is extended to the original purchaser and any succeeding owner for products purchased for
home use within the USA. In Alaska, the warranty excludes the cost of shipping or service calls to your home.
Some states do not allow the exclusion or limitation of incidental or consequential damages. This warranty
gives you specific legal rights, and you may also have other rights which vary from state to state. To know
what your legal rights are, consult your local or state consumer affairs office or your state’s Attorney General.
Warrantor: General Electric Company. Louisville, KY 40225
Customer Service Troubleshooting Tips Installation Instructions Care and Cleaning Operating Instructions Safety Instructions
18
Page 19

Read your Owner’s Manual.
If you then have any questions about operating the product, please contact your
dealer or our Consumer Relations office at:
Manager, Consumer Relations
Camco Inc.
1 Factory Lane, Suite 310
Moncton, N.B.
E1C 9M3
Or call, toll free: 1-800-361-3400
WARRANTOR IS NOT RESPONSIBLE FOR CONSEQUENTIAL DAMAGES.
Warrantor: CAMCO INC.
19
Safety Instructions Operating Instructions Care and Cleaning Installation Instructions Troubleshooting Tips Customer Service
GE Electric Warming Drawer Warranty.
(For Customers in Canada)
All warranty service provided by our Factory Service Centers
or an authorized Customer Care
®
technician. For service,
call 1-800-361-3400.
■Service trips to your home to teach you how to use
the product.
■Improper installation.
■Failure of the product if it is abused, misused,
or used for other than the intended purpose or
used commercially.
■Replacement of house fuses or resetting of circuit
breakers.
■Damage to the product caused by accident, fire, floods
or acts of God.
■Incidental or consequential damage to personal
property caused by possible defects with this appliance.
What GE Will Not Cover:
For The Period Of: GE Will Replace, At No Charge To You:
One Year Any part
of the warming drawer which fails due to a defect in materials or workmanship.
From the date of the
During this
full one-year warranty,
GE will also provide,
free of charge,
all labor and
original purchase
in-home service to replace the defective part.
Page 20

Customer Service Troubleshooting Tips Installation Instructions Care and Cleaning Operating Instructions Safety Instructions
20
Printed in the USA
Service Telephone Numbers.
GE Answer Center
®
In the U.S.: 800-626-2000
The GE Answer Center® is open 24 hours a day, 7 days a week.
Visit our Website at:
www.geappliances.com
In Canada,
call 1-800-361-3400.
In-Home Repair Service
In the U.S.: 800-432-2737
Expert GE repair service is only a phone call away.
In Canada,
call 1-800-361-3400.
Special Needs Service
In the U.S.: 800-626-2000
GE offers, free of charge, a brochure to assist in planning a barrier-free kitchen for persons
with limited mobility.
In the U.S., call 800-TDD-GEAC (800-833-4322).
In Canada,
contact: Manager, Consumer Relations, Camco Inc., 1 Factory Lane, Suite 310,
Moncton, N.B., E1C 9M3.
Service Contracts
In the U.S.: 800-626-2224
Purchase a GE service contract while your warranty is still in effect and you’ll receive a
substantial discount. GE Consumer Service will still be there after your warranty expires.
In Canada,
call 1-800-461-3636.
Parts and Accessories
In the U.S.: 800-626-2002
Individuals qualified to service their own appliances can have parts or accessories sent directly
to their homes (VISA, MasterCard and Discover cards are accepted).
Instructions contained in this manual cover procedures to be performed by any user. Other servicing
generally should be referred to qualified service personnel. Caution must be exercised, since
improper servicing may cause unsafe operation.
In Canada, please consult your yellow pages for your local Camco number.
Service Satisfaction
If you are not satisfied with the service you receive from GE:
First,
contact the people who serviced your appliance.
Next,
if you are still not pleased,
in the U.S.,
write all the details—including your phone number—
to: Manager, Customer Relations, GE Appliances, Appliance Park, Louisville, KY 40225; or,
in Canada,
to Manager, Consumer Relations, Camco Inc., 1 Factory Lane, Suite 310, Moncton,
N.B., E1C 9M3.
 Loading...