

Page 1
.q&com
Safety Instru_tions ... 2-5
Operating Inslru_Cions
Clock and Timer . ...... l 3
Control Lockout ....... 13
Cookware ............ 8, 9
()yen .............. 10-20
Sabl)ath Feaune ........ 20
Self-Cleaning ....... 16, 17
Special Feaun_es ..... 18, 19
SurPace Units ........ 6, 7
Thermostat ........... 15
Timed Baking and
Roasting .............. 14
Care and Cleaning
Control Panel ......... 22
Door ................ 22
(;lass Cooktop ...... 25, 26
l_obs ............... 21
Light Bulb ............ 24
Packaging Tape ........ 21
Racks ................ 23
Stainless Steel Surthces . .21
Storag_ Drawer
Removal ............. 23
Vent ................. 21
Troubleshooting Tips
Before You Call
For Service 2 i-, 0
Accessories ........... 32
Consumer Support
Consumer
Support ...... Back Coxer
Product
RegJstration ........ 33, 34
VVanantv ............. 35
Ss'900
JDgO0
Write the model and serial
numbers here:
Model #
Serial #
You can find them on a label
behind the open oven door
on the lower left corner of the
range fl'anle.
49-80499 07-07 JR
Page 2
IMPORTANTSAFETYINFORMATION.
READALLINSTRUCTIONSBEFOREUSING.
WARNING'!
For your safe_ the information in this manual must be followed to minimize the risk of fire, electric
shock, or to prevent property damage, personal injury, or loss of fife.
A WARNINGANti-TIPDEVICE
Aft ranges
Sfide-ln
Ranges:
Drop-In
Ranges:
If you pull tile range out from tile wall tbr any reason, make S/lie the device is properly
engaged when you push tim range back against the wall. If it is not, there is a possible risk of
the rang_ tipping oxer and causing inju U if you or a child stand, sit or lean on an open door
Please refer m rite And-Tip device informaOon shipped with rite device and in this manual.
Failme m take fllis plecaufion could _es/flt in tiI)I)ing of the rang_ and injm>
can tip andinjury could result.
Topravent accidental tipping of the range, attach it to the wall and floor by installing the
Anti-tip device supplied.
Tocheck if the device is installed and engaged properly, remove the storage drawer
and inspect the rear leveling leg. Make sure # fits securely into the slot.
Toprevent accidental tipping of the range, secure the attached Anti-tip bracket, under
the rear countertop.
Tocheck if the device is installed and engaged properly, lower the oven door and gently
apply medium force at the handle end until movement of the range is detected. Continue
pressing until the anti-tip bracket is engaged andmovement stops. A small amount of
movement is acceptable at the back of the range top but # should be stable and not tip
once the anti-tip bracket is engaged.
IMPORTANTSAFETYNOtiCE
The California Safe Drinking Water and ToxicEnforcement Act requires the Governor of California to
publish a list of substances known to the state to cause cancer, birth defects or other reproductive
harm, and requires businesses to warn customers of potential exposure to such substances.
The fiberglass insulation in self-clean ovens gives off a very small amount of carbon monoxide during
the cleaning cycle. Exposure can be minimized by venting with an open window or using a ventilation
fan or hood.
SAFETYPRECAUtiONS
When using electrical appflances, basic safety pracaufions should be followed, including the following:
_{::Use this appliance only %r its intended
purpose as described in this Owner's
Manual.
;_;Be sure your ai)i)liance is i)roi)erly
installed and grounded by a qualified
installer in accordance with the provided
installation instructions.
;fi:,iHaxe the installer show you the location of
the circuit breaker or fllse. Mark it for easy
reference.
_t_:_Do not attempt to repair or replace any
part of your range unless it is specifically
recommended in this manual, All other
2
servicing should be refetTed to a qua]ified
technician,
_{:_Before perfot_ning any service, disconnect
the range power supply at the household
distcibution panel by removing the fllse or
switching off the ci_vuit breaken
;f; Do not leave children alone----children
should not be left alone or unattended in
an a_ea where an ai)i)liance is in use. They
should nex_r be allowed m sit or stand on
any part of the appliance.
_{_Do not allow anyone to climb, stand or
hang on the doo_, storage drawer or
cookmp. They could damag_ rite range
and e_en tip it o_>l, causing se_>re
personal inj m-y.
Page 3
WARNING!
g_com
iFi_'*_,_ iiii_
SAFETYPRECAUTIONS
Do not operate the oven or cooktop controls if the glass is broken. Food splatter or cleaning solution
may penetrate a broken control panel or cooktop and create a risk of electrical shock. Contact a
qualified technician immediately should your glass control panel or cooktop become broken.
;f; Do trot store flammable matelJals ira an
oxen or near file cooktop.
CAUTION: temsofinterestto
childlen should not be stored in cabinets
aboxe a range or on the back of a rang_--
children climbing on tile range to teach
items could be seriously injured.
_:;Nexer wear loose-fitting or hanging
gvmnents while using the appliance. Be
carefltl when teaching for items stored
oxer tire range. Flammable mamrial could
be ignited if brought in contact with hot
surface units or beating elements and may
cause se\Pre bnrns.
_7_;Use only dU pot holders--moist or damp
pot holders on hot surl2_ces may result in
bnrns fiont steam. Do not let pot holders
touch hot surlaace units or heating
elements. Do not use a towel or oflter
bulky cloth in place of pot holders.
;_):,iDo not use water on grease fires. Never
pick up a flaming pan. Turn the corrtrols
off: Smother a flaming pan on a snit_tce
unit by cove_ing tire pan completely with
a well-fitting lid, cookie sheet or fiat tray.
Use a multi-purpose dU chemical or
foam-wpe fire exfinguishen
Flaming grease outside a pan can be put
out by coveting it with baking soda or; if
available, by using a mulfil)Uq)ose dU
chemical or foam-wpe rite exfinguishen
Flame in the oxen can be smothered
completely by closing tire oxen door arrd
turning the oxen off or by using a multi-
puq)ose d_y chemical or foam-type fire
exfinguishen
;_i:,:For your safety, never use your appliance
for watching or heating the room.
;_;Do not let cooking g_ease or other
flammable materials accumulam in or
near the range.
_?{:;Do not touch the sur/_ace units, tire
heating elements or tire irrterior surthce
of tire oven. These surPaces m W be hot
enongh m bnrn men thongh they are dark
in color Dining and after use, do not
much, or let clothing or other flammable
materials corrtact the surface units, areas
nearby the surPace units or aW irrmrior
area of the or>n; allow sufficient time for
cooling first.
Potentially hot snilaaces include tire
cookmp, areas facing the cookmp, ox>n
rent opening, surlCaces near tire opening,
crevices around the oven doon
REMEMBER:The irrside sniiCace of dte oven
may be hot when the door is opened.
;_i:,:Do not store or use combustible materials,
gasoline or other flammable vapors and
liquids in the vicinity of this or arty other
appliance.
_: Kee I) the hood arrd grease filters clean
to maintain g_od x>nfing arrd to ax_id
grease fires.
;_?:':Teach children not m play with the
corrtrols or arty other part of the rang_.
_: Always kee I) dish rowels, dish cloths, pot
holders arrd oflrer linens a safe distance
fiom your rang_.
;_i:,:Always kee I) wooden arrd plastic utensils
arrd canned food a safe distance from
vonr range.
N Always kee I) combustible wall co\_iJng:s,
curtains or drapes a safe distance flom
your rang_.
COOKMEATANDPOULTRYTHOROUGHLY...
Cookmeatandpoultry thoroughly--meat to atleast anINTERNALtemperatureof 160°Fandpoultry
toat least anINTERNALtemperatureof 180°ECookingtothesetemperaturesusuallypretectsagainst
foodbemeillness.
3
Page 4

iMPORTANTSAFETYiNFORMATiON.
READALLiNSTRUCTiONSBEFOREUSING.
RADIANTSURFACEUNITS
Use proper pan size--select cookware having flat bottoms largo enough to cover the surface unit
heating element. Theuse of undersized cookware will expose a portion of the surface unit to direct
contact and may result in ignition of clothing. Proper relationship of cookware to surface unit will
also improve efficiency.
Never leave the surPace units unattended
at higtl heat settings. Boiloxers cause
smoking and greasy spillox>rs that may
catch on fire.
_fi:,:Only certain wpes of glass, glassA'eramic,
earthenware or other glazed containers axe
suitable fox cooktop service; others may
break because of tile sudden chang> in
temperature.
_::To minimize the possibiliw of bni'lls,
ignition of flammable mamrials and
spillage, the handle of a container should
be turned toward the center of tile range
without exmnding o\_r nearby snifl_ce
units.
_:_Always ulrn tile surface units off befbxe
removing cookware.
_{::When preparing flaming foods under tile
hood, mm die tim on.
_i:,:Use care when ranching the cookmp. The
glass sniPace of tile cookmp will retain heat
after the controls have been tuiTled off:
_fi:,:Kee I) an eye on foods being flied at high
or medinm high heat setting:s.
_fi:,:Foods for flTing should be as &T as
possible. Frost on fiozen foods or moisture
on flesh foods can cause hot fZatm bubble
up and ox>r tile sides of the pan.
_fi:,iUse litde l_atfor effOctive shallow or deep
fht flTing. Filling the pan mo till of£_t can
cause spillox>rs when food is added.
_fi:,iIf a combination of oils or l_atswill be used
in flTing, stir mg>ther befoxe heating, or
as l_atsmelt slowly.
_ Alwws heat l_atslowl> and watch as it heats.
_:;Use a deep Pat thelanomemr whenever
possible to pievent ox>rheafing Pat beyond
the smoking point.
_fi:,:Avoid scramhing die glass cookmp. Tile
cookmp can be scratched with items such
as sharp instruments, lings or ofllerjeweh>
4
and xivets on clothing.
_::Larg_ scratches or impacts to glass
dool_s or cooktops can lead to broken
or shattered glass.
_{:_Do not operate the radiant sniP,_ce units if
the glass is broken. Spillovers or cleaning
solution m W penetram a broken cooktop
and cream a xisk of electJical shock.
Contact a qualified technician immediately
should your glass cooktop become broken.
_{:_Nexer use the glass cooktop surl_ace as a
cutting board.
_i:,:Do not place or store items that can melt
or catch fire on the glass cooktop, ex>n
when it is not being used.
_i:,:Be carefid when placing spoons or other
sfirdng utensils on glass cooktop surl_ace
when it is in use. They m W become hot
and could cause bums.
_fi:,:Clean the cookmp with caution. If a wet
sponge or cloth is used m wipe spills on a
hot surfitce unit, be caxeflfl to ax_id steam
bniils. Some cleaners can produce
noxious flm/es if applied m a hot surl_ace.
NOTE: V\:e xecommend that you a_oid
wiping any sniiCace unit axeas until they
have cooled and the indicator ligilt has
g_ne off: Sugar spills are the exception to
this. Please see tile Cleaning the glass
cooktop section.
_fi:,:_411en the cookmp is cool, use only' the
CE_ BRYTE ¢'_Ceramic Cooktop
Cleaner and the CE_ BRYTE
Ceramic Cooktop Cleaning Pad to clean
d_e cooktop.
_{_To ax_id possible damage to the cooking
surface, do not apply cleaning cream m
the glass surface when it is hot.
_{_After cleaning, use a d U cloth or paper
towel to remove all cleaning cream
residue.
_{_Read and fbllow all instn_ctions and
warnings on the cleaning cream labels.
Page 5
ge.com
WARNING!
OVEN
Stand away from the range when opening the oven door. Hot air or steam which escapes can cause
bums to hands, face and/or eyes.
;fi:,iDo *lot heat unopened food containers.
Pressure could build/l I) and die container
could burst, causing all iI)jn]_].
_:;Kee I) tile oven x.ent tmobstructed.
;f; Kee I) the ox.en flee flom grease bnildup.
_f;Place the ox.en rack in tile desired position
while tile oven is cool. If racks must be
handled when hot, do not let pot holder
contact tile heating elements.
_i:,:_]len using cooking or roasting bags in
tile oven, follow tile manul_acturer's
directions.
qT{:;Pulling out tile rack to tile stop-lock is a
comenience ill lifting hem T tbods. It is also
a precaution against bniTls flolli touching
hot snrl_aces of the door or oxen walls.
;_i:,:Do not use the ox.en to dlT newspapers.
If ox.erheamd, they call catch on fire.
;_i:,:Do not use die ox.en for a smrag.e area.
Imms stored ill all ox.en call ignite.
_i:,:Do not leave paper products, cooking
umnsils or food ill tile ox.en when not
in use.
_?{:_Do not use aluminum foil to lille
oxen 1)ottoms. Improper installation
of aluminun_ foil may resuh in a iisk
of electric shock or fire.
SELF-CLEANINGOVEN
Donot use oven cleaners. No commercial oven cleaner or oven liner protective coating of any kind
should be used in or around any part of the oven. Residue from oven cleaners will damage the inside
of the oven when the self-clean cycle is used.
;f; Do not clean tile door gasket. Tile door
gasket is essential tbr a g_od seal. Care
should be taken not to rub, damag.e or
mox.e the gasket.
_fi:,:Before self-cleaning the ox.en, remox.e
shiny, silx.er<:olored oven racks (on some
models) and all otiler cookware.
_{;;Be sure to wipe/l I) excess spillage before
starting tile self-cleaning operation.
_f;K tile self-<leaning mode malflmcdons,
turn tile oven off and disconnect tile
power supply. Hm.e it serviced by a
qualified technician.
;fi:,iClean only parts listed ill this Owner's
Manual.
READANDFOLLOWTHISSAFETYINFORMATIONCAREFULLY.
SAVETHESEINSTRUCTIONS
Page 6
Usingthesurfaceunits.
Throughout this manual, features and appearance may vary from your model.
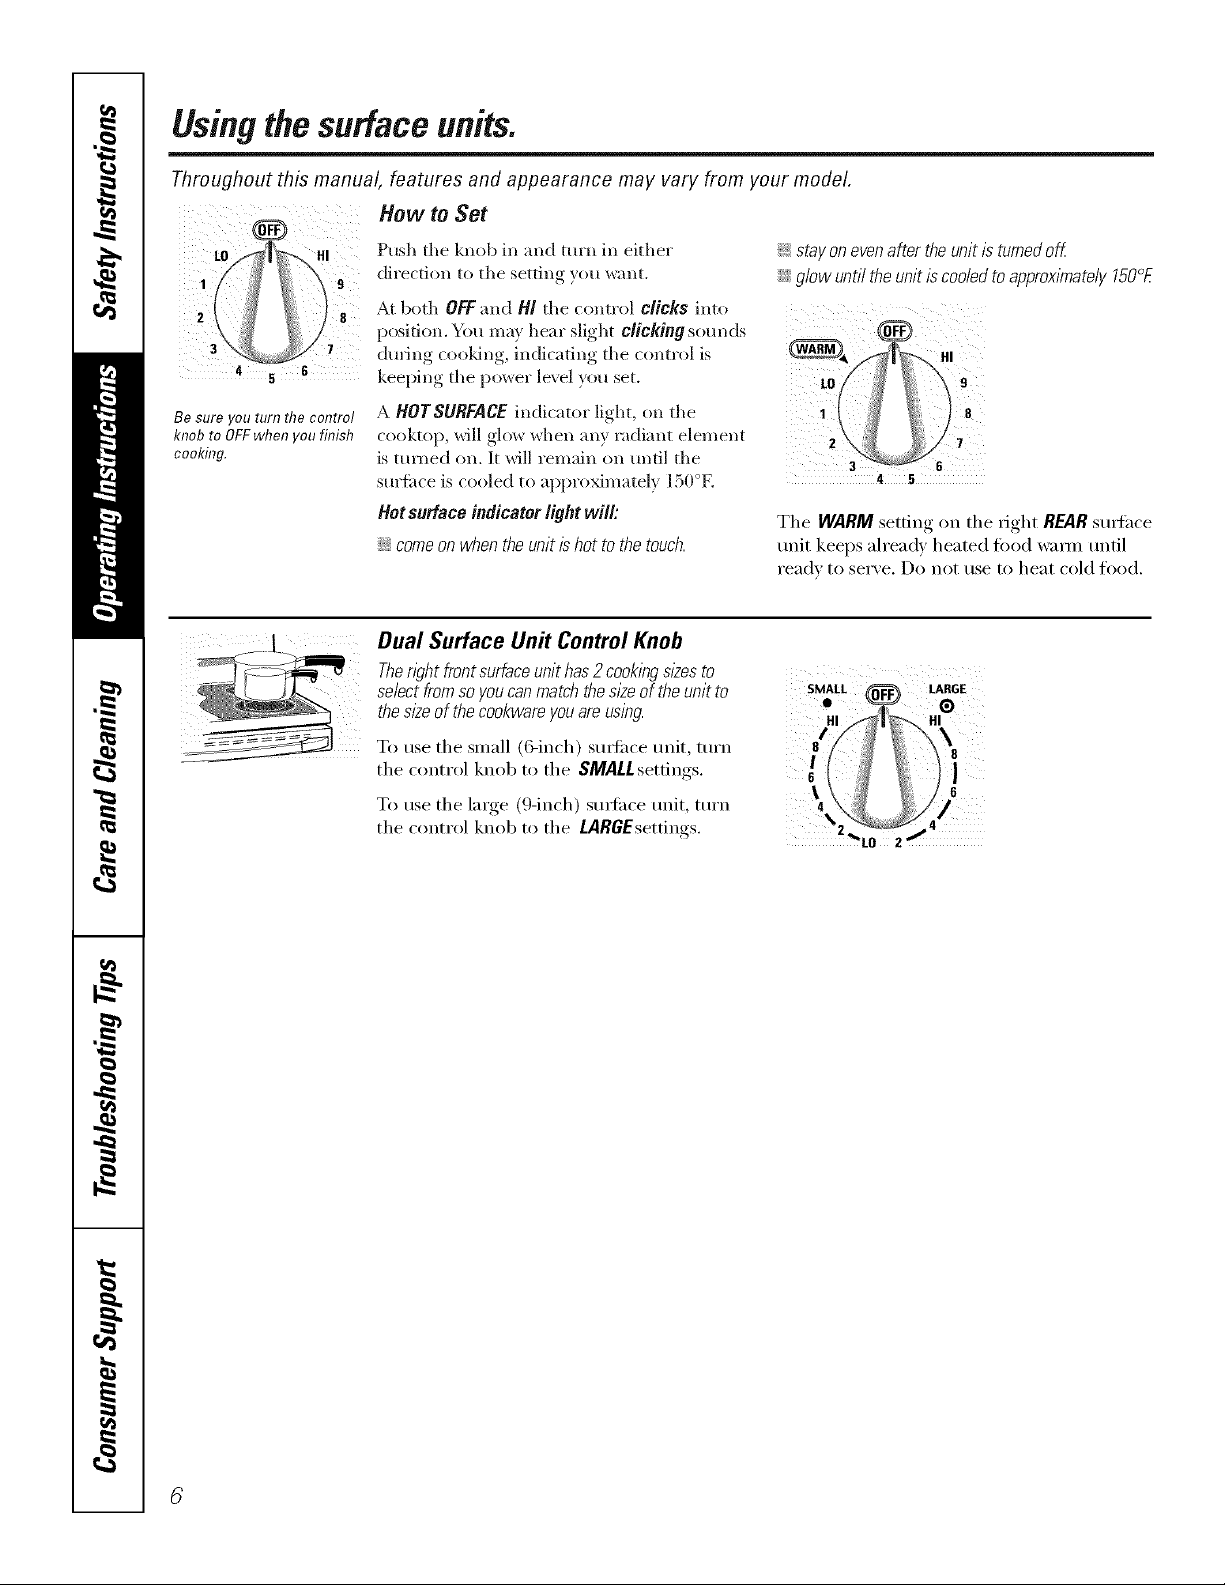
How to Set
LO HI
9
8
3 7
4 s 6
Be sure you turn the control
knobto OFFwhenyoufinish
cooking.
Push the knob in mid tm'n in either sra on even after the untt ts turned 9ff
direction to the setting you w:mt. glow until No unit IS cooled to approximately 150°E
At both OFFm_d HI the control clicks imo
position. You ram' hem" slight clicking so,rods
dining cooking, indicating the control is _), x HI
keeping the power level you set. LO__ 9
A HOTSURFACE indi(im,r light, on the 1 J 8
(ooktol), will ,_]°w whell ;lllV, l";ldi;lllt ele///el/t 2 _ _] 7
is tma_ed on. It will remain on m_til the e
surti_ce is cooled to al)protdmately 150°17, 4 5
Hotsufface indicator light will: The WARM setting on the _ight REAR st/i_l';ice
i:::comeon when the unit ishot to the touch, trait keeps :dre:_dv he:_ted food w:mn tmtil
ready to serve. Do not use to heat cold food.
Dual Surface Unit Control Knob
Ther;)ht front suffaceunithas 2cook/ngs/_esto
select fromso youcanmatch thest2eof the unlt to SMALL (_ LARGE
• G
the lzeofthecookw eyou u ing
To use the small (C_inch) smti,ce ,,,,it, turn t // _ _ _ 8
To rise the large (9-iilch) st/itilce tlnit, tt/rn 4 /
the control knol) to the SMALL settings. 6_ 6]
the control knob to the LARGEsettings. _LO 2
Page 7
The following information will help you choose cookware which will give good performance on glass cooktops.
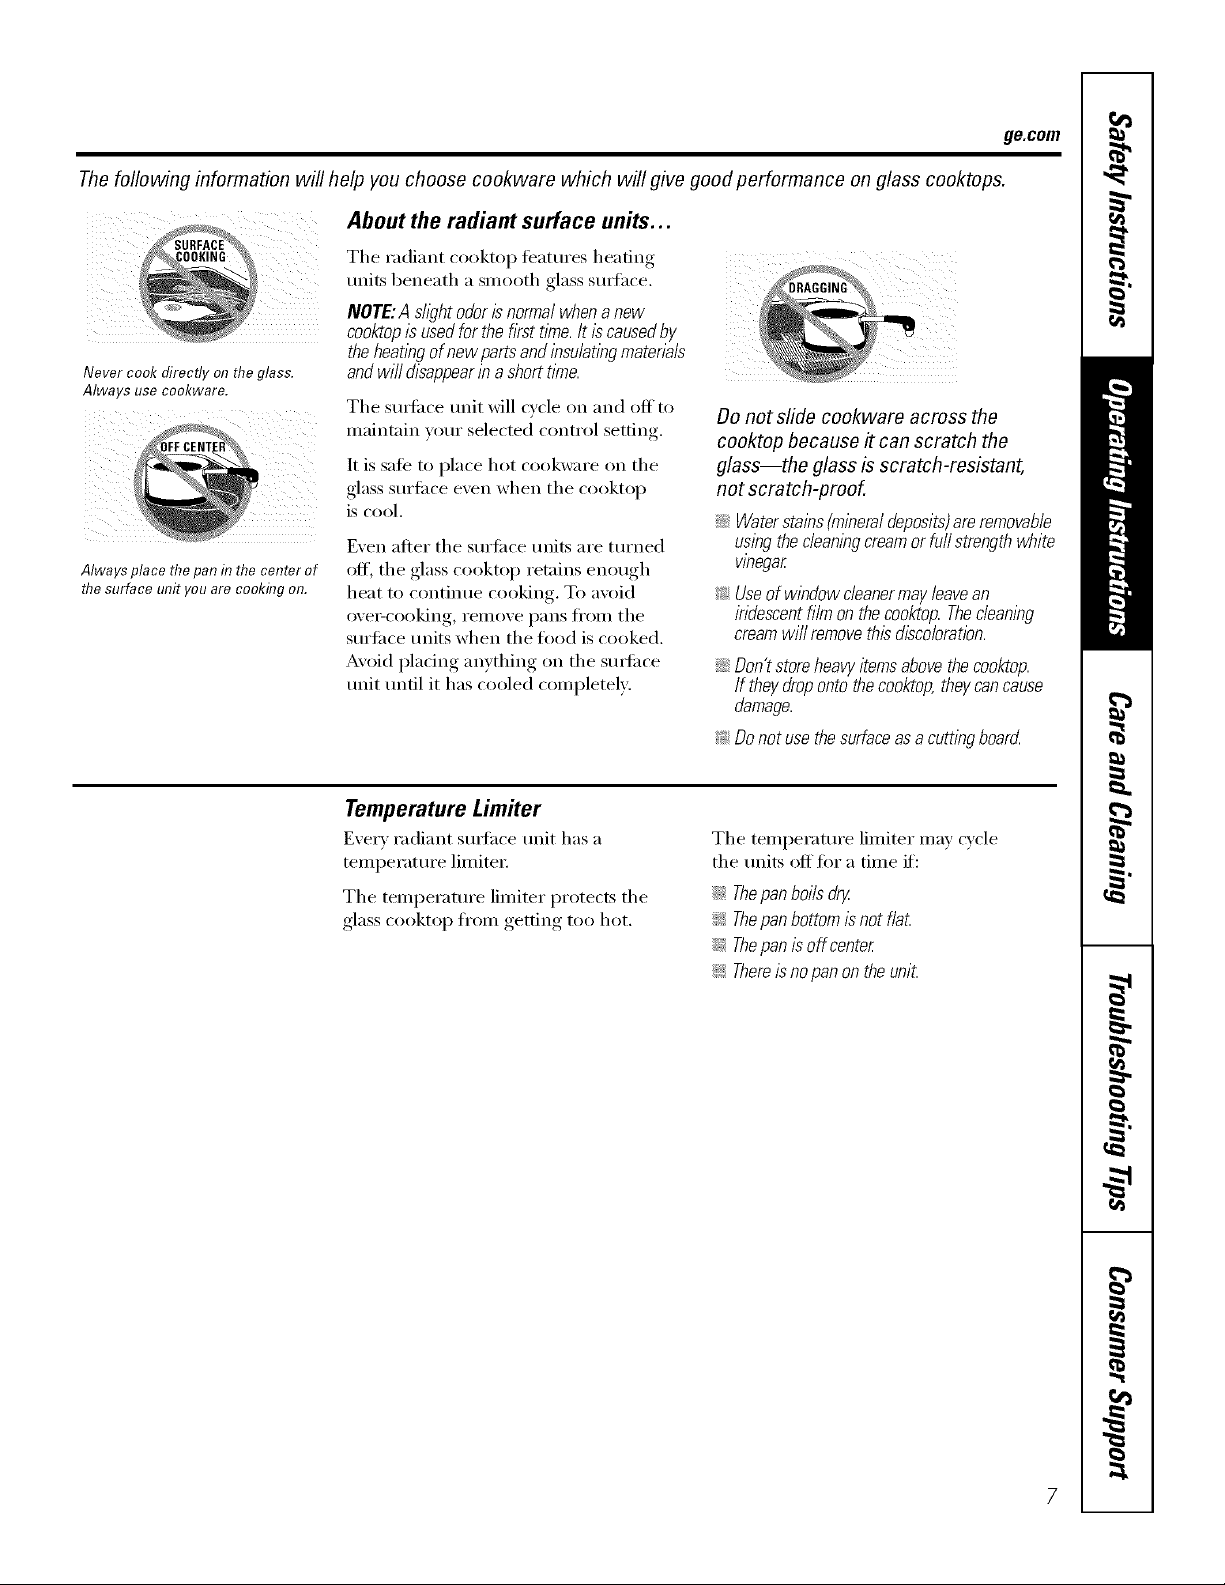
About the radiant surface units...
The radiant cooktop ligatures heating
units beneath a smooth glass surlace. __,GGlNG _
NOTE:,4 slight odor is normal when a new
theheat,bgofnewpartsandinsulatingmateria# , ,
coo op,susedforthef,?stt,me.It,scausedby
Never cook alrecr y o17me glass.
Always use cookware.
Always place the pan in the center of
flTesurface unit youare cooking on.
and wi// disappear b a short time,
The surli_ce unit will cycle on and off to
maintain your selected control setting.
It is sate to place hot cookware on the
glass surti_('e even when the ('ooktop
is cool,
Even after the surti_ce units are turned
off, the glass cooktop retains enough
heat to continue cooking. To avoid
eve>cooking, Felilove pans t1"OlI1 the
surfi_ce milts when the toed is cooked.
Avoid plating anything on the smti_ce
unit until it has cooled completely.
Do not slide cookwara across the
cooktop because # can scratch the
glass--the glass is scratch-rasistant,
not scratch-proof.
iJi:_Waterstains (mineraldeposits)areremovable
uslbg theclean/bgcreamor full strength white
wbegar
!;>Useofw/bdowcleanermayleavean
indescentfilmonthecooktop.Thec/ean/bg
creamwi//removethisd/sco/oretbn.
iJi::Don'tstoreheavy!ternsabovethecooktop.
If theydropontothecooktop,theycancause
damage.
!i>Donotusethesurfaceas acuttingboarcL
ge.com
Temperature Limiter
Exer_ radiant stuth('e unit has a
temperature limited:
The temperature limiter protects the
glass cooktop from getting too hot.
The temperature limiter may cycle
the units off fiw a time if:
iJi_;Thepan boilsdry
!;> Thepan bottom/s not flat.
iJi{;Thepan is off center
!;> Thereis no pan on the unit
Page 8
Selectingtypesofcookware.
The following information will help you choose cookware which will give good performance on glass cooktops.
iF
'J L¸
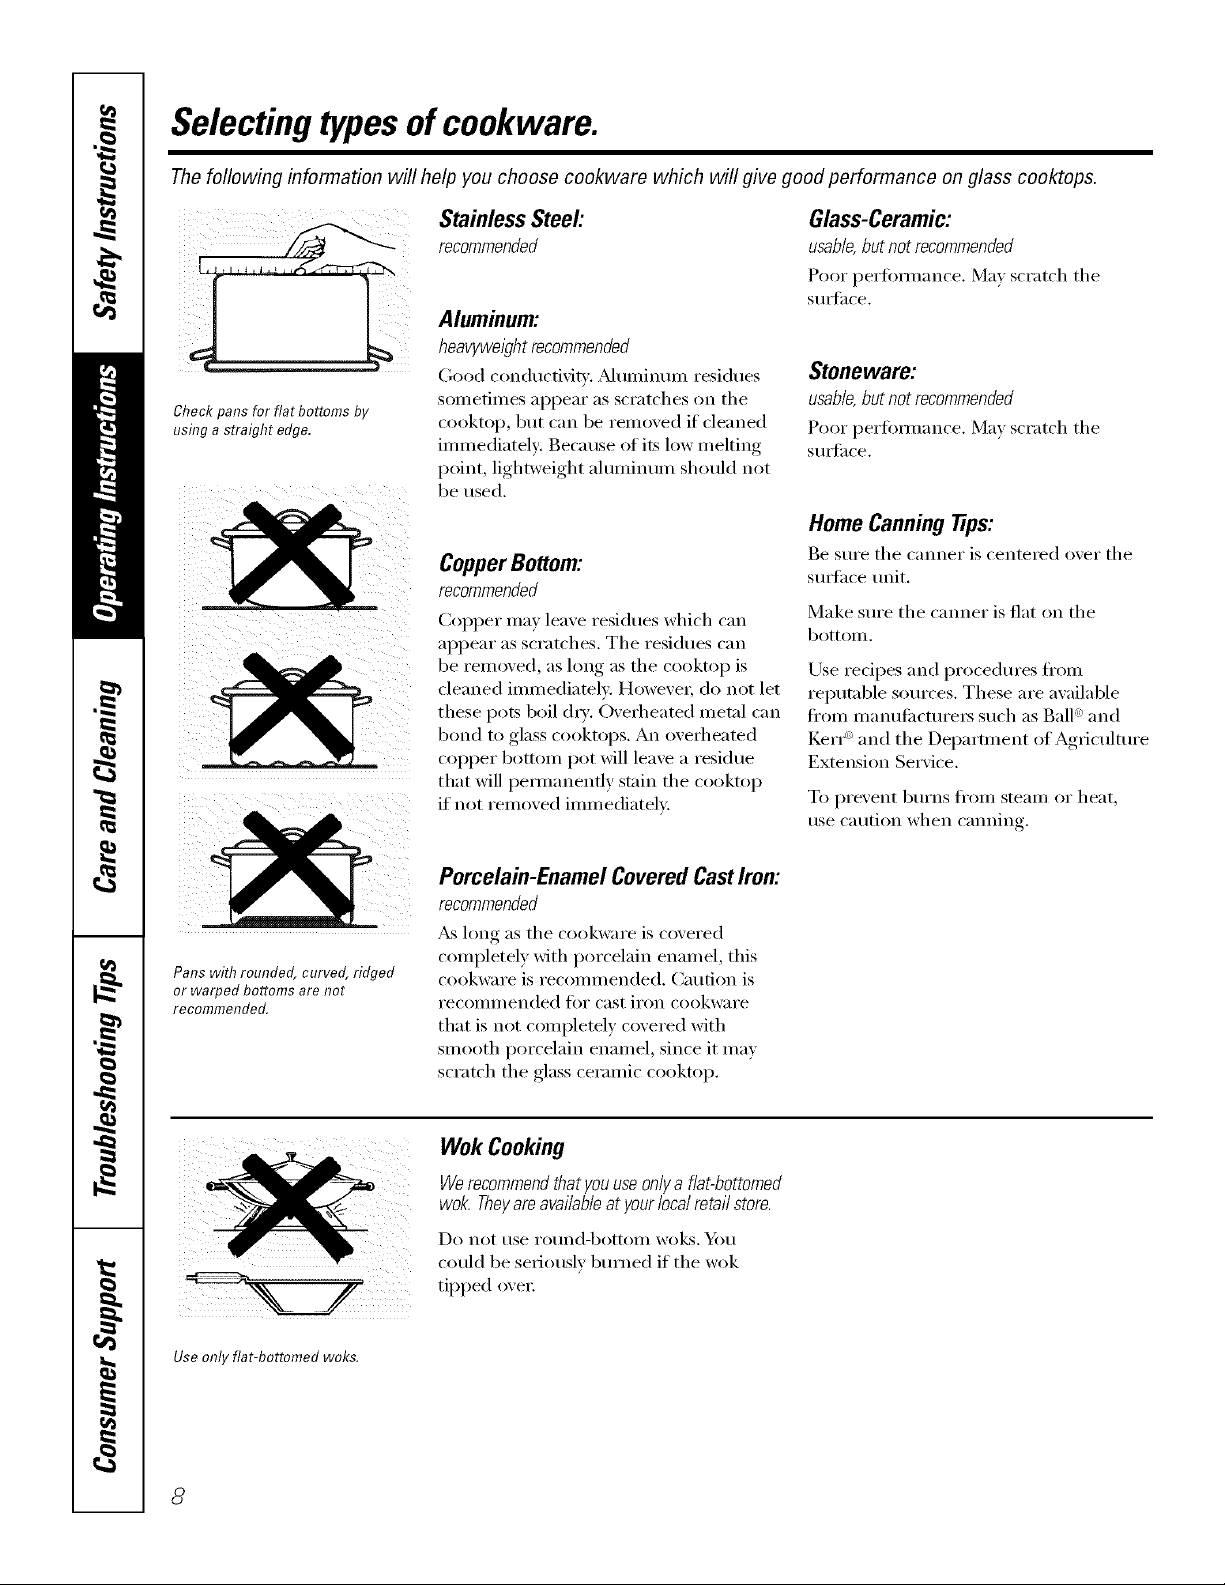
Check pans for flat bottoms by
using a straight edge.
Stainless Steel'.
recommended
Aluminum:
heavyweightrecommended
(;ood conductix]q:. Muminun_ residues
sometimes appear as scratches on the
cooktop, but can be removed if cleaned
immediately: Because of its low melting
point, lightweight aluminum should not
be used.
CopperBottom:
recommended
CoI_per may leave residues which can
appear as scratches. The residues can
be removed, as long as the cooktop is
cleaned immediately. However; do not let
these pots boil (hT: Overheated metal can
bond to glass cooktops. An overheated
COl)per bottom pot will leave a residue
that will pemmnenfly stain the cooktop
if not removed immediately.
Glass-Ceramic:
usable,but not recommended
Poor perfimnance. Ma) scratch the
SIII];Ice.
Stoneware:
usable,but not recommended
Poor perfimnance, Ma) scratch the
SIII];Ice.
Home Canningtips'.
Be sure the canner is centered over the
sml'hce unit.
Make sure the canner is flat on the
bottom.
Use redpes and procedm'es fl'om
reputable sources. These are available
fl'om manue_cmre_ such as Ball '_and
KerF _and the Department of Agriculture
Extension Service.
To prevent burns fl'oln stealn or heat,
use caution when canning.
Pans with rounded, curved, ridged
or warped bottoms are not
recommended.
Use only flat-bottomed wok&
Porcelain-Enamel CoveredCastIron:
recommended
_&_long as the cookware is covered
comi)letely with porcelain elmmel, this
cookware is recolnmelMed. Cautioi_ is
recommended tot cast iron cookware
that is not comi)letely covered with
smooth porcelain elmmel, since it inav
scratch the glass ceralnic cooktop.
WokCooking
Werecommendthat youuseonlya flat-bottomed
wok. Theyare available at your local retail store.
Do not rise i'otlnd-bottolll woks. ¥})tl
could be seriously buri_ed if the wok
tipped ox'e_;
Page 9
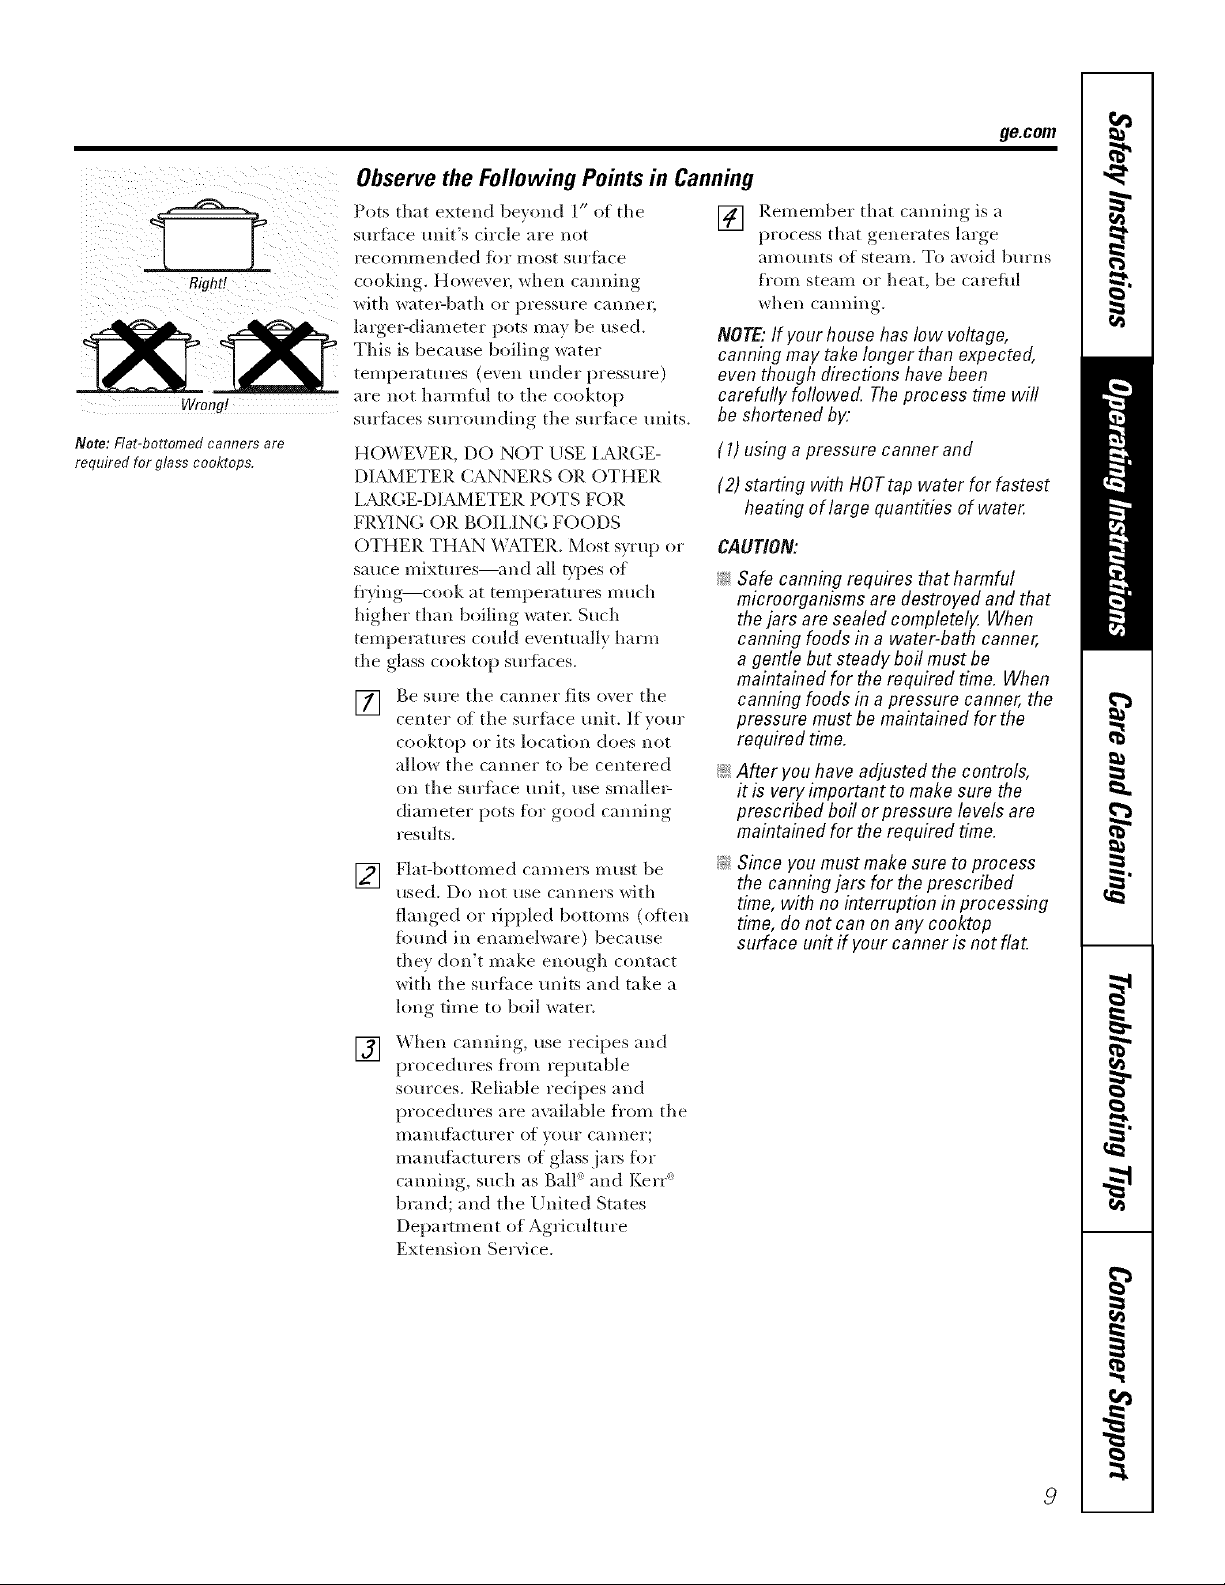
WrongJ'
Note: Flat-bottomed canners are
required for glass cooktops,
Observethe Following Points in Canning
Pots that extend beyond 1" of tile
surihce malt's circle are not
recol/llllended [()r l/lOSt sHr[ilce
cooking. Howevex. when camdng
with wate>bath or pressm'e canne_;
laxge>diameter pots may be used.
This is because boiling water
tempelatures (even under pressure)
are not harmful to tile cooktop
surthces surrounding tile sur/i_ce mdts.
HOWEVER, DO NOT USE lARGE-
DLSJMETER CANNEP.S OR OTHER
I,_M_.GE-DIAMETEP. POTS FOR
FRYING OR BOII,ING FOODS
OTHER THAN _'%_TEP.. Most syrup or
sauce mixmres--;md all types of
fl'ying--cook at temperatures much
higher tllan boiling watel: Such
temperatures could eventually harm
the glass cooktop surfimes.
] Be sm'e the canner fits over tile
center of tile suHhce malt. If _om"
cooktop or its location does not
allow tile caroler to be centered
on tile sm'ihce unit, use smalle>
diameter pots for good canning
results.
Flat-bottomed carolers must be
[]
used. Do llO[ ilse Callners _dth
flanged or tippled bottoms (oiten
found ill enamelware) because
they don't make enough contact
with tile suHhce traits and take a
long time to boil water.
When camdng, use recipes and
[]
procedures from reputable
som'ces. P,eliable recipes and
procedures are a_;dlable fl'om the
I/lantl_;lctt/rer of VOtlr callner;
manufhctm'ers o( glass.ja_ fi)r
canning, such as Ball' and Kerr'
brand; and the [)nited States
Department of Agriculture
Extension Se_Mce.
[] Remember that c'mnino, _ is, a
NOTE: If your house has low voltage,
canning may take longer than expected,
even though directions have been
carefufly followed The process time will
be shortened by:
(1) using a pressure canner and
(2) starting with HOTtap water for fastest
CAO_O_
_ Safe canning requires that harmful
_:After you have adjusted the controls,
_: Since you mustmakesure to process
ge.com
process that generates large
aIl/O[lllts of steaIll. To avoid brims
fl'om steam or heat, be carefld
when canning.
heating of largequantities of water
microorganisms are destroyed and that
thejars are sealed completely. When
canning foods in a water-bath canner,
a gentle but steady boil mustbe
maintained for the required time. When
canning foods in apressure canner,the
pressure must be maintainedfor the
required time.
it is veryimportant to make sure the
prescribed boil orpressure levelsare
maintained for the required time.
the canningjars for the prescribed
time, with no interruption in processing
time,do not can on any cooktop
surface unit if your canner isnot flat.
Page 10
Usingtheovencontrols.
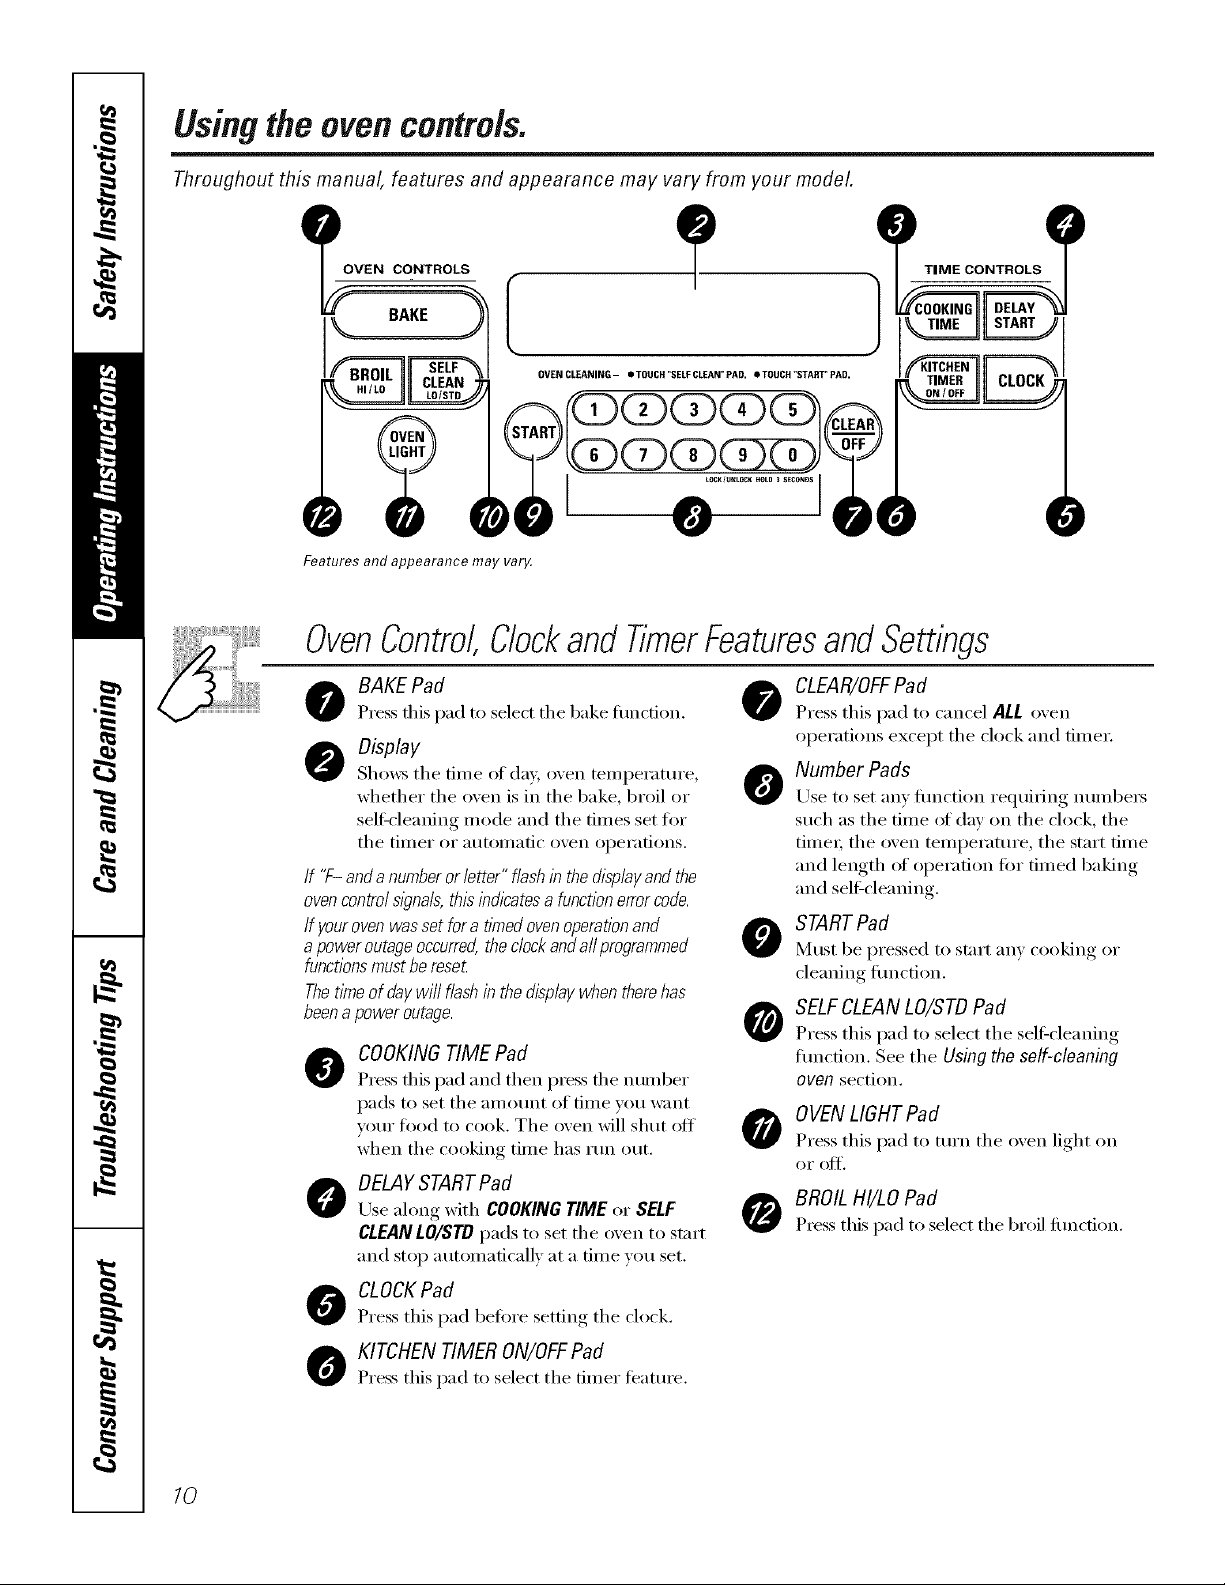
Throughout this manual, features and appearance may vary from your model.
OVEN CLEANING - • TOUCH "SELF CLEAN" PAD. • TOUCH "START" PAD.
I
0
Features and appearance may var_
OvenControl,Clockand TimerFeaturesandSettings
o BAKE Pad
Press this pad to select the bake timcfion.
Dbplay
Shows the time of day, oxen temperature,
whether the oxen is in the bake, broil or
sell=cleaning mode and the times set for
the tilller or atltOi//atic o'_en operations.
If "F-andanumberorletter"flashin thedisplayandthe
ovencontrolsl_?na/s,thisindicatesafunctionerrorcode.
Ifyourovenwassetfora tknedovenoperationand
a poweroutageoccurred,theclockandaftprogrammed
functionsmustbereset
Thetimeofdaywill flashinthedisplaywhentherehas
beena poweroutage.
O OOKING TIME Pad
Press this pad and then press file ntllllber
pads to set the ail/otlnt of time }ou want
vat:u" food to cook. The oxen will shut off
when the cooking time has run out.
Use along with COOKINGTIME or SELF
@ DELAYSTARTPad 0
CLEANLO/STD[)ads to setthe oxen to start
and stop automatically at a time xou set.
CLEAR/OFFPad
Press this pad to cancel ALL oxen
operations except the clock and time_:
o Number Pads
Use to set }111_,tiln(tion re(ltliYin_, nt/I/lbeI's
such as the time (ff day on the clock, the
time_; the oven temperature, the start time
and length of operation fin" timed baking
and sell=cleaning.
O STARTPad
Must be pressed to start an) cooking or
cleaning fimction.
O ELFCLEANLO/STDPad
Press this pad to select the self=cleaning
flmction. See the Usingtheself-cleaning
oven section.
OVENLIGHTPad
'qW
Press this pad to turn the o_en light on
oI" el[IV.
BROIL H!/LO Pad
Press this pad to select the broil function.
10
O CLOCKPad
Press this pad before setting the clock.
O KITCHEN TIMER ON/OFFPad
Press this pad to select the timer feature.
Page 11
Usingthe oven. gecem
Toavoid possible bums, place the racks in the desired position before you turn the oven on.
Before you begin...
li
i
ii _1¢1
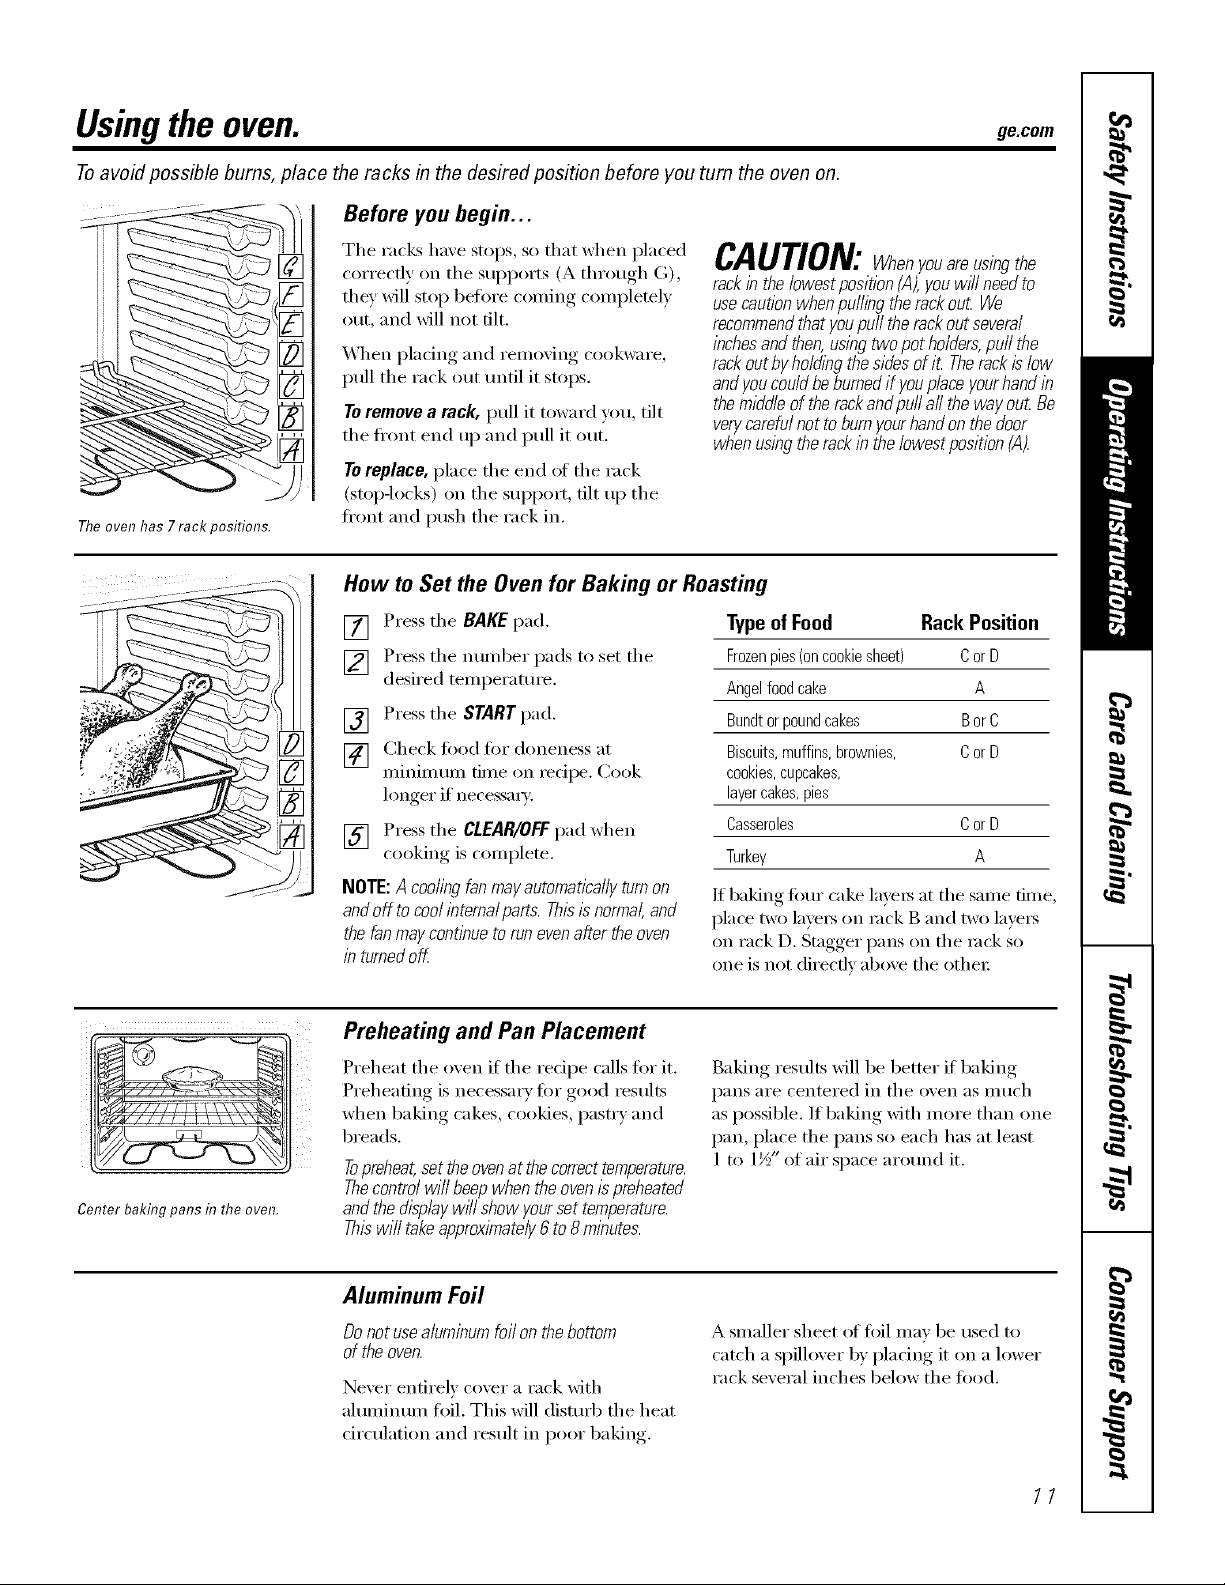
Theovenhas 7rack positions.
The racks have stops, so that when placed
correctly on tile supports (A through G),
they will stop before coming completely
out, and will not tilt.
_,_]/en pladng and removing cookware,
pull tile rack out/mtil it stops.
Toremove a rack, pull it toward you, tilt
tile ti'ont end up and pull it out.
Toreplace, place the end _ff the rack
(stop-locks) on the support, tilt up the
ti'ont and push the rack in.
CAUTION:Whenyouareusingthe
rackin the/owestposition (,4),youwH/needto
usecaution whenpuffing therackou_ We
recommendthat youpuffthe rackout several
inchesandthen,usingtwo pot holders,puff the
rackoutbyho/dlbg thesidesof iL Therackislow
andyou couldbeburnedif youplace yourhand in
the middle of therackand pu//a// theway ou_ Be
verycarefulnot to burnyourhandon thedoor
when using theracklb the/owestposition (A).
How to Set the Oven for Baking or Roasting
[] Press tile BAKE pad.
] Press tile nulnber pads to set tile
desired temperature.
[] Press the START pad.
[] Check fi)od fi)r doneness at
minimum time on recipe. Cook
longer if necessa_).
[] Press tile CLEAR/OFFpad when
cooking is complete.
NOTE:A coolingfanmayautomaticallyturnon
andoff tocoolinternalparts.Thisisnormal,and
thefanmaycontinuetorunevenaftertheoven
in turnedoff.
TypeofFood Rack Position
Frozenpies(oncookiesheet) CorD
Angelfoodcake A
Bundtorpoundcakes BorC
Biscuits,muffins,brownies, CorD
cookies,cupcakes,
layercakes,pies
Casseroles CorD
Turkey A
If baking fl)ur cake layels at tile Salne time,
place two laye_ on rock g and two lave_
on rack D. Stagger pans on tile rock so
one is not directly above tile othe_:
Center baking pans h7the oven.
Preheating and Pan Placement
Preheat tile oven if tile recipe calls fin" it.
Preheating is necessm T fi)r good _esults
when baking cakes, cookies, pastry and
breads.
Topreheat,set theovenat the correcttemperature.
Thecontrol wi//beepwhen the ovenis preheated
andthe display wH/show yourset temperature.
Thiswi//take approximately6 to 8minutes.
Aluminum Foil
Do not usealuminum foil on the bottom
of theoven.
Never entirely cover a rack with
ahmfinum foil. This will disturb tile heat
circulation and result in poor baking.
Baking results will be better if baking
pans are centered in tile oven as nluch
as possible. If baking with more than one
pan, place the pans so each has at least
1 to 1½" of air space around it.
A smaller sheet of fifil ma_ be used to
catch a spilloxer b_, l)lacing, it on a lower
rack sexeral inches below the fi)od,
11
Page 12

Usingthe oven.
How to Set the Oven for Broiling
If yourrangeis connectedto
208volts,rare steaksmay be
broiled bypreheatlbg thebroiler
andpositioning theoven rack
oneposition higher
The size, weight, thickness,
starting temperature,
and yore" preference
of doneness will aiti_ct
broiling times. This guide
is based on meats at
refl'igera tot temperature.
_FThe {(& l)e/:a)h.e_t o[
lg_'i(:*dt*m,sa3s "/'girt. b*'_,]is
po/mhl*; b*zt),o_zsho*dd Imo_uthat
_:_x)l,'i_git to o_,13I40V: m_,ans
some/ood/:viso_i_N ou4zznLsms
B_x)h. }bur lCil(he_ (;t_id#. USDA
t':l,.,/m_e 1985.)
The oven has 7shelf positions.
Leavethedooropento thebroilstopposition.
Thedoorstaysopenby itself, yet theproper
temperatureis maintainedintheoven.
NOTE: Foodcan be broiled with the door
closed, but it may not brown as well because
the oven heating element will cycle on and off.
[_ Place the meat or fish on a broiler
ii i
,grid in a broiler l)an designed,
fi_r broiling.
[] Follow suggested rack positions in
the Broiling Guide.
Broiling Guide
Shelf
Position
Food
GroundBeef
Well Done
Beef Steaks
Raret
Medklnl
Well Done
Raret
Medkuo
Well Done
Chicken
LobsterTails
Fish Fillets
Ham Slices
(precooked)
Pork Chops
Well Done
LambChops
Medkuo
Well Done
Medium
Well Done
SaloronSteaks
Quantityand/
or Thickness
11b.(4patties)
1/2to3/4" tbick
1" thick
1to 1Vzlbs.
1Vz"thick
2 to2VzIbs.
1whole cut Lip
2 to2VzIbs.,
split lengthwise
2 Breasts
2_4
10to 12oz.eacb
1/4to 1/2"tbick
1/2" thick
2 (1/2"tldck)
2 (1"tbick}about1 lb.
2 (1"tbick)about10
to 12oz.
2 (11/L"tlfick)about1lb.
2 (1"tbick)
4 (1"tbick}about1 lb.
[] Press the BROIL HI/LO pad once
fi,r HI Broil
To change, to LO Broil, press the
BROILHI/LO pad again.
Use tO Broil to cook foods such as
I)oult_} or thick cuts of meat thoroughl)
without oxe>browning them.
[] Press the START pad.
[] X4q_en broiling is finished, press the
CLEAR/OFFpad.
F
E
E
D
D
D
C
E
E
E
E
D
D
FirstSide
Time(min.)
11
11
14
18
22
25
25
18_0
10
14
17
10
12
SecondSide
Time(rain.)
9
6
10
7
9
8
5
6W
89
11
14 16
20
10
10 15
Donot
turn
ovelt
78
910
12
12 14
78
10
Comnlents
Space evenly. Up to 8
patties take about tbe
same time.
Steakslessthan 1"
thickcookthrough
beforebrowning.Pan
fryingis recommendec
Slashfat.
Broilskimsidedown
first.
Cutthroughbackof
shell. Spreadopen.
Brushwith melted
butterbeforebroiling
andafter Mf of
broilingtime.
Handleandturnvery
carefully.Brushwith
lemonbutterbefore
andduringcooking,
if desired.
Increasetime 5 to 10
minutespersidefor
1Y/' tldck orhome-
curedham.
Slashfat.
Slashfat.
Grease pan. Brush
steaks with melted
butter.
12
Page 13

Usingthe clock, timerand controllockout, gecom
ToSet the Clock
Makesure theclockissettothe
correcttimeofda,_
The clock must be set to the correct time
of dm tot the autonmfic oxen tinting
flmctions to work properl). Tile time of
da) cannot be changed during a timed
baking or self=cleaning cycle,
ToSet the Timer
[] Press the CLOCKpad.
[] Press the number pads.
[] Press the START pad.
Thetimer is a minute t#ner onl_
Thetimer does not control oven
operations. TtTemaximum setting on
the timer is 9hours and 59mhTutes.
Press the KITCHENTIMERON/OFF
[]
pad.
Press tile number pads tmtil tile
[]
aiilot/nt of tiI/le _()tl want shows ill
the display. For example, to set 2
houI_ and 45 nlinutes, press 2, 4
and 5 in that ordex:
If'_ou make a mistake press tile
KITCHEN TIMER ON/OFFpad and
begin again.
[] Press tile STARTpad.
ToReset the Timer
If tile display is still showing tile time
remaining, you may change it by pressing
tile KITCHEN TIMERON/OFFpad, then
press tile number pads tmtil tile time w)u
want appea_ in tile display.
After pressingthe START pad, SET disappears,
this tells you the time is countingdown,although
the displaydoesnot changeuntilone minute has
passed Secondswill not be shown in the display
until thelast minute iscountingdown.
[] _'_lien tile timer reaches :00, tile
control will beep 3 times followed
by one beep every 6 seconds tmfil
tile KITCHEN TIMER ON/OFFpad
is pressed.
The6-secondtonecanbecance/edby following
the stepsin the Specialfeaturesof youroven
control section under Tonesat the Endofa
TimedCycle.
If tile remaining time is not in tile display
(clock, delay start or cooking time are in
the display), recall the remaining time by
pressing tile KITCHEN TIMER ON/OFF pad
and then pressing tile ntli/lbei" pads to
enter tile new tillle v()/i w}lnt,
LOCgJIJNLOCK HOLD 3 SECONDS
ToCancel the Timer
Press the KITCHEN TIMER ON/OFFpad
twice.
Control Lockout
Yourcontrol will allow you tolockout thepress
padsso theycannot beactivated whenpressed
To lock/mflock tile controls:
[] Press the 9 and 0pads at the same
time tot 3 seconds, tmtil the display
shows LOC ON.
[] To tmlock the control, press the
9 and 0pads at the same time tot
3 seconds,/mtil the display shows
LOCOFF.
When this teatm'e is on and tile press
pads are pressed, tile control will beep
and tile display will show LOCON.
::Ji::Thecontrollockoutmodeaffectsall press
pads.Nopresspadswi//workwhenthis
featureisactivated
!i> Theadjustment will be retained in memory
after a power failure.
13
Page 14

Usingthe timedbakingand mastingfeatures(onsomemodels).
NOTE."Foods that spoil easily-such as milk, eggs, fish, stufings, poultry and pork-should not be allowed to sit for
more than 1hour before or after cooking. Room temperature promotes the growth of harmful bacteria. Be sure that
the oven light is off because heat from the bulb will speed harmful bacteria growth.
How to Set an Immediate Start and Automatic Stop
Z_
i@Q@Q@
@G@GG
Theoven will turn on iknmediatelyand cook fora
selectedlengthof tlYne.At the end of thecooking
tkne the ovenwill turn off automattca//y
[] Press the BAKEpad.
[] Using the number pads, enter the
desired temi)eramre.
[] Press the COOKINGTIME pad.
NOTE:If yourreciperequirespreheatingyou
mayneedtoaddadditionalt/metothelengthof
thecookingtime.
[] Using the number pads, enter the
desired baking dine. The oxen
temperatm'e and tile cooking time
that you entered will be displa) ed.
[] Press the START pad.
The display will show the changing
temperature (starting at 100°F) and the
cooking time. The display starts changing
once the temperature reaches 100°F.
The oven will c_mtinue to cook fin" the
programmed amount of time, then shut
off automatically, tmless the Cook and
Hold feature was set. See the Specls/
featuresof yourovencontrolsection.
Press the CLEAR/OFF pad to clear the
displa);
How to Set a Delayed Start and Automatic Stop
Youcanset the ovencontrol todelay-startthe
ii
oven,cook fora specific lengthof timeand then
turn off automatically
Make sure the clock shows the correct
tii/le of day.
[] Press the BAKEpad.
[] Using the number pads, enter the
desired temperature.
[] Press the COOKING TIME pad.
NOTE:If yourreciperequkespreheating you
mayneed to add additional timeto the length of
the cooking time.
[] Using the number pads, enter the
desired baking time.
[] Press the DELAYSTART pad.
[] Using tile number pads, enter the
time of da)you want the oxen to
tHEn on [lnd start cookiil_
[] Press the STARTpad.
If you would like to check the times w)u
have set, press the DELAYSTART pad'to
check the start time um have set or press
the COOKINGTIME pad to check the
length (ff cooking time you have set.
When the oven turns on at the time of
da} you haxe set, the display will show the
changing, , teml)eratm'e (startino, _ at IO0"F)
and the cooking itme. The displa} starts
changing, , once the teml)eratm'e reaches
10t)°K
The oven will continue to cook ,fin" the
programmed amotmt of time, then shut
off automatically, tmless the Cook and
Hold teature was set. See the Special
featuresof yourovencontrolsection.
Press the CLEAR/OFFpad to clear the
display.
NOTE:Anattentiontonewill soundif youare
usingtl_nedbakinganddonotpresstheSTART
padafterenteringthebakingtemperature.
/4
Page 15

Adjust the oven thermostat--Do it yourself! ge.com
Youmay find that your new oven cooks differently than the one #replaced. Use your new oven for a few
weeks to become more familiar with it. If you still think your new oven is too hot or too cold, you can adjust
the thermostat yourself.
Do not use thermometers, such as those found in grocery stores, to check the temperature setting of your oven.
These thermometers may vary 2_40 degrees.
NOTE,"This adjustment will only affect baking and roasting temperatures; # will not affect the broiling or the self-
cleaning temperatures. The adjustment will be retained in memory after apower failure.
ToAdjust the Thermostat
C BAKE )'['_
00000
O00
®
[] Press the BAKE and BROILHI/LO
})ads at the same time fin 3 see(rods
until the displa_ shows SE
[] Press the BAKE pad. A two-digit
number shows in the display,
Press BAKE again to alternate
between increasing and decreasing
the oxen tenlpei_Kure.
[] The oxen temperature can be
a(!justed up to (+) . t_ hotter or (-)
35°F coole_: Press the number pads
the same way you read them. For
example, to change the oven
temperature 15°K press land 5.
[] _q_en you haxe made the
a(!jusnnent, press the STARTpad
to go back to the dine ot day display.
Use your oven as you would
nOlill}lllv;
. . 35,,_
Thetype ofmargarine will affectbakingperformanc!!
Most recipes for baking have been developed using high fat products such as butter or margarine (80% fat). If you
decrease the fat, the recipe may not give the same results as with a higher fat product.
Recipe failure can result if cakes, pies, pastries, cookies or candies are made with Iow-fat spreads. Thelower the fat
content of aspread product, the more noticeable these differences become.
Federal standards reqtlire l)ro(hl('ts labeled "margarine" to contain at least 80% tilt by weight. I,(m_lilt spreads, on the
other hand, contain less tilt and m(ne water: The high moistme content of these spreads aftects the texture and flavor
of baked goods. For best results with your old tilvorite redpes, use mmgm_ine, butter or stick spreads containing at least
70% vegetable oil.
/5
Page 16

Usingtheself-cleaning oven.
Before a Clean Cycle
Wipe up heavy soil onflTeoven
bottom.
@@@(3)@
(3)
START_
_\'e recommend venting your kitchen
with an open window or using a
ventilation tim or hood (hwing the fi_st
sel6clean cycle.
Remove rack& broiler pan, broiler grid,
all cookware and am almninmn fifil fl'om
the O_*en,
The shiny, silvePcolored oven racks
(on some models) can be selfi<-leaned,
but they will darken, lose their luster
and become hard to slide.
Soil on the fl'ont fl'ame ot the range and
outside the gasket on the door will need
to be cleaned by hand. Clean these areas
with hot water; soap-filled steel wool pads
or cleansei_ such as Soft Scrub (:. Rinse
well with clean water and dry:
How to Set the Oven for Cleaning
[] Pressthe SELFCLEANLO/STDpad
on(e _0I" a _-hot/I" clean tinle or
twice fin" a 3-horn" clean time.
A 3-horn" sel6clean time is
recommended fi)r rise when
cleaning small, contained spills. A
self=clean time of 4 hom_ or longer
is recommended fin" a dirtier oven.
[] If a time other than 4 hom_ or
3 hom_ is needed, use the number
pads and enter the desired clean
time.
You can change the clean time to any
time between 3 hom_ and 5 hom_,
depending on how di m' yore" oven is.
Do not clean the gasket. The fiberglass
material ot the oven door gasket cannot
withstand abrasion. It is essential fin" the
gasket to remain intact. If w_u notice it
becoming worn or fl'ayed, replace it.
_._]l)e up any hea\ T spillove_ on the oven
bottom.
Make sm'e the oven light bulb cover is in
place and the oven light is off,
IMPORTANT'. The health of some birds is
extremely sensitive to the fim/es given off
dtwing the sel6cleaning cycle of any
range. Move birds to another well-
ventilated room.
\,_]_en the LOCKED light goes off; you will
be able to open the dora:
:_::The word LOCKED will flash and the
oven control will signal if you set the
clean wcle and finget to close the oven
dooI;
?_:To stop a clean cycle, press the
CLEAR/OFFpad._._l/en the LOCKED
light goes off indicating the oven has
cooled below the locking temperature,
you will be able to open the doo_:
[] Press the STARTpad.
The door locks automatically. The display
will show the dean time remaining. It will
not be possible to open the oven door
tmfil the temperatm'e drops below the
lock temperatm'e and the LOCKEDlight
goes off'.
/6
Page 17

The oven door must be closed and all controls must be set correctly for the cycle to work properly.
How to Delay the Start of Cleaning
!
@@(3)@@
@ (Z)(X)(EE3)
@@@@dE)
(X)(Z)(X)(EE
START
[] Pressthe SELFCLEANLO/STDpad
once toI" a _-hotli" (lean [lille oi"
twice fo_ a 3-horn clean time.
A 3-hem sel6clean time is
Fecoi/lillended ]'0F rise when
cleaning small, contained spills. A
selIklean time of 4 hom_ or longer
is recommended t0r a dirtier o',en.
[] If a time other than 4 hom_ or
3 houI_ is needed, use the iminber
pads and enter the desired clean
tim e.
Y}m can change the clean time to any
dine between .'4 houi_ and 5 houi_,
dei)ending, on how di_l)your oxen is.
[] Press the DE/JIYSTART pad.
[] Using the mmfl)er pads, enter the
time of day xou want the clean cxcle
to staI't.
[] Press the STARTpad.
The door locks automaficall); The display
will show the start time. It will not be
possible to open the oven door tmtil
the temperature drops below the lock
temperature and the LOCKEDlight
goes ofl_
When the LOCKEDlight goes off', you will
be able open the doo_;
ge.com
After a Clean Cycle
You may notice some white ash in the
o',en. _,_ipe it up with a damp cloth aiier
the o_,en cools,
If whitespotsremain,removethemwitha
soap-filledsteelwoolpadandrinsethoroughly
withavinegarandwatermlkture.
These deposits are usuallx a salt residue
that cannot be remoxed bx the dean
cxcle.
If the oven is not clean after one clean
c)cle, repeat the c_cle.
!i_:Y)u cannot set the o'_en fi)r cooking
tmfil the o_en is cool enough for the
door to unlock.
::Ji::X4]file the oven is sell:cleaning, you
can press the CLOCK pad to display
the time of day. To return to the
clean cotmtdown, press the SELF
CLEANLO/STD pad.
_ If the racks become hard to slide, apply
a small amotmt of cooking oil to a
paper towel and wipe the edges of the
oven racks with the paper towel.
17
Page 18

Special featuresof yourovencontrol.
Yournew touch pad control has additional features that you may choose to use. The following are the features and
how you may activate them.
The special feature modes can only be activated while the display is showing the time of day. They remain in the
control's memory until the steps are repeated.
When the display shows your choice, press the $TARTpad. Thespecial features will remain in memory after a
power failure.
12-Hour Shutdown
iiii!l( ii )
÷÷
Withthisfeature,shouldyouforgetandleavethe
ovenon,thecontro/wi//automatlca//yturnoff the
ovenafter 12hoursduringbakingfunctionsor
after3 hoursduringa broilfunction.
If )ou wish to turn OFF this teature, follow
the steps below.
[] Press the BAKE and BROILHI/LO
pads at the same time fin" 3 seconds
until the display shows SE
[] Press the DELAYSTART pad until n0
shdn (no shut-off) appeax5 in the
display.
[] Press the START pad to activate the
no shut-off and leaxe the control set
in this special teatures mode,
Fahrenheit or Celsius Temperature Selection
Youroven contro/isset to use the Fahrenheit
temperatureselectionsbutyoumay changethis
to use the Ce/siusselections.
[] Press the BAKE and BROILHI/LO
pads at the same time fi)r 3 seconds
until the display shows SF
Press the COOKING TIME and BROIL
[]
HI/LO pads at the same time. The
displa) will show F (Fahrenheit).
Press the COOKING TIME and BROIL
[]
HI/LO pads again at the same time.
The displa)will show C (Celsius),
[] Press the STARTpad.
( ....-),,÷
÷
/8
Tonesat the End of a TimedCycle
At theendofa timedcyc/e,3 shortbeepswill
soundfo//owedby onebeepevery6 secondsuntil
theCLEAR/OFFpadispressedThiscontinua/
&secondbeepmaybecanceled
To cancel the (_-second beep:
[] Press the BAKE and BROILHI/LO
pads at the same time fin" 3 seconds
until the display shm_s SF.
Press the KITCHENTIMERON/OFF
[]
pad. The displa)shows CONBEEP
(continuous beep). Press the
KITCHENTIMERON/OFFpad again.
The display shows BEEP.(This
cancels tile one beep every 6
seconds.)
Press the STARTpad.
[]
Page 19

12-Hour, 24-Hour or Clock Blackout
Yourcontrolis setto usea 12-hourclod<
If you would preter to ha_e a 24-hour
military time clock or black out the clock
display; follow the steps below.
[] Press the BAKE and BROIL HI/LO
pads at the sanle time fb_ 3 seconds
tmtil the display shows SF.
Press the CLOCK pad (race. The
[]
display will show 12 hr. If this is
the choice _ou want press the
START pad,
Cook and Hold
ge.com
Press the CLOCKpad again to chan(,e_ to
the 24 hour military time clock. The
display will show 24"hr. If this is the choice
you want, press the START pad.
Press the CLOCKpad again to black out
the clock displa> The display will show
OFF.If this is the choice you want, press
the STARTpad.
NOTE'.Ifthe dock isin the Mack-outmode you
wi//not beabletousetheDelayStartfunction.
Yourcontrolhasa cookandholdfeaturethat []
keepscookedfoodswarmforupto 3hoursafter
tiYnedBak/#gorRoast/#gisf#ished
NOT[" Thisfeaturecanonlybeprogrammedto
workwithtiYnedBakl#gorRoasting.(Seethe
Usingthetknedbakl#gorroastlbgfeatures
section.)After timedBak/worRoastl#ghas
automaticallystoped,theprogrammedcookand []
holdwillautomaticallystart.
To actix Ke this teatm'e fiw use after
Timed Baking or Roasting, follow the
steps below.
[] Press the BAKE and BROIL HI/LO
pads at the same time fiw 3 seconds
tmtil the display shows SF.
Press the COOKING TIME pad.
The display will show Hid OFF.
Press the COOKING TIME pad again
to actixate the ti_atm'e. The display
will show Hid ON.
Press the START pad to activate
the cook and hold teatm'e and
leaxe the control set in this special
_%'att Ires i/lode.
19
Page 20

Usingthe SabbathFeature(onsomemodels).
(Designed for use on the Jewish Sabbath and Holidays.)
TheSabbathfeaturecanbe usedfor baking/roastingonlg It cannot beusedfor broiling,self-cleaningorDelayStart cooking.
NOTE:TheovenlightcomesonautomaticallywhenthedoorisopenedandgoesoffwhenflTedoorisclosed.Thebulbmayberemoved.SeetheOven
LightReplacementsection.Onmodelswithalightswitchonthecontrolpanel,theovenlightmaybeturnedonandlefton.
How to Set for Regular Baking/Roasting
C
OGGGG
@:i (;0/;¸
When the display shows D the
oven is set in Sabbath. When the
display shows D C the oven is
bakflTg/roasting.
iiiiiii!i! iii;ii !iiilliiil!iiii
GGGOG
When the display shows D the
oven is set fl7Sabbath. When the
display shows D C the oven is
bakflTg/roasfing.
Make sure the clock shows the correct time of dan
I_q Press mid hold both th( BAKE and BROIL
I.'1
HI/LO pads, at the same time, mldl the
distil <, sho\vs SE
NOTE:I/bake or broil alltlears in tit('
distil m, the BAKEand BROIL HI/LOtlads
were LID[ presse(t at tit(' SalIle tillle. Press
tile CLEAR/OFFllad and beg_n ak_fin.
] Ta l) the DELAYSTART pad until SAb
bAtHalll)ears in the display.
] Press the START tlad and D will al)l)ear
in the distlla _
[] t)'ess tlte BAKE tlad. No signal will be
] Llsing dte nmnt)er t)ads, enwr the d(sired
temllemture 1)et\*(eelt 170°F and 551)°E
No signal or temperature will be given.
] Press the START pad.
] \t+ter a ran(ton/delay period ot
tt p ox'm'a(1) )0 s((onds to 1 mhmte,
D C will appear in tile display
indicadng that tile oven is baking/rlmsdng.
IfD C doesn't aptlem: in the dist)la}, start
ag_dn at Step 4.
"Ib a(!just tile o\en temllerature, tlress the
BAKft)ad, enter tile new temtlerature using
the nmnber pads and press tile STARTpad.
NOTE:TheCLEAR/OFFand COOKINGTIMEpads
are acdve (tin'inK tile Sabbath t_'ature.
How to Set for Timed Baking/Roasting - Immediate Start andAutomatic Stop
Make sure the clockshows the correct time of dan
] Press and hoM both the BAKE mid BROIL
HI/tO llads, atthe same time, mldl the
dist)lay S] _()_r_ SE
NOTE: If bake ot" t)roil al)pem:s in tile
(lisl)la _, the BAKEand BROIL HI/LOt)ads
were trot t)resse(I at the s_l//(' tiltte. Press
the CLEAR/OFFpad and begill again.
[] Tail the DELAYSTART pad mttil SAb bAtH
appears in the disl)lay.
] Press the START pad aH(t D will atltlear in
the disl)lay.
[] Press the COOKING TIME tlad.
Press the It/llIll)er t)a(ls to set the desired
[]
length of looking time lletweelt
1 mimne mid 9 hours mid 99 mimltes.
The cooking thne that you entered will
be displa}_'d.
Press the START tlad.
[]
] P!'ess the BAKEtlad. No signal will be
Llsing the munber pads, enter dw
] desired ten/l)eratm:e. No sigl/_d or
temperature will l)e g,rixell.
] Press the START pad.
[_ At+LeTa randon/delay t)eriod of
tt)tlroximud ) )0 s((on(Is to 1 mint t(,
D C will allllear in the distil m indicating
that tile oven is baking/r(msdng. If D C
doesn't appear in the diN)la b start
a_fin at Step 7.
To a(!iusi tile o\en temt)emture, press tile
BAKEt)ad, enter tile new temt)emture using
the mmlber t)ads and press the STARTpad.
When cooking is tinished, the dist)lay will
cl/ange/i'om D C to D att(t 0:00\*,rill appear
indicating that the oven has turned
OFFbut is still set in Sabl)ath. Remove
the cooked/oDd.
2O
BAKE
How to Exit the Sabbath Feature
Press the CLEAR/OFFtlad.
[]
If the oven is cooking, wait for a r;tlldom
[]
delay period of at)t)roxin/ately 30
se(onds to 1 minute, mttil only D
is in the (tistlla)
Press and hold both dte BAKE and BROIL
[]
HI/LO tlads, at the same time, mttil the
dist)lay shows SE
"[;tt) dte DELAY START tlad until 12shdn
[]
or no shdn appears in the display.
12shdn indicates that the o_x'n will
automatic_fllv turn off alter 12 horn's, no shdn
indicates that the o\en will not autonmdeallv
t/lrl/oll_
] Press the START tlad.
NOTE:I/a l)ower outage occurred while
tile o'+etl was ill Saltl)ath, the o_'n will
a/ltOlttatie_dlv tllrll off attd st_w off e\ el/
whetl the power rettlrtts. The ovetl
control lIl[ISt be reset.
Page 21

Camandcleaningoftherange, ge.com
Be sure all controls are off and all surfaces are cool before cleaning any part of the range.
If vour range is removed for cleaning, servicing or any reason, be sure the anfi-tip
device is reengaged properly when the range is replaced. Failure to take this
precaution could result in tipping of the range and cause injury.
How toRemoveProtectiveShippingFilmand Packaging Tape
Careflllly grasp a corner of tile protective
shipping fihn with veto" finge_ and slowly
peel it from tile appliance sm_hce. Do
not use any sharp items to remove tile
fihn. Remove all of tile fihn befln'e using
tile appliance fin" tile first time.
Control Knobs
Thecontrolknobsmayberemovedforeasier
c/eanlbg.
Make sm'e tile knobs are in tile OFF
positions and pull them straight off tile
stems fi)r cleaning.
Oven Vent
Theovenventislocatedabovethelefi sideof
thedoor
This area could becolne hot during
oven rise.
To [lSSllFe no danlage is done to tile
finish of the product, the safest way to
remove tile adhesive fl'om packaging tape
on new appliances is an application of a
household liquid dishwashing detergent.
Apply with a soft cloth and allow to soak.
NOTE: The adhesive must be removed from all
parts.It cannot be removed if it is baked on.
Tile knobs can be cleaned in a
dishwasher or they may also be washed
with soap and water: Make sure tile insides
of tile knobs are dry before replacing.
Replace tile knobs in tile OFFposition
to ensure proper placement.
It is nOlilla] ti)i" steaI/l to COllle ()/It ot
tile vent.
The vent is important for proper air circulation.
Never block this ven£
Stainless Steel Surfaces (onsomemodels}
Donotusea steel woolpad;it will scratch
thesurface.
To clean tile stainless steel surfi_ce,
use wam_ sudsy water or a stainless steel
cleaner or polish. Mways wipe tile smti_ce
in tile direction of tile grain. Follow tile
cleaner instructions for cleaning tile
stainless steel sm'ti_ce,
To inquire about pro'chasing stainless
steel appliance cleaner or polish, or to
find the location of a dealer nearest you,
please call ore" toll-li'ee number:
National Parts Center 1.800.626.2002
ge.com
2/
Page 22

Careand cleaningof therange.
Painted Surfaces
Do not rub or clean the door gasket--
it has an extremely low resistance to
abrasion.
If you notice the gasket becoming worn,
frayed or damaged in any way or if it has
become di,_olaced on the door, you should
have it replaced.
Painted suHi_ces include the doo_; top of
the control panel and the drawer fl'ont.
Clean fl/ese with soap and water or a
vinegar and water solution.
Control Panel
!'!:_Clean up splattex_ with a damp cloth.
!i_:You may also use a glass cleane_:
Cleaning the Oven Door
To clean the inside of the door:
;i_ Because tile area inside tile gasket is
cleaned dm'ing tile self:clean cycle, you
do not need to clean this by hand.
_: Tile area outside tile gasket and
the door liner can be cleaned with a
soap-filled steel wool or plastic pad,
hot water and detergent. Rinse well
with a vinegar and water solution.
To clean the outside of the door:
iJi::Use soap and water to thoroughly
clean the top, sides and ti'ont of the
oven dooi: Rinse well. _O/l Ill,Iv [llso
use a glass cleaner to clean tile glass
Do not use COillil/ercial o_,en cleaneis,
cleaning powde_, steel wool or hm_h
abrasixes on an) painted suHhce.
!i?:Remoxe heavier soil with wam_
soapy wateE
}i_:Do not use abrasixes of am kind.
on tile outside of tile do(n: Do not let
water drip into the vent openings.
iJi::If any stain on tile door vent trim is
persistent, use a soft abrasive cleaner
and a sponge-scrtfl)ber for best results.
iJi::Spillage of marinades, fl'uitjuices,
tomato sauces and basting materials
containing acids may cause
discoloration and should be wiped
up immediately: When suHhce is cool,
clean and rinse.
ij?::Do not use ()veil cleaners, cleaning
powde_ or hm_h abrasives on the
outside of tile dora:
Hingelock
Pullhinge locks down to unlock.
1(7 /
Removalposition
22
Lift-Off OvenDoor
The door is very heavy. Be careful when
removing and lifting the door.
To remove the door:
[] Fully open tile door.
[] Pull tile hinge locks down toward
tile door fl'ame, to tile unlocked
position. A tool, such as a small
fiat-blade screwdrixe_; ma) be
reqtfired.
[] Fimflv,_,,raso._ both sides of tile door
at tile top. DOnot/fit the door by the
hand&.
[] Close door to tile door remoxal
position, which is half Win between
tile broil stop position and flfll,x
closed.
[] Lift door up and out tmtil tile hinge
am_ is dear of the slot.
Toreplace the door:.
V_ Firefly <m_s,) both sides of tile door
it i
at tile top. DOnot lift thedoorbythe
handle.
] "x4ith tile Bottom Hingearm
door at tile edge
same angle as of sl0t
tile remox:d
position, seat tile
notch stop of
tile hinge am_
into tile bottom
edge ()f the hinge slot. The notch in
the hinge am_ must be flfllv seated
into the b()ttom of the slot.
[] Full) open tile door tmfil it is
parallel to tile floo_: If tile door will
not fillly open, the notch stop is not
seated correctly in the bottom edge
of the slot. Repeat step 2 if
necessaiT:
[] Push the hinge locks up against the
fl'ont fl'ame of tile oxen caxit_ to tile
locked position.
arm
Hingelock
Push hinge locks up to lock.
F_] Close tile oxen doo_:
IJI
N
Page 23

Oven Racks
ge.com
I St@ guide
_M1oven racks may be cleaned bv hand
with an abrasive cleaner or steel wool.
_Mter cleaning, rinse the racks with clean
water and dry with a clean cloth. Gray
porcelain-coated oven racks may remain
in the oven dm-ing the self cleaning
cycle without being damaged. The shiny,
silvei_colored oven i'ac]_s Illav rei/lain in
the o;'en dm_ing the self:cleaning cycle,
but they will lose their luster and become
hard to slide.
It will be necessm y to grease all oven
rack side edges with a light coating of
vegetnble oil after cleaning them by hand
or in the oven. This will help maim;fin
the ease of sliding the racks in and out
of the oven.
Storage Drawer Removal (onsomemodels)
Toremove He drawer:
[] Pull the drawer out tmfil it stops.
[] I,ifi the fl'ont of the drawer tmfil the
stops clear the guides.
[] Remo;e the drawe_:
Toreplace the drawer:
[] Place the drawer rails on the guides.
[] Push the drawer back tmtil it stops.
[] Lift the front of the drawer and
[] I,ower the fl'ont of the drawer and
push back tmtil the stops clear the
guides.
push back tmtil it closes.
23
Page 24

Careand cleaningof therange.
Oven Light Replacement
CAUTION:Beforereplacingyour
oven light bulb, disconnect the electrical
power to the range at the main fuse or
circuit breaker panel
Be sure to let the light co_er and bulb
cool completely.
Toremovethecover'.
ii__ if!!
] Twist lens counterclockwise about a
qtlal'tei" ttll'll to l'exllove_
Do not remove any screws to remove the cover.
[] Replace bulb with a 40-_<_tt
appliance bulb or t_o-l)rong,
halogen bulb, as appropriate.
Oven Heating Elements
Donotcleanthebakeelementorthebroil
element Any soil will bum off when the
elements are heate_
Toreplacethecover:
[] I_ine up tabs of lens in front of tabs
on housing and rotate clockwise to
engage.
To clean the oven flora; gently liti
the bake element. Clean with wam_
soap} watei:
24
Page 25

Cleaningthe glasscooktop, ge.com
Control Lockout (o. somemodels)
Beoin b_ lockino the cooktop; see the
LOCK/UNLOCKHOLD3 SECONDS
Cleanyourcooktopafter
eachspill. Use CERAMA
BRYTE®Ceramic Cooktop
Cleaner.
ControlLockoutsection.
Normal Daily Use Cleaning
ONLY use CEILBd_JIA BRYTE _)(;ermnic
Cooktop Cleaner on the glass cooktop.
Other creams may not be as eflecfixe.
To maintain and protect the stwfhce of
yore" glass cooktop, tollow these steps:
[] gefin'e using the cooktop fin" the
fi_t time, clean it with CEIL_d_/IA
BRYTE (':Ceramic Cooktop Cleane_;
This helps protect the top and
makes clemmp easier
[] Dail) rise of (;EILBd_g__BRYTE (_'
Ceramic Cookto I) Cleaner will help
kee I) the cooktop looking new.
[] Shake the cleaning cream well.
Appl) a few drops of C.EIL_dMA
BRYTE _)Ceramic Cooktop Cleaner
directly to the cooktop.
Use a paper towel or (;EI{Bd_4A
[]
BRYTE (_)Cleaning Pad fin" Ceramic
Cooktops to clean the entire
cooktop St/I'J[ilce.
[] Use a dry cloth or paper towel
to remove all cleaning residue.
No need to rinse.
NOTE:Itis veryimportantthat youDONOT
heatthecooktopuntilit has beencleaned
thorough/>
Use a CERAMABRYT£_Cleaning
Pad for Ceramic Co&tops.
TheCERAMABRYTE_ Ceramic
Cooktop Scraper and all
recommended supplies are
available through our Parts Cente_
See instructions under "ToOrder
Parts" section on nextpage.
NOTE:Do not use a dull or
nicked blade.
Burned-On Residue
WARNING:DAMAGEtoyourglasssurface
mayoccurif youusescrubpadsotherthanthe
padincludedwith yourcooktop.
[] Allow the cooktop to cool.
[] Spread a few droI)S of CEIL_dVIA
BRYTE (_'Ceramic Cookto I) Cleaner
on the entire bm'ned residue area.
Using a CEILZ_d_IA BRYTE (_)
[]
Cleanino Pad tot Ceramic
(2ooktops, Iub the residue area,
ali))lying, , pressm'e as needed.
Heavy, Burned-On Residue
[] Allow the {ooktop to cool.
[] Use a single-edge razor blade
scraper at approximately a 45 °
angle against the glass surtace
and scrape the soil. It will be
necessary to apply pressm'e to
the razor scraper in order to
remove the residue.
After scraping with the razor
[]
scraper, spread a few drops of
CEILBdVlA BRYTE : Ceramic
(2ooktop Cleaner on the entire
burned residue area. Use a
CEI_BdMA BRYTE ')Cleaning Pad to
remove any remaining residue.
If any residue remains, repeat the
[]
steps listed above as needed.
For additional protection, alter all
[]
residue has been remoxed, polish
the entire stu'thce with CEI{_dVIA
BRYTE ': Ceramic (_ooktop Cleaner
and a paper towel.
For additional protection,
[]
after all residue has been
removed, polish the entire
surface with CEILBd_JIA BRYTE':
Ceramic Cooktop Cleaner
and a paper towel.
25
Page 26

Cleaningthe glasscooktop.
Metal Marks and Scratches
Be careflll not to slide pots and
[]
pans across your cooktop. It will
leave metal markings on the
cooktop S/li_il ce,
These marks are remox_d)le using
the (:EI_JlA BRYTE <':Ceramic
Cooktop Cleaner with the CEIL_J]A
BRYTE <': (:leaning Pad fin" Ceramic
Cooktops.
Glasssurface--potential for permanent damage.
[] If pots with a thin oxerla) of
aluminum or copper are allowed
to boil dr); the overlay may leave
black discoloration on tile cooktop.
This should be removed
immediatek betore heating
again or tile discoloration may
be pemmnent.
WARNING: Carefullycheckthe bottom ofpans
forroughnessthat would scratchthecooktop.
Our testing shows that if you
are cooking high sugar mixtures
suchas jelly or fudgeand have
a spillover, it can cause
permanent damage to the glass
surface unless the spillover is
immediately removed.
Damage from Sugary Spills and Melted Plastic
[] Turn off all surti_ce units. Remo',e
hot pans.
[] _4'earing an oven mitt:
a. Use a single-edge razor blade
scraper (CEI_IA BRYTE (:
Ceramic Cooktop Scraper) to
move the spill to a cool area on
the cooktop,
b, Remove the spill with
paper towels,
To Order Parts
To order CE/_d_IA BRYTE _ Ceramic
Cooktop Cleaner and tile cooktop
scrape_; please call our toll-li'ee number:
National Parts Center 800.626.2002
CERAMA BRYTE ®Ceramic
Cooktop Cleaner ............. # WX 70)(300
CERAMA BRYTE_ Ceramic
CooktopScraper ............ # WX70)(0302
Kit ......................... # WB64XS027
(Kitincludes cream and cooktop scraper)
CERAMABRYTE_ CleaningPadsfor
Ceramic Cooktops ........... # WX 70)(350
[] Any remaining spilloxer should be
left tmtil the sm_hce of the cooktop
has cooled,
] Don't use tile sm'ti_ce milts again
tmtil all of the residue has been
completely removed.
NOTE"Ifpitting or indentationin the glass
surface hasalready occurred,thecooktopglass
wi// have to bereplaced/n this case,semce wi//
be necessary
26
Page 27

Beforeyoucarlforservice.., ge.co,,
Troubleshooting tips
Save time and money! Review the charts on the following
pages first and you may not need to call for service.
Possible Causes What To Do
Surfaceunits willnot
maintainamlling boH
hnproper cookware
being used.
• Use pans which are fiat and match tile diameter
of tile surthce unit selected.
orcooking_ not
fastenough
Surface units do A fuse hz your home may be • I_el)lace the fl/se or reset the circuit l_reake_:
not work properly blown or the circuit breaker
tripped.
Cooktop controls • Check to see the correct control is set ior the surthce
improperly set. trait you are using.
Scratches (mayappear
as cracks) on cooktop
glass surface
Areas of discoloration Food spillovers not cleaned • See the Cleaning the glass cooktop section.
on the cooktop before next use.
Incorrect demlhlg
methods being used.
Cookware with rough bottoms
being used or com'se particles
(salt or saaid) were between
the cookwaxe and the surface
of the cooktop.
Cookware has been slid
across the cooktop surface.
Hot surface on a model • This is normal. The stu'tace may appear discoh)red
with a white glass cooktop, when it is hot. This is teml/orar _ and will disappear
• Scratches are not remowd)le. Tiny scratches will become
less visible in time as a result of cleaning.
• To avoid scratches, use tile recommended cleaning
procedures. Make sure bottoms oI cookware are clean
before use, and use cookware with smooth bottoms.
as the glass cools.
Plastic melted to Hot cooktop came into • See the Glass surface potential for permanent damage
the surface contact with plastic placed sectiou in the Cleaning the glass cooktop section.
on the hot cooktop.
Pitting (or indentation) Hot sugar mixture spilled • (',:ill a qualified technician for rel/la('euleut.
of the cooktop on the cooktop.
Frequent cycling hnproper cookware • Use only flat cookware to minimize cvcliu
off and on of being used.
surface units
Control signals after You forgot to enter a • Press the BAKEpad and desired temperature or
entering cooking time bake temperature or the SELF CLEAN LO/STD pad and desired clean time.
or delay start clemfing time.
Fooddoes notbake Oven controls improperly set. • See tile Usingthe oven sectiou.
or roast properly Rack position is incorrect • See the Using the oven section.
i/ iiiii_iii!_!_!_!_!_!_!_!_!_!_
ii i i i i i i i
or the rack is not level.
Incorrect cookware or • See the Using the oven section.
cookware of improper
size being used.
Oven thermostat needs
adjustment. 2 7
• See tile Adjust the oven thermostat--Do it yourself!
section.
Page 28

Beforeyoucall for service...
Troubleshooting -tips
Possible Causes What To Do
Clock and timerdo Plug on range is not completely * Make sure electrical l_lug, is l)lugged,, into a live, properly
not work haserted in the electrical outlet, grounded outlet.
A fuse in your home may * Replace tile h/se or reset tile circuit breaker:
be blown or the circuit
breaker tripped.
Oven controls improperly set. * See the Using the clock and timer section.
Oven lightdoes Light bulb is loose or defective. * Tighten or replace the btdb.
not work
Fooddoes not Oven controls improperly set. * Make sure you press the BROIL HI/LO1)11(1.
bmil properll,
Switch operating light * Call for service.
is broken.
Improper rack position * See the Broiling Guide.
being used.
Cookware not stilted * For best results, use a pan designed for broiling
for broiling.
ha some areas the power * Preheat the broil element for 10 minutes.
(voltage) may be low.
• Broil for the lon,_est_, period of time recommended in
the Broiling Guide.
Oven temperature too Oven thermostat • See the Adjust the oven thermostat--Do it yourself!
hot or too cold needs adjustment, section.
Oven will not work A fuse ha your home may be • Replace the fl/se or reset the circtdt l_reake_:
Storage drawer Rear drawer support is • Reposition the drawer. See the Storage Drawer
is crooked on top of the guide rail. Removalinstructions in the Care and cleaning of
Storage drawer Power cord may be • Reposifi(n_ the drawer and power cord. See the
won't close obstructhag drawer Storage Drawer Removal instructions in the Care and
blown or the circuit
breaker tripped.
Oven controls improperly set. • See the Using the oven section.
your range section.
inofthethelowerrange.back cleaning of your range seth( )n.
Rear drawer support is • Reposition the (h'awe_: See the Storage Drawer
on top of the guide rail. Removalinst_uctions in the Care and cleaning of
your range section.
28
Page 29

Possible Causes What ToDo
ge.com
Ovenwill notself-clean
"Crackling" or This is the sound of the • This is normal.
"popping" sound metal heating and cooling
Excessive smoking Excessive soil. • Press the CLEAR/OFFpad. Open the windows to
during a clean cycle rid tire room of smoke. _ait tmtil tire LOCKEDlight
Oven door will not Oven too hot. • Allow the oven to cool below locking temperatt/re.
open after a
clean cycle
Oven not clean after Oven controls not properly set. • See tire Using the self-cleaning oven section.
a clean cycle
"LOCKED"flashes The self-deml cycle has been • Close the oven door.
in the display selected but the door is not
The oven telnperatttre is
too high to set a self-clema
operation.
Oven controls improperly set. • See tile Using the serf-cleaning oven section.
during both the cooking and
cleaning functions.
Oven was heavily soiled. • (3can up heavv, spilh)vers before .startiu,,_ the clean
closed.
• _Mlow the oven to cool and reset the controls.
goes off. _]pe tq) the excess soil and reset tire
clean cycle.
cycle. Hea\'ilv soiled ovens luav ueed to sell=cleau
again or fin" a hmger period of time.
"LOCKED" light is on The oven door is locked • Press the CLEAR/OFFpad. ?dlow the ox'eu to cool.
when you want to cook because the temperature
inside the oven has not
dropped below the
locking temperature.
"F--- and a number You have a function • Press tire CLEAR/OFFpad. Put the oveu back lute
or letter"flash error code. operation.
in the display If the function code repeats. • Disconnect :111power to tire range for at least
30 seer>ntis and then recrmuect pr>wer./f the
hmction error code repeats, call tot service.
29
Page 30

Beforeyoucall forservice...
Troubleshooting -tips
Possible Causes What ToDo
Displaygoesblank
blown or the circuit
breaker tripped.
The clock is in the • See the Specialfeatures of your oven controlsection.
black-out mode.
Oisplayflashes Power failure. • Reset the dock.
Unable t° get the Oven control pads were •TheBAKEandBRO/LH//LOpadsmustbepressed
displayto show "SF" not pressed properly, at the same time and held fin" 3 seconds.
Power outage or surge. • Reset the clock. If the oven was in use, )ou must reset
"Burning" or "oily. This is normal in a new • To speed the process, set a sellXclean c_cle for a
odor emitting from oven and will disappear ufiniumm of 3 hours. See the Using the self-cleaning
the vent in time. oven section.
Strong odor An odor from the insulation • This is temporary.
around the inside of the
oven is normal for the first
few times the oven is used.
Fan noise A cooling fan may
automatically turn
on mzd off.
• Replace the fllse or reset the circuit breaker:A fuse in your home may be
it b_, I)ressing, the CLEAR/OFFpad, setting" the clock
and resetting any cooking flmction.
• This is normal. The cooling thn will turn off and
on to cool internal parts. It may rtm alter the oxen
is tin'ned OFE
30
Page 31

Notes.
_t
m
m.
w
w
m
31
Page 32

Accessories.
Looking For Something More ?You can find these accessories and many more at ge.com, or call 800.626.2002
(during normal business hours). Have your model number ready.
OvenRacks Broiler Pan Oven Elements
)
LightBulbs
Cleaning Pads Scraper
Tired of discolored racks? Wishing you had extra-heavy-duD_ oven rocks?
NOWA VAILABLE for your range:
(;E's innovative, self-cleanable porcelain<oated oven racks!
• Hea_ T Duty
• Durable
• Able m be cleaned in a self-cleaning oven
Knobs Cleaner
22
Visit ge.com for more infbnnation.
Page 33

GE Service Protection Plus 'M
GE, a name recognized worldwide fbr quality and dependability, offers you
Service Protection Plus'_'--comprehensive protection on all yore appliances--
No Matter What Brand!
Benefits Include:
* Backed by GE
* All brands covered
* Unlimited service calls
* All parts and labor costs included
o No out-of-pocket expenses
o No bidden deductibles
o One 800 number to call
You _dll be completel) satisfied with our service protection or )ou ma) request )our mone) back
on the remaining value of your contract. No questions asked. It's that simple.
Protect yore" refrigerator, dishwasher, washer and dryer, range, TV_ VCR and much more--a_y brand!
Plus there's no extra charge flw emergency service and low monthly financing is available. Even icemaker
coverage and toed spoilage protection is offered. You can rest easy, knowing that all your valuable
household products are protected against expensive repairs.
Place ,our confidence in GE and call us in the U.S. toll-free at _UU._Z_.ZZZ_
for l//Ol'e infol'I//atiOll.
:_,_*]1 hi}in(Is (o_.{!l_{!(L tip t(t _0 ){!iris Ill(I, ]11 the (on[lllenl tl [.S.
We TICover Any Appliance.
Anywhere. Anytime.
.n_ ( Jill here
Please place in envelope and mail to:
GeneralElectricCompany
Warranty Registration Department
P.O. Box 32150
Louisville, KY 40232-2150
33
Page 34

Consumer Product Ownership Registration
Deal Customer:
Thank you for purchasing our product and thank you for placing your confidence in us.
VVe are proud to ha_e you as a customer!
Follow these three steps to protect your new appliance investment:
Complete and mail
your Consumer
Product Ownership
Registration today.
ttaw' the peace of
mind of knowing wc
C_lll COlltact Vail ill
the tmlikely event of a
satbly modificalion.
Atter mailing tile
registration below,
store this document
ill a sati., place. It
contains inl)mnation
you will need should
you require service.
Our selwice number is
800.GE.CARES
(8t)0.432.2737).
Model Number Serial Number
I I I I I I
Important: If you did not get a registration card with your
product, detach and return the form below to
ensure that your product is registered, or register
online at ge.com.
Consumer Product Ownership Registration
Read your Owner's
Malmal carefilllv.
It will help you
operat( your lle'*_
appliance properly.
, I
._,_ Cut h(r(
Model Number Serial Number
Ms. M*>,. Mixs
Fir,,1 I I L_sl]
Name I I I I I I I I I Nain(! I I I I I I I I I I I I
SI r( (!1 I
Addr( ss I I I I I I I I I I I I I I I I I I I I I I I I
I I I I I I I E-lnailAddress*
I I I I I I I I I I
* Please pr(wide your e-mail address to rcceive, via e-mail, discounts, special oflbl-, and other impoltant
commmficalions from (;E Appliances ((;15\).
[ Check herc if you do not want to receixe COlmmmications fl-om G1LVscarcfillly selected paltner_,.
FAIIJ£RE T() COMt'LET1.2 AND RETI JRN TIIIS CAR1) D()ES NOT DIMINISII YOIR
_,)\I_L \N'IY RI(;IfFS.
For more inti)rmation about (',ILVs priva( 3 and daIa usage policg go to ge.com and click on
'Privacy Policy" or call 800.626.2224.
, , I
Pholl(
Nt/lll|)(!r I
State I , 1 .o_,(, , I I I I
Zip I
34
Apt. # I
lime P[aced
In Use 111
Monlh
Ciw I
Appliances
General Electric Company
GE Consumer&, Industrial
Louisville, K¥ 40225
ge.com
I
I
Page 35

GEElectricRange Warranty.
Aft warranty service provided by our Factory Service Centers,
or an authorized Customer Care® technician. Toschedule
service, on-line, 24 hours a day, vis# us at ge.com, or carl
800.GE.CARES (800.432.2737). Please have serial number and
model number available when calling for service.
GE Will Provide:
One Year
Fromthedate of the
originalpurchase
::Ji::Service trips to your home to teach you how to use
the product.
)_:Improper installation, delivery or maJntenm_ce.
::Ji::Failure of the product if it is abused, misused,
or used for other than the intended purpose or
used commercially.
::Ji::Damage to the glass cooktop caused by use of demlers
other thml the recommended clemah_g creams and
pads.
Anypart ot the range which _ifils due to a detect in materials or workmanshii_. During this
limited one-year warranty, GE will also provide, free ofcharge, all labor and in-home service
to replace the (lefecti\'e part,
Staple your receipt here.
Proof of the original purchase
date is neededto obtain service
under the warranty.
iJi::Replacement of house fuses or resetting of circuit
breakers.
!i_:Dmnage to the product caused by accident, f'we, floods
or acts of God.
::Ji::Incidental or consequential dmnage caused by possible
defects with this appliance.
iJi::Dmnage caused after delivery.
!i?:Product not accessible to provide required service.
::Ji::Damage to the glass cooktop caused by hardened
spills of sugaxy materiaJs or melted plastic that
are not clemled accordhlg to the directions in
the Owner's MmmaJ.
EXCLUSIONOFIMPLIED WARRANTIES--Your sole and exclusive remedyisproduct repa# as provided hi this Limited
Warranty.Any implied warranties, including the implied warranties of merchantability orfitnessfor aparticular purpose,
are limited toone year or the shortestperiod allowed by law.
This warranty is extended to the original purchaser and any succeeding owner for products purchased for
home use within the USA. If theproduct is located in an area where service by a GEAuthorized Servicer is not
available, you may be responsible for a trip charge or you may be required to bring the product to an Authorized GE
Service location for service. In Alaska, the warranty excludes the cost of shipping or service calls to your home.
Some states do not allow the exclusion or limitation of incidental or consequential damages. This warranty
gives you specific legal rights, and you may also have other rights which vary from state to state. Toknow
what your legal rights are, consult your local or state consumer affairs office or your state's Attorney General.
Warrantor."General Electric Company.Louisville, KY 40225
II
35
Page 36

ConsumerSupport.
Hme a question or need assistance with your appliance? Try the GE Appliances _,Vebsite 24 hours a (la};
l gEAppliancesWebsite ge.com
' any day of the year! For greater comenience and taster service, you can now download Owner s Manuals,
order parts or exert schedule set\ice on-line.
ScheduleService
Expert GE repair service is onl) one step away fl'om xom" door Get on-line and schedule veto" ser',ice at
_om', comenience 24 hom_ am' (lm of the year! Or call 800.(;E.(:ARES (80().432.2737) dining nomml
business hem's.
ge.com
RealLifeDesignStudio ge.com
GE suI)ports tile Universal Design concept--l)roducts, services and enviromnents that can be used by
people _ff all ages, sizes and capabilities. We recognize tile need to design for a wide range _ffi)hysical and
ment;d abilities and impaim_ents. For details of GE's Universal Design applications, including kitchen
design ideas t0r people with disabilities, check out our Websim today. For the heating impaired, please call
800.TDD.GEAC (800.833.4322).
ExtendedWarranties ge.com
Pro'chase a (;E extended warrant_ and learn about special disco/rots that are axailable while _om', warrant_
is still in effect. You can purchase it on-line anytilne, or call 8 .626.2224 during normal l)usiness hours.
GE Consmner Home Serxices will still be there after )ore" warrant}, expires.
PartsandAccessories
00 "_ __
ge.com
Individuals qualified to service their own appliances can have parts or accessories sent directly to their
homes (VISA, MasterCard and Discover cards are accepted). Order on-line today, 24 hours every,, day or
by phone at 800.626.2002 during nomml business holms.
Instructions contained in this manual coverprocedures to be performed by any user. Otherservicing generally
should be referred to qualified service personnel Cautionmust be exercised, since improper servicing may cause
unsafe operation.
ContactUs
If you are not satisfied with tile service w)u receive fl'om GE, contact us on our X,Vebsite with all tile details
including yore" phone ntlll/beI; oI" write to: General Manage_; C/lStOll/ei" ]),elations
GE Appliances, Appliance Park
I,ouisville, KY 40225
RegisterYourApplbnce
Register your new applimlce on-line---at your convenience! TimeE, l)r°(hlct registration, will allow fin"
enhanced commtmication and prompt service trader tile terms of your warranty, should tile need arise.
You mm also mail in tile prepfinted registration card included in tile I)ackin'"_ material.
Printed in flTe United States
ge.com
ge.com
 Loading...