

Page 1

GEAppliances.com
.
Lo
oi
0
Z
Safety Instructions., ..... 2-7
OperatingInstructions
Aluminum Foil .13
Clock and Timer ............... 16
Oven. ................... _.10-19
Baking and Roasting ........ 13
Broiling ...................... 14
Broiling Guide ............... 15
Oven Control .... ........ 10, 11
Power Outage ......... 9, 12, 16
Preheating ................... 13
Sabbath Feature .... _.:..... 19
Special Features..- ......... J.18
Surface Cooking ............. 8,9
Thermostat Adjustment ....... 17
Careand Cleaning
Air Vents ..... :................ 25
Burner Assemblies ........ 20-21
Burner:Caps and Heads ...... 22
Burner Grates....: ............ 21
Control Panel and Knobs ..... 25
...Cooktop Surface,. ............. 23
Drip Pans ..: ................... 20
Lift-Off Oven Door ............ 2/4
Lift-UpCooktop ............... 23
Oven Bottom ................. 24
Oven Interior ................. :26
Racks ......................... 26
Removable Broiler Drawer .... 25
Stainless SteelSurfaces ...._..23
• . _
Write the model and serial:
numbershere:
Model#
Serial #
Youcan find them on a label on the
front of the range behind the kick
panel or broiterdrawer.
Installation
Instructions ............ 27-42
Anti-Tip Device ......... _.31,41, 42
Connect the Range
togas ..................... 32-35
Convert to LPGas. ............ 42
Dimensions and
Clearances .................... 30
Electrical Connections .... 36-37
Levelthe Range ............... 41
Light the Pilots ............ 37-40
Troubleshooting
Tips ...................... 43-45
Accessories ................ 49
Consumer Support
Consumer
Support .............. Back Cover
Product Registration ...... 47,/48
Warranty for Customers
in Canada ..................... 51
Warranty for Customers
in the U.S.A.................... 50
.... -: _ ,.,
,:, ,, :,.. _::L_: • : :•'•
-183D5580P248
Models:
JGBS04 JGBS20
JGBS07 JGBS21
JGBS17 JGB523
JGBS18 JGSS05
JGBS19
49-85156 02-09 JR
Page 2

IMPORTANT SAFETYINFORMATION.
READALL INSTRUCTIONS BEFOREUSING.
III II i iiiiii i II illlllllllll i
_AWARNING! ::
For your safety, the information inthis manual must be fOiiowedto minimize the risk of fire or explosion, electricshock,
or to prevent property damage, personal injury, or lossof life.
®
• • °
ANTI-TIP DEVICE
-All ranges can tip.
• BURNS or other SERIOUS
INJURIES can result.
• INSTALL and CHECK the
ANTI-TIP bracket following
the instructions supplied
with the bracket.
,_ WARNING: Ifthe information
in this manual is not followed exactlg,
a fire or explosion mag result causing
propertg damage, personalinjurg
or death.
-- Do not store or use gasoline or other
flammable vapors and liquids in the
vicinitg of this ,or ang other appliance.
- WHAT TO DO IFYOU
SHELL GAS :_
@ Do not trg to light ang appliance:
Do not touch ang electrical:switch;
do not use ang phone in gour
building.
Immediatelg call gour gas supplier
from a neighbor's phone._Follow the
gas supplier's instructionS.
If gou cannot reach gour gas supplier,
call the fire department.
-- Installation and service must be
performed bg a qualified installer,
service agencg or the gas supplier.
Toreduce the risk of tipping the.range, the range must
be secured by a properly installed anti-tip bracket. See
installation instructions shipped with the bracket for complete
details before attempting to install.
To check if the bracket is installed and engaged properly,
carefully tip the range forward. The bracket should stop the
range within 4 inches, tf it does not, the bracket must be
reinstalled. If the range is pulled from the watt for ang reason,
always repeat this procedure to verify the range is properlg
secured by the anti-tip bracket.
For free-standing or slide-in ranges, never completelg remove
the leveling legs or the range will nat be secured to the anti-tip
device properlg.
If goudid not receive an anti-tip bracket with your purchase,
call $.80.0.626.8774to receive one at no cost (in Canada, call
£800.56£3344). For installation instructions of the bracket,
visit GEApplic]nces.com (in Canada, GEAppliances.ca).
Page 3

ii iii iiiii ijllllllllllllILIIIIIIIIIIIIII,IIIHill III I I
' GEAppliances:com
A WARNING!
.;IMPORTANTSAFETYNOTICE • ' .... '
_afeDrinking Water and ToxicEnforcement Act requiresthe Gcvernor of California to
• : _pubfisha list of substances known to the state to cause birth defects or other reproductive harm, and
:_' ' . requires businesses to warn customers of potentia! exposure to such substances..
: _:Gas appliances can cause minor exposure to four of thesesubstances, namefg benzene, carbon
.. -. ..... _:_monoxide, formaldehgde and soot, caused primarilg bg the incomplete Combustion of natural gas
or LPfuels.Properlg adjusted burners, indicated bg a bluish rather than a geltow flame, will minimize
incomplete combustion. Exposureto these substances can be minimized bg venting with an open
window or using a ventilation fan or hood.
"SAFETYPRECAUTIONS
Have the installer show gou the location of the range gas shut-offvafve and how to shut it off if
necessarg.
.. :_ Have gout range installed and propertg
•grounded bga qualified installer, n
accordance with the installation instructions.
Ang adjustment and service should be
performed onlg bg qualified gas range
installers or service technicians.
@Donot attempt to repair or replace ang
part of gour range unless it is specificallg
recommended in this manual. All other service
should be referred to a qualified technician.
_ Plug gour range into a 120_volt grounded
outlet onlg. Do not removethe round
grounding prong from the plug. Ifin doubt
about the grounding of the home electrical
sgstem, it is gour personal responsibilitg and
obligation to have an ungrounded outlet
replaced with a properlg grounded,
three-prong outlet in accordance with
the National Electrical Code. Do not use
an extension cord withthis appliance.
WARNING: NEVERuse this
appliance as a space heater to heat or
warm the room. Doing so mag result
in carbon monoxide poisoning and
overheating of the oven.
Page 4

IMPORTANT SAFETYINFORMATION.
READ ALL INSTRUCTIONS BEFOREUSING.
i, ii i iiil, ln
..... n :
, Jl ,11,,,
4
SAFETYPRECAUTIONS
Locate the range out of kitchen trafficpath _Never wear loose fitting or hanging ga_6ts ::
and out of draftg locations to prevent pilot: ,:,:: .while using the appliance. Be careful when::.:
,: :., outage (on standing pilot models} and poor ....... reaching for items stored incabinets Over:the'
,. i . :..: - air circulation. • .... . range. Flammable material could be ignited :
Besure all packaging materials are :, . .......if brought in contact with flame or hot oven
removed from the range before operating ....... surfaces and mag cause severeburns.
i it to prevent fire or smoke damage shou d ::: _ Do not store flammable mater a s in an oven,
,.. _. the packaging material ignite. _ . " .arangebroiler or neara cooktop.
_ Be sure sour range is correctlg adjusted bg : _ Do not store oruse combustible materials
a qualified service technician or installer for gasoline or other flammable vapors and
the tgpe of gas {naturalor LP)that isto be
used. Your range can beconverted for use
with either tgpe of gas. See the Installation
of the range section.
WARNING: These adjustments
must be made bg a qualified service technician
in accordance with the manufacturer's
instructions and all codes and requirements
ofthe authoritg having jurisdiction. Failure to
follow these instructions could result in serious
injurg or propertg damage. The qualified
agencg performing this work assumes
responsibility for the conversion.
Be careful when you clean the cooktop
because the area over the pilot (on standing
pilot models) will be hot.
After prolonged use of a range, high floor
tern peratures may result and many floor
coverings will not withstand this kind of use.
Never install the range over vingl tile or
linoleum that cannot withstand such tgpe
of use. Never install it directlg over interior
kitchen carpeting.
Do not leave children alone or unattended
where a range ishot or in Operation. Theg
could be seriouslg burned.
_ Do not allow anyone to climb, stand or hang
on the oven door, broiler drawer or cooktop.
Theg could damage the range and even tip
it over. causing severe personal injury.
,A CAUTION:Itemsofinterestto
children should not be stored in cabinets
above a range or on the backsplash of a
range-children climbing on the range to
reach items could be seriouslg injured.
liquids in the vicinitg of this or ang other
apptiance.
Do not iet cooking grease or other flammable
materials accumulate in or near the range/ "
Do not use water on grease fires. Never
pick up a flaming pan. Turn the controls off.
Smother a flaming pan on a surface burner
bg covering thepan completelg with a
well-fitting lid,cookie sheet or flat trag.
Use a multi-purpose drg chemical or
foam-tgpe fire extinguisher.
Flaming grease outside a pan can be put out
bg covering it with baking soda or, if available,
bg using a multi-purpose drg chemical or
foam-tgpefire extinguisher.
Flame in the oven can be smothered
completelg bg closing the oven door and
turning the control to off or bg using a
multi-purpose drg chemical or foam-tgpe
fire extinguisher.
Letthe burner grates and other surfaces cool
before touching them or leaving them where
children can reach them.
Never block the vents (air openings] of the
range. Theg provide the air inlet and outlet
that are necessarg for the range to ooerate
properlg with correct combustion. Air openings
are located at the rear of the cooktop, at the
top and bottom of the oven door, and atthe
bottom of the range under the broiler drawer.
•_] Large scratches or impacts to glass doors
can lead to broken or shattered glass.
@Cleanonlg parts listed inthis Owner's HanuaL
Page 5

GEAppliances.com
COOKMEAT AND POULTRYTHOROUGHLY...
Cook meat and poultry thoroughly meat to at least an,INTERNALtemperature of l 60°F and poultry to
at least an INTERNALtemperature of 180_ Cooking to these temperatures usually protects against
foodbome illness.
OVEN
Stand away from the range when opening the door of a hot oven. The hot air and steam that escape
can cause bums to hands, face and eyes.
Do not usethe oven for a storage area.
tems stored in the oven can ignite.
@Do not use gour oven todrg newspapers.
If overheated, theg can catch fire.
Keep the oven free from grease buildup.
@Placethe oven racks in the desired position
while the oven is cool.
Pulling out the rack to the stop-lock is a
convenience in lifting heavg foods. It isalso
a precaution against burns from touching hot
surfaces of the door or oven walls. The lowest
position isnot designed to slide.
@
Do not heat unc pened food containers.
Pressure could build up and the container
Could burst, causing an injurg.
Never use aluminum foil to line the oven
bottom. Improper use of foil could start
a fire and.result in high carbon monoxide,
WARNING: NEVERcover
ang slots, holes or passages in the oven
bottom or cover an entire rack with
materials such as aluminum foil. Doing
so blocks air flow through the oven and
mag cause carbon monoxide poisoning.
Aluminum foil linings mag also trap
heat, causing afire hazard.
use onlg glass cookware that is recommended
for use in gas ovens.
_Alwags remove ang broiler pan from range
assoon as gou finish broiling. Grease left in
the pan can catch fire if oven is used without
removing the grease from the broiler pan.
_ When broiling, if meat istoo close to the flame,
the fat mag ignite: Trim excess fat to prevent
excessive flare-ups.
Make sure ang broiler pan isin place correctlg
to reduce the possibilitg of grease fires.
If gou should have a grease fire in a
broiler pan, turn offthe oven control, and keep
the broiler drawer and oven door closed to
contain fire until it burns out.
Forsafetg and proper cooking performance,
alwags bake and broil with the oven door
closed.
When using cooking or roasting bags in the
oven, follow the manufacturer's directions.
For continuous clean models, do not use oven
cleaners on ang of the continuous cleaning
surfaces. Continuous cleaning Surfaces can
be identified bg their rough surface finish.
v
,iI_1
i,_1. i
5
Page 6

o
£
v
IMPORTANTSAFETYINFORMATION.
READALL INSTRUCTIONS BEFOREUSING.
,, : ,, .... i lul i i illljll , lU ....
tl WARNING! ..........
SURFACEBURNERS -
Use proper pan size avoid pans that are unstable or easily tipped. Select cookware having fiat
bottoms large enough to cover bumer grates. To avoid spiftovers,make sure cookware is large enough
to contain the food properly. Thiswill both save cleaning time and prevent hazardous accumulations of
food, since heavy spattering or spiftoversleft on range can ignite. Usepans with handles that can be
easily grasped and remain cool.
Always use the LEE position Ion electric
ignition models) or the Ht position (onstanding
pilot models) when igniting the top burners
and make sure the burners have ignited.
Never leave the surface burners unattended at
. high flame settings. Boilovers cause smoking
and greasy spillovers that may catch on fire.
@Adjust the top burner flame size so it
does not extend beyond the edge of the
cookware. Excessiveflame is hazardous.
Use only dry pot holders moist or damp pot
holders on hot surfaces may result in burns
• from steam. Do not let pot holders come near
open flames when lifting cookware. Do not use
a towel or other bulky cloth in place of a pot
holder.
_ When using glass cookware, make sure it
is designed for top-of-range cooking.
To minimize the possibility of burns, ignition
of flammable materials and spillage, turn
cookware handles toward the side or back
of the range without extending over adjacent
burners.
Carefully watch foods being fried at a high
flame setting.
Alwags heat fat slowly, and watch as it heats.
Do not leave any items on the cooktop. The
hot air from the vent may ignite flammable
items and will increase pressure in closed
containers, which may cause them to burst.-
_ Ifa combination of oils or fats wilt be used in
frying, stir together before heating or as fats
melt slowly.
_ Use a deep fat thermometer whenever
possible to prevent overheating fat beyond
the smoking point.
Usethe least possible amount of fat for
effective shallow or deep-fat frying. Fillingthe
pan too full of fat can cause spillovers when
food isadded.
_Do not flame foods on the Cooktop.lfgou do
flame foods under the hood. turn the fan on.
@Do not use a wok onthe cooking surface
ifthe wok has _ round meto ring that is
placed over the burner grate to support
the wok. This ring acts as aheat trap, which
may damage the burner grate and burner
head. Also, it may cause the burner to work
improperly. This may cause a carbon
monoxide levelabove that allowed bg current
standards, resulting in a health hazard.
@Foodsfor frying should beas dry as possible.
Froston frozen foods or moisture on fresh
foods can cause hot fat to bubble up and
over the sides of the pan.
£_!Never trg to move a pan of hot fat, especially
a deep fat frger. Wait untit the fat iscool.
i® Do not leave plastic items on the cooktop-
theg mag melt if left too close to the vent.
Keep all plastics awag from the surface
burners;
_To avoid the possibilitg of a burn, alwags be
certain thatthe controls for all burners are at
the OFF position and all grates are cool before
attempting to remove them.
If range is located near a window, do not hang
long curtains that could blow over the surface
burners and create a fire hazard.
If gou smell gas, turn off the gas to the range
and call o qualified service technician. Never
usean open flame to locate a leak.
Page 7

GEAppliances.corn
SURFACEBURNERS(cont.)
Alwags turn the surface burner controls off
before removing cookware.
Donot lift the cool_op on sealed burner
...... models. Lifting the cooktop can lead to
damage and imp[oper operation of the range.
When a pilot goes out {on standing pilot
models), gou will detect a faint odor of gas
as gour signal to relight the pilot. When
relighting the pilot, make sure burner controIs
are in the Off positiOn_and follow instructions
in this book to religitt.
If gou smell gas, and gou have atreadg made
sure pilots are lit (on standing pilot models),
'turn offthe gas to the range and call a
qualified service technician. Never use
anopen flame to locate a leak.
Do not place or store items that can meIt
or catch fire on the grates, even when the
cooktop is not being used.
@Keep range clean and free of accumulatioris
of grease or spillovers, which mag ignite.
READAND FOLLOWTHISSAFETYINFORMATION
CAREFULLY.
SAVETHESEINSTRUCTIONS
• • L L •.
o!
I I
I I
I t
Page 8

!
!
: I
I
!
0
0
I
Using thergaS surface burners.
iiiiiiiiiiiiiiiiiiiiii ii L
ThroUghout this manual, features and appearance may vary from your model.
iii i
Before Lighting a Gas Burner . _ After Lighting a Gas Burner .........." "
............................... _ Ifdrip pans aidesuppliedwith your rangei _ Do not operatethe burne_:foran extended ::
..... _ : : : theg shouldbe usedat all times. : ' : periodof time without Cookwareonthe
: : :: " .... ' grate.Thefinishon thegrate may chip :
: _ Hake sureal .burnersarein place.
' -:: :.......... , .... without cookwareto absorb the heat.
..... .... :: _ Hakesureal!grateson the range are _ Besurethe burnersand gratesarecool
: _: -:, properly placed:beforeusingany burner.i : beforeyou placegout hand, a pot holder,
..... . . : cleaning.clothsor othermaterialsonthem.
-[ ....
::_ How toLight a Gas Surface Burner ...... , :: ..... :
_ntheir respectivepositions. Pushcontrolknob in andturn itto HIposition.
f._.7_iElectricIgnition t4odels: Theburnershouldlight within afew seconds.
Pushthe control knob in andturn it Turnthe knobto adjusttheflame size.
,:_.::,:_4:i_:::'_:.i_.:_,,:_._:::<:::.,:;._:_#:_:_:,totheLITE position- .... , : . : : ..... : - " : - .
ii_ii_i:i_ii_:i;_i_ii!:!;_!i'_!iii_ii!_i:__;:_!::i_;77!_ii_!_i.... : _ _: ' , .: ........ : _. Flame willbe almost honzontaland will,,, :
_:}_}-;ii!!!ii_:ili:i_!i i::i_ii!:ii!:i;_iiii:_i:i_ii_!i!i::; Youwill heara littleclicking noise- ift s!ghtJgaway fromthe burnerwhen :
PUShthecontr01kngbinandturn.......... thesound of the e!ectricspark igniting................the bumeris firstturned on._ blowing:: :
it tothe LtTEposition[onelectric theburner. ........... or:hissingsound.magbe heardfor . :
ignitionmodels)or//l(on standing ', :: ; :_" ' ...... "
pilotmodels}. Turnthe knobto adjustthe"flameSize,...... _3(3-60seconds:Thisnormalsound isdue::-:!:
Ifthe knobstagsat LITE,itwill continue
to click.
Whenone burner isturned to LITE,
all theburnersspark.Do notattempt to
disassembleor cleanaround any burner
whileanother burner ison. An electricshock
may result,which could causeyou to knock
overhot cookware.
to improvedinjectionof gasand air into
the burner.Puta panonthe burnerbefore
lightingit, or adjustthe flame to match pan
sizeassoonas it lights,andthe blowingor
hissingsoundwill be much lessnoticeable.
Onsomemodels.
i-!ii_::_:iiii!!:• • _i)!_}_i!iii!i.!i;ii
Onsomemodels,the burnersareall
the samesizeandpowe_
On Ranges with Sealed Gas Burners
Thesmallest burnerin the rightrear position
isthe simmer burner.Thisburner canbe
turned downto a very low simmersetting.
It providesprecisecooking performancefor
delicatefoods suchas saucesor foodsthat
requirelow heatfor along cookingtime.
Themedium (leftrearand left front}
and the large (rightfront)burners arethe
primary burnersfor mostcooking.These
general-purposeburners canbe turneddown
from HIto LOto suitawide rangeof cooking
needs.
NOTE:Onsomemodels,the bumersareall
thesamesizeandpower.
8
Page 9

ii
-r
GEAppliances.com
n
How to Select Flame Size
Forsafe handling of cookware, never let the
flames extend up the sides of the cookware.
Watchthe flame, notthe knob,as youreduce
heat.Whenfastheating is desired,the flame
sizeon a gas burnershould match the
cookwareyou areusing.
Flames larger than the bottom of the
cookware willnot result infaster heating
ofthe cookware and could be hazardous.
Top-of-Range Cookware
Aluminum: Medium-weight cookwareis
recommendedbecauseit heatsquickly
andevenly.Mostfoods brown evenlyin an
aluminumskillet.Usesaucepanswith tight:
fitting lidswhen cookingwith minimum
amounts ofwater.
Cast-Iron: Ifheated slowly, most skillets wil
give satisfactory results.
Enamelware: Undersome conditions,the
enamet ofsome cookweremay melt. Follow
.................. cookwaremanufacturer's recommendations
forCookingmethods:
Glass:Therearetwo types of g_ass
cookware--thosefor oven useonly andthose
for top-of-[ange cookng {saucepans,coffee
andteapots).Glassconducts heat very
slowly,
HeatproofGlassCeramic: Canbe usedfor
eithersurfaceor oven cooking.Itconducts
heatvery slowly and coolsvery slowly.Check
cookwaremanufacturer's directionsto be
sureit can be used on gas ranges.
StainlessSteel: Thismetal alonehaspoor
heatingpropertiesand is usuallycombined
with copper,aluminumor othermetalsfor
improvedheat distribution.Combination
metalskilletsusuallywork satisfactorilgif
thegare usedwithmedium heat asthe
manufacturer recommends.
Sf:ovetop Grills (onmodelswith sealed Oumersl
Donot usestovetopgrillson your sealedgas Thiscanbehazardoustoyour health.
burners.If you usethe stovetopgrill onthe
sealedgas burner,itwill causeincomplete .
combustionand can resultinexposureto
carbonmonoxidelevelsaboveallowable
standards.
Usea flat-bottomedwok.
Wok This Wag [on modelswith sealedburners)
Werecommendthatgou usea 14"orsmalter Do.not useaflat-bOttomedwok on a support
flat-bottomedwok.Makesurethe wok bottom ring.Placingthe ring overthe burneror grate
sitsflot on thegrate.Thegareavaitableat may causethe burnerto work improperly,
yourlocal retailstore, resultingin carbonmonoxide levelsabove
Onlyaflat-bottomed wok shouldbe used. allowablestandards.Thiscouldbedangerous
to your health;
In Case of Power Failure (electricignition models)
Incaseof a powerfailure,gou can light
the gassurface burnerson your rangewith
a match. Holda lit match to the burner,then
pushinandturn the control knob to the LEE
position.Useextremecaution when lighting
burnersthiswag.
Surfaceburnersin usewhen an electrical
powerfailure occurswillcontinueto operate
normally.
9
÷ _,_
¢b
1:1
I:1
OI
0
0,)
t::
t_
0
Page 10

I..I
.£
I=
n
w
u
t,_1. _,
__ i
.-- L
O:
w ._
•
:£
E
8
Using the oven controls.
JllllIJL
Throughout this manual, features and appearance may vary from your model.
Oo',0
Temp Recall
Ji•
• Clear
Brod
4
¸
L Ligh_
Tillne Cont s
• /
_imeDL_L' CD
On/Off
Oven Control,Clockand Timer Features and Settings lonso e odets
0
Bake/Tamp RecallPad
Touchthis pad to selectthe bakefunction.
Bake Light
Flasheswhileineditmode-gou canchangethe
oventemperatureatthispoint.Glows:whenthe
ovenis inbakemode.
O StartiOnPad
Mustbe touched to start ang cooking function.
iO Display
Showsthetime ofday, oventemperature,
whether the ovenisinthe bakeOrbroil mode
and the timessetfor the timer.Thedisplaywill
show PREwhilepreheating.Whenthe oven
reachestheselectedternperoture,the oven
control wilt beepandthe displagwill show the
oventemperature.
If"F-" and a numberorletterflashin thedisp!ayand
theoven controlsignals,thisindicatesafunction error
code.
Thetime of day will flash in the display when there has
been a power outage. Reset the clock.
Touch the Ctear/Off pad. Allow the oven to cool
for one hour. Put the oven back into operation. If the
function errorcode repeats, disconnect the power
to the range and calffor service.
O itchen TimerOn/OffPad
Touch this pad to select the timer feature. Then
press the + and - pads to adjust the timer,
Kitchen Timer Light
Flashes whilein editmode-gou can change the
set time at this point. Glowswhen the timer has
been activated. Flashes again when the time has
-runout untilthe control is reset.
0
ClockPad .... : .
Tosetthe dock pressth s padtwce andthen
pressthe + and - pads.Thetime:of dogwill
flash inthe displagwhen theoven isfirst
turnedon.
OvenLight Pad Ion some models)
Touchthis padto turn theovenlightonoroff.
-Pad
Shorttaps tothis pad will decreasethetime or
temperatureby small amounts.Touchand hold
the pad to decreasethe time or temperature bg
largeramounts.
+Pad
Shorttaps to this padwilt increasethe timeor
temperaturebgsmallamounts.Touchand hold
the pad to increasethe time or t6mi_eraturebg
largeramounts.
10
Page 11

i |11 ii i i i i i ii iii i
GEAppliances.com
OvenControlClockandTimerFeaturesandSettingS_onsomemo_e_s_
O leariOffPad
Touchthis pad to cancelALL ovenoperations
exceptthe clockand timer.
O Broil Hi/Lo Pad
Touchthis pad to selectthe broilfunction.
Broil Light
Flasheswhile in edit mode-you can switch from
Hi to Lo Broil at this point, Glows when the oven
isin broitmode.
Indicator Lights fan some pads)
EditmodelasLsseveralsecondsafterthelast
padpress.
Oven Control Knob fonsomemodels)
!i;!ii!iii:i:!i:ii::iiiii_ii!:iii_i;i!iiiiii!!i!_:i:ii::ii:_:_:_a!i_Turn the OVEN CONTROL knob to the setting gou want.
Appearancemayvary.
11
!.n
t_
O"
_L : ,:
I:1
w A
u
in •
_T
v
*_,,4 ' iPl't,
0
w
0
Page 12

O
IL.....
J,tJ-J,_-
.£
: 111;
• w
w
.-. L
_L
£
O•
8
m
Usingthe oven.
I IIIIIIII iiii ii iii iiii J J II IIII II Jll
Toavoid pOssibiebums, ptaceth e racks in the desired position before gou turn the oven on. ...... ........................
Theracks havestop-locks,sothat when ...........
placedcorrectlg on the racksupports
(Athrough E),theg wiil stop before
: comingcompletelgout,and willnot tilt: : ..
' whenp!acing land removingcookware,
pull therack outto the bumpon the
rack support. .....
To removea racklpull it toward you,till the
front end up and pullit out.
:To.replace,ptacethe endof.the rack
!stop:t0¢ks)on theSupporL:tittup the
front and push the rack in.
NOTE:Therack isnot designedtosfideoutat
thespedal tow rackfR)position.
Theovenhas5 rackpositions.
Itatsohasaspecial{owrackposition(R)
forextralargeitems,suchasalarge
turkey,
Oven Control
Youroveniscontrolledbga singleOVEN
CONTROLknob.
It willnormallgtake30-90 secondsbefore
the flame comeson.After the ovenreaches
the selectedtemperature,the ovenburner
cgcles-off completelu,then on with a
fullflame-to maintain the selected
temperature.
Plastic items on the caoktop may melt
if left too close to the vent
Vent appearance and location vary.
Oven Vent
Yourovenisvented through ducts at the rear
ofthe range. Donot blockthese ductswhen
cookinginthe oven-it isimportant that the
flow of hot air from the ovenand freshair
to the ovenburner be uninterrupted.
Avoidtouching the vent openingsor
nearbg surfacesduringoven or broiler
operotion-theg mag becomehot.
_! Handlesofpotsandpanson thecooktop
may becomehotiffelt too closeto thevent.
Donot leaveplasticor flammableitems on
thecooktop-theg mag melt or igniteifleft
toocloseto the vent.
Donot leavecbsedcontainersonthe
cooktop.Thepressureinclosedcontainers
may _ncrease,whichmay causethem to
burst.
@Metalitemswillbecomevery hatiftheg are
lefton thecooktop,and couldcausebums.
Power Outage {electricignition models)
^,.,CAUTION: notmakeany
attempt to operatetheelectricignitionoven
duringan electricalpower failure.
Theovenor broilercannot be lit during
a powerfailure.Gaswillnot flowunless
theglow bar ishot.
If the ovenisinusewhen a powerfailure
occurs,the ovenburner shutsoff and cannot
be re-tituntil powerisrestored.Thisis
becausethe flow of gasisautomaticallg
stoppedand will not resumewhen power
isrestoreduntilthe glow bar has reached
operatingtemperature.
12
Oven Light (on some models)
Usethe switch on the lower control panelto
turn thelight on or off.
Page 13

GEAppliances.com
The,oven has a speciaXlow Fack(R)
position iust above th_ oven bottom. Use
it when extra cookingspace is needed,
for example, when cooking a large
turkey. The rack is not designed to slide
out at this position.
How to Set the Oven for Baking or Roasting "'_
Your oven is not designed for open-door Tgpe of Food Rock Position
cooking. Frozenpies(oncookiesheet) Bor C
NOTE:On models with an OVENCONTROL : Angelfood cake. B
knob, turn it to the desired temperature.
[Z] Touchthe Bake pad.
[] Touchthe + or- pads untilthedesired
temperatureis displayed.
I-_ Touchthe Start/On pad.
bundtorpoundcakes
Biscuits.muffins,brownies, C
coekies,,cupcakes,
layer cokes, Dies
Casseroles BorE
Roasting RorA
Theovenwill start automaticaUg.Thedisptag
will showPREwhile preheating.Whenthe
oven reachestheselectedtemperature,the
ovencontrolwill oeepseveraltimes andthe
displaywill show theoventemperature.
Tochange the oven temperature during Bake
cgde, touch the Bake pad and then the+ or-
pads to get the new temperature.
r_ Checkfood for donenessat minimum
time on recipe.Cooklongerif necessary.
r_ Touchthe Clear/Off padwhen bakingis.
finishedand then removethe food from
the oven. " " : :-
Preheating and Pan Placement
Preheatthe ovenifthe recipecallsfor it.
Topreheat,setthe ovenat the correct
temperature. Preheatingisnecessaryfor
good resultswhen bakingcakes,cookies,
pastry and breads.
Forovenswithout a preheatindicatorlight or
tone,preheat10minutes.
Bakingresultswill be betterif baking pans
are centeredinthe oven asmuch as possible.
Pansshould nottouch eachother orthe walls
ofthe oven.Ifyou needto usetwo racks,
staggerthe panssoone isnot directly above
the other,andleaveapproximately 1Y2"
betweenpans,from the front, back and
sidesofthe wall.
Aluminum Foil
Donot usealuminum foil on the bottomof
the oven.
Neverentirelgcover o rack with aluminum
foil.Thiswilldisturb the heatcirculationand
resultin poor baking.
Asmallersheetof foilmay beusedto catch a
spilloverby placingit on a lowerracksevera!
inchesbelowthe food.
Oven Hoisture
Asyour oven heatsup,the temperature
changeof the air inthe ovenmay cause
water dropletsto form onthe door glass,
Thesedropletsare harmlessand will
evaporateasthe oven continuesto
heat up.
13
9
O"
1:1
_'4'I
5
w A
w
O
O
Page 14

• U
U_
.£
I&l
:'0
w A
v_ f_
.-- L
0
w
w.. t._
£
-E-
9
kll
eo
E
0
{J
Usingthe oven.
i
Broiling
Broilingiscooking food bg directheatfrom
abovethe food. Mostfishandtendercutsof
meat can be broiled.Followthesedirections
tokeep spattering andsmoking to a
minimum.
Yourrange hasa compartment belowthe
ovenfor broiling.
Boththe ovenand broilercompartment
doorsmust beCLOSEDduringbroiling.
Turnmost foods onceduringcooking (the
exceptionis thin filletsoffish:oil one side,
placethat sidedown on broilergrid and cook
without turning untildone].Timefoodsfor
aboutone-half the total cookingtime,turn
food,then continue to cookto preferred
doneness.
g]
Youcan change:thedistanceof thefood
from the heat sourcebg positioninga
broilerpan and gridon oneof threerack
positionsin the broilercompartment-
A(bottom of broilercompartment).B
(middle]and C(top).
Preheatingthe broileror oven is not
necessargandcan produce poor results,
Ifmeat has fat or gdstlearoundthe edge,
cut vertical slashesthroughboth about
2"apart. If desired,the fat may be
trimmedl leavinga lagerabout :i/8" thick.
_-] Arrangethe food onthe grid and position
the broilerpan on the appropriate rack
inthe oven or broilingcompartment.
Placingfood closerto theflame "
increasesexteriorbrowning ofthe
food, but alsoincreasesspattering
and the possibilitgOffatsand meat
juices igniting.
[_] Closethe ovenand broilercompartment
door.
NOTE:Onmodelswith an OVEN
CONTROLknob,tum.:itto Broil.
Touchthe Broil Hi/Lo padoncefor
HiBroil.
%
Tochange to LoBroil, touch the
BroilNi/Lo pad again.
UseLo Broil to cookfoodssuchas
poultrg or thickcuts ofmeatthoroughlg
withoutover-browning them.
Touchthe Start/On pad.
When broilingisfinished,touchthe
Clear/Off pad.
Removethe broiler panfrom the
broi!ercompartment and servethe food
immediately Leavethe panoutsidethe
rangeto cool.
!4
Page 15

[hesize,weight,thickness,starting
temperatureandyourpreferenceof
donenesswillaffectbroilingtimes.This
guideisbasedonmeatsatrefrigerator
temperature.
tThe U.S. Department of Agriculture
says "Rare beef is popular, but you
should knew that cooking it to only
140°Fmeans some food poisoning
organisms may survive,"[Source:.
Safe FoodBook, YourKitchen Guide,
USDA Rev.June ?gB_l
Theovenhas5 rackpositions.
" " GFAnnlioncp=.rnm
iiiiii,ii i i u
Broiling Guide
The oven and broiler compartment doors
must be closed during broiling.
Atwagsuse a broilerpunand grid.It is
designedto minimizesmokingand
spatteringbg trappingjuices inthe
shielded.10werpart of the pen.
•_.Forsteaksend chops,slashfat evenl#
aroundthe outsideedgesofthe meat. To
slash,cutcrosswisethrough the outerfat
surfacejust to theedge ofthe meat. Use
tongs to turn the meat over to prevent
piercingthe meat andlosingjuices,
Ifdesired,marinate meatsor chicken
beforebroiling.Or brushwith barbecue
saucelast 5to 10minutesonlg.
@Whenarrangingthe food on thepan,do
not letfattg edgeshang over the sides
becausedrippingfat CoUldsoil the oven.
ThebroiIercompartment doesnot needto
bepreheated.However,for vergthin foods,
or to increasebrowning,preheat ifdesired.
Frozensteakscan be broiledbg positioning
the rackat the next lowestrack position
and increasingthe cookingtime givenin
this guide1Vztimes perside.
Foe ouontitg end/ '
d or Thickness
Bacon
(about 8 thin slices)
Ground Beef 1 lb. (4 patties)
Well Dane 1/2" to 3/4" thick
Beef Steaks
Rock*:: First Side SecondSide
Position Time (min.) Time (min.)
C . 4
C i0
Comments
Arrange in singte lager.
Spaceevenlg, Up to
8 patties take about
the same time.
Raret ....... 1"thick
Medium I to 1VzIbs.
Well Done
•Raret : 1V_"thick
Medium 2 to 2VzIbs_
Well Dane
Chicken 7'
•Lobster TaBs
Fish Fillets
Ham Slices
tprecooked)
Pork ChoPS ,,
Well Done.....
Wieners
SimilarPrecooked
Sausages,
Bratwurst
....C.... 9 ' ' 7 '
C :. 12 ' : 5-6
B 13 8-9
.... .C ' i0
C 12-15
B 25
!whole " = , i B :.t - :30-35 ..
2to 2VzIbs.,
split lengthwise . ,
4 bone-in breasts B
2-4 A
6to 8 oz. each "
6-7
i0-]2
16-18
," 15
25-30 10-15
13-16 Do nat
turn
over.
1lb. fillets C S 5
1/4" to 112"thick . :
I • " i ...... I :-
1" thick B 8
l!2"thick B i : " 6
2(Z/2"thick) : , , : B 10
2 (1" thick) about 1 lb, B " 13
8
6
4-5
9-]2
,1.Ib, I_kg,(10) ' C
1-2
Steaks lessthan I" thick
cookthrough before
browning. Panfrging is
recommended.
Slash fat.
•Brush each side with
melted butter. Broil
skin-side-down first,
Cutthrough b_cl{' of
shell. Spread open. Brush
with meited butter before
broiling and after half
of broiling time,
Handie and turn very "
carefullg, Brush with
lemon butter before
and during cooking, if
desired, Preheat broiler
to increase browning.
r
Slash fat.
If desired, split sausages
in half lengthwise; cut
into 5- to 6qnch pieces.
*Seeillustration for description of rack positions.
15
t'l
O"
Cl
S"
w _
_ u
•
O•
Page 16

6"}
la
! _2:•
w
_1.) •
v _
_i, f_
o
_.. I.n
w
8
Usingthe clockand timer.
||1 ,
Not all features ore on all models.
To Set the Clock
i!i!_!_i!ii!:iii:::!iiii!i_iI!!'' C_!;ock'_!!!:!ii::iii!ii!:_i!ii!i!) _ Touc_theClock padtwice
iiii!ii!iii!!i_ __!i_! '" Touc the.or pads '" "
;ii_:iiii!iii!!! i!_ii!i_i If the+ or-pads are nottouchedwithin one
_:%!-i_:_:_? :_!::_: _;i:i{!!!i:'!minute after gou touchthe Clock pad,the
:_;i_:!:/_!/t_:i!_ii:;!,:i_::;:;!::_:Si'!!_;i_,i_::),;:,_:_;_:!ii!!_:.;!i_;i-idisplagrevertsto the originalsetting.Ifthis
(_!ii_i!;:!_:;!:!:!_!ii!i_ :!i!_!ii_!(! happens touch theClockpad twice and
;;i_i_i_!_!i_i:i:![_' J!:i!i;i!!ii!!!i_i_iii!i!reenterthe time ofdog.
Makesuretheclock issetto the correct
time ofday.
TouchtheStart/On pad until thetime of
daMshows inthe disptag.Thisentersthe
timeand starts theclock.
Tocheckthetimeofdog whenthedisptagis
showingotherinformation,simpl_ttouch the
Clockpad. Thetimeof dogshowsuntil
"anotherpad is touched.
To Turn Off the Clock Oisplag
tf gou havesevera!clocksin gour kitchen,
goumeg.wish toturn off the time ofdag
clockdisplag on gout range.
[Z] Touchthe Clockpad once to turn off the
time of day:display.Althoughgou will
not be ableto seeit, the clockmaintains
the correcttime ofdag.
Touchthe Clockpad twiceto recall
the clockdisplag.
iiii)!;ii_!i;!_!i:i_!:!::_-itch,qi'_i!i:ili!i_iii_i!iii_
Thetimeris a minutetimer onty.
The Clear/Offped does not affect
the timer.
To Set the Timer
Thetimer does not control oven operations.
The maximum setting on the timer is 9 hours
and 59 minutes.
Touchthe Kitchen TimerOn/Off pad.
Touchthe +or - padsuntilthe amount [_]
oftime gou want showsinthe displag.
Themaximum time that can beentered
in minutesis59.Timesmorethan
59 minutesshouldbechanged to
hours andminutes.
ff gou makeamistake,touchthe Kitchen
TimerOn/Offpodand beginagain.
TouchtheStart/On pad.Thetime wilI
star_countingdown, atthoughthe
displagdoes notchangeuntil one
minute haspassed.
Whenthe timer reaches:00,the Control
will beep3timesfo!towed bgone beep
every 6 secondsuntilthe Kitchen Timer
On/Off pad istouched.
To Reset the Timer
If thedisplagisstillshowing thetime
remaining,youmag changeit bgtouching
the KitchenTimerOn/Off pad,then touch the
+or- padsuntil the time gouwant appears
inthe disp]ag.
Ifthe remainingtime isnot in the displag
(clockisinthe display),recallthe remaining
time bg touchingtheKitchen TimerOn/Off
padand then touchingthe + or - padsto
enterthe newtime you want.
To Cancel the Timer
Touchthe Kitchen TimerOn/Off padtwice.
16
/ :
Power Outage
Ifa flashingtime isin thedisptag,you have
experienceda power failure.Resetthe clock.
Toresettheclock,touch the Clock pad.Enter
the correcttime ofdagbg touching the +or -
pads.TouchtheStort/On pad.
Page 17
Adjust the oven thermostat-Do it yourself! GEApp,io.cos.oom
t J i .111 i i i ii
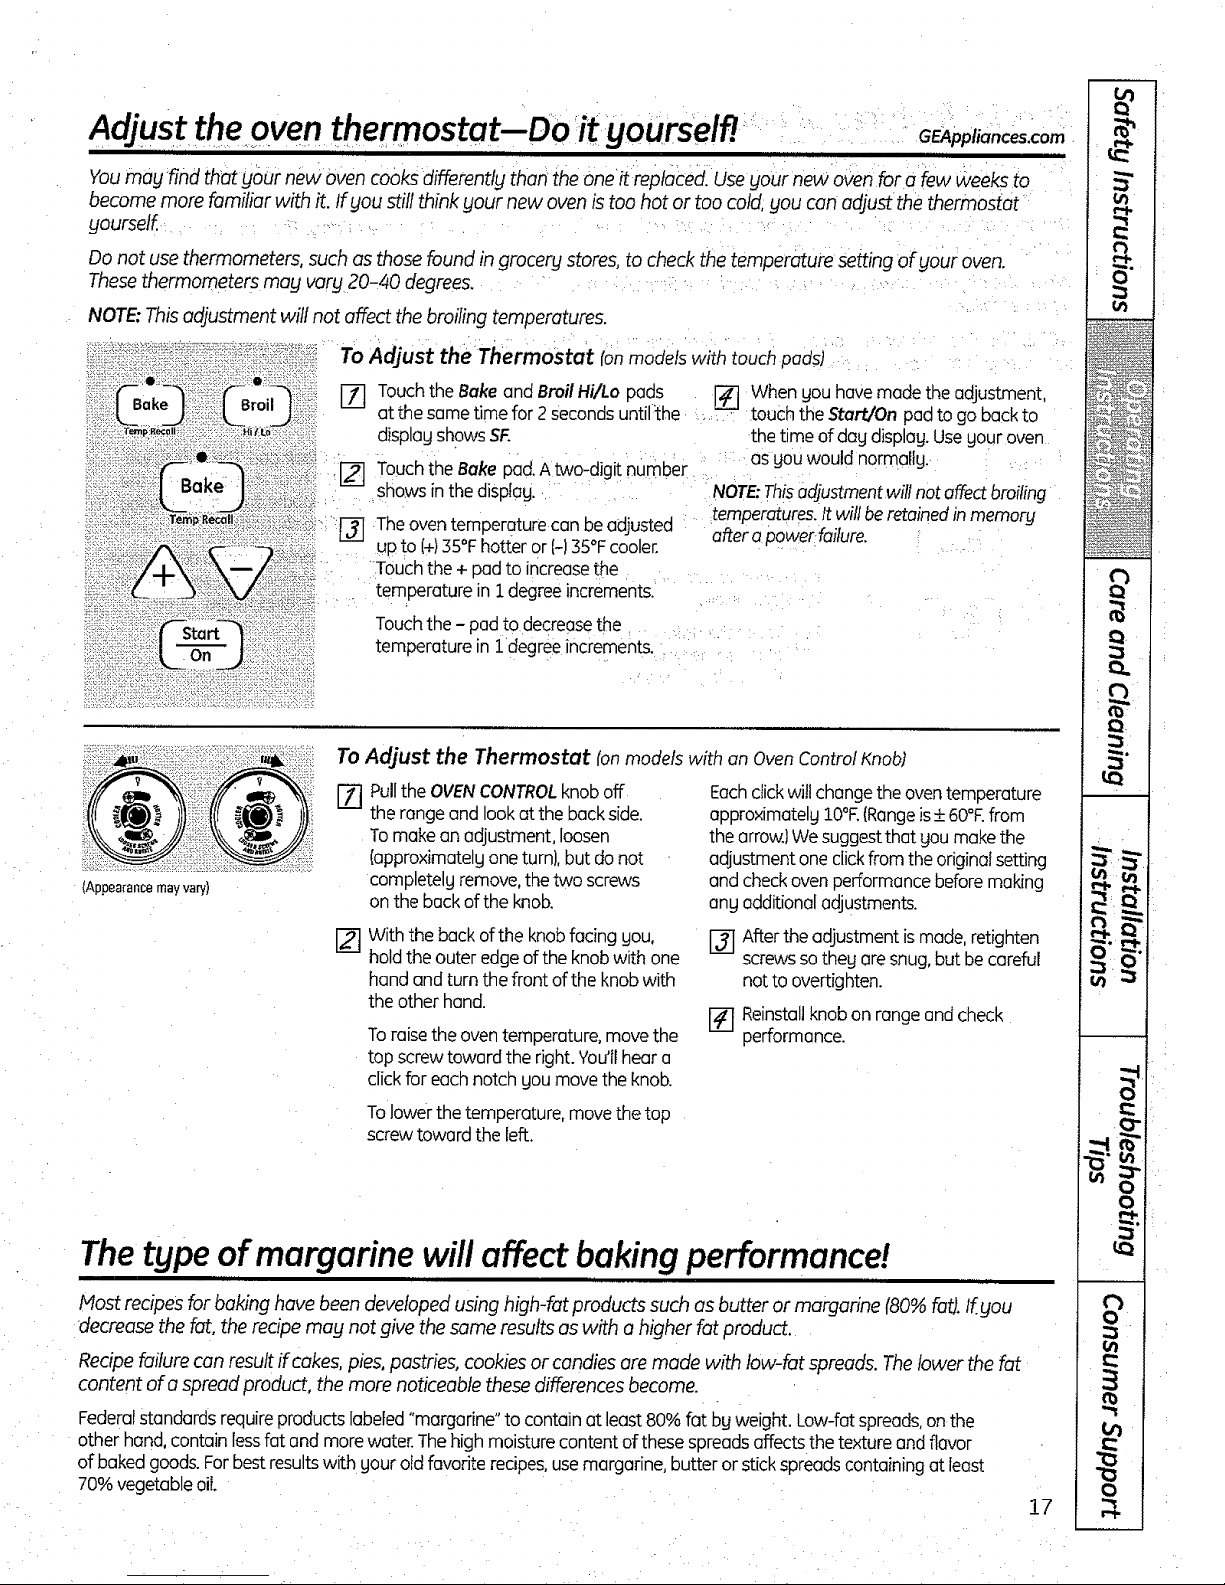
Youmayfind that your new oven cooks differently than the Oneit replaced. Usegour new ovenfor a few weeks to
become more familiar with it. If you still think your new ovenis toohot or too cold. gou con adjust the thermostat
yourself. .........
i i!:i !i !! ;ii i!iT-st}aq!ii i!ii!!i2:!i!i
Do not use thermometers, such as those found in grocery stores, to check the temperature setting of gour oven.
Thesethermometers mag varg 20-40 degrees.
NOTE:This adjustment will not affect the broiling temperatures.
-v-:_:_;_;_:_,_:%!:_;:i_._ii_i;i:_!;_i!;i_:_To Adjust the Thermostat fan models with touch pads)
Touch the Bake and Broil Hi/Lo pads
atthe some time for 2 Seconds until the
displag shows SF.
Touch the Bake pad. A two-digit number
shows in the displag. ,: ' "
The oven temperature can be adjusted
up to (+)35°F hotter or 1-)35°F cooler.
,Touch the + pad to increase the
temperature in I degree increments.
When gouhavemodethe adjustment,
..: - ,touchthe Start/On pad to go backto
thetime ofdag displag.Usegout oven
asgou would normaltg.
NOTE:Thisadjustment wilt not affect broiling
temperatures. It will be retained in memory
after a powerfailure.
Touch the - pad to decrease the
temperature in i degree increments.
(Appearancemayvan/)
To
Adjust the Thermostat [on models with an Oven Control Knob)
Pullthe OVENCONTROLknob off
the rangeand lookatthe back side.
Tomakean adjustment,loosen
(approximatelgoneturnj, but do not
completelgremove,thetwo screws
on the back of the knob.
Eachclickwillchange theoventemperature
approximatelg10°E(Rangeis_+60°Efrom
thearrow,)Wesuggestthat goumakethe
adjustmentone clickfromthe originalsetting
and checkovenperformancebeforemaking
ang additionaladjustments.
With the back of the knobfacing gou,
hold theouter edgeofthe knobwith one
hand and turn the front ofthe knob with
theother hand.
Toraisethe oventemperature,movethe
top screwtoward the right. You'llheara
clickfor each notch goumovethe knob.
[-_ Afterthe adjustmentismode,retighten
screwssothee aresnug,but becareful
notto overtighten.
[_] Reinstallknob on range andcheck
performance.
Tolower thetemperature,movethe top
screwtoward the left.
Thetype of margarine will affect baking performance!
i i i ii ii i
Most recipes for baking have been developed using high-fat products such as butter or margarine (80% fat).Ifgou
decrease the fat, the recipe mug not give the some results as with a higher fat product.
Recipe failure can result if cakes, pies, pastries, cookies or candies are made with tow-fat spreads. The lower the fat
content of o spread product, the more noticeable these differences become.
Federal standards require products labeled "margarine" to contain at least 80% fat bg weight. Low-fat spreads, on the
other hand, contain less fat and more water. The high moisture content ofthese spreads affects the texture and flavor
of bakedgoods.Forbestresultswith gour aidfavorite recipes,usemargarine, butteror stickspreadscontainingat least
70%vegetableoil.
17
:%:22LL1 i
;:r;-..
_n
r,t,z
0
¢b
w
w
0
Page 18

2.
"o
v ¸ A
W
I,Wi f_
t_
Specialfeatures of your oven control . .
] i i i .i L |ill t II
Your new touch pad COntrolJ_asadditional features that you may choose to use. The following are the features and
how you mag activate them.
Thespedal feature modes can only be activated while the display is showing the time of day. The#remain in the
control's memory until the steps are repeated,
When the display shows your choice, touch the Start/On pad. The special features will remain in memory after
a power failure.
NOTE: The Sabbath feature and the Thermostat Adjustment feature are also special Features, but they are addressed
separatelg in their own sections.
12 Hour Shut-Off
With this feature, should gou forget and leave
the oven on, the control Willautomaticaltg turn
off the oven after 12 hours during baking
functions or:after 3 hours during a broit
fdnctionl "
Ifgou wish toturn OFFthis feature,follow
the stepsbelow.
r_] Touchthe Bake and BroilHi/Lo pads
at the sametime for 3 secondsuntil
the displagshowsSF.
Touchthe Clockpad.Thedisplegwill
show On(t2 hour shut-off).Touchthe
Clockpad repeatedlguntil thedisplag
shows0ff(no shut-off).
TouchtheStart/On pad to activatethe
noshut-off andleavethe controlset in
this specialfeaturesmode.
°. •
18
Page 19

"-: -u ,ngthe Sabbath Feature. con omemode sJ
(Designedfor use onthe Jewish Sabbath and Holidags) GEAppliances.com
J i J lluH
TheSabbath feature can beused for baking/roasting only. It cannot be used for broiling.
NOTE:The oven light comes on automatically (onsome models) when the door is opened and goes off when the
door is closed. Thebulb mad be removed. On models with a light switch on the control panel, the oven light mad be
turned on and left on.
ii!ii ii ¸ii!
i_ Bake !_iii:_i!i_i_!!ii!i_;(--Broiiiil
When the dis_tay shows _ the ove_ is
set in Sabbath. When [he display shows
c the oven is baking/roasting•
How to Set for Regular Baking/Roasting
NOTE:Tounderstandhow the ovencontrol
works,practiceusingregularbaking(non-
Sabbath)beforeenteringSabbathmode._
NakesuretheclockshowstheCorrecttime
of dadand theovenisoff.
[_ TOuchand holdboththe Bakeand
Broil Hi/Lo pads,at the same time,
untilthe displag showsSF.
17t
Tapthe Clock pad untilS_bappears
in thedisplag.
F_ Touchthe Start/On padand _ will
appear in the displag.
Touchthe Bake pad.No signalwill
be given.
[-_ Touch the Start/Onpad.
After a random deled period of
epproximatelg 30seconds to,1 minute,
c will appear in the displag indicating
that the oven is baking!roasting.If_
doesn't appear in the disptag, star1 again
at Step/4.
Toadjustthe oventemperature,touchthe
Bakepad and topthe + or - padsto increase
or decreasethe temperaturein 25°
increments.Touchthe Start/On pod.
NOTE:TheClear/Offpad is activeduring
theSabbath feature.
Thepresetstarting temperature will
automaticallg beset to 350°.Tap.the+
or- padsto increaseor decreasethe
temperature in 25°increments.The
temperature can beset between 170°
end 550°.Nosignal or temperaturewill
begiven.
i:_8ake ::::i:!;14;:i!_::_,iii!_Broil__.
i_!i:iiiiii,:;i::ii!iiiii_Clock i!!ii;:_iiiiii!i_:I
How to Exit the Sabbath Feature
Touchthe Clear/Off pad.
tfthe oveniscooking,wait for a
randomdela_ periodof approximatelg
30secondsto i minute,until onig
isinthe displabj.
Touchand hold boththe Bake and
BroilHi/Lo pads,at the same time,
untilthe displag showsSF.
@
Tapthe Clock paduntilOnor Off
appearsinthe displa_j.Onindicates
that the ovenwillautomaticallgturn
off after 12hours.Offindicatesthat
the ovenwill not automaticollgturn off.
SeetheSpecialFeaturessectionfor an
explanationofthe 12HourShut-Off
feature,
TouchtheStart/On pad.
NOTE:lfapower outageoccurredwhile
the ovenwas inSabbath,theavenwill
automaticallgtum off andstag off even
when thepower returns.Theovencontrol
must be reset.
19
O"
r_
v
u
0 1
0 1
Page 20

£o
o u
P
v •
i
8
Care and cleaning of the range.
i m m m
Be sure electrical power is off and all surfaces are coot before cleaning ang part of the range.
Ifgour range is removed for cleaning, servicing or ang reason, be sure the anti-tip
device is reengaged properfg when the range is replaced. Failure to take this precaution
could result in tipping of the range and cause injury.
..... Standard Twin Burner Assemblies fansomemodels)
CAUTION:
Be not operate the ceektop without all
burnerparts,drip pans(ifsoequipped)
andgratesin place,
Forcleaning information on sealed
burners, see next section. Sealed burner
cooktops do not lift up.
Ij Toremoveburned-onfood, soakthe surface
burner ina solutionof mildliquiddetergent
and hot water.Soakthe surfaceburnerfor
20-30 minutes.
:--:_: On models with standard twin burners, the '
Turn all controlsOFF before removing burner
partsand drippans (ifsoequipped).
Theburner gratesand drip pans(ifso
equipped) can belifted off,makingthem
easg tOclean.
Theholesinthe surface burnersof gour
rangemust be kept cleanat all times for
properignitionandan even,unhampered
flame.
Youshouldclean thesurface burners
routinelg,especiallgafter bad spillovers,
which couldclogtheseholes.
Wipeoff surfaceburners.IfheavgspilIover
occurs,removethe surfaceburnersfrom the
range.Burnerslift out fordeaning. Lift upthe
cooktopand then liftout the surfaceburners.
Clean these holes thoroughly on each
burner•
• Drip Pans/ifso equipped)
Removethe grates and liftout the drip pans.
Drippans can be cleanedin a dishwasheror
:?i:":_:L_•_:,:.:.:.:.:?:::_•_:::,-:..-_::._....::_"•_ bg hand.
Whenreplacingthe drip pans,make sure
theg arein thecorrect position.
For more stubborn stains, use a cleanser like
Soft Scrub®brand or Ban AmP brand. Rinse
.well to remove ang traces of the cleanser
that might clog the surface burner openings.
Do not use steel wool because itwillclog
the surface burner openings and scratch the
surface burners. Ifthe holes become clogged,
clean them with a sewing needle or twist4ie.
Beforeputtingthe surface burner back,shake
out excesswater and then drg itthoroughlg
bgsettingit ina warm ovenfor 30minutes.
Thenplaceit backin the range, makingsure
it ispropedgseatedand level.
Checkthe flame pattern of each burner.If
theflames are '_iumpg"inot steadg),cleanthe
holesagain with a sewingneedleortwist-tie.
Toget rid of burned-onfood,placethem
ina coveredcontainer (orplasticbag)
with _/4 cup ammonia to loosenthesoil.
Thenscrubwith a soap-filledscouring
padif necessarg.
CAUTION: nonotclean
thedrippansin a self-cleaningoven.
2O
Page 21

ii ,111iiiii i i1|111111i i iltl ii i
Sealed Burnei'AssembfieS _tohsomemodels_ _
,urna,,co ,ro, o o 'fore
burner partsand drip (if:soequipped). :: ///
Theburner grates,caps,burner headsand ' El_Ctr°de///
drip pans (ifsoequipped)can be lifted off, (///
makingthem easgto clean.Theelectrodes
are notremovable.
NOTE:Do not use steel wool or scouring :
powders to dean the burners., ....... '
CAUTlON; no opirote"
the cooktop without a!l burner parts, drip
puns (ifso equipped) and grates in place.
NOTE:Donot liftthe cooktop. Liftingthe
cooktop on sealed burner models can lead to
damage and improper operation of the range.
The electrodeof thesparkigniteris
exposedwhenthe burner head is
removed.Whenone burner isturned
to LITE,allthe burnersspark.Donot
attempt to disassembleor clean
around ang burnerwhile another
•burner:ison.Anelectricshockmag
result,which couldcausegouto knock
overhot coakware:
Burner Grates
Lift outwhen cool.Gratesshouldbewashed
regularlgand,ofcourse,after spillovers.
Washthem in hot,s0opgWaterand rinse
with cleanwater.After cleaning,drg them
thoroughlgbg putting them inu warm oven
for afew minutes.Don't put the grotesback
on therangewhiletheg are wet:When
replacingthe grates,besuretheg are
positionedsecurelgoverthe burners.
Donot operate a bumerfor an extended
periodof time without cookwareon the grate.
Thefinishonthe gratemag chip without
cookwareto absorb the heat.
Toget rid of burned-onfood,placethe grates
in a coveredcontainer.Add 1/4 cupammonia
and letthem soakseveralhoursor overnight.
Wash,rinsewellanddrg.
Althoughtheg are durable,the grates
willgradualtg losetheirshine,regardless
ofthe best caregoucan givethem. This
isdue_otheircontinualexposureto high
temperatures.Youwill noticethis sooner
with lighter colorgrates.
NOTE:Do not clean the grates in a
self-cleaningoven.
21
Page 22

Ang spillOnor aroundanelectrodemust
becarefullgcleaned.Takecareto not hit
an electrodewith angthinghard or it could
be damaged.
Youshouldcleanthe burnercapsand .
burner headsroutinetg,especiallgafter bad
spillovers,which couldclog.theopenings
in the burlier heads.Liftoff whencool,
Toremovebumed-onfood, soaktheburner
headsin a solutionof mild liquiddetergent
and hot water for 20-30 minutes.Formore
stubborn stains,usea toothbrush.
After cleaning
Beforeputting the burnercaps and heads
back,shakeout excesswater and then drg
them thoroughlg bg settinginawarm oven
for 30 minutes.
NOTE:Donot usesteelwool or scouring
powdersto cleontheburners.
Replacethe matchingsizecapsonto the
heads.Thereisone small,two medium and
one largecap.Sizesarestamped into the
bottom ofthe caps.
iii:ii: !÷.
Makesurethat the headsandcapsare
replacedinthe correct locations.
NOTE:Onsomemodels,theburnersareall
thesamesizeand power.
22
Page 23

iii
GEAppliances.com
Cooktop Surface
Toavoid damagingthe porcelainenamel
surfaceof the cookbp and to preventit
.from becomingdull,cleanup spillsright
awag. Foodswith a lotof acid(tomatoes,
sauerkraut, fruitjuices, etc.)orfoodswith
high sugarcontentcould causeadull spot
ifallowed to set.
when thesurfacehas cooled,wash and
rinse:Forother spillssuch asfat sPatterings,
wash with soapandwater oncethe surface
hascooled.Thenrinseand polishwith a drg
cloth.
Becarefulwhen gou cleanthe coot{top
becausethe areaoverthe pilotwill be hot
Ionmodelswithstanding pilots).
NOTE:Donot storeflammablematerials
in an.ovenor near thecool<top,Donot
storeor usecombustiblematerials,
gasolineor other flammablevapors,and
liquidsin thevicinitgof thisor angother
appliance.
NOTE:Donot riftthe cool_opOnsealed
- burnermodels.Liftingthecooktopcan leadto
damageand improperoperationoftherange,
Stainless Steel Surfaces fonsome models)
Donot usea steelwool pad; it will scratch
the surface.
Toclean the stainless steel surface,
use warm sudsg water or a stainless steel
cleaner or polish. Alwags wipe the surface in
the direction of the grain. Follow the cleaner
instructions for cleaning the stainless steel
surface.
Toinquireabout purchasingstainlesssteel
appliancecleaner or polish,or tofind the
locationof a dealernearestgou, pleasecall
ourtoll4ree number:
National PartsCenter 800.626.2002[U.&}
88&261.3055(Canada)
GEAppliances.com[U.&)
www.GEAppliances.ca[Canada)
...................................................Lift-Up Cooktop tonmodelswith standardtwinburners)
Cleanthe area underthe cooktopoften. Cleanunderthe cooktop with hot, soapg
Built-upsoil,especiallggrease,mag catch water and a clean cloth. If gou removedgout
on fire. Surfaceburnerswhilecleaning,makesure
Tomake cleaningeasier,the cooktop may : theg are properlgseatedwhenreplacing
.belifted up..... : : :them.
tShOa_ew_[i]th_vecto_atloSUpp_r_d]ou NOTE:Do notlift thecooktoponsealed _ After cleaning,lower the cooktop(be
#p y
cleanunderi)eatSit , : . ' _ bumermodefs, Liftingthe cooktOpcanteadto careful notto pinch gourfingers).Lower
_ damageand improperOperationofthe range; cooktop gentlgto avoid blowingout pilot
, : .,, Toraise.thecool_op: , ,: • flames(onstanding pilot models).
' , surethe burnersareturnedOff- ' i ., .
' I-_ Be , , , Replacedrippans(ifsoequipped)andgrates.
:.: ' , ' ,,_ Removethegrates and drip pans: '
, . (ifsOequippedL . ..... "" :,
r-_ .Graspthetwo front burnerwells and ' ' "
lift up. : ' " ....
23 ¸
• IIIlll
2
0
";:;:? _-_"3L;-
,11,111
Q
Page 24

:; -7":.....
............oo
n
v A
w
.-- L
vJ l_
0
0
Careand cleaning of the range.
u_
Liftthe doorstra|ghtupand _ff
thehinges.
Thegasketisdesignedwith agap
at the bottom to allow for proper
aircirculation,
Donotruborcteanthadoorgasket--it
hasanextremelylowresistancato
abrasion.
Ifyounoticethe gasketbecomingworn,
frayedordamagedinanywa_or if it has
becomedisplacedonthed_o_you
shouldhaveit replaced:
Lift-Off Oven Door
Theovendoorisremovable,butitisheavy.
Youmag needhelpremovingand repladng
thedoor._
Toremove the door, open it afew inches
tothe specialstop positionthat wil!holdthe
door open.Graspfirmlg oneach sideand lift
the door straight up and offthe hinges.
NOTE:Be careful not to place hands between
the hinge and the oven door frame as the
,hinge could snap. back and pinch fingers,
Toreplace the door, makesurethe hinges
are inthe specialstop Rosition.Positionthe
slotsinthe bottom ofthe doorsquarelgover
the hinges.Thenlowerthe doorslowigand
evenlgover both hingesatthe sametime.If
the hingessnap.backagainstthe ovenframe,
pullthem back out....
Tocleanthe outside of the:door:
Usesoapand water to thoroughlgclean
the top,sidesand front of theoven door.
Rinsewell.Youmag alsouseaglass
cleanerto cleantheig aSSOi_"theouts de
Ofthe door.
_ Spillageofmarinades,fruitjuices,tomato
saucesand basting materialscontaining
acidsmag causediscolorationandshould
bewiped up immediatelg.Whenthe
surface iscool,clean and rinse.
Do not use oven cleaners, cleansing
powders or harsh abrasives on the
outside of the door.
Tocleon the insideof the door:
Donot allow excesswater to runinto
ang holesor slotsin the door.
-_ Becausethe area insidethe gasketis
cleanedduring thesetfcleancgcle,gou do
not needto cleanthisbg.hand.Ang soap
left on the.linercausesadditionalstains
whenthe oven isheated.
_ The area outsidethegasket can be
cleanedwitha soap-filledsteelwool or
plasticpad.
Oven Bottom
Theoven bottom hasa porcelainenamel
finish.To make cleaningeasier,protectthe
oven bottom from excessivespilloversbg
placing a cookiesheeton the rackbelowthe
.rackgou are cookingon.Thisisparticularlg
impor_antwhen bakingafruit pie or othe[
foods with a high acid content. Hotfruit
fillingsor other foodsthat are hightgacidic
(suchastomatoes, sauerkraut,and sauces
with vinegaror lemonjuice}magcause
pitting and damage to the porcelainenamel
surfaceand shouldbewiped up immediatelg.
Wedon't recommendusingaluminum foil on
the ovenbottom.It can affect air flow ifthe
holesare.blockedand it canconcentrateheat
at the bottom ofthe oven,resultinginpoor
bakingperformance.
Toclean up spillovers,useso_pand water,
an abrasivecleaner or soap-filledscouring
pad.Removethe ovenbottom for easier
clean-upand to preventdamage tothe
continuouscleaning ovencoating
(onsomemodelsl.
24
Page 25

GEAppliances.com
Ventappearanceandlocationvary.
Removable Broiler Drawer Ionsomemodels)
Toremove: Toreplace:
EZ] Whenthe broileriscool,removeang grid , Holdthe broilerdrawerinthe raisedposition
and pan. asgou slideit par(wag into the range.Then
lowerthe drawer and push it complete[g
[] Pullthe broilerdrawer out until itstops, closed.
then pushit back inabout one inch.
[] Graspthe handle,lift and pullthe broiler
drawerout. Cleanthe broilerdrawerwith
hot, soapgwater.
Oven Air Vents
Neverblockthevents(airopenings)ofthe
range.Theyprovidethe air inlet and outlet
thot are necessaryfor the rangeto operate
properlywith correctcombustion.
AirOpeningsarelocated atthe rear of
the cOoktop,atthe top andbottom ofthe
ovendoor and at the bottom of therange,
underthe kickpanelor broilerdrawer
(dependingon the model/.
PuII the knob straight off(he stem,
LowerControl Panel (Front Manifold Panel) and Knobs
It's a good idea to wipe the control panel after The control knobs may be removed for easier
eachuse ofthe oven_Usea damp cloth to
cleanor rinse.Forcleaning,usemild soap
and water or o 50/50 solutionof vinegarand
water.Forrinsing, usecleonwater. Polishdrg
witho soft cloth.
Do not use abrasive cleansers, strong liquid
cleaners, plastic scouring pads or oven
cleaners on the control panel-theg wil
damage the finish.
Donot bend knobsbg pullingthem upor
down or bg hanging a towel or othersuch
loads.Thiscon damagethe gas valveshaft.
cleaning.
Hake sure the knobs ore in the OFF positions
and pull themstraight off the stems for
cleaning.
The knobs can be cleaned in a dishwasher
or theg mog also be washed with soap and
water. Hake sure the insides of the knobs are
drg before replacing.
Replace the knobs in the OFF position to
ensure proper placement.
Hetai parts can be cleanedwith soapand
water.Donot usesteelwool, abrasives,
ammonia,acidsorcommercialoven
cleaners.Drgwith o soft cloth.
25
Page 26

• ltl
ij
l/t •
• t.l_ _
1/
r
v
u
v
m .
q
9•
E
Careand,cleaning of the range.
Oven Racks
Cleanthe rackswith an abrasivecleanseror
scouringpad.After cleaning,rinsethe racks
with clean water and drg with aclean cloth.
Porcelain Oven Interior
With proper care,the pbrcelainenamel
interiorwil!retainitsattractivefinishfor mang
gears.
Soapand water will normallg dothe job.
Heavg.spatteringorspilloversmag require
cleaningwith a mild abrasivecleanser.
Soap-fliedscouring padsmagalso be used.
Donot allow food spillswith a highsugaror
acidcontent (suchas tomatoes,sauerkraut
fruitjuices or piefilling)to remain on the
surface.Thegmag causedullspotseven
after cleaning.
Householdammonia mag makethe
€leaningjob easier.Place1/2 Cupammonia
in a shallowglasspan and leave ina cold
ovenovernight.Theammonia fumeswill
help loosenthe burned-ongrease and food.
When necessarg, gou mag use a commercial
oven cleaner. Follow the package directions.
Cautionsabout usingsprag-on oven
cleaners:
Becareful wherethe ovencleaner is
sprayed.
,_ Donot sprag ovencleaneron the electrical
controlsandswitches(on somemodels)
becauseitcould cause ashort circuitand
result in sparkingor:fire.
Donot allow a filmfrom the cleanerto
remainon thetemperaturesensing-bulb
itcould causethe oven to heatimproperlg.
(Thebulbislocated at the rear ofthe oven.]
Carefullgwipethe bulb cleanafter each
ovencleaning,being carefulnot to move
the bulbasa changeinits positioncould
affect howthe oven bakes.
Donot sprag angoven cleaneron the
outsideovendoor,handlesor ang exterior
surfaceof the oven,cabinet or painted
surfaces.Thecleanercan damage these
surfaces,
26
Page 27

Installation
Instructions
nge
If gou have questions, call 800.GE.CARESor visit our Website at: GEAppliances.com
I
BEFORE YOU BEGIN
Read these instructions completelg and
carefullLj.
Installation of this range must conform with
local codes, or in the absence of local codes,
with the National Fuel Gas Code, ANSI
Z223.1/NFPA.S4, latestedition. In Canada,
installation must conform with the current
Natural Gas Installation Code, CAN/CGA-B149.1
or the current Propane Installation Code,
CAN/CGA-B149.2, and with local codes where
applicable. This range has been desig n-certified
bg CSA International according to ANSI Z21.1,
latest edition and Canadian Gas Association
according to CAN/CGA-I.1 latest edition.
As with ang appliance using gas and generating
heat, there are certain safetg precautions gou
should follow. You will find these precautions in the
tmportantSafetg Information section in the front
of this manual. Read them carefullg.
• IMPORTANT - savetheseinstructions
for !oca] inspector's use.
IMPORTANT -Observeall governing
codes and ordinances.
Note to Installer - Besure to leave these
instructions with the Consumer.
Note to Consumer - Keep these instructions for
future reference.
• Note-This appliance must be properlg
grounded.
• Servicer-The electrical diagram is n an
envelope attached to the back of the range.
° Skill Level - Installation of this appliance
requires basic mechanical skills.
Proper installation is the responsibilitg of the
installer.
Product failure due to improper installation is not
covered under the Warrantg.
27
Page 28

FOR YOUR SAFETY
Installation
iii
Do not store or use combustible materials,
gasoline or other flammable vapors and liquids
in the vicinitg of this or ang other appliance. If
gou smell gas:
Instructions
,, " k k
MATERIALS YOU MAY NEED
• Gasline shut=off valve '
• Pipe]oint sealant orUL-approved pipethread
-tape with Teflon _ that resists i]_:fiori _of hatural
and LP gases
[_] Open windows. •
r-2-] Don't touch electrical switches.
[] Extinguish ang open flame ........
[] tmmediatelg, call gour gas supplier.
f ii i ii ii
TOOLS YOU WILL NEED
Phillipsscrewdriver
! ........ oPen-endor
Flat-blade'scrawdrive]"3/'16"or
adjustablewrench
• Flexible metal applianceconnector (1/2" I.D.}.
A S-foot length :isrecoromended :forease of
installation but Other lengths areacceptable.
Never use an old connector When installing r,
a new range.
• Flare union adapter for connection to gas
1 "
supplg line (3/4" or /2 NPT x t/2:' I.D.)
• Flare union adapter for connection to pressure
regulator on range (1/2" NPT xli21U.D.)
• Liquid leak detector or soapg water
• Lag bolt or 1/21'O.D.sleeve_anchor (for concrete
floors onlg)
• Long matches and/or match holder (for models
equipped with standing pilots)
smaller
l.L' ........................
, Pencilandruter
Level
Pipewrenches(2)
(onefor backup}
DdIl.awl or nail
*Teflon: Registered trademark of DuPont
ii i
PART INCLUDED
Anti4ip bracket kit
ii
28
Page 29

InstallatiOn Instructions
-&WARNING!
INSTALLATIONSAFETY
INSTRUCTIONS
Read these instructions completelg and
carefullg.
Improper installation, adjustment, alteration,
service or maintenance can cause injurg or
propertg damage. Refer to this manual. For
assistance or additional information, consult a
qualified installer, service agencg, manufacturer
(dealer) or the gas supplier.
Never reuse old flexible connectors. The use
of old flexible connectors can cause gas leaks
and personal injurg. Alwags use NEW flexible
connectors when installing agas appliance.
IMPORTANT- Remove all packing material
and literature from oven before connecting gas and
electrical supplg to range.
CAUTION- DOnot attemptto operate;:.
the oven of this range during a power'failure ": ":
(Electric Ignition models onlg).
• Have gour range installed bg a qualified installer.
° Your range must be electricallg grounded
in accordance with local codes or, in the absence
of local codes, in accordance with the National
Electrical Code (ANSI/NFPA 70, latest edition}.
In Canada, electrical grounding must be in
accordance with the current CSAC22.1 Canadian
Electrical Code Part 1 and/or local codes.
See Electrical Connections in this section.
• Before installing gour range on linoleum or ang
other sgnthetic floor covering, make sure the
floor covering can withstand 180°F without
shrinking, warping or discoloring. Do not install
the range over carpeting unless a sheet of 1/4"
thick plgwood or similar insulator is placed
between the range and carpeting.
• Hake sure the wall coverings around the range
can withstand heat generated bg the range up
to 200°E
Avoid placing cabinets above the range.
To reduce the hazard caused bg reaching over
the open flames of operating burners, install a
ventilation hood over the range that projects
forward at least 5" begond the front of the
cabinets.
The ventilating hood must be constructed of
sheet metal not less.than 0.0122" thick. Install
above the cooktop with a clearance of not less
than 1/4" between the hood and the underside
ofthe combustible material or metal cabinet.
The hood must be atleast as wide as the
appliance and centered over the appliance.
Clearance between the cooking surface and the
ventilation hood Surface MUST NEVER BELESS
THAN 24 INCHES.
EXCEPTION:Installation of a listed microwave
oven or cooking appliance over the cooktop shall
conform to the installation instructions packed with
that appliance.
, if cabinets are placed above the range, allow a
minimum clearance of 30" between the cooking
surface and the bottom of unprotected cabinets.
• '!If'a 30" clearance:between cooking surface and
overhead combustible material or metal cabinets
cannot be maintained, protect the underside of
the cabinets above the cooktop with not less than
1/4" insulating millboard covered with sheet metal
not less than 0.0t22" thick. Clearance between
the cooking surface and protected cabinets MUST
NEVERBELESSTHAN 24 INCHES.
• The vertical distance from the plane of the
cooking surface to the bottom of adjacent
overhead Cabinets extending closer than 1" to
the plane of the range sides must not be less
than 18". (See the Dimensions and Clearances
illustration in this section.)
• CAUTION -Itemsofinterestto
children should not be stored in cabinets above
a range or on the backsplash of a range
:_children climbing on the range to reach items
could be Seriouslg injured.
29
Page 30

Installation Instructions
i • , ill
DIMENSIONS AND CLEARANCES
Provide adequate clearances between the range and adjacent combustible surfaces. These dimensions must
be met for safeuse of your,range. The location of the electrical outlet and pipe opening [see Gas Pipe and
Electric Outlet Locotions}may be adjusted to meet specific requirements.
The range mag be placed with 0" clearance (flush) at the back wail.
Minimumto
cabinetson
either side '
of the range
Towall oneither side,
standardburnermodels
2° Towatlon eitherside.
sealedburnermodels
i
Maximumdepthfor
cabinetsabove
countertops
k
O'
Tocabinetsbe!ow
cooktepandatthe
rangeback
k '
Height*
Depthwith doorclosed(includesdoorhandte)
27_° to28W'
Depthvariesdependingonmodal.See
specificationssheetfor yourmodel.
*Product Height:.
36" JGSS05
4SVz" JGBS04
47¥8" JGBS18
JGBS23
JGBS07
JGBS19
3O
Page 31

Installation Instructions
i i
AWARNINGJ
ANTI-TIP.DEVICE
• All ranges can tip.
• BURNSorother SERIOUS
INJURIEScan result.
-INSTALL and CHECK the
ANTi-TIP bracket following
the instructions supplied
With the bracket.
Toreduce the risk of tipping the range, the range
must be secured bg a properly installed anti-tip
bracket. See instaftation instructions shipped with
the bracket for complete details beforeattempting
to install.
Tocheck if the bracket is installed and engaged
properly, carefully tip the range forward. The bracket
should stop the range within 4 inches, lf itdoes not,
the bracket must be reinstalled. If the range ispulled
from the waft for any reason, always repeat this
procedure to verifg the range is properlg secured
by the anti-tip:bracket.
For free-standing or slide-in ranges, never
completely remove the leveling legs or the range will
not be secured to the anti-tip deviceproperly.
ff gou did not receive an anti-tip bracket with gour
purchase, ca!l 1-800-626-8774to receive one'at
no cost (in Canada, call 2-800-561G344).For
installation instructions of the bracket; visit
GEAppliances.com (inCanada, GEAppliances.ca).
i
LOCATION
Do not locate the range where it mag be subject
to strong drafts. Ang openings in the floor or
wall behind the range should be sealed. Hake
sure the openings around the base of the range
that supplg fresh air for combustion and
ventilation are not obstructed bg carpeting
or woodwork.
Your range, like mang other household items, is
heavg and can settle into soft floor coverings such
as cushioned vingl or carpeting, Use care when
moving the range on this tgpe of flooring, t is
recommended that the following simple and
inexpensive nstructions be followed to protect
gour floor.
The range should be installed on a sheet of
plgwood (or similar material). When the floor
covering ends at the front of the range, the area
that the range wilt rest on should be built up With
plgwood to the same level or higher than the floor
covering.
This wil allow the range to be moved for cleaning
or servicing. Also, make sure gour floor covering
will withstand 180°R (See the Installation Safety
Instructions section.}
Hake surethe wall coverings around gout range
can withstand the heat generated (upto 200°F)bg
the range.(Seethe Installation Safety Instructions
section.]
MODEL AND SERIAL NUMBER LOCATION
Depending on gour range, gou'll find the model
and serial numbers on a label on the front frame of
the range, behind the kick panel or broiler drawer.
IMPORTANT!
Remove all tape and packaging. Make sure the
burners are propertg seated and level.
Lift up the cooktop (on models with standard
twin burners) and remove ang packing material
under it.
Take the accessorg pack out of the oven and/or
drawer.
Check to be sure that no range parts have come
loose during shipping.
!
Page 32

Installation Instructions
[] PROVIDE ADEQUATE GAS SUPPLY
Your range is designed to operate at a
pressure of 4" of water column on natural gas
or, if designed for LPgas (propane or butane),
10" of water column.
Make sure you are supplying your range with
the type of gas for which it is designed.
This range is convertible for use on natural or
propane gas. If you decide to use this range
on LP gas, conversion must be made by a
qualified LPinstaller before attempting to
operate the range on that gas,
For proper operation, the pressure of natural
gas supptied to the regulator must be between
4" and 13" of water column.
For LP gas, the pressure supplied must be
between 10" and 13" of water column.
When checking for proper operation of the
regulator, the inlet pressure must be at least 1"
greater than the operating (manifold) pressure
as given above.
The pressure regulator located at the inlet of
the range manifold must remain in the supplg
line regardless of whether natural or LP gas is
being used.
A flexible metal c ppliance connector used
to connect the range to the gas supplg line
should have an I.D.of 1/2" and be 5 feet in
length for ease of installation. In Canada,
flexible connectors must be single wall metal
connectors no longer than 6 feet inlength.
[_]CONNECT THE RANGE TO GAS
Shut offthe main gas supplg valve before
disconnecting the old range and leave it off
until the new hookup has been cam pleted.
Don't forget to relight the pilot on other gas
appliances when £1outurn the gas back on.
Because hard piping restricts movement
of the range, the use of a CSA International-
certified flexible metal appliance connector
is recommended unless local codes require
a hard-piped connection.
Never use an old connector when installing a
new range. If the hard piping method is Used,
you must carefully align the pipe;,the range
cannot be moved after the connection is
made.
TQprevent gas leaks, put pipe joint compound
on, or wrap pipe thread tc pewith Teflon*
around, all mate (external) pipe threads.
[] nsta a manual gas line shut-off valve in the
gas line n an easily accesSedlocation Outside
of the range, lake sure everyone operating the
range knows Where and how to shut offthe gas
supplg to the range.
[-_ Install male 1/2" flare u nion adapter to the 1/2"
NPT internal thread at inlet of regulator. Use a
backup wrench on the regulator fitting to
avoid damage.
[] Install male 1/2" or 3/4" flare union adapter to
the NPT interna thread of the manual shut-off
valve, taking care to back up the shut-off valve
to keep it from turning.
[_ Connect ftexibie metal appliance connector
to the adapter on the range. Position range
to permit connection at the shut-off valve
[] When all connections have been made,
make sure all range controls are in the off
position and turn on the main gas supply
valve. Use a liquid leak detector at all joints
and connections to Check for teaks in the
system.
i WARNING DO NOT USE A FLAME
TO CHECK FORGAS LEAKS.
When using test pressures greater than 1/2
psig to pressure test the gas supplg sgstem
of the residence, disconnect the range and
individual shut-offvalve from the gas supplg
piping. When using test pressures of 1/2 psig
or less to test the gas supplg sgstem, sim pig
isolate the range from the gas supplg sgstem
bg closing the individual shut-off valve.
*Teflon:Registeredtrademark of DuPont
32
Page 33

Installation InstrUctions
i ii i i i
GAS PIPE AND .ELECTRICAL OUTLET LOCATIONS
(for models with Sealed Burners)
This area allows for flush range
installation with through;the÷wall
connection of pipe stub/shut-off
valve and rear wall 120Voutlet.
Shortest connection from
hard pipe stub location to
range hookup.
This area allows for flush range
installation with thraugh-theTfloor
connection of pipe stub/shut-off
valve.
_ ._]°' ...... .... :: -
,...., ,r
GAS PIPE AND ELECTRICAL OUTLET LOCATIONS
(for models with Standard Twin Burners)
This area allows for flush range
installation with through-the-wall
connection of pipe stub/shut-off
valve and rear wall 120Voutlet.
.=ctionfrom
hard pipe stub location to
range hookup.
This area allows for flush range
installation with through-the-floor
connection of pipe stub!shut-off
valve.
33
Page 34

Installation Instructions
H H, 1 HH,n,,, ,
II Ill I
FLEXIBLE CONNECTOR HOOKUP [for models equipped with Sealed Burners)
k
Installer: Inform
the consumerof
the locationof the
gasshut-off Valve.
Gaspipe
Gasshut-off
Valve
if ii ill i
RIGID PIPE HOOKUP OPTIONS [for models equipped with Sealed Burners)
'Installer: Inform
the consumer of
the location of the
gas shut-off valve.
Alternate Hookup ......
valve
112° or3/4'
Gaspipe 90° Elbow
Quickconnect
Pressure
Nipple regulator
Installer: Inform
the consumerof
the location of the
gasshut-off valve.
Adap[er
leVI II,l,,'i,,, _I_ll[al_
ly
rlr i
34
Page 35

i
Installation InStructions
FLEXIBLE CONNECTOR HOOKUP
(for models equipped with Standard Twin Burners)
, k
Installer: |nform
the consumer of
the Iocationof the
gas shut_off valve.
Pressure
regulator
_. Adapter
(6feetmaximum) _
Adapter-_
_---- Gasshut-off
1/2"or3/4" _ _ valve
Gaspipe
RIGID PIPE HOOKUP (for models equipped with Stondord Twin Burners)
- k
Pressure
regu[atar
Manifold pipe
Installer: Inform
the consumer of
the location of the
gas shut-off valve.
.,J
__ _ 90_Elbow
Nipple Union _ Blackir°n pipe
_ Union
35
Page 36

Installation: Instructions
,11,11
i_:ELECTRICAL CONNECTIONS
Preferred Method
Electrical Requirements '::
120-volt, 60 Hertz, properlg grounded branch
circuit protected by a 15-amp or 20-amp
circuit breaker or time-delag fuse.
Extension Cord Cautions ....._::.
Because of potential safetg hazards
associated with certain conditions, we stronglg
recommend against the use of an extension
cord. However, if gou still elect to use an
extension cord, it is absolutelg necessarg that it
be a UL-listed, 3-wire grounding-type appliance
extension cord and that the current carrging
rating of the cord in amperes be equivalent to,
or greater than, the branch circuit rating. , :
Grounding
IMPORTANT--IPIease read carefullg)
FOR PERSONAL SAFETY,THIS APPLIANCE ........
MUST BE PROPERLYGROUNDED.
sureproperground: ::: ), : : :_;iii:!::
exists before use :::: : ' __::_
The power cord of this appliance is equipped
with a 3-prong (grounding) plug which metes
with a standard 3-prong grounding welt
receptacle to minimize the possibilitg of ,
electric shock hazard from this appliance. :
The customer should have the wall receptacle
and circuit checked bg a qualified electrician :
to make sure the receptacle is proper!g :
grounded. :
Where a standard 2-prong wall receptacle is
encountered, it is the persona/responsibi itg ....
and obligation of the customer to have it
replaced with a properlg grounded 3-prong
wall receptacle.
DO NOT, UNDER ANY CIRCUMSTANCES, CUT
OR REMOVE THE THIRD (GROUND) PRONG
FROM THE POWER CORD.
A word:about GFCls--GFCls are not required
or recommended for gas range receptacles/ i
Ground Fault Circuit Interrupters (GFCIs}ore
devices that sense leakage of current in a
circuit and automaticallg switch off power
when a threshold leakage level is detected.
These devices must be manuallg reset bg the
consumer. The National Electrical Code requires
the :use of GFCIsin kitchen receptacles installed
to serve countertop surfaces. Performance of
the range will not be affected if operated on
a GFCt-protected circuit but occasional
nuisance tripping of the GFC! breaker
is possible.
[_] Usage Situations,where Appliance Power
Cord will be Disconnected Infrequenttg.
An adapter mag be used onlg on a
15-amp circuit, Do not use an adapter on
a 20-amp circuit. Where local codes permit,
a TEMPORARY CONNECTION mag be made •
........to a propertg grounded two-prong wall
receptacle bg the use of a UL-listed adapter,,
' available at,most hardware storeS.The larger :
slatin the adapter must be aligned with the
larger slot in the wall receptacle to provide
proper poladtg in the connection of the
power cord. '
Temporarg Method
(Adaptorplugsn0t
)ermittedin Canada}
prongs!sl0ts
Ensureproperground
andfirm connection
beforeuse
CAUTION - Attaching the adapter
ground terminal to the wall receptacle cover
screw does not ground the appliance unless the
cover screw is metal, and not insulated, and the
wall receptacle is grounded through the house
wiring. The customer should have the circuit
checked bg a qualified electrician to make
sure the receptacle is propertg grounded.
36
Page 37

Insta llati On ,Instru ctions
i
[] ELECTRICALCONNECTIONS(cont.)
When disconnecting the power cord from the
adapter, always hold the adapter with one
hand. If this is not done, the adapter ground
terminal is very likely to break with repeated
use. Should this happen, DO NOT USE the
appliance until a proper ground has again
been establish ed.
I-B] Usa ge Situations where Appliance Power
Cord will be Disconnected Frequently.
Do not use an adapter plug in these situations
because disconnecting of the power cord
places undue strain on the adapter and leads
to eventual failure of the adapter ground
terminal. The customer should have the
2-prong wall rece ptacle replaced with a
three-prong (grounding} receptacle bg a
qualified electrician before using the
appliance.
The installation of appliances designed for
mobile home installation must conform with
the Hanufactured Home Construction and
Safety Standard, Title 24 CFR,Part 3280
(formerly the Federal Standard for Hobile
Home Construction and Safety, Title 2/4,HUD,
Part 280) or, when such standard is not
applicable, the Standard for Manufactured
Home Installations, latest edition
(lVlanufactured Home Sites, Communities and
Set-Ups}, ANS A225.1, latest edition, or with
local codes, n Canada, mobile home
installation must be in accordance with the
current CAN/CSA Z240/NIH Hobile Home
Installation Code.
Electric Disconnect
• Locate disconnect plug on the range back.
• Pinch sides of connector and pull out of
range back.
[-4"ISEAL THE OPENINGS
_, Seal any openings in the wall behind the-
range and in the floor under the range when
hookups are cam pleted.
[] LIGHT THE PILOTS
.{For models equipped with standing pilots.
If the range is an electric ignition model, the
burners are ignited bg electric ignition which
eliminates the need for standing pilot lights.)
The range should be installed in its permanent
position before any pilots are lit or adjusted,
Jl, CAUTION - Make sure the surface
burner control knobs are in .the OFF position.
before attain pting to light the pilots.
[] Light the Surf(Ice Burner Pilots
1. Raise the cooktop.
2. Light both pilots with a match.
3. To avoid pilotoutage, use caution when
Closing cooktop after lighting pilots.
NOTE: Do not leave standing pilot it in
a newly constructed or remodeled home or
apartment that will be unoccupied for more
than a month.
Each pilot flame was adjusted at the factory
to be appro×imatelg 5/16" tall. A tinge of yellow
appearing at the upper tip _snormal. If you
find pilot adjustment is necessary, follow
instructions in Step B.
37
Page 38

Installation Instructions
i i
[] LIGHT THE PILOTS(cont.)
[] Adjust the Surface Burner Pilots if Necesserg
CAUTION - Make surethesurface
burner control knobs are in the OFF position
before attempting to adjust the pilots.
1. Raise the cooktop.
2. Locate the pilot adjustment screw. It can
be accessed through the small hole near
the center of the manifold panel.
.
To adjust, use a blade-tgpe screwdriver
with a shaft diameter of less than or equal
to 3/16",Turn pilot adjustment screw until
pilot flame is 5/16" high. Do not reduce the
flame to Jessthan 5/16" or pilot outage may
occur. A pilot flame burning higher than
recommended mag generate soot (carbon
black) on the bottom of gour cooktop,
[] Light the Oven Pilot
1. Ensure the top burners are lit before
attempting to light the Oven pilot (turn them
off after gou have tit the oven pilot).
2. Remove the oven door. See Lift-Off Oven
Door in the Care and cleaning of range
section.
3. Remove the oven racks.
[] Light the Oven Pilot Icont.!
4. Remove the oven bottom. To remove:
• Remove knurled screws holding down
rear of oven bottom.
• Grasp oven bottom at finger slots on
each side.
• Lift rear of oven bottom enough to clear
the lip of range frame: then pull out.
J
5. Locate the pilot in the back of the oven
bottom. The pilot is attached tothe left side
of the oven burner.
Shield.
(onsome
Pilot
6. To light the oven pilot, push in and hold the
oven control knob while ighting the pilot
With a tong match or match holder. Once
the oven pilot is lit, continue holding the
oven control knob for one minute before
releasing.
No adjustments are required for natural
gas. If the range is connected to LPgas,
contact the person who installed gout
range or made the conversion. If pilot
flame does not stag lit, repeat this step.
38
Page 39

Installation :inStructi0n s
iii iii i i i
[] LIGHT THE PILOTS{cont.)
[] Check Ignition of Oven Burner
The oven isdesigned to operate quietlg and
automaticallg. To operate the oven, turn the
OVENCONTROLknob to a setting above 260°F.
After 30-90 seconds, the oven burner will ignite
and burn until the set temperature is reached.
The oven burner will continue to cgcle on and
off as necessarg to maintain the oven at the
temperature indicated bg the OVENCONTROL
knob.
Electric ignition models require electrical power
to operate. In case of a power outage, the oven
burners on these models cannot be lit manuailg
with a match. Gaswill not flow unless the glow
bar is hot.
If the oven is in use when a power outageoccurs,
the burner will shut off and cannot be re-tit until
power is restored.
1-_ Adjust Broil Burner Air Adjustment
Shutter on Models with a Broiler Drawer,
if Necessarg
Determine ifthe bottom burner flames are
burning properlg.
With the oven bottom removed, properlg
adjusted flames should have approximatetg
1" blue cones and, if range is supplied with
natural gas, should burn with no geltow
tipping. [With most LPgas, small gellow
tips at the end of outer cones are normal.}
Flames should not lift off burner ports. If lifting
is observed, graduailg reduce air shutter
opening until flames are stabilized.
The shutter for the oven burner is near the
back well of the oven and behind the broiler
drawer.
[_ Adjust Broil Burner Air Adjustment
Shutter on Models with a Broiler Drawer,
if Necessarg (cont.)
To Remove the Broiler Drawer:
1. Puli thedrawer out until it stops; then push
it back in about one inch.
2. Grasp handle, lift and pull broiler
drawer out.
. Loosen
Airadjustmentshutter
C
On some models, remove the metal shield at
the rear of the cavitg.
To adjust the flow of air to the burner, loosen
the Phillips-head screw and rotate theshutter.
to ailow more Or less airinb.the bu_rier tube_ i
,_ .L ?
39
Page 40

[]
[]
Installation Instructions
LIGHT THE PILOTS [cont.)
Check Ignition of Surface Burners
Operation of all cooktop and oven burners should
be checked after pilots have been lighted (on
some models] and the range and gas supply
lines have been carefullg Checkedfor leaks.
Standing Pilot Models
Select a top burner knob and simUltaneouSly
push in and turn to HI position. The burner should
light within a few seconds. Try each burner in
succession until al! burners have been checked.
Electric Ignition Models
Select.a top burner knob and simukaneouslg push
in and turn to UTE position. Youwill hear a clicking
sound indicating proper operation of the spark
module. Once the air has been purged from the
supply lines, burnersshould light within 4 seconds.
After burner lights: rotate knob out of the LITE
position, Try each burner in succession until all
burners have been checked.
Quality of Flames
The combustion quality of burner flames needs
to be determined visually.
_] A)Yellow flames.
Call for service
(B)Yellow tips on
outer cones--
Normal for LP gas
(C)Soft blue
flames--Normal for
natural gas
If burner flames look like [A),callfor service.
Normal burner flames should look like {B)or (C),
depending on the type of gas you use.
With LPgas, some yellow tipping on outer cones
is normal.
[] Replace Oven Parts
After all adjustments are made, replace
the broiler drawer, oven bottom, racks and
oven door.
40
Page 41

Installation Instructions
ii i
[] LEVEL THE RANGE .....
J-_ Install the oven racks in the oven and position
the range where,it will be installed.
Raise
range Lower
range
[]
[]
[]
(onsomemodels} (onsomemodels
Check.for levelness bg placing a spirit level
or a cup, partiatlg filled with water, on one of
the oven racks. If using a spirit level, take two
readings--with the level placed diagonaflg first
in one direction and then_the other.
Remove the broiler drawer or kick panel.
See the Careand cleaning 6f the range section.
The front leveling legs can be adjusted from
the bottom and the rear legs can be adjusted
from the top or the bottom.
Use an open-end or adjustable wrench to
adjust the leveling legs until the range is level.
After the range is level, slide the range awag
from the wall so that the Anti-Tip device can
be installed.
t-_ iNSTALL THE ANTI-TIP DEVICE
WARNING-
Range must be secured with an approved
Anti-Tip device.
Unless properlg installed, the range could be
tipped bg you era child standing, sitting or
leaning on an open door
• After installing the Anti-Tip device, verifg that
it is in place bg carefullg attempting to tilt the
range forward.
• This range has been designed to meet all
recognized ind_4strg tip standards for all
normal conditions.
The use of this device does not preclude
tipping of the range when not properfg
installed.
If the Anti-Tip device. SUpplied with the range
does not fit thisapplication, use the universal
Anti-Tip device WBO2K10254.
Hark the wattwhere the RIGHT EDGE
of the range is to be located. Be sure
to allow for the countertop overhang
if gou intend to install the range next
to cabinets.
Slottedhead
screw
Anti-Tip !.
device I
ofrange
[] Locate the outside edge of the device 2W'
toward the center of the range from the
marked edge of the range.
[] Using the device as a template, markthe
position of the hole for the screw.
41
Page 42

Installation Instructions
[]
INSTALLTHE ANTI-TIP DEVICE (cont.)
For wood construction, drill a pilot hole at an
angle of 20° from the horizontal. A nail Or awl
mag be used if a drill is not available.
Mount the Anti-Tip device with the screw
provided.
For cement or concrete construction, gou
will need a 1/4" x 1Vz"lag bolt and a 1/21' O.D.
sleeve anchor, which are not provided. Drill the
recommended size hole for the hardware.
Backof
range
Install the sleeve anchor into the drilled
hole and then install the lag bolt thr0iJgh the "
device. The bolts must be properlg tightened
as recommended for the hardware.
Slide the range against the wal ,and check for
proper installation bg grasping the front edge
of the cooktop and carefullg attempting tOtilt
the range forward. The bracket should stop
the range within 4 inches, tf it does not. the
bracket must be reinstaJ ed.
WHEN ALL HOOKUPS ARE COMPLETED
Hake sure all controls are left in the OFF
position. Make sure the flow Of combustion and
ventilation airt0 the range is unobstructed.
CONVERTTOLP GASIor convert beck to
natural gas from LP)
This range leaves the factorg set for use with
natural gas: Ifyou want to convert to LP gas, the
conversion must be performed bg a qualified LP
gas installer.
The conversion instructions and LP'orifices can be
found attached to the range next to the pressure
regulator.
Keep these instructions and the orifices in case
gou want to convert back to natural gas.
42
Page 43

Before gou call for service...
GEAppliances.com
ii
Troubleshooting Tips
Savetime and money! Reviewthe charts on the following
pages first and you may not need to call for service.
Possible Causes What To Do
Plugon range is notcompletelg * Hake sureelectricalplugispluggedinto a live,
insertedin the electrical outlet, properly groundedoutlet.
Burner hole or slits on the side •
of the burner may be clogged.
Removethe burners [onmodelswith standardtwin
bumerslOrburner headsand caps(onmodelswith
sealedburners)and cleanthem with asewingneedle
or twist4ie. Hakesureyou do not enlargethe holes.
Onsealedburnermodels,checkandcleanthe electrode
areafor burned-onfoodor grease.
Improper burnerassemblg. • Make sure the burner parts are installed correctlg.
Seethe Care and deaning of the range section.
• Drip penstifso equipped) • Hakesurethe drip pansareinstalledcorrectlg.
ere not installed correctlg.
.......... Pilot,s)is (ore]not lit • Seethe Lightthe SurfaceBurnerPilotssection inthe
;:_._--:,._-..............,s. .................Ionstanding pilotmodels). InstallationInstructions.
:::::::::::::::::::::::::::::::::::::::::::::::::::::
Burner:flames #erg :!i;:;!:::::,[iImproper airto gasratio. • Ifrange isconnected to LPgas,contactthe person
iJarge::or:#eiiow!:;!_i::i:i!i;:i::ii:_::ii::j.!_i who installedgour rangeor made the conversion.
:Surfaceburners light:-!:,:i:.Theovengasshut-offvalve
maghove accidentallg been
° Tocheckthe ovengasshut-offvulve onsealed burner
models,removethe broilerdrawer or kickpanel
movedduring cleaningor
moving.
i:!;ii:i:!::!ii!::!/ii !U ¸¸:
° _. - :--: : ;:,::, ::;!
.................:ii:_I:!..:-::-_ .....
{seethe Careanddeaning of the rangesection)and
lookfor the gas shut-off leveratthe backofthe range.
Sealedburnermodels
Tocheck the ovengasshut-off valve onstandard twin
burnermodels;raisethe cooktopand lookfor the
gasshut-off leverat the extremeright rearcorner.
IStondingpilot modelsdonot havea gasshut-off valve
on the regulator.)Fol!owthedirections inboxA or Bthat
matchyour regulatortype.
Leverisshownclosed.
PULLT0 OPEN.
Standardtwin burnermodels
Leverisshownclosed. B
t
Staodard twin burner models
43
(/1
t3
0 °
_n
r3
O" :;:3'
Q
r_
I:1
1-3 t
£ ,
£ !
_ s
£
¢
Page 44
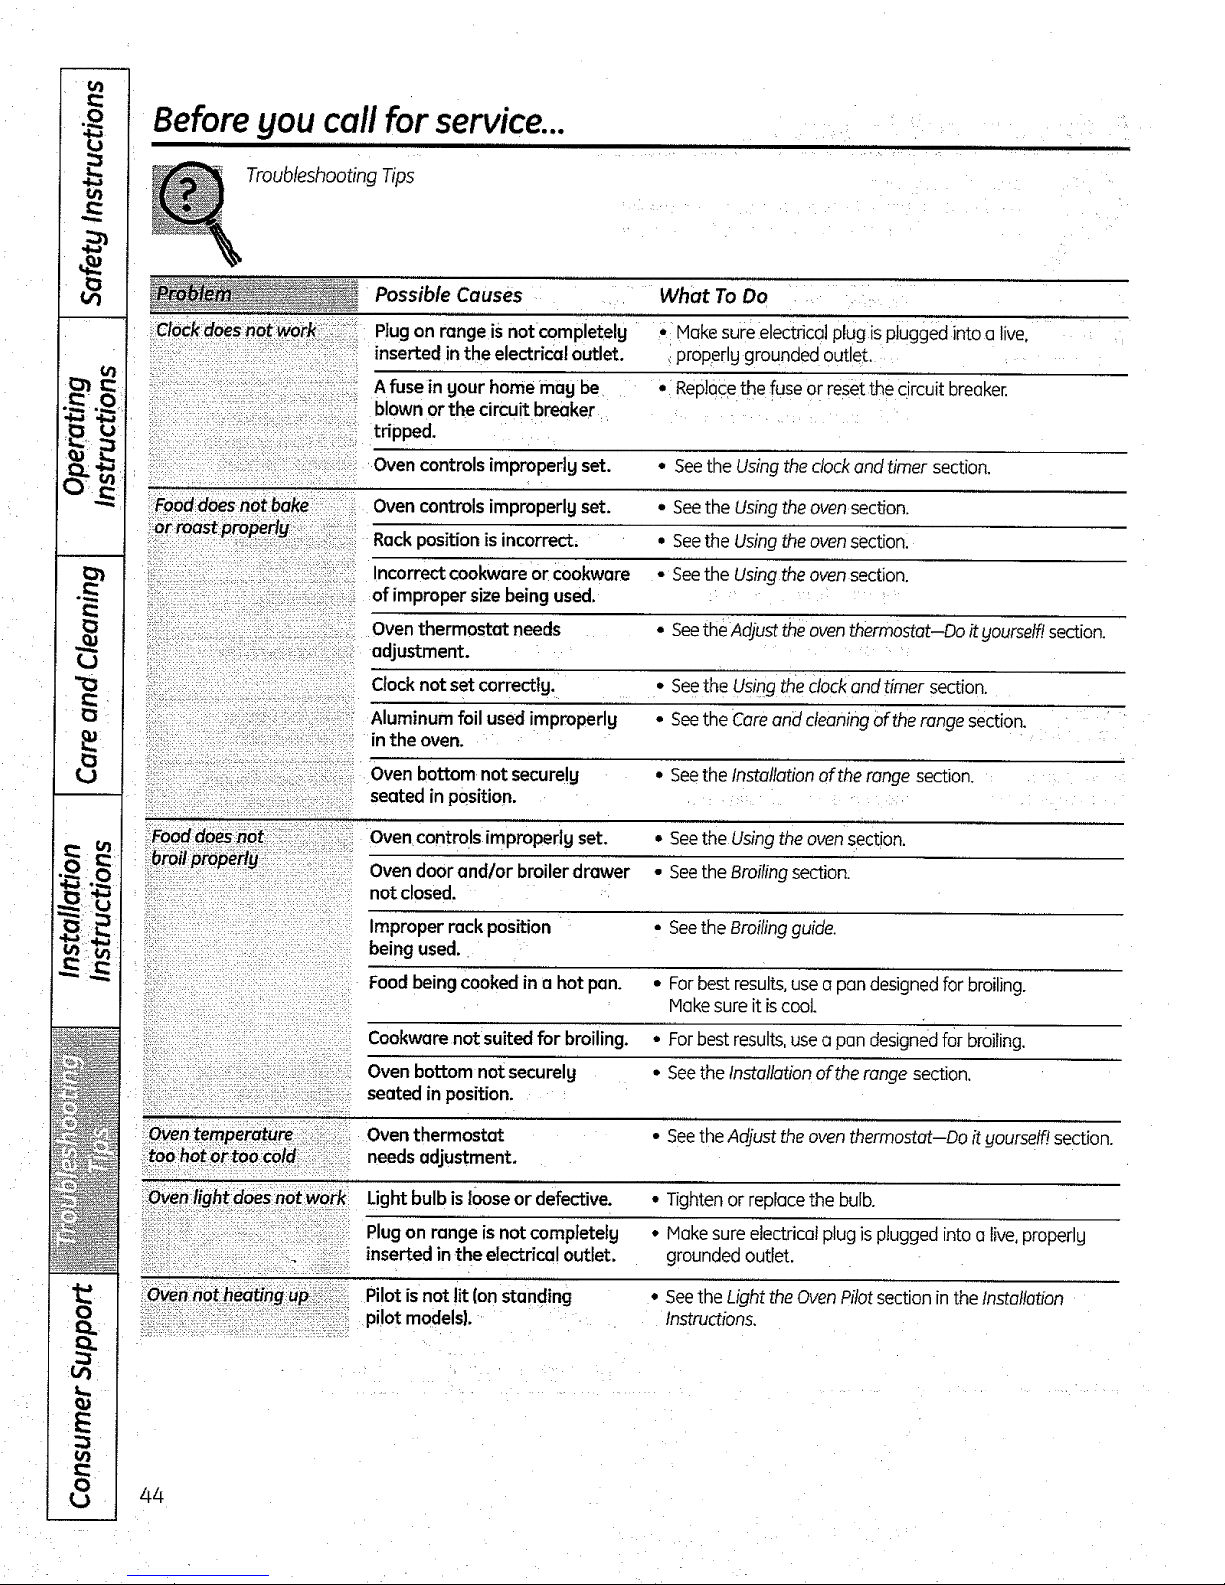
Ij
v
"o
Before you call for service...
II
i i i i
Troubleshooting Tips
Possible Causes What To Do
_iClock:doesnot!_O._ii!i_ii_i_::(i:i!,Plugon rangeis notcompletelg • Hakesureelectricalplug isplugged intoa live,
...... ':_": inserted in the electrical outlet, properlg groundedoutlet.
-"": :"_-................:_•........ Afuse in gourhomemag be • Replacethefuse or resetthecircuit breaker.
.....:::: :- blownorthe circuitbreaker
: tripped.
.........::_i-: .::...... Ovencontrols improperlg set. • Seethe Usingthe clockand timer section.
Fooddoes not :_ Oven controls improperlg set. • Seethe Usingthe ovensection.
orroast rO#eriy::I:!:: ;
-_::::::: _;::,:,_,::,:,.,::_i:,:_::.:,::::._!::;!:,Rackpositionisincorrect, • Seethe Usingtheovensection,
c ..................... ......
:......................................:,i:•:,..:;:i::i_:_::,:-:,:-Incorrect cookware or cookware • Seethe Usingtheovensection.
::::::::::::::::::::::::;:_ ::;%ii_.__,!-_,:_?;!i:3b......of improper size beingused.
......i:i!i:i:::i_:....... -i_}!i_,:,_::.:::,:i........ Oven thermostat needs - See the Adjust the oven thermostat--Do it gourseff! section.
_:::'-,"-':_,'_'._:: adjustment.
/ :i : ]: Z
Clocknot set correcttg. • Seethe Usingtheclockandtimer section.
.z Aluminum foil usedimproperlg • SeetheCareand cleaningof the rangesection.
xo, :c> .... • _ • : ....
.................................inthe oven.
,:...........:_,:_:;,:,_::::,:_:,;_:_::_,_::_::;:,:_::_.Ovenbottom notsecure!g • Seethe Installationof therange section.
seated in position.
_Food::d6_i:_ot_:i!i_:'___'::_" Ovencontrols im properlg set. • SeetheUsingtheovensection.
broil pmpe_!_! : ....
}_,}:(:(:)/:]:•ii_i:i(,(_: ::_ Ovendoor and/or broiler drawer • Seethe Broilingsection.
= U :_,,:: ,::-i:ii:i.:ii::- notclosed.
n_,_¸,_, :__:. _o:_
o
w ¸
Improper rack position • Seethe Broilingguide.
being used.
:_!:,................................. Foodbeing cooked in a hot pan. • Forbest results,usea pundesignedforbroiling.
....... Hakesure it iscoot.
_!:.,iii!ii_!:i!'ili:i_i!iiiii_iiiiiiiii!ii_ill Cookwarenot suited for broiling. • Forbestresults,usea pun designedfor broiling.
Oven bottomnotsecurelg • Seethe Installationof the range section.
seated in position.
_i:Oven:l_emperat_i!_i,!,ii_,.:, Oventhermostat • Seethe Adjust the oventhermostat--Doitgoursetf!section.
!_fo6!ho_or:tObcold:_':i_i!.i:!_::iii:. needsadjustment.
:OVenfightdoesnot work
Light bulb is loose ordefective.
Plugon range isnotcompletelg
inserted inthe electricaloutlet.
Pilotisnot lit (onstanding
pilotmodels}.
• Tightenor replacethe bulb.
• Hakesure electricalplug ispluggedintoa live,properlg
groundedoutlet.
* Seethe LighttheOvenPilotsection inthe Installation
Instructions.
44
Page 45

........................................................................................................................... GEAppliance&com
IIIIIIIIIIIIIIIIIII IIII ILIIU I III IIIII I tl I IJ lUl I I IIIJ
Possible Causes What To Do
ii_!C_q_k_g_:igr!J_!::_:i:_ii_j:i_!_!i_iThis isthe soundofthe • Thisisnormal.
_sou_h_i_;_:_.ii_:!:7:i!:iii_i_i!metal heatingand cooling
!i_!:_;!i:_i,;:!_:il;i!._i!i!;i_,!_iii_iiii__'iii_ii_:;;:i_iii_,ii::!i:,,i_:ii_!ii:ii!i;_!_iiduringcooking.
i,_inS_e_!:iniiiiii:!iiii!iii:_iiiiii! ThisiScaused bg the heat • Thisisnormal.
i;fl_ei_i_:_n_i_ili,i_!i!iiiiiii!!!_:_!_treatment appliedto the
i-_o_e_i_g_ii_i_ii!!iii!i:i!i!!iii!i_!i!i:Poweroutage or surge. • Resettheclock.
!_p_g:i:_d_:ii!ii!ii!i:ii!i!i!ii!iiii:;i;_!iiiii!iAn odorfrom the insulation • ThisistempororU.
i:!_ii:!-i!i_i:?ii:iiii:!!i_;;!iiii_!:i_!:;;,i:;,_ii!_i!?!_:,!;ii!i_i::!ii_i_i_!!aroundtheinsideoftheoven
..............................................................._;..... isnormal for the first few times
i_i_!!ii_iiii!ii_i_!iiiii_ the ovenis used.
;_:-_:::=::,_:__: improper air to gasratio. • Adjustovenburner airshutter.
Fbhnbise!_i_',;_!il;i;:!_i!7_ili!7:_iilA coolingfan mag automoticallg • ThisisnormaLThecoolingfanwillturn off and on.
: .:_ ,:>-.m .<,: <,..,:m -L ...:,, :>;, .,-,:.<.-,:: :> =:
!_!_i_ii_i!_!_ii_i!_!i_i_!!_!_ii_;!_!;_i_7_i_i_?:i_ii_!_i!ii:turn onand offto cool
;_: internalparts.
45
I
t
I,
Page 46

0
_o
_..o• 1_
v •_._.=
0
m 1
_ I
Notes.
46
iiiu
_1jj uLJ
Page 47

Please placein envelope and mail to:
Veuillez mettre darts une enveloppe et envoyez _"
OWNERSHIPREGISTRATION
P.O.BOX1780
MISSISSAUGA,ONTARIO
L4Y4G1
'k i k
(FORCANADIANCONSUMERSONLY)
47
Page 48

For Canadian _"
Customers _i
,,
<:
Pour les
Consommateurs
Canadiens F-
O
............ :=.L ............ Ullll i i II I] i i
......................... iii ....... III/ II IIIII IIIIIIII IIIIIIIIIIIIIIII II I II I
me),viTl ! Ii -'_,.'llll=ll -'] l_ J,,_lI-'_*-_II tO__l!t] lli ItI [J±_ i I l [1_II:ll l] Iil_'[j =:IIUI[It]II|]III lj f,_Ot"_;J I1 V±]Ij_
Please registeryourproductto enable usto contactyou Veui_ezenregis'_rervotreprodu'r[afinde nous pen-net_'ede
_I :in_eremol_eventasaf-etyno_ceisissuedforthisproductcammuniqueravecvoussijamaisunavisdes6cuff_concemant
and to al]owfor effici6nt communie_on underthe _rras ee produit_it6rnisetdecornmuniquerfacilementavecvous en
ofyourvcarranty,shouldtheneedadse.:_: :_::!_ .... :vertudevotregarantie,silebesoins'ehfaitser_r,
REGISTERON-UNE: i :: : :, ::www'geappl!ances'ca :: : iV_LTO: ; RO. BOX1780, MISSISSAUGA
ENREGIS_EMENTSURINTERNET,A: wv'mN.electromenaqe__qe_.ca POo-"]EP,_,: ONTARIO, L4Y4G1
DD_tMI.LE,MI_/Mr'l[]Ms,MRS'/MMERRSTNAME!_OM
STREETNO/N° RUE ]_NAMEiRUE
CITY/VILLE
AREACODEtlND._G, TELEPHONE . IE4'v1AJL
I
! DIDYOUPURCHASEASERVICECONTPACTFORTHIS_?
AVEZ-VOUSACHErEUNCONTRATDESERVICEPOURCEI"AFPAREIL?
NAMEOFSELUNGDEALER/NOMDUMARCHAND
_5_I"ALLATIDNDAl_/DATEDINSTAIJ_ION
YiA IV _)[J CORRESPONDENCE [] ENGUSH
:COBRESPONDANCE [] FR_
[] I 6onotw_shtore_eTvea_ ptemo_onaloffersregardingth_sproduc_
I-13ened_m pasre_evoird'otfresprornotlonr_tescor_ernantcepmdu_
LASTNAME/NOM
YES/OUI []
NOINON []
IAP_.NOI,aPRIRP,#
IPOSTALCODE/POSTAL
t MODEL/MODI_LE
SERIALtSE_RIE
IFYES/SIOUhEXRRATION
.' : YIA M D/J
48
Page 49

;' , " : : _ : ,.: .DripPans : ,:: ' ' Grates ': - .
' : surfaceBurners&Caps :; ....
Cleaner " -
Light Bulbs Knobs
Tired of discolored racks? Wishing you had extra-heavy-duty oven racks?
NOW AVAILABLE for your range:
GE'sinnovative, _self-cleanable porcelain-coated oven racks!
• Heavy Duty
• Durable
• Able to be cleaned in a self-cleaning oven
Visit GEAppfiances.com for more information.
/49
Page 50

,_ £
3
i
q
GEGasRange Warrantg. (Forcustomers in the UnitedStates)
IIIIIIIII IIIII I I , , _ . 4
Aff warranty service provided by our Factory Service Centers, . I Stapleyour receipt here ......I
or an authorized Customer Care®technician. To schedule " ' ] proof of the originat purchase ]
service, on-line,_visit ,us.at GEAppliances,com, or call . Jdate is ne_ededto obtain Service
800.GE.CARES(800.432.2737). Please have serial number ' I under thewarranty
and model number available when calling for service..... _ .... "
GE Wifl Replacei ........... '.....
i!o__i!ii_'ii!ii!ii_ii!iii!iii! _Anypart of the rangewhich fails dueto a defectin materials:or Workmanship.Duringths
i_!_i_}_ii_i_i_i limited one-gearwarrantg, GEwil!alsoprovide,free of charge, all laborand in-homeservice
ii;_!!: e;i_;_i_:;i to replacethe defectivepart. ' i :- . " . :
_ Servicetrils to your home to teach gouhow to use @Damageto the product causedby occident, fire,floods
the product, or acts of God.
Improper installation, delivery or maintenance. _ Incidentalor consequential damage caused bg possible
@Failureof the product if it isabused, misused, defectswith this appliance.
or used for other than the intended purpose or _ Damage caused after deliverg.
usedcommerc!o!!g. :i . ' "_ Productnotoccessibletoproviderequired servce.
_Replacementofhbusefusesorresettingofcircuit i !: • -- ' • • . ..' i
breakers. _ _: .........
!t EXCLUSION OFIMPLIED WARRANTIES--Your sole and exclusive remedy isproduct repair as II
I Jprovided in this Limited Warrantg. Ang implied warranties, including the implied warranties of I i
I I merchantability or fitness for a particular purpose, are limited to one gear or the shortest period 1I
I allowed by law "
1 " .... • II
,.......... , , .......................,........ .. .......,
This warranty is extended to the original purchaser and any succeeding owner for products purchased
for home use within the USA. If the product is located in an area where: service by a GEAuthorized Servicer
is not available, you may be responsible for a trip charge or you may be required to bring the product to an
Authorized 5E Service Location for service. In Alaska, the warranty excludes the cost of shipping or service
calls to your home.
5ome states do not allow the exclusion or fimitation of incidental or consequential damages. This warranty
gives you specific legal rights, and you may also have other rights which vary from state to state. To know
what your legal rights are, consult your local or state consumer affairs office or your state's Attorney General.
Warranton General Electric Company. Louisville,KY40225
SO
Page 51

GEGas Range Warrantg. {Forcustomers in Canada) • •
AIt warrantg service provided bg our Factorg Service Centers J ' Staple gour receipt here, I
:Or an authorized Customer Care _ technician. For service, - J Proof of the original purchase I_• ,u_
cafl t.800,561.3344. Please have serial number and mode! • : • t date is needed to obtain service I
"°'_'__"'_'_ number available when calling for service, : : . . e,_"__
i i i ii iii iiii ii ii "
Mabe Will Replace: , ._ , u_
i:_i#e_!i_!_iii!i_i!iii_ii!!_ii!i!i!!ii!_ii' Any part Ofthe range which failsdueto a defect in materialsor workmanship.Duringthis , " _"
_:_r6m(_;_fl_t__#_i!ii;;i!iiii_limited one-yearwarranty, Mabewill alsoprovide,freeof charge,all:laborand relatedService ._
ii_igi'_!:_:iiii_ii!ii_i_!! !!i to rep,(icethe defective part. .... '-' ....... _"' i , .U__i, "¢)C
C: "_
Service trips to gour home tot_each gou how to use _ Replacemeni_ of house fuses or resettingof circuit.... " ' ,-_ _'_
the product::" _i_ _"_ _.... " , breakers. : ,
"" _ Improper installation, deliverLjor maintenance:• • _ Damageto the productcausedbg accident, fire,floods
" ..... ' _-: _,, .... _ . or acts of God. : , , "
Failureof the productifit isabused, misused, _)
or usedfor otherthan the intendedpurposeor " .... _ Incidentalorconsequentialdamage causedbg possible
usedcommerciallg, defectswith this applianCe_
" " R Damagecausedafter deliverg. . _
. :... ............ _ Product notaccessibleto providerequired service. " _"
Q.
I altowedbgtaw ..... _ :._ ..... ' _ _"
This warranty is extended to the originaf purchaser and any succeeding owner for products purchased in Canada _ ""
for home use within Canada. In-home warranty service will be provided in areas where it is available and deemed O"
reasonable by Mabe,to provide. ..... . .... : • - ' : ' • _ _ --_
Some provinces do not alfowthe exclusion orlimitatioh of incidental.or consequentiai damagesl Sol the above
exclusion may not apptg to gou. This warranty gives you specific legal rights, and gou mag also have other rights
which varg from province to province. To know what:gour legal rights are in gour province, consult gour!ocal or
provincial consumer affairs office. _"
Warrantor'. Mabe Canada inc.,
Burlington, Ontario _
5t
Page 52

ConsumerSupport.
GEAppliances Website
nthe U.S.:GEAppliances.com
Havea questionor needassistancewithgour appliance?Trgthe GEAppliancesWebsite24 hoursa dag,
ang dag of the gear!Forgreaterconvenienceand fasterservice,gou can nowdownloadOwner's Hanuals,
orderparts or,evenscheduleserviceon-iine.In Canada:www.GEAppliances.ca
ScheduleService Inthe U.S.:GEAppliances.com
ExpertGErepairserviceisonlg onestep away from your door.Geton-lineand scheduleyourserviceat your
convenienceany day of the gead Orcall 800.GECARES(800.432.2737)duringnormal businesshours.
InCanada, call1.800.56!.3344
RealLifeDesign Studio In the U.S.:GEAppliances.com
GEsupp0rts";heUniversalDesignconcept-products, servicesand environmentsthat can beuSedbgpeopleOfoil
ages,sizesend capabilities.We recognizethe needto design for a wide rangeof phgsicaland mental abilitiesand
impairments.Fordetailsof GE'.sUniversalDesignapplications,includingkitchendesignideasfor peoplewith disabilities,
checkout ourWebsitetodeg. Forthe hearing impaired,pleasecell800.TDD.GEAC1800.833.4322).
In Canada,contact: Manager,ConsumerRelations.MabeCanadainc.
Suite310. 1 FactorgLane
MonctoniN.B.E!C9M3
Extended Warranties
Inthe U.S.:GEAppliances.com
Purchasea GEextendedwarrantg and4earnabout specialdiscountsthat are availablewhile gour warrantg isstil!
in effect.Youcanpurchaseit on-lineangtime,orcall 800.626.2224during normal businesshours.GEConsumerHome
Serviceswill still bethereaftergour warrantg expires.InCanada,call 1.888.261.Z1:33
Parts and Accessories ,ntheu.s.:GEAppfiances.com
Individualsqualifiedtoservicetheir own appliancescan hoveparts or accessoriessent directtgto their homes
(VISA,MasterCardand Discovercordsareaccepted].Orderon-linetodeg, 28 hoursevergdogor bg phone
ot 800.626.2002during normal businesshours. .
Instructions containedin this manualcoverproceduresto beperformedby any user.Otherservicing generally
should bereferred to qualified servicepersonnel.Caution mustbe exercised,sinceimproper servicing may cause
unsafe operation.
Customersin Canadashould consultthe gellowpages forthe nearestHabe servicecenter,orcall 1.800.66:L:[616.
I ContactUs IntheU.S.:GEAppliunces.com
If gou arenot satisfiedwith theservicegou receivefrom GE.contactus onourWebsitewith allthe detailsincluding
your phonenumber,orwrite to: GeneralHanager,CustomerRelations
GEAppliances,Appliance Park
Louisville,KY40225
In Canada:www.GEAppliances.ca,or write to: Director,ConsumerRelations,HabeCanadaInc.
Suite3!0, :].FactorgLane
Honcton, N.B.E1C9H3
!_ ] RegisterYourAppliance IntheU.S.:GEAppliances.com
Registergour new appliance on-line-atgour convenience!Timelgproduct registrationwiltatlow for enhanced
| communication and prompt serviceundertheterms of gour warrantg, shouldthe needarise.Youmeg alsomail
J inthe pre-printedregistrationcard includedin the packingmaterial. In Canada:_w.GEAppliances.ca
Printed in Mexico
Thisbook is printed on recycled paper.
 Loading...