

Page 1
Howtoget the best from
W_
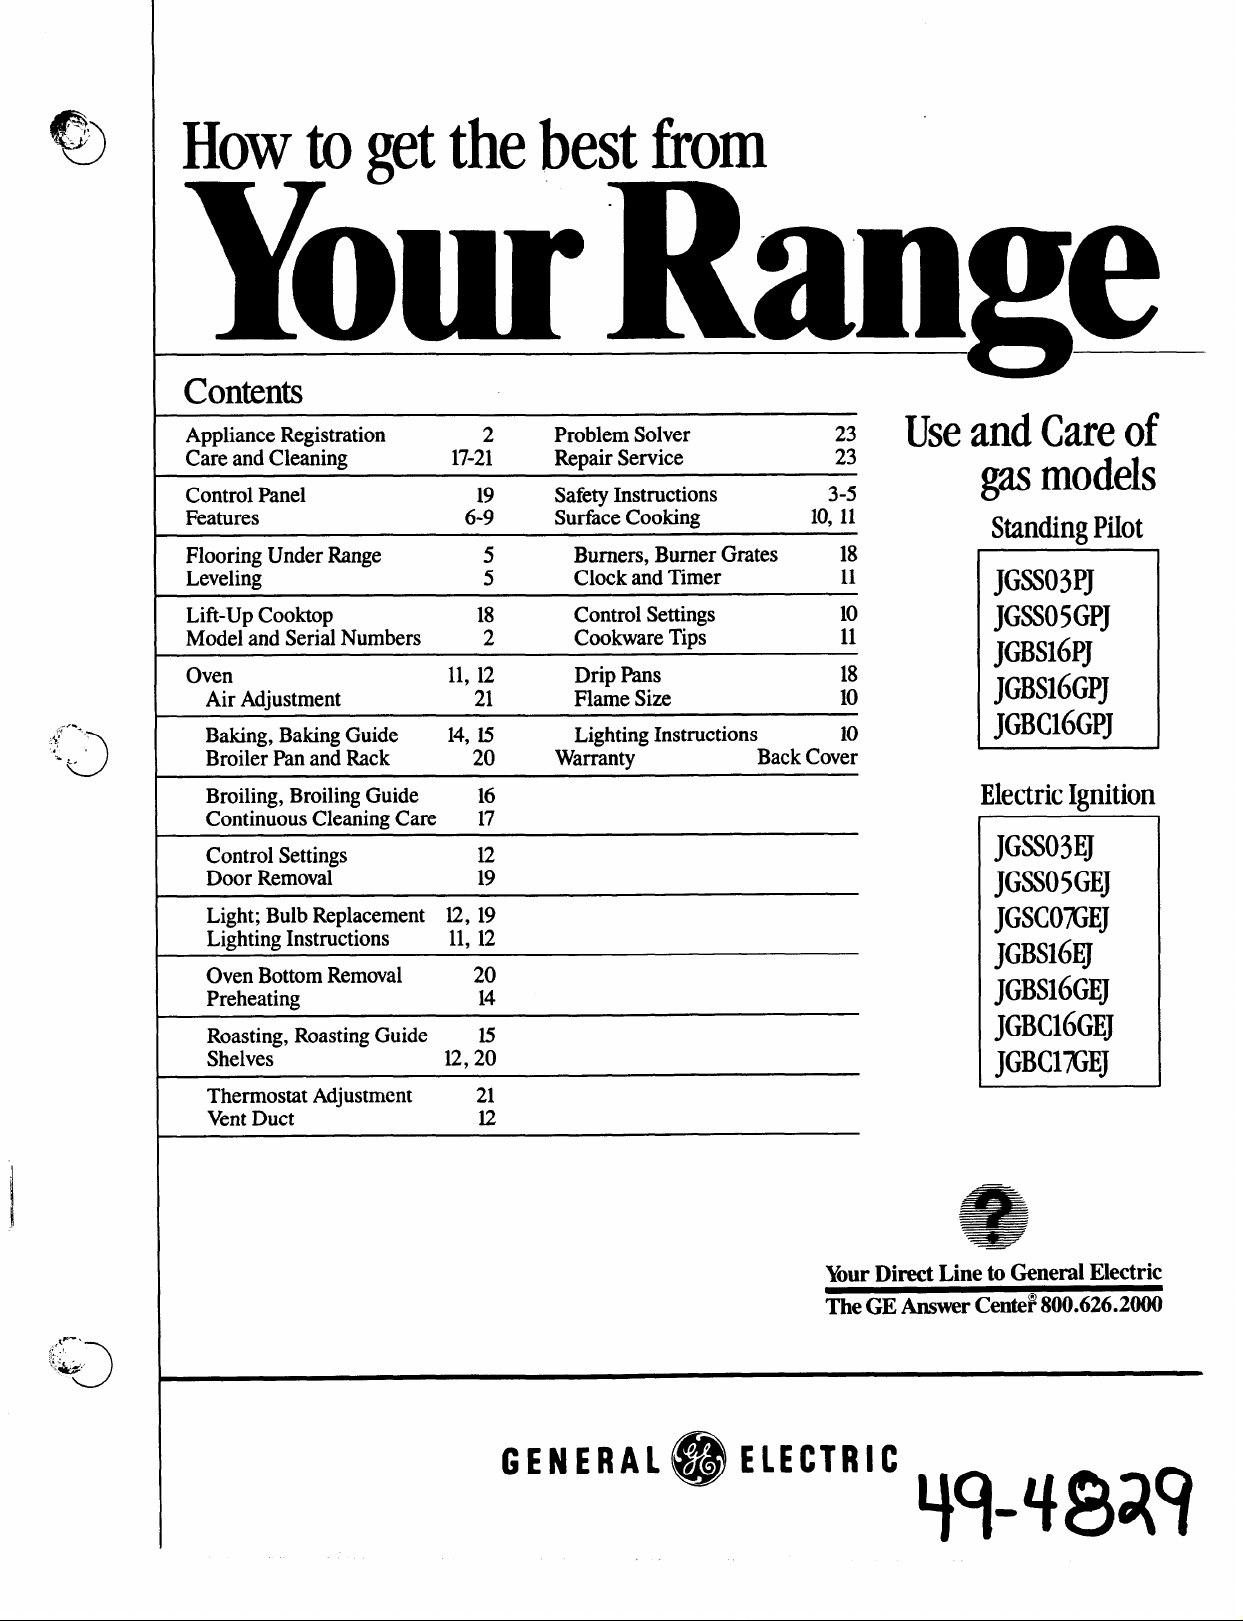
Contents
Appliance Registration
Care and Cleaning
Control Panel 19
Features
Flooring Under Range
Leveling
Lif&Up Cooktop
Model and Serial Numbers
Oven 11,12
Air Adjustment 21
Baking, Baking Guide
Broiler Pan and Rack
Broiling, Broiling Guide 16
Continuous Cleaning Care 17
Control Settings 12
Door Removal
I
Light; Bulb Replacement 12, 19
Lighting Instructions 11,12
Oven Bottom Removal
Preheating
I
Roasting, Roasting Guide 15
Shelves 12,20
Thermostat Adjustment
VentDuct
2
17-21
6-9 Surface Cooking 10,11
5 Burners, Burner Grates 18
5 Clock and Timer 11
18
2
14,15
20 Warranty
19
20
14
21
12
Problem Solver 23
Repair Service 23
Safety Instructions
Control Settings
Cookware Tips
Drip Pans 18
Flame Size 10
Lighting Instructions 10
Back Cover
3-5
10
11
UseandCareof
gasmodels
StandingPilot
JGSS03PJ
JGSS05GPJ
JGBS16PJ
JGBS16GPJ
JGBC16GPJ
ElectricIgnition
JGSS03EJ
JGSS05GEJ
JGSCOXEJ
JGBS16EJ
JGBS16GEJ
JGBC16GEJ
JGBCliGEJ
GE NE RAL@EIECTRIC
-
dll!llg
-
YourDirectLineto GeneralElectric
TheGEAnswerCentd 800.626.2000
y%4$~~
Page 2

Help us
help you...
Read this book carefully.
It is intended to helpyou operate and
maintain your newrangeproperly.
Keep ithandy for answers to your
questions.
If you don’t understand something
or need more help, write (include
your phone number):
Consumer Affairs
General Electric Company
Appliance Park
Louisville, KY 40225
Write down the model
and serial numbers.
You’ll find them on a label located in
the burner box under the cooktop.
See pages 6 and 8.
These numbers are also on the
Consumer Product Ownership
Registmtion Card that came with
your range. Before sending inthis
card, please write these numbers
here:
Model Number
Serial Number
Use these numbers in any
correspondence or service calls
concerning your range.
If you received
a damaged range ...
Immediately contact the dealer (or
builder) that sold you the range.
Save time and money.
Before Yourequest
service:..
Check the Problem Solver on
page 23. It lists causes of minor
operating problems that you can
correct yourself.
FOR YOUR SAFETY
TurnOFFallrange
controls
Ifyousmellgas:
1.Openwindows
2.Don’ttouch
electricalswitches*
3
Extinguishany
openflame
4. Immediatelycall
yourgassupplier
●Don’t turn electric switches on
or offbecause sparks may
ignite the gas.
FOR YOURSAFETY
Keeptheappliance
areaclearandfree
fromcombustible
materials,gasoline
andotherflammable
vaporsandliquids.
2
Page 3
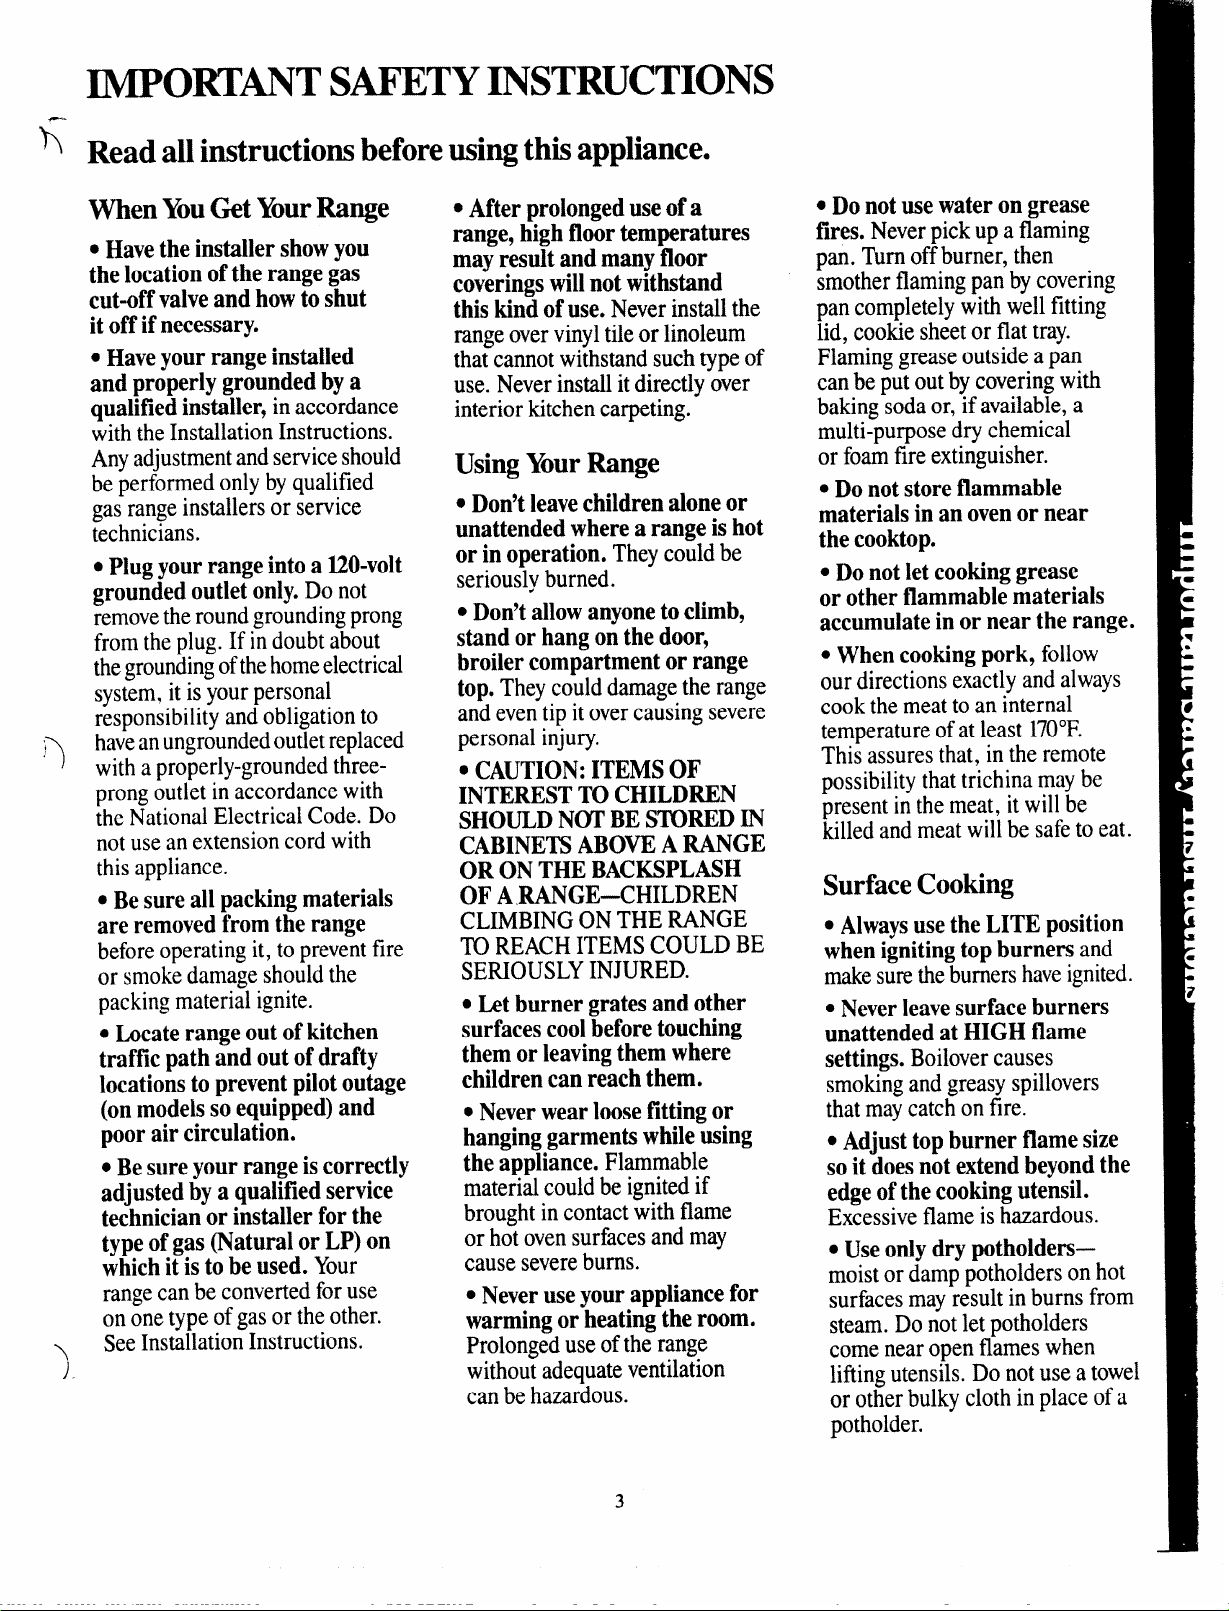
SAFETY INSTRUCTIONS
h
Read all instructions beforeusing this appliance.
When YouGet YourRange
● Havethe installer showYOU
the location of the range gas
cut-offvalve and howto shut
it off if necessary.
● Haveyour rangeinstalled
and properlygroundedbya
qualified installer,
with the Installation Instructions.
Any adjustment and service should
be performed only by qualified
gas range installers or service
technicians.
. Plug
yourrange intoa 120-VOlt
groundedoutlet only. Do not
remove the round grounding prong
from the plug. If in doubt about
the grounding of the home electrical
system, it is your personal
responsibility and obligation to
haveanungroundedoutlet replaced
‘3
with a properly-grounded three-
prong outlet in accordance with
the National Electrical Code.
not use an extension cord with
this appliance.
Be sureall packing materials
.
are removedfrom the range
beforeoperating it, to prevent fire
or smokedamage should the
packingmaterial ignite.
. Locaterangeout of kitchen
traffic path and out of drafty
locations to preventpilot outage
(onmodeis so equipped)and
pooraircirculation.
QBesureyourrangeiscorrectly
adjustedbya qualified service
technicianor installer for the
typeofgas (Naturalor LP)on
whichitis to be used. Your
rangecan be converted foruse
on one type of gasor the other.
SeeInstallation Instructions.
\
)
in accordance
Do
● After prolongeduseof a
range,high floortemperatures
mayresult andmany floor
coveringswillnotwithstand
this kindof use. Never
range over vinyl tile or linoleum
that cannot withstand such type of
use. Never install it directly over
interior kitchen carpeting.
install the
Using Your Range
QDon’tleavechildrenaloneor
unattendedwhere arangeis hot
or in operation. They could be
seriously burned.
● Don’tallow anyoneto climb,
standorhang on the door,
broiler compartmentor range
top. They could damagethe range
and eventip it overcausing severe
personal injury.
● CAUTION:ITEMSOF
INTERESTTOCHILDREN
SHOULDNUI’BE SIXIREDIN
CABINETSABOVEA RANGE
OR ON THEBACKSPLASH
OF A RANGE-CHILDREN
CLIMBINGONTHERANGE
TOREACHITEMSCOULDBE
SERIOUSLYINJURED.
c Letburner gratesand other
surfacescoolbeforetouching
them orleavingthem where
childrencanreachthem.
QNeverwearloose fitting or
hanginggarmentswhile using
the appliance. Flammable
material could be ignited if
brought in contact with flame
or hot ovensurfaces and may
cause severebums.
● Neveruse your appliancefor
warmingor heatingthe room.
Prolongeduse of the range
without adequate ventilation
can be hazardous.
● Do notuse waterongrease
fires. Neverpick up a flaming
pan. Turn offburner, then
smother flaming pan bycovering
pan completely with well fitting
lid, cookie sheet or flat tray.
Flaming grease outside a pan
can be put out by coveringwith
baking soda or, if available, a
multi-purpose dry chemical
or foamfire extinguisher.
c Do not storeflammable
materialsin anovenor near
the cooktop.
● Do notlet cookinggrease
or other flammable materials
accumulatein or near the range.
● Whencooking pork, follow
our directions exactly and always
cook the meat to an internal
temperature of at least 170°F.
This assures that, in the remote
possibility that trichina may be
present in the meat, it will be
killed and meat will be safe to eat.
Surface Cooking
● Alwaysuse theLITEposition
whenignitingtop burners and
makesuretheburnershaveignited.
c Neverleavesurface burners
unattendedat HIGH flame
settings. Boilovercauses
smokingand greasy spillovers
that maycatch on fire.
● Adjusttop burner flame size
so it doesnot extendbeyondthe
edge ofthe cookingutensil.
Excessiveflame is hazardous.
. Use only dry potholders—
moist or damp potholders on hot
surfacesmay result in burns from
steam. Do not let potholders
come near open flames when
lining utensils. Do not use a towel
or other bulky cloth in place of a
potholder.
3
Page 4

IMPORTANT SAFETY INSTRUCTIONS (continued)
QTominimize the possibility of
burns, ignition of flammable
materials, and spillage, turn
cookware handlestowardthe side
or back ofthe range without
extendingover adjacent burners.
c Alwaysturn surface burnerto
OFF beforeremovingutensil.
QCarefullywatchfwds being
fried at HI flame setting.
s Neverblock the vents (air
openings)oftherange. They
providethe air inlet and outlet
which is necessary for the range
to operate properly with correct
combustion.
● Do notuse a wokon the
cooking surface if the wokhasa
roundmetalringwhichis placed
overthe burnergrateto support
the wok. This ring acts as a heat
trap whichmaydamagethe burner
grate and burner head. Also, it
maycause the burner to work
improperly. This maycause a
carbon monoxide levelabovethat
allowedbycurrent standards,
resulting in a health hazard.
● Foodsfor frying shouldbeas
dryas possible. Frost on frozen
foodsor moisture on fresh foods
can cause hot fatto bubble up and
oversides of pan.
● Useleast possibleamount of
fat for effectiveshallowor deep-
fat frying. Filling the pan too full
of fatcan cause spilloverswhen
food isadded.
c If a combinationof oils or
fatswillbe usedin frying, stir
together beforeheating, or as fats
melt slowly.
● Alwaysheat fat slowly,and
watchas it heats.
c Use deep fat thermometer
wheneverpossibleto prevent
overheatingfat beyondthe
smokingpoint.
. useproper pansize—Avoid
pans that are unstable or easily
tipped. Select utensils havingflat
bottomslarge enough to properly
contain foodavoidingboilovers
and spillovers,but large enough
to coverburner grate. This will
both savecleaning and prevent
hazardousaccumulations of food,
sinceheavyspatteringor spillovers
lefton rangecan ignite. Use pans
with handles that can be easily
grasped and remain cool.
c Useonlyglasscookwarethat
is recommended
burners.
Keepall plastics awayfrom
c
topburners.
● Toavoidthe possibilityof a
burn, alwaysbecertainthatthe
controlsforall burnersare at
OFF positionand all gratesare
coolbeforeattemptingtoremove
the grate.
● Whenflaming foods under
the hood, turn the fan off. The
fan, if operating, may spread
theflame.
● If rangeis locatedneara
window,do not use long curtains
whichcould blowover the top
burners and create a fire hazard.
● Whena pilot goes out, (on
models soequipped), you will
detect a faint odor of gas as your
signalto relight pilot. When
relightingpilot, make sure burner
controls are in OFF position and
followinstructions described on
followingpages to relight.
● If you smell gas, and youhave
already made sure pilots are lit,
turn offthe gas to the range and
call a qualified service technician.
Neveruse an open flame to locate
a leak.
for use on gas
Baking, Broiling and
Roasting
● Do not use ovenfor a storage
area.
QStandawayfrom the range
whenopening the door of a hot
oven.Thehotair or steamwhich
escapescan cause burns to
hands,face and/or eyes.
● Keepovenfree from grease
buildup.
● Placeovenshelvesindesired
positionwhile oveniscool.
● Pullingoutshelf to theshelf
stopis a convenienceinlifting
heavyfoods. It is also a
precautionagainstburnsfrom
touchinghot surfaces of the
doororovenwalls.
● Don’theat unopenedfood
containersin the oven. Pressure
couldbuildupand thecontainer
couldburstcausing an injury.
c Don’tuse aluminum foil
anywherein the ovenexceptas
describedin this book. Misuse
could result in a fire hazard or
damageto the range.
c When usingcooking or
roastingbags in oven, followthe
manufacturer’sdirection.
● Useonly glasscookware
thatisrecommendedfor use
in gasovens.
● Alwaysremovebroiler pan
frombroilercompartmentas
soonasyou finish broiling.
Grease left in the pan can catch
fire if ovenis used without
removingthe grease from the
broiler pan.
Page 5
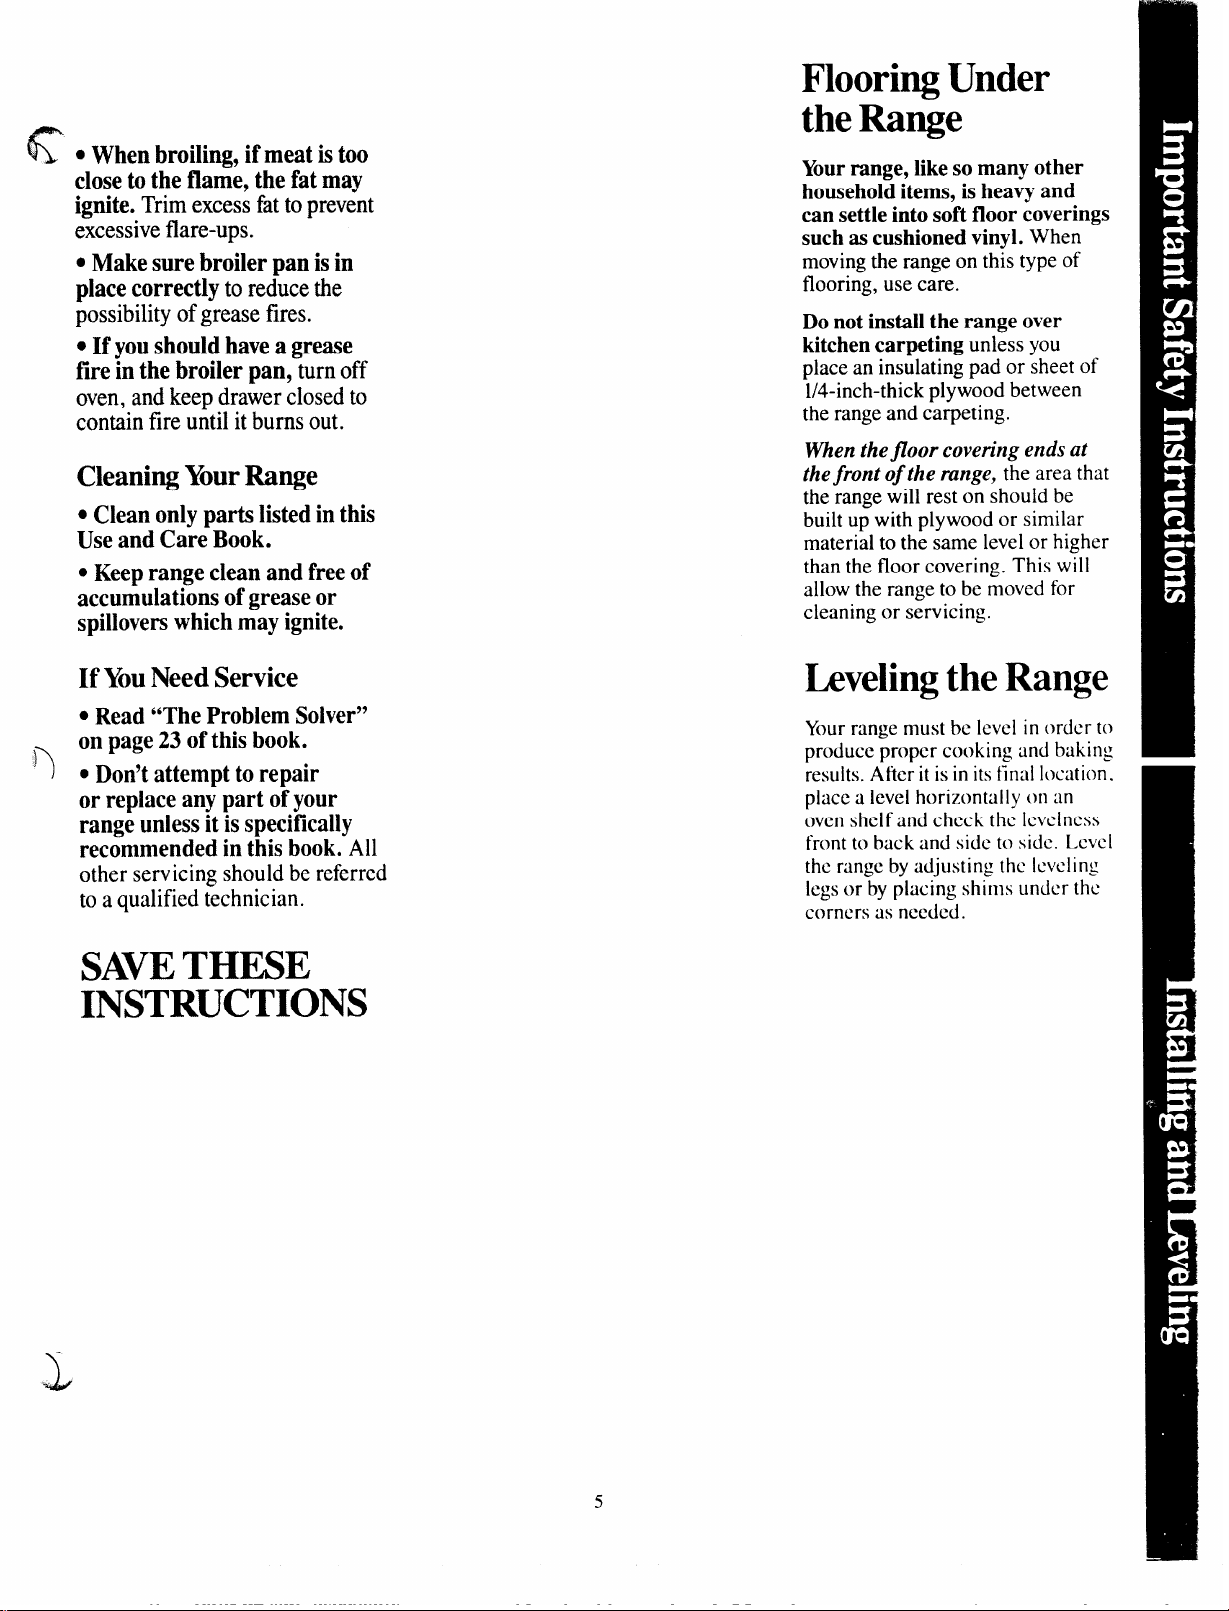
Flooring Under
the Range
~ ● When broiling, if meat is too
close to the flame, the fat may
ignite. Trim excess fat to prevent
excessiveflare-ups.
● Make sure broiler panisin
place correctly
to reduce the
possibility of grease fires.
● If youshould havea grease
fiie in the broiler pan, turnoff
oven, and keep drawer closed to
contain fire until it burns out.
Cleaning Your Range
● Cleanonly partslistedinthis
Use andCareBook.
● Keeprange clean and freeof
accumulations of grease or
spilloverswhich may ignite.
If YouNeed Service
● Read “The Problem Solver”
on page23 of this book.
● Don’tattempt to repair
or replace any part of your
range unless it is specifically
recommendedin this book. All
other servicing should be referred
to a qualified technician.
Yourrange, like so many other
household items, is heavy and
can settle into soft floor coverings
such as cushioned vinyl. When
moving the range on this type of
flooring, use care.
Do not install the range over
kitchen carpeting unless you
place an insulating pad or sheet of
l/4-inch-thick plywood between
the range and carpeting.
When the floor covering ends at
the front of the range, the area that
the range will rest on should be
built up with plywood or similar
material to the same level or higher
than the floor covering. This will
allow the range to be moved for
cleaning or servicing.
Leveling the Range
Your range must be level in order to
produce proper cooking and baking
results. After it is in its final location,
place a level horizontally on an
oven shelf and check the Icvclness
front to
the range by adjusting the leveling
legs or by placing shims under the
corners tis nccdcd.
back and side to sick. Level
SAVETHESE
INSTRUCTIONS
L
Page 6
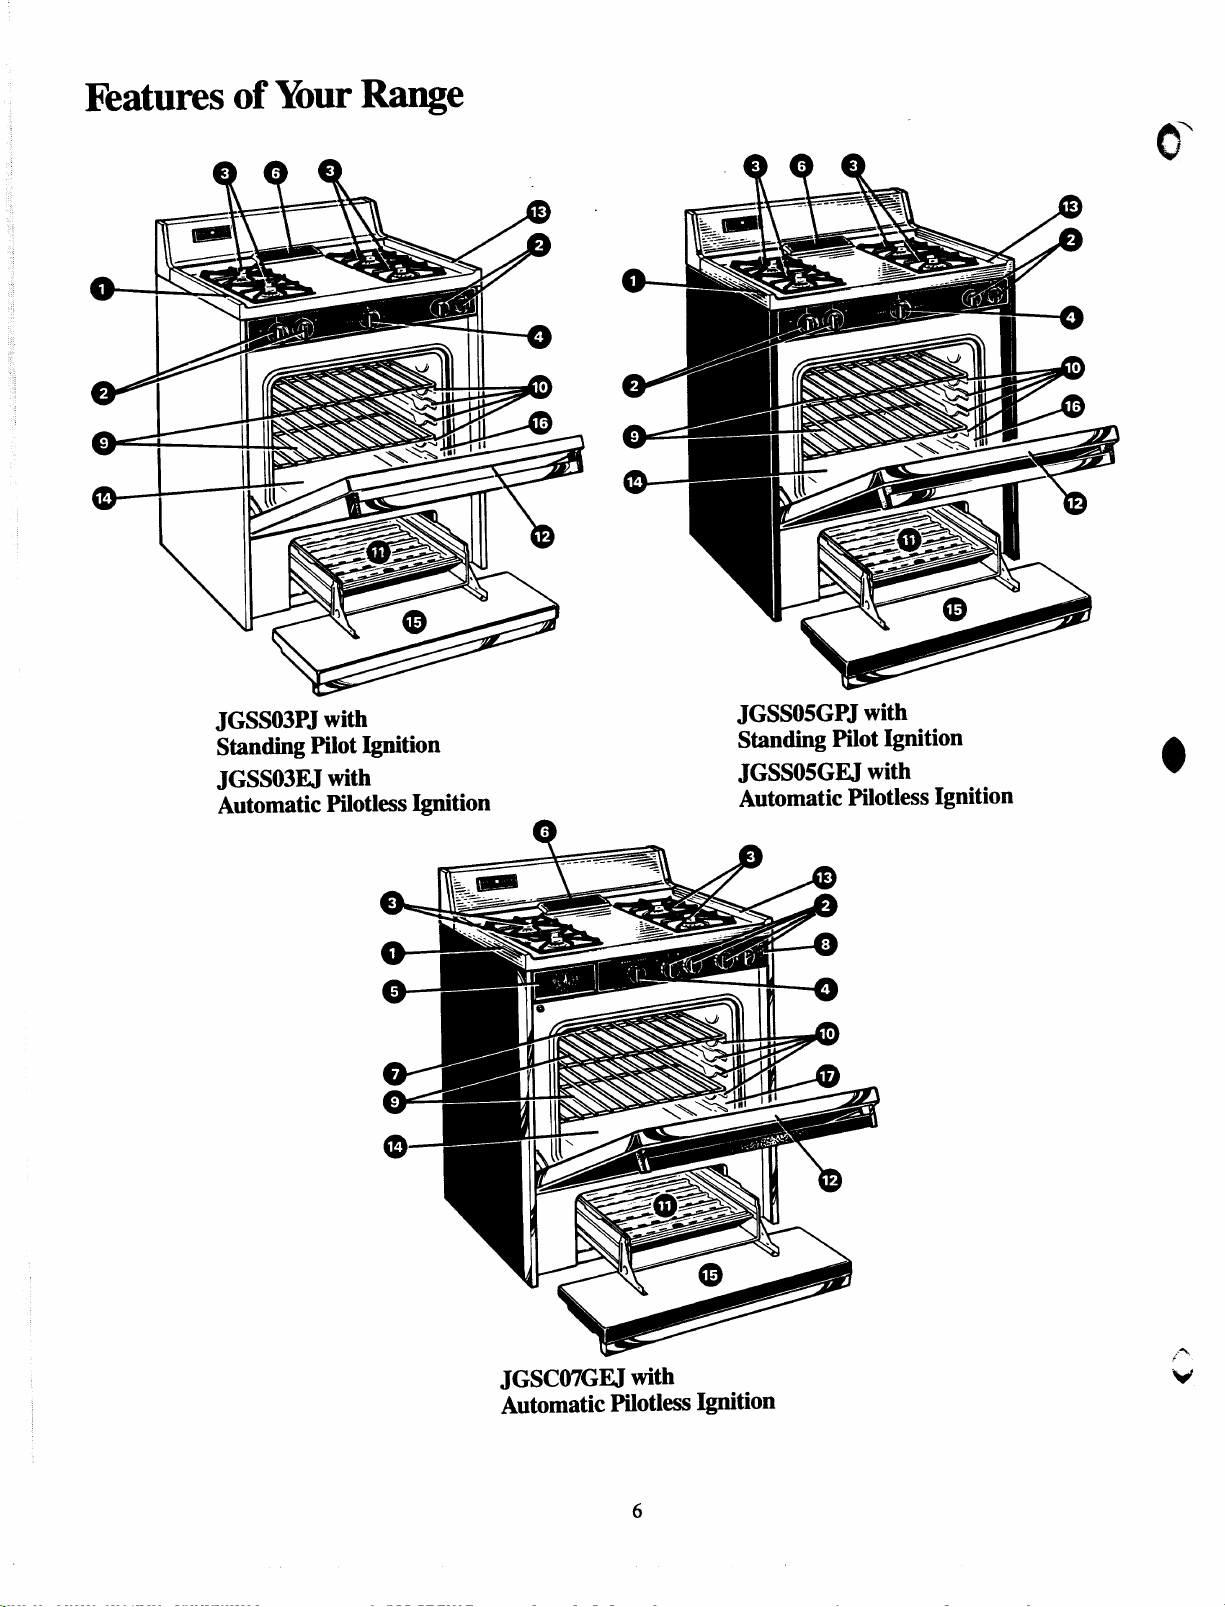
Features of YourRange
QQQ
JGSS03PJwith
Standing Pilot Ignition
JGSS03EJ with
Automatic Pilotless Ignition
Q
JGSS05GPJ with
Standing Pilot Ignition
JGSS05GEJ with
Automatic Pilotless Ignition
●
JGSC07Ga with
Automatic Pilotless Ignition
6
Page 7
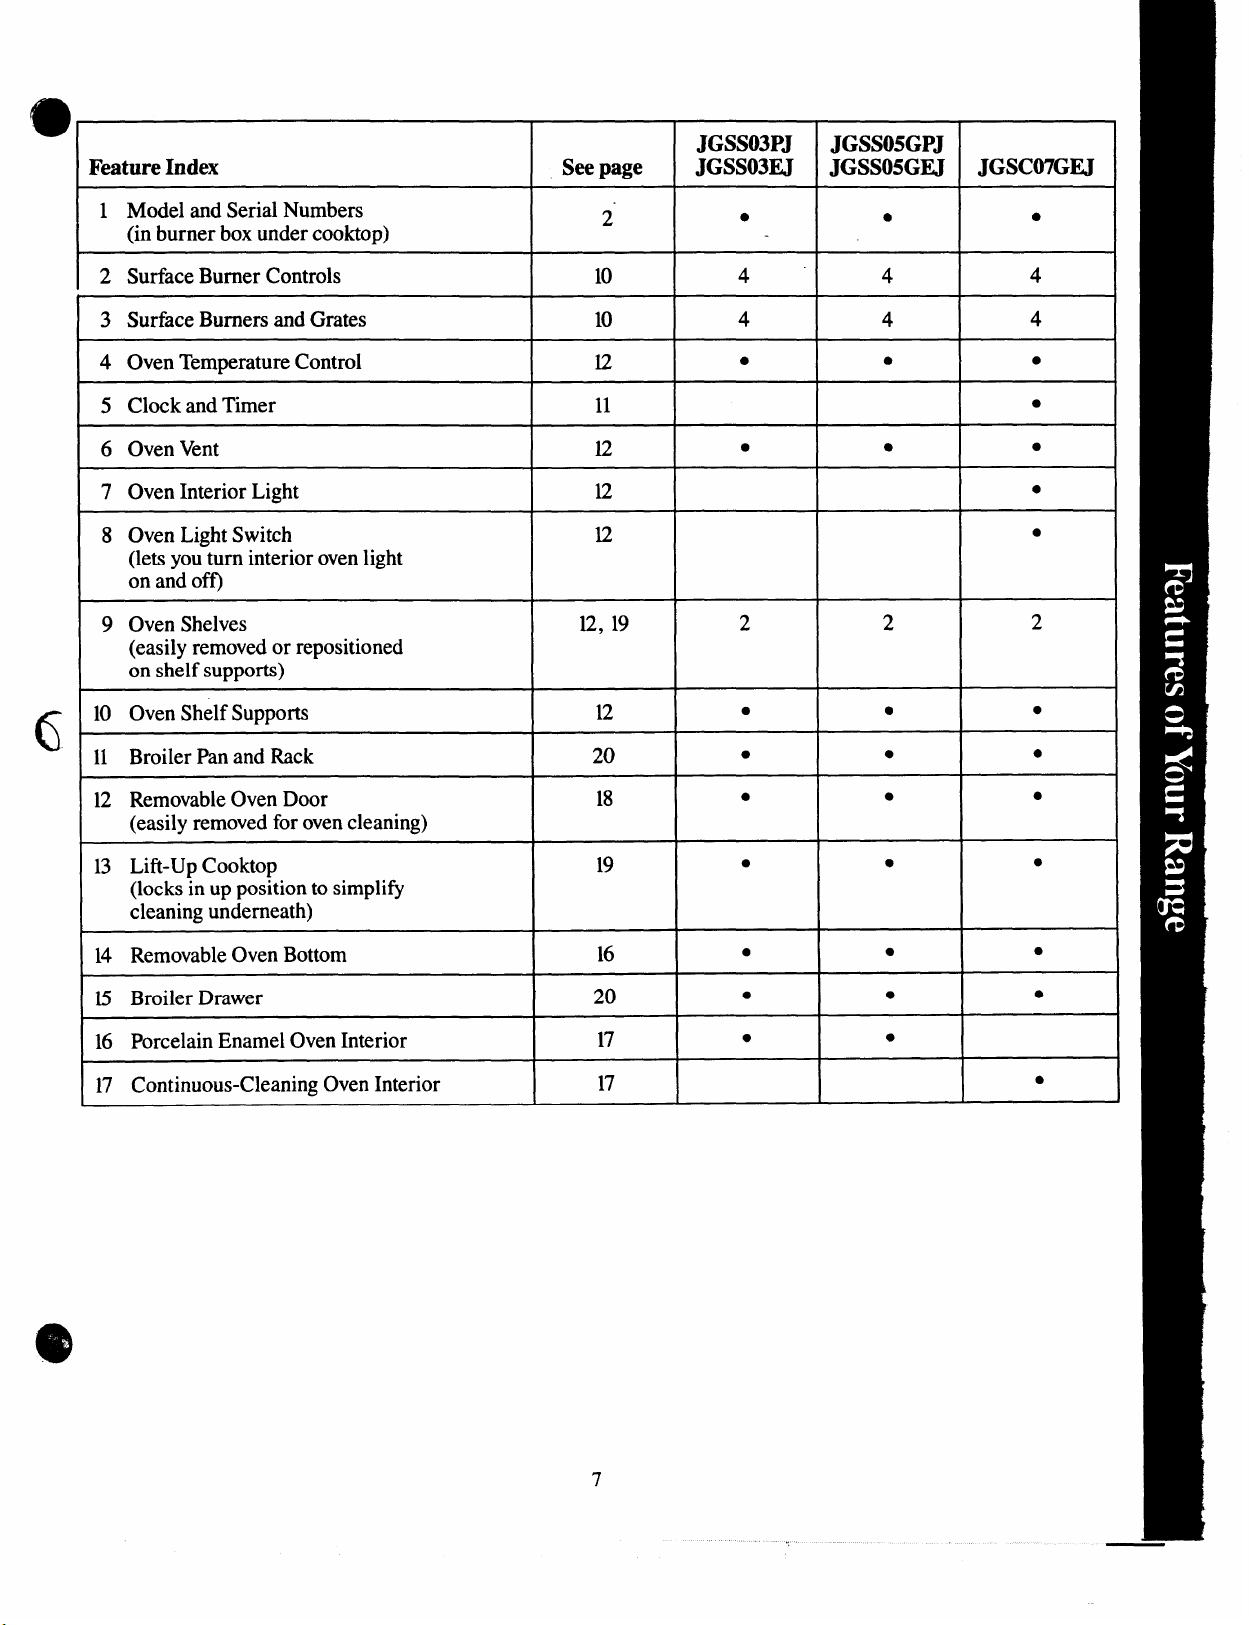
FeatureIndex
Seepage
JGSS03PJ
JGSS03EJ
JGSS05GPJ
JGSS05GEJ JGSC07GU
1 Model and Serial Numbers
(in burner box under cooktop)
2 Surface Burner Controls
3 Surface Burners and Grates
4 Oven Temperature Control
5 Clock and Timer
6 Oven Vent
7 Oven Interior Light
8 Oven Light Switch
(lets you turn interior oven light
on and off)
9 Oven Shelves 12, 19
(easily removed or repositioned
on shelf supports)
10 Oven Shelf Supports 12
6
11 Broiler Pan and Rack 20
2
● ●
10 4 4 4
10 4 4 4
12
● ● ●
11
12
● ●
12
12
2 2
● ●
●
● ●
●
●
●
●
●
2
●
12 Removable Oven Door 18
(easily removed for ovencleaning)
13 Lift-Up Cooktop 19
(locks in up position to simplify
cleaning underneath)
14 Removable Oven Bottom
15 Broiler Drawer
16 Porcelain Enamel Oven Interior
17 Continuous-Cleaning Oven Interior
16
20
17
17
●
● ●
●
● ●
● ●
●
● ●
●
●
●
●
Page 8
Features of YourRange
JGBS16PJwith
Standing Pilot Ignition
JGBS16EJwith
Automatic Pilotless Ignition
JGBS16GPH with
Standing Pilot Ignition
JGBS16GEHwith
Automatic Pilotless Ignition
0
JGBC16GPJwith
Standing Pilot Ignition
JGBC16GEJwith
Automatic Pilotless Ignition
JGBC17G~ with
Brushed Chrome Cooktop
Automatic pilotless Ignition
8
Page 9

FeatureIndex
Explained
on page
JGBS16PJ JGBS16GPJ JGBc16GPJ
JGBS16EJ JGBS16GU JGBa6GEJ JGBa7Gw
1 Model and Serial Numbers
2 “o
(in burner box under cooktop)
2 Surface Burner Controls
3 Surface Burners and Grates
4 Oven Temperature Control
5 Clock and Timer
6 Oven Vent
7 Oven Interior Light
8 Oven Light Switch
10 4 4
10 4 4
12
11
12
E
12
● ● ●
● ●
● ●
● ●
● ●
(lets you turn interior oven light
on and off)
9 Oven Shelves 12, 19 2 2
(easily removed or repositioned
on shelf supports)
10 Oven Shelf Supports 12
11 Broiler Pan and Rack
20
●
●
●
● ●
4 4
4 4
●
● ●
● ●
● ●
● ●
2 2
●
●
●
● ●
●
0
12 Removable Oven Door
18
(easily removed for ovencleaning)
13 Lift-Up Cooktop
19
(locks in up position to simplify
cleaning underneath)
14 Removable Oven Bottom 18
15 Broiler Drawer
16 Porcelain Enamel Oven Interior
17 Continuous-Cleaning Oven Interior
20
17
17
●
● ●
●
●
●
●
●
s
●
● ●
● ●
●
● ●
● ●
9
Page 10

Surface Cooking
Lighting Instructions
StandingPilotModels
JGSS03PJ
JGSS05GPJ
JGBS16PJ
The
surface burners on your range
have standing pilots that must be lit
initially. Tolight them:
1. Be sure surface burner control
knobs are in the OFF position.
2. Remove the grates and lift the
cooktop up (see page 18).
3. Locate the two pilot ports and
light each of them-witla match.
4. Lower the cooktop. Yoursurface
burners are now ready for use.
ElectricIgnitionModels
JGSS03EJ
JGSS05GEJ
JGSC07GEJ
JGBS16EJ
Surfhceburners on these ranges are
lighted by electric ignition, ending
the need for standing pilots with
constantly burning flames.
In case
light the pilotless ignition surface
burnerson your rangewith a match.
Hold alighted matchto the burner,
thenturn the knob to the JJTE
position.
ofa poweroutage,you can
Toavoidgettingburned,
useextremecautionwhen lighting
burnersinthismanner.
Surface burners in use when an
electrical power failure occurs will
continue to operate normally.
JGBS16GPJ
JGBC16GPJ
JGBS16GEJ
JGBC16GEJ
JGBC17GEJ
Surface Burner Controls
The knobs that turn the surfhce
burners on and off are located on
the lower control panel in front of
the burners.
The two on the left control the left
front and left rear burners. The two
on the right control the right ffont
and right rear burners.
lb Light a Surface Burner
*
Push the control knob in and turn it
toLITE. On electric ignition models,
you willhear a littlec~cking noise—
the sound of the electric spark
ignitingthe burner.
m
I
Afterthe burner ignites, turn the
knob to adjust the flame size.
Note:
● Do not operatea burner for
extendedperiods oftime without
havingcookwareon the grate. The
finishon the grate may chip without
cookwareto absorb the heat.
● Check to be surethe burner you
turned on is the one you want to use.
● Be sure the burners and grates are
cool before you place your hand, a
potholder, cleaning cloths or other
materials on them.
How to Select Flame Size
The flame size on a gas burner
should match the cookware you
,areusing.
NEVER LET THE FLAME
EXTEND UP THE SIDES OF
THE COOKWARE. Any flame
larger than the bottom of the
cm-kwareis wasted and only serves
to heat the handles.
Whenusingaluminumor
aluminum-cladstainlesssteel
pOtSandpans,
the circle it makes is about 1/2inch
smaller than the bottom of the
cookware.
Whenboiling,use this same
flame size-1/2 inch smaller than
the bottom of the cookware—no
matter what the cookware is made
of. Foods cook just as quickly at a
gentle boil as they do at a firious,
rolling boil. A high boil creates
steam and cooks away moisture,
flavorand nutrition. Avoid it except
for the few cooking processes
which need a vigorous boil.
Whenfryingorwarmingfoods
instainksssteel,castironor
enamelware,
lower—toabout 1/2the diameter
ofthe pan.
Whenfryingin glassor ceramic
cookware,
more.
adjust the flame so
keep the flame down
lower the flame even
o
10
Page 11

Clockand Timer
Using YourOven
F
op-of-llmge Cookware
%
Aluminum: Medium-weight
cookware is recommended because
it heats quickly and evenly. Most
foods brown evenly in an aluminum
skillet. Minerals in food and water
will stain but will not harm
aluminum. A quick scour with a
soap-filled steel wool pad after
each use keeps aluminum cookware
looking shiny new. Use saucepans
with tight-fitting lids for cooking
with minimum amounts of water.
CastIron:If heated slowly, most
skillets will give satisfactory results.
Enamelware:Under some
conditions, the enamel of some
cookwaremaymelt. Followcookware
manufacturer’s recommendations
for cooking methods.
Glass:There are two types of glass
cookware-those for oven use only
and those for top-of-range cooking
(saucepans, coffee and teapots).
o
Glass conducts heat very slowly.
HeatproofGlassCeramic:Can
be used for either surface or oven
cooking. It conducts heat very
slowlyand cools very slowly.Check
cookware manufacturer’s directions
tobe sureitcan beused on gasranges.
StainlessSteel:Thismetalalonehas
poorheatingproperties,andisusually
combined with copper, aluminum
or other metals for improved heat
distribution. Combination metal
skillets generally work satisfactorily
if used at medium heat as the
manufacturer recommends.
The Clock and Timer (on models
so equipped) are helpfid devices
that serve several purposes.
The Clock
Tosetthe Clock,push in the knob
and turn the clock hands to the
right to the correct time. Then let
the knob out and continue turning
to OFF.
Timer
The Timer has been combined with
the range clock. Use it to time all
your precise cooking operations.
You’llrecognize the Timer as the
pointer which is different in color
than the clock hands.
Minutes are marked up to 60 on the
center ring of the clock.
TosettheTimer,turn the knob to
the left, without pushing in, until
the pointer reaches the number of
minutes you want to time.
Attheendof theset time,a
buzzersoundstotell youtimeis
up.
lkm the knob, without pushing
in, until the pointer reaches OFF
and the buzzer stops.
Lighting Instructions
Standing PilotModels
JGSS03PJ
JGSS05GPJ
JGBS16PJ
Theseranges
pilot port that must be lit initially.
Tolight it:
1. Be sure OVEN TEMP knob is in
the OFF position.
2. Removethe oven bottom (see
page 19)and the oven baffle.
3. Locate the pilot port on the side
ofthe burner at the back of the
broiler compartment. Using along
match or match holder, reach in
and light the oven pilot.
Note: The oven must beat room
temperature before you can light
the oven pilot.
4. Replace the burner baffle and
ovenbottom and close the door.
Youroven and broiler are now
ready for use.
JGBS16GPJ
JGBc16GPJ
havea standing oven
11
Poweroutage?
An electrical power failure will not
affectalighted standing oven pilot.
Page 12

usingYourOven
(continued)
Lighting Instructions
ElectricIgnitionModels
JGSS03EJ
JGSS05GEJ
JGSC07GEJ
JGBS16EJ
The ovenpilot on these ranges is
lighted by electric ignition. The
ovenand broiler cannot be operated
in the event of a power failure.
Tolight the burners, turn the
OVEN TEMP knob to the desired
temperature. The burner should
light within 60 seconds. Youwill
hear a little clicking noise—the
sound ofthe electric spark igniting
the burner.
Pbwer outage?
A burner in use when an electrical
power failure occurs will continue
to operate normally. Yourovenmay
be used during an electrical power
outage by carefully following the
steps below.
Tolighttheovenpilotduring an
electrical power
1. Be
sure OVEN TEMP knob is in
the OFF position.
2. Open both the oven and broiler
doors and wait 5 minutes to allow
any pilot gas to dissipate.
3. Unplug the range from the wall
outlet, turn off the circuit breaker,
or removethe fise toavoidaccidental
ignition of the oven if electric power
is restored while you are ligh&g
the pilot.
4. Remove the broiler pan.
5. Locate the oven pilot assembly
by looking into the broiler opening.
The pilot is at the back of the
broiler compartment, on the right
side of the burner.
Note: The oven must beat room
temperature before you should
attempt to light the oven pilot
manually.
&“Ihm the OVEN TEMP knob to
the desired temperature setting.
JGBS16GEJ
JGBc16GEJ
JGBC17GEJ
outage:
—
7. Light the pilot with a match and
withdraw your arm immediately
because the oven burner may light
in as little as 20 seconds.
& Replace the broiler pan and
close the oven and broiler doors.
Note: It is necessary to light the
pilot manually each time the oven
is used during a power outage.
OvenTemperatureControl
The OVEN TEMP control is
located at the center of the control
panel on the front of the range.
Simply turn the knob to the desired
cooking temperatures, which are
marked in 25‘F. increments on the
dial. It will normally take 60
seconds before the flame comes on.
After the oven reaches the selected
temperature,the ovenburner cycles—
off completely, then on with a fill
flame-to keepthe oventemperature
controlled.
Oven Light
(on models so equipped)
Use the switch on the control panel
to turn the light on and off.
Oven Shelves
The shelves are designed with stopIocks so when placed correctly on
the shelf supports, they will stop
before coming completely out of
the oven and will not tilt when you
are removing food from them or
placing food on them.
When placing cookware on a shelf,
pull the shelf out to the “stop”
position. Place the cookware on
the shelf, then slide the shelf back
into the oven. This will eliminate
reaching into the hot oven.
Toremove the shelves from the
oven, pull them toward you, tilt
front end upward and pull them out.
Toreplace, place shelf on shelf
support with stop-locks (curved
extension under shelf) facing up
and toward rear of oven. Tdt up
front and push shelf toward back of
oven until it goes past “stop” on
ovenwall. Then lower front of shelf
and push it all the wayback.
Shelf Positions
The oven has five shelf supports—
A (bottom), B, C, D and E (top).
Shelf positions for cooking are
suggested on Baking and Roasting
pages.
Oven Vent
Youroven is vented through ducts
at the rear of the range (see pages 6
and 8). Do not block these ducts
when cooking in the oven—it is
important that the flow of hot air
from the oven and fresh air to the
ovenburner be uninterrupted.
Avoidtouching the vent openings
or nearby surfaces during oven
or broiler operation—they may
becomehot.
e
@
12
Page 13

Baking
How to Set YourRange
for Baking
1. Position the shelf or shelves in
the oven.
2. Close oven door. lhm OVEN
TEMP knob to desired temperature.
Preheat oven for at least 15minutes
if preheating is necessary.
3. Place food in oven on center
of shelf. Allow at least 2 inches
between edge of bakeware and oven
wall or adjacent cookware.
If cooking on two shelves at the
same time, place shelves about 4
inches apart and stagger food on
them.
4. Check food for doneness at
minimum time on recipe. Cook
longer if necessary. Switch off
heat and remove food.
Preheating
Preheating is very important when
using temperatures below 225”F.
and when baking foods such as,
biscuits, cookies, cakes and other
pastries.
Preheating is not necessary when
roasting or for long-time cooking of
whole meals.
Shelf Positions
Most baking is done on the second
shelf position (B) from the bottom.
When baking three or four items,
use two shelves positioned on the
second and fourth sets of supports
(B& D) from bottom of oven.
Bake angel food cakes on first shelf
position (A) from bottom of oven.
Baking T@
● Follow atested recipe and
measure the ingredients carefully.
Ifyou are using a package mix,
followlabel directions.
● If mois~re is noticeable ontie
frontofthe ovenor ontheblackglass
door when first turning on the oven,
leavethe ovendoor ajar for afew
minutes or until the oven is warm.
● Do not open the ovendoor during
abaking operation-heat will be lost
andthe baking time might need to
beextended. This could cause poor
baking results. If youmust open the
door, open it partially-only 3or4
inches—and close it as quickly as
possible.
. Do not dis~rb fie heat circulation
inthe ovenwith theuse ofaluminum
foil. If foilis used, place a small
sheetof it, about 10by 12inches at
the most, on a lower shelf several
inches below the food. Do not place
foilon the oven bottom.
Common Baking Problems
and Possible Solutions
PIES
Burningaroundedges
● Oventoo fill; avoidovercrowding.
● Edges ofcrust too thin.
● Incorrect baking temperature.
Bottomcrustsoggyandunbaked
s
Allow crust and/or filling to cool
sufficiently beforefilling pie shell.
● Filling maybe too thin or juicy.
● Filling allowedto stand inpie shell
beforebaking. (Fill pie shells and
bakeimmediately.)
● Ingredients and proper measuring
affectthe quality ofthe crust. Use a
tested recipe and good technique.
Make sure there are no tiny holes or
tears ina bottom crust. “Patching’apiecrust could cause soaking.
Pie fiiling runs over
● Topand bottom crust not well
sealedtogether.
● Edges ofpie crust not built up
highenough.
● Toomuch falling.
● Check size ofpie plate.
I%stryis tough;crustnotflaky
● Toomuch handling.
. Fat too softor cut intoo fine.
Rolldough lightly and handle as
little aspossible.
Cakerises higher on one
● Batterspreadunevenlyinpan.
● ~ge not level.
● using warped pans.
● Incorrect pan size.
side
Cakes cracking on top
● Check oventemperature.
s Batter too thick, follow recipe
or exactpackage directions.
● Check for proper shelf position.
● Check pan sizecalled for inrecipe.
● Improper mixing of cake.
Cake f~
● Toomuch shortening, sugar or
liquid.
● Check leavening agent, baking
powderor baking soda to assure
freshness. Make ahabit to note
expiration dates ofpackaged
ingredients.
● Cake not baked long enough or at
correct temperature.
● If adding oil toa cake mix, make
certain the oil is the type and
amount specified.
Crustis
● Checktemperature.
. check
hard
shelf position.
Cake has soggy layeror streaks at
bottom
. Underminingingredients.
● Shorteningtoosoftforproper
creaming.
● T&Imuchliquid.
COOKIES &BISCUIX3
Doughycenter;heavycruston
surface
● Checktemperature.
sCheckshelfposition.
.
FOllOW baking instructions
carefidly as given in reliable recipe
or onconvenience food package.
● Flat cookie sheets will give more
even baking results. Don’tovercrowd
fds on abaking sheet.
● Convenience fbods used beyond
their expiration date.
Browningmorenoticeable on
side
one
. Ovendoornotclosedproperly,
checkgasketseal.
. Checkshelfposition.
13
Page 14
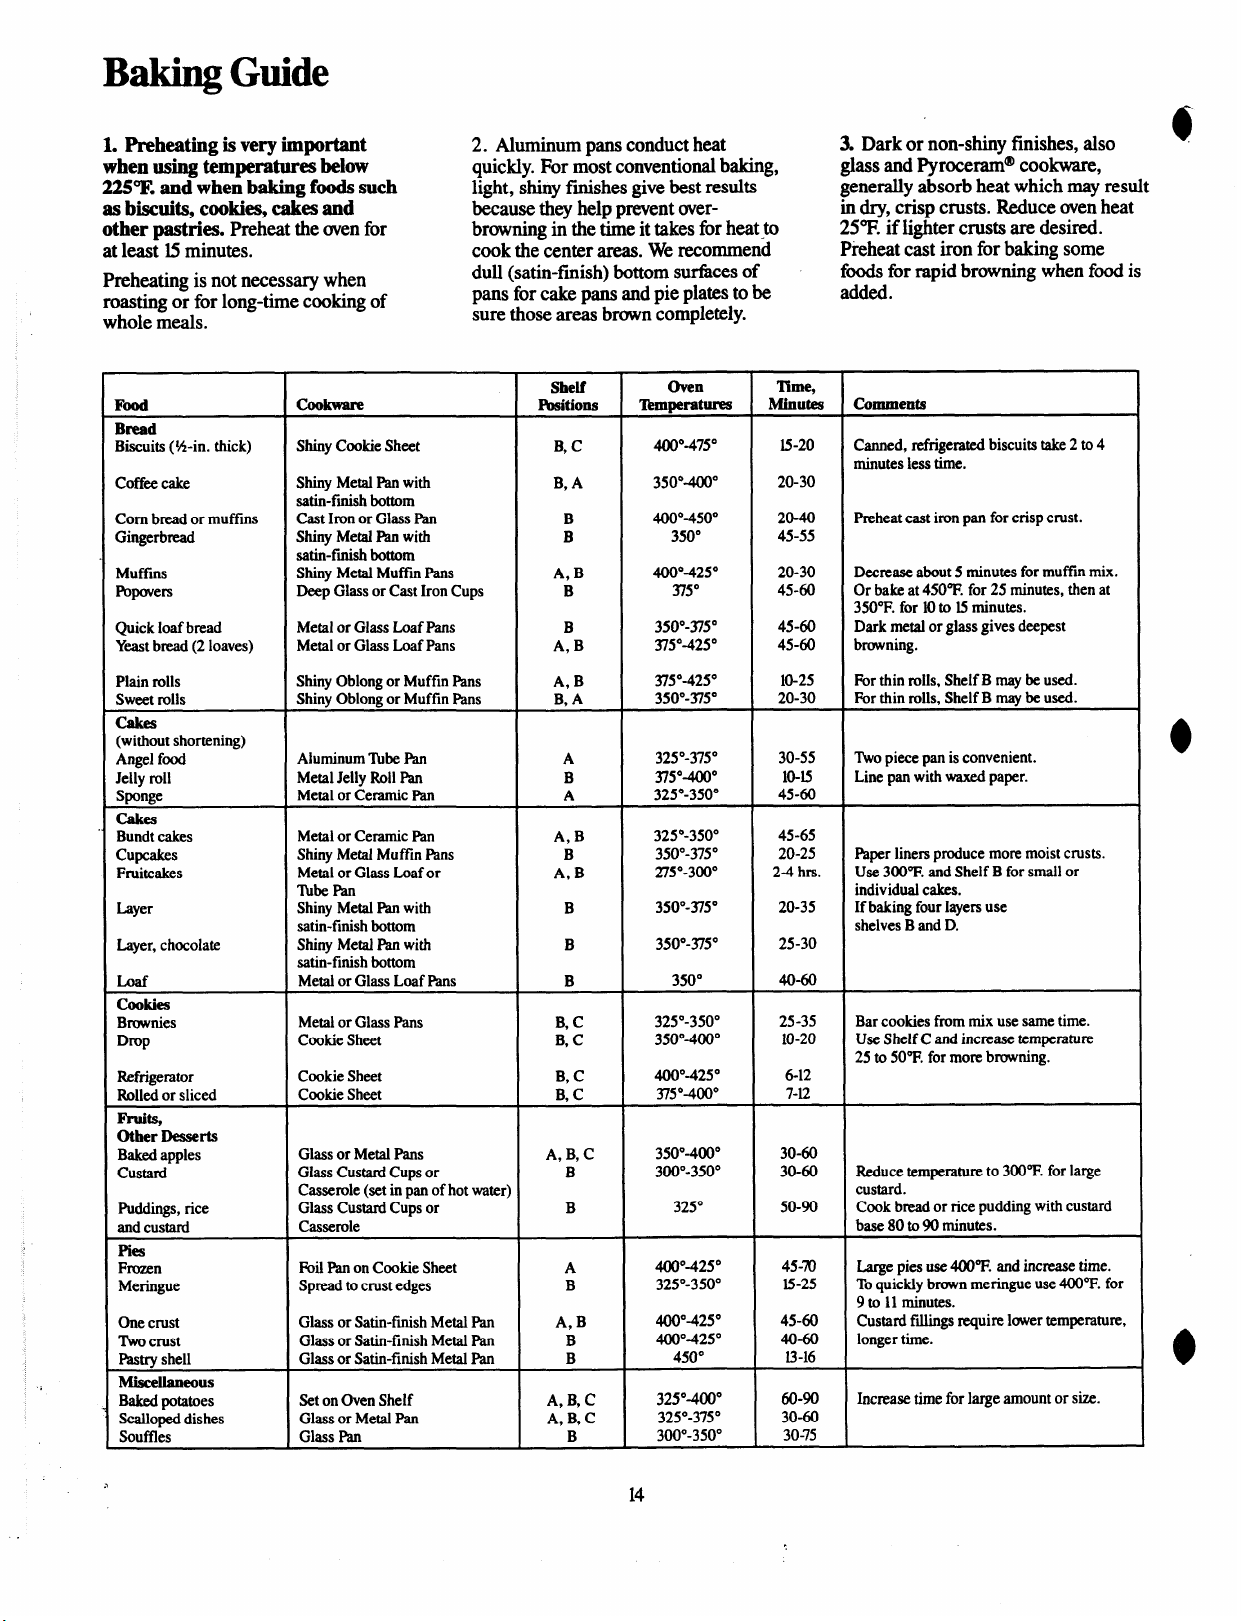
1. Preheating is very important 2. Aluminumpansconductheat A Darkor non-shinyfinishes,also
whenusingtemperaturesbelow
22SK. andwhenbaking fti such
as biscuits,
COOkit?S,cakes and
otherpastries.Preheat theovenfor
quickly.Formostconventionalbaking,
light,shinyftishes givebestresults
becausetheyhelppreventover-
browningin thetimeit takesforheat-to
atleast 15minutes. cookthecenter areas.Werecommend
Preheatingisnotnecessarywhen
roastingor forlong-timecookingof
wholemeals.
dull(satin-finish)bottomsuri%cesof
pansforcake pansandpieplatestobe added.
surethoseareasbrowncompletely.
glassandPyrocerammcookware,
generallyabsorbheatwhichmayresult
indry,crispcrusts.Reduceovenheat
25% if lightercrustsaredesired.
Preheatcastironfor
bakingsome
f- forrapidbrowning~hen fbod is
6
Food
Bread
Biscuits(%-in. thick) Shiny Cookie Sheet
Coff* cake Shiny Metal Panwith
Corn b-d or muffins Cast Iron or Glass Pan
Gingerbm.ad Shiny Metall% with
MuffIns Shiny Metal Muf!ln Pans
l%povers
QuickIoafbread
Ymt bread (2 loaves) Metalor GlassLoafPans
Plain rolls ShinyOblongor Muffin Pans
sweet rolls ShinyOblongor Muffin Pans
(without shortening)
Angelfood Aluminum ‘IbbePan
Jelly roll MetalJelly RollPan
Sponge
cakes
Bundtcakes Metalor CeramicPan
cupcakes ShinyMetal Muffin Pans
Fruitcakes Metal or Glass Loafor
Layer Shiny Metal Panwith
Layer,chocolate ShinyMetal Pan with
cookies
Brownies Metal or Glass Pans
Dmp CookieSheet
Refrigerator Cookie Sheet
Rolledor sliced Cookie Sheet
Fruits,
Other Desserts
Baked apples
custaKi
Puddings, rice
CUStd Casserole base 80 to ~ IllillUteS.
and
Pies
Froz,en Foil Rm on Cookie Sheet
Meringue Spreadto crust edges
One crust
‘Ikvocrust
Pastry shell
MiSewlneous
Bakedpotatoes
Scallopeddishes
Souffles
satin-ftish bottom
satin-ftish bottom
Deep Glass or Cast Iron Cups
Metal or Glass LoafPans
Metal or Ceramic Pan
‘lllbePan
satin-finishbottom shelvesB and D.
satin-finishbottom
Metal or Glass Loaf RUM
Glass or Metal Pans
Glass Custad Cups or
Casserole (set in pan of hot water) custard.
Glass Custard Cups or
Glass or Satin-finishMetal Pan
Glass or Satin-finish Metal Pan
Glassor Satin-finishMetal Pan
Set onOven Shelf
Glass or MetalPan
Glass Pan B 300°-3500 30-75
shelf
R3sitions ‘hmperatures Minutes
B, C
B, A
B
B
A, B
B 375°
B
A, B
A, B
B, A 350°-3750 20-30 For thin rolls, Shelf B maybe used.
A
B
A
A, B
B
A, B
B
B
B
B, C
B, C
B, C
B, C
A, B, C
B
B
A
B
A, B
B
B
A, B, C
A, B, C
oven ‘llme,
4M1°-4750
350°-4000 20-30
400°-4500
350° 45-55
400°-4250
350°-3750 45-60 Dark metalor glass gives deepest
375”-425°
375”-425° 10-25 Forthin rolls, Shelf B maybe used.
325°-3750 30-55
375”-400° 1045 Line pan with waxedpaper.
325°-3500
325°-3500 45-65
350”-375° 20-25 Paper liners produce moremoist crusts.
275°-3000
350°-3750
350°-375” 25-30
350° 40-60
325”-350° 25-35 Bar cookies from mix use same time.
350°-4000 10-20
400°-4250
375”-400° 7-E
350°-4000 30-60
300°-3500 30-60 Reducetemperature to 3W’F. for large
325°
400°-4250
325°-3500 15-25 Toquickly brown meringue use 4WF. for
400”-425°
400°-4250
450°
325°-4000 60-90
325”-375” 30-60
15-20 Canned, refrigeratedbiscuits take 2 to 4
20-40 Preheatcast iron pan forcrisp crust.
20-30
45-60 Or bakeat 450”F. for 25 minutes,then at
45-60 brmvning.
45-60
2-4 hrs.
20-35
6-12
50-90 Cook bread or rice puddingwith custard
45-70 Large pies use @O”F.and increase time.
45-60 Custardfdlingsrequire lowertemperature,
40-60
13-16
Comments
minutesless time.
Decrease about 5 minutes formut%nmix.
350T. for 10to 15minutes.
TWOpiecepan isconvenient.
Use 300”F.andShelf B forsmallor
individualcakes.
Ifbaking four layersuse
Use Shelf C and incnxisetemperature
25to 50”F. for morebrcnvning.
9to 11minutes.
longer time.
Increase time for large amount or size.
>
14
..
Page 15

Roasting
Roasting is cooking by dry heat.
Tender meat or poultry can be
roasted uncovered in your oven.
Roasting temperatures, which
should be low and steady, keep
spattering to a minimum. When
roasting, -itis not necessary to sear,
baste, cover, or add water to your
meat. Roasting is easy,just follow
these steps:
Step 1. Position oven shelf at
second from bottom position (B)
for small size roast (3 to 5 lbs.) and
at bottom position (A) for larger
roasts.
Step 2: Check weight of roast.
Place meat fat-side-up or poultry
breast-side-up on roasting rack in a
shallow pan. The melting tit will
baste the meat. Select a pan as
close to the size of meat as possible.-
(Broiler pan with rack is a good
pan for this.)
Step 3: ‘Ibm OVEN TEMP to
desired temperature. Check the
Roasting Guide for temperatures
and approximate cooking times.
Step 4: Most meats continue to
cook slightly while standing after
being re-movedfkomthe oven. For
rare or medium internal doneness,
you may wish to remove meat fkom
the ovenjust before it is done if it is
to stand 10to 20 minutes while you
make gravy or attend to other fds.
If no standing is planned, cook
meat to suggested temperature.
FrozenRoasts
Frozen roasts of beef, pork,
Iamb, etc., can bes tarted without
thawing, but allow 15to 25 minutes
per pound additional time (15
minutes per pound for roasts under
5 pounds, more time for larger
roasts).
Thaw most frozen poultry before
roasting to ensure even doneness.
Some commercial frozen poultry
can be cooked successfully without
thawing. Follow directions given
on packer’s label.
o
Roasting Guide
Oven
‘NPe
Meat 3 to 5-lbs.
Tendercuts; rib, high quality
sirloin tip, rump or top round*
Lamb leg or bone-in shoulder* 325°
Vealshoulder, leg or loin*
Fork loin, rib or shoulder* 325° Well Done: 35-45
Ham, pre-cooked 325°
Ham, raw 325° Well Done:
*For boneless rolled roasts over 6-inches
thick, add 5 to 10minutesper lb. to times
given above.
Fbultry 3 to 5-lbs. Over 5 ibs.
Chicken or Duck
Chickenpieces 375° WellDone:
‘1’brkey
Temperature
325°
325° Well Done:
325° WellDone: 3540 30-35 185°-1900
325° Well Done:
Doneness
Rare:
Medium: 29-33 22-25 150°-1600
WellDone: 35-45 28-33 170”-185°
Rare:
Medium:
WellDone: 30-35 28-33 170°-185°
ToWarm:
Approximate Roasting ‘Ilme Internal
in Minutes per Ikmnd
24-30
21-25
25-30
3545
18-23minutesper lb. (anyweight)
Under 10 Ibs. 10 to lwim
27-35
30-35 185°-1900
10 to 15-ibs.
16-22
6 to S-ibs.
18-22
20-23
24-28
30-40
30-40
24-27
Over 15 lbs.
13-19
Temperature “F
130°-1400
130°-140”
150°-1600
170°-180°
170°-180°
115°-1250
170°
rn thigh:
185°-1900
15
Page 16
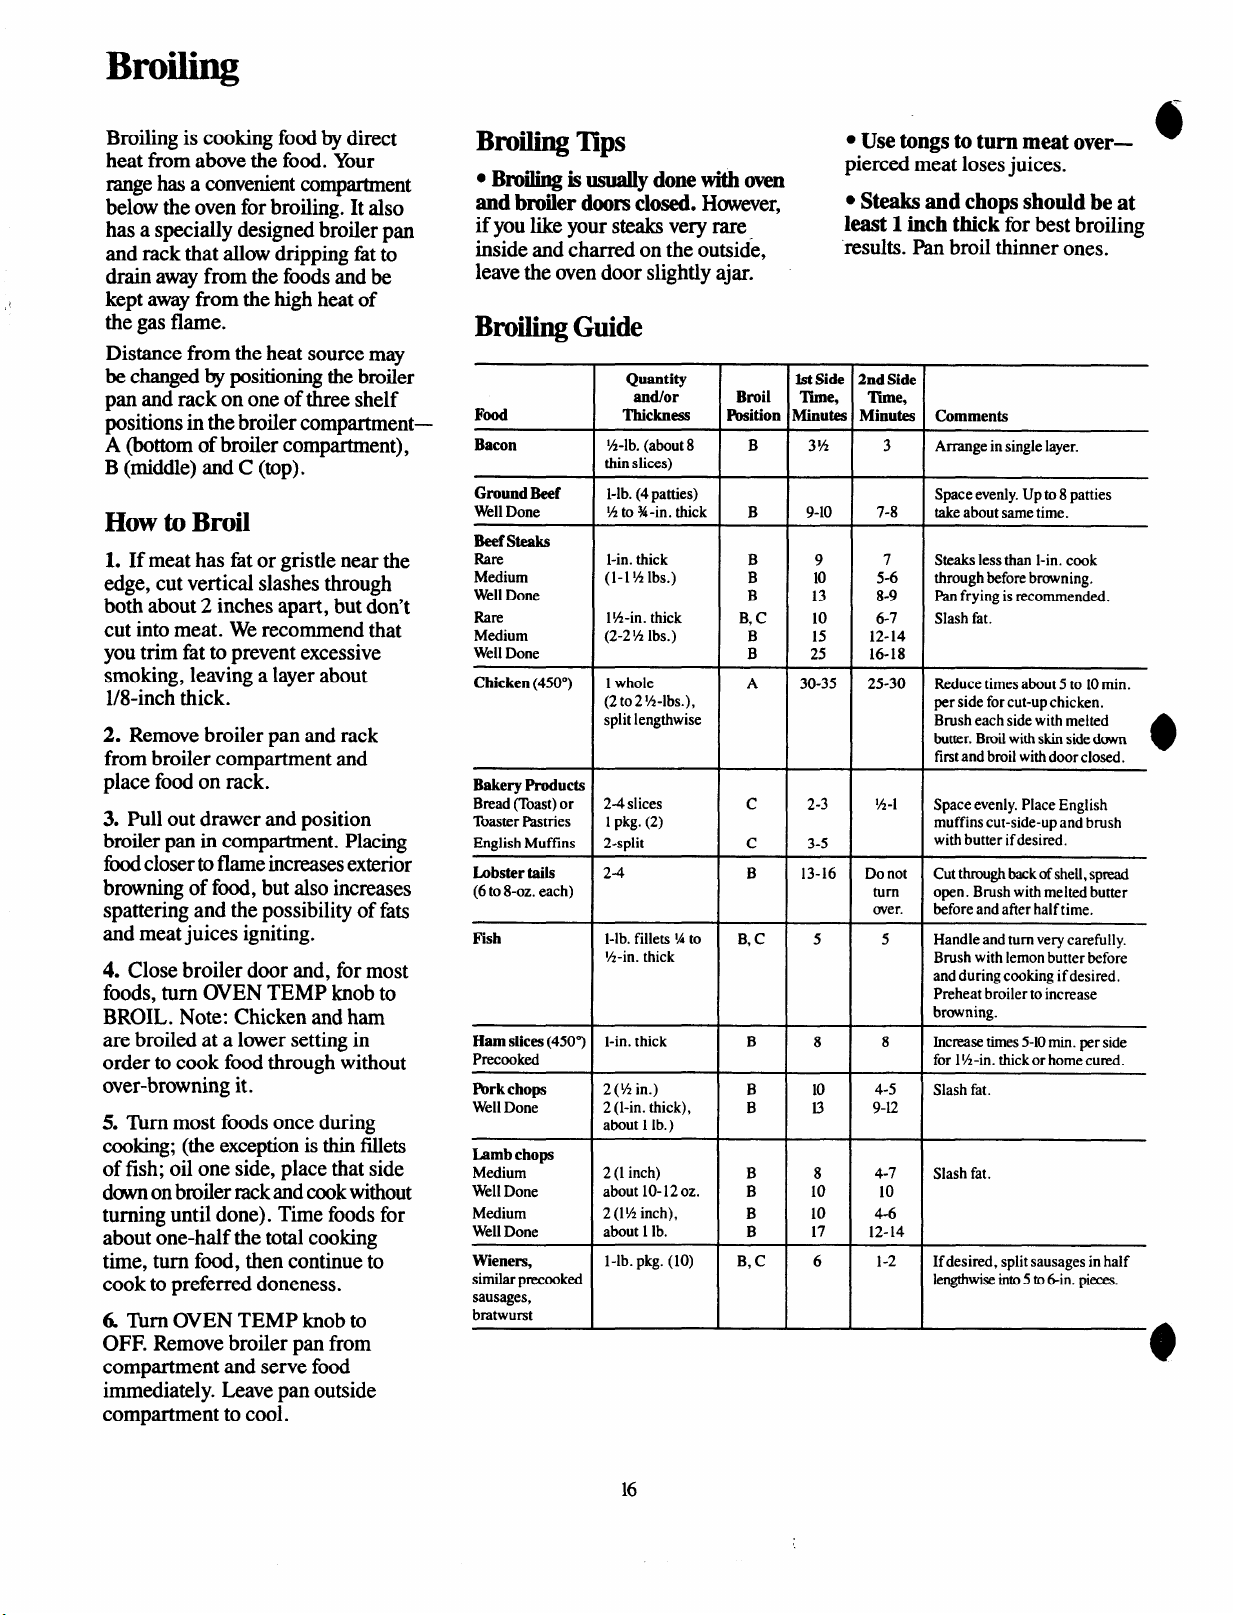
Broiling
Broiling is cooking food by direct
heat from above the food. Your
rangehas a convenientcompartment
below the oven for broiling. It also
has a specially designed broiler pan
and rack that allow dripping fatto
drain awayfrom the foods and be
kept awayfrom the high heat of
the gas flame.
Distance from the heat source may
be changedby positioningthe broiler
pan and rack on one of three shelf
positions in the broiler compartment—
A (bottom of broiler compartment),
B (middle) and C (top).
How to
Broil
1. If meat has fat or gristle near the
edge, cut vertical slashes through
both about 2 inches apart, but don’t
cut into meat. Werecommend that
you trim fat to prevent excessive
smoking, leaving a layer about
l/8-inch thick.
2. Remove broiler pan and rack
from broiler compartment and
place food on rack.
3. Pull out drawer and position
broiler pan in compartment. Placing
fd closertoflameincreases exterior
browning of food, but also increases
spattering and the possibility of fats
and meat juices igniting.
4. Close broiler door and, for most
foods, turn OVEN TEMP knob to
BROIL. Note: Chicken and ham
are broiled at a lower setting in
order to cook food through without
over-browning it.
5. ‘Ibm most foods once during
cooking; (the exceptionis thin fillets
of fish; oil one side, place that side
downonbroilerrackandcookwithout
turning until done). Time foods for
about one-half the total cooking
time, turn fbod, then continue to
cook to preferred doneness.
6 lbm OVEN TEMP knob to
OFF. Remove broiler pan from
compartment and serve food
immediately. Leave pan outside
compartment to cool.
Broiling ~PS
● Broilingisusuallydonewith oven
and broiler doomclosed. However,
if you like your steaks very rare
inside and charred on the outside,
leavethe oven door slightly ajar.
Broiling Guide
Bacon
Ground Beef
WellDone
Beef
steaks
Rare
Medium
WellDone
Rare
Medium
WellDone
Chicken (450°) 1whole
Bakery Products
Bread(Toast)or
ToasterI%tries
EnglishMuffins
Lobster tails
(6
to8-oz. each)
Fish l-lb,fillets %to B,C
Ham slices (4507 l-in. thick B
Precooked
Pbrk chops 2( Viin.)
WellDone
Lamb chops
Medium
WellDone
Medium 2(1% inch),
WellDone
Wieners,
Simikif precooked
sausages,
bratwurst
%-lb.(about8
thinslices)
I
l-lb. (4patties)
%to %-in.thick B
I
l-in. thick
(1-l %lbs.)
1%-in.thick
(2-2% Ibs.)
(2to2 %-lbs.),
split lengthwise
2-4slices
1pkg.(2)
2-split
124
%-in. thick
2(l-in. thick),
about 1 lb.)
2(1 inch)
about 10-12oz. B
about 1lb. B
l-lb. pkg. (10) B, C
I
I B
B
B
B
B
B,C
B
B
A
c
c
B
B
B
B
● Usetongstoturnmeatover—
pierced meat loses juices.
. S-and chops should
least1inch thick for best broiling
results. Pan broil thinner ones.
M Side
mute!
2nd Side
Tune,
9-1o
30-35 25-30
13-16 Do not
‘Ilme,
Minutes
9
10
13
10
12-14
15
16-18
25
2-3
3-5
5 5
8
10
13
8
1~ .1
turn
over.
4-5
9-E
4-7
10
10
17
6 1-2 If desired, splitsausagesin half
4-6
12-14
Comments
3 Arrange in singlelayer.
Spaceevenly.Upto8 patties
7-8
takeaboutsametime.
7
Steakslessthan l-in. cook
5-6
throughbefore browning.
8-9
I%nfryingis recommended.
6-7
Slash fat.
Reducetimes about5 to 10min.
per side forcut-up chicken.
Brusheach sidewith melted
butter.Bmiiwithskin sidedmvn
firstand broilwithdoorclosed.
Spaceevenly.Place English
muffinscut-side-up and brush
withbutter ifdesired.
Cutthroughbackof shell,spread
open. Brush withmeltedbutter
before andafier halftime.
Handleandturnvery carefidly.
Brushwith lemonbutter before
and during cookingif desired.
Preheat broiler toincrease
browning.
Incn?asetimes5-10min.perside
8
for 1%-in.thickor homeCUM.
Slashfat.
Slashfat.
10
lengthwiseinto5 to 6-in.pieces.
6
beat
o
16
Page 17

Care and Cleaning
Proper care and cleaning are
o
important so your range will give
you el%cientand satisfactory
service. Follow these directions
carefully in caring for it to help
assure safeand proper maintenance.
BESUREELECTRICPOWER
ISOFFBEFORECLEANING
ANY P~T OFYOURRANGE.
Special Care of
Continuous-Cleaning
OvenInterior
(onmodels soequipped)
The Continuous-Cleaning oven
cleans itself while cooking. The
inside of the oven—top, bottom,
sides, back and inside of the
door—is finished with a special
coating which cannot be cleaned in
the usual manner with soap,
detergents, steel wool pads,
commercial oven cleaners, coarse
abrasive pads or coarse brushes.
Their use and/or the use of oven
sprayswillcause permanentdarnage.
t’
The special coating is a porous
ceramic material which is dark in
color and feels slightly rough to the
touch. If magnified, the surface
would appear as peaks, valleys, and
sub-surface “tunnels:’ This rough
finish tends to prevent grease
spatters from forming little beads
or droplets which run down the
side walls of a hard-surface oven
liner leaving unsightly streaks that
require hand cleaning. Instead,
when spatter hits the porous finish
it is dispersed and is partially
absorbed. This spreading action
increases the exposure of oven
soil to heated air, and makes it
somewhat less noticeable.
Soil may not disappear completely
and at some time after extended
usage, stains may appear which
cannot be removed.
The special coating works best on
small amounts
not work well with larger spills,
(3
especially sugars, egg or dairy
mixtures.
ofspatter. It does
The special coating is not used
on oven shelves. Shelves should be
cleaned outside the oven to avoid
damage to the sficial coating
inside the oven.
ToClean the Continuous-
Cleaning Oven:
1. Let range parts cool before
handling. It is recommended that
rubber glovesbe worn when
cleaning range parts.
2. Remove shelves and cookware.
3. Soil visibility maybe reduced by
operating the ovenat 400”F. Close
the door and turn OVEN TEMP
knob to 400”F. Time for at least 4
hours. Repeated cycles may be
necessary before improvement in
appearance is apparent.
REMEMBER: DURINGTHE
OPERATIONOFTHEOVEN,THE
DOOR, WINDOW AND 01’HER
RANGE SURFACES WILL GET H(YI’
ENOUGH K) CAUSE BURNS. DO N~
11’wcH. LET THE RANGE COOL
BEFORE REPLACING OVEN SHELVES.
4. If a spilloveror heavy soiling
occurs on the porous surface, as
soon as the oven has cooled, remove
as much of the soil as possible using
a small amount of water and a stiff
bristle nylon brush. Use water
sparingly and change it frequently,
keeping it as clean as possible, and
be sure to blot it up with paper
towels, cloths, or sponges. Do not
rub or scrub with paper towels,
cloths or sponges, since they will
leaveunsightly lint on the oven
finish. If water leavesa white ring
on the finish as it dries, apply water
again and blot it with a clean
sponge, starting at the edge of the
ring and working towardthe center.
Do not use soap, detergent, steel
woolpads,commercialovencleaner,
silicone oven sprays, coarse pads
or coarse brushes on the porous
surface. These products will spot,
clog, and mar the porous surface
and reduce its ability to work.
Do not scrape the porous surface
with a knife or spatula—they
could permanently damage it.
Rmcelain Oven Interior
(onmodels so equipped)
With proper care, the porcelain
enamel finish on the inside of the
oven—top,bottom, sides, back and
inside of the door—will stay newlooking for years.
Let range cool before cleaning. We
recommend that you wear rubber
gloves when cleaning the range.
Soap and water will normally
do the job. Heavy spattering or
spillovers may require cleaning
with a mild abrasive cleanser.
Soapy,wet metal pads may also be
used. Do not allow food spills with
a high sugar or acid content (such
as milk, tomatoes, sauerkraut, fruit
juices or pie filling) to remain on
the surface. They may cause a dull
spot even after cleaning.
Household ammonia may make the
cleaning job easier. Place 1/2cup in
a shallow glass or pottery container
in a cold oven overnight. The
ammonia fumes will help loosen
the burned-on grease and food.
If necessary, you may use a caustic
cleaner. Follow package directions.
Cautions about using
spray-on oven cleaners:
● Do not spray on the electrical
controls and switches (on models so
equipped) because it could cause a
short circuit and result in sparking
or fire.
● Do not allow a film from the
cleanertobuildup on thetempecatw
sensing bulb—it could cause the
ovento heat improperly. (The bulb
is located at the top of the oven.)
Carefhlly wipe the bulb clean after
each oven cleaning, being carelid
not to move the bulb as a change
in its position could affect how
the oven bakes.
● Do not spray any oven cleaner
on the oven door, handles or any
exterior surtkce ofthe oven, wood
or painted surfaces. The cleaner
can damage these surfaces.
17
Page 18

Care and Cleaning (CO~ti~~)
Lift-Up (hoktop
Clean the area under the cooktop
often. Built-up soil, especially
grease, may catch fm.
When replacing a
pair of grates,
the irregular -
sides should
interlock in
the middle as
shown at right.
RangeTopBurners
The holes in the burners must be
kept clean at all times for proper
ignition and an
flame.
Clean the burners routinely and
especially after bad spillovers
which could clog these holes.
Burners lift out for cleaning.
even,unhampered
tzsl
Drip Pans
(on models so eqtipped)
Tomake cleaning easier, the entire
cooktop maybe lifted up and
supported by locking arms that
catch and hold the top when it’s all
the wayup.
Be sure all burners are turned off
before raising the cooktop. Then
removethe grates and drip pans,
grasp the front sides of the cooktop
and lift.
After cleaning under the cooktop
with hot, mild soapy water and a
clean cloth, put the cooktop back in
place. Lift up a little to release the
locking arms and push them in
while guiding the top back down.
Be careful not to pinch your fingers.
Burner Grates
Grates should be washed regularly
and, of course, after spillovers.
Washthem in hot, soapy water and
rinse with clean water. Dry the
grates with a cloth-don’t put them
back on the range wet.
Toget rid of burned-on food, soak
the grates in a slightly diluted
liquid cleanser.
Although they’re durable, the
!
1
!
(
grates will gradually lose their
shine, regardless of the best care
you can give them. This is due to
their continual exposure to high
temperatures.
Do not operate a burner for an
extended period oftime without
cootie on the grate. The finish
on the grate may chip without
cookware to absorb the heat.
,-
Remove the grates and lift out the
chrome drip pans. Washthem in
hot, soapy water. Rinse them with
clean, hot water and polish them
dry with a cloth. Never use
abrasive cleaner or steel wool—
they’ll scratch the surface. Instead,
soak the drip pans for about 20
minutes in slightly diluted liquid
cleanser or mild solution of
ammonia and water (1/2cup of
ammonia to one gallon of water).
After soaking, washthem in hot,
soapy water. Rinse with clean water
and polish with a clean, soft cloth.
Do not attempt to clean the drip
Dans in the self-cleaning oven.
1
When replacing
drip pans, the
notch on the rear
pan and the notch
on the front pan
should meet in
the middle.
/
Note: Wo screws hold each burner
pair in place to keep them from
wobbling around during shipment.
Remove and discard the shipping
screws and lift the burners up and
out. This disengages them from the
mounting bracket under each
burner pair.
To removeburned-on food, soak
the burner in a solution of a product
used forcleaning the inside of coffke
makers. Soak the burner for 20 to
30 minutes. If the food doesn’t
rinse off completely, scrub it with
soap and water or a mild abrasive
cleanser and a damp cloth.
Do not attempt to clean burners in
an automatic dishwasher. Loosened
food soil can clog burner holes,
and the caustic action of the
dishwasher detergent can damage
the burner heads.
Beforeputting the burner back, dry
it thoroughly by setting it in a warm
oven for 30 minutes. Then place it
back in the range, making sure it is
properly seated on the mounting
bracket and is level.
18
Page 19

ControlPanels
@
It’sa good idea to wipe the control
panels clean after each use of the
oven. For a more thorough cleaning,
the control knobs can be pulled off
the knob stems and, on models so
equipped, the glass upper control
panel canbe cleanedon both sides.
Toremovethe glass panel:
1.Removethe screwon each end of
the backsplash.
2. Removethe metal strips on each
end that hold the glass in place.
3. Removethe clock knob and nut
securingthe light switch.
=4. Carefidly removethe glass and
; place it on a smooth, flat surfhce.
6
Clean it with mild soap and water,
rinse with clean waterand dry with
a softcloth. Caution: Do not use
abmsivecleansers, strong liquid
cleanersor ovencleaners on glass or
enamel control panel suri%ces-they
will damagethe finish.
OuterEnamelFinish
When the range is cool, wash the
enamel finish with mild soap and
wateror a mild abrasivecleanser
appliedwith a damp cloth. Rinse
with clean water and dry with a soft
cloth. Ifyou wish, occasionally
apply a thin coat of mild cleaning
waxto help protectthe finish.
Toavoid
the range and to preventit from
becoming dull, don’tslide heavy
pans across it. If you spill finis with
a lot of acidor high sugarcontent,
cleanthem up as soon as possible. If
allowedto remain, these foods could
cause adull spot. Also, neveruse
c
ha.mhabrasivecleansers. They could
permanently damage the enamel
Surfiwe.
marring the surfhceof
Brushed Chrome Finish
(on models so equipped)
Ckxn the brushed chrome top
with warm, soapy titer or an aUpurpose householdcleaner and -
immediatelydry it with a clean, soft
cloth. TAe care to dry the surke
folluwingthe “grain.” To help
preventfingermarh after cleaning,
spxad a thin film of baby oil on the
suriiwe.Wipe awayexcessoil with a
clean, soft cloth. A good appliance
waxwill help protect this iinish.
OvenLightBulb
Replacement
(onmodels so equipped)
lightbulb is locatedin the upper
The
leilcomer of the oven. Befo~
replacingthe bulb, disconnect
electricpowerto the range at the
main fuseor circuit bnmker panel or
pull the rangepowercord plug tim
the electricaloutlet. Let the bulb
cool completelybeforeremovingit.
Do not toucha hot bulb with a damp
cloth asthe bulb will break.
Replacewith a high temperature
appliancebulb of the same wattage.
RemovableOven Door
The ovendoor is removableto make
the interior more accessible.
Remove
Open the oven door fidly and
removethe two Phillips screwsthat
holdthe door to the hinges. Then
closethe door to the automatic stop
position (at about 3 inches open),
andlift the door straight up and off
the hinges. (Due to the large amount
of indurationand the construction
ofthe door, it is heavy.)
Note: Care should be taken not to
place hands between the spring
hinge and the oven door frame as
the hinge could snap back and
pinch fingers.
To replace the door, make sure the
hinges are in the “out” position.
Position the slots in the bottom of
the door squarely over the hinges.
Then lower the door slowly and
evenly over both hinges at the same
time. If hinges snap back against
the oven frame, pull them back out.
When the door is in position, open
it fully and insert the two Phillips
screws.
19
Page 20
Care and Cleaning (continu~)
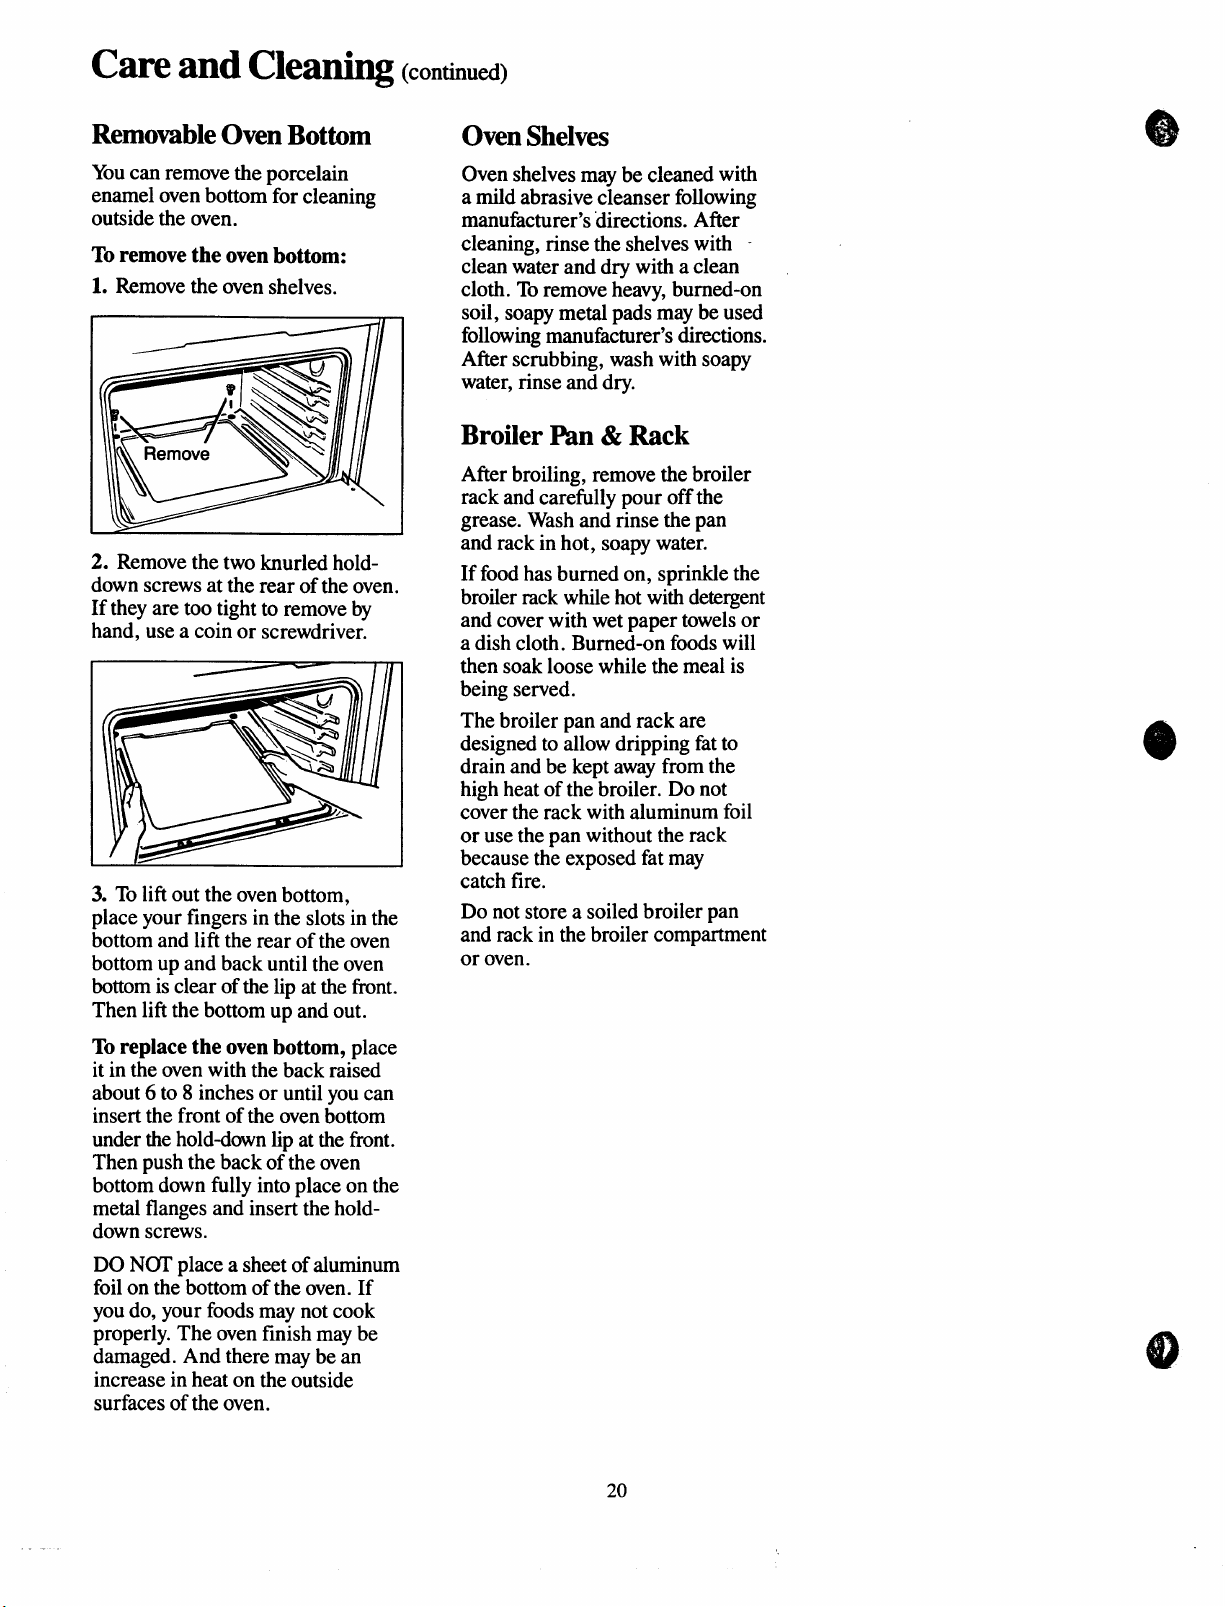
RemovableOven Bottom
Youcan remove the porcelain
enamel oven bottom for cleaning
outside the oven.
Toremove the oven bottom:
1. Remove the oven shelves.
2. Remove the two knurled holddown screws at the rear of the oven.
If they are too tight to remove by
hand, use a coin or screwdriver.
3. To lift out the oven bottom,
place your fingers in the slots in the
bottom and lift the rear of the oven
bottom up and back until the oven
bottom is clear of the lip at the tiont.
Then lift the bottom up and out.
OvenShelves
Oven shelves may be cleaned with
a mild abrasive cleanser following
manufacturer’s “directions.After
cleaning, rinse the shelves with clean water and dry with a clean
cloth. Toremove heavy, burned-on
soil, soapy metal pads may be used
followingmanufacturer’s directions.
After scrubbing, wash with soapy
water, rinse and dry.
Broiler I%n& Rack
After broiling, remove the broiler
rack and carefilly pour off the
grease. Wash and rinse the pan
and rack in hot, soapy water.
If food has burned on, sprinkle the
broiler rack while hot with detergent
and cover with wet paper towels or
a dish cloth. Burned-on foods will
then soak loose while the meal is
being served.
The broiler pan and rack are
designed to allow dripping fat to
drain and be kept awayfrom the
high heat of the broiler. Do not
cover the rack with aluminum foil
or use the pan without the rack
because the exposed fat may
catch fire.
Do not store a soiled broiler pan
and rack in the broiler compartment
or oven.
Toreplace the oven bottom, place
it in the oven with the back raised
about 6 to 8 inches or until you can
insert the front ofthe oven bottom
under the holddown lip at the front.
Then push the back of the oven
bottom down filly into place on the
metal flanges and insert the hold-
down screws.
DO N~ place a sheet of aluminum
foil on the bottom of the oven. If
you do, your foods may not cook
properly. The oven finish may be
darnaged. And there maybe an
increase in heat on the outside
surfaces of the oven.
20
Page 21

Minor Adjustments YouCan Make
/
e
Oven Thermostat
Adjustment
The temperature control in your
new oven has been carefully adjusted
to provide accurate temperatures.
However, if this oven has replaced
one you have used for several years,
you may notice a difference in the
degree of browning or the length of
time required when using your
favorite recipes. Oven temperature
controls have a tendency to “drift”
over a period of years and since
this drift is very gradual, it is not
readily noticed. Therefore, you
may have become accustomed to
your previous oven which may
have provided a higher or lower
temperature than you selected.
Before attempting to have the
temperature of your new oven
changed, be sure you havefollowed
the baking time and temperature of
the recipe carefilly. Then, after
you have used the oven a fewtimes
and you feel the oven is too hot
6
or too cool, there is a simple
adjustment you can make yourself
on the OVEN TEMP knob.
Pull the knob off the shafi and look
at the back side. There is a disc in
the center of the knob skirt with a
series of marks opposite a pointer.
the direction of arrow for LOWER.
Each mark will change the oven
temperature approximately 20”F.
Wesuggest that you-makethe
adjustment one mark from the
original setting and check oven
performance before making any
additional adjustments.
After the adjustment is made,
press skirt and knob together and
retighten screws so they are snug,
but be carefi.dnot to overtighten.
Re-install knob on range and
check performance.
Note: After an adjustment has
been made to the OVEN TEMP
knob, OFF and BROIL will not
line up with the indicator mark on
the control panel as they previously
did. This condition is normal and
will not create a problem.
OvenDoor Height
Adjustment
Repeated openings and closings
can cause the oven door to work
itself out of adjustment. One side
may close higher than the other,
and the door may not seal properly.
Toadjust the height of the door:
1. Remove the door (seepage 19).
OvenBurner
Air AdjustmentShutter
The air adjustment shutter for the
ovenburner regulates the flow of
air to the flame.
The shutter for the oven burner is
near the back wall of the oven
behind the broiler drawer.
Toreach the shutter, remove
the ovenbottom (page 19)and the
burner baffle.
Toadjust the flow of air to the
burner, loosen the Phillips head
screwand rotate the shutter to
allow more or less air into the
burner tube as needed.
Loosen only the
locking screws
I Note position of
pointer to marks
before adjustment
Note to which mark the pointer is
pointing. To make an ad~ustment,
carefully loosen (approximately
one turn), but do not completely
remove the two screws that hold the
skirt to the knob. Hold the knob
_blade in one hand and the outer
skirt in the other hand.
@
To raise the oven temperature,
move the pointer in the direction of
the arrow for RAISE. To lower the
temperature, move the pointer in
2. With a thin-bladed screwdriver,
turn the screw in the opening at
the top of each door hinge. Turn
clockwiseto lower,counterclockwise
to raise each side of the door.
3. Replace the door, close it, and
check alignment and door seal.
21
Todetermine if the burner flame
proper,lighttheburner.The
is
flameshould
have 1/2”to 3/4”blue
cones with no yellow tipping. When
the baffle is back in place, the
flame will resettle.
Page 22

Cleaning Guide
Note: Let range/oven parts cool before touching or handling.
Pm
Broiler Pan and Rack
Control Knobs
Outside Glass Finish
Metal, including
Side l’kims, ‘him
Strips and Brushed
Chrome Cooktop
Outer Enamel
Finish*
MATERIALS ‘N) USE
● Soap and Water
● Soap-Filled Scouring Pad
● Plastic Scouring Pad
● Mild Soap and Water
● Soap and Water
● Soap and Water
● Paper Towel
● Dry Cloth
● Soap and Water
GENERAL DIRECTIONS
Drain tit, cool pan and rack slightly. (Do not let soiled pan and rack stand in
broiler compartment to cool.) Sprinkle detergent on rack and pan. Fti pan with
water and spread cloth-or paper towel over rack. Let pan and rack stand
warm
for a few minutes. Wash; scour if necessary. Rinse and dry. OF1’ION: Clean pan
and rack in dishwasher.
Pull off knobs. Wmh gently but do not soak. Dry and return controls to range.
Clean outside of cooled black glass door with a glass cleaner that does not
contain ammonia. Washother glass with cloth dampened in soapy water. Rinse
and polish with a dry cloth. If knobs are removed, do not allow water to run
down inside surface of glass while cleaning.
Wash, rinse and then polish with a dry cloth. DO NOT USE steel wool,
abrasives, ammonia, acids, or commercial oven cleaners which may damage
the finish.
Avoidcleaning powders or harsh abrasives which may scratch the enamel.
If acids should spill on the range while it is hot, use a dry paper towel or cloth
to wipe up right away.When the surface has cooled, wash and rinse.
For other spills, such as fat smatterings,etc., wash with soap and water when
cooled and then rinse. Polish with a dry cloth.
C*
c
‘ >,
.)
Painted Surfaces
● Soap and Water
Use a mild solution of soap and water. Do not use any harsh abrasives or
cleaning powders which may scratch or mar surface.
Shelves
Surface Burner
Grates
Chrome-Plated
Drip I%ns
Surface Burners
● Soap and Water
● Soap-Filled Scouring Pad
● Plastic Scouring Pad
● Soap and Water
● Soap-Filled Scouring Pad
(Non-metallic)
● Soap and Water
● Stiff-Bristled Brush
● Soap-Filled Scouring Pad
(Non-metallic)
● Solution for Cleaning
Inside of Coffke Makers
● Soap and Water
● Mild Abrasive Cleanser
● Damp Cloth
Shelves can be soaked in dishwasher or cleaned by hand using soap and water.
Rinse thoroughly to remove any soap after cleaning.
Lifl out when cool. Soak 5 to 10minutes if desired in warm solution of
dishwasher detergent. Scour with materials mentioned here to remove burnedon food particles.
Clean as described below or in dishwasher. Wipe drip pans after each cooking
so unnoticed spatter will not “bum on” next time you cook. To remove “burnedon” spatters, use any or all cleaning materials mentioned. Rub
scouring pad to prevent scratching of the surface.
W@eoff burner heads. If heavy spillover occurs, remove burners from range
(see page 19)and soak them for 20 to 30 minutes in solution of hot water and
product for cleaning inside of coffeemakers, such as Dip-It brand. If soil does
not rinse off completely, scrub burners with soap and water or a mild abrasive
cleanser and a damp cloth. Dry burners in a warm oven for 30 minutes before
returning them to the range.
USEFOLLOWING DIRE~ONS FOR STANDARDPORCELAIN ENAMEL OVENONLY.Seepage
Inside Oven DocH
● seebelow Removeovendoor-see page 18.DO N~ place door under running water, or
immerse. Use same directions for cleaning as for Oven Liner, below.
Oven Liner
● Soap and Water Cool before cleaning. Frequent wiping with mild soap and water (particularly
● Commercial Oven Cleaner
● Soap-Filled Scouring Pad
● Plastic Scouring Pad cleaner and follow label instructions, using thin layer of cleaner. Use of rubber
after cooking meat) will prolong time between major cleanings. Rinse
thoroughly. Soap left on liner can cause stains.
gloves is recommended. Wipe or rub lightly on stubborn spots. Wipe off any
cleaner that gets on thermostat bulb found in back or on side, near top of oven.
lighdy with
17for Continuous-Cleaning oven.
For heavy soil, use non-abrasive
Removable Pbrcelain ● See above
Enamel Oven BottorrF
The oven bottom panel can be removed for cleaning (seepage 18). Use same
directions for cleaning as for Oven Liner above.
*Spillage of marinades, fruit juices, and basting materials containing acids maycause discoloration, so should be wiped up immediately (blotted up
if in Continuous-Cleaning oven). Thkecare notto touch hot portion of oven. When surface is cool, clean and rinse. CAUTION: Light bulbs can get
warm enough to break if touched with moist cloth. When cleaning, avoid warm lamp.
22
Page 23

~, Questions?
~ UseThis Problem Solver
PROBLEM
I
TOP BURNERS
DO NOI’ LIGHT
OVEN DOES NOT’
COOK PROPERLY
CLOCK DOES
NOT WORK
, (onmodel ssoequipped)
POSSIBLE
● Pilots are not lit. Remove or lift cooktop and hold lighted match next to pilot opening
CAUSEAND1ORWHATTODO
between front and rear burners. On models with electric ignition, make sure electrical
plug is plugged into a live power outlet.
● Burner holes on side of burner may be clogged. Remove and clean them.
● Burners may not be fitted correctly onto the mounting brackets. Remove and reinstall
them properly.
● Make sure thermostat capillary buib (located in upper portion of oven) is in correct
position, not touching oven sides and not coated with anything.
● Aluminum foil being used improperly in oven.
● Oven vent blocked on top of range.
● Incorrect cookware being used. Check each cooking section for cookware tips or
recommendations.
● Oven bottom not securely seated in position.
s OVEN TEMP knob set incorrectly or not turned on.
● Check common baking, roasting and broiling problems on pages 13-16.
● Range electrical plug must be securely seated in a live power outlet. Check for blown
fuse or tripped circuit breaker.
OVEN LIGHT DOES
NOT COME ON
(on models so equipped)
STRONG ODOR
I
s Bulb may be loose or burned out.
● Electrical plug must bc plugged into a live power outlet.
● Improper air/gas ratio in oven. Adjust oven burner air shutter.
If you need more help.. call, toll free:
The GE Answer Center’R)
800.626.2000
consumer information service
If YouNeed Service
TCJobtain service. see your warranty
on the back page of this book.
We’re proud of our service and
want you to be pleased. If for some
reason you are not happy with the
service-you receive, here are three
steps to follow for further help.
FIRST, contact the people who
serviced your appliance. Explain
why you are not pleased. In most
cases, this will solve the problem.
NEXT, if you are still not pleased,
FINALLY. if your problem is still
not resolved, write:
Major Appliance
write all the details—including Consumer Action Panel
your phone number—to:
Manager. Consumer Relations
20 North Wacker Drive
Chicago, Illinois 60606
General Electric Company
Appliance Park
Louisville, Kentucky 40225
Page 24

YOUR GENERAL ELECTRIC RANGE
proofoforiginalpurchasedatesuchas yoursalessliporcancelledcheck to establishwarrantyperiod.
Save
WHAT IS COVERED
WARRANTY
FULL ONE-YEAR WARRANTY
For one year from date of original.
purchase, we will provide, free of
charge, parts and service labor
in your home to repair or replace
any parf of the range that fails
because of a manufacturing defect.
This warranty is extended to
the original purchaser and any
succeeding owner for products
purchased for ordinary home use
in the 48 mainland states, Hawaii
and Washington, D.C. In Alaska the
warranty is the same except that it is
LIMITED because you must pay to
ship the product to the service shop
or for the service technician’s travel
costs to your home.
All warranty service will be provided
by our Factory Service Centers or
by our authorized Customer Care”
servicers during normal working
hours.
Look inthe White or Yellow Pages
of your telephone directory for
GENERAL ELECTRIC COMPANY,
GENERAL ELECTRIC FACTORY
SERVICE, GENERAL ELECXRIC-
HOTPOINT FA~ORY SERVICE or
GENERAL ELE~RIC CUSTOMER
CARE@ SERVICE.
4’
F
*
WHAT IS NUT COVERED
● Service trips to your home to
teach you how to use the product.
Read your Use and Cam material.
If you then have any questions
about operating the product,
pIease contact your dealer or our
Consumer Affairs office at the
address below, or call, toll free:
The GE Answer Cente@
800.626.2000
consumer information service
● Improper installation.
● Replacement of house fuses or
resetting of circuit breakers.
c Failure of the product if it is used
for other than its intended purpose
or used commercially.
● Damage to product caused
by accident, fire, floods or acts
of God.
WARRANlOR IS NOT RESPONSIBLE
FOR CONSEQUENTIAL DAMAGES.
If you have an installation problem,
contact your dealer or installer.
You are responsible for providing
adequate electrical, gas, exhausting
and other connecting facilities.
Some statesdo not allow the exclusion or limitation of incidental or consequential damages, so the above limitation or exclusion
may not apply to you. This warranty gives you specific legal rights, and you may also have other rights which vary from state to state.
To know what your legal rights are in your state, consult your local or state consumer affairs office or your state’s Attorney General.
Warrantor: General Electric Company
If further help is needed concerning this warranty, write:
Manager–Consumer Affairs, General Electric Company, Appliance Park, Louisville, KY 40225 ;:
—
I Part No. 164D1352 P035 [
Pub.
No. 49-4829
P/N 56(YT691 P391
s-s?
GENERAL@ ELECTRIC :~;p, :::;: !%!’
JGSS05GEJ JGBS16EJ
JGBC16’
JGBC17
 Loading...