

Page 1
wvvw.GEAppliances.com
Safety Ins_cCions ............ 2-7
°_
oq
©
Operating Instm_tions
Baking or Roasting .............. 11
Broiling, Broiling Guide ......... 14
Clock and Timer ............... 15
Control Lockout ............... 15
Convection ................. 18-22
Cookware ...................... 9
Oven ...................... 10-30
Probe ........................ 17
Proofing ...................... 23
Sabbath Feaune ................ 30
Self-Cleaning ............... 25, 26
Special Feaulres ............. 27-29
Surlhce Burners .............. 8, 9
The_nostat .................... 24
Timed Baking & Roasting ........ 16
VV:mning ...................... 23
Care and Cleaning
Broiler Pan and Grid ........... 33
Burner Assembly ............... 31
Burner Grates and
Vent Grille .................... 32
Control Panel ................. 35
Door. ........................ 34
Floor . ........................ 35
Glass Cooktop .............. 36, 37
Knobs ........................ 31
jcs96s
J(;sP48
Lift-Off Oven Door . ............ 34
Light Bulbs ................. 32, 33
Packaging Tape ................ 31
Painted SurPaces ................ 35
Racks ........................ 33
Stainless Steel SurPaces .......... 35
Storag> Drawer . ............... 33
Vent ...................... 32, 35
Troubleshooting Tips ....... 38-42
Accessories . .................. 45
Com_tmer Support
Consumer Support ..... Back Cox_r
Product Registration ......... 43, 44
¼'a_Tantv for Customers
in Canada .................... 47
Wa_Tantv for Customers
in the U.S.A ................... 46
www.geappfiances.ca
Write the model and serial
numbers here:
Model #
Serial #
You can lind them on a label
behind the open oven door
on the lower lett corner of the
range fl'ame.
164D4290P322-1 49-80166-1 09-04JR
Page 2
IMPORTANTSAFETYINFORMATION.
READALLINSTRUCTIONSBEFOREUSING.
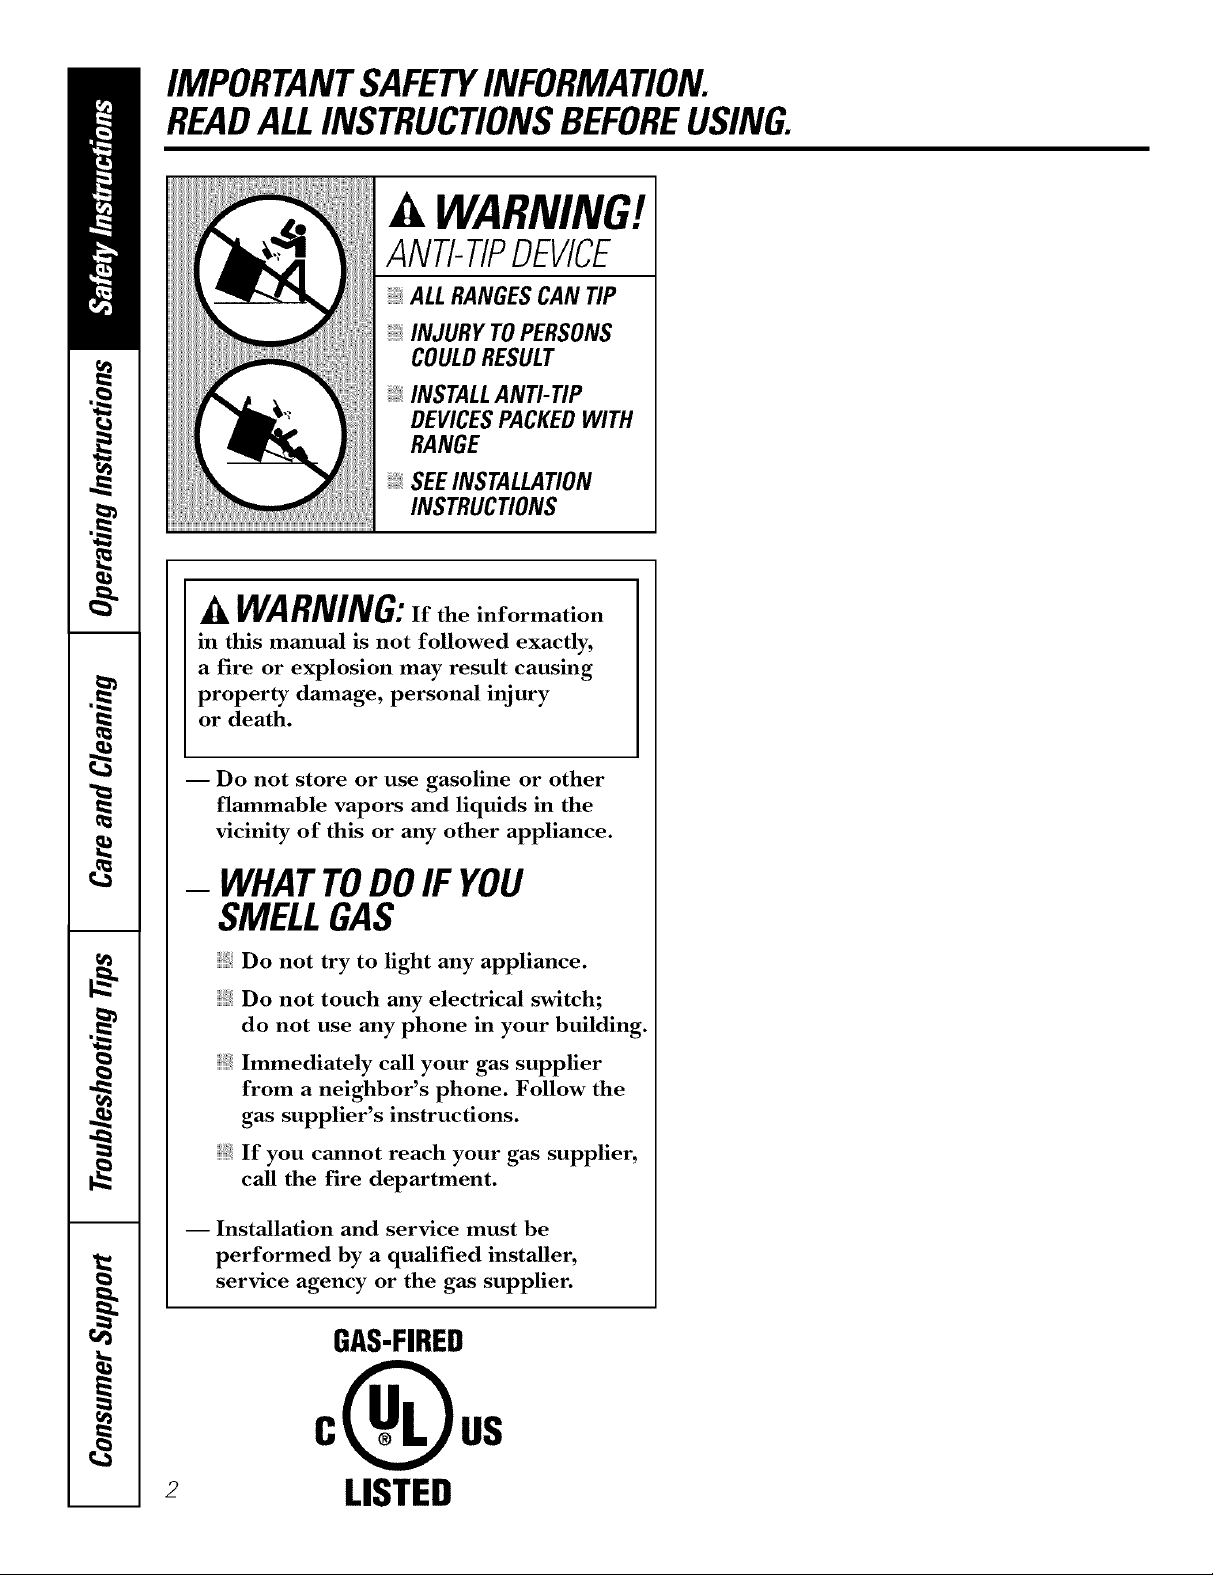
A WARNING!
ANTI-TIPDEVICE
, ALLRANGESCAN TIP
INJURY TOPERSONS
COULDRESULT
INSTALLANTI-TIP
DEVICESPACKEDWITH
RANGE
SEEINSTALLATION
INSTRUCTIONS
A WARNING:If the information
in this manual is not followed exactly,
a fire or explosion may result causing
property damage, personal injury
or death.
I Do not store or use gasoline or other
flammable vapors and liquids in the
vicinity of this or any other appliance.
- WHATTODOIF YOU
SMELLGAS
Do not try to light any appliance.
Do not touch any electrical switch;
do not use any phone in your building.
Immediately call your gas supplier
from a neighbor's phone. Follow the
gas supplier's instructions.
If you cannot reach your gas supplier,
call the fire department.
I Installation and service must be
performed by a qualified installer,
service agency or the gas supplier.
GAS-FIRED
2
LISTED
Page 3
www.GEAppliances.com
WARNING!
For your safety, the information in this manual must be followed to minimize the risk of fire or
explosion, electric shock, or to prevent property damage, personal injury, or loss of life.
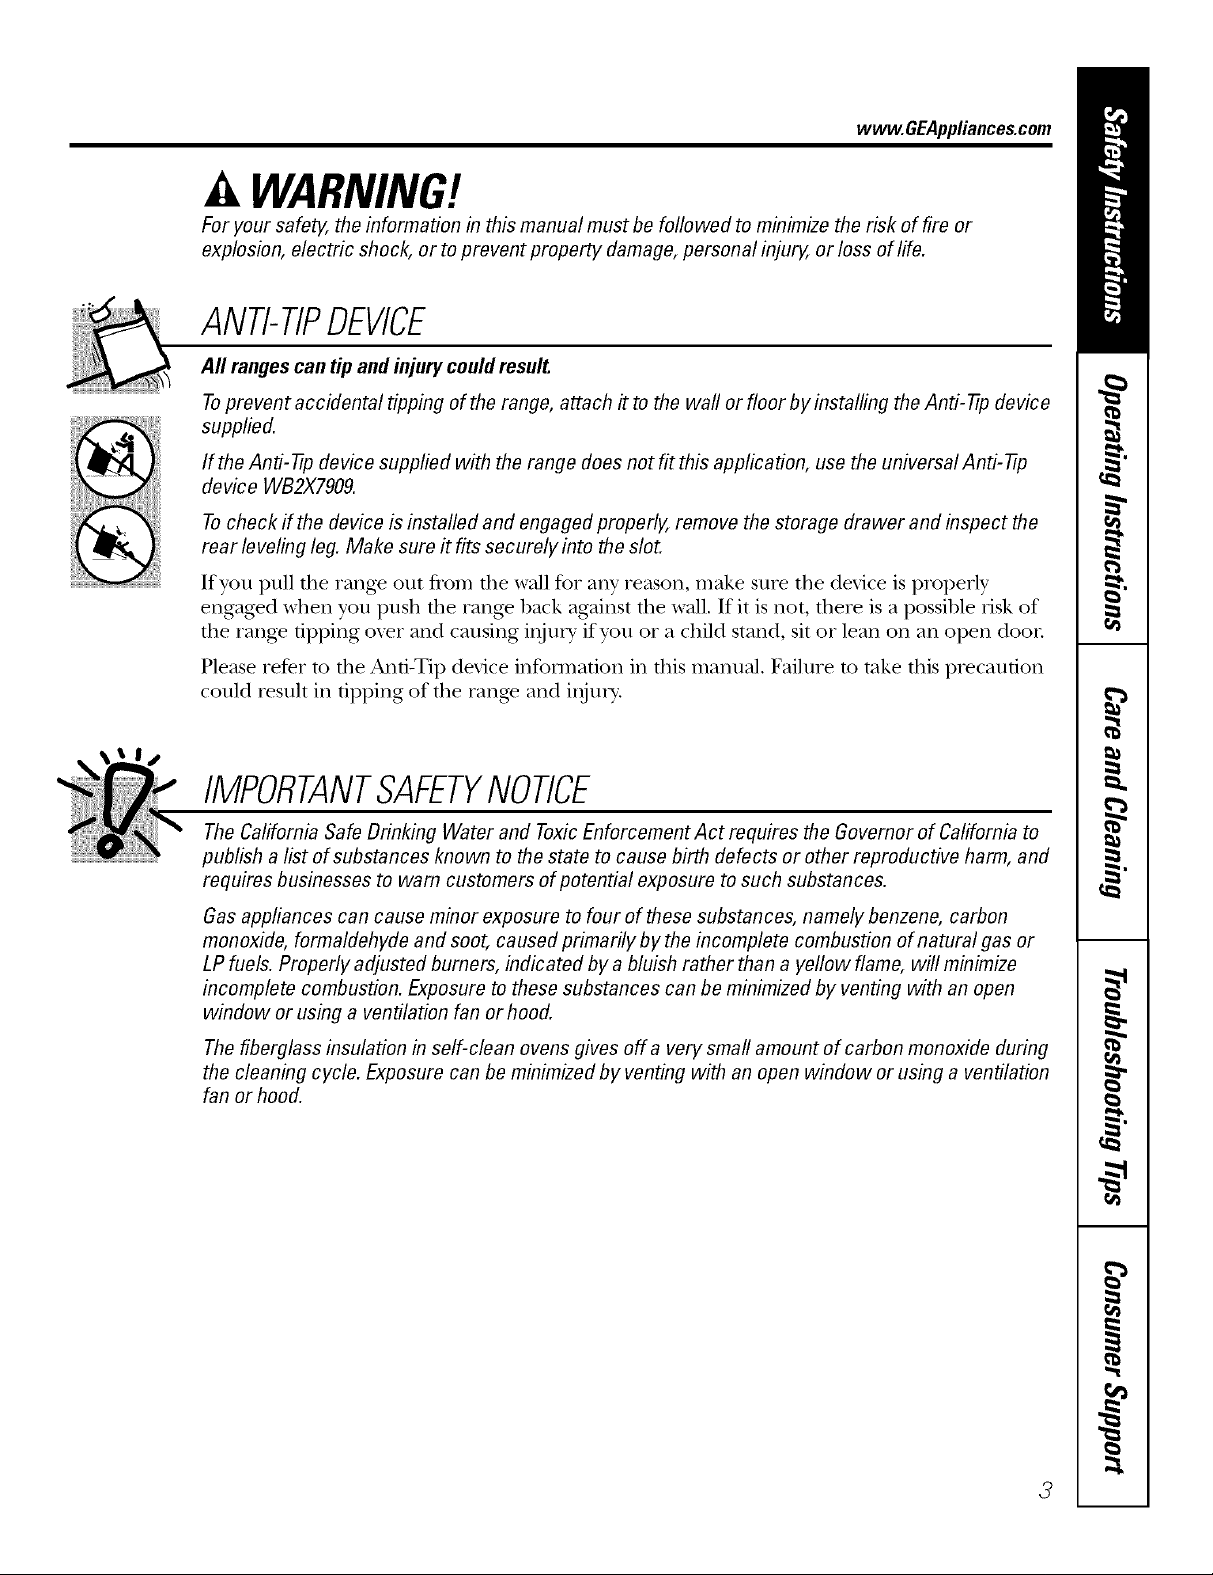
ANTI-TIPDEVICE
All rangescan tip and injury could result.
Toprevent accidental tipping of the range, attach it to the wall or floor by installing the Anti--tip device
supplied.
If the Anti--tip device supplied with the range does not f# this application, use the universal Anti--17p
device WB2X7909.
Tocheck if the device is installed and engaged properly, remove the storage drawer and inspect the
rear leveling leg. Make sure #fits securely into the slot.
If you I)ull the range ont from the wall for any reason, make snre the device is properly
engaged when you push the range back against fl)e wall. If it is not, there is a possible Hsk of
the range tipping oxer and causing illjn]_y" if yon or a child stand, sit or lean on an open door
Please refer m the And-Tip device infonnafion in fills manual. Failure m take fills precanfion
could iesnlt in tipping of the range and i,)jm>
IMPORTANTSAFETYNOTICE
The California Safe Drinking Water and Toxic Enforcement Act requires the Governor of California to
publish a list of substances known to the state to cause birth defects or other reproductive harm, and
requires businesses to warn customers of potential exposure to such substances.
Gas appliances can cause minor exposure to four of these substances, namely benzene, carbon
monoxide, formaldehyde and soot, caused primarily by the incomplete combustion of natural gas or
LP fuels. Properly adjusted burners, indicated by a bluish rather than a yellow flame, will minimize
incomplete combustion. Exposure to these substances can be minimized by venting with an open
window or using a ventilation fan or hood.
The fiberglass insulation in self-clean ovens gives off a very sma# amount of carbon monoxide during
the cleaning cycle. Exposure can be minimized by venting with an open window orusing a ventilation
fan or hood.
3
Page 4
IMPORTANTSAFETYINFORMATION.
READALLINSTRUCTIONSBEFOREUSING.
WARNING!
SAFETYPRECAUflONS
When using electrical appfiances, basic safety precautions should be foflowed, including the
following:
Use this appliance only %r its intended
purpose as described m tim )wner s
Manual.
Be sure your appliance is properly installed
and grounded by a qualified technician in
accordance with the prox4ded installation
instructions.
Before perfo_ning any service, disconnect
the rang,e power supply at the household
disu-ibufion panel by removing the fl_se or
switching off the circuit breaken
Hme the installer show yon the location of
the circuit breaker or fi_se. Mark it for easy
reference.
Do not leme children alone----_'hildren
should not be left alone or unattended in
an area where an appliance is in use. They
should nexer be allowed to sit or stand on
any part of the appliance.
Haxe the installer show you the location
of the range gas shut-offxahe and how to
shut it off if necessa U.
Hax.e your rang.e installed and properly
grounded by a qualified installei; in
accordance with the Installauon
Instructions. Any adjusunent and service
should be perforated only by qualified gas
rang.e installers or se_wice mchnicians.
Locate the range out of kitchen tral_c pafl_
and out of drafty locations to prexent poor
air circulation.
Be snre all packaging materials are
removed from the rang.e before operaung
it to pre\.ent fire or smoke damag.e should
the packag_ing material ignite.
Do not leme children alone or unattended
where a rang.e is hot or in operation. They
could be seriously bumed.
Do not attempt to repair or replace any
part of your range unless it is specifically
recommended in this manual. All other
service should be refelTed to a qualified
technician.
iiiiiiiiiiii_iii
Be sure your rang.e is con_ecfly adjusted
by a qualified se_Mce mchnician or installer
for the type of gas (natural or LP) that is
to be used. Your range can be corn.erred
for use with either type of gas. See the
Installation Instructions packed with
the rang.e.
Plug your rang,e into a 190_\_lt grounded
outlet only. Do not remox.e the round
g_ounding prong from the ping. If in
doubt about the grounding of the home
elecuical system, it is your personal
responsibility and obligation to hax.e
an ungrounded outlet replaced wifll a
properly gTounded, three-prong outlet in
accordance with rite National Electrical
(',ode. Do not nse an exmnsion cord with
this appliance.
-& WARNING:>eseadjustments
must be made by a qualified service
technician in accordance with the
manufacturer's instructions and aft codes
and requirements of the authority having
jurisdiction. Failure to follow these
instructions could result in serious injury or
property damage. The qualified agency
performing this work assumes
responsibility for the conversion.
Kee I) the hood and grease filters clean to
maintain good xenting and to mold grease
fires.
Teach children not to play with the
controls or any other part of the rang.e.
Always kee I) dish towels, dish cloths, pot
holders and other linens a satb distance
fronl vonr rang.e.
4
Page 5
SAFETYPRECAUTIONS
www.GEAppliances.com
Always kee I) wooden and plastic utensils
and canned food a safe distance fiom your
rangP.
Always kee I) combustible wall coxetings,
curtains or drapes a safe distance fiom
your rang.e.
Do not clean the rang.e with flammable or
x_latile cleaning fluids.
After prolong.ed use of a range, high floor
mmperauues may result and many floor
cox.elings will not withstand this kind of
use. Nex.er install tile tang`e, ox.er vinyl tile
or linoleum that cannot wifllsmnd such
type of use. Nexer install it directly over {
inmtior Mtchen carpeting.
Avoid scratching dte glass cooktop widl
shaq) instruments, or wiflt tings and other
jeweh T.
Do not allow anyone to climb, stand or
hang on dte oxen door; storag.e drawer or
cookmp. They could damag.e the rang.e
and even tip it ox.el; causing sex.ere
personal ilIjm T.
CAUTION:Itemsinteresttochildren
shouldnot be storedin cabinetsabovearangeor
on thebacksplashof a range--children climbing
on therangeto reachitemscould beseriously
injured.
mamdal could be ignimd if brought in
contact with flame or hot ox.en sur/aaces
and may cause sex.ere bums.
Do not store flammable materials in an
oven, a rang.e storag.e drawer or near a
cooktop.
Do not store or use combustible mamrials,
gasoline or other flammable vapors and
liquids in the viciniw of this or any other
appliance.
Do not let cooking grease or other
flammable mamrials accunmlam in or
near the rang.e.
Do not use wamr on grease fires. Never
pick up a flaming pan. Turn dm conuols
off: Smother a flaming pan on a surthce
burner 1)5' coxelqng tile pan complemly
wiflt a well-fitting lid, cooMe sheet or fiat
trW. Use a multi-pml)ose di T chemical or
foam-type rit.e exfinguishe_:
Flaming grease outside a pan can be put
out by coveting it with baking soda or;
if available, 1)5'using a multi-pm])ose dU
chemical or foam-type fire extinguisher.
Flame in dte oxen can be smodtered
completely by closing the ox.en door and
mining tile control to off or by using a
nntlti-purpose dU chemical or foam-type
fire extinguisher
WARNING:NEVERusethis
appliance as a space heater to heat or
warm file room, Doing so may result
in carbon monoxide poisoning and
ox.erheating of the cooktop or ox.en,
For your safety, never use your appliance
for wmlning or heating the room.
Larg.e scratches or impacts to glass doors
can lead to broken or shatmred glass.
Do not clean dte rang.e when the appliance
is in use.
Nexer wear loose-fitting or hanging
gammnts while using the appliance.
Be carefltl when reaching for items stored
in cabinets ox.er the rang.e. Flammable
Let tile bui_ler g_ates and other surthces
cool before touching them or leaving
them where children can reach them.
Never block die x.ents (air openings) of
the rang.e. They provide die air inlet and
outlet fllat are necessat T for the range to
operam properly with COtTect combustion.
'Air openings at.e located at rite t.ear of the
cooktop, at tile top and bottom of file
ox.en door; and at tile 1)oUom of the rang.e
under rite smrag.e drawer or kick panel.
Do not lift tile cooktop, iJfting tim
cooktop can lead to damag.e and improper
operation of the rang.e.
5
Page 6
IMPORTANTSAFETYINFORMATION.
READALLINSTRUCTIONSBEFOREUSING.
WARNING!
SURFACEBURNERS
Useproperpan size--avoid pansthatareunstableor easilytipped.Selectcookwarehavingflat bottomslarge
enoughto coverburnergrates.Toavoidspillovers,makesurecookwareis largeenoughto containthefood
properly, Thiswillbothsave cleaningtimeandprevent hazardousaccumulationsoffood,sinceMaw spattering
or spilloverslefton rangecan ignite.Usepanswith handlesthat can be easilygraspedandremaincooL
Ahvays use tim tirE position when igniting
the top burners and make sure the burners
hme ig_fited.
Never leme the stuface btunets unattended
at high flame settings. Boilovers cause
smoking and greasy spilloxers that may
catch on fire.
Adjust the top burner flame size so it does
not extend 1)eyond the edge of the cookware.
Excessive flame is hazardous.
Use only dry pot holders--moist or damp pot
holders on hot surPaces may resuh in burns
flom smam. Do not let pot holders come
near open flames when lifting cookware. Do
not use a towel or other 1)ulky cloth in place
of a pot holder:
_\ hen using glass cookware, make sure it
is desig_md for top-of-v,mge cooking.
To minimize tim possibili b, of 1)urns, ignition
of flammal)le materials and spillage, turn
cookware handles toward the side or back of
the range without extending over adjacent
1)tlI'IleI's.
Careflflly watch foods 1)eing flied at a high
flame setting.
Ahvays heat fat slowly and watch as it heats.
Do not lea\> any imms on the cooktop. The
hot air flom the vent may ig_im flammable
imms and will increase pressure in closed
containers, which mW cm_se them m buIst.
ff a coml)ination of oils or _lts will be used
in flying, sdr together before heating or
as flits meh slowh,
the pan too flfll of_u can cause spillovers
when food is added.
X&qmnpreparing flaming foods under the
hood, turn the fan on.
Do not use a wok on the cooking sut_l(e
if the wok has a round metal ring that is
placed o\er the burner gram to support the
wok. This ring acts as a heat uap, which m W
damage the burner g_m and N_rner head.
Also, it m W cm_se the N_rner m work
improperly. This may cause a cad)on
monoxide level above that allowed by current
standards, resulting in a heahh hazard.
Foods for fiying should be as dry as possible.
Frost on fiozen foods or moisture on fiesh
foods can cause hot _lt to 1)ul)l)le up and over
the sides of the pan.
Nexer u}, to move a pan of hot Pat especially
a deep _lt fiyer. X&hituntil the _lt is cool.
Do not leme plastic items on tim cooktop--
they may meh if left too close to the vent.
Kee I)all plastics mvay flom the surPace
1)tlI'Ile I'S.
To moid the possibili b, of a burn always be
certain that the conuols for all burners are
at the OFFposition and all grates are cool
before attempting to remove them.
If _ange is located near a window, do not
hang long curtains that could 1)low over the
surface burners and create a fire hazard.
If you smell gas, turn off the g_s to the range
and call a qualified service technician. Nexer
use an open flame to locate a leak.
Use a deep flit thermometer whenever
possible to prevent oxerheating _t 1)eyond
the smoking point.
Do not operate the 1)umer wifl_out all btuner
parts in place.
17se the least possible amount of £_t for
eft>cdve shallow or deep-_lt flying. Filling
Ahvays turn the stu£_ce burner conuols off
before removing cookware.
6
Page 7
vvww.GEAppliances.com
COOKMEATANDPOULTRYTHOROUGHLY...
Cookmeatandpoultrythoroughly--meattoatleastanINTERNALtemperatureof 160°Fandpoultrytoatleastan
INTERNALtemperatureof I80°ECookingtothesetemperaturesusualtypmtectsagainstfoodbomeillness.
WARNING!
OVEN
Stand away from the range when opening the oven door. Hot air or steam which escapes can cause
bums to hands, face and/or eyes.
Do not heat unopened fbod containe,s.
Pressure could build up and the container
could bum, causing an inju U.
KeeI) the oven vent unobstructed.
KeeI) the oven flee from grease buildup.
iii}iiii_
Place the oven rock in the desired position
while the oven is cool. If rocks must be handled
when hot, do not let pot holder contact the
heating elements.
When using cooking or roasting bags in the
oven, follow the manufi/cturer's directions.
Pulling out the rock to the stop-lock is a
convenience in lifting heavy fbods. It is also a
precaution against burns flom touching hot
surfilces of the door or oven walls.
iii}iiii
Do not use the oven to dU newspapers.
If overheated, the} can catch on fire.
iii}iiii
Do not use the oven fbr a storage area. Items
stored in an oven can ignite.
Do not leave paper products, cooking utensils
or food in the oven when not in use.
WARNING:N WRcove,
any slots, holes or passages in the oven bottom
or cover an entire rock with materials such as
aluminum _6il. Doing so blocks air flow
through the oven and may cause carbon
monoxide poisoning. Aluminum %il linings
may also trap heat, causing a fire hazard.
Do not use aluminum fioilto line oven bottoms,
except as suggested in this manual, hnproper
installation of alulninuln foil may resuh in a
risk of electric shock or fire.
iii}iiii
Make sure the broiler pan isin place conectl}
to reduce the possibilit} of grease fires.
iii}iiii
If you should have a grease fire in the broiler
pan, press the CLEAR/OFFpadand kee I) the
oven door closed to contain fire until it
BuI'nS OUt.
SELF-CLEANINGOVEN
Donot useovencleaners.No commercialoven cleaneror ovenlinerprotective coatingof anykind shouldbe
usedin oraroundanypart of theoven.Residuefrom ovencleanerswill damagetheinsideoftheovenwhen the
self-cleancycle is used,
Do not clean the door gasket. The door gasket
is essential fbr a good seal. Care should be
taken not to rub, damage or move the gasket.
} Be%re self,leaning the oven, remove the mcLs,
broiler pan, grid and other cookware.
} Be sure to x0pe up excess spillage be%re
starting the self cleaning ope_'ation.
} If the self cleaning mode malflmctions, turn the
oven off and disconnect the power supply. Have
it serviced b} a qualified technician.
} Clean only parts listed in this Owner's Manual.
READANDFOLLOWTHISSAFETYINFORMATIONCAREFULLY.
SAVETHESEINSTRUCTIONS 7
Page 8
Usingthegas surfaceburners.
Throughout this manual, features and appearance may vary from your model
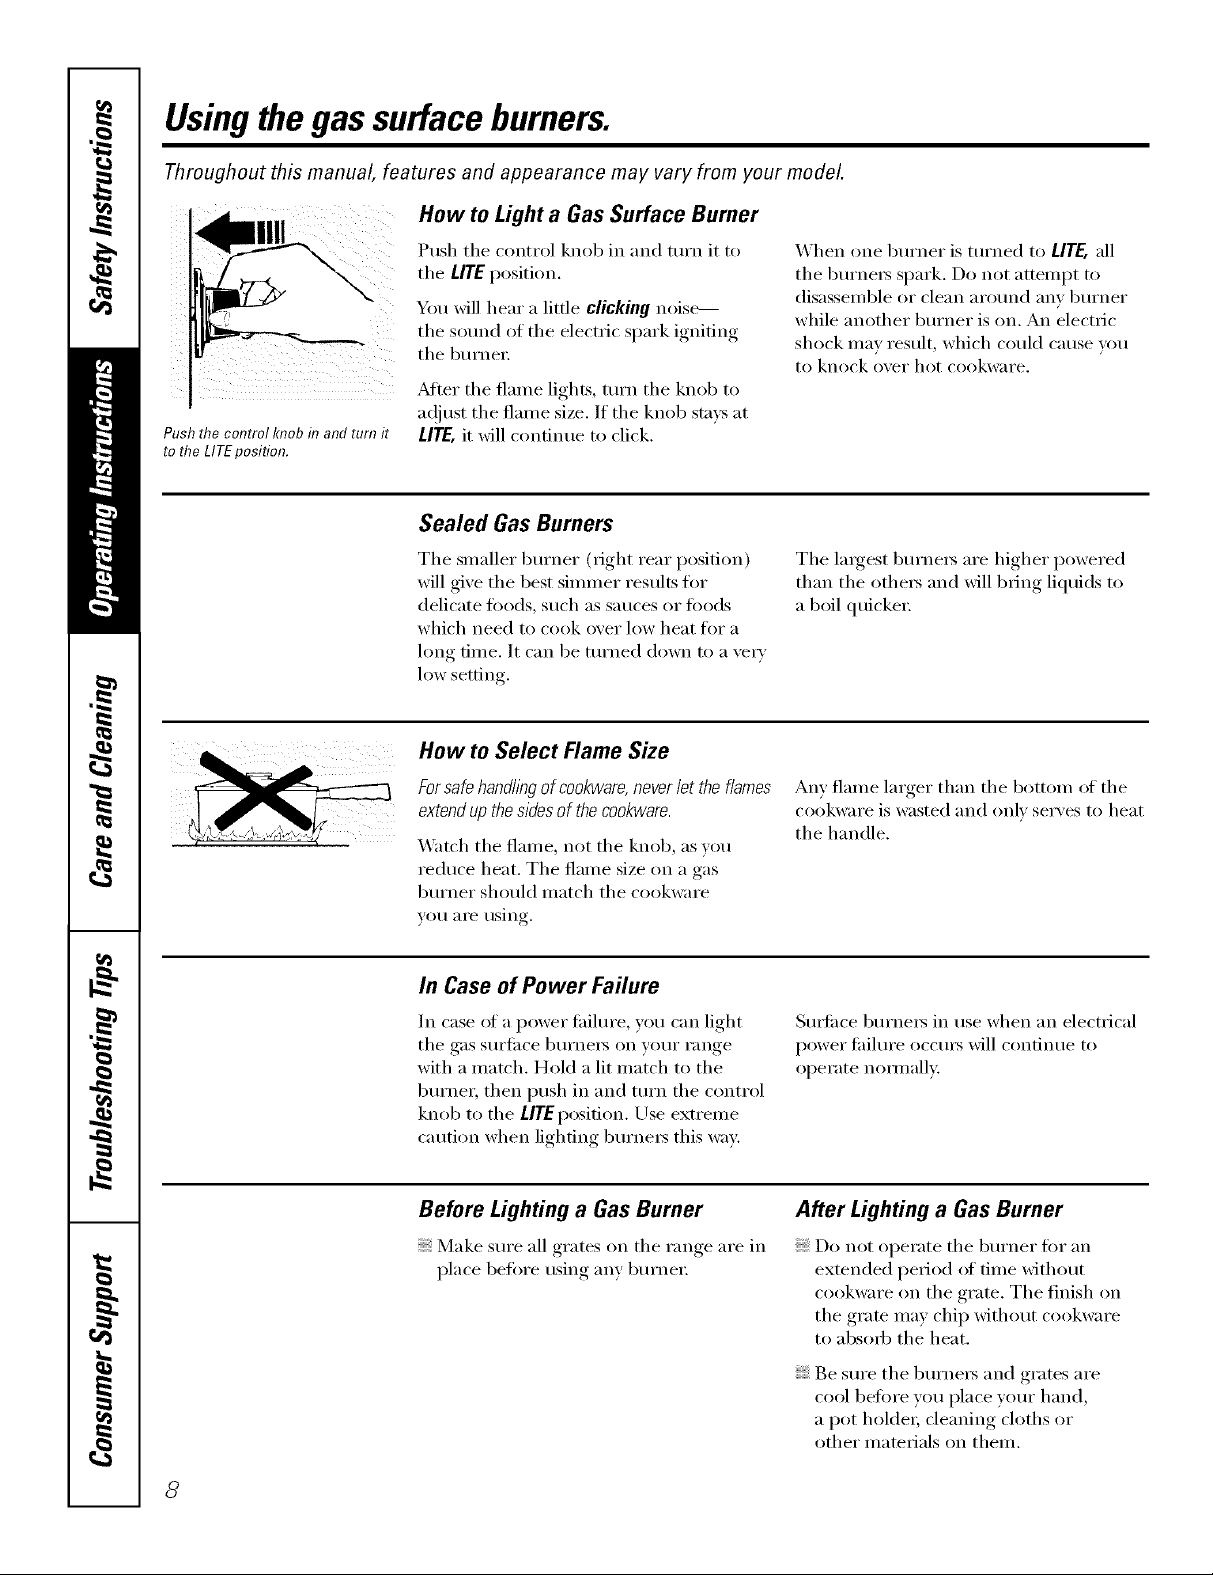
How to Light a Gas Surface Burner
Push the control knob f17and turn it
to the LITEposifion.
Push the control knob in and turn it to
tile LITE l)osition.
You will hear a little clicking noise----
the sound of the electric spark igniting
tile burllel:
z_dtet" the flame lights, mrn the knob to
a(!just the flmne size. If the knob stm:s at
£1TE, it will continue to click.
Sealed Gas Burners
When one burxler is turxled to LITE,all
the burnei_ spark. Do not attelnpt to
disasselnble or clean aroulld allY burner
while another 1)urner is o11. An electric
shock inay result, which could cause you
to knock ovei" hot cookw;li'e,
The slnaller burner (right rear posidon)
will give the best silnn/er results for
delicate fi)ods, such as sauces or fi)ods
which need to cook over low heat fi)r a
hmg dine, It can be turned down to a veI_'
low setting.
How to Select Flame Size
Forsafe handlleg of cookware,never let the flames
extendup the sides of thecookware.
Watch the flalne, not the knob, as you
reduce heat. The flame size on a gas
burner should Inatch the cookware
VOII _lI'e rIsing.
In Case of Power Failure
In case of a power tifilure, you can light
the gas surlilce burnei_ on your range
with a inatch. Hold a lit inatch to the
burner, then push in and turn the control
knob to the LITEposition. Use extrelne
caution when lighting burnei_ this way:
The largest burners are higher powered
than the othels and will bring liquids to
a boil quickeI:
Any flame larger than the bottom of the
cookware is wasted _111(1 only selwes to heat
the handle.
Sut_i_ce burners in use when an electrical
power tifilure occui_ will continue to
operate noHnall>
Before Lighting a Gas Burner
Make sure all grates on the range are in
place before using any burnei:
After Lighting a Gas Burner
Do not operate the burner [or an
extended period of tilne without
cookware on the grate. The finish on
the grate Inay chip without cookware
to absorb the heat.
Be sure the burnels and grates are
cool befi)re you place your hand,
a pot holdeI; cleaning cloths or
other inaterials on theln.
8
Page 9
Top-of-Range Cookware
www.GEAppliances.com
Aluminum: Medium-weight cookware is
recommended because it heats quickly
and evenly: Most fi)ods brown evenh' in
an ahmfinum skillet. Use saucepans with
tight-fitting lids when cooking with
IllinilllHI// alllO/ints ot _;Ker.
Cast-Iron: If heated slowly, most skillets
will give satisti_cto_ y results.
Enamelware: Under some conditions,
tile enamel of SOille cookware I/laY
Illelt. Follow cookware illailt/tiiCttli'eF's
recommendations fi)r cooking methods.
Glass: There are two t}pes of glass
cookware--those fi)r oven/lse onlY
and those fi)r toi>ot:range cooking
(saucepans, coffee and teapots).
Glass conducts heat ve_' slowly:
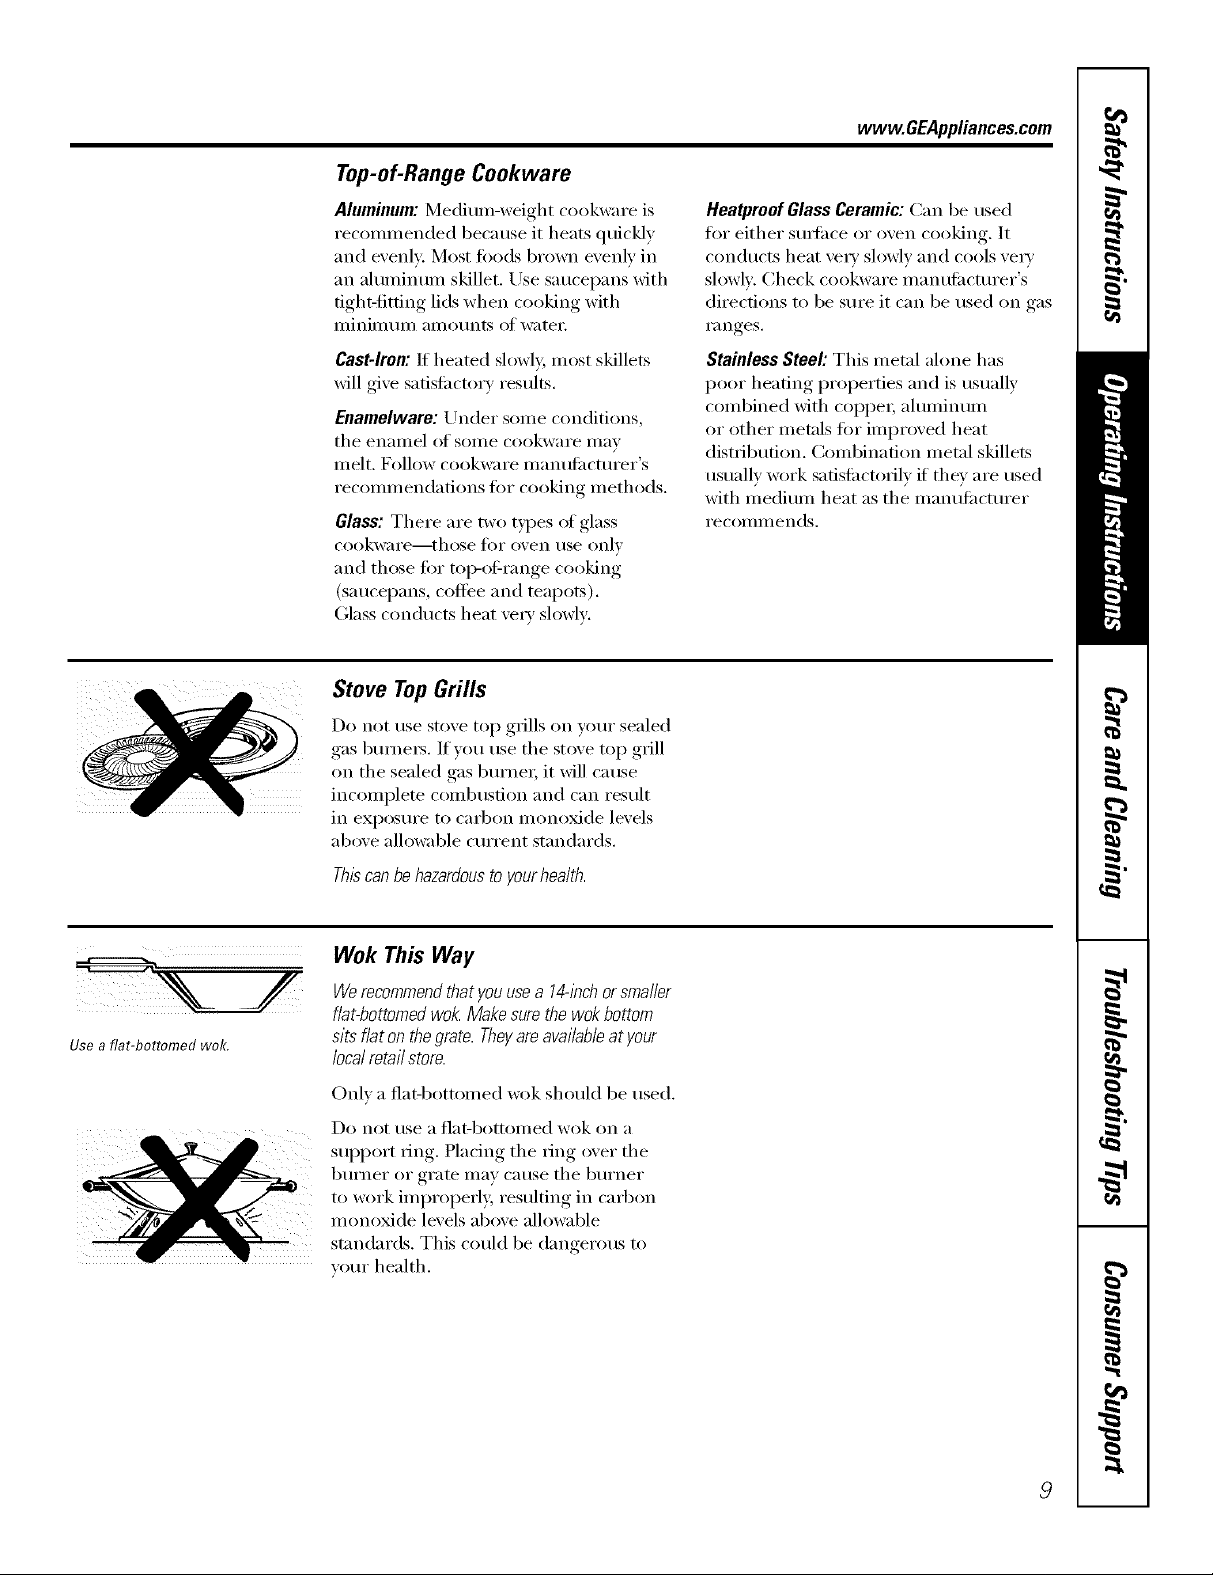
Stove TopGrills
Do not use stove top grills on your sealed
gas burners. If you use tile st()ve top grill
on tile sealed gas burne_; it will cause
incomplete combustion and can result
in exposure to carbon inonoxide levels
above allowable cmTent standards.
Heatproof Glass Ceramic: Can be used
fl)r either smti_ce or oven cooking. It
conducts heat \'e_' slowly and cools \'e_'
slowh'. Check cooJ¢ware inanufilcturer's
directions to be sure it can be used on gas
ranges.
Stainless Steel'. This metal alone has
poor heating properties and is usually
combined with coppe_; ahmfinum
or other metals fi)r improved heat
distribution, Combination metal skillets
usually work safisfi_ctofilv if they are used
with medium heat as tile manufi_cmrer
i'ecoi/lillends.
Use a fiat-bottomed wok.
(
Thiscanbehazardousto yourhealth.
Wok This Way
Werecommendthatyouusea 14-inchorsmaller
flat-bottomedwok.Makesurethewokbottom
sitsflatonthegrate.Theyareavailableat your
localretailstore.
Onh a fiat-bottomed wok should be used.
Do not/Ise a I']at-bottoi//ed wok on a
support ring. Placing tile ring over tile
burner or grate may cause tile burner
to work improperl> resulting in carbon
monoxide levels above allowable
standards. This could be dangerous to
veto _health.
9
Page 10
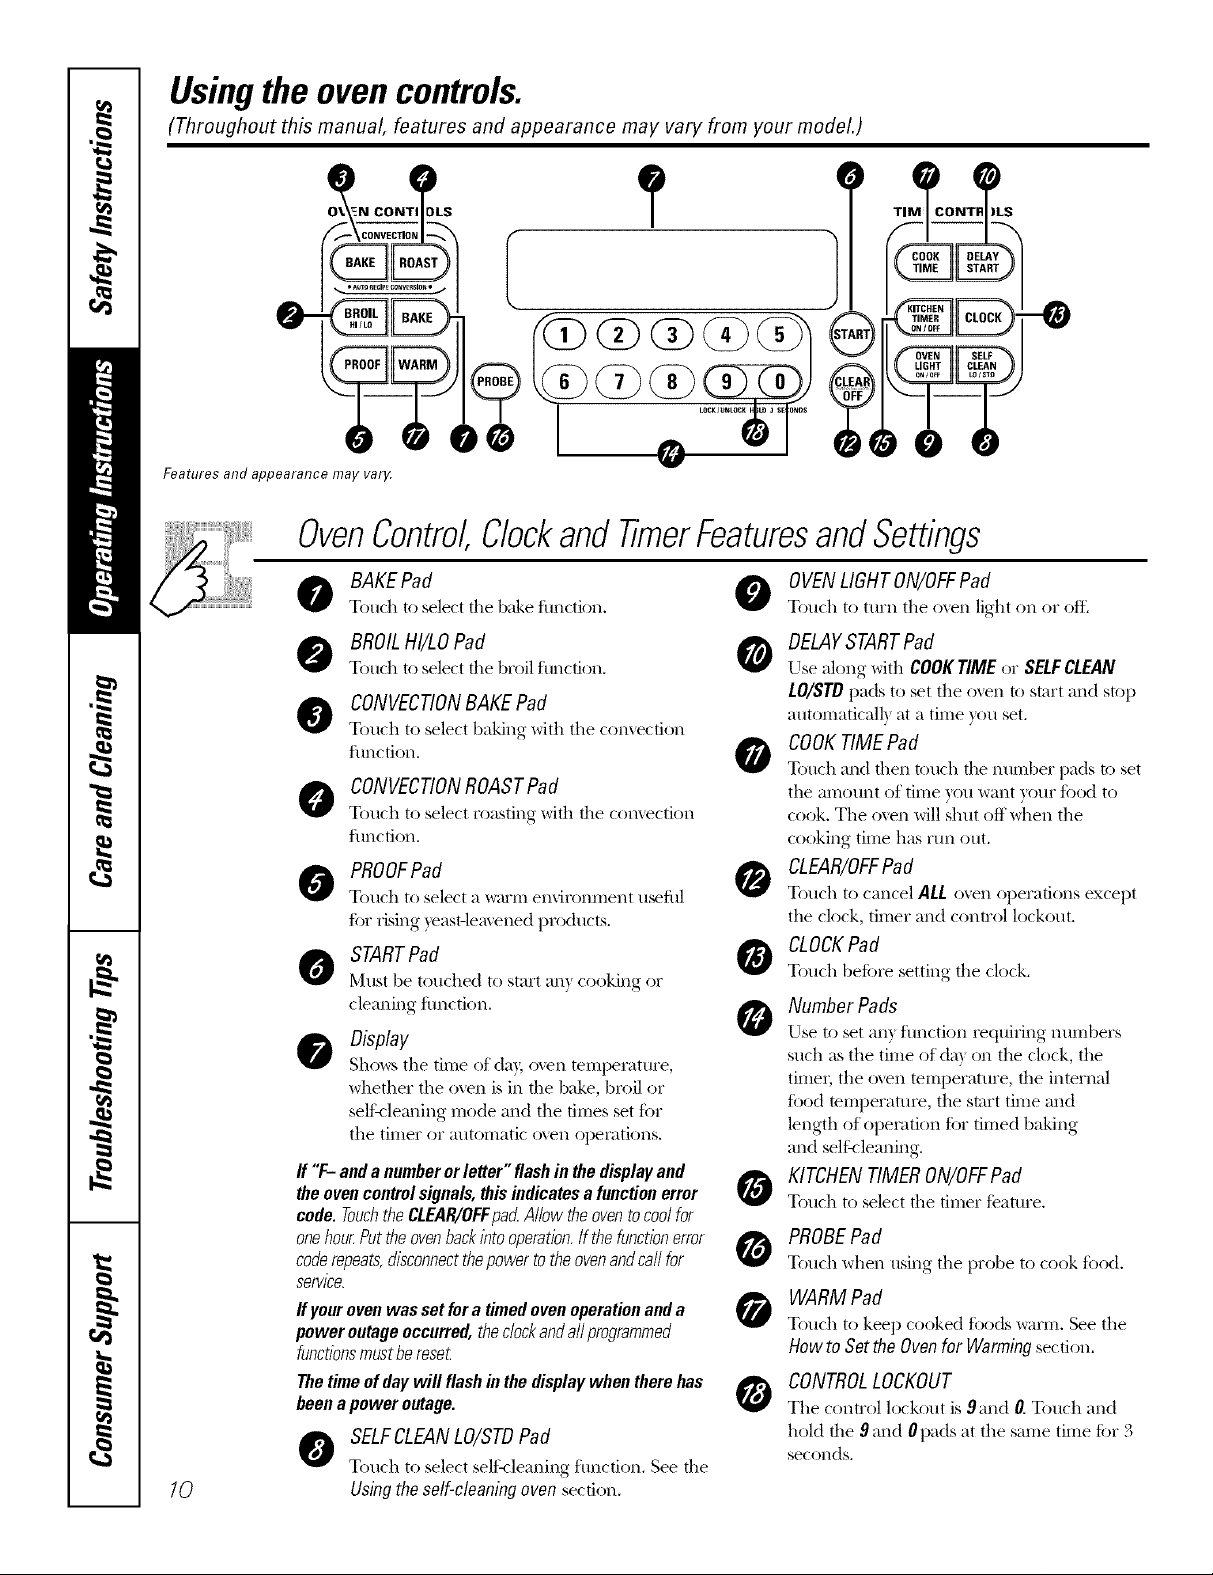
Usingthe ovencontrols.
(Throughout this manual, features and appearance may vary from your model.)
I ,,
Featuresandappearancemayvar_¢
OvenControl,ClockandTimerFeaturesandSettings
--0
10
BAKEPad 0
Touch to select tile b;&e fimction.
@ BROILHI/LOPad 0
Touch to select tile broil function,
CONVECTIONBAKE Pad
Touch to select baking with the comection
function.
CONVECTIONROASTPad
Touch to select roasting with tile comection
function,
PROOFPad
Touch to select a warm emironment u_ful
fi)r rising yeastdemened products.
STARTPad
_'ltlst be tot]ched to start all} cooking or
cleaning fimction,
Display
Sho_,_stile time of da); oxvn telllpei'attlre,
whether the oven is in the bake, broil or
sell:vlemfing mode and the times set fi)r
the timer or automatic o_en opemtkms.
ff "F- and a number orletter" flashin thedisplayand
theovencontrolsignals, thisindicates a functionerror
code. Touchthe CLEAR/OFFpad Allow the oventocoolfor
onehour.Putthe ovenbackinto operation,lEthefunctionerror
coderepeats,disconnectthepowerto theovenandcall for
service.
ffyour oven was set for a timed ovenoperationand a
power outage occurred, theclockandall programmed
functionsmustberese_
Thetime of day will flash #1the display when there has
beena power outage.
SELFCLEANLO/STDPad
Touch to select selik-leaning fimction. See tile
Usingthe self-cleaning oven section.
OVENLIGHTON/OFFPad
Touch to tm'n tile oxen light on or elk
DELAYSTARTPad
Else ahmg with COOKTIME or SELFCLEAN
LO/STD pads to set tile o_vn to start and stop
automaticall) at a time you set.
COOKTIMEPad
O
Touch and then touch the nun-Jber pads to set
the amount of time you want your filed to
cook. Tile oven will shut off when tile
cooking time has run out.
CLEAR/OFFPad
Touch to cancel ALL oven operations except
the clock, timer and control lockout.
CLOCKPad
Touch befi)re setting the clock.
Number Pads
Else to set an} flmction requiring numbers
such as tile time of da) on the clock, the
time_; the oxen temperatm'e, the internal
filed temperatm'e, the start time and
length of operation fi)r timed baking
and sellqlemling.
KITCHENTIMERON/OFFPad
Touch to select the timer featm'e.
PROBEPad
Touch when using tile probe to cook fbod.
WARM Pad
Touch to keep cooked tbods warm. See tile
How to Set the Ovenfor Warming section,
CONTROLLOCKOUT
Tile control lockout is 9and O.Touch and
hold the 9 and 0 pads at the same time tar 3
seconds.
Page 11
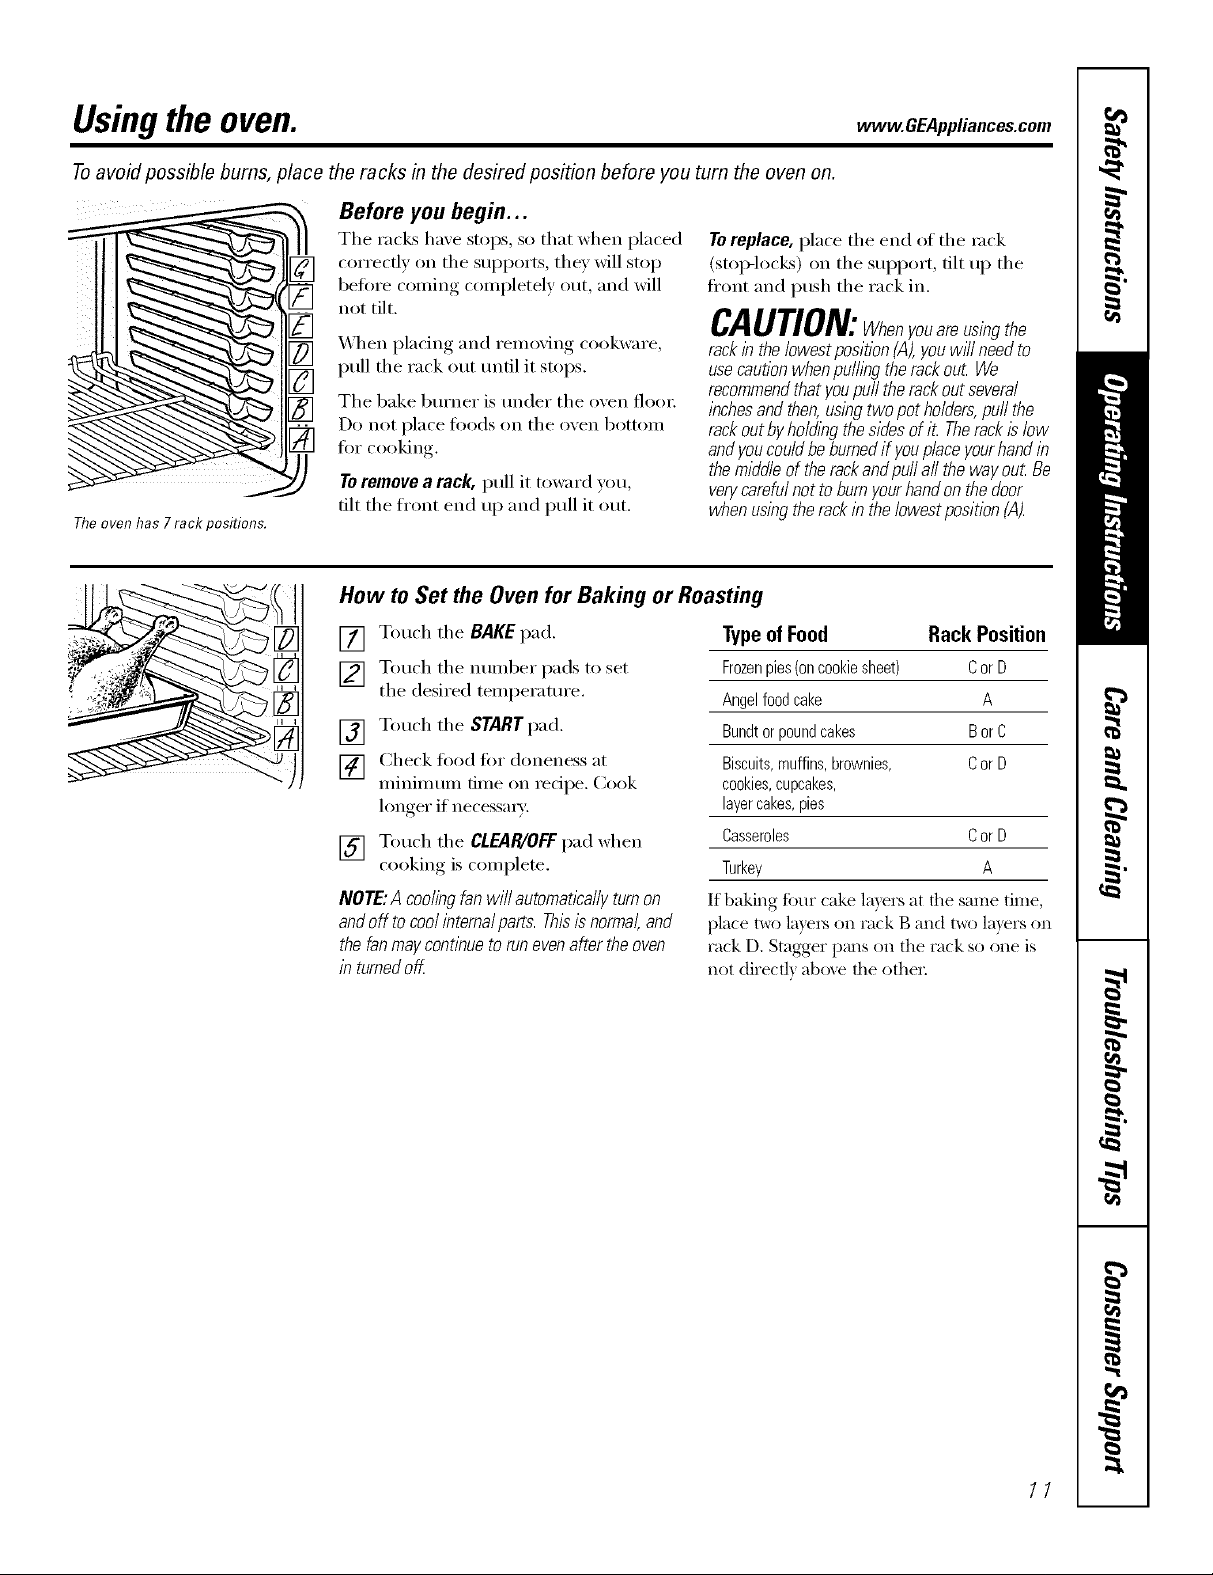
Usingthe oven. vvvvw.GEAppliances.com
Toavoid possible bums, place the racks in the desired position before you turn the oven on.
Before you begin...
The racks have stops, so that when placed
correctly on the supports, they will stop
before coming completely out, and will
not tilt.
Toreplace, place tile end of tile rock
(stop-loci<s) on tile support, tilt ul) tile
fl'ont and push the rack in.
CAUTION:Whenyouareusingthe
_,_]/en placing and removing cookware,
pull tile rack out until it stops.
The bake burner is under the oven floo_:
Do not place toods on tile oven bottom
fi)r cooking.
Toremove a rack, pull it toward you,
tilt tile ti'ont end up and pull it out.
Theoven has 7rack positions.
How to Set the Oven for Baking or Roasting
rackin the lowest position (,4),youwffl need to
usecautionwhen pulling the rackout We
recommendthat you puffthe rackoutseveral
inchesandthen, using two pot holders,puff the
rackout byho/ding the sides of iL Therack is low
andyou couldbe burnedif youplace yourhand in
the middleof therackand pu//a// the way ou_ Be
verycarefulnot to burnyour handon the door
when using therack in the/owestposition CA).
[] Touch tile BAKE pad.
[] Touch tile number pads to set
the desired temperature.
[] Touch tile START pad.
[] Check fi)od fin" doneness at
minimum time on recipe. Cook
longer if necessmT:
[] Touch tile CLEAR/OFFpad when
cooking, is coml)lete.
NOTE:A coolingfanwill automaticallyturnon
andoff tocoolinternalparts.Thisisnormal,and
thefanmaycontinuetorunevenaftertheoven
in turnedoff
TypeofFood Rack Position
Frozenpies(oncookiesheet) CorD
Angelfoodcake A
Bundtorpoundcakes BorC
Biscuits,muffins,brownies, CorD
cookies,cupcakes,
layercakes,pies
Casseroles CorD
Turkey A
If baking fi)ur cake layers at the same time,
place two la)'e_ on rock B and t_ layers on
rack D. Stagger pans on the rack so one is
not (tirect]} ab_e the othe_:
11
Page 12
Usingthe oven.
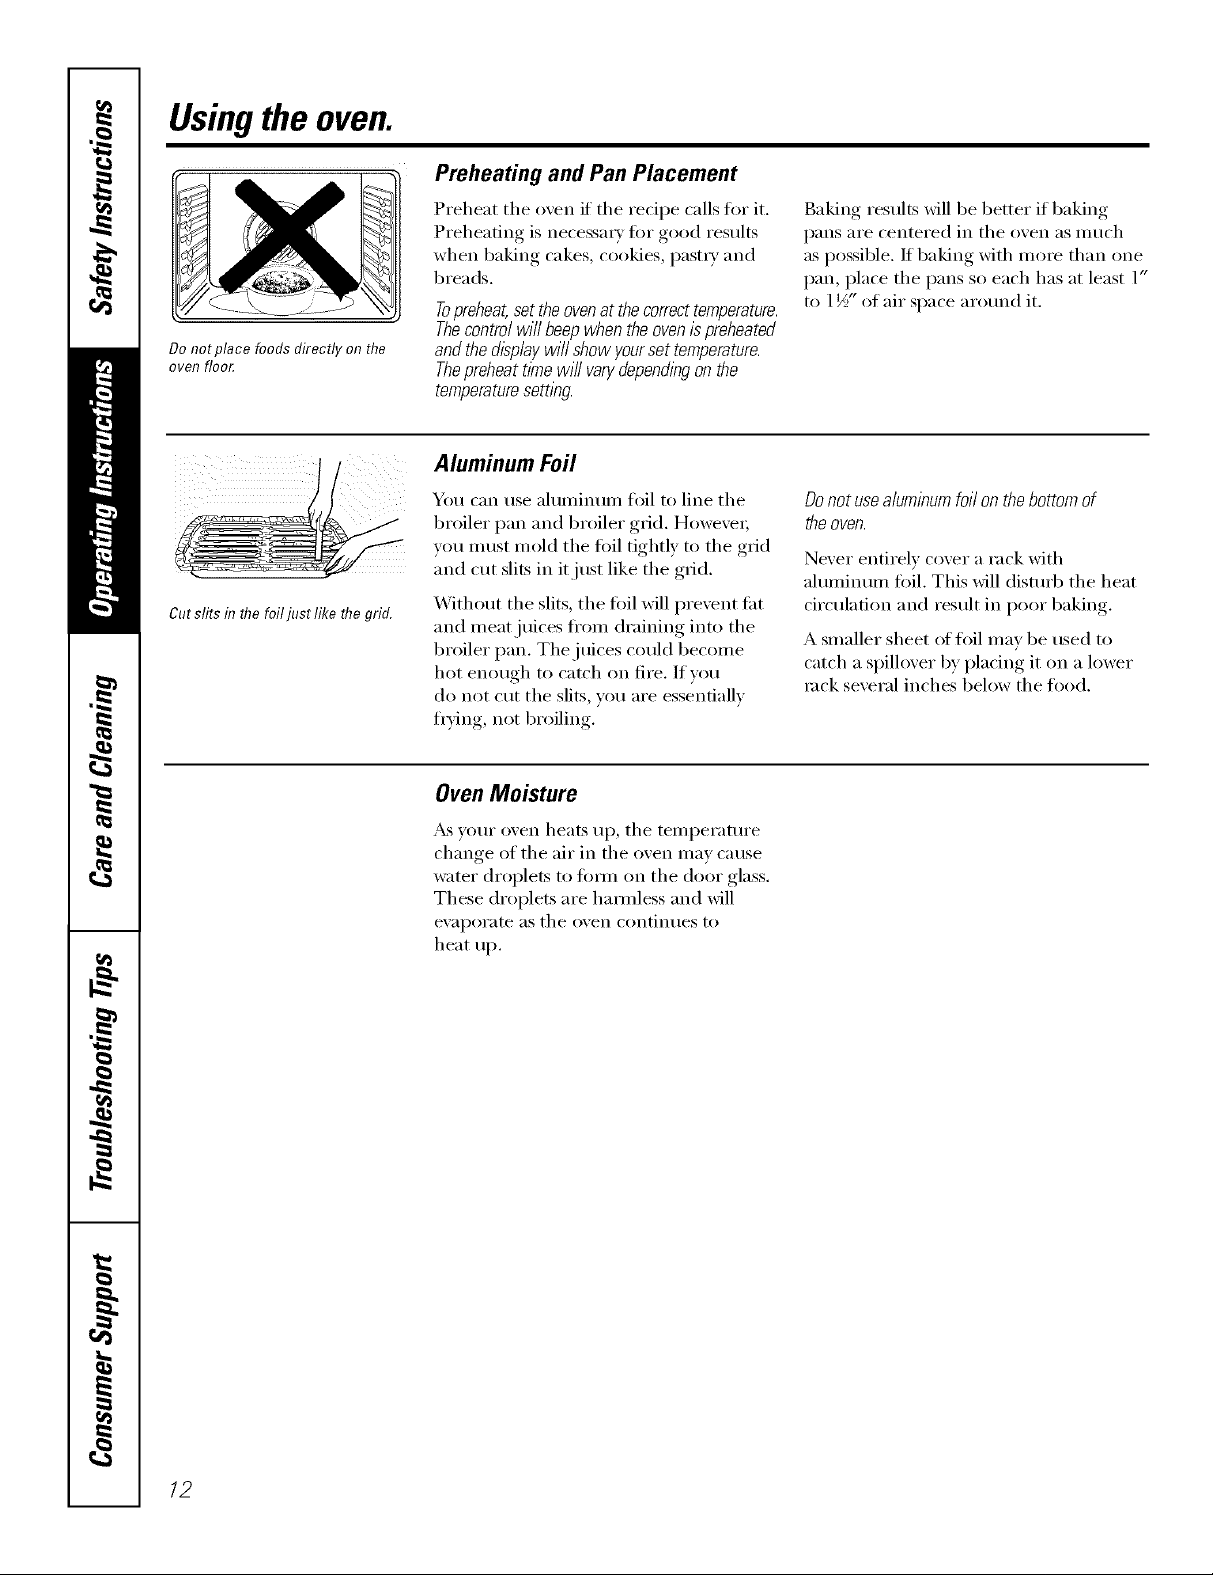
Preheating and Pan Placement
Do not place foods directly on tlTe
oven floo_
Cut stirs f17the foil just like the grid.
Preheat the oven it the redpe calls fin" it.
Preheating is necessm T fin" good results
when baking cakes, cookies, past_ T and
breads.
Topreheat,settheovenat thecorrecttemperature.
Thecontrolwillbeepwhentheovenis preheated
andthedisplaywillshowyoursettemperature.
Thepreheattimewill van/dependingonthe
temperaturesettl))g.
Aluminum Foil
You can use ahmfinum hill to line tile
broiler pan and broiler grid. Howexe_;
you must mold tile fifil tightly to tile grid
and cut slits in it just like tile grid.
Without the slits, the toil will prevent tilt
and meat juices ti'om draining into the
broiler pan. The juices could become
hot enough to catch on fire. If wm
do not cut the slits, you are essentially
flTing, not broiling.
Oven Moisture
Baking results Mll be better if baking
pans are centered in tile oven as nluch
as possible. If baking with more than one
pan, place the pans so each has at least 1"
to 11/-,"of air space around it.
Donotusealuminumfoil onthebottomof
theoven.
Never entirely cover a rack with
ahmfinum fifil. This Mll dismd) tile heat
circulation and result in poor baking.
A smaller sheet of fl)il may be used to
catch a spillover by plating it on a lower
rock several inches below tile food.
_&svour oven heats up, tile temperature
change of the air in the oven may cause
water droplets to titan on tile door glass.
These droplets are hamfless and will
e;'al)OI'ate as tile oven contintles to
heat up.
12
Page 13
Oven Vent
www.GEAppliances.com
Ybm" oven is vented through one vent
located toward the rear ot the range, Do
not block this vent when cooking in the
oven--it is important that the flow of hot
air fl'om the oven and fl'esh air to the
oven burner be uninterrupted, Avoid
touching the vent openings or nearby
surfaces duringoven or broiler operation--
they may become hot
Power Outage
CAUTION: Do not make any attempt to operate
the electric i_?nitionoven during an electrical
power failure.
The oven or broiler cmmot be lit dtwing a
power fifilm'e, Gas will not flow mfless the
glow bar is hot.
Handlesofpotsandpansonthecooktopmay
becomehotif left toodoseto thevenL
Donotleaveplasticitemsonthecooktop--
theymaymeltif lefttooclosetothevenL
Donotleaveanyitemsonthecooktop.Thehot
air fromtheventmayigniteflammableitems
andwillincreasepressureinclosedcontainers,
whichmaycausethemtoburst.
Metalitemswillbecomeveryhotif theyare
leftonthecooktop,andcouldcauseburns.
If the oven is in use when a power fifilm'e
occm_, the oven bm'ner shuts off and
cannot be re-lit tmfil power is restored.
This is bec;mse the flow of gas is
automatically stopped and will not resume
when power is restored tmtil the glow bar
has reached operating temperattu'e.
/3
Page 14
Usingthe oven.
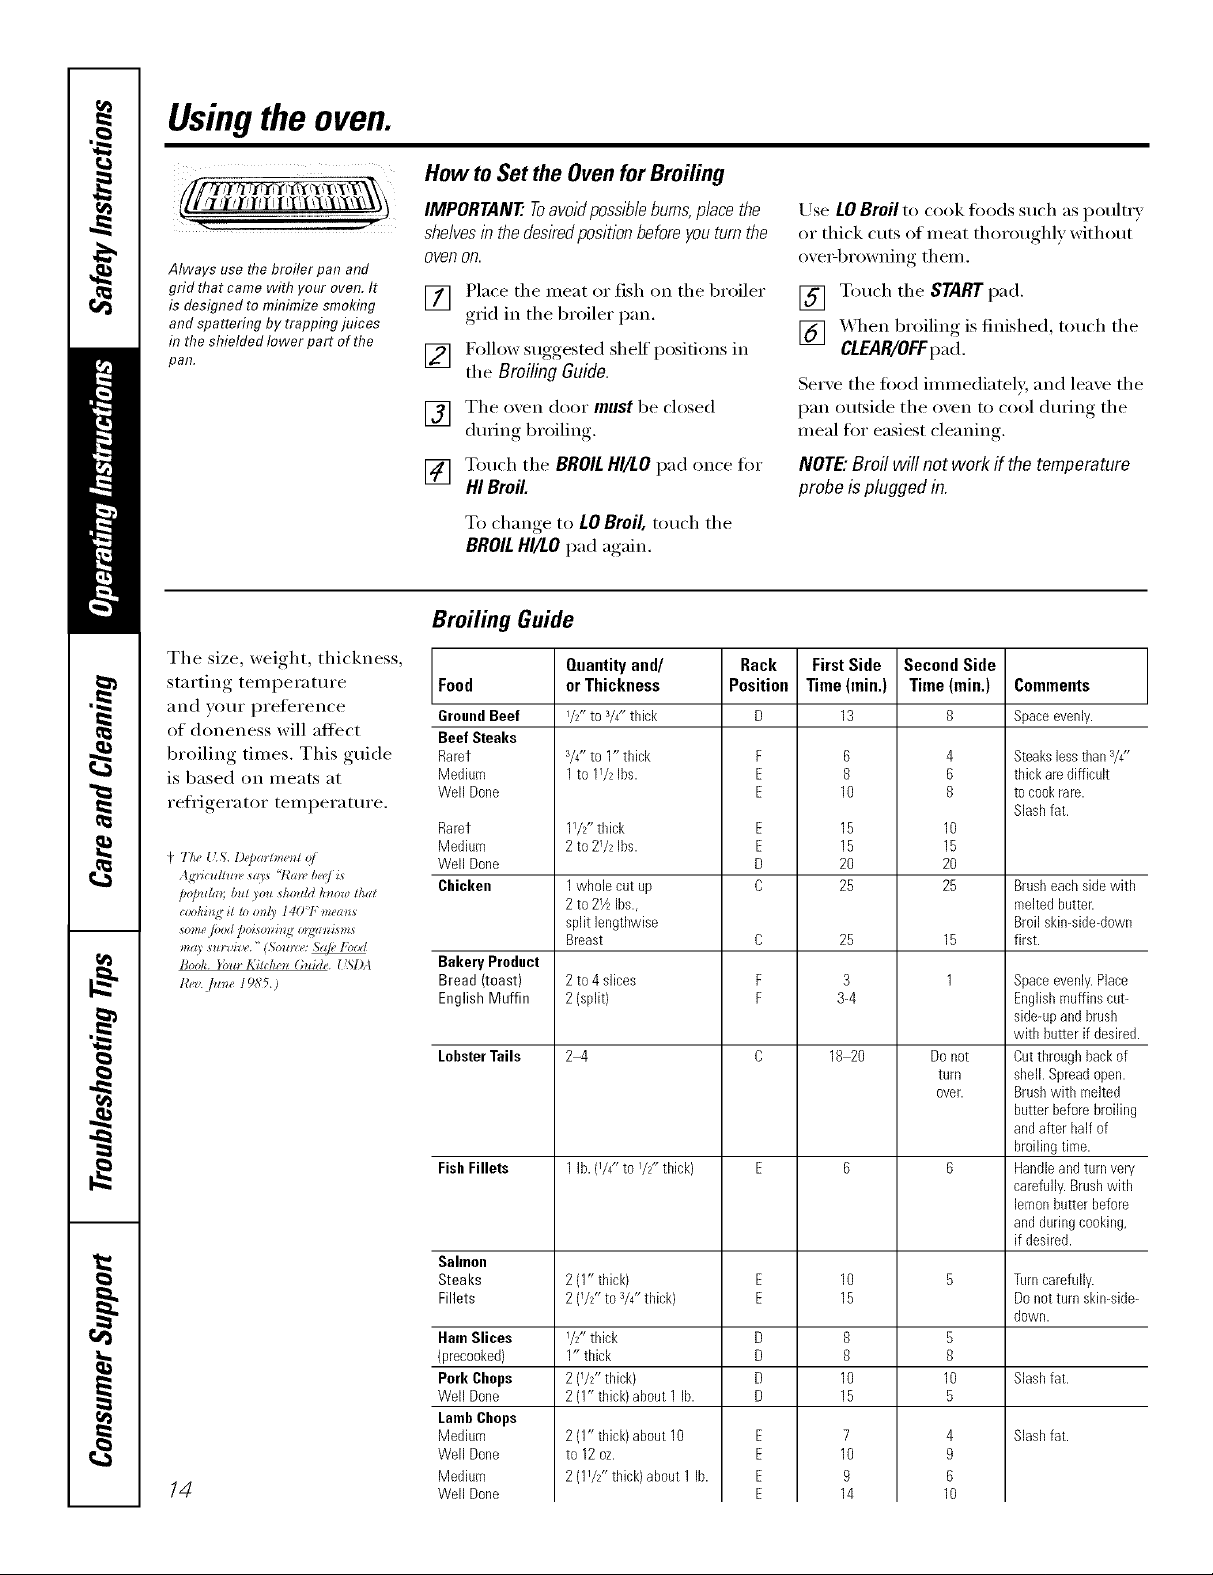
How to Set theOvenforBroiling
IMPORTANT'.Toavoidpossib/eburns,placethe
she/yesinthedesiredpomtionbeforeyouturnthe
Always use the broiler pan and
grid that came with your oven. It
is designed to mflfimize smoking
and spattering by trappflTgjuices
f17the shielded lower part of the
pan.
oven on.
[] Place the meat or fish on the broiler
grid in the broiler pan.
[] Follow suggested shelf positions in
the BroilingGuido.
[] The oxen door must be closed
dm_Jng broiling
[] Touch the BROIL HI/LO pad once for
HI Broil.
To change to LOBroil, touch the
BROILHI/LOpad again.
Broiling Guide
The size, weight, thickness,
starting, teml)erature Food
and VOtli" pI'eleI'ence GroundBeef
of doneness will aft'oct BeefSteaks
broiling times. This guide Raret
is based on meats at Medium
refligerator temperature.
# 7/w {L% Department of
tg'_Tcullu_, *a3* "l{m_,be(J is
/;o/mhz_; bul )ou _ho_ffdImm_: that
cookhg it lo o_(_ I40'F mean*
*omejood poism_i_g o_;e,z_zisms
ma) su_'uiv_,." (.Sour<_,:S_@l"uod
Book. _bu_KiZch* t* Guide. [ SIM
leer. fll_e 19S5.)
/4
WellDone
Rarer
Medium
Well Done
Chicken
Bakery Product
Bread (toast)
English Muffin
LobsterTails
FishFillets
Salmon
Steaks
Fillets
HamSlices
(precooked)
Pork Cbops
Well Done
LambChops
Medium
Well Done
Medium
Well Done
Quantityand/
or Thickness
1/2" to 3/4" thick
s/4"to I" thick
1to 11/2Ibs.
11/2'' thick
2 to 2V2Ibs.
1wholecut up
2 to 2YzIbs.,
split lengthwise
Breast
2 to 4slices
2 (split)
2-4
1lb. {I/4" to I/2" thick)
2 (1" thick)
2 (1/2',tos/4"thick)
1/_-thick
1" thick
2 (V2"thick)
2 (1" thick) about 1 lb.
2 (1" thick) about 10
to 12oz.
I
2 (1/2" thick)about 1lb.
Rack
Position
F
E
E
E
E
D
D
C
F
F
D
D
D
D
Use LOBroil to cook fi)ocls such as poultx T
or thick cuts of meat thoroughly without
ovePbrowning them.
[] Touch the STARTpad.
[] _Aq_en broiling is finished, touch the
CLEAR/OFFpad.
Serve the food immediately, and leave the
pan outside the oven to cool dm'ing the
meal tor easiest cleaning.
NOTE:Broil will not work if the temperature
probe is plugged in.
FirstSide
Time(rain.)
13
10
15
15
20
25
25
3-4
18 20
10
15
10
14
Second Side
Time (min.)
8
6
8
3
8
8
7
9
4
6
8
10
15
2O
25
15
1
Do not
turn
over.
5
8
10
5
4
9
6
10
Comments
Spaceevenly.
Steakslessthans/4"
thick are difficult
to cookrare.
Slashfat.
Brusheachsidewith
meltedbutter.
Broilskimsidedown
first.
Spaceevenly.Place
Englishmuffins cat-
side-upandbrush
with butter if desired.
Cutthroughback of
shell. Spreadopen.
Brushwith malted
batterbeforebroiling
andafter Mf of
broilingtime.
Handleandturnvery
carefully.Brushwith
lemonbutter before
anddaringcooking,
if desired.
Turncarefully.
Donotturn skin-side-
down.
Slashfat.
Slashfat.
Page 15
Usingthe clock, timer and control lockout, vvvvw.GEAppliances.com
ToSet the Clock
ii ii ii ili!;!i)
Make sure the clock is set to the
correct time of da_
Thetimer is a mflTutetimer onI,A
Thetimer does not control oven
operations. The maximum setting on
the timer is 9 hours and 59mflTutes.
The clock must be set to tile correct time
of dm fin" tile autonmfic o',en tinting
flmctions to work properly. Tile time of
da) cannot be changed during a timed
baking or self=cleaning cycle,
ToSet the Timer
Touch tile KITCHENTIMER
ON/OFF pad,
Touch tile number pads tmfil tile
[]
_lIllO/lnt of time yell want shows
in tile display: For example, to set
2 hom_ and 45 minutes, touch 2, 4
and 5 in that ordex: If you make a
mistake touch tile KITCHEN TIMER
ON/OFF pad and begin again.
[] Touch tile STARTpad.
ToReset the Timer
[] Touch tile CLOCK pad.
[] Touch tile number pads.
[] Touch the START pad.
AftertouchingtheSTARTpad,SETdisappears,
thistellsyouthetl_neis countingdown,although
thedisplaydoesnotchangeuntiloneminutehas
passedSecondswi//notbeshownb thedisplay
untilthe/astmbute iscountingdown.
[] _,_ hen tile timer reaches :00, tile
control will beep 3 times followed
by one beep eve_ T 6 seconds tmtil
tile KITCHENTIMERON/OFFpad
is touched.
The&secondtonecanbecanceledbyfollowlw
thestepsb theSpecialfeaturesofyouroven
controlsectionunderTonesat theEndeta
TimedCycle.
LOCK/UNLOCK HOLD 3 SECONDS
If tile display is st.ill shoMng tile time
remaining, you may change it by
touching tile KITCHEN TIMER ON/OFF pad,
then touch tile number pads tmtil tile
time w_u want appea_ in tile displa>
ToCancel the Timer
Touch tile KITCHENTIMERON/OFF
pad twice.
Control Lockout
Yourcontrolwill allowyoutolockout thetouch
padssotheycannotbeactivatedwhenpressed
To hmk/tmlock tile controls:
[] Touch tile 9 and Opads at tile same
time fin 3 seconds, tmtil tile displa)
shows LOC ON.
[] To unlock tile control, touch tile 9
and 0pads at tile sanle tinle for 3
seconds, until tile display shows
LOCOFF.
If tile remaining time is not in tile display
(clock, delay start or cooking time are in
tile display), recall tile remaining time by
touching tile KITCHENTIMERON/OFFpad
and then touching tile ntli//ber pads to
entei" tile new [lille veil want.
When this teatm'e is on and tile touch
pads are touched, tile control will beep
and tile display will show LOCON.
Thecontrollockoutmodeaffectsall touch
pads.Notouchpadswi//workwhenthis
featureisactivated
Theadjustmentwiii beretalhedlnmemory
afterapowerfailure.
15
Page 16

Usingthe timedbakingand mastingfeatures.
NOTE" Foods that spoil easily--such as milk, eggs, fish, stuffings, poultry and pork--should not be allowed to s# for
more than 1hour before or after cooking. Room temperature promotes the growth of harmful bacteria. Be sure that
the oven light is off because heat from the bulb will speed harmful bacteria growth.
How to Set an Immediate Start and Automatic Stop
Theoven will turn on immediatelyandcook for
aselected lengthof tlYne.At the end of the
cookingt/me the oven wi// turnoff automatica//y
[] Touch the BAKEpad.
[] Using the nulnber pads, enter the
desired telnl)erature.
[] Touch the COOKTIMEpad.
NOTE:If yourreciperequkespreheatingyou
mayneedtoaddadditionaltimetothelengthof
thecookingrime.
[] Using the number pads, enter the
desired baking time. The oxen
teml)erature and the cooking dine
that you entered will be displa) ed.
[] Touch the STARTpad.
The display will show the changing
temperature (starting at I00°F) and the
cooking tiine. The display starts changing
once the temperatm'e reaches IO0<'F.
The oven will continue to cook for the
programmed aillOtlnt oil time, then shut
off atmmmtically, tmless the WM{M or
the Cook and Hold tbatme was set.
Depending on yore" model, see the How to
Set the Ovenfor Warmingsect.ion or tile
Special featuresof your ovencontro/section.
Touch the CLEAR/OFFpad to clear the
display:
ii;¸ (
(DGCDOCD;
i(iii ! i)ii il
(DCDCDGCD:
iQGQCDG
How to Set a Delayed Start and Automatic Stop
Youcanset the oven control to delay-start the
oven,cookfor a specifc length of time and then
turnoff automafical/g
Make sm'e the clock shows the correct
time of day:
[] Touch the BAKEpad.
[] Using the number pads, enter the
desired temperatm'e.
[] Touch the COOKTIME pad.
NOTE:If yourreciperequkespreheating,you
mayneedtoaddadditionaltimetothelengthof
thecookingrime.
[] Using the number pads, enter the
desired baking time.
[] Touch the DELAYSTART pad.
[] Using tile number pads, enter the
time of da)}ou want the oxen to
ttlI'n on and st;lI't cooking.
[] Touch the STARTpad.
If you would like to check tile times you
have set, touch the DELAYSTART pad to
check the start time you have set or touch
the COOKTIMEpad to check the length
of cooking time you have set.
X'_hen the oven turns on at the time of
da) you haxe set, the displa)will show the
changino, ,_ temperatm'e (startino._ at 100°F)
and the cooking inne. The displa) starts
changing once the temperature reaches
lO0°E
The oven will continue to cook fi)r the
programmed amount of time, then shut
off automatically, tmless the _._;M/M or
the Cook and Hold teattue was set.
Depending on yore" model, see the How to
Set the Ovenfor Warmingsection or tile
Special featuresof your ovencontro/secfion.
Touch the CLEAR/OFFpad to clear the
display:
16
NOTE:An attention tone wi// soundif youare
using tlYnedbaking and do not touch the START
padafter entering the baking temperature.
Page 17

Using theprobe.(onsome models) www.GEAppliances.com
For many foods, especially roasts and poultry, internal food temperature is the best test for aloneness. The
temperature probe takes the guesswork out of roasting by cooking foods to the exact doneness you want.
Use of probes other than tile one
proxided with this product ma) result in
daillage to tile probe or oxen control,
Use tile handles of tile probe and plug
Thetemperature probe has a
skewer-like probe at one end and a
plug at the other end that goes title
the outlet d7the oven.
when inserting and remoxim, tl/em fl'()m
tile tood and outlet.
Toavoiddamaglbgyourprobe,donotuse
tongstopuffonthecamewhenremowbgit
Toavoidbreakingtheprobe,makesurefood
iscompletelydefrostedbeforeinserting.
Topreventpossiblebums,donotunplugthe
probefromtheoufletunti/theovenhas
cooler_
I
Neverleave yourprobe lbside the ovenduring
a self-cleaningcycle.
Donotstore the probe in the oven.
CdD@(3)@
(E)(Z)dD(3)
(DdD.= (E)C
(D(Z)dD(ESED
{tSTART_
,@
_Mier preparing tile meat and placing it
on a trivet or on the broiler pan grid,
tOllow these directions for proper probe
placement,
Insert the probe completely into the
meat. It should not touch bone, fat or
gristle.
For roasts Mth no bone, insert tile probe
into tile meatiest part of tile roast. For
bone-in haul or laud), insert tile probe
into tile center of tile lowest laige muscle.
Insert the probe into the center of dishes
S/Ich _lS ll/eat loaf or casseroles.
Insert tile probe into tile meatiest part of
the inner thigh fl'om below and parallel
to the leg era whole turkey.
How to Set the Oven For Roasting When Using the Probe (onsomemodels)
Insert tile probe into tile fi_od.
[]
Plug tile probe into tile outlet ill tile
[]
oven. Make sure it's pushed all the
way ill. Close the oven dora: Make
sure the probe cable is not touching
tile broil element.
[] Touch tile PROBEpad.
Touch tile munber pads to set
[]
tile desired internal fi)od or meat
temperature. Tile maxinmn/
internal temperature for tile
food that you can set is 200°E
[] Touch tile BAKEpad.
[] Touch tile munber pads to set tile
desired oxen temperature.
[] Touch tile STARTpad.
Thedisplaywill flashif theprobeis lbserted
intotheoutletandyouhavenotsetaprobe
temperatureandtouchedtheSTARTpad
_Mter tile internal temperature of
the food reaches 100°E the changing
internal temperature will be shown ill
tile display:
XYhen tile internal temperature of
[]
tile food reaches tile munber you
have set, the probe and the oven
turn off and tile oven control
signals. To stop the signal, much the
CLEAR!OFFpad. Use hot pads to
remove tile probe ti'om tile too(l.
Do not use tongs to pull on it--they
might (lmnage it.
To change tile oven temperature during
tile Roast cycle, touch tile BAKE pad and
then tile nmnber pads to set tile new
temperature.
If theprobe Isremovedfrom the food before
the final temperatureisreached,a tonewill
soundand the displaywill flash until theprobe
isremoved from the oven.
Youcan use the timer even though you
cannot use t/kned oven operations while
using the probe. 1 7
Page 18

Usingthe convectionoven.(on some models)
ConvectionFan
/n a convection oven,a fan circulates hot air
over, under and around the foocL
This circulating hot air is evenly distributed
throughout the oven cavity.As a result, foods
are,evenly cooked andbrowned--often in less
time with convection heat.
1-Rack Convection Baking
The convection fire circulates the heated
air evenly over and around the fi)od.
Whenconvectionbakingwith only I rack,
use therackpositions recommendedinthe Using
the oven section.
Multi-Rack Convection Baking
Because heated air is circulated evenly
throughout the oven, fi)ods can be
[] baked with excellent results using
inultii)le racks.
Multi-rack baking nlay increase cook tiines
slightly fi)r sonle foods, but the overall
result is tin/e saved. Cookies, inuflins,
Multi-rack position.
biscuits, and other quick breads give
good results with n/uld-iack baking.
NOTE:The convection fan will cycle on
and oft while cooking to best distrJl)ute
hot air in the oven.
The convection oven tim shuts offwhen
the oven door is opened.
Idealforevenlybrownedbakedfoodscooked
on I rackandforlargefoods.Additionally,
sometimesawbgsmaybenoticed
Goodresultswithcookies,biscuits,muffins,
brownies,cupcakes,creampuffs,sweetrolls,
angelfoodcakeandbreacL
_A]/ei1baking Oil 3 racks, place one
iack in tile fi/urth (D) position, one
in the fifth (El position and one in
the sixth (F) position. If pans will not
fit, use rack positions B, D and E
18
Adapting Recipes...
Y)u can use your fi_\'oiite I'ecipes in the
convection ()veil.
\\qlen convection baking, the Auto
Recipe" Conversion feature automatically
reduces the set regular baking
teml/erature by tile recominended 25°12
See Auto Recipe'" Conversion in the
Sl/ecial Featm'es secfioil,
Usepansize recommendecL
Somepackageinstructionsfor frozen
casserolesormain disheshave been
developedusing commercialconvection ovens.
Forbest results inthis oven,preheat the oven
anduse the temperatureon thepackage.
Page 19

vvww.GEAppliances.com
Boastingrack
Grid
Broilerpan
When baking cookies, you will
get the best results if you use a
flat cookie sheet instead of a
pan with Iow side&
Convection Roast
Goodfor large tendercutsof meat, uncovered
The convection tim circulates the heated
air evenly over and around the food.
Meat and I)oult_T are browned on all
sides as if tile)' were cooked on a
rotisserie. Lrsing the roasting rock
provided, heated air will be drculated
ove_; trader and arotmd the ti)od being
roasted. The heated air seals in juices
quickly for a moist and render product
while, at the same time, creating a rich
golden brown exterim:
Cookware for Convection Cooking
Before using your convection oven,
check to see if yore" cookware leaves
room fi)r air drculation in the oven.
If you are baking with several pans, leave
Sl)_ce between them. Also, be sure the
pans do not touch each other or the
walls ot the oven.
Paper and Plastic
Heat-resistant paper and plastic
containe_ that are recommended fi)r
use in regular baking can also be used
for convection baking, but should not
be used at temperattues higher than
the temperature recommended by the
cookware ii/_lllttlilCtui'ei: Plastic cookware
that is heat-resistant to temperatm'es of
400°F can also be used.
\&l_en _m are convection roasting it is
iml)ommt that you use the broiler I)an
and grid and the special roasting rack for
best convection roasting results. The pan
is used to catch grease spills and the grid
is used to prevent grease spatters, while
the rack allows the heamd air to circulate
trader the meat and increase browning
on the tmde_ide of the meat or i)oult_T:
Place tile oven rack in tile position
that cente_ the food between the top
and bottom of the oven.
Place the grid on the broiler l)an
and put the roasting rack ()vet" them,
making sm'e the posts on the roasting
rack fit into the holes in broiler pan.
Place the meat on the roasting rack.
Metal and Glass
Any type of cookware will work in your
convection oven, Howe\'ex; Illetnl l)_llIS
heat the fi_stest and are recommended
for convection baking.
Darkenedor matte-finishedpans will bake
faster thans&by pans.
Glassor ceramtcpans cookmore s/ow/)z
For recipes like ovenq)aked chicken,
use a pan with low sides. Hot air cmmot
drculate well arotmd food in a pan with
high sides.
CONVECTION
Q Q (5)(Z)(Z)
How m Set the Oven for Convection Baking or Roasting
[] Touch tile CONVECTION BAKEor
CONVECTION ROAST pa d.
[] Touch the nmnber pads to set the
desired oxen temperatm'e.
[] Touch the STARTpad.
To change tile oven temperature, touch
the CONVECTIONBAKEor CONVECTION
ROASTpad and then the number pads to
set the new temperature.
X4hen the oven starts to heat, the
changing temperatm'e, starting at lO0°K
will be displayed. _,\]_en oven reaches the
temperatm'e you set, 3 beeps will sotmd.
[] Touch CLEAR/OFFpad when
finished.
Youwill hear a fan while cooking with
convection.Thefan will stop when thedoor is
opened,but the heat will not turn off.
Youmayhearthe oven clicking dunbg
baklbg. Thisis normal
19
Page 20

Usingthe timedfeaturesforconvectioncooking.(onsome models)
Youwill hear a fan while cooking with these features. The fan will stop when the door is opened, but the heat
will not turn off.
NOTE:Foods that spoil easily--such as milk, eggs, fish, stuffings, poultry and pork--should not be allowed to
sit for more than 1hour before or after cooking. Room temperature promotes the growth of harmful bacteria.
Be sure that the oven light is off because heat from the bulb will speed harmful bacteria growth.
How to Set an Immediate Start and Automatic Stop
CONVECTION
QCQ00
0C0
(Z>(Z>GGC
6
®
Theovenwilf turnon immediate/I/andcookfor a
selectedlengthof time.At theendof thecooking
time,theovenwill turn offautomatically
Make stlre tile clock sho_,_:stile correct finle
of day.
[] Touch tile CONVECTIONBAKE
or CONVECTION ROAST pad.
[] Touch tile nunlber pads to set tile
desired o'_en temi)eratm'e.
[] Touch tile COOKTIME pad.
NOTE:If yourreciperequirespreheating,youmay
needtoaddadditionaltimeto thelengthof the
cookingtime.
[] Touch tile ntllllber pads to set tile
desired length of cooking time. Tile
mininmm cooking dine you can set
is 1 minum. Tile ()veil temi)eiatm'e
that you set and the cooking time that
you enmred will be in tile displa):
[] Touch tile STARTpad.
Tile displa} will show tile changing
temperatm'e (starting at 100°F) and tile
cooking dine. Tile displa} starts changing
once the mmperature reaches 100°E
Tile oxvn will continue to cook for tile
progTanlnled anlount of tinle, then shut
offautonmtically, unless tile _'\%_RM or
tlle Cook and Hold ff'ature was set.
Depending oil your model, see tl/e How
to Set the Oven for Warming section or tl/e
Specialfeaturesof your ovencontrolsection.
[] Touch tile CLEAR/OFFpadto clear
the displa) if necessai 3 Remo'_e
the ti)od fl'Oln tile oxen. RelnembeI;
even though the ()veil ttlI'ns O_"
automadcall?, food left in the ()veil
will confintle cooking afier the o_en
turns oiti
20
Page 21

vvww.GEAppliances.com
CONVECTION
(2)(X)
(3)(3)(3)(3)(3)
How to Set a Delayed Start and Automatic Stop
Youcansettheovencontroltode/ay-stai?theoven,
cookforaspecificlengthof timeand thenturnoff
automaticall_
Make sure die clock sho_:s file correct time
o
of day.
[] Touch the CONVECTIONBAKEor
CONVECTIONROAST pad,
[] Touch the number pads to set the
desired oven temperattu'e.
[] Touch the COOKTIME pad.
NOTE."Ifyourreciperequirespreheating,youmay
needtoadd additionaltime tothe lengthof the
cookingtime.
[] Touch the number i)ads to set the
desired cooking time.
[] Touch the DELAYSTARTpad.
[] Touch the number i)ads to set the
time of da} )ou want the o'_en to tllI'n
on and start cooking.
lf gouwouldlike tocheckthe timesyouhaveset,
touchtheDELAYSTARTpadto checkthestarttime
youhaveset,or touchthe COOl(TIMEpafl to
checkthelengthofcookingtimeyouhaveset.
[] Touch the STARTpad.
NOTE."An attentiontonewill soundff youare
usingtimedbakingorroastingand donot touch
the STARTpadafter enteringthebakingor
roastingtemperature.
_'\l_en file oven turns on at file tinle
of da)you hme set, the displa)will
show the changing telnIletature
(starting at 1()()°F) and the cooking time.
Tile displa) starts chmlging once the
temperature reaches 100°K
The ()veil will continue to cook for the
programmed amount of time, then shut
off atm)maficall}, unless the _'\_RM or
the Cook and Hold feature was set.
Depending on your inodel, see the How
to Set the Ovenfor Warmingsect.ion or the
Specls/ featuresof your ovencontrolsection.
[] Touch the CLEAR/OFFpad to clear
the displa} if necessai T. Relno'_e
the filed f?'om the oven. Remembei;
even t]lOtlg]l the o_,en shuts off
automaticalb, filed left in the oven
will condntle cooking after the o_en
trims oiI_
21
Page 22

Usingthe convectionoven.(on some models)
How to Set the Oven for Convection Roasting when Using the Probe
For best results when roasting large
turkeys androasts, we recommend
usflTgthe probe flTcluded b7the
cmTvectioI7 oveR.
CONVECTION
(D(Z) (3ZD
@ 7¸¸¸¸¸¸¸/(
Tochange the oven temperature
during the Convection Roast cycle,
touch the CONVECTIONROASTpad
and then touch the number pads to
set the new desired temperature.
The display will flash PROBE and the
oven control will signal if the probe is
inserted into the outlet, and you have not
set a probe temperature and pressed the
STARTpad,
Place the o'_en rack in the position
[]
that cente_ the food between the
top and bottom of tile o_en. Insert
tile probe into tile meat.
Plug tile probe into tile outlet in tile
[]
oxen. Make sure it is pushed all the
wa_ in. Close tile oxen (loo_:
[] Touch tile CONVECTION ROAST pad,
[] Touch tile number pads to set tile
desired oxen temperature.
[] Touch tile PROBE pad,
[] Touch tile number pads to set tile
desired internal meat temperature,
[] Touch tile START pad,
When tile oxen starts to heat, tile word
tO will be in tile displa):
_Mier tile internal temperature of tile meat
reaches 100°K the changing internal
temperature will be shown in the (lispla).
Convection Roasting Guide
[] X._q/en tile internal temperature of
tile meat reaches tile number xou
have set, tile probe and tile oven
ttlI'n off }lll(l tile oven conti'ol
signals. To stop the signal, touch the
CLEAR/OFFpad. Use hot pads to
remove tile probe ti'om tile too(l.
Do not use tongs to pull on it--they
might damage it.
CAUTION:ropreventpossibfeburns,
donotunplugtheprobefromtheovenoutletuntil
the oven has cooled Do not store the probe/b
the oven.
NOTE:
If theprobe is removedfrom the foodbefore
the flbal temperatureis reached,atone will
soundand the displaywill flashuntil theprobe
is removedfrom the oven.
Youwi//heara fanwfeTecooklhgwiththis
feature.Thefenwill sto/_whenthedooris
opened,but theheatwfflnotturnof[
Youcanusethekitchentl_nereventhoughyou
cannotuset_medovenoperations.
22
Meats Minutes/Lb, Oven Temp. Internal Temp.
Beef Rib,BonelessRib, Rare 30_4 325°F 140°Ft
TopSirloin Medium 34_8 325°F 160"F
(3to 5 Ibs.) Well 38-42 325'+ 170"F
BeefTenderloin Rare 10 14 325°F 140"Ft
Medklm 14 18 32R°F 160°F
Perk Bonedn,Boneless(3to RIbs.)(tenderloin) 3044 32R°F 160°F
Ham Banned,Butt,Shank(3to 5 Ibs.fully cooked) 32_6 32R°F 140°F
Lamb Bonedn,Boneless(3to 5 Ibs.) Medium 17_0 325°F 160°F
Well 20_4 325°F 160°F
Poultry WholeChicken(21/zto 31/zIbs.} 30_5 350°F 180° 185°F
CornishHens,Unstuffed(1to 11/LIbs.) 50 55total 350°F 180° 185°F
Stuffed(1to 11/LIbs.) 55 BOtotal 350°F 180° 185%
Buckling(4to 5 Ibs.) 24_6 325°F 180° 185°F
Turkey,Whole (unstuffed)' 10 12 32R°F 180° 185%
TurkeyBreast(4to 6 Ibs.) 18_2 325°F 170°F
Page 23

Usingtheproofingand warming features. CEApplia,cescem
Theproofing feature maintains a warm environment useful for rising yeast-leavened products.
How to Set the Oven For Proofing (onsomemodels)
0
®
[] Place tile coxered dough in a dish in
tile oxen on shelf B or C.
NOTE."Forbestrasu/ts,coverthedoughwitha
clothorwithgraasedplasticwrap(theplastic
mayneedtobeanchoredunderneaththe
containersotheovenfanwillnotblowit off).
[] Touch tile PROOF pad and then tile
STARTpad.
Tile display will read PrF (proof).
Tile oven interior light turns on and
remains on during proofing.
Tile proofing teatm'e automaticalh'
provides tile optimum temperatm'e fin.
the proofing process, and therefin'e does
not have a temperatm'e ac!iustment.
[] Set tile KITCHENTIMERON/OFFfi,r
the minim tun proof tim e.
How to Set the Oven For Warming (onsomemodels)
Tile WARMteattlre keeps cooked Check (lJsl)ness atter 90-.'40 i/lintltes,
foods hot. Add time as needed.
This teatm'e is not designed to reheat
cold food.
To use tile WARMleamre, touch tile
WARMpad and then tile STARTpad.
To use tile WARMteature after Timed
Baking or Roasting, tollow these steps:
[] Touch the mode of cooking that
w,u want to use (BAKE, CONVECTION
BAKE,or CONVECTIONROAST).
[] Touch tile number pads to set tile
oven teIllpeI';l[t II'e.
[] Touch tile COOKTIMEpad.
[] Touch tile nunlber pads to set tile
desired length of cooking time.
[] X&hen proofing is finished, touch
tile CLEAR/OFFpad.
Toavoid lowering the oven temperature
andfengtheningproofing tlYne,donot
openthe ovendoor unnecessarily
Checkbraadproductsearly toavoid
over-proofing
NOTE:
Donotuse the proofingmode for warming
foodor keepingfood ho£ Theproofing oven
temperatureis nothot enough tohold foods
at safe temperatures.Usethe WARM orthe
Cookand Hold featura(dependingon model) to
keepfood warm.
Proofingwill not operate when ovenis above
125°£ "HOT"will show in thedisplay
IMPORTANTNOTES:
Foodshouldbekepthotin itscooking
containeror transferredtoaheat-safe
servingdish.
Formoistfoods,coverthemwithanoven-safe
lid oraluminumfoil.
Friedorcrispfoodsdonotneedtobecovered,
butcanbecometoodryif warmedfortoolong.
Repeatedopeningofthedoorallowsthehot
air toescapeandthefoodtocool
AllowextratlYneforthetemperatureinsidethe
oventostabih2eafteraddingitems.
Withlargeloadsit maybenecessarytocover
someofthecookedfooditems.
[] Touch tile WARMpad.
[] Touch tile STARTpad.
To Crisp Stale Items
Place toed in lo_sided dishes or pans.
For best results, place tile food items in
a single laved: Do not stack.
i.eave theIl/ tlncovei'ed.
Removeservingspoons,etc.,beforeplacing
containersin theoven.
Do not useplastic containers,lids or plastic
wrap.
CAUTION: last,ccontainers,lids
or plastic wrap will melt if placed in theoven.
Melted plastlc may not be removableand is not
coveredunder your warranty
23
Page 24

Adjust the oven thermostat--Do it yourself!
Youmay find that your new oven cooks differently than the one it replaced. Use your new oven for a few weeks to
become more familiar with it. If you still think your new oven is too hot or too cold, you can adjust the thermostat
yourself.
Donot use thermometers, such as those found in grocery stores, to check the temperature setting of your oven.
These thermometers may vary 20_40 degrees.
NOTE"This adjustment will only affect baking androasting temperatures; # will not affect broiling, convection or
self-cleaning temperatures. Theadjustment will be retained in memory after apower failure.
ToAdjust the Thermostat
(D(Z)(Z)(Z)CD
(D(Z)(Z)(Z)ZD
0
[] T(>uch tile BROILHI/LO and BAKE
pads at tile same Ome fi)r 3 seconds
until tile display sh(m:s SF.
[] Touch tile BAKEpad. A two-digit
imlnber shows in tile display:
Touch BAKE again to alternate
between increasing and decreasing
tile oven telnpelature.
[] The oxen telnperature can be
a(!justed up to (+) 35°F hotter or (-)
35°F cooleI: Touch tile imlnber pads
tile sanle way you read theln. For
example, to change tile oven
temperature I5°K touch I and 5.
[] _hen you haxe made tile
a(!justlnent, touch tile START pad to
go back to tile tilne of day display.
Use your oven as you would
naturally.
Thetype ofmargarine will affect bakingperformancet.
Most recipes for baking have been developed us&g high-fat products such as butter ormargarine (80% fat). If you
decrease the fat, the recipe may not give the same results as with a higher-fat product.
Recipe failure can result if cakes, pies, pastries, cookies or candies are made with Iow-fat spreads. Thelower the fat
content of a spread product, the more noticeable these differences become.
Federal standards reqtlire prodtlctS labeled "margarii_e" to coi_tain at least 80% tilt by weight, ixm_lht spreads, on tile
other hand, contain less tilt and inore watei: The high inoisture content at these spreads affects the texture and flavor
of baked goods. For best results with your old tin:afire redpes, use inalgafii_e, butter or sock spreads coi_tailfing at least
70% vegetable oil.
24
Page 25

Usingthe self-cleaning oven. OEA..lia.cescom
The oven door must be closed and all controls set correctly for the cycle to work properly.
Before a Clean Cycle
Wipe up heavy soil on flTeoven
bottom.
C(E)(E)(
_'e recommend venting your
kitchen with an open window or using a
ventilation tim or hood dining tile fi_t
sel6clean cycle.
Remoxe tile racks, broiler pan, broiler
grid, probe, all cookware and am
ahuninuln foil fl'om tile oxen.
Tile oxen racks can be self-cleaned, but
they will darken, lose their luster and
become hard to slide.
Soil on tile fl'ont fl'ame of tile range
and outside the gasket on the door will
need to be cleaned bv hand. Clean these
areas with hot water; soap-filled or plastic
scom_ing pads or cleansers such as Soft
Scrub! Rinse well with clean water
and dry:
How to Set the Oven for Cleaning
[] Touch the SELFCLEANLO/STD pad
on(e _0i" a 4-hotli" clean [ii/le oi"
twice fin" a 9_-hour clean time.
A 3-horn" seltk'lean time is
recommended fin" rise when
cleanino,_ small, contained spills. A
seltklean time of 4 horns or hmoer
is recommended fin" a dirtier oxen.
V_ If a time other than 4 hom_ or
3 houI_ is needed, use tile nulnber
pads and enter the desired clean
time.
YO/l C[lll chancre tile clean tillle to [lliV
time between 3 hom_ and 5 hom_,
dei)ending, on how dirP,, yore" oxen is.
Do not clean tile gasket. Tile fiberglass
material ot the oven door gasket cmmot
withstand abrasion. It is essential fin" the
gasket to remain intact. If you notice it
becoming worn or fl'ayed, replace it.
_._]l)e up any hear)' spillove_ on tile oven
bottom.
Make sm'e tile oven light bulb cover is in
place and tile oven light is ott_
IMPORTANT'.Tile health of some birds
is extremely sensitive to the flmms given
off dtwing tile self cleaning cycle of any
range. Move birds to another well-
ventilated i'OOlil.
When tile LOCKEDlight goes off; you will
be able to open tile door
Tile word LOCKEDwill flash and tile
oven control will signal if you set the
clean cycle and finget to close tile
oven (loo_:
To stop a clean cycle, touch tile
CLEAR/OFFpad. _,_]/ell tile LOCKEDlight
goes off indicating the oven has cooled
below tile locking temperature, you
will be able to open tile (loo_:
[] Touch tile START pad.
Tile door locks automaficallx; Tile display
will show tile dean time remaining. It will
not be possible to open tile oven door
tmtil tile temperatm'e drops below tile
lock temperature and tile LOCKEDlight
goes off'.
25
Page 26

Usingthe self-cleaning oven.
The oven door must be closed and all controls must be set correctly for the cycle to work properly.
How to Delay the Start of Cleaning
OD(Z)(?b(Z)C
(E)(Z)(?b( E)
OD(?D(E)(D(Z)
(E)OD(X)(ZE3)
[] T(Tuch the SELF CLEAN LO/STD pad
once fiIr a 4-h(mr clean tiine or
twice fiTi a 3-h(TuI clean tinle.
A 3-hour selfk'lean tinie is
i'ec(Tilli/i ended fiTr rise when
cleaning snmlL contained spills. A
sel6clean time of 4 houi_ (Tr lonoei"
is i'econnnended for a dirtier oxen.
[_] ]fa tiIne other than 4 houI_ or
3 houI_ is needed, use the nunlber
pads and enter the desired clean
tinle.
You can change the clean dine to any
tiine between 3 h()ui_ and 5 h(TuI_,
dei)ending, on h(Tw dirt_, your o',en is.
[] T(Tuch the DELAYSTART pad.
[] Using tile nuinber pads, enter the
tiIne of (lax V(TUwant the clean cycle
t() start.
[] Touch the STARTpad.
After a Clean Cycle
YTU nlav notice S(Tine white ash in the
(Tven. _'ipe it up with a daInp cloth alter
the oven Co(Tls,
If whitespotsremain,removethemwithasoap-
filledorplasticscounngpadandnnsethoroughly
witha wnegarandwatermixture.
These deposits are usually a salt residue
that cannot be reni(Tved bv the clean
cycle.
If the oven is not clean after one clean
wcle, repeat the cvcle.
The d(Tor locks autoniatically: The display
will show the start tinie. It will not be
p(Tssible to open the oven do(Tr until
the temi)eramre dr(Tps below the lock
tenll)ei'ature and the LOCKEDlight
goes (7tt.
'_41_eIl the tOCgEOlight goes (7tt; you will
be able t(7 (Tpen the d(7(Tr.
Y}TUcannot set the oxen fin" Co(Tking
until the oxen is C(Tol en(Tugh fin" the
do(TI" to tlnlock.
X,_]file the (Tven is selfXcleaning, y(TUcan
t()uch the CLOCKpad t(7 display the
dine (71day T(7 return to the clean
C(Tuntdown, UTuch the SELFCLEAN
LO/STD pad.
If the racks bec(Tnie hard to slide,
apply a snIall anl(Tunt (Tf(_Toking oil to
a paper towel and wipe the edges of the
(Tven racks with the paper t(Twel.
26
Page 27

Special featuresof yourovencontrol, vvvvw.GEAppliances.com
Yournew touch pad control has additional features that you may choose to use. The following are the features
and how you may activate them.
Thespecial feature modes can only be activated while the display is showing the time of day. They remain
in the control's memory until the steps are repeated.
When the display shows your choice, touch the STARTpad. Thespecial features will remain in memory after
a power failure, except for the Sabbath feature, which will have to be reset.
12-Hour Shutdown
! , thisfeatureshouldyouforgetandleavethe
ovenon,thecontrolwillautomaticallyturnoffthe
ovenafter 12hoursduringbakingfunctionsor
after3hoursduringa broilfunction.
_r;,,/,,,.i,_ht,,t,.-,,off thi,_>.t,.e, _,,ll,,,,'
the._tep._bel,,,,'.
[] Touch tile BROIL Hl/LOand BAKE
pads at tile same time to_ 3 seconds
until tile display sho_:s SF.
Fahrenheit or Celsius Temperature Selection
Yourovencontro/isset touse the Fahrenheit
temperatureselectionsbut youmay changethis
to use the Ce/siusselect/bns.
[] Touch tile BROIL HI/LOand BAKE
pads at tile sanle time fo_ 3 seconds
until tile displa) shows SF
[] T(mch tile DELAYSTARTpad until
no shdn(no shut-off) appea_ in tile
display,
[] Touch tile STARTpad to acfix Ke tile
no shut-offand leaxe the control
set in this special teattlI'es inode.
Touch tile COOKTIMEand BROIL
[]
HI/LO pads at tile same time. Tile
display will show F (Fahrenheit).
Touch tile COOKTIMEand BROIL
[]
HI/LOpads again at tile same time.
Tile display will show C (Celsius).
,÷
!i ii ii!il
Tonesat the End of a Timed Cycle
Attheendofa timedcycle,3shortbeepswill
soundfollowedbyonebeepevery6seconds
untiltheCLEAR/OFFpafl/stouche_This
continual&secondbeepmaybecanceled
To cancel tile 6-second beep:
[] Touch tile BROIL HI/LO and BAKE
pads at tile same time for 3 seconds
until tile display shows SF
[] Touch tile STARTpad.
Touch tile KITCHENTIMERON/OFF
[]
pad. Tile displa)shows CONBEEP
(continuous beep). Touch tile
KITCHENTIMERON/OFFpad
again. Tile displayshowsBEER
(This cancels tile one beep
eveIT 6 seconds.)
Touch tile STARTpad.
[]
27
Page 28

Special featuresof yourovencontrol.
Tone Volume (on some models)
i 'iii < i ill ! <i) ?;
ii iii@ iii ! i
Thisfeatureallows you toadjust the tone
volumesto amore acceptable volume.Thereare
threepossiblevolumelevels.
[] Touch the BROIL HI/LO and BAKE
pads at the sanle time fin 3 seconds,
until the display shows SF.
Touch the OVEN LIGHTON/OFFpad.
[]
The displa)_dll show 2BEEP.This is
the high _olume level.
Touch tile OVEN LIGHT ON/OFFpad
again. The display _dll show 3 BEEP.
This is the hmdest _olmne level.
12-Hour, 24-Hour or Clock Blackout
Yourcontrol is set to usea 12-hourclock.
If you would prefer to have a 24-hour
military time clock or 1)lack ()tit the clock
display, fi)llow the steps 1)elow.
[] Touch the BROILHI/LO and BAKE
pads at the same time fi)r 3 seconds
tmtil the display shows SE
[] Touch the CLOCKpad once. The
display will show 12hr. If this is
the choice you want, touch the
STARTpad.
Touch the OVEN LIGHT ON/OFFpad
again. The display will show I BEEP.
This is the quietest volmne level.
For each time the level is changed,
a tone will sound to provide an
indication of the volmne level.
(_hoose tile desired sotmd level
[]
(1BEEP,2 BEEP,3BEEP).
Touch the START pad to activate the
[]
level shown.
Touch the CLOCKpad again to change
to the 24 hour milimx_' time clock. The
display will show 24hr. If this is the choice
you want, touch the START pad.
Touch the CLOCKpad again to black out
the clock display. The display will show
OFF..If this is the choice you want, touch
the START pad.
NOTE:If the clock is in the black-outmode you
will not be able touse the Delay Start function.
28
Cook and Hold (onsomemodels)
Yourcontrolhas a cookand hold feature that
keepscooked foodswarm for up to 3 hoursafter
tinnedBakingor Roastingis finished
NOTE"ThisNature can only beprogrammed to
work with tiknedBakingor Roasting.{Seethe
Usingthe tkned baking or roasting features
section.)After timed Bakingor Roastinghas
automaticallystoped, theprogrammedcook
andhold will automatically start.
To acfix Ke this ti_atm'e fin" use after
Timed Baking or Roasting, follow the
steps beh)w.
[] Touch the BROILHI/LO and BAKE
pads at the sanle dine fox 3 seconds
tmtil the displa) shows SE
Touch the COOK TIME pad. The
[]
displa) _dll show Hid OFF
Touch the COOKTIME pad again
to acti',ate tile feature. The displa)
will show Hid ON.
Touch the START pad to activate
[]
the cook and hold teatm'e and
leaxe the control set in this special
JeattlI'es illode.
NOTE:ThecontrolwillbeepeveryGseconds
if theCookandHoldfeatureissettoremindyou
thatfoodisin theoven.TouchtheCLEAR/OFF
padandremovefoodwhendesiredThis
reminderwill notworkif thetonesat the
endera tknedcyc/ewerecancelledSee
theTonesat theEndofa tiYnedCyclein
thisSpecblFeaturessection.
Page 29

CONVECTION
@
Using Auto Recipe TM Conversion
Whenusingconvectionbake,theAuto Recipe_
Conversionfeaturewill automaticallyconvert
enteredregularbaklbg temperaturesto
convectionbaklbgtemperatures.
Thedisplaywill show the actual converted
(reduced)temperature.Forexample, if you entera
regularrecipe temperatureof 350°Fand touch the
STARTpad, the displaywill show CON
andthe convertedtemperatureof 325°£
NOTE"Thisfeatureonlyconvertscooking
temperatures,not cookingtimes.
www.GEAppliances.com
Toturn off this feature:
Touch the BROIL HI/LO and BAKE
[]
pads at the same time fo_ 3 seconds
until the display shows SF.
Touch the CONVECTION BAKE
[]
pad. The display will show CON ON.
Touch the CONVECTION BAKE
pad again. The display will
show CON OFF.
[] Touch the STARTpad.
To turn on this teature, repeat steps 1-3
abo'_e but touch the STARTpad when
CON ON is in the display.
29
Page 30

Usingthe SabbathFeature.
(Designed for use on the Jewish Sabbath and Holidays.) (Onsomemodels)
TheSabbathfeature canbeusedfor baking/roastingonlg Itcannot be usedfor convection,broiling,self-cleaningor
DelayStart cooking.
NOTE:Theovenlightcomesonautomatically(onsomemodels)whenthedoorisopenedandgoesoffwhenthedoorisclosed.Thebulbmaybe
removed.SeetheOvenLightReplacementsection.Onmodelswithalightswitchonthecontrolpanel,theovenlightmaybeturnedonandlefton.
How to Set for Regular Baking/Roasting
Llsing the mlmt/er t)ads, elm:_r the
desired temllerattlre l)et'weel*, 170°F and
550°F. No sig_ml or teml)erature will 1)e
g1%ell.
Tou(h Ill(! STARTpad.
[]
,\{_er a ran(ton/delay t)eriod of
[]
atlllroximatelT_ 30 seconds to 1 mimlte,
C will alll)ear in tile dislllay
indi(ating that the oven is baking!
roasting. If D c doesn't allt)ear in the
dist)lay, start again at Stet) 4.
"Ib a(!iust tile o\en temt)eramre, touch the
BAKEI)ad, enter tile new temperature using
the lmmber t)ads and toucl*, tile STARTpad.
NOTE:The CLEAR/OFFand COOK TIMEt)ads will
flmction during tile Sabl)att*, t('ature.
When the display shows D the
oven is set in Sabbath. When the
display shows D c the oven is
bakflTg/roasfing.
Make sure the clockshows thecorrect time of day and I_q
theoven is off
VII Tou(h a,/d hold both tile BROIL HI/LO
Ill
and BAKE llads, atthe same time, until
the dist)lay sllows SE
NOTE:If bake or broil al)llears ill tile
(lisplay, tile BROIL HI/tO and BAKE pads
were not touched at the same time.
Touch the CLEAR/OFFI>ad and beg+n
again.
[_] Tall the DELAY START pad tmtil SAbbAtH
atlt)ears ill the dist)lay.
] Tou(h the STARTpad mM D *,*,rillal)tlear
in the disl)la }.
] "]'ou(h the BAKEt)ad.No sig_lal will
be _,4'_en.
When the display shows D the
oven is set& Sabbath. When the
display shows D c the oven is
bakflTg/roasting.
How to Set for Timed Baking/Roasting -
Makesuretheclockshowsthecorrecttimeofdayand
theovenisoff,
F1] "lbuch and hold both the BROIL HI/LO and
Ill
BAKE tlads, at the same time, tmtil the
display shows SE
NOTE:If bake or t/roil al)llears in the
dist)lay, the BROIL HI/LOandBAKEpads
were not touched at the same time.
"Ibuch tile CLEAR/OFFt)ad and 1)egJn
again.
_] Tall the DELAYSTART t)ad/mtil SAb bAtH
i¢,.- i
atll)ears ill the (lisl)la _.
] "Ibu(h the START pad and D *,*,rillal)tlear
in the dist)la},
[_q "lbu(h the COOK TIME pad.
171
"Ibuch the numl)er llads to set the
[]
desired length ot (ooking time tletvvreell
1 mimne and 9 hours and 99 mim=tes.
The (ookillg tJl//e that yoH elltered will
1)e distllayed.
How to Exit the Sabbath Feature
Immediate Start and Automatic Stop
] "[ou(]*,the STARTlind.
] "['Otlcl*,the BAKE pad. No signal *,*,'ill1)e
] Llsing the numl)er tlads, enter the
desired tel//l)erattlre. No sigl*,al or
Wmtlerattlre will 1)e gdxen.
] "['ou(l*, the START t)ad.
,\t_er a ran(ton/delay t)eriod of
[]
allllroximatelT_ 30 se(onds to 1 minute,
D c will allllear ill the (tispla} indicating
that the oven is baking/roasting. If D c
doesn't at)peru: in the dist)lay, start agvdn
at Step 7.
To a(!iust tile oxen temt)emmre, touch tile
BAKEI)ad, enter the new temllemture using
the immber t)ads and toucl*, the STARTllad.
When cooking is tinishe(I, th( dist)lay will
change/i:om D c to D and 0:00will appear
indicating that the oven has turned OFFbut is
still set in SabbatlL P,emove the cooked/oDd.
30
"['O/lcl*,the CLEAR/OFFtlad.
[]
I1"the oven is cooking, wait for a nmdom
[]
delay t)eriod of apl)roxin/ately 30
seconds to 1 mimue, m*,til only D
is in the display.
"Ibuch and hold both the BROIL HI/tO
[]
and BAKE llads, atthe same time, until
the disl)lay shows SE
"[_*,t) the DELAYSTART tlad until 12shdn
[]
or no shdn allt)ears in the display.
] (_hoose 12shdn, indicating that the o'_en
*,,,rillmnomati(allv turn off a/ier 12 hours
or no shdn, indi(ating that the o'_en will
v,ot auton/ati( alh' turIJ, off after 12 hours.
] "lbuch the STARTI)ad *,_hen the ot)tion
that "_ou want is in the distlla } ( 12shdn or
no shdn).
NOTE:II a l/ower outage o((urred \*,Idle
the oxen was in Satlbath, the o*,en will
a/ltOl/latica]]v ttlrll ott' ai/d sta\ ott e\ el/
when tile t)ower rettlrl/s. The oven
COl*,trol liHist be reset.
Page 31

Careand cleaning ofthe range, www.GEAppliances.com
Be sure all controls are off and all surfaces are cool before cleaning any part of the range.
If your range is removed for cleaning, servicing or any reason, be sure the anti-tip
device is reengaged properly when the range is replaced. Failure to take this
precaution could result in tipping of the range and cause injury.
How toRemovePackaging Tape
To assure no damage is done to the finish
ot the product, the satest way to remove
the adhesive left fl'om packaging tape
and cooktop labels on new appliances
is an application of a household liquid
dishwashing detergent, mineral oil or
cooking oil.
Control Knobs
Thecontrol knobsmay be removed for easier
cleaning.
Before removing the knobs tot
cleaning, please note that the knobs are
in the Off position. When replacing the
Apply with a soft cloda and allow to soak.
Wipe (h T and then apply an appliance
polish to thoroughly clean and protect
the surti_ce.
NOTE: Theadhesivemust be removedfrom all
parts. It cannotbe removedif it is bakedon.
knobs, check the OFFposition to insm'e
proper placement.
_'ash the knobs in soap and water or a
vinegar and hot water solution but (lo
not soak.
Grate
Burnercad
Burnernea0
Electrode
-'_ Burneruase
CAUTION:DONOT OPERATETHE
BURNERWlTHOUTALL BURNER
PARTSIN PLACE.
Burner Assembly
The 1)urner assemblies should be washed
regularly and, of coui_e, after spillovei_.
Turnall controlsoff before remowngburnerparts.
The 1)urner grates, 1)urner heads and
btlI'neY caps can be i'ei//oved ilk)i" easv
cleaning.
The electrode (ff the spark ignitor is
eN)osed beyond the Stli-[ilce (ff the
btlrner base. \,_]/ell cleaning tile cooktop,
be carefld not to snag the electrode (ff
the spark igniter with yore" cleaning
cloth. Damage to the igniter could occm:
Toavoid snagging a cloth on the spark
igniter, leave the burner heads inplace
when cleaning the cooktop.
Be careful not to push in any cooktop
controls while cleaning the cooktop.
A slight electrical shock might result
which could cause you to knock over
hot cookware.
Wash burner parts with an allI)uq)ose
non-abi'asive cleaner and W[liil/watei:
Soak stubborn soil. Dry them with a
cloth--<lo not reassemble while wet.
To reassemble, replace the burner head
first, then the burner cap and finally the
burner grate. Be sure the pins in the
burner head are properly located in the
btlrner base holes.
31
Page 32

Careand cleaning ofthe range.
BurnerGratesand VentGrille
ii i i i i i i i i
Porcelain enamel burner grates and the
xent grille should be washed regularly
and, of com_e, atter spilloxex_.
_'ash them in hot, soapy water and
rinse with clean watex: You may also use
abrasive cleanex_ and scouring pads to
clean burner grates and tile vent grille.
Dx_' tile grates and grille with a cloth--
don't put them back on tile cooktop wet.
To get rid of burned-on load, place tile
grates and grille in a covered containex:
Add l/4 cup ammonia and let them soak
several hom_ or overnight. _.V_sh, rinse
well and dx_'.
_Mthough they're durable, tile grates
and grille will gradually lose their shine,
regardless ot the best care you can give
them. This is due to their continual
exposm'e to high temperatures.
Do not operate a burner for an extended
period of time without cookware on tile
grate. Tile finish on tile grate ma} chip
without cookware to absorb tile heat.
AJter cleaning, replace tile center grille
fix_t. Replace the side grates so that the
notches lock over tile tabs on tile center
grate. Make sm'e the grates are positioned
securely over tile burnex_ and that tile}'
are stable and level.
Rubber Grate Feet
For stability, your cooktop has rubber
teet on the burner grates. If am' of these
rubber feet should become damaged or
lost, replace them immediately.
To order replacement rubber grate feet,
please call am" toll-ti'ee mmfl)er:
National Parts
Center ............... 800.626.2002(U.S.)
888.261.3055(Canada)
Rubber Grate Feet ....... #WBO2TI0101
RecePtacle" Z
i i
i
i
i
i i
1 1 Bulb
i i
Glasscover
32
i
i
Socket
Oven Light Bulbs (onsomemodels)
NOTE." The glass cover should be
removed only when cold. Wearing latex
gloves may offer a better grip.
CAUtiON.Before replacing your
oven light bulb, disconnect the electrical
power to the oven at the main fuse or
circuit breaker panel
Be stxx'eto let tile light cover and bulb
cool completely:
For yam" safer,i, do not touch a hot bulb
with bare hands or a damp cloth.
Toremove:
[] Turn tile glass coxer
counterclockwise 1/4 turn until tile
tabs {it tile glass cover clear tile
grooves {it tile socket.
[] Using gloves or a dr} cloth, remoxe
tile bulb b) I)ullin°_ it ,strai,,ht_out.
Toreplace:
[] Use a new 130-volt halogen bulb,
not to exceed 50 watts.
[] Using gloxes or a dry cloth relnoxe
tile bulb ti'om its packaging. Do not
touch the bulb with bare fingexs.
\
use g eves
or ClO[Ir
"Y /
[] Push tile bulb straight into tile
receptacle all tile way:
[] Place the tabs of the glass coxer into
tile grooxes {if tile socket. Tm'n tile
glass cover clockwise 1/4 mrn to
engage.
For improved lighting inside
the oven, clean the glass cover
fl'equendy using a wet cloth. This
should be done when the oven is
completely cool.
[] P,econnect electxical power to
tile oxen.
Page 33

Oven Light Replacement (onsomemodels)
www.GEAppliances.com
Do not store a soiled broiler pan
and grid anywhere in the range.
CAUTlON:Beforereplacingyouroven
light bulb, disconnect the electncal power to the
range at the main fuse or circuit breaker panel.
Be sure to let the light cover and bull)
cool completely.
Toremove the cover:
V_ Twist lens com_terclockwise about a
qtlartei" [[/i'n [o i'eilloxe.
DO not remove any screws to remove
the cover
[] Replace bulb with a 40-watt
appliance bull) or rw(_prong
halogen bulb as apl)ropriate.
To replace the cover:
[] I,ine up tabs of lens in fl'ont of tabs
on housing and rotate clockwise to
engage.
[] Com_ect elecn_ical power to the
I';Inge.
Broiler Pan and Grid
Do not c/eanthe broi/erpanor grid ina
J
self-cleaningoven.
,Mter broiling, renlo\'e the broiler pan
fl'om the oven. Remove the grid fl'om the
pan. Careflflly I)Om" Otlt the grease fl'om
the pan into a proper contnine_:
Washand rinse the broi/er panandgrid in hot
water with a soap-filledor plastic scouringpad
If fi)od has bm'ned on, sprinkle the grid
with detergent while hot and cover with
wet paper towels or a dishcloth. Soaking
the pan will remove bm'ned-on fl)ods.
Both the broiler pan and grid may be cleaned with
a commercial oven cleaner
Both the broiler pan and grid can also be
cleaned in a dishwasher;
il Stopguide
Roastingrack
Storage Drawer Removal
To remove the drawer:
[] Pull the drawer out tmfil it stops.
[] Lift the fl'ont of the drawer tmfil the
stops clear the guides.
[] Remo',e the (h'awe_:
Toreplace the drawer:
[] Place the drawer rails on the guides.
[] Push the drawer back tmtil it stops.
[] Lift the front of the drawer and
[] I,ower the front of the drawer and
Oven Racks andConvecfion Roas6ng Rack
Clean the oven racks and the convection
roasting rack with an al)rasive cleanser or
scouting pad. _Mter cleaning, rinse the
racks with clean water and (h_' with a
clean cloth.
NOTE: Theoven racks and convection roasting
rack may be cleaned in the self-cleaning oven.
However, the oven racks wi// darken in color,
lose their luster and become hard to slide if
cleaned during the self-cleaning cycle.
To make the oven racks slide more easily,
apply a small amount of cooking oil to a
paper towel and wipe the edges of the
oven racks with the paper towel.
push back tmfil the stops clear the
guides.
push 1)ack until it closes.
33
Page 34

Careand cleaning ofthe range.
Cleaning the Oven Door
To clean the inside of the door:
_: Because tile area inside tile gasket is
cleaned during tile self,'lean c_cle _ou
do not need to clean this b_ hand.
Thegasketis designedwith a gapatthe
bottomto allowfor properaircirculation.
Donotrub or cleanthedoorgasket--
it hasan extremelylowresistanceto
abrasion.
Ifyou noticethe gasketbecomingworn,
frayed ordamagedin anyway or if it has
becomedisplacedonthedoor,you should
haveit replaced.
Tile area outside tile gasket and
tile door liner can be cleaned with a
soap-filled or plastic scouting pad,
hot water and detergent, Rinse well
with a vinegar and water solution.
To clean the outside of the door:
Use soap and water to thoroughly
clean tile rap, sides and ti'ont of tile
()veil dooi: ]_diise well. _J_)/i ill,iv also
use a glass cleaner to clean the glass
Lift-Off Oven Door
on the outside of the door: Do not let
water drip into the vent openings.
If any stain on the door vent trim is
persistent, use a soft abrasive cleaner
and a sponge-scrubber tot best results.
Spillage oI marinades, fl'uitjuices,
tomato sauces and basting materials
containing acids may cause
discoloration and should be wiped
up immediately. _4]/en sm'ti_ce is cool,
clean and rinse.
Do IlOt t/se o_,eI1 cleallei's, cleallillg
powde_ or ha_h abrasixes on tile
outside of tile doo_:
SI0t
Hinge10ck
Pull hinge locks down to unlock.
Removalposition
Thedoorisveryheavy.Becarefulwhen
removingandlifting thedoor.
Donotliftthedoorbythehandle.
Toremovethe door."
Fully open tile d()m:
[]
Pull tile hinge locks down toward
[]
the door fi'ame, to the tmlocked
position. A tool, such as a small
flat-blade screwdrixe_; may be
required.
Firefly _*ras,) both sides of tile door
[]
at the top.
Close door to tile door removal
[]
position, which is half Win between
tile broil stop position m_d flflly
closed,
[] I,ifl door up and out tmfil tile hinge
aml is clear of the slot.
Toreplacethe door."
[] Fimflv,_oras,),t both sides of tile door
at tile top.
X&qthtile Bottom Hingearm
[]
door at tile edge
same angle as 0fslot
tile remowd
position, seat the
indentation of
the hinge aml
into tile bottom
edge of the hinge
slot. The notch in the hinge am/
must be flfllv seated into tile bottom
of tile slot.
Fully open tile d(:,(:,r.If tile do(:,r will
[]
not flflly open, tile indentation is
not seated correctly in the bottom
edge (ff the slot.
Push tile hinge locks up against tile
[]
front fl'ame of tile oxen cavity to tile
locked position.
Hing
Pushhingelocksup tolock.
F_q Close the oven dora:
\
34
Page 35

Stainless Steel Surfaces (onsomemodels)
www.GEAppliances.com
Do not use a steel-wool pad; it will
scratch the surface.
Shake botde well.
[]
Place a small amount of CE]_dV/A
[]
BRYTE _'Stainless Steel Appliance
Cleaner on a damp cloth or damp
paper towel.
Clean a small area (al)l)ro_mately
[]
8" x 8"), rtfl)bing with the grain of
the stainless steel if applicable.
Dr_ and buff with a clean dry paper
[]
towel or soft cloth.
] Repeat as necessai_,'.
/VOTE."If a mineral oil-based stainless steel
appliance cleaner has been used befi)re
to clean the appliance, wash the smtace
with dishwashing liquid and water prior
Painted Surfaces
Painted surfi_ces include tile top and
sides oI tile (loo_; and tile drawer fl'ont.
Clean these _id/soap and water or
a vinegar and water solution.
to using tile CEI_L_d_/IABRYTE )Stainless
Steel Appliance Cleane_: _Mter washing
the smtace with dishwashing liquid and
wateI; tlse a genero/ls all/ount ()_
CE]_d_4A BRYTE ')Stainless Steel
Appliance Cleaner to clean the
appliance.
ToOrder
To order CEILa2dA BRYTE (_:'Stainless
Steel Appliance Cleane_; please call our
toll-free ntllllbei':
National Parts
Center ............ 800.626.2002 (U.S.)
888.261.3055 (Canada)
www.GEAppliances.com (U.S.)
www.geappliances.ca (Canada)
CERAMA BRYTEc*
Stainless Steel Appliance
Cleaner .................... # PM10X311
Do not t/se COillillei'cial o_en cleaneiN,
cleanino_ l)O_(le_, steel _ool or l/m_h
abrasixes on an) painted surfi_ce.
Ovenfloor ,
Oven Vent
Tile oven is vented through an opening
in tile cooktop under tile grille.
Never cover tile opening with aluminum
loft or any other material. This would
Control Panel
If desired,the touchpads maybe turnedoff
beforecleaning.
See tile Control Lockoutsection.
Clean up sl)latte_ with a damp cloth.
RemovableOvenFloor
Toremove the oven floor for easier
cleaning:
[] Remo_e tile o_en door using tile
instructions in tile Lift-Off Oven Door
section.
[] (;rasp oxen floor at tile rear finger
slots on each side, lift it up, push it
back and pull it out.
l)i'ex, ent tile o_,en x,ent ti'Olll tvoi'killg
properly,
_i_)tl II/ay also use a glass cleaneE
Remove heavier soil with warn/soap)'
water: Do not use abrasives of any kind.
Turnon the touchpads after cleanlbg.
V_ Clean tile oven floor with w;mn
soap} wateE
IMPORTANT'._Mways replace tile
remox O)le floor befiwe tile next use.
35
Page 36

Cleaningtheglass cooktop.
Control Lockout
Begin b} locking the cooktop; see the
LOCK/UNLOCKHOLD3 SECONDS Dahlia/Lockout sectioIl.
Normal Daily Use Cleaning
ONLY use (;ERA_L_ BR'tTE ® (]emmi(
Cooktop Cleaner on tile glass cooktop.
Other creams may not be as effective.
To maintain and protect tile surlhce of your
glass cooktop, tbllo_ these steps:
[] gefi/re using, tile cooktop tor the
tirst time, clean it with CEP_kMA
BR'tTE ¢_Ceramic Cooktop (]leaner
Cleanyour cooktopafter
eachspill. Use CERAMA
BRYTE® CeramicCooktop
Cleaner.
This helps promct the top and makes
cleam_p easier
[] Daily use °f CEP'_kMABR_TE® Ceramic
Cooktop Cleaner xqll help kee t) the
cooktop k/oking ne_.
] Remme the burner grates and xent
grille.
[] Shake the cleaning cream x_ell.
Appl} a te_ drops of (;ERAI_L_ BRUTE¢'_
Cermnic Cooktop Cleaner directly to
tile cooktop.
[] Use a pap er t°wel °r CEP'A_L_ BR_tTE_'_
Cleaning Pad for Cerm-nic Cooktops to
clean the entire cooktop surtaee.
[] Use a dr> cloth or paper towel to
remoxe all cleaning residue. No need
to rinse.
NOTE:It is veryirgportantthatyou DONOTheat
thecooktopuntil it has beencleanedthomughl_
Use a CERAMABRYTE_ CleanhTg
Pad for Ceramic Cooktops or a
Scotch-Brite _ Multi-Purpose No
Scratch blue scrub pad.
The CERAMABRYTE'*_Ceramic
Cooktop Scraper and all
recommended supplies are
available through our Parts CenteE
See instructions under "ToOrder
Parts" section onnext page.
NOTE:Do not use a dull or
nicked blade.
Burned-On Residue
WARNING:DAMAGEtoyourglasssurfacemay
occurif you usescrubpadsotherthanthepad
includedwith yourcooktop.
[] Allow the cooktop to cool.
] Remme tile burner grates and vent
grille.
[] Spread a tb_ drops of (;EP_I_/_
BR_TE ®Ceramic Cooktop (]leaner on
tile entil_ burned residue al_a.
Heavy, Burned-On Residue
[] Allow the cooktop to cool.
] Remme tile burner grates and vent
grille.
[] Use a single-edge razor blade scraper
at approxin/ately a 45 ° angle against
tile glass surfi_ce and scrape the soil.
It will be necessary to apply pressure
to tile razor scraper ill order to
ten/Dye tile residue.
[] Using the included (:EIL_MA BR'_TE®
(]leaning Pad tor (]enunic (2)oktops,
rub the residue area, applying
pressure as needed.
[] If ally residue remains, repeat the
steps listed above as needed.
[] For additional protection, after all
residue has been remoxed, polish the
entire surfime with (;ERA_L_ BRYTE®
Ceramic Cooktop Cleaner and a paper
towel.
[] After scraping with the razor scraper,
spread a tew drops of CERAMA
BR'tTE ¢')Ceramic Cooktop (]leaner on
the entire burned residue area. Use tile
(]E/L_MA BR'_TE ®(]leaning Pad to
remme any remaining residue.
[] For additional protection,
after all residue has been ren/oved,
polish tile entire surfime x_ith
(;ERA_L_ BR'tTE ¢'_Ceramic Cooktop
Cleaner and a paper t(}_el.
36
Page 37

Glasssurface--potential forpermanentdamage. CEAppliancescom
Sugaryspillovers(suchas
jellies, fudge,candy,syrups)
ormeltedplasticscancause
pitting ofthesurfaceofyour
cooktop(notcoveredby the
warranty)unlessthespillis
removedwhile stillhot.
Specialcare shouldbetaken
whenremovinghotsubstances.
Besuretousea new,sharp
razorscraper.
Donot usea dullornicked
blade.
Damage from Sugary Spills and Melted Plastic
[] Turn off all sm_i_ce unit_sand, _fith
_lIl ox, en Illitt, I'eIllOX, e hot pans _lIld
grates.
[] _4'eai]ng an oven Initt:
a. Use a single-edge razor blade
scraper (CEI_AAMA BRYTE _
Ceramic (:ooktop Scraper) to
move the spill to a cool area on
the cooktop.
b. Remove the spill with
paper t()wels.
To Order Parts
To order (:EILAJX4ABRYTE '_Ceramic
Cooktop (]leaner and the cooktop
scrape_; please call ore" toll-fi'ee number:
NationalParts
Center .............. 800.626.2002(U.S.)
888.261.3055(Canada)
CERAMABRYTE®Ceramic
CeektepCleaner ........... # WXTOX300
CERAMABRYTE_Ceramic
CooktopScraper ........... _€WXIOX0302
Kit ........................ # WB64XSO£7
(Kitincludescreamandcooktopscraper)
CERAMABRYTE®CleaningPadsfor
CeramicCooktops ......... # WXTOX350
[] An) remaining spilloxer should be
leit until the surti_ce ()f the c()okt()p
has cooled.
] Don't use the suYti_ce units again
until all of the residue has been
completely removed.
NOTE:Ifpitting or indentationin theglass
surfacehasalreadyoccurred,thecooktopglass
will have to be replaced In this case,servicewill
benecessa_
37
Page 38

Beforeyoucall forservice...
Troubleshooting -tips
Save time and money! Review the charts on the following
pages first and you may not need to call for service.
Possible Causes
Burners have yellow or The combustion quality of
yellow-tippedflames burner flames needs to be
determhmd visuaJly.
What ToDo
• Use the illustrafions beh)w to detemfine if vour burner
flames are hernial. If burner flames look like A, call fin"
service. No_mal btlrner flames should look like B or C,
dei)ei_ding on the tH)e of gas you use. With I,P gas, some
yellow tii)i)ing on outer cones is noi_nal.
A-Yellow flames B-Yellow tips C-Softblue flames
Carlfor service onouter cones Normalfor natural
Normalfor LPgas gas
Control knobs Knob isn't pushed down. • To turn from the OFF position, push the knob in and
will not turn then turn.
Burners do Plug on range is not • Make sure electrical l)lug, is l)lugged,, into a live, properly
notlight completely inserted in the grounded outlet.
electrical outlet.
Gas supply not commcted • See the Installation hastrucfions that came with your
or tttnmd on. I'HU re
A fuse ill your home may be • Replace the ti/se (>r reset the circtdt breakel:
blown or the circuit breaker
tripped.
Bur]mr parts not replaced • See the Careand cleaningof therange section.
correctly.
Control Lockoutfeature •/f LOC ONappears in the display, the oven control is
is activated locked. Ttu'u this feature off to use the oven. See the
Control Lockout section.
Tickingsoundofspark Control knob is still • Turn the knob out of the LITEposition to the desired
igniterpersistsafter in the LITEposition, settin
burnerlights • Turn the burner off and relight. It ticking is still
present, (';ill tot service.
Burner flames very hnproper air to gas ratio. •/f range is connected to LP gas, check all steps
large or yellow in the Installation Instructions that came with
VOtII" l';lll re
Ovenlightdoes Light bulb is loose or defective. • Tighten or replace the btdb.
not work
Oven will not work Plug on range is not completely • Make sure electrical l)lug, is l)lugged,, into a live, properly
3_ Oven controls improperly set. • See the Using the oven section.
Switch operating • (',:Ill fin" service.
light is broken.
inserted ill the eleclricaJ outlet, grounded outlet.
A fuse ill your home may be • Replace the fl/se or reset the circuit breaker:
blown or the circuit
breaker tripped.
Page 39

www.GEAppliances.com
Possible Causes
Fooddoes not bake
or roast properly
Food does not Oven controls improperly set. • Make sure vet/touch the BROIL HI/LOpad.
broil properly
Oven controls hnproperly set.
Rack position is incorrect
or the rack is not level.
Incorrect cookware or • See tile Using the oven section.
cookware of improper
size being used.
Oven thermostat needs • See tile Adjust the oven thermostat - Do it yourself[
adjustment, section.
hnproper rack position • See tile Broiling Guide.
being used.
Cookware not suited • Use tile broiling pan and grid that came with your range.
for broiling.
The probe is plugged into the • Uu.})lug, and l'elllOVe tire probe from tire oveu.
outlet ha the oven.
(on some models)
Almnhamn foil used on the • See tire Using the oven section.
the broiling pan mad grid has
not been fitted properly mad
slit as recommended.
What To Do
• See the Using the oven section.
• See the Using the oven section.
In some areas the power • Preheat tire broil element fi)r 10 minutes.
(voltage) may be low.
• Broil for tire longest period of time recommended in
tire Broiling Guide.
Oven temperature Oven therlnostat • See tire Adjust the oven thermostat - Do it yourself[
too hot or too cold needs adjustlnent, sectiou.
Oven dooris crooked The door is out of position. • gecause the oven door ix removable, it soinetimes
gets out of position during installation. Remove and
replace tire oven door. See tire Lift-Off Oven Door
sectiou.
Storagedrawer Rear drawer support is • Repositiou the drawer. See the Storage Drawer
is crooked on top of the guide rail. Removaliustructious in the Care and cleaning of your
range section.
Storage drawer Power cord may be • I_.epositiou tire drawer and power cord. See the
won't close obstructing drawer Storage Drawer Removal instructi_ms in the Care and
in the lower back cleaning of your range section.
of the range.
Rear drawer support is
on top of the guide rail.
• Reposition the drawer. See the Storage Drawer
Removal instructions in the Care and cleaning of
your range section.
39
Page 40

Beforeyoucall forservice...
Troubleshooting tips
Possible Causes What To Do
Clock and timer do Plug on range is not completely * Make sure electrical l)lug, is l)lugged,, into a live, properly
not work inserted in the electrical oudet, grounded outlet.
A fuse in your home * Replace tile fl/se or reset tile circuit breakel:
may be blown or the
circuit breaker tripped.
Oven controls improperly set. * See the Using the clock and timer section.
Oven will not self-clean The oven temperature is * _Mh>wthe range to cool and reset the controls.
too high to set a self-clemz
operation.
Oven controls improperly set. * See the Using the self-cleaning oven section.
The probe is plugged into * Remove the probe fi'om the oven.
the outlet in the oven.
(on some models)
"Crackling" or This is the sound of the * This is normal.
"popping" sound metal heating and cooling
during both the cooking and
clemfing functions.
Excessive smoking Excessive soil. * Touch the CLEAR/OFFpad. Open the windows to
during a clean cycle rid the room of smoke. _'ait tmtil the LOCKEDlight
goes off. _4"ipe up the excess soil and reset the clean
cvcle.
Oven door will not Oven too hot. * Allow the oven to cool below locking tern )erature
open after a clean cycle
Ovennot clean after a Oven controls not properly set. * See the Using the self-cleaning oven secti_>n.
clean cycle Oven was heavily soiled. • Clean up heavy spillovers before starting the clean
cycle. Heavily soiled ovens may need t(> sell=clean
again or fin" a h>n,_er_ period of time.
"LOCKED"flashes The self-cleml cycle has been * Close the oven door.
in the display selected but the door is not
closed.
"LOCKED"light is The oven door is locked * Touch the CLEAR/OFFpad. Alh>w the oven to cool.
on when you want because the temperature
to COOk inside the oven has not
dropped below the
locking temperature.
"F--and a number You have a function error code. * Touch the CLEAR/OFFpad. Put the oven back into
orletter" flash (>peration.
in the display
If the function code repeats. * Disconnect all power to the range for at least 30
seconds and then reconnect power. If the flmcti(m
err(>r code repeats, call for serxice.
4O
Page 41

www.GEAppliances.com
Possible Causes
Control signals after You forgot to enter a
entering cooking time bake temperature or
What To Do
• Touch the BAKE pad and desired temperature or
the SELF CLEANLO/STD pad and desired clean time.
or start time cleaning time.
Display goes blank A fuse in your home may • Replace tile fl/se or reset tile circuit breaker:
be blown or the circuit
breaker tripped.
The clock is in the • See tile Special features of your oven control section.
black-out mode.
Displayflashes Power failure. • Reset tile clock.
Unable to get the Oven control pads were • Tile BROILHI/LOand BAKEpads must be touched at
displayto show "SF" not touched properly, tile same time and held fm 3 seconds.
"Probe" appears in This is reminding you to • Enter a l)robe temlaeratm'e.
thedisplay enter a probe temperature
(on some models) after plugging in the probe.
Power outage, Power outage or surge. • Reset tile clock. ]f the oven was in use you must reset
clock flashes it by touching the CLEAR/OFFpad,setting tile clock
and resetting any cooking fiuactiou.
Steam from the vent When using the convection • This is normal.
feature (on some models),
it is normal to see steam
coming out of the oven
vent. As the number of racks
or amount of food being
cooked increases, the amount
of visible stemn will increase.
"Burning" or "oily" This is normal in a new oven • To speed tile process, set a self-clean cycle for a
odor emitting from and will disappear in time. illillii/ltlul of 3 hours. See the Using the self-cleaning
the vent oven section.
Strong odor An odor from the insulation • This is temporary.
aromad the inside of the oven
is normal for the first few times
the oven is used.
Fan noise A cooling fan or a convection • This is i]OFlll_ll. Tile cooling fiul will till'l] off slid Ol1
fan (depending on the to cool internal parts. It may run after tile oven is
function you are using) may turned OFF. Tile convection tim (on some models)
automatically turn on mad off. will cycle on and off m]til tile flu]orion is over or tile
door is ()l)eI]ed.
4/
Page 42

Beforeyoucall forservice...
Troubleshooting tips
Possible Causes What ToDo
Scratches (may appear
as cracks) on cooktop
glass surface
Incorrect clem_hlg
methods being used.
Cookware with rough bottoms
being used or com'se particles
(salt or sand) were between
the cookwaJce mid the surface
of the cooktop.
Cookware has been slid
across the cooktop surface.
• Scratches are not remo_al)le. Tim scratches will
beconm less _isible in time as a result of cleaning.
• To axoid scratches, use tile recommended cleaning
i)rocedures. Make s/Ire bottoIns of cookware are clean
betore rise, and t/se cookware with slnooth bottoins.
Areas of discoloration
on the glass cooktop
surface
Plastic melted Hot cooktop came into
to the glass cooktop contact with plastic placed
surface on the hot cooktop.
Htting (or indentation) Hot sugar mixture spilled
of the cooktop on the cooktop.
Food spillovers not cleaned • See tile Cleaning the glass cooktop section.
before next use.
Hot surface on a model • This is normal. Tile surtace Ina) appear discolored
with a light-colored cooktop, when it is hot. This is temporary and will disappear
as the glass cools.
• See the Glass surface- potential for permanent
damage section in the Cleaning the glass cooktop
surface section.
• Call a qualified technician for replacement.
42
Page 43

GE Service Protection Plus 'M
GE, a name recognized worldwide %r quality' and dependability, oflers y'ou
Service Protection Plus'_'--comprehensive protection on all y'our appliances--
No Matter What Brand!
Benefits Include:
• Backed by GE
• All brmads covered
• Unlimited service calls
• All parts mad labor costs included
• No out-of-pocket expenses
• No hidden deductibles
• One 800 number to call
You will be completely satisfied with our service protection or you ma} request ,your inone,_ back
on the remaining value of 3our contract. No questions asked. It's that simple.
Protect yore" reffigerat(m dishwasher; washer and dryer; range, TV, VCR and much more--rely brand!
Plus there's no extra charge tot eulergency ser;'ice and low inonthly financing is available. Even icelnaker
coverage and tood spoilage protection is ottered. You can rest eas> knowing that all your valuable
household products are protected against expensive repairs.
Place your confidence in (;E and call us in the IU.S. toll-free at _tllt._Z_.ZZZ_
foY UlOI'e inloi'u/ation.
"*Allbrands cmered, up to 2(}years old. in the contin< nlal I_.S.
We71CoverAnyAppliance.
Anywhere. Anytime.*
_.. (2."._22.............
Please place in envelope and mail to:
General Electric Company
Warranty Registration Department
EO. Box 32150
Louisville, KY 40232-2150
4,3
Page 44

Consumer Product Ownership Registration
Dear Customer:
Thank you for purchasing our product and thank you for placing your confidence in us.
_a/e are proud to haxe you as a customer'.
Follow these three steps to protect your new appliance investment:
Important: If you did not get a registration card with your
................................................................................................... _(M111{ 1-<
Consumer Product Ownership Registration
Complete and mail
your Consumer
Product Ownership
Registration today.
ttaw' the peace of
mind of knowing w(
call colltact VOl/ ill
tile tmlikely exent era
satbly modification.
Atter mailing tile
registration below,
store this document
in a saib place. It
contains inlormation
you will need should
you require service.
Our selwice number is
800.GE.CARES
(800.432.2737).
Model Number Serial Number
, , , , , I I , , , , , , , I
product, detach and return the form below to
ensure that your product is registered, or register
online at www.GEAppliances.com.
Read your Owner's
Manual carethllv.
It will help you
operate yol/r lle',_
appliance properly.
Model Number Serial Number
MI: Ms. M*>,. Mix_,
Fir',l I I Lasll
Name I I I I I I I I I Nain(! I I I I I I I I I I I I
SI r( (!1 I
Addr(';s I I I I I I I I I I I I I I I I I I I I I I I I
Apt. # I i i
(;i,vI I I
l )ale Placed
hi Use III
Monlh
0
GE Consmner Products
General Electric Companf
Louisville, KontuckF
_ ww_aEApplia.oos,oom
I I I I I I EqnailAddress*
I I I I I I I I s_., I
_,i!a r I I I Phon(
* Please l)rovide your e-mail addrc,,,, to receive, xia e-mail, discounts, special offfP_ and other important
commtmications fl-om GE Appliances (GK\).
Check hero ifw)u do not want to receive colmmmicalions h-ore (;EA's carctiflly selected partnel'_.
GEAppliances
FAIL/RE TO COMPI.ETE AND RE'I'[ rRN Tt tlS C,_(I) DOES NOT DIMINISt t h_)l JR
W.\RI_ \NTY RIGt tTS.
For more information about Gl_\'s privacy and data usage poli(); go to _a_a_.(;1L\pl)liances.com and
click on 'Privacy Poli_y" or call 800.626.2224.
Nulnl)(!r I i I
I ] Code I I I I
Zip I
I-I,, I-I , , ,II
I
Page 45

Accessories.
Looking For Something More?
Youcan find these accessories and many more at www.GEAppliances.com (U.S.) or
www.geappliances.ca (Canada), or call 800.626.2002(U.S.) or 888.261.3055 (Canada)
(during normal business hours). Have your model number ready.
ii; i /¸¸¸7¸¸¸¸¸¸¸¸¸¸¸
Grates Surface Burner Heads & Caps
Oven Racks Broiler Pan Cleaner
Light Bulbs Knobs
Tired of discolored _cks? ¼qshing you had exua-hea_T-duty oven racks?
NOW AVAILABLEfor your range:
(;E's innovative, self-cleanable porcelain<oared oven racks!
• Hem T Dut T
• Durable
• Able to be cleaned in a self-cleaning oven
Visit www.GEAppliances.com (U.S.) or www.geappliances.ca (Canada)
fi)r more information.
45
Page 46

GEGasRange Warranty.(Forc.stomersintheUnitedstates)
All warranty service provided by our Factory Service Centers,
or an authorized Customer Care®technician. Toschedule service,
on-line, 24 hours a day, vis# us at www.GEAppliances.com, or carl
800.GE.CARES (800.432.2737).
GE Will Replace:
Any part of the range which tifils due to a defect in matei_ials or workmanship. During this
Fromthe date of the
origina!purchase
Fromthe dateofthe
originalpurchase
(onglass Cooktop
modelsonly)
Service trips to your home to teach you how to use
the product.
hnproper hastaJlation, delivery or mahltenmlce.
Failure of the product if it is abused, misused,
or used for other thm_ the intended purpose or
used commercially.
Dmuage to the glass cooktop caused by hardened
spills of sugary materials or melted plastic that
axe not clem_ed according to the directions in
the Owner's Manual.
full one-year warranty, GE will also pro_ide, free of charge, all labor and in-home sex'vice to
replace the defbcti_e part,
A replacement glass cooktop if it should: crack due to thermal shock; discolor; crack at the
rubber seal between the glass cooktop and the porcelain edge,
Dudng this limited additional four-year warranty, you will be responsible for any labor or
in-home sex'vice.
Staple your receipt here.
Proof of the original
purchase date is needed to
obtain service under the
warranty.
Damage to the glass cooktop caused by use of clemlers
other than the recommended clemfing creams.
Replacement of house fuses or resetting of circuit
breakers.
Damage to the product caused by accident, fire, floods
or acts of God.
h_cidentaJ or consequential damage caused by possible
defects with this applimace.
Damage caused after delivery.
This warranty is extended to the original purchaser and any succeeding owner for products purchased for
home use within the USA. In Alaska, the warranty excludes the cost of shipping or service calls to your home.
Some states do not aflow the exclusion or limitation of incidental or consequential damages. This warranty
gives you specific legal rights, and you may also have other rights which vary from state to state. Toknow what
your legal rights are, consult your local or state consumer affairs office or your state's Attorney General.
Warrantor:General Electric Company.Louisville,KY40225
46
Page 47

GEGasRange Warranty. (Forc.stomorsi, Canada)
All warranty service provided by our Factory Service Centers
or an authorized Customer Care®technician. For service,
call 1.800.361.3400.
Camco Will Replace:
Anypart )f the range xd_lch falls due to a defect in materials or workmanshii_. During this
Fromthedate of the
origina!purchase
Fiw,.Years
Fromthedate of the
origina/purchase
(onglasscooktop
full one-year warrantF, Camco will also provide, free of charge, all labor and in-home service to
replace the defecfixe part.
A replacement glass cooktop if it shotfld: crack due to thermal shock; discolor; crack at the
rubber seal between the glass cooktop and the porcelain edge.
During this limited additional four-year warranty, you will be responsible fin" any labor or
in-home service.
modelsonly)
Service trips to your home to teach you how to use
the product.
Improper installation, delivery or maintenance.
Failure of the product if it is abused, misused, or
used for other thaa_ the intended purpose or used
commercially.
Dmnage to the glass cooktop caused by hardened
spills of sugaxy materials or melted plastic that axe not
cleaned according to the directions ha the Owner's
Manual.
( (Y • , • ,
Staple your receipt here.
Proof of the original
purchase date is needed to
obtain service under the
warrant_
Dmnage to the glass cooktop caused by use of cleaners
other than the recommended cleaa_hlg cretans.
Replacement of house fuses or resetting of circuit
breakers,
Dmnage to the product caused by accident, fire, floods
or acts of God.
h_cidentaJ or consequential dmnage caused by possible
defects with this appliance.
Dmnage caused after delivery.
I WARRANTOR IS NOT RESPONSIBLE FOR CONSEQUENTIAI, DAIVlAGES. I
I
Warrantor: CAMCO IN(:.
I
47
Page 48

ConsumerSupport.
gEAppliancesWebsite i,, theu.s.:www.GEAppliances.com
Have a question or need assistance with your appliance? Try the GE Appliances X.Vebsite 24 hou_ a day,
any day of the year'. For greater convenience and taster service, you can now download Owner's Mmmals,
order parts, catalogs, or even schedule service ondine. Y_)u can also "_sk Ore" Team of EN)erts'"" yore" questions,
and so much more... In Cmlada: www.geapplimlces.ca
ScheduleService i,,theu.s.:www.GEAppliances.com
Expert GE repair se_ice is one one step awa_ fi'om yore" do(n: Get on-line and schedule veto" service at _om"
comenience 24 hom_ any da} of the year! Or call 800.(;E.CARES (800.432.2737) dining nomml business hom_.
In Cmmda, cab 1.800.361.8400
flea/Life DesignStudio i,, theu.s.:www.GEAppliances.com
GE supports the Uni\'etsal Design concept--products, services and enviromnents that can be used by people of
all ages, sizes and capabilities. _'e recognize the need to design for a wide range of physical and mental abilities
and impaim_ents. For details of GE's Universal Design applications, including kitchen design ideas fin" people with
disabilities, check out (mr X_'ebsite today. For the hearing impaired, please call 800.TDD.GEAC (800.833.4322).
In Cmlada, contact: Manage_; Consmner Relations, Cameo, Inc.
Suite 310, 1 Fatting' I,ane
Moncton, N.B. E1C 9M3
ExtendedWarranties i,,theu.s.:www.GEAppliances.com
Purchase a (;E extended warranty and learn about special discotmts that are axailable while veto" warranty is still
in effect. Yim can i)m'chase it on-line anytime, or call 800.626.2224 dining nomml business houi_. (;E ())nsulner
Hom e Serxices will still be th ere ate r yet u"wa rra nt} expires. In Canada, call 1.888.261.2133
PartsandAccessories 1,,theu.s.:www.GEAppliances.com
Individuals qualified to se_'ice their own appliances can have parts or accessories sent directly to their homes
(VISA, MasterCard and Discover cards are accepted). Order on-line today, 24 hom_ eveI T day or by phone at
800.626.2002 dtwing nomml business hom_.
Instructions contained in this manual coverprocedures to be performed by any user. Other servicing generally should be
referred to qualified service personnel Cautionmust be exercised, since improper servicing may cause unsafe operation.
Customex_ ha Cm_ada shouM consult the yellow pages t0r the nearest Cameo service centex; or call 1.888.261.3055.
ContactUs i,,theu.s.:www.GEAppliances.com
It you are not satisfied with the service you receive ti'om GE, contact us on our Website with all the details
including your phone nmnbe_; or write to: General Manage_; Customer Relations
GE Appliances, Appliance Park
I,ouisville, KY 40225
In Cmaada: www.geapplimaces.ca, or write to: Directo_; Consumer Relations, (_m_co, Inc.
Suite 310, 1 Factory i,ane
Moncton, N.B. E 1C 9M3
flegisterYourAppliance 1,, the U.S.: www.GEAppliances.com
Register your new applim_ce on-line-at your convenience! Timel} product registration will allow fin" enhanced
commtmication and prompt serxice trader the temps of veto" warranty, should the need arise. You may also mail
in the pre-printed registration card included in the packing material. In Cmmda: www.geappfimlces.ca
Printed in flTe United States
 Loading...