

Page 1
Installation
Gas Slide-In Range
Instructions
JGSP23, JGSP44
Questions? Call GE Answer Center at 800.626.2000 or visit our
Website at: www.geappliances.com
In the Commonwealth of Massachusetts:
• This product must be installed by a licensed
plumber or gas fitter.
• When using ball-type gas shut-off valves,
they shall be the T-handle type.
CAUTION: Before you begin—read these
instructions completely and carefully.
• IMPORTANT—Save these instructions for
local inspector’s use.
• IMPORTANT—OBSERVE ALL GOVERNING
CODES AND ORDINANCES.
• Note to Installer—Be sure to leave these
instructions with the Consumer.
• A flexible gas connector, when used,
must not exceed 3 feet.
• Note to Consumer—Keep these instructions
for future reference.
• Note—This appliance must be properly
grounded.
• IMPORTANT: Leak testing of the appliance
shall be conducted according to the
manufacturer’s instructions.
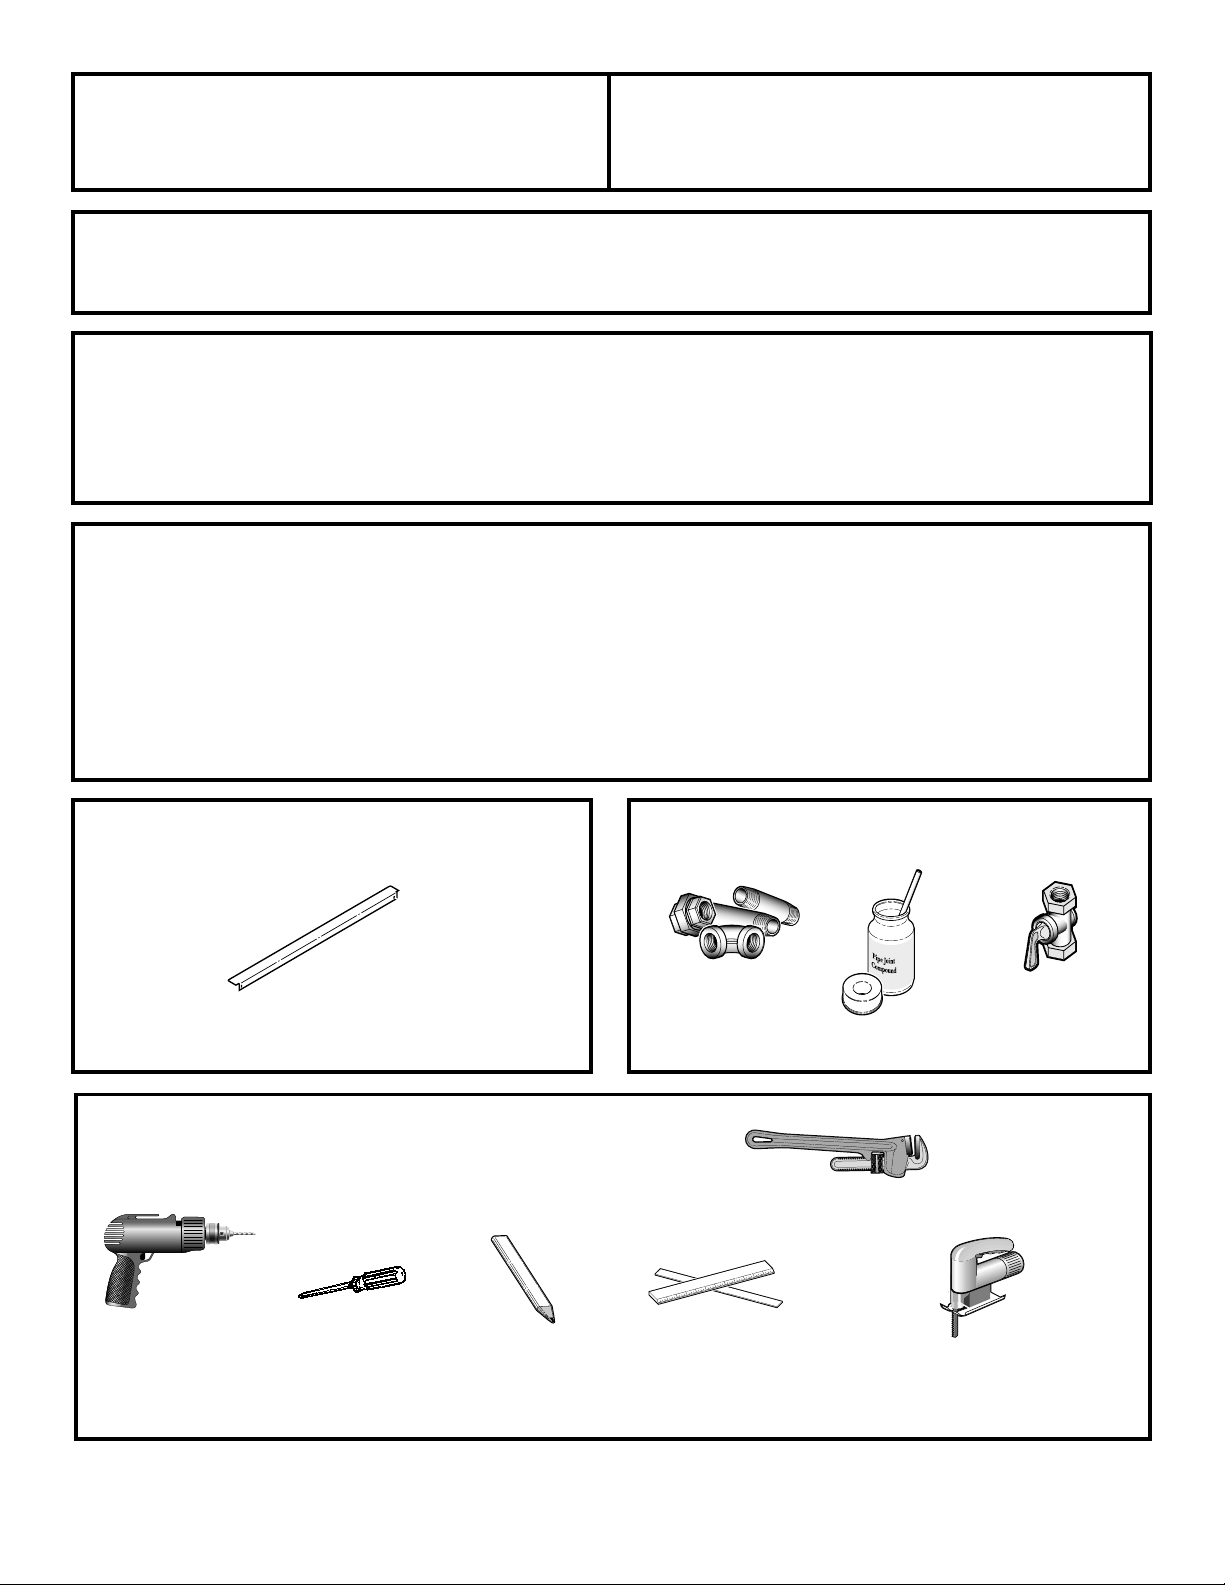
PARTS INCLUDED
Filler Strip
TOOLS YOU WILL NEED
1/8" Drill Bit &
Electric or
Hand Drill
Phillips
Head
Screwdriver
Pencil
MATERIALS YOU MAY NEED
n
T
o
l
a
f
p
e
e
Pipe Fittings
Pipe Wrench
Ruler or
Straightedge
T
F
s
o
a
r
G
U
s
h
t
e
i
W
Joint Sealant
Saber Saw
Shut Off Valves
229C4053P484-1
31-10500-1 (05-03 JR)
1
Page 2
STOP!
Installation Instructions
IMPORTANT SAFETY INSTRUCTIONS
For Your Safety
WARNING!! If the information
in this manual is not followed
exactly, a fire, explosion or gas
leak may result, causing property
damage, personal injury or death.
Do not store or use gasoline or other
flammable vapors and liquids in the vicinity
of this or any other appliance!
WHAT TO DO IF YOU SMELL
GAS:
STOP!
• Do not try to light any appliance. Do not touch
any electrical switch; do not use any phone in
your building.
• Immediately call your gas supplier from a
neighbor’s phone. Follow the gas supplier’s
instructions.
• If you cannot reach your gas supplier, call the
fire department.
Electrical Requirements
This Appliance must be electrically
grounded. Check with your local codes which
apply in your area. If no local codes apply, the
National Electrical Code, ANSI/NFPA No. 70Latest Edition must be followed. Write to:
National Fire Protection Association
Batterymarch Park
Quincy, MA 02269
Be sure the installation of this range in a mobile
home conforms with the Manufactured Home
Construction and Safety Standard, Title 24 CFR,
Part 3280. If this standard does not apply, you
must follow the standard for Manufactured
Home Installations, ANSI A225. 1 and
Manufactured Home Installations, Sites
and Communities and ANSI/NFPA 501A or with
local codes. You can get a copy of the Federal
Standard by Writing:
Office of Mobile Home Standards
HUD Building
451 7th Street, S.W.
Washington, D.C. 24010
Installation and service must be performed
by a qualified installer, service agency or the
gas supplier.
This range has been design certified by CSA
International. You’ll find safety precautions in
your Owner’s Manual. Read them carefully.
• Installation of this range must conform with
local codes or in the absence of local codes
with the National Fuel Gas Code, ANSI Z223.
1-Latest edition.
• Be sure your range is installed properly by a
qualified installer or service technician.
• To eliminate reaching over surface burners,
cabinet storage above burner should be avoided.
• Do not install the unit near an outside door or
where a draft may affect its use.
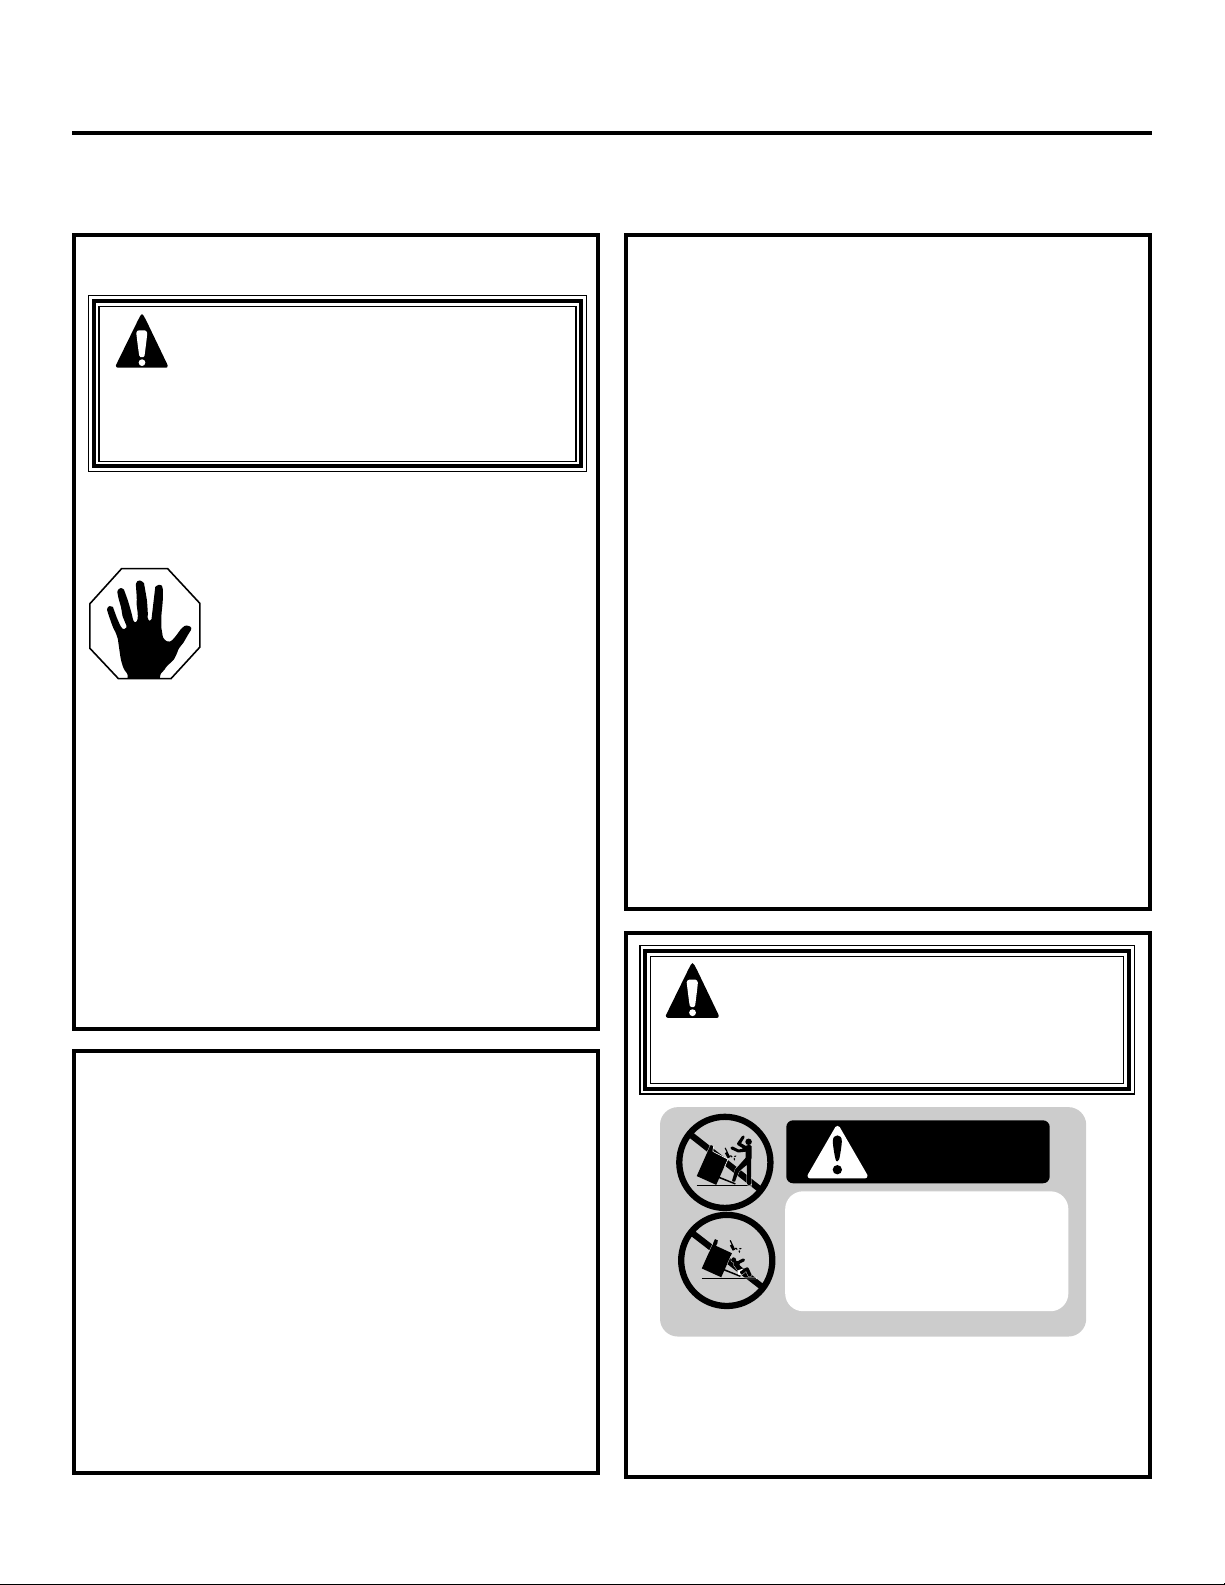
WARNING: To reduce the risk of
tipping, the appliance must be
secured by properly installed anti-tip
device packed with the appliance.
WARNING
• All ranges can tip
• Injury to persons could result
• Install anti-tip bracket
packed with range
• See Installation Instructions
If you pull the range out and away from the wall
for any reason, make sure the Anti-Tip device
is engaged when the range is pushed back
against the wall.
2
Page 3

Installation Instructions
Pre-Installation Checklist
When preparing the range opening,
make sure the inside of the cabinet and
the slide-in do not interfere with each
other. (See section on preparing the
opening.)
Remove packaging materials and
literature package from the oven before
beginning installation.
Oven Racks
E
A
S
Y
I
N
S
T
A
L
L
A
EASY INSTALLATION OF YOUR NEW
T
I
O
3
B
B
B
B
B
B
B
B
B
B
B
B
0
e
e
e
e
e
e
e
e
e
e
e
e
N
f
f
f
f
f
f
f
f
f
f
f
f
o
o
o
o
o
o
o
o
o
o
o
o
"
r
r
r
r
r
r
r
r
r
r
r
r
e
e
e
e
e
e
e
e
e
e
e
e
O
W
y
y
y
y
y
y
y
y
y
y
y
y
o
o
o
o
o
o
o
o
o
o
o
o
I
I
I
I
I
I
I
I
I
I
I
I
u
u
u
u
u
u
u
u
u
u
u
u
F
M
M
M
M
M
M
M
M
M
M
M
M
A
b
b
b
b
b
b
b
b
b
b
b
b
P
P
P
P
P
P
P
P
P
P
P
P
30" WALL OVEN
e
e
e
e
e
e
e
e
e
e
e
e
O
O
O
O
O
O
O
O
O
O
O
O
Y
g
g
g
g
g
g
g
g
g
g
g
g
L
R
R
R
R
R
R
R
R
R
R
R
R
i
i
i
i
i
i
i
i
i
i
i
i
n
n
n
n
n
n
n
n
n
n
n
n
T
T
T
T
T
T
T
T
T
T
T
T
O
L
-
-
-
-
-
-
-
-
-
-
-
-
A
A
A
A
A
A
A
A
A
A
A
A
R
R
R
R
R
R
R
R
R
R
R
R
I
I
I
I
I
I
I
I
I
I
I
I
N
N
N
N
N
N
N
N
N
N
N
N
e
e
e
e
e
e
e
e
e
e
e
e
M
M
M
M
M
M
M
M
M
M
M
M
U
a
a
a
a
a
a
a
a
a
a
a
a
T
T
T
T
T
T
T
T
T
T
T
T
O
P
P
P
P
P
P
P
P
P
P
P
P
d
d
d
d
d
d
d
d
d
d
d
d
-
-
-
-
-
-
-
-
-
-
-
-
O
O
O
O
O
O
O
O
O
O
O
O
R
S
S
S
S
S
S
S
S
S
S
S
S
t
t
t
t
t
t
t
t
t
t
t
t
V
R
R
R
R
R
R
R
R
R
R
R
R
h
h
h
h
h
h
h
h
h
h
h
h
a
a
a
a
a
a
a
a
a
a
a
a
e
e
e
e
e
e
e
e
e
e
e
e
T
T
T
T
v
v
v
v
T
T
T
T
T
T
T
T
v
v
v
v
v
v
v
v
s
s
s
s
s
s
s
s
s
s
s
s
E
e
e
e
e
e
e
e
e
e
e
e
e
A
A
A
A
A
A
A
A
A
A
A
A
N
e
e
e
e
e
e
e
e
e
e
e
e
N
N
N
N
N
N
N
N
N
N
N
N
N
N
N
N
N
N
N
N
N
N
N
N
t
t
t
t
t
t
t
t
t
t
t
t
h
h
h
h
h
h
h
h
h
h
h
h
i
i
i
i
i
i
i
i
i
i
i
i
N
o
o
o
o
o
o
o
o
o
o
o
o
T
T
T
T
T
T
T
T
T
T
T
T
n
n
n
n
n
n
n
n
n
n
n
n
E
e
e
e
e
e
e
e
e
e
e
e
e
t
t
t
t
t
t
t
t
t
t
t
t
-
-
-
-
-
-
-
-
-
-
-
-
s
s
s
s
s
s
s
s
s
s
s
s
e
e
e
e
e
e
e
e
e
e
e
e
s
s
s
s
s
s
s
s
s
s
s
s
O
O
O
O
O
O
O
O
O
O
O
O
t
t
t
t
t
t
t
t
t
t
t
t
e
e
e
e
e
e
e
e
e
e
e
e
W
r
r
r
r
r
r
r
r
r
r
r
r
t
t
t
t
t
t
t
t
t
t
t
t
u
u
u
u
u
u
u
u
u
u
u
u
o
o
o
o
B
B
B
B
o
o
o
o
o
o
o
o
B
B
B
B
B
B
B
B
i
i
i
i
i
i
i
i
i
i
i
i
n
n
n
n
n
n
n
n
n
n
n
n
c
c
c
c
c
c
c
c
c
c
c
c
S
S
S
S
S
S
S
S
S
S
S
S
I
I
I
I
I
I
I
I
I
I
I
I
s
s
s
s
t
t
t
t
s
s
s
s
s
s
s
s
t
t
t
t
t
t
t
t
n
n
n
n
n
n
n
n
n
n
n
n
E
E
E
E
E
E
E
E
E
E
E
E
i
i
i
i
i
i
i
i
i
i
i
i
O
O
O
O
O
O
O
O
O
O
O
O
t
t
t
t
t
t
t
t
t
t
t
t
o
o
o
o
o
o
o
o
o
o
o
o
s
s
s
s
s
s
s
s
s
s
s
s
r
r
r
r
r
r
r
r
r
r
r
r
R
R
R
R
R
R
R
R
R
R
R
R
Before you begin-Read these instructions completely and carefully.
Before you begin-Read these instructions completely and carefully.
Before you begin-Read these instructions completely and carefully.
Before you begin-Read these instructions completely and carefully.
Before you begin-Read these instructions completely and carefully.
Before you begin-Read these instructions completely and carefully.
Before you begin-Read these instructions completely and carefully.
Before you begin-Read these instructions completely and carefully.
Before you begin-Read these instructions completely and carefully.
Before you begin-Read these instructions completely and carefully.
Before you begin-Read these instructions completely and carefully.
Before you begin-Read these instructions completely and carefully.
t
t
t
t
t
t
t
t
t
t
t
t
n
n
n
n
n
n
n
n
n
n
n
n
u
u
u
u
u
u
u
u
u
u
u
u
W
W
W
W
W
W
W
W
W
W
W
W
a
a
a
a
a
a
a
a
a
a
a
a
V
V
V
V
V
V
V
V
V
V
V
V
s
s
s
s
s
s
s
s
s
s
s
s
c
c
c
c
c
c
c
c
c
c
c
c
l
l
l
l
l
l
l
l
l
l
l
l
N
N
N
N
N
N
N
N
N
N
N
N
E
E
E
E
E
E
E
E
E
E
E
E
l
l
l
l
l
l
l
l
l
l
l
l
t
t
t
t
t
t
t
t
t
t
t
t
e
e
e
e
e
e
e
e
e
e
e
e
c
c
c
c
c
c
c
c
c
c
c
c
i
i
i
i
i
i
i
i
i
i
i
i
E
E
E
E
E
E
E
E
E
E
E
E
o
o
o
o
o
o
o
o
o
o
o
o
r
r
r
r
r
r
r
r
r
r
r
r
o
o
o
o
o
o
o
o
o
o
o
o
A
A
A
A
A
A
A
A
A
A
A
A
-
-
-
-
-
-
-
-
-
-
-
-
R
R
R
R
R
R
R
R
R
R
R
R
n
n
n
n
n
n
n
n
n
n
n
n
m
m
m
m
m
m
m
m
m
m
m
m
L
L
L
L
L
L
L
L
L
L
L
L
B
B
B
B
B
B
B
B
B
B
B
B
s
s
s
s
s
s
s
s
s
s
s
s
-
-
-
-
-
-
-
-
-
-
-
-
L
L
L
L
L
L
L
L
L
L
L
L
p
p
p
p
p
p
p
p
p
p
p
p
e
e
e
e
e
e
e
e
e
e
e
e
K
K
K
K
K
K
K
K
K
K
K
K
N
N
N
N
N
N
N
N
N
N
N
N
f
f
f
f
f
f
f
f
f
f
f
f
l
l
l
l
l
l
l
l
l
l
l
l
o
o
o
o
o
o
o
o
o
o
o
o
G
G
G
G
G
G
G
G
G
G
G
G
e
e
e
e
e
e
e
e
e
e
e
e
e
e
e
e
e
e
e
e
e
e
e
e
o
o
o
o
o
o
o
o
o
o
o
o
IMPORTANT- Save these instructions for local inspector's use.
IMPORTANT- Save these instructions for local inspector's use.
IMPORTANT- Save these instructions for local inspector's use.
IMPORTANT- Save these instructions for local inspector's use.
IMPORTANT- Save these instructions for local inspector's use.
IMPORTANT- Save these instructions for local inspector's use.
IMPORTANT- Save these instructions for local inspector's use.
IMPORTANT- Save these instructions for local inspector's use.
s
s
s
s
IMPORTANT- Save these instructions for local inspector's use.
IMPORTANT- Save these instructions for local inspector's use.
IMPORTANT- Save these instructions for local inspector's use.
IMPORTANT- Save these instructions for local inspector's use.
s
s
s
s
s
s
s
s
r
r
r
r
r
r
r
r
r
r
r
r
t
t
t
t
t
t
t
t
t
t
t
t
e
e
e
e
e
e
e
e
e
e
e
e
O
O
O
O
O
O
O
O
O
O
O
O
u
u
u
u
u
u
u
u
u
u
u
u
t
t
t
t
t
t
t
t
t
t
t
t
e
e
e
e
e
e
e
e
e
e
e
e
e
e
e
e
e
e
e
e
e
e
e
e
l
l
l
l
l
l
l
l
l
l
l
l
p
p
p
p
p
p
p
p
p
p
p
p
r
r
r
r
r
r
r
r
r
r
r
r
o
o
o
o
o
o
o
o
o
o
o
o
V
V
V
V
V
V
V
V
V
V
V
V
l
l
l
l
l
l
l
l
l
l
l
l
-
-
-
-
-
-
-
-
-
-
-
-
e
e
e
e
e
e
e
e
e
e
e
e
y
y
y
y
y
y
y
y
y
y
y
y
c
c
c
c
c
c
c
c
c
c
c
c
t
t
t
t
t
t
t
t
t
t
t
t
E
E
E
E
E
E
E
E
E
E
E
E
T
T
T
T
T
T
T
T
T
T
T
T
h
h
h
h
h
h
h
h
h
h
h
h
t
t
t
t
t
t
t
t
t
t
t
t
a
a
a
a
a
a
a
a
a
a
a
a
a
a
a
a
a
a
a
a
a
a
a
a
R
R
R
R
R
R
R
R
R
R
R
R
h
h
h
h
h
h
h
h
h
h
h
h
o
o
o
o
o
o
o
o
o
o
o
o
e
e
e
e
e
e
e
e
e
e
e
e
l
l
l
l
n
n
n
n
l
l
l
l
l
l
l
l
n
n
n
n
n
n
n
n
i
i
i
i
i
i
i
i
i
i
i
i
N
N
N
N
N
N
N
N
N
N
N
N
s
s
s
s
s
s
s
s
s
s
s
s
i
i
i
i
i
i
i
i
i
i
i
i
d
d
d
d
d
d
d
d
d
d
d
d
s
s
s
s
s
s
s
s
s
s
s
s
l
l
l
l
l
l
l
l
l
l
l
l
n
n
n
n
n
n
n
n
n
n
n
n
e
e
e
e
e
e
e
e
e
e
e
e
e
e
e
e
e
e
e
e
e
e
e
e
I
I
I
I
I
I
I
I
I
I
I
I
N
N
N
N
N
N
N
N
N
N
N
N
s
s
s
s
s
s
s
s
s
s
s
s
a
a
a
a
a
a
a
a
a
a
a
a
a
a
a
a
a
a
a
a
a
a
a
a
c
c
c
c
c
c
c
c
c
c
c
c
IMPORTANT- OBSERVE ALL GOVERNING CODES AND ORDIANCES.
IMPORTANT- OBSERVE ALL GOVERNING CODES AND ORDIANCES.
IMPORTANT- OBSERVE ALL GOVERNING CODES AND ORDIANCES.
IMPORTANT- OBSERVE ALL GOVERNING CODES AND ORDIANCES.
IMPORTANT- OBSERVE ALL GOVERNING CODES AND ORDIANCES.
IMPORTANT- OBSERVE ALL GOVERNING CODES AND ORDIANCES.
IMPORTANT- OBSERVE ALL GOVERNING CODES AND ORDIANCES.
IMPORTANT- OBSERVE ALL GOVERNING CODES AND ORDIANCES.
IMPORTANT- OBSERVE ALL GOVERNING CODES AND ORDIANCES.
IMPORTANT- OBSERVE ALL GOVERNING CODES AND ORDIANCES.
IMPORTANT- OBSERVE ALL GOVERNING CODES AND ORDIANCES.
IMPORTANT- OBSERVE ALL GOVERNING CODES AND ORDIANCES.
i
i
i
i
i
i
i
i
i
i
i
i
p
p
p
p
p
p
p
p
p
p
p
p
p
p
p
p
p
p
p
p
p
p
p
p
v
v
v
v
v
v
v
v
v
v
v
v
a
a
a
a
a
a
a
a
a
a
a
a
G
G
G
G
G
G
G
G
G
G
G
G
n
n
n
n
n
n
n
n
n
n
n
n
e
e
e
e
e
e
e
e
e
e
e
e
e
e
e
e
r
r
r
r
e
e
e
e
e
e
e
e
r
r
r
r
r
r
r
r
p
p
p
p
p
p
p
p
p
p
p
p
s
s
s
s
s
s
s
s
s
s
s
s
e
e
e
e
e
e
e
e
e
e
e
e
C
C
C
C
c
c
c
c
C
C
C
C
C
C
C
C
c
c
c
c
c
c
c
c
l
l
l
l
l
l
l
l
l
l
l
l
t
t
t
t
t
t
t
t
t
t
t
t
t
t
t
t
t
t
t
t
t
t
t
t
i
i
i
i
i
i
i
i
i
i
i
i
f
f
f
f
f
f
f
f
f
f
f
f
r
r
r
r
r
r
r
r
r
r
r
r
t
t
t
t
t
t
t
t
t
t
t
t
h
h
h
h
h
h
h
h
h
h
h
h
a
a
a
a
a
a
a
a
a
a
a
a
O
O
O
O
O
O
O
O
O
O
O
O
u
u
u
u
u
u
u
u
u
u
u
u
u
u
u
u
u
u
u
u
u
u
u
u
o
o
o
o
o
o
o
o
o
o
o
o
n
n
n
n
n
n
n
n
n
n
n
n
e
e
e
e
e
e
e
e
e
e
e
e
l
l
l
l
l
l
l
l
l
l
l
l
c
c
c
c
c
c
c
c
c
c
c
c
D
D
D
D
r
r
r
r
D
D
D
D
D
D
D
D
r
r
r
r
r
r
r
r
l
l
l
l
l
l
l
l
l
l
l
l
s
s
s
s
s
s
s
s
s
s
s
s
c
c
c
c
c
c
c
c
c
c
c
c
'
'
'
'
y
y
y
y
'
'
'
'
'
'
'
'
y
y
y
y
y
y
y
y
t
t
t
t
t
t
t
t
t
t
t
t
s
s
s
s
s
s
s
s
s
s
s
s
E
E
E
E
E
E
E
E
E
E
E
E
e
e
e
e
e
e
e
e
e
e
e
e
e
e
e
e
i
i
i
i
e
e
e
e
e
e
e
e
i
i
i
i
i
i
i
i
.
.
.
.
.
.
.
.
.
.
.
.
o
o
o
o
o
o
o
o
o
o
o
o
S
S
S
S
S
S
S
S
S
S
S
S
u
u
u
u
u
u
u
u
u
u
u
u
i
i
i
i
i
i
i
i
i
i
i
i
m
m
m
m
m
m
m
m
m
m
m
m
n
n
n
n
Note to Installer- Be sure to leave these instructions with the consumer.
Note to Installer- Be sure to leave these instructions with the consumer.
Note to Installer- Be sure to leave these instructions with the consumer.
Note to Installer- Be sure to leave these instructions with the consumer.
Note to Installer- Be sure to leave these instructions with the consumer.
Note to Installer- Be sure to leave these instructions with the consumer.
Note to Installer- Be sure to leave these instructions with the consumer.
Note to Installer- Be sure to leave these instructions with the consumer.
Note to Installer- Be sure to leave these instructions with the consumer.
Note to Installer- Be sure to leave these instructions with the consumer.
Note to Installer- Be sure to leave these instructions with the consumer.
Note to Installer- Be sure to leave these instructions with the consumer.
n
n
n
n
n
n
n
n
n
n
n
n
n
n
n
n
n
n
n
n
s
s
s
s
s
s
s
s
s
s
s
s
A
A
A
A
A
A
A
A
A
A
A
A
s
s
s
s
s
s
s
s
s
s
s
s
s
s
s
s
s
s
s
s
s
s
s
s
u
u
u
u
u
u
u
u
u
u
u
u
e
e
e
e
e
e
e
e
e
e
e
e
N
N
N
N
N
N
N
N
N
N
N
N
t
t
t
t
t
t
t
t
t
t
t
t
.
.
.
.
s
s
s
s
.
.
.
.
.
.
.
.
f
f
f
f
s
s
s
s
s
s
s
s
f
f
f
f
f
f
f
f
r
r
r
r
r
r
r
r
r
r
r
r
o
o
o
o
o
o
o
o
o
o
o
o
t
t
t
t
t
t
t
t
t
t
t
t
D
D
D
D
D
D
D
D
D
D
D
D
u
u
u
u
u
u
u
u
u
u
u
u
r
r
r
r
r
r
r
r
r
r
r
r
b
b
b
b
b
b
b
b
b
b
b
b
c
c
c
c
c
c
c
c
c
c
c
c
O
O
O
O
O
O
O
O
O
O
O
O
f
f
f
f
f
f
f
f
f
f
f
f
e
e
e
e
e
e
e
e
e
e
e
e
t
t
t
t
t
t
t
t
t
t
t
t
u
u
u
u
u
u
u
u
u
u
u
u
i
i
i
i
i
i
i
i
i
i
i
i
R
R
R
R
R
R
R
R
R
R
R
R
o
o
o
o
o
o
o
o
o
o
o
o
t
t
t
t
t
t
t
t
t
t
t
t
p
p
p
p
p
p
p
p
p
p
p
p
u
u
u
u
u
u
u
u
u
u
u
u
n
n
n
n
n
n
n
n
n
n
n
n
D
D
D
D
D
D
D
D
D
D
D
D
r
r
r
r
r
r
r
r
r
r
r
r
OWNER- Keep these instructions for future reference.
OWNER- Keep these instructions for future reference.
OWNER- Keep these instructions for future reference.
OWNER- Keep these instructions for future reference.
OWNER- Keep these instructions for future reference.
OWNER- Keep these instructions for future reference.
OWNER- Keep these instructions for future reference.
OWNER- Keep these instructions for future reference.
OWNER- Keep these instructions for future reference.
OWNER- Keep these instructions for future reference.
OWNER- Keep these instructions for future reference.
OWNER- Keep these instructions for future reference.
r
r
r
r
r
r
r
r
r
r
r
r
o
o
o
o
o
o
o
o
o
o
o
o
s
s
s
s
s
s
s
s
s
s
s
s
I
I
I
I
I
I
I
I
I
I
I
I
e
e
e
e
e
e
e
e
e
e
e
e
A
A
A
A
A
A
A
A
A
A
A
A
p
p
p
p
p
p
p
p
p
p
p
p
w
w
w
w
w
w
w
w
w
w
w
w
r
r
r
r
r
r
r
r
r
r
r
r
N
N
N
N
N
N
N
N
N
N
N
N
e
e
e
e
e
e
e
e
e
e
e
e
e
e
e
e
e
e
e
e
e
e
e
e
i
i
i
i
i
i
i
i
i
i
i
i
F
F
F
F
r
r
r
r
r
r
r
r
r
r
r
r
t
t
t
t
C
C
C
C
t
t
t
t
t
t
t
t
C
C
C
C
C
C
C
C
f
f
f
f
f
f
f
f
f
f
f
f
l
l
l
l
l
l
l
l
l
l
l
l
h
h
h
h
h
h
h
h
h
h
h
h
O
O
O
O
e
e
e
e
e
e
e
e
e
e
e
e
y
y
y
y
y
y
y
y
y
y
y
y
E
E
E
E
E
E
E
E
E
E
E
E
r
r
r
r
r
r
r
r
r
r
r
r
t
t
t
t
t
t
t
t
t
t
t
t
R
R
R
R
g
g
g
g
g
g
g
g
g
g
g
g
S
S
S
S
S
S
S
S
S
S
S
S
e
e
e
e
e
e
e
e
e
e
e
e
h
h
h
h
h
h
h
h
h
h
h
h
r
r
r
r
n
n
n
n
r
r
r
r
r
r
r
r
n
n
n
n
n
n
n
n
.
.
.
.
.
.
.
.
.
.
.
.
e
e
e
e
e
e
e
e
e
e
e
e
Y
Y
Y
Y
o
o
o
o
o
o
o
o
o
o
o
o
Note- This appliance must be properly grounded (if applicable).
Note- This appliance must be properly grounded (if applicable).
Note- This appliance must be properly grounded (if applicable).
Note- This appliance must be properly grounded (if applicable).
Note- This appliance must be properly grounded (if applicable).
Note- This appliance must be properly grounded (if applicable).
Note- This appliance must be properly grounded (if applicable).
Note- This appliance must be properly grounded (if applicable).
Note- This appliance must be properly grounded (if applicable).
Note- This appliance must be properly grounded (if applicable).
Note- This appliance must be properly grounded (if applicable).
Note- This appliance must be properly grounded (if applicable).
c
c
c
c
c
c
c
c
c
c
c
c
O
O
O
O
u
u
u
u
u
u
u
u
u
u
u
u
c
c
c
c
c
c
c
c
c
c
c
c
e
e
e
e
e
e
e
e
e
e
e
e
o
o
o
o
o
o
o
o
o
o
o
o
n
n
n
n
n
n
n
n
n
n
n
n
U
U
U
U
.
.
.
.
.
.
.
.
.
.
.
.
n
n
n
n
n
n
n
n
n
n
n
n
d
d
d
d
d
d
d
d
d
d
d
d
R
R
R
R
s
s
s
s
s
s
s
s
s
s
s
s
e
e
e
e
e
e
e
e
e
e
e
e
u
u
u
u
u
u
u
u
u
u
u
u
d
d
d
d
d
d
d
d
d
d
d
d
S
S
S
S
m
m
m
m
m
m
m
m
m
m
m
m
A
A
A
A
(
(
(
(
(
(
(
(
(
(
(
(
i
i
i
i
i
i
i
i
i
i
i
i
F
F
F
F
e
e
e
e
e
e
e
e
e
e
e
e
f
f
f
f
f
f
f
f
f
f
f
f
r
r
r
r
r
r
r
r
r
r
r
r
E
E
E
E
a
a
a
a
a
a
a
a
a
a
a
a
.
.
.
.
.
.
.
.
.
.
.
.
p
p
p
p
p
p
p
p
p
p
p
p
T
T
T
T
p
p
p
p
p
p
p
p
p
p
p
p
Y
Y
Y
Y
r
r
r
r
l
l
l
l
l
l
l
l
l
l
l
l
e
e
e
e
i
i
i
i
i
i
i
i
i
i
i
i
c
c
c
c
c
c
c
c
c
c
c
c
y
y
y
y
a
a
a
a
a
a
a
a
a
a
a
a
o
o
o
o
b
b
b
b
b
b
b
b
b
b
b
b
u
u
u
u
l
l
l
l
l
l
l
l
l
l
l
l
e
e
e
e
e
e
e
e
e
e
e
e
b
b
b
b
)
)
)
)
)
)
)
)
)
)
)
)
.
.
.
.
.
.
.
.
.
.
.
.
e
e
e
e
g
g
g
g
c
c
c
c
i
i
i
i
n
n
n
n
t
t
t
t
i
i
i
i
-
-
-
-
o
o
o
o
R
R
R
R
n
n
n
n
e
e
e
e
s
s
s
s
a
a
a
a
d
d
d
d
c
c
c
c
o
o
o
o
t
t
t
t
h
h
h
h
m
m
m
m
ELECTRICAL REQUIREMENTS
ELECTRICAL REQUIREMENTS
ELECTRICAL REQUIREMENTS
ELECTRICAL REQUIREMENTS
l
l
l
l
e
e
e
e
l
l
l
l
y
y
y
y
p
p
p
p
s
s
s
s
.
.
.
.
l
l
l
l
e
e
e
e
e
e
e
e
t
t
t
t
e
e
e
e
l
l
l
l
y
y
y
y
a
a
a
a
n
n
n
n
E
E
E
E
T
T
T
T
d
d
d
d
A
A
A
A
L
L
L
L
E
E
E
E
N
N
N
N
C
C
C
C
T
T
T
T
T
T
T
T
-
-
-
-
R
R
R
R
S
S
S
S
a
a
a
a
I
I
I
I
C
C
C
C
v
v
v
v
i
i
i
i
A
A
A
A
e
e
e
e
o
o
o
o
Before you begin-Read these
Before you begin-Read these
Before you begin-Read these
Before you begin-Read these
L
L
L
L
n
n
n
n
t
t
t
t
h
h
h
h
s
s
s
s
R
R
R
R
e
e
e
e
f
f
f
f
E
E
E
E
s
s
s
s
o
o
o
o
e
e
e
e
B
B
B
B
Q
Q
Q
Q
r
r
r
r
e
e
e
e
U
U
U
U
l
l
l
l
o
o
o
o
f
f
f
f
I
I
I
I
o
o
o
o
c
c
c
c
R
R
R
R
instructions completely and
instructions completely and
instructions completely and
instructions completely and
r
r
r
r
a
a
a
a
N
N
N
N
E
E
E
E
e
e
e
e
l
l
l
l
T
T
T
T
M
M
M
M
i
i
i
i
y
y
y
y
-
-
-
-
n
n
n
n
o
o
o
o
E
E
E
E
O
O
O
O
s
s
s
s
i
i
i
i
u
u
u
u
N
N
N
N
n
n
n
n
p
p
p
p
B
B
B
B
s
s
s
s
T
T
T
T
e
e
e
e
b
b
b
b
S
S
S
S
t
t
t
t
S
S
S
S
c
c
c
c
e
e
e
e
r
r
r
r
E
E
E
E
t
t
t
t
u
u
u
u
g
g
g
g
carefully.
carefully.
carefully.
carefully.
N
N
N
N
o
o
o
o
R
R
R
R
c
c
c
c
i
i
i
i
r
r
r
r
G
G
G
G
n
n
n
n
t
t
t
t
V
V
V
V
'
'
'
'
s
s
s
s
i
i
i
i
-
-
-
-
o
o
o
o
R
R
R
R
E
E
E
E
C
C
C
C
u
u
u
u
c
c
c
c
n
n
n
n
e
e
e
e
O
O
O
O
A
A
A
A
a
a
a
a
s
s
s
s
s
s
s
s
a
a
a
a
r
r
r
r
D
D
D
D
e
e
e
e
L
L
L
L
d
d
d
d
e
e
e
e
c
c
c
c
.
.
.
.
L
L
L
L
E
E
E
E
f
f
f
f
o
o
o
o
t
t
t
t
u
u
u
u
IMPORTANT- Save these
IMPORTANT- Save these
IMPORTANT- Save these
IMPORTANT- Save these
S
S
S
S
h
h
h
h
m
m
m
m
t
t
t
t
l
l
l
l
e
e
e
e
a
a
a
a
l
l
l
l
A
A
A
A
y
y
y
y
p
p
p
p
s
s
s
s
l
l
l
l
l
l
l
l
.
.
.
.
l
l
l
l
N
N
N
N
e
e
e
e
e
e
e
e
e
e
e
e
I
I
I
I
M
M
M
M
r
r
r
r
D
D
D
D
t
t
t
t
-
-
-
-
e
e
e
e
P
P
P
P
B
B
B
B
l
l
l
l
O
O
O
O
y
y
y
y
O
O
O
O
e
e
e
e
R
R
R
R
a
a
a
a
R
R
R
R
instructions for local inspector's use.
instructions for local inspector's use.
instructions for local inspector's use.
instructions for local inspector's use.
D
D
D
D
s
s
s
s
n
n
n
n
T
T
T
T
c
c
c
c
u
u
u
u
I
I
I
I
d
d
d
d
A
A
A
A
A
A
A
A
t
t
t
t
r
r
r
r
i
i
i
i
i
i
i
i
e
e
e
e
o
o
o
o
N
N
N
N
N
N
N
N
n
n
n
n
n
n
n
n
T
T
T
T
t
t
t
t
C
C
C
C
s
s
s
s
o
o
o
o
s
s
s
s
t
t
t
t
-
-
-
-
E
E
E
E
r
r
r
r
S
S
S
S
l
l
l
l
w
w
w
w
u
u
u
u
S
S
S
S
e
e
e
e
a
a
a
a
c
c
c
c
IMPORTANT- OBSERVE ALL
IMPORTANT- OBSERVE ALL
IMPORTANT- OBSERVE ALL
IMPORTANT- OBSERVE ALL
i
i
i
i
a
a
a
a
.
.
.
.
t
t
t
t
v
v
v
v
t
t
t
t
e
e
e
e
v
v
v
v
h
h
h
h
i
i
i
i
e
e
e
e
o
o
o
o
p
p
p
p
e
e
e
e
t
t
t
t
I
I
I
I
n
n
n
n
t
t
t
t
h
h
h
h
M
M
M
M
t
t
t
t
h
h
h
h
s
s
s
s
h
h
h
h
e
e
e
e
P
P
P
P
e
e
e
e
e
e
e
e
f
f
f
f
s
s
s
s
c
c
c
c
O
O
O
O
o
o
o
o
s
s
s
s
e
e
e
e
o
o
o
o
r
r
r
r
e
e
e
e
R
R
R
R
n
n
n
n
GOVERNING CODES AND ORDIANCES.
GOVERNING CODES AND ORDIANCES.
GOVERNING CODES AND ORDIANCES.
GOVERNING CODES AND ORDIANCES.
l
l
l
l
T
T
T
T
i
i
i
i
o
o
o
o
s
s
s
s
n
n
n
n
e
e
e
e
A
A
A
A
c
c
c
c
u
u
u
u
s
s
s
s
r
r
r
r
G
G
G
G
a
a
a
a
N
N
N
N
m
m
m
m
e
e
e
e
t
t
t
t
r
r
r
r
l
l
l
l
n
n
n
n
O
O
O
O
T
T
T
T
u
u
u
u
e
e
e
e
i
i
i
i
c
c
c
c
-
-
-
-
n
n
n
n
V
V
V
V
c
c
c
c
r
r
r
r
e
e
e
e
.
.
.
.
O
O
O
O
s
s
s
s
t
t
t
t
E
E
E
E
.
.
.
.
i
i
i
i
p
p
p
p
o
o
o
o
B
B
B
B
R
R
R
R
Note to Installer- Be sure to leave
Note to Installer- Be sure to leave
Note to Installer- Be sure to leave
Note to Installer- Be sure to leave
e
e
e
e
n
n
n
n
S
S
S
S
N
N
N
N
c
c
c
c
s
s
s
s
E
E
E
E
I
I
I
I
t
t
t
t
N
N
N
N
N
N
N
N
l
l
l
l
o
o
o
o
Literature
R
R
R
R
i
i
i
i
o
o
o
o
a
a
a
a
r
r
r
r
G
G
G
G
V
V
V
V
'
'
'
'
n
n
n
n
t
t
t
t
s
s
s
s
e
e
e
e
E
E
E
E
C
C
C
C
c
c
c
c
u
u
u
u
e
e
e
e
t
t
t
t
O
O
O
O
A
A
A
A
o
o
o
o
s
s
s
s
m
m
m
m
D
D
D
D
these instructions with the consumer.
these instructions with the consumer.
these instructions with the consumer.
these instructions with the consumer.
e
e
e
e
L
L
L
L
I
I
I
I
.
.
.
.
n
n
n
n
L
L
L
L
E
E
E
E
u
u
u
u
t
t
t
t
s
s
s
s
S
S
S
S
s
s
s
s
h
h
h
h
d
d
d
d
t
t
t
t
t
t
t
t
e
e
e
e
e
e
e
e
a
a
a
a
A
A
A
A
b
b
b
b
s
s
s
s
d
d
d
d
l
l
l
l
l
l
l
l
N
N
N
N
e
e
e
e
e
e
e
e
e
e
e
e
(
(
(
(
r
r
r
r
D
D
D
D
i
i
i
i
i
i
i
i
f
f
f
f
-
-
-
-
n
n
n
n
OWNER- Keep these instructions
OWNER- Keep these instructions
OWNER- Keep these instructions
OWNER- Keep these instructions
a
a
a
a
B
B
B
B
O
O
O
O
s
s
s
s
i
i
i
i
n
n
n
n
p
p
p
p
t
t
t
t
e
e
e
e
R
R
R
R
O
O
O
O
r
r
r
r
-
-
-
-
p
p
p
p
R
R
R
R
u
u
u
u
D
D
D
D
s
s
s
s
W
W
W
W
l
l
l
l
c
c
c
c
i
i
i
i
e
e
e
e
u
u
u
u
I
I
I
I
c
c
c
c
A
A
A
A
N
N
N
N
t
t
t
t
a
a
a
a
r
r
r
r
a
a
a
a
i
i
i
i
e
e
e
e
o
o
o
o
d
d
d
d
N
N
N
N
E
E
E
E
b
b
b
b
n
n
n
n
R
R
R
R
t
t
t
t
C
C
C
C
l
l
l
l
t
t
t
t
o
o
o
o
e
e
e
e
s
s
s
s
h
h
h
h
for future reference.
for future reference.
for future reference.
for future reference.
-
-
-
-
E
E
E
E
)
)
)
)
e
e
e
e
l
l
l
l
.
.
.
.
w
w
w
w
K
K
K
K
f
f
f
f
S
S
S
p
p
p
p
l
l
l
l
e
e
e
e
t
t
t
t
e
e
e
e
e
e
e
e
t
t
t
t
h
h
h
h
e
e
e
e
s
s
s
s
c
c
c
c
a
a
a
a
l
l
l
l
i
i
i
i
n
n
n
n
s
s
s
s
R
R
R
R
V
V
V
V
E
E
E
E
A
A
A
A
S
S
S
S
A
A
A
A
N
N
N
N
D
D
D
D
s
s
s
s
u
u
u
u
r
r
r
r
e
e
e
e
t
t
t
t
o
o
o
o
h
h
h
h
t
t
t
t
h
h
h
h
e
e
e
e
c
c
c
c
s
s
s
s
t
t
t
t
r
r
r
r
u
u
u
u
c
c
c
c
s
s
s
s
t
t
t
t
b
b
b
b
e
e
e
e
l
l
l
l
i
i
i
i
c
c
c
c
a
a
a
a
b
b
b
b
l
l
l
l
S
e
e
e
e
s
s
s
s
o
o
o
o
e
e
e
e
i
i
i
i
a
a
a
a
.
.
.
.
e
e
e
e
r
r
r
r
t
t
t
t
e
e
e
e
v
v
v
v
h
h
h
h
f
f
f
f
p
p
p
p
e
e
e
e
u
u
u
u
t
t
t
t
l
l
l
l
h
h
h
h
t
t
t
t
t
t
t
t
y
y
y
y
u
u
u
u
h
h
h
h
e
e
e
e
r
r
r
r
a
a
a
a
e
e
e
e
e
e
e
e
c
c
c
c
Note- This appliance must be
Note- This appliance must be
Note- This appliance must be
Note- This appliance must be
n
n
n
n
s
s
s
s
N
N
N
N
o
o
o
o
d
d
d
d
r
r
r
r
e
e
e
e
e
e
e
e
n
n
n
n
o
o
o
o
i
i
i
i
f
f
f
f
s
s
s
s
t
t
t
t
n
n
n
n
e
e
e
e
e
e
e
e
u
u
u
u
s
s
s
s
r
r
r
r
-
-
-
-
m
m
m
m
e
e
e
e
t
t
t
t
T
T
T
T
r
r
r
r
n
n
n
n
u
u
u
u
e
e
e
e
h
h
h
h
c
c
c
c
c
c
c
c
r
r
r
r
i
i
i
i
e
e
e
e
properly grounded (if applicable).
properly grounded (if applicable).
properly grounded (if applicable).
properly grounded (if applicable).
.
.
.
.
s
s
s
s
t
t
t
t
p
p
p
p
.
.
.
.
i
i
i
i
o
o
o
o
r
r
r
r
a
a
a
a
o
o
o
o
n
n
n
n
p
p
p
p
p
p
p
p
s
s
s
s
p
p
p
p
e
e
e
e
l
l
l
l
Before you begin-Read these
Before you begin-Read these
Before you begin-Read these
Before you begin-Read these
i
i
i
i
r
r
r
r
B
B
B
B
a
a
a
a
l
l
l
l
e
e
e
e
y
y
y
y
n
n
n
n
e
e
e
e
c
c
c
c
f
f
f
f
g
g
g
g
o
o
o
o
e
e
e
e
r
r
r
r
r
r
r
r
o
o
o
o
e
e
e
e
m
m
m
m
u
u
u
u
y
y
y
y
u
u
u
u
n
n
n
n
o
o
o
o
s
s
s
s
d
d
d
d
instructions completely and
instructions completely and
instructions completely and
instructions completely and
i
i
i
i
u
u
u
u
t
t
t
t
n
n
n
n
e
e
e
e
p
p
p
p
b
b
b
b
d
d
d
d
s
s
s
s
b
b
b
b
e
e
e
e
e
e
e
e
t
t
t
t
e
e
e
e
(
(
(
(
r
r
r
r
c
c
c
c
i
i
i
i
u
u
u
u
g
g
g
g
f
f
f
f
t
t
t
t
c
c
c
c
i
i
i
i
o
o
o
o
a
a
a
a
n
n
n
n
t
t
t
t
r
r
r
r
p
p
p
p
i
i
i
i
-
-
-
-
'
'
'
'
o
o
o
o
R
R
R
R
s
s
s
s
p
p
p
p
carefully.
carefully.
carefully.
carefully.
c
c
c
c
n
n
n
n
e
e
e
e
l
l
l
l
u
u
u
u
i
i
i
i
a
a
a
a
s
s
s
s
a
a
a
a
c
c
c
c
s
s
s
s
r
r
r
r
d
d
d
d
a
a
a
a
e
e
e
e
c
c
c
c
e
e
e
e
L
L
L
L
b
b
b
b
f
f
f
f
o
o
o
o
.
.
.
.
L
L
L
L
t
t
t
t
u
u
u
u
l
l
l
l
h
h
h
h
m
m
m
m
e
e
e
e
l
l
l
l
e
e
e
e
l
l
l
l
)
)
)
)
y
y
y
y
p
p
p
p
.
.
.
.
s
s
s
s
.
.
.
.
l
l
l
l
e
e
e
e
e
e
e
e
I
I
I
I
IMPORTANT- Save these
IMPORTANT- Save these
IMPORTANT- Save these
IMPORTANT- Save these
M
M
M
M
t
t
t
t
e
e
e
e
P
P
P
P
l
l
l
l
y
y
y
y
O
O
O
O
O
O
O
O
a
a
a
a
R
R
R
R
R
R
R
R
n
n
n
n
T
T
T
T
D
D
D
D
d
d
d
d
A
A
A
A
I
I
I
I
A
A
A
A
i
i
i
i
N
N
N
N
n
n
n
n
instructions for local inspector's use.
instructions for local inspector's use.
instructions for local inspector's use.
instructions for local inspector's use.
N
N
N
N
T
T
T
T
s
s
s
s
C
C
C
C
t
t
t
t
-
-
-
-
r
r
r
r
E
E
E
E
S
S
S
S
u
u
u
u
l
l
l
l
S
S
S
S
a
a
a
a
e
e
e
e
c
c
c
c
v
v
v
v
a
a
a
a
.
.
.
.
t
t
t
t
i
i
i
i
e
e
e
e
v
v
v
v
o
o
o
o
e
e
e
e
I
I
I
I
n
n
n
n
t
t
t
t
M
M
M
M
h
h
h
h
IMPORTANT- OBSERVE ALL
IMPORTANT- OBSERVE ALL
IMPORTANT- OBSERVE ALL
IMPORTANT- OBSERVE ALL
s
s
s
s
P
P
P
P
e
e
e
e
Pack
f
f
f
f
s
s
s
s
O
O
O
O
o
o
o
o
e
e
e
e
r
r
r
r
R
R
R
R
o
o
o
o
l
l
l
l
n
n
n
n
T
T
T
T
o
o
o
o
s
s
s
s
A
A
A
A
c
c
c
c
u
u
u
u
G
G
G
G
a
a
a
a
N
N
N
N
m
m
m
m
l
l
l
l
GOVERNING CODES AND ORDIANCES.
GOVERNING CODES AND ORDIANCES.
GOVERNING CODES AND ORDIANCES.
GOVERNING CODES AND ORDIANCES.
O
O
O
O
T
T
T
T
i
i
i
i
e
e
e
e
-
-
-
-
n
n
n
n
V
V
V
V
r
r
r
r
O
O
O
O
s
s
s
s
E
E
E
E
.
.
.
.
t
t
t
t
p
p
p
p
B
B
B
B
i
i
i
i
R
R
R
R
o
o
o
o
e
e
e
e
S
S
S
S
N
N
N
N
n
n
n
n
c
c
c
c
E
E
E
E
I
I
I
I
s
s
s
s
t
t
t
t
N
N
N
N
N
N
N
N
o
o
o
o
R
R
R
R
o
o
o
o
r
r
r
r
G
G
G
G
Note to Installer- Be sure to leave
Note to Installer- Be sure to leave
Note to Installer- Be sure to leave
Note to Installer- Be sure to leave
V
V
V
V
'
'
'
'
t
t
t
t
s
s
s
s
e
e
e
e
E
E
E
E
C
C
C
C
u
u
u
u
t
t
t
t
O
O
O
O
A
A
A
A
o
o
o
o
s
s
s
s
D
D
D
D
e
e
e
e
L
L
L
L
I
I
I
I
.
.
.
.
n
n
n
n
L
L
L
L
E
E
E
E
t
t
t
t
s
s
s
s
S
S
S
S
h
h
h
h
t
t
t
t
e
e
e
e
a
a
a
a
these instructions with the consumer.
these instructions with the consumer.
these instructions with the consumer.
these instructions with the consumer.
A
A
A
A
s
s
s
s
l
l
l
l
l
l
l
l
N
N
N
N
e
e
e
e
e
e
e
e
r
r
r
r
D
D
D
D
i
i
i
i
-
-
-
-
n
n
n
n
B
B
B
B
O
O
O
O
s
s
s
s
t
t
t
t
e
e
e
e
R
R
R
R
O
O
O
O
r
r
r
r
u
u
u
u
D
D
D
D
s
s
s
s
W
W
W
W
c
c
c
c
u
u
u
u
OWNER- Keep these instructions
OWNER- Keep these instructions
OWNER- Keep these instructions
OWNER- Keep these instructions
I
I
I
I
A
A
A
A
N
N
N
N
t
t
t
t
r
r
r
r
i
i
i
i
e
e
e
e
o
o
o
o
N
N
N
N
E
E
E
E
n
n
n
n
R
R
R
R
t
t
t
t
C
C
C
C
o
o
o
o
s
s
s
s
-
-
-
-
e
e
e
e
E
E
E
E
l
l
l
l
w
w
w
w
)
)
)
)
K
K
K
K
f
f
f
f
S
S
S
S
e
e
e
e
.
.
.
.
o
o
o
o
e
e
e
e
i
i
i
i
a
a
a
a
.
.
.
.
r
r
r
r
t
t
t
t
e
e
e
e
v
v
v
v
h
h
h
h
for future reference.
for future reference.
for future reference.
for future reference.
f
f
f
f
p
p
p
p
e
e
e
e
u
u
u
u
t
t
t
t
h
h
h
h
t
t
t
t
t
t
t
t
u
u
u
u
h
h
h
h
e
e
e
e
r
r
r
r
e
e
e
e
e
e
e
e
c
c
c
c
s
s
s
s
N
N
N
N
o
o
o
o
r
r
r
r
e
e
e
e
e
e
e
e
n
n
n
n
o
o
o
o
i
i
i
i
f
f
f
f
s
s
s
s
t
t
t
t
n
n
n
n
e
e
e
e
e
e
e
e
Note- This appliance must be
Note- This appliance must be
Note- This appliance must be
Note- This appliance must be
u
u
u
u
s
s
s
s
r
r
r
r
-
-
-
-
m
m
m
m
e
e
e
e
t
t
t
t
T
T
T
T
r
r
r
r
n
n
n
n
u
u
u
u
e
e
e
e
h
h
h
h
c
c
c
c
c
c
c
c
r
r
r
r
i
i
i
i
e
e
e
e
.
.
.
.
s
s
s
s
t
t
t
t
p
p
p
p
.
.
.
.
i
i
i
i
o
o
o
o
r
r
r
r
a
a
a
a
o
o
o
o
n
n
n
n
p
p
p
p
p
p
p
p
s
s
s
s
p
p
p
p
properly grounded (if applicable).
properly grounded (if applicable).
properly grounded (if applicable).
properly grounded (if applicable).
e
e
e
e
l
l
l
l
i
i
i
i
r
r
r
r
a
a
a
a
l
l
l
l
y
y
y
y
n
n
n
n
c
c
c
c
g
g
g
g
e
e
e
e
r
r
r
r
o
o
o
o
m
m
m
m
u
u
u
u
u
u
u
u
n
n
n
n
s
s
s
s
d
d
d
d
t
t
t
t
e
e
e
e
b
b
b
b
d
d
d
d
e
e
e
e
(
(
(
(
i
i
i
i
f
f
f
f
a
a
a
a
p
p
p
p
p
p
p
p
l
l
l
l
i
i
i
i
c
c
c
c
a
a
a
a
b
b
b
b
l
l
l
l
e
e
e
e
)
)
)
)
.
.
.
.
Broiler Pan
and Grid
O
O
O
f
f
f
f
o
o
o
o
N
N
N
N
o
o
o
o
p
p
p
p
r
r
r
r
o
o
o
o
i
i
i
n
n
n
c
c
c
c
a
a
a
a
I
I
I
I
M
M
M
M
P
P
P
P
i
i
i
i
n
n
n
n
s
s
s
s
t
t
t
t
I
I
I
I
M
M
M
M
P
P
P
P
O
O
O
O
G
G
G
G
O
O
O
O
V
V
V
V
E
E
E
E
N
N
N
N
o
o
o
o
t
t
t
t
e
e
e
e
t
t
t
t
t
t
t
t
h
h
h
h
e
e
e
e
s
s
s
s
e
e
e
e
i
i
i
i
O
W
W
W
W
N
N
N
N
E
E
E
E
R
R
R
R
r
r
r
r
f
f
f
f
u
u
u
u
t
t
t
t
u
u
u
u
r
r
r
r
e
e
e
e
t
t
t
t
e
e
e
e
-
-
-
T
T
T
T
h
h
h
h
i
i
i
i
p
p
p
p
e
e
e
e
r
r
r
r
l
l
l
l
y
y
y
y
g
g
g
g
B
B
B
B
e
e
e
e
i
i
i
i
n
n
n
n
s
s
s
s
c
c
c
c
a
a
a
a
r
r
r
r
e
e
e
e
I
I
I
I
M
M
M
M
P
P
P
P
O
O
O
O
i
i
i
i
n
n
n
n
s
s
s
s
t
t
t
t
r
r
r
r
u
u
u
u
Before you begin-Read these
Before you begin-Read these
Before you begin-Read these
Before you begin-Read these
I
I
I
I
M
M
M
M
P
P
P
P
O
O
O
O
R
R
R
R
instructions completely and
instructions completely and
instructions completely and
instructions completely and
G
G
G
G
O
O
O
O
V
V
V
V
E
E
E
E
R
R
R
R
carefully.
carefully.
carefully.
carefully.
N
N
N
N
o
o
o
o
t
t
t
t
e
e
e
e
t
t
t
t
o
o
o
o
IMPORTANT- Save these
IMPORTANT- Save these
IMPORTANT- Save these
IMPORTANT- Save these
t
t
t
t
h
h
h
h
e
e
e
e
s
s
s
s
e
e
e
e
i
i
i
i
n
n
n
n
instructions for local inspector's use.
instructions for local inspector's use.
instructions for local inspector's use.
instructions for local inspector's use.
s
s
s
s
O
O
O
O
W
W
W
W
N
N
N
N
E
E
E
E
R
R
R
R
IMPORTANT- OBSERVE ALL
IMPORTANT- OBSERVE ALL
IMPORTANT- OBSERVE ALL
IMPORTANT- OBSERVE ALL
-
-
-
-
f
f
f
f
o
o
o
o
r
r
r
r
f
f
f
f
u
u
u
u
t
t
t
t
u
u
u
u
r
r
r
r
e
e
e
e
GOVERNING CODES AND ORDIANCES.
GOVERNING CODES AND ORDIANCES.
GOVERNING CODES AND ORDIANCES.
GOVERNING CODES AND ORDIANCES.
N
N
N
N
o
o
o
o
t
t
t
t
e
e
e
e
-
-
-
T
T
T
T
h
h
h
h
i
i
i
i
Note to Installer- Be sure to leave
Note to Installer- Be sure to leave
Note to Installer- Be sure to leave
Note to Installer- Be sure to leave
s
s
s
s
p
p
p
p
r
r
r
r
o
o
o
o
p
p
p
p
e
e
e
e
r
r
r
r
l
l
l
l
B
B
B
B
y
y
y
y
e
e
e
e
g
g
g
g
these instructions with the consumer.
these instructions with the consumer.
these instructions with the consumer.
these instructions with the consumer.
f
f
f
f
r
r
r
r
o
o
o
o
o
o
o
o
r
r
r
r
e
e
e
e
y
y
y
y
o
o
o
o
i
u
u
u
u
n
s
s
s
s
b
b
b
b
OWNER- Keep these instructions
OWNER- Keep these instructions
OWNER- Keep these instructions
OWNER- Keep these instructions
t
t
t
t
r
r
r
r
u
u
u
u
c
c
c
c
t
t
t
t
i
i
i
i
o
o
o
o
n
n
n
n
s
s
s
s
r
r
r
r
for future reference.
for future reference.
for future reference.
for future reference.
e
e
e
e
f
f
f
f
u
u
u
u
l
l
l
l
l
l
l
l
y
y
y
y
.
.
.
.
Note- This appliance must be
Note- This appliance must be
Note- This appliance must be
Note- This appliance must be
O
O
O
O
R
R
R
R
T
T
T
T
A
A
A
A
N
N
N
N
T
T
T
T
-
-
-
-
r
r
r
r
properly grounded (if applicable).
properly grounded (if applicable).
properly grounded (if applicable).
properly grounded (if applicable).
S
S
S
S
u
u
u
u
c
c
c
c
t
t
t
t
i
i
i
i
o
o
o
o
n
n
n
n
Before you begin-Read these
Before you begin-Read these
Before you begin-Read these
Before you begin-Read these
s
s
s
s
f
f
f
f
o
o
o
o
r
r
r
r
R
R
R
R
T
T
T
T
A
A
A
A
N
N
N
N
instructions completely and
instructions completely and
instructions completely and
instructions completely and
T
T
T
T
-
-
-
-
O
O
O
O
B
B
B
B
R
R
R
R
N
N
N
N
I
I
I
I
N
N
N
N
G
G
G
G
carefully.
carefully.
carefully.
carefully.
C
C
C
C
O
O
O
O
o
o
o
o
D
D
D
D
I
I
I
I
n
n
n
n
s
s
s
s
t
t
t
t
a
a
a
a
IMPORTANT- Save these
IMPORTANT- Save these
IMPORTANT- Save these
IMPORTANT- Save these
l
l
l
l
l
l
l
l
e
e
e
e
r
r
r
r
-
-
-
-
n
n
n
n
B
B
B
B
s
s
s
s
t
t
t
t
r
r
r
r
u
u
u
u
c
c
c
c
instructions for local inspector's use.
instructions for local inspector's use.
instructions for local inspector's use.
instructions for local inspector's use.
t
t
t
t
i
i
i
i
o
o
o
o
n
n
n
n
s
s
s
s
-
-
-
-
K
K
K
K
e
e
e
e
e
e
e
e
IMPORTANT- OBSERVE ALL
IMPORTANT- OBSERVE ALL
IMPORTANT- OBSERVE ALL
IMPORTANT- OBSERVE ALL
p
p
p
p
t
t
t
t
h
h
h
h
e
e
e
e
s
s
s
s
r
r
r
r
e
e
e
e
f
f
f
f
e
e
e
e
GOVERNING CODES AND ORDIANCES.
GOVERNING CODES AND ORDIANCES.
GOVERNING CODES AND ORDIANCES.
GOVERNING CODES AND ORDIANCES.
r
r
r
r
e
e
e
e
n
n
n
n
c
c
c
c
e
e
e
e
s
s
s
s
.
.
.
.
a
a
a
a
p
p
p
p
p
p
p
p
Note to Installer- Be sure to leave
Note to Installer- Be sure to leave
Note to Installer- Be sure to leave
Note to Installer- Be sure to leave
l
l
l
l
i
i
i
i
a
a
a
a
n
n
n
n
c
c
c
c
e
e
e
e
r
r
r
r
o
o
o
o
u
u
u
u
n
n
n
n
these instructions with the consumer.
these instructions with the consumer.
these instructions with the consumer.
these instructions with the consumer.
d
d
d
d
e
e
e
e
d
d
d
d
(
(
(
(
i
i
i
i
f
f
f
f
OWNER- Keep these instructions
OWNER- Keep these instructions
OWNER- Keep these instructions
OWNER- Keep these instructions
for future reference.
for future reference.
for future reference.
for future reference.
Note- This appliance must be
Note- This appliance must be
Note- This appliance must be
Note- This appliance must be
properly grounded (if applicable).
properly grounded (if applicable).
properly grounded (if applicable).
properly grounded (if applicable).
f
f
f
f
o
o
o
o
t
t
t
t
r
r
r
r
u
u
u
u
f
f
f
f
u
u
u
u
FOR YOUR SAFETY
FOR YOUR SAFETY
FOR YOUR SAFETY
FOR YOUR SAFETY
R
R
R
R
c
c
c
c
t
t
t
t
T
T
T
T
A
A
A
A
N
N
N
N
I
I
I
I
I
I
I
I
n
n
n
n
s
s
s
s
t
t
t
t
r
r
r
r
u
u
u
u
K
K
K
K
e
e
e
e
r
r
r
r
e
e
e
e
f
f
f
f
a
a
a
a
p
p
p
p
p
p
p
p
u
u
u
u
n
n
n
n
e
e
e
e
g
g
g
g
c
c
c
c
o
o
o
o
m
m
m
m
a
a
a
a
v
v
v
v
l
l
l
l
o
o
o
o
S
S
S
S
E
E
E
E
E
E
E
E
e
e
e
e
w
w
w
w
i
i
i
i
t
t
t
t
e
e
e
e
i
i
i
i
n
n
n
n
m
m
m
m
u
u
u
u
a
a
a
a
p
p
p
p
p
p
p
p
Remove Installation Instructions
from literature pack and read them
carefully before you begin.
Be sure to place all literature,
Owner’s Manual, Installations, etc.
in a safe place for future reference.
EASY INSTALLATION OF YOUR NEW
30" COOKTOP
Before you begin-Read these instructions completely and carefully.
Before you begin-Read these instructions completely and carefully.
Before you begin-Read these instructions completely and carefully.
IMPORTANT- Save these instructions for local inspector's use.
IMPORTANT- Save these instructions for local inspector's use.
IMPORTANT- Save these instructions for local inspector's use.
IMPORTANT- OBSERVE ALL GOVERNING CODES AND ORDIANCES.
IMPORTANT- OBSERVE ALL GOVERNING CODES AND ORDIANCES.
IMPORTANT- OBSERVE ALL GOVERNING CODES AND ORDIANCES.
Note to Installer- Be sure to leave these instructions with the consumer.
Note to Installer- Be sure to leave these instructions with the consumer.
Note to Installer- Be sure to leave these instructions with the consumer.
OWNER- Keep these instructions for future reference.
OWNER- Keep these instructions for future reference.
OWNER- Keep these instructions for future reference.
Note- This appliance must be properly grounded (if applicable).
Note- This appliance must be properly grounded (if applicable).
Note- This appliance must be properly grounded (if applicable).
FOR YOUR SAFETY
ELECTRICAL REQUIREMENTS
Before you begin-Read these
Before you begin-Read these
instructions completely and
instructions completely and
carefully.
carefully.
IMPORTANT- Save these
IMPORTANT- Save these
instructions for local inspector's use.
instructions for local inspector's use.
IMPORTANT- OBSERVE ALL
IMPORTANT- OBSERVE ALL
GOVERNING CODES AND ORDIANCES.
GOVERNING CODES AND ORDIANCES.
Note to Installer- Be sure to leave
Note to Installer- Be sure to leave
these instructions with the consumer.
these instructions with the consumer.
OWNER- Keep these instructions
OWNER- Keep these instructions
for future reference.
for future reference.
Note- This appliance must be
Note- This appliance must be
properly grounded (if applicable).
properly grounded (if applicable).
Before you begin-Read these
Before you begin-Read these
instructions completely and
instructions completely and
carefully.
carefully.
IMPORTANT- Save these
IMPORTANT- Save these
instructions for local inspector's use.
instructions for local inspector's use.
IMPORTANT- OBSERVE ALL
IMPORTANT- OBSERVE ALL
GOVERNING CODES AND ORDIANCES.
GOVERNING CODES AND ORDIANCES.
Note to Installer- Be sure to leave
Note to Installer- Be sure to leave
these instructions with the consumer.
these instructions with the consumer.
OWNER- Keep these instructions
OWNER- Keep these instructions
for future reference.
for future reference.
Note- This appliance must be
Note- This appliance must be
properly grounded (if applicable).
properly grounded (if applicable).
Make sure you have all the tools and
materials you need before starting the
installation of the range.
Your home must provide the adequate
electrical service needed to safely and
properly use your range. (Refer to
section on electrical requirements.)
When installing your range in your
home, make sure all local codes and
ordinances are followed exactly as
stated.
Make sure the wall coverings,
countertop and cabinets around the
range can withstand heat (up to 200°F)
generated by the range.
3
Page 4
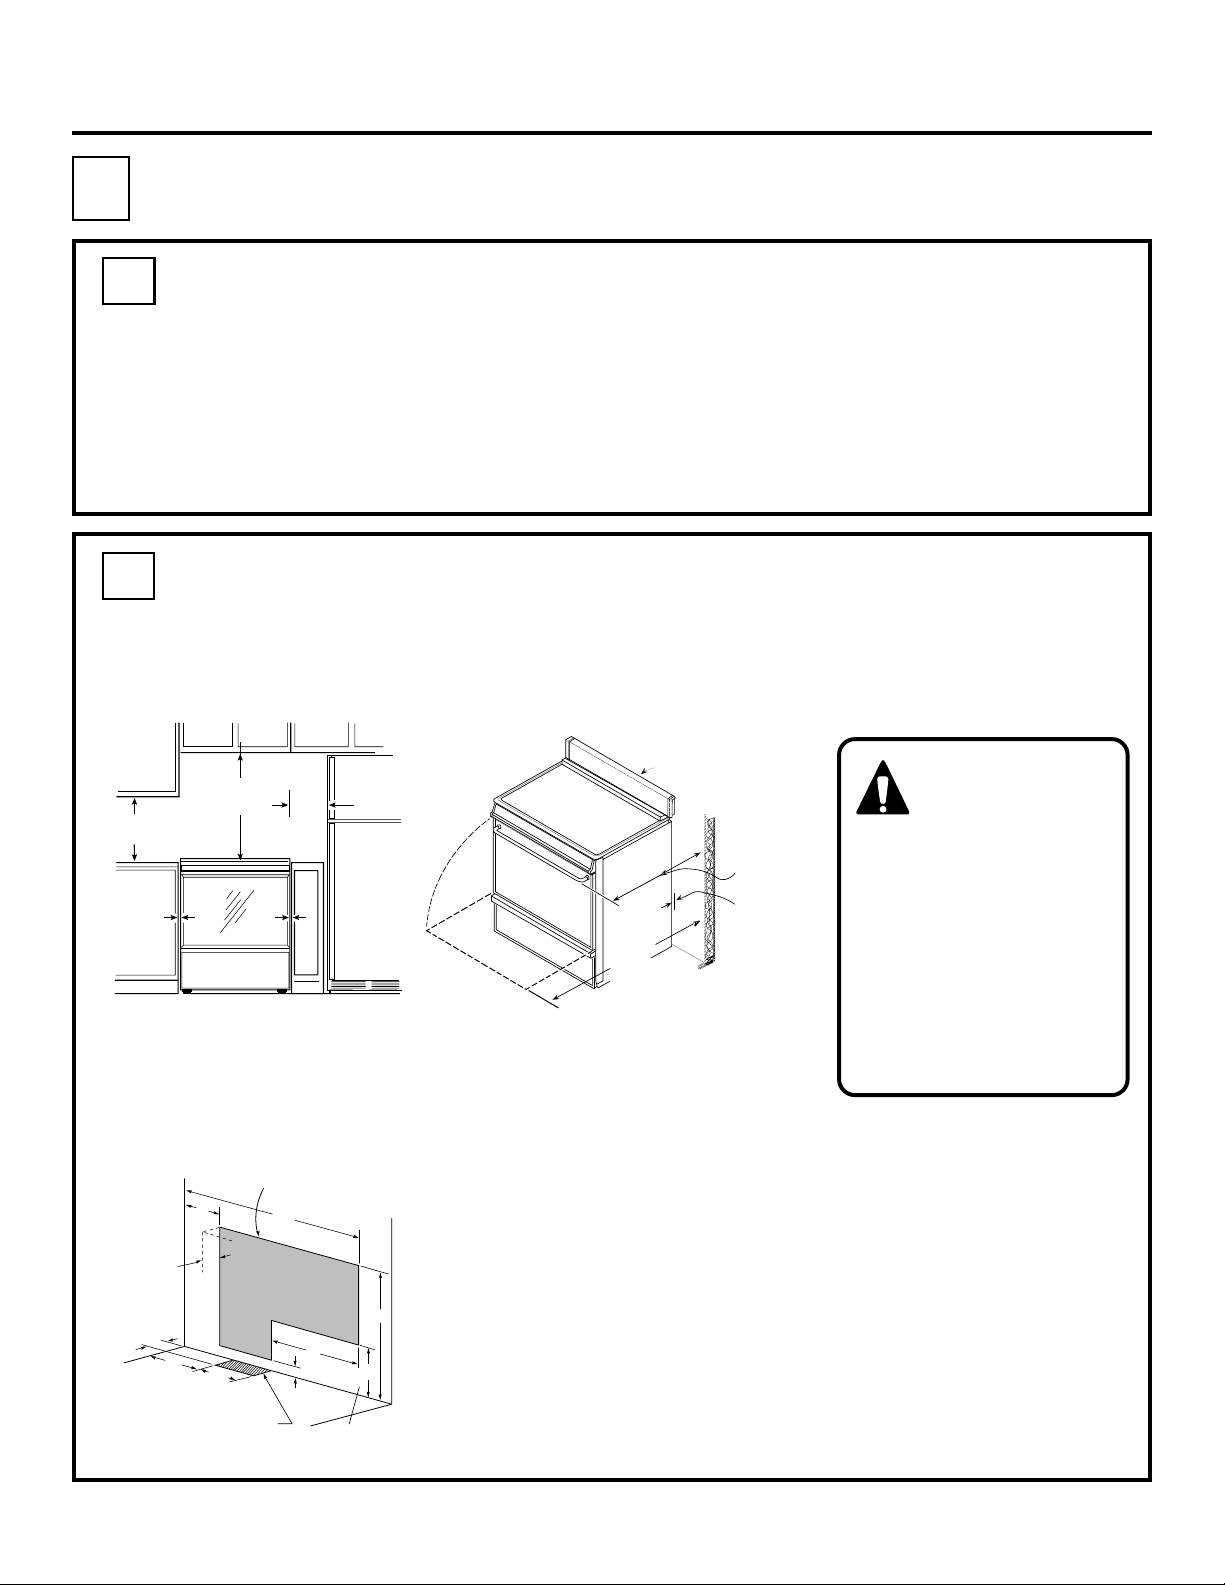
Installation Instructions
A
Preparing the Opening
A1
Location of Range
• The distance from the floor to the top of the counter must be at least 35 7/8". The maximum counter
height is 38".
• Do not put the range near an outside door or where a draft may affect use.
• Cabinet space directly over the range should not be used. You could be seriously injured when
reaching over the range for items stored in such cabinets. This hazard can be reduced by installing
a range hood that projects a minimum of 5" beyond the bottom of the cabinets. Cabinets installed
above the range may be no deeper than 13".
A2
CLEARANCES
• You must keep a clearance of at least 2" between the sides of cooktop portion of range and any
material that could catch fire, from the cooktop upward, to a height of at least 18".
• You must keep a vertical distance of at least 30" between the cooktop and any overhead cabinets
for an area equal to the width and depth of the range (30" x 28").
30" MIN
18" MIN
0"
2"
MIN
0"
NOTE: 2" minimum dimension to nearest
combustible side wall on either side of cooktop.
Dimension extends upward 18" minimum from
cooktop.
Backguard or
Filler Strip
45 5/16"
Wall to top of
door frame
(Door Open)
28 15/32' Wall to
28 15/32" wall
front of door
to front of door
handle
handle
(Door Closed)
(Door Closed)
7/16" space
7/16" Space
between rear
between rear
of body side
of body side
and wall
be solid either at floor
level or with the bottom
edge of the cutout. Any
openings around the gas
or electrical outlets must
be sealed. All cabinet
openings must be sealed
at the time of installation
to prevent drafts. Drafts
will affect safe use of the
oven.
The cabinet must
have solid sides,
back and bottom.
The bottom must
Recommended area for 120V outlet on rear
Recommended area for 120V outlet on rear
wall and aea for through the wall connection
wall and area for through the wall connection
of pipe stub and shut-off valve
of pipe stub and shut-off valve
5"
2 1/2"
2 1/2"
7"
5 1/2"
Recommended area for
through the floor connection
of pipe stub and shut-off valve
25"
12 1/2"
1 1/2"
18"
7"
Anti-Tip location
All rough-in and minimum clearance dimensions.
• For listed over-the-range microwave ovens, the oven
can be installed above the cooktop as per
manufacturer’s instructions.
• Some vinyl wall tiles and floor coverings, as well as
some indoor-outdoor carpeting, soften at fairly low
temperatures. If you are unsure of the heat resistance
of a material, put a protective covering under the range
to prevent possible heat damage during range use.
• Recommended location for the gas inlet pipe and
electrical outlet.
• Make sure the wall coverings, countertop and cabinets
around the range can withstand the heat (up to 200°F)
generated by the range.
4
Page 5
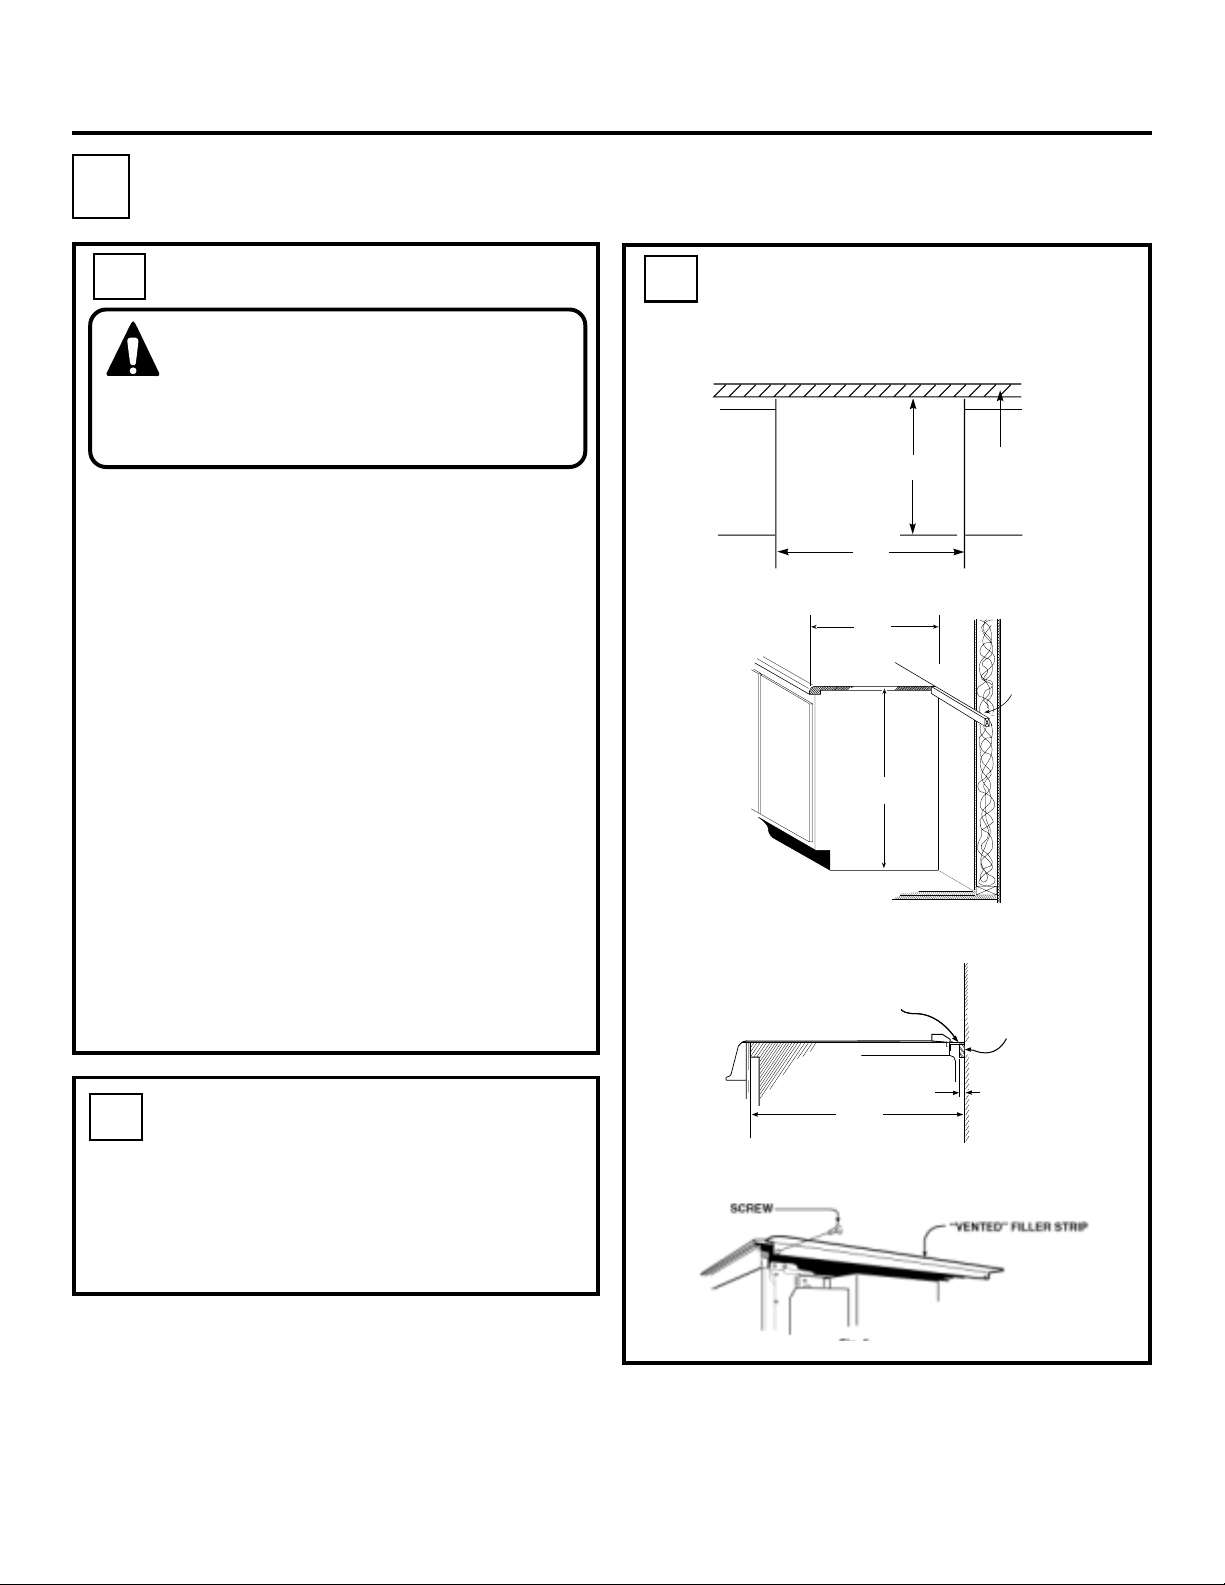
Installation Instructions
25"
30"
Rear Wall
B
Preparing the Counter
B1
Filler Strips or Backguard
WARNING: The Filler Strip supplied or
optional backguard must be used. With
any installation, do not let the countertop
or other combustible material fill the
space between the back edge of the cooktop
and back of the required cutout.
Your range is designed to be installed in
a 30" wide opening; the cutout depth will
vary with the type countertop you have.
Here are three basic recommended
installations:
1. Standard 25" countertop without postformed backsplash.
2. Island.
3. Standard countertop with post-formed
backsplash.
After determining the countertop type you
have, choose the best installation to meet
your needs.
With any installation, mark the cutout on
the counter.
Dimensions given in the following references
are measured from the front of the counter,
not from the cabinet face. To minimize
chipping, you may apply masking tape. For
best appearance, it is important that the cut
be smooth and straight.
B3
For Standard 25" Counter Without
Post-Formed Backsplash
(Top view of counter cutout)
25"
Furring
Strip
35 7/8" MIN.
38" MAX.
Range to Wall with Filler Strip
Rear Vented
Filler Strip
Furring
Strip
B2
If there is a small gap between the sides of
the range and the cabinets (up to 1/4" each
side) you can order a side trim extension kit
through any Service Center.
Order Pub. No. 8078690/3-A040.
Side Trim Extension Kit
1/2" MAX
25"
From Front of
Countertop to Wall
5
Page 6
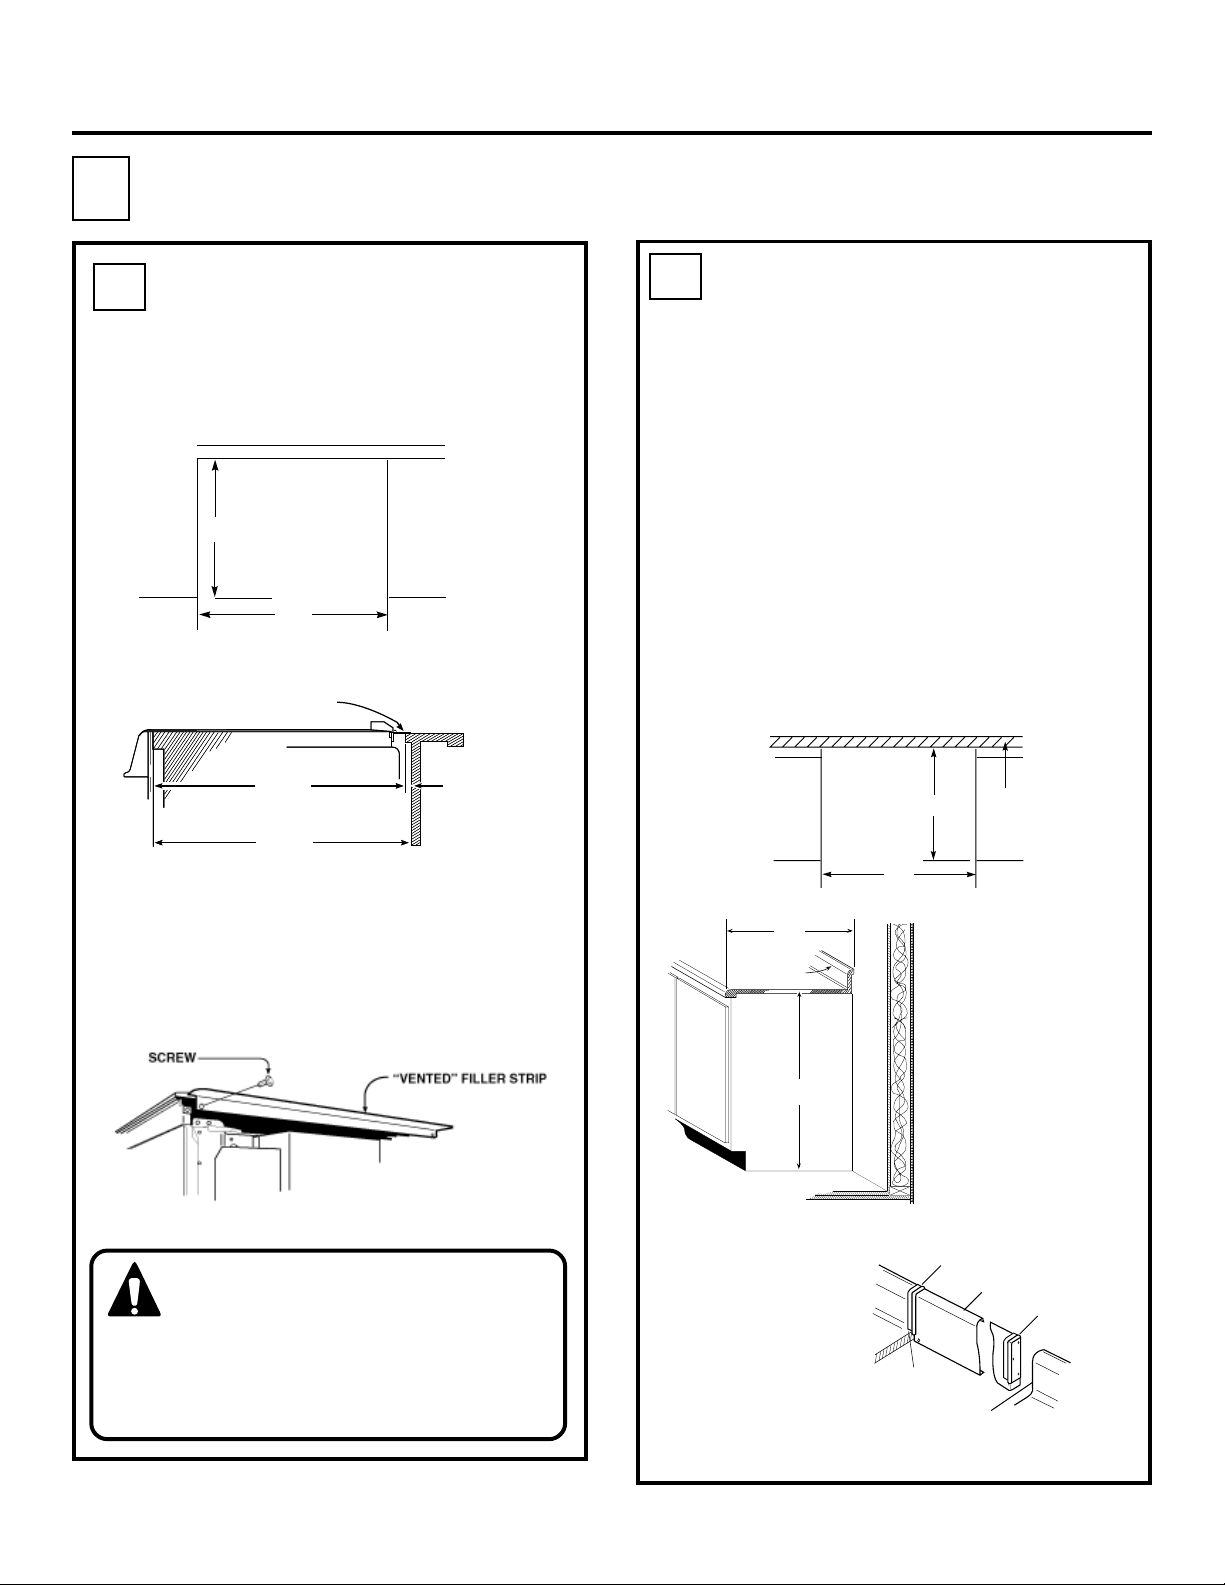
Installation Instructions
(End Caps Overlap Counter Backsplash)
(Preassembled)
Trim End Cap
to fit
Post-Formed Counter
Backsplash Ends
Backguard
B
Preparing the Counter cont.
B4
Island Installation
with Rear Filler Strip
If your countertop does not have a
post-formed backsplash, your choice
may be to use the rear filler strip kit.
24 1/2"
30"
Vented Rear
Filler Strip
24 1/2"
Front of Countertop
to Rear of Cutout
25"
From Front of Countertop
to Inside Wall of Cabinet
1/2" Max
Filler Strip
Overlap at
Rear of Cutout
B5
Standard 25" Countertop with
a Post-Formed Backsplash
If your countertop has a post-formed
backsplash, your choice may be to use the
4" backguard kit. Your choice may be:
Kit No. JXS31/ 80501 (White)
Kit No. JXS32/ 22555 (Brushed Chrome)
Kit No. JXS33/ 80508 (Bisque)
Kit No. JXS34/ 80509 (Black)
You may order either of these kits from your
Service Center. The backguard kit will attach
to the back of the range and fill in the space
between the back of the range and wall.
When using the backsplash kit, the postformed backsplash of the countertop must
be cut.
(Top view of counter cutout)
Rear Wall
25"
30"
Use the screws provided to attach the filler
strip to the back of the range.
IMPORTANT: For proper operation
of your self-cleaning gas range,
you must provide the correct
cutout depth as shown. DO NOT let
the countertop or other materials fill the
space between the back edge of the cooktop
and the back of the required cutout.
25"
Post-Formed
Backsplash
35 7/8" Min.
38" Max.
6
Page 7
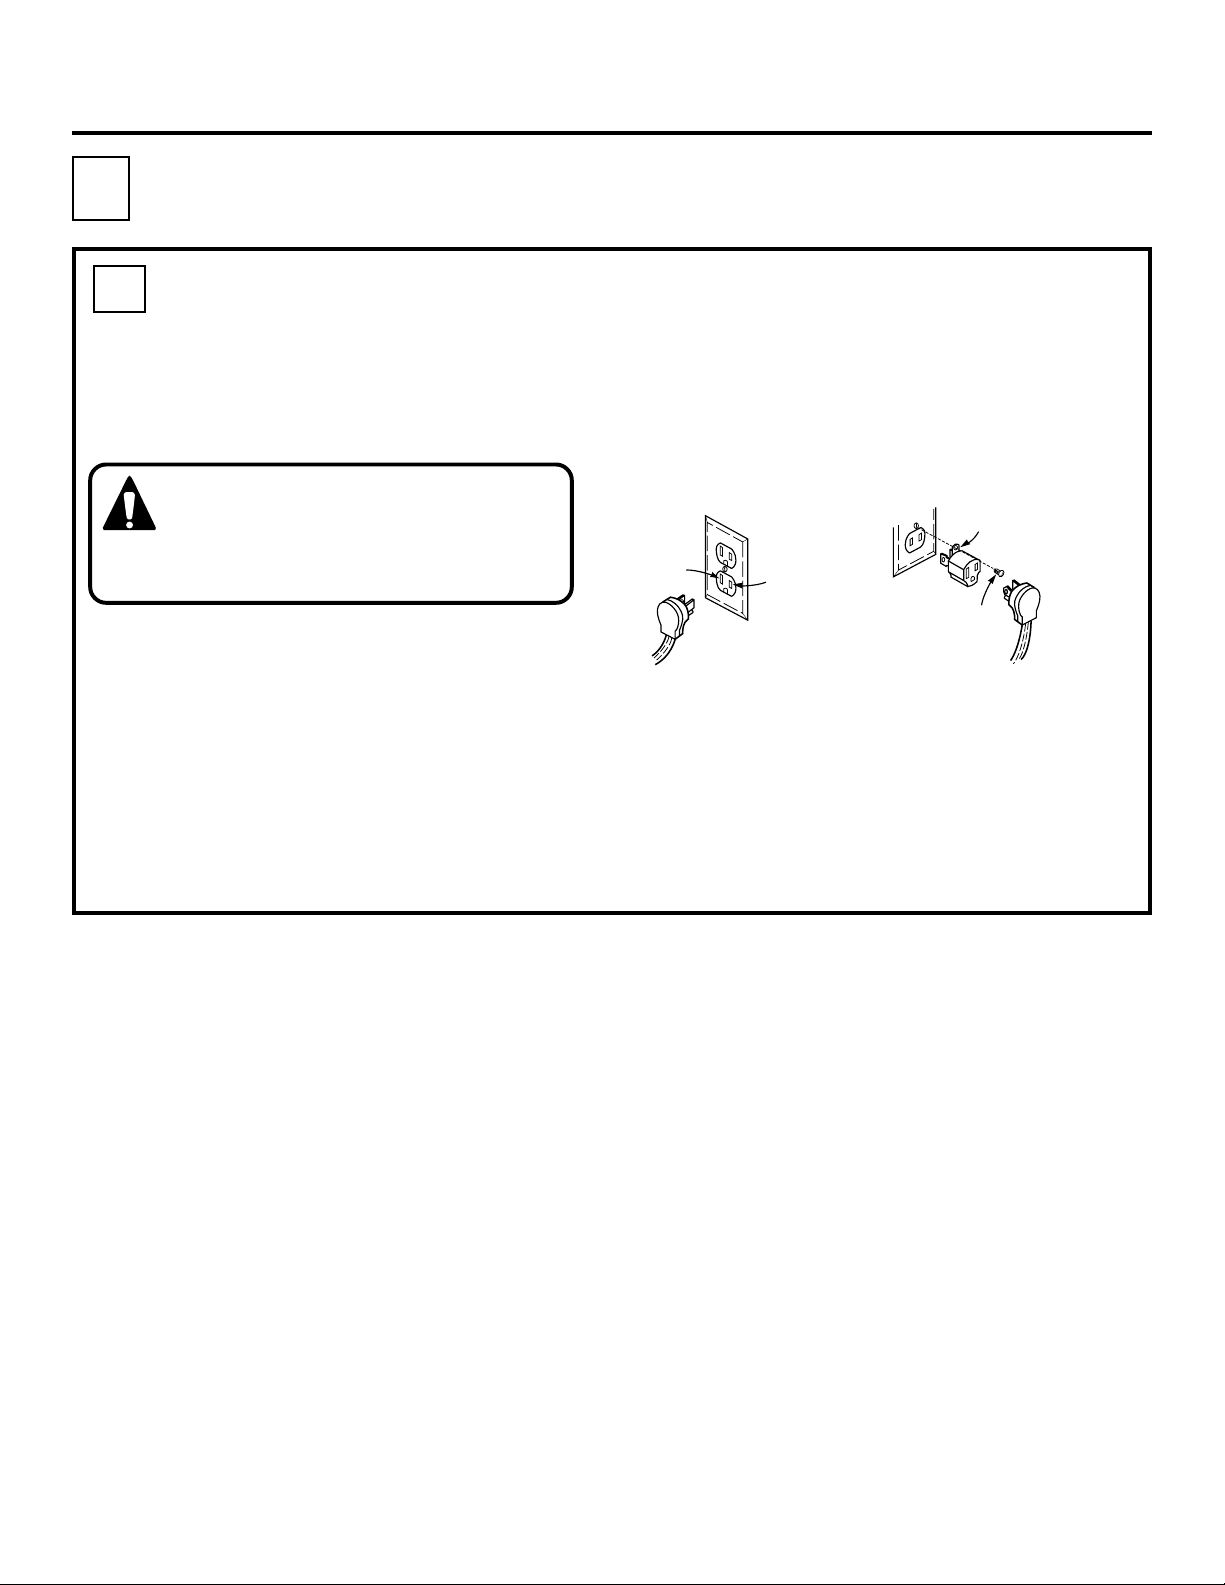
Installation Instructions
C
Electrical Connections
C1
The range cord has a three-prong plug and
must be plugged into a properly grounded
three-hole outlet. The outlet must be in a
standard 120 Volt, 60 Hertz AC household
circuit.
cause shock and fire hazard.
Improper grounding can affect spark ignition
on models so equipped.
If you do not have a grounded three-hole
outlet, have an electrician change your old
outlet or install a new one.
The Three-Prong Outlet
Do not under any circumstances
cut or remove the grounding prong
from the range cord. Failure to
provide proper polarization may
To temporarily use a properly polarized and
grounded two-hole outlet until a grounded
three-hole outlet can be installed, a
grounding adapter plug may be used. Have
an electrician test the outlet to be sure it
meets requirements.
Plug with Ground Prong Properly
Polarized and Grounded Receptacle
N
PREFERRED METHOD
Where a standard two-prong wall receptacle
is encountered, it is the personal
responsibility and obligation of the customer
to have it replaced with a properly grounded
three-prong wall receptacle.
DO NOT UNDER ANY CIRCUMSTANCES CUT
OR REMOVE THE THIRD GROUND PRONG
FROM THE POWER CORD.
L
Polarized Receptacle
Properly Grounded
Receptacle
Plate Mounting
Screw
TEMPORARY METHOD
Metal Eyelet Ground
7
Page 8
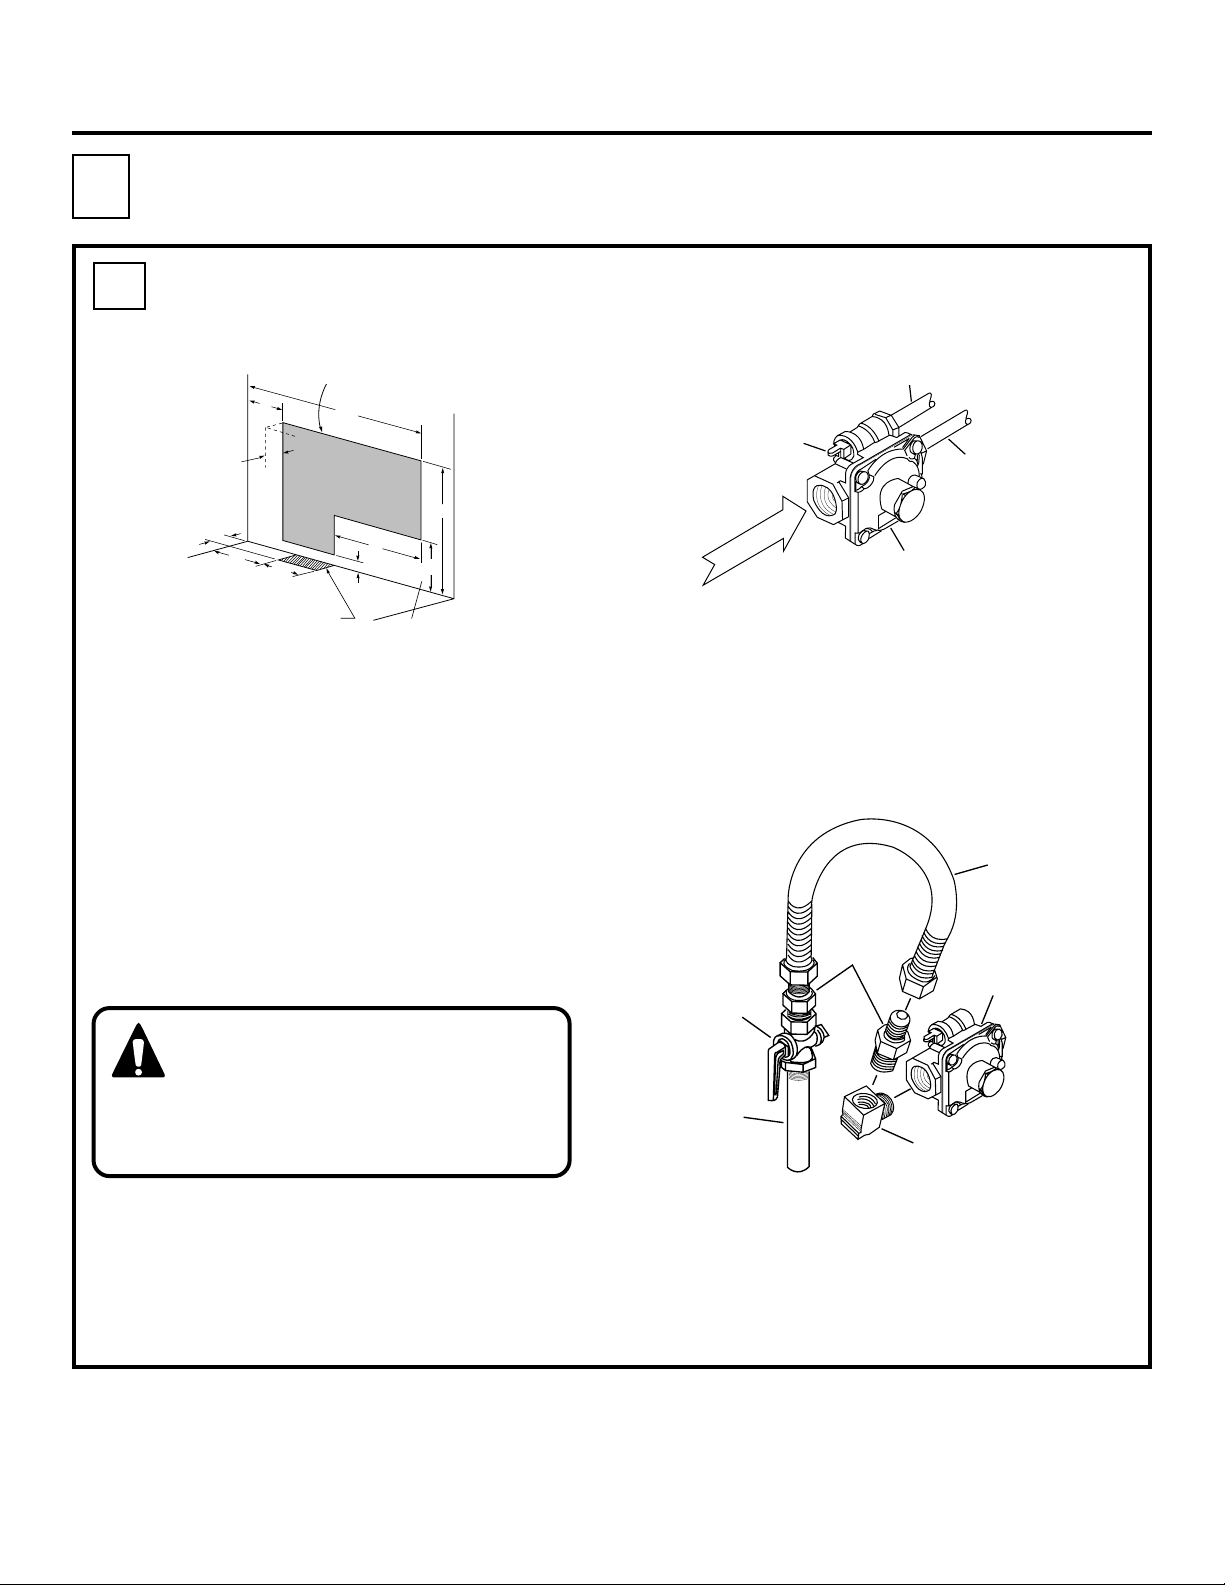
Installation Instructions
D
Gas Connections
D1
Making the Connections
Recommended area for 120V outlet on rear
Recommended area for 120V outlet on rear
wall and aea for through the wall connection
wall and area for through the wall connection
of pipe stub and shut-off valve
of pipe stub and shut-off valve
5"
2 1/2"
2 1/2"
7"
5 1/2"
Recommended area for
through the floor connection
of pipe stub and shut-off valve
25"
18"
12 1/2"
7"
1 1/2"
Anti-Tip location
1. Install a manual shut-off valve in the gas
supply line in an easily accessible
location.
2. Know how and where to shut off the gas
supply to the range.
3. Shut off gas supply before removing an
old range. Leave it off until hookup of new
range is finished.
4. Because solid pipe restricts moving the
range, we recommend use of a C.S.A.
certified metal appliance connector.
NEVER REUSE AN OLD CONNECTOR WHEN
INSTALLING A NEW RANGE.
WARNING: Never reuse old flexible
connectors. The use of old flexible
connectors can cause gas leaks
and personal injury. Always use
new flexible connectors when installing
a gas appliance.
5. Before making gas connections, make
sure that the oven shut-off lever (visible at
the back of range) is in the open position.
Gas Supply
to Oven
Shut-Off Lever
Shown in the
Open Position
t
le
In
s
a
G
Pressure Regulator
Pressure Regulator
as Seen from Front
as see from Front of
of Range
Range
Gas Supply to
Top Burner
6. Install 1/2" flare union adaptor to the 1/2"
NPT elbow on pressure regulator.
7. Connect flexible appliance connector to
flare union.
8. Move range into approximate position and
connect flexible connector to gas supply
line with proper flare union adaptor.
Flex
Connector
Flair Unions
Shut-Off
Valve
Gas Supply
Line
Flare Unions
90˚ Street Elbow
Pressure
Regulator
9. To prevent gas leaks, put a pipe joint
sealant on all male threads.
10. When you are finished making
connections, be sure that all range knobs
are turned to OFF before you open the
main gas supply valve.
8
Page 9
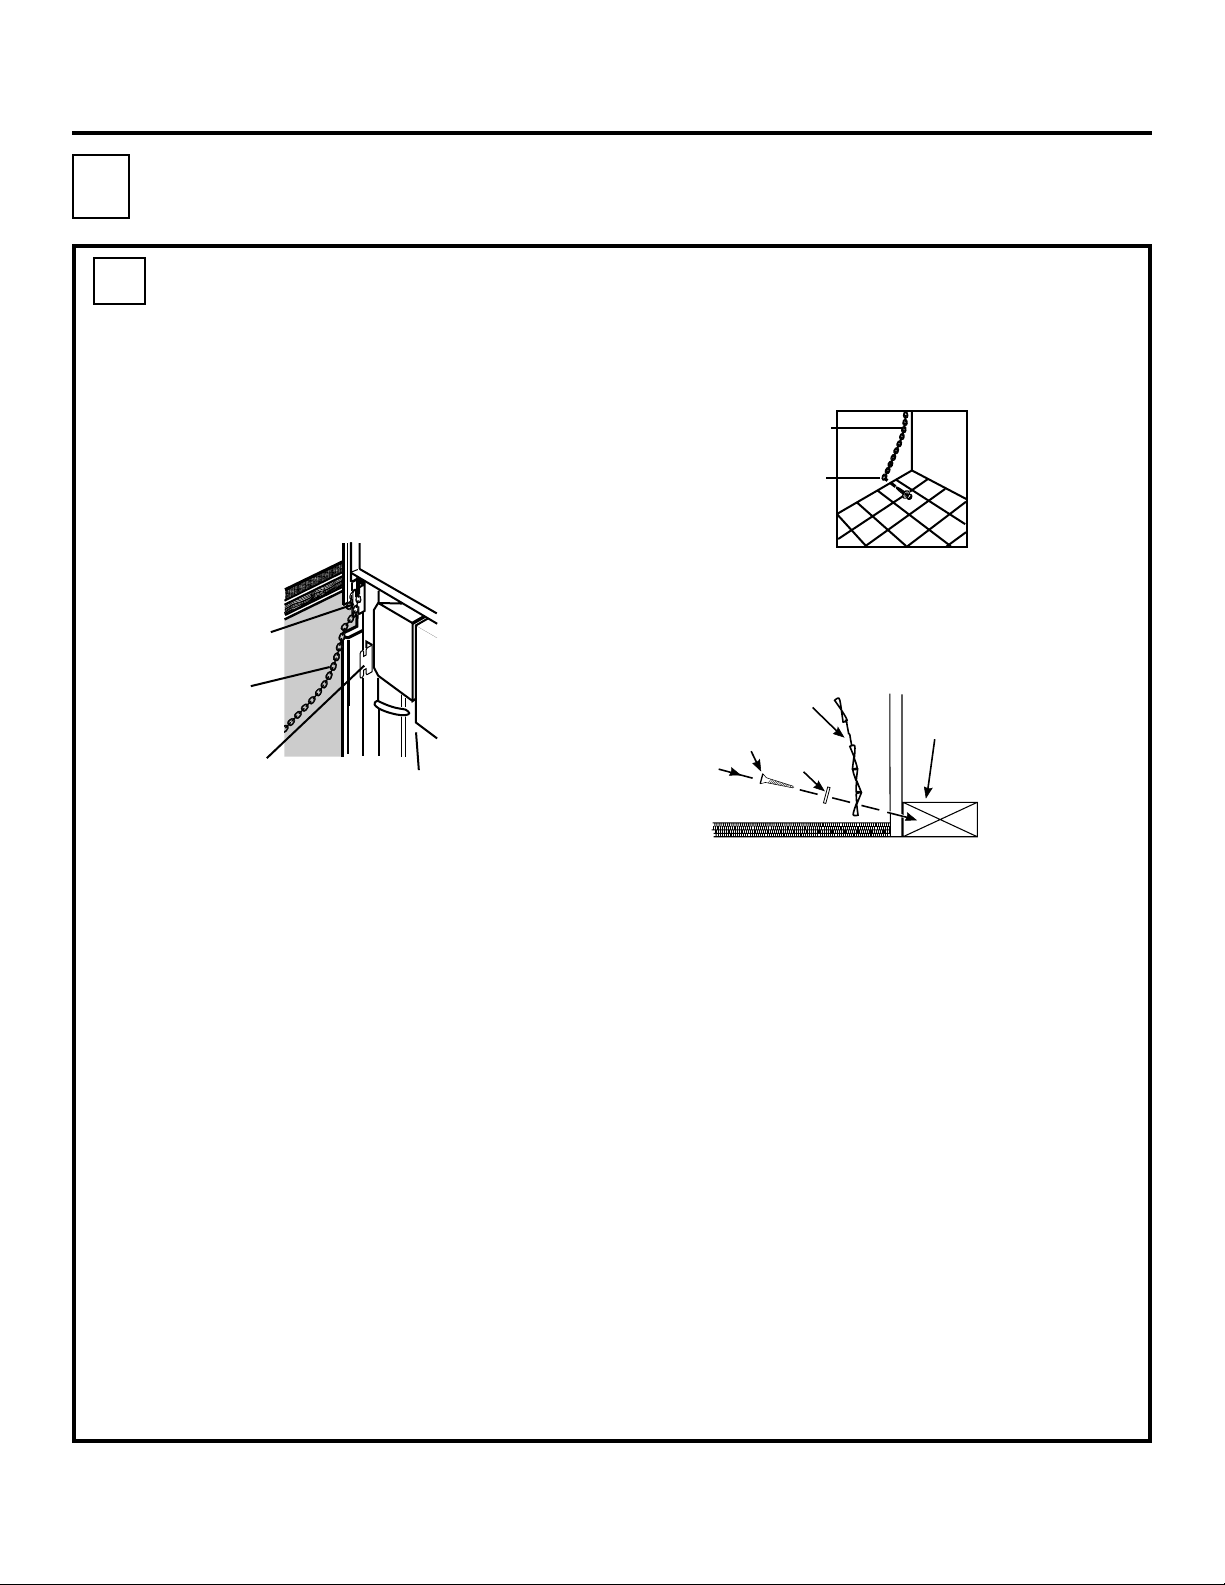
Installation Instructions
E
Anti-Tip Device
E1
Installing the Anti-Tip
Device
Before placing range in the counter, check
the factory location of the stability device on
the back of the range. This location should
work for most installations. For convenience,
you can hook the stability chain in the upper
set of holes. Make sure there is no structural
interference when using the upper set
of holes.
Bracket
Optional
Location
Chain
Bracket
Factory
Location
1. Decide on a location that has no electrical
wiring or plumbing.
Chain
Washer
and Screw
2. With the long screw provided, anchor the
chain to the floor or wall.
LONG
SCREW
CHAIN
WASHER
WALL
PLATE
The upper set of holes are intended for use
with an optional backsplash kit. If a
backsplash kit is being used, the stability
bracket can be relocated and put on the same
time as the optional backsplash kit. If the
backsplash is not being used, make sure that
there are no countertop structural supports
that will interfere with the stability bracket
when located in the upper set of holes.
3. Make sure the screw is going into the
wall plate or stud at the base of the wall
at least 3/4".
4. Attach the stability chain so that it lines up
with the bracket on the back of the range.
5. Tug the chain to make sure it is securely
fastened.
6. Take the packaging tape and temporarily
attach the loose end of the chain to the rear
of the countertop.
7. Slide the range into the counter, leaving
enough space behind to attach the chain
to the bracket.
8. Slip the nearest link of the chain onto the
bracket. Pull to make sure it is as snug
as possible.
9. Slide the range all the way back. It is normal
to have some slack in the chain, but it should
not be excessive.
9
Page 10
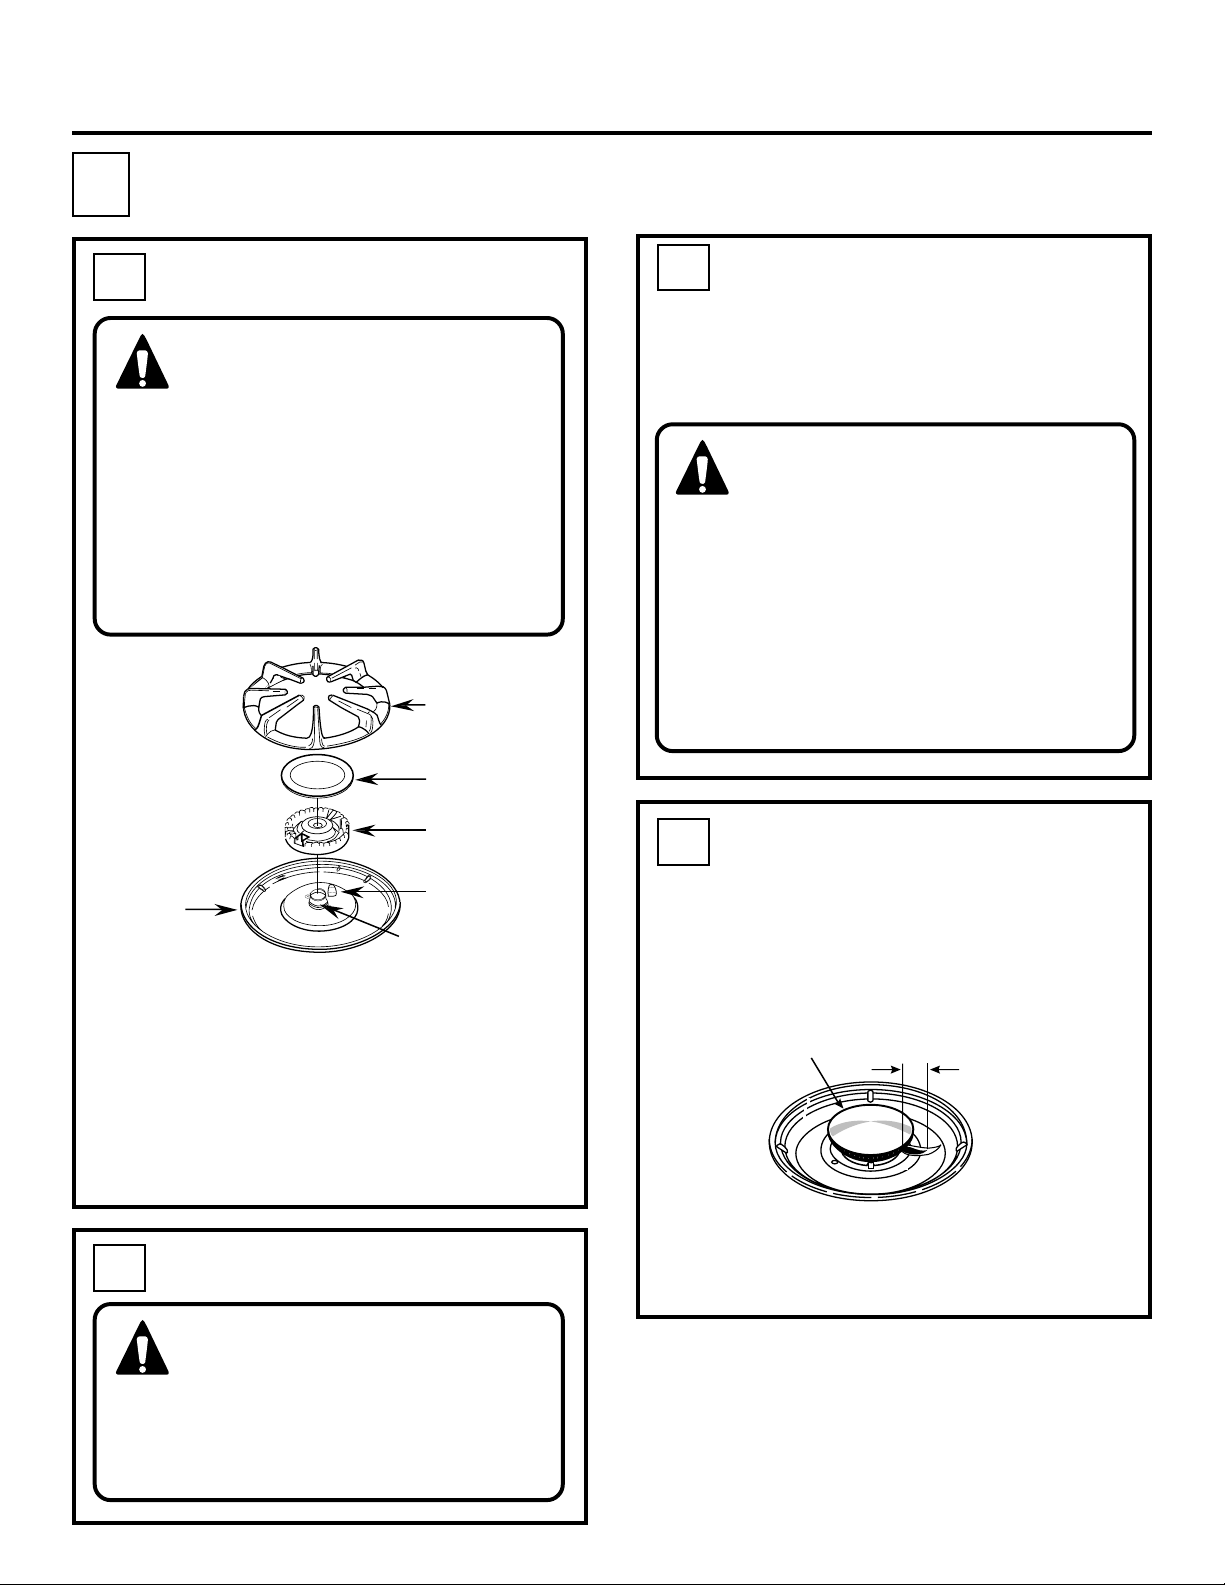
Installation Instructions
F
Cooktop Burners
F1
Assembling The Burners
CAUTION: The electrode of the
spark igniter is exposed and the
mixer bowl may have sharp edges.
When cleaning the burner bowl,
be careful not to snag the electrode of
the spark igniter with a cleaning cloth.
Damage to the igniter could occur.
Be careful not to turn on any cooktop
controls while cleaning burner bowls.
A slight electrical shock might result,
which could cause you to knock over
hot cookware.
Burner Grate
Burner Cap
F3
The maximum allowable pressure for the
regulator is 14" W.C. The minimum pressure
needed to check the regulator setting is 7"
W.C. for natural gas.
Pressure Test Information
The range and its individual shut-off
valve must be disconnected from
the gas supply piping system during
any pressure testing of the gas
supply system at test pressures of more
than 1/2 psig (pounds per square inch
gauge).
The range must be isolated from the gas
supply piping system by closing its
individual shut-off valve during any pressure
testing of the gas supply system at test
pressures equal to or less than 1/2" psig.
Burner Head
Burner
Bowl
1. Place the Burner Head onto the Burner
Bowl. Align the opening of the Burner
Head with the location of the Spark Igniter.
2. Place the Burner Cap onto the Burner Head.
3. Place the grate over the burner assembly
and burner bowl. The indentations of the
bowl should match the location pins on
the bottom of the grate.
F2
Check for Leaks
WARNING: Turn the gas supply
on and use a liquid leak detector
(soap solution) at all joints and
connections to check for leaks.
Do not use an open flame to look for
leaks. Be sure all leaks are stopped
before lighting burners.
Spark Igniter
Mixer Tube
(Chimney)
F4
Turn each burner on. Flames should be blue
in color with no trace of yellow. The burner
flames should not flutter or blow away from
the burner. The inner cone of the flame
should be between 1/2" and 3/4" long.
Foreign particles in the gas line may cause
an orange flame at first, but this will soon
disappear.
About the Cooktop Burners
Cooktop
Burner
1/2 to 3/4"
1/2" to 3/4"
10
Page 11

Installation Instructions
Air Shutter
Screw
Orifice Fitting
Cover
Air Shutter
Air
Shutter
Air Shutter
Screw
G
Bake and Broil Burners
G1
Checking the Oven Burners
To check the bake burner flames with the
oven door in the closed position:
1. Open the door.
2. Remove the oven bottom.
a. Slide the tab to the left to unlock.
b. Lift the oven bottom up and out.
Unlock
Lock
3. Remove the two screws holding the burner
baffle (flame spreader) to the burner box.
2 Screws
G2
To Adjust the Air Shutter
BAKE BURNER
1. Remove the
orifice fitting
cover.
2. Use a screwdriver
to loosen the air
shutter screw.
3. Adjust the air shutter.
4. Retighten the air shutter screw.
WHAT ADJUSTMENT TO MAKE:
a. If the flames are yellow, open the air shutter
more than the original setting.
b. If the flames blow away or fluttered from the
burner, close the air shutter more than the
original setting.
Burners should be checked frequently.
4. Close the oven door.
5. Turn on the bake or broil burner.
As you watch the flames, check the following:
• Burner flames should not flutter or blow
away from the burner.
• They should be blue in color with no trace
of yellow.
BROIL BURNER
1. The broil burner is located and accessible
in the top rear of the oven.
2. Using a
screwdriver,
loosen the air
shutter
adjustment
screw.
3. Make the air shutter adjustment.
4. Retighten the air shutter screw.
5. Check the inner cone of
the flame. It should be
between 1/2" and 3/4"
Inner Cone of Flame
1/2" To 3/4"
Oven Broiler
Burner
long for the oven bake
and broil burners.
WHEN ALL ADJUSTMENTS ARE MADE AND
THE RESULTS ARE SATISFACTORY
1. Replace the orifice fitting cover.
2. Replace the burner baffle (flame spreader)
and screws.
3. Replace the oven bottom.
11
Page 12

Installation Instructions
H
Leveling the Range
H1
For proper baking results, the range must be leveled. The height of the range must also be
adjusted to the height of the counter.
To do this:
1. Install the oven racks (see cleaning sections of the Owner’s Manual for instructions and
2. Use a 1 3/8" open end or adjustable wrench to equally back out the four leg levelers until the
3. Place range where it will be installed. Put a spirit level or glass measuring cup partially filled
4. Use the wrench to adjust the leg levelers.
I
Checking the Range
additional information).
flanges (rims) on the sides of the cooktop are above the top of the counter.
with water on one of the open racks.
Leg
Leveler
Raise
Range
Lower
Range
38" Cabinet Installation
Spirit
Level
I1
The height of the range must be adjusted to the countertop height. For countertop heights greater than
37", additional measurements may need to be taken as detailed below.
When the range is elevated to the maximum height, there is a large space between the bottom of the
range and the floor, referred to as the toe space. This may be visually objectionable. The legs should
not be extended any further than to provide a maximum
of 3" toe space.
The range is designed to provide a minimum of 1" air gap
at the bottom of the range. (Example: When legs are
screwed all the way into the base rail).
This gap is very important to the proper ventilation of the range and must be maintained when
treating the appearance of the toe space.
The following is a suggested method of making a filler for the toe space when the legs are
extended as mentioned before.
After the range is installed with the longer legs and is in
position and level, measure from the bottom of the bodyside
to the floor. This will be the required height of the toe space
filler. This height may range from 2 1/16" to 3". Any height
less than 2 1/16" may not be visually objectionable and not
need the filler.
Build the filler as shown. Make sure to provide the 3/4" gap
at the top and the 5/16" gap at the bottom. These gaps will
provide the proper ventilation as mentioned before.
If you wish to attach the filler to the floor or adjacent
cabinets, use screws or other removable fasteners, so that
the range can be readily removed if necessary.
Adjusting the height of the range to match that of the cabinet height
1" Min. Height
3" Max. Height
3" Max. Height
2 1/16" to 3"as
Required or as
required to recess
behind toe area of
adjacent cabinets
6"
1" Min. Height
Gusset corners
with 3/4" to 1"
Triangular or
square Stock
5/16"
30"
Use 1/4" to 1/2" material
finished to match toe area
of cabinets
3/4"
12
Page 13

Installation Instructions
Operation Checklist
Double check to make sure
everything in this guide has been
completed. Rechecking steps will
ensure safe use of the range.
Make sure all controls are left in the
OFF position.
Make sure the flow of combustion
and ventilation air to the range is
unobstructed.
The serial plate for your range
is located on the bottom of the
burner box. In addition to the
model and serial numbers, it tells
you the ratings of the burners and
the type of fuel and pressure the
range was adjusted for when it left
the factory.
When ordering parts, always include
the serial number, model number
and a code letter to ensure proper
replacement parts.
Recheck Steps:
Double check to make sure
everything in this guide has been
completed. Rechecking steps will
ensure safe use of the Range.
13
Page 14

NOTES
14
Page 15

NOTES
15
Page 16

NOTES
16
Page 17

Instructions
Cuisinière du gaz encastrée
d’installation
JGSP23, JGSP44
Questions? Appelez le Centre de réponse GE au 1.800.361.3400 ou visitez
notre site Web à l’adresse : www.electromenagersge.ca
Dans le Commonwealth of Massachusetts :
•
Vous devez faire installer ce produit par
un plombier
licencié ou un monteur
d’installations au gaz.
MISE EN GARDE : Avant de commencer, lisez
attentivement la totalité de ces instructions.
• IMPORTANT—Conservez ces instructions
pour votre inspecteur local.
• IMPORTANT—Respectez toutes les
ordonnances et les codes locaux.
• Note à l’installateur : Assurez-vous de
laissez ces instructions au consommateur.
• Si vous utilisez des robinets d’arrêt de gaz
à verrouillage à bille, ces robinets doivent
être de la catégorie à manche en T.
• Si vous utilisez un tuyau de jonction du gaz,
celui-ci ne doit pas dépasser 1 mètre (3 pieds).
• Note au consommateur—Conservez ces
instructions pour référence future.
•Note—Cet appareil coit être bien mis à la terre.
• IMPORTANT : Vous devez vérifier que cet
appareil n’a pas de fuite conformément aux
instructions du fabricant.
PIÈCES COMPRISES
Bande de
support
OUTILS DONT VOUS AUREZ BESOINS
Perceuse à main ou
électrique et foret
de 1/8 po
Tournevis
Phillips
Crayon
MATÉRIAUX NÉCESSAIRES
n
T
o
l
a
f
p
e
e
T
F
s
o
a
r
G
Raccords de
tuyaux
Règle
ordinaire ou
de vérification
U
s
h
t
e
i
W
Agent de
scellement
de tuyau
Clé à tuyau
Robinet
d’alimentation
de gaz
Scie
sauteuse
229C4053P484-1
31-10500-1 (05-03 JR)
1
Page 18

STOP!
Instructions d’installation
INSTRUCTIONS IMPORTANTES EN MATIÈRE DE SÉCURITÉ
POUR VOTRE SÉCURITÉ
Avertissement!! Si vous ne suivez
pas exactement les instructions de
ce manuel, vous risquez
d’occasionner un incendie, une explosion
ou une fuite de gaz, qui peuvent provoquer
des dommages matériels, des blessures
corporelles ou la mort.
NE CONSERVEZ PAS OU N’UTILISEZ JAMAIS
D’ESSENCE OU D’AUTRES LIQUIDES OU VAPEURS
INFLAMMABLES À PROXIMITÉ DE
CET APPAREIL OU DE TOUT AUTRE
APPAREIL MÉNAGER!
STOP!
CI QUE VOUS DEVEZ FAIRE SI VOUS
SENTEZ LE GAZ :
• N’essayez jamais d’allumer un appareil
électroménager. Ne touchez à aucun commutateur
d’électricité, n’utilisez jamais un téléphone dans votre
bâtiment.
• Appelez immédiatement votre fournisseur de gaz à
l’aide du téléphone d’un voisin. Suivez les instructions
de votre fournisseur de gaz.
• Si vous ne pouvez pas entrer en communication avec
votre fournisseur de gaz, appelez les pompiers.
L’installation et service de votre table de cuisson doivent
être faites par un installateur qualifié, un technicien de
service ou votre fournisseur de gaz.
BESOINS D’ÉLECTRICITÉ
Cet appareil doit être mis à la terre. Vérifiez les
codes locaux qui s’appliquent dans votre région. Si
aucun code local ne s’applique, conformez-vous au
National Electrical Code, ANSI NFPA N° 70 Dernière
édition. Pour de plus amples renseignements, écrivez
à l’adresse suivante:
National Fire Protection Association
Batterymarch Park
Quincy, MA 02269
Assurez-vous que l’installation de cette cuisinière
dans une maison mobile se conforme à la
Manufactured Home Construction and Safety
Standard, Title 24 CFR, Part 3280. Si cette norme
ne s’applique pas, vous devez vous conformer à la
norme Standard for Manufactured Home Installations,
Sites and Communities et ANSI/NFPA 501A, ou aux
codes locaux. Vous pouvez obtenir un exemplaire de
la norme fédérale en écrivant à l’adresse suivante :
Office of Mobile Home Standards
HUD Building
451 7th Street, S.W.
Washington, D.C. 24010
AVERTISSEMENT : Pour éviter
que votre cuisinière ne bascule
accidentellement, fixez-la au mur à
l’aide du mécanisme anti-basculement fourni.
La conception de votre cuisinière a été approuvé par
l’ACNOR International. Vous trouverez des précautions ô
prendre en matière de sécurité dans votre Manuel
d’utilisation. Lisez-les attentivement.
• L’installation de votre cuisinière doit se conformer aux
codes locaux ou, en l’absence de codes locaux, au
National Fuel Gas Code, ANSI Z223.1 Dernière édition.
• Assurez-vous que votre cuisinière soit bien installée par
un installateur qualifié ou un technicien de service.
• Pour éliminer tout mouvement corporel au dessus des
brûleurs de votre cuisinière, évitez de placer des armoires
de cuisine au dessus des brûleurs.
• N’installez jamais votre appareil près d’une porte d’entrée
ou à un emplacement où un courant d’air peut gêner son
usage.
AVERTISSEMENT
WARNING
• All ranges can tip
•
Toutes les cuisinières peuvent
• Injury to persons could result
basculer et causer des blessures
• Install anti-tip bracket
•
Installez mécanisme anti-basculement
à l’arrière de votre cuisinière
packed with range
•
Voir Instructions d’installation
• See Installation Instructions
Si vous devez éloigner la cuisinière du mur
pour une raison ou pour une autre, assurezvous que le dispositif soit de nouveau engagé
lorsque vous remettez la cuisinière en place
contre le mur.
2
Page 19

Instructions d’installation
LISTE DE VÉRIFICATION AVANT INSTALLATION
Enlevez les instructions d’installation
Pour préparer l’ouverture de la cuisinière,
vous devez vous assurer que l’intérieur
de l’armoire ne touche pas la cuisinière
(consultez la section sur la préparation
de l’ouverture).
Retirez les matériaux d’emballage et la
trousse de documentation de votre cuisinière
avant de commencer à l’installer.
de la trousse de documentation et lisez-les
soigneusement avant de commencer.
Assurez-vous de bien ranger toute la
documentation, Manuel d’utilisation, les
installations, etc. dans un endroit sûr pour
référence future.
EASY INSTALLATION OF YOUR NEW
30" COOKTOP
Before you begin-Read these instructions completely and carefully.
Before you begin-Read these instructions completely and carefully.
Before you begin-Read these instructions completely and carefully.
IMPORTANT- Save these instructions for local inspector's use.
IMPORTANT- Save these instructions for local inspector's use.
IMPORTANT- Save these instructions for local inspector's use.
IMPORTANT- OBSERVE ALL GOVERNING CODES AND ORDIANCES.
IMPORTANT- OBSERVE ALL GOVERNING CODES AND ORDIANCES.
IMPORTANT- OBSERVE ALL GOVERNING CODES AND ORDIANCES.
Note to Installer- Be sure to leave these instructions with the consumer.
Note to Installer- Be sure to leave these instructions with the consumer.
Note to Installer- Be sure to leave these instructions with the consumer.
OWNER- Keep these instructions for future reference.
OWNER- Keep these instructions for future reference.
OWNER- Keep these instructions for future reference.
Note- This appliance must be properly grounded (if applicable).
Note- This appliance must be properly grounded (if applicable).
Note- This appliance must be properly grounded (if applicable).
FOR YOUR SAFETY
ELECTRICAL REQUIREMENTS
Before you begin-Read these
Before you begin-Read these
instructions completely and
instructions completely and
carefully.
carefully.
IMPORTANT- Save these
IMPORTANT- Save these
instructions for local inspector's use.
instructions for local inspector's use.
IMPORTANT- OBSERVE ALL
IMPORTANT- OBSERVE ALL
GOVERNING CODES AND ORDIANCES.
GOVERNING CODES AND ORDIANCES.
Note to Installer- Be sure to leave
Note to Installer- Be sure to leave
these instructions with the consumer.
these instructions with the consumer.
OWNER- Keep these instructions
OWNER- Keep these instructions
for future reference.
for future reference.
Note- This appliance must be
Note- This appliance must be
properly grounded (if applicable).
properly grounded (if applicable).
Before you begin-Read these
Before you begin-Read these
instructions completely and
instructions completely and
carefully.
carefully.
IMPORTANT- Save these
IMPORTANT- Save these
instructions for local inspector's use.
instructions for local inspector's use.
IMPORTANT- OBSERVE ALL
IMPORTANT- OBSERVE ALL
GOVERNING CODES AND ORDIANCES.
GOVERNING CODES AND ORDIANCES.
Note to Installer- Be sure to leave
Note to Installer- Be sure to leave
these instructions with the consumer.
these instructions with the consumer.
OWNER- Keep these instructions
OWNER- Keep these instructions
for future reference.
for future reference.
Note- This appliance must be
Note- This appliance must be
properly grounded (if applicable).
properly grounded (if applicable).
Broiler Pan
Gril-lèchefrite
and Grid
Grilles du four
Oven Racks
E
A
S
Y
I
N
S
T
A
L
L
A
EASY INSTALLATION OF YOUR NEW
T
I
O
3
B
B
B
B
B
B
B
B
B
B
B
B
0
e
e
e
e
e
e
e
e
e
e
e
e
N
f
f
f
f
f
f
f
f
f
f
f
f
o
o
o
o
o
o
o
o
o
o
o
o
"
r
r
r
r
r
r
r
r
r
r
r
r
e
e
e
e
e
e
e
e
e
e
e
e
O
W
y
y
y
y
y
y
y
y
y
y
y
y
o
o
o
o
o
o
o
o
o
o
o
o
I
I
I
I
I
I
I
I
I
I
I
I
u
u
u
u
u
u
u
u
F
u
u
u
u
M
M
M
M
M
M
M
M
M
M
M
M
A
b
b
b
b
b
b
b
b
b
b
b
b
P
P
P
P
P
P
P
P
P
P
P
P
30" WALL OVEN
e
e
e
e
e
e
e
e
e
e
e
e
O
O
O
O
O
O
O
O
O
O
O
O
Y
g
g
g
g
g
g
g
g
g
g
g
g
L
R
R
R
R
R
R
R
R
R
R
R
R
i
i
i
i
i
i
i
i
i
i
i
i
n
n
n
n
n
n
n
n
n
n
n
n
T
T
T
T
T
T
T
T
T
T
T
T
O
L
-
-
-
-
-
-
-
-
-
-
-
-
A
A
A
A
A
A
A
A
A
A
A
A
R
R
R
R
R
R
R
R
R
R
R
R
I
I
I
I
I
I
I
I
I
I
I
I
N
N
N
N
N
N
N
N
N
N
N
N
e
e
e
e
e
e
e
e
e
e
e
e
M
M
M
M
M
M
M
M
M
M
M
M
a
a
a
a
a
a
a
a
a
a
a
a
T
T
T
T
T
T
T
T
T
T
T
T
O
P
P
P
P
P
P
P
P
P
P
P
P
d
d
d
d
d
d
d
d
d
d
d
d
-
-
-
-
-
-
-
-
-
-
-
-
O
O
O
O
O
O
O
O
O
O
O
O
S
S
S
S
S
S
S
S
S
S
S
S
t
t
t
t
t
t
t
t
t
t
t
t
V
R
R
R
R
h
h
h
h
R
R
R
R
h
h
h
h
R
R
R
R
h
h
h
h
a
a
a
a
a
a
a
a
a
a
a
a
e
e
e
e
e
e
e
e
e
e
e
e
T
T
T
T
v
v
v
v
T
T
T
T
v
v
v
v
T
T
T
T
v
v
v
v
s
s
s
s
s
s
s
s
s
s
s
s
e
e
e
e
E
e
e
e
e
e
e
e
e
A
A
A
A
A
A
A
A
A
A
A
A
e
e
e
e
e
e
e
e
e
e
e
e
N
N
N
N
N
N
N
N
N
N
N
N
N
N
N
N
N
N
N
N
N
N
N
N
t
t
t
t
t
t
t
t
t
t
t
t
h
h
h
h
h
h
h
h
h
h
h
h
i
i
i
i
i
i
i
i
i
i
i
i
o
o
o
o
N
o
o
o
o
o
o
o
o
T
T
T
T
T
T
T
T
T
T
T
T
n
n
n
n
n
n
n
n
n
n
n
n
e
e
e
e
e
e
e
e
e
e
e
e
t
t
t
t
t
t
t
t
t
t
t
t
-
-
-
-
-
-
-
-
-
-
-
-
s
s
s
s
s
s
s
s
s
s
s
s
e
e
e
e
s
s
s
s
e
e
e
e
s
s
s
s
e
e
e
e
s
s
s
s
O
O
O
O
t
t
t
t
O
O
O
O
t
t
t
t
O
O
O
O
t
t
t
t
e
e
e
e
e
e
e
e
e
e
e
e
r
r
r
r
r
r
r
r
r
r
r
r
t
t
t
t
t
t
t
t
t
t
t
t
u
u
u
u
u
u
u
u
u
u
u
u
o
o
o
o
B
B
B
B
o
o
o
o
B
B
B
B
o
o
o
o
B
B
B
B
i
i
i
i
i
i
i
i
i
i
i
i
n
n
n
n
n
n
n
n
n
n
n
n
c
c
c
c
c
c
c
c
c
c
c
c
S
S
S
S
S
S
S
S
S
S
S
S
I
I
I
I
I
I
I
I
I
I
I
I
s
s
s
s
t
t
t
t
s
s
s
s
t
t
t
t
s
s
s
s
t
t
t
t
n
n
n
n
n
n
n
n
n
n
n
n
E
E
E
E
E
E
E
E
E
E
E
E
i
i
i
i
i
i
i
i
i
i
i
i
O
O
O
O
O
O
O
O
t
t
t
t
O
O
O
O
t
t
t
t
t
t
t
t
o
o
o
o
o
o
o
o
o
o
o
o
s
s
s
s
s
s
s
s
s
s
s
s
r
r
r
r
r
r
r
r
r
r
r
r
R
R
R
R
R
R
R
R
R
R
R
R
Before you begin-Read these instructions completely and carefully.
Before you begin-Read these instructions completely and carefully.
Before you begin-Read these instructions completely and carefully.
Before you begin-Read these instructions completely and carefully.
Before you begin-Read these instructions completely and carefully.
Before you begin-Read these instructions completely and carefully.
Before you begin-Read these instructions completely and carefully.
Before you begin-Read these instructions completely and carefully.
Before you begin-Read these instructions completely and carefully.
Before you begin-Read these instructions completely and carefully.
Before you begin-Read these instructions completely and carefully.
Before you begin-Read these instructions completely and carefully.
t
t
t
t
t
t
t
t
n
n
n
n
n
n
n
n
t
t
t
t
n
n
n
n
u
u
u
u
u
u
u
u
u
u
u
u
W
W
W
W
W
W
W
W
W
W
W
W
a
a
a
a
a
a
a
a
a
a
a
a
V
V
V
V
V
V
V
V
V
V
V
V
s
s
s
s
s
s
s
s
s
s
s
s
c
c
c
c
c
c
c
c
c
c
c
c
l
l
l
l
l
l
l
l
l
l
l
l
N
N
N
N
N
N
N
N
N
N
N
N
E
E
E
E
E
E
E
E
E
E
E
E
l
l
l
l
l
l
l
l
l
l
l
l
t
t
t
t
t
t
t
t
t
t
t
t
e
e
e
e
e
e
e
e
c
c
c
c
c
c
c
c
e
e
e
e
c
c
c
c
i
i
i
i
i
i
i
i
i
i
i
i
E
E
E
E
E
E
E
E
E
E
E
E
o
o
o
o
o
o
o
o
o
o
o
o
r
r
r
r
r
r
r
r
o
o
o
o
o
o
o
o
r
r
r
r
o
o
o
o
A
A
A
A
A
A
A
A
A
A
A
A
-
-
-
-
-
-
-
-
-
-
-
-
R
R
R
R
R
R
R
R
n
n
n
n
R
R
R
R
n
n
n
n
n
n
n
n
m
m
m
m
m
m
m
m
m
m
m
m
L
L
L
L
L
L
L
L
L
L
L
L
B
B
B
B
B
B
B
B
B
B
B
B
s
s
s
s
s
s
s
s
s
s
s
s
-
-
-
-
-
-
-
-
-
-
-
-
L
L
L
L
L
L
L
L
L
L
L
L
p
p
p
p
p
p
p
p
p
p
p
p
e
e
e
e
e
e
e
e
e
e
e
e
K
K
K
K
K
K
K
K
K
K
K
K
N
N
N
N
N
N
N
N
N
N
N
N
f
f
f
f
f
f
f
f
f
f
f
f
l
l
l
l
l
l
l
l
l
l
l
l
o
o
o
o
o
o
o
o
o
o
o
o
G
G
G
G
G
G
G
G
G
G
G
G
e
e
e
e
e
e
e
e
e
e
e
e
e
e
e
e
e
e
e
e
e
e
e
e
o
o
o
o
s
s
s
s
o
o
o
o
s
s
s
s
o
o
o
o
IMPORTANT- Save these instructions for local inspector's use.
IMPORTANT- Save these instructions for local inspector's use.
IMPORTANT- Save these instructions for local inspector's use.
IMPORTANT- Save these instructions for local inspector's use.
IMPORTANT- Save these instructions for local inspector's use.
IMPORTANT- Save these instructions for local inspector's use.
IMPORTANT- Save these instructions for local inspector's use.
IMPORTANT- Save these instructions for local inspector's use.
IMPORTANT- Save these instructions for local inspector's use.
IMPORTANT- Save these instructions for local inspector's use.
IMPORTANT- Save these instructions for local inspector's use.
IMPORTANT- Save these instructions for local inspector's use.
s
s
s
s
r
r
r
r
r
r
r
r
r
r
r
r
t
t
t
t
t
t
t
t
t
t
t
t
e
e
e
e
O
O
O
O
e
e
e
e
O
O
O
O
e
e
e
e
O
O
O
O
u
u
u
u
u
u
u
u
u
u
u
u
t
t
t
t
t
t
t
t
t
t
t
t
e
e
e
e
e
e
e
e
e
e
e
e
e
e
e
e
e
e
e
e
l
l
l
l
e
e
e
e
l
l
l
l
l
l
l
l
p
p
p
p
p
p
p
p
p
p
p
p
r
r
r
r
r
r
r
r
r
r
r
r
o
o
o
o
o
o
o
o
o
o
o
o
V
V
V
V
l
l
l
l
V
V
V
V
l
l
l
l
V
V
V
V
l
l
l
l
-
-
-
-
-
-
-
-
-
-
-
-
e
e
e
e
e
e
e
e
y
y
y
y
y
y
y
y
e
e
e
e
y
y
y
y
c
c
c
c
c
c
c
c
c
c
c
c
t
t
t
t
E
E
E
E
t
t
t
t
E
E
E
E
t
t
t
t
E
E
E
E
T
T
T
T
T
T
T
T
T
T
T
T
h
h
h
h
h
h
h
h
h
h
h
h
t
t
t
t
a
a
a
a
t
t
t
t
a
a
a
a
a
a
a
a
a
a
a
a
t
t
t
t
a
a
a
a
a
a
a
a
R
R
R
R
R
R
R
R
R
R
R
R
h
h
h
h
o
o
o
o
h
h
h
h
o
o
o
o
h
h
h
h
o
o
o
o
e
e
e
e
e
e
e
e
e
e
e
e
l
l
l
l
n
n
n
n
l
l
l
l
n
n
n
n
l
l
l
l
n
n
n
n
i
i
i
i
i
i
i
i
N
N
N
N
N
N
N
N
i
i
i
i
N
N
N
N
s
s
s
s
s
s
s
s
s
s
s
s
i
i
i
i
i
i
i
i
i
i
i
i
d
d
d
d
d
d
d
d
d
d
d
d
s
s
s
s
l
l
l
l
s
s
s
s
l
l
l
l
s
s
s
s
l
l
l
l
n
n
n
n
n
n
n
n
n
n
n
n
e
e
e
e
e
e
e
e
e
e
e
e
e
e
e
e
e
e
e
e
e
e
e
e
I
I
I
I
I
I
I
I
I
I
I
I
N
N
N
N
N
N
N
N
N
N
N
N
s
s
s
s
s
s
s
s
s
s
s
s
a
a
a
a
a
a
a
a
a
a
a
a
a
a
a
a
c
c
c
c
a
a
a
a
c
c
c
c
a
a
a
a
c
c
c
c
IMPORTANT- OBSERVE ALL GOVERNING CODES AND ORDIANCES.
IMPORTANT- OBSERVE ALL GOVERNING CODES AND ORDIANCES.
IMPORTANT- OBSERVE ALL GOVERNING CODES AND ORDIANCES.
IMPORTANT- OBSERVE ALL GOVERNING CODES AND ORDIANCES.
IMPORTANT- OBSERVE ALL GOVERNING CODES AND ORDIANCES.
IMPORTANT- OBSERVE ALL GOVERNING CODES AND ORDIANCES.
IMPORTANT- OBSERVE ALL GOVERNING CODES AND ORDIANCES.
IMPORTANT- OBSERVE ALL GOVERNING CODES AND ORDIANCES.
IMPORTANT- OBSERVE ALL GOVERNING CODES AND ORDIANCES.
IMPORTANT- OBSERVE ALL GOVERNING CODES AND ORDIANCES.
IMPORTANT- OBSERVE ALL GOVERNING CODES AND ORDIANCES.
IMPORTANT- OBSERVE ALL GOVERNING CODES AND ORDIANCES.
i
i
i
i
i
i
i
i
i
i
i
i
p
p
p
p
p
p
p
p
p
p
p
p
p
p
p
p
v
v
v
v
p
p
p
p
v
v
v
v
a
a
a
a
p
p
p
p
a
a
a
a
v
v
v
v
a
a
a
a
G
G
G
G
G
G
G
G
G
G
G
G
n
n
n
n
n
n
n
n
n
n
n
n
e
e
e
e
e
e
e
e
e
e
e
e
r
r
r
r
e
e
e
e
r
r
r
r
e
e
e
e
e
e
e
e
r
r
r
r
p
p
p
p
p
p
p
p
p
p
p
p
s
s
s
s
s
s
s
s
s
s
s
s
e
e
e
e
e
e
e
e
e
e
e
e
C
C
C
C
c
c
c
c
C
C
C
C
c
c
c
c
C
C
C
C
c
c
c
c
l
l
l
l
l
l
l
l
l
l
l
l
t
t
t
t
t
t
t
t
t
t
t
t
t
t
t
t
t
t
t
t
t
t
t
t
i
i
i
i
i
i
i
i
i
i
i
i
r
r
r
r
r
r
r
r
r
r
r
r
t
t
t
t
t
t
t
t
t
t
t
t
h
h
h
h
h
h
h
h
h
h
h
h
a
a
a
a
a
a
a
a
a
a
a
a
O
O
O
O
O
O
O
O
O
O
O
O
u
u
u
u
u
u
u
u
o
o
o
o
u
u
u
u
o
o
o
o
o
o
o
o
n
n
n
n
e
e
e
e
n
n
n
n
e
e
e
e
n
n
n
n
e
e
e
e
c
c
c
c
D
D
D
D
c
c
c
c
r
r
r
r
D
D
D
D
c
c
c
c
r
r
r
r
D
D
D
D
r
r
r
r
s
s
s
s
s
s
s
s
s
s
s
s
c
c
c
c
c
c
c
c
c
c
c
c
'
'
'
'
'
'
'
'
'
'
'
'
t
t
t
t
t
t
t
t
t
t
t
t
s
s
s
s
s
s
s
s
s
s
s
s
E
E
E
E
E
E
E
E
E
E
E
E
e
e
e
e
e
e
e
e
e
e
e
e
e
e
e
e
i
i
i
i
e
e
e
e
i
i
i
i
e
e
e
e
i
i
i
i
o
o
o
o
o
o
o
o
o
o
o
o
S
S
S
S
S
S
S
S
S
S
S
S
u
u
u
u
u
u
u
u
u
u
u
u
i
i
i
i
i
i
i
i
i
i
i
i
m
m
m
m
m
m
m
m
m
m
m
m
n
n
n
n
n
n
n
n
n
n
n
n
Note to Installer- Be sure to leave these instructions with the consumer.
Note to Installer- Be sure to leave these instructions with the consumer.
Note to Installer- Be sure to leave these instructions with the consumer.
Note to Installer- Be sure to leave these instructions with the consumer.
Note to Installer- Be sure to leave these instructions with the consumer.
Note to Installer- Be sure to leave these instructions with the consumer.
Note to Installer- Be sure to leave these instructions with the consumer.
Note to Installer- Be sure to leave these instructions with the consumer.
Note to Installer- Be sure to leave these instructions with the consumer.
Note to Installer- Be sure to leave these instructions with the consumer.
Note to Installer- Be sure to leave these instructions with the consumer.
Note to Installer- Be sure to leave these instructions with the consumer.
n
n
n
n
n
n
n
n
n
n
n
n
s
s
s
s
s
s
s
s
s
s
s
s
A
A
A
A
A
A
A
A
A
A
A
A
s
s
s
s
s
s
s
s
s
s
s
s
s
s
s
s
s
s
s
s
s
s
s
s
u
u
u
u
u
u
u
u
u
u
u
u
e
e
e
e
e
e
e
e
e
e
e
e
N
N
N
N
N
N
N
N
N
N
N
N
t
t
t
t
t
t
t
t
t
t
t
t
.
.
.
.
.
.
.
.
s
s
s
s
f
f
f
f
.
.
.
.
s
s
s
s
f
f
f
f
s
s
s
s
f
f
f
f
r
r
r
r
r
r
r
r
r
r
r
r
o
o
o
o
o
o
o
o
o
o
o
o
t
t
t
t
D
D
D
D
t
t
t
t
D
D
D
D
t
t
t
t
D
D
D
D
u
u
u
u
u
u
u
u
u
u
u
u
r
r
r
r
r
r
r
r
r
r
r
r
b
b
b
b
b
b
b
b
b
b
b
b
c
c
c
c
c
c
c
c
c
c
c
c
O
O
O
O
O
O
O
O
O
O
O
O
f
f
f
f
f
f
f
f
f
f
f
f
e
e
e
e
t
t
t
t
e
e
e
e
t
t
t
t
e
e
e
e
t
t
t
t
u
u
u
u
u
u
u
u
u
u
u
u
i
i
i
i
i
i
i
i
i
i
i
i
R
R
R
R
R
R
R
R
R
R
R
R
o
o
o
o
o
o
o
o
o
o
o
o
t
t
t
t
t
t
t
t
t
t
t
t
p
p
p
p
p
p
p
p
p
p
p
p
u
u
u
u
u
u
u
u
u
u
u
u
n
n
n
n
n
n
n
n
n
n
n
n
D
D
D
D
D
D
D
D
D
D
D
D
r
r
r
r
r
r
r
r
r
r
r
r
OWNER- Keep these instructions for future reference.
OWNER- Keep these instructions for future reference.
OWNER- Keep these instructions for future reference.
OWNER- Keep these instructions for future reference.
OWNER- Keep these instructions for future reference.
OWNER- Keep these instructions for future reference.
OWNER- Keep these instructions for future reference.
OWNER- Keep these instructions for future reference.
OWNER- Keep these instructions for future reference.
OWNER- Keep these instructions for future reference.
OWNER- Keep these instructions for future reference.
OWNER- Keep these instructions for future reference.
r
r
r
r
r
r
r
r
r
r
r
r
o
o
o
o
s
s
s
s
o
o
o
o
s
s
s
s
o
o
o
o
s
s
s
s
I
I
I
I
I
I
I
I
I
I
I
I
e
e
e
e
e
e
e
e
e
e
e
e
A
A
A
A
A
A
A
A
A
A
A
A
p
p
p
p
p
p
p
p
p
p
p
p
w
w
w
w
w
w
w
w
w
w
w
w
r
r
r
r
r
r
r
r
r
r
r
r
N
N
N
N
N
N
N
N
N
N
N
N
e
e
e
e
e
e
e
e
e
e
e
e
e
e
e
e
e
e
e
e
e
e
e
e
i
i
i
i
i
i
i
i
i
i
i
i
F
F
F
F
r
r
r
r
r
r
r
r
r
r
r
r
t
t
t
t
t
t
t
t
t
t
t
t
f
f
f
f
f
f
f
f
f
f
f
f
l
l
l
l
l
l
l
l
l
l
l
l
h
h
h
h
h
h
h
h
h
h
h
h
O
O
O
O
e
e
e
e
e
e
e
e
e
e
e
e
y
y
y
y
y
y
y
y
y
y
y
y
r
r
r
r
r
r
r
r
r
r
r
r
t
t
t
t
t
t
t
t
t
t
t
t
R
R
R
R
g
g
g
g
g
g
g
g
g
g
g
g
e
e
e
e
e
e
e
e
e
e
e
e
h
h
h
h
h
h
h
h
h
h
h
h
r
r
r
r
n
n
n
n
r
r
r
r
n
n
n
n
r
r
r
r
n
n
n
n
e
e
e
e
e
e
e
e
e
e
e
e
Y
Y
Y
Y
o
o
o
o
o
o
o
o
o
o
o
o
Note- This appliance must be properly grounded (if applicable).
Note- This appliance must be properly grounded (if applicable).
Note- This appliance must be properly grounded (if applicable).
Note- This appliance must be properly grounded (if applicable).
Note- This appliance must be properly grounded (if applicable).
Note- This appliance must be properly grounded (if applicable).
Note- This appliance must be properly grounded (if applicable).
Note- This appliance must be properly grounded (if applicable).
Note- This appliance must be properly grounded (if applicable).
Note- This appliance must be properly grounded (if applicable).
Note- This appliance must be properly grounded (if applicable).
Note- This appliance must be properly grounded (if applicable).
c
c
c
c
c
c
c
c
c
c
c
c
O
O
O
O
u
u
u
u
c
c
c
c
u
u
u
u
c
c
c
c
u
u
u
u
c
c
c
c
e
e
e
e
e
e
e
e
e
e
e
e
o
o
o
o
o
o
o
o
o
o
o
o
n
n
n
n
n
n
n
n
n
n
n
n
U
U
U
U
.
.
.
.
.
.
.
.
.
.
.
.
n
n
n
n
n
n
n
n
n
n
n
n
d
d
d
d
d
d
d
d
d
d
d
d
R
R
R
R
e
e
e
e
e
e
e
e
e
e
e
e
d
d
d
d
d
d
d
d
d
d
d
d
S
S
S
S
A
A
A
A
(
(
(
(
(
(
(
(
(
(
(
(
i
i
i
i
i
i
i
i
i
i
i
i
F
F
F
F
f
f
f
f
f
f
f
f
B
B
B
B
f
f
f
f
E
E
E
E
a
a
a
a
a
a
a
a
a
a
a
a
e
e
e
e
p
p
p
p
p
p
p
p
p
p
p
p
T
T
T
T
f
f
f
f
o
o
o
o
p
p
p
p
p
p
p
p
p
p
p
p
Y
Y
Y
Y
r
r
r
r
l
l
l
l
l
l
l
l
l
l
l
l
e
e
e
e
i
i
i
i
i
i
i
i
i
i
i
i
c
c
c
c
c
c
c
c
c
c
c
c
y
y
y
y
a
a
a
a
a
a
a
a
a
a
a
a
o
o
o
o
b
b
b
b
b
b
b
b
b
b
b
b
i
i
i
i
u
u
u
u
l
l
l
l
l
l
l
l
l
l
l
l
n
n
n
n
e
e
e
e
e
e
e
e
e
e
e
e
s
s
s
s
)
)
)
)
)
)
)
)
b
b
b
b
)
)
)
)
.
.
.
.
.
.
.
.
.
.
.
.
t
t
t
t
e
e
e
e
r
r
r
r
u
u
u
u
g
g
g
g
c
c
c
c
i
i
i
i
n
n
n
n
t
t
t
t
i
i
i
i
-
-
-
-
o
o
o
o
R
R
R
R
c
c
c
c
n
n
n
n
e
e
e
e
a
a
a
a
s
s
s
s
a
a
a
a
r
r
r
r
d
d
d
d
e
e
e
e
c
c
c
c
f
f
f
f
o
o
o
o
t
t
t
t
u
u
u
u
h
h
h
h
m
m
m
m
ELECTRICAL REQUIREMENTS
FOR YOUR SAFETY
FOR YOUR SAFETY
FOR YOUR SAFETY
FOR YOUR SAFETY
ELECTRICAL REQUIREMENTS
ELECTRICAL REQUIREMENTS
ELECTRICAL REQUIREMENTS
l
l
l
l
e
e
e
e
l
l
l
l
y
y
y
y
p
p
p
p
s
s
s
s
.
.
.
.
l
l
l
l
e
e
e
e
e
e
e
e
I
I
I
I
M
M
M
M
t
t
t
t
e
e
e
e
P
P
P
P
l
l
l
l
y
y
y
y
O
O
O
O
a
a
a
a
R
R
R
R
n
n
n
n
E
E
E
E
T
T
T
T
d
d
d
d
A
A
A
A
L
L
L
L
i
i
i
i
E
E
E
E
N
N
N
N
n
n
n
n
C
C
C
C
T
T
T
T
s
s
s
s
T
T
T
T
t
t
t
t
-
-
-
-
r
r
r
r
R
R
R
R
S
S
S
S
u
u
u
u
a
a
a
a
Before you begin-Read these
Before you begin-Read these
Before you begin-Read these
Before you begin-Read these
I
I
I
I
c
c
c
c
C
C
C
C
v
v
v
v
t
t
t
t
i
i
i
i
A
A
A
A
e
e
e
e
o
o
o
o
Before you begin-Read these
Before you begin-Read these
Before you begin-Read these
Before you begin-Read these
I
I
I
I
L
L
L
L
n
n
n
n
t
t
t
t
M
M
M
M
h
h
h
h
s
s
s
s
R
R
R
R
P
P
P
P
e
e
e
e
f
f
f
f
E
E
E
E
s
s
s
s
O
O
O
O
o
o
o
o
e
e
e
e
Q
Q
Q
Q
B
B
B
B
r
r
r
r
R
R
R
R
instructions completely and
instructions completely and
instructions completely and
instructions completely and
e
e
e
e
l
l
l
l
T
T
T
T
o
o
o
o
f
f
f
f
A
A
A
A
o
o
o
o
c
c
c
c
instructions completely and
instructions completely and
instructions completely and
instructions completely and
G
G
G
G
r
r
r
r
a
a
a
a
N
N
N
N
e
e
e
e
l
l
l
l
O
O
O
O
T
T
T
T
i
i
i
i
y
y
y
y
-
-
-
-
n
n
n
n
V
V
V
V
o
o
o
o
O
O
O
O
s
s
s
s
E
E
E
E
i
i
i
i
u
u
u
u
n
n
n
n
p
p
p
p
B
B
B
B
R
R
R
R
carefully.
carefully.
carefully.
carefully.
s
s
s
s
e
e
e
e
b
b
b
b
S
S
S
S
N
N
N
N
t
t
t
t
c
c
c
c
e
e
e
e
r
r
r
r
E
E
E
E
I
I
I
I
t
t
t
t
u
u
u
u
g
g
g
g
carefully.
carefully.
carefully.
carefully.
N
N
N
N
N
N
N
N
o
o
o
o
R
R
R
R
c
c
c
c
i
i
i
i
o
o
o
o
r
r
r
r
G
G
G
G
n
n
n
n
t
t
t
t
V
V
V
V
'
'
'
'
t
t
t
t
s
s
s
s
i
i
i
i
-
-
-
-
e
e
e
e
o
o
o
o
E
E
E
E
R
R
R
R
C
C
C
C
u
u
u
u
c
c
c
c
n
n
n
n
t
t
t
t
e
e
e
e
O
O
O
O
A
A
A
A
o
o
o
o
a
a
a
a
s
s
s
s
s
s
s
s
a
a
a
a
IMPORTANT- Save these
IMPORTANT- Save these
IMPORTANT- Save these
IMPORTANT- Save these
r
r
r
r
D
D
D
D
e
e
e
e
L
L
L
L
d
d
d
d
I
I
I
I
e
e
e
e
c
c
c
c
.
.
.
.
n
n
n
n
L
L
L
L
E
E
E
E
f
f
f
f
o
o
o
o
t
t
t
t
s
s
s
s
u
u
u
u
IMPORTANT- Save these
IMPORTANT- Save these
IMPORTANT- Save these
IMPORTANT- Save these
S
S
S
S
h
h
h
h
m
m
m
m
t
t
t
t
l
l
l
l
e
e
e
e
a
a
a
a
l
l
l
l
A
A
A
A
y
y
y
y
p
p
p
p
s
s
s
s
l
l
l
l
l
l
l
l
.
.
.
.
N
N
N
N
l
l
l
l
e
e
e
e
e
e
e
e
e
e
e
e
I
I
I
I
M
M
M
M
r
r
r
r
D
D
D
D
t
t
t
t
i
i
i
i
-
-
-
-
e
e
e
e
n
n
n
n
P
P
P
P
instructions for local inspector's use.
instructions for local inspector's use.
instructions for local inspector's use.
instructions for local inspector's use.
B
B
B
B
O
O
O
O
l
l
l
l
s
s
s
s
y
y
y
y
O
O
O
O
t
t
t
t
e
e
e
e
R
R
R
R
O
O
O
O
W
W
W
W
N
N
N
N
E
E
E
E
f
f
f
f
o
o
o
o
r
r
r
r
f
f
f
f
u
u
u
u
t
t
t
t
u
u
u
u
N
N
N
N
o
o
o
o
t
t
t
t
e
e
e
e
-
-
-
T
T
T
T
h
h
h
h
p
p
p
p
r
r
r
r
o
o
o
o
p
p
p
p
e
e
e
e
r
r
r
r
l
l
l
l
B
B
B
B
y
y
y
y
e
e
e
e
f
f
f
f
o
o
o
o
r
r
r
r
e
e
e
e
y
y
y
y
o
o
o
o
i
i
i
i
n
n
n
n
s
s
s
s
t
t
t
t
r
r
r
r
u
u
u
u
c
c
c
c
t
t
t
t
i
i
i
i
o
o
o
o
c
c
c
c
n
n
n
n
a
a
a
a
r
r
r
r
e
e
e
e
f
f
f
f
u
u
u
u
l
l
l
l
l
l
l
l
y
y
y
y
.
.
.
.
I
I
I
I
M
M
M
M
P
P
P
P
O
O
O
O
R
R
R
R
T
T
T
T
A
A
A
A
i
i
i
i
N
N
N
N
n
n
n
n
T
T
T
T
s
s
s
s
t
t
t
t
r
r
r
r
u
u
u
u
c
c
c
c
t
t
t
t
i
i
i
i
o
o
o
o
I
I
I
I
n
n
n
n
M
M
M
M
s
s
s
s
P
P
P
P
O
O
O
O
R
R
R
R
T
T
T
T
A
A
A
A
G
G
G
G
N
N
N
N
O
O
O
O
T
T
T
T
-
-
-
-
V
V
V
V
E
E
E
E
R
R
R
R
N
N
N
N
I
I
I
I
N
N
N
N
N
N
N
N
o
o
o
o
G
G
G
G
t
t
t
t
e
e
e
e
C
C
C
C
t
t
t
t
o
o
o
o
I
I
I
I
n
n
n
n
t
t
t
t
s
s
s
s
h
h
h
h
t
t
t
t
e
e
e
e
a
a
a
a
s
s
s
s
l
l
l
l
l
l
l
l
e
e
e
e
e
e
e
e
i
i
i
i
n
n
n
n
s
s
s
s
t
t
t
t
O
O
O
O
r
r
r
r
u
u
u
u
W
W
W
W
c
c
c
c
N
N
N
N
t
t
t
t
i
i
i
i
o
o
o
o
E
E
E
E
R
R
R
R
-
-
-
K
K
K
K
f
f
f
f
o
o
o
o
e
e
e
e
r
r
r
r
e
e
e
e
f
f
f
f
p
p
p
p
u
u
u
u
t
t
t
t
t
t
t
t
u
u
u
u
h
h
h
h
r
r
r
r
e
e
e
e
N
N
N
N
r
r
r
r
e
e
e
e
o
o
o
o
f
f
f
f
t
t
t
t
e
e
e
e
e
e
e
e
r
r
r
r
-
-
-
e
e
e
e
T
T
T
T
n
n
n
n
h
h
h
h
c
c
c
c
i
i
i
i
s
s
s
s
p
p
p
p
r
r
r
r
a
a
a
a
o
o
o
o
p
p
p
p
p
p
p
p
p
p
p
p
e
e
e
e
l
l
l
l
i
i
i
i
r
r
r
r
a
a
a
a
l
l
l
l
y
y
y
y
n
n
n
n
g
g
g
g
r
r
r
r
o
o
o
o
u
u
u
u
n
n
n
n
d
d
d
d
e
e
e
e
d
d
d
d
r
r
r
r
u
u
u
u
s
s
s
s
c
c
c
c
u
u
u
u
t
t
t
t
r
r
r
r
i
i
i
i
e
e
e
e
o
o
o
o
n
n
n
n
R
R
R
R
t
t
t
t
o
o
o
o
s
s
s
s
IMPORTANT- OBSERVE ALL
IMPORTANT- OBSERVE ALL
IMPORTANT- OBSERVE ALL
IMPORTANT- OBSERVE ALL
-
-
-
-
w
w
w
w
K
K
K
K
e
e
e
e
i
i
i
i
t
t
t
t
e
e
e
e
h
h
h
h
p
p
p
p
t
t
t
t
h
h
h
h
t
t
t
t
h
h
h
h
e
e
e
e
r
r
r
r
e
e
e
e
e
e
e
e
c
c
c
c
GOVERNING CODES AND ORDIANCES.
GOVERNING CODES AND ORDIANCES.
GOVERNING CODES AND ORDIANCES.
GOVERNING CODES AND ORDIANCES.
s
s
s
s
r
r
r
r
e
e
e
e
e
e
e
e
i
i
i
i
f
f
f
f
n
n
n
n
e
e
e
e
s
s
s
s
r
r
r
r
e
e
e
e
t
t
t
t
r
r
r
r
n
n
n
n
u
u
u
u
c
c
c
c
c
c
c
c
i
i
i
i
Note to Installer- Be sure to leave
Note to Installer- Be sure to leave
Note to Installer- Be sure to leave
Note to Installer- Be sure to leave
e
e
e
e
s
s
s
s
t
t
t
t
.
.
.
.
a
a
a
a
p
p
p
p
p
p
p
p
l
l
l
l
i
i
i
i
a
a
a
a
n
n
n
n
c
c
c
c
g
g
g
g
these instructions with the consumer.
these instructions with the consumer.
these instructions with the consumer.
these instructions with the consumer.
e
e
e
e
r
r
r
r
o
o
o
o
m
m
m
m
u
u
u
u
u
u
u
u
n
n
n
n
s
s
s
s
d
d
d
d
t
t
t
t
e
e
e
e
u
u
u
u
b
b
b
b
d
d
d
d
b
b
b
b
e
e
e
e
OWNER- Keep these instructions
OWNER- Keep these instructions
OWNER- Keep these instructions
OWNER- Keep these instructions
(
(
(
(
e
e
e
e
i
i
i
i
f
f
f
f
g
g
g
g
a
a
a
a
i
i
i
i
n
n
n
n
p
p
p
p
-
-
-
-
p
p
p
p
R
R
R
R
l
l
l
l
i
i
i
i
e
e
e
e
c
c
c
c
s
s
s
s
a
a
a
a
a
a
a
a
d
d
d
d
for future reference.
for future reference.
for future reference.
for future reference.
c
c
c
c
b
b
b
b
o
o
o
o
l
l
l
l
t
t
t
t
e
e
e
e
h
h
h
h
m
m
m
m
e
e
e
e
p
p
p
p
s
s
s
s
l
l
l
l
e
e
e
e
e
e
e
e
t
t
t
t
e
e
e
e
l
l
l
l
y
y
y
y
Note- This appliance must be
Note- This appliance must be
Note- This appliance must be
Note- This appliance must be
a
a
a
a
n
n
n
n
d
d
d
d
-
-
-
-
properly grounded (if applicable).
properly grounded (if applicable).
properly grounded (if applicable).
properly grounded (if applicable).
S
S
S
S
a
a
a
a
v
v
v
v
e
e
e
e
t
t
t
t
h
h
h
h
Before you begin-Read these
Before you begin-Read these
Before you begin-Read these
Before you begin-Read these
e
e
e
e
f
f
f
f
s
s
s
s
o
o
o
o
e
e
e
e
r
r
r
r
l
l
l
l
o
o
o
o
c
c
c
c
a
a
a
a
l
l
l
l
instructions completely and
instructions completely and
instructions completely and
instructions completely and
i
i
i
i
n
n
n
n
O
O
O
O
s
s
s
s
p
p
p
p
B
B
B
B
e
e
e
e
S
S
S
S
c
c
c
c
E
E
E
E
t
t
t
t
o
o
o
o
R
R
R
R
r
r
r
r
carefully.
carefully.
carefully.
carefully.
V
V
V
V
'
'
'
'
s
s
s
s
E
E
E
E
u
u
u
u
O
O
O
O
A
A
A
A
s
s
s
s
D
D
D
D
L
L
L
L
L
L
L
L
E
E
E
E
S
S
S
S
IMPORTANT- Save these
IMPORTANT- Save these
IMPORTANT- Save these
IMPORTANT- Save these
A
A
A
A
N
N
N
N
r
r
r
r
D
D
D
D
-
-
-
-
B
B
B
B
O
O
O
O
e
e
e
e
R
R
R
R
D
D
D
D
s
s
s
s
u
u
u
u
instructions for local inspector's use.
instructions for local inspector's use.
instructions for local inspector's use.
instructions for local inspector's use.
I
I
I
I
A
A
A
A
r
r
r
r
e
e
e
e
N
N
N
N
n
n
n
n
t
t
t
t
C
C
C
C
o
o
o
o
s
s
s
s
l
l
l
l
w
w
w
w
e
e
e
e
i
i
i
i
a
a
a
a
t
t
t
t
v
v
v
v
h
h
h
h
IMPORTANT- OBSERVE ALL
IMPORTANT- OBSERVE ALL
IMPORTANT- OBSERVE ALL
IMPORTANT- OBSERVE ALL
e
e
e
e
t
t
t
t
h
h
h
h
e
e
e
e
e
e
e
e
c
c
c
c
s
s
s
s
o
o
o
o
e
e
e
e
n
n
n
n
i
i
i
i
s
s
s
s
n
n
n
n
u
u
u
u
GOVERNING CODES AND ORDIANCES.
GOVERNING CODES AND ORDIANCES.
GOVERNING CODES AND ORDIANCES.
GOVERNING CODES AND ORDIANCES.
s
s
s
s
m
m
m
m
t
t
t
t
r
r
r
r
u
u
u
u
e
e
e
e
c
c
c
c
r
r
r
r
e
e
e
e
.
.
.
.
t
t
t
t
.
.
.
.
i
i
i
i
o
o
o
o
n
n
n
n
s
s
s
s
Note to Installer- Be sure to leave
Note to Installer- Be sure to leave
Note to Installer- Be sure to leave
Note to Installer- Be sure to leave
c
c
c
c
e
e
e
e
m
m
m
m
u
u
u
u
these instructions with the consumer.
these instructions with the consumer.
these instructions with the consumer.
these instructions with the consumer.
s
s
s
s
t
t
t
t
b
b
b
b
e
e
e
e
(
(
(
(
i
i
i
i
f
f
f
f
a
a
a
a
p
p
p
p
OWNER- Keep these instructions
OWNER- Keep these instructions
OWNER- Keep these instructions
OWNER- Keep these instructions
p
p
p
p
l
l
l
l
i
i
i
i
c
c
c
c
a
a
a
a
b
b
b
b
l
l
l
l
e
e
e
e
)
)
)
)
.
.
.
.
for future reference.
for future reference.
for future reference.
for future reference.
Note- This appliance must be
Note- This appliance must be
Note- This appliance must be
Note- This appliance must be
properly grounded (if applicable).
properly grounded (if applicable).
properly grounded (if applicable).
properly grounded (if applicable).
R
R
R
R
instructions for local inspector's use.
instructions for local inspector's use.
instructions for local inspector's use.
instructions for local inspector's use.
D
D
D
D
T
T
T
T
I
I
I
I
A
A
A
A
A
A
A
A
i
i
i
i
N
N
N
N
N
N
N
N
n
n
n
n
T
T
T
T
C
C
C
C
s
s
s
s
t
t
t
t
-
-
-
-
E
E
E
E
r
r
r
r
S
S
S
S
l
l
l
l
u
u
u
u
S
S
S
S
e
e
e
e
a
a
a
a
c
c
c
c
IMPORTANT- OBSERVE ALL
IMPORTANT- OBSERVE ALL
IMPORTANT- OBSERVE ALL
IMPORTANT- OBSERVE ALL
a
a
a
a
.
.
.
.
v
v
v
v
t
t
t
t
v
v
v
v
i
i
i
i
e
e
e
e
o
o
o
o
e
e
e
e
I
I
I
I
n
n
n
n
t
t
t
t
M
M
M
M
h
h
h
h
s
s
s
s
P
P
P
P
e
e
e
e
f
f
f
f
s
s
s
s
O
O
O
O
o
o
o
o
o
o
o
o
e
e
e
e
r
r
r
r
R
R
R
R
n
n
n
n
GOVERNING CODES AND ORDIANCES.
GOVERNING CODES AND ORDIANCES.
GOVERNING CODES AND ORDIANCES.
GOVERNING CODES AND ORDIANCES.
l
l
l
l
T
T
T
T
o
o
o
o
s
s
s
s
A
A
A
A
c
c
c
c
u
u
u
u
G
G
G
G
a
a
a
a
N
N
N
N
m
m
m
m
l
l
l
l
O
O
O
O
T
T
T
T
e
e
e
e
i
i
i
i
-
-
-
-
n
n
n
n
V
V
V
V
r
r
r
r
.
.
.
.
O
O
O
O
s
s
s
s
E
E
E
E
i
i
i
i
p
p
p
p
o
o
o
o
B
B
B
B
R
R
R
R
Note to Installer- Be sure to leave
Note to Installer- Be sure to leave
Note to Installer- Be sure to leave
Note to Installer- Be sure to leave
e
e
e
e
n
n
n
n
S
S
S
S
N
N
N
N
s
s
s
s
E
E
E
E
I
I
I
I
N
N
N
N
N
N
N
N
R
R
R
R
o
o
o
o
G
G
G
G
V
V
V
V
t
t
t
t
e
e
e
e
E
E
E
E
C
C
C
C
t
t
t
t
O
O
O
O
A
A
A
A
o
o
o
o
D
D
D
D
these instructions with the consumer.
these instructions with the consumer.
these instructions with the consumer.
these instructions with the consumer.
L
L
L
L
I
I
I
I
n
n
n
n
E
E
E
E
t
t
t
t
s
s
s
s
S
S
S
S
h
h
h
h
t
t
t
t
e
e
e
e
a
a
a
a
A
A
A
A
s
s
s
s
l
l
l
l
l
l
l
l
N
N
N
N
e
e
e
e
e
e
e
e
r
r
r
r
D
D
D
D
i
i
i
i
-
-
-
-
n
n
n
n
OWNER- Keep these instructions
OWNER- Keep these instructions
OWNER- Keep these instructions
OWNER- Keep these instructions
B
B
B
B
O
O
O
O
s
s
s
s
t
t
t
t
e
e
e
e
O
O
O
O
r
r
r
r
u
u
u
u
s
s
s
s
W
W
W
W
c
c
c
c
u
u
u
u
N
N
N
N
t
t
t
t
r
r
r
r
i
i
i
i
e
e
e
e
o
o
o
o
E
E
E
E
n
n
n
n
R
R
R
R
t
t
t
t
o
o
o
o
s
s
s
s
for future reference.
for future reference.
for future reference.
for future reference.
-
-
-
-
)
)
)
)
.
.
.
.
l
l
l
l
w
w
w
w
K
K
K
K
f
f
f
f
e
e
e
e
o
o
o
o
e
e
e
e
i
i
i
i
r
r
r
r
t
t
t
t
e
e
e
e
h
h
h
h
f
f
f
f
p
p
p
p
u
u
u
u
t
t
t
t
h
h
h
h
t
t
t
t
t
t
t
t
u
u
u
u
h
h
h
h
e
e
e
e
r
r
r
r
e
e
e
e
e
e
e
e
c
c
c
c
Note- This appliance must be
Note- This appliance must be
Note- This appliance must be
Note- This appliance must be
s
s
s
s
N
N
N
N
o
o
o
o
r
r
r
r
e
e
e
e
e
e
e
e
n
n
n
n
o
o
o
o
i
i
i
i
f
f
f
f
t
t
t
t
n
n
n
n
e
e
e
e
e
e
e
e
s
s
s
s
r
r
r
r
-
-
-
-
e
e
e
e
t
t
t
t
T
T
T
T
r
r
r
r
n
n
n
n
u
u
u
u
h
h
h
h
c
c
c
c
c
c
c
c
i
i
i
i
e
e
e
e
properly grounded (if applicable).
properly grounded (if applicable).
properly grounded (if applicable).
properly grounded (if applicable).
s
s
s
s
t
t
t
t
p
p
p
p
.
.
.
.
i
i
i
i
o
o
o
o
r
r
r
r
a
a
a
a
o
o
o
o
p
p
p
p
p
p
p
p
p
p
p
p
e
e
e
e
l
l
l
l
Before you begin-Read these
Before you begin-Read these
Before you begin-Read these
Before you begin-Read these
i
i
i
i
r
r
r
r
B
B
B
B
a
a
a
a
l
l
l
l
y
y
y
y
n
n
n
n
e
e
e
e
c
c
c
c
f
f
f
f
g
g
g
g
o
o
o
o
e
e
e
e
r
r
r
r
r
r
r
r
o
o
o
o
e
e
e
e
m
m
m
m
u
u
u
u
y
y
y
y
u
u
u
u
n
n
n
n
o
o
o
o
s
s
s
s
d
d
d
d
instructions completely and
instructions completely and
instructions completely and
instructions completely and
i
i
i
i
u
u
u
u
t
t
t
t
n
n
n
n
e
e
e
e
b
b
b
b
d
d
d
d
s
s
s
s
b
b
b
b
e
e
e
e
t
t
t
t
e
e
e
e
(
(
(
(
r
r
r
r
i
i
i
i
u
u
u
u
g
g
g
g
f
f
f
f
c
c
c
c
i
i
i
i
a
a
a
a
n
n
n
n
t
t
t
t
p
p
p
p
i
i
i
i
-
-
-
-
o
o
o
o
R
R
R
R
p
p
p
p
carefully.
carefully.
carefully.
carefully.
c
c
c
c
n
n
n
n
e
e
e
e
l
l
l
l
i
i
i
i
a
a
a
a
s
s
s
s
a
a
a
a
c
c
c
c
r
r
r
r
d
d
d
d
a
a
a
a
e
e
e
e
c
c
c
c
e
e
e
e
b
b
b
b
f
f
f
f
o
o
o
o
.
.
.
.
t
t
t
t
u
u
u
u
l
l
l
l
h
h
h
h
m
m
m
m
e
e
e
e
l
l
l
l
e
e
e
e
l
l
l
l
)
)
)
)
y
y
y
y
p
p
p
p
.
.
.
.
s
s
s
s
.
.
.
.
l
l
l
l
e
e
e
e
e
e
e
e
I
I
I
I
IMPORTANT- Save these
IMPORTANT- Save these
IMPORTANT- Save these
IMPORTANT- Save these
M
M
M
M
t
t
t
t
e
e
e
e
P
P
P
P
l
l
l
l
y
y
y
y
O
O
O
O
a
a
a
a
R
R
R
R
n
n
n
n
T
T
T
T
d
d
d
d
A
A
A
A
i
i
i
i
N
N
N
N
n
n
n
n
instructions for local inspector's use.
instructions for local inspector's use.
instructions for local inspector's use.
instructions for local inspector's use.
T
T
T
T
s
s
s
s
t
t
t
t
-
-
-
-
r
r
r
r
E
E
E
E
S
S
S
S
u
u
u
u
S
S
S
S
a
a
a
a
c
c
c
c
.
.
.
.
v
v
v
v
t
t
t
t
i
i
i
i
e
e
e
e
o
o
o
o
I
I
I
I
n
n
n
n
t
t
t
t
M
M
M
M
h
h
h
h
IMPORTANT- OBSERVE ALL
IMPORTANT- OBSERVE ALL
IMPORTANT- OBSERVE ALL
IMPORTANT- OBSERVE ALL
s
s
s
s
P
P
P
P
e
e
e
e
f
f
f
f
s
s
s
s
O
O
O
O
o
o
o
o
e
e
e
e
r
r
r
r
R
R
R
R
l
l
l
l
T
T
T
T
o
o
o
o
A
A
A
A
c
c
c
c
G
G
G
G
a
a
a
a
N
N
N
N
l
l
l
l
GOVERNING CODES AND ORDIANCES.
GOVERNING CODES AND ORDIANCES.
GOVERNING CODES AND ORDIANCES.
GOVERNING CODES AND ORDIANCES.
O
O
O
O
T
T
T
T
i
i
i
i
-
-
-
-
n
n
n
n
V
V
V
V
O
O
O
O
s
s
s
s
E
E
E
E
p
p
p
p
B
B
B
B
R
R
R
R
e
e
e
e
S
S
S
S
N
N
N
N
c
c
c
c
E
E
E
E
I
I
I
I
t
t
t
t
N
N
N
N
N
N
N
N
o
o
o
o
R
R
R
R
o
o
o
o
r
r
r
r
G
G
G
G
Note to Installer- Be sure to leave
Note to Installer- Be sure to leave
Note to Installer- Be sure to leave
Note to Installer- Be sure to leave
V
V
V
V
'
'
'
'
t
t
t
t
s
s
s
s
e
e
e
e
E
E
E
E
C
C
C
C
u
u
u
u
t
t
t
t
O
O
O
O
A
A
A
A
o
o
o
o
s
s
s
s
D
D
D
D
e
e
e
e
L
L
L
L
I
I
I
I
n
n
n
n
L
L
L
L
E
E
E
E
t
t
t
t
s
s
s
s
S
S
S
S
h
h
h
h
t
t
t
t
e
e
e
e
a
a
a
a
these instructions with the consumer.
these instructions with the consumer.
these instructions with the consumer.
these instructions with the consumer.
A
A
A
A
s
s
s
s
l
l
l
l
l
l
l
l
N
N
N
N
e
e
e
e
e
e
e
e
r
r
r
r
D
D
D
D
i
i
i
i
-
-
-
-
n
n
n
n
B
B
B
B
O
O
O
O
s
s
s
s
t
t
t
t
e
e
e
e
R
R
R
R
O
O
O
O
r
r
r
r
u
u
u
u
D
D
D
D
s
s
s
s
W
W
W
W
c
c
c
c
u
u
u
u
OWNER- Keep these instructions
OWNER- Keep these instructions
OWNER- Keep these instructions
OWNER- Keep these instructions
I
I
I
I
A
A
A
A
N
N
N
N
t
t
t
t
r
r
r
r
i
i
i
i
e
e
e
e
o
o
o
o
N
N
N
N
E
E
E
E
n
n
n
n
R
R
R
R
t
t
t
t
C
C
C
C
o
o
o
o
s
s
s
s
-
-
-
-
E
E
E
E
l
l
l
l
w
w
w
w
K
K
K
K
f
f
f
f
S
S
S
S
e
e
e
e
o
o
o
o
e
e
e
e
i
i
i
i
a
a
a
a
r
r
r
r
t
t
t
t
e
e
e
e
v
v
v
v
h
h
h
h
for future reference.
for future reference.
for future reference.
for future reference.
f
f
f
f
p
p
p
p
e
e
e
e
u
u
u
u
t
t
t
t
h
h
h
h
t
t
t
t
t
t
t
t
u
u
u
u
h
h
h
h
e
e
e
e
r
r
r
r
e
e
e
e
e
e
e
e
c
c
c
c
s
s
s
s
N
N
N
N
o
o
o
o
r
r
r
r
e
e
e
e
e
e
e
e
n
n
n
n
o
o
o
o
i
i
i
i
f
f
f
f
s
s
s
s
t
t
t
t
n
n
n
n
e
e
e
e
e
e
e
e
Note- This appliance must be
Note- This appliance must be
Note- This appliance must be
Note- This appliance must be
u
u
u
u
s
s
s
s
r
r
r
r
-
-
-
-
m
m
m
m
e
e
e
e
t
t
t
t
T
T
T
T
r
r
r
r
n
n
n
n
u
u
u
u
e
e
e
e
h
h
h
h
c
c
c
c
c
c
c
c
r
r
r
r
i
i
i
i
e
e
e
e
.
.
.
.
s
s
s
s
t
t
t
t
p
p
p
p
.
.
.
.
i
i
i
i
o
o
o
o
r
r
r
r
a
a
a
a
o
o
o
o
n
n
n
n
p
p
p
p
p
p
p
p
s
s
s
s
p
p
p
p
properly grounded (if applicable).
properly grounded (if applicable).
properly grounded (if applicable).
properly grounded (if applicable).
e
e
e
e
l
l
l
l
i
i
i
i
r
r
r
r
a
a
a
a
l
l
l
l
y
y
y
y
n
n
n
n
c
c
c
c
g
g
g
g
e
e
e
e
r
r
r
r
o
o
o
o
m
m
m
m
u
u
u
u
u
u
u
u
n
n
n
n
s
s
s
s
d
d
d
d
t
t
t
t
e
e
e
e
b
b
b
b
d
d
d
d
e
e
e
e
(
(
(
(
i
i
i
i
f
f
f
f
a
a
a
a
p
p
p
p
p
p
p
p
l
l
l
l
i
i
i
i
c
c
c
c
a
a
a
a
b
b
b
b
l
l
l
l
e
e
e
e
)
)
)
)
.
.
.
.
U
R
N
E
W
f
f
f
f
f
f
f
f
f
f
f
f
u
u
u
u
u
u
u
u
u
u
u
u
l
l
l
l
l
l
l
l
l
l
l
l
l
l
l
l
l
l
l
l
l
l
l
l
y
y
y
y
y
y
y
y
y
y
y
y
.
.
.
.
.
.
.
.
.
.
.
.
C
C
C
C
C
C
C
C
C
C
C
C
E
E
E
E
E
E
E
E
E
E
E
E
S
S
S
S
S
S
S
S
S
S
S
S
.
.
.
.
.
.
.
.
.
.
.
.
s
s
s
s
s
s
s
s
s
s
s
s
u
u
u
u
u
u
u
u
u
u
u
u
m
m
m
m
m
m
m
m
m
m
m
m
e
e
e
e
e
e
e
e
e
e
e
e
r
r
r
r
r
r
r
r
r
r
r
r
.
.
.
.
.
.
.
.
.
.
.
.
U
U
U
U
I
I
I
I
R
R
R
R
E
E
E
E
M
M
M
M
E
E
E
E
N
N
N
N
T
T
T
T
S
S
S
S
t
t
t
t
h
h
h
h
e
e
e
e
s
s
s
s
e
e
e
e
a
a
a
a
n
n
n
n
d
d
d
d
c
c
c
c
t
t
t
t
o
o
o
o
Literature
r
r
r
r
'
'
'
'
Trousse de
s
s
s
s
u
u
u
u
s
s
s
s
e
e
e
e
.
.
.
.
L
L
L
L
R
R
R
R
D
D
D
D
I
I
I
I
A
A
A
A
N
N
N
N
C
C
C
C
E
E
E
E
S
S
S
S
a
a
a
a
.
.
.
.
v
v
v
v
e
e
e
e
s
s
s
s
u
u
u
u
m
m
m
m
e
e
e
e
r
r
r
r
.
.
.
.
n
n
n
n
s
s
s
s
documentation
Pack
.
.
.
.
.
.
.
.
Assurez-vous d’avoir tous les outils et tous les
matéraux nécessaires avant de commencer à
installer votre cuisinière.
Votre maison doit être alimentée en courant
électrique adéquat pour vous permettre de
bien utiliser en toute sécuité votre cuisinière.
(Consultez la section sur les besoins
d’électricité)
Pour installer votre cuisinière dans votre
maison, assurez-vous de vous conformer
scrupuleusement à tous les codes et à toutes
les ordonnances locales.
Assurez-vous que les revêtements de mur,
le comptoir et les armoires autour de la
cuisinière puissent supporter la chaleur
[pouvant atteindre 93°C (200°F)] produite
par la table de cuisson.
3
Page 20

Instructions d’installation
A
Préparation de l’ouverture
A1
Emplacement de la cuisinière
• La distance du plancher jusqu’en haut du comptoir doit être au moins égale à 35 7/8." La hauteur maximale
de comptoir est de 38."
• N’installez jamais votre cuisinière près d’une porte donnant sur l’extérieur ou dans tout endroit où un
courant d’air peut gêner son usage.
• Vous devez éviter d’utiliser une armoire immédiatement au-dessus de votre cuisinière. Vous risquez de
vous blesser sérieusement en essayant d’atteindre des articles placés dans une armoire de rangement
située directement au-dessus de votre cuisinière. Vous pouvez réduire ce risque en installant une hotte de
ventilation qui avance au moins de 5" par rapport à l’avant de l’armoire. Les armoires installées au-dessus
d’une table de cuisson ne peuvent dépasser 13" de largeur.
A2
Espaces libres
• Vous devez conserver un espace libre d’au moins 2" entre les côtés de la table de cuisson de la cuisinière et tout
matériau qui peut prendre feu, depuis le haut de la table de cuisson jusqu’à une hauteur d’au moins 18".
• Vous devez conserver un espace libre vertical d’au moins 30" entre la table de cuisson et toute armoire située au-
dessus de la cuisinière, sur une surface au moins égale à la largeur et à la profondeur de la cuisinière (30" x 28").
Dosseret de
30" MIN
18" MIN
0"
2"
MIN
0"
NOTE : au moins 2" d’espace libre jusqu’au mur de
côté combustible le plus proche de chaque côté de la
table de cuisson. Cet espace libre doit s’étendre vers
Backguard or
protection ou bande
Filler Strip
de support
45 5/16"
45 5/16"
d’espace entre
Wall to top of
le mur et le
door frame
haut du châssis
de la porte
(Door Open)
(porte fermée)
28 15/32" d’espace
28 15/32' Wall to
28 15/32" wall
entre le mur et
front of door
l’avant de la
to front of door
poignée de porte
handle
handle
(porte fermée)
(Door Closed)
(Door Closed)
7/16" d’espace
7/16" space
7/16" Space
entre l’arrière
between rear
between rear
du côté de la
of body side
of body side
cuisinière et le mur
and wall
ou à l’extrémité du bas de
l’ouverture. Toute ouverture
autour du robinet de gaz ou
de la prise d’électricité doit
être scellée. Toutes les
ouvertures de l’armoire
doivent être scellées au
moment de l’installation
pour éviter les courants
d’air. Les courants d’air
empêchent une utilisation
du four en toute sécurité.
L’armoire doit avoir
des côtés massifs, à
l’arrière et au bas. Le
bas doit être massif
au niveau de la porte
le haut au moins à 18" de la table de cuisson.
Surface recommandée pour la prise de
Recommended area for 120V outlet on rear
Recommended area for 120V outlet on rear
120V sur le mur arrière et surface pour
wall and aea for through the wall connection
wall and area for through the wall connection
le branchement au mur de la sortie de
of pipe stub and shut-off valve
of pipe stub and shut-off valve
tuyau et du robinet d'arrêt
5"
2 1/2"
2 1/2"
Surface recommandée pour le
branchement au plancher de la sortie
de tuyau et du robinet d’arrêt
7"
5 1/2"
Recommended area for
through the floor connection
of pipe stub and shut-off valve
25"
18"
12 1/2"
7"
1 1/2"
Emplacement du mécanisme
Anti-Tip location
anti-basculement
Toutes dimensions d’espaces libres arrondies et minimum
• Pour les fours à micro-ondes à hotte intégrée, vous pouvez
installer le four au-dessus de la table de cuisson
conformément aux instructions du fabricant.
• Certains carreaux muraux en vinyle et revêtements
de plancher, ainsi que certains tapis intérieur/extérieur,
ramollissent à des températures assez basses. Si vous
ne connaissez pas la résistance à la chaleur d’un matériau,
mettez une couverture protectrice sous la cuisinière pour
empêcher tout dommage dû à la chaleur quand la cuisinière
est en usage.
• Emplacement recommandé pour la sortie de tuyau de gaz et
la prise d’alimentation électrique.
• Assurez-vous que les revêtements de mur, le comptoir et les
armoires autour de la cuisinière puisse supporter la chaleur
(pouvant atteindre 200°F) produite par la cuisinière.
4
Page 21

Instructions d’installation
B
Préparation du comptoir
B1
Dosseret de protection ou
bande de support
AVERTISSEMENT : Vous devez utiliser la
bande de support fournie ou un dosseret
de protection. Pour toute installation, ne
laissez jamais le comptoir ou tout autre
entre l’extrémité arrière de la table de cuisson
et l’arrière de l’ouverture requise.
Votre cuisinière est conçue pour être installée
dans une ouverture large de 30"; la profondeur
de l’ouverture varie selon votre type de comptoir.
Nous vous recommandons trois installations
de base.
1. Comptoir normal de 25" sans dosseret
2. Îlot.
3. Comptoir normal avec dosseret de protection
Après avoir déterminé votre type de comptoir,
choisissez l’installation qui vous convient.
Pour toute installation marquez l’ouverture sur
le comptoir.
Les dimensions données plus bas à titre de
référence sont mesurées depuis l’avant du
comptoir, et pas depuis l’avant de l’armoire.
Pour éviter d’écailler votre comptoir, vous pouvez
poser du ruban masque. Pour obtenir une bonne
apparence, il faut que la coupure soit droite
et lisse.
matériau combustible remplir l’espace
de protection moulé par préformage.
moulé par préformage.
B3
Pour comptoir normal de 25"
sans dosseret de protection
moulé par préformage
(Vue du haut de l’ouverture de comptoir)
Mur arrière
25"
30"
25"
35 7/8" MIN.
38" MAX.
Cuisinière au mur avec bande de support
Range to Wall with Filler Strip
Rear Wall
Furring
Strip
Planche
B2
Trousse d’extension
de garniture de côté
S’il existe un petit espace entre les côtés de
la cuisinière et les armoires (jusqu’à 1/4" de
chaque côté) vous pouvez commander une
trousse d’extension de garniture de côté, que
vous trouverez dans tous nos Centres de
service.
No de commande 8078690/3-A040.
Rear Vented
Bande de support
Filler Strip
arrière ventilé
Depuis le devant du
From Front of
comptoir jusqu’au mur
Countertop to Wall
Vis
25"
Furring
Strip
Planche
1/2" MAX
Bande de support ventilé
5
Page 22

Instructions d’installation
(End Caps Overlap Counter Backsplash)
(Preassembled)
Trim End Cap
to fit
Post-Formed Counter
Backsplash Ends
Backguard
B
Préparation du comptoir suite
B4
Installation en îlot avec bande
de support arrière
Si votre comptoir n’a pas un dosseret de
protection moulé par préformage, vous
pouvez choisir d’utiliser la trousse de
bande de support arrière.
24 1/2"
30"
Bande de support
Vented Rear
arrière ventilé
Filler Strip
1/2" max.
Depuis l’avant du comptoir
jusqu’à l’arrière de l’ouverture
Depuis l’avant du comptoir
From Front of Countertop
jusqu’àu mur intérieur de l’armoire
to Inside Wall of Cabinet
24 1/2"
Front of Countertop
to Rear of Cutout
25"
1/2" Max
chevauchement
Filler Strip
du bande de
Overlap at
support à
Rear of Cutout
l’arrière de
l’ouverture
B5
Comptoir normal de 25" avec
dosseret de protection moulé
par préformage
Si votre comptoir a un dosseret de protection
moulé par préformage, vous pouvez décider
d’utiliser la trousse de garde arrière de 4".
Vous pouvez choisir :
la trousse No JXS31/80501 (blanc)
la trousse No JXS32/22555 (chrome brossé)
la trousse No JXS33/80508 (bisque)
la trousse No JXS34/80509 (noir)
Vous pouvez commander l’une de ces trousses
à votre Centre de service. La trousse de garde
arrière se fixe à l’arrière de votre cuisinière et
remplit l’espace entre l’arrière de la cuisinière
et le mur. Pour utiliser la trousse de garde
arrière, vous devez couper le comptoir.
(Vue du haut de l’ouverture du comptoir)
Rear Wall
25"
30"
Mur
arrière
Utilisez les vis fournies pour fixer la bande
de support à l’arrière de votre cuisinière.
Vis
IMPORTANT : Pour un bon
fonctionnement de votre cuisinière
auto-nettoyante à gaz, vous devez
prévoir la bonne profondeur
d’ouverture indiquée. NE PERMETTEZ
PAS au comptoir ou à d’autres matériaux
de remplir l’espace entre l’extrémité arrière
de la table de cuisson et l’arrière de
l’ouverture requise.
Bande de support ventilé
25"
Dosseret de
protection
Post-Formed
moulé par
Backsplash
préformage
35 7/8" Min.
38" Max.
(Capuchons d’extrémité chevauchant
le dosseret de protection du comptoir)
Garde
arrière
(Préassemblé)
Coupez le
capuchon
d’extrémité
Extrémités du
dosseret de
protection moulé
par préformage
6
Page 23

Instructions d’installation
C
Branchement de l’électricité
C1
La prise triphasée
Le cordon d’alimentation de votre cuisinière a
une fiche à trois broches (triphasée), qui doit être
branchée dans une prise à trois trous bien mise
à la terre. La prise doit être branchée à un circuit
domestique normal de courant alternatif de 120
volts, 60 hertz.
Ne coupez jamais ou n’enlevez jamais
la broche de mise à la terre du cordon
d’alimentation de votre cuisinière. Si
vous ne donnez pas une bonne
polarisation à votre appareil, vous risquez
d’occasionner des secousses électriques et
des incendies.
Une mauvaise mise à la terre peut gêner
l’allumage par étincelle sur les modèles qui
en sont équipés.
Si vous n’avez pas une prise triphasée,
demandez à un électricien de changer votre
vieille prise ou d’en installer une nouvelle.
Fiche munie d’une broche de mise à la terre,
Plug with Ground Prong Properly
bien polarisée et mise à la terre
Polarized and Grounded Receptacle
N
PREFERRED METHOD
L
Polarized Receptacle
Properly Grounded
Receptacle
Plate Mounting
Screw
TEMPORARY METHOD
Metal Eyelet Ground
S’il a une prise murale normale biphasée, le
client est personnellement responsable et
obligé de la faire remplacer par une prise
murale triphasée bien mise à la terre.
NE COUPEZ OU N’ENLEVEZ JAMAIS LA
TROISIÈME BROCHE DE MISE À LA TERRE
DU CORDON D’ALIMENTATION ÉLECTRIQUE.
7
Page 24

Instructions d’installation
D
Branchement du gaz
D1
Branchement
Recommended area for 120V outlet on rear
Recommended area for 120V outlet on rear
Surface recommandée pour la prise de 120V sur le mur arrière
wall and aea for through the wall connection
wall and area for through the wall connection
et surface pour le branchement dans le mur de la sortie de
of pipe stub and shut-off valve
of pipe stub and shut-off valve
tuyau et du robinet d’arrêt
5"
2 1/2"
2 1/2"
Surface recommandée pour le branchement
au plancher de la sortie de tuyau et du robinet
d’arrêt
7"
5 1/2"
Recommended area for
through the floor connection
of pipe stub and shut-off valve
25"
18"
12 1/2"
7"
1 1/2"
Emplacement du mécanisme
Anti-Tip location
anti-basculement
1. Posez un robinet d’arrêt manuel dans la
conduite d’alimentation de gaz dans un
emplacement facile d’accès.
2. Trouvez comment et où couper
l’alimentation de gaz de la cuisinière.
3. Coupez l’alimentation de gaz avant
d’enlever votre vieille cuisinière. Laissezla coupée jusqu’à la fin du branchement
de votre nouvelle cuisinière.
4. Comme les conduites rigides limitent le
déplacement de la cuisinière, nous vous
recommandons l’utilisation d’un raccord
flexible en métal certifié par l’ACNOR.
N’UTILISEZ JAMAIS UN VIEUX RACCORD
QUAND VOUS INSTALLEZ UNE NOUVELLE
CUISINIÈRE.
5. Avant de brancher le gaz, assurez-vous
que le levier d’arrêt d’alimentation de gaz
(visible à l’arrière de la cuisinière) soit en
position ouverte.
Gas Supply
Alimentation de gaz
de la cuisinière
to Oven
Levier d’arrêt
Shut-Off Lever
d’alimentation de
Shown in the
gaz en position
Open Position
ouverte
a
t
g
e
le
d
In
e
s
é
a
tr
G
n
E
z
Régulateur de pression
Pressure Regulator
vu à partir de l’avant de
as see from Front of
la cuisinière
Range
Gas Supply to
Alimentation de gaz
Top Burner
du brûleur du haut
6. Installez l’adaptateur évasé au coude NPT
de 1/2" sur le régulateur de pression.
7. Branchez le raccord flexible d’appareil
ménager à l’adaptateur évasé.
8. Mettez la cuisinière dans son emplacement
approximatif et branchez le raccord flexible
à la conduite d’alimentation de gaz avec le
bon adaptateur évasé.
Flex
Raccord flexible
Connector
Adaptateur
Flair Unions
Shut-Off
Robinet d’arrêt
Valve
évasé
Pressure
Régulateur de pression
Regulator
AVERTISSEMENT : N’utilisez
jamais un vieux raccord flexible.
L’utilisation d’un vieux raccord
flexible peut occasionner des fuites
de gaz et des blessures corporelles.
Utilisez toujours un raccord flexible neuf
quand vous installez un appareil ménager
à gaz.
Gas Supply
Conduite
d’alimentation
Line
de gaz
Coude en provenance
90˚ Street Elbow
de la rue 90°
9. Pour empêcher les fuites de gaz, mettez
un agent d’étanchéité pour joint de tuyau
sur tous les filetages mâles.
10. Après avoir fait tous les branchements,
assurez-vous que tous les boutons de la
cuisinière soient en position OFF (arrêt)
avant d’ouvrir le robinet d’alimentation
de gaz principal.
8
Page 25

Instructions d’installation
E
Mécanisme anti-basculement
E1
Installation du mécanisme
anti-basculement
Avant de mettre la cuisinière dans le
comptoir, vérifiez l’emplacement d’origine
du mécanisme de stabilisation à l’arrière de
votre cuisinière. Cet emplacement devrait
convenir à la plupart des installations. Pour
simplifier, vous pouvez accrocher la chaîne
de stabilisation à la série de trous du haut.
Assurez-vous qu’il n’y ait aucune
interférence structurelle quand vous utilisez
la série de trous du haut.
Bracket
Optional
Emplacement du
Location
support en option
Chain
Chaîne
Bracket
Emplacement
d’origine
Factory
du support
Location
1. Choisissez un emplacement qui n’ait pas de
fils électriques ou de plomberie.
Chaîne
Chain
Rondelle
Washer
et vis
and Screw
2. À l’aide de la longue vis fournie, fixez la
chaîne au plancher ou au mur.
CHAIN
LONG
Longue vis
SCREW
Chaîne
WASHER
Rondelle
WALL
Plaque
murale
PLATE
Vous devez utiliser la série de trous du haut
avec une trousse de dosseret de protection
arrière. Si vous utilisez une trousse de
dosseret de protection arrière, vous pouvez
déplacer et mettre le support de stabilisation
en même temps que la trousse de dosseret
de protection arrière en option. Si vous
n’utilisez pas de dosseret, assurez-vous
qu’aucun soutien structurel du comptoir ne
gène le support de stabilisation quand vous
le placez dans la série de trous du haut.
3. Assurez-vous qu’au moins 3/4" de la vis
pénètre dans la plaque murale ou dans un
montant à la base du mur.
4. Fixez la chaîne de stabilisation en l’alignant
au support situé à l’arrière de la cuisinière.
5. Tirez sur la chaîne pour vérifier qu’elle soit
bien attachée.
6. Prenez le ruban adhésif d’emballage et fixez
temporairement l’extrémité libre de la chaîne
à l’arrière du comptoir.
7. Faites glisser la cuisinière dans le comptoir,
en laissant suffisamment d’espace à l’arrière
pour fixer la chaîne au support.
8. Faites glisser le chaînon le plus proche
de la chaîne dans le support. Tirez pour vous
assurer que la chaîne est aussi serrée que
possible.
9. Faites glisser la cuisinière jusqu’au fond. Il
est normal que la chaîne ait un peu de jeu,
mais cela ne devrait pas être excessif.
9
Page 26

Instructions d’installation
F
Brûleurs de la table de cuisson
F1
Assemblage des brûleurs
MISE EN GARDE : L’électrode de
l’allumeur étincelle est exposée et
le bol de malaxage peut avoir des
bords aiguisés. Quand vous nettoyez
le bol de brûleur, faites bien attention de ne
pas tordre l’électrode de l’allumeur étincelle
avec votre chiffon. Vous pouvez
endommager l’allumeur. Faites attention de
ne pas tourner un bouton de contrôle de la
table de cuisson quand vous nettoyez les
bols de malaxage. Cela peut vous donner
une secousse électrique qui peut vous faire
toucher un ustensile de cuisine chaud.
Grille de brûleur
Burner Grate
Capuchon de brûleur
Burner Cap
F3
Information sur l’essai
de pression
La pression maximale permise pour le
régulateur est de 14" W.C. La pression
minimale nécessaire pour vérifier le réglage
du régulateur est de 7" W.C. pour le gaz
naturel.
La cuisinière et son robinet d’arrêt
doivent être débranchés du système
de conduites d’alimentation de gaz
pendant tout essai de pression du
système d’alimentation de gaz à des
pressions d’essai de plus de 1/2 psig
(pounds per square inch jauge).
Vous devez isoler votre cuisinière du
système de conduites de gaz en fermant
son robinet d’arrêt pendant tout essai de
pression du système d’alimentation de gaz
à des pressions d’essai égales ou
inférieures à 1/2" psig.
Tête de brûleur
Burner Head
Spark Igniter
Burner
Bol de brûleur
Bowl
Allumeur étincelle
Tube de malaxage
Mixer Tube
(cheminée)
(Chimney)
1. Placez la tête de brûleur dans le bol de brûleur.
Alignez l’ouverture de la tête de brûleur à
l’emplacement de l’allumeur étincelle.
2. Placez le capuchon de brûleur dans la tête
de brûleur.
3. Placez la grille sur l’ensemble de brûleur
et le bol de brûleur. Les indentations du
bol doivent correspondre aux taquets
d’emplacement du bas de la grille.
F2
Vérification d’absence de fuite
AVERTISSEMENT : Alimentez en gaz
votre cuisinière et utilisez un détecteur
de fuite liquide (solution savonneuse)
sur tous les joints et les raccords pour
vérifier que vous n’avez pas de fuite. N’utilisez
jamais de flamme pour trouver les fuites.
Assurez-vous de bien arrêter toute fuite avant
d’allumer vos brûleurs.
F4
Les brûleurs de la table
de cuisson
Allumez chaque brûleur. Les flammes doivent
être bleues, sans trace de jaune. Les flammes
des brûleurs ne doivent pas scintiller ou
s’écarter du brûleur. Le cône intérieur de la
flamme doit avoir entre de 1/2" à 3/4" de long.
Cooktop
Brûleur de table
Burner
de cuisson
Des particules étrangères dans la conduite
de gaz peuvent occasionner une flamme
orange au début, mais cette couleur orange
doit disparaître rapidement.
10
1/2 à 3/4"
1/2" to 3/4"
Page 27

Instructions d’installation
Air Shutter
Screw
Orifice Fitting
Cover
Air Shutter
Air
Shutter
Air Shutter
Screw
G
Brûleurs de cuisson et de grillade
G1
Vérification des brûleurs du four
Pour vérifier les flammes du brûleur de cuisson
avec la porte du four en position fermée:
1. Ouvrez la porte.
2. Enlevez le bas du four.
a. Faites glisser le taquet vers la gauche pour
déverrouiller.
b. Soulevez le bas du four et faites-le sortir.
Unlock
Déverrouillage
Lock
Verrouillage
3. Enlevez les deux vis qui tiennent l’écran
du brûleur (écarteur de flammes) au boîtier
de brûleur.
2 vis
2 Screws
G2
Ajustement de l’obturateur d’air
Brûleur de cuisson
1. Enlevez le
Couvercle qui
va sur l’orifice
couvercle qui va
sur l’orifice.
2. Utilisez un
tournevis pour
Vis de obturateur
d’air
Obturateur
d’air
desserrer la vis
de l’obturateur
d’air.
3. Ajustez l’obturateur d’air.
4. Resserrez la vis de l’obturateur d’air.
Ajustement à faire :
a. Si les flammes sont jaunes, ouvrez
l’obturateur d’air davantage que dans
le réglage original.
b. Si les flammes scintillent ou s’écartent du
brûleur, fermez l’obturateur d’air davantage
que dans le réglage original.
Vous devez vérifier fréquemment les brûleurs.
4. Fermez la porte du four.
5. Allumez le brûleur de cuisson ou de grillade.
Quand vous voyez les flammes, vérifiez ce
qui suit :
• Les flammes du brûleur ne doivent pas
scintiller ou s’écarter du brûleur.
• Les flammes du brûleur doivent être
bleues sans trace de jaune.
Brûleur de grillade
1. Le brûleur de grillade est situé et est
accessible à l’arrière et en haut du four.
2. À l’aide d’un
tournevis,
desserrez la vis
Obturateur d’air
de l’obturateur
d’air.
3. Ajustez
l’obturateur d’air.
4. Resserrez la vis de l’obturateur d’air.
Inner Cone of Flame
5. Vérifiez le cône intérieur
de la flamme. Il doit avoir
Cône intérieur de la flamme
1/2" To 3/4"
1/2" à 3/4"
de 1/2" à 3/4" de longueur
pour les brûleurs de cuisson
et de grillade du four.
Quand tous les ajustements sont faits et les
résultats sont satisfaisants
1. Remettez en place le couvercle qui va sur
l’ouverture.
2. Remettez en place l’écran du brûleur
(écarteur de flamme) et les vis.
3. Remettez en place le bas du four.
11
Vis de
l’obturateur
d’air
Brûleur de
Oven Broiler
Burner
grillade du four
Page 28

Instructions d’installation
Spirit
Level
Lower
Range
Raise
Range
Leg
Leveler
H
Mise à niveau de la cuisinière
H1
Vérification de la cuisinière
Pour obtenir de bons résultats de cuisson, vous devez mettre à niveau votre cuisinière. Vous devez
également faire correspondre la hauteur de la cuisinière à la hauteur du comptoir.
Pour mettre la cuisinière à niveau :
1. Mettez les clayettes du four (consultez les sections de nettoyage du Manuel d’utilisation et de
soins pour y trouver les instructions et des renseignments additionnels).
2. Utilisez une clé ouverte de 1 3/8" ou une clé anglaise pour sortir également les quatre vérins de
calage jusqu’à ce que les rebords (garnitures) des côtés de la table de cuisson soient au-dessus
de la surface du comptoir.
3. Placez la cuisinière à l’endroit où vous désirez
l’installer. Mettez un niveau d’eau ou un verre à
moitié rempli d’eau sur l’une des clayettes ouvertes.
4. À l’aide de la clé, ajustez les vérins de calage.
I
Installation en l’armoire de 38"
I1
Ajustement de la hauteur de la cuisinière afin qu’elle corresponde à la
Vérin de calage
Cuisinière
plus haute
Cuisinière
plus basse
Niveau d’eau
hauteur de l’armoire
Vous devez ajuster la cuisinière à la hauteur du comptoir. Si votre comptoir est plus haut que 37",
vous aurez peut-être besoin de prendre les mesures additionnelles suivantes :
Quand la cuisinière est haussée à sa hauteur maximale, il y a un grand espace libre entre le bas
de la cuisinière et le plancher, que l’on appelle le «retrait». Ce retrait peut créer des problèmes
visuels. Vous ne devez pas hausser les pieds à une
hauteur de retrait supérieure à 3".
La cuisinière est conçue pour laisser un espace libre
minimum de 1" en bas de la cuisinière (quand les
pieds sont vissés à fond dans le rail de base).
Hauteur max. de 3"
3" Max. Height
Cet espace libre est très important pour assurer une bonne ventilation de la cuisinière et doit être
conservé quand vous vous occupez de l’ajustement du retrait.
Nous vous suggérons la méthode suivante pour remplir le retrait quand les pieds sont à la
hauteur maximale que nous avons mentionnée plus haut.
Après avoir installé votre cuisinière avec les pieds haussés au
maximum, après avoir mis votre cuisinière en place et à niveau,
mesurez la distance entre le bas du côté de l’armoire et le plancher.
Cette distance vous donne la hauteur de l’élément de remplissage
du retrait. Cette hauteur d’espace libre peut aller de 2 1/16" à 3".
Toute hauteur inférieure à 2 1/16" ne crée pas de problème visuel
et ne nécessite pas d’élément de remplissage.
Construisez l’élément de remplissage comme l’indique la
figure. Assurez-vous de prévoir un espace libre de 3/4" en
2 1/16" to 3"as
Required or as
2 1/16" à 3" comme
required to recess
requis ou comme
behind toe area of
correspondre au retrait
adjacent cabinets
requis pour
des armoires
adjacentes
6"
haut et de 5/16" en bas. Ces espaces libres permettent la
bonne ventilation, que nous avons mentionnée plus haut.
Si vous désirez fixer l’élément de remplissage au plancher ou à des armoires adjacentes, utilisez des
vis ou d’autres fixations amovibles, de manière à pouvoir enlever l’élément de remplissage facilement
en cas de nécessité.
12
1" Min. Height
Hauteur min. de 1"
Gusset corners
Coins à soufflet
with 3/4" to 1"
avec matériau
Triangular or
triangulaire ou
square Stock
carré de 3/4" à 1"
5/16"
30"
Utilisez le matériau de 1/4" à
Use 1/4" to 1/2" material
1/2" fourni pour correspondre
finished to match toe area
au retrait des armoires
of cabinets
3/4"
Page 29

Instructions d’installation
Liste de vérification de fonctionnement
Vérifiez deux fois pour vous assurer de
bous être bien conformé à toutes les
instructions de ce guide. En vérificant
deuxième fois, vous vous assurez
d’utiliser la cuisinière en toute sécurité.
Assurez-vous que tous les réglages
soient en position OFF (arrêt).
Assurez-vous qu’il n’y ait pas d’obstacle
à la circulation d’air de combustion et
de ventilation de la cuisinière.
La plaque de série de votre cuisinière est
située en bas de la boîte des brûleurs.
En plus du modèle et du numéro de série,
cette plaque vous indique la notation des
brûleurs, la catégorie de carburant et la
pression à laquelle la cuisinière a été
réglée à sa sortie de la fabrique.
Double Vérification :
Vérifiez deux fois pour assurer de bien vous
être conformé à toutes les instructions de ce
guide. En vérifiant une deuxième fois, vous
vous assurez d’utiliser la cuisinière en toute
sécurité.
Si vous commandez des pièces,
indiquez toujours le numéro de série, le
numéro de modèle et un lettre de code
pour vous assurer d’obtenir les bonnes
pièces de remplacement.
13
Page 30

NOTES
14
Page 31

NOTES
15
Page 32

NOTES
16
 Loading...