

Page 1

www.GEAppliances.com
350A4502P303 164D3333P114-4 49-8878-5 07-02 JR
JGP326
JGP336
JGP930
JGP626
JGP636
JGP960
Owner’s Manual
Cooktops
Built-In Gas
Safety Instructions . . . . . . . . 2–6
Operating Instructions
Cookware . . . . . . . . . . . . . . . . . . 8
Flame Size . . . . . . . . . . . . . . . . . 7
To Light a Burner . . . . . . . . . . . 7
Care and Cleaning
Burner Assembly . . . . . . . . . . . . .9
Burner Grates . . . . . . . . . . . . . .10
Control Knobs . . . . . . . . . . . . . . .9
Glass Cooktop . . . . . . . . . . .11, 12
Porcelain Enamel Cooktop . . . .10
Stainless Steel Surfaces . . . . . . .10
Troubleshooting Tips . . . . . . .13
Consumer Support
Canada Warranty . . . . . . . . . . . .15
Consumer Support . . . . . . . . . .16
U.S. Warranty . . . . . . . . . . . . . .14
Write the model and serial
numbers here:
Model # ________________
Serial # ________________
You can find them on a label
under the cooktop.
Page 2
2
IMPORTANT SAFETY INFORMATION.
READ ALL INSTRUCTIONS BEFORE USING.
Safety Instructions
Operating Instructions
Care and CleaningTroubleshooting TipsConsumer Support
– Do not store or use gasoline or other
flammable vapors and liquids in the
vicinity of this or any other appliance.
– WHAT TO DO IF YOU SMELL GAS
■ Do not try to light any appliance.
■ Do not touch any electrical switch;
do not use any phone in your building.
■ Immediately call your gas supplier
from a neighbor’s phone. Follow the
gas supplier’s instructions.
■ If you cannot reach your gas supplier,
call the fire department.
– Installation and service must be
performed by a qualified installer,
service agency or the gas supplier.
WARNING: If the information in this
manual is not followed exactly, a fire or
explosion may result causing property
damage, personal injury or death.
IMPORTANT SAFETY NOTICE
The California Safe Drinking Water and Toxic Enforcement Act requires the Governor of California to
publish a list of substances known to the state to cause cancer, birth defects or other reproductive
harm, and requires businesses to warn customers of potential exposure to such substances.
Gas appliances can cause minor exposure to four of these substances, namely benzene, carbon
monoxide, formaldehyde and soot, caused primarily by the incomplete combustion of natural gas or
LP fuels. Properly adjusted burners, indicated by a bluish rather than a yellow flame, will minimize
incomplete combustion. Exposure to these substances can be minimized by venting with an open
window or using a ventilation fan or hood.
Page 3

3
GEAppliances.com
WARNING!
For your safety, the information in this manual must be followed to minimize the risk of fire or
explosion, electric shock, or to prevent property damage, personal injury, or loss of life.
Have the installer show you the location of the cooktop gas shut-off valve and how to shut it
off if necessary.
■ Have your cooktop installed and properly
grounded by a qualified installer, in
accordance with the Installation
Instructions. Any adjustment and service
should be performed only by qualified gas
cooktop installers or service technicians.
■ Do not attempt to repair or replace any
part of your cooktop unless it is specifically
recommended in this manual. All other
service should be referred to a qualified
technician.
■ Locate the cooktop out of kitchen traffic
path and out of drafty locations to prevent
pilot outage and poor air circulation.
■ Plug your cooktop into a 120-volt
grounded outlet only. Do not remove
the round grounding prong from the
plug. If in doubt about the grounding
of the home electrical system, it is your
personal responsibility and obligation to
have an ungrounded outlet replaced with
a properly grounded, three-prong outlet
in accordance with the National Electrical
Code. Do not use an extension cord with
this appliance.
■ Let the burner grates and other surfaces
cool before touching them or leaving
them where children can reach them.
■ Be sure all packaging materials are
removed from the cooktop before
operating it to prevent fire or smoke
damage should the packaging material
ignite.
■ Be sure your cooktop is correctly
adjusted by a qualified service technician
or installer. This counter unit, as shipped
from the factory, can only be operated
with natural gas. Do not try to operate it
with LP (bottled) gas unless you follow the
Installation Instructions packed with your
cooktop. See LP Gas Adjustments.
SAFETY PRECAUTIONS
Safety Instructions Operating Instructions Care and Cleaning Troubleshooting Tips
Consumer Support
Page 4

■ Do not leave children alone or unattended
where a cooktop is hot or in operation.
They could be seriously burned.
■ Do not allow anyone to climb, stand or
hang on the cooktop.
■ CAUTION: Items of interest to children
should not be stored in cabinets above a
cooktop—children climbing on the
cooktop to reach items could be seriously
injured.
■ Always keep wooden and plastic utensils
and canned food a safe distance away from
your cooktop.
■ Always keep combustible wall coverings,
curtains or drapes a safe distance from
your cooktop.
■ Never wear loose-fitting or hanging
garments while using the appliance.
Be careful when reaching for items stored
in cabinets over the cooktop. Flammable
material could be ignited if brought in
contact with flame or hot oven surfaces
and may cause severe burns.
■ Teach children not to play with the controls
or any other part of the cooktop.
■ For your safety, never use your appliance
for warming or heating the room.
■ Always keep dish towels, dishcloths, pot
holders and other linens a safe distance
from your cooktop.
■ Do not store flammable materials near
a cooktop.
■ Do not store or use combustible materials,
gasoline or other flammable vapors and
liquids in the vicinity of this or any other
appliance.
■ Do not let cooking grease or other
flammable materials accumulate near
the cooktop.
■ Do not operate the burner without all
burner parts in place.
■ Do not place hot cookware on the glass
cooktop (on some models). This could
cause glass to break.
■ Do not clean the cooktop with flammable
or volatile cleaning fluids.
■ Do not clean the cooktop when the
appliance is in use.
■ Avoid scratching the cooktop with sharp
instruments, or with rings and other jewelry.
■ Never use the cooktop as a cutting board.
■ Do not use water on grease fires. Never
pick up a flaming pan. Turn the controls
off. Smother a flaming pan on a surface
burner by covering the pan completely with
a well-fitting lid, cookie sheet or flat tray.
Use a multi-purpose dry chemical or foamtype fire extinguisher.
■ Flaming grease outside a pan can be put
out by covering it with baking soda or, if
available, by using a multi-purpose dry
chemical or foam-type fire extinguisher.
SAFETY PRECAUTIONS
IMPORTANT SAFETY INFORMATION.
READ ALL INSTRUCTIONS BEFORE USING.
4
Safety Instructions
Operating Instructions
Care and CleaningTroubleshooting TipsConsumer Support
Page 5
5
Safety Instructions Operating Instructions Care and Cleaning Troubleshooting Tips
Consumer Support
GEAppliances.com
Use proper pan size—avoid pans that are unstable or easily tipped. Select cookware having flat
bottoms large enough to cover burner grates. To avoid spillovers, make sure cookware is large
enough to contain the food properly. This will both save cleaning time and prevent hazardous
accumulations of food, since heavy spattering or spillovers left on cooktop can ignite. Use pans
with handles that can be easily grasped and remain cool.
WARNING!
SURFACE BURNERS
■ Always use the LITE position when igniting
the top burners and make sure the burners
have ignited.
■ Never leave the surface burners
unattended at high flame settings.
Boilovers cause smoking and greasy
spillovers that may catch on fire.
■ Use only dry pot holders—moist or damp
pot holders on hot surfaces may result in
burns from steam. Do not let pot holders
come near open flames when lifting
cookware. Do not use a towel or other
bulky cloth in place of a pot holder. Such
cloths can catch fire on a hot burner.
■ When using glass cookware, make sure it
is designed for cooktop cooking.
■ To minimize the possibility of burns,
ignition of flammable materials and
spillage, turn cookware handles toward
the side or back of the cooktop without
extending over adjacent burners.
■ Always turn the surface burner controls
off before removing cookware.
■ Carefully watch foods being fried at a high
flame setting.
■ Always heat fat slowly, and watch as it heats.
■ Do not leave any items on the cooktop.
The hot air from the vent may ignite
flammable items and will increase pressure
in closed containers, which may cause
them to burst.
■ If a combination of oils or fats will be used
in frying, stir together before heating or as
fats melt slowly.
■ Do not use a wok on the cooking surface
if the wok has a round metal ring that is
placed over the burner grate to support
the wok. This ring acts as a heat trap, which
may damage the burner grate and burner
head. Also, it may cause the burner to work
improperly. This may cause a carbon
monoxide level above that allowed by
current standards, resulting in a health
hazard.
■ Foods for frying should be as dry as
possible. Frost on frozen foods or moisture
on fresh foods can cause hot fat to bubble
up and over the sides of the pan.
■ Use the least possible amount of fat for
effective shallow or deep-fat frying. Filling
the pan too full of fat can cause spillovers
when food is added.
■ Use a deep fat thermometer whenever
possible to prevent overheating fat beyond
the smoking point.
■ Never try to move a pan of hot fat,
especially a deep fat fryer. Wait until the fat
is cool.
■ When preparing flaming foods under the
hood, turn the fan on.
■ Large scratches or impacts to glass
cooktops can lead to broken or shattered
glass.
Page 6
Your cooktop is shipped from the factory set to operate only with Natural Gas.
If you wish to use your cooktop with Liquefied Petroleum Gas, you must follow the
Installation Instructions packed with your cooktop. See LP Gas Adjustments.
■ Do not leave plastic items on the
cooktop—they may melt if left too
close to the vent.
■ Keep all plastics away from the surface
burners.
■ If you smell gas, turn off the gas to the
cooktop and call a qualified service
technician. Never use an open flame to
locate a leak.
■ To avoid the possibility of a burn, always be
certain that the controls for all burners are
at the off position and all grates are cool
before attempting to remove them.
■ Never clean the cooktop surface when it is
hot. Some cleaners produce noxious fumes
and wet cloths could cause steam burns if
used on a hot surface.
■ Never leave jars or cans of fat drippings
on or near your cooktop.
■ Don’t use aluminum foil to line burner
bowls. Misuse could result in a fire hazard
or damage to the cooktop.
■ Do not cover or block the area around the
cooktop knobs. This area must be kept
clear for proper ventilation and burner
performance.
■ Clean only parts listed in this Owner’s
Manual.
LP CONVERSION KIT
IMPORTANT SAFETY INFORMATION.
READ ALL INSTRUCTIONS BEFORE USING.
Adjust the top burner flame size so it does not extend beyond the edge of the cookware. Excessive
flame is hazardous.
SURFACE BURNERS
Cook meat and poultry thoroughly—meat to at least an INTERNAL temperature of 160°F and poultry to at least
an INTERNAL temperature of 180°F. Cooking to these temperatures usually protects against foodborne illness.
COOK MEAT AND POULTRY THOROUGHLY…
READ AND FOLLOW THIS SAFETY INFORMATION CAREFULLY.
SAVE THESE INSTRUCTIONS
6
Safety Instructions
Operating Instructions
Care and CleaningTroubleshooting TipsConsumer Support
Page 7
7
Safety Instructions Operating Instructions Care and Cleaning Troubleshooting Tips
Consumer Support
Using the cooktop burners. GEAppliances.com
Throughout this manual, features and appearance may vary from your model.
How to Light a Burner
Your cooktop burners are lit by electric
ignition, eliminating the need for
standing pilot lights with constantly
burning flames.
Push the control knob in and turn it
counterclockwise to the LITE position.
After the burner ignites, turn the knob to
adjust the flame size. To turn the burner
off, turn the knob clockwise as far as it
will go, to the OFF position.
■ In case of a power failure, you can light the
burners with a match. Hold a lit match to the
burner, then push in and turn the control knob
to the LITE position. Use extreme caution when
lighting burners this way. Burners in use when
an electrical power failure occurs will continue
to operate normally.
■ Do not operate the burner for an extended
period of time without cookware on the grate.
The finish on the grate may chip without
cookware to absorb the heat.
■ Check to be sure the burner you turn on is the
one you want to use.
■ Be sure the burners and grates are cool before
you place your hand, a pot holder, cleaning
cloths or other materials on them.
Be sure you turn the control knob
to OFF when you finish cooking.
How to Select Flame Size
For safe handling of cookware, never let the
flames extend up the sides of the cookware.
Watch the flame, not the knob, as you
reduce heat. The flame size on a gas
burner should match the cookware
you are using.
Any flame larger than the bottom of the
cookware is wasted and only serves to
heat the handle.
Simmer and Power Burners (on some models)
The left front and rear burners are best
for smaller pans and cooking operations
requiring carefully controlled simmering
conditions.
The front right burner is a high power
burner for larger pans and fast boiling
operations.
Page 8
Using the cooktop burners.
Wok This Way
We recommend that you use a flat-bottomed
wok, available at your local retail stores, or use
the Wok Holder accessory with traditional round
bottomed woks. The Wok Holder accessory,
model JXWK, can be ordered from your
appliance dealer.
The Wok Holder fits on top of the
cooktop grate to provide support and
proper air circulation for traditional
round bottom woks only. Do not use flatbottomed woks with the Wok Holder.
Do not use a wok on any other support
ring. Placing the ring over the burner
grate may cause the burner to work
improperly, resulting in carbon
monoxide levels above allowable current
standards. This could be dangerous to
your health. Do not try to use such woks
without the ring unless you are using the
Wok Holder. You could be seriously
burned if the wok tipped over.
Use a flat-bottomed wok.
Cookware
Aluminum: Medium-weight cookware is
recommended because it heats quickly
and evenly. Most foods brown evenly in
an aluminum skillet. Use saucepans with
tight-fitting lids when cooking with
minimum amounts of water.
Enamelware: Under some conditions,
the enamel of some cookware may
melt. Follow cookware manufacturer’s
recommendations for cooking methods.
Glass: There are two types of glass
cookware: those for oven use only
and those for cooktop cooking
(saucepans, coffee and tea pots).
Glass conducts heat very slowly.
Cast Iron: If heated slowly, most
skillets will give satisfactory results.
Heatproof Glass Ceramic: Can be used
for either surface or oven cooking.
It conducts heat very slowly and cools
very slowly. Check cookware
manufacturer’s directions to be sure it
can be used on a gas cooktop.
Stainless Steel: This metal alone has
poor heating properties and is usually
combined with copper, aluminum
or other metals for improved heat
distribution. Combination metal skillets
usually work satisfactorily if they are used
with medium heat as the manufacturer
recommends.
8
Safety Instructions
Operating Instructions
Care and CleaningTroubleshooting TipsConsumer Support
Home Canning Tips
Be sure the canner is centered over
the burner.
Make sure the canner is flat on the
bottom.
To prevent burns from steam or heat,
use caution when canning.
Use recipes and procedures from
reputable sources. These are available
from manufacturers such as Ball®and
Kerr®and the Department of Agriculture
Extension Service.
Flat-bottomed canners are
recommended. Use of water bath
canners with rippled bottoms may
extend the time required to bring
the water to a boil.
Page 9
9
Care and cleaning of the cooktop. GEAppliances.com
Be sure electrical power is off and all surfaces are cool before cleaning any part of the cooktop.
How to Remove Packaging Tape
To assure no damage is done to the finish
of the product, the safest way to remove
the adhesive left from packaging tape on
new appliances is an application of a
household liquid dishwashing detergent,
mineral oil or cooking oil.
Apply with a soft cloth and allow to soak.
Wipe dry and then apply an appliance
polish to thoroughly clean and protect
the surface.
NOTE: The plastic tape must be removed from all
chrome trim. It cannot be removed if it is baked on.
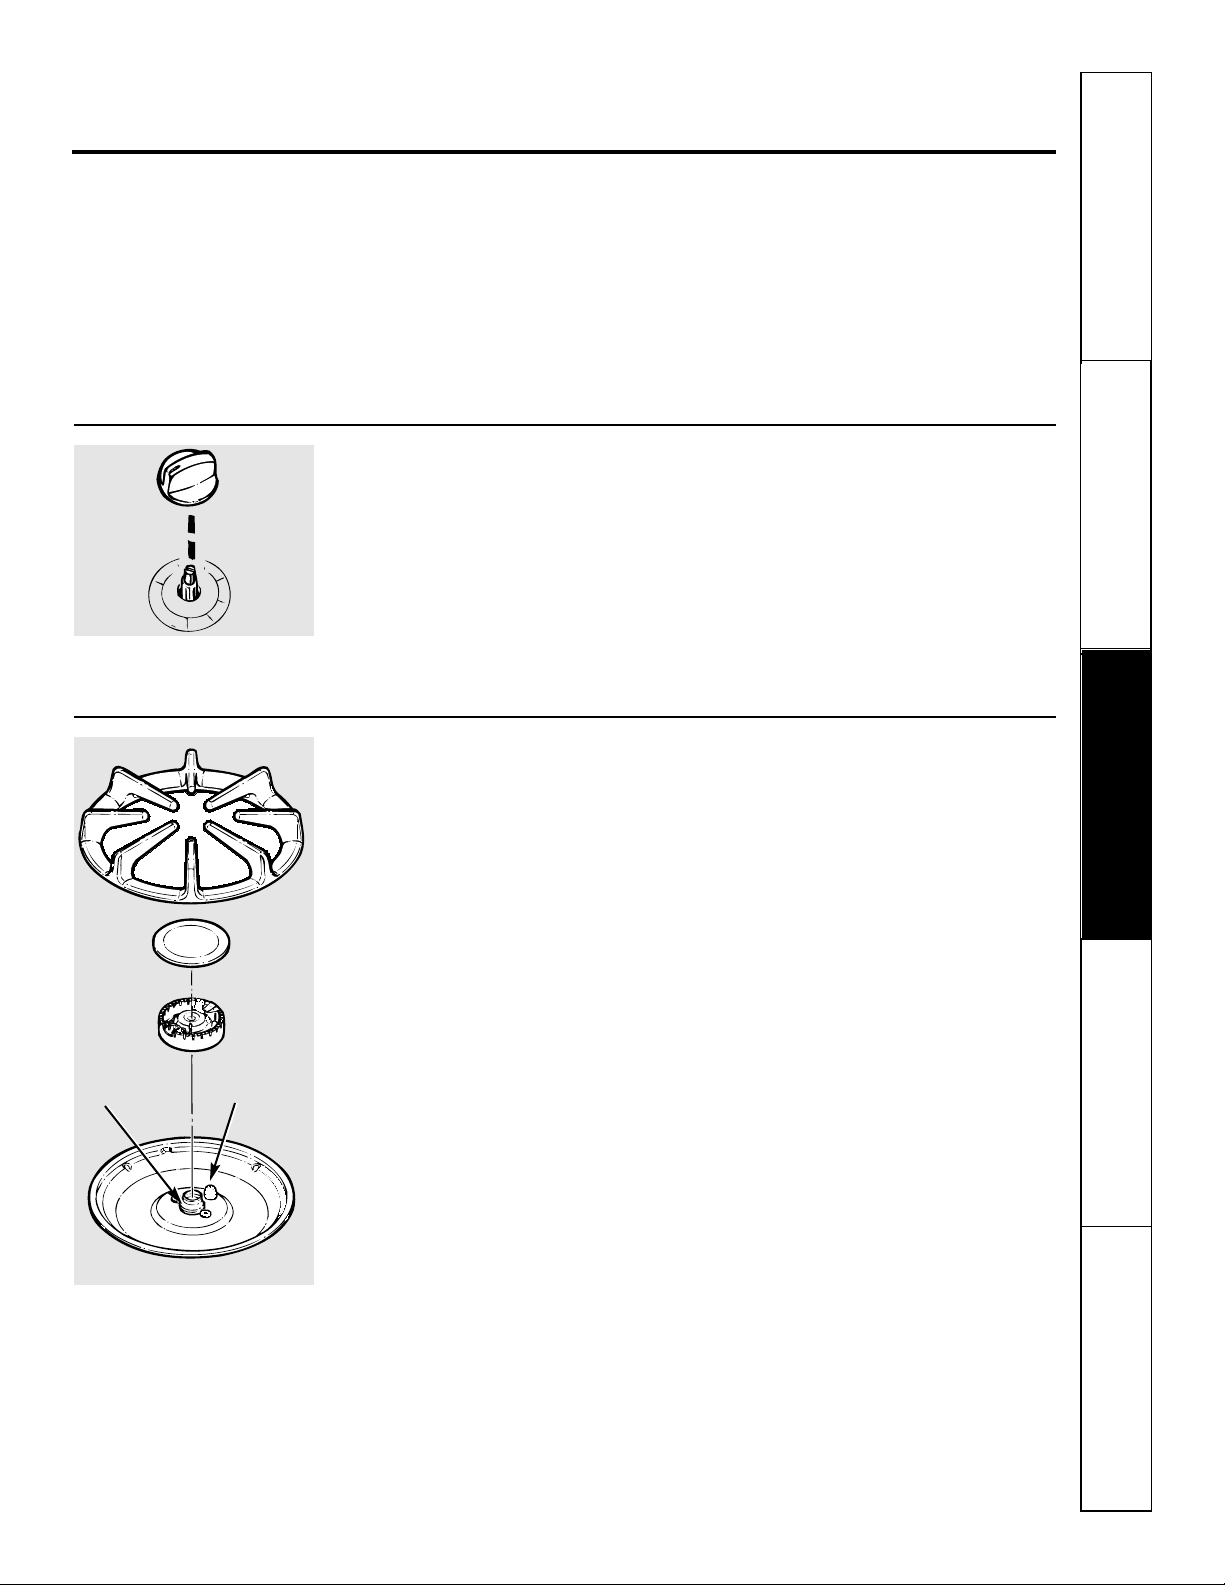
Control Knobs
Clean up spatters with a damp cloth.
Remove heavier soil with warm, soapy
water.
Do not use abrasives of any kind on the control
panel.
The control knobs may be removed for
easier cleaning. To remove a knob, pull it
straight off the stem. Wash the knobs in
soap and water but do not soak.
Pull the knob straight off the stem.
Burner Assembly
The burner assemblies should be washed
regularly and, of course, after spillovers.
Turn all controls off before removing burner parts.
The burner grates, burner heads and
burner caps can be removed for easy
cleaning. Removing them gives you
access to the burner bowls.
The electrode of the spark igniter is
exposed beyond the surface of the
burner bowl. When cleaning the burner
bowl, be careful not to snag the electrode
of the spark igniter with your cleaning
cloth. Damage to the igniter could occur.
To avoid snagging a cloth on the spark
igniter, leave the burner heads in place
when cleaning the burner bowls.
Be careful not to push in any cooktop
controls while cleaning the burner bowls.
A slight electrical shock might result
which could cause you to knock over hot
cookware.
Wash burner parts with an all-purpose
non-abrasive cleaner and warm water.
Soak stubborn soil. Dry them with a
cloth—do not reassemble while wet.
If the igniter orifice gets dirty or clogged
you may use a small sewing needle to
remove the soil.
To reassemble, replace the burner head
first, then the burner cap and finally the
burner grate.
CAUTION: DO NOT OPERATE THE
BURNER WITHOUT ALL BURNER
PARTS IN PLACE.
Grate
Burner cap
Burner head
Spark igniterMixing tube
Burner bowl
Safety Instructions Operating Instructions Care and Cleaning Troubleshooting Tips
Consumer Support
Page 10
Porcelain Enamel Cooktop (on some models)
The porcelain enamel finish is sturdy
but breakable if misused. This finish is
acid-resistant. However, any acidic foods
spilled (such as fruit juices, tomato or
vinegar) should not be permitted to
remain on the finish.
If acids spill on the cooktop while it is hot, use a
dry paper towel or cloth to wipe it up right away.
When the surface has cooled, wash with soap
and water. Rinse well.
For other spills such as fat spatterings,
wash with soap and water or cleansing
powders after the surface has cooled.
Rinse well. Polish with a dry cloth.
Care and cleaning of the cooktop.
Burner Grates
Porcelain enamel burner grates should
be washed regularly and, of course, after
spillovers.
Wash them in hot, soapy water and rinse
with clean water. You may also use abrasive
cleaners and scrub pads to clean burner
grates. Dry the grates with a cloth—don’t
put them back on the cooktop wet.
To get rid of burned-on food, place the
grates in a covered container or plastic
bag. Add 1/4 cup ammonia and let them
soak several hours or overnight. Wash,
rinse well, and dry.
To prevent rusting, apply a light coating of
cooking oil to the grates.
Although they’re durable, the grates will
gradually lose their shine, regardless of
the best care you can give them. This is
due to their continual exposure to high
temperatures.
Do not operate a burner for an extended
period of time without cookware on the
grate. The finish on the grate may chip
without cookware to absorb the heat.
Stainless Steel Surfaces (on some models)
Do not use a steel-wool pad; it will
scratch the surface.
To clean the stainless steel surface,
use warm sudsy water, a stainless steel
cleaner such as Kleen King®, or an
all-purpose liquid or spray cleaner.
Always scrub in the direction of the
grain. Rinse thoroughly with a sponge
or cloth and clean water. Dry with
a soft, clean cloth.
After cleaning, use a stainless steel
polish, such as Stainless Steel Magic
®
,
Revere Copper and Stainless Steel
Cleaner®or Wenol All Purpose
Metal Polish®. Follow the product
instructions for cleaning the stainless
steel surfaces.
When replacing the grates, be sure
they’re positioned securely over the
burners.
Safety Instructions
Operating Instructions
Care and CleaningTroubleshooting TipsConsumer Support
10
Page 11

Safety Instructions Operating Instructions Care and Cleaning Troubleshooting Tips
Consumer Support
11
Cleaning the glass cooktop surface. (on some models) GEAppliances.com
Normal Daily Use Cleaning
ONLY use the recommended cleaning
cream included with your cooktop on
the glass surface. Other creams may
not be as effective.
To maintain and protect your glass
surface, follow these steps.
Before using the cooktop for the
first time, remove the burner
grates and vent grille, and clean
the glass surface with the cooktop
cleaning cream. This helps protect
the top and makes cleanup easier.
Daily use of the cooktop cleaning
cream will help keep the glass
surface looking new.
Shake the cleaning cream well.
Apply a few drops of the cream
directly to glass surface.
Use a paper towel or sponge to
clean the entire glass surface.
NOTE: It is very important that you DO NOT
heat the cooktop until it has been cleaned
thoroughly.
Burned-On Residue
WARNING: DAMAGE to your glass surface
may occur if you use scrub pads other than
the pad included with your cooktop.
Allow the glass surface to cool.
Remove the burner grates and
spread a few drops of cooktop
cleaner over the entire burned
residue area.
Using the included scrub pad, rub
the residue area, applying pressure
as needed.
If any soil remains, repeat the steps
listed above as needed.
For additional protection, after
all residue has been removed,
polish the entire glass surface with
cooktop cleaner and a paper towel.
The RAZOR SCRAPER is available
through our Parts Center. See
instructions under “To Order Parts”
section on next page.
NOTE: Do not use a dull or nicked
blade.
Clean your cooktop after each spill.
Heavy, Burned-On Residue
Allow the cooktop to cool.
Remove the burner grates and
spread a few drops of cooktop
cleaner over the entire burned
residue area.
Use a razor scraper at approximately
a 45° angle against the glass surface
and scrape the soil. It will be
necessary to apply pressure to the
razor scraper in order to remove
the residue.
Keep a small amount of cream on
the soil as you scrape.
After scraping with the razor
scraper, use the scrub sponge to
remove any remaining residue.
For additional protection, after all
residue has been removed, polish
the entire glass surface with
cooktop cleaner and a paper towel.
Included scrub pad
COOKTOP
CLEANER
Page 12

12
Our testing shows that if you are cooking
high sugar mixtures such as jelly or fudge
and have a spillover, it can cause permanent
damage to the glass surface unless the
spillover is immediately removed.
Turn off all surface burners and,
with an oven mitt, remove hot pans
and grates.
Wearing an oven mitt:
■ Use a razor scraper to move the spill
to a cool area on the surface.
■ Remove the spill with paper towels.
Any remaining spillover should be left
until the surface of the cooktop has
cooled.
Don’t use the surface units until all
of the residue has been completely
removed.
NOTE: If pitting or indentation in the glass
has already occurred, the cooktop glass will have to
be replaced. In this case, service will be necessary.
Damage from Sugary Spills and Melted Plastic
Be careful not to slide pots and pans
across your cooktop. It will leave
metal markings on the cooktop
surface.
These marks are removable using
the cleaning cream with a scrub pad
and/or razor scraper.
If pots with a thin overlay of
aluminum or copper are allowed to
boil dry, the overlay may leave black
discoloration on the cooktop.
This should be removed immediately
before heating again or the
discoloration may be permanent.
WARNING: Carefully check the bottom of pans for
roughness that would scratch the surface.
Metal Marks and Scratches
To order Cerama Bryte®cooktop cleaning
cream and the razor scraper, please call our
toll-free number 800.626.2002.
Cerama Bryte
®
Cooktop
Cleaning Cream . . . . . . . . . . . . . .# WX10X300
Razor Scraper . . . . . . . . . . . . . . .# WX5X1614
Kit . . . . . . . . . . . . . . . . . . . . . . . . .# WB64X5027
(Kit includes cream and razor scraper)
To Order Parts
Cleaning the glass cooktop surface. (on some models)
Glass surface–potential for permanent damage
.
Safety Instructions
Operating Instructions
Care and CleaningTroubleshooting TipsConsumer Support
Page 13

13
Safety Instructions Operating Instructions Care and Cleaning Troubleshooting Tips
Consumer Support
Before You Call For Service… GEAppliances.com
Troubleshooting Tips
Save time and money! Review the chart on this page first
and you may not need to call for service.
Problem Possible Causes What To Do
Burners have yellow or The combustion quality of • Use the illustrations below to determine if your burner
yellow-tipped flames burner flames needs to be flames are normal. If burner flames look like A, call for
determined visually. service. Normal burner flames should look like B or C,
depending on the type of gas you use. With LP gas, some
yellow tipping on outer cones is normal.
A–Yellow flames B–Yellow tips C–Soft blue flames
Call for service on outer cones Normal for natural
Normal for LP gas gas
Control knobs Controls improperly set. • To turn from the OFF position, push the knob in and
will not turn then turn.
Burners do Plug on cooktop is not • Make sure electrical plug is plugged into a live, properly
not light completely inserted in the grounded outlet.
electrical outlet.
Gas supply not connected • See the Installation Instructions that came with your
or turned on. cooktop.
A fuse in your home may be • Replace the fuse or reset the circuit breaker.
blown or the circuit breaker
tripped.
Igniter orifice in burner body • Remove the obstruction. See the Care and cleaning of
may be clogged. the cooktop section.
Burner parts not replaced • See the Care and cleaning of the cooktop section.
correctly.
Hole in burner top behind • Use a small sewing needle to unplug.
the igniter may be clogged.
Ticking sound of spark Control knob is still • Turn the knob out of the LITE position to the desired
igniter persists after in the LITE position. setting.
burner lights
• Turn the burner off and relight. If ticking is still
present, call for service.
Ticking sound persists Be sure the knob is in the • Remove knob by pulling it straight off the stem and
after burner is turned off OFF position. check the bottom of the knob for any buildup of soil.
Burner flames very Improper air to gas ratio. • If cooktop is connected to LP gas, check all steps
large or yellow in the Installation Instructions that came with
your cooktop.
Page 14

GE Gas Cooktop Warranty. (For Customers in the United States)
All warranty service provided by our Factory Service
Centers, or an authorized Customer Care
®
technician.
To schedule service, on-line, 24 hours a day, visit us at
GEAppliances.com, or call 800.GE.CARES (800.432.2737).
For The Period Of: GE Will Replace:
One Year Any part of the cooktop which fails due to a defect in materials or workmanship.
From the date of the During this full one-year warranty, GE will also provide, free of charge, all labor
original purchase and related service costs to replace the defective part.
■ Ser vice trips to your home to teach you how to use
the product.
■ Improper installation.
■ Failure of the product if it is abused, misused,
or used for other than the intended purpose or
used commercially.
■ Replacement of house fuses or resetting of circuit
breakers.
■ Damage to the product caused by accident, fire, floods
or acts of God.
■ Incidental or consequential damage caused by possible
defects with this appliance.
What GE Will Not Cover:
This warranty is extended to the original purchaser and any succeeding owner for products purchased for
home use within the USA. In Alaska, the warranty excludes the cost of shipping or service calls to your home.
Some states do not allow the exclusion or limitation of incidental or consequential damages. This warranty
gives you specific legal rights, and you may also have other rights which vary from state to state. To know
what your legal rights are, consult your local or state consumer affairs office or your state’s Attorney General.
Warrantor: General Electric Company, Louisville, KY 40225
Safety Instructions
Operating Instructions
Care and CleaningTroubleshooting TipsConsumer Support
14
Staple your receipt here.
Proof of the original purchase
date is needed to obtain service
under the warranty.
Page 15

15
Safety Instructions Operating Instructions Care and Cleaning Troubleshooting Tips
Consumer Support
GE Gas Cooktop Warranty. (For Customers in Canada)
All warranty service provided by our Factory Service Centers
or an authorized Customer Care
®
technician. For service,
call 1.800.361.3400.
For The Period Of: GE Will Replace:
One Year Any part of the cooktop which fails due to a defect in materials or workmanship.
From the date of the During this full one-year warranty, GE will also provide, free of charge, all labor
original purchase and related service costs to replace the defective part.
■ Ser vice trips to your home to teach you how to use
the product.
■ Improper installation.
■ Failure of the product if it is abused, misused,
or used for other than the intended purpose or
used commercially.
■ Replacement of house fuses or resetting of circuit
breakers.
■ Damage to the product caused by accident, fire, floods
or acts of God.
■ Incidental or consequential damage caused by possible
defects with this appliance.
What GE Will Not Cover:
WARRANTOR IS NOT RESPONSIBLE FOR CONSEQUENTIAL DAMAGES.
Warrantor: CAMCO INC.
Page 16

Register Your Appliance In the U.S.: GEAppliances.com
Register your new appliance on-line–at your convenience! Timely product registration will allow for enhanced
communication and prompt service under the terms of your warranty, should the need arise. You may also mail
in the pre-printed registration card included in the packing material. In Canada: geappliances.ca
16
Consumer Support.
GE Appliances Website
In the U.S.: GEAppliances.com
Have a question or need assistance with your appliance? Try the GE Appliances Website 24 hours a day,
any day of the year! For greater convenience and faster service, you can now download Owner’s Manuals,
order parts, catalogs, or even schedule service on-line. You can also “Ask Our Team of Experts™” your questions,
and so much more... In Canada: geappliances.ca
Schedule Service In the U.S.: GEAppliances.com
Expert GE repair service is only one step away from your door. Get on-line and schedule your service at your
convenience 24 hours any day of the year! Or call 800.GE.CARES (800.432.2737) during normal business hours.
In Canada, call 1.800.361.3400
Real Life Design Studio In the U.S.: GEAppliances.com
GE supports the Universal Design concept—products, services and environments that can be used by people of all
ages, sizes and capabilities. We recognize the need to design for a wide range of physical and mental abilities and
impairments. For details of GE’s Universal Design applications, including kitchen design ideas for people with
disabilities, check out our Website today. For the hearing impaired, please call 800.TDD.GEAC (800.833.4322).
In Canada, contact: Manager, Consumer Relations, Camco, Inc.
Suite 310, 1 Factory Lane
Moncton, N.B. E1C 9M3
Extended Warranties In the U.S.: GEAppliances.com
Purchase a GE extended warranty and learn about special discounts that are available while your warranty is still
in effect. You can purchase it on-line anytime, or call 800.626.2224 during normal business hours. GE Consumer
Home Services will still be there after your warranty expires. In Canada, call 1.888.261.2133
Parts and Accessories In the U.S.: GEAppliances.com
Individuals qualified to service their own appliances can have parts or accessories sent directly to their homes
(VISA, MasterCard and Discover cards are accepted). Order on-line today, 24 hours every day or by phone at
800.626.2002 during normal business hours.
Instructions contained in this manual cover procedures to be performed by any user. Other servicing generally should be
referred to qualified service personnel. Caution must be exercised, since improper servicing may cause unsafe operation.
Customers in Canada should consult the yellow pages for the nearest Camco service center, or call 1.888.261.3055.
Contact Us In the U.S.: GEAppliances.com
If you are not satisfied with the service you receive from GE, contact us on our Website with all the details
including your phone number, or write to: General Manager, Customer Relations
GE Appliances, Appliance Park
Louisville, KY 40225
In Canada: geappliances.ca, or write to: Director, Consumer Relations, Camco, Inc.
Suite 310, 1 Factory Lane
Moncton, N.B. E1C 9M3
Printed in the United States
Page 17

electromenagersge.ca
350A4502P303 164D3333P114-4 49-8878-5 07-02 JR
JGP326
JGP336
JGP930
JGP626
JGP636
JGP960
Manuel du propriétaire
Plaque de Cuisson
À Gaz
Instructions de sécurité . . . . 2–6
Instructions de fonctionnement
Casseroles . . . . . . . . . . . . . . . . . . 8
Hauteur de la flamme . . . . . . . . 7
Pour allumer un brûleur . . . . . . 7
Nettoyage et entretien
Acier inoxydable . . . . . . . . . . . .10
Boutons de commande . . . . . . . .9
Email en porcelaine de la
plaque . . . . . . . . . . . . . . . . . . . .10
Ensemble du brûleur . . . . . . . . .9
Grilles de brûleur . . . . . . . . . . .10
Surface en vitrocéramique
de la plaque de cuisson . . . .11, 12
Informations sur
le dépannage . . . . . . . . . . . . . .13
Soutien au consommateur
Garantie . . . . . . . . . . . . . . . . . . .15
Soutien au consommateur . . . . 16
Transcrivez les numéros
de modèle et de série ici :
Modèle # ______________
Série # ________________
Vous les trouverez sur une
étiquette apposée sous la
plaque.
Page 18

2
INFORMATIONS IMPORTANTES SUR LA SÉCURITÉ.
LIRE TOUTES LES INSTRUCTIONS AVANT UTILISATION.
Instructions de sécurité
Instructions de
fonctionnement
Entretien et nettoyageEn cas de panne
Soutien au
consommateur
– Ne pas entreposer ou utiliser de
l’essence ou d’autres combustibles à
proximité de cet appareil ou tout autre
appareil.
– QUE FAIRE SI VOUS SENTEZ L’ODEUR
DE GAZ
■ Ne pas tenter d’allumer tout autre
appareil.
■ Ne pas toucher tout interrupteur
électrique; ne pas utiliser le
téléphone dans votre résidence.
■ Appeler immédiatement votre
fournisseur de gaz à partir du
téléphone d’un voisin. Suivre les
instructions du fournisseur.
■ Si vous ne pouvez pas rejoindre le
fournisseur de gaz, appeler le service
des incendies.
– L’installation et l’entretien doivent être
exécutés par un spécialiste qualifié,
une compagnie assurant l’entretien de
ce type d’appareil ou par le fournisseur
de gaz.
AVERTISSEMENT : Si vous ne suivez pas
exactement les informations communiquées
dans ce manuel, un incendie ou une
explosion peut se produire entraînant des
dommages à votre propriété, des blessures
corporelles ou même la mort.
AVIS IMPORTANT SUR LA SÉCURITÉ
Le décret de la Californie sur la consommation d’eau de table et l’application des règles sur les
produits toxiques exige que le gouverneur de cet état publie une liste des substances connues pour
causer le cancer, des malformations à la naissance et autres dommages du même type. Ce décret
exige que les fabricants avertissent leur clientèle quant à leur exposition potentielle à ces produits.
Les appareils fonctionnant au gaz peuvent causer une exposition mineure à quatre de ces
substances, soit le benzène, l’oxyde de carbone, le formaldehyde et la suie qui sont causées
principalement par la combustion incomplète du gaz naturel ou du gaz LP. Le bon réglage des
brûleurs indiqué par une flamme de couleur plutôt qu’une flamme jaune minimisera une combustion
incomplète. L’exposition à ces substances peut être réduite par l’ouverture d’une fenêtre, l’utilisation
d’un ventilateur ou d’une hotte.
Page 19

3
electromenagersge.ca
AVERTISSEMENT!
Pour votre sécurité, nous vous conseillons de suivre les informations contenues dans ce manuel
afin de réduire les risques d’incendie ou d’explosion, les chocs électriques ou pour empêcher tout
dommage à la propriété, les blessures corporelles ou la perte de vie.
Demander à l’installateur d’indiquer où se trouve le robinet de fermeture de la plaque de cuisson et
si nécessaire, comment le fermer.
■ Assurez-vous que votre plaque de cuisson
est correctement montée et mise à la terre
par un installateur qualifié conformément
aux instructions de montage. Tout réglage
et service doivent être exécutés par un
installateur de plaques de cuisson à gaz ou
un technicien qualifié.
■ Ne pas tenter de réparer ou de remplacer
toute pièce de votre plaque de cuisson
excepté si une telle intervention est
spécifiquement recommandée dans ce
manuel. Tout autre service doit être référé
à un technicien qualifié.
■ Placer votre plaque de cuisson en dehors
de la circulation de personnes dans la
cuisine et à l’abri de courants d’air afin de
prévenir l’extinction de la veilleuse et une
circulation d’air déficiente.
■ Brancher votre plaque de cuisson sur
une prise de 120 volts avec mise à la terre
uniquement. Ne pas couper la troisième
broche de mise à la terre de la prise. En
cas de doute sur la mise à la terre du
circuit d’alimentation électrique du
domicile, il vous appartient et vous êtes
dans l’obligation de faire remplacer une
prise sans mise à la terre par une prise à
trois broches avec mise à la terre
conformément au code sur la sécurité des
installations électriques. Ne pas utiliser un
fil de rallonge avec cet appareil.
■ Laisser les grilles des brûleurs ainsi que
les autres surfaces se refroidir avant de
les toucher et ne pas les laisser sans
surveillance au cas où des enfants
pourraient y avoir accès.
■ Assurez-vous que tout le matériel
d’emballage à été enlevé de la plaque
de cuisson avant d’utiliser celle-ci afin de
prévenir des dommages causés par un
incendie ou la formation de fumée si le
matériel d’emballage s’enflamme.
■ Assurez-vous que votre plaque de
cuisson a été correctement réglée par un
technicien de service ou un installateur
qualifié. Tel qu’expédié de l’usine, cet
appareil de comptoir ne peut être utilisé
qu’avec du gaz naturel. Ne pas tenter de
l’alimenter au gaz de pétrole liquéfié
(en bouteille) sauf si vous respectez les
instructions qui accompagnent la plaque.
Voir la section Réglages pour utilisation
avec gaz LP (gaz de pétrole liquéfié).
PRÉCAUTIONS DE SÉCURITÉ
Instructions de sécurité
Instructions de
fonctionnement
Entretien et nettoyage En cas de panne
Soutien au
consommateur
Page 20

■ Ne pas laisser des enfants seuls ou sans
surveillance lorsqu’une plaque de cuisson
est chaude ou en cours d’utilisation. Ils
pourraient être gravement brûlés.
■ Ne permettre à personne de grimper, de
se tenir debout ou de se suspendre à la
plaque de cuisson.
■ ATTENTION : Les articles intéressant les
enfants ne doivent pas être entreposés dans
des placards au dessus d’une plaque de
cuisson. Les enfants grimpant sur la plaque
de cuisson pour atteindre des articles
peuvent subir de graves blessures.
■ Toujours garder les ustensiles en bois et en
plastique ainsi que les boîtes de conserve à
l’écart de votre plaque.
■ Toujours garder les papiers muraux
inflammables, rideaux et draperies à l’écart
de votre plaque.
■ Ne jamais porter de vêtements amples
ou pendants au cours de l’utilisation de
l’appareil. Faire attention si vous désirez
avoir accès aux articles entreposés dans des
placards au dessus de la plaque de cuisson.
Les matériaux inflammables peuvent
prendre feu s’ils sont exposés au contact
d’une flamme ou d’une surface chaude,
entraînant la possibilité de brûlures graves.
■ Enseigner aux enfants de ne pas jouer avec
les commandes ou toute autre partie de la
plaque de cuisson.
■ Pour votre sécurité, ne jamais utiliser
l’appareil pour chauffer ou réchauffer
une pièce.
■ Toujours garder les serviettes, torchons,
mitaines de four et tout autre linge à l’écart
de votre plaque de cuisson.
■ Ne pas entreposer des matières
inflammables à proximité de la plaque de
cuisson.
■ Ne pas entreposer ou utiliser des matières
combustibles, de l’essence ou autre gaz et
liquide inflammables à proximité de cet
appareil ou tout autre type d’appareil.
■ Ne pas laisser la graisse de cuisine ou toute
autre matière inflammable s’accumuler à
proximité de la plaque de cuisson.
■ Ne pas faire fonctionner le brûleur sans
que tous les autres éléments de brûleurs
soient en place.
■ Ne pas placer des casseroles chaudes sur la
surface vitrée de la plaque de cuisson (cette
vitre existe sur certains modèles). Ceci peut
entraìner le bris du verre.
■ Ne pas nettoyer la plaque de cuisson avec
des liquides de nettoyage inflammables ou
volatiles.
■ Ne pas nettoyer la plaque de cuisson
lorsqu’elle est en service.
■ Eviter d’égratigner la plaque de cuisson
avec des instruments pointus, bagues et
autres bijoux.
■ Ne jamais utiliser la plaque de cuisson
comme planche à découper.
■ Ne pas utiliser de l’eau sur les feux de
graisse. Ne pas soulever une poêle qui a
pris feu. Mettre les commandes sur arrêt.
Etouffer une poêle enflammée sur un
brûleur de surface en la couvrant
complètement avec un couvercle de la
même dimension, une tôle à biscuits ou un
plateau. Utiliser un extincteur multi-usages
à poudre ou à mousse.
■ La graisse enflammée hors d’une poêle
peut être éteinte en la couvrant avec du
bicarbonate de soude ou si disponible,
avec un extincteur multi-usages à poudre
ou à mousse.
PRÉCAUTIONS DE SÉCURITÉ
INFORMATIONS IMPORTANTES SUR LA SÉCURITÉ.
LIRE TOUTES LES INSTRUCTIONS AVANT UTILISATION.
4
Instructions de sécurité
Instructions de
fonctionnement
Entretien et nettoyageEn cas de panne
Soutien au
consommateur
Page 21

■ Toujours utiliser la position LITE (allumage)
lors de l’allumage des brûleurs supérieurs et
s’assurer que les brûleurs se sont allumés.
■ Ne jamais laisser les brûleurs de surface
fonctionner sans surveillance lorsque les
réglages de flamme sont à la position “Hi.”
Les débordements entraînent la formation
de fumée et une accumulation de graisse qui
peut s’enflammer.
■ N’utiliser que des mitaines de four sèches.
S’ils sont humides ou mouillés en présence
d’une surface chaude, ils peuvent causer
des brûlures dûes à la vapeur. Lorsque vous
soulevez des casseroles, ne pas laisser les
mitaines de four s’approcher des flammes.
Ne pas utiliser de serviettes ou un autre linge
épais pour remplacer des mitaines de four.
Ce type de linge peut s’enflammer au contact
d’un brûleur chaud.
■ Si vous utilisez de la vaisselle en verre,
assurez-vous qu’elle est prévue pour la
cuisson sur ce type de plaque.
■ Afin de réduire les possibilités de brûlures,
l’allumage de matières inflammables et les
débordements, orienter les poignées de la
casserole sur le côté ou vers l’arrière de la
plaque sans qu’elles ne surplombent les
brûleurs adjacents.
■ Toujours mettre les commandes du brûleur
de surface sur OFF (arrêt) avant de déplacer
la casserole.
■ Observer attentivement la nourriture qui frit
lorsque le réglage de flamme est élevé.
■ Faire chauffer la graisse lentement et
observer l’opération.
■ Ne laisser aucun objet sur la plaque. L’air
chaud provenant de l’évent peut enflammer
les objets inflammables, entraînant une
augmentation de pression dans les contenants
fermés donc un risque d’explosion.
■ Si un mélange d’huile et de graisse est
utilisé pour la friture, mélanger les deux
composants avant le chauffage ou lorsque
la graisse fond lentement.
■ Ne pas utiliser un wok sur la surface de
cuisson si cet ustensile comporte un support
métallique rond placé sur le brûleur. Cet
anneau se comporte comme accumulateur
de chaleur qui peut endommager la grille
du brûleur et la tête de ce dernier. De plus,
l’anneau peut empêcher le brûleur de
fonctionner correctement et causer une
concentration d’oxyde de carbone supérieure
à celle tolérée par les normes actuelles et
représenter un danger pour la santé.
■ Les aliments à frire doivent être aussi secs
que possible. La gelée sur les aliments
surgelés ou l’humidité des aliments frais
peut entraîner le bouillonnement de graisse
chaude avec débordement sur les parois de la
casserole.
■ Utiliser le minimum de graisse pour faire
une friture avec un volume de graisse
important ou minime. Le remplissage
excessif de la casserole peut entraîner des
débordements lorsque les aliments sont
ajoutés.
■ Dans la mesure du possible, utiliser un
thermomètre pour prévenir une surchauffe
au delà du degré de température provoquant
une émanation de fumée.
■ Ne jamais tenter de déplacer une
casserole contenant de la graisse chaude,
particulièrement une friteuse. Attendre
jusqu’à ce que la graisse ait refroidi.
■ Lorsque vous préparez des plats flambés sous
la hotte, faites fonctionner le ventilateur.
■ Les rayures importantes ou les chocs sur les
plaques de cuisson en vitrocéramique
peuvent occasionner des cassures de la
surface de vitrocéramique et des éclats.
5
Instructions de sécurité
Instructions de
fonctionnement
Entretien et nettoyage En cas de panne
Soutien au
consommateur
electromenagersge.ca
Utiliser une poële de dimensions correctes—Eviter les poêles instables et pouvant se renverser
facilement. Choisir des casseroles avec fond plat et dont la surface est suffisante pour couvrir les
grilles des brûleurs. Pour éviter des débordements, assurez-vous que la casserole est suffisamment
grande pour contenir les aliments correctement. Ces précautions vous feront gagner du temps pour
la vaisselle tout en prévenant les accumulations dangereuses de nourriture étant donné que les
éclaboussures importante et les débordements sur la plaque peuvent s’enflammer. Utiliser des
casseroles munies de manches et qui sont de ce fait facilement manipulables et restent froides.
AVERTISSEMENT!
BRÛLEURS DE SURFACE
Page 22

Votre plaque est réglée en usine pour ne fonctionner qu’au gaz naturel.
Si vous désirez alimenter votre plaque au gaz de pétrole liquéfié, vous devez suivre les
instructions d’installation qui l’accompagnent. Voir Réglages pour utilisation avec le LP
(gaz de pétrole liquéfié).
■ Ne pas laisser des objets en plastique sur la
plaque. Ils peuvent fondre si placés à
proximité de l’évent.
■ Garder tous les objets en plastique à l’écart
des brûleurs de surface.
■ Si vous sentez une odeur de gaz, en arrêter
l’arrivée à la plaque et contacter un
technicien de service qualifié. Ne jamais
utiliser la flamme d’une source
quelconque pour localiser une fuite.
■ Pour éviter la possibilité de brûlures,
toujours s’assurer que les commandes des
brûleurs sont sur la position OFF (arrêt)
et que les grilles se sont refroidies avant de
les enlever.
■ Ne jamais nettoyer la surface de la plaque
lorsqu’elle est chaude. Certains nettoyants
produisent des vapeurs nocives et un tissu
mouillé peut causer des brûlures
provenant de la vapeur si utilisé sur une
surface chaude.
■ Ne jamais laisser des bocaux ou des boîtes
contenant de la graisse qui dégoutte sur ou
à proximité de la plaque.
■ Ne pas utiliser de papier d’aluminium
pour tapisser les réceptacles des brûleurs.
Une mauvaise utilisation peut entraîner
des dangers d’incendie ou endommager
la plaque.
■ Ne pas masquer ou bloquer le pourtour
des boutons de commande de la plaque.
Cette zone doit être gardée libre pour
assurer une bonne ventilation et un bon
fonctionnement des brûleurs.
■ Ne nettoyer que les composants listés dans
ce manuel.
TROUSSE DE CONVERSION
INFORMATIONS IMPORTANTES SUR LA SÉCURITÉ.
LIRE TOUTES LES INSTRUCTIONS AVANT UTILISATION.
Régler la flamme du brûleur supérieur de façon à ce qu’elle ne dépasse pas les bords de la plaque de
cuisson. Une trop grande flamme peut présenter des dangers.
BRÛLEURS DE SURFACE
Cuire les viandes et la volaille complètement. La température INTERNE de la viande doit être au moins
71 degrés celsius (160 degrés F) et la température INTERNE de la volaille doit être au moins 82 degrés celsius
(180 degrés F). Habituellement, la cuisson à ces températures prévient les empoisonnements alimentaires.
CUIRE LES VIANDES ET LA VOLAILLE COMPLÈTEMENT...
LIRE ET SUIVRE AVEC ATTENTION CETTE INFORMATION SUR LA SÉCURITÉ.
SAUVEGARDER CES INSTRUCTIONS
6
Instructions de sécurité
Instructions de
fonctionnement
Entretien et nettoyageEn cas de panne
Soutien au
consommateur
Page 23

7
Instructions de sécurité
Instructions de
fonctionnement
Entretien et nettoyage En cas de panne
Soutien au
consommateur
Utilisation des brûleurs de la plaque de cuisson. electromenagersge.ca
Tout au long de ce manuel, les caractéristiques et l’apparence peuvent varier d’un modèle à l’autre.
Comment allumer un brûleur
Les brûleurs de votre plaque sont allumés
électriquement, éliminant ainsi la
nécessité d’avoir une flamme témoin
constamment allumée.
Pousser le bouton de commande et
le tourner dans le sens anti-horaire
sur la position LITE (allumage). Après
l’allumage du brûleur, tourner le bouton
pour régler la taille de la flamme. Pour
éteindre le brûleur, tourner le bouton
dans le sens horaire jusqu’au maximum
de sa course sur la position OFF (arrêt).
■ En cas de panne de courant, vous pouvez
allumer les brûleurs avec une allumette. Tenir
une allumette allumée proche du brûleur puis
pousser le bouton de commande et le placer
sur la position LITE (allumage). Faire très
attention lorsque vous allumez les brûleurs
de cette façon. Les brûleurs en cours de
fonctionnement lorsque la panne de courant
survient continuent à fonctionner normalement.
■ Ne pas utiliser le brûleur longtemps sans qu’il
y ait de casserole sur la grille. La finition de la
grille peut s’écailler sans la présence d’une
casserole pour absorber la chaleur.
■ Vérifiez que le brûleur que vous voulez utiliser
est celui que vous avez allumé.
■ Assurez-vous que les brûleurs et les grilles
sont froids avant d’y poser la main, des
mitaines de four, des chiffons ou tout autre
matériau.
Assurez-vous de placer le bouton
sur OFF (arrêt) après la fin de la
cuisson.
Comment choisir la taille de la flamme
Afin de sécuriser l’utilisation des casseroles,
ne jamais laisser la flamme dépasser les parois
de celles-ci.
Lorsque vous réduisez la chaleur,
surveillez la flamme et non le bouton de
commande. La taille de la flamme d’un
brûleur à gaz doit correspondre au type
de casserole que vous utilisez.
Toute flamme qui dépasse le fond de
la casserole est gâchée et ne fait que
réchauffer la poignée.
Brûleur pour faire mijoter et brûleur à grand débit (sur certains modèles)
Le brûleur avant gauche et celui de
l’arrière sont les plus appropriés pour
les petites casseroles et la cuisson
exigeant de faire mijoter certains
aliments de façon contrôlée.
Le brûleur avant droit est un brûleur à
grand débit pour des casseroles plus
grandes et pour faire bouillir rapidement.
Page 24

Utilisation des brûleurs de la plaque de cuisson.
Cuisinez avec un Wok comme suit
Nous recommandons l’utilisation d’un wok à fond
plat disponible dans vos magasins à rayons
locaux ou utiliser l’accessoire Support de Wok
traditionnel avec les woks à fond arrondi.
Le support de Wok, modèle JXWK peut être
commandé chez votre vendeur d’appareils
ménagers.
Le support de Wok s’adapte à la partie
supérieure de la grille de la plaque
et assure une bonne circulation d’air
pour les woks à fond arrondi seulement.
Ne pas utiliser les woks à fond plat avec
le support de Wok.
Ne pas utiliser un wok avec tout autre
type d’anneau de support. Le fait de
placer l’anneau sur la grille du brûleur
entraîne un mauvais fonctionnement de
celui-ci causant la formation d’oxyde de
carbone dont la concentration est
supérieure aux normes standards
courantes. Ceci peut présenter un danger
pour votre santé. Ne pas utiliser ce type
de wok sans anneau excepté si vous le
faites avec le support de wok. Vous
risqueriez de sérieuses brûlures si le wok
se renversait.
Utiliser un Wok à fond plat.
Casseroles
En aluminium : Les casseroles
de dimensions moyennes sont
recommandées compte tenu du fait
qu’elles se réchauffent rapidement et
uniformément. La plupart des aliments
brunissent uniformément dans les
casseroles en aluminium. Utiliser un
poêlon avec un couvercle bien ajusté
lorsque la cuisson est faite avec une
quantité minime d’eau.
En métal émaillé : Sous certaines
conditions, l’émail de certaines casseroles
peut fondre. Suivre les recommandations
du fabricant pour la méthode de cuisson
à suivre.
Verre : Il existe deux types de casseroles
en verre : celles pour utilisation dans un
four seulement et celles pour la cuisson
sur plaque (casseroles, pots à café et
à thé). Le verre conduit la chaleur très
lentement.
En fonte : Si réchauffées lentement, la
plupart des casseroles en fonte donnent
des résultats satisfaisants.
En verre céramique insensible à la chaleur :
Ce type d’ustensiles peut être utilisé
pour cuisson soit au four, soit en surface.
Il conduit la chaleur et se refroidit très
lentement. Vérifier les instructions du
fabricant pour s’assurer qu’il est possible
d’utiliser l’ustensile sur une plaque de
cuisson à gaz.
En acier inoxydable : Les propriétés de
chauffage de ce métal sont médiocres.
Habituellement, il est combiné avec du
cuivre, de l’aluminium ou avec d’autres
métaux pour améliorer la répartition de
chaleur. Les casseroles en alliage de
métaux se comportent de manière
satisfaisante si elles sont utilisées avec une
chaleur moyenne comme le fabricant le
recommande.
8
Instructions de sécurité
Instructions de
fonctionnement
Entretien et nettoyageEn cas de panne
Soutien au
consommateur
Renseignements pratiques de mise en conserve à la maison
Assurez-vous que l’ustensile de mise en
conserve se trouve bien au centre du
brûleur.
Assurez-vous que le fond de l’ustensile de
mise en conserve soit bien plat.
Pour prévenir toute brûlure de vapeur
ou de chaleur, faites attention quand
vous mettez en conserve.
Utiliser des recettes et des procédures de
sources réputées. Vous les trouverez en
vous adressant à des fabricants comme
Ball®et Kerr®et aux services de
publications du ministère de
l’agriculture.
Nous recommandons les ustensiles de
mise en conserve à fond plat. L’utilisation
des ustensiles de mise en conserve au
bain-marie à fond strié nécessite
davantage de temps pour amener
l’eau à la température d’ébullition.
Page 25

Ensemble du brûleur
Les ensembles de brûleur doivent être
lavés régulièrement et bien sûr, après un
débordement.
Placer toutes les commandes sur OFF (arrêt) avant
d’enlever les composants du brûleur.
Les grilles, têtes et chapeaux de brûleur
peuvent être retirés pour faciliter le
nettoyage. Le fait de les retirer vous
permet d’accéder aux réceptacles des
brûleurs.
L’électrode de l’allumeur à étincelles
dépasse la surface du réceptacle. Lors du
nettoyage du réceptacle, faire attention
de ne pas accrocher l’électrode de
l’allumeur avec votre chiffon. Ceci
pourrait endommager l’allumeur.
Pour éviter d’accrocher le chiffon à
l’allumeur à étincelles, laisser les têtes
de brûleur en place pendant le nettoyage
des réceptacles de brûleur.
Faire attention de ne pas enfoncer les
commandes de la plaque pendant le
nettoyage des réceptacles de brûleur. Un
léger choc électrique pourrait en résulter,
lequel pourrait vous faire basculer une
casserole chaude.
Laver les éléments de brûleur avec un
détergent tout usages non-abrasif et de
l’eau chaude. Faire tremper les éléments
très souillés. Sécher avec un chiffon.
Ne pas réassembler s’ils sont mouillés.
Si l’orifice de l’allumeur est sale ou
bouché, vous pouvez utiliser une petite
aiguille à coudre pour enlever les
impuretés.
Pour réassembler, remettre d’abord en
place la tête de brûleur puis le chapeau
et finalement, la grille.
ATTENTION : NE PAS FAIRE
FONCTIONNER LE BRÛLEUR SANS
QUE TOUS SES ÉLÉMENTS SONT
EN PLACE.
Grille
Chapeau
de brûleur
Tête de
brûleur
Allumeur à
étincelles
Tube de
mélange
Réceptacle de brûleur
9
Entretien et nettoyage de la plaque de cuisson. electromenagersge.ca
Assurez-vous que l’alimentation électrique est coupée et que toutes les surfaces sont froides avant de
nettoyer une partie quelconque de la plaque.
Comment retirer le ruban d’emballage
Pour s’assurer qu’aucun dommage ne
soit causé à la finition du produit, le plus
sûr moyen d’enlever l’adhésif provenant
du ruban d’emballage resté sur les
appareils neufs est d’appliquer du
détergent liquide pour lavage de la
vaisselle, de l’huile minérale ou de
l’huile de cuisson.
Appliquer avec un linge doux et laisser le
liquide s’imbiber. Sécher puis appliquer
un produit pour appareils ménagers pour
nettoyer complètement et protéger la
surface.
NOTE : Le ruban de plastique doit être retiré
de toutes les moulures chromées. Il n’est pas
possible de le faire si le ruban a été chauffé à
haute température.
Boutons de commande
Nettoyer les éclaboussures avec un
chiffon humide. Enlever les souillures
plus importantes avec de l’eau chaude
savonneuse.
Ne pas utiliser de produits abrasifs sur le
panneau de commande.
Il est possible d’enlever les boutons de
commande pour faciliter le nettoyage.
Pour enlever un bouton, le tirer
complètement de l’axe. Laver les
boutons avec de l’eau et du savon mais
ne pas les laisser tremper.
Tirer le bouton complètement de l’axe.
Instructions de sécurité
Instructions de
fonctionnement
Entretien et nettoyage En cas de panne
Soutien au
consommateur
Page 26

Plaques avec porcelaine émaillée (sur certains modèles)
La finition en porcelaine émaillée est
durable. Cependant, elle peut être
endommagée en cas de mauvaise
utilisation. La finition résiste à l’acide.
Néanmoins, tout aliment acide qui a été
épandu (jus de fruits, de tomates ou
vinaigre) ne doit pas demeurer sur la
finition.
Si de l’acide est épandu sur la plaque alors
qu’elle est chaude, utiliser une serviette en papier
sèche ou un chiffon pour l’essuyer
immédiatement. Une fois la surface refroidie,
laver avec de l’eau et du savon. Bien rincer.
Pour les autres débordements, par
exemple des éclaboussures de graisse,
laver avec de l’eau et du savon ou du
récurant en poudre après
refroidissement de la surface. Bien rincer
et polir avec un chiffon sec.
Entretien et nettoyage de la plaque de cuisson.
Grilles de brûleur
Les grilles de brûleur en porcelaine
émaillée doivent être lavées régulièrement
et bien sûr, après tout débordement.
Les laver avec de l’eau chaude savonneuse
et rincer avec de l’eau propre. Vous
pouvez aussi utiliser des produits
nettoyants abrasifs et des tampons à
récurer pour nettoyer les grilles. Sécher
les grilles avec un chiffon. Ne pas les
remettre mouillées sur la plaque.
Pour se débarrasser des aliments brûlés,
placer les grilles dans un contenant
couvert ou dans un sac en plastique.
Ajouter 0,6 dl (1/4 de tasse)
d’ammoniaque et les laisser tremper
plusieurs heures ou toute la nuit. Laver,
bien rincer et sécher.
Pour prévenir la rouille, appliquer une légère
couche d’huile de cuisson sur les grilles.
Bien qu’elles soient durables, les grilles
perdront de leur lustre graduellement,
quelle que soit toute l’attention que vous
pouvez leur prodiguer. Ceci est dû à une
exposition continuelle aux températures
élevées.
Ne pas faire fonctionner un brûleur
longtemps sans qu’un ustensile ne soit sur
la grille car sans ustensile pour absorber la
chaleur, la finition de celle-ci peut être
endommagée.
Surfaces en acier inoxydable (sur certains modèles)
Ne jamais utiliser un tampon en laine
d’acier; il rayera la surface.
Pour nettoyer la surface en acier
inoxydable, utiliser de l’eau légèrement
savonneuse, un nettoyant pour acier
inoxydable comme le nettoyant Kleen
King®ou un nettoyant tous usages
liquide ou en pulvérisateur. Frotter
toujours dans le sens du grain. Rincer
complètement avec une éponge ou un
linge et de l’eau propre. Sécher avec un
linge doux et propre.
Après le nettoyage, utiliser un produit à
polir l’acier inoxydable, comme le
produit Stainless Steel Magic
®
, Revere
Copper and Stainless Steel Cleaner®ou
Wenol All Purpose Metal Polish®. Suivre
les instructions du produit pour nettoyer
les surfaces en acier inoxydable.
Lorsque vous remettez les grilles en
place, assurez-vous qu’elles sont
positionnées de manière sécuritaire
au dessus des brûleurs.
10
Instructions de sécurité
Instructions de
fonctionnement
Entretien et nettoyageEn cas de panne
Soutien au
consommateur
Page 27

11
Instructions de sécurité
Instructions de
fonctionnement
Entretien et nettoyage En cas de panne
Soutien au
consommateur
Nettoyage normal quotidien
UTILISEZ UNIQUEMENT de la crème
nettoyante incluse avec votre plaque de
cuisson sur la surface vitrocéramique.
Autres crèmes peuvent être moins
efficaces.
Pour entretenir et protéger votre
plaque de cuisson en vitrocéramique,
conformez-vous aux instructions
suivantes :
Avant d’utiliser votre plaque de
cuisson pour la première fois,
enlevez les grilles des brûleurs
et nettoyez la surface de
vitrocéramique avec de la crème
nettoyante pour plaque de cuisson.
Cela vous aidera à la protéger et
à la conserver propre.
Votre surface de vitrocéramique
conservera son aspect neuf si vous
utilisez chaque jour de la crème
nettoyante pour plaque de cuisson.
Secouez bien le flacon de crème
nettoyante. Versez quelques gouttes
de crème directement sur la plaque
de cuisson.
Utilisez une serviette en papier ou
une éponge pour nettoyer toute la
surface de vitrocéramique.
NOTE : Vous devez faire bien attention de ne
pas faire chauffer la plaque de cuisson avant
de la nettoyer complètement.
Résidus calcinés
AVERTISSEMENT : Vous pouvez endommager
votre surface en vitrocéramique si vous utilisez
des tampons à récurer autres que les tampons
à récurer inclus avec votre plaque de cuisson.
Permettez à la surface de
vitrocéramique de se refroidir.
Enlevez les grilles de brûleurs et
versez quelques gouttes de crème
nettoyante sur toute la surface des
résidus calcinés.
À l’aide du tampon à récurer inclus,
frottez la surface à nettoyer. Exercez
de la pression si nécessaire.
S’il reste des résidus, répétez si
nécessaire les opérations indiquées
ci-dessus.
Pour ajouter de la protection après
avoir effacé toutes traces de résidus,
polissez toute la surface avec de la
crème nettoyante et une serviette
en papier.
Vous trouverez le grattoir à lame
dans nos Centres de pièces
détachées. Consultez les
instructions dans la section
«comment commander des pièces»,
à la page suivante.
NOTE : N’utilisez jamais une lame
émoussée ou édentée.
Nettoyez votre plaque de cuisson
chaque fois qu’elle est sale.
Résidus calcinés difficiles à enlever
Laissez refroidir la plaque de
cuisson.
Enlevez les grilles de brûleurs et
versez quelques gouttes de crème
nettoyante sur toute la surface des
résidus calcinés.
Tenez un grattoir à lame à un angle
de 45° sur la vitrocéramique et
raclez les résidus. Vous devrez
exercer de la pression sur le grattoir
à lame pour les enlever.
Laissez toujours un peu de crème
sur les résidus pendant que vous
les grattez.
Après avoir enlevé les résidus avec
un grattoir à lame, effacez toutes
leurs traces avec l’éponge à récurer.
Pour ajouter de la protection après
avoir effacé toutes traces de résidus,
polissez toute la surface avec de la
crème nettoyante et une serviette
en papier.
Tampon à récurer inclus
Nettoyage de la surface en vitrocéramique
de la plaque de cuisson. (sur certains modèles) electromenagersge.ca
COOKTOP
CLEANER
Page 28

12
Instructions de sécurité
Instructions de
fonctionnement
Entretien et nettoyageEn cas de panne
Soutien au
consommateur
D’après nos essais, il semble que si vous
cuisinez des aliments riches en sucre
comme de la confiture ou du caramel,
et s’ils débordent, ils peuvent occasionner
des dommages permanents à la surface
de vitrocéramique si vous ne la nettoyez
pas immédiatement.
Éteignez tous les brûleurs de surface
et, avec des gants isolants, enlevez
les ustensiles de cuisine chauds et
les grilles.
Portez des gants de cuisine.
■ Utilisez un grattoir à lame pour
repousser les matières fondues
sur une surface froide de la plaque
de cuisson.
■ Enlevez les matières fondues avec
une serviette en papier.
Vous devez laisser toute matière
fondue que vous n’avez pas réussi
à enlever jusqu’à ce que la plaque de
cuisson refroidisse complètement.
Ne réutilisez jamais la plaque de
cuisson avant d’avoir enlevé
complètement les résidus.
NOTE : S’il s’est déjà formé sur votre plaque de
cuisson en vitrocéramique des creux ou des piqûres,
vous devrez la remplacer. Dans ce cas, vous devez
appeler le service.
Dommages causés par du sucre chaud ou des matières plastiques fondues
Faites attention de ne pas faire glisser
des ustensiles de cuisine sur votre
plaque de cuisson. Ils laisseront des
traces de métal sur la surface de
vitrocéramique.
Vous pouvez enlever ces traces en
utilisant la crème nettoyante avec un
tampon à récurer et/ou un grattoir
à lame.
Si vous laissez des casseroles
recouvertes d’une couche
d’aluminium ou de cuivre
chauffer à sec, leur métal peut
laisser des traces noires sur la
plaque de cuisson.
Vous devez enlever ces traces
immédiatement, avant de faire
chauffer à nouveau la plaque de
cuisson. Autrement, les traces
risquent de devenir permanentes.
AVERTISSEMENT : Vérifiez toujours le fond de vos
casseroles afin de vous assurer qu’elles n’aient pas
d’aspérités qui risquent de rayer la surface.
Traces de métal et rayures
Pour commander de la crème nettoyante
Cerama Bryte®et un grattoir à lame,
veuillez appeler notre numéro sans
frais 1.800.661.1616.
Crème Nettoyante
Cerama Bryte
®
. . . . . . . . . . . . . . .#WX10X300
Grattoir à lame . . . . . . . . . . . . . . .#WX5X1614
Trousse . . . . . . . . . . . . . . . . . . . . .#WB64X5027
(La trousse comprend un flacon de crème
et un grattoir à lame)
Comment commander des pièces
Surface de vitrocéramique – possibilité de dommages permanents
Nettoyage de la surface en vitrocéramique
de la plaque de cuisson. (sur certains modèles)
Page 29

13
Avant d’appeler un technicien pour le service... electromenagersge.ca
Informations sur le dépannage
Gagnez du temps et économiser de l’argent! Passez en revue la carte de
cette page d’abord. Il est possible que vous n’ayez pas besoin de service.
Problème Causes possibles Que faire
L’extrémité de la flamme La qualité de combustion • Utiliser l’illustration ci-dessous pour déterminer si la
du brûleur est jaune ou de la flamme de brûleur flamme de votre brûleur est normale. Si la flamme est
bleue doit être déterminée semblable à A, appeler le technicien de service.
visuellement. Normalement, la flamme devrait être semblable à B ou C
en fonction du type de gaz utilisé. Avec le gaz LP, il est
normal que l’extrémité de la flamme sur le cône
extérieur soit jaune.
A–Flamme jaune B–Extrémité jaune C–Flamme bleue
Appeler le sur les cônes pâle
technicien extérieurs Normal pour le
de Service Normal pour le gaz naturel
gaz LP
Les boutons de Les commandes ne sont pas • Pour tourner de la position OFF (arrêt), pousser le
commande ne correctement réglées. bouton et tourner.
tournent pas
Les brûleurs ne La prise de la plaque de • S’assurer que la prise d’alimentation électrique est
s’allument pas cuisson n’est pas complètement branchée dans un circuit correctement mis à la terre.
enfoncée.
L’alimentation en gaz n’est pas • Voir les instructions d’installation qui accompagnaient
raccordée ou mise en circuit. la plaque de cuisson.
Un fusible de votre domicile • Remplacer le fusible ou réenclencher le disjoncteur.
a sauté ou un disjoncteur
s’est déclenché.
L’orifice de l’allumeur dans • Enlever l’obstruction. Voir la section Entretien et
le corps du brûleur peut être nettoyage de votre plaque de cuisson.
bouché.
Les éléments du brûleur n’ont • Voir la section Entretien et nettoyage de votre plaque de
pas été replacés correctement. cuisson.
L’orifice au sommet du • Utiliser une petite aiguille à coudre pour le déboucher.
brûleur derrière l’allumeur
peut être bouché.
Le bruit tic-tic de Le bouton de commande • Tourner le bouton de la position LITE (allumage) pour
l’allumeur à étincelles est encore sur la position le placer au réglage désiré.
persiste après LITE (allumage).
• Eteindre le brûleur et le rallumer. Si le problème
l’allumage du brûleur
persiste, appeler pour le service.
Le bruit tic-tic persiste Assurez-vous que le bouton • Retirer le bouton en le tirant de l’axe et vérifier la
après extinction du est sur la position OFF (arrêt). base du bouton pour toute accumulation de crasse.
brûleur
Les flammes du brûleur Mélange air/gaz incorrect. • Si la plaque est connectée à une source de
sont très grandes ou gaz LP, vérifier toutes les étapes des instructions
jaunes accompagnant la plaque.
Instructions de sécurité
Instructions de
fonctionnement
Entretien et nettoyage En cas de panne
Soutien au
consommateur
Page 30

14
Notes.
Instructions de sécurité
Instructions de
fonctionnement
Entretien et nettoyageEn cas de panne
Soutien au
consommateur
Page 31

15
Garantie sur les plaques de cuisson à gaz GE. (Pour la clientèle au Canada)
Le service sous garantie est assuré par nos centres de
service de l’usine ou par un technicien agréé Customer Care
™
.
Pour obtenir le service, contacter 1.800.361.3400.
Pendant une période de : GE remplacera :
Une année Tout élément de la plaque de cuisson déficient à cause d’un vice de fabrication
à partir de la date d’achat ou de main d’oeuvre. Durant cette période de pleine garantie d’un an, GE fournira
également sans frais le service à domicile pour le remplacement de l’élément
faisant défaut.
■ Le déplacement à votre domicile du technicien de
service pour vous enseigner comment utiliser le produit.
■ Une mauvaise installation.
■ Une panne du produit causée par une utilisation
abusive, une mauvaise utilisation dans un but autre
que celui lequel pour il a été conçu ou s’il a été utilisé
commercialement.
■ Le remplacement de fusibles à votre domicile ou le
réenclenchement de disjoncteurs.
■ Les dommages au produit causés par un accident,
un incendie, une inondation ou un acte de Dieu.
■ Les dommages indirects ou accidentels causés par des
défauts possibles de cet appareil.
Ce que GE ne couvre pas :
LE FABRICANT NE SE TIENT NULLEMENT RESPONSABLE DE TOUT DOMMAGE INDIRECT.
Garant : CAMCO INC.
Instructions de sécurité
Instructions de
fonctionnement
Entretien et nettoyage En cas de panne
Soutien au
consommateur
Agrafez le reçu d’achat ici.
Pour obtenir le service sous
garantie, vous devrez fournir la
preuve de l’achat original.
Page 32

16
Imprimé aux États-Unis
Soutien au consommateur.
Site Web appareils électroménagers GE
electromenagersge.ca
Vous avez une question ou vous avez besoin d’aide pour votre appareil électroménager? Contactez-nous
par Internet au site electromenagersge.ca 24 heures par jour, tous les jours de l’année.
Service de réparations 1.800.361.3400
Service de réparations GE est tout près de vous.
Pour faire réparer votre électroménager GE, il suffit de nous téléphoner.
Studio de conception réaliste
Sur demande, GE peut fournir une brochure sur l’aménagement d’une cuisine pour les personnes
à mobilité réduite.
Écrivez: Directeur, Relations avec les consommateurs, Camco, Inc.
Bureau 310, 1 Factory Lane
Moncton, N.B. E1C 9M3
Prolongation de garantie electromenagersge.ca
Achetez un contrat d’entretien GE avant que votre garantie n’expire et bénéficiez d’un rabais substantiel.
Ainsi le service après-vente GE sera toujours là après expiration de la garantie.
Visitez notre site Web ou appelez-nous au 1.800.461.3636.
Pièces et accessoires
Ceux qui désirent réparer eux-mêmes leurs électroménagers peuvent recevoir pièces et accessoires
directement à la maison (cartes VISA, MasterCard et Discover acceptées).
Les directives stipulées dans le présent manuel peuvent être effectuées par n’importe quel utilisateur. Les autres
réparations doivent généralement être effectuées par un technicien qualifié. Soyez prudent, car une réparation
inadéquate peut affecter le fonctionnement sécuritaire de l’appareil.
Vous trouverez dans les pages jaunes de votre annuaire le numéro du Centre de service Camco le plus
proche. Autrement, appelez-nous au 1.888.261.3055.
Contactez-nous
Si vous n’êtes pas satisfait du service après-vente dont vous avez bénéficié :
Premièrement, communiquez avec les gens qui ont réparé votre appareil.
Ensuite, si vous n’êtes toujours pas satisfait, envoyez tous les détails—numéro de téléphone compris—au
Directeur, Relations avec les consommateurs, Camco, Inc.
Bureau 310, 1 Factory Lane
Moncton, N.B. E1C 9M3
Inscrivez votre appareil électroménager electromenagersge.ca
Inscrivez votre appareil électroménager en direct, aussitôt que possible. Cela améliorera nos
communications et notre service après-vente. Vous pouvez également nous envoyer par la poste
le formulaire d’inscription joint à votre documentation.
16
 Loading...