

Page 1
—-
ckmt’ents
ApplianceRegistration
Careand Cleaning
2
14-18
V
GasH7LWcooking
‘\
ThermostatAdjustment 20
VentDuct
9
.-
—
Clock 9
ControlPanels
Features 6 SafetyInstructions 2-5
InstaHation
Leveling
Lift-UpCooktop
MinuteTimer
ModelandSerialNumbers
Oven
14
5
5
16
9
2 CookwareTips
8 DripPans
ProblemSolver
RepairService 23
SurfaceCooking
Burners
BurnerGrates
ControlSettings
21
15,18
15,18
15,18
AirAdjustment 19 FlameSize ‘7
Baking,BakingGuide
10,11
LightingInstructions 7
BroilerPanand Rack 16,18 Warranty BackCover
Broiling,BroilingGuide 13
Continuous-Cleaning 14
ControlSettings 8
DoorRemoval 16
Light;BulbReplacement
8,17
OvenBottomRemoval 17
OvenTimer 9
Preheating
Roasting,RoastingGuide 12
Shelves 8,16
10,11
GEAnswer Centera
8LMWU88tl
7
7
7
McdeIyxm56GEJ
Page 2
ReadibisbookCarefklllye
1[isintendedtohelpyouopmatc
andmaintainyournewrange
properly.
Keepithan(.lyt’oranswerstoyour
questions.
Ifyoudcm’tunderstandsomething
orReedmomhelp. write(include
yourphonenumber):
ConsumerAffairs
GEAppliances
AppliancePark
Louisville,KY40225
writedomthemodel
andserialnumbers.
You’llfindthemona labellocated
intheburnerboxunderthe
cooktop.Seepage6.
Thesenumbersarealsoonthe
ConsumerProductOwnership
Registrationcard thatcamewith
yourrange.Beforesendinginthis
card,pleasewritethesenumbers
here:
Model Number
%rial Number
Uscthesenumbersin any
correspondenceorservicecalls
concerningyourrange.
=RYOUR SAFETY
Hyousmell gas:
openwindows,
t
2. Don’t touch
electrical
3“Extinguish any
open
4.Immediatelycall
yourgassupplier.
“Don’tturn electric switches
on oroff
becausesparksmay
ignitethegas.
FOR YOUR SAFETY
Do not Stem or use
gasoline or other
fl~mm~bl~ v~pom
liquidsinthevicinity
ofthisoranyother
appliance.
switches:
flames
and
I’heCalifbmiaWk llrifiking
water atd ToxicEnfOrumxmt
ActrequirestheGovcrmwof
Californiatopublisha listof
substancesknownto thestate
tocausecancerand requires
businessestowarricustomers
ofpotential exposuretosuch ‘
substances.
Gas appliancescaficause
mirmrexposuretothreeofthese
substances,namelybenzene,
formaldehydeand soot, caused
primarilybythe incomplete
combustionof naturalgasor I_l
fuels. Properlyadjustedranges,
indicatedbya bluishrather than
a yellowflame, will minimize
incompletecombustion.Exposure
to these substancescan be
minimizedfurther by venting
with an open windowor using
aventilationfanor hood.
Ifymlnwih%d
a dam~edrange. ● Q
Immediatelycontactthedealer(or
builder)whosoldyoutherange.
savetimeandmoneye
Beforeyou.request
ser’vkeee o
C-hecktheProblemSolveron
page21.It listscausesofminor
operatingproblemsthatyou
cancorrectyourself.
WhenYOUGetYourWnge
~Havetheinstaw?rshow you
thelocationoftherangegas
cut-offvalveandkm’toshutit
offifnecessary.
e ~av~your Hu& i~S@ii~dWi
properlygroundedbyaqualified
instiller, in accordancewith the
InstallationInstructions.Any
adjustmentand serviceshouldbe
performedonly byqualifiedgas
rangeinstallersor service
technicians.
Page 3
“=.
-—
..- - = ?f%g
yourrimqeintoa
m-witgroi!ildidWthxonly.
#Tg~~~}~](]~~~m(jvethe~()~]~~
‘%27groundingprongfromthe plug.
if indoubtabout[hegroundingof
thehomeelectricalsystem,itis
yourpcrsorxdresponsibilityand
OMigatiorito havean ungrounded
outk[ repked witha pro@y-
wmmded three-prongoutletin
~
accordancewiththe National
ElectricalCode.Do not use an
extensioncord wi{hthisappliance.
@Bem-e all
areremovedfromtherange
beforeoperatingit,toprevent
f% orsmokedamageshoukI
thepackingmaterialignite.
@Besureyourrangeiscorrectly
adjustedbyaqualifiedservice
technicianorMdkr forthe
typ ofgas(NatmdorIll) m
whkhitistobeused.Your
: rangecanbeconvertedforuseon
.-; onetypeofgasortheother.See
InstallationInstructions.
s Afterprolongeduseofa
rangti+ihighfloortemperatures
may
resdt andmanyfloor
WverhlgswillnotWithshnd
thiskindofuse.Neverinstallthe
rangeovervinyltileorlinoleum
thatcannotwithstandsuchtypeof
use.Neverinstallitdirectlyover
interiorkitchencarpeting.
using %?@rRange
GDon9tk!avechildrenaloneor
~~a~te~dedwherearange
w h operation.
seriouslyburned.
oDon’t2MWVanyonetoClimb,
standor hangonthe door or
rangetop,Theycoulddamage
the
rangeand eventip it over
musing
packingmaterhis
ishot
Theycouldbe
severepersonalinjury.
e ~A~~~~~~: ~~~~~~ ~~
INTERESTm CHILDREN
SHOULDNon’BEsm&wD
Im4CABIW.E ABOVEA
RANGEOR ON
n-m
BACMPLMHOFARANGECHILDRENCLIMBINGON
THE
RANGETOREACH
ITEMSC.01.JIDBE
SERIOUSLYINJURED.
~M 13umer
gratesandother
surfacescod beforetouching
themor kavingthemwhere
ChildrenUx31nreachthem.
@Neverwearloosefittingor
hanginggarmentswhileusing
theappliance.
materialcould be ignitedif
broughtin contactwith flameor
hotovensurfacesand maycause
severeburns.
~Never use
Flammable
yourappliancefor
warmingor heatingtheroom.
Prolongeduseoftherange
withoutadequateventilationcan
behazardous.
*Donotusewaterongrease
fires.Neverpickupaflaming
pan.Turnoffburner,then
smotherflamingpanbycovering
pancompletelywithwellfitting
lid,cookiesheetorflattray.
Flaminggreaseoutsideapancan
beputoutbycoveringwithbaking
sodaor,ifavailable,a multipurposedrychemicalor foam
fireextinguisher.
@Do~~~~~o~eflam~ab~e
materialsinan ovenornear
‘theCooktope
@Donot M cooitinggrease
orotherflammablematerials
accumulateh orneartherange,
e }%’henC{)oliillgpork, follow
thedirectionsexactlyanda[ways
COCAthemeattoanintcrnal
temperatureofatleast170°F.
Thisassuresthat,intheremote
possibilitythattrichinamaybe
presentinthemeat,itwillbekilkxi
andmeatwillbesafetoeat.
surface Ceoting
eAlwaysusetheLmi positkm
whenignitingtopburners and
makesuretheburnershaveignited.
@Neverleavesurfaci’hnmers
unattendedatHIflame
settings.Boilovercauses
smokingandgreasyspillovers
thatmaycatchonfire.
~Adjusttopburner flamesize
soit doesnotextendbeyondthe
edged thecookingutensiL
Excessiveflameishazardous.
@Useonlydry potholders—
moistordamppotholdersonhot
surfacesmayresultinburnsfrom
steam.Donotletpotholders
comenearopenflameswhen
Iiftingutensils.Donotuseatowel
orotherbulkyclothinplaceofa
potholder.
@‘l?ominimizethepossibility
of’hrm+ ignitionofflammable
materials,andspillage,turnthe
cookwarehandlestowardtheside
orbackoftherangewithout
extendingoveradjacentburners.
@Alwaysturn surfaceburner to
IOFFbeforeremovingutensil.
@Carefullywatchfoodsbeing
friedat HIflamesetting.
3
Page 4
... ...—.
-
- ----—
..-”.— -—-
.——.——...
INIPoRTmT SMETY INSTRUCTIONS(~~~tinL@
Readdli instruction
@N&mMockthevents(air
beforeusingthisappliance.
openings)oftherange.They
providetheairinletandoutlet
whichisnecessaryfor the range
tooperateproperlywi!hcorrect
combustion.
@Donotusea wokonthe
cookingsurfaceif’the wokhas
a roundmettdringwhichis
placedovertheburner grateto
supportthe wok.Thisringacts
asaheattrapwhichmaydamage
theburnergrateandburnerhead.
Also,itmaycausetheburnerto
workimproperly.Thismaycause
acarbonmonoxidelevelabove
currentstandards,resultingina
healthhazard.
s Foodsfor fryingshouldbeas
dryas possible.Frostonfrozen
foodsormoistureonfreshfoods
cancausehotfattobubbleupand
oversidesofpan.
@Useleastpossibleamountof
fatforeffectiveshallowordeepfatfrying.Fillingthepantoofull
offatcancausespilloverswhen
foodisadded.
@Hacombinationofoilsor
fatswillbeusedinfrying,stir
togetherbeforeheating,oras
fatsmeltslowly.
@Alwaysheat fatslowly,and
watchasitheats.
~Usedeepfatthermometer
wheneverpossibletoprevent
overheatingfatbeyondthe
smokingpoint.
“
*
Useproperpansize—Avoid
@
pansthatareunstableoreasily
tipped.Selectutensils
havingflat
bottomslargeeno~ghtoproperly
containfoodavoidingboilovers
andspillovers,andlargeenough
tocoverburnergrate.ThisWII1
bothsavecleaningandprevent
hazardousaccumulationsoffood,
sinceheavyspatteringorspillovers
leftonrangecanignite.Usepans
withhandlesthatcanbeeasily
graspedandremaincool.
@Weonlyglasscookwarethat
isrecommendedforuseongas
burners.
@Keepallplasticsawayfrom
topburners.
@TOavoidthepossibilityofa
burn, alwaysbecertainthat the
controlsforallburners areat
OFFpositionandallgratesare
coolbeforeattemptingto
removethegrate.
~‘When
flamingfoodsunder
thehood,turn the fanoff.The
fan,ifoperating,mayspread
theflame.
*If rangeislocatedneara
window,donotuselongcurtains
whichcouldblowoverthetop
burnersandcreateafire hazard.
@If yousmellgas,turnoffthe
gastotherangeandcallaqualified
servicetechnician.Neverusean
openflametolocatealeak.
-----
*Donotuseovenfor a storage –
area.
@Wandawayfromthe range
whenopeningthedoorofa hot
oven.Thehotair or steam
whichescapescancauseburns
tohands,faceand/oreyes.
@Keepovenfreefromgrease
buikiup.
*Placeovenshelvesindesired
positionwhileoveniscool.
ePullingout shelftotheshelf
stopisa convenienceinlifting
heavyfoods.It isalsoa
precautionagainstburnsfrom
touchinghotsurfacesofthe
dooror ovenwalls.
@Don’theatunopenedfood
~
containersintheoven.Pressure
couldbuildupandthecontainer —
couldburst causingan injury.
@Don’tusealuminumfoil
anywherein theovenexceptas
describedinthisbook.Misuse
couldresultinafirehazardor
damagetotherange.
~use onlyglasscookwarethat is
recommendedforuseingas
oven.
9Whenusingcookingor
roastingbagsinoven,follow
themanufacturer’sdirection.
~Alwaysremovebroilerpan
frombroilercompartmentas
soonas youfinishbroiling.
Greaseleftinthepancancatch
fireifovenisusedwithout
removingthegreasefromthe
broilerpan.
Page 5
Ck’w+iwfkre-llps.
Cleanil%gYom’Range
a?&q Hinge dean mldfree
d’accumt~lations ofgrease or
Spiilovemwhich may ignite.
M%uNeedservice
@Read‘The Pmbk?msolver”
on page 21ofyisbook.
.
amm?attempttorepair’
or rephw any partd’ ym.lr
rangeunlessit isspecifically
reeoi~~mendedinthisbw)k.AH
otherservicing shouldbe refe~recl
qualifiedtechnician.
to a
SlMiYE4THESE
msTRucTIoNs
Mall-range, likeso manyo!hH-
himwhokiitems,is hew? and
can settle into soft floorcoverings
such as Cmhiomd vinylor
wwpeting. Wkn
movingthe range
onthistype0( llooring,usec:irc.
Do Iht install the range over
kitchencarpeting
unlessyou
placeaninsulatingpador sheetof
l/4-inch-thickplywoodbetween
thermgcandcarpeting.
thefloor cwerhg endsat
When
thefront of the range, the
areathat
therangewillrestonshouldlx
builtupwithplywoodorsimilar
materialtothesamelevelorhigher
thanthe floorcovering.Thiswill
allowthe rangetobe movedfor
cleaningor servicing.
Range
Yourrangemustbe levelinorderto
producepropercookingandbaking
results.Afieritisinitsfinal
location,placea levelhorizontally
onanovenshelfandcheckthe
levelnessfronttobackandsideto
side.Leveltherangebyadjusting
thelevelinglegsorbyplacing
shimsunderthecornersas needed.
,r--- -
. _-.,
f
5
Page 6
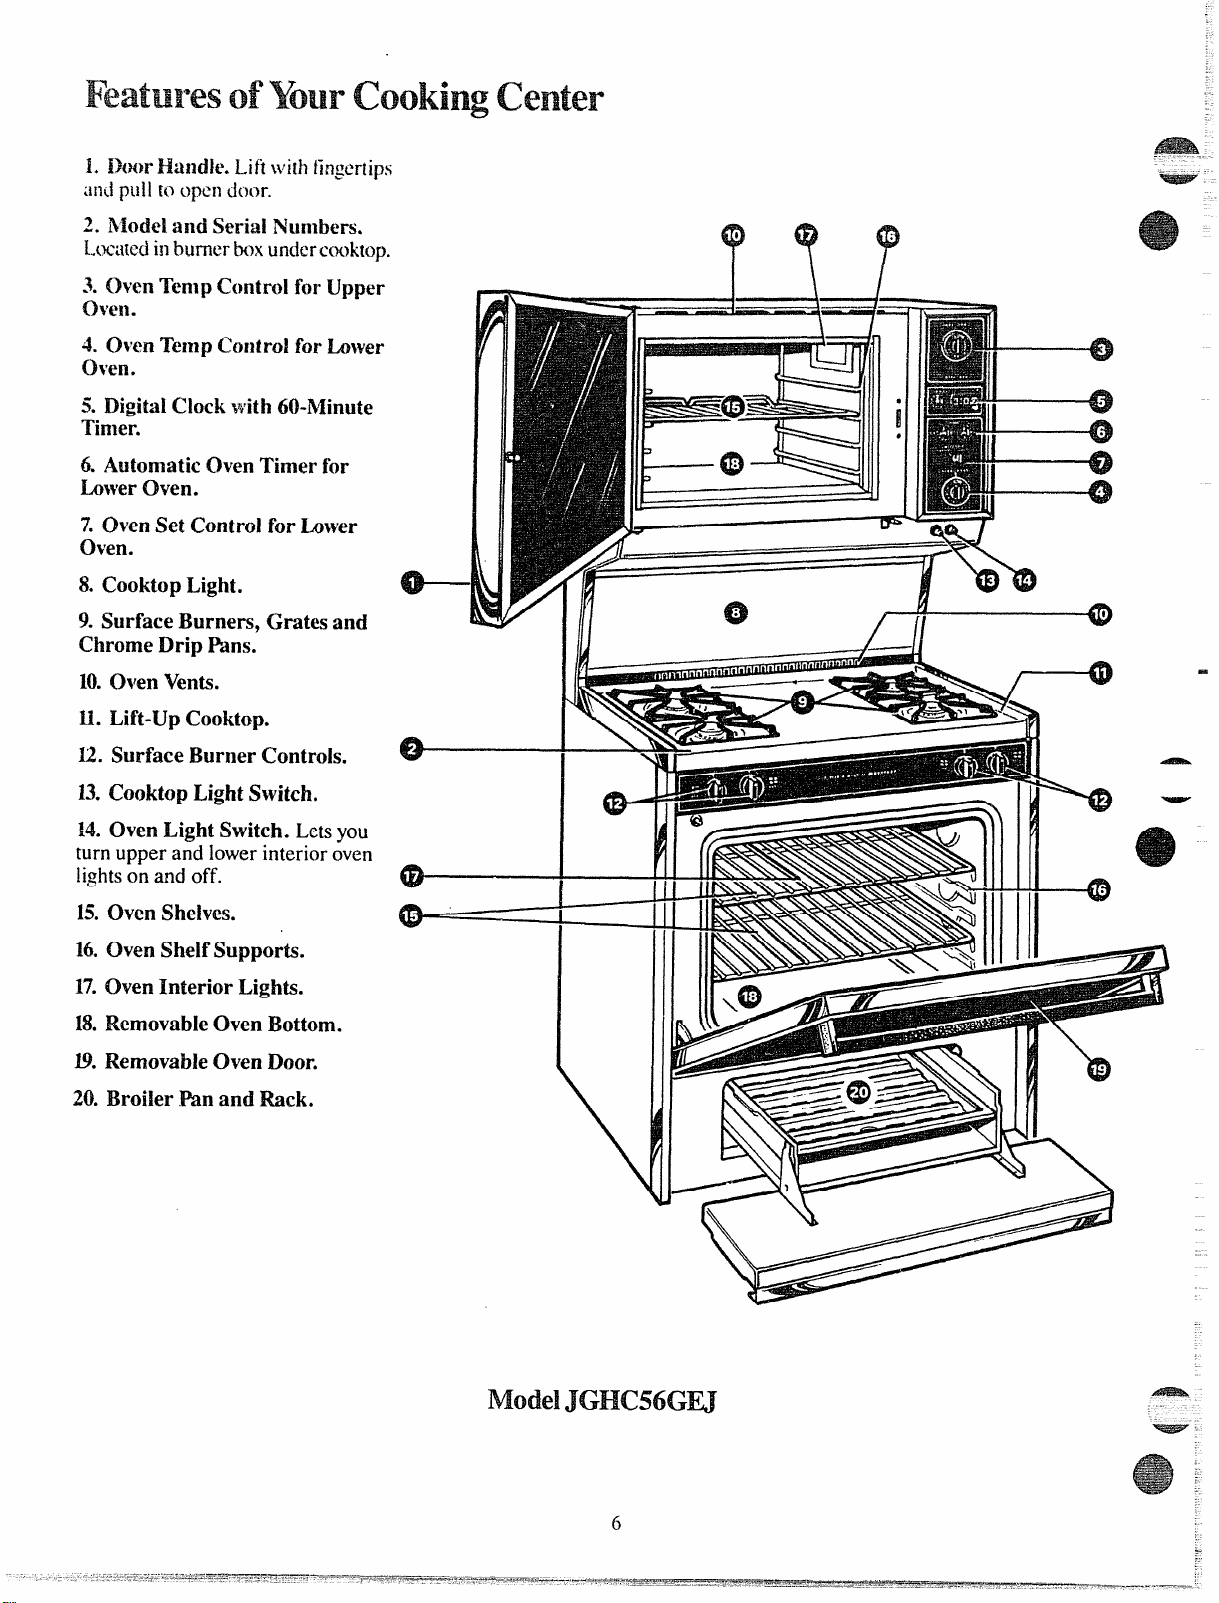
Featuresof’Yourcookingcenter
1.I}t)tlrHaildle. Liftlvilhfingertips
and pul i m open door-.
2. Rhkl and
I.ocawd
3. OvenTemp COntrolfor Upper
oven.
4. oven ?kmp Gmiroi for Lower
!32riaiI’Xumlwxs.
inburnerboxundercooktop.
(hen. -
5. Digital Clock with (iWMinute
Timer.
6. Automatic Oven Timer for
LowerOven.
7. oven Set Control for Lower
Oven.
8. CooktopLight.
9. Surface Burners, Gates and
Chrome Drip Fans.
N).oven Vents.
Il. Lift-Up Cooktop.
12. Surface BurnerControls.
13.Cooktop Light Switch.
???
H
[I
14.(Men Light Switch.
Letsyou
turnupperand lowerinterioroven
lightsonandoff.
15.
Oven Shelves.
16.
Oven Shelf Supports.
17.
Oven Interior Lights.
18.
Removable oven Bottom.
D.
Removable Oven Door.
20.
Broiler .Panand Rack.
ModelJGHC56GM
6
Page 7
AutoIll:3tieIgnition
.
Y~mrsurfaceburnersare lightedby
clm-tricignition.dimimting the
needforpilotlights.
in caseofa
proveroutage, youcan
1ightthesurfaceburnersonyour
rtingcwitha match.Holda lighted
nmmhtotheburner.thenturnthe
knobtotheLITEposition.Use
extreme
burnersthis way.
caution when lighting
Surfwxburnersinusewhenan
electricalpowerfailureoccurswill
continuetooperatenormally.
SurfaceBurnerControls
Knobsthatturnthesurfaceburners
onandoffarelocatedon thelower
frontpanel.Thetwoon theleftand
the Iwoon therightaremarkedas
towhichburnerstheycontrol.
ToLightaSurfaceBurner
Pushthecontrolknobinandturnit
toLITE. Youwillheara little
clickingnoise—thesoundofthe
electricsparkignitingtheburner.
Aftertheburnerignites,turnthe
knobtoadjust theflamesize.
*Alwayshavecookwareonthe
gratebeforeturningonaburner.
Thefinishon thegratemaychip
withoutcookwaretoabsorbtheheat.
~Checktobe suretheburneryou
turnedonistheoneyouwanttouse.
s Besuretheburnersandgratesare
cool beforeyouplaceyourhand,a
potholder,cleaningclothsorother
materialson them.
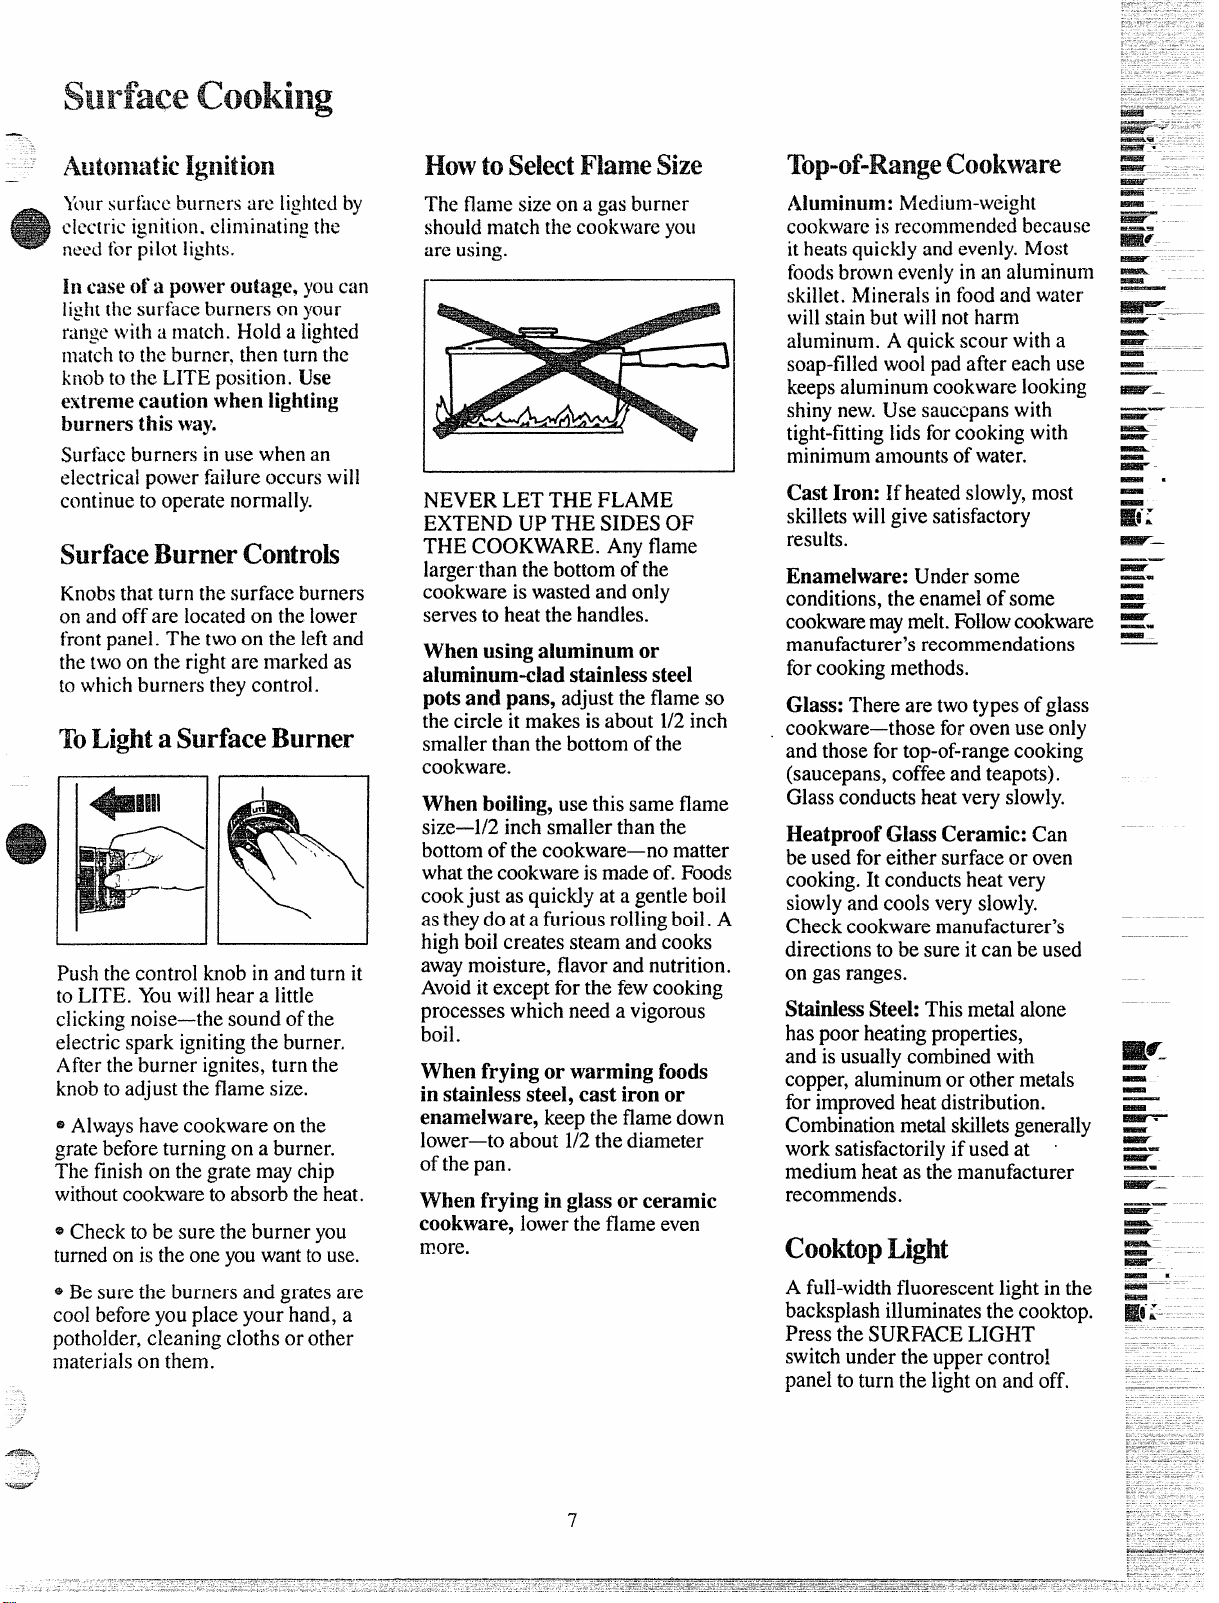
EkNVtoSoledFlameSk
Theflamesizeona gasburner
shouldmatchthe cookwre yoLt
areusing.
NEVERLETTHEFLAME
EXTENDUPTHESIDESOF
THECOOKWARE.Anyflame
largerthanthebottomofthe
cookwareiswastedandonly
servestoheat thehandles.
When using aluminum or
aluminum-clad stainless steel
potsand pans,
thecircleitmakesisabout1/2inch
smallerthanthebottomofthe
cookware.
When boiling, usethissameflame
size—1/2inchsmallerthanthe
bottomofthecookware—nomatter
whatthecookwareismadeof.Foods
cookjustas quicklyata gentleboil
astheydoatafuriousrollingboil.A
highboilcreatessteamandcooks
aw-aymoisture,flavorandnutrition.
Avoiditexceptforthefewcooking
processeswhichneedavigorous
boil.
When frying or warming foods
in stainless steel, cast ironor
enamelware,
lower—toabout1/2thediameter
ofthepan.
When frying in glass or ceramic
cookware,
m-ore.
adjusttheflameso
keepthe flamedown
lowertheflameeven
Top-of-RangeCookware
Ahninmn: Medium-weight
cookwareisrecommendedbecause
itheatsquicklyandevenly.Most
foodsbrownevenlyinan aluminum
skillet.Mineralsinfoodandwater
willstainbutwillnotharm
ahnninum.Aquickscourwitha
soap-filledwoolpadaftereachuse
keepsaluminumcookwarelooking
shinynew.Usesaucepanswith
tight-fittinglidsforcookingwith
minimumamountsofwater.
Cast Iron: If heatedslowly,most
skilletswillgivesatisfactory
results.
Enamelware:Undersome
conditions,theenamelofsome
cookwaremay melt.I%I1owcookware
manufacturer’srecommendations
forcookingmethods.
Glass:Therearetwotypesofglass
cookware—thoseforovenuseonly
andthosefortop-of-rangecooking
(saucepans,coffeeandteapots).
Glassconductsheatveryslowly.
Heatproof Glass Ceramic: Can
beusedforeithersurfaceoroven
cooking.It conductsheat very
siowlyandcools veryslowly.
Checkcookwaremanufacturer’s
directionstobe sureitcanbeused
ongasranges.
Stairdess
Steel:Thismetalalone
haspoorheatingproperties,
andisusuallycombinedwith
copper,aluminumorothermetals
forimprovedheatdistribution.
Combinationmetalskilletsgenerally
worksatisfactorilyif usedat ~
mediumheatasthemanufacturer
recommends.
CooktopLight
A full-widthfluorescentlightinthe
backsplashilluminatesthecooktop.
PresstheSURFACELIGHT
switchunderthe uppercontro!
paneltoturnthelightonandoff.
7
Page 8

usingYburOvem
.AutonaaticIgnition
‘Ik ovenburners on yourrange
are lighted by ehxtric ignition.
Theovensand in-oilercannotbe
operatedin the event of a power
failure.
Tolightthe burners,
OVENTEMPknobtothedesired
temperature.Theburnershould
ignitewithin60seconds.
CAUTION:DON(YI’MAKEANY
ATTEMPI’TOOPERATETHE
ELECTRICIGNITIONOVENS
DURING ANELECIXICAL
POWERFAILURE. Resumption
ofelectricalpowerwhenOVEN
TEMPcontrolsarein anyposition
otherthanOFF willresultin
automaticignitionoftheoven
burnersandcouldcausesevere
bumsif, atthetime,youwere
attemptingtolightaburner
witha match.
Anovenburnerinusewhenan
electricalpowerfailureoccurswill
continuetooperatenormally.
turnthe
oven Wmpemturecontrol
TheOVENTEMPcontrolsfor
eachovenare locatedon theupper
ovencontrolpanel.
UpperOven
Simplyturntheknobto thedesired
cookingtemperatures,whichare
markedin25*F.incrementsonthe
dial.
Aftertheovenreachestheselected
temperature,theovenburnercycles—
offcompletely,thenonwithafull
flame-to keeptheoventemperature
controlled.
LowerOvm
OvenSheIves
Whenplacingcookw~reonashelf,
pulltheshelfouttothe “stop”
position,Placethecookwareon
the shelf,thenslidetheshelfback
intotheoven.Thiswilleliminate
reachingintothehotoven.
TOremovea shelffrom either
oven,
pullouttostopposition,lift
upon front,andpullout.
Lower-OvenSklfl?bsitiom
Thelowerovenhasfiveshelf
supports-A(bottom),B,C,Dand
E (top).Shelfpositionsforcooking
aresuggestedonbakingandroasting
pages.
(hen Lights
Usetheswitchunderthe upper
controlpaneltoturnthe lightson
andoffintheupperandlowerovens.
e-
Before Usillgj Your
Lookat thecontrols.Besure
1.
youunderstandhowtosetthem
properly.
2. Checktheinsidesoftheovens.
Lookatthe shelves.Practice
removingandreplacingthem
whilethe oveniscool.
3. Readtheinformationandtips
onthefollowingpages.
4. Keepthisbookhandywhereyou
canreferto it—especiallyduring
thefirstfewweeksofgetting
acquaintedwithyouroven.
ovens
Theshelvesaredesignedwith
stop-lockssowhenplacedcorrectly
ontheshelfsupports,theywillstop
beforecomingcompletelyoutof
theovenandwillnottiltwhenyou
areremovingfoodfromthemor
placingfoodon them.
—
8
;..
Page 9

-%3s==
—
—
ovenvent
Yourovenisventedthroughducts
attherearoftherange(seepage6).
Donotblocktheseductswhen
cookingintheoven-it isimportant
thattheflowofhotairfromtheoven
andfreshairtotheovenburnerbe
uninterrupted.Avoidtouchingthe
ventopeningsornearbysurfaces
duringovenorbroileroperation—
theymaybecomehot.
Ventopenings and nearby
~
surfacesmay become hot. Do not
touchtherm.
~Handlesof potsand pansonthe
cooktop
closet6thevent.
maybecomehot if lefttoo
meclock
Toset the Clock, pushinthecenter
knoboftheMinuteTimerandturn
theknobineitherdirectiontoset
the digitalclocknumeralstothe
correcttime.(Aftersettingthe
clock,let theknoboutandturn the
MinuteTimerpointertoOFF.)
MinuteTimer
TheMinuteTimeristhelargedial
totheleftofthedigitalclock.Use
ittotimeallyourprecisecooking
operations.Thisdialalsochanges
thedigitalclock.
Tosetthe Minute Timer, turnthe
centerknobclockwise,~“thout
pushingin,untilthepointerreaches
the numberofminutesyouwantto
time(upto60).
2. SettheSTARTcontrol.Pushin
andtumtheSTARTknobtothe
timeyouwanttheoventoturnitself
on. (Ifyouwantitto startcooking
immediately,donotsetthe Start
time.)
3. SettheSTOPcontrol.Pushin
andturntheS~P knobtothetime
youwanttheoventoturnitselfoff.
Note:Theremustbeat leastahalfhour differencebetvleenthe START
andSTOP dialsfortheautomatic
controltowork.
4. SettheOVENSETknobto
AUTOMATIC.
~Donot leaveplasticitemsonthe
cooktop-they-rnay meltif lefttoo
closetothe vent.
(himMoisture
Asyourovenheatsup,the
temperaturechangeoftheair
intheovenmaycausewater
dropletstoformonthedoor
glass.Topreventthis,openthe
ovendoorforthefirstminute
ofovenheat-uptoletthemoist
airout.
Atthe endof thesettime, a buzzer
soundsto tellyou time is up.
Turn
theknob,withoutpushingin,until
the pointerreachesOFFandthe
buzzerstops.
AutomaticOvenTimer
(forlowerovenonly)
ThisTimerwillautomaticallystart
andstopyourlowerovenforyou.
Here’swhatyoudo:
L Makesurebothyourrangeclock
andtheSTARTdialshowthecorrect
timeofday.
5. SetthelowerOVENTEMPknob
tothedesiredoventemperature.
Theovenwillturnitselfon
in-mediatelyor ata laterSTART
timethatyousetifyousettheSTART
control,cookatthe temperature
youselectedandturnitselfoffat
theSTOPtimeyouselected.
Aftertakingfoodoutofthe oven,
besureto turn theOVENTEMP
controltooffandtheOVENSET
knobtothe MANUALOVENsetting
whereitshouldbekeptfornormal
ovenuse.
9
Page 10

Bating
.—
.—
HowtosetYourRange
forBaki~
L Positiontheshelfor shelvesin
theoven.
2, Closeovendoor.TurnOVEN
TEMPknobtodesiredtemperature.
Preheatovenforat least 15minutes
ifpreheatingisnecessary.
3. Placefoodinovenoncenter
ofshelf.Allowatleast2 inches
betweenedgeofbakewareandoven
walloradjacentcookware.
Ifcookingon twoshelvesatthe
sametime,placeshelvesabout4
inchesapartandstaggerfoodon
them.
4. Checkfoodfordonenessat
minimumtimeon recipe.Cook
longerif necessary.Switchoff
heatandremovefood.
Reheating
Preheatingisveryimportantwhen
usingtemperaturesbelow225”F.
andwhenbakingfoodssuchas
biscuits,cookies,cakesandother
pastries.
Preheatingisnotnecessarywhen
roastingorforlong-timecookingof
wholemeals.
Shelf wsitiom
Mostbakingisdoneonthesecond
shelfposition(B)fromthebottom.
Whenbakingthreeor fouritems,
usetwoshelvespositionedonthe
secondandfourthsetsof supports
(B& D) frombottomofoven.
Bakeangelfoodcakesonfirstshelf
position(A) frombottomofoven.
BaMng mps
~Followatestedrecipeand
measuretheingredientscarefully.
Ifyouareusingapackagemix,
followlabel directions.
* IfInoistureisnoticeableon{he
tint oftheovenorontheblackglass
doorwhenfirstturningontheoven,
leavetheovendoor ajarforafew
minutesoruntiltheoveniswarm.
s Donot opentheovendoorduring
abakingoperation—heatwillbelost
andthebakingtimemightneedto
beextended.Thiscouldcausepoor
bakingresults.Ifyoumustopenthe
door,openitpartially-only3or4
inches—andcloseitasquicklyas
possible.
@Donotdisturbthe heatcirculation
intheovenwiththeuseofaluminum
foil.If foilisused,placeasmall
sheetofit,about10by 12inchesat
the most,onalowershelfseveral
inchesbelowthefood.Donotplace
foilontheovenbottom.
CommonBakingProblems
andPossibleSolutions
PIES
Burning aroundedges
*
Oventoofill; avoidovercrowding.
eEdgesofcrusttoothin.
@Incorrectbakingtemperature.
Bottomcrust soggyand unbaked
~
AHOW crustand/cwfillingtoCOO1
sufficientlybeforetillingpieshell.
o Fillingmaybe toothinorjuicy.
Fillingallowedtostandinpieshell
~
beforebaking.(Fillpieshellsand
bakeimmediately.)
~Ingredientsandpropermeasuring
affectthequalityofthecrust.Usea
testedrecipeandgoodtechnique.
Makesuretherearenotinyholesor
tearsinabottomcrust. “Patching”
apiecrustcouldcausesoaking.
fillingrunsover
Pie
~
Topandbottomcrustnotwell
sealedtogether.
@Edgesofpiecrustnot builtup
highenough.
~Toomuchfilling.
~ Checksizeofpieplate.
P%tryistough;crustnotflaky
@
Toomuchhandling.
~Fat too sofior cut intoo fine.
Rolldoughlightlyandhandleas
littleaspossible.
Cake riseshigherononeside
@Batterspreadunevenlyinpan.
@Ovenshelvesnotlcvel.
@Usingwarpedpans.
@Incorrectpansize.
Cakescrackingontop
@
Oventemperaturetoohigh
~Battertoothick,foiiowrec
pe
orexactpackagedirections.
@Checkforpropershelfpos
[ion.
echeckpan-sizecalledforinrecipe.
@Impropermixingofcake.
Cakefalls
oToomuchshortening,sugaror
liquid.
eCheckleaveningagent,baking
powderor bakingsodatoassure
freshness.Makeahabittonote
expirationdatesofpackaged
ingredients.
eCakenotbakedlongenoughor
atincorrecttemperature.
eIfaddingoil toacakemix.make
certaintheoil isthetypeand
amountspecified.
Crustis hard
~
Checktemperature.
oChecksheifposition.
Cakehassoggylayer or streaks
atbottom
o
lJndermixingingredients.
eShorteningtoosoftforproper
creaming.
oTOOmuchliquid.
COOKIES&IMscurm
Doughycenter; heavycrust on
surface
oCheck
@Checkshelfposition.
eFO11OWbakinginstructions
carefullyasgiveninreliablerecipe
oronconveniencefoodpackage.
e Flat cookie sheets will give more
evenbakingresults.Don’tovercrowd
foodsonabakingsheet.
oConveniencefoodsusedbeyond
theirexpirationdate.
Browningmore noticeable on
oneside
@
checkgasketseal.
@Checkshelfposition.
temperature.
Ovendoornotclosedproperly,
+-
10
Page 11

w
—
—
-.
2. Aluminumpansconductheat
quickly.Formostconventionalbaking.
light,shinyfinishesgivebestresults
txxausetheyhelppreventovcrbrowninginthe timeittakesfbrheatto
cooktheccntcrareas.Werecommend
Preheatingisnotnecessarywhen
roast ing or fixlong-timecookingof
\vhoic
meals.
Food
Bread
Biscuits(Yz-in.[hick) ShinyCookieSheet
Cotlcecake ShinyMetalPanwith
Cornbreadortnuffins
Gingerbrca41
Muffins
Popovers DeepGlassorCastIronCups
Quickloafbread
Yeastbread(~
Plainrolls
Sweetrolls ShinyOblongorMuffinPins
Cakes
(withoutshortening)
Angelfood AluminumTubePan A 325°-3750
Jellyroll Metal JellyRollPan
sponge
cakes
Bundtcakes MetalorCeramicPan
Cupcakes ShinyMetalMuffinPans
Fruitcakes MctaIorGkussLoafor
Layer
Layer.chocolate
Loaf MetalorGlassLoafPans
Cookies
Brownies MetalorGlassPans B,C 325°-3500 25-35
Drop CookieSheet
Refrigerator
Rolledorsliced CookieSheet
Fruits,
OtherDesserts
EIakedapples
:ustard
Puddings,rice GlassCustardCupsor
mdcustard Casserole
Pies
%ozen FoilPanonCookieSheet A 400°-4250
Ucringuc Spreadtocrustedges
he crust Glassor Satin-finishMetalPan
rwocrust GlassorSatin-finishMetalPan
‘astryshell Glassor Satin-fii]ish
Miscellaneous
Yakedpotatoes SetonOvenShelf
;callopeddishes GlassorMetal Pan
louffles
]OW’CS)MetalorGlassLoafPans
Cookwwe
satin-finishbottom
CaMIronorGlassPan B
ShinyMetalPanwith
satin-finishbottom
ShinyMctidMuffinPans
MetalorGlassLoafPans B
ShinyOblongorMuffinPans
MetalorCeramicPan
TubePm
ShinyMc!al I%nwith
satin-finishbottom
ShinyMetalPanwith
satin-finishbottom
CookieSheet
Glassor MetalPans
GlassCustardCupsor
Casserole (setinpanofhotwater)
GlassPan
dull(satin-finish)bottomsurfacesof
pansforcakepansandpieplatestobe
surethoseareasbrowncompletely.
CNen ‘Hme,
Temperatwa Minutes
400°-4750
350°-4000
400°-4500 20-40
400°-4250 20-30 Decreaseabout5minutesformuffh mix.
350°-3750 45-60
350°-3750 20-30
375°-4000 10-15
275°-3000
350°-3750
400°-4250 6-12
325°-3500
MetalPan
shelf
Positions
Il.c
B,A
B 350°
A.B
B
A, B 375°-4250
A, B 375°-4250 10-25
B,A
B
A 325°-3500
A, B 325°-3500
B 350°-3750 20-25
A, B
B 350”-375°
B
B 350° 40-60
B,C 350°-4000
B,C
B,C 375°-4000 7-12
A, B,C 350°-4000 30-60
B 300°-350” 30-60 Reducetemperatureto300”F.forlarge
B
B
A, B 400°-4250 45-60
B 400°-4250 40-60
B 450° 13-16
,A, B,C 325°-4000 60-90 Increasetimeforlargeamountorsize.
A, B,C 325°-3750
B 300”-350° 30-75
15-~(j
~().3()
45-55
375” 45-60
45-60 browning.
30-55
45-60
45-65
2-4hrs.
20-35
25-30
325° 50-90
45-70 Largepiesuse400°F.andincreasetime.
30-60
3. Darkor non-shinyfinishes,also
g]assandPvroc~~m@~~&ware,
generallyabsorbheatwhichmayresult ‘. -=
indry,crispcrusts.Reduceovenheat
25°F.ifligh!ercrustsaredcsirmf.
Preheatcastironforbakingsome
foodsforrapidbrowningwhenf(mdis
added.
Comments
Canned,refrigeru[edbiscui~stake2to4
minuteslesstime.
castironpanforcrispcrust.
Preheat
Orbakeat450”F.for25minutes,thenat
350”F.for 10to 15minutes.
Darkmetal orglassgivesdeepest
Forthinrolls,ShelfBmaybeused.
Forthinrolls,ShelfBmaybeused.
Twopieeepanisconvenient.
Linepanwithwaxedpaper.
Paperlinersproducemoremoistcrusts.
Use300”F.andShcl(B forsmallor
individualcakes.
Ifbakingfourlayersuse
shelvesBandD.
Barcookiesfrommixusesametime.
10-20
15-25
UseShelfCandincreasetemperature
25 to50”F.formorebrowning.
custard.
Cookbreadorricepuddingwithcustard
base80to90minutes.
Toquicklybrownmeringueuse400”F.for
9to 11minutes.
Custardfillingsrequirelowertemperature,
longertime.
11
Page 12

Roasti13g
Roaslingiscookingbydry heti:.
limier meator poultryam be
roasteduncoveredinyouroven.
Roastingtemperatures,which
shouldbelowandsteady,keep
spatteringto a minimum.When
romting,itis notnecessarytosear,
baste,cover,oraddwatertoyour
meat. Roasting is easy, just follow
thesesteps:
StepL Positionovenshelfat
secondfrombottomposition(B)
forsmallsizeroast(3to5 lbs.)and
atbottomposition(A)forlarger
roasts.
Step2: Checkweightofroast.
Placemeatfat-side-upor poultry
breast-side-uponroastingrackina
shallowpan.Themeltingfatwill
bastethemeat.Selectapanas
closetothesizeofmeataspossible.
(Broilerpanwithrackisa good
panforthis.)
Step3:TurnOVENTEMPcontrol
todesiredtemperature.Checkthe
RoastingGuidefortemperatures
andapproximatecookingtimes.
$i%ep4: Mostmeatscontinueto
cooksligh~lywhilestandingafter
beingremovedfromthe oven.For
rareormediuminternaldoneness,
youmaywishtoremovemeatfrom
the ovenjust beforeitisdoneifit is
tostand10to20minuteswhileyou
makegravyor attendtootherfoods.
Ifno~andingisplanned,cook
meattosuggestedtemperature.
FrozenRoasts
Frozenroastsofbeef,pork,
lamb,etc.,canbestartedwithout
thawing,but allow15to25minutes
perpoundadditionaltime(15
minutesperpoundforroastsunder
5 pounds,moretimeforlarger
roasts).
Thawmostfrozenpoultrybefore
roastingtoensureevendoneness.
Somecommercialfrozenpoultry
canbecookedsuccessfullywithout
thawing.Followdirectionsgiven
onpacker’slabel.
Roastingchide
Npe
Meat
Tendercuts;rib,highquality
sirlointip,rumpor topround*
Lamblegorbone-inshoulder*
Vealshoulder,legorloin*
Porkloin,ribor shoulder*
Ham,pre-cooked
Ham,raw
*Forbonelessrolledroasts over6-inches
thick,add5to 10minutesperlb.totimes
givenabove.
Poultry
Chickenor Duck
Chickenpieces
Turkey
Oven
Temperature Doneness
325°
325°
325°
325° WellDone: 35-45 30-40 170°-180°
325” ToWarm: 18-23minutesper lb.(anyweight)
325°
325°
375°
325°
Rare: 24-30 18-22
Medium:
WellDone:
Rare:
Medium:
WellDone: 30-35 28-33 170°-1850
WellDone:
WellDone: 27-35 24-27
WellDone:
WellDone:
WellDone:
ApproximateRoastingTime Internal
in Minutes per Pound Temperature‘F
3to5-lbs. 6 to fklbs.
29-33 22-25 150°-160°
35-45 28-33 170°-185°
21-25 20-23 130°-1400
25-30 24-28 150°-1600
35-45
Under 10 lbs. 10to 15-lbs.
3 to 5-Ibs. Over5Ibs.
35-40 30-35 185°-1900
30-35 185°-190°
10 to lS-lbs.
16-22 13-19 185°-190°
30-40 1700-180°
Over lS ibs.
130°-140°
115°-1250
170°
Inthigh:
I
I
12
Page 13

~ Broilingis cooking food bydirect
heat from abovethe
food.Your
rangehasa convenientcompartment
belowtheovenforbroiling.Italso
hasaspeciallydesignedbroilerpan
andrackthatallowdrippingfatto
drainawayfromthefoodsandbe
keptawayfromthehighheatof
the gasflame.
Distancefromtheheatsourcemay
be changedbypositioningthebroiler
panandrackononeofthreeshelf
positionsinthebroilercompartment—
A (bottomofbroilercompartment),
B(middle)andC(top).
Both the oven and broiler
compartment doors should be
dosed during broiling.
HOW~0
Ifmeathasfatorgristlenearthe
L
Broil
edge,cutverticalslashesthrough
bothabout2 inchesapart,but don’t
cutintomeat.Werecommendthat
youtrimfattopreventexcessive
smoking,leavinga layerabout
l/8-inchthick.
2. Removebroiler panandrack
frombroilercompartmentand
placefoodon rack.
3. Pulloutdrawerandposition
broilerpanincompartment.Placing
f~ closertoflameincreasesexterior
browningoffood,butalsoincreases
spatteringandthe possibilityoffats
andmeatjuicesigniting.
4. Closebroilerdoorand,formost
foods,turnOVENTEMPknobto
BROIL.Note:Chickenandham
arebroiledata lowersettingin
ordertocookfoodthroughwithout
over-browningit.
5. Turnmostfoodsonceduring
cooking;(theexceptionisthinffiets
offish;oiloneside,placethatside
downonbroilerrackandcookwithout
turninguntildone).Timefoodsfor
aboutone-halfthetotalcooking
time,turnfood,thencontinueto
cooktopreferreddoneness.
6. TurnOVENTEMPknobto
OFF.Removebroilerpanfrom
compartmentandservefood
immediately.Leavepanoutside
compartmenttocool.
BroilingTips
Usetongsto turnmeatover—
~
piercedmZatlosesjuices.
BroilingGuide
Quantity
andlor
Food
Bacon
GroundBeef
WellDone
BeefSteaks
Rare
Medium
WellDone
Rare
Medium
WellDone
Chicken (450°)
BakeryProducts
Bread(Toast)or
ToasterPastries
EnglishMuffins
Lobstertails
(6to 8-02.
Fish
Hamslices (450°)
Precooked
I%rkchops
WellDone
Lambchops
Medium
WellDone
Medium
WellDone
Wieners,
similarprecooked
zausages,
bratwurst
each)
Thickness
‘h-lb.(about8
thinslices)
l-lb.(4patties)
%to34-in.thick
l-in.thick
(1-l%lbs.)
1%-in.thick
(2-2%Ibs.)
1whole
(2to2%-lbs.),
splitlengthwise
2-4slices
1pkg.(2)
2-split
24
l-lb.fiilets%to
l/z-in.thick
l-in.thick
2(%in.)
2(l-in.thick),
about1lb.
2(1inch)
about10-12oz.
2(1%inch),
about1lb.
l-lb.pkg.(10)
13
* Steaksmdlchopsshould beat --
least 1 inch thick
results.Panbroilthinnerones.
IstSide
Broil
Pbsition Comments
Minutes
B
B 7-8
B
B
B
B,C
B
B
A 30-35 25-30
c
c
B
B,C
B
B
B
B
B
B
B
B,C
2ndSide
llme,
9-1o
13-16 Donot
‘llme,
Minutes
Atmngeinsinglelayer.
3
Spaceevenly.Upto8patties
takeaboutsame time.
9
10
13
10
15
25
2-3
3-5
5 5 Handleandturnverycaret%lly.
8 8 Incm.asetimes5-10min.perside
10
13
8
10
10
17
6 1-2 Ifdesired, splitsausagesinhalf
7
Steakslessthanl-in.cook
5-6
throughbeforebrowning.
Panfryingisrecommended.
8-9
6-7
12-14
16-18
turn
over.
9-12
12-14
Slashfat.
Reducetimesabout5 to 10min.
persideforcut-upchicken.
Brusheachsidewithmelted
butter.Broilwithskinsidedown
fimtandbmilwithdoorclosed.
%-1 Spaceevenly.PlaceEnglish
muffinscut-side-upandbrush
withbutterifdesired.
Cutthroughbackofshell,spread
open.Brushwithmeltedbutter
beforeandafterhalftime.
Brushwithlemonbutterbefore
andduringcookingifdesired.
Preheatbroilertoincrease
browning.
for1%-in.thickorhomecured.
4-5
Slashfat.
4-7
Slashfat.
10
4-6
lengthwise;cutinto5to6-in.
pieces
forbest broiling .- .=
!a!Esa––
-–A
—
—
-.
-
-.
-
Page 14

careandcleaning
.-—
Propercareandcleaningare
importantsoyourrangewillgive
youefficientandsatisfactory
service.Followthesedirections
carefullyincaringforitto help
assuresafeandpropermaintenance.
Beforecleaninganypartofyour
EHX20NINECTELECTRIC
mnge,
POWERTO ‘IWERANGE
fuseboxorcircuitbreakerpanel,
orpull the rangepowercordplug
fromtheelectricoutlet.
specialGu’’ed’continuow-
CkaningOvenInteriors
Yourrange has Continuous-
Cleaningovens that clean
themselveswhile cooking.
insideoftheovens—top,sides,and
back—isfinishedwithaspecial
coatingwhichcannotbecleaned
intheusualmannerwithsoap,
detergents,commercialoven
cleaners,coarseabrasivepads
orcoarsebrushes.Useofsuch
cleansersand/orthe useofoven
sprayswillcausepermanentdamage.
special coating is a porous
The
ceramicmaterial
colorandfeelsslightlyroughtothe
touch.Ifmagnified,thesurface
wouldappearaspeaks,valleys,and
sub-surface“tunnels:’Thisrough
finishtendstopreventgrease
spattersfromforminglittlebeads
ordropletswhichrundownthe
sidewallsofa hard-surfaceoven
linerleavingunsightlystreaksthat
requirehandcleaning.Instead,
whenspatterhitstheporousfinish
itisdispersedandispartially
absorbed.Thisspreadingaction
increasestheexposureofoven
soiltoheatedair, andmakesit
somewhatless noticeable.
may not disappearcompletely
Soil
andatsometimeafierextended
usage,stainsmayappearwhich
cannotbe removed.
Thespecial
smalimmmts ofspatter,notas
withlargerspills,especially
well
sugars,eggordairymixtures.
whichis darkin
coating works best on
atthe
The
‘I’he
special coating is not used
on ovenshelves.
cleanedoutsidefheoventoavoid
damagetothespecialcoating.
Cleanthe
‘Fo
Shelvesshouldbe
Continuous-CleaningOvens:
Letrangepartscoolbefore
1.
handling.Itisrecommendedthat
rubberglovesbe wornwhen
cleaningrangepartsmanually.
2. Removeshelvesandcookware.
3. Soilvisibilitymaybereducedby
operatingtheovenat450”F.Close
thedoorand turnOVENTEMP
knobto450”F.Timeforatleast4
hours.Repeatedcyclesmaybe
necessarybeforeimprovementin
appearanceisapparent.
REmmt: DURINGTHE
OPERATIONOFTHEOVEN,THE
DOOR,WINDOWANDOTHERRANGE
SURFACESWILLGETHOTENOUGH
113CAUSE13URNS.DONOT
Ifaspilloverorheavysoiling
4.
occursontheporoussurface,as
soonaspracticalafierthe ovenhas
cooled,removeasmuchofthesoil
aspossibleusingasmallamountof
waterandastiffbristlenylon
brush.Whenusingwater,useit
sparinglyandchangeitfrequently,
keepingitas cleanaspossible,and
besuretoblotitup withpaper
towels,cloths,or sponges.Donot
ruborscrubwithpapertowels,
clothsorsponges,sincetheywill
leaveunsightlylintontheoven
finish.If waterleavesa whitering
onthefinishasitdries,apply water
againandblotitwithacleansponge,
startingattheedgeoftheringand
workingtowardthecenter.
not use soap, detergent,
Do
commercial ovencleaner, silicone
ovensprays, coarse steel pads or
coarse brushes on the porous
surface.
clog, andmar theporoussurface
andreduceitsabilitytowork.
Theseproductswillspot,
‘KXN2H.
Do
not scrape the porous surface
witha knife or
permanentlydamagethefinish.
outer Enamel Fin&h
Whentherangeiscool,washthe
enamelfinishwithmildsoapand
waterora mildabrasivecleanser
appliedwithadampcloth.Rinse
thesurfacewithcleanwaterand
drywithasoftcloth.Ifyouwish,
occasionallyapplyathincoatof
mildcleaningwaxtohelpprotect
thefinish.
Thereare a numberofprecautions
youcantaketo avoidmarringthe
surfaceoftherangeandtoprevent
itfrombecomingdull.Don’tslide
heavypansacrossit. Ifyouspill
foodswithalotofacid(tomatoes,
sauerkraut,fruitjuices,etc.)or
foodswithhighsugarcontent,
cleanthemupas soonaspossible.
If allowedto remain,thesefoods
couldcauseadull spot.Also,no
matterhowstubbornthefoodstain,
neveruseharshabrasivecleansers.
Theycouldpermanentlydamage
theenamelsurface.
spatula-—theycoukl
ControlPanels
It’sa goodideatowipethecontrol
panelscleanafiereachuseofthe
oven.Fora morethoroughcleaning,
thecontrolknobscanberemoved
bypullingthemofftheknobstems.
Cleanwithmildsoapandwater,
rinsewithcleanwaterandpolish
drywithasoftcloth.
Don’tmixupOVENTEMPknobs.
TheonewithBROILprintedonit
belongsin thelowerposition.
Donotuseabrasivecleansers,
strongliquidcleanersoroven
cleanersonthecontrolpanelas
theywilldamagethefinish.
lr-
Page 15

Range‘I-@Bmmm
BurnerGrates
DripPans
Theholes in the burners mustbe
keptcleanatalltimesforproper
. .
ignitionandaneven.unhampered
flame.
Cleantheburnersroutinelyand
especiallyafterbadspillwers
whichcouldclogtheseholes.
Burnersliftoutforcleaning.
Note:Twoscrewsholdeachburner
pairinplacetokeepthemfrom
wobblingaroundduringshipment.
Removeanddiscardtheshipping
screwsandlifttheburnersupand
out.Thisdisengagesthemfromthe
mountingbracketundereach
burnerpair.
To removeburned-onfood,soak
[heburnerinasolutionofaproduct
usedforcleaningtheinsideofcofke
makers.Soaktheburnerfor20to
30minutes.Ifthefooddoesn’t
rinseoffcompletely,scrubitwith
soapandwateror a mildabrasive
cleanseranda dampcloth.
Donotattempttocleanburnersin
anautomaticdishwasher.Loosened
foodsoilcanclogburnerholes,
andthecausticactionofthe
dishwasherdetergentcandamage
the burnerheads.
Beforeputtingtheburnerback,dry
itthoroughlybysettingit inawarm
ovenfor30minutes.Thenplaceit
backinthe range,makingsureitis
properlyseatadonthemounting
bracketandislevel.
Gratesshouldbe washedregularly
and,ofcourse,afterspillovers,
Washtheminhot,soapywaterand
rinsewithcleanwater.Drythe
grateswithacloth—don’tput them
backontherangewet.
Togetridofburned-onfood,soak
the gratesinaslightlydiluted
liquidcleanser.
Althoughthey’redurable,the
grateswillgraduallylosetheir
shine,regardlessofthebestcare
youcangivethem.Thisisdueto
theircontinualexposuretohigh
temperatures.
Donotoperatea burnerforan
extendedperiodoftimewithout
cookwareon thegrate.Thefinish
onthegratemaychipwithout
cookwaretoabsorbtheheat.
Whenreplacinga
pairofgrates,
theirregular
sidesshould
interlockin
themiddleas *
shownatright.
12iIt
Removethegratesandliftout the
chromedrippans.Washthemin
hot,soapywater.Rinsethemwith
clean,hotwaterandpolishthem
drywithacloth.Neveruse
abrasivecleaneror steelwool—
they’llscratchthe surface. Instead,
soakthedrippansforabout20
minutesin slightlydilutedliquid
cleanserormildsolutionof
ammoniaandwater(1/2cupof
ammoniatoonegallonof water).
Aftersoaking,washtheminhot,
soapywater.‘Rinsewithcleanwater
andpolishwithacloth.
Whenreplacing *
drippans,the notchontherear
panandthenotch
onthefrontpan
shouldmeetin
themiddle. +
P
,~[
‘[p’
r
%
(
\
—.
—
-
Eiii5F—.
—.
——
-
~..
—.
—.
-
-.
-.
-
15
Page 16

Lift-upCooktop
--
Cleantheareaunderthecooktop
often.Built-upsoil,especially
grease,maycatchfire.
Tomakecleaningeasier,theentire
cooktopmaybeliftedup and
supportedbyIocklngarmsthat
catchandholdthetop whenit’sall
thewayup.
Besure al! burnersare turnedoff
beforeraising the cooktop.
removethegratesanddrippans,
graspthefrontsidesofthecooktop
andlift.
Aftercleaningunderthecooktop
withhot,mildsoapywateranda
cleancloth,put thecooktopbackin
place.Liftupa littleto releasethe
lockingarms andpushthemin
whileguidingthetopbackdown.
Becarefulnot topinchyourfingers.
Then
Removable
LfmVeroven Door
Theovendooris removableto
maketheinteriormoreaccessible
forreplacementofthelampbulb.
Opentheovendoorfullyand
removethetwoPhillipsscrewsthat
holdthedoortothe hinges.Then
closethedoortotheautomaticstop
position(atabout3inchesopen),
andliftthedoorstraightupandoff
the hinges.(Duetothelargeamount
ofinsulationandtheconstruction
ofthedoor,itisheavy.)
Note:Be carefulnottoplacehands
betweenthe springhingeandthe
ovendoorframe.Thehingecould
snapbackandpinchfingers.
Toreplacethedoor,makesurethe
hingesarein the“out”position.
Positiontheslotsinthe bottomof
thedoorsquarelyoverthe hinges.
Thenlowerthedoorslowlyand
evenlyoverbothhingesatthesame
time.Ifhingessnapbackagainstthe
ovenframe,pullthembackout.When
thedoorisin position,openitfully
andinsertthetwoPhillipsscrews.
NOTE:DO NOTATTEMPT
TOREMOVETHE UPPER
OVENDOOR.
ovenshelves
Ovenshelvesmaybe cleanedwith
amildabmsivecleanserfollowing
manufwturer’sdirections.After
cleaning,rinsetheshelveswith
cleanwateranddrywithaclean
cloth.Toremoveheavy,burned-on
soil,soapymetalpads maybeused
followingmanufacturer’sdirections.
Afterscrubbing,washwithsoapy
water,rinseanddry.
RemovableUpperOven
SMfslqlpom
Shelfsupportsintheupperoven
areremovableforcleaningoutside
thecontinuous-cleaningoven.
Removetheovenshe~f.Thenlift
upwardontheshelfsupports,
swingthebottomsofthesupports
towardthecenteroftheovenand
takethemout. Cleanthesupports
inthesamemannerasyouclean
theshelves.
BroikrPan&Rack
Afterbroiling,removethebroiler
rackandcarefullypouroffthe
grease.Washandrinsethepanand
rackinhot, soapywater.
If foodhasburnedon, sprinklethe
broilerrackwhilehot withdetergent
andcoverwithwetpapertowelsor
adishcloth. Burned-onfoodswill
thensoakloosewhilethemealis
beingserved.
Donotstorea soiledbroiler
panandrackintheovenor broiler
drawer.
~
16
Page 17

---
RemovableOvwnBottom
----
The bottom panel in each ovenis
cmovablefor cleaning.
~anelsmustberemovedwhenyou
useeffectivecleaners to clean up
excessivespilloversor removesoil
bakedontoit—cleanersthatshould
neverbeusednearthespecial
porousceramicoveninteriors.
lb remove
L Removethe ovenshelves.
theloweroven bottom:
These
Toremovethe upper oven
bottom:
L
Removetheovenshelf.
ovenLightBulb ‘
Replacement
Beforereplacing any light bulb,
disconnectelectric powerto the
rangeat the main fuse or circuit
breakerpanel.
completelybeforeremovingit. Do
nottoucha hotbulbwithadamp
cloth—thebulbwillbreak.
Replaceaburned-outbulbwitha
high-temperatureappliancebulbof
thesamewattage.
Letthe bulbcool
2. Removethetwoknurledhold-
—
downscrewsattherearoftheoven.
Ifscrewsaretootightto removeby
—
hand,usea screwdriver.
3. Toliftouttheovenbottompanel,
placeyourfingersintheslotsinthe
bottomandlifttherearofthepanel
upandbackuntilitis clearofthe
lipatthefront.
2. Pullbottomforwardandout
ofoven.
Theovenbottomineachovenhas
aporcelainenamelfinish.Tomake
cleaningeasier,protecttheoven
bottomsfromexcessivespillovers.
Placea smallcookiesheetorpiece
ofaluminumfoilslightlylarger
thanthebakingdishona lower
racktocatchanyboilovers.It
shouldnot completelycoverthe
rackasthiswouldcauseuneven
heatintheoven.
AluminumFoil,in Oven
DONOI’place a sheetof “
aluminumfoilonthebottomof
eitheroven.Ifyoudo,yourfoods
maynotcookproperly.Theoven
finishmaybedamaged.Andthere
maybean increaseinheatonthe
outsidesurfacesoftheoven.
Lower
Oven: Thelightbulbis
locatedintheupperleftcornerof
theoven.Removingtheovendoor
(seepage16)willmakeiteasierfor
ymJtoremoveandreplacethe bulb.
Upper Oven: Thelightbulb is
locatedonthe rightwalloftheoven.
.
Toreplaceit, removethescrewon
theframeinfrontofthe lightand
takeouttheframe,gasketandglass
shield.
Afterreplacingthebulb, reinstall
theglassshield,gasketandframe
inthatorder.
—.
--
-
-
Es!ais-
—.
——
-
~-
—.
—.
4. Thenlift thebottomupandout.
Toreplacethebottom,placeitin
theovenwiththebackraisedabout
6to 8 inchesoruntilyoucaninsert
thefrontoftheovenbottomunder
thehold-downlipatthefront.Then
pushthe backoftheovenbottom
downfullyintoplaceonthemetal
flangesand insertthehold-down
screws.
17
Page 18

Cleaning Guide
Note: Letrange par[scool &fore cleaning.
PART
Brder Panand Rack
controlKnobs
Outside Glass Finish eSoapandWater
Metal, including
SideTrims and
TrimStrips
OuterI%rcelain o paperTowel
EnamelFinish
PaintedSurfaces o Soapand Water
InsideOven Door*
LowerOven Only
OvenInterior*— *
Top,Sides and
Back
(CAUTION:Whenin
use,lightbulbscan
becomewarmenoughto
breakiftouchedwith
moistclothortowel.
Whencleaning,avoid
warmlampswithcleaning
NIA’rERIAM‘m USE
e SO;lp
iUldWamr Drainfat,cXwlfliiil andrackslight!y.(Do110[Iclsoiledpaniind rack Stand inovenor
oSoap-FilledScouringI%d
CommercialOvenCleaner walerandSprciidclo[horpiiper[owclover[hcreck. Letpanandrack~[iindfora tiiw
e
SoapandWittcr
e Mild
o
SoapandWater
@
DryCloth spillon therangewhileitishot,useadrypapertowelorclothmwipeuprightway.
e SoapandWater
e
SoapandWater
● Soap-FilledScouringP~d
● CommercialOvenCleaner OVENDOOR.
StiffBristleNylonBrush
cloths.)
GENERALi)IRE(V’10?W
broilercompartmenttocool.)Sprinkledelcrgcnton
minutes.Wash;scourifnecessary.Rinse
alsobccleanwiina dishwasher.
iind dry.OW1ON:Thebroilerpanandrick[]~ii~
f)iillitnd mcli, Fill[hcpanwi[hWilrlll
Puiloffknobs.WiishgentlybutdonotsoiIk.Dryandrcmrncontrolsmringcmakingsure
[Omatchflatiirciiontheknobiind shuft.
Cleanoutsideofcooledblack@assdoorwithaglasscleanerthtitdoesnotcontain
ammonia.Washotherglirsswithclothdampenedinsoapywater. Rinseandpolishwitha
drycloth.If knobsare removed,do notallowwatermrundowninsidethesurfaceofgltiss
whilecleaning.
Wash,rinse,andthenpolishwithadrycloth.DONOT
USE steelwool,abrisives.
ammonia,acids,orcommercialovencleanemwhichmaydamagethefinish.
Avoidcleaningpowdersor harshabrasiveswhichmayscratchtheenamel.Ifacidsshould
Whenthesurfacehascooled,washandrinse.Forotherspills.suchasfatsjx~ttcrings.etc.,
washwithsoapandwater
Usea mildsolutionofsoapandwater.Donotuscanyharshabrdsivcsorcleaningpowders
whichmayscmtchor marsurfiice.
Tocleanlowerovendoor;removeit(seepage
materials.andreplace it.
when cooled and then rinse. Polishwithdrycloth.
16),cleanwithanyandallmentioned
DO NOTATTEMPTTOREMOVETHEUPPER
Coolbeforecleaning.
Ifheavysoilinghasoccurredontheporoussurjace, removeasmuchofthesoilas possible
usingasmallamountofwaterandastiffbristlenylonbrush.Usewater sparinglyand
changeit frequently,keepingitascleanaspossible,andbesure:0biotitupwithpaper
towels,cloths,orsponges.
theywillleaveunsightlylintontheovenfinish.If waterleavesa whiteringonthefinishas
itdries,applywateragainand
Do not rub or scrub withpapertowels,clothsorsponges,since
bh itwithacleansponge.startingattheedgeof thering
andworkingtowardthecenter.
Forspecialcleaning instructions, see page M.
RemovableOven
Bottom oSoap-FilledScouringPad
SurfaceBurner oSoapar.dWater
Grates @Soap-FilledScouringPad
Chrome-Plated
DripPans
Burners e SolutionforCleaning
IJ
SoapandWater
(Non-metallic)
(Non-metallic)
e
SoapandWater
StiffBristledBrush
e
Soap-FilledScouringPad
e
(Non-metallic)
InsideofCoffeeMakers
e SoapandWater ofcoffeemakers,suchas Dip-Itbrand.If soildoesnotrinseoffcompletely,scrubburners
oMildAbrasiveCleanser
~DampCloth
;helves
@SoapandWater Removeshelvesandcleanthemoutsideoftheoventoavoiddamagingthespeciallycoated
QSoap-FilledScouringPad
oCommercialOvenCleaner
Theovenbottompanelcanberemovedforeasycleaning(seepage17).Usethesame
directionsforcleaningas explainedaboveforPorcelainEnamelFinish.
Liftoutwhencool.Soak5to 10minutesifdesiredinwarmsolutionofdishwasher
detergent.Scourwithmaterials mentionedheretoremoveburned-onfoodparticles.
Washaftereachcookingsounnoticedspatterwillnot“burnon”nexttimeyouCOOK.To
remove“burned-on”spatters,useanyorallcleaningmaterialsmentioned.Rub
withscouringpadtopreventscratchingofthesurface.
lightly
Wipeoffburnerheads.Ifheavyspilloveroccurs,removeburnersfromrange(seepage15)
andsoakthemfor20to30 minutesinsolutionof hotwaterandproductforcleaninginside
withsoapandwateroramildabrasive cleanserandadampcloth.Dryburnersinawarm
ovenfor30minutesbeforereturningthemtotherange.
oventop,sidesandback. Useanyandall mentionedmaterials. Rinsethoroughlyto
removeallmaterialsaftercleaning.N(XE: Somecommercialovencleanerscause
darkeninganddiscoloration.Whenusingforfirsttime,testcleaneron smallpartof
shelfandcheckfordiscolorationbeforecompletelycleaning.
‘Spillageofmarinades,fruitjuices,andbastingmaterials containingacidsmaycausediscoloration.Spilloversshouldbeblottedupimmediately,withcare
beingtakennottotouchanyhotportionoftheoven.Whenthe surfaceiscool,cleanandrinse.
Page 19

Adjwtment -
Repeatedopenings and closings
can cause the ovendoor to work
itself out of adjustment. One side
mayclose higher than the other,
andthedoormaynotsealproperly.
‘I’oadjust the height of the door:
L
Removethedoor(seepage 16).
—
fchwlBurner
AirAdjustmentShutter
Theairadjustmentshutterforthe
ovenburnerregulatestheflowof
airto theflame.
Theshutterforgheovenburneris
nearthe backwalloftheoven
behindthebroilerdrawer.
reach the shutter, remove
To
theovenbottom(page17)andthe
burnerbaffle.
Toadjust the flow of air to the
burner,
screwandrotatetheshutterto
allowmoreor less air intothe
burnertubeasneeded.
loosenthePhillipshead
Loosenscrew ~
and rotateshutter -
oval Ihmler
AirAdjmtmentShutter
Theshutterfortheupperoven
burnerisontherightsideofthe
burnerundertheovenbottom.Pull
theovenbottomstraightout,
loosenthePhillips!]eadscrewon
theshutterandrotatetheshutterto
adjustflowofair totheburner.
Whenthe shutterisproperly
adjusted,theflamewilllook
approximatelyas shownabove.
—
turnthe screwintheopeningat
topofeachdoorhinge.Turn
the
clockwisetolower,coun~erclockwise
toraiseeachsideofthedoor.
3. Replacethedoor,closeit,and
checkalignmentanddoorseal.
I —
II
Todetermine if the burner flame
isproper,
U f——
#
lighttheburner.The
flameshouldhave1/2”to3/4”blue
coneswithnoyellowtipping.When
thebaffleisbackinplace,the
flamewillresettle.
6msFE _Esssl -
--
~==.
—.
19
Page 20

MiElorAdjmtmen@YoucanMake(Continued)
.-
O’wmThern?osht
Adjwtment
The temperature control in your
newoven
hasbeencarefullyadjusted
toprovideaccuratetemperatures.
However,ifthis cwenhasreplaced
oneyouhaveusedforseveralyears,
youmaynoticea differenceinthe
degreeofbrowningor thelengthof
timerequiredwhenusingyour
favoriterecipes.Oventemperature
controlshaveatendencyto“drift”
overaperiodofyearsandsince
thisdriftis verygradual,itisnot
readilynoticed.Therefore,you
mayhavebecomeaccustomedto
yourpreviousovenwhichmay
haveprovideda higheror lower
temperaturethanyouselected.
Beforeattemptingtohavethe
temperatureofyournewoven
changed,besureyouhavefollowed
the bakingtimeandtempemtureof
therecipecarefully.Then,after
youhaveusedtheovenafewtimes
andyoufeeltheovenistoohot
ortoocool, thereisa simple
adjustmentyoucanmakeyourself
ontheOVEN TEMPknob.
Pulltheknoboffthecontrolshaft
andlookatthebackside.Thereis
adiscinthecenterof theknobskirt
withaseriesofmarksoppositea
pointer.
Loosenonly the
locking screws
I Noteposition of
pointerto marks
before adjustment
Note to whichmarkthepointeris
pointing.Tomakeanadjustment,
carefullyloosen(approximately
one turn),butdonotcompletely
removethetwoscrewsthat holdthe
skirttotheknob.Holdtheknob
bladeinonehandandtheouter
skirtintheother hand.
Toraisetheoventemperature,
movethepointerinthe directionof
thearrowforRAISE.Tolowerthe
temperature,movethe pointerin
thedirectionofarrowforLOWER.
Eachmarkwillchangetheoven
teniperatureapproximately20°F.
Wesuggestthatyoumakethe
adjustmentonemarkfromthe
originalsettingandcheckoven
performancebeforemakingany
additionaladjustments.
Aftertheadjustmentismade,
pressskirtandknobtogetherand
retightenscrewssotheyaresnug,
butbecarefulnottoovertighten.
Re-installknobon rangeand
checkperformance.
Note:Afteranadjustmenthas
beenmadeto thelowerOVEN
TEMPknob,the OFF andBROIL
positionswillnotlineupwiththe
indicatormarkonthecontrolpanel
astheypreviouslydid.This
conditionisnormalandwillnot
createaproblem.
Note:Wheneverknobshavebeen
removedfromovencontrolpanel,
besuretoreinstalltheknobwith.
BROILprintedonittothelower
ovenknobstemat thebottomofthe
uppercontrolpanel.
20
Page 21

—
—. ...
.———
‘@
—.
I~E30BLEfiI
Possmm CAUSE AND
RB:wiEDY
. ..—
CWEN4WILL NOTWORK @Hug on mngeis riotcompletely inserted in!othe mutleireceptacle.
~
Circuitbreakerin househasbeentrippedor fusehasbeenblown.
~Ovencontrolsarenotproperlyset.
OVENLIGHTDOES
NOT’WORK
~Lightbulbisloose.
@Bulbisdefective.Replace.
~Switchwhichoperatesovenlightsisbroken.Callforservice.
FOODDOESNOT
BROILPROPERLY
~OVENTEMPknobnotsetatBROIL.
@Foodisbeingcookedonhot pan.
~Cookwareisnot suitedforbroiling.
FOODDOESNOTROAST ~OVENSETknobnotsetonAUTOMATICwhenusingAutomaticOven
ORBAKEPROPERLY
Timer.
@OVENTEMPknobnot setcorrectly.
@Shelfpositionisincorrect.Checkroasting,bakingandbroilingpages.
@(km shelf’isnotlevel.
~ Wrongcookwareis beingused.Whenroasting,panistoosmall.
@Foiltent notusedwhenneededtoslowdownbrowningduringroasting.
MOEH.’UREINSIDEAND
OUTSIDEOVEN
TOPBURNERSDO
NOTLIGHT
u’you need more help... call, toll free:
GE Answer center@
808.626.2000
Consumerinformationservice
--:4
,
-j
/’”
,m, --
;
. ...
—.-
@Besureovenventductisnotblockedorcovered.
~lMakesureelectricalplugis phlggedintoa livepower
outlet.
~Burnerholeson sideofburnermaybeclogged.Removeandcleanthem.
~Burnersmaynotbefittedcorrectlyontomountingbrackets.Removeand
reinstallthemproperly.
21
Page 22

—
~_——––-–
—
If YouNeedservice
T<>obtainservice.seeyourwarranty
onthebackpageofthisbook.
We’reproud of our service and
wantyou to be pleased. If for some
reason you are not happywith the
service you receive, here are three
stepsto followfor further help.
FIRST,contactthepeoplewho
servicedyourappliance.Explain
whyyouarenotpleased.In most
cases,thiswillsolvetheproblem.
NEXT,if youarestillnotpleased,
writeallthedetails—including
your phonenumber—to:
Manager,ConsumerRelations
GEAppliances
AppliancePark
Louisville,Kentucky40225
FINALLY,ifyourproblemisstill
notresolved,write:
MajorAppliance
ConsumerActionPanel
20 NorthWackerDrive
Chicago,Illinois60606
—
—
-
—.
-
——
23
Page 23

YOURGENERALELECTRIC-RANGE
WARRANTY
Saveproof of original purchase date such asyour sales slip or canceiled check to establish warranty period.
F
WHAT!sCOVEHED
WHAT1sNor COVEFED
FULL ONE-YEARWARRANTY
Forone year
purchase, we will provide,
charge, parts and service labor
in your home to repair or replace
any part of the range that fails
because of a manufacturing defect.
e Service trips to your hometo
teach you howto usethe product.
Readyour Use
If you then haveany questions
about operating the product,
please contact your dealer or our
Consumer Affairs office at the
address below,or call, toll free:
GE Answer Center”
800.626.2000
consumer information service
~ Improper installation.
from da& of original
free of
andCarematerial.
This warranty is extended to
the original pur~~aser and any
succeeding
purchased for ordinary home use
in the 48 mainland states, Hawaii
and Washington, D.C.InAlaska the
warranty isthe sameexcept that it is
LIMITED because you must pay to
ship the product to the service shop
or for the service technician’s travel
coststo your home.
All warranty service will be provided
byour FactoryService Centers or
byour authorized Customer Care”
servicers during normalworking
hours.
Look in the White or YeHowPages
of your telephone directory for
GENERAL ELECTRICCOMPANY,
GENERAL ELECTRIC FACTORY
SERVICE, GENERAL ELECTRIC-
HOTPOINTFACTORYSERVICE or
GENERAL ELECTRICCUSTOMER
CARE@SERVICE.
@Replacement of house fuses or
resetting of circuit breakers.
* Failure of the product if it is used
for other than itsintended purpose
or used commercially.
e Damage to product caused
by accident, fire,floods or acts
of God.
WARRANTORISNOTRESPONSIBLE
FORCONSEQUENTIAL DAMAGES.
owner for products
w
Some statesdo not ailow the exclusion or !imitation of incidental or consequential damages, so the above limitation or exclusion
may not apply to you. This warranty gives you specific legal rights, and you may aiso have other rights which vary from state to state.
Toknowwhat your legal rights are in your state, consult your local or stateconsumer affairs office or your state’sAttorney General.
I Part No. 164D1352P219
r Pub.No. 4!3-4987
If you have an installation problem,
contact your dealer or installer.
Youare responsible for providing
adequateelectrical, gas,exhausting
and other connecting facilities.
Warrantor: General Electric Company
If further help is needed concerning this warranty, write:
Manager—Consumer
Affairs,GEAppliances, Louisville, KY 40225
A
.—
-=zE&-
 Loading...