

GE JGGN24, JGGR24, JGGB27, JGGN27, JGGR27 Owner’s Manual

www.GEAppliances.com
JGGN24
JGGR24
JGGB27
JGGN27
JGGR27
Owner’s Manual
Outdoor Cooking Centers
24″and 27″
164D4290P033 49-80075 05-01 JR
Safety Instructions . . . . . . . . . . . 2–5
Operating Instructions
Cooking with Your Gas Grill . .11–13
Convection/Roasting Tips . . . . . .14
Cooking Temperatures . . . . . . . . .11
Grid Lifter . . . . . . . . . . . . . . . . . . . .13
Grid Positions . . . . . . . . . . . . . . . . .13
Rotisserie Cooking Tips . . . . .14–16
Features of Your Gas Grill . . . . . .6, 7
Lighting the Grill . . . . . . . . . . . . .8–10
Lighting the Main Burners . . . . . . .8
Lighting the Rotisserie Burners . .10
Lighting the Side Burner . . . . . . . .9
Using a Meat Thermometer . . . . . .16
Care and Cleaning
Annual Maintenance . . . . . . . . . . . 19
Leak Testing . . . . . . . . . . . . . . . . . . . 22
LP Gas Tank . . . . . . . . . . . . . . . 20–23
Regular Cleaning . . . . . . . . . . . . . . 17
Venturi Tubes . . . . . . . . . . . . . . . . . 18
Troubleshooting Tips . . . . . . . . .24
Consumer Support
Consumer Support . . . . . Back Cover
Product Registration . . . . . . . . .25, 26
Warranty . . . . . . . . . . . . . . . . . . . . . . 27
Write the model and serial
numbers here:
Model # ________________________
Serial # ________________________
You can find these numbers on the
rating plate located on the lower side
base of your grill.
Operating Instructions
2
Safety InstructionsCare and CleaningTroubleshooting TipsConsumer Support
IMPORTANT SAFETY INFORMATION.
READ ALL INSTRUCTIONS BEFORE USING.
TESTED IN ACCORDANCE WITH ANSI
Z21.58, LATEST EDITION STANDARD FOR
OUTDOOR COOKING GAS GRILLS. THIS
COOKING CENTER IS FOR OUTDOOR
USE ONLY.
Check your local building codes for
acceptable outdoor grill locations. In the
absence of local codes, this unit should
be located in accordance with the
National Fuel Gas Code No. Z223.1,
Latest Edition and the National Electric
Code ANSI/NFPA No. 70, Latest Edition.
WARNING!
For your safety, the information in this manual must be followed to minimize the risk of fire or
explosion, electric shock, or to prevent property damage, personal injury, or loss of life.
WARNING!
Do not use an open flame to check for
gas leaks. Be sure there are no sparks or open
flames in the area while you check for leaks.
Sparks or flames will result in a fire or
explosion, which can cause serious bodily
injury or death, and damage to property.
FOR YOUR SAFETY
1. Do not store or use gasoline or other
flammable vapors and liquids in the
vicinity of this or any other grill.
2. An LP tank not connected for use shall not
be stored in the vicinity of this or any other
grill.
FOR YOUR SAFETY
If you smell gas:
1. Shut off gas to the grill.
2. Extinguish any open flame.
3. Open lid.
4. If odor continues, immediately call your
gas supplier or your fire department.
WARNING!
Do not try lighting this grill without reading
the lighting instructions contained in this
Owner’s Manual.
WARNING!
Follow all leak test procedures carefully in
this Owner’s Manual prior to operation. Do this
even if the grill was dealer-assembled.
I
S
G
E
N
D
C
E
D
R
E
I
T
F
I
Consumer Support
Operating Instructions
Safety Instructions
www.GEAppliances.com
Care and Cleaning Troubleshooting Tips
IMPORTANT SAFETY NOTICE
3
■
The California Safe Drinking Water and Toxic
Enforcement Act
requires the Governor of
California to publish a list of substances
known to the state to cause cancer, birth
defects or other reproductive harm, and
requires businesses to warn customers of
potential exposure to such substances.
■
Gas grills can cause minor exposure to four of
these substances,
namely benzene, carbon
monoxide, formaldehyde and soot, caused
primarily by the incomplete combustion of
natural gas or LP fuels.
■ Properly adjusted burners, indicated by
a bluish rather than a yellow flame,
will minimize incomplete combustion.
Exposure to these substances is minimized
because this is an outdoor unit.
When using your grill, follow basic safety
precautions, including the following:
■
Be sure your grill is properly assembled and
grounded
in accordance with the provided
Assembly Instructions.
Failure to follow
these safety precautions may result in damage
or injury.
■
Do not attempt to repair or replace any part of
your cooking center unless it is specifically
recommended in this manual.
All other servicing
should be referred to a GE Authorized
Service Center.
■
If you smell gas,
the assembler has not done a
proper job of checking for leaks. You can have
a small leak and therefore a faint gas smell if
the connections are not completely tight.
Some leaks can only be found with the burner
control in the ON position and for your
protection it must be done in accordance
with leak test procedures. See the
Leak testing
section.
Never use an open flame to locate
a leak.
■
Check your local building codes for acceptable
outdoor grill locations.
In the absence of
local codes, this unit should be located in
accordance with the National Fuel Gas Code
No. Z223.1, Latest Edition and the National
Electrical Code ANSI-NFPA No. 70,
Latest Edition.
■
Do not try lighting this grill without reading the
lighting instructions in this manual.
■
Read this manual carefully and completely
before using your outdoor cooking center
to
reduce the risk of fire, burn hazard or other
injury. Please retain this manual for future
reference.
■
This gas outdoor cooking center is not intended
to be located in or on recreational vehicles
and/or boats.
■
Never allow anyone to sit, stand or play on or
around the outdoor cooking center at any time.
When in use, portions of the outdoor cooking
center get hot enough to cause severe burns.
■
Do not store items of interest to children around
or below the grill.
■
Never allow children to crawl inside the cart.
■
Never let clothing, pot holders or other
flammable materials come in contact with or
too close to any grate, burner or hot surface
until it has cooled.
Fabric may ignite and
result in personal injury.
SAFETY PRECAUTIONS
Operating Instructions
Safety InstructionsCare and CleaningTroubleshooting TipsConsumer Support
4
IMPORTANT SAFETY INFORMATION.
READ ALL INSTRUCTIONS BEFORE USING.
WARNING!
When using your grill, follow basic safety
precautions, including the following:
■
Do not use water on grease fires. Never pick up
a flaming pan.
Turn the controls off. Smother
a flaming pan on a burner by covering the pan
completely with a well-fitting lid, cookie sheet
or flat tray. Use a multi-purpose dry chemical
or foam-type fire extinguisher.
■ Flaming grease outside a pan can be put out
by covering it with baking soda or, if available,
by using a multi-purpose dry chemical or
foam-type fire extinguisher.
■
Use this grill only for its intended use
as described in this manual.
■
Children should not be left alone or unattended
in an area where the grill is being used.
■
Do not leave the grill unattended while cooking.
■
For personal safety, wear proper apparel.
Loose
fitting garments or sleeves should never be
worn while using this grill. Some synthetic
fabrics are highly flammable and should not
be worn while grilling.
■
Only certain types of glass, heat-proof glass
ceramic, earthenware, or other glazed utensils
are suitable for grill use.
Unsuitable types of
materials may break with sudden temperature
changes. Use only on low or medium heat
settings according to the manufacturer’s
directions.
■
Do not heat unopened food containers
as a build-up of pressure may cause the
container to burst.
■
Never lean over an open grill.
■
Pay close attention when lighting a burner.
Be certain you are rotating the control knob
labeled for the burner you intend to use.
■
When using the grill,
do not touch the grill
rack, burner grate or immediate surrounding
areas as these areas become extremely hot
and could cause burns.
Keep children away!
■
Do not operate main burners simultaneously with
the rear burner.
This may result in a grease fire
or damage to the grill.
■
Do not use aluminum foil to line grill racks.
This
can severely upset combustion air flow or trap
excessive heat in the control area. The result
of this can be melted knobs or igniters.
■
When using the side burner always use flatbottomed pans which are large enough to cover
the burner.
Adjust the flame so that it heats
only the bottom of the pan to avoid ignition
of clothing. Position handles inward away
from open edges of the unit to avoid burns
associated with spillovers. Hold the handle
of the pan with a pot holder when turning or
stirring food.
■
Never grill without the drip pan in place.
Without it, hot grease could leak downward
and produce a fire or explosion hazard.
■
Grease is flammable. Let hot grease cool before
attempting to handle it.
Avoid letting grease
deposits collect in the drip pans. Clean the
drip pans often.
■
Never rotisserie cook without a drip pan in place
and placed on top of the Flav-R-Wave®*and
beneath the center of the food.
Without it,
hot grease could leak downward and produce
a fire or explosion hazard.
■
For proper lighting and performance of the
burners
it is necessary to keep the ports clean.
■
Clean the grill with caution.
To avoid steam
burns, do not use a wet sponge or cloth to
clean the grill while it is hot. Some cleaners
produce noxious fumes or can ignite if
applied to a hot surface.
■
Do not operate the grill under combustible
construction.
Use only in well ventilated areas.
Do not use in buildings, garages, sheds,
breezeways or other such enclosed areas.
This unit is for outdoor use only.
■
Do not locate the grill where the grill exhaust is
directed at combustible materials,
windows
(open or closed), doorways, etc., as the grill
vents combustion gases and smoke.
■
Keep the area surrounding the grill free from
combustible materials,
trash, or combustible
fluids and vapors such as gasoline or charcoal
lighter fluid. Do not obstruct the flow of
combustion and ventilation air.
SAFETY PRECAUTIONS
*Flav-R-Wave® is a registered trademark of Onward Multi-Corp, Inc.
www.GEAppliances.com
Consumer Support
Operating Instructions
Safety Instructions Care and Cleaning Troubleshooting Tips
5
READ AND FOLLOW THIS SAFETY INFORMATION CAREFULLY.
READ AND SAVE THESE INSTRUCTIONS
■
Minimum horizontal clearance
from side
and back of unit to adjacent vertical
combustible construction and extending
above the top, from sides, and back is
30
″.
■
At least once a year, the grill should be inspected
for the presence of spiders, spider webs or
other insects. The burner area is a common
and desired spider haven and can present a
dangerous condition which can damage the
cooking center and render it unsafe for use.
The presence of spiders, spider webs or other
insects can cause the gas to flow from the front
of the burner. This is a very dangerous
condition which can cause a fire to occur
behind the valve panel. See the
Venturi tubes
section. Check the cooking center immediately
if any of the following conditions exist:
1.
The smell of gas in conjunction with
extreme yellow tipping of the burner flames.
2.
The grill or side burner do not reach
temperature.
3.
The grill or side burner heat unevenly.
4.
The burners make popping noises.
■
Do not use charcoal on the grill.
■
Cook meat and poultry thoroughly—meat to at
least an INTERNAL temperature of
160°F.
and
poultry to at least an INTERNAL temperature
of
180°F
.
Cooking to these temperatures
usually protects against foodborne illness.
■
Keep any electrical supply cord, or the
rotisserie motor away from the heated areas
of the outdoor cooking center.
■
Never use the outdoor cooking center in windy
conditions.
If located in a consistently
windy area (oceanfront, mountaintop, etc.),
a wind break will be required. Always
adhere to the specified clearances listed
in the assembly instructions.
■
The grills utilize a Flav-R-Wave®tray to evenly
distribute heat and to minimize cooking
flare-ups.
Do not place lava rocks on top
of the Flav-R-Wave.® This can damage the
knobs and ignition components and void
the warranty.
■
LP gas models:
Be sure to
CLOSE
the LP tank
mounted valve after every use of the grill.
■
If a grill is stored indoors ensure that it is cool
before attempting to move it.
The LP tank
must be unhooked and stored outside in
a well ventilated area, out of the reach of
children.
■
Never use a dented or rusty LP tank.
See the requirements in the Assembly
Instructions.
■
Never use more than one LP tank and mount in
accordance with the Assembly Instructions.
Never modify the cart to house a larger tank
or more than one tank at a time. Do not
store spare tanks in a built-in enclosure.
■
Keep the ventilation openings of the LP tank
enclosure free and clear from debris.
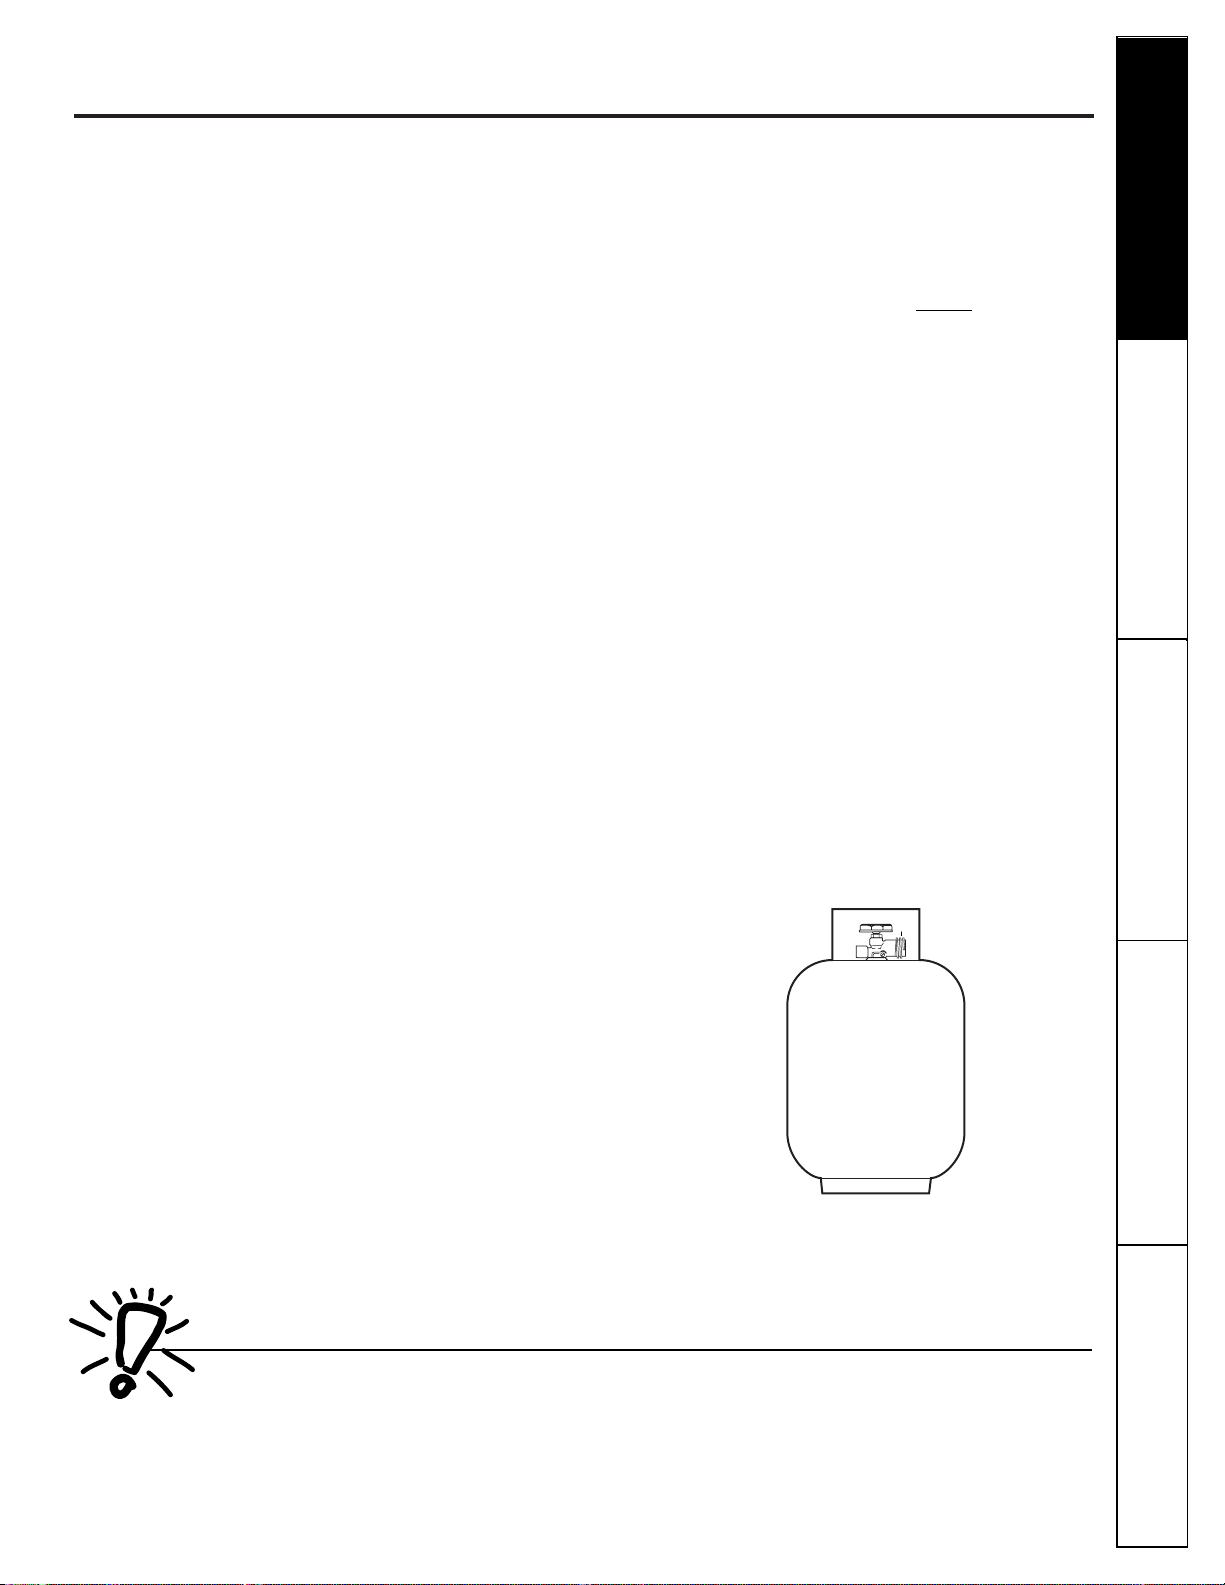
■
All models require an LP tank
equipped
with a QCC-1® quick close coupling
system*. If you use a tank exchange system,
be sure to
exchange the tank for a similarly
equipped tank.
■
* per ANSI Z21.58, Latest Edition
QCC1
®
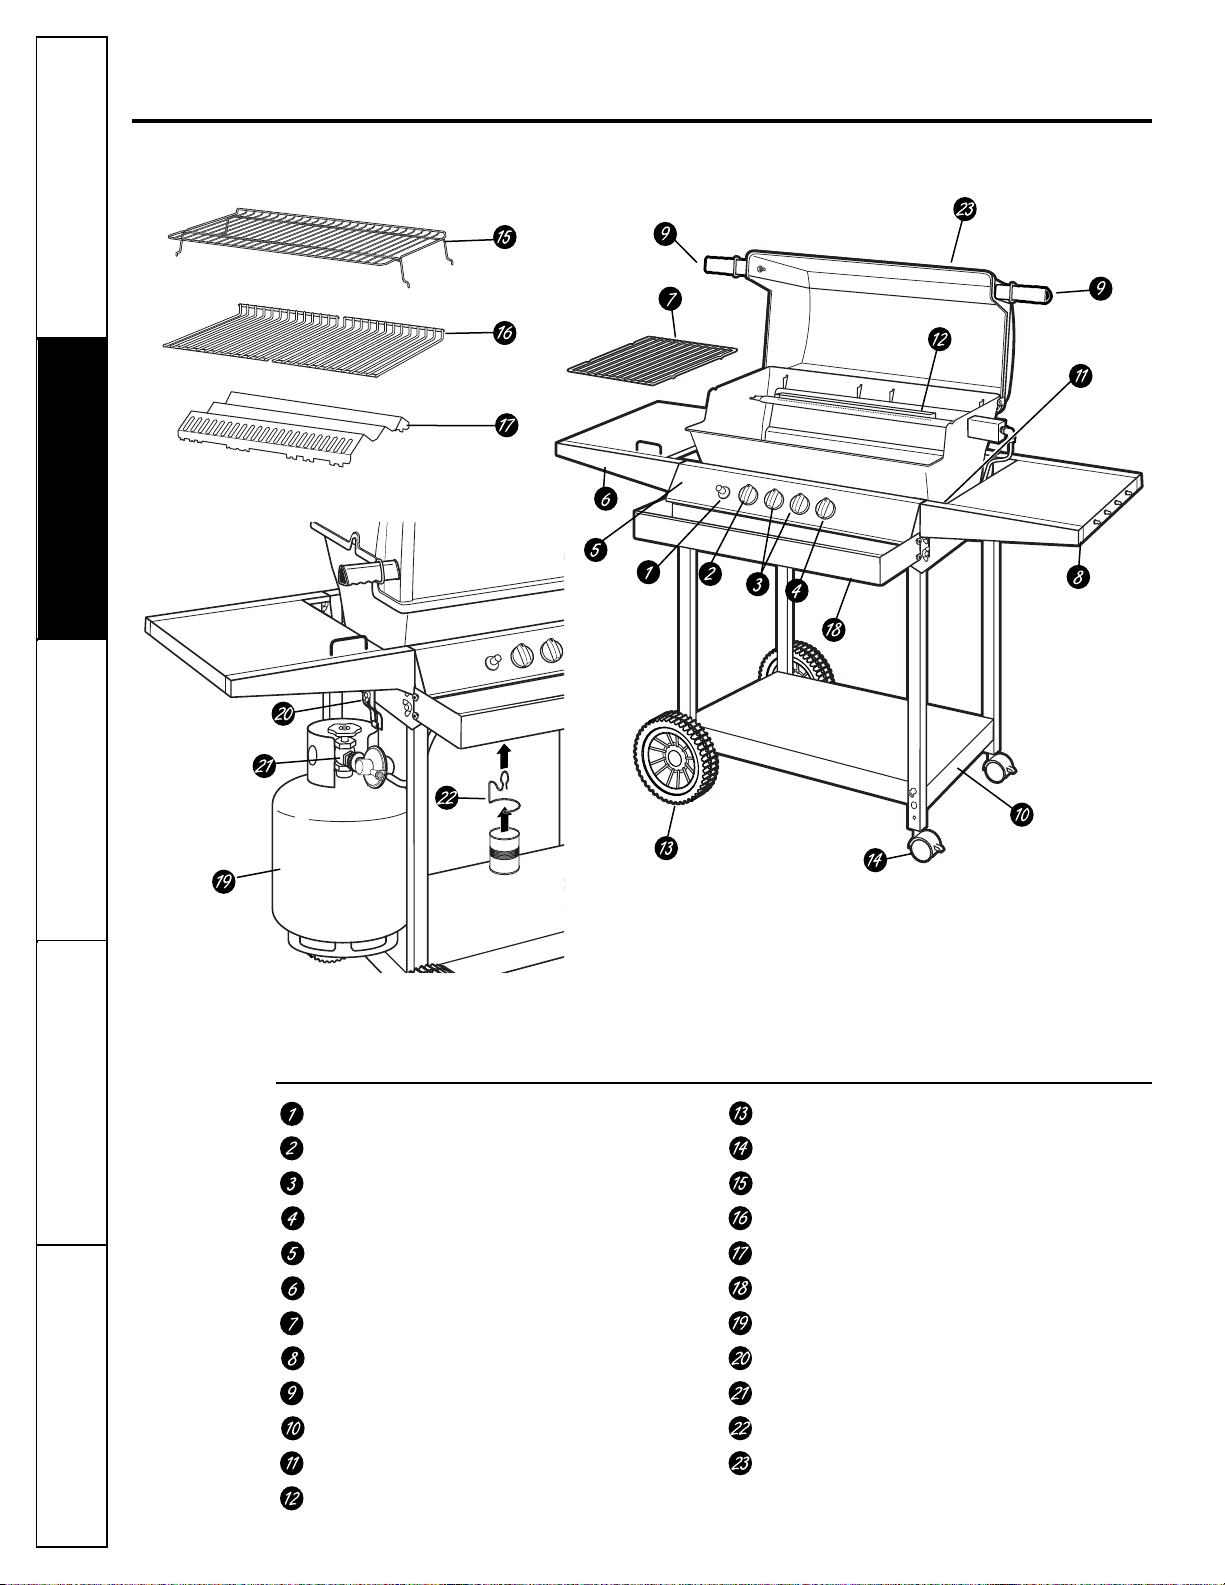
Ignitor Button
Left Side (shelf) Burner Control
Main Grill Burner Controls
Rotisserie Burner Control
Lighting Instructions
Left Side Burner or Shelf
Side Burner Grid
Side Shelf
Lid Handle
Model/Serial Numbers
Match Lighting Hole
Rotisserie Burner
Wheels
Swivel Casters
Warming Rack (Upper Grid)
Side-by-side Grids
Flav-R-Wave
®
Front Bin
LP Tank (not included—obtain locally)
LP Tank Bracket
LP Tank (QCC-1) Connector
Grease Cup Holder
Heat Indicator
Features of your gas grill.
Operating Instructions
6
Safety InstructionsCare and CleaningTroubleshooting TipsConsumer Support
Throughout this manual, features and appearance may vary from your model.
Feature Index for 24″Models
(features and appearance may vary)
7
www.GEAppliances.com
Consumer SupportCare and Cleaning Troubleshooting Tips
Operating InstructionsSafety Instructions
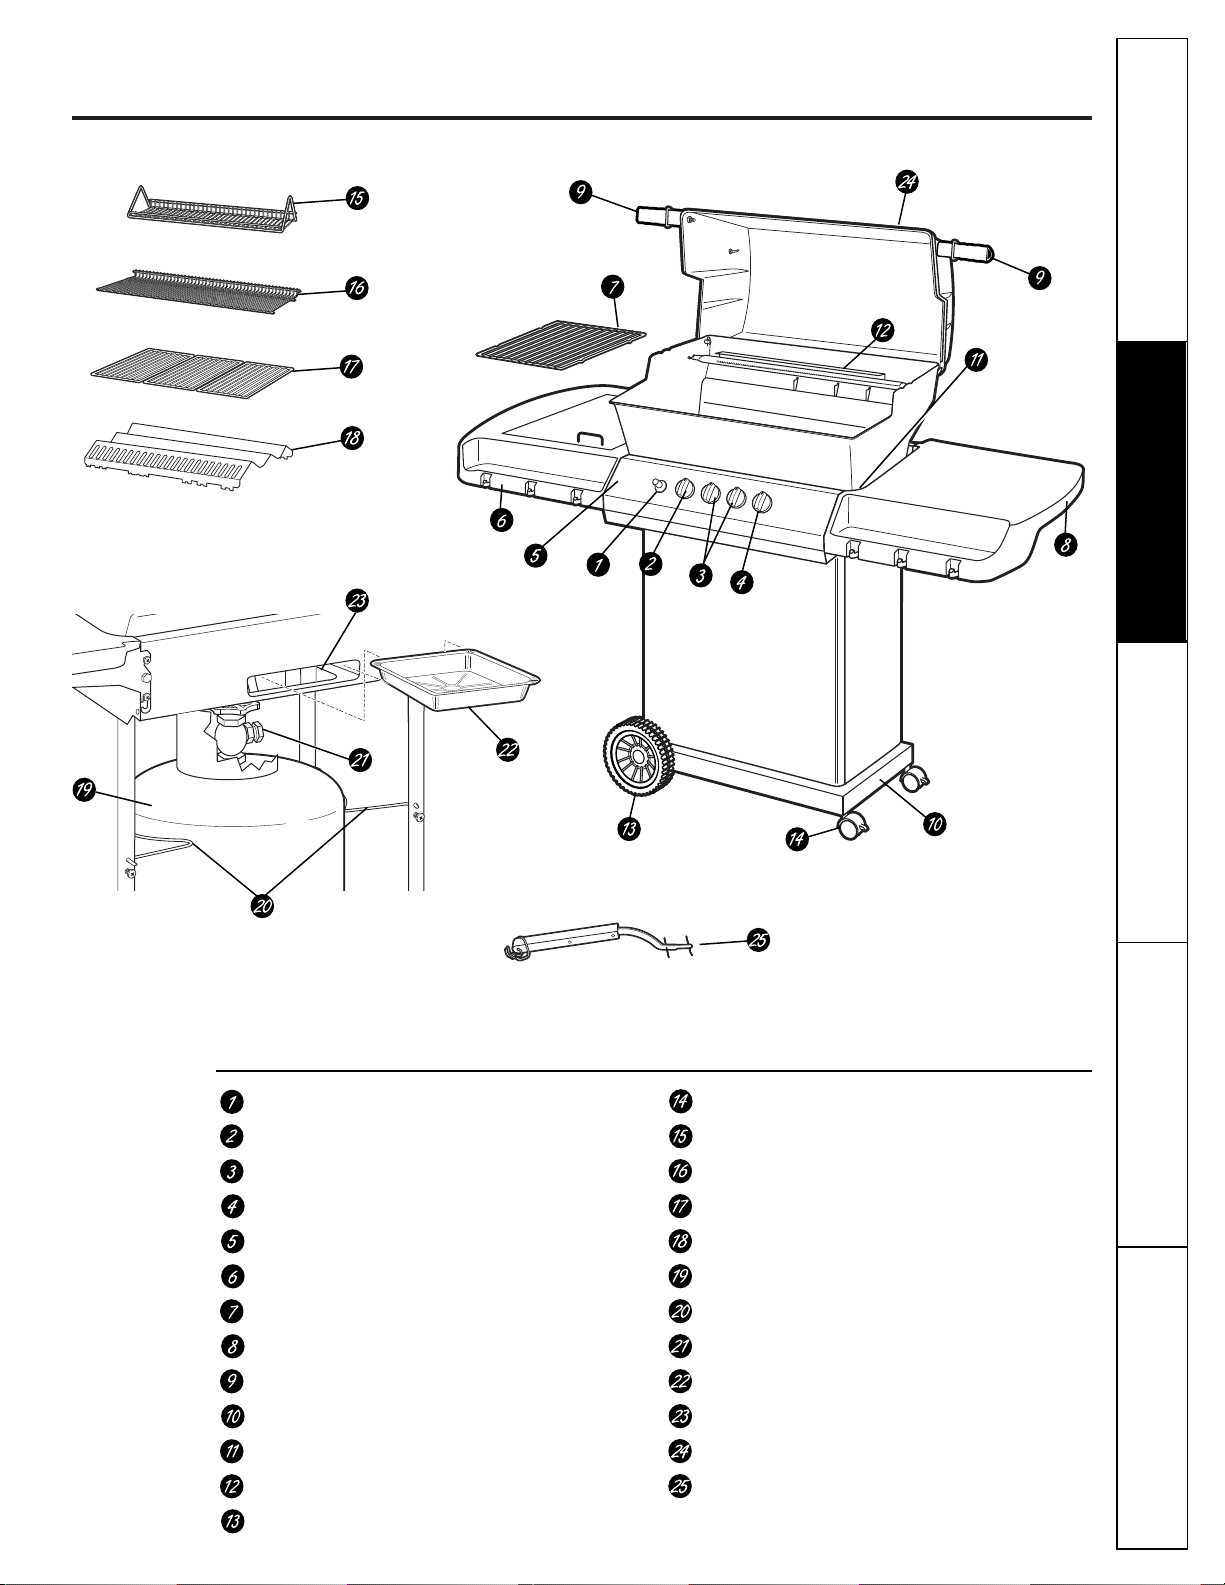
Ignitor Button
Left Side (shelf) Burner Control
Main Burner Controls
Rotisserie Burner Control
Lighting Instructions
Left Side Burner or Shelf
Side Burner Grid
Side Shelf
Lid Handle
Model/Serial Numbers
Match Lighting Hole
Rotisserie Burner
Wheels
Swivel Casters
Swing Basket
Warming Rack (Upper Grid)
Cast Iron Cooking Grids
Flav-R-Wave
®
LP Tank (not included—obtain locally)
LP Tank Retainers
LP Tank (QCC-1) Connector
Disposable Aluminum Drip Pan
Drip Pan Holder
Heat Indicator
Grid Lifter
Feature Index for 27″Models
(features and appearance may vary)
8
Operating Instructions
Safety InstructionsCare and CleaningTroubleshooting TipsConsumer Support
Before Lighting the Grill
■
The grill must be assembled in
accordance with the Assembly
Instructions.
■
Check that your LP tank is full and
properly connected to the regulator.
■
Check that there are no gas leaks in
the gas supply system. See the Leak
Testing section.
■
Check that the venturi tubes are properly
located over the gas valve orifices.
■
Check that both Main Burner and Side
Burner ignition wires are connected.
■
Read carefully all instructions contained
on the rating plate.
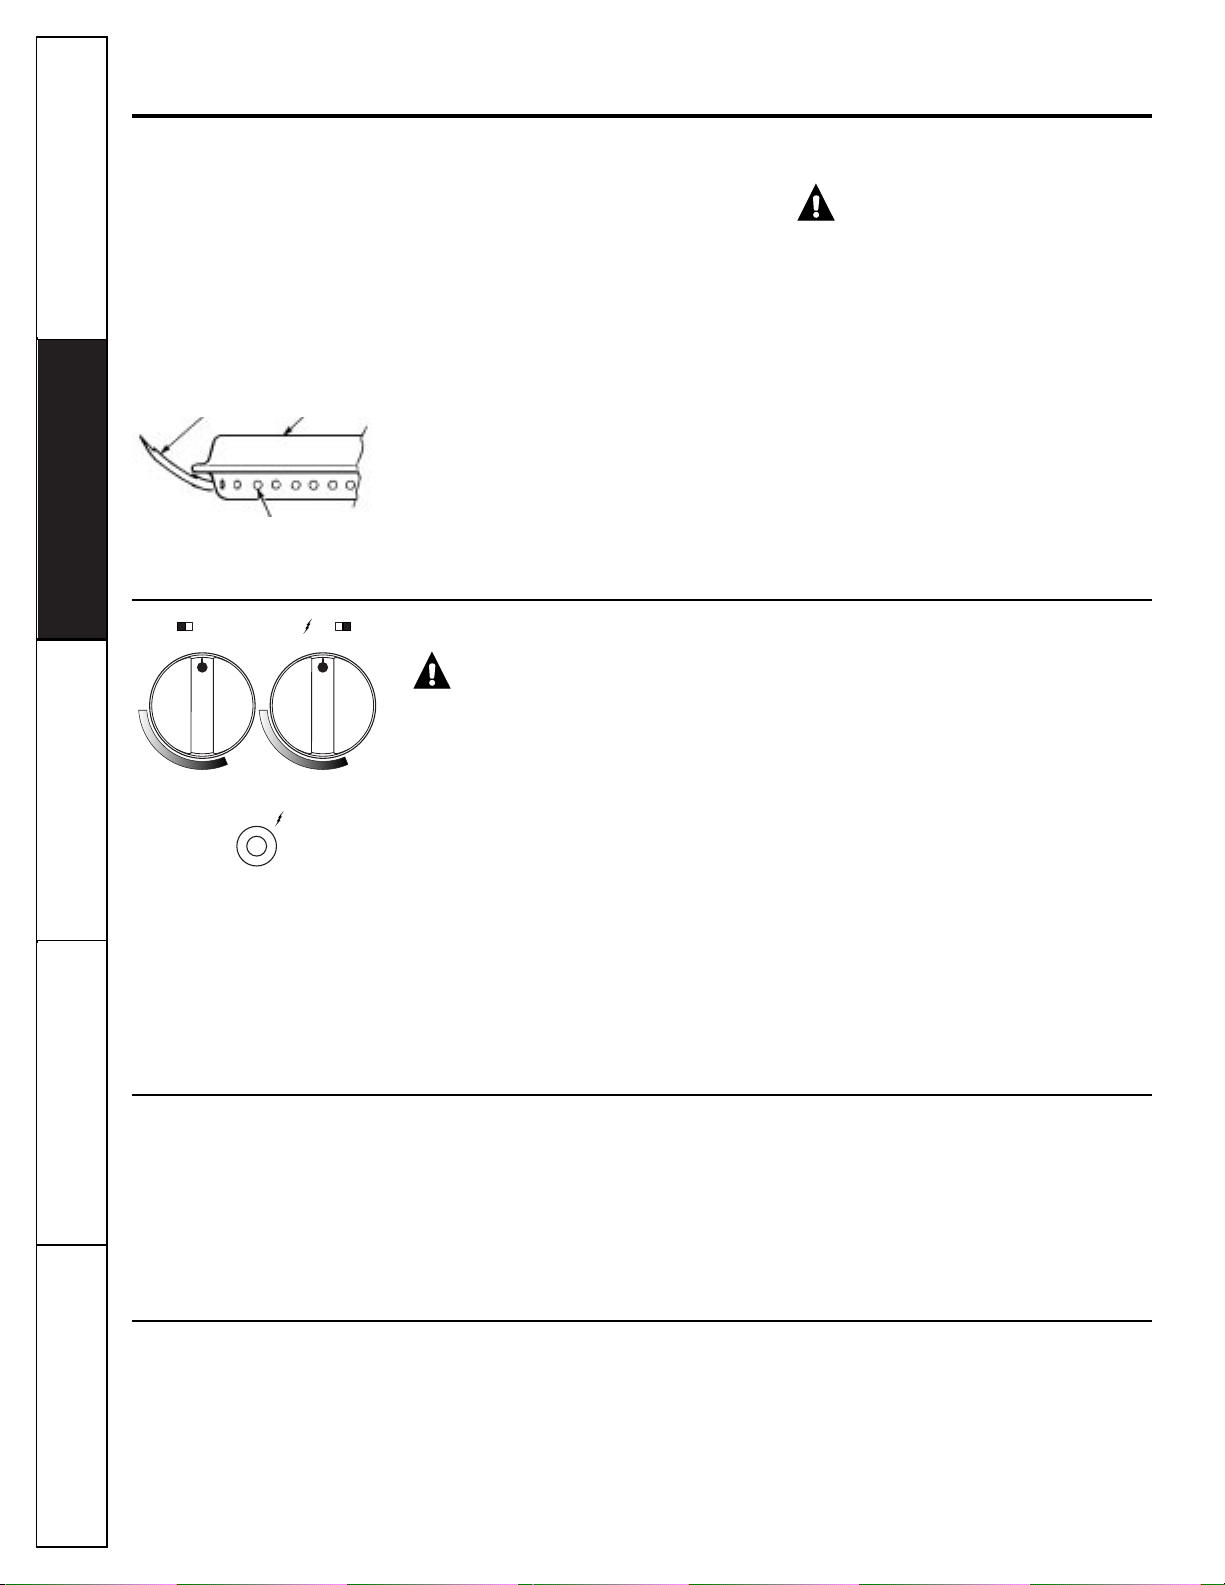
CAUTION:
Check your grill
after lighting. All the ports on the burner
should show a 1″(2.5 cm) flame on HI
setting.
■
If any of the following symptoms occur,
there is probably a blockage in the
venturi tubes. Shut off gas at once and
clean the venturi tubes. See the Venturi
tubes section.
1. You smell gas.
2. If a flashback fire occurs.
3. Your grill heats unevenly.
4. The burners make popping noises.
TO LIGHT WITH THE IGNITOR:
1.
Make sure control knobs are set to
OFF
and turn on the gas supply by
opening the LP tank valve.
2.
Push and turn right control knob
to HI.
3.
Push the ignitor button 3 or 4 times.
The burner should ignite within
4 seconds.
After the right burner is lit, push
and turn left control knob to HI.
Left burner will ignite automatically.
TO LIGHT WITH A MATCH:
1.
Make sure control knobs are set to
OFF
and turn on the gas supply by
opening the LP tank valve.
2.
Insert lighted match through lighting
hole located at the bottom right of the
grill housing.
3.
Push and turn right control knob to
HI
. The burner should ignite within
4 seconds.
After the right burner is lit, push
and turn left control knob to HI.
Left burner will ignite automatically.
Check Flame
Burner
Burner Port
Lighting the grill.
Lighting the Main Burners
WARNING:
Open lid before lighting.
If the Main Burner Will Not Light
1.
Turn control knobs to
OFF
.
Wait 5 minutes, then try again.
2.
If any burner will not light, consult
the
Troubleshooting Tips
section at
the back of this manual. If problem
cannot be resolved, do not attempt
to operate the grill. Contact a
GE Authorized Service Center.
Shutting Down
1.
Turn off the gas supply by closing
the LP tank valve.
2.
Turn control knobs to
OFF
.
LEFT
OFF
HI
LO
IGNITOR
RIGHT
OFF
HI
LO
9
Consumer SupportCare and Cleaning Troubleshooting Tips
Operating InstructionsSafety Instructions
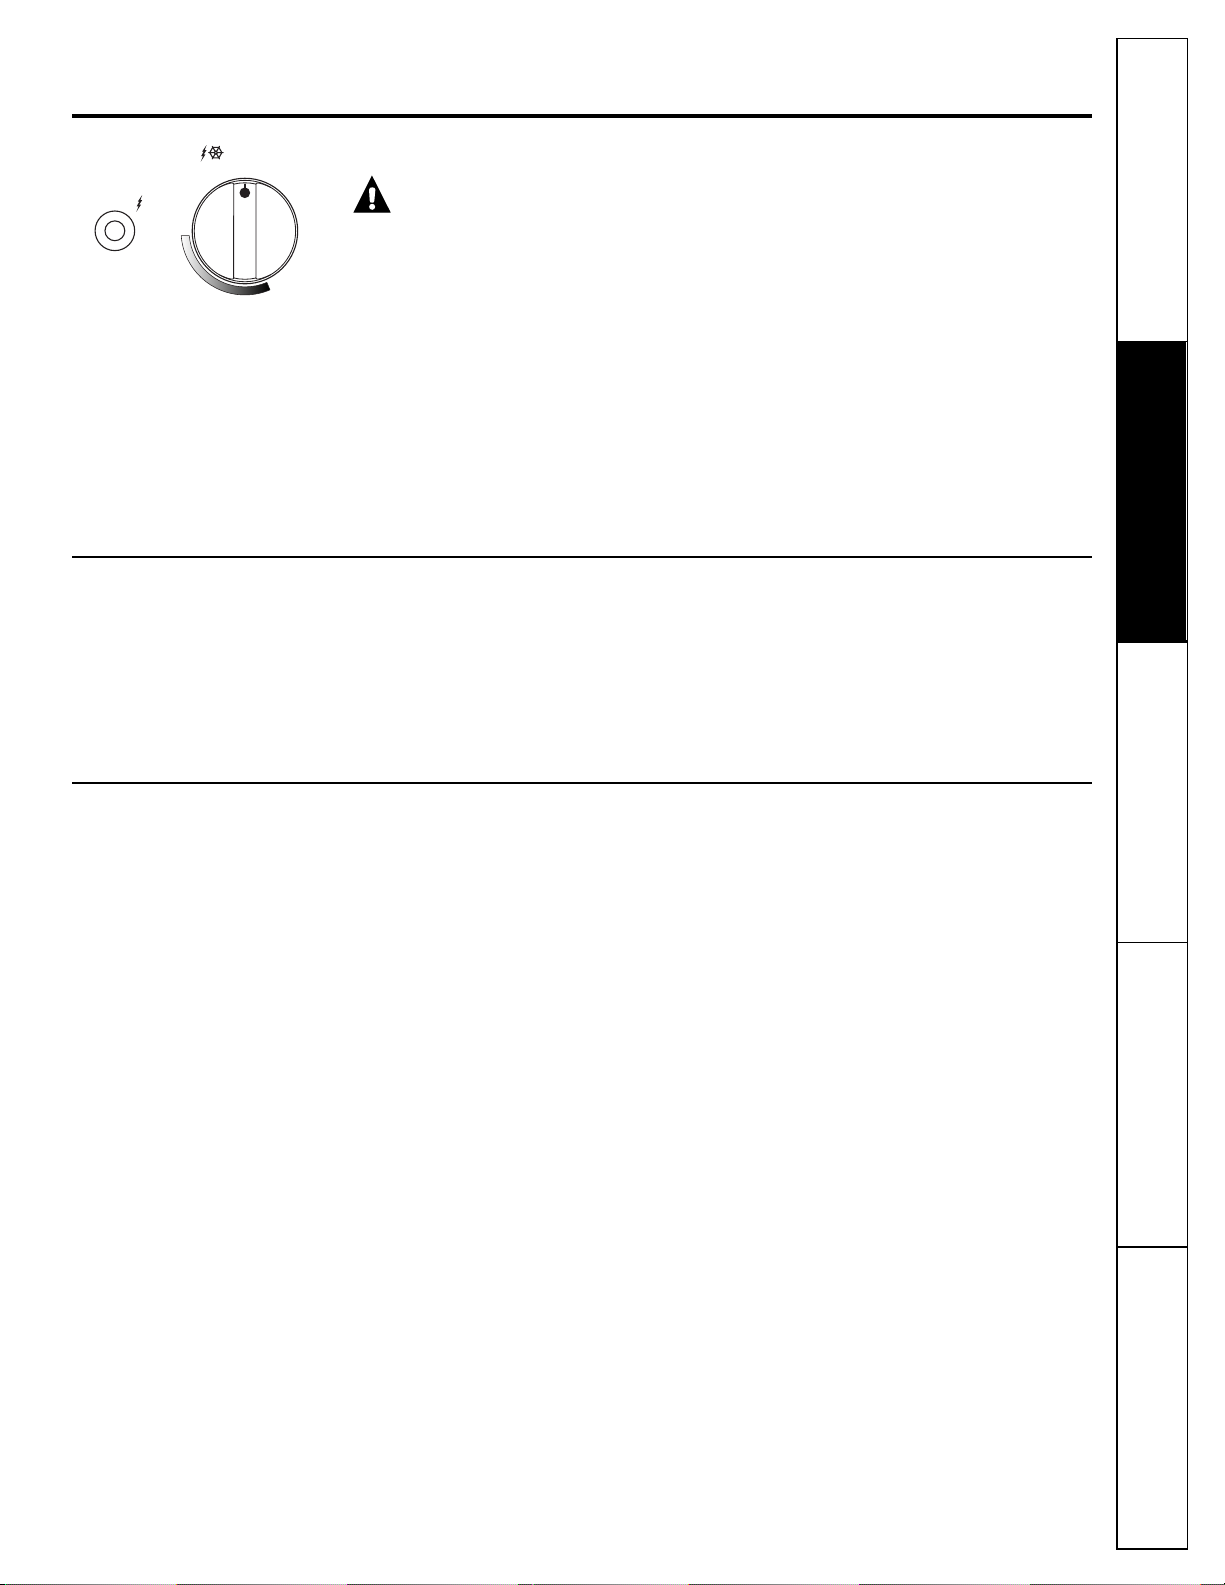
TO LIGHT WITH THE IGNITOR:
1.
Make sure control knobs are set to
OFF
and turn on the gas supply by
opening the LP tank valve.
2.
Push in and turn the control knob
to HI.
3.
Push the ignitor button 3 or 4 times.
The burner should ignite within 4
seconds.
TO LIGHT WITH A MATCH:
1.
Make sure control knobs are set to
OFF
and turn on the gas supply by
opening the LP tank valve.
2.
Apply lighted match to the side
burner ports. It is important to have
lighted match near burner ports
BEFORE
turning the control knob.
3.
Push in and turn the control knob to
HI
. The burner should ignite within
4 seconds.
Lighting the Side Burner (on some models)
WARNING:
Open lid before lighting.
If the Side Burner Will Not Light
1.
Turn control knobs to
OFF
.
Wait 5 minutes, then try again.
2.
If any burner will not light, consult
the
Troubleshooting Tips
section at
the back of this manual. If problem
cannot be resolved, do not attempt
to operate the grill. Contact a
GE Authorized Service Center.
Shutting Down
1.
Turn off the gas supply by closing
the LP tank valve.
2.
Turn control knobs to
OFF
.
www.GEAppliances.com
IGNITOR
SIDE BURNER
OFF
HI
LO
 Loading...