

Page 1

.
—
C4cmtents
Anti-TipBracket
ApplianceRegistration
CareandCleaning
Control Panel
Features 6
FlooringUnder Range
Leveling
Lift-UpCooktop
Modeland SerialNumbers
Oven
AirAdjustment 9
Baking,BakingGuide
BroilerPan and Rack
Broiling,BroilingGuide
ContinuousCleaningCare 14
ControlSettings
DoorRemoval
Light;BulbReplacement 17
LightingInstructions
OvenBottomRemoval
Preheating
Roasting,RoastingGuide 12
3,.5 Shelves
14-18 VentDuct
16
16
10,11 CookwareTips 8
17,18
13 FlameSize
15
15
10
~
5 SafetyInstructions
5 SurfaceCooking
2 Burners
9 ClockandTimer
9
9
ThermostatAdjustment 17
ProblemSolver
RepairService
BurnerGrates
ControlSettings
DripPans 16,18
LightingInstructions 7
Warranty BackCover
GEAnswerCentera
80ti62&2WQ
9,15
9
19
19
2-5
7,8
16,18
16,18
8
7
7
.@#?&j
—......-
‘*=?2W
~odeki JGCS54EH
JGCC58EH
Page 2
1!is intcndtxi k) help ylu operate
~
1
:
_-.—
andmaintainyournewrange
properly.
Keepithandyforanswerstoyour
questions.
ifyoudon’tunderstandsomething
orneedmorehelp,write(include
jmurphone number):
ConsumerAffairs
GEAppliances ~
AppliancePark
Louisville,KY40225
You’llfindthemona labellocated
intheburnerboxunderthe
cooktop.
Seepage 6.
Thesenumbersare alsoonthe
ConsumerProductOwnership
RegistrationCardthatcamewith
yourrange.Beforesendinginthis
card,pleasewritethesenumbers
here:
ModelNumber
Serial Number
Usethese numbersinany
correspondenceor servicecalls
concerningyourrange.
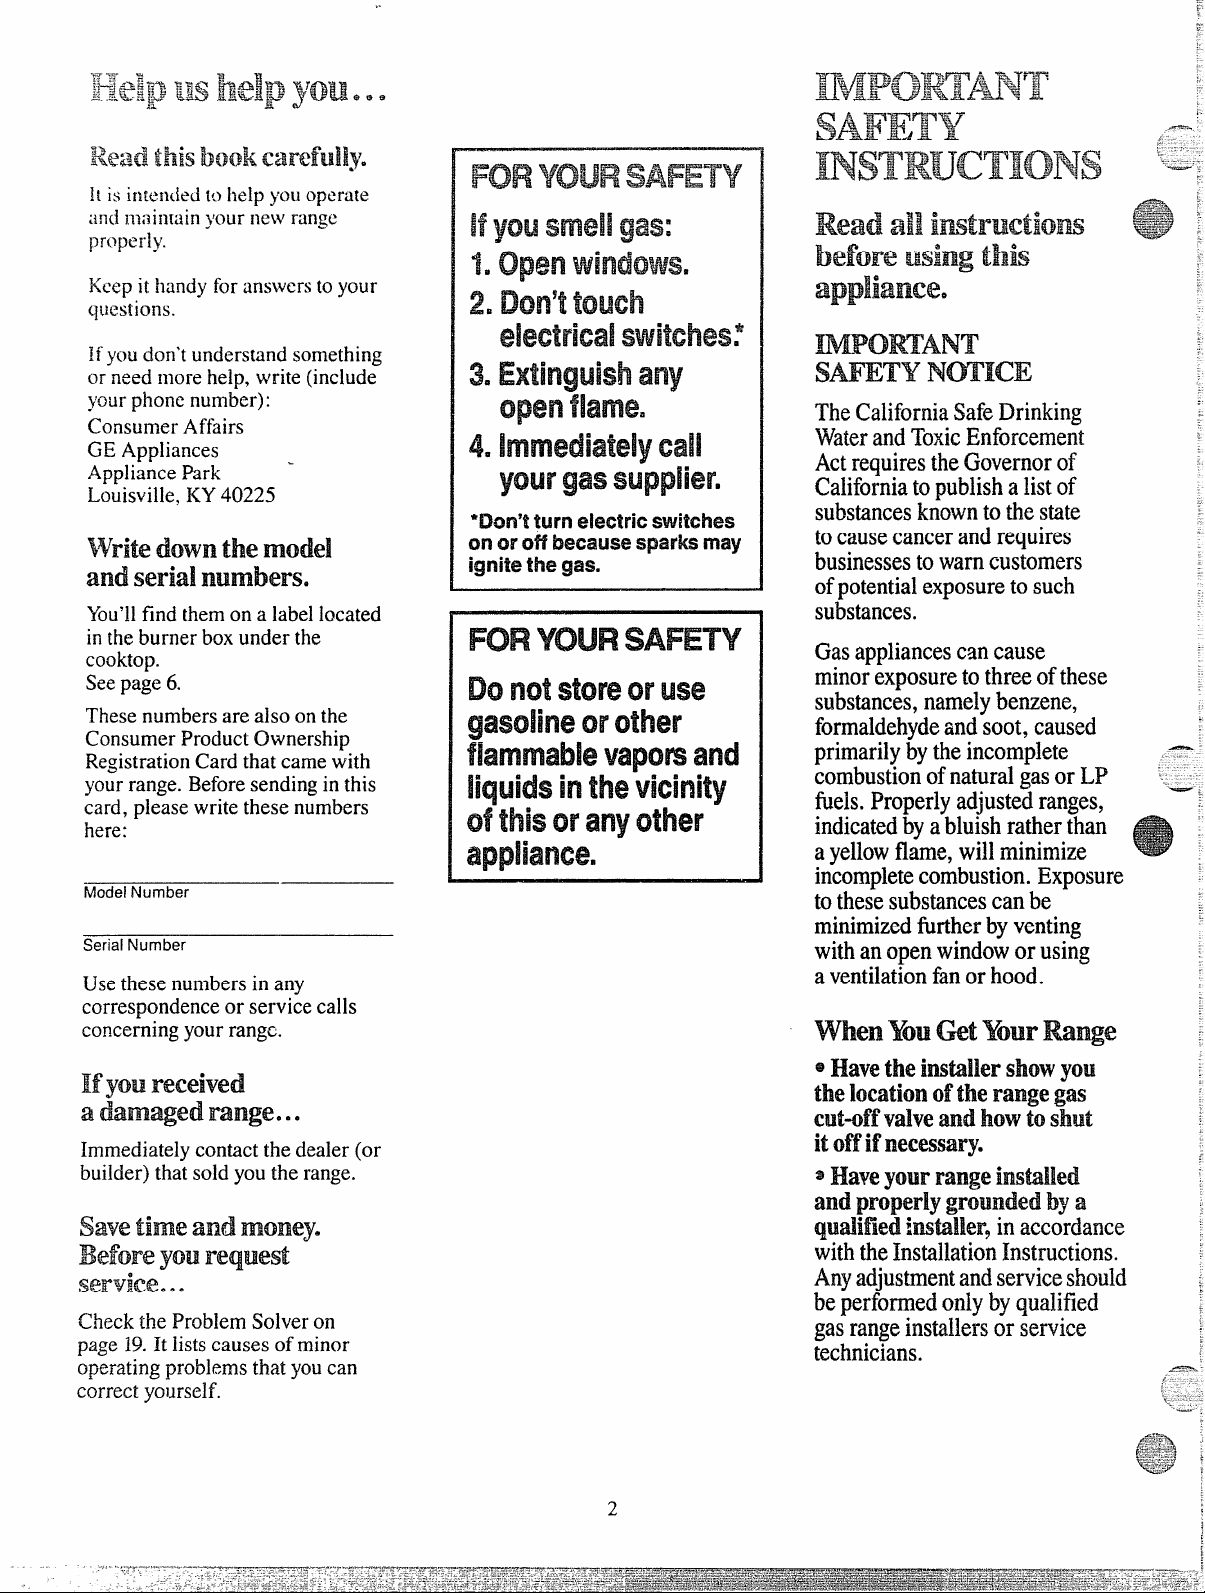
FOR YOUR SAFETY
you smell gas:
[f
openwindows.
1.
2, Don’ttouch
electricalswitches:
3. Extinguish any
open flame.
4. immediately call
your gassupplier.
‘Don’tturnelectric
cmoroff13ecausesparksmay
ignitethegas.
FOR YOUR SAFETY
Do not store or use
gasoline or other
flammable Vapomand
liquids inthe vicinity
of this or anyother
appliance.
switches
TheCaliforniaSafeDrinking
WaterandToxicEnforcement
Actrequiresthe Governorof
Californiato publisha list of
substartcesknownto the state
tocausecancerand requires
businessesto warn customers
ofpotentialexposureto such
substances.
Gasappliancescan cause
minorexposureto three ofthese
substances,namelybenzene,
formaldehydeand soot, caused
primarilyby the incomplete
combustionof naturalgasor LP
fhels.Properly adjustedranges,
indicatedby a bluish rather than
a yellowflame, will minimize
incompletecombustion.Exposure
to these substancescan be minimizedfurther by venting
withan open windowor using
a ventilationfanor hood.
menYOUGetYourWue
Ifym?received
adam~ed range.
Immediatelycontactthedealer(or
builder)that soldyouthe range.
e o
sawtimeandmoney.
Befiml
Jm.Rrequest
service.e e
Checkthe ProblemSolveron
page19.It listscauses of minor
operatingproblemsthat youcan
correctyourself.
@Havetheinstillershowyou
thelocation
clltd’ valveandhow
itoffifnecessary.
oftherangegas
toshut
ad pripdy griundedbya
qudifled im~ller~ in accordance
withthe Installationhtructions.
Anyadjustmentandserviceshould
be~er&med onlybyqualified
gasrangeimXaHersor service
technicians.
2
—.
Page 3

3Hugy’wm rangeintoaDo-volt
g~~~~]]~~~
Q@~Q~!f@a DO ~()~
removetheroundgroundingprong
fromtheplug.Ifindoubtabout
thegroundingofthehomeelectrical
system,itisyourpersonal
responsibilityandobligationto
ha&.anungroundedoutletreplaced
a properly-groundedthree-
with
prongoutletinaccordancewith
theNationalElectricalCode.Do
notuseanextensioncordwith
thisappliance.
QBesureaupacking !miterids
areremovedfromtherange
beforeoperatingit,topreventfire
orsmokedarnageshouldthe
packingmaterialignite.
%Besureyourrangeiscorrectly
adjustedbyaqualifiedservice
technicianorinstallerforthetype
ofgas(Natura]orLp)onwhichit
istobeused.Yourrangecanbe
convertedforuseoneithertypeof
gas.SeeInstallationInstructions.
eAfterprolongeduseofa
range,highfloortemperatures
mayresultand manyfloor
CoveringswillnotWithsmnd
thiskind ofuse.Neverinstallthe
rangeovervinyltileorlinoleum
thatcannotwithstandsuchtypeof
use.Neverinstallitdirectlyover
interiorkitchencarpeting.
usingYourRange
sIkm9tallowanyonetodirnb9
orhang cmthe door9
SWM.1
broilereompartnlentor range
top.Theycoulddamagetherange
andeventip itovercausingsevere
pefsonalinjury
e
CAUTION:ITflR4sOF
INTEWST‘m cHILDmN
sHoImDNor EmsmMD IN
cABINmmABOVEARANGE
ORONTHEBACKSPLASH
OFARANGE–--CHILDREN
CLHVIEHNGONTEERANGE
TOREACHITEIvHColJLIl BE
SE~O(JSLY IIYJ~REll
w~ G–AHranges
cantipandinjurycouh!
result.‘h
prevent
accidental
tippingofthe
range9attach
ittothewall
Or f100T by
installingthe
AINT1-TIPbracketsupplied.To
checkif thebracketisinstalled
andengagedproperly,carefblly
tiptherangeforwardto check if
theAN(T1-TIPbracketis engaged
withthelevelingleg.
Ifyoupulltherangeout from
thewallfor anyreason, make
suretherearlegisreturnedtoits
positioninthebracketwhenyou
pushtherangeback.
~Letburner gratesand other
surfacescoolbeforetouching
themorleavingthemwhere
ctildrencanreachthem.
@Neverwearloosefittingor
hanginggarmentswhileusing
theappliance.Flammable
materialcouldbeignitedif
broughtincontactwithflame
orhotovensurfacesandmay
causesevereburns.
~Neverfuseyourappliancefor
warmingorheatingtheroom.
Prolongeduseoftherange
withoutadequateventilation
canbehazardous.
@Donotusewtw m grease
fires.Neverpickupa flaming
pan.Turnoffburner,then
smotherflamingpanbycovering
pancompletelywithwellfitting
lid,cookiesheetor flattray.
Flaminggreaseoutsidea pan
canbeputoutbycoveringwith
bakingsodaor,ifavailable,a
multi-purposedrychemical
orfoamtypefireextinguisher.
QDo~o~s~o~eflamma~~e
materialsinm ovenornear
thecooktop.
@Donot!etcookinggrease
orotherflammablematerials
accumulateinorneartheraqge.
@Whencookingpork,follow
thedirectionsexactlyandalways
cookthemeattoaninternal
temperatureofatleast170°F.
Thisassuresthat,intheremote
possibilitythattrichinamaybe
presentinthemeat,itwillbe
killedandmeatwillbesafetoeat.
SUfiac$?Cooting
~AlwaysusetheIJTEposition
whenignitingtopburnersand
makesuretheburnershaveignited.
@Neverleaves~rfa~e~~r~ers
unattendedat~GH flame
settings.Boilovercauses
smokingandgreasyspilIovers
thatmaycatchonfire.
~~just topburnerflamesize
~
soitdoesnotextendbeyondthe
edgeofthecookingutensil.
Excessiveflameishazardous.
@Useon!ydrypotk3dders—
moistordamppotholdersonhot
surfacesmayresultinburnsfrom
steam.Donotletpotholders
comenearopenflameswhen
liftingutensils.Donotuseatowel
orotherbulkyclothinplaceofa
potholder.
e
3
Page 4
G’‘y~>~~~~:~~nlizethe pt?ssibi!ityd
—
.-
.—
hm$,
makriais, and spillage,turn
coL3kw~n3 h~n~ks Kwwci theside
ignitionofM-nmabk
orbackoftherangewithout
Wendingoveradjacentburners.
@Alwaysturn surfaceburner to
OFFbeforerelnovingutensiL
@CarefulIywatchfoodsbeing
friedatHIGHflamesetting.
QNew%’Mockthevents(air
Openings)oftherange.They
providetheairinletandoutlet
whichisnecessaryfortherange
tooperateproperlywithcorrect
combustion.
eDonotusea wokon‘the
cookingsurfaceifthe wokhasa
roundmetalringwhichisplaced
overtheburnergratetosupport
thewok.Thisringactsasaheat
trapwhichmaydamagetheburner
grateandburnerhead.Also,it
maycausetheburnertowork
improperly.Thismaycausea
carbonmonoxideleve~abovethat
allowedbycurrentstandards,
resultinginahealthhazard.
@Foodsfor fryingshouklbeas
dryaspossible.Frost
foodsor moistureon fresh foods
cancausehot fatto bubbleup and
oversides ofpan.
~use h?astpm%ibieamount of
fat for effective
on frozen
shallowordeep-
fatfrying.Fillingthepantoofull
offatcancausespilloverswhen
foodisadded.
gIf a combinationofoilsor
fatswillbe usedin frying,stir
togetherbeforeheating,orasfats
meltslowly.
@Alwaysheatfatsh.nvly9and
watchasitheats.
etkwdeepfatther~mofileter
WMWW possibleto prevent
overheatingfatbeyondthe
smokingpoint.
*use properpansiw-=Avoid
pansthatareunstableor easily
tipped.Selectutensilshavingflat
bottomslargeenoughtoproperly
containfoodavoidingboiiovms
andspillovers,butlargeenough
tocoverburnergrate.Thiswill
bothsavecleaningandprevent
hazardousaccumulationsoffood,
sinceheavyspatteringorspillovers
leftonrangecanignite.Usepans
withhandlesthatcanbeeasily
graspedandremaincool.
@Useonlyglasscookwarethat
isrecommendedforuseongas
burners.
~Keepallplasticsawayfrom
topburners.
@JToavoidthepossibilityofa
burn,alwaysbecertainthatthe
controlsforallburnersareat
OFFpositionandallgratesare
coolbeforeattemptingtoremove
thegrate.
~Whenflamingfoods
thehood,turnthefanoff.The
fan,ifoperating,mayspread
theflame.
~Ifrangeislocatedneara
window,do
notuselongcurtains
whichcouldblowoverthetop
burnersandcreateafire hazard.
~U’yousmellgas,
thegasto the rangeandcall a
qualifiedservicetechnician.
IVeverusean openflameto locate
a leak.
under
turnoff
aStandaway from‘theii-tinge
;VhtllO[leIliElgthe door d a hot
W’en. mehot airor $X62231%1Whkh
escapescall causebums to
hands, faceardor eyes.
Keepoven freefroin grease
~
buildllp.
Placeown shelvesindesired
*
positionwhileoveniscod.
@Pullingoutshelftotheshe~f
stopisaconvenienceinlifting
heavyfoods.Itisalsoa
precautionagainstburns
touchinghotsurfacesofthe
doororoveilwalls.
@Don’theatunopenedfood
containersintheoven.Pressure
couldbuikilupandthecontainer
couldburstcausinganinjury.
@Don’tusealuminumfoil
anywhereintheovenexceptas
deicribedinthisbook.Mjsuse
couldresultina firehazardor
damagetotherange.
*Whenusingcookingor
roastingbagsinoven,followthe
manufacturer’sdirection.
@Useonlyglasscookware
thatisrecommendedforuse
ingasovens.
~AIwaysremovebroilerpan
frombroilercompartmentas
soonasyoufinishbroiling.
Greaseleftinthepancancatch
fireifovenisusedwithout
removingthegreasefromthe
. ..
from
.
Page 5
*
.-
$y’~&~bmiting~if meatisW3
CMM.#3
tomeflame,h? fatmay
igri.iteeTrimexcessfit toprevent
excessiveflare-up%
Flooringunder
Rmge
the
Yourmnge, likeso manyother
hOUSChU\d items, k heavy and
cm settleintosoftfloorcoverings
SWh W CllShitMMd Vhljf]. Whcn
movingtherangeon!histype of
flooring,usecare.
Donotinstallthe rangeover
kitchencarpeting unlessyou
placeaninsulatingpador sheetof
l/4-inch-thickplywoodbetween
therangeandcarpeting.
clmi~ YilurRange
s ~ie~ otiy partsiistedinthis
useandcare Bouk.
@Keeprangechmnandfreeof
mxmmlationsofgreaseor
spilkwerswhichmayignite.
mibllNeedS$?r’via!
* Read66Theproblem!%her”
m page
*Don9tattempttorepair
orreplaceanypartofyour
rangeunlessitisspecifically
recommendedinthisbook.
otherservicing shouldbe referred
toaqualifiedtechnician.
B ofthisbook.
AII
thefloor cowing endsat
When
thefront ofthe range,theareathat
therangewiHrestonshouldbe
builtupwithplywoodorsimilar
materialtothesamelevelorhigher
thanthefloorcovering.This will
allowtherangetobemovedfor
cleaningor servicing.
LevelingtheRange
Levelinglegsarelocatedoneach
comerofthebaseoftherange.
Yourrangemustbelevelinorderto
producepropercookingandbaking
results.Afteritisinits finallocation,
placea levelhorizontallyon an
ovenshelfandcheckthelevelness
fronttobackandsidetoside.Level
therangebyadjustingthe leveling
legsorbyplacingshimsunderthe
comersasneeded.
Oneofthe rear levelinglegswill
engagetheANTI-TIPbracket(allow
forsomesidetosideadjustment).
Allowaminimumclearanceof 1/8”
betweentherangeandtheleveling
legthatistobeinstalledinto
theANTI-TIP bracket.
-
—
—-
—
—
-
-=
-
-
.
EgsIrA- .
m. =
m=_
=
iiaxmi+
—.
-
m==-- -–
--
EsaaE–
----ma. .
—
~ -.
~.. _-
-..
5
Page 6
—
.
--i
——
—
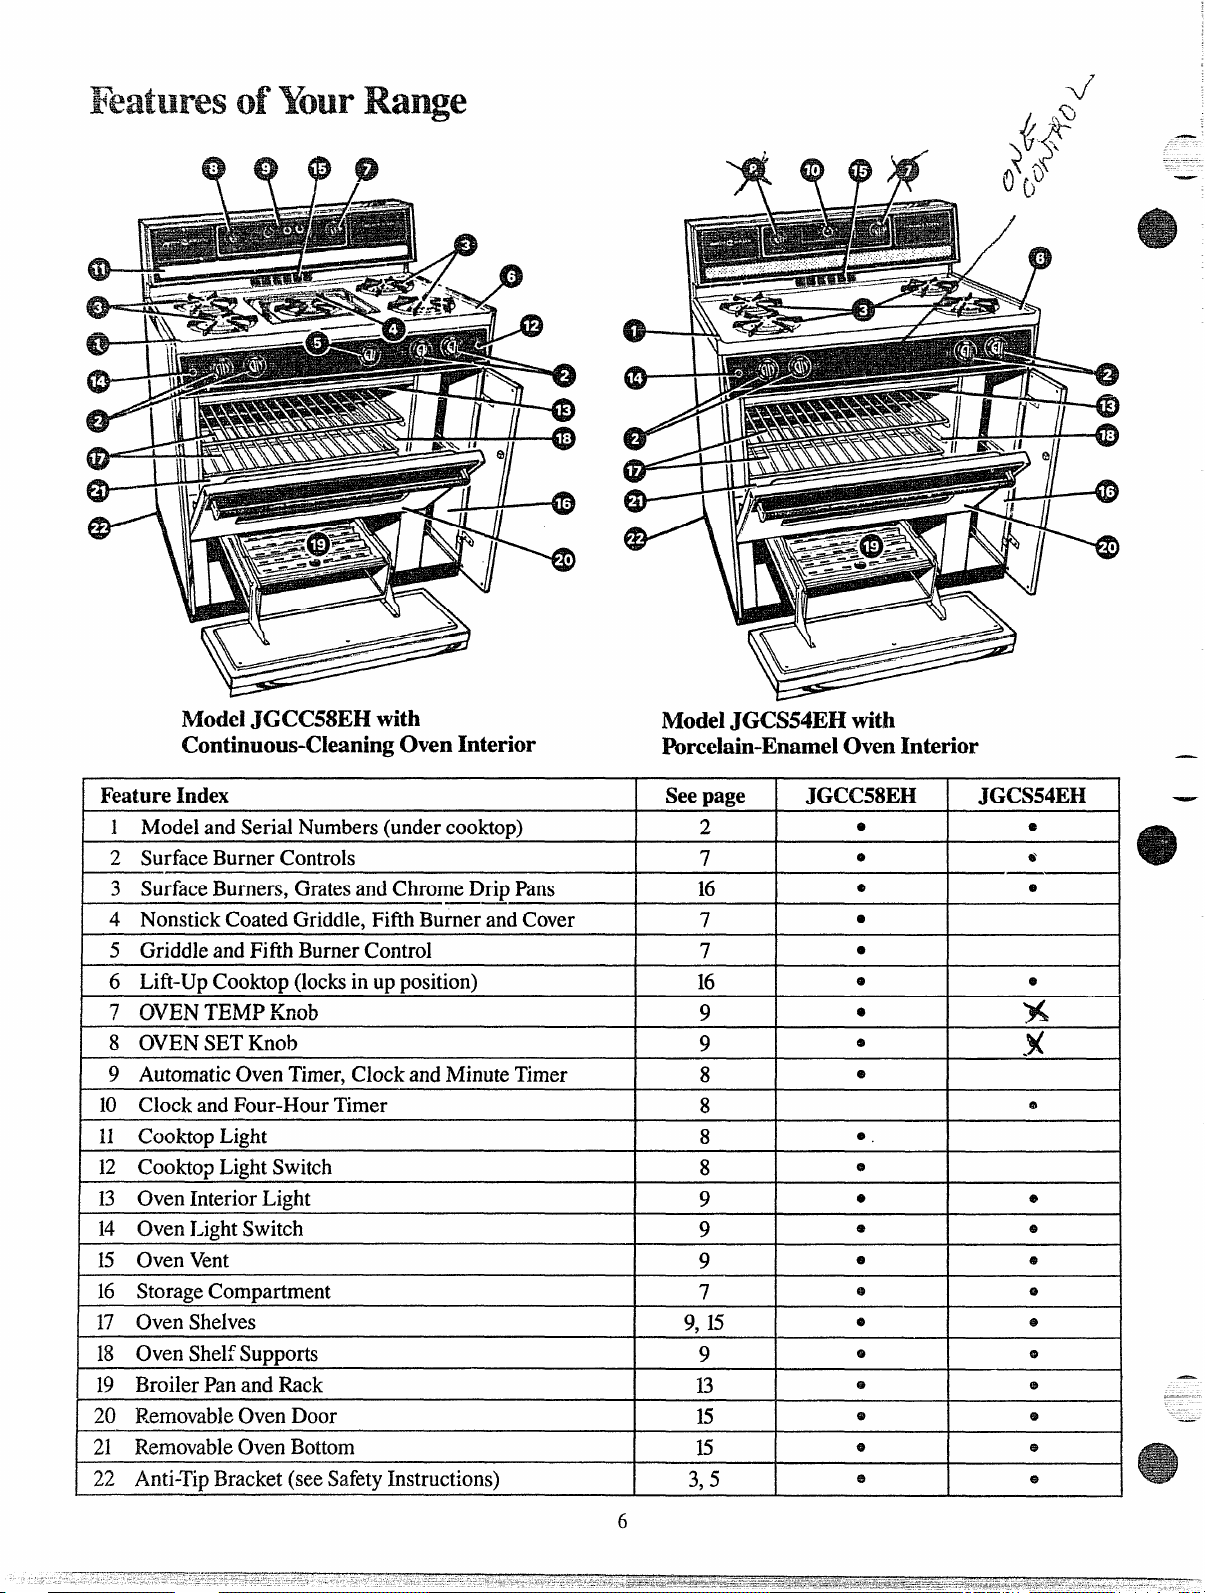
ModelJGCC58EHwith
Continuous-CleaningOvenInterior
Feature Index
ModelJGCS54EHwith
Porcelain-EnamelOvenInterior
Seepage
1 ModelandSerialNumbers(undercooktop)
2 SurfaceBurnerControls
3 SurfaceBurners,GratesandChromeDripPans
——
4 NonstickCoatedGriddle,FiflhBurnerandCover
5 GriddleandFifthBurnerControl
6 Lift-UpCooktop(locksinupposition) 16
7 OVENTEMPKnob
8 OVENSETKnob
9 AutomaticOvenTimer,ClockandMinuteTimer
10 ClockandFour-HourTimer
H CooktopLight
12 CooktopLightSwitch
13 OvenInteriorLight
14 OvenLight Switch
15 OvenVent
16 StorageCompartment
17 OvenShelves
18 OvenShelfSupports
19 BroilerPanandRack
20 RemovableOvenDoor
21 RemovableOvenBottom
22 Anti-TipBracket(seeSafetyInstructions)
2
7
16
‘7
7
9
9
8
8
8
8
9
9
9
7
9, 15
9
13
15
15
3,5
JGCC58EH JGCS54EH
@
e
e @
@ e
e
0
e @
e
e
%
.
%
e
e
0.
@
e @
e e
e
e
e e
e @
e
@
@
e
@ @
e e
@
t4
—
6
Page 7

.4utoBHaticIgnition
Wursurfaceburnersarelightedby
electricignition,eliminatingthe
needforpilotlightswithconstantly
burningflames.
In caseofa powwoutage,youcan
light thesurfaceburnersonyour
rangewitha match.Holda lighted
matchtotheburner,thenturnthe
knobtotheLITEposition.Use
extremecautionwhenlighting
burnersthisway.
SI.wfaceBw-h!rcontrols
Knobsthatturnthesurfaceburners
onandoffare locatedon thelower
frontpanel.Thetwoontheleftand
thetwoontherightaremarkedas
towhichburnerstheycontrol.The
knobinbetweencontrolsthe griddle
andfifthburner.
TO~i~~~
Pushthecontrolknobinandturn
ittoLITE. Youwillhearalittle
clickingnoise—thesoundofthe
burnerlighting.Aftertheburner
ignites,turntheknobtc adjustthe
flamesize.
@Checktobesuretheburneryou
turnedonistheoneyouwanttouse.
~ Donotoperateaburnerforan
extendedperiodoftimewithout
cookwareonthegrate.The finish
onthegratemaychipwithout
cookwareto absorbtheheat.
~ Besuretheburnersandgratesare
coolbeforeyouplace yourhand,a
potholder,cleaningclothsor other
materialson them.
aSurfaceBurner
HowtoSekctFlameSize
Theflamesizeonagasburner
shouldmatchthecookwareyou
areusing.
*
I
NEVERLETTHE FLAME
EXTENDUP THE SIDESOF
THECOOKWARE.Anyflame
largerthanthebottomofthe
cookwareis wastedandonly serves
toheat thehandles.
Whenusing aluminum or
aluminum-cladstainlesssteel
potsand pans, adjusttheflameso
thecircleitmakesisabout1/2inch
smallerthanthebottomofthe
cookware.
Whenboiling,usethissameflame
size-1/2 inchsmallerthanthe
bottomofthecookware-no matter
whatthecookwareismadeof.Foods
cookjustasquicklyatagentleboil
astheydoat a furiousrollingboil.
A highboilcreatessteamandcooks
awaymoisture,flavorandnutrition.
Avoiditexceptforthefewcooking
processeswhichneedavigorousboil.
When frying or warming foods
in stainless steel, cast iron or
enamelware,keeptheflamedown
lower—toabout 1/2thediameterof
thepan.
When frying in glassor ceramic
cookware,lowertheflameeven
more.
Adjwtment
Ar
Anairadjustmentshutterforeach
surfaceburnerregulatestheflowof
airtotheflame.
Whentherightamountofair
intotheburner,theflame
flows
willbesteady,relativelyquietand
haveapproximately3/4”sharpblue
cones.Thisusuallyresultswhen
theshutterisabout halfivayopen.
Withtoomuch air, the flamewill
beunsteady,possiblywon’tburnall
thewayaround,andwillbenoisy,
soundinglikea blowtorch.
With not enoughair, youwon’t
seeanysharpblue conesinthe
flame,youmayseeyellowtips,and
sootmayaccumulateoncookware.
I
Theair adjustmentshuttersseton
thehood ofthevalveandareeither
lockedinplacewithPhillipshead
screwsor positionedontheburner
tubesbyfrictionfit.
Toadjust the flowofair to the
burners, loosenthePhillipshead
screwsandrotatetheshutters(or
applyablade-typescrewdriver
againstthefriction-fitshuttersand
push)to allowmoreor lessairinto
theburnertubesasneeded.
Interchangeable(Wide
andFifthBurner
ModelJGCC!58EH
Thenonstickgriddlechangesplaces
quicklyandeasilywiththefifthdrip
panandburnergrate,andcanbe
keptinthestoragecompartment
rightattherangewhennotinuse.
Anenamelcoverhelpsprotectthe
nonstickfinishwhenyouleavethe
griddleontherange.
7
Page 8

SurfaceCooMng
--
——
CooktopLight
hhiei JGCC58EH
14thll-widthfluorescentlightinthe
backsplashilluminatesthecooktop.
Pressandmomentarilyholdthe
panelLightswitchonthelowerfront
paneltoturnthelightcmandoff.
Top-of-Ra~eCookware
Aluminum:Medium-weight
cookwareisrecommendedbecause
itheatsquicklyandevenly.Most
foodsbrownevenlyinanaluminum
skillet.Mineralsinfoodandwater
willstainbutwillnotharm
aluminum.A quickscourwitha
soap-filledwoolpadaftereachuse
keepsaluminumcookwarelooking
shinynew.Use saucepanswith
tight-fittinglidsforcookingwith
minimumamountsofwater.
CastIron: Ifheatedslowly,most
skilletswillgivesatisfactoryresults.
Enamelware:Undersome
conditions,the enamelofsome
cookwaremaymelt.Followcookware
manufacturer’srecommendations
forcookingmethods.
Glass:Therearetwotypesofglass
utensils—thoseforovenuseonly
andthosefor top-of-rangecooking
(saucepans,coffeeandteapots).
CHassconductsheat veryslowly.
Heatproof GlassCeramic: Can
beusedforeithersurfaceoroven
cooking.It conductsheatvery
slowlyandcools veryslowly.
Checkcookwaremanufacturer’s
directionstobesureitcanbe
usedongasranges.
StainIessSteel:Thismetalalonehas
poorheatingproperties,andisusually
combinedwithcopper,aluminum
or othermetalsforimprovedheat
distribution.Combinationmetal
sldletsgenerallyworksatisfactorily
ifusedat mediumheatas the
manufacturerrecommends.
Clockand~mers
TheClockandTimersonyour
rangearehelpfuldevicesthatserve
severalpurposes.
Clock&MinuteTimer
ModelJGCC58EH
TOsettheclock,pushtheknobin
andturntheclockhandstotheright
tothe correcttime.Thenlettheknob
outandcontinueturningtoOFF.
TheMinuteTimer hasbeen
combinedwiththe rangeclock.
Useitto timeallyourprecise
cookingoperations.You’llrecognize
itasthepointerwhichisdifferent
incolorthantheclockhands.
Minutesaremarkedupto60on the
centerringoftheclock.
TosettheMinuteTimer,turnthe
knobtotheleft, withoutpushingin,
untilthe pointerreachesthenumber
ofminutesyouwanttotime.
Attheendof the settime, a
buzzersoundsto tellyoutimeis
up. Turntheknob,’withoutpushing
in, untilthepointerreachesOFF
andthebuzzerstops.
AutomaticOvenTimer
ModelJGCC58EH
ThisTimerwillautomaticallystart
andstopyourovenforyou.Here’s
whatyoudo:
1.Make surebothyourrangeclock
andtheSTARTdial showthecorrect
timeofday.WhentheSTARTknob
ispushedinandturned,itwill“pop”
intoplacewhenthetimeshownon
therangeclockisreached.
2. SettheSTARTcontrol.Push
inandturntheSTARTknobtothe
timeyouwanttheovento turnitself
on. (Ifyouwantittostartcooking
immediately,donotsetStarttime.)
3. SettheSlOP control.Pushin
andturntheSTOPknobtothe time
youwanttheoventoturnitselfoff.
Note:Theremustbeat leasta halfhourdifferencebetweentheSTART
andSKIP dialsfortheautomatic
controltowork.
4. SettheOVENSETknobto
AUTOOVEN.
5. SettheOVENTEMPknob to
thedesiredcookingtemperature.
Nowtheovenwillturn itselfon
immediatelyoratalaterStarttime
thatyouset, cookatthetemperature
youselectedandturn itselfoffat
theStoptimeyouselected.
Afteryoutake yourfoodoutofthe
oven,besuretoturntheOVEN
TEMPcontroltooffandthe
OVENSETknobtotheMAN
OVENsettingwhereit shouldbe
keptfor normalovenuse.
Clockand4-HourTimer
ModelJGCS54EH
Thismodelhasatime-of-dayclock
anda 4-hourtimerbutdoesnot
haveStartandStopdialsneededfor
automaticovencooking.
—
—–
—
—
-
Page 9

usingYouroven
m%=.”
EEss?z—
,AutomaticIgilition
The ovenburneronyourrange
islightedbyelectricignition
eliminatingtheneedforstanding
pilotlights.
To Light the oven Burner
TurntheOVENTEMPknobtothe
desiredtemperature.Theburner
shouldignitewithin60seconds.
Yourovencannotbeoperated
withoutelectricpower.
CAUTION:DONCYI’MAKEANY
ATTEMPI’‘IOOPERATETHE
ELECTRICIGNITIONOVEN
DURING ANELECTRICAL
POWERFAILURE. Resumption
ofelectricalpowerwhenOVEN
TEMPcontrolis in anyposition
otherthanOFFwillresultin
automaticignitionoftheoven
burnerandcouldcausesevereburns
if, atthetime,youwereattempting
tolightthe burnerwitha match.
AirAdjustment
The flowofairtotheovenburneris
adjustedin thesamemannerasitis
forthesurfaceburnezs(seepage7).
Whentheair flowis properly
adjusted,theovenburnerflame
shouldbesteady,withapproximately
l-inchblue conesandshouldnot
extendoutoverthebaffleedges.
TheOVENSETknobhastwo
settings.TheAUTOOVEN setting
letsyouprogramyouroventostart
andstopautomaticallyatpre-set
times.TheMANOVEN settingis
wheretheknobshouldbesetfor
normalovenuse.
The OVENTEMPknobhas
cookingtemperaturesmarkedin
25*F.incrementsonthedial.llm it
tothedesiredcookingtemperature
andthe flamewillcomeon,usually
within30to60seconds.
Aftertheovenreachestheselected
temperature,theovenburnerwill
cycle-off completely,thenonwith
a fullflame-to keeptheoven
temperaturecontrolled.
Ove~
Shelves
Theovenhasfourshelfsuppor&-—
A(bottom),B,CandD(top).Shelf
positionsforcookingarc suggested
cmBakingandRoastingpages.
ovenLight
Usetheswitchonthelowercontrol
paneltoturnlightonandoff.
OvenVent
Yourovenis ventedthroughducts
attherearofthe range(seepage6).
Donotblocktheseductswhen
cookingintheoven—itisimportant
thattheflowofhotairfromtheoven
andfreshair totheovenburnerbe
uninterrupted.Avoidtouchingthe
ventopeningsor nearbysurfkces
duringovenorbroileroperation—
theymaybecomehot.
*Ventopeningsandnearby
surfaces
touchthem.
~Handlesofpotsandpansonthe
cooktopmaybecomehotif left
toocloseto thevent.
maybecomehot.Donot
lBef&e ~s@j llioui”O~e~
Besureyouunderstandhowto set
thecontrolsproperly.Practice
removingandreplacingtheshelves
whiietheoveniscool.Readthe
informationandtipsonthe
followingpages.Keepthisbook
handywhereyoucanrefertoit—
especiallyduringthefirstfewweeks.
oven controls
The controls foryouroven,marked
OVEN SETandOVENTEMP,are
locatedontheuppercontrolpanel—
oneoneachsideofthe clock.
Theshelvesaredesignedwith
stop-locks.Whenplacedcorrectly
ontheshelfsupports,theshelves
willstopbeforecomingcompletely
out oftheovenandwillnottilt
whenyouareremovingfoodfrom
themor placingfoodonthem.
Whenplacingcookwareona shelf,
pull theshelfouttothe “stop”
position.Placethecookwareon
theshelf,thenslidetheshelfback
intotheoven. Thiswilleliminate
reachingintothehot oven.
Toremovea shelffromtheoven,
pushitback,lifttherearofthe
shelfandpullitout.
9
Donotleaveplasticitemson
~
thecooktop—theymaymeltif
lefttooclosetothevent.
(km Moisture
Asyour ovenheatsup, the
temperaturechangeoftheair
intheovenmaycausewater
dropletsto formonthedoor
glass.Topreventthis, openthe
ovendoorforthetirst minute
ofovenheat-uptoletthemoist
airout.
Page 10

——.——..—....—
—
—
—
-&
..——..--.—...———-—.—.
Hol$’tosetMtsrRange
for BakiElg
1. Positiontheshelfor shelvesin
the oven.
2. Closeovendoor,turnOVEN
TEMPknobtodesiredtemperature
andpreheatovenfora{least 10
minutesifpreheatingis necessary.
MakesureOVENSETcontrolis
turnedto MANOVEN1,indicating
theovenistobeoperatedmanually.
3. Placefoodinovenoncenterof
shelf.Allowatleastaninchbetween
edgeofbakewareandovenwallor
ad,jacentcookware.
Ifcookingontwoshelvesatthe
sametime, placeshelvesabout4
inchesapartandstqger foodon
them.
4. Checkfoodfordonenessat
minimumtimeon recipe.Cook
longerifnecessary.Switchoff
heatandremovefood.
Preheating
Preheatingisimportantwhenusing
temperaturesbelow225”F.and
whenbakingfoodssuchasbiscuits,
cookies,cakesandotherpastries.
Preheatingisnotnecessarywhen
roastingor long-timecookingof
wholemeals.
sheIfPositiom
Most baking isdoneonthesecond
shelfposition(B)fromthebottom.
Whenbakingthreeor fouritems,
usetwoshelvespositionedonthe
secondandfourthsets(B&D)of
supportsfrombottomof oven.
Bakeangelfoodcakesonfirstshelf
position(A)frombottomofoven.
~ Followatestedrecipeand
measuretheingredientscarefully.
Ifyouareusingapackagemix,
followlabeldirections.
e Ifmoistureisnoticeableonthe
frontofthe ovenorontheoven
windowwhenfirstturningonthe
oven,leavethe ovendoorajarfora
fewminutesoruntiltheoveniswarm.
@Donotopenthe ovendoorduring
abakingoperation—heatwillbelost
andthe bakingtimemightneedto
beextended.Thiscouldcausepoor
bakingresults.Ifyoumustopenthe
door,openitpartially-only3or4
inches—andcloseitasquicklyas
possible.
0Donotdisturbthe heatcirculation
inthe ovenwiththeuseofaluminum
foil.Iffoilisused,placeasmall
sheetofit,about10by12inchesat
themost,onalowershelfseveral
inchesbelowthefood.Donotplace
foilontheovenbottom.
CommonBakingl?robkms
andPossibleSolutions
PDH3
Burningaroundedges
oOventoofill; avoidovercrowding.
@Edgesofcrusttoothin.
~Incorrectbakingtemperature.
Bottomcrustsoggyandunbaked
~Allowcrustand/orfillingtocool
sufficientlybeforefillingpieshell.
eFillingmaybe too thinorjuicy.
@Fillingallowedtostandinpieshell
beforebaking.(Fillpieshellsand
bakeimmediately.)
eIngredientsandpropermeasuring
affectthequalityofthecrust.Usea
testedrecipeandgoodtechnique.
Makesuretherearenotinyholesor
tearsinabottomcrust.“Patching”
apiecrustcouldcausesoaking.
Piefillingrunsover
and bottomcrustnotwell
@Top
sealedtogether.
@Edgesofpiecrustnotbuiltup
highenough.
@Toomuchfilling.
~Checksizeofpie plate.
Pastryistough;crustnotflaky
@Toomuchhandling.
~Fattoo~ofiorcutintoofine.
Rolldoughlightlyandhandleas
littleaspossible.
CAKES
Cakeriseshigherononeside
~Batterspreadunevenlyinpan.
s @en shelvesnotlcv~l.
@Usingwarpedpans.
~Incorrectpansize.
Cakescrackingontop
~o}~entemperaturetoohigh.
~Battertoothick,follow
orexactpackagedirections.@Checkforpropershelfposition.’
~Checkpansizecalledforinrecipe.
~ Impropermixingofcake.
Cakefalls
@Toomuchshortening,sugaror
liquid.
@Checkleaveningagent,baking
powderorbakingsodatoassure
freshness.Makeahabittonote
expirationdatesofpackaged
ingredients.
@Cakenotbakedlongenoughorat
incorrecttemperature.
@Ifaddingoiltoacakemix,make
certaintheoilisthe typeand
amountspecified.
Crustishard
oChecktemperature.
~Checkshelfposition.
Cakehassoggylayeror streaksat
bottom
@Underminingingredients.
~Shorteningtoosoftforproper
creaming.
TOOmuchliquid.
o
recipe
COOKIES&ImmJrrs
Doughycenter;heavycruston
surface
eChecktemperature.
@Checkshelfposition.
FO~lOWbakinginstructions
o
carefillyasgiveninreliablerecipe
oronconveniencefoodpackage.
~Flatcookiesheetswillgivemore
evenbakingresults.Don’tovercrowd
foodsonabakingsheet.
~Conveniencefoodsusedbeyond
theirexpirationdate.
Browningmorenoticeableon
oneside
~Ovendoor notclosedproperly,
checkgasketseal.
~ Checkshelfposition.
—
—.
10
Page 11

—
BakingGuide
—
—
—
L Preheatingisveryimportant
whenusingtemperaturesbelow
225X andwhenbakingfoods
suchasbiscuits,cookies,cakes
andotherpastries.Preheatthe
ovenforatleast 15minutes.
Preheatingis notnecessarywhen
roastingor forlong-timecooking
2. Aluminumpans conductheat
quickly.Formostconventional
baking,light,shinyfinishesgive
best resultsbecausethey help
preventoverbrowning.Forbest
browningresults,werecommend
dullbottomsurfacesforcakepans
andpieplates.
3. Darkor non-shinyfinishes,also
glassandPyroceram@cookware,
generallyabsorbheat which may
resultindry,crispcrusts.Reduce
ovenheat25”F.iflightercrustsare
desired.Rapidbrowningofsome
foodscanbeachievedbypreheating
castironcookware.
ofwholemeals.
Shelf Oven Time,
Food Cookware
Bread
Biscuits(%-in.thick) ShinyCookieSheet
Coffeecake ShinyMetalPanwith
Cornbreadormuffins
Gingerbread ShinyMetalPanwith
Muffins ShinyMetalMuffinPans
Popovers
Quickloafbread MetalorGlassLoafPans B 350°-3750
Yeastbread(2loaves)
Plainrolls ShinyOblongor MuffinPans A, B
Sweetrolls
Cakes
(withoutshortening)
Angelfood
Jellyroll
Sponge
Cakes
Bundtcakes
Cupcakes ShinyMetalMuffinPans
Fruitcakes MetalorGlassLoafor A, B 275°-3000 2-4hrs. Use300°F.andShelfBforsmallor
Layer ShinyMetal Panwith B 350°-3750 20-35
Layer,chocolate
Loaf MetalorGlassLoafPans B 350° 40-60
Cookies
Brownies MetalorGlassPans
Drop
Refrigerator
Rolledorsliced CookieSheet
Fruits,
OtherDesserts
Bakedapples GlassorMetalPans
Custard
Puddings,rice GlassCustardCupsor B 325°
mdcustard
Pies
Frozen FoilPanonCookieSheet A 400°-4250 45-70 Largepiesuse400°F.andincreasetime.
Meringue Spreadtocrustedges
he crust GlassorSatin-finishMetalPan A, B 400°-4250 45-60 Custardfillingsrequirelowertemperature,
Twocrust Glassor Satin-finishMetalPan
Pastryshell
Miscellaneous
5akedpotatoes SetonOvenShelf
!callopeddishes Glassor MetalPan
;Oufflcs GlassPan B
satin-finishbottom
CastIronor GlassPan B
satin-finishbottom
DeepGlassorCastIronCups B 375° 45-60 Orbakeat450”F.for25minutes,thenat
Metal orGlassLoafPans A,B 375°-4250
ShinyOb!ongorMuffinPans B,A 350°-3750
Aluminumllbe Pan A 325°-3750
MetalJellyRollPan B 375°-4000 10-15 Linepanwithwaxedpaper.
MetalorCeramicPan A 325°-3500
MetalorCeramicPan A,B 325°-3500 45-65
ThbePan individualcakes.
satin-finishbottom
ShinyMetalPanwith B
satin-finishbottom
CookieSheet B,C 350°-4000 10-20
CookieSheet
GlassCustardCupsor B
Casserole (setinpanof hotwater)
Casserole base80to90minutes.
GlassorSatin-finishMetalPan B 450° 12-15
Positions
B,C 400°-4750 15-20
B,A
B 350° 45-55
A,B 400°-4250
B 350°-3750 20-25 Paperlinersproducemoremoistcrusts.
B,C
B,C
B,C 375°-4000 7-12
A, B,C
B,A
B 400°-4250
A, B,C 325°-400” 60-90 Increasetimeforlargeamountor size.
A, B,C
Temperatures
350°-4000
400°-4500
375°-4250 10-25 Forthinrolls,ShelfBmaybeused.
350°-375”
325°-3500 25-35 Barcookiesfrommixusesametime.
400°-4250 6-12
350°-4000
300°-3500 30-60 Reducetemperatureto300”F.forlarge
325°-3500 15-25
325°-3750 30-60
300°-3500
Minutes Comments
Canned,refrigeratedbiscuitstake2to4
20-30
20-40
20-30
45-60 Darkmetal orglassgivesdeepest
45-60 browning.
20-30 Forthinrolls,SheifB maybeused.
30-55 Twopiecepanisconvenient.
45-60
25-30
30-60
50-90 Cookbreadorricepuddingwithcustard
40-60 longertime.
30-75
minuteslesstime.
Preheatcastironpan forcrispcrust.
Decreaseabout5minutesformuffinmix.
350”F.for10to 15minutes.
UseShelfCandincreasetemperature
25to 50”F.formorebrowning.
custard.
Toquicklybrownmeringueuse400”F.for
8 to 10minutes,
Page 12

Roasting
—-
Roastingis cookingbydry heat. Step2: Checkweightofroast.
Tendermeator poultrycanbe Placemeatfat-side-upor poultry
roasteduncoveredinyouroven.
Roastingtemperatur~s,which shallowpan.‘Themeltingfatwill
shouldbelowandsteady,keep
spatteringtoa minimum,When
rilasling,-itisnotnecessarytosear,
baste,cover,oraddwaterto your
meat.Roastingiseasy,just follow
thesesteps:
StepL Positionovenshelf at
secondfrombottomposition(B)for
smallsizeroast(3to5 lbs.)andat
bottomposition(A)forlargerroasts.
breast-side-uponroastingrackina
bastethemeat.Selectapanas
closetothesizeofmeataspossible.
(Broilerpanwithrackisagood
panforthis.)
Step3:TurnOVENTEMPcontrol
todesiredtemperature.Checkthe
RoastingGuidefortemperatures
andapproximatecookingtimes.
Step4: Mostmeatscontinueto
cookslightlywhilestandingafter
beingremovedfromtheoven.For
rareor mediuminternaldoneness,
youmaywishtoremovemeat from
theovenjustbeforeitisdone if itis
tostand~or10to20minuteswhile
youmakegravy.You’llfindit
easiertocarveaswellasdoneto
your liking. If no standingis
planned,cookmeattosuggested
temperature.
FI’QzenRoasts
Frozenroastsofbeef,pork,
lamb,etc.,canbe startedwithout
thawing,butallow10to25minutes
perpoundadditionaltime(10
minutesper poundforroastsunder
5 pounds,moretimeforiarger
roasts).
Thawmostfrozenpoultrybefore
roastingto ensureevendoneness.
Somecommercialfrozenpoultry
canbecookedsuccessfullywithout
thawing.Followdirectionsgiven
onpacker’slabel.
_-
RoastingGuide
Oven
mm
Meat
Tendercuts;rib,highquality
sirlointip,rumpor topround*
Lamblegorbone-inshoulder*
Vealshoulder,legor loin* 325°
Porkloin,ribor shoulder*
Ham,pre-cooked
Ham,raw
*Forbonelessrolledroastsover6-inches
thick,add5 to 10minutesperlb.to times
givenabove.
Poultry
Chickenor Duck
Chickenpieces
Turkey
Temperature
Doneness inMinutesperPound
325° Rare:
325° Rare: 21-25 20-23 130°-140°
325°
325°
325°
325°
375° WellDone: 35-40
325°
Medium: 30-35
WellDone:
Medium: 25-30 24-28
Well Done:
WellDone: 35-45 30-40 170°-180°
WellDone:
ToWarm: 10minutesper lb.(anyweight) 125°-1300
WellDone: 20-30
WellDone: 35-40
WellDone: 20-25
ApproximateRoastingTime Internal
3to5-lbs. 6to8-lbs.
24-30
35-45
30-35 28-33 170°-185°
35-45
Under10Ibs. 10tolS-lbs,
3toS-lbs.
10to15-lbs.
18-22
22-25
28-33
30-40
17-20 170°
Over5Ibs.
30-35 185°-1900
OverMIbs.
15-20
Temperature‘F
1
130°-140°
150°-160°
I
170°-185°
150°-160°
170°-180°
185°-190°
Inthigh:
185°-190”
12
Page 13

—-
—
Broiling
-.
Elroil& is c~oking foodbydirect
heatfromabovethefood.Your
rangehasa convenientcompartment
belowtheovenforbroiling.Italso
hasaspeciallydesignedbroilerpan
andrackthatailowdrippingfat to
drainawayfromthefoodsandbe
kept away fromthehighheatof
thegasflame.
Distancefromtheheatsourcemay
bechangedbypositioningthebroiler
panandrackononeofthreeshelf
positionsinthebroilercompartment–
.4(bottomofbroilercompartment),
B(middle)andC (top).
Boththeovenandbroiier
compartmentdoorsshouldbe
closedduringbroiling.
HowtoBroil
1. Ifmeathasfator gristlenearthe
edge,cutverticalslashesthroughit
about2 inchesapart,butdon’tcut
intomeat.Werecommendthatyou
fidtto preventexcessive
trim
smoking,leavingalayerabout
l/8-inchthick.
2. Removebroilerpanandrack
frombroilercompartmentand
placefoodonrack.
3. Pulloutdrawerandposition
broilerpanincompartment.
Placingfoodcloserto flame
increasesexteriorbrowningof
food,butalsoincreasesspattering
andthepossibilityoffatsandmeat
juicesigniting.
4. Close broilerdoorand,formost
foods,turnOVENTEMPknobto
BROIL.Exceptionsarechicken
andhamwhicharebroiledata
lowersettinginordertocookfood
1
[hroughbeforeover-browningit.
5.~rn mostfoodsonceduring
;ooking;(theexceptionisthinfillets
offish;oiloneside,placethatside
~ownonbroilerrackandcookwithout
:urninguntildone).Timefoodsfor
~boutone-halfthetotal cooking
:ime,turnfood,thencontinueto
:ooktopreferreddoneness.
5.TurnOVENTEMPknobto
3FF.Removebroilerpanfrom
~ompartmentandservefood
rnmediately.Leavepanoutside
compartmenttocool.
BroiIi~ Tips
*Usetongstoturnmeatover—
piercedmeatlosesjuices.
Bmili~ Guide
Quantity
andlor
Thickness
Bacon
GroundBeef
WellDone
BeefSteMs
Rare
Medium
WellDone
Rare
Medium
Well Done
Chicken(450°) 1whole
BakeryProducts
Bread(Toast)or
ToasterPastries
EnglishMuffins
Lobstertails
(6to8-02.each)
Fish
Hamslices(4509
Precooked
E%rkchops
WellDone
Lambchops
Medium
WellDone
Medium
Well Done
Wienem,
similar precooked
sausages,
bratwurst
%-lb,(about8
thinslices)
l-lb.(4patties)
1/2to%-in.thick c
l-in,thick
(1-lfilbs.)
I%-in.thick
(2-2HIbs.)
(2to2Wbs.),
splitlengthwise
24 slices
1pkg.(2)
2-sp!it
2-4 B
l-lb.fillets%to
V&in.thick
l-in.thick B
2(% inch)
2(%-in.thick),
about1lb,
2(1 inch)
about10-12oz.
2(1%inch),
about1lb.
l-lb, pkg.(10)
Shelf
PositionFood
*Steaksandchopsshouldbeat -least1inchthickforbest
results.Pm broilthinnerones.
Side 2nd Side
M
The, Time,
Minutes Minutes Comments
I
c
9-1o 7-8 takeaboutsametime.
A
A
A
A
A
A
A
c
c
c
9
12
13
10
15
25
30-35 25-30 Reducetimesabout5 to 10min.
2-3
34
13-16
5
8 I 8 I Increasetimes5-10min.perside
I
A
A
B
B
B
B
c
10
13
II
8 4-7
10 10
10
17
6
I
I
Spaceevenly.Upto8patties
7
Steakslessthanl-in.cook
5-6
throughbeforebrowning.
8-9
Panfryingisrecommended.
6-7
12-14
16-18
Donot Cutthroughbackofshell,spnxd
turn open,Brushwithmeltedbutter
over.
1042
12-14
Slashfat.
persideforcut-upchicken.
Brusheachsidewithmelted
butter.Broilwithskinsidedown
firstandbroilwithdoorclosed.
1~-1
Spaceevenly.PlaceEnglish
muffinscut-side-upandbrush
withbutterifdesired.
beforeandafterhalftime.
5 Handleandturnverycarefully.
Brushwithlemonbutterbefore
andduringcookingifdesired.
Preheatbroilertoincrease
browning.
I forlYGin.thickorhomecured.
4-5
Slashfat,
Slashfat.
4-6
1-2
Ifdesired,splitsausages inhalf
lengthwise;cutinto5to6-in,
broiling ~--
lwis -
——
=;
;f.
-- *
Page 14

careandcleating
—
—
Propercareandcleaningare
importmtsoyourrangewillgive
youefficientandsatisfactory
service.Followthesedirections
carefullyincaringfor ittohelp
assuresafeandpropermaintenance.
BESUREELECTRICPOWER
ISOFF BEFORECLEANING
ANYPARTOF YOURRANGE.
specialcm?of’
(lmtinums-(kming
OvenInterior
Mode] JGCC58EH
Yourovenhasa ContinuousCleaninginteriorthatcleansitself
whilecooking.Theinsideofthe
oven—top,sides,andback—is
finishedwitha specialcoating
whichcannotbecleanedinthe
usualmannerwithsoap,detergents,
commercialovencleaners,coarse
abrasivepadsor coarsebrushes.
Useofsuchcleanersand/ortheuse
ofovensprayswillcausepermanent
damage.
Thespecia!coatingisa porous
ceramicmaterialwhichisdarkin
colorandfeelsslightlyroughtothe
touch.Ifmagnified,thesurface
wouldappearaspeaks,valleys,and
sub-surface“tunnels:’Thisrough
finishtendstopreventgrease
spattersfromforminglittlebeads
ordropletswhichrundownthe
sidewallsofahard-surfaceoven
linerleavingunsightlystreaksthat
requirehandcleaning.Instead,
whenspatterhitstheporousfinish
itisdispersedandispartially
absorbed.Thisspreadingaction
increasestheexposureofoven
soiltoheatedair,andmakesit
somewhatlessnoticeable.
Soilmaynotdisappearcompletely
andat sometimeafterextended
usage,stainsmayappearwhich
cannotbe removed.
Thespecialcoatingworksbeston
smallamountsofspatter.Itdoes
not workwellwithlargerspilk,
especiallysugars,eggor dairy
mixtures.
Thisspecialcoatingisnotused
onovenshelves,ovenbottomor
doorliner.Removethesetoclean
withacommercialovencleanerto
preventdamagingthecontinuous
cleancoating.
To ~1~~~ ~~~
Continuous-
CleaningOven:
1. Letovenpartscool before
handling.It isrecommendedthat
rubberglovesbewornwhen
cleaningovenpartsmanually.
2. Removeshelvesandcookware.
3. Soilvisibilitymrr~bereducedby
operatingtheovenat450”F.Close
thedoorandturnOVENTEMP
knobto450”F.Timeforat least4
hours.Repeatedcyclesmaybe
necessarybeforeimprovementin
appearanceisapparent.
REMEMBER:INwNG THE
OPERATIONOFTHEOVEN,THE
DOOR,WINDOWAND01’HER
SURFACESWILLGETHOr ENOUGH
‘IOCAUSEBURNS.DO1$1~
LETTHEOVENCOOLBEFORE
REPLACINGSHELVES.
4. Ifa spilloveror heavysoiling
occursontheporoussurface,as
soonas practicalaftertheovenhas
cooled,removeasmuchofthesoil
aspossibleusinga smallamountof
wateranda stiffbristlenylon
brush.Whenusingwater,useit
sparinglyandchangeitfrequently,
keepingitascleanaspossible,and
besuretoblot it upwithpaper
towels,cloths,or sponges.Donot
ruborscrubwithpaper towels,
clothsor sponges,sincetheywill
leaveunsightlylintontheoven
finish.If waterleavesa whitering
onthefinishasitdries,applywater
againandblot
startingat theedgeoftheringand
workingtowardthecenter.
Donotusesoap,
commercialovencleaner,silicone
ovensprays,coarsesteelpadsor
coarsebrushesontheporous
surface.Theseproductswillspot,
clog,andmartheporoussurface
aridreduceitsabilitytowork.
itwithacleansponge,
detergent,
TOUCH.
Donotscrapetheporoussurface
withaknifeor spatula—theycould
permanentlydamagethefinish.
Theovenbottomand the inside
ofthe ovendoor havea porcelain
enamelfinish. FollowPorcelain
OvenInteriorcleaninginstructions
below.Besuretoremoveandclean
theovenbottomandovendoor
linerawayfiom the oventoprevent
damagetothecontinuous-cieaning
interior.
PorcelainOvenInterior
ModelJGCS54E13
Theporcelainenamelfinishonthe
insideofthe oven—top,bottom,
sides,backandinsideofthedoor—
isessentiallyglassfhsedonsteelat
hightemperature.Withpropercare,
theporcelainenamelinteriorwill
retainitsgood-lookingfinishfor
manyyears.
Lettherangecoolbeforecleaning.
Werecommendthatyouwearrubber
gloveswhencleaningtherange.
Soapandwaterwillnormallydothe
job.Heavyspatteringor spillovers
mayrequirecleaningwithamild
abrasivecleanser.Soapy,wetmetal
padsmayalsobe used.Donotallow
foodspillswithahighsugaror acid
content(suchasmilk,tomatoes,
sauerkraut,fruitjuicesorpie
filling)toremainonthesurface.
Theymaycauseadull spoteven
allercleaning.
Householdammoniamaymakethe
cleaningjob easier.Place1/2cupin
ashallowglassorpotterycontainerin
acoldovenovernight.Theammonia
fumeswillhelploosentheburned-on
greaseandfood.
Ifnecessary,youmayuseacaustic
cleaner.Followthepackage
directions.
Cautionsaboutusing
spray-onovencleaners:
Becarefulwheretheovencleaner
issprayed.
—
—
—
14
Page 15

—_
—
~ DoNotsprayontheovenlight,
electricalcontrolsandswitches(on
modelssoequipped)becauseit
couldcauseashortcircuitand
result in sparkingor fire.
~ Do not allovva filmfromthe
cleanertobuilduponthe temperature
sensingbulb—itcouldcausethe
ovento heatimproperly.(Thebulb
islocatedatthe,topof theoven.)
Carefullywipethebulbcleanafler
eachovencleaning,beingcarefhl
notto movethe bulbas achangein
itspositioncouldaffecthowthe
ovenbakes.
notsprayanyovencleaner
~Do
onthe outsideoftheovendoor,
handles,or anyexteriorsurfaceof
theoven,woodor paintedsurfaces.
Thecleanercandamagethese
surfaces.
RemovableovenDoor
—
Theovendooris removableto
makecleaningtheoveneasier.
I
Toremovethedoor,openit a few
inchesto thespecialstopposition
thatwillholdthedooropen.Grasp
firmlyoneachsideand lifithe
door straightupandoffthehinges.
(Duetothelargeamountof
insulationandtheconstructionof
thedoor,it isheavy.)
Note:Becarefulnot to placehands
betweenthespringhingeandthe
ovendoorframe.Thehingecould
snapbackandpinchfingers.
-.
Washwithhot,soapywater.For
stubbornspots,usea solutionof
ammoniaandwater.Do not
~g+~~.:
~
K@7$
‘Y~$ZTimmersethedoorinwater.
Toreplacethedoor,positionslots
inbottomofdoor overthehinges
thatare inthe“out” position.Then
lowerthedoor slowlyandevenly
overbothhingesatthesametime.
Ifhingessnapbackagainsttheoven
frame,pullthembackout.
3. Pullthebottomforwardandout
oftheoven, keepingtherearofthe
ovenbottomglidingonthebottom
ofthelowestshelfglide.Thiskeepsit
fromcatchingonthe burnerigniter
shield.Toreplacethebottom,just
reversethisprocedure,makingsure
thetwotabsontherearoftheoven
OvenShelves
bottomgointotheslots attherear.
Theovenbcttomhasa porcelain
Ovenshelvesmaybecleanedwith
a mildabrasivecleanserfollowing
manufacturer’sdirections.After
cleaning,rinsetheshelveswithclean
wateranddry witha drycloth. To
removeheavy,burned-onsoil, soapy
metalpadsmaybeusedfollowing
manufacturer’sdirections.After
scrubbing,washwithsoapywater,
rinseanddry.
enamelfinish.Tomakecleaning
easier,protecttheovenbottom
fromexcessivespillovers.Thisis
particularlyimportantwhenbaking
a fruitpieor otherfoodswitha
highacidcontent.FIotfruitfillings
or foodsthatareacidin content
suchasmilk,tomatoor sauerkraut,
andsauceswithvinegaror lemon
juice,maycausepittinganddamage
tothe porcelainenamelsurface.
RemovalieOvenBottom
The porcelainenamelovenbottom
canberemovedtomakecleaning
easier.
Toremovethe ovenbottom:
1. Removethe ovenshelves.
Toprotecttheovenbottomsurface,
placeapieceofaluminumfoil
slightlylargerthanthebakingdish
or a smallcookiesheetona lower
shelfor underthebakingdishto
catchanyboi}overs.It shouldnot
completelycovertheshelfasthis
wouldcauseunevenheatinthe
oven.Aluminumfoilshouldnot
beplacedon theovenbottom.
If a spilloverdoesoccuronthe
ovenbottom, allowtheoventocool
-.
-
-
-
~
-
w.
——
-
msr
—.
-=
-
-
-
-m
-
u.- .-
ifw=
first.Youcancleanthebottomwith
+f2m=z-
soapandwater,amildabrasive
cleanser,soap-filledabrasivepads,
orcausticovencleanerfollowing
.
2. Removethe twoknurledholddownscrewsateachfrontcorner.
If screwsaretootight toremoveby
hand,useascrewdriver.
manufacturer’sdirections.
Whenapplyingovencleaner,be
carefhlnottogetit onthecountertop,
floor,continuous-cleaningoven
partsonmodelssoequipped,or
anyother surface.
Note:Theporcelainovendoor
linerandovenbottommaybe
cleanedwithacommercialoven
cleaner.If yourrangehasa
continuous-cleaningoven,the
doorlinerandovenbottommust
beremovedandcleanedawayfrom
theovento preventdamagetothe
Placeyourfingersintheslotsinthe
continuous-cleaningovenliner.
—
bottomandliftupthefrontedgeof
theovenbottomuntilitis clearof
theovenfrontframe.
Page 16

careandcleaning
OtlterEnamelFinish
Whentherange is cool, wash the
enamel
water or a mildabrasivecleanser
appliedwithadampcloth.Rinse
thesurfacewithclean water and
dry witha softcloth.If youwish,
occasionallyapplyathincoatof
mildcleaningwaxtohelpprotect
thefinish.
Therearea numberofprecautions
youcantaketo avoidmarringthe
surfaceoftherangeandtoprevent
itfrombecomingdull. Don’tslide
heavypansacrossit. If youspill
foodswitha lotofacid(tomatoes,
sauerkraut,fruitjuices,etc.)or
foodswithhighsugarcontent,
cleanthemup as soonas possible.
Ifallowedto set, these foodscould
causea dullspot.Also,nomatter
howstubbornthefoodstain,never
useharshabrasivecleansers.They
couldpermanentlydamagethe
enamelsurface.
controlRmd
It’sagoodideatowipetheupper
andlowercontrolpanelscleanafter
eachuseofthe oven.Foramore
thoroughcleaning,theknobscan
beremovedbypullingthemoffthe
knobstems.Cleanwithmildsoap
andwater,rinsewithcleanwater
andpolishdry witha softcloth.
Donotuseabrasivecleansers,
strongliquidcleanersoroven
cleanersonthecontrolpanelas
theywilldamagethefinish.
BurnerGates ‘
Gratesshouldbewashedregularly
and,ofcourse,afterspillovers.
Washtheminhot,soapywaterand
rinsewithcleanwater.Drythe
grateswithacloth—don’tputthem
backontherangewet.When
replacingthe grates,be surethey’re
lockedintopositionovertheburners.
Togetridofburned-onfood,soak
thegratesina slightlydiluted
liquidcleanser.
finishwithmildsoapand
Althoughthey’redurable,the
grateswillgraduallylosetheir
shine,regardlessofthecareyou
takeofthem.Thisisduetotheir
exposureto hightemperatures.
Topreservethe grates’porcelain
finishaslongaspossible,donot
operateaburnerforanextended
periodoftimewithoutcookwareon
thegrate.Thefinishonthegrate
maychipwithoutcookwareto
absorbtheheat.
DripPans
Removethegratesandliftoutthe
chromedrippans.Washthemin
hot,soapywater.Rinsethemwith
cleanhotwaterandpolishthemdry
withacloth.Neveruseabrasive
cleanerorsteelwool-they’llscmtch
thesurface.Instead,soakthedrip
pansforabout20minutesinslightly
dilutedliquidcleanseror mild
solutionofammoniaandwater(1/2
cupofammoniatoonegallonof
water).Aftersoaking,washthem
inhot,soapywater.Rinsewith
water and polish with a cloth.
clean
Lif’t-Up(lwktop
Cleantheareaunder thecooktop
ofien.Built-upsoil,especially
grease,maycatchfire.
Tomakecleaningeasier,theentire
cooktopmaybelifkdupandheldup
bylockingarmsthatcatchand hold
thetopupwhenit’sallthewayup.
Besureallburnersare turned
offbeforeraisingthecooktop.
Thenremovethe grates,graspthe
frontsidesofthe cooktopandIift.
Aftercleaningunderthecooktop
withhot, mildsoapywateranda
cleancloth,putthecooktopbackin
place.LiftupalittletoAcme (he
lockingarmsandpushthcmin
whileguidingthe topbackdown.
Becarefulnottopinchyourflngcrs.
RangeTopBurners
Theholesintheburnersofyour
rangemustbekeptcleanatall
timesforproperignitionandan
even,unhamperedflame.
Cleantheburnersroutinelyand
especiallyafterbadspillovers
whichcouldclogtheseholes.
Burnersliftrightoutforcleaning..
Note:A screwholdseachofthe
burnersinplacetokeepthemfrom
wobblingaroundduringshipment.
Labelsindicatetheirlocations.
Removetheshippingscrewwitha
Phillipsheadscrewdriver,lift the
burner,tiltittoonesideattheend
closestto theigniterandmoveit
towardthebackoftherange.This
disengagesitfromthegasvalvesat
thefrontoftherange,anditlifts
outeasily.
Toremoveburned-onfood,soak
theburnerinasolutionofaproduct
usedforcleaningtheinsideofcoffee
makers.Soakthe burnerfor20 to
30minutes.Ifthefooddoesn’t
rinseoffcompletely,scrubitwith
soapandwaterora mildabrasive
cleanserandadampcloth.
Beforeputtingtheburnerback,dry
itthoroughlybysettingitinawarm
ovenfor30minutes.Thenplaceit
backintherange, makingsureitis
properlyseatedandlevel.
—
—
—
—
16
Page 17

Griddle
—
—
—
IVipea U2aspoonofvegetable oil
overthe nonsticksurface ofthe
griddleto “condition”it before
you use it fbrthefirsttime.
Honotoverheatthe griddle—to
dO so willcausepermanent staining
nonsiick coating.
Of the
‘Ibclean thegriddle, scour its
surfucc regularly with
aplastic
padtoremoveunseenor stubborn
foodorgrease.Evenifthegriddle
looksclean,athinlayerof foodor
greasemayclingtothesurfaceand
eventuallybuildupto whereitwill
affectthe nonsticksurface.
notuse metalutensilsonthe
Do
griddle—usewoodor plasticones.
Donotusemetalscouringpads
orharshscouringpowderson the
nonstick surface.
Stainingofthenonsticksurface
can becausedby(1)failureto
washitthoroughlyaftereachuse,
(2)mineralsinthewaterifthe
griddleisnotdried,and(3)useof
toohighheat.
BroilerPan&Rack
Afterbroiling,removethebroiler
rackandcarefullypouroffthe
grease.Washandrinsethepan
andrdckin hot,soapywater.
Iffoodhasburnedon, sprinkle
thebroilerrackwhilehotwith
detergentandcoverwithwetpaper
towelsor a dishcloth.Thatway,
burned-onfoodswillsoakloose
whilethemealisbeingserved.
Donotstoreasoiledbroilerpan
andrackintheoven.
OvenLightReplacement
Thelightbulbislocatedinthe
upper right corner of the oven.
Before replacing the bulb,
disconnect electric power to the
range at the main fuse or circuit
breaker panel.
completely before reriloving it.
Replace with a high temperature
appliance bulb of the same wattage.
Donottouchahotbulbwitha
=i$?ctampclothasthebulbwillbreak.
%???
Letthebulb cool
COoktopLigiltReplacelllent
Mode},~GCCS8EH
Toreplacethefluorescent[ubein
thebacksplash:
1. Disconnectelectricpowertothe
rangeat thefuseboxor circuit
breakerpanel.
2. Removethe screwon eachend
ofthebacksplash.
3. Removethemetalstripsoneach
endthat holdtheglassinplace.
4. Removethefivecontrolkliobs.
5. Carefullyremovetheglass and
placeitona fiatsurfdce.
6. Rotatethefluorescenttubeinthe
socketsandtakeitout.
7. Replacetube andreassemble
backsplash.
Adjustingthe
OvenThermostat
Thetemperaturecontrolinyour
newovenhasbeencarefidlyadjusted
toprovideaccuratetemperatures.
However,ifthisovenhasreplaced
one youhaveusedforseveralyears,
youmaynoticeadifferenceinthe
degreeofbrowningor thelengthof
timerequiredwhenusingyour
favoriterecipes.Oventemperature
controlshavea tendencyto “drift”
overaperiodofyearsandsince
thisdriftisverygradual,itisnot
readilynoticed.Therefore,you
mayhavebecomeaccustomedto
yourpreviousovenwhichmay
haveprovideda higheror lower
temperaturethanyouselected.
Beforeattemptingtohavethe
temperatureofyournewoven
changed,be sureyouhavefollowed
thebakingtimeandtemperatureof
therecipe carefully.Then,after
youhaveusedtheovenafewtimes
andyoufeeltheovenistoohot
ortoocool,thereisa simple
adjustmentyoucanmakeyourself
ontheOVENTEMPknob.
17
Pull
tk knob off the control shaft
and look at the kck side. Them is
a disc in the center of the knob
with a series of notches on the inner
nexttotheknob shaft.Oncof
edge
skiri
thesenotchesispositionedovera
pointeronthe sideoftheknobshah.
Notepositionof
pointertonotches
beforeadjustment
#?%--?\~k
i
@
6$ ‘
(0)
G.\’..
~6.w
Loosenonlythe
lockingscrews
Notewhichnotchthepointeris
locatedin.Tomakeanadjustment,
carefullyloosen(approximately
oneturn), butdonotcompletely
removethetwoscrewsthat holdthe
skirttotheknob.Holdtheknobin
onehandandwiththeotherhand
carefullytilttheskirtuntilthe
notchinthediscclearsthepointer
ontheknobshaft.
Toraisetheoventemperature,turn
thedialinthedirectionofthe
arrowfor“Raise~’Tolowerthe
temperature,turnthe dial inthe
directionofarrowfor “Lower?’
Eachnotchwillchangetheoven
temperatureapproximately25”F.
Wesuggestthatyoumakethe
adjustmentonenotchfromthe
originalsettingandcheckoven
performancebeforemakingany
additionaladjustments.
Aftertheadjustmentismade,make
surethepointerontheknobshaft
isalignedwiththenotchinthedisc.
Pressskirtandknob togetherand
retightenscrewssotheyare snug,
butbecarefulnot to overtighten.
Re-installknobonrangeand
checkperformance.Note:Afteran
adjustmenthasbeenmadethe“Off”
and “Broil”positionswillnot line
upwiththeindicatormarkonthe
controlpanelastheypreviously
did.Thisconditionis normaland
willnotcreateaproblem.
(continuednext page)
I
IEssr.
—.
-=
Biiim
ii5EiF—.
-.
-
E==
~
-
BIEsir.
—.
~
—w
-.
-
-
-
-=
-
g=- .-
Eim..&_
Page 18

Cieanlllg Guise
Note: Let ransykwcmpw-~COOIbefore touching or handling.
L
—
I?m-r
EroiierPanandRack
hiATERIALSTOUSE
oSoapandWater
Soap-Filled Scouring Pad
@
* PlasticScouringPd
GENERALDIRECTIONS
Drain fat, cool pan and mck slightly.(Do notIctsoiled pan and rackstandin
broilercompartmenttocool.)Sprinkleondetergent.Fillpanwithwarmwater
andspreadclothorpapertoweloverreck. Letpanandmck stand fora few
minutes.VAJsh;
scourifnecessary.Rinseanddry.OPHON:Cleanpanandrack
indishwmher.
ContrclKnobs:
RanKeTopandOven
OutsideGlassFinish
o MildSoapandWater Pulloffknobs.Washgentlybutdonotsoak.Dryand
makingsuretomatchflatareaonknobandshaft.
* SoapandWater
Washall glasswithcloth dampenedinsoapywater.Rinseandpolishwitha dry
returncontrolsto range,
cloth.
l$letai,including
SideTrimsand
Trim Strit3s
OuterPorcelain
EnamelFinish
@SoapandWater
@PaperTowel
e DryCloth
● SoapandWater
Wash,rinseandthenpolishwithadry clo(h.DONOTUSEsteelwool,
abrasives,ammonia,acids,orcommercialovencleanerswhichmaydamage
thefinish.
Avoidcleaningpowdersor harshabrasiveswhichmayscratchtheenamel.
Ifacidsshouldspillon the rangewhileitishot, useadrypapertowelorcloth
towipeuprightaway.Whenthesurfacehascooled,washandrinse.
Forotherspills,suchasfatsmatterings,etc., washwithsoapandwaterwhen
cooledandthenrinse.Polishwithadrycloth.
PaintedSurfaces ~ SoapandWater
Usea mildsolutionofsoapandwater.Donotuseanyharshabrasivesor
cleanimz~owderswhichmavscratchormarsurface.
Shelves @SoapandWater
e Soap-FilledScouringPad
Shelvescanbecleanedindishwasher,orbyhandusingscouringpad.Rinse
thoroughlyaftercleaning.
e PlasticScouringPad
SurfaceBurner
Grates
● SoapandWater
@Soap-FilledScouringPad
(Non~mctallic) -
Chrome-Plated
DripPans
e SoapandWater
@Stiff-BristledBrush
* Soap-FilledScouringPad
(Non-metallic)
Burners ~SolutionforCleaning
InsideofCoffeeMakers
o SoapandWater
@MildAbrasiveCleanser
o DampCloth
Liftoutwhencool.Soak5to 10minutesifdesiredinwarmsolutionof
dishwasherdetergent.Scourwithmaterialsmentionedheretoremoveburnedonfoodparticles.
Cleanasdescribedbeloworindishwasher.Wipedrippansaftereachcooking
sounnoticedspatterwillnot“burn on” nexttimeyoucook.Toremove“burnedon”spatters,useanyorallcleaningmaterialsmentioned.Rub
lightly with
scouringDadtomeventscratchingofthesurface.
Wipeoffburnerheads.If heavyspilloveroccurs,removeburnersfromrange
(seepage16)andsoakthemfor20to30minutesinsolutionofhotwaterand
productforcleaninginsideofcoffeemakers,suchas Dip-Itbrand.Ifsoildoes
notrinseoffcompletely,scrubburnerswithsoapandwaterora mildabrasive
cleanseranda dampcloth.Dryburnersin a warmovenfor 30minutesbefore
returningthemtotherange.
See below Removeovendoor—seepage15.DON~ placedoorunderrunningwater,or
InsideOvenDoor
@
immerse.Usesamedirectionsforcleaningasfor PorcelainEnamelOven
Interior,below.
Continuous-CleaningOvenInterior—Top,
Sidesand Back
(ModelJGCC58EH)
~StiffBristleNylonBrush
Coolbeforecleaning.
Ifheavysoilinghasoccurredonthe
porous surface, removeasmuchofthesoil
aspossibleusingasmallamountofwateranda stiffbristlenylonbrush. Use
watersparinglyandchangeitfrequently,keepingitascleanaspossible,and be
suretoblotit upwithpapertowels,cloths,orsponges.Dono?
rub or scrub with
papertowels,clothsorsponges,sincetheywillleaveunsightlylintontheoven
finish.Ifwaterleavesawhiteringonthefinishas itdries,applywateragainand
blot itwithacleansponge,startingattheedgeof the ringandworkingtoward
thecenter.
Forspecialcleaninginstructions,seepageM.
PorcelainEnamel
OvenInterior
(ModelJGCS54EH)
@SoapandWater
~CommercialOvenCleaner
~ Soap-FilledScouringPad
~ PlasticScouringPad
Coolbeforecleaning.Frequentwipingwithmildsoapandwater(particularly
aftercookingmeat)willprolongtimebetweenmajorcleanings.Rinse
thoroughly.Soapleftonlinercancausestains.Forheavysoil,usenonabrasive
cleanerandfollowlabelinstructions,usingthinlayerof cleaner.Useof rubber
glovesis recommended.Wipeor rublightlyonstubbornspots.Wipeoffany
cleanerthatgetsonthermostatbulbfoundinbackoronside,neartopofoven.
RemovablePorcelain
EnamelOvenBottom
ISSeeabove
Theovenbottompanelcanberemovedforcleaning(seepage15).Usesame
directionsforcleaningasfor PorcelainEnamelOvenInteriorabove.
Spillageofmarinades,fruitjuices,andbastingmaterialscontainingacidsmaycausediscoloration,soshouldbewipedupimmediately(blottedup
ifinContinuous-Cleaningoven).l%kecarenot totouchhotportionofoven.Whensurfaceiscool,cleanandrinse.CAUTION:Lightbulbscanget
w~rmenoughtobreakiftouchedwithmoistcloth.Whencleaning,avoidwarmlamp.
18
—
-
—
-
Page 19

.’
.—
~“--
.-
,-
—.—
Qllestiom?
._<a.:&___
.—-—--..4=+— ..-
. ..._.+._.
.__...__—
.——
UseThis
~~(]~s~~>l
TOPE3LJRNERSDo
ProblemSolver
POSSIBLE CAUSE AND RENIEDY
Q ~a~e sure e~ectrjca~plug jsp~ugy(j ~nt~~]ive.properly groundedpoweratltl~t.
~~T ~~JGHT
~Burnerholesonsideofburrw maybeclogged.Removeandclean[hem.
~ Burnersmaynotbefittedcorrectlyontothegasvalves.Removeandreinstti!lthem
properly.
OVENDOESNOT
COOKPROPERLY
@Nlakesure thermostatcapillarybulb(lccatedinupperportionofoven)isincorrect
position,nottouchingovensidesandnotcoatedwithanything.
@Aluminumfoilbeingusedimproperlyinoven.
~Ovenventblockedontopofrange.
~ Incorrect@ensilbeingused.Checkeachcookingsectionforutensiltipsor
recommendations+
~Ovenbottomnotsecurelyseatedinposition.
@OVENTEMPknobsetincorrectlyornotturnedon.
~CheckcommonBaking,RoastingandBroiling
~
CLOCKDOESNOT
Rangeelectricalplugmustbesecurely seated in a live power outlet. Checkforblown
WORK fuseortrippedcircuitbreaker.
—
problemsonpages10-13.
.3
OVENLIGHTDOES
NOT COMEON
f you need more help.. .u3H,M free:
@Bulbmaybelooseorburnedout.
~Electricalplugmustbepluggedintoalivepoweroutlet.
EAnswer Center@
800.626.2000
consumer information service
If YouNeedservice
TOobtain service, see your warranty
onthebackpageofthisbook.
Tlk’re proud of our service and
.
2
..
,
J
w-antyou to be pleased. If for some
reason you are not happy with the
service you receive, here are three
steps to foHow for further help.
FIRST,contactthe peoplewho
..
.
servicedyourappliance.Explain
whyyouare notpleased. In most FINALLY,ifyour problemisstill ‘-’
cases,thiswillsolvethe problem. notresolved,write:
NEXT,if youarestill notpleased,
writeallthedetails-including
yourphonenumber—to:
Manager,ConsumerRelations
MajorAppliance
ConsumerActionPanel
20NorthWacker‘Drive
Chicago,Illinois60606
GEAppliances
AppliancePark
Louisville,Kentucky40225
-.
Page 20

YOURGENERALELEmR1c RANGE
WARRANTY
Saveproof of original purchase date such as your salesslip or caneelh?dcheck to establish warranty period,
1
I
I
WHATIs COVERED
FULLONE-YEARWARRANTY This warranty @extended to
Forone yearfrom date of original
purchase,wewill provide,free of
charge,parts and service labor
in your home to repairor replace
partof therangethat fails
ar?y
becauseof a manufacturing defect.
WHATs NOTCOVEREDese~icetriPstoYourhometo
teach you howto usethe product.
Readyour UseandCarematerial.
Ifyou then haveanyquestions
about operating the product,
please contact your dealer or our
Consumer Affairs office at the
addressbelow,or call, toll free:
GEAnswer Center@
800.626.2000
consumer information service
~ Improper installation.
the original purchaser and any
succeeding owner for products
purchased for ordinary home use
48mainlandstates,Hawaii
in the
and Washington, D.C.[nAlaska the
warranty is the sameexceptthat it is
LiMITED becauseyou must payto
ship the prcduct tothe service shop
or for the servicetechnician’s travel
coststo
All warranty service will be provided
byour Factory Service Centers or
byour authorized Customer Care@
servicers during normal working
hours.
Look in the White or Yellow Pages
of yourtelephone directory for
GENERAL ELECTRICCOMPANY,
GENERAL ELECTRICFACTORY
SERVICE,GENERAL ELECTRICHOTPOINTFACTORYSERVICEor
GENERAL ELECTRICCUSTOMER
CARE@SERVICE.
e Replacement of housefuses or
resetting of circuit breakers.
o Failureof the product if it is used
for other than its intended purpose
or used commercially.
e Damage to product caused
byaccident, fire,floods or acts
of God.
WARRANTORISNOTRESPONSIBLE
FORCONSEQUENTIAL DAMAGES.
yourhome.
4
Some statesdo notallow the exclusion or limitation of incidental or consequential damages, so the above limitation or exclusion
may not apply to you. This warranty gives you speeific legal rights,and you may also have other rights which vary from state to state.
Toknow what your legal rights are in your state, consult your local or state consumer affairs office or your state’sAttorney General.
Part No. 164D1352P223
NO. 49-4991
Pub.
489
560 T691P496
If you havean installation problem,
contact your dealer or installer.
Youareresponsible for providing
adequateelectrical, gas,exhausting
and other connecting facilities.
Warrantor:General Electric Company
If further help is needed concerning this warranty, write:
Manager—Consumer Affairs, GEAppliances, Louisville, KY 40225
“-&
JGCS54
 Loading...